

MODELL
FO-2970M
TELEFAX
BRUKSANVISNING
1. Installation
2. Sending Documents
3. Receiving Documents
4. Making Copies
5. Making Telephone Calls
6. Answering Machine Hookup
7. Special Functions
8. Printing Lists
9. Maintenance
10. Troubleshooting

CAUTION: For a complete electrical disconnection pull out the mains plug.
VORSICHT: Zur vollständigen elektrischen Trennung vom Netz den Netzstecker ziehen.
ATTENTION: Pour obtenir une mise hors-circuit totale, débrancher la prise de courant secteur.
AVISO: Para una desconexión eléctrica completa, desenchufar el enchufe del tomacorriente.
VARNING: För att helt koppla från strömmen, dra ut stickproppen.
ATTENZIONE: Per un totale scollegamento elettrico rimuovere la spina di corrente.
"The mains outlet (socket-outlet) shall be installed near the equipment and shall be easily accessible."
"De aansluiting op de stroomvoorziening (stopkontakt) moet nabij het apparaat zijn aangebracht en moet
gemakkelijk bereikbaar zijn."
Ett nätuttag (vägguttag) bör befinna sig nära utrustningen och vara lätt att tillgå.
La presa di corrente deve essere installata vicino all'apparecchio, e deve essere facilmente accessibile.
El tomacorriente principal se debe encontrar cerca del aparato y debe ser fácil de acceder a él.
"Die Netzsteckdose (Wandsteckdose) sollte in der Nähe des Geräts installiert werden und leicht zugänglich sein."
Stikkontakten skal være placeret nær faxen og være let tilgængelig.
Pääpistoke (pistokkeen poisto) tulee asentaa lähelle laitetta ja tulee olla helposti poistettavissa.
Stikkontakten må være montert i nærheten av utstyret og den må være lett tilgjengelig.
La prise de courant principale (d'alimentation) doit être située près de l'appareil et facilement accessible.
This equipment complies with the requirements of Directive 1999/5/EC.
Dieses Gerät entspricht den Anforderungen der EU-Richtlinie 1999/5/EG.
Cet appareil est conforme aux exigences de la directive 1999/5/CE.
Este aparato satisface las exigencias de las Directiva 1999/5/CE.
Quest’apparecchio è conforme ai requisiti delle direttiva 1999/5/CE.
Dit apparaat voldoet aan de eisen van de richtlijn 1999/5/EG.
Este equipamento obedece às exigências da directiva 1999/5/CE.
Η συσκευή αυτή ανταποκρίνεται στις απαιτήσεις των οδηγια 1999/5/ΕK.
Denna utrustning uppfyller kraven enligt direktiv 1999/5/EC.
Dette udstyr overholder kravene i direktiv 1999/5/EF.
Dette produktet oppfyller kravene i direktiv 1999/5/EC.
Tämä laite täyttää direktiivi 1999/5/EY.
Detta är en faxapparat som fungerar i ett svenskt, norskt, finskt, danskt, grekiskt, belgiskt och holländskt analogt
offentligt kopplat telenät enligt CTR21 standard.
Dette er et faksprodukt som fungerer i svenske, norske, finske, danske, greske, belgiske og nederlandske
analoge offentlige telekommunikasjonsnett som følger CTR21-standard.
Tämä on telekopiolaite, joka toimii Ruotsin, Norjan, Suomen, Tanskan, Kreikan, Belgian ja Hollannin CTR21standardin mukaisissa julkisissa analogisissa puhelinverkoissa.
Dette er et faksimileprodukt, der fungerer i offentlige svenske, norske, finske, danske, græske, belgiske og
hollandske analoge telefonnet, der følger CTR21 standarden.
Αυτό είναι ένα τηλεοµοιοτυπικό προϊόν που λειτουργεί σε αναλογικά δηµόσια τηλεφωνικά δίκτυα µεταγωγής στη
Σουηδία, Νορβηγία, Φινλανδία, ∆ανία, Ελλάδα, Βέλγιο και Ολλανδία που συµφωνούν µε το Πρότυπο CTR21
Ceci est un télécopieur fonctionnant sur les réseaux téléphoniques commutés publics (RTCP) analogiques
suédois, norvégien, finlandais, danois, grec, belge et néerlandais, conforme à la norme CTR21.
Dit faxapparaat is geschikt voor gebruik in een Zweeds, Noors, Fins, Deens, Grieks, Belgisch en Nederlands
analoog telefoonnetwerk dat de CTR21 standaard volgt.
This is a facsimile product operating in Swedish, Norwegian, Finnish, Danish, Greek, Bergian and Dutch analogue public switched telephone networks which follow the CTR21 Standard.

Table of Contents
Table of Contents 1
Snabbguide 4
Sammenfattet bruksanvisning 12
Pikaohjeisto 20
Kortfattet reference-guide 28
Snelle referentiegids 36
Guide de référence rapide 44
Guia de referência rápida 52
Quick Reference Guide 60
Introduction 68
Important safety information . . . . . . . . . . . . . . . . . . . . . . . . . . . . . . . 70
A Look at the Operation Panel 72
1. Installation 75
Unpacking Checklist . . . . . . . . . . . . . . . . . . . . . . . . . . . . . . . . . . . . . 75
Connections . . . . . . . . . . . . . . . . . . . . . . . . . . . . . . . . . . . . . . . . . . . 76
Installing the Toner Cartridge . . . . . . . . . . . . . . . . . . . . . . . . . . . . . . 82
Loading Printing Paper . . . . . . . . . . . . . . . . . . . . . . . . . . . . . . . . . . . 86
Setting Up the Multifunction Interface. . . . . . . . . . . . . . . . . . . . . . . . 88
Entering Your Name and Fax Number . . . . . . . . . . . . . . . . . . . . . . . 92
Setting the Date and Time . . . . . . . . . . . . . . . . . . . . . . . . . . . . . . . . 96
Setting the Reception Mode . . . . . . . . . . . . . . . . . . . . . . . . . . . . . . . 99
Volume Adjustment . . . . . . . . . . . . . . . . . . . . . . . . . . . . . . . . . . . . 103
1

Table of Contents
PBX Settings . . . . . . . . . . . . . . . . . . . . . . . . . . . . . . . . . . . . . . . . . . 105
Setting the Display Language . . . . . . . . . . . . . . . . . . . . . . . . . . . . . 107
2. Sending Documents 108
Transmittable Documents . . . . . . . . . . . . . . . . . . . . . . . . . . . . . . . . 108
Loading the Document . . . . . . . . . . . . . . . . . . . . . . . . . . . . . . . . . . 110
Adjusting the Resolution and Contrast . . . . . . . . . . . . . . . . . . . . . . 113
Sending a Fax by Normal Dialling. . . . . . . . . . . . . . . . . . . . . . . . . . 116
Sending a Fax by Automatic Dialling . . . . . . . . . . . . . . . . . . . . . . . 118
3. Receiving Documents 134
Using TEL/FAX Mode . . . . . . . . . . . . . . . . . . . . . . . . . . . . . . . . . . . 134
Using FAX Mode . . . . . . . . . . . . . . . . . . . . . . . . . . . . . . . . . . . . . . . 136
Using A.M. Mode . . . . . . . . . . . . . . . . . . . . . . . . . . . . . . . . . . . . . . 138
Using TEL Reception Mode . . . . . . . . . . . . . . . . . . . . . . . . . . . . . . 139
Substitute Reception to Memory . . . . . . . . . . . . . . . . . . . . . . . . . . . 145
4. Making Copies 146
5. Making Telephone Calls 149
6. Answering Machine Connection 153
Connecting an Answering Machine . . . . . . . . . . . . . . . . . . . . . . . . 153
Using the Answering Machine Connection . . . . . . . . . . . . . . . . . . . 154
Optional A.M. Mode Settings . . . . . . . . . . . . . . . . . . . . . . . . . . . . . 156
7. Special Functions 160
Broadcasting . . . . . . . . . . . . . . . . . . . . . . . . . . . . . . . . . . . . . . . . . . 160
Cover Sheet . . . . . . . . . . . . . . . . . . . . . . . . . . . . . . . . . . . . . . . . . . 165
Batch Page Numbering. . . . . . . . . . . . . . . . . . . . . . . . . . . . . . . . . . 168
Blocking Reception of Unwanted Faxes . . . . . . . . . . . . . . . . . . . . . 170
Polling (Requesting a Fax Transmission) . . . . . . . . . . . . . . . . . . . . 172
Timer Operations . . . . . . . . . . . . . . . . . . . . . . . . . . . . . . . . . . . . . . 178
8. Printing Lists 181
2

Table of Contents
9. Maintenance 187
Scanning glass and rollers . . . . . . . . . . . . . . . . . . . . . . . . . . . . . . . 187
The housing . . . . . . . . . . . . . . . . . . . . . . . . . . . . . . . . . . . . . . . . . . 187
Replacing the toner cartridge . . . . . . . . . . . . . . . . . . . . . . . . . . . . . 188
Replacing the drum cartridge . . . . . . . . . . . . . . . . . . . . . . . . . . . . . 189
Cleaning the drum cartridge . . . . . . . . . . . . . . . . . . . . . . . . . . . . . . 192
10. Troubleshooting 194
Problems and Solutions . . . . . . . . . . . . . . . . . . . . . . . . . . . . . . . . . 194
Messages and Signals . . . . . . . . . . . . . . . . . . . . . . . . . . . . . . . . . . 200
Clearing Paper Jams . . . . . . . . . . . . . . . . . . . . . . . . . . . . . . . . . . . 203
Index 207
1. Installation
3

Snabbguide
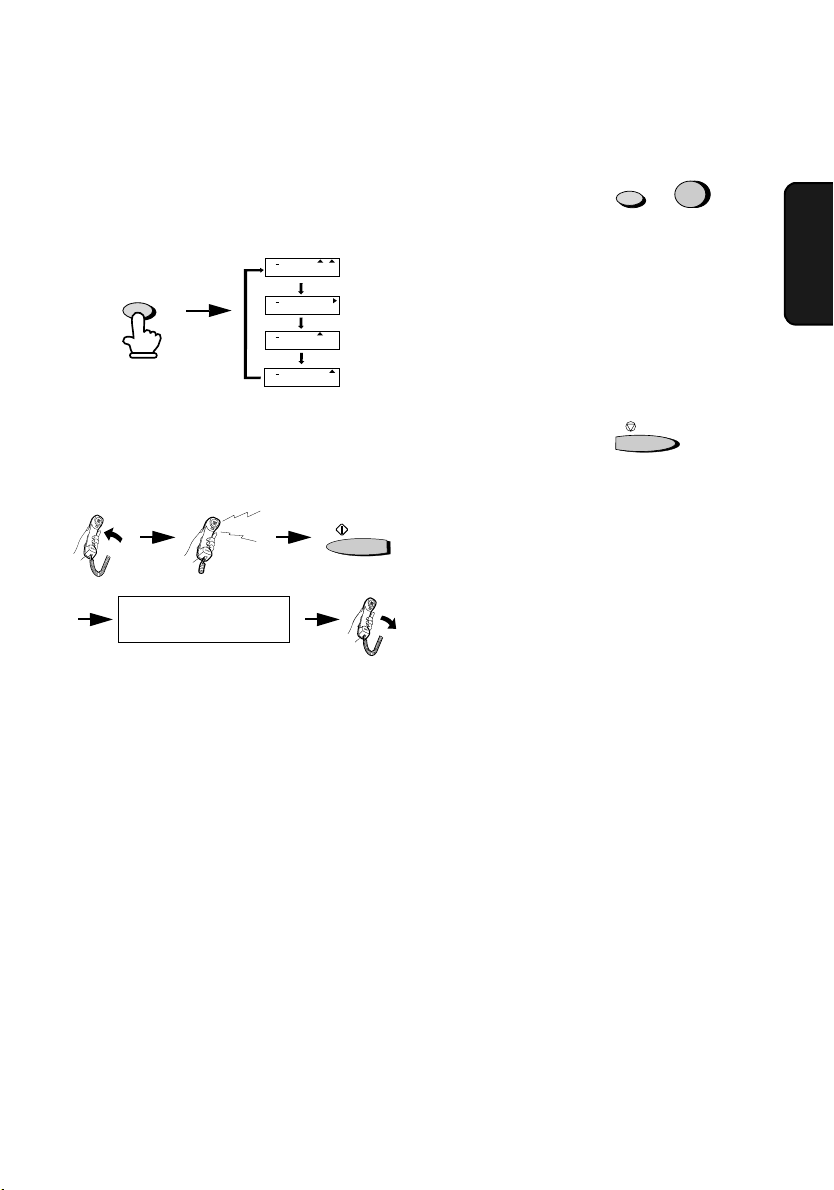
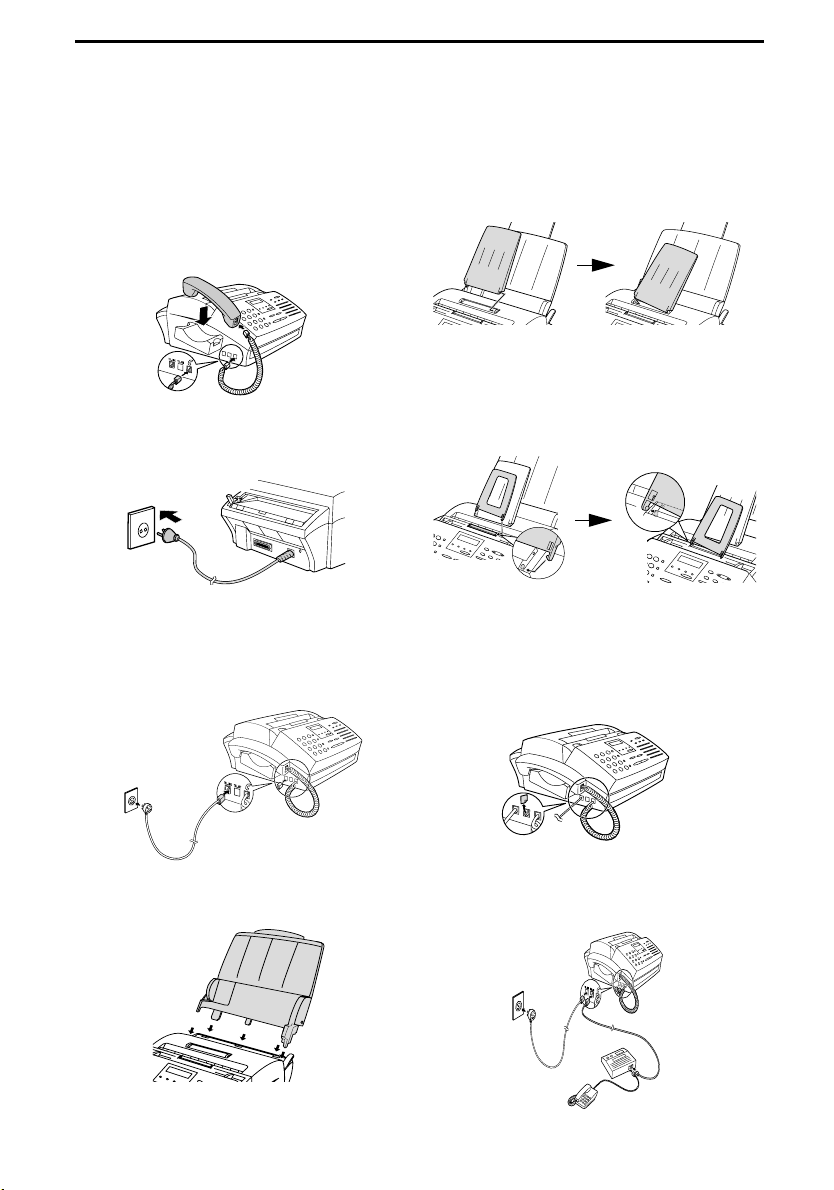
Installation
1. Anslut telefonluren och placera den på
klykan.
2. Stick in nätkabeln i en 220 -230 V, 50 Hz,
jordad (2-stift) eluttag.
3. Anslut telefonledningen till kontakten på
maskinens vänstra sida, märkt
. Anslut till telefonjacket i väggen.
LINE
TEL.
5. Montera mottagarbrickan
6. Montera originaldokumentstödet.
Se till att stödets framsida är något böjd
•
uppåt.
7. En sidoapparat eller en telefonsvarare
kan anslutas till faxen.
Ta bort säkerhetstejpen på
kontakten.
TEL.SET
4. Montera pappersfacket
4
Anslut sidoapparaten eller
telefonsvararen till
TEL.SET
kontakten.
Snabbguide
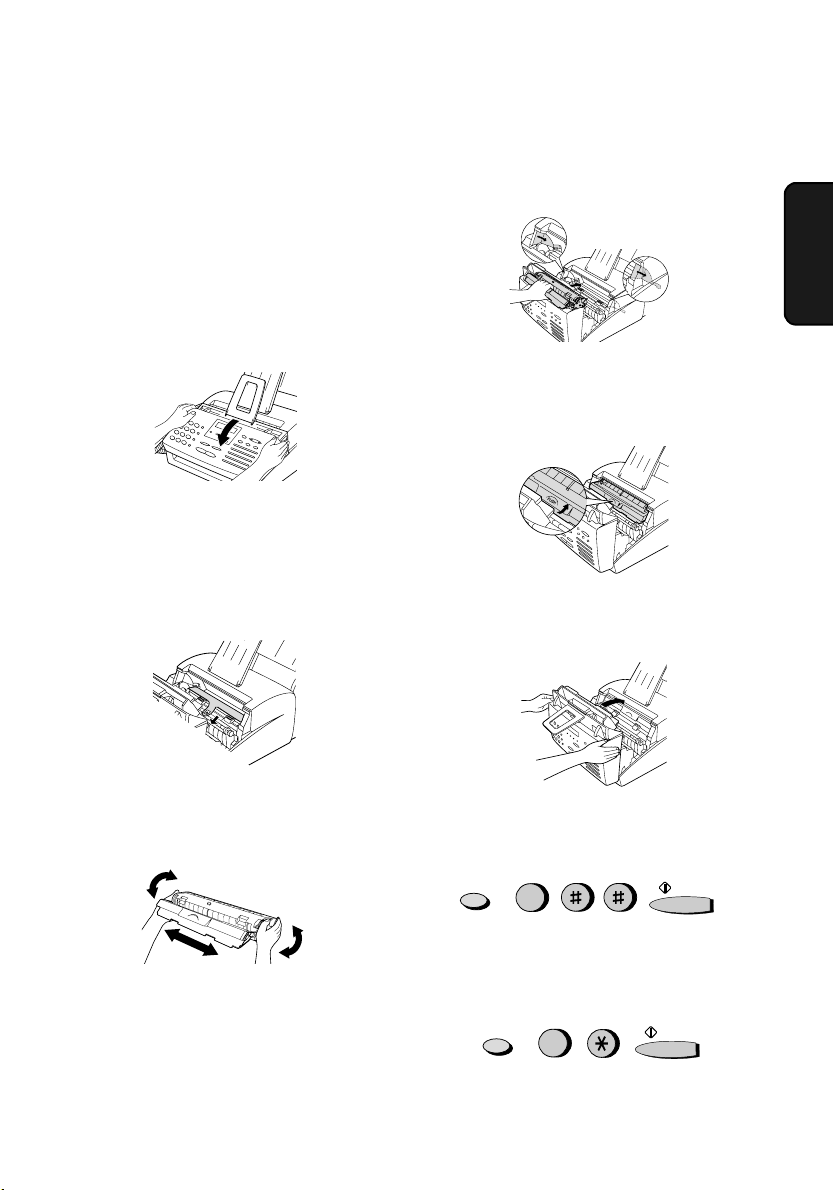
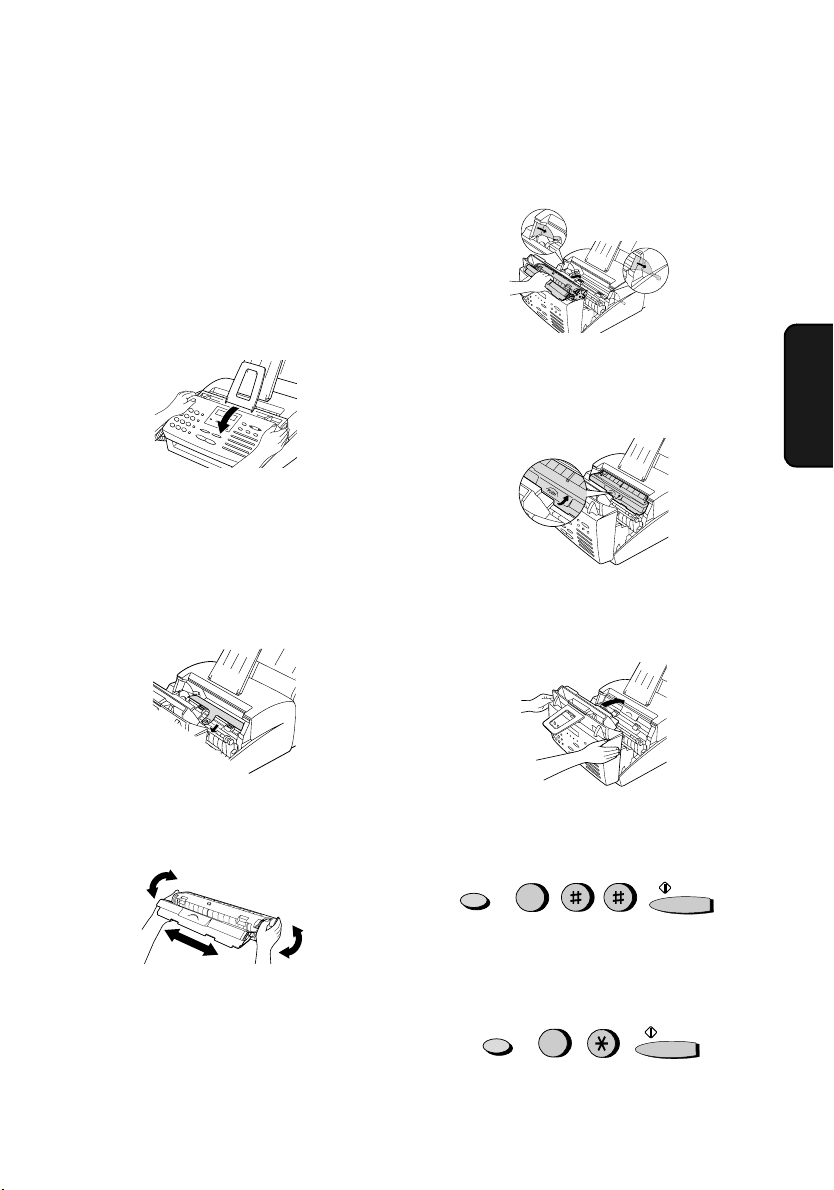
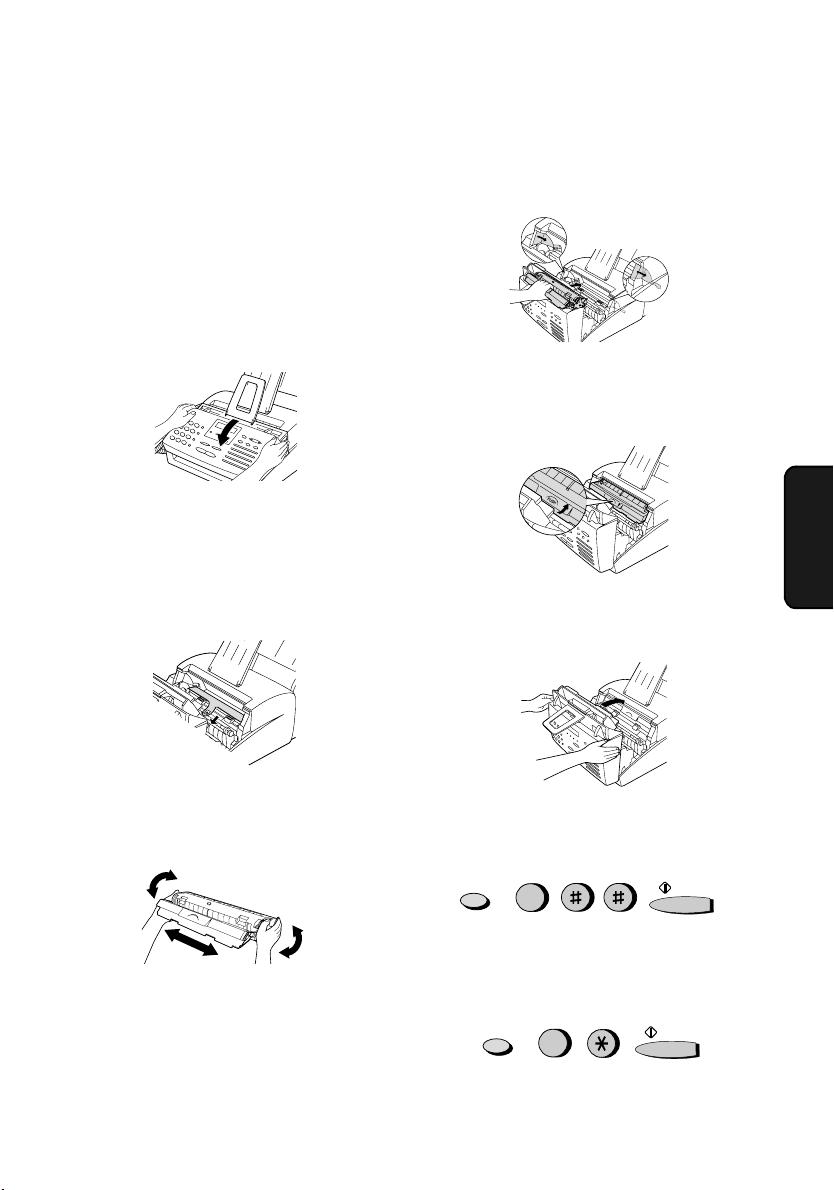
Montera tonerkassett
1. Greppa locket på båda sidor som visas
och drag uppåt för att öppna locket.
•
Varning!
Trumman i printerdelen blir mycket varm
under drift. Rör inte printerdelens insida
eller pappersstyrningen på undersidan av
printerdelens lock.
2. Trumkassetten har installerats på
fabriken. Dra försiktigt bort det svarta
skyddspappret från kassetten.
Se till att få med hela skyddspappret.
•
Avrivna pappersbitar får inte lämnas i
maskinen.
4. Håll i kassettens handtag, markeringen
5. Tryck med tummen på markeringen
6. Stäng printerdelen. Kontrollera att båda
skall vara uppåt, och sätt in
PUSH
kassetten i printerdelen.
och se till att kassetten sitter på
PUSH
plats.
sidor är ordentligt stängda.
SVERIGE
3. Ta ur den nya kassetten ur
förpackningen. Skaka den fyra eller fem
gånger så att tonern fördelas jämnt i
kassetten.
Ta försiktigt bort tejpen och
förpackningsmaterialet.
7. Nollställ toners räknare enligt följande:
FUNCTION
9
8. Nollställ trummans räknare enligt
följande:
FUNCTION
9
START
START
5

Snabbguide
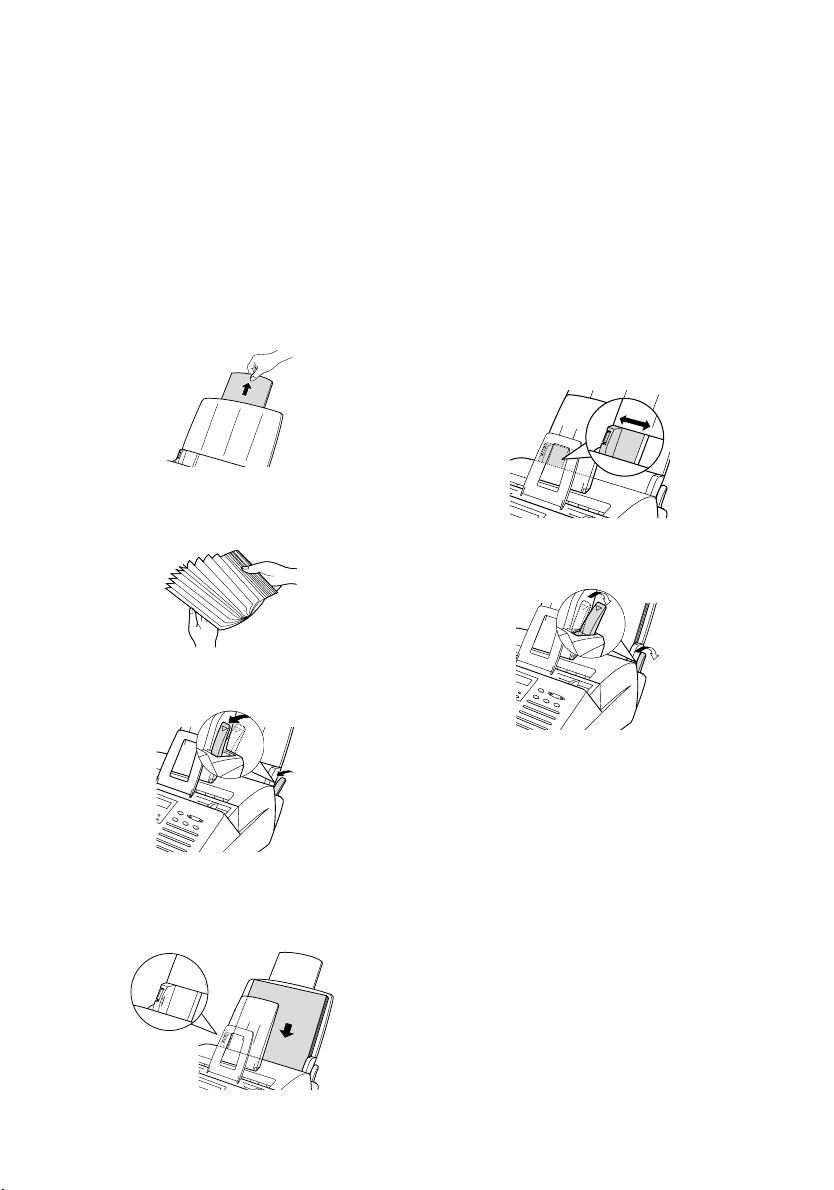
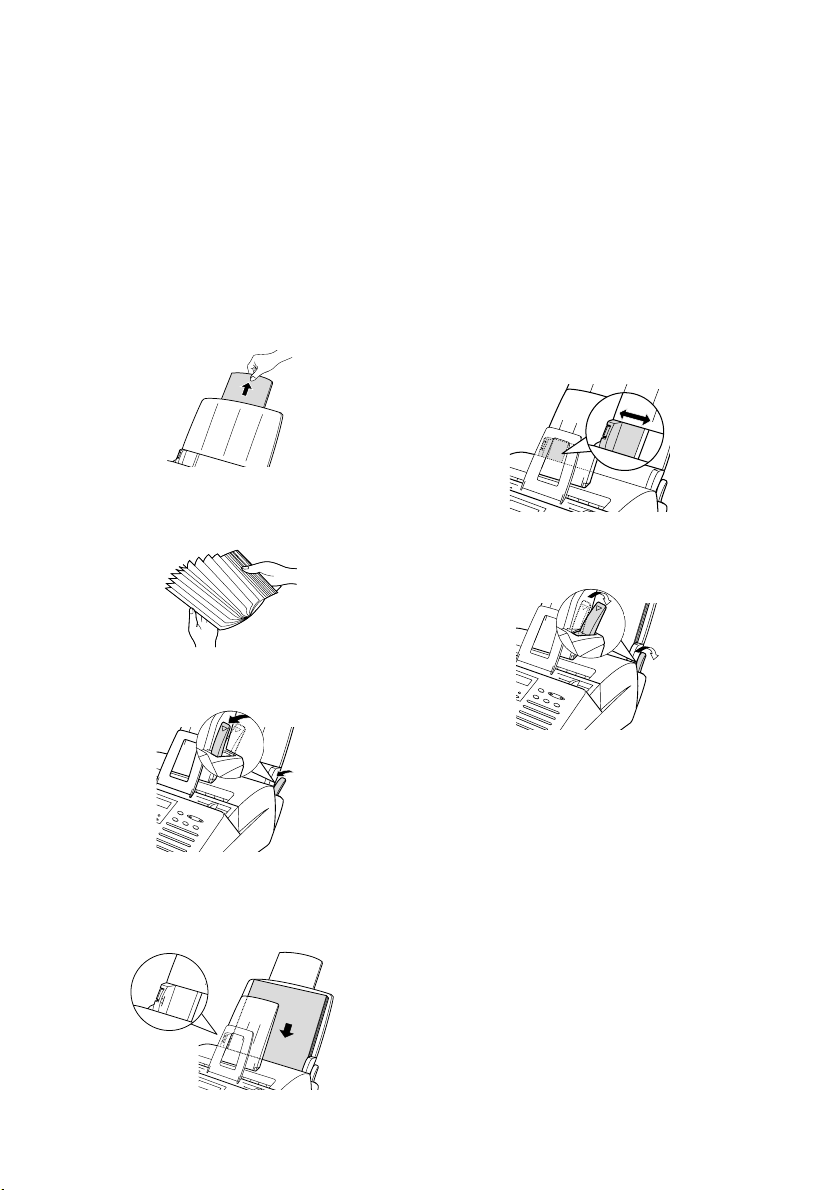
Ladda papper
Pappersfacket rymmer 200 blad A4papper (max. 80g/m²).
Varning!
Återanvänd inte papper som redan körts i
fax eller kopieringsmaskin.
1. Dra ut pappersfacket.
2. Lufta pappret och se till att buntens
kanter är jämna.
3. Dra handtaget mot dig.
Se till att inte pappersbunten är högre än
•
markeringslinjen. För mycket papper kan
förorsaka pappersstopp.
Ta ur eventuella restblad och slå ihop och
•
lufta dessa med den nya pappersbunten.
5. Se till att pappersbunten ligger mot den
högra pappersstyrningen och flytta sedan
den vänstra styrningen till A4-läge.
6. Tryck tillbaka handtaget.
4. Lägg pappersbunten i facket med
trycksidan uppåt.
6
Notera: Gör om hela
laddningsproceduren om inte pappret
matar ordentligt.
Snabbguide
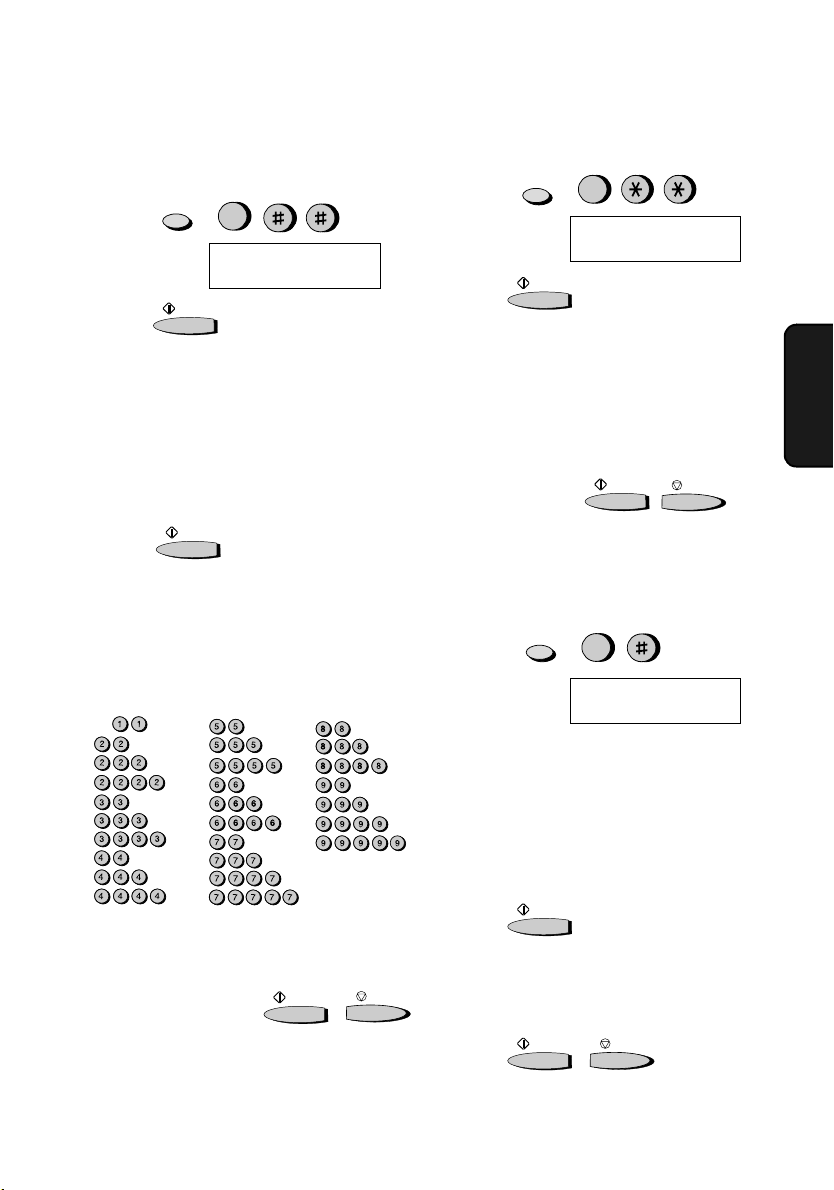
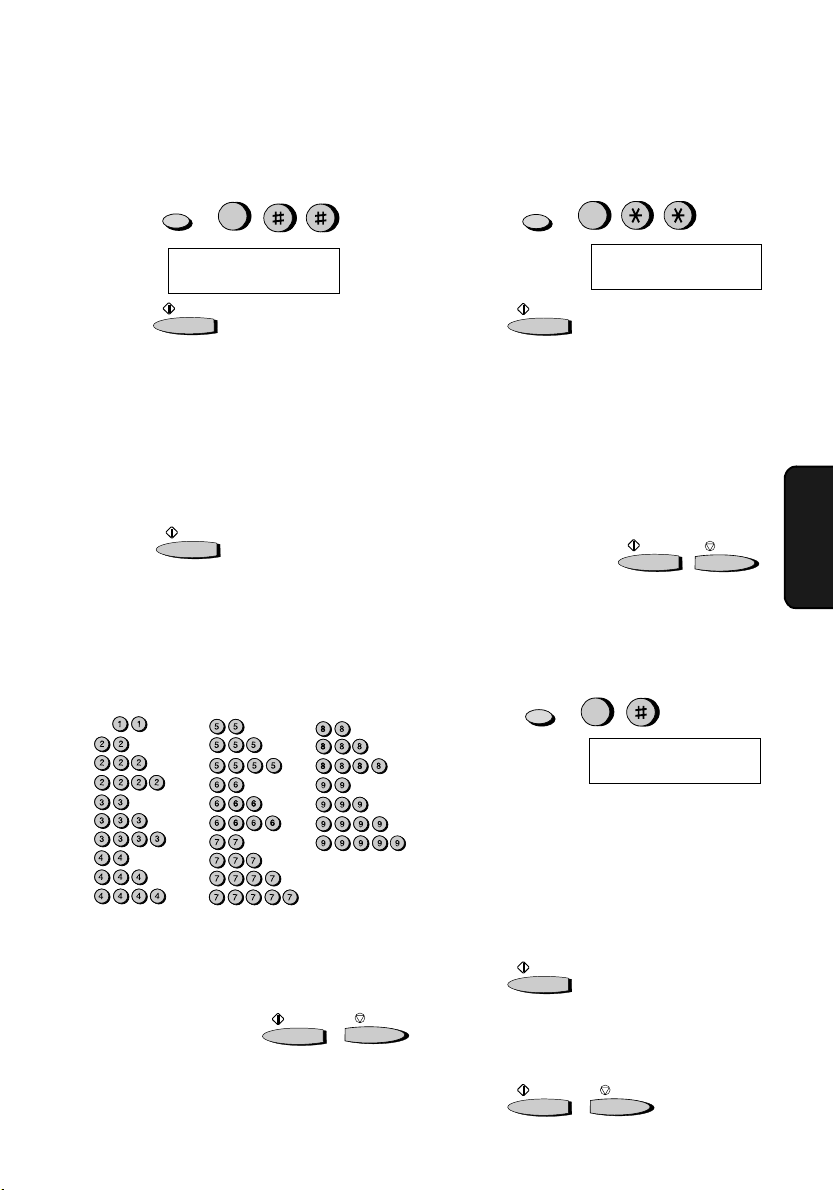
Mata in ditt namn och
faxnummer
1. Tryck:
2. Tryck:
3. Mata in ditt faxnummer (max. 20 siffror)
•
•
4. Tryck:
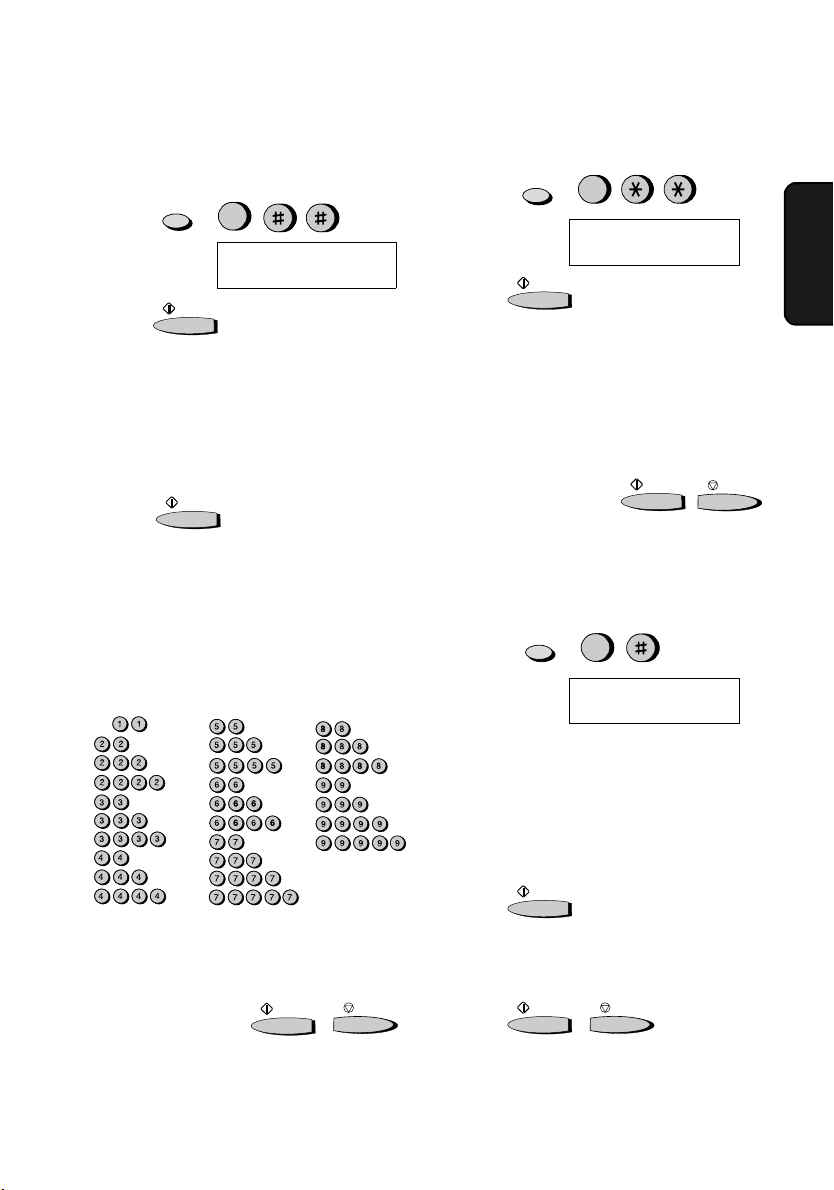
5. Mata in ditt namn med respektive tangent
•
SPACE =
A =
B =
C =
D =
E =
F =
G =
H =
I =
FUNCTION
3
Displayen visar:
med siffertangenterna.
För mellanslag, använd #.
Om du gör fel, tryck
backa tillbaka och korrigera felet.
som visas nedan.
Skall samma bokstav skrivas två gånger,
tryck
SPEAKER
bokstaven.
ANGE EGET NUMMER
TRYCK START
START
SPEED DIAL
START
efter den första
J =
K =
L =
M =
N =
O =
P =
Q =
R =
S =
för att
T =
U =
V =
W =
X =
Y =
Z =
Mata in datum och klockslag
1. Tryck:
2. Tryck:
3. Mata in två siffror för datum (01-31).
4. Mata in två siffror för månad (01-12).
5. Mata in fyra siffror för år ( T.ex. 2000).
6. Mata in två siffror för timme (00-23) och
7. Tryck...
FUNCTION
Displayen visar:
3
ANGE DATUM & TID
TRYCK START
START
två siffror för minut (00-59).
när du är färdig:
START
STOP
Spara och rensa kortnummer
1. Tryck:
2. Tryck 1 för att spara kortnummer eller 2
3. Välj en snabbtangent eller mata in ett två-
4. Mata in hela fax/telefonnumret.
5. Tryck:
FUNCTION
3
Displayen visar:
för att rensa kortnummer.
siffrigt kortnummer (
ett kortnummer, gå till steg 7).
FAX/TEL NR
1=VAL, 2=RADERA
00-99
START
) (om du rensar
SVERIGE
•
REDIAL
ger stora bokstäver. Tryck # eller
* för att bläddra genom symboler och
specialtecken.
6. Tryck...
START
när du är färdig:
STOP
6. Mata in kortnumrets namn på samma
sätt som du matade in ditt eget namn (se
ovan)
7. Tryck:
START
STOP
7
Snabbguide
Spara nummer på
grupptangenter
1. Tryck:
Displayen visar:
2. Tryck 1 för att programmera en
grupptangent, eller 2 för att rensa en
grupptangent.
3. Tryck en grupptangent (en av
snabbtangenterna 17/G1 till 20/G4). (om
du rensar ett gruppnummer, gå till steg 5).
4. Använd en eller båda sätten att mata in
faxnummer som skall sparas på
grupptangenten.
Välj snabbtangent.
Använd siffertangenterna för att mata in
kortnummer.
5. Tryck:
FUNCTION
START
7
GRUPP-VAL
1=VAL, 2=RADERA
STOP
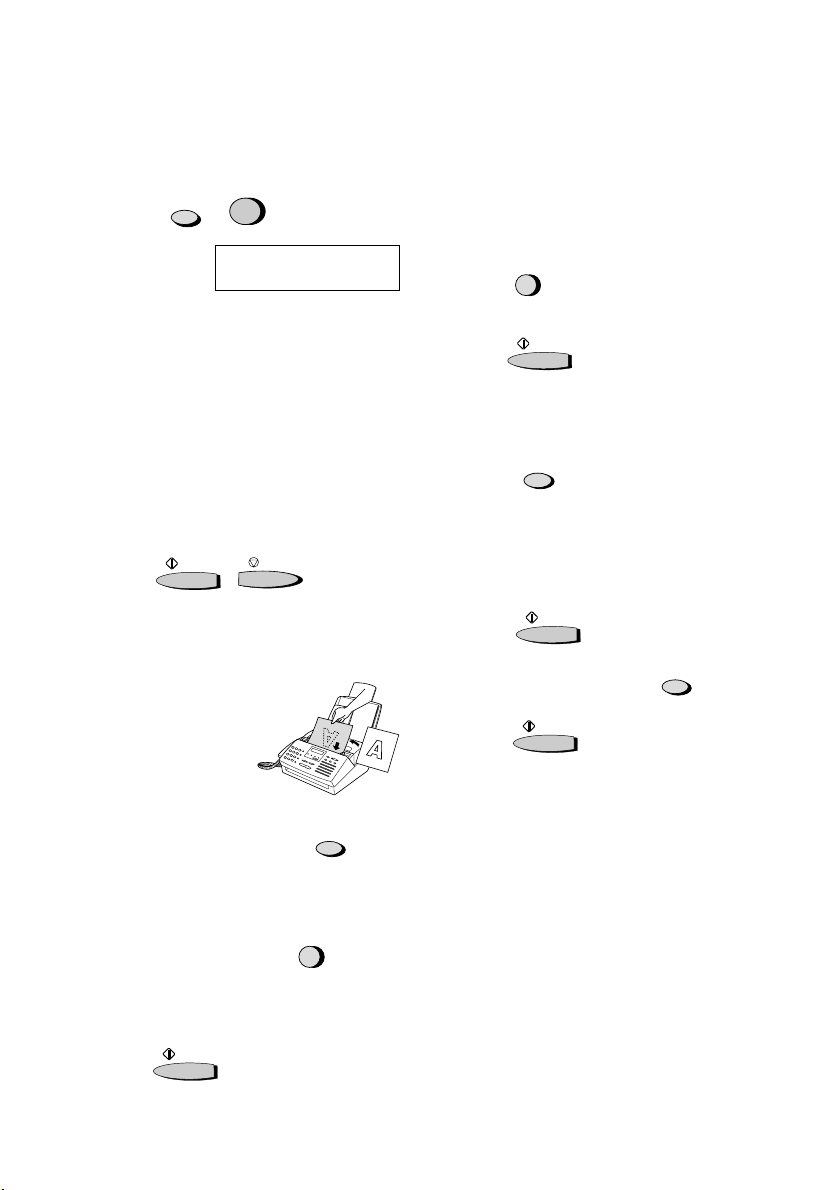
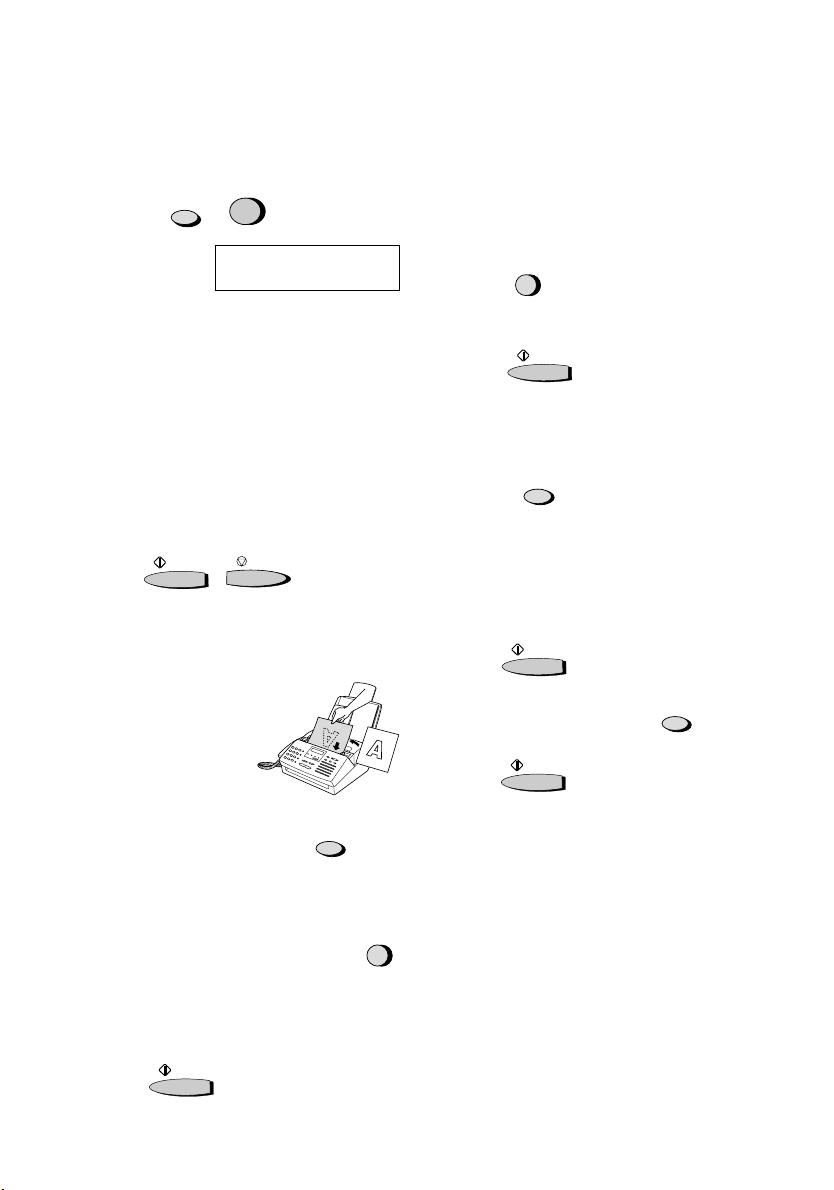
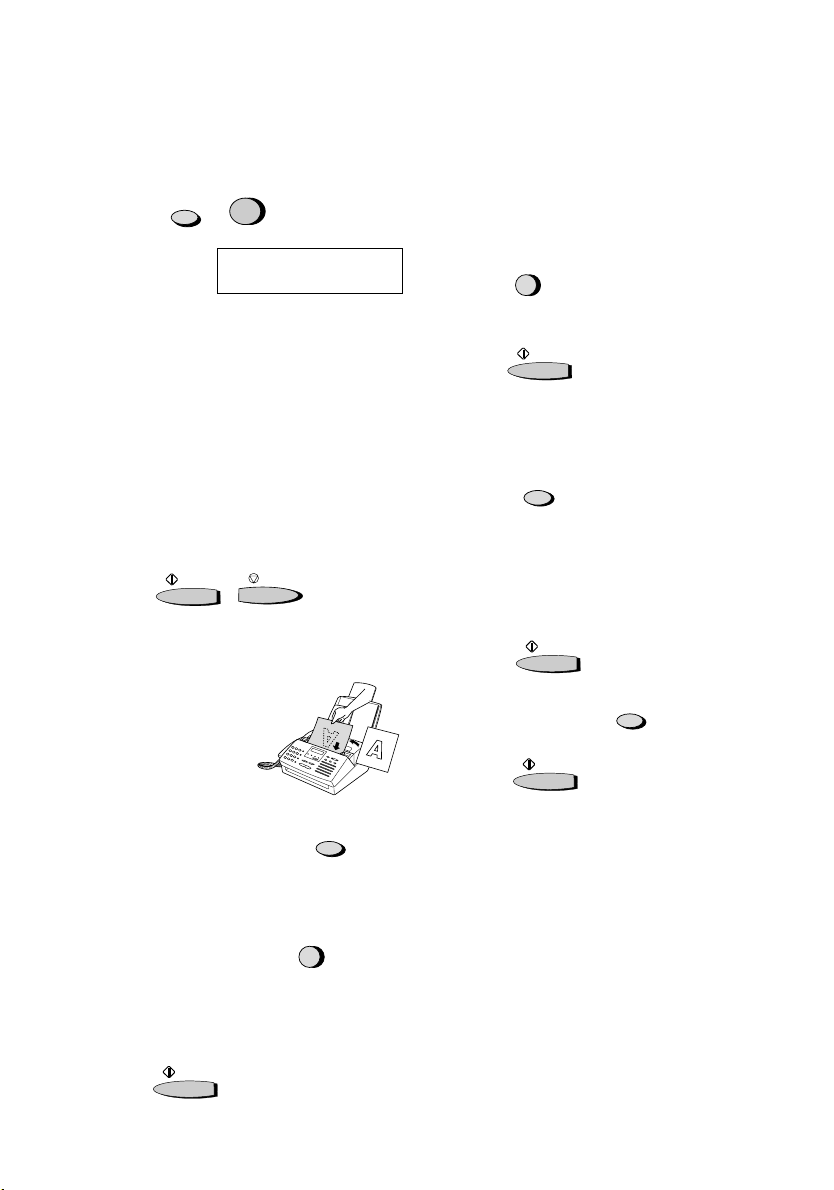
Sända fax
Placera dokumenten
(max. 20 blad) i
dokumentmataren
med den skrivna sidan
nedåt.
Justera upplösning och/
eller kontrast om
önskvärt.
RESOLUTION
Uppringning med snabbtangent
Välj respektive snabbtangent
Uppringningen börjar automatiskt.
Uppringning med kortnummer
SPEED
1. Tryck:
DIAL
2. Välj det tvåsiffriga kortnumret.
3. Tryck:
START
Broadcasting (sända ett dokument till
flera mottagare)
1. Tryck:
BROADCAST
2. Slå numret till mottagarna enligt en eller
båda följande sätten:
Välj en eller flera snabbtangenter.
Välj ett eller flera kortnummer med
siffertangenterna.
3. Tryck:
4. Justera upplösningen om
START
RESOLUTION
så önskas.
5. Tryck:
START
Broadcasting med grupptangent
Om alla mottagare har programmerats in
på samma grupptangent, välj denna.
Normal uppringning
1. Lyft luren eller tryck
SPEAKER
2. Slå faxnumret
3. Vänta på ton ( svarar det, be personen
trycka ner sin START-knapp).
4. Tryck:
START
8
Snabbguide
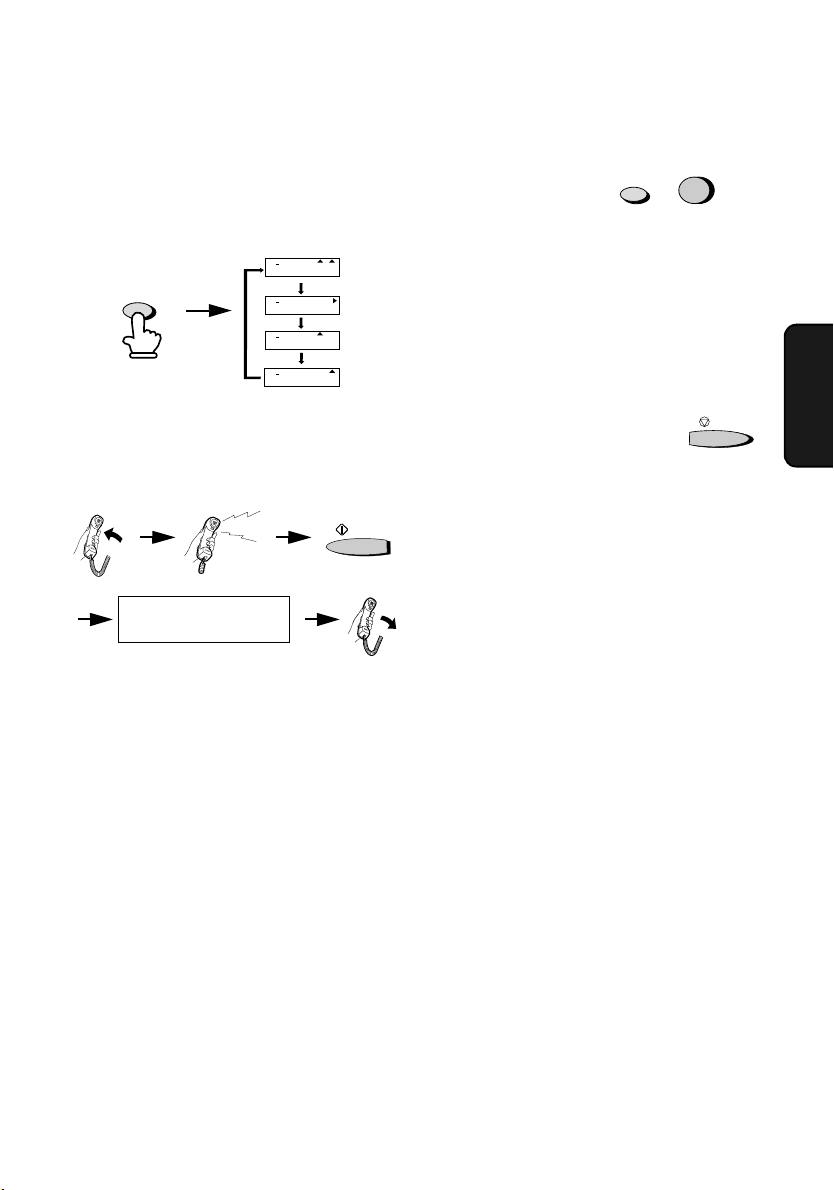
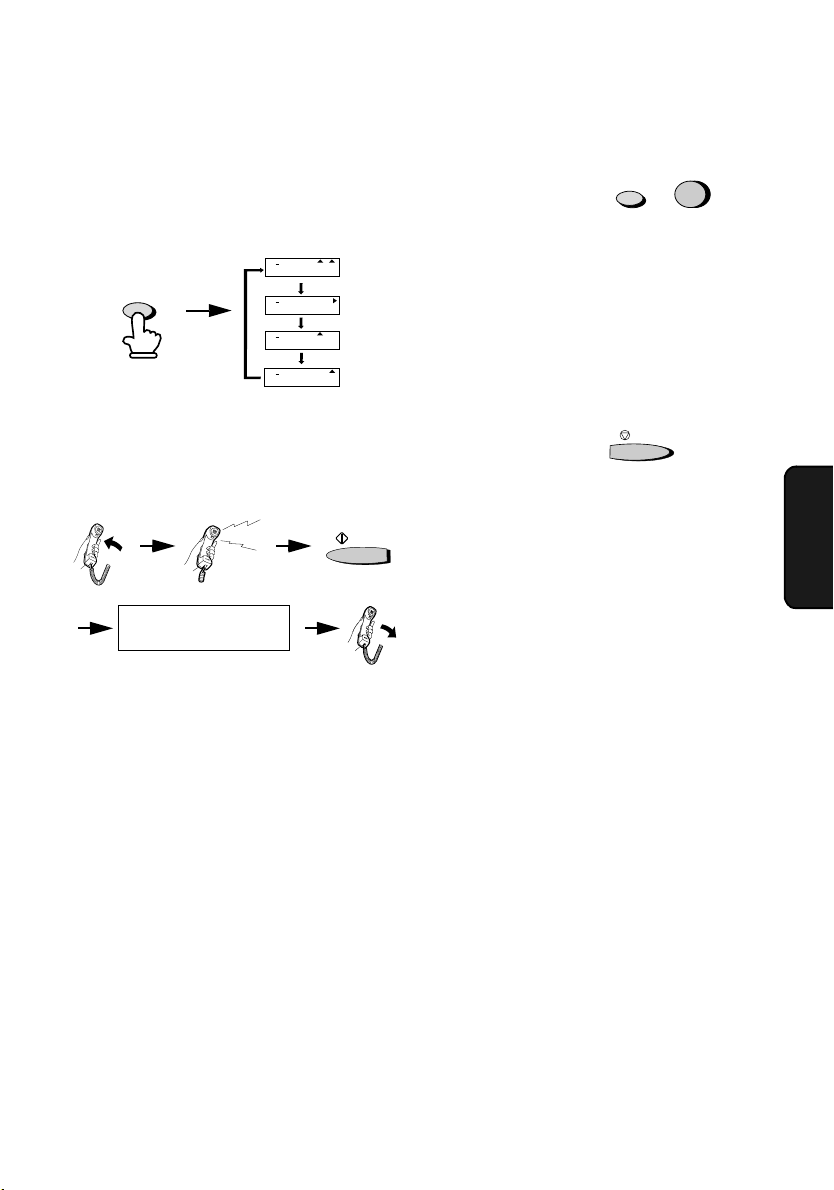
Ta e m ot f ax
Tryck
RECEPTION MODE
visar önskat läge för mottagning.
RECEPTION
MODE
FAX l äge:
Faxen svarar automatiskt efter
inställt antal signaler och tar emot det
inkommande dokumentet.
TEL läge:
TA R EMO T
TEL/FAX läge:
Detta läge används för att
kunna ta emot både fax och telefonsamtal.
Faxen känner av om inkommande samtal är
ett röstsamtal, (även manuella fax) eller ett
inkommande fax.
A.M. läge:
Använd detta läge när en
telefonsvarare är tillkopplad och dessutom
påslagen.
tills displayen
01 FEB 10:30
M:00% STAND-BY
01 FEB 10:30
M:00% STAND-BY
01 FEB 10:30
M:00% STAND-BY
01 FEB 10:30
M:00% STAND-BY
Beep
FAX
TEL
A.M.
FAX
TEL
A.M.
FAX
TEL
A.M.
FAX
TEL
A.M.
START
Användarinställningar
1. Tryck följande
tangenter:
2. Tryck # för att bläddra genom
inställningar (använd * för att bläddra
bakåt).
3. När önskad inställning visas, mata in
valet för inställningen: (se nedan) med
siffertangenterna.
4. Har valet matats in visas inställningen.
Tryck... för att komma tillbaka till datum
och klockslag
Inställningar
INSTÄLLNING FÖR UPPLÖSNING
Bestämmer läge för upplösning vid
dokumentsändning. Tryck 1 (JA) för FINE
upplösning eller 2 (NEJ) för STANDARD
upplösning.
ANTAL SIGNALER
Bestämmer hur många signaler som skall
gå fram innan faxen svarar på inkommande
samtal i FAX-läge och TEL/FAX-läge. Mata
in antal signaler från 1 till 5.
ÅTERUPPRINGNING, TID
Bestämmer hur länge faxen skall vänta
innan den återuppringer vid upptagen linje.
Mata in 01 för 1 minut, 02 för 2 minuter,
osv., upp till max. 15 minuter.
ÅTERUPPRINGNING, ANTAL
Bestämmer antal gånger faxen skall
återuppringa. Mata in antal gånger från 00
till 10.
FUNCTION
4
STOP
SVERIGE
FJÄRRSTYRNINGSKOD
Bestämmer fjärrstyrningskod som via
sidoapparat (följt av **) aktiverar
mottagning av fax. Mata in en siffra mellan 1
och 9.
9

Snabbguide
FJÄRRSTYRNINGSSTART
Tryck 1 för att aktivera mottagning via
sidoapparat genom att använda
ovanstående FJÄRRSTYRNINGSKOD.
Tryck 2 för att inaktivera fjärrstyrningsstart.
SÄNDNINGSRAPPORT
Bestämmer när en sändningsrapport skall
skrivas ut. Tryck en siffra enligt följande:
: Efter varje sändning eller mottagning.
1
: Efter fel, tidsinställning eller
2
minnessändning.
: Endast efter sändning.
3
: Aldrig.
4
: Endast efter fel.
5
PSEUDORINGNING
Bestämmer längden på pseudoringningen
som anger röstsamtal i TEL/FAX-läge. Tryck
för 15 sekunder, 2 för 30 sekunder, 3 för
1
60 sekunder, eller 4 för 120 sekunder.
TYST AVKÄNNINGSTID
Om faxen känner av tystnad efter att en
telefonsvarare tagit emot samtalet, tar faxen
över och påbörjar mottagning.
Telefonsvararen skall vara ansluten och
A.M-läge aktivt. Bestämmer tyst
avkänningstid i sekunder. Mata in en siffra
från 01 till 10 eller mata in 00 för att
inaktivera funktionen.
STARTTID FÖR TYST AVKÄNNINGSTID
Fördröjer den tysta avkänningstidens
startfunktion. Mata in två siffror för antal
sekunder (00 till 15).
AUTOMATISK MOTTAGNING
Om telefonsvararen inte svarar innan 5
signaler, svarar faxen automatiskt i A.Mläge. Tryck 1 för att aktivera funktionen.
Tryck 2 för att inaktivera funktionen.
SPRÅK
Byter språk i display, rapporter och listor.
Tryck
språk visas i displayen, tryck
, sedan * eller # tills önskat
START
START
igen.
TELEFONVÄXEL
Är faxen ansluten till en telefonväxel gäller
följande: Tryck 1 för JA, och ange
anslutningsläge till extern linje (1 för JORD,
för TID, eller 3 för ID). Ange ID-numret till
2
växeln och tryck sedan
slutligen RETUR TILL VÄXELN-läge (1 för
JORD, 2 för TID, eller 3 för INGEN
FUNKTION).
FAX SIGNAL
Hörs en högfrekvent ton när man svarar på
ett samtal kan mottagning påbörjas
automatiskt, tryck 1 för att aktivera. Tryck 2
för att inaktivera (funktionen bör inaktiveras
om ett dator-faxmodem är anslutet till
samma linje).
KONTROLL AV SPÄRRAT NUMMER
Tr y c k 1 för att förhindra mottagning av fax
från spärrade nummer. Tryck 2 för fri
mottagning av alla nummer.
POLLING – HÄMTFAX
Tr y c k 1 för att aktivera snabbtangent 16/
POLL -HÄMTA. Tryck 2 för att använda
snabbtangent som vanlig tangent.
AUTOMATISKT TÄCKBLAD
Tr y c k 1 för att automatiskt sända täckblad
vid slutet av varje faxsändning. Tryck 2 för
att inaktivera funktionen.
AUTOMATISK AKTIVITETSRAPPORT
Tr y c k 1 för att automatiskt skriva ut en
rapport efter var 30:e aktivitet. (Rapporten
kan skrivas ut när det passar). Tryck 2 för
att inaktivera utskrift.
ECM LÄGE
Tr y c k 1 för att automatiskt korrigera
störningar före utskrift, under överföring
eller mottagning. Observera att båda
faxarna måste ha ECM-läge. Tryck 2 för att
inaktivera funktionen.
START
. Välj
10

Snabbguide
QUICK ON-LINE
Tryck 1 för att slå mottagande nummer och
påbörja överföring när inläsning fortfarande
pågår. Tryck 2 för att faxen skall vänta tills
alla sidor lästs in.
ANPASSA STORLEK VID MOTTAGNING
Tryck 1 för att automatiskt anpassa de
inkommande dokumentens storlek till
utskriftspappret. Data eller text vid
dokumentets kanter tappas inte bort. Tryck
för att inaktivera funktionen och ta emot
2
dokumenten i originalstorlek.
CUT-OFF KOPIA
Om man gör en kopia där originalet är
längre än kopieringspappret, kan man
bestämma om resten av dokumentet skall
klippas bort eller skrivas ut på nästa sida.
Tryck 1 för att klippa bort, eller 2 för att
skriva ut på nästa sida.
Listor och rapporter
1. Tryck följande
tangenter:
2.Tryck # för att bläddra genom listorna
(bläddra bakåt, tryck *).
3. Tryck ... när önskad lista visas.
Aktivitetsrapport
Visar information om senaste sändningar
och mottagningar.
Timerlista
Visar aktiva tidsinställningar.
Telefonlista
Visar förprogrammerade faxnummer för
automatisk uppringning.
Kodordlista
Visar inställningar för säkerhet vid polling/
hämtning, namn och fax/telnummer (som
inmatad i faxen) och dokumenthuvudet
(överförs på varje sida).
Användarinställningar
Visar aktuella inställningar
FUNCTION
2
START
SVERIGE
Spärrade nummer
Visar spärrade faxnummer (mottagning icke
tillåten)
Grupplista
Visar förprogrammerade faxnummer på
grupptangenterna.
11

Sammenfattet bruksanvisning
Installasjon
1. Kople til telefonhøreren og plasser den på
holderen.
2. Plugg strømkabelen inn i en 220-230 V,
50 Hz, jordet (2 pinner) AC stikkontakt
3. Før den ene enden av telefonledningen
inn i kontakten på venstre side av
apparatet, merket med
den andre enden inn i enn telefonveggkontakt.
TEL. LINE
.
. Før
5. Monter skuffen for mottatte dokumenter.
6. Monter støtten for originaldokumenter.
Kontroller at forsiden på støtten vender
•
mot deg (støtten skal være litt buet på
den siden som vender mot deg).
7. Kople et biapparat eller en telefonsvarer
til faxapparatet hvis du ønsker det:
Fjern forseglingen som dekker
jakken på siden av faxapparatet.
TEL. SET
4. Monter papirskuffen.
12
Kople biapparatet eller telefonsvareren til
TEL. SET
jakken på faxapparatet.
Sammenfattet bruksanvisning
Installasjon av toner-patronen
1. Ta tak i begge sider av skriverdekselet,
slik som vist på figuren, og trekk det opp
for å åpne dekslet.
•
Forsiktig!
Sikringsenheten inne i skriverhuset blir
veldig varm under bruk. Berør ikke
innsiden av huset eller papirføringen på
undersiden av skriverdekslet.
2. Trommelpatronen ble installert på
fabrikken. Trekk forsiktig i papirlasken for
å fjerne det svarte arket
beskyttelsespapir fra patronen.
Vær forsiktig så du ikke river sundt
•
papiret eller lar det være papirstykker
igjen inne i apparatet.
4. Hold toner-patronen i håndgrepet med
det påtrykkede merket på patronen vendt
opp og før patronen inn i skriverhuset.
5. Plasser tommelen på merket
på håndgrepet og press håndgrepet ned
og inn, slik at patronen settes korrekt på
plass.
6. Lukk skriverdekslet ved å presse det
bestemt ned på begge sider for å være
sikker på at det er helt stengt.
PUSH
midt
NORGE
3. Ta en ny toner-patron ut av emballasjen.
Ryst patronen fra side til side fire eller
fem ganger, slik at toneren fordeles jevnt
inne i patronen.
Fjern båndet og pappemballasjen
forsiktig fra toner-patronen.
7. Tilbakestill toner-telleren ved å presse
tastene nedenunder i følgende
rekkefølge:
FUNCTION
9
8. Tilbakestill trommel-telleren ved å presse
tastene nedenunder i følgende
rekkefølge:
FUNCTION
9
START
START
13
Sammenfattet bruksanvisning
Innlegging av papir i
papirskuffen
Du kan legge opptil 200 ark A4 papir
(maks. 80 g/m²) i papirskuffen.
Forsiktig!
Bruk ikke den blanke siden av et ark som
det allerede er skrevet på.
1. Trekk ut papirskuff-forlengelsen.
2. Lag en vifte av papiret og dunk deretter
kanten mot en flat overflate for å få en
jevn stabel.
3. Trekk papirutløserarmen mot deg.
Kontroller at stabelen ikke er høyere enn
•
den markerte linjen. Hvis du legger inn for
mye papir, kan det oppstå papirkø eller
feil på matingen.
Hvis det blir værende papir igjen i
•
skuffen, må du ta det ut og legge det
sammen med det nye papiret til en stabel
før du legger inn det nye papiret.
5. Kontroller at papirstabelen ligger inntil
høyre papirføring, og beveg deretter
venstre papirføring forsiktig til A4
posisjonen.
6. Press papirutløserarmen ned igjen.
4. Før papirstabelen bestemt inn i skuffen,
med siden som det skal skrives på vendt
opp.
14
Merk: Hvis papiret ikke mates korrekt, må
du ta hele stabelen ut av skuffen og
gjenta innleggingsprosedyren fra
begynnelsen av.
Sammenfattet bruksanvisning
Innlegging av navn og
nummer
1. Trykk:
2. Trykk:
3. Legg inn ditt faxnummer (maks. 20 siffer)
•
•
4. Trykk:
5. Legg inn ditt navn ved å trykke passende
•
SPACE =
A =
B =
C =
D =
E =
F =
G =
H =
I =
•
6. Trykk: når du er ferdig.
FUNCTION
3
Displayet viser:
ved å trykke talltastene.
Trykk # tasten for å legge inn et
mellomrom mellom sifre.
Hvis du gjør en feil, kan du trykke
tasten for å gå tilbake og slette
DIAL
feilen.
talltaster slik som vist nedenunder.
For å legge inn to bokstaver
etterhverandre, når disse krever bruken
av samme tast, må du trykke
tasten etter å ha lagt inn første bokstav.
Trykk
REDIAL
eller * for å rulle gjennom symboler og
spesielle tegn.
SETT EGET TLF NR
TRYKK START
START
SPEED
START
SPEAKER
J =
K =
L =
M =
N =
O =
P =
Q =
R =
S =
T =
U =
V =
W =
X =
Y =
Z =
tasten for å endre. Trykk #
START
STOP
Innstilling av dato og klokke
1. Trykk:
2. Trykk:
3. Legg inn to siffer for dagen (01 til 31).
4. Legg inn to siffer for måneden (01 til 12).
5. Legg inn fire siffer for året (Eks.: 2000)
6. Legg inn to siffer for time (00 til 23) og to
7. Når du er ferdig,
FUNCTION
Displayet viser:
3
SETT DATO&TID
TRYKK START
START
siffer for minutt (00 til 59).
START
trykker du:
Lagring og sletting av
automatisk valg-numre
1. Trykk:
2. Trykk 1 for å lagre et nummer eller 2 for å
3. Trykk en hurtig-tast eller legg inn et
4. Legg inn hele fax-/telefonnummeret.
5. Trykk:
6. Legg inn navnet på stedet ved å trykke
7. Trykk:
FUNCTION
3
Displayet viser:
slette et nummer.
tosifret hurtigvalg-nummer (fra 00 til 99).
(Hvis du vil slette et nummer, må du gå
videre til punkt 7.)
talltaster. (Se tabellen for innlegging av
bokstaver i
nummer
.)
FAKS/TEL#MODUS
1=VALG,2=SLETT
START
Innlegging av navn og
START
STOP
NORGE
STOP
15
Sammenfattet bruksanvisning
Lagring av faxnummer i
gruppe-taster
1. Trykk:
Displayet viser:
2. Trykk 1 for å programmere en gruppetast, eller 2 for å slette en gruppe-tast.
3. Trykk en gruppe-tast (en av hurtig-tastene
17/G1 til 20/G4). (Hvis du vil slette en
gruppe-tast, kan du gå videre til punkt 5.)
4. Bruk en eller begge av de to metodene
som er beskrevet nedenunder for å legge
inn faxnumrene som du vil lagre i gruppetasten:
Trykk hurtig-tastene.
Trykk talltaster for å legge inn hurtigvalgnummer.
5. Trykk:
FUNCTION
START
7
GRUPPE-VALG
1=VALG,2=SLETT
STOP
Sending av fax
Legg dokumentet
(opptil 20 sider) med
forsiden vendt ned i
dokumentmateren.
Valg med hurtig-tast
Trykk den passende hurtig-tast.
Overføringen starter automatisk.
Hurtig-valg
1. Trykk:
SPEED
DIAL
2. Legg inn det tosifrede hutigvalgnummeret.
3. Trykk:
START
Kringkasting (sending av et dokument til
flere adressater)
1. Trykk:
BROADCAST
2. Velg mottakerapparatene ved hjelp av en
eller begge de metoder som beskrives
nedenunder:
Trykk en eller flere hurtig-taster.
Legg inn et eller flere hurtigvalg-nummer
med talltastene.
3. Trykk:
4. Juster oppløsningen hvis
START
RESOLUTION
du ønsker det:
5. Trykk:
START
Juster oppløsningen
og/eller kontrasten hvis
RESOLUTION
du ønsker det.
Normalt valg
1. Løft opp telefonhøreren eller trykk
SPEAKER
2. Velg faxnummeret.
3. Vent til du hører mottakssignalet (hvis en
person svarer, må du be ham/henne
trykke Start-tasten).
4. Trykk:
START
16
kringkasting ved hjelp av gruppe-tast
Hvis alle adressater er programmert i en
gruppe-tast, behøver du bare trykke
gruppe-tasten.
Sammenfattet bruksanvisning
Mottak av fax
Trykk
RECEPTION MODE
pilen i displayet peker på ønsket
mottaksmodus.
RECEPTION
MODE
FAX mo de :
Faxapparatet svarer automatisk
etter det forhåndsinnstilte antall
ringesignaler og mottar det inngående
dokumentet.
TEL mode:
MOTTAR
TEL/FAX mode:
Denne modus er praktisk
for mottak av både fax og telefonsamtaler.
Når det kommer et anrop, registrerer
faxapparatet om det er en telefonoppringing
(inkl. manuelt valgt faxoverføring) eller
automatisk valgt fax.
A.M. mode:
Velg denne modus når det er
koplet telefonsvarer til faxapparatet, og
telefonsvareren er slått på.
tasten helt til
01 FEB 10:30
M:00% STAND-BY
01 FEB 10:30
M:00% STAND-BY
01 FEB 10:30
M:00% STAND-BY
01 FEB 10:30
M:00% STAND-BY
Beep
FAX
TEL
A.M.
FAX
TEL
A.M.
FAX
TEL
A.M.
FAX
TEL
A.M.
START
Innstilling av opsjoner
1. Trykk disse tastene:
2. Trykk # tasten for å rulle gjennom
innstillingene (trykk * tasten for å rulle
bakover).
3. Legg inn valgt innstilling når den ønskede
innstilling vises (se nedenunder), ved å
trykke talltastene.
4. Når du har lagt inn et valg, vises neste
innstilling. For å vende tilbake til dato- og
klokke-displayet, må du trykke:
Innstillinger
FINE RESOLUTION PRIORITY
(PRIORITERT FIN OPPLØSNING)
Denne opsjonen innstiller standard
oppløsning for overføring av dokumenter.
Trykk 1 (JA) for å innstille standard
oppløsning til FIN, eller 2 (NEI) for å innstille
den på STANDARD.
NUMBER OF RINGS (ANTALL
RINGESIGNALER)
Denne opsjonen innstiller antallet
ringesignaler faxapparatet skal vente før det
svarer på inngående anrop i FAX og TEL/
FAX mottaksmodus. Legg inn et nummer fra
til 5.
1
RECALL INTERVAL (INTERVALL FOR
GJENTATT ANROP)
Denne opsjonen innstiller den tid
faxapparatet venter mellom automatisk
gjentatte anrop når linjen er opptatt. Legg
inn 01 for 1 minutt, 02 for 2 minutter, etc.,
opp til maks. 15 minutter.
RECALL TIMES (ANTALL
GJENTAGELSER AV ANROP)
Denne opsjonen innstiller maks. antall
ganger faxapparatet automatisk skal gjenta
anropet når linjen er opptatt. Legg inn et
vilkårlig tall fra 00 til 10.
FUNCTION
4
STOP
NORGE
17

Sammenfattet bruksanvisning
TEL/FAX REMOTE NUMBER (TEL/FAX
FJERNNUMMER)
Denne opsjonen innstiller det nummeret du
kan presse på et biapparat (fulgt av **) for
å aktivere faxmottaket. Legg inn et vilkårlig
tall fra 1 til 9.
REMOTE RECEPTION (AUTOMATISK
MOTTAK)
Trykk 1 hvis du ønsker å kunne aktivere
faxmottaket fra et biapparat med det
ovenfor nevnte TEL/FAX FJERNNUMMER.
Trykk 2 for å deaktivere fjernmottak.
TRANSACTION REPORT
(OVERFØRINGSPROTOKOLL)
Denne opsjonen innstiller betingelsene for
når det skal skrives ut overføringsprotokoll.
Trykk en talltast fra 1 til 5 på følgende måte:
: Etter hver overføring og etter hvert
1
mottak.
: Etter feil, timer- eller minne-overføring.
2
: Kun etter overføringer.
3
: Aldri.
4
: Kun etter feil.
5
PSEUDO RING DURATION (VARIGHET
PSEUDO-ANROP)
Denne opsjonen innstiiller varigheten av det
spesielle ringesignalet som varsler deg om
telefonoppringninger i TEL/ FAX
mottaksmodus. Trykk 1 for 15 sekunder, 2
for 30 sekunder, 3 for 60 sekunder eller 4 for
120 sekunder.
QUIET DETECT TIME (TAUS
IDENTIFISERINGSTID)
Når en telefonsvarer er koplet til
faxapparatet og mottaksmodus er innstilt på
A.M., overtar faxapparatet linjen og starter
mottaket hvis den indentifiserer en viss tid
med taushet etter at telefonsvareren mottar
anropet. Denne opsjonen innstiller
taushetens varighet i sekunder. Legg inn et
tall fra 01 til 10, eller legg inn 00 for å
deaktivere funksjonen.
QUIET DETECT START TIME (STARTTID
TAUS IDENTIFISERING)
Bruk denne funksjonen hvis du behøver å
utsette starten av den ovenfor nevnte tause
18
identifiseringstid. Legg inn et tosifret tall for
antall sekunder utsettelsen skal var (00 til
).
15
SELECT AUTO RECEIVE (VALG
AUTOMATISK MOTTAK)
Trykk 1 for å la faxapparatet svare
automatisk etter 5 ringesignaler i A.M.
modus hvis telefonsvareren som er tilkoplet
faxapparatet ikke har svart innen den tid.
Trykk 2 for å deaktivere funksjonen.
LANGUAGE SELECT (SPRÅKVALG)
Bruk denne funksjonen for å forandre det
språk som brukes i display, protokoller og
lister. Trykk
det ønskede språket vises på displayet og
trykk deretter
PBX CONNECTION (PBX-TILKOPLING)
Bruk denne innstillingen hvis ditt faxapparat
er tilkoplet en PBX. Trykk 1 for å velge JA,
og velg deretter modus for tilkopling til
ekstern linje (1 for JORD, 2 for TIDSPAUSE
eller 3 for ID). Hvis du valgte ID, må du
legge inn ditt PBX ID nummer og deretter
trykke
START
gjentakelsesmodus (1 for JORD, 2 for
TIDSPAUSE eller 3 for INGEN
FUNKSJON).
FAX SIGNAL RECEIVE (MOTTAK AV
FAXSIGNAL)
Trykk 1 for at faxapparatet skal starte
mottaket når du hører et lavt faxsignal etter
å ha tatt telefonen. Trykk 2 for å deaktivere
funksjonen (deaktiver funksjonen hvis du
bruker et faxmodem for datamaskin på
samme linjen).
JUNK NUMBER CHECK (KONTROLL AV
SKRAPNUMMER)
Trykk 1 for å sperre mottaket av faxnummer
som er ført inn i "anti-skrap" nummerlisten.
Trykk 2 for å frigi mottak av alle nummer.
POLLING (AVSPØRRING)
Trykk 1 for å bruke hurtig-tast 16/POLL som
avspøringstast. Trykk 2 for å bruke den som
en regulær hurtig-tast.
tasten, trykk * eller # til
START
tasten en gang til.
START
tasten. Velg til slutt register-

Sammenfattet bruksanvisning
AUTO COVER SHEET (AUTOMATISK
TITTELBLAD)
Trykk 1 for å få faxapparatet til å generere et
tittelblad automatisk og sende det som siste
side av alle overføringer. Trykk 2 for å
deaktivere funksjonen.
AUTO PRINT OUT (AUTOMATISK
UTSKRIFT)
Trykk 1 for at faxapparatet automatisk skal
skrive ut hendelsesprotokoll etter hver 30.
operasjon. (Listen kan fortsatt skrives ut
manuelt når man ønsker det.) Trykk 2 for å
deaktivere automatisk utskrift.
ECM MODE (ECM-MODUS)
Trykk 1 for at faxapparatet skal korrigere
eventuelle forstyrrelser på en faxoverføring
eller på et mottak før faxet skrives ut ved
slutten av mottaket (vær oppmerksom på at
det andre faxapparatet også må ha ECMmodus). Trykk 2 for å deaktivere
funksjonen.
QUICK ON-LINE (HURTIG ON-LINE)
Trykk 1 for at faksapparatet skal velge
mottakerens nummer og starte overføringen
før skanningen er avsluttet. Trykk 2 for at
faxapparatet skal vente til alle sidene er
skannet før det velger nummeret.
RECEPTION RATIO
(MOTTAKSFORHOLD)
Trykk 1 for at faxapparatet automatisk skal
redusere størrelsen til de mottatte
dokumenter så den passer til formatet på
utskriftspapiret. Dette sikrer at ikke data
langs kantene av dokumentet blir klippet
bort. Trykk 2 for å deaktivere funksjonen og
få mottatte dokumenter skrevet ut i full
størrelse.
COPY CUT-OFF (KOPIAVKLIPP)
Når du gjør en kopi av et dokument som er
lenger enn utskriftspapiret, kan du bruke
kopiavklipps-funksjonen for å velge om
gjenværende del av dokumentet skal
klippes av eller skrives ut på en ny side.
Trykk 1 for å klippe av resten eller 2 for at
resten skal skrives ut på en ny side.
Utskrift av lister og
protokoller
1. Trykk disse tastene:
2. Trykk # tasten for å rulle gjennom listene
(trykk * tasten for å rulle bakover).
3. Når den ønskede listen vises på
displayet, trykker du:
Aktivitetsprotokoll
Denne viser informasjon om de siste sendeog mottaksoperasjoner.
Timer-liste
Denne viser timer-operasjoner som er
innstilte i øyeblikket.
Telefonnummer-liste
Denne viser faxnummer som er
programmert for automatisk valg.
Passord-liste
Denne viser innstillinger gjort for
avspørrings-sikkerhet, ditt navn og fax-/
telefonnummer slik dette er lagt inn i
apparatet, og et eksempel på brevhodet
som skrives øverst på hver side du sender.
Liste over innstillingsopsjoner
Denne viser momentan status for
innstillingsopsjonene.
Skrap-nummer
Denne viser faxnummer som er sperret for
mottak.
Gruppeliste
Denne viser faxnumrene som er
programmert i gruppetaster.
FUNCTION
2
START
NORGE
19
Pikaohjeisto
Asennus
1. Liitä kuuloke ja aseta se kuulokkeen
kannattimeen.
2. Kytke virtajohto 220-230 V, 50 Hz
maadoitettuun AC-pistorasiaan
3. Pistä puhelinjohdon toinen pää koneen
vasemmalla reunalla olevaan pistukkaan,
jossa on merkintä
johdon toinen pää puhelimen
pistorasiaan.
TEL. LINE
.
. Pistä
5. Kiinnitä saapuvien dokumenttien teline.
6. Kiinnitä alkuperäiskappaleiden kannatin.
Varmista, että kannattimen etupuoli on
•
sinuun päin (kannattimen on kaarruttava
hieman sinua kohti).
7. Liitä faksiin halutessasi rinnakkaispuhelin
tai puhelinvastaaja:
Poista faksin kyljessä olevan
jakkikoskettimen peittävä suojus.
TEL. SET
-
4. Kiinnitä paperiteline.
20
Kytke rinnakkaispuhelin tai
puhelinvastaaja faksin
jakkikoskettimeen.
TEL. SET
-
Pikaohjeisto
Värikasetin asennus
1. Tartu kiinni tulostinlokeron kannen
molemmista reunoista kuvassa näkyvällä
tavalla ja nosta kansi auki.
•
Varo!
Tulostinlokeron sisällä oleva
sulatusyksikkö kuumenee voimakkaasti
käytön aikana. Älä koske lokeron sisälle
tai tulostinlokeron kannen alapuolella
olevaan paperinohjaimeen.
2. Rumpukasetti on asennettu tehtaalla.
Ve dä paperin repäisynauhaa kevyesti,
jotta saat poistettua mustan suojapaperin
kasetin päältä.
Varo, ettet repäise paperia eikä koneen
•
sisälle jää paperin palasia.
4. Pitele kiinni kasetin kädensijasta, niin että
kasettiin painetut merkinnät osoittavat
ylöspäin, ja aseta kasetti tulostinlokeroon.
5. Pistä peukalosi kädensijan keskiosaan,
jossa on merkintä
kädensijaa alas, niin että kasetti asettuu
paikoilleen.
6. Sulje tulostinlokeron kansi painamalla
lujasti kummastakin reunasta ja varmista,
että kansi on aivan kiinni.
PUSH
, ja paina
SUOMI
3. Ota uusi värikasetti pakkauksesta.
Ravistele värikasettia kevyesti puolelta
toiselle 4 - 5 kertaa, jotta väri leviää
tasaisesti kasetin sisälle.
Irrota varovasti kasetissa oleva nauha ja
pahvinen pakkausmateriaali.
7. Nollaa värilaskin painamalla seuraavia
näppäimiä:
FUNCTION
9
8. Nollaa rumpulaskin painamalla seuraavia
näppäimiä:
FUNCTION
9
START
START
21
Pikaohjeisto
Paperin laittaminen
paperitelineeseen
Telineeseen mahtuu enintään 200 arkkia
A4-kokoisia papereita (enint. 80 g/m²).
Varo!
Älä käytä papereita, joiden toiselle
puolelle on jo tulostettu tekstiä.
1. Vedä paperitelineen uloke ulos.
2. Leyhytä papereita ja tasoita pino tasaista
alustaa vasten.
3. Vedä paperilaukaisinta itseäsi kohti.
Varmista, ettei pino ylitä merkkiviivaa. Jos
•
papereita on liikaa, paperit saattavat
juuttua kiinni ja syöttöön tulee virheitä.
Jos telineeseen on jäänyt papereita, ota
•
ne pois ja laita ne uuden pinon joukkoon,
ennen kuin laitat pinon telineeseen.
5. Varmista, että paperipino on
oikeanpuoleista paperinohjainta vasten ja
siirrä sitten vasen paperinohjain varovasti
-asentoon.
A4
6. Työnnä paperin laukaisin takaisin alas.
4. Aseta paperipino paikoilleen telineeseen,
painettava puoli ylöspäin.
22
Huomaa: Jos paperinsyöttö ei toimi
oikein, ota koko paperipino pois
telineestä ja suorita edellä kuvatut
vaiheet uudelleen.
Pikaohjeisto
Oman nimen ja numeron
syöttö
1. Paina:
2. Paina:
3. Syötä faksinumerosi (enintään 20
•
•
4. Paina:
5. Syötä nimesi painamalla vastaavia
•
SPACE =
A =
B =
C =
D =
E =
F =
G =
H =
I =
•
6. Kun olet valmis, paina
FUNCTION
3
Näyttöön
ilmestyy:
merkkiä) painamalla numeronäppäimiä.
Paina #-näppäintä, kun numeroiden väliin
on jätettävä tyhjä kohta.
Jos teet virheen, paina
näppäintä, jolloin pääset takaisinpäin ja
saat korjattua virheen.
numeronäppäimiä alla kuvatulla tavalla.
Kun sinun on kirjoitettava peräkkäin kaksi
kirjainta, jotka näppäillääm samalla
näppäimellä, paina
kun olet syöttänyt ensimmäisen kirjaimen.
Kun haluat muuttaa kirjasintasoa, paina
REDIAL
haluat vierittää tietyn symbolin tai
erikoismerkin kohdalle.
OMAN NO:N ASETUS
PAINA START
START
SPEED DIAL
START
SPEAKER
J =
K =
L =
M =
N =
O =
P =
Q =
R =
S =
-näppäintä,
T =
U =
V =
W =
X =
Y =
Z =
-näppäintä. Paina # tai *, kun
START
-
STOP
Päivämäärän ja kellonajan
asettaminen
1. Paina:
2. Paina:
3. Syötä päivän kaksi numeroa (01 - 31).
4. Syötä kuukauden kaksi numeroa
5. Syötä vuosiluvun neljä numeroa (esim:
6. Syötä tuntien (00 - 23) ja minuuttien kaksi
7. Kun olet valmis,
FUNCTION
Näyttöön ilmestyy:
START
(01 - 12).
2000)
numeroa (00 - 59).
paina:
3
PVM&AJAN ASETUS
PAINA START
START
STOP
Automaattisesti valittavien
numerojen tallennus ja poisto
1. Paina:
2. Paina 1, kun haluat tallentaa numeron tai
3. Paina pikanäppäintä tai syötä
4. Syötä koko puhelin/faksinumero.
5. Paina:
6. Syötä paikan nimi painamalla
7. Paina:
FUNCTION
3
Näyttöön ilmestyy:
, kun haluat poistaa numeron.
2
kaksinumeroinen pikavalintanumero
(00 - 99). (Jos haluat poistaa numeron,
siirry vaiheeseen 7).
START
numeronäppäimiä. (Kirjainten syöttöön
liittyvät tiedot löydät kohdasta
nimen ja numeron syöttö
START
FAX N O
1=ASETA,2=POISTA
Oman
.)
STOP
SUOMI
23
Pikaohjeisto
Numeroiden tallentaminen
ryhmänäppäimiin
1. Paina:
Näyttöön
ilmestyy:
2. Paina 1, kun haluat ohjelmoida
ryhmänäppäinen tai 2, kun haluat nollata
ryhmänäppäimen.
3. Paina ryhmänäppäintä (yhtä
pikanäppäimistä 17/G1 - 20/G4). (Jos
haluat nollata ryhmänäppäimen, siirry
vaiheeseen 5.)
4. Käytä yhtä tai molempia seuraavista
menetelmistä, kun haluat syöttää
faksinumerot, jotka haluat tallentaa
ryhmänäppäimeen:
Paina pikanäppäimiä.
Paina numeronäppäimiä, kun haluat
syöttää pikavalintanumeroita.
5. Paina:
FUNCTION
START
7
RYHMÄN ASETUS
1=ASETA,2=POISTA
STOP
Faksien lähettäminen
Aseta asiakirja (enintään 20 sivua) oikea
puoli alaspäin asiakirjojen syöttötelinee-
seen.
Säädä erottelutarkkuutta ja/tai kontrastia,
jos tarpeellista.
Numeron tavallinen valinta
1. Nosta kuuloke tai paina
2. Näppäile faksinumero.
3. Odota vastaanottoääntä (jos joku henkilö
vastaa, pyydä häntä painamaan
käynnistysnäppäintä (start).
4. Paina:
START
RESOLUTION
SPEAKER
Valinta pikanäppäintä painamalla
Paina sopivaa pikanäppäintä. Lähetys alkaa
automaattisesti.
Pikavalinta
1. Paina:
SPEED
DIAL
2. Syötä kaksinumeroinen
pikavalintanumero.
3. Paina:
START
Yleislähetys (asiakirjan lähettäminen
useampaan kohteeseen)
1. Paina:
BROADCAST
2. Valitse vastaanottajien numerot
käyttämällä yhtä tai molempia seuraavista
menetelmistä :
Paina yhtä tai useampaa pikanäppäintä.
Syötä yksi tai useampi pikavalintanumero
numeronäppäinten avulla.
3. Paina:
4. Säädä halutessasi
START
RESOLUTION
erottelutarkkuutta:
5. Paina:
START
Yleislähetys ryhmänäppäimen avulla
Jos kaikki kohteet on ohjelmoitu yhteen
ryhmänäppäimeen, voit valita ne
painamalla ryhmänäppäintä.
24
Pikaohjeisto
Faksien vastaanotto
Paina
RECEPTION MODE
kunnes näytössä oleva nuoli soittaa
haluamaasi vastaanottotapaa.
RECEPTION
MODE
FAX m o de :
Faksilaite vastaa
automaattisesti ennalta asetettujen
soittokertojen kuluttua ja vastaanottaa
lähetetyn asiakirjan.
TEL mode:
VASTAANOTTO
TEL/FAX mode:
Tämä käyttötapa on
sopiva, kun halutaan vastaanottaa sekä
fakseja ja tavallisia puheluita. Kun puhelu
tulee, faksilaite tunnistaa, onko kyseessä
tavallinen puhelu (mukaanlukien käsin
valitut faksilähetykset) vai automaattisesti
valittu faksi.
A.M. mode:
Valitse tämä tila, kun faksiin on
liitetty puhelinvastaaja ja puhelinvastaaja on
kytketty päälle.
Beep
-näppäintä,
FAX
TEL
01 FEB 10:30
M:00% STAND-BY
FAX
TEL
01 FEB 10:30
M:00% STAND-BY
01 FEB 10:30
M:00% STAND-BY
01 FEB 10:30
M:00% STAND-BY
FAX
TEL
FAX
TEL
A.M.
A.M.
A.M.
A.M.
START
Valinnaiset asetteet
1. Paina näitä
näppäimiä:
2. Paina #, kun haluat vierittää tietyn
asetteen kohdalle (kun haluat vierittää
taaksepäin, paina *-näppäintä).
3. Kun haluamasi asete tulee esiin, syötä
haluamasi vaihtoehdot (katso alhaalla)
painamalla numeronäppäimiä.
4. Kun olet päättänyt syötön, esiin tulee
seuraava asete. Kun haluat palata
päivämäärän ja kellonajan näyttöön,
paina:
Asetteet
FINE RESOLUTION PRIORITY (erottelutarkkuus)
Tämän vaihtoehdon avulla asetetaan lähetettävien asiakirjojen erottelutarkkuuden oletusarvo. Paina 1 (KYLLÄ), jos haluat asettaa
tarkkuuden hienoksi (FINE) tai 2 (EI), jos
haluat asettaa sen normaaliksi (STANDARD).
NUMBER OF RINGS (soittojen lukumäärä)
Tämän avulla säädetään soittojen lukumäärä, joiden ajan faksilaite odottaa, kunnes se vastaa tulevaan soittoon FAX ja TEL/
FAX -vastaanottotiloissa. Syötä numero 1 -
.
5
RECALL INTERVALL (uudelleenvalinnan
väli)
Tämän avulla säädetään, kuinka kauan faksilaite odottaa, kunnes numero valitaan
automaattisesti uudelleen, kun numero oli
varattu. Syötä 01, kun haluat ajan olevan 1
minuutin, 02, kun haluat ajan olevan 2
minuuttia, jne.; pisin mahdollinen aika on 15
minuuttia.
RECALL TIMES (uudelleenvalintakerrat)
Tämän avulla asetetaan, kuinka monta kertaa faksilaitteesi valitsee numeron automaattisesti uudelleen, jos numero on
varattu. Syötä numero 00 - 10.
FUNCTION
4
STOP
SUOMI
25

Pikaohjeisto
TEL/FAX REMOTE NUMBER (puh/faksikaukonumero)
Tämän avulla valitaan numero, jota voit painaa rinnakkaispuhelimessa (**:n jälkeen),
jotta saat aktivoitua faksien vastaanoton.
Syötä numero 1 -
REMOTE RECEPTION (kaukovastaanotto)
Paina 1, jos haluat mahdollistaa faksien vastaanoton aktivoinnin rinnakkaispuhelimesta
käsin käyttämällä edellä mainittua TEL/FAX
REMOTE-numeroa. Paina 2, kun haluat kytkeä toiminnon pois päältä.
TRANSACTION REPORT
Tämän avulla asetetaan ehdot, joiden vallitessa tapahtumaraportti tulostetaan. Paina
numeronäppäintä 1 - 5:
, jos haluat tapahtumaraportin: Jokaisen
1
lähetyksen ja vastaanoton jälkeen.
: Virheen, ajastimen tai muistissa olevan
2
lähetyksen jälkeen.
: Ainoastaan lähetysten jälkeen.
3
: Ei koskaan.
4
. Ainoastaan virheiden jälkeen.
5
PSEUDO RING DURATION (valesoittoää-
nen kesto)
Tämän avulla asetetaan erityisen soittoäänen kesto, jonka avulla voit tunnistaa tavalliset puhelut TEL/ FAX -vastaanottotilassa.
Paina 1, jos haluat soiton kestävän 15
sekuntia, 2, jos haluat sen kestävän 30
sekuntia, 3, jos haluat sen kestävän 60
sekuntia tai 4, jos haluat sen kestävän 120
sekuntia.
QUIET DETECT TIME (tauon kesto)
Kun faksiin on kytketty puhelinvastaaja ja
vastaanottotila on A.M, faksilaite kytkeytyy
päälle ja aloittaa vastaanoton, jos se havait-
see tietynmittaisen tauon sen jälkeen, kun
puhelinvastaaja vastaa puheluun. Tauon
kesto asetetaan sekunteina. Syötä numero
- 10 tai 00, jos haluat kytkeä toiminnon
01
pois päältä.
QUIET DETECT START TIME (tauon alka-
misajankohta)
Käytä tätä, jos sinun on viivytettävä edellä
mainittua Quiet Detect Time -toiminnon
käynnistymistä. Syötä kaksinumeroinen
9
luku, joka ilmoittaa viivytyksen keston
sekunteina (00 - 15).
SELECT AUTO RECEIVE (automaattisen
vastaanoton valinta)
Paina 1, jotta saat faksilaitteen vastaamaan
puheluun 5 soiton jälkeen A.M.-tilassa, jos
faksilaitteeseen kytketty puhelinvastaaja ei
mene päälle ennen sitä. Saat kytkettyä toiminnon pois päältä painamalla 2.
LANGUAGE SELECT (kielen valinta)
Käytä tätä, kun haluat muuttaa näytössä,
raportteissa ja luetteloissa käytetyn kielen.
Paina
nes haluamasi kieli ilmestyy näyttöön ja
paina sitten
PBX CONNECTION (PBX-yhteys)
Käytä tätä asetetta, jos faksilaitteesi on liitetty
PBX:ään. Valitse
itse sitten tila ulkopuoliseen linjaan liittämistä
varten (
VAIHDENO). Jos olet valinnut VAIHDENO,
syötä PBX ID numerosi ja paina sitten
START
palautustila (
EI TOIMINTOA).
FAX SIGNAL RECEIVE (faksin vastaanottosignaali)
Paina 1, jolloin faksilaitteesi aloittaa vastaanoton automaattisesti, jos kuuluu pehmeä faksiääni, kun puheluun on vastattu.
Paina 2, jos haluat kytkeä toiminnon pois
päältä (kytke toiminto pois päältä, jos käytät
tietokoneen faksimodeemia samalla linjalla).
JUNK NUMBER CHECK (kielletyn numeron
tarkistus)
Paina 1, kun haluat estää vastaanoton Anti
Junk Number-luetteloon syötetyistä faksinu-
meroista. Paina 2, jolloin vastaanotto kaikista numeroista on mahdollista.
POLLING (pollaus)
Paina 1, jolloin voit käyttää pikanäppäintä
16/POLL pollausnäppäimenä. Paina 2, kun
haluat käyttää sitä tavallisena näppäimenä.
AUTO COVER SHEET (automaattinen kansilehti)
Paina 1, kun haluat faksilaitteen luovan
automaattisesti kansilehden ja lähettävän
-näppäintä, paina * tai #, kun-
START
-näppäintä uudelleen.
START
KYLLÄ
painamalla 1 ja val-
= MAAD, 2 = KATKOS tai 3 =
1
-näppäintä. Valitse lopuksi rekisterin
= MAAD, 2 = KATKOS tai 3 =
1
26

Pikaohjeisto
sen kunkin lähetyksen viimeisenä sivuna.
Paina 2, kun haluat kytkeä toiminnon pois
päältä.
AUTO PRINT OUT (raportin automaattinen
tulostus)
Paina 1, kun haluat faksisi tulostavan toimintoraportin (Activity Report) joka 30. käytön
jälkeen. (Luettelo voidaan silti tulostaa haluttaessa milloin tahansa.) Paina 2, kun haluat
kytkeä automaattitulostuksen pois päältä.
ECM MODE (virheenkorjaustila)
Paina 1, kun haluat faksin korjaavan kaikki
faksin lähettämisessä tai vastaanottamisessa esiintyneet säröt, ennen kuin faksi
tulostetaan vastaanottopuolella (huomaa,
että toisenkin faksilaitteen on oltava virheenkorjaustilassa). Saat kytkettyä toiminnon
pois päältä painamalla 2.
QUICK ON-LINE (lähetyksen aloitus heti)
Paina 1 , kun haluat faksin valitsevan vastaanottajien numeron ja aloittavan lähettämisen, vaikka skannaus on vielä käynnissä.
Paina 2, kun haluat faksilaitteen odottavan,
että kaikki sivut on skannattu ennen numeron valitsemista.
RECEPTION RATIO (vastaanotettavan
asiakirjan koko)
Paina 1, kun haluat, että faksilaite pienentää
automaattisesti vastaanotettujen asiakirjojen
kokoa, niin että ne mahtuvat tulostuksessa
käytettävälle paperille. Tämän ansiosta
asiakirjan reunat eivät leikkaudu pois tulostettaessa. Paina 2, kun haluat kytkeä toiminnon pois päältä, jolloin asiakirjat
vastaanotetaan todellisen kokoisina.
COPY CUT-OFF (kopion loppu pois)
Kun haluat kopioida asiakirjan, joka on
pitempi kuin käytössä oleva paperi, käytä
copy cut-off-asetetta, jolloin voit valita, jäte-
täänkö asiakirjan loppuosa pois vai tulostetaanko se toiselle paperille. Paina 1, kun
haluat jättää loppuosan pois tai 2, kun
haluat, että loppuosa tulostetaan toiselle
paperille.
Luetteloiden ja raporttien
tulostus
1. Paina näitä näppäimiä:
2. Paina #-näppäintä, jolloin voit vierittää
luetteloiden tiettyyn kohtaan (saat
vieritettyä takaperin, kun painat *-
näppäintä).
3. Kun haluamasi luettelo
ilmestyy näyttöön, paina:
Activity Report
Tämä näyttää viimeksi suorittamiasi
lähetys- ja vastaanottotoimintoja koskevat
tiedot.
Timer List (ajastusluettelo)
Tämä näyttää sillä hetkellä voimassa olevat
ajastimen toiminnot.
Telephone Number List
(puhelinumeroluettelo)
Tämä näyttää faksinumerot, jotka on
ohjelmoitu valittaviksi automaattisesti.
Passcode List (avainkoodiluettelo)
Tämä näyttää pollauksen turvallisuutta
varten tehdyt asetteet, koneeseen
syöttämäsi nimen ja faksi/puhelinnumeron
ja näytteen jokaisen lähettämäsi sivun
yläreunaan tulostettavasta tekstistä.
Option Setting List (valinnaisten
asetteiden luettelo)
Tämä näyttää valinnaisten asetteiden sen
hetkisen tilan.
Junk Number List (kiellettyjen
numeroiden luettelo)
Tämä näyttää faksinumerot, joista ei oteta
vastaan fakseja.
Group List (ryhmäluettelo)
Tämä näyttää faksinumerot, jotka on
ohjelmoitu ryhmänäppäimiin.
(toimintaraportti)
FUNCTION
2
START
SUOMI
27

Kortfattet reference-guide
Installering
1. Tilslut telefonen og anbring den på
holderen.
2. Stik netstikket i en 220-230 V, 50 Hz,
jordet (2-bens) AC stikdåse
3. Srik den ene ende af telefonledningen
ind i bøsningen på venstre side af
maskinen, mærket med
den anden ende i en telefonstikdåse.
.
TEL. LINE
. Stik
5.Anbring bakken for modtagne
dokumenter.
6. Anbring holderen for originaldokumentet.
Kontroller, at forsiden af holderen vender
•
mod Dem (holderen skal bue let henimod
Dem).
7. Hvis ønsket, tilsluttes en ekstratelefon
eller telefonsvarer til telefaxmaskinen:
Fjern afdækningen som dækker
bøsningen på siden af
SET
telefaxmaskinen.
TEL.
4. Anbring papirbakken.
28
Tilslut en ekstratelefon eller telefonsvarer
til
TEL. SET
telefaxmaskinen.
bøsningen på siden af

Kortfattet reference-guide
Installering af tonerpatronen
1. Grib fat i printerrummet på begge sider
som vist, og træk opad for at åbne
afdækningen.
•
Giv agt!
Opvarmningsenheden inde i
printerrummet bliver meget varm under
drift. Berør ikke indersiden af rummet
eller papirføringen på undersiden af
printerrumsafdækningen.
2. Kopitromlen er blevet installeret på
fabrikken. Træk forsigtigt i papirtappen
for at fjerne det sorte beskyttelsespapir
fra tromlen.
Pas på , at De hverken river papiret eller
•
efterlader papirstykker i maskinen.
4. Hold tonerpatronen i grebet med de
påstemplede markeringer vendende
opad, og sæt patronen i printerrummet.
5. Anbring Deres tommelfinger midt på
grebet, hvor det er markeret
grebet nedad og ind, således at patronen
glider på plads.
6. Luk printerrumsafdækningen, ved at
trykke kraftigt på begge sider for at sikre,
at det er fuldstændigt lukket.
PUSH
, tryk
3. Tag den nye tonerpatron ud af
emballagen. Ryst patronen fra side til
side fire eller fem gange for at fordele
toneren jævnt i patronen.
Tag fo rs igt ig t b åndet og
papemballeringsmaterialet af
tonerpatronen.
7. Reset tonertælleren ved at trykke
følgende tastfølge:
FUNCTION
9
8. Reset tromletælleren ved at trykke
følgende tastfølge:
FUNCTION
9
START
START
DANMARK
29

Kortfattet reference-guide
Ilægning af papir i
papirbakken
Der kan ilægges op til 200 ark A4 papir
(maks. 80 g/m²) i papirbakken.
Giv agt!
Udskriv ikke på bagsiden af papir, hvorpå
der allerede er printet.
1. Træk forlængelsen på papirbakken ud.
2. Spred papiret vifteformet, og bank derpå
kanten mod en plan flade for at samle
stablen.
3. Træk papirudløserarmen hen imod Dem
selv.
Konroller, at papirstablen ikke er højere
•
end den markerede linje. Ilægning af for
meget papir kan medføre fastsiddende
og forkert indført papir.
Hvis papiret ikke trækkes ind, tages det
•
ud og samles med det nye papir til een
stabel før det lægges i.
5. Kontroller, at papirstablen er rettet ind
mod den højre papirføring, og skub derpå
forsigtigt den venstre papirføring til A4
positionen.
6. Skub papirudløserarmen tilbage og
nedad.
4. Skub papirstablen fast ind i bakken, med
printsiden opad.
30
Giv agt: Hvis papiret ikke indføres
korrekt, fjernes hele stablen fra bakken
og hele ilægningsproceduren gentages
forfra.

Kortfattet reference-guide
Indtastning af Deres navn og
telefaxnummer
1. Tryk:
2. Tryk:
3. Indtast Deres telefaxnummer (maks. 20
•
•
4. Tryk:
5. Indtast Deres navn ved at trykke de
•
SPACE =
A =
B =
C =
D =
E =
F =
G =
H =
I =
•
6. Hvis De er færdig, trykkes på:
FUNCTION
3
Displayet viser:
cifre) ved at trykke på ciffertasterne.
For at indføre et mellemrum mellem cifre,
trykkes # tasten.
Hvis De laver en fejl, trykkes
tasten for at rykke tilbage og slette
DIAL
fejlen.
respektive ciffertaster, som vist nedenfor.
For at indtaste to bogstaver efter
hinanden, som kræver den samme tast,
trykkes på
indtastet det første bogstav.
For at skifte mellem store og små
bogstaver, trykkes
på # eller * for at rulle gennem symboler
og specialtegn.
SET EGET NUMMER
TRYK PÅ START
START
START
SPEAKER
J =
K =
L =
M =
N =
O =
P =
Q =
R =
S =
tasten efter at have
REDIAL
SPEED
T =
U =
V =
W =
X =
Y =
Z =
tasten. Tryk
START
STOP
Indstilling af dato og
klokkeslæt
1. Tryk:
2. Tryk:
3. Indtast to cifre for dagen (01 til 31).
4. Indtast to cifre for måneden (01 til 12).
5. Indtast fire cifre for året (eks.: 2000)
6. Indtast to cifre for timetallet (00 til 23) og
7. Hvis De er færdig,
FUNCTION
Displayet viser:
3
SET DATO & TID
TRYK PÅ START
START
to cifre for minuttallet (00 til 59).
trykkes på:
START
STOP
Lagring og sletning af
automatiske kaldenumre
1. Tryk:
2. Tryk på 1 for at lagre et nummer eller 2
3. Tryk en hurtigtast eller indtast et 2-cifret
4. Indtast hele telefax-/telefonnummeret.
5. Tryk:
6. Indtast navnet på abonnenten ved at
7. Tryk:
FUNCTION
3
Displayet viser:
for at slette et nummer.
tempokaldenummer (fra 00 til 99). (Hvis
De vil slette et nummer, gå til 7.)
trykke på ciffertasterne. (Referer til
indtastningstabellen for bogstaver i
(
Indtastning af Deres navn og
telefaxnummer
FAX/TLF NR. REG.
1=SET, 2=SLET
START
.)
START
STOP
DANMARK
31

Kortfattet reference-guide
Lagring af numre i
gruppetaster
1. Tryk:
Displayet viser:
2. Tryk 1 for at programmere en gruppetast,
eller 2 for at slette en gruppetast.
3. Tryk på en gruppetast (en af hurtigtasterne 17/G1 til 20/G4). (Hvis De ønsker
at slette en gruppetast, gå til trin 5.)
4. Benyt en eller begge af de følgende
metoder for at indtaste telefaxnumre, som
De ønsker at lagre i gruppetasten:
Tryk hurtigtaster.
Tryk ciffertaster for at indtaste
tempokaldenumre.
5. Tryk:
FUNCTION
START
7
GRUPPE POSITION
1=SET, 2=SLET
STOP
Forsendelse af telefaxer
Anbring Deres dokument (indtil 20 sider)
med tekstsiden nedad
i dokumentindføringen.
Hurtigtast opkald
Tryk den respektive hurtigtast. Overførslen
starter automatisk.
SPEED
DIAL
Tempoopkald
1. Tryk:
2. Indtast det 2-cifrede tempokaldenummer.
3. Tryk:
START
Gruppetelefaxforsendelse (sende et
dokument til mange abonnenter)
1. Tryk:
BROADCAST
2. Kald den modtagende maskine ved at
benytte en eller begge de følgende
metoder:
Tryk en eller flere hurtigtaster.
Indtast en eller flere tempokaldenumre
med ciffertasterne.
3. Tryk:
4. Hvis ønsket, indstilles
START
RESOLUTION
opløsningen.
5. Tryk:
START
Indstil opløsningen og/
eller kontrasten hvis
RESOLUTION
ønsket.
Normalt opkald
1. Løft telefonen eller tryk
SPEAKER
2. Indtast telefaxnummeret.
3. Vent på kvitteringstonen (hvis en person
svarer), bed dem trykke på deres
starttast).
4. Tryk:
START
32
Gruppetelefax ved anvendelse af en
gruppetast.
Hvis alle abonnenter er blevet
programmeret i en gruppetast, trykkes
ganske enkelt på gruppetasten.

Kortfattet reference-guide
Modtagelse af telefaxer
Tr yk p å
RECEPTION MODE
displayet peger på den ømskede modtagemodus.
RECEPTION
MODE
FAX modus:
telefaxmaskinen svarer
automatisk på det forud indstillede antal
ringetoner og modtager det indkommende
dokument.
TEL modus:
MODTAGER
TEL/FAX modus:
Denne modus er fremragende til at modtage både telefax- og taleopkald. Hvis der kommer et taleopkald,
detekterer telefaxmaskinen hvadenten det
er et taleopkald (inklusive manuelt opkaldte
telefaxoverførsler), eller en automatisk
opkaldt telefax.
A.M. modus:
Vælg denne modus hvis en
felefonsvarer er tilsluttet til telefaxmaskinen
og der er tændt for telefonsvareren.
Beep
01 FEB 10:30
M:00% STAND-BY
01 FEB 10:30
M:00% STAND-BY
01 FEB 10:30
M:00% STAND-BY
01 FEB 10:30
M:00% STAND-BY
indtil pilen på
FAX
TEL
A.M.
FAX
TEL
A.M.
FAX
TEL
A.M.
FAX
TEL
A.M.
START
Optionale indstillinger
1. Tryk disse taster:
2. Tryk på # tasten for at rulle gennem
indstillingerne (for at rulle i modsat
retning, trykkes * tasten).
3. Hvis de ønskede indstillinger
fremkommer, indtastes et valg for
indstillingen (se nedenfor) ved at trykke
på ciffertasterne.
4. Efter indtastning af valget, fremkommer
følgende indstilling. For at returnere til
dato- og klokkeslætvisningen, trykkes:
Indstillinger
FINOPLØSNINGSPRIORITET
Denne indstilling indstiller default-opløsnin-
gen for forsendelse af dokumenter. Tryk på
(JA) for at ændre default-indstillingen til
1
fin, eller 2 (NEJ) for at indstille STANDARD.
ANTAL RINGETONER
Denne indstilling indstiller antal ringetoner,
som telefaxmaskinen venter, før den svarer
på et indkommende opkald i FAX eller TEL/
FAX modtagemodierne. Indtast et ciffer fra
til 5.
1
GENOPKALDSINTERVAL
Denne indstilling indstiller det tidsrum, som
Deres telefaxmaskine venter mellem
automatiske genopkald, når ledningen er
optaget. Indtast 01 for 1 minut, 02 for 2
minutter, etc., op til maksimalt 15 minutter.
ANTAL GENOPKALD
indstiller det maksimale antal gange Deres
telefaxmaskine genopkalder et nummer,
hvis linjen er optaget. Indtast et vilkårligt tal
fra 00 til 10.
TEL/FAX FJERNSTYRINGSNUMMER
indstiller det nummer, som De kan trykke på
en ekstratelefon fulgt af ** for at aktivere
telefaxmodtagelse. Indtast et vilkårligt ciffer
fra 1 til 9.
FUNCTION
4
STOP
33
DANMARK

Kortfattet reference-guide
FJERNSTYRET MODTAGELSE
Tr yk p å 1, hvis De ønsker at kunne aktivere
telefaxmodtagelse fra en ekstratelefon ved
at anvende ovenstående TEL/FAX
REMOTE NUMBER. Tryk 2 for at slukke for
fjernstyret modtagelse.
TRANSAKTIONSRAPPORT
Dette indstiller betingelserne under hvilke
en transaktionsrapport udskrives. Tryk på
en ciffertast fra 1 til
som følger: Efter hver overførsel og mod-
1
tagelse.
: Efter en fejl, timer eller hukommelses-
2
overførsel.
: Kun efter overførsler.
3
: Aldrig.
4
: Kun efter fejl.
5
PSEUDO OPKALDSVARIGHED
Denne indstilling indstiller varigheden af
den specielle ringetone, som gør Dem
opmærksom på taleopkald i TEL/FAX modtagemodien. Tryk 1 for 15 sekunder, 2 for
30 sekunder, 3 for 60 sekunder, eller 4 for
120 sekunder.
PAUSETIDSDETEKTERING
Hvis en telefonsvarer er tilsluttet til telefaxmaskinen og modtagemodien er indstillet til
A.M., vil telefaxmaskinen overtage linjen og
begynde modtagelse, hvis det detekterer en
pause af en vis varighed efter at telefonsvareren har svaret på et opkald. Dette indstiller pausens varighed i sekunder. Indtast
et nummer fra 01 til 10, eller indtast 00 for at
slukke for funktionen.
STARTTID FOR PAUSETIDSDETEKTERING
Benyt dette, hvis De har brug for en forsinkelse af starten på den ovenstående
funktion pausetidsdetektering. Indtast et
tociftret tal for antallet af sekunder, som forsinkelsen (00 til 15) skal vare.
5
VALG AF AUTOMATISK MODTAGELSE
Tr yk p å 1 for at få Deres telefaxmaskine til
automatisk at svare på et opkald efter 5
ringetoner i A.M. modien, hvis en telefonsvarer, der er tilsluttet til telefaxmaskinen,
ikke når at svare indenfor dette tidsrum.
Tr yk p å 2 for at afbryde funktionen.
VALG AF SPROG
Benyt dette for at ændre sproget, der anvendes i displayet, rapporter og lister. Tryk
på
ønskede sprog vises på displayet, og tryk
derpå igen
PBC TILSLUTNING
Benyt denne indstilling hvis Deres telefaxmaskine er tilsluttet en PBC. Tryk på 1 for at
vælge JA, og vælg derefter modien for forbindelse til en ekstern linje (1 for JORD GENNEMV.,
Hvis De har valgt UD NR., indtastes Deres
PBC ID nummer og tryk derefter på
tasten. Til sidst vælges register genopkaldemodien (1 for JORD GENNEMV., 2 for
PAUSE, eller
FAX-SIGNAL MODTAGELSE
Tr yk p å 1 for at få Deres telefaxmaskine til
automatisk at begynde modtagelsen, hvis
De hører en svag telefaxtone efter at røret
er løftet ved et opkald. Tryk på 2 for at
afbryde funktionen (afbryd funktionen, hvis
De anvender et PC telefaxmodem på
samme linje).
CHECK FOR SPØGNUMRE
Tr yk p å 1 for at blokere modtagelse fra telefaxnumre, der er indtastet i antispøg telefaxnummerlisten. Tryk på 2 for at tillade
modtagelse fra alle telefaxnumre.
POLLING
Tr yk p å 1 for at benytte hurtigtast 16/POLL
som pollingtaste. Tryk på 2 for at benytte
den som en regulær hurtigtast.
tasten, tryk på * eller # indtil det
START
tasten.
START
for PAUSE, eller 3 for UD NR.).
2
for DIREKTE LINIE).
3
START
34

Kortfattet reference-guide
AUTOMATISK DÆKBLAD
Tr yk p å 1 for at få telefaxmaskinen til
automatisk at generere et dækblad og
sende det som den sidste side i hver overførsel. Tryk på 2 for at afbryde funktionen.
AUTOMATISK UDSKRIFT
Tr yk p å 1 for at få Deres telefaxmaskine til
automatisk at udskrive en aktivitetsrapport
efter hver 30. operation. (Listen kan stadig
udskrives ved behov.) Tryk på 2 for at
afbryde den automatiske udskrift.
ECM MODUS
Tr yk p å 1 for at få telefaxmaskinen til at korrigere forstyrrelser i telefax-overførslen eller
-modtagelsen før udskrivning af telefaxen
efter afslutning af modtagelsen (bemærk, at
det sendende telefaxmaskine også skal
have ECM modien). Tryk på 2 for at afbryde
funktionen.
QUICK ON-LINE
Tr yk p å 1 for at få telefaxmaskinen til at
opkalde den modtagende abonnent og begynde overførslen, medens scanningen sta-
dig løber. Tryk på 2 for at få
telefaxmaskinen til at vente indtil alle sider
er blevet scannet, før der ringes op.
MODTAGEFORMAT
Tr yk p å for at få telefaxmaskinen til automatisk at reducere formatet af de modtagne
dokumenter for at tilpasse formatet til printpapiret. Dette sikrer, at dataene på randen
af dokumentet også udskrives. Tryk på 2 for
at afbryde funktionen og få det modtagne
dokument udskrevet i fuldt format.
KOPIAFSKÆREENHED
Hvis De laver en kopi af et dokument, der er
længere end printerpapiret, anvendes
afskæreindstillingen for at vælge om den
resterende del af dokumentet skal skæres
bort eller udskrives på en ekstra side. Tryk
på 1 for at bortskære resten, eller 2 for at få
resten udskrevet på en ekstra side.
Udskrivning af lister og
rapporter
1. Tryk disse taster:
2. Tryk på # tasten for at rulle gennem
listerne (for at rulle i modsat retning,
trykkes på * tasten).
3. Hvis den ønskede liste vises på
displayet, trykkes på:
Aktivity report
Denne viser informationer vedrørende
Deres sidst gennemførte sende- og modtage-operationer.
Timer-liste
Denne viser de timeroperationer der aktuelt
er indstillet.
Telefonnummerliste
Denne viser telefaxnumre, der er blevet
programmeret for automatisk opkald.
Adgangskodeliste
Denne viser indstillingerne, der er valgt for
polling-sikkerhed, Deres navn og telefax-/
telefonnumre, som er indtastet i maskinen,
og et eksemplar af toplinjen, der udskrives
øverst på hver side, der sendes.
Liste over optionale indstillinger
Denne viser den øjeblikkelige status for de
optionale indstillinger.
antispøg telefaxnummerliste
Denne viser telefaxnumre, fra hvilke modtagelse ikke er tilladt.
Gruppeliste
Denne viser telefaxnumrene, der er blevet
programmeret i gruppetaster.
FUNCTION
2
START
DANMARK
35

Snelle referentiegids
Installatie
1. Sluit de hoorn aan en plaats deze op de
haak.
2. Steek het netsnoer in een geaarde,
220-230 V, 50 Hz, (2-aderige) AC
uitgang
.
3. Steek een uiteinde van de leiding in de
bus aan de linkerkant van het apparaat
met de markering
andere einde aan op de telefoonbus in de
wand.
TEL. LINE
. Sluit het
5. Bevestig de lade voor ontvangen
documenten.
6. Bevestig de steun voor het originele
document.
Controleer of de voorzijde van de steun
•
naar u gericht is (de steun moet licht naar
u toe gebogen zijn).
7. Desgewenst kunt u een neventoestel of
een antwoordapparaat aan het faxtoestel
aansluiten:
Verwijder de verzegeling van de
bus aan de zijkant van het
SET
faxtoestel.
TEL.
4. Bevestig de papierlade.
36
Sluit een neventoestel of een
antwoordapparaat aan op de
bus op het faxtoestel.
TEL. SET

Snelle referentiegids
Het installeren van de
tonerpatroon
1. Pak het deksel van printvak aan beide
kanten vast en trek dit omhoog om het
deksel te openen. (Zie afbeelding).
•
Voorzichtig!
De heatereenheid in het printvak wordt
zeer heet tijdens de werking. Raak de
binnenkant van het printvak of de
papiergeleider aan de onderkant van het
printvak niet aan.
2. De drumpatroon werd in de fabriek
geïnstalleerd. Trek voorzichtig aan de
papierstrip om het zwarte
beschermpapier van de patroon te
verwijderen.
Pas op dat u het papier niet scheurt en
•
dat u geen stukjes papier in het apparaat
achterlaat.
4. Houd de tonerpatroon aan de handgreep
vast terwijl de markeringen op de patroon
naar boven gericht zijn en plaats de
patroon in het printvak.
5. Plaats uw duim in het midden van de
handgreep bij de markering
druk de handgreep omlaag en naar
binnen tot de patroon op zijn plaats
ineensluit.
6. Sluit het deksel van het printvak door
stevig op de zijkanten te drukken en
controleer of het helemaal gesloten is.
PUSH
, en
NEDERLANDS
3. Neem de nieuwe tonerpatroon uit de
verpakking. Schud de patroon vier of vijf
keer heen en weer om de toner
gelijkmatig in de patroon te verdelen.
Verwijder het band en het kartonnen
verpakkingsmateriaal voorzichtig van de
tonerpatroon.
7. Zet de tonerteller terug door de toetsen in
de volgende toetsvolgorde in te drukken:
FUNCTION
9
8. Zet de teller van de drumpatroom terug
door de toetsen in de volgende
toetsvolgorde in te drukken:
FUNCTION
9
START
START
37

Snelle referentiegids
Het laden van papier
De papierlade kan tot maximaal
200 bladen A4 papier bevatten (max.
80 g/m²).
Attentie!
Niet de blanco zijde van papier waarop
reeds werd geprint gebruiken.
1. Trek de verlenging van de papierlade
naar buiten.
2. Spreid het papier waaiervormig uit en
klop de rand vervolgens op een vlakke
ondergrond om de stapel te effenen.
3. Trek de papierontgrendelingshefboom
naar u toe.
Vul het papier niet boven de lijn voor de
•
maximum hoogte. Indien u te veel papier
invoert, kan het papier vastlopen.
Wanneer u papier wilt toevoegen, dient u
•
het resterende papier eerst te
verwijderen, dit te combineren met het
nieuwe papier en vervolgens in één
stapel opnieuw te laden.
5. Controleer of de stapel papier in één lijn
tegen de rechter papiergeleider werd
geplaats en beweeg de linker
papiergeleider vervolgens voorzichtig
naar de A4 positie.
6. Druk de papierontgrendelingshefboom
weer omlaag.
4. Plaats de stapel papier stevig in de lade
met de printzijde omhoog.
38
Opmerking: Wanneer het papier niet
correct wordt gevoed, dient u de gehele
stapel uit de lade te verwijderen en de
laadprocedure vanaf het begin te
herhalen.

Snelle referentiegids
Invoeren van naam en
nummer
1. Druk op:
Het display toont:
2. Druk op:
3. Voer uw faxnummer in (max. 20 cijfers)
door op de numerieke toetsen te drukken.
Voor het invoeren van een spatie tussen
•
de cijfers, drukt u op de # toets.
Wanneer u een fout heeft gemaakt,
•
bedient u de
teken terug te gaan en de fout te wisen.
4. Druk op:
5. Voer uw naam in door op de volgende
manier op de desbetreffende numerieke
toetsen te drukken.
Voor het invoeren van opeenvolgende
•
letters waarvoor dezelfde toets nodig is,
drukt u op de
eerste letter heeft ingevoerd.
SPACE =
A =
B =
C =
D =
E =
F =
G =
H =
I =
Om de functie te wijzigen, drukt u op de
•
REDIAL
symbolen en speciale karaktertekens te
scrollen.
6. Wanneer u klaar
bent, drukt u op:
FUNCTION
3
OWN NUMBER SET
PRESS START KEY
START
SPEED DIAL
START
SPEAKER
J =
K =
L =
M =
N =
O =
P =
Q =
R =
S =
toets. Druk op # of * om door de
toets om een
toets nadat u de
T =
U =
V =
W =
X =
Y =
Z =
START
STOP
Instellen van datum en tijd
1. Druk op:
Het display toont:
2. Druk op:
3. Voer twee cijfers in voor de dag (01
tot 31).
4. Voer twee cijfers in voor de maand (01
tot 12).
5. Voer vier cijfers in voor het jaar (Ex: 2000)
6. Voer twee cijfers in voor het uur (00 tot
23) en twee cijfers voor de minuten (00
tot 59).
7. Wanneer u klaar
bent, drukt u op:
FUNCTION
START
3
DATE & TIME SET
PRESS START KEY
START
STOP
Opslaan en wissen van
automatische kiesnummers
1. Druk op:
Het display toont:
2. Druk op 1 om een nummer op te slaan of
om een nummer te wissen.
2
3. Druk op een snelkiestoets of voer een
verkortkiesnummer met twee cijfers in
(van 00 tot 99). (Wanneer u een nummer
wist, gaat u verder naar stap 7.)
4. Voer het volledige telefoon/faxnummer in.
5. Druk op:
6. Voer de naam van de lokatie in door de
numerieke toetsen te bedienen. (Zie de
letter invoertabel in Invoeren van uw
naam en nummer.)
7. Druk op:
FUNCTION
START
START
3
FAX/TEL # MODE
1=SET, 2=CLEAR
STOP
NEDERLANDS
39

Snelle referentiegids
Het opslaan van nummers in
groepstoetsen
1. Druk op:
Het display
toont:
2. Druk op 1 om een groepstoets te
programmeren, of op 2 om een
groepstoets te wissen.
3. Druk op een groepstoets (één van de
snelkiestoetsen 17/G1 tot 20/G4). (Indien
u een groepstoets wilt wissen, gaat u
verder naar stap 5.)
4. Voer m.b.v. één (of beide) van de
volgende methodes de faxnummers in,
die u in de groepstoets wilt opslaan:
Druk op de snelkiestoetsen.
Druk de numerieke toetsen in om
verkortkiescodes in te voeren.
5. Druk op:
FUNCTION
START
7
GROUP ENTRY MODE
1=SET, 2=CLEAR
STOP
Het zenden van faxberichten
Plaats uw document
(t/m 20 pagina's) met
de printzijde omlaag in
de documentinvoer.
Kiezen m.b.v. snelkiestoetsen
Druk op de betreffende snelkiestoets. De
transmissie begint automatisch.
Kiezen m.b.v. verkortkiescodes
SPEED
1. Indrukken:
DIAL
2. Voer de 2-cijferige verkortkiescode in.
3. Indrukken:
START
Multi-verzenden (een document naar
meerdere bestemmingen zenden)
1. Druk op:
BROADCAST
2. Kies de ontvangende apparaten m.b.v.
één (of beide) van de volgende
methodes:
Druk één of meerdere snelkiestoetsen in.
Voer één of meer verkortkiescodes in
m.b.v. de numerieke toetsen.
3. Druk op:
4. Desgewenst kunt u de
START
RESOLUTION
resolutie instellen:
5. Indrukken:
START
Stel desgewenst de
resolutie en/of het
RESOLUTION
contrast af.
Normaal kiezen
1. Neem de hoorn op of druk op
SPEAKER
2. Kies het faxnummer.
3. Wacht op de ontvangsttoon (wanneer er
een persoon opneemt, vraagt u deze om
de starttoets in te drukken)
4. Druk op:
START
40
Multi-verzenden m.b.v. een groepstoets
Wanneer de bestemmingen allemaal in
een groepstoets werden geprogrammeerd, kunt u gewoon op de groepstoets
drukken.

Snelle referentiegids
Het ontvangen van
faxberichten
Druk op de
RECEPTION MODE
pijl op het display naar de gewenste
ontvangstmode wijst.
RECEPTION
MODE
FAX m o de :
Het faxtoestel antwoordt
automatisch na het vooringestelde aantal
belsignalen en ontvangt het
binnenkomende document.
Beep
RECEIVING
TEL mode:
TEL/FAX mode:
Deze mode is goed
geschikt om zowel faxberichten als
binnenkomende gesprekken te ontvangen.
Wanneer er een gesprek binnenkomt,
herkent het faxtoestel of het om een
gesprek (inclusief handmatig gekozen
faxberichten), of om een automatisch
gekozen faxbericht gaat.
A.M. mode:
Selecteer deze functie wanneer
er een antwoordapparaat op het faxtoestel
is aangesloten en het antwoordapparaat
ingeschakeld is.
01 FEB 10:30
M:00% STAND-BY
01 FEB 10:30
M:00% STAND-BY
01 FEB 10:30
M:00% STAND-BY
01 FEB 10:30
M:00% STAND-BY
toets tot de
FAX
TEL
A.M.
FAX
TEL
A.M.
FAX
TEL
A.M.
FAX
TEL
A.M.
START
Optionele instellingen
1. Druk op deze
toetsen:
2. Druk op de # toets om door de
instellingen te scrollen (om achterwaarts
te scrollen, drukt u op de * toets).
3. Wanneer de gewenste instelling
verschijnt, voert u een selectie voor de
instelling in (zie hierna) door op de
numerieke toetsen te drukken.
4. Na het invoeren van een selectie,
verschijnt de ernavolgende instelling. Om
terug te keren naar de datum en de tijd,
drukt u op:
Instellingen
FINE RESOLUTION PRIORITY (PRIORITEIT VOOR FIJNE RESOLUTIE)
Met deze optie zet u het apparaat op de
standaard resolutiewaarde voor het zenden
van documenten. Druk op 1 (YES) om de
standaardresolutie op FINE in te stellen, of
op 2 (NO) om deze op STANDARD te zetten.
NUMBER OF RINGS (AANTAL
BELSIGNALEN)
Hiermee wordt het aantal belsignalen ingesteld die het faxtoestel wacht, voordat een
binnenkomend gesprek wordt beantwoord in
de FAX en TEL/FAX ontvangstmodes. Voer
een nummer van 1 tot 5 in.
RECALL INTERVAL (HERKIES INTERVAL)
Hiermee wordt de tijdsduur ingesteld, die
het faxtoestel wacht met automatisch herkiezen, wanneer de leiding bezet is. Voer 01
in voor 1 minuut, 02 voor 2 minuten, etc., tot
maximaal 15 minuten.
RECALL TIMES(AANTAL MALEN
HERKIEZEN)
Hiermede wordt het maximaal aantal keren
ingesteld dat uw faxtoestel automatisch herkiest wanneer de leiding bezet is. Voer een
willekeurig cijfer in van 00 tot 10.
FUNCTION
4
STOP
NEDERLANDS
41

Snelle referentiegids
TEL/FAX REMOTE NUMBER
(AFSTANDSNUMMER)
Hiermee wordt het nummer ingesteld dat u
op een neventoestel kunt indrukken
(gevolgd door **) om de faxontvangst te
activeren. Voer een willekeurig cijfer in van 1
tot 9 in.
REMOTE RECEPTION
(AFSTANDONTVANGST)
Druk op 1 indien u de faxontvangst vanaf
een neventoestel wilt kunnen activeren met
het bovengenoemde TEL/FAX REMOTE
NUMBER. Druk op 2 om de afstandsontvangst uit te zetten.
TRANSACTION REPORT
(TRANSACTIEBERICHT)
Hiermede wordt de voorwaarde ingesteld,
waaronder een transactiebericht wordt
geprint. Druk op een numerieke toets van 1
tot 5 op de volgende manier:
: Na elke transmissie en/of ontvangst.
1
: Na een fout, timer- of geheugentransmis-
2
sie.
: Alleen na transmissies.
3
: Nooit.
4
: Alleen na fouten.
5
PSEUDO RING DURATION
(DUUR VAN HET PSEUDO BELSIGNAAL)
Hiermee wordt de duur vastgelegd van het
speciale belsignaal, dat u op gesprekken
attendeert in de TEL/ FAX ontvangstmode.
Druk op 1 voor 15 seconden, op 2 voor 30
seconden, op 3 voor 60 seconden, of op 4
voor 120 seconden.
QUIET DETECT TIME
(STILLE DETECTIETIJD)
Wanneer er een antwoordapparaat op uw
faxtoestel is aangesloten en de ontvangstmode op A.M. staat, zal het faxtoestel de leiding overnemen en met de ontvangst
beginnen nadat deze een bepaalde duur
van stilte heeft herkent nadat het antwoordapparaat een gesprek beantwoordt. Hiermee wordt de tijdsduur van de stilte in
seconden ingesteld. Voer een cijfer van 01
tot 10 in, of voer 00 in om deze functie uit te
zetten.
QUIET DETECT START TIME (STARTTIJD
STILLE DETECTIE)
Deze functie kunt u gebruiken om de start
van de bovengenoemde stille detectietijd
42
functie te vertragen. Voer een getal met
twee cijfers in voor het aantal seconden van
de vertraging (00 tot 15).
SELECT AUTO RECEIVE (SELECTEREN
AUTOMATISCHE ONTVANGST)
Druk op 1 om uw faxtoestel automatisch na
5 belsignalen in de A.M. mode een gesprek
te laten beantwoorden, wanneer het antwoordapparaat dat op uw faxtoestel is aangesloten binnen deze tijd niet heeft
geantwoord. Druk op 2 om deze functie uit
te zetten.
LANGUAGE SELECT
(SELECTEREN TAAL)
Hiermee kunt u de taal selecteren voor het
display, de berichten en de lijsten. Druk op
de
gewenste taal op het display verschijnt en
druk dan opnieuw op de
PBX CONNECTION(PBX AANSLUITING)
Gebruik deze instelling wanneer uw faxtoestel op een PBX is aangesloten. Druk op 1
om YES te selecteren en selecteer vervolgens de mode voor de verbinding met een
externe leiding (1 voor EARTH, 2 voor
FLASH, of 3 voor ID). Indien u ID heeft
geselecteerd, voert u uw PBX ID (identificatie) nummer in en drukt u vervolgens op de
START
gistreerde terugbelmode (1 voor EARTH, 2
voor FLASH, of 3 voor NO OPERATION).
FAX SIGNAL RECEIVE
(ONTVANGST FAXSIGNAAL)
Druk op 1 om uw faxtoestel automatisch met
de faxontvangst te laten beginnen wanneer
u een zacht faxsignaal hoort nadat u een
gesprek heeft beantwoord. Druk op 2 om de
funcie uit te zetten (zet de functie uit wanneer u een computer fax modem op
dezelfde leiding gebruikt).
JUNK NUMBER CHECK
(CONTROLE JUNKNUMMERS)
Druk op 1 om de ontvangst van faxnummers
te blokkeren die op de lijst met anti-junknummers vermeld staan. Druk op 2 om de
ontvangst van alle nummers toe te staan.
POLLING
Druk op 1 om snelkiestoets 16/POLL als
polling toets te gebruiken. Druk op 2 om
deze toets als normale snelkiestoets te
gebruiken.
toets, druk op * of # tot de
START
toets.
START
toets. Tenslotte selecteert u de gere-

Snelle referentiegids
AUTO COVER SHEET
(AUTOMATISCH DEKBLAD)
Druk op 1 om uw faxtoestel automatisch een
dekblad te laten maken en dit als laatste
blad van elke transmissie te zenden. Druk
op 2 om de fucntie uit te zetten.
AUTO PRINT OUT
(AUTOMATISCH PRINTEN)
Druk op 1 om uw faxtoestel automatisch na
elke 30 bewerkingen een activiteitenbericht
te laten printen. (De lijst kan desgewenst
nog steeds op verzoek worden geprint.)
Druk op 2 om het automatische printen uit te
zetten.
ECM MODE
Druk op 1 om uw faxtoestel storingen in de
faxtransmissie of -ontvangst te laten corrigeren, voor het faxbericht bij de ontvanger
wordt geprint (let erop dat het andere faxtoestle ook over de ECM mode moet beschikken). Druk op 2 om deze functie uit te
zetten.
QUICK ON-LINE
Druk op 1 om uw faxtoestel de ontvanger al
te laten kiezen en met de transmissie te
beginnen, terwijl er nog wordt gescand.
Druk op 2 om het faxtoestel met het kiezen
le laten wachten tot alle pagina's werden
gescand.
RECEPTION RATIO
(ONTVANGSTPERCENTAGE)
Druk op 1 om uw faxtoestel automatisch het
formaat van de ontvangen documenten te
laten reduceren op het formaat van het
printpapier. Op die manier wordt ervoor
gezorgd dat de randen van het document
niet afgesneden worden. Druk op 2 om deze
functie uit te zetten en de ontvangen documenten op vol formaat te printen.
COPY CUT-OFF(KOPIE AFSNIJDEN)
Wanneer u een kopie maakt van een document dat langer is dan het printpapier, kunt
u de kopie-afsnijdfunctie instelling gebruiken
om te bepalen of het resterende gedeelte
wordt afgesneden of op een tweede pagina
wordt geprint. Druk op 1 om het resterende
gedeelte af te snijden, of op 2 om het resterende gedeelte op een tweede pagina te
printen.
Het printen van lijsten en
berichten
1. Druk op deze toetsen:
2. Druk op de # toets om door de lijsten te
scrollen (om achterwaarts te scrollen,
drukt u op de * toets).
3. Wanneer de gewenste lijst op het display
verschijnt, drukt u op:
Activiteitenbericht
Hierop staat informatie over de meest
recent uitgevoerde zend- en
ontvangstbewerkingen.
Timerlijst
Hierop staan de actueel ingestelde
timerbewerkingen vermeld.
Lijst met telefoonnummers
Hierop staan de faxnummers die werden
geprogrammeerd voor automatisch kiezen.
Lijst met pascodes
Hierop staan de gemaakte instellingen voor
de veiligheid van polling, uw naam en fax/
telefoonnummer, zoals deze in het toestel
werden ingevoerd en een voorbeeld van de
koptekst, die op elke verzonden pagina
wordt geprint.
Lijst met optionele instellingen
Hierop staat de huidige status van de
optionele instellingen.
Lijst met junknummers
Hierop staan de faxnummers waarvan de
ontvangst niet is toegestaan.
Groepenlijst
Hierop staan de faxnummers die in
groepstoetsen werden geprogrammeerd.
FUNCTION
2
START
NEDERLANDS
43

Guide de référence rapide
Installation
1. Connecter le combiné et le placer sur son
support.
2. Brancher le cordon d'alimentation dans
une prise murale en c.a. de 220-230 V,
50 Hz, avec prise de terre (à 2 broches)
3. Insérer une extrémité du cordon de ligne
téléphonique dans la fiche située sur le
côté gauche de l'appareil portant le
symbole
extrémité dans la prise jack murale.
TEL. LINE
. Introduisez l'autre
5. Fixer le compartiment pour documents
reçus.
6. Fixer le support pour documents
originaux.
S'assurer que la face avant du support
•
fait face à l'utilisateur (le support doit se
courber légèrement vers l'utilisateur).
.
7. Si besoin est, connecter un téléphone
supplémentaire ou un répondeur au
télécopieur:
Enlevez l'obturateur de la prise jack
située sur le côté du télécopieur.
SET
TEL.
4. Fixer la cassette à papier.
44
Connecter un téléphone supplémentaire
ou un répondeur à la prise jack
du télécopieur.
TEL. SET

Guide de référence rapide
Installation de la cartouche de
toner
1. Saisir le couvercle du compartiment
d'impression des deux côtés tel
qu'illustré, et tirer pour l'ouvrir.
•
Attention!
L'unité chauffante se trouvant dans le
compartiment d'impression devient très
chaude durant le fonctionnement. Ne pas
toucher l'intérieur du compartiment ou le
guide papier se trouvant sur la face
inférieure du couvercle du compartiment
d'impression.
2. La cartouche de photoconducteur a été
installée en usine. Tirer doucement la
languette de papier pour enlever la feuille
noire de protection de la cartouche.
Veiller à na pas déchirer le papier et à ne
•
laisser aucun morceau de papier dans
l'appareil.
4. Tenir la cartouche de toner par la
poignée avec les marques de la
cartouche pointant vers le haut, et insérer
la cartouche dans le compartiment
d'impression.
5. Placer le pouce sur la poignée à l'endroit
portant l'inscription
poignée vers le bas jusqu'à ce que la
cartouche s'encliquette en place.
6. Fermer le couvercle du compartiment
d'impression en poussant fermement vers
le bas de chaque côté pour s'assurer qu'il
est fermé correctement.
, et pousser la
PUSH
3. Retirez la nouvelle cartouche de toner de
son emballage. Secouer horizontalement
la cartouche quatre ou cinq fois pour
répartir le toner de manière homogène
dans la cartouche.
Retirer soigneusement la bande adhésive
et l'emballage de carton de la cartouche
de toner.
7. Remettre le compteur de cartouche de
toner à zéro en composant la séquence
de touches suivante:
FUNCTION
9
8. Remettre le compteur de cartouche de
photoconducteur à zéro en composant la
séquence de touches suivante:
FUNCTION
9
START
START
FRANÇAIS
45

Guide de référence rapide
Chargement du papier dans la
cassette à papier
Jusqu'à 200 feuilles de papier A4
peuvent être chargées (max. 80 g/m²)
dans la cassette à papier.
Attention!
Ne pas utiliser la face vierge d'une feuille
de papier qui a été imprimée sur l'autre
face.
1. Tirer l'extension de la cassette à papier.
2. Déramer le papier et l'égaliser en tapant
le bord sur une surface plane.
3. Tirer le levier de libération du papier vers
l'utilisateur.
S'assurer que la rame ne dépasse pas la
•
ligne de repère. Le chargement d'une
quantité trop importante de papier peut
entraîner des bourrages de papier et des
problèmes d'alimentation de papier.
Si du papier reste dans la cassette, le
•
sortir et le rassembler en un seul tas avec
la nouvelle rame avant de le recharger
dans la cassette.
5. S'assurer que la rame de papier est
alignée avec le guide de papier droit,
ensuite déplacer doucement le guide
papier gauche en position A4.
6. Repousser le levier de libération du
papier vers le bas.
4. Insérer la rame de papier fermement dans
la cassette, face imprimable vers le haut.
46
Remarque : Si le papier ne se charge pas
correctement, enlever la rame complète
de la cassette et répéter la procédure de
chargement depuis le début.

Guide de référence rapide
Entrée de vos nom et numéro
1. Entrer
L'écran affiche:
2. Presser :
3. Entrer le numéro de télécopieur (max. 20
caractères) en pressant les touches
numérotées.
Pour insérer un espace entre les chiffres,
•
appuyer sur la touche #.
Si une erreur est comise, presser la
•
touche
arrière et effacer l'erreur.
4. Presser :
5. Entrer le nom en pressant les touches
numérotées appropriées tel que décrit ci-
après.
Pour entrer deux lettres à la suite qui
•
exigent la même touche, presser la
touche
première lettre.
SPACE =
A =
B =
C =
D =
E =
F =
G =
H =
I =
Pour changer la casse, presser la touche
•
REDIAL
les symboles et les caractères spéciaux.
6. Lorsque l'opération est terminée,
enfoncer:
FUNCTION
3
OWN NUMBER SET
PRESS START KEY
START
SPEED DIAL
SPEAKER
. Presser # ou * pour faire défiler
pour revenir en
START
après avoir entré la
J =
K =
L =
M =
N =
O =
P =
Q =
R =
S =
START
T =
U =
V =
W =
X =
Y =
Z =
STOP
Réglage de la date et de
l'heure
1. Entrer
L'écran affiche:
2. Presser :
3. Entrer deux chiffres pour le jour (01 à 31).
4. Entrer deux chiffres pour le mois (01 à 12).
5. Entrer quatre caractères pour l'année
(Ex: 2000)
6. Entrer deux chiffres pour l'heure (00 à
23) et deux chiffres pour les minutes (00
à 59).
7. Lorsque l'opération est terminée,
enfoncer :
FUNCTION
START
3
DATE & TIME SET
PRESS START KEY
START
STOP
Enregistrement et effacement
de numéros à composition
automatique
1. Enfoncer:
L'écran affiche:
2. Entrer 1 pour mémoriser un numéro ou 2
pour effacer un numéro.
3. Presser une touche express ou entrer
une numéro de touche à composition
abrégée à deux chiffres (de 00 à 99). Si
un numéro doit être effacé, passer à
l'étape 7.)
4. Entrer le numéro complet de téléphone/
télécopieur.
5. Presser :
6. Entrer le nom et l'endroit en pressant les
touches numérotées. (Se reporter au
tableau d'entrée de lettres dans ENTRÉE
DU NOM ET DU NUMÉRO.)
7. Enfoncer:
FUNCTION
START
START
3
FAX/TEL # MODE
1=SET, 2=CLEAR
STOP
FRANÇAIS
47

Guide de référence rapide
Enregistrement de numéros
sous une touche de groupe
1. Enfoncer:
L'écran affiche:
2. Presser 1 pour programmer une touche
de groupe, ou 2 pour effacer une touche
de groupe.
3. Presser une touche de groupe (une des
touches express 17/G1 à 20/G4). (Pour
effacer une touche de groupe, passer à
l'étape 5).
4. Suivre une de ces deux méthodes pour
entrer les numéros de télécopieur à
enregistrer sous la touche de groupe:
Presser les touches express.
Presser les touches numérotées pour
entrer des numéros à composition
abrégée.
5. Enfoncer:
FUNCTION
START
7
GROUP ENTRY MODE
1=SET, 2=CLEAR
STOP
Envoi de télécopies
Placer le document
(jusqu'à 20 pages)
face imprimée vers le
bas dans le chargeur
de documents.
Ajuster la résolution et/
ou le contraste si
besoin est.
RESOLUTION
Composition par touche express
Pressez la touche express adéquate. La
transmission débutera automatiquement.
Composition abrégée
SPEED
1. Presser :
DIAL
2. Entrer un numéro à composition abrégée
à 2 chiffres.
3. Presser :
START
Diffusion (envoi d'un document à
plusieurs destinataires)
1. Presser :
BROADCAST
2. Composer les numéros des appareils
destinataires selon une des deux
méthodes suivantes:
Enfoncer une ou plusieurs touches
express.
Entrer un ou plusieurs numéro(s) à
composition abrégée au moyen des
touches numérotées.
3. Enfoncer:
4. Si besoin est, ajuster la
START
RESOLUTION
résolution:
5. Presser :
START
Diffusion à l'aide d'une touche de groupe
Numérotation normale
1. Décrocher le combiné ou presser
SPEAKER
2. Composer le numéro de télécopieur
3. Attendre la tonalité de réception (si une
personne répond, lui demander de
presser la touche START)
4. Enfoncer:
START
48
Si les destinataires ont tous été
programmés dans une touche de groupe,
il suffit simplement de presser la touche
de groupe.

Guide de référence rapide
Réception de télécopies
Presser la touche
RECEPTION MODE
jusqu'à ce que la flèche se positionne
devant le type de réponse souhaité.
01 FEB 10:30
RECEPTION
MODE
FAX m o de :
Le répondeur répond
M:00% STAND-BY
01 FEB 10:30
M:00% STAND-BY
01 FEB 10:30
M:00% STAND-BY
01 FEB 10:30
M:00% STAND-BY
automatiquement après un nombre
prédéterminé de sonneries et reçoit le
document entrant.
Mode TEL:
Beep
RECEIVING
Mode TEL/FAX:
Ce mode est pratique pour
recevoir tant des télécopies que des appels
vocaux. Lorsqu'un appel entre, le
télécopieur détectera s'il s'agit d'un appel
vocal (y compris une transmission manuelle
de télécopie) ou une télécopie transmise par
numérotation automatique.
Mode A.M.:
Sélectionner ce mode lorsque
qu'un répondeur est connecté au
télécopieur et que le répondeur est branché.
FAX
TEL
A.M.
FAX
TEL
A.M.
FAX
TEL
A.M.
FAX
TEL
A.M.
START
Paramètres optionnels
1. Presser les touches
suivantes :
2. Presser la touche # pour faire défiler la
liste de paramètres (pour inverser le sens
du défilement, presser la touche *).
3. Lorsque le paramètre souhaité apparaît,
entrer la sélection du paramètre (voir ciaprès) au moyen des touches
numérotées.
4. Après l'entrée de la sélection, le
paramètre suivant apparaît. Pour
retourner à l'affichage de la date et de
l'heure, presser:
Paramètres
PRIORITÉ RÉSOLUTION FINE
Cette option définit la résolution par défaut
pour la transmission de documents. Entrez
(YES) pour régler la résolution sur FINE
1
par défaut, ou 2 (NO) pour la régler sur
STANDARD.
NOMBRE DE SONNERIES
Cette fonction règle le nombre de sonneries
durant lesquelles le télécopieur attend
avant de répondre à un appel entrant en
modes de réception FAX et TEL/FAX.
Entrez un numéro à 2 chiffres compris entre
et 5.
1
INTERVALLE DE RAPPEL
Cette fonction définit le temps que le télé-
copieur attendra entre les rappels automatiques lorsque la ligne est occupée. Entrer
pour 1 minute, 02 pour 2 miutes et iansi
01
de suite jusqu'à un maximum de 15 minutes.
NOMBRE DE RAPPELS
Cette fonction définit le nombre maximum
de tentatives de rappel que votre télé-
copieur exécutera si la ligne est occupée.
Entrer un nombre entre 00 et 10.
NUMÉRO À DISTANCE TEL/FAX
Cette fonction détermine le numéro à
FUNCTION
4
STOP
49
FRANÇAIS

Guide de référence rapide
presser sur un téléphone supplémentaire
(suivi de **) pour activer la réception par
télécopieur. Entrer un nombre entre 1 et 9.
RÉCEPTION À DISTANCE
Presser 1 pour pouvoir activer la réception
par le télécopieur à partir d'un téléphone
supplémentaire au moyen du NUMÉRO À
DISTANCE TEL/FAX cité ci-avant. Presser
pour désactiver la réception à distance.
2
RAPPORT DE TRANSACTION
Cette fonction définit les conditions
d'impression d'un rapport de transaction.
Presser une touche numérotée entre 1 et 5
comme suit:
: Après chaque transmission et réception.
1
: En cas d'erreur, de programmation ou de
2
transmission à partir de la mémoire.
: Uniquement après les transmissions.
3
: Jamais.
4
: Uniquement en cas d'erreur.
5
DURÉE DE LA PSEUDO-SONNERIE
Cette fonction définit la durée de la sonne-
rie spéciale choisir pour avertir l'utilisateur
de l'entrée d'un appel vocal en mode de
réception TEL/FAX. Presser 1 pour 15 secondes, 2 pour 30 secondes, 3 pour 60 secondes ou 4 pour 120 secondes.
TEMPS DÉTECTION SILENCE
Lorsqu'un répondeur est raccordé au télé-
copieur et que le mode de réception est
réglé sur A.M. (répondeur), le télécopieur
prendra la ligne en charge et démarrera la
réception s'il détecte un certain temps de
silence après que le répondeur a répondu à
un appel. Cette fonction définit le temps de
silence en secondes. Entrer un nombre de
à 10, ou entrer 00 pour désactiver la
01
fonction.
TEMPS DE DÉMARRAGE DE LA DÉTEC-
TION SILENCE
Utiliser cette fonction pour retarder la fonction de Temps détection silence expliquée
ci-dessus. Entrer un nombre à deux chiffres
pour le nombre de secondes du retardement (00 à 15).
50
SÉLECTION DE R´CEPTION AUTO
Presser 1 pour faire en sorte que le télé-
copieur réponde automatiquement à un
appel après 5 sonneries en mode A.M.
(répondeur) si le répondeur connecté au
télécopieur ne peut répondre avant ce
moment. Presser 2 pour déscativer la fonction.
SÉLECTION DE LA LANGUE
Utiliser cette fonction pour changer la
langue d'affichage, les rapports et listings.
Presser la touche
jusqu'à ce que la langue désirée apparaisse
à l'écran, ensuite presser à nouveau la touche
CONNEXION PBX
Utiliser ce réglage si le télécopieur est connecté en PBX. Presser 1 pour sélectionner
YES et ensuite sélectionner le mode pour la
connexion à une ligne extérieure (1 pour
EARTH, 2 pout FLASH ou 3 pour ID). SI ID
est sélectionné, entrer le numéro d'ID du
PBX et presser la touche
sélectionner le mode de rappel de registre
(1 pour EARTH, 2 pour FLASH ou 3 pour
NO OPERATION).
RÉCEPTION DE SIGNAL FAX
Presser 1 pour faire en sorte que le télé-
copieur démarre automatiquement la récep-
tion si une tonalité douce de télécopieur est
perçue après avoir répondu à un appel.
Presser 2 pour désactiver la fonction (dés-
activer la fonction si un modem fax pour PC
est utilisé sur la même ligne).
FILTRAGE
Presser 1 pour bloquer la réception de document en provenance de numéros de télé-
copieurs entrés dans la liste de filtrage.
Presser 2 pour autoriser la réception de
documents en provenance de n'iùmporte
quel télécopieur.
RELÈVE
Presser 1 pour utiliser la touche express 16/
POLL en tant que touche de relève. Presser
pour utiliser cette touche comme une tou-
2
che express normale.
START
.
START
, et * ou #
. Enfin,
START

Guide de référence rapide
PAGE DE GARDE AUTOMATIQUE
Presser 1 pour que le télécopieur génère
automatiquement une page de garde et
l'envoie en dernière page de chaque transmission. Pressez la touche 2 pour désac-
tiver la fonction.
IMPRESSION AUTO
Presser 1 pour que le télécopieur imprime
un rapport d'activités toutes les 30 transmissions. (La liste peut toujours être
imprimée sur demande). Presser 2 pour
désactiver l'impression automatique.
Mode ECM
Presser 1 pour que le transmetteur corrige
toute distorsion au cours d'une transmission
ou d'une réception avant d'imprimer la télé-
copie en fin de réception (il faut noter que
l'autre télécopieur doit également être
équipé du mode ECM). Presser 2 pour
déscativer la fonction.
CONNEXION RAPIDE
Presser 1 pour que le télécopieur compose
le numéro de l'appareil destinataire alors
que la numérisation est toujours en cours.
Presser 2 pour que le télécopieur attende la
fin de la numérisation de toutes les pages
avant de composer le numéro.
POURCENTAGE DE RÉCEPTION
Presser
automatiquement le format du document
reçu afin de correspondre au format du
papier d'impression. Cela assure que les
données présentes à proximité des bords
du papier ne seront pas découpées. Presser
pour désactiver la fonction et recevoir des
2
documents imprimés en taille réelle.
DÉCOUPAGE COPIE
Lors de la réalisation d'une copie d'un document dont le format est plus long que celui
du papier d'impression, utiliser la fonction
de découpage pour sélectionner quelle partie restante du document sera imprimée sur
une seconde page. Presser 1 pour couper
la partie restante ou 2 pour imprimer la partie restante sur une seconde page.
pour que le télécopieur réduise
1
Impression de listes et de
rapports
1. Presser les touches
suivantes :
2. Presser la touche # pour faire défiler les
listes (pour le défilement en sens inverse,
presser la touche *).
3. Lorsque la liste souhaitée apparaît à
l'écran, presser:
Rapport des activités
Cete liste reprend des informations
relatives au opérations de transmission et
de réception les plus récentes.
Liste numéros différés (Timer List)
Cette liste reprend les opérations différes
actuellement programmées.
Liste des numéros de téléphone
Cette liste reprend les numéros de
télécopieur qui ont été programmés pour
une composition automatique.
Liste des codes d'accès
Cette liste reprend les réglages définis pour
la sécurité de relève, le nom/numéro de
téléphone de l'utilisateur tels qu'entrés dans
l'appareil, et un échantillon de l'en-tête
imprimée en haut de chaque page
transmise.
Liste des paramètres optionnels
Cette liste le statut actuel des paramètres
optionnels.
Liste de filtrage
Cette liste reprend les numéros pour
lesquels la réception n'est pas autorisée.
Liste des groupes
Cette liste reprend les numéros de
télécopieur qui ont été programmés sous
des touches de groupe.
FUNCTION
2
START
FRANÇAIS
51

Guia de referência rápida
Instalação
1. Ligue o auscultador e pouse-o no
respectivo descanso.
2. Ligue o cabo de alimentação eléctrica a
uma tomada de 220-230 V, 50 Hz, com
ligação à terra (2 terminais) AC
3. Introduza uma das extremidades do fio
da linha de telefone na tomada do lado
esquerdo do aparelho onde se encontra
a marca
extremidade numa tomada de telefone
existente na parede.
TEL. LINE
. Introduza a outra
.
5. Monte o tabuleiro para receber
documentos.
6. Monte o suporte para o documento
original.
Assegure-se de que a parte da frente do
•
suporte fica virada para si (o suporte
deve curvar-se ligeiramente na sua
direcção).
7. Se assim o entender ligue um telefone de
extensão ou um atendedor ao fax:
Retire a protecção que cobre a tomada
TEL. SET
de fax.
na parte de trás do aparelho
4. Monte o tabuleiro para o papel.
52
Ligue um telefone de extensão ou um
atendedor à tomada
TEL. SET
do fax.

Guia de referência rápida
Instalar o cartucho do toner
1. Pegue em ambos os lados da tampa do
compartimento de impressão tal como
ilustrado e puxe para abrir a tampa.
•
Cuidado!
A unidade de fusão que se encontra
dentro do compartimento de impressão
atinge temperaturas muito elevadas
durante a operação. Não toque no
interior do compartimento ou na guia de
papel que está montada por baixo da
tampa do compartimento de impressão.
2. O cartucho de tambor vem instalado de
fábrica. Puxe cuidadosamente a ponta de
papel para retirar a película de protecção
preta do cartucho.
Tenha muito cuidado para não rasgar o
•
papel ou deixar pedaços de papel dentro
do aparelho.
4. Segure o cartucho do toner pela pega
com as marcas impressas no cartucho
viradas para cima e introduza o cartucho
no compartimento de impressão.
5. Posicione o seu polegar no centro da
pega onde está a marca
empurre a pega para baixo de forma a
que o cartucho entre na posição correcta.
6. Feche a tampa do compartimento de
impressão pressionando firmemente em
ambos os lados, assegurando-se assim
de que fica bem fechada.
PUSH
, e
3. Retire o novo cartucho de toner da
respectiva embalagem. Abane o cartucho
quatro ou cinco vezes de um lado para
outro para distribuir o toner
uniformemente dentro do cartucho.
Retire cuidadosamente a fita e o material
da embalagem de cartão do cartucho do
toner.
7. Faça um reset ao contador do toner
premindo a seguinte sequência de teclas:
FUNCTION
9
8. Faça um reset do contadr do tambor
premindo a seguinte combinação de
teclas:
FUNCTION
9
START
START
PORTUGUÊS
53

Guia de referência rápida
Colocar papel no tabuleiro de
papel
Pode colocar até a um máximo de 200
folhas de papel A4 (máx. 80 g/m²) no
tabuleiro de papel.
Cuidado!
Não utilize o verso de papel que já tenha
sido impresso.
1. Puxe a extensão do tabuleiro de papel
para fora.
2. Ventile o papel e bata depois com uma
das extremidades contra um superfície
direita para endireitar a resma.
3. Puxe a alavanca de libertação do papel
na sua direcção.
Assegure-se de que a resma não é mais
•
alta do que a linha marcada. Se colocar
demasiado papel no tabuleiro poderá
fazer com que o papel fique
congestionado ou nem sequer seja
puxado.
Se ainda existir papel no tabuleiro
•
quando fizer uma recarga retire-o e
misture-o com o papel que quer
recarregar numa só resma antes de
colocar o papel novo.
5. Assegure-se de que a resma de papel
fica alinhada com a guia de papel do lado
direito e depois desloque
cuidadosamente a guia de papel do lado
esquerdo até à posição A4.
6. Volte a empurrar a alavanca de
libertação do papel para baixo.
4. Introduza a resma de papel firmemente
no tabuleiro com o lado a imprimir virado
para cima.
54
Nota: Se o papel não for correctamente
alimentado retire toda a resma de papel
do tabuleiro e repita o processo de
colocação do papel desde o início.

Guia de referência rápida
Introduzir o seu nome e
número
1. Prima:
2. Prima:
3. Introduza o seu número de fax (máx. de
•
•
4. Prima:
5. Introduza o seu nome através das
•
SPACE =
A =
B =
C =
D =
E =
F =
G =
H =
I =
•
6. Quando terminar
FUNCTION
3
O display mostra:
20 dígitos) pressionando as respectivas
teclas numéricas.
Para introduzir um espaço entre os
dígitos, prima a tecla #.
Se errar prima a tecla
voltar atrás e corrigir o erro.
respectivas teclas numéricas tal como
abaixo exemplificado.
Para introduzir duas letras de seguida
que requerem a mesma tecla prima a
tecla
SPEAKER
primeira letra.
Para mudar de maiúsculas para
minúsculas e vice-versa, prima a tecla
REDIAL
. Prima # ou * para folhear os
símbolos e caracteres especiais.
prima:
OWN NUMBER SET
PRESS START KEY
START
SPEED DIAL
START
depois de introduzir a
J =
K =
L =
M =
N =
O =
P =
Q =
R =
S =
T =
U =
V =
W =
X =
Y =
Z =
START
para
STOP
Acertar a data e a hora
1. Prima:
O display mostra:
2. Prima:
3. Introduza dois dígitos para o dia (01 a 31).
4. Introduza dois dígitos para o mês (01 a 12).
5. Introduza quatro dígitos para o ano
(ex: 2000)
6. Introduza dois dígitos para a hora
(00 a 23) e dois dígitos para os minutos
(00 a 59).
7. Quando terminar
prima:
FUNCTION
START
3
DATE & TIME SET
PRESS START KEY
START
STOP
Memorizar e apagar números
de marcação automática
1. Prima:
O display mostra:
2. Prima 1 para memorizar o número ou 2
para apagar o número.
3. Prima uma tecla rápida ou introduza um
número de 2 dígitos de marcação rápida
(de 00 a 99). (Para apagar um número,
prossiga até ao passo 7.)
4. Introduza o número de fax/telefone
completo.
5. Prima:
6. Introduza o nome da localização
premindo as teclas numéricas. (Consulte
a tabela de introdução de letras em
Introduzir o seu nome e número.)
7. Prima:
FUNCTION
START
START
3
FAX/TEL # MODE
1=SET, 2=CLEAR
STOP
PORTUGUÊS
55

Guia de referência rápida
Memorizar números em teclas
de grupo
1. Prima:
O display mostra:
2. Prima 1 para programar uma tecla de
grupo ou 2 para apagar a tecla de grupo.
3. Prima uma tecla de grupo (uma das
teclas rápidas 17/G1 a 20/G4). (Se
pretende apagar uma tecla de grupo
prossiga para o passo 5.)
4. Utilize um ou ambos os métodos a seguir
indicados para introduzir os números de
fax que pretende memorizar na tecla de
grupo:
Prima as teclas rápidas.
Prima as teclas numéricas para introduzir
os números de marcação rápida.
5. Prima:
FUNCTION
START
7
GROUP ENTRY MODE
1=SET, 2=CLEAR
STOP
Enviar faxes
Coloque o seu
documento (até um
máximo de 20 páginas)
virado com o rosto para
baixo no alimentador.
Ajuste a resolução e/ou
o contraste se
necessário.
RESOLUTION
Marcação por tecla rápida
Prima a tecla rápida pretendida. A
transmissão inicia-se imediatamente.
SPEED
DIAL
Marcação rápida
1. Prima:
2. Introduza um número de marcação rápida
de 2 dígitos.
3. Prima:
START
Difusão (enviar um documento para
múltiplos destinatários)
1. Prima:
BROADCAST
2. Marque os números de quem pretende
enviar o fax utilizando um ou ambos os
métodos a seguir indicados:
Prima uma ou mais teclas rápidas.
Introduza um ou mais números de
marcação rápida com as teclas
numéricas.
3. Prima:
4. Se necessário ajuste a
START
RESOLUTION
resolução:
5. Prima:
START
Difusão com uma tecla de grupo
Marcação normal
1. Levante o auscultador ou prima
SPEAKER
2. Marque o número de fax.
3. Aguarde até ouvir o som de recepção (se
alguém responder peça-lhe para premir a
tecla de Start).
4. Prima:
START
56
Se os destinatários foram todos
programados para uma tecla de grupo,
prima simplesmente a tecla de grupo.

Guia de referência rápida
Receber faxes
Prima a tecla
RECEPTION MODE
seta no display apontar para o modo de
recepção pretendido.
01 FEB 10:30
RECEPTION
MODE
Modo FAX:
o fax atende automaticamente
M:00% STAND-BY
01 FEB 10:30
M:00% STAND-BY
01 FEB 10:30
M:00% STAND-BY
01 FEB 10:30
M:00% STAND-BY
após o número de toques predefinido e
recebe o documento.
Modo TEL:
Beep
RECEIVING
Modo TEL/FAX:
Este modo é o mais
adequado para receber tanto chamadas de
fax como de voz. Quando entra uma
chamada o fax detecta se é uma chamada
de voz (incluindo as transmissões de fax
com marcação manual) ou um fax marcado
automaticamente.
Modo A.M.:
Seleccione este modo se um
atendedor automático estiver ligado ao
aparelho de fax e se encontrar activo.
TEL
TEL
TEL
FAX
TEL
até a
FAX
A.M.
FAX
A.M.
FAX
A.M.
A.M.
START
Definições opcionais
1. Prima estas teclas:
2. Prima a tecla # para se deslocar através
das definições (para se deslocar para
trás prima a tecla *).
3. Quando a definição pretendida aparecer
introduza a selecção para a definição
(ver em baixo) premindo as teclas
numéricas.
4. Depois de introduzir uma selecção
aparece a definição subsequente. Para
voltar ao display da data e da hora,
prima:
Definições
PRIORIDADE ALTA RESOLUÇÃO
esta opção define a resolução por defeito
para transmitir documentos. Prima 1 (YES)
para definir a resolução por defeito como
FINE, ou 2 (NO) para a definir como STANDARD.
NÚMERO DE TOQUES
Define o número de toques que o aparelho
de fax aguarda até responder a uma chamada nos modos de recepção FAX e TEL/
FAX. Introduza um número de 1 a 5.
INTERVALO DE REMARCAÇÃO
Define o período de tempo que o aparelho
de fax aguarda entre as remarcações
automáticas quando uma linha está ocupada. Introduza
minutos, etc., até ao máximo de 15 minutos.
NÚMERO DE REMARCAÇÕES
Define o número máximo de vezes que o
seu fax tenta fazer a remarcação
automática quando a linha está ocupada.
Introduza um número de 00 a 10.
NÚMERO REMOTO DE TEL/FAX
Define o número que pode premir numa
extensão (seguido de **) para activar a
recepção de fax. Introduza um número de 1
a 9.
FUNCTION
4
STOP
para 1 minuto, 02 para 2
01
PORTUGUÊS
57

Guia de referência rápida
RECEPÇÃO REMOTA
Prima 1 se quiser ter a possibilidade de
activar o fax a partir de uma extensão
através do acima descrito TEL/FAX
REMOTE NUMBER. Prima 2 para desligar
a recepção remota.
RELATÓRIO DE ENVIO
Define a condição na qual um relatório de
transacção deve ser impresso. Prima uma
tecla numérica de 1 a 5 da seguinte forma:
: Após cada transmissão e recepção.
1
: Após um erro, transmissão a partir do
2
temporizador ou da memória.
: Apenas após as transmissões.
3
: Nunca.
4
: Apenas em caso de erro.
5
DURAÇÃO DO PSEUDO-TOQUE
Define a duração do toque especial de
alerta para chamadas de voz quando o
aparelho está em modo de recepção TEL/
FAX. P r im a 1 para 15 segundos, 2 para 30
segundos, 3 para 60 segundos, ou 4 para
120 segundos.
TEMPO DE DETECÇÃO DE SILÊNCIO
Quando se encontra conectado um atendedor ao fax e o modo de recepção está
definido ara A.M., o fax activa e inicia a
recepção se detectar a existência de uma
determinada duração de silêncio depois do
atendedor ter atendido a chamada. Esta
função define a duração do silêncio em
segundos. Introduza um número de 01 a
, ou introduza 00 para desligar a função.
10
INÍCIO TEMPO DE DETECÇÃO DE
SILÊNCIO
Utilize esta função caso necessite de
atrasar o início da função Quite Detect
Time acima descrita. Introduza um número
de dois dígitos para o tempo em segundos
que deve demorar o atraso (00 a 15).
SELECÇÃO RECEPÇÃO AUTOMÁTICA
Prima 1 para o seu fax atender automaticamente uma chamada após 5 toques no
modo A.M., se o atendedor que está
conectado ao fax não atender antes de
passar esse período de tempo. Prima 2
para desligar a função.
58
SELECÇÃO DO IDIOMA
Utilize esta função para alterar o idioma utilizado no seu display, nos relatórios e nas listas. Prima a tecla
aparecer o idioma pretendido no display, e
prima de seguida novamente a tecla
LIGAÇÃO PBX
Utilize esta definição se o seu fax estiver
ligado a um PBX. Prima 1 para seleccionar
YES e seleccione de seguida o modo para
a ligação a uma linha exterior (1 para
EARTH, 2 para FLASH, ou 3 para ID). Se
seleccionou ID, introduza o seu número de
identificação do PBX e prima depois a tecla
. Seleccione finalmente o registo do
START
modo de nova chamada (1 para EARTH, 2
para FLASH, ou 3 para NO OPERATION).
RECEPÇÃO SINAL DE FAX
Prima 1 para que o seu fax inicie automaticamente a recepção se ouvir o tom de soft
fax depois de atender uma chamada. Prima
para desligar a função (desligue a função
2
se utilizar um fax modem de computador na
mesma linha).
VERIFICAÇÃO DE NÚMEROS INDESEJADOS
Prima 1 para bloquear a recepção de
números de fax introduzidos na lista de
números não autorizados. Prima 2 para
permitir a recepção de todos os números.
PUXAR DOCUMENTOS
Prima 1 para utilizar a tecla rápida 16/POLL
como uma tecla para puxar documentos .
Carregue em 2 para a poder utilizar como
tecla rápida normal.
FOLHA DE ROSTO AUTOMÁTICA
Carregue em 1 para o aparelho de fax criar
automaticamente uma folha de rosto e
enviá-la no final de cada transmissão. Carregue em 2 para desactivar esta função.
IMPRESSÃO AUTOMÁTICA
Carregue em
imprima automaticamente um Relatório de
actividades ao fim de cada 30 operações.
(Todavia, existe a possibilidade de imprimir
esse relatório a qualquer momento, se
assim se desejar.) Carregue em
activar a função de impressão automática.
para que o aparelho de fax
1
, prima * ou # até
START
START
para des-
2
.

Guia de referência rápida
MODO ECM
Carregue em 1 para que o aparelho de fax
corrija todas as interferências durante um
envio ou recepção de um fax, antes de o
documento ser impresso no terminal receptor (atenção que, para este efeito, o
aparelho de fax com o qual se estabelece a
comunicação também tem de dispor do
modo de correcção dos erros (ECM). Prima
para desligar a função.
2
LIGAÇÃO RÁPIDA
Carregue em 1 para que o aparelho de fax
marque o número de destino e dê início à
transmissão enquanto a digitalização
(scanning) está ainda em curso. Carregue
em 2 para que o aparelho de fax aguarde
até que todas as páginas tenham sido digitalizadas antes de marcar o número.
REDUÇÃO DA IMPRESSÃO
Carregue em 1 para que o aparelho de fax
reduza automaticamente o tamanho dos
documentos recebidos, para que caibam na
superfície de impressão do papel disponível no alimentador. Esta função assegura que os dados que estão junto às
margens não são cortados na impressão.
Carregue em 2 para desactivar esta função
e receber os documentos impressos em
tamanho integral.
CORTE DA FOTOCÓPIA
Quando estiver a tirar uma cópia de um
documento que é mais comprida do que o
tamanho do papel disponível, use a
definição de corte da fotocópia para seleccionar se a parte que resta do documento
original deve ser truncada ou impressa
numa segunda página. Carregue em 1 para
truncar a parte restante ou 2 para que a
parte remanescente do documento seja
impresso numa segunda página.
Impressão de listas e
relatórios
1. Prima estas teclas:
2. Carregue na tecla # para se deslocar
através das listas (para se deslocar para
trás, carregue na tecla *).
3. Assim que a lista pretendida aparecer no
mostrador prima:
Relatório de actividades
Esta função exibe a informação respeitante
às operações de envio e recepção mais
recentes.
Lista do temporizador
Esta função mostra as operações
temporizadas actualmente definidas.
Lista de números de telefone
Esta função mostra os números de telefone
que se encontram programados para
marcação automática.
Lista de códigos-passe
Esta função mostra as definições para que
a operação de puxar documentos se
processe em segurança, o seu nome e
número de telefone/fax, tal como foi
introduzido no aparelho e ainda uma
amostra do cabeçalho impresso no topo de
cada página enviada.
Lista de definições opcionais
Esta função mostra a situação actual no
que diz respeito às opções definidas.
Lista de números não autorizados
Esta função mostra os números de fax, cuja
recepção não está autorizada.
FUNCTION
2
START
PORTUGUÊS
Lista de grupo
Esta função mostra os números de fax que
foram programados para teclas de grupo.
59

Quick Reference Guide
Installation
1. Connect the handset and place it on the
handset rest.
2. Plug the power lead into a 220-230 V, 50
Hz, earthed (2-prong) AC outlet
3. Insert one end of the line cord into the
socket on the left side of the machine
marked
into a wall telephone socket.
TEL. LINE
. Insert the other end
.
5. Attach the received document tray.
6. Attach the original document support.
Make sure the front side of the support
•
faces you (the support should curve
slightly toward you).
7. If desired, connect an extension
telephone or answering machine to the
fax:
Remove the seal covering the
jack on the side of the fax.
TEL. SET
4. Attach the paper tray.
60
Connect an extension telephone
telephone or answering machine to the
TEL. SET
jack on the fax.

Quick Reference Guide
Installing the Toner Cartridge
1. Grasp the print compartment cover at
both sides as shown, and pull up to open
the cover.
•
Caution!
The fusing unit inside the print
compartment becomes very hot during
operation. Do not touch the inside of the
compartment or the paper guide on the
underside of the print compartment cover.
2. The drum cartridge has been installed at
the factory. Gently pull the paper tab to
remove the black sheet of protective
paper from the cartridge.
Be careful not to tear the paper nor leave
•
any pieces of paper in the machine.
4. Hold the toner cartridge by the handle
with the stamped markings on the
cartridge facing upwards, and insert the
cartridge into the print compartment.
5. Place your thumb on the centre of the
handle where it is marked
push the handle down and in so that the
cartridge fits into place.
6. Close the print compartment cover,
pressing down firmly on each side to
make sure it is completely closed.
PUSH
, and
3. Remove the new toner cartridge from its
packaging. Shake the cartridge side to
side four or five times to distribute the
toner evenly within the cartridge.
Carefully remove the band and the
cardboard packaging material from the
toner cartridge.
7. Reset the toner counter by pressing the
following sequence of keys:
FUNCTION
9
8. Reset the drum counter by pressing the
following sequence of keys:
FUNCTION
9
START
START
ENGLISH
61

Quick Reference Guide
Loading Paper in the Paper
Tray
You can load up to 200 sheets of A4
paper (max. 80 g/m2) in the paper tray.
Caution!
Do not use the blank side of paper that
has already been printed on.
1. Pull out the paper tray extension.
2. Fan the paper, and then tap the edge
against a flat surface to even the stack.
3. Pull the paper release lever toward you.
Make sure that the stack is not higher
•
than the marked line. Loading too much
paper may cause paper jams and
misfeeds.
If paper remains in the tray, take it out and
•
combine it into a single stack with the
new paper before adding the new paper.
5. Make sure the stack of paper is aligned
against the right paper guide, and then
gently move the left paper guide to the A4
position.
6. Push the paper release lever back down.
4. Insert the stack of paper firmly into the
tray, print side up.
62
Note: If the paper does not feed correctly,
remove the entire stack from the tray and
repeat the loading procedure from the
beginning.

Quick Reference Guide
Entering Your Name and
Number
1. Press:
2. Press:
3. Enter your fax number (max. of 20 digits)
•
•
4. Press:
5. Enter your name by pressing the
•
SPACE =
A =
B =
C =
D =
E =
F =
G =
H =
I =
•
6. When finished, press:
FUNCTION
3
Display shows:
by pressing the number keys.
To insert a space between digits, press
the # key.
If you make a mistake, press the
key to backspace and clear the
DIAL
mistake.
appropriate number keys as shown below.
To enter two letters in succession that
require the same key, press the
SPEAKER
letter.
To change case, press the
Press # or * to scroll through symbols
and special characters.
OWN NUMBER SET
PRESS START KEY
START
SPEED
START
key after entering the first
J =
K =
L =
M =
N =
O =
P =
Q =
R =
S =
T =
U =
V =
W =
X =
Y =
Z =
REDIAL
START
key.
STOP
Setting the Date and Time
1. Press:
2. Press:
3. Enter two digits for the day (01 to 31).
4. Enter two digits for the month (01 to 12).
5. Enter four digits for the year (Ex: 2000)
6. Enter two digits for the hour (00 to 23)
7. When finished, press:
FUNCTION
Display shows:
3
DATE & TIME SET
PRESS START KEY
START
and two digits for the minute (00 to 59).
START
STOP
Storing and Clearing Auto
Dial Numbers
1. Press:
2. Press 1 to store a number or 2 to clear a
3. Press a Rapid Key or enter a 2-digit
4. Enter the full fax/telephone number.
5. Press:
6. Enter the name of the location by
7. Press:
FUNCTION
3
Display shows:
number.
Speed Dial number (from 00 to 99). (If
you are clearing a number, go to Step 7.)
pressing number keys. (Refer to the letter
entry table in Entering Your Name and
Number.)
FAX/TEL # MODE
1=SET, 2=CLEAR
START
START
STOP
ENGLISH
63

Quick Reference Guide
Storing Numbers in Group
Keys
1. Press:
Display shows:
2. Press 1 to program a Group Key, or 2 to
clear a Group Key.
3. Press a Group Key (one of Rapid Keys
17/G1 to 20/G4). (If you are clearing a
Group Key, go to Step 5.)
4. Use one or both of the following methods
to enter the fax numbers that you want to
store in the Group Key:
Press Rapid Keys.
Press number keys to enter Speed Dial
numbers.
5. Press:
FUNCTION
START
7
GROUP ENTRY MODE
1=SET, 2=CLEAR
STOP
Sending Faxes
Place your document
(up to 20 pages) face
down in the document
feeder.
Adjust the resolution
and/or contrast if
desired.
RESOLUTION
Rapid Key Dialling
Press the appropriate Rapid Key.
Transmission will begin automatically.
SPEED
DIAL
Speed Dialling
1. Press:
2. Enter the 2-digit Speed Dial number.
3. Press:
START
Broadcasting (sending a document to
multiple destinations)
1. Press:
BROADCAST
2. Dial the receiving machines using one or
both of the following methods:
Press one or more Rapid Keys.
Enter one or more Speed Dial numbers
with the numeric keys.
3. Press:
4. If desired, adjust the resolution:
5. Press:
START
RESOLUTION
START
Broadcasting using a Group Key
If the destinations have all been
programmed into one Group Key, simply
press the Group Key.
Normal Dialling
1. Lift the handset or press
SPEAKER
2. Dial the fax number.
3. Wait for the reception tone (if a person
answers, ask them to press their Start
key).
4. Press:
START
64

Quick Reference Guide
Receiving Faxes
Press the
RECEPTION MODE
arrow in the display points to the desired
reception mode.
RECEPTION
MODE
FAX m o de :
The fax machine automatically
answers on the preset number of rings and
receives the incoming document.
TEL mode:
Beep
RECEIVING
TEL/FAX mode:
This mode is convenient
for receiving both faxes and voice calls.
When a call comes in, the fax will detect
whether it is a voice call (including manually
dialled fax transmissions), or an
automatically dialled fax.
A.M. mode:
Select this mode when an
answering machine is connected to the fax
and the answering machine is turned on.
key until the
01 FEB 10:30
M:00% STAND-BY
01 FEB 10:30
M:00% STAND-BY
01 FEB 10:30
M:00% STAND-BY
01 FEB 10:30
M:00% STAND-BY
FAX
TEL
A.M.
FAX
TEL
A.M.
FAX
TEL
A.M.
FAX
TEL
A.M.
START
Option Settings
1. Press these keys:
2. Press the # key to scroll through the
settings (to scroll backwards, press the *
key).
3. When the desired setting appears, enter
a selection for the setting (see below) by
pressing the number keys.
4. After entering a selection, the subsequent
setting appears. To return to the date and
time display, press:
Settings
FINE RESOLUTION PRIORITY
This option sets the default resolution for
transmitting documents. Press 1 (YES) to
set the default resolution to FINE, or 2 (NO)
to set it to STANDARD.
NUMBER OF RINGS
This sets the number of rings the fax
machine waits before answering an
incoming call in FAX and TEL/FAX
reception modes. Enter a number from 1 to
.
5
RECALL INTERVAL
This sets the amount of time your fax will
wait between automatic redials when the
line is busy. Enter 01 for 1 minute, 02 for 2
minutes, etc., up to a maximum of 15
minutes.
FUNCTION
4
STOP
RECALL TIMES
This sets the maximum number of times
your fax will automatically redial if the line is
busy. Enter any number from 00 to 10.
TEL/FAX REMOTE NUMBER
This sets the number that you can press on
an extension phone (followed by **) to
activate fax reception. Enter any number
from 1 to 9.
65
ENGLISH

Quick Reference Guide
REMOTE RECEPTION
Press 1 if you want to be able to activate fax
reception from an extension phone using
the above TEL/FAX REMOTE NUMBER.
Press 2 to turn remote reception off.
TRANSACTION REPORT
This sets the condition under which a
transaction report is printed. Press a
number key from 1 to 5 as follows:
: After every transmission and reception.
1
: After an error, timer or memory
2
transmission.
: Only after transmissions.
3
: Never.
4
: Only after errors.
5
PSEUDO RING DURATION
This sets the duration of the special ringing
sound that alerts you to voice calls in TEL/
FAX reception mode. Press 1 for 15
seconds, 2 for 30 seconds, 3 for 60
seconds, or 4 for 120 seconds.
QUIET DETECT TIME
When an answering machine is connected
to the fax and the reception mode is set to
A.M., the fax will take over the line and
begin reception if it detects a certain
duration of silence after the answering
machine answers a call. This sets the
duration of silence in seconds. Enter a
number from 01 to 10, or enter 00 to turn off
the function.
QUIET DETECT START TIME
Use this if you need to delay the start of the
above Quite Detect Time function. Enter a
two-digit number for the number of seconds
of the delay (00 to 15).
SELECT AUTO RECEIVE
Press 1 to have your fax automatically
answer a call after 5 rings in A.M. mode if
an answering machine connected to the fax
fails to answer before that time. Press 2 to
turn off the function.
LANGUAGE SELECT
Use this to change the language used in the
display, reports and lists. Press the
key, press * or # until the desired language
appears in the display, and then press the
key again.
START
PBX CONNECTION
Use this setting if your fax is connected to a
PBX. Press 1 to select YES, and then select
the mode for connection to an outside line
(1 for EARTH, 2 for FLASH, or 3 for ID). If
you selected ID, enter your PBX ID number
and then press the
select the register recall mode (1 for
EARTH, 2 for FLASH, or 3 for NO
OPERATION).
FAX SIGNAL RECEIVE
Press 1 to have your fax automatically begin
reception if you hear a soft fax tone after
answering a call. Press 2 to turn the
function off (turn the function off if you use a
computer fax modem on the same line).
JUNK NUMBER CHECK
Press 1 to block reception from fax numbers
entered in the Anti Junk Number List. Press
to allow reception from all numbers.
2
POLLING
Press 1 to use Rapid Key 16/POLL as a
polling key. Press 2 to use it as a regular
Rapid Key.
AUTO COVER SHEET
Press 1 to have the fax automatically
generate a cover sheet and send it as the
last page of each transmission. Press 2 to
turn the function off.
AUTO PRINT OUT
Press 1 to have your fax automatically print
out an Activity Report once every 30
operations. (The list can still be printed out
on demand when desired.) Press 2 to turn
off automatic print out.
START
key. F i na ll y,
START
66

Quick Reference Guide
ECM MODE
Press 1 to have the fax machine correct any
distortions in a fax transmission or reception
before printing the fax at the receiving end
(note that the other fax machine must also
have ECM mode). Press 2 to turn off the
function.
QUICK ON-LINE
Press 1 to have the fax dial the receiving
party and begin transmitting while scanning
is still in progress. Press 2 to have the fax
wait until all pages have been scanned
before dialling.
RECEPTION RATIO
Press 1 to have the fax automatically
reduce the size of received documents to fit
the size of the printing paper. This ensures
that data on the edges of the document are
not cut off. Press 2 to turn off the function
and have received documents printed at full
size.
COPY CUT-OFF
When making a copy of a document that is
longer than the printing paper, use the copy
cut-off setting to select whether the
remaining part of the document will be cut
off or printed on a second page. Press 1 to
cut off the remainder, or 2 to have the
remainder printed on a second page.
Printing Lists and Reports
1. Press these keys:
2. Press the # key to scroll through the lists
(to scroll backwards, press the * key).
3. When the desired list appears in the
display, press:
Activity Report
This shows information on your most
recently performed send and receive
operations.
Timer List
This shows timer operations that are
currently set.
Telephone Number List
This shows fax numbers that have been
programmed for automatic dialling.
Passcode List
This shows settings made for polling
security, your name and fax/telephone
number as entered in the machine, and a
sample of the header printed at the top of
every page you transmit.
Option Setting List
This shows the current status of the option
settings.
FUNCTION
2
START
Junk Number List
This shows the fax numbers from which
reception is not allowed.
Group List
This shows the fax numbers that have been
programmed into Group Keys.
67
ENGLISH

Introduction
Welcome, and thank you for
choosing a Sharp facsimile! The
features and specifications of
your new Sharp fax are shown
below.
Automatic dialling Rapid Key Dialling: 20 numbers
Speed Dialling: 100 numbers
Memory size* 4 MB (approx. 300 pages)
Modem speed 33,600 bps (max.)
Automatic fallback to lower speeds.
Transmission time* Approx. 3 seconds
Toner cartridge yield
(4% page coverage, A4
paper)
Drum cartridge yield Initial starter cartridge (included with fax
Scanning resolution Fax/copy:
*Based on ITU-T Test Chart #1 at standard resolution in Sharp special mode,
excluding time for protocol signals (i.e., ITU-T phase C time only).
68
Initial starter cartridge (included with fax
machine): Approx. 1,875 pages
Replacement cartridge (FO-29DC):
Approx. 3,750 pages
machine): 20,000 pages (ave.)
Replacement cartridge (FO-29DR): 20,000
pages (ave.)
Horizontal: 8 pels/mm
Ve rt i ca l:
Standard: 3.85 lines/mm
Fine /Halftone: 7.7 lines/mm
Super fine: 15.4 lines/mm
PC: Enhanced 600 dpi

Automatic document
20 pages max. (80 g/m
2
A4 paper)
feeder
Halftone (grayscale) 64 levels (PC scan: 256 levels)
Paper tray capacity
200 sheets (80 g/m
2
A4 paper)
Compression scheme MMR, MR, MH, Sharp (H2)
Intended use Analogue public switched telephone network
(CTR 21) / PBX
Compatibility ITU-T (CCITT) G3 mode
Printing resolution Horizontal: 16 lines/mm
Ve rt i ca l: 15.4 lines/mm
PC Printing: 600 dpi (enhanced 1,800 dpi)
Input document size Automatic feeding:
Width: 148 to 216 mm
Length: 140 to 297 mm
Manual feeding:
Width: 148 to 216 mm
Length: 140 to 1,000 mm
Effective Scanning width 210 mm max.
Effective Printing width 202 mm max.
Reception modes Fax, Tel, Tel/Fax, A.M.
Scanning speed 8 ppm (A4 paper)
Full Dual Access Ye s
Copy function Single/Multi/Sort (99 copies/page)
Power requirements 220-230 V AC, 50 Hz
Operating temperature 10 - 30°C
Humidity 20 to 85% RH
69

Power consumption Standby: 9.0 W
Maximum: 840 W
Dimensions Width: 386 mm
Depth: 398 mm
Height: 169 mm
Wei ght
As a part of our policy of continuous improvement, SHARP reserves the right to make
design and specification changes for product improvement without prior notice. The
performance specification figures indicated are nominal values of production units.
There may be some deviations from these values in individual units.
Approx. 6.3 kg
Important safety information
Be sure to save these instructions!
When using your facsimile equipment, basic safety precautions
should always be followed to reduce the risk of fire, electric shock and
injury to persons, including the following:
• Do not disassemble this machine or attempt any procedures not
described in this manual. Refer all servicing to qualified service
personnel.
• This machine must only be connected to a 220-230 V, 50 Hz,
earthed (2-prong) outlet. Connecting it to any other kind of outlet
will damage the machine and invalidate the warranty.
70

• Do not install or use the machine near water, or when you are wet.
For example, do not use the machine near a bath tub, wash bowl,
kitchen sink or laundry tub, in a wet basement, or near a swimming
pool. Take care not to spill any liquids on the machine.
• Unplug the machine from the telephone socket and then the power
outlet and consult a qualified service representative if any of the
following situations occur:
- Liquid has been spilled into the machine or the machine has been
exposed to rain or water.
- The machine produces odors, smoke, or unusual noises.
- The power cord is frayed or damaged.
- The machine has been dropped or the housing damaged.
• Do not allow anything to rest on the power cord, and do not install
the machine where people may walk on the power cord.
• Never insert objects of any kind into slots or openings on the
machine. This could create a risk of fire or electric shock. If an
object falls into the machine that you cannot safely remove, unplug
the machine and consult a qualified service representative.
• Do not place this machine on an unstable cart, stand or table. The
machine could be seriously damaged if it falls.
• Avoid using a telephone (other than a cordless type) during an
71

A Look at the Operation Panel
ABC21DEF
JKL
GHI MNO
54
TUV
PQRS WXYZ
87
0
1 2 3 4 7 8 9 13
FAX
TEL
A.M.
SPEED
DIAL
PAPER
CHECK
TONER
EMPTYPCIN USE
LINE
IN USE
3
REDIAL
6
SEARCH
9
R
SPEAKER
COPY/HELP
START
REDUCTION/
ENLARGEMENT
STOP
FUNCTION
RECEPTION
MODE
01
13
10 11 125 6
DOWN
RESOLUTION
02
14
14151620 1921 171822
1
SPEED DIAL key
Press this key to dial a fax or voice number using an abbreviated 2digit Speed Dial number.
REDIAL key
2
Press this key to automatically redial the last number dialled.
VOLUME
BROADCAST
03 04
15
UP
08070605
12111009
16/POLL
20/G419/G318/G217/G1
PAPER CHECK indicator
3
This lights when the paper tray is out of paper, the paper has jammed,
the printer compartment cover is open, or a paper size error has
occurred.
TONER EMPTY indicator
4
This blinks when the toner cartridge nears empty and lights steadily
when the toner cartridge needs replacement.
Display
5
This displays messages and prompts during operation and
programming.
72

Panel release
6
Grasp this release and pull toward you to open the operation panel.
PC IN USE light
7
This blinks when data is being sent to or from the computer connected
to the fax machine.
LINE IN USE light
8
This lights when the fax machine is using the telephone line.
RECEPTION MODE key
9
Press this key to select the reception mode. An arrow in the display
will point to the currently selected reception mode.
FUNCTION key
10
Press this key to select special functions and settings.
RESOLUTION key
11
Press this key to adjust the resolution for faxing or copying.
VOLUME (UP/DOWN) keys
12
Press these keys to adjust the volume of the speaker when the
SPEAKER key has been pressed, or the volume of the ringer at all
other times. The keys can also be used to scroll through FUNCTION
key settings.
BROADCAST key
13
Press this key to send a document to a group of receiving fax
machines.
Rapid Dial Keys
14
Press one of these keys to dial a fax number automatically, or send a
document as an E-mail attachment to a preset E-mail address.
E-MAIL key
15
Press this key to send a document as an E-mail attachment. After you
press the key, your specified E-mail program will open to let you enter
the E-mail address, a subject, and a message if desired. (For details on
setting up and using this function, see Setting Up the E-mail Key in
Chapter 5 of the Online Guide.)
73

REDUCTION/ENLARGEMENT key
16
Press this key to select an enlargement or reduction setting when
making a copy of a document.
STOP key
17
Press this key to cancel an operation before it is completed.
START key
18
Press this key to begin transmission when using Speed Dialling,
Direct Keypad Dialling, or Normal Dialling.
COPY/HELP key
19
When a document is in the feeder, press this key to make a copy of a
document. At any other time, press this key to print out the Help List,
a quick reference guide to the operation of your fax machine.
SEARCH/R key
20
When dialling, press this key to search for an auto-dial fax number. If
you are on a P.B.X. extension, press this key to transfer a call.
SPEAKER key
21
Press this key to listen to the line and fax tones through the speaker
when faxing a document.
Note: This is not a speakerphone. You must pick up the handset to
talk with the other party.
Number keys
22
Use these keys to dial numbers, and enter numbers and letters when
storing auto-dial numbers.
74

1. Installation
Unpacking Checklist
Before setting up,
make sure you
have all of the
following items.
Original
document
support
Handset
Handset
cord
1. Installation
If any are missing,
contact your dealer
or retailer.
Rapid Key
labels
Received
document tray
Operation
manual
Toner
cartridge
Drum cartridge
(comes pre-installed
in machine)
Paper tray
Sharp Laser
Multifunction
CD-ROM
75

Connections
Connections
Points to keep in mind when setting up
Do not place the machine or
the drum cartridge in direct
sunlight.
Keep dust away from the
machine.
Do not place the machine near
heaters or air conditioners.
Keep the area around the
machine clear.
About condensation
If the machine is moved from a cold to a warm place, it is possible
that condensation may form on the scanning glass, preventing proper
scanning of documents for transmission. To remove the condensation,
turn on the power and wait approximately two hours before using the
machine.
76

Connections
Connecting the Handset
Connect the handset as shown and place it on the handset rest.
♦ The ends of the handset cord are identical, so they will go into
either socket.
Make sure the handset
cord goes into the
socket marked with a
handset symbol on the
side of the machine!
1. Installation
Use the handset to
make ordinary phone
calls, or to transmit and
receive faxes manually.
77

Connections
Connecting the power lead
Plug the power lead into a 220-230 V, 50 Hz, earthed (2-prong) AC
outlet.
♦ Caution: The mains outlet (socket outlet) should be installed near
the equipment and be easily accessable.
The machine does not have
a power on/off switch, so the
power is turned on and off by
simply plugging in or
unplugging the power cord.
Note: If your area experiences a high incidence of lightning or power
surges, we recommend that you install surge protectors for the power and
telephone lines. Surge protectors can be purchased at most telephone
specialty stores.
78

Connecting the telephone line cord
Insert one end of the line cord into the socket on the left side of the
machine marked TEL. LINE. Insert the other end into a wall
telephone socket.
Be sure to insert the
line into the
socket.
LINE
insert it into the
not
TEL. SET
TEL.
Do
socket.
Connections
1. Installation
79

Connections
Attaching the paper tray and document supports
Attach the paper tray.
Attach the received document tray.
Attach the original document support.
♦ Make sure the front side of the support faces you (the support
should curve slightly toward you).
80

Extension phone (optional)
If desired, you can connect an extension phone to the TEL. SET
socket on the fax.
♦ To connect an answering machine to your fax, see Chapter 6,
Answering Machine Connection.
1
Remove the seal covering the TEL.
SET socket.
Connections
1. Installation
2
Connect the extension phone line to
the TEL. SET socket.
81

Installing the Toner Cartridge
Installing the Toner Cartridge
The laser printer in your fax machine uses a toner cartridge and a
drum cartridge. The drum cartridge comes pre-installed, and the toner
cartridge must be installed.
The starter toner cartridge
included with your fax can
print approximately 1,875
A4-size pages at 4% page
coverage.
♦ The drum cartridge can print approximately 20,000 A4-size pages.
When replacing the drum cartridge, use a Sharp FO-29DR drum
cartridge.
Follow the steps below to install the toner cartridge and prepare the
drum cartridge.
1
Grasp the print compartment cover at
both sides as shown, and pull up to
open the cover.
When replacing the toner
cartridge, use a Sharp FO29DC toner cartridge. One
cartridge can print about
3,750 A4-size pages.
82
• Caution!
The fusing unit inside the print
compartment becomes very hot
during operation. Do not touch the
inside of the compartment or the
paper guide on the underside of the
print compartment cover.

Installing the Toner Cartridge
2
The drum cartridge has been installed
at the factory. Gently pull the paper
tab to remove the black sheet of
protective paper from the cartridge.
• Be careful not to tear the paper nor
leave any pieces of paper in the
machine.
3
Remove the new toner cartridge from
its packaging. Shake the cartridge
side to side four or five times to
distribute the toner evenly within the
cartridge.
1. Installation
Carefully remove the band and the
cardboard packaging material from
the toner cartridge.
83

Installing the Toner Cartridge
4
Hold the toner cartridge by the handle
with the stamped markings on the
cartridge facing upwards, and insert
the cartridge into the print
compartment.
5
Place your thumb on the centre of the
handle where it is marked PUSH, and
push the handle down and in so that
the cartridge fits into place.
6
Close the print compartment cover,
pressing down firmly on each side to
make sure it is completely closed.
84

Installing the Toner Cartridge
7
Reset the toner counter by pressing
the following keys:
Display shows:
8
Reset the drum counter by pressing
the following keys:
• Note: This setting is only necessary
after you have replaced the drum
cartridge (not after replacing the
toner cartridge).
1. Installation
FUNCTION
9
CLR TONER COUNT
PRESS START KEY
START
FUNCTION
9
Display shows:
CLR DRUM COUNT
PRESS START KEY
START
85

Loading Printing Paper
Loading Printing Paper
You can load up to 200 sheets of A4 paper (max. 80 g/m2) in the paper
tray.
Caution!
Do not use the blank side of paper that has already been printed on.
1
Pull out the paper tray extension.
2
Fan the paper, and then tap the edge
against a flat surface to even the
stack.
3
Pull the paper release lever toward
you.
86

Loading Printing Paper
4
Insert the stack of paper firmly into
the tray, print side up.
• Make sure that the stack is not
higher than the marked line.
Loading too much paper may cause
paper jams and misfeeds.
• If paper remains in the tray, take it
out and combine it into a single
stack with the new paper before
adding the new paper.
Important:
Be sure to load the paper so that printing takes place on the print side of
the paper. Printing on the reverse side may result in poor print quality.
5
Make sure the stack of paper is
aligned against the right paper guide,
and then gently move the left paper
guide to the A4 position.
1. Installation
6
Push the paper release lever back
down.
• Note: If the paper does not feed
correctly, remove the entire stack
from the tray and repeat the loading
procedure from the beginning.
87

Setting Up the Multifunction Interface
Setting Up the Multifunction Interface
To enable the multifunction
features of your fax,
connect it to your computer
and install the Multifunction
software.
Connecting the parallel cable
Connect the fax machine to your computer with a parallel cable.
♦ If you do not have already have a parallel cable, you can purchase
one from your dealer or any computer store.
♦ Make sure the cable is IEEE 1284-compliant. We recommend a
shielded cable no longer than two meters.
1
Make sure your computer is turned
off and the fax machine is unplugged.
88

2
Connect one end of the cable to the
port on the Sharp Laser Multifunction
fax. Snap the clips on each side of the
port onto the cable connector to
secure it.
3
Connect the other end of the cable to
the parallel port on the back of your
computer.
Setting Up the Multifunction Interface
1. Installation
Note: There is normally no need to change the parallel port setting in
your computer's setup (BIOS) program. However, if you find that the
Sharp Laser Multifunction fax does not operate well when scanning or
printing, you may need to change the setting. In this case select ECP,
PS2, Bi-directional, or an equivalent parallel port mode.
89

Setting Up the Multifunction Interface
Installing the Multifunction software
Minimum system requirements
Processor: Pentium 90 MHz or higher
Operating system:
Windows
95/98, Windows NT 4.0
(Service Pack 3 or later), English version
Physical RAM: Windows 95/98: 16 MB
Windows NT 4.0: 32 MB
Free hard-disk space: Windows 95/98: 30 MB
Windows NT 4.0: 35MB
♦ The Sharp Laser Multifunction software cannot be installed by Plug
and Play. If the New Hardware Found box appears when you turn
on your computer, click the Cancel button to exit the dialog box.
♦ If you have other multifunction device software installed in your
computer, uninstall that software before installing the Sharp Laser
Multifunction software. Otherwise, the Sharp Laser Multifunction
software may not function correctly.
1. Insert the Sharp Laser Multifunction CD into your computer’s CD-
ROM drive.
2. If the Sharp Laser Multifunction Setup window appears, click Next
in the window and go to step 4. If the window doesn’t appear, click
the Start button on the Windows taskbar and select the Run...
command.
3. Type e:\setup in the Open text box, where e is the letter of your CD-
ROM drive, and then click OK.
4. Follow the instructions that appear on the screen.
5. When installation is completed, restart your computer.
90

Setting Up the Multifunction Interface
Online Operation Guide
Detailed instructions for using the Sharp Laser Multifunction software
can be found in the Online Guide on the CD. To open the guide,
follow these steps:
1. Insert the Sharp Laser Multifunction CD into your CD-ROM drive. (If
the Sharp Laser Multifunction Setup window appears, click Cancel
and then Exit Setup to close the window.)
2. Click the Start button on the Windows taskbar, point to Programs,
and then point to Sharp Laser Multifunction. Click Online Guide.
1. Installation
91

Entering Your Name and Fax Number
Entering Your Name and Fax Number
Before you can begin using
your fax machine, you must
enter your name and fax
(telephone) number. You
also need to set the date and
time.
3 key
21
3
54 6
87 9
0
Once you enter this
information, it will
automatically appear at
the top of each fax page
you send.
FUNCTION key
1
Press these keys:
The display will show:
ENTRY MODE
PRESS * OR #
92
# key
START key
STOP key
FUNCTION
3

Entering Your Name and Fax Number
2
Press the # key twice.
(Or the UP key twice.)
The display will show:
OWN NUMBER SET
PRESS START KEY
3
Press the START key.
The display will show:
ENTER FAX #
4
Enter your fax number by pressing
the number keys (max. of 20 digits).
• To insert a space between digits, press
the # key. To enter a “+”, press the *
key.
• If you make a mistake, press the
SPEED DIAL key to backspace and
clear the mistake.
Note: When scrolling through the
settings, you can press the UP key
in place of the # key, and the
DOWN key in place of the * key.
START
4
4
2
1 1
4
4
(Example)
1. Installation
5
Press the START key to enter the fax
number in memory.
The display will show:
ENTER YOUR NAME
START
93

Entering Your Name and Fax Number
6
Enter your name by pressing number
keys for each letter as shown in the
chart below. Up to 24 characters can
be entered.
Example: SHARP = 77777 444 22 7777 77
SPEAKER
SPACE =
A =
B =
C =
D =
E =
F =
G =
H =
I =
J =
K =
L =
M =
N =
O =
P =
Q =
R =
S =
T =
U =
V =
W =
X =
Y =
Z =
♦ To enter two letters in succession that require the same key, press
the SPEAKER key after entering the first letter.
(The SPEAKER key moves the cursor forward, and the SEARCH/
R key moves the cursor backward.)
♦ To clear a mistake, press the SPEED DIAL key.
♦ To change case, press the REDIAL key.
♦ To select one of the following symbols, press the # key or the * key
repeatedly:
. / ! " # $ % & ’ ( ) + + , - : ; < = > ? @ [ ] ^ _ ' { | }
(Note: Characters particular to the selected display language will
appear at the end of the symbol list.)
94
Cursor: A dark square mark in the display that indicates where a
number or letter will be entered.

Entering Your Name and Fax Number
7
Press the START key.
The display will show:
SECURITY SELECT
1=ON, 2=OFF
8
Press the STOP key to return to the
date and time display.
1. Installation
START
STOP
95

Setting the Date and Time
Setting the Date and Time
The date and time
appear in the display and
are printed at the top of
every page you fax.
Set the date and time by pressing the keys on the operation panel as
shown below.
*
1
Press these keys:
The display will show:
ENTRY MODE
PRESS * OR #
2
Press these keys:
The display will show:
key
3 key
21
3
54 6
87 9
0
FUNCTION key
STOP keySTART key
FUNCTION
3
96
DATE & TIME SET
PRESS START KEY

Setting the Date and Time
3
Press the START key.
• The currently set date will appear in
the display.
4
Enter a two-digit number for the day
(“01” to “31”).
• To correct a mistake, press the
SPEED DIAL key to move the cursor
back to the mistake and then enter the
correct number.
5
Enter a two-digit number for the
month (“01” for January, “02” for
February, “12” for December, etc.).
6
Enter the year (four digits).
START
5
0
Example: the 5th
0 1
Example: January
2
0 0 0
1. Installation
7
Enter a two-digit number for the hour
(“00” to “23”) and a two-digit number
for the minute (“00” to “59”).
Example: 2000
059
Example: 9:25
2
97

Setting the Date and Time
8
Press the START key to start the
clock.
The display will show:
JUNK FAX # MODE
1=SET, 2=CLEAR
9
Press the STOP key to return to the
date and time display.
Note: The time setting will change automatically at the beginning and
end of summertime.
START
STOP
98
 Loading...