

SHARR
FACSIMILE
OPERATION MANUAL
1. INSTALLATION
2. INITIAL SETTINGS
3. BASIC OPERATIONS
4. ANSWERING MACHINE CONNECTION
5. SPECIAL FUNCTIONS
6. OPTIONAL SETTINGS
7. PRINTING OUT REPORTS AND LISTS
8. MAINTENANCE
9. TROUBLESHOOTING
SPECIFICATIONS
QUICK REFERENCE GUIDE
WARNING - AUSTEL Regulations state that no unauthorised changes or modifications to this
equipment are permitted.
Note: Complies with the AUSTEL standards TS 002-1990 regarding Emission of Electromagnetic Interference.
These limits are designed to provide reasonable protection against interference in an
installation. This equipment generates, uses and can radiate radio frequency energy and, if
not installed and used in accordance with the instructions, may cause interference. However,
there is no guarantee that interference will not occur in a particular installation. If this
equipment does cause interference to radio or television reception, which can be determined
by turning the equipment off and on, the user is encouraged to try to correct the interference
by one or more of the following measures:
- Reorient or relocate the receiving antenna.
- Increase the separation between the equipment and the receiver.
- Connect the equipment into an outlet on a circuit different from that to which the receiver
is connected.
- Consult the dealer or an experienced radio/TV technician for help.
FOR YOUR RECORDS
Please record the model number and serial number below, for easy reference, in
case of loss or theft. These numbers are located on the rear side of the unit.
Space is also provided for other relevant information.
Model Number
Serial Number
Date of Purchase
Place of Purchase
Thank you for purchasing the FO-2600! In addition to providing you with the ease and
convenience of plain-paper printing, the FO-2600 features a variety of special
functions designed to increase the range and power of your communications.
This manual gives you easy-to-follow instructions for installing and using the FO-2600.
The Table of Contents will show you where instructions for using each feature are
located. Whilst you may not need to read every section in detail at first, we
recommend you at least review them briefly.
The FO-2600 is designed to operate in Australia and New Zealand only.
If you have any questions or problems which cannot be solved by reading this manual,
please contact your Sharp dealer.
.
+ Important safety information
l Never install telephone wiring during a lightning storm.
l Never install telephone jacks in wet locations unless the jack is specifically designed for
wet locations.
l Never touch uninsulated telephone wires or terminals unless the telephone line has
been disconnected at the network interface.
l Use caution when installing or modifying telephone lines.
l Avoid using a telephone (other than a cordless type) during an electrical storm. There
may be a remote risk of electric shock from lightning.
l Do not use a telephone to report a gas leak in the vicinity of the leak.
+ Your fax machine and the telephone system
The Austel Registration Number and Ringer Equivalence Number (REN) for this
equipment are shown on the label on the back of the machine. The telephone
company may require these numbers.
The sum of all Ringer Equivalence Numbers on your telephone line should be three or
less in order to assure proper service from the telephone company.
For your safety, if any of your equipment is not operating properly or should any
physical damage occur to the equipment where internal parts may become exposed,
the equipment should be immediately disconnected from the phone line and then the
power lines and returned to a SHARP authorised Service Centre for inspection, repair,
or disposal.
1
INSTALLATION
UNPACKING
.....................................
INSTALLING THE PRINTER CARTRIDGES
ASSEMBLY AND CONNECTIONS
LOADING PRINTING PAPER
.........................
............................
....................
l-l
l-2
l-6
l-10
2
INITIAL SETTINGS
A LOOK AT THE OPERATION PANEL
ENTERING YOUR NAME AND FAX NUMBER
ENTERING LETTERS FOR NAMES. . . . . .
SETTING THE DATE AND TIME . . . . . . .
SELECTING THE RECEPTION MODE . . . .
DISTINCTIVE RINGING . . . . . . . . . . . .
STORING NUMBERS FOR AUTOMATIC DIALL
3
BASIC OPERATIONS
SENDING DOCUMENTS
RECEIVING DOCUMENTS
MAKING COPIES
..................................
MAKING TELEPHONE CALLS
4
ANSWERING MACHINE HOOK-UP
USING THE HOOK-UP
OPTIONAL A.M. CONNE&l& &iN& : : : : : : : : : : : : : : : : : : : . 4-5
5 SPECIAL FUNCTIONS
MEMORY.
......................................
TRANSMISSION RESERVATION
BROADCASTING
..................................
CONFIDENTIAL TRANSMISSION
POLLING
RELAY REQUEST
.......................................
..................................
TIMER OPERATIONS
ENTERING AND USING PROGRAMS
ANTI JUNK FAX
...................................
.......................
..............................
.............................
...........................
..........................
..........................
................................
.......................
...................
. . . . . . . . . . . . . . . . . .
. . . . . . . . . . . . . . . . . .
. . . . . . . . . . . . . . . . . .
tiG’ : : : : : : : : : : : : : : : : 2-8
.I
3-l 1
3-14
3-l 6
. 4-l
5-10
5-l 3
5-16
5-22
2-l
2-2
2-3
2-5
2-6
2-7
3-l
5-l
5-3
5-4
5-6
5-7
6
OPTIONAL SE-l-l-INGS
7 PRINTING OUT REPORTS AND LISTS
8
9 TROUBLESHOOTING
MAINTENANCE
PROBLEMS AND SOLUTIONS
MESSAGES AND SIGNALS
CLEARING PAPER JAMS
..............................
...........................
.............................
SPECIFICATIONS
QUICK REFERENCE GUIDE
ii
9-l
9-3
9-5
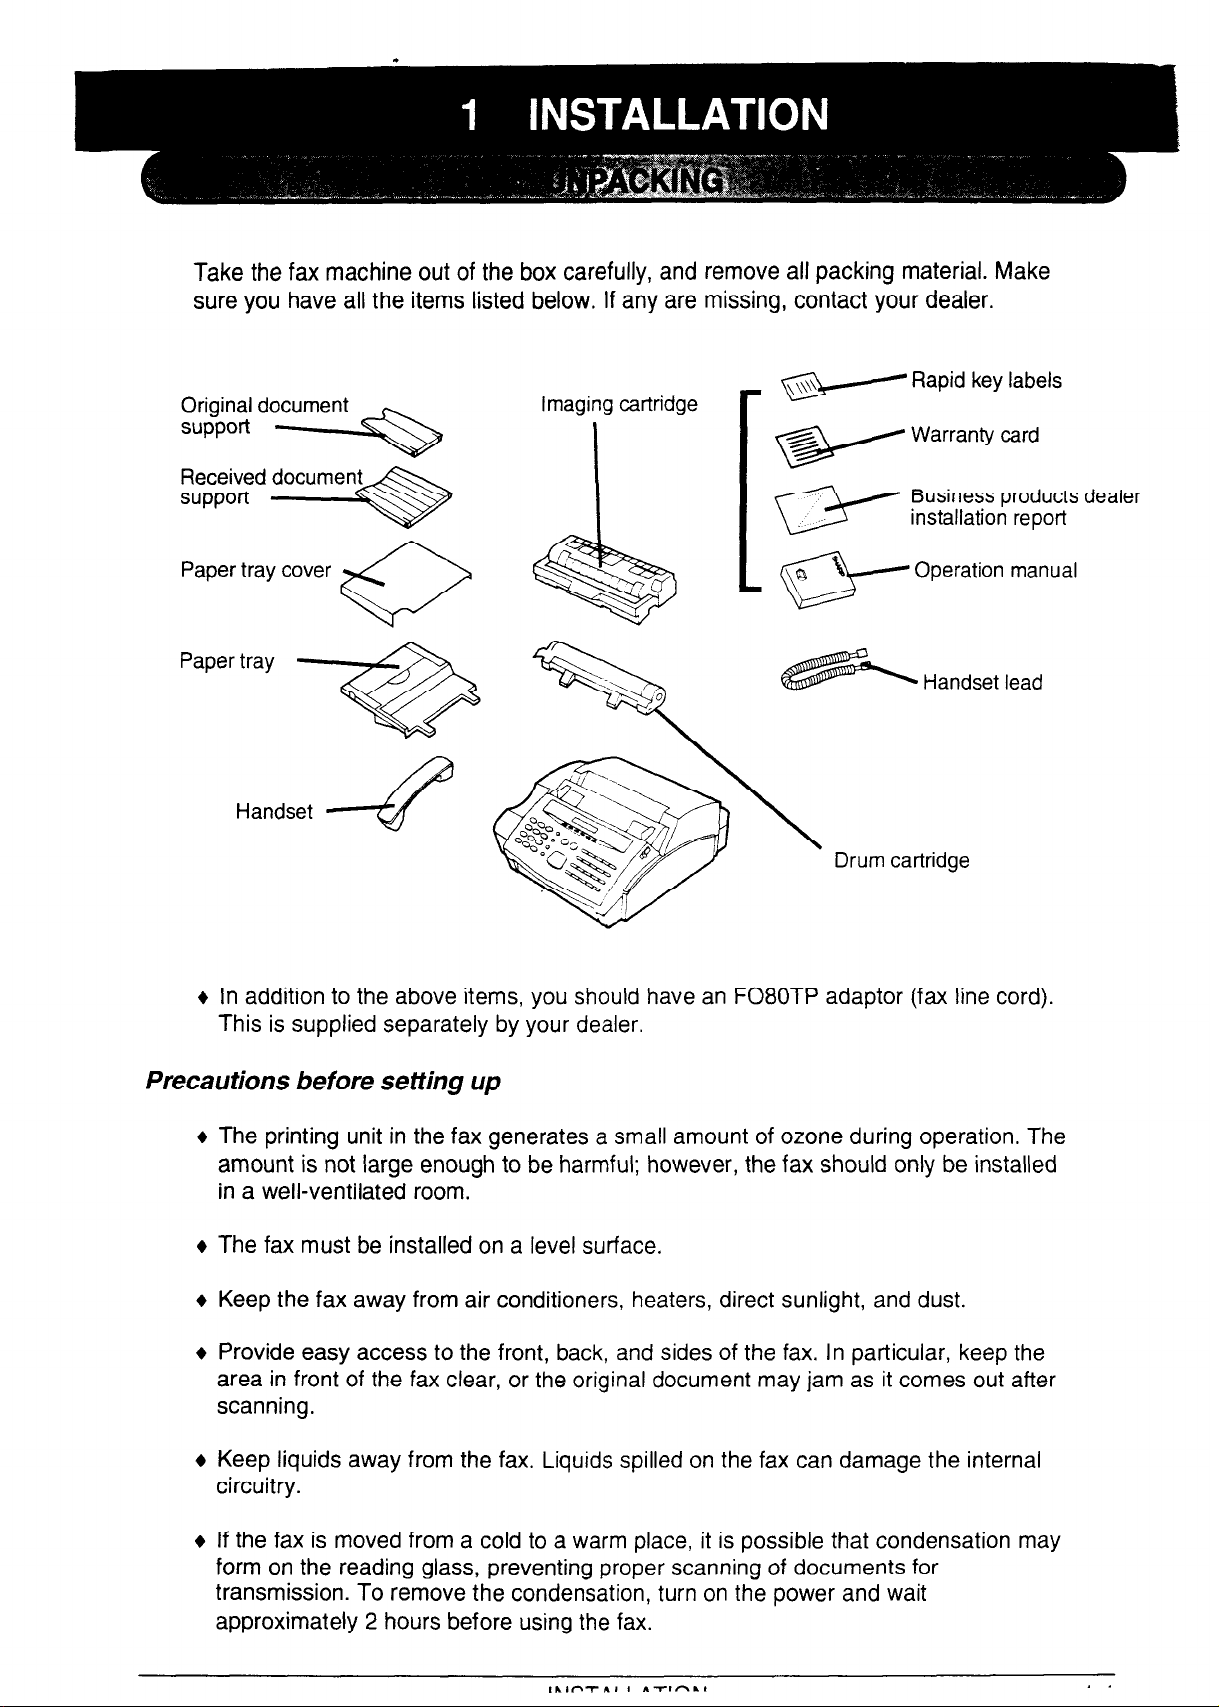
Take the fax machine out of the box carefully, and remove all packing material. Make
sure you have all the items listed below. If any are missing, contact your dealer.
Original document
support
Received document
support
Paper tray cover
Paper tray
*
Handset
imaging cartridge
v
v Warranty card
w installation report
Drum cartridge
Rapid key labels
Business products dealer
Operation manual
Handset lead
+ In addition to the above items, you should have an F080TP adaptor (fax line cord).
This is supplied separately by your dealer.
Precautions before setting up
The printing unit in the fax generates a small amount of ozone during operation. The
amount is not large enough to be harmful; however, the fax should only be installed
in a well-ventilated room.
The fax must be installed on a level surface.
Keep the fax away from air conditioners, heaters, direct sunlight, and dust.
Provide easy access to the front, back, and sides of the fax. In particular, keep the
area in front of the fax clear, or the original document may jam as it comes out after
scanning.
Keep liquids away from the fax. Liquids spilled on the fax can damage the internal
circuitry.
If the fax is moved from a cold to a warm place, it is possible that condensation may
form on the reading glass, preventing proper scanning of documents for
transmission. To remove the condensation, turn on the power and wait
approximately 2 hours before using the fax.
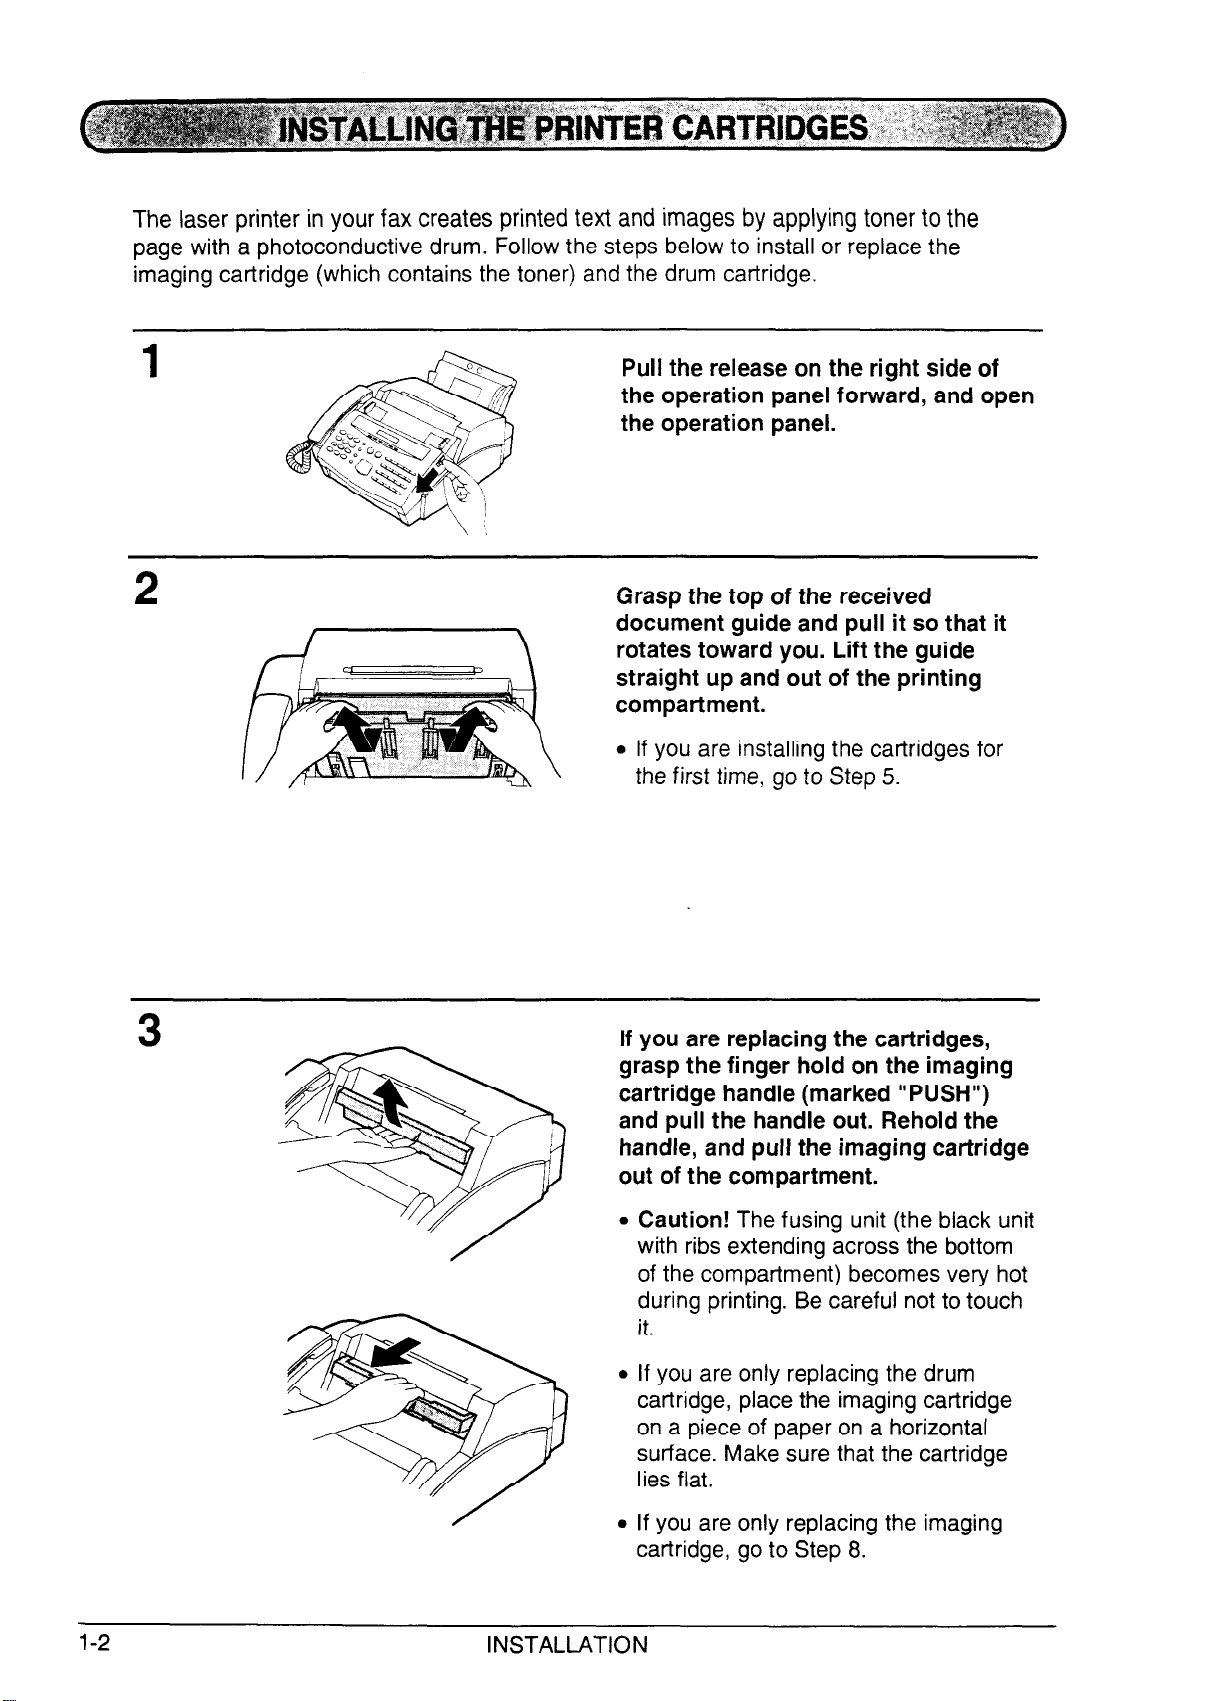
The laser printer in your fax creates printed text and images by applying toner to the
page with a photoconductive drum. Follow the steps below to install or replace the
imaging cartridge (which contains the toner) and the drum cartridge.
Pull the release on the right side of
the operation panel forward, and open
the operation panel.
Grasp the top of the received
document guide and pull it so that it
rotates toward you. Lift the guide
straight up and out of the printing
compartment.
l If you are installing the cartridges for
the first time, go to Step 5.
3
If you are replacing the cartridges,
grasp the finger hold on the imaging
cartridge handle (marked “PUSH”)
and pull the handle out. Rehold the
handle, and pull the imaging cartridge
out of the compartment.
Caution! The fusing unit (the black unit
with ribs extending across the bottom
of the compartment) becomes very hot
during printing. Be careful not to touch
it.
If you are only replacing the drum
cartridge, place the imaging cartridge
on a piece of paper on a horizontal
surface. Make sure that the cartridge
lies fiat.
If you are only replacing the imaging
cartridge, go to Step 8.
1-2
INSTALLATION

INSTALLING THE PRINTER CARTRIDGES
Grasp the two finger holds on
section of the drum cartridge,
the blue
and pull
it out of the compartment.
Unfold the end of the drum cartridge
bag, and remove the new drum
cartridge.
0
Do not use a sharp object to cut the
bag.
Do not remove the sheet of black
protective paper yet.
Grasp the two finger holds on the blue
section of the drum cartridge, and
insert it into the compartment. Make
sure it fits into place on top of the
roller in the bottom of the
compartment.
l If you have removed a used drum
cartridge, place it in the empty drum
cartridge bag, seal the bag, and
dispose of it in a way that conforms to
any local regulations that may exist in
your area.
Grasp the protruding end of the
protective paper, and pull the paper
out of the cartridge.
l Be sure not to leave any pieces of torn
paper in the printing compartment.
l If you are not replacing the imaging
cartridge, go to Step 10.
INSTALLATION 1-3
INSTALLING THE PRINTER CARTRIDGES
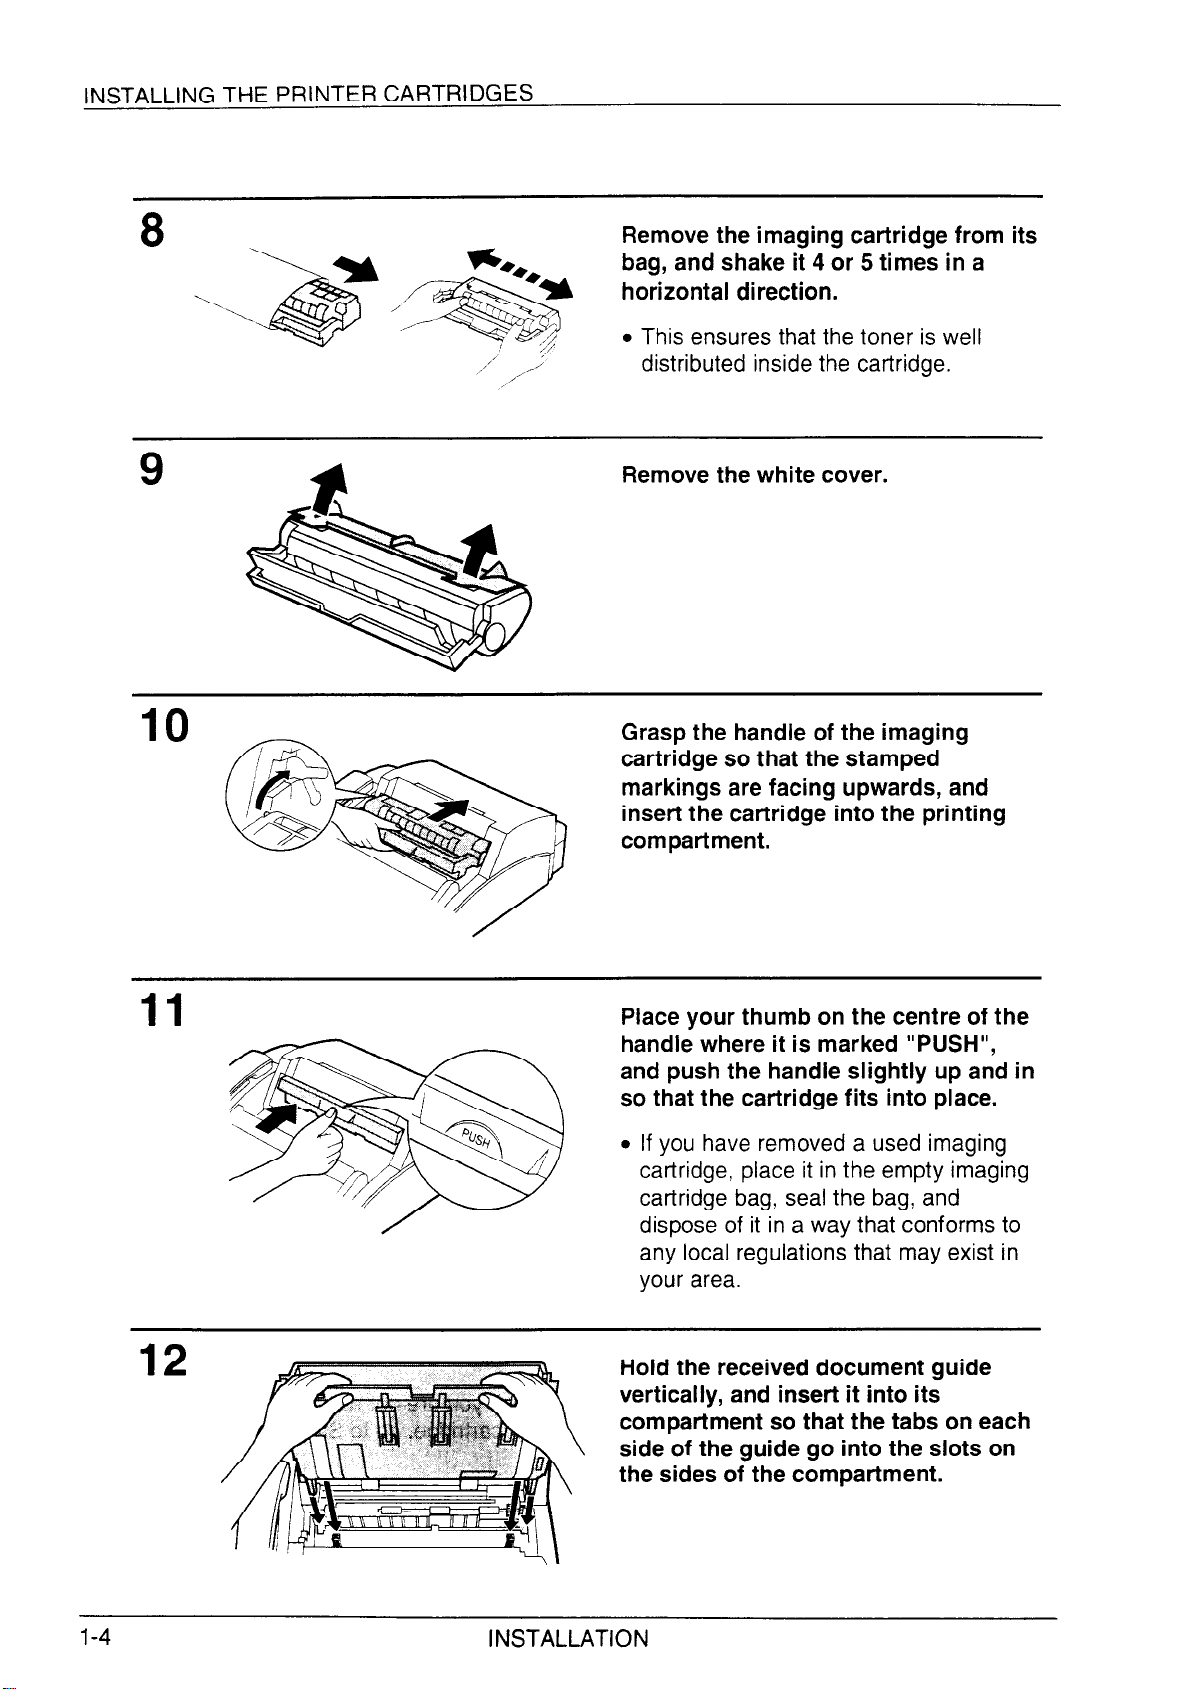
8
1..
Remove the imaging cartridge from its
bag, and shake it 4 or 5 times in a
horizontal direction.
l This ensures that the toner is well
distributed inside the cartridge.
Remove the white cover.
Grasp the handle of the imaging
cartridge so that the stamped
markings are facing upwards, and
insert the cartridge into the printing
compartment.
Place your thumb on the centre of the
handle where it is marked “PUSH”,
and push the handle slightly up and in
so that the cartridge fits into place.
If you have removed a used imaging
cartridge, place it in the empty imaging
cartridge bag, seal the bag, and
dispose of it in a way that conforms to
any local regulations that may exist in
your area.
Hold the received document guide
vertically, and insert it into its
compartment so that the tabs on each
side of the guide go into the slots on
the sides of the compartment.
1-4
INSTALLATION
INSTALLING THE PRINTER CARTRIDGES
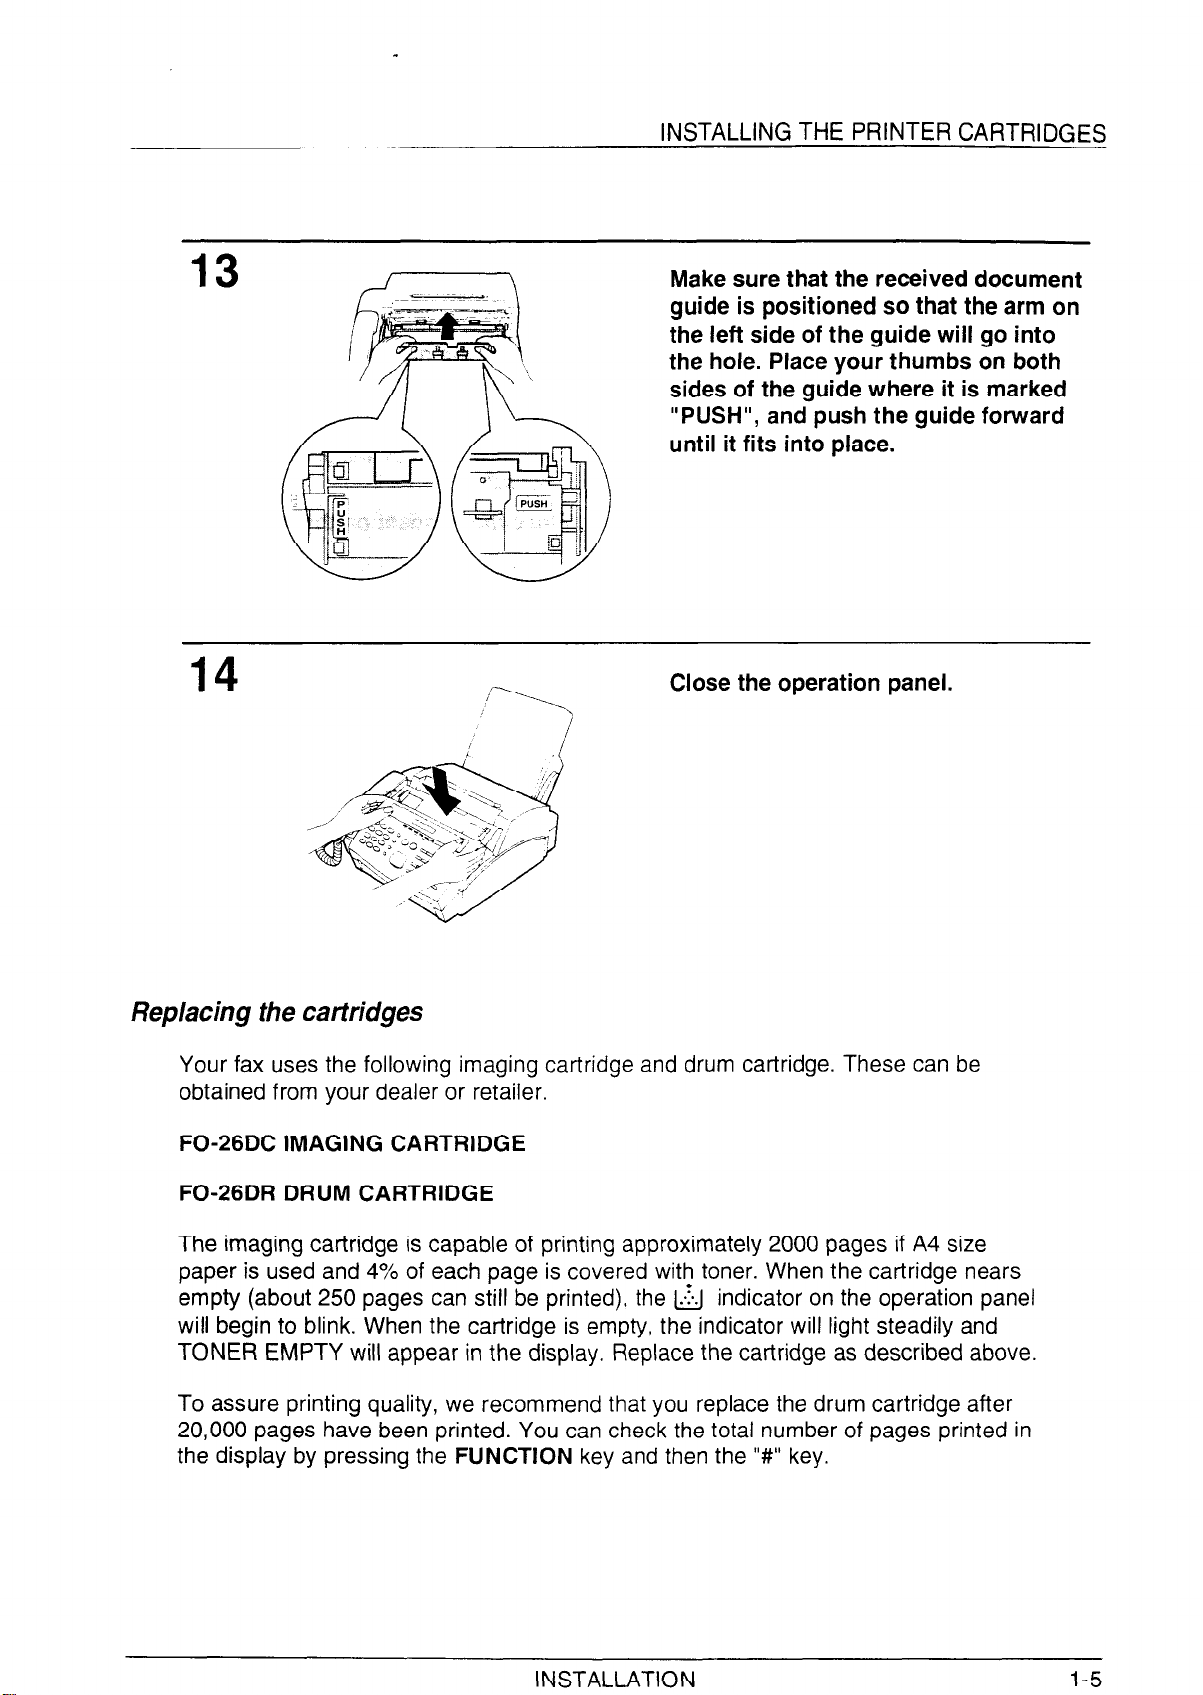
13
14
Make sure that the received document
guide is positioned so that the arm on
the left side of the guide will go into
the hole. Place your thumbs on both
sides of the guide where it is marked
“PUSH”, and push the guide forward
until it fits into place.
Close the operation panel.
,jr---Y
Replacing the cartridges
Your fax uses the following imaging cartridge and drum cartridge. These can be
obtained from your dealer or retailer.
FO-26DC IMAGING CARTRIDGE
FO-26DR DRUM CARTRIDGE
The imaging cartridge is capable of printing approximately 2000 pages if A4 size
paper is used and 4% of each page is covered with toner. When the cartridge nears
empty (about 250 pages can still be printed), the & indicator on the operation panel
will begin to blink. When the cartridge is empty, the indicator will light steadily and
TONER EMPTY will appear in the display. Replace the cartridge as described above.
To assure printing quality, we recommend that you replace the drum cartridge after
20,000 pages have been printed. You can check the total number of pages printed in
the display by pressing the FUNCTION key and then the “#” key.
INSTALLATION
l-5
Connect the handset lead to the
handset and the fax as shown.
l The ends of the handset lead are
identical, so they will go into either
socket.
Place the handset on the handset rest.
Use the handset to make ordinary
phone calls, or to transmit and
receive documents manually.
Plug the power lead into a 230-240 V,
50 Hz, grounded (3-prong) AC outlet.
Press the power switch to turn on the
power.
Caution: When disconnecting the
FO-2600, unplug the telephone line
cord before unplugging the power cord.
1-6
For Australia
For New Zealand
INSTALLATION
Insert the small modular plug which
terminates the F080TP adaptor line
cord into the socket on the side of the
fax marked “TEL. LINE”. Plug the
F080TP adaptor into the telephone
socket on the wall.
l Be sure to plug the line cord into the
TEL. LINE socket on the fax. Do not
plug it into the TEL. SET socket.
ASSEMBLY AND CONNECTIONS
Comments:
Your fax is set for tone dialling. If you are on a pulse only dial line, you must reset it for pulse
dialling by changing Option Setting 16. This procedure is described in Chapter 6, “Optional
Settings “.
If you intend to use a computer fax modem on the same phone line, you must reset Option
Setting IO to OFF in order to prevent transmission and reception errors. This procedure is
described in Chapter 6, “Optional Settings”.
If your area experiences a high incidence of lightning or power surges, we recommend that
you install surge protectors for the power and telephone lines. Surge protectors can be
purchased from your dealer or at most telephone specialty stores.
WARNING NOTICE: For all units installed in New Zealand, only the T setting for tone dialling is
permitted. The P setting for pulse dialling does not operate properly and must not be used.
Moving your fax and reconnecting
Should it be necessary to move your fax to a new location, first disconnect the
telephone line cord before disconnecting the power lead. When reconnecting, it is
necessary to connect the power lead before connecting the telephone line cord.
Adjust the volume of the speaker for on-hook dialling as follows:
FUNCTION
-
SPEAKER
Press the FUNCTION key and then the
SPEAKER key.
0
Press the “#” key to turn the volume
up, or the “Jt” key to turn it down.
START
Press the START key.
TO adjust the volume of the ringer, reset Option Setting 19 as described in Chapter 6,
“Optional Settings”.
INSTALLATION
l-7
ASSEMBLY AND CONNECTIONS
Attach the paper tray by inserting the
tabs into the holes at the rear of the
fax.
Place the paper cover on the paper
tray so that the notches on each side
of the cover fit onto thecatches on
each side of the tray.
Received document
=JPPOfl --.
3riginal document
3Jpport
l-8
Attach the original document support
and the received document support to
the top of the fax as shown.
INSTALLATION

ASSEMBLY AND CONNECTIONS
If desired, you can connect either an answering machine or an extension telephone to
your fax.
+ Connecting an answering machine to the fax will allow you to receive both voice and
fax messages on the same line while you are out. For details on using this feature,
see Chapter 4.
+ You can connect an extension phone to the fax to make and receive calls like any
other extension phone on your line. For details on receiving faxes from an extension
phone, see “Receiving Documents” in Chapter 3.
Insert one end of the answering
machine or extension phone line
either into the socket on the back side
of the F080TP adaptor, or into the
socket marked “TEL. SET” on the fax
(first remove the seal from the socket).
or
Important: If you are connecting an
answering machine, make sure the line
plug is inserted into the answering
machine’s telephone line socket, not its
telephone socket.
Important:
l In New Zealand, not all standard telephones and answering machines will respond
to incoming ringing when connected to the extension socket of the equipment.
INSTALLATION
1-9
The paper tray holds the paper on which received documents and copies are printed.
Up to 100 sheets of A4 size paper from 60 to 90 g/m2 can be loaded in the tray.
Comments:
l Plain paper has a “print” side which should be used to obtain the best print quality. The print
side is not visible to the naked eye, so check the label on the end of the package before
removing the paper. The print side will be indicated by an arrow, symbol, or wording. Load
the paper in the tray print side up as described below.
l Best printing results can be obtained from using clean, unused paper. We do not recommend
that you use paper that has already been printed on one side, as print quality problems or
paper jams may result. Some photocopier machines use toner that fuses at a lower
temperature than that used in your printer. If you run these through the printer, the toner
which is already on the paper may fuse onto the roller in the fusing unit.
l Some pre-printed sheets a/so use inks or coatings that may be affected by the heat from the
fusing unit. If possible, check with the supplier before using such papers. Moreover, print
quality cannot be guaranteed for paper with a particularly rough texture or embossing.
Remove the paper tray cover.
Fan the paper, and then tap the edge
against a flat surface to even the
stack.
Pull the lever on the right side of the
paper tray (marked “PULL”) toward
you.
l-10
INSTALLATION
”
INSTALLATION
l-11
\
LOADING PRINTING PAPER
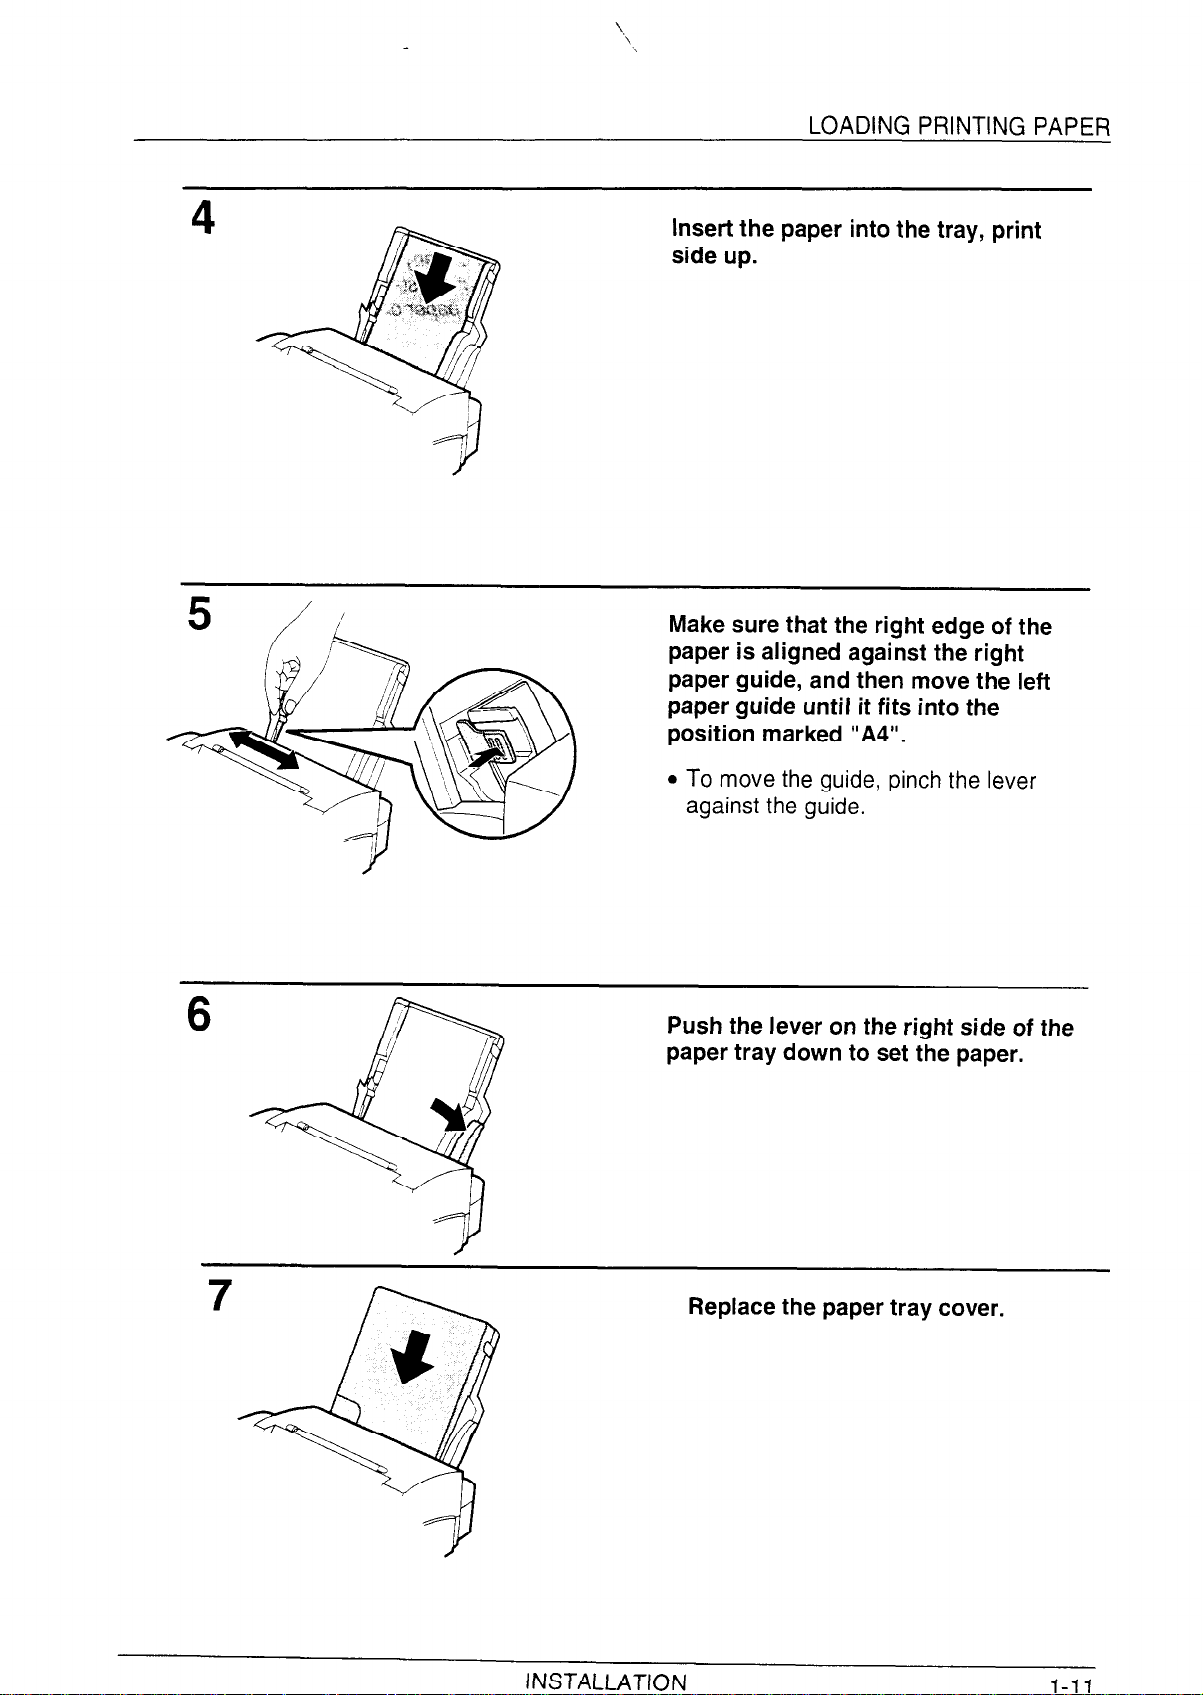
Insert the paper into the tray, print
side up.
6
Make sure that the right edge of the
paper is aligned against the right
paper guide, and then move the left
paper guide until it fits into the
position marked “A4”.
l To move the guide, pinch the lever
against the guide.
Push the lever on the right side of the
paper tray down to set the paper.
Replace the paper tray cover.
LOADING PRINTING PAPER
Note: When adding paper to the paper tray, you must first take out any remaining paper,
combine it into one stack with the new paper, and then put the stack in the tray. If you
do not remove the remaining paper and simply place new paper on top of it, double
feeding may result.
l-12
INSTALLATION
Before you can begin using your fax, there are some settings which must be made
INITIAL
SETTINGS
using the keys on the operation panel. First take a moment to familiarize yourself with
the operation panel, and then make the settings as described on the following pages.
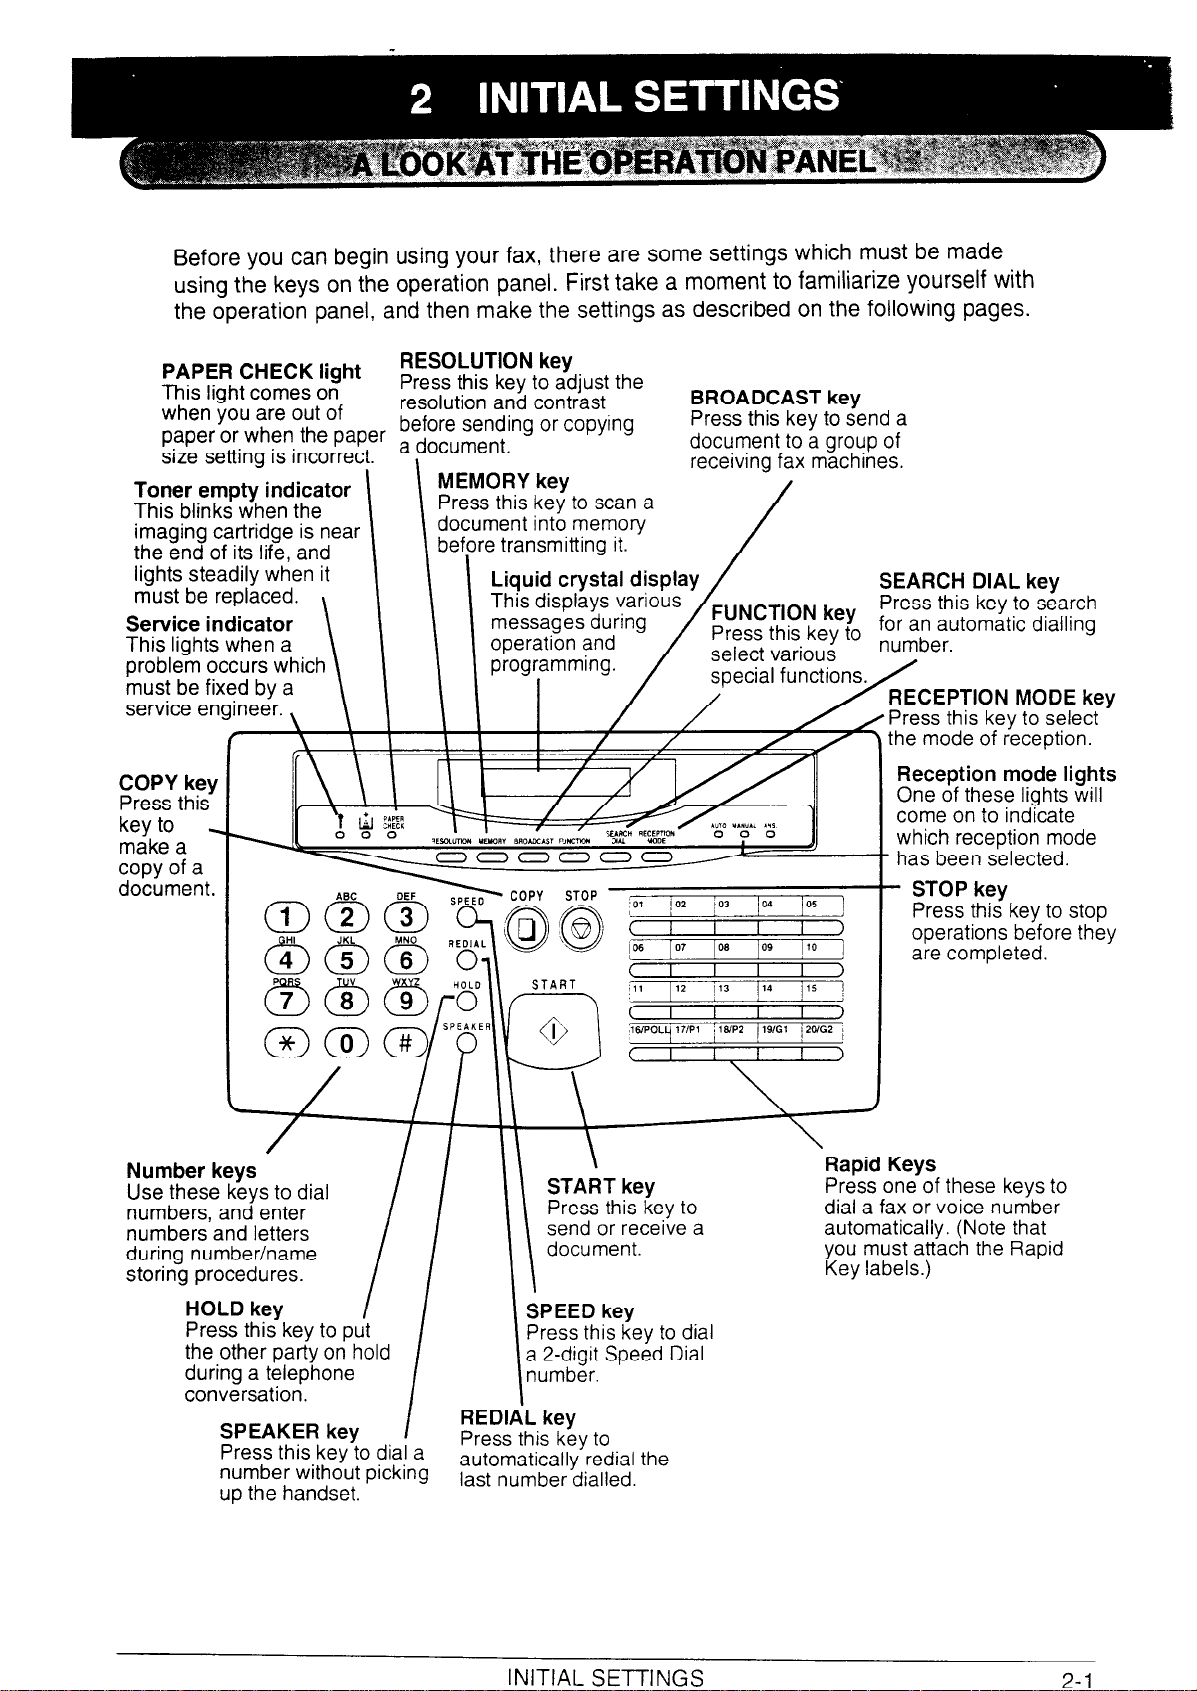
PAPER CHECK light
This light comes on
when you are out of
paper or when the paper a document,
size setting is incorrect.
Toner empty indicator
This blinks when the
imaging cartridge is near
the end of its life, and
lights steadily when it
must be replaced.
Service indicator
This lights when a
problem occurs which
must be fixed by a
service engineer. ,
r
COPY key
Press this
key to _
make a
copy of a
document.
\
ABC
RESOLUTION key
Press this key to adjust the
resolution and contrast
before sending or copying
1
DEF > COPY STOP
BROADCAST key
Press this key to send a
,
MEMORY key
Press this kev to scan a /
I
nent in6 memory
cur
2 transmitting it.
document to a group of
receivina fax machines.
”
SEARCH DIAL key
Press this key to search
the mode of deception.
Reception mode lights
One of these lights will
come on to indicate
which reception mode
- has been selected.
- STOP key
Press this key to stop
operations before they
are completed.
Number kevs
Use these keys to dial
numbers, and enter
numbers and letters
during number/name
storing procedures.
HOLD key
Press this key to put
the other party on hold
during a telephone
conversation.
SPEAKER key
Press this key to dial a
number without picking
up the handset.
J
/I’
I
I
REC
-
i
Press this key to
automatically redial the
last number dialled.
SPEED key
Press this key to dial
a 2-digit Speed Dial
number.
L key
\
START key
Press this key to
send or receive a
document.
Rapid Keys
Press one of these keys to
dial a fax or voice number
automatically. (Note that
you must attach the Rapid
Key labels.)
3-I

To have your name and fax/telephone number (called the “Sender’s name” and
“Sender’s number”) printed at the top of every page you transmit, program them by
pressing the panel keys as shown below.
If you enter an incorrect number or letter, press the HOLD key to move the cursor
back to the mistake, then enter the correct number or letter. (To move the cursor
forward, press the SPEAKER key.)
Step i Press these keys:
1
FUNCTION
1i (0
I
i%Ja /
2
31 a
I
~
a @ 0 @J 0 ts> (4) I pressing the numeric keys. (To insert a space
/
4
START
5 1
0
0
,~@)~~(YJ :
;a@@ 1
)\BC
oa
S/f?3f?3~(3
(Example)
I
/ Comments
I
I
“ENTRY MODE” will appear in the display.
“OWN NUMBER SET” will appear in the display.
Enter your fax number (max. of 20 digits) by
; between digits, press the “#” key. To insert a “+“,
/ press the “Jt” key.)
Enter your name by pressing the appropriate
numeric keys as shown on the following page.
Press each key repeatedly until the desired letter
appears in the display.
1 (Max. of 24 characters.)
!
~ spr
i (?J(9J
(Example: “SHARP”) I
/
7 I
2-2 INITIAL SETTINGS
START
0
cl
STOP
~
I
/ Exit.
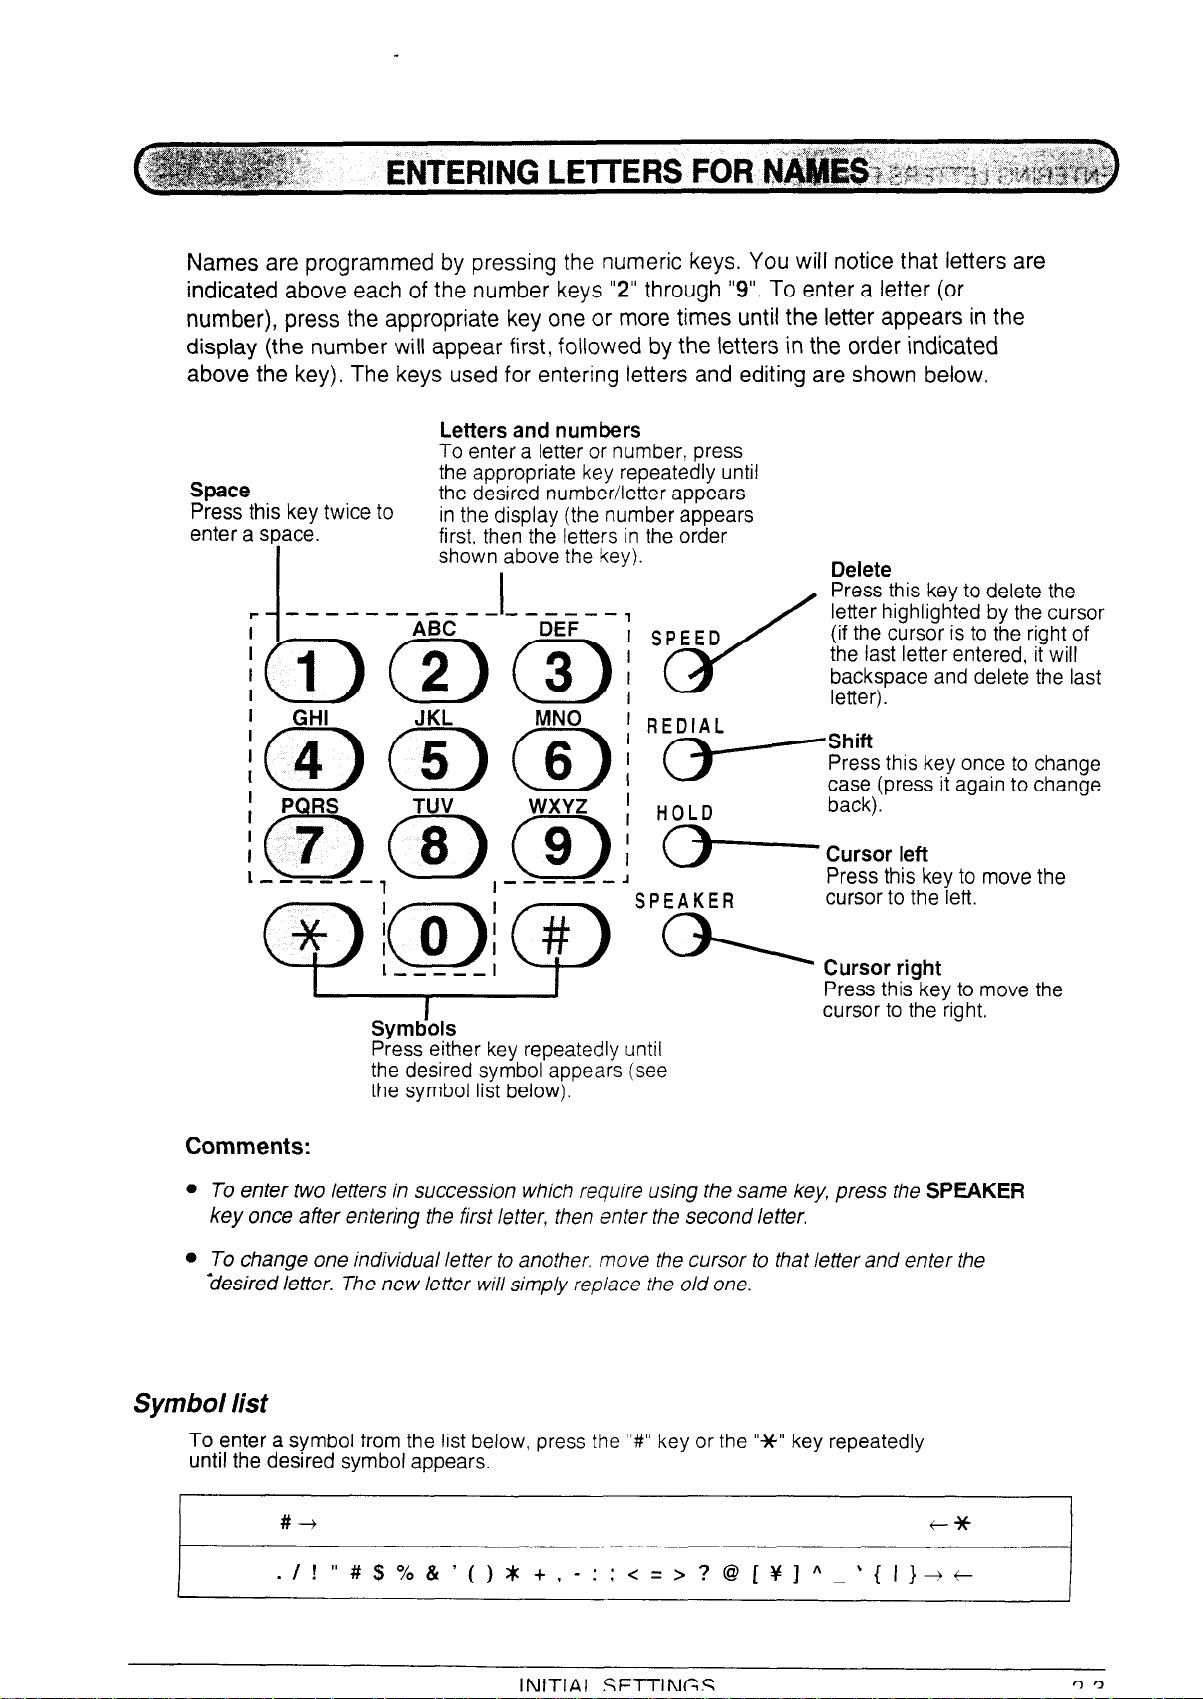
Names are programmed by pressing the numeric keys. You will notice that letters are
indicated above each of the number keys “2” through “9”. To enter a letter (or
number), press the appropriate key one or more times until the letter appears in the
display (the number will appear first, followed by the letters in the order indicated
above the key). The keys used for entering letters and editing are shown below.
Letters and numbers
To enter a letter or number, press
Space
Press this key twice to
enter a space.
the appropriate key repeatedly until
the desired number/letter appears
in the display (the number appears
first, then the letters in the order
shown above the key).
Press either key repeatedly until
the desired symbol appears (see
the symbol list below).
Comments:
l TO enter two letters in succession which require using the same key, press the SPEAKER
key once after entering the first letter, then enter the second letter.
l To change one individual letter to another. move the cursor to that letter and enter the
-desired letter. The new letter will simply replace the old one.
Symbol list
To enter a symbol from the list below, press the “W key or the “Jt” key repeatedly
until the desired symbol appears.
#+
. I ! v #$%&‘()*+,-:;<=>?@[~]A_‘{I}-rt
t*
~____._ ___
INlTlAl SFTTINGC
cl’3
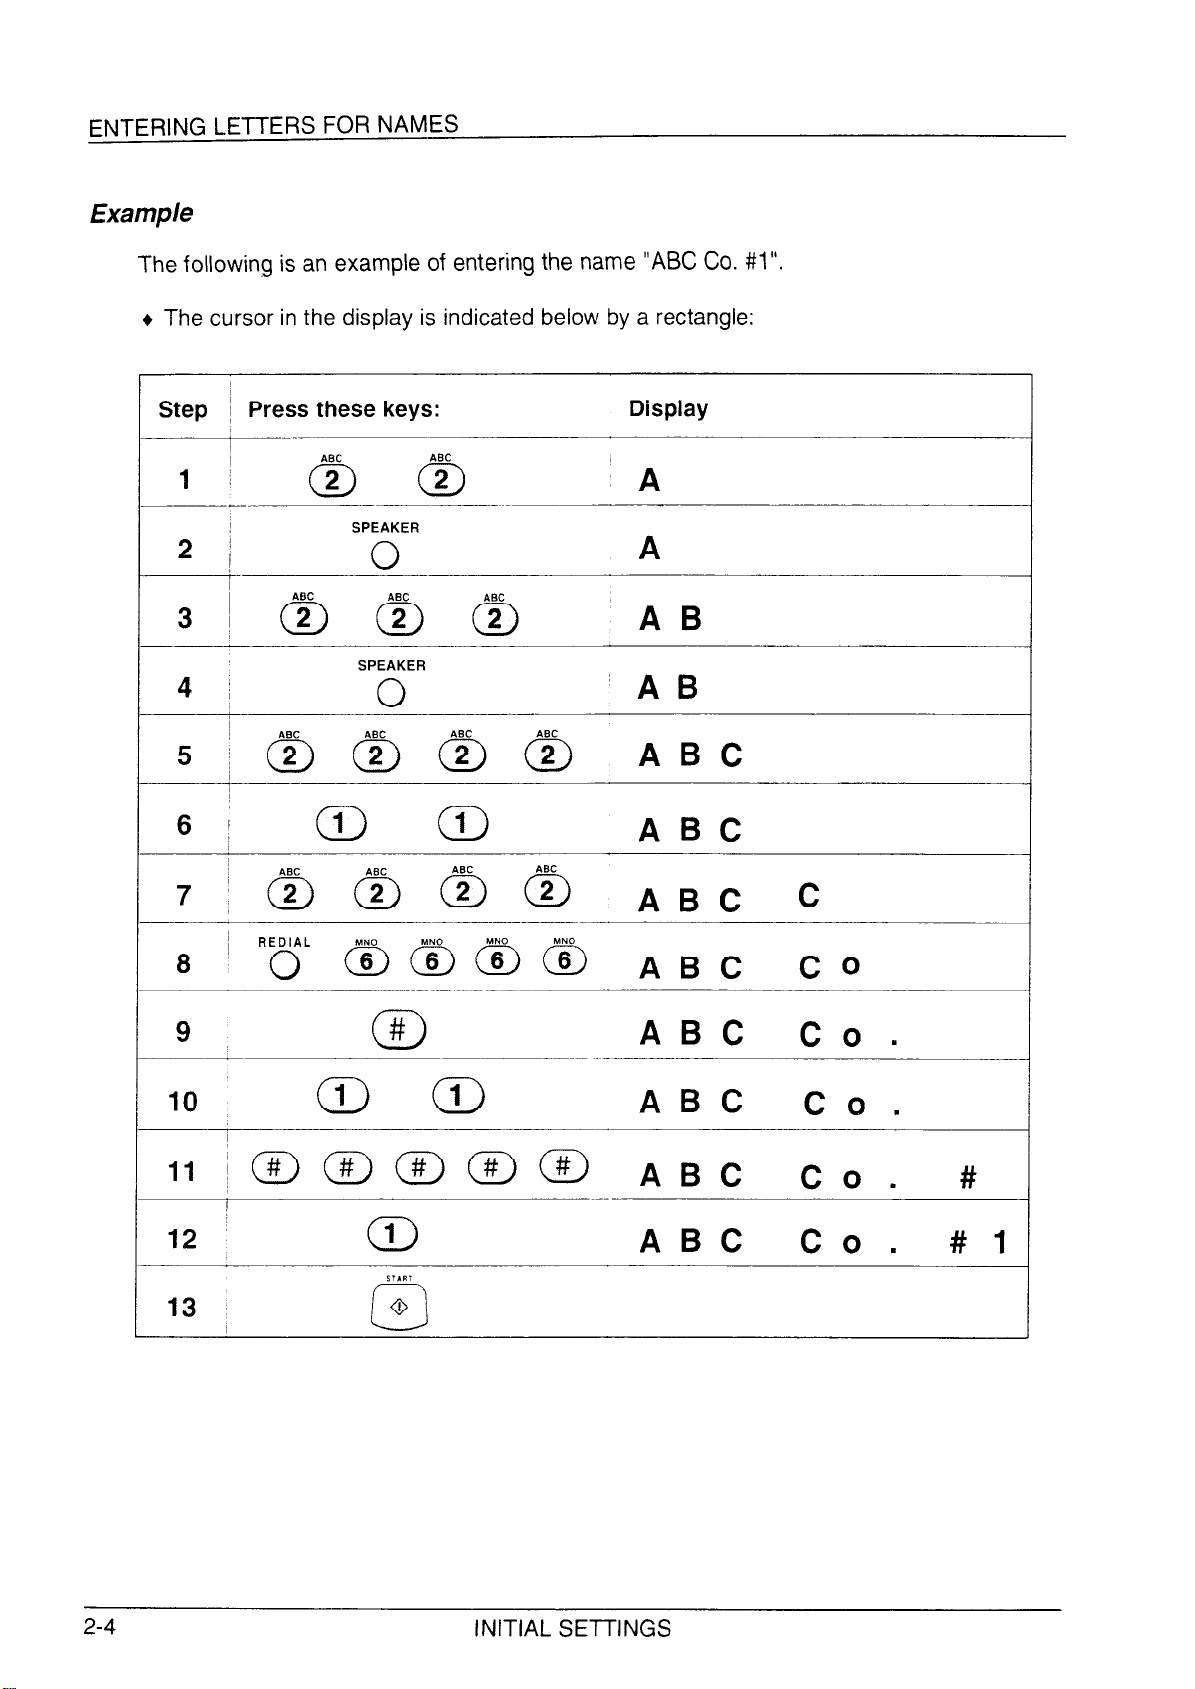
ENTERING LETTERS FOR NAMES
Example
The following is an example of entering the name “ABC CO. #l”.
+ The cursor in the display is indicated below by a rectangle:
Step
2 /
4 I
6 j
~ Press these keys:
SPEAKER
0
SPEAKER
0
Display
A
A
AB
ABC
9
10
#
0
c;i-) CD
ABC Co.
ABC Co.
ABC Co. #I
2-4
INITIAL SETTINGS
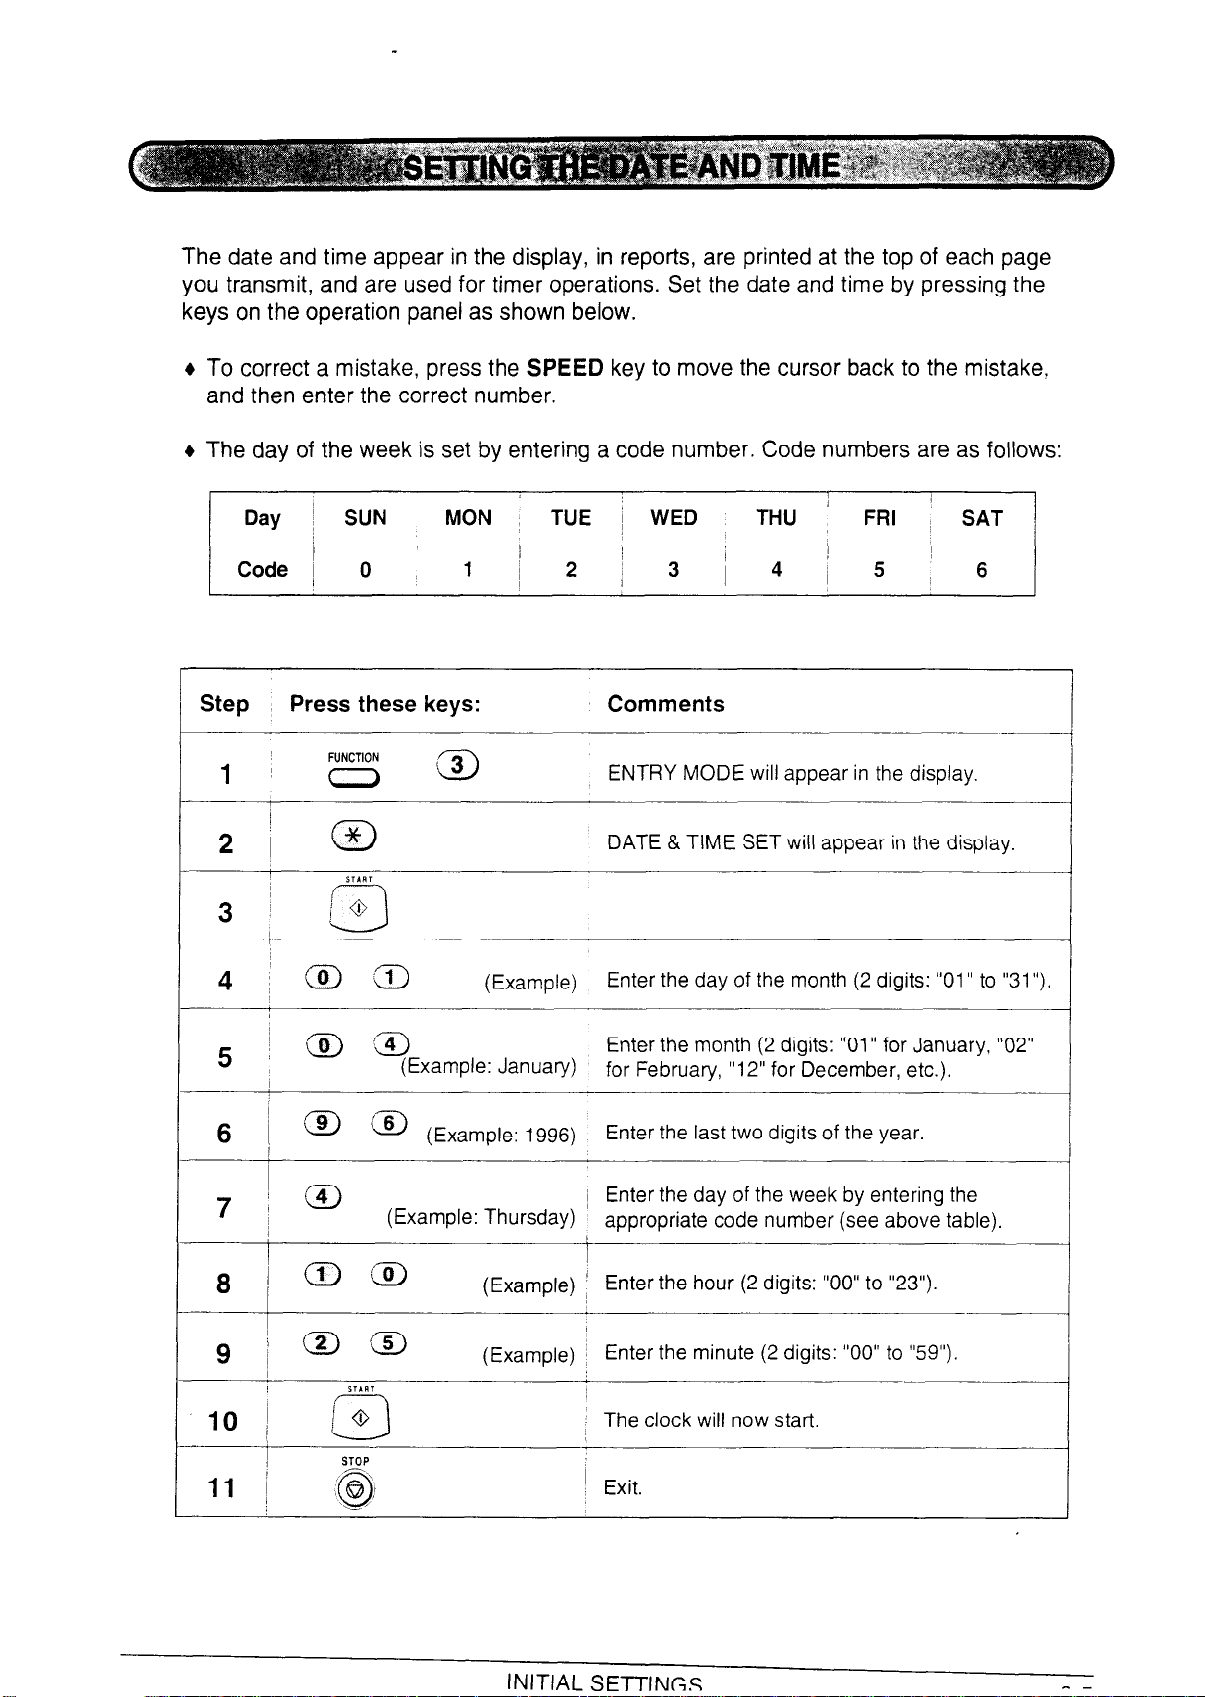
The date and time appear in the display, in reports, are printed at the top of each page
you transmit, and are used for timer operations. Set the date and time by pressing the
keys on the operation panel as shown below.
6 To correct a mistake, press the SPEED key to move the cursor back to the mistake,
and then enter the correct number.
6 The day of the week is set by entering a code number. Code numbers are as follows:
; 1
Day
Code
j SUN MON
1
0 1
TUE
/
~ 2 4 5
i WED THU FRI
I /
13 ;
i
SAT
6
Step Press these keys:
ji (a
FUNCTION
!
2i @
,
3
START
io
czII
4 ,@:a
) io) ‘g-J
5
I
im@)
6 /
i @J
7 1
(Example: January)
(Example: 1996)
(Example: Thursday)
I
8 i(i)@
Comments
ENTRY MODE will appear in the display.
DATE & TIME SET will appear in the display.
(Example)
Enter the day of the month (2 digits: “01” to “31”)
Enter the month (2 digits: “01” for January, “02”
for February, “12” for December, etc.).
Enter the last two digits of the year.
~ Enter the day of the week by entering the
appropriate code number (see above table).
(Example) ’ Enter the hour (2 digits: “00” to “23”).
I
/aa
9
10) h
c3
STIRI
(Example) ~ Enter the minute (2 digits: “00” to “59”).
The clock will now start.
’ Exit.
INITIAL SETTINGS
^ -
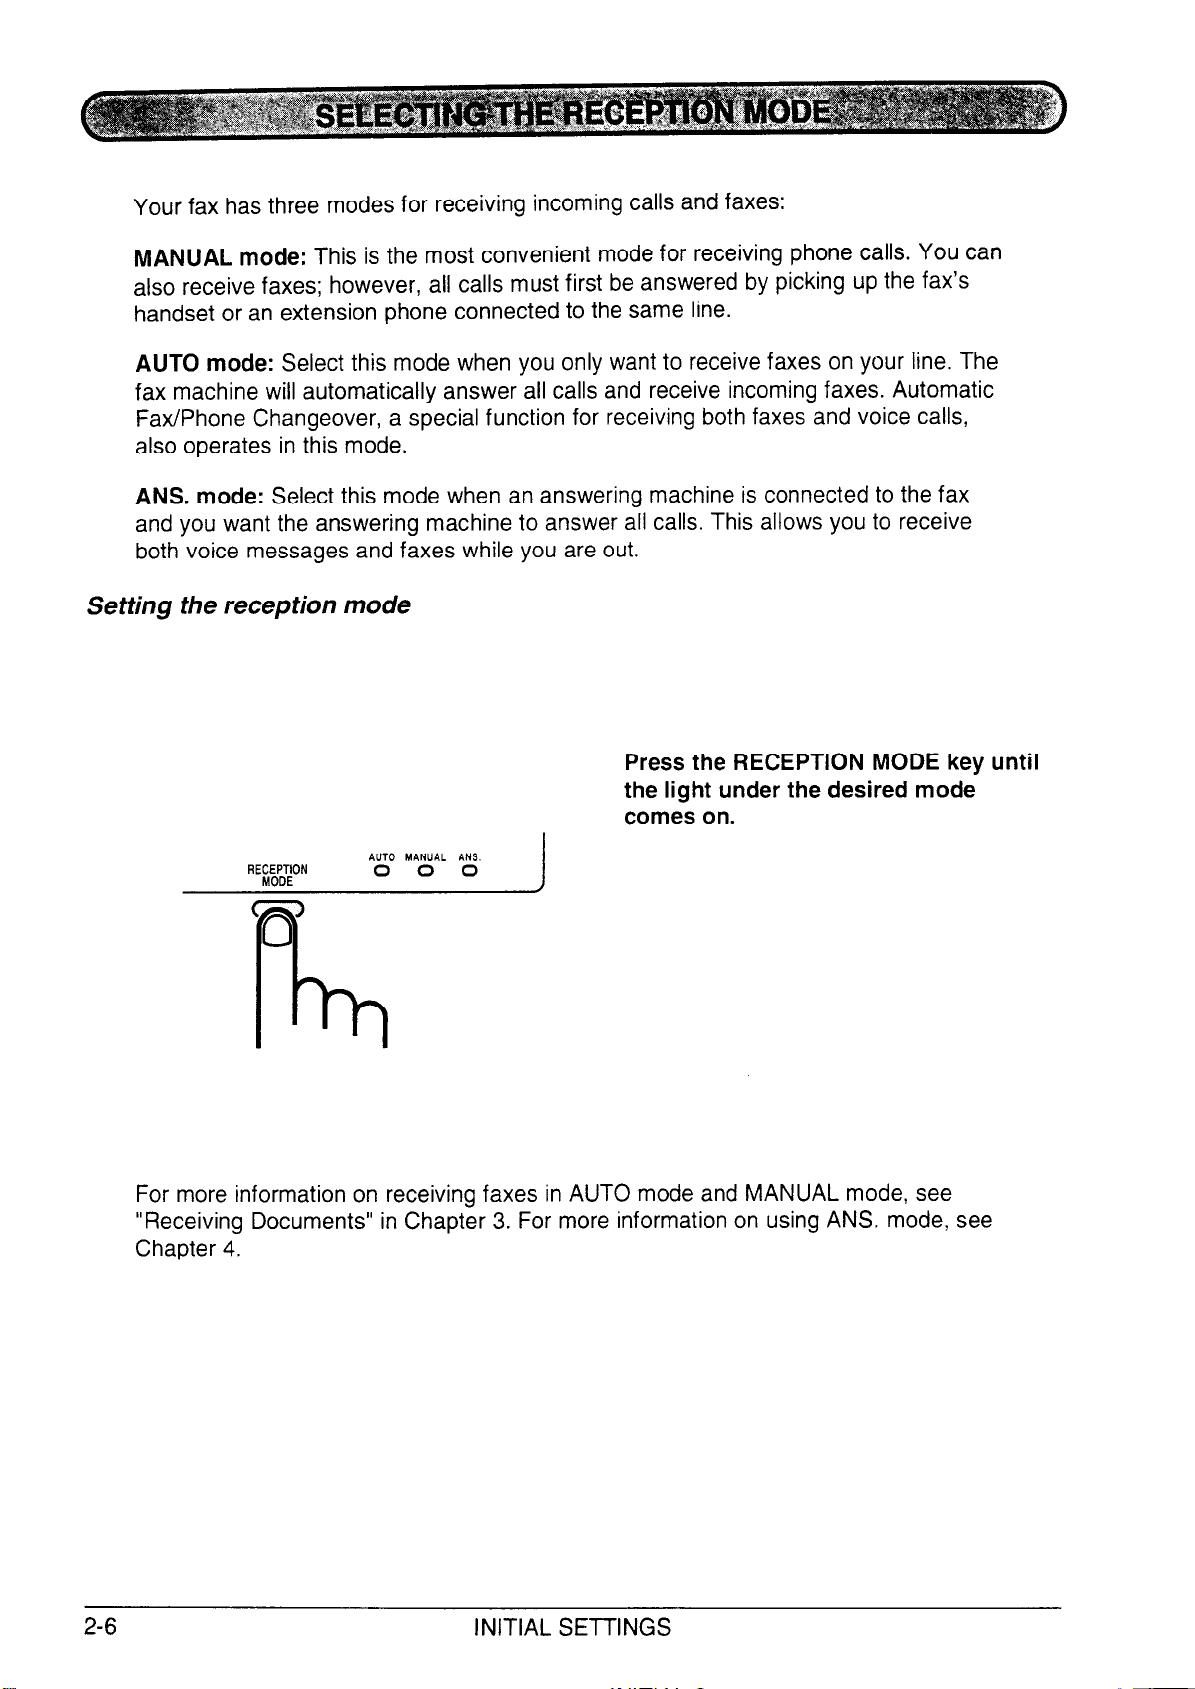
Your fax has three modes for receiving incoming calls and faxes:
MANUAL mode: This is the most convenient mode for receiving phone calls. You can
also receive faxes; however, all calls must first be answered by picking up the fax’s
handset or an extension phone connected to the same line.
AUTO mode: Select this mode when you only want to receive faxes on your line. The
fax machine will automatically answer all calls and receive incoming faxes. Automatic
Fax/Phone Changeover, a special function for receiving both faxes and voice calls,
also operates in this mode.
ANS. mode: Select this mode when an answering machine is connected to the fax
and you want the answering machine to answer all calls. This allows you to receive
both voice messages and faxes while you are out.
Setting the reception mode
Press the RECEPTION MODE key until
the light under the desired mode
comes on.
RE$IX&;ON
AUTO MANUAL ANS.
0 0 0
For more information on receiving faxes in AUTO mode and MANUAL mode, see
“Receiving Documents” in Chapter 3. For more information on using ANS. mode, see
Chapter 4.
2-6
INITIAL SETTINGS
If you subscribe to a distinctive ringing service from your telephone company, you will
need to reset Option Setting 17 to turn on the Distinctive Ringing function. When this
is done, your fax machine will signal voice calls by the normal ringing pattern, and fax
transmissions by a special ringing pattern. In the case of a fax transmission, your fax
machine will automatically answer the call after 2 rings and receive the fax. To reset
Option Setting 17, see Chapter 6.
Important:
The Distinctive Ringing function can only be used if you subscribe to a distinctive ringing
service from your telephone company, Do not set Option Setting 17 to ON if you are on a
normal line, as the fax machine will not operate properly.
If you turn on Distinctive Ringing, do not turn on Automatic Fax/Phone Changeover (Option
Setting 6). If you do, the fax machine will not operate properly.
INITIAL SETTINGS
2-7
Automatic dialling is a quick and convenient way of dialling which is performed by
either pressing a Rapid Key (Rapid Key Dialling), or pressing the SPEED key and
entering a 2-digit number (Speed Dialling). It can be used for both fax transmissions
and voice calls.
To use Automatic Dialling, you must first store the full number in your fax. The way
you store it depends on whether you want to use it for Rapid Key Dialling or Speed
Dialling:
+ Rapid Key Dialling: You assign a full fax number to a Rapid Key. You can also
store a name, a voice number (dialled as described in “Making telephone calls” in
Chapter 3) and a back-up fax number which is automatically dialled if the first fax
number is busy. 20 Rapid Keys are available.
+ Speed Dialling: You assign a full fax or voice number to a 2-digit Speed Dial
number. You can also store a name. 30 Speed Dial numbers are available. (Speed
Dial numbers are independent of Rapid Keys.)
Chain Dialling for long numbers
The maximum number of digits which may be entered when storing a telephone or fax
number is 20. If you need to store a number which is longer than 20 digits, use Chain
Dialling.
Chain Dialling allows you to combine two or more automatic dialling numbers, or use
an automatic dialling number followed by additional digits entered manually with the
numeric keys, to dial a single number. In addition to being convenient for storing long
numbers, it allows you to store an area code or access code as an automatic dialling
number.
For example, to store a 36-digit number for automatic dialling, you would need to
break it into two parts:
1. Store the first 20 digits into one Speed Dial number (“Ol”? for example) using the
storing procedure on the following page, and press “1” in Step 11 of that procedure
to specify it as a Chain Dialling number (when dialling, this tells the machine to wait
for the remainder of the telephone number when you use the Speed Dial number
“01 ‘I).
2. Store the remaining 16 digits into a separate Speed Dial number (“02”, for example),
and this time press “2” in Step 11 of the storing procedure to specify that it is not a
Chain Dial number (this tells the machine that the final part of the number has been
dialled).
In this way, you specify all parts of the number except the last as Chain Dial numbers.
+ The maximum number of digits which can be dialled at one time by Chain Dialling is
50.
2-8
INITIAL SETTINGS
STORING NUMBERS FOR AUTOMATIC DIALLING
Comments:
l You may need to add a pause between certain digits in the number to allow time for
connection. For example, if you are on a PBX telephone system that requires an access
number to be dialled (such as “,I,) to access an outside line, you will need to enter a pause
between the access number and the telephone/fax number of the other party. Pauses are
entered by pressing the REDIAL key (2 seconds per pause). If necessary, several pauses
can be entered in a row.
l To enter letters for names or correct a mistake, see “Entering letters for names” in this
chapter.
Step
; Press these keys:
I
1 i ( 0
2~ #
FUNCTION
0
3~ a
4 ~
~ ta fa 15) fi) a :B m
5
6
! (5) (5) ,QiJ 3 ‘3 !a :a
7
~
Comments
ENTRY MODE will appear in the display.
FAX/TEL !# MODE will appear in the display.
Select SET.
To store a Rapid Key number, press a Rapid
Key.
To store a Speed Dial number, press two
(Example) numeric keys (“01” to “30”).
Enter the fax number (max. of 20 digits including
(Example)
(Example) : this step.
pauses) using the numeric keys.
If you are storing a Speed Dial number, go to
!
Step 9 after pressing START.
Enter a full voice number (max. of 20 digits).
If you don’t want to enter a voice number, skip
g !B:3)a...@J
I
I
1
Enter the name of the location or party by
pressing numeric keys as described in “Entering
Letters for Names” in this chapter (max. of 20
characters). If you don’t want to enter a name,
:
(Example) skip this step.
INITIAL SETTINGS
2-9

STORING NUMBERS FOR AUTOMATIC DIALLING
Press “1” if you want to specify the number as a
Chain Dialling number (see the beginning of this
11 ~
I
‘~~@)mcwam
12 I
(iJ or (2)
(Example) ! to Step 14.
section). Otherwise, press “2” or “START”.
If you pressed “1” or are storing a Speed Dial
number, go to Step 14.
Enter a full back-up fax number.
If you don’t want to enter a back-up number, go
14 I Step4 or
Clearing numbers
Step
~ Press these keys:
FUNCTION
I, < 0
21 0
!
4 ,
I
10’
STOP
@
_-
(Em-W) ~ number with the numeric keys.
~ Return to Step 4 to store another number, or
press STOP to exit. If the number is a Rapid Key
~ number, you can write the name on the label
above the appropriate Rapid Key.
! Comments
i ENTRY MODE will appear in the display.
( FAXflEL. # MODE will appear in the display.
Select CLEAR.
! To clear a Rapid Key number, press the
I appropriate Rapid Key.
To clear a Speed Dial number, enter the 2-digit
2-10
STOP
I
/ / Return to Step 4 to clear another number, or
press STOP to exit.
INITIAL SETTINGS
STORING NUMBERS FOR AUTOMATIC DIALLING
3-11
Group Keys allow you to dial a group of fax numbers by simply pressing the
appropriate Group Key once. They are convenient for the Broadcasting function.
which is used to transmit a document to a group of fax machines.
Rapid Keys 19/Gl and 20/G2 can be programmed as Group Keys. To program or
clear a Group Key, follow the steps below. Note that one key cannot be
simultaneously programmed as both a Rapid Key and a Group Key.
Up to 49 fax numbers can be stored in one Group Key.
Only Rapid Keys and Speed Dial numbers can be stored in a Group Key. No full
numbers can be stored.
A Group Key cannot be cleared if it is being used in a programmed Broadcasting
operation. First clear the programmed operation as described in “Entering and
Using Programs” in Chapter 5, then clear the key. If you need to check which
program the key is used in, print out the Program and Group List as described in
Chapter 7.
Step
i
1 ~ 0
2
4
7
~ Press these keys:
FUNCTION
0
19/G1
p-02 z
0
x
aa . . . &
t
t
Step 4 or
7
(Example)
Comments
_
PROGRAM/GROUP will appear in the display.
GROUP ENTRY MODE will appear in the
display.
Press “1” (SET) to program a Group Key, or “2”
(CLEAR) to clear a Group Key.
Press a Group Key (“19/Gl” or “20/G2”) to
select it. If you are clearing the key, go to Step 6.
Enter fax numbers using one or both of the
following methods:
l Press one or more Rapid Keys.
l Enter one or more Speed Dial numbers
with the numeric keys.
Return to Step 4 to program/clear another Group
Key, or press STOP to exit.
INITIAL SETTINGS
STORING NUMBERS FOR AUTOMATIC DIALLING
Notes
2-12
INITIAL SElTINGS
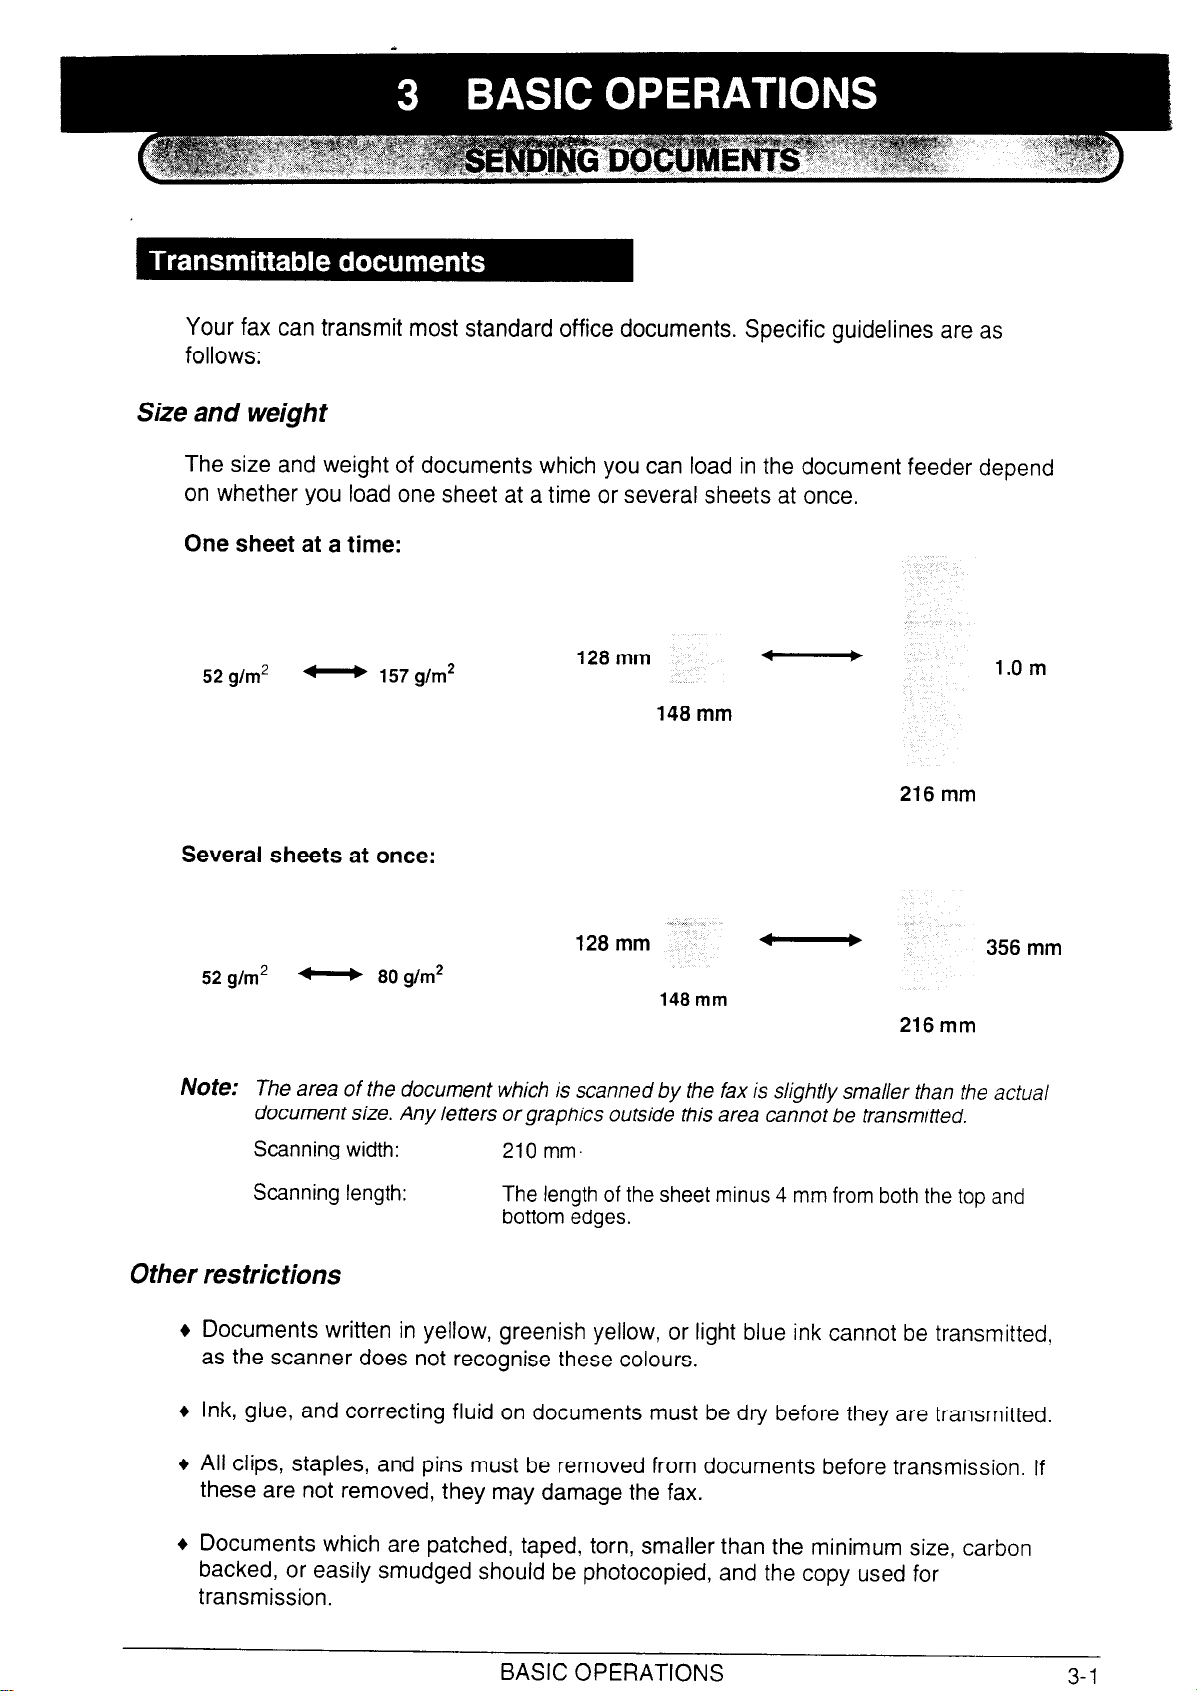
Your fax can transmit most standard office documents. Specific guidelines are as
follows:
Size and weight
The size and weight of documents which you can load in the document feeder depend
on whether you load one sheet at a time or several sheets at once.
One sheet at a time:
52 g/m2
_ 157 g/m2
Several sheets at once:
52 g/m* v
Note:
The area of the document which is scanned by the fax is slightly smaller than the actual
document size. Any letters or graphics outside this area cannot be transmitted.
Scanning width:
Scanning length:
80 g/m2
210 mm.
128 mm
148 mm
128mm ‘i_
148 mm
4
*
b
b
1.0 m
216 mm
356 mm
216 mm
The length of the sheet minus 4 mm from both the top and
bottom edges.
0 ther res tric Cons
Documents written in yellow, greenish yellow, or light blue ink cannot be transmitted,
as the scanner does not recognise these colours.
Ink, glue, and correcting fluid on documents must be dry before they are transmitted.
All clips, staples, and pins must be removed from documents before transmission. If
these are not removed, they may damage the fax.
Documents which are patched, taped, torn, smaller than the minimum size, carbon
backed, or easily smudged should be photocopied, and the copy used for
transmission.
BASIC OPERATIONS
3-1
SENDING DOCUMENTS
Up to 20 pages can be placed in the feeder at one time. The pages will be
automatically fed into the fax starting from the page on the bottom.
+ If you need to send or copy more than 20 pages. place the additional pages gently
and carefully in the feeder just before the last page is scanned. Do not try to force
them in, as this may cause double-feeding or jamming.
+ If your document consists of several large
at a time, insert each page into the feeder
Insert gently to prevent double-feeding.
or thick pages which must be loaded one
as the previous page is being scanned.
Adjust the document guides to the
width of your document.
Place the document face down and
push it gently into the document
feeder. The top edge of the document
should enter the fax first.
l The feeder will draw the leading edge
of the document into the fax.
SEND/COPY READY will appear in the
display.
3 You can now either make resolution
and/or contrast settings as described
in the following section, or dial the
other party as described in the
section, “Dialling and transmission”.
important:
l If you need to remove the document from the feeder before transmission or copying, first
open the operation panel by pulling the panel release on the right side of the fax forward. and
then remove the document. If you tv to pull the document out without opening the operation
panel, you may damage the feeder mechanism.
3-2
BASIC OPERATIONS

SENDING DOCUMENTS
BASIC
OPFRATIONS
n-n
If desired, there are several transmission settings which you can make before dialling
and transmitting the document.
Note: To make the settings. the document must first be loaded in the feeder.
Resolution
Your fax has 4 resolution settings:
STANDARD:
FINE:
SUPER FINE:
HALF TONE:
Use STANDARD for ordinary documents. This setting
gives you the fastest and most economical transmission.
Use FINE for improved reproduction, especially with docu-
ments containing small letters or fine drawings.
Use SUPER FINE when you need the highest quality of
reproduction.
Use HALF TONE for photographs and illustrations. The
original will be reproduced in 32 shades of grey.
If you do not make a setting, the fax will automatically send the document in .
qTANDARD.
In order to transmit with FINE or SUPER FINE resolution, the receiving fax machine
must also have that resolution. If it doesn’t, the next best available setting will be
used.
The default resolution (the resolution the fax uses if you do not make a resolution
setting) can be changed to FINE by changing Option Setting 1. See Chapter 6.
“Optional Settings”.
Contrast
Setting the resolution and contrast
The contrast is normally set to AUTO, which means that the fax automatically controls
the contrast, but for faint documents you can change the setting to DARK.
Press the RESOLUTION key one or
more times until the desired
PAPER
CHECK
0
RESOLUTION MEMORY BROADCAST
resolution and contrast settings
appear in the display.
l The first time you move through the list
of resolution settings, the contrast
setting AUTO will appear next to each
resolution setting. The second time you
move through the list, the contrast
setting DARK will appear.

SENDING DOCUMENTS
Cover Sheet
You can have your fax generate a cover sheet and send it as the last page of the
transmission. The cover sheet includes the date and time, the sender’s name and
number, and the receiver’s name and number if an automatic dialling number is used.
The total number of pages sent is indicated on the bottom.
+ Your name and number must be programmed in order for them to appear on the
cover sheet. (See “Entering Your Name and Fax Number” in Chapter 2.)
+ Cover Sheet cannot be selected when you use the Relay Request Function.
To include a cover sheet with only a single transmission, press the panel keys as
shown below. In this case, you can also select a message which will appear at the top
of the cover sheet. If you want the fax to automatically send a cover sheet with every
transmission, set Option Setting 11 to YES as described in Chapter 6, “Optional
Settings” (no message can be selected in this case).
Step Press these keys:
1 ~ < a
FUNCTION
2; aor(2)
I
2
0
3
1
(Example)
’ Comments
COVER SHEET MODE will appear in the
display.
I
Press "1" to turn the cover sheet function on, or
“2” to turn it off.
If you pressed "1" in the previous step, select a
message by entering a number from “2” to “5” as
~
shown below. or enter “1” if you don’t want to
include a message.
“1”: NO MESSAGE
“2”: URGENT
“3”: IMPORTANT
“4”: CONFIDENTIAL
~ “5”: PLS. DISTRIBUTE
3-4
BASIC OPERATIONS

\
BASIC
0PFRATlnN.S
QC
‘\.,
SENDING DOCUMENTS
Batch Page Numbering (Page Counter)
This setting is used to change the page numbering of the transmitted document from
simple numbering (“P. 1 “,
and the total number of pages being sent is added after each page number (for
example, “P. l/5”,
“P.2/5”. etc.). This allows the receiver to check for any missing
pages.
+ If you are sending a cover sheet, do not include the cover sheet in the total number
of pages. Your fax will adjust the number to
“P.2”, etc.) to batch numbering, which means that a slash
include the cover sheet automatically.
+ If you need to cancel a batch number entry,
remove the document from the feeder
or press the STOP key.
+ If the number of pages actually transmitted does not coincide with the batch number
entered, the alarm will sound and PAGE COUNT ERROR will appear in the display.
“PAGE E” will also appear in the “NOTE” column of the Transaction Report if it has
been set to print out.
Step Press these keys:
Comments
PAGE COUNTER SET will appear in the display. 1
Enter the total number of pages (2 digits - “01” to
‘99”) by pressing the numeric keys.

SENDING DOCUMENTS
Once you have loaded the document and made any desired contrast/resolution
settings, you are ready to dial the number of the receiving fax machine and transmit
the document. There are several ways of dialling, and you can select the one which
best suits your needs.
Normal Dialling
With Normal Dialling, you pick up the handset (or press the SPEAKER key) and dial
as you would to make a telephone call. If the receiving machine is set to receive faxes
manually (this means that the receiving party first answers your call vocally, and then
presses their Start key to begin fax reception), you can talk with them before sending
the fax.
Pick up the handset or press the
SPEAKER key. Listen for the dial tone.
2 Dial the number of the receiving
machine by pressing the numeric
keys.
3
,-‘,/.’
,‘L,
Beep
-+..,
Wait for the connection. Depending
on the setting of the receiving
machine, you will either hear a
facsimile reception tone or the other
person will answer.
l If the other party answers, ask them to
press their Start key (if you pressed the
SPEAKER key, pick up the handset to
speak with them). This causes the
receiving machine to issue a reception
tone.
3-6
4
START
When you hear the reception tone,
press the START key. Replace the
handset if you used it.
l When transmission is completed, the
fax will beep.
BASIC OPERATIONS

SENDING DOCUMENTS
RASIC
0PFRATlnN.S
Direct Keypad Dialling
If you do not need to talk with the other party before sending the fax, you can just dial;
it isn’t necessary to pick up the handset or press the SPEAKER key.
Direct Keypad Dialling is a form of automatic dialling, so if you need to insert a
pause between any digits of the number, press the REDIAL key. (For more
information on pauses, see “Storing Numbers for Automatic Dialling” in Chapter 2.)
Enter the number of the receiving
machine by pressing the numeric
keys.
2
START
Check the display. If the number of
the receiving machine shown is
correct, press the START key.
l If it is not correct, press the STOP key
to backspace and clear one digit at a
time, and then re-enter the correct
digit(s).
Rapid Key Dialling
If the number you want to dial has been stored as a Rapid Key number (see “Storing
Numbers for Automatic Dialling” in Chapter 2), you can dial it by pressing the
appropriate Rapid Key.
Press the appropriate Rapid Key.
l The name of the receiving party will
appear in the display. If no name was
stored, the fax number will appear. (If
the name or number is incorrect, press
the STOP key.)
l The document will be automatically
transmitted once the connection is
made.
97

SENDING DOCUMENTS
Speed Dialling
If the number you want to dial has been stored as a Speed Dial number, you can dial
it by pressing the SPEED key and then entering the 2-digit number (see “Storing
Numbers for Automatic Dialling” in Chapter 2).
1
2
SPEED
START
1
G
Gtll
4
C
p7
0
‘aa
,&I@
-
p”
9r
/ ’
FI
/ \
ABC
10
DEF
9
Press the SPEED key and then enter
the two digits of the Speed Dial
number by pressing the number keys.
. To enter numbers 1 through 9, first
enter 0 and then the number.
Check the display. If the name or
number shown is correct, press the
START key. (If not, press the STOP
key and then repeat Step 1.)
Chain Dialling
An automatic dialling number set for Chain Dialling (see “Storing Numbers for
Automatic Dialling” in Chapter 2) can be combined with another automatic dialling
number or digits entered manually with the numeric keys to dial one phone number up
to 50 digits long. The following are some examples of how this can be done:
+ Press appropriate Rapid Keys in the proper order. For example, press Rapid Key
01, then Rapid Key 02.
+ Enter Speed Dial numbers in the proper order. For example, press the SPEED key
and “22”, then the SPEED key and “23”. Press the START key after the final
number to begin transmission.
+ Press a Rapid Key and then manually enter a number by pressing appropriate
numeric keys. Press the START key after the final numeric key to begin
transmission. (Use this method, for example, when you have stored a long distance
access code into a Rapid Key, and want to dial this in combination with a number
which hasn’t been stored as an automatic dialling number.)
3-8
BASIC OPERATIONS

Using the SEARCH DIAL key
3-9
SENDING DOCUMENTS
If you don’t remember the Rapid Key or Speed
a particular fax number, you can search for the
Once you have found the number, you can dial
by simply pressing the START key.
(Example: “6”)
Dial number in which you have stored
number by following the steps below.
it and transmit the loaded document
Press the SEARCH DIAL key.
Enter the first letter of the stored
name by pressing the appropriate
number key (the key which
corresponds to the required letter)
one or more times until the letter
appears in the display. If the name
begins with a special character or
number, press “1 ‘I.
l If you don’t remember the first letter,
go to Step 3 (you will scroll through the
list from the beginning).
l If a name wasn’t stored for the number,
press “0”. This will cause numbers, not
names, to appear when you scroll.
l To access voice numbers stored in
Rapid Keys which have no name,
press “0” twice (note that Speed Dial
numbers will also appear).
Press the “#I” key or the “36” key to
scroll through the names (numbers if
you pressed “0”). Stop when the
desired name appears in the display.
l If no names have been stored that
begin with the entered letter, you will
scroll from the next name, in
alphabetical order, in the list. If no
names/numbers have been stored at
all, NO DATA will appear.
BASIC OPERATIONS

SENDING DOCUMENTS
4
START
Press the START key. The ducument
will be automatically transmitted once
the connection is made.
Note: The SEARCH DIAL key can be used to access the first number in a Chain Dialling
sequence, but not subsequent numbers.
Automa tic redialling
If you use automatic dialling (including Direct Keypad Dialling) and the line is busy,
your fax will automatically redial the number. Up to 2 redialling attempts will be made
at intervals of 5 minutes.
+ To stop automatic redialling, press the STOP key.
Using the RED/AL key
You can press the REDIAL key to redial the last number dialled. To send a document,
proceed from Step 3 of Normal Dialling. Note that the speaker will be automatically
activated, so you do not need to pick up the handset immediately.
3-10
BASIC OPERATIONS

When the reception mode is set to AUTO (press the RECEPTION
AUTO light comes on), your fax automatically answers all calls on
MODE key until the
1 ring and receives
incoming documents.
+ You can change the number of rings on which the fax answers incoming calls by
changing Option Setting 2 (see Chapter 6? “Optional Settings”). Any number from
“0” to “4” can be selected. (Select “0” to have your fax answer calls without ringing.)
+ If you pick up the handset before your fax answers, you can talk to the other party
and/or receive a document as described below in “Using MANUAL mode”.
Note: Documents sent to your fax in Superfine resolution are printed in Fine resolution.
When the reception mode is set to MANUAL (press the RECEPTION MODE key until
the MANUAL light comes on), you must answer all calls (including fax transmissions)
using the fax’s handset or an extension phone connected to the same line.
Receiving faxes on the FO-2600
When your fax rings, pick up the
handset.
l If you hear a fax tone, wait until
RECEIVING appears in the display,
and then replace the handset.
l If the other party first talks to you and
then wants to send a fax, press the
START key after speaking. Replace
the handset.
Note: As a back-up feature of MANUAL mode. you can set the fax to automatically answer
calls and receive documents on any number of rings from 1 to 4. This is useful if you
are occasionally unable to respond to an incoming call personally. The setting is made
with Option Setting 3. See Chapter 6, “Optional Settings”.
BASIC OPERATIONS
3-11

RECEIVING DOCUMENTS
Receiving faxes on an extension phone
If you hear a fax tone when you answer an extension phone, wait until your fax
answers (the extension phone will go dead), and then hang up. Your fax will
automatically receive the document.
Note: If your fax does not respond within 5 seconds, noise on the line may be preventing it
from detecting the fax tone. In this case, manually activate fax reception as described in
the following paragraph.
If the other party first talks to you and then wants to send a document, press “5”, “Jt”
and “36” if you are on a tone dial phone. If you are on a pulse dial phone, set the
handset down (do not hang up), walk over to the fax, pick up the handset, and press
the START key.
Note: Your fax will not accept the signal to begin reception (‘5 “, “X ‘I, and “* ‘) if a document is
loaded in its feeder.
Comments:
l lfyou have set Option Setting 10 to “0FF”and hear a fax tone when you answer the
extension phone, you must press “5”, “* I’, and “Jc ” if you are on a tone dial phone, or walk
over to the fax, pick up the handset, and press the START key if you are on a pulse dial only
phone.
l The code used to activate fax reception from a tone dial extension phone (“5’: “* “, and “* ‘7
can be changed if desired. See Option Setting 8 (“Tel/Fax Remote Number’) in Chapter 6,
“Optional Settings “.
l If you do not intend to use the code for activating fax reception, you can turn detection of the
code off by resetting Option Setting 9. This will ensure that the fax never mistakenly attempts
to begin reception if it detects a signal which it perceives to be similar to “S’, “S ‘I, and “36 ”
while you are talking on an extension phone.
In New Zealand, not all standard telephones and answering machines will respond to
incoming ringing when connected to the socket of the equiipment.
3-12
BASIC OPERATIONS

RECEIVING DOCUMENTS
This is a special function in AUTO reception mode which is convenient for receiving
both faxes and voice calls. When it is turned on, your fax will detect whether an
incoming call is a voice call (including manually dialled fax transmissions), or an
automatically dialled fax. If it is a voice call. the fax will make a special ringing sound
to alert you to answer. If it is an automatically dialled fax transmission, reception will
begin automatically.
Caution!
l Automatic Fax/Phone Changeoverwill not route voice calls to extension telephones on the
same line as the fax machine. Do not use Automatic Fax/Phone Changeover if you intend to
use one or more extension telephones together with the fax machine.
Turning Automatic Fax/Phone Change0 ver on
Automatic Fax/Phone Changeover is turned on by setting Option Setting 6 to “YES”
The procedure for doing this is described in Chapter 6! “Option Settings”.
+ Make sure the reception mode is set to AUTO
Note:
If Option Setting 2 is set to a large number of rings, your fax may not be able to receive
documents sent by automa tic dialling. If you have difficulty receiving documents,
change the setting of Option Setting 2 to a lesser number of rings.
How the function operates
When a call comes in, your fax will answer it after the number of rings set with Option
Setting 2. After answering, the fax monitors the line for about 5 seconds to see if a fax
tone is being sent.
+ If your fax detects a fax tone (this means that the call is an automatically dialled
fax), it will automatically begin reception of the incoming document.
+ If your fax doesn’t detect a fax tone (this means that the call is a voice call or
manually dialled fax), it will make a special ringing sound (called pseudo ringing) for
15 seconds to alert you to answer. If you don’t answer within this time, your fax will
send a fax tone to the other machine to allow the calling party to send a fax
manually if they desire.
Note:
The duration of pseudo ringing can be adjusted with Option Setting 7. See Chapter 6,
“Optional Settings”.
Silent ring fax recognition system
You can also set your fax machine to receive faxes silenty, but ring to alert you to voice
call. To do so, set Option Setting 2 to “O”, and turn Option Setting 6 on (this procedure
is described in Chapter 6). When a voice call comes in, a special ringer on the fax
machine will ring. Note that extension telephones will not ring.
BASIC OPERATIONS
3-13

Your fax can also be used to make copies. Single and multiple copies (up to 99 per
original) can be made, enabling your fax to double as an office copier.
+ The default resolution for copying is FINE.
Follow these steps when you only want to make one copy of each original in the
feeder. Single copying is particularly convenient for making sample copies of
documents to be transmitted to see if the resolution or contrast needs adjustment.
Load the document(s) face down.
l If desired, adjust the resolution and/or
contrast with the RESOLUTION key.
2 Press the COPY key, and then the
COPY
START
Follow these steps when you want to make
Up to 99 copies per original can be made.
+ If you are making multiple copies of more than one original, you can choose
whether to have the copies sorted (SORT COPY) or not sorted (MULTI COPY). The
following example shows how each mode works when 3 copies each of 3 originals
are made.
+=s-l Originals
START key.
multiple copies of one or more originals.
3-14
SORT COPY ,/ W \ MULTI COPY
BASIC OPERATIONS

MAKING COPIES
Load the document(s) face down.
l If desired, adjust the resolution and/or
contrast with the RESOLUTION key.
COPY
(Example)
Press the COPY key.
Press “1” to select MULTI COPY, or
“2” to select SORT COPY.
Enter the desired number of copies
with the numeric keys.
l If the desired number of copies is from
1 to 9, enter “0” first.
5
Note:
START
If you place a large number of originals in the feeder, the memory may become full
before all of them can be scanned (MEMORY FULL will appear in the display). lf this
happens, press the START key to copy the originals which have been scanned, and
then repeat the multiple copy procedure for the remaining originals, including the
original which was being scanned when the memory became full.
BASIC ~IPFRATI~VUC
Press the START key.

Your fax can be used like a regular telephone to make and receive voice calls.
+ To make or receive a phone call, the power must be on.
1
2
fl
B
1
0
GHI
4
0
ABC
2
0
JKL
5
0
or
SPEAKER
n
Pick up the handset or press the
SPEAKER key. Listen for the dial tone.
l To use Rapid Key Dialling,
press the SPEAKER key.
Dial the number using one of the
following methods:
Normal Dialling: Enter the full
telephone number with the numeric
keys.
Rapid Key Dialling: Press the
appropriate Rapid Key. (The voice
number will be dialled.)
Speed Dialling: Press the SPEED
key, and enter the 2-digit Speed Dial
number with the numeric keys.
you must
3-16
3
Speak with the other party when they
answer.
l If you pressed the SPEAKER key, pick
up the handset.
BASIC OPERATIONS

MAKING TELEPHONE CALLS
Using the SEARCH key
You can use the SEARCH key to search for a Rapid Key or Speed Dial number. First
search for the number as described in “Using the SEARCH key” in “Sending
Documents” in this chapter, and then pick up the handset or press the SPEAKER key.
The number will be dialled automatically after you do so (do not press the START key).
Redial
The last number called can be redialled by pressing the REDIAL key (it is not
necessary to pick up the handset or press the SPEAKER key). When the other party
answers, pick up the handset.
Hold
You can put the other party on hold during a conversation by pressing the HOLD key.
When this is done, they cannot hear you. You can put the handset back in the cradle
without breaking the connection. When you are ready to speak with them again, pick
up the handset. If you did not put the handset back in the cradle, press the HOLD key
one more time.
BASIC OPERATIONS
n-17

MAKING TELEPHONE CALLS
Notes
3-18
BASIC OPERATIONS

If you have connected an answering machine to your fax as described in “Assembly
and Connections” in Chapter 1, you can receive both voice messages and fax
transmissions on the same line while you are out. To use the connection, first change
the outgoing message of your answering machine, and then set the reception mode of
your fax to ANS. when you go out.
The outgoing message (OGM) of your answering machine should be changed to
inform callers who want to send a fax to press their Start key. For example, your
message might go as follows:
“Hello. You’ve reached the ABC company. No one is available to take your call right
now. Please leave a message after the beep or press your facsimile Start key to send
a fax. Thank you for calling.”
Comments:
It is advisable to keep the length of the message under 10 seconds. If it is too long, you may
have difficulty receiving faxes sent by automatic dialling.
Your callers can even leave a voice message and send a fax message on the same call.
Modify your outgoing message to explain that they can first leave a voice message, and then
press their Start key to send a fax.
1
Set the reception mode of your fax to
ANS. by pressing the RECEPTION
MODE key.

USING THE HOOK-UP
2
Note:
Set your answering machine to auto
answer.
l Your answering machine must be set
to answer on a maximum of 4 rings. If
not, you may not be able to receive
faxes sent by automatic dialling.
l If your answering machine has a toll
saver function, make sure that it will
answer by the fourth ring.
If your answering machine has a remote retrieval function, make sure the code used to
activate remote retrieval is different from the code used to activate fax reception with an
extension telephone (see “Receiving Documents” in Chapter 3). If they are the same,
entering the code from an outside telephone to retrieve messages will cause the fax
machine to be activated.
How the answering machine mode operates
While you are out, all of your incoming calls will be answered by your answering
machine and its outgoing message will play. During this time, your fax will quietly
monitor the line.,lf your fax detects a fax transmission, it will take over the line and
begin reception.
+ If the connection is not good or there is noise on the line, the answering machine
and/or fax machine may not respond properly.
+ The call counter on your answering machine may indicate that voice messages
were received, when only fax messages were received.
Note: To prevent the fax from taking over the line and beginning reception if you call in from
an external phone or answer on an extension phone, press any three keys (other than
’
the code to activate fax reception, ‘5 “,
This can only be performed from a phone capable of tone dialling.
and “36”) on the dial pad of the phone.
W,
4-2
ANSWERING MACHINE HOOK-UP

USING THE HOOK-UP
ANSWERING
MACHINE
HOOK-tJP
If the connection doesn’t operate properly, first check the following:
Is the answering machine connected properly to the fax? One end of the answering
machine line should be inserted in the “TEL. SET” socket on the fax, and the other
end in the answering machine’s telephone line socket.
Is the reception mode set to ANS.?
If the above settings and connections are correct and the connection still doesn’t
operate properly, the timing with which the answering machine and the fax operate
are probably not well synchronized. Some common synchronization problems and
their solutions are described below.
In addition, read the following section, “How fax transmissions are detected”, to gain a
better understanding of how the fax operates when an answering machine is
connected. This will help you determine what course of action to take.
+ Are callers who want to leave a voice message being interrupted by the fax before
they can do so?
The fax is set to take over the line and begin reception if it detects a specified duration
of silence (called “Quiet Detect Time”). If your outgoing message contains a pause
or the caller pauses while leaving a message, and the pause is longer than the
specified duration, the fax will interrupt.
It is best to shorten or eliminate such pauses, but if necessary you can also try
lengthening the Quiet Detect Time setting. This procedure is described in “Optional
A.M. Connection Settings” at the end of this chapter.
+ Are callers who want to send a fax manually having trouble doing so after your
answering machine’s outgoing message plays?
If so, the answering machine may be disconnecting the line (hanging up) before your
fax has a chance to take over the line and begin reception. You can make your fax
activate sooner by shortening the Quiet Detect Time setting. This procedure is
described in “Optional A.M. Connection Settings” at the end of this chapter.
+ Are you having trouble receiving documents sent by automatic dialling?
Make sure that your answering machine’s outgoing message is less than 10 seconds
long, and that your answering machine is set to answer on between 2 and 4 rings.
Inserting a short pause at the beginning of your answering machine’s outgoing
message might also help, as this gives your fax a chance to clearly hear and detect
the fax “calling” tone which the transmitting fax sends in the case of automatic dialling.
A-2

USING THE HOOK-UP
How fax transmissions are detected:
Your fax detects fax transmissions in two ways when an answering machine is
connected, depending on whether the document is being sent automatically or
manually:
Automatic dialling:
If the document is sent using a form of automatic dialling, such as Rapid Key or Speed
Dialling, the transmitting fax machine will send a “calling tone” at 3-second intervals
for a period of about 30 to 40 seconds after dialling. When your fax detects this tone, it
will disconnect the answering machine, send a “reception tone” in response, and
begin receiving the transmission.
If the transmitting fax does not receive a reception tone from your fax within 30 to 40
seconds after dialling, it will usually hang up and automatically redial several minutes
later.
Since your fax may not be able to detect the transmitting fax’s calling tone until after
the outgoing message ends, it is important that the answering machine answers the
call within 4 rings and the outgoing message does not last too long. Otherwise, your
fax may not be able to establish communication with the transmitting fax before the
latter hangs up.
Manual dialling:
If the document is being sent by normal (manual) dialling, the transmitting fax machine
does not send a calling tone. Instead, the person faxing normally waits until they hear
a reception tone and then presses their Start key. In the case of an answering
machine connection, they will hear your outgoing message instead of a reception
tone, and then press their Start key.
However, this does not signal a fax transmission to your fax. Instead, it must use a
function called “Quiet Detect Time” to detect the transmission. This function causes
your fax to disconnect the answering machine and begin reception if it detects a
certain duration of silence.
Your fax is set to automatically begin fax reception if it detects a duration of silence of
6 seconds. When the person faxing presses their Start key, the line will go quiet, and
the transmitting fax machine will wait for a reception tone from your fax. Your fax will
therefore disconnect the answering machine 6 seconds after the key is pressed, and
send a reception tone to tell the other fax machine to begin transmission.
If your answering machine has a fast disconnect time and disconnects the line before
6 seconds elapses, fax reception will not be possible. In this case, you must shorten
the Quiet Detect Time setting as described on the following page. On the other hand,
if the Quiet Detect Time setting is too short, your fax may interrupt voice callers if they
pause during their message or if there is a period of silence in your outgoing message.
4-4
ANSWERING MACHINE HOOK-UP

If necessary, you can use the following settings to improve the response of the
answering machine connection to incoming calls.
This function causes the fax machine to take over the line and begin reception if a
certain duration of silence is detected after the answering machine answers.
Time selections for the period of silence are 1 to 10 seconds. Quiet Detect Time has
been set to 6 seconds at the factory. This gives the best performance with most
answering machines; however, you may need to adjust this setting depending on the
disconnect time of your answering machine.
Some answering machines may have unusually fast disconnect times (equal to or
very slightly less than 4 seconds), which means that the answering machine may
disconnect the line before fax reception can begin. In this case, try a Quiet Detect
Time setting of about 3 seconds.
If the fax machine is interrupting callers before they can leave a message, try a
longer Quiet Detect Time setting. If your outgoing message includes a period of
silence, make sure that the setting is longer than that period of silence, or re-record
your outgoing message to shorten the silence.
Note:
Quiet Detect Time can be turned of7 by entering “00” for the time. Note, however, that
the fax machine will not be able to receive faxes sent manually by Normal Dialling.
Step Press these keys:
FUNCTION
1
*/ GD
3
4
0 o
(o)@ ~
STOP
,$g
0
-1
/ Comments
0
I A.M. MODE will appear in the display.
I
~
~ QUIET DETECT TM. will appear in the display.
Set the time by entering a two-digit number
1 equal to the number of seconds (“01 ‘I to “10”
(Example) seconds), or enter “00” to turn off the function.
1 Exit.
/

OPTIONAL HOOK-UP SETTINGS
If it still doesn’t work...
With certain answering machines, it may not be possible to find a Quiet Detect Time
setting which will allow both fax reception and uninterrupted voice message recording.
In this case, callers on tone dial lines can still send faxes by pressing “5”, “Jc”, and “Jc”
on their fax. This is the code for activating fax reception which can be changed by
resetting Option Setting 8.
To use this method, turn off Quiet Detect Time by entering “00” in Step 3 of the above
procedure, and then change your outgoing message to inform callers with tone dial
telephones that they can send a fax by pressing “5”, “*“, “Jc”, and then their Start key.
The message might go as follows:
“Hello. You’ve reached the ABC company. No one is available to take your call right
now. After the beep, please leave a message, or, if you want to send a fax and are
calling on a touch-tone line, press ‘five’ once, ‘asterisk’ twice, and then your facsimile
Start key.”
When this function is turned on, your fax will answer the call after 5 rings if the
answering machine for some reason fails to answer before that time. This ensures
that you will receive fax messages even if the answering machine’s tape fills up or the
answering machine is not turned on.
+ The factory setting is “NO” (off).
Note: When this function is turned on, make sure that the answering machine is set to answer
on 4 rings or less. If if isn’t, the fax will always answer first, preventing callers from
leaving voice messages.
Step
3 I
4
~ Press these keys:
FUNCTION
1
0
STOP
or
2
0
’ Comments
I
A.M. MODE will appear in the display.
,
; SELECT AUTO RCV. will appear in the display.
: Press "1" to turn the function on, or “2” to turn it
Off.
~ Exit.
4-6
ANSWERING MACHINE HOOK-UP

Your fax has a memory which can be used to store both incoming and outgoing
documents.
+ Approximately 28 pages of average content (based on ITU-T Test Chart #l at
standard resolution) can be held in memory if they are all to be transmitted, or 32
pages if they are all received (39 received pages if Option Setting 23, Error
Correction Mode, is set to NO). Less can be held if any were scanned using fine or
halftone resolution.
+ If you need more memory, a 1 MB add-on option is available from your dealer or
retailer which will increase the capacity to 92 transmission pages or 92 received
pages (99 received pages if Error Correction Mode is set to NO).
With this function, the original document is scanned immediately, stored in memory,
and then transmitted once the connection to the receiving machine is made. This is
convenient when transmitting to places where the line is often busy, as it saves you
from waiting to collect the original document and frees the feeder for other operations.
+ Only one memory transmission can be set at a time.
+ The amount of memory currently occupied appears as a percentage in the display
while the document is being scanned.
Load the document(s).
l Set the resolution and/or contrast if
desired.
Press the MEMORY key.
Enter the number of the receiving
machine using one of the following
methods:
(Example)
^__^... _.._.___-..-
l Press a Rapid Key.
l Press the SPEED key and enter a
Speed Dial number.
l Enter a full telephone number by
pressing the number keys.

4
cl
START
1
0
h
Press the START key if you entered a
Speed Dial number or a full number.
l The document is first scanned and
stored in memory. The other machine
is then dialled (redialling will be
performed automatically if necessary).
When the connection is made,
transmission begins. Afterwards, the
document is cleared from memory and
your fax returns to standby mode.
If the memory becomes full...
If the memory becomes full while the document is being scanned, MEMORY FULL will
appear in the display.
+ Press the START key if you want to transmit the pages which have been stored up
to that point in memory. The remaining pages will be ejected from the feeder. After
transmission, the memory will be cleared and you can transmit the remaining
pages. You will also need to transmit the page which was being scanned when the
memory filled up.
+ Press the STOP key if you want to cancel the entire transmission.
This is a back-up function which is automatically activated if your fax runs out of
paper, the imaging cartridge needs replacement, or the paper jams.
When you have received a document in memory, FAX RX IN MEMORY will appear in
the display, alternating with CHECK PAPER, REPLACE TONER, or PAPER JAM.
When you add paper, replace the imaging cartridge, or clear the jam, the stored
documents will automatically be printed out.
+ If you received documents in memory because the fax ran out of paper, be sure to
add paper which is the same size as the paper previously used. If not, the
document print-out size may not match the size of the printing paper.
Caution!
When documents are stored in memory, do not turn the power off This will erase all of the
con tents.
If documents received in memory are lost due to a power failure or other interruption of the
power supply, a “CLEAR REPORT” will be printed out when the power is restored. This gives
information about the receptions lost, including the fax numbers of the transmitting machines
if they are available.
5-2
SPECIAL FUNCTIONS

When your fax is busy receiving a document or transmitting a document from memory,
you can “reserve” a transmission by loading the document and entering the fax
number. Once the current operation is completed, your fax will automatically dial the
number and transmit the document, saving you from having to wait.
Load the document(s).
l RESERVE READY will appear in the
display.
l Set the resolution and/or contrast if
desired.
Enter the number of the receiving
machine using one of the following
methods:
Press a Rapid Key.
l
Press the SPEED key and enter a
(Example)
Speed Dial number.
0
Enter a full number with the numeric
keys.
3
START
Press the START key if you entered a
Speed Dial number or a full number.
The number will be dialled once the
current operation is completed, and
transmission will begin once the
connection is made.
ffote: If the document is removed from the feeder after a transmission reservation is set, the
reservation will be cancelled.
SPECIAL FUNCTIONS
5-3

This function allows you to send the same document to as many as 50 different
locations with just one operation. You feed the document through the machine once
and it is stored in memory. After this, the numbers you have entered are automatically
dialled in succession, and the document transmitted to each location.
+ To enter the fax numbers of the receiving machines, you must use Rapid Keys,
Speed Dial numbers, or Group Keys; no full numbers can be entered.
1
2
3
BROADCAST
101 02
?I I ---
09
I .
(Example)
Load the document(s).
Press the BROADCAST key.
Dial the receiving units using one or
more of the following methods:
Press one or more Rapid Keys.
0
Enter Speed Dial numbers with the
numeric keys.
.
Press one or more Group Keys.
5-4
4
5
START
START
Press the START key.
l Set the resolution and/or contrast if
desired.
Press the START key. Transmission
will begin.
l A Transaction Report is automatically
printed out after Broadcasting is
completed. Check the “Note“ column of
the report to see if any of the locations
are marked “Busy” or have a
communication error code. If so, send
the document to those locations again.
SPECIAL FUNCTIONS

Broadcasting using a Group Key
5-5
If the fax machines to which you want to broadcast have all been programmed into
one Group Key, you can perform the broadcasting operation using the following
simplified procedure:
Load the document(s).
l Make any desired transmission
settings (resolution, contrast, etc.).
BROADCASTING
2
19/Gl
I I
Press the appropriate Group Key.
Transmission will begin.
(Example)
SPECIAL FUNCTIONS

I, ^_
^’
The Confidential function is used to send documents confidentially. When the
receiving machine receives the document, it stores it in memory instead of
immediately printing it out. Print-out will not be performed until the receiving party
enters the correct passcode.
+ Confidential transmission is only possible when the receiving machine is a Sharp
model with confidential reception capability.
+ Confidential reception is not possible with the FO-2600.
CONFIDENTIAL TRANSMISSION
Load the document(s).
l Make any desired transmission
settings (resolution, contrast, etc.).
3
5
START
(Example)
Press the FUNCTION key, “6”, and the
“START” key.
l CONF. TX MODE will appear in the
display.
If the receiving machine has multiple
mail boxes, enter the appropriate
2-digit mailbox number with the
numeric keys (if not, skip this step).
Press the START key.
Dial the receiving unit using one of
the following methods:
5-6
101
(Example)
SPECIAL FUNCTIONS
Press a Rapid Key.
Press the SPEED key and enter a
Speed Dial number. Press the START
key.
Enter a full telephone number with the
numeric keys, and press the START
key.
Transmission will take place once the
connection is made.

Polling allows you to request another fax machine to send a document to your fax
machine. In other words, the receiving fax machine, not the transmitting fax machine,
activates the transmission. You can use your fax to both poll and be polled by others.
To use the polling function, you must first set Rapid Key lG/POLL for use as a polling
key. This is done by pressing the panel keys as shown below.
+ The polling key cannot be used for both Rapid Key Dialling and Polling. If it has
already been programmed for Rapid Key Dialling, you must clear it first as
described in “Storing Numbers for Automatic Dialling” in Chapter 2.
I
Step I Press these keys:
,;w’j-,
I
5 /
STOP
Comments
ENTRY MCDE will appear in the display.
POLLING FUNCTION will appear in the display.
Press “1” to turn the polling function on, or “2” to
I turn it off.
Exit.
I
_i
1 Dial the fax machine you want to poll
using one of the following methods:
SPEED
0 I,Qga
(Example)
SPECIAL FUNCTIONS
0
Pick up the handset (or press the
SPEAKER key) and dial the full
number. Wait for the fax answerback
tone.
0
Press the SPEED key and enter a
2-digit Speed Dial number.
l
Enter the full number using the
numeric keys.
r-?

2
After polling a fax machine, you can send a document to it on the same connection.
Simply place the document to be sent in the feeder and follow the steps described
above in “Polling others”. When polling is finished, the document will be automatically
transmitted.
+ The other fax machine must also have Turnaround Polling capability.
+ Turnaround Polling cannot be performed when a timer transmission operation is set.
Press Rapid Key lG/POLL.
l If you used the handset, replace it
when POLLING appears in the display.
Reception will begin.
To let another fax machine poll your fax, simply set the Reception mode switch to
AUTO, and load the document(s) to be sent.
Transmission will take place when the other fax machine calls your fax and activates
polling. Automatic reception is possible whilst your fax is on polling standby.
Polling Security allows you to prevent unauthorized polling of your fax. When this
function is turned on, polling will only take place when the fax number of the polling
fax machine has been entered in your fax’s list of permitted fax numbers (called
“passcode numbers”). The number of the polling fax must also be correctly
programmed into itself.
Turning Polling Security on and off
Step j Press these keys:
~ Comments
I
/ ENTRY MODE will appear in the display.
5-8
2
(#,aa I
SPECIAL FUNCTIONS
i SECURITY SELECT will appear in the display.
I
I

: Press “1” to turn polling security on, or “2” to turn
/ 3 ; aora
STOP
5 I
I’$
Q
it off.
1 Exit.
Storing and clearing fax numbers for polling permission
You can store up to 10 fax numbers in your fax’s list of permitted numbers.
POLLING
Step
! Press these keys:
1 i (
2
FUNCTION
@@(Jc‘) !
3
a
3
m?II
4
(Example) go to Step 6.
q%J@@~@I@)c1s)
5
(Example) ,
(__a ;
STOP
7
Step 4 or
: Comments
ENTRY MODE will appear in the display.
I PASSCODE # MODE will appear in the display.
Press “1” to set a number, or “2” to clear a
! number.
Storing: Enter a 2-digit number (from 01 to 10).
This number identifies the fax number you will
~
enter in the next step.
! Clearing: Enter the 2-digit number which
identifies the fax number you want to clear, and
Enter the fax number (max. 20 digits).
______ _-___
~ Return to Step 4 to enter another number, or
press STOP to exit.
SPECIAL FUNCTIONS
5-9

RELAY REQUEST
), . _ . _I
Relay Request allows you to send a document to another fax machine and have that
fax broadcast the document to a number of other fax machines. This function is useful
when the relay fax machine is closer to the end fax machines than your fax, as it
reduces telephone line costs.
Important:
l Relay Request can only be used if the intermediate relay machine is a Sharp machine having
the Relay Broadcast function (note that your fax cannot act as a relay machine).
To make a relay request, you must first enter the relay group. This consists of the fax
number of the intermediate relay machine and the fax numbers of the end receiving
machines. Only one group can be entered, and this group will remain in memory until
cleared.
Only a Rapid Key number or a Speed Dial number can be entered to specify the
relay machine; a full number cannot be entered.
Fax numbers of the end receiving machines can be entered as Rapid Key numbers,
Speed Dial numbers, and/or Group Key numbers if they have been stored as such
in the reiay machine (not in your fax machine). Check with the operator of the relay
machine for these numbers.
The total number of end receiving machines which can be entered varies with the
model used as the intermediate relay machine. Check with the operator of the relay
machine to find out how many receiving machines can be entered.
A maximum of 400 spaces are available in memory for storing the numbers of end
receiving machines. The number of spaces occupied by each number depends on
what kind of number it is:
Rapid Key number:
Speed Dial number:
Group Key number:
Full number:
4 spaces
2 spaces
4 spaces (for one group)
Number of digits in number (eg. a maximum of 14 full
numbers can be entered, with a maximum of 30 digits per
number).
5-10
SPECIAL FUNCTIONS

Step i Press these keys: Comments
RELAY REQUEST
1: 0 (5)
FUNCTION
I
2;@J(-FJ
1-qY-J
3
!
'a@-J
4 /
(Example) I Dial number with the numeric keys.
START
5: (-y-J
6 ~
7
Goa
EILRI
0
(Example) don’t want to enter Rapid Key numbers.)
0
I RELAY FUNCTION will appear in the display.
SET RELAY GROUP will appear in the display.
Enter the fax number of the relay machine by
pressing a Rapid Key or entering a 2-digit Speed
Enter the relay machine’s Rapid Key numbers of
the end receiving machines by pressing numeric
keys (not Rapid Keys). (Skip this step if you
!a(iJ
8
I,
START
91 @
;rJa
10 /
I
11 I
I
/ 0
I
START
cl
;~~@~~~~BJ@
12 ~
!
I
13 i .,;@,
S,lRT
0
Enter the relay machine’s Speed Dial numbers
of the end receiving machines by pressing
numeric keys. (Skip this step if you don’t want to
(Example) enter Speed Dial numbers.)
Enter numbers of Group Keys for end machines
by pressing numeric keys. (Skip this step if you
(Exampk) don’t want to enter Group Key numbers.)
Enter a full fax number (skip this step if you don’t
want to enter full numbers). Include the area
code (e.g. “201”) if the number is outside of the
(Example)
calling area of the relay unit.
Press START and go back to Step 12 if you
want to enter another full number.

RELAY REQUEST
clear the relay group
To
/
Step
I Press these keys: ’ Comments
I
3
1,111
@
u
STOP
RELAY FUNCTION will appear in the display.
I
1 CLEAR RELAY GRP will appear in the display.
/ Exit.
Important:
l To make a relay request. your fax number must be entered into the Relay Passcode List of
the relay fax machine by the operator of that fax. (Your number must also be correct/y
entered in your fax as described in “Entering Your Name and Fax Number” in Chapter 2.)
1
Load the document.
l Set the resolution and/or contrast if
desired.
Press the FUNCTION key, the “5” key,
and the “#” key.
5-12
START
Press the START key.
SPECIAL FUNCTIONS

TIMER OPERATIONS
The timer function allows you to set a transmission or polling operation to be
performed automatically at a time you specify. Up to two transmission operations (one
from the feeder and one from memory) and one polling operation can be set at any
one time, and the times they will be performed can be specified up to a week in
advance.
You can use this function, for example, to take advantage of off-peak telephone rates
without having to be there when the operation is performed.
+ For a timer transmission, you can either scan the document into memory when you
set the transmission, or leave the document in the feeder before the transmission
time. Scanning the document into memory is convenient because you don’t have to
worry about document mix-ups or forgetting to load the document. If a transmission
from the feeder is set, a highlighted “T” will appear at the right of the display.
+ Code numbers are used to specify days of the week. Refer to the table below when
making time settings which include a specified day:
I
Day
Code
SUN
0
MON
I 1
TUE
2 3
1
WED ~ THU
-.
4 5
FRI SAT
1
6
Note:
Only regular transmissions and polling operations can be set using the procedure
described below. If you want to set a broadcast, confidential. or relay request operation
to be performed at a specified time, program the operation into a Program Key and
include a timer setting. This is described in “Entering and Using Programs” in this
chapter.
Setting a timer operation
Step 1 Press these keys: Comments
I
r)
TIMER MODE will appear in the display.
Select SET.
Press “#” to set a transmission operation (SEND
MODE), or “W to set a polling operation
(POLLING MODE).
SPECIAL FUNCTIONS
= 4n

TIMER OPERATIONS
5 ~(ii-JQ@y
(Example) 1
2
6
0
(Example)
STAR,
7 /
cl
0
0 a
8 1
(Example) I
RESOLUTION
10 /
1 o
~ Enter the time of the operation (2 digits for the
hour and 2 digits for the minute).
j Enter the code for the day of the operation (skip
/
this step if the operation will be performed within
!
the next 24 hours).
I
I
I
~ Enter the fax number of the other machine using
one of the following methods:
1 l Press a Rapid Key.
l Enter a Speed Dial number
with the numeric keys.
If this is a transmission operation, adjust the
resolution and/or contrast if desired. (Otherwise,
i skip this step.)
12 j
i Transmission operation: If you want to send
the document from memory, load it now and
press MEMORY. Otherwise, press START and
ST&R?
0
/
I
/
I
I
0
MEMORY
Or 0
load the document any time before the set
transmission time. If a non-memory timer
transmission has already been set (START:
~
END OF SET will appear), you must load the
’
document now and press START to send it from
memory.
Polling operation: Press START.
SPECIAL FUNCTIONS

TIMER OPERATIONS
To cancel an operation
If you need to cancel an operation after it has been set, follow the steps below.
If the operation is a transmission operation, you will need to know the number
assigned to it. If you don’t remember the number (it appears in the display when you
set the operation), print out the Timer List. See Chapter 6, “Printing Out Reports and
Lists”.
1 Step / Press these keys:
1
FUNCTION
STOP
5
1
0
/ Comments
TIMER MODE will appear in the display.
Select CLEAR.
Enter the 1 -digit timer number assigned to the
(Example) I operation.
STOP
I
Exit.
SPECIAL FUNCTIONS
5-15

ENTERING AND USi& PtiOGRAMS
,;
If you frequently perform the same operation involving the same party, you can
program all the steps of the operation into one Program Key. This allows you to
perform the operation by simply pressing that key.
+ Rapid Keys 17/Pl and 18/P2 can be used as Program Keys. However, a key
cannot be used if it is already being used for Rapid Key Dialling.
+ Only Rapid Keys, Speed Dial numbers, and Group Keys can be used to enter fax
numbers of receiving machines in Program Keys. Full numbers cannot be entered.
+ You can also include a timer setting in the program to have the operation performed
automatically at a selected time.
+ To clear a mistake, press the STOP key.
To program an operation, first perform the following basic procedure. After you have
completed it, refer to the procedure for the specific operation you want to program.
+ Code numbers are used to set days of the week. Refer to the table below when
making time settings which include a specified day:
/
Day
~ SUN / MON ~
I
1
TUE
WED i THU FRI I
SAT
Code i 0 j 1 2
Step ~ Press these keys:
2 ,
I
#
0
3/ CD
Comments
PROGRAM/GROUP will appear in the display.
I PROG. ENTRY MODE will appear in the display.
I
/ Select SET.
5-16
’ a&l@J . ..@J
5
Select a Program Key by pressing the
(Example) 1 appropriate Rapid Key.
1 Enter a name for the program (max. of 20
/ letters). (See “Entering Letters for Names” in
j Chapter 2.)
(Example) 1
Skip this step if you don’t want to enter a name.
SPECIAL FUNCTIONS

6
ENTERING AND USING PROGRAMS
START
I@
3
7
8
,
9 ~
10
11
I
/ 0
12
CDGO
(1)a
0
i'zp
ZI
4
START
c)
START
#
*
Enter the hour (2 digits: “00” to “23”). If you don’t
(Example)
(Example)
(Example)
i
I
want to make a timer setting, go to Step 10.
Enter the minute (2 digits - “00” to “59”).
Enter the day of the week by entenng the
appropriate code number (see previous table).
(Skip this step if the operation will be done within
24 hours of pressing the Program Key.)
Press the “#” key or “*” key until the desired
operation appears in the display.
The operations will appear in the following order:
l Transmission
0 Polling
l Confidential transmission
l Broadcasting
l Relay Request
Continue with the specific procedure for your
operation (see the following pages).
(Continued from “Initial procedure”.)
T
13
(Example) !
/
14
I-
15
L
/
RESOLUTION
(
1
SPECIAL FUNCTIONS
Enter the fax number of the other machine using
one of the following methods:
l Press a Rapid Key.
l Enter a Speed Dial number with
the numeric keys.
Adjust the resolution and contrast if desired
(otherwise skip this step).
I- 47

ENTERING AND USING PROGRAMS
STAR,
V
0
17
/ o
MEMORY
or
STOP
18 i
If you want the document to be sent from
;
1 memory, press MEMORY.
If you want the document to be sent from the
'
: feeder, press START.
~ Exit.
(Continued from “initial procedure”.)
(Example) ! mailboxes.)
14
15
/
I
/
START
(Example) 1
16 I
I
RESOLUTION
I
17 ~
()
Enter the mailbox number (2 digits). (Skip this
step if the receiving machine does not have
Enter the fax number of the other machine using
/
j one of the following methods:
l Press a Rapid Key.
;
l Enter a Speed Dial number with
i
the numeric keys.
/
I
I
I
Adjust the resolution and contrast if desired
~ (otherwise skip this step).
5-18
19
20 /
MEMORY
CL3
STOP
START
: c,;@ ’
or
0
SPECIAL FUNCT/ONS
If you want the document to be sent from
, memory, press MEMORY.
If you want the document to be sent from the
/
1 feeder, press START.
Exit.

(Continued from “Initial procedure”.)
ENTERING AND USING PROGRAMS
-** io) (2)
13 1
ST*RI
14 :
15~ 0
,6; a ig
I
10
1
RESOLUTION
STOP
(Example)
j Enter the numbers of the receiving fax machines
using one or more of the following methods:
l Press one or more Rapid Keys.
l Enter one or more Speed Dial numbers.
l Press one or more Group Keys.
Adjust the resolution and contrast if desired
(otherwise skip this step).
Exit.
(Continued from “Initial procedure”.)
I
I
I
RE(XlLUTl,,,
START
a_--.__ -. _~
~ , 3 1
14 /
’ Adjust the resolution and contrast if desired
(otherwise skip this step).
-
/ i If you want the document to be sent from
memory, press MEMORY.
j If you want the document to be sent from the
/ feeder, press START.
I
1 Exit.

ENTERING AND USING PROGRAMS
(Continued from “Initial procedure”.)
(Example)
Enter the fax number of the other machine using
one of the following methods:
1 l Press a Rapid Key.
l Enter a Speed Dial number with
the numeric keys.
To clear a Program key, follow these steps:
Step ~ Press these keys:
Comments
PROGRAM/GROUP will appear in the display.
PROG. ENTRY MODE will appear in the display.
Select CLEAR.
I
i'"'J
4 j f---j
I
(Example)
Press the Program Key you want to clear.
Exit.
5-20
SPECIAL FUNCTIONS

A programmed operation is performed as follows:
ENTERING AND USING PROGRAMS
1
2
Note:
Load the document.
Press the appropriate Program Key.
(Example)
A maximum of 3 timer operations can be set at any one time, including both timer
operations set by pressing a Program Key and operations set as described in “Timer
Operations” in this chapter.
If a Program Key has been pressed for a timer operation and you need to cancel the
operation before it is performed, follow these steps:
1
2
i’“”
(Example)
START
Press the Program Key.
Press the START key.

The Anti Junk Fax function lets you avoid wasting fax paper by preventing reception of
faxes from specified parties.
To use this function, first turn it on as shown below, and then enter the fax numbers
from which you do not want to receive faxes as shown on the following page.
Turning Anti Junk Fax on and off
Step Press these keys:
I !
FUNCTION
1
(1) or (2)
STOP
Comments
(a>
ANTI JUNK FAX will appear in the display.
I
/ ANTI JUNK SELECT will appear in the display.
Press “1” to turn Anti Junk Fax on, or “2” to turn
~ it off.
Exit.
SPECIAL FUNCTIONS

Storing and clearing junk numbers
Comments:
0
Up to 10 numbers can be entered in the Anti Junk Number List.
0
To c/ear a number from the Anti Junk Number List, you need to know the Z-digit number
which identifies it. If you have forgotten this number, print out the Anti Junk Number List as
described in Chapter 7.
ANTI JUNK FAX
) Step /
Press these keys:
FUNCTION
11 0 0
0
3 1
,
&@a
/B@QQBO@
5 1
Step 4 or
(1) or 0
Comments
ANTI JUNK FAX will appear in the display.
JUNK FAX # MODE will appear in the display.
Press “1” to store a fax number in the Anti Junk
Fax List, or “2” to clear a fax number from the list.
Storing: Enter a number from “01” to “10”. This
number identifies the fax number you will store
in the next step.
Clearing: Enter the number which identifies the
FxampW fax number you want to clear, and go to Step 6.
(Example)
STOP
Enter the fax number (max. of 20 digits).
Return to Step 4 to enter (or clear) another
number, or press STOP to exit.
SPECIAL FUNCTIONS
5-23

ANTI JUNK FAX
Notes
SPECIAL FUNCTIONS

A variety of optional settings are available which you can use to fine-tune your fax to
better suit your needs. The settings are made by pressing the panel keys, and each
setting is described in the list below.
Step , Press these keys:
Comments
1 OPTION SETTING will appear in the display.
! Move through the list of settings by pressing “#”
to move forward, or “*‘” to move backward. The
settings will appear in the order listed below.
I
4 1
2
0
(Example) change it appropriately as described below.
STOP
When the desired setting appears in the display,
I Exit.
I
Setting 1: FINE RESOLUTION PRIORITY
This sets the default resolution (the resolution used if a setting is not made with the
RESOLUTION key) for transmitting documents. Press “1” (YES) to set it to FINE, or “2” (NO) to
set it to STANDARD.
_
l Factory setting: “2”
Setting 2: NUMBER OF RINGS AUTO RECEPTION
This sets the number of rings your fax allows before answering an incoming call in AUTO
receive mode. Enter a number from “0” to “4” (if “0” is entered your fax will answer without
ringing).
l Factory setting: “1”
Setting 3: NUMBER OF RINGS MANUAL RECEPTION
This sets your fax to automatically answer a call after a certain number of rings when it is in
manual reception mode. Any number from “0” to “4” can be entered (enter “0” if you don’t want
your fax to answer automatically).
l Factory setting: “0”

OPTIONAL SETTINGS
Setting 4: ACTIVITY REPORT AUTO LISTING
Press “1” (YES) to have your fax automatically print out Send/Receive Activity Reports every
30 operations. (The list can still be printed out manually when desired.) Press “2” (NO) to turn
the function off.
l Factory setting: “2”
Setting 5: TRANSACTION REPORT PRINT SELECT
This sets the condition for printing out Transaction Reports. Enter a number from “1” to “5” as
follows:
“1” (ALWAYS PRINTS):
“2” (ERR/TIMER/MEM.):
Print out after each transmission, reception, or error.
Print out only after an error, a timer operation, or a memory
operation.
“3” (SEND ONLY):
“4” (NEVER PRINT):
“5” (ERROR ONLY):
l Factory setting: “5”
Print out only after a transmission.
Never print out.
Print out only after an error occurs.
Setting 6: AUTO FAX/PHONE CHANGEOVER
Press “1” (YES) to have your fax detect whether incoming calls are voice calls or fax
transmissions in automatic reception mode. Press “2” (NO) to turn the function off.
l Factory setting: “2”
Setting 7: PSEUDO RINGING DURATION
This sets the duration of pseudo ringing when Automatic Fax/Phone Changeover is turned on.
Enter a number from “1” to “2” as follows:
“1” (15 SEC.): 15 seconds
“2” (30 SEC.):
l Factory setting: “1”
30 seconds
Setting 8: TEL/FAX REMOTE NUMBER (TRANSFER CODE)
This sets the 1 -digit number for activating fax reception from an extension telephone. Enter any
number from “0” to “9”.
l Factory setting: “5”
Setting 9: REMOTE RECEPTION SELECT
This turns detection of the code for activating fax reception from an extension phone on or off.
Press “1” to turn detection on, or “2” to turn detection off.
l Factory setting: “1”
Setting 10: FAX SIGNAL RECEIVE
Your fax is set to automatically begin reception if you hear a high-pitched fax tone after
answering a call. If you use a computer fax modem on the same line, you must turn this setting
off in order to prevent your fax from mistakenly attempting to receive documents sent from the
computer fax modem. Press “2” to turn the setting off. or “1” to turn it on.
l Factory setting: “1”
6-2
OPTIONAL SE777NGS

OPTIONAL SETTINGS
Setting 11: AUTO COVER SHEET
Press “1” (YES) to have the fax automatically generate a cover sheet and send it as the last
page of each transmission. Press “2” (NO) to turn the function off.
l Factory setting: “2”
Setting 12: COPY REDUCE
This sets the amount by which copies are reduced before printing to ensure that data on the
edges is not cut off. Enter a number from “1” to “3” as follows:
“1 (REDUCE AUTO)“:
Automatic reduction depending on the size of the original
and the printing paper.
“2 (REDUCE 100 %)‘I:
“3 (REDUCE 95 %))“:
l Factory setting: “2”
No reduction.
Reduction of A4 size originals to the printing paper size.
Setting 13: RECEIVE REDUCE
This sets the amount by which received documents are reduced before printing to ensure that
data on the edges is not cut off. Enter a number from “1” to “3” as follows:
“1 (REDUCE AUTO)“:
Automatic reduction depending on the size of the original
and the printing paper.
“2 (REDUCE 100 %)‘I:
“3 (REDUCE 94 %)‘I:
l Factory setting: “1”
No reduction.
Reduction of A4 size originals to the printing paper size.
Setting 14: COPY CUT-OFF
Press “1” (CONTINUE) to have documents longer than the printing paper be continued on a
second page when copied. Press “2” (CUT-OFF) to have the part outside that length not printed.
l Factory setting: “2”
Setting 15: FOOTER PRINT
Press “1” (YES) to have the transmitting machine’s fax number (if provided) together with the
date and time of reception printed at the bottom of each page you receive (this is in addition to
similar information printed at the top of each page). Press “2” (NO) for no footer printing.
l Factory setting: “2”
Setting 16: DIAL MODE
This sets the mode of dialling. Press “1” if you are on a tone dial line, or “2” if you are on a pulse
dial line.
l Factory setting: “1”
Setting 17: DISTINCTIVE RINGING
If you subscribe to a distinctive ringing service from your telephone company, press “1” (ON) to
have your fax signal voice calls and fax transmissions by different ringing patterns. Press “2” to
turn the function off.
l Factory setting: “2”
OPTIONAL SETTINGS
6-3

OPTIONAL SETTINGS
Setting 18: ERROR CORRECTION MODE (ECM)
Press ‘;I” (YES) to have any distortions in a transmission due to noise on the telephone line be
corrected before print-out at the receiving end. This is only effective when the other machine
has ECM as well. Press “2” (NO) to turn the function off.
l Factory setting: “1”
Setting 19: RINGING VOLUME
This sets the volume of the ringer. Press “1” for low, “2” for middle, or “3” for high.
l Factory setting: “2”
6-4
OPTIONAL SElTINGS

You can print out a variety of lists showing settings and information entered in the fax.
You can also have the fax automatically print out a report on transactions after they
are made. Each list and the report is described below.
Step 1 Press these keys:
Go
Comments
LISTING MODE will appear in the display.
Move through the lists by pressing “#” or “W.
Stop when the desired list appears in the display
Print out the list.
This report shows details on up to 30 of the operations most recently performed. The
report is divided into two parts: the TRANSMISSIONS ACTIVITY REPORT, which
shows details on transmissions, and the RECEPTIONS ACTIVITY REPORT, which
shows details on receptions.
+ If Option Setting 4 is set to “1 ‘I, a report will be automatically printed out whenever
data on 30 operations has accumulated. (A report can still be printed out manually
at any time.)
+ All data is erased after a report is printed out. If automatic print-out is disabled and
print-out has not been performed manually for more than 30 operations, the oldest
data is successively overwritten each time an operation is performed .
Explanation of headings
SENDER/
RECEIVER
START
TXIRX TIME
PAGES
TYPE
The name or fax number of the other machine involved in the transaction. If that machine
does not have an ID function, the communication mode will appear (for example, “G3”).
The time at which transmission/reception started.
Total time taken for transmission/reception.
Number of pages transmitted/received.
CONF. TX - A confidential operation was performed.
RELAY TX - A relay operation was performed.
(T) - A timer operation was performed.
(M) - The memory was used.
PRINTING OUT REPORTS AND LISTS
7-1

PRINTING OUT REPORTS AND LISTS
NOTE
OK - Transmission/reception was normal.
P.FAIL - A power failure occurred.
JAM - A problem with the printing paper or document occurred.
BUSY - The line was busy.
COM.E-0 to COM.E-7 - A telephone line error prevented the transaction. See the
appropriate list below based on whether you were transmitting or receiving.
CANCEL - Transmission was cancelled because the STOP key was pressed, no
document was in the feeder, or the other machine requested transmission using a
function which your fax does not have.
CANCEL 3 - Confidential transmission was cancelled because the receiving machine
does not have a confidential function, a confidential passcode is not programmed in it,
its memory is full, or it is not a Sharp model.
CANCEL 4 - Confidential transmission was cancelled because an incorrect mailbox
number was entered for a fax machine with confidential mailboxes.
CANCEL 5 - A relay request was not successful because the machine to which the
request was made has no relay function, it is not a Sharp model, or its memory was full.
CANCEL 6 - A relay request was not successful because your machine’s fax number
has not been entered into the relay machine’s list of permitted numbers, an automatic
dialling number not stored in the relay machine was specified, or your fax number has
not been entered in your machine as described in Chapter 2.
Transmission errors Reception errors
E-O
E-l
E-2 1 Line disconnected during transmission.
E-3
E-4
E-6 I Cannot recognize the handshake signal for
E-7 ; No response from receiver side or “disconnect
E-8 1 predetermined number of retries because of
E-l 1
E-12 /
E-13
Able to recognize handshake signal, but it has
errors.
Cannot recognize the handshake signal from
the receiver side.
Line disconnected after modem speed fall-
I back.
/
Line disconnected during multi-page
transmission.
1 next page at receiver side.
I
I signal” is received at transmitter side.
! Error was not corrected after the
/ an error in a part of a page.
Error occurred after or whilst reception by the
remote (receiving) machine was revealed to be
impossible.
Error occurred just after fall-back.
Error occurred after a response to a
retransmission end command was received.
I I
’ Able to recognize handshake signal, but it has
errors.
Line disconnected during reception.
/ Cannot recognize the handshake signal from
the transmitter side.
/ Cannot recognize the last handshake signal
j from the transmitter side.
1 Cannot recognize the handshake signal for
1 next page from the transmitter side in the
/ case of mode change.
anno recognize the handshake signal for
1C t
/ next page from transmitter side.
1 N
o response from transmitter or “disconnect
j signal” is received at receiver side.
~ Error occurred upon completion of reception
1 of all pages.
i
i Error occurred when mode was changed or
/ transmission/reception switching was
i performed.
i
E-l 0
Error occurred during partial page or physical
1
page reception.
Error occurred after or during inquiry from the
/
remote (transmitting) machine as to whether
reception was possible or not.
1
Error occurred during or just after fallback.
1 Error occurred after retransmission end
E-l 3
E-14
!
command was received.
1 Error occurred after voice communication
I command was received.
PRINTING OUT REPORTS AND LISTS

This list shows the timer operations
which are currently set.
This list shows the fax and voice
numbers which have been stored
for automatic dialling, the numbers
in the relay group, your name and
fax number as entered in your fax,
and a sample of the header printed
at the top of every page you
transmit.
PRINTING OUT REPORTS AND LISTS
This list shows the fax numbers
which have permission to poll you.
This list shows the current status of
the optional settings.
FINE PKlORllY
NUYBER 1%: RlYG3
NUYBR (ii MAk INS
AUT3 LISTINI:
TRANSACT'ON PRIN: Sitit"
iUT0 CiiGEOVER '
PSEUDO R!NG DliR
TEL/FAX REMOTE i
REMOTE KCiPTlON 3i!EIT
NC
iPINt
NO
I
t
FOOiER PRINT
31111 YOCi
IISTINCTIYE lllli
ECU YODE
KINGEN YOt3E
PRINTING OUT REPORTS AND LISTS

PRINTING OUT REPORTS AND LISTS
The top part of this list shows the
programs which have been
entered. The bottom part shows the
fax numbers which have been
stored in each Group Key.
?KiPku L GPOUF LlSi
.-
FOP lakn Dar Co!i. 20; 5% 1234
I!-NO';-95 Tt’l lB’3P :
.,
t
t
This list shows the fax numbers
from which reception is not allowed.
:I
:;
;:
::
:
This report is printed out automatically after an operation is completed to allow you to
check the result. Your fax is set at the factory to print out the report only when an error
occurs, but you can change the setting to have it printed out after every operation,
only after certain types of operations, or not at all. This is done by changing Option
Setting 5 as described in Chapter 6.
+ The Transaction Report shows the same information as the Activity Report. See
“Activity Report” in this chapter for an explanation of the headings.
+ The report cannot be printed out manually.
7-4
PRINTING OUT REPORTS AND LISTS

Clean the reading glass and rollers frequently to ensure the quality of transmitted
images and copies. Open the operation panel (pull the panel release on the right side
of the fax forward), and clean the parts as shown below.
Documen
rollers
White backplate
Wipe the reading glass, white
backplate, and rollers with a soft cloth.
l Make sure that all dirt and stains (such
as those of correcting fluid) are
removed, as these will cause vertical
lines on transmitted images and copies.
Reading glass
Wipe the external parts and surface of the machine with a dry cloth.
Caution!
l Do not use benzene or thinner. These solvents may damage or discolour the machine.
MAINTENANCE
8-l

MAINTENANCE
If some of the characters are missing from the printed page, the surface of the drum in
the drum cartridge may need cleaning. Follow the steps below to clean the drum.
Remove any documents from the
received document outlet. Open the
operation panel, and remove the
received document guide, the imaging
cartridge, and the drum cartridge. (For
detailed instructions, see Steps 1 to 4
in “Installing the Printer Cartridges” in
Chapter 1.)
l Caution! The fusing unit (the black unit
with ribs extending across the bottom
of the compartment) becomes very hot
during printing. Be careful not to touch
it.
2
Place the drum gently on a clean,
uncluttered, and level surface.
l Do not touch the green drum in the
drum cartridge, and do not expose the
drum to direct light. Doing so will
damage the surface of the drum.
Take a sheet of clean paper and roll it
tightly into a tube. Gently tap the
surface of the drum with the tube to
pick up any particles of toner which
may be sticking to the drum.
l Caution! Do not touch the drum
surface with the edges of the rolled up
paper or wipe the drum with the paper.
This will damage the drum.
Replace the drum cartridge, imaging
cartridge, and received document
guide. Close the operation panel. (For
detailed instructions, see Step 6 and
Steps 10 to 14 in “Installing the
Printer Cartridges” in Chapter 1.)
8-2
MAINTENANCE

Problem
Check and remedy
Nothing appears in the display.
i l Make sure the power cord is properly plugged into a power
!
outlet.
; l Make sure the power switch has been switched to the
correct position.
I
I l Connect another electrical appliance to the outlet to confirm
that it is live.
The fax does not respond when you l If a beep sound is not made when you press the keys, turn
press any of its keys.
Automatic document feeding does
not work for transmission or copying.
off the power and then turn it back on several seconds later.
~ l Check the size and weight of the document (see
~ “Transmittable documents” in Chapter 3).
Dialling cannot be performed. 1 l Make sure the power is on.
I
1 l Make sure that the telephone line is properly connected to
both the TEL. LINE socket and the wall socket.
l Make sure that the fax is set to the correct dialling mode for
your telephone line. See Option Setting 16 in Chapter 6.
Nothing is printed at the receiving
end.
l Make sure that the document for transmission is placed face
down in the feeder.
The power is on, but no
transmission takes place.
A distorted image is received at the
other end.
l Make sure that the printing paper is properly loaded in the
receiving machine.
l Make sure that the receiving machine has printing paper.
l If the receiving machine is in manual mode with no
attendant, reception will not be possible.
If the receiving machine is not a Sharp model, make sure it is
1 l
G3 compatible.
/
I l Check the display for error messages.
/
l Pick up the handset and check for a dial tone. Call the
receiving machine by nomal (manual) dialling, and confirm
its response.
i l Noise on the telephone line may cause distortion. Try
I
sending the document again.
i 0
Make a copy of the document on your fax. If the copy is also
distorted, your fax may have a problem. If the problem
persists, call for service.
TROUBLESHOOTING
9-1

PROBLEMS AND SOLUTIONS
The printing paper does not come
out.
The printing paper comes out blank ~
when you try to receive a document. j
The received document is faint.
Received images are distorted.
l The printing paper may be jammed. See “Clearing Jammed
Printing Paper” in this chapter.
l Make sure that the printing paper is properly loaded in your
machine.
/ l Make sure the power is on.
l Make sure that the document is loaded properly in the feeder
of the transmitting machine. Make a copy to confirm the
printing ability of your machine.
,
l Ask the other party to send higher contrast documents. If the
i
contrast is still too low, your fax may have a problem. Make a
copy to check it.
j l The imaging cartridge may need replacement.
l Noise on the telephone line may cause distortion. Have the
other party try sending the document again.
l Make a copy of another document on your fax. If the copy is
also distorted, your fax may have a problem. If the problem
persists, call for service.
l The photoconductor drum may be damaged. Try a new drum
cartridge.
No confidential transmission or
relay broadcast occurs.
Bell Tinkle
(New Zealand)
l Check the message in the display. See the next section,
“Display Messages”.
l The operation of this equipment on the same line as the
telephone or other equipment with audible warning devices
or automatic ring detectors will give rise to bell tinkle or noise
and may cause problem occur, contact your Sharp
authorised Service Centre for information.
9-2
TROUBLESHOOTING

.
CHECK PAPER
CONF REFUSED
COVER OPEN
DOCUMENT JAM
FAX RX IN MEMORY
FUNCTION MODE
LINE ERROR
You are out of printing paper.
A confidential transmission has been denied because you
entered an incorrect mailbox number for a machine with
i mailboxes.
/
/ The printer cover (or received document guide) has been
1 removed or is open. Replace or close it.
/
1 The original document is jammed. See the following section,
! “Clearing Paper Jams”.
A fax has been received in memory because the imaging
cartridge needs replacement, the fax machine has run out of
printing paper, or the paper is jammed. The fax will be printed
out automatically once the problem is fixed.
~ The FUNCTION key has been pressed.
I
I Transmission or reception was not successful. Press STOP to
clear the message, and then try again.
MEMORY FULL
MEMORY PRINTING
NO CONF. FUNC
NO RELAY FUNC
PANEL OPEN
PAPER JAM
/ The memory,is full. See “Memory” in Chapter 5.
The fax is preparing or printing out a document from memory.
1 Confidential transmission was cancelled because the receiving
I machine does not have a confidential function, a confidential
passcode is not programmed in it, its memory is full, or it is not
a Sharp model.
A relay request has been denied because the other machine
does not have a relay broadcast function, its memory is full, or
it is not a Sharp machine.
The operation panel is open. Close it.
The printing paper is jammed. See the following section,
“Clearing Paper Jams”.
TROUBLESHOOTING
0-Q

DISPLAY MESSAGES
ONHOOK DIAL MODE
RELAY REFUSED
RESERVE READY
REPLACE TONER
RECALL MODE
The SPEAKER key has been pressed and the fax is waiting
/
; for you to dial.
A relay request has been denied because your fax number
has not been entered in the relay machine’s list of permitted
numbers, an automatic dialling number not stored in the rela)
machine was specified, or your fax number has not been
I entered in your machine.
I
The machine is ready to reserve a transmission (see
I
“Transmission reservation” in Chapter 5).
1
The imaging cartridge needs replacement, or has not been
/
I installed.
The connection was not made when automatic dialling was
attempted. The fax will make up to 2 redialling attempts at
intervals of 5 minutes.
Continuous tone
Intermittent tone
(3 bleeps)
Rapid intermittent tone
j 3 seconds
5 seconds
(1 second on,
I
j 1 second off)
0.5 seconds on,
/
, 0.5 seconds off
I
35 seconds
Rapid intermittent tone / (0.7 seconds on,
1 0.3 seconds off)
Indicates the end of transmission, reception, or
j
i copying.
I
Indicates incomplete transmission, reception, or
/
/ copying.
/
Indicates that the printer cover is open.
i
I
I
Indicates that the handset is off hook.
1
I
/
9-4
TROUBLESHOOTING

If a document doesn’t feed properly during transmission or copying, or DOCUMENT
JAM appears in the display, first try pressing the START key. If the document doesn’t
feed out, open the operation panel (pull the release on the right side of the fax
forward) and pull it out gently.
If most of the jammed page is
protruding from the back of the fax,
try pulling it out.
l If the jammed page comes out, clear
the “PAPER JAM” message in the
display by resetting the stack of
printing paper (pull the lever marked
“PULL” on the paper tray toward you,
take out the stack of paper, put it back
in, and push the lever back down).
l If you are unable to clear the paper jam
in this way, continue with the following
steps.
Remove any documents from the
received document outlet. Open the
operation panel, and remove the
received document guide, the imaging
cartridge, and the drum cartridge. (For
detailed instructions, see Steps 1 to 4
in “Installing the Printer Cartridges” in
Chapter 1.)
l Caution! The fusing unit (the black unit
with ribs extending across the bottom
of the compartment) becomes very hot
during printing. Be careful not to touch
it.
TROUBLESHOOTING
9-5

CLEARING PAPER JAMS
Wrap the drum cartridge in a large
sheet of paper as shown at left so that
the green drum section is shielded
from light, and place it gently on a
level surface.
l Do not touch the green drum in the
drum cartridge. This will damage the
surface of the drum.
l Do not expose the drum to direct light.
This will damage the drum.
I
Wheel
Fusing unit
If the leading edge of the paper has
entered the fusing unit, turn the wheel
on the top, right side of the fusing unit
in the direction of the arrow until the
leading edge of the paper is released
from the unit.
Caution! Do not pull the paper out of
the fusing unit with your hands. This
may cause toner smudges on
succeeding pages.
Important: Do not turn the wheel in
the direction opposite that of the arrow.
Also, note that the wheel will not turn if
the drum cartridge has not been
removed.
Grasp the leading edge of the paper,
and pull it gently out of the
compartment.
9-6
TROUBLESHOOTING

.
CLEARING PAPER JAMS
6
Replace the drum cartridge, imaging
cartridge, and received document
guide. Close the operation panel. (For
detailed instructions, sea Step 6 and
Steps 10 to 14 in “Installing the
Printer Cartridges” in Chapter 1.)
TROUBLESHOOTING
9-7

CLEARING PAPER JAMS
Notes
9-8
TROUBLESHOOTlNG

Note: Steps which are optional are enclosed in a dotted frame:
Transmitting documents
r---------7
;
L_________d
Normal Dialling
Direct Keypad
Dialling
Load
document
1 Load
document
I
Rapid Key Dialling ( i;;trnent
Speed Dialling
! Load + :
/ document
1
,
Redialling
I
r____-__-_~
-4
+ Wait for
m:
:___G!__J
reception tone
+ j
L___‘__!
r---------7
RESOLUTION
: a :
L_________L
v---------7
L_________J
Lift handset
ITIlT
+
RESOL”TlON : Press Rapid
--) Key
Enter Speed Dial
j -+ SPEED
j number (press 2
0
+, Wait for
numeric keys)
reception tone
+ Dial (press
numeric keys)
+ Hangup
ST&l,
--)
ST.87
*
Making voice calls
Normal Dialling ;
I
Rapid Key Dialling 1
I
/
Speed Dialling j
Redialling
I
I
I Loft handset
Function Guidance List
Lift handset
press &MER
Press SPEAKER
Lift handset
press &AKER
Enter Speed Dial number
(press 2 numeric keys)
+
+ Key
+
+
Dial (press
numeric keys)
Press Rapid
SPEED
0
+
REDIAL
0
+
+ pressed SPEAKER
+
Loft handset if you
pressed SPEAKER
Lift handset if you
pressed SPEAKER
Lift handset if you
To print out a guide to ail of the functions which are accessed by ptX?SShJ the
FUNCTlON key, press the FUNCTION key and then the START key.
Quick-i
QUICK REFERENCE GUIDE

Applicable telephone line:
Compatibility:
Configuration:
Memory size*:
Compression scheme:
Scanning method:
Resolution:
Display:
Reception modes:
Modem speed:
Transmission time*:
Effective recording width:
Paper capacity:
Input document size:
Effective scanning width:
Automatic document feeder:
Halftone (grey scale):
Contrast control:
Copy function:
Timer communication:
Power requirements:
Operating temperature:
Power consumption:
Dimensions:
Weight:
Public switched telephone network
ITU-T (CCITT) G3 mode
Half-duplex, desktop transceiver
512 KB (approx. 39 average pages with ECM function off)
1 MB add-on available as option
Modified Huffman and Sharp special mode
Flat-bed, solid-state CCD
Horizontal:
8 lines/mm
Vertical:
Standard - 3.85 lines/mm
Fine /Halftone- 7.7 lines/mm
Super fine - 15.4 lines/mm
7 x 5 dots, 1 line by l&digit display
Auto/Manual/Answering machine
9600 bps with automatic fallback to 7200, 4800, or 2400 bps
Approx. 13 seconds (Sharp special mode)
202 mm (average)
100 sheets
Automatic feeding:
Width - 148 to 216 mm
Length - 128 to 356 mm
Manual feeding:
Width - 148 to 216 mm
Length - 128 to 1000 mm
210 mm max.
20 sheets max.
32 levels
Automatic/Dark selectable
Single/Multi-copy/Sort-copy (99 copies/page)
Max. 3 communications
230 - 240 V AC, 50 Hz
lo-30°C
Stand-by: 7 W
Transmission: 25 W
Reception: 640 W
copy: 680 w
Maximum: 680 W
Width: 360 mm
Depth: 412 mm
Height: 169 mm
(Without attachments)
Approx. 7.2 kg
* Based on ITU-TTest Chart #l at standard resolution in Sharp special mode, excluding time for protocol
signals (i.e., ITU-T phase C time only).
As a part of our policy of continuous improvement, SHARP reserves the right to make design and
specification changes for product improvement without prior notice. The performance specification
figures indicated are nominal values of production units. There may be some deviations from these
values in individual units.
SPECIFICATIONS
SPEC.-1

A
Activity Report Auto Listing mode ......
Activity Report .............
Answering machine hook-up
Fax Reception When A.M. Fails
Connecting ...............
Problems ................
Quiet Detect Time ...........
Touch-tone fax activation .......
Anti Junk Fax ............. 5-22 - 5-23
Audible signals ................
AUTO reception mode .........
Automatic dialling, storing numbers .....
Automatic Fax/Phone Changeover ...
.... 4-6
6-1
7-l - 7-2
l-9
4-3
4-5
4-6
9-4
2-6, 3-l 1
2-8
3-13, 6-2
B
Batch page numbering ............
Broadcasting ..............
Broadcast Key .............
3-5
5-4 - 5-5
2-1,5-4
C
Chain Dialling ..............
Cleaning ...................
Confidential transmission ...........
Connections ..............
Contrast. ...................
Copies ................ 3-14 - 3-15
Copy key ................
Copy Reduce .................
Copy Cut-off .................
Cover sheet ..................
2-8, 3-8
8-l
5-6
l-6 - l-7
3-3
2-7,3-14
6-3
6-3
3-4
D
Date, setting .................
Dialling
Chain
Direct Keypad’ : : : : : : : : : :
Normal .................
Rapid Key ...............
Search .................
Speed .................
Dialling mode .................
Direct Keypad Dialling ............
Display messages ...........
Distinctive ringing ...............
Document feeder ...............
Document guides ...............
Document restrictions ............
Document rollers ...............
Document sizes ...............
Document, readable length and width ....
Drum Cartridge ................
2-5
2-8, 3-8
. .. 3-7
3-6
3-7
3-9
3-8
6-3
3-7
9-3 - 9-4
2-7
3-2
3-2
3-t
8-l
3-l
3-l
l-5
E
Electrical outlet ................
Error Correction Mode ............
Extension telephone, connecting .......
Extension telephone, using
F
Fine Resolution Priority . .
Function Guidance List .
Function key . . .
Footer Print . . . . .
. . . .
. . . . . -
. . Quiik!i
. . . . 2-l
. . .
l-6
6-4
l-9
3-12
6-3
G
Group Keys . . .
H
Halftone . . . . .
Handset . . .
Hold . . . .
Hold key . . . . . . . 2-1, 3-17
Housing, cleaning . . . . . . . 8-l
I
Imaging Cartridge . .
J
Jams, clearing . .
L
Letters, entering . . . . 2-3 - 2-4
Liquid crystal display . .
Loading the document . . . . . . 3-2
Lower case (shift key) . . . . . . . . . . . 2-3
M
MANUAL reception mode . . 2-6, 3-l 1
Memory
Transmission . . . . . . . . . 5-t - 5-2
Reception . . . . . . . . . . . . 5-2
Memory Key . . . . . . . . . . . 2-1,5-l
N
Normal Dialling . . . . . . . . 3-6
Number of Rings in Auto Answer Mode . 6-l
Numeric keys . . . . . . . . . . . . . . 2-l
0
Optional Setting List . . . . . . . . . . . . 7-3
2-l 1, 5-5
3-3
. . l-6
3-l 7
. .
. . . l-5
. . . .
. . .
9-5
2-1
Index-i

P
Paper, loading
PAPER CHECK light
Paper jams, clearing
Papertray ...........
Passcode List
Pauses in automatic dialling numbers
Polling .................
Polling key, setting
Power cord ..................
Program and Group List
Programs ...............
............ l-10 - 1-11
.............
.............
1-8, l-lo- l-11
................
.............
...........
R
Rapid Key Dialling .
Rapid Keys . . . . . . .
Reading glass, cleaning .
Recall mode . . . . . .
Receiver volume . . .
Reception mode . . . . .
Setting . . . . . . .
AUTO mode . .
MANUALmode .
Reception mode key . . .
Redial key . . . . . . .
Redialling . . . . . . .
Relay Request . . . . . .
Remote Reception Number
Resolution . . . . . .
Resolution key . . . . . .
Ringing volume . . . .
Rollers, cleaning . . . . .
. . . . .
. .
. . . .
.
. . . . . .
.
. . . .
. . 2-6, 3-l 1
. .
.
2-;;3:10,3-17
. .
. . 5-10 - 5-12
. .
. .
.
. . . . .
. . . . . . l-7
.
2-l
9-5
7-3
....
2-9
5-7 - 5-9
5-7
l-6
7-4
5-l 6 - 5-21
.
3-7
2-l
. .
. .
8-l
3-10
l-7
2-6
2-6
. . 2-6, 3-l 1
2-1,2-6
.
3-10,3-17
3-12, 6-2
3-3
.
2-1, 3-3
. . . .
8-l
Timer operations . . . . . . .
Timer List . . . . . . . . . . . .
Toner empty indicator . . . .
Transaction Report . . . . . . . .
Transaction Report Print Select .
Transmission reservation. . . . .
. 5-13 - 5-15
. . . . .
. . . . . 2-l
. . . . . 7-4
. . . . .
. . . . .
7-3
6-2
5-3
U
Upper case (shift key) . . . . . . . . . . . . 2-3
S
Search Dial key
Search Dialling
Sender’s name and number, entering
Service indicator
Speaker key ...........
Speaker volume
Speed Dial key
Speed Dialling
Start key ...................
Stop key ...................
Storing numbers for automatic dialling
T
Telephone, using as
Telephone line cord
TEL. LINE jack
TEL. SET jack
Telephone and Relay Group List
Time, setting
Index-ii
.......... 2-1, 3-9, 3-17
................
...............
...............
.......... .2-l, 3-8,3-16
................
.......
.......
.......... .
..........
...........
3-9
....
2-2
2-l
.2-l, 3-6,3-16
l-7
3-8
2-l
2-l
....
.
. .
. .
. .
. .
2-8
3-16
. l-6
. l-6
. l-6
. 7-3
. 2-5

\
“I
SHARR
SHARP CORPORATION OF AUSTRALIA PTY.LTD.
A.C.N. 003 039 405
1 Huntingwood Drive, Huntingwood, Blacktown, N.S.W., 2148
SHARP CORPORATION OF NEW ZEALAND LIMITED.
Cnr Mahunga Drive & Hastie Ave. Mangere Bridge, Auckland
New Zealand
“SHARP CORPORATION
PRINTED IN THAILAND
(TINSE3670XHZZ)
 Loading...