

Page 1
CD-BA160H/1700H
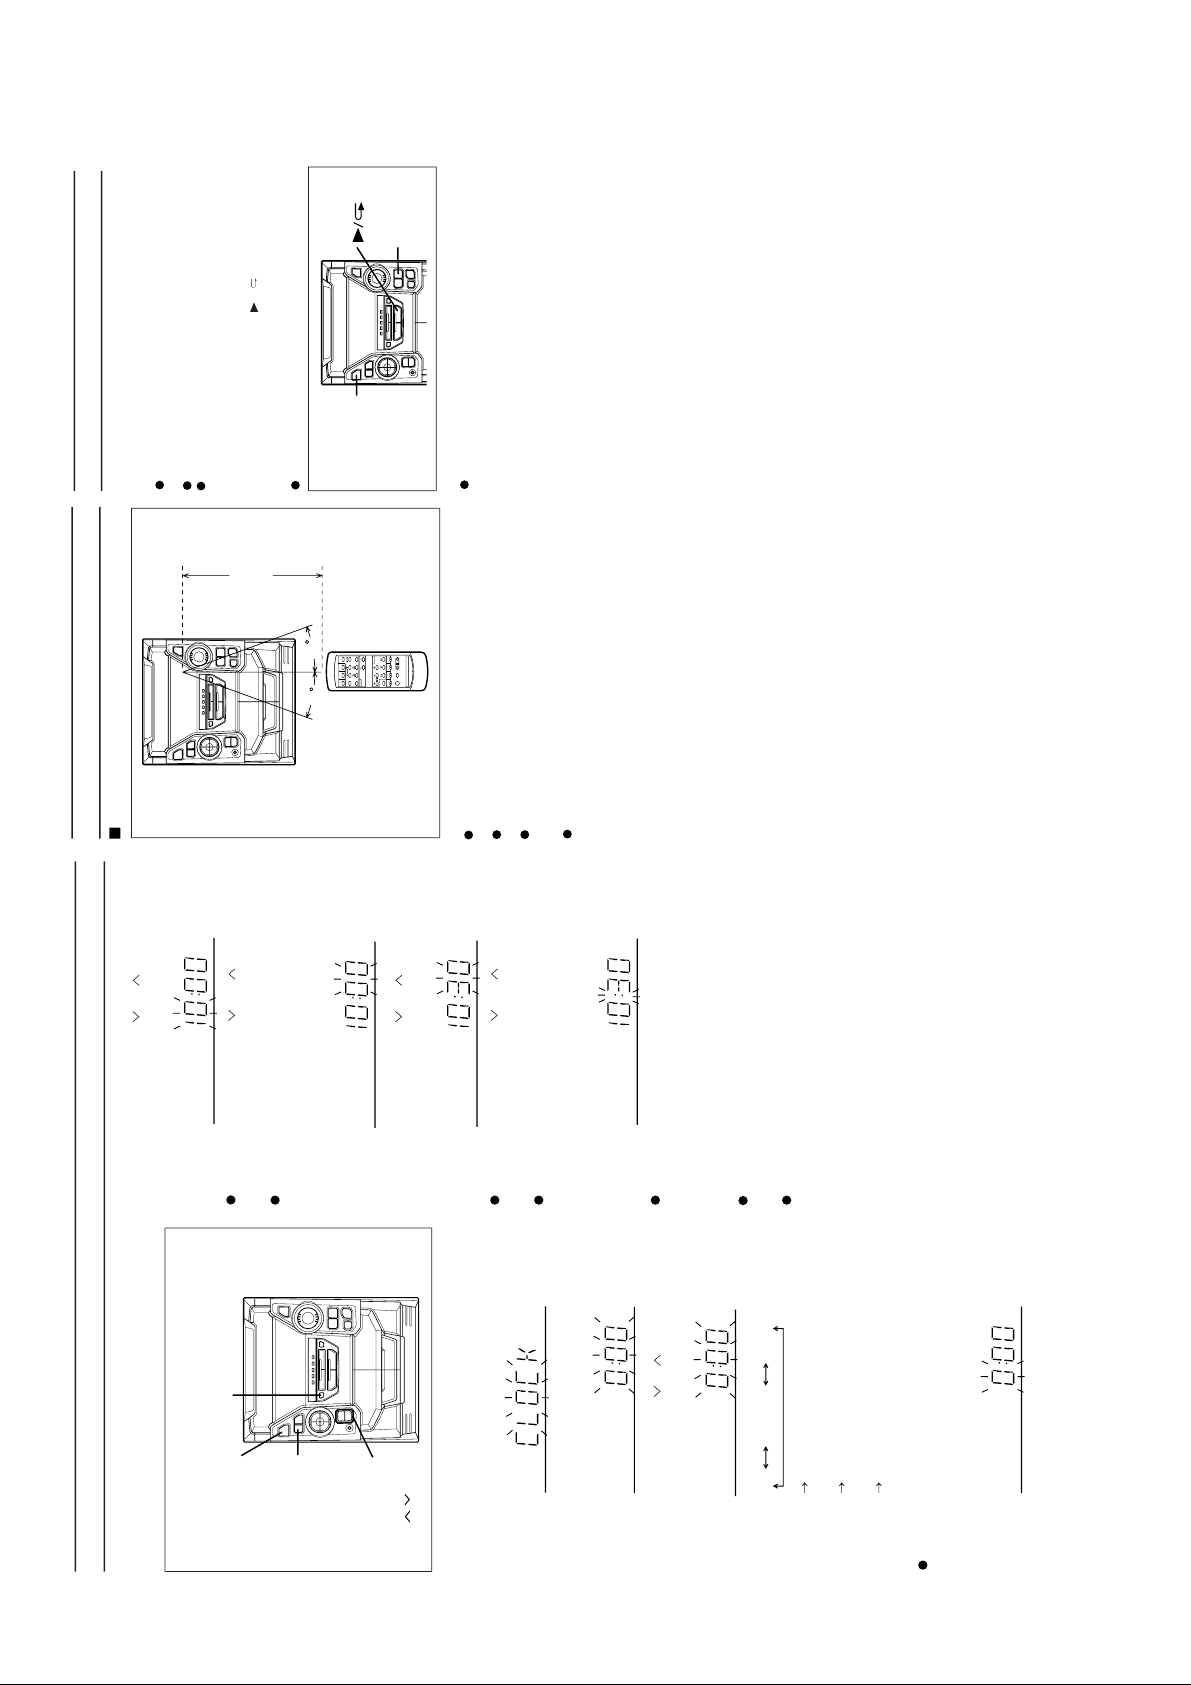
SETTING THE CLOCK
In this example, the clock is set for the 24-hour (0:00) sys-
tem.
1
Press the ON/STAND-BY button to enter the stand-
by mode.2Press the CLOCK button.
3
Within 5 seconds, press the MEMORY/SET button.
4
Press the TUNING/TIME ( or ) button to select the
time display mode.
Note that this can only be set when the unit is first
installed or it has been reset (see page 33).
5
Press the MEMORY/SET button.
6
Press the TUNING/TIME ( or ) button to adjust
the hour.
Press the TUNING/TIME ( or ) button once to
advance the time by 1 hour. Hold it down to adv ance con-
tinuously .
When the 12-hour display is selected, "AM" will change
automatically to "PM".
7
Press the MEMORY/SET button.
8
Press the TUNING/TIME ( or ) button to adjust
the minutes.
Press the TUNING/TIME ( or ) button once to
advance the time by 1 minute. Hold it down to change the
time in 5-minute intervals.
The hour setting will not advance even if minutes
advance from "59" to "00".
9
Press the MEMORY/SET button.
The clock starts operating from "0" second. (Seconds are
not displayed.) And then the clock display will disappear
after a few seconds.
To see the time display:
Press the CLOCK button.
The time display will appear for about 5 seconds.
Note:
The clock display will flash on and off at the push of the
CLOCK button when the AC power supply is restored
after a power failure occurs or after the AC power lead is
disconnected. If this happens, follow the procedure below
to change the clock time.
To change the clock time:
1 Press the CLOCK button.
2 Within 5 seconds, press the MEMORY/SET button.
3 Perform steps 6 - 9 above.
To change the time display mode:
1 Perform steps 1 - 2 in "RESETTING THE MICROCOM-
PUTER",.
2 Perform steps 1 - 9 above.
(Main unit operation)
"0:00" The 24-hour display will appear. (0:00 -
23:59)
"AM 0:00" The 12-hour display will appear. (AM 0:00
- PM 11:59)
"AM 12:00" The 12-hour display will appear. (AM
12:00 - PM 11:59)
ON/
STAND-BY
CLOCK
MEMORY/SET
TUNING/
TIME
( )
AM 12:00AM 0:000:00
RESETTING THE MICROCOMPUTER
Reset the microcomputer under the following condi-
tions:
To erase all of the stored memory contents (clock and
timer settings, and tuner and CD presets).
If the display is not correct.
If the operation is not correct.
1
Press the ON/STAND-BY button to enter the stand-
by mode.
2
Whilst pressing down the / button and the X-
BASS/DEMO button, hold down the ON/STAND-BY
button for at least 1 second.
"CLEAR AL" will appear.
Caution:
The operation explained above will erase all data stored
in memory including clock and timer settings, and tuner
and CD presets.
X-BASS/
DEMO
ON/
STAND-BY
PREPARATION FOR USE
Remote control
Notes concerning use:
Replace the batteries if the operating distance is reduced
or if the operation becomes erratic.
Periodically clean the transmitter LED on the remote con-
trol and the sensor on the main unit with a soft cloth.
Exposing the sensor on the main unit to strong light may
interfere with operation. Change the lighting or the direc-
tion of the unit.
Keep the remote control away from moisture, excessive
heat, shock, and vibrations.
15
15
0.2 m - 6 m
(8" - 20')
OPERATION MANUAL
– 6 –
Page 2

CD-BA160H/1700H
Check the supplied accessories
AM loop aerial
× 1
FM aerial
× 1
Remote control
× 1
AC power lead
× 1
Putting batteries into the remote control
Placing the system
10 cm (4")
10 cm (4")
1
Remove the battery cover .
2
Insert the batteries.
3
Replace the battery cover.
1
2
3
10 cm (4")
10 cm (4")
●
2 "AA" size batteries
(UM/SUM-3, R6, HP-7 or similar)
(For U.K.)
(For Europe)
Left speaker
Black
Connections
4
AC 230 V, 50 Hz (For U.K.)
1
Connect the AM and FM aerials.
2
Connect the speaker system.
3
Connect the AC power lead.
Right speaker
AM loop
aerial
FM aerial
1
2
Red
With
white line
AC 230 V, 50 Hz (For Europe)
– 7 –
Page 3

CD-BA160H/1700H
7
Listening to a tape
1
Press the ON/STAND-BY button to turn the power on.
4
Press the TAPE (1 2) button to select the TAPE 1
or TAPE 2.
3
Load the cassette into the TAPE 1 or TAPE 2 cassette
compartment.
2
Open the cassette door by pushing the area marked
"PUSH EJECT".
5
Press the button to start playback.
1
Press the ON/STAND-BY button to turn the power on.2Press the TUNER (BAND) button to select FM ST, FM
or AM.
4
Adjust the sound volume using the VOLUME buttons.
6
Adjust the sound volume using the VOLUME buttons.
3
Press the TUNING/TIME ( or ) button to tune in-
to the desired station.
Listening to the radio
6
1
Press the ON/STAND-BY button to turn the power on.2Press the CD button.
3
Press the OPEN/CLOSE button to open the disc tray .
4
Place the CD(s) on the disc tray, label side up.
5
When loading a third disc, press the DISC SKIP button
to turn the disc tray, then place the CD in the open pos-
ition.
6
Press the OPEN/CLOSE button to close the disc tray.
Listening to a CD
5
7
Press the button. 8Adjust the sound volume using the VOLUME buttons.
●
And then, close the cassette door completely until it is locked.
4
5
1
2
3,6
587
4
12 cm (5")
8 cm (3")
2
1
3
TAPE 1 TAPE 2
PUSH
EJECT
PUSH
EJECT
1
4
5
6
3
2
2
3
● Resetting the microcomputer
1Press the ON/STAND-BY button to enter the stand-by
mode.
2Whilst pressing down the button and the X-BASS/
DEMO button, hold down the
ON/STAND-BY button for
at least 1 second.
●
"CLEAR AL" will appear.
Caution:
●
The operation explained above will er ase all data stored
in memory including clock and timer settings, and tuner
and CD presets.
If this product is subjected to strong external interference
(mechanical shock, excessive static electricity, abnormal
supply voltage due to lightning, etc.) or if it is operated in-
correctly, it may malfunction or the display may not functi-
on correctly. If such a problem occurs, do the following:
● CD pickup cleaning
1Press the ON/STAND-BY button to turn the power on.
3Press the CD button and load the desired disc.
2
Load a cassette into the TAPE 2 cassette compartment.
4Press the REC PAUSE button.
5Press the button.
Recording from CDs
8
Clean the dust or stain on the CD pickup lens
using a commercial cleaning disc (brush type).
Cleaning disc
1
4
3
5
TAPE 2
PUSH
EJECT
2
1,2
2
2
– 8 –
 Loading...