

Page 1
MODEL
AR-650
AR-800
DIGITAL COPYING MACHINE
OPERATION MANUAL
Page 2

❧❧❧❧❧❧❧❧❧❧❧❧❧❧❧❧❧❧❧❧❧❧❧❧❧❧❧❧❧❧❧❧❧❧❧❧❧❧❧❧❧❧❧❧❧❧❧
❧
The power switch positions are marked “ ” to indicate power “ON” and
“
” to indicate stand-by.
In the stand-by position, power is being supplied to a drying heater within
the optical system of the copier.
Caution:
For complete electrical disconnection, pull out the main plug.
The socket-outlet shall be installed near the equipment and shall be
easily accessible.
❧❧❧❧❧❧❧❧❧❧❧❧❧❧❧❧❧
❧
❧
❧❧❧❧❧❧❧❧❧❧❧❧❧❧❧❧❧
❧
❧❧❧❧❧❧❧❧❧❧❧❧❧❧❧❧❧❧❧❧❧❧❧❧❧❧❧❧❧❧❧❧❧❧❧❧❧❧❧❧❧❧❧❧❧❧❧
➢➣➢➣➢➣➢➣➢➣➢➣➢➣➢➣➢➣➢➣➢➣➢➣➢➣➢➣➢➣➢➣
➣
➢
FOR YOUR RECORDS ...
To protect against loss or theft, record and retain for reference the
copier’s serial number located on the left hand side at the rear corner of
the copier.
Model Number
Serial Number
Date of Purchase
Place of Purchase
Authorized Sharp Copier
Service Department Number
➣➢➣➢➣➢➣➢➣➢➣➢➣➢➣➢➣➢➣
➢
➣➢➣➢➣➢➣➢➣➢➣➢➣➢➣➢➣➢➣➢➣➢➣➢➣➢➣➢➣➢➣➢➣
➢
➣➢➣➢➣➢➣➢➣➢➣➢➣➢➣➢➣➢➣
➢
Page 3

FCC N OTICE
This equipment has been tested and found to comply with the limits for a Class A digital
dev ice, pu rsuan t to Part 15 of t he FCC Rules. These lim its are designed to provide
reasonable protection against harmful interference when the equipment is operated in a
commercial environment. This equipment generates, uses, and can radiate radio frequency
ener g y an d, i f n o t i n st al l ed an d u sed in acco r d an ce w i t h th e i n st r uct i o n m an u al , m ay
cause harmful interference to radio communications. Operation of this equipment in a
resi den t ial area i s li kely to cau se har m fu l i nt er fer ence i n w h ich case th e u ser w i ll be
required to correct the interference at his own expense.
WARNING:
FCC Regulations state that any unauthorized changes or modifications to this
equipment not expressly approved by the manufacturer could void the user‘s
authority to operate this equipment.
This Class [A] digital apparatus complies with Canadian ICES-003.
Cet appareil numérique de la classe [A] est conforme á la norme NMB-003 du Canada.
Page 4

EPA ENERGY STAR ® (MFD)
The Uni ted States Env ironmen tal Pro tection Agency (EPA) has i ntrod uced a vol unt ary progr am, the
ENERGY STAR Program, to enourage the widespread and voluntary use of energy-efficient technologies
th at en han ce th e w or kp lace, i m pr ov e pr od uct per fo rm an ce and pr ev ent po ll ut io n. A s an ENERGY
STAR Partn er, t he Shar p Cor p. h as deter m ined th at th is co pi er m od el m eets t he ENERGY STAR
guidelines for energy efficiency.
ENERGY STAR guidelines for this class of copier require ENERGY STAR copiers to have an 'Off Mode'
feature that automatically turns the copier off after a period of inactivity, ensuring night and weekend
shut-off. The copier must also automatically change to a 'Low Power Mode' (Automatic E nergy Save)
after a period of time since the last usage.
For Copier+Print er or FAX mo dels,
copiers to have a 'Sleep Mode' feature that automatically makes the copier enter the sleep mode after
a period of inactivity. The co pier must also automaticall y change to a 'Low Power Mode' (A utomatic
Energy Save) after a period of time since the last usage.
Specifically, this copier complies with the following requirements-
The AR-650/ 800 Copier model (Base model)
'Off M ode'-
The co pi er con sum es less t han 20 wat ts i n th e 'Of f M od e'.
'Off M ode' Default Tim e-
The d efau lt t im e fo r t he ' Off M o de' is 90 m in utes.
'Autom atic Energy Save'-
The co p i er co n su mes l ess t han 255 wat t s (A R-650) / 313 w at t s (A R-800) du r i n g Ener g y Sav e.
'Autom atic Energy Save' Default Tim e-
The d efau lt t im e fo r t he ' Aut om ati c Ener gy Sav e' is 15 m in utes.
The AR-650/ 800 Copier + Printer model (M ult ifunct ion model)
'Sleep M ode'-
The co pi er con sum es less t han 95 wat ts i n th e 'Sl eep M od e'.
'Sleep M ode' Default Tim e-
The d efau lt t im e fo r t he ' Sleep M o de' is 90 m in utes.
'Autom atic Energy Save'-
The co p i er co n su mes l ess t han 300 wat t s (A R-650) / 358 w at t s (A R-800) du r i n g Ener g y Sav e.
'Autom atic Energy Save' Default Tim e-
The d efau lt t im e fo r t he ' Aut om ati c Ener gy Sav e' is 15 m in utes.
Not e1- The d ef au l t set t i n g f o r th e 'Of f Mod e' o r ' Sleep Mo d e' and 'A u t o mat i c Ener g y Sav e' can b e
changed. If you want to increase the default setting, contact your authorized Sharp dealer.
Note2- For Cop i er mo d el (Base m o d el ), t o r est ar t th e co p i er af t er an au t o mat i c sh u t-o f f , r et u r n th e
power switch to the 'On' position.
Note3- For Copier model (Base model), after an automatic shut-off, the weekly timer feature cannot be
activated. If you prefer to activate this feature, contact your authorized Sharp dealer.
ENERGY STAR gu idelin es require ENERGY STA R Mul tifuncti on
If you have any questions regarding the use of recycled paper or some recommended types of recycled
paper, please contact your authorized Sharp dealer.
ENERGY STAR is a U. S. registered mark.
Page 5
PREFACE
Thank you for purchasing the Sharp Digital Copier AR-650/800. This Operator’s Manual describes the
following:
• how to use the digital copier
• how to make copies
• how to inspect and carry out maintenance on the digital copier
• how to remedy mechanical and copying problems.
Before using the digital copier, thoroughly read and understand this Operator’s Manual. To ensure that
clean copies are made at all times and to make sure that the digital copier is in optimum working order,
keep this Operator’s Manual in a handy place for future reference.
n To ensure correct and safe use of the Sharp Digital C opier AR-650/800, this Operator’s Manual
describes safety precautions according to the following three levels of warning:
Before reading this Operator’s Manual, you should fully understand the meaning and importance
of these signal words.
Warning ------ Indicates a potentially hazardous situation which, if not avoided, could result in
death, serious injury, or serious damage, or fire in the equipment or surrounding
area.
Caution ------- Indicates a potentially haz ardous situation which, if not avoided, may result in
minor or moderate injury, partial damage of the equipment or surrounding
area, or loss of data.
Note------------ Indicates a procedure you should follow to ensure the optimal performance of
the digital copier and problem-free copying.
PREFACE
CONTENTS
PRECAUTIONS
Tip -------------- Describes information useful to know when operating the digital copi er.
Advice--------- Describes an operation you should follow to maintain the digital copier in good
working order.
User Safety
This Sharp digital plain paper copier does not produce laser radiation hazardous to the user. It is certified
as a Class 1 laser product under the U.S. Department of Health and Human Services (DHHS) Radiation
Performance Standard according to the Radiation Control for Health and Safety Act of 1968.
Protective housing and external covers completely confine the laser light emitted inside the plain paper
copier. The laser beam cannot escape from the machine during any phase of user operation.
Regulations implemented on August 2, 1976 by the Bureau of Radiological Health (BR H) of the U.S. F ood
and Drug Administration apply to laser products manufactured from August 1, 1976. Laser products
marketed in the United States must comply with these regulations.
CAUTION: Usi n g co nt r ol s o r ad j ust m en ts o r per f or m i ng p ro ced ur es, ot h er t h an t h ose sp ecif i ed
herein may result in hazardous radiation exposure.
COPYRIGHT 2001
SHARP CORPORATION
1
Page 6
PREFACE
Features of the AR-650/800
The AR-650/800 is a plain paper digital copier.
The AR-650/800 scans originals and stores the resulting data in its memory as digital images.
The A R-650/800 allo w s yo u n ot on ly to pr ocess an d ed it th ese di gi tal im ag e dat a, bu t al so
enables copies to be sorted and grouped quietly, quickly and easily. The AR-650/800 incorporates
a lar ge-si ze di spl ay w i t h a t ou ch p an el an d m en u bu tt on s t hat gr aph i call y r epr esen t co pi er
functions. As a result, anybody can make clear-looking copies quickly and easily.
The AR-650/800 also has the following convenient features which allow the digital copier to be
used in many applications.
. Copying speed is 65 copies (Letter) per minute for the AR-650, and 80 copies (Letter) per
minute for the AR-800.
. The automatic original density function automatically reads the density of the original to
set the ideal copy density.
. The size of the original is automatically read and the appropriate paper size and reproduction
ratio are automatically selected.
. Wide reproduction range (25% to 400%).
. Duplex copies or single-sided copies can be made automatically from two-sided originals.
Duplex copies can also be made automatically from single-sided originals.
. Comes with the following digital editing functions:
Trimming, masking, negative/positive reversal, X-Y zoom and mirror image, etc.
. Comes with the following memory editing functions:
2 in 1, 4 in 1, document storage, annotation and page numbering.
. With th e electron ic sort fun ction, y ou can also sor t at hig h speed wit hout d amaging t he
origin als.
. The cover-sheet mode allows you to add cover pages at the first and/or last pages of the
copies. The sheet-insertion mode allows you to insert copied and/or blank sheets at userspecified pages.
. Copy sizes from Statement up to Ledger are acceptable.
. Adding the optional finisher permits the stapling and sorting of copies as well as magaz ine
sor t i ng (A R-FN9: wi th t h e sadd l e st it ch i ng f u nct i o n, A R-FN8 : w i th o u t t h e f un ct i on ). A n
optional hole punching unit can be installed.
. Comes with a weekly timer. This timer allows automatic turning ON or OFF of the power
supply at the specified startup or shutdown times, respectively.
. An automatic job start mode. This mode allows you to start copying when warming-up is
completed after you have set the desired copy modes and pressed the START key.
Installing an optional printer unit allows you to print out data from PCs.
2
Page 7

TABLE OF CONTENTS
■ PREFACE.................................................................................................................... 1
■
TABLE OF CONTENTS ............................................................................................. 3
■
PRECAUTIONS .......................................................................................................... 5
1. INSTA LLATION ..................................................................................................................... 5
2. GENERA L PRECAUTION S ................................................................................................... 6
■
DESCRIPTION OF THE DIGITAL COPIER ............................................................... 7
1. NA MES OF MA IN COM PONENTS ..................................................................................... 8
2. DESCRIPTION OF OPTIONA L EQUIPM ENT ...................................................................... 9
3. DESCRIPTION OF THE CONTROL PANEL ...................................................................... 10
4. DESCRIPTION OF THE GRAPHIC DISPLAY .................................................................... 13
■
HOW TO M AKE COPIES ........................................................................................ 15
1. TURNIN G ON THE POWER SWITCH / AU TO JOB STA RT .......................................... 16
2. USIN G THE REVERSING A UTOM ATIC DOCUM ENT FEEDER ...................................... 19
3. COPYIN G IN THE AU TOMA TIC PA PER SELECTION M ODE ........................................ 24
4. ACTUA L-SIZE COPYING BY SPECIFYING THE COPY SIZE.......................................... 27
5. REDU CTION AN D ENLA RGEM ENT COPYING ................................................................ 29
6. DUPLEXED COPIES FROM SINGLE-SIDED ORIGINALS ............................................... 34
7. DUPLEXED COPIES FROM TWO-SIDED ORIGINA LS .................................................... 39
8. SINGLE-SIDED COPIES FROM TWO-SIDED ORIGINA LS .............................................. 41
9. DUPLEXED COPIES FROM BOOK ORIGINA LS .............................................................. 43
10. COPYIN G WITH COPY DEN SITY SELECTION ................................................................ 46
11. COPYIN G IN THE TEXT OR PHOTO M ODE ................................................................... 47
12. BYPASS COPYIN G ............................................................................................................. 48
13. BYPASS COPYIN G BY SPECIFYING THE COPY SIZE ................................................... 50
14. INTERRU PT COPYING ....................................................................................................... 52
15. PRESETTING OF COPY M ODES ...................................................................................... 53
16. ALL CLEAR KEY ................................................................................................................. 54
PREFACE
CONTENTS
PRECAUTIONS
DESCRIPTION
OF THE DIGITAL
COPIER
HOW TO
M AKE
COPIES
USIN G THE
EDITING
FUNCTIONS
USIN G THE
SPECIAL
FUNCTIONS
USIN G THE
OPTIONAL
FINISHER
WHEN THE
GRAPHIC SYMBOLS
FLASH
■
USIN G THE EDITING FUN CTIONS ....................................................................... 55
1. IM AGE SHIFT COPYING .................................................................................................... 56
2. EDGE ERASE COPYING .................................................................................................... 58
3. DUA L-PAGE COPYING ...................................................................................................... 60
4. X-Y ZOOM .......................................................................................................................... 61
5. TRIMM ING/M A SKING ........................................................................................................ 62
6. M IRROR IMA GE ................................................................................................................. 66
7. NEGATIVE/POSITIVE REVERSAL ...................................................................................... 67
8. 2 IN 1 / 4 IN 1 .................................................................................................................... 69
9. AN NOTATION ..................................................................................................................... 73
10. PAGE NUM BER .................................................................................................................. 75
11. M AGAZIN E SORT .............................................................................................................. 78
12. COVER SHEET COPYING .................................................................................................. 80
13. SHEET IN SERTION COPYIN G ........................................................................................... 84
14. SETTING A CASSETTE FOR COVER SHEET/SHEET-INSERTION COPYING ............... 87
15. DOCUM ENT STORAGE ..................................................................................................... 89
MAINTE-
NANCE
SPECIFICATIONS,
ACCESSORIES &
OPTIONS
3
Page 8
TABLE OF CONTENTS (Cont.)
■
USIN G THE SPECIAL FUNCTIONS ....................................................................... 93
1. ACCOUNT N UM BER.......................................................................................................... 94
2. JOB M EMORY .................................................................................................................... 95
3. WEEKLY TIMER .................................................................................................................. 99
4. COPYIN G USIN G PAPER OF OTHER SIZES ................................................................. 101
5. SETTING THE DATE AND TIM E .................................................................................... 102
6. CHANGIN G AUTOM A TIC ENERGY SAVE TIME/AU TOM ATIC SHUTOFF TIME ....... 104
7. CHANGE OF LANGU AGE ON THE DISPLAY PAN EL .................................................. 105
■
USIN G THE OPTIONAL FINISHER....................................................................... 107
1. NA MES OF THE M AIN COM PONENTS ........................................................................ 108
2. NON -SORT COPYING ...................................................................................................... 109
3. SORT COPYING ................................................................................................................ 110
4. GROUP COPYING ............................................................................................................ 114
5. STAPLING ......................................................................................................................... 118
6. HOLE PU NCHING M ODE ................................................................................................ 122
7. M AGAZIN E SORT & SA DDLE STITCHING M ODE ....................................................... 124
■
WHEN THE GRAPHIC SYM BOLS FLASH ........................................................... 127
1. ADD PAPER SYMBOL ..................................................................................................... 128
2. REPLACE TONER BAG SYM BOL ................................................................................... 130
3. ADD TON ER SYM BOL ..................................................................................................... 132
4. CLEA R PA PER SYM BOL .................................................................................................. 136
5. CHECK ORIGINAL SYM BOL ........................................................................................... 147
6. FINISHER/HOLE PUNCHING U NIT M ISFEED SYM BOL ............................................... 149
7. SADDLE STITCHER JA M SYMBOL ................................................................................ 152
8. REPLACING STA PLES (OPTIONA L) ............................................................................... 154
9. REM OVIN G JAM M ED STAPLES (OPTIONA L) .............................................................. 159
10. CLEA RING ACCUM ULATED PUNCHED PAPER BITS .................................................. 164
11. CALL SERVICE SYMBOL ................................................................................................. 165
12. PERIODIC MA INTENA NCE .............................................................................................. 166
■
M AINTENAN CE ...................................................................................................... 167
1. DAILY IN SPECTION ......................................................................................................... 168
2. SIM PLE TROUBLESHOOTING ........................................................................................ 169
■
SPECIFICATIONS, ACCESSORIES & OPTIONS .................................................. 171
1. SPECIFICATION S .............................................................................................................. 172
2. FINISHER SPECIFICATIONS (OPTIONA L) ...................................................................... 174
4
Page 9
PRECAUTIONS
1. INSTALLATION
The AR-650/800 should be installed by a qualified service technician.
Note: The packi ng m at erial sho uld be d ispo sed o f pr op erly .
1
To obtain the best possible results, this copier should be used in conjunction with a
dedicated AC power line at the following ratings:
2
115V–60 Hz, 16 A
Not es:
1. The use of other appliances or other equipment on the same line as this copier may adversely
aff ect p erfo rm ance an d co py q uali ty .
2. Be sur e to use a 3-con du ctor , gr oun ded wal l o utl et.
3. In ar eas w here a 2-p in plu g i s used, t he co pier m ust b e gr oun ded for safety .
Nev er g rou n d it t o a gas pi p e, a wat er p ipe, o r an y ot h er ob j ect not su itab l e f or g r oun d i ng.
After a suitable place has been selected for the installation of the AR-650/800, please
do not change it. Avoid excessive heat , dust, vibration and direct sunlight. Also,
3
provide proper ventilation as the copier emits a small amount of ozone.
PREFACE
CONTENTS
PRECAUTIONS
Notes:
1. Recom m ended env iro nm ent al r ange f or u se is as f oll ow s:
• Tem per atur e: 10~30˚C/50~86˚F
• Hum i dit y: 20~85% RH
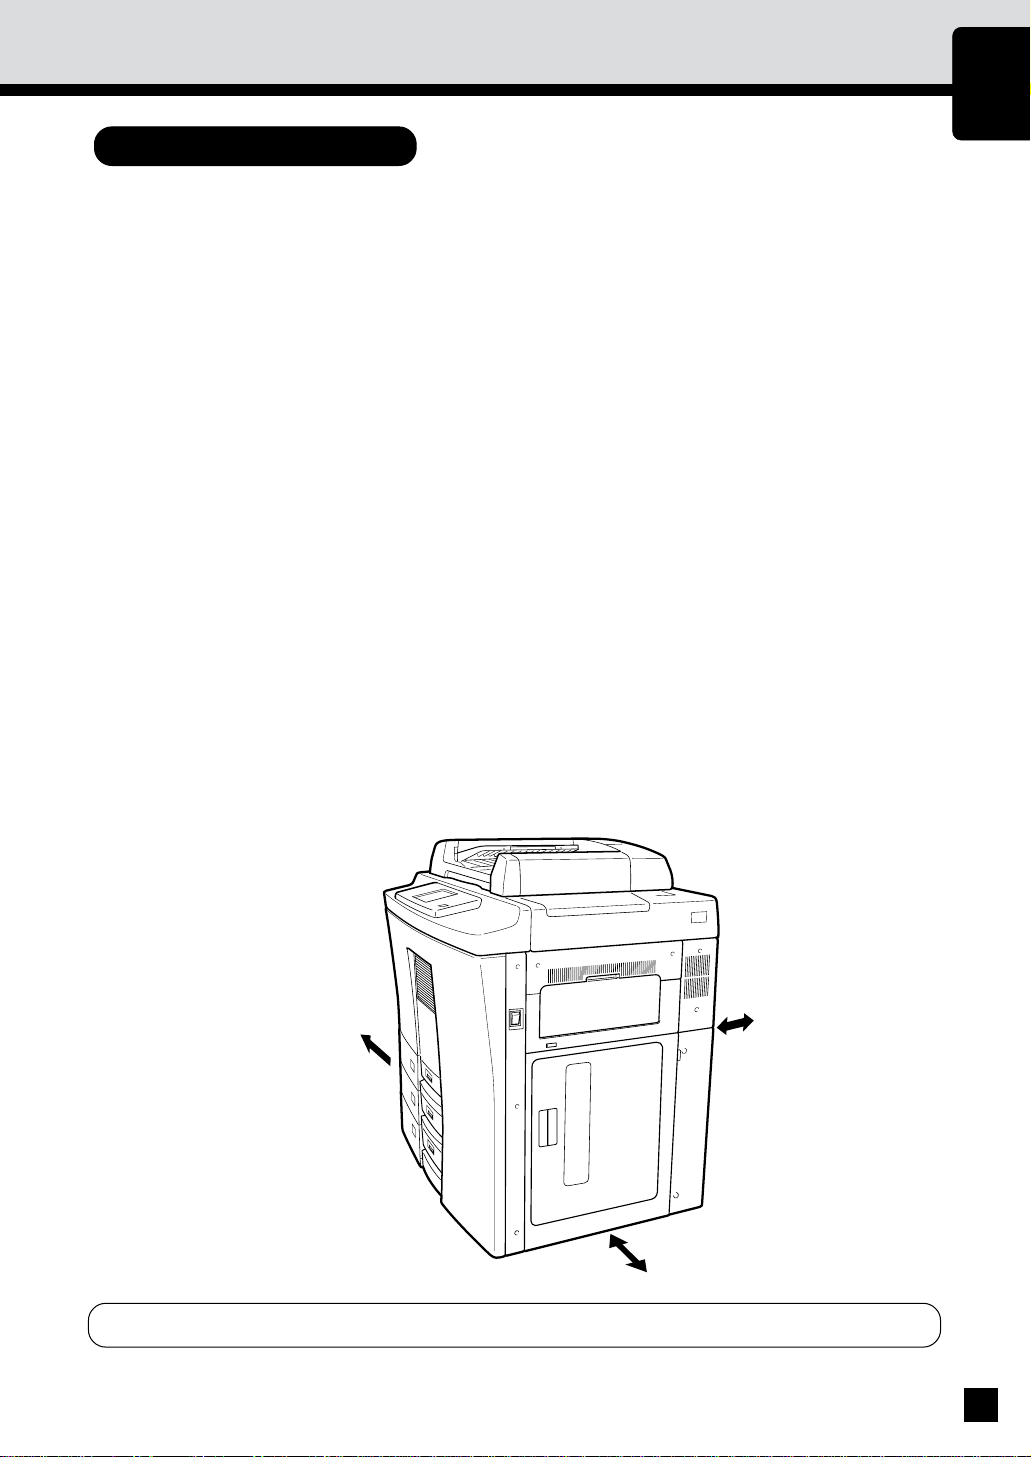
2. To i nsu re o pt im al o per ati on , all ow cl earan ces of at l east 32" on th e lef t, 32" on th e ri g ht
and 4" in th e rear (r efer to t he i llu str atio n b elow ).
4 inches
32 inches
The socket-outlet shall be installed near the equipment and shall be easily accessible.
32 inches
5
Page 10

PRECAUTIONS
(Cont.)
2. GENERAL PRECAUTIONS
Handle and use the copier gently and carefully.
. Do n ot place an yt hin g o n th e pap er cassett es or the o ri gin al f eed tr ay.
1
. Never allo w the power cable to b e trampled on or pin ched between hard object s, otherwi se
an acci den t or elect rical tr oub le m ig ht occur .
. Do n ot allo w any m et al it em s such as p aper clip s to fall in to t he co pier .
Be sure to turn OFF the power switch (unless using the automatic timer mode):
. Wh en y ou l eave y our of fice at ni ght .
2
. If a p ow er f ail ure o ccur s.
Caution: When turning OFF the power switch, be sure to do so only after the machine cycling
has come to a complete stop.
Be sure to disconnect the power-cord plug:
. w hen you do not in tend to use th e copi er f or an ext ended per iod of tim e.
Be sure to turn OFF the power switch immediately and call for service:
. If an un usual no ise is h eard fro m the co pi er.
. If t he o utsi de o f th e cop ier b ecom es un usu ally ho t.
. If an y p art o f t his co pi er is d am aged, o r i f it has b een dr op ped.
. If t he co pier has b een exp osed to r ain or l iq uid .
It is recommended t hat only supplies made or designated by Sharp be used for the
copier in order to optimize copy quality. All supplies should be s tored in a c ool, dry area.
3
For optimum performance, it is recommended that 22lb. xerographic bond paper of high quality
be u sed.
Paper o f l ow er q uali ty m ay con tai n in her ent p ro pert ies su ch as ex cess paper du st and m ay
lead to prem at ure ser vi cing .
"BATTERY DISPOSAL"
CONTAINS MANGANESE DIOXIDE LITHIUM BATTERY. MUST BE DISPOSED OF
PROPERLY. CONTACT YOUR SHARP DEALER OR SERVICER FOR INSTRUCTIONS.
This product utilizes tin-lead solder, and fluorescent lamp containing a small amount of mercury.
Disposal of these materials may be regulated due to environmental considerations.
For disposal or recycling information, please contact your local authorities or the Electronics Industries
Alliance:www.eia.org
WARNING–DO NOT LEAN ON, APPLY FORCE OR PLACE HEAVY OBJECTS ON THE
FINISHER. PERSONAL INJURY OR PROPERTY DAMAGE MAY RESULT.
6
Page 11
DESCRIPTION
OF THE DIGITAL
DESCRIPTION OF THE DIGITAL COPIER
COPIER
7
Page 12
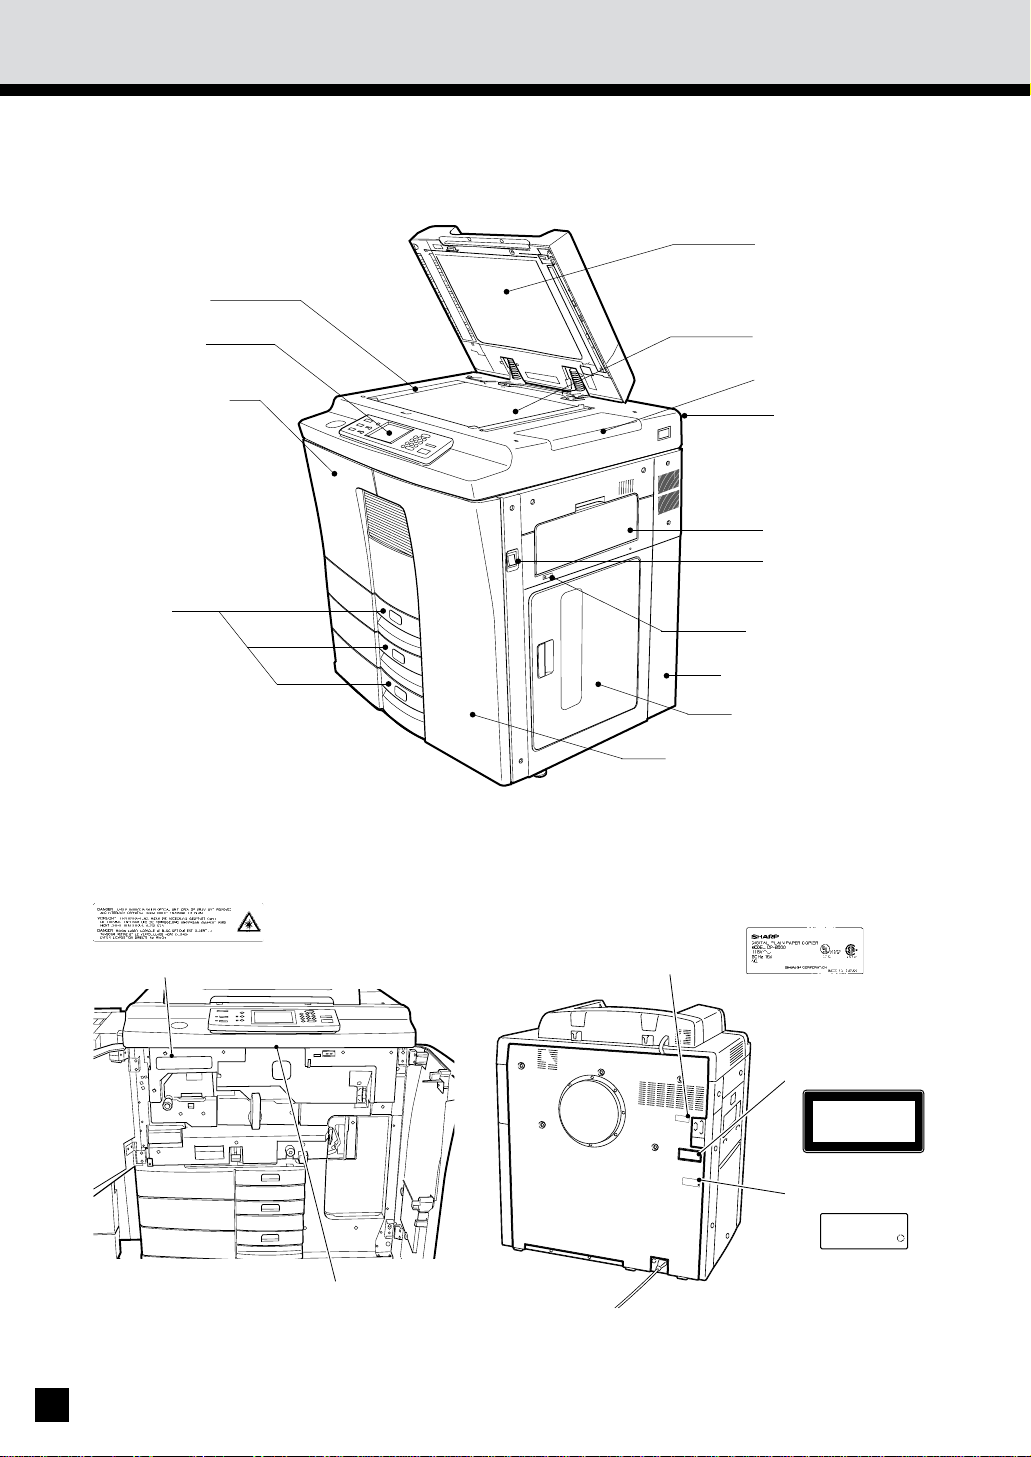
1. NAMES OF MAIN COMPONENTS
Automatic
document feeder
Original scale
(ADF)
Control panel
Left-hand front
door
Cassette
Glass
Toner hopper lid
Operator's manual
pocket (back side)
Sheet bypass
Power switch
Tray-down key
Used toner bag door
Large capacity feeder
Right-hand front door
Warning Label
Touch panel contrast
adjustment volume
8
Identification Label
CLASS
1
LA
SER
PRODUCT
LASER
KLASSE 1
APPAREIL
'
A
LASER
DE
DLASSE 1
PRODU
CT
IS
CERTIFIED
MANUFACTURER
BY
TO
THE
RULE 21
COMPLY
WITH DHHS
CFR
SUBCHAPTER
AT
J APPLICABLE
THE DATE OF MANUFACTURE
MANUFACTURED
.
: Y
JS
Explanatory Label
CLASS
1
LASER PRODUCT
LASER
KLASSE 1
A
LASER DE CLASSE 1
APPAREIL
Certification Label
PRODUCT
IS
CERTIFIED
BY
CFR SUBCHAPTER
: Y
THE
WITH DHHS
J APPLICABLE
.
JS
MANUFACTURER TO COMPLY
RULE 21
AT
THE DATE OF MANUFACTURE
MANUFACTURED
Page 13
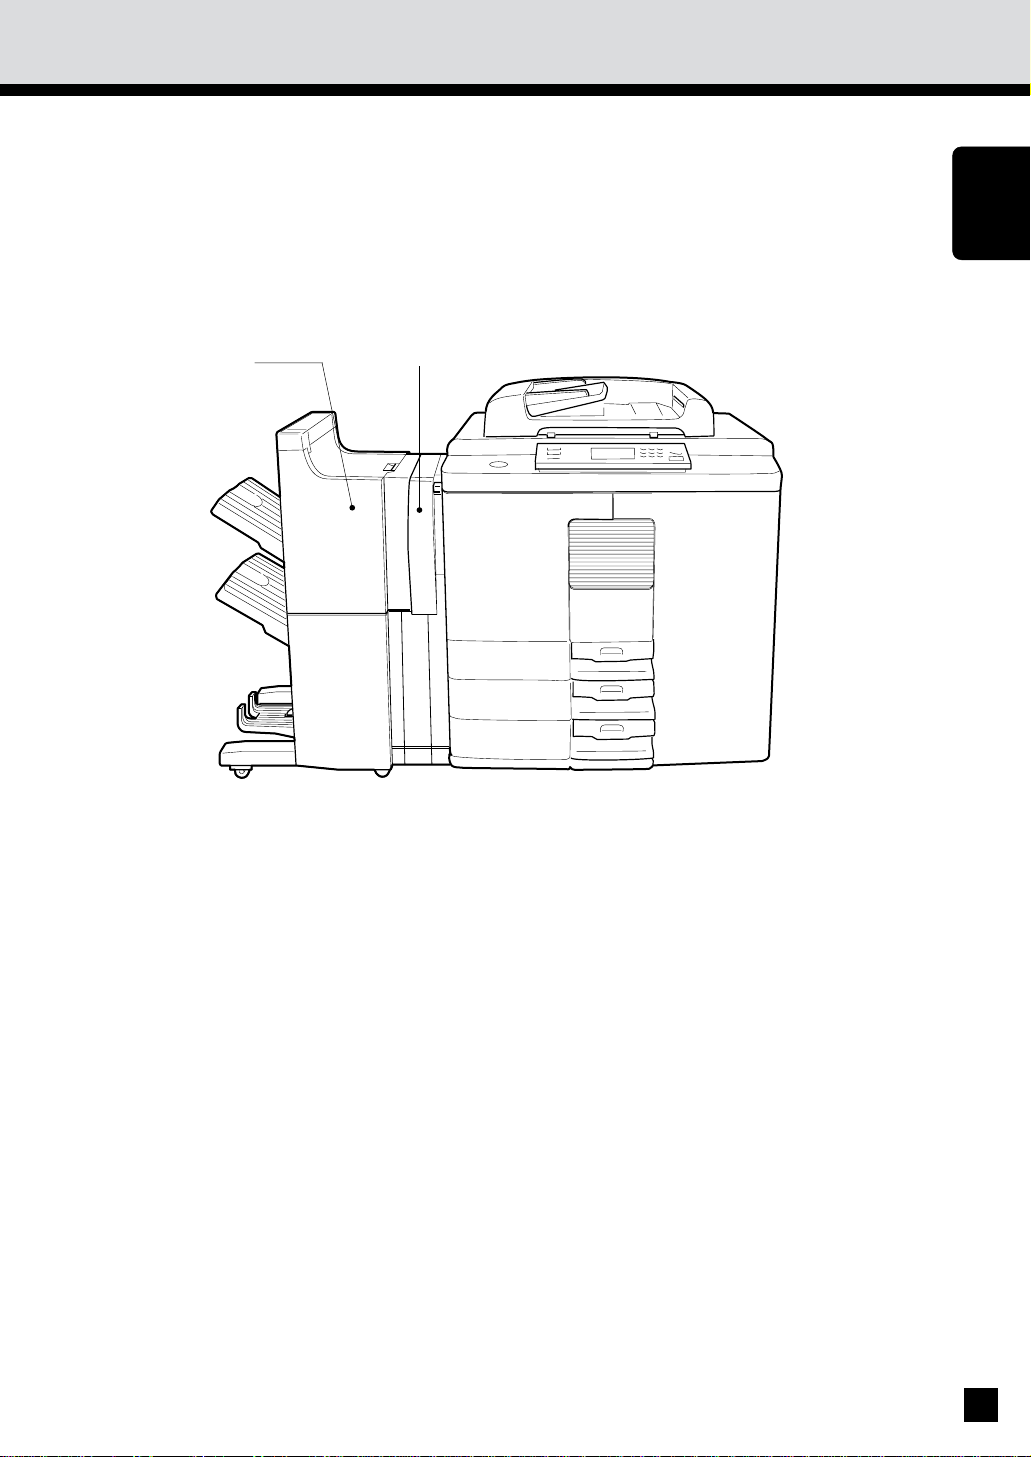
2.
DESCRIPTION OF OPTIONAL EQUIPMENT
DESCRIPTION
OF THE DIGITAL
COPIER
1
2
1. Finisher (AR-FN8, AR-FN 9)
The fin isher allow s SORT, GROUP, STAPLE cop yin g, MAGA ZINE SORT, MAGAZINE SORT
& SADDLE STITCH, SADDLE STITCH and HOLE PUNCH as w ell as N ON-SORT cop yi ng.
2. Hole Punching Unit
The h ol e pun chi ng u ni t is an op tio n f or t he fi ni shers.
* Th e saddl e sti tchi ng fun cti on i s avai labl e w hen t he A R-FN9 i s inst all ed.
9
Page 14

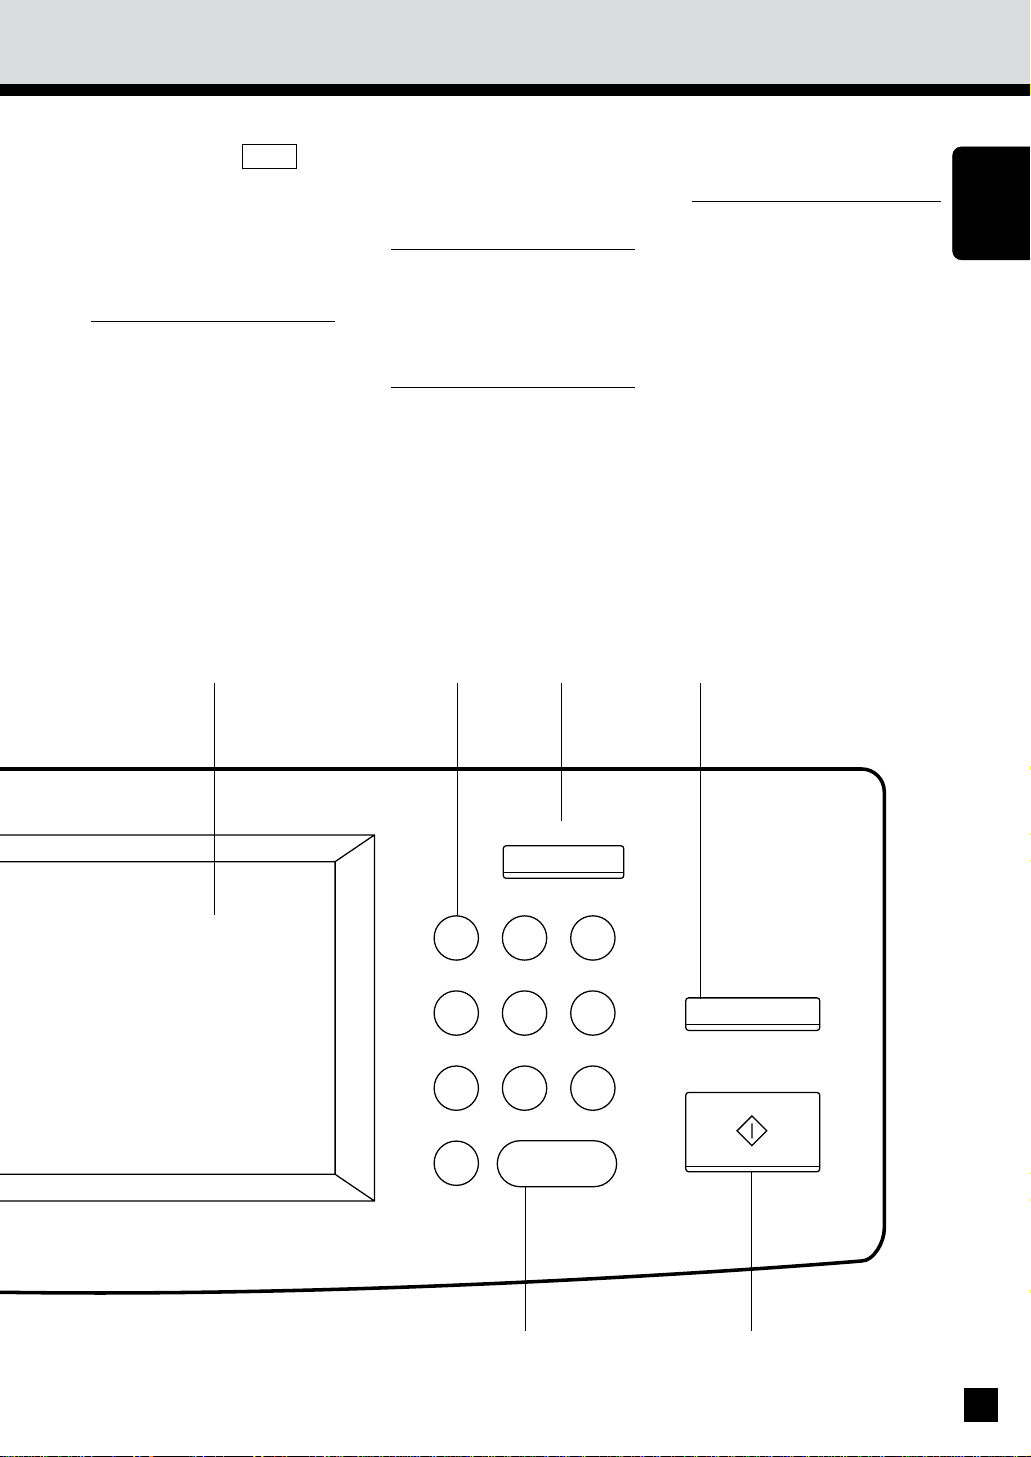
3.
DESCRIPTION OF THE CONTROL PANEL
Clip tray
Put any paper clips removed from the originals
here.
IN TERRU PT key
Wh en you wan t to make
a cop y o f a di f f er en t or i ginal dur ing a m ultico py
run, press this key. During
interrupt-copying, you
can make copies only one
at a time. To return to the
previous multicopying
run, press this key again.
ENERGY SAVER key
Wh en yo u are n o t u si ng
the copier for a fairly long
period of time, press this
key. The copier enters the
energy-saving mode, and
all displ ay lamp s go out .
To resume copying, press
this key again. After a
short while, the copier
becomes ready for
copying.
TOTAL COUNTER
Displays the total number
of co p i es mad e af t er t h e
cop ier was i nst alled .
PRINTER /NETWORK key
If you have an optional
printer installed, press
this key to access the
pr in ter f unct io n.
COPY key
If you have an optional
printer installed, press
this key to select the copy
function.
10
ENERGY SAVER
TIMER
INTERRUPT
HELP
COPY
PRINTER/NETWORK
Page 15
OPERATION GUIDE key
Pressing the HELP key
di spl ays t he ap p ro pr iat e
op erat ion pr ocedu re.
Pressin g t hi s key af ter a
function has been set
displays the features
available.
M ESSAGE display
Displays the status of the
cop ier, o perat ion pro cedures and various
instructions to the user in
short sentences and
graphics.
DIGITAL keys
Use t hese keys t o ent er
the desired copy quantity.
You can set up to 999
copies.
ALL CLEAR key
When you press this key,
all the m od es you have
selected are cleared to the
def aul t sett ing s.
STOP key
Press th is key t o sto p a
cop y r un.
START key
Press this key to start
copying.
CLEAR key
Use this key to correct the
ent ered copy qu anti ty .
DESCRIPTION
OF THE DIGITAL
COPIER
ALL CLEAR
1 2 3
4 5 6
7 8 9
0C
CLEAR
STOP
START
11
Page 16
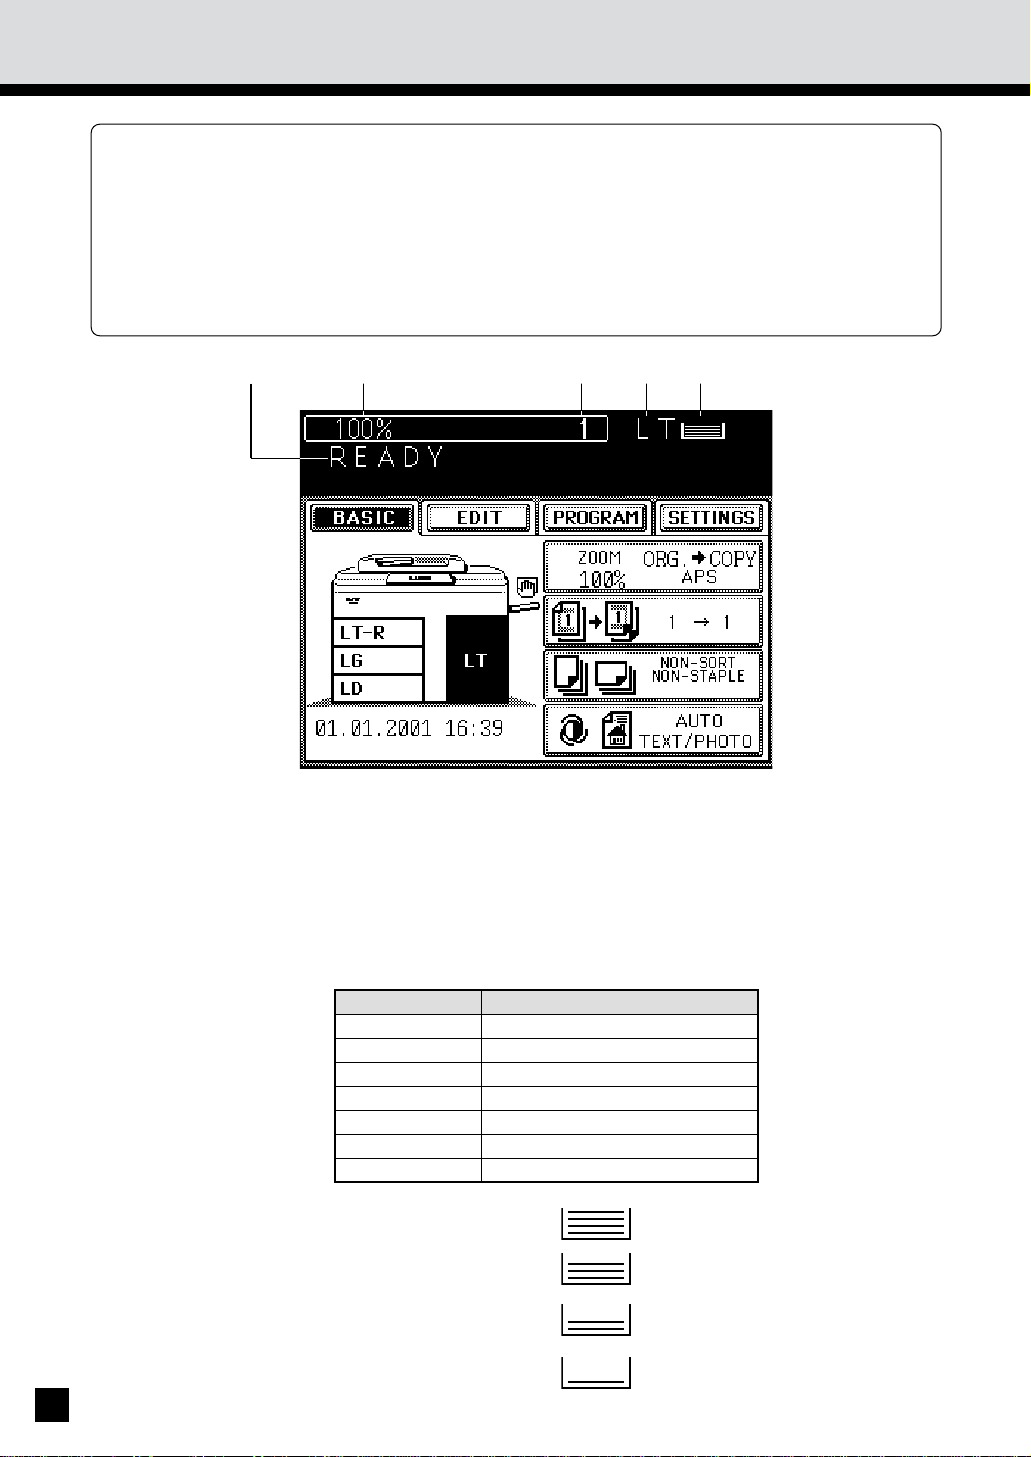
DESCRIPTION OF THE CONTROL PANEL (Cont.)
3.
The M essage Display panel show s operation status,error messages and function m enus.
Each function item displayed is shown in the form of a touch key.You can select the function
.
by touching the key lightly with your finger.
Tou chi ng o ne o f th e fu ncti on i tem s w il l sho w the n ext disp lay .
.
The function items shown on the right can be selected directly on the Message Display panel.
* The brightness of the touch panel can be ad justed with the touch panel contrast adjustment
volum e. Open the f ront d oors and fi nd it o n the back side o f the con trol panel . (Refer to th e
illustration on the page8.)
Message
Reproduction Ratio
Copy Quantity
Paper size of the currently selected paper source
Paper Indicator: Indicates the remaining number of sheets.
The table to show the relation between the paper size display on this
machine and the actual dimensions is as follows:
Paper Size Dimensions
LT 8-1/2" x 11"
LD 11" x 17"
LG 8-1/2" x 14"
ST-R 5-1/2" x 8-1/2"R
COMP 10-1/8" x 14"
FOLIO 8.27" x 13"
LG13 8-1/2" x 13"
Note: All the num bers are approxim ate. The
numbers in parentheses are for the largecapacity feeder.
12
: 500 ~ 376 (4000 ~2001)
: 375 ~ 251 (2000 ~1001)
: 250 ~ 126 (1000 ~ 501)
: 125 ~ 1 ( 500 ~ 1)
Page 17
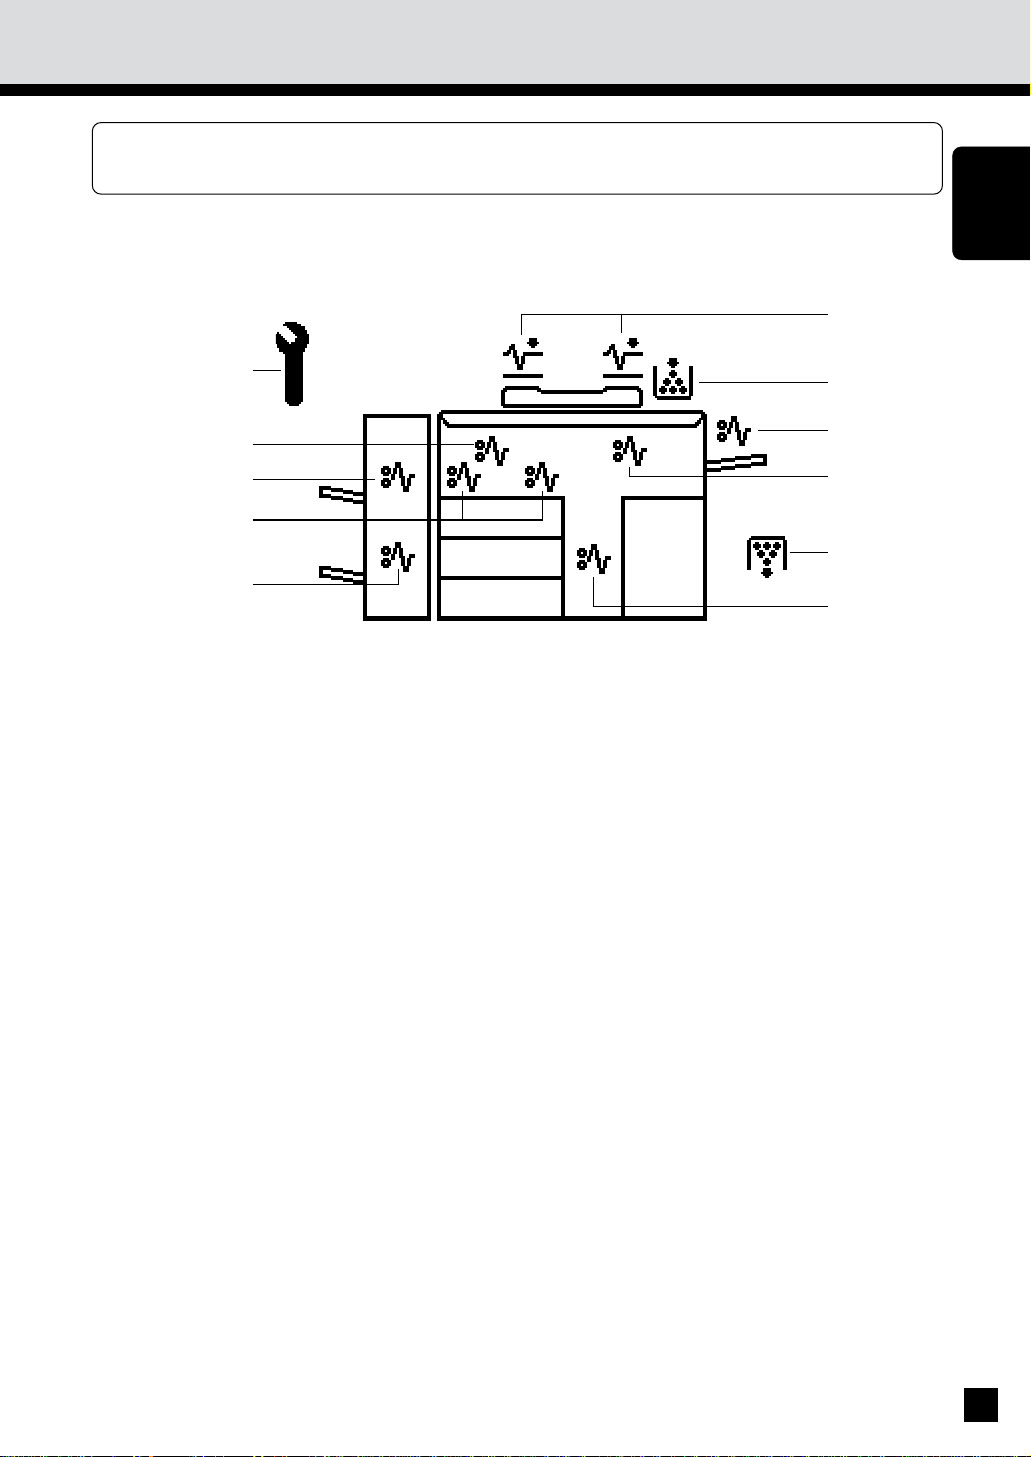
DESCRIPTION OF THE GRAPHIC DISPLAY
4.
The g raph ic displ ay sho ws t he stat us of the co pier. Wh en on e of t he gr aphi c symbo ls fl ashes,
take t he ap pro pr iate act io n ref err ing to the p age sh ow n.
DESCRIPTION
OF THE DIGITAL
COPIER
13
Page 18

4.
DESCRIPTION OF THE GRAPHIC DISPLAY (Cont.)
SADDLE STITCHER JAM
symbol
This symbol flashes when
paper is misfed in the
saddle stitcher. (See page
152.)
CLEAR PAPER symbol
This symbol flashes when
paper is misfed in the
automatic duplexer. (See
page 141~144.)
FINISHER/HOLE
PUNCHING
UN IT M ISFEED symbol
This symbol flashes when
paper is misfed in the
op ti onal fin ish er or ho le
punching unit. (See page
149.)
CLEAR PAPER symbol
BYPASS MISFEED
symbol
This symbol flashes when
no paper is fed int o th e
copier in bypass copying.
Remove and reset the
sheets on the sheet
bypass. (See page 146.)
CLEAR PAPER symbol
This symbol flashes when
a sheet of paper fed from
th e l arge-cap acity f eeder
is misfed in the paper feed
section. (See page 146.)
REPLACE TONER BAG
symbol
This symbol flashes when
the toner bag in use
becomes full of used
toner. (See page 130.)
CLEAR PAPER symbol
This symbol flashes when
paper is misfed on the
paper path inside the
copier. (See page 136.)
CALL SERVICE symbol
This symbol flashes when
maintenance by a service
technician is necessary.
(See page 165.)
CHECK ORIGINAL
symbol
This symbol flashes when
an original is misfed
inside the automatic
document feeder. (See
page 147.)
ADD TONER symbol
This symbol flashes when
the toner hopper is empty.
(See page 132.)
This symbol flashes when
a sheet of paper fed from
the selected cassette is
misfed in the paper
feeding section. (See page
145.)
14
Page 19
HOW TO MAKE COPIES
HOW TO
M AKE
COPIES
15
Page 20
1. TURNING ON THE POWER SWITCH / AUTO JOB START
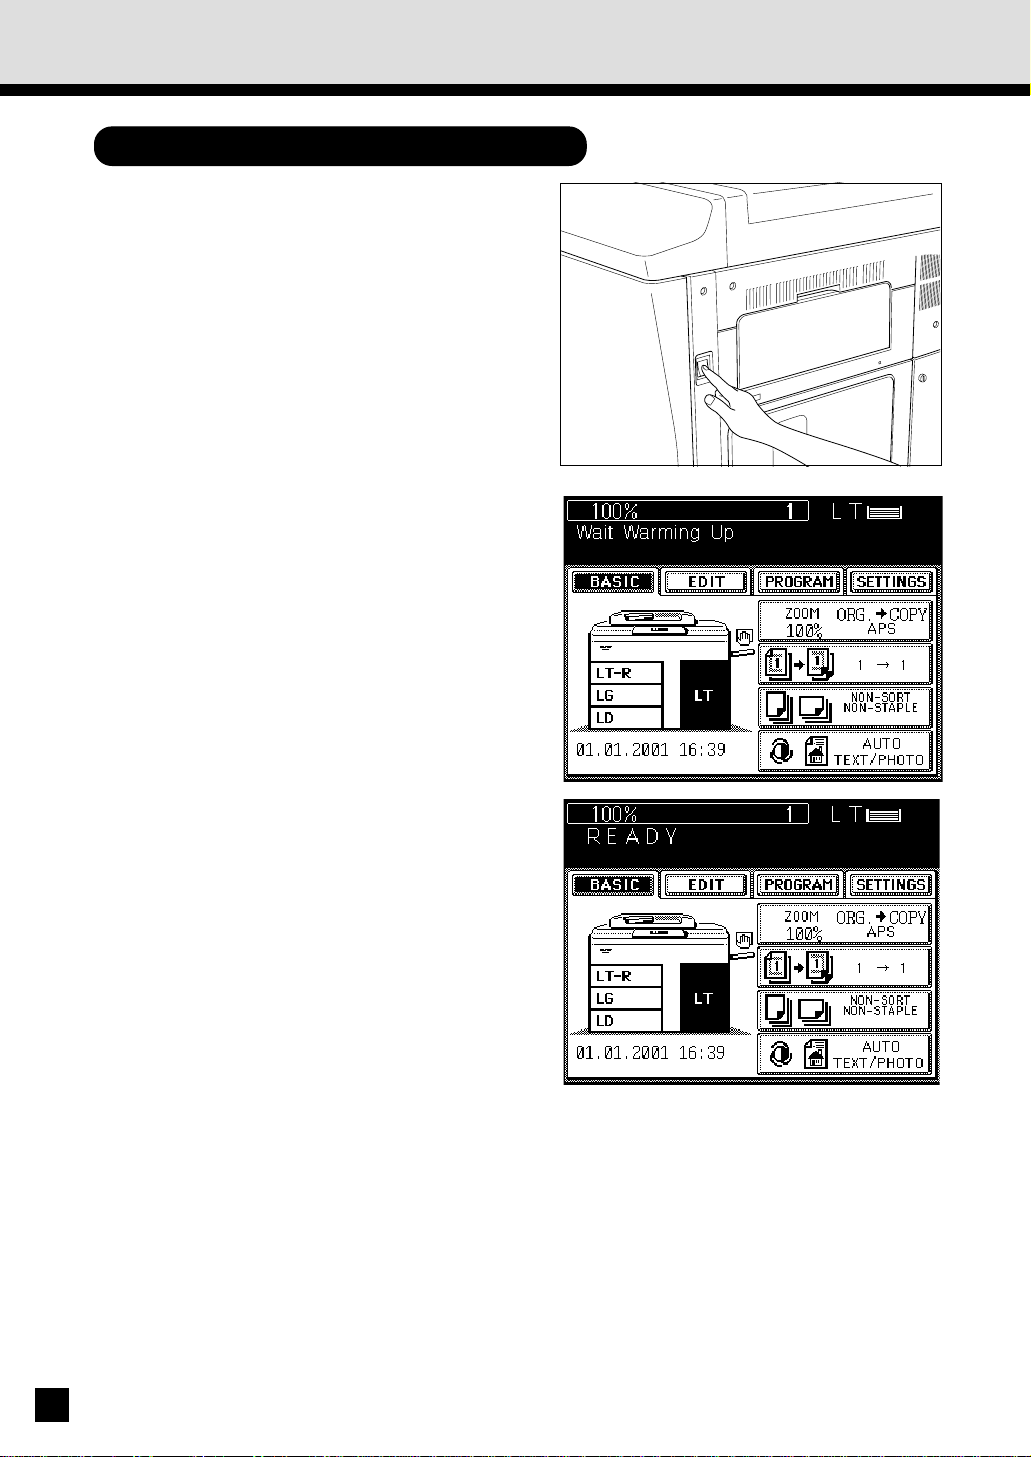
Turning ON the Power Switch
Turn ON t he pow er sw it ch.
1
The message “Wait Warming Up” appears.
. Wai t u nti l t he cop ier becom es r eady.
2
About 7 minutes later, the message
“READY” appears.
3
. Thi s m essage in di cates th at y ou can m ake
cop ies at any t im e.
16
Page 21
Auto Job Start M ode
If y o u set t he d esir ed cop y in g m o des an d pr ess t he STA RT key d ur in g w ar m -u p, t h e cop i er
aut om atical ly st arts co pyi ng wh en it b ecom es READY. Follow t h e pro cedur e belo w t o set u p
th e Au to J ob Start m ode.
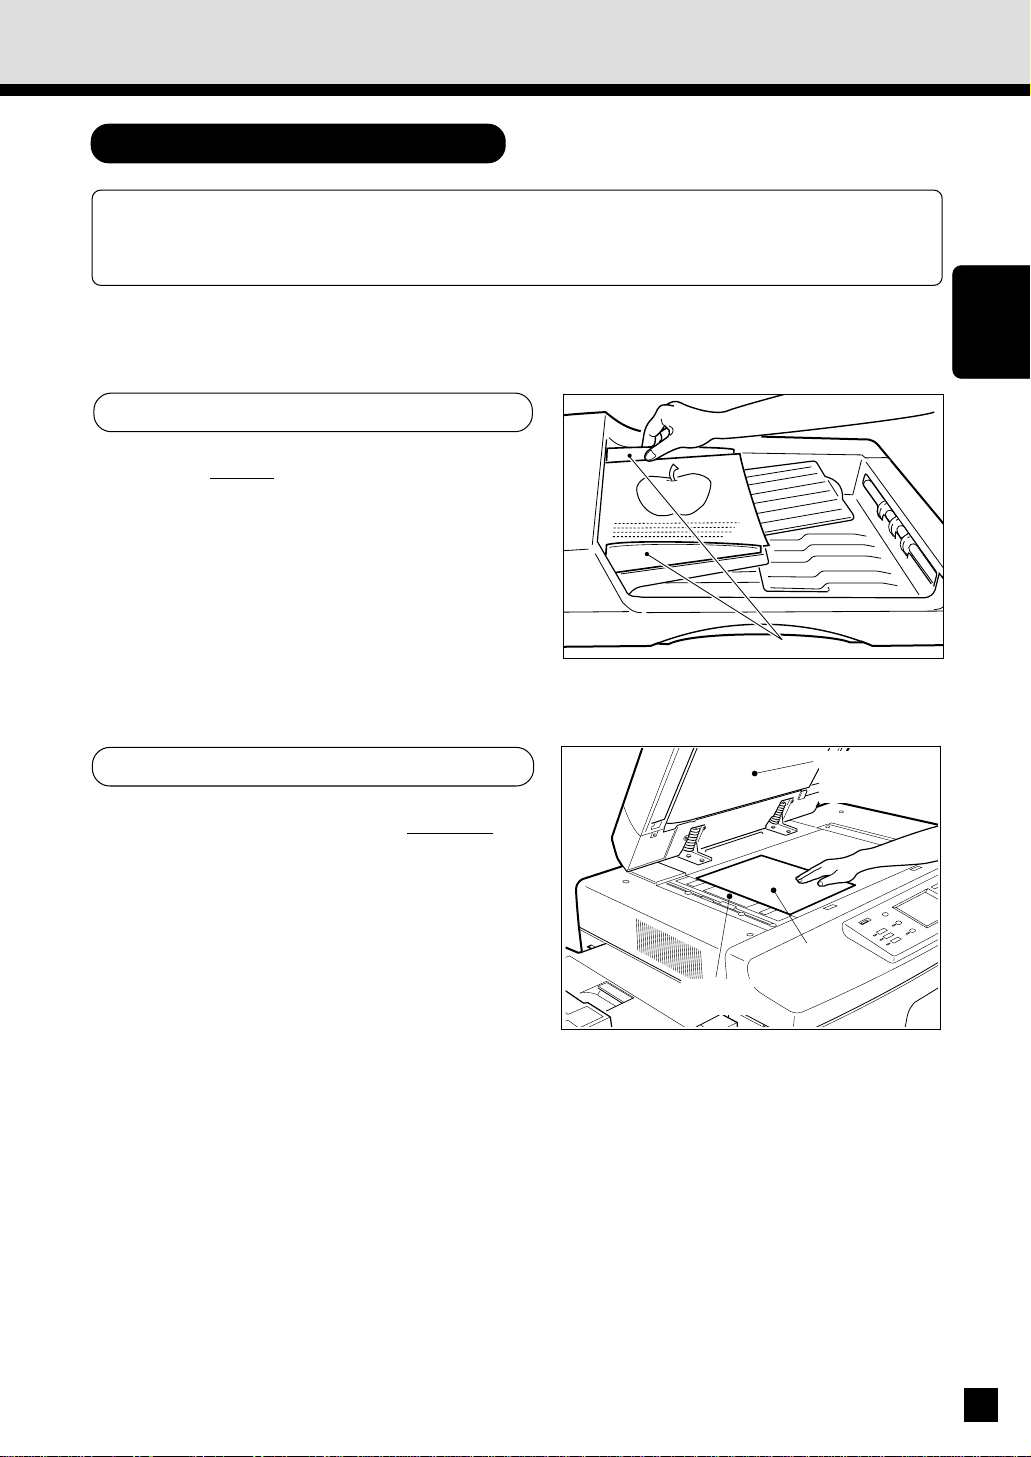
Place t he original(s) on the original feed
tray or on t he glass.
1
When U sing the Aut omatic Document Feeder
. After ali gning th e edges of the o riginals, set
them face u p on th e or ig in al f eed t ray an d
align the slides to the edges of the originals.
. The n u mb er o f t h e o r i g i n al s y o u can set u p
at a t im e is sh ow n b elo w.
Lett er, Let ter-R, Stat em ent-R
Ledg er : 30
Legal : 35
Not e: Rem ove any paper clips or stap les from
originals before placing them on the
or ig inal feed tray .
: 60
Slides
HOW TO
M AKE
COPIES
When Placing the Original on the Glass
. After lift ing the aut omatic do cument feeder,
place the original on the glass face down with
the bottom toward you and the left side
cent ered again st t he or ig inal scale.
Set t he desired copy modes.
. The au t o mat i c p ap er sel ect i o n (A PS) m o d e,
2
auto-exposure mode and copying of one
or ig inal are t he def aul t sett in gs.
Original
scale
Automatic
document
feeder
Original
17
Page 22

1. TURNING ON THE POWER SWITCH / AUTO JOB START (Cont.)
Press the START key.
3
. The message “Wait Warming Up. Auto start”
appears. When the copier becomes ready, it
aut o mati cal l y st art s co p y i ng i n t h e select ed
cop yi ng m o des.
ALL CLEAR
1 2 3
4 5 6
7 8 9
0C
CLEAR
STOP
START
Not e: You can change the copying modes even
after pressi ng the START key. To cancel
the Au to Job Start mode, p ress the ALL
CLEAR key.
ALL CLEAR
1 2 3
4 5 6
7 8 9
0C
CLEAR
STOP
START
18
Page 23
2. USING THE REVERSING AUTOMATIC DOCUMENT FEEDER
The Reversing Automatic Document Feeder autom atically feeds and copies sheet paper
originals placed on the feeding tray one at a time. This is called the “continuous feed mode.”
You can al so m an u al l y f eed o r i gi n al s i n on e sh eet at a t ime. Th i s i s cal l ed t h e “ sin g l e f eed
m ode.” If y ou h ave tw o-sided ori gin als, the docum ent f eeder automatical ly r everses the
or ig in als so th at bo th sid es can b e cop ied .
Precautions when Feeding Originals
Use originals wit h a paper w eight in the range of 16 t o 24 lb.
1
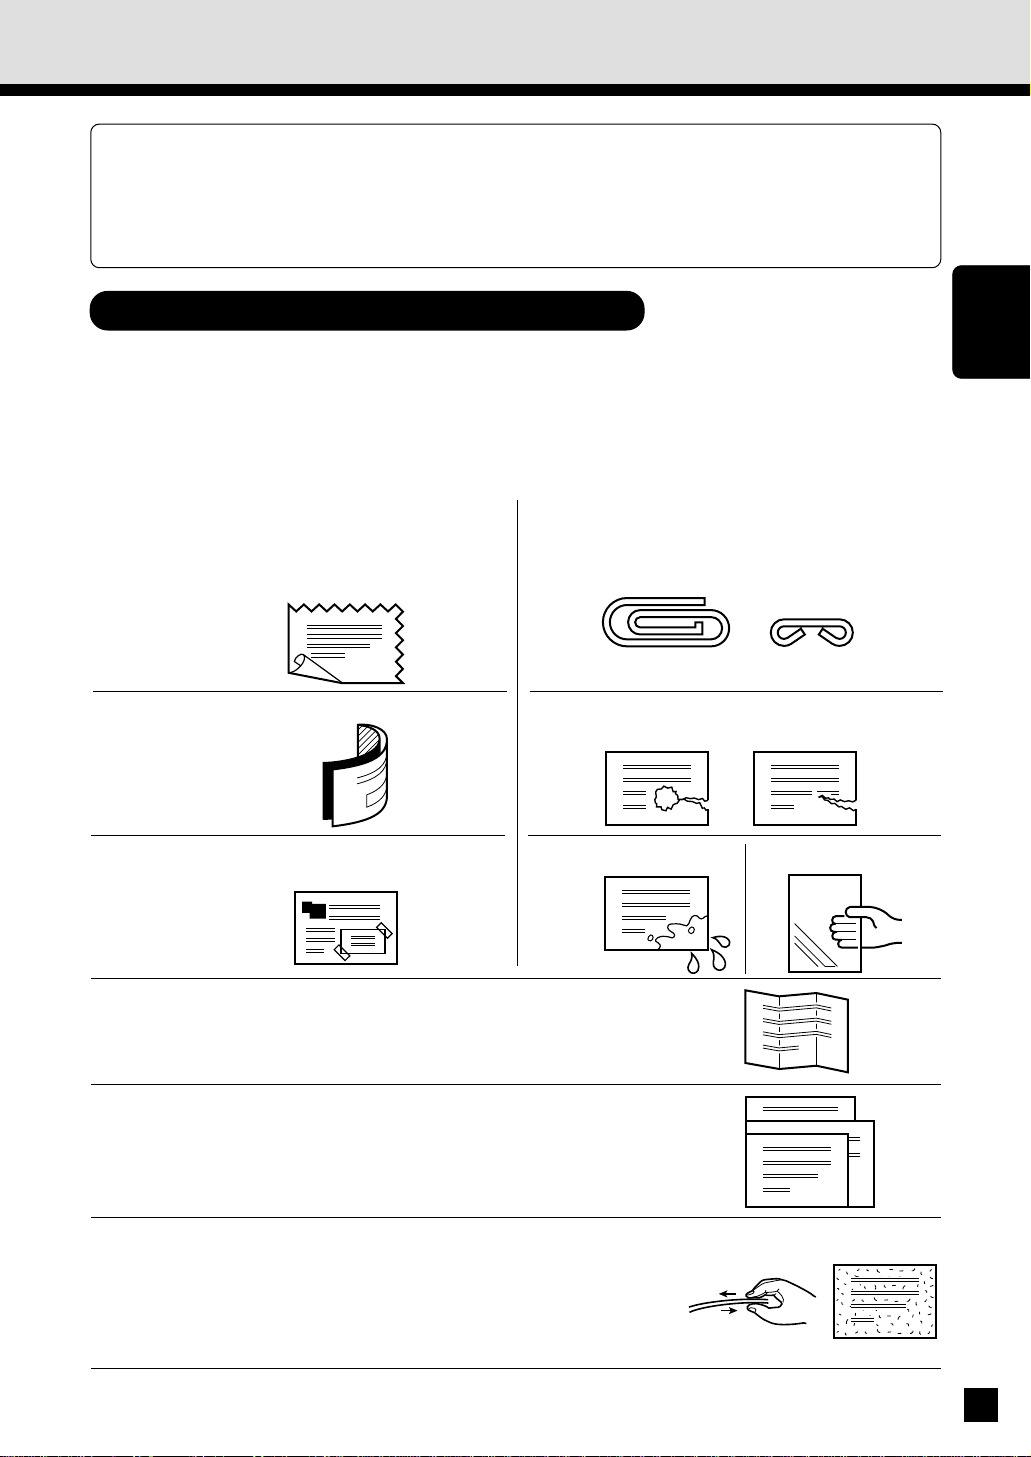
Do not use the following types of originals as they tend to misfeed or become damaged
in the aut omat ic document feeder:
2
(1) Badly wrinkled or folded originals. In
particular, originals whose leading edge
is curled may not be correctly fed into the
rev ersi ng au to mat ic d ocum en t feed er.
(2) Carbo n p aper
(3) Taped or igi nal s
(4) Clip ped or st apl ed or ig inal s
(5) Torn originals (including those with holes
in th em)
(6) Dam p o rig in als (7) OHP fil m ori gi nals
HOW TO
M AKE
COPIES
Folded or c urled originals s hould be smoothed out before
being set on the aut omat ic document feeder.
3
Do not mix originals of different widths at the same time.
4
If the surface of the originals is s o rough that they cannot
be moved when t wo of t hem are pinched between t wo
5
fingertips, or if the surface has been processed, these
originals should not be used even if the paper weight is
w ithin t he recom mended range.
19
Page 24
2. USING THE REVERSING AUTOMATIC DOCUMENT FEEDER (Cont.)
Copying in the Cont inuous Feed Mode
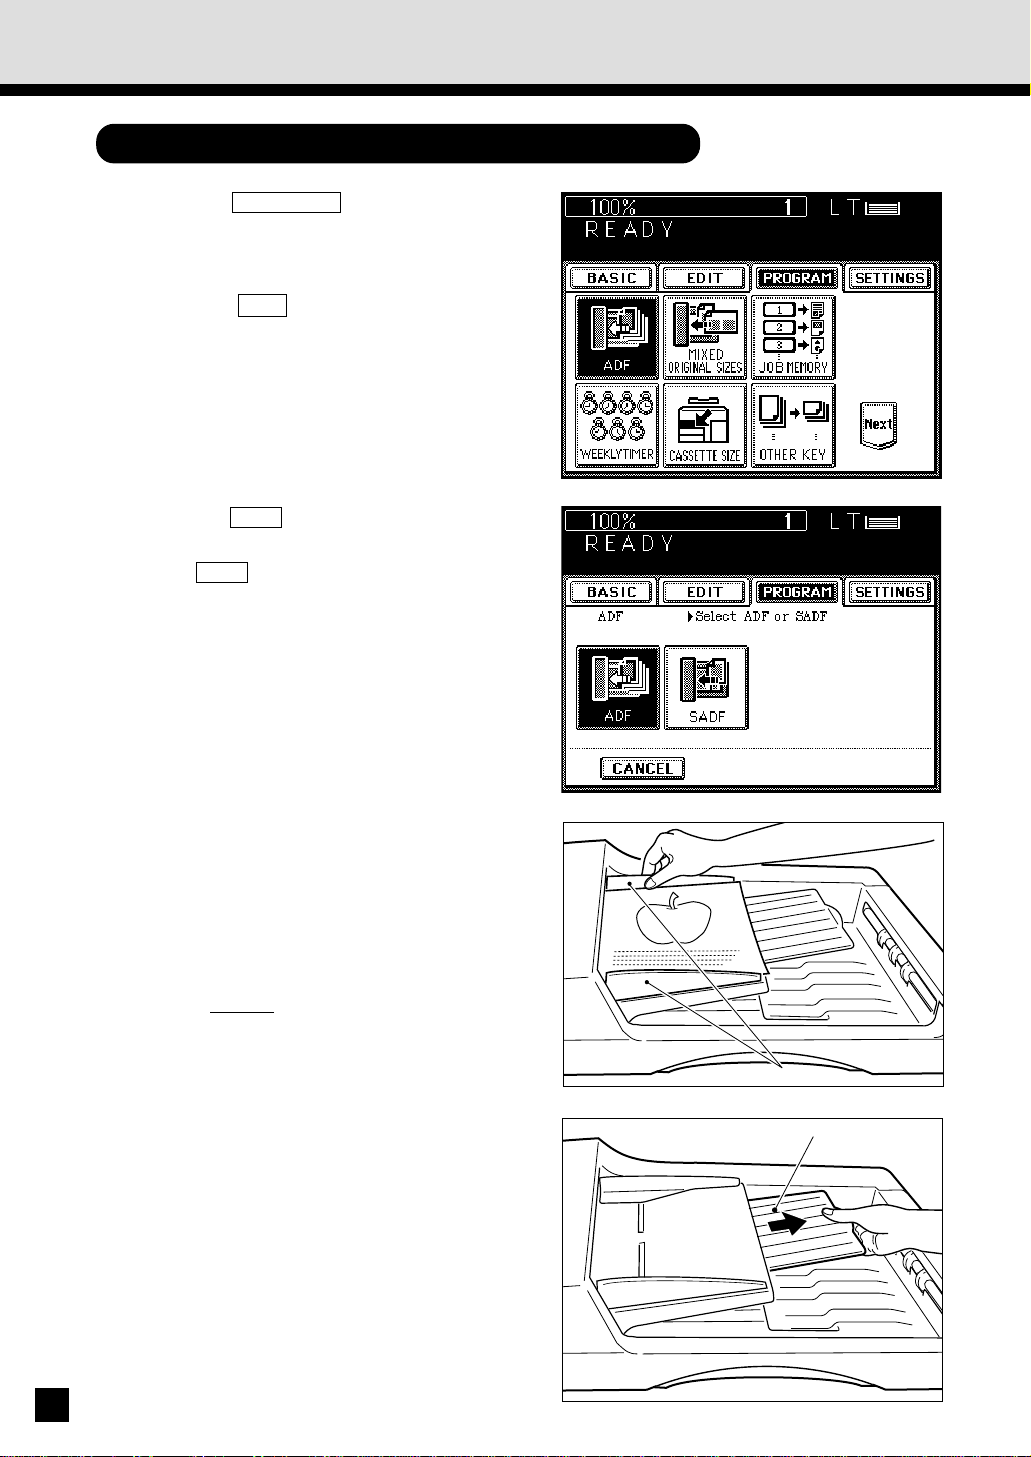
Press the PROGRAM key on the display
panel.
1
. The m en u on th e rig ht appear s.
Press the ADF key.
. The document feeder menu on the right
2
3
appears.
Press the ADF key on the panel to select
continuous feed.
. The A DF key i s h ig h l i gh t ed an d set as t h e
def aul t feed m ode.
. The display panel returns to the original
display.
20
Select the desired copy size, reproduction
ratio, exposure and copy quantity.
4
. The au to mat ic p aper selecti on m ode i s set
as th e def ault m ode.
Plac e the originals on the original feed tray.
. After ali gning th e edges of the o riginals, set
5
6
them face u p on th e or ig in al f eed t ray an d
align the slides to the edges of the originals.
. The n um ber of or igi nal s you can l oad at a
ti m e is sho w n bel ow .
Lett er, Let ter-R, Stat em ent-R
Ledg er : 30
Legal : 35
Press the START key.
. The originals are fed starting with the
lowermost one, copied and then exit onto the
or ig inal exi t area.
: 60
Slides
Holder
Page 25

Tip: If you want to set more originals than the
maximum number which can be set on the
original feed tray at one time, you may add
or i gi nal s u p t o 3 t i m es at t h e m axi m u m .
Press the CONTINUE key during the
scanning. After scanning the loaded
or ig in als, p lace t he n ext set of or ig in als.
Set t he l ast pag es of the o ri gin als f irst .
Copying in the Single-Feed M ode
Press the PROGRAM key on the display
panel.
1
. The m en u on th e rig ht appear s.
Press the ADF key.
2
HOW TO
M AKE
COPIES
Pres s the SADF key on the panel to select
single feeding.
3
. The SA DF key is hi g hli ght ed and sel ect ed.
. The display panel returns to the original
display.
Select the desired copy size, reproduction
ratio, exposure and copy quantity.
4
. The au to mat ic p aper selecti on m ode i s set
as th e def ault m ode.
21
Page 26
2. USING THE REVERSING AUTOMATIC DOCUMENT FEEDER (Cont.)
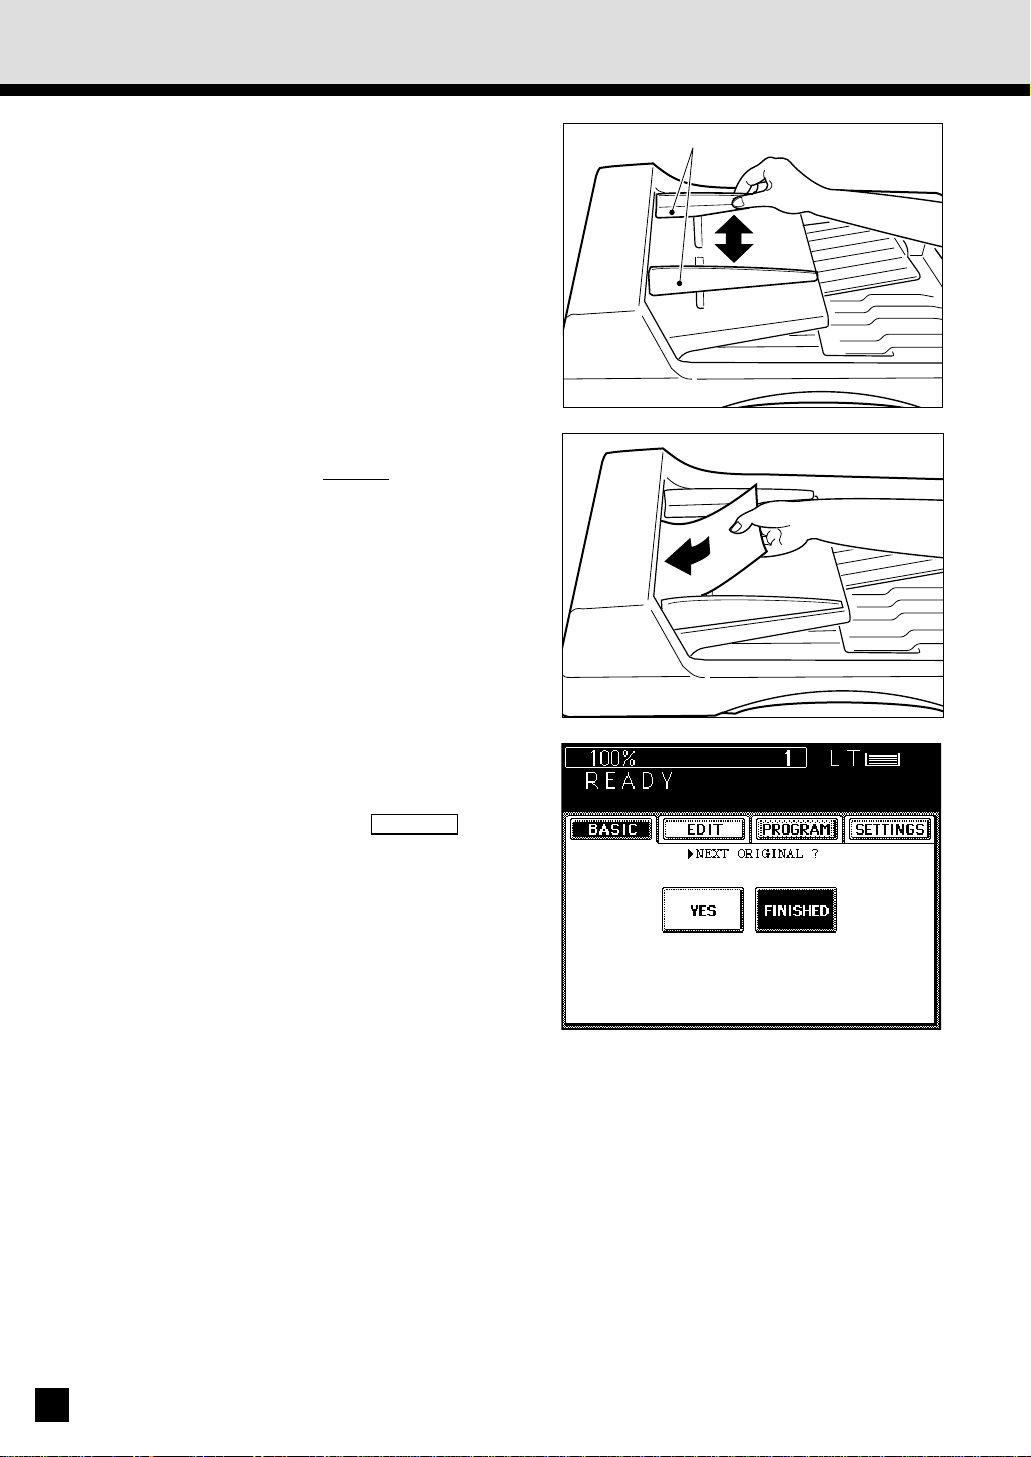
Align the slides on the original feed tray
to t he size of the original.
5
. Set t he sl ides a l it tl e wi der than th e actu al
or ig inal w idt h.
Insert the original.
. Place the original face up and insert it in
6
str aig ht al on g th e sli des.
. When the original starts being pulled in
aut om ati call y, let go of t he o rig in al.
The original is automatically copied and then
exi ts o nto th e ori gi nal ex it area.
Sli des
Not e: W hen u sin g t he si ngl e-feed m od e w ith
Sort/Group/Staple copying or with the
functions in the “ Using the Editing
Functions” , press the F INISHED key after
all th e ori gi nals h ave b een set.
22
Page 27

Copying in the Mixed Originals M ode
Press the PROGRAM key on t he display
panel.
1
. The m en u on th e rig ht appear s.
Press the M IX ED ORIGINAL SIZES key.
2
Press the SET key.
3
Select the Automatic P aper Selection (APS)
mode or Automatic Magnification Selection
4
(AMS) mode. Then select the desired copy
size, reproduc tion ratio, exposure and c opy
quantit y as required.
HOW TO
M AKE
COPIES
Plac e the originals on the original feed tray.
. M i x ed or i g i n als o f Leg al an d Let t er -R/Lett er
5
6
and Ledger sized paper can be copied at the
sam e ti me.
. After ali gning th e edges of the o riginals, set
face u p o n t he o ri gin al f eed t ray and
them
align the slides to the edges of the originals.
. The n um ber of or igi nal s yo u can l oad at a
ti m e is 30.
Press the START key.
Sli des
23
Page 28
3. COPYING IN THE AUTOMATIC PAPER SELECTION MODE
Wh en t he p ow er sw it ch i s tu rn ed ON, t he A ut om at ic Paper Select io n (A PS) m od e is set as
th e def ault m ode.
In t his m o de, if you pl ace an or igi nal on t he or ig inal feed t ray or o n th e gl ass, the co pier
automatically detects the size of the original, and selects paper of the same size as the original.
Thi s m ode i s avai labl e on ly f or actual -size (100%) cop yin g.
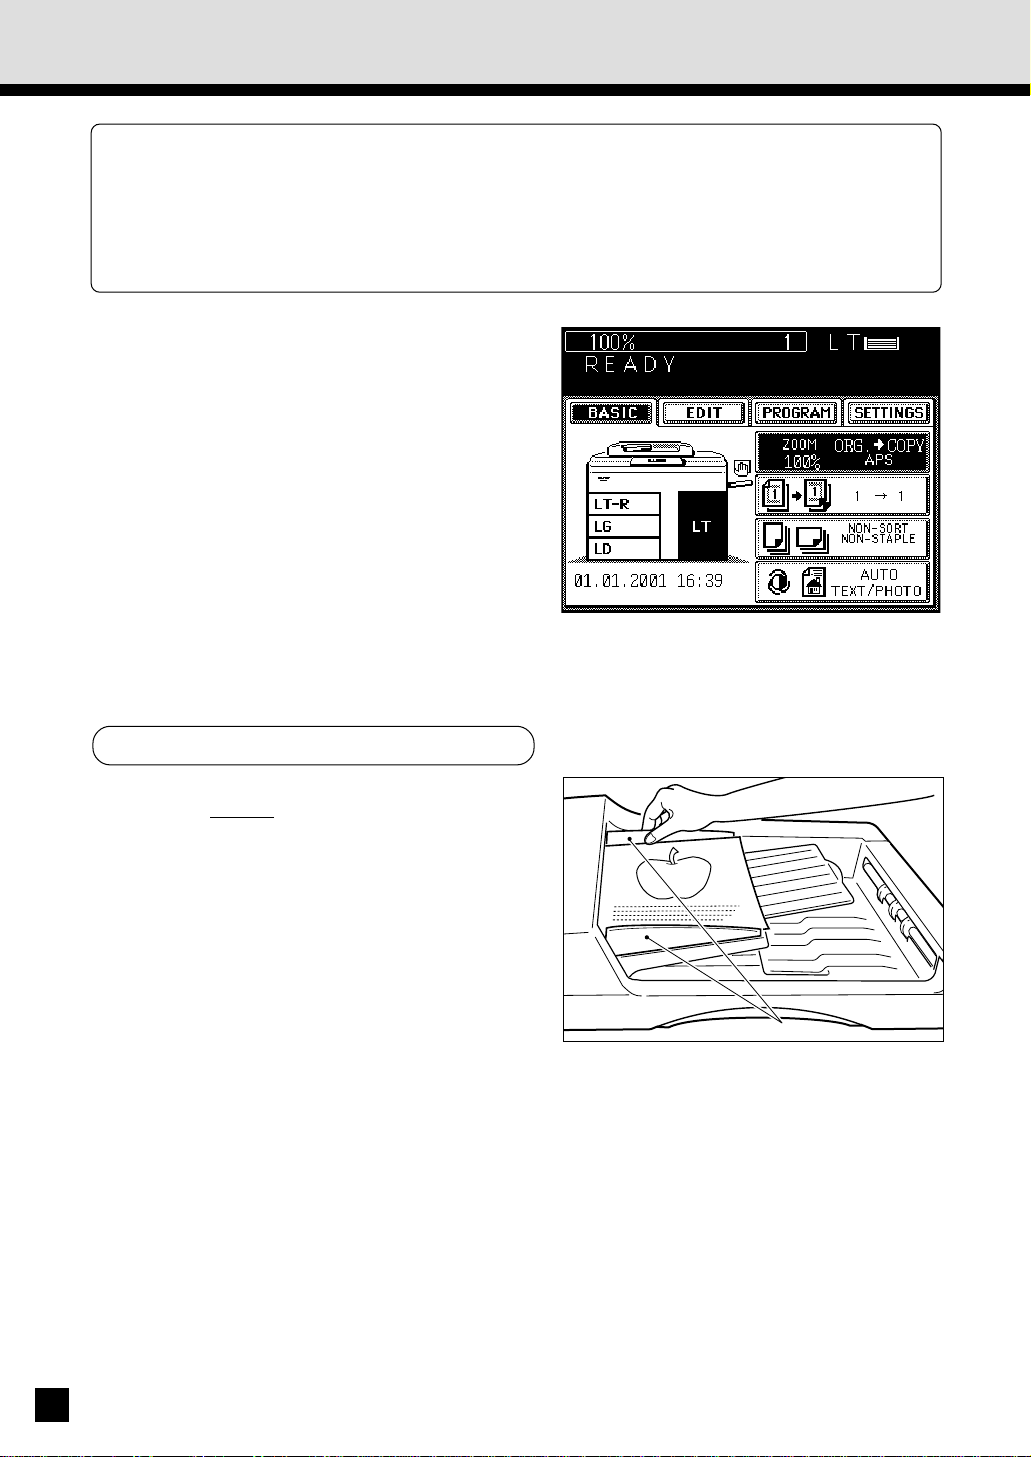
Check that the Automatic Paper Selection
mode is select ed.
1
Place t he original(s) on the original feed
tray or on t he glass.
2
When U sing the Aut omatic Document Feeder
. After ali gning th e edges of the o riginals, set
them face u p on th e or ig in al f eed t ray an d
align the slides to the edges of the originals.
. The n um ber of or igi nal s you can l oad at a
ti m e is sho w n bel ow .
Lett er, Let ter-R, Stat em ent-R
Ledg er : 30
Legal : 35
. When t he START key is pr essed, the senso r
det ects t he si ze of th e or ig inal , and select s
th e pap er size m atch ed to th e ori gi nal.
Not e: Remove any paper clips or stap les from
originals before placing them on the
or ig inal feed tray .
: 60
Slides
24
Page 29
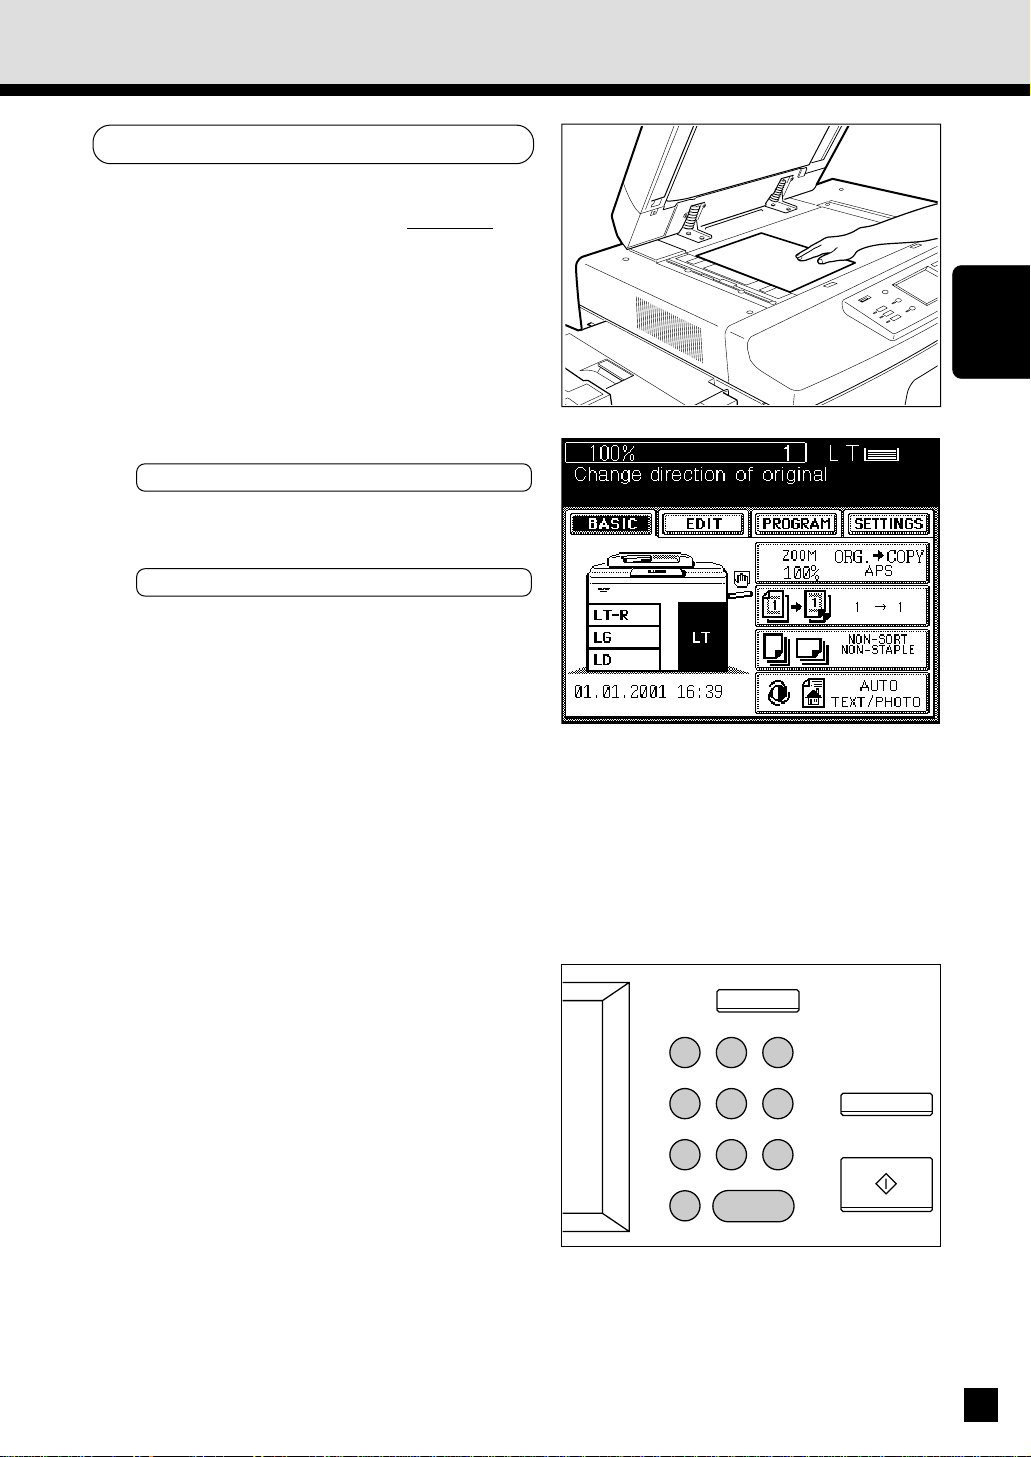
When Placing the Original on the Glass
. After lift ing the aut omatic do cument feeder,
place the original on the glass face down with
the bottom toward you and the left side
cent ered again st t he or ig inal scale.
. The sensor unit immediately detects the siz e
of th e ori gi nal , and sel ects t he ap pro pr iat e
pap er si ze.
. Close the automatic document feeder slowly
aft er t he or ig inal size has b een det ected .
. Somet i mes t h e f o l l o wi n g message ap p ear s:
Chang e di recti on of o ri gin al
chan ge th e dir ection o f th e origi nal on t he
gl ass.
If t he f oll ow in g m essage ap pear s:
Set co rr ect cassett e
in stal l th e cor rect-si zed casset te.
HOW TO
M AKE
COPIES
,
,
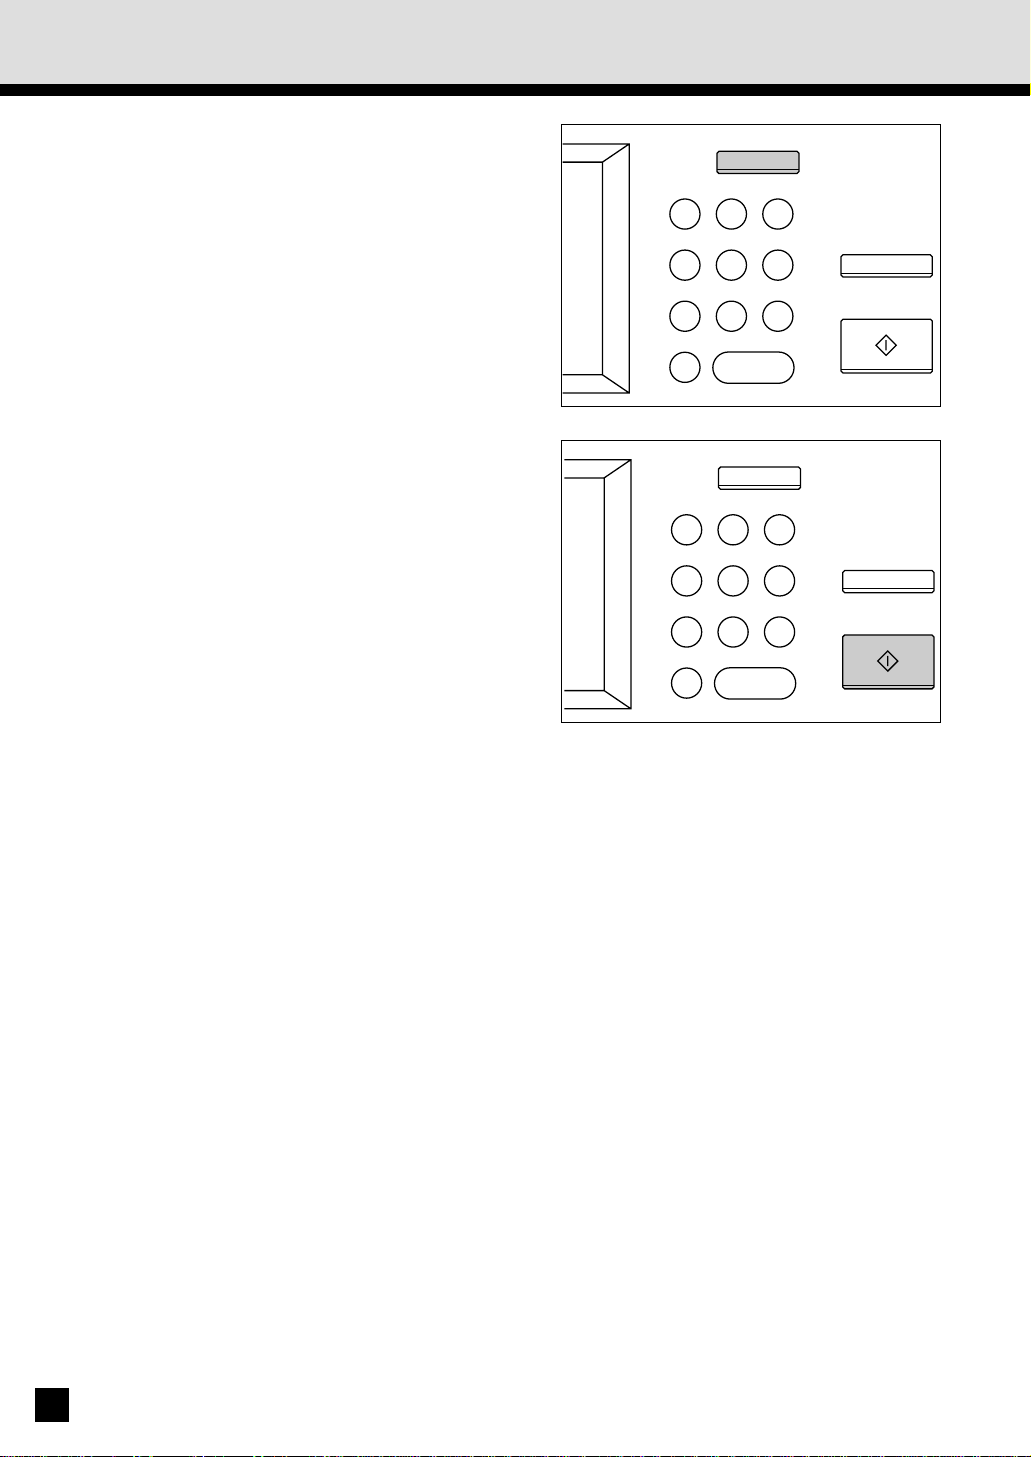
Select the exposure.
. The AUTO-EXPOSURE mode is set as the
3
4
default mode, and provides the optimum
exposure automatically according to the
dar kness o f th e or igi nal .
. If y ou w ant to select th e desi red exp osu re,
see pag e 46.
Key in the desired copy quant ity.
. You can key in u p t o 999.
. There is n o need for th is when maki ng onl y
on e cop y.
. Wh en an in corr ect quan t ity is set, p r ess the
CLEAR key an d key i n t he cor rect num b er.
ALL CLEAR
1 2 3
4 5 6
7 8 9
0C
C
CLEAR
STOP
START
25
Page 30
3. COPYING IN THE AUTOMATIC PAPER SELECTION MODE (Cont.)
. If you press the ALL CLEAR key, all current copier
settings will be cleared and returned to the default
settings. For details on the default copy mode, see
pag e 54.
Press the START key.
. Copying starts and when the required number
5
of copies are made, the copier automatically
stops.
. If you do not press the START key w ithin
about 45 seconds after having set the desired
copy modes, the functions you have selected
are automatically cleared and the copier
ret ur ns to th e defau lt copy m ode.
ALL CLEAR
1 2 3
4 5 6
7 8 9
0C
CLEAR
ALL CLEAR
1 2 3
4 5 6
7 8 9
0C
CLEAR
STOP
START
STOP
START
Not e: The copier may not be able to detect the
size of the following types of originals in
th e APS m ode:
. Transparent originals such as OHP film
. Ori gi nals w i th b lack ar eas
26
Page 31

4. ACTUAL-SIZE COPYING BY SPECIFYING THE COPY SIZE
When copying irregular-siz e originals such as newspapers and magazines, or originals unable
to be det ect ed in the au tomat i c paper selecti o n (APS) m ode, d o so b y speci f yin g th e desir ed
copy siz e. For copying those originals in the enlargement or reduction mode, see “REDUCTION
AN D ENLA RGEMENT COPYING” o n p age 29.
Press the ZOOM ORG.→COPY key.
1
HOW TO
M AKE
COPIES
Select the copy size.
. Press the cassette of the desired copy paper
2
size chosen from t hose listed in the Copy
colum n.
. Or sel ect t he d esired cassett e on the Basi c
pan el.
Place t he original(s) on the original feed
tray or on t he glass.
3
When U sing the Aut omatic Document Feeder
. After ali gning th e edges of the o riginals, set
them face u p on th e or ig in al f eed t ray an d
align the slides to the edges of the originals.
. The n um ber of or igi nal s you can l oad at a
ti m e is sho w n bel ow .
Lett er, Let ter-R, Stat em ent-R
Ledg er : 30
Legal : 35
Not e: Rem ove any paper clips or stap les from
originals before placing them on the
or ig inal feed tray .
: 60
Slides
27
Page 32

4.
ACTUAL-SIZE COPYING BY SPECIFYING THE COPY SIZE (Cont.)
When Placing the Original on the Glass
. After li fting the aut omatic do cument feed er,
place the original face down on the glass with
the bottom toward you, and the left side
cent ered again st t he or ig inal scale.
. The y ell ow i nd icat o rs sh ow t he ar ea of th e
or ig inal to be cop ied .
. Close the automatic document feeder slowly.
Select the exposure and copy quantity as
required.
4
Press the START key.
5
Note: If ther e are sheet s of p aper set on t he
sheet bypass, you must press the COP YSIZE key corresponding to the siz e of the
sheet s. (See pag e 50.)
ALL CLEAR
1 2 3
4 5 6
7 8 9
0C
CLEAR
STOP
START
28
Page 33

5. REDUCTION AND ENLARGEMENT COPYING
Ther e are t hree m et hod s avai labl e fo r enl arg emen t an d red uct ion copy in g.
. Usi ng Aut om ati c M agni fi catio n Sel ectio n (AM S):
Af t er select i n g th e A MS m o d e an d th e co p y si ze, w h en yo u p l ace an o r i g in al o n th e g l ass
or w hen an o ri gi nal is f ed f ro m th e aut om at ic d ocu m ent feed er, t he co pi er au to m ati call y
det ects t he size of th e ori gi nal, an d cal culat es th e appr op riat e rep rod ucti on rati o.
. Speci fy ing th e ori gi nal an d co py si zes:
Wh en y o u sp eci f y b o t h t h e o r i g i n al an d co p y si zes, th e co p i er au t o mat i cal l y cal cu l at es t he
app ro pri ate r epro du ctio n rat io .
. Usi ng the ZOOM key s:
The ZOOM key s
in crem ent s of 1%.
Dow n an d Up all ow sel ect io n o f t h e desi red rep ro d uct io n r at io in
HOW TO
M AKE
COPIES
Using Aut omatic M agnification Selection
Press the ZOOM ORG.→COPY key.
1
Press the AM S key.
. The A M S key get s hi ghl ig hted .
2
Press the desired COPY-SIZE key.
. The selected C OPY-SIZE key gets highlighted.
3
Place t he original(s) on the original feed
tray or on t he glass.
4
When U sing the Aut omatic Document Feeder
. After ali gning th e edges of the o riginals, set
them face u p on th e or ig in al f eed t ray an d
align the slides to the edges of the originals.
. The n um ber of or igi nal s yo u can l oad at a
ti m e is sho w n bel ow .
Lett er, Let ter-R, Stat em ent-R
Ledg er : 30
Legal : 35
Note: Remov e any paper cli ps or staples f rom
originals before placing them on the
or ig inal feed tray .
: 60
Slides
29
Page 34

5. REDUCTION AND ENLARGEMENT COPYING (Cont.)
When Placing the Original on the Glass
. After li fting the aut omatic do cument feed er,
place the original on the glass face down with
the bottom toward you and the left side
cent ered again st t he or ig inal scale.
. Close the automatic document feeder slowly.
. The sensor unit immediately detects the siz e
of the original, selects the paper size matched
to the original, and calculates the reproduction
ratio based on the detected original size and
the selected copy size. The reproduction ratio
is t hen disp lay ed.
. If t he f oll ow in g m essage ap pear s:
Change direct ion of or iginal ,
chan ge t he di rect ion of the o ri gi nal o n t he
gl ass.
. If t he f oll ow in g m essage ap pear s:
Use r edu ct io n casset te ,
install the correct-sized cassette, and set the
or ig inal on the g lass ag ain.
Select the desired exposure and copy
quantity.
5
Press the START key.
. Reduced o r enl ar g ed co p ies o f t he sel ect ed
6
size w il l be m ad e.
Not e: The copier may not be able to detect the
fo l lo wi n g t y pes o f o ri g i nal s i n th e A M S
m o de:
. Transparent originals such as OHP film
. Ori gin als w it h b lack areas
ALL CLEAR
1 2 3
4 5 6
7 8 9
0C
CLEAR
STOP
START
30
Page 35

Selecting the Original Size and the Copy Size
Press the ZOOM ORG.→COPY key.
1
Press the ORIGINAL SIZE key of the same
size as t he original to be copied.
2
Press the desired COPY-SIZE key.
. The copier calculates the correct reproduction
3
ratio based on the selected orig inal size and
copy siz e, and displays the reproduction ratio
on th e repr od ucti on -rati o d ispl ay.
HOW TO
M AKE
COPIES
. If t he d esir ed si ze of p ap er i s no t i n an y o f
the installed cassettes, the following message
appears:
Set co rr ect cassett e .
Inst all the co rr ect-si zed casset te or use t he
sheet by pass.
Place t he original(s) on the original feed
tray or on t he glass.
4
When U sing the Aut omatic Document Feeder
. After ali gning th e edges of the o riginals, set
face u p o n t he o ri gin al f eed t ray and
them
align the slides to the edges of the originals.
. The n um ber of or igi nal s yo u can l oad at a
ti m e is sho w n bel ow .
Lett er, Let ter-R, Stat em ent-R
Ledg er : 30
Legal : 35
Not e: Rem ove any paper clips or stap les from
originals before placing them on the
or ig inal feed tray .
: 60
Slides
31
Page 36

5. REDUCTION AND ENLARGEMENT COPYING (Cont.)
When Placing the Original on the Glass
. After li fting the aut omatic do cument feed er,
place the original on the glass face down with
the bottom toward you and the left side
cent ered again st t he or ig inal scale.
. Close the automatic document feeder slowly
aft er t he or ig inal size has b een det ected .
Select the desired exposure and copy
quantity.
5
Press the START key.
6
Not e: If there are sh eets of paper set o n the sheet bypass, yo u must press t he COPY-SIZE key
cor resp ond in g to th e size of t he sh eets. (See pag e 50.)
Using t he Zoom Keys
Pres s the cas sette of the desired paper s ize
on the display.
1
Press the ZOOM ORG.→COPY key.
2
Select the desired reproduction ratio using
the ZOOM keys.
3
. For enlargement, use the UP key. For
red uct ion , use t he Do wn key.
. Each ti m e yo u pr ess eit her ZOOM key , th e
rep ro du cti on rat io chan ges b y 1%. Ho ld in g
down the key changes the reproduction ratio
continuously.
. Pressing the 400% key or the 25% key causes
400% or 25% to be i m med iat ely di spl ayed .
. Pressin g the 100% key r etur ns th e co pier t o
actu al-si ze copy in g.
32
Page 37

Plac e the original, key in the copy quantity,
and press t he START key.
4
HOW TO
M AKE
COPIES
33
Page 38

6. DUPLEXED COPIES FROM SINGLE-SIDED ORIGINALS
Ther e are t hree m et hod s of maki ng dup lex ed cop ies f rom si ngl e-sid ed or ig inal s:
• U sing the autom atic docum ent feeder – For duplex-copy ing from sheet originals o f the
speci fi ed sizes and w eigh ts.
• Set t ing originals on the glass – For d up l ex-co p yi ng f ro m o ri g in al s th at can n ot be h an dl ed
by th e auto m atic d ocu men t f eeder.
• Using the dual-page function – For d u p l ex -co p y i n g f rom t h e f aci n g pages o f a b o ok or t wo
sheet or igi nal s (Letter size) pl aced on th e glass.
Example of Duplexed Copies from Single-Sided Originals
Originals
Dup lex ed cop y
When U sing the Aut omatic Document Feeder
Press the BASIC key to enter the Basic
menu.
1
. The m en u on th e rig ht appear s.
Press the 1→1 key.
34
Page 39

Press the 1→2 key to select t he function
of single-s ided originals to duplexed copies.
2
Note: If sheets of paper are left in the automatic
duplexer, the STACK symbol flashes
and th is m essage i s show n :
Remo ve p aper f ro m d up lexer
Pull out the automatic duplexer slowly and
rem o ve th e sheets f rom t he in side (see p age
141~144).
If t hi s messag e app ears:
To ex it paper in dup lex er:
Press HELP ,
press HELP and the sheets of paper will
aut om ati call y exi t.
Select the desired copy size, exposure,
reproduction ratio and copy quantit y.
3
HOW TO
M AKE
COPIES
Place t he originals.
. After ali gning th e edges of the o riginals, set
4
them face u p on th e or ig in al f eed t ray an d
align the slides to the edges of the originals.
. The n um ber of or igi nal s yo u can l oad at a
ti m e is sho w n bel ow .
Lett er, Let ter-R, Stat em ent-R
Ledg er : 30
Legal : 35
: 60
Slides
35
Page 40

6. DUPLEXED COPIES FROM SINGLE-SIDED ORIGINALS (Cont.)
. When originals are to be placed horizontally
(Ledger, Leg al and Lett er-R), invert th e oddnumbered and even-numbered originals
relative to each other as shown before setting
them.
4
5
Press the START key.
. Duplexed copies are output from the copier.
5
When Placing the Original on the Glass
Press the BASIC key to enter the Basic
menu.
1
. The m en u on th e rig ht appear s.
Press the 1→1 key.
3
2
1
36
Pres s the 1→2 key to s elect the function
of single-sided originals to duplexed
2
copies.
Page 41

Select the desired copy size, exposure,
reproduction ratio and copy quantit y.
3
Place t he first page of the originals (first
side).
4
. After lift ing the aut omatic do cument feeder,
place the original on the glass
the bottom toward you and the left side
cent ered again st t he or ig inal scale.
. Close the automatic document feeder slowly.
Press the START key.
face down with
5
Place t he next original (second side).
. When the first-side original was placed
6
vertically, the second-side original should be
pl aced i n th e sam e dir ecti on.
Vert ical placem en t
HOW TO
M AKE
COPIES
. When the first-side original was placed
horiz ontally, the second-side original should
be placed horizontally but in the opposite
direction.
(First sid e)
Hor izon tal p lacem ent
(First sid e) (Secon d si de)
(Secon d si de)
37
Page 42

6. DUPLEXED COPIES FROM SINGLE-SIDED ORIGINALS (Cont.)
Press the START key.
7
Repeat steps 4 to 7 until all t he originals
are copied.
8
Press the FINISHED key after all the
originals have finished being copied.
9
. Duplexed copies are output from the copier.
38
Page 43

7. DUPLEXED COPIES FROM TWO-SIDED ORIGINALS
Placin g two -sid ed or i gi n als o n th e o ri g i nal f eed t r ay an d pr essi ng t he STA RT key f eeds o n e
of th e ori gi nals an d co pies t he f irst sid e of t he o rig in al on to a sh eet.
The original and the sheet are then turned over automatically and the second side of the original
is co pi ed on to the o th er sid e of the sh eet.
You can set up t o ab out 60 Lett er size or ig inal s at a ti m e.
Example of Duplexed Copies from Tw o-Sided Originals
HOW TO
M AKE
COPIES
Ori gi nal
Dup lex ed cop y
Procedure
Press the BASIC key to enter t he Basic
menu.
1
. The m en u on th e rig ht appear s.
Press the 1→1 key.
Press the 2→2 key to select the function
of duplexed copies from two-sided
2
originals.
39
Page 44

7. DUPLEXED COPIES FROM TWO-SIDED ORIGINALS (Cont.)
Select the desired copy size, reproduction
ratio, exposure and copy quantity.
3
. The au to mat ic p aper selecti on m ode i s set
as th e def ault m ode.
Place t he originals.
. After ali gning th e edges of the o riginals, set
4
5
them face u p on th e or ig in al f eed t ray an d
align the slides to the edges of the originals.
. The n um ber of or igi nal s you can l oad at a
ti m e is sho w n bel ow .
Lett er, Let ter-R, Stat em ent-R
Ledg er : 30
Legal : 35
Note: Remov e any paper cli ps or staples f rom
originals before placing them on the
or ig inal feed tray .
Press the START key.
. Duplexed copies are output from the copier.
: 60
Slides
40
Page 45

8. SINGLE-SIDED COPIES FROM TWO-SIDED ORIGINALS
Example of Single-Sided Copies from Two-Sided Originals
Original Copy Copy
HOW TO
M AKE
COPIES
Procedure
Press the BASIC key to enter the Basic
menu.
1
. The m en u on th e rig ht appear s.
Press the 1→1 key.
Press the 2→1 key to select t he function
of single-sided copies from two-sided
2
originals.
41
Page 46

8. SINGLE-SIDED COPIES FROM TWO-SIDED ORIGINALS (Cont.)
Select the desired copy s ize, expos ure and
copy quantity.
3
. The au to m atic p aper select ion m od e is set
as th e def ault m ode.
Place t he originals.
. After ali gning th e edges of the o riginals, set
4
them face u p on th e or ig in al f eed t ray an d
align the slides to the edges of the originals.
. The n um ber of or igi nal s you can l oad at a
ti m e is sho w n bel ow .
Lett er, Let ter-R, Stat em ent-R
Ledg er : 30
Legal : 35
: 60
Note: Remov e any paper cli ps or staples f rom
originals before placing them on the
or ig inal feed tray .
Press the START key.
. Single-sided copies are output from the copier.
5
Slides
42
Page 47

9. DUPLEXED COPIES FROM BOOK ORIGINALS
Example of Duplexed Copies from a Book Original
Sin gl e-sided cop y
HOW TO
M AKE
1
Dup lex ed cop y
(Pages 2 and 3 are co pied )
COPIES
Exam pl e of
du pl ex cop yi ng:
Facing pag es 1 & 2
and 3 & 4
21
2
Sin gl e-sided cop y
43
4
43
Page 48

9. DUPLEXED COPIES FROM BOOK ORIGINALS (Cont.)
Procedure
Press the BASIC key to enter the Basic
menu.
1
. The m en u on th e rig ht appear s.
Press the 1→1 key.
Press the BOOK→2 key to select the
function of duplexed copies from book
2
originals.
44
Select the start and end page.
. Press th e desi red key .
3
. RIGHT→RIGHT Cop yi ng i s star ted f ro m a
right page of the book and it
end s on a rig ht page.
. RIGHT→LEFT Copy in g is st art ed fr om a
right page of the book and it
end s on a left pag e.
. LEFT→LEF T C opying is started from a left
page of the book and it ends
on a lef t pag e.
. LEFT→RIGHT Copying is started from a left
page of the book and it ends
on a ri ght pag e.
Select the copy size.
. Press th e LETTER key .
4
Page 49

Select the BOOK margin of IMAGE SHIF T
if necessary.
5
. See pag e 56.
Select the desired exposure, reproduction
ratio and copy quantit y.
6
Plac e the original and pres s the START key.
. The b o o k sh o u l d b e cen t er ed o n t h e y el l o w
7
8
in di cator li ne w it h it s bo tto m tow ar d yo u.
. The co py of p age 1 w ill exi t wit h it s reverse
side blank.The copies of page 2 and
subsequent pages will temporarily be stacked
in sid e the co pi er.
. Place th e fi rst p age o f th e or igi nal s fir st.
Set t he next original.
. Tur n o ver t he l eaf o f t he b oo k an d set it in
th e sam e way as pr evio usl y.
B
O
O
K
Yell ow in di cator li ne
HOW TO
M AKE
COPIES
Press the START key.
9
Repeat steps 8 and 9 until you finish c opying
the book.
10
Press the COPY FINAL PAGE key if
necessary.
11
. If you want to copy only the next page, press
th e COPY FINAL PAGE key.
Finally press the FINISHED key.
. The co py of the l ast p age w i ll ex it w ith it s
12
rev erse si de bl ank.
45
Page 50

10. COPYING WITH COPY DENSITY SELECTION
Ther e are t wo ty pes of exp osur e: aut om ati c expo sur e and m anu al ex posu re.
In the au tomat ic exp osure m ode, t he copier autom atically detect s the densi ty of t he or iginal ,
and select s th e op ti m um ex po sur e. Thi s m od e is su it abl e fo r o ri gi nal s con tai ni ng on ly tex t
and i ll ust r ati on s. Or ig i nal s w i th b lack ar eas and h alf to n ed o r ig in al s sho ul d be co p ied in t he
m anu al exp osu re m od e.
In t he m anu al ex posu re m od e, yo u can p ro duce l igh ter or d arker copi es.
Copying in the Automatic Exposure M ode
M ake sure that "AUTO" is displayed.
. If " M an u al " i s d i sp lay ed , p r ess th e key , t hen
1
2
pr ess th e AUTO key .
Plac e the original and pres s the START key.
. The copier automatically detects the density
of the original, and makes copies at the
op ti mu m expo sure.
Copying in t he Manual Exposure Mode
Press the TEXT/ PHOTO key.
1
Press the or key to enter the
manual exposure mode.
2
. To produce lighter copies, press the key.
Each time you press the key, the densityin d icat in g m ar k m ov es o ne st ep to t he l eft ,
and your copies are produced proportionally
lighter.
. To produce darker copies, press the key.
Each time you press the key, the densityindicating mark moves one step to the right,
and your copies are produced proportionally
darker.
Place t he original and press the START
key.
3
. How t o set o ri gin als→See p age 17.
. Copi es ar e mad e i n t he select ed ex posu r e.
46
Page 51

11. COPYING IN THE TEXT OR PHOTO MODE
You can sel ect the cop y mod e (Photo/Text, Text or Photo ) and pro duce clear co pies mat ched
to th e ty pe of or ig in al. Th e text m od e is su it able f or m akin g co pies o f o ri gi nal s cont ain in g
text, or text an d line artw ork. The photo mode is suit able for maki ng copies of o riginals
con tain ing black-an d-whi te ph oto s, colo r ph oto s or h alft one p hot os. The Pho to/Text mo d e is
set as t he d efaul t m od e. Thi s mo de i s used f or maki ng copi es of r egu lar o ri gin als.
Place t he original(s) on the original feed
tray or on t he glass.
1
. After ali gning th e edges of the o riginals, set
them
face u p o n t he o ri gin al f eed t ray and
align the slides to the edges of the originals.
Not e: Rem ove any p aper clip s or staples fr om
originals before placing them on the
or ig inal feed tray .
HOW TO
M AKE
COPIES
. Place the original face down on the glass, and
ali gn it w i th t he o rig in al scale o n t he lef t.
Press the TEXT/ PHOTO key.
2
Press either t he PHOTO or TEX T key.
. The sel ected key is h ig hli gh ted.
3
If necessary, press the or key
to adjust t he exposure.
4
Slides
Select the desired copy size, reproduction
ratio and copy quantit y.
5
Press the START key.
Not e: The am ou nt o f to ner co nsum ed v aries
6
depending on the originals and the image
qu ali ty m o de.
47
Page 52

12. BYPASS COPYING
The b yp ass copy in g m od e is con ven ient in the f ol low i ng i nst ances:
• w hen th e size of an y o f t he p aper cassettes i nst all ed i n t he cop ier is n ot th at w hi ch y ou
req ui re.
• w hen you w ant t o u se a special ty pe of paper such as OHP fi lm .
Place t he original(s) on the original feed
tray or on t he glass.
1
. After ali gning th e edges of the o riginals, set
them face u p on th e or ig in al f eed t ray an d
align the slides to the edges of the originals.
Note: Remov e any paper clips or stap les from
originals before placing them on the
or ig inal feed tray .
. After li fting the aut omatic do cument feed er,
place the original on the glass
the bottom toward you and the left side
cent ered again st t he or ig inal scale.
face down with
Slides
Select the desired exposure and
reproduction ratio.
2
48
Page 53

Place sheets of copy paper on the sheet
bypass.
3
The f ol low i ng m essag e appear s:
Ready f or byp ass feed ing
. Paper f r om si ze Ledger t o St atemen t -R can
be u sed.
. Place th e sheets on the by pass guide and
ali gn the sl id es to t he p aper si ze.
. You can set up to 100 sheets of paper (17 to
22 lb ).
. Thick sheets of paper (23 to 32 lb), OHP films,
sti cker l abel s sho uld be i nser ted on e sheet
at a t im e.
. For set ting Ledger, Leg al or Letter-R sized
pap er, p ull ou t th e pap er ho ld er.
HOW TO
M AKE
COPIES
Key in the desired copy quant ity.
4
Press the START key.
. If t h e BYPASS M ISFEED sym b ol f lash es on
5
the graphic di splay, rem ove all t he sheets
fr om th e sheet byp ass and repl ace th em.
49
Page 54

13. BYPASS COPYING BY SPECIFYING THE COPY SIZE
In b y p ass co py i n g by sp eci f y in g t h e co py si ze, yo u can select t h e f ol l o wi ng co p y i ng mo d es:
. Dup lex copy in g . Docu m ent st orag e . Im ag e shif t . Sort copy in g
. An no tati on . Edge er ase . Page nu m ber` . Dual-page copying
Place sheets of copy paper on the sheet
bypass.
1
The f ol low i ng m essag e appear s:
Ready f or byp ass feed ing
. Paper o f si ze Ledg er to St at emen t -R can be
used .
. Place th e sheets on the by pass guide and
ali gn the sl id es to t he p aper si ze.
. You can set up to 100 sheets of paper (17 to
22 lb ).
. Thick sheets of paper (23 to 32 lb), OHP films,
sti cker l abel s sho uld be i nser ted on e sheet
at a t im e.
. For setting Ledger , Legal or Letter-R sized
pap er, p ull ou t th e pap er ho ld er.
Select the desired copy size.
. Press th e desi red COPY-SIZE key.
2
.
If Let ter -R pap er is u sed, p ress t he COPYSIZE key twi ce. Th e pap er si ze in th e u p p er
right corner of the display panel will change.
Select the desired, image shift mode, edge
erase mode, dual-page copying, sort
3
copying, annotation, page number,
document storage or duplex copying mode
as well as the exposure and the reproduction
ratio.
50
Page 55

Key in the desired copy quant ity.
4
Place t he original(s) on the original feed
tray or on t he glass.
5
. After ali gning the edg es of the ori ginals, set
them
face u p o n t he o ri gi nal feed tr ay and
align the slides to the edges of the originals.
Not e: Remove any paper clips or stap les from
originals before placing them on the
or ig inal feed tray .
. After li fting the aut omatic do cument feed er,
place the original on the glass
the bottom toward you and the left side
cent ered again st t he or ig inal scale.
Press the START key.
face down with
6
Note: Rem o ve co p i es m ad e o n sp eci al sh eets
such as thick paper (23~35 lb.), OHP films
or sticker labels one by one. They should
not be allowed to stack up in the exit tray
or fi nish er (o pti on al).
Slides
HOW TO
M AKE
COPIES
51
Page 56

14
. INTERRUPT COPYING
The Interrupt Copy is a convenient feature that allows the user to pause a job that is currently
bei n g d o n e. Th i s mo d e al l o ws f o r a si n g l e co p y t o b e made f r o m ei t h er t h e b y p ass g u i d e o r
no m i n at ed casset t e. M u l ti p l e cop i es are p o ssi bl e b y p r essi ng t h e START key o n ce fo r ev ery
cop y r equi erd .
Press the IN TERRU PT key.
The f ol low i ng m essag e appear s:
1
Jo b i nter ru pted jo b 1 saved
HELP
Note: Interrupt copying is not available during
scanning of the originals. Press the
INTERRUPT key when t h e scan n i n g h as
comp l et ed .
Replace t he original w it h a new original.
. After li fting the aut omatic do cument feed er,
2
3
place the original on the glass face down with
the bottom toward you and the left side
cent ered again st t he or ig inal scale.
. Close the automatic document feeder slowly
aft er t he or ig inal size has b een det ected .
Not e: During the interruption, the autom atic
document feeder and automatic duplexer
are i no perab le.
Select the desired copy s ize, expos ure and
reproduction ratio.
ENERGY SAVER
TIMER
INTERRUPT
COPY
PRINTER/NETWORK
Press the START key.
. You can make multiple copies by pressing the
4
5
52
START key o nce f or each cop y desi red .
After int errupt copying is finished, press
the IN TERRUPT key again.
. Thi s m essage w il l app ear:
READY to resu me j ob 1
Page 57

15. PRESETTING OF COPY MODES
JOB PRESET is a f eat u r e t h at al l o ws an o t h er jo b t o b e set w h i le a cur r en t job i s b ei ng d o n e.
You can p reset t he n ext co py mo des d uri ng a co py run .
You cann ot p reset the n ext copy m odes d ur ing the scan ni ng o f t he or ig inal s.
Press the JOB PRESE T key during a copy
run.
1
Set t he next copy modes.
2
HOW TO
M AKE
COPIES
Plac e the originals on the original feed tray
and press t he START key.
3
The preset job will start when the current
copying is finished.
4
. To can cel the p r eset cop y m o des, pr ess t he
JOB CAN CEL key.
Note: If t h e STOP key i s p r essed o r t h e co p y
ru n i s i n t err u p t ed d u e t o r u n n i n g o u t o f
paper, etc. du ring job presetting , the set
modes are cleared. Set the desired cop y
modes again after the copy operation
restarts.
53
Page 58

16. ALL CLEAR KEY
Wh en yo u w an t to set th e co py mo des o v er ag ai n , or af ter a co py r u n h as f in i sh ed, p r essin g
th e ALL CLEAR key r etu rn s t he co pi er to th e d efau lt co py m o des. Th e def au lt m o des ar e t he
status when the “ R EADY” message is shown after the power is turned ON. The following modes
are set as def ault m odes:
. Copy quan ti ty “ 1”
. Repro duct io n rat io “ 100%”
. Phot o/Text m ode
. Au tom at ic exp osu re
. Au tom at ic pap er sel ectio n
. Cont inu ou s-feed m o de
. No n-sor t m od e (if the o pt ion al f ini sher is in stal led)
Using t he ALL CLEAR key
Press the ALL CLEAR key.
. The d isp l ay o n t he co nt ro l pan el r etu rn s t o
1
th e def ault m odes.
Tip: The co pier returns to the default co py
m o des aft er 45 second s even i f the A LL
CLEAR key i s not pr essed.
ALL CLEAR
1 2 3
4 5 6
7 8 9
0C
CLEAR
STOP
START
54
Page 59

USING THE EDITING FUNCTIONS
USIN G THE
EDITING
FUNCTIONS
55
Page 60

1. IMAGE SHIFT COPYING
You can cr eat e m arg i ns o n t h e cop y, an d yo u can speci f y t he p o sit io n of th ese m ar gi n s on
eit her th e r ig ht or th e lef t sid e of th e cop y. Yo u can al so cr eate m ar gi ns o n cop ies o f b oo k
or i gi n als w i t h j u st t h e use o f th e DU AL PAGE m od e. Th e def au lt m ar g in i s app r ox imat el y 7
m m , but yo u can sel ect an y m arg in b etw een 0 an d 30 m m .
Example of Im age Shift Copying
M arg in o n l eft
sid e
Copy
No rm al b in din g : l eft o r r igh t
M arg in o n r igh t
sid e
Copy
Procedure
Press the EDIT key to ent er t he Editing
menu.
1
. The m en u on th e rig ht appear s.
Press the IMAGE SHIFT key to select the
image shift function in t he Editing m enu.
2
Select on w hich side the m argin is to be
created.
3
. Press one of LE FT , R IGHT or BOOK to select
th e ty pe of m argi n.
. If y ou sel ect th e BOOK mar gin , use it in
con ju ncti on wi th the DU AL PAGE m ode.
56
Page 61

Press the SET key.
. The set m argi n d efaul t i s 7 mm .
4
. To ch ang e the m ar gin :
Press the
the desired margin setting, and press the SET
key.
. When combining image shifting with duplex
copying, select FRONT for the front side and
BACK fo r t he back si de o f th e cop y.
Plac e the originals on the original feed tray
or on the glass.
5
. After ali gning th e edges of the o riginals, set
them
align the slides to the edges of the originals.
. Place the original on the glass
the bottom toward you and the left side
cent ered again st t he or ig inal scale.
Select the desired copy size, exposure,
reproduction ratio and copy quantit y.
6
0mm or 30mm key to select
face u p o n t he o ri gin al f eed t ray and
face down with
USIN G THE
EDITING
FUNCTIONS
Press the START key.
7
Tip: Margins can be created also in the bypass
copy mode. To do this, set the paper in the
sheet by pass (see page 50), and pr ess the
desired C OPY-SIZE key to select the paper
size. If LETTER-R pap er i s used , p r ess t h e
cor resp ond in g COPY-SIZE key t wi ce.
57
Page 62

2. EDGE ERASE COPYING
If t h e ed g es o f an or i g inal ar e t o rn o r d i rty , t h ey are r ep r odu ced as b l ack st ains o n t h e copy .
In the edge erase mode, a white border will be created along the all edges of the copy eliminating
the m arks. The defau lt ed ge erase mar gin is 5 mm, b u t you can select an y marg in wi thin t he
ran ge o f 5 to 20 m m.
Example of Edge Erase Copying
Original
P rocedure
Press the EDIT key to ent er t he Editing
menu.
1
. The m en u on th e rig ht appear s.
Press the EDGE ERASE key to select the
edge erase funct ion.
2
Edge-er ased co py
How to Change the Edge Erase M argin
. To change the edge erase margin, pr ess the
5mm or 20mm key to select the desired
edg e erase m arg in .
. If t he set ti ng s are OK, p ress t he SET key.
Notes:
. The edge erase margin changes at increments
of 1 m m o n t he fr on t and rear sides.
. About 45 seconds af ter copying , the edge
erase m ar gin ret urn s to the d efau lt 5 m m .
58
Page 63

Place t he original(s) on the original feed
tray or on t he glass.
3
When U sing the Aut omatic Document Feeder
. After ali gning th e edges of the o riginals, set
them
face u p o n t he o ri gin al f eed t ray and
align the slides to the edges of the originals.
Note: Remov e any paper cli ps or staples f rom
the originals before placing them on the
or ig inal feed tray .
When Placing the Original on the Glass
. After lift ing the aut omatic do cument feeder,
place the original on the glass
the bottom toward you and the left side
cent ered again st t he or ig inal scale.
. Close the automatic document feeder slowly
aft er t he or ig inal size has b een det ected .
face down with
Slides
USIN G THE
EDITING
FUNCTIONS
Select the desired copy size, exposure,
reproduction ratio and copy quantit y.
4
Press the START key.
5
Tip: Edges can b e er ased al so i n t h e b y p ass
cop y mo d e. To d o t h i s, set t h e p ap er i n
the sheet bypass (see page 50), and press
th e desired COPY-SIZE key
paper size. If LETTER-R paper is used,
press the corresponding COPY-SIZE key
twice.
to select the
59
Page 64

3. DUAL-PAGE COPYING
The f aci ng p ages o f a bo o k or m ag azin e are co p i ed o n e at a t i m e o nt o two sep arat e sh eets
of paper at the same time. You need not move the original on the glass. Two Letter size originals
placed side by side on the glass can also be copied onto two separate sheets of paper. Reduction
or enl argem en t cop yi ng i s also avail abl e.
Example of Dual-Page Copying
Procedure
Press the EDIT key to ent er t he Editing
menu.
1
. The m en u on th e rig ht appear s.
Press the DU AL PAGE key to select the
dual-page copy funct ion.
2
Select 1 SIDE (single-sided) copying or 2
SIDE (tw o-sided) copying.
3
Select the Lett er copy size.
4
Place t he original on the glass.
. Align the center of the ori ginal to the y ellow
5
6
in di cator w ith it s bot to m t ow ard yo u.
Select the desired exposure, c opy quantity,
reproduction ratio, et c. as required.
B
O
O
K
Press the START key.
7
60
Yell ow in di cator li ne
Page 65

4. X-Y ZOOM
This fu nction allow s you to make copi es of o rigin als wit h the rep roduct ion rat io of t he X and
Y di rect ion s chan ged.
Example of X -Y zoom
100%
100%
Procedure
Select the X-Y zoom function in the Editing
menu.
1
. Press the EDIT key to enter the Editing menu,
and th en pr ess th e XY ZOOM key.
. The m en u on th e rig ht appear s.
Wh en t he Y zoom r atio
is ch ang ed
200%
Wh en t he X zoo m r ati o
is ch anged
200%
USIN G THE
EDITING
FUNCTIONS
Specify the X and Y reproduction rat ios.
. Press the 25%< or >400% key to select the
2
X an d Y r epr od uct io n r ati os, an d p ress t he
up per SET key.
Press the low er SET key.
3
Select the desired copy s ize, expos ure and
copy quantity.
4
Place the original on the glass or the
autom atic document feeder and press
5
the START key.
61
Page 66

5. TRIMMING/MASKING
Thi s fu ncti on allo w s you to tri m or m ask co pies.
You can tr im ori gin als (in side ar ea o nly ) by sel ectin g th e tri mmi n g m ode, an d you can m ask
originals (outside area only) by selecting the masking mode. You can specify areas by placing
or ig inal s on the g lass.
* Yo u can sp ecif y up to 4 places o n a si ngl e or igi nal .
* In byp ass cop yin g, t he cop y si ze mu st b e specif ied .
Example of t rimming/ masking
Tri m med cop y
Ori gi nal
M asked co py
62
Page 67

How to read areas
Place t he original.
Place th e or i gi nal f ace up on th e g lass w i t h i ts b o tt om ed g e to w ar ds y ou . Al i gn th e o ri gi n al
1
w it h th e or igi nal scale on th e left and its cen ter wi th the cen ter of t he or ig inal scale.
X2
X1
Y2
Y1
Original scale
USIN G THE
EDITING
FUNCTIONS
63
Page 68

5. TRIMMING/MASKING (Cont.)
Using the original scale and the front scale,
read the values defining the desired area
2
as follows:
. X1 • • Distance from the original scale to the
lef t ed ge of th e specif ied area
. X2 • • Distance from the original scale to the
ri gh t edg e of the sp ecif ied ar ea
. Y1 • • Di stan ce fr om t he fr on t scal e to th e
lo w er edg e of the sp ecif ied ar ea
. Y2 • • Di stan ce fr om t he fr on t scal e to th e
up per edge o f t he speci fi ed area
Set the above values us ing the digital keys
and the SET key as described in the
3
follow ing procedure.
Procedure
Select the edit ing function in t he Editing
menu.
1
. Press the EDIT key to enter the Editing menu,
and th en pr ess th e EDITING key.
Press the TRIM or M ASK key.
2
64
Page 69

Specify the area of the original.
. Key in the value X1 using the digital keys and
3
pr ess th e up per SET key. If yo u key in a
w ro ng v alu e, press t he RESET key.
. Values X2, Y1 and Y2 require the same
pr oced ure as X 1.
Press the low er SET key.
4
Select the desired copy size, exposure,
reproduction ratio and copy quantit y.
5
Place the original on the glass
w it h t he bot tom t oward you and t he left
6
side cent ered against t he original scale.
Press the START key.
. Trimmed or masked copies exit from the
7
copier.
face down
USIN G THE
EDITING
FUNCTIONS
65
Page 70

6. MIRROR IMAGE
Thi s fu ncti on allo w s you to make m i rro r-i mag ed co pies.
Example of m irror image
Example of m irror image
Procedure
Select the edit ing function in t he Editing
menu.
1
. Press the EDIT key to enter the Editing menu,
and th en pr ess th e EDITING key.
Press the M IRROR key.
2
Select the desired copy size, exposure,
reproduction ratio and copy quantit y.
3
Plac e the original on the glass or the original
feed tray.
4
. How t o set o ri gin als→See p age 17.
Press the START key.
5
66
Page 71

7. NEGATIVE/POSITIVE REVERSAL
Thi s fu ncti on allo w s you to rever se th e black ar eas on the o ri gin al as w hi te ar eas, or v ice
ver sa.
Example of negat ive/ positive reversal
Original
Procedure
Reversing negat ive/ positive areas wit hout specifying an area
Select the edit ing function in t he Editing
menu.
1
. Press the EDIT key to enter the Editing menu,
and th en pr ess th e EDITING key.
Copy
USIN G THE
EDITING
FUNCTIONS
Press the N EG/ POS key.
2
67
Page 72

7. NEGATIVE/POSITIVE REVERSAL (Cont.)
Select the desired copy size, exposure,
reproduction ratio and copy quantit y.
3
Place t he original(s) on the original feed
tray or on t he glass.
4
. After ali gning th e edges of the o riginals, set
them
face u p o n t he o ri gi nal f eed t ray and
align the slides to the edges of the originals.
. Place the original on the glass
the bottom toward you and the left side
cent ered again st t he or ig inal scale.
Press the START key.
face down with
5
68
Page 73

8. 2 IN 1 / 4 IN 1
This function allows you to reduce and copy two or more originals onto a single sheet. Reducing
tw o sheet s at a t im e on to a sin gl e sheet is call ed “ 2 i n 1” cop yi ng . Redu cin g f ou r sheet s at
a ti m e ont o a si ngl e sheet is call ed “ 4 in 1” co py ing .
* Redu ctio n/en larg em ent co py ing is n ot av ail able w i th t hi s fun cti on.
Examples of 2 in 1 / 4 in 1
Example of 2 in 1
USIN G THE
EDITING
FUNCTIONS
Example of 4 in 1
69
Page 74

8. 2 IN 1 / 4 IN 1 (Cont.)
Procedure
When using the aut omat ic document feeder
Plac e the originals on the original feed tray.
. Place all the originals on the original feed tray
1
2
with the 1st original
sli des t o th e edg es of t he o rig in als.
Select the 2 in 1 / 4 in 1 function in the
Editing menu.
. Press the EDIT key to enter the Editing
m enu , and p ress t he 2 IN 1 / 4 IN 1 key .
. If the corresponding key is not displayed,
sw i tch t h e screen b y pr essi n g t h e N ext o r
Pre key.
facing up, and align the
Slides
Select 2 in 1 or 4 in 1.
. Press th e 2 IN 1 , 4 IN 1 , 2 IN 1 DUPLEX
3
70
or 4 IN 1 DU PLEX key .
Page 75

Select the t ype of original.
. Press eit her the 1 SIDE or 2 SIDE key.
4
Select the desired copy s ize, expos ure and
copy quantity.
5
Press the START key.
6
When placing the original on t he glass
Select the 2 in 1 / 4 in 1 function in the
Editing menu.
1
. Press the EDIT key to enter the Editing menu,
th en p ress th e 2 IN 1 / 4 IN 1 key.
. If the corresponding key is not displayed,
sw i tch t h e screen b y p r essi ng t he N ex t or
Pre key.
USIN G THE
EDITING
FUNCTIONS
Select 2 in 1 or 4 in 1.
. Press the 2 IN 1 , 4 IN 1 , 2 IN 1 DU PLEX
2
or 4 IN 1 DU PLEX key .
71
Page 76

8. 2 IN 1 / 4 IN 1 (Cont.)
Select the t ype of original.
. Press eit her the 1 SIDE or 2 SIDE key.
3
Select the desired copy size, exposure
and copy quantity.
4
Plac e the original and pres s the START key.
. Place the original on the glass
5
the bottom toward you and the left side
cent ered again st t he or ig inal scale.
. Place th e fi rst p age o f th e or igi nal s fir st.
face down with
72
When the first original has finished being
copied, place t he next original and press
6
the START key.
For all subsequent originals, repeat step 6
above.
7
After t he last original has been scanned,
press t he FINISHED key.
8
. Prin ti ng st art s.
Page 77

9.ANNOTATION
Thi s fu nct ion all ow s yo u t o p ri nt t he d ate an d ti m e at ei th er th e to p o r bo tt om o f th e cop y.
Example of annot ation
Octo ber 31st,2001,11:54 p.m .
10.31.2001 23:54
10.31.2001 23:54
USIN G THE
EDITING
FUNCTIONS
Procedure
Select the annotation function in the
Editing menu.
1
. Press the EDIT key to enter the Editing menu,
th en p ress th e AN NOTATION key.
. If the corresponding key is not displayed,
sw i t ch t h e scr een b y p ressi n g t he N ex t or
Pre key.
Select w here the date and time are to be
printed.
2
. Select t h e p r i n t d i r ect i o n an d p o si ti o n , t h en
pr ess th e SET key.
Wh en t he d ate and
ti m e ar e pr i nt ed o n
th e lo wer sid e
Wh en t he d ate and
ti m e ar e pr i nt ed o n
th e up per si de
73
Page 78

9.ANNOTATION (Cont.)
Select the desired copy s ize, expos ure and
copy quantity.
3
When U sing the Aut omatic Document Feeder
Place t he original(s) on the original feed
tray and press the START key.
4
When Placing the Original on the Glass
Place the originals on the glass and press
the START key.
4
. How t o set o ri gin als→See p age 17.
When the first original has finished being
copied, place t he next one and press t he
5
START key.
For the second and subsequent originals,
repeat step 5 above.
6
When t he last original has been scanned,
press t he FINISHED key.
7
74
Page 79

10. PAGE NUMBER
Thi s functi on al lows y ou t o pr int the p age num ber at one o f th e follo wi ng si x locati ons o n th e
cop y:
Top lef t
Top cent er
Top ri ght
Bot to m l eft
Bot to m cen ter
Bot to m r ig ht
Example of page num ber
USIN G THE
EDITING
FUNCTIONS
Procedure
Select the page number function in the
Editing menu.
1
. Press the EDIT key to enter the Editing menu,
and th en pr ess th e PAGE NUM BER key.
. If the corresponding key is not displayed,
sw i t ch t h e scr een b y p ressi n g t he N ex t or
Pre key.
1
2
3
75
Page 80

10. PAGE NUMBER (Cont.)
Select the page num ber position.
. Select t h e p r i n t d i r ect i o n an d p o si ti o n , t h en
2
3
pr ess th e SET key.
Key in the start page num ber.
. Key in the start page number using the digital
keys. If the setting is OK, press the SET key.
Select the desired copy s ize, expos ure and
copy quantity.
4
When U sing the Aut omatic Document Feeder
Place t he original(s) on the original feed
tray and press the START key.
5
When Placing the Original on the Glass
Plac e the original on the original glass and
press t he START key.
5
. How t o set o ri gin als→See p age 17.
76
Page 81

When the first original has finished being
copied, place t he next one and press t he
6
START key.
For all subsequent originals, repeat step 6
above.
7
When t he last original has finished being
scanned, press the FINISHED key.
8
USIN G THE
EDITING
FUNCTIONS
77
Page 82

11. MAGAZINE SORT
The magazine sort mode allows you to copy and sort originals so that the copies can be folded
in hal f alo ng the i nsi de as if yo u w ere m akin g a m agazin e.
* The optional finisher with the saddle stitcher (AR-FN9) can automatically fold the copies and
stap le t heir cent ers. See pag e 124.
* W it h th e Cov er Sheet m o d e, bl an k cov er s or co pi ed co ver s can be ad d ed at t he t o p o f th e
cop ies. In thi s case, no thi ng is pr in ted o n t he back o f t he cov er sheet .
Example of magazine sort
. Exam pl e of co py ing a 12-pag e docu m ent.
1
2
3
Procedure
Select the m agazine sort function in t he
Editing menu.
1
. Press the EDIT key to enter the Editing menu,
and th en pr ess th e M AGA ZINE SORT key .
. If the corresponding key is not displayed,
sw i tch t h e screen b y pr essi n g t h e N ext o r
Pre key.
Set t he center m argin.
. Set the center margin using the
2
or 30mm key. When the setting is OK, press
th e SET key.
. 2 m m is set as t he d efaul t.
12
2mm key
76
94
112
78
Page 83

. The o pt io nal fi ni sher w it h a sad dl e sti tch er
(AR-FN9) all o w s y ou t o stap l e th e cen ter o f
th e pap er aut om ati call y. Press t he STAPLE
ON key if you w ant t o st aple.
The n u mb er o f t h e o r i g i n al s y o u can set u p
at a t ime i s 60 sh eets an d t he p ap er si ze is
Ledg er o r Lett er-R.
Select the desired copy s ize, expos ure and
copy quantity.
3
When U sing the Aut omatic Document Feeder
Place t he original(s) on the original feed
tray and press the START key.
4
When Placing the Original on the Glass
USIN G THE
EDITING
FUNCTIONS
Place t he original on t he glass and press
the START key.
4
. How t o set o ri gin als→See p age 17.
When the first original has finished being
copied, place t he next one and press t he
5
START key.
For the second and subsequent originals,
repeat t he step 5 above.
6
When t he last original has finished being
scanned, press the FINISHED key.
7
79
Page 84

12. COVER SHEET COPYING
Ther e are f ou r m o des i n co ver sheet cop yi ng all ow i ng user s to add a to p co ver and /or back
cov er t o each set of copi es, as li sted b elo w:
. Ad di ng a b lan k top cov er
. Ad di ng a co pi ed to p co ver
. Ad di ng a b lan k top cov er and a bl ank back co ver
. Ad di ng a co pi ed to p co ver an d a b lank b ack cov er
The au to mat ic d ocum en t feed er m ust be used fo r th is p urp ose.
Examples of Cover Sheet Copying
. Ad di ng a b lan k top cov er
1
2
3
1
Blan k to p
cov er
. Ad di ng a co pi ed to p co ver
1
2
3
2
3
Copi ed t op
cov er
1
2
3
80
Page 85

. Ad di ng a b lan k top and back cov er
1
2
3
. Ad di ng a co pi ed to p an d bl ank b ack
cov ers
1
2
3
Blan k to p
1
2
3
1
2
3
cov er
Blan k back
cov er
Copied top
cover
Blan k back
cov er
USIN G THE
EDITING
FUNCTIONS
Copying Procedure
Place t he originals.
. Set the originals on the original feed tray with
1
2
page 1 facing upward and align the side
gu id es to t he o rig in als.
. The n um ber of or igi nal s you can l oad at a
ti m e is sho w n bel ow .
Lett er, Let ter-R, Stat em ent-R : 60
Ledg er : 30
Legal : 35
Set the special sheets of paper for the
cover sheet s.
. Setting the sheets on the sheet bypass:
Set t hem
. Make sure to specify the size of the paper on
th e sheet byp ass.
. Se tt in g a ca sset te f or cov er shee t:
Refer t o p age 87.
faci ng up.
Slides
81
Page 86

12. COVER SHEET COPYING (
Select the cover sheet copying function in
the Editing m enu.
3
. Press the EDIT key to enter the Editing
m enu , then pr ess the COVER SHEET key.
. If the corresponding key is not displayed,
sw it ch t he scr een b y pr essin g t he N ext or
Pre key.
Select the desired COVER SHEET mode.
. Ad di ng a b lan k
4
to p co ver
)
→
TOP BLANK
Cont.
)
. Ad di ng a co pi ed
to p co ver
. Ad di ng b lan k top
and back co vers
. Ad di ng co pi ed
to p an d bl ank
back co ver s
Press the BASIC key.
)
)
)
→
→
→
TOP COPIED
BOTH BLAN K
TOP COPIED
BACK BLAN K
5
Pres s the c ass ette on the display matc hing
the size and the direction of special cover-
6
sheet paper set on the sheet bypass or in
the casset te.
82
Page 87

Key in the desired number of copies (or
sets).
7
. Select the desired reproduction ratio,
exp osu re, etc. as r equ ired .
Press the START key.
. Copy i n g st ar t s an d t h e sp eci al co v er sh eet s
8
are automatically added to each set of copies.
Note: In TOP COPIED o r TOP COPIED BACK
BLAN K copy ing , onl y th e top sides of
cov er sheet s wi ll b e copi ed even if y ou
select the SINGLE-SIDE D ORIGINALS TO
DUPLEXED COPIES
m od e.
USIN G THE
EDITING
FUNCTIONS
83
Page 88

13. SHEET INSERTION COPYING
There are two modes in sheet insertion copying which inserts special sheets of paper (e.g. colored
pap er ) at t h e speci f ied p ages o f cop i es. In t h is case, b o th t he p ap er i n th e sh eet b y pass an d
th e cassett e mu st b e of t he sam e size and li e in t he sam e di rect ion .
. In sert ing a bl ank speci al sh eet in fr ont of the sp ecif ied p age
. In sert ing a cop ied sp ecial sheet at th e specif ied page n um ber
To perform “ sheet insertion copying” , two paper sources of the same size and orientation should
be av ail able; o ne f or f eedi ng nor m al cop y p aper an d t he o ther fo r speci al “ sheet in sert ion ”
pap er.
Al so, t he aut om ati c do cum ent feeder m ust b e used f or thi s pu rpo se.
Examples of Sheet Insertion Copying
. Inser ti ng a b lan k special sheet in f ro nt o f t he speci fi ed pag e
1
2
3
1
2
3
. Inser ti ng a co pi ed speci al sh eet at t he sp ecifi ed p age nu mb er
1
2
3
4
1
2
3
4
Blank sheet
Copi ed sh eet
84
Page 89

Copying Procedure
Place t he originals.
. Set the originals on the original feed tray with
1
2
page 1 facing upward and align the side
gu id es to t he o rig in als.
. The n um ber of or igi nal s you can l oad at a
ti m e is sho w n bel ow .
Lett er, Let ter-R, Stat em ent-R : 60
Ledg er : 30
Legal : 35
. To set larger originals (Ledger or Legal size),
pu ll out th e exten sio n ho lder .
Place special sheets of paper in the
designated sheet-insertion cassett e.
. For p laci n g p aper i n t he casset te, see p ag e
128.
. If the appr opriate cassett e is not d esignated
for sheet-insertion copying, do so by referring
to pag e 87.
Slides
USIN G THE
EDITING
FUNCTIONS
Select the sheet-insertion copying function
in the Editing m enu.
3
. Press the EDIT key to enter the Editing
menu, then press the SHEET INSERTION
key.
. If the corresponding key is not displayed,
sw it ch t he scr een b y pr essin g t he N ext or
Pre key.
85
Page 90

13. SHEET INSERTION COPYING (
Press the BLANK or COPIED key.
4
. Inser ti ng a b lan k special
sheet in fro nt of t he
speci fi ed pag e
. Inser ti ng a co pi ed spe-
cial sheet at th e speci fi ed p age
Using the digital keys, specify the desired
page and press N EXT .
5
. The display shows that the first sheet will be
inserted at the specified page. In the example
shown, paper from INSER T 1 will be inserted
at (o r b efor e) pag e 10.
To specify t he next page, repeat step 5.
. Up to 15 pages can be sp ecifi ed.
6
)
)
→
→
BLANK
COPIED
Cont.
)
When you finish setting pages, press t he
SET key.
7
Press the BASIC key.
8
Pres s the c ass ette on the display matc hing
the size and the direction of special sheet-
9
insertion paper set in the sheet-insertion
cassett e.
Key in the number of copies (or set s).
. Select the desired reproduction ratio,
10
11
exp osu re, etc. as r equ ired .
Press the START key.
. Copying starts and the special insertion sheets
are automatically inserted at the specified
pages.
. To r et ur n t he sh eet -in sert i on cassett e to i ts
initial size, refer to "Resetting to the Previous
Size" o n pag e 88.
86
Page 91

14. SETTING A CASSETTE FOR COVER SHEET/SHEET-INSERTION COPYING
Wh en t w o p aper sou rces of th e sam e size are av ail abl e and yo u w ant to m ake on e of th em
a cov er sh eet or sheet -inser ti on casset te, f oll ow th e pr ocedu re b elow .
* If y ou wan t t o chan ge t he pap er si ze of the casset tes, ask y our serv ice tech ni cian.
Setting Procedure
Press the PROGRAM key to enter the
PROGRAM menu.
1
Press the CASSETTE SIZE key.
2
USIN G THE
EDITING
FUNCTIONS
Sett ing the cassett e for cover sheet
Select the casset te for cover sheet, then
press t he COVER key.
3
. Thi s sett ing m ay no t b e possi bl e for som e
cop ier mo del s.
Sett ing the cassett e for sheet insertion
Select the cass ette for sheet insertion, then
press t he INSERT key.
3
Check that "COVER", "INSERT 1" or
"INSERT 2" is show n on the screen.
4
. The scr een on the r igh t appears w hen the
cassette is selected for the cover sheet or
sheet -in serti on mo de.
87
Page 92

14. SETTING A CASSETTE FOR COVER SHEET/SHEET-INSERTION COPYING (Cont.)
Resett ing to the Previous Size
To r eset t he co v er sheet o r sh eet-i n ser t io n casset te
to th e prev io us size cassett e, pr oceed as f ol low s.
Press the PROGRAM key to enter the
Program menu. Press the CASSETTE SIZE
1
key.
Select the cassette to be reset, then press
the COVER or INSER T key on the bottom
2
right and check that t he cassette is reset
to t he previous paper size.
88
Page 93

15. DOCUMENT STORAGE
Thi s f u n ct i o n al l o ws y o u t o st o r e t h e i mag e of t h e o r i g i n al s on t o t h e h ar d d isk t o b e r ecal l ed
and pr int ed w hen ever mo re co pies ar e need ed. The f ol low i ng t wo m odes ar e avai labl e.
(1) M EMORIZE mo de
Thi s m ode al lo ws y ou to st or e the i m age of th e ori gi nals o n t he har d di sk.
(2) PRINT m od e
Thi s m ode al lo ws y ou to p ri nt t he d ata sto red in st ep (1) ab ove.
* Th ere are 24 st or age lo cati ons.
* 100 o rig in al sheet s can b e stor ed i n each l ocai ton .
Procedure (1) M EM ORIZE mode
Select the document storage function in
the Editing m enu.
1
. Press the EDIT key to enter the Editing menu,
and then press the DOCU MENT STORAGE
key.
. If the corresponding key is not displayed,
sw i tch t h e screen b y pr essi n g t h e Nex t o r
Pre key.
USIN G THE
EDITING
FUNCTIONS
Press the M EM ORIZE key.
2
89
Page 94

15. DOCUMENT STORAGE (Cont.)
Select the number (location) where you
w ant t he docum ent stored.
3
. Press the desired number key and then press
th e SET key.
.
The keys are n ot highl ighted even if im ages
are al read y sto red ther e.
Confirm whether any document has been
stored or not by pressing the keys before
sto ri ng t he n ew d ocu men t.
Select the desired exposure.
4
Plac e the original on the glass or the original
feed tray and press the START key.
5
Procedure (2) PRIN T mode
Select the document storage function in
the Editing m enu.
1
. Press the EDIT key to enter the Editing menu,
and th en pr ess th e DOCUM ENT STORAGE
key.
. If the corresponding key is not displayed,
sw i tch t h e screen b y pr essi n g t h e Nex t o r
Pre key.
Press the PRINT key.
2
90
Page 95

Select the number (location) containing
the document you w ant printed.
3
. Press th e desi red n um ber key.
. If y ou pr ess th e TEST PRINT key , on ly th e
fi rst page i s pr int ed o ut.
Select the copy size.
. Press th e BA SIC key t o r et u r n t o t h e Basi c
4
m en u .
. Press the cassette on the display to select the
cassett e co rr esp on di n g t o th e p aper si ze of
th e sto red d ocu men t.
Select the desired copy quantity.
5
Press the START key.
6
Tip: It i s a g o o d i d ea t o keep a r eco r d cl ose to
th e cop ier of w hat do cum en ts ar e sto red
in each l ocati on .
USIN G THE
EDITING
FUNCTIONS
91
Page 96

MEMO
92
Page 97

DESCRIPTION
OF THE DIGITAL
USING THE SPECIAL FUNCTIONS
COPIER
USIN G THE
SPECIAL
FUNCTIONS
93
Page 98

1. ACCOUNT NUMBER
If t he co p ier is set u p so th at accou nt n um b er s can b e used , yo u can m ake co p ies o nl y aft er
ent eri ng t he acco unt nu mb er.
When making copies using account numbers, the copy quantity is stored for each account number
used . The acco unt nu mb er i s a 4-dig it num b er, and up to 120 co des can b e set.
Not e: If y ou w an t to use t he accou nt num b ers, ask th e serv ice tech ni cian t o set them .
* 0000 can not be set as an accou nt num b er.
Procedure
The follow ing message appears:
Enter accou nt n um ber
1
Key in a 4-digit account number.
2
. The account number appears on the message
display, and the touch panel then displays the
following:
RE ADY
M ake copies as you would norm ally do.
. When you have finished making copies, either
3
pr ess th e ALL CLEAR key t w ice, o r w ait 45
secon ds. Th e fol lo wi ng messag e app ears:
Enter accou nt n um ber
94
Page 99

2. JOB MEMORY
You can st o re an d r ecal l a co m b in ati on o f f req u ent ly used co py m o des at any t im e y ou l ike.
In addition to reproduction ratios, you can also store exposure and copy quantities, editing modes,
du pl ex cop yi ng m o des and im age sh if t m odes. Yo u can stor e up to f ou r com b inat io ns.
Storing a New Combination of Copy Modes
Set t he desired copy modes.
Example:
1
2
Repro du ctio n r atio .... 85%
Copy qu anti ty ............ 10
Expo sur e..................... Au to mat ic
Copy size .................... LT
. Check th at each mo de i s corr ectl y set.
Select the job memory function in the
Program menu.
. Press the PROGRAM key to enter the
Program menu, and then press the JOB
MEMORY key.
DESCRIPTION
OF THE DIGITAL
COPIER
USIN G THE
SPECIAL
FUNCTIONS
Press the MEMORY key to select the
storing function.
3
95
Page 100

2. JOB MEMORY (Cont.
)
Press the
M EM ORY3 , M EM ORY4 ) key.
4
. The combination of copy modes is stored in
jo b m em or y 1 (or , 2, 3, 4).
. Stored combinations of co py modes remain
until new ones are entered. They are not
erased even when the power switch is turned
OFF .
MEMORY1
(or,
M EM ORY2
,
96
 Loading...