

Sharp AR-5316,AR-5320 Service Manual
CODE : 00ZAR5320/A1E
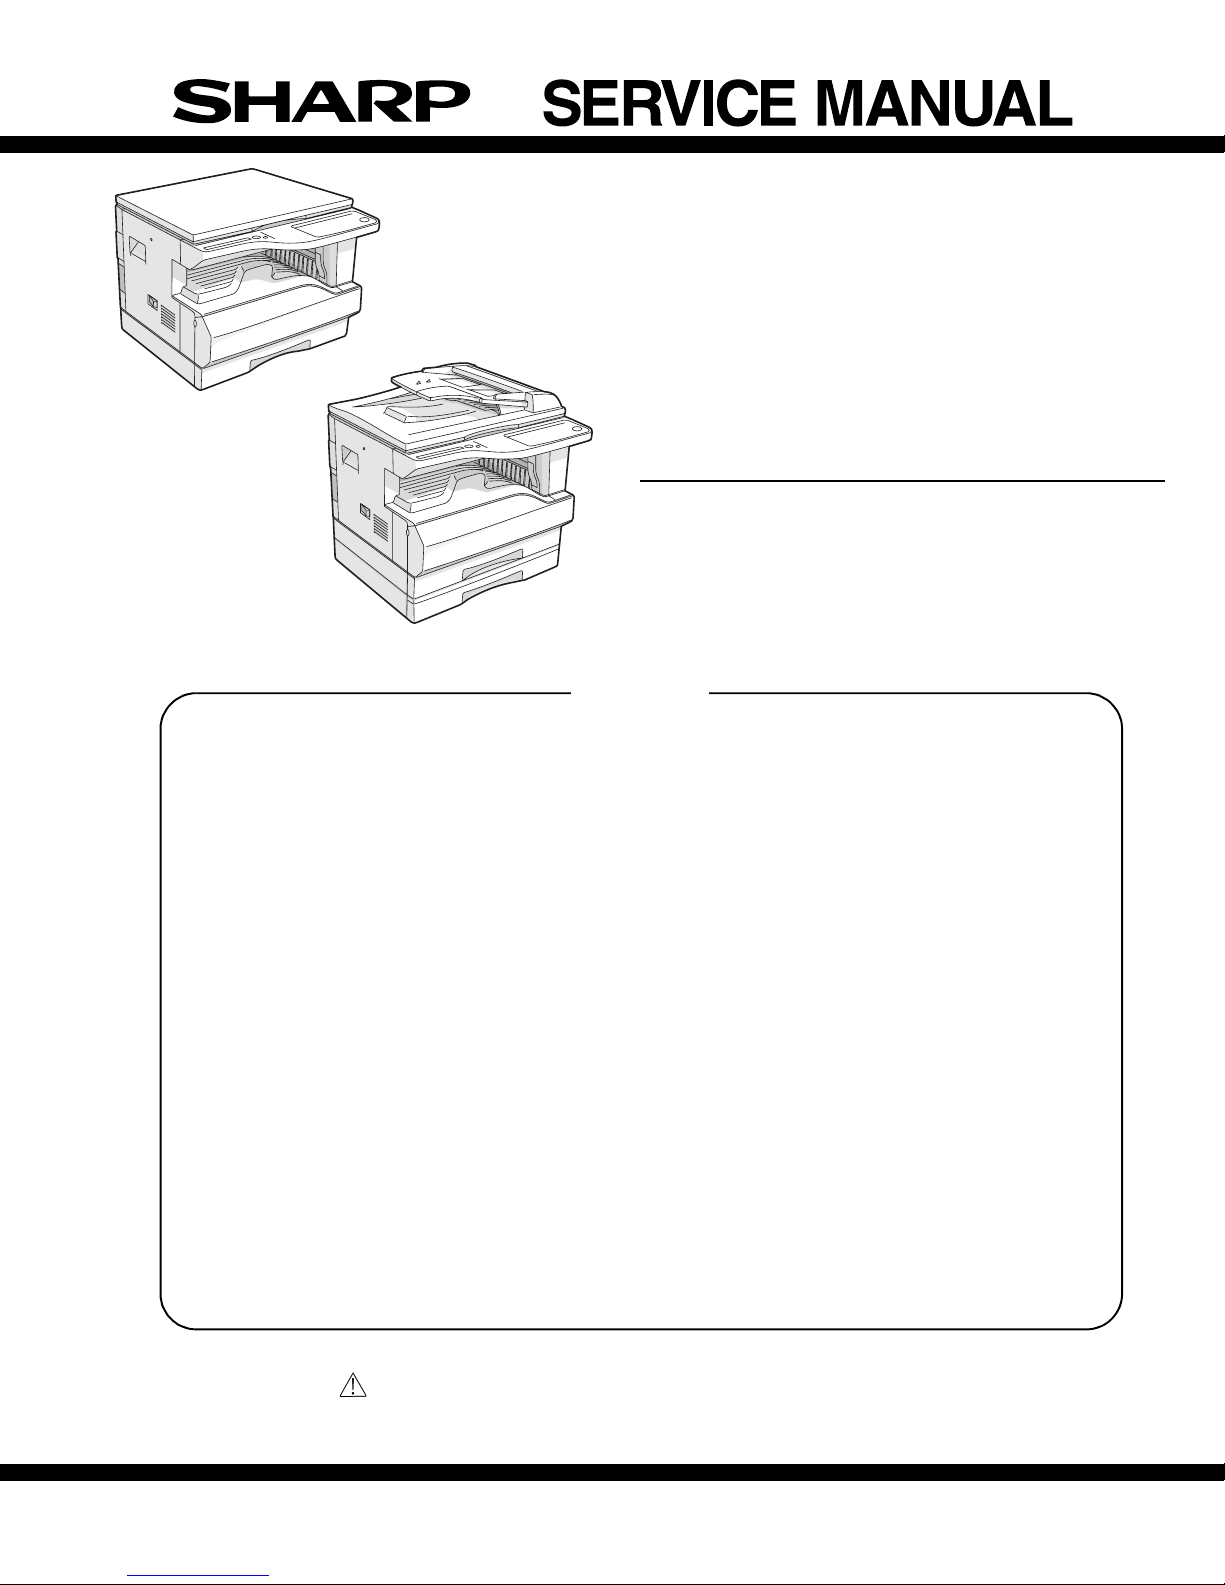
DIGITAL COPIER
AR-5316
AR-5316
MODEL AR-5320
AR-5320
(with option installed)
CONTENTS
[ 1 ] NOTE FOR THIS SERVICE MANUAL . . . . . . . . . . . . . . .Refer to AR-M160
[ 2 ] SPECIFICATIONS. . . . . . . . . . . . . . . . . . . . . . . . . . . . . . . . . .AR-5316/5320
[ 3 ] CONSUMABLE PARTS. . . . . . . . . . . . . . . . . . . . . . . . . . . . . .AR-5316/5320
[ 4 ] EXTERNAL VIEWS AND INTERNAL STRUCTURES . . . . . .AR-5316/5320
[ 5 ] UNPACKING AND INSTALLATION . . . . . . . . . . . . . . . . . . . . .AR-5316/5320
[ 6 ] ADJUSTMENTS . . . . . . . . . . . . . . . . . . . . . . . . . . . . . . . .Refer to AR-M160
[ 7 ] SIMULATIONS . . . . . . . . . . . . . . . . . . . . . . . . . . . . . . . . . . . .AR-5316/5320
[ 8 ] USER PROGRAMS . . . . . . . . . . . . . . . . . . . . . . . . . . . . . . . .AR-5316/5320
[ 9 ] TROUBLE CODE LIST . . . . . . . . . . . . . . . . . . . . . . . . . . .Refer to AR-M160
[10] MAINTENANCE . . . . . . . . . . . . . . . . . . . . . . . . . . . . . . . . . . .AR-5316/5320
[11] DISASSEMBLY AND ASSEMBLY. . . . . . . . . . . . . . . . . . .Refer to AR-M160
[12] FLASH ROM VERSION UP PROCEDURE . . . . . . . . . . .Refer to AR-M160
[13] ELECTRICAL SECTION . . . . . . . . . . . . . . . . . . . . . . . . . . . . .AR-5316/5320
Parts marked with “ “ are important for maintaining the safety of the set.
Be sure to replace these parts with specified ones for maintaining the safety and performance of the set.
SHARP CORPORATION
This document has been published to be used for
after sales service only.
The contents are subject to change without notice.
[1] NOTE FOR THIS SERVICE MANUAL
This Service Manual describes only the items related to the AR-5316 and AR-5320. For the other items common with the AR-M160/M205, please refer
to the AR-M160/205 Service Manual (Document code:00ZA RM205/A1E). The table below shows which document(s) should be referred to for each
section. (Refer to the document marked with O.)
[ 1 ] GENERAL O
[ 2 ] SPECIFICATIONS O O Some specifications
[ 3 ] CONSUMABLE PARTS O
[ 4 ] EXTERNAL VIEWS AND INTERNAL STRUCTURES O O Appearance / Internal / Operation panel
[ 5 ] UNPACKING AND INSTALLATION O O Changing the copy paper size in the tray
[ 6 ] ADJUSTMENT S O
[ 7 ] SIMULATIONS O O Shifter sensors status display, etc. deleted.
[ 8 ] USER PROGRAMS O O USB2.0 mode switch, etc. deleted.
[ 9 ] TROUBLE CODE LIST O
[10] MAINTENANCE O
[11] DISASSEMBLY AND ASSEMBLY O
[12] FLASH ROM VERSION UP PROCEDURE O
[13] ELECTRICAL SECTION O O Block diagram / Actual wiring diagram 1/7
Section AR-M160/M205 AR-5316/AR-5320 Changed item
[2] SPECIFICATIONS
The table below shows the specifications of this model and the contents of changes from the AR-M160/M205 and AR-5316/5320.
Item AR-M160 AR-5316 AR-M205 AR-5320
Paper feed system 1cassette +
Multi manual paper feed
Weight Approx.31.3Kg Approx.31.3Kg
Interface USB1.1/USB2.0
IEEE1284
One automatic feeding paper
tray(250sheets) +
bypass tray(100sheets)
(Not including TD cartridge)
IEEE1284parallel connector/
USB1.1
2cassette +
Multi manual paper feed
Approx.35.1Kg Approx.36.3Kg
USB1.1/USB2.0
IEEE1284
Two automatic feeding paper
trays(250sheets each) +
bypass tray(100sheets)
(Not including TD cartridge)
IEEE1284parallel connector/
USB1.1
Option
Machine Model AR-M160 AR-M205 AR-5316 AR-5320 Remark
250 sheets paper feed unit AR-D24 / D25 O O - SPF AR-SP6 O - O O
RSPF AR-RP6 - O - Original cover AR-VR5 Standard O Standard Standard
O : The option can be installed.
- : The option cannot be installed.
AR-5316/5320 NOTE FOR THIS SERVICE MANUAL 1-1
[3] CONSUMABLE PARTS
1. Supply system table
A. East Europe / Russia
NO Name Content Life Product name Remark
1 Toner cartridge(Black)
<With IC>
2 Developer Developer
3 Dr um ki t Drum
Note 1: The individual carton is printed with English, German, French, and Spanish as well as the green mark.
B. Middle East / Africa / Philippine
NO Name Content Life Product name Remark
1 Toner cartridge(Black)
<With IC>
2 Developer Developer
3 Dr um ki t Drum
Note 1: The individual carton is printed with English, German, French, and Spanish as well as the green mark.
C. Asia
NO Name Content Life Product name Remark
1 Toner cartridge(Black)
<With IC>
2 Developer Developer
3 Dr um ki t Drum
Note 1: The individual carton is printed with English, German, French, and Spanish as well as the green mark.
D. Hong Kong
NO Name Content Life Product name Remark
1 Toner cartridge(Black)
<With IC>
2 Developer Developer
3 Dr um ki t Drum
Note 1: The individual carton is printed with English and Chinese as well as the green mark.
Ton er
(Toner: Net Weight 537g)
Vinyl bag
(Developer : Net Weight 400g)
Drum fixing plate
Ton er
(Toner: Net Weight 537g)
Vinyl bag
(Developer : Net Weight 400g)
Drum fixing plate
Ton er
(Toner: Net Weight 537g)
Vinyl bag
(Developer : Net Weight 400g)
Drum fixing plate
Ton er
(Toner: Net Weight 537g)
Vinyl bag
(Developer : Net Weight 400g)
Drum fixing plate
x10
160K AR-016LT Life setting by A4 6% document
x10
x10 500K AR-202LD LD=DV*10
x1x150K AR-202DM
x10
190K AR-016ET Life setting by A4 6% document
x10
x10 500K AR-202CD CD=SD*10
x1x150K AR-202DR
x10
190K AR-016CT Life setting by A4 6% document
x10
x10 500K AR-202CD CD=SD*10
x1x150K AR-202DR
x10
190K AR-016CT-C Life setting by A4 6% document
x10
x10 500K AR-202CD-C CD-C=SD-C*10
x1x150K AR-202DR-C
LT=T*10
ET=FT*10
CT=ST*10
CT-C=ST-C*10
AR-5316/5320 CONSUMABLE PARTS 3-1
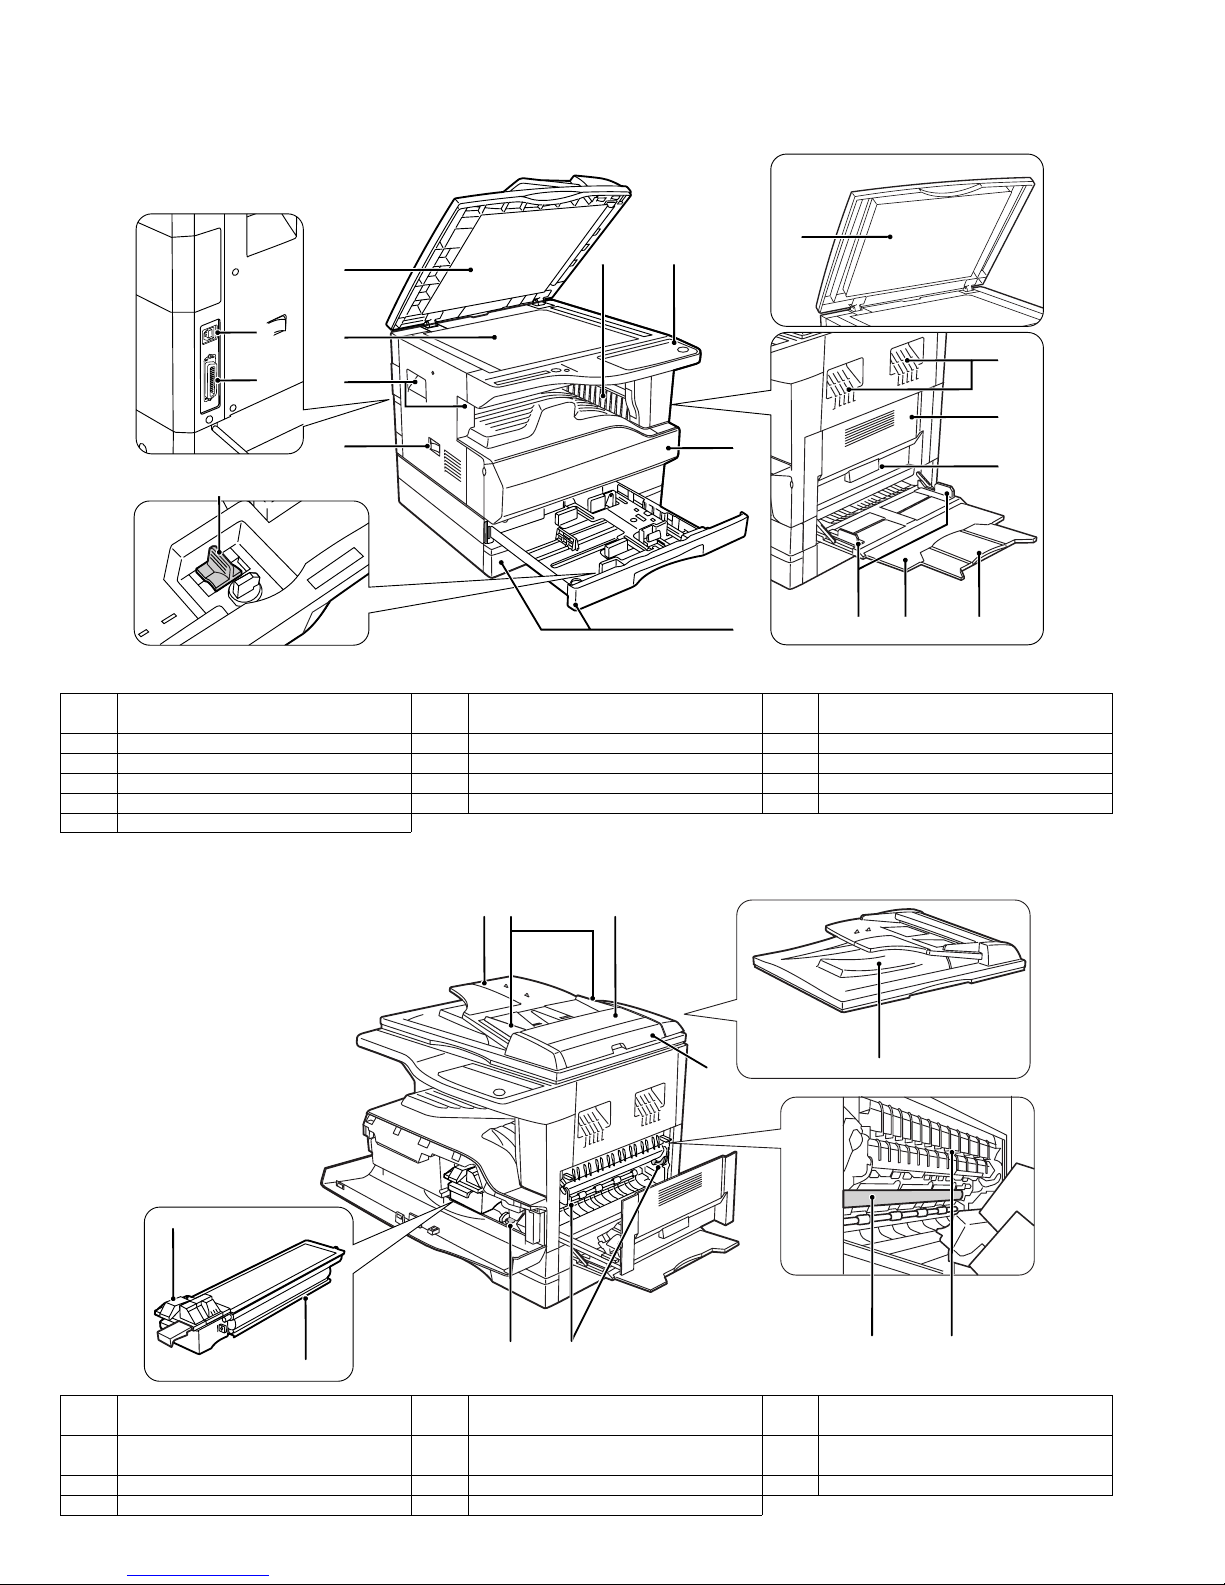
[4] EXTERNAL VIEWS AND INTERNAL STRUCTURES
1. Appearance
6 5
7
15
16
1
2
3
4
14
8
1
1 Document feeder cover (when the SPF
is installed) /document cover
4 Power s witch 5 Operation panel 6 Paper output tray
7 Front cover 8 Paper trays 9 Side cover
10 Side cover handle 11 Bypass tray guides 12 Bypass tray
13 Bypass tray extension 14 Charger cleaner 15 USB 1.1 connector
16 Parallel connector
2 Document glass 3 Handles
3
9
10
131211
2. Internal
18
22
23
17 Document feeder tray
(when the SPF is installed)
20 Right side cover
(when the SPF is installed)
23 Toner cartridge 24 Roller rotating knob 25 Fusing unit release levers
26 Photoconductive drum 27 Fusing unit paper guide
18 Original guides
21 Exit area
24 25
(when the SPF is installed)
(when the SPF is installed)
1917
20
19 Feeding roller cover
22 Toner cartridge lock release lever
21
2726
(when the SPF is installed)
AR-5316/5320 EXTERNAL VIEWS AND INTERNAL STRUCTURES 4-1
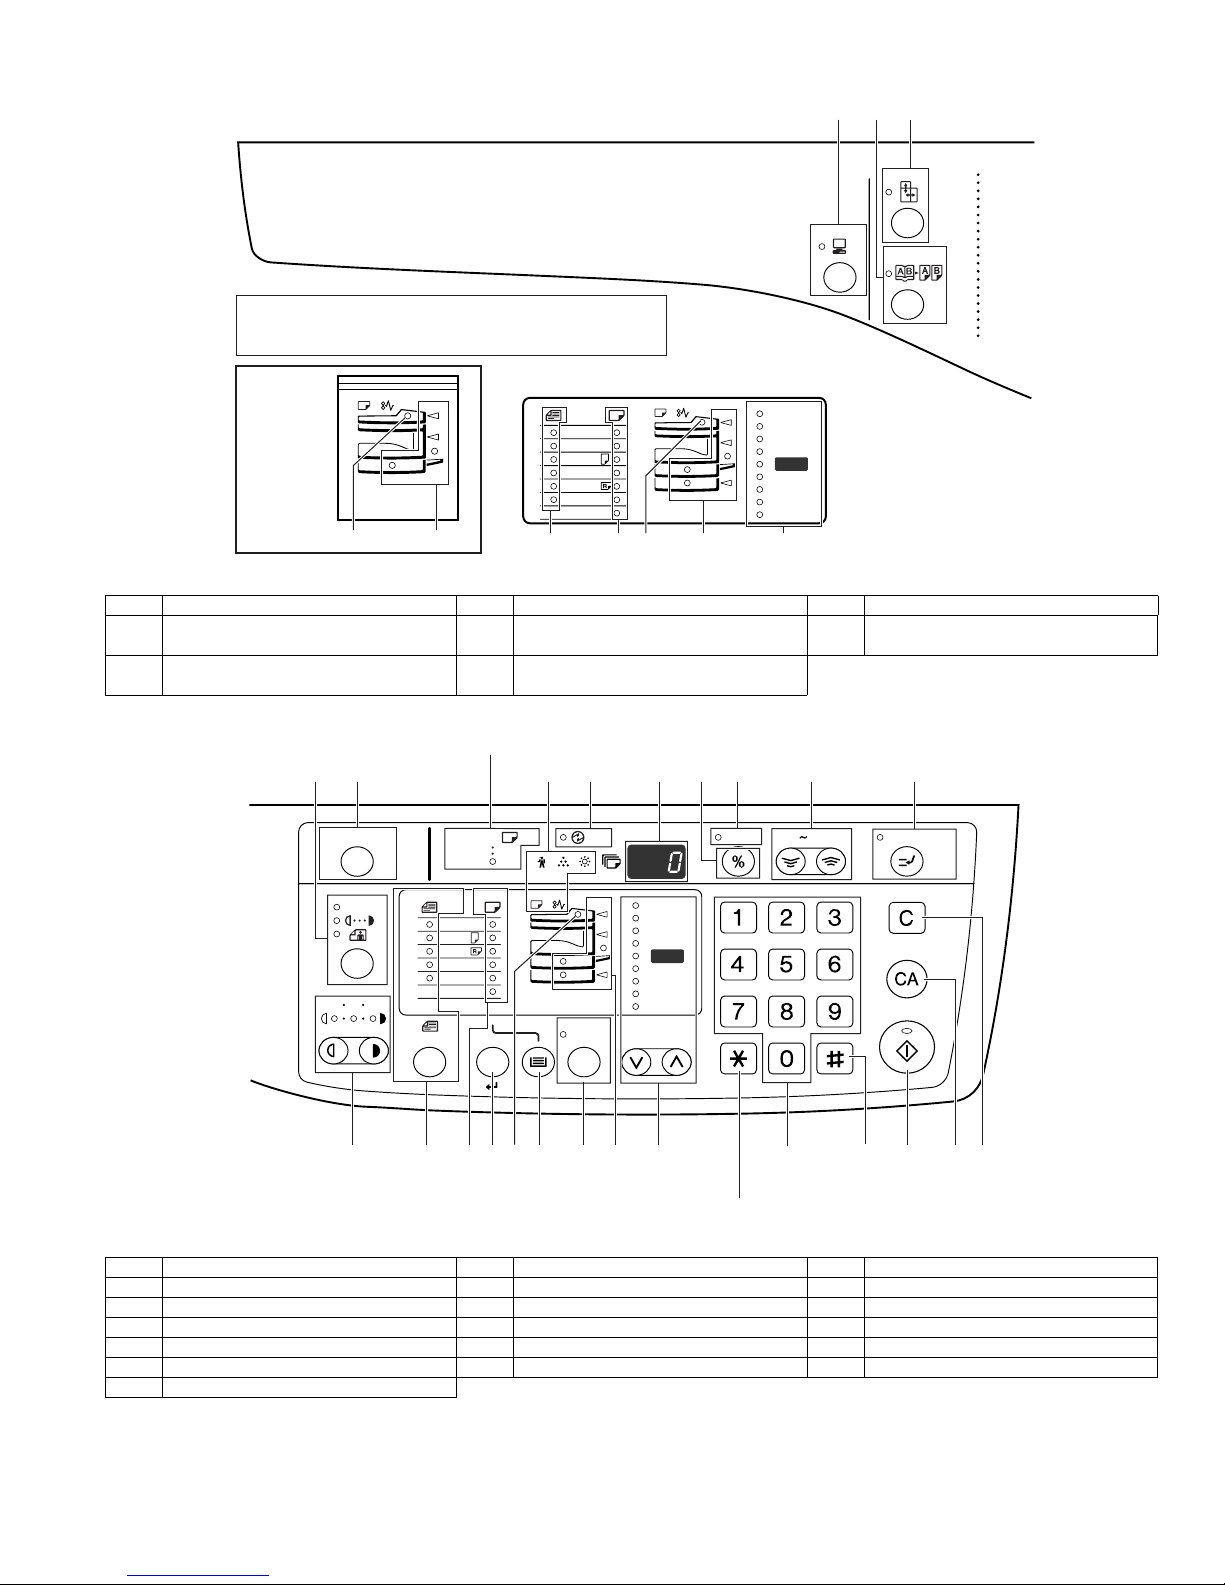
3. Operation Section
The indications of the operation panel may differ
depending on the country and the region.
1
2
3
AR-5316/
AR-5316X
4
5
The example of a display of inch series
200
%
141
129
121
100
8
%
95
77
64
50
%
6
11X17
8½
X
X
8½
8½
X
X
8½
8½X13
EXTRA
14
11
5½
11
5
4
7
1 ON LINE key/indicator 2 DUAL PAGE COPY key/indicator 3 XY-ZOOM key/indicator
4 SPF indicator
(when the SPF is installed)
5 Paper feed location / misfeed location
indicators
6 ORIGINAL SIZE ENTER key /
ORIGINAL SIZE indicators
7 PAPER SIZE indica tors 8 PRESET RATIO selector keys /
indicators
11
9
ACC.#-C
135
10
AUTO
EXTRA
ENTER
A3
A4
A4
A5
B4
AUTO
12
13
AUTO
15
14
200
141
122
115
100
86
81
70
50
%
16
ZOOM
%
%
%
17
25 400%
18
INTERRUPT
19
9 AUTO/TEXT/PHOTO key / indicators 10 AUDIT CLEAR key 11 AUTO PAPER SELECT indicator
12 Alarm indicators 13 POWER SAVE indicator 14 Display
15 Copy ratio display key 16 ZOOM indicator 17 Zoom keys
18 INTERRUPT key / indicator 19 Light and Dark keys / indicators 20 PAPER SIZE ENTE R key
21 TRAY SELECT key 22 AUTO IMAGE key / indicator 23 Numeric keys
24 # key 25 STA RT key / indicator 26 CLEAR ALL key
27 CLEAR key
AR-5316/5320 EXTERNAL VIEWS AND INTERNAL STRUCTURES 4-2
6
7
20
4
21
22
8
5
23 25
27
2624
Not used for this machine.
[5]UNPA CKING AND INSTALLATION
A3
A4
A4
A5
B4
TRA
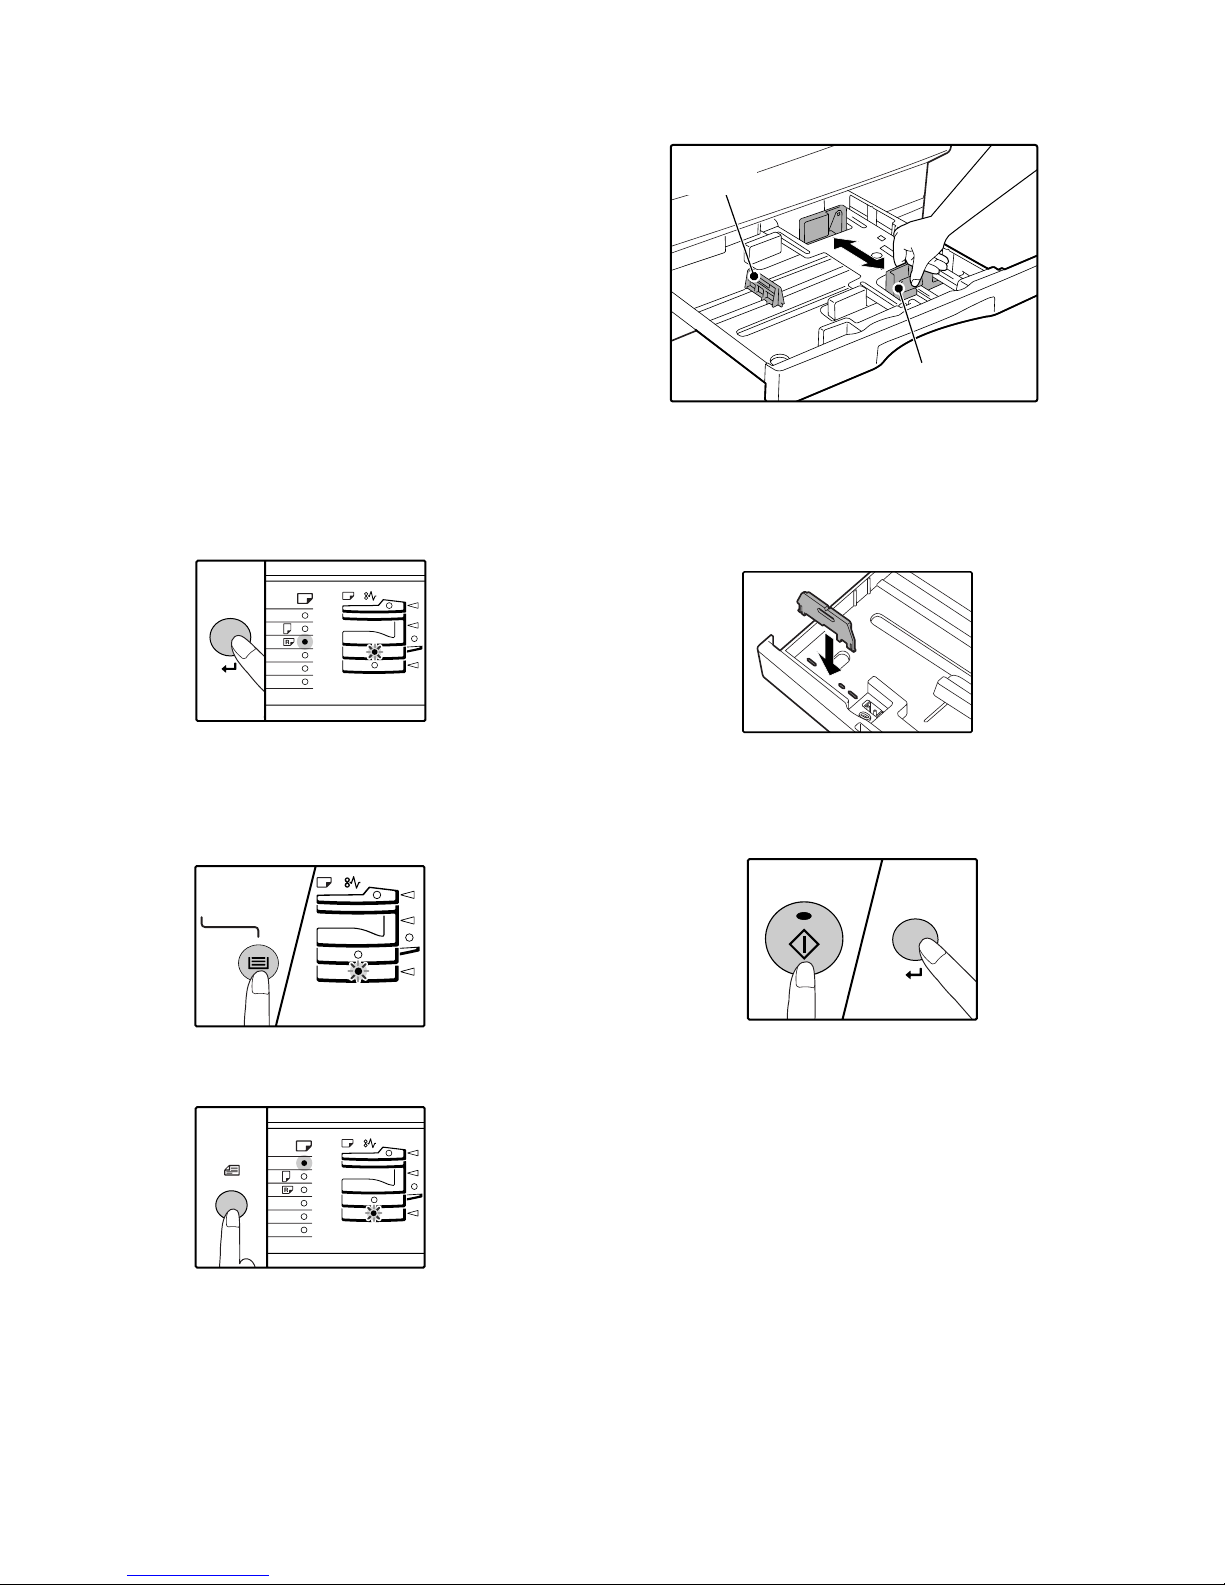
5. Changing a tray's paper size setting
Follow these steps to change a tray's paper size setting.
Note:
•The paper size setting cannot be changed when the machine has
stopped temporarily due to running out of paper or a m isfeed, or during
interrupt copying.
•During printing (even in copy mode), the paper size setting cannot be
changed.
•A5 size paper can only be selected in upper paper tray.
•Do not load paper that is a different size than the paper size setting.
Copying will not be possible.
4) Squeeze the lock lever of the front guide and slide the front guide to
match the width of the paper, and move the left guide to the
appropriate slot as marked on the tray.
Left guide
Front guide
1) Hold down the [PAPER SIZE ENTER] key for more than 5 seconds to
set the selected paper size.
The currently selected paper feed location indicator will blink and the
corresponding paper size (which is currently set) indicator will light
steadily.
All other indicators will go out.
2) If the machine has two paper trays, use the [TRAY SELECT] key to
select the paper tray for which you wish to change the paper size
setting.
Each time the [TRAY SELECT] key is pressed, a paper tray will be
indicated with a blinking paper feed location indicator.
•The front guide is a slide-type guide. Grasp the locking knob on the
guide and slide the guide to the indicator line of the paper to be loaded.
•The left guide is an insert-type guide. Remove it and then insert it at the
indicator line of the paper to be loaded.
•When using 11" x 17" sized paper store the left guide in the slot at the
left front of the paper tray.
5) Press the [START] key and then the [PAPER SIZE ENTER] key.
To change the paper size setting of another tray, repeat steps 2) to 5)
after pressing the [START] key.
3) Use the [ORIGINAL SIZE ENTER] key to select the paper size.
The indicator of the selected paper size lights up.
ENTER
AR-5316/5320 UNPACKING AND INSTALLATION 5-1
Note: Affix the paper size label for the paper size selected in step 3) to
the label position on the right end of the tray.
Important points when using th e printer mode
•Make sure that the tray's paper size setting is the same as the tray's
paper size setting in the printer driver. For example, if the tray's paper
size setting is A4R, set "Setting Paper Size" to "A4-R". For more
information, see "CONFIGURING THE PRINTER DRIVER" in the
"Software Setup Guide".
 Loading...