

Page 1

AR-5127 Series
PRINTER OPERATION MANUAL
INTRODUCTION
CONTENTS
INDEX
Page 2

INTRODUCTION
This manual describes the printer feature of the AR5127 digital laser copier/printer.
Warning:
This product is a class A product. If it is operated in
NOTES:
zThis manual describes only the printer feature. For
information about copier functions, maintenance,
supplies, related topics and specifications of the
printer feature, refer to the operation manual.
zThis manual assumes that you have a practical
knowledge of your operating system (Windows 95,
Windows 98, Windows Me, Windows NT 4.0,
Windows 2000, or Windows XP).
zFor information on the functions and procedures for
using your operating system, refer to your operating
system's manual or online Help.
zIn this manual, screen images and operating
procedures are mainly for Windows XP.
zThis manual refers to AR-5127 digital laser copier/
printer with the printer feature installed simply as the
"printer".
households, offices or similar surroundings, it can
produce radio interferences at other appliances, so
that the user has to take adequate countermeasures.
CONTENTS INDEX TOP OF CHAPTER
2
2
Page 3

HOW TO USE THIS MANUAL
In this manual, the following buttons are displayed at the
bottom of each page. Click these buttons to move
quickly to your desired page.
CONTENTS
Displays the Contents of this manual. From the Contents
you can jump to various pages.
INDEX
Displays the Index of this manual. From the Index you
can jump to various pages.
Takes you forward page by page.
This manual uses a link function that allows you to jump
to a related page. If you click green, underlined text, the
related page will be displayed.
Example:
NORMAL PRINTING
☞
To return to the previous link, click the button on the
menu bar of Acrobat Reader. In the Contents and Index
sections, the linked areas are not underlined.
How to print out this manual
In order to print out a hard copy of this manual for your
reference, click the 'File' menu of Acrobat Reader and
select 'Print'. After specifying the printer setting, click the
'Print' ('OK' in operating systems other than Windows
2000/XP) button to print.
For details on the operation and the functions of Acrobat
Reader, see the Acrobat Reader's help.
Takes you back page by page.
TOP OF CHAPTER
Takes you to the beginning of the chapter.
CONTENTS INDEX TOP OF CHAPTER
3
3
Page 4

CONTENTS
INTRODUCTION 2
HOW TO USE THIS MANUAL 3
PRINTING FROM A COMPUTER
NORMAL PRINTING 5
Supplementary notes on printing 7
USING THE OPERATION PANEL
OPERATION PANEL 8
Display 9
Indicators 10
Operation keys 11
CONFIGURING SETTINGS FROM THE OPERATION PANEL
Procedure for selecting basic menu settings 12
TROUBLESHOOTING
OUTLINE OF TROUBLESHOOTING 13
PRINTER DOES NOT PRINT 15
IMPROPER PRINTING OPERATION 18
PRINT QUALITY PROBLEMS 21
PRINTER DRIVER PROBLEMS 22
NOTICE PAGE PRINTED 23
ERROR MESSAGES SHOWN DURING PRINTING 24
UNINSTALLING THE PRINTER DRIVER 25
12
SHARING PRINTER
SHARING THE PRINTER USING WINDOWS NETWORKING
SHARED PRINTER SETTINGS 27
On the computer to which the printer is directly connected
CLIENT SETTINGS 28
GENERAL INFORMATION
PRINTER DRIVER FEATURES 31
GLOSSARY 34
KEY OPERATOR PROGRAMS
KEY OPERATOR PROGRAMS 35
LIST OF KEY OPERATOR PROGRAMS 36
USING THE KEY OPERATOR PROGRAMS 37
Basic procedure for accessing key operator programs 37
INDEX 39
26
27
CONTENTS INDEX TOP OF CHAPTER
4
44
Page 5

NORMAL PRINTING (1)
PRINTING FROM A COMPUTER
In most cases, it is not necessary to use the operation
panel when printing documents from your computer.
When a document is sent to the printer from the
computer, the printer will automatically print the
document. However, following the procedure specified
below can help ensure that documents are printed
accurately. The procedure assumes that the printer has
been properly connected to a computer, and that a
printer driver has been installed.
For more information regarding the printer operation
panel:
USING THE OPERATION PANEL
☞
1
Check the operation panel to confirm that the
ONLINE indicator is lit.
zIf the ONLINE indicator is not lit, press the PRINT key
to select the print mode and then press the key to
set the printer to the online condition.
Ready to print.
ONLINE
OFFLINE
CONTENTS INDEX TOP OF CHAPTER
5
5
Page 6

NORMAL PRINTING (2)
PRINTING FROM A COMPUTER
2
3
4
Check the paper tray(s) to ensure that the
desired paper is loaded.
Using the computer and any appropriate application
software, load the document to be printed, set any
desired features using the installed printer driver,
and give the command to print the document.
zIf necessary, refer to the documentation for the
computer and/or the application software for help on
issuing the necessary commands.
zFor details of the printer driver settings, see the
printer driver help.
The printer will print the document.
zIf an optional Job Separator Tray Kit is installed,
printed sheets will be delivered to the job separator
tray. (This setting can be changed using the key
operator program or 'Output' setting in the printer
driver.)
To cancel a print job
To interrupt a print job when the printer is printing, press
the key in the print mode to select "OFFLINE". The
printer will enter the offline mode and stop printing. To
resume printing, press the key to select the online
mode. To cancel the print job, press the CLEAR key.
NOTE:
Depending on the computer's processing speed and
the machine's I/O timeout setting, it may take time for
the cancellation to take effect. In some cases, the
cancellation may take effect more quickly if the print
job is cancelled from the computer.
CONTENTS INDEX TOP OF CHAPTER
6
6
Page 7

NORMAL PRINTING (3)
Supplementary notes on printing
PRINTING FROM A COMPUTER
zIf you try to start printing before the printer is turned on
or while the message "Warming up. Please wait." is
displayed, immediately after the printer is turned on,
incorrect printing may result. Be sure to wait until the
printer is online before sending a print job.
zAlways check the message in the display before
adding A4, B5 or 8-1/2" x 11" (letter) paper to the
bypass tray during a print job. If 'R' is added to the
paper size indication, for example "Add A4R paper.",
set the paper narrow side first into the feed slot. If 'R' is
not added to the paper size indication, set the paper
longest side first into the feed slot.
zIf paper needs replenishing in the middle of a print job,
be sure to set the paper in the same orientation. If the
orientation is changed in the middle of a print job,
incorrect printing may result. Image rotation will not
zWhen setting A5 or 5-1/2" x 8-1/2" (invoice) size paper
in a paper tray or in the bypass tray, be sure to set the
paper longest side first into the feed slot, otherwise
incorrect printing may result.
zWhen setting A6, B6, 7-1/4" x 10-1/2" (executive), DL,
C5 or COM10 in the bypass tray, be sure to set the
paper narrow side first into the feed slot. If not,
incorrect printing may result.
zIf any paper tray is open when a print job is sent to the
printer, incorrect printing may result. Ensure that all
paper trays and covers are closed before printing.
z"BYPASS MANUAL" cannot be specified in the middle
of a job. It will be regarded as "BYPASS TRAY"
(automatic feeding).
occur in the middle of a print job.
CONTENTS INDEX TOP OF CHAPTER
7
7
Page 8

USING THE OPERATION PANEL
OPERATION PANEL (1)
The operation panel is used to set the display contrast, paper size, and other parameters. The operation panel also lets
you use key operator programs to adjust printer settings.
CONFIGURING SETTINGS FROM THE OPERATION PANEL
☞
Operation panel keys and the printer basic screen are shown below.
You can jump to their description by clicking the underlined text.
Indicators Display
☞☞
Ready to print.
ONLINE
OFFLINE
For description of operation keys used in the print mode:
Operation keys
☞
The display may be different depending on the configuration of optional equipment.
The key names and the key icons may be different for users in different countries and regions.
CONTENTS INDEX TOP OF CHAPTER
8
8
Page 9

OPERATION PANEL (2)
Display
The display in the print mode is composed of three
sections: message display, status information, and
machine image.
Message display
Messages are displayed regarding the printer status and
operation.
Status information
The online or offline mode is indicated. Also the selected
paper size is indicated when a print job is executed.
Machine image
The configuration of optional equipment is indicated.
USING THE OPERATION PANEL
Also the selected paper tray is indicated when a print job
is executed.
When any problem occurs or when accessing the key
operator programs, the display will vary depending on
the situation.
CONTENTS INDEX TOP OF CHAPTER
9
9
Page 10

OPERATION PANEL (3)
Indicators
USING THE OPERATION PANEL
The indicators show printer status as described below:
ONLINE indicator
Lit Indicates that the printer is online and
data can be transferred and printed.
Extinguished Indicates that the printer is offline and
data cannot be transferred or printed.
Make settings from the operation
panel in this mode.*
* You cannot change settings if the DATA indicator is
lit. To clear the DATA indicator, press the key to
select ONLINE and wait for the print job to finish.
DATA indicator
Lit Indicates that there is print data
remaining in memory but printing has
been stopped.
Blinking Indicates that there is print data
remaining in memory and printing is
being performed.
Extinguished Indicates that there is no data
remaining in memory or being
received.
CONTENTS INDEX TOP OF CHAPTER
10
10
Page 11

OPERATION PANEL (4)
Operation keys
USING THE OPERATION PANEL
To make printer settings from the operation panel, use
the operation keys which have the following functions:
PRINT key
and keys
and keys
SPECIAL
FUNCTION key
Press to select the PRINT
mode.
Press to change between the
online and offline modes and
select an item in the printer
setting screen.
Use to move the setting item
horizontally in some key
operator programs.
Press to display the screen for
setting the key operator
programs, display contrast or
paper size from the basic
screen of the PRINT mode. If
OK key
BACK key
CLEAR key
CLEAR ALL key
Numeric keys
Press to confirm the selected
setting or entered data in the
PRINT mode.
Press to return the display to
the previous screen.
If pressed in the offline mode
while data remains in memory,
the current print data will be
cleared. Also used to clear an
entry in the configuration
setting if a mistake is made.
Press to cancel setting and
return to the basic screen.
Used to enter numbers such
as key operator codes.
pressed in the DISPLAY
CONTRAST screen, you will
return to the basic screen of
PRINT mode. If pressed in the
PAPER SIZE SET screen, a
message appears confirming
the paper size in the tray.
CONTENTS INDEX TOP OF CHAPTER
NOTE:
Except for the PRINT key and keys, these keys are
available only when the printer is not executing a print
job and no print data remains.
11
11
Page 12

USING THE OPERATION PANEL
CONFIGURING SETTINGS FROM THE OPERATION PANEL
Procedure for selecting basic menu settings
The printer operation panel is used to adjust print
settings.
Follow these steps to adjust the print settings from the
operation panel.
Press the PRINT key to select the print mode.
1
zMake sure the PRINT indicator lights up and the
basic screen is displayed on the display.
Press the SPECIAL FUNCTION key.
2
3
Use the key or key to select "PAPER SIZE
SET", "DISPLAY CONTRAST", or "KEY
OPERATOR PRG.", and press the OK key.
zThe paper size and display contrast settings are
adjusted using the same procedure as in COPY
mode. For this procedure, see the Operation Manual
for the machine.
SPECIAL FUNCTION
PAPER SIZE SET
DISPLAY CONTRAST
KEY OPERATOR PRG.
zFor details on the key operator programs,
KEY OPERATOR PROGRAMS
☞
CONTENTS INDEX TOP OF CHAPTER
12
12
Page 13
OUTLINE OF TROUBLESHOOTING (1)
TROUBLESHOOTING
This chapter describes how to solve printer problems.
Refer to the relevant section based on the problem.
If a notice page is printed, refer to the section entitled
"NOTICE PAGE PRINTED" to clear a memory error.
NOTICE PAGE PRINTED
☞
If an error message appears in the message display,
follow the troubleshooting instructions in the message.
ERROR MESSAGES SHOWN DURING PRINTING
☞
In other cases, find your problem in the list on the next
page and read the relevant solution by clicking the
underlined text. If a problem persists after checking the
list, please consult your authorized SHARP dealer.
For problems inside the printer, such as paper feeding
errors and paper misfeeds, see the operation manual.
For problems occurring in the paper tray, read the
description of "Types and sizes of copy paper", "Loading
copy paper", and "Storage of supplies". For misfeed
problems, read the section of "Misfeed removal".
CONTENTS INDEX TOP OF CHAPTER
13
13
Page 14

OUTLINE OF TROUBLESHOOTING (2)
TROUBLESHOOTING
PRINTER DOES NOT PRINT
zThe printer does not operate.
zThe printer is on but data is not received (DATA
indicator does not blink).
zThe printer is on, data has been received (DATA
indicator was blinking) but is not printed.
IMPROPER PRINTING OPERATION
zPrinting is slow.
zPrinted characters (or graphics) are different from
those on screen (garbled characters).
zThe printer does not print the full image.
zPaper specified from application is not used.
zStapling cannot be performed.
zPrinter write error occurs.
PRINT QUALITY PROBLEMS
PRINTER DRIVER PROBLEMS
zThe printer driver is uninstallable.
zThe printer cannot be selected from computer.
zThe printer driver does not operate correctly.
UNINSTALLING THE PRINTER DRIVER
zPrint quality problem occurs, such as blurred or
stained printout, character voids, dirty background,
dropouts or double printing.
CONTENTS INDEX TOP OF CHAPTER
14
14
Page 15

PRINTER DOES NOT PRINT (1)
The printer does not operate.
Check: Printer plugged in?
Solution: Plug the printer into a grounded outlet.
Check: Power switch on?
Solution: Turn the power switch on.
TROUBLESHOOTING
CONTENTS INDEX TOP OF CHAPTER
15
15
Page 16
PRINTER DOES NOT PRINT (2)
TROUBLESHOOTING
The printer is on but data is not received (DATA
indicator does not blink).
Check: Printer set to the ONLINE mode?
Solution: Select the PRINT mode and use the
key to select the ONLINE mode.
NORMAL PRINTING
☞
Check: Correct printer cable properly connected
between the printer and your computer?
Solution: Check both ends of the printer cable and
make sure you have a solid connection.
Try a known good cable. For information
on cables, see "SPECIFICATIONS" in
the Operation Manual for the machine.
Check: Correct printer driver installed?
Check: Is the port configured correctly?
Solution: It is possible that there is a problem with
the port configuration, for example
another printer driver may be using the
port. Open the printer driver properties
and correctly configure the port that you
are using.
Check: Is the correct printer selected?
Solution: From the application, select the correct
printer.
Solution: Install the appropriate printer driver. For
the procedure for installing the printer
driver, see the separate "AR-5127 Series
SOFTWARE SETUP" manual.
CONTENTS INDEX TOP OF CHAPTER
16
16
Page 17
PRINTER DOES NOT PRINT (3)
The printer is on, data has been received (DATA
indicator was blinking) but is not printed.
Check: Copy job being performed?
Solution: Wait until the copy job is complete. You
can also change jobs in the job status
screen. To change jobs, press the JOB
STATUS key on the machine's operation
panel and select "JOB OUTPUT".
Check: Is the "I/O TIMEOUT" setting too short?
TROUBLESHOOTING
Solution: Select a longer "I/O TIMEOUT" setting.
If a notice page is printed or an error message appears,
see the message.
NOTICE PAGE PRINTED
☞
ERROR MESSAGES SHOWN DURING PRINTING
☞
CONTENTS INDEX TOP OF CHAPTER
17
17
Page 18

TROUBLESHOOTING
IMPROPER PRINTING OPERATION (1)
Printing is slow. Printed characters (or graphics) are different from
those on screen (garbled characters).
Check: Simultaneous use of two or more
application software programs?
Check: Interface cable not connected properly?
Solution: Start printing after quitting all unused
application software programs.
Check: Is an appropriate print quality selected in
the printer driver?
Solution: When the print quality setting in the
printer driver is 'Normal' or 'Photo', slow
printing sometimes results. Open the
printer driver setup screen and select
'Draft' for the print quality.
Check:
Solution: Add memory (RAM) to the computer.
Computer running out of memory (RAM)?
Solution: Securely plug the interface cable into the
connectors of the printer and computer.
Check: Interface cable not conforming to
specification?
Solution: For the specifications of the interface
cable, see "SPECIFICATIONS" in the
Operation Manual for the machine.
CONTENTS INDEX TOP OF CHAPTER
18
18
Page 19

IMPROPER PRINTING OPERATION (2)
The printer does not print the full image.
Check: Paper size loaded in machine larger than
TROUBLESHOOTING
Check: Page layout too complex?
Solution: Simplify the page layout.
Check: Is an appropriate print quality selected in
the printer driver?
Solution: When the print quality setting in the
printer driver is 'Normal' or 'Photo', slow
printing sometimes results. Open the
printer driver setup screen and select
'Draft' for the print quality.
Check: Wrong page orientation setting for
printing?
Solution: Change the page orientation with the
printer driver.
that specified on used application
software or printer driver?
Solution: Load the machine with paper of correct
size.
Check: Computer running out of memory (RAM)?
Solution: Add memory (RAM) to the computer.
Check: Simultaneous use of two or more
application software programs?
Solution: Start printing after quitting all unused
application software programs.
CONTENTS INDEX TOP OF CHAPTER
19
19
Page 20

IMPROPER PRINTING OPERATION (3)
TROUBLESHOOTING
Paper specified from application is not used.
Check: Is the paper selection setting in the
printer driver appropriate?
Solution: Place the desired size of paper in the
printer paper tray, and set the paper
selection setting in the printer driver to
'Auto Select'.
Stapling cannot be performed.
Check: Different sized papers used?
Solution: Stapling cannot be performed on different
sized papers.
Check: Paper size acceptable for stapling?
Solution: Check the acceptable paper sizes for
Printer write error occurs.
Check: Timeout time too short?
Solution: Open the printer driver properties and
select a longer timeout setting.
NOTE:
Even if a longer time is set, a printer write error may
occur when copying is being performed.
stapling referring to the operation
manual.
CONTENTS INDEX TOP OF CHAPTER
20
20
Page 21
PRINT QUALITY PROBLEMS
TROUBLESHOOTING
Print quality problem occurs, such as blurred or
stained printout, character voids, dirty background,
dropouts or double printing.
Check: Non-standard paper used?
Solution: Check that the paper conforms to the
specification. Refer to "Types and sizes
of copy paper" in the operation manual.
Check: Toner cartridge was previously used in
another SHARP printer?
Solution: Avoid using a toner cartridge which was
used in another printer. It will cause dirty
printout.
Check: Printed on uneven surface?
Solution: If dirty background occurs in envelopes,
shift the printed area from the joint of the
envelope rear surface.
Check: Printer used in high-temperature, high-
humidity environment?
Solution: Start using the printer some time after
power-on or change the operating
environment.
Check: Fusing rollers dirty?
Solution: Print several white pages to clean the
fusing rollers.
Check: Are you using paper with a high moisture
content?
Solution: Use newly unpacked paper.
CONTENTS INDEX TOP OF CHAPTER
21
21
Page 22

PRINTER DRIVER PROBLEMS
TROUBLESHOOTING
The printer driver is uninstallable.
Check: Not enough hard disk space available to
load printer driver?
Solution: Delete unnecessary files and application
software to increase the free space of the
hard disk.
Check: Are you using a compatible operating
system?
Solution: See the separate "AR-5127 Series
SOFTWARE SETUP" manual to see if
your operating system is compatible.
The printer cannot be selected from computer.
Check: Printer driver installed correctly?
Solution: Install the printer driver correctly. For the
procedure for installing the printer driver,
see the separate "AR-5127 Series
SOFTWARE SETUP" manual.
The printer driver does not operate correctly.
Solution: If for some reason the printer driver does
not operate correctly, delete the printer
driver and then reinstall it following the
directions in the separate "AR-5127
Series SOFTWARE SETUP" manual.
UNINSTALLING THE PRINTER DRIVER
☞
CONTENTS INDEX TOP OF CHAPTER
22
22
Page 23

NOTICE PAGE PRINTED
TROUBLESHOOTING
If you find that a notice page has been printed at the end
of a print job, the print data received from the computer
has not been printed as specified. Fix the problem as
explained below and then try printing again.
If a NOTICE PAGE is printed
If the following NOTICE PAGE is printed, check your
settings for the Staple function.
****************************************************
Notice Page
****************************************************
The IMC memory full error had occurred,
a normal output was not able to be executed.
Please refer to the operation manual for
the solution method.
When the Staple function is selected:
Either set the print quality to 'Draft', or select a larger
number for "MEM. FOR PRINTER" in the "COPY" "FUNCTION SETTING" key operator program. If this
When the Staple function is not selected:
Turn off the ROPM function setting. If you wish to use
the ROPM function, set the print quality to 'Draft' or
increase memory.
NOTE:
The IMC memory is used to store print data when the
ROPM function is used. This memory is also used to
store original image data in the copy mode. The
percentage of the memory used for the printer feature
can be adjusted using a copier key operator program.
See the key operator's guide in the operation manual.
The memory can be extended by adding commercially
available memory modules. For details, contact your
SHARP dealer.
Disabling notice page printing
Notice page printing can be disabled using a key
operator program.
KEY OPERATOR PROGRAMS
☞
still does not solve the problem, increase the IMC
memory.
CONTENTS INDEX TOP OF CHAPTER
23
23
Page 24

TROUBLESHOOTING
ERROR MESSAGES SHOWN DURING PRINTING
If any error occurs during printing, an error message will appear in the display of the operation panel. Follow the
message directions to solve the problem. When the messages below appear, see the operation manual.
Display message Cause Remedy
Check stapler The stapler unit is not set properly or staple
position.
Or select item
from below.
Add staples. The stapler has run out of staples. Add staples referring to the operation
Or select item
from below.
jam has occurred.
Check the stapler referring to the
operation manual. Or, press the key
and select "PRINT WITHOUT
STAPLE" or "CANCEL JOB".
manual. Or, press the key and select
"PRINT WITHOUT STAPLE" or
"CANCEL JOB".
CONTENTS INDEX TOP OF CHAPTER
24
24
Page 25

UNINSTALLING THE PRINTER DRIVER
TROUBLESHOOTING
To delete a printer driver that has been installed using
the installer, follow the procedure shown below.
Click the 'start' button, and then click 'Control
1
Panel'.
zIn an operating system other than Windows XP, click
the 'Start' button, select 'Settings', and then click
'Control Panel'.
Click 'Add or Remove Programs'.
2
zIn an operating system other than Windows XP,
double-click the 'Add/Remove Programs' icon.
Delete the 'SHARP AR-5127 Series printer
3
driver' from the list of applications.
zFor more information, refer to your operating manual
or to the help files for your operating system.
To delete a printer driver that has been installed using
the Add Printer Wizard, follow the procedure shown
below.
Click the 'start' button, click 'Control Panel',
1
2
click 'Printers and Other Hardware', and then
click 'Printers and Faxes'.
zIn an operating system other than Windows XP, click
the 'Start' button, select 'Settings', and then click
'Printers'.
Right-click the 'SHARP AR-5127' printer driver
icon, and click 'Delete' from the shortcut menu.
Follow the instructions on your screen.
3
CONTENTS INDEX TOP OF CHAPTER
25
25
Page 26

SHARING PRINTER
SHARING THE PRINTER USING WINDOWS NETWORKING
The printer can be used as a shared printer in a Windows 95/98/Me/NT 4.0/2000/XP network environment.
Note that the Windows network environment must already be established.
Client with
Client
Client Client
The print server explained here is a client to which a printer is directly connected, and a "Client" is any computer, which
is connected to the same network.
SHARED PRINTER
shared printer
CLIENT SETTINGS
Shared printer
SETTINGS
CONTENTS INDEX TOP OF CHAPTER
26
26
Page 27

SHARED PRINTER SETTINGS
On the computer to which the printer is directly connected
SHARING PRINTER
For sharing a printer on a Windows operating system,
follow the setup procedures below.
If your operating system is Windows 95/98/Me, start
from step 1 to setup the network. If your operating
system is Windows NT 4.0, 2000 or XP Home Edition,
open the control panel, and then start from step 6.
NOTE:
If your operating system is Windows XP Professional,
refer to the operation manual or the help file of your
operating system.
Click the 'Start' button, select 'Settings', and
1
then click 'Control Panel'.
Double-click the 'Network' icon.
2
NOTE:
If the 'Network' icon does not appear on Windows Me,
click 'view all Control Panel options' to view it.
Click the 'OK' button in the 'Network' dialog box.
5
NOTE:
If a message appears asking you to restart the
computer, click the 'Yes' button and restart the
computer. Then, open the printer folder and continue
the setup procedures from Step 6.
Click 'Printers and Other Hardware' in the control
6
7
8
panel, and click 'Printers and Faxes'.
zIn an operating system other than Windows XP,
double-click the printer icon.
Right-click the 'SHARP AR-5127' printer driver
icon, and click 'Sharing' from the shortcut menu.
Establish the settings for sharing, and click the
'OK' button.
NOTE:
For information on the various preferences available,
3
4
Click the 'File and Print Sharing' button.
Enable 'I want to be able to allow others to print
to my printer(s).' by clicking the check box, and
then click the 'OK' button.
CONTENTS INDEX TOP OF CHAPTER
click the '?' button located at the top-right of the dialog
box. Then, click the option you want to know more
about, for a pop-up explanation to appear.
CLIENT SETTINGS
☞
27
27
Page 28

CLIENT SETTINGS (1)
SHARING PRINTER
Follow the procedure below to install the printer driver in
the client.
NOTE:
This page provides steps for Windows XP Home Edition
users only. If your operating system is Windows 95/98/
Me/2000/XP Professional, refer to the operation manual
or the help file of your operating system.
If your operating system is Windows NT 4.0, refer to
"Settings in Windows NT 4.0
Click the 'start' button, and click 'Control
1
2
Panel'.
Click 'Printers and Other Hardware', and click
'Printers and Faxes'.
Click 'Add a printer' in 'Printer Tasks'.
".
3
zThe "Add Printer Wizard" will appear.
4
5
Click the 'Next' button.
Select
to another computer', and click the 'Next'
button.
'A network printer, or a printer attached
CONTENTS INDEX TOP OF CHAPTER
28
28
Page 29

CLIENT SETTINGS (2)
SHARING PRINTER
6
Select
button.
'Browse for a printer', and click the 'Next'
7
8
Select the printer to be shared in the network,
and click the 'Next' button.
zThe contents of this window will vary depending on
your network environment.
Select settings in the 'Default Printer' screen,
and click the 'Next' button.
C
lick the 'Finish' button.
9
CONTENTS INDEX TOP OF CHAPTER
29
29
Page 30
CLIENT SETTINGS (3)
SHARING PRINTER
Settings in Windows NT 4.0
If your operating system is Windows NT 4.0, establish
settings as follows in the printer properties after installing
the printer driver.
For the procedure for installing the printer driver, see the
separate "AR-5127 Series SOFTWARE SETUP" manual.
Click the 'Start' button, select 'Settings', and
1
2
3
then click 'Printers'.
Right-click the 'SHARP AR-5127' printer driver
icon, and click 'Properties' from the shortcut menu.
zThe printer properties will appear.
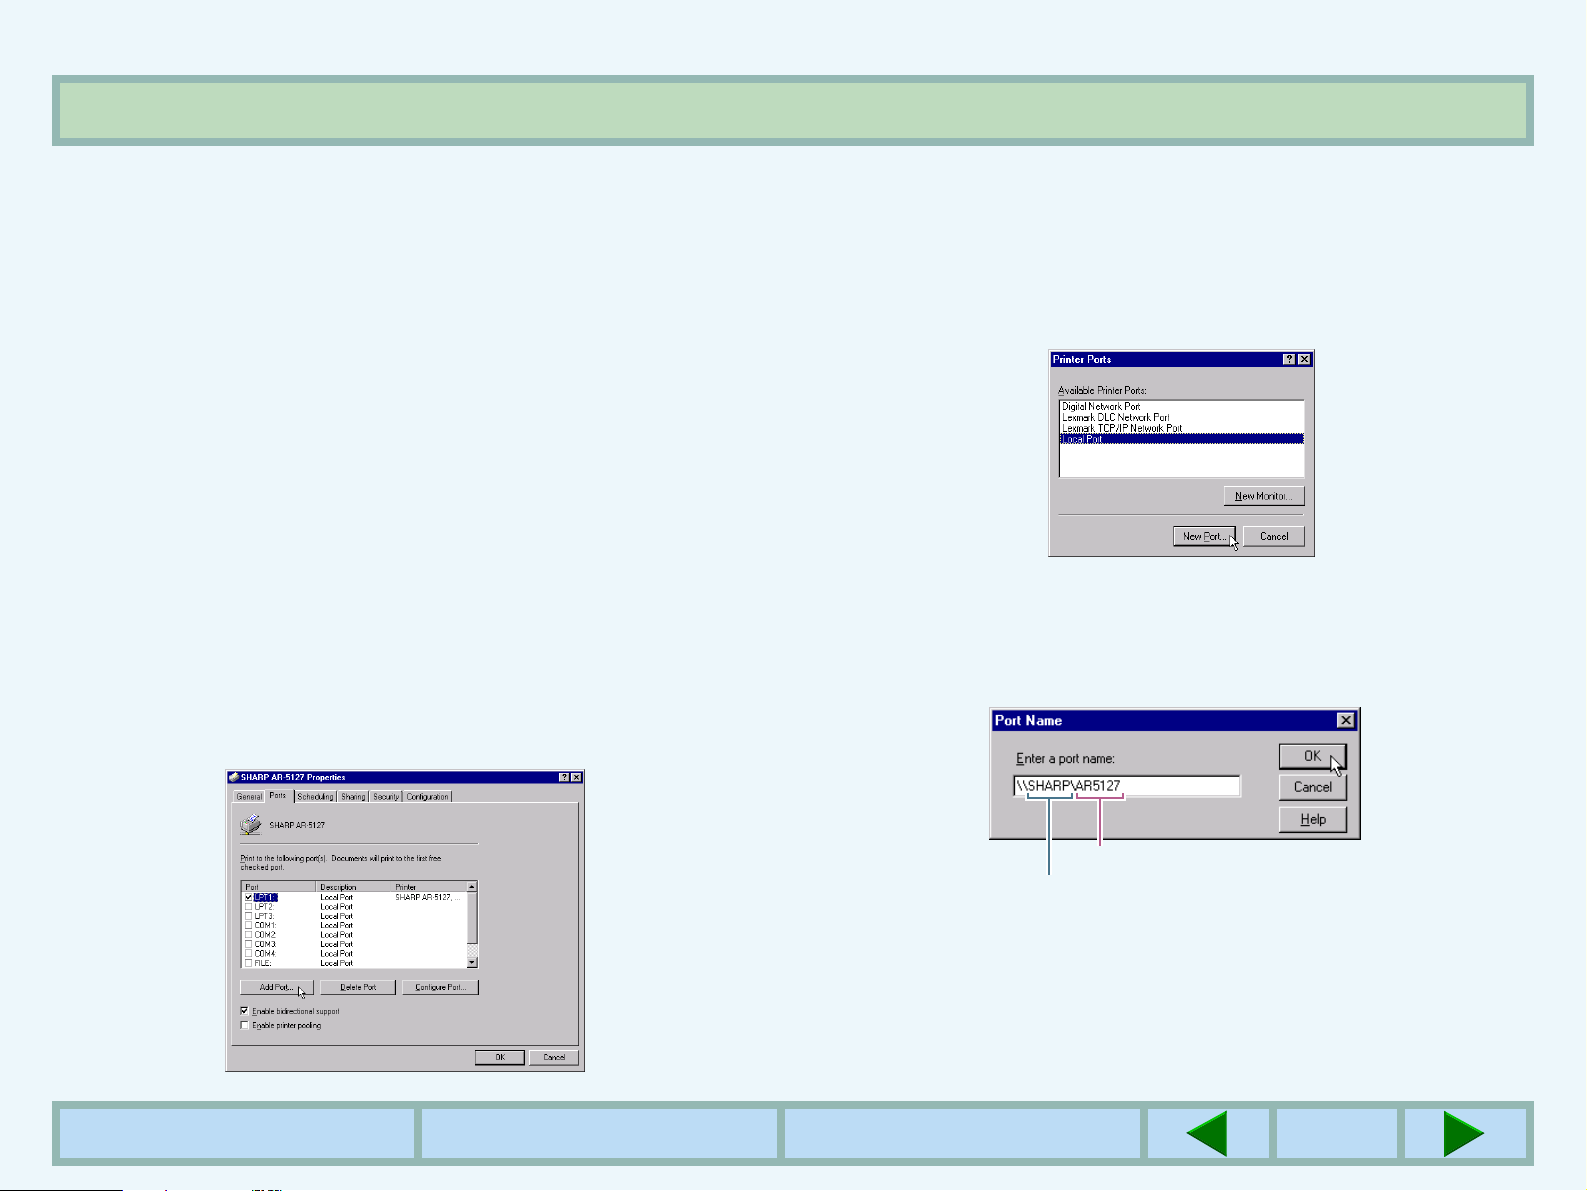
Click the 'Ports' tab, and click the 'Add Port'
button.
zThe 'Printer Ports' dialog box will appear.
4
5
Select 'Local Port' in the list of 'Available
Printer Ports', and click the 'New Port' button.
zThe 'Port Name' dialog box will appear.
Enter "\\(name of server connected to printer)\
(name of shared printer)", and click the 'OK'
button.
name of server connected to printer
C
lick the 'OK' button in the printer properties
6
CONTENTS INDEX TOP OF CHAPTER
window.
name of shared printer
30
30
Page 31

PRINTER DRIVER FEATURES (1)
Tab Setting Selections Initial setting
GENERAL INFORMATION
Main
Paper
Copies 1 to 999 1
Collate On/Off On
N-Up Printing 1-Up/2-Up/4-Up 1-Up
Border On/Off Off
Staple On/Off Off
User Settings -
[User Settings]
Setting Name Up to seven names, 20 characters each -
Paper Size A3, A4, A5, A6, B4, B5, B6, Ledger, Letter, Legal,
Executive, Folio, Invoice, Foolscap, 8K, 16K, DL, C5,
COM10, Custom
Fit To Page On/Off Off
Image Orientation Portrait/Landscape Portrait
Factory Defaults
A4*
Paper Source Auto Select, Bypass Tray, Bypass Manual, Tray 1,
Tray 2, Tray 3, Tray 4
*This initial setting may vary depending on your operating system settings. (continued)
For information on each setting, see Help in the printer driver setup screen.
CONTENTS INDEX TOP OF CHAPTER
Auto Select
31
31
Page 32

PRINTER DRIVER FEATURES (2)
Tab Setting Selections Initial setting
GENERAL INFORMATION
Paper
Advanced
Transparency Print On/Off Off
Output Center Tray, Job Separator Tray, Finisher Offset Tray Center Tray
[Custom]
Width 100.0 to 297.0 (mm.)/3.94 to 11.69 (in.) 100.0 (mm.)*
Length 148.0 to 431.8 (mm.)/5.83 to 17.00 (in.) 148.0 (mm.)*
Size millimeters/inches millimeters*
Print Quality Draft/Normal/Photo Normal
Smoothing On/Off On
Photo
Enhancement
Toner Save On/Off Off
2 Gradation Print On/Off Off
[Image Adjustment]
On/Off Off
Brightness 0 to 100 50
Contrast 0 to 100 50
*This initial setting may vary depending on your operating system settings. (continued)
For information on each setting, see Help in the printer driver setup screen.
CONTENTS INDEX TOP OF CHAPTER
32
32
Page 33

PRINTER DRIVER FEATURES (3)
Tab Setting Selections Initial setting
GENERAL INFORMATION
Watermarks
Configuration
Watermark (None)/TOP SECRET/CONFIDENTIAL/DRAFT/
ORIGINAL/COPY
Text - -
Size 6 to 300 200
Angle -90 to +90 +45
Gray Scale 0 to 255 192
On First Page Only On/Off Off
Input Tray Two Trays/Three Trays/Four Trays Two Trays
Output Tray Options None/Job Separator/Staple Finisher None
ROPM On/Off On
[Set Tray Status]
Paper Source Bypass Tray, Bypass Manual, Tray 1, Tray 2, Tray 3,
Tray 4
(None)
Bypass Tray
Setting Paper Size Not Setting, A3, A4, A4-R, A5, A5-R, A6-R, B4, B5, B5-R,
B6-R, Ledger, Letter, Letter-R, Legal, Executive-R, Folio,
Invoice, Invoice-R, Foolscap, 8K, 16K, 16K-R, DL, C5,
COM10, Custom
For information on each setting, see Help in the printer driver setup screen.
CONTENTS INDEX TOP OF CHAPTER
Not Setting
33
33
Page 34

GLOSSARY
GENERAL INFORMATION
interface cable
An electrical cable which transfers data between a
computer and a printer.
local printer
A printer that is directly connected to your computer, as
opposed to a remote or network printer.
memory
The capacity of a device (computer, printer, etc.) to store
information, or the devices in which information is
stored, usually measured in bytes.
offline
A condition in which the printer is not ready to accept
data from or communicate with the computer.
online
printer driver
A printer driver is software designed to convert print data
from any application into data understandable by the
printer so that the printer can quickly and efficiently print
out the data.
random-access memory (RAM)
The working memory of the computer in which programs
and data are temporarily stored while you use them.
Resetting or shutting off the computer clears all
information from RAM. Printing very complicated
documents may require closing other running programs
or adding more RAM to the computer.
resolution
The fineness of lines displayed on a monitor or printed,
measured in dots per inch (dpi). Low-resolution devices
may display or print visibly jagged images, particularly
A condition in which the printer is ready to accept data
from and communicate with the computer.
CONTENTS INDEX TOP OF CHAPTER
diagonal lines.
34
34
Page 35

KEY OPERATOR PROGRAMS
A variety of key operator programs are available which
allow a key operator to adjust certain printer settings,
functions, or operating conditions. These programs are
listed on the following pages.
LIST OF KEY OPERATOR PROGRAMS
☞
General information on accessing key operator
programs, including registration of a key operator code
number, is included in the Key Operator's Guide in the
operation manual.
The basic procedure for accessing key operator
KEY OPERATOR PROGRAMS
programs for the printer feature is described in this
chapter.
Procedure for selecting basic menu settings
☞
CONTENTS INDEX TOP OF CHAPTER
35
35
Page 36

KEY OPERATOR PROGRAMS
LIST OF KEY OPERATOR PROGRAMS
A list of key operator programs for the printer feature is provided below. Factory default settings are indicated in boldface type.
The programs with the settings "On" and "Off" are set by pressing the OK key so that a check mark is displayed in the check box.
Program Possible settings Description
EXPOSURE LEVEL 1 - 3 - 5 Lightens or darkens printouts.
NOTICE PAGE
ROTATED PRINT
FORCED OUTPUT
OF PRINT
AUTO TRAY
SWITCH
TRAY EXCLUDED
FROM ATS
EXCLUDE BYPASSTRAY FROM ATS
DISABLE INTERRUPT
PRINT JOB
I/O TIMEOUT 1 sec. - 180 sec. -
On / Off
On / Off
On / Off
On / Off
NO / TRAY 1 /
TRAY 2 / TRAY 3* /
TRAY 4*
On / Off
On / Off Disables printing from being interrupted by another function if this
Specifies whether a notice page will be printed when specified printing
is not performed because of a problem such as IMC memory full error.
Enables/disables rotation of print image for printing onto A4R, B5R or
8-1/2" x 11"R paper.
Specifies whether printing onto another size paper determined by the priority
rule is performed when no tray with the specified size paper is installed.
Enables/disables automatic switching between paper trays containing the
same size paper in the same orientation during printing when paper runs out.
Specifies a tray which will not be used with the auto select setting for
paper source.
* The available settings reflect the installed trays.
Specifies whether the bypass tray is included in the trays selected with
the auto select setting for paper source.
program is set.
In the event that data is not received, printing is ended after the set
999 sec.
CONTENTS INDEX TOP OF CHAPTER
time.
36
36
Page 37
USING THE KEY OPERATOR PROGRAMS (1)
Basic procedure for accessing key operator programs
KEY OPERATOR PROGRAMS
To access the printer key operator programs, follow the
steps below.
Press the PRINT key to select the print mode.
1
zMake sure the PRINT indicator lights up and the
basic screen is displayed in the display.
zIf the DATA indicator is lit or blinking, key operator
programs cannot be accessed. Wait until printing is
complete or cancel printing.
To cancel a print job
☞
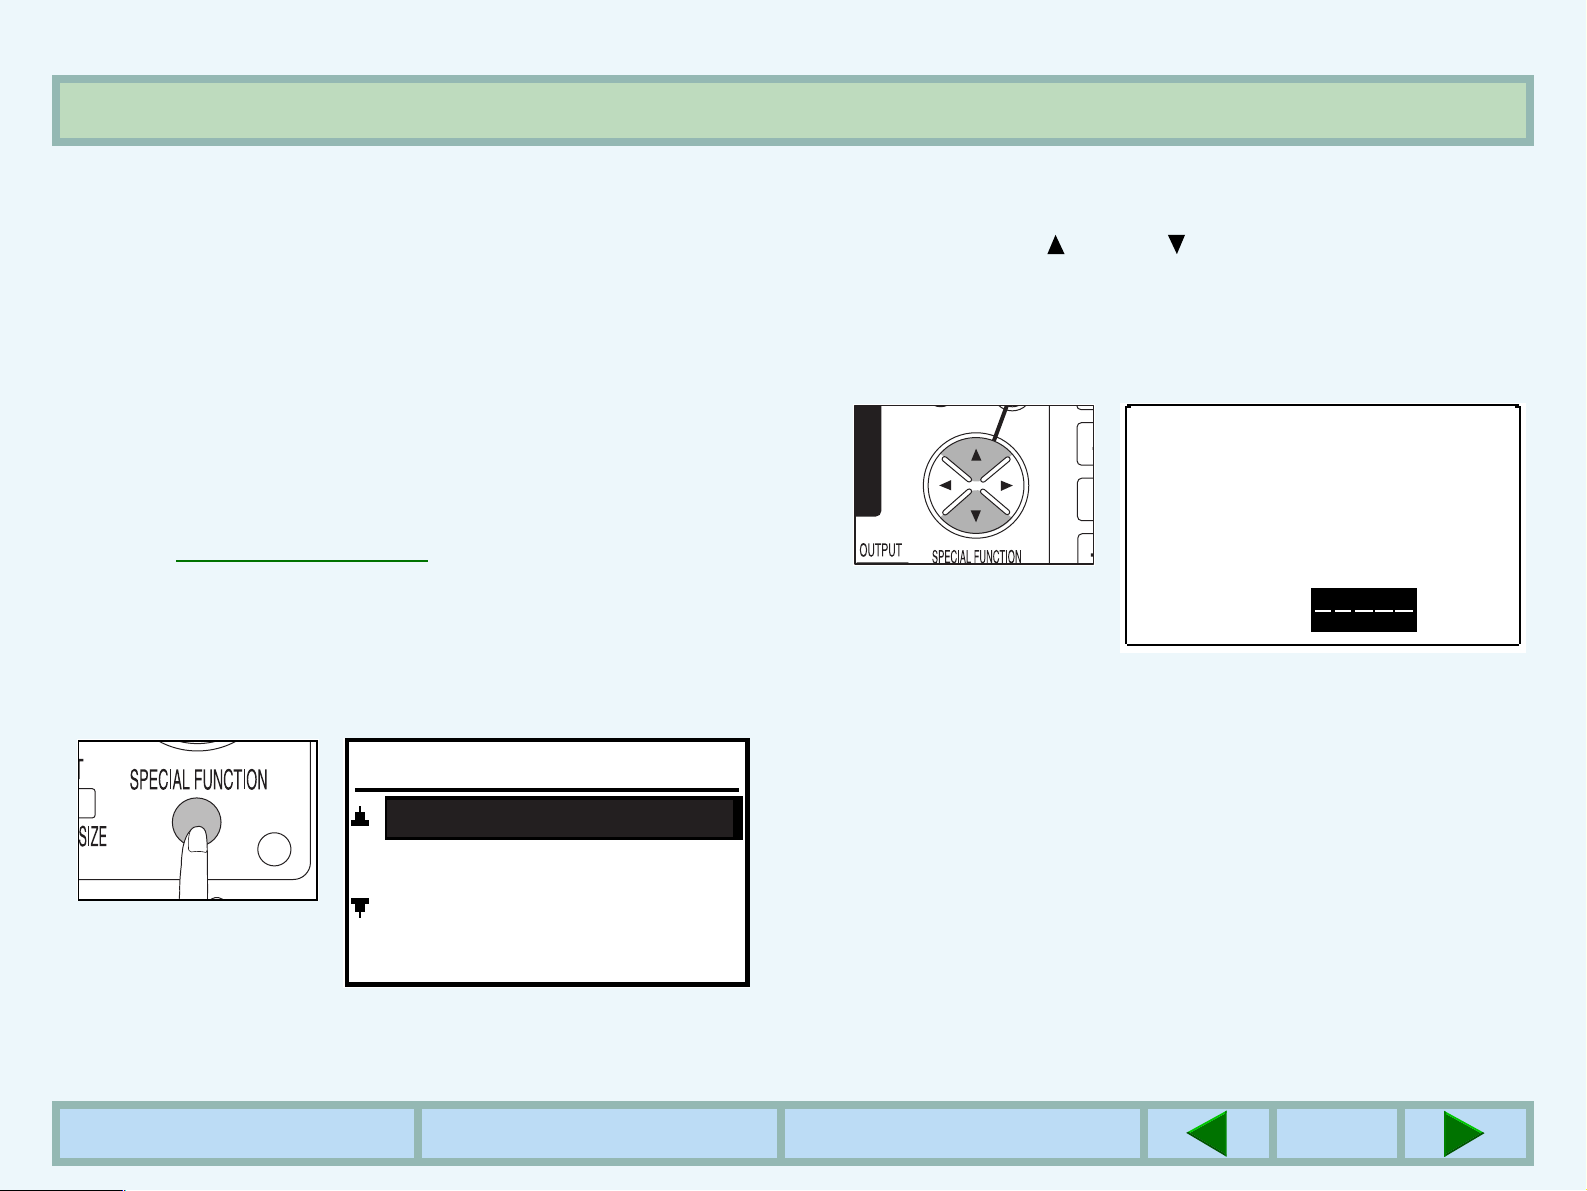
Press the SPECIAL FUNCTION key.
2
zThe following display will appear.
SPECIAL FUNCTION
3
4
Use the and keys to select "KEY
OPERATOR PRG." and press the OK key.
zThe following display will appear.
Enter key operator
code.
KEY OPERATOR CODE:
Enter the key operator code number using the
numeric keys.
zThe dashes in the display will change to asterisks.
PAPER SIZE SET
DISPLAY CONTRAST
KEY OPERATOR PRG.
CONTENTS INDEX TOP OF CHAPTER
37
37
Page 38

USING THE KEY OPERATOR PROGRAMS (2)
KEY OPERATOR PROGRAMS
5
6
Use the and keys to select "PRINTER" and
press the OK key.
zThe following display will appear.
KEY OPERATOR PRG.
EXPOSURE LEVEL
NOTICE PAGE
ROTATED PRINT
FORCED OUTPUT OF
Use the and keys to select the desired
program and press the OK key.
zFor some programs, a check box is displayed to the
left of the program name. If the OK key is pressed, a
check mark will appear and the function will be set. If
the OK key is pressed again, the check mark will
disappear and the function will be canceled. Proceed
to step 8.
zFor other programs, the setting screen of the function
will appear when the OK key is pressed.
7
8
Follow instructions for the program.
zUse the , , or key to select the desired item or
use the numeric keys to enter a number. Then press
the OK key.
zIf a mistake is made during entry, press the CLEAR
key to clear the entry.
To continue with other functions, use the and
keys to select another program.
zTo exit the key operator programs, press the CLEAR
ALL key.
CONTENTS INDEX TOP OF CHAPTER
38
38
Page 39
INDEX
A
Auto tray switch 36
B
BACK key 11
C
CLEAR ALL key 11
CLEAR key 11
Client 28
D
DATA indicator 10
Disable interrupt print job 36
Display 9
Display contrast 12
I
I/O timeout 36
Indicators 10
K
Key operator programs 35
M
Machine image 9
Memory 34
Message display 9
N
Network 26
Normal printing 5
Notice page 23
Numeric keys 11
P
Paper size set 12
PRINT key 11
Print quality problems 21
Printer driver 34
Printer driver features 31
Printing 5
R
Rotated print 36
S
Sharing printer 26
SPECIAL FUNCTION key 11
Status information 9
Supplementary notes on printing 7
E
Error messages 24
Exclude bypass-tray from ats 36
Exposure level 36
G
Glossary 34
CONTENTS INDEX TOP OF CHAPTER
O
Offline 34
OK key 11
Online 34
ONLINE indicator 10
Operation keys 11
Operation panel 8
T
To cancel a print job 6
Tray excluded from ats 36
Troubleshooting 13
U
Uninstalling the printer driver 25
39
39
 Loading...