

Sharp AR-405 User Manual
CHAPTER 6
GENERAL INFORMATION
This chapter describes general information for using this copier.
|
Page |
● PART NAMES AND FUNCTIONS ...................... |
6-2 |
Exterior ......................................... |
6-2 |
Interior .......................................... |
6-3 |
Operation panel ................................... |
6-4 |
Touch panel (Basic screen) ........................... |
6-5 |
● USER MAINTENANCE .............................. |
6-6 |
● TOUCH PANEL CONTRAST ADJUSTMENT .............. |
6-7 |
● SPECIFICATIONS ................................. |
6-8 |
6CHAPTER
6-1

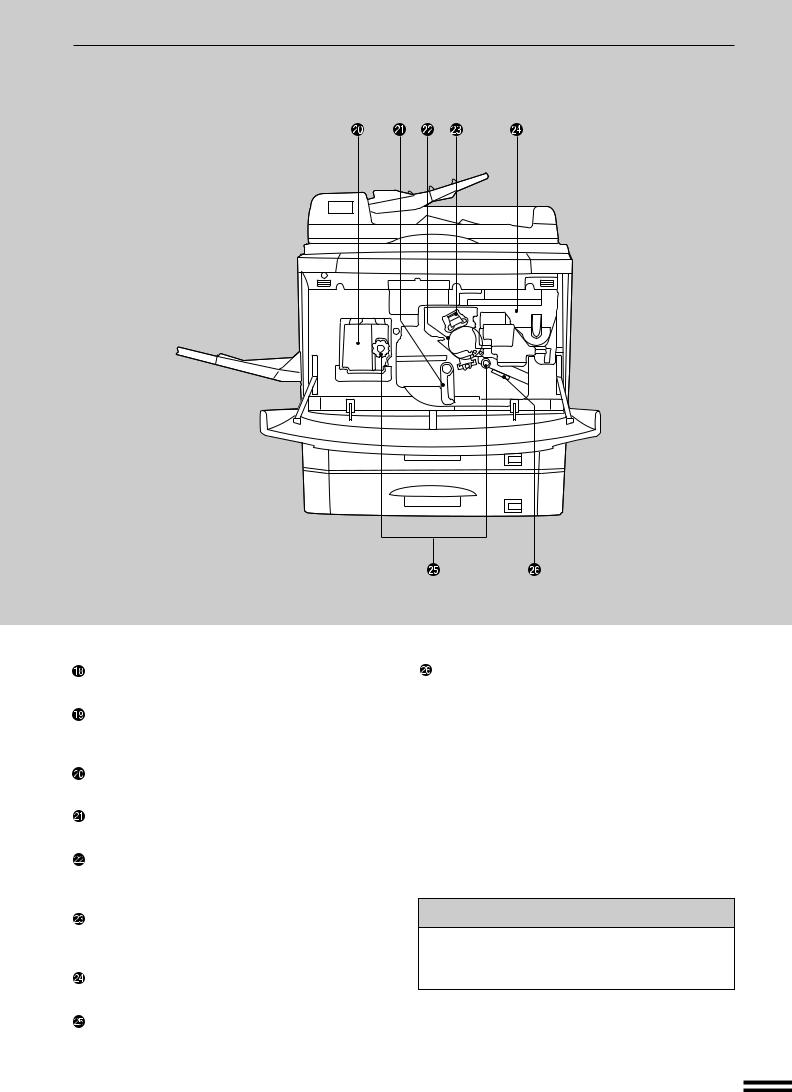
PART NAMES AND FUNCTIONS
Exterior
6CHAPTER |
|
names Part |
GENERAL |
functions and |
INFORMATION |
Exit area cover
Open to remove misfed paper.
Power switch
Press to turn copier power on and off.
Exit tray (optional)
Finished copies are deposited in the exit tray.
Operation panel
All copier controls are located here for easy operation.
Document feeder indicators
Original feed indicator
Indicates the originals in the tray will be fed.
 Original reminder
Indicates an original is still on the document glass.
RADF feeding roller cover
Open to remove misfed originals.
Original guides
Adjust to the size of the originals.
Document feeder tray
Holds up to 50 originals.
RADF exit area
Finished originals are output here.
RADF exit roller cover
Open to remove misfed originals.
Paper trays
Each tray holds 500 sheets of paper.
Front cover
Open to remove misfeeds and to service the copier.
Handles
Right side cover
Open to remove misfeeds in the paper feed area.
Toner collecting container cover
Open to replace the toner collecting container.
Document glass
All originals which cannot be copied from the RADF must be copied here.
Paper clip tray
Keep paper clips here.
6-2
PART NAMES AND FUNCTIONS
Interior
Bypass tray paper guides
Adjust to the width of the copy paper.
Bypass tray
Special papers (including transparency film) and copy paper can be fed from the bypass tray.
Fusing unit
The fusing unit is hot. Exercise care in this area.
Transport lever
Turn to open the transport section.
Photoconductive drum
Copy images are formed on the photoconductive drum.
Corona unit
The unit is used to charge the photoconductive drum.
Toner hopper
Contains toner.
Roller rotating knobs
Turn to remove misfed paper.
Paper guide
Push down to remove misfed paper.
Accessories
Operation manual . . . . . . . . . . . . . . . . . . . . . 1 Toner collecting containers
(including 1 pre-installed at the factory) . . . . . 3
6CHAPTER |
|
|
|
names Part |
GENERAL |
functions and |
INFORMATION |
6-3

PART NAMES AND FUNCTIONS
Operation Panel
1 |
2 |
3 |
INTERRUPT |
CLEAR ALL |
DATA ON LINE |
|
|
|
CA |
|
|
|
|
|
4 |
5 |
6 |
|
|
|
|
|
START |
|
8 |
9 |
|
|
|
7 |
CLEAR |
|
||
AUDIT CLEAR |
|
PROGRAM |
C |
|
COPY |
0 |
P |
|
|
|
|
|
The key and indicators are not used for the copier features.
6CHAPTER |
|
names Part |
GENERAL |
functions and |
INFORMATION |
LCD touch panel
Displays information to assist the operator. Various operation keys are included in the touch panel depending on the particular screen being displayed.
10-key pad
Used to set the copy quantity.
INTERRUPT ( ) key and indicator (p. 2-20) Interrupts a copy run.
CLEAR ALL ( CA ) key
Clears all selected settings and returns the copier to the initial settings.
COPY key
Press during standby to display the total output count.
AUDIT CLEAR (

 ) key
) key
Closes an open account.
PROGRAM ( P ) key (p. 2-18) Press to select the job memory mode.
CLEAR ( C ) key
Press to clear the copy quantity display, or press during a copy run to terminate copying. The copier will stop after copies in progress are finished.
START ( ) key and indicator
Copying is possible when the indicator is on. Press to start copying.
SPECIAL MODES key (p.3-1)
Press to select special functions.
Message display
Messages are displayed regarding copier status and operation.
Paper size display
The sizes of loaded copy paper are displayed and the selected paper feed location is highlighted.
 indicates the amount of copy paper.
Copy quantity display
Displays the specified number of copies.
Original size display
The original paper size is displayed.
INFORMATION ( ) key (p. 1-7)
Press for operation guidance on use of various features of this copier.
Press for guidance when a misfeed occurs, when adding toner, or when used toner must be disposed of.
6-4

PART NAMES AND FUNCTIONS
Touch Panel (Basic screen)
READY TO COPY.
ORIGINAL A4
A4R
1. A4
2. A3
AUTO |
|
AUTO A4 |
|
100% |
|||
|
|
||||||
EXPOSURE |
|
PAPER SELECT |
|
COPY RATIO |
|||
|
|
|
|
|
|
|
|
|
|
|
|
|
|
|
|
CUSTOM SETTINGS (

 ) key
) key
Press to set key operator programs or adjust the contrast of the touch panel.
2-SIDED COPY key
Press to select the 1-sided to 1-sided, 1-sided to 2-sided, 2-sided to 1-sided or 2-sided to 2-sided copy mode.
OUTPUT key
Press to select the finisher mode: SORT or GROUP.
EXPOSURE display
Indicates the selected exposure mode.
EXPOSURE key (p. 2-16)
Press to select the exposure mode: AUTO, TEXT, TEXT/PHOTO, or PHOTO.
PAPER SELECT display
Displays the selected paper size. When “AUTO” is displayed, paper size matching the original and copy ratio will be automatically selected.
PAPER SELECT key
Press to select the desired paper tray.
COPY RATIO display
Displays the copy ratios for reductions or enlargements.
COPY RATIO key
Press to select a reduction or enlargement copy ratio or select the automatic copy ratio selection mode.
REVIEW (

 ) key
) key
Press to check the settings of selected functions.
The copier assumes the initial settings when the |
CHAPTER6 |
|||
Initial settings |
|
|
|
|
CLEAR ALL ( CA ) key is pressed and approximately 1 |
|
|
||
minute after the last copy is made in any mode. |
namesPart |
GENERAL |
||
Except for the paper tray selection, the copier also |
||||
|
|
|||
assumes the initial setting when it is turned on. |
|
|
||
● Copy ratio: 100% |
|
|
|
|
● Automatic exposure |
|
functionsand |
INFORMATION |
|
● Copy quantity: 0 |
|
|||
|
|
|
||
● All special copier modes are set to off. |
|
|
||
● Tray select: Paper tray 1 (At power on, the |
|
|
||
previously selected tray will again be selected.) |
|
|
||
Optional large capacity tray will be selected when |
|
|
||
installed. |
|
|
|
|
KEY OPERATOR |
Initial settings can be |
|
|
|
programmed as desired. The auto clear time can also be changed. See pages 8-17 and 8-21.
6-5

USER MAINTENANCE
The document glass and the document cover (RADF transport belt) must be kept clean to avoid dirty areas from being copied onto the copies.
Document glass and document cover
Wipe the document glass and the document cover (RADF transport belt) with a soft, clean cloth.
●If necessary, dampen the cloth with water. Do not use thinner, benzene, or similar volatile cleaning agents.
INFORMATION GENERAL 6
maintenance User CHAPTER
6-6

TOUCH PANEL CONTRAST ADJUSTMENT
The contrast of the touch panel can be adjusted as below.
1
ETTINGS |
2 |
|
|
DISPLAY |
KEY OPERATOR |
CONTRAST |
PROGRAMS |
TTINGS |
3 |
|
|
ONTRAST |
|
LIGHTER DARKER
Press the CUSTOM SETTINGS ( ) key.
Press the “DISPLAY CONTRAST” key on the touch panel.
Press the “LIGHTER” or “DARKER” key to adjust the contrast.
4 Press the “OK” key.
TER DARKER
INFORMATION GENERAL 6
adjustment contrast panel Touch CHAPTER
6-7

6CHAPTER |
|
Specifications |
INFORMATION GENERAL |
SPECIFICATIONS
COPIER
Type |
Desktop |
|
|
Copy system |
Dry, electrostatic transfer system |
||
Originals |
Sheets, bound documents |
||
Original feed system |
Reversing automatic document |
||
|
feeder (RADF) |
||
Original sizes |
Max. A3 (11" x 17") |
||
Copy sizes |
Max. A3 (11" x 17"), min. A6 (5-1/2" x 8-1/2") |
||
|
Image loss: |
Max. 5 mm (13/64") (both leading and trailing edges) |
|
|
|
|
Max. 5 mm (13/64") (along all other edges in total) |
|
For paper weight, see page 4-2. |
||
Copying speed |
40 copies/min. (A4 (8-1/2" x 11")) |
||
(at 100% copy ratio) |
27 copies/min. (A4R (8-1/2" x 11"R)) |
||
|
24 copies/min. (B4 (8-1/2" x 14")) |
||
|
19 copies/min. (A3 (11" x 17")) |
||
Continuous copy |
Max. 999 copies; subtractive counter |
||
First-copy time |
Approx. 4.5 |
sec. |
|
Warm-up time |
Approx. 75 sec. |
||
Copy ratio |
Variable: 25 to 400% in 1% increments, total 376 steps |
||
|
(can be set in the horizontal and vertical directions independently) |
||
|
Fixed presets: 25%, 50%, 70%, 81%, 86%, 100%, 115%, 122%, 141%, |
||
|
200%, 400% (25%, 50%, 64%, 77%, 95%, 100%, 121%, 129%, 141%, |
||
|
200%, 400%) |
||
Exposure system |
Document glass: Moving optical source |
||
|
|
|
(stationary platen) with automatic |
|
|
|
exposure function |
Copy paper feed |
Two paper trays with automatic paper feed (500 sheets each); |
||
|
one bypass tray with 50-sheet automatic feed capability |
||
Fusing system |
Heat rollers |
|
|
Developer system |
Magnetic brush development |
||
Light source |
Xenon lamp |
|
|
Resolution |
Scan: |
400 dpi |
|
|
Output: 600 dpi |
||
Gradation |
Scan: |
256 levels |
|
|
Output: 2 levels (normal copying) |
||
Required power supply |
Local voltage ±10% (For this copier’s power supply requirements, |
||
|
see the name plate located on the left hand side at the rear corner of |
||
|
the copier.) |
|
|
|
|
|
|
6-8

SPECIFICATIONS
Power consumption |
Max. 1.85 kW |
|
Overall dimensions |
1292 mm (W) x 700 mm (D) (50-7/8" (W) x 27-9/16" (D)) |
|
Weight |
Approx. 98 kg (217 lbs.) |
|
Copier dimensions |
600 mm (W) x 700 mm (D) x 750 mm (H) |
|
|
(23-5/8" (W) x 27-9/16" (D) x 29-17/32" (H)) |
|
Operating conditions |
Temperature: 15°C to 30°C (59°F to 86°F) |
|
|
Humidity: |
20% to 85% |
Optional equipment |
Finisher (AR-FN1N, AR-FN2) |
|
|
Large capacity tray (AR-LC1) |
|
|
Stand/500-sheet paper drawer (AR-DE1N) |
|
|
500-sheet paper drawer (AR-CS1) |
|
|
Dual tray output unit (AR-TR1) |
|
|
Exit tray (AR-TE1) |
|
|
|
|
DOCUMENT FEEDER
Type |
Reversing automatic document feeder |
|
|
(RADF) |
|
Acceptable originals |
Single-sided originals: |
50 to 128 g/m2 (14 to 34 lbs.) |
Weight: |
Two-sided originals: |
50 to 128 g/m2 (14 to 34 lbs.) |
|
for A5 and A4 (5-1/2" x |
8-1/2" and 8-1/2" x 11") originals. |
|
50 to 110 g/m2 (14 to 29 lbs.) for B4 and A3 (8-1/2" x 14" and 11" x 17") |
|
|
originals. |
|
|
|
|
Size: |
A5 to A3 (5-1/2" x 8-1/2" to 11" x 17") |
|
|
|
|
Capacity: |
Up to 50 sheets for A5 and A4 (5-1/2" x 8-1/2" and 8-1/2" x 11") originals |
|
|
provided the total aggregate thickness does not exceed 6.5 mm or 1/4" |
|
|
(50 to 80 g/m2 (14 to 20 lbs.)) or 5 mm or 3/16" (80 to 128 g/m2 (21 to 34 |
|
|
lbs.)) |
|
|
Up to 30 sheets for B4 and A3 (8-1/2" x 14" and 11" x 17") originals |
|
|
|
|
DUPLEX MODULE
Paper type |
Ordinary paper only |
|
Number of copies |
1 (trayless system) |
|
Copy paper size |
A5, A4, A4R, B4, A3 (8-1/2" x 11", 8-1/2" x 11"R, 8-1/2" x 14", 11" x 17") |
|
Copy paper weight |
56 to 105 g/m2 (15 lbs. to 28 lbs.) |
|
|
|
|
Specifications are subject to change for improvement without notice.
6CHAPTER |
|
|
|
Specifications |
INFORMATION GENERAL |
6-9
CHAPTER 7
OPTIONAL EQUIPMENT
This chapter describes operating instructions for the Finisher (AR-FN1N, AR-FN2), Large Capacity Tray (AR-LC1), Stand/500-sheet Paper Drawer (AR-DE1N) and Dual Tray Output Unit (AR-TR1).
|
Page |
● SYSTEM CONFIGURATION .......................... |
7-2 |
● FINISHER (AR-FN1N) .............................. |
7-3 |
Part names ...................................... |
7-3 |
Specifications ..................................... |
7-3 |
Offset stack ...................................... |
7-4 |
Sort and group .................................... |
7-5 |
Staple sort ....................................... |
7-6 |
Staple cartridge replacement ......................... |
7-10 |
Staple jam removal ................................ |
7-12 |
Misfeed removal .................................. |
7-14 |
● FINISHER (AR-FN2) ............................... |
7-19 |
Part names ..................................... |
7-19 |
Specifications .................................... |
7-19 |
Offset stack ..................................... |
7-20 |
Sort and group ................................... |
7-21 |
Staple sort ...................................... |
7-22 |
Staple cartridge replacement ......................... |
7-26 |
Staple jam removal ................................ |
7-27 |
Misfeed removal .................................. |
7-28 |
● LARGE CAPACITY TRAY (AR-LC1) ................... |
7-30 |
Part names ..................................... |
7-30 |
Specifications .................................... |
7-30 |
Loading copy paper ............................... |
7-31 |
Misfeed removal .................................. |
7-32 |
● STAND/500-SHEET PAPER DRAWER (AR-DE1N) ........ |
7-34 |
Part names ..................................... |
7-34 |
Specifications .................................... |
7-34 |
Loading copy paper ............................... |
7-35 |
Misfeed removal .................................. |
7-36 |
● DUAL TRAY OUTPUT UNIT (AR-TR1) ................. |
7-37 |
Part names ..................................... |
7-37 |
Specifications .................................... |
7-38 |
7CHAPTER
7-1

SYSTEM CONFIGURATION
The options which are available for this copier are shown below.
Finisher (AR-FN1N) |
Finisher (AR-FN2) |
|||
|
|
|
Large capacity tray (AR-LC1) |
|
|
|
|
||
|
|
|||
|
|
|
|
|
|
|
|
|
|
|
|
|
|
|
|
|
|
|
|
Dual tray output unit
(AR-TR1)
Exit tray (AR-TE1)
EQUIPMENT OPTIONAL configuration System |
500-sheet paper drawer (AR-CS1) |
Stand/500-sheet paper drawer (AR-DE1N) |
|
7CHAPTER |
|
7-2

FINISHER (AR-FN1N)
The copier has two different finisher modes: one sorts copies into sets matching the sequence of the originals and the second groups copies by original. When the optional finisher (AR-FN1N) is installed, the copier can automatically staple the sorted copies. Each collated set of copies or group of copies can be stacked offset from the previous set.
PART NAMES |
Top tray |
Top cover |
Finisher release lever |
|
|||
|
|
Second tray
(not used in the copy mode)
Paper feed area cover
Paper transport area cover
Offset tray
When copying onto size A3 (11” x 17”) paper, lower the metal support located at the tip of the offset tray.
Stapler unit
●The top tray and second tray are each furnished with an extendable component, which is to be used when copying onto size A3 (11” x 17”) paper.
Specifications
Tray capacity |
Top tray: |
500 sheets |
|
Second tray: |
500 sheets |
|
Offset tray: |
1,500 sheets (A4 (8-1/2" x 11")) |
|
|
750 sheets (larger than A4 (8-1/2" x 11")) |
Paper size |
Top tray: |
A6 to A3 (5-1/2" x 8-1/2" to 11" x 17") |
|
Second tray: |
A5 to A3 (5-1/2" x 8-1/2" to 11" x 17") |
|
Offset tray: |
A4 to A3 (8-1/2" x 11" to 11" x 17") |
Paper weight |
Top tray: |
52 to 128 g/m2 (14 lbs. to 34 lbs.) (when face up) |
|
|
64 to 105 g/m2 (17 lbs. to 28 lbs.) (when face down) |
|
Second tray: |
64 to 105 g/m2 (17 lbs. to 28 lbs.) |
|
Offset tray: |
64 to 128 g/m2 (17 lbs. to 34 lbs.) (when face up) |
|
|
64 to 105 g/m2 (17 lbs. to 28 lbs.) (when face down) |
|
For paper weighing more than 105 g/m2 (28 lbs.), A4 |
|
|
(8-1/2" x 11") is the maximum size. |
|
Offset |
30 mm (1.2 inch) |
|
Paper size |
A4, A4R, B4, A3 (8-1/2" x 11", 8-1/2" x 11"R, 8-1/2" x 14", 11" x 17") |
|
for stapling |
|
|
Stapling capacity |
50 sheets (80 g/m2 (21 lbs.)) |
|
|
(25 sheets for B4 and A3 (8-1/2" x 14" and 11" x 17") paper) |
|
Power supply |
Drawn from the copier |
|
Weight |
Approx. 50 kg (111 lbs.) |
|
Dimensions |
590 mm (W) x 560 mm (D) x 998 mm (H) |
|
|
(23-15/64"(W) x 22-1/16"(D) x 39-19/64"(H)) |
|
|
|
|
Specifications are subject to change for improvement without notice.
7 EQUIPMENT OPTIONAL
CHAPTER FN1N)-(AR Finisher
7-3

FINISHER (AR-FN1N)
Offset stack
OUTPUT
TOP TRAY |
|
OFFSET |
S |
TRAY |
|
OFFSET |
|
AUTO |
AUTO |
|
1 |
1 |
|
|
|
|
|
3 |
1 |
|
|
2 |
|
|
|
1 |
|
|
2 |
|
|
1 |
|
|
|
|
|
EQUIPMENTOPTIONAL FN1N)-(ARFinisher |
|
1 |
|
1 |
|
|
|
|
|
|
|
3 |
|
|
|
2 |
|
|
|
1 |
|
|
1 |
7CHAPTER |
|
|
|
In the initial setting, the offset tray will move from side to side so that each copy set is offset by approximately 30 mm (1.2 inch).
When the offset stack function is disabled, the offset tray will not move from side to side.
The offset stack function can be enabled or disabled by pressing the OUTPUT key and then the “OFFSET” check mark box on the touch panel.
When the STAPLE SORT mode is selected, the offset stack function will be disabled.
The top tray cannot be used to offset copies.
To select the top tray, press the “TOP TRAY” key on the touch panel.
OFFSET mode
When copying in the SORT mode, each collated set of copies will be stacked offset approximately 30 mm (1.2 inch) from the previous set. When copying in the GROUP mode, copies will be offset stacked in groups of multiple copies from the same original.
NON-OFFSET mode
All copies will be aligned in one stack in the offset tray or the top tray with no offset.
7-4

FINISHER (AR-FN1N)
Sort and group
When SORT is selected, the SORT ( ) icon will be indicated and copies will be collated by sets.
When STAPLE SORT is selected, the STAPLE SORT ( ) icon will be indicated and collated copies will be stapled automatically. When the SORT or STAPLE SORT icon is not indicated on the touch panel, copies will be grouped by originals.
To change the finisher mode, press the OUTPUT key and then select the desired mode on the touch panel.
●When the RADF is used for copying, copies will be collated in the OFFSET mode as the default setting.
When the document glass is used for copying, copies will be grouped in the OFFSET mode as the default setting.
3
2
1
3
2
1
3
2
1
1 2 3
1 2 3
1 2 3
1 1 1
2 2 2
3 3 3
3
2 1
3
2 1
3
2 1
SORT mode
Each set of copies will be sequentially delivered to the offset tray or the top tray as selected.
GROUP mode |
EQUIPMENTOPTIONAL FN1N)-(ARFinisher |
|
|
All copies of the same original will be grouped in the offset |
|
tray or the top tray. |
|
|
|
STAPLE SORT mode |
7CHAPTER |
|
|
Collated sets of copies will be stapled and delivered to the offset tray.
●See next page for details.
NOTE:
Rotation copy (image of original will be rotated when the orientation of the original does not match that of the copy paper) will not function when the STAPLE SORT mode is set.
7-5

FINISHER (AR-FN1N)
Staple sort
The STAPLE SORT mode staples A4, A4R, B4, and A3 (8-1/2" x 11", 8-1/2" x 11"R, 8-1/2" x 14", and 11" x 17") size copies. Stapled sets cannot be delivered to the top tray.
NOTE:
Different size originals cannot be copied onto copy paper of their respective sizes in the STAPLE SORT mode. The paper size selected for the first scanned original will be used for all originals. To copy different size originals in the STAPLE SORT mode, select the paper size for the largest original.
Using the RADF
Set the originals in the document feeder tray.
Stapling position |
1 ● If the number of copies in one set is more than 50 for |
|
|
|
A4 or A4R (8-1/2" x 11" or 8-1/2" x 11"R) paper or 25 for B4 or |
|
A3 (8-1/2" x 14" or 11" x 17") paper, the copies will not be |
|
stapled. |
|
● The stapling position shown in the left figure is the factory |
|
default position for the AR-405. |
7 EQUIPMENT OPTIONAL
CHAPTER FN1N)-(AR Finisher
|
|
AUTO |
|
EXPOSURE |
|
READY TO COPY.(DOCUMENT FEEDER MODE) |
|
|
OUTPUT |
|
OK |
TOP TRAY |
|
|
OFFSET |
STAPLE |
GROUP |
SORT SORT |
||
TRAY |
|
|
OFFSET |
|
|
AUTO |
AUTO |
|
EXPOSURE |
PAPER |
|
2
3
Press the OUTPUT key.
Press the “STAPLE SORT” key on the touch panel.
7-6

FINISHER (AR-FN1N)
OPY.(DOCUMENT FEEDER MODE)
OK
STAPLE
SORT SORT GROUP
READY TO COPY.(DOCUMENT FEEDER MODE)
OUTPUT
TOP TRAY |
|
|
|
OFFSET |
|
SORT |
|
TRAY |
|
|
|
AUTO |
AUTO A4 |
|
|
EXPOSURE |
PAPER SELECT |
|
|
1 |
2 |
3 |
INTERRUPT |
4 |
5 |
6 |
|
7 |
8 |
9 |
CLEAR |
AUDIT CLEAR |
|
PROGRAM |
C |
|
0 |
P |
|
INTERRUPT |
|
CLEAR ALL |
|
CA
START
CLEAR
C
4
5
6
7
Select the desired stapling position.
●The AR-FN1N finisher has three selectable stapling positions as shown below.
Press the “OK” key.
Set the number of copies.
Press the START ( ) key.
●When copying of one set is completed, the copies will be automatically stapled and delivered to the offset tray.
7 EQUIPMENT OPTIONAL
CHAPTER FN1N)-(AR Finisher
7-7

FINISHER (AR-FN1N)
Using the document glass
Stapling position
|
EQUIPMENT OPTIONAL |
|
|
AUTO |
|
|
EXPOSURE |
||
FN1N)-(AR Finisher |
READY TO COPY. |
|
|
|
OUTPUT |
|
OK |
||
TOP TRAY |
|
|
||
OFFSET |
STAPLE |
GROUP |
||
SORT SORT |
||||
TRAY |
|
|
||
|
|
|
|
|
CHAPTER7 |
OFFSET |
|
|
|
AUTO |
AUTO |
|
||
|
|
|
||
|
|
EXPOSURE |
PAPER |
|
OPY.
OK
STAPLE
SORT SORT GROUP
1
2
3
4
Set the original on the document glass with the corner to be stapled to the upper right.
●Copy from the last page to the first page.
●If the number of copies in one set is more than 50 for A4 or A4R (8-1/2" x 11" or 8-1/2" x 11"R) paper or 25 for B4 or A3 (8-1/2" x 14" or 11" x 17") paper, the copies will not be stapled.
●The stapling position shown in the left figure is the factory default position.
Press the OUTPUT key.
Press the “STAPLE SORT” key on the touch panel.
Select the desired stapling position.
●The AR-FN1N finisher has three selectable stapling positions as shown below.
7-8

READY TO COPY.
OUTPUT
TOP TRAY |
|
|
|
OFFSET |
|
SORT |
|
TRAY |
|
|
|
AUTO |
AUTO A4 |
|
|
EXPOSURE |
PAPER SELECT |
|
|
1 |
2 |
3 |
INTERRUPT |
4 |
5 |
6 |
|
7 |
8 |
9 |
CLEAR |
AUDIT CLEAR |
|
PROGRAM |
C |
|
0 |
P |
|
INTERRUPT |
|
CLEAR ALL |
|
CA
START
CLEAR
C
PLACE NEXT ORIGINAL. PRESS [START]. WHEN FINISHED, PRESS [READ-END].
AUTO |
AUTO A4 |
EXPOSURE |
PAPER SELECT |
FINISHER (AR-FN1N)
5 Press the “OK” key.
6 Set the number of copies.
7 Press the START ( |
|
) key. |
FN1N)-(ARFinisher |
EQUIPMENTOPTIONAL |
|||
|
|
|
|||||
|
|
|
|||||
Replace the finished original with the next original after |
|
|
|||||
8 the START ( |
|
|
) key indicator lights up, and then press |
|
|
||
|
|
|
|||||
|
|
|
|||||
the START ( |
|
|
) key. Repeat this step until all originals |
|
|
||
|
|
|
|
||||
|
|
|
|
||||
have been scanned. |
|
|
|||||
After all originals are scanned, press the “READ-END” |
7CHAPTER |
||||||
9 key on the touch panel. |
|
|
|||||
●Copying will start and each set of copies will be automatically stapled and delivered to the offset tray.
7-9

FINISHER (AR-FN1N)
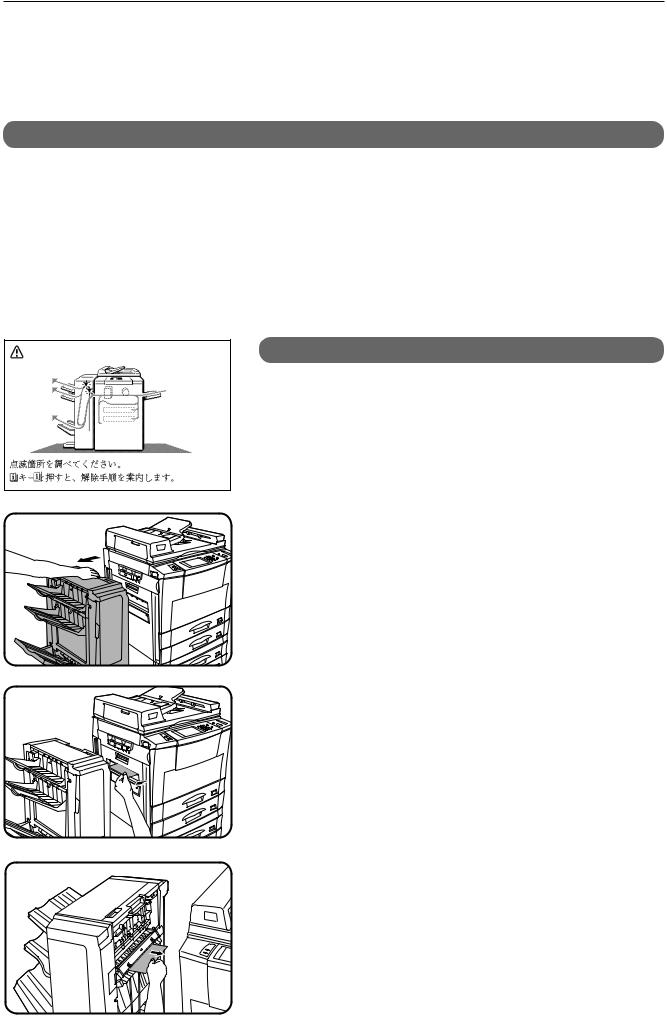
Staple cartridge replacement
The message “SLIDE THE FINISHER AWAY FROM THE COPIER
AND ADD STAPLES.” will appear when the staple cartridge is empty.
Replace the staple cartridge as follows:
While holding the finisher release lever, slide the finisher 1 away from the copier.
7 EQUIPMENT OPTIONAL
CHAPTER FN1N)-(AR Finisher
2
3
4
5
Turn the stapler unit to face up.
Hold the staple box release lever to unlatch the staple box.
Remove the staple box.
Remove the empty staple cartridge from inside the staple box.
 7-10
7-10
FINISHER (AR-FN1N)
Insert the new staple cartridge into the box until it clicks 6 in place.
●Insert the new cartridge by aligning the arrows on the cartridge with those on the box. Check that the cartridge locks in place by pulling it slightly.
●The cartridge holds 5,000 staples.
7 |
Remove the rear paper and tape from the cartridge. |
● Pull them straight. If they are pulled obliquely, the tape may be |
torn.
Insert the staple box to the stapler unit until it clicks into 8 place.
9 Return the stapler unit to face down.
10Push the finisher toward the copier and latch it in place.
7 EQUIPMENT OPTIONAL
CHAPTER FN1N)-(AR Finisher
7-11 

FINISHER (AR-FN1N)
Staple jam removal
If staples become jammed in the stapler, “CHECK STAPLER POSITION OR STAPLE JAM.” will be displayed. Remove the jammed staples in the manner described below.
While holding the finisher release lever, slide the finisher 1 away from the copier.
7 EQUIPMENT OPTIONAL
CHAPTER FN1N)-(AR Finisher
2
3
4
5
Turn the stapler unit to face up.
Hold the staple box release lever to unlatch the staple box.
Remove the staple box.
Lower the lever at the end of the staple box and remove the jammed staples.
 7-12
7-12

FINISHER (AR-FN1N)
6 Return the lever to its original position.
Insert the staple box to the stapler unit until it clicks in 7 place.
8 Return the stapler unit to face down.
9 Push the finisher toward the copier and latch it in place.
7 EQUIPMENT OPTIONAL
CHAPTER FN1N)-(AR Finisher
7-13 
FINISHER (AR-FN1N)
Misfeed removal
The copier will stop when a misfeed occurs.
The message “A MISFEED HAS OCCURRED. CLEAR INDICATED AREA. PRESS  FOR RECOVERY INSTRUCTIONS.” will appear with a display of paper misfeed locations. Press the INFORMATION (
 ) key for more detailed information as necessary.
A MISFEED HAS OCCURRED.
|
CLEAR |
INDICATED AREA. |
|
|
|
|
|
|
PRESS |
FOR RECOVERY INSTRUCTIONS. |
|
|
|
|
|
7 EQUIPMENT OPTIONAL
CHAPTER FN1N)-(AR Finisher
Misfeed in the upper transport area
While holding the finisher release lever, slide the finisher 1 away from the copier.
2 Remove the misfed paper.
 7-14
7-14
 Loading...