

Page 1

SG-237 SMARTUNER™
INSTALLATION MANUAL
Page 2

S G -23 7 S m ar t u n er ™ M an ual
SGC, 13737 S E 26th Street Bellevue, WA 98005 USA • Ph: 425-746-6310, Fx: 425-746-6384, Email : [email protected]
www.sgcworld .com
SGC RESERVES THE RIGHT TO CHANGE SPECIF ICATIONS WITHOUT NOTICE
Copyright SGC 2008
1
SG-237 Specifications
HF Frequency Range: 1.8-60 MHz
Power Input Range: 3-100 W (PEP)
40 W CW Max (40% duty cycle)
Input Impedance Range: 45-55 Ohms
VSWR (Typical): Less than 1.4:1
DC Input Requirement: +13.8 VDC (nominal)
Average Input Current: 300 mA
Initial Tune Time: Less than 2 sec. (typical)
Retune from Memory: Less than 10 msec. (typical)
Memory Bins: 170
Tuning Combinations: ½ Million
Antenna Length (>3.3 MHz): 8 feet (2.5 M) minimum
Antenna Length (<3.3 MHz): 28 (8.5 M) feet minimum
Installation: Any Position
Operating Temperature: -35 to +70 C (-31 to +158 F)
Case: Weatherproof ABS plastic with aluminum base
Cable: 9 foot shielded 4-conductor/RG-58 coax
(PL-259 connector)
Dimensions: 9”L x 7”W x 1.5”H (23L x 18W x 4H cm)
2 Lbs. (1 Kg)
1.0 The Coupler Basics
Congratulations on purchasing the most versatile and reliable HF coupler available on the market
today. Your SGC Smartuner™ is designed to give you dependable operation and the flexibility
to operate on any HF frequency without any extra ‘tuning’ effort on your part. Unlike a
traditional ‘tuner’ – there are no knobs or buttons to fiddle with. You simply install the unit, and
operate – the Smartuner does the rest! Once the unit is installed, it will automatically sense your
RF frequency and tune your antenna down to minimum SWR to maximize the efficiency of your
signal and squeeze the most out of every watt. A Smartuner doesn’t require any special interface
or balun and will work with any transceiver and any antenna within its specifications range.
Installation is simple too! Read on to get on the air quickly and easily.
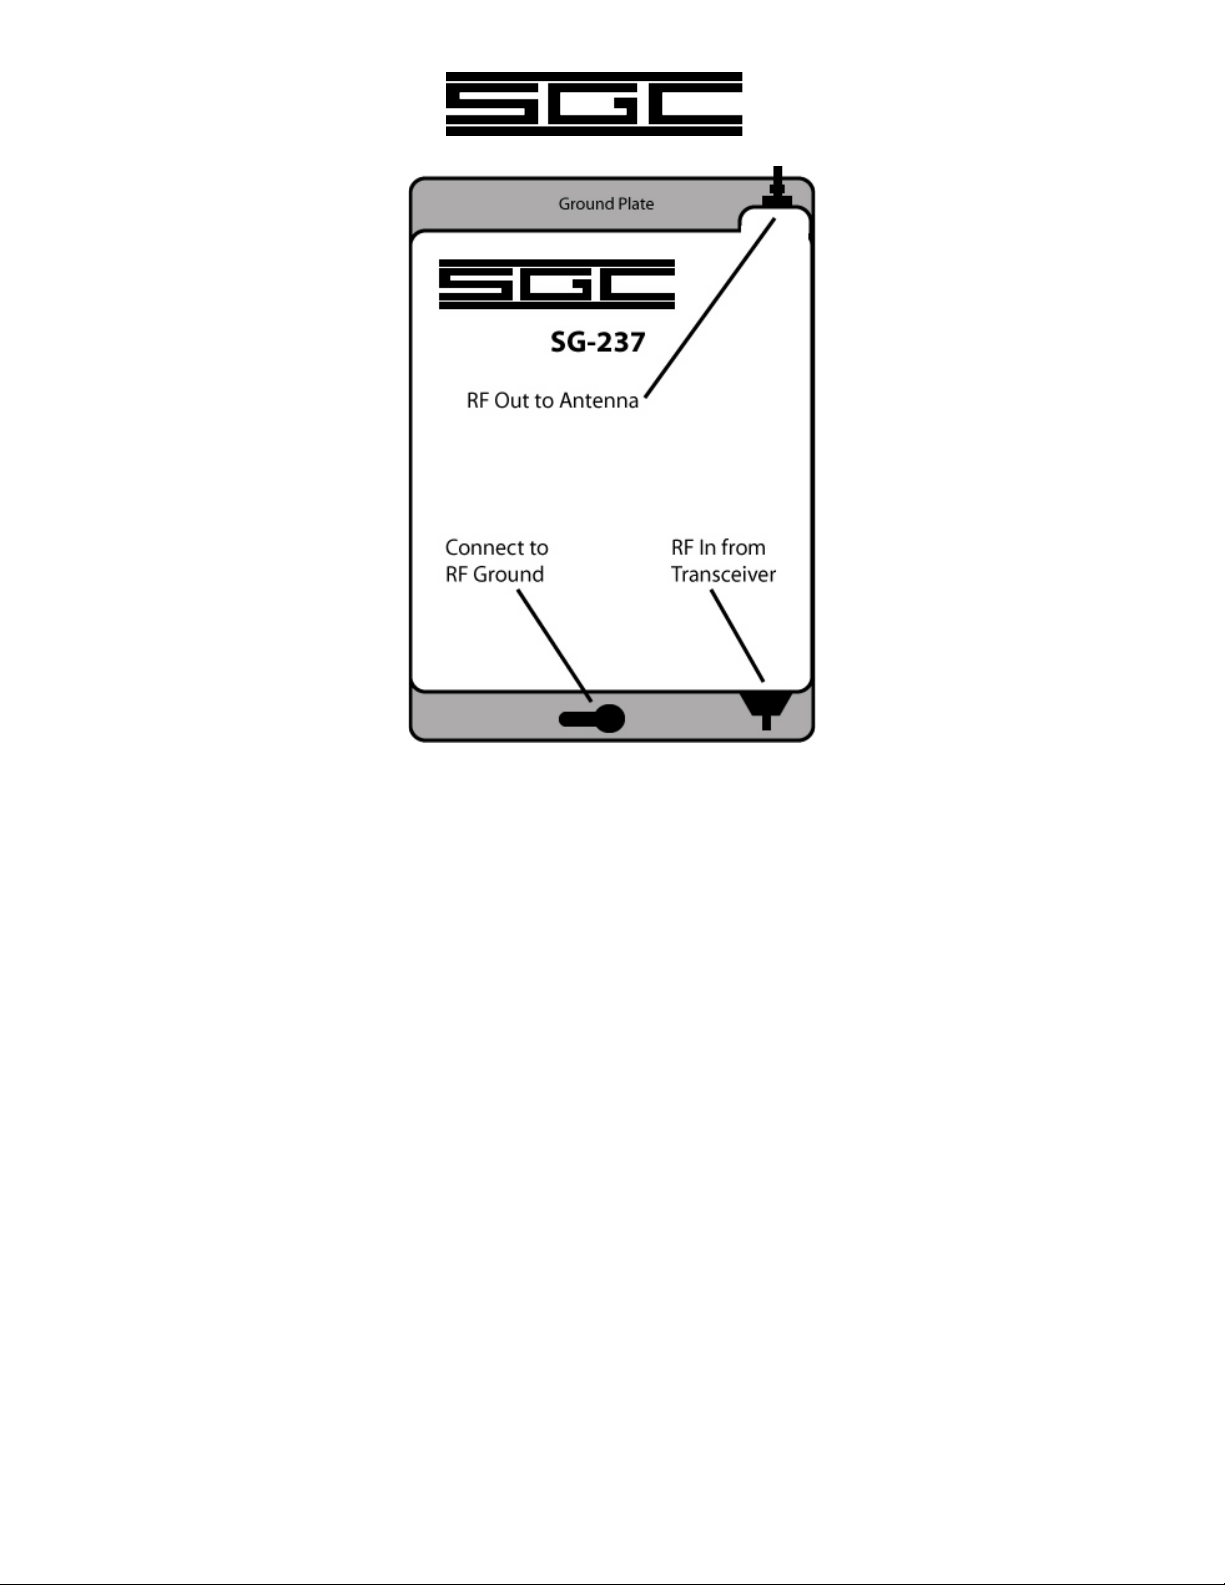
There are three connections on the SG-237 case: (1) The coaxial RF cable and power cables
(bundled together) that will connect to your transceiver and power supply. (2) The antenna
output connection. (3) The RF ground connection. All that is necessary to begin using your
coupler is to supply power, hook up to antenna, ground, and transceiver – and transmit. The SG237 does the rest.
Page 3
S G - 2 3 7 S m ar t u n er ™ M an ual
SGC, 13737 S E 26th Street Bellevue, WA 98005 USA • Ph: 425-746-6310, Fx: 425-746-6384, Email : [email protected]
www.sgcworld .com
SGC RESERVES THE RIGHT TO CHANGE SPECIF ICATIONS WITHOUT NOTICE
Copyright SGC 2008
2
The SG-237 is supplied in a waterproof case, on a mounting plate with pre-drilled holes. It is
ideal for any mobile or base-station installation. RF and DC power is supplied to the unit
through the same bundled cable (9 feet supplied). The cable includes the RG-58 coax for the RF
connection to the transceiver, two wires for DC and ground, and two wires for optional
accessories. (See Section 5 for more details on the Smartlock™).
Wiring for the SG-237 is as follows:
RF Coax: To transceiver
Red Wire: DC Power
Black Wire: DC Ground
White Wire w/ Black Stripe: LED Indicator (Smartlock)
White Wire w/ Red Stripe: Tune Lock/Reset (Smartlock)
2.0 Coupler Placement
SGC always recommends placing the antenna coupler as close as possible to the base of the
antenna – regardless of whether it is an SGC coupler or another brand. All SGC couplers can be
operated with a coaxial cable output connection; but this is not our recommendation. Antenna
“tuners” which use coaxial cable connection are actually line trimmers and have a limited
adjustment range (25 to 800 ohms). This impedance limitation prevents high voltages and
current which may cause flashing or burning of the coaxial cable – not the coupler. Trimmers
are less expensive than actual antenna couplers and much more common. However, because of
the impedance range limitations, they cannot tune whip or end fed wire antennas. On the other
Page 4

S G - 2 3 7 S m ar t u n er ™ M an ual
SGC, 13737 S E 26th Street Bellevue, WA 98005 USA • Ph: 425-746-6310, Fx: 425-746-6384, Email : [email protected]
www.sgcworld .com
SGC RESERVES THE RIGHT TO CHANGE SPECIF ICATIONS WITHOUT NOTICE
Copyright SGC 2008
3
hand, SGC antenna couplers are not limited in their impedance ranges and will tune all types of
antennas, including end fed wires and whips. For the most efficient operation possible, install
your SGC coupler as close to the feedpoint of your antenna as physical limitations allow. See
section 4.0 for examples of ideal configurations. More information, including details of several
real installations and technical notes can be found on our website.
3.0 Outdoor Installation
The SG-237 antenna coupler’s waterproof case is designed to withstand the environmental
conditions encountered aboard ship when mounted on weather decks. The internal construction
is designed to withstand the shock and vibration of marine service. Corrosion resistant hardware
and passive alloys are employed throughout. We do not recommend opening the case unless it is
necessary. For 99% of installations, the factory settings for jumpers will be correct.
The coupler must be installed in an area not directly exposed. Excessive weather or exposure to
heat and sunlight can shorten the life of the unit. Although the SG-237 built very solidly, it is
good installation practice to provide additional protection from the elements. SGC makes the
following recommendations:
3.1 Marine Mounting
The Smartuner should be located inside the house or under the aft lazaret on a sailboat.
On powerboats, the coupler may be mounted outside, but an additional protective housing
is recommended. The preferred installation if vertical is with the RF stud pointing
upward. The antenna connects to the bolt on the top. The SG-237 may be mounted in
any position, including inverted without any degradation of performance.
3.2 Desert and High Temperature Installations
The Smartuner may be used in very hot climates on a continuous basis if installed in a
manner that protects it from direct sunlight.
3.3 Additional Weather Protection Installations
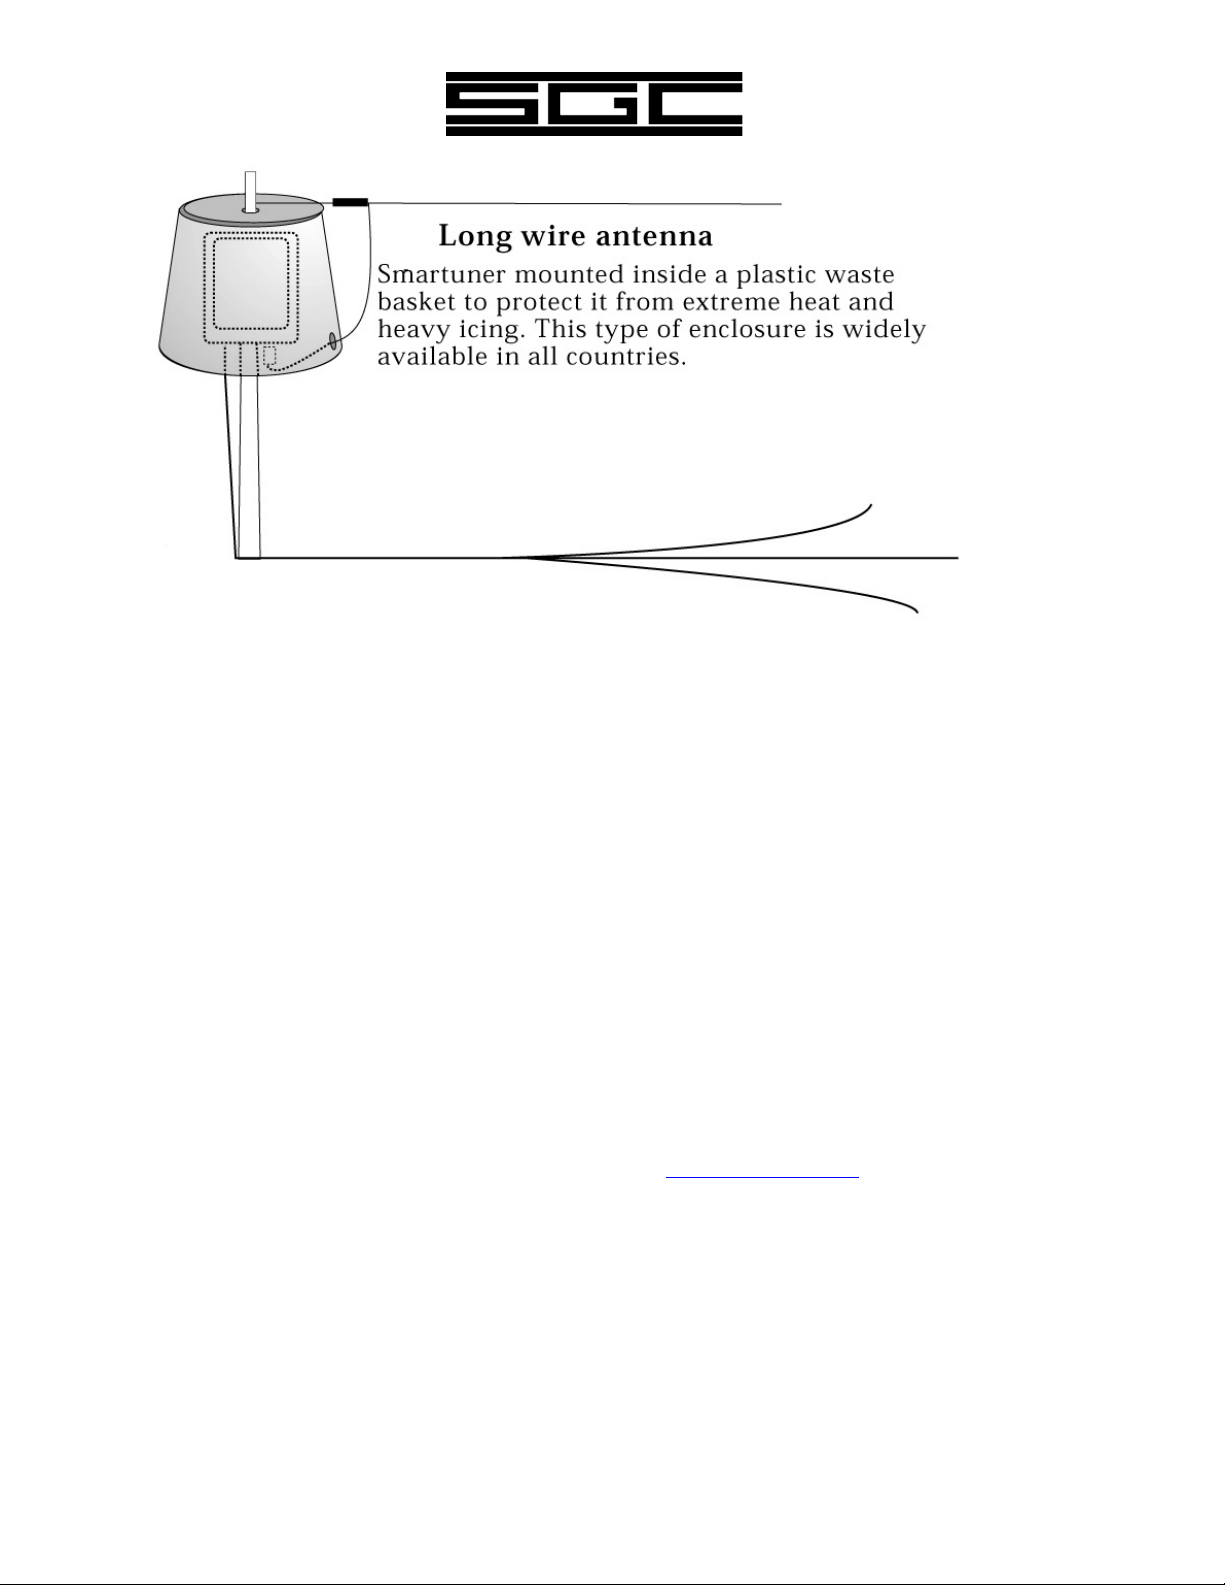
To protect the unit from direct exposure to sunlight, and to prevent heavy build-up of ice,
we recommend installing the Smartuner under additional protective housing. If you are
mounting it on a tower or in an extremely hot or cold climate, a plastic wastebasket (such
as those made by Rubbermaid™) makes an excellent weather cover and costs only a few
dollars.
Page 5
S G - 2 3 7 S m ar t u n er ™ M an ual
SGC, 13737 S E 26th Street Bellevue, WA 98005 USA • Ph: 425-746-6310, Fx: 425-746-6384, Email : [email protected]
www.sgcworld .com
SGC RESERVES THE RIGHT TO CHANGE SPECIF ICATIONS WITHOUT NOTICE
Copyright SGC 2008
4
4.0 Five Golden Rules of HF Installation
These rules apply to all types of stations, including base, mobile, airborne and marine. They are
very important for planning and installing your HF system, if you want to achieve good
communications.
1. Install transceiver as close to operation site and power supply system as possible
(whether an external power supply or battery system).
2. The antenna must be installed in an open space and as far as possible from your operating
point. Example: On a sailboat, use the backstay as the antenna, since it is the farthest
point away from the rest of the vessel.
3. The antenna coupler should be installed at the base/feedpoint of the antenna.
4. Always create your own ground with radial wire or copper straps. They will guarantee a
solid and proper ground system.
5. All cables – power supply, control or coaxial – must always be as short as possible and/or
necessary. An excess cable should be shortened to the proper length – never coiled.
Following these rules will minimize marginal installations and problem sources such as RF
feedback in the radio, power supply or cables and “hot” or RF burning microphones. If all five
of the above points are followed during the design and installation of your HF system, the
operator can expect top performance. Further information regarding applications, installation
and operation can be downloaded from our website at www.sgcworld.com. These publications
include:
• HF User’s Guide
• Go Mobile at 500 Watts
• Stealth Antennas
• Smartuner Antenna Coupler Manuals
Page 6

S G - 2 3 7 S m ar t u n er ™ M an ual
SGC, 13737 S E 26th Street Bellevue, WA 98005 USA • Ph: 425-746-6310, Fx: 425-746-6384, Email : [email protected]
www.sgcworld .com
SGC RESERVES THE RIGHT TO CHANGE SPECIF ICATIONS WITHOUT NOTICE
Copyright SGC 2008
5
This manual is produced as a guideline for the SG-237 antenna coupler. Performance and results
may very and SGC does not warrant any installation or any result. This manual is subject to
change without notice.
Selected Antenna Configurations
Automobiles: RVs or trailers provide an excellent base to install effective low cost antennas, and
end feed or loop antennas can be used.
Buildings: The horizontal quad loop is a groundless antenna for high angle radiation and is ideal
for HF communications up to 500 miles in the frequency range of 2 to 10 MHz. This
configuration provides optimum near-right angle reflection to the ionosphere for short-range
communications.
Roofs/Walls: E. Under a roof overhang, all kinds of wire antennas may be installed. F. All types
of antennas may be hidden along the roof of a building, as long as it uses non-metallic roofing
materials. Loop antennas are good for this type of installation. G. A downspout, rain gutter
antenna works well if the piping and gutter are aluminum.
Page 7

S G - 2 3 7 S m ar t u n er ™ M an ual
SGC, 13737 S E 26th Street Bellevue, WA 98005 USA • Ph: 425-746-6310, Fx: 425-746-6384, Email : [email protected]
www.sgcworld .com
SGC RESERVES THE RIGHT TO CHANGE SPECIF ICATIONS WITHOUT NOTICE
Copyright SGC 2008
6
Flagpole: If a flagpole is made of PVC pipe, it is easy to tape a large gauge wire to the inside of
the pipe and use a good counterpoise. Typical flagpoles are 25 to 35 feet in height, which offers
excellent performance on all bands. Note the ground radials that are necessary with any long
wire or vertical antenna.
Helicopters/Planes: The Smartuner will also match well the more common wire antenna from
fuselage to vertical stabilizer (and continuing to a wing tip, if desired) and a long wire antenna
under the tail and rotor of the helicopters. When installed in an aircraft, the Smartuner will
operate well with a shunt-fed antenna. This is generally a 13-foot piece of metal that mounts on
the fuselage and is grounded to the aircraft at one end.
Page 8

S G - 2 3 7 S m ar t u n er ™ M an ual
SGC, 13737 S E 26th Street Bellevue, WA 98005 USA • Ph: 425-746-6310, Fx: 425-746-6384, Email : [email protected]
www.sgcworld .com
SGC RESERVES THE RIGHT TO CHANGE SPECIF ICATIONS WITHOUT NOTICE
Copyright SGC 2008
7
Insulated Backstay: The coupler must be placed as close as possible to the base of the backstay
antenna. Connect the RF ground terminal to all the metal parts or structure of the boat.
Triangular Loop Antenna: This antenna for sailboats is designed to operate in a groundless
environment and still provide high performance. This type of installation will require only one
insulation point on the bottom backstay and an electrical connection on top of the mast and the
stay. The grounded side of the coupler should be connected to the bottom of the mast. (See
above)
Delta Loop Antennas: These are ideally suited to long range communications due to their low
angle. This configuration is best for communications ranging from 500 to 5000 miles in the HF
frequency range of 4 to 22 MHz. Noise rejection is excellent. Because the antenna system is not
connected to a ground, noise rejection is enhanced.
Page 9

S G - 2 3 7 S m ar t u n er ™ M an ual
SGC, 13737 S E 26th Street Bellevue, WA 98005 USA • Ph: 425-746-6310, Fx: 425-746-6384, Email : [email protected]
www.sgcworld .com
SGC RESERVES THE RIGHT TO CHANGE SPECIF ICATIONS WITHOUT NOTICE
Copyright SGC 2008
8
Long Wire Antenna: These perform well on fishing vessels and are very efficient because
antenna lengths of 50 feet or more can be installed without any difficulties. If vessel is not of a
metal structure 3 radial wires as long as possible can be connected to the coupler and spread on
the lower bottom part of the vessel.
Ladder feed Antenna: These may be used if necessary, however, installation of the coupler
directly at the antenna is preferred for higher efficiency.
Page 10

S G - 2 3 7 S m ar t u n er ™ M an ual
SGC, 13737 S E 26th Street Bellevue, WA 98005 USA • Ph: 425-746-6310, Fx: 425-746-6384, Email : [email protected]
www.sgcworld .com
SGC RESERVES THE RIGHT TO CHANGE SPECIF ICATIONS WITHOUT NOTICE
Copyright SGC 2008
9
“V” Antennas: Both “V” and inverted “V” antennas are convenient for limited space installation
and increase of directivity.
5.0 Optional Smartlock
The Smartlock allows the operator to have additional controls over the SG-237. It is not required
for normal operation.
5.1 Tune, Tune Lock/Reset
The ‘Tuned’ (Green LED): This LED lights when the coupler has successfully tuned.
Normal/Tune Lock: The toggle switch allows the user to prevent coupler re-tuning by
switching to the Tune Lock position. When in the Tune Lock position, the red LED
blinks to notify the user that the coupler is locked on the current setting.
Page 11

S G - 2 3 7 S m ar t u n er ™ M an ual
SGC, 13737 S E 26th Street Bellevue, WA 98005 USA • Ph: 425-746-6310, Fx: 425-746-6384, Email : [email protected]
www.sgcworld .com
SGC RESERVES THE RIGHT TO CHANGE SPECIF ICATIONS WITHOUT NOTICE
Copyright SGC 2008
10
Reset:
Pushing the red reset button allows the coupler to be reset, if the toggle switch is in the
normal position. This is preferred over turning the input power off an on.
5.2 Smartlock Notes
The Tune Lock function is in most cases unneeded. Inadvertent retuning is a rare
occurrence. Re-tuning may occur when the environment or antenna system has changed
(as in with mobile operation being used while in motion). In this case, re-tuning is within
normal operation of the coupler.
5.3 Smartlock Connections
Refer to the diagram below for the pathways of the different Smartlock connections. To
hook the unit up to your SG-230 or SG-237, connect as follows:
(1) Red wire/13.6 VDC – Red wire in coupler cable
(2) Green wire/Tuned Indicator – White/Black wire in coupler cable
(3) White wire/Reset Line – White/Red wire in coupler cable
(4) Black wire/DC Ground – Black wire in coupler cable
Please note: the wire colors may change. If your wire colors do not match what is listed
here, refer to our website for more current information, or contact SGC for assistance.
Page 12

S G - 2 3 7 S m ar t u n er ™ M an ual
SGC, 13737 S E 26th Street Bellevue, WA 98005 USA • Ph: 425-746-6310, Fx: 425-746-6384, Email : [email protected]
www.sgcworld .com
SGC RESERVES THE RIGHT TO CHANGE SPECIF ICATIONS WITHOUT NOTICE
Copyright SGC 2008
11
6.0 Troubleshooting
SGC has a knowledgeable staff that can assist you with several common issues you may
encounter with your coupler, however, we suggest you follow these steps before contacting us.
1. Check all of your connections and cables. The most common fault with an SGC
coupler is insufficient RF grounding. Many users underestimate the importance of this,
and as a result, compromise their station’s performance. Several guides to good
grounding can be found under the ‘Technical’ section of our website.
2. Download our ‘Coupler Troubleshooting Guide’ from our website and follow the
instructions. It is best to use an in-line meter to determine how your coupler is
functioning.
3. Use the troubleshooting methods outlined below.
4. If you contact SGC for assistance, the best way to do so is through our Online Help
Request, which you can fill out and submit on our website, or print and fax. In either
case, it is best to have the information on this form readily available before calling an
SGC representative, as it will insure timely handling of your problem.
6.1 Do-It-Yourself Light Bulb Dummy Load Procedure
Any time that a transmitter is used, it must be outputting into a load. A load is anything that the
output power can be pumped into. If the transmitter is operated without any sort of load
connected, the final amplifier stage should never test a transmitter on the air for the first time, if
you are unsure about how to operate it, and if you are unsure whether it is working properly.
You could create a harmful interference to other stations.
To test transmitters without actually without actually operating into an antenna, dummy loads
were created. A dummy load is a load that will dissipate the energy from the transmitter instead
of emanating it into the ionosphere. Nearly all commercial dummy loads are large oil-filled
cans. These dummy loads change the transmitted energy into heat, which is absorbed by the oil.
Because different transmitters output different amounts of power, different sizes of dummy loads
must be used. Dummy loads for typical amateur power (<500 watts) are relatively inexpensive
and readily available.
Unfortunately, when you use a can-type dummy load, you can’t see “what’s happening” with
your transmitter. In this case, you can use a light-bulb dummy load to test your transmitter.
Here, the light bulb is directly connected to the output of the transmitter and it dissipates the RF
energy as light. The light bulb dummy load is more useful than the oil-can type because you can
guess how much power is being output, you can see the voice modulation the SSB (the light will
flicker with your voice peaks), and you can tune the transmitter for maximum output (if the
transmitter is an older model that requires tuning).
Page 13

S G - 2 3 7 S m ar t u n er ™ M an ual
SGC, 13737 S E 26th Street Bellevue, WA 98005 USA • Ph: 425-746-6310, Fx: 425-746-6384, Email : [email protected]
www.sgcworld .com
SGC RESERVES THE RIGHT TO CHANGE SPECIF ICATIONS WITHOUT NOTICE
Copyright SGC 2008
12
Before building or using the light-bulb dummy load, remember that these models typically don’t
dissipate the transmitter’s output as well as an oilcan dummy load. The result is that weak RF
will ‘leak’ out; we have heard a few stories of amateurs who were heard around town while
operating their transmitters into a light-bulb dummy load. If you use this system, make sure that
you test the equipment on a clear, harmless frequency. (NEVER test with the transmitter set on
an emergency frequency.)
SGC recommends that you build the light-bulb dummy load with the following parts:
- AC socket to cable with a PL-259 connector (for transceiver)
- AC socket to cable with alligator clips (for coupler)
- Light bulb to AC adapter
- 75 to 125 Watt light bulb, 120 to 220 VAC
- 100 Watt transceiver
- SGC Coupler
RADIO TEST PROCEDURE
1. Connect the transceiver light bulb to the radio RF in/out jack.
2. Turn the radio and set the CW mode.
3. Key the PTT switch on the microphone and look at the light bulb. If the light bulb load is
connected and the radio is transmitting, the light should turn on.
4. Set the radio to SSB mode.
5. Key the PTT switch on the microphone and talk into the microphone. Notice that the
light turns on when you talk.
COUPLER TEST PROCEDURE
1. Connect the coupler to the radio.
2. Connect coupler light bulb load to Smartuner coupler antenna output.
3. Turn on radio and Smartuner.
4. Set the radio to the CW mode.
5. Key the PTT switch on the microphone and look at the light bulb. The light should turn
on if the coupler has completed its’ tuning cycle and if the radio is transmitting.
6. For further testing, follow steps 4 & 5 of the radio test procedure. Note: The light bulb
might not turn on immediately if the coupler has not yet been tuned for the frequency of
the transmitter. The output power (light-bulb brightness) is greatest when the coupler is
properly tuned.
This test will ensure that the radio and coupler are working properly. If your unit fails this test,
contact SGC for further assistance.
Page 14

S G - 2 3 7 S m ar t u n er ™ M an ual
SGC, 13737 S E 26th Street Bellevue, WA 98005 USA • Ph: 425-746-6310, Fx: 425-746-6384, Email : [email protected]
www.sgcworld .com
SGC RESERVES THE RIGHT TO CHANGE SPECIF ICATIONS WITHOUT NOTICE
Copyright SGC 2008
13
6.2 B.I.T.E.* LED Descriptions
*Built-In Test Equipment: Utilizing these LEDs to troubleshoot your Smartuner requires
opening the coupler case and observing the LEDs located on the PCB. Please note that doing
so will break the factory seal and may compromise the weatherproofing of your unit. If your
unit is still under warranty, it is recommended that you call SGC before opening the cover.
TND
This LED will light when the turner has found an acceptable match. It will remain lit until
conditions have changed which will cause the turner to find a different match. (i.e. A new
transmit frequency has been detected or tuner has been reset.)
L ‘Z’
This LED shows the stats of the antenna impedance. When lit, the impedance is 50 ohms or
less. When off, the impedance is greater than 50 ohms.
2:1
This LED will light when the VSWR is greater than 2:1. It will extinguish when VSWR is
less than 2:1.
PHZ
This LED indicates the presence of lack of RF power from the radio. When transmitting, the
LED will light to indicate RF is being detected. In receive, the LED should be extinguished.
OTHER
All LEDs will blink on and off at a rate of 2Hz to indicate the tuner was not able to find a
valid match.
Note that these status LEDs are usually used to aid a technician in diagnosing the status of
the system and should not be thought of as laboratory instruments.
As the Smartuner tunes, the BITE status will be continually updated from the CPU. If your
coupler’s BITE LEDs are not responding as outlined above, contact SGC for further assistance.
Additional technical information on coupler design and theory, with schematics, is available for
download from our website free of charge.
Visit www.sgcworld.com for more information on our full line of HF antenna couplers and
accessories.
 Loading...