


PowerTalk™ Manual
SG-2000
PowerTalk
TM
TM
Head w/ADSP
TM
SNS
(Catalog Number 04-22)
&
For the SG-2000 HF SSB
Installation and Operations Manual
Revised: Sept. 6, 1995
SGC Inc. SGC Building, 13737 S.E. 26th St. P.O.Box 3526, Bellevue, WA. 98009 USA
© 1994 SGC, Inc.
June 28, 2004; 15:46
Fax: 206-746-6384 • Tel: 206- 746-6310 • 1-800-259-7331

PowerTalk™ Manual i
Table of Contents
Section Page
1.0 General Description ...............................................................................................1
2.0 Noise Reduction ...................................................................................................2
2.1 Adaptive Digital Signal Processing .........................................................................2
2.2 Spectral Noise Subtraction (SNS™) .....................................................................2
2.3 ADSP™ ...............................................................................................................3
2.4 Notch Filter ..........................................................................................................3
2.5 High, Low and Center Frequency Filters ................................................................4
3.0 Front Panel Layout ................................................................................................5
4.0 ADSP™ Control Panel Layout .............................................................................6
4.1 Notch Filter (NOTCH) .........................................................................................6
4.2 Bandpass Filter .....................................................................................................7
4.2.1 Low Frequency Corner .........................................................................................7
4.2.2 High Frequency Corner .........................................................................................8
4.2.3 Center Frequency .................................................................................................9
4.3 Noise Reduction (NOISE) ....................................................................................10
4.4 Spectral Noise Subtraction (SNS™) .....................................................................11
4.5 Preset Memory (PRESET) ....................................................................................12
4.6 User Memory .......................................................................................................13
4.7 Bypass (BYPASS) .............................................................................................14
4.8 Digital Rotary Control (ADJ) .................................................................................15
4.9 LED Display .........................................................................................................15
4.9.1 "Off" Condition .....................................................................................................15
4.9.2 "On" Condition ......................................................................................................15
4.10 Mnemonics ...........................................................................................................16
4.10.1 Memory Selection .................................................................................................16
4.10.2 Preset Memory Function .......................................................................................17
4.10.3 Operating Functions ..............................................................................................17
4.11 Toggling Between Bandpass and User ...................................................................17
4.12 Conclusion ............................................................................................................18
5.0 Key Pad Changes .................................................................................................19
5.1 Keys Deleted ........................................................................................................19
5.2 Keys Modified ......................................................................................................20
5.3. Keys Added...........................................................................................................20
5.4 Modes of Operation ..............................................................................................21
5.5 Operational Changes with Tuning Knob...................................................................22
6.0 Operating the PowerTalk™ ..................................................................................24
6.1 Key Functions.........................................................................................................24
6.2 Sample Entries........................................................................................................28
7.0 Display LCD .........................................................................................................30
SGC Inc. SGC Building, 13737 S.E. 26th St. P.O.Box 3526, Bellevue, WA. 98009 USA
© 1994 SGC, Inc.
June 28, 2004; 15:46
Fax: 206-746-6384 • Tel: 206- 746-6310 • 1-800-259-7331

PowerTalk™ Manual ii
8.0 Front Panel Controls ...............................................................................................33
8.1 Primary Keyboard Functions .................................................................................33
8.2 SHIFT Functions ..................................................................................................40
8.3 Program Functions ..................................................................................................41
8.4 Operating Session .................................................................................................42
8.6 Scanning Functions ................................................................................................48
8.7 Changing Frequency...............................................................................................52
8.8 Additional Functions................................................................................................54
9.0 Schematics..............................................................................................................60
10.0 Index ....................................................................................................................66
SGC Inc. SGC Building, 13737 S.E. 26th St. P.O.Box 3526, Bellevue, WA. 98009 USA
© 1994 SGC, Inc.
June 28, 2004; 15:46
Fax: 206-746-6384 • Tel: 206- 746-6310 • 1-800-259-7331

PowerTalk™ Manual iii
Disclaimer
The "ADJ" knob has a mechanical detent. You can feel
the detents when the ADJ knob is rotated. The
ADSP™ portion of the PowerTalk™ head can hang up
if the ADJ knob stops between detents. Rotating the
ADJ knob and stopping on the detent will allow the
head to adjust properly.
SGC Inc. SGC Building, 13737 S.E. 26th St. P.O.Box 3526, Bellevue, WA. 98009 USA
© 1994 SGC, Inc.
June 28, 2004; 15:46
Fax: 206-746-6384 • Tel: 206- 746-6310 • 1-800-259-7331

PowerTalk™ Manual 1
1.0 General Description
Since the PowerTalk™ head is only one of the several optional heads for the SG-2000
HF SSB radio, this manual is designed as a companion to the manual for the SG-2000.
There is much vital information on such things as antenna and grounding setups,
licenses needed, computer control of the radio, software and hardware accessories and
troubleshooting in the SG-2000 manual that is beyond the scope of this manual.
This manual will tell you how to operate the PowerTalk™ Head. If you have just
bought the SG-2000 radio with the PowerTalk™ head, please read the SG-2000 manual
to make sure you have properly set up the radio before you start reading this manual.
If you have bought this head separately to install on an existing SG-2000 setup and are
happy with the performance of the system, this manual will tell you how to get the
most from the PowerTalk™ head. If you think the performance of your radio could be
better, you might want to look at the SG-2000 manual again and follow some of its
suggestions for optimal performance.
SGC Inc. SGC Building, 13737 S.E. 26th St. P.O.Box 3526, Bellevue, WA. 98009 USA
© 1994 SGC, Inc.
June 28, 2004; 15:46
Fax: 206-746-6384 • Tel: 206- 746-6310 • 1-800-259-7331

PowerTalk™ Manual 2
2.0 Noise Reduction
The PowerTalk™ head incorporates several technologically advanced processes to
filter out unwanted received noise, resulting in dramatically enhanced signal clarity.
Adaptive Digital Signal Processing (ADSP™), Spectral Noise Subtraction (SNS™) and
the Notch filter (tone suppressor) are three methods used by the PowerTalk™ head to
filter out signal noise. In addition, the user can adjust the quality of the audio signal by
setting the Low, High and Center frequency. These processes can be used separately or
in combination by the user to configure the audio to get the best possible reception.
2.1 Adaptive Digital Signal Processing (ADSP™)
The benefit of ADSP
TM
is illustrated in the following graph:
2.2 Spectral Noise Subtraction (SNS™)
The benefit of SNS™ is illustrated by the following graph:
SGC Inc. SGC Building, 13737 S.E. 26th St. P.O.Box 3526, Bellevue, WA. 98009 USA
© 1994 SGC, Inc.
June 28, 2004; 15:46
Fax: 206-746-6384 • Tel: 206- 746-6310 • 1-800-259-7331

PowerTalk™ Manual 3
2.3 ADSP™ and SNS™
The benefit of ADSP™ and SNS™ working in tandem is even more dramatic as
illustrated in the following graph:
2.4 Notch Filter
If the PowerTalk™ head detects the presence of any constant tones, enabling the
Notch filter will suppress this tone by 40 dB. The Notch filter will automatically
suppress up to 5 tones at once.
SGC Inc. SGC Building, 13737 S.E. 26th St. P.O.Box 3526, Bellevue, WA. 98009 USA
© 1994 SGC, Inc.
June 28, 2004; 15:46
Fax: 206-746-6384 • Tel: 206- 746-6310 • 1-800-259-7331

PowerTalk™ Manual 4
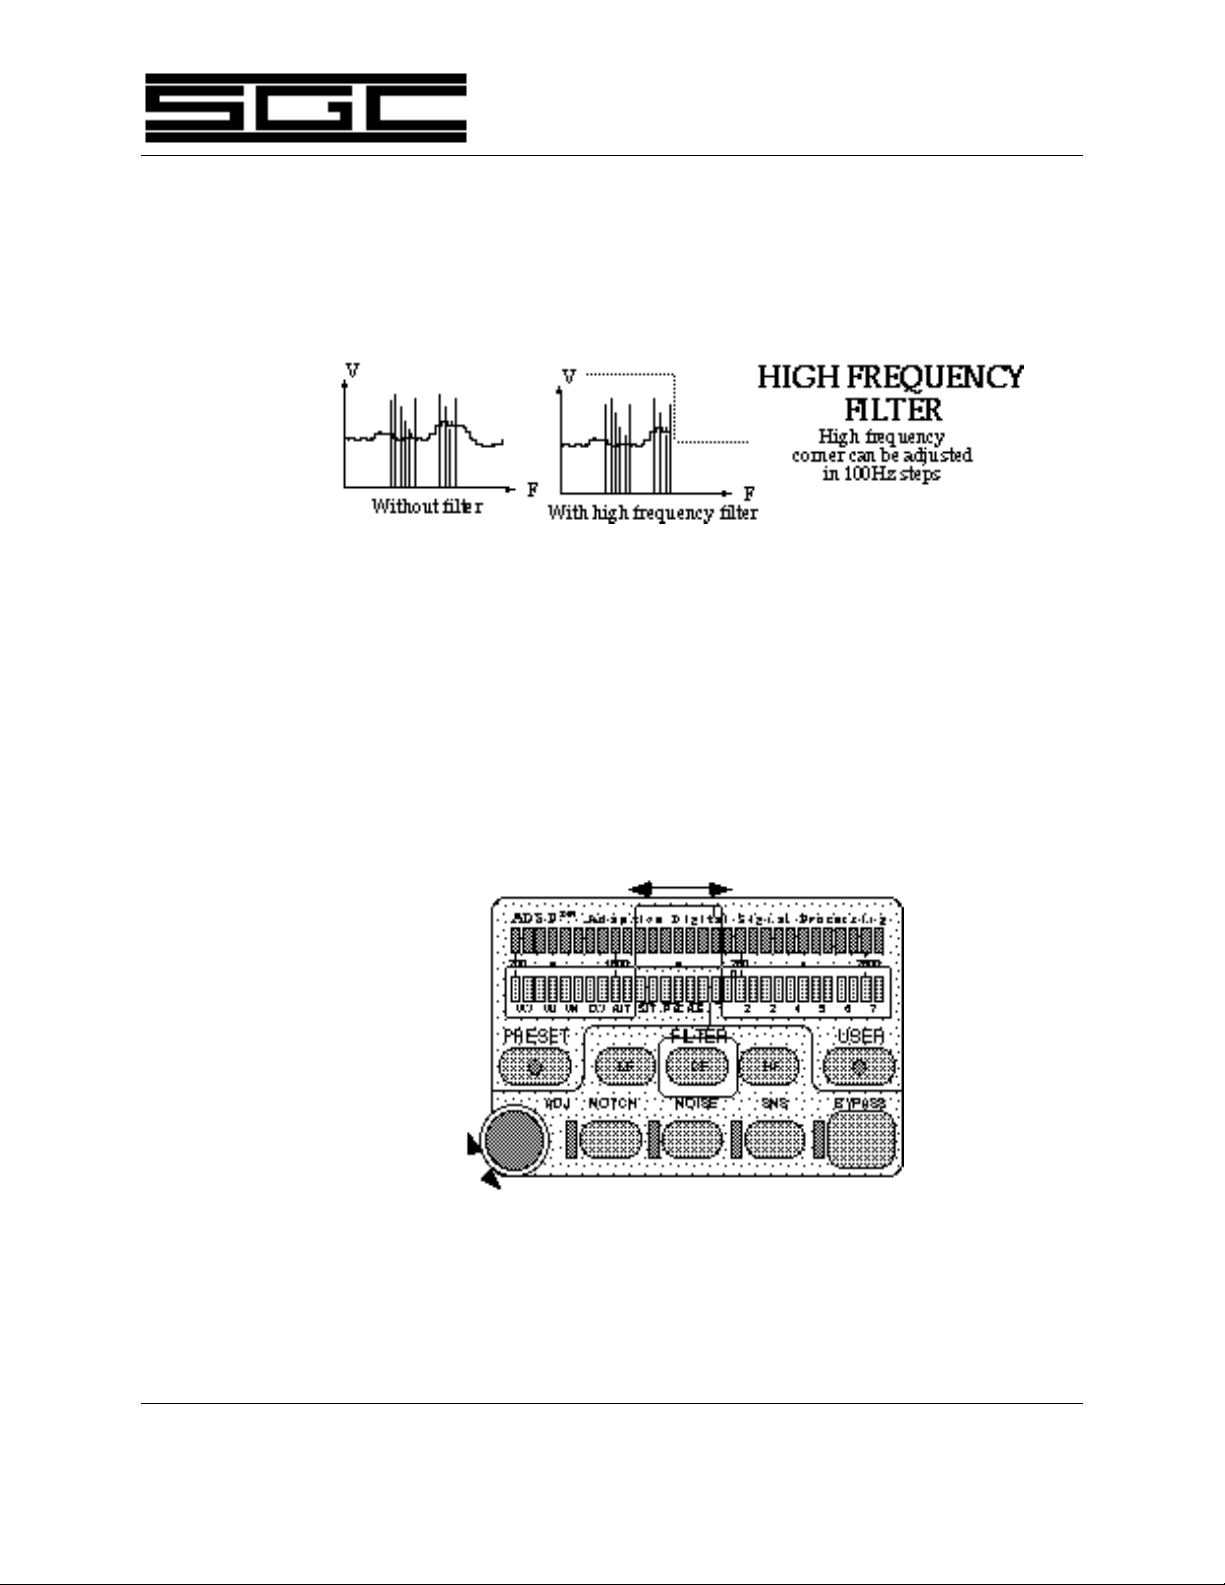
2.5 High, Low and Center Frequency Filters
In addition to the above noise reduction features, which are mainly on or off, the
PowerTalk™ head lets the user adjust the audio quality to their own liking by
means of the High, Low and Center Frequency filters as illustrated below:
SGC Inc. SGC Building, 13737 S.E. 26th St. P.O.Box 3526, Bellevue, WA. 98009 USA
© 1994 SGC, Inc.
June 28, 2004; 15:46
Fax: 206-746-6384 • Tel: 206- 746-6310 • 1-800-259-7331

PowerTalk™ Manual 5
3.0 Front Panel Layout
The front panel of the PowerTalk™ head is shown in Figure 1 below. While the basic
display and many of the button functions are similar to the Standard SG-2000 head,
there are enough differences and new capabilities to warrant giving the PowerTalk™
its own manual.
The main visible differences in the new PowerTalk™ head are the ADSP™ control
section in the upper left corner, the tuning knob in the lower left corner that replace the
up and down arrows of the standard head, and associated buttons. The following
sections of this manual, detailing the operations of the PowerTalk™ head, will refer to
this drawing.
SGC Inc. SGC Building, 13737 S.E. 26th St. P.O.Box 3526, Bellevue, WA. 98009 USA
© 1994 SGC, Inc.
June 28, 2004; 15:46
Figure 1
Fax: 206-746-6384 • Tel: 206- 746-6310 • 1-800-259-7331

PowerTalk™ Manual 6
4.0 ADSP™ Control Panel Layout
Let's start with the section that gives the PowerTalk™ its reason for being: the ADSPTM
(Adaptive Digital Signal Processing) control panel in the upper left corner of the
PowerTalk™ face. The overall panel layout is shown below in Figure Two:
Figure Two
Disclaimer:
The "ADJ" knob has a mechanical detent. You can feel the detents when the ADJ knob is
rotated. The ADSP™ portion of the PowerTalk™ head can hang up if the ADJ knob stops
between detents. Rotating the ADJ knob and stopping on the detent will allow the head to
adjust properly
Now lets go over the operation and control of the ADSP™ control panel step by step.
4.1 Notch Filter (NOTCH)
The PowerTalk™ head has the ablility to sense and suppress up to five (5) tones
simultaneously. When the NOTCH push-button is selected, the green LED next
to it will illuminate. Tones will be rejected in the 0-4,000 Hz. frequency band.
(See Figure Three).
SGC Inc. SGC Building, 13737 S.E. 26th St. P.O.Box 3526, Bellevue, WA. 98009 USA
© 1994 SGC, Inc.
June 28, 2004; 15:46
Fax: 206-746-6384 • Tel: 206- 746-6310 • 1-800-259-7331

PowerTalk™ Manual 7
Figure Three
The noise reduction benefit of the Notch Filter is shown in the graph below,
reproduced from Section 2.4:
4.2 Bandpass Filter
Band Pass functionality is achieved by separately adjusting the lower and higher
bandpass corner frequencies in 100 Hz increments and moving the filter's center
frequency across the available bandwidth. Displayed frequencies are between
200 and 3100 Hz. The lower frequency limit, however, can be as small as 100 Hz.
Adjustments are made through the digital rotary control—labeled "ADJ"—on the
ADSP
TM
panel.
4.2.1 Low Frequency Corner (LF)
The low corner frequency is selected by the LF push-button. The default
setting is 200 Hz. with the first red LED and the last 29 green LEDs
illuminated. Positioning of the lower corner frequency is set by the rotary
control. (See Figure Four).
SGC Inc. SGC Building, 13737 S.E. 26th St. P.O.Box 3526, Bellevue, WA. 98009 USA
© 1994 SGC, Inc.
June 28, 2004; 15:46
Fax: 206-746-6384 • Tel: 206- 746-6310 • 1-800-259-7331

PowerTalk™ Manual 8
Figure Four
A graphic representation of setting the Low Corner Frequency is shown
below, reproduced from Section 2.5:
SGC Inc. SGC Building, 13737 S.E. 26th St. P.O.Box 3526, Bellevue, WA. 98009 USA
© 1994 SGC, Inc.
June 28, 2004; 15:46
4.2.2 High Frequency Corner (HF)
This filter is selected by the HF push-button. Default setting for this filter
is 3100 Hz. with the first 29 green LEDs and the last, or 30th, red LED
illuminated. Positioning of the Higher Corner Frequency is controlled by
the digital rotary control. (See Figure Five).
Fax: 206-746-6384 • Tel: 206- 746-6310 • 1-800-259-7331
PowerTalk™ Manual 9
Figure Five
A graphic representation of setting the High Corner Frequency is shown
below, reproduced from section 2.5:
4.2.3 Center Frequency (CF)
Once the operator has chosen the Bandpass Filter's range by means of the
Upper and Lower Corner Frequencies, the Center Frequency can be
selected by pressing the CF push-button. When selected, all green LEDs
within the passband range will be illuminated. In addition, within five
seconds of pressing the CF push-button, the operator may begin adjusting
the Center Frequency up or down via the digital rotary control. (See
Figure Six).
Figure Six
SGC Inc. SGC Building, 13737 S.E. 26th St. P.O.Box 3526, Bellevue, WA. 98009 USA
© 1994 SGC, Inc.
June 28, 2004; 15:46
Fax: 206-746-6384 • Tel: 206- 746-6310 • 1-800-259-7331

PowerTalk™ Manual 10
A graphic representation of the Center Frequency Filter is shown below,
reproduced from section 2.5:
4.3 Noise Reduction (NOISE)
Noise reduction (shown below in the ADSP™ graph) is obtained via a digital
process which is initiated by pressing the NOISE push-button. When selected,
the green LED next to the NOISE push-button illuminates. (See Figure Seven).
SGC Inc. SGC Building, 13737 S.E. 26th St. P.O.Box 3526, Bellevue, WA. 98009 USA
© 1994 SGC, Inc.
June 28, 2004; 15:46
Figure Seven
Fax: 206-746-6384 • Tel: 206- 746-6310 • 1-800-259-7331

PowerTalk™ Manual 11
The noise reduction benefit of the Noise button is illustrated in the graph below,
reproduced from section 2.1:
4.4 Spectral Noise Subtraction (SNSTM)
Spectral Noise Subtraction is the special process of subtracting noise and that
portion of the spectrum where voice modulation is not used. It is selected by
TM
pushing the SNS
push-button. When selected, the LED next to the SNSTM
push-button illuminates. (See Figure Eight).
Figure Eight
SGC Inc. SGC Building, 13737 S.E. 26th St. P.O.Box 3526, Bellevue, WA. 98009 USA
© 1994 SGC, Inc.
June 28, 2004; 15:46
Fax: 206-746-6384 • Tel: 206- 746-6310 • 1-800-259-7331

PowerTalk™ Manual 12
The benefit of Spectral Noise Subtraction is illustrated in the graph below,
reproduced from Section 2.2:
4.5 Preset Memory (PRESET)
Eight options are preset into the unit's memory. These are:
VOICE BANDWIDTH NOTCH NOISE SNSTM
VW Wide (300 to 3100 Hz.) Yes Yes Yes
VM Medium (300 to 2000 Hz.) Yes Yes No
VN Narrow (300 to 1700 Hz.) Yes Yes No
CW Filter on 1000 Hz. ± 200 Hz. No Yes No
DATA BANDWIDTH
AMTOR Filter on 2175 Hz. ± 150 Hz.
SITOR Filter on 1700 Hz. ± 150 Hz.
PACTOR Filter on 2175 Hz. ± 200 Hz.
ALE Filter on 1725 Hz. ± 1125 Hz.
Two digital filters are used in the eight PRESET functions. For voice and CW
functions, a filter with a shape factor of 1:1 (130 ms delay) is used. The low ,
center and high frequency points of this filter can be adjusted to reduce adjacent
channel interference.
SGC Inc. SGC Building, 13737 S.E. 26th St. P.O.Box 3526, Bellevue, WA. 98009 USA
© 1994 SGC, Inc.
June 28, 2004; 15:46
For data modes, the 130 ms delay of the voice/CW filter prevents a proper
handshake in ARQ modes and other data protocols due to increased switching
time between transmit and receive. Therefore, in the case of AMTOR, SITOR,
PACKET, PACTOR, G-TOR , and ALE, a second, very short, delay filter
Fax: 206-746-6384 • Tel: 206- 746-6310 • 1-800-259-7331

PowerTalk™ Manual 13
(approximately 2 ms) is selected. This filter's shape factor is 1.15:1, and its
extremely steep skirts reject interference from adjacent frequencies.
Of necessity, the low, center and high frequency settings of data filter memories
are fixed. However, by transferring data memory parameters in PRESET mode to
USER mode, the short delay filter can be accessed and used in conjunction with
new parameters defined by the user and stored in a USER memory.
For information on transferring data memory parameters, see Section 4.6.
Selecting the PRESET function activates the last-used preset memory and causes
the two red LEDs above the selected function to become illuminated. The
digital rotary control can then be used to change to any of the eight preset
locations. (See Figure Nine).
SGC Inc. SGC Building, 13737 S.E. 26th St. P.O.Box 3526, Bellevue, WA. 98009 USA
© 1994 SGC, Inc.
June 28, 2004; 15:46
Figure Nine
4.6 User Memory (USER)
Seven locations are provided for user-programmed memories. Pressing the
USER push-button activates the last-used User Memory selection and displays it
by illuminating the two LEDs above that position. If no memory has been
programmed into a particular User Memory location, the two LEDs above it will
be blinking. If a User Memory location has already been programmed, the LEDs
are on continuously. Use the rotary control to move between USER locations.
Fax: 206-746-6384 • Tel: 206- 746-6310 • 1-800-259-7331

PowerTalk™ Manual 14
To program a user-defined memory, configure the ADSPTM section as desired
(frequency, mode, etc.) and choose an empty memory location. Then press and
hold the USER switch for six seconds. The LED pair above the location chosen
changes from blinking (empty) to being on steadily (programmed). To clear a
user-defined memory, depress the USER push-button and select the memory
location in question with the digital rotary control. Then press and hold the
USER button for six seconds. When the associated LED pair changes from being
on continuously to blinking, release the USE R switch. The memory and its old
program have now been successfully cleared.
SGC Inc. SGC Building, 13737 S.E. 26th St. P.O.Box 3526, Bellevue, WA. 98009 USA
© 1994 SGC, Inc.
June 28, 2004; 15:46
Figure Ten
By the same process, a Preset Memory location can be selected, modified and
then entered into a User Memory location.
4.7 Bypass (BYPASS)
The BYPASS push-button is a toggle that determines whether or not the ADSP
system is active. When BYPASS is pressed, its associated LED is illuminated
and all functions of the ADSP™ are disabled, or bypassed. If BYPASS is pushed
again or any ADSP
TM
function is selected (PRESET, USER, NOTCH, NOISE,
SNSTM, LF, CF or HF), ADSP™ becomes active again and the green LED
associated with the BYPASS button goes off, confirming that the ADSP
TM
is engaged and operating. Pushing the BYPASS button to re -engage the ADSP™
Fax: 206-746-6384 • Tel: 206- 746-6310 • 1-800-259-7331
TM
system

PowerTalk™ Manual 15
system will return the unit to the previous ADSP™ function while pushing any
other button will engage that particular function (See Figure Eleven).
Figure Eleven
4.8 Digital Rotary Control (ADJ)
The digital rotary control affects ADSP
TM
functions as follows:
Preset Memory (PRESET) Set Location
User Memory (USER) Set Location
Spectral Noise Subtraction (SNSTM) Set Level
Low Frequency Corner Filter (LF) Set Frequency
High Frequency Corner Filter (HF) Set Frequency
Center Frequency Filter (CF) Adjusts Frequency Center
4.9 LED Display
4.9.1 "Off" Condition
When the unit is in bypass mode, all LED indicators, except BYPASS,
including dedicated LEDs, i.e., NOTCH, NOISE and SNSTM are off.
4.9.2 "On" Condition
Appropriate dedicated LEDs are on. NOTCH, NOISE , SNSTM and
SGC Inc. SGC Building, 13737 S.E. 26th St. P.O.Box 3526, Bellevue, WA. 98009 USA
© 1994 SGC, Inc.
June 28, 2004; 15:46
BYPASS have dedicated LEDs.
Fax: 206-746-6384 • Tel: 206- 746-6310 • 1-800-259-7331

PowerTalk™ Manual 16
When selected, the PRESET Memory or USER Memory functions will
cause the LED pair associated with the last-used memory location to
illuminate and blink if empty or stay on continuously if already
programmed.
If NOISE is selected, the adjacent LED is illuminated.
If SNSTM is selected, the adjacent LED is illuminated and the row of red
LEDs - labeled "SNSTM LEVEL" on Figure One - is used as a spectral noise
subtraction, peak-reading meter.
If LF, CF, or HF buttons are depressed, the lower corner frequency, the
upper corner frequency and/or the bandwidth frequencies outside the
passband are indicated by red LEDs. The selected corner or center
frequency can be set by the ADJ (for ADJUST) knob. When bandpass is
activated, both green and red LED displays change to VU-type metering
within five seconds. When either the PRESET or USER memory function
buttons are depressed, the LED memory pair of the specific memory
selected will be displayed. If NOISE , SNS
selected, the display will change to VU metering.
4.10 Mnemonics
4.10.1 Memory Selection
Preset Memory PRESET Section 4.5
User Memory USER Section 4.6
TM
, NOTCH, LF, CF or HF is
SGC Inc. SGC Building, 13737 S.E. 26th St. P.O.Box 3526, Bellevue, WA. 98009 USA
© 1994 SGC, Inc.
June 28, 2004; 15:46
Fax: 206-746-6384 • Tel: 206- 746-6310 • 1-800-259-7331

PowerTalk™ Manual 17
4.10.2 Preset Memory Function
Voice Wide VW Section 4.5
Voice Medium VM Section 4.5
Voice Narrow VN Section 4.5
Morse, 1000 Hz. CW Section 4.5
AMTOR AMT Section 4.5
SITOR SIT Section 4.5
PACTOR/PACKET PAC Section 4.5
Automatic Link
Establishment ALE Section 4.5
4.10.3 Operating Functions
Notch Filter NOTCH Section 4.1
Noise Reduction NOISE Section 4.3
Spectral Noise
Subtraction SNS
ADSP
TM
Bypass BYPASS Section 4.7
TM
Section 4.4
Low Frequency
Corner LF Section 4.2.1
High Frequency
Corner HF Section 4.2.2
Center Frequency CF Section 4.2.3
4.11 Toggling Between Bandpass and User or Preset
This unit includes the ability of allowing the user to toggle between the
currently selected bandpass and any Preset or User Programmed conditions.
This provides the user the ability to listen and compare before selecting one set
of parameters over another.
Select a Bandpass Filter width as described in Section 4.2. To toggle to a PRESET
or USER defined filter, push the PRESET or USER button and turn the rotary
knob to find the desired setting, i.e. VN, ALE, 1, 2, etc. To toggle back to the
originally selected Bandpass mode, push LF, CF or HF. Pushing the PRESET or
SGC Inc. SGC Building, 13737 S.E. 26th St. P.O.Box 3526, Bellevue, WA. 98009 USA
© 1994 SGC, Inc.
June 28, 2004; 15:46
Fax: 206-746-6384 • Tel: 206- 746-6310 • 1-800-259-7331

PowerTalk™ Manual 18
USER button again will toggle back to the previous PRESET or USER setting.
This toggling can continue indefinitely, allowing the user to listen to and
compare the two sets of conditions.
If the user wants the Bandpass changed to the parameters of the PRESET or
USER setting, pushing the PRESET or USER button twice in succession will
update the Bandpass settings to those of the PRESET or USER.
4.12 Conclusion
The foregoing technical/operational description has been generated by SGC to
provide a highly intuitive and friendly interface between an operator and the
ADSPTM/SNSTM operating modes unique to this unit. This design is exclusive
and proprietary to SGC and must not be emulated, simulated or copied by other
parties for any purpose. This manual was produced solely to provide the
operator an understanding of the outstanding capabilities of the PowerTalk™
head.
SGC Inc. SGC Building, 13737 S.E. 26th St. P.O.Box 3526, Bellevue, WA. 98009 USA
© 1994 SGC, Inc.
June 28, 2004; 15:46
Fax: 206-746-6384 • Tel: 206- 746-6310 • 1-800-259-7331

PowerTalk™ Manual 19
5.0 Key Pad Changes
The other major difference between the PowerTalk™ head and the standard SG-2000
head is the presence of the tuning knob instead of the up/down arrows to control
tuning.
The tuning knob and its six associated push-buttons control adjustments to Receive or
Transmit frequencies or channels. In addition, several other keys have been added,
deleted or had their functions altered.
For our customers who have just switched over from the stand ard SG-2000 head to the
PowerTalk™ head, the following is a detailed list of changes.
For the next sections, refer to the drawing of the PowerTalk™ head in Figure 1, of this
manual.
5.1 Keys Deleted
VOL - The VOL select button is deleted. The volume adjustment is now a
potentiometer. See Also section 5.3 VOLUME POTENTIOMETER. A secondary
function of the VOL button was to escape in the middle of a SHIFT or PRGR key
code sequence. The escape function is now implemented with the SHIFT button.
CLAR - The CLAR select button is deleted. The fine tuning is now done by the
STEP selecting .1 increments and turning the TUNING KNOB.
EMER - The EMER key is deleted. The Emergency function is removed from the
head.
UP ARROW AND DOWN ARROWS - The UP and DOWN arrows are being
replaced with the TUNING KNOB. Rotating the knob clockwise increments.
Rotating the knob counter-clockwise decrements.
SGC Inc. SGC Building, 13737 S.E. 26th St. P.O.Box 3526, Bellevue, WA. 98009 USA
© 1994 SGC, Inc.
June 28, 2004; 15:46
Fax: 206-746-6384 • Tel: 206- 746-6310 • 1-800-259-7331

PowerTalk™ Manual 20
5.2 Keys Modified
RATE - The RATE function is the same as the current head. The difference is that
it was a shift function. Now it is a separate button. Previous SHIFT, FREQ button
sequences are replaced with a single RATE button push.
STEP - The STEP button selects the step value. Steps of .1, .5, 1, 5, and 10 KHz
may be selected. The step value is used by both the frequency being adjusted by
the TUNING KNOB and the scanning by frequency.
5.3. Keys Added
TUNING KNOB - The TUNING KNOB replaces the UP and DOWN arrows.
BANDS - The BANDS button selects one of 64 pre -programmed channels. These
are ITU channels 101 to 153 and 155 to 165. Channel 154 is not used. The key
sequence is BANDS, then adjust the TUNING KNOB to select one of 64 ham
channels, then push BANDS (or wait for time out) to set the receive and
transmit frequencies.
RX - The RX button sets the displayed frequency into the RX frequency
memory. To set the RX frequency, first adjust the displayed frequency to the
desired RX frequency then push the RX button.
TX - The TX button sets the displayed frequency into the TX frequency memory.
To set the TX frequency, first adjust the displayed frequency to the desired TX
frequency then push the TX button.
FLIP - The FLIP button exchanges the receive and transmit frequencies memory
values.
VOLUME POTENTIOMETER - The volume control is a 10K ohm audio taper
potentiometer. This is a totally analog approach and as in the Standard head is
SGC Inc. SGC Building, 13737 S.E. 26th St. P.O.Box 3526, Bellevue, WA. 98009 USA
© 1994 SGC, Inc.
June 28, 2004; 15:46
not controlled by the microprocessor.
Fax: 206-746-6384 • Tel: 206- 746-6310 • 1-800-259-7331

PowerTalk™ Manual 21
PWR - The PWR button is physically different but functionally the same. The
physical size is smaller. The PWR button is recessed into the front panel. This
improves the likelihood of not accidentally turning the radio off.
END FUNC - The end function button terminates any function
5.4 Modes of Operation
The receive and transmit frequencies operate in two modes. When both
frequencies are different this is the FLIP Mode (Duplex). When both frequencies
are the same this is the NON-FLIP Mode (Simplex).
In memory are stored the two frequencies. These two memories and the mode
along with the RX, TX, FLIP buttons determines the receive and transmit
frequencies.
Setting FLIP Mode - To set the FLIP mode, display frequency on the LCD then
adjust the TUNING KNOB to the desired transmit frequency, then press the TX
button. Then adjust the TUNING KNOB to the desired receive frequency and
press the RX button. RX and TX will contain different frequencies in the FLIP
mode.
Setting NON-FLIP Mode - To set the NON-FLIP mode, display the frequency
on the LCD then adjust the TUNING KNOB to the desired frequency and
individually press the RX and TX buttons. RX and TX will contain the same
frequency.
Displaying the TX Frequency - The display always shows the receiving
frequency regardless of the mode. To display the TX frequency push the FLIP
buttons once. Push the FLIP button a second time to revert back to the correct RX
and TX frequencies.
SGC Inc. SGC Building, 13737 S.E. 26th St. P.O.Box 3526, Bellevue, WA. 98009 USA
© 1994 SGC, Inc.
June 28, 2004; 15:46
Fax: 206-746-6384 • Tel: 206- 746-6310 • 1-800-259-7331

PowerTalk™ Manual 22
5.5 Operational Changes with Tuning Knob
INCREMENT/DECREMENT FREQUENCY - The incrementing and
decrementing of a frequency uses the TUNING KNOB in conjunction with the
STEP button. The STEP button selects the resolution of the increment. See
section 5.2 for a complete explanation of the STEP button.
CHANGE FREQUENCY STEP - The frequency step can be changed by rotating
the TUNING KNOB which replaces the up and down arrows. The key sequence
is STEP, then rotate the TUNING KNOB to select the step, then push STEP again
(or wait for time-out) to set the step value into memory. Steps of .1, .5, 1, 5, and
10 KHz may be selected. If you wi sh the displayed (i.e. receive) frequency to be
rounded off to the step boundary push the OPTION button instead of pushing
the STEP button the second time. This will set the step value into memory and
round off the display to the step boundary .
SQUELCH LEVEL - The squelch level is adjusted by the TUNING KNOB which
replaces the up and down arrows.
SCAN BY FREQUENCY - The scan by frequency no longer is initiated by the
SCAN, then up and down arrows. The key sequence is SCAN, FREQ. The initial
direction is up from the displayed frequency.
CHANGE FREQUENCY SCAN DIRECTION - While scanning by frequency,
the scan direction can be changed by rotating the TUNING KNOB which
replaces the up and down arrows. Counterclockwise scans down. Clockwise
scans up.
CHANGE FREQUENCY STEP WHILE SCANNING - Same as section
CHANGE FREQUENCY STEP above. The scanning of the frequency is
interrupted by pushing the STEP button. Following the adjustment of the step
SGC Inc. SGC Building, 13737 S.E. 26th St. P.O.Box 3526, Bellevue, WA. 98009 USA
© 1994 SGC, Inc.
June 28, 2004; 15:46
scanning is resumed.
Fax: 206-746-6384 • Tel: 206- 746-6310 • 1-800-259-7331

PowerTalk™ Manual 23
SCAN BY CHANNEL - The scan by channel is no longer initiated by the SCAN,
CHAN, then up and down arrows. The key sequence is SCAN, CHAN. The
initial direction is up from the displayed channel.
CHANGE CHANNEL SCAN DIRECTION - While scanning by frequency, the
scan direction can be changed by rotating the TUNING KNOB which replaces
the up and down arrows. Counterclockwise scans down. Clockwise scans up.
SCAN RATE - While scanning by channel the scan rate is adjusted by the
TUNING KNOB which replaces the up and down arrows. The key sequence is
RATE, then rotate the TUNING KNOB, then push RATE again (or wait for timeout) to set rate value. Scanning by channel will resume with the new rate value.
DEFINE SCAN BANK - In the define scan banks function the next scan bank
memory is optionally selected by the TUNING KNOB which replaces the up
and down arrows. The key sequence is PRGR, SCAN, enter bank #, enter channel
# or (optionally rotate the TUNING KNOB to select the next scan bank memory),
PRGR.
DELETE SCAN BANK - In the delete scan bank function the next scan bank is
optionally selected by the TUNING KNOB which replaces the up and down
arrows. The key sequence is PRGR, SCAN, enter bank #, (optionally rotate the
TUNING KNOB to select the next scan bank), SHIFT, 7.
SET TIME ON - In the set time on key sequence the DOWN ARROW button is
replaced by the TUNING KNOB button.
BACKLIGHT LEVEL - The backlight level adjustment will use the TUNING
KNOB to select the level. The key sequence is SHIFT/FUNC, RATE. This turns
off the backlight. If backlighting is desired, then rotate the TUNING KNOB for
the desired level. There are four levels of brightness to select.
SGC Inc. SGC Building, 13737 S.E. 26th St. P.O.Box 3526, Bellevue, WA. 98009 USA
© 1994 SGC, Inc.
June 28, 2004; 15:46
Fax: 206-746-6384 • Tel: 206- 746-6310 • 1-800-259-7331

PowerTalk™ Manual 24
6.0 Operating the PowerTalk™
Now that you understand some of the differences and new capabilities of the
PowerTalk™, lets explain the key functions as they actually work on the new
PowerTalk™.
Key functions are loosely grouped into two categories, basic and advanced. Basic key
functions do not require the use of the SHIFT/FUNC keys. Advanced operations do
require the use of the SHIFT/FUNC keys and may involve several key strokes.
6.1 Key Functions
BASIC FUNCTIONS
Power ON/OFF Press POWER
NOTE: When you first turn on the SG-2000, it will
automatically switch to the last frequency used.
Increase Volume To increase or decrease volume rotate Volume knob.
Display Frequency Press FREQ or RX
Display Channel Press CHAN
Change Channel Press CHAN until 4 dashes appear, enter channel number,
CHAN
EXAMPLE: To call KMI on channel 401 press: CHAN , 401,
CHAN
SGC Inc. SGC Building, 13737 S.E. 26th St. P.O.Box 3526, Bellevue, WA. 98009 USA
© 1994 SGC, Inc.
June 28, 2004; 15:46
Fax: 206-746-6384 • Tel: 206- 746-6310 • 1-800-259-7331

PowerTalk™ Manual 25
FREQUENCY FUNCTIONS
Enter a SIMPLEX Frequency Press PRGR , FREQ enter frequency, PRGR
NOTE: When a programming sequence begins with PRGR,
you must press PRGR at the end of the key sequence
to execute the sequence.
EXAMPLE: To enter the simplex frequency 3920.5 KHz, you would
Press PRGR , FREQ 39205 PRGR
Enter a DUPLEX Frequency Press PRGR , FREQ enter receive frequency , FREQ
enter mode, FREQ ,enter transmit frequency, PRGR
EXAMPLE: To enter the duplex frequency 3920.5 KHz receive,
3815.3 KHz transmit and Lower Sideband, you would press:
PRGR , FREQ
39205 FREQ 1 FREQ 38153 PRGR
NOTE: The 1 key toggles selection of LSB or USB in this
example.
Increment Frequency (NonFLIP) Press FREQ then turn Tuning Knob clockwise. Press
SHIFT/FUNC or FREQ to complete
Decrement Frequency (NonFLIP) Press FREQ then turn Tuning Knob counterclockwise. Press
SHIFT/FUNC or FREQ to complete
Increment RX Frequency (FLIP) Press RX then turn Tuning Knob clockwise to increment
receive frequency only. Press SHIFT/FUNC or RX to
complete
Decrement TX Frequency (FLIP) Press RX then turn Tuning Knob counterclockwise. to
decrement receive frequency only. Press SHIFT/FUNC or RX
to complete
SGC Inc. SGC Building, 13737 S.E. 26th St. P.O.Box 3526, Bellevue, WA. 98009 USA
© 1994 SGC, Inc.
June 28, 2004; 15:46
Fax: 206-746-6384 • Tel: 206- 746-6310 • 1-800-259-7331

PowerTalk™ Manual 26
Flip RX & TX Frequencies Press FLIP , to exchange the receive and transmit frequencies.
Change Frequency Step Press STEP , then turn Tuning Knob counterclockwise or
clockwise. Press SHIFT/FUNC or STEP to complete
Select Frequency Bands Press BANDS , then turn Tuning Knob counterclockwise or
clockwise. Press SHIFT/FUNC or BANDS to complete
CHANNEL FUNCTIONS
Display Channel Press CHAN
Change Channel Press CHAN until 4 dashes appear, enter channel number,
CHAN
EXAMPLE: To call KMI on channel 401 press CHAN , 401,
CHAN
MODE FUNCTIONS
USB/LSB Toggle Press 1 Observe front panel display changes
Voice - Telex Filter SwitchPress 2 Observe front panel display changes
Squelch On / Off Press 3 Observe front panel display changes and
receiver is silenced if no signal is present.
Speaker On - Off Press 4 Observe front panel display changes and
speaker is silenced when SPK light is
extinguished on LCD.
Timer On - Off Press 5 Observe "TIMER" indication over clock portion
on LCD.
Time - Date Display Press 6 Displays clock time or date on front panel.
Intercom On - Off Press 7 enter # of remote head desired or 7 , 0 for
SGC Inc. SGC Building, 13737 S.E. 26th St. P.O.Box 3526, Bellevue, WA. 98009 USA
© 1994 SGC, Inc.
June 28, 2004; 15:46
Fax: 206-746-6384 • Tel: 206- 746-6310 • 1-800-259-7331

PowerTalk™ Manual 27
all heads
20 dB Attenuator On - Off Press 8 Observe front panel display changes
Power High - Low Press 9 Observe HI PWR or LO PWR flag on LCD.
SHIFT FUNCTIONS
Back light Set Press SHIFT/FUNC , RATE then turn Tuning Knob left or right.
Display control head ID Press SHIFT/FUNC , 0
View Timer Frequency On Press SHIFT/FUNC , 1
Alarm Time - Frequency Off Press SHIFT/FUNC , 2
Squelch Level Set Press SHIFT/FUNC , 3 then turn Tuning Knob left or right
Noise Blanker On - Off Press SHIFT/FUNC , 4
Beep each key stroke Press SHIFT/FUNC , 5
Alternate Time - Date Press SHIFT/FUNC , 6
SWR Forward - Reverse Press SHIFT/FUNC , 9
SCAN FUNCTIONS
Scan by FREQUENCY RADIO MUST BE IN FREQUENCY DISPLAY MODE. PRESS
FREQ BEFORE ACCESSING THIS FUNCTION. THEN:
Press SCAN then turn Tuning Knob left or right.
Change Scan Direction While Scanning, press Tuning Knob right or left
Change Frequency Step While scanning by frequency, Press SHIFT/FUNC , FREQ
SGC Inc. SGC Building, 13737 S.E. 26th St. P.O.Box 3526, Bellevue, WA. 98009 USA
© 1994 SGC, Inc.
June 28, 2004; 15:46
Fax: 206-746-6384 • Tel: 206- 746-6310 • 1-800-259-7331

PowerTalk™ Manual 28
then turn Tuning Knob left or right. Steps of .1, .5, 1, 5, 10 KHz
may be selected.
CHANNEL SCAN
Scan by CHANNEL Press SCAN ,
CHAN (if dashes displayed, press CHAN again) , then turn
Tuning Knob left or right.
Scan Rate While Scanning Press SHIFT/FUNC , SCAN , turn Tuning Knob left or right.
(8 bars =Fastest, 1 bar = Slowest)
Scan by Scan Bank(s) Press SCAN (if freq. displayed, press CHAN again) , enter
bank #(s), then SCAN
Define Scan Bank Press PRGR , SCAN enter bank # (0-9), enter channel # in
bank, OPTIONAL - press Up or Down for next scan bank
memory], PRGR
Delete Scan Bank Press PRGR , SCAN enter bank # ,turn tuning knob
clockwise, SHIFT/FUNC 7
DEFINE MEMORY
Define User Channel Simplex Press PRGR , CHAN enter channel #, FREQ enter RCV
frequency, FREQ set parameters, PRGR . (RCV means "Receive")
Define User Channel Duplex Press PRGR , CHAN enter channel #, FREQ enter RCV
frequency, FREQ set parameters, FREQ enter TX frequency,
PRGR
Delete User Channel Press PRGR , CHAN enter channel # to delete, CHAN
(Begin with Channel Display) SHIFT/FUNC , 7 , PRGR
TIMER FUNCTIONS
SGC Inc. SGC Building, 13737 S.E. 26th St. P.O.Box 3526, Bellevue, WA. 98009 USA
© 1994 SGC, Inc.
June 28, 2004; 15:46
Fax: 206-746-6384 • Tel: 206- 746-6310 • 1-800-259-7331

PowerTalk™ Manual 29
Set Time ON Press PRGR , 5 on time turn Tuning Knob counterclockwise, off time
PRGR
Set Timer On Frequency Press PRGR , 5 , FREQ receive frequency FREQ mode PRGR
Set Timer on CHAN Press PRGR , 5 , CHAN enter CHAN number PRGR
SGC Inc. SGC Building, 13737 S.E. 26th St. P.O.Box 3526, Bellevue, WA. 98009 USA
© 1994 SGC, Inc.
June 28, 2004; 15:46
Fax: 206-746-6384 • Tel: 206- 746-6310 • 1-800-259-7331

PowerTalk™ Manual 30
6.2 Sample Entries
Marine Use : Here's all you need to do to call the AT&T Marine Operator on
ITU Channel 401:
It's easy to call the POWER To turn on the radio
Marine Operator! CHAN Until 4 dashes appear.
4 0 3 Channel number desired
CHAN To execute channel change.
Ham Radio Use : Here's all you need to do to get on to 14,290.0 in the 20 Meter
Ham Band and tune down the band from this frequency:
POWER To turn on the radio
PRGR , FREQ Six dashes will appear
1 4 2 9 0 0 Frequency desired
PRGR To execute frequency change.
Then, to QSY down the band (move frequency down) simply
touch:
Move to any Frequency FREQ , turn Tuning Knob counterclockwise.
in 100 Hz steps! You can move up or down the band by turning the
Tuning Knob clockwise (to move up) or
counterclockwise (to move down). You can change the
size of the frequency step easily. See Frequency
Functions.
SGC Inc. SGC Building, 13737 S.E. 26th St. P.O.Box 3526, Bellevue, WA. 98009 USA
© 1994 SGC, Inc.
June 28, 2004; 15:46
Fax: 206-746-6384 • Tel: 206- 746-6310 • 1-800-259-7331

PowerTalk™ Manual 31
7.0 Display LCD
The front panel of the SG-2000 is dominated by a large liquid crystal display (LCD) .
The large display was selected because in many applications, the operating conditions
of the radio need to be quickly determined. The large backlit display is easily read
under all conditions. The backlight may be turned on and off or adjusted as conditions
indicate. Now, lets explore the display and what the various LCD indicators mean.
REFER TO DRAWING - Figure 1 (Left to Right - Top half of display)
PRGR Upper left corner of display. This indicates when the radio is
in the Program mode. This mode is used to make permanent
or temporary changes to the memories of the SG-2000. Think
of this button as the "Enter" key.
SCAN Upper left corner of display. This is activated when the radio
is Scanning. Note that the SG-2000 has several ways to scan:
by Channel, by Frequency, and by Band. These functions are
fully explained in the section Advanced Operations, later in
this manual.
SGC Inc. SGC Building, 13737 S.E. 26th St. P.O.Box 3526, Bellevue, WA. 98009 USA
© 1994 SGC, Inc.
June 28, 2004; 15:46
CHAN
FREQ
RCV
XMT
Upper left corner of display. These are status indicator lights
which tell you what the SG-2000 is doing at any particular
moment. Most times, you will have two of the four status
indicators on. If you are listening to KMI on Channel 403,
you would have the CHAN indicator on and the RCV
indicator on. This tells you that the number on the display,
to the right of the indicator is showing a channel number, in
this case, 403. It also says that the radio is in the receive
mode, as indicated by the RCV indicator.
Fax: 206-746-6384 • Tel: 206- 746-6310 • 1-800-259-7331

LCD Numerals Upper center of display. This shows the frequency or the
A3J A3H
A3A CW
USB LSB
VOC TLX
SPK SQL
TND ATT
NB Upper right corner of radio. These indicators show the
PowerTalk™ Manual 32
channel which is being used by the SG-2000. Just left of the
numerals is a flag which indicated "CHN" if channel
information is displayed or "FRQ" if frequency is being
displayed.
current mode of transmitting/receiving (A3J, A3H, A3A,
CW), whether upper or lower sideband is selected (USB
LSB), status of the voice/telex filter (VOC, TLX), whether
speaker and squelch are activated (SPK, SQL), whether the
antenna coupler is reporting tuned system (TND), if the 20
dB receive attenuator is active (ATT) and if the optional noise
blanker (NB) is active.
REFER TO DRAWING - figure 1 (Left to Right - Bottom Half of Display)
SGC Inc. SGC Building, 13737 S.E. 26th St. P.O.Box 3526, Bellevue, WA. 98009 USA
© 1994 SGC, Inc.
June 28, 2004; 15:46
Timer Lower left corner of display. Indicates on or off status of
radio timer.
Small Numerals Lower left corner of display. Displays either the date or the
time from the SG-2000 system clock.
FWD
S or SWR Lower left center of display. In receive, the letter S is dis-played
and the bar graph to the right of the S will indicate relative
signal strength. In transmit, either FWD or SWR will be
displayed. Forward power is transmitter power going to the
antenna. Alternatively, in transmit, SWR may be dis-played.
SWR is an abbreviation for "standing wave ratio", the ratio of
power going to the antenna compared with power coming back
from the antenna which creates standing waves on the antenna
feed line. SWR should always be as low as possible. A good
Fax: 206-746-6384 • Tel: 206- 746-6310 • 1-800-259-7331

PowerTalk™ Manual 33
automatic antenna coupler, such as the SG-230 or SG-235
Smartuner™, will virtually eliminate SWR on antenna feed
lines and increase transmitter efficiency.
INTCM Lower center of display over bar graph. It indicates if the
intercom feature to another control head is active. You can
activate this feature on an SG-2000 with no additional heads
attached, but no one will hear you!
Bar Graph Lower center of display. Small numbers show under graph
(10, 20, 50, 100). The bar graph displays relative strength of
received signals and relative strength of transmitted signals.
TEMP Lower right corner of display. This light indicates a
temperature condition which is abnormal for the transmitter
and means that transmitter power output is being reduced to
correct the condition.
HI LO
PWR Lower left corner of display. This indicates whether the
transmitter is in the high or low power mode. High power
output is 150 watts PEP on SSB and 150 watts CW while low
power is 50 watts PEP and CW output.
Red LED's There are two red lights which are located in the lower left
corner of the SG-2000 control panel just above the power
switch.
The right hand light of this pair indicates that 12 VDC power
is being applied to the radio and that the crystal oven, used
for the onboard frequency standard, is available and is being
supplied.
The left hand light above the power switch indicates that the
radio's electronics are on and ready for operation. Please
always allow for 10 minutes of warm-up for the crystal oven
to insure the frequency standard has stabilized. This is
especially important when the SG-2000 is being operated in
extremely cold environments. The radio will, of course,
work when first turned on with no warm up, but may be
SGC Inc. SGC Building, 13737 S.E. 26th St. P.O.Box 3526, Bellevue, WA. 98009 USA
© 1994 SGC, Inc.
June 28, 2004; 15:46
Fax: 206-746-6384 • Tel: 206- 746-6310 • 1-800-259-7331

PowerTalk™ Manual 34
slightly off frequency in violation of regulations which
govern operations.
8.0 Front Panel Controls
Control of the SG-2000 is accomplished through push buttons located on the front panel
of the radio. We will cover the functions of each button, then we will do some actual
"on-the-air" operations in the Operating Session section.
The primary functions of each button are imprinted on the button itself. The gray 1
button is the number 1 when you are enteri ng a frequency. When you are listening to
the radio, it will toggle between LSB and USB. SHIFT functions are printed on the front
panel above and below the button. These advanced functions are accessed by use of the
SHIFT/FUNC key.
The key pad of the SG-2000 may be operated with or without a confirming beep when
each key is pressed.
8.1 Primary Keyboard Functions
In this section, we will discuss the various primary keyboard functions. Let's
start our exploration left to right, beginning with the top row of buttons and
working left to right.
RX This function displays the frequency being received or
transmitted. If the Channel is currently displayed, pressing
the RX key will switch the display to the receive frequency of
the channel. If the frequency is being displayed, pressing
this key, then rotating the Spinner Knob clockwise or
counterclockwise will change the operating receive
frequency of the radio. When the RX button is pushed the
receive frequency is changed. The transmit is not. Thus the
radio is entering the FLIP mode (duplex) of operation.
TX This function stores the receive frequency in the transmit
frequency memory.
FLIP The FLIP function is to exchange the receive and transmit
frequencies.
SGC Inc. SGC Building, 13737 S.E. 26th St. P.O.Box 3526, Bellevue, WA. 98009 USA
© 1994 SGC, Inc.
June 28, 2004; 15:46
FREQ This function displays the frequency being received or
Fax: 206-746-6384 • Tel: 206- 746-6310 • 1-800-259-7331

PowerTalk™ Manual 35
transmitted. If the Channel is currently displayed, pressing
the Frequency key will switch the display to the receive
frequency of the channel. If the frequency is being displayed,
pressing this key, then rotating the Spinner Knob clockwise
or counterclockwise will change the operating frequency of
the radio.
CHAN If the frequency desired is currently displayed, the CHAN
button will change the display to the corresponding channel
number if the frequency has been assigned to one of the
channel memories. If the desired frequency is displayed, but
does not have a corresponding channel, the CHAN button
enables the user to input a preprogrammed channel of their
choosing .
This is slightly different from the memory architecture of
typical amateur radios which have memories numbered 1 to
99. The SG-2000 has memories numbered from 1 to 2520, 644
of which are preprogrammed and 100 of which are user
definable. Channel E0 is the international distress frequency,
2182 KHz.
SGC Inc. SGC Building, 13737 S.E. 26th St. P.O.Box 3526, Bellevue, WA. 98009 USA
© 1994 SGC, Inc.
June 28, 2004; 15:46
The SG-2000 comes preprogrammed with all standard
marine ITU and most SITOR channels (see ITU programmed
frequency chart). The SG-2000 has the capability to hold up
to 100 operator chosen channels in permanent memory.
BANDS The BANDS select one of 65 pre -defined frequencies located
in the ham bands. These frequencies correspond to channels
101 to 165.
Selecting BANDS displays the frequency 14150 Khz. The
Spinner Knob is then used to select the desired frequency
within the desired band.
END FUNC The END FUNC button is used to treminate an active key
sequence.
PRGR Pressing this key activates the programming mode which
tells the SG-2000 what to do. The best way to think of the
Program function is to remember that commands must be
"sandwiched between Program commands". For example, to
program a simplex frequency directly into use, the keyboard
sequence is PRGR, FREQ, enter the digits of the desired
Fax: 206-746-6384 • Tel: 206- 746-6310 • 1-800-259-7331

PowerTalk™ Manual 36
frequency and press PRGR to finish the programming
operation. You will note that FREQ and the actual digits of
the frequency desired were sandwiched between the PRGR
key strokes.
It is best to think of the Program button as meaning both
"Program" and "Enter".
SHIFT/ FUNC Pressing this key accesses the alternate key functions which
are screened on the front panel of the SG-2000.
MODE Display of the current mode is in the upper right corner of
the LCD display. The mode operation button allows the user
to sequence through 4 modes of operations. The modes of
operations are:
1) A3H: AM/AM compatible. On receive, this is the AM
mode and utilizes the SG-2000's true AM detector. In
transmit, the SG-2000 transmits compatible AM
(sometimes called AME, meaning AM equivalent)
which is single sideband with 50% re-inserted carrier.
2) A3J: Single Sideband. This is the most commonly
used method of voice transmission and is very
efficient because all the transmitter power is devoted
to carrying voice information. No power is wasted by
transmitting a carrier.
3) A3A: Single Sideband with pilot carrier. This mode
has a 4% pilot carrier reinsertion. This is commonly
used among public shore stations and ITU stations
where the carrier can be locked on and used by
automated services.
4) CW mode: This mode is used for key coded
transmissions. While in this mode the user can only
transmit a 1 KHz tone by either keying the
microphone or Morse code key.
These modes are sequenced counter clock-wise on the LCD
display and are stored with the current configuration when
the unit is turned off. Mode information may be stored as
desired in the channel memory which also stores transmit
and receive frequencies.
SGC Inc. SGC Building, 13737 S.E. 26th St. P.O.Box 3526, Bellevue, WA. 98009 USA
© 1994 SGC, Inc.
June 28, 2004; 15:46
Fax: 206-746-6384 • Tel: 206- 746-6310 • 1-800-259-7331

PowerTalk™ Manual 37
LSB - USB The use of this button directs the transceiver to operate
either upper sideband (USB) or lower sideband (LSB). U.S.
and International Marine and Commercial regulations
require that only upper sideband be used in marine
frequency operation. Lower sideband may be used for
Government or special applications only. In the amateur
bands, frequencies on 40 meters (the 7 MHz band) and lower
have traditionally employed lower sideband.
VOC - TLX The standard SG-2000 has two selectable audio filters which
allow the user to optimize the reception of incoming voice or
data signals. The Voice filter, (VOC) allows a wide band
width of 400 Hz to 2400 Hz. The second, the Telex (TLX)
filter, is a tight filter centered at 1700 Hz. This filte r increases
the "signal to noise ratio" of the frequencies used in SITOR,
RTTY, and FEC communications by removing unwanted
noise.
Technical note for advanced users:
SG-2000's that have been ordered for ALE (Automatic Link
Establishment), or adaptive HF controller service employing Digital
Signal Processing (DSP) systems are specially modified to use the
VOC-TLX switch to turn the automatic (receiver) gain circuits (AGC)
on and off. This configuration is selected by moving a jumper on the
exciter board of the radio. ALE and other advanced government
protocols require that automatic gain control circuits be defeated. This
modification allows the AGC speed switch to be called via the serial
port. The modification removes the TLX filter function which is not
used under wide spectrum digital protocols. The PRC -2250 MIL is
supplied standard with the ALE modification selected by the internal
jumper.
SQL The squelch is used to block non-voice reception (e.g.
atmospheric background noise) and is incorporated in most
SSB transceivers. The SG-2000 converts the signal to a digital
form. The signal is then analyzed by the micro -processor to
determine if it is a voice signal. If the signal is determined to
be voice, it is allowed to pass. If not, the radio remains
silent. This feature provides a faster response time to the
incoming signal so that no data is lost.
SGC Inc. SGC Building, 13737 S.E. 26th St. P.O.Box 3526, Bellevue, WA. 98009 USA
© 1994 SGC, Inc.
June 28, 2004; 15:46
Fax: 206-746-6384 • Tel: 206- 746-6310 • 1-800-259-7331

PowerTalk™ Manual 38
SPK This button will engage the front panel speaker on or off.
This feature is utilized when the privacy of using a telephone
style handset is desired. The SG-2000 back panel speaker
jack (J-505) is also controlled by this switch. Please note that
when the SG-2000 is first turned on, all control heads are
normalized at one half volume, regardless of the last setting
of the SPK switch.
Note: External Speaker jack J-505 is only usable when the SG-
2000 is used in the control head attached to the radio
configuration.
20 DB ATTN This control inserts or removes a special -20 dB receiver gain
reduction pad in the front end receiver of the SG-2000. When
this pad is in the ON position, the SG-2000 reduces it's
sensitivity to overcome unwanted RF noise, interference
signals and helps to prevent signal overload when
communicating with nearby stations. Signal overload occurs
only when your location is extremely close to another
transmitting station or the amount of signal arriving at your
location is extremely high due to high power transmitters
and high gain directional antennas being used.
If your SG-2000 is operated in the area of high power
broadcast stations, you may wish to order the optional
Broadcast Band filter. This filter will virtually eliminate all
AM broadcast signals allowing the SG-2000 to operate in the
same room with very high power AM broadcast transmitters.
PWR HI / LO Power to the transmitter is controlled by this button. When
power is reduced, or on LO, the maximum output power is
approximately 35% of the full power available. This feature
can be used when your normal power output is overloading
(saturating) the receiver of the station with whom you are
communicating. In the LO power mode, the SG-2000
consumes less DC current and will therefore reduce power
consumption from the supply battery. This feature is
recommended to save the life of the battery and is useful
when using the SG-2000 under sail or when solar and other
power sources are low.
SGC Inc. SGC Building, 13737 S.E. 26th St. P.O.Box 3526, Bellevue, WA. 98009 USA
© 1994 SGC, Inc.
June 28, 2004; 15:46
Fax: 206-746-6384 • Tel: 206- 746-6310 • 1-800-259-7331

PowerTalk™ Manual 39
INTCM / XCV The SG-2000's intercom system is unique, allowing
communication between the user and any or all of up to
eight separate control heads. By engaging this button and
"0", the user may communicate with all control heads by
using the microphone. Engaging this button then pressing
the number of another control head (1 - 8) enables the user to
privately communicate with a specific control head. The
control head ID numbers are programmed at the factory and
the control head number, which is permanently etched into
the memory of the control head MicroProcessor can be
displayed by pressing the "SHIFT /FUNC" and then the
number 0 on the keypad. The LCD will display the head
number in the frequency window.
CLOCK / DATE The lower left hand corner of the display shows the current
time or date. Either option may be selected by engaging this
button. The default setting preferred by most users is the
clock function. Time is displayed in military (24 hour) format.
If you are making position sightings, you may wish to check
the clock periodically against the U.S. Bureau of Standards
time stations, WWV and WWVH. These may be found 24
hours a day on 2.5, 5, 10, 15, and 20 MHz providing time of
day, storm warnings and navigation aid updates including
the status of GPS satellites.
SGC Inc. SGC Building, 13737 S.E. 26th St. P.O.Box 3526, Bellevue, WA. 98009 USA
© 1994 SGC, Inc.
June 28, 2004; 15:46
TIMER This button engages/disables the alarm time programmed
into the unit. (See Function Operation Instructions). When
engaged, the unit will automatically shut down at midnight
if there is no previous pre-programmed time. The SG-2000
may be programmed to turn on, tune to a pre-assigned
frequency and mode of operation to receive daily broadcasts.
At the end of these broadcasts, the radio can then be
programmed to turn itself off.
This feature is used to schedule receiving weather faxes in
unattended operation. It may also turn on the radio for a
regularly scheduled net or if you want to use the SG-2000 as
a sophisticated clock radio.
STEP The Step function is used in conjunction with the frequency
function to allow the operator to select the size of frequency
step. The steps are in preprogrammed increments of .1 (100
Fax: 206-746-6384 • Tel: 206- 746-6310 • 1-800-259-7331

PowerTalk™ Manual 40
Hz), 1, 3 and 5 KHz. If you are operating in ham bands (and
especially when using CW), the 100 Hz (.1 KHz) mode is
best. On the short wave broadcast bands, scanning at 5 KHz
is great!
SCAN The Scan button engages the automatic scanning functions of
the SG-2000. The scanning function operates in three
different modes; scanning by frequency, scanning by channel,
and scanning by scan bank. Scanning may also be controlled
by an external device such as a computer or ALE controller.
When operated by an ALE controller the SG-2000 will scan at
speeds in excess of 5 channels per second. Manual operation
is variable from 5 seconds per channel to approximately 5
channels per second.
In the frequency mode, the SG-2000 will scan up or down in
discrete steps defined by the Step Function. By rotating the
Spinner Knob clockwise or counterclockwise, the direction of
the scan can be changed to direct the scan to the desired
frequency range. If the squelch is activated in scan, the unit
will continue scanning until activity breaks the squelch. The
unit will then pause for 5 seconds and if there are no more
breaks in the squelch, the unit will continue in the original
direction.
SGC Inc. SGC Building, 13737 S.E. 26th St. P.O.Box 3526, Bellevue, WA. 98009 USA
© 1994 SGC, Inc.
June 28, 2004; 15:46
The scan channel mode is similar to the frequency mode in
that when activated, the unit will begin to scan factory
programmed ITU-VOICE and ITU-SITOR channels. The
direction of the scan can be changed rotating the Spinner
Knob clockwise or counterclockwise. When rotating the
Spinner Knob in scan, the unit will step once in that direction
and then pause for approximately 2 seconds. This will allow
the manual stepping through of the scan routine to find
activity. The ITU or SITOR channels can be selected by first
setting the radio in VOC or TELEX modes respectively.
The programmed scan mode allows you to program
channels into one of six banks or files for scanning. There are
six banks with up to 10 files in each, allowing up to 60
channels to be programmed. When scanning, the unit will
search through the selected banks at a pre-determined rate.
This scan rate may be changed at any time using the RATE.
Fax: 206-746-6384 • Tel: 206- 746-6310 • 1-800-259-7331

PowerTalk™ Manual 41
key. If the squelch is on during the scan routing, scanning
will pause on a squelch break. If there is no further activity
on that channel, scanning will resume after 5 seconds. The
Tuning Knob can be used to change the direction of the scan
and to step through the scan banks manually.
RATE The Rate function allows you to select pre-programmed
scanning speeds of both frequencies and channels which
range from .2 seconds to 40 seconds. See Section 13.11,
Changing Frequency or Channel Scan Rates, for specific rates.
8.2 SHIFT Functions
To access the secondary function keys on the upper half on
the front panel, the operator will depress the SHIFT/FUNC
key prior to pressing the desired key. Secondary functions of
keys (The functions printed above the buttons on the panel)
are described as follows:
Control Head # This key is used to view the Control Head number pre-
programmed by the manufacturer (see INTCM-XCV key in
preceding section).
View Timer These two keys are used to preview the pre-programmed
alarm times and their corresponding channel or frequency.
SQL Level This function allows you to set a squelch level by rotating the
Spinner Knob clockwise or counterclockwise. To optimize
the squelch level, depress the Up and Down buttons
respectively and increase the SQL-Level once or twice. This
function allows for optimum detection and minimum
background noise. For viewing purposes, the adjustment
levels are displayed on the bar coded meter.
RF Noise Blanker This optional feature allows the radio to recover information
that would otherwise be drowned out by high powered
impulse type noise. In noisy environments, engine spark
noise, lightning, radar pulses or other EMI sources can cause
the radio's built-in automatic gain control to reduce the
sensitivity to the input signal. With the noise blanker,
incoming noise is detected and turns off the receiver for the
length of the noise pulse, thus preventing the automatic gain
SGC Inc. SGC Building, 13737 S.E. 26th St. P.O.Box 3526, Bellevue, WA. 98009 USA
© 1994 SGC, Inc.
June 28, 2004; 15:46
Fax: 206-746-6384 • Tel: 206- 746-6310 • 1-800-259-7331

PowerTalk™ Manual 42
control from causing desensing.
FWD - SWR This function is used to display the output power and
returned (lost) power when transmitting via the bar graph
portion of the display. Widely fluctuating readings of either
the FWD or SWR when in the CW transmit mode usually
indicate problems such as an improperly tuned antenna or a
faulty connection between the radio and antenna. Situations
such as these can harm the radio and should be resolved
immediately.
Lockout Function not available in this version of SG-2000. (Not to be
confused with scanning lockout).
Delete The SHIFT/FUNC plus DELETE sequence is used to delete
obsolete or incorrect information when in the PRGR mode.
Display Engaging this key directs the date and time to flash
intermittently on the display in 2 second intervals, thus
allowing the operator hands-free access for viewing time and
date.
Beep This key is used to engage audible sound (a beep) when any
key is depressed. To turn off the beeping sound, press the
SHIFT/FUNC plus BEEP keys again.
Back Light This function engages the back lighting of the front panel. To
change the back lighting, press "SHIFT/FUNC", "RATE", then
rotate the Spinner Knob clockwise or counterclockwise to
adjust the back lighting to a comfortable level.
8.3 Program Functions
As was mentioned earlier, remember that the PRGR key means two things: At
the beginning of a key sequence it means "OK, do the following". At the end of a
key sequence, it means "OK, enter the preceding and execute the command".
The Program Functions allow the operator to program the following:
Channel Up to 100 channels can be entered by the operator. These
channels will remain a part of the pre-programming of the
SGC Inc. SGC Building, 13737 S.E. 26th St. P.O.Box 3526, Bellevue, WA. 98009 USA
© 1994 SGC, Inc.
June 28, 2004; 15:46
Fax: 206-746-6384 • Tel: 206- 746-6310 • 1-800-259-7331

PowerTalk™ Manual 43
unit until deleted by the operator. All pertinent information
such as USB/LSB mode, VOC/TLX, and Attenuator can be
programmed via this function and mode.
Clock / Date The current time or date can be entered via this function.
Timer The Timer function allows the unit to power itself on or off
at any time to a specific preprogrammed frequency or
channel of your choice .
Frequency This function is used to select any frequency between 1.6
MHz and 30 MHz. For transmission purposes, care should
be taken not to transmit on restricted frequencies.
Scan This function is used to program the different banks used by
the scanning function. The bank number is programmed
first, then the desired channels to be contained in that bank.
The Spinner Knob is used to step through each bank.
Lock Feature The SG-2000 can be limited to channelized operation. This
function is used to prevent transmission on any frequency
other than the legal ITU channels. This is useful in areas
where there are restricted frequencies in which to operate.
See Transmit Channel Locking of this manual for the sequence
to turn the feature on and off.
SGC Inc. SGC Building, 13737 S.E. 26th St. P.O.Box 3526, Bellevue, WA. 98009 USA
© 1994 SGC, Inc.
June 28, 2004; 15:46
8.4 Operating Session
This section will give you practical key entry sequences which will make
operating the SG-2000 very efficient.
Power Before turning on the powe r to the SG-2000, you may notice
a red stand-by light glowing on the lower left portion of the
control head. This indicates the 12 VDC power is available
for the radio. If you do not see the red stand-by light on,
please check your 12 VDC power wiring to determine why
power is not being supplied to the radio. The Oven LED is
only active when rear panel oven switch is on.
The Stand-by light also serves to indicate whether 12 VDC
power is being supplied to the onboard crystal oven. As
Fax: 206-746-6384 • Tel: 206- 746-6310 • 1-800-259-7331

PowerTalk™ Manual 44
you'll recall from the introduction to the radio, the onboard
frequency standard uses a highly stable crystal oscillator.
Allow 12 VDC power to be applied for 10 minutes or longer.
If you do not do this, the frequency standard will not be
standard and off frequency operation may be noticed.
Failure to allow the oven to come up to temperature may
result in operation on an improper frequency.
Once the availability of power has been confirmed, turn
power to the on position.
The control head should begin to display radio status
information.
The first frequency displayed will be the last frequency used
prior to the radio being turned off.
You may also notice when power is turned on that the radio
comes up at partial volume. The SG-2000 always comes on
at its last volume setting before it was last turned off.
Now, notice the frequency/channel portion of the display.
The indicator to the left of the numbers will inform you
whether CHN (channel number) or FRQ (frequency) is being
displayed. If Channel is displayed, go to the CHANNEL
section to continue operating in the channel mode. If you
wish to operate in the frequency mode, go to FREQUENCY
section.
If you are in CHN and wish to see FRQ, press the FREQ key.
If you are in the FRQ mode and wish the display to show
channel information, simply press CHAN. If the frequency
displayed does not have an assigned channel number, four
dashes will appear on the display. This indicates that the
radio is not operating on a channel (and mode) which is in
memory.
Change Channel - Voice Mode
In order to change the operating channel, press the CHAN
key until four dashes appear. You will need to press it 1 or 2
times before the dashes appear.
SGC Inc. SGC Building, 13737 S.E. 26th St. P.O.Box 3526, Bellevue, WA. 98009 USA
© 1994 SGC, Inc.
June 28, 2004; 15:46
With the dashes displayed, type in the desired channel
Fax: 206-746-6384 • Tel: 206- 746-6310 • 1-800-259-7331

PowerTalk™ Manual 45
number with the key pad. Then press the CHAN key a
second time to enter the command.
(Refer to the Quick Reference Card)
If the channel desired is a four digit channel number, the
function will be entered automatically following input of the
fourth digit.
Change Channel - Telex ModeIf the new operating channel desired involves the
use of the Telex mode, you must change the mode to Telex
before attempting to change to a SITOR channel.
This is incorporated into the SG-2000's software
programming to prevent accidental entry and accidental
voice use of SITOR channels. Voice on these channels could
interfere with data reception.
As you can imagine, if this feature was not incorporated, it
would be possible to enter channel 812, a SITOR channel,
accidentally when you meant to enter channel 812, a semiduplex ITU voice channel.
Use the following sequence to change to a Telex SITOR
channel:
1) Set mode to TLX by pressing the VOC/TLX key. TLX
will be displayed on the right hand side of the LCD
display.
2) Depress "CHAN" key until dashes appear. Press
CHAN once if CHN flag is on left of numbers, or twice
if FRQ flag is on).
3) Enter the desired SITOR channel number.
4) Depress "CHAN" key to enter the channel and make it
current.
Frequency Change - General
There are two ways to change the operating frequency of an
SG-2000. For large frequency changes, you may use the
direct entry method. For small changes of frequency you
may use the Tuning Knob. When the knob is used, the
frequency will increment or decrement in steps of .1 (100
SGC Inc. SGC Building, 13737 S.E. 26th St. P.O.Box 3526, Bellevue, WA. 98009 USA
© 1994 SGC, Inc.
June 28, 2004; 15:46
Fax: 206-746-6384 • Tel: 206- 746-6310 • 1-800-259-7331

PowerTalk™ Manual 46
Hz), .5, 1, 3, and 5 KHz. The size of the step is set by the
Change Frequency Scan Step procedure.
Frequency Change - Direct Entry
To change to a new operating frequency via the direct entry
method, the following steps are used:
1) Press "PRGR" to alert the memory that new
information is coming.
2) Press "FREQ" to specify that frequency numbers will
follow.
3) Enter the frequency digits including the first number
to the right of the decimal point. If you are satisfied
with the mode and are not working duplex (e.g. a
different receive and transmit frequency), go to Step 4.
Otherwise, keep reading.
Optional: After you have keyed in the digits for the direct entry
frequency you may change two other variables. You
can specify mode and specify a transmit frequency if
you wish it to be different from the receive frequency.
SGC Inc. SGC Building, 13737 S.E. 26th St. P.O.Box 3526, Bellevue, WA. 98009 USA
© 1994 SGC, Inc.
June 28, 2004; 15:46
3-A) You may press the "FREQ" button again at this time
to enter MODE information and select the desired
sideband (USB or LSB).
3-B) You may press the "FREQ" button once more to bring
up 6 dashes which are displayed as [ - - - - - - ]. This is
where you enter your desired transmitter frequency.
Note: While most of the ITU High Seas voice channels use
relatively small frequency differences of under 1 MHz,
the SG-2000 may be operated with any difference
desired. For example, if you wanted to transmit on 2
MHz and listen on 26 MHz, this is easily within the
capability of the SG-2000.
4) Press "PRGR" to enter the information into memory
and execute the function.
Fax: 206-746-6384 • Tel: 206- 746-6310 • 1-800-259-7331

PowerTalk™ Manual 47
Frequency Change - Incremental
To change frequency a relatively small distance, you may
use the following sequence.
1) Press "FREQ" once if FRQ flag is on, twice if CHN
flag is on.
2) Rotate the Tuning knob.
You will notice that the frequency displayed is changing by
the increment specified by the Change Frequency Scan Step
function.
Fine Tuning - CW Operation
If you are using the SG-2000 in the CW mode, you should
tune in the desired station by pressing the Frequency button
and then using the Tuning Knob until the received station is
heard at the same pitch as the CW sidetone emitted from the
control head speaker.
When this is done, you will be operating on the same
frequency as the station you wish to work.
If you then wish to adjust the note or tone of the CW station,
this may be done with the clarifier. You will be able to
adjust the note between 400 and 1600 Hz.
SPECIAL NOTE: Do NOT use the SG-2000 on CW in the LO PWR
mode. If you desire to operate CW and LO PWR,
use an external tone source and connect it to the
external audio I/O port J-301 located on the rear panel
of the SG-2000. Vary the amplitude of the external
tone source to control output power of the SG-2000.
Program User Channel into Memory
User defined channels are assigned channel numbers 1-99.
You may designate any frequency to be a channel from 1-99.
Channel 0 is displayed as E0 - the international distress
frequency - and may not be reassigned.
SGC Inc. SGC Building, 13737 S.E. 26th St. P.O.Box 3526, Bellevue, WA. 98009 USA
© 1994 SGC, Inc.
June 28, 2004; 15:46
Enter a Simplex Channel into Memory
Fax: 206-746-6384 • Tel: 206- 746-6310 • 1-800-259-7331

PowerTalk™ Manual 48
The following steps are required to assign the simplex
frequency 14,735.1 KHz to user channel 09:
1) Press the "PRGR" key
2) Press the "CHAN "key
3) Enter the desired channel number (09)
4) Press the "FREQ" key
5) Enter the desired frequency including one digit right
of the decimal point. (147351)
6) Press the "FREQ" key to select mode of operation
7) Press the "PRGR" key for simplex operation and to
end the programming sequence.
Enter a Duplex Channel into Memory
If the desired channel is a duplex channel (e.g. different
receive and transmit frequencies), these additional steps are
required:
SGC Inc. SGC Building, 13737 S.E. 26th St. P.O.Box 3526, Bellevue, WA. 98009 USA
© 1994 SGC, Inc.
June 28, 2004; 15:46
1) Follow steps 1 through 6 as shown above under
Entering Simplex Frequency into Memory.
2) After step #6, press the "FREQ" key once more. Six
dashes will be displayed on the LCD [ - - - - - - ].
3) Enter the transmit frequency
4) Press the "PRGR" key to enter the information into
memory.
Deleting Errors in Entry
In the event an error is made entering information, press the
"SHIFT/FUNC" key and the "7" key to delete any errors.
Repeat this sequence as necessary.
Delete a Channel from Memory
Fax: 206-746-6384 • Tel: 206- 746-6310 • 1-800-259-7331

PowerTalk™ Manual 49
You may not delete a frequency from an SG-2000. You may
only delete user definable channels. You may or may not be
on the channel you wish to delete. To delete a channel, use the
following key sequence: "PRGR", "CHAN", "the channel
number you wish to delete, if channel 1-9, you must add a
preceding 0", "CHAN", "SHIFT", "7" and "PRGR".
8.6 Scanning Functions
The SG-2000 will scan both frequencies and channels. You can scan from 2 to 30
MHz continuously in 100 Hz steps. Or, you may scan just a few of the hundreds
of channels.
Program a Channel Bank
The SG-2000 has 6 channel banks number 00 to 05. Each of
these banks will hold up to 10 channels, complete with mode
and offset (if duplex). The entry sequence is:
1) Press the "PRGR" key.
2) Press the "Scan" key.
Note: The display will show the "PRGR" indicator active with the large
digit display showing a "-0" on the far left.
3) Enter the desired bank number to be programmed (0-
5). The display will show the bank number on the far
left of the display and the previous channel
programmed in the first file of that bank. If the file
has not been previously programmed, the display
will show 4 dashes to indicate it is empty.
4) If the file is empty, as indicated by 4 dashes, enter the
desired channel number.
5) Rotate the Tuning Knob clockwise to proceed to next
file in that bank and repeat step 4, or press the "PRGR"
key to end the function.
SGC Inc. SGC Building, 13737 S.E. 26th St. P.O.Box 3526, Bellevue, WA. 98009 USA
© 1994 SGC, Inc.
June 28, 2004; 15:46
6) If a file is not empty, the file can be deleted by first
engaging "SHIFT/FUNC" and then "7" or
Fax: 206-746-6384 • Tel: 206- 746-6310 • 1-800-259-7331

PowerTalk™ Manual 50
"INTCM/XCV".
7) Press the "PRGR" key to end the function.
SGC Inc. SGC Building, 13737 S.E. 26th St. P.O.Box 3526, Bellevue, WA. 98009 USA
© 1994 SGC, Inc.
June 28, 2004; 15:46
Fax: 206-746-6384 • Tel: 206- 746-6310 • 1-800-259-7331

PowerTalk™ Manual 51
Scan by Frequency - General
1) Press the "Scan" key.
2) Press the "FREQ" key.
Note: If there are no keys pressed within 4 seconds, the unit
will start scanning automatically from the original
channel on display at the start of the function.
3) To change the direction of the scan or to step through
the frequencies, rotate the Tuning Knob
4) To allow the pause on detection, press the squelch by
pressing "3" or "SQL".
5) To stop the scan, simply press the "Scan" key.
Scan by Frequency - Specific Range
This is an advanced function and should be studied closely.
Also called Program or Band scanning, this capability allows
the SG-2000 to scan in a particular mode between two
frequencies. There are two steps to using band scanning
with the SG-2000. First, you will need to load channels into
the scan brackets. This tells the radio the range within which
to scan. When you are done using the band scanning, you
will need to unload the scan brackets to allow the radio to
resume normal scanning operation.
Load Frequency Limits
Before following this sequence you will need to have the
upper and lower frequencies assigned to memories. This is
explained in an earlier section. For the purpose of this
discussion, let's suppose that you have put 3900 KHz LSB
into Channel 22 and 4000 KHz into Channel 23.
1) Press "PRGR".
SGC Inc. SGC Building, 13737 S.E. 26th St. P.O.Box 3526, Bellevue, WA. 98009 USA
© 1994 SGC, Inc.
June 28, 2004; 15:46
2) Press "SCAN".
Fax: 206-746-6384 • Tel: 206- 746-6310 • 1-800-259-7331

Begin Scanning
PowerTalk™ Manual 52
3) Press "CHAN" Display will flash [ LC: - - - - ] (lower
channel).
4) Enter the channel number of the lower frequency. In
this example, 22.
5) Press "CHAN" Display will flash [ UC : - - - - ] (upper
channel).
6) Enter the channel number of the upper frequency. In
this example, 23.
7) Press "PRGR" to exit programming and execute
commands.
This is done by simply displaying frequency and scanning.
If you start within the frequency range bracketed, the radio
will simply go low to high or high to low, depending on
whether you have rotated the Spinner Knob clockwise or
counterclockwise.
If you begin scanning frequencies which are outside of the
range, the radio will only scan to the range. E.G. If you start
scanning down from 28.400 MHz the radio would scan down
until it got to 3.9 MHz and would then scan only from 4.00
MHz to 3.900 MHz after it reached that range.
Unload Frequency Limits
In order for the SG-2000 to resume normal frequency
scanning (scanning up or down anywhere in its range), it is
necessary to unload the scan brackets. To do this, the
following sequence is used.
1) Press "PRGR"
2) Press "SCAN"
3) Press "CHAN"
SGC Inc. SGC Building, 13737 S.E. 26th St. P.O.Box 3526, Bellevue, WA. 98009 USA
© 1994 SGC, Inc.
June 28, 2004; 15:46
4) Display will show [ LC : - - 2 2 ] (If Channel 22 is
lower limit)
Fax: 206-746-6384 • Tel: 206- 746-6310 • 1-800-259-7331

Scan by Channels
PowerTalk™ Manual 53
5) Press "SHIFT/FUNC"
6) Press "7" (the delete key in the SHIFT/FUNC mode)
7) Press "CHAN"
8) Display will show [ L C : - - 2 3 ] (If Channel 23 is
upper limit)
9) Press "SHIFT/FUNC"
10) Press "7" (the delete key in the SHIFT/FUNC mode)
11) Press "PRGR" to execute the function and exit the
programming mode.
1) Press "SCAN" .
2) Press "CHAN". (If dashes appear, press CHAN
again).
Note: If there are no keys pressed within 4 seconds, the unit
3) To change the direction of the scan or to step through
4) To allow the pause on detection, press the squelch by
5) To change from scanning the ITU channels to the
6) To stop the scan, simply press the "SCAN" key.
Scan by Channel Banks
1) Press the "SCAN" key.
will start scanning automatically from the original
channel on display at the start of the function.
the channels, rotate the Tuning Knob clockwise or
counterclockwise.
pressing "3" or "SQL".
SITOR channels or visa versa, set the unit in VOC or
TLX mode respectively by engaging the "2" or
"VOC/TLX" key.
SGC Inc. SGC Building, 13737 S.E. 26th St. P.O.Box 3526, Bellevue, WA. 98009 USA
© 1994 SGC, Inc.
June 28, 2004; 15:46
2) If the frequency is displayed, press the "CHAN" key to
Fax: 206-746-6384 • Tel: 206- 746-6310 • 1-800-259-7331

PowerTalk™ Manual 54
display 6 dashes.
3) If 6 dashes are already displayed, type in the desired
banks to scan. Example: By entering "0134", the radio
will scan through banks 0, 1, 3 and 4. If an empty bank
is selected, the unit will first try to scan through that
bank, however the bank will be eliminated once it is
determined the bank is vacant.
Note: If the re are no keys pressed within 4 seconds, the unit will begin
scanning automatically from the original channel on
display at the start of the function.'
4) Press the "SCAN" key again to begin scanning.
5) To change the direction of the scan , or to step through
the scan banks, rotate the Tuning Knob clockwise or
counterclockwise.
6) To allow the pause on detection, press the squelch by
pressing "3" or "SQL".
7) To stop the scan, simply press the "SCAN" key.
8.7 Changing Frequency or Channel Scan Rates
Separate scan rates are available for frequency or channel scanning. You must be
in the frequency scan mode to set frequency scan rate and in channel scan to set
channel scan rate. If the unit is not scanning, the function will change the rate of
the last scan mode performed.
Change Frequency Scan Rate (In Frequency Scan Mode)
1) Press the "SHIFT/FUNC" key.
2) Press the "Scan" key.
3) Rotate the Tuning Knob clockwise or counterclockwise to change the rate to the following:
SGC Inc. SGC Building, 13737 S.E. 26th St. P.O.Box 3526, Bellevue, WA. 98009 USA
© 1994 SGC, Inc.
June 28, 2004; 15:46
a) 1 step per second |
Fax: 206-746-6384 • Tel: 206- 746-6310 • 1-800-259-7331

PowerTalk™ Manual 55
b) 2 steps per second ||
c) 5 steps per second |||
SGC Inc. SGC Building, 13737 S.E. 26th St. P.O.Box 3526, Bellevue, WA. 98009 USA
© 1994 SGC, Inc.
June 28, 2004; 15:46
Fax: 206-746-6384 • Tel: 206- 746-6310 • 1-800-259-7331

PowerTalk™ Manual 56
4) This function will automatically time out after 4
seconds.
Change Channel Scan Rate (In Channel Scan Mode)
1) Press the "SHIFT/FUNC" key.
2) Press the "SCAN" key.
3) Rotate the Tuning Knob clockwise or counterclockwise to change the rate to the following:
a) 1 channel per 40 seconds |
b) 1 channel per 20 seconds ||
c) 1 channel per 10 seconds |||
d) 1 channel per 5 seconds ||||
e) 1 channel per 2 seconds |||||
f) 1 channel per second ||||||
g) 2 channels per second |||||||
h) 5 channels per second ||||||||
4) This function will automatically time out after 4
seconds.
Change Frequency Scan Step
1) Press the "SHIFT/" key
2) Press the "FREQ" key
3) Rotate the Tuning Knob clockwise or counterclockwise to change the rate to the following:
a) 100 Hz per step
b) 500 Hz per step
b) 1000 Hz per step
SGC Inc. SGC Building, 13737 S.E. 26th St. P.O.Box 3526, Bellevue, WA. 98009 USA
© 1994 SGC, Inc.
June 28, 2004; 15:46
c) 3000 Hz per step
Fax: 206-746-6384 • Tel: 206- 746-6310 • 1-800-259-7331

PowerTalk™ Manual 57
d) 5000 Hz per step
SGC Inc. SGC Building, 13737 S.E. 26th St. P.O.Box 3526, Bellevue, WA. 98009 USA
© 1994 SGC, Inc.
June 28, 2004; 15:46
Fax: 206-746-6384 • Tel: 206- 746-6310 • 1-800-259-7331

PowerTalk™ Manual 58
4) The function will automatically time out after 4
seconds.
8.8 Additional Functions
Timer
To turn timer on and off:
Press "5" or "TIMER"
Display Alarm Time ON and Frequency
1) Press the "SHIFT/FUNC" key
2) Press "1" or "LSB/USB" keys
Display Alarm Time OFF
1) Press the "SHIFT/FUNC" keys
2) Press "2" or "VOC/TLX"
Program Time ON-OFF
1) Press the "PRGR" key
2) Press "5" or "TIMER"
3) Type in 1-4 digits for time on in 24 hour format
4) Rotated the Tuning Knob counterclockwise to
program off time or "PRGR" to end
Program Time ON Frequency
1) Press the "PRGR" key
2) Press the "5" or "TIMER" key
3) Press the "FREQ" key
SGC Inc. SGC Building, 13737 S.E. 26th St. P.O.Box 3526, Bellevue, WA. 98009 USA
© 1994 SGC, Inc.
June 28, 2004; 15:46
4) Type in frequency desired
5) Press the "FREQ" key for more parameters or "PRGR"
Fax: 206-746-6384 • Tel: 206- 746-6310 • 1-800-259-7331

PowerTalk™ Manual 59
to end
6) Press desired parameters (LSB, ATTN, VOC,...ETC.)
7) Press the "FREQ" key for transmit frequency or
"PRGR" to end
8) Type in transmit frequency desired
9) Press the "PRGR" key to end or the "FREQ" key to
repeat settings
Program Timer on Channel
1) Press "PRGR"
2) Press "5" or "TIMER"
3) Press "CHAN"
4) Type in desired channel number
Clock / Date
Set Clock
Set Date
5) Press "PRGR"
To toggle between time of day (24 hour format), and date:
Press "Clock/Date".
1) While clock is displayed, press the "PRGR" key
2) Press "6" or "Clock/Date"
3) Type 6 digits for time desired (ie..131500 FOR 1:15
PM)
4) Press the "PRGR" key to end
To program in the date:
SGC Inc. SGC Building, 13737 S.E. 26th St. P.O.Box 3526, Bellevue, WA. 98009 USA
© 1994 SGC, Inc.
June 28, 2004; 15:46
1) While date is displayed, press the "PRGR" key
Fax: 206-746-6384 • Tel: 206- 746-6310 • 1-800-259-7331

Attenuator
Power HI-LO
PowerTalk™ Manual 60
2) Press "6" or "Clock/Date"
3) Type 6 digits for date desired in the format MM DD YY
4) Press the "PRGR" key
To turn 20 dB Attenuator on or off:
Press the "20 dB / ATTN" key.
To change output power level:
Press the "PWR/Hi LO" key.
Volume
To change the volume level adjust the Volume knob.
Intercom
To activate the intercom:
1) Press the "7" or "INTCM/XCV" keys
2) Depress a number key 1-8 for any specific control
head or 0 for all control heads.
3) Depress the "7" key to disperse.
Control Head Number Display
To display control head nu mber for 2 seconds (will be timed
out after 4 seconds):
1) Press the "SHIFT/FUNC" key
SGC Inc. SGC Building, 13737 S.E. 26th St. P.O.Box 3526, Bellevue, WA. 98009 USA
© 1994 SGC, Inc.
June 28, 2004; 15:46
2) Press the "0" or "Mode" key
Fax: 206-746-6384 • Tel: 206- 746-6310 • 1-800-259-7331

PowerTalk™ Manual 61
SGC Inc. SGC Building, 13737 S.E. 26th St. P.O.Box 3526, Bellevue, WA. 98009 USA
© 1994 SGC, Inc.
June 28, 2004; 15:46
Fax: 206-746-6384 • Tel: 206- 746-6310 • 1-800-259-7331

Back Light
Noise Blanker
Beep
PowerTalk™ Manual 62
To turn back light on or off or adjust brightness level:
1) Press the "SHIFT/FUNC" key
2) Press the "RATE" key
3) Rotate the Tuning Knob clockwise or counterclockwise to step through available levels
To turn RF Noise Blanker on or off (optional):
1) Press the "SHIFT/FUNC" key
2) Press the "4" or "SPK" key
To enable a beep for every key stroke:
1) Press the "SHIFT/FUNC" key
2) Press the "5" or "TIMER" key
Display (Date / Time)
To toggle between constant date/time display or to alternate
date/time display:
1) Press the "SHIFT/FUNC" key
2) Press the "6" or "Clock/Date" key
Delete
To delete last entry made:
While in programming mode, press the "SHIFT/FUNC" key
1) Press the "7" or "INTCM/XCV" key
SGC Inc. SGC Building, 13737 S.E. 26th St. P.O.Box 3526, Bellevue, WA. 98009 USA
© 1994 SGC, Inc.
June 28, 2004; 15:46
Fax: 206-746-6384 • Tel: 206- 746-6310 • 1-800-259-7331

PowerTalk™ Manual 63
Lockout
To lock out a channel in scan mode:
1) While scanning, wait for a channel to appear and press
2) Press the "8" or "20 dB/ATTN" key
FWD / SWR
To toggle forward power and SWR display in transmit:
1) Press the "SHIFT/FUNC" key
2) Press the "9" or "PWR/Hi LO" key
Transmit Channel Locking
The SG-2000 includes a provision in software for locking the
the "SHIFT/FUNC" key
radio into channelized operation only. We recommend that
this function be invoked whenever you are using an SG-2000
in a maritime mobile situation where only one operator who
is knowledgeable about direct entry of frequencies is aboard.
In this way, the persons aboard the vessel, who might need
to operate the SG-2000 in an emergency, need only be taught
how to call for help on the desired emergency channels.
Please note that the channels include major ham frequencies
on the 75, 40 and 20 meter bands where distress assistance
may be available. When the lock is invoked, reception on all
frequencies is possible, but transmitting will only occur on
programmed channels (including those which are user
defined).
Lock for Channelized Operation Only
Use the following key sequence to lock out direct entry of
SGC Inc. SGC Building, 13737 S.E. 26th St. P.O.Box 3526, Bellevue, WA. 98009 USA
© 1994 SGC, Inc.
June 28, 2004; 15:46
transmit frequencies:
Fax: 206-746-6384 • Tel: 206- 746-6310 • 1-800-259-7331

PowerTalk™ Manual 64
SHIFT/FUNC, 8, 8, CHAN
Unlock Channelized Only Operation
Use the following sequence to enable transmit capability on
all direct entry frequencies plus frequencies which are
contained in channel memories:
SHIFT/FUNC, 8, 7, CHAN
NOTE: If you are operating the SG-2000 aboard a vessel or in
a mobile installation where channelized operation only is
allowed, you may disable the all frequency transmit
capability of the SG-2000 . You may not wish to
disclose the unlocking sequence to some operators.
Simply say that the radio is type approved for ITU
channels and it includes reception capabilities for all
frequencies. You will be able to demonstrate that it will
not transmit on unauthorized frequencies.
Temporary Settings:
The SG-2000 will store current settings on a temporary basis
so they may be easily recovered after changing radio
parameters. To temporarily store settings, press the "PRGR"
then "SHIFT/FUNC" keys. To recover these temporary
settings, press "SHIFT/FUNC" then "PRGR".
SGC Inc. SGC Building, 13737 S.E. 26th St. P.O.Box 3526, Bellevue, WA. 98009 USA
© 1994 SGC, Inc.
June 28, 2004; 15:46
Fax: 206-746-6384 • Tel: 206- 746-6310 • 1-800-259-7331

9.0 Schematics
PowerTalk™, Audio Circuits J50100911, Sh 1 of 5
PowerTalk™, Power and Mic Circuits J50100911, Sh 2 of 5
PowerTalk™, ADSP™ Control Circuits J50100911, Sh 3 of 5
PowerTalk™, MicroProcessor Interface J50100911, Sh 4 of 5
PowerTalk™, LCD Display Circuits J50100911, Sh 5 of 5
PowerTalk™ Manual
SGC Inc. SGC Building, 13737 S.E. 26th St. P.O.Box 3526, Bellevue, WA. 98009 USA
© 1994 SGC, Inc.
June 28, 2004; 15:46
Fax: 206-746-6384 • Tel: 206- 746-6310 • 1-800-259-7331


10.0 INDEX
20 dB Attn 37
ADJ 15, 16
ADSP™ 2, 3, 6
ALE 12
AMTOR 12
Attenuator 56
Back Light 23, 41, 57
Bandpass Filter 7
Bar Graph 32
BASIC FUNCTIONS 24
Beep 41, 57
Begin Scanning 50
BYPASS 14
Center Frequency 9
CHAN 30
Change Channel - Telex Mode 44
Change Channel - Voice Mode 43
Change Channel Scan Rate (In Channel
Scan Mode) 53
Change Frequency Scan Rate (In
Frequency Scan Mode) 52
Change Frequency Scan Step 53
Changing Frequency 52
Channel 41
CHANNEL FUNCTIONS 26
CHANNEL SCAN 27
Channel Scan Rates 52
Clock/Date 38, 41, 55
Control Head Number Display 56
CW 12
DEFINE MEMORY 28
Delete 41, 57
Delete a Channel from Memory 47
DELETE SCAN BANK 23
Deleting Errors in Entry 47
Display 41
Display (Date / Time) 57
Display Alarm Time OFF 54
SGC Inc. SGC Building, 13737 S.E. 26th St. P.O.Box 3526, Bellevue, WA. 98009 USA
© 1994 SGC, Inc.
June 28, 2004; 15:46
PowerTalk™ Manual
Display Alarm Time ON and Frequency
54
Display LCD 30
Enter a Duplex Channel
into Memory 47
Enter a Simplex Channel
into Memory 46
Fine Tuning - CW Operation 46
FLIP Mode 21
FREQ 30, 33
Frequency 42
FREQUENCY FUNCTIONS 25
Frequency Change - Direct Entry 44
Frequency Change - General 44
Frequency Change - Incremental 45
Frequency Filters 4
Front Panel Controls 33
Front Panel Layout 5
FWD 31
FWD - SWR 40, 58
Ham Radio Use 29
HI LO 32
High Frequency Corner 8
Intcm 32
Intcm / Xcv 38
Intercom 56
Key Functions 24
Keys Added 20
Keys Deleted 19
Keys Modified 20
LCD Numerals 31
LED Display 15
Load Frequency Limits 49
Lock Feature 42
Lock for Channelized
Operation Only 58
Lockout 41, 58
Low Frequency Corner 7
LSB - USB 35
Marine Use 29
Mnemonics 17
Fax: 206-746-6384 • Tel: 206- 746-6310 • 1-800-259-7331

PowerTalk™ Manual
Mode 35
MODE FUNCTIONS 26
Modes of Operation 21
NOISE 10, 12, 16
Noise Reduction 2
NON-FLIP Mode 21
Notch 3, 6, 12, 16
Notch Filter 3
Notch Filter (NOTCH) 6
Operating Session 42
Operating the PowerTalk™ 24
PACTOR 12
Power 42
Power HI-LO 56
PRESET 16, 17
Preset Memory (PRESET) 12
PRGR 30, 34
Primary Keyboard Functions 33
Program a Channel Bank 48
Program Functions 41
Program Time ON Frequency 54
Program Time ON-OFF 54
Program Timer on Channel 55
Program User Channel
into Memory 46
PWR Hi / Lo 37
RATE 40
RCV 30
Red LED's 32
RF Noise Blanker 40, 57
S or SWR 31
Sample Entries 29
SCAN 22, 23, 30, 39, 42
SCAN BANK 23
Scan by Channel Banks 51
Scan by Channels 51
Scan by Frequency - General 49
Scan by Frequency -
Specific Range 49
SCAN FUNCTIONS 27
SCAN RATE 23
SGC Inc. SGC Building, 13737 S.E. 26th St. P.O.Box 3526, Bellevue, WA. 98009 USA
© 1994 SGC, Inc.
June 28, 2004; 15:46
Scanning Functions 48
Set Clock 55
Set Date 55
SHIFT FUNCTIONS 27
SHIFT Functions 40
SHIFT/ FUNC 35
SITOR 12
Small Numerals 31
SNS™ 2, 3, 11, 12, 16
Spk 37
SQL 36
SQL Level 40
SQUELCH LEVEL 22
STEP 38
Temp 32
Temporary Settings 59
Timer 31, 38, 42, 54
TIMER FUNCTIONS 28
Transmit Channel Locking 58
Tuning Knob 22
Unload Frequency Limits 50
Unlock Channelized Only
Operation 59
USER 13, 16, 17
User Memory 13
View Timer 40
Voc - Tlx 36
Volume 56
XMT 30
Fax: 206-746-6384 • Tel: 206- 746-6310 • 1-800-259-7331
 Loading...