

Page 1

SKM 9000
Instruction manual
Page 2

Contents
Contents
Important safety instructions ........................................................... 2
The SKM 9000 radio microphone ...................................................... 4
Delivery includes ................................................................................. 4
Product overview ................................................................................ 5
Preparing the SKM 9000 for use ....................................................... 7
Changing the microphone head ..................................................... 8
Using the SKM 9000 ........................................................................... 9
Switching the SKM 9000 on/off ................................................. 10
Activating/deactivating the automatic lock mode
(Autolock) ....................................................................................... 11
Basic functions of the Sennheiser operating menu ................ 12
Overview of the status displays ................................................. 13
Overview of the menu items ....................................................... 14
Cleaning and maintaining the SKM 9000 ...................................... 16
If a problem occurs ... ........................................................................ 18
Specifications .....................................................................................19
System characteristics .................................................................. 19
Operating conditions .................................................................... 20
SKM 9000 characteristics ............................................................. 21
SKM 9000 | 1
Page 3

Important safety instructions
Important safety instructions
• Read this instruction manual.
• Keep this instruction manual. Always include this instruction
manual when passing the product on to third parties.
• Heed all warnings and follow all instructions.
• Do not use the product near water.
• Only clean the product with a dry cloth.
• Do not place the product near any heat sources such as radiators, stoves, or other devices (i
produce heat.
• Only use attachments, accessories or spare parts specified by
Sennheiser.
• Refer all servicing to qualified service personnel. Servicing is
required if the product has been damaged in any way, liquid
has been spilled, objects have fallen inside, the product has
been exposed to rain or moisture, does not operate properly or
has been dropped.
• WARNING: To reduce the risk
shock, do not expose the product to rain or moisture.
• Do not expose the product to dripping or splashing.
Intended use
Intended use of the Digital 9000 system components includes:
• having read and understood this instruction manual, especially
the chapter “Important safety instructions”,
• using the product within the operating conditions and
tions described in this instruction manual.
“Improper use” means using the produc
this instruction manual, or under operating conditions which differ
from those described herein.
This instruction manual is also available at www.sennheiser.com.
ncluding amplifiers) that
of fire or electric
limita-
t other than as described in
Safety instructions for lithium-ion rechargeable batteries
If abused or misused, the rechargeable batteries may leak. In
extreme cases, they may even present a risk of
•explosion,
• fire development,
Sennheiser does not accept any liability for damage arising from
ab
use or misuse.
2 | SKM 9000
• heat generation,
• smoke or gas development.
Page 4
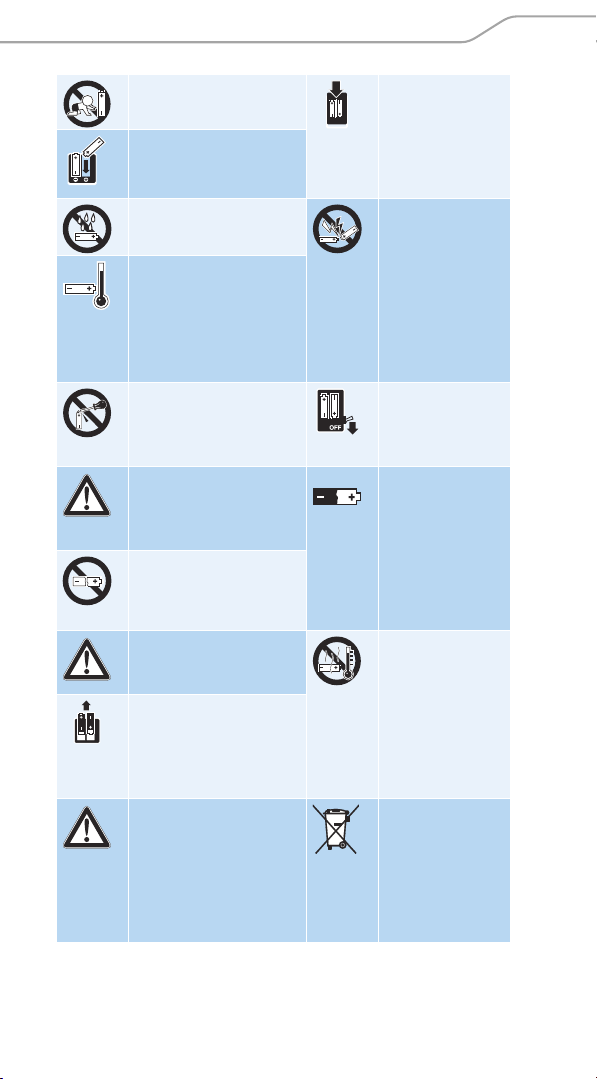
Important safety instructions
Keep away from
children.
Observe correct polarity.
Do not expose to
moisture.
Only charge rechargeable batteries at
ambient temperatures
between 10°C/50°F
and 40°C/104°F.
Do not mutilate or
dismantle.
Immediately remove
rechargeable batteries
from an obviously
defective product.
Do not continue to use
defective rechargeable
batteries.
Only use rechargeable
batteries specified by
Sennheiser.
Remove the rechargeable batteries if the
product will not be
used for extended
periods of time.
Store the product in
a cool and dry place
at room temperature
(approx. 20 °C/68 °F).
Only charge
rechargeable
batteries with a
charger recommended by
Sennheiser.
Pack/store
charged
rechargeable batteries so that the
rminals cannot
te
contact each
other – danger
of shorting out/
fire hazard.
Switch rechargeable batterypowered products off after use.
When not using
rechargeable
batteries for
extended periods
of time, charge
them regularly
(about every
three months).
Do not heat
above 70°C/
158°F, e.g. do not
expose to sunlight or throw
into a fire
Dispose of
rechargeable batteries at special
co
or return them to
your specialist
dealer.
.
llection points
SKM 9000 | 3
Page 5

The SKM 9000 radio microphone
The SKM 9000 radio microphone
The SKM 9000 radio microphone offers great ease of use and can
easily be adapted to any transmission situation:
•Rugged housing
• Input gain adjustable in 3 dB steps
•Switchable 1 kHz test tone, useful for level matching the
stem and for the walk test
sy
• Detection and support of the type of microphone head being
used, incl. Neumann microphone heads
• High accuracy of charge status display (BA 60) or remaining
operating
• Switchable low cut filter for filtering out low frequency
components
• Frequencies tuneable in 25 kHz steps
• Power supply optionally via BA 60 lithium-ion accupack or B 60
battery pack (2 AA size alkaline batteries or 2 AA size lithium
batteries)
• Different microphone heads for different areas of application
(see page 6)
• Optionally available with command function
time display (B 60)
Delivery includes
1SKM 9000 or SKM 9000 COM radio microphone
1 MZQ 9000 microphone clamp
1 supplement “Framework requirements and restrictions on fre-
quency usage”
1 instruction manual
You additionally require microphone heads as well as
a BA 60 accupack and/or a B 60 battery pack.
A list of accessories can be found on the Digital 9000
product page at www.sennheiser.com.
For information on suppliers, contact your local Sennheiser
partner: www.sennheiser.com > “Service & Support”.
4 | SKM 9000
Page 6
Product overview
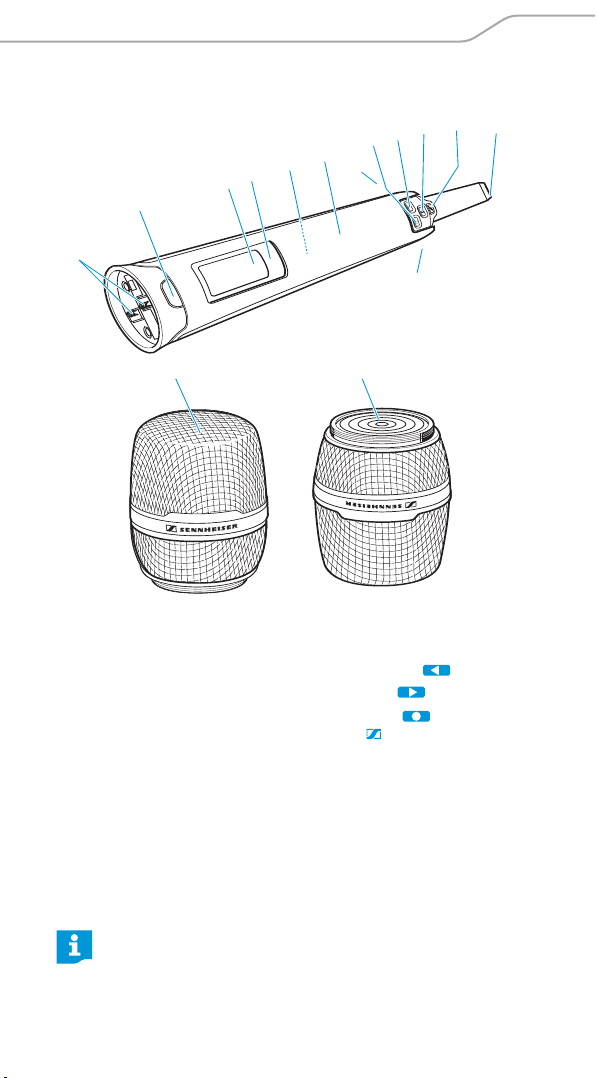
Product overview
5
4
3
1 2
B
A
0
9
8
7
6
D
D
C
1 Microphone head
2 Contact rings
of microphone head
3 Contacts of radio microphone
4 COMMAND button
(COM version only)*
5 Display panel
6 Infra-red interface
7 Accupack or
battery pack for 2 AA size
cells
9 DOWN button
0 UP button
A SET button ON/OFF
button
with ESC function (cancel):
- lights up constantly:
radio microphone is
operational
B Antenna
C Catches
for accupack/battery pack
8 Body of radio microphone
The COMMAND button can be configured via the operating
menu of the EM 9046 receiver (see "Cmd mode – Configuring the audio and command outputs" in the the system
instruction manual).
SKM 9000 | 5
Page 7
Product overview
3:59
480.000
1 3 54 62
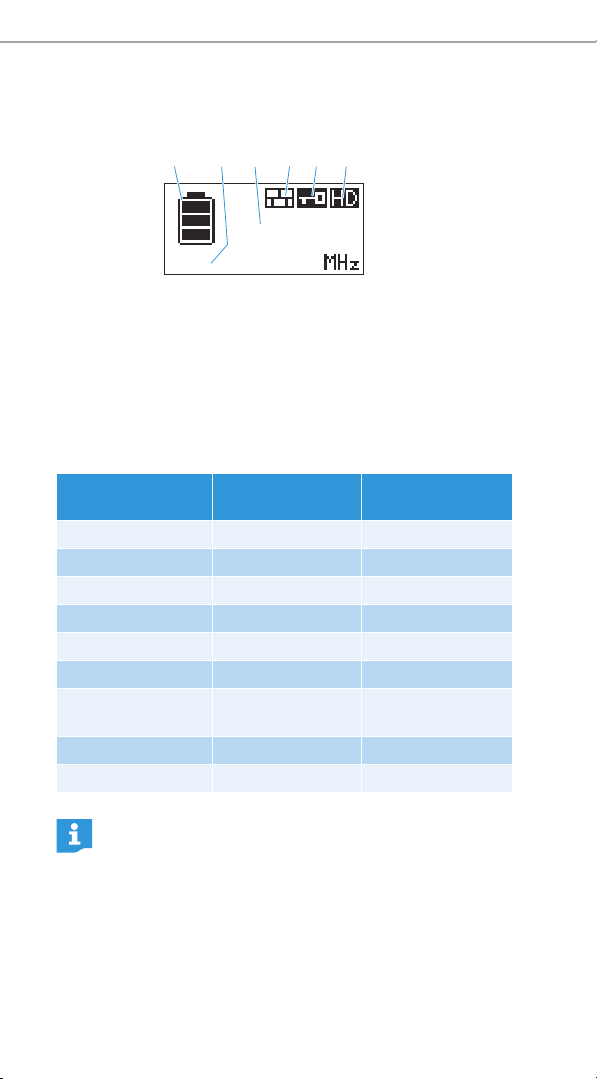
Overview of the standard display after switch-on
After switch-on, the radio microphone displays the following standard display.
1 Display for charge status of
the accupack/battery pack
2 Operating time display (only
when used with the BA 60)
3 Frequency/channel/name
display, switchable
4 “Encryption” display
5 Lock mode icon
6 Transmission mode display:
“HD” (High Definition Audio)
or “LR” (Long Range Audio)
Recommended microphone heads
Microphone head Pick-up pattern Transducer
ME 9002 omni-directional condenser
ME 9004 cardioid condenser
ME 9005 super-cardioid condenser
MD 9235 super-cardioid dynamic
MMD 935-1 cardioid dynamic
MMD 945-1 super-cardioid dynamic
MMK 965-1 cardioid/super-
cardioid, switchable
KK 204 (Neumann) cardioid condenser
KK 205 (Neumann) super-cardioid condenser
You can also use your radio microphone together with the
microphone heads of the ew G3 and 2000 series.
principle
permanently
polarized
6 | SKM 9000
Page 8
Preparing the SKM 9000 for use
Preparing the SKM 9000 for use
Selecting the accupack/battery pack
You can power the SKM 9000 radio microphone using:
•the BA 60 accupack
•the B 60 battery pack for two 1.5 V AA size batteries
Charge the BA 60 accupack before using it for the first time
(see the instruction manual for the Digital 9000 system).
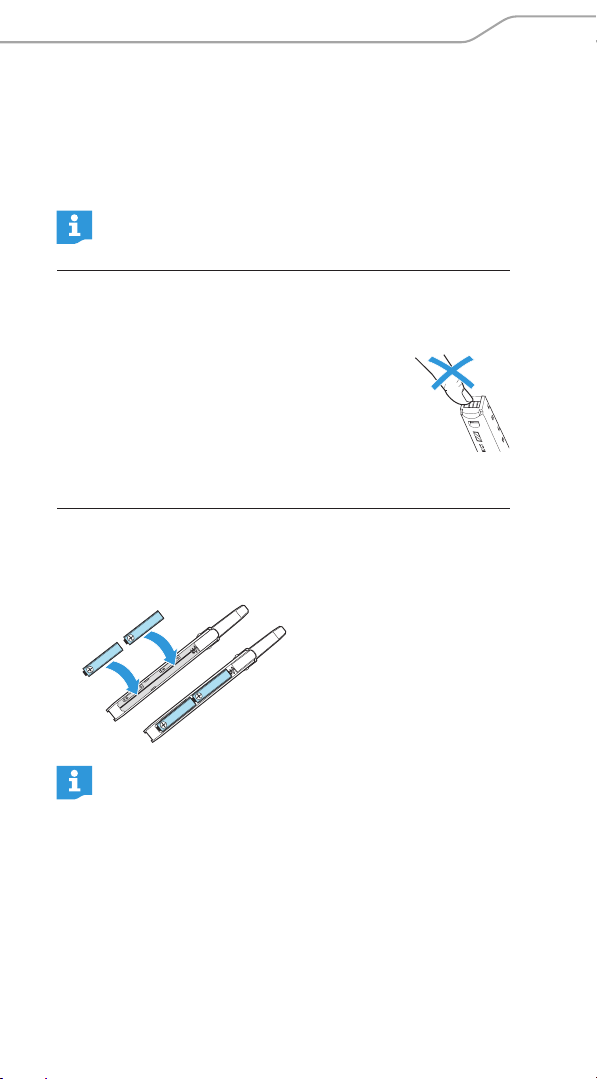
CAUTION!
Damage to the radio microphone and/or the accupack/battery
pack
If you touch the following contacts, they can
become dirty or damaged:
• Charging and data contacts of the BA 60 accu-
pack
• Data contacts of the B 60 battery pack
not touch the contacts of the BA 60 accupack nor the con-
왘 Do
tacts of the B 60 battery pack.
Inserting batteries into the B 60 battery pack
왘 Insert the batteries into the battery pack (see diagram). Observe
correct polarity when inserting the batteries.
Only insert high-quality AA size batteries (e.g. lithium or
alkaline batteries) into the B 60 battery pack. If you insert
rechargeable batteries, the charge status display 1 will
show a wrong value.
SKM 9000 | 7
Page 9

Preparing the SKM 9000 for use
Removing and attaching the accupack/battery pack
To remove the accupack/battery pack:
왘 Push the two catches D and pull the accupack/battery pack out
of the radio microphone’s body (see diagram 1).
When removing the accupack/battery pack, the settings of
the radio microphone are retained.
To attach the accupack/battery pack:
왘 Push the accupack/battery pack into the radio microphone’s body
until it locks into place with an audible click (see diagram 2).
1 2
Changing the microphone head
CAUTION!
Damage to the microphone head!
If you touch contacts, they can
왘 Do not touch the contacts 3 of the radio microphone nor the
contact rings 2 of the microphone head.
왘 Unscrew the microphone head 1.
8 | SKM 9000
become dirty or damaged.
Page 10

Using the SKM 9000
1
1
With some microphone heads, the upper part of the sound
inlet basket can be unscrewed. To fully unscrew the micro
phone head, always hold it as shown.
For an overview of suitable micr
table on page 6.
왘 Screw the desired microphone head to the radio microphone.
The radio microphone is operational again.
When unscrewing the microphone head 1 during operation, the muting function is automatically activated.
ophone heads, refer to the
-
Using the SKM 9000
Before using your radio microphone, ask the relevant wire-
less regulatory authority for the exact frequency allocations and apply for an individual license if necessary.
The supplied supplement “Framework requirements and
restrictions on frequency usage” provides an overview of
the different European framework requirements and
restrictions on frequency usage. If there is no entry in the
supplement, ask the relevant wireless regulatory authority
for the current rules governing frequency usage.
We recommend you to adjust the transmitter settings via
the operating menu of the EM 9046 receiver and then to
synchronize the transmitter and the receiver.
SKM 9000 | 9
Page 11

Using the SKM 9000
B
3:59
480.000
Switching the SKM 9000 on/off
To switch the SKM 9000 on:
왘 Keep the ON/OFF button
B pressed until the
Sennheiser logo appears on
the display panel 5.
The ON/OFF button B is
backlit in blue and the
lected standard display
se
(here: “Frequency”, see
page 15) appears on the
display panel 5. The radio
microphone transmits an RF
and the transmission
signal
mode display “HD”/“LR”
lights up constantly:
To switch the SKM 9000 off:
왘 Keep the ON
goes off.
왘 Remove the accupack/battery pack when the radio microphone
will not be used for extended periods of time (see page 8).
To switch the SKM 9000 of
왘 Press the ON/OFF button B while the standard display is
shown.
“LOCK”
activated.
왘 Pres
“UNLOCK” appears on the display panel.
왘 Press the SET button A.
The lock mode is temporarily
deactivate
icon5 flashes.
thin the next 2 seconds, press
왘 Wi
the ON/OFF button B and
keep it pressed until the display panel goes off.
If you switch on the SKM 9000, the
/OFF button B pressed until the display panel
f with the lock mode activated:
appears on the display panel because the lock mode is
s the UP button 0 or the DOWN button 9.
d, the lock mode
lock mode is activated again.
3:59
3:59
480.000
480.000
10 | SKM 9000
Page 12

Using the SKM 9000
Switching on the SKM 9000 on and checking the set
frequency before the RF signal is activated
왘 Switch on the SKM 9000 by keeping the ON/OFF button B
pressed until the “Name” standard display appears.
The RF signal is not activated and the transmission mode display
“HD”/“LR” 6 flashes.
If you call up the “Tu
10 seconds, the RF signal remains deactivated until you exit the
menu item. If you do not call up one of the mentioned menu items,
the RF signal is automatically activated after 10 seconds.
To check the set frequency/the selected frequency preset:
up the operating menu and press the UP button 0/
왘 Call
DOWN button 9 until the “Tune” or “Preset” menu item
appears.
The set frequency/the selected frequency preset is displayed.
If the displayed value is the desired one:
ait for 10 seconds to pass.
왘 W
The RF signal is automatically activated and the transmission
mode display “HD”/“LR” lights up constantly.
If the displayed value is not the desired one:
왘 Call up the “Tune” or “Preset” menu item.
The RF signal remains deactivated until you exit the menu item.
왘 Set the frequency (menu item “Tune ”) or select a frequency
preset (menu item “Preset”) and store your setting.
The RF signal is activated and the radio microphone transmits an
signal on the set frequency.
RF
ne” or “Preset” menu item within the next
Activating/deactivating the automatic lock mode
(Autolock)
The radio microphone has an automatic lock mode that can be activated or deactivated via the “LOCK” menu item
To permanently activate the automatic lock mode:
왘 Call up the “LOCK” menu item and select “On”.
왘 Store your setting by pressing the SET button A.
The automatic lock mode is activated and the lock mode icon 5
appears on the standard display.
When the automatic lock mode is activated, you can still call up the
operating menu and use the UP button 0/DOWN button
9 to select menu items (read-only function). You can also call
up the “LOCK”
mode. If, however, you try to call up any other menu item, the following display appears on the display panel:
menu item in order to deactivate the automatic lock
(see page 15).
SKM 9000 | 11
Page 13

Using the SKM 9000
While this display is shown (about 2 seconds), you can temporarily
deactivate the lock mode:
s the UP button 0 or the DOWN button 9.
왘 Pres
The following display appears on the display panel:
왘 Press the SET button A.
The lock mode is temporarily deactivated.
- If you do not press a button, the lock mode is activated again
after 2 seconds. The lock mode icon 5 lights up constantly
again.
- If you continue navigating the operating menu
up a menu item, the lock mode is activated 2 seconds after the
last button press.
- If you exit a called up menu item, the lock mode is activated
mmediately after exiting the menu item.
i
To permanently deactivate the automatic lock mode:
왘 Call up the “LOCK” menu item and select “Off”.
왘 Store your setting by pressing the SET button A.
The automatic lock mode is permanently deactivated. The lock
mode icon 5 goes off
or if you call
Basic functions of the Sennheiser operating menu
A special feature of the Sennheiser 9000 series is the straightforward, intuitive operating concept. As a result, you can act quickly
and precisely – even in stressful situations, for example on stage or
during a live show or presentation.
12 | SKM 9000
Page 14

Using the SKM 9000
Calling up and selecting menu items, changing and storing
settings, cancelling an entry
Button Operation
UP /
DOWN /
SET
ON/OFF
When keeping the UP button /DOWN button pressed
within a menu item, you continuously adjust the next/
previous setting of the menu item. Keep the buttons pressed
for a longer time to accelerate the speed.
왘 Press the SET button to call up the
operating menu or a menu item, to
switch between the selection areas of a
menu item and to store your settings.
ess the UP button /DOWN
왘 Pr
button to select menu items and to
change the settings of a menu item.
왘 Press the ON/OFF button to exit
a menu item without storing your settings or to change from the operating
menu to the standard display.
Overview of the status displays
Status display Meaning
SKM 9000 switches on
SKM 9000 switches off
BA/B 60 accupack/battery pack:
charge status ≤ 100% | ≤ 70% | ≤ 30%
BA 60 accupack: remaining operating time in
2:204:406:59
h:mm
Accupack/battery pack is completely
discharged, transmitter is not operational
Setting is being stored
Firmware is being updated
Firmware update has failed
SKM 9000 | 13
Page 15

Using the SKM 9000
Overview of the menu items
Icon Name Function Page
Tune Sets a frequency
Preset Selects a frequency preset
Name Enters a name
Gain Adjusts the input gain
Low cut Sets the low-cut filter
RF mode
Display Selects a standard display
Lock
Test tone
Reset
Information
Adjusts the transmission
mode
Activates/deactivates the
lock mode
Activates the test tone for
level matching the system
and for the walk test
Resets the factory default
settings
Displays the firmware
version and frequency
range
14
14
15
15
15
15
15
15
16
16
16
“Tune”– Setting a frequency
Via the “Tune” menu item, you can set a frequency. The frequencies
are tuneable in 25 kHz steps. If you store your setting, the set frequency is automatically assigned to the user-defined frequency
et “U”. The radio microphone then changes from the currently
pres
set frequency preset to the frequency preset “U” and transmits on
the set frequency.
“Preset” – Selecting a frequency preset
Via the “Preset” menu item, you can select a frequency preset from
the active booster frequency range or the frequency preset “U” (see
also the “Tune” menu item).
14 | SKM 9000
Page 16

Using the SKM 9000
`+` `,` `-` `|` `/` `0` `1` `2` `3` `4` `5` `6` `7` `8` `9` `*` `;` `<` `=` `>`
`space` `#` `A` `B` `C` `D` `E` `F` `G` `H` `I` `J` `K` `L` `M` `N` `O` `P`
`Q` `R` `S` `T` `U` `V` `W` `X` `Y` `Z`
To activate a different booster frequency range:
왘 Proceed as described in the instruction manual for the
Digital 9000 system. You first activate the booster frequency range on the EM 9046. If you then synchronize
the transmitter and the receiver, the booster frequency
range on the transmitter will also be activated.
“Name” – Entering a name
Via the “Name” menu item, you can enter a freely selectable name
for the radio microphone. The name can consist of up to 6 characters from the following character set:
“Gain” – Adjusting the input gain
Via the “Gain” menu item, you can adjust the input gain in 3 dB
steps.
The radio microphone automatically detects the type of
microphone head being used and changes the adjustment
range of the “Gain” menu item accordingly.
“Low cut” – Setting the low-cut filter
Via the “Low cut” menu item, you can set the low-cut filter.
Settings: “80 Hz”, “100 Hz”, “120 Hz”.
“RF mode” – Adjusting the transmission mode
The “RF mode” menu item allows you to adjust the transmission
mode (see the instruction manual for the Digital 9000 system).
“Display” – Selecting a standard display
The “Display” menu item allows you to select one out of 3 standard
displays.
480.000
3:59
Frequency Preset Name
3:59
U
480.000MHz
GUITAR
3:59
“Lock” – Activating/deactivating the lock mode
Via the “Lock” menu item, you can activate or deactivate the lock
mode. For more information on how to activate or deactivate the
lock mode, refer to page 11.
SKM 9000 | 15
Page 17

Cleaning and maintaining the SKM 9000
“Test tone” – Activating the 1 kHz test tone
Via the “Test tone” menu item, you can activate a 1 kHz test tone.
This test tone is transmitted instead of the input signal. You can use
this function for level matching your system or for the walk test.
“Reset” – Resetting the factory default settings
Via the “Reset” menu item, you can reset the radio microphone to
its factory default settings.
“Information” – Displaying the firmware version and
frequency range
Via the “Information” menu item, you can display the firmware
version and the transmitter’s frequency range.
Cleaning and maintaining the SKM 9000
CAUTION!
Liquids can damage the electronics of the devices!
Liquids entering the housing of the devices can cause a short-circuit
and damage the electronics.
왘 Keep all liquids away from the devices.
왘 Do not use any solvents or cleansing agents.
왘 Remove the rechargeable batteries or batteries before cleaning.
왘 Only use a soft, dry cloth to clean the radio microphone.
Cleaning the sound inlet basket of the microphone head
왘 Unscrew the upper sound inlet basket from the microphone
head by turning it counterclockwise (see diagram).
왘 Remove
16 | SKM 9000
the foam insert.
Page 18

Cleaning and maintaining the SKM 9000
To clean the sound inlet basket:
• Use a slightly damp cloth to clean the upper sound inlet basket
from the inside and outside
• or scrub with a brush and rinse with clear water.
왘 If necessary, clean the foam insert with a mild detergent or
replace the foam insert.
왘 Dry th
왘 Reinsert the foam insert.
왘 Replace the sound inlet basket on the microphone head and
You should also clean the contact rings of the microphone head
from time to time:
왘 Wipe the
e upper sound inlet basket and the foam insert.
screw it tight.
contact rings of the microphone head with a soft, dry
cloth.
SKM 9000 | 17
Page 19

If a problem occurs ...
If a problem occurs ...
Problem Possible cause Possible solution
Transmitter
cannot be operated, “LOCK”
appears on the
display panel
No operation
indication
No RF signal at
the receiver
Audio signal has
a high level of
background
noise or is
distorted
Lock mode is
activated
Batteries are flat
or accupack is flat
Transmitter and
receiver are not
on the same
frequency
Transmission
range is exceeded
Transmitter’s RF
signal is
deactivated
(“RF Mute”)
Transmitter input
gain is adjusted
too low/too high
Deactivate the lock mode
Replace the batteries or
recharge the accupack.
Transmitter to the same
frequency as the receiver.
Reduce the distance
between transmitter and
receiving antennas.
Activate the RF signal.
Adjust the input gain
(see page 15).
If a problem occurs that is not listed in the above table or if the
problem cannot be solved with the proposed solutions, please
contact your local Sennheiser partner for assistance.
To find a Sennheiser partner in your country, search at
www.sennheiser.com under “Service & Support”.
18 | SKM 9000
Page 20

Specifications
EM 9046 DRX TX variant Booster variant
A1–A8
470–798 MHz
(expandable to
934 MHz)
A1–A4
470–
558 MHz
A1 470–494 MHz
A2 494–518 MHz
A3 510–534 MHz
A4 534–558 MHz
A5–A8
550–
638 MHz
A5 550–574 MHz
A6 574–598 MHz
A7 590–614 MHz
A8 614–638 MHz
EM 9046 DRX TX variant Booster variant
B1–B8
470–798 MHz
(expandable to
934 MHz)
B1–B4
630–
718 MHz
B1 630–654 MHz
B2 654–678 MHz
B3 670–694 MHz
B4 694–718 MHz
B5–B8
710–
798 MHz
B5 710–734 MHz
B6 734–758 MHz
B7 750–774 MHz
B8 774–798 MHz
Specifications
System characteristics
Frequency ranges 470 to 798 MHz,
divided into 24 MHz booster frequency
ranges
Transmission method digital modulation
“HD” mode:
Audio frequency
response
Dynamic range “HD” mode: 112
without audio data compression
“LR” mode:
SeDAC (Sennheiser Digital Audio Codec)
80 Hz to 20 kHz (3 dB)
with SKM 9000
“LR” mode: 101 dB(A)
dB(A)
SKM 9000 | 19
Page 21

Specifications
Latency Analog Audio Out: 3.2 ms
Digital Audio Out: 3 ms (AES/EBU)
THD “HD” mode: < 0.01% (at 1 kHz)
“LR” mode: < 0.03% (at 1 kHz)
Operating conditions
Ambient temperature –10°C to +50°C
Relative humidity max. 85% at 40°C
(non-condensing)
Protection against
ripping and light
d
splashing of liquids
the product must not be exposed to
dripping and splashing (IP2X)
Storage and transport conditions
Ambient temperature –25°C to +70°C
Relative humidity max. 90% at 40°C
Protection against
dripping and light
splashing of liquids
Shock resistance as per IEC 68 or EN 60068, T2-27
the product must not be exposed to
dripping and splashing (IP2X)
20 | SKM 9000
Page 22

Specifications
SKM 9000 characteristics
RF characteristics
Frequency ranges 470 MHz to 798 MHz,
divided into 4 ranges:
SKM 9000 A1–A4: 470–558 MHz
SKM 9000 A5–A8: 550–638 MHz
SKM 9000 B1–B4: 630–718 MHz
SKM 9000 B5–B8: 710–798 MHz
(see also table “System characteristics”
on
page 19)
Frequency ranges USA 550 MHz to 718 MHz,
divided into 2 ranges:
SKM 9000 A5–A8: 550–638 MHz
SKM 9000 B1–B4: 630–718 MHz
Switching bandwidth 88 MHz
RF output power “HD” mode: 10 mW rms, 50 mW peak
“LR” mode: 25 mW rms, 50 mW peak
Frequency stability < 5 ppm
Tuneability in steps of 25 kHz
AF characteristics
Audio gain adjustable in 3 dB steps from
Lower cut-off
quency (–3 dB)
fre
Other characteristics
Operating t
Power consumption approx. 1 W
Dimensions 270 x 40 mm (L x ∅)
Weight approx. 350 g (with BA 60 accupack and
ime 5.5 hrs (with BA 60 accupack)
In compliance with
Europe EMC EN 301489-1/-9
0 dB to +62 dB
(depending on microphone head)
adjustable: 60 Hz, 80 Hz, 100 Hz, 120 Hz
ME 9005
Radio EN 300422-1/-2
Safety EN 60065
microphone head)
EN 62311 (SAR)
SKM 9000 | 21
Page 23

Manufacturer Declarations
Approved by
US
A
Canada Industry Canada RSS-123
Brazil
Part 74
FCC-ID: DMOSKM9000
limited to 698 MHz
IC: 2099A-SKM9000
limited to 698 MHz
QUANTA BRASIL IMPORTAÇÃO E
EXPOR-TAÇÃO LTDA. 0261-15-7356
EUROBRAS FILM PRODUÇÕES CINEMATOGRAFICAS LTDA. 0936-15-7356
22 | SKM 9000
Page 24

Sennheiser electronic GmbH & Co. KG
Am Labor 1, 30900 Wedemark, Germany
www.sennheiser.com
Publ. 06/17, 559419
 Loading...