

Page 1

EXPOSURE METER
Operating Instructions
Page 2
q
Operating instructions
SAFETY PRECAUTIONS
This manual uses the following safety labels for AWARNING and ACAUTION
that you must follow.
/b
WARNING
Indicates hazards or unsafe practices that can result in severe
personal injurry or death.
ACAUTION Indicates hazards or unsafe practices that can rresult in
personal injury or damage to your L-308Bll exposure meter.
(CAUTIONI
NOTE(S) Provides the reference information and related functions that are
A
/b
WARNING
Indicates an operation note or limitation you must use. Please read
the notes to avoi d an incorrect L-308BII operation.
useful for your L-308Bll operations.
&ZAUTlON
Page 3

CONTENTS
1
SAFETY PRECAUTIONS
CONTENTS
....................................................................................................................
..........................................................................................
i
ii
1. Parts Designations ......................................................................................
2. Display ...................................................................................................................
..................................................................................................................................
LCD panel
2.1
3. Mode Selection ................................................................................................
3.1 Switching between incident light metering and reflected light metering ...........
3.2 How to
fit
3.3 How to remove the Lumidisc ..........................................................................................................
the Lumidisc
4. Light-receiving Method
4.1 Incident light metering .......................................................................................
4.2 Reflected light metering .... ................................................................................. 4
......................................................................................................................... 3
.........................................................................................................................................
5. Preparation for Measurement ..........................................................................................
5.1 Inserting the battery ...........................................................................................
5.2 Battery check .
5.3 Auto Power-off ..................................................................................................
5.4 Measurement mode setup
5.5 Setting up
5.6 Setting up shutter speed (T)
5.7 Setting up number of frames per second (f/s) ................................................... 6
...................................................................................................... 5
.................................................................................
film
speed
............................................................................... 6
(ISO)
.............................................................................. 6
5
5
6. Ambient Light Measurement .........................................................................
6.1 Mode Selection
6.2 Measurement of EV (Exposure Value
................................................................................................. 7
) ............................................................ 7
7. Flash Measurement with cord .......................................................................
7.1 Setting up of the flash measurement with cord
and making measurement in this mode .......................................................... 8
8. Flash Light Wireless Measurement
8.1 Flash light wireless measurement
9. How to use the Lumidisc
9.1 How to measure light contrast ......................................................................... 10
9.2 Using the L-308BII as an illuminance meter
.............................................................
.................................................................... 9
...............................................................................
................................................... 10
10. Specifications ...................................................................................................
11. Instructions and Maintenance Notes..
3
8
9
11
2
2
3
3
4
4
5
5
7
10
12
ii
Page 4

1. Parts Designations
Measuring
Power button
Lumisphere(Light receiving element) Lens (Light receiving element)
/
Up/Down button
\
I
Lumisphere
I
I
IS0 button
’
Synchro terminal
Synchro terminal cap(Accessory)
Lumidisc (Accessory) How to fasten a strap
\
Strap eyelet
Battery case
cover
1
Page 5
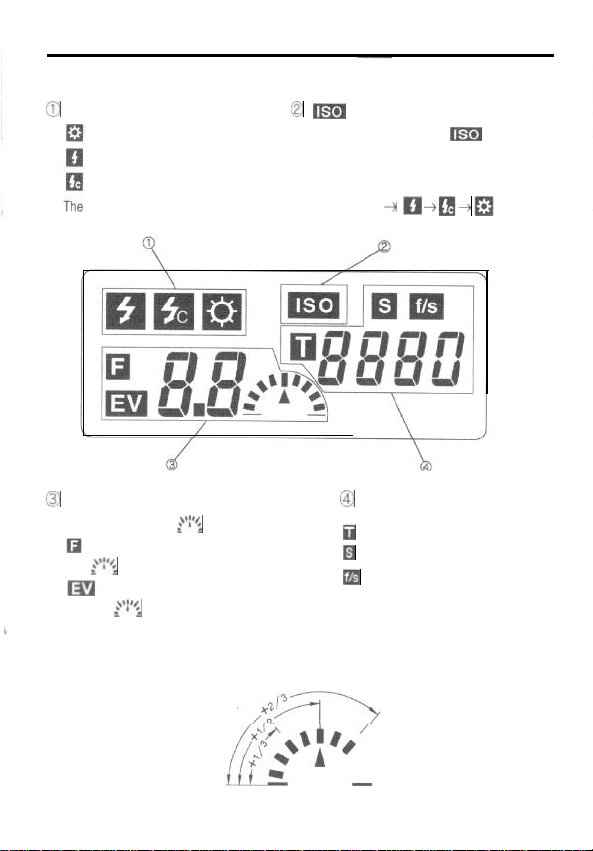
2.1 LCD panel
2
0
Mode selection
Ambient light measurement
Flash measurement without cord
Flash measurement with cord
mode symbols are switched in the following sequence:
0
m
IS0 film speed display. See Page 6.
Press the IS0 button, and
q
+
2. Display
m
is displayed.
--da+
8
Aperture/EV/Battery/Others
“b.c” Battery capacity
Aperture value (Indicated by a number and
dots
$“;
and dots
E.u Under exposure
E.o Over exposure
One full stop is shown by 9 bars.
A single bar
z:‘$
See Page 5.
)
Exposure value (Indicated by a number
$‘$
) See Page 7.
indicates one tenth stop.
@I Shutter speed/film frame count/film
speed display. See Page 6.
a
Shutter speed
El Shutter speed in seconds
@j
Number of frames per second
Film speed is displayed if the IS0 button
is pressed.
Page 6

3. Mode Selection
Your L-308Bll can measure both incident and reflected light in both ambient light and flash light
(electronic flash or flash bulb) modes. You can switch the modes as follows:
[Ligh&y.eng [Ligh$xec#ng [Measured light] [Mode/display method]
see Page 7.
3.1
Switching between incident light metering and reflected light
metering
Slide the lumisphere and stop it at the clicking position of “a” or “b” (See Fig.1 and 2).
Fig. 1 Incident light metering Fig. 2 Reflected light metering Fig. 3
Slide the lumisphere by pushing the part as shown in Fig. 3.
Caution: 1
3.2 How to fit the Lumidisc
0
Slide the Lumisphere to the right for reflected light metering.
@ Insert the part (B) of the lumidisc aslant in the groove (A) of L-308Bll. (See Fig. 6). Then
depress the strap eyelet (C) toward the L-308Bll body. (See Fig. 7)
5
Lumisphere
b
(See Fig. 5)
umisphere
Fig. 4 Lumidisc Fig. 5 Fig. 6 Fig. 7
3.3 How to remove the Lumidisc
Take reverse procedures described above to remove the Lumidisc.
You may break the lumidisc if you do not take care when fitting and removing,
Caution:
3
Page 7

4,
Light-receiving Method
4.1 Incident light metering
Hold L-308BII close to the subject, point the lumisphere towards the camera, and measure the
incident light intensity, (Fig. 8)
;Q,,
////
II
Fig
.
8
Caution: Do not fit the Lumidisc next to the Lumisphere when you take incident light
metering. Otherwise, the Lumidisc will affect the exposure in proper reading.
4.2 Reflected light metering
You can meter the reflected light of the object by pointing the L-308Bll’s lens at the object from the
camera’s position. (Fig. 9).
Fig. 9
Caution:
If you measure from the camera position, the entire object is measured in average.
If you want to measure only a part of the object, do it at as close a position as
possible to the part measured. Take care so that the part measured may not be
shadowed by the meter, etc.
4
Page 8

5. Preparation for Measurement
5.1 Inserting the battery
Use a 1.5-volt, type-AA battery.
Use a manganese dry cell (R6P) or an alkaline one (LR6).
Never use any of other types.
0
To remove the battery case cover simply slide it in the
direction of the arrow.
0
Insert the battery in the battery case aligning the polarities as
indicated on the inside of the case. (Fig. 10)
8
Slide the battery case cover along the unit to close it. Check
that the cover is securely closed.
5.2 Battery check
Depress the POWER button, and the LCD panel (“b.c” message
and bar marking
The battery level is indicated by a number of bars for one
second. Then, the LCD panel automatically switches to the
normal measurement mode.
piii?iq
$‘i)
displays the current battery level.
NOTES l You can sustain battery level display by holding down the Power button.
l When the battery level is indicated by only two or three dots, prepare a new battery.
When the battery capacity drops below the limit, the “b.c” display blinks and then
disappears.
5.3 Auto Power-off
To save battery capacity, the L-308Bll is automatically turned off (and all readings are erased) 4
minutes after your last operation.
Press the mode selection button to select the desired measurement mode.
Mode switching sequence:
5
a
Measurement mode
Measurement mode with cord
-
-
Measurement mode
---II
without cord
Page 9

NOTE
5.5
0
@ Set up the film speed by pressing the Up or Down button
NOTE
0 If you press the mode selector in the ambient light measurement mode while
holding down the IS0 button, the display is toggled between EV and F values
(Fig. 12 and 13). If it is toggled after measurement, the measurement data is
automatically recalculated and redisplayed.
Fig. 12 Fig. 13
Setting up film speed
Press the IS0 button, and a film speed value is
displayed (Fig. 14).
while holding down the IS0 button. If you press the Up Fig. 14
button, the speed increases; if you press the Down button it decreases. If you hold down the
Up/Down button for more than one second, the speed changes continuously.
l You can set up the film speed either before or after measurement.
(ISO)
5.6 Setting up shutter speed (T)
Set up the shutter speed used by pressing the Up or Down
button (Fig, 15). If you press the Up button, the speed
increases; if you press the Down button it decreases.
If
YOU hold down the Up/Down button for more than one
second, the speed changes
@in
NOTES
5.7
the case of ambient light, you can set up the shutter speed in a range of 60 and
1/8000 sec.
r
@
In the case of flash light, you can set up the synchronizing shutter speed in a range
of 1 and 1/500 sec.
After 1/500 see, 1/75 1/80 1/90, and 1/100 sec. are displayed in order. You can
select any one you want.
Setting up number of frames per
contrnuously
Fig. 15
second (f/s)
The film frame counts are displayed after 1/8000 set of
shutter speed in the ambient light mode. Choose any count
you want (Fig. 16).
NOTES
l The f/s count options are: 8, 12, 16, 18, 24, 25, 30, 32, 64, and 128. These values
l This setting up is used for a motion picture camera only.
represent those used with the shutter angle 180 degrees.
Fig 16
6
Page 10

6. Ambient Light Measurement
6.1 Mode Selection
0
Press the mode selector to enter the ambient light
measurement mode.
0
Set up the film and shutter speeds.
@ Press the measuring button, and the aperture value is
displayed (Fig. 17).
NOTES
0 Fig. 17 shows the shutter speed 1/125, and aperture F2.0+3/10 measured.
l In the ambient light measurement mode, light measurement is continuously
conducted while the measuring button is kept depressed.
l If you changed the film speed (ISO) or the shutter speed (T) value after
measurement, the measurement value is automatically recalculated and displayed
again.
l E.u (underexposure error) or E.o (overexposure error) is displayed if the metering
range is exceeded. If E.u was displayed, reduce the shutter speed; if E.o was
displayed, increase it. (Fig. 18) (Fig. 19)
Fia. 17
Fig. 18
6.2 Measurement of EV (Exposure Value)
Press the mode selector to enter the EV measurement
mode. Press the measuring button, and the EV value is
displayed (Fig. 20).
NOTE
1
l “EV” represents a specific amount of light, and is a combination of a shutter speed
and an aperture value.
7
Fig. 19
Fig. 20
Page 11

7..
Flash Measurement with cord
7.1
Setting up of the flash measurement with cord and making
measurement in this mode
0
Press the mode selector to enter this mode (Fig. 21).
@I Set up the film and shutter speeds.
Fig. 21
Caution: l Set up the shutter speed which has been already set up on your camera.
0
Connect the synchro cord to the L-308Bll’s synchro
Caution:
@ Press the measuring button, and the flash fires and the
NOTES
l If you measure the flash bulb light, make sure that the shutter speed set is within
the synchronizing range.
terminal (Fig. 22).
c---
\F
aperture value is displayed (Fig. 23).
ically recalculated and redis
B
-J
Fig. 22
*
Synchro cord (optional):
A 5-meter-long synchro cord with three plugs is available
for synchronous metering between your L-308Bll, the
camera and the flash unit. It is very convenient as no
cord replacement is required during shooting pictures.
The
L-308Bll is also equipped with a connector terminal
lock for securing cable connection.
To flash unitATo camera
8
Page 12

8. Flash Light Wireless Measurement
(Measurement without using the syrchro cord)
8.1
Flash light wireless measurement
(1>
Press the mode selector to enter this mode (Fig. 24).
@ Set up the film and shutter speeds.
Fig. 24
Caution: Set up the shutter speed which has been already set up on your camea.
0
Press the measuring button. After releasing it,
blinks showing that your L-308BII is in a stand-by mode
(Fig.25); this holds for about 90 seconds.
@ If the flash is fired, L-308Bll receives the flash light and
displays an aperture value (Fig.26). After firing, the
stand-by mode holds for another 90 seconds, You can
repeat measuring so long as the mark is blinking.
@ If the mark goes out, press the measuring button again to
make another measurement.
Caution:
NOTES
mark
Fig. 25
p&giT--j
-a
ount is small relative to
flash measurement with
Page 13

ow to use the Lumidisc
How to measure light contrast
9.1
@) Fit the Lumidisc on the light receiving part.
See page 3 ‘3.2 How to fit the Lumidisc’.
@ Select the light mode you are going to use with the mode
selector.
@ Hold the L-308BII close to the subject and point the
Lumidisc toward the main light source (turn off the
auxiliary light source). Take reading.
@I Keep holding the L-308BII close to the subject and point the Lumidisc toward the auxiliary light
source (turn off the main light source).
0
Compare the difference in brightness between the main and auxiliary light sources, and
determine the contrast.
(Example) If you read F16 for the main light source and F8 for auxiliary light source, the
NOTE
9.2
01 Fit the Lumidisc on the light receiving part.
0
Select the EV metering mode and set the film speed at IS0 100.
@I Face the Lumidisc toward the lighting and hold the L-308Bll parallel to the subject and take
reading.
@ Determine the brightness level using the following conversion table.
X?
EV to lx conversion table
difference between them is two F stops. Then you will obtain 4:1 contrast as shown
in the above table.
l To obtain exposure, hold the L-308Bll close to the subject and point the
Lumisphere towards the camera with the main light and auxiliary light on.
Using the L-308B II as an illuminance meter
(Example) If you read
the approx. illuminance
value is 1800lx.
EV9 $1
_,
10
Page 14

10.
Specifications
l Digital exposure meter for ambient and flash metering
Type
Light-receiving method
Light-receiving section
Light receiving element
Metering systems
l Incident and reflected light metering system
l Incident light: Lumisphere, Lumidisc
l Reflected light: Lens (light receiving angle of 40°)
l Silicon photo diode
0 Ambient light: Shutter speed-priority metering
l
Flash light:
With synchro cord
Without synchro cord
l
Measuring range
(IS0 100)
Repeat accuracy
Calibration constant
Display range
Ambient light: EVO to EV19.9 (at 0.1 EV step)
*
Flash:
l
Incident light metering:
*
Reflected light metering: K = 12.5
l IS0 (film speed): 3 to 8000 (at
l T (shutter speed):
F1.4 to F90 + 0.9 stop (at 0.1 AV step)
kO.1
EV or less
C
=
340 (lumisphere), C = 250 (lumidisc)
1/3
SV step)
Ambient light: 60 sec to 1/8000 sec (at 1 TV step)
f/s (frames/sec): 8, 12, 16, 18, 24, 25, 30, 32, 64, 128
Opening angle: 180 degrees
Flash:
1 sec to 1/500 sec (at 1 TV step), and 1/75,1/80,1/90,
1/100
l Aperture:
0.5 to 90.9 (at 0.1 AV step)
Other function
*
EV (Exposure Value): -5 to 26.2
l Out-of-range metering:
“E.u” (underexposure) or “E.0” (overexposure) warning indication
l Battery check
l Auto power-off
*
Battery used
Operating temperature
A single type-AA battery (Alkaline or manganese), 1.5V
l 0°C to +4O°C
range
Storage temperature . -20°C to +60°C
range
Dimensions
Weight
Standard accessories
l Approx. 63W x 110H x 22D mm
l Approx. 80 g (without battery)
l Soft case, strap, lumidisc, soft case for lumidisc, synchro terminal cap,
AA battery
The specifications and appearance of the L-308Bll are subject to change without notice due to
improvement.
11
Page 15

11. Instructions and Maintenance Notes
Caution: l To avoid damaging your L-308611, never drop it or subject it to impact.
0 Avoid keeping your L-308Bll in places of high temperature or humidity.
l Avoid excessive temperature changes, otherwise condensation will occur,
resulting in malfunction
l Remove the battery if your L-308Bll is not to be used for a long time.
MAINTENANCE NOTES
l Keep the surfaces of the lumisphere, lens and Lumidisc clean and free from dust,
foreign particles and scratches.
l Wipe off dirt with a soft or silicon cloth,
Never use solvent such as thinner or
benzine.
12
 Loading...