

Page 1
Sega G-80 Multigame Instruction Manual
Version 1.0
Copyright © 1998, Clay Cowgill
clayc@diamondmm.com
Sega G-80 Multigame, Version 1.0 Copyright © 1998, Clay Cowgill
Page 2
Notice Regarding this Upgrade
Warning!
Although this upgrade has been tested and the
techniques used will not directly cause harm to your
Sega G-80 System, if you do something wrong, you
can very seriously damage the game electronics!
To perform this upgrade you should:
• Be familiar with safe handling procedures for electronic components.
• Be able to remove and replace socketed IC’s (chips) without causing damage.
• Be able to follow directions.
Arcade games are rugged equipment, but anytime you start messing around with something (particularly
something electronic) you accept a certain amount of risk that you may break something.
This kit carries with it no guaranty of compatibility to your particular game. Although this kit has been
tested in several Sega G-80 arcade games and CPU boards, there’s a remote possibility that some of
them are different. If you carefully follow these instructions, you’ll do fine and everything will work.
I’ll try to help walk you through any problems you have, but if this looks like it’s above your confidence
level please recruit someone locally to install the kit for you!
Please read these instructions completely through before starting. If at any point your PCB looks
significantly different than what you see in here, please ask before trying something!
Credits and Thanks:
I wanted to take a little space and thank a few people that helped in various ways with this particular
project.
Dave Fish Dave performed the original hacks on the Sega game code to allow all games
to run without their respective security chips. Without Dave’s work, the multigame would not be.
Al Kossow Al has been compiling all technical knowledge of the Sega G-80 system into a
handy reference guide. Al also provided me full source code to his Macintosh
G-80 simulator program so I could use it to modify the original games as needed.
MarkJ, RayG, ZonnM, JoeW, PaulK, and the rest of the “vectorlist” people that helped bounce ideas
around and generally keep me motivated.
Introduction:
Sega G-80 Multigame, Version 1.0 Copyright © 1998, Clay Cowgill
Page 3
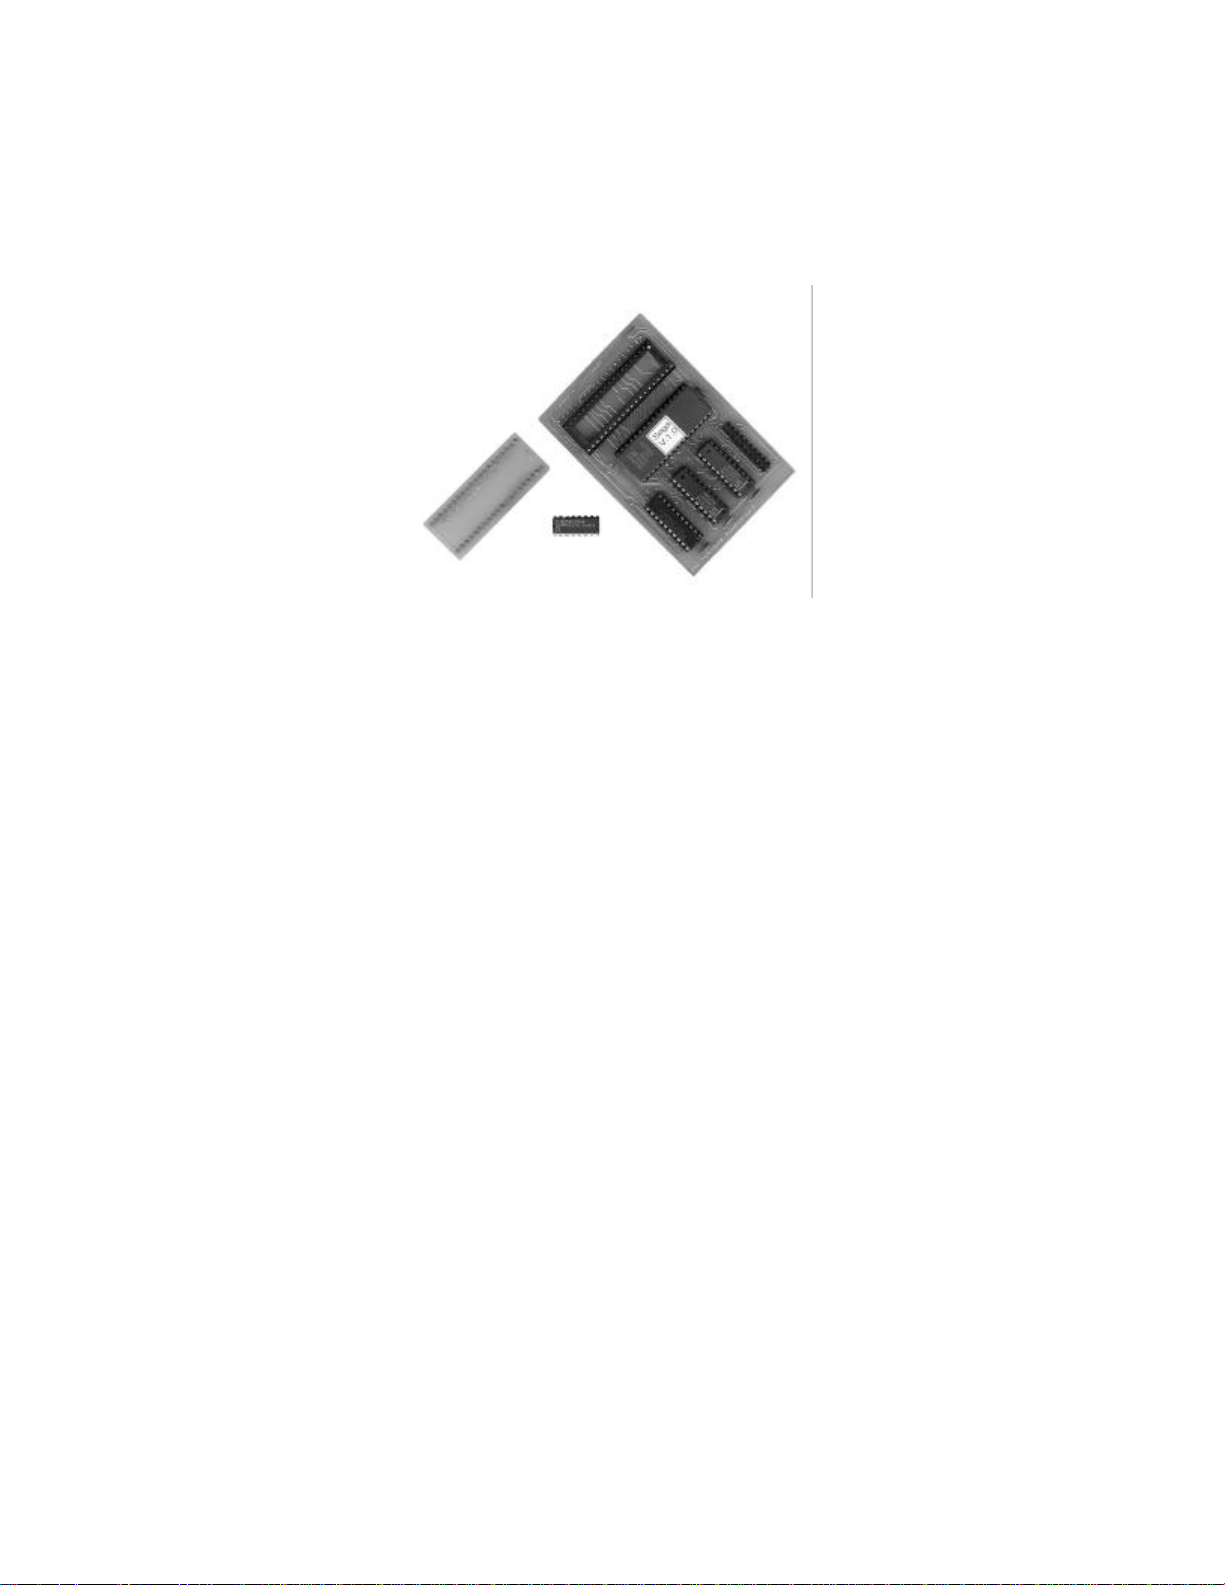
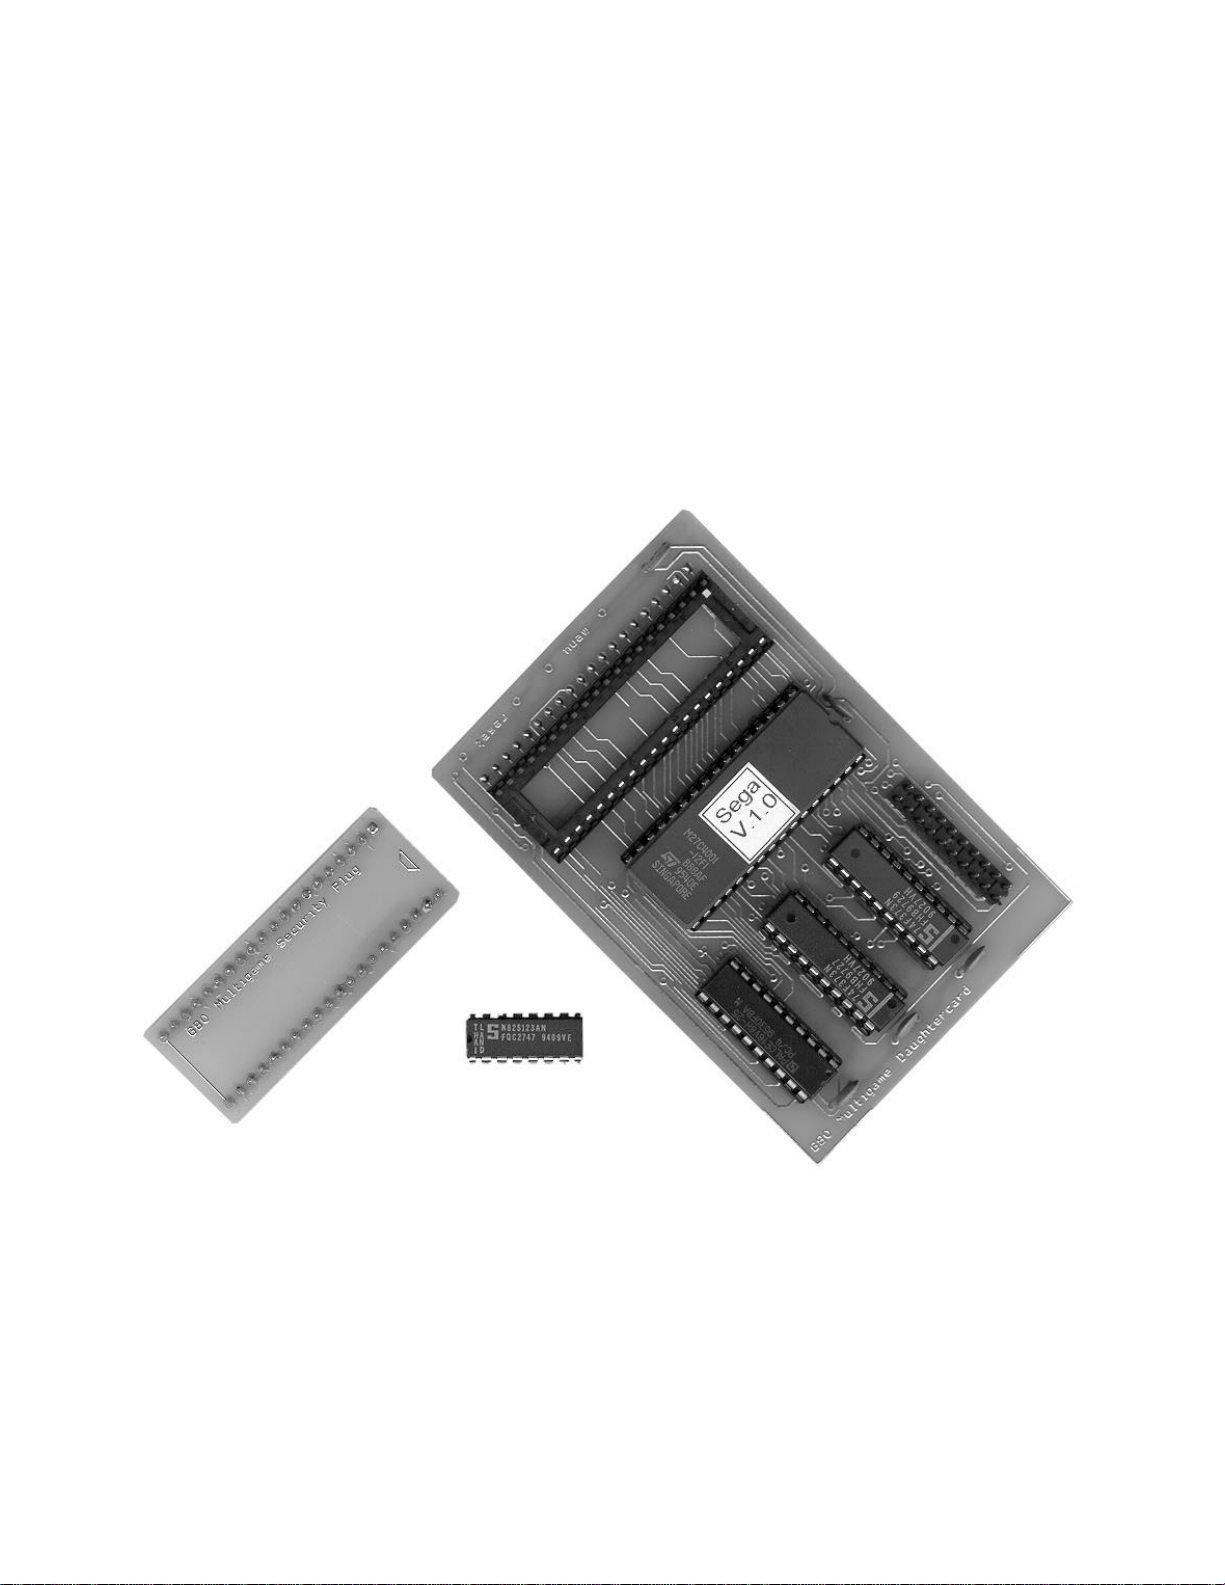
The Sega G-80 Multigame (the “kit”) consists of two assembled printed circuit boards and a replacement
PROM. When installed on the CPU board of Sega G-80 Vector Game (Star Trek, Zektor, Space Fury,
Eliminator, or Tac/Scan) the kit eliminates the need for the EPROM board and allows all the Sega G-80
vector games to be played from a single cabinet. Games are selected from an on-screen menu system.
These instructions describe how to install the kit into a working Sega G-80 arcade game. No soldering is
required and all operations are fully reversible. Please read all these instructions thoroughly before
starting the conversion.
Getting Started:
First, let’s cover what you’ll need in some detail. The kit is designed to be installed into any Sega G-80
Vector Arcade Game (“game” or “machine”), but in order to play all the games you need to have a Star
Trek type control panel. Only Star Trek’s control panel has enough buttons to support all the games.
Remove the CPU and EPROM card:
Start with the machine turned off and unplugged from the wall. Open your game to gain access to the
“card cage”. Depending on the machine, you might need to remove a metal cover to gain access to the
cards inside the card-cage. You will need to remove the cables connected to the CPU board (the one with
the most cables attached to it). Make SURE you mark or somehow identify where the cables need to
re-connect to the cards!
Sega G-80 Multigame, Version 1.0 Copyright © 1998, Clay Cowgill
Page 4

Press the “release” levers on the edges of the CPU board to eject the card. (This can be very difficult if
the card hasn’t been removed in 15 years…) The CPU card looks like this:
Locate the EPROM card (it should be the only card without any cables attached to the end). Press the
release levers on the EPROM card and remove it as well. The EPROM card for different games will
have different numbers of chips on it. It will look something like this:
Put the EPROM card somewhere safe. You won’t need it in your game anymore.
Sega G-80 Multigame, Version 1.0 Copyright © 1998, Clay Cowgill
Page 5

Upgrading the CPU card:
We’ll be removing four chips from the CPU card. They are:
• U15 – a 16 pin PROM
• U21 – a 40 pin security chip
• U25 – a 24 pin 2K EPROM
• U22 – a 40 pin Z-80 processor (usually U22 is not labeled on the PCB)
Using a small-blade standard screwdriver or chip puller, remove the four chips listed above and place
them in a static-safe area. (Be sure you didn’t bend any pins—if you did, bend them back carefully.)
You can put the EPROM, security chip, and PROM with the EPROM card as we will not need them any
longer.
U22
U15
U25
U21
Take the Multigame Daughtercard and hold it so that the empty 40 pin socket is at the bottom, closest to
you. Carefully place the Z-80 processor you removed from U22 into the socket on the Daughtercard.
Pin one of the Z-80 should be in the lower-left corner and the “notch” of the IC should be on the left-side
of the board like the EPROM above it on the Daughtercard. Press the Z-80 down firmly into the socket.
Make sure you didn’t miss any pins or bend any under.
Take the CPU card and hold it so the “card edge” is closest to you. The red “test” switch should be in
the upper-right hand corner. Take the Daughtercard and orient it so the Z-80 is closest to the red “test”
switch. The three smaller chips on the daughtercard should be closest to you. Make sure the pins on the
daughtercard are lining up with the socket at U22 and firmly press the Daughtercard into the socket. It
should seat with a “chunk” sound. The card should be covering the SRAM’s at U26 - U29. Make sure
all the pins line up and go into the socket.
Take the “G80 Multigame Security Plug” and orient it so the “notch” is facing the Daughtercard. (The
text should be “right-side up” as you look at it. Press it firmly into the empty socket at U21. Make sure
all the pins line up and go into the socket.
Sega G-80 Multigame, Version 1.0 Copyright © 1998, Clay Cowgill
Page 6

Place the replacement PROM in socket U15 so that the notch is pointed towards the end of the CPU card
that the red “test” switch is on. The notch should be facing the same direction as the 7400 at U14 and
the 7408 at U13. Press it firmly into the socket. Make sure all the pins line up and go into the socket.
Put it back together and test:
The CPU card is now complete. Plug the CPU card back into the card cage. Note that the CPU card
takes up more space with the Daughter card now, so you may want to re-arrange the order of cards in the
cardcage to give an empty slot next to the CPU card. Putting the CPU card in the “first” card slot so that
there isn’t a neighboring card next to the Daughtercard works well too.
Re-attach the cables and make sure the CPU card is seated properly in the card cage. (It should be flush
with the other cards and the removal levers should rest flat against the front of the circuit board.)
Plug the machine back in. You’ll want to be able to get at the red “test” switch for the next step with the
power to the machine on. Depending on your cabinet there might be different safety-switches you need
to set to allow the machine to run with the door open. Turn the machine on. A game intro-screen should
start as normal. If you don’t get a picture after a few moments, turn the game off, remove the CPU card
and check your work. Look for bent pins and pins that are out of the sockets. The kit is hand-tested
before shipping, so there shouldn’t be any surprises.
Sega G-80 Multigame, Version 1.0 Copyright © 1998, Clay Cowgill
Page 7

Try it out:
Assuming you now have a game on the screen, coin-up and play around for a minute. The Star Trek
control panel is used like so:
Game Spinner “Warp” “Photon” “Thrust” “Fire”
Star Trek rotate warp photon thrust fire
Eliminator - rotate left rotate right thrust fire
Space Fury - rotate left rotate right thrust fire
Tac/Scan rotate - - add ship fire
Zektor rotate - - thrust fire
You may have noticed that “thrust” and “fire” are reversed from how the control panel is labeled. If you
like, open your control panel and swap wires or switches on “thrust” and “fire”. Do that with the power
off, just in case. (There’s a technical reason for having to swap wires, but I won’t go into it. Trust me.)
Time to try the multigame functions. Press the red “test” switch on the CPU card. You should get a title
screen for the multigame. Press the “player 1” start button to go to the menu screen. Press the “player
1” start button to move the selection arrows to a game to play. Press “player 2” start to begin that game.
If you put the arrows on “-more-“ you can switch to the second menu. The available options are
currently:
Option Notes
Star Trek Star Trek, with Star Trek control panel.
Eliminator Eliminator, with Star Trek control panel. Limited to one-player game do to nature
of control panel. Controls are remapped according to table above.
Space Fury Space Fury, with Star Trek control panel. Controls are remapped according to
table above.
Tac/Scan Tac/Scan, with Star Trek control panel. Controls are remapped according to table
above.
Zektor Zektor, with Star Trek control panel. Controls are remapped according to the
table above.
2-player Eliminator Eliminator, with no control changes. You can use this with an Eliminator control
panel to play 2-player games.
4-player Eliminator 4 player Eliminator, with no control changes. You can use this with a 4-player
Eliminator control panel and control adapter to play 4-player games of Eliminator.
Note—this seems to work fine on some machines, but hangs on others. I don’t
know why. Your mileage may vary.
(Table continued on next page)
Sega G-80 Multigame, Version 1.0 Copyright © 1998, Clay Cowgill
Page 8

Space Fury Space Fury, with no control changes. You can use this with a Space Fury control
panel to play Space Fury.
Self Test The self test runs much like a “standard” self test on the G-80. To skip tests, hold
down both Player 1 and Player 2 start buttons for several seconds and then release
them. ROM tests are not performed. Sound tests are limited to the Universal
Sound Board and Star Trek Speech board. When complete, the test will run Star
Trek.
Adding a “menu” button:
If everything seems to be working at this point you can either close everything up and call it quits, or you
can power-down and remove the CPU card again. You may have noticed that there two areas labeled
“reset” and “menu” on the Daughtercard. By attaching a pair of small wires to the holes on either side of
the labels you can add a hard-reset button to the game and/or a “menu” button. Run the pair of wires out
of the card cage and attach them to a push-button normally-open momentary (PBNO momentary) switch.
(Radio Shack has many to choose from.)
Pressing the “menu” button has the same function as pressing the red “test’ button on the CPU card (it
calls the menu). Pressing “reset” is a hard-reset and is useful mostly when developing programs and you
need to “un-hang” the system. Don’t hold either button down too long—it’s possible to damage the
monitor by having it on but not displaying anything on the screen.
Mount your “menu” and/or “reset” buttons where-ever you want.
A note about sound:
The multigame does not currently support sound-switching with anything included with this kit. That
means that whatever sound-card is in your machine will be what you get sounds for. There are basically
three kinds of sound cards:
Sound Card Type Games that use it
Universal Sound Board Tac/Scan, Star Trek
Eliminator Eliminator, Zektor
Space Fury Space Fury
.
Sometime in the future we’ll try to come up with an “all-in-one” soundcard, but for now you’re stuck
with either living with one sound card or making your own switching-system.
Speech boards are compatible between Zektor, Star Trek, and Space Fury. Once again, there’s no “built
in” support for switching speech, but there’s nothing stopping you from doing it yourself if you have the
technical know-how.
Sega G-80 Multigame, Version 1.0 Copyright © 1998, Clay Cowgill
Page 9

Technical information:
This info is for any of you technical-types that want to make your own speech-switchers, sound
switchers, or whatever. You’ll notice that the Daughtercard has an expansion header on it. This gives
you access to two 8-bit output latches. Holding the Daughtercard so that the Z-80 is on the right, the
header pinout is as follows:
D0 D1 D2 D3 D4 D5 D6 D7
+5V Latch2 Latch2 Latch2 Latch2 Latch2 Latch2 Latch2 Latch2 GND
+5V Latch1 Latch1 Latch1 Latch1 Latch1 Latch1 Latch1 Latch1 GND
D7 is the most significant bit, D0 is the least significant bit. As games are selected the following values
are placed on Latch1:
snd_map: ; D7654 3210
.db h'10 ; star trek 0001 0000 (USB)
.db h'21 ; eliminator 0010 0001 (elim/zek)
.db h'42 ; space fury 0100 0010 (sf)
.db h'13 ; tac/scan 0001 0011 (USB)
.db h'24 ; zektor 0010 0100 (elim/zek)
.db h'25 ; elim 2p 0010 0101 (elim/zek)
.db h'26 ; elim 4p 0010 0110 (elim/zek)
.db h'47 ; sf (original) 0100 0111 (sf)
.db h'10 ; self test
Sega G-80 Multigame, Version 1.0 Copyright © 1998, Clay Cowgill
 Loading...