

Page 1

NOTE: Products with a model number that ends with “Q” or have a round green “Q” sticker represent RoHs compliant products.
Manual
SK-3523-SDQ
Heavy-Duty Outdoor Stand-Alone Keypad
Also available from SECO-LARM:
SK-1123-SQ
SK-1123-FQ
SK-1011-SQ
SK-1131-SQ
SK-2323-SPAQ
SK-1323-SDQ
Indoor Keypads
Outdoor Keypads
Page 2
ENFORCER Heavy-Duty Outdoor Stand-Alone Keypad
Sample Application – Connecting to
a Gate Operator ........................................... 8
Wiring – Door Hold Open Code ..................... 9
Wiring – Auxiliary Accessories ...................... 9
Wrong Code Lockout ..................................... 9
Changing Code Length ................................. 9
Restoring Keypad to Factory Default ............ 9
Programming Instructions ..................... 10-11
Factory Defaults .......................................... 11
Troubleshooting ........................................... 11
Operation and Programming
Quick Reference Guide ............................... 12
Warranty ...................................................... 12
Features ........................................................ 2
Parts List ....................................................... 2
Specifications ................................................ 2
Overview ....................................................... 3
LED & Audible Indicators .............................. 3
Dimensions .................................................... 3
Important Notes ............................................. 4
Wiring Diagram .............................................. 4
Reed Jumper ................................................. 4
Installation ..................................................... 5
Wiring – Connecting to a Lock Device
and Arm/Disarm ............................................ 5
User Control Chart .................................... 6-7
Features:
Table of Contents:
Specifications:
Rugged construction: heavy-duty stainless-steel faceplate
with a coated steel backing.
Up to 210 user codes.
Code flexibility: Codes can be 4 or 5 digits long.
Dual voltage: 12~24 VAC/VDC operation.
2 Form C relays rated 12 Amps @ 14VDC.
Door sensing input allows for anti-tailgating operation.
Overhead LEDs and programmable backlit keys for easy use in the dark.
Each relay output can be set from 1~99 seconds or toggle.
Wrong code lockout: After 3 wrong codes are entered, the keypad will go into lockdown for
55 seconds.
All features are programmed directly from the keypad — no need for an external programmer.
EEPROM Memory protects programmed information in case of
power loss.
Tamper switch: N.C. dry contact, 3 Amp @ 125/250 VAC.
Egress / push button input.
Operating Voltage
12~24 VAC/VDC
Current draw
Standby
20mA@12VDC / 10mA@24VDC
Relay active
220mA@12VDC / 110mA@24VDC
Relay outputs
Output #1
12A@14VDC / 7A@120VAC
Output #2
12A@14VDC / 7A@120VAC
Tamper switch
3A@125/250 VAC
Egress (P.B.) input
N.O. Ground
Reed input
N.C. Ground
Operating temperature
-4°~158° F (-20°~70° C)
Dimensions
69/16”x51/16”x43/8” (167x128x112 mm)
Weight
4-lb (1.8kg)
Parts List:
1 x Keypad with steel box
1 x Manual
4 x Mounting screws
4 x Screw anchors
1 x Gasket
Replacement Key
(Sold separately)
SK-3523-KEY
2 SECO-LARM U.S.A., Inc.
Page 3
ENFORCER Heavy-Duty Outdoor Stand-Alone Keypad
LED & Audible Indicators:
Dimensions:
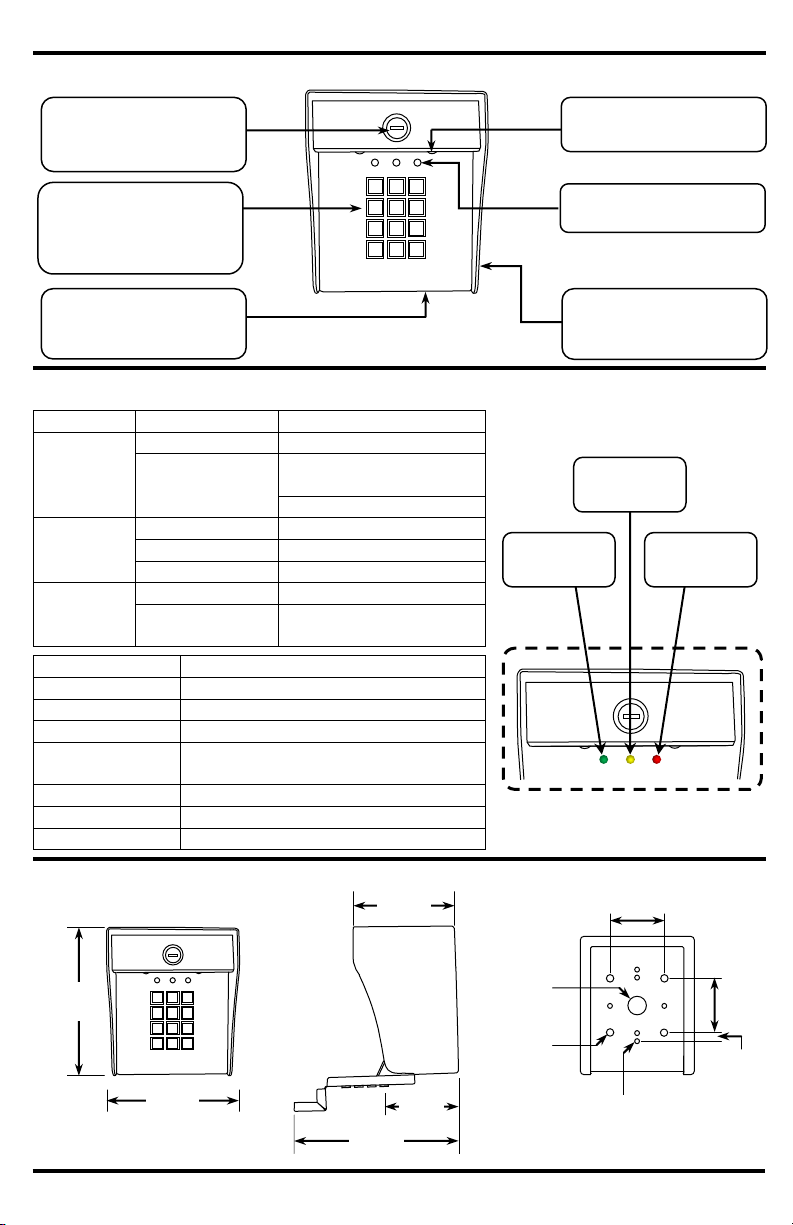
Overview:
1 2 3 4 5 6 7 8 9 0 #
Heavy duty: Weather and
vandal resistant for
protected installations.
Keylock: Provides secure
access to the interior of
the keypad.
Overhead LEDs: Illuminate
the face of the keypad.
LED indicators: Show the
status of the keypad.
Keypad: Heavy-duty
programmable backlit
keys provide years of use
in adverse weather.
CDS sensor: Turns on
overhead LEDs when the
surrounding area is dark.
Audible Tones
Keypad Status
1 Short beep
Key press
1 Long beep
Valid access code / valid entry
2 Short beeps
Enter / exit programming mode
3 Short beeps
Incorrect user code (3 sec. after code
entered) / invalid input programming mode
15 Long beeps
All Output #1 or Output #2 codes cleared
22 Short beeps
Code length changed
26 Short beeps
Keypad restored to factory default
LED
Indicator
Keypad Status
Green
Solid
Output #1 active/occupied
Flashing
Waiting to program
Output #1 user code
Door open*
Yellow
Solid
Master code programmed
Slow flash
Standby
Fast flash
Programming mode
Red
Solid
Output #2 active/occupied
Flashing
Waiting to program
Output #2 user code
Green LED
Yellow LED
Red LED
Rear:
Side:
Front:
21/2”
(64mm)
21/2”
(64mm)
1”
(25mm)
83/8”
(213mm)
43/8”
(112mm)
3
/16”
(5mm)
1
/2”
(13mm)
5
/16”
(8mm)
1
2
3
4 5 6 7 8 9 0
#
51/16”
(128mm)
27/8”
(74mm)
69/16”
(167mm)
*See Reed Jumper (page 4)
SECO-LARM U.S.A., Inc 3
Page 4
ENFORCER Heavy-Duty Outdoor Stand-Alone Keypad
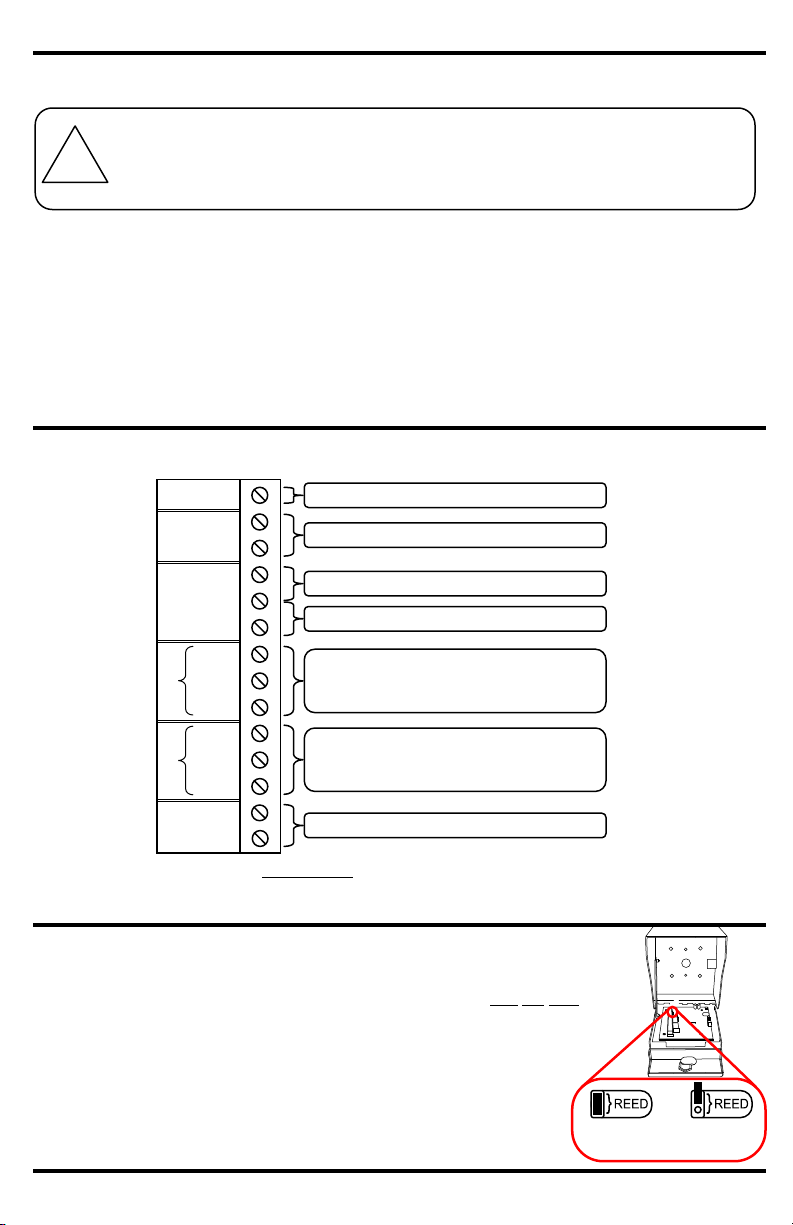
When the reed jumper is in place (default), the door sensor input is bypassed.
To enable the door sensor input, place the reed jumper on one pin only.
When the door sensor input is enabled, connect the COM (-) terminal
and REED terminal to a N.C. contact. The keypad will deactivate
output #1 whenever the contact is opened and closed, working as an
anti-tailgating feature.
The green LED will flash rapidly whenever the N.C. contact is open
and the relay is inactive.
Important Notes:
1. Always disconnect power before servicing the keypad.
2. The keypad must be properly grounded. Use a minimum 22AWG (18AWG is best) wire to
ground the circuit board’s earth terminal. Failure to do so may damage the keypad.
3. All wiring and programming should be done by a professional installer to reduce the risk of
improper installation.
4. Operating instructions are located on page 12 of this manual. Be sure to store this manual
in a safe place for future reference.
Wiring Diagram:
Earth ground terminal: Connect a continuous wire from the Earth Ground terminal to a grounding point to avoid
damage from static discharge. If using an AC adapter for power input, do not connect the AC adapter output to
Earth Ground.
Reed Jumper:
Earth ground
Power 12~24 VAC / VDC (non-polarity)
Reed / door sensing input (N.C.)
Push button / egress input (N.O.)
Relay 1
12A@14VDC, Form C, NO/NC/COM
Relay 2
12A@14VDC, Form C, NO/NC/COM
N.C. Tamper output (3A@125/250VAC)
12~24
VAC/VDC
REED
COM (-)
EG IN
OUTPUT 1
OUTPUT 2
N.O.
COM
N.C.
N.O.
COM
N.C.
N.C.
Tamper
EARTH
GROUND
Door Sensor
Bypassed
(Default)
Door Sensor
Enabled
IF USING THE SK-3523-SDQ WITH A MECHANICALLY OPERATED DOOR OR
GATE, MOUNT THE KEYPAD AT LEAST 10 FEET FROM THE DOOR OR GATE TO
PREVENT USERS FROM BEING CRUSHED OR PINNED. FAILURE TO DO SO MAY
RESULT IN SERIOUS INJURY OR DEATH.
!
4 SECO-LARM U.S.A., Inc.
Page 5
ENFORCER Heavy-Duty Outdoor Stand-Alone Keypad
Installation:
1. Unlock the keylock mounted on the face of the keypad
with one of the included keys.
2. Open the faceplate of the keypad. The hinge will allow
the faceplate to open to a 90° angle.
3. Remove the 1” wiring hole cover from back of keypad.
4. Run wires into the keypad using the 1” wiring hole on
the back of the enclosure.
5. Using the wiring diagram on pg. 4, wire the keypad
according to the specific application.
6. Place the included gasket between the keypad and
mounting surface.
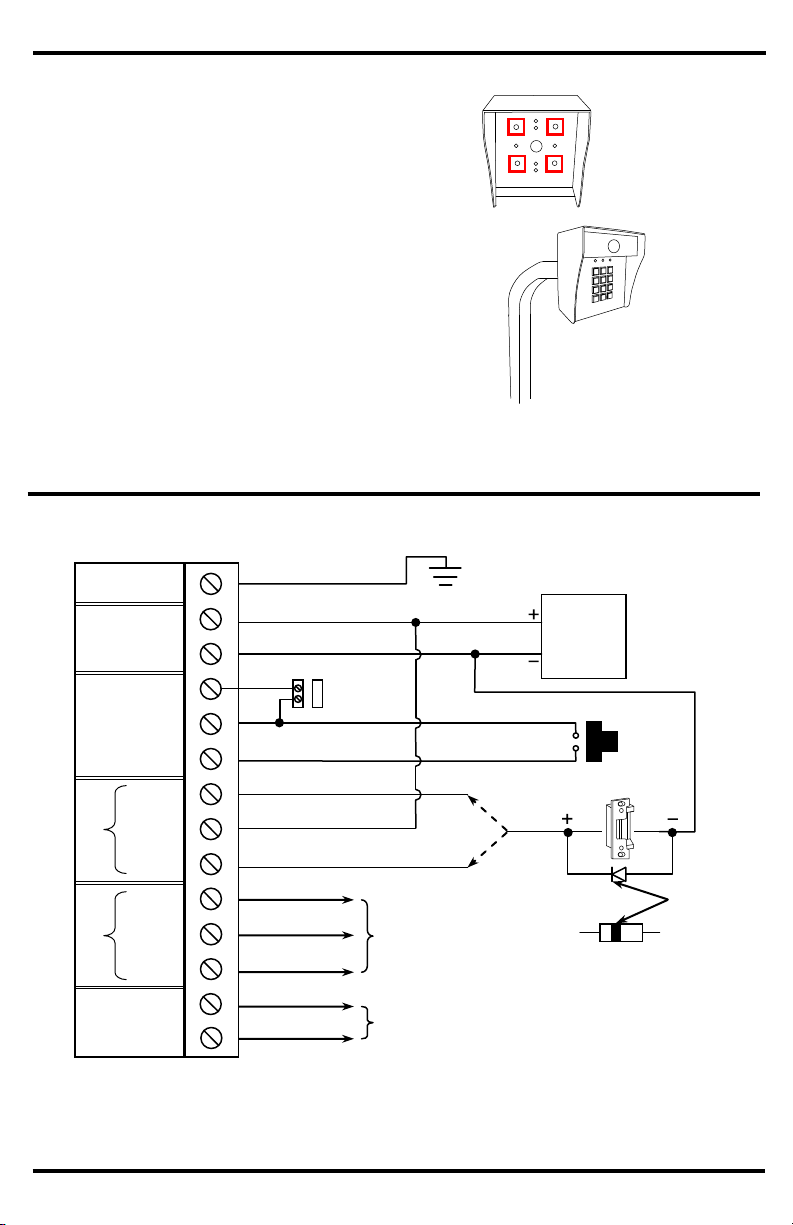
7. If attaching the keypad to a mounting plate such as a
gooseneck stand, use the 4 mounting plate holes
located on the back of the keypad.
These holes are
used to mount the
keypad to a
gooseneck stand.
Wiring – Connecting to a Lock Device and Alarm Arm/Disarm:
1
Connect a IN4004 diode (not included) as close as possible and in parallel with an electric strike.
This absorbs possible electromagnetic interference to prevent operation of the strike from
damaging the keypad. Do not connect a diode when using electromagnetic locks.
2
Please consult the alarm control panel’s manual for more information.
Cathode
To alarm control panel
(24-hour N.C. zone)2
To alarm control panel
(Alarm arm/disarm control)2
IN4004
Diode
Electric strike
Egress
button
EARTH
GROUND
12~24
VAC/VDC
REED
OUTPUT 1
OUTPUT 2
COM (-)
EG IN
N.O.
COM
N.C.
N.O.
COM
N.C.
N.C.
Tamper
12~24
VAC/VDC
Power Supply
Magnetic
contact
SECO-LARM U.S.A., Inc 5
Page 6

SK-3523-SDQ – User Control Chart
USER ID
User Name
Access Code
001
SAMPLE – John Doe
4321
001
002
003
004
005
006
007
008
009
010
011
012
013
014
015
016
017
018
019
020
021
022
023
024
025
026
027
028
029
030
031
032
033
034
035
036
037
038
039
040
041
042
043
044
045
046
047
048
049
050
USER ID
User Name
Access Code
001
SAMPLE – John Doe
4321
051
052
053
054
055
056
057
058
059
060
061
062
063
064
065
066
067
068
069
070
071
072
073
074
075
076
077
078
079
080
081
082
083
084
085
086
087
088
089
090
091
092
093
094
095
096
097
098
099
100
Output #2: □ Toggle □ Timed (___secs.) Programmed for _________________
Output #1: □ Toggle □ Timed (___secs.) Programmed for _________________
USER ID
User Name
Access Code
001
SAMPLE – John Doe
4321
201
202
203
204
205
USER ID
User Name
Access Code
001
SAMPLE – John Doe
4321
206
207
208
209
210
Note: Up to 200 users may be programmed to Output #1.
Page 7
ENFORCER Heavy-Duty Outdoor Stand-Alone Keypad
N.O.
To earth ground
Gate
operator
Power output
Gate open/close signal input
EARTH
GROUND
12~24
VAC/VDC
REED
COM (-)
EG IN
OUTPUT 1
N.O.
COM
N.C.
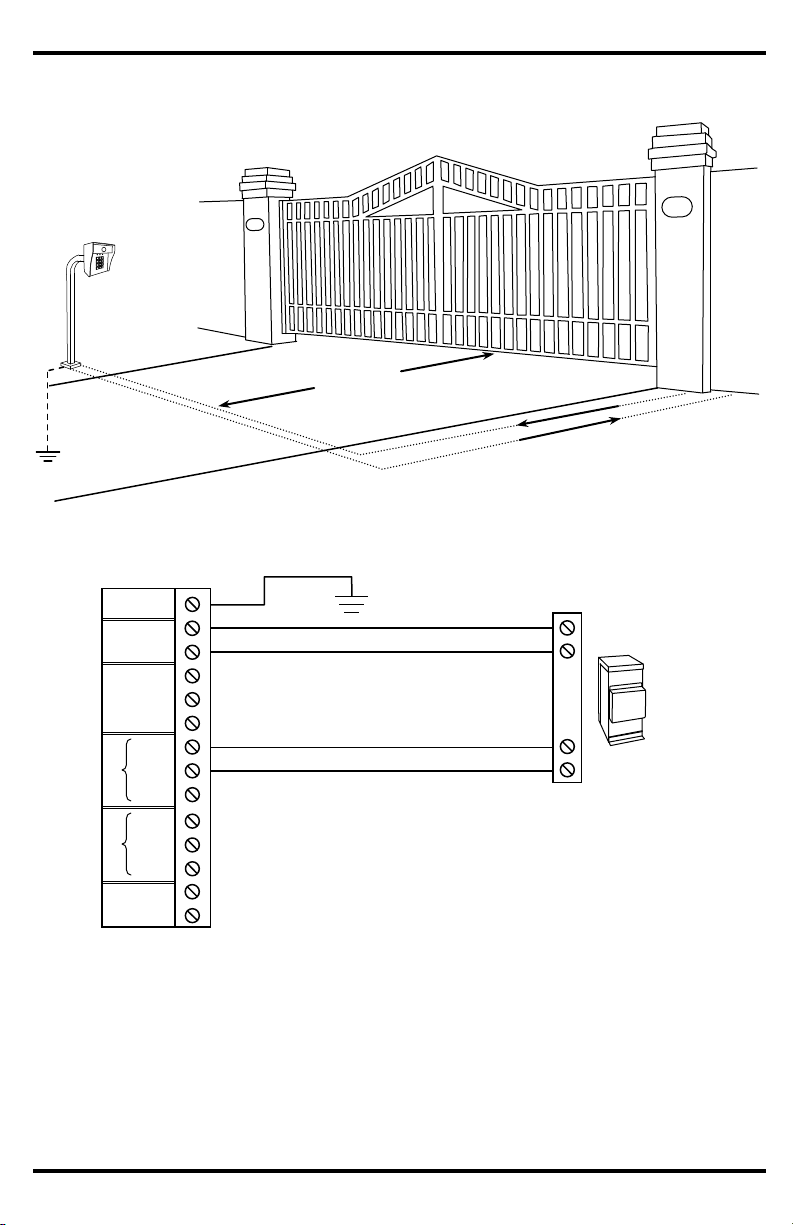
Sample Application: Connecting to a Gate Operator
1. Run a continuous wire from the earth terminal to earth ground. For more details, please see
page 4, Earth Ground Terminal.
2. Run two wires from the gate operator’s power output terminals to the SK-3523-SDQ’s
power terminals.
3. Run two wires from Output #1 on the SK-3523-SDQ to the open/close signal input terminals of
the gate operator. Please consult your gate operator manual for more detailed instructions.
OUTPUT 2
COM
N.C.
N.C.
Tamper
Gate open/close
signal input
To earth ground
Power to keypad
At least 10ft (3m)
8 SECO-LARM U.S.A., Inc.
Page 8
ENFORCER Heavy-Duty Outdoor Stand-Alone Keypad
OUTPUT 2
4-Digit
code length
(Default)
12~24
VAC/VDC
Power
Supply
N.C.
N.C.
1. If an incorrect code is entered 3 times in a row, the keypad will lock down.
2. To use the keypad again wait 55 seconds or disconnect and reconnect the power.
3. To avoid lockout, wait 5 seconds after entering an incorrect code. The keypad will give 3
short beeps. It is now safe to enter another code without being locked out.
Wrong Code Lockout:
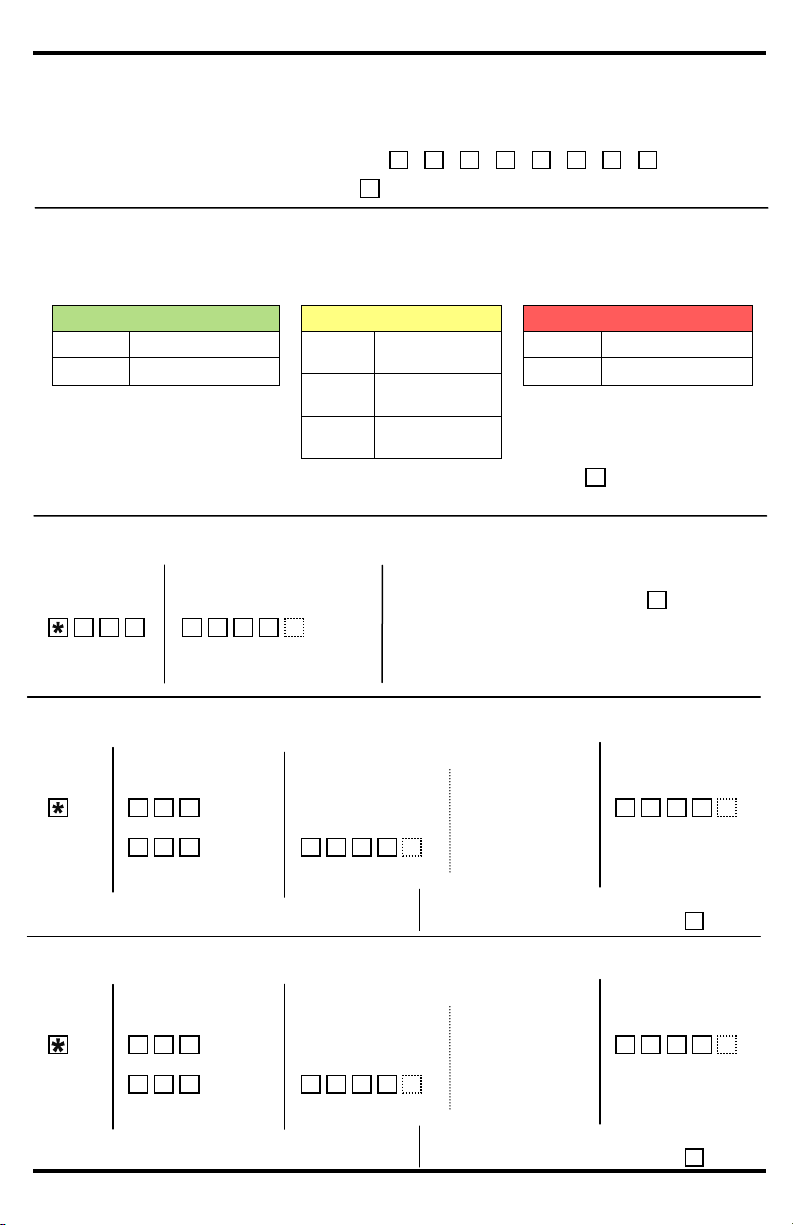
Changing Code Length:
1. Disconnect power to the keypad.
2. To make the code length 5 digits, place the PIN3 jumper on pins 1 and 2.
3. To make the code length 4 digits, place the PIN3 jumper on pins 2 and 3 (default).
4. Reconnect power to the keypad.
5. Keypad will beep 22 times, then return to standby mode.
Note: This will delete all previous codes, including the master code. All
other programming will remain.
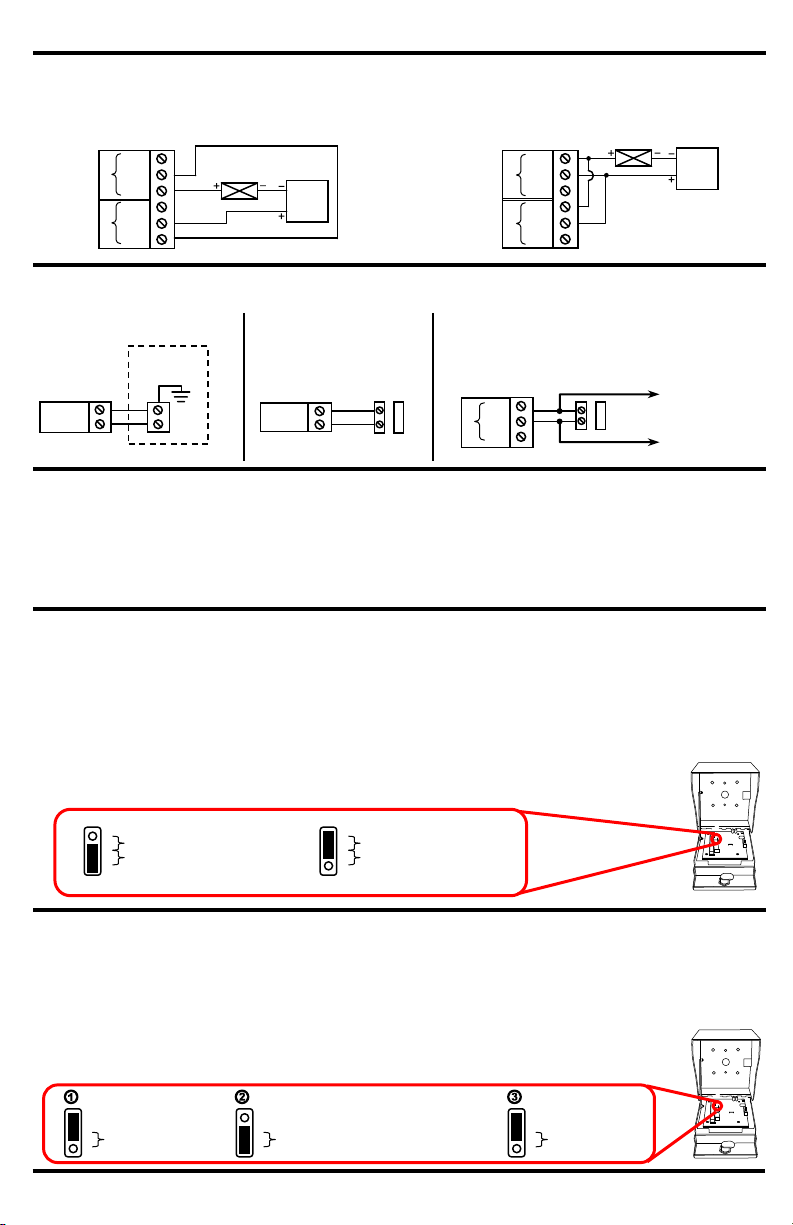
For N.C. locking devices:
Connect output 2 in series with the locking device
For N.O. locking devices:
Connect output 2 in series with the locking device
Wiring – Door Hold Open Code:
Tamper N.C.
Door Sensing
Wiring – Auxiliary Accessories:
Relay Output #2 – Example, to shunt
an alarm N.C. zone
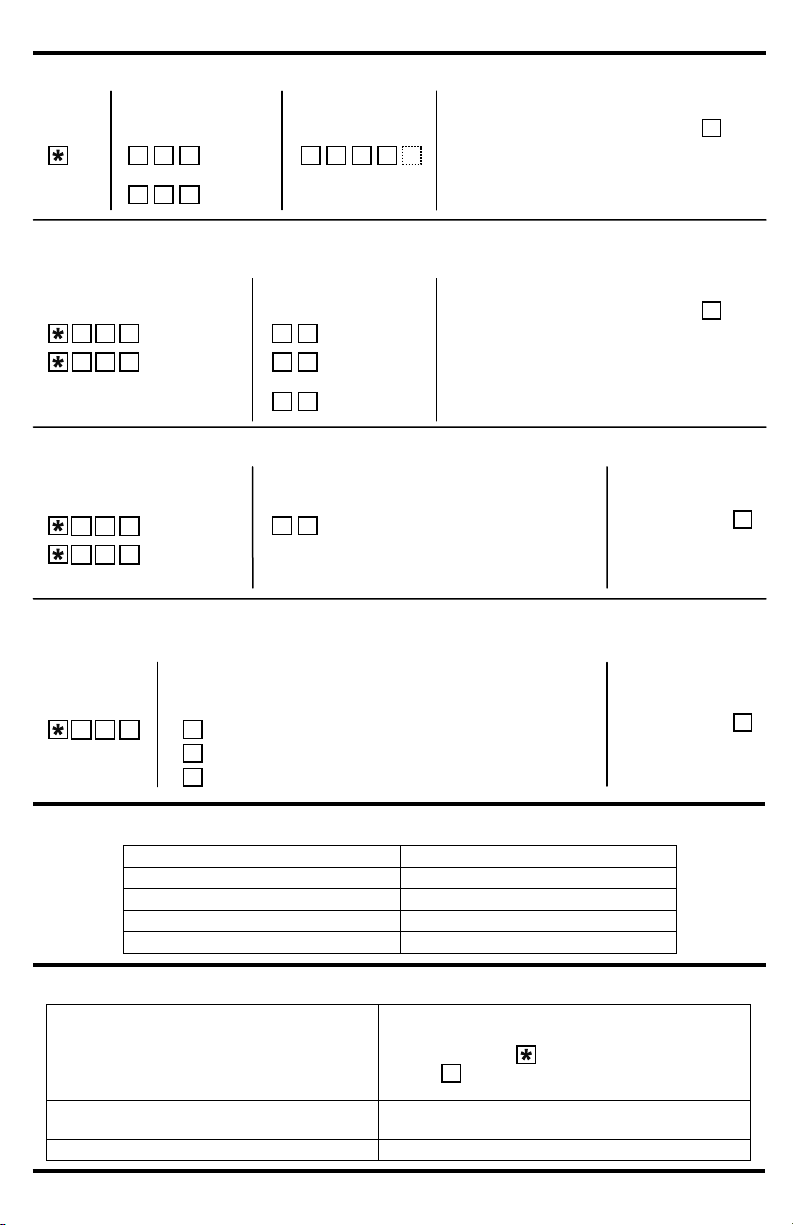
Restoring Keypad to Factory Default (see pg. 11):
1. Pull the PIN2 jumper from pins 1 and 2 (default).
2. Place the PIN2 jumper on pins 2 and 3. Wait for the keypad to beep 26 times.
3. Pull the jumper and place on pins 1 and 2. The keypad is now ready to be
reprogrammed using the programming instructions on page 10.
Note: This resets the keypad to factory default settings. All user codes
are deleted and the master code is 1234 or 12345 (see above).
To the protection zone of
an alarm control panel
Keypad will
beep 26 times
Alarm
Control Panel
Magnetic
Door Contact
(N.C.)
Magnetic
Door Contact
(N.C.)
OUTPUT 1
OUTPUT 2
N.O.
COM
N.C.
N.O.
COM
OUTPUT 1
OUTPUT 2
N.O.
COM
N.C.
N.O.
COM
N.C.
Tamper
REED
COM (-)
N.O.
COM
N.C.
Electromagnetic
Lock
Electromagnetic
Lock
12~24
VAC/VDC
Power
Supply
5-Digit
code length
1
2
3
5 digits
4 digits
S.R. (System restore)
JUMPER
1
2
3
5 digits
4 digits
1
2
3
S.R. (System restore)
JUMPER
S.R. (System restore)
JUMPER
1
2
3
1
2
3
SECO-LARM U.S.A., Inc 9
Page 9
ENFORCER Heavy-Duty Outdoor Stand-Alone Keypad
Step 5
Restart from Step 1 to program another Output #2 User Code.
Step 6
Return to programming mode by entering:
#
Enter:
1. The master code is always 4 or 5 digits, depending on the set code length (see pg. 9).
2. To enter programming mode enter the master code twice.
Example: If the master code is 1234, enter
3. To exit programming mode, press the key or wait 25 seconds.
#
Programming Tips:
1 2 3 4 1 2 3
4
Programming a New Master Code:
NOTE: The default master code is 1234 (4 digits) or 12345 (5 digits)
Program a new master code immediately.
Take note of the keypad status LEDs.
Green
Flashing
Output #1 available
Solid
Output #1 occupied
Yellow
Steady
flashing
Standby
mode
Rapid
flashing
Programming
mode
Solid
Master code
programmed
Red
Flashing
Output #2 available
Solid
Output #2 occupied
If you are unsure of which mode the keypad is in, repeatedly press until the yellow
LED is flashing steadily, then re-enter programming mode.
#
0
Step 1
Step 2
Step 3
Enter a new master code:
0 0 X X X
X
The yellow LED will turn solid,
confirming the new master code.
X
Programming Instructions:
Programming an Output #1 User Code:
NOTE: No code may be set as 0000 or 00000.
Enter:
Step 1
Enter a user ID number:
Step 2
0 0 1
2 0 0
to
If the green LED is solid,
delete the existing code
by entering:
Step 3
0 0 0 0 0
If the green LED is
flashing, proceed to the
next step.
Enter a new user code:
Step 4
X X X X X
The green LED will turn
solid, confirming the new
user code.
Return to programming mode by entering:
#
Programming an Output #2 User Code:
NOTE: No code may be set as 0000 or 00000.
Enter:
Step 1
Enter a user ID number:
Step 2
2 0 1 2 1
0
to
If the red LED is solid,
delete the existing code
by entering:
Step 3
0 0 0 0 0
If the red LED is
flashing, proceed to the
next step.
Enter a new user code:
Step 4
X X X X X
The red LED will turn
solid, confirming the new
user code.
Step 5
Restart from Step 1 to program another Output #1 User Code.
Step 6
Return to programming mode by entering:
#
10 SECO-LARM U.S.A., Inc.
Page 10
ENFORCER Heavy-Duty Outdoor Stand-Alone Keypad
Enter:
Step 3
Step 1
Enter a user ID number:
Step 2
0 0 1 2 1
0
to
Enter:
Factory Defaults:
Code length
4 Digits
Master code
1234
Output #1 timer
5 Seconds
Output #2 timer
5 Seconds
Keypad backlighting
10 Seconds after a key press
Troubleshooting:
Keypad programming option won’t work
Make sure the keypad is in programming mode. Enter
programming mode by entering the master code twice.
Make sure to press before every programming option.
Press until you have exited programming mode. Try
entering programming mode again.
Keypresses and programming options won’t register
The keypad may be in lockout mode. Wait 55 seconds,
or disconnect and reconnect the power
A device wired to the keypad won’t activate
Check the wiring diagram on page 4.
Setting Output #1 or Output #2 Timer:
NOTE: Default setting is 5 seconds for both outputs.
Deleting All Output #1 or Output #2 User Codes
9 9 9
Programming the Keypad Backlighting
NOTE: Default setting is keypad backlighting is ON for 10 seconds after a key press.
5 5 5
Keypad backlighting is always OFF
0 1 2
Deleting Individual Output #1 or Output #2 User Codes:
Enter:
Step 4
Step 1
Enter:
Step 2
0 1 9
9
to
Step 3
3 0 0 4 0 0 0
0
Output #1
Output #2
Toggle
1 second
99 seconds
Enter:
Step 1
8 8 8
Output #1
Output #2
Enter:
Step 2
Deletes all output codes for the selected output.
Enter:
Step 1
Keypad backlighting is always ON
Keypad backlighting is ON for 10 seconds after a key press
Enter:
Step 2
Step 3
Return to programming
mode by entering:
#
to
# 0 0 0 0
0
Return to programming mode by entering:
#
Return to programming mode by entering:
#
0 0
Keypad will beep 15 times after deleting output codes.
Step 3
Return to programming
mode by entering:
#
SECO-LARM U.S.A., Inc 11
Page 11
ENFORCER Heavy-Duty Outdoor Stand-Alone Keypad
NOTICE: The information and specifications printed in this manual are current at the time of publication. However, the
SECO-LARM policy is one of continual development and improvement. For this reason, SECO-LARM reserves the right to
change specifications without notice. SECO-LARM is also not responsible for misprints or typographical errors.
Copyright © 2013 SECO-LARM U.S.A., Inc. All rights reserved. This material may not be reproduced or copied, in whole
or in part, without the written permission of SECO-LARM.
WARRANTY This SECO-LARM product is warranted against defects in material and workmanship while used in normal
service for a period of two (2) years from the date of sale to the original consumer customer. SECO-LARM’s obligation is
limited to the repair or replacement of any defective part if the unit is returned, transportation prepaid, to SECO-LARM.
This Warranty is void if damage is caused by or attributed to acts of God, physical or electrical misuse or abuse, neglect,
repair, or alteration, improper or abnormal usage, or faulty installation, or if for any other reason SECO-LARM determines
that such equipment is not operating properly as a result of causes other than defects in material and workmanship.
The sole obligation of SECO-LARM, and the purchaser’s exclusive remedy, shall be limited to replacement or repair only,
at SECO-LARM’s option. In no event shall SECO-LARM be liable for any special, collateral, incidental, or consequential
personal or property damages of any kind to the purchaser or anyone else.
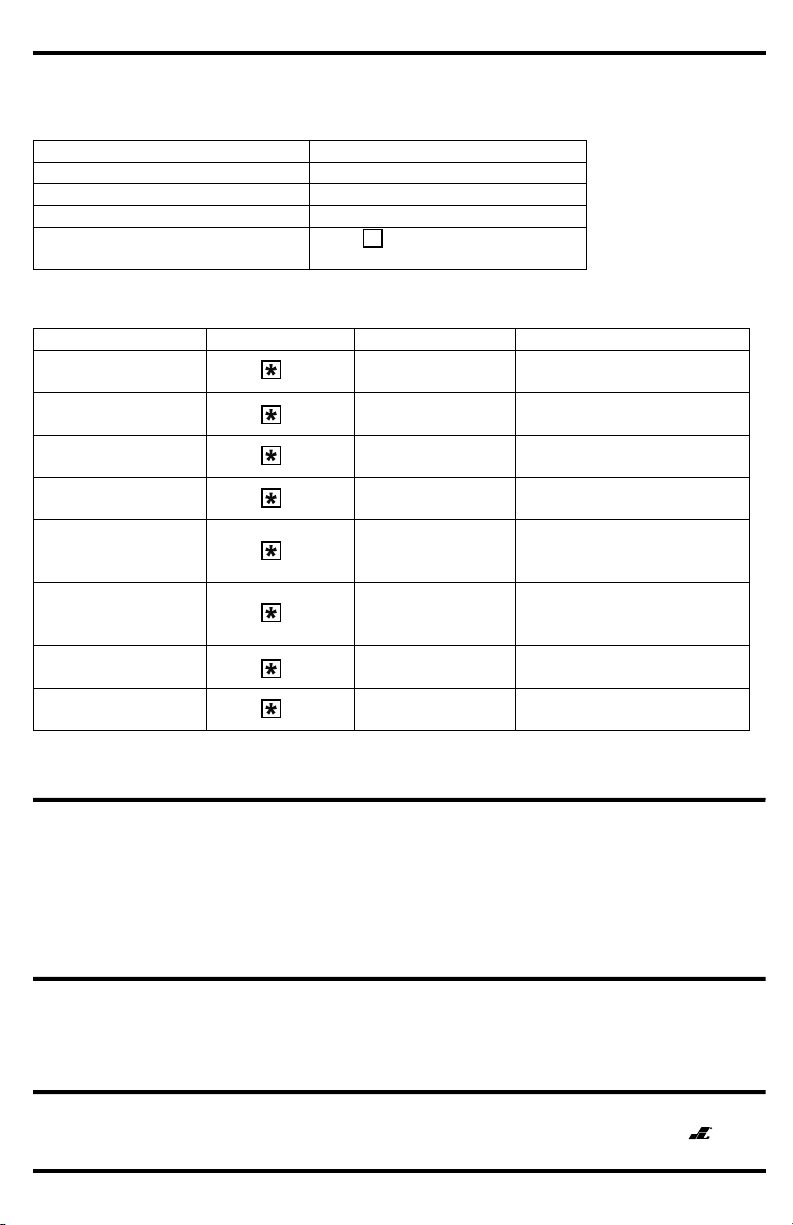
Operation and Programming Quick Reference Guide:
mi-SK-3523-SDQ_1301.docx
PITGW1
SECO-LARM
®
U.S.A., Inc.
16842 Millikan Avenue, Irvine, CA 92606 Website: www.seco-larm.com
Tel: 800-662-0800 / 949-261-2999 Fax: 949-261-7326 E-mail: info@seco-larm.com
Operation Function
Action
Enter an Output #1 user code
Directly enter on the keypad
Enter an Output #2 user code
Directly enter on the keypad
Enter programming mode
Enter the master code twice
Exit programming mode
Press repeatedly until the yellow
LED is flashing steadily.
Operation Function
Step 1
Step 2
Step 3
Programming a new
master code
Press
Enter 000
Enter the new master code
Programming an
Output #1 user code
Press
Enter an Output #1
ID number 001~200
Enter an Output #1 user code
Programming an
Output #2 user code
Press
Enter an Output #2
ID number 201~210
Enter an Output #2 user code
Deleting a user code
Press
Enter an ID number
001~210
Enter 0000 or 00000
Output #1 timer
Press
Enter 300
Enter: 00 for toggle
01 to 99 for # seconds
output will activate
Output #2 timer
Press
Enter 400
Enter: 00 for toggle
01 to 99 for # seconds
output will activate
Delete all Output #1
Users
Press
Enter 888
Enter 00
Delete all Output #2
Users
Press
Enter 999
Enter 00
Note: For complete programming instructions, please see page 10, Programming Instructions.
The following functions are performed after entering Programming Mode.
#
12 SECO-LARM U.S.A., Inc.
 Loading...