

Page 1
OWNER’S MANUAL
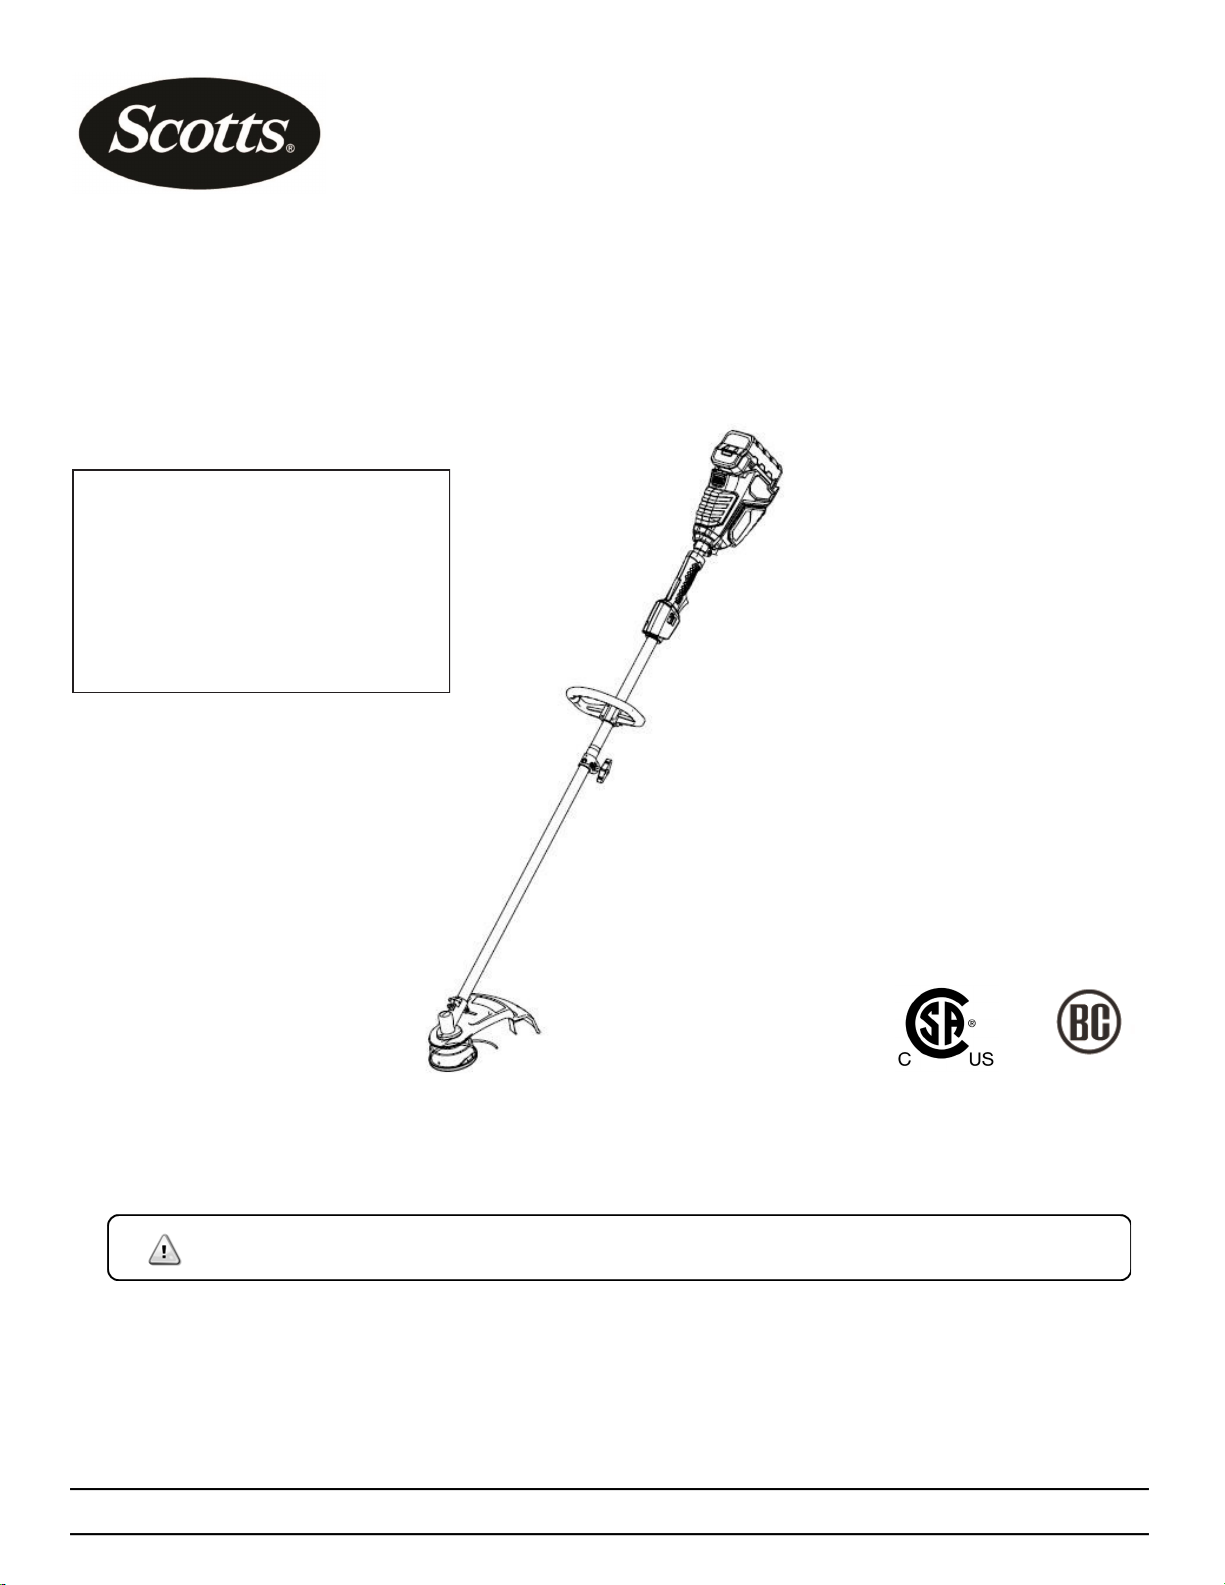
CORDLESS STRING TRIMMER 62 VOLT LITHIUM
BRUSHLESS MOTOR
Copyright. All Rights Reserved.
Model LST01562S
Your string trimmer has been engineered and manufactured to our high standard for dependability, ease of operation, and
operator safety. Properly cared for, it will give you years of rugged, trouble-free performance.
WARNING: To reduce the risk of injury, the user must read and understand the owner’s manual before using
this product.
Thank you for your purchase.
DO NOT RETURN THIS PRODUCT TO THE STORE. OPERATING,
ASSEMBLY, PARTS, SERVICE QUESTIONS? GO TO
SCOTTS.AMERICANLAWNMOWER.COM OR CALL 1-800-618-7474
BETWEEN 8:00 AM—5:00 PM EST FOR ASSISTANCE.
SAVE THIS MANUAL FOR FUTURE REFERENCE
CA Compliant charger
included, Model No.
CHL86200)
244026
BATTERY MUST BE CHARGED
BEFORE FIRST USE. TWO TO
THREE INITIAL CHARGING/
DISCHARGING CYCLES MAY
BE REQUIRED TO ACHIEVE
MAXIMUM RUN TIME/
CAPACITY.
Page 2

TO REDUCE RISK OF INJURY:
Before any use, be sure everyone using this tool reads and understands
all safety instructions and other information contained in this manual.
CAUTION: Wear appropriate personal hearing protection during use.
Under some conditions and duration of use, noise from this product may
contribute to hearing loss.
Save these instructions and review frequently prior to use and in
instructing others.
WARNING: When using electric gardening appliances, basic safety
precautions should always be followed to reduce risk of fire, electric
shock, and personal injury, including the following:
READ ALL INSTRUCTIONS
KEEP CHILDREN AWAY - All visitors, children and pets should stay at a
safe distance from the work area.
DRESS PROPERLY – Don’t wear loose clothing or jewelry.
Wear protective hair covering to contain long hair. They can be caught in
moving parts. Use of rubber gloves and substantial footwear is
recommended when working outdoors. Always wear long pants while
operating this string trimmer.
USE SAFETY GLASSES –Wear safety glasses with side shields or
goggles that are marked to comply with ANSI Z87.1 standard when
operating this product. Use face or dust mask if operation is dusty.
USE RIGHT APPLIANCE – Do not use appliance for any job except that
for which it is intended.
REMOVE THE BATTERY FROM THE STRING TRIMMER when not in
use or when servicing or cleaning. Do not leave unattended.
CHECK DAMAGED PARTS – Before further use of the string
trimmer, a guard or other part that is damaged should be carefully checked
to determine that it will operate properly and perform its intended function.
Check for alignment of moving parts, binding of moving parts, breakage of
parts, mounting and any other condition that may affect its operation. A
guard or other part that is damaged should be properly repaired or replaced.
Call our customer service help line at 1-800-618-7474 for assistance.
LIGHTING - Only operate trimmer in daylight or good artif icial light.
DON’T OVERREACH – Keep proper footing and balance at all times.
WARNING: Do Not use the string trimmer with any type of
accessory or attachment. Such usage might be hazardous.
AVOID DANGEROUS ENVIRONMENTS – Don’t use trimmer in rain,
damp or wet locations. Do not operate trimmer in gaseous or explosive
atmospheres. Motors in these tools normally spark, and the sparks might
ignite fumes.
AVOID UNINTENTIONAL STARTING – Be sure switch trigger is in the
locked or off position before inserting battery pack. Carrying tools with
your finger on the switch trigger or inserting the battery pack into a tool
with the switch on invites accidents.
DANGER: Risk of cut. Keep hands away from lines. Keep both hands on
handles when power is on.
DANGER: Don’t use tool if switch trigger does not turn it on or off. Call
Customer Service for assistance.
DANGER: Do not dispose of the batteries in a fire. The cell may explode.
Check with local codes for possible special disposal instructions.
DANGER: Do not open or mutilate the batteries. Released
electrolyte is corrosive and may cause damage to the eyes or skin. It may
be toxic if swallowed.
WARNING: Keep guards in place and in working order.
WARNING: Keep hands and feet away from cutting area.
DO NOT ATTEMPT to remove cut material or hold material to be cut
when lines are moving. Make sure trimmer switch is off when clearing
jammed material from guard. Do not grasp the guard or lines when picking
up or holding the trimmer.
CAUTION: Lines coast after turned off.
DON’T FORCE STRING TRIMMER – It will do the job better and with less
likelihood of a risk of injury at the rate for which it was designed.
STAY ALERT – Watch what you are doing. Use common sense. Do not
operate string trimmer when you are tired or under the influence of
medications, drugs or alcohol.
STORE IDLE STRING TRIMMER INDOORS – When not in use, your
string trimmer should be stored indoors in a dry and high or locked-up
place, out of reach of children.
WARNING: Do not operate the equipment while barefoot or when
wearing sandals or similar lightweight footwear. Wear protective
footwear that will protect your feet and improve your footing on
slippery surfaces.
WARNING: Use only identical manufacturer’s recommended
replacement parts. Use of any other parts may create a hazard or
cause product damage.
WARNING: Use only the manufacturer’s replacement string in the
cutting head when using a string trimmer attachment. Do not use
any other cutting attachment, for example, metal wire, rope, or the
like. To install any other brand of cutting head to the string trimmer
attachment can result in serious personal injury.
MAINTAIN TRIMMER WITH CARE – Keep guard and handles
clean for best performance and to reduce the risk of injury. Keep
handles dry and free from oil and grease.
WARNING: California Proposition 65: This product contains
chemicals known to the State of California to cause cancer, birth
defects or other reproductive harm.
WARNING: Some dust created by this product could contain
chemicals known to the State of California to cause cancer and birth
defects or other reproductive harm. Some examples of these
chemicals are:
-chemicals in fertilizers
-compounds in insecticides, herbicides and pesticides
-arsenic and chromium from chemically treated lumber
Your risk from exposure to these chemicals varies, depending on
how often you do this type of work. To reduce your exposure to
these chemicals, wear approved safety equipment such as dust
masks that are specially designed to filter out microscopic particles.
WARNING: Cancer and Reproductive Harm www.P65Warnings.ca.gov.
CAUTION: Use only the following type and size battery(ies):
BL86225, BL86240, BL86250.
CAUTION: Exercise care in handling batteries in order not to short
the battery with conducting materials such as rings, bracelets, and
keys. The battery or conductor may overheat and cause burns.
Disconnect the battery pack from the appliance before making any
adjustments, changing accessories, or storing appliance. Such
preventive safety measures reduce the risk of starting the appliance
accidentally.
When battery pack is not in use, keep it away from other metal
objects, like paper clips, coins, keys, nails, screws or other small
metal objects, that can make a connection from one terminal to
another. Shorting the battery terminals together may cause burns or
a fire.
Do not use a battery pack or appliance that is damaged or modified.
Damaged or modified batteries may exhibit unpredictable behavior
resulting in fire, explosion or risk of injury.
Do not expose a battery pack or appliance to fire or excessive
temperature. Exposure to fire or temperature above 130°C may
cause explosion. The temperature of 130°C can be replaced by the
temperature of 265°F.
Follow all charging instructions and do not charge the battery pack
or appliance outside of the temperature range specified in the
instructions. Charging improperly or at temperatures outside of the
specified range may damage the battery and increase the risk of
fire.
Have servicing performed by a qualified repair person using only
identical replacement parts. This will ensure that the safety of the
product is maintained.
Do not modify or attempt to repair the appliance or the battery pack
(as applicable) except as indicated in the instructions for use and
care.
2
Model LST01562S
IMPORTANT SAFETY WARNINGS
Page 3
PRODUCT SPECIFICATIONS
LST01562S
Input . . . . . . . . . . . . . . . . . . . . . . . . . . . . . . . . . . . . . . . . . . . . . . . . . . . . . . 62V, DC only
Battery. . . . . . . . . . . . . . . . . . . . . . . . . . . . . . . . . . . . . . . . . . . . . . . . . . . . . 62V, 2.5Ah
Speed . . . . . . . . . . . . . . . . . . . . . . . . . . . . . . . . . . . . . . . . . . . . . . . . . . . . . 5600/ 7000 RPM
Cutting Width . . . . . . . . . . . . . . . . . . . . . . . . . . . . . . . . . . . . . . . . . . . . . . . 13 in. or 15 in.
Weight . . . . . . . . . . . . . . . . . . . . . . . . . . . . . . .. . . . . . . . . . . . . . . . . . . . . . . 15.43lb (7 kg)
.080 Dual Twisted Line - Bump Feed
3
Model LST01562S
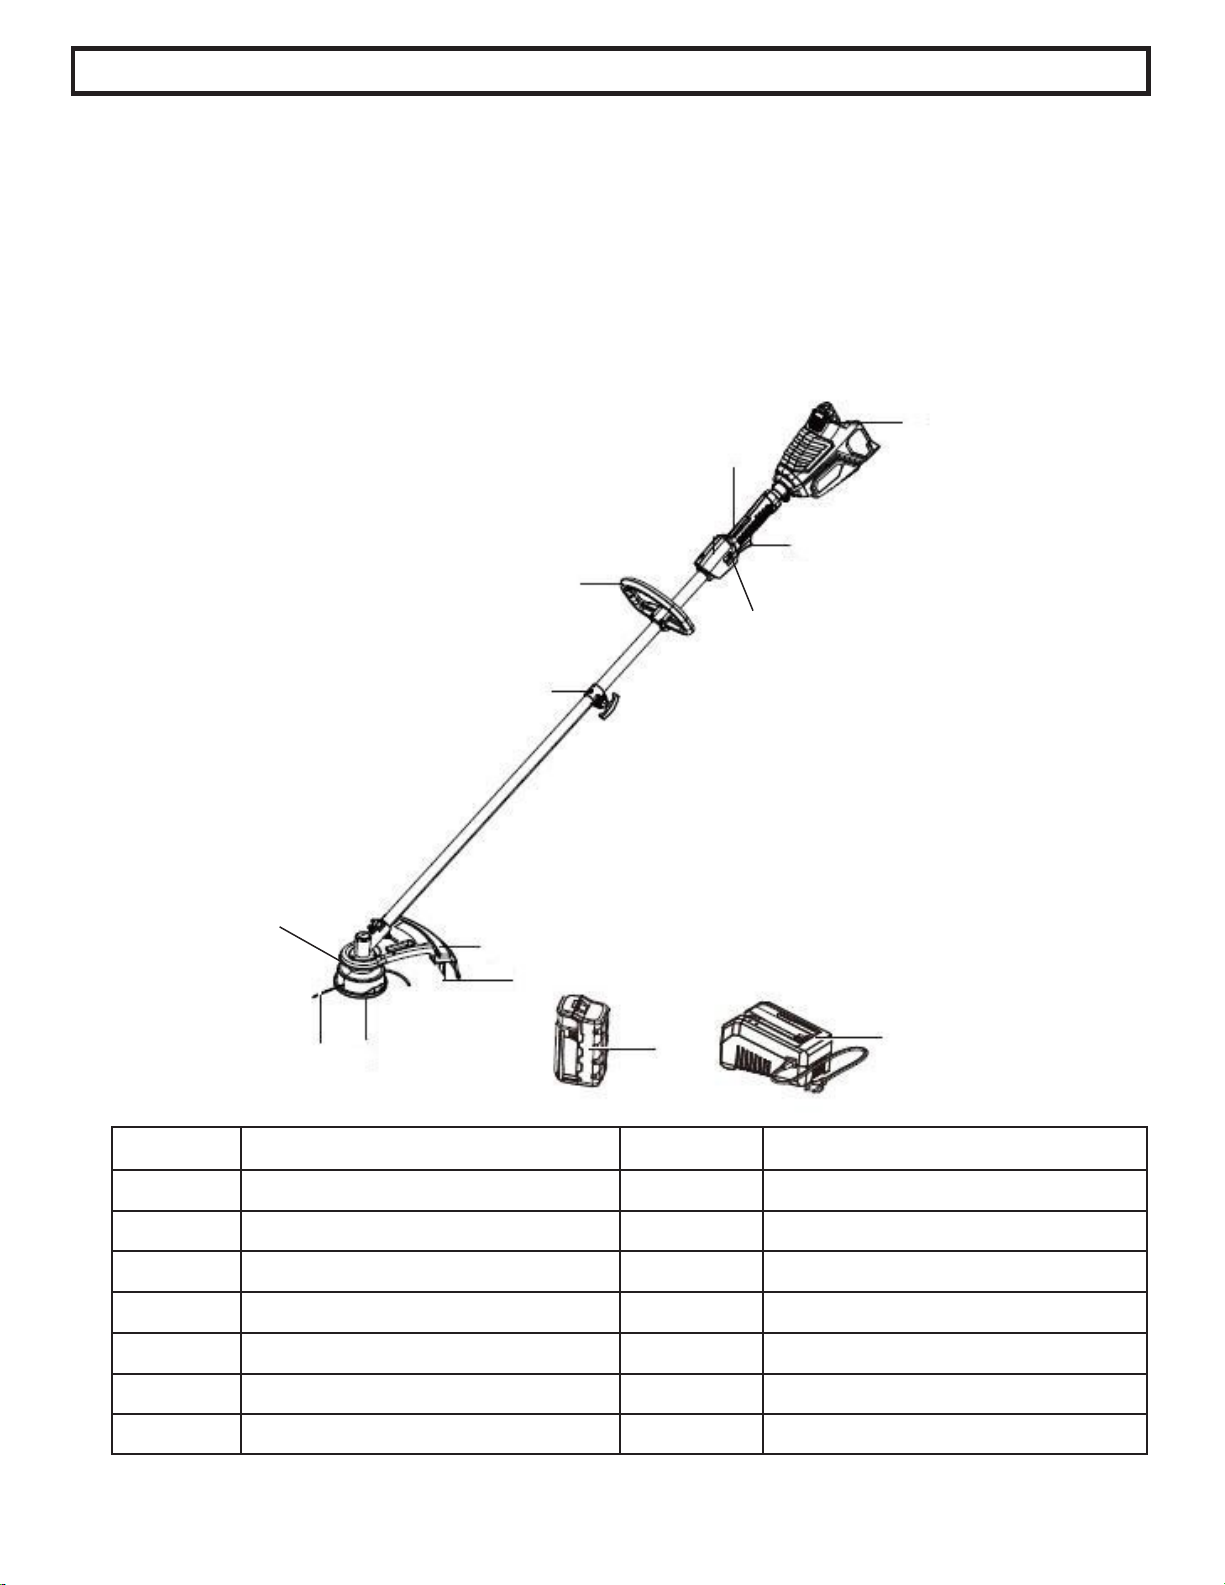
FEATURES
13
1
2
4
3
5
6
7
8
10
9
11
12
No. Description No. Description
1 Lock out button 8 Steel Spacer
2 Switch trigger 9 Spool knob
3 Two Speed Button 10 String
4 Auxiliary handle 11 Battery
5 Connection Assy. 12 Charger
6 Guard 13 Battery release button
7 Line cutting blade
Page 4
UNPACKING
This product requires some assembly.
PACKING LIST
- Power Head
- String Trimmer Attachment
- Safety Guard
- Charger and Battery Pack
- Spool Assembly
- Auxiliary Handle
- Owner’s Manual
- Hardware Bag, containing parts as below:
WARNING: Do not install battery until assembly is complete. Failure to
comply could result in accidental starting and possible serious personal
injury.
WARNING: If any parts are damaged or missing do not operate this
product until the parts are replaced. Failure to heed this warning could
result in serious personal injury.
Carefully remove the product and any accessories from the box. Make sure
that all items listed in the packing list are included.
Inspect the product carefully to make sure no breakage or damage
occurred during shipping.
Do not discard the packing material until you have carefully inspected
and satisfactorily operated the product.
If any parts are damaged or missing, please call 1-800-618-7474 for
assistance.
4
Model LST01562S
ASSEMBLY
Blade positioned
inside for 13”cut
Blade positioned
outside for 15”cut
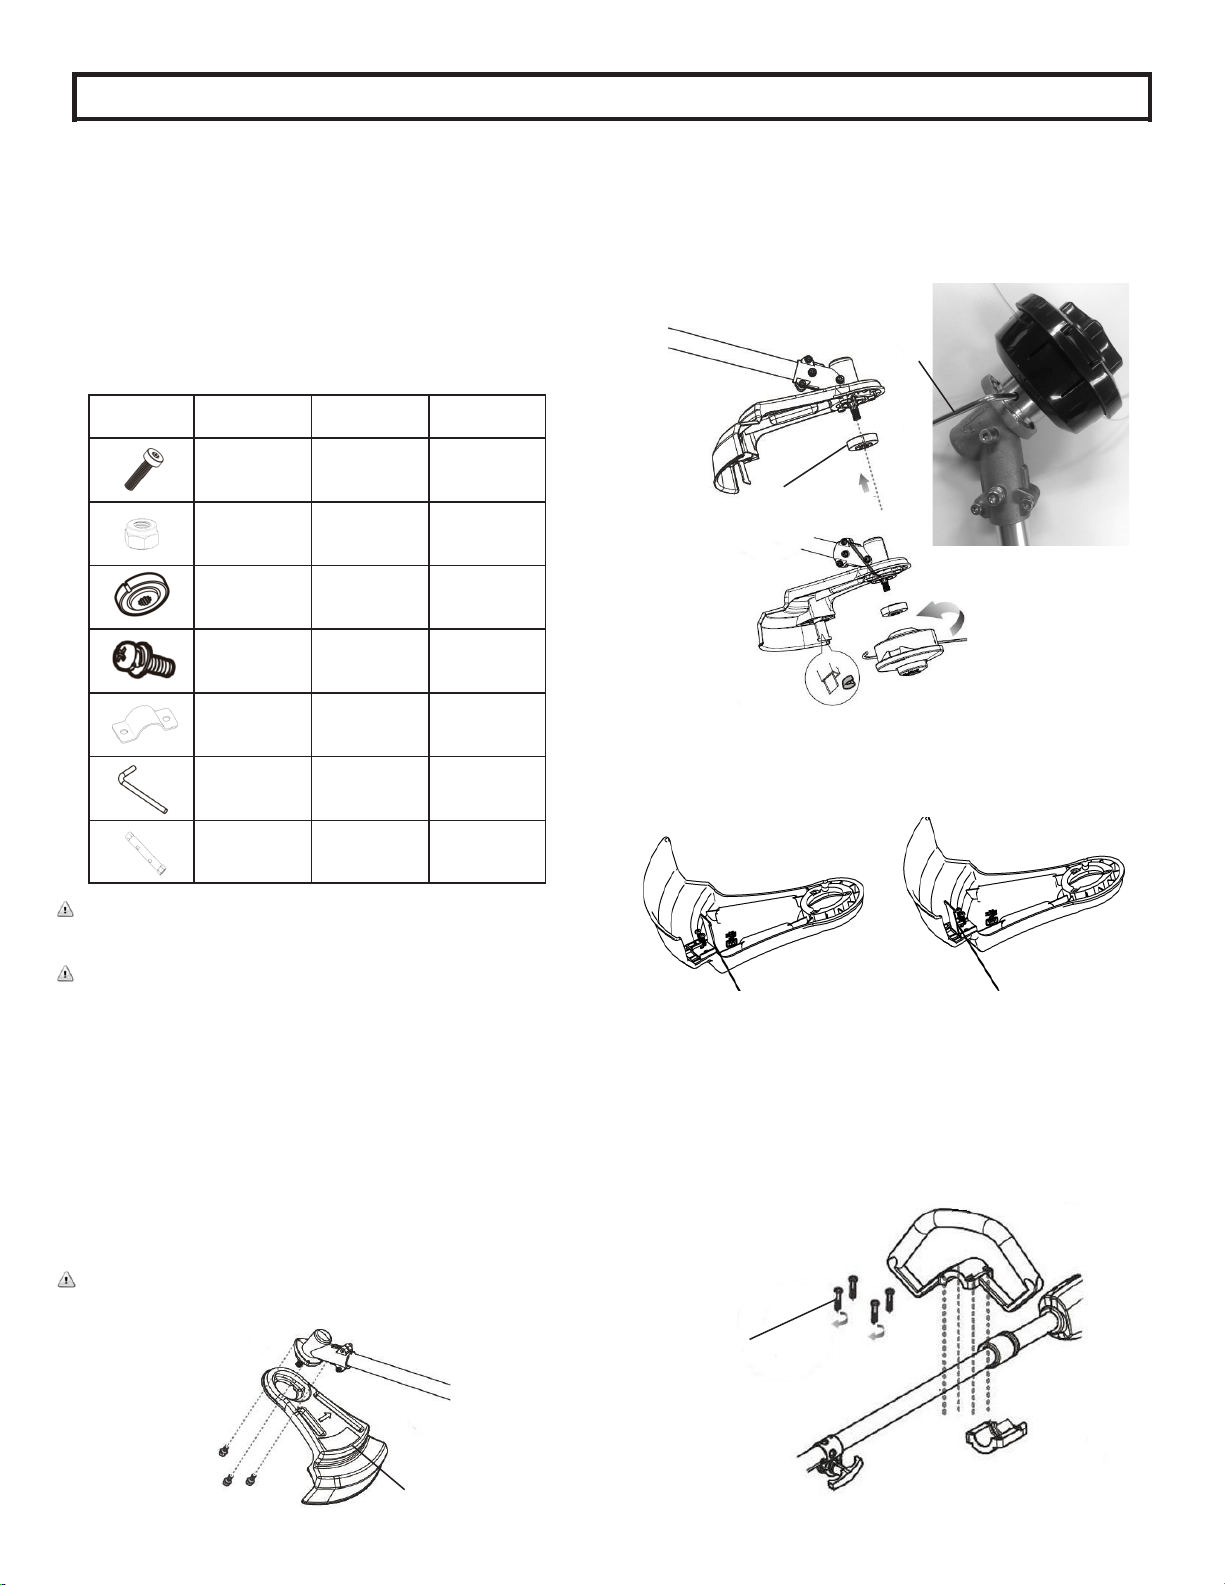
CUTTING WIDTH ADJUSTMENT
Cutting width can be adjusted to 13” or 15” by positioning the line
cutting blade as shown.
Image Name Size Quantity
Bolt M5x0.8x35 2 PCS
Nut M5x0.8 2 PCS
Steel Spacer N/A 1 PC
Socket Screw M5x0.8x12 3 PCS
Auxiliary
Handle Plate
N/A 1 PC
Wrench T25&+ 1 PC
Socket
Spanner
8mm/10mm 1 PC
ATTACHING THE AUXILIARY HANDLE
Install the auxiliary handle and bottom bracket around the shaft of the
power head, at a comfortable distance from the switch trigger. Insert the
four M5.0*0.8*35 bolts into each the four holes. Using the combo tool
provided, tighten the bolts securely so the handle is stationary on the
shaft.
Bolt
Safety Guard
ATTACHING THE GUARD
Assemble the guard as shown below by positioning it onto the trimmer
attachment. Using a Phillips screw driver, secure the guard by installing
three (3) screws into the die cast head. Remove blade cover.
WARNING: Do not operate the trimmer without the guard attached.
Failure to comply could result in possible serious personal injury.
INSTALLING THE STRING SPOOL
Ensure battery pack is removed. Place the steel spacer onto the cutting
head shaft. Align the hole in the spacer with the notched area of the
casting. Insert the wrench provided through the hole in the spacer and
casting to secure the spacer while installing the spool. Twist the spool
onto the bolt in a counter clockwise direction. Make sure the spool is
firmly connected.
Steel Spacer
Wrench
Page 5
TO TURN THE TOOL ON
Select the desired operating speed (Hi or Low). Press and hold the
trigger lock out button at the top of the front handle and squeeze the
switch trigger with your fingers. Release the lockout button when the
trigger is depressed.
TO TURN THE TOOL OFF
Release the switch trigger.
Before you start the unit, make sure the trimmer is not contacting any
object.
WARNING: Stones, pieces of metal and other objects can be thrown out
at high speed by the line. The unit and guard are designed to reduce the
danger.
WARNING: To guard against injury, observe the following:
Read owner’s manual before using, save owner’s manual.
Keep hands away from lines.
Keep hands on handles. Don’t overreach.
If you strike or become entangled with a foreign object, stop tool
immediately, check for damage and have any damage repaired before
further operation is attempted. Do not operate with a broken hub or
spool.
OPERATING
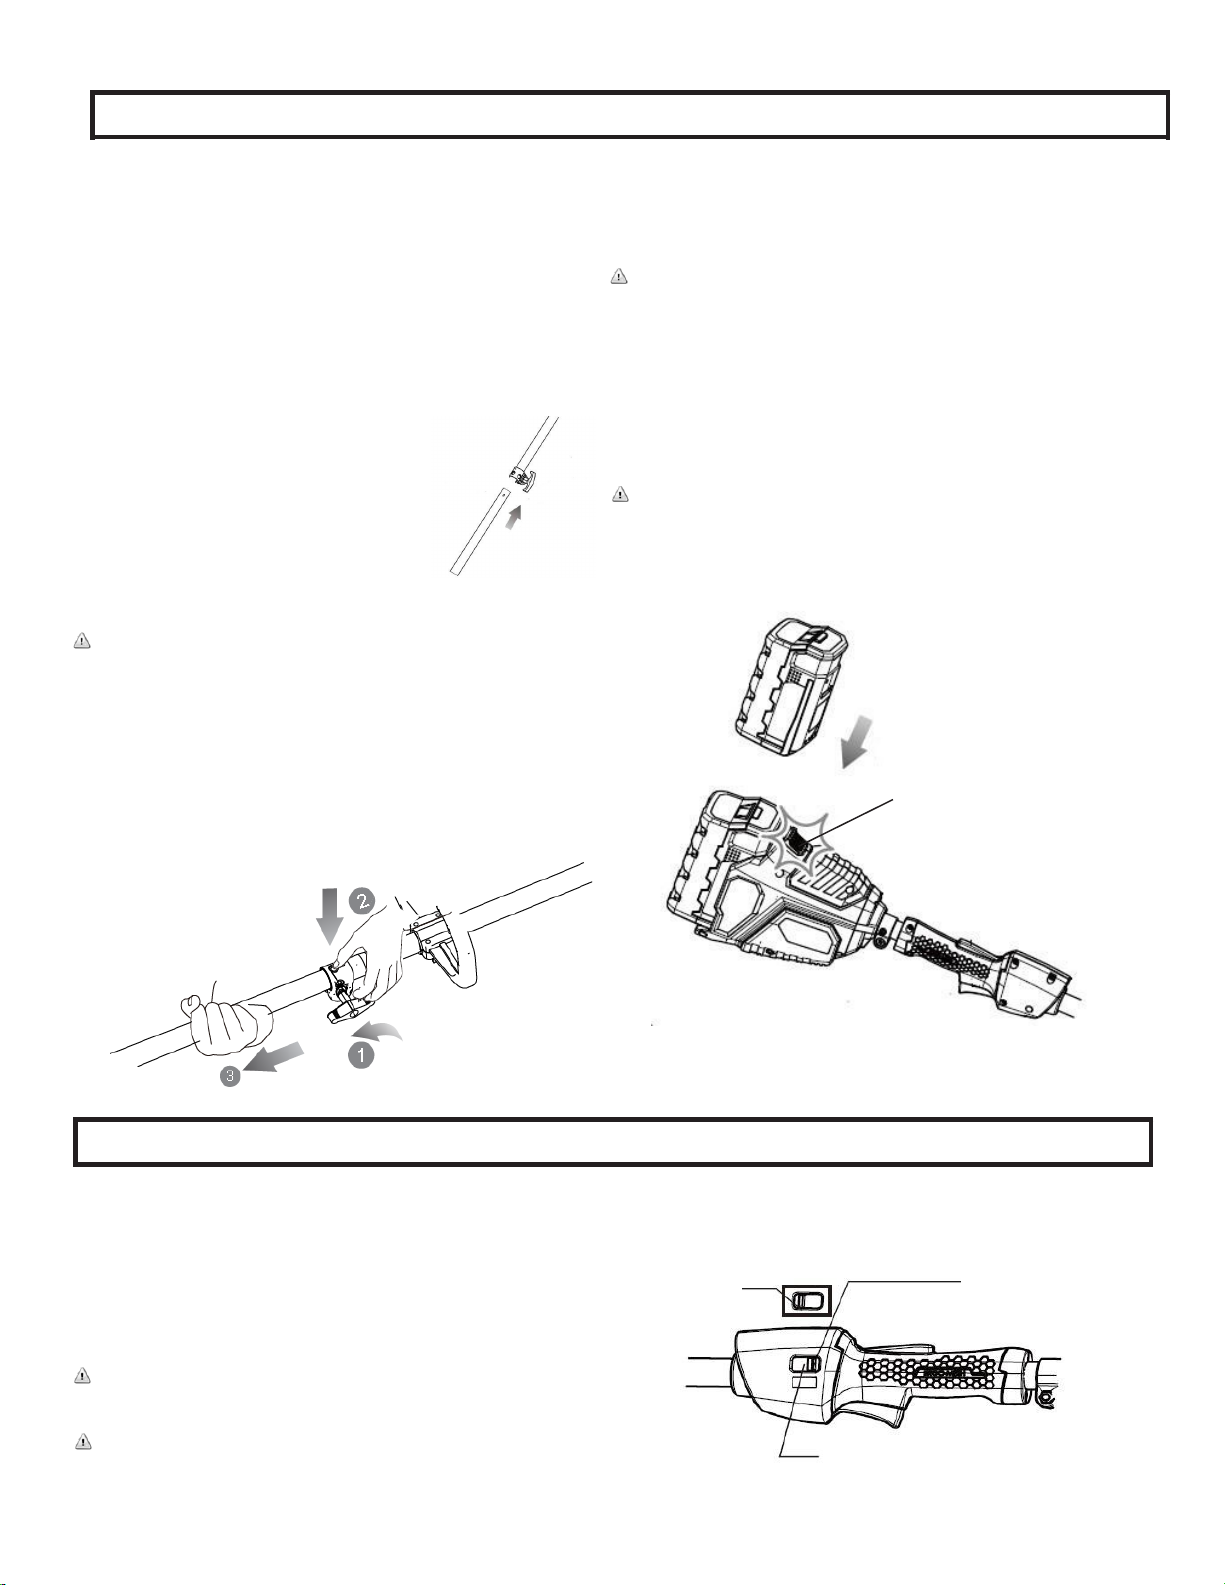
INSTALLING STRING TRIMMER ATTACHMENT TO POWER HEAD
The attachment connects to the power head by means of a
coupler device.
● Remove the battery pack.
● Loosen the wingnut on the coupler of the power head shaft.
● Pull the retaining pin located on the power head shaft and rotate
1/4 turn. Rotating allows the pin to lock out of the shaft even when
released.
● Align the hole in the attachment shaft with the retaining pin on the
power head shaft and slide the two shafts together.
● Rotate the retaining pin 1/4 turn to allow
the pin to fully seat through the hole in
the attachment shaft.
NOTE: If the pin does not release
completely in the positioning hole, the
shafts are not locked into place. Slightly
rotate from side to side until the pin is
locked into place.
● Tighten the wingnut securely.
WARNING: Be certain the wingnut is fully tightened before operating
equipment; check it periodically for tightness during use to avoid
serious personal injury.
Removing the Attachment From the Power Head
● Stop the motor and remove the battery pack.
● Loosen the wingnut.
● Pull the retaining pin and twist the shafts to remove and separate
ends.
ASSEMBLY
INSTALLING/REMOVING BATTERY PACK
To install battery pack:
● Align grooves on battery pack with raised ribs in the tool’s
battery port and place the battery pack in the tool.
Warning: Make sure the latch on the tool snaps in place and the
battery pack is fully seated and secure in the battery port before
beginning operation. Failure to securely seat the battery pack could
cause the battery pack to fall out, resulting in serious personal injury.
To remove battery pack:
● Press the battery latch button on the tool and pull the battery
pack out of the battery port.
Warning: To avoid serious personal injury, always remove the
battery pack and keep hands clear of the trigger lock-out when
carrying or transporting the tool.
Battery release button
5
Model LST01562S
Low Speed
High Speed
Two Speed Button
The trimmer will have a longer run time if operated in the low
speed setting.
Page 6
CAUTION: Lines coasts after turn off.
Do not use under wet conditions.
CAUTION: Inspect area to be trimmed and remove any wire, cord,
or string-like objects which could become entangled in the rotating
line or spool. Be particularly careful to avoid any wire which might be
bent outwardly into the path of the tool, such as barbs at the base of
a chain link fence.
OPERATING THE POWER HEAD
Hold the power head with your right hand on the rear handle and
your left hand on the front handle. Keep a firm grip with both hands
while in operation. Power head should be held at a comfortable
position with the rear handle about hip height.
If debris becomes wrapped around the attachment, RELEASE THE
SWITCH TRIGGER, remove the battery pack, and remove the
debris.
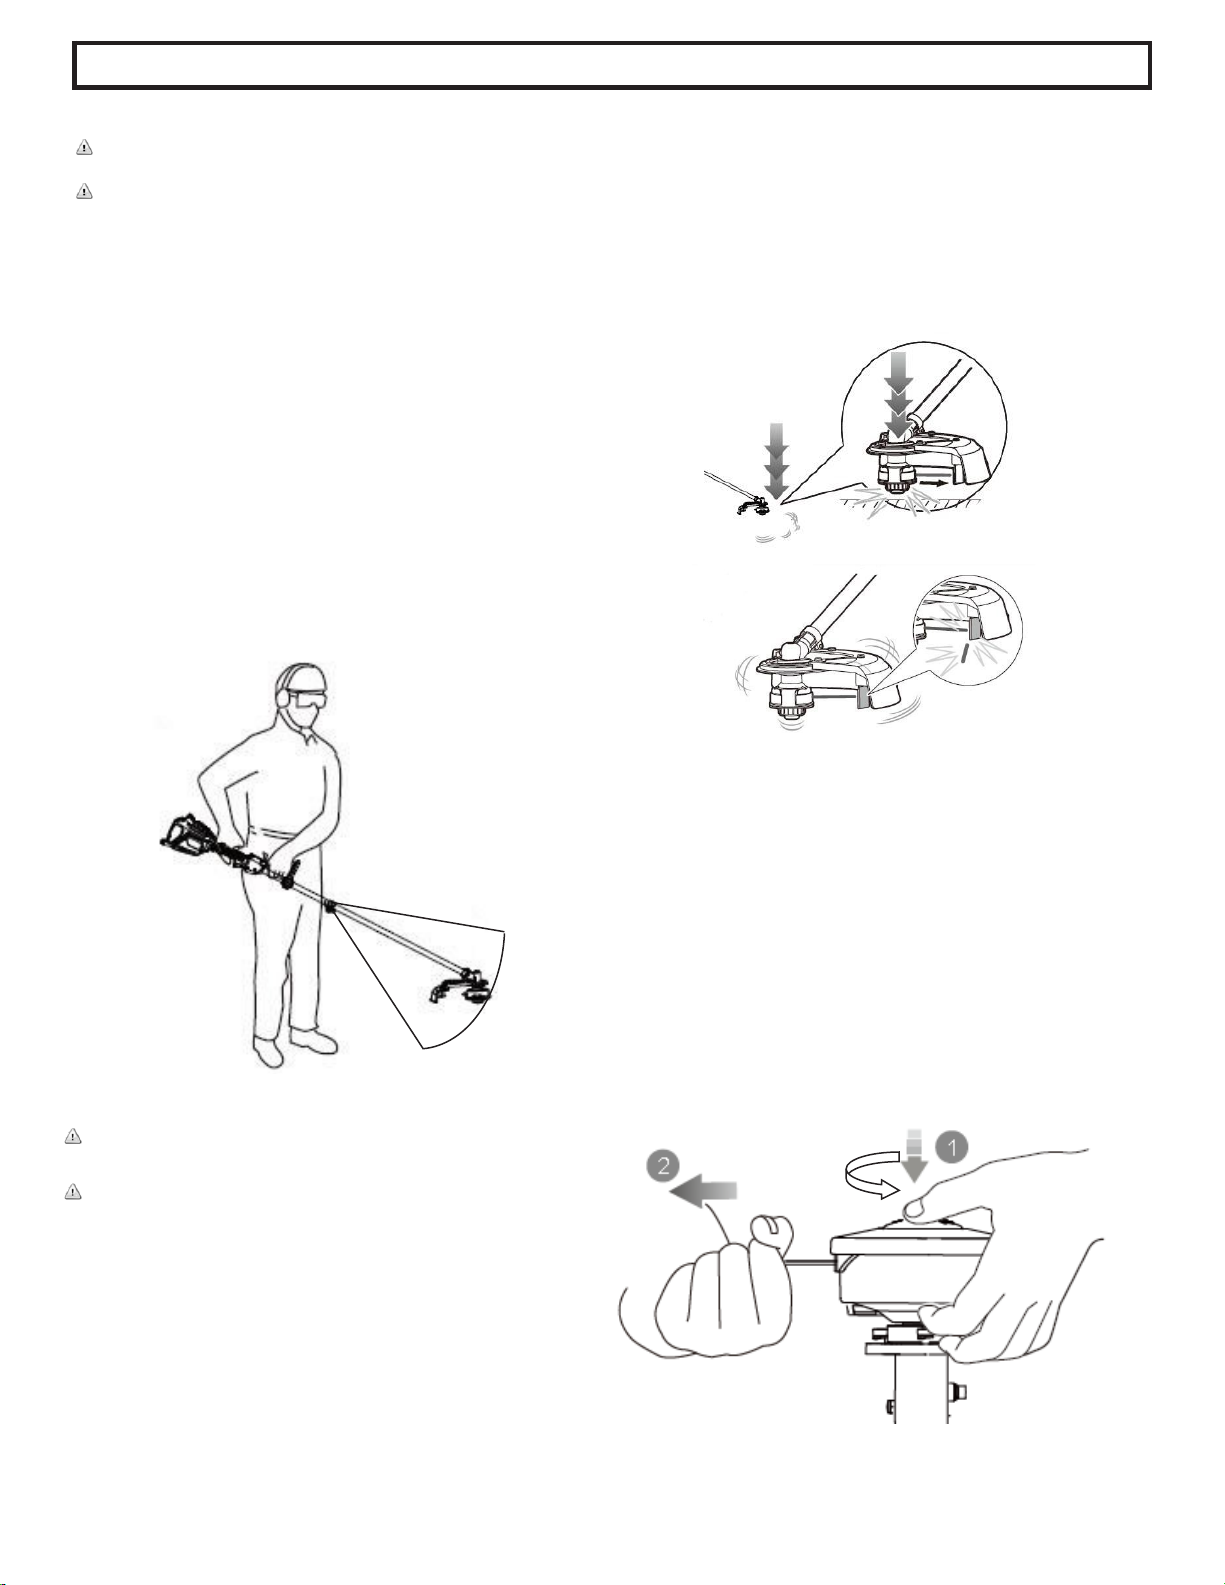
CUTTING INSTRUCTIONS
Proper Cutting Stance
Weight should be balanced with both feet on solid ground.
Basic Cutting Procedure
Slowly swing trimmer side-to-side as shown.
6
Model LST01562S
OPERATING
WARNING: Do not trim near electrical wires or buildings.
WARNING: Do not allow familiarity with this type of product to make
you careless. Remember that a careless fraction of a second is
sufficient to inflict serious injury.
Do not operate a string trimmer in a tree, on a ladder, or on a
scaffold; this is extremely dangerous.
Wear non-slip gloves for maximum grip and protection.
LINE FEEDING/ BUMP FEEDING
Your trimmer uses .080” diameter twisted nylon line to cut grass and
weeds quickly and easily. In time, the tip of the nylon line will become
worn. To release line, position cutting head parallel to the ground and
bump the head 2 or 3 times on the ground when the trimmer is
running. When enough line is released, you will hear the sound of the
blade cutting the line. The cutting line will wear faster if the cutting is
done along sidewalks or other abrasive surfaces or heavier weeds are
being cut.
MANUALLY EXTENDED LINE
If your trimmer line hits sharp or abrasive objects, such as stones,
metal pieces, or concrete, the trimmer line can be cut too short to
continue trimming. In this case, you can manually extend the line:
1. REMOVE THE BATTERY PACK.
2. Push the spool knob in and rotate in a counter clockwise
direction. Pull the lines out after every quater turn to achieve the
proper length. (Note: Release only enough line to extend just
beyond the blade. If too much line is released, the blade will be
unable to cut it to the correct working length and it may become
tangled on the rotating shaft.)
3. Install the battery pack.
4. Restart the trimmer and return to normal operation.
Page 7
7
Model LST01562S
OPERATING
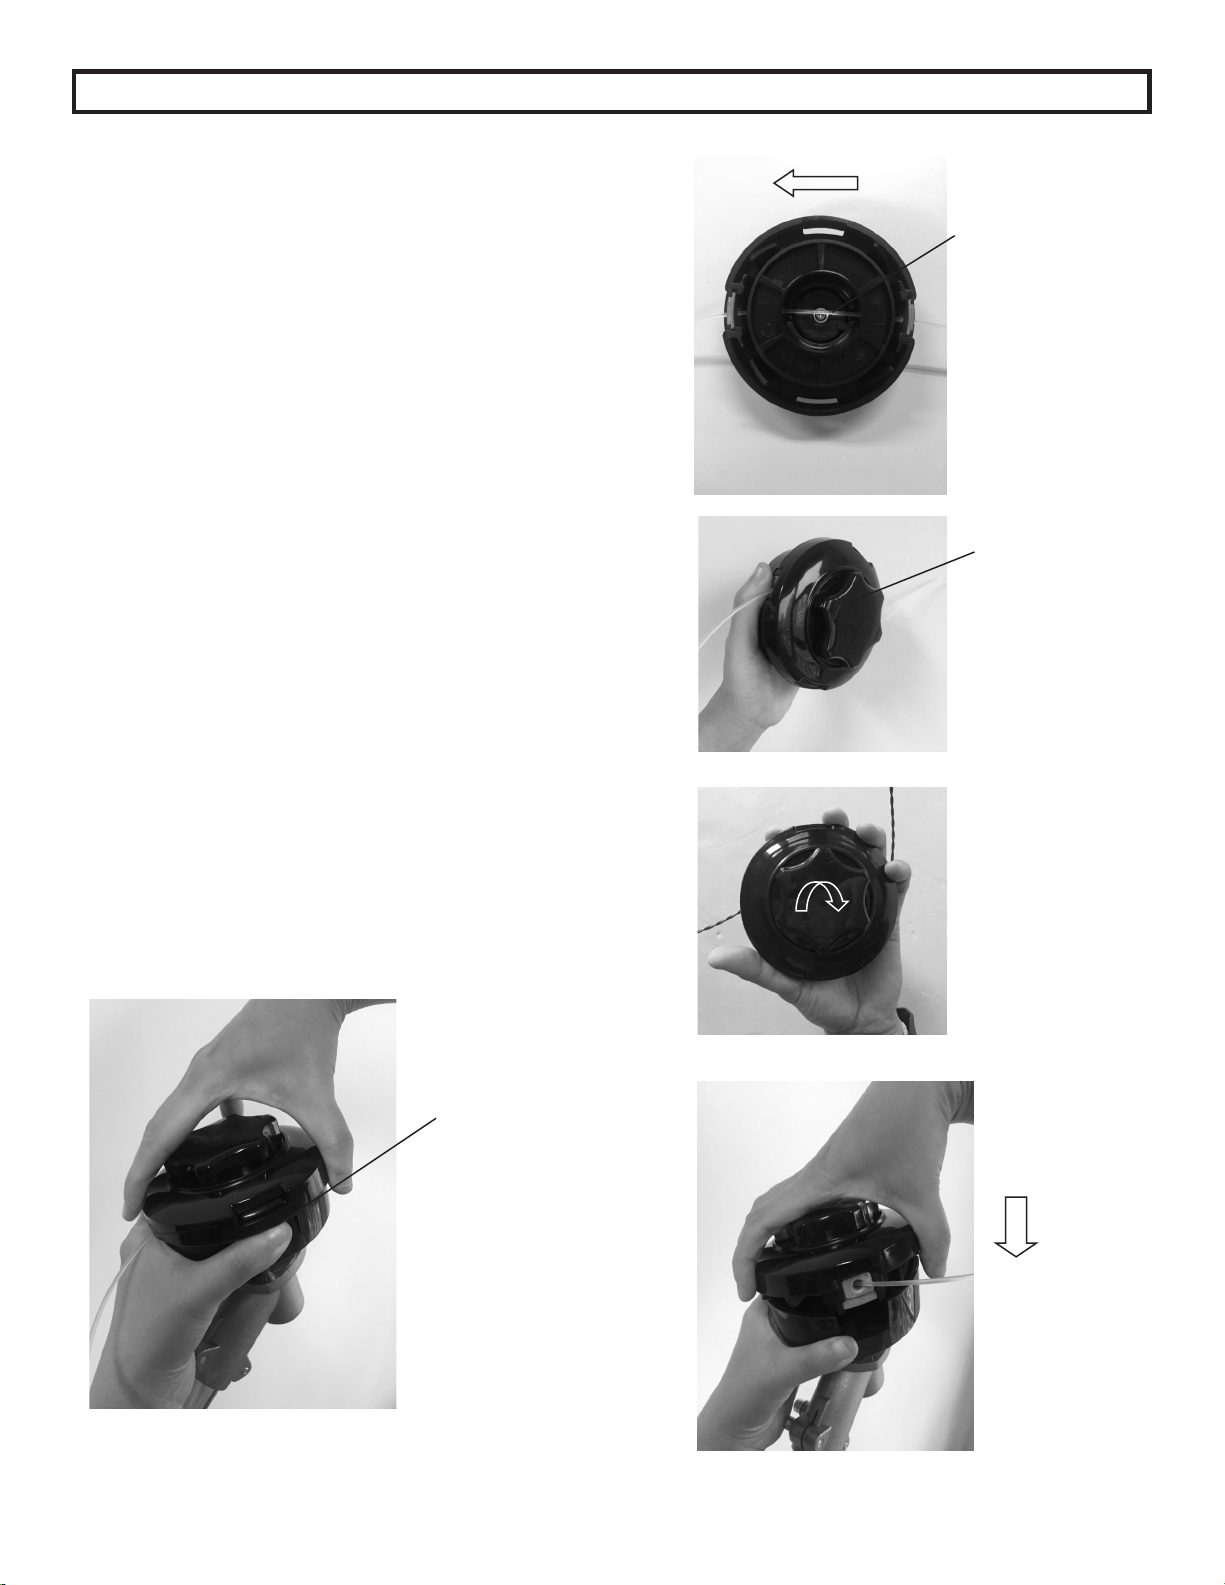
REWINDING SPOOL FROM BULK LINE
(USE ONLY .080” DIAMETER LINE)
Bulk line for your trimmer is available at extra cost
from your local dealer. To install bulk line, follow these
steps:
• Turn off the trimmer and remove the battery.
• Cut line to a length of 14.7 feet.
• Press the release tabs on the line spool cover as
shown in Fig. 1, and remove the spool by pulling it
straight off. Remove and discard all line on the
spool.
• Rotate the spool knob so that the 2 holes in the
spool hub are aligned with the holes in the 2 metal
eyelets.
• Insert the line through all four holes. Pull the line
until there is an equal length of the line on each
side of the spool. (See Fig. 2)
• Turn the spool knob in a clockwise direction (see
arrows on the top of the knob) until the line is
wound to the proper cutting length. (See Fig. 3)
• Install the spool back into the spool cover making
sure it is firmly locked in place. (See Fig. 4)
Release tab
Fig.1
Fig. 2
Fig. 3
Fig. 4
Spool knob
Line
Page 8
8
Model LST01562S
SEE CHARGER MANUAL FOR COMPLETE
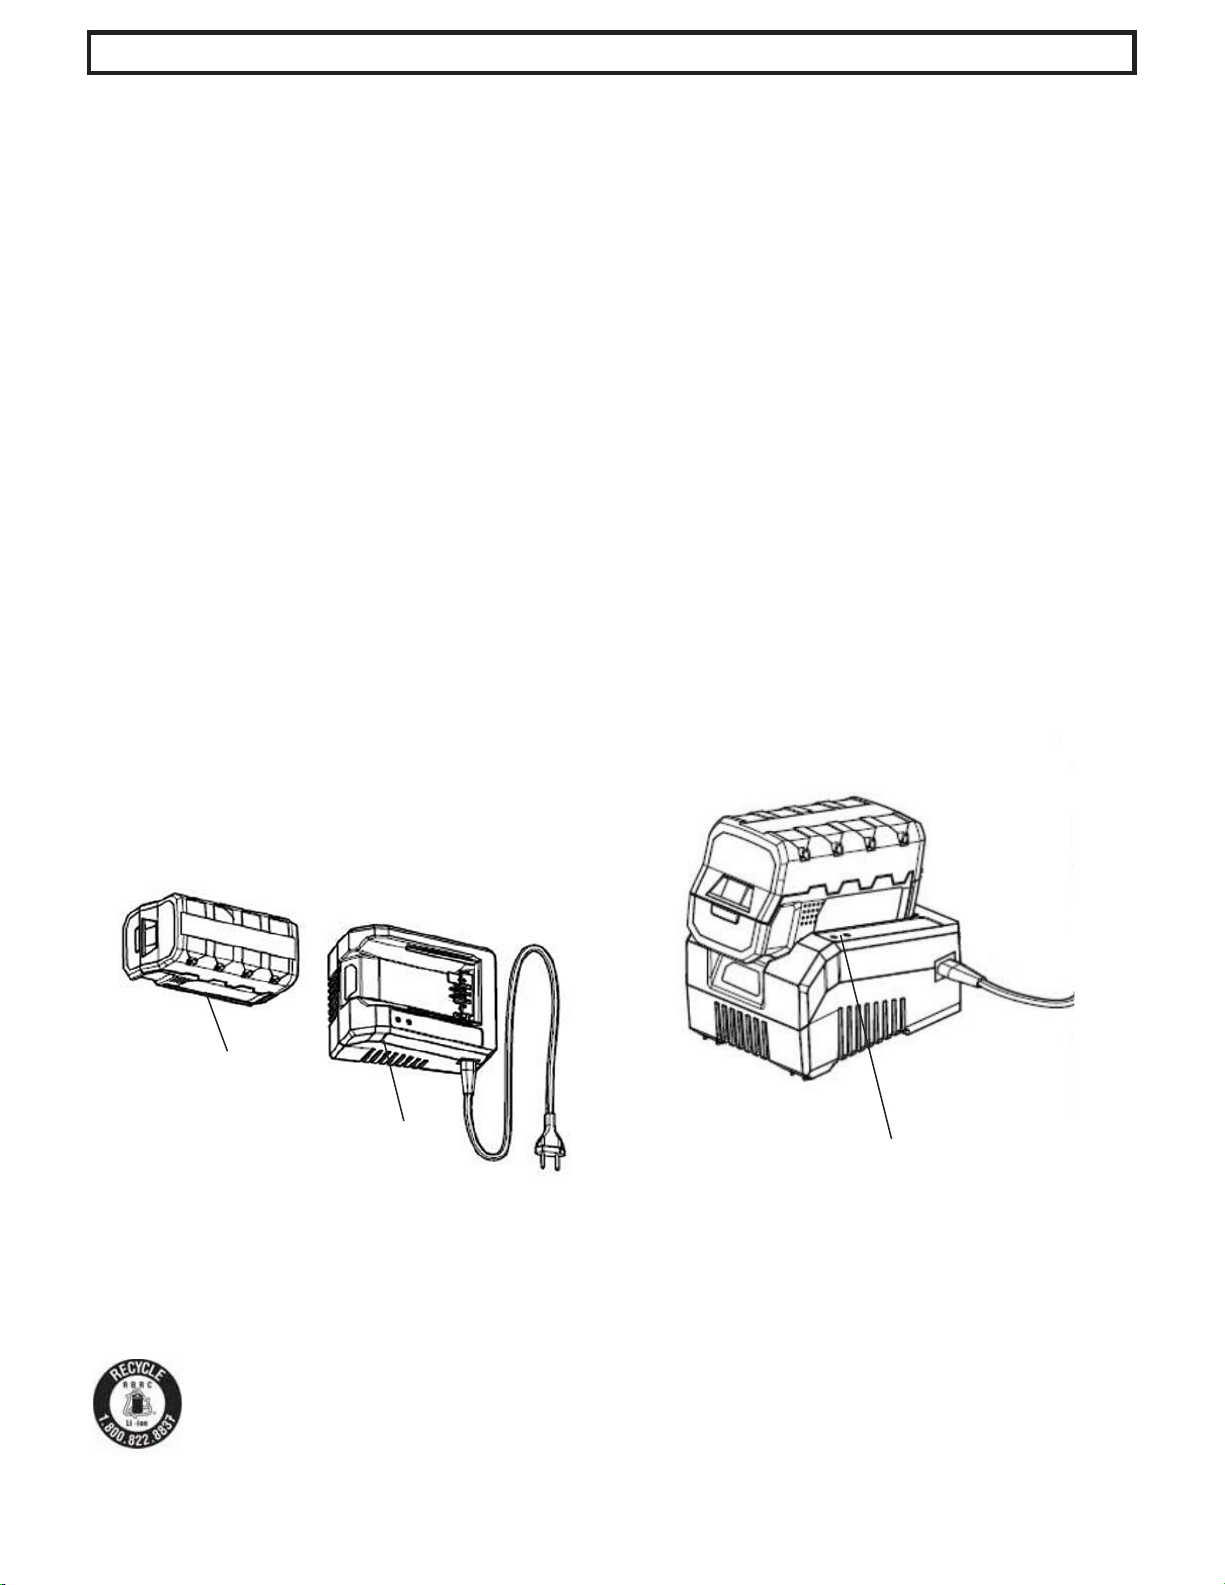
INSTRUCTIONS
Charge the battery pack only with the charger provided.
Allow at least 90 minutes of charge time for 2.5Ah battery,
140 minutes of charge time for 4.0Ah battery, or 180
minutes of charge time for 5.0Ah battery before initial use
of the string trimmer.
Make sure the power supply is normal household voltage,
120volts, 60Hz, AC only.
The battery charger should be operated in temperatures
between 39 and 104 degrees F.
The battery should be charged in a cool, dry place.
2 to 3 initial charging/discharging cycles may be required
to achieve maximum run time/capacity.
Do not attempt to open the charger or the unit. There are
no customer serviceable parts inside. Call the customer
service help line at 1-800-618-7474 for assistance.
DO NOT incinerate battery packs even if they are severely
damaged or completely worn out. They can explode in a
fire causing injury.
Use the battery charger indoors only.
Disconnect charger from the power supply when not in
use to prevent damage to the charger during a power
surge.
When fully charged, the battery can be safely stored in
temperatures down to –4° degrees F for a period of up to
four weeks, before requiring charging.
Fully charge battery pack every 90 days.
If over a period of time the battery pack quickly runs down
after a full 90, 140 or 180 minutes charging period, a
replacement battery pack is needed.
To prevent permanent damage to the battery, never store
in a discharged condition.
WINTER STORAGE— Fully recharge before storage and
then again every 90 days.
Since the battery will not develop a memory, it does not
have to be fully discharged before recharging.
A small leakage of liquid from the battery cells may occur
under extreme usage, charging or temperature conditions.
This does not indicate a failure. However, if the outer seal
is broken and this leakage gets on your skin.
a. Wash quickly with soap and water.
b. Neutralize with a mild acid such as lemon juice or
vinegar.
c. If the battery liquid gets in your eyes, flush them with
clean water for a minimum of 10 minutes and seek
immediate medical attention.
BATTERY DISPOSAL
Remove the battery pack from the string trimmer. Cover the terminals with heavy duty adhesive tape. Do not attempt to destroy or disassemble
battery pack or remove any components. This product contains lithium-ion batteries which must be recycled or disposed of properly. Local, state
or federal laws may prohibit disposal of these batteries in ordinary trash.
The RBRC seal on the li-ion battery pack indicates that the costs to recycle the battery pack at the end of its useful life has already
been paid by The Great States Corporation American Lawn Mower Company. It is illegal to place spent li-ion batteries in the local
municipal solid waste or in the trash. RBRC in cooperation with The Great States Corporation American Lawn Mower Company
has provided an environmentally friendly and easy way to recycle spent li-ion batteries. Just contact your local recycling center or
call 1-800-8BATTERY for information on where to drop off the spent battery.
CHARGING THE BATTERY PACK
Constant Red + Flash Green = Battery is charging
Constant Red + Constant Green = Battery is fully charged.
Battery Pack
Charger
Page 9

CAUTION: Do not at any time let brake fluids, gasoline,
petroleum based products, penetrating oils, etc., come in
contact with plastic parts. They contain chemicals that can
damage, weaken or destroy plastic.
Make sure the battery is detached from the unit, then use
only mild soap and a damp cloth to clean the tool. Never let
any liquid get inside the tool; never immerse any part of the
tool into a liquid.
Fertilizers and other garden chemicals contain agents which
greatly accelerate the corrosion of metals Do not store the
tool on or adjacent to fertilizers or chemicals.
IMPORTANT: To assure product SAFETY and RELIABILITY,
repairs, maintenance and adjustment should be performed by
a qualified individual using only identical replacement parts.
If you drop the trimmer, carefully inspect it for damage. If the
guard is bent or cracked, handles broken or if you see any
other condition that may affect the trimmer’s operation, it must
be repaired before putting it back into use. Call our customer
service help line at 1-800-618-7474 for assistance.
MAINTENANCE
9
Model LST01562S
TROUBLESHOOTING
Call us first with questions about operating or maintaining your product
at 1.800.618.7474 between 8:00 a.m. – 5:00 p.m. Eastern Standard Time,
or get assistance on scotts.americanlawnmower.com.
CALL US FIRST !!
Problem Possible Couse Possible Solution
-Unit does not Run -Battery not making contact -Check battery is fully inserted
-Tripper switch not operational -Check that lock off button is fully forward prior to moving trigger
-Battery not installed properly -Check battery installation
-Battery not charged -Check battery charging requirements
-Line won't feed
-Line tangled in spool
-Unwrap 24" of line and re-wind
-Line fails to cut off
-Line cutter in guard is damaged or missing -Replace guard
-Battery will not charge -Battery not inserted into charger
-Insert battery into charger until red LED appears
-Charger not plugged in -Plug charger into a working outlet
-Check current at receptacle by plugging in a lamp or other appliance
-Check to see if receptacle is connected to a light switch which turns
power off when you turn out the lights
-Surrounding air temperature too hot or too cold -Move charger and tool to a surrounding air temperature of about 39
degree F (4 degree C) or below 104 degree F (40 degree C)
Page 10
10
Model LST01562S
CALL US FIRST !!
Call us first with questions about operating or maintaining your product
at 1.800.618.7474 between 8:00 a.m. – 5:00 p.m. Eastern Standard Time,
or get assistance on scotts.americanlawnmower.com.
PARTS AND SERVICE
Always mention the model number when ordering kits/items for this tool.
No. Kit/Item Number Description QTY
1 LST62-HBK-1 Handle Bolt Kit 1
2 LST62-AHK-1 Auxiliary Handle Kit 1
3 LST62-PGK-1 Protective Guard Kit 1
4 RS95815 Spool Kit 1
5 BL86225 Battery Pack 62V 2.5Ah 1
6 CHL86200 Charger 1
For parts or service, please call 1-800-618-7474 or visit us online at
scotts.americanlawnmower.com. Be sure to provide all relevant information when you call or visit.
REPAIR PARTS (KITS/ ITEMS)
The model/ serial number of this tool is found on a plate or label attached to the housing. Please
record the serial number in the space provided below.
MODEL NUMBER LST01562S
SERIAL NUMBER_______________
Page 11

NOTES
____________________________________________________________________
____________________________________________________________________
____________________________________________________________________
____________________________________________________________________
____________________________________________________________________
____________________________________________________________________
____________________________________________________________________
____________________________________________________________________
____________________________________________________________________
____________________________________________________________________
____________________________________________________________________
____________________________________________________________________
____________________________________________________________________
____________________________________________________________________
____________________________________________________________________
____________________________________________________________________
____________________________________________________________________
____________________________________________________________________
____________________________________________________________________
____________________________________________________________________
____________________________________________________________________
____________________________________________________________________
____________________________________________________________________
____________________________________________________________________
____________________________________________________________________
____________________________________________________________________
____________________________________________________________________
____________________________________________________________________
____________________________________________________________________
____________________________________________________________________
____________________________________________________________________
____________________________________________________________________
____________________________________________________________________
____________________________________________________________________
____________________________________________________________________
____________________________________________________________________
11
Model LST01562S
Page 12

In a continued commitment to improve quality, the Manufacturer reserves the
right to make component changes or design changes when necessary.
Rev. 12/06/2018
OWNER’S MANUAL
CORDLESS STRING TRIMMER 62 VOLT LITHIUM
BRUSHLESS MOTOR
Copyright. All Rights Reserved.
Model LST01562S
WARRANTY POLICY
Scotts Warranty policy
• 5 Year limited warranty on all Scotts 62V lithium ion power tools from date of purchase when used for personal, household, or
family use.
• 3 Year limited warranty on all Scotts 62V lithium ion batteries and chargers from date of purchase when used for personal,
household, or family use.
The Great States Corp. (GSC) warrants to the original owner that this Scotts product and service part is free from defects in materials
and workmanship and agrees to repair or replace any defective product or part for the warranty period as stated above.
• Warranty voided if used for commercial or industrial purposes or any other improper use as determined by GSC.
• Warranty does not include repairs necessary due to operator’s abuse or negligence (including overloading the product beyond
capacity or immersion in water), or the failure to assemble, operate, maintain or store the product according to the instructions in
the owner’s manual.
• This warranty does not cover
Wear items, including but not limited to - drive belts & gears, tines, cutting blades, mower blades, saw chains, mulching
blades, blower fans, spool covers, trimmer line, blower and vacuum tubes, guide bars, high pressure hoses, wheels,
handles, augers, worn bags, power cables, and other items subject to wear over time.
Wear on batteries, including but not limited to – drops, wear and breakage on charger, exposure to extreme temperature
swings (hot or cold), battery left on charger too long, battery left uncharged for too long, and misuse or abuse of the
battery.
• This warranty does not cover damage caused by cold, heat, rain, excessive humidity or other environmental extremes.
• This warranty does not cover normal deterioration of the exterior finish or normal wear and tear on the products including, but not
limited to scratches, cracks, dents, or damage caused by outside chemicals.
• This warranty is not transferable and only applies to new products sold directly from an authorized retailer. This warranty d oes not
apply to any product, new or used, purchased through unauthorized third-party channels. For information on authorized dealers,
contact our customer support hotline at 1-800-618-7474 (Mon-Fri 8am-5pm Est)
• Any incidental, indirect or consequential loss, damage, or expense that may result from any defect or malfunction of the prod ucts is
not covered by the warranty.
• The warranty does not include installation, assembly or normal adjustments explained in the operator’s manual. The expense of
delivering the product to the vendor and the expense of returning the product or replacement parts to the owner is not covere d by
the warranty.
Additional Warranty Limitations
Some states do not allow the exclusion or limitation on how long an implied warranty lasts, so the above limitation may not apply to you.
Products sold damaged or incomplete, sold ―as is, or sold as reconditioned are not covered under the warranty.
Damage or liability caused by shipping, improper handling, improper assembly, incorrect voltage, improper wiring, improper
maintenance, improper modification or the use of accessories and/or attachments not specifically recommended is not covered b y this
warranty.
Proof of purchase, original dated sales receipt, must accompany all warranty claims.
For claims go to scotts.americanlawnmower.com or call our customer support hotline from 8am-5pm EST, Mon-Fri at
1-800-618-7474
American Lawn Mower Company
The Great States Corporation
7444 Shadeland Station Way
Indianapolis, IN 46256 USA
Phone 1-800-618-7474
scotts.americanlawnmower.com
Page 13

MANUAL DEL OPERARIO
DESBROZADORA A BATERÍA DE LITIO DE 62 VOLTIOS
MOTOR SIN ESCOBILLAS
Copyright. Todos los derechos reservados.
Modelo LST01562S
Su desbrozadora fue diseñada y fabricada de acuerdo con nuestros altos estándares de confiabilidad, facilidad de operación y seguridad para el
operario. Si se la trata con cuidado, le otorgará años de óptimo rendimiento y resistencia.
ADVERTENCIA: para reducir el riesgo de sufrir alguna lesión, el usuario debe leer y comprender el manual del operario antes de usar
este producto.
Muchas gracias por su compra.
NO DEVUELVA ESTE PRODUCTO A LA TIENDA. ¿TIENE PREGUNTAS SOBRE
FUNCIONAMIENTO, MONTAJE, PIEZAS O SERVICIO TÉCNICO? IR A
SCOTTS.AMERICANLAWNMOWER.COM O LLAME AL 1-800-618-7474 ENTRE
LAS 8:00 AM Y LAS 5:00 PM, HORA DEL ESTE DE LOS ESTADOS UNIDOS.
GUARDE ESTE MANUAL PARA CONSULTAS FUTURAS
Cargador apto para
CA, Modelo N.º
CHL86200.
244026
DEBE CARGAR LA BATERÍA
ANTES DE UTILIZARLA POR
PRIMERA VEZ. ES POSIBLE QUE
SE NECESITEN DE DOS A TRES
CICLOS DE CARGA/ DESCARGA
INICIALES PARA OBTENER LA
MÁXIMA CAPACIDAD O TIEMPO DE
FUNCIONAMIENTO.
Page 14

PARA REDUCIR EL RIESGO DE LESIONES:
Antes de poner en uso la herramienta, asegúrese de que todos los usuarios
lean y comprendan las instrucciones de seguridad y la demás información
incluida en este manual.
PRECAUCIÓN: use protección auditiva apropiada mientras trabaja. En ciertas
condiciones y con cierta duración de uso, el ruido generado por este producto
puede contribuir a la pérdida de la audición.
Guarde estas instrucciones y revíselas con frecuencia antes de usar la
herramienta y capacitar a otros.
ADVERTENCIA: al utilizar aparatos eléctricos para el jardín, se deben
respetar siempre las precauciones de seguridad básicas que se
detallan a continuación, a fin de reducir riesgos de incendios,
descargas eléctricas y lesiones personales.
LEA TODAS LAS INSTRUCCIONES
MANTENGA ALEJADOS A LOS NIÑOS. Todos los visitantes, niños y
mascotas deben mantenerse a una distancia segura de la zona de trabajo.
USE ROPA ADECUADA. No use prendas sueltas ni artículos de joyería. Use
protección para cubrir y contener el cabello largo, ya que puede quedar
atrapado en las piezas móviles. Se recomienda usar guantes de goma y
calzado resistente cuando se trabaja al aire libre. Use siempre pantalones
largos mientras opera esta desbrozadora.
USE GAFAS DE SEGURIDAD. Al trabajar con este producto, use gafas de
seguridad con protectores laterales que cumplan con la norma ANSI Z87.1. Si
la operación genera polvo, protéjase el rostro con una mascarilla antipolvo.
USE LA HERRAMIENTA EN FORMA CORRECTA. No utilice esta herramienta
en trabajos para los que no esté indicada.
EXTRAIGA LA BATERÍA DE LA DESBROZADORA cuando no esté en uso o
durante el mantenimiento o la limpieza. Manténgala bajo vigilancia constante.
VERIFIQUE LAS PIEZAS DAÑADAS. Antes de seguir usando la
desbrozadora, se deberán revisar los protectores u otras piezas dañadas en
forma exhaustiva para determinar si la herramienta funcionará correctamente y
realizará el trabajo previsto. Verifique la alineación y las uniones de las piezas
móviles, el montaje, las averías y otros factores que puedan afectar el
funcionamiento. Un protector o cualquier otra pieza dañada deben ser
reemplazados o reparados en forma adecuada. Comuníquese con nuestra
línea de ayuda de atención al cliente al 1-800-618-7474 para recibir asistencia.
ILUMINACIÓN. Trabaje sólo con luz natural o buena luz artificial.
NO ADOPTE UNA POSTURA INCÓMODA. Mantenga una base y equilibro
apropiados en todo momento.
ADVERTENCIA: no aplique ninguna clase de accesorio o dispositivo de
sujeción a la desbrozadora. Dicha práctica podría resultar peligrosa.
EVITE AMBIENTES PELIGROSOS. No utilice esta herramienta en la lluvia ni
en lugares húmedos o mojados. Tampoco trabaje en entornos donde existan
gases o sustancias explosivas. Por lo general, los motores de estas
herramientas producen chispas que podrían inflamar los gases.
EVITE EL ENCENDIDO ACCIDENTAL. Asegúrese de que el interruptor esté
en la posición de aseguramiento o de apagado antes de instalar el paquete de
baterías. Llevar las herramientas con el dedo en el interruptor o instalar el
paquete de baterías en la herramienta con el interruptor puesto es causa
común de accidentes.
PELIGRO: riesgo de corte. Mantenga las manos alejadas de los hilos.
Mantenga ambas manos en los mangos mientras la herramienta está
encendida.
PELIGRO: No utilice la herramienta si el interruptor no enciende o no apaga.
Comuníquese con nuestra línea de ayuda de atención al cliente al
1-800-618-7474 para recibir
PELIGRO: No deseche las baterías en el fuego. Las baterías pueden estallar.
Verifique los códigos de la localidad para conocer posibles instrucciones
especiales para desecharlas.
PELIGRO: No desarme el paquete de baterías. El electrolito emitido es
corrosivo y puede causar daños en los ojos y en la piel. Puede ser tóxico si se
ingiere.
ADVERTENCIA: Mantenga las guardas en su lugar y en orden de trabajo.
ADVERTENCIA: Mantenga las manos y los pies alejados del área de corte.
NO INTENTE extraer el material cortado ni sostener el material que desea
cortar mientras los hilos están en movimiento. Asegúrese de que el interruptor
esté en posición de apag ado para luego retirar el material atascado en el
protector. No tome la desbrozadora por los hilos al tratar de levantar o
sostener la herramienta.
PRECAUCIÓN: los hilos se mueven por inercia después de apagar el motor.
NO FUERCE LA DESBROZADORA. Realizará mejor el trabajo con menor
probabilidad de lesiones si maneja la desbrozadora a la velocidad para la que
fue diseñada.
PONGA ATENCIÓN. Observe lo que está haciendo. Use el sentido común. No
opere la desbrozadora si está cansado o bajo la influencia de medicamentos,
drogas o alcohol.
GUARDE LA DESBROZADORA BAJO TECHO. Cuando no esté en uso, la
desbrozadora se deberá guardar en un lugar cerrado, seco y elevado y fuera
del alcance de los niños.
ADVERTENCIA: No accione el equipo cuando esté descalzo o al llevar
puestas sandalias o calzado liviano similar. Use calzado de seguridad
que le proteja sus pies y mejore su postura en superficies resbaladizas.
ADVERTENCIA: Sólo utilice piezas de repuesto idénticas y accesorios
del fabricante original. El empleo de piezas diferentes puede causar un
peligro o dañar el producto.
ADVERTENCIA: En el cabezal de corte use únicamente hilo de
repuesto del fabricante original si está usando un accesorio para
recortar de eje. No use ningún otro aditamento de corte, por ejemplo,
cable metálico, cuerda o producto similar. Instalar cualquier otra marca
de hilo de corte en esta recortadora de hilo puede producir lesiones
corporales serias.
MANTENGA LA HERRAMIENTA EN CONDICIONES. El protector y
los mangos deben estar limpios para lograr un óptimo funcionamiento y
reducir el riesgo de lesiones. Mantenga los mangos secos y libres de
grasa y aceite.
ADVERTENCIA: disposición 65 del estado de California: Este producto
contiene químicos reconocidos por el Estado de California como
causantes de cáncer, defectos de nacimiento u otros efectos nocivos
para el aparato reproductor.
ADVERTENCIA: parte del polvo generado por este producto podría
contener químicos reconocidos por el Estado de California como
causantes de cáncer y defectos de nacimiento u otros efectos nocivos
para el aparato reproductor. Algunos ejemplos de estos productos
químicos son:
- químicos presentes en fertilizantes
- compuestos presentes en insecticidas, herbicidas y pesticidas
- arsénico y cromo de maderas tratadas químicamente
El riesgo que usted corre al exponerse a estos químicos varía según la
frecuencia con la que realiza este tipo de trabajo. Para reducir la
exposición a estos químicos, use equipo de protección aprobado,
como mascarillas antipolvo que están especialmente elaboradas para
eliminar partículas microscópicas mediante un proceso de filtrado.
ADVERTENCIA: Cáncer y Daño Reproductivo www.P65Warnings.ca.gov.
PRECAUCIÓN: Utilice únicamente el siguiente tipo y tamaño de
batería/ baterías: BL86225, BL86240, BL86250.
PRECAUCIÓN: Tenga cuidado cuando maneje baterías a fin de no
realizar un cortocircuito en la batería con materiales conductores como
anillos, brazaletes y llaves. La batería o el conductor pueden
recalentarse y provocar quemaduras.
Desconecte la batería del dispositivo antes de realizar ajustes, cambiar
accesorios o guardar el dispositivo. Estas medidas de seguridad
preventivas reducen el riesgo de que el aparato se encienda
accidentalmente.
Cuando la batería no esté en uso, manténgala alejada de otros objetos
metálicos, como clips, monedas, llaves, clavos, tornillos u otros objetos
metálicos pequeños, que pueden hacer una conexión de un terminal a
otro. Cortocircuitar los terminales de la batería puede causar
quemaduras o un incendio.
No utilice un paquete de baterías o un aparato que esté dañado o modi
fi cado. Las baterías dañadas o modificadas pueden exhibir un
comportamiento impredecible que puede resultar en un incendio,
explosión o riesgo de lesiones.
No exponga un paquete de baterías o un aparato a fuego o
temperatura excesiva. La exposición al fuego oa una temperatura
superior a 130 ° C puede causar una explosión. La temperatura de 130
° C se puede reemplazar por la temperatura de 265 ° F.
Siga todas las instrucciones de carga y no cargue la batería o el
aparato fuera del rango de temperatura especificado en las
instrucciones. La carga incorrecta o a temperaturas fuera del rango
especificado puede dañar la batería y aumentar el riesgo de incendio.
Haga que un técnico de reparaciones calificado realice el servicio de
reparaciones utilizando solo repuestos idénticos. Esto asegurará que
se mantenga la seguridad del producto.
No modifique ni intente reparar el electrodoméstico o la batería (según
corresponda), excepto lo indicado en las instrucciones de uso y
cuidado.
2
Modelo LST01562S
ADVERTENCIAS DE SEGURIDAD IMPORTANTES
Page 15

ESPECIFICACIONES DEL PRODUCTO
LST01562S
Entrada . . . . . . . . . . . . . . . . . . . . . . . . . . . . . . . . . . . . . . . . . . . . . . . . . . .. . . . . . .62 V, CC solamente only
Batería . . . . . . . . . . . . . . . . . . . . . . . . . . . . . . . . . . . . . . . . . . . . . . . . . . . . . . . . . . 62 V, 2.5Ah
Velocidad . . . . . . . . . . . . . . . . . . . . . . . . . . . . . . . . . . . . . . . . . . . . . . . . . . . . . . . . 5600/ 7000RPM
Ancho de corte . . . . . . . . . . . . . . . . . . .. . . . . . . . . . . . . . . . . . . . . . . . . . . . . . . . .33 o 38 cm (13 o 15 pulg.)
Peso . . . . . . . . . . . . . . . . . . . . . . . . . . . . . . . . . . . . . . . . . . . . . . . . . . . . . . . . . . . . 7 kg (15.43 Iibras)
Hilo trenzado dual de 080" - Alimentación por golpe
3
Modelo LST01562S
CARACTERÍSTICAS
13
1
2
4
3
5
6
7
8
10
9
11
12
N.° Descripción N.° Descripción
1 Botón de bloqueo de seguridad 8 Espaciador de acero
2 Interruptor de Gatillo 9 Perilla del carrete
3 Botón de dos velocidades 10 Cuerda
4 Mango auxiliar 11 Batería
5 Fijador de bloqueo 12 Cargador
6 Protector de seguridad 13 Botón de liberación de la batería
7 Cuchilla para cortar el hilo
Page 16

AJUSTE DEL ANCHO DE CORTE
El ancho de corte puede ajustarse a 33 o 38 cm (13 o 15 pulg.)
ubicando la cuchilla del hilo como se muestra.
DESEMBALAJE
Este producto requiere algunas operaciones de montaje.
LISTA DE EMBALAJE
- Cabezal motor
- Accesorio de desbrozadora
- Protector de seguridad
- Cargador y paquete de baterías
- Montaje del carrete
- Mango auxiliar
- Manual del propietario
- Bolsa, contiene las siguientes piezas:
ADVERTENCIA: no instale la batería hasta haber completado el
montaje. De lo contrario, la máquina podría arrancar accidentalmente y
provocar lesiones personales de gravedad.
ADVERTENCIA: si alguna pieza falta o está dañada, no utilice este
producto hasta reponer la pieza en cuestión. De lo contrario, podría
sufrir lesiones corporales serias.
Extraiga el producto y los accesorios de la caja con cuidado. Asegúrese
de que estén incluidos todos los elementos detallados en la lista de
embalaje. Inspeccione el producto detenidamente para corroborar que
no existan roturas ni averías ocurridas durante el envío. No deseche el
material de embalaje hasta haber inspeccionado exhaustivamente el
producto y comprobado que funciona en forma satisfactoria.
Si alguna pieza falta o está dañada, llame al 1-800-618-7474 para
obtener asistencia.
4
Modelo LST01562S
MONTAJE
Imagen Nombre Tamaño Cantidad
Tornillo M5x0.8x35 2 PCS
Nuez M5x0.8 2 PCS
Espaciador de
acero
N/A 1 PC
Tornillo Allen M5x0.8x12 3 PCS
Placa de
manija auxiliar
N/A 1 PC
Llave inglesa T25&+ 1 PC
Llave de
zócalo
8mm/10mm 1 PC
Ubíquela en la
posición interna para
lograr un corte de
33 cm (13 pulg.)
Ubíquela en la
posición externa para
lograr un corte de 38 cm
(15 pulg.)
COLOCACIÓN DEL MANGO AUXILIAR
Instale el mango auxiliar y el soporte inferior alrededor del eje del
cabezal de potencia, a una distancia cómoda del interruptor del gatillo.
Inserte los pernos M5.0*0.8*35 en cada uno de los cuatro orificios.
Con la herramienta combinada, ajuste los pernos con firmeza de
manera que el mango quede fijo en el eje.
Tornillo
COLOCACIÓN DEL PROTECTOR
Arme el protector como se muestra a continuación, colocándolo sobre el
accesorio de la desbrozadora. Con un destornillador Phillips, asegure el
protector instalando tres (3) tornillos en el cabezal de molde fundido. Retire
el protector de la cuchilla.
ADVERTENCIA: no utilice la desbrozadora si el protector no está
colocado. El incumplimiento de estas instrucciones podría ocasionar
lesiones personales graves.
Protector de
seguridad
INSTALACIÓN DEL CARRETE DE HILO
Cerciórese de retirar el paquete de baterías. Coloque el espaciador de
acero sobre el eje del cabezal de corte. Alinee el orificio en el
espaciador con el área de la muesca del molde fundido. Inserte la llave
suministrada a través del orificio en el espaciador y el molde fundido
para asegurar el espaciador mientras instala el carrete. Gire el carrete
sobre el perno en sentido contrario a las agujas del reloj. Asegúrese de
que el carrete esté firmemente conectado.
Espaciador de
acero
Llave
inglesa
Page 17

MONTAJE
INSTALACIÓN DEL ACCESORIO DE DESBROZADORA EN EL
CABEZAL DE POTENCIA
El aditamento se conecta al cabezal motor mediante un
dispositivo acoplador.
● Retire la batería.
● Afloje la tuerca mariposa en el acoplador del eje del cabezal de
potencia.
● Tire del pasador de retención ubicado en el eje del cabezal motor
y rótelo un 1/4 de vuelta. Esta rotación le permite al pasador
desbloquearse del eje aun cuando esté liberado.
● Alinee el orificio del eje del accesorio con el pasador de retención
del eje del cabezal motor y deslice ambos ejes juntos.
● Rote el pasador de retención un 1/4 de
vuelta para que el pasador esté
completamente asentado en el orificio
del eje del accesorio.
NOTA: Si el pasador no se libera
completamente en el orificio de
posicionamiento, los ejes no están asegurados en su lugar. Rote ligeramente de un lado
al otro hasta que el pasador esté asegurado
en su lugar.
● Apriete firmemente la perilla.
ADVERTENCIA: Asegúrese de que esté bien apretada la perilla antes
de utilizar el equipo. Verifique periódicamente el apriete de la misma
durante el uso para evitar lesiones serias.
DESMONTAJE DEL ACCESORIO DEL
CABEZAL MOTOR
● Apague el motor y retire el paquete de baterías.
● Afloje la perilla.
● Tire del pasador de retención y gire los ejes para quitar y separar
los extremos.
INSTALACIÓN / EXTRACCIÓN DE LA BATERÍA
Para instalar el paquete de baterías:
● Alinee la ranura exterior del paquete de baterías con la costilla
realzada interior del receptáculo para pilas de la herramienta y
coloque el paquete de baterías en la herramienta.
ADVERTENCIA: Retire siempre el paquete de baterías de la
herramienta antes de instalar las piezas, realizar ajustes. limpiarla o
cuando no la utilice. Retirar el paquete de baterías evitará que la
unidad se accione accidentalmente y provoque lesiones graves.
Para retirar el paquete de baterías:
● Presione el botón del pestillo de la batería en la herramienta y
tire del paquete de baterías hacia fuera mediante el mango.
ADVERTENCIA: Asegúrese de que el pestillo de la herramienta est
adecuadamente en su lugar y que el paquete de baterías esté bien
colocado y asegurado en el puerto de batería de la herramienta antes
de que encenderla. No asentar el paquete de baterías correctamente
podría provocar que el paquete de baterías se caiga y cause lesiones
personales graves.
Botón de liberación de
la batería
FUNCIONAMIENTO
ENCENDIDO DE LA HERRAMIENTA
Seleccione la velocidad de funcionamiento deseada (alta o baja).
Mantenga presionado el botón de bloqueo del gatillo en la parte superior
del mango delantero y apriete el interruptor de gatillo con sus dedos.
Suelte el botón de bloqueo cuando se presiona el gatillo.
PARA APAGAR LA HERRAMIENTA
Suelte el interruptor de gatillo.
Antes de encender la unidad, asegúrese de que no esté en contacto con
ningún objeto.
ADVERTENCIA: el hilo puede lanzar piedras, trozos de metal y otros
objetos a gran velocidad. La unidad y el protector están diseñados para
reducir este peligro.
ADVERTENCIA: para prevenir lesiones personales, tenga en cuenta las
siguientes recomendaciones:
Lea el manual de instrucciones antes de usar el producto y
guárdelo para consultas futuras.
Mantenga las manos alejadas de los hilos.
Sostenga la herramienta con ambas manos en los
mangos. No adopte una postura incómoda.
Si la herramienta se golpea o se enreda con algún objeto extraño,
deténgala de inmediato y verifique si hay daños; en ese caso,
hágala reparar antes de usarla nuevamente. No utilice la
desbrozadora si el eje o el carrete están rotos.
5
Modelo LST01562S
Baja Velocidad
Alta Velocidad
Botón De Dos Velocidades
El recortador tendrá un tiempo de funcionamiento más largo
si se opera en el ajuste de baja velocidad.
Page 18

PRECAUCIÓN: los hilos se mueven por inercia después de ap
agar el motor.
No trabaje en condiciones de humedad.
PRECAUCIÓN: inspeccione el área de trabajo y elimine alambres, cables, u
objetos similares que pudieran enredarse en el hilo giratorio o en el carrete.
Sea particularmente cuidadoso con los alambres que puedan proyectarse
hacia afuera e interponerse en el recorrido de la herramienta; por ejemplo,
púas en la base de una cerca de alambre.
MANEJO DE LA CABEZAL MOTOR
Sujete el cabezal motor con la mano derecha en el mango trasero y coloque
la mano izquierda en el mango delantero. Sujete firmemente la unidad con
ambas manos durante la operación. Se recomienda sujetar el cabezal motor
en una posición cómoda, con el mango trasero a la altura de la cadera.
Si se acumulan residuos en el accesorio, SUELTE EL GATILLO DEL
INTERRUPTOR, retire el paquete de baterías y quite los residuos.
INSTRUCCIONES DE CORTE
Posición de corte correcta
El peso debe estar equilibrado, con ambos pies apoyados en suelo firme.
Procedimiento básico de corte
Desplace la desbrozadora de lado a lado lentamente como se muestra en la
ilustración.
ADVERTENCIA: no corte cerca de cableados eléctricos ni de edificaciones.
ADVERTENCIA: no permita que la familiaridad con este tipo de productos
termine en negligencia. Recuerde que un segundo de descuido es suficiente
para provocar una lesión seria.
No opere la desbrozadora en un árbol, en una escalera ni en un andamio;
esto es sumamente peligroso.
Use guantes antideslizantes para lograr un máximo agarre y una protección
adecuada.
HILO
EXTENDIDO MANUALMENTE
Si el hilo de la desbrozadora golpea objetos filosos o abrasivos,
como piedras, piezas de metal o concreto, podría cortarse y
quedar demasiado chico como para poder seguir cortando. En
este caso, puede extender manualmente el hilo:
• QUITE EL PAQUETE DE BATERÍAS
• Presione la perilla del carrete y rótela en sentido contrario a
las agujas del reloj. Tire del hilo después de cada cuatro
vueltas hasta alcanzar la longitud deseada. (Nota: Libere
solamente la cantidad de hilo suficiente para extenderlo
justo pasando la hoja. Si libera demasiado hilo, la hoja no
podrá cortarlo con el largo correcto para su funcionamiento
y podría enredarse en el eje giratorio.)
• Instale el paquete de baterías.
• Vuelva a encender la desbrozadora y vuelva a utilizarlo
normalmente.
FUNCIONAMIENTO
AVANCE DEL HILO/ ALIMENTACIÓN POR GOLPE
Su desbrozadora usa un hilo de nylon trenzado de 0.80" para
cortar el césped y las malezas de manera rápida y sencilla. Con
el tiempo, la punta del hilo de nylon se gasta. Para liberar el hilo,
coloque el cabezal de corte paralelo al suelo. Golpee el cabezal 2
o 3 veces en el piso cuando la desbrozadora está funcionando.
Una vez que haya liberado suficiente hilo, escuchará el sonido de
la cuchilla que corta el hilo. El hilo de corte se desgasta con
mayor rapidez si el corte se realiza a lo largo de las aceras u
otras superficies abrasivas o si se cortan malezas más densas.
6
Modelo LST01562S
Page 19

7
Modelo LST01562S
REBOBINADO DEL HILO A GRANEL EN EL CARRETE
(USE SÓLO HILO DE 2,00 MM [0,080 PULG.] DE
DIÁMETRO)
El distribuidor o centro de servicio local ofrece hilo a granel
para su desbrozadora/bordeadora con un costo adicional.
Para instalarlo, siga estos pasos:
• Apague la desbrozadora y extraiga la batería.
• Corte el hilo a una longitud de 4,5 m (14,7 pies).
• Presione las lengüetas de desbloqueo del carrete de hilo
tal como se muestra en la Fig 1, y tire del carrete para
retirarlo. Retire y deseche todo el hilo del carrete.
• Rote la perilla del carrete de manera que los dos orificios
del eje del carrete están alineados con los orificios de los
2 ojales de metal.
• Inserte el hilo a través de los cuatro orificios. Tire del hilo
hasta que su longitud sea igual a cada lado del carrete.
(Ver Fig. 2)
• Gire la perilla del carrete en sentido contrario a las agujas
del reloj (vea las flechas en la parte superior de la perilla)
hasta que el hilo se bobine en la longitud de corte
adecuada. (Ver Fig. 3)
• Vuelva a instalar el carrete en la cubierta del carrete,
asegurándose de que esté bien trabado en el lugar. (Ver
Fig. 4)
FUNCIONAMIENTO
Perilla del carrete
Línea
Pestaña de
liberación
Fig.1
Fig. 2
Fig. 3
Fig. 4
Page 20

Cuando la batería está cargada por completo, se puede almacenar
de forma segura en temperaturas de hasta –20 ºC (-4 ºF) durante un
período de hasta cuatro semanas antes de que requiera una nueva
carga. Cargue el paquete de baterías completamente cada 90 días.
Si transcurrido un tiempo determinado, el paquete de baterías se
agota rápidamente después de un período de carga de 90, 140, o
180 minutos, es necesario un cambio de batería.
Para prevenir un daño permanente a la batería, nunca la almacene
descargada.
ALMACENAMIENTO EN INVIERNO. Recargue la batería
completamente antes de guardarla y repita la operación cada
90 días.
Debido a que la batería no tiene ningún efecto memoria, no es
necesario que esté totalmente descargada para volver a cargarla.
Es posible que ocurra una pequeña pérdida de líquido de las pilas en
condiciones de uso, carga o temperaturas extremas. Esto no indica
una falla. No obstante, si el sello externo está roto y el líquido entra
en contacto con la piel:
a. Lávese con agua y jabón de inmediato.
b. Neutralice el efecto con un ácido débil como jugo de
limón o vinagre.
c. Si el líquido de la batería penetra en los ojos,
enjuáguese con agua limpia durante un mínimo de
10 minutos y obtenga asistencia médica inmediata.
PROCEDIMIENTO DE CARGA. CONSULTE LAS
INSTRUCCIONES COMPLETAS EN EL MANUAL DEL
CARGADOR
Cargue el paquete de baterías únicamente con el cargador provisto.
Permita al menos 90 minutos de tiempo de carga para una batería
de 2,5 Ah, o 140 minutos para una batería de 4 Ah, o 180 minutos
para una batería de 5 Ah antes del uso inicial de la cortadora de hilo.
Asegúrese de que el voltaje del suministro eléctrico sea el doméstico
normal: 120 voltios, 60 Hz, CA únicamente.
El cargador de baterías debe funcionar en temperaturas que oscilen
entre los 4 y 40 ºC (39 y 104 ºF).
La batería debe cargarse en un lugar fresco y seco.
Es posible que se necesiten de dos a tres ciclos de carga/descarga
iniciales para obtener la máxima capacidad o tiempo de
funcionamiento.
No intente abrir el cargador ni la unidad, ya que en su interior no
existen piezas que el usuario pueda reparar. Comuníquese con la
línea de ayuda de atención al cliente al 1-800-618-7474 para recibir
asistencia.
NO incinere los paquetes de baterías, aunque estén muy dañados o
totalmente agotados, porque pueden estallar y provocar lesiones.
Utilice el cargador de baterías sólo bajo techo.
Desconecte el cargador del suministro eléctrico cuando no esté en
uso para evitar daños en caso de que se produzca un pico de
tensión.
ELIMINACIÓN DE LA BATERÍA
Extraiga el paquete de baterías de la herramienta. Cubra los terminales con una cinta adhesiva resistente. No trate de destruir ni desarmar el
paquete de baterías ni de extraer ninguno de sus componentes. Este producto contiene baterías de iones de litio, que se deben reciclar o
desechar adecuadamente. Es posible que las leyes locales, estatales o federales prohíban eliminar estas baterías con los desechos comunes.
El sello RBRC que aparece en el paquete de baterías de iones de litio indica que los costos para reciclarlo al término de su vida útil
ya han sido pagados por The Great States Corporation/American Lawn Mower Company. Es ilegal arrojar las baterías de iones de
litio gastadas en un depósito municipal de residuos sólidos o en la basura. RBRC, en colaboración con The Great States
Corporation/American Lawn Mower Company, ofrece una forma fácil y ecológica de reciclar las baterías de iones de litio gastadas.
Simplemente comuníquese con el centro de reciclaje local o llame al 1-800-8-BATTERY para obtener información sobre dónde dejar
las baterías gastadas.
8
Modelo LST01562S
CARGA DEL PAQUETE DE BATERÍAS
Paquete de
baterías
Cargador
Luz roja constante + Parpadea en verde = La batería es está cargando
Luz roja constante + Luz verde constante = La batería se cargó por
complete
Page 21

PRECAUCIÓN: evite en todo momento que líquidos de frenos,
gasolina, productos a base de petróleo, aceites penetrantes, etc.
entren en contacto con piezas plásticas. Contienen químicos que
pueden dañar, debilitar o destruir el plástico.
Asegúrese de que la batería se haya retirado de la unidad y luego
utilice únicamente un jabón suave y un paño húmedo para limpiar
la herramienta. No permita que se filtre líquido en el interior de la
herramienta ni sumerja ninguna pieza en líquido.
Los fertilizantes y otros productos químicos para el jardín
contienen agentes que aceleran la corrosión de los metales en
forma considerable. No guarde la herramienta junto a fertilizantes
ni productos químicos.
IMPORTANTE: a fin de garantizar la SEGURIDAD y la CONFIABILIDAD,
las reparaciones, el mantenimiento y los ajustes deben llevarse a cabo
en un centro de servicio autorizado u otra organización de servicio
calificada, y siempre utilizando repuestos idénticos.
Si la desbrozadora se ha caído, inspecciónela cuidadosamente para
comprobar si sufrió algún daño. Si el protector está doblado o tiene
grietas o los mangos están rotos, o si detecta alguna otra condición que
pudiera afectar el funcionamiento de la desbrozadora, se deben realizar
las reparaciones pertinentes antes de volver a usarla. Comuníquese con
nuestra línea de ayuda de atención al cliente al 1-800-618-7474 para
recibir asistencia.
MANTENIMIENTO
9
Modelo LST01562S
SOLUCIÓN DE PROBLEMAS
Si tiene preguntas sobre el funcionamiento o el mantenimiento de su
producto al 1.800.618.7474, de 8:00 a 17:00, hora estándar del este,
, o obtener asistencia en scotts.americanlawnmower.com.
¡LLÁMENOS PRIMERO!
Problema Posible causa Posible solución
- La unidad no funciona. - La batería no hace contacto. - Verifique que la batería esté bien colocada.
- El botón de bloqueo no está en la posición correcta - Compruebe que el botón de bloqueo se encuentre totalmente
hacia adelante antes de accionar el gatillo.
- La batería no está instalada correctamente. - Controle la instalación de la batería.
- La batería no está cargada. - Revise los requisitos de carga de la batería.
- El hilo no avanza. - El hilo está enredado en el carrete. - Desenrolle 60,9 cm (24 pulg.) de hilo y rebobine.
- El hilo no se corta. - La cortadora de hilo en el protector falta o está dañada. - Reemplace el protector.
- La batería no se carga. - La batería no está bien colocada en el cargador. - Coloque nuevamente la batería en el cargador hasta que
aparezca una luz roja en el indicador LED.
- El cargador no está enchufado. - Enchufe el cargador en un tomacorriente que funcione.
- Compruebe la corriente en el receptáculo; para ello enchufe
una lámpara u otro artefacto.
- Asegúrese de que el receptáculo no esté conectado a un
interruptor de luz que corta el suministro eléctrico cuando usted
apaga las luces.
- La temperatura del aire en el ambiente es muy baja o
muy elevada.
- Traslade el cargador y la herramienta a un lugar con una
temperatura ambiente superior a los 4 ºC (39 ºF) e inferior a
40 ºC (104 ºF).
Page 22

10
Modelo LST01562S
PIEZAS Y SERVICIO
Para solicitar repuestos o servicio técnico, llame al 1-800-618-7474 o visite nuestra página
scotts.americanlawnmower.com. Asegúrese de proporcionar toda la información relevante cuando
nos llame o visite.
REPUESTOS (KITS / ARTÍCULOS)
El número de modelo/ de serie de esta herramienta se encuentra en una placa o etiqueta adjunta a
la caja. Registre el número de serie en el espacio provisto a continuación.
MODELO N.º LST01562S__
NÚMERO DE SERIE_______________
Mencione siempre el serial del modelo cuando ordene kits para el mismo.
N.° Número de kit/
Número de artículo
Descripción Cantidad
1 LST62-HBK-1 Kit de pernos de la
manija
1
2 LST62-AHK-1 Mango auxiliar 1
3 LST62-PGK-1 Protector de seguridad 1
4 RS95815 Carrete 1
5 BL86225 Batería 62V 2.5Ah 1
6 CHL86200 Cargador 1
¡LLÁMENOS PRIMERO!
Si tiene preguntas sobre el funcionamiento o el mantenimiento de su
producto al 1.800.618.7474, de 8:00 a 17:00, hora estándar del este,
, o obtener asistencia en scotts.americanlawnmower.com.
Page 23

NOTAS
____________________________________________________________________
____________________________________________________________________
____________________________________________________________________
____________________________________________________________________
____________________________________________________________________
____________________________________________________________________
____________________________________________________________________
____________________________________________________________________
____________________________________________________________________
____________________________________________________________________
____________________________________________________________________
____________________________________________________________________
____________________________________________________________________
____________________________________________________________________
____________________________________________________________________
____________________________________________________________________
____________________________________________________________________
____________________________________________________________________
____________________________________________________________________
____________________________________________________________________
____________________________________________________________________
____________________________________________________________________
____________________________________________________________________
____________________________________________________________________
____________________________________________________________________
____________________________________________________________________
____________________________________________________________________
____________________________________________________________________
____________________________________________________________________
____________________________________________________________________
____________________________________________________________________
____________________________________________________________________
____________________________________________________________________
____________________________________________________________________
____________________________________________________________________
____________________________________________________________________
11
Modelo LST01562S
Page 24

Con el compromiso constante de mejorar la calidad, el fabricante se reserva el derecho de modificar
los componentes o diseñar cambios cuando lo considere necesario.
Rev. 12 /06/2018
MANUAL DEL OPERARIO
DESBROZADORA A BATERÍA DE LITIO DE 62 VOLTIOS
MOTOR SIN ESCOBILLAS
Copyright. Todos los derechos reservados.
Modelo LST01562S
• Garantía limitada de 5 años para todas las herramientas eléctricas de iones de litio de 62 V Scotts a partir de la fecha de compra cuando se utilizan
para uso personal, doméstico o familiar.
• Garantía limitada de 3 años para todas las baterías y cargadores de iones de litio de 62 V Scotts a partir de la fecha de compra cuando se utilizan
para uso personal, doméstico o familiar.
The Great States Corp. (GSC) garantiza al propietario original que este producto y pieza de servicio Scotts están libres de defectos de materiales y mano
de obra y acepta reparar o reemplazar cualquier producto o pieza defectuosa durante el período de garantía indicado anteriormente.
• La garantía queda anulada si se utiliza con fines comerciales o industriales o cualquier otro uso inadecuado según lo determine GSC.
• La garantía no incluye las reparaciones necesarias debido al abuso o negligencia del operador (incluyendo la sobrecarga del producto más allá de
su capacidad o la inmersión en agua), o la falta de montaje, operación, mantenimiento o almacenamiento del producto de acuerdo con las
instrucciones del manual del propietario.
• Esta garantía no cubre
Elementos de desgaste, incluyendo pero no limitado a: correas y engranajes de transmisión, púas, cuchillas de cortadoras, hojas de
segadora, cadenas de motosierra, hojas de trituración, ventiladores, cubiertas de carretes, hilo de desbrozadora, tubos de soplador y de
vacío, barras guía, mangueras de alta presión, ruedas, manijas, barrenas, bolsas desgastadas, cables de alimentación y otros elementos
que se someten a desgaste a lo largo del tiempo.
Desgaste de las baterías, incluyendo pero no limitado a: caídas, desgaste y rotura del cargador, exposición a oscilaciones extremas de
temperatura (caliente o fría), batería dejada en el cargador demasiado tiempo, batería dejada sin cargar por demasiado tiempo, y mal uso
o abuso de la batería.
• Esta garantía no cubre los daños causados por el frío, el calor, la lluvia, el exceso de humedad u otras condiciones ambientales extremas.
• Esta garantía no cubre el deterioro normal del acabado exterior ni el desgaste normal de los productos, incluidos, entre otros, los arañazos, grietas,
abolladuras o daños causados por productos químicos externos.
• Esta garantía no es transferible y sólo se aplica a productos nuevos vendidos directamente por un distribuidor autorizado. Esta garantía no se aplica
a ningún producto, nuevo o usado, comprado a través de canales de terceros no autorizados. Para obtener información sobre distribuidores
autorizados, comuníquese con nuestra línea de ayuda de asistencia al cliente llamando al 1-800-618-7474 (de lunes a viernes, de 8 a. m. a 5 p. m.,
hora del este).
• Cualquier pérdida, daño o gasto incidental, indirecto o consecuente que pueda derivarse de cualquier defecto o mal funcionamiento de los productos
no está cubierto por la garantía.
• La garantía no incluye la instalación, el montaje o los ajustes normales que se explican en el manual del operador. Los gastos de entrega del
producto al vendedor y los gastos de devolución del producto o de las piezas de recambio al propietario no están cubiertos por la garantía.
Limitaciones adicionales de la garantía
Algunos estados no permiten la exclusión o limitación respecto de la duración de una garantía implícita; por lo tanto, es posible que las limitaciones
enunciadas anteriormente no le correspondan. Los productos vendidos con averías o incompletos, vendidos en las condiciones que se encuentren, o
vendidos como reacondicionados no están cubiertos por la garantía.
Daños ni inconvenientes causados por envío, manipulación inadecuada, instalación incorrecta, voltaje incorrecto, cableado incorrecto, mantenimiento
deficiente, modificaciones inadecuadas o el uso de accesorios o dispositivos de sujeción no recomendados específicamente no están cubiertos por la
garantía.
Todos los reclamos de garantía deben estar acompañados de un comprobante de compra, recibo de compra original con fecha.
Para reclamos vaya a scotts.americanlawnmower.com o llame a nuestra línea de ayuda de asistencia al cliente al 1-800-618-7474 de lunes a
viernes, de 8 a. m. a 5 p. m., hora del este.
GARANTÍA
Política de garantía de Scotts
American Lawn Mower Company
The Great States Corporation
7444 Shadeland Station Way
Indianapolis, IN 46256
Estados Unidos
Teléfono 1-800-618-7474
scotts.americanlawnmower.com
Page 25

MANUEL DE L’UTILISATEUR
TONDEUSE À FIL AUTONOME AU LITHIUM DE 62 VOLTS
MOTEUR SANS BALAIS
Droit d'auteur. Tous droits réservés.
Modèle LST01562S
Votre tondeuse à fil a été conçue et fabriquée selon notre norme élevée de fiabilité, de facilité d’utilisation et de sécurité
de l’utilisateur. Correctement entretenue, elle vous procurera des années de service intensif et sans souci.
AVERTISSEMENT: Afin d’éviter de se blesser, l’utilisateur doit lire et comprendre le manuel de l’utilisateur
avant d’utiliser ce produit.
Merci pour votre achat.
NE RENVOYEZ PAS CE PRODUIT AU MAGASIN. AVEZ-VOUS DES
QUESTIONS CONCERNANT LE FONCTIONNEMENT, L’ASSEMBLAGE, LES
PIÈCES OU LA RÉPARATION DU PRODUIT? ALLER À
SCOTTS.AMERICANLAWNMOWER.COM OU COMPOSEZ LE 1-800-618-7474
DE 8 h 00 à 17 h 00, HEURE DE L’EST, POUR TOUTE ASSISTANCE.
CONSERVEZ CE MANUEL POUR POUVOIR LE CONSULTER ULTÉRIEUREMENT
244026
Chargeur conforme
CA inclus, modèle no
CHL86200
LA BATTERIE DOIT ÊTRE CHARGÉE
AVANT LA PREMIÈRE UTILISATION.
2 À 3 CYCLES INITIAUX DE CHARGE/
DÉCHARGE PEUVENT ÊTRE
NÉCESSAIRES POUR OBTENIR LA
DURÉE/CAPACITÉ MAXIMUM.
Page 26

POUR RÉDUIRE LE RISQUE DE BLESSURES :
Avant toute utilisation, assurez-vous que toute personne utilisant cet outil a
lu et compris toutes les consignes de sécurité et les autres renseignements
contenus dans ce manuel.
MISE EN GARDE : Portez des protections auditives appropriées pendant
l’utilisation. Dans certaines conditions, ou en cas d’utilisation prolongée, le
bruit émis par ce produit peut contribuer à une perte auditive.
Conservez ces instructions et relisez-les souvent avant d’utiliser le produit et
lorsque vous apprenez son emploi à d’autres personnes.
AVERTISSEMENT : Lors de l’utilisation d’outils électriques de jardinage, les
consignes de sécurité de base doivent toujours être suivies afin d’éviter les
incendies, les chocs électriques et les blessures, notamment :
LIRE TOUTES LES INSTRUCTIONS
GARDER HORS DE PORTÉE DES ENFANTS – Tous les visiteurs, enfants
et animaux domestiques doivent se tenir au-delà du périmètre de sécurité
de la zone de travail.
S’HABILLER DE FAÇON APPROPRIÉE – Ne portez pas des vêtements
amples ou des bijoux. Portez une protection des cheveux pour contenir les
cheveux longs. Ceux-ci risquent en effet d’être happés par les pièces en
mouvement. L’utilisation de gants en caoutchouc et de chaussures robustes
est recommandée pour les travaux à l’extérieur. Portez toujours des
pantalons longs lors de l'utilisation de cette tondeuse à fil.
PORTER DES LUNETTES DE SÉCURITÉ – Lors de l’utilisation de ce
produit, portez des lunettes de sécurité avec des écrans latéraux portant
une marque de conformité à la norme ANSI Z87.1. Portez un masque facial
ou antipoussières en présence de poussières.
UTILISER LE BON OUTIL – N’utilisez pas l’outil pour une tâche pour
laquelle il n’a pas été conçu.
RETIRER LA BATTERIE DE LA TONDEUSE À FIL quand elle n’est pas
utilisée ou lors de l’entretien ou du nettoyage. Ne la laissez pas sans
surveillance.
VÉRIFIER LES PIÈCES ENDOMMAGÉES – Avant de poursuivre
l’utilisation de la tondeuse à fil, toute protection ou autre pièce qui est
endommagée doit être vérifiée avec précaution afin de vérifier qu’elle
fonctionnera correctement et remplira sa fonction prévue. Vérifiez que les
pièces mobiles sont alignées, qu’elles ne sont pas coincées, qu’aucune
pièce n’est cassée, et inspectez la qualité du montage et toute autre
condition pouvant affecter le fonctionnement de l’outil. Une pièce de
protection ou autre qui est endommagée doit être réparée ou remplacée de
manière adéquate. Appelez notre service clientèle au 1-800-618-7474 pour
obtenir de l'aide.
ÉCLAIRAGE – N’utilisez la tondeuse à fil qu’à la lumière du jour ou sous un
bon éclairage artificiel.
NE PAS ESSAYER DE COUPER TROP LOIN – Conservez toujours une
assise correcte et un bon équilibre.
AVERTISSEMENT : N’utilisez pas la tondeuse à fil avec n’importe quel type
d’accessoire ou d’outil. Une telle utilisation pourrait être dangereuse.
ÉVITER LES ENVIRONNEMENTS DANGEREUX – N’utilisez pas la
tondeuse à fil sous la pluie ou dans les endroits humides ou mouillés.
N’utilisez pas la tondeuse à fil dans les atmosphères gazeuses ou
explosives. Les moteurs de ces outils émettent normalement des étincelles,
qui pourraient enflammer les vapeurs.
ÉVITER UNE MISE EN MARCHE ACCIDENTELLE – S’assurer que la
gâchetteest verrouillée en position d’arrêt avant d’insérer le bloc piles.Le
transport d’outils avec le doigt sur le commutateur oul’insertion du bloc piles
avec le commutateur en position demarche est une invite aux accidents.
DANGER : Risque de coupure. N’approchez pas les mains des fils. Gardez
les deux mains sur les poignées quand l’outil est en marche.
DANGER: Don’t use tool if switch trigger does not turn it on or off. Appelez
notre service clientèle au 1-800-618-7474 pour obtenir de l'aide.
DANGER: Ne pas jeter les piles au feu. La cellule peut exploser. Vérifier les
codes locaux pour connaître toute instruction spéciale relative à
l’élimination des piles.
DANGER: Ne pas altérer le bloc piles. L’électrolyte est un produit corrosif
pouvant causer des lésions cutanées ou oculaires. Il peut être toxique en
cas d’ingestion.
AVERTISSEMENT : Garder les gardes en place et en ordre de marche.
AVERTISSEMENT : Gardez les mains et les pieds éloignés de la zone de
coupe.
NE PAS TENTER d’enlever du matériau coupé, ni de tenir du matériau à
couper quand les fils sont activés. Assurez-vous que la tondeuse à fil est
hors tension pour enlever le matériau coincé dans les fils. Ne saisissez pas
les protections ou les fils quand vous prenez ou tenez la tondeuse à fil.
MISE EN GARDE : Les fils tournent encore après la mise hors tension.
NE PAS FORCER PAS LA TONDEUSE À FIL – Elle sera plus efficace et
avec un moindre risque de blessures à l’intensité pour laquelle elle a été
conçue.
RESTER VIGILANT – Regardez ce que vous faites. Faites preuve de bon
sens. N’utilisez pas la tondeuse à fil si vous êtes fatigué ou sous l’influence
de médicaments, de drogues ou d’alcool.
RANGER LA TONDEUSE À FIL À L’INTÉRIEUR – Lors qu’elle n’est pas
utilisée, la tondeuse à fil doit être rangée à l’intérieur dans un endroit sec et
élevé ou verrouillé, hors de portée des enfants.
AVERTISSEMENT : Ne pas faire fonctionner l’équipement pied-nu ou en
portant des sandales ou des chaussures légères similaires. Porter des
chaussures de protection qui protègent vos pieds et améliorent votre
équilibre sur des surfaces glissantes.
AVERTISSEMENT : Utiliser exclusivement des pièces de rechange et
accessoire d’origine. L’usage de toute autre pièce pourrait créer une
situation dangereuse ou endommager l’produit.
AVERTISSEMENT : Utiliser exclusivement des lignes de coupe d’origine si
l’on d’utiliser l’accessoire taille-bordures. Ne pas utiliser un autre accessoire
de coupe, tel que fil métallique, corde, ou autre. L’utilisation d’une tête de
coupe d’autre marque sur cette tondeuse à fouet peut entraîner des
blessures graves.
ENTRETENIR LA TONDEUSE À FIL AVEC ATTENTION – Maintenez la
protection et les poignées propres pour un rendement optimal et pour
réduire le risque de blessures. Maintenez les poignées sèches et exemptes
d’huile et de graisse.
AVERTISSEMENT : Proposition 65 de l’État de la Californie: L’État de la
Californie considère que certains produits chimiques contenus dans cet
appareil sont à l’origine de cancers, de malformations congénitales et
d’autres troubles de l’appareil reproducteur.
AVERTISSEMENT : L’État de la Californie considère que certaines
poussières créées par ce produit contiennent des produits chimiques qui
sont à l’origine de cancers, de malformations congénitales et d’autres
troubles de l’appareil reproducteur. Parmi ces produits chimiques, citons :
- les produits chimiques contenus dans les engrais
- les composés contenus dans les insecticides, les
herbicides et les pesticides
- l'arsenic et le chrome du bois traité chimiquement
Votre risque d’exposition à ces produits chimiques varie en fonction de la
fréquence à laquelle vous effectuez ce type de travail. Afin de réduire
l’exposition à ces produits chimiques, portez un équipement de sécurité
homologué, comme un masque antipoussières spécialement conçu pour
filtrer les particules microscopiques.
AVERTISSEMENT : Cancer ET Troubles de l'appareil reproducteur www.P65Warnings.ca.gov.
MISE EN GARDE : Utilisez uniquement les batteries de type et de taille
suivants: BL86225, BL86240, BL86250
MISE EN GARDE : Manipuler les piles avec soin pour éviter des courts circuits
avec des objets conducteurs comme des anneaux, des bracelets et des clés. La
pile ou l’objet conducteur peuvent surchauffer et causer des brûlures.
Déconnectez la batterie de l'appareil avant de procéder à des réglages, de
changer d'accessoire ou de ranger l'appareil. Ces mesures de sécurité préventives
réduisent le risque de démarrage accidentel de l'appareil.
Lorsque vous n'utilisez pas la batterie, gardez-la à l'écart d'autres objets en métal,
tels que des trombones, des pièces de monnaie, des clés, des clous, des vis ou
tout autre petit objet en métal, pouvant établir une connexion d'un terminal à un
autre. Court-circuiter les bornes de la batterie peut provoquer des brûlures ou un
incendie.
N'utilisez pas de batterie ou d'appareil endommagé ou modifié. Les batteries
endommagées ou modifiées peuvent présenter un comportement imprévisible
entraînant un incendie, une explosion ou un risque de blessure.
Ne pas exposer une batterie ou un appareil au feu ou à une température
excessive. L'exposition au feu ou à une température supérieure à 130 ° C peut
provoquer une explosion. La température de 130 ° C peut être remplacée par la
température de 265 ° F.
Suivez toutes les instructions de chargement et ne chargez pas la batterie ou
l'appareil en dehors de la plage de température spécifiée dans les instructions.
Une charge incorrecte ou à des températures inférieures à la plage spécifiée peut
endommager la batterie et augmenter le risque d'incendie.
Confier les réparations à un réparateur qualifié en utilisant uniquement des pièces
de rechange identiques. Cela garantira le maintien de la sécurité du produit.
Ne modifiez pas et n'essayez pas de réparer l'appareil ou le bloc-batterie (selon le
cas), sauf si cela est indiqué dans les instructions d'utilisation et d'entretien.
2
Modèle LST01562S
AVERTISSEMENTS DE SÉCURITÉ IMPORTANTS
Page 27

CARACTÉRISTIQUES
SPÉCIFICATIONS DU PRODUIT
LST01562S
Entrée . . . . . . . . . . . . . . . . . . . . . . . . . . . . . . . . . . . . . . . .62 V, CC uniquement
Batterie . . . . . . . . . . . . . . . . . . . . . . . . . . . . . . . . . . . . . . . 62 V, 2,5Ah
Vitesse . . . . . . . . . . . . . . . . . . . . . . . . . . . . . . . . . . . . . . . .5600/ 7000RPM
Largeur de coupe . . . . . . . . .. . . . . . . . . . . . . . . . . . . .. . .33 ou 38 cm (13 ou 15 po)
Poids . . . . . . . . . . . . . . . . . . . . . . . . . . . . . . . . . . . . . . . . .7 kg (15.43 livres)
2,03 mm (0,08 po) fil double enroulé - Alimentation par coup
13
1
2
4
3
5
6
7
8
10
9
11
12
N° Description (Numéro de pièce) N° Description (Numéro de pièce)
1 Bouton de verrouillage de sécurité 8 Espaceur en acier
2 Contacteur 9 Bouton de dévidoir
3 Bouton à deux vitesses 10 Chaîne
4 Poignée auxiliaire 11 Batterie
5 Pince de blocage 12 Chargeur
6 Carter de protection 13 Bouton de déverrouillage
7 Lame de coupe du fil
3
Modèle LST01562S
Page 28

RÉGLAGE DE LA LARGEUR DE COUPE
La largeur de coupe peut être réglée à 33 ou 38 cm (13 ou 15 po) en
positionnant la lame de la tondeuse à fil comme illustrée.
FIXER LA POIGNÉE AUXILIAIRE
Installez la poignée auxiliaire et le support du bas autour de l’axe de la
tête d’alimentation, à une distance confortable de l’interrupteur de
gâchette. Insérez les boulons M5.0*0.8*35 dans chacun des quatre
trous. À l’aide de l’outil combiné fourni, serrez les boulons fermement
afin que la poignée soit stationnaire sur l’axe.
DÉBALLAGE
Ce produit requiert un assemblage.
LISTE DU CONTENU
- Bloc moteur
- Pièce de tondeuse à fil
- Carter de protection
- Chargeur et bloc-batterie
- Assemblage de dévidoir
- Poignée auxiliaire
- Manuel du propriétaire
- Sac de quincaillerie, contenant les pièces ci-dessous :
AVERTISSEMENT : N'installez pas la batterie tant que l’assemblage
n’est pas terminé. Le non-respect de cette consigne peut entraîner un
démarrage accidentel et éventuellement des blessures graves.
AVERTISSEMENT : Si des pièces sont endommagées ou
manquantes, n’utilisez pas ce produit tant qu'elles ne sont pas
remplacées. Le non-respect de cette consigne peut entraîner des
blessures graves.
Enlevez avec précaution le produit et les accessoires du carton.
Assurez-vous que tous les éléments figurant dans la liste du contenu
sont inclus. Inspectez soigneusement le produit pour vous assurer
que rien n’a été cassé ou endommagé pendant le transport.
Inspectez soigneusement le produit pour vous assurer que rien n’a
été cassé ou endommagé pendant le transport. Ne jetez pas le
matériau d’emballage tant que vous n’avez pas soigneusement
inspecté et utilisé le produit de façon satisfaisante.
Si des pièces sont endommagées ou manquantes, veuillez appeler le
1-800-618-7474 pour obtenir de l'aide.
FIXATION DU CARTER DE PROTECTION
Assemblez le carter de protection comme indiqué ci-dessous en
l'insérant sur la fente de la tête du boîtier du moteur. Avec un
tournevis Phillips, fixez la seule (1) vis dans le carter de protection
et le boîtier du moteur. Retirez la protection de lame.
AVERTISSEMENT : N’utilisez pas la tondeuse à fil sans le carter de
protection fixé. Le non-respect de cette consigne peut entraîner des
blessures graves.
ASSEMBLAGE
Positionnez à
l'intérieur pour une
coupe de 33 cm
(13po)
Positionnez à
l'extérieur pour une
coupe de 38 cm
(15 po)
Image Nom Taille Quantité
Boulon M5.0*0.8*35 2 PCS
Écrou M5x0.8 2 PCS
Espaceur en acier N/A 1 PC
Vis creuse M5.0*0.8*12 3 PCS
Plaque de poignée
auxiliaire
N/A 1 PC
Clé T25&+ 1 PC
Clé à douille 8mm/10mm 1 PC
Carter de
protection
4
Modèle LST01562S
INSTALLER LE DÉVIDOIR À FIL
Assurez-vous que le bloc-batterie est enlevé. Placez l’espaceur en acier
sur l’axe de la tête de coupe. Alignez le trou dans l’espaceur avec la
zone entaillée du bâti. Insérez la clé fournie dans le trou de l’espaceur
et du bâti pour fixer l'espaceur tout en installant le dévidoir. Tournez le
dévidoir sur le boulon dans le sens antihoraire. Assurez-vous que le
dévidoir est fermement posé.
Espaceur en
acier
Clé
Boulon
Page 29

MISE EN MARCHE DE L'OUTIL
Choisissez la vitesse d’opération désirée (Élevée ou Basse).
Maintenez appuyé le bouton de déverrouillage de l’interrupteur au
haut de la poignée avant et comprimez l’interrupteur de gâchette avec
vos doigts. Relâchez le bouton de verrouillage lorsque la gâchette est
enfoncée.
POUR ARRÊTER L’OUTIL
Relâchez l’interrupteur de gâchette.
Avant de mettre l’outil en marche, assurez-vous que la tondeuse à fil
ne touche aucun d’objet.
AVERTISSEMENT : Des pierres, des morceaux de métal ou d’autres
objets peuvent être projetés à grande vitesse par le fil. L’outil et le
carter de protection sont conçus afin de réduire le danger.
AVERTISSEMENT : Respectez les consignes suivantes pour éviter
de vous blesser :
Lisez le manuel d’instructions avant toute utilisation et conservez-le.
N’approchez pas les mains des fils.
Gardez les mains sur les poignées. N’essayez pas de couper trop
loin.
Si vous heurtez ou happez un objet étranger, arrêtez immédiatement
l’outil, vérifiez s’il est endommagé et faites-le réparer s’il le faut avant
de l’utiliser à nouveau. Ne l’utilisez pas avec un moyeu ou un dévidoir
brisé.
5
Modèle LST01562S
UTILISATION
INSTALLER LA PIÈCE DE TONDEUSE À FIL SUR LA TÊTE
D’ ALIMENTATION
L’accessoire se raccorde au bloc-moteur à l’aide d’un dispositif de
couplage.
● Retirer le bloc-piles.
● Desserrez l’écrou papillon du coupleur sur l’axe de la tête
d’alimentation.
● Tirer la clavette d’arrêt située sur l’arbre de l’ensemble moteur et
tourner sur 1/4 de tour. Cette rotation permet de bloquer la clavette
à l’extérieur de l’arbre même lorsqu’elle est retirée.
● Aligner le trou de l'arbre avec la clavette d'arrêt de l'arbre de
l'ensemble moteur et insérer les deux arbres l'un dans l'autre.
● Tourner la clavette d’arrêt sur 1/4 de tour
pour asseoir complètement la clavette
dans le trou de l’arbre.
NOTE : Une clavette qui ne s’engage pas
complètement dans le trou de positionnement
signifie que les arbres ne sont pas fixés correctement en place. Tourner légèrement d’un
côté à l’autre jusqu’à ce que la clavette cesse
de bouger.
● Serrer le bouton fermement.
AVERTISSEMENT : S’assurer que le bouton est bien serré avant
d’utiliser l’outil et le vérifier de temps à autre pour éviter le risque de
blessures graves.
RETRAIT DE I’ACCESSOIRE DU BLOC MOTEUR
● Arrêter le moteur et retirer le bloc-piles.
● Desserrer le bouton.
● Tirer la clavette d’arrêt et faire pivoter les arbres afin de séparer et
retirer les extrémités.
ASSEMBLAGE
INSTALLER ET RETIRER LE BLOC-BATTERIE DE L'APPAREIL
Installer le bloc-piles :
● Aligner la rainure du bloc-piles sur la nervure en saillie du
logement d’outil et placer la pile dans l’outil.
AVERTISSEMENT : S’assurer que le loquet de l’outil s’enclenche et
que le bloc-piles est installé et fixé correctement au l’outil avant de
commencer le travail. Ne pas installer et fixer correctement le
bloc-piles peut provoquer la chute de ce dernier et occasionner des
blessures graves.
Retirer le bloc-piles :
● Appuyer sur le taquet de la pile situé sur l’outil et pousser le
bloc-piles vers l’extérieur en utilisant la poignée.
AVERTISSEMENT : Pour éviter des blessures graves, toujours retirer
le bloc-piles et tenir à distance de mains le gâchette avec verrou en
portant l’outil.
Bouton de
déverrouillage
Basse vitesse
Élevée vitesse
Bouton à deux vitesses
Le trimmer aura un temps d'utilisation plus long s’il est utilisé à la
vitesse lente.
Page 30

MISE EN GARDE : Les fils tournent encore après la mise hors tension.
N’utilisez pas l’outil dans des conditions mouillées.
MISE EN GARDE : Inspectez la zone à couper et enlevez tout fil de fer,
câble ou objet filaire pouvant s'emmêler dans le fil ou le dévidoir en
rotation. Faites particulièrement attention d’éviter tout fil de fer pouvant
être tordu vers l’extérieur dans la trajectoire de l’outil, comme le fil barbelé
à la base d’une clôture à mailles en losange.
UTILISATION DU BLOC MOTEUR
Tenir le bloc moteur avec la main droite sur la poignée arrière et la main
gauche sur la poignée avant. Garder une prise ferme sur les deux
poignées pendant le fonctionnement. Le bloc-moteur doit être tenu dans
une position confortable, la poignée arrière se trouvant à peu près à
hauteur de la taille.
Si des débris s’enroulent autour de l’accessoire, RELÂCHER LA
GÂCHETTE, retirer le bloc-piles et retirer les débris.
INSTRUCTIONS DE COUPE
Position correcte pour la coupe
Votre poids doit être équilibré, avec les deux pieds sur un sol ferme.
Procédure de coupe de base
Balancez doucement la tondeuse de gauche à droite, comme illustré.
ADVERTISSEMENT : Ne coupez pas à proximité de câbles ou de
bâtiments.
AVERTISSEMENT : L'utilisation répétée de ce produit ne doit pas vous
rendre imprudent. N’oubliez pas qu’une fraction de seconde d’inattention
suffit pour infliger des blessures graves.
N’utilisez pas la tondeuse à fil dans un arbre, sur une échelle ou sur un
échafaudage, car ceci est extrêmement dangereux.
Portez des gants non glissants pour une tenue et une protection
maximales.
6
Modèle LST01562S
AVANCE DU FIL / ALIMENTATION PAR COUP
Votre tondeuse à fil utilise du fil de nylon enroulé d'un diamètre de
2,03 mm (0,08 po) pour couper la pelouse et les mauvaises herbes
rapidement et facilement. Le temps venu, la pointe du fil de nylon
s’usera. Pour libérer du fil, positionnez la tête de coupe de façon
parallèle au sol et cognez la tête 2 à 3 fois contre le sol lorsque la
tondeuse fonctionne. Lorsqu'assez de fil est libéré, vous entendrez le
son de la lame coupant le fil. Le fil de coupe s'usera plus rapidement
si la coupe est effectuée le long des trottoirs ou d'autres surfaces
abrasives, ou si des mauvaises herbes plus robustes sont coupées.
FIL ÉTENDU MANUELLEMENT
Si le fil de la tondeuse heurte des objets tranchants ou abrasifs,
comme des pierres, des pièces de métal ou du béton, il risque d'être
rogné trop court pour poursuivre la coupe. Dans ce cas, vous
pouvez l'allonger à la main :
• RETIREZ LE BLOC-BATTERIE.
• Rentrez le bouton du dévidoir et tournez-le dans le sens
antihoraire. Sortez le fil après chaque quart de tour pour
atteindre la longueur adéquate.(Remarque : ne faites sortir que
la quantité de fil lui permettant de dépasser à peine de la
lame.En cas d'une sortie excédentaire de fil, la lame ne pourra
pas le couper à la longueur utile correcte et celui-ci risque de
s'enchevêtrer sur l'axe de rotation.)
• Installez le bloc-batterie.
• Redémarrez la tondeuse et reprenez votre travail normal.
UTILISATION
Page 31

7
Modèle LST01562S
REMBOBINER LE DÉVIDOIR DU FIL EN VRAC
(UTILISEZ SEULEMENT DU FIL D'UN DIAMÈTRE DE
2,00 MM (0,080po) )
Du fil en vrac conçu pour votre tondeuse/coupe-bordure et
sans frais supplémentaire est disponible auprès de votre
fournisseur local ou votre centre service. Pour installer,
suivez les instructions suivantes :
• Éteignez la tondeuse et retirez la batterie.
• Coupez le fil à une longueur de 4,5 m (14,7 pi).
• Appuyez sur les onglets de dégagement du couvercle
du dévidoir, comme illustré à la Fig. 1, puis retirez le
dévidoir en le tirant tout droit. Enlevez et jetez tout le fil
sur le dévidoir.
• Tournez le bouton du dévidoir afin que les 2 trous dans
le moyeu du dévidoir soient alignés avec les trous des
deux œillets métalliques.
• Insérez complètement le fil dans les quatre trous. Tirez
le fil jusqu’à ce qu’il y ait une longueur égale de fil de
chaque côté du dévidoir. (Voir la Fig. 2)
• Tournez le bouton de dévidoir dans le sens horaire
(voir les flèchez sur le haut du bouton) jusqu’à tirer le fil
à la longueur de coupe adéquate. (Voir la Fig. 3)
• Réinstallez le dévidoir dans le protège-dévidoir en
s'assurant qu’il est fermement verrouillé en place. (Voir
la Fig. 4)
UTILISATION
Patte de
dégagement
Fig.1
Bouton de dévidoir
Li Ne
Fig. 2
Fig. 3
Fig. 4
Page 32

POUR RECHARGER - VOIR LE MANUEL DU CHARGEUR POUR LES
INSTRUCTIONS COMPLÈTES
Ne chargez le bloc-batterie qu’avec le chargeur fourni.
Prévoyez au moins 90 minutes de temps de charge pour une batterie de
2,5 Ah, ou 140 minutes pour une batterie de 4 Ah, ou 180 minutes pour
une batterie de 5 Ah avant la première utilisation du taille-bordures.
Assurez-vous que l’alimentation est d’une tension domestique normale :
120 V, 60 Hz, CA uniquement.
Le chargeur de batteries doit être utilisé à des températures entre 4 et
40 °C (39 et 104 °F).
La batterie doit être chargée dans un endroit frais et sec.
2 à 3 cycles initiaux de charge/décharge peuvent être nécessaires pour
obtenir la durée/capacité maximum.
Ne tentez pas d’ouvrir le chargeur ou l’appareil. Ils ne contiennent pas
de pièces réparables par le client. Appelez le service clientèle au
1-800-618-7474 pour obtenir de l'aide.
NE brûlez PAS les blocs-batteries, même si ces derniers sont
sévèrement endommagés ou complètement usés. Ils peuvent exploser
dans un feu et provoquer des blessures.
N’utilisez le chargeur de batterie qu’à l’intérieur.
Déconnectez le chargeur de l’alimentation quand il n’est pas utilisé afin
d’éviter de l’endommager en cas de surtensions.
MISE AU REBUT DE LA BATTERIE
Retirez le bloc-batterie de la tondeuse à fil. Couvrez les bornes avec du ruban adhésif résistant. Ne tentez pas de détruire ou de démonter le bloc-batterie
ou d’enlever des composants. Ce produit contient des batteries au lithium-ion qui doivent être recyclées ou éliminées de façon appropriée. Les lois
locales, provinciales ou fédérales peuvent interdire l’élimination de ces batteries dans les déchets ménagers.
Le sceau RBRC sur le bloc-batterie au lithium-ion indique que les coûts du recyclage du bloc-batterie à la fin de sa durée de vie utile ont
déjà été payés par la société The Great States Corporation/American Lawn Mower Company. Il est illégal de placer des batteries lithium-ion
usagées dans les ordures domestiques de la localité ou dans les poubelles. RBRC, en coopération avec la société The Great States
Corporation/American Lawn Mower Company, fournit un moyen facile et écologique de recycler les batteries lithium-ion usagées. Il suffit de
communiquer avec votre centre de recyclage local ou d’appeler le 1-800-8BATTERY pour savoir où déposer la batterie usagée.
Lorsqu’elles sont entièrement chargées, les batteries peuvent être stockées
de façon sûre à des températures pouvant atteindre –20 °C (-4 °F)
pendant quatre semaines avant de devoir être rechargées. Chargez
complètement le bloc-batterie tous les 90 jours.
Si, avec le temps, le bloc-batterie s’épuise rapidement après une période
complète de charge de 90, 140, ou 180 minutes, vous devrez le remplacer.
Pour éviter des dégâts permanents de la batterie, ne la stockez jamais
lorsqu’elle est déchargée.
REMISAGE POUR L’HIVER - Effectuez une recharge complète avant le
remisage et ensuite tous les 90 jours.
La batterie ne développant pas de mémoire, il n’est pas nécessaire qu’elle
soit entièrement déchargée avant de la recharger.
Une faible fuite de liquide des compartiments de batterie peut se produire
dans des conditions extrêmes d’utilisation, de charge ou de températures.
Ceci n’est pas le signe d’une défaillance. Toutefois, si le joint extérieur est
rompu et que cette fuite atteint votre peau :
a. Lavez rapidement avec du savon et de l’eau.
b. Neutralisez avec un acide doux, comme du jus de citron ou
du vinaigre.
c. c. Si du liquide de batterie atteint les yeux, rincez-les avec de
l’eau propre pendant un minimum de 10 minutes et appelez
immédiatement un médecin.
8
Modèle LST01562S
CHARGER LE BLOC-BATTERIE
Bloc-Batterie
Chargeur
Rouge fixe + Clignote vert = Batterie en charge.
Rouge fixe + Vert fixe = Batterie entièrement chargée.
Page 33

MISE EN GARDE : Ne laissez jamais de liquide de frein,
d’essence, de produits à base de pétrole, d’huiles pénétrantes, etc.
entrer en contact avec les pièces en plastique. Ces substances
contiennent des produits chimiques pouvant endommager, affaiblir
ou détruire le plastique.
Assurez-vous que la batterie soit retirée de l'appareil, n’utilisez
ensuite que du savon doux et un chiffon mouillé pour nettoyer
l'outil. Ne laissez jamais de liquide entrer dans l'outil; n'immergez
jamais une partie de l'outil dans du liquide.
Les engrais et autres produits chimiques de jardinage contiennent
des agents qui accélèrent fortement la corrosion des métaux. Ne
rangez pas l'outil sur ou à côté d'engrais ou de produits chimiques.
IMPORTANT : Pour garantir la SÉCURITÉ et la FIABILITÉ du
produit, les réparations, la maintenance et le réglage doivent être
effectués par un centre de réparation agréé ou un autre organisme
de réparation qualifié qui utilise toujours des pièces de rechange
identiques.
Si la tondeuse à fil tombe, vérifiez avec soin si elle est
endommagée. Si le carter est tordu ou fendu, les poignées
cassées ou si vous constatez d'autres problèmes pouvant affecter
le fonctionnement de la tondeuse à fil, la pièce doit être réparée
avant de réutiliser la tondeuse. Appelez notre service clientèle au
1-800-618-7474 pour obtenir de l'aide.
MAINTENANCE
9
Modèle LST01562S
DÉPANNAGE
Problème
- L'appareil ne fonctionne pas
- Le fil n’avance pas
- Impossible de couper le fil
- La batterie ne se charge pas
Cause possible
- La batterie ne fait pas contact
- Le déverrouillage n'est pas activé à fond
- La batterie n'est pas correctement installée
- La batterie n’est pas chargée
-Le fil est enchevêtré dans le dévidoir
- Le coupe-fil du carter de protection est endomma-
gé ou manquant
- La batterie n’est pas insérée dans le chargeur
- Le chargeur n’est pas branché
- La température de l’air ambiant est trop élevée ou
trop basse
Solution possible
- Vérifier que la batterie soit insérée à fond
- Vérifier que le déverrouillage soit à fond vers l'avant
avant d'activer la gâchette
- Vérifier l'installation de la batterie
- Vérifier les exigences de charge de la batterie
- Dérouler 60,9 cm (24 po) de fil et le rembobiner
- Remplacer le carter de protection
- Insérer la batterie dans le chargeur jusqu'à ce que la
DEL rouge s'allume
- Brancher le chargeur sur une prise opérationnelle
- Vérifier le courant à la prise en branchant une lampe ou
un autre appareil
- Vérifier si la prise est connectée à un interrupteur d’é-
clairage qui coupe l’alimentation quand vous éteignez la
lumière
- Placer le chargeur et l’appareil dans un endroit où la
température ambiante est supérieure à 4 °C (39 °F) ou
inférieure à +40 °C (104 °F)
Appelez-nous d'abord pour toute question concernant le fonctionnement ou la maintenance
de produit au 1.800.618.7474 entre 8h00 et 17h00,
heure normale de l'Est, ou obtenir de l'aide sur scotts.americanlawnmower.com.
APPELEZ-NOUS D’ABORD!!
Page 34

10
Modèle LST01562S
Appelez-nous d'abord pour toute question concernant le fonctionnement ou la maintenance
de produit au 1.800.618.7474 entre 8h00 et 17h00,
heure normale de l'Est, ou obtenir de l'aide sur scotts.americanlawnmower.com.
APPELEZ-NOUS D’ABORD!!
PIÈCES ET SERVICE
RÉPARATION
Pour les pièces ou la réparation, veuillez appeler le 1-800-618-7474 ou visitez-nous en ligne au
scotts.americanlawnmower.com. Veillez fournir toute l'information pertinente lorsque vous nous
appelez ou nous rendez visite.
PIÈCES DE RECHANGE (KITS/ ARTICLES)
Le numéro de modèle/ de série de cet outil se trouve sur une plaque ou une étiquette fixée au
bâti. Notez votre numéro de série dans l’espace prévu ci-dessous.
NUMÉRO DE MODÈLE _LST01562S___
NUMÉRO DE SÉRIE _______________
Toujours mentionner le numéro de modèle lors de la commande de kits pour cet outil.
N° Numéro de kit/ Numéro d'article Description Quantité
1 LST62-HBK-1 Kit de boulon de poignée 1
2 LST62-AHK-1 Poignée auxiliaire 1
3 LST62-PGK-1 Carter de protection 1
4 RS95815 Dévidoir 1
5 BL86225 Batterie 62V 2,5Ah 1
6 CHL86200 Chargeur 1
Page 35

NOTES
____________________________________________________________________
____________________________________________________________________
____________________________________________________________________
____________________________________________________________________
____________________________________________________________________
____________________________________________________________________
____________________________________________________________________
____________________________________________________________________
____________________________________________________________________
____________________________________________________________________
____________________________________________________________________
____________________________________________________________________
____________________________________________________________________
____________________________________________________________________
____________________________________________________________________
____________________________________________________________________
____________________________________________________________________
____________________________________________________________________
____________________________________________________________________
____________________________________________________________________
____________________________________________________________________
____________________________________________________________________
____________________________________________________________________
____________________________________________________________________
____________________________________________________________________
____________________________________________________________________
____________________________________________________________________
____________________________________________________________________
____________________________________________________________________
____________________________________________________________________
____________________________________________________________________
____________________________________________________________________
____________________________________________________________________
____________________________________________________________________
____________________________________________________________________
____________________________________________________________________
11
Modèle LST01562S
Page 36

RÉV 12 /06 /2018
MANUEL DE L’UTILISATEUR
TONDEUSE À FIL AUTONOME AU LITHIUM DE 62 VOLTS
MOTEUR SANS BALAIS
Droit d'auteur. Tous droits réservés.
Modèle LST01562S
• Garantielimitée de 5 ans sur tous les outilsélectriques au lithium-ion 62 V Scotts à compter de la date d’achatlorsqu’ilssontutilisés à des fins
personnelles, domestiques oufamiliales.
• Garantielimitée de 3 ans sur toutes les batteries et chargeurs au lithium-ion 62 V Scotts à compter de la date d’achatlorsqu’ilssontutilisés à des
fins personnelles, domestiques oufamiliales.
The Great States Corp. (GSC) garantit au propriétaire original que ceproduit et cette pièce de rechange Scotts sont exempts de défauts de matériaux et
de fabrication et accepte de réparerouremplacer tout produitou pièce défectueux pendant la période de garantiecommeindiqué ci-dessus.
• La garantieestannuléeencasd’utilisation du produit à des fins commercialesouindustriellesou à toute fin inappropriéecommedéterminé par GSC.
• La garantie ne comprend pas les réparationsnécessairesdécoulant d’un mauvais usage oud’unenégligence de l’utilisateur (y comprissurcharger le
produit au-delà de sacapacitéoul’immerger dans l’eau), ou le manquement à assembler, opérer, entretenirou ranger le produitselon les instructions
du manuel du propriétaire.
• Cettegarantie ne couvre pas
L’usure des articles, notamment les - courroies et engrenagesd’entraînements, dents, lames de coupe, lames de tondeuse, chaînes de
scie, lames à déchiqueter, ventilateurs de souffleuse, couvercles de dévidoir, ligne de coupe, tubes de souffleuse et d’aspiration,
barres-guides, tuyaux à haute pression, roues, poignées, tarières, sacs usées, câblesélectriques et autres articles sujets à l’usure au fil
du temps.
L’usure des batteries, y comprisnotamment - les chutes, l’usure et le bris sur le chargeur, l’exposition à des changementsextrêmes de
températures (chaudoufroid), la batterie laissée trop longtemps sur le chargeur, la batterie laissée trop longtemps non chargée, et
unemauvaiseutilisationou un mauvaistraitement de la batterie.
• Cettegarantie ne couvre pas les dommagescausés par le froid, la chaleur, la pluie, l’humidité excessive et les autres conditions
environnementalesextrêmes.
• Cettegarantie ne couvre pas la détériorationnormale de la finitionextérieureoul’usurenormale sur les produits, y comprisnotamment les éraflures,
fissures, entaillesoudommagescausés par des produitschimiquesextérieurs.
• Cettegarantien’est pas transférable et s’appliqueseulement aux nouveaux produitsvendusdirectement par un détaillantautorisé. Cettegarantie ne
s’applique pas à tout produit, neufoud’occasion, acheté par le biais de canaux tiers non autorisés. Pour de l’information sur les détaillantsautorisés,
communiquez avec notrelignedirecte du service à la clientèle au 1-800-618-7474 (lun. au ven., 8 h à 17 h, HNE)
• Tout dommage, perteou frais consécutif, indirect ouconséquent qui pourraitrésulter d’un défaut, d’unedéfaillanceou d’un dysfonctionnement du
produitn’est pas couvertpar la garantie.
• La garantie ne comprend pas l’installation, l’assemblageou les réglagesnormauxexpliqués dans le manuel de l’opérateur. Les frais de livraison du
produit au vendeur et les frais de renvoi du produitou des pièces de rechange au propriétaire ne sont pas couvertspar la garantie.
Limitessupplémentairesconcernant la garantie
CertainsÉtats/provinces ne permettent pas l’exclusionou la limitation de la durée d’unegarantieimplicite; les restrictions ci-dessus peuventdonc ne pas
s’appliquer. Les produitsvendusendommagésouincomplets, vendustelsquels, vendus remis enétat ne sont pas couvertspar la garantie. Les
dommagesouresponsabilitésprovoqués par le transport, unemauvaise manipulation, un mauvais assemblage, une tension ou un câblage incorrect,
unemauvaise maintenance, une modification incorrecteoul’utilisationd’accessoiresoud’outils non spécifiquementrecommandés ne sont pas couverts par
cettegarantie.
Une preuved’achat (original du reçu de vente daté) doitaccompagnertouteréclamation de garantie.
Pour les réclamations, allez à scotts.americanlawnmower.com oucommuniquez avec notrelignedirecte du service à la clientèle de 8 h à 17 h
HNE, lun. au ven. au 1-800-618-7474
Dans le cadre d’un engagement permanent d’amélioration de la qualité,
le Fabricant se réserve le droit d’apporter des modifications à des composants ou à la conception si nécessaire.
GARANTIE
Politique de garantie Scotts
American Lawn Mower Company
The Great States Corporation
7444 Shadeland Station Way
Indianapolis, IN 46256 États-Unis
Téléphone 1-800-618-7474
scotts.americanlawnmower.com
 Loading...