

Page 1
FVP61
Sommario
La cottura a vapore, 2
Come si presenta il vostro forno, 3
Accessori, 4
Come installare il vostro forno, 5
Collegamento elettrico
Incasso nel mobile
Come utilizzare il forno, 6
Impostazione dell’ora
Blocco display
Stand-by del display
Come fare una cottura immediata, 8
Gestione dell’acqua
Come fare una cottura differita
Come utilizzare il contaminuti
Descrizione delle funzioni, 14
Tabella di cottura, 15
Come pulire il vostro forno, 16
Come sostituire la lampadina, 17
Che fare in caso di anomalie nel
funzionamento, 18
IT
Istruzioni per l’uso
FORNO A VAPORE
EN FR
Italiano, 1 English, 19 Français, 37
IT
Lungo tutto il manuale,
indica le disposizioni per la sicurezza,
segnala i consigli e le astuzie
Page 2

Generalità
La cottura a vapore è totalmente benefica se si rispettano le modalità d’impiego. Sana e naturale, la cucina
a vapore lascia inalterato il sapore degli alimenti. Una
salsa raffinata o alle erbe aromatiche aggiunge quel
tocco che fa la differenza
Non trasmette alcun odore: è inutile aromatizzare l’acqua della cottura con erbe o spezie, mentre si può
profumare il pesce ponendolo su un letto di lauro o il
pollame su un po’ di rosmarino o di dragoncello.
La cottura a vapore cuoce simultaneamente carne,
pesce e verdura.
Riscalda con delicatezza pasta, riso e purè senza rischio che si attacchino e che si secchino.
Facilita la cottura delle creme, dei flan, delle torte di
riso... ricoperti di carta stagnola, l’acqua di condensa
non vi si deposita.
Inutile salare in anticipo, neppure dopo nell’acqua di
cottura
Per dare migliore aspetto alla carne, basta farla dorare
rapidamente da ogni lato in padella, con burro caldo.
Paragonata alla cottura ad acqua, quella a vapore non
presenta che vantaggi:
È rapida: la cottura inizia immediatamente mentre i
tempi di cottura degli alimenti in un recipiente d’acqua
decorrono solo dal momento in cui inizia l’ebollizione.
È dietetica: le vitamine (quelle dette idrosolubili) e i sali
minerali sono ben preservati poiché si dissolvono
minimamente nell’acqua condensata che ricopre gli
alimenti.
Inoltre non viene utilizzata nessuna materia grassa per
portare a termine la cottura.
Il vapore rispetta il gusto degli alimenti: non aggiunge
odori, né il sapore della griglia o della padella e al contempo non li elimina poiché non c’è diluizione nell’acqua.
L’altra faccia della medaglia: inutile cercare di cucinare
in questa maniera un pesce non più fresco, o una verdura dimenticata nel frigorifero da una settimana. Il
risultato sarebbe catastrofico!
Il vapore non trasmette né i gusti né gli odori; quindi
non esitate a guadagnare tempo e denaro facendo
cuocere per esempio un pesce e un dessert l’uno
accanto all’altro ma senza toccarsi.
Il vapore serve anche per scottare, scongelare e riscaldare e anche mantenere caldo, in particolare i sughi.
Fate prima rinvenire in padella, con pochissimo olio o
burro, carni come il pollame, il vitello, il maiale, per dare
quella doratura appetitosa. Terminate poi la cottura a
vapore.
Tagliati a pezzetti, gli alimenti cuociono più velocemente e in maniera più omogenea che se rimangono interi.
2
La cottura a vapore
IT
Page 3
3
IT
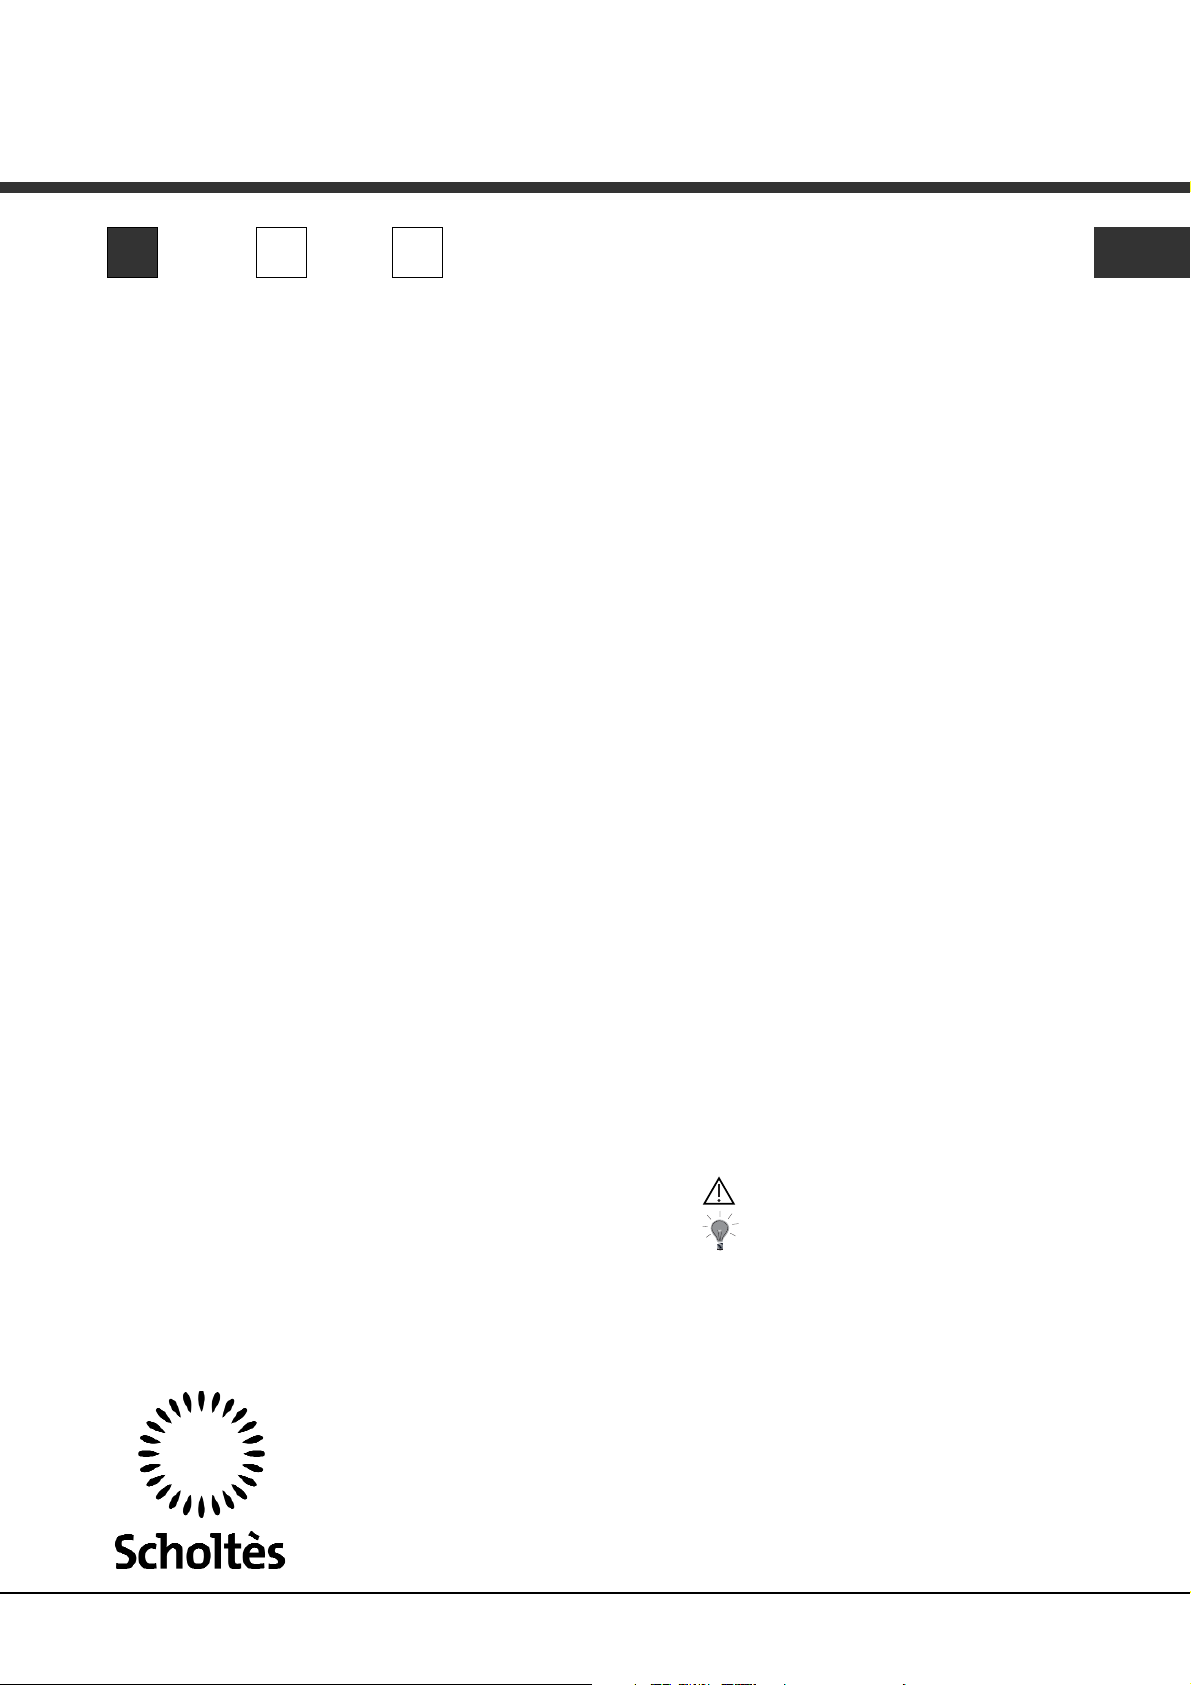
Come si presenta il vostro forno
Vista d’insieme
Dettaglio del programmatore
Programmatore
Serbatoio
Display
Generatore
di vapore
Tubo sgocciola-
toio dell’acqua
Canaletto di scolo
Pulsante: Acceso/Spento
Modifica dei tempi e
delle temperature
Regolazioni delle temperature
Durata della cottura
Fine cottura
Contaminuti indipendente
1
2
3
4
5
6
1
3
2
4
5
6
7
7
Selettore di funzioni.
Indicatore di scongelamento
Indicatore di cottura
Indicatore di assenza d’acqua
Display dell’orologio e dei
tempi
Indicatore di temperatura
8
10
9
11
12
8
10
9
11
12
START
STOP
Page 4
4
IT
Serbatoio che permette l’alimentazione d’acqua del vostro
forno in maniera indipendente.
La capienza è di circa 1 litro
(livello massimo).
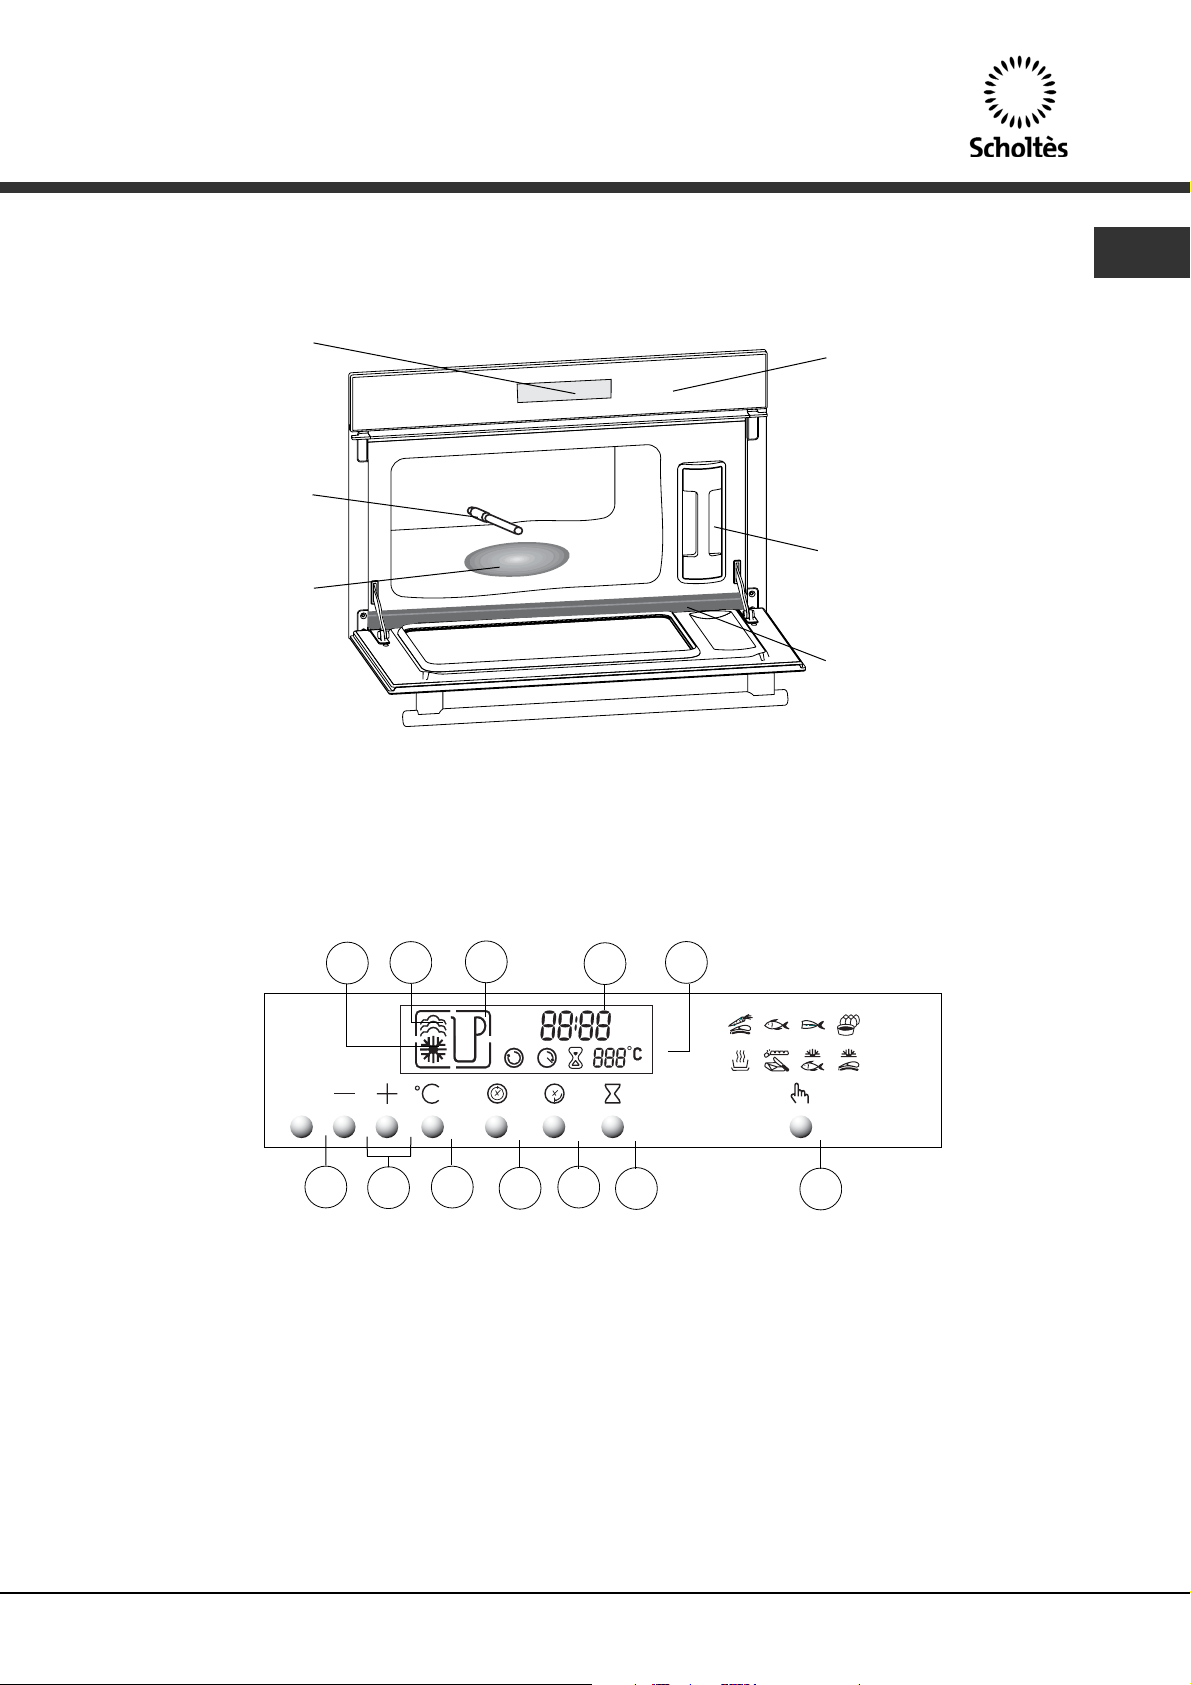
Accessori
Vassoio di cottura forato per evitare il contatto diretto tra gli alimenti e l’acqua di condensa.
Vassoio con maniglie che
permette di recuperare l’acqua
di condensa..
Griglia di supporto amovibile in
acciaio inossidabile:
da inserire obbligatoriamente.
LL’’uuttiilliizzzzoo ddii aaccqquuaa aa bbaassssoo ccoonntteennuuttoo ddii ccaallccaa--
rree ffaacciilliitteerràà llaa mmaannuutteennzziioonnee ddeell vvoossttrroo ffoorrnnoo..
ÈÈ vviieettaattoo ll’’uuttiilliizzzzoo ddii aaccqquuaa ddeemmiinneerraalliizzzzaattaa
((nnoonn èè iinnddiiccaattaa ppeerr ggllii aalliimmeennttii))..
II vvaassssooii ppoossssoonnoo eesssseerree llaavvaattii iinn llaavvaassttoovviigglliiee..
Page 5
5
IT
Collegamento elettrico
Per un collegamento fisso, assicuratevi di porre lungo il
cavo di alimentazione un dispositivo di interruzione conforme alle norme d’installazione.
In caso di collegamento con presa di corrente, tale presa
deve restare accessibile dopo l’installazione dell’apparecchio.
Utilizzare obbligatoriamente una presa di corrente fornita
di messa a terra e conforme alle norme di sicurezza
vigenti.
L’impianto elettrico deve essere dotato di una protezione
termica da 10 Ampere.
Non mettete in funzione il forno se il cavo di alimentazione o la spina sono rovinati. In tal caso, per evitare ogni
pericolo, dovranno essere sostituiti dal Servizio
Assistenza Clienti o da personale qualificato.
Come installare il vostro forno
380
560
50
386,5
20
595
405
544
378
550
Tensione di funzionamento.............220-240 V ~ 50 Hz
Potenza totale del forno .................1,77 kW
Consumo di energia
- di salita e di mantenimento a 100°C
per 1 ora ........................................0,71 kWh
Volume utile ..............................23,5 litri
Incasso nel mobile
1. Porre l’apparecchio nella nicchia. L’apparecchio deve
essere posto orizzontalmente. Controllare tale posizione.
2. Per maggiore stabilità, fissate il forno al mobile inseren-
do 2 viti nei fori previsti a tale scopo sui montanti laterali.
3. Effettuate l’allacciamento elettrico.
Controllate che dopo l’installazione la presa
sia accessibile.
Page 6
6
IT
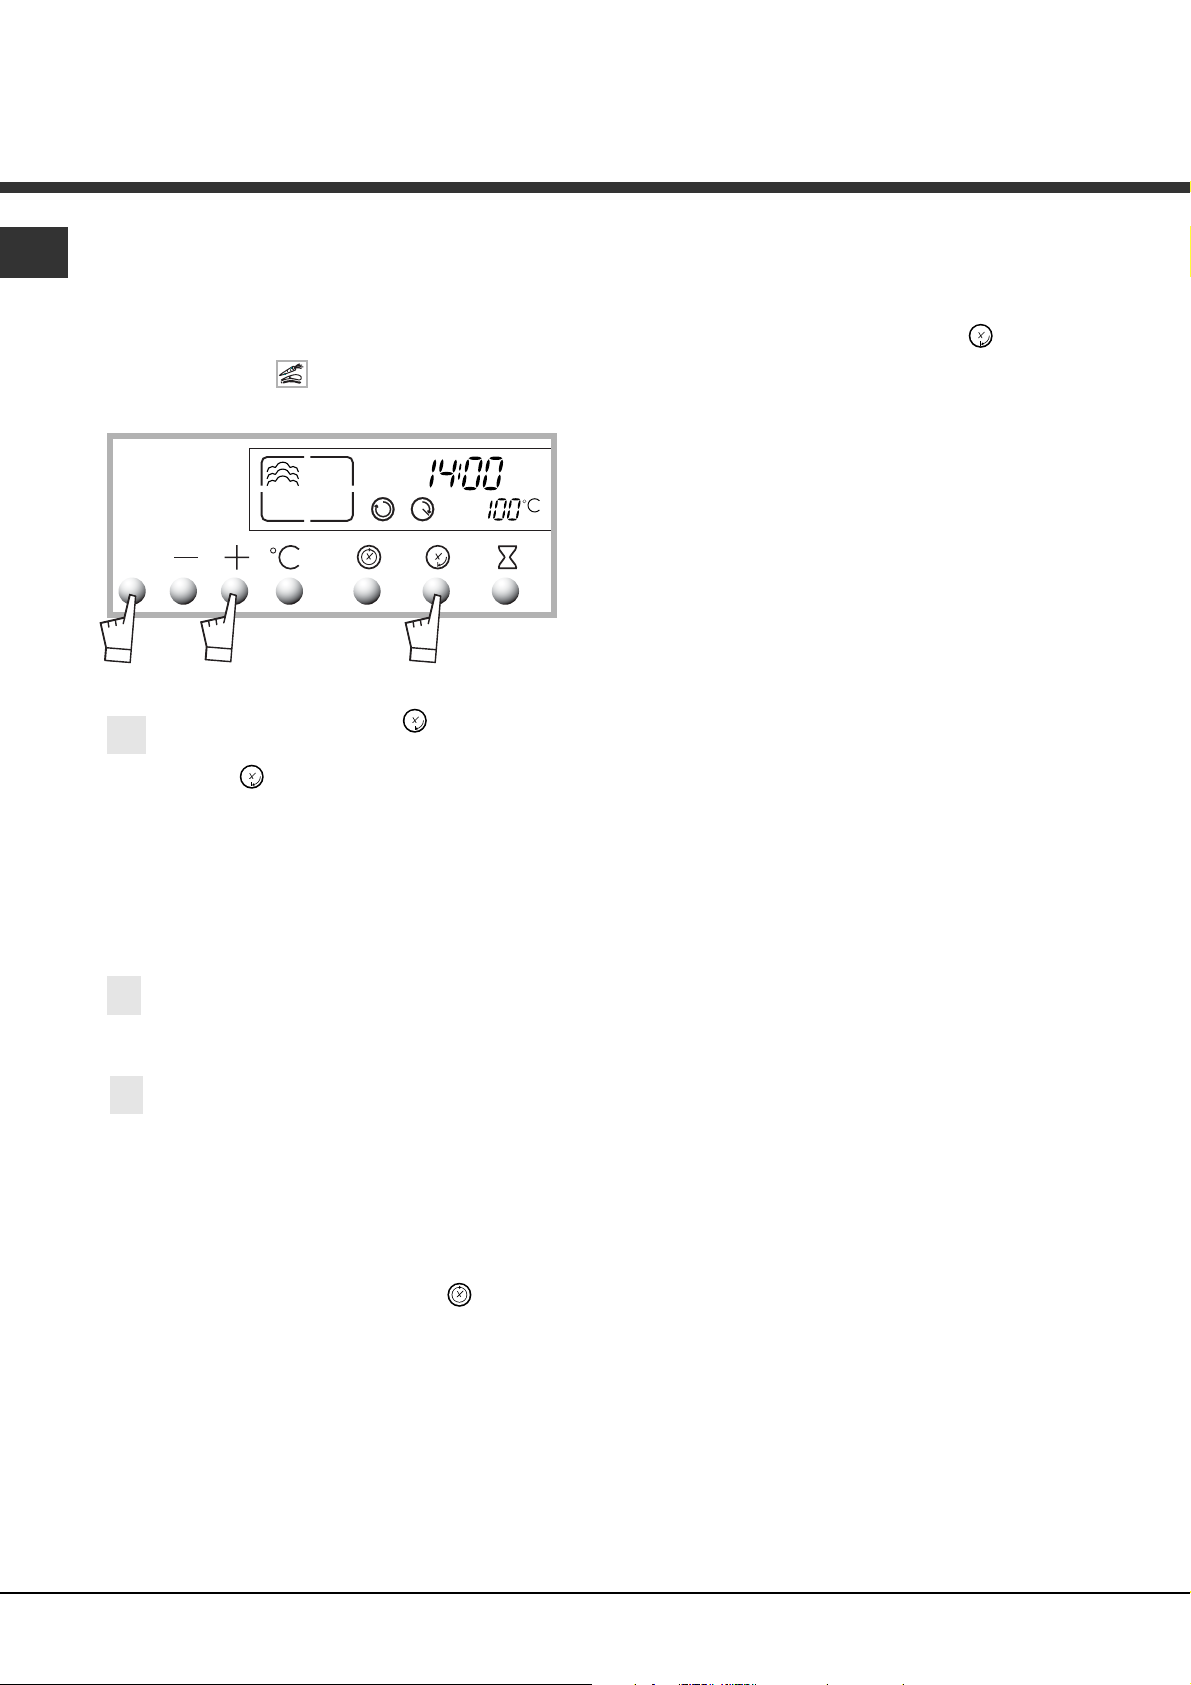
Impostazione dell’ora
Come utilizzare il forno
Alla prima accensione.
Impostate l’ora.
Il display lampeggia ed appare “12.00”.
Premete i tasti + o – per regolare l’ora.
START
STOP
1
Viene visualizzata l’ora fissa.
Premete contemporaneamente i tasti e
fino a che l’ora non lampeggia. Regolate l’ora con i
tasti + o -.
Confermate con .
1
2
2
Confermate con START / STOP.
START
STOP
Modifica dell’ora
START
STOP
START
STOP
SSee ll’’oorraa iimmppoossttaattaa nnoonn vviieennee ccoonnffeerrmmaattaa
mmeeddiiaannttee iill ttaassttoo ,, ssaarràà rreeggiissttrraattaa aauuttoommaattii--
ccaammeennttee ddooppoo uunn mmiinnuuttoo..
Blocco display
È possibile effettuare un blocco del display. Questo può
essere attivato soltanto a forno spento in modalità ora.
Premere il tasto START/STOP per qualche secondo.
Si udirà un bip e sullo schermo apparirà una “chiave” ( ). A partire da questo momento, non è più
attivo alcun tasto.
1
2
START
STOP
Per sbloccare, premere il tasto START/STOP per
alcuni secondi, si udirà un bip e la chiave sparirà.
3
Page 7
7
IT
Stand-by del display
Per limitare il consumo di energia del vostro forno quando
non utilizzato, avete la possibilità di mettere il display in
MODALITÀ STAND-BY.
Per farlo, seguite la seguente procedura:
IIll ffoorrnnoo ddeevvee eesssseerree iinn mmooddaalliittàà vviissuuaalliizzzzaazziioonnee oorraa..
Premete i tasti + o - contemporaneamente per 5 secondi.
Il display indica “LCD OFF”.
Rilasciate i tasti.
30 secondi dopo, il display si spegne.
START
STOP
Attivazione della modalità stand-by:
Disattivazione della modalità stand-by:
START
STOP
Il vostro forno è ora in modalità stand-by, si spegnerà
automaticamente dopo 30 secondi in modalità visualizzazione ora.
START
STOP
START
STOP
Premete contemporaneamente i tasti + e - per 5 secondi.
Il display indica “LCD ON”.
Rilasciate i tasti.
Siete usciti dalla MODALITÀ STAND-BY, il display resta
sempre acceso.
Page 8

8
IT
Come fare una cottura immediata
Principi di funzionamento
L’acqua contenuta nel serbatoio arriva nella cavità
attraverso un tubo. Quest’acqua è trasformata in
vapore a contatto con una superficie calda posta nella
parte inferiore della cavità:
il generatore di vapore.
Non è necessario aggiungere acqua nel piatto di cottura. Per garantire UNA VERA COTTURA A VAPORE,
il vostro forno è munito di vassoi appositamente studiati per una cottura perfetta.
RRiieemmppiittee OOBBBBLLIIGGAATTOORRIIAAMMEENNTTEE iill sseerrbbaattooiioo
dd’’aaccqquuaa ffiinnoo aall lliivveelllloo mmaassssiimmoo pprriimmaa ddeellllaa
ccoottttuurraa.. RRiimmeetttteettee iill sseerrbbaattooiioo nneell ssuuoo aallllooggggiioo
ssppiinnggeennddoo aa FFOONNDDOO ffiinnoo aa qquuaannddoo aavvvveerrttiirree--
ttee uunnoo SSCCAATTTTOO..
DDuurraannttee llaa ccoottttuurraa,, ll’’aappppaarreecccchhiioo ddiivveennttaa
ccaallddoo.. QQuuaannddoo ssii aapprree llaa ppoorrttaa ddeellll’’aappppaarreecc--
cchhiioo eessccee vvaappoorree ccaallddoo.. TTeenneettee aa ddiissttaannzzaa ii
bbaammbbiinnii..
Una durata di cottura è preprogrammata per le diverse funzioni.
Cottura
Temperatura
°C
Tempo
preprogrammato
Tempo
regolazione
mini
Tempo
regolazione
maxi
25 min
15 min
15 min
20 min.
30 min.
15 min
30 min.
30 min.
5 min
5 min
5 min
5 min
5 min
5 min
5 min
5 min
1 ora
1 ora
1 ora
1 ora
1 ora
1 ora
1 ora
1 ora
100
85
75
90
95
80
55
60
Page 9
9
IT
Cottura a vapore
START
STOP
Premete il tasto e fate scorrere le funzioni di cottura. Selezionate per esempio la funzione . Viene
visualizzata la temperatura predefinita di 100°C e
viene proposto un tempo di 25 minuti. Il simbolo
lampeggia.
Premete START / STOP per avviare la cottura, il
tempo predefinito e i simboli diventano fissi, l’indicatore di cottura lampeggia.
Quando viene raggiunta la temperatura, 100°C
diventa fisso e si sente un bip.
2
3
1
2
3
PPeerr nnoonn aalltteerraarree ii rriissuullttaattii ddeellllaa ccoottttuurraa,, nnoonn aapprrii--
ttee mmaaii llaa ppoorrttaa ddeell ffoorrnnoo dduurraannttee llaa ccoottttuurraa..
1
Regolate la durata desiderata (mini. 5 min e maxi 60
min) premendo + o -
Page 10
10
IT
Modifica della temperatura di cottura
START
STOP
2
1
2
3
3
1
Premete il tasto °C.
Il simbolo °C lampeggia.
Regolate premendo i tasti + o -.
Registrate la vostra scelta premendo il tasto °C.
Se non vi è conferma mediante il tasto °C la registrazione è automatica dopo qualche secondo.
È possibile regolare la temperatura unicamente in posizione .
Modificare i tempi di cottura
Arresto durante la cottura
Durante la cottura, potete modificare il tempo di cottura premendo e i tasti + o -.
Potete interrompere la cottura in qualsiasi momento
premendo START/ STOP (tenere premuto per circa 1
secondo).
Se la produzione di vapore non è ancora avviata (circa
1 minuto), il forno si ferma immediatamente e l’indicatore del tempo scompare.
Se la produzione di vapore è già cominciata, l’indicatore del tempo rimanente indica 3 minuti e inizia un
conto alla rovescia; il vapore si disperde prima dell’apertura dello sportello.
Come fare una cottura immediata.
Page 11
11
IT
Alla fine della cottura
Il display segna 0m 00s e cessa di lampeggiare.
Emissione di bip discontinui per 3 minuti.
Per fermare i bip, premere START / STOP o aprire lo
sportello.
SSvvuuoottaarree OOBBBBLLIIGGAATTOORRIIAAMMEENNTTEE iill sseerrbbaattooiioo..
PPeerr ggaarraannttiirree uunnaa bbuuoonnaa aaffffiiddaabbiilliittàà ddeell ffoorrnnoo,, iill
vveennttiillaattoorree ccoonnttiinnuuaa aa ffuunnzziioonnaarree ppeerr uunn cceerrttoo
tteemmppoo ddooppoo llaa ffiinnee ddeellllaa ccoottttuurraa
In caso di problemi dovuti al circuito dell’acqua durante
la cottura, si accende l’indicatore “assenza d’acqua” e si
sente un bip
Tale mancanza è dovuta in particolare a:
- serbatoio vuoto.
- serbatoio incastrato male.
Dopo aver verificato questi due punti, la cottura riprende
automaticamente quando si chiude lo sportello.
Gestione dell’acqua
Page 12
12
IT
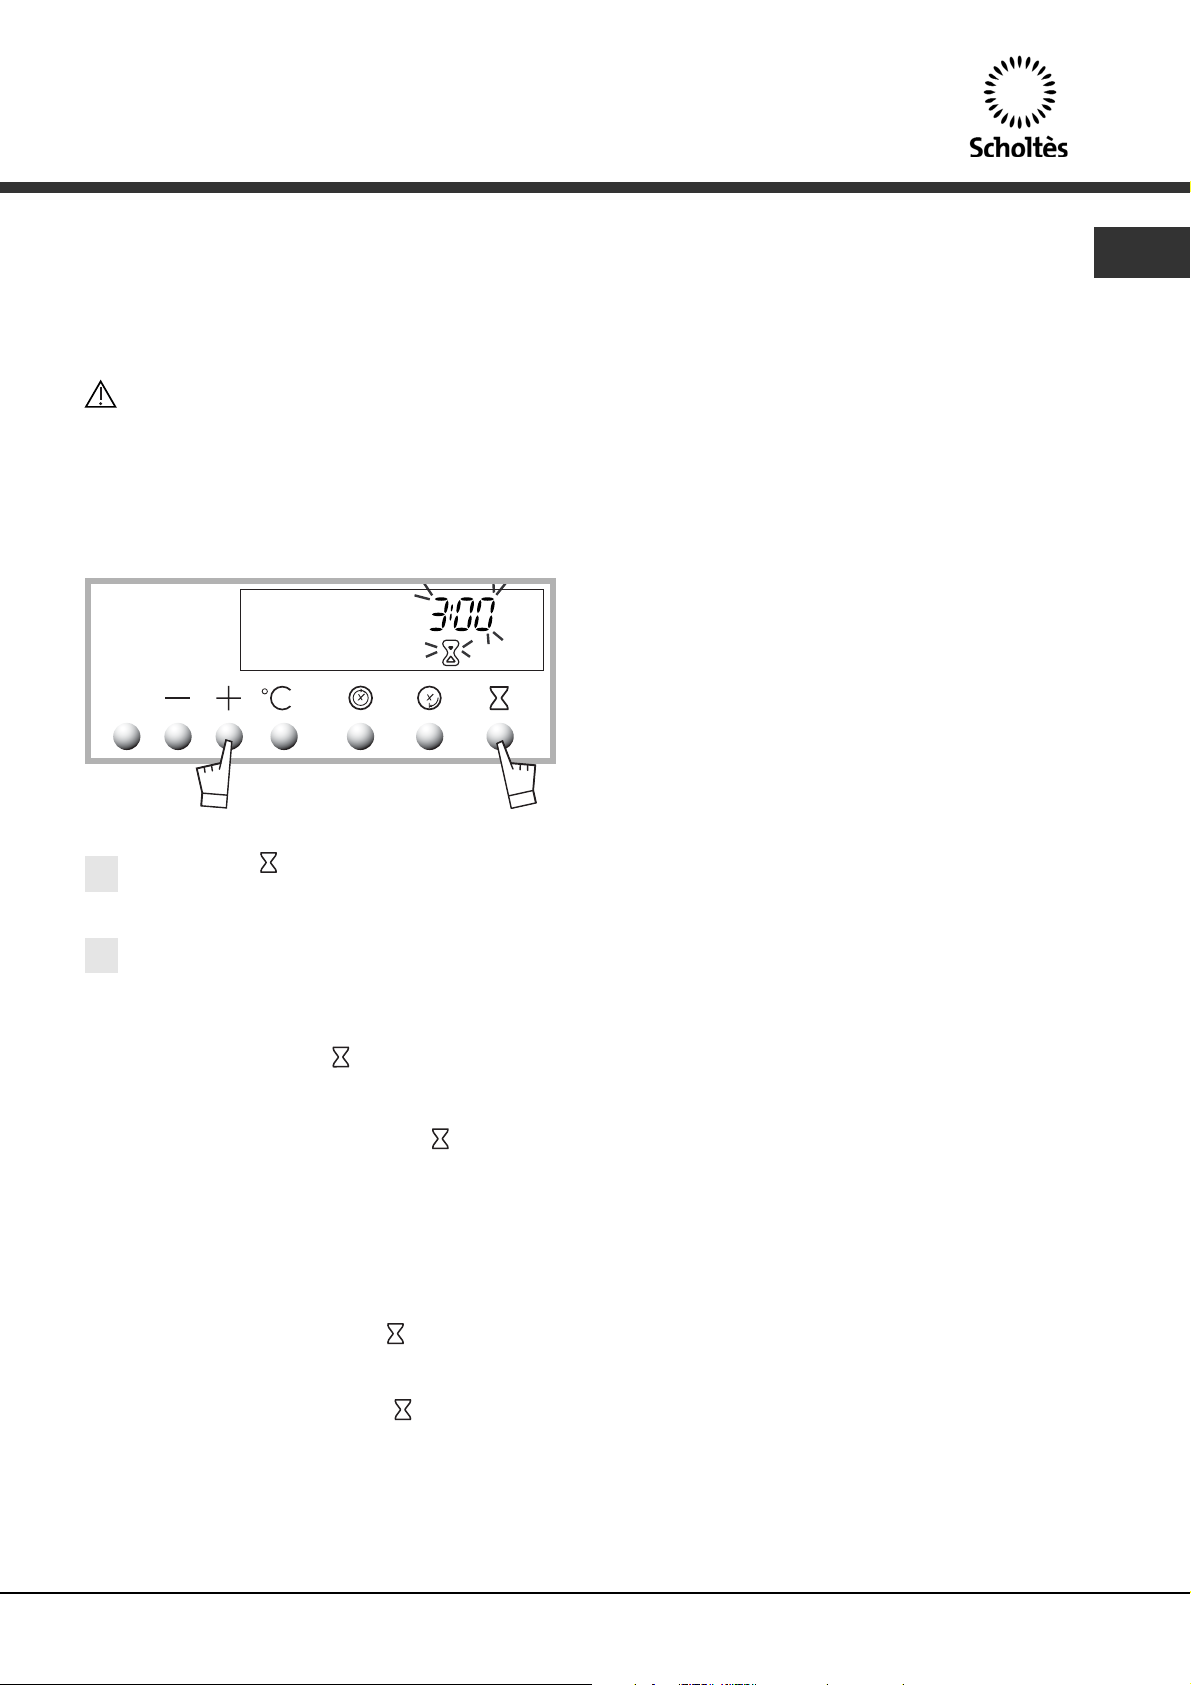
Come fare una cottura differita
Non applicabile alle funzioni “scongelamento”.
Regolate la modalità di cottura scelta, il tempo ed
eventualmente regolare la temperatura,
((vveeddeerree CCAAPPII--
TTOOLLOO ““CCoommee ffaarree uunnaa ccoottttuurraa iimmmmeeddiiaattaa”” PPuunnttii 11 ee
22))..
Esempio: posizione Temperatura a 100°C.
2
1
3
Premete il tasto “fine cottura” , l’ora di fine
cottura viene visualizzata e lampeggia così come
il simbolo per indicare che la regolazione è
possibile.
Esempio: Sono le 12:30.
Avete programmato una durata di cottura di
30 min. L’ora di fine cottura visualizzata è 13:00.
1
2
Regolate l’ora di fine cottura premendo i tasti + o
-.
Esempio: Fine cottura.
3
Confermate premendo START / STOP.
Una volta programmata l’ora di fine cottura differita,
l’ora riappare sul display.
Dopo queste operazioni l’inizio del riscaldamento
viene differito affinché la cottura finisca alle 14:00.
Quando la cottura sarà terminata, si udiranno una
serie di bip per alcuni minuti e il simbolo lampeggerà. L’interruzione dei bip si ottiene premendo il tasto
START / STOP per un secondo.
Modifica dei tempi di cottura e dell’orario
di fine cottura
Avete la possibilità in qualsiasi momento di consultare o di
modificare la fine cottura premendo il tasto .
Per annullare la programmazione, premere START/STOP.
START
STOP
Page 13
Contaminuti
13
Come utilizzare il contaminuti
IT
Il vostro forno è dotato di un contaminuti elettronico indipendente dal funzionamento del forno che permette di
fare il conto alla rovescia.
TTaallee ffuunnzziioonnee èè iinnddiippeennddeennttee ddaall ffoorrnnoo.. EEssssaa nnoonn
ppuuòò ccoommaannddaarree ll’’iinntteerrrruuzziioonnee aauuttoommaattiiccaa ddeellllaa
ccoottttuurraa..
TTuuttttaavviiaa ttaallee ffuunnzziioonnee ppuuòò eesssseerree uuttiilliizzzzaattaa aanncchhee
dduurraannttee iill ffuunnzziioonnaammeennttoo ddeell ffoorrnnoo.. IInn qquueessttoo
ccaassoo,, llaa vviissuuaalliizzzzaazziioonnee ddeell ttiimmeerr pprreevvaallee ssuullllaa
vviissuuaalliizzzzaazziioonnee ddeellll’’oorraa ddeell ggiioorrnnoo..
Premete il tasto .
0m00s e il simbolo contaminuti lampeggiano.
Regolate la durata desiderata (maxi 59 min 50 secondi) premendo i tasti + o -.
Dopo qualche secondo, inizia il conto alla rovescia.
Una volta trascorso il tempo, si odono dei bip per
alcuni secondi. Il simbolo lampeggia.
Quando il conto alla rovescia è cominciato, potete modificare il tempo rimanente premendo e poi i tasti + o
--
.
Per annullare il contaminuti, premere e riportare il
tempo a 0m00s.
1
2
START
STOP
2
1
L’interruzione dei bip si ottiene premendo o START/
STOP.
Modifica e arresto del contaminuti
Page 14
14
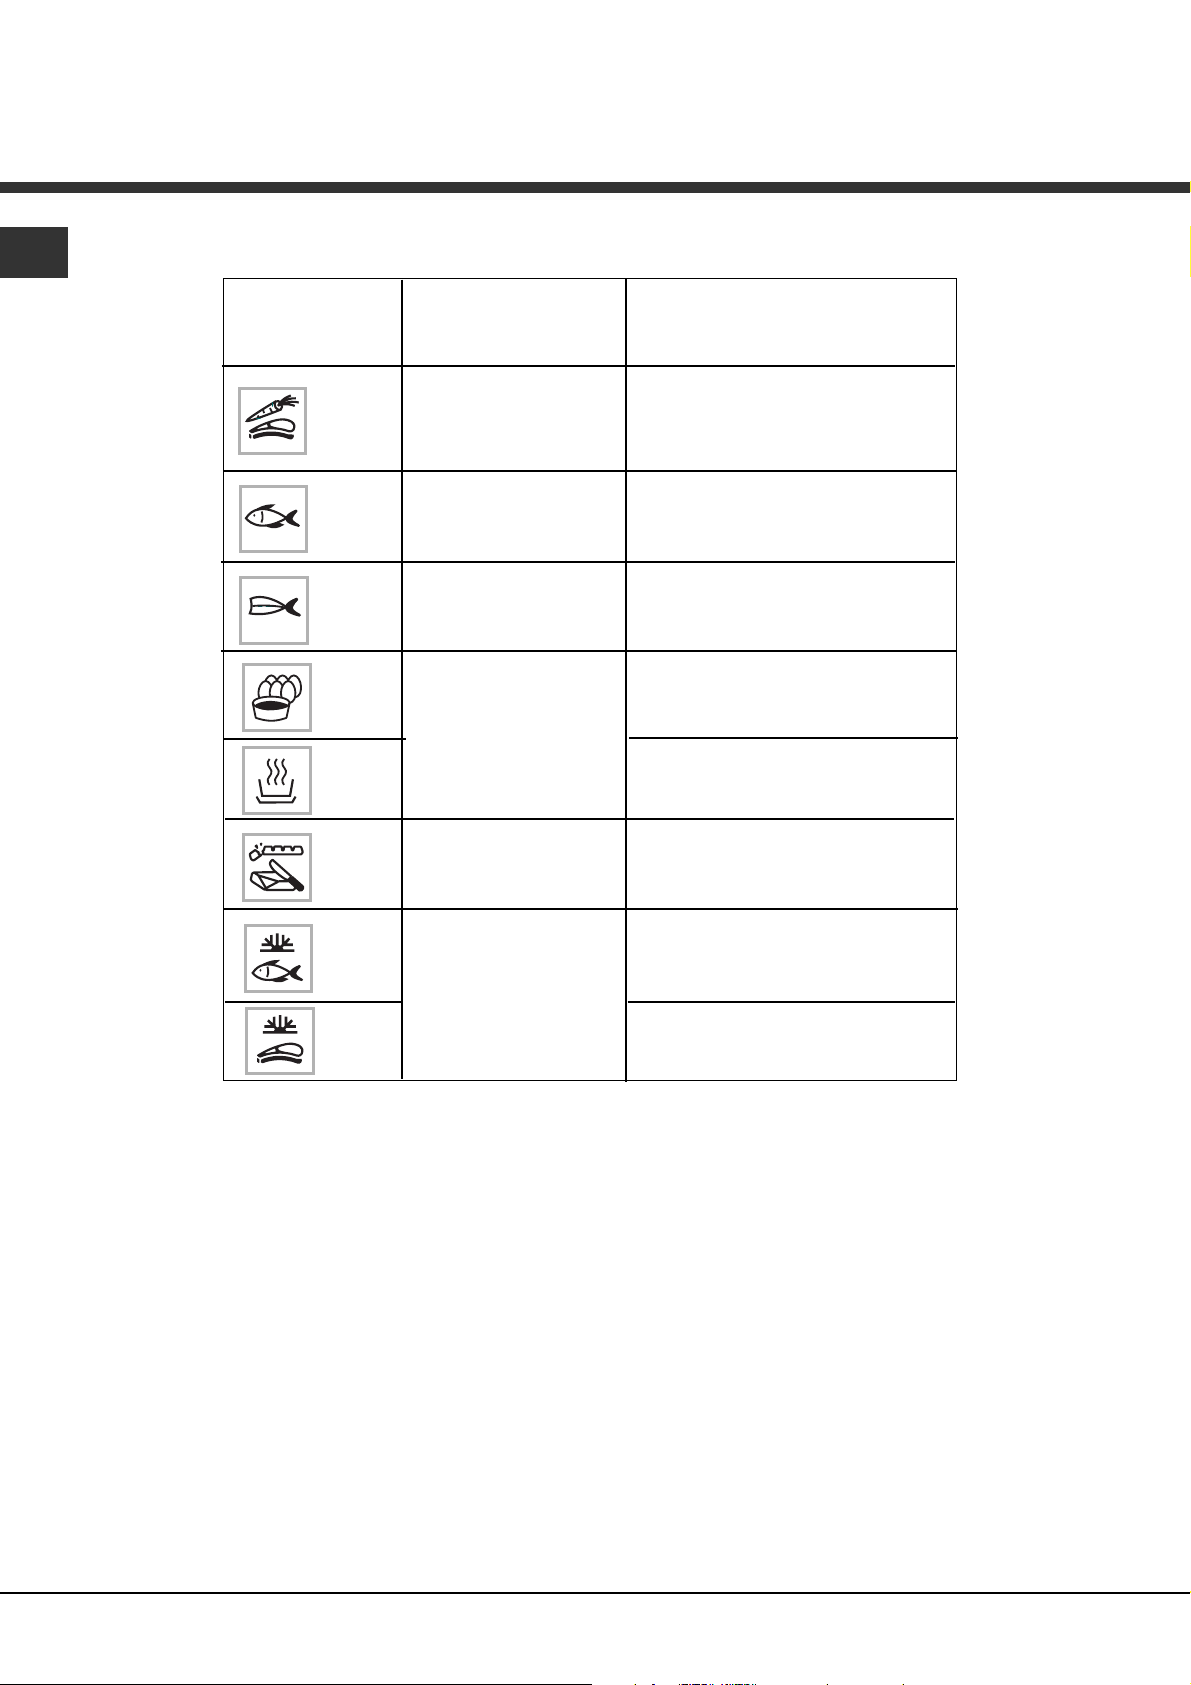
Descrizione delle funzioni
IT
VVeerrdduurree ee ccaarrnnee
PPeessccii ffrraaggiillii iinntteerrii ((ttrroottee))
CCoottttuurraa ddii ppeessccii ffrraaggiillii
((FFiilleettttii ddii ssaarrddee,, ddii ttrriigglliiaa)
)
UUoovvaa iinn ccooccoottttee;; bbuuoonnaa tteennuuttaa ddeeii
ppoommooddoorrii rriippiieennii..
TToorrttiinnee aall ffoorrmmaaggggiioo,, ccrreemmee......
TTeerrrriinnee,, ffeeggaattiin
nii ddii ppoolllloo.. RRiissccaallddaammeennttoo
ppiiaattttii pprroonnttii..
CCiiooccccoollaattoo ffuussoo,, bbuurrrroo..
FFrruuttttaa aappppeennaa ttiieeppiiddaa ppeerr ccoonnssuummoo
ii
mmmmeeddiiaattoo
SSccoonnggeellaammeennttoo ddii ffiilleettttii ddii ppeessccee pprriimmaa
ddii eesssseerree ppaannaattii..
FFrruuttttii rroossssii cchhee ddeevvoonnoo rreessttaarree ffr
reeddddii
((ppeerr ccrroossttaattee ee ccoouulliiss))
SSccoonnggeellaammeennttoo ddii ccaarrnnee pprriimmaa ddii eessssee--
rree ggrriigglliiaattaa ((eess:: ssaallssiiccccee))
CCoottttuurraa vvaappoorree
ppiiùù uuttiilliizzzzaattaa
PPeerr llaa ccoottttuurraa ddeeggllii
aalliimmeennttii ffrraaggiillii
LLaa ccaarrnnee rreessttaa mmaaddrree--
ppeerrllaacceeaa,, i
ill ccoollllaaggeennee
nnoonn aappppaarree
PPeerr llaa ccoottttuurraa ddeeggllii
aalliimmeennttii ffrraaggiillii,, ffrruuttttaa,,
ccoommppoossttee
RRiissccaallddaammeennttoo
lleeggggeerro
o
SSccoonnggeellaammeennttoo
lleennttoo sseennzzaa rriisscchhiioo
ddii ccoottttuurraa
FUNZIONI
Temperatura
°C
COTTURA
ESEMPI DI COTTURA
100
85
75
90
95
80
55
60
Page 15
15
IT
Tabella di cottura
Tempi
40-45 min.
35-40 min.
18 min.
20-22 min.
25-30 min.
15-20 min.
15 min.
30-35 min.
30-35 min.
10-15 min.
20 min.
35 min
30 min.
22 min.
30-35 min
15-20 min.
20-25 min.
25 min.
25 min.
40-45 min.
10-12 min.
20-25 min.
25 min.
30-35 min.
10-15 min.
25 min.
10 min.
13-15 min.
20-25 min.
20 min.
15-20 min.
15 min.
20 min.
15 min.
25-30 min.
15 min.
20 min.
15-20 min.
10-12 min
20-25 min.
20-25 min.
15-30 min.
25 min.
20-25 min.
25 min.
20 min.
7 min.
5-6 min.
8 min.
10-12 min.
30 min.
25 min.
Preparazione
disporli sul vassoio col gambo all'insù
per le punte, ridurre i tempi
in piccoli mazzetti
a rondelle sottili
tagliato sottile
a cubetti
a lamelle sottili
di Bruxelles
verdi a fettine
a rondelle
(freschi) girare durante la cottura
(surgelati) girare durante la cottura
togliere il torsolo e tagliare
in 2 nel senso della lunghezza
tagliato in 2
a cubetti
tagliati in 2
tagliate a rondelle
intere
con aromi
con aromi
secondo il peso
intere, sbucciate
frutta a fettine
negli stampi
trancio (180 g)*
intera (1 kg)
intera (200 g)
trancio (180 g)
secondo spessore
intero (250 g)
filetti
intera (200 g)
grandi tranci (da 6 a 10 cm di lunghezza)
tranci (180/200 g)
filetti
tranci (180/200 g)
intera (200 g) 13-15 min.
100 g di riso lavato - 20 cl di latte
2 cucchiai da tavola di zucchero
200 g (1/4 litro di acqua)
Avvertenze
• Questi tempi sono in
funzione della natura, della
grandezza e della
freschezza della verdura.
Seguite le indicazioni
presenti nella colonna
"Preparazione".
• I tempi di cottura rimangono
gli stessi, qualunque sia la
quantità da cuocere.
Esempio: uno o quattro
carciofi hanno lo stesso
tempo di cottura.
• Per controllare il punto di
cottura pungere la parte più
spessa della verdura; se è
cotta, non si troverà alcuna
resistenza.
• Disporre i frutti di mare sulla
griglia del piatto in vetro,
aggiungendo erbe
aromatiche.
• Disporre i crostacei su un
letto di lauro.
• Tempi a seconda della
maturazione.
•
*Tranci: porzioni rotonde di
pesce da 2 a 3 cm di
spessore (180/200 g) per
persona.
•
Chiedete prodotti molto
freschi.
•
Mettete i pesci interi nel
piatto vuoto oppure su
foglie di lauro, di finocchio o
altre erbe aromatiche.
Alla fine della cottura,
eliminate la pelle che si
staccherà molto facilmente.
•
Successivamente dorate
con il grill in un altro piatto.
• Alla fine della cottura
sgranate con la forchetta
Alla coque: mettere direttamente sulla griglia
Al piatto: rotto in un piatto singolo e ricoperto da pellicola alimentare
Sodo / In padella: vedere ricette specifiche
Ponete direttamente in un piatto, ricoprite di acqua o di latte, in quanto il vapore non è sufficiente per saturare questi alimenti che si gonfiano. Ponete un foglio di alluminio sul piatto per evitare la ricaduta delle gocce d'acqua.
Arrosto 800 g: 55-60 min.
Cosce di pollo: 35-40 min.
Arrosto di tacchino: 50-60 min.
Salciccia di Morteau: 400 g
°C
100
100
100
100
100
100
100
100
100
100
100
100
100
100
100
100
100
100
100
100
90
95
95
95
90
95
90
85
85
85
85
80
85
75
80
80
85
85
75
100
100
100
100
100
95
90
100
100
100
100
100
100
Alimenti
Carciofi (piccoli)
Asparagi
Broccoli
Carote
Sedano
Zucca
Funghi
Cavolo
Zucchine
Spinaci
Insalata indivia
Finocchio
Fagiolini
Rape
Pisellini freschi
Porri
Patate
Capesante
Cozze/Lumache di mare
Astice
Scampi
Mele/pere/pesche
Composte
Creme
Merluzzo/Stoccafisso
Orata
Aringa
Nasello (nero e giallo)
Coda di rospo
Sgombro
Baccalà/Merluzzo
Razza
Triglia
Trota salmonata
Salmone
Sogliola
Tonno
Trota intera (1 kg)
Vitello
Maiale (filetti piccoli)
Pollame (petti in filetti)
(involtini)
Salsicce
Uova fresche e conservate a
temperatura ambiente
Riso, pasta, semola
Riso al latte
Semola
Page 16
16
IT
Come pulire il vostro forno
Pulizia
• Interno (dopo ogni cottura)
Asciugate l’interno con un panno asciutto dopo il raffreddamento del generatore di vapore oppure fate asciugare
bene lasciando lo sportello semiaperto.
•
TTuubboo dd’’aarrrriivvoo ddeellll’’aaccqquuaa
Togliete il tubo di sgocciolamento dell’acqua tirandolo
verso di voi.
Eliminate il deposito di calcare che si può essere eventualmente formato all’interno (con l’aiuto di uno strumento sottile e a punta come uno spiedino o un ferro da
maglia).
•
GGeenneerraattoorree ddii vvaappoorree
Versate 1/2 bicchiere di aceto di vino bianco sul generatore.
Lasciate agire qualche minuto, pulite e sciacquate.
Non utilizzare spugne o polveri abrasive, né anticalcare
per caffettiere.
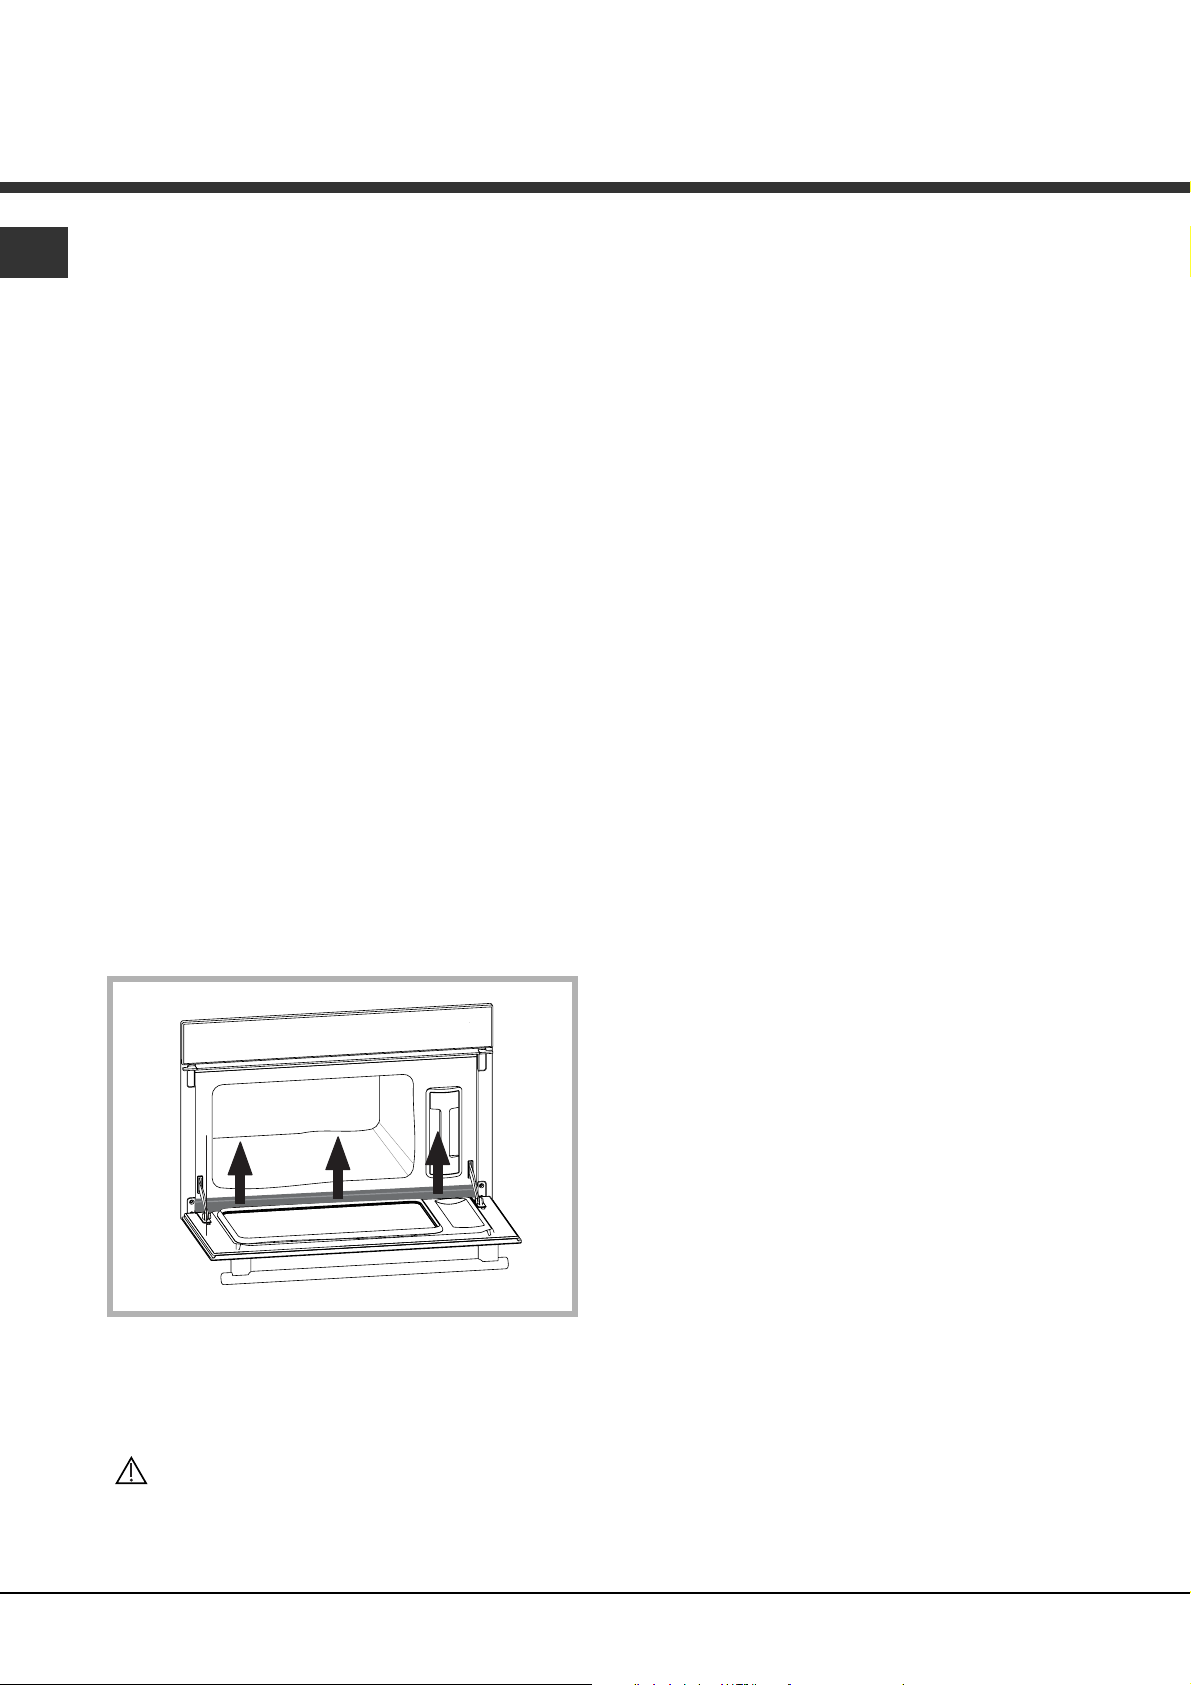
Pulizia del canaletto di scolo
Smontate il canaletto di scolo tirandolo verso l’alto, pulitelo e rimettetelo a posto sfruttando le tre tacche previste a tale scopo.
LLaa ppuulliizziiaa ddeell ffoorrnnoo nnoonn ddeevvee eesssseerree eeffffeettttuuaattaa
ccoonn uunn ppuulliittoorree aa vvaappoorree..
Page 17
17
IT
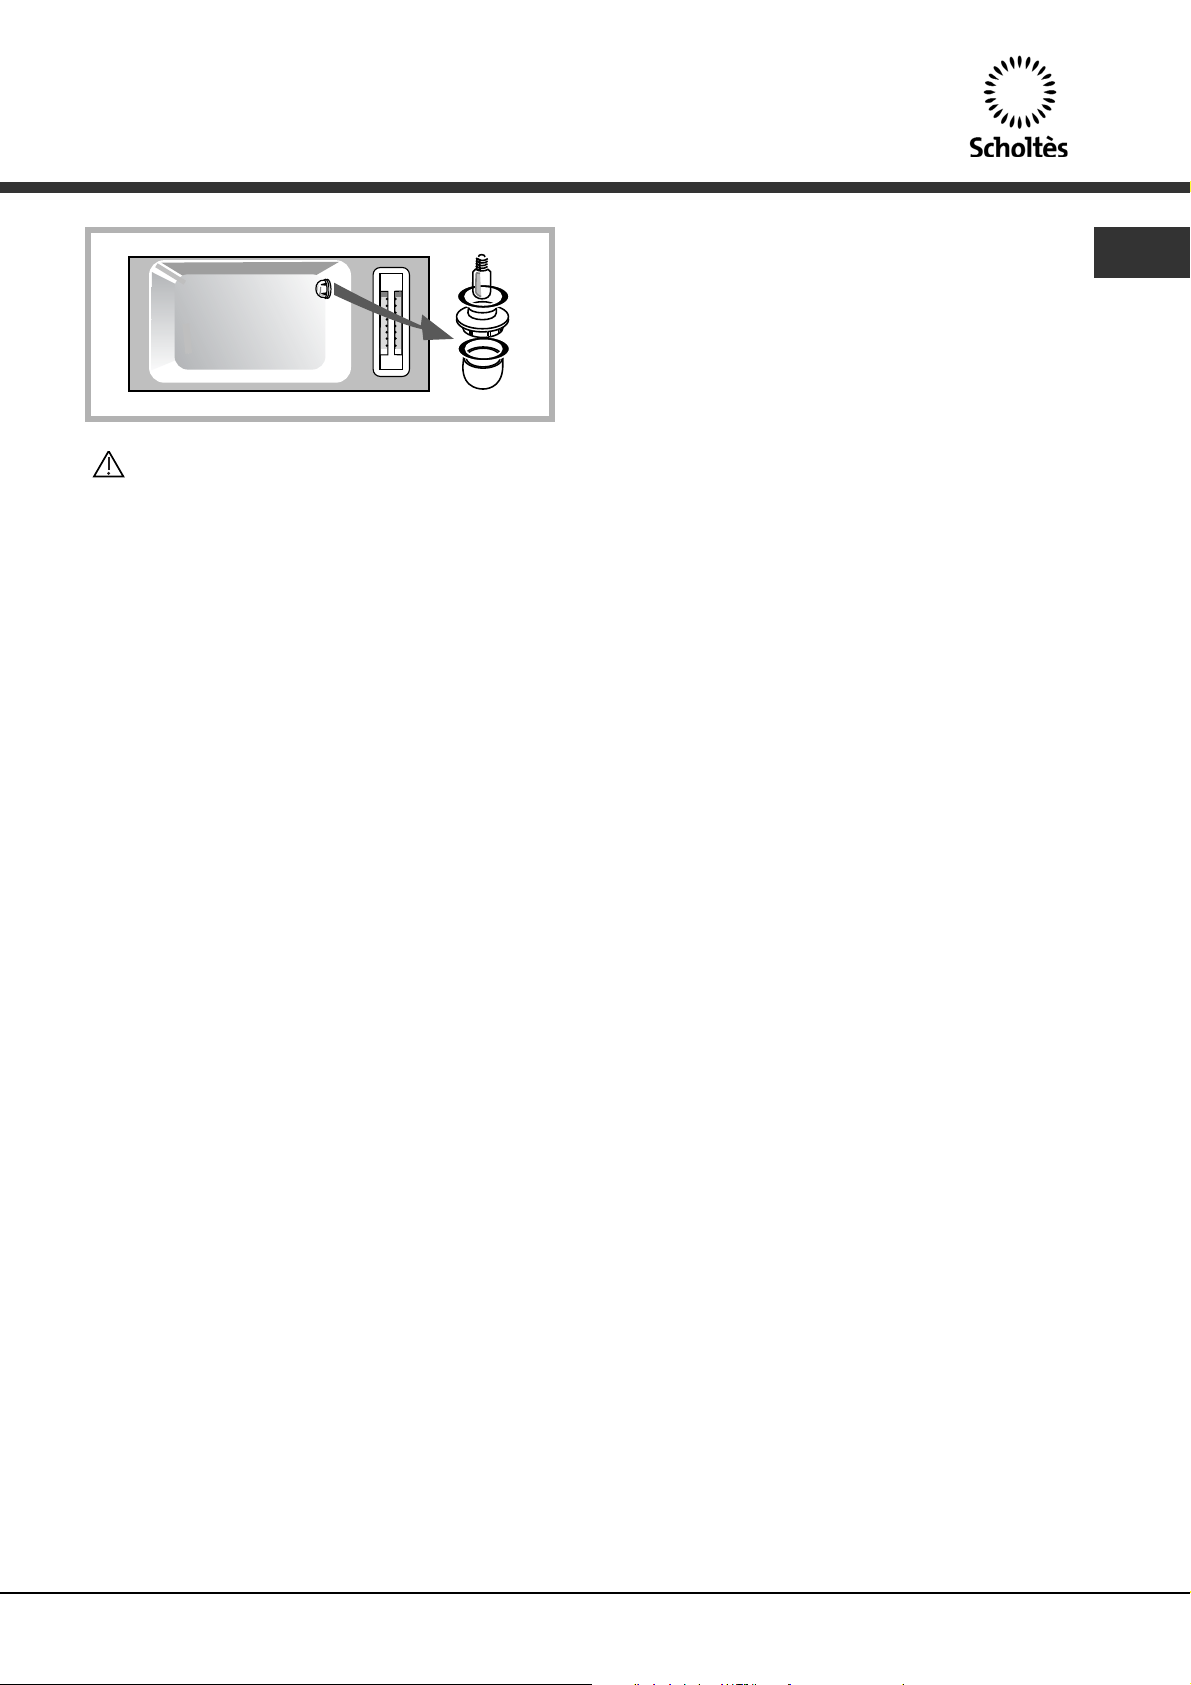
Come sostituire la lampadina
- Girate il coperchietto verso sinistra per un quarto di
giro.
- Svitate la lampadina nello stesso senso.
Caratteristiche della lampadina :
- 15 w - 220-240 V
- 300°C - zoccolo E 14
- Cambiate la lampadina, poi rimontate il coperchietto
prestando attenzione al corretto posizionamento della
guarnizione.
- Ricollegate il forno.
LLaa llaammppaaddiinnaa ssii ttrroovvaa nneellllaa ppaarrttee ppoosstteerriioorree
aallll’’iinntteerrnnoo ddeell ffoorrnnoo..
SSttaaccccaattee iill ffoorrnnoo ddaallll’’aalliimmeennttaazziioonnee eelleettttrriiccaa
pprriimmaa ddii qquuaallssiiaassii iinntteerrvveennttoo ssuullllaa llaammppaaddiinnaa,, iinn
mmooddoo ddaa eevviittaarree rriisscchhii ddii ssccoossssaa eelleettttrriiccaa..
Page 18

18
IT
Cosa fare in caso di anomalie
CCOOSSAA BBIISSOOGGNNAA
FFAARREE ??
LLEE CCAAUUSSEE
PPOOSSSSIIBBIILLII
Il display non si
accende.
La lampadina non si
accende più.
C’è una perdita di acqua o di vapore dallo
sportello durante la
cottura.
Al forno non arriva l’alimentazione elettrica.
Scheda elettronica
guasta.
- Verificare l’alimentazione (fusibile del vostro impianto elettrico).
-Chiamare il Servizio
Post-Vendita.
- Cambiare la lampadina.
- Collegare il forno.
- Cambiare il fusibile
dell’impianto elettrico.
La lampadina è
guasta.
Il forno non è collegato.
Il fusibile del vostro
impianto elettrico è
guasto.
La porta è chiusa
male.
La guarnizione della
porta è difettosa.
- Chiamare il Servizio
Post-Vendita.
VVII AACCCCOORRGGEETTEE
CCHHEE......
IInn ooggnnii ccaassoo,, ssee iill vvoossttrroo iinntteerrvveennttoo nnoonn èè ssuuffffiicciieennttee,,
ccoonnttaattttaarree iimmmmeeddiiaattaammeennttee iill SSeerrvviizziioo AAssssiisstteennzzaa CClliieennttii..
Page 19

Table of Contents
Steam cooking, 20
What does your oven look like?, 21
Accessories, 22
How do you install your oven?, 23
Electrical connection
Build-in
How do you use your oven?, 24
Setting the clock
Locking display
Display stand-by mode
How do you program for immediate cooking?, 26
Water management
How do you set a cooking programme with delayed start?
How do you use the timer?
Setting description, 32
Cooking chart, 33
How do you care for your oven?, 34
How do you change the bulb?, 35
What to do in case of malfunctions?, 36
EN
User manual
STEAM OVEN
EN FR
Italiano, 1 English, 19 Français, 37
IT
Throughout the manual,
indicates safety recommendations,
indicates advice and tips
FVP61
Page 20

Overview
Steam cooking presents nothing but advantages if
you follow the instructions for use. Healthy and natural, steam cooking preserves the full flavour of foods.
A delicate sauce or aromatic herb seasonings add
that something extra that makes the difference.
This kind of cooking releases no odours. There is no
need to season the cooking water with herbs or spices; however, you can flavour a fish by placing it on a
bed of seaweed or make a savoury poultry dish by
adding a bunch of rosemary or tarragon.
You can simultaneously cook meat, fish and vegetables.
Steam cooking gently reheats pasta, rice and mashed
potatoes with no risk of food sticking or drying out.
It makes it easier to cook puddings, flans, rice pudding, etc. covered with aluminium foil, the condensation water does not add moisture to the preparations.
There is no need to season before cooking--not even
the steam water.
To make meat look more appetising, quickly brown it
on all sides with hot butter in a pan.
Compared to boiling, steam offers nothing but advantages:
It is quick: cooking starts immediately, whereas for
food in a water-filled dish, the cooking time only
begins counting down once the water returns to a full
boil.
It is healthy: vitamins (those that are water soluble)
and minerals are well preserved because they scarcely dissolve in the condensation water that touches
the food.
Moreover, no fats are used for this type of cooking.
The steam maintains the taste of food. It does not
add odours, nor the taste of the grill or the pan.
Furthermore, it takes nothing away because the food
is not diluted in the water.
Words of advice: there is no point in using this cooking method to prepare fish that is not fresh or vegetables left in the refrigerator for a week--the results are
catastrophic!
The steam does not transfer flavours or aromas; therefore do not hesitate to save both time and money
by cooking items side by side, but without touching.
For example, you can cook a fish next to a dessert.
Steam is also appropriate for blanching, defrosting
and reheating or even holding warm, especially sauces.
First use a very small amount of fat to heat meats like
poultry, veal and pork so that they take on an appetizing browned appearance. Then finish cooking them
using the steam method.
Cut into pieces, food cooks faster and more evenly
than if left whole.
20
Steam cooking
EN
Page 21

21
EN
What does your oven look like?
Overview
Close-up of control panel
Control
panel
Tank
Display
Steam
generator
Water intake
tube
Gutter
Button: Start/Stop
Changing time and tempe-
rature
Temperature setting
Cooking duration/time
End cooking
Independent timer
1
2
3
4
5
6
1
3
2
4
5
6
7
7
Function selector
Defrost indicator
Cooking indicator
Lack of water indicator
Clock and time display
Temperature indicator
8
10
9
11
12
8
10
9
11
12
START
STOP
Page 22

22
EN
Tank that allows for independent water supply to the oven.
Its capacity is approximately
one litre (maximum level).
Accessories
Pierced cooking dish to prevent
contact between food and the
condensation water.
Dish that makes it possible to
recover the condensation
water.
Stainless steel removable support grid: it must be placed in
the oven.
UUssiinngg wwaatteerr wwiitthh aa llooww lleevveell ooff lliimmee wwiillll mmaakkee iitt
eeaassiieerr ttoo ccaarree ffoorr yyoouurr oovveenn..
UUssiinngg ddeemmiinneerraalliisseedd wwaatteerr iiss ffoorrbbiiddddeenn ((nnoott ffoorr
hhuummaann ccoonnssuummppttiioonn))..
TThhee ccooookkwwaarree mmaayy bbee cclleeaanneedd iinn tthhee ddiisshhwwaass--
hheerr..
Page 23

23
EN
Electrical connection
For permanent installation, be mindful to add a standardised, compliant cut-off device in the electrical conduit.
Otherwise the appliance must be positioned so that the
electrical outlet is accessible after the unit has been builtin.
You must use an electrical receptacle that contains a
ground wire and is connected in compliance with applicable safety standards. Your electrical installation must
be equipped with 10 ampere thermal-sensitive protection.
Do not operate the oven if the power cable or its plug
are damaged. In this case, they must be replaced by the
manufacturer, its After Sales Service department or a
person of similar qualifications so as to avoid any danger.
How do you install your oven?
380
560
50
386,5
20
595
405
544
378
550
Operating voltage...........................220-240 V ~ 50 Hz
Total oven power............................1.77 kW
EEnneerrggyy ccoonnssuummppttiioonn
-heating up to and holding at 100°C
for one hour ...................................0.71 kWh
NNeett ccaappaacciittyy
................................23.5 litres
Build-in
1. Place the appliance in the nook. The appliance must be
horizontal. Check the position.
2. For greater stability, attach the oven in the cabinet with
two screws through the holes provided for this purpose on
either side of the front inner panels.
3. Make the electrical connection.
EEnnssuurree tthhaatt tthhee pplluugg wwiillll bbee aacccceessssiibbllee aafftteerr iinnss--
ttaallllaattiioonn..
Page 24

24
EN
Setting the clock
How do you use your oven?
When supplied with electricity.
Set the time.
The display flashes 12:00.
Press the + or - buttons to set the time.
START
STOP
1
The set time is displayed.
Press the and buttons at the same time
until the time flashes. Set the clock with the + or buttons.
Validate by pressing .
1
2
2
Validate by pressing START/STOP.
START
STOP
Resetting the clock
START
STOP
START
STOP
IIff tthhee ttiimmee iiss nnoott vvaalliiddaatteedd uussiinngg tthhee bbuuttttoonn ,,
iitt iiss aauuttoommaattiiccaallllyy ssaavveedd aafftteerr oonnee mmiinnuuttee..
Locking display
It is possible to lock the display. This feature cannot be
used during timed cooking programmes.
Press the START/STOP touch control for a few
seconds.
A beep is sounded and a "key" ( ) appears on
the screen. From this moment on, no touch control
is active.
1
2
START
STOP
To unlock the display, press the START/STOP
touch control for a few seconds: a beep is sounded
and the "key" disappears.
3
Page 25

25
EN
Display stand-by mode
To limit your oven's consumption of energy when it is not
in use, you may put it in STAND-BY MODE.
To do so, perform the following procedure:
YYoouurr oovveenn mmuusstt bbee iinn ttiimmee ddiissppllaayy mmooddee..
Press the + and - buttons at the same time for 5
seconds.
Your display indicates "LCD OFF" Release the buttons.
30 seconds later, your display will turn off.
START
STOP
Activation of stand-by mode:
Deactivation of stand-by mode:
START
STOP
Your oven is now in stand-by mode, it will automatically
turn off after 30 seconds in time display mode.
START
STOP
START
STOP
Press the + and - buttons at the same time for 5
seconds.
Your display indicates "LCD ON". Release the buttons.
You are out of STAND-BY MODE, your display will
remain on constantly.
Page 26

26
EN
How do you program
for immediate cooking?
Operating principle
The water contained in the tank arrives in the cavity via
a pipe. This water is transformed into steam when it
comes into contact with a hot surface located in the
lower part of the cavity: this is the steam generator.
There is no need to add water to the cooking dish. To
guarantee REAL STEAM COOKING, your oven is furnished with specially designed cookware that will allow for
perfect cooking.
YYoouu AABBSSOOLLUUTTEELLYY MMUUSSTT ffiillll tthhee wwaatteerr ttaannkk
ttoo tthhee MMaaxx.. lleevveell bbeeffoorree ccooookkiinngg.. RReettuurrnn tthhee
ttaannkk ttoo iittss hhoouussiinngg bbyy ffiirrmmllyy ppuusshhiinngg AALLLL TTHHEE
WWAAYY uunnttiill yyoouu ffeeeell tthhee ttaannkk LLOOCCKK IINNTTOO
PPOOSSIITTIIOONN..
WWhheenn iinn uussee,, tthhee aapppplliiaannccee bbeeccoommeess hhoott..
HHoott sstteeaamm wwiillll eessccaappee wwhheenn yyoouu ooppeenn tthhee
ddoooorr ooff tthhee aapppplliiaannccee.. KKeeeepp cchhiillddrreenn aawwaayy..
A cooking time is pre-programmed for the various settings.
Cooking
temperature
°C
Pre-program-
med time
Min. setting
time
Max. setting
time
25 min
15 min
15 min
20 min
30 min
15 min
30 min
30 min
5 min
5 min
5 min
5 min
5 min
5 min
5 min
5 min
1 hour
1 hour
1 hour
1 hour
1 hour
1 hour
1 hour
1 hour
100
85
75
90
95
80
55
60
Page 27

27
EN
Steam cooking
START
STOP
Press the button and scroll down to select cooking function, for example the function. The
preset temperature 100°C is displayed and 25
minutes cooking time is suggested. The symbol flashes.
Press START/STOP to begin cooking; the preset
time and symbols are fixed, the cooking indicator
comes up.
When the oven reaches the set temperature, 100°C
is fixed and the oven beeps.
2
3
1
2
3
TToo aavvooiidd ccoommpprroommiissiinngg tthhee ccooookkiinngg rreessuullttss,, ddoo
nnoott ooppeenn tthhee aapppplliiaannccee ddoooorr dduurriinngg ccooookkiinngg..
1
Set the desired length of time (minimum is 5 minutes and maximum is 60 minutes) by pressing the +
and - touch controls.
Page 28

28
EN
Changing cooking temperature
START
STOP
2
1
2
3
3
1
Press the °C button.
The °C symbol flashes.
Adjust the temperature by pressing the + or buttons.
Save your choice by pressing the °C button.
If your choice is not validated using the °C button, the
temperature is automatically saved after a few
seconds.
It is only possible to adjust the cooking temperature in
the position.
Changing the cooking time
Cancelling cooking in progress
During cooking, you can adjust the cooking time by
pressing and the + or - touch controls.
You can stop the cooking at any time by pressing the
START/ STOP touch control (press and hold for
approximately one second).
If steam generation has not yet begun (approximately
one minute), the oven stops immediately and the time
disappears.
If steam generation has already begun, the time converts to three minutes; a countdown begins and the
steam escapes before the door is opened.
How do you program
for immediate cooking?
Page 29

29
EN
At the end of a cooking programme
0m00s is displayed. The display animation ceases.
Discontinuous beeps are emitted for three minutes.
To silence the beeps, press the START/STOP touch control or open the door.
YYoouu AABBSSOOLLUUTTEELLYY MMUUSSTT eemmppttyy tthhee ttaannkk..
IInn oorrddeerr gguuaarraanntteeee ggoooodd oovveenn rreelliiaabbiilliittyy,, tthhee ffaann
ccoonnttiinnuueess ttoo ffuunnccttiioonn ffoorr aa sshhoorrtt ppeerriioodd aafftteerr
ccooookkiinngg iiss ccoommpplleettee..
In the event of a water circuit-related problem during
cooking, the "no water" indicator appears and a beep is
emitted.
This error is specifically associated with:
- An empty tank.
- A poorly seated tank.
After checking these two items, cooking automatically
restarts as soon as the door is closed.
Water management
Page 30

30
EN
How do you set a cooking
programme with delayed start?
Set the selected cooking mode, the time, and the
temperature if necessary,
((sseeee CCHHAAPPTTEERR ""HHooww ddoo
yyoouu pprrooggrraamm ffoorr iimmmmeeddiiaattee ccooookkiinngg??"" PPaarraaggrraapphhss 11
aanndd 22))
Example: position . Temperature 100°C.
2
1
3
Press the "end of cooking" touch control
The end of cooking time appears and flashes, as
well as the symbol, to indicate that it is now
possible to set the time.
Example: It is 12:30.
You programmed a cooking time of 30 minutes.
The displayed end of cooking time is 13:00.
1
2
Adjust the end of cooking time by pressing the +
or - touch controls.
Example: End of cooking 14:00.
3
Validate by pressing START/STOP.
Once the cooking end time has been programmed,
the time comes back on the display.
After these steps, the oven heating is delayed so that
cooking ends at 14:00.
When cooking is over, the oven will beep for several
minutes and the symbol flashes. You can stop
the beeps by pressing START/STOP for one second.
Changing cooking time and
cooking end time
You can consult the cooking end time at any time during
cooking by pressing the button.
To cancel the programme, press START/STOP.
START
STOP
Page 31

Timer
31
How do you use the timer?
EN
Your oven is equipped with an electronic timer that is
independent of the oven functions, making it possible to
measure times.
TThhiiss ffuunnccttiioonn iiss iinnddeeppeennddeenntt ooff tthhee oovveenn.. IItt ccaann--
nnoott bbee uusseedd ttoo aauuttoommaattiiccaallllyy ssttoopp aa ccooookkiinngg pprroo--
ggrraammmmee..
TThhiiss ffuunnccttiioonn ccaann hhoowweevveerr bbee uusseedd wwhhiillee tthhee
oovveenn iiss wwoorrkkiinngg.. IInn tthhiiss ccaassee,, tthhee ttiimmeerr ddiissppllaayy
h
haass pprriioorriittyy oovveerr tthhee cclloocckk ddiissppllaayy..
Press the button.
0m00s and the timer symbol flash.
Set the desired length of time (max. 59 min
50 seconds) by pressing the + or - buttons.
After a few seconds, the timer starts working.
When the cooking time is finished, the timer beeps.
The symbol flashes.
Once the timer starts working, you can change the
remaining time by pressing then the + or - buttons.
To cancel the timer, press then set time at 0m00s.
1
2
START
STOP
2
1
Stop beeping by pressing or START/STOP.
Changing or cancelling the timer programme
Page 32

32
Setting description
EN
VVeeggeettaabblleess aanndd mmeeaattss
DDeelliiccaattee wwhhoollee ffiisshh ((ttrroouutt))
CCooookkiinngg ddeelliiccaattee ffiisshh
((ssaarrddiinnee ffiilleettss,, rreedd mmuulllleett))
B
Booiilleedd eeggggss;; ssttuuffffeedd ttoommaattooeess tthhaatt
mmaaiinnttaaiinn tthheeiirr sshhaappee..
PPuuddddiinnggss,, eettcc..
TTeerrrriinneess,, ppââttééss..
RReehheeaattiinngg c
cooookkeedd ddiisshheess..
MMeellttiinngg cchhooccoollaattee,, bbuutttteerr..
SSlliigghhttllyy wwaarrmm ffrruuiitt ffoorr iimmmmeeddiiaattee
sseerrvviinngg
DDeeffrroossttiinngg ffiissh
h ffiilleettss bbeeffoorree bbrreeaaddiinngg..
BBeerrrriieess tthhaatt mmuusstt rreemmaaiinn ccooooll ((ffoorr ppiieess
aanndd ssaauucceess))
DDeeffrroossttiinngg mmeeaattss bbeeffoorre
e ggrriilllliinngg
((eegg:: ssaauussaaggeess))
VVaappoouurr ccooookkiinngg mmooddee
mmoosstt oofftteenn uusseedd
FFoorr ccooookkiinngg ddeelliiccaattee
ffoooodd
TThhee mmeeaatt rreemmaaiinnss iirriiddeess--
cceenntt,, tthhee ccoolll
laaggeenn ddooeess
nnoott aappppeeaarr
FFoorr ccooookkiinngg ddeelliiccaattee
ffoooodd,, ffrruuiittss,, ccoommppootteess
LLooww hheeaatt
SSllooww ddeeffrroossttiinngg
wwiitthhoouutt cco
oookkiinngg
SETTING
Temperature
C°
COOKING MODE
COOKING EXAMPLES
100
85
75
90
95
80
55
60
Page 33

33
EN
Cooking chart
TIMES
40 to 45 min.
35 to 40 min.
18 min.
20 to 22 min.
25 to 30 min.
15 to 20 min.
15 min.
30 to 35 min.
30 to 35 min.
10 to 15 min.
20 min.
35 min
30 min.
22 min.
30 to 35 min
15 to 20 min.
20 to 25 min.
25 min.
25 min.
40 to 45 min.
10 to 12 min.
20-25 min.
25 min.
30 to 35 min.
10 to 15 min.
25 min.
10 min.
13 to 15 min.
20 to 25 min.
20 min.
15 to 20 min.
15 min.
20 min.
15 min.
25 to 30 min.
15 min.
20 min.
15 to 20 min.
10 to 12 min
20 to 25 min.
20 to 25 min.
15 to 30 min.
25 min.
20 to 25 min.
25 min.
20 min.
7 min.
5 to 6 min.
8 min.
10 to 12 min.
30 min.
25 min.
Preparations
Placed upside down in the dish
For tips decrease cooking time
in small bunches
in thin, round slices
in thin slices
in cubes
in thin strips
Brussels sprouts
chopped green cabbage
in round slices
(fresh) stir while cooking
(frozen) stir while cooking
core removed, cut in half
lengthwise
cut in half
in cubes
cut in half
cut in round slices
whole
with seasoning
with seasoning
depending on weight
whole, peeled
fruit in strips
in ramekins
steaks (180 g)*
whole (1kg)
whole (200 g)
steaks (180 g)
depending on thickness
whole (250 g)
filets
whole (200 g)
thick steaks (6 to 10 cm in length)
steaks (180/200 g)
filets
steaks (180/200 g)
whole (200 g) 13 to 15 min.
30 min. 100 g rinsed rice - 20 cl milk
2 T. sugar
200 g (1/4 litre water)
Notes
• These times may vary
according to type, size and
freshness of the
vegetables. Follow the
indications that appear in
the "Preparations" column.
• The cooking time remains
the same regardless of the
quantity to be cooked.
Example: 1 or 4 artichokes
require the same cooking
time.
• To check cooking progress,
stick the tip of a knife into
the thickest part of the
vegetable; there will be no
resistance if the food is
cooked.
• Place the scallo ps on the
grid of the glass dish, add
aromatic herbs.
• Place the crustaceans on a
bed of seaweed.
• Times depend on ripeness.
•
*Steaks: Round slices of
fish of 2 to 3 cm in
thickness (180/200g) per
person.
•
Insist on very fresh
products.
•
Place whole fish in the dish
as is or on bay leaves,
fennel or other aromatic
As soon as cooking is
complete, remove the skin,
which will detach easily.
•
Then brown under the
grill in another dish.
• Fluff with a fork when
cooking is complete.
Soft-boiled: placed directly on the grid.
Fried: broken in an individual dish placed on the grid and covered with cooking wrap.
Poached: See detailed recipes.
Place directly in a dish then cover with water or milk. The steam is not enough to saturate these inflating foods. Place a
sheet of aluminium foil on the dish to prevent water droplets from falling in.
Roast 800 g: 55 to 60 min.
Chicken thighs: 35 to 40 min.
Roast turkey: 50 to 60 min.
Piece: 400 g
°C
100
100
100
100
100
100
100
100
100
100
100
100
100
100
100
100
100
100
100
100
90
95
95
95
90
95
90
85
85
85
85
80
85
75
80
80
85
85
75
100
100
100
100
100
95
90
100
100
100
100
100
100
Food
Artichokes (small)
Asparagus
Broccoli
Carrots
Celery root
Pumpkin
Mushrooms
Cauliflower
Courgettes
Spinach
Endives
Fennel
Green beans
Turnips
Fresh peas
Leeks
Potatoes
Sea scallops
Mussels/periwinkles
Crabs
Lobsters
Apples/pears/peaches
Compote
Puddings
Northern pike/Cod
Sea bream
Herring
Pollack/black cod
Monkfish
Mackerel
Atlantic cod
Skate
Red mullet
Spotted dogfish
Salmon
Sole
Tuna
Trout, whole (1 kg)
Beef
Pork (filet mignon)
Poultry ( breasts, filets)
(stuffed)
Sausages
Start with very fresh eggs
kept at room temperature
Rice, pasta, semolina
Rice pudding
Semolina
Page 34

34
EN
How do you care
for your oven?
Maintenance
•
CCaavviittyy
(after each use)
Wipe the cavity with a dry cloth after the steam generator has cooled or let the cavity air-dry by leaving the door
open.
•
WWaatteerr iinnttaakkee ttuubbee
Remove the water intake tube by pulling it toward you.
Remove any hard-water deposits that may be inside
(using a thin, pointed object such as a thick skewer or a
knitting needle).
•
SStteeaamm ggeenneerraattoorr
Pour 1/2 cup of white alcohol vinegar on the generator.
Let sit for a few minutes, then clean and rinse with water.
Do not use sponges or abrasive powders, nor coffee
maker cleaning agents.
Cleaning the gutter
Remove this gutter by pulling it upward. Wipe it off and
return it to its position using the three notches provided.
TThhee oovveenn sshhoouulldd nnoott bbee cclleeaanneedd wwiitthh aa sstteeaamm
cclleeaanneerr..
Page 35

35
EN
How do you change
the bulb?
- Turn the view port a quarter turn to the left.
- Unscrew the bulb in the same direction.
Bulb characteristics:
- 15 W - 220-240 V
- 300°C - E 14 socket
- Replace the bulb then reposition the view port, making
sure the joints are correctly positioned.
- Reconnect your oven.
TThhee bbuullbb iiss llooccaatteedd aatt tthhee bbaacckk rriigghhtt ooff yyoouurr
oovveenn''ss ccaavviittyy..
DDiissccoonnnneecctt yyoouurr oovveenn bbeeffoorree ppeerrffoorrmmiinngg aannyy
ttaasskk oonn tthhee bbuullbb ttoo aavvooiidd tthhee rriisskk ooff eelleeccttrriicc
sshhoocckk..
Page 36

36
EN
What to do in case
of malfunctions?
WWHHAATT SSHHOOUULLDD
YYOOUU DDOO??
PPOOSSSSIIBBLLEE
CCAAUUSSEESS
Your display does not
light up.
The bulb doesn't
work anymore.
Water or steam leak
around the door during cooking.
Oven is not connected to power source.
Electronic board is
not functioning.
- Check that the appliance is receiving
electricity (good fuse).
- Call the After-Sales
Service Department.
- Change the bulb.
- Connect the oven.
- Change the fuse.
The bulb is out of order.
The oven is not connected.
Your fuse is out of order.
The door is not properly closed.
The door seal is defective.
- Call the After-Sales
Service Department.
YYOOUU OOBBSSEERRVVEE
TTHHAATT……
IInn aallll cciirrccuummssttaanncceess,, iiff yyoouurr eeffffoorrttss aarree nnoott ssuuffffiicciieenntt,,
ccoonnttaacctt tthhee AAfftteerr--SSaalleess SSeerrvviiccee DDeeppaarrttmmeenntt wwiitthhoouutt ddeellaayy..
Page 37

Sommaire
La cuisson vapeur, 38
Comment se présente votre four, 39
Accessoires, 40
Comment installer votre four, 41
Raccordement électrique
Encastrement
Comment utiliser votre four, 42
Réglage de l’heure
Verrouillage afficheur
Veille de l’afficheur
Comment faire une cuisson immédiate, 44
Gestion de l’eau
Comment faire une cuisson différée
Comment utiliser la minuterie
Description des fonctions, 50
Tableau de cuisson, 51
Comment entretenir votre four, 52
Comment changer l’ampoule, 53
Que faire en cas d’anomalies, 54
FR
Mode d’emploi
FOUR VAPEUR
EN FR
Italiano, 1 English, 19 Français, 37
IT
Tout au long de la notice,
vous signale les consignes de sécurité,
vous signale les conseils et les astuces
FVP61
Page 38

Généralités
La cuisson vapeur est tout bénéfice si l’on respecte le
mode d’emploi. Saine et naturelle, la cuisine vapeur
conserve leur bon goût aux aliments. Une sauce raffinée ou aux herbes aromatiques ajoute le petit plus
qui fait la différence.
Elle ne transmet aucune odeur. Inutile d’aromatiser
l’eau de cuisson avec des herbes ou des épices, en
revanche, on peut parfumer un poisson en le déposant sur un lit d’algues ou une volaille sur un bouquet
de romarin ou d’estragon.
Elle cuit simultanément viande, poisson et légumes.
Elle réchauffe en douceur pâtes, riz et purée sans ris-
que d’attacher et sans dessèchement.
Elle facilite la cuisson des crèmes, flans, gâteaux de
riz... recouverts de papier aluminium, l’eau de condensation ne les détrempe pas.
Inutile de saler avant, pas même l’eau de cuisson.
Pour donner meilleure mine à une viande, faîtes la
dorer rapidement de tous les côtés, au beurre chaud
à la poële.
Comparée à la cuisson à l’eau, la vapeur ne présente
que des avantages:
Elle est rapide: la cuisson démarre immédiatement
alors que le temps de cuisson des aliments dans un
récipient d’eau n’est décompté qu’à partir de la reprise de l’ébullition.
Elle est diététique: les vitamines (celles dites hydrosolubles) et les sels minéraux sont bien préservés puisqu’ils se dissolvent à peine dans l’eau condensée qui
nappe les aliments.
De plus, aucune matière grasse n’est utilisée pour
conduire la cuisson.
La vapeur respecte le goût des aliments. Elle n’ajoute
pas de parfum, ni goût de grillé ou de poêlé et n’en
ôte pas non plus puisqu’il n’y a pas de dilution dans
l’eau.
Revers de la médaille: inutile de cuire de cette façon
un poisson qui ne serait pas frais, ou un légume
oublié au réfrigérateur depuis une semaine: résultat
catastrophique!
La vapeur ne communique pas les goûts ni les
odeurs; n’hésitez donc pas à gagner à la fois du
temps et de l’argent en faisant cuire côte à côte mais
sans se toucher, un poisson et un dessert par exemple.
La vapeur convient aussi pour blanchir, décongeler et
réchauffer ou encore maintenir au chaud, en particulier
les sauces.
Faîtes d’abord revenir à la poêle, avec très peu de
matière grasse, les viandes genre volaille, veau, porc,
pour qu’elles prennent un aspect doré appétissant.
Achever ensuite leur cuisson à la vapeur.
Détaillés en morceaux, les aliments cuisent plus vite et
de façon plus homogène que s’ils sont entiers.
38
La cuisson vapeur
FR
Page 39

39
FR
Comment se présente votre four
Vue d’ensemble
Détail du bandeau de commande
Bandeau de
commande
Réservoir
Afficheur
Générateur
de vapeur
Tube d’arrivée
d’eau
Goulotte
Bouton : Marche/Arrêt
Modification des temps et
températures
Réglages des températures
Durée de cuisson
Fin de cuisson
Minuteur indépendant
1
2
3
4
5
6
1
3
2
4
5
6
7
7
Sélecteur de fonctions
Indicateur de décongélation
Indicateur de cuisson
Indicateur de d’absence d’eau
Afficheur de l’horloge et des
temps
Indicateur de température
8
10
9
11
12
8
10
9
11
12
START
STOP
Page 40

40
FR
Réservoir permettant l’alimentation en eau de votre four de
façon indépendante.
Sa contenance est d’environ 1
litre (niveau maxi.)
Accessoires
Plat de cuisson perforé évitant
le contact entre les aliments et
l’eau de condensation.
Plat permettant de récupérer
l’eau de condensation.
Grille support amovible en inox:
à enfourner obligatoirement.
LL’’uuttiilliissaattiioonn dd’’uunnee eeaauu ffaaiibblleemmeenntt ccaallccaaiirree ffaacciillii--
tteerraa ll’’eennttrreettiieenn ddee vvoottrree ffoouurr..
LL’’uuttiilliissaattiioonn dd’’uunnee eeaauu ddéémmiinnéérraalliissééee eesstt iinntteerrddii--
ttee ((ppaass aalliimmeennttaaiirree))..
LLaa ccaasssseerroolleerriiee ppeeuutt êêttrree nneettttooyyééee aauu llaavvee--vvaaiiss--
sseellllee..
Page 41

41
FR
Raccordement électrique
Pour un branchement fixe, veillez à placer dans la conduite d’alimentation, un moyen de déconnexion conforme aux règles d’installation.
Sinon l’appareil doit être placé de telle façon que la fiche
de prise de courant soit accessible lorsque celui-ci est
encastré.
Utilisez impérativement une prise de courant comportant
une borne de mise à la terre et raccordée conformément
aux normes de sécurité en vigueur.
Votre installation doit être équipée d’une protection thermique de 10 Ampères.
Ne faites pas fonctionner le four si le cordon d’alimentation ou sa fiche sont abîmés. Dans ce cas, ils doivent
être remplacés par le fabricant, son S.A.V. ou des personnes de qualification similaire pour éviter tout danger.
Comment installer votre four
380
560
50
386,5
20
595
405
544
378
550
Tension de fonctionnement ............220-240 V ~ 50 Hz
Puissance totale du four.................1,77 kW
CCoonnssoommmmaattiioonn dd’’éénneerrggiiee
-de montée et maintien à 100°C
pendant 1 heure.............................0,71 kWh
VVoolluummee uuttiillee
.................................23,5 litres
Encastrement
1. Placez l’appareil dans la niche. L’appareil doit être hori-
zontal. Contrôlez cette position.
2. Pour plus de stabilité, fixez le four dans le meuble par 2
vis dans les trous prévus à cet effet sur les montants latéraux.
3. Effectuez le raccordement électrique.
VVeeiilllleezz àà ccee qquuee llaa ffiicchhee ssooiitt aacccceessssiibbllee aapprrèèss iinnss--
ttaallllaattiioonn..
Page 42

42
FR
Réglage de l’heure
Comment utiliser votre four
A la première mise sous tension.
Réglez l’heure.
L’afficheur fait apparaître 12h00 clignotant.
Appuyez sur les touches + ou - et faites défiler
l’heure.
START
STOP
1
L’heure fixe est affichée.
Appuyez simultanément sur les touches et
jusqu’au clignotement de l’heure. Réglez
l’heure par les touches + ou -.
Validez avec .
1
2
2
Validez avec START / STOP.
START
STOP
Modification de l’heure
START
STOP
START
STOP
SS’’iill nn’’yy aa ppaass ddee vvaalliiddaattiioonn ssuurr llaa ttoouucchhee ,,
ll’’eennrreeggiissttrreemmeenntt eesstt aauuttoommaattiiqquuee aauu bboouutt dd’’uunnee
mmiinnuuttee..
Verrouillage afficheur
Un verrouillage de l’afficheur est possible. Celui-ci ne
peut être activé que hors cuisson en mode heure.
Appuyez sur la touche START / STOP pendant
quelques secondes.
Un bip retentit et une “clé” ( ) apparaît sur l’écran . A partir de ce moment, aucune touche n’est
active.
1
2
START
STOP
Pour déverrouiller, appuyez sur la touche START/
STOP pendant quelques secondes, un bip retentit
et la “clé” disparaît.
3
Page 43

43
FR
Veille de l’afficheur
Afin de limiter la consommation d’énergie de votre four
hors utilisation, vous avez la possibilité de mettre votre
afficheur en MODE VEILLE.
Pour cela, veuillez suivre la procédure suivante :
VVoottrree ffoouurr ddooiitt êêttrree eenn mmooddee aaffffiicchhaaggee hheeuurree..
Appuyez sur les touches + ou - simultanément pendant
5 secondes.
Votre afficheur indique “LCD OFF”
Relâchez l’appui.
30 secondes après, votre afficheur s’éteint.
START
STOP
Activation du mode veille:
Désactivation du mode veille :
START
STOP
Votre four est maintenant en mode veille, il s’éteindra
automatiquement après 30 secondes en mode affichage
heure.
START
STOP
START
STOP
Appuyez simultanément sur les touches + et - pendant
5 secondes.
Votre afficheur indique “LCD ON”.
Relâchez l’appui.
Vous êtes sorti du MODE VEILLE, votre afficheur reste
allumé en permanence.
Page 44

44
FR
Comment faire une cuisson
immédiate
Principe de fonctionnement
L’eau contenue dans le réservoir arrive dans la cavité
par un tuyau. Cette eau est transformée en vapeur au
contact d’une surface chaude placée dans la partie
inférieure de la cavité:
il s’agit du générateur de vapeur.
Il n’est pas nécessaire de rajouter de l’eau dans le plat
de cuisson. Pour garantir UNE VRAIE CUISSON
VAPEUR, votre four est proposé avec une casserolerie
spécialement étudiée pour une parfaite cuisson.
RReemmpplliisssseezz IIMMPPEERRAATTIIVVEEMMEENNTT llee rréésseerrvvooiirr
dd''eeaauu jjuussqquu''aauu nniivveeaauu mmaaxxii aavvaanntt llaa ccuuiissssoonn..
RReemmeetttteezz llee rréésseerrvvooiirr ddaannss ssoonn llooggeemmeenntt eenn
ll''eennggaaggeeaanntt AA FFOONNDD jjuussqquu''àà ccee qquuee vvoouuss
rreesssseennttiieezz llee PPAASSSSAAGGEE DD''UUNN CCRRAANN..
LLoorrss ddee llaa ccuuiissssoonn,, ll’’aappppaarreeiill ddeevviieenntt cchhaauudd..
DDee llaa vvaappeeuurr cchhaauuddee ss’’éécchhaappppee lloorrssqquuee vvoouuss
oouuvvrreezz llaa ppoorrttee ddee ll’’aappppaarreeiill.. EEllooiiggnneezz lleess
eennffaannttss..
Une durée de cuisson est préprogrammée pour les différentes fonctions.
Cuisson
Température
°C
Temps
préprogrammé
Temps réglage
mini
Temps réglage
maxi
25 min
15 min
15 min
20 min
30 min
15 min
30 min
30 min
5 min
5 min
5 min
5 min
5 min
5 min
5 min
5 min
1 heure
1 heure
1 heure
1 heure
1 heure
1 heure
1 heure
1 heure
100
85
75
90
95
80
55
60
Page 45

45
FR
Cuisson à la vapeur
START
STOP
Appuyez sur la touche et faites défiler les fonctions de cuisson. Sélectionnez par exemple la fonction . La température de 100°C prédéfinie s’affiche et un temps de 25 minutes vous est proposé. Le
symbole clignote.
Appuyez sur START / STOP pour démarrer votre
cuisson, le temps prédéfini et les symboles deviennent fixes, l’indicateur de cuisson s’anime.
Lorsque la température est atteinte, 100°C devient
fixe et un bip retentit.
2
3
1
2
3
AAffiinn ddee nnee ppaass aallttéérreerr lleess rrééssuullttaattss ddee ccuuiissssoonn,,
nn’’oouuvvrreezz ppaass llaa ppoorrttee ddee ll’’aappppaarreeiill ppeennddaanntt llaa
ccuuiissssoonn..
1
Réglez la durée souhaitée (mini. 5 min et maxi.
60 min) en appuyant sur + ou -.
Page 46

46
FR
Modification de la température de
cuisson
START
STOP
2
1
2
3
3
1
Appuyez sur la touche °C.
Le symbole °C clignote.
Ajustez en appuyant sur les touches + ou -.
Enregistrez votre choix en appuyant sur la touche °C.
S’il n’y a pas de validation par la touche °C l’enregistrement est automatique après quelques secondes.
Il vous est possible d’ajuster la température uniquement en position .
Modification du temps de cuisson
Arrêt en cours de cuisson
En cours de cuisson, vous pouvez modifier le temps
de cuisson en appuyant sur et sur les touches +
ou -.
A tout moment,vous pouvez stopper la cuisson en
appuyant sur START/ STOP (appui long d’environ
1 seconde).
Si la génération de vapeur ne s’est pas encore
déclenchée (environ 1 minute), le four s’arrête immédiatement et le temps disparait.
Si la génération de vapeur est déjà commencée, le
temps passe à 3 minutes et un décompte s’effectue,
la vapeur s’évacue avant l’ouverture.
Comment faire une cuisson
immédiate
Page 47

47
FR
En fin de cuisson
0m00s s’affiche. Suppression de l’animation. Emission
de bips discontinus durant 3 minutes.
Pour stopper les bips, appuyer sur START / STOP ou
ouvrez la porte.
VViiddeezz IIMMPPEERRAATTIIVVEEMMEENNTT llee rréésseerrvvooiirr..
AAffiinn ddee ggaarraannttiirr uunnee bboonnnnee ffiiaabbiilliittéé dduu ffoouurr,, llee
vveennttiillaatteeuurr ccoonnttiinnuuee ddee ffoonnccttiioonnnneerr uunn cceerrttaaiinn
tteemmppss aapprrèèss llaa ffiinn ddee ccuuiissssoonn..
En cas de problème lié au circuit d’eau en cours de
cuisson, l’indicateur “absence d’eau” apparaît et un bip
retentit.
Ce défaut est lié en particulier à:
- un réservoir vide.
- un réservoir mal emboîté.
Après avoir vérifier ces deux points, la cuisson redémarre automatiquement après fermeture de la porte.
Gestion de l’eau
Page 48

48
FR
Comment faire une cuisson
différée
Non applicable pour les fonctions “décongélation”.
Réglez le mode de cuisson choisi, le temps et éventuellement ajustez la température,
((vvooiirr CCHHAAPPIITTRREE
““CCoommmmeenntt ffaaiirree uunnee ccuuiissssoonn iimmmmééddiiaattee”” PPooiinnttss 11 eett 22))
Exemple: position Température à 100°C.
2
1
3
Appuyez sur la touche “Fin de cuisson”
l’heure de fin de cuisson s’affiche et clignote
ainsi que le symbole pour indiquer que le
réglage est alors possible.
Exemple : Il est 12h30.
Vous avez programmé une durée de cuisson de
30 min. L’heure de fin de cuisson affichée est
13h.
1
2
Réglez l’heure de fin de cuisson en appuyant sur
les touches + ou -.
Exemple : Fin de cuisson 14h00.
3
Validez en appuyant sur START / STOP.
Une fois l’heure de fin de cuisson différée programmée l’heure réapparaît dans l’afficheur.
Après ces actions, le départ de la chauffe est différé
pour que la cuisson soit finie à 14h.
Quand votre cuisson est terminée, une série de bips
est émise pendant quelques minutes et le symbole
clignote. L’arrêt des bips se fait en appuyant sur
la touche START / STOP pendant une seconde.
Modification du temps de cuisson et
heure de fin de cuisson
Vous avez la possibilité à tout moment de consulter ou de
modifier la fin de cuisson en appuyant sur la touche .
Pour annuler la programmation, appuyez sur START /
STOP.
START
STOP
Page 49

Minuteur
49
Comment utiliser la minuterie
FR
Votre four est équipé d’un minuteur électronique indépendant du fonctionnement du four permettant de
décompter un temps.
CCeettttee ffoonnccttiioonn eesstt iinnddééppeennddaannttee dduu ffoouurr.. EEllllee nnee
ppeeuutt ppaass ccoommmmaannddeerr uunn aarrrrêêtt ddee ccuuiissssoonn aauuttoo--
mmaattiiqquuee..
CCeeppeennddaanntt cceettttee ffoonnccttiioonn ppeeuutt êêttrree uuttiilliissééee
mmêêmmee ppeennddaanntt llee ffoonnccttiioonnnneemmeenntt dduu ffoouurr.. DDaannss
ccee ccaass,,
ll’’aaffffiicchhaaggee ddee llaa mmiinnuutteerriiee eesstt pprriioorriittaaiirree
ssuurr ll’’aaffffiicchhaaggee ddee ll’’hheeuurree dduu jjoouurr..
Appuyez sur la touche .
0m00s et le symbole minuteur clignotent.
Réglez la durée souhaitée (maxi. 59 min 50 secondes) en appuyant sur les touches + ou -.
Au bout de quelques secondes, la minuterie
décompte le temps.
Une fois le temps écoulé, des bips retentissent
quelques secondes. Le symbole clignote.
Lorsque le décompte est commencé, vous pouvez
modifier le temps restant en appuyant sur puis sur
les touches + ou
--
.
Pour annuler la minuterie, appuyez sur puis ramenez
le temps sur 0m00s.
1
2
START
STOP
2
1
L’arrêt des bips se fait par un appui sur ou START /
STOP.
Modification et arrêt de la minuterie
Page 50

50
Description des fonctions
FR
LLéégguummeess eett vviiaannddeess
PPooiissssoonnss ffrraaggiilleess eennttiieerrss ((ttrruuiitteess))
CCuuiissssoonn ddee ppooiissssoonnss ffrraaggiilleess ((ffiilleettss ddee
ssaarrddi
inneess,, ddee rroouuggeettss))
OOeeuuffss ccooccoottttee ;; bboonnnnee tteennuuee ddeess ttoommaa--
tteess ffaarrcciieess..
RRaammeeqquuiinnss,, ccrrèèmmeess......
TTeerrrriinneess,, ffo
oiieess ddee vvoollaaiilllleess.. RRéécchhaauuffffaaggee
ppllaattss ccuuiissiinnééss
CChhooccoollaatt ffoonndduu,, bbeeuurrrree..
FFrruuiittss jjuussttee ttiièèddeess ppoouurr ccoonnssoom
mmmaattiioonn
iimmmmééddiiaattee
DDééccoonnggééllaattiioonn ddee ffiilleettss ddee ppooiissssoonn
aavvaanntt dd’’êêttrree ppaannééss..
FFrruuiittss rroouuggeess qquuii ddooiivveenntt rre
esstteerr ffrrooiiddss
((ppoouurr ttaarrtteess eett ccoouulliiss))
DDééccoonnggééllaattiioonn ddee vviiaannddeess aavvaanntt dd’’êêttrree
ggrriillllééeess ((eexx:: ssaauucciisssseess))
CCuuiissssoonn vvaappeeuurr llaa pplluuss
uuttiilliissééee
PPoouurr llaa ccuuiissssoonn ddeess
aalliimmeennttss ffrraaggiilleess
LLaa cchhaaiirr rreessttee nnaaccrrééee,,
llee ccoolllla
aggèènnee nn’’aappppaarraaîîtt
ppaass
PPoouurr llaa ccuuiissssoonn ddeess
aalliimmeennttss ffrraaggiilleess,, ffrruuiittss,,
ccoommppootteess
CChhaauuffffaaggee ddoouuxx
DDééccoonnggéélla
attiioonn lleennttee ssaannss
rriissqquuee ddee ccuuiissssoonn
FONCTIONS
Température
°C
CUISSON
EXEMPLES DE CUISSON
100
85
75
90
95
80
55
60
Page 51

51
FR
Tableau de cuisson
Temps
40 à 45 min.
35 à 40 min.
18 min.
20 à 22 min.
25 à 30 min.
15 à 20 min.
15 min.
30 à 35 min.
30 à 35 min.
10 à 15 min.
20 min.
35 min
30 min.
22 min.
30 à 35 min
15 à 20 min.
20-25 min.
25 min.
25 min.
40 à 45 min.
10 à 12 min.
20 à 25 min.
25 min.
30 à 35 min.
10 à 15 min.
25 min.
10 min.
13 à 15 min.
20 à 25 min.
20 min.
15 à 20 min.
15 min.
20 min.
15 min.
25 à 30 min.
15 min.
20 min.
15 à 20 min.
10 à 12 min
20 à 25 min.
20 à 25 min.
15 à 30 min.
25 min.
20 à 25 min.
25 min.
20 min.
7 min.
5 à 6 min.
8 min.
10 à 12 min.
30 min.
25 min.
Préparations
posés à l'envers dans le plat
pour les pointes, réduire le temps
en petits bouquets
en fines rondelles
en fines tranches
en cubes
en fines lamelles
Bruxelles
Fleurs en petits bouquets
en rondelles
(frais) remuer en cours de cuisson
(surgelés) remuer en cours de cuisson
trognon ôté et coupées
en 2 dans la longueur
coupés en 2
en cubes
coupés en 2
coupées en rondelles
entières
avec aromates
avec aromates
selon le poids
entières, épluchées
fruits en lamelles
en ramequins
darnes (180 g)*
entière (1kg)
entier (200g)
darnes (180 g)
selon épaisseur
entier (250g)
filets
entier (200g)
gros tronçons (6 à 10cm de long)
darnes (180/200 g)
filets
darnes (180/200 g)
entière (200 g) 13 à 15 min.
100g de riz lavé-20cl de lait
2 c. à soupe de sucre
200 g (1/4 litre d'eau)
Remarques
• Ces temps sont fonction
de la nature, de la grosseur
et de la fraîcheur des
légumes. Suivez les
indications figurant dans la
colonne “Préparations”.
• Le temps de cuisson reste
le même quelle que soit la
quantité à cuire. Exemple :
1 ou 4 artichauts même
temps de cuisson .
• Pour contrôler le degré de
cuisson, piquez dans la
partie la plus épaisse du
légume ; s'il est cuit, il n'y
aura pas de résistance.
• Disposez les coquillages
sur la grille du plat en verre,
ajoutez herbes
aromatiques.
• Déposez les crustacés sur
un lit d'algues.
• Temps selon maturité.
•
*Darnes: tranches de
poissons rondes de 2 à
3 cm d'épaisseur
(180/200 g) par personne.
•
Exigez des produits très
frais.
•
Posez des poissons entiers
dans le plat tels quels ou sur
des feuilles de laurier, de
fenouil ou autre herbe
aromatique.
Dès la fin de la cuisson, ôtez
la peau qui se décollera très
facilement.
•
Puis dorez au gril dans un
autre plat.
• Égrenez à la fourchette en
fin de cuisson.
Coque: posé directement sur la grille.
Au plat: cassé dans un plat individuel posé sur la grille et recouvert d'un film alimentaire.
Cocotte: voir recettes détaillées.
Déposez directement dans un plat, recouvrez d'eau ou de lait. En effet la vapeur ne suffit pas pour saturer ces aliments
qui gonflent. Posez une feuille d'aluminium sur le plat pour éviter les retombées des gouttelettes d'eau.
Rôti 800 g : 55 à 60 min.
Cuisses poulet : 35 à 40 min.
Rôti dindonneau : 50 à 60 min.
Morteau : 400 g
°C
100
100
100
100
100
100
100
100
100
100
100
100
100
100
100
100
100
100
100
100
90
95
95
95
90
95
90
85
85
85
85
80
85
75
80
80
85
85
75
100
100
100
100
100
95
90
100
100
100
100
100
100
Aliments
Artichauts (petits)
Asperges
Brocolis
Carottes
Céleri-rave
Citrouille
Champignons
Choux
Courgettes
Épinards
Endives
Fenouil
Haricots verts
Navets
Petits pois frais
Poireaux
Pommes de terre
Coquilles St Jacques
Moules/Bigorneaux
Crabes/Tourteaux
Homards
Pommes/pêches/poires
Compote
Crèmes
Cabillaud/Colin
Dorade
Hareng
Lieu (noir & jaune)
Lotte
Maquereau
Merlan/Morue
Raie
Rougets
Saumonette
Saumon
Sole
Thon
Truite entière (1kg)
Bœuf
Porc (filets mignon)
Volaille (blancs)
(paupiettes)
Saucisses
À partir d'œufs très frais conservés à température
ambiante.
Riz, pâtes semoule
Riz au lait
Semoule
Page 52

52
FR
Comment entretenir
votre four
Entretien
•
CCaavviittéé
(après chaque cuisson)
Essuyez la cavité avec un chiffon sec après refroidissement du générateur de vapeur ou bien laissez sécher la
cavité en maintenant la porte entrouverte.
•
TTuuyyaauu dd’’aarrrriivvééee dd’’eeaauu
Retirez le tuyau d’arrivée d’eau en le tirant vers vous.
Enlevez le dépôt de tartre pouvant éventuellement s’être
déposé à l’intérieur (à l’aide d’un objet fin et pointu type
fine brochette ou aiguille à tricoter).
•
GGéénnéérraatteeuurr ddee vvaappeeuurr
Versez 1/2 verre de vinaigre d’alcool blanc sur le générateur.
Laissez agir quelques minutes, nettoyez et rincez à l’eau.
Ne pas utiliser d’éponge ou poudres abrasives, de détartrant à cafetière.
Nettoyage de la goulotte
Démontez cette goulotte en la tirant vers le haut, essuyez-la et remettez-la en place grâce aux trois encoches
prévues à cet effet.
LLee nneettttooyyaaggee dduu ffoouurr nnee ddooiitt ppaass êêttrree rrééaalliisséé
aavveecc uunn nneettttooyyeeuurr vvaappeeuurr..
Page 53

53
FR
Comment changer
l’ampoule
- Tournez le hublot vers la gauche d'un quart de tour.
- Dévissez l'ampoule dans le même sens.
Caractéristiques de l'ampoule :
- 15 W - 220-240 V
- 300°C - culot E 14
- Changez l'ampoule puis remonter le hublot en veillant
au bon positionnement des joints.
- Reconnectez votre four.
LL''aammppoouullee ssee ssiittuuee àà ll''aarrrriièèrree ddrrooiitt ddee llaa ccaavviittéé
dduu ffoouurr..
DDééccoonnnneecctteezz vvoottrree ffoouurr ddee ll''aalliimmeennttaattiioonn éélleecc--
ttrriiqquuee aavvaanntt ttoouuttee iinntteerrvveennttiioonn ssuurr ll''aammppoouullee
aaffiinn ddéévviitteerr ttoouutt cchhoocc éélleeccttrriiqquuee..
Page 54

54
FR
Que faire en cas
d’anomalies
QQUUEE FFAAUUTT--IILL
FFAAIIRREE ??
LLEESS CCAAUUSSEESS
PPOOSSSSIIBBLLEESS
Votre afficheur ne s’allume pas.
L'ampoule ne fonctionne plus.
Fuite d'eau ou de vapeur au niveau de la
porte pendant la cuisson.
Défaut d'alimentation
du four.
Carte électronique
hors service.
- Vérifier l'alimentation
(fusible de votre installation).
- Faire appel au Service Après-Vente.
- Changer l'ampoule.
- Brancher le four.
- Changer le fusible de
l'installation.
L'ampoule est hors
service.
Le four n'est pas
branché.
Le fusible de votre
installation est hors
service.
La porte est mal
fermée.
Le joint de porte est
défectueux.
- Faire appel au Service Après-Vente.
VVOOUUSS CCOONNSSTTAATTEEZZ
QQUUEE......
DDaannss ttoouuss lleess ccaass,, ssii vvoottrree iinntteerrvveennttiioonn nn’’eesstt ppaass ssuuffffiissaannttee,,
ccoonnttaacctteerr ssaannss aatttteennddrree llee SSeerrvviiccee AApprrèèss--VVeennttee..
Page 55

55
Page 56

99637713 10/06
 Loading...