

Page 1

User’s Guide for
ImageCard® Magna™ and
UltraGrafix® Magna™ Printers
January 2002
Part No. 539177-001
Page 2

ii
Please note and heed the WARNING and CAUTION labels that have been placed on
the equipment for your safety. Please do not attempt to operate or repair this
equipment without adequate training.
Liability statement
This Datacard® product has been built to the high standards of DataCard Corporation.
See “Safety and compliance” on page A-1 for the statement of liability.
Regulatory compliance
This Datacard product conforms to regulatory requirements as specified in North
America and Europe. See “Safety and compliance” on page A-1 for detailed
regulatory compliance information.
Trademark acknowledgments
Trademark, service mark, and copyright acknowledgments are listed in “Safety and
compliance” on page A-1.
Proprietary Notice
All drawings and information herein are the property of DataCard Corporation.
Copyright © 2002 DataCard Corporation. All rights reserved.
Revision Log: User’s Guide for ImageCard® Magna™ and UltraGrafix® Magna™
Printers
Revision Date Affected Pages Description of Changes
A January
2002
© 1999-2002 Datacard Corporation. All rights reserved. Printed in the United States of
America.
All Initial release
User’s Guide for ImageCard® Magna™ and UltraGrafix® Magna™ Printers
Page 3

Contents
Section 1: Operating the Printer
Chapter 1: Overview . . . . . . . . . . . . . . . . . . . . . . . . . . . . . . . . . . 1-1
About this manual . . . . . . . . . . . . . . . . . . . . . . . . . . . . . . . . 1-2
Audience . . . . . . . . . . . . . . . . . . . . . . . . . . . . . . . . . . . . . . . . 1-2
About the Magna Class printer . . . . . . . . . . . . . . . . . . . . . . 1-2
About Advanced Imaging Technology . . . . . . . . . . . . . . . 1-3
Printer models . . . . . . . . . . . . . . . . . . . . . . . . . . . . . . . . . 1-3
Printer features . . . . . . . . . . . . . . . . . . . . . . . . . . . . . . . . 1-6
How options are identified in this manual . . . . . . . . . . . 1-11
Chapter 2: Using the printer . . . . . . . . . . . . . . . . . . . . . . . . . . . 2-1
Tips for success . . . . . . . . . . . . . . . . . . . . . . . . . . . . . . . . . . 2-2
Loading cards . . . . . . . . . . . . . . . . . . . . . . . . . . . . . . . . . . . . 2-3
Loading the print ribbon . . . . . . . . . . . . . . . . . . . . . . . . . . . 2-5
Loading the overlay or topcoat material . . . . . . . . . . . . . . 2-7
Verifying the debower position . . . . . . . . . . . . . . . . . . . . 2-11
Powering on the printer and PC . . . . . . . . . . . . . . . . . . . . 2-13
Ready button . . . . . . . . . . . . . . . . . . . . . . . . . . . . . . . . . . . 2-14
Status light . . . . . . . . . . . . . . . . . . . . . . . . . . . . . . . . . . . . . 2-15
Making cards . . . . . . . . . . . . . . . . . . . . . . . . . . . . . . . . . . . 2-16
Operating tips . . . . . . . . . . . . . . . . . . . . . . . . . . . . . . . . 2-18
Removing cards . . . . . . . . . . . . . . . . . . . . . . . . . . . . . . . . . 2-18
Responding to messages . . . . . . . . . . . . . . . . . . . . . . . . . 2-19
Shutting down the printer and PC . . . . . . . . . . . . . . . . . . 2-21
iii
Chapter 3: Using the printer driver . . . . . . . . . . . . . . . . . . . . . . 3-1
Working with Properties and other driver dialog boxes . 3-2
Tips for Properties, Printing Preferences, and
Default Document Properties . . . . . . . . . . . . . . . 3-2
Properties for Windows Me & 98 . . . . . . . . . . . . . . . . . . . 3-3
Properties & Printing Preferences for
Windows 2000 & XP . . . . . . . . . . . . . . . . . . . . . . 3-4
Properties & Default Document Properties for
Windows NT . . . . . . . . . . . . . . . . . . . . . . . . . . . . 3-7
Using the Status Monitor . . . . . . . . . . . . . . . . . . . . . . . . . . 3-10
Opening and using the Status Monitor . . . . . . . . . . . . . 3-11
Viewing Status Monitor information . . . . . . . . . . . . . . . . 3-12
Chapter 4: Maintaining the printer . . . . . . . . . . . . . . . . . . . . . . 4-1
Running a cleaning cycle . . . . . . . . . . . . . . . . . . . . . . . . . . 4-2
Using the printer cleaning card . . . . . . . . . . . . . . . . . . . . 4-2
Replacing the cleaning roller sleeve . . . . . . . . . . . . . . . . 4-3
Using the magnetic stripe cleaning card . . . . . . . . . . . . . . 4-5
Cleaning the printer rollers . . . . . . . . . . . . . . . . . . . . . . . . . 4-6
Using the duplex/laminator cleaning card . . . . . . . . . . . . . 4-9
Cleaning the supply tracker . . . . . . . . . . . . . . . . . . . . . . . 4-11
Cleaning the heated roller . . . . . . . . . . . . . . . . . . . . . . . . . 4-12
User’s Guide for ImageCard® Magna™ and UltraGrafix® Magna™ Printers
Page 4

iv
Cleaning tips . . . . . . . . . . . . . . . . . . . . . . . . . . . . . . . . . . . . 4-14
Cleaning the printhead . . . . . . . . . . . . . . . . . . . . . . . . . . . 4-14
Replacing the printhead cartridge . . . . . . . . . . . . . . . . . . 4-16
Chapter 5: Troubleshooting . . . . . . . . . . . . . . . . . . . . . . . . . . . . 5-1
Troubleshooting guide . . . . . . . . . . . . . . . . . . . . . . . . . . . . 5-2
If you think the printer is not working . . . . . . . . . . . . . . . . 5-2
Making and evaluating test cards . . . . . . . . . . . . . . . . . . . . 5-3
Printer test card . . . . . . . . . . . . . . . . . . . . . . . . . . . . . . . . 5-4
Windows test page . . . . . . . . . . . . . . . . . . . . . . . . . . . . . 5-5
Magnetic stripe test card . . . . . . . . . . . . . . . . . . . . . . . . . 5-7
Problems with card appearance . . . . . . . . . . . . . . . . . . . . . 5-8
Print module . . . . . . . . . . . . . . . . . . . . . . . . . . . . . . . . . . . 5-8
Topcoat applied using the print module . . . . . . . . . . . . . 5-14
Optional topcoat module . . . . . . . . . . . . . . . . . . . . . . . . 5-16
Optional overlay module . . . . . . . . . . . . . . . . . . . . . . . . 5-18
Obtaining service . . . . . . . . . . . . . . . . . . . . . . . . . . . . . . . . 5-22
When to obtain service . . . . . . . . . . . . . . . . . . . . . . . . . 5-22
Packing the printer for shipping . . . . . . . . . . . . . . . . . . . . 5-22
Section 2: Installing the Printer
Chapter 6: Before you install . . . . . . . . . . . . . . . . . . . . . . . . . . . 6-1
Installation audience . . . . . . . . . . . . . . . . . . . . . . . . . . . . . . 6-2
General requirements . . . . . . . . . . . . . . . . . . . . . . . . . . . . . 6-2
Selecting the site . . . . . . . . . . . . . . . . . . . . . . . . . . . . . . . . . 6-3
Environmental requirements . . . . . . . . . . . . . . . . . . . . . . 6-3
Electrical requirements . . . . . . . . . . . . . . . . . . . . . . . . . . 6-3
Physical requirements . . . . . . . . . . . . . . . . . . . . . . . . . . . 6-3
PC and software specifications . . . . . . . . . . . . . . . . . . . . . 6-5
ID system installation sequence . . . . . . . . . . . . . . . . . . . 6-6
Chapter 7: Install the printer . . . . . . . . . . . . . . . . . . . . . . . . . . . 7-1
Unpacking the printer . . . . . . . . . . . . . . . . . . . . . . . . . . . . . 7-2
Who to call for assistance . . . . . . . . . . . . . . . . . . . . . . . . . . 7-5
Connecting cables . . . . . . . . . . . . . . . . . . . . . . . . . . . . . . . . 7-5
Preparing the printer for driver installation . . . . . . . . . . . . 7-9
Installing the printer driver . . . . . . . . . . . . . . . . . . . . . . . . 7-10
Changing required printer settings . . . . . . . . . . . . . . . . . 7-16
Printing sample cards . . . . . . . . . . . . . . . . . . . . . . . . . . . . 7-17
Setup tips . . . . . . . . . . . . . . . . . . . . . . . . . . . . . . . . . . . . . . 7-17
Changing optional settings . . . . . . . . . . . . . . . . . . . . . . . . 7-18
Setting printer permissions . . . . . . . . . . . . . . . . . . . . . . . 7-19
Section 3: Reference Information
Appendix A: Safety and compliance . . . . . . . . . . . . . . . . . . . . . A-1
Regulatory compliance . . . . . . . . . . . . . . . . . . . . . . . . . . . . A-1
Notice for USA (FCC notice) . . . . . . . . . . . . . . . . . . . . . . A-1
Notice for Canada . . . . . . . . . . . . . . . . . . . . . . . . . . . . . . A-1
User’s Guide for ImageCard® Magna™ and UltraGrafix® Magna™ Printers
Page 5

Notice for Europe . . . . . . . . . . . . . . . . . . . . . . . . . . . . . . . A-1
Notice to Users of Printers Equipped with
Contactless Smart Card Coupler . . . . . . . . . . . . . . . . . . . A-1
Liability statement . . . . . . . . . . . . . . . . . . . . . . . . . . . . . . . . A-2
Safety . . . . . . . . . . . . . . . . . . . . . . . . . . . . . . . . . . . . . . . . . . A-2
Safe environment . . . . . . . . . . . . . . . . . . . . . . . . . . . . . . . A-2
Safe human interface . . . . . . . . . . . . . . . . . . . . . . . . . . . . A-2
Acknowledgments . . . . . . . . . . . . . . . . . . . . . . . . . . . . . . . . A-3
Appendix B: Supplies and cards . . . . . . . . . . . . . . . . . . . . . . . . B-1
Personalization supplies . . . . . . . . . . . . . . . . . . . . . . . . . . . B-2
Print ribbons . . . . . . . . . . . . . . . . . . . . . . . . . . . . . . . . . . . B-2
Overlay material . . . . . . . . . . . . . . . . . . . . . . . . . . . . . . . . B-3
Topcoat material . . . . . . . . . . . . . . . . . . . . . . . . . . . . . . . B-4
Supply roll storage . . . . . . . . . . . . . . . . . . . . . . . . . . . . . . B-5
Cards . . . . . . . . . . . . . . . . . . . . . . . . . . . . . . . . . . . . . . . . . . . B-5
Card specifications . . . . . . . . . . . . . . . . . . . . . . . . . . . . . B-6
Card quality guidelines . . . . . . . . . . . . . . . . . . . . . . . . . . B-8
Card storage specifications . . . . . . . . . . . . . . . . . . . . . . . B-9
Cleaning supplies . . . . . . . . . . . . . . . . . . . . . . . . . . . . . . . . B-9
Printer cleaning card . . . . . . . . . . . . . . . . . . . . . . . . . . . . B-9
Replaceable cleaning sleeve . . . . . . . . . . . . . . . . . . . . . B-10
Cleaning kits (optional) . . . . . . . . . . . . . . . . . . . . . . . . . B-10
Magnetic stripe cleaning card . . . . . . . . . . . . . . . . . . . . B-10
Duplex/laminator cleaning card . . . . . . . . . . . . . . . . . . . B-11
Cleaning pen . . . . . . . . . . . . . . . . . . . . . . . . . . . . . . . . . B-11
Heated roller cleaning stick . . . . . . . . . . . . . . . . . . . . . . B-11
Printer driver CD-ROM . . . . . . . . . . . . . . . . . . . . . . . . . . . . B-11
Printer components . . . . . . . . . . . . . . . . . . . . . . . . . . . . . . B-13
Printhead cartridge . . . . . . . . . . . . . . . . . . . . . . . . . . . . B-13
Print ribbon cartridge . . . . . . . . . . . . . . . . . . . . . . . . . . . B-14
Card cartridge . . . . . . . . . . . . . . . . . . . . . . . . . . . . . . . . B-15
Cleaning roller spindle . . . . . . . . . . . . . . . . . . . . . . . . . . B-15
Card output stacker . . . . . . . . . . . . . . . . . . . . . . . . . . . . B-15
Data cable . . . . . . . . . . . . . . . . . . . . . . . . . . . . . . . . . . . B-16
Power cable . . . . . . . . . . . . . . . . . . . . . . . . . . . . . . . . . . B-16
Smart card serial cable . . . . . . . . . . . . . . . . . . . . . . . . . B-17
Overlay cartridge . . . . . . . . . . . . . . . . . . . . . . . . . . . . . . B-17
Topcoat cartridge . . . . . . . . . . . . . . . . . . . . . . . . . . . . . . B-18
Spool cap . . . . . . . . . . . . . . . . . . . . . . . . . . . . . . . . . . . . B-18
Replacement keys for optional locks . . . . . . . . . . . . . . . B-18
Optional security lock . . . . . . . . . . . . . . . . . . . . . . . . . . . B-18
Related publications . . . . . . . . . . . . . . . . . . . . . . . . . . . . . B-19
v
Appendix C: PC port settings . . . . . . . . . . . . . . . . . . . . . . . . . . C-1
Appendix D: Magnetic stripe encoding . . . . . . . . . . . . . . . . . . D-1
Magnetic Stripe Setup . . . . . . . . . . . . . . . . . . . . . . . . . . . . . D-2
IATA, ABA, and TTS character sets . . . . . . . . . . . . . . . . . . D-2
NTT character set . . . . . . . . . . . . . . . . . . . . . . . . . . . . . . . . . D-3
Magnetic Stripe settings used by the Magna Class printer D-4
User’s Guide for ImageCard® Magna™ and UltraGrafix® Magna™ Printers
Page 6

vi
User’s Guide for ImageCard® Magna™ and UltraGrafix® Magna™ Printers
Page 7

Overview
1
This chapter presents the following:
•
•
•
•
•
The purpose of this manual
Who should use this manual
The Datacard® Magna™ Class photo ID printer with Advanced Imaging
Technology™, including a description of the printer, the models available, and
their components
How information about optional features is identified in this manual
Specifications for the PC used with the printer and the software that runs on the
PC
1
User’s Guide for ImageCard® Magna™ and UltraGrafix® Magna™ Printers
Page 8

1-2 Overview
About this manual
This manual provides detailed information about the Datacard® Magna™ Class photo
ID printer with Advanced Imaging Technology™. The first section provides operators
with information about the printer and how to use it. The second section provides
installers with requirements for installation and installation procedures. The third
section provides reference information.
This User Guide works with the online e-Guide, which you can see using the desktop
icon installed with the printer driver. Figure 1-1 shows the e-Guide icon.
Figure 1-1: Desktop icon for the e-Guide
Audience
This manual is intended for persons using a Magna Class printer. To operate the
printer, you must have the following skills:
•
Ability to read and understand written and graphical instructions
•
Ability to operate a personal computer (PC)
•
Experience with Microsoft® Windows® 2000, Windows XP, Windows 98,
Windows Me
•
Ability to load supplies
•
Ability to perform simple troubleshooting using written and graphical instructions
For the skills needed for installation, see “Installation audience” on page 6-2.
, or Windows NT®
About the Magna Class printer
The Magna Class photo ID printer includes the printer and a printer driver which runs
on a PC. The printer uses supplies when printing cards, including:
•
New Platinum™ Series Advanced Imaging Technology™ print ribbon
•
New replaceable cleaning sleeves
•
Blank cards
•
Optional topcoat or overlay supply material
The Magna Class printer prints full-color or monochrome images on one or both sides
of PVC cards. The images printed can include photos, text, logos, barcodes and
digitized signatures. The printer can perform additional personalization tasks, such as
encoding magnetic stripe data and sending data to smart card chips. With the optional
overlay module, the printer can apply a durable polyester patch (overlay) to one or
both sides of the personalized card. With the optional topcoat module, the printer can
apply a protective clear topcoat or a secure holographic topcoat to the surface of the
card. Magnetic stripe encoding, smart card programming, overlay, and topcoat are
ser’s Guide for ImageCard® Magna™ and UltraGrafix® Magna™ Printers
U
Page 9
Overview 1-3
options that can be purchased as part of the printer. See “Printer models” on page 1-3
for details about which combinations are supported.
The printer driver receives digital information from a card creation application and
processes the data to send to the printer. When the printer receives the data, it prints
the card. The driver keeps track of the progress of the card in the printer and sends
data for the next card as soon as the printer is ready and the data is available.
See “PC and software specifications” on page 6-5 for more information about the
printer driver and the PC on which it runs.
About Advanced Imaging Technology
With Advanced Imaging Technology, processing and printing are enhanced for the
highest quality images. Three features of the printer work together to provide the
benefits of Advanced Imaging Technology:
Print ribbon:
Technology must be used in the Magna Class printer with Advanced Imaging
Technology.
Printer unit:
Printer Driver:
on page 3-10 provides more information about color settings.
Printer models
Several models of the printer are available. ImageCard printers can print full-color or
monochrome images, while UltraGrafix printers can print only monochrome images.
The printer label provides information about the options in your printer (see
Figure 1-2). The label also includes the printer serial number.
New Platinum series print ribbon for use with Advanced Imaging
The printer has been enhanced to provide optimal color printing.
The printer driver includes color settings. “Using the Status Monitor”
Printer label
Figure 1-2: Printer label
User’s Guide for ImageCard® Magna™ and UltraGrafix® Magna™ Printers
Page 10
1-4
A printer can be ordered with the following optional modules:
•
Duplex module. The duplex module flips the card to automatically print on both
sides of the card. The printer label includes the number “2” if the printer has a
duplex module.
•
Magnetic stripe module, for either 3-track (IAT) encoding or single-track NTT (J)
encoding. The module is installed in-line with the print operation. It encodes data
on the magnetic stripe and then verifies the data.
•
Smart card module. The smart card module can have one of the following:
– Contact coupler (SC410 on the printer label)
– Contactless (RF) coupler (SC680 on the printer label)
– Both contact and contactless couplers (SC4/6 on the printer label)
– Contact station (SCCS on the printer label) with external coupler
– Smart card ready (SCR on the printer label), which is shipped without a
coupler installed
i
A custom smart card application can use the module to initialize and program
the smart card chip on a card.
•
Optional overlay module. The optional overlay module applies a durable polyester
patch (overlay) to one or both sides of the personalized card. The patch can be
clear or have a holographic image on it.
•
Optional topcoat module. The optional topcoat module applies a protective film to
the card surface. The topcoat can be clear, which protects images, or have a
tamper-evident holographic image on it.
Ta bl e 1 -1 lists the models and their features.
Overview
Table 1-1: Magna Class printer features
Model name Colors
printed
ImageCard
Magna
Ultragrafix
Full color or
monochrome
Monochrome No No
Magna
#. Only one of these modules can be installed; the printer cannot have both topcoat and
overlay modules.
†. Optional
i
Monochrome printing uses a ribbon with a single color, such as black. To optimize
monochrome printing, use a monochrome printhead.
User’s Guide for ImageCard® Magna™ and UltraGrafix® Magna™ Printers
Overlay
module
†
Ye s
Topcoat
#
†
module
Ye s
Magnetic
†
stripe
†
#
Duplex
module
module
†
Ye s
Ye s
†
†
Ye s
Ye s
†
†
†
Smart
card
module
†
Ye s
No
†
Page 11
Overview 1-5
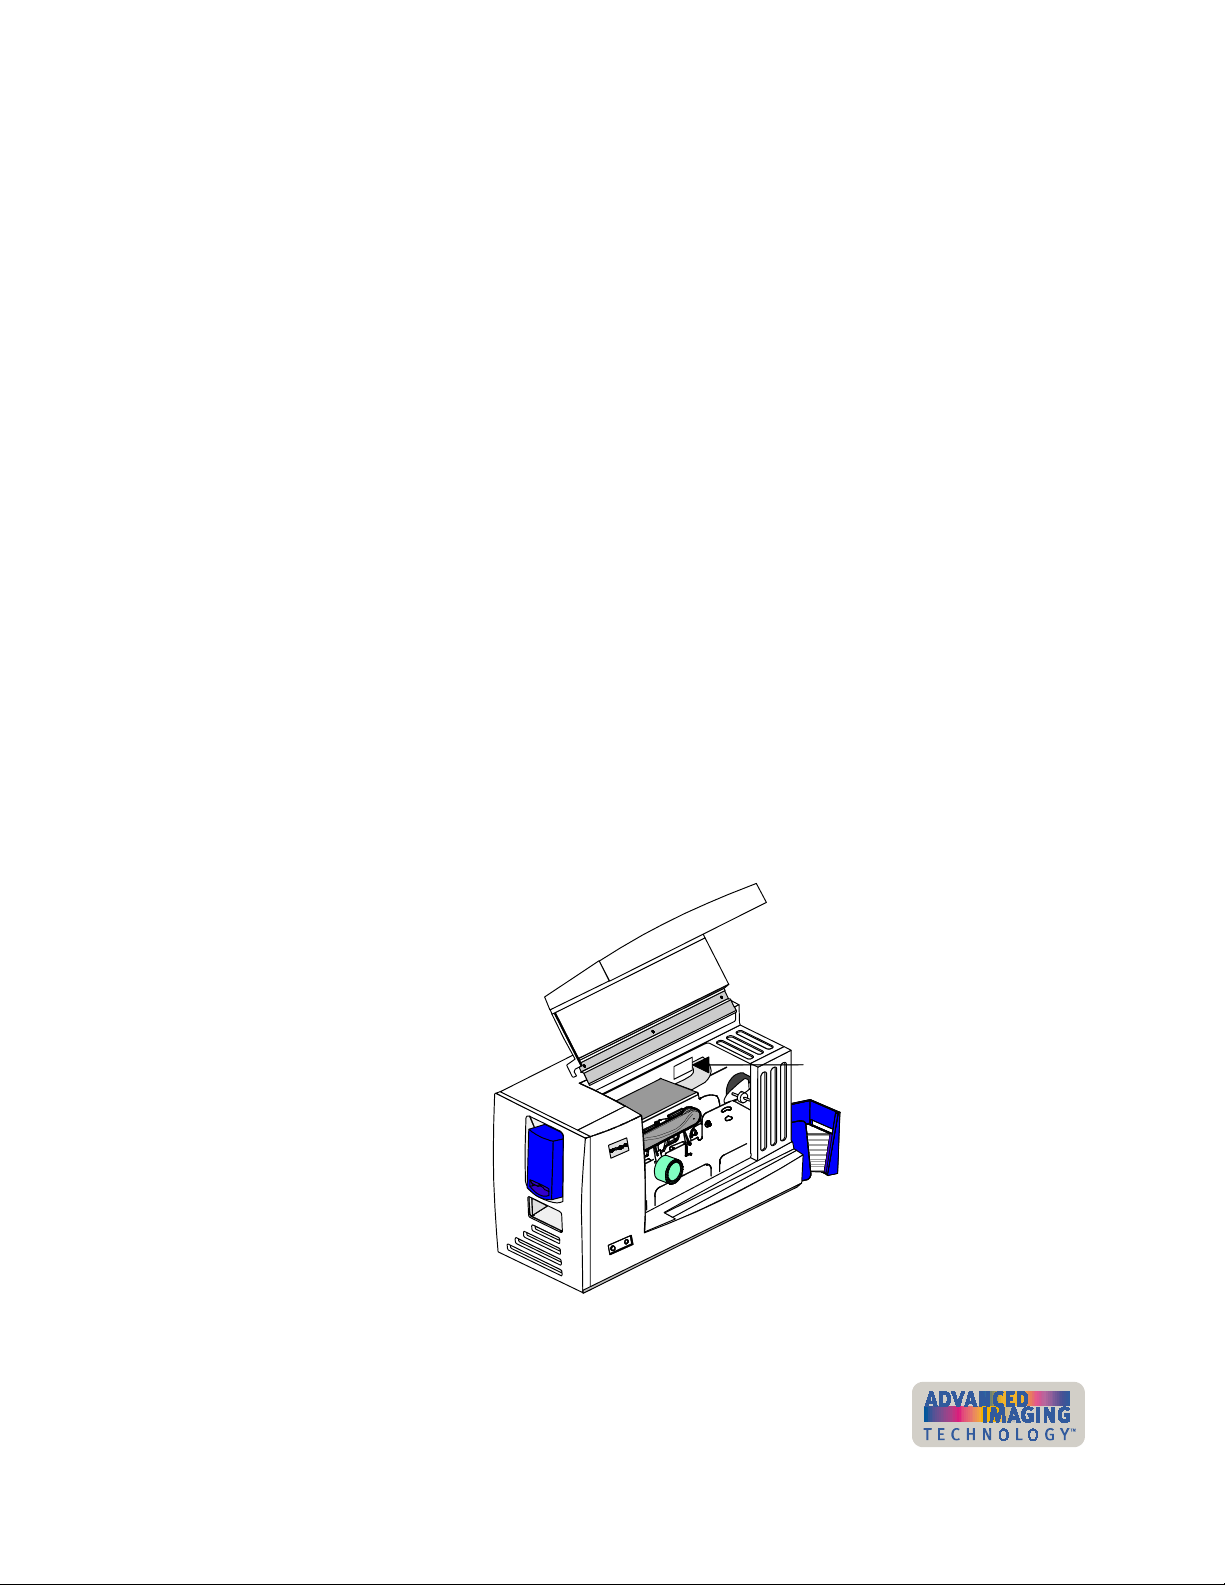
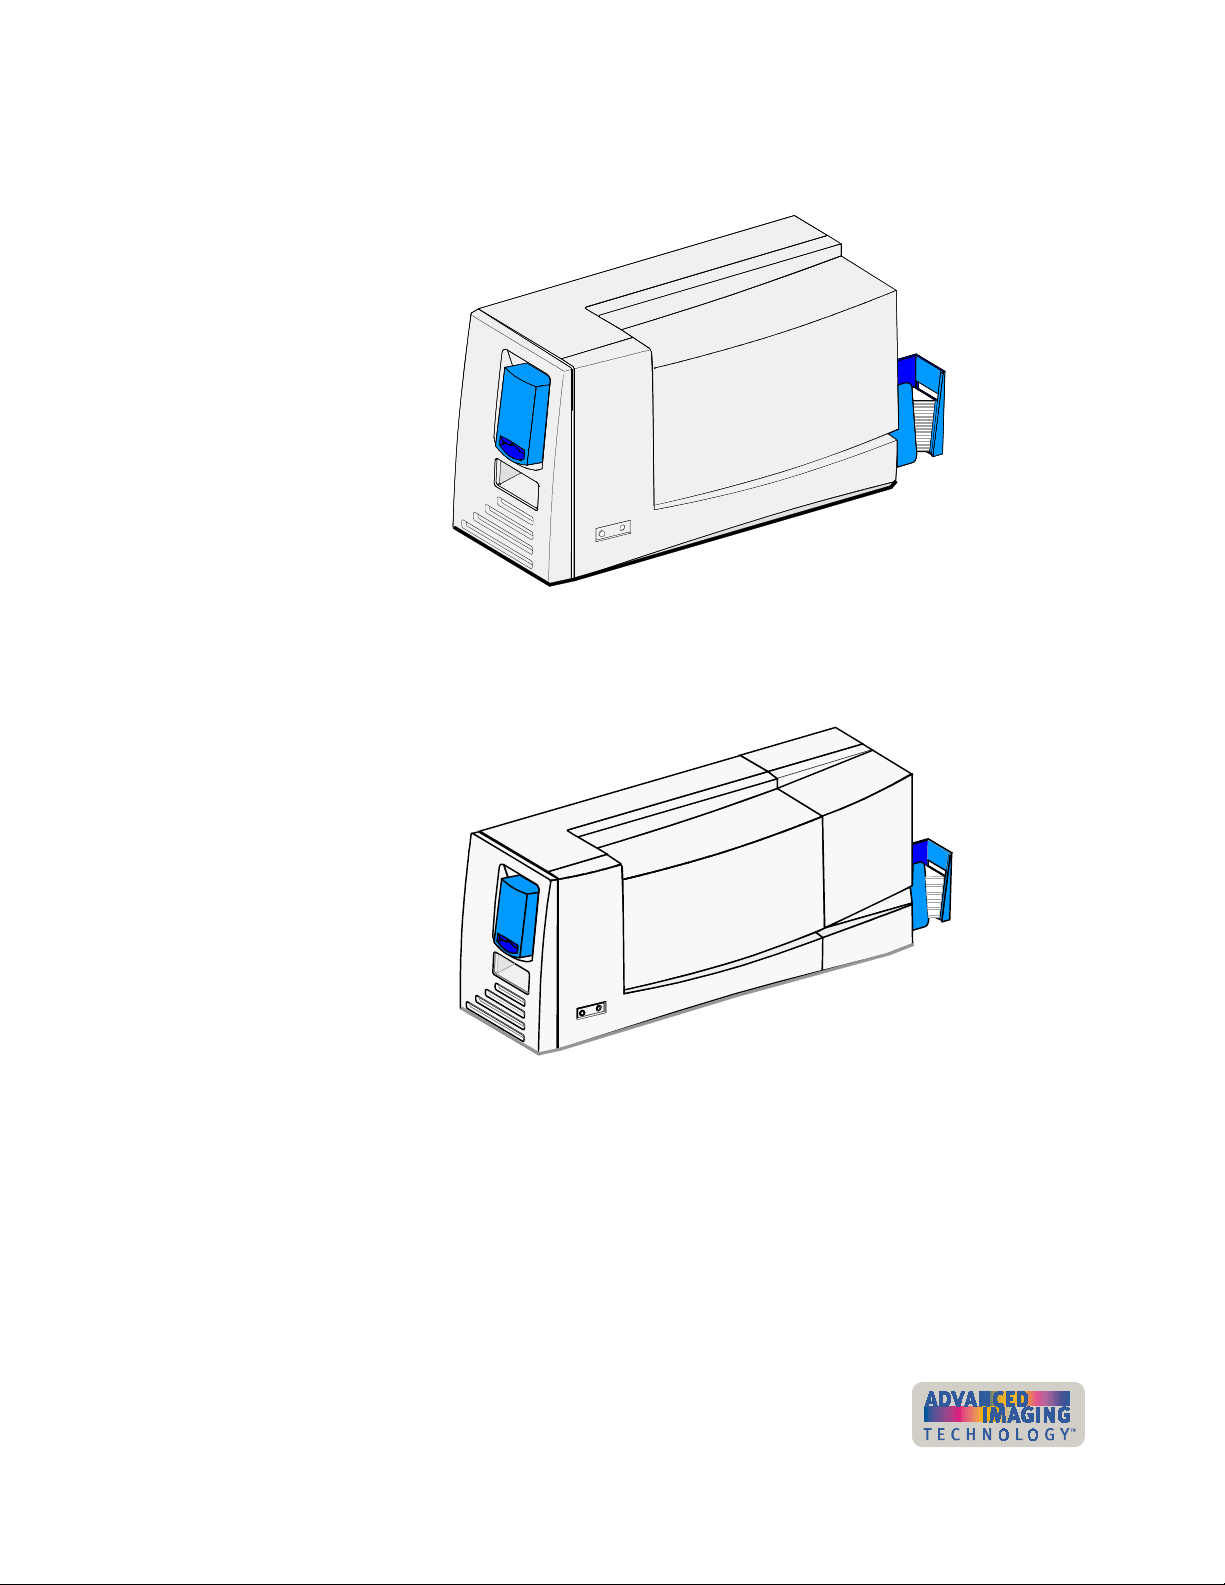
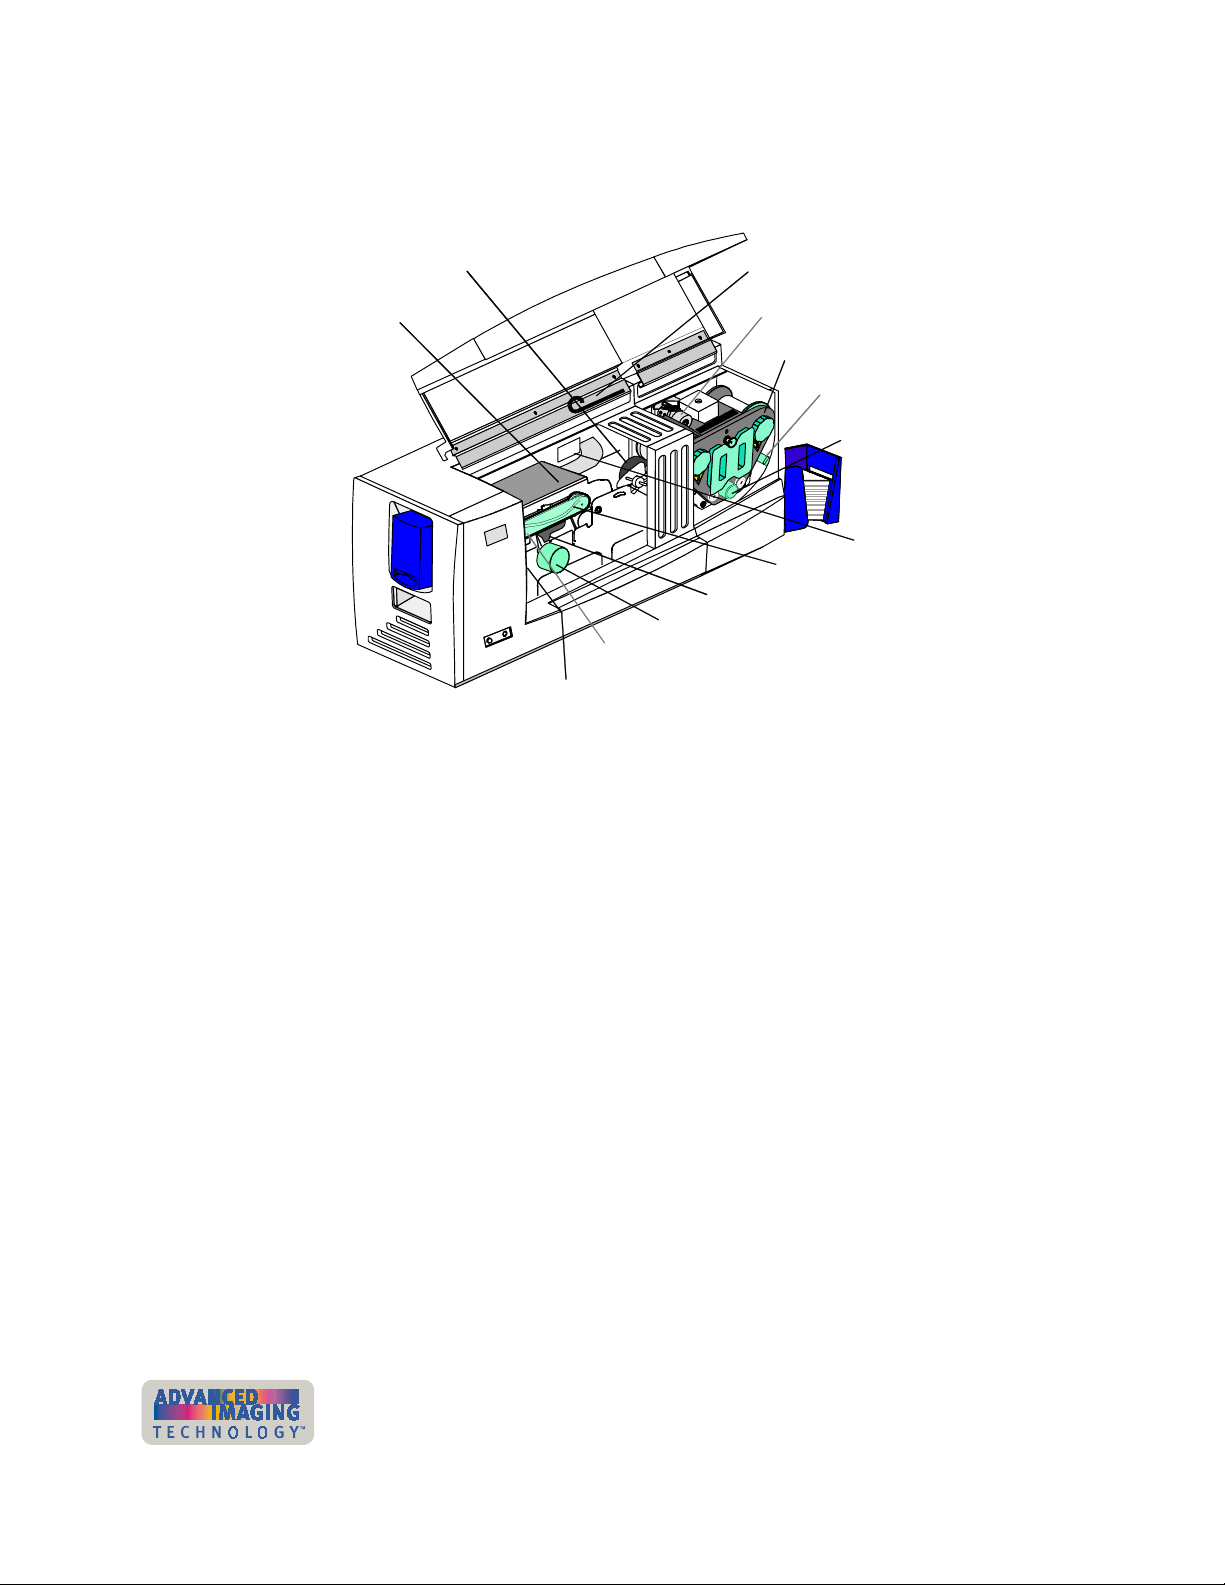
Figure 1-3 shows the Magna Class printer without a topcoat or overlay (laminator)
module. All UltraGrafix Magna printers look like this.
Figure 1-3: Magna Class printer without an optional laminator
Figure 1-4 shows the Magna Class printer with an optional topcoat or overlay
(laminator) module.
Figure 1-4: ImageCard Magna printer with an optional laminator
The ImageCard model of the printer can include the optional topcoat or overlay
(laminator) module. The topcoat module applies clear or holographic topcoat to the
printed card as part of processing. The overlay module applies a polyester patch to
the printed card as part of processing.
User’s Guide for ImageCard® Magna™ and UltraGrafix® Magna™ Printers
Page 12
1-6 Overview
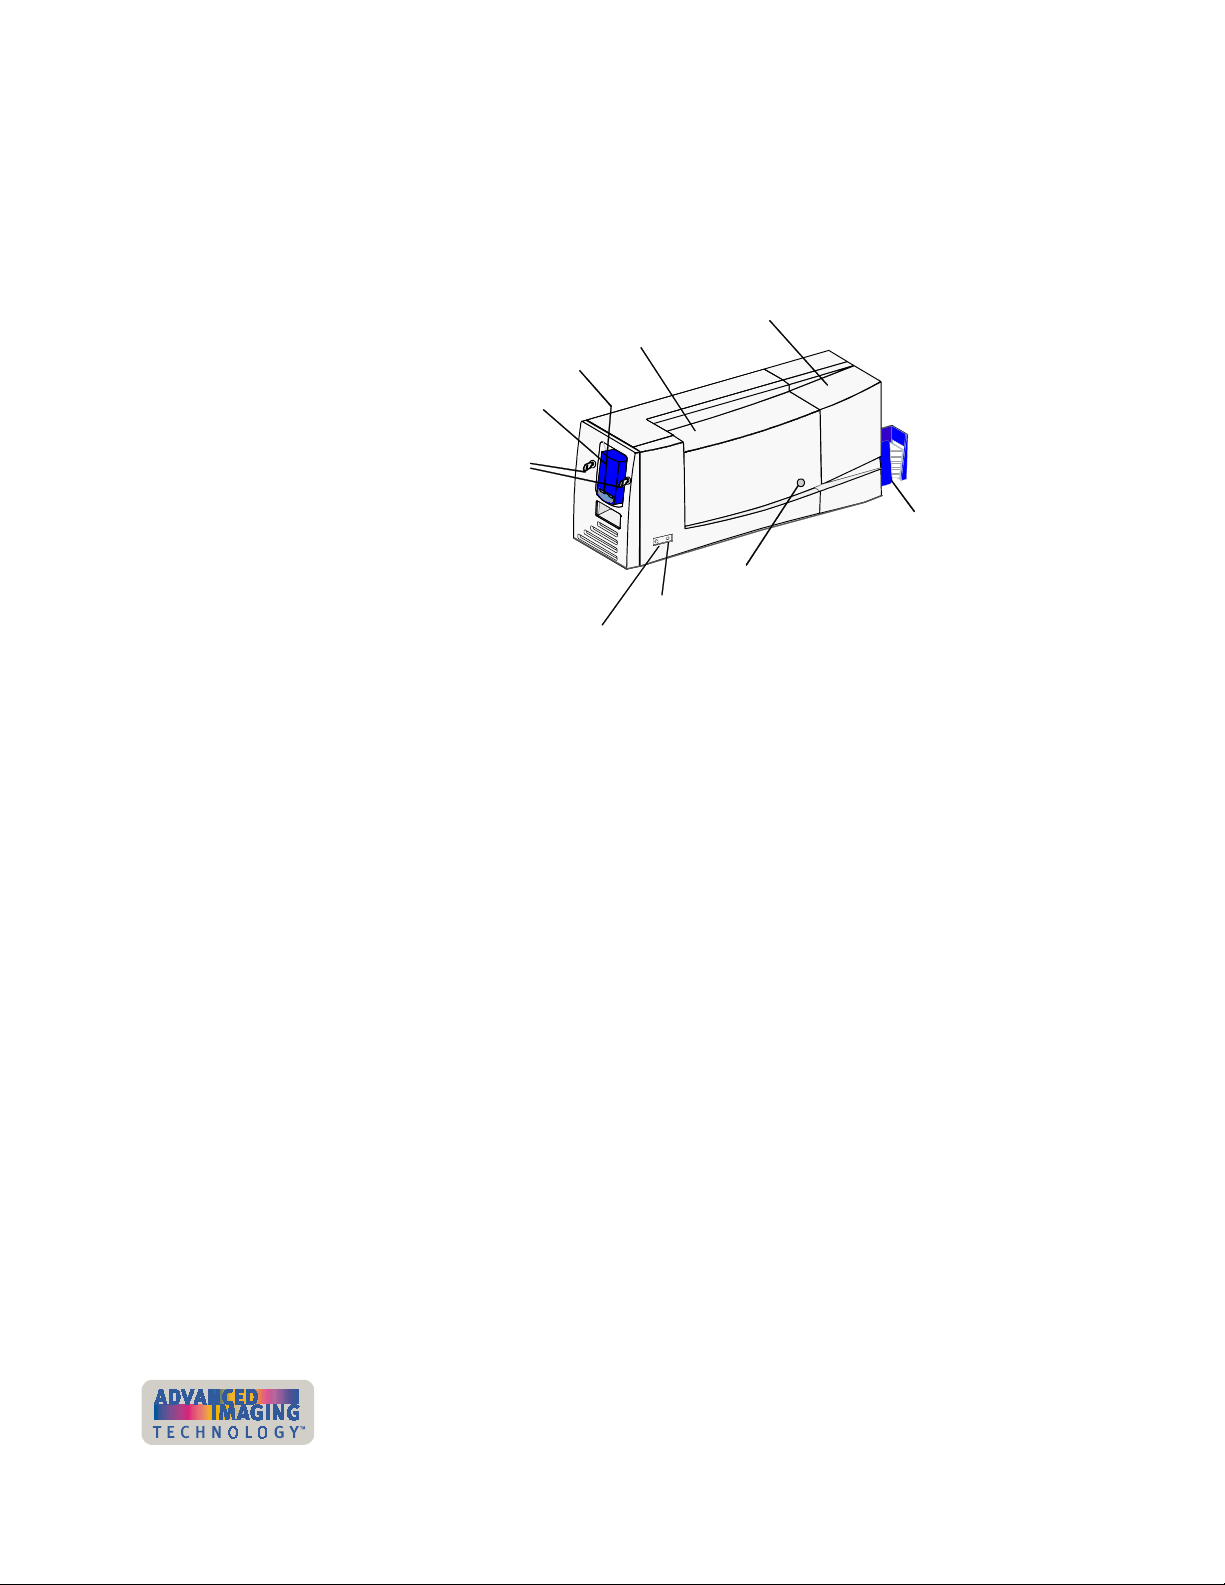
Printer features
Use the information in this section to identify the features and controls you use on the
printer.
Topcoat or overlay (laminator)
module (optional)
Exception
card slot
Card cartridge
Card cartridge
locks (optional)
Ready button
Top cover
Card output
stacker
Top cover lock (optional)
Status light
Front of the printer
Find the following on the outside of the printer:
Top cover
The cover protects the internal parts of the printer from dust and debris. It also lessens
the sound from the printer.
Top cover lock (optional)
The optional top cover lock allows you to lock the top cover into position, preventing
access to the inside of the printer without authorization.
Status light
The status light indicates that the printer power is on, is processing data, is ready to
receive data, or is in an error condition.
Card cartridge
The card cartridge holds blank cards to print. It holds about 100 cards (with a nominal
thickness of 0.030 inches (0.76 mm)). At the bottom of the card cartridge, the
exception card slot
in the card cartridge.
Figure 1-5: Front of the Magna Class printer
allows you to insert a single card that is different from the cards
User’s Guide for ImageCard® Magna™ and UltraGrafix® Magna™ Printers
Page 13

Overview 1-7
Card cartridge lock (optional)
The optional card cartridge lock allows you to lock the card cartridge into position,
preventing cards from being removed without authorization. Some printers have two
locks to meet the security requirements of the organization.
Card output stacker
The card output stacker holds the cards after they have been processed. Both
completed cards and rejected cards go to the card output stacker.
Optional laminator module
The optional laminator module applies a protective surface to the card. A printer can
have a topcoat module or an overlay module, but not both. “Laminator” is the general
term that describes the process of applying the protective surface.
Overlay module (optional)
The overlay module is available on ImageCard Magna printers. It applies a die-cut
polyester patch to one or both sides of the card after it has been personalized. You
can choose the DuraGard™ protective overlay or a holographic overlay. Both provide
a durable and long-lasting protective surface to the card. The holographic overlay
includes a tamper-evident image.
Topcoat module (optional)
The topcoat module is available on Image Card Magna printers. It applies a protective
film to one or both sides of the card surface to protect card images. The topcoat
applied can be clear or it can include a hologram or other images that make the card
resistant to tampering.
Ready button
The Ready button allows you to pause the printer while printing a card, to clear an
error condition, to cancel a print job and delete all data for the job, or to create a
printer test card.
User’s Guide for ImageCard® Magna™ and UltraGrafix® Magna™ Printers
Page 14
1-8
Inside the printer
Overview
Open the cover to find the following on the inside of the printer.
Duplex or pass-through
mechanism
Swing arm
Figure 1-6: Internal parts of the Magna Class printer
Duplex or pass-through mechanism
Top cover support
Supply tracker
Topcoat or overlay
supply cartridge
Debower
Laminator advance knob
Printer label
Print ribbon cartridge
Printhead cartridge
Card advance knob
RIbbon tracker
(hidden in this view)
Continuous cleaning roller
(hidden in this view)
The optional duplex module flips the card to automatically print on both sides of the
card. Magna printers that do not have a duplex mechanism will have a pass-through
mechanism in this location. If the printer includes an optional smart card module, it is
located under the duplex mechanism.
Swing arm
The swing arm opens to give you access to the print ribbon cartridge, continuous
cleaning roller, and printhead cartridge. Push down on the raised end of the swing arm
to unlatch it and then open it.
Ribbon tracker
The ribbon tracker measures the movement of the print ribbon as it moves from the
supply spool during printing. (Hidden in this view.)
Overlay supply cartridge (optional)
This cartridge holds the overlay supply and can be removed for easy reloading.
User’s Guide for ImageCard® Magna™ and UltraGrafix® Magna™ Printers
Page 15

Overview
Topcoat supply cartridge (optional)
This cartridge holds the topcoat supply and can be removed for easy reloading.
Laminator advance knob (optional)
The laminator advance knob turns to move a card along the card transport track in the
topcoat or overlay module. Use it to release stuck cards in the topcoat or overlay
module.
Debower (optional)
The debower is part of the optional laminator module and corrects for any change to
the flatness of the card caused by heat applied by the laminator module.
Supply tracker (optional)
The supply tracker is part of the optional laminator module and measures the
movement of the supply material as it moves from the supply spool.
Printhead cartridge
1-9
The printhead, contained in the printhead cartridge, applies heat and pressure, which
transfers dye and other material from the print ribbon to the card. The printhead
cartridge is replaceable.
Printer label
The printer label includes the printer serial number and information about optional
components of the printer.
Print ribbon cartridge
The print ribbon cartridge holds the print ribbon.
Card advance knob
The card advance knob turns to move a card along the card transport track. If a card
remains in the printer, use this knob to move the card in the card track.
Continuous cleaning roller
The continuous cleaning roller is a new feature of the Magna Class printer with
Advanced Imaging Technology. The roller includes a spindle and a replaceable
cleaning sleeve. The spindle holds the roller in place. The replaceable cleaning sleeve
removes dirt and debris from the permanent cleaning roller in the printer and should
be changed regularly.
User’s Guide for ImageCard® Magna™ and UltraGrafix® Magna™ Printers
Page 16
1-10
Top cover support
Back of the printer
Overview
The top cover support holds the top cover in the open position while you perform tasks
with the printer, such as changing the print ribbon or optional overlay material, or
clearing a card jam. Use the top cover support whenever you work inside the printer.
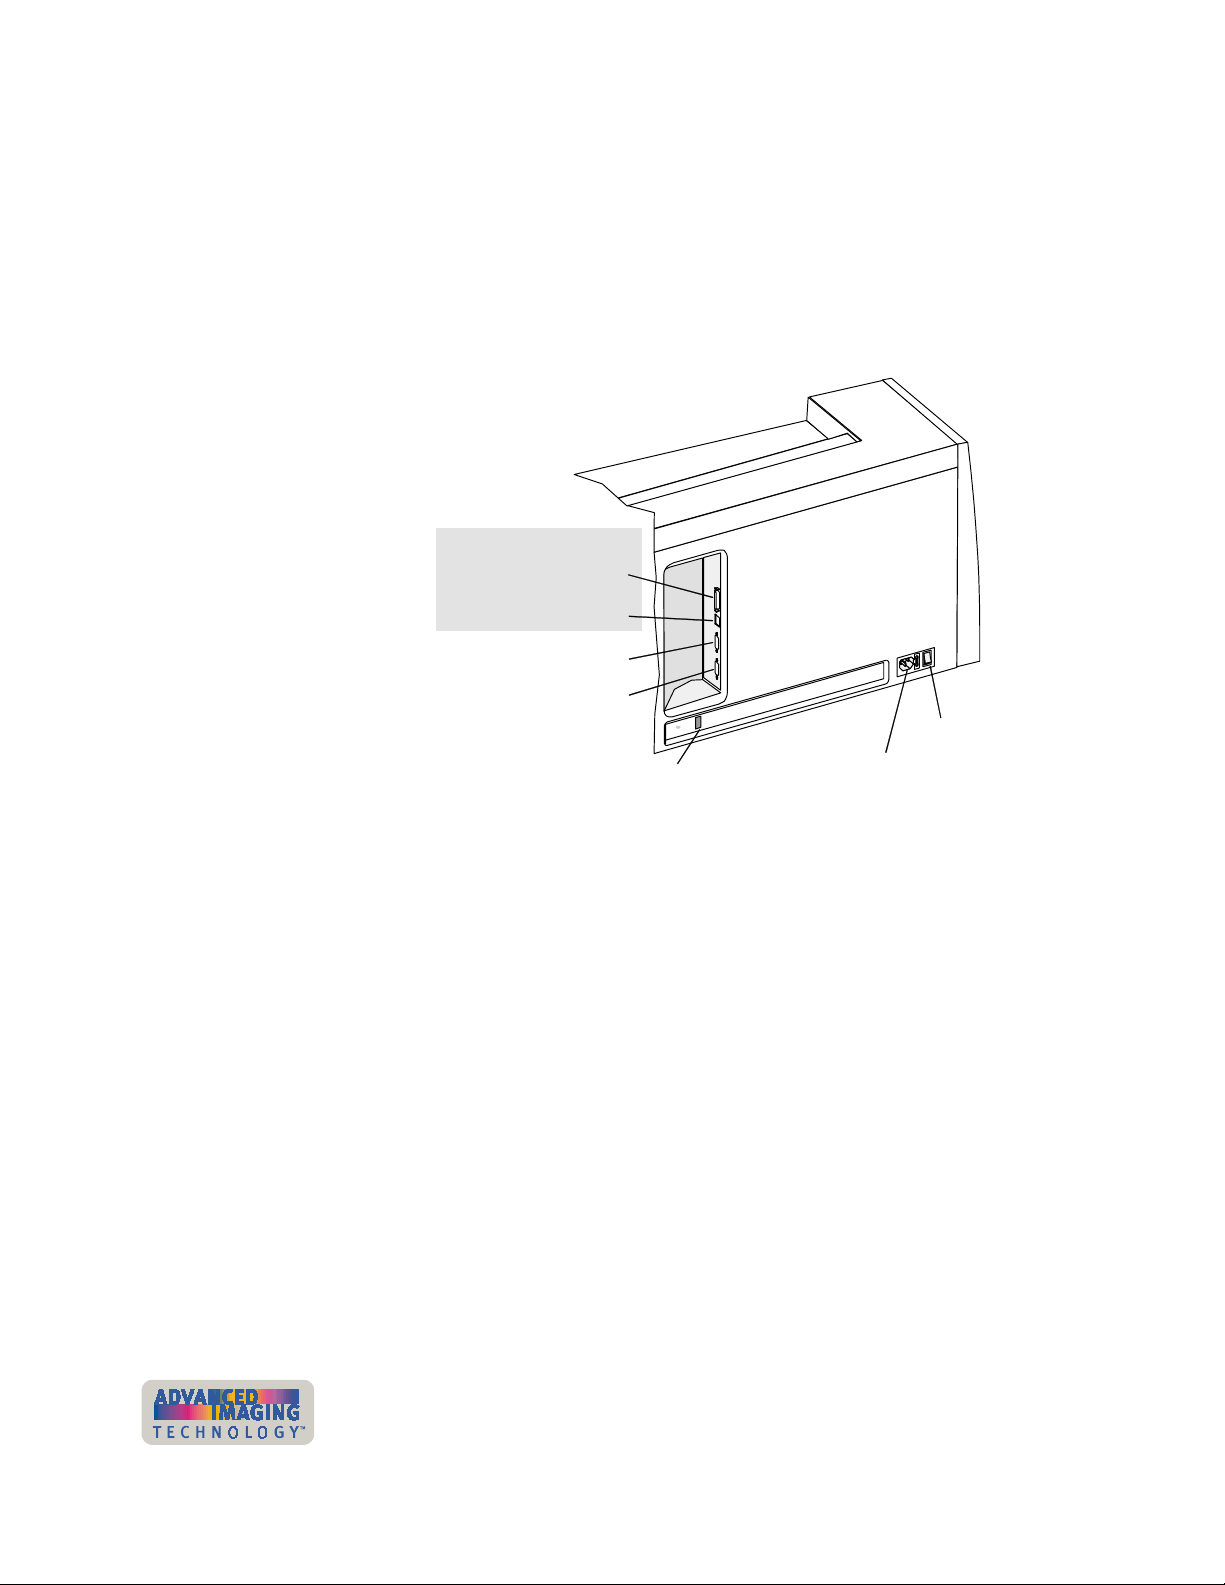
Figure 1-7 shows the back of the Magna Class printer:
Data port
ECP parallel port
USB port
Contactless smart card serial port
Data Port
Power switch
Contact smart card serial port
Power switch
Security lock receptacle
Power receptacle
Figure 1-7: The back of the Magna Class printer
If the printer includes an optional laminator module, that module extends farther than
the ports and receptacles area.
Find the following on the back of the printer:
The printer includes two data ports. Select only one data port to use.
•
ECP parallel port
Use the ECP parallel port to connect the printer's data cable to the PC, if the
printer was ordered with a parallel cable.
•
USB port
Use the USB port to connect the printer's data cable to the PC, if the printer was
ordered with a USB cable.
Use the Power switch to power on or power off the printer.
User’s Guide for ImageCard® Magna™ and UltraGrafix® Magna™ Printers
Page 17
Overview
Power receptacle
This is the receptacle for connecting the power cable.
Smart card serial port(s)
On printers equipped with the smart card option, use these connectors for the serial
cable from the PC or contact station that carries the data to encode on the smart card
chip. If the printer does not have any smart card options, the ports will not be installed
in the printer.
Security lock receptacle
Included on all printers, an optional printer security lock can be inserted in this
receptacle to secure the printer to the work surface.
How options are identified in this manual
This manual describes all of the features of the Magna Class printer, including all the
options. Because many printers do not have all options, the following method is used
to help you identify information that applies to an option.
1-11
The icons for each option are:
Magnetic stripe encoding module
Smart card module
Overlay or topcoat module
When you see the icon for an option, use the section or follow the step if you have the
option installed in your printer. If your printer does not have the option, you can ignore
the section or step.
User’s Guide for ImageCard® Magna™ and UltraGrafix® Magna™ Printers
Page 18

1-12 Overview
User’s Guide for ImageCard® Magna™ and UltraGrafix® Magna™ Printers
Page 19

Using the printer
2
This section describes how to perform basic tasks required to
operate the Datacard® Magna™ Class photo ID printer with
Advanced Imaging Technology™. It describes:
•
Tips for success
•
Loading cards
•
Loading print ribbon
•
Loading topcoat or overlay supply
•
Powering on the printer
•
Making cards
•
Removing cards
•
Responding to messages
•
Powering off the printer
Begin with the printer set up and the printer driver installed. If the printer is not set up,
see “Before you install” on page 6-1 and “Install the printer” on page 7-1 to set up the
printer and install the driver.
2
User’s Guide for ImageCard® Magna™ and UltraGrafix® Magna™ Printers
Page 20

2-2 Using the printer
Tips for success
To achieve the best quality cards and to maintain optimum performance of your
printer, follow these tips for success:
•
Use the correct cables, connect them correctly, and keep them out of the way.
See “Connecting cables” on page 7-5 for information on connecting cables.
•
Use the best quality cards available. Good quality cards have a smooth, glossy
PVC surface (with no debris embedded in the surface), a mylar signature panel
(optional), a flush magnetic stripe (optional), are not pre-punched, and are printed
only once. See “Card quality guidelines” on page B-8.
•
Keep a stock of supplies on hand and store them safely. Also, keep a replacement
printhead cartridge on hand to ensure high quality cards. See “Supplies and cards”
on page B-1.
•
Match the card design, the supplies you use, and the printer to obtain the results
you want.
– Edge to edge printing requires high-quality cards and can require fine-tuning
the printer and the card design.
– Do not place an important image, such as a photo, on the front of the card in
the same area as a magnetic stripe. Frequent use of a card in a magnetic
stripe reader can wear away the image on the opposite side of the card. (Or,
apply overlay to the front of the card to protect it from wear.)
– Locate bar codes at least .25 inches from other printing and from the edge of
the card. Make sure the color used to print the bar code works in your bar
code readers. (Infrared readers require that the K panel be used to print the
bar code.)
– Do not print closer than .1 inch from a signature panel, magnetic stripe, or
smart card chip.
– Avoid placing a photo directly on the other side of a signature panel. Residue
from the panel can cause printing problems on an adjacent card.
– Avoid placing a photo or other critical information directly on the other
side of a smart card chip. The card might not be as flat in that area and
printing voids can occur.
– Do not apply topcoat or overlay over a magnetic stripe or over a smart card
chip.
•
Follow instructions carefully when replacing supplies, correcting problems,
cleaning the printer, and replacing parts.
•
Keep the printer clean and keep the area around the printer clean.
User’s Guide for ImageCard® Magna™ and UltraGrafix® Magna™ Printers
Page 21
Using the printer 2-3
Loading cards
Load cards when beginning work or when the card cartridge is low on cards or empty.
You can load cards when the printer power is on or off. You can also load cards while
the printer is printing.
To order more cards, contact your card vendor. For information on card requirements,
see “Supplies and cards” on page B-1.
Load cards
i
If the printer has a locking card cartridge, unlock the cartridge before removing it.
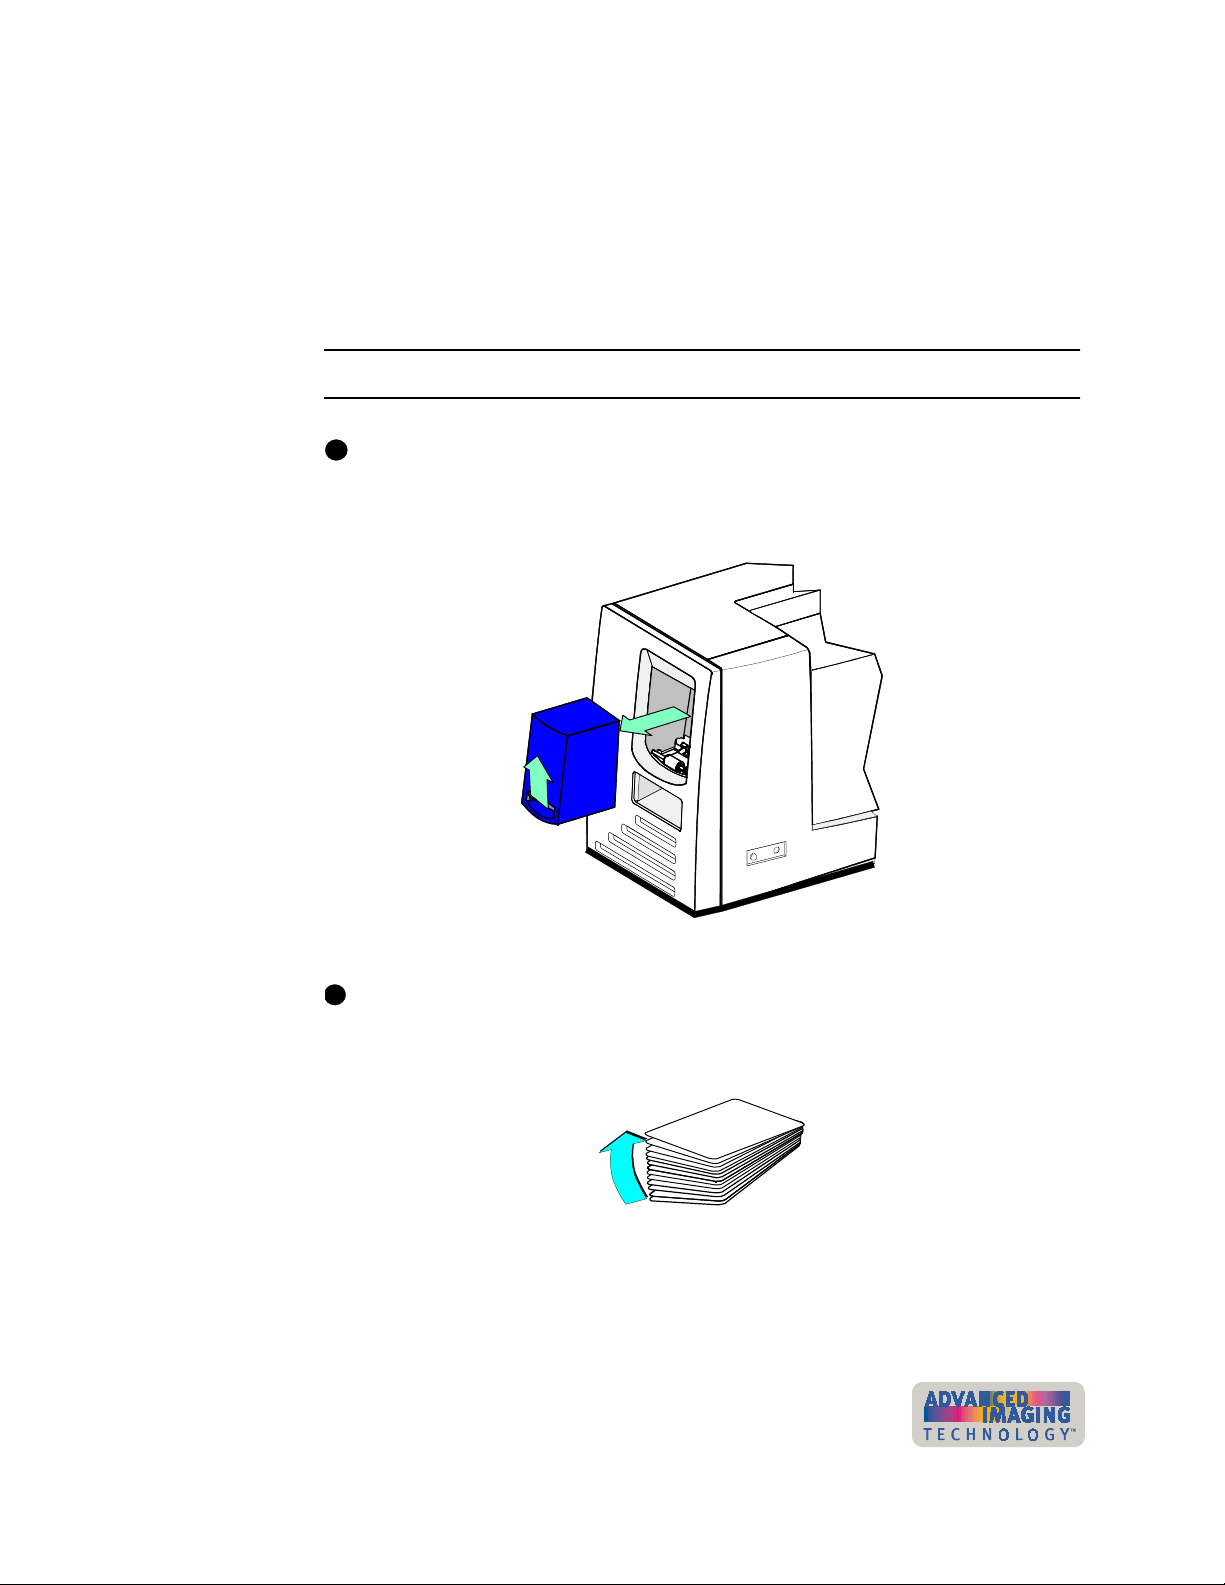
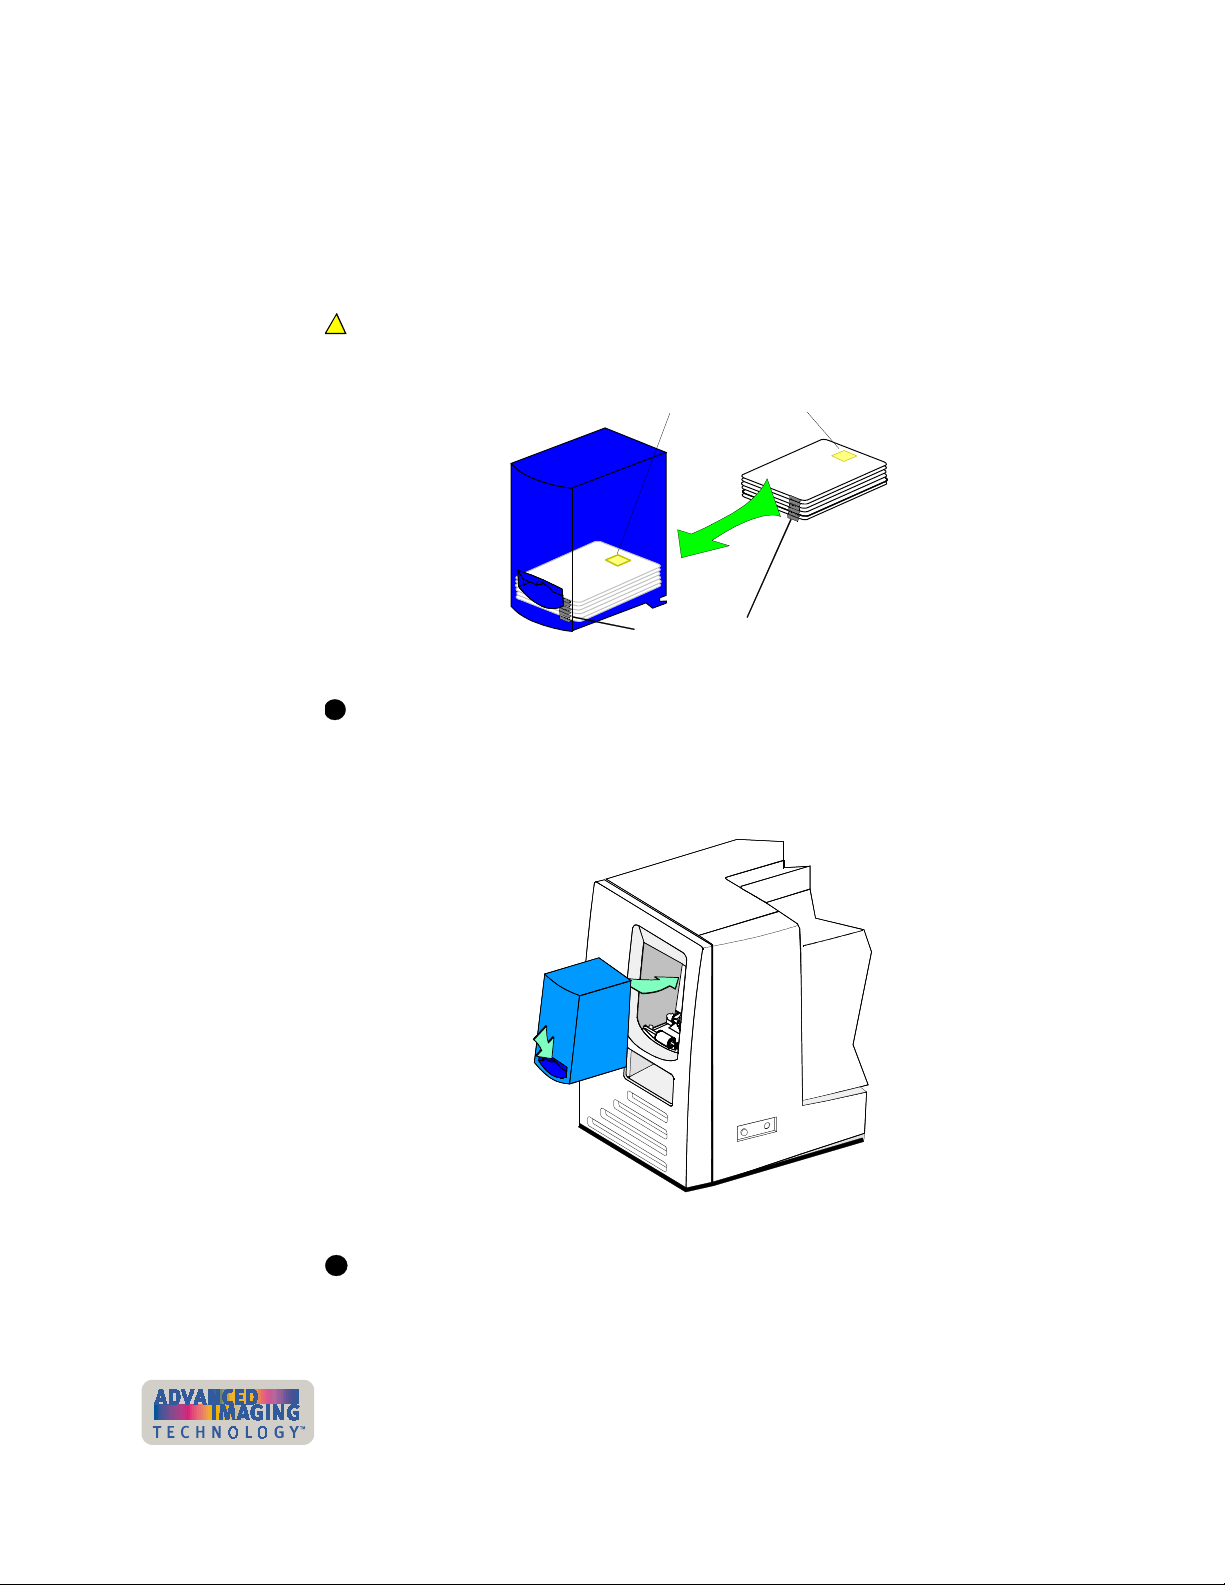
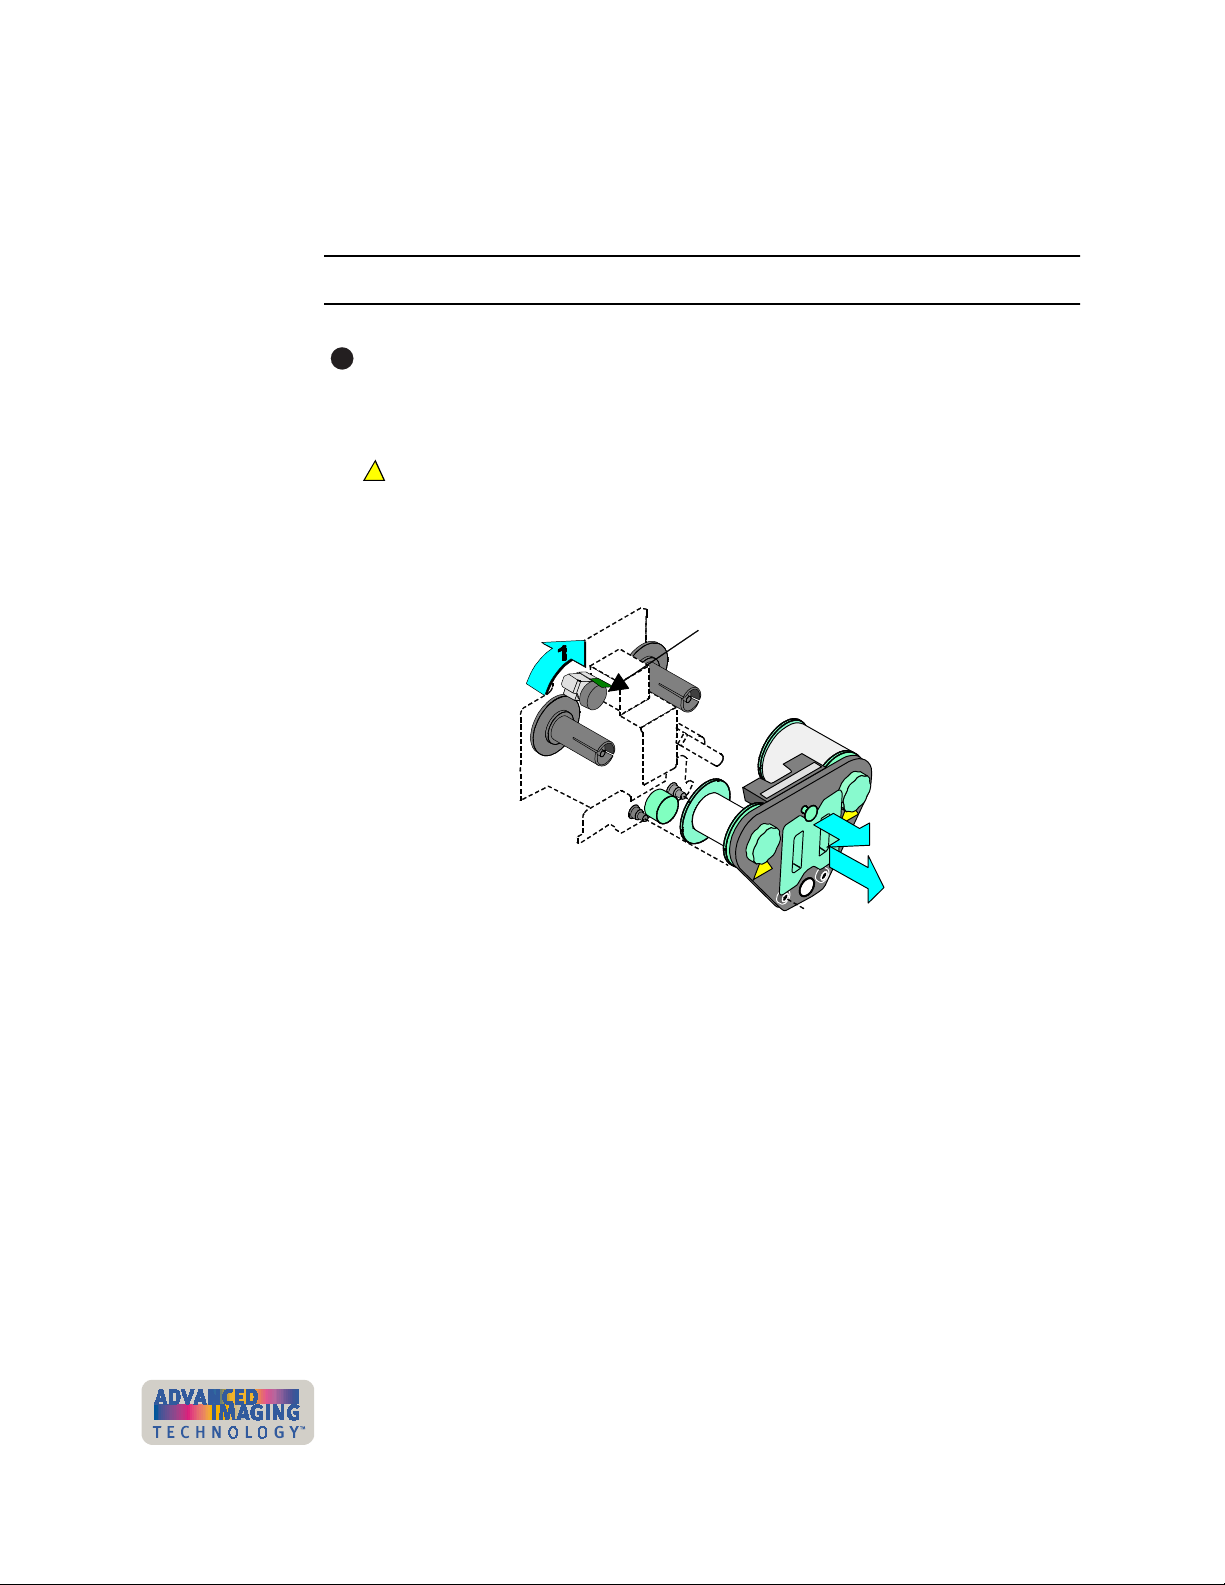
1 Pull up on the lower edge of the card cartridge (step 1 in Figure 2-1). Lift the card
cartridge up and out of the printer (step 2 in Figure 2-1).
2
1
Figure 2-1: Remove the card cartridge
i
Do not touch the surface of cards before printing them. Oils on hands can cause
discolored printing. Handle cards by the edges or wear gloves to protect cards.
2 Fan cards to separate the edges of the cards (see Figure 2-2).
Figure 2-2: Fan cards
3 Place up to 100 blank cards into the card cartridge. (If cards are thicker or thinner
than 0.030 inch (0.76 mm), the maximum number of cards you can load varies.)
User’s Guide for ImageCard® Magna™ and UltraGrafix® Magna™ Printers
Page 22
2-4 Using the printer
For magnetic stripe cards, the magnetic stripe faces down and is positioned
toward the side of the printer that opens (see Figure 2-3). (For some custom
applications, you might receive instructions to place cards in a different
orientation.)
For smart cards, position the card so the chip is up and toward the open end of
the card cartridge.
!
!
If you use a topcoat or overlay module, use composite cards with a nominal
thickness of at least 0.030 inch (0.76 mm).
Smart Card Chip
Magnetic Stripe
Figure 2-3: Load cards into the card cartridge
i
Do not run the printer for an extended time without cards in the card cartridge.
Load more cards as soon as you are prompted.
4 Replace the card cartridge in the cavity (step 1 in Figure 2-4). Push the bottom of
the card cartridge toward the printer until it clicks into place (step 2 in Figure 2-4).
1
2
Figure 2-4: Replacing the card cartridge
i
If the printer has a locking card cartridge, lock the cartridge after replacing it.
♦
User’s Guide for ImageCard® Magna™ and UltraGrafix® Magna™ Printers
Page 23
Using the printer 2-5
Loading the print ribbon
The printer uses print ribbon with color panels, continuous color, or color and topcoat.
Full-color ribbon (such as YMCKT) must be Platinum Series ribbon, which uses blue
ribbon spools. Monochrome (one color) ribbon on teal ribbon spools can also be used.
(Full-color ribbon on teal spools cannot be used.)
i
The type of ribbon in the printer must match the print ribbon setting in the driver.
To order new ribbon, contact your service provider. See “Supplies and cards” on
page B-1 for information about ribbons available.
Remove the print ribbon cartridge
i
If the printer has a locking cover, unlock the cover before opening it.
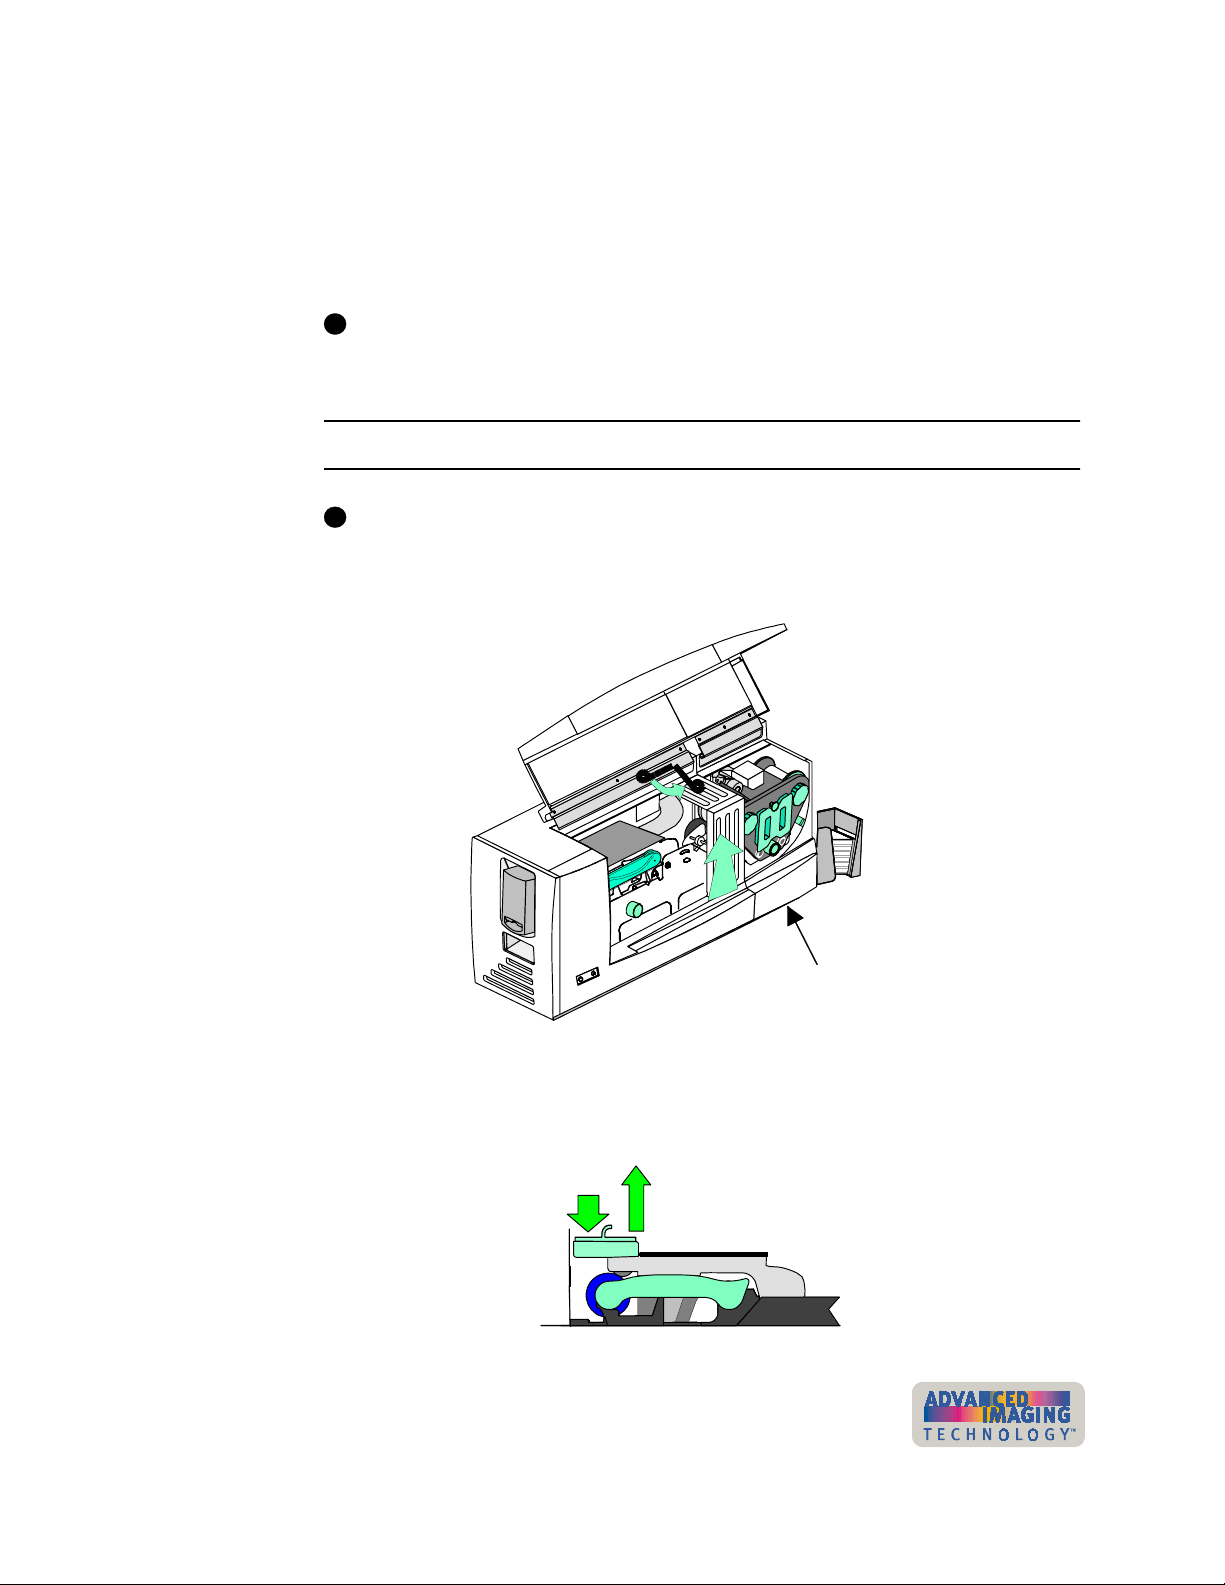
1 Lift the top cover, and then move the support down so it rests on the internal
frame, as shown in Figure 2-5.
2
1
Optional laminator module
Figure 2-5: Open the cover
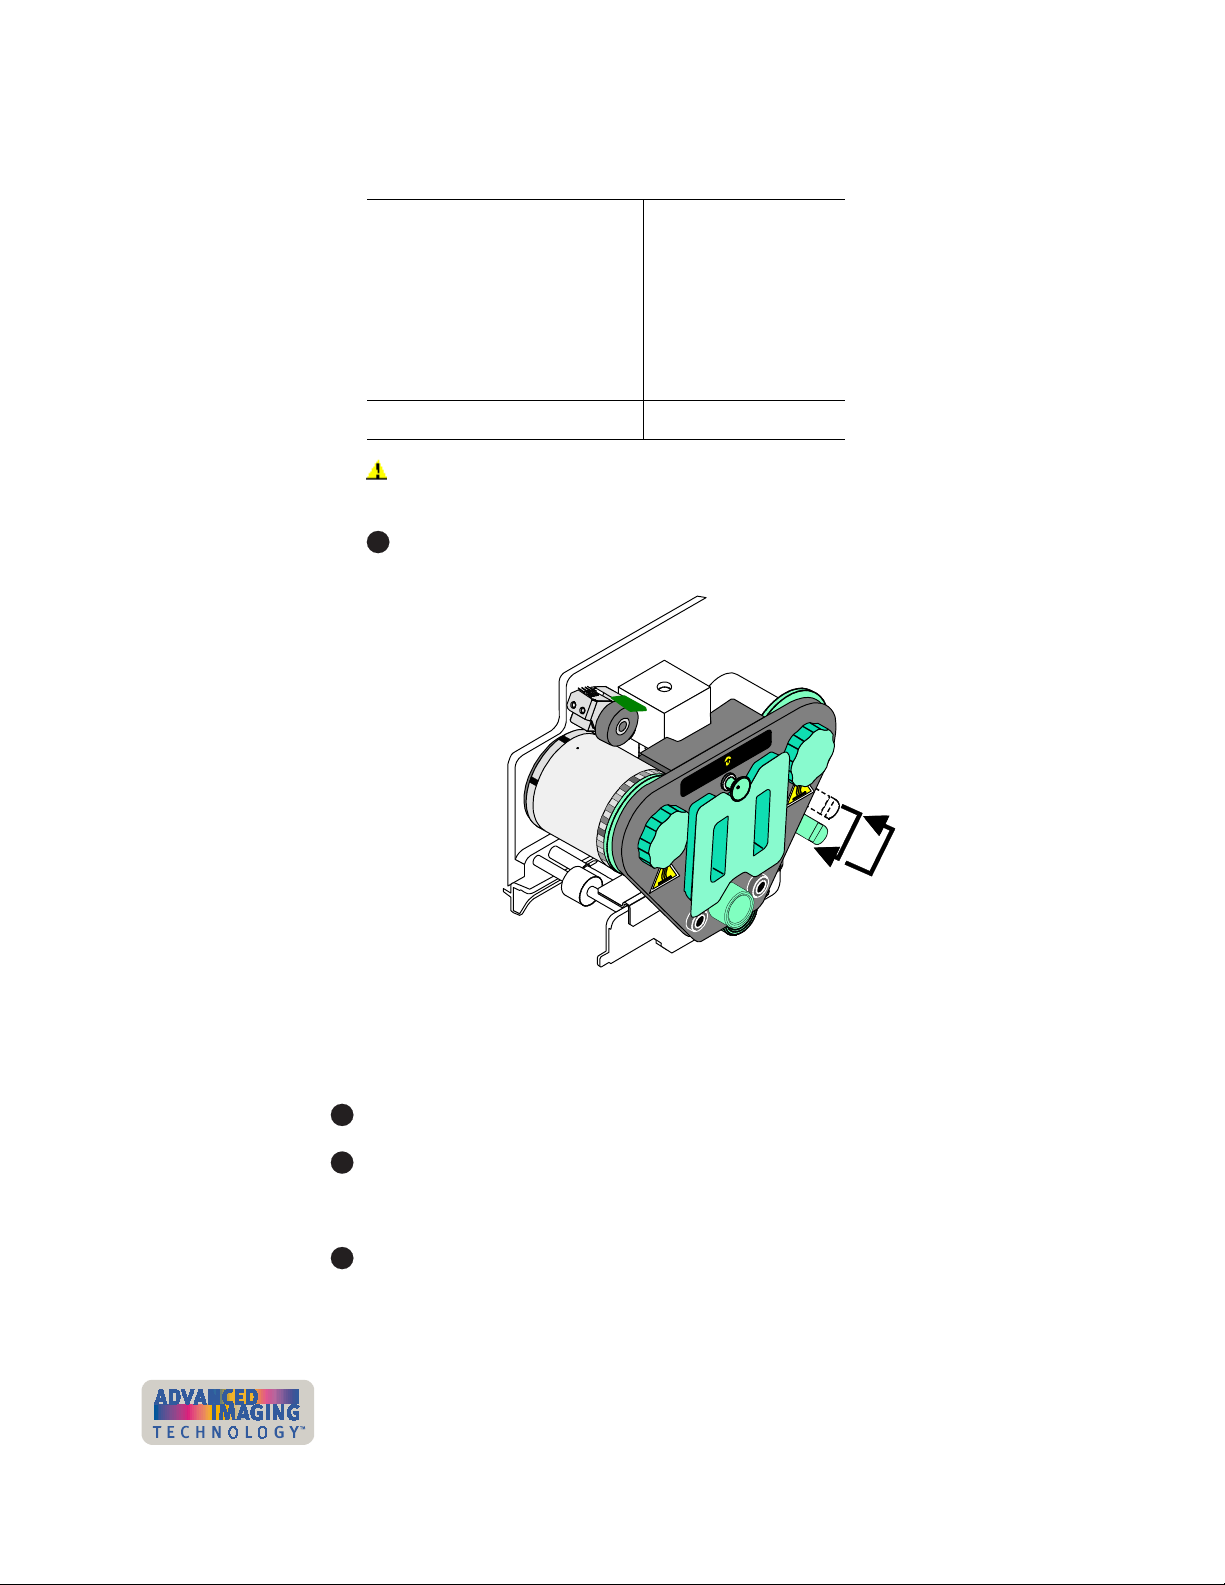
2 Press down on the swing arm until it clicks (step 1 in Figure 2-6). The push latch
releases the swing arm. Lift the swing arm until it is fully open (step 2 in
Figure 2-6).
2
1
Figure 2-6: Open the swing arm
User’s Guide for ImageCard® Magna™ and UltraGrafix® Magna™ Printers
Page 24
2-6
Using the printer
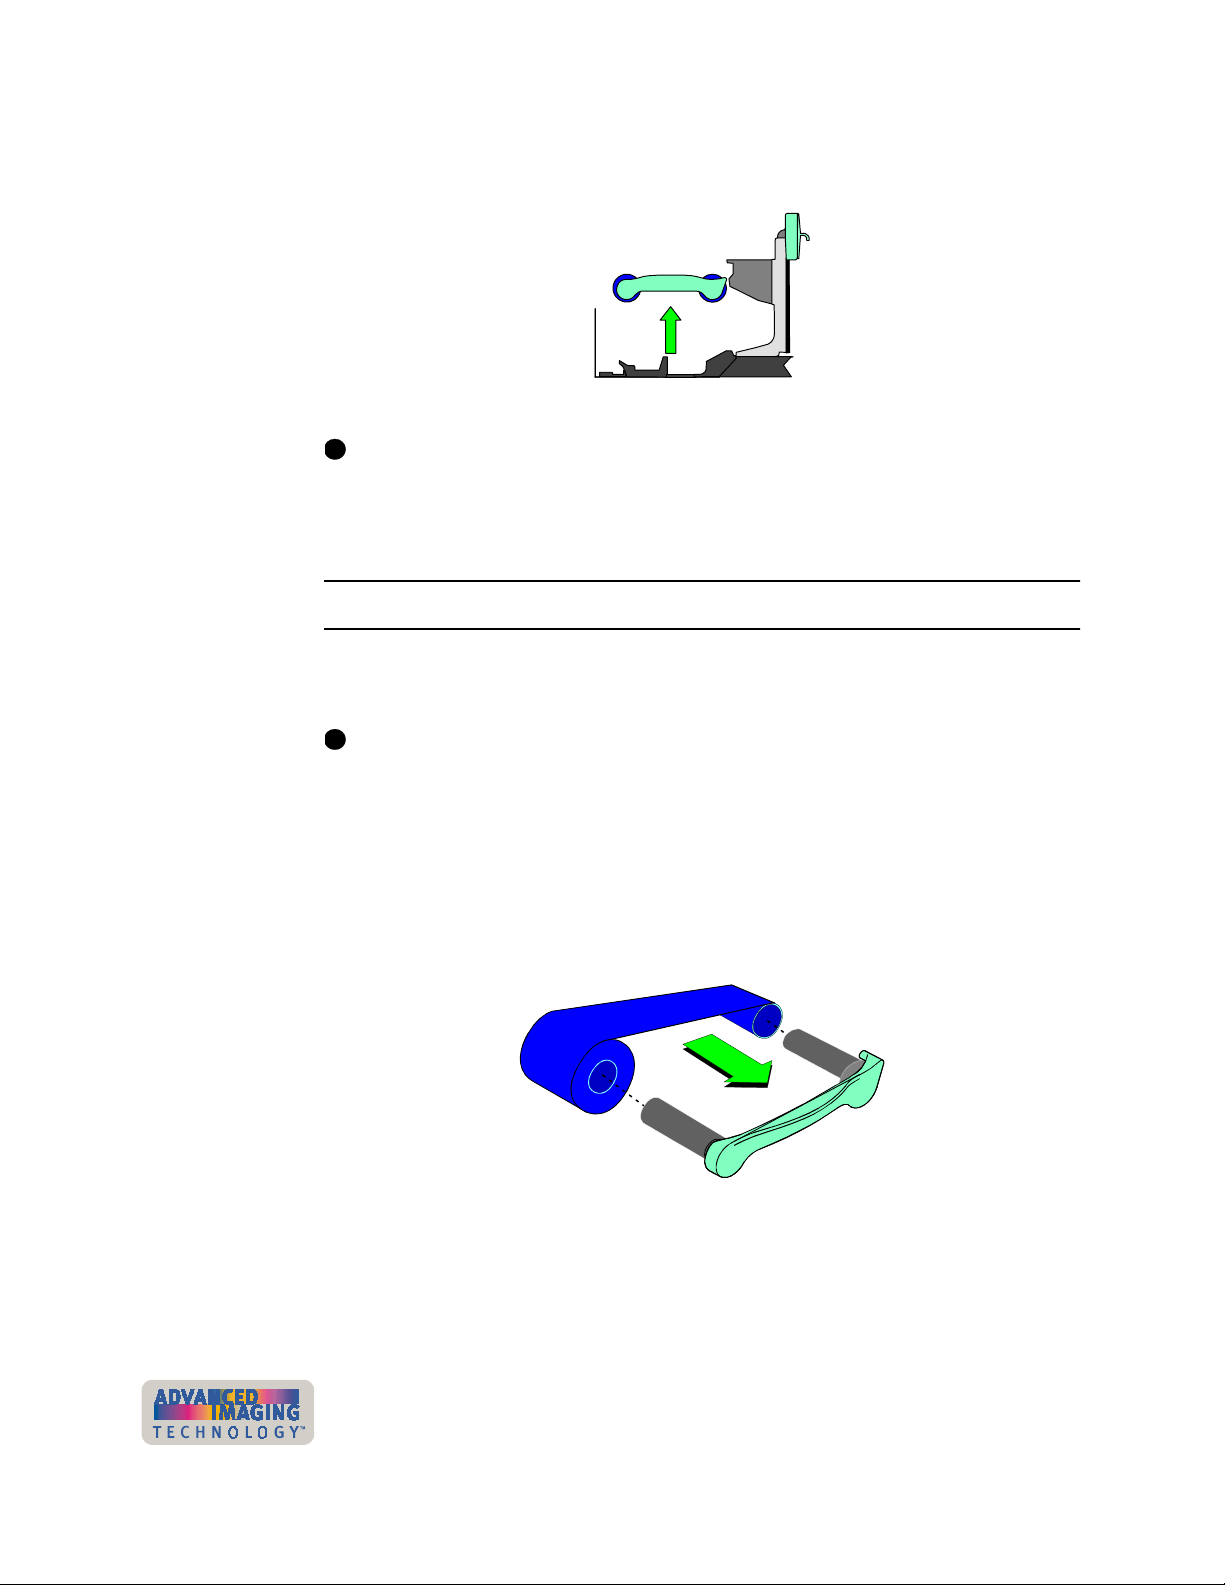
3 Grasp the ribbon cartridge handle, and lift up to remove the print ribbon cartridge
(see Figure 2-7). Avoid touching the printhead cartridge and ribbon tracker.
Figure 2-7: Remove the print ribbon cartridge
i
Some users run a cleaning cycle whenever the print ribbon is changed. If your site
follows this policy, see “Running a cleaning cycle” on page 4-2 for the steps to
follow, and then return to this section.
♦
Load the print ribbon
1 Remove the used ribbon and the used ribbon spools from the ribbon cartridge
shafts.
i
The print ribbon has a negative image of the information printed on the card.
Dispose of print ribbon according to your policy for protecting the data that might
be visible on it.
2 Unwrap the new print ribbon.
3 Slide the full supply roll onto the left ribbon cartridge shaft (see Figure 2-8).
4 Slide the empty take-up ribbon spool onto the right ribbon cartridge shaft (which
has a gear). Leave very little slack in the ribbon between the ribbon cartridge
spools (see Figure 2-8).
Figure 2-8: Load new print ribbon on the ribbon cartridge
5 Make sure print ribbon unwinds over the top of the print ribbon cartridge, not from
the bottom.
♦
User’s Guide for ImageCard® Magna™ and UltraGrafix® Magna™ Printers
Page 25
Using the printer
2-7
Replace the print ribbon cartridge
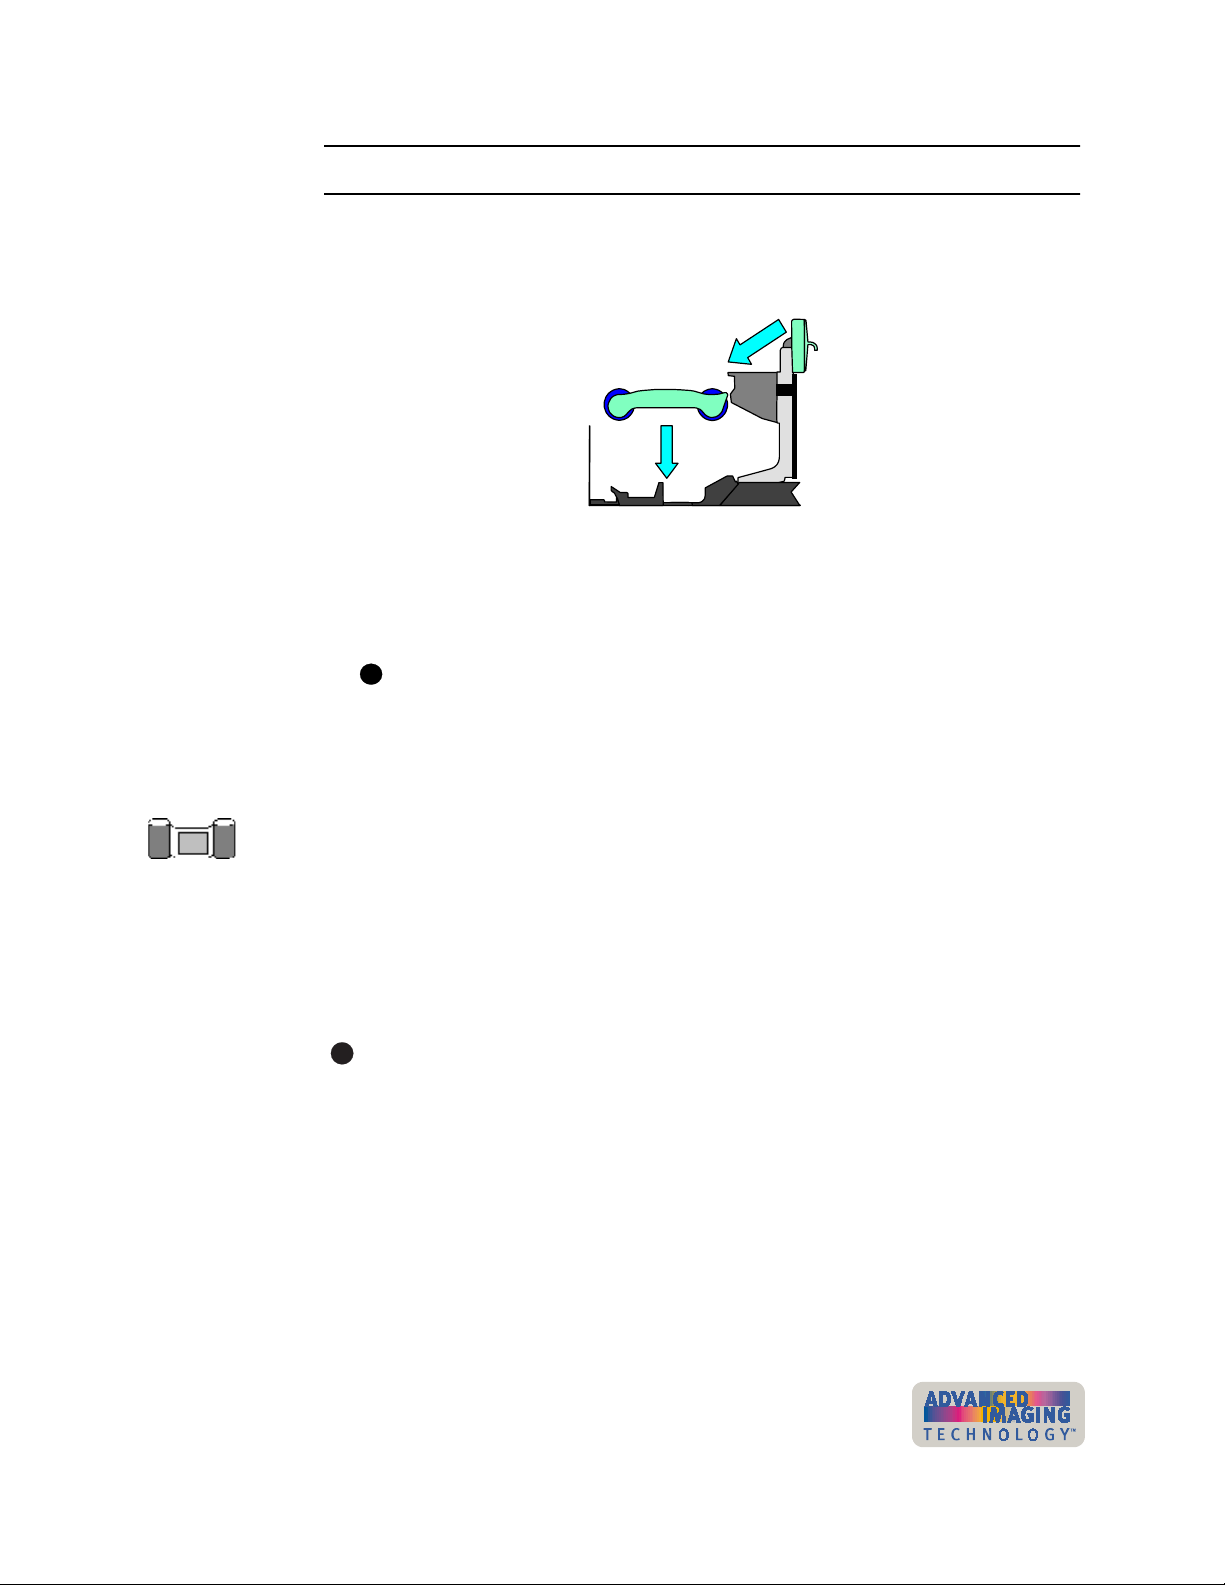
1 Place the ribbon cartridge onto the ribbon cartridge supports (see Figure 2-9).
Make sure the cartridge is securely seated. Avoid touching the printhead cartridge
and ribbon tracker.
2
1
Figure 2-9: Replace the print ribbon cartridge
2 Close the swing arm, pressing it down until the push latch clicks into place.
3 To close the cover, lift the top slightly. Move the support up so it is parallel with the
hinges, and lower the cover.
If the printer has a locking cover, lock the cover after closing it.
i
♦
Loading the overlay or topcoat material
If your printer includes an optional overlay or topcoat module, the module uses supply
material. For information about material, see “Supplies and cards” on page B-1.
This section describes the three steps of changing the topcoat or overlay material:
Remove the supply cartridge
•
Load material in the cartridge
•
Replace the supply cartridge
•
i
If you change the type of supply material you use, see the e-Guide for
ImageCard® Magna™ and UltraGrafix® Magna™ Printers for more information.
User’s Guide for ImageCard® Magna™ and UltraGrafix® Magna™ Printers
Page 26
2-8 Using the printer
Removing the supply cartridge
Remove the supply cartridge when a "Supply empty" message appears, or when
setting up the printer.
Remove the supply cartridge
i
If the printer has a locking cover, unlock the cover before opening it.
1 Lift the top cover, and then move the support down so it rests on the internal
frame, as shown in Figure 2-5.
!
The module is HOT to the touch and remains HOT for up to 30 minutes after
the printer is powered off.
2 Lift the supply tracker, and then push until it clicks into place (step 1 in
Figure 2-10).
Supply tracker
Figure 2-10: Remove the supply cartridge
3 Pull out on the cartridge lock to release the supply cartridge (step 2 in
Figure 2-10).
4 Pull the supply cartridge out until the cartridge is out of the printer (step 3 in
Figure 2-10).
Loading supply in the cartridge
After removing the supply cartridge from the printer, remove the used material and
load new material.
2
3
♦
User’s Guide for ImageCard® Magna™ and UltraGrafix® Magna™ Printers
Page 27
Using the printer
2-9
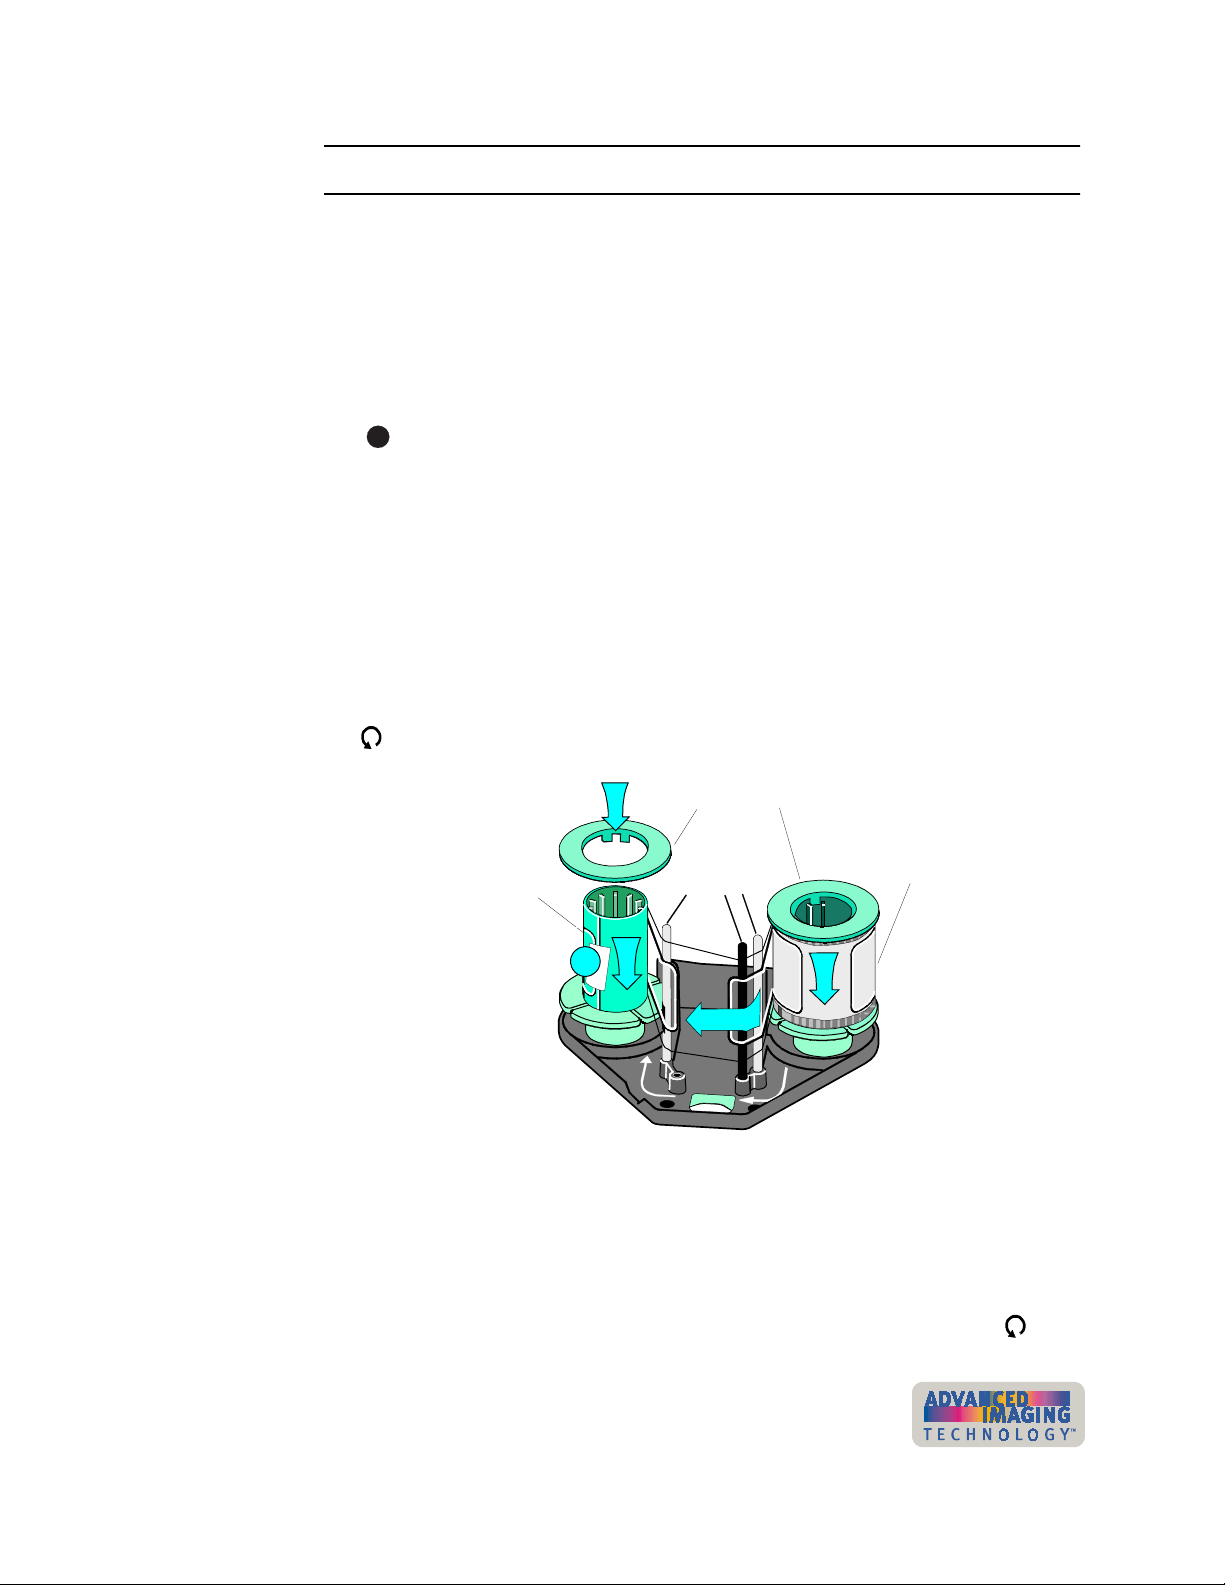
Load supply in the cartridge
1 Place the supply cartridge upside down on a level surface, such as a table, with
the wide side away from you.
2 Remove the spool caps from both spools.
3 Pull up firmly on the full take-up spool to remove it.
4 Remove the end of the supply material from the empty supply spool if needed.
Dispose of the used supply according to your policy.
i
On a regular basis, such as weekly, use the cleaning pen to clean deposits
from the guides of the supply cartridge and clean the supply tracker.
5 Remove the empty spool from the holder and press it into place on the take-up
holder (step 1 in Figure 2-11). Make sure the ribs inside the spool align with the
grooves in the holder.
6 Press on the spool and turn it slightly (if needed) until the spool fully covers the
ribs of the holder.
7 Unwrap the new supply material.
8 Place the full supply roll on the right holder as you face the open side of the
cartridge (step 2 in Figure 2-11). Make sure the supply will unroll counterclockwise
, as shown.
5
Take-up spool
1
4
Figure 2-11: Load supply in the cartridge
9 Make sure the ribs inside the spool align with the grooves in the holder. Press on
the spool and turn it slightly (if needed) until the spool fully covers the ribs.
10 Lift the label on the supply roll and unroll about 8 inches from the supply roll.
Spool caps
Guides
3
Supply roll
2
11 Wind the supply material in front of the guides and around the take-up spool (step
3 in Figure 2-11). Make sure that the material will wind counterclockwise .
User’s Guide for ImageCard® Magna™ and UltraGrafix® Magna™ Printers
Page 28
2-10
12 Press the label onto the take-up spool to secure the supply material (step 4 in
Figure 2-11).
13 Press the spool caps back into position on the ends of the take-up spool and
supply roll (step 5 in Figure 2-11).
14 Pick up the supply cartridge and turn it over. Turn the take-up knob clockwise
to remove any slack in the supply material.
The supply cartridge is ready to be replaced in the printer.
Replacing the supply cartridge
When replacing the supply cartridge, begin with the top cover open.
Replace the supply cartridge
i
Make sure the supply tracker is raised and out of the way. See Figure 2-10.
1 Hold the loaded supply cartridge next to the module, with the cartridge handle
toward you.
♦
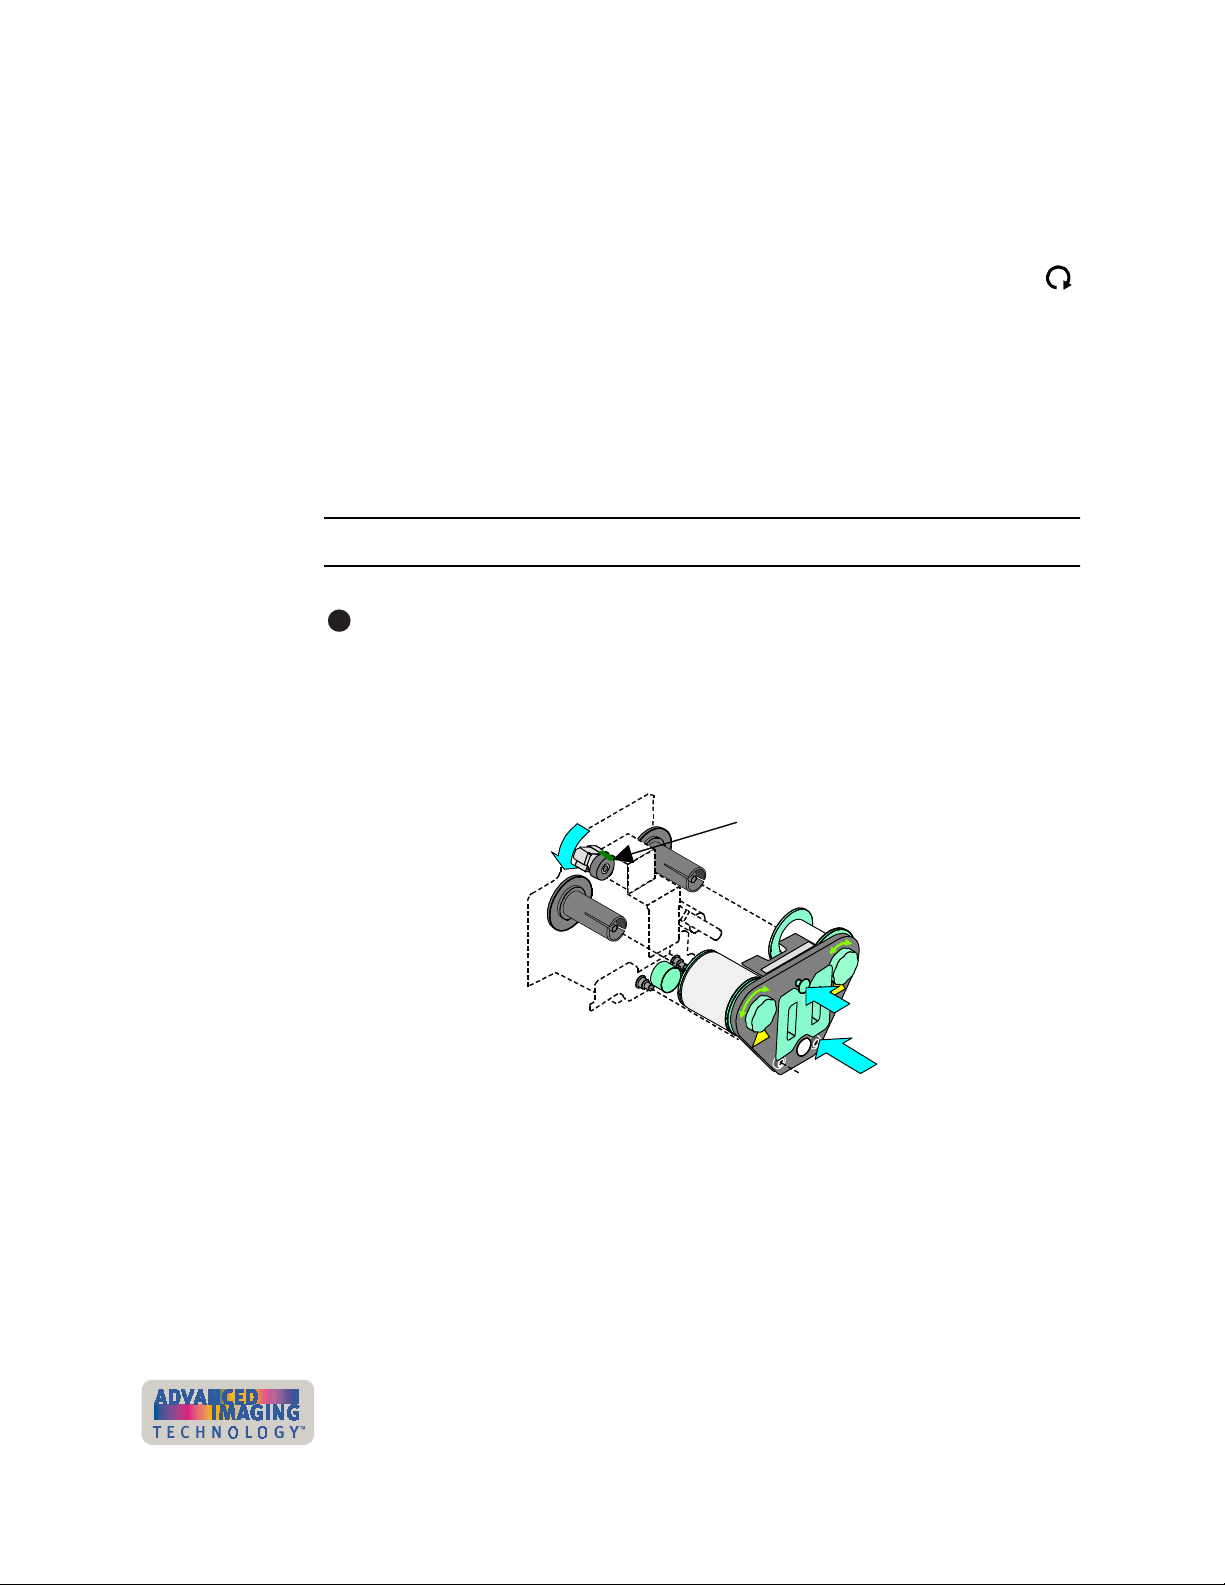
Using the printer
2 Align the supply cartridge so the spools in the cartridge are even with the spindles
in the module.
Supply tracker
3
2
1
Figure 2-12: Replace the supply cartridge
3 Push the supply cartridge into the printer (step 1 in Figure 2-12). Make sure the
supply material passes between the heated roller and the platen roller. Turn the
supply knobs if needed to take up slack so the material does not wrinkle as the
cartridge is pushed in place.
4 Hold the back of the printer and push firmly on the supply cartridge to seat it in the
printer.
User’s Guide for ImageCard® Magna™ and UltraGrafix® Magna™ Printers
Page 29
Using the printer
2-11
i
If the cartridge becomes stuck part of the way into the module, pull it out a few
inches and then turn the supply and take-up knobs clockwise slightly so the
spindle ribs fit between the ribs. Push the cartridge in again.
5 Press the cartridge lock to secure the supply cartridge in the printer (step 2 in
Figure 2-12).
6 Lower the supply tracker until it rests on the supply material (step 3 in
Figure 2-12).
7 Verify that the cartridge is replaced correctly by making sure the locating posts
come through the locating holes in the cartridge (Figure 2-12).
i
If needed, release the cartridge lock and seat the cartridge completely. Press the
cartridge lock again.
8 To close the cover, lift the top slightly. Move the support up so it is parallel with the
hinges and lower the cover.
i
If the printer has a locking cover, lock the cover after closing it.
♦
Verifying the debower position
The debower in the optional topcoat or overlay module should be set for the type of
cards you print. The debower assures that the heat used to apply the topcoat or
overlay does not leave cards bowed or curled.
Set the debower
!
Do not use the debower in the On position with proximity cards or smart cards.
i
Make sure power to the printer is off.
i
If the printer has a locking cover, unlock the cover before opening it.
1 Lift the top cover, and then move the support down so it rests on the internal
frame, as shown in Figure 2-5.
!
The overlay or topcoat module is HOT to the touch and remains HOT for up to
30 minutes after the printer is powered off.
User’s Guide for ImageCard® Magna™ and UltraGrafix® Magna™ Printers
Page 30
2-12 Using the printer
2 Pull out the handle for the debower and move it to the desired position for the card
type. Figure 2-13 shows the on and off positions for the debower.
Card or module type Debower position
0.030 inch (0.76 mm) card on
0.050 (1.27 mm) cards off
Smart card off
Proximity card off
Topcoat module off
If you use a topcoat or overlay module, you must use cards that are at least
0.030 inch or 0.760 mm thick.
i
Make sure the debower is seated in the latch.
Off
On
Figure 2-13: Lift the handle, move the debower, and lower it
3 To close the cover, lift the top slightly. Move the support up so it is parallel with the
hinges.
i
If the printer has a locking cover, lock the cover after closing it.
i
If you are setting up the printer, check the bow on the test card when you make it.
If you are changing this settings after running the printer with other cards, make
several test or sample cards to be sure the setting produces the result you want.
i
If you are switching to proximity cards or use smart cards, be sure to test the
function of the card after applying the overlay or topcoat.
♦
User’s Guide for ImageCard® Magna™ and UltraGrafix® Magna™ Printers
Page 31

Using the printer 2-13
Powering on the printer and PC
Use the following procedure to power on the printer and attached PC.
Power on the printer and PC
i
If the printer is connected over a network using a print server, see the
Direct Network Installation and User Guide
on the printer.
1 Make sure cards and all other supplies are loaded. See other sections of this
chapter for more information.
2 Remove any printed or rejected cards from the output stacker. See “Removing
cards” on page 2-18 for more information.
3 Make sure the power cord and data cable are connected. If needed, see “Printing
sample cards” on page 7-17 for more information.
4 Press the printer Power switch to turn on power. Observe the printer status light
which lights with a sequence of colors and then becomes steady green. See
“Status light” on page 2-15 for more information. The printer initializes
components and makes audible sounds.
for more information about powering
SmartDriver
Figure 2-14: Power on the printer
i
i
The optional overlay or topcoat module in some Magna Class printers requires
about 10 minutes to reach operating temperature before printing a card. If you
send a card to print before the module is ready, a message appears on the PC
and processing waits until the module is ready. If the printer power was on
recently, warm-up time is shorter. The overlay or topcoat module makes a series
of beeps while it is warming up.
User’s Guide for ImageCard® Magna™ and UltraGrafix® Magna™ Printers
Page 32

2-14 Using the printer
5 Press the PC Power switch to turn on the power to the PC. Turn on power to any
other equipment needed.
♦
Ready button
The Ready button allows you to pause the printer while printing a card, to clear an
error condition, to cancel a print job and delete all data for the job, or to create a
printer test card.
•
To pause the printer, press and hold the Ready button for three seconds or less.
Any cards being printed complete the current operation and stop. The status light
continues to blink green while the printer is paused with jobs in the queue. The
status light is amber when the printer is paused with no jobs in the print queue.
i
i
If the printer is paused and a message box is displayed on the PC, use the
buttons on the message box to clear the message. If you press the Ready button
to clear a message, the current print job is cancelled. If you press the Ready
button to clear a pause condition, the job is not cancelled.
•
To cancel and clear the current print job, press and hold the Ready button for
between three and ten seconds. When the sound changes tone, release the
Ready button. The job is cleared from the printer memory and the card is ejected.
•
You can verify that the printer is working correctly by making a printer test card.
See “Making and evaluating test cards” on page 5-3.
User’s Guide for ImageCard® Magna™ and UltraGrafix® Magna™ Printers
Page 33

Using the printer 2-15
Status light
The front of the printer has a light that provides information about the printer’s current
state.
Status light
Figure 2-15: Status light
Status Light Description
The printer is starting. The printer displays colors
Red Amber Green
repeatedly while it initializes.
The printer is ready and waiting to print cards.
Steady green
Blinking green
Steady amber
Blinking amber
Steady red
Off
#. If the light blinks amber but no message appears on the PC, the
following might have occurred:
* You used the Power-on/Ready sequence to print a test card.
Messages are not reported.
* You changed the name of the printer. Remove and re-install the
printer driver to change the printer name.
(The laminator might be heating.)
The printer is busy printing cards.
The printer is paused without an error.
If the light remains steady amber during powerup, the printer has a problem that requires
service.
The printer has issued a message. See the PC
for the message.
The printer has a problem that requires service.
The printer power is off.
#
User’s Guide for ImageCard® Magna™ and UltraGrafix® Magna™ Printers
Page 34

2-16 Using the printer
Making cards
This section describes several ways to make cards using the Magna printer.
•
Usually, cards are sent from a card creation application, such as Datacard’s ID
Works™ which captures, organizes, and formats the information on the card. A
card creation application is specially designed software that handles the types of
information used on cards. See “Use a card creation application” for the steps to
follow.
•
If you do not have a card creation application, you can use another PC application
to format the information to print on cards. If you are encoding magnetic stripe
data, be sure to use an application in which you can save the result and edit it
again, such as Windows WordPad™ or Word. See “Print from a PC application”
for the steps to follow.
i
With any application, test your card design to verify the results.
Use a card creation application
1 Follow the instructions for the card creation application to capture, format, and
save the data for the card.
2 In the card creation application, send cards to the printer.
The printer driver receives data for each card, prepares the card for printing, and
sends each card to the printer in the order received. The printer driver keeps
cards in a queue if the printer is busy.
i
Developers can write card creation applications using the SmartDriver™ Software
Developer’s Kit. This kit can be downloaded from www.datacard.com.
♦
Print from a PC application
1 Select the printer settings that correspond to the cards to print. See “Working with
Properties and other driver dialog boxes” on page 3-2 for more information.
Settings might include the following:
– Enable two-sided printing if you plan to print the front and back of the card.
The printer must have a duplex module to print on both sides of the card.
– Set the margins for the area to print on the card. A setting of Edge-to-Edge is
the same as a margin of 0.
– Set the magnetic stripe format and coercivity if you plan to encode magnetic
stripe data.
– Enable or disable topcoat or overlay, depending on the options in the printer
and the features you want for this card.
User’s Guide for ImageCard® Magna™ and UltraGrafix® Magna™ Printers
Page 35

Using the printer 2-17
2 In the application, select the SmartDriver as the current printer.
i
The default name for the Magna Class printer, when it is installed, is
SmartDriver. The printer driver supports the Magna Class printer with
Advanced Imaging Technology™, the Select Class printer with Advanced
Imaging Technology™, and the ImageCard IV printer. Your printer might have
a different name than SmartDriver.
3 Using the application's page setup feature, set the paper size to CR80 Card 2.13"
x 3.38". Set all the margins to the same value as the driver. (You can set the
margins in the application wider than the driver, if desired.)
4 Select the orientation for the card design—either portrait or landscape.
5 Format the text to print using only a TrueType ( ) font. To print using the K
(solid black) panel of the print ribbon, choose the Black color in the application. All
other colors are printed using the color panels of the print ribbon if you use a color
print ribbon.
6 To print on the front of the card, keep data on one page. To print the front and
back of the card, send a two-page document. (Make sure Print on Both Sides is
set to Automatic.)
7 Also on the front of the card, enter the information to be encoded on the magnetic
stripe and format the text using one of the following fonts:
– Track 1—Magnetic Stripe
– Track 2—Magnetic Stripe
– Track 3—Magnetic Stripe
– Track NTT—Magnetic Stripe (use only on a PC running a Japanese language
Windows operating system)
i
Windows must be set to display all fonts. (Some PC’s are set to display
TrueType fonts only.) See Windows help for more information.
The text must use the default type size of 3.5 or 4 points to keep characters on the
same line. To view the characters, zoom in on the text. Also, follow these
guidelines:
– Avoid formatting characters, such as tabs and returns, in the data for one
magnetic stripe track. In some cases, these characters are converted to
spaces, which might not be valid characters for the track.
– Do not use typographic features, such as letter spacing, on magnetic stripe
text.
– The paragraph style must be Normal.
– The magnetic stripe text, along with graphics and text to print on the front of
the card, must be on the first page.
8 When the card data is captured and formatted correctly, select the application’s
print function to send the card to print.
♦
User’s Guide for ImageCard® Magna™ and UltraGrafix® Magna™ Printers
Page 36

2-18 Using the printer
Operating tips
•
For the most current information about messages, see the online help for each
message.
•
Whenever you are encoding magnetic stripe data or programming smart cards, be
sure to handle incomplete cards according to your policy for handling the
confidential data that might be on the card.
•
Used print ribbon contains negative images of data printed on cards. Be sure to
handle used print ribbon according to your policy for handling the confidential data
that might be on the card.
Removing cards
The card output stacker holds both completed cards and rejected cards. Remove
completed cards from the output stacker to distribute printed cards. The output
stacker holds up to 100 cards with a nominal thickness of 0.030 inch (0.76 mm).
Remove rejected cards as soon as they are ejected from the printer so you do not
need to sort through all cards to locate them. Cards are rejected when a print job is
cancelled or when a problem occurs while personalizing a card.
You can remove cards when the printer power is on or off, or while the printer is
printing. Completed and rejected cards are removed in the same way.
Remove cards
1 Lift the cards from the card output stacker.
Figure 2-16: Remove cards
2 Dispose of partly processed cards according to your policies for handling the
confidential data that might be on the cards.
♦
User’s Guide for ImageCard® Magna™ and UltraGrafix® Magna™ Printers
Page 37

Using the printer 2-19
Responding to messages
The Magna printer provides information to the printer driver about the status of cards
being processed. If the printer is not able to process and print a card, the printer driver
generates a message on the PC in response to this situation. In most cases, the
message is displayed on the PC. Some applications manage printer driver messages,
and those messages might be different than described in this section.
In some circumstances, the printer might beep and the status light blink amber without
a message appearing on the PC. The most likely causes are:
•
Renaming the printer on Windows 2000 or XP (Restart Windows to fix the
problem)
•
Printing a test card in a printer with a magnetic stripe module, when the card does
not have a magnetic stripe (use a card with a magnetic stripe and make sure the
stripe is oriented correctly)
Messages displayed on one PC can be generated from a different networked PC. For
example, a different ribbon type can be selected on another networked PC. Make sure
the Ribbon Type on both PCs matches the ribbon installed in the printer.
Messages include a Help button, where information about recovering from the
situation is available. Typical messages might indicate that the print ribbon needs to
be replaced or that a card is stuck. See the “Fix a printer problem” procedure that
follows.
i
When a message box appears, only use the buttons on the message box, so that
both the printer driver and printer can return to normal operation. Do not close the
message box by using the Exit button .
Figure 2-17: Typical message
If a message appears repeatedly and you cannot reliably correct the situation, service
might be required.
i
Before you call your service representative, write down the following:
– The message and message number.
– The model of the printer, such as “ImageCard Magna Class with Advanced
Imaging Technology™”.
– The serial number of the printer, located on the inside panel. See “Printer
label” on page 1-3.
User’s Guide for ImageCard® Magna™ and UltraGrafix® Magna™ Printers
Page 38

2-20 Using the printer
– The driver version, described in “Working with Properties and other driver
dialog boxes” on page 3-2.
– The firmware version (available on Windows Me and Windows 98).
For more information about obtaining service, see “Obtaining service” on page 5-22.
Fix a printer problem
1 When a message is displayed on the PC, follow the suggested action. Click the
Help button to identify the likely cause of the problem and the possible solution.
2 From the help topic, click the “Click for error recovery procedures ” link to view a
list of printers. Click the link for the printer you are using and follow the procedure
provided in the e-Guide to fix the problem.
Most parts of the printer designed to be used by the operator are colored green.
These parts include knobs for clearing jams and handles of supply cartridges.
3 After fixing the problem, close the cover of the printer.
i
If the printer has a locking cover, lock the cover after closing it.
4 Depending on the situation, the message box might be removed automatically or
you might need to respond. Cards still in the printer might be ejected.
The message box can have one or more of these buttons:
– Retry: Clears the card from the printer. The driver sends the card or cards to
the printer again. If the problem is corrected, normal operation resumes.
– Cancel: Clears the card from the printer. The card is not sent to print again. If
the problem is corrected, normal operation resumes.
– OK: Used for a message that occurs when no card was being printed, a status
message, or an equipment failure message. If the problem is corrected,
normal operation resumes. (Power cycle the printer if operation does not
resume.)
– If the message box disappears automatically, decide whether to return to the
card creation application to send the card to print again.
♦
User’s Guide for ImageCard® Magna™ and UltraGrafix® Magna™ Printers
Page 39

Using the printer 2-21
Shutting down the printer and PC
Shut down the Magna Class printer and the PC to which it is attached when you are
done making cards for the day or will be away from the system for an extended period
of time.The printer and PC can be left on during lunch time and other short breaks.
Follow your security procedures when leaving the printer.
Shut down the printer and PC
1 Make sure all cards have completed processing before turning off the power. (You
can suspend the Status Monitor to stop communication between the printer and
driver. See “Using the Status Monitor” on page 3-10.)
2 Press the Power switch to turn off power to the printer.
Figure 2-18: Press the power switch to power off the printer
3 Follow your policy to secure unprinted card stock, supplies, and printed cards.
4 Close PC applications and power off other equipment (including the PC) following
the procedure established.
i
If you will store the printer for several months, remove supplies before storing the
printer. Supplies to remove include cards, print ribbon, topcoat or overlay supply,
and the replaceable cleaning sleeve.
♦
User’s Guide for ImageCard® Magna™ and UltraGrafix® Magna™ Printers
Page 40

2-22 Using the printer
User’s Guide for ImageCard® Magna™ and UltraGrafix® Magna™ Printers
Page 41

Using the printer driver
3
This chapter provides information to help you use the printer
driver for the Datacard® Magna™ Class photo ID printer with
Advanced Imaging Technology™ effectively and efficiently. It
describes:
•
How to work with printer settings and data
•
How to use the Status Monitor
3
User’s Guide for ImageCard® Magna™ and UltraGrafix® Magna™ Printers
Page 42

3-2 Using the printer driver
Working with Properties and other driver dialog boxes
Printer driver settings and data are organized differently for Windows Me and 98,
Windows 2000, Windows XP, and Windows NT. Use the section that applies to the
operating system you use.
The printer driver allows you to connect one of the following printer types to the same
port:
•
Select Class with Advanced Imaging Technology™
•
Magna Class with Advanced Imaging Technology™
•
ImageCard IV
The default printer name when the driver is installed is SmartDriver. References in this
guide to the printer driver refer to the SmartDriver. The driver detects the type of
printer attached and displays a status icon that matches the printer type.
Tips for Properties, Printing Preferences, and Default Document Properties
When you use settings, consider the following for greatest success:
•
When it is installed, the SmartDriver printer driver uses default settings for the
printer. You need to view, change, and save printer and driver settings before
printing cards. Make sure that driver settings match printer features and supplies
used.
•
For settings that affect the printer, such as print ribbon type, make sure that the
printer and PC are connected so the value you select is sent to the printer and
saved. (For printers shared over a network, see the
Magna™ and UltraGrafix® Magna™ Printers
network using a print server, see the
User Guide
•
For settings that affect only the card format, such as landscape or portrait
orientation, the printer does not need to be connected and powered on.
•
Select the Print on Both Sides setting before selecting the Print Ribbon Type and
Topcoat Pattern. The choices available for Print Ribbon Type and Topcoat
Pattern depend on the Print on Both Sides setting. If you change the Print on Both
Sides setting to No after selecting YMCKT-KT ribbon, the Print Ribbon Type value
will be blank (YMCKT-KT is not a valid choice for printing on one side.)
•
The card creation application might include settings that override driver settings.
Also, you can access printer settings through the application’s print feature.
(Depending on the application and operating system, settings will apply only to the
current document or session.)
•
If you change the card design, review all settings and make changes as needed to
reflect the new card design.
.)
SmartDriver Direct Network Installation and
. For printers connected over a
e-Guide for ImageCard®
User’s Guide for ImageCard® Magna™ and UltraGrafix® Magna™
Page 43

Using the printer driver
•
When the printer is installed, the default spool setting is “Spool printing so
program finishes printing faster.” Use this setting, not “Print directly to printer.”
•
The Printer Type affects the settings that are available. To change the printer type,
disconnect the current printer before selecting another printer type. The settings
displayed change to the last known settings for the new printer type.
•
When the printer is installed, “Enable bi-directional support” is selected. This
setting is required to display messages, print test cards, and perform other
functions.
•
When the printer is directly networked to a PC, the Color Settings page of
Advanced Setup can be used from all PCs. The Printhead and Laminator pages
of Advanced Setup should be used only from the administrative PC.
•
When the printer is networked to more than one PC, make sure to select the same
ribbon type on all networked PCs.
Properties for Windows Me & 98
Settings that control the printing and personalization of the card include:
•
Print on both sides (duplex printing)
•
Print ribbon type
•
Card design settings, such as landscape or portrait orientation
•
Topcoat pattern during the print cycle
•
Whether to apply topcoat or overlay material to the front of the card, back of the
card, or both
•
Magnetic stripe encoding formats and coercivity
Data about the printer is available, including the “About” dialog box which shows the
printer driver version.
3-3
Settings that control the non-printing operation of the printer include:
•
Printer type
•
Port to which the printer is attached
•
Cleaning interval
Use the Properties dialog box
Make sure the printer power is on and the printer is connected to the PC.
1 Select Start from the Windows taskbar.
2 From the Windows Start menu, select Settings and then Printers. The Printers
window appears.
3 Click once on the SmartDriver icon.
User’s Guide for ImageCard® Magna™ and UltraGrafix® Magna™ Printers
Page 44

3-4
Using the printer driver
4 Select File from the Printers menu bar, and then select Properties. The
SmartDriver Properties dialog box appears.
Figure 3-1: Properties dialog box, Windows Me and 98
5 Select the tab with the information to view or change.
i
To view help for settings, click on the What's This help button and then click a
setting.
6 If you make changes or if you have just installed the printer driver, click Apply to
save the settings. Click OK to close the dialog box. If you do not want to make
changes and have saved settings once, click Cancel to close the Properties dialog
box.
♦
Properties & Printing Preferences for Windows 2000 & XP
Settings that control the printing and personalization of the card are in the Printing
Preferences dialog box for the printer. These settings include:
•
Card design settings, such as landscape or portrait orientation
•
Print ribbon type
•
Topcoat pattern during the print cycle
•
Cleaning interval
•
Whether to apply topcoat or overlay material to the front of the card, back of the
card, or both
•
Magnetic stripe encoding formats and coercivity
User’s Guide for ImageCard® Magna™ and UltraGrafix® Magna™
Page 45

Using the printer driver
The Printing Preferences dialog box also provides access to the About dialog box,
which shows the printer driver version.
Settings that control the non-printing operation of the printer are in the Properties
dialog box for the printer. These settings include:
•
•
•
Use the Properties dialog box
Make sure the printer power is on and the printer is connected to the PC.
1 Select Start from the Windows 2000 or XP taskbar.
2 From the Windows Start menu, select Settings and then Printers (2000) or
Printer type
Port to which the printer is attached
Permissions for other users of the PC
i
The SmartDriver provides help for the Printing Preferences dialog box, and
Windows 2000 or XP provides help for the Properties dialog box. Help provides
information about specific settings of the printer driver. Help does not include stepby-step procedures or detailed conceptual information.
Printers and Faxes (XP). The Printers (and Faxes) window appears.
3-5
3 Click once on the SmartDriver icon.
4 Select File from the Printers menu bar, and then select Properties. The
SmartDriver Properties dialog box appears.
Figure 3-2: Properties dialog box, Windows 2000 and XP
User’s Guide for ImageCard® Magna™ and UltraGrafix® Magna™ Printers
Page 46

3-6
Using the printer driver
5 Select the tab that contains the information you want to view or change.
6 If you make changes, click OK to save the settings and close the dialog box. If you
do not want to make changes, click Cancel to close the Properties dialog box.
7 If you change the port, reboot the PC and power the printer off and on.
♦
Use the Printing Preferences dialog box
Make sure the printer power is on and the printer is connected to the PC.
1 Select Start from the Windows 2000 or XP taskbar.
2 From the Windows Start menu, select Settings and then Printers (2000) or
Printers and Faxes (XP). The Printers (and Faxes) window appears.
3 Click once on the SmartDriver icon.
4 Select File from the Printers menu bar, and then select Printing Preferences. The
SmartDriver Printing Preferences dialog box appears.
Figure 3-3: Printing Preferences dialog box, Windows 2000 and XP
5 If the setting you want to change appears, select the setting.
User’s Guide for ImageCard® Magna™ and UltraGrafix® Magna™
Page 47

Using the printer driver
6 If the setting you want to change does not appear, click the Advanced button to
3-7
display the Advanced Options dialog box (Figure 3-4). Click the plus sign (+) to
see all selections available. When you click a selection, a list of choices appears
next to the selection. Click the arrow on the box to see the selections available.
Figure 3-4: Advanced Options, Windows 2000 and XP
i
If the selections you want to use are not available (are grayed out), make sure the
feature is available in the printer. Also make sure that the printer is powered on
and connected to the PC, and then resume the Status Monitor. See “Opening and
using the Status Monitor” on page 3-11. For a network-connected printer, see the
e-Guide for ImageCard® Magna™ and UltraGrafix® Magna™ Printers.
i
To view help for settings, click on the What's This help button and then click
any setting in the Printer Features list. A list of settings is displayed. Select the
setting for which you want help.
7 If you make changes or if this is the first time you have viewed the Printing
Preferences dialog box, click OK on each dialog box to save the settings and
close the dialog box.
♦
Properties and Default Document Properties for Windows NT
Settings that control the printing and personalization of the card are in the Default
Document Properties dialog box for the printer. These settings include:
•
Print on both sides (duplex printing)
•
Print ribbon type
•
Card design settings, such as landscape or portrait orientation
•
Topcoat pattern during the print cycle
•
Cleaning interval
User’s Guide for ImageCard® Magna™ and UltraGrafix® Magna™ Printers
Page 48

3-8
Using the printer driver
•
Whether to apply topcoat or overlay material to the front of the card, back of the
card, or both
•
Magnetic stripe encoding formats and coercivity
i
The Default Document Properties dialog box also provides access to the About
dialog box, which shows the printer driver version.
Settings that control the non-printing operation of the printer are in the Properties
dialog box for the printer. These settings include:
•
Port to which the printer is attached
•
Permissions for other users of the PC
i
The SmartDriver provides help for the Default Document Properties dialog box,
and Windows NT provides help for the Properties dialog box. Help provides
information about specific settings of the printer driver. Help does not include stepby-step procedures or detailed conceptual information.
Use the Properties dialog box
Make sure the printer power is on and the printer is connected to the PC.
1 Select Start from the Windows NT taskbar.
2 From the Windows NT Start menu, select Settings and then Printers. The Printers
window appears.
3 Click once on the SmartDriver icon.
4 Select File from the Printers menu bar, and then select Properties. The
SmartDriver Properties dialog box appears.
Figure 3-5: Properties dialog box, Windows NT
User’s Guide for ImageCard® Magna™ and UltraGrafix® Magna™
Page 49

Using the printer driver
5 Select the tab that contains the information you want to view or change.
6 If you make changes, click OK to save the settings and close the dialog box. If you
7 If you change the port, restart Windows and power cycle the printer.
Use the Default Document Properties dialog box
Make sure the printer power is on and the printer is connected to the PC.
1 Select Start from the Windows NT taskbar.
2 From the Windows NT Start menu, select Settings and then Printers. The Printers
3 Click once on the SmartDriver icon.
4 Select File from the Printers menu bar, and then select Document Defaults. The
do not want to make changes, click Cancel to close the Properties dialog box.
♦
window appears.
SmartDriver Default Document Properties dialog box appears.
3-9
Figure 3-6: Default Document Properties dialog box, Windows NT
5 Select the tab that contains the information you want to view or change. On the
Advanced tab, click the plus sign (+) if needed to see all selections available.
When you click a selection, choices appear in the “Change
value you want.
i
If the selections you want to use are not available (are grayed out), make sure the
feature is available in the printer. Also make sure that the printer is powered on
and connected to the PC and resume the Status Monitor. See “Opening and using
User’s Guide for ImageCard® Magna™ and UltraGrafix® Magna™ Printers
. . .
“ box. Click the
Page 50

3-10
the Status Monitor” on page 3-11. For a network-connected printer, see the
e-Guide for ImageCard® Magna™ and UltraGrafix® Magna™ Printers.
i
To view help for settings, click on the What's This help button and then click
any setting in the Printer Features list. A list of settings is displayed. Select the
setting for which you want help.
6 If you make changes or if this is the first time you have viewed the Document
Default Properties dialog box, click OK to save the settings and close the dialog
box.
Using the Status Monitor
The Status Monitor tracks communication between the Magna Class printer and its
printer driver. The Status Monitor starts on Windows 2000 or XP after a card is printed
or Properties or Printing Preferences dialog boxes are opened. On other operating
systems, the Status Monitor starts as part of Windows startup. The Status Monitor
icon is located in the lower right corner of the Windows desktop (see Figure 3-7).
♦
Using the printer driver
Figure 3-7: Status Monitor icon
The Status Monitor icon shows the state of communication between them, listed in the
table below.
Icon Description Indicates
This Status Monitor
icon is white with a
green dot.
This Status Monitor
icon is gray.
This Status Monitor
icon is white with a
white exclamation
point in a red circle.
The Status Monitor is active and
communicating with the printer.
The Status Monitor is suspended
and not monitoring the printer for
status, including errors.The Status
Monitor automatically suspends
when the printer is powered off or
disconnected.
The Status Monitor is active but is
not communicating with the
printer. The printer might be off,
cables might be loose, or a
problem might exist.
User’s Guide for ImageCard® Magna™ and UltraGrafix® Magna™
Page 51

Using the printer driver 3-11
i
i
This Status Monitor
icon is white with a
blue magnifying
glass.
The Status Monitor
icon is white, includes
a PC, and has a
green stripe on top.
The Status Monitor
icon is white with a
green stripe and dot.
The Status Monitor
icon is white with a
green stripe and
yellow hourglass.
The Status Monitor is in advanced
setup mode.
Use advanced setup when
changing color settings,
monochrome printing intensity, or
the position of printing.
The Status Monitor is running at a
network-connected client PC.
The Status Monitor displays
the client status and advanced
setup provides access to color
settings.
The Status Monitor is active and
communicating on a PC
connected to the printer using a
Direct Network Kit.
The Status Monitor is attempting
to communicate with a printer
attached using a Direct Network
Kit but the network is not
responding.
The Status Monitor is
gray with a green
stripe.
Use the Help button on the Status Monitor for more information about each window.
The Status Monitor is temporarily
suspended from the network.
Opening and using the Status Monitor
You can use the Status Monitor to do the following:
•
View Status Monitor information
•
Run a cleaning cycle (see “Maintaining the printer” on page 4-1)
•
Suspend the Status Monitor
•
Close or exit the Status Monitor
•
Start or quit advanced setup
User’s Guide for ImageCard® Magna™ and UltraGrafix® Magna™ Printers
Page 52

3-12 Using the printer driver
Open the Status Monitor
•
Double-click on the Magna Status Monitor icon (see Figure 3-7). The Status
Monitor appears.
Figure 3-8: Status Monitor
Viewing Status Monitor information
The Status Monitor displays the following status information:
•
The top line displays the current state of the Status Monitor or printer.
•
If the printer is directly connected to this PC, the second line displays any
messages. If the printer is shared through a network, this line indicates where to
find information about messages.
•
The third line displays the current port mode, which can be ECP, USB, Shared
Mode, or Directly Networked.
•
The fourth line displays the printer type.
•
The lower half of the dialog box shows the driver version number.
Suspending the Status Monitor
Suspending the Status Monitor stops communication between the printer and driver.
To suspend the Status Monitor, double-click on the Status Monitor icon and select
Suspend. Suspend the Status Monitor before power off to avoid interrupted
communication.
i
You cannot suspend the Status Monitor while printing a card.
User’s Guide for ImageCard® Magna™ and UltraGrafix® Magna™
Page 53

Using the printer driver 3-13
The Status Monitor automatically resumes when you print a card, or when you open
Properties, Document Default Properties, or Printing Preferences.
Closing and Exiting the Status Monitor
Closing the Status Monitor closes the Status Monitor dialog box. The program
continues to run. Exiting the Status Monitor does more: it stops the Status Monitor
(program) and closes the Status Monitor dialog box.
To exit or stop the Status Monitor, double-click on the Status Monitor icon and select
Exit. You should exit the Status Monitor when you receive instructions to do so.
i
You cannot exit the Status Monitor while printing a card.
The Status Monitor automatically restarts when you print a card, or when you open
Properties, Document Default Properties, or Printing Preferences. If you need to
restart the Status Monitor, open Properties, as described in “Working with Properties
and other driver dialog boxes” on page 3-2.
Starting or quitting advanced setup
The Advanced Setup button on the Status Monitor changes the printer driver from
printing mode to advanced setup. After you start advanced setup, additional tabs
appear on the Status Monitor, where you can change color settings, printing intensity,
position of printing, and laminator settings. For shared printers, you can only change
color settings.
Color settings (see Figure 3-9) are one of the features of Advanced Imaging
Technology.
Figure 3-9: Color Settings page
User’s Guide for ImageCard® Magna™ and UltraGrafix® Magna™ Printers
Page 54

3-14 Using the printer driver
i
From directly networked PCs, color settings affect cards sent from the PC. Other
tabs also affect settings in the printer. It is recommended that the settings for
networked PCs be changed only from an Administration PC.
i
You cannot start advanced setup while printing a card. Wait until all cards are
printed, and then click Advanced Setup.
For information about using the features available in advanced setup, see the
for ImageCard® Magna™ and UltraGrafix® Magna™ Printers
While in advanced setup, the button on the Status page is named “Quit Advanced
Setup.” Click the Quit Advanced Setup button to remove the additional tabs and return
to printing mode.
.
e-Guide
User’s Guide for ImageCard® Magna™ and UltraGrafix® Magna™
Page 55

Maintaining the printer
4
This chapter provides information to help you maintain the
Magna™ Class printer with Advanced Imaging Technology for
optimal performance. It describes:
•
How to run a cleaning cycle
•
How to use the magnetic stripe cleaning card
•
How to clean the rollers in the printer
•
How to use the duplex/laminator cleaning card
•
How to clean the supply tracker in the optional overlay or topcoat module
•
How to clean the heated roller in the optional overlay or topcoat module
•
How to clean the printhead
•
How to replace the printhead cartridge
4
User’s Guide for ImageCard® Magna™ and UltraGrafix® Magna™ Printers
Page 56

4-2 Maintaining the printer
Running a cleaning cycle
A cleaning cycle includes replacing the sleeve of the continuous cleaning roller and
running a cleaning card. Replace the cleaning roller first, and then run a cleaning card.
Select one of the following primary methods to make sure cleaning occurs regularly.
•
You can set the cleaning interval in the driver to indicate when it is time to clean.
The default “Cards between cleaning” value is 250 cards. You can change the
number of cards between cleaning in the printer Properties, Printing Preferences,
or Default Document Properties dialog box. See “Working with Properties and
other driver dialog boxes” on page 3-1 for the steps to follow.
•
You can clean the printer when you change the print ribbon, when you load cards
in the card cartridge, or at another regular interval you determine.
You might want to run a cleaning cycle more often if:
•
The cards, especially magnetic stripe cards or cards with signature panels, have
particles on them
•
A monochrome ribbon is used
•
The printer is operated in a relatively dirty environment
•
Printed cards have defects in the printing because of residue on the cards
Using the printer cleaning card
Use the printer cleaning card when prompted or according to schedule. You can run a
printer cleaning card whenever you are not printing, whether or not you have been
prompted. See “Supplies and cards” on page B-1 for information about ordering the
printer cleaning card.
Run a printer cleaning card
i
If the printer has a locking card cartridge, unlock the cartridge before
removing it.
1 Remove the card cartridge and set it aside.
i
If the print ribbon sticks to the printer cleaning card, remove the print ribbon
and repeat this procedure with a new printer cleaning card.
2 Peel the protective paper backing from both sides of the printer cleaning card (see
Figure 4-1).
Figure 4-1: Printer cleaning card
User’s Guide for ImageCard® Magna™ and UltraGrafix® Magna™ Printers
Page 57

Maintaining the printer 4-3
3 Insert the printer cleaning card on the input rollers, which you can see after
removing the card cartridge (see Figure 4-2).
Figure 4-2: Insert the printer cleaning card
4 Start a cleaning cycle by doing one of the following:
– Click the OK button when the printer driver displays the “printer has reached
the cleaning count” message. (If you do not click OK, the message appears
each time you print a card, until you use the printer cleaning card.)
– Open the Status Monitor by double-clicking the icon. Click the Printer button
in the Clean area and then the OK button.
The printer pulls in the cleaning card and moves it back and forth to clean the print
area.
5 The cleaning card is ejected on the left side of the printer directly under the card
cartridge area.
6 Discard the used printer cleaning card.
7 Replace the card cartridge. Push the bottom of the card cartridge until it clicks into
place. The printer module is cleaned and the printer is ready to resume normal
operation.
i
If the printer has a locking card cartridge, lock the cartridge after replacing it.
Replacing the cleaning roller sleeve
Replace the sleeve of the continuous cleaning roller when prompted or according to
your schedule. You can change the replaceable cleaning sleeve at any time, whether
or not you have been prompted. See “Supplies and cards” on page B-1 for information
about ordering the replaceable cleaning sleeve.
Replace the cleaning roller
i
If your printer has a locking cover, unlock the cover before opening it.
1 Open the top cover of the printer.
♦
User’s Guide for ImageCard® Magna™ and UltraGrafix® Magna™ Printers
Page 58

4-4 Maintaining the printer
i
The printer power can be on or off when you replace the cleaning roller.
2 Move the top cover support into position and allow the cover to rest on it.
3 Press down on the swing arm until it clicks (step 1 in Figure 4-3). The push latch
releases the swing arm. Lift the swing arm by firmly grasping the handle and
pulling up until it is fully open (step 2 in Figure 4-3).
2
1
Figure 4-3: Open the swing arm
4 Remove the print ribbon cartridge.
5 Lift the continuous cleaning roller unit out of the printer (step 1 in Figure 4-4).
2
1
Figure 4-4: Lift the roller out of the printer
6 Slide the used sleeve off the cleaning roller spindle (step 2 in Figure 4-4). Discard
the used sleeve.
User’s Guide for ImageCard® Magna™ and UltraGrafix® Magna™ Printers
Page 59

Maintaining the printer 4-5
7 Slide a new replaceable cleaning sleeve onto the spindle (step 1 in Figure 4-5).
2
1
3
Figure 4-5: Replace the cleaning roller sleeve
8 Hold the replaceable cleaning roller spindle by the ends and remove the
protective cover from the sleeve (step 2 in Figure 4-5). Discard the protective
cover.
3
i
Avoid touching the sticky surface of the replaceable sleeve. Oils from your
fingers could reduce cleaning and could affect card quality.
9 Continue to hold the spindle by the ends. Replace the spindle with sleeve in the
printer (step 3 in Figure 4-5).
10 Replace the print ribbon cartridge.
11 Close the swing arm, pressing it down until the push latch clicks into place.
12 Close the cover by lifting it slightly, move the support up so it is parallel with the
hinges, and lower the cover.
i
If the printer has a locking cover, lock the cover after closing it.
♦
Using the magnetic stripe cleaning card
The printer’s magnetic stripe module should be cleaned when the printer has
displayed several magnetic stripe errors that list running the magnetic stripe cleaning
card as a solution. See “Supplies and cards” on page B-1 for information about
ordering magnetic stripe cleaning cards.
!
Do not use the magnetic stripe cleaning card more than once every 2000 cards or
excessive wear can result.
User’s Guide for ImageCard® Magna™ and UltraGrafix® Magna™ Printers
Page 60

4-6 Maintaining the printer
Run the magnetic stripe cleaning card
1 Insert a magnetic stripe cleaning card into the exception card slot. Make sure the
arrow is on top and pointing into the printer (see Figure 4-6). (You can also
remove the card cartridge and place the cleaning card on the card input rollers.)
Figure 4-6: Insert the magnetic stripe cleaning card
!
Do not peel off the blue stripe on the back of the card.
2 Open the Status Monitor by double-clicking the icon.
3 Click the Mag Stripe button in the Clean area.
The printer automatically runs the magnetic stripe cleaning process and ejects the
card in the output stacker when it is complete.
4 Remove the used magnetic stripe cleaning card. The card can be used again.
Cleaning the printer rollers
The printer rollers move the card during printing or cleaning operations. Clean the
rollers once a week or when problems occur such as repeated card jams or cards not
being picked.
Clean printer rollers
1 Open the Status Monitor by double-clicking the printer icon.
♦
i
Make sure that printing of cards is complete before cleaning the rollers.
User’s Guide for ImageCard® Magna™ and UltraGrafix® Magna™ Printers
Page 61

Maintaining the printer 4-7
2 Clean the two pick rollers:
i
If the printer has a locking card cartridge, unlock the cartridge before
removing it.
a Remove the card cartridge.
b Remove the cap from the cleaning pen. Hold the end of the cleaning pen
against the first pick roller (step 1 inFigure 4-7).
2
1
Figure 4-7: Clean the pick rollers
c Click the “Printer” button in the Clean area of the Status dialog box. Click OK
on the prompt that appears. Do not insert a cleaning card! The driver sends a
command to the printer to run the printer cleaning card. The printer moves
rollers when it attempts to pick the card.
d Slowly move the pen on the pick roller.
e Lightly wipe any dirt from the end of the cleaning pen onto a clean cloth or
paper. Move the cleaning pen to another area of the roller.
f Repeat steps c through e until no more dirt appears on the pen.
g Repeat steps c through f, placing the cleaning pen on the second pick roller
(step 2 in Figure 4-7).
3 Clean the transport area rollers:
i
If the printer has a locking cover, unlock the cover before opening it.
a Open the printer cover and remove the print ribbon cartridge. The card
cartridge should stay out of the printer.
User’s Guide for ImageCard® Magna™ and UltraGrafix® Magna™ Printers
Page 62

4-8 Maintaining the printer
b Place the cleaning pen on top of the first transport roller (location 1 in
Figure 4-8).
D
1
2
Figure 4-8: Roller locations in the card track
i
Do not place the pen next to the black transport base. The pen can get
pinched between the roller and the transport base.
c Do one of the following to turn the rollers in the printer.
• Click the “Printer” button in the Clean area. Click OK on the prompt that
appears. Do not insert a cleaning card! The driver sends a command to
the printer to run the printer cleaning card. The printer moves rollers when
it attempts to pick the card.
• Turn the card advance knob to move rollers by hand.
d Move the pen on the roller.
e Lightly wipe any dirt from the end of the cleaning pen onto a clean cloth or
paper. Move the cleaning pen to another area of the roller.
f Repeat steps c through e for the roller at location 1 until no more dirt appears
on the pen or cloth.
g Move the cleaning pen to location 2 (in Figure 4-8). Repeat steps c through f.
h If the printer has a magnetic stripe module, move the cleaning pen to location
3 (in Figure 4-8). Repeat steps c through f.
4
3
L
i Replace the print ribbon cartridge and close the swing arm.
4 Clean the exit roller.
a Begin with the swing arm down and latched.
b Hold the end of the cleaning pen against the top of the lower exit roller
(location 4 in Figure 4-8).
c Do one of the following to turn the rollers in the printer.
• Click the “Printer” button in the Clean area. Click OK on the prompt that
appears. Do not insert a cleaning card! The driver sends a command to
the printer to run the printer cleaning card. The printer moves rollers when
it attempts to pick the card.
• Turn the card advance knob to move rollers by hand.
d Move the pen on the roller.
User’s Guide for ImageCard® Magna™ and UltraGrafix® Magna™ Printers
Page 63

Maintaining the printer 4-9
e Lightly wipe any dirt from the end of the cleaning pen onto a clean cloth or
paper. Move the cleaning pen to another area of the roller.
f Repeat steps c through e for the roller at location 4 until no more dirt appears
on the pen or cloth.
g Lower the swing arm by grasping the handle and pushing it down into
position.
i
You can also clean the rollers in the duplex or pass-through mechanism
(location D in Figure 4-8), and in the laminator (location L in Figure 4-8). Turn
the black duplex wheel to move rollers in the duplex or pass-through
mechanism. Turn the laminator advance knob to turn the wheels in the
laminator.
h Close the printer top cover by lifting the top slightly and moving the support so
it is parallel with the hinges. Then lower the cover into position.
i
If the printer has a locking top cover, lock the cover after closing it.
5 Replace the card cartridge.
i
If the printer has a locking card cartridge, lock the cartridge after replacing it.
6 Print a card to verify the quality of printing. You can print a printer test card, a
sample card, or a card using your card creation application.
♦
Using the duplex/laminator cleaning card
If your printer includes a duplex module, a topcoat module, or an overlay module, use
the duplex/laminator cleaning card to maintain card quality and reduce the likelihood
of jammed cards in the duplex and laminator modules.
Use the duplex/laminator cleaning card once a month or when problems occur, such
as repeated card jams in the overlay or topcoat module. See “Supplies and cards” on
page B-1 for ordering information.
Use the duplex/laminator cleaning card
i
If the printer has a locking card cartridge, unlock the cartridge before removing it.
1 Remove the card cartridge and set it aside.
i
If the print ribbon sticks to the duplex/laminator cleaning card, remove the
print ribbon and repeat this procedure with a new cleaning card.
User’s Guide for ImageCard® Magna™ and UltraGrafix® Magna™ Printers
Page 64

4-10 Maintaining the printer
2 Peel the middle strip of protective paper from both sides of the duplex/laminator
cleaning card (see Figure 4-9).
i
The outside protective paper strips must stay on the card.
Keep
Remove
Keep
Figure 4-9: Duplex/laminator cleaning card
3 Insert the duplex/laminator cleaning card near the bottom of the card cartridge
cavity (see Figure 4-10).
Figure 4-10: Insert the duplex/laminator cleaning card
4 Open the Status dialog box by double-clicking the icon.
5 Click the Duplex/Laminator button in the Clean area.
The printer automatically runs the laminator cleaning process and ejects the card
in the output stacker when it is complete.
6 Remove the used cleaning card and discard it.
7 Replace the card cartridge. Push the bottom of the card cartridge until it clicks into
place.
i
If the printer has a locking card cartridge, lock the cartridge after replacing it.
The duplex and laminator modules are clean and the printer is ready to resume
normal operation.
♦
User’s Guide for ImageCard® Magna™ and UltraGrafix® Magna™ Printers
Page 65

Maintaining the printer 4-11
Cleaning the supply tracker
The supply tracker in the optional overlay or topcoat module can become
slippery, which might cause messages to appear. Clean the supply tracker weekly or
when needed.
Use a printer cleaning card to clean the supply tracker. You can also use a duplex/
laminator cleaning card; however, with this card, it is more difficult to clean the full
width of the supply tracker.
Clean the supply tracker
1 Power off the printer.
!
The heated roller in the overlay or topcoat module operates at 400° F (200°
C). Wait 30 minutes or until the heated roller area is cool.
2 Lift the top cover, and then move the cover support down so it rests on the internal
frame.
i
If your printer has a locking cover, unlock the cover before opening it.
3 Prepare a printer cleaning card.
– If you just used a printer cleaning card in the printer, you can use that card to
complete this procedure.
– If you have not run a printer cleaning card, remove the protective paper from
one side of the card.
Figure 4-11: Remove the protective paper from the cleaning card
4 Lift the supply tracker until it stops and is held in place.
i
Remove the supply cartridge for easier access to the supply tracker. See
“Removing the supply cartridge” on page 2-8 for steps to follow.
User’s Guide for ImageCard® Magna™ and UltraGrafix® Magna™ Printers
Page 66

4-12 Maintaining the printer
5 Roll the sticky surface of the cleaning card against the supply tracker. Rotate the
supply tracker to clean all sides.
!
Do not touch the surface of the supply tracker with your fingers. Oils from the skin
can cause the supply tracker to slip or can affect card quality.
Figure 4-12: Clean the supply tracker
i
Replace the supply cartridge if it was removed. See “Replacing the supply
cartridge” on page 2-10 for steps to follow.
6 Lower the supply tracker.
7 To close the cover, lift the top slightly. Move the cover support up so it is parallel
with the hinges and lower the cover.
i
If the printer has a locking cover, lock the cover after closing it.
8 Dispose of the used cleaning card.
Cleaning the heated roller
At times, the heated roller in the optional overlay or topcoat module can have deposits
that affect card appearance. Clean the heated roller to remove deposits and improve
card appearance.
Clean the heated roller
1 Power off the printer. The heated roller in the overlay or topcoat module operates
at 400° F (200° C). Wait 30 minutes or until the heated roller area is cool.
♦
!
The cleaning stick can withstand the operating temperature of the heated
roller. However, your hands will be close to the heated roller. Wait until the
heated roller is cool to avoid burning your hands.
User’s Guide for ImageCard® Magna™ and UltraGrafix® Magna™ Printers
Page 67

Maintaining the printer 4-13
i
If your printer has a locking cover, unlock the cover before opening it.
2 Lift the top cover, and then move the cover support down so it rests on the internal
frame.
3 Remove the supply cartridge to access the heated roller. See “Removing the
supply cartridge” on page 2-8.
!
Use only the cleaning stick on the heater roller. Tools and sharp objects can
permanently scratch the heated roller and reduce card quality.
4 Use the cleaning stick to remove deposits from the heated roller.
a Push the cleaning stick back and forth on the heated roller (step 1 in
Figure 4-13).
i
The heated roller is above the card track, mounted in a pivoting frame.
b Use the cleaning stick to move the heated roller and make another area
available for cleaning (step 2 in Figure 4-13).
c Repeat steps a and b to clean the entire area of the heated roller.
1
Heated roller
Figure 4-13: Clean the heated roller
5 Replace the supply cartridge. See “Replacing the supply cartridge” on page 2-10.
6 To close the cover, lift the top slightly. Move the cover support up so it is parallel
with the hinges and close the cover.
i
If the printer has a locking cover, lock the cover after closing it.
7 Power on the printer to resume card production.
i
If these steps do not fix the problem, contact your service provider.
♦
User’s Guide for ImageCard® Magna™ and UltraGrafix® Magna™ Printers
2
Page 68

4-14
Cleaning tips
Follow these tips to clean your printer effectively and maintain optimum operation.
Clean the ribbon tracker using the printer cleaning pen. The ribbon tracker is
•
located on the swing arm (see Figure 4-14).
Some card features can require more frequent cleaning of the printer, especially if
•
the cards are not high quality. Signature panels and magnetic stripes can deposit
particles on rollers. Set the prompted cleaning cycle more often than the default of
every 250 cards.
Maintaining the printer
Figure 4-14: Clean the ribbon tracker
Clean printer rollers regularly, such as weekly, or every 1000 cards. If your printer
•
is connected over a network using a print server, the cleaning frequency set in the
printer will apply to cards sent from all attached PCs.
If you use StickICards, clean the card tracks after every 100 cards. Use the
•
cleaning pen to reach most areas of the card track. Use an isopropyl alcohol swab
(not included in the cleaning kit) to reach hidden areas of the card track.
If the printer includes an optional topcoat or overlay module, use the cleaning pen
•
to remove deposits from the guides of the supply cartridge. Clean the guides on a
regular basis, such as weekly.
Cleaning the printhead
The printhead can have contamination stuck to it. You might notice it as unprinted
lines on printed cards. Clean the printhead only when needed, such as:
The printhead has been accidently touched, such as when changing supplies or
•
clearing a card jam
You have replaced the printhead
•
Your observe problems with card appearance, as described in “Troubleshooting”
•
on page 5-1
!
Do not touch the printing edge of the printhead cartridge with your fingers. The oils
on your fingers can damage the printhead.
!
Do not bump the printing edge of the printhead cartridge with any sharp objects.
Sharp objects can permanently damage the printhead.
User’s Guide for ImageCard® Magna™ and UltraGrafix® Magna™ Printers
Page 69

Maintaining the printer
Use the cleaning pen to clean the printhead. Do not use a cotton swab. The fibers
from the cotton can stick to the printhead.
Clean the printhead
1 Power off the printer, and disconnect it from the power source.
2 Open the printer cover.
3 Move the top cover support into position and allow the cover to rest on the support
4 Press down on the swing arm. The push latch will release the swing arm. Using
5 Open the cleaning pen.
6 Using gentle pressure, move the cleaning pen back and forth along the full length
i
If your printer has a locking cover, unlock cover before opening it.
bar.
the handle, lift the swing arm until it is fully open.
of the printhead edge. Be sure to clean the rounded edge of the printhead
completely.
4-15
Edge of the printhead
Figure 4-15: Clean the printing surface of the printhead
i
If the cleaning pen does not remove all contamination from the printhead,
contact your service provider for additional assistance.
7 Close the swing arm, by grasping the handle, lowering it into position, and
pressing it down until the push latch clicks into place.
8 To close the cover, lift the top slightly. Move the support up so it is parallel with the
hinges and lower the cover.
i
If your printer has a locking cover, lock the cover after closing.
9 Connect the power cable to the power source and power on the printer.
User’s Guide for ImageCard® Magna™ and UltraGrafix® Magna™ Printers
Page 70

4-16 Maintaining the printer
Print a card to verify the quality of printing. You can print a Windows test page or a
sample card. If card quality is still inadequate, see “Problems with card appearance”
on page 5-8.
♦
Replacing the printhead cartridge
The printer uses an operator-replaceable printhead cartridge. For more information
about printhead cartridges, see “Supplies and cards” on page B-1.
Remove the printhead cartridge
!
Do not touch the printing edge of the printhead cartridge. If you do, clean it using
the cleaning pen, as described in “Cleaning the printhead” on page 4-14.
!
Do not bump the printing edge of the printhead cartridge with any sharp objects.
Sharp objects can permanently damage the printhead.
1 Power off the printer.
i
If your printer has a locking cover, unlock the cover before opening it.
2 Open the top cover, and then move the support down so it rests on the internal
frame.
3 Push down on the swing arm. The push latch will release the swing arm. Grasp
the handle and lift the swing arm up until it is fully open.
4 Press down on the green printhead cartridge latch to release the printhead (step 1
in Figure 4-16).
Figure 4-16: Printhead cartridge latch lever
User’s Guide for ImageCard® Magna™ and UltraGrafix® Magna™ Printers
Page 71

Maintaining the printer 4-17
5 Lift the printhead cartridge up and off the swing arm (step 2 in Figure 4-16).
6 Remove the printhead cables.
– Push the black locking tabs to the side. Remove the gray connector of the
printhead data cable from the printhead cartridge (see Figure 4-17).
– Pull firmly on the white connector of the printhead power cable to remove it
from the printhead cartridge. You can gently pull on the wires attached to the
plug if needed to remove the cable.
Power cable
Data cable
Ground cable
Figure 4-17: Printhead cables and connectors
7 Remove the ground cable connector from the ground tab of the swing arm by
pulling on the red sleeve (see Figure 4-18).
Figure 4-18: Printhead ground cable
♦
User’s Guide for ImageCard® Magna™ and UltraGrafix® Magna™ Printers
Page 72

4-18 Maintaining the printer
Replace the printhead cartridge
1 Carefully align the openings on the (white) power cable plug with the wires of the
power receptacle on the printhead. Push the cable’s plug all the way onto the
receptacle (see Figure 4-17).
2 Push the (gray) data cable plug into the new printhead cartridge (see
Figure 4-17). Make sure the locking tabs are in place.
!
Do not press on the wires of the printhead cables.
3 If the printhead has a ground cable, slide the ground cable connector onto the
ground tab of the swing arm (see Figure 4-18).
4 Align the printhead cartridge pins with the printhead cartridge slots on the swing
arm (see Figure 4-19).
5 Slide the new printhead cartridge onto the swing arm, so the pins slide into the
slots (see Figure 4-19).
1
1
Figure 4-19: Align pins with slots on the swing arm
User’s Guide for ImageCard® Magna™ and UltraGrafix® Magna™ Printers
Page 73

Maintaining the printer 4-19
i
The notches on the printhead cartridge should align with the notches on the
spring bar (A in Figure 4-20).
A
2
1
Figure 4-20: Secure the printhead cartridge
6 Hold the printhead cartridge latch lever down (step 1 in Figure 4-20) and pivot the
printhead cartridge down toward the swing arm (step 2 in Figure 4-20). Release
the latch lever when the printhead cartridge is in place.
7 Clean the printhead. Move the cleaning pen back and forth along the length of the
printhead edge. (See Figure 4-15 on page 4-15.) Be sure to completely clean the
rounded edge of the printhead.
8 Close the swing arm, pressing it down until the push latch clicks into place.
9 To close the cover, lift the top slightly. Move the support up so it is parallel with the
hinges and lower the cover.
i
If the printer has a locking cover, lock the cover after closing it.
10 Power on the printer.
11 Print a card to verify the quality of printing. You can print a sample card or a card
using your card creation application. If card quality is still inadequate, see
“Troubleshooting” on page 5-1.
♦
User’s Guide for ImageCard® Magna™ and UltraGrafix® Magna™ Printers
Page 74

4-20 Maintaining the printer
User’s Guide for ImageCard® Magna™ and UltraGrafix® Magna™ Printers
Page 75

Troubleshooting
5
This chapter explains how to troubleshoot the Datacard®
Magna™ Class photo ID printer with Advanced Imaging
Technology™ and how to obtain service. It explains:
•
What to do if you think the printer is not working
•
How to make test cards
•
Problems you might see in the appearance of cards
•
How to obtain service
•
How to package the printer to return for service
When you experience problems using the printer, follow these guidelines:
•
Record the printer model and serial number. The model and configuration are
displayed on a label that is visible when you open the top cover.
•
Keep notes on the problem, including the message number and the solutions you
attempt.
•
Obtain information about the supplies used, including:
– Card stock and type (such as composite or PVC, three-track magnetic stripe,
manufacturer, and so on). This information is located on the packaging for
cards.
– Type of ribbon (such as YMCKT) and the lot number used for personalizing
cards. This information is located on the package of the ribbon.
– Lot number of the overlay supply roll if used. This information is located on the
package or label of the supply.
If you need to call for service, this information will help your service representative
address your concerns.
5
For more information about messages, see “Responding to messages” on page 2-19.
User’s Guide for ImageCard® Magna™ and UltraGrafix® Magna™ Printers
Page 76

5-2 Troubleshooting
Troubleshooting guide
Use the following to help you locate information about different types of problems.
Problem Location
Printer beeps without a message
displayed on the PC
Installation problems See “Install the printer” on page 7-1.
Appearance of printed cards See “Problems with card appearance”
Communication between PC and
printer (parallel port)
Communication between PC and
printer (USB)
Messages displayed on the PC Click the Help button on the message
Printer beeps because of a problem
and a message is displayed on the
PC
Card did not print as expected See “Working with Properties and
See “Responding to messages” on
page 2-19.
on page 5-8.
See “Setup tips” on page 7-17.
See the
Magna™ and UltraGrafix® Magna™
Printers.
box.
Click the Help button on the message
box.
other driver dialog boxes” on page 3-2
and the
Magna™ and UltraGrafix® Magna™
Printers
e-Guide for ImageCard®
e-Guide for ImageCard®
.
If you think the printer is not working
The printer, printer driver, and card creation application work together to produce
cards. If the system is not working as you expect and does not display messages,
follow these steps to isolate the source of the problem before contacting your service
representative.
1 Make a printer test card, following the steps in “Making and evaluating test cards”
on page 5-3.
If the printer does not make a test card, the printer is likely not working properly.
2 Print a sample card, following the steps in “Printing sample cards” on page 7-17.
As an alternative, you can print a Windows test page, following the steps in
“Making and evaluating test cards” on page 5-3.
If the sample card or Windows test page does not print as expected, the printer
driver is likely not set or operating properly.
User’s Guide for ImageCard® Magna™ and UltraGrafix® Magna™ Printers
Page 77

Troubleshooting 5-3
3Check “Setup tips” on page 7-17 to make sure the PC and printer are set up
correctly.
4 Make sure the printer is the selected printer in the card creation application.
5 Use the card creation application to print a sample card. See “Making cards” on
page 2-16.
If the sample card does not print the card as expected, the card creation
application is likely not set or operating properly.
Making and evaluating test cards
You can make the following types of test cards.
•
Printer test cards verify the function of the printer. You print them using controls
on the printer. The personalization of the card is determined by the printer, the
print ribbon, and modules (such as magnetic stripe, duplex, overlay, or topcoat)
installed in the printer.
•
The Windows test page, which you can print on a card, verifies that the PC and
printer work together. You print them using the printer Properties dialog box on
the PC. The appearance of the card is determined by Windows.
•
Printer magnetic stripe test cards, which verify that the driver sends magnetic
stripe information to the printer and verifies that it is encoded. Use controls in the
Status Monitor to print magnetic stripe test cards.
i
You can also make sample cards, using the driver sample card or your card
creation application to test print quality and card design. Do not make sample
cards until you are sure the printer and driver work properly (by printing a printer
test card and Windows test page). See “Printing sample cards” on page 7-17.
Follow these steps to make printer test cards on all supported Windows operating
systems.
Make a printer test card
i
The Magna Class printer does not need to be connected to a PC to print this card.
1 Power off the Magna Class printer.
2 Confirm that all supplies are loaded: cards, print ribbon, and optional overlay or
topcoat material. See “Using the printer” on page 2-1 if needed.
i
If the printer has a magnetic stripe module, the cards for a printer test card
must have a magnetic stripe. If it is a three-track module, be sure to use the
high coercivity blank cards shipped in the supplies kit.
3 Press and hold the Ready button (1), and then power on the printer (2) as shown
in Figure 5-1. Hold the Ready button until the printer sounds three tones, usually 5
to 10 seconds.
User’s Guide for ImageCard® Magna™ and UltraGrafix® Magna™ Printers
Page 78

5-4 Troubleshooting
2
1
Figure 5-1: Press and hold Ready button (1) and then Press Power switch (2)
4 Release the Ready button. You hear the internal components initialize. Allow 30
to 60 seconds for the printer to begin printing the test card. The status light will
flash green while the printer is processing the data.
i
i
If the printer includes a topcoat or overlay module, the module might require time
to heat up. The card pauses and the module makes a series of beeps while it is
warming up.
5 Remove the card from the card output stacker. A printer test card is shown in
Figure 5-2.
If the printer test card did not print successfully, see “Status light” on page 2-15. If
needed, turn to “Troubleshooting” on page 5-1.
Printer test card
The printer test card is designed to perform most functions available in the printer.
Red
Green
Dark Blue
Black
♦
Black Border
Blue Cyan
Magenta
Yellow
Black
Figure 5-2: ImageCard printer test card (using color ribbon)
User’s Guide for ImageCard® Magna™ and UltraGrafix® Magna™ Printers
Page 79

Troubleshooting 5-5
i
Your service provider might ask you to use a different procedure to make a
printer test card. The card printed might have additional areas printed on it.
For UltraGrafix printers, the test card is printed with one color, such as black.
Check the following:
•
The test card has the pattern shown on the front of the card. The back of the card
will be printed with a similar pattern if the printer includes a duplex module.
•
If a magnetic stripe module is installed in the printer and enabled, the following
data is encoded on the card:
Track Format Data
Track 1 (IATA) TEST PATTERN IATA CHARACTER
SUBSET 0123456789
Track 2 (ABA) 012345678012345678990123456789
Track 3 (TTS) 0123456789=9876543210
Track 3 (NTT) 0123456789=9876543210
See “Magnetic stripe encoding” on page D-1 for more information about magnetic
stripe tracks.
•
The tracks available depend on the type of module installed.
•
The magnetic stripe data on the printer test card is generated by the printer and
does not test driver-to-printer communication.
•
If a topcoat module is installed in the printer and enabled, topcoat is applied to the
front of the card.
•
If an overlay module is installed in the printer and enabled, an overlay patch is
applied to the front of the card.
If you are not satisfied with the appearance of the test card, see “Problems with card
appearance” on page 5-8 to identify the problem and possible solutions.
Windows test page
Follow these steps to print a Windows test page on all supported operating systems.
Print the Windows test page
i
i
The printer must be connected to the PC with the driver installed, and both printer
and PC must be running.
1 Select Start from the Windows taskbar.
2 Select Settings and then Printers (Printers and Faxes on Windows XP) from the
Windows Start menu. The Printers (and Faxes) window appears.
3 Click once on the printer icon.
User’s Guide for ImageCard® Magna™ and UltraGrafix® Magna™ Printers
Page 80

5-6 Troubleshooting
p
4 Select File from the Printers menu bar, and then select Properties. The Properties
dialog box appears.
5 Select the Print Test Page button on the General tab. Wait while Windows creates
a test page image. The card will print when the PC and printer are connected, and
the printer and driver are working together.
i
i
After you select the Print Test Page button, Windows displays a wizard asking if
the page printed correctly. Click “Yes” on this dialog box to end the Wizard. The
“Setup tips” on page 7-17 provide the information you need to address problems
with PC to printer communication.
6 Remove the card from the card output stacker.
The card should look similar to the cards shown in Figure 5-3 and Figure 5-4. The
exact appearance depends on the operating system and selections made on the
PC (some cards have more characters printed while others have fewer
characters).
If it does not print, see “Setup tips” on page 7-17.
Microsoft
Windows
Congratulat
If you can
read this
information
you have
98
win98t
Figure 5-3: Windows test page, portrait orientation
Win
Microsoft
Windows
NT
NT
Print
winNTtp
Figure 5-4: Windows test page, landscape orientation
The Windows test page has a slightly different appearance, depending on the
operating system and how the printer is connected to the PC.
User’s Guide for ImageCard® Magna™ and UltraGrafix® Magna™ Printers
Page 81

Troubleshooting 5-7
i
The Windows test page is generated by Microsoft Windows. The small size of the
card, compared to printer paper, means that some of the text is not printed on the
card.
♦
Magnetic stripe test card
If the printer includes a magnetic stripe module, you can print a magnetic stripe test
card. The card uses the magnetic stripe settings in the Properties, Default Document
Properties, or Printing Preferences dialog box.
Use this card to verify that the printer encodes a card correctly.
i
i
If the printer is set to print a custom magnetic stripe format, it will not print this test
card successfully. The driver will display a message indicating that the data does
not meet the requirements for the magnetic stripe track or that it cannot read the
data.
Print a magnetic stripe test card
i
i
The printer must be connected to the PC with the driver installed, and both printer
and PC must be running.
1 Double-click the printer icon in the System tray. The Status Monitor
opens.
2 Make sure that magnetic stripe cards are loaded in the card cartridge. (See
“Loading cards” on page 2-3 for information on loading cards.)
3 Click once on the Mag Stripe Card button in the Test Cards area. The printer
driver formats card data for the type of module installed, as follows:
– Three-track: IAT formatted data (IATA data on track 1, ABA data on track 2,
and TTS data on track 3). See “Magnetic stripe encoding” on page D-1 for
more magnetic stripe information.
– NTT track: NTT formatted data on the track
4 Remove the card from the card output stacker.
5 Test the card by passing it through a card reader that will display the data
encoded on the card. The encoded data should match the data printed on the test
card.
♦
User’s Guide for ImageCard® Magna™ and UltraGrafix® Magna™ Printers
Page 82

5-8 Troubleshooting
Problems with card appearance
Problems with card appearance can be the result of the following:
•
Image capture tools, such as the camera
•
Card creation application, which displays the image
•
Limitations in technology, such as differences between how an image looks on the
monitor and how it looks after it is printed
•
Printer maintenance or PC settings
i
New Magna Class printers include Datacard’s Advanced Imaging Technology™
(AIT). Cards printed with Advanced Imaging Technology have a different
appearance than cards printed with earlier Magna Class printers, including those
with Tru Image™.
This section describes possible problems you might observe with the quality of cards
you produce with the Magna Class printer. To diagnose and fix card quality problems,
find the symptom in the tables that follow. For each possible cause, attempt the
solutions listed.
Problem Troubleshooting
Print module
Print quality Table 5-1 on page 5-8
Topcoat quality—print ribbon Table 5-2 on page 5-14
Topcoat quality—optional topcoat
module
Overlay quality—optional overlay
module
Ta bl e 5 -1 describes problems that can originate in the print module.
Table 5-3 on page 5-16
Table 5-4 on page 5-18
Table 5-1: Print quality problems
What you see Possible causes Solutions
One or more unprinted
lines run the entire length
of the card.
The printhead might be
dirty or damaged.
Clean the printhead. See
Chapter 4.
Run a test card. See this
chapter.
If cleaning does not solve
the problem, replace the
printhead. See Chapter 4.
#
User’s Guide for ImageCard® Magna™ and UltraGrafix® Magna™ Printers
Page 83

Troubleshooting 5-9
Table 5-1: Print quality problems
What you see Possible causes Solutions
Part of the printed card is
blank.
The leading or trailing
edge of the printed card is
not the expected color.
ic4tcpnl
Cards might not meet
specifications.
Cards might be dirty.
The printhead cartridge
might not be installed
properly.
Text to print on the card
was formatted using a
non-TrueType font.
Cards might be slipping in
the card track.
Two cards might have
been picked.
The print ribbon might not
be Datacard Platinum
Series ribbon.
The ribbon registration
might be incorrect.
Obtain and use a different
supply of cards. See
Appendix B.
Increase the frequency of
cleaning. See Chapter 4.
Run a cleaning cycle. See
Chapter 4.
Remove and reinstall the
printhead cartridge. See
Chapter 4.
Format text to print using
only TrueType fonts.
Run a printer cleaning
cycle, then clean the
rollers. See Chapter 4.
Fan cards before inserting
them in the card cartridge.
Obtain and use Datacard
Platinum Series print
ribbon. See Appendix B.
Change the ribbon panel
length. See the
e-Guide.
#
No image is printed on the
card or the printing is very
light.
The ribbon is loaded
incorrectly.
The printhead cartridge
power cable might be
loose.
The printhead cable or
printhead cartridge might
be damaged.
#
Obtain guidance from service before performing this task.
User’s Guide for ImageCard® Magna™ and UltraGrafix® Magna™ Printers
Remove and replace the
ribbon. See Chapter 2.
Power off the printer.
Make sure the printhead
power cable is securely
connected. See
Chapter 4.
Replace the printhead.
See Chapter 4.
#
If the problem persists,
contact your service
representative.
Page 84

5-10 Troubleshooting
Table 5-1: Print quality problems
What you see Possible causes Solutions
One color panel is not
aligned correctly with
other panels.
ic4tcaln
Printed card images
(photos) are blurry.
Printed cards, including
text, are blurry.
Cards might be slipping in
the card track.
The card registration
might be incorrect.
The image capture system
needs adjustment.
The rollers may be dirty.
The cards may not meet
specifications.
The printhead may be
dirty.
Run a printer cleaning
cycle, then clean the
rollers. See Chapter 4.
Set the position of printing.
See the
e-Guide
#
.
If the problem persists,
contact your service
representative.
See the information for the
image capture system.
Run a printer cleaning
cycle, then clean the
rollers. See Chapter 4.
Obtain and use a different
supply of cards. See
Appendix B.
Clean the printhead. See
Chapter 4.
If the problem persists,
contact your service
representative.
All card data is positioned
unevenly on the card.
#
Obtain guidance from service before performing this task.
The card registration
might be incorrect.
Set the position of printing.
See the
e-Guide
#
.
If the problem persists,
contact your service
representative.
User’s Guide for ImageCard® Magna™ and UltraGrafix® Magna™ Printers
Page 85

Troubleshooting 5-11
Table 5-1: Print quality problems
What you see Possible causes Solutions
Card is printed upside
down (the image is rotated
180 degrees).
Printed card images
(photos) look faded.
Printed cards, including
text, look faded.
The card creation
application has rotated the
card.
The card rotation setting
might be incorrect.
The image capture system
needs adjustment.
Print ribbon may have
been stored improperly or
damaged.
Color settings might not
be set for the card design.
The cards may not meet
specifications.
The printhead may be
dirty.
The print ribbon is not
Datacard Platinum ribbon.
See the information for the
card creation application.
Set the card rotation using
the Properties (98),
Printing Preferences
(2000 or XP), or Default
Document Properties (NT)
dialog box. See Chapter 2.
See the information for the
image capture system.
Change the print ribbon
and then print a test card.
See Chapter 2.
Change color settings.
See the e-Guide.
Obtain and use a different
supply of cards. See
Appendix B.
Clean the printhead. See
Chapter 4.
Use only Datacard
Platinum ribbon in the
Magna Class printer with
Advanced Imaging
Technology™.
If the problem persists,
contact your service
representative.
#
Obtain guidance from service before performing this task.
User’s Guide for ImageCard® Magna™ and UltraGrafix® Magna™ Printers
Page 86

5-12 Troubleshooting
Table 5-1: Print quality problems
What you see Possible causes Solutions
Part of the printed image
is discolored.
The printed card shows
small unprinted spots.
Cards might have
fingerprints or other dirt on
them.
The cards might be
contaminated or otherwise
not meet specifications.
The rollers might be dirty.
A signature panel is
located on the other side
of the card.
The card is scratched, the
card surface is uneven, or
the card edge has burrs.
The replaceable cleaning
sleeve might be dirty.
The printer rollers might
be dirty.
Handle cards without
touching the surface to be
printed. Wear gloves when
handling unprinted cards.
Obtain and use a different
supply of cards. See
Appendix B.
Run a printer cleaning
card, change the cleaning
sleeve, then clean the
rollers. See Chapter 4.
Redesign the card to
avoid printing photos over
signature panel residue.
If the problem occurs
frequently, obtain and use
a different supply of cards.
See Appendix B.
Run a printer cleaning
card and then change the
cleaning sleeve. See
Chapter 4
Run a printer cleaning
card, change the cleaning
sleeve, and then clean the
rollers. See Chapter 4.
The printed card shows
wavy lines along the
length of the card
(woodgrain).
#
Obtain guidance from service before performing this task.
User’s Guide for ImageCard® Magna™ and UltraGrafix® Magna™ Printers
The print ribbon is not
loaded correctly.
The printhead is not
aligned correctly.
Load the print ribbon
again. Make sure the
cartridge is firmly seated.
See Chapter 2.
Contact your service
representative.
Page 87

Troubleshooting 5-13
Table 5-1: Print quality problems
What you see Possible causes Solutions
The card shows irregular
lighter or darker spots.
The card shows wrinkles
in dark areas of printing.
Part or all of the printed
image is expanded.
The printhead is not
aligned correctly.
The printhead intensity is
too high.
The printhead is not
aligned correctly.
The printhead is not
installed properly.
Contact your service
representative.
Decrease the printhead
intensity setting. See the
e-Guide
#
.
Contact your service
representative.
Remove and reinstall the
printhead cartridge. See
Chapter 4.
If the problem persists,
contact your service
representative.
Part or all of the printed
image is compressed.
The card path may be
obstructed.
The rollers might be dirty.
The cards might not meet
specifications.
#
Obtain guidance from service before performing this task.
User’s Guide for ImageCard® Magna™ and UltraGrafix® Magna™ Printers
Check the card transport
track for jams. Check the
duplex or pass-through
module for jams. Clear
any card jams.
Run a printer cleaning
cycle, then clean the
rollers. See Chapter 4.
Obtain and use a different
supply of cards. See
Appendix B.
If the problem persists,
contact your service
representative.
Page 88

5-14 Troubleshooting
Table 5-1: Print quality problems
What you see Possible causes Solutions
Black-and-white images
are poorly dithered.
The operating system
does not support dithering.
The application does not
support dithering.
Topcoat applied using the print module
You might apply topcoat to the card using a T panel as part of the print ribbon or using
an optional topcoat module. Holographic topcoat can be applied only in the topcoat
module.
See the appropriate table for the application method for the problem you observe.
Use this table to address problems you see with topcoat applied using the print ribbon.
Table 5-2: Topcoat quality problems—print ribbon
What you see Possible causes Solutions
Random scratches appear
in the topcoat of the
printed card.
The inside of the printer
might be dirty.
Supplies were
mishandled.
Use a PC running the
Windows 98 SE or
Windows ME operating
system.
Use an application that
dithers colored images,
such as Datacard’s ID
Works software.
Run a printer cleaning
cycle and a duplex/
laminator cleaning card.
Clean the rollers. See
Chapter 4.
Store supplies in a clean
environment. Keep
supplies in their packaging
until loaded in the
cartridge.
The topcoat shows bands
across the width of the
card.
#
Obtain guidance from service before performing this task.
User’s Guide for ImageCard® Magna™ and UltraGrafix® Magna™ Printers
The printhead intensity is
too low.
The printhead is not
aligned correctly.
Increase the printhead
intensity setting for
topcoat. See the
Contact your service
representative.
e-Guide
#
.
Page 89

Troubleshooting 5-15
Table 5-2: Topcoat quality problems—print ribbon
What you see Possible causes Solutions
The topcoat shows lines
along the length of the
card.
A short edge of the
topcoat does not stick to
the card.
The card shows irregular
lighter or darker spots.
The printhead intensity is
too high.
The printhead is not
aligned correctly.
The printhead intensity is
too low.
The printhead is not
aligned correctly.
The topcoat panel of print
ribbon is wrinkling
because the intensity
setting is too high.
The printhead is not
aligned correctly.
Lower the printhead
intensity setting for
topcoat. See the
e-Guide
Contact your service
representative.
Increase the printhead
intensity setting for
topcoat. See the
e-Guide
Contact your service
representative.
Lower the printhead
intensity setting for
topcoat. See the
e-Guide
Contact your service
representative.
#
.
#
.
#
.
#
Obtain guidance from service before performing this task.
User’s Guide for ImageCard® Magna™ and UltraGrafix® Magna™ Printers
Page 90

5-16 Troubleshooting
Optional topcoat module
This section describes problems that might originate in the topcoat modules.
Table 5-3: Topcoat quality problems—topcoat module
What you see
Random scratches appear
in the topcoat of the
printed card.
Repeating scratches or
marks appear in the
topcoat of the printed
card.
The topcoat shows one or
more bands across the
width of the card.
Possible causes Solutions
The inside of the printer is
dirty.
Supplies were
mishandled.
The heated roller is dirty or
damaged.
The topcoat supply is not
loaded correctly in the
cartridge or the cartridge
is not fully seated in the
topcoat module.
Run a printer cleaning
cycle. See Chapter 4
Store supplies in a clean
environment. Keep
supplies in their packaging
until loaded in the
cartridge.
Clean the heated roller.
See Chapter 4.
In the problem persists,
contact your service
representative.
Load the topcoat supply in
the cartridge again. When
replacing the topcoat
cartridge, make sure it is
fully seated in the module
and locked. See
Chapter 2.
The topcoat shows wavy
lines along the length of
the card (woodgrain).
#
Obtain guidance from service before performing this task.
User’s Guide for ImageCard® Magna™ and UltraGrafix® Magna™ Printers
The guide bars in the
cartridge are bent or
misaligned.
The topcoat module needs
fine tuning.
Use a new topcoat
cartridge. See
Appendix B.
Contact your authorized
service representative.
Page 91

Troubleshooting 5-17
Table 5-3: Topcoat quality problems—topcoat module
What you see
The hologram of the
topcoat does not appear
on the card.
Particles of topcoat
appear under the
holographic topcoat or
overlay.
i
All topcoat materials
release particles. Cleaning
the inside of the printer
can help control topcoat
particles.
Possible causes Solutions
The Apply Material setting
is No.
Clear topcoat supply or
overlay supply is installed
in the topcoat cartridge.
The topcoat supply is not
loaded correctly in the
cartridge.
The inside of the printer
contains topcoat particles.
The supply is not a
Datacard-approved supply
material.
The lot number of supply
material produces
particles excessively.
Change the setting. See
Chapter 3.
Remove the topcoat
cartridge and change the
supply material to the
desired type. See
Chapter 2.
Remove the topcoat
cartridge. Load the supply
in the cartridge again. See
Chapter 2.
Run the duplex/ laminator
cleaning card. See
Chapter 4.
Obtain Datacard-approve d
topcoat material.
Contact your Datacard
supplies vendor.
A long edge of the topcoat
does not stick to the card.
(It might have a gray
appearance.)
The temperature of the
heated roller is too low.
The card has a T-panel
applied as part of the print
ribbon.
The heated roller is tilted
and is prevented from
pivoting.
Contact your service
representative.
Holographic topcoat is not
designed to be applied to
cards with a printed
topcoat (T panel). Switch
your ribbon type or stop
using holographic topcoat.
Contact your service
representative.
#
Obtain guidance from service before performing this task.
User’s Guide for ImageCard® Magna™ and UltraGrafix® Magna™ Printers
Page 92

5-18 Troubleshooting
Optional overlay module
This section describes problems originating in the optional overlay module.
Holographic or clear overlay can be applied in the overlay module.
When you apply overlay, you might see problems. Use this table to address problems
you see with overlay.
i
If your printer has the optional topcoat module, see Table 5-3.
Table 5-4: Overlay quality problems
What you see Possible causes Solutions
Supply material sticks to
leading edge of the card.
Supply material pulls the
card from the track.
Proximity cards do not
work after overlay is
applied.
Cards are bowed (curved)
too much.
Temperature is too high.
The overlay station needs
fine tuning.
Supply is loaded
incorrectly.
Temperature is too high.
You have switched to a
different card stock.
The overlay module needs
adjustment.
Debower is not set for the
cards you are processing.
Debower is not set for the
cards you are processing.
Decrease temperature for
the module. See the e-
-Guide.
-Guide.
#
#
Guide.
Contact your service
representative.
Load supply correctly. See
Chapter 2.
Decrease temperature for
the overlay module. See the
e
Change settings for the
modu le. See the
e
Contact your service
representative.
Set the debower to off. See
Chapter 2.
Set the debower to on. See
Chapter 2.
Temperature is too high
for the card stock.
Overlay patch comes off
the card when it is flexed.
#
Obtain guidance from service before performing this task.
User’s Guide for ImageCard® Magna™ and UltraGrafix® Magna™ Printers
Temperature is too low. Increase the temperature
Decrease temperature for
the overlay module. See the
e
-Guide.
#
#
e
-Guide.
for the overlay module. See
the
Page 93

Troubleshooting 5-19
Table 5-4: Overlay quality problems
What you see Possible causes Solutions
Overlay patch is off a long
edge of the card.
Jane Doe
Overlay patch is not
parallel to card edges.
Jane Doe
Supply material is not
loaded correctly in the
cartridge.
Supply material is wound
loosely on supply roll,
possibly because of hand
winding.
Supply material is not
loaded correctly in the
cartridge, the spool caps
are missing, or the
cartridge is not firmly
seated in the module.
Supply material is wound
loosely on supply roll,
possibly because of hand
winding.
Load the supply roll
correctly. See Chapter 2.
Remove used supply from
the take-up spool. Place
spool caps on both supply
and take-up spools. See
Chapter 2. If the problem
does not go away, change
the supply roll. See
Chapter 2.
Load the supply roll
correctly using the spool
caps. See Chapter 2. Make
sure there are no
obstructions when replacing
the cartridge.
Remove used supply from
the take-up spool. Place
spool caps on both supply
and take-up spools. See
Chapter 2. If the problem
does not go away, change
the supply roll. See
Chapter 2.
The guide bars in the
cartridge are bent or
misaligned.
Overlay patch is off the
trailing edge of the card.
There was slack in the
supply material.
The supply roll and
machine settings do not
match.
Jane Doe
Supply material is upside
down after hand winding.
Machine settings were
changed during service.
The heated roller does not
move.
#
Obtain guidance from service before performing this task.
User’s Guide for ImageCard® Magna™ and UltraGrafix® Magna™ Printers
Use a new overlay
cartridge.
Apply overlay on another
card. If problem repeats, go
to the next solution.
Change supply rolls. If that
fixes the problem, request
new supply rolls. If it does
not, change the supply
advance. See the e-Guide.
Load the overlay supply
correctly. See Chapter 2.
Contact your service
representative.
Contact your service
representative.
#
Page 94

5-20 Troubleshooting
Table 5-4: Overlay quality problems
What you see Possible causes Solutions
Overlay patch is off the
leading edge of the card.
Jane Doe
Overlay patch is wrinkled
on the card.
An overlay patch is on the
driver roller.
The rollers are dirty.
The supply tracker is
slipping.
The supply roll and
machine settings do not
match.
Machine settings were
changed during service.
Supply roll is not pushed
firmly onto supply spindle
or take-up spool is not
pushed firmly onto take-up
spindle.
Use a duplex/laminator
cleaning card. See
Chapter 4.
Use a duplex/laminator
cleaning card. See
Chapter 4.
Clean the supply tracker.
See Chapter 4.
Be sure your hands and the
materials used are clean
and free of grease or oil.
Change supply rolls. If that
does not fix the problem,
adjust the supply advance.
See Chapter 4.
#
Contact your service
representative.
Load the overlay supply
again. See Chapter 2.
The supply spindle needs
Jane Doe
#
Obtain guidance from service before performing this task.
adjustment.
Contact your service
representative.
User’s Guide for ImageCard® Magna™ and UltraGrafix® Magna™ Printers
Page 95

Troubleshooting 5-21
Table 5-4: Overlay quality problems
What you see Possible causes Solutions
Particles appear between
card and overlay.
The surface of the card or
overlay appears uneven.
The inside of the printer is
dirty.
The heated roller is dirty.
The supplies were
mishandled.
The supplies are not
Datacard-recommended.
The printer is being used
in a dirty environment.
The temperature setting is
too high.
The heated roller is
damaged.
The card stock is not
compatible with the
overlay material.
Use a printer cleaning card
and then use a duplex/
laminator cleaning card.
See Chapter 4.
Clean the heated roller. See
Chapter 4.
Store supplies in a clean
environment. Keep supplies
in packaging until loaded in
the cartridge.
Obtain and use Datacardrecommended supplies.
Move the printer to a clean
environment or clean the
environment.
Change the temperature
setting. See the e-Guide.
#
Turn off the power to the
printer. Contact your service
representative.
Obtain and use cards that
meet specifications or stop
using overlay.
The surface of the card
has ridges, and the
The supply was missing
an overlay patch.
overlay is missing. The
printer makes a sound
when the card is
processed.
#
Obtain guidance from service before performing this task.
User’s Guide for ImageCard® Magna™ and UltraGrafix® Magna™ Printers
Remake the card. If the
problem occurs frequently,
contact your representative
for supplies.
Page 96

5-22 Troubleshooting
Obtaining service
For repair assistance, contact your service representative. Place the service call from
a telephone close to the printer so that you can access the printer and the PC running
the driver while talking to the customer support representative.
Before you call for service, make sure you have the information recorded during
troubleshooting, as described on page 5-1. Also, make sure you have the serial
number of the printer. It is located on a label that is visible when you open the top
cover of the printer.
When to obtain service
Perform the steps at the beginning of this chapter before obtaining service. Call for
service if:
•
A troubleshooting process instructs you to call service
•
A troubleshooting process does not produce the expected result
•
You experience a problem repeatedly
Packing the printer for shipping
When service requests that you return the printer to a service center for repair, pack
the printer for shipping. You might also need to pack the printer to send it to another
location.
Pack the printer
1 Turn off power to the printer. If the printer includes a laminator module, allow the
module to cool before packing.
2 Remove the power cord from the printer and power receptacle. Remove the data
cable and any other cables attached to the printer.
– If you are shipping the printer to use at another location, pack the power cord,
data cable, and any other cables in the accessories box.
– If you are shipping the printer for service, do not ship cables with the printer
unless asked to do so.
3 Remove all cards from t he card cartridge, card out put stacker, and print er.
Do not ship cards unless asked to do so.
4 Remove the replaceable cleaning sleeve.
5 Secure the print ribbon cartridge. Leave the print ribbon cartridge in place or apply
pack ing tape. See Figure 7-4 for the location of the tape. Avoid applying tape to
labels in the printer.
6 Make sure all other supply cartridges are secured in place.
7 Close the cover.
User’s Guide for ImageCard® Magna™ and UltraGrafix® Magna™ Printers
Page 97

Troubleshooting 5-23
8 Use the original shipping carton, plastic bag, and foam shipping supports.
9 Remove the card output stacker (step 1 in Figure 5-5) from the printer and place it
in the accessories box.
10 Place the plastic bag around the printer and close it.
11 Place the foam shipping supports on the front and back of the printer (step 2 in
Figure 5-5). in the printer carton.
1
2
2
4
3
5
Figure 5-5: Pack a Magna printer for shipping
12 Place the printer in the shipping carton (step 3 in Figure 5-5).
13 Place the accessories box along the end of the shipping cushion, near the front of
the printer (step 4 in Figure 5-5).
i
If you are transporting the printer to another location for use, be sure to pack the
User’s Guide, card output stacker, data cable, power cord, any smart card serial
cables, printer driver CD, cleaning pen, warranty, and declaration of conformity in
the accessories box.
i
Service might ask you to ship cards or additional samples of your current
supplies. If service requests cards or supply samples, place them in an envelope,
plastic bag, or in the accessory box to prevent damage to the printer.
5
14 Close the shipping carton (step 5 in Figure 5-5).
User’s Guide for ImageCard® Magna™ and UltraGrafix® Magna™ Printers
Page 98

5-24 Troubleshooting
15 Secure the carton with shipping tape. Be sure to wrap around the shipping carton
several times to secure it.
16 Put a shipping label on the carton. If you are returning the printer for service, use
the address provided by service.
17 Ship the carton. If you are returning the printer for service, follow the instructions
provided by service to ship the carton to a service center.
♦
User’s Guide for ImageCard® Magna™ and UltraGrafix® Magna™ Printers
Page 99

Before you install
6
This chapter presents the following:
•
Skills that installers need
•
Physical, electrical, and other requirements for the site
•
Requirements for the PC used with the Datacard® Magna™ Class photo ID
printer printer with Advanced Imaging Technology™
•
The preferred sequence for installing this printer as part of an identification system
6
User’s Guide for ImageCard® Magna™ and UltraGrafix® Magna™ Printers
Page 100

6-2 Before you install
Installation audience
This manual is intended for persons using a Magna Class printer. To perform the
procedures in the installation section of this guide, you need the following skills:
•
Ability to read and understand written and graphical instructions
•
Experience and comfort installing hardware (such as a printer, scanner,
expansion card, etc.) in a personal computer (PC)
•
Experience with configuring applications and ports
•
Experience installing and using Microsoft® Windows® 98, Windows Me, Windows
2000, Windows XP, or Windows NT® (for Windows 2000, XP and NT the installer
must have administrator access to the PC)
•
Ability to perform simple troubleshooting using written and graphical instructions
If you do not feel comfortable with installing the printer, find a network support or other
technical professional to install the printer. Datacard-authorized service personnel
also use this information.
General requirements
When choosing a site for the Magna Class printer and its supplies, consider the
following general requirements:
•
Keep all dust, dirt, food, liquids, etc. away from the Magna Class printer at all
times.
•
Keep the top cover closed at all times, except when changing supplies, fixing
problems, or performing maintenance.
•
Do not use supplies or cards that have been dropped on the floor or have
otherwise become contaminated.
•
Keep paper and foreign materials off the Magna Class printer.
•
Place the Magna Class printer on a stable platform; keep it off the floor.
•
Place the Magna Class printer away from direct sunlight.
•
Place the Magna Class printer away from heating ducts, blowers, or other air
vents.
•
Do not use the Magna Class printer for purposes other than its intended use.
•
When cleaning around the Magna Class printer, prevent debris from entering the
printer.
•
Place the Magna Class printer in a clean office environment, protected from any
type of construction.
•
Store all supplies (ribbons, cards, etc.) in the original packaging until loaded in the
cartridges. Keep the original packaging closed.
•
Store all supplies in a clean, cool, dry location. See “Card storage specifications”
on page B-9 and “Supply roll storage” on page B-5 for information about the
storage environment for Magna Class supplies.
User’s Guide for ImageCard® Magna™ and UltraGrafix® Magna™
 Loading...