

Page 1
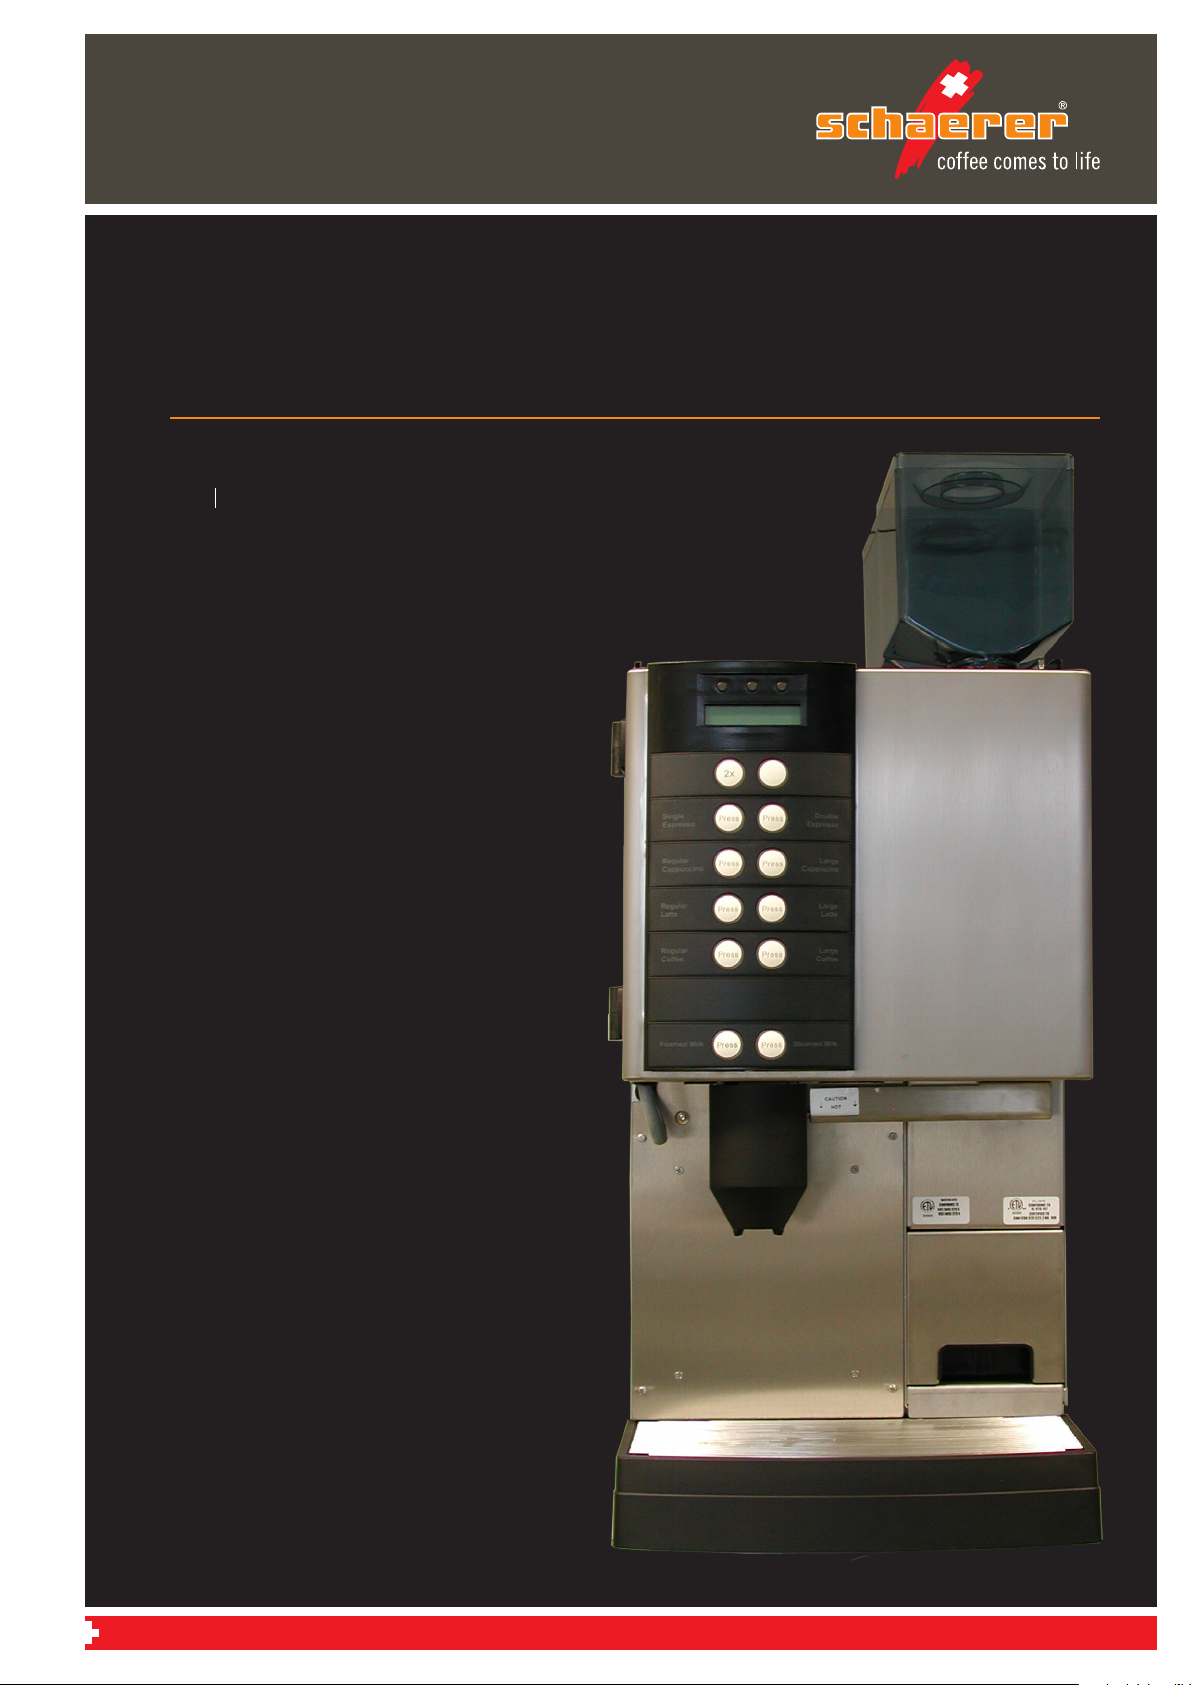
E6 Milk Unit
User Manual
V03 01.2008
SWISS MADE www.schaerer.com
Page 2
ADDITIONAL SAFETY INFORMATION
This Symbol requires special attention. It will inform you in detail on the safety instructions, commissioning, usage, operation, handling and programming of the E6Mu. It contains important safety instructions to ensure safe use and
operation.
This symbol indicates a risk of re and/or to life and health due to electric shock. Work on electric system must be carried out by authorized service personnel only. The supply voltage must comply with the information given on the machine’s serial plate. Never open the machine or expose its internal parts.
Read the safety notes on page 8 to 10 inside this User Manual.
Contact address USA: Contact address all other countries:
Schaerer USA Corporation M. Schaerer Ltd. BAMU - EN
2900 Orange Avenue, Suite 102 Gewerbestrasse 15
Signal Hill, CA 90755 3302 Moosseedorf
USA Switzerland
www.schaererusa.com www.schaerer.com Order number: 021700
Page 3
Introduction www.schaerer.com
www.schaerer.com
E6 Milk Unit
User Manual
V03 01.2008
Herausgeber:
M. Schaerer Ltd., CH-3302 Moosseedorf
Version:
Version 03
Software:
V 2.22
Designed an edited by:
M. Schaerer Ltd., CH-3302 Moosseedorf
© Copyright by:
M. Schaerer Ltd., CH-3302 Moosseedorf
01.2008
MIPA
The safety chapter (page 8) must be read before operating the coffee maker for the rst time!
All rights reserved, including translations into foreign languages. It is prohibited to copy, reproduce and distribute this document
or any excerpts thereof in any manner – including electronic means – without rst obtaining the publisher’s written consent. All of
the information, technical data, pictures and illustrations in this manual are based on the most current data available at the time of
printing. M. Schaerer Ltd. reserves the right to make changes at any time without issuing a separate notication. All pictures, illus-
trations and display messages in this manual serve only as examples. Due to a variety of possible options, your machine may differ
from the devices shown in this manual.
BAE6Mu - EN
Version 03 01.2008
3
3
Page 4
www.schaerer.com
4
BAE6Mu - EN
Version 03 01.2008
Introduction
CAUTION & WARNINGS
USE CAUTION WHILE OPERATING AND CLEANING THE E6Mu MACHINE!
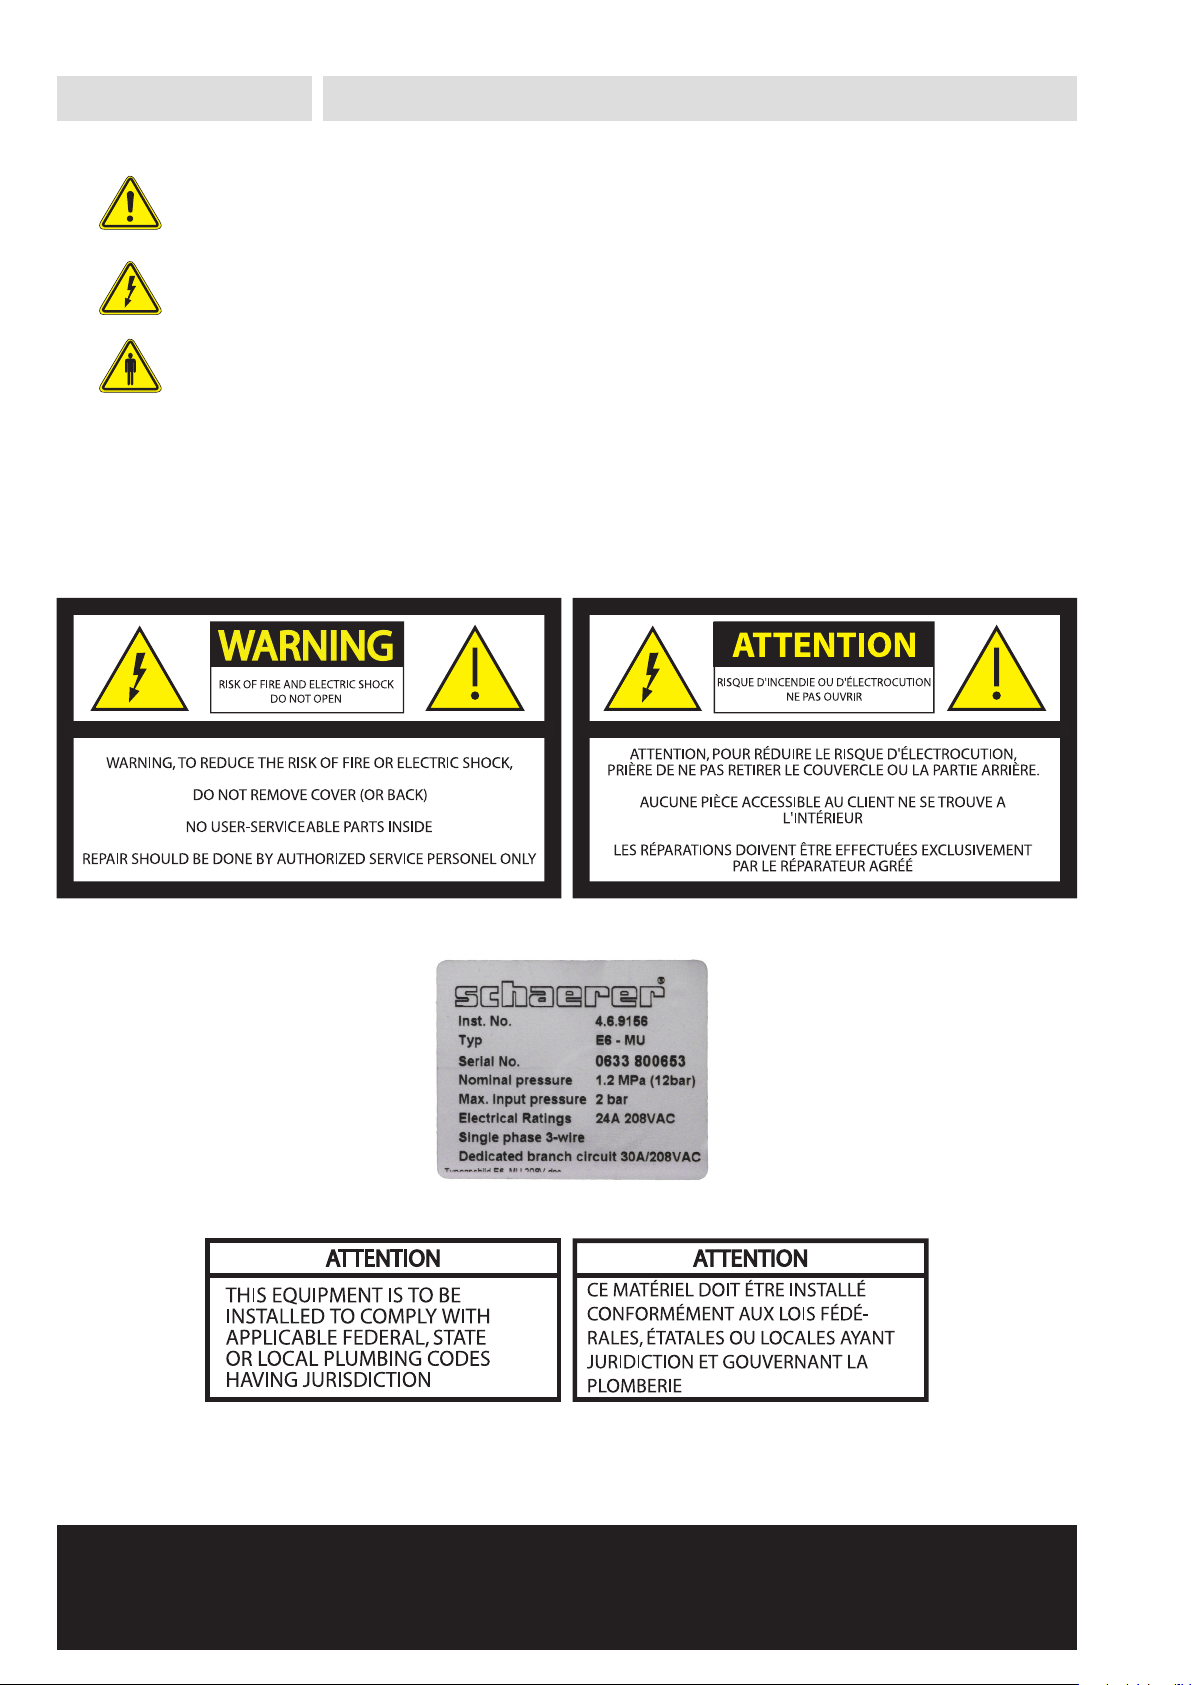
WARNING:
TO PREVENT ELECTRICAL SHOCK, DO NOT REMOVE SIDE OR BACK PANELS FROM THIS MACHINE.
NO USER SERVICABLE PARTS INSIDE. REFER SERVICING TO AUTHORIZED SERVICE PERSONNEL ONLY.
WARNING:
IF WATER OR SMOKE IS COMING FROM INSIDE THE MACHINE, TURN OFF MACHINE IMMEDIATELY.
UNPLUG THE MACHINE, TURN OFF WATER SUPPLY, AND CONTACT AN AUTHORIZED SERVICE
AGENT.
WARNING:
DO NOT MOVE MACHINE WHILE IT IS STILL CONNECTED TO UTILITIES.
CAUTION:
ALL DISPENSED PRODUCTS ARE EXTREMELY HOT! USE CAUTION WHILE OPERATING ALL
FUNCTIONS. KEEP HANDS AWAY FROM FOAMER/COFFEE SPOUT/SPLITTER WHILE DISPENSING OR
CLEANING (EXTREMELY HOT).
CAUTION:
DO NOT PLACE HANDS INSIDE MACHINE WHILE OPERATING, EXCEPT WHEN FOLLOWING
CLEANING PROCEDURES.
CAUTION:
DO NOT TILT MACHINE TO EITHER SIDE (VERY HEAVY).
CAUTION:
DO NOT PLACE LIQUID CONTAINERS (SYRUPS, MILK, ETC.) ON TOP OF THIS EQUIPMENT.
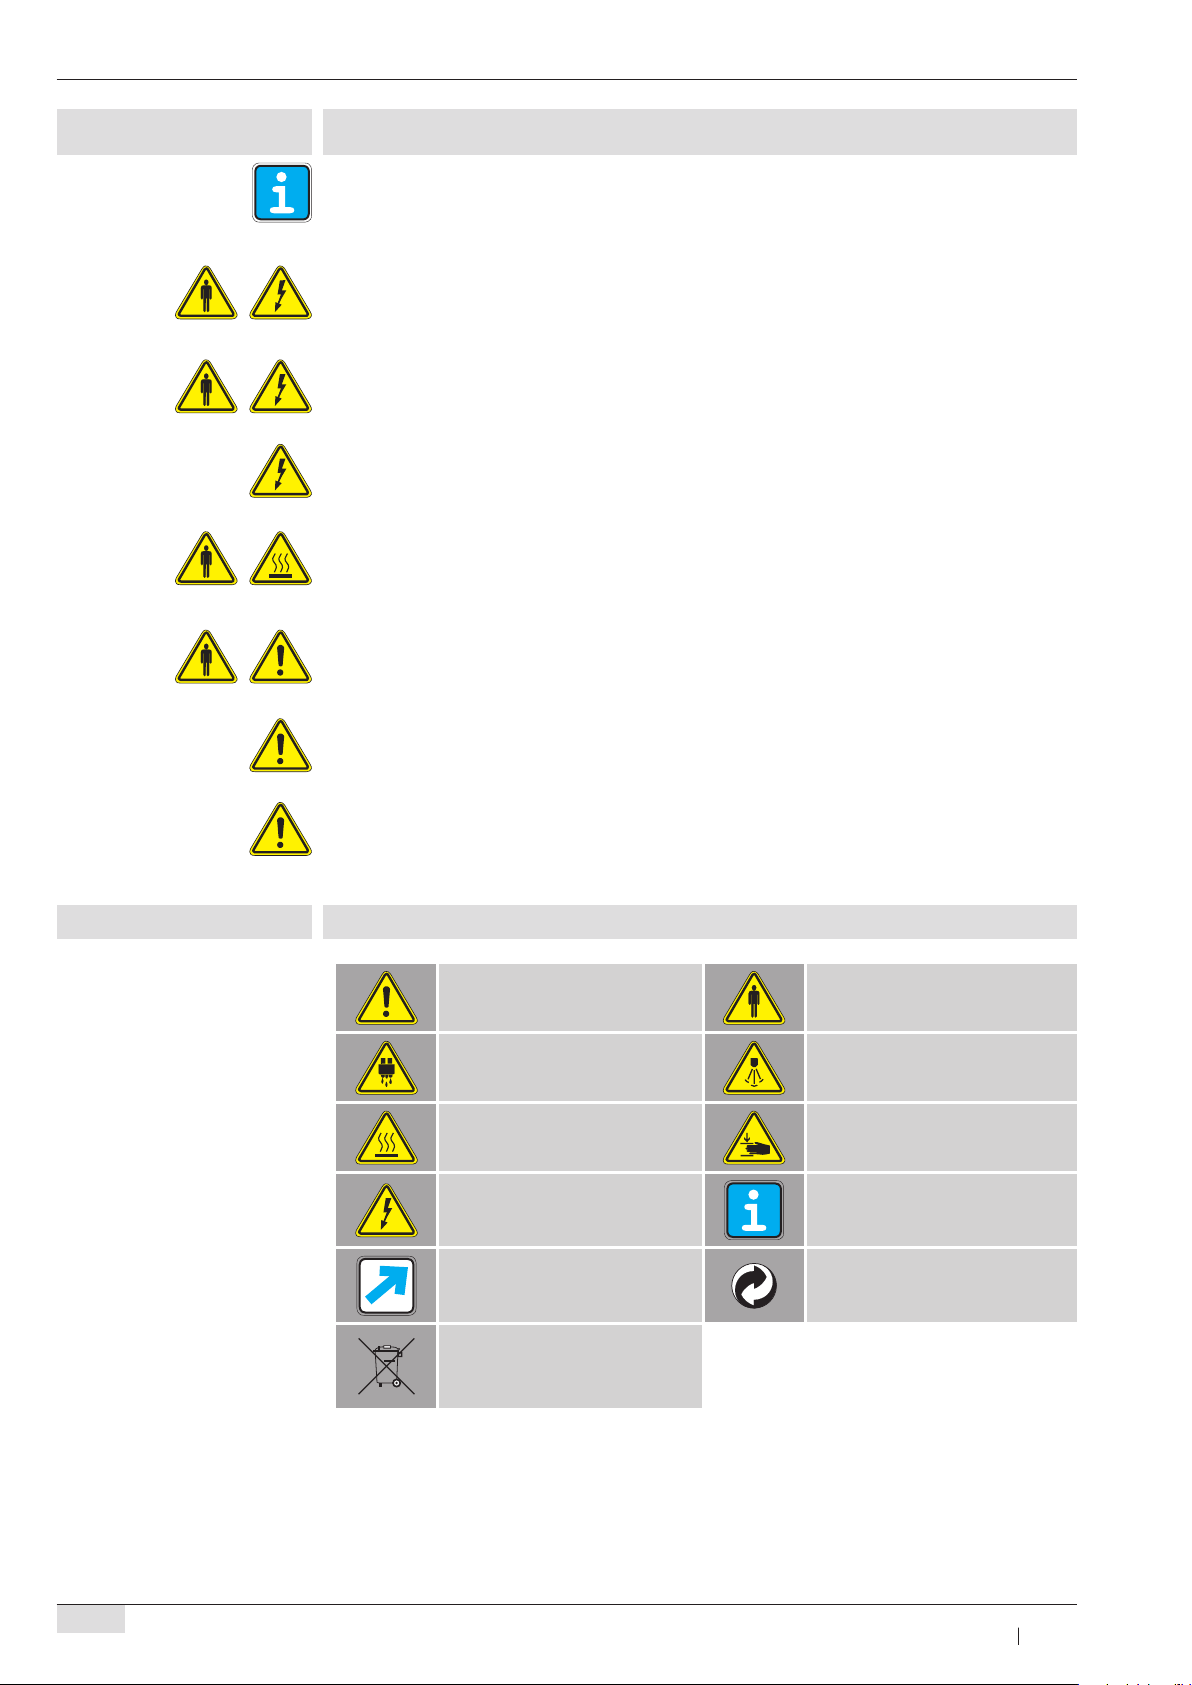
GENERAL SAFETY SYMBOLS AND PICTOGRAMS
CAUTION!
RISK OF DAMAGE TO MACHINE!
CAUTION!
HOT FLUID!
CAUTION!
HOT SURFACE!
CAUTION!
ELECTROCUTION!
CROSS-REFERENCE ENVIRONMENTAL ASPECTS
CAUTION!
USER AT RISK!
CAUTION!
HOT STEAM!
CAUTION!
RISK OF SQUEEZING!
REMARK
INFORMATION, TIPS
DISPOSAL!
THE MACHINE MUST BE
DISPOSED OF ACCORDING TO
REGULATIONS!
Page 5

www.schaerer.com
5
BAE6Mu - EN
Version 03 01.2008
Introduction
INTRODUCTION
WELCOME
With this new coffee machine, you have purchased a Swiss quality product especially designed
for the catering trade.
This manual will inform you in detail on the programming, commissioning, usage and cleaning of
your new machine. It also contains important safety instructions to ensure safe use.
Prior to commissioning the machine, carefully read the chapter "Safety notes". The manufacturer re-
jects any liability for damages that are caused by improper usage of the machine. Performance of the
coffee machine depends to a great extent on proper usage and careful maintenance of the machine.
We therefore recommend that you read all instructions carefully before commissioning the machine.
Keep the user manual at hand for future reference.
We trust you will enjoy using your new coffee machine!
Page 6

www.schaerer.com
6
BAE6Mu - EN
Version 03 01.2008
Introduction
TABLE OF CONTENTS
ADDITIONAL SAFETY INFORMATION ...................................................... 2
CAUTION & WARNINGS
GENERAL SAFETY SYMBOLS AND PICTOGRAMS ..............................................................4
............................................................................. 4
INTRODUCTION ............................................................................................. 5
WELCOME .............................................................................................................. 5
SAFETY NOTES ................................................................................................ 8
USER AT RISK ............................................................................................................8
RISK OF DAMAGE TO THE MACHINE ............................................................................. 9
HYGIENE ................................................................................................................. 9
INTENDED USE
LIABILITY
........................................................................................................ 10
................................................................................................................ 10
COMMISSIONING ......................................................................................11
INITIAL COMMISSIONING OF THE COFFEE MACHINE ...................................................... 11
SET-UP CONDITIONS ................................................................................................ 11
LOCATION ............................................................................................................ 11
INSTALLATION OF THE COFFEE MACHINE ..................................................................... 11
POWER SUPPLY ...................................................................................................... 12
WATER SUPPLY/DRAIN ............................................................................................. 12
INSTALLATIONSPLAN E6MU ....................................................................................... 13
PRODUCT DESCRIPTION ........................................................................... 14
GENERAL INFORMATION FOR THE MACHINE ................................................................ 14
MACHNINE OVERVIEW ............................................................................................ 15
E6MU INSIDE VIEW
ACCESSORIES ........................................................................................................ 17
.................................................................................................. 16
OPERATION ..................................................................................................18
REFILLING COFFEE BEANS ......................................................................................... 18
MAKING THE COFFEE MACHINE READY FOR OPERATION ............................................... 18
OPERATION MODES ................................................................................................ 18
SWITCHING ON THE COFFEE MACHINE ....................................................................... 18
CHANGING MILK BAG............................................................................................. 19
CHANGING MILK GALLON ...................................................................................... 20
FILLING MILK CONTAINER ......................................................................................... 21
BUTTON OVERVIEW ................................................................................................. 22
DRINK PREPARATION (SHOWN WITH OPTIONAL BUTTON PANEL) ....................................... 22
PREPARING ESPRESSO ............................................................................................. 22
PREPARING LATTE ................................................................................................... 23
PREPARING CAPPUCCINO ....................................................................................... 23
PREPARING "DECAF" PRODUCTS ................................................................................ 24
PREPARING TWO PRODUCTS AT ONE TIME .................................................................. 24
PREPARING FOAMED MILK ....................................................................................... 25
PREPARING STEAMED MILK ....................................................................................... 25
TIPS DURING OPERATION ......................................................................................... 26
Page 7

www.schaerer.com
7
BAE6Mu - EN
Version 03 01.2008
Introduction
PROGRAMMING: CHEF CARD ...............................................................27
NAVIGATION IN PROGRAMMING-LEVEL ...................................................................... 27
OVERVIEW PROGRAMMING: CHEF CARD
READ OUT COUNTERS: DAILY COUNTERS
READ OUT COUNTERS: MACHINE COUNTER ................................................................. 29
READ OUT COUNTERS: SERVICE COUNTER ................................................................... 30
READ OUT COUNTERS: CLEANING STATISTICS ............................................................... 31
READ OUT COUNTERS: ERROR STATISTICS
PRODUCT BUTTONS: ALL PRODUCTS
PRODUCT BUTTONS: CAPPUCCINO ............................................................................ 33
PRODUCT BUTTONS: MACCHIATO .............................................................................. 35
PRODUCT BUTTONS: LATTE ........................................................................................ 37
PRODUCT BUTTONS: HOT MILK
PRODUCT BUTTONS: MILK FOAM
PRODUCT BUTTONS: STEAM ...................................................................................... 41
SYSTEM SETTINGS .................................................................................................... 42
.................................................................................. 39
................................................................................ 40
................................................................... 27
..................................................................... 28
.................................................................... 31
........................................................................... 32
CLEANING ...................................................................................................43
DAILY CLEANING E6MU WITH MILK BAG ...................................................................... 43
DAILY CLEANING E6MU WITH MILK GALLON ................................................................ 45
DAILY CLEANING E6MU WITH MILK CONTAINER ............................................................ 47
WEEKLY CLEANING ................................................................................................. 49
TROUBLESHOOTING ...................................................................................51
E6MU DISPLAY & ERROR MESSAGES ........................................................................... 51
HELP DESK PROCEDURE (USA ONLY) .......................................................................... 53
HOW TO CONTACT US (USA ONLY)
INFORMATION AND SUPPORT (ALL OTHER COUNTRIES) .................................................. 54
............................................................................ 53
APPENDIX .....................................................................................................55
DECLARATION OF CONFORMITY ............................................................................... 55
SERIAL PLATE ......................................................................................................... 55
CLEANING PRODUCTS ............................................................................................. 56
CLEANING TABLET SCHAERER (ART.-NO.: 065221).......................................................... 56
TECHNICAL DATA FOR COFFEE MACHINE ................................................................... 57
CONDITIONS FOR USE AND INSTALLATION ................................................................... 57
ENVIRONMENTAL ASPECTS ....................................................................................... 58
WATER QUALITY ..........................................................................................59
GENERAL .............................................................................................................. 59
PURITY OF WATER ................................................................................................... 59
WATER CHARACTERISTICS FOR SCHAERER COFFEE MACHINES ........................................ 59
CONVERSION TABLE ............................................................................................... 59
FILTER TECHNICS ..................................................................................................... 59
Page 8
www.schaerer.com
8
BAE6Mu - EN
Version 03 01.2008
Safety notes
SAFETY NOTES
USER AT RISK
Maximum safety is one of M. Schaerer AG’s most important product features. The effectiveness
of the safety devices is only ensured as long as the following is observed to prevent injuries or
health hazards:
► Read the User Manual carefully before using the device!
► Do not touch any hot machine parts!
► Do not use the coffee maker if it is not functioning optimally or is damaged!
► Keep children away from the coffee maker!
► Under no circumstances may the installed safety devices be modied!
Health hazard!
Children as well as persons under the influence of drugs, alcohol or medication or with limited
physical, sensorial or mental abilities may not use the device unless they are supervised.
Health hazard!
Only place the appliance where it can be supervised by trained personnel.
Risk of scalding!
There is a risk of scalding in the area where coffee, hot water and steam are dispensed. Never
reach under the outlet while a beverage is being dispensed!
Risk of burns!
The brew unit may only be cleaned when the coffee maker is cold. The brew unit can become
hot.
Risk of squeezing!
There is risk of squeezing ngers or hands when handling moving components!
While the coffee maker is switched on, never reach into the bean containers or into the opening
of the brew unit.
Health hazard!
The bean containers and the manual slot may only be lled with the materials (coffee beans)
intended for use!
Health hazard!
When handling cleaning tablets and cleaning agents, follow the safety instructions on the packaging. Cleaning tablets and cleaning agents are irritants. Do not insert the cleaning tablet or
solution with cleaning agents until a request appears on the display asking you to do so.
Risk of irritation and burns!
Never reach under the outlets during a cleaning cycle or during beverage output! Cleaning fluid
and hot beverages come out of the combination outlet (Splitter) during cleaning cycles and
beverage outputs.
Caution, electrocution!
► Only skilled electricians may carry out work on electrical systems!
► The device must be connected to a secured circuit! (We recommend using an earth leakage
circuit breaker in the connection).
► All relevant guidelines on low voltage and/or country-specic or local safety regulations and
laws must be observed.
► The connection must be grounded according to regulations and safeguarded against elec-
trocution.
► The voltage must correspond to the data on the device’s serial plate.
► Never insert the power plug into the socket while it is wet or touch it with wet hands!
► Never touch energized parts!
► Before carrying out service work, always switch off the main switch and/or disconnect the
device from the power supply system.
► The power cord may only be replaced by a qualied service technician.
When choosing cleaning products, please pay attention to its environmental friendliness, health
risks, disposal requirements and any local options for proper disposal.
Page 9

www.schaerer.com
9
BAE6Mu - EN
Version 03 01.2008
Safety notes
RISK OF DAMAGE TO THE MACHINE
Please comply with the following instructions in order to prevent technical problems or damage
to the coffee maker:
► For water with a carbonate hardness of more than 5°dKH, a lime-scale lter should be con-
nected; otherwise the coffee maker could be damaged through limescale deposits.
► For insurance reasons, always make sure that the main tap for the water supply (coffee maker
with xed water connection) is closed after operating hours have ended and that the main
electrical switch has been switched off or the power cord has been pulled out.
► The device may not be operated if the water supply is blocked, since the boilers otherwise
cannot be relled and the pump runs "dry".
► To prevent water damage in the event of a ruptured hose, it is recommended to (structurally)
direct the water supply through a water stop valve.
► After extended down times (e.g. holidays), the coffee maker must be cleaned before it is
placed in operation again.
► Protect the coffee maker from weather conditions (frost, moisture, etc.).
► Malfunctions may only be rectied by a qualied service technician!
► Only use M. Schaerer Ltd. original spare parts!
► In devices with a refrigerator, the power supply must never be completely interrupted, or the
cooling function will not work.
► In the event of noticeable damage or leaks, notify a qualied service representative ap-
proved by the manufacturer and have faulty parts replaced and/or repaired!
► Never spray the device with water or any other fluid (e.g. steam cleaner)!
► Never immerse the device in water or in any other fluid!
► When using caramelized coffee (aromatized coffee), the brew unit must be cleaned at least
twice a day!
► If the coffee machine and/or auxiliary devices are transported at temperatures below 10°C,
the coffee machine and/or auxiliary devices must remain for 3 hours at room temperature
before it can be connected to a power supply and switched on. If this is not observed, there is
a risk of short circuits or damage to the electrical components as a result of condensation.
► Always use the new hoses supplied with the machine (fresh-/drain water hose)! Do not use old
fresh- and drain water hoses!
HYGIENE
Before using the coffee maker for the rst time, carry out the cleaning program
(refer to User Manual, chapter Cleaning).
Observe the general applicable hygiene regulations according to HACCP!
(HACCP= Hazard Analysis and Critical Control Point)
Coffee, milk and other contents:
► Do not use any raw milk! Only use pasteurized milk or UHT milk!
In all cases, the milk must be homogenized!
► Only use pre-refrigerated milk with a maximum temperature of 5 °C. If the milk is warmer than
5 °C, an optimal product cannot be dispensed.
► For hygienic reasons, it is recommended to use milk directly out of its original package.
► When using a milk container: Never top up milk; always clean the container thoroughly be-
fore relling it.
► Do not ll with more coffee or milk than is needed in a day.
► It is recommended to pour out remaining milk at the end of the day (if the milk was in contact
with the milk tube).
► Before opening milk packages, check them for damage.
► Store coffee and products in a dry, cool and dark place.
► Use the oldest products rst ("rst-in-rst-out" rule of thumb).
► Use the products before their expiry date.
► Always seal opened packages tightly so that their contents will remain fresh and are protect-
ed from dirt.
► Store coffee and products separately from cleaning products.
► Close the bean hopper lids immediately after adding beans!
Page 10
www.schaerer.com
Safety notes
Cleaning:
► Thoroughly wash and disinfect hands before cleaning the machine!
► Clean the machine daily once beverage output has been completed.
► For daily cleaning, follow the steps in the User Manual (chapter "Cleaning") and on the clean-
ing card.
► Never mix cleaning products!
► Never use abrasive substances or cleaning tools made of metal!
► Do not touch parts that come into contact with beverages (during output) after they have
been cleaned.
► Follow the dosage and safety instructions on the cleaning product! Information about clean-
ing products can be found in the User Manual, chapter "Appendix".
INTENDED USE
The intended use of the device and corresponding options is subject to the purpose agreed upon
in the contract and, if applicable, to any existing supplementary agreements, the "General terms
and conditions" of M. Schaerer Ltd. and this User Manual. In legal terms, any other use is not an in-
tended use. The manufacturer accepts no liability for damage resulting from unintended use.
LIABILITY
No responsibility will be taken for warranty or liability claims in the event of personal injury or
material damage as a result of one or more of the following causes:
► Improper use of the device;
► Improper installation, commissioning, operation and servicing of the device and its corre-
sponding options;
► Non-observance of maintenance intervals;
► Operation of the device with defective safety devices, non-functioning safety devices or im-
properly attached protective devices;
► Non-observance of safety notes in the User Manual with respect to storing, installing, commis-
sioning, operating and servicing the machine;
► Operation of the device in less than optimal condition;
► Improperly conducted repairs;
► Catastrophes due to the effects of a foreign body, accident or vandalism as well as acts of
God;
► Insertion of objects into the device as well as opening of the housing.
The manufacturer only accepts liability or honors warranty claims provided that all specied
maintenance and service intervals have been kept and that only original spare parts supplied
by the manufacturer or an approved authorized supplier have been used.
M. Schaerer AG must be notied in writing immediately of any material flaws.
The device must be serviced every 12 months or after 30'000 products have been dispensed.
Safety-relevant parts such as safety valves, safety thermostats, boilers, etc. must never be repaired under any circumstances. They must be replaced!
► Safety valves every 12 months
► Boiler (steam boiler, flow heater) every 60 months
10
BAE6Mu - EN
Version 03 01.2008
Page 11
Commissioning
www.schaerer.com
COMMISSIONING
INITIAL COMMISSIONING OF THE COFFEE MACHINE
The coffee machine must be installed and commissioned by a qualied technician.
If the coffee machine and/or auxiliary devices are transported at temperatures below 10°C, the
coffee machine and/or auxiliary devices must remain for 3 hours at room temperature before
it can be connected to a power supply and switched on. If this is not observed, there is a risk of
short circuits or damage to the electrical components as a result of condensation.
Always use the new hoses supplied with the machine (fresh-/drain water hose)!
SET-UP CONDITIONS
LOCATION
► Do not install the machine near an oven or any other heat source.
► Not suitable for outdoor use. Never expose the coffee machine to external conditions such
as rain, snow, frost, etc.
► Do not place the coffee machine on a surface cleaned with a hose.
► Only place the appliance where it can be supervised by trained personnel.
► The support surface for the unit must be stable and level and may not be deformed by the
weight of the coffee machine.
The location must comply with the following climatic conditions:
► Ambient temperature from 10°C to 35°C (50°F to 104°F)
► Relative humidity max. 80 % rF
The machine is designed exclusively for interior use!
Protect the coffee machine from frost. If the coffee machine has been exposed to
temperatures below freezing point, contact an authorised customer service representative
before starting the machine.
INSTALLATION OF THE COFFEE MACHINE
Installation of the coffee machine should be done under the following conditions:
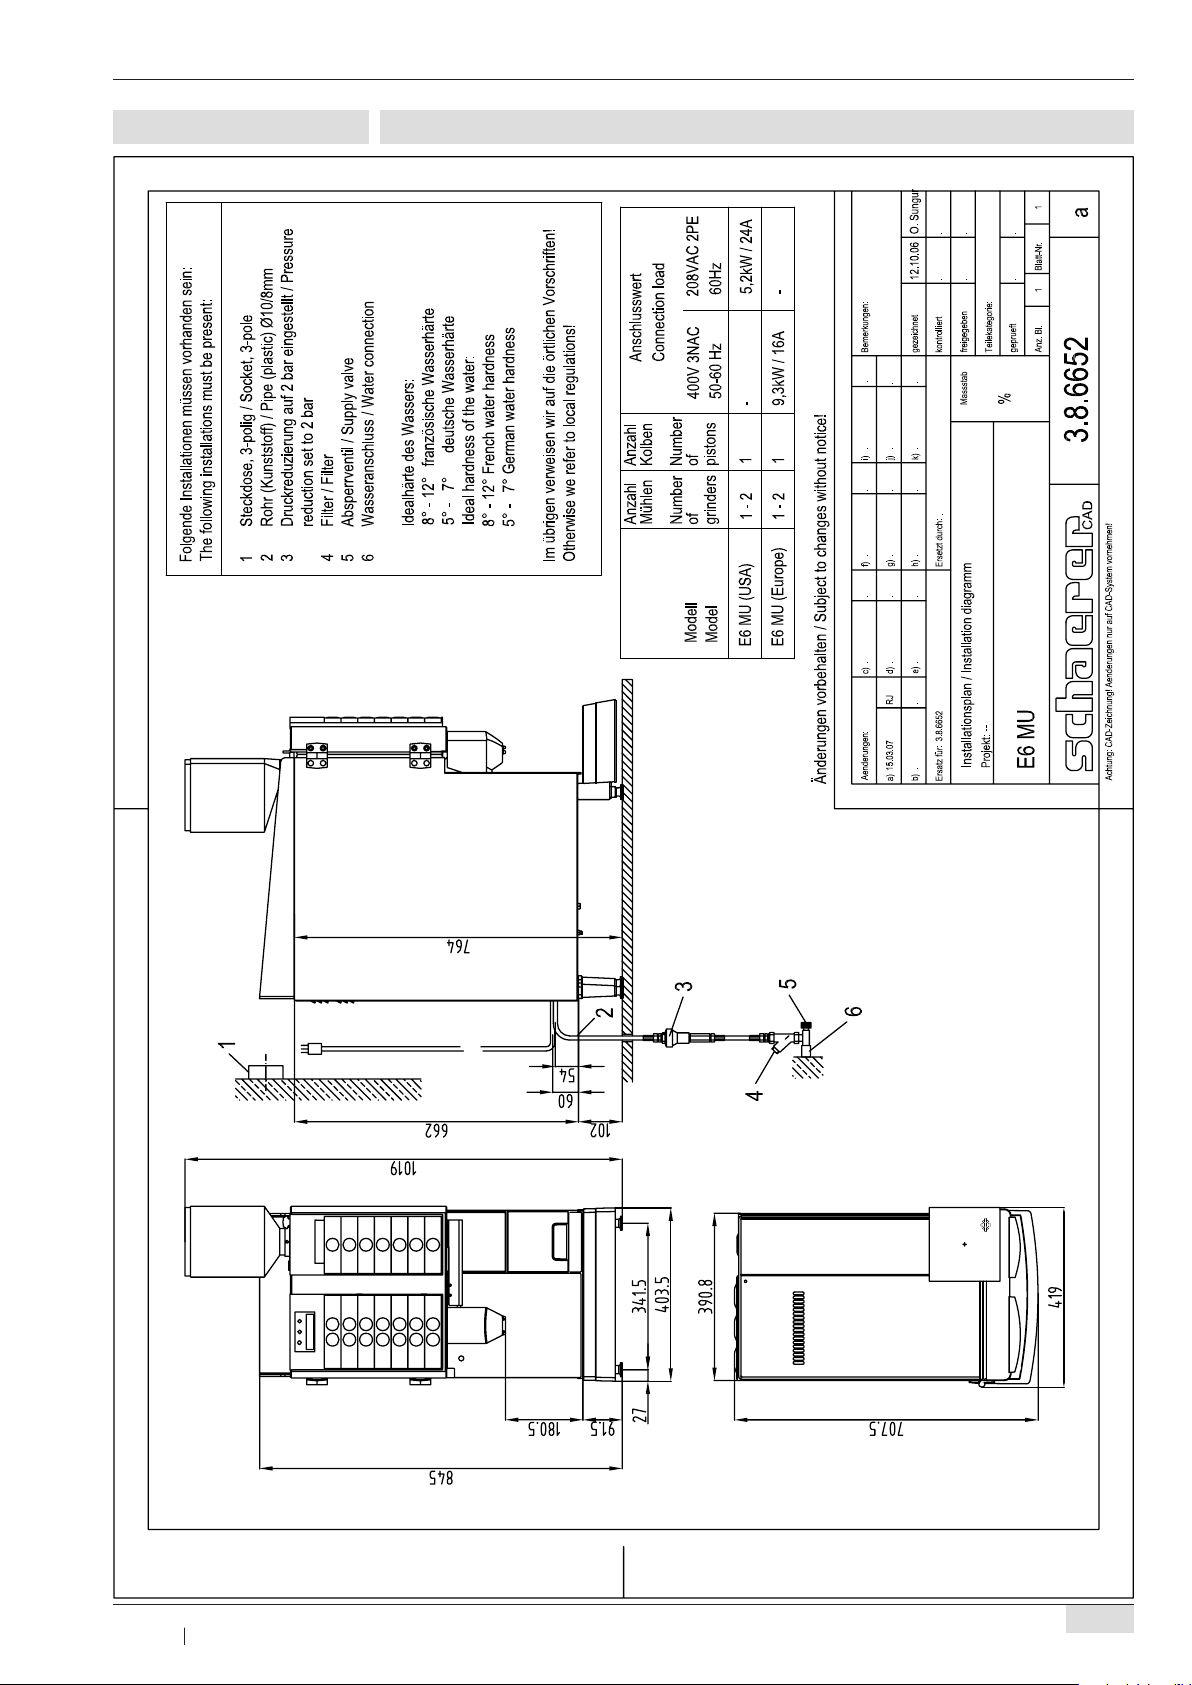
► Install the supply lines as shown in the mains-side installation diagram to within one meter of
the place of installation.
► Conform to the technical data (see page 50).
► Provide and maintain sufcient clearance for maintenance work and operation:
- Above for lling coffee beans
- Keep approx. 35 cm clear on the right side
- A minimum of 15 cm between machine back panel to wall (air circulation)
► Comply with the respective local statutory regulations regarding catering / restaurant
premises.
The dimensions of the installed coffee machine are given in the corresponding installation plan
(see page 13).
BAE6Mu - EN
Version 03 01.2008
11
Page 12
www.schaerer.com
12
BAE6Mu - EN
Version 03 01.200
Commissioning
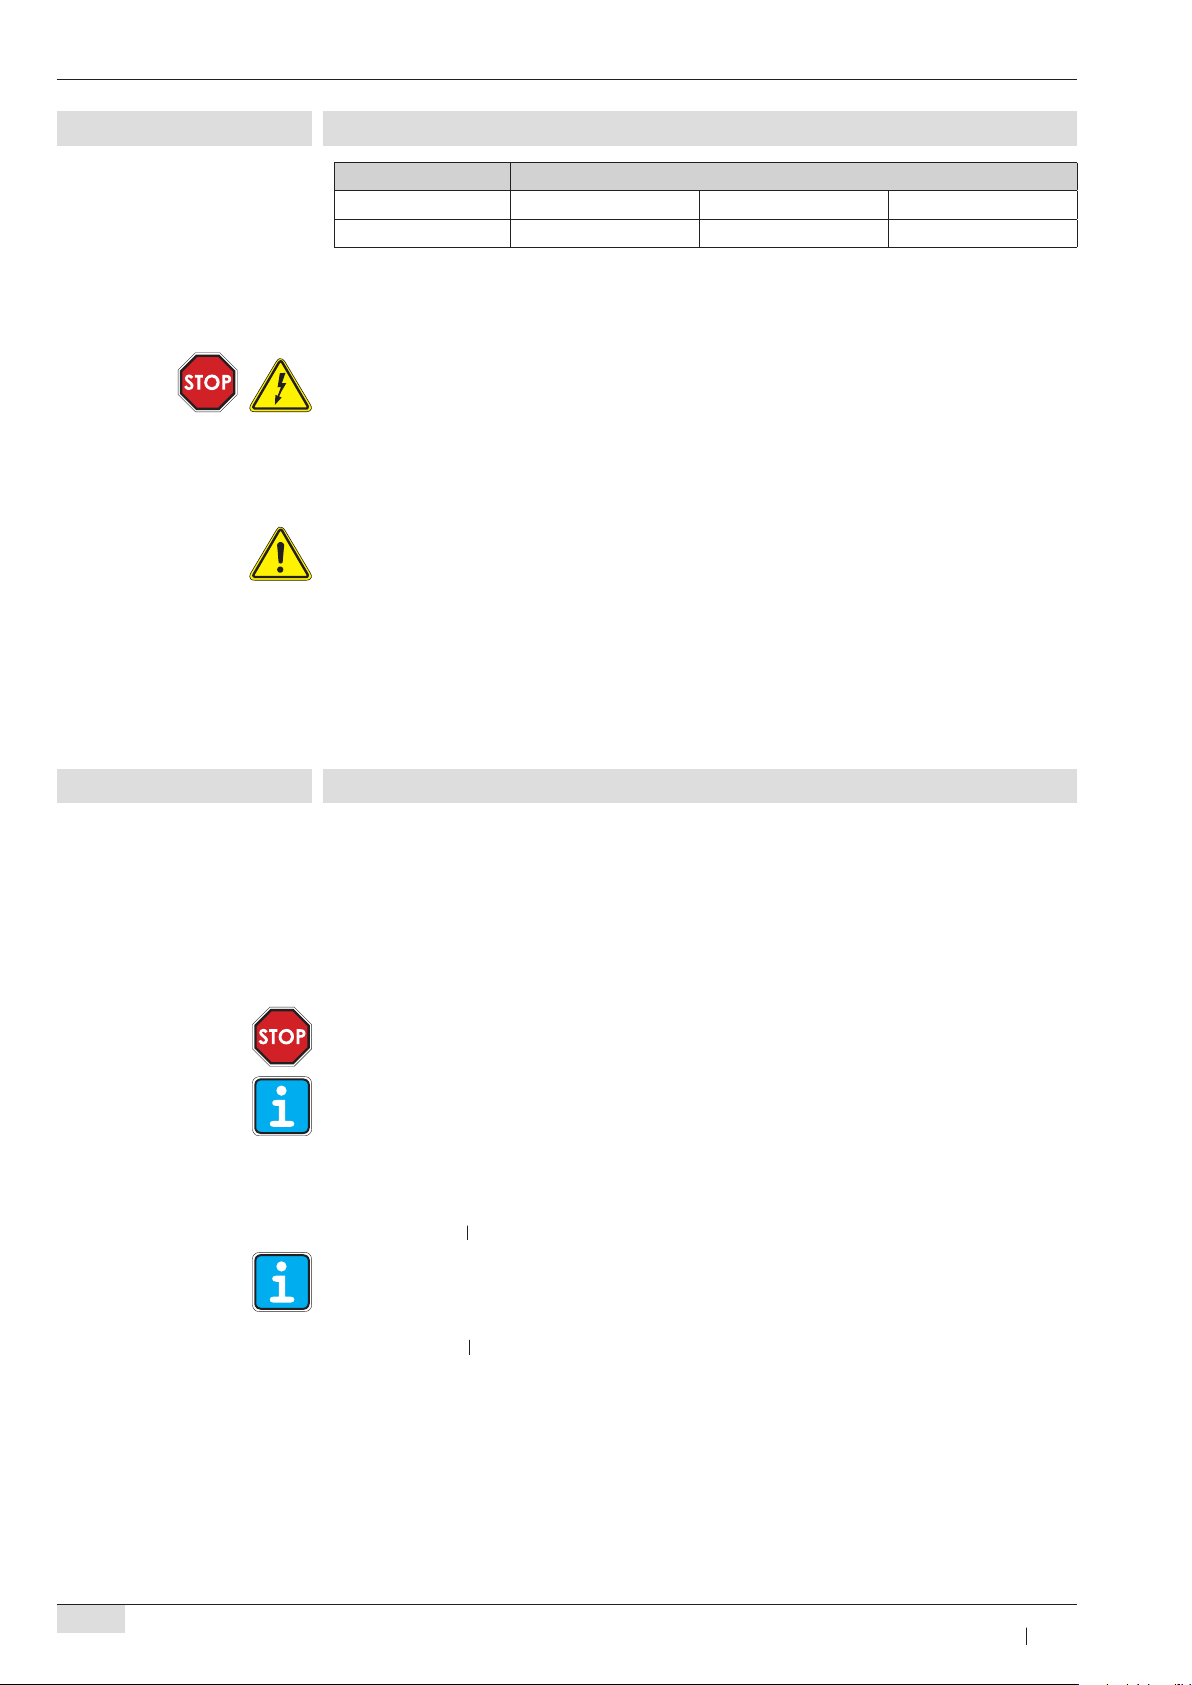
POWER SUPPLY
Model Power rating
E6Mu USA 5.5 kW / 2 x 30 A 60 Hz 208 V / 2N AC
E6Mu Europe 6.1 kW / 3 x 16 A 50/60 Hz 400 V / 3N AC
The device must be electrically connected according to all valid regulations (VDE 0100) as well as
national stipulations. The type of power cable must be at least H 07 RN-F. The voltage specied on
the serial plate must match the supply voltage at the installation location.
Electric shock!
An authorised specialist must install or inspect the installation!
► The phase must be protected with USA = 30 A / Europe = 16 A fuse.
► The machine must be fully disconnected from the power supply.
► Never operate the coffee machine if the mains cable is defective. A defective mains
cable or plug must immediately be replaced by a qualied service technician.
► Use extension cords only when you are sure that they are in perfect condition. The
extension cord must have a minimum cross section of 1.5 mm² for each core and a
permitted 5 pole plug (PNE) for 30 A / 16 A.
► Power cable and/or extension cords must be placed so that they pose no safety or health
hazard. Do not pinch the cords or pull them around sharp corners and over sharp edges;
do not let them hang exposed in the room. Do not place the cords on hot surfaces and
protect them from oil and harsh cleaning agents.
► Never lift or pull the appliance by the mains cable. Never pull the plug out of the socket
by gripping the mains cable or extension cord. Never touch cord and plug with wet hands.
Never insert a wet plug into the socket.
WATER SUPPLY/DRAIN
The water supply must be connected according to all valid regulations as well as national stipulations.
The machine must be connected as shown in the installation layout to a G 1/2“ drinking water
line (see page 13). If the machine is to be connected to a newly installed water line, the line
and the pressure hose must be properly rinsed to ensure that no dirt particles are fed into the
machine. If the machine is to be connected to a water drain, the supplied drainage hose
should be connected to the Drip Tray and the siphon and fastened securely. The hose should
point downwards so that water can easily flow out of the Drip Tray.
Always use the new hoses supplied with the machine (fresh-/drain water hose)!
The water must be free of contaminants and the chlorine content may not exceed 100 mg/l.
Do not use RO water (Reverse Osmosis) or any other type of aggressive water. The carbonate
hardness may not exceed 5 – 7°dH (German hardness) or 8 – 12°fH (French hardness) and the
total hardness must be always higher than the carbonate hardness. The minimal carbonate
hardness is 4°dH or 7°fH. The pH value must be between 6.5 and 7.
Water pressure:
Minimum: 1 bar
We recommend setting the decompression valve to 3 bar.
Feed water temperature:
Minimum: 10 °C
Maximum: 3 bar
Maximum: 30 °C
Page 13
www.schaerer.com
13
BAE6Mu - EN
Version 03 01.2008
Commissioning
INSTALLATIONSPLAN E6MU
Page 14

www.schaerer.com
14
BAE6Mu - EN
Version 03 01.2008
Product description
PRODUCT DESCRIPTION
GENERAL INFORMATION FOR THE MACHINE
Drip Tray Grill
Is removable for easy cleaning and access to the inside of the Drip Tray.
Drip Tray:
Is not connected to a xed drain line (optional). Check and empty regularly to prevent overflow.
Also, do not pour large amounts of liquid into the Drip Tray.
The Discharge Tube discharges a small amount of water into the Drip Tray after dispensing each
espresso shot.
Coffee Grounds Bin:
Holds the used grounds which are disposed after each espresso shot is brewed. The Bin slides
straight out from the machine and must be emptied periodically or when prompted by the Display
Screen.
Page 15
www.schaerer.com
15
BAE6Mu - EN
Version 03 01.2008
Product description
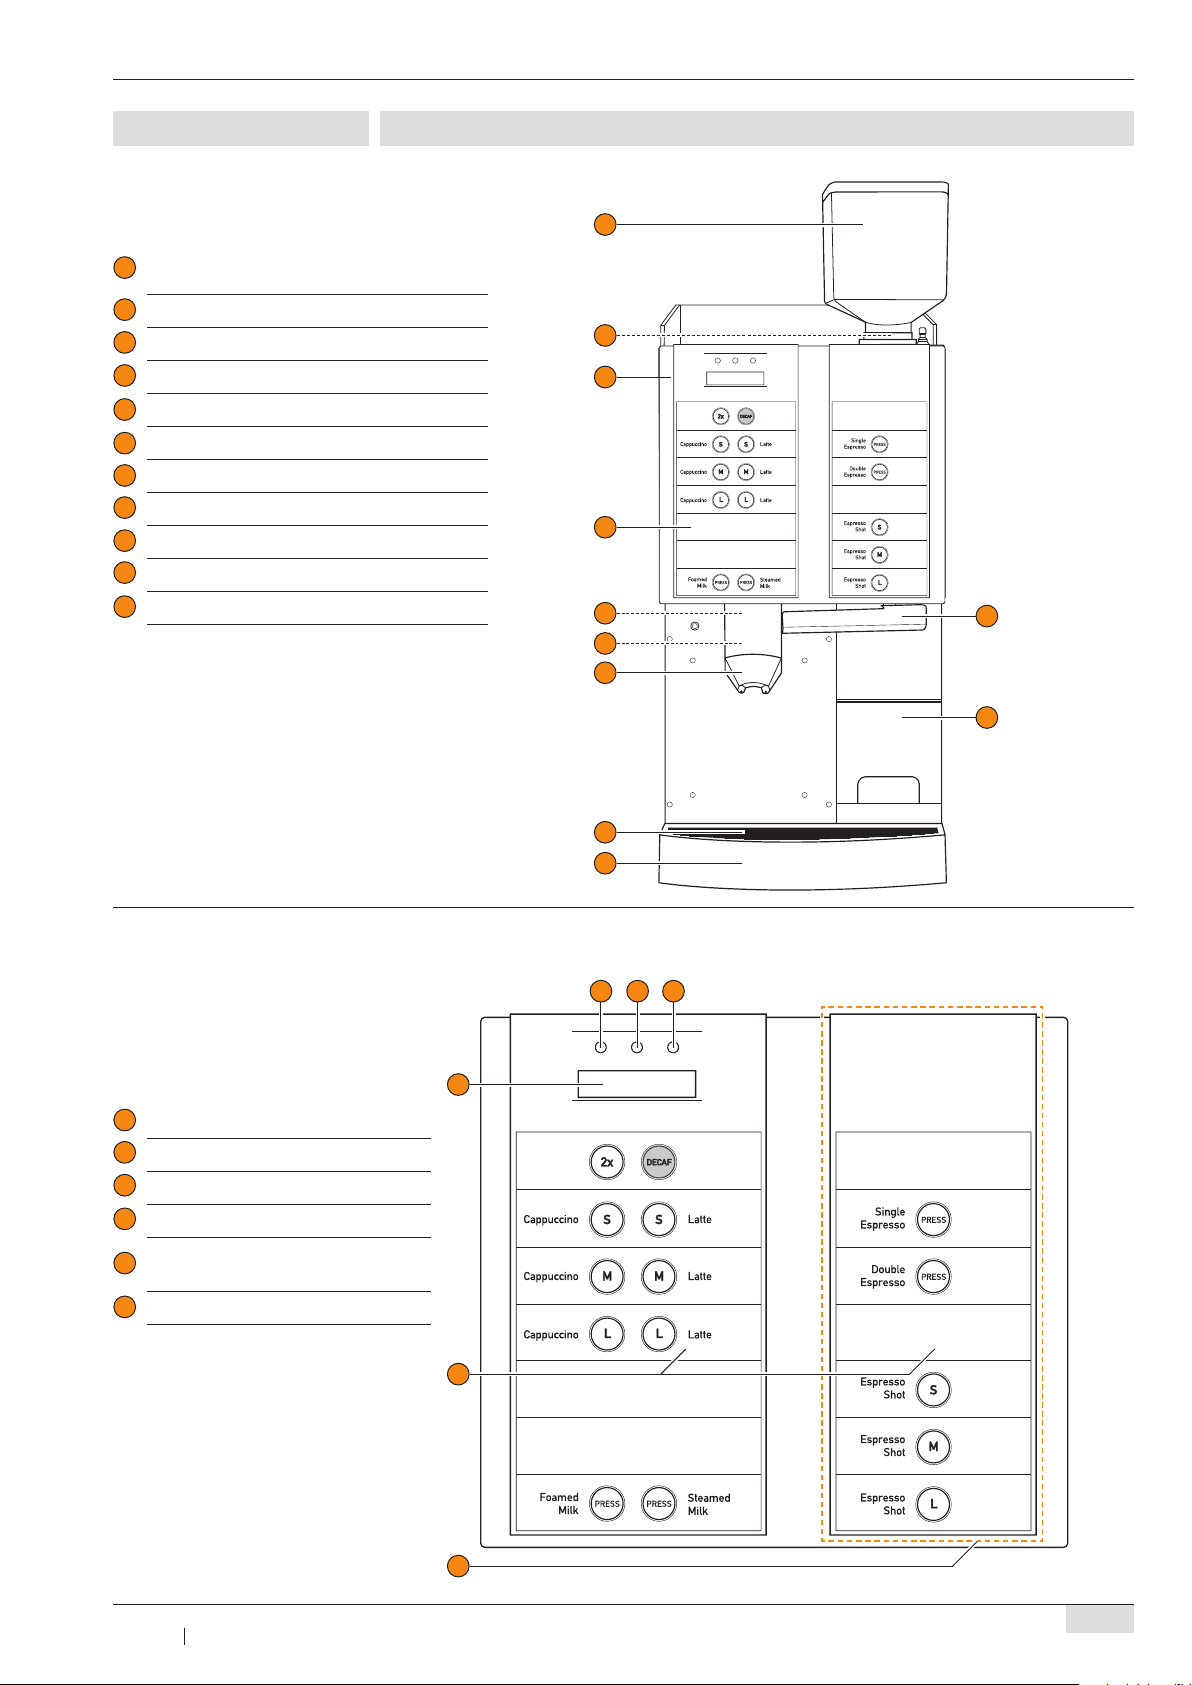
Front Bean Hopper /
1
Rear Bean Hopper for DECAF (unseen)
2
Slot for Cleaning Tablet (unseen)
3
Front Door
4
Button Panel (detail see below)
Coffee Spout (see page 16)
5
Foamer (see page 16)
6
Splitter
7
Trip Tray Grill
8
Trip Tray
9
10
Espresso Arm with Putlet
Coffee Grounds Bin
11
MACHNINE OVERVIEW
1
2
3
4
5
6
7
10
1
Cleaning Button / Minus Button
2
ON / OFF Button
3
STOP Button / Plus-Button
4
Display Screen
Programmable Product (with
5
label)
6
Optional second Button Panel
11
8
9
1 2 3
4
5
6
Page 16
www.schaerer.com
16
BAE6Mu - EN
Version 03 01.2008
Product description
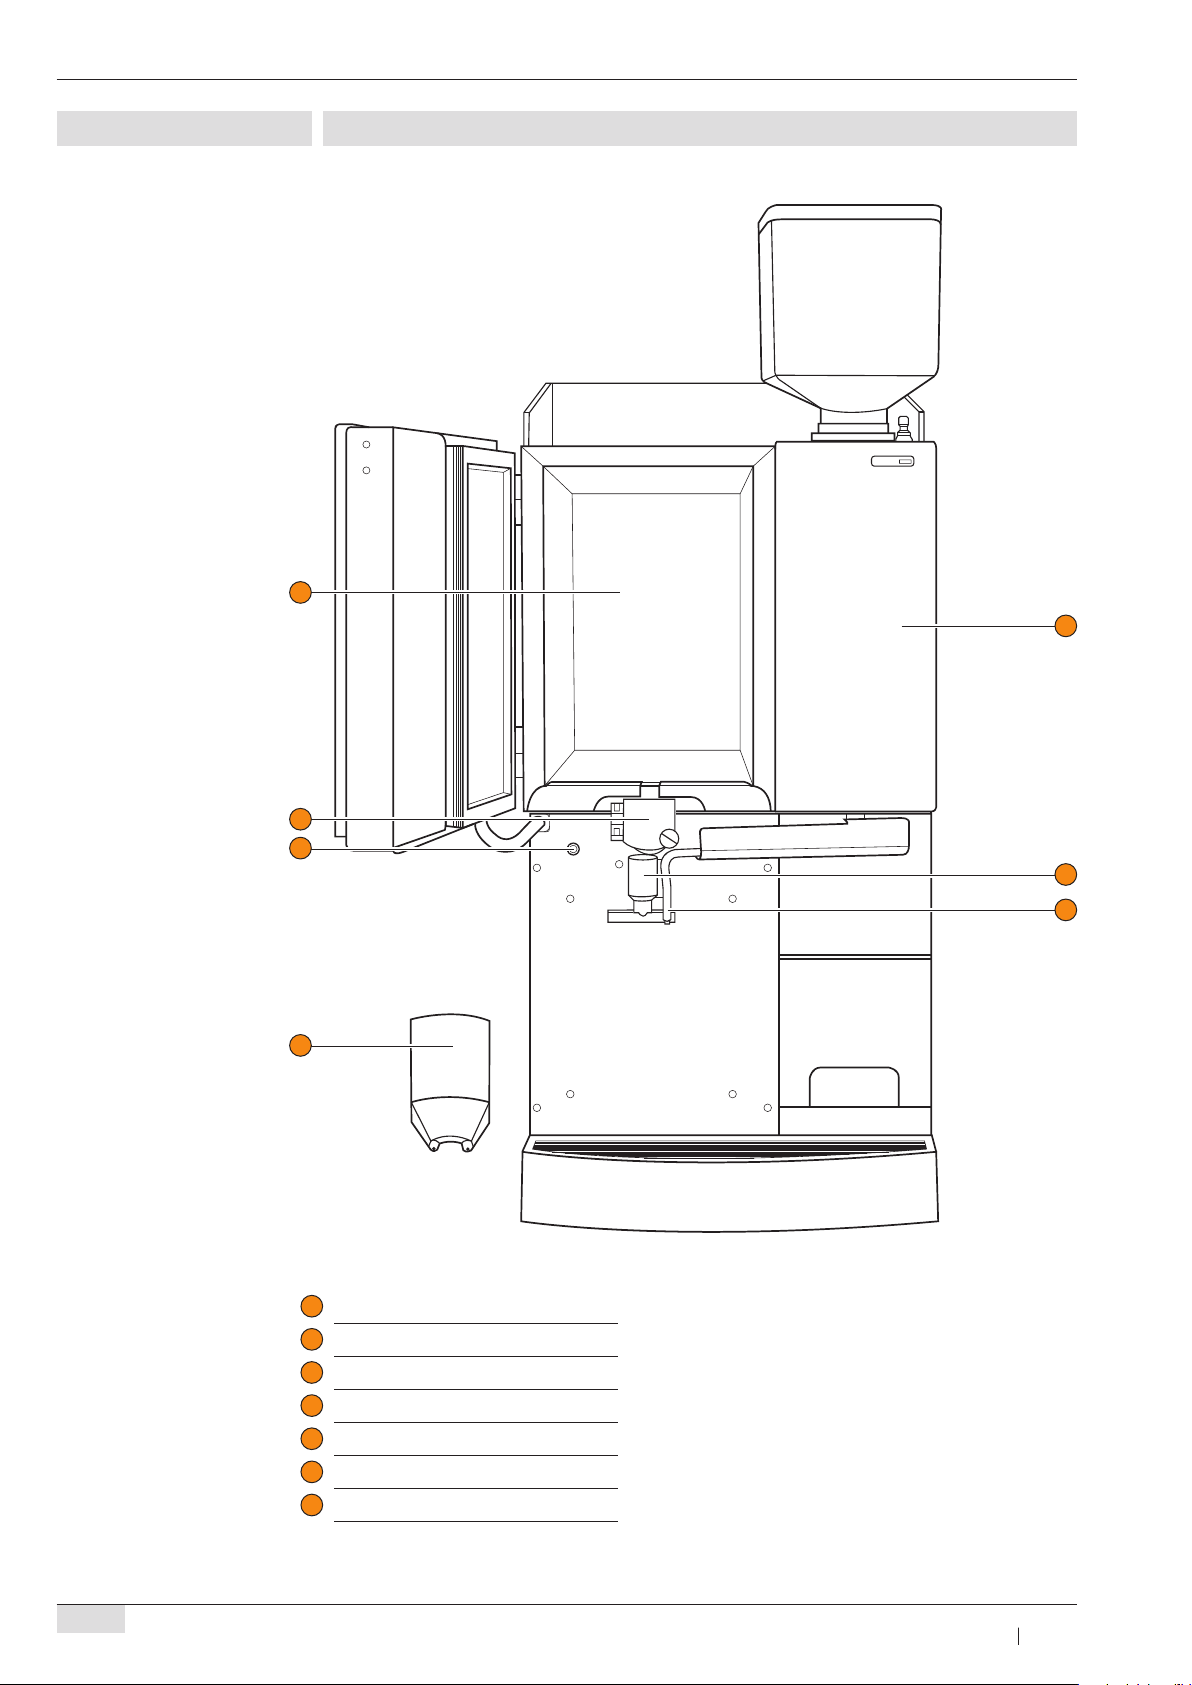
E6MU INSIDE VIEW
1
7
2
3
6
Refrigerator Compartment
1
Pinch door for milk hose
2
Air adjustment knob
3
Coffee Spout
4
Foamer
5
Splitter
6
Espresso unit door
7
5
4
Page 17
www.schaerer.com
17
BAE6Mu - EN
Version 03 01.2008
Product description
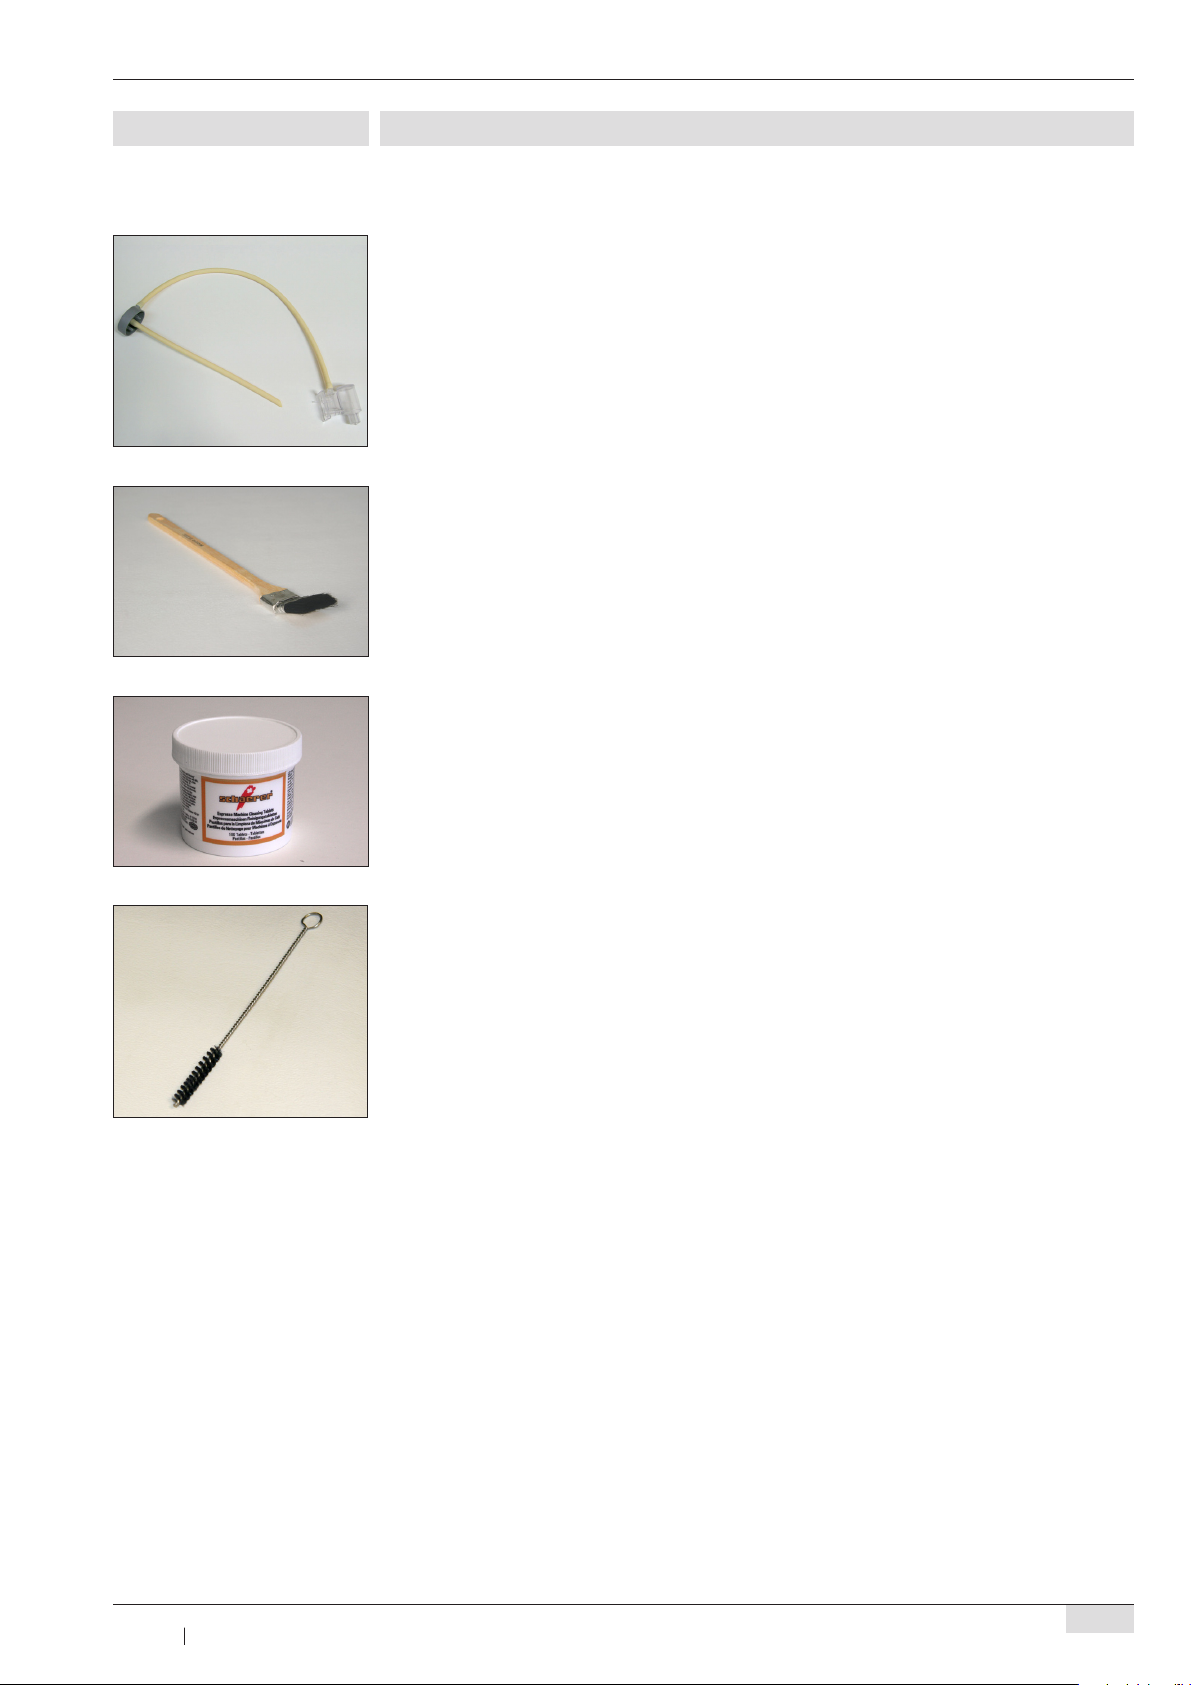
ACCESSORIES
The Foamer and Hose should be replaced every day.
The Cleaning Brush is used to remove coffee grounds residue from the Brewing mechanism
behind the Front Door.
Schaerer Cleaning Tablets are used during the Daily Espresso Unit cleaning cycle
(see page 37 - 44). One Tablet is used per cycle.
The Splitter Cleaning Brush is used to remove residue from the dispensing points of the Splitter.
Page 18
www.schaerer.com
18
BAE6Mu - EN
Version 03 01.2008
Operation
OPERATION
Please refer to the Safety notes on page 8!
REFILLING COFFEE BEANS
The bean container may be lled with a maximum of 1000 grams of fresh coffee beans. Only
pour roasted coffee beans into the bean container(s)! Never reach with your hands into the
bean container(s) when the machine is switched on!
► Open the bean container lid.
► Fill with coffee beans (max. 1000 grams per bean container).
► Reclose lid to bean container.
A well closed cover prevents the loss of aroma.
MAKING THE COFFEE MACHINE READY FOR OPERATION
Prior to switching on the machine, check the following:
► The Fresh Water Supply is open.
► The Coffee Bean Hoppers are lled (see above).
► The Grounds Bin is empty.
► The coffee machine is connected to the power supply.
► Check whether the Coffee Bean Slides are open.
<< Stand by >>
select product
select product
OPERATION MODES
The E6Mu has two (2) operating modes:
The machine is switched off, but is still plugged in and has AC power.
The Display will be slightly darkened. The Refrigerator will stay ON during "Stand by" mode.
The machine is ready for normal operation.
The Display will be illuminated.
SWITCHING ON THE COFFEE MACHINE
Switch on the coffee machine by pressing the [ON/OFF] button.
A product selection can be made when the message "select product" appears on the Display.
Page 19

www.schaerer.com
19
BAE6Mu - EN
Version 03 01.2008
Operation
CHANGING MILK BAG
1
► Open the Refrigerator door. ► Crimp (tight) the Milk Hose.
4
► Turn the Pinch door knob
counter clockwise to open the
pinch door.
2
5
► Pull out the Foamer. ► Remove the Milk Hose from
3
1
2
► Remove Splitter by carefully tilt-
ing up 1 and pulling down 2 .
► Clean Splitter under warm, run-
ning water.
6
Foamer.
7
► Pull out the metal drawer from
the Refrigerator.
► Remove and discard the emp-
ty Milk Bag.
► Keep the crimper for the new
Milk Bag.
10
► Place the new Milk Bag on a
flat surface (see picture).
► Place the crimper on the Milk
Hose (as close to base as possible).
11
98
► Place the new Milk Bag (hose
facing downward) into the
milk drawer.
► Feed Milk Hose through the
drawer opening.
12
► Re-insert the Milk Drawer into
the Refrigerator.
► Align scissors with the top noz-
zle and cut the Milk Hose while
holding it taut.
► Re-attach Milk Hose on the
Foamer.
► Place the Foamer back onto
the nozzles.
Page 20

www.schaerer.com
20
BAE6Mu - EN
Version 03 01.2008
Operation
BAD
GOOD
13
14
1
2
► Release the crimper.► Close pinch door. ► Replace Splitter by pushing
15
up (onto the screws) 1 and
droping down 2 to rest on the
mounting ledge.
► Close the Refrigerator door.
CHANGING MILK GALLON
1
32
► Open the refrigerator door. ► Remove the cap with milk
4
► Close the refrigerator door
hose from the milk gallon.
► Discard the empty milk gallon.
5
► Press and hold the Latte or
Cappuccino button for 2 seconds to prime the line.
► Place a new milk gallon inside
the refrigerator.
► Place the milk hose into the
new milk gallon.
Page 21

www.schaerer.com
21
BAE6Mu - EN
Version 03 01.2008
Operation
FILLING MILK CONTAINER
1
► Open the Rrefrigerator door ► Crimp the Milk Hose.
4
► Turn the Pinch door knob
counter clockwise to open the
pinch door.
2
1
2
► Remove Splitter by carefully
tilting up
.
2
► Clean Splitter under warm,
running water.
and pulling down
1
5
► Pull out the Foamer.
3
4
► Pull out the Milk Container.
► Rinse and clean the Milk Con-
tainer under warm, running
water.
4
► Place the Milk Container back
in.
► Turn the Pinch door knob
clockwise to close the pinch
door.
► Uncrimp the Milk Hose.
► Fill the Milk Container with fresh
Milk.
6
1
2
► Replace Splitter by pushing
up (onto the screws) 1 and
droping down 2 to rest on the
mounting ledge.
► Close the Milk Unit door.
Page 22

www.schaerer.com
22
BAE6Mu - EN
Version 03 01.2008
Operation
BUTTON OVERVIEW
SINGLE CUP SYMBOL:
Buttons with this symbol are used to make drinks one at a time.
DOUBLE CUP SYMBOL:
Buttons with this symbol are used to make drinks two at a time.
DECAF SYMBOL:
Selecting the DECAF Button before selecting espresso size will make DECAF drinks.
Depending on machine programming the buttons can be assigned in a different order then
shown on the following pages (shown with Optional Button Panel).
DRINK PREPARATION (SHOWN WITH OPTIONAL BUTTON PANEL)
PREPARING ESPRESSO
Prepare single Espresso
Press "Single Espresso" Button
1
Attention!
Beverages are hot!
Keep hands away
from the outlets!
Example:
(at one time)
1
Page 23

www.schaerer.com
23
BAE6Mu - EN
Version 03 01.2008
Operation
PREPARING LATTE
Prepare Small Latte
Press "Small Latte" Button
1
Attention!
Beverages are hot!
Keep hands away
from the outlets!
Example:
(at one time)
1
Prepare Small Cappuccino
Press "Small Cappuccino"
1
Attention!
Beverages are hot!
Keep hands away
from the outlets!
Example:
(at one time)
Button
PREPARING CAPPUCCINO
1
Page 24

www.schaerer.com
24
BAE6Mu - EN
Version 03 01.2008
Operation
PREPARING "DECAF" PRODUCTS
(decoffeinated) coffee products
Press the "DECAF" Button
1
Make your Product selection
2
To prepare DECAF
proceed as follows.
Attention!
Beverages are hot!
Keep hands away
from the outlets!
1
2
To prepare two products at one
1
2
time proceed as follows:
Press "2x" Button
Make your Product selection
Attention!
Beverages are hot!
Keep hands away
from the outlets!
PREPARING TWO PRODUCTS AT ONE TIME
1
2
Page 25

www.schaerer.com
25
BAE6Mu - EN
Version 03 01.2008
Operation
PREPARING FOAMED MILK
Prepare Foamed Milk
Press and hold
1
"Foamed Milk" Button
Attention!
Beverages are hot!
Keep hands away
from the outlets!
Example:
1
Prepare Steamed Milk
Press and hold
1
"Steamed Milk" Button
Attention!
Beverages are hot!
Keep hands away
from the outlets!
Example:
PREPARING STEAMED MILK
1
Page 26

www.schaerer.com
Operation
TIPS DURING OPERATION
Periodically press the button once shortly to initiate a brief flush cycle to clean and sanitize
the Foamer. This is especially effective immediatly after peak dispensing hours.
Always start a rince cycle after replacing the Foamer!
Periodically rince the Splitter under warm, running water.
This should be done at least once a day.
Machines without drain:
The Drip Tray and Grill should removed and cleaned under warm, running water once a day.
Remember, the Drip Tray is not connected to a xed drain water connection so it can overflow
if not emptied! Make sure the Drip Grill is clean and free from milk residue.
Machines with drain:
The Drip Grill should removed and cleaned under warm, running water once a day.
The Drip Tray should rinsed with water once a day.
Make sure the Drip Grill is clean and free from milk residue.
Empty the Grounds Bin regularly and clean it under warm, running water when prompted by
the Display.
Periodically clean the machine exterior (don’t use abrasives!) with a clean and sanitized cloth
to remove residue from steamed Milk and Espresso shots.
26
When making two drinks at a time place two cups next to each other with the rims at the
center of the Splitter.
BAE6Mu - EN
Version 03 01.2008
Page 27

Programming
und
= =
PROGRAMMING: CHEF CARD
NAVIGATION IN PROGRAMMING-LEVEL
► Forward and backward in the menu, set parameters
► Access, conrm or continue through a menu
PT
► Product button
OVERVIEW PROGRAMMING: CHEF CARD
Menu selection:
www.schaerer.com
select product
12:00 01.01.2008
counter read out
product buttons
system parameters
► Insert CHEF card
Sub menus:
► Enter with the button
► see page 27 – 31
► Enter with the button
► see page 31 – 41
► Enter with the button
► see page 42
BAE6Mu - EN
Version 03 01.2008
27
Page 28

www.schaerer.com
28
BAE6Mu - EN
Version 03 01.2008
Programming
read out counters
daily counters
READ OUT COUNTERS: DAILY COUNTERS
► To access a menu, see „Programming overview: CHEF card”, page 27.
Range: Daily counters / Machine counter / Service counter / Cleaning statistics / Error satistics.
► Select counter using the
/ buttons / Show selected counter using the button
dispenced product (all)
XXX
+
coffee products
XXX
+
cappuccino / latte
XXX
+
hot milk / milk foam
XXX
+
decaf
XXX
+
double products (2x)
XXX
+
► All product purchases are displayed.
► Use the
► Coffee product purchases are displayed.
► Use the
► Cappuccino and coffee with milk product purchases are displayed.
► Use the
► Hot milk and foam product purchases are displayed.
► Use the
► Decaffeinated product purchases are displayed.
► Use the
► Double product purchases are displayed.
► Use the
button and after the / to erase the counter
button and after the / to erase the counter
button and after the / to erase the counter
button and after the / to erase the counter
button and after the / to erase the counter
button and after the / to erase the counter
steam products
XXX
clear daily counters
execute with 'ON'
daily counters
► Steam purchases are displayed.
+
► Use the
► Use the / to continue without erasing the daily counter
► Use the
button and after the / to erase the counter
button to erase the daily counter
Page 29

www.schaerer.com
29
BAE6Mu - EN
Version 03 01.2008
Programming
counter read out
machine counter
READ OUT COUNTERS: MACHINE COUNTER
► To access a menu, see „Programming overview: CHEF card”, page 27
Range: Daily counters / Machine counter / Service counter / Cleaning statistics / Error satistics.
► Select counter using the
/ buttons / Show selected counter using the button.
dispenced prod. (all)
XXX
coffee products
XXX
cappuccino / latte
XXX
hot milk / milk foam
XXX
decaf
XXX
double products (2x)
XXX
► All product purchases are displayed.
► Coffee product purchases are displayed.
► Cappuccino and coffee with milk product purchases are displayed
► Decaffeinated product purchases are displayed.
► Decaffeinated product purchases are displayed.
► Double product purchases are displayed.
steam products
XXX
cleaning cycle count.
XXX
rins cycle count
XXX
piston cycles
XXX
► Steam purchases are displayed.
► The number of cleaning cycles is displayed
► The number of rins cycles is displayed
► Pressing the desired product button shows all purchases.
Page 30

www.schaerer.com
30
BAE6Mu - EN
Version 03 01.2008
Programming
grind time (total)
XXX.X g.
► The grind quantity (of both grinders) is displayed.
runtime w-pump [h]
XX.X
water quantity
XX Liter
machine counter
read out counters
service counter
► The operating time of the water pump is displayed (in hours).
► The water volume is displayed.
READ OUT COUNTERS: SERVICE COUNTER
► To access a menu, see „Programming overview: CHEF card”, page 27.
Range: Daily counters / Machine counter / Service counter / Cleaning statistics / Error satistics.
► Select counter using the
/ buttons / Show selected counter using the button.
piston cycles
XXX
front grinder qty
XXX.X g.
rear grinder qty
XXX.X g.
runtime w-pump [h]
XXX
change lter after
XXX Liter
last lter change
01.11.2007
► Brew piston strokes are displayed.
► The grind quantity of the front grinder is displayed.
► The grind quantity of the rear grinder is displayed.
► Operating time of the water pump is displayed (in hours).
► Amount of litres until the next lter exchange are displayed.
► The last lter change is displayed.
Page 31

www.schaerer.com
31
BAE6Mu - EN
Version 03 01.2008
Programming
service after
service counter
counter read out
XXX Kaffee
► The next service has to be done after that amount of coffees.
last service
01.10.2007
► The last service is displayed.
READ OUT COUNTERS: CLEANING STATISTICS
► To access a menu, see „Programming overview: CHEF card”, page 27
cleaning statistics
cleaning 3/3
> 01.01.2008 15:07 <
cleaning 2/32
> 01.01.2008 17:55 <
cleaning 1/3
> 01.01.2008 12:00 <
cleaning statistics
Range: Daily counters / Machine counter / Service counter / Cleaning statistics / Error satistics.
► Select counter using the
All carried out cleaning cycles from the machine are displayed (including date and time / MUST
and IS status of the cleaning cycles).
► Use the
► Use the button to return to the menu
/ buttons to show all cleaning cycles
/ buttons / Show selected counter using the button.
READ OUT COUNTERS: ERROR STATISTICS
counter read out
error statistics
► To access a menu, see „Programming overview: CHEF card”, page 27
Range: Daily counters / Machine counter / Service counter / Cleaning statistics / Error satistics.
► Use the
/ buttons to show all errors / ► Use the button to return to the menu
Page 32

www.schaerer.com
32
BAE6Mu - EN
Version 03 01.2008
Programming
> 01.01.2008 08:00 <
Error 1
Error 2
> 01.01.2008 13:00 <
Error 3
> 01.01.2008 17:55 <
Error 10
> 01.01.2008 23:00 <
error statistics
product buttons
All errors registered on the machine are displayed (including date and time).
► Use the
► Use the
/ buttons to show all errors
button to return to the menu
PRODUCT BUTTONS: ALL PRODUCTS
► To access a menu, see „Programming overview: CHEF card”, page 27.
select product
> press button <
PT
select product type
coffee
double product
no
counted products
1
prod. preselection
no
select grinder
rear grinder
► Select the product for which the parameters are to be set.
► The product type can only be changed by a qualied service technician!
► Parameter can only be changed by a qualied service technician!
► Parameter can only be changed by a qualied service technician!
► Parameter can only be changed by a qualied service technician!
Range: Grinder rear / front + rear / Grinder front.
► Parameter can only be changed by a qualied service technician!
coffee grams
9.8 g.
Range: 4.0 – 16.0 g.
+
► Quantity of coffee powder (max.: 14.0 gr; depending on the type of grind)
Page 33

www.schaerer.com
33
BAE6Mu - EN
Version 03 01.2008
Programming
cycles per button
1
water quantity
230 ml
+
bypass water
0.0 s
+
base tamp. pressure
Stufe 3
pre-infusion
0 ml
Range: 1 – 9
► Parameter can only be changed by a qualied service technician!
Range: 10 – 600 ml
► Quantity of the coffee water.
Range: 0 – 3.0 s
► Quantity of coffee powder for double products.
► Parameter can only be changed by a qualied service technician!
► Parameter can only be changed by a qualied service technician!
chamber opening time
0 ms
Produktetasten
product buttons
select product
> press button <
PT
select product
Cappuccino
► Parameter can only be changed by a qualied service technician!
PRODUCT BUTTONS: CAPPUCCINO
► To access a menu, see „Programming overview: CHEF card”, page 27.
► Select the product for which the parameters are to be set.
► The product type can only be changed by a qualied service technician!
double produc
counted products
no
► Parameter can only be changed by a qualied service technician!
1
► Parameter can only be changed by a qualied service technician!
Page 34

www.schaerer.com
34
BAE6Mu - EN
Version 03 01.2008
Programming
dispensing sequence
milk and coffee
► Parameter can only be changed by a qualied service technician!
prod. preselection
no
select grinder
front grinder
coffee grams
9.0 g.
+
cycles per button
1
water quantity
40 ml
+
► Parameter can only be changed by a qualied service technician!
Range: Grinder front/ front + rear / Grinder rear.
► Parameter can only be changed by a qualied service technician!
Range: 6.0 – 16.0 g.
► Quantity of coffee powder (max.: 14.0 gr; depending on the type of grind).
Range: 1 – 9
► Parameter can only be changed by a qualied service technician!
Range: 10 – 600 ml
► Quantity of the coffee water.
bypass water
0.1 s
+
base tamp. pressure
level 5
pre-infusion
5 ml
delay pre-infusion
1.0 s
chamber opening time
0 ms
Range: 0 – 3.0 s
► Duration of bypass water
► Parameter can only be changed by a qualied service technician!
► Parameter can only be changed by a qualied service technician!
► Parameter can only be changed by a qualied service technician!
► Parameter can only be changed by a qualied service technician!
wet pressing
no
► Parameter can only be changed by a qualied service technician!
Page 35

www.schaerer.com
35
BAE6Mu - EN
Version 03 01.2008
Programming
milk dispensing time
14.5 s
+
delay time foam
0.0 s
foam ratio
50 %
+
delay time foam
0.0 s
product buttons
Range: 0 - 90.0 s
► Duration of the milk foam output.
► Parameter can only be changed by a qualied service technician!
Range: 0 – 100%
► The lower the pump speed the more hot the milk will be. Recommended value 50 – 55 % (re-
sults in an output temperature of ± 70 – 72 °C, when the milk in the fridge is ± 5 °C).
► Parameter can only be changed by a qualied service technician!
PRODUCT BUTTONS: MACCHIATO
product buttons
select product
> press button <
PT
select product
Latte Macchiato
double product
no
counted products
1
dispensing sequence
milk before coffee
► To access a menu, see „Programming overview: CHEF card”, page 27.
► Select the product for which the parameters are to be set.
► The product type can only be changed by a qualied service technician!
► Parameter can only be changed by a qualied service technician!
► Parameter can only be changed by a qualied service technician!
► Parameter can only be changed by a qualied service technician!
prod. preselection
yes
► Parameter can only be changed by a qualied service technician!
Page 36

www.schaerer.com
36
BAE6Mu - EN
Version 03 01.2008
Programming
milk dispensing time
15.0 s
delay time milk
1.0 s
Range: 0.0 – 90.0 Sekunden
+
► Duration of the milk foam output.
► Parameter can only be changed by a qualied service technician!
foam ratio
50 %
+
delay time foam
2.0 s
select grinder
rear grinder
coffee grams
8.0 g
+
cycles per button
1
Range: 0 – 100%
► The lower the pump speed the more hot the milk will be. Recommended value 50 – 55 % (re-
sults in an output temperature of ± 70 – 72 °C, when the milk in the fridge is ± 5 °C).
► Parameter can only be changed by a qualied service technician!
► Parameter can only be changed by a qualied service technician!
Range: 6.0 – 16.0 g
► Quantity of coffee powder (max.: 14.0 gr; depending on the type of grind)
► Parameter can only be changed by a qualied service technician!
Water quantity
40 ml
+
Bypasswater
0.0 s
+
base tamp. pressure
level 5
pre-infusion
0 ml
chamber opening time
0 ms
Range: 10 – 600 ml
► Quantity of the coffee water.
Range: 0.0 – 30.0 s
► Duration of the bypass water.
► Parameter can only be changed by a qualied service technician!
► Parameter can only be changed by a qualied service technician!
► Parameter can only be changed by a qualied service technician!
product buttons
Page 37

www.schaerer.com
37
BAE6Mu - EN
Version 03 01.2008
Programming
product buttons
select product
> press button <
PT
select product
double produc
PRODUCT BUTTONS: LATTE
► To access a menu, see „Programming overview: CHEF card”, page 27.
► Select the product for which the parameters are to be set.
Latte
► The product type can only be changed by a qualied service technician!
non
► Parameter can only be changed by a qualied service technician!
counted product1
dispensing sequence
milk and coffee
prod. preselection
no
select grinder
front grinder
coffee grams
9.0 g
+
cycles per button
► Parameter can only be changed by a qualied service technician!
► Parameter can only be changed by a qualied service technician!
► Parameter can only be changed by a qualied service technician!
► Parameter can only be changed by a qualied service technician!
Range: 6.0 – 16.0 g
► Quantity of coffee powder (max.: 14.0 gr; depending on the type of grind)
Water quantity
42 ml
Bypasswasser
0.0 s
► Parameter can only be changed by a qualied service technician!
Range: 10 – 600 ml
+
+
► Quantity of the coffee water.
Range: 0.0 – 30.0 s
► Duration of the bypass water.
Page 38

www.schaerer.com
38
BAE6Mu - EN
Version 03 01.2008
Introduction
base tamp. pressure
level 5
pre-infusion
5 ml
delay pre-infusion
1.0 s
► Parameter can only be changed by a qualied service technician!
► Parameter can only be changed by a qualied service technician!
► Parameter can only be changed by a qualied service technician!
chamber opening time
0 ms
wet pressing
non
milk dispensing time
12.5 s
+
delay time milk
0.0 s
foam ratio
20 %
+
► Parameter can only be changed by a qualied service technician!
► Parameter can only be changed by a qualied service technician!
Range: 0.0 – 90.0 seconds.
► Duration of milk foam output.
► Parameter can only be changed by a qualied service technician!
Range: 0 – 100%
► The lower the pump speed the more hot the milk will be. Recommended value 50 – 55 % (re-
sults in an output temperature of ± 70 – 72 °C, when the milk in the fridge is ± 5 °C).
delay time foam
product buttons
0.0 s
► Parameter can only be changed by a qualied service technician!
Page 39

www.schaerer.com
39
BAE6Mu - EN
Version 03 01.2008
Introduction
product buttons
select product
> press button <
PT
select product
double product
PRODUCT BUTTONS: HOT MILK
► To access a menu, see „Programming overview: CHEF card”, page 27.
► Select the product for which the parameters are to be set.
hot milk
► The product type can only be changed by a qualied service technician!
non
► Parameter can only be changed by a qualied service technician!
counted products
1
prod. preselection
no
Start / Stop
no
Press-/Hold
no
milk dispensing time
9.0 s
+
product buttons
► Parameter can only be changed by a qualied service technician!
► Parameter can only be changed by a qualied service technician!
► Parameter can only be changed by a qualied service technician!
► Product output can be stopped by pressing the product button again
► Parameter can only be changed by a qualied service technician!
Ranges: 0.0 – 90.0 seconds
► Duration of milk foam output.
Page 40

www.schaerer.com
40
BAE6Mu - EN
Version 03 01.2008
Introduction
product buttons
select product
> press button <
PT
select product
milk foam
double product
PRODUCT BUTTONS: MILK FOAM
► To access a menu, see „Programming overview: CHEF card”, page 27.
► Select the product for which the parameters are to be set.
► The product type can only be changed by a qualied service technician!
no
► Parameter can only be changed by a qualied service technician!
counted products
1
prod. preselection
non
start / stop
no
Press-/ Hold
no
milk dispensing time
9.0 s
+
► Parameter can only be changed by a qualied service technician!
► Parameter can only be changed by a qualied service technician!
► Parameter can only be changed by a qualied service technician!
► Product output can be stopped by pressing the product button again
► Parameter can only be changed by a qualied service technician!
Range: 0.0 – 90.0 seconds.
► Duration of milk foam output.
delay time milk
foam ratio
0.0 s
100%
► Parameter can only be changed by a qualied service technician!
Range: 0 – 100%
► The lower the pump speed the more hot the milk will be. Recommended value 50 – 55 % (re-
+
sults in an output temperature of ± 70 – 72 °C, when the milk in the fridge is ± 5 °C).
Page 41

www.schaerer.com
41
BAE6Mu - EN
Version 03 01.2008
Introduction
delay time foam
product buttons
product buttons
select product
> press button <
PT
0.0 s
► Parameter can only be changed by a qualied service technician!
PRODUCT BUTTONS: STEAM
► To access a menu, see „Programming overview: CHEF card”, page 27.
► Select the product for which the parameters are to be set
select product
steam
counted products
1
start / stop
yes
dosing time
0.15 s
+
product buttons
► The product type can only be changed by a qualied service technician!
► Parameter can only be changed by a qualied service technician!
► Parameter can only be changed by a qualied service technician!
► Product output can be stopped by pressing the product button again
Ranges: 0.1 – 99.9 seconds
► Duration of the steam output
Page 42

www.schaerer.com
system settings
machine number
X.XX.XXX’XXX
Programming
SYSTEM SETTINGS
► To access a menu, see „Programming overview: CHEF card”, page 27.
► Parameter can only be changed by a qualied service technician!
machine number
X
language
englisch
+
adjust time
XX.XX
+
adjust date
XX.XX.XXXX
+
summer-/winter time
locked
+
system settings
► Parameter can only be changed by a qualied service technician!
Range: German / French / Englisch
► Use the
Range: HH:MM
►Use the
Range: TT.MM.JJJJ
► Use the
Range: deaktiviert / Europa (EU) / Nord-Amerika
► Use the
button and after the / to change display language
button and after the / to adjust time
button and after the / to adjust date
button and after the / to adjust summertime-/winter time
42
BAE6Mu - EN
Version 03 01.2008
Page 43

Cleaning
Contact address USA: Contact address all other countries:
Schaerer USA Corporation M. Schaerer Ltd. Cleaning instruction 12.2007 V03
2900 Orange Avenue, Suite 102 Gewerbestrasse 15 QRCMU MBd_EN
Signal Hill, CA 90755 3302 Moosseedorf
USA Switzerland
www.schaererusa.com www.schaerer.com Order number: 021705
Daily cleaning
E6Mu with milk bag
7
► Open front door.
► Remove splitter by carefully tilting up
and pulling down
► Clean splitter under warm, running wa-
ter.
► Remove milk hose
► Pull out used foamer
► Dispose used foamer (and milk bag if
empty).
10
For regular operators:
► Switch-ON machine.
► Open front door.
► Connect milk bag with hose to the new
foamer.
► Place new foamer onto the nozzles.
► Close pinch door.
13
BAD GOOD
Refer to the safety instructions and to the chapter cleaning in the user manual!
Never reach into the machine or under the beverage outlets during the automatic cleaning!
The status of the cleaning and some cleaning steps are shown on the display.
Discard the milk bag only when it‘s empty! During stand by mode the refrigerator is still cooling!
► Place large pitcher (volume: ± 1 liter) un-
der the splitter.
► Press the
button for ± 4 seconds.
The display shows:
31
► Remove grounds bin within 6 seconds
and clean it under warm, running water.
► Open front and espresso unit door.
► Clean brew group and brew area with
the brush.
► Replace grounds bin.
► Close espresso unit door and front door.
The display shows:
► Drop one tablet (as shown) into the fun-
nel.
64 5
► Press the button.
cleaning program
clean grounds bin
cleaning program
insert tablet
select product
12:00 01.12.2007
2
Attention! Hot fl uid!
Wait until the display shows:
► After the cleaning cycle is complete, re-
move and empty the pitcher.
If the grounds bin is not removed
within 6 seconds, the machine will
return to "select product" mode.
Cleaning program is running!
(duration: ± 4,5 minutes)
Machines without drain:
► Remove drip tray and grill.
► Clean parts under warm, running water.
► Replace drip tray and grill.
Machines with drain:
► Remove drip grill.
► Clean drip grill under warm, running
water.
► Replace drip grill.
www.schaerer.com
CLEANING
DAILY CLEANING E6MU WITH MILK BAG
BAE6Mu - EN
Version 03 01.2008
43
Page 44

www.schaerer.com
44
BAE6Mu - EN
Version 03 01.2008
Cleaning
7
► Open front door.
► Remove splitter by carefully tilting up
1
and pulling down
2
.
► Clean splitter under warm, running wa-
ter.
8
► Turn espresso arm to the right side. ► Crimp milk hose.
► Open pinch door.
► Remove milk hose
1
.
► Pull out used foamer
2
.
► Dispose used foamer (and milk bag if
empty).
10
► Uncrimp milk hose.
► Turn espresso arm back.
► Replace splitter by pushing up (onto the
screws)
1
and dropping down 2 .
► Close front door.
15
14
► Press the button once to quickly rinse
the new foamer.
For hygienic reasons we recommend to change the foamer the
following morning!
Attention! Hot fl uid!
2
1
1
2
11 12
► Clean nozzles and the area arround with
a damp towel.
► Clean refrigerator with a damp towel.
► Close front door.
For 24-hour operators:
► Do not switch-OFF machine!
For regular operators:
► Switch-OFF machine.
► Clean external surfaces with a damp
towel.
Do not use any abrasives!
Do not use any abrasives!
9
1
2
For regular operators:
► Switch-ON machine.
► Open front door.
► Connect milk bag with hose to the new
foamer.
► Place new foamer onto the nozzles.
► Close pinch door.
13
BAD GOOD
Page 45

www.schaerer.com
45
BAE6Mu - EN
Version 03 01.2008
Cleaning
Contact address USA: Contact address all other countries:
Schaerer USA Corporation M. Schaerer Ltd. Cleaning instruction 12.2007 V03
2900 Orange Avenue, Suite 102 Gewerbestrasse 15 QRCMU MFd_EN
Signal Hill, CA 90755 3302 Moosseedorf
USA Switzerland
www.schaererusa.com www.schaerer.com Order number: 021710
Daily cleaning
E6Mu with milk gallon
7
► Open front door.
► Remove splitter by carefully tilting up
and pulling down
► Clean splitter under warm, running wa-
ter.
► Pull out used foamer with milk hose
► Dispose used foamer and milk hose (and
milk gallon if empty).
For hygienic reasons we recom-
mend to change the foamer and
milk hose the following morning!
For regular operators:
► Switch-ON machine.
► Open front door.
► Place new foamer with new milk hose
onto the nozzles .
► Place milk hose into the milk gallon.
► Close pinch door.
10
13
BAD GOOD
Machines without drain:
► Remove drip tray and grill.
► Clean parts under warm, running water.
► Replace drip tray and grill.
Machines with drain:
► Remove drip grill.
► Clean drip grill under warm, running
water.
► Replace drip grill.
Refer to the safety instructions and to the chapter cleaning in the user manual!
Never reach into the machine or under the beverage outlets during the automatic cleaning!
The status of the cleaning and some cleaning steps are shown on the display.
Discard the milk gallon only when it‘s empty! During stand by mode the refrigerator is still cooling!
► Place large pitcher (volume: ± 1 liter) un-
der the splitter.
► Press the
button for ± 4 seconds.
The display shows:
31
► Remove grounds bin within 6 seconds
and clean it under warm, running water.
► Open front and espresso unit door.
► Clean brew group and brew area with
the brush.
► Replace grounds bin.
► Close espresso unit door and front door.
The display shows:
► Drop one tablet (as shown) into the fun-
nel.
64 5
► Press the button.
cleaning program
clean grounds bin
cleaning program
insert tablet
select product
12:00 01.12.2007
2
Attention! Hot fl uid!
Wait until the display shows:
► After the cleaning cycle is complete, re-
move and empty the pitcher.
If the grounds bin is not removed
within 6 seconds, the machine will
return to "select product" mode.
Cleaning program is running!
(duration: ± 4,5 minutes)
DAILY CLEANING E6MU WITH MILK GALLON
Page 46

www.schaerer.com
46
BAE6Mu - EN
Version 03 01.2008
Cleaning
7
► Open front door.
► Remove splitter by carefully tilting up
1
and pulling down
2
.
► Clean splitter under warm, running wa-
ter.
8
► Turn espresso arm to the right side. ► Remove milk hose from milk gallon.
► Open pinch door.
► Pull out used foamer with milk hose
1
.
► Dispose used foamer and milk hose (and
milk gallon if empty).
► Turn espresso arm back.
► Replace splitter by pushing up (onto the
screws)
1
and dropping down 2 .
► Close front door.
15
14
► Press the button once to quickly rinse
the new foamer.
For hygienic reasons we recommend to change the foamer and
milk hose the following morning!
Attention! Hot fl uid!
2
1
11 12
► Clean nozzles and the area arround with
a damp towel.
► Clean refrigerator with a damp towel.
► Close front door.
For 24-hour operators:
► Do not switch-OFF machine!
For regular operators:
► Switch-OFF machine.
► Clean external surfaces with a damp
towel.
Do not use any abrasives!
Do not use any abrasives!
1
2
For regular operators:
► Switch-ON machine.
► Open front door.
► Place new foamer with new milk hose
onto the nozzles .
► Place milk hose into the milk gallon.
► Close pinch door.
9
10
1
13
BAD GOOD
Page 47

www.schaerer.com
47
BAE6Mu - EN
Version 03 01.2008
Cleaning
Contact address USA: Contact address all other countries:
Schaerer USA Corporation M. Schaerer Ltd. Cleaning instruction 12.2007 V03
2900 Orange Avenue, Suite 102 Gewerbestrasse 15 QRCMU MCd_EN
Signal Hill, CA 90755 3302 Moosseedorf
USA Switzerland
www.schaererusa.com www.schaerer.com Order number: 021720
Daily cleaning
E6Mu with milk container
Refer to the safety instructions and to the chapter cleaning in the user manual!
Never reach into the machine or under the beverage outlets during the automatic cleaning!
The status of the cleaning and some cleaning steps are shown on the display.Rinse and clean the milk container if empty! During stand
by mode the refrigerator is still cooling!
► Open front door.
► Remove splitter by carefully tilting up
and pulling down
► Clean splitter under warm, running wa-
ter.
► Pull out used foamer with milk hose
► Dispose used foamer and milk hose
(and rinse and clean the milk container
if empty).
For regular operators:
► Switch-ON machine.
► Open front door.
► Place new foamer with new milk hose
onto the nozzles.
► Place milk hose into the milk gallon.
► Close pinch door.
10
13
BAD GOOD
► Place large pitcher (volume: ± 1 liter) un-
der the splitter.
► Press the
button for ± 4 seconds.
The display shows:
31
► Remove grounds bin within 6 seconds
and clean it under warm, running water.
► Open front and espresso unit door.
► Clean brew group and brew area with
the brush.
► Replace grounds bin.
► Close espresso unit door and front door.
The display shows:
► Drop one tablet (as shown) into the fun-
nel.
64 5
► Press the button.
cleaning program
clean grounds bin
cleaning program
insert tablet
select product
12:00 01.12.2007
2
Attention! Hot fl uid!
Wait until the display shows:
► After the cleaning cycle is complete, re-
move and empty the pitcher.
If the grounds bin is not removed
within 6 seconds, the machine
will return to "select product"
Cleaning program is running!
(duration: ± 4,5 minutes)
Machines without drain:
► Remove drip tray and grill.
► Clean parts under warm, running water.
► Replace drip tray and grill.
Machines with drain:
► Remove drip grill.
► Clean drip grill under warm, running
water.
► Replace drip grill.
DAILY CLEANING E6MU WITH MILK CONTAINER
Page 48

www.schaerer.com
48
BAE6Mu - EN
Version 03 01.2008
Cleaning
97
► Open front door.
► Remove splitter by carefully tilting up
1
and pulling down
2
.
► Clean splitter under warm, running wa-
ter.
8
► Turn espresso arm to the right side. ► Crimp milk hose.
If milk container empty:
► Pull off milk hose from container.
If milk container not empty:
► Leave milk hose on container.
► Open pinch door.
► Pull out used foamer with milk hose
1
.
► Dispose used foamer and milk hose
(and rinse and clean the milk container
if empty).
► Turn espresso arm back.
► Replace splitter by pushing up (onto the
screws)
1
and dropping down 2 .
► Close front door.
15
14
► Press the button once to quickly rinse
the new foamer.
For hygienic reasons we recommend to change the foamer and
milk hose the following morning!
Attention! Hot fl uid!
2
1
11 12
► Clean nozzles and the area arround with
a damp towel.
► Clean refrigerator with a damp towel.
► Close front door.
For 24-hour operators:
► Do not switch-OFF machine!
For regular operators:
► Switch-OFF machine.
► Clean external surfaces with a damp
towel.
Do not use any abrasives!
Do not use any abrasives!
1
2
For regular operators:
► Switch-ON machine.
► Open front door.
► Place new foamer with new milk hose
onto the nozzles.
► Place milk hose into the milk gallon.
► Close pinch door.
10
1
13
BAD GOOD
Page 49

www.schaerer.com
49
BAE6Mu - EN
Version 03 01.2008
Cleaning
Weekly cleaning
E6Mu Brewer & bean hopper cleaning
Contact address USA: Contact address all other countries:
Schaerer USA Corporation M. Schaerer Ltd. Cleaning instruction 12.2007 V03
2900 Orange Avenue, Suite 102 Gewerbestrasse 15 QRCMU w_EN
Signal Hill, CA 90755 3302 Moosseedorf
USA Switzerland
www.schaererusa.com www.schaerer.com Order number: 021715
► Place the completely dry brewer back
into the machine.
► Replace splitter by pushing up (onto the
screws)
► Close front door.
13
► Move the brew group back into the
home position.
► Move the lever clockwise
in picture) and slowly place it onto the
cover.
► Move the brew group downwards.
► Pull out and hold the lever
7 8
Carefully read the information given in the user manual as it contains important information regarding safety, hygiene, use and maintenance of the machine.
Never reach into the machine or under the beverage outlets during the automatic cleaning! Turn off power on machine before proceeding with brewer cleaning!
Execute the brewer & bean hopper cleaning in minimum once per week! The weekly cleaning is complementary to the daily cleaning and
does not replace it!
► Remove grounds bin.
► Turn espresso arm to the right side.
► Open espresso unit door.
► Disconnect the espresso hose.
5
3
4
► Open front door.
► Remove splitter by carefully tilting up
1
and pulling down
2
.
2
1
► Hold the brew group.
► Squeeze the two brackets inwards
1
and turn them upwards
2
into locking
position to release the brewer.
6
2
2
1
1
Brewer cleaning:
(Recommended by M. Schaerer Ltd.)
1 2
► Push bean slide inwards.
► Pull locking pin
1
and remove the bean
hopper(s).
1
► Empty the bean hopper(s).
► Clean the bean hopper(s) under warm,
running water.
► Dry the bean hopper(s) completely.
► Replace the bean hopper(s).
WEEKLY CLEANING
Page 50

www.schaerer.com
► Clean the brewer thoroughly from both
sides under warm, running water.
► Remove residues with a damp tissue.
► Place the completely dry brewer back
into the machine.
► Lock the brew group by closing the two
brackets.
► Re-connect the espresso hose.
► Turn the lever counter clockwise
1
and
move the lever back
2
to lock the brew
group.
► Replace grounds bin.
► Turn espresso arm back.
► Close espresso unit door.
► Replace splitter by pushing up (onto the
screws)
1
and dropping down 2 .
► Close front door.
1110 12
13
The brewer must be completely
dry before re-installing!
1
2
Never use a dish washer to clean
the Brewer!
9
► Move the brew group back into the
home position.
► Move the lever clockwise
2
(as shown
in picture) and slowly place it onto the
cover.
► Move the brew group downwards.
► Pull out and hold the lever
1
.
► Pull out the brewer.
7 8
2
1
2
1
Attention! Risk of crushing!
Attention! Risk of Crushing!
Cleaning
50
BAE6Mu - EN
Version 03 01.2008
Page 51

Troubleshooting
Message Cause What to do
www.schaerer.com
TROUBLESHOOTING
E6MU DISPLAY & ERROR MESSAGES
<< Stand by >>
cleaning
container
container full
door open
grinder block
G1
grinder block
G2
heating
man. cleaning
motor control
front grinder empty
G1
A dark Display with no visible text means
there is no power to the machine.
There is power going to the machine but it
is in an "OFF" state.
The Product Buttons will be locked.
This message appears while the cleaning
program is running. During the cleaning
cycle, all Product Buttons are locked.
The machine can be used again when
“Ready“ appears on the Display.
The Grounds Bin is not making contact
with a designated switch inside the
machine. The Bin is either not in the
machine or not placed all the way into
the correct position.
The Grounds Bin is full. The Product Buttons
will not work until the Bin is removed,
emptied, and placed back in the
machine.
The Front Door is open. The Product
Buttons will not work until the Door is
closed.
An object is blocking the Bean flow into
the Grinder of the Front Bean Hopper.
An object is blocking the Bean flow into
the Grinder of the Rear Bean Hopper.
When the machine is switched on after it
has been in "Stand by" mode for a while,
it takes a few minutes for the machine
to heat up. Products can be made after
approximately ve (5) minutes.
After you remove the Grounds Bin during
the cleaning program, the machine
reminds you to use the Cleaning Brush to
remove any excess Coffee Grounds from
the machine.
The machine is registering a disruption in
the control function of the Brew Group
Motor.
The Front Bean Hopper (for regular Beans)
is empty.
Unplug the machine and plug it back in.
If Display remains dark, ► call for service.
To turn on machine, press the "ON/OFF" button.
If the message persists for more than eight (8)
minutes, ► call for service.
Remove the Bin and slide it all the way in again. If
the message persists, ►call for service.
If the message persists after emptying and
replacing the Bin, ► call for service.
Close the Front Door securely. If the message
persists, ► call for service.
Switch the machine off and on once, then press
the Product Button again. If the message persists,
disconnect the machine from its power supply
and vacuum out the remaining Beans from the
Front Bean Hopper. Visually check the Grinder for
obstructions. DO NOT PLACE HANDS OR FINGERS
INTO THE GRINDER! If the problem persists, ► call
for service.
Switch the machine off and on once, then press
the Product Button again. If the message persists,
disconnect the machine from its power supply
and vacuum out the remaining Beans from the
Rear Bean Hopper. Visually check the Grinder for
obstructions. DO NOT PLACE HANDS OR FINGERS
INTO THE GRINDER! If the problem persists, ► call
for service.
If the message persists for longer than ve (5)
minutes, ► call for service.
-
Switch the machine off and back on again. Press
any Espresso Product Button. If the message
disappears, it was temporary (i.e. voltage drop). If
the message persists, ► call for service.
Fill the Hopper with regular Beans and press the
Product Button again to continue the grind cycle.
It may also mean that the Bean flow into the
Grinder is blocked by an object. If the Hopper is
full, stir the Beans with the back of the Cleaning
Brush, then press the Product Button again, if
necessary two or three times. If the message
persists, ► call for service. DO NOT PLACE HANDS
OR FINGERS INTO THE GRINDER!
BAE6Mu - EN
Version 03 01.2008
51
Page 52

www.schaerer.com
52
BAE6Mu - EN
Version 03 01.2008
Troubleshooting
Message Cause What to do
rear grinder empty
NTC water
remove cont.
tablet
timeout
G2
The Rear Bean Hopper (for DECAF Beans)
is empty.
The machine is registering a failure in
the Temperature Probe of the Hot Water
Boiler.
When you rst press the CLEANING Button
to initiate the cleaning cycle, the Display
Screen prompts you to remove the
Grounds Bin.
During the cleaning program, after you
use the Brush and slide the Grounds Bin
back in place, the machine will prompt
you to now insert the Schaerer Cleaning
Tablet in the Funnel.
The machine is registering a disruption in
the control function of the Brew Group
because it can not detect the nal
position of the Brewer.
Fill the Hopper with DECAF Beans and press the
Product Button again to continue the grind cycle.
It may also mean that the Bean flow into the
Grinder is blocked by an object. If the Hopper is
full, stir the Beans with the back of the Cleaning
Brush, then press the Product Button again, if
necessary two or three times. If the message
persists, ► call for service. DO NOT PLACE HANDS
OR FINGERS INTO THE GRINDER!
Turn the machine off and back on again.
If the message persists, call for service.
This must be done within six (6) seconds.
-
Switch the machine off and back on again. Press
any Espresso Product Button. If the message
persists, ► call for service.
change foamer
flushing 1
high temp
lower temp
lower water
press flush now
It is time to replace the Foamer.
The machine is running a brief flush cycle
to clean and sanitize the Foamer. The
number to the right describes which
Foamer is being cleaned at that point in
time.
The Temperature of the Steam Boiler has
exceeded the set point.
The Temperature of the Steam Boiler has
not reached its set point.
The water level in the Steam Boiler is not
high enough or the Level Probe cannot
indicate the water is there.
Brief flush cycle to clean and sanitize the
Foamer.
Change the Foamer and Milk Hose according to
instructions found on page 42 - 50.
-
If the message does not go away after 5 minutes
call for service.
If the message does not go away after 5 minutes
call for service.
Call for service.
Press the CLEANING Button to start the cycle
according to instructions found on page 37 - 44.
Page 53

www.schaerer.com
53
BAE6Mu - EN
Version 03 01.2008
Troubleshooting
HELP DESK PROCEDURE (USA ONLY)
IF YOU NEED HELP WITH THE E6Mu MACHINE CALL 888-989-3004
HOURS OF BUSINESS:
Normal Hours:
During normal business hours, a Schaerer representative will answer your call directly.
In case all lines are busy, please leave a message on our voice mail system according to the
instructions that you hear on the voice mail.
Monday through Friday: 8:00AM to 8:00PM EST
Weekends: 8:00AM to 6:30PM EST
Messages received during business hours will be returned in the order they were received.
Paging Hours:
Outside of normal hours, you can use our voice mail system to page an on-duty technician for
emergencies. Our voice mail paging system is active during the following hours:
Monday through Friday: 8:00PM to 11:59PM EST
Weekends: 6:30PM to 11:59PM EST
Messages received during paging business hours will be returned within ½ hour.
Please do not use the voice mail paging system for general questions or other non-emergency
requests!
* Messages received outside normal and paging hours will be returned the next day.
HOW TO CONTACT US (USA ONLY)
CALL OUR TOLL FREE NUMBER AT 888-989-3004
► Press "1" for a list of departments.
► Press "1" to get service on your espresso machine.
► During normal business hours, a Schaerer representative will answer your call directly.
► Should you reach voice mail, please leave a message containing the following information:
1. The store number.
2. Your phone number, including the local area code.
3. Your name.
4. The store address.
5. A brief description of the problem.
6. The machine's serial number.
► Leaving a message in the Service Dispatch box will page the on-duty technician
(during paging hours).
Please do not use this procedure for general questions or other non-emergency requests!
ONSITE RESPONSE TIMES:
If a service request comes in before 12:00NOON EST, all attempts possible will be made for same
day service.
If a service request comes in after 12:00NOON EST, same day service will be attempted,
otherwise, service will be scheduled for the next day.
Page 54

www.schaerer.com
Troubleshooting
INFORMATION AND SUPPORT (ALL OTHER COUNTRIES)
Please contact your local service partner (refer to www.schaerer.com ► Worldwide partners).
54
BAE6Mu - EN
Version 03 01.2008
Page 55

Appendix
www.schaerer.com
APPENDIX
DECLARATION OF CONFORMITY
These products conform to the requirements of EU guidelines.
2006/95/EU EU low voltage directive
2004/108/EU EU directive electromagnetic compatibility
Information about the declaration of conformity can be obtained from the manufacturer upon
request:
M. Schaerer Ltd.
Gewerbestrasse 15
3302 Moosseedorf
Switzerland
Tel.: +41 31 858 51 11
Fax: +41 31 858 51 40
info@schaerer.com www.schaerer.com
Inst. No. 4.6.9156
Typ E6MU
Serial No. x xxx xxxxxx
Nominal pressure 1.2 MPa (12bar)
Min. input pressure 1 bar
Max. input pressure 3 bar
Electrical Ratings 380-415V 3NAC 16A
SERIAL PLATE
Machine-specic data are listed on the serial plate. This serial plate is afxed to the inside of
the machine and is visible when the grounds container and the cover above are removed.
For warranty purposes, and in case of failure, please copy the data in the eld on this page:
Installation No: ___________________________
Type: E6MU _____________________
Serial No: ___________________________
Nominal pressure: ___________________________
Electrical ratings:
_______ V _______ NAC _______ Hz _______ W
zH0500101-0058 W
Fuse: _______ A
BAE6Mu - EN
Version 03 01.2008
55
Page 56

www.schaerer.com
56
BAE6Mu - EN
Version 03 01.2008
Appendix
CLEANING PRODUCTS
CLEANING TABLET SCHAERER (ART.-NO.: 065221)
Before using the cleaning tablet, please read the information on the tablet’s packaging as well
as the safety data sheet (“HEALTH & SAFETY DATA SHEET”). If you do not have this safety data
sheet, please request it from the vendor.
Purpose:
For cleaning the coffee maker’s coffee system on a daily basis.
Shape and odor:
See safety data sheet (“HEALTH & SAFETY DATA SHEET”).
Use:
► Keep the cleaning tablet out of the reach of children and unauthorized persons.
► Do not swallow!
► Never mix the cleaning tablet with other chemicals (cleaning products)!
► Do not eat or drink while handling cleaning tablets.
► Wash your hands and face immediately before breaks and after handling cleaning tablets.
► Never mix the cleaning tablet with liquid or powdery cleaning products or with acids!
Emergency information:
Ask your vendor or a customer service authorized by the vendor for an emergency-information
telephone number (Toxicological Information Center) in your country. If your country does not
have such an institution, call the following Swiss telephone number for information in emergency
cases:
++41 01 251 51 51 (Toxicological Information Center)
www.toxi.ch (DE / UK / FR)
First aid:
See information on the packaging or the safety data sheet (“HEALTH & SAFETY DATA SHEET”).
Important for the physician to know:
If possible, show the information on the packaging or the safety data sheet (“HEALTH & SAFETY
DATA SHEET”) to the treating physician.
How to store cleaning tablets:
► Keep the cleaning tablet out of the reach of children and unauthorized persons.
► Protect cleaning products from heat, light and moisture.
► Store cleaning products separately from acids.
► Store them only in their original packaging.
► Do not store them together with food, beverages or tobacco.
► All local and legally applicable regulations on storing chemicals (cleaning products) must
be observed.
Page 57

www.schaerer.com
57
BAE6Mu - EN
Version 03 01.2008
Appendix
TECHNICAL DATA FOR COFFEE MACHINE
We reserve the right to make
technical changes!
* Special equipment, see Serial
plate; specied values refer to
standard equipment.
Power rating * Steam Bolier (Mu) Hot Water Boiler (E6)
2 x 3000 W 3000 W
Volumes Steam Bolier (Mu) Hot Water Boiler (E6)
1 litre 0.8 litre
Operating temperature
Admissible operating temperature (T max):
Minimum operating temperature (T min):
Operating temperature (adjustable):
Operating over pressure
Operating over pressure:
Admissible operating over pressure (p max):
Test over pressure:
Mains connection *
Bean containers ± 1000 g. each
Outside dimensions:
Width:
Height:
Depth:
Empty weight ± 40-50 kg
Steam Bolier (Mu) Hot Water Boiler (E6)
192 °C
10 °C
152 °C
Steam Bolier (Mu) Hot Water Boiler (E6)
4 bar
12 bar
24 bar
Europe: 3N AC
USA: 2N AC
404 mm (with drip tray)
1019 mm (with bean containers and feet)
707 mm
50/60 Hz 400 V
60 Hz 208 V
192 °C
10 °C
95 °C
2.5 bar
12 bar
24 bar
CONDITIONS FOR USE AND INSTALLATION
Preparatory structural work must be commissioned by the machine supplier. It must be carried out
by licensed installers observing all general as well as locally applicable regulations.
M. Schaerer Ltd. customer service may only make the connections that have already been prepared. It is neither authorized to carry out structural installation, nor is it responsible for its implementation!
Mains voltage
tolerance
Protection IP 50
Water supply 3/8 inch flexihose connector with mains tap and lter on customer
Water quality The water must be free of contaminants and the chlorine content
Water drainage line
(optional)
Ambient temperature + 10 °C up to max. + 35 °C (in event of frost, drain the water system)
Maximum humidity 80 % relative humidity without condensation, no water spray, do not
Europe:
400 V + 10 % - 10 %, mains outage < 50 ms no interruption of function
USA:
208 V + 10 % - 10 %, mains outage < 50 ms no interruption of function
supply side, water temperature max. 35 °C (95 °F).
min. 1 bar flow pressure, max. 3 bar flow pressure.
may not exceed 100 mg/l. Do not use RO water (Reverse Osmosis) or
any other type of aggressive water. The carbonate hardness may not
exceed 5 – 7°dH (German hardness) or 8 – 12°fH (French hardness)
and the total hardness must be always higher than the carbonate
hardness. The minimal carbonate hardness is 4°dH or 7°fH. The pH
value must be between 6.5 and 7.
Flexihose to DN 19, min. gradient 57 cm/m (0,057 inch / inch)
use unit outdoors!
Page 58

www.schaerer.com
58
BAE6Mu - EN
Version 03 01.2008
Appendix
ENVIRONMENTAL ASPECTS
Spare parts:
Parts exchanged during a service can be reconditioned as far as possible and used again.
Cleaning agents: Environmental protection!
If no re-use is possible, cleaning agents and their packaging must be disposed of in line with
local laws and regulations in accordance with the "HEALTH & SAFETY DATA SHEET".
Energy consumption:
The energy consumption corresponds to the technical state of the art at the time the machine
was developed.
Disposal: Environmental protection!
The machines must be disposed of correctly and in accordance with local laws and
regulations.
Page 59

www.schaerer.com
59
BAE6Mu - EN
Version 03 01.2008
Appendix
WATER QUALITY
GENERAL
99% of a cup of coffee is water. Not only because of the considerable influence water has on the
flavour of coffee, but also to protect the machine itself, special attention must be drawn to the
water.
The properties of water have a signicant effect on how your coffee is brewed, and on the life of
your coffee machine.
PURITY OF WATER
Water flows over rock and stone and through bedrock, where it gathers valuable minerals. The
source of the water, the bedrock and soil properties, and the local water treatment all affect the
properties and the flavour of water.
In preparing coffee, the pH level has a strong effect: acidic water emphasises the acidity of the
coffee. Another phenomenon is that the crema disappears more quickly if prepared with water
that has been fully softened. Not all machine parts are resistant to acidic water. Some can become corroded.
Water that is too hard can result in lime scale build-up in coffee machines (such as within the boilers and valves). Lime scale can impact the performance and shorten the lifespan of the coffee
machine.
Depending on the scale of the
measuring tool the value must be
converted using the table right!
WATER CHARACTERISTICS FOR SCHAERER COFFEE MACHINES
► 5 – 7°dH (German hardness) relate to 8 – 12°fH (French hardness)
• If the measured value is below this range, the water must be mineralised.
• If the measured value is above this range, a descaling lter / softener must be used.
► Chlorine content max. 100 mg per litre
► PH value 6.5 – 7 (ph neutral)
Failure to observe these property ranges voids the M. Schaerer AG factory warranty!
CONVERSION TABLE
Unit ° dH ° eH ° fH ppm mmol/l
German hardness 1 ° dH 1 1.253 1.78 17.8 0.1783
English hardness 1 ° eH 0.798 1 1.43 14.3 0.142
French hardness 1 ° fH 0.560 0.702 1 10 0.1
CaCO3 (USA) 1 ppm 0.056 0.07 0.1 1 0.01
mmol/l 1 mmol/l 5.6 7.02 10 100 1
FILTER TECHNICS
Filters are essential for the care and maintenance of the machine, not to mention for hygiene, and
for the best quality of coffee. Water is a vital medium: Its properties do not remain constant. Regardless of the system used, the water properties must be measured and the water lter replaced
annually.
Please contact your local dealer or your customer service representative for further information!
Page 60

www.schaerer.com
Notes
NOTES
60
BAE6Mu - EN
Version 03 01.2008
 Loading...