

Page 1

Schaerer Coffee Vito
Operating instructions
V06 / 11.2015
Schaerer Ltd. P.O. Box 336 Original operating instructions
Page 2
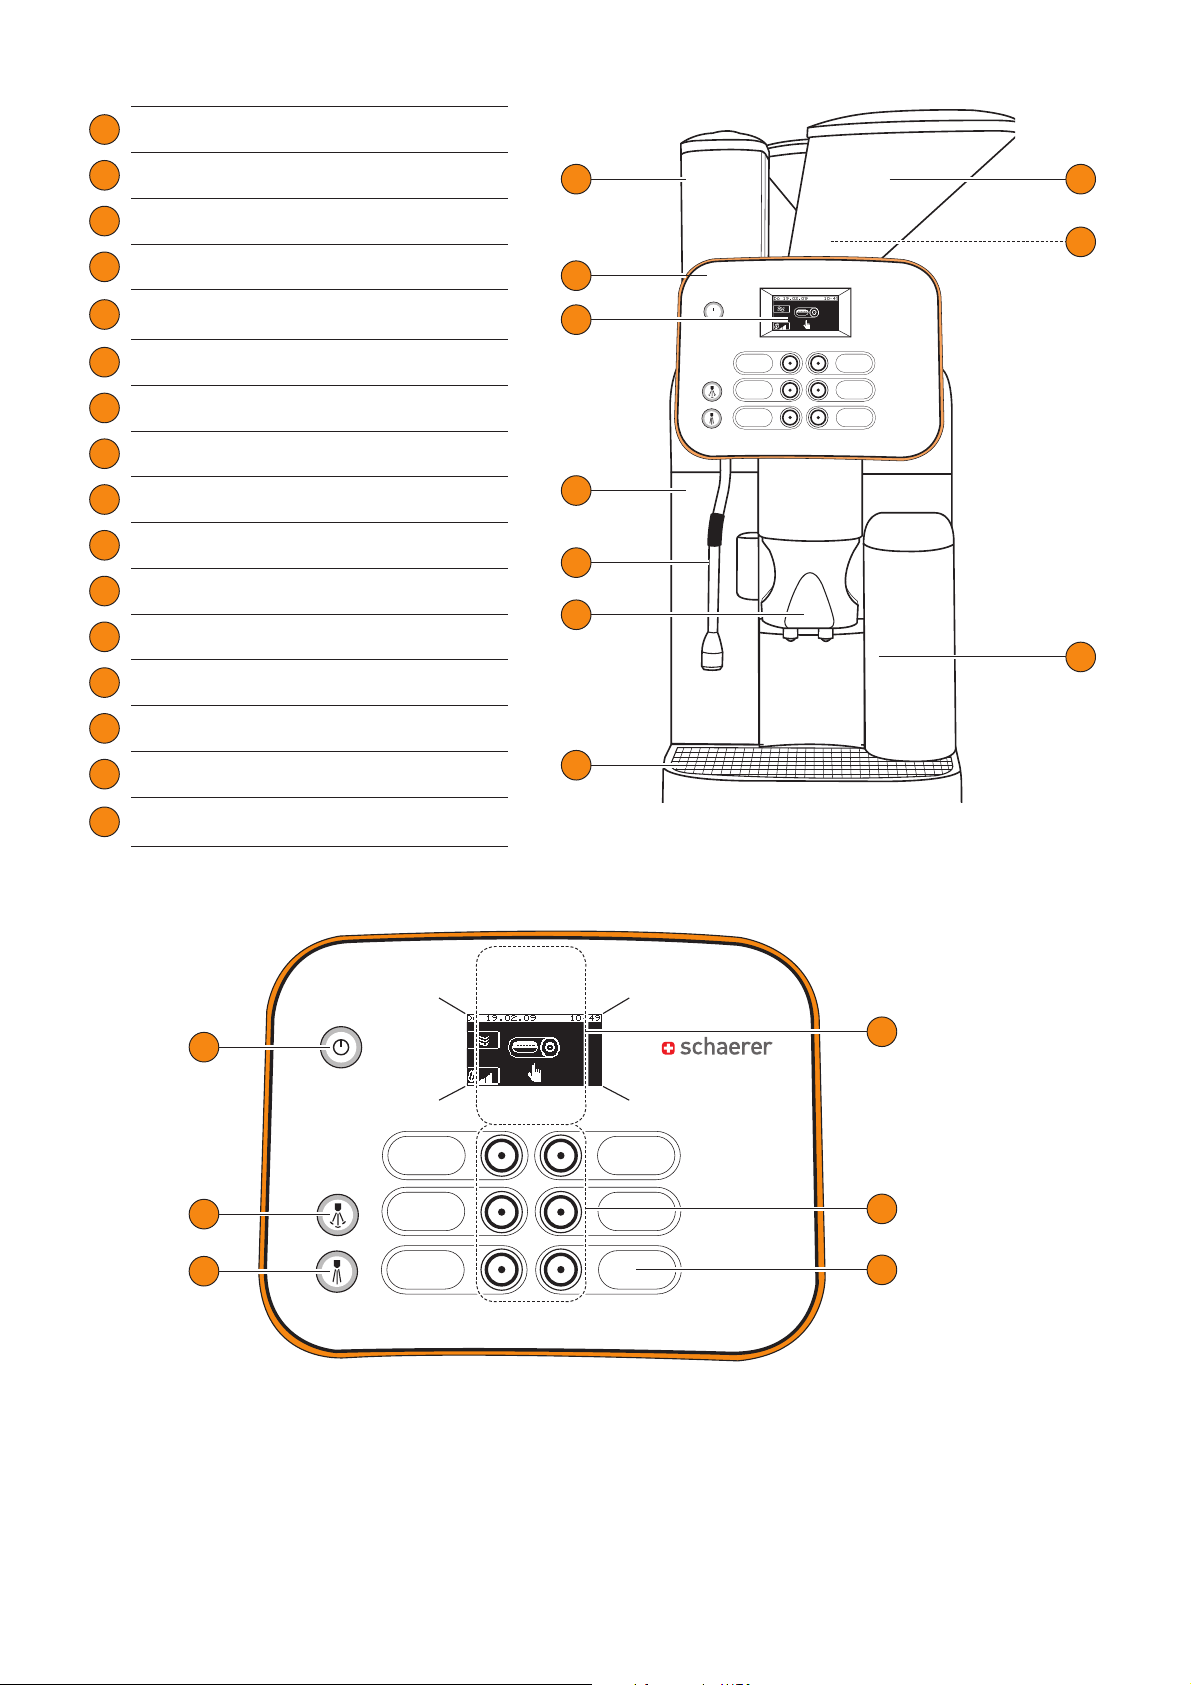
Topping- / Choc-Container
Control panel (Details see below)
Touchscreen
1
2
3
4
5
6
7
8
9
10
11
12
13
14
15
16
Frontcover left
Hot water outlet
Steam outlet (optional)
Height-adjustable Combi Spout
Removable drip tray with drip tray grid
Bean hopper with cover (lockable)
Tablet and coffee powder insert (not displayed)
Water tank intern
ON / OFF button
Steam button
Hot water button
Touchscreen
6 Beverage buttons (programmable)
1
10
9
4
5
7
6
2
3
8
Labeling for beverage buttons
Download:
www.schaerer.com/download
11
12
13
16
15
14
Schaerer Ltd. Original operating instructions
P.O. Box 336
Allmendweg 8
CH-4528 Zuchwil
info@schaerer.com
www.schaerer.com
BA SCV_en
N° 022001
Page 3

Schaerer Coffee Vito
Operating instructions
V06 / 11.2015
www.schaerer.com
Published by
Schaerer Ltd., P.O. Box 336, Allmendweg 8, CH-4528 Zuchwil
Edition
Version 06 | 11.2015
Software
V5.1.1
Concept and editorial department
Schaerer Ltd., P.O. Box 336, Allmendweg 8, CH-4528 Zuchwil
Copyright by ©
Schaerer Ltd., P.O. Box 336, Allmendweg 8, CH-4528 Zuchwil
This document is copyrighted. All rights are reserved. The reproduction, distribution, transmission via electronic systems or translation of this document in another language is not permitted without the written consent of Schaerer Ltd. This applies to the entire
document, as well as to individual excerpts thereof. The contents of the document are based on the most current data available at
the time of printing. Schaerer Ldt. reserves the right to make changes at any time without further notice. All pictures, illustrations
and display messages in this manual serve only as examples. Due to the wide variety of possible options, a particular machine
may differ from the devices depicted here. Schaerer AG is only liable for the contents of the original German document.
BA SCV_EN
V06 | 11.2015
3
Page 4

www.schaerer.com
Table of contents
Introduction . . . . . . . . . . . . . . . . . . . . . . . . . . . . . . . 6
Welcome . . . . . . . . . . . . . . . . . . . . . . . . . . . . . . . . . . . . . . . . 6
Signs and symbols . . . . . . . . . . . . . . . . . . . . . . . . . . . . . . . . . 6
General safety notes . . . . . . . . . . . . . . . . . . . . . . . . . 7
Danger to the user . . . . . . . . . . . . . . . . . . . . . . . . . . . . . . . . . 7
Risk of damage to the machine . . . . . . . . . . . . . . . . . . . . . . 10
Product description . . . . . . . . . . . . . . . . . . . . . . . . 11
Intended use . . . . . . . . . . . . . . . . . . . . . . . . . . . . . . . . . . . . 11
Beverage types and output . . . . . . . . . . . . . . . . . . . . . . . . . 11
Models . . . . . . . . . . . . . . . . . . . . . . . . . . . . . . . . . . . . . . . . . 12
Scope of delivery and accessories. . . . . . . . . . . . . . . . . . . . 13
Options and optional accessories . . . . . . . . . . . . . . . . . . . . 14
Technical data . . . . . . . . . . . . . . . . . . . . . . . . . . . . . . . . . . . 17
Serial plate . . . . . . . . . . . . . . . . . . . . . . . . . . . . . . . . . . . . . . 17
Declaration of conformity . . . . . . . . . . . . . . . . . . . . . . . . . . . 18
Applied standards . . . . . . . . . . . . . . . . . . . . . . . . . . . . . . . 18
Manufacturer's address . . . . . . . . . . . . . . . . . . . . . . . . . . 19
Installation and commissioning. . . . . . . . . . . . . . . 20
Setting up the coffee machine . . . . . . . . . . . . . . . . . . . . . . . 20
Location . . . . . . . . . . . . . . . . . . . . . . . . . . . . . . . . . . . . . . 20
Ambient conditions . . . . . . . . . . . . . . . . . . . . . . . . . . . . . . 20
Power supply . . . . . . . . . . . . . . . . . . . . . . . . . . . . . . . . . . . . 20
Conditions. . . . . . . . . . . . . . . . . . . . . . . . . . . . . . . . . . . . . 20
Power requirements . . . . . . . . . . . . . . . . . . . . . . . . . . . . . 21
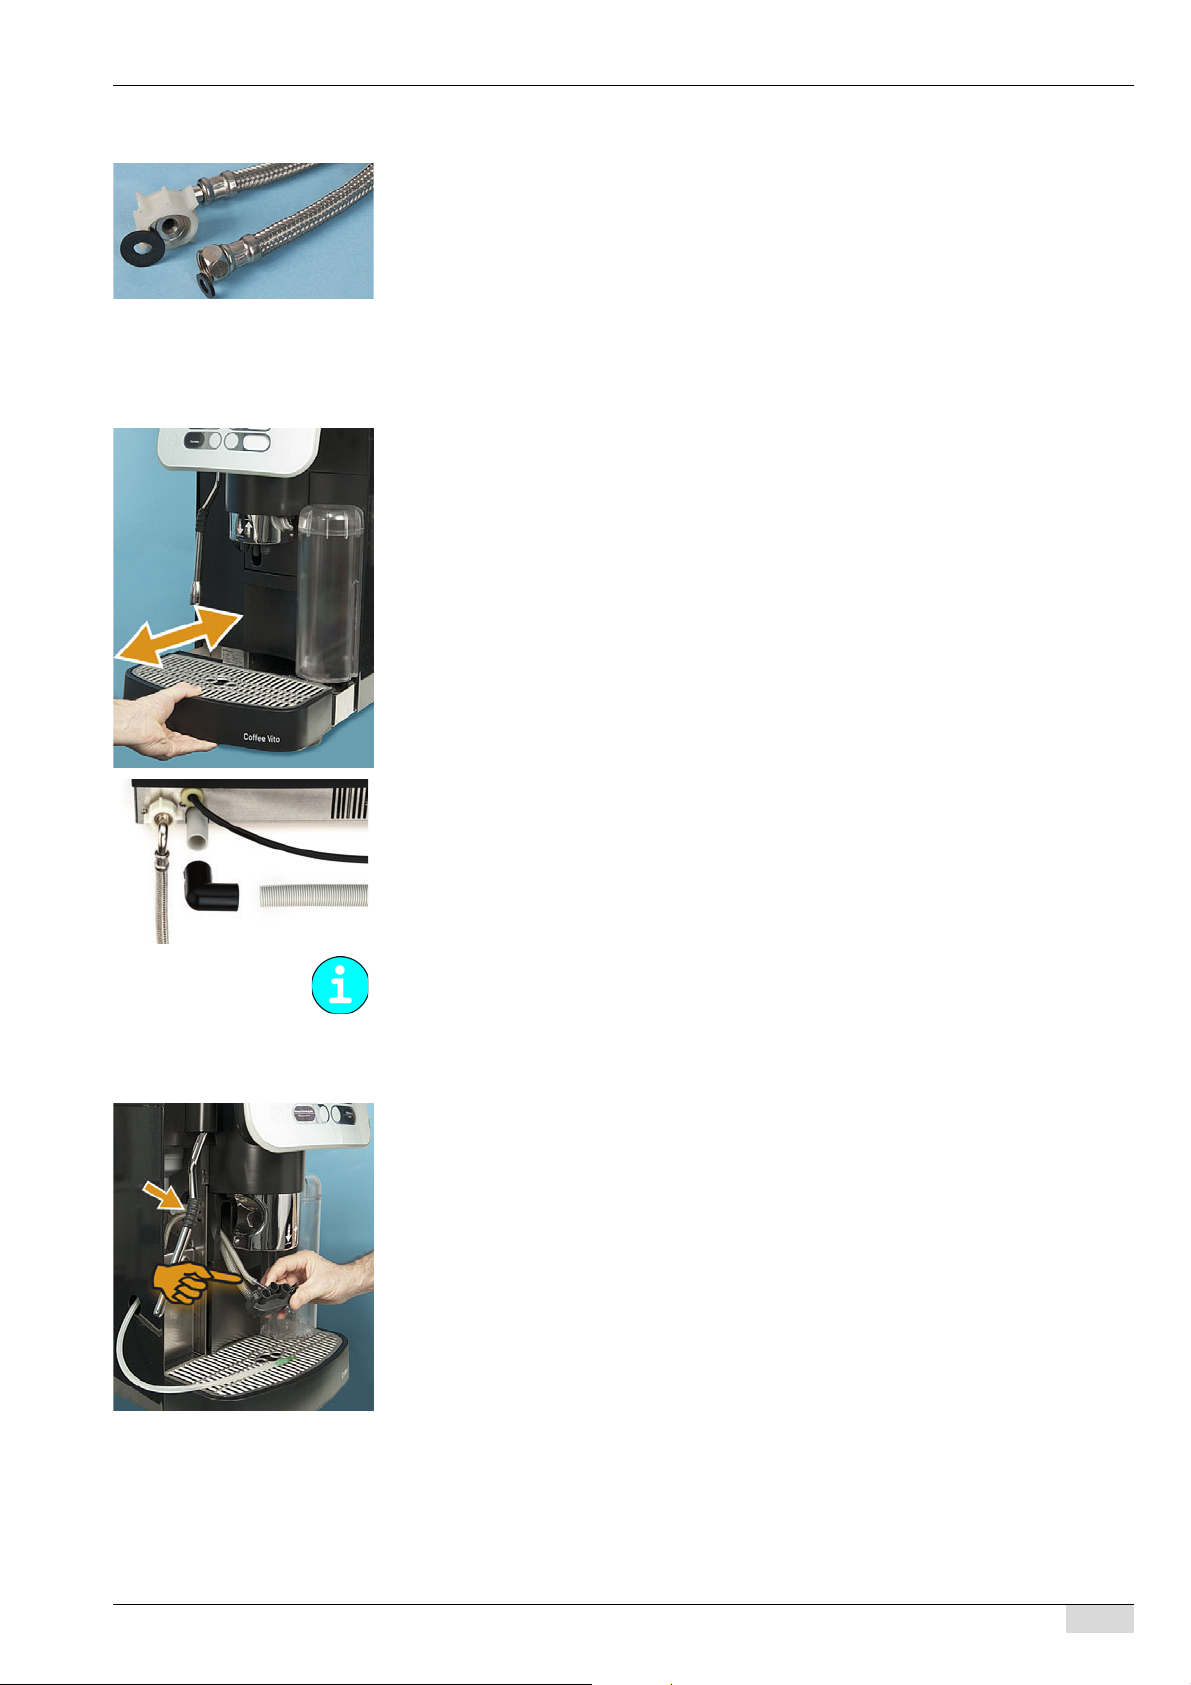
Water connection/drain . . . . . . . . . . . . . . . . . . . . . . . . . . . . 21
Conditions. . . . . . . . . . . . . . . . . . . . . . . . . . . . . . . . . . . . . 21
Power requirements . . . . . . . . . . . . . . . . . . . . . . . . . . . . . 22
Switching between mains water supply and
drinking water tank (Option) . . . . . . . . . . . . . . . . . . . 22
Installation . . . . . . . . . . . . . . . . . . . . . . . . . . . . . . . . . . . . . . 22
Unpacking the machine . . . . . . . . . . . . . . . . . . . . . . . . . . 22
Installing the mains water supply (Option) . . . . . . . . . . . . 23
Installing a waste water outlet. . . . . . . . . . . . . . . . . . . . . . 23
Connecting the milk system . . . . . . . . . . . . . . . . . . . . . . . 23
Button labelling. . . . . . . . . . . . . . . . . . . . . . . . . . . . . . . . . . . 24
Commissioning program . . . . . . . . . . . . . . . . . . . . . . . . . . . 25
Deinstallation and disposal . . . . . . . . . . . . . . . . . . . . . . . . . 28
Operation . . . . . . . . . . . . . . . . . . . . . . . . . . . . . . . . . 29
Check before switching on . . . . . . . . . . . . . . . . . . . . . . . . . . 29
Filling and connecting . . . . . . . . . . . . . . . . . . . . . . . . . . . . . 29
Coffee beans . . . . . . . . . . . . . . . . . . . . . . . . . . . . . . . . . . 29
Water . . . . . . . . . . . . . . . . . . . . . . . . . . . . . . . . . . . . . . . . 29
Milk . . . . . . . . . . . . . . . . . . . . . . . . . . . . . . . . . . . . . . . . . . 30
Automatic machine powder . . . . . . . . . . . . . . . . . . . . . . . 31
Switching the machine on . . . . . . . . . . . . . . . . . . . . . . . . . . 32
Main touch screen window. . . . . . . . . . . . . . . . . . . . . . . . . . 35
Dispensing . . . . . . . . . . . . . . . . . . . . . . . . . . . . . . . . . . . . . . 36
Pre-warming cups (Option). . . . . . . . . . . . . . . . . . . . . . . . 36
Adjusting the outlet height . . . . . . . . . . . . . . . . . . . . . . . . 36
Coffee beverages . . . . . . . . . . . . . . . . . . . . . . . . . . . . . . .37
Beverages with ground coffee. . . . . . . . . . . . . . . . . . . . . . 37
Hot water. . . . . . . . . . . . . . . . . . . . . . . . . . . . . . . . . . . . . .38
Milk beverages . . . . . . . . . . . . . . . . . . . . . . . . . . . . . . . . . 38
Hot milk . . . . . . . . . . . . . . . . . . . . . . . . . . . . . . . . . . . . . . . 38
Milk foam. . . . . . . . . . . . . . . . . . . . . . . . . . . . . . . . . . . . . .38
Steam . . . . . . . . . . . . . . . . . . . . . . . . . . . . . . . . . . . . . . . . 39
Dispensing options . . . . . . . . . . . . . . . . . . . . . . . . . . . . . . . .39
Stopping and cancelling beverage dispensing . . . . . . . . . 39
Double beverages . . . . . . . . . . . . . . . . . . . . . . . . . . . . . . .40
Emptying. . . . . . . . . . . . . . . . . . . . . . . . . . . . . . . . . . . . . . . .40
Grounds container. . . . . . . . . . . . . . . . . . . . . . . . . . . . . . . 40
Under-counter grounds disposal (Option) . . . . . . . . . . . . . 40
Drip tray. . . . . . . . . . . . . . . . . . . . . . . . . . . . . . . . . . . . . . .41
Waste water tank (Option) . . . . . . . . . . . . . . . . . . . . . . . .41
Transport requirements . . . . . . . . . . . . . . . . . . . . . . . . . . . .41
Display notes/instructions. . . . . . . . . . . . . . . . . . . . . . . . . . . 41
In self-service mode . . . . . . . . . . . . . . . . . . . . . . . . . . . . . 44
Switching the machine off. . . . . . . . . . . . . . . . . . . . . . . . . . . 44
End of operation . . . . . . . . . . . . . . . . . . . . . . . . . . . . . . . .44
Extended downtimes (1 week or more). . . . . . . . . . . . . . . 44
Cleaning . . . . . . . . . . . . . . . . . . . . . . . . . . . . . . . . . . 46
Cleaning intervals . . . . . . . . . . . . . . . . . . . . . . . . . . . . . . . . . 46
Mandatory cleaning . . . . . . . . . . . . . . . . . . . . . . . . . . . . . . .47
Cleaning options. . . . . . . . . . . . . . . . . . . . . . . . . . . . . . . . . .47
Warm rinsing . . . . . . . . . . . . . . . . . . . . . . . . . . . . . . . . . . . 47
Mixer rinsing . . . . . . . . . . . . . . . . . . . . . . . . . . . . . . . . . . .47
Milk foamer cleaning with "Plug & Clean" (Option) . . . . . . 47
Removing the foamer head. . . . . . . . . . . . . . . . . . . . . . . . 48
As needed . . . . . . . . . . . . . . . . . . . . . . . . . . . . . . . . . . . . . . 48
Brewing unit . . . . . . . . . . . . . . . . . . . . . . . . . . . . . . . . . . . 48
Daily cleaning . . . . . . . . . . . . . . . . . . . . . . . . . . . . . . . . . . . .50
Daily cleaning card . . . . . . . . . . . . . . . . . . . . . . . . . . . . . . 50
Milk container . . . . . . . . . . . . . . . . . . . . . . . . . . . . . . . . . . 52
Internal cooling unit (Option) . . . . . . . . . . . . . . . . . . . . . . .52
Side cooling unit (Option) . . . . . . . . . . . . . . . . . . . . . . . . .52
Internal/external drinking water tank (Option) . . . . . . . . . . 52
External waste water tank (Option) . . . . . . . . . . . . . . . . . . 53
Manual weekly cleaning . . . . . . . . . . . . . . . . . . . . . . . . . . . .54
Weekly cleaning card . . . . . . . . . . . . . . . . . . . . . . . . . . . .54
Bean hoppers . . . . . . . . . . . . . . . . . . . . . . . . . . . . . . . . . .
Powder container . . . . . . . . . . . . . . . . . . . . . . . . . . . . . . .55
Optional accessories . . . . . . . . . . . . . . . . . . . . . . . . . . . . . .56
Cup Heater (Option) . . . . . . . . . . . . . . . . . . . . . . . . . . . . .56
Cup & Cool (Option) . . . . . . . . . . . . . . . . . . . . . . . . . . . . .56
Defrosting the cooling unit (Option). . . . . . . . . . . . . . . . . . 56
HACCP cleaning concept . . . . . . . . . . . . . . . . . . . . . . . . . . .56
Cleaning regulations . . . . . . . . . . . . . . . . . . . . . . . . . . . . . 56
Cleaning products. . . . . . . . . . . . . . . . . . . . . . . . . . . . . . . . . 57
Cleaning tablets . . . . . . . . . . . . . . . . . . . . . . . . . . . . . . . . 57
Milkpure. . . . . . . . . . . . . . . . . . . . . . . . . . . . . . . . . . . . . . .57
Descalers . . . . . . . . . . . . . . . . . . . . . . . . . . . . . . . . . . . . .57
55
4
BA SCV_EN
V06 | 11.2015
Page 5

www.schaerer.com
Service and maintenance . . . . . . . . . . . . . . . . . . . . .58
Maintenance . . . . . . . . . . . . . . . . . . . . . . . . . . . . . . . . . . . . .58
Setting the grind level . . . . . . . . . . . . . . . . . . . . . . . . . . . . . .58
Descaling . . . . . . . . . . . . . . . . . . . . . . . . . . . . . . . . . . . . . . .59
Descaling message . . . . . . . . . . . . . . . . . . . . . . . . . . . . . . 59
Descaling preparations . . . . . . . . . . . . . . . . . . . . . . . . . . .59
Starting the descaling programme . . . . . . . . . . . . . . . . . .59
Water filter (Option) . . . . . . . . . . . . . . . . . . . . . . . . . . . . . . .62
Installing the water filter for
the internal drinking water tank (Option) . . . . . . . . . . . . . .62
Changing the water filter for
the internal drinking water tank (Option) . . . . . . . . . . . . . .63
External water filter (Option) . . . . . . . . . . . . . . . . . . . . . . .63
Programming. . . . . . . . . . . . . . . . . . . . . . . . . . . . . . .64
Navigation. . . . . . . . . . . . . . . . . . . . . . . . . . . . . . . . . . . . . . .64
Overview. . . . . . . . . . . . . . . . . . . . . . . . . . . . . . . . . . . . . . . .64
"Milk and foam" menu. . . . . . . . . . . . . . . . . . . . . . . . . . . . . .64
Topping quality / Foam quality . . . . . . . . . . . . . . . . . . . . .65
Macchiato pause . . . . . . . . . . . . . . . . . . . . . . . . . . . . . . . .65
"Timer programme" menu. . . . . . . . . . . . . . . . . . . . . . . . . . .65
Timer status. . . . . . . . . . . . . . . . . . . . . . . . . . . . . . . . . . . .66
Set timer . . . . . . . . . . . . . . . . . . . . . . . . . . . . . . . . . . . . . .66
Timer overview . . . . . . . . . . . . . . . . . . . . . . . . . . . . . . . . .67
Clear timer. . . . . . . . . . . . . . . . . . . . . . . . . . . . . . . . . . . . .67
Timer info . . . . . . . . . . . . . . . . . . . . . . . . . . . . . . . . . . . . .67
"Care" menu . . . . . . . . . . . . . . . . . . . . . . . . . . . . . . . . . . . . .67
Filling the coin changer (Option) . . . . . . . . . . . . . . . . . . . .68
"Settings" menu . . . . . . . . . . . . . . . . . . . . . . . . . . . . . . . . . .68
Recipes and beverage buttons . . . . . . . . . . . . . . . . . . . . .68
Boiler temperature. . . . . . . . . . . . . . . . . . . . . . . . . . . . . . .70
Reset . . . . . . . . . . . . . . . . . . . . . . . . . . . . . . . . . . . . . . . . .71
Time and date . . . . . . . . . . . . . . . . . . . . . . . . . . . . . . . . . .71
Language . . . . . . . . . . . . . . . . . . . . . . . . . . . . . . . . . . . . .71
Contrast. . . . . . . . . . . . . . . . . . . . . . . . . . . . . . . . . . . . . . .72
Calcium filter . . . . . . . . . . . . . . . . . . . . . . . . . . . . . . . . . . .72
Water hardness . . . . . . . . . . . . . . . . . . . . . . . . . . . . . . . . .72
Warm-up rinsing . . . . . . . . . . . . . . . . . . . . . . . . . . . . . . . .72
Foamer rinsing . . . . . . . . . . . . . . . . . . . . . . . . . . . . . . . . .73
Rinse interval. . . . . . . . . . . . . . . . . . . . . . . . . . . . . . . . . . .73
Operating options . . . . . . . . . . . . . . . . . . . . . . . . . . . . . . .73
Lighting . . . . . . . . . . . . . . . . . . . . . . . . . . . . . . . . . . . . . . .76
Expert settings. . . . . . . . . . . . . . . . . . . . . . . . . . . . . . . . . .76
Intro . . . . . . . . . . . . . . . . . . . . . . . . . . . . . . . . . . . . . . . . . .80
Eco Mode . . . . . . . . . . . . . . . . . . . . . . . . . . . . . . . . . . . . .80
Milk . . . . . . . . . . . . . . . . . . . . . . . . . . . . . . . . . . . . . . . . . . 82
Setting the "MDB" (Option) . . . . . . . . . . . . . . . . . . . . . . . .82
"PIN entry" menu . . . . . . . . . . . . . . . . . . . . . . . . . . . . . . . . .82
"Access control" menu . . . . . . . . . . . . . . . . . . . . . . . . . . . . .83
"Accounting" menu . . . . . . . . . . . . . . . . . . . . . . . . . . . . . . . .84
Use . . . . . . . . . . . . . . . . . . . . . . . . . . . . . . . . . . . . . . . . . 92
Storage . . . . . . . . . . . . . . . . . . . . . . . . . . . . . . . . . . . . . . 92
Disposal . . . . . . . . . . . . . . . . . . . . . . . . . . . . . . . . . . . . . . 92
Emergency information . . . . . . . . . . . . . . . . . . . . . . . . . . 92
Hygiene rules . . . . . . . . . . . . . . . . . . . . . . . . . . . . . . . . . . . 93
Water . . . . . . . . . . . . . . . . . . . . . . . . . . . . . . . . . . . . . . . . 93
Coffee . . . . . . . . . . . . . . . . . . . . . . . . . . . . . . . . . . . . . . . 93
Milk. . . . . . . . . . . . . . . . . . . . . . . . . . . . . . . . . . . . . . . . . . 93
Automatic machine powder / Instant powder. . . . . . . . . . 94
Liability . . . . . . . . . . . . . . . . . . . . . . . . . . . . . . . . . . . 95
Operator responsibilities . . . . . . . . . . . . . . . . . . . . . . . . . . . 95
Warranty and liability. . . . . . . . . . . . . . . . . . . . . . . . . . . . . . 95
Troubleshooting . . . . . . . . . . . . . . . . . . . . . . . . . . . .85
Faults with display message. . . . . . . . . . . . . . . . . . . . . . . . .85
Error messages with fault code . . . . . . . . . . . . . . . . . . . . . 88
Faults without display message . . . . . . . . . . . . . . . . . . . . . .90
Safety notes. . . . . . . . . . . . . . . . . . . . . . . . . . . . . . . .92
Danger posed by cleaning products . . . . . . . . . . . . . . . . . . .92
BA SCV_EN
V06 | 11.2015
5
Page 6
www.schaerer.com Introduction
DANGER!
Risk of electrocution!
CAUTION!
User at risk!
CAUTION!
Risk of machine
damage!
CAUTION!
Hot fluid!
CAUTION!
Hot steam!
CAUTION!
Hot surface!
CAUTION!
Risk of trapping
fingers!
Introduction
Welcome
This coffee machine is part of the next generation of fully automatic coffee machines. In designing this equipment, we utilised both our company's core competencies and our decades
of experience.
These operating instructions provide information about the product, its operation and how to
clean the coffee machine. If the coffee machine is not used in accordance with the instructions,
we cannot be held liable for any damages. However, these operating instructions cannot take
every possible application into account. For further information, please contact our customer
service.
The performance of the coffee machine depends on its proper operation and maintenance.
Carefully read the operating instructions before using the machine for the first time, and keep
the instructions in an easily accessible place.
We hope you enjoy using your new coffee machine!
Signs and symbols
See also "Safety notes"
The following signs and symbols are used in these operating instructions to point out hazards
and special features:
An imminently dangerous situation that may result in death or serious injury from electrocution.
The measures described for preventing this danger must be adhered to.
A generally dangerous situation that may result in injury.
The measures described for preventing this danger must be adhered to.
A situation that may result in damage to the machine.
The measures described for preventing this danger must be adhered to.
A dangerous situation that may result in scalding injuries. This danger is present at the
dispensing units. In this document, the danger is only indicated by this symbol.
The measures described for preventing this danger must be adhered to.
A dangerous situation that may result in scalding injuries. This danger is present at the
dispensing units. In this document, the danger is only indicated by this symbol.
The measures described for preventing this danger must be adhered to.
6
A dangerous situation that may result in burn injuries. This danger is present at the dispensing units and cup warmer locations (option). In this document, the danger is only
indicated by this symbol.
The measures described for preventing this danger must be adhered to.
A dangerous situation that may result in crushing injuries. In this document, the danger
is only indicated by this symbol.
The measures described for preventing this danger must be adhered to.
BA SCV_EN
V06 | 11.2015
Page 7

General safety notes www.schaerer.com
CAUTION!
User at risk!
General safety notes
Maximum safety is one of the most important features of Schaerer AG products. The effectiveness of the safety equipment can only be ensured if the chapter containing precautions for
avoiding injury and health hazards is adhered to.
Safety notes can be requested from Schaerer AG or downloaded directly from the MediaCentre on the website (http://www.schaerer.com/member).
Danger to the user
Improper handling of the coffee machine can lead to minor injuries.
Please observe the following points:
• Read the operating instructions carefully before using the device.
• Do not use the coffee machine if it is not working properly or is dam-
aged.
• Under no circumstances must the installed safety devices be modi-
fied.
• Do not touch hot machine parts.
• Under continuous supervision this device can be used by children
aged 8 and up and by persons with limited physical, sensory or
mental capabilities or a lack of experience and/or knowledge, pro-
vided they have been instructed about the safe use of the device
and understand the potential hazards resulting from said use.
• Supervise children to ensure that they do not play with the device.
• Cleaning and user maintenance must not be performed by children.
• The coffee machine must be installed so that care and maintenance
are possible without any interference.
• Whether the machine is used for self-service or full-service opera-
tion, trained personnel must supervise the machine to ensure that
care measures are performed and that personnel is available to an-
swer questions regarding its use.
BA SCV_EN
V06 | 11.2015
• Only fill the bean hopper with coffee beans, the powder container
with automatic machine powder and the manual inlet with ground
coffee (or cleaning tablets during cleaning).
7
Page 8

www.schaerer.com General safety notes
DANGER!
Risk of electrocution!
CAUTION!
User at risk!
Improper handling of electrical devices can result in electric
shock.
Please observe the following points:
• Work on electrical systems must only be performed by qualified
electricians.
• The device must be connected to a fused electrical network (we rec-
ommend routing the connection through a residual-current device).
• All applicable low voltage guidelines and/or country-specific or local
safety regulations and laws must be observed.
• The connection must be properly earthed and protected against
electric shock.
• The voltage must match the specified values on the device's serial
plate.
• Never touch live parts.
• Before performing service work, always switch off the main switch
and/or disconnect the device from the power supply.
• The power cable must only be replaced by qualified service techni-
cians.
Beverages containing additives or traces of additives may trigger
allergies.
Please observe the following points:
• For self-service mode, a sign should be displayed in the vicinity of
the machine to provide information about any additives used which
could trigger an allergic reaction.
• For full-service mode, trained personnel should be on hand to pro-
vide information about any additives used which could trigger an allergic reaction.
8
BA SCV_EN
V06 | 11.2015
Page 9
General safety notes www.schaerer.com
CAUTION!
User at risk!
CAUTION!
Hot fluid!
CAUTION!
Hot surface!
CAUTION!
Risk of trapping
fingers!
Danger of poisoning from swallowing cleaning products.
Always observe the following points:
• Store cleaning products away from children and unauthorised per-
sons.
• Do not swallow the cleaning products.
• Never mix cleaning products with other chemicals or acids.
• Never pour cleaning products into the milk container.
• Never pour cleaning products into the drinking water tank (internal/
external).
• Only use the cleaning and descaling products for their intended pur-
pose (see label).
• Do not eat or drink while handling cleaning products.
• Ensure that the area is well ventilated when handling cleaning prod-
ucts.
• Wear safety gloves when handling cleaning products.
• Wash your hands thoroughly after handling cleaning products.
Before using cleaning products, read the information on the package carefully. If it is not already on hand, the health and safety data sheet can be obtained from the sales partner (see
cleaning product packaging).
There is a risk of scalding in the area where beverages, hot water
and steam are dispensed.
Never reach under the dispensing units while the machine is dis-
pensing or during cleaning.
The dispensing units and brewing unit can become hot.
Do not touch any part of the dispensing equipment except for the
grips provided. Only clean the brewing unit after the coffee ma-
chine has cooled down.
When working with moving components, there is a risk of fingers
or hands becoming trapped.
While the coffee machine is switched on, never reach into the
bean hoppers or powder containers or into the opening of the
brewing unit.
BA SCV_EN
V06 | 11.2015
9
Page 10

www.schaerer.com General safety notes
CAUTION!
Risk of machine
damage!
Risk of damage to the machine
Improper handling of the coffee machine can lead to damage or
contamination.
Please observe the following points:
• For water with a carbonate hardness above 5 °dH, install a calcium
filter, as the coffee machine can otherwise be damaged by limescale deposits.
• For insurance reasons, always ensure that at the end of the busi-
ness day, the stop valve on the water supply (coffee machine with
mains water supply) is closed and the main power switch is
switched off or the power cable is unplugged.
• Applicable low voltage guidelines and/or country-specific or local
safety regulations and laws must be observed.
• Do not operate the device if the water supply is blocked. Otherwise,
the boilers will not be refilled and the pump will run dry.
• To prevent water damage in case of hose breakage, Schaerer AG
recommends routing the water supply connection through a water
shut-off valve (at the installation site).
• After extended downtime (e.g. holiday), the coffee machine must be
cleaned before it is put back into operation.
• Protect the coffee machine from weather elements (frost, moisture,
etc.).
• Faults must only be remedied by a qualified service technician.
• Only use Schaerer AG original spare parts.
• Report any noticeable damage or leaks immediately to an author-
ised service partner, and have any faulty parts replaced and/or repaired.
• Never spray off the device with water or clean it using a steam
cleaner.
• Do not set up the device on surfaces on which a water jet might be
used.
• When using caramelised coffee (flavoured coffee), clean the brew-
ing unit twice daily.
• Only fill the bean hopper with coffee beans, the powder container
with automatic machine powder and the manual inlet with ground
coffee (or cleaning tablets during cleaning).
• Never use freeze-dried coffee as it clogs the brewing unit.
• If the coffee machine and/or auxiliary equipment is transported at
temperatures below 10°C, the coffee machine and/or auxiliary
equipment must be stored at room temperature for three hours before it can be connected to the power supply and switched on. If
these instructions are not followed, condensation may cause short
circuits or damage electrical components.
• Always use the new hose set supplied with the machine (drinking
water/waste water hose). Never use old hose sets.
10
BA SCV_EN
V06 | 11.2015
Page 11

Product description www.schaerer.com
CAUTION!
Risk of machine
damage!
Product description
Intended use
The Schaerer Coffee Vito has been designed to dispense coffee beverages, hot water, milk
beverages and/or powder-based beverages (toppings & chocolate) in different versions and
combinations – in cups, glasses or pots. The steam wand is intended only for warming up milk.
This device is intended for commercial use in hotels, restaurants and similar establishments.
The device can be installed at self-service locations where a staff member is present for supervision purposes. It is permitted for use in businesses, offices and other similar work environments, hotels, motels and bed and breakfast establishments, and it can be operated by
non-experts and customers.
Under continuous supervision this device can be used by children aged 8 and up and by persons with limited physical, sensory or mental capabilities or a lack of experience and/or knowledge, provided they have been instructed about the safe use of the device and understand the
potential hazards resulting from said use. Children must not play with the device. Cleaning and
user maintenance must not be performed by children.
Use of this equipment is subject to the "General Terms and Conditions" of Schaerer AG and
these operating instructions. In legal terms, any form of use that differs from or extends beyond
the scope of the aforementioned use shall be considered unintended use. The manufacturer
does not accept any liability for damage resulting from unintended use.
Improper handling of the coffee machine can result in damage.
Under no circumstances must the Schaerer Coffee Vito be used to heat or dispense any
liquid other than the beverages indicated herein or cooled milk (pasteurised, homogenised, UHT).
Beverage types and output
Depending on the machine model and options, the following beverages can be prepared (beverage output? is specified in cups per hour):
Beverages dispensed per hour (coffee - espresso)
Beverage type SCV PM* SCV FM**
Coffee / Espresso ± 100 cups ± 100 cups
Available dispensing options and daily output
Beverage type SCV PM* SCV FM**
Ristretto
Espresso 120 120
Coffee / Café crème 90 90
Small pot (250 ml)
Latte / Bowl
Cappuccino 130
Latte macchiato
Chociatto
Hot milk
Hot milk foam
Hot water 120 l 120 l
BA SCV_EN
V06 | 11.2015
11
Page 12
www.schaerer.com Product description
Available dispensing options and daily output
Beverage type SCV PM* SCV FM**
Steam –
Powder based beverages –
* PM = powdered milk
** FM = fresh milk
Models
The following versions are available:
• Schaerer Coffee Vito Fresh Milk
• Schaerer Coffee Vito Powdered Milk
12
BA SCV_EN
V06 | 11.2015
Page 13
Product description www.schaerer.com
Scope of delivery and accessories
Quantity Designation Article number
Documentation
1 Operating instructions (EN) 022001
1 Daily cleaning card (EN) 022021
1 Weekly cleaning card (EN) 022041
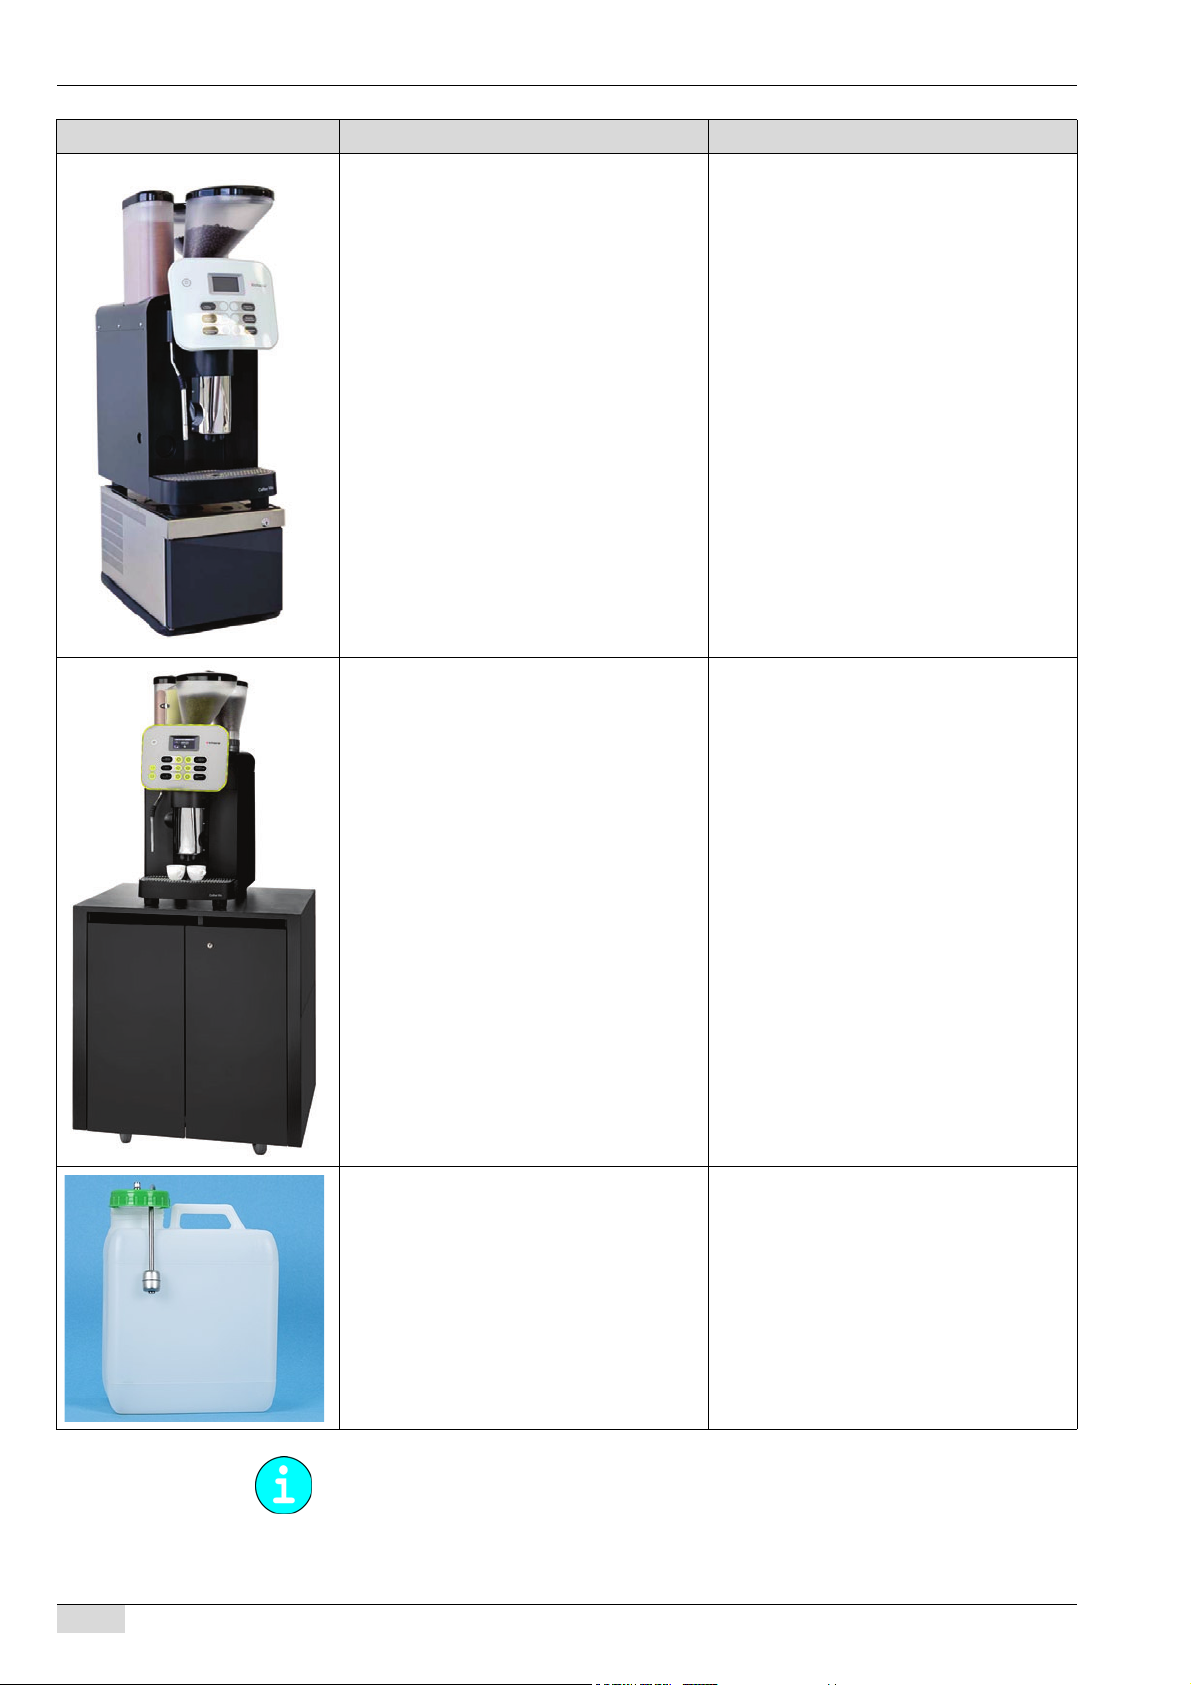
1 Delivery quality form (FRG) -
Cleaning / Accessories cleaning
** Descaler, Schaerer AG -
100 "Coffeepure" cleaning tablets 065221
* "Milkpure" cleaning product (1000 ml bottle) 071530
2 Brushes (two different sizes)
2 Cleaning brush 067409
1 Carbonate hardness test 067720
General accessories
1 Complete spare foamer head (upper and lower part) 3322598000
1 Multi-tool 071261
1 Labels 3323153000
1 Measuring spoon for ground coffee 3307424000
1 Right-hand front cover 060692
1 Drinking water tank cpl. with lid 060704
* Milk nozzle set 071246
* Milk hose 0.7 m 061108
* Mixer hose 0.21 m 0000480064
* Drain hose 1.5 m 0000480042
* Elbow 3321658000
* Fixed water hose 3322921000
* Choco outlet 3322962000
1 Food-grade grease (Molykote 111) for sealing rings 3321799000
2 Membrane pockets for button labelling 060613
1 Outlet sticker 071718
Special accessories
* Optional cover for drinking water tank 060689
* Closed drip tray with floater 060702
* Water filter (for tank or Aquaflex) 071398
** Drinking water tank lid 060706
Waste water tank lid 065415
Drinking water tank 16 l 064998
Waste water tank 13 l 064999
3315219000
3303500000
BA SCV_EN
V06 | 11.2015
* * Depending on machine version.
** Please contact a service partner in your vicinity or our customer service department.
13
Page 14
www.schaerer.com Product description
Options and optional accessories
Example Option Description
Aquaflex For switching from the mains water supply to
the internal drinking water tank and vice versa.
Under-counter grounds disposal The grounds container and the bottom of the
Side cooling unit Cooling unit for machines with Milk Smart.
Side cooling unit with cup dispenser Side cooling unit for machines with Milk
coffee machine have a cutout that extends
through the counter. The coffee grounds are
collected in a large container underneath the
counter.
The cooling temperature can be regulated.
Milk capacity: 4 l
Smart. The cooling temperature can be regulated.
Milk capacity: 4 l
Cup dispenser with two dispensing tubes:
• Diameter from 60 mm
• Diameter up to 90 mm
• Cup capacity ca. 40 pcs
14
BA SCV_EN
V06 | 11.2015
Page 15
Product description www.schaerer.com
Example Option Description
Cup & Cool Cup warmer with a cooling unit for machines
with Milk Smart. The milk temperature and
the cup heating can be regulated.
Milk capacity: 4 l
Cup capacity: max. 60 cups
Cup warmer For preheating several different cups. Cup
heating can be regulated.
Cup capacity: ca. 70 – 100
Integrated cooling unit Integrated cooling unit, built directly into the
machine. For the preparation and refrigeration of milk beverages. This option is also
appropriate where limited space is available
on or under the counter.
Milk capacity: up to 1 l ("Tetra Pak")
Milk capacity: 1 l (milk container)
Plug & Clean Integrated cooling unit, built directly into the
machine. For automatic cleaning of the milk
hose and milk foamer.
BA SCV_EN
V06 | 11.2015
15
Page 16
www.schaerer.com Product description
Example Option Description
Under-machine cooling unit UM KE Cooling unit for fresh milk positioned directly
under the machine. The cooling temperature
can be regulated.
Milk capacity: 9.5 l
Trolley The trolley offers space for an external drin-
king water tank and an external waste water
tank.
When positioned on a trolley, the machine
can be operated at different locations.
16
External drinking water tank/waste water
tank with level monitoring
An external drinking water tank and waste
water tank in a trolley enables operation at
different locations.
An external drinking water tank provides a
large drinking water supply in places where
there is no connection to the mains water
supply.
An external waste water tank replaces a waste water outlet where none is available onsite.
For detailed information, please contact your local sales partner.
BA SCV_EN
V06 | 11.2015
Page 17
Product description www.schaerer.com
Technical data
Nominal power*: 2000 – 2200 W 10 – 16 A
Mains power supply*: 220 – 240 V CA 50/60 Hz
Operating temperature*: Steam boiler ** Hot water boiler **
Minimum (Tmin. ) 10°C 10°C
Maximum (Tmax. ) 192°C 192°C
Operating temperature 140°C 95°C
Overpressure: Steam boiler ** Hot water boiler **
Working overpressure 2.5 bar 2.5 bar
Permissible working overpressure (pmax. ) 12 bar 12 bar
Test overpressure 24 bar 24 bar
Filling quantities:
Drinking water tank 4.5 l
Coffee bean hopper 1100ca. each g
Grounds container 40 coffee grounds cakes
Powder system Choco Choco 1x1400 g / Twin Choco 2x 700 g
External dimensions:
Width 329 mm
Height 836 mm
Depth 570 mm
Empty weight: 30 – 40 kg
Continuous sound pressure level*** <70 dB (A)
Power cable length 1.0 m
We reserve the right to make technical changes.
* For special equipment, see serial plate. The values specified here apply to the basic equip-
ment.
** Depending on machine configuration and model.
*** The A-weighted sound pressure level Lpa (slow) and Lpa (impulse) at the operator work-
station is less than 70 dB (A) in each operating mode.
Serial plate
The serial plate label is located behind the drip tray on the left side and behind the left machine
cover plate.
BA SCV_EN
V06 | 11.2015
17
Page 18
www.schaerer.com Product description
Example of serial plate
► In case of a technical problem or warranty claim, state the serial number indicated on the
serial plate.
The first 2 digits in the serial number denote the year the machine was manufactured, and the
second 2 digits indicate the calendar week.
Declaration of conformity
Manufacturer Documentation specialist
Schaerer AG
P.O. Box 336
Allmendweg 8
CH-4528 Zuchwil, Switzerland
T +41 (0)32 681 62 00
F +41 (0)32 681 64 04
info@schaerer.com
www.schaerer.com
Schaerer AG
Hans-Ulrich Hostettler
P.O. Box
Allmendweg 8
CH-4528 Zuchwil, Switzerland
Applied standards
The manufacturer indicated above hereby declares that this machine complies with all relevant
• EN 55014-1:2006 +A1
• EN 55014-2:1997 +A1 +A2
• EN 61000-3-2:2006
• EN 61000-3-3:2008
• CISPR 14-1:2005 +AMD1
• CISPR 14-2:1997 +AMD1 +AMD2
• IEC 61000-3-2:2005
• IEC 61000-3-3:2008
provisions of the specified directives. Any device modifications that are not approved by
Schaerer will render this declaration invalid. The following harmonised standards have been
applied. For proper implementation of the requirements, a quality management system certified to SN EN ISO 9001: 2008 by Bureau Veritas has been applied.
CE conformity
Machinery Directive 2006/42/EC EMC Directive 2004/108/EC
• EN 60335-1:2002 +A1 +A11 +A12 +A13
+A14 +A2
• EN 60335-2-75:2004 +A1 +A11 +A12
+A2
• EN 62233:2008
International CB
Safety EMC
• IEC 60335-1 Ed4.2:2006
• IEC 60335-2-14 Ed 5.1:2008
• IEC 60335-2-15 Ed 4.1:2000
• IEC 60335-2-15 Ed 5.2:2008
• IEC 60335-2-24 Ed6:2002/2006 +A1 +A2
• IEC 60335-2-75 Ed 2.2:2009
• IEC 62233 Ed1:2005
• IEC 60335-1 Ed5:2010-05
• IEC 60335-2-24 Ed7:2010
18
BA SCV_EN
V06 | 11.2015
Page 19
Product description www.schaerer.com
China
Safety
• GB4706.19-2008
• GB4706.1-2005
• GB4706.13-2008
Manufacturer's address
Manufacturer Documentation specialist
Schaerer AG
P.O. Box 336
Allmendweg 8
CH-4528 Zuchwil, Switzerland
T +41 (0)32 681 62 00
F +41 (0)32 681 64 04
info@schaerer.com
www.schaerer.com
Schaerer AG
Hans-Ulrich Hostettler
P.O. Box
Allmendweg 8
CH-4528 Zuchwil, Switzerland
BA SCV_EN
V06 | 11.2015
19
Page 20

www.schaerer.com Installation and commissioning
CAUTION!
Risk of machine
damage!
CAUTION!
Risk of machine
damage!
Installation and commissioning
Setting up the coffee machine
Location
The location where the coffee machine is installed must satisfy the conditions specified
below. If they are not satisfied, the coffee machine may become damaged.
Be sure that the following conditions are met:
• The installation surface must be stable and level so that it does not become deformed un-
der the weight of the coffee machine.
• Do not set up the coffee machine on hot surfaces or close to heat sources.
• Set up the coffee machine in such a way that it can be monitored by trained personnel at
all times.
• Route the necessary supply connections to within 1 m of the machine location according
to the on-site installation plans.
• Maintain the following clearances for maintenance work and operation:
• Allow enough space above the machine for refilling the beans.
• Leave min. 5 cm of clearance between the back of the machine and the wall (for air cir-
• Comply with all applicable local regulations for kitchen equipment.
culation).
Ambient conditions
The location where the coffee machine is set up must provide the ambient conditions
specified below. If these conditions are not ensured, the coffee machine may become
damaged.
Please adhere to the following conditions:
• Ambient temperature of +10 °C to +40 °C (50 °F to 104 °F)
• Relative humidity of max. 80% RH
• The coffee machine is designed for indoor use only. Do not use in the open and never ex-
pose to the weather (rain, snow, subzero temperatures).
20
If the coffee machine was exposed to subzero temperatures:
► Contact customer service before commissioning.
Power supply
Conditions
The equipment must be connected in accordance with the regulations of the country in which
it is installed. The voltage specified on the serial plate must match the mains voltage at the
installation location.
BA SCV_EN
V06 | 11.2015
Page 21
Installation and commissioning www.schaerer.com
DANGER!
Risk of electrocution!
CAUTION!
Risk of machine
damage!
Risk of electrocution!
Always observe the following points:
• The phase must be fused at the ampere value specified on the serial plate.
• It must be possible to disconnect the device from the mains power supply at all poles.
• Never operate a device with a damaged power cable. Have a defective power cable or plug
replaced immediately by a qualified service technician.
• Schaerer AG does not recommend using an extension cable. If an extension cable is nev-
ertheless used (minimum cross-section: 1.5 mm²), please comply with the manufacturer’s
specifications for the cable (operating instructions) and with applicable local regulations.
• Route the power cable in such a way that it does not pose a tripping hazard. Do not pull
the cable over corners or sharp edges, pinch it between objects or allow it to hang loosely
in open spaces. Do not position the cable over hot objects, and be sure to protect the cable
from exposure to oil and aggressive cleaning products.
• Never lift or pull the device by the power cable. Never pull the plug out of the socket by its
cable. Never touch the power cable or plug with wet hands. Never insert a wet plug into a
power socket.
Power requirements
Connecting
Mains Power requirements
1L, N, PE: 220 – 240 V CA 50/60 Hz 2000 – 2200 W 10 – 16 A 3 x 1.0 mm²
1L, N, PE: 100 – 120 V CA 50/60 Hz 1800 – 2100 W 20 A 3 x 14AWG
2L, PE: 200 – 220 V CA 50/60 Hz 1700 – 1900 W 2x15 A 3 x 1 mm²
2L, PE: 200 – 220 V CA 50/60 Hz 2600 – 3200 W 2x15 A 3 x 1.5 mm²
Fuse protection (on-site)
cable conductor
cross-section
Water connection/drain
Conditions
The machine can become damaged as a result of poor material and incorrect water values.
Always observe the following points:
• The water must be free of contaminants and the chlorine content must not exceed 100 mg
mg per litre.
• Do not connect the machine to pure reverse osmosis water or other aggressive types of
water.
• The carbonate hardness must not exceed 5 – 6 °dKH (German carbonate hardness) or 8.9
– 10.7°fKH (French carbonate hardness), and the total hardness value must always be
greater than the carbonate hardness.
• The minimum carbonate hardness is 5°dKH or 8.9°fKH. The pH value must be between
6.5 and 7.
• Always use the new hose set (fresh water/waste water hose) supplied with the machine.
The machine must be connected to the water supply in accordance with applicable requirements and the regulations of the respective country. If the machine is connected to a newly
installed water pipe, the pipe and intake hose must be rinsed thoroughly to ensure that no dirt
gets into the machine.
The coffee machine must be connected to an installed drinking water line with a shut-off valve.
The machine is connected to the pressure reducing valve on the main water valve (set to
0.3 MPa (3 bar)) using the mounted pressure hose and the G 3/8" screw connection.
BA SCV_EN
V06 | 11.2015
If the machine is connected to a drain, the supplied thermally stable drain hose must be connected to the drip tray and the siphon. This hose must be firmly attached to the drain and slanted at a downward angle (so that the water is able to drain).
21
Page 22

www.schaerer.com Installation and commissioning
The "Water quality" supplementary instructions include information about recording water values and using filter equipment. The supplementary instructions can be requested from
Schaerer AG or downloaded directly from the MediaCentre on the website (http://www.schaerer.com/member).
Power requirements
Water pressure
Water inlet temperature
Recommended: 0.1 – 0.6 MPa (1 – 6 bar)
Maximum: 0.6 MPa (6 bar)
Minimum: 10°C
Maximum: 30°C
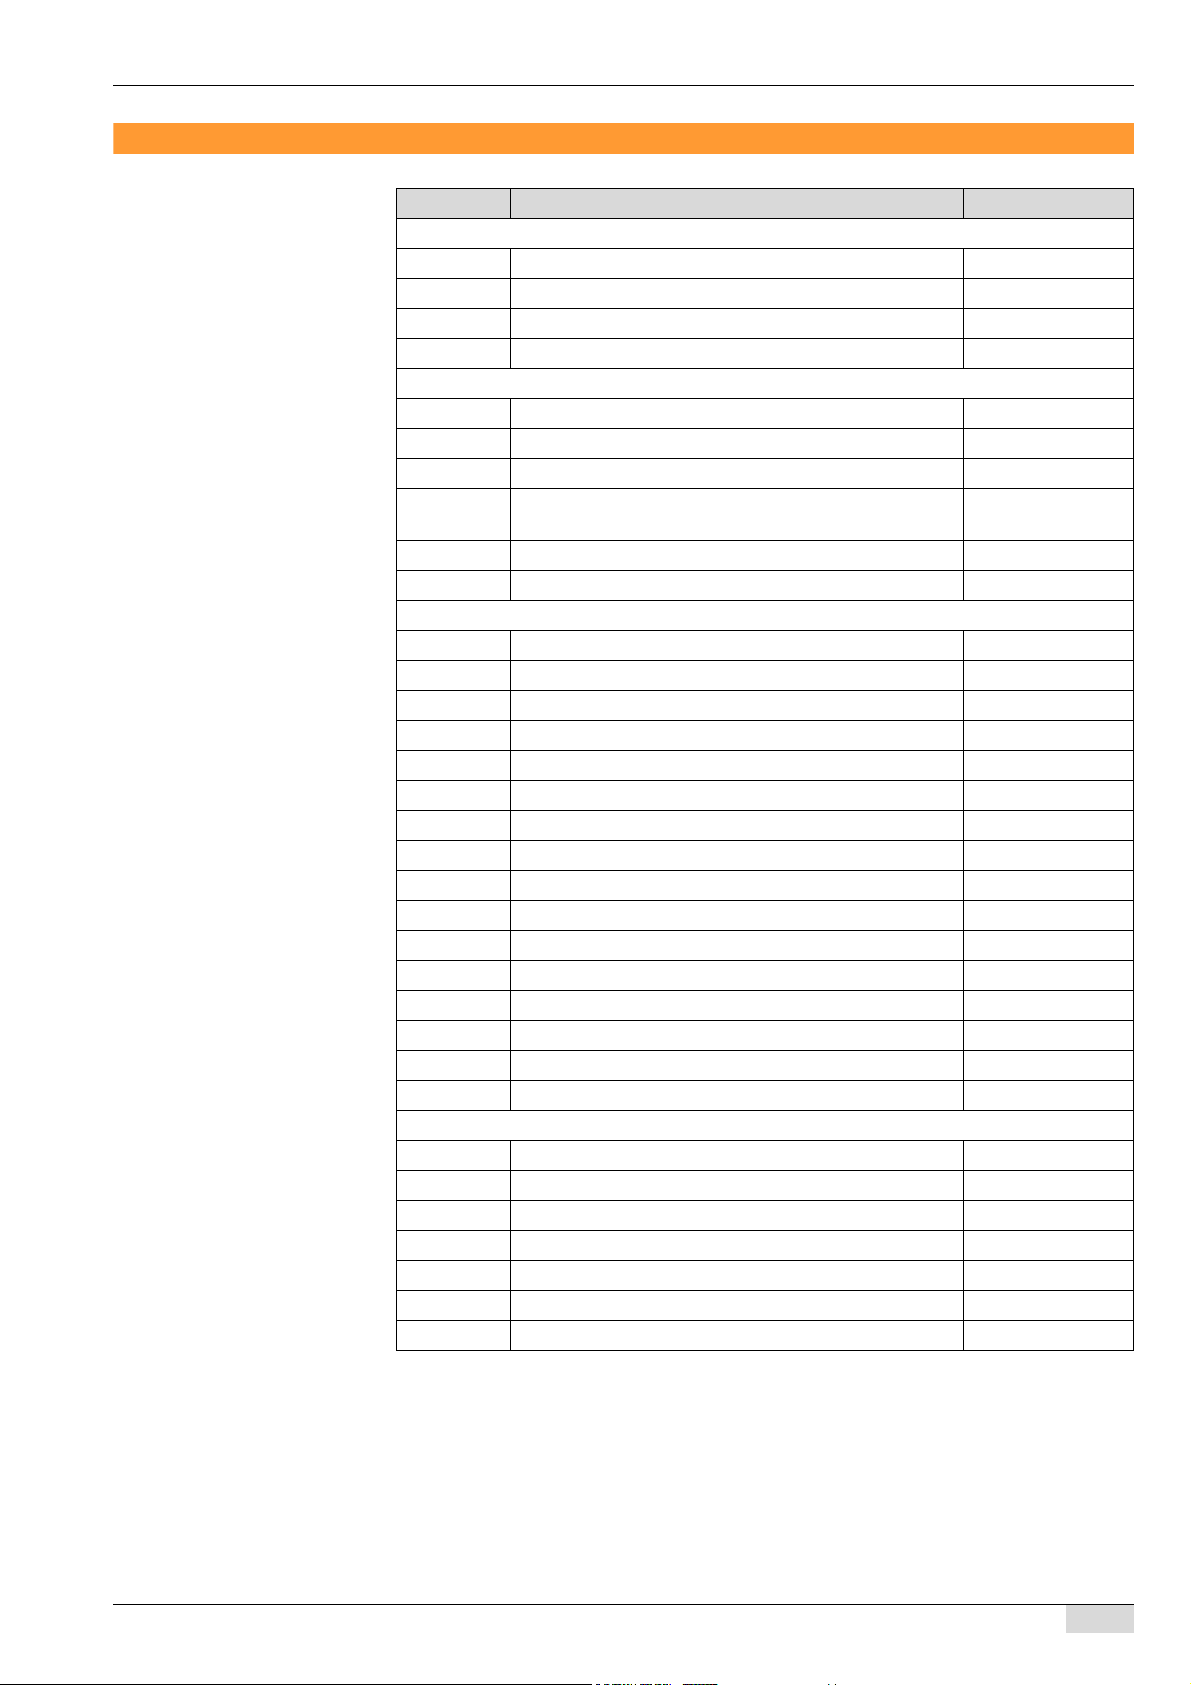
Switching between mains water supply and drinking water tank
(Option)
Switching from the mains water supply to the drinking water tank (e.g. for descaling) and vice
versa is possible with the "Aquaflex" option.
Option 1: Switching from mains water supply to drinking water tank
► Close the stop valve on the water supply line and, if necessary, detach the hose.
► Remove the right-hand front cover.
► Turn the rotary switch anticlockwise with the multi-tool.
► Fill and insert the drinking water tank.
The arrow on the rotary switch now points to the tank symbol.
The set screw is located behind the
drinking water tank.
Option 2: Switching from drinking water tank to mains water supply.
► Remove and empty the drinking water tank.
► Turn the rotary switch clockwise with the multi-tool.
The arrow on the rotary switch now points to the water tap symbol.
► Attach the right-hand front cover.
► Fit the hose for the water supply to the machine and the water supply line.
► Open the stop valve on the water supply line.
Installation
Unpacking the machine
Read the "Setting up the coffee machine" and "Power supply" chapters carefully before installing.
► Unpack the machine.
► Check the remaining package contents for accessories.
► Remove the accessories supplied in the grounds container and water tank.
► Keep the original packaging in case the equipment needs to be sent back.
22
BA SCV_EN
V06 | 11.2015
Page 23
Installation and commissioning www.schaerer.com
Installing the mains water supply (Option)
► Insert the seals carefully (attached to the hose).
► It is imperative that you check the connections for seal tightness.
► Attach the hose to the connector on the back of the machine and to the on-site angle valve
(3/8").
► Open the main water valve.
Installing a waste water outlet
Option 1: Inserting a drip tray without an opening
► Insert the drip tray.
Option 2: Drip tray with opening
► Insert the drip tray.
► Assemble the waste water connection (see below).
Option 3: Waste water connection
► Connect the waste water hose and elbow to the hose end on the back of the machine.
► Connect the drain hose to the waste water system.
► Make sure that the hose does not sag (shorten it if necessary!).
With the "Aquaflex" option, a selection can be made from the options indicated above.
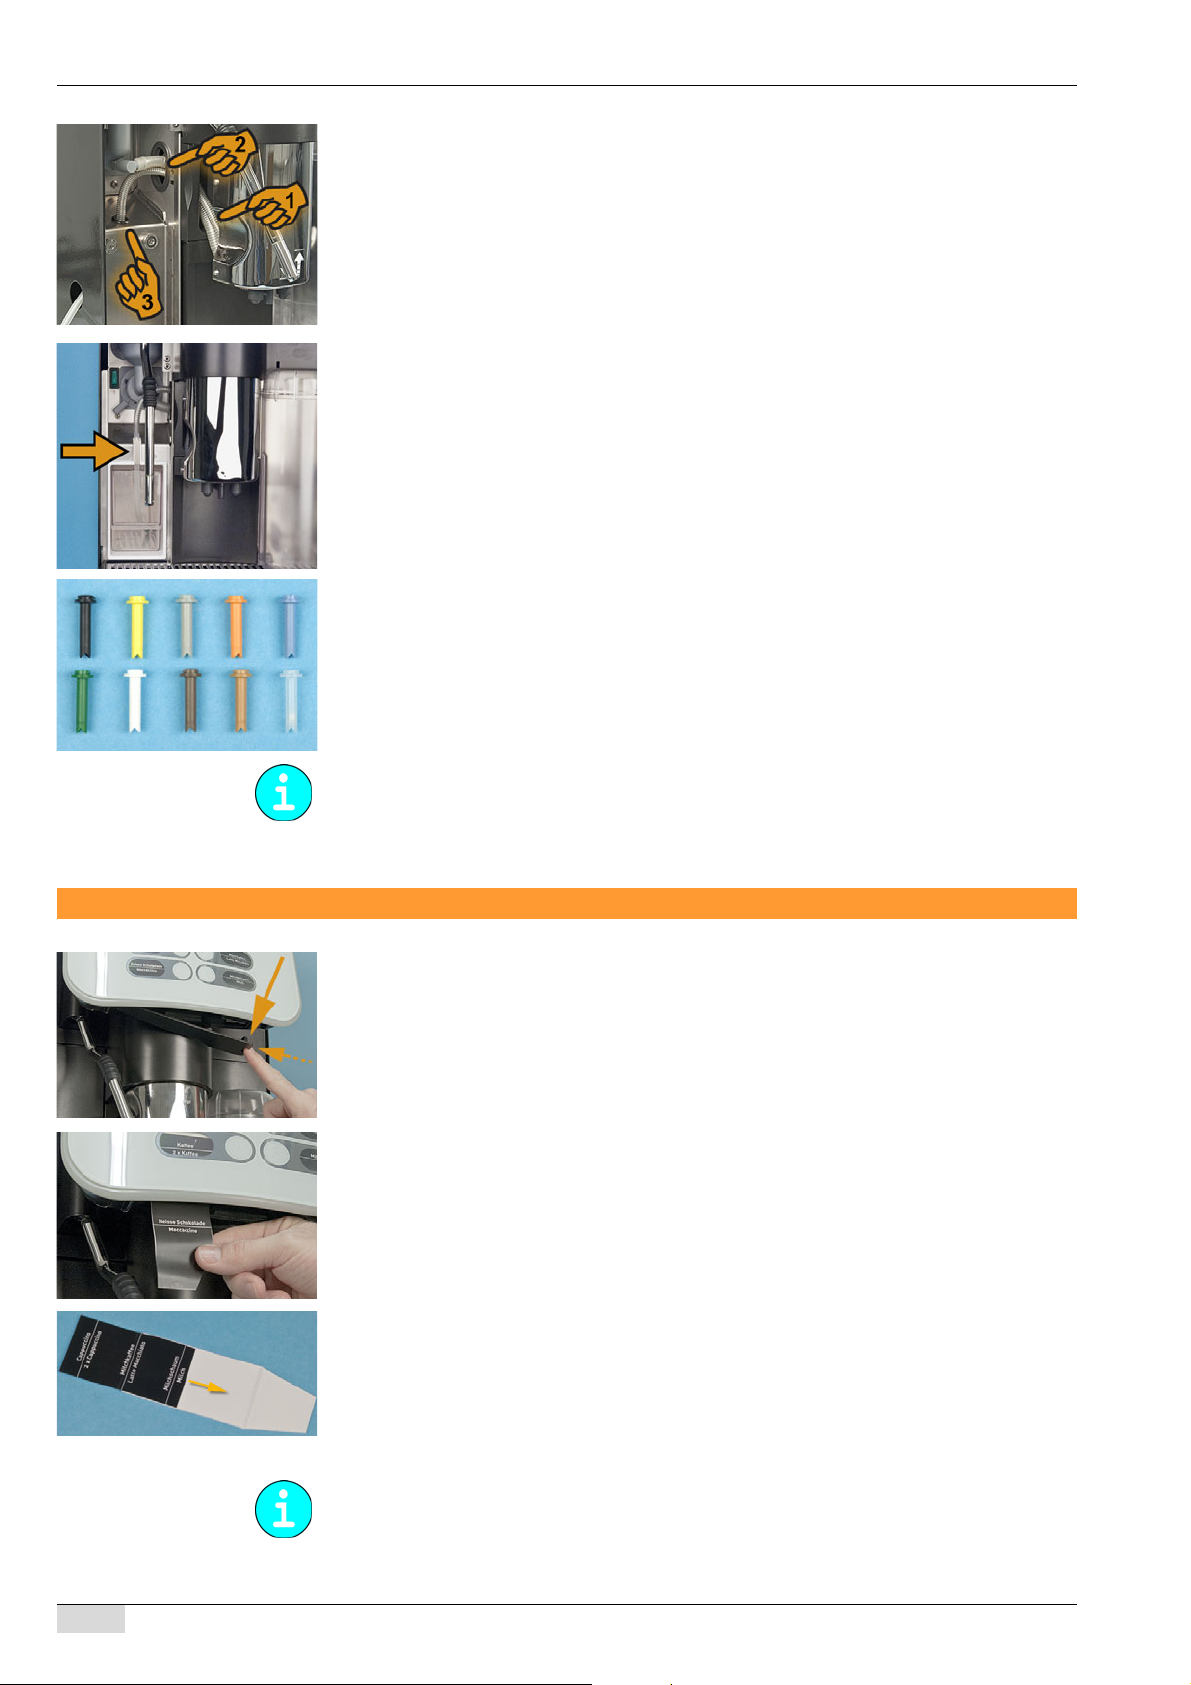
Connecting the milk system
► Slide the beverage outlet into its highest position.
► Press the release on the rear side of the beverage outlet and pull the foamer head down-
wards.
► Pass the milk hose through the opening (arrow) and fit it onto the foamer head (see figure).
► Reinsert the foamer head upwards into the beverage outlet guide from below until the head
engages.
BA SCV_EN
V06 | 11.2015
23
Page 24
www.schaerer.com Installation and commissioning
Option 1: External cooling units
► Pass the milk hose through the bottom openings (see figure). Make sure that the milk hose
does not become kinked when the beverage outlet is adjusted.
► Select the desired milk nozzle (included in the scope of delivery) and insert it at the hose
end located outside the machine.
The milk connection is now ready for external milk cooling units.
Option 2: Internal cooling unit
► Select the desired milk nozzle (included in the scope of delivery) and insert it at the hose
end located outside the machine.
► Insert the milk hose into the guide (arrow) and position the end of the hose in the milk con-
tainer.
The milk connection is now ready for the internal milk cooling unit.
The milk nozzles (1 mm – 1.7 mm) contained in the scope of delivery influence the milk temperature. If the milk foam is too cold, a smaller nozzle diameter is necessary. If the milk foam
is too hot, a larger nozzle diameter is necessary.
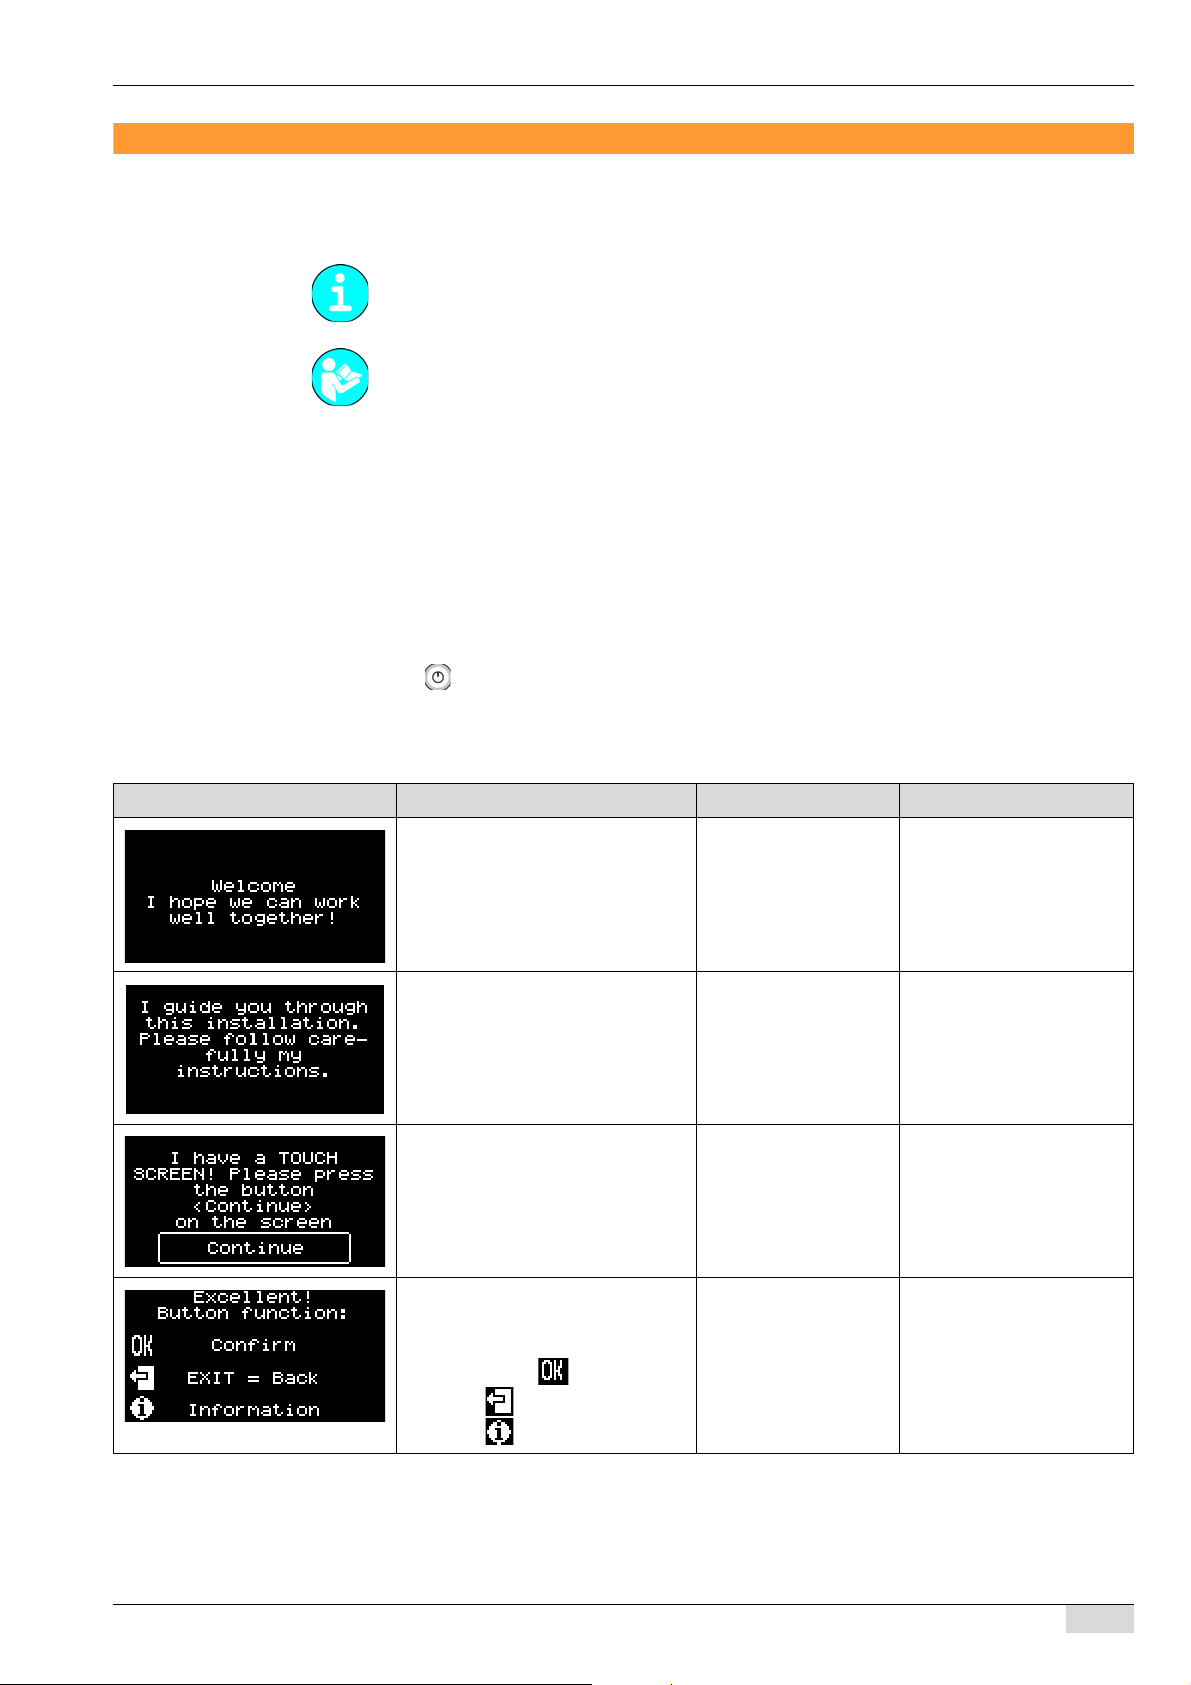
Button labelling
► Switch off the coffee machine to avoid accidentally dispensing a beverage.
► Remove the bottom cover of the user panel. Push the tongue on the right-hand side to the
left while pulling the cover downwards.
► Pull out the existing button label in a downward direction by the protruding tab.
► Download a new button labelling template at (www.schaerer.com-Member-MediaCentre).
► Define the desired beverage assignment using the template.
► Print the template (printer setting A4).
► Cut out the label sheet.
► Insert the button labels into the designated plastic sleeve (see illustration) and slide it back
into place behind the front pane.
K
Label templates can be downloaded free of charge from www.schaerer.com.
24
BA SCV_EN
V06 | 11.2015
Page 25
Installation and commissioning www.schaerer.com
Commissioning program
When the coffee machine is switched on for the first time, the commissioning programme is
started automatically. It goes through the initial settings step by step. A detailed description of
all steps follows.
Before starting the commissioning programme, determine the water hardness and have it on
hand.
See "Water quality" - "Determining the water hardness".
The following machine settings are configured:
• General information about the touch screen.
• Language setting
• Descaling filter/Water filter setting
• Water hardness
• Water supply connection
• Container filling
• Activating the 2nd button level
• Cup fill volume (optional)
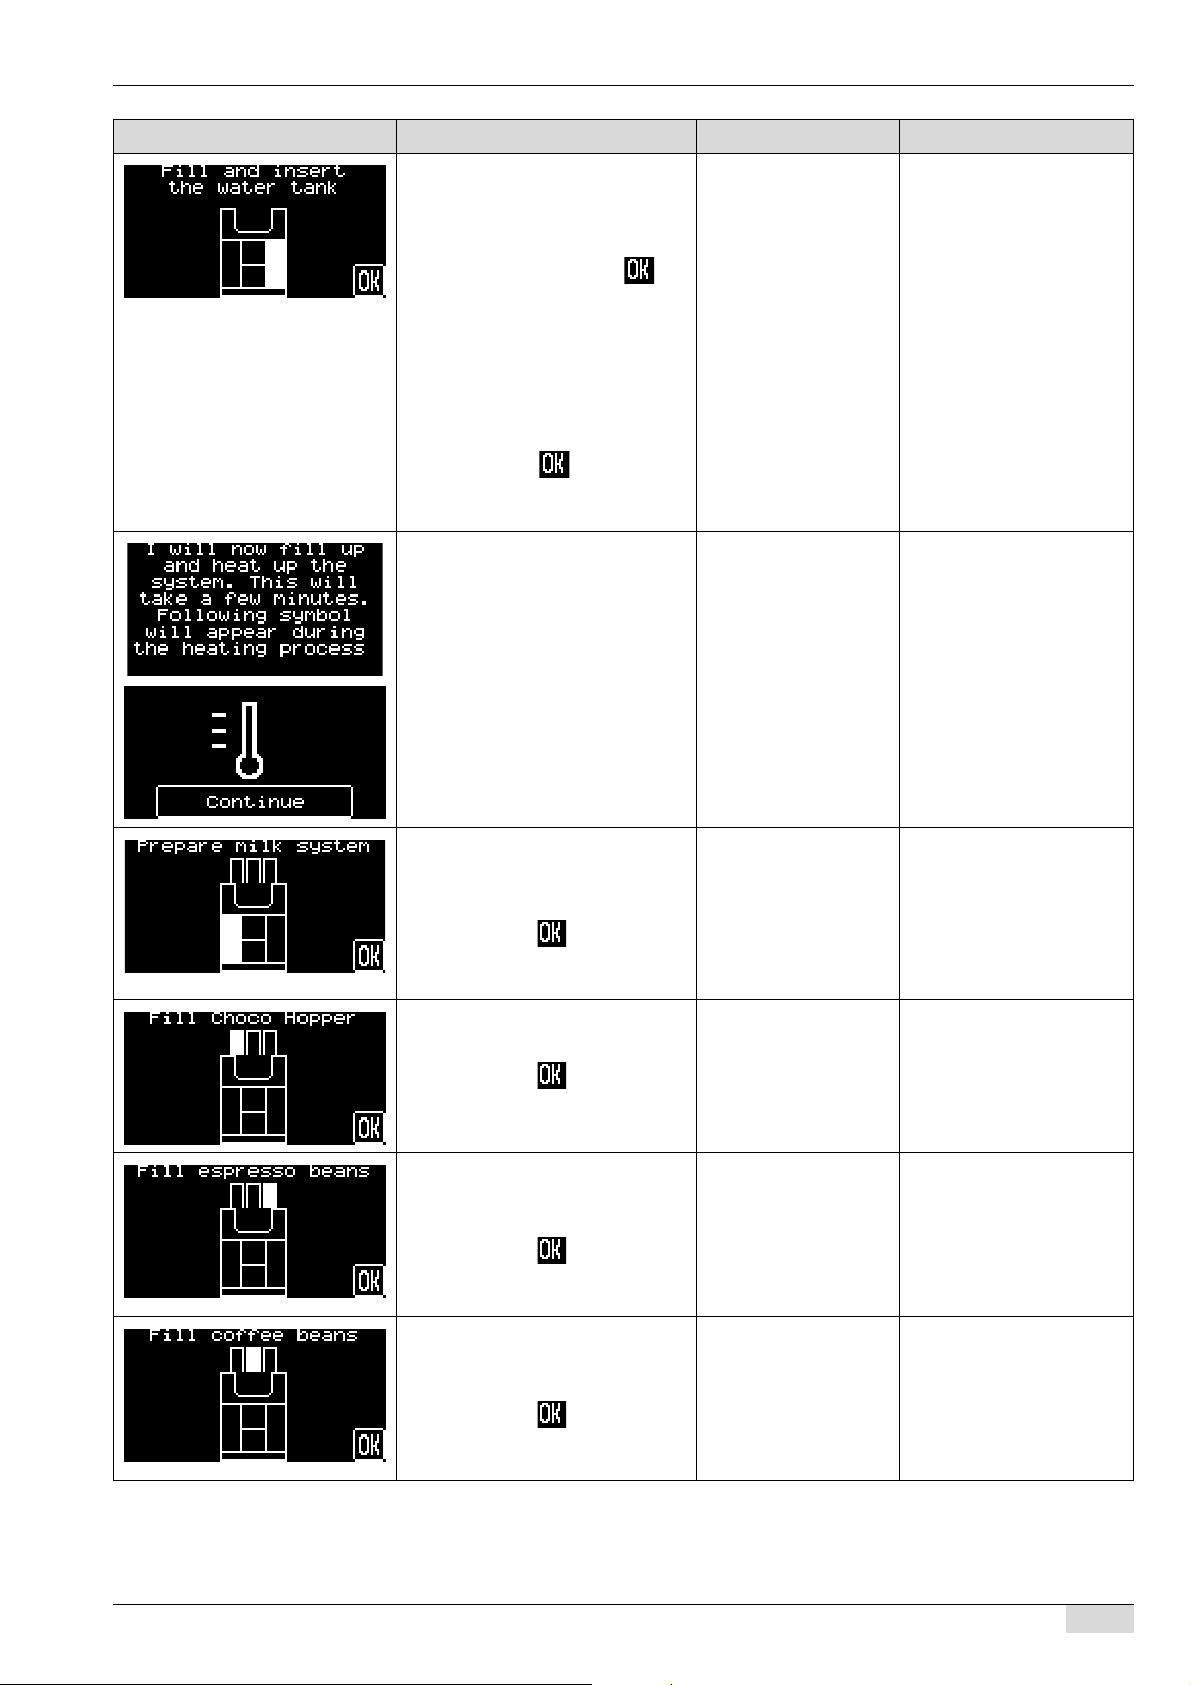
Press the button.
►
The coffee machine switches on and the commissioning programme begins.
► Follow the instructions on the touch screen.
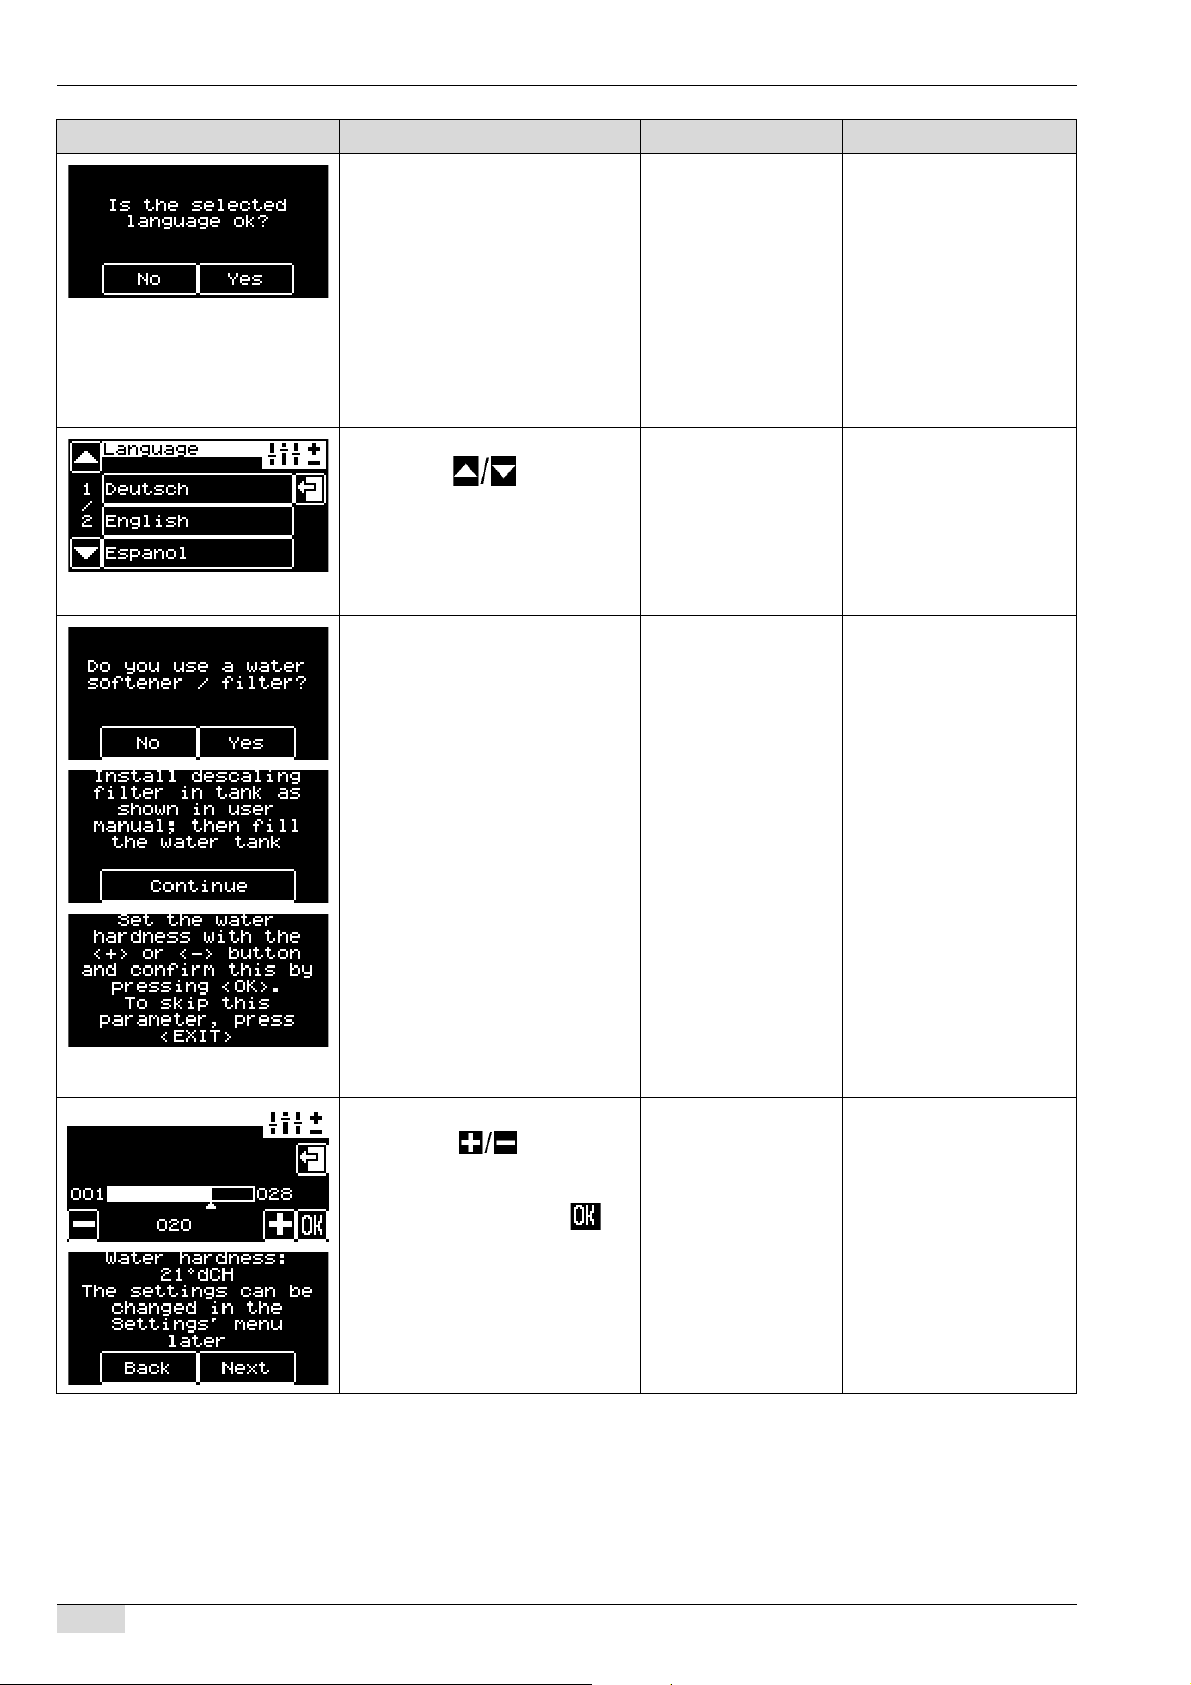
Display/ Display text Parameter description Setting range Notes
The greeting text before the commissioning programme begins.
- The default setting is
"English".
Note that the ensuing instructions
should be followed.
Note that this display has a "touch
screen" function.
► Touch the "Continue" field on
the display.
Button functions:
Navigation buttons within the commissioning programme
► Confirm with .
► Press to go back a step.
► Press for information.
- The default setting is
"English".
"Continue" The default setting is
"English".
- The default setting is
"English".
BA SCV_EN
V06 | 11.2015
25
Page 26
www.schaerer.com Installation and commissioning
Display/ Display text Parameter description Setting range Notes
"Is the language setting correct?"
"YES/NO" The default setting is
"English".
Option 1: "NO"
► Select the button "NO".
Leads to choice of languag-
In this step, the display alternates between "English"
and "German".
es.
Option 2: "YES"
► Select "YES".
The next commissioning
step appears.
Language selection: German, English, Itali- The pre-installed language
► Press the arrow buttons
to move to the desired language.
► Touch the field with the desired
language.
The next commissioning
step appears.
an, French, Dutch,
Spanish, Danish, Estonian, Finnish, Norwegian, Polish, Romanian, customer.
Russian, Swedish, Turkish, Greek, Hungarian,
Lithuanian, Latvian
packages (max. 6 languages) are compiled specifically for each individual
Calcium filter / Water filter: "YES/NO" The water hardness setting
Option 1: "YES"
► Connect the calcium filter in the
water tank according to the operating instructions and fill the
"Continue"
"Exit"
can also be configured at
later point in time in the
"Settings" menu.
See "Service and maintenance" - "Water filter".
water tank.
► Touch "Continue".
The next commissioning
step "Water hardness" appears.
Option 2: "NO"
The next commissioning
step "Water hardness" appears.
Option 3: "Exit"
Skips the "Wader hardness"
setting.
Water hardness:
► Using the buttons, set
the water hardness that has
been determined.
► Confirm the setting with .
► Confirm the water hardness with
"Continue" or touch "Back" to repeat the setting.
The next commissioning
step appears.
1 – 28 hardness levels
"Back" / "Next"
The water hardness is specified in °dKHor "German
carbonate hardness".
See "Water quality".
26
BA SCV_EN
V06 | 11.2015
Page 27
Installation and commissioning www.schaerer.com
Display/ Display text Parameter description Setting range Notes
Water connection:
- The water supply connection with the optional
Option: Drinking water tank
► Fill the drinking water tank.
► Confirm tank filling with .
The next commissioning
step appears
"Aquaflex" device makes it
possible to switch from the
drinking water tank to the
mains water supply.
See "Switch over Aquaflex".
Option: Mains water supply
► Switch the "Aquaflex" from "wa-
ter tank" to "mains water supply"
using the multi-tool.
► Confirm with .
The next commissioning
step appears.
Information about system filling and "Continue" During the heating-up phathe heating-up phase: se the thermostat symbol
The system is filled and heat-
ed up.
► Touch "Continue".
The next commissioning
step appears.
flashes.
The heating-up phase
takes ca. 5 minutes to reach the operating temperature.
Filling the containers:
Fill with milk.
► Connect/fill with milk.
► Confirm with .
- Various milk systems are
possible as an option.
See "Operation" - "Filling
and connecting" - "Milk"
The next commissioning
step appears.
Fill with choco powder. - Various powder systems
► Fill with choco powder
► Confirm with .
The next commissioning
step appears.
Fill with espresso beans.
► Pour the espresso beans into
the right-hand bean hopper.
- The right-hand bean hop-
are possible as an option.
See "Operation" - "Filling
and connecting" - "Machine
powder"
per is reserved for espresso.
► Confirm with .
The next commissioning
step appears.
Fill with coffee beans.
► Pour the coffee beans into the
left-hand or middle bean hopper.
- The left-hand or middle
bean hopper is reserved for
coffee beans.
► Confirm with .
The next commissioning
step appears.
BA SCV_EN
V06 | 11.2015
27
Page 28
www.schaerer.com Installation and commissioning
Display/ Display text Parameter description Setting range Notes
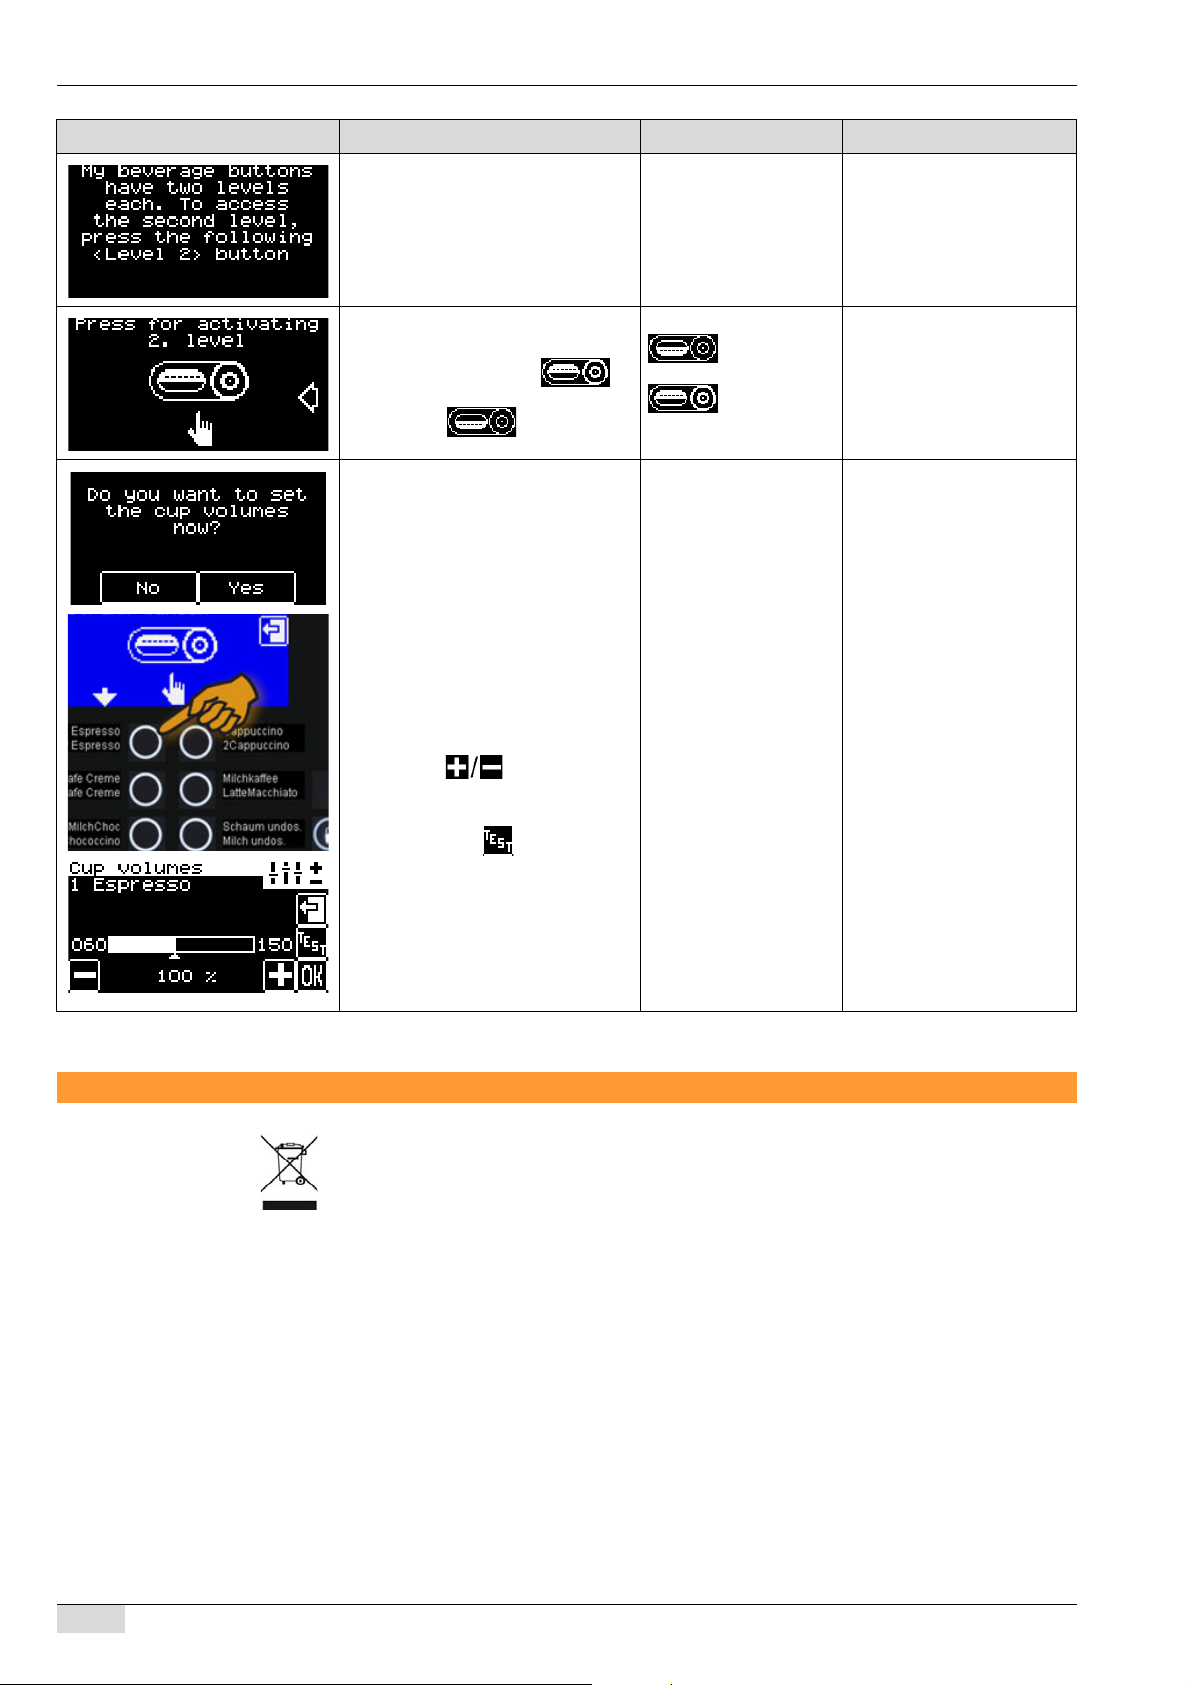
Information about the second beve- - The buttons can optionally
rage button level have double assignments.
The possible button selection is "top" or "bottom".
Selection of the beverage button level:
► Change to 2nd level .
The level changes. The new
Cup fill volume
Option 1: "NO"
The commissioning pro-
Option 2: "YES"
► Select the button "YES".
► Select the beverage button (be
sure to note the level selected).
► Use the buttons to con-
figure the setting.
► If necessary, check the cup vol-
ume with the button.
► Confirm the setting with "OK".
► Repeat the procedure with the
other buttons.
The display indicates that
level is displayed.
gramme is complete. The
coffee machine is now ready
for use.
the coffee machine is ready
for use.
"Top" level
"Bottom" level
50% – 150% The cup fill volume can also
See "Operation - Operating
options" to deactivate this
function.
be set at a later point in time.
See "Programming" - "Settings menu"
The display will then automatically be ready for use.
28
Deinstallation and disposal
The coffee machine must be disposed of correctly in conformity with local and legal regulations.
► Contact your service partner.
BA SCV_EN
V06 | 11.2015
Page 29
Operation www.schaerer.com
CAUTION!
User at risk!
CAUTION!
Risk of machine
damage!
Operation
Check before switching on
► Before switching on the coffee machine, check whether the conditions below are met.
Conditions for switching on the coffee machine:
• The drinking water supply is open or the water tank is filled.
• The waste water hose (option) is correctly routed.
• The bean hopper(s) is/are filled and the locking mechanism is open.
• The powder container(s) is/are filled.
• The grounds container is empty and inserted correctly.
• The coffee machine is connected to the mains power supply.
Filling and connecting
Coffee beans
Rotating grinding discs in the grinder are an injury hazard.
Never reach into the bean hoppers while the coffee machine is switched on.
Filling the hoppers with foreign objects can lead to clogging or destruction of the grinder.
Never fill the bean hoppers with anything other than beans.
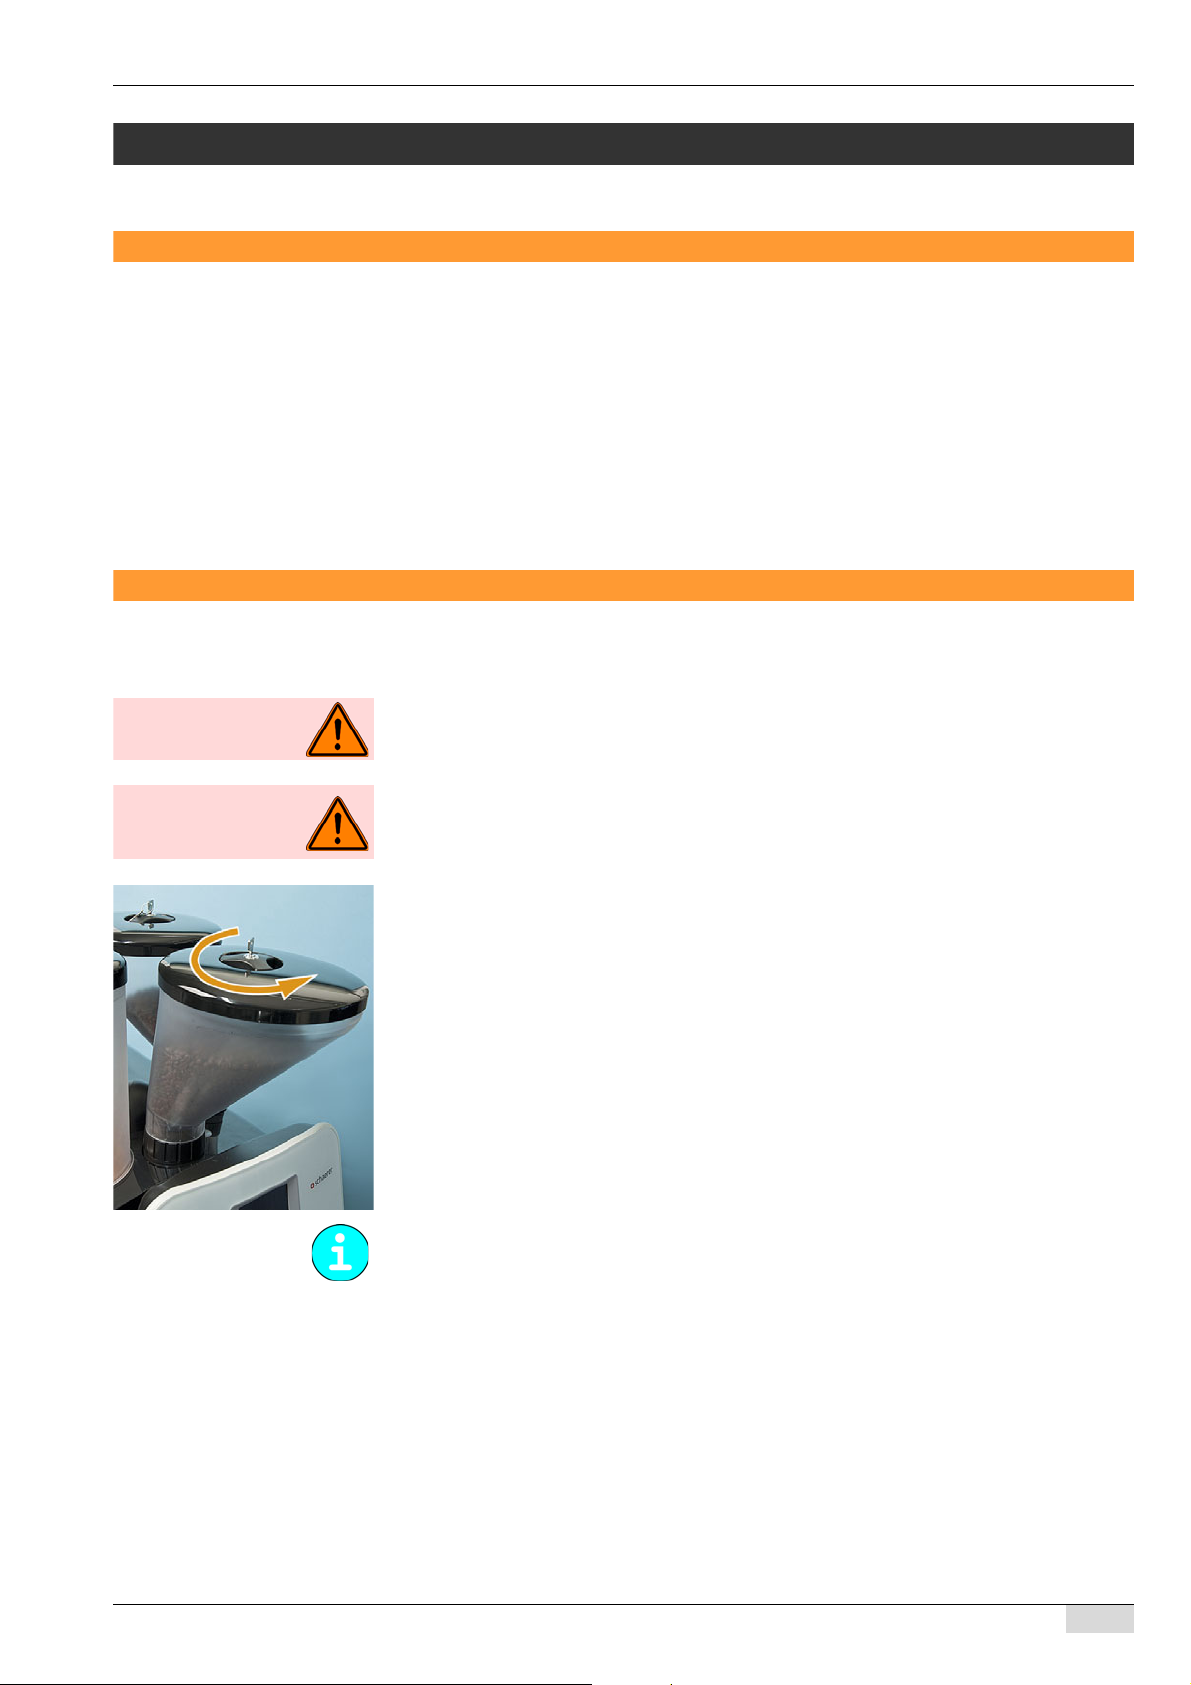
► Rotate the turn-lock fastener in the bean hopper lid anticlockwise.
► Remove the lid.
► Pour in coffee beans (max. 1100 g per bean hopper).
Ensure that the filled beans do not touch the closed bean hopper lid.
► Reattach the lid and turn the turn-lock fastener in the bean hopper lid clockwise.
The locking device opens.
Water
Option: Internal/External drinking water tank
► Rinse out the drinking water tank thoroughly with fresh water every day.
► Clean the lid of the drinking water tank with fresh water.
► Fill the drinking water tank with fresh drinking water before using it.
► Reinsert the drinking water tank.
BA SCV_EN
V06 | 11.2015
29
Page 30

www.schaerer.com Operation
Ensure that the filled drinking water does not touch the closed drinking water tank lid.
Option: Mains water supply
See also "Installation and commissioning" - "Changeover from mains water supply to drinking
water tank"
► Connect to the water mains the hose for the supply of water to the coffee machine.
► Open the water valve on the water supply line.
Milk
Option 1: Milk Smart
No more than 40 cm should be between the milk package and the beverage outlet.
► Have fresh, pre-cooled milk (3 – 5°C) ready.
► Place the hose or hoses in the milk.
The hose end must be in contact with the container floor.
See also "Safety notes" - "Hygiene" - "Milk".
Option 2: Side cooling unit
► Open the door.
► Remove and rinse the milk container.
► Pour in fresh, pre-cooled milk (3 – 5°C).
► Place the milk container in the cooling unit.
► Place the hose or hoses in the container.
The hose end must be in contact with the container floor.
► Close the door.
Option 3: Internal cooling unit
► Remove the left-hand door or cover.
► Remove and rinse the milk container.
► Pour in fresh, pre-cooled milk (3 – 5°C).
► Place the milk container into the cooling unit.
► Place the hose or hoses in the container.
The hose end must be in contact with the container floor.
See "Installation and commissioning" - "Connecting the milk system" for additional information
about milk nozzles.
► Close the door or cover.
30
Option 4: Cup & Cool
Ensure that the filled milk does not touch the closed milk container lid.
BA SCV_EN
V06 | 11.2015
Page 31

Operation
CAUTION!
User at risk!
CAUTION!
Risk of machine
damage!
www.schaerer.com
► Open the door.
► Pull the milk hose adapter out of the lid.
► Connect the desired milk nozzle (1 mm – 1.7 mm) between the hose and the adapter if not
► Remove and rinse the milk container.
► Pour in fresh, pre-cooled milk (3 – 5°C).
already installed.
► Place the milk container back in the cooling unit.
► Push the hose adapter back into the lid.
► Close the door.
The milk nozzles (1 mm – 1.7 mm) contained in the scope of delivery influence the milk temperature. If the milk foam is too cold, a smaller nozzle diameter is necessary. If the milk foam
is too hot, a larger nozzle diameter is necessary.
Option: Under-machine cooling unit
► Open the door.
► Remove and rinse the milk container.
► Pour in fresh, pre-cooled milk (3 – 5°C).
Ensure that the filled milk does not touch the closed milk container lid.
► Place the milk container into the cooling unit.
► Place the hose in the container.
The hose end must be in contact with the container floor.
► Close the door.
BA SCV_EN
V06 | 11.2015
Automatic machine powder
Danger of injury from rotating dosing screws!
Never reach into the powder container while the device is switched on.
Risk of blockage from adding improper powder!
Never fill anything into the powder container other than powder for automatic operation.
Ensure that the filled choco powder does not touch the closed powder container lid.
Option 1: Choco
► Add the desired choco powder.
Option 2: Topping
► Add the desired milk powder.
31
Page 32

www.schaerer.com Operation
Option 3: Choco topping
The powder container for chocolate topping is divided in the middle and has two compartments
for one type of milk powder and one type of chocolate powder.
The feed screws for chocolate powder and milk powder have different sizes. Label the two
container compartments from the outset to avoid mix-ups when topping up the powder.
► Fill compartment 1 with the desired milk powder.
► Fill compartment 2 with the desired chocolate powder.
Option 4: Twin Topping
The powder container for Twin Topping is divided in the middle and has two compartments for
two different types of milk powder.
► Pour the desired milk powders into compartments 1 and 2.
Option 5: Twin Choco
The powder container for Twin Choco is divided in the middle and has two compartments for
two different types of chocolate powder.
► Pour the desired chocolate powder into compartments 1 and 2.
Switching the machine on
► Press and hold the button for 5 sec.
The coffee machine switches on and heats up.
The "Ready for use" main window appears as soon as the coffee machine is ready to
dispense a beverage.
The beverage buttons are lit.
"Ready for use" display with "2nd level" option
"Ready for use" display without "2nd
level" option
See also "Programming" - "Settings" - "Operating options".
Option 1: Cup warmer
► Switch on the cup warmer unit via the main switch (1).
The switch lights up.
32
BA SCV_EN
V06 | 11.2015
Page 33

Operation www.schaerer.com
Option 2: Cup & Cool
► Switch on the cup warmer unit via the main switch (1).
The switch lights up.
► Switch on the cooling unit via the main switch (2).
The switch lights up.
A detailed description of how to set the thermostats (see arrow) can be found in the separate
operating instructions for the "Cup warmer and Cup & Cool".
Option 3: Integrated cooling unit
► Remove the left front cover.
► Switch on the toggle switch at the top left.
The switch lights up green.
The temperature is preset at the factory.
► Mount the front cover again.
Option 4: Side cooling unit
► Connect the side cooling unit to the power supply.
► Turn the rotary switch clockwise to the middle position.
► Check for a cooling temperature of 3 – 5°C and adjust the temperature setting if neces-
sary.
BA SCV_EN
V06 | 11.2015
Be sure to observe the operating instructions for the side cooling unit.
Option 5: Under-machine cooling unit
Connecting:
► Connect the under-machine cooling unit at the rear using the separate mains cable
33
Page 34

www.schaerer.com Operation
Switching on:
► Open doors.
► Switch on the toggle switch on the bottom.
The switch lights up green.
Temperature setting:
The temperature is preset at the factory.
The thermostat (A) is located on the rear for any necessary temperature adjustments.
► Close the door again.
Be sure to observe the operating instructions for the under-machine cooling unit.
34
BA SCV_EN
V06 | 11.2015
Page 35

Operation www.schaerer.com
Main touch screen window
Visible and hidden symbols are displayed in the main window. The menus, information and
functions behind these are described below:
Symbol Description
Shift field
Each beverage button has two levels and can therefore be assigned two beverages. In order to do so, this function must be activated in the programming.
By default, the 1st level is always active.
► Press the shift field.
Level 1 active
The 2nd level is now active.
► Press the shift field once more.
The 1st level is active again.
See also "Programming" - "'Settings' menu" - "Operating options" to (de)activate this function.
Level 2 active
Warm rinsing Pressing the field allows the coffee system to be rinsed with warm wafield ter after an extended downtime (recommended after 30 minor more). This
heats the brewing unit and pipes, which ensures an optimal coffee temperature.
► Press the field.
Warm rinsing begins.
See also "Programming" - "Settings" - "Operating options" to (de)activate
this function.
Barista field
The Barista field can be used to adjust the strength of the dispensed beverage for one brewing. Once beverage dispensing is complete, the Barista
field returns to the "normal" standard setting.
► Press the field repeatedly until the desired strength is reached.
weak (−15%)
► Press the desired beverage button.
The beverage button flashes and beverage dispensing begins.
The display shows the beverage name and dispensing progress.
normal
strong (+15%)
Information The Information field is a hidden field.
► Tap the right third of the touch screen.
The hidden fields and will appear (see figure).
► Press the field.
The "Information" menu appears.
See also "Programming" - "Settings" - "Operating options" for additional
function options.
BA SCV_EN
V06 | 11.2015
35
Page 36

www.schaerer.com Operation
CAUTION!
Hot surface!
CAUTION!
Hot surface!
Symbol Description
MENU The MENU field is a hidden field.
► Tap the right third of the touch screen.
The hidden fields and will appear (see figure).
► Press the field.
The "Information" menu appears.
See also "Programming" - "Settings" - "Operating options" for additional
function options.
Dispensing
Pre-warming cups (Option)
Option 1: Cup warmer
Hot surfaces can cause burns.
Do not touch the cup storage surface.
► Place cups on the heated storage surfaces.
► Regulate the temperature as required on the rear side of the cup warmer.
The cups are prewarmed.
Option 2: Cup & Cool
Hot surfaces can cause burns.
Do not touch the cup storage surface.
► Place cups on the heated storage surfaces.
► Regulate the temperature as needed on the rear side of the "Cup & Cool".
The cups are then pre-warmed.
Adjusting the outlet height
Adjustable height = 70 – 180 mm.
36
BA SCV_EN
V06 | 11.2015
Page 37

Operation www.schaerer.com
CAUTION!
Hot fluid!
CAUTION!
Risk of machine
damage!
► Place a cup under the beverage outlet.
► Grasp the beverage outlet from the front and slide it into the correct position (see figure).
► Remove the cup after the beverage has been dispensed.
Coffee beverages
Lit beverage buttons signal that the respective beverage is ready for dispensing.
► Place a cup under the beverage outlet.
► Slide the beverage outlet into the desired position.
► Press the desired beverage button.
The beverage button flashes while the machine is dispensing the beverage.
The beverage name and the dispensing progress are shown on the display.
► Remove the cup after the beverage has been dispensed.
See also "Operation" - "Dispensing options" - "Stopping and cancelling beverage dispensing".
Beverages with ground coffee
The inlet for ground coffee is located between the bean hoppers.
Incorrect use may damage the machine.
Never put anything into the inlet other than ground coffee or cleaning tablets.
► Open the manual inlet.
The display messages "Insert ground coffee" and "Close manual inlet" appear.
BA SCV_EN
V06 | 11.2015
If the manual inlet remains open for too long, the message "Manual inlet time limit exceeded"
appears and the procedure is cancelled.
► Pour in ground coffee (max. 15 g).
► Close the manual inlet lid.
The "Select coffee beverage" display instruction appears.
► Press the desired beverage button.
The beverage button flashes while the machine is dispensing the beverage.
The beverage name and the dispensing progress appear on the display.
The dispensing process cannot be interrupted.
► Remove the cup after the beverage has been dispensed.
37
Page 38

www.schaerer.com Operation
CAUTION!
Hot fluid!
CAUTION!
Hot fluid!
Hot water
► Place a cup under the hot water outlet.
Three different dispensing options are available for dispensing hot water:
Option 1: Metered
► Press the hot water button.
The set quantity is dispensed.
Dispensing cannot be interrupted.
Option 2: Free flow
Press and hold the hot water button.
►
Dispensing continues for as long as the button is pressed.
Option 3: Start/Stop
► Press the hot water button.
► If desired, you can end the dispensing process by pressing the beverage button again.
The dispensing option can only be set by the service technician.
Milk beverages
The dispensing process for milk beverages that contain multiple ingredients (coffee, chocolate, etc.) and are stored on a beverage button is identical to the dispensing of coffee beverages.
See "Operation" - "Dispensing" - "Coffee beverages".
Hot milk
► Place a cup under the beverage outlet.
To dispense hot milk, three dispensing options are available:
Option 1: Metered
► Press the [Hot milk] button.
The set quantity is dispensed.
Dispensing cannot be interrupted.
Option 2: Free flow
► Press and hold the [Hot milk] button.
Dispensing continues for as long as the button is pressed.
Option 3: Start/Stop
► Press the [Hot milk] button.
The set quantity is dispensed.
► If desired, you can end the dispensing process by pressing the beverage button again.
38
The dispensing option can only be set by the service technician.
Milk foam
► Place a cup under the beverage outlet.
BA SCV_EN
V06 | 11.2015
Page 39

Operation www.schaerer.com
CAUTION!
Hot fluid!
CAUTION!
Hot steam!
To dispense milk foam, three different dispensing options are available:
Option 1: Metered
► Press the [Milk foam] button.
Option 2: Free flow
► Press and hold the [Milk foam] button.
Option 3: Start/Stop
► Press the [Milk foam] button.
► If desired, you can end the dispensing process by pressing the beverage button again.
The dispensing option can only be set by the service technician.
The set quantity is dispensed.
Dispensing cannot be interrupted.
Dispensing continues for as long as the button is pressed.
The set quantity is dispensed.
Steam
► Place a cup under the steam wand.
To dispense steam, three different dispensing options are available:
Option 1: Metered
►
Press the steam button.
The set quantity is dispensed.
Dispensing cannot be interrupted.
Option 2: Free flow
Press and hold the steam button.
►
Dispensing continues for as long as the button is pressed.
Option 3: Start/Stop
►
► If desired, you can end the dispensing process by pressing the
The dispensing option can only be set by the service technician.
Press the steam button.
The set quantity is dispensed.
steam button again.
Dispensing options
Stopping and cancelling beverage dispensing
To cancel beverage dispensing, the "Beverage cancel" parameter in the "Operating options"
menu must be activated.
See "Programming" - "Settings menu" - "Operating options".
BA SCV_EN
V06 | 11.2015
Dispensing of a beverage has started:
► Select the active (flashing) beverage button again.
Beverage dispensing is cancelled.
The "Beverage cancel" notice appears on the display.
All set beverages are available for selection again.
39
Page 40

www.schaerer.com Operation
On machines with a payment system (option), the cancellation of beverage dispensing cannot
be selected.
Double beverages
The "Two beverages" dispensing option can be used to dispense two beverages at the same
time. The following beverages can be programmed:
• 2 cappuccinos
• 2 café cremes
• 2 mugs of café crème
• 2 espressos
• 2 lattes
• 2 mugs of milk coffee
• 2 latte macchiatos
See also "Main touch screen window" and/or "Programming" - "Settings" - "Recipes and beverage buttons" for assigning the beverage buttons and setting the dosage.
► Place two cups under the beverage outlet.
► Press the desired beverage button.
The beverage button flashes while the machine is dispensing the beverage.
The beverage name and the dispensing progress appear on the display.
Emptying
Grounds container
The coffee grounds cakes ejected out of the brewing unit are collected in the grounds container. This container holds coffee grounds from ca. 40 – 45 brewings.
A message appears on the display when the grounds container is full. Beverage dispensing is
disabled until the grounds container is emptied and reinserted.
► Slide the beverage outlet into its highest position.
► Remove the grounds container.
► Empty the grounds container and insert it again.
The message shown here appears on the display.
► Acknowledge the display message accordingly.
If "Yes" is pressed: Beverages can now be dispensed again.
If "No" is pressed: Beverage dispensing remains blocked.
If the prompt is accidentally acknowledged with "No" after the grounds container is emptied,
the instruction to empty the container remains visible on the display. The grounds container
must be removed and inserted again, and the prompt then reappears.
Under-counter grounds disposal (Option)
40
The coffee grounds cakes ejected out of the brewing unit pass through the under-counter
grounds disposal cutout and into the grounds container below the counter.
► Open the counter door and remove the under-counter grounds container.
► Empty the under-counter grounds container.
► Return the under-counter grounds container to its proper position and close the counter
door.
When the container is full, no instruction to empty it will appear on the machine’s display. The
under-counter grounds container should therefore be checked at regular intervals.
BA SCV_EN
V06 | 11.2015
Page 41

Operation www.schaerer.com
CAUTION!
Risk of trapping
fingers!
CAUTION!
User at risk!
CAUTION!
Risk of machine
damage!
Drip tray
The drip tray must be emptied as soon as the floater appears or at least once daily.
► Carefully pull out the drip tray.
► Empty the drip tray and reinsert it.
► Check that the tray is correctly positioned. An incorrectly inserted drip tray can cause water
to leak or the machine to jam.
Waste water tank (Option)
Option: Emptying the waste water tank
On coffee machines with an external waste water tank, the tank needs to be emptied regularly,
or at the very latest when the instruction to empty appears on the display.
► Remove and empty the waste water tank.
► Clean the waste water tank thoroughly with household cleaner and rinse with fresh water.
► Replace the waste water tank.
Transport requirements
Improper transport of the coffee machine can result in injuries.
Observe general regulations for health and safety.
► Before moving the coffee machine, be certain to disconnect the drinking water supply,
► Before moving the coffee machine, check the floor for obstacles and uneven areas.
Improper transport of the machine can result in damage to the machine.
Adhere to the following instructions when moving machines on a cart:
• For safety reasons, the cart must be pulled and not pushed when moving the coffee ma-
• Only pull the cart; never pull the machine directly.
• The cart is not intended to be used for transporting freight.
The manufacturer cannot be held liable for any damage resulting from unintended use of the
cart or the failure to comply with the operating instructions.
power supply and waste water outlet.
chine.
Display notes/instructions
The machine shows display messages when intervention by the user or a service technician
is necessary to be able to assure that the machine remains ready for use.
There are two different categories of display messages:
• Note / Instruction
• Error message
BA SCV_EN
V06 | 11.2015
41
Page 42

www.schaerer.com Operation
If one of these display messages is present on the machine:
Option 1: It will appear directly.
Option 2: The field appears with an error code.
If an error code is displayed, a fault has occurred.
► Follow the displayed instruction to reference the operating instructions.
Some error messages have the same display messages as notes/instructions.
► Always perform the action indicated by the notes/instructions first. These actions are de-
scribed in the table below.
If the error message persists after the action is performed, a fault has occurred.
See "Troubleshooting" - "Fault with display message".
Display message Cause What to do
Reheating The water in the boilers is not warm enough.
The machine reheats it.
Beverages cannot be dispensed.
Refill beans The bean hopper on the left is empty.
This display message is only informational. The
message disappears as soon as the boiler has
reached working temperature.
► Refill the beans.
Beverages cannot be dispensed.
If the machine has two bean hoppers, the one
that is empty flashes in the error message.
Fill topping hopper The powder container is empty.
It is not possible to dispense beverages with
topping or choco powder.
Fill the water tank. The drinking water tank is empty.
Only on machines with a drinking water tank or
Aquaflex!
Manual inlet closed? The manual inlet is open.
The dispensing of a beverage with ground coffee has been aborted. See chapter "Dispensing" - "Beverages with ground coffee".
Open water supply! The stop valve on the water supply line is
closed.
Only on machines with mains water supply or
Aquaflex!
► Add powder.
► Rinse out and fill up the drinking water tank.
► Close the manual inlet.
► Open the stop valve of the water supply.
42
BA SCV_EN
V06 | 11.2015
Page 43

Operation www.schaerer.com
Display message Cause What to do
Empty grounds container! The grounds container is full.
Beverages cannot be dispensed.
Please clean soon
Please clean now
Daily cleaning is due.
If the message "Please clean soon" appears,
beverages can continue to be dispensed. If the
message "Please clean now" appears, beverage dispensing is disabled until the cleaning
has been performed.
Please descale! Descaling of the machine is due.
The descaling must be performed within a
week. Beverage dispensing is disabled once
this period of time expires.
Change filter The calcium filter in the drinking water tank
must be replaced.
Only on machines with a drinking water tank or
Aquaflex!
The message appears once daily. However, if
the filter is not changed within a week, the message then appears after each brewing cycle.
► Pull out the grounds container, empty it and
push it back in.
A prompt appears on the display.
► Confirm with [Yes].
► Perform the daily cleaning routine.
"Cleaning" - "Daily cleaning".
► Perform the descaling procedure.
"Service and maintenance" - "Descaling".
► Replace the filter in the drinking water tank.
"Service and maintenance" - "Filter replacement"
Rinse filter The calcium filter in the drinking water tank
must be replaced.
Only on machines with a drinking water tank or
► Replace the filter in the drinking water tank.
"Service and maintenance" - "Filter replacement"
Aquaflex!
The message appears once daily. However, if
the filter is not changed within a week, the message then appears after each brewing cycle.
Change filter The calcium filter in the drinking water tank
must be replaced.
Only on machines with mains water supply or
► Replace the filter on the mains water sup-
ply.
See operating instructions for the calcium filter.
Aquaflex!
The message appears once daily. However, if
the filter is not changed within a week, the message then appears after each brewing cycle.
Service maintenance Service is due. ► Please contact your service partner.
Milk empty message (option) The milk level in the milk container is below the
level of the sensor monitor.
► Fill the milk container.
The optional cooling unit has a level monitor.
The level monitor must be activated in the machine data by the service technician.
BA SCV_EN
V06 | 11.2015
43
Page 44

www.schaerer.com Operation
In self-service mode
The following display messages and functions are available in the "Self-service" mode:
Display symbols Function Default setting Self-service display
cup symbol (B) is shown instead.
The beverages of the top button level are
used.
The beverage buttons are ready.
celled.
(immediate)
The "Menu" field appears with a delay.
Full-service display symbols
Self-service display symbols
2nd button level (A) No / (Yes) The 2nd button level is not available. The
On/Off button direct / (via PIN) Switching on/off is possible directly.
Warm rinsing field (C) inactive / (active) Display without warm rinsing button.
Barista field (D) inactive / (active) Display without barista field.
Beverage cancel No / (Yes) Dispensing of a beverage cannot be can-
Menu field (E) delayed /
Error display symbol / (normal) Error messages appear as a symbol.
Switching the machine off
End of operation
See "Cleaning".
► Perform the daily cleaning routine.
Press the button.
►
The machine switches off.
Option 1: Mains water supply and drinking water tank
► Close the stop valve of the mains water supply.
Option 2: Drinking water tank
► Empty the drinking water container, then clean and reinsert it.
Option 3: Aquaflex
► Perform and complete the steps described for options 1 and 2.
► Unplug the power cable.
Failure to follow the instructions above will result in a loss of warranty coverage in the event of
damage.
Extended downtimes (1 week or more)
44
For extended downtimes, such as company holidays, the coffee machine and accompanying
accessories must be taken out of service.
► Carry out all the steps described in the "End of operation" chapter.
If the machine will be exposed to subzero temperatures, the boilers must be drained beforehand:
► Please contact your service partner.
BA SCV_EN
V06 | 11.2015
Page 45

Operation www.schaerer.com
CAUTION!
Risk of machine
damage!
c
The boilers can be destroyed by freezing water as it expands.
In rooms where the temperature can fall below freezing, the boilers must be emptied.
Perform a daily cleaning before putting the machine back into operation.
BA SCV_EN
V06 | 11.2015
45
Page 46

www.schaerer.com Cleaning
Cleaning
Cleaning intervals
Cleaning intervals
Daily
Weekly
When switching on
When switching off
As instructed
Coffee machine
x x Cleaning programme
x Foamer cleaning (optional)
x Mixing bowl rinsing (optional)
x Mixing bowl cleaning (optional)
x Under-counter grounds disposal (optional)
x x Grounds container
x Drip tray
x External surface of machine
x Internal drinking water tank
x Bean hopper
x Powder container
x Brewing unit
x Brewing chamber
Optional accessories/options
x Clean the milk container
x Cleaning of interior of cooling unit
x Cleaning of interior of the side cooling unit
x Defrost cooling unit
x Clean outer surfaces of side cooling unit
x External surfaces of Cup & Cool
x External surfaces of cup warmer
46
Legend
Daily: At least once a day or more often if necessary.
Weekly: At least once a week or more often if necessary.
When switching on: Automatically when the coffee machine is switched on.
When switching off: Automatically when the coffee machine is switched off.
As instructed: An instruction appears on the display.
For a better overview of the cleaning steps that are required or that have already been performed, use the cleaning schedule in this chapter.
BA SCV_EN
V06 | 11.2015
Page 47

Cleaning www.schaerer.com
Mandatory cleaning
If the display shows an instruction that a cleaning is due, but this cleaning is not performed,
notification of a mandatory cleaning will occur (if programmed) after a certain time. When the
notification for a mandatory cleaning appears, beverage dispensing is blocked.
Beverages cannot be dispensed again until after the machine has been cleaned.
Mandatory cleaning, along with the amount of time that elapses before the notification appears, can only be programmed by the service technician.
Cleaning options
Warm rinsing
"Warm rinsing" can be activated via a button on the display.
See "Operation" - "Main window" and "Programming" - "Settings menu" - "Operating options"
to (de)activate this function.
Mixer rinsing
If milk or powder beverages have been dispensed, mixer rinsing is performed automatically
during the cleaning programme. However, it can also be performed separately.
See "Daily cleaning card", "Cleaning programme"- "Care" - "Mixer rinsing"
Milk foamer cleaning with "Plug & Clean" (Option)
► Remove the milk hose adapter from the milk container by turning it anticlockwise a 1/4 turn.
► Remove the front panelling on the left-hand side of the machine.
BA SCV_EN
V06 | 11.2015
47
Page 48

www.schaerer.com Cleaning
CAUTION!
User at risk!
► After being instructed by the cleaning programme, connect the milk hose adapter to the
"Plug & Clean" equipment on the coffee machine with a 1/4 clockwise turn.
► Follow the instructions on the display.
See "Daily cleaning".
Removing the foamer head
► Press the locking lever behind the foamer head.
The foamer head is unlocked.
► Pull off the foamer head in the downward direction.
► Detach hose (A) from the powder system (option) and milk hose (B) (option) from the foam-
er head.
► Perform a daily cleaning.
► After daily cleaning of the foamer head, insert it back into the beverage outlet in reverse
order until the locking mechanism can be heard to engage.
The instruction to perform a daily cleaning of the foamer head appears during the "Daily cleaning programme". With the "Plug & Clean" option, daily cleaning takes place without any instruction based on the "Daily cleaning programme".
See "Daily cleaning card", "Daily cleaning programme", step (4).
48
As needed
Brewing unit
Coffee residue in the brewing unit can quickly lead to the formation of mould. The
spread of mould spores in the machine results in the risk of the coffee becoming contaminated.
Clean the brewing unit monthly (depending on the degree of soiling) as described.
BA SCV_EN
V06 | 11.2015
Page 49

Cleaning www.schaerer.com
CAUTION!
Risk of machine
damage!
Never wash the brewing unit in a dishwasher, as this may damage the unit considerably.
Only clean the brewing unit as described below.
► Remove the drip tray.
► Remove the grounds container.
► Unlock the brewing unit by pulling slider (A) toward you.
The unlocked brewing unit will fall into your hand under its own weight.
► Pull the unlocked brewing unit down while pivoting it forward out of the machine.
► Turn the spindle of the brewing unit all the way anti-clockwise using the multi-tool.
The scraper (B) is in the scraper position.
► Push the funnel (C) out in the direction of the arrow.
► Remove any ground coffee residue with a dry brush.
► To clean, slightly lift the drop-in slide (D) away from the brewing screen.
► Clean the brewing screen under warm running water if necessary.
► Clean the brewing unit under warm running water if necessary.
► Allow the brewing unit to dry fully.
► Grease the O-ring of the brewing screen with Molykote 111 grease.
See Scope of delivery and accessories for more information on food-grade grease.
► Slide the funnel (C) back on to the brewing unit.
► Turn the spindle clockwise back to the stop using the multi-tool.
► Turn the spindle away from the stop with a brief 1/4 rotation.
► Insert the brewing unit into the machine in reverse order.
► Reinsert the grounds container.
► Reinsert the drip tray.
BA SCV_EN
V06 | 11.2015
49
Page 50

Schaerer Ltd. P.O. Box
www.schaerer.com Cleaning
CAUTION!
User at risk!
CAUTION!
Risk of machine
damage!
Preparations
Ź Press the area on the touch screen.
Ź Select .
Ź Press [cleaning symbol].
; The "Care" menu appears with all
ava
ilable programmes.
Option 1: Without waste water tank
Ź
Place a container under the outlet
(ca. 2 l).
Option 2: With waste water tank
Ź Pu
sh the outlet to the lowest position.
See also "Safety instructions" and "Cleaning" in the operating instructions.
There is a risk of scalding in the dispensing area of beverages, hot water and steam.
Never reach under the dispensing areas during dispensing or cleaning.
The touch screen can suffer damage from improper handling.
Never press the touch screen using force, strong pressure or pointed objects. Do not use abrasive
cleaning products. Never spray glass cleaning products directly onto the touch screen.
Daily cleaning program
Ź Select [cleaning program].
Ź Select whether the machine should
switch off after cleaning or not.
Option 1: With fresh milk
Ź Co
ntinue with step 2.
Option 2: With powder system
Ź Co
ntinue with step 5.
Option 3: Without milk/powder
Ź Co
ntinue with step 6.
Option 4: With Plug&Clean
Ź Co
ntinue with step 7.
Ź Select for foamer cleaning.
Ź Put 25 ml of cleaning product (Milk-
pure) and 500 ml of cold water into a
cleaning container.
Ź Immerse the milk intake hose with the
nozzle in the container.
Ź Selec
t .
; Cleaning is running.
Ź Fill the cleaning container with ± 400 ml
of fresh water.
Ź Immerse the milk hose with the nozzle
in the container.
Ź S
elect .
; Water rinsing starts.
; A request for foamer cleaning ap-
pea
rs.
Ź Press the release at the back of the
foamer head.
Ź
Pull the foamer head off downward.
Daily cleaning
Daily cleaning card
50
V06 | 11.2015
BA SCV_EN
Page 51

Cleaning www.schaerer.com
Ź Demount the foamer head parts.
Ź Place the parts and milk hose ±30 min
in a solution of 500 ml hot water and
25 ml cleaning product (Milkpure).
Ź Cl
ean all the parts in lukewarm running
water.
Ź
Refit the foamer head parts.
Ź Mount the foamer head at the outlet so
that it engages with a "click".
Ź
Select
and continue with step 6.
Option: Plug & Clean
Perform the specified cleaning steps once
a wee
k.
Option: Plug & Clean
Ź Select for machine cleaning.
Ź Push the milk hose adapter into the
"Plug&Clean" device.
Ź Select
.
Ź Follow the instructions on the touch
screen.
Ź Insert the cleaning tablet into the inlet
for ground coffee.
Ź Close the inlet.
Ź Select
.
; Cleaning runs and ends.
Ź Weekly foame
r head cleaning, see
step 4.
; The mixer rinse runs automatically.
Ź
Continue with step 6.
Outer surfaces and
containers
Ź Wipe down the outer surfaces of the
machine with a damp paper towel.
Depending on the option available, perform the following actions:
Ź Rin
se out the drinking water tank with
fresh water.
Ź Th
oroughly rinse out the milk container
with fresh water.
Ź Th
oroughly clean the waste water tank
and/or drip tray with a domestic cleaning product.
Ź S
elect for machine cleaning.
Ź Follow the instructions on the touch
screen.
Ź Insert the cleaning tablet into the inlet
for ground coffee.
Ź Close the inlet.
Ź Select
.
; Cleaning runs and ends.
Separate programmes
Foamer cleaning and mixer rinsing can be
performed separately.
Option 1: Foamer cleaning
Ź Pre
ss [Foamer cleaning] in the "Care"
menu.
Ź S
elect .
; Foamer cleaning starts.
Option 2: Mixer rinsing
Ź Pre
ss [Mixer rinsing] in the "Care"
menu.
Ź S
elect .
; Mixer rinsing starts.
Improper handling of beans, water, milk, powder or other coffee ingredients can lead to health prob-
CAUTION!
lems!
User at risk!
Comply with the hygiene regulations stipulated in HACCP!
See also "Safety instructions" - "HACCP hygiene regulations" in the operating instructions.
BA SCV_EN
V06 | 11.2015
51
Page 52

www.schaerer.com
CAUTION!
User at risk!
CAUTION!
User at risk!
CAUTION!
User at risk!
CAUTION!
User at risk!
Cleaning
Milk container
There is a risk of contamination of the milk and milk container due to milk deposits and
bacteria.
Clean the milk container and lid daily and every time before filling.
See also "Safety notes" - "Hygiene rules" - "Milk".
► Mix 5 ml of the Milkpure cleaning product with 500 ml of warm water in a container.
► Clean the milk container and lid with the prepared cleaning solution.
► Rinse with clear water and dry with a clean cloth.
Internal cooling unit (Option)
There is a risk of contamination of the milk and cooling unit due to milk deposits and
bacteria.
Clean the cooling unit daily.
► Open the front door or remove the cover.
► Take the milk out of the cooling unit.
► Mix 5 ml of the Milkpure cleaning product with 500 ml of warm water in a container.
► Clean the interior of the cooling unit with the prepared cleaning solution.
► Clean with clear water and wipe dry with a clean cloth.
► Place the milk back into the cooling unit.
► Insert the hose into the milk container again.
► Close the front door or attach the cover.
See also "Safety notes" - "Hygiene rules" - "Milk".
Side cooling unit (Option)
There is a risk of contamination of the milk and cooling unit due to milk deposits and
bacteria.
Clean the cooling unit daily.
► Take the milk container out of the cooling unit.
► Wipe out the inside of the cooling unit with fresh water and a fresh, unused cloth.
► Place the milk back into the cooling unit.
See also "Safety notes" - "Hygiene rules" - "Milk".
Internal/external drinking water tank (Option)
There is a risk of contamination of the drinking water tank due to deposits and bacteria.
Rinse and clean the drinking water tank and lid daily; do not use cleaning products.
See also "Safety notes" - "Hygiene rules" - "Water".
52
► Thoroughly rinse the drinking water tank with fresh water several times.
► Thoroughly clean the lid of the drinking water tank with fresh water.
► Dry with a clean cloth.
BA SCV_EN
V06 | 11.2015
Page 53

Cleaning www.schaerer.com
CAUTION!
User at risk!
External waste water tank (Option)
There is a risk of contamination of the waste water tank due to deposits and bacteria.
Rinse and clean the waste water tank and lid every day.
► Thoroughly rinse the waste water tank with fresh water several times.
► Thoroughly clean the lid of the waste water tank with fresh water.
► Dry with a clean cloth.
BA SCV_EN
V06 | 11.2015
53
Page 54

Schaerer Ltd. P.O. Box
www.schaerer.com Cleaning
CAUTION!
User at risk!
CAUTION!
Risk of machine
damage!
See also "Safety instructions" and "Cleaning" in the operating instructions.
It is dangerous to reach into the machine.
Before any manual cleaning, switch off the machine and disconnect it from the mains supply.
Carry out weekly cleaning at least once weekly!
The weekly cleaning is additional to the daily cleaning and is not a substitute for it.
Outlet mixing cup (optional)
This cleaning is only necessary on machines with an optional "powder system".
Ź Switch off the machine with the
button.
Ź Disconnect the power plug.
Ź Remove the left-hand cover.
Ź Pull the hose (that leads from the mixer
to the beverage outlet) off the beverage outlet.
Ź Turn the bayonet fastening handle an-
ticlockwise.
; The outlet mixing cup is released
from the locking device.
Ź Take out the outlet
mixing cup com-
plete with hose.
; The mixer’s impeller is now visible.
Ź
Clean the impeller with a cloth.
Ź Pull off the hose and disassemble the
outlet mixing cup.
Ź Clean both parts of the outlet mixing
cup and the hose under running water.
Ź Reassemble the outlet mixing cup
again. Turn all the openings in the
same direction.
Ź Insert the outlet mixing cup again in the
reverse order.
Ź Push
the mixer hose complete with the
spiral guide back onto the beverage
outlet.
Ź Rei
nsert the left-hand cover.
Manual weekly cleaning
Weekly cleaning card
54
BA SCV_EN
V06 | 11.2015
Page 55

Cleaning www.schaerer.com
CAUTION!
User at risk!
CAUTION!
Risk of machine
damage!
CAUTION!
Risk of machine
damage!
Bean hoppers
Old coffee bean oil in the bean hopper can negatively impact the taste of the coffee.
Rotating grinding discs in grinder are an injury hazard.
Never reach into the bean hoppers while the coffee machine is switched on.
High temperatures can cause damage.
Never clean the bean hopper in the dishwasher.
► Clean the bean hopper with a moist cloth.
► Clean the bean hopper lid with a moist cloth
► Dry the lid and hopper with a clean cloth.
Powder container
Never clean the product hoppers in a dishwasher. The hoppers can get damaged.
Clean the hoppers only with a damp cloth.
► Switch off the coffee machine using the
► Release the powder container by pressing the button and lift it out.
► Empty the powder container.
button and unplug the power cable.
► Loosen the securing screw(s) and pull out the drive wheel(s).
► Pull out the slider.
► Take out the dosing screw(s) and thoroughly clean the component parts.
► Thoroughly clean the powder container with a damp cloth.
► Let the parts dry fully.
► Reassemble the dosing screws in the reverse order.
► Screw the securing screw(s) back onto the drive wheel(s).
► Reinsert the powder container by pressing the release button.
If using a twin topping container, i.e. with special compartments divided in the centre, for two
different products, e.g. milk powder and choco powder, different dosing screws are used. Use
dosing screw (1) for choco powder. Use dosing screw (2) for milk powder. It is best to label the
powder container from the very beginning.
BA SCV_EN
V06 | 11.2015
55
Page 56

www.schaerer.com
CAUTION!
Risk of machine
damage!
CAUTION!
Risk of machine
damage!
Cleaning
Optional accessories
Cup Heater (Option)
The cleaning for the cup warmer is described in the separate operating instructions "Cup
warmer/ Cup & Cool".
Cup & Cool (Option)
The cleaning procedure for Cup & Cool is described in the separate "Cup Warmer/Cup & Cool"
operating instructions.
Defrosting the cooling unit (Option)
Option 1: Cup & Cool
Defrosting of the cooling unit is described in the separate "Cup warmer/ Cup & Cool" operating
instructions.
Option 2: Defrosting the side cooling unit
The interior surface of the cooling unit can become damaged.
Never remove the ice layer with pointed or sharp objects; always let it defrost.
► Switch off the side cooling unit or unplug the power cable.
► Open the front door and leave it open.
► Wipe up all accumulated condensation water with an absorbent cloth.
► Repeat the procedure until the ice layer has melted completely.
► Close the front door and switch the device on again or plug the power cable in again.
HACCP cleaning concept
Cleaning regulations
When installation, maintenance, care and cleaning are performed properly, Schaerer AG coffee machines satisfy the conditions of HACCP requirements.
If the coffee machine is not cared for and cleaned properly, the dispensing of milk beverages will become a health hazard in terms of food hygiene.
Always observe and comply with the following points:
56
• Wear safety gloves during cleaning.
• Wash your hands thoroughly before and after cleaning.
• Clean the coffee machine daily after beverage dispensing has ended.
• Clean the milk container before each filling and after you have finished dispensing bever-
ages for the day.
• Never pour cleaning products into the milk container.
• Never pour cleaning products into the drinking water tank (internal/external).
• Never mix cleaning products.
• Store cleaning products separately from coffee, milk and automatic machine powder.
• Do not use any abrasive products, brushes or cleaning tools made of metal.
• Do not touch parts that come into contact with beverages after cleaning.
• Read and follow the dosage and safety instructions specified on the cleaning product.
• For daily and weekly cleaning, proceed as described in the operating instructions and on
the cleaning cards.
BA SCV_EN
V06 | 11.2015
Page 57

Cleaning www.schaerer.com
CAUTION!
Risk of machine
damage!
For a better overview of the cleaning steps that are required or that have already been performed, use the cleaning schedule in this chapter.
Cleaning products
The use of incorrect cleaning products can damage the machine.
Only use the cleaning products recommended by Schaerer AG for daily and weekly
cleaning.
Daily cleaning Weekly cleaning
Schaerer cleaning tablets -
Milkpure milk system liquid cleaner -
Cleaning tablets
Information
Application Coffee system cleaning
Purpose Removal of residual grease in the coffee system
Interval min. once every 7 days.
Milkpure
Information
Application Daily cleaning of the milk system
Purpose
Interval Once daily
State and odour See Safety Data Sheet
Removal of limescale deposits and milk stone from the milk
system and steam nozzle
Descalers
Information
Application Descaling the boiler and line system
Purpose of cleaning Removal of lime scale deposits in the coffee machine
Application interval As instructed by the coffee machine
BA SCV_EN
V06 | 11.2015
57
Page 58

www.schaerer.com Service and maintenance
CAUTION!
Risk of machine
damage!
CAUTION!
Risk of machine
damage!
CAUTION!
User at risk!
Service and maintenance
Maintenance
The coffee machine requires regular maintenance. The maintenance schedule depends on
multiple factors, most notably the degree to which the machine is used.
When maintenance is due, the machine indicates this on the display. The machine can continue to be operated normally.
► Notify your service partner that maintenance is due.
Failure to perform required maintenance in a timely manner may lead to wear, and reliable operation will no longer be assured.
Inform the service partner as soon as possible after the maintenance message appears.
Setting the grind level
The grind level is influenced by wear on the grinding discs. The grind level needs to be adjusted as necessary to achieve constant grinding quality.
There is a danger of injury from the inside of the grinders.
Never reach into the grinders.
► Lock the bean hopper by turning the closure.
► Remove the bean hopper.
► Remove the blind plug.
Access to the adjusting screws is clear.
Adjusting the grind level when the grinder is stationary can cause damage.
Always run the grinder while adjusting.
► Press the beverage button (coffee beverage without milk) and wait until the grinder has
started up.
► Push the multi-tool well into the opening of the adjusting screw, hold it tightly and alter the
grind level as desired.
58
A scale is provided by the adjusting screw as a guide: Grind level 0 (clockwise) = coarsest
grinding. Grind level 20 (anticlockwise) = finest grinding.
► Reattach the bean hopper.
► Open the locking mechanism by turning the closure.
► Refit the blind plug.
► Perform a reference grind.
See "Programming" - "Weigh grounds".
BA SCV_EN
V06 | 11.2015
Page 59

Service and maintenance www.schaerer.com
CAUTION!
User at risk!
CAUTION!
Risk of machine
damage!
Descaling
Descaling message
When the machine needs to be descaled, a corresponding instruction appears on the display.
1st display instruction
The interval between descaling procedures depends on the following factors:
• Water hardness
• Water flow rate
• Use of a water filter
Danger of poisoning from ingesting or inhaling the descaler.
Do not drink or inhale the descaler or the rinse water output during the descaling process.
Household descalers can destroy the coffee machine.
Only use Schaerer descaler for descaling. Liability cannot be accepted for damage resulting from the use of other descalers.
Option: Resetting the descaling instruction
When the 1st display instruction for descaling appears, descaling must be performed within a
week. During this week, the 1st display instruction can be overridden.
► Touch the
The "Ready for use" window appears and the machine is ready for use again.
Option: Mandatory descaling
If descaling is not performed within one week after the 1st display instruction appears, beverage dispensing is blocked. The 2nd display request cannot be reset.
field.
2nd display instruction
Descaling preparations
The following utensils are needed for the descaling process:
Option 1: With drip tray
• 2 bottles of Schaerer liquid descaler (0.75 dl each).
• 5 l collecting containers.
• Drinking water tank
• Sufficient drinking water for rinsing.
• The multi-tool and a screwdriver (size 3) for switching from mains water supply to drinking
Option 2: With waste water outlet
• 2 bottles of Schaerer liquid descaler (0.75 dl each).
• Drinking water tank
• Sufficient drinking water for rinsing.
• The multi-tool and a screwdriver (size 3) for switching from mains water supply to drinking
water tank (optional).
water tank (optional).
Starting the descaling programme
BA SCV_EN
V06 | 11.2015
The entire descaling procedure takes ca. 80 min
59
Page 60

www.schaerer.com Service and maintenance
The descaling process consists of four stages:
• Cooling down of the machine, the "cooling down routine" (ca. 5 – 10 min).
• System descaling (ca. 36 min).
• 3-fold system rinsing (ca. 8 min per rinse).
• Preparing the machine for use (ca. 5 min).
The display provides guidance through the entire descaling process.
► Select the menu "Care".
► Select the "Descaling" field.
► Follow the optional display instruction for machines with a mains water supply. See option
"With water filter".
► Confirm the "Start descaling" display instruction by pressing "Continue".
The descaling process cannot be interrupted.
1. "Cooling down routine" descaling step
Once the machine is at working temperature, the "cooling down routine" has to be started with
[YES].
► Touch the [YES] field.
The cooling down routine starts.
The "Fill water tank to max." display instruction appears.
► The [No] field
Leads to the next descaling step.
► Fill and insert the water tank. Confirm the ensuing display requests with [Continue].
The "Place container under outlets" display instruction appears.
► Place the previously provided 5 l container under the outlets and confirm the display in-
struction. (for machines with a waste water outlet (optional), confirm the display instruction).
The "cooling down routine" begins (ca. 5-10 min).
A display instruction to empty the container and drip tray appears.
► Empty the container and drip tray and place them under the outlets again.
2. "Descaling" descaling step
► Follow the optional display instruction for machines with an internal water filter. See option
"With water filter".
► Fill the internal drinking water tank with the correct mixture ratio of Schaerer liquid descaler
and water and then insert it.
Prepare a descaling solution with a mixture ratio of 1 to 1.5:
• Pour 2 bottles of liquid descaler (2 x 0.75 l) = 1.5 l in the drinking water tank.
• Fill an empty liquid descaler bottle (0.75 l) with water 3 times and add the contents to the
drinking water tank each time = 2.25 l
► Insert the drinking water tank with the descaling solution.
► Continue the descaling process by pressing the field "Continue".
► Follow the display instruction to "Place container under outlets".
The descaling process begins.
After the descaling process the instruction appears to rinse out the drinking water tank
and empty the collecting container and drip tray.
60
BA SCV_EN
V06 | 11.2015
Page 61

Service and maintenance www.schaerer.com
CAUTION!
Hot steam!
3. 3-fold system rinsing
► Rinse the drinking water tank with water, fill it and reinsert it.
► Empty the collecting container and drip tray and place them back under the outlets.
► Continue the descaling process by pressing the field "Continue".
Rinsing starts and is then repeated with 2 additional identical rinsing procedures.
► Empty and replace the collecting container and drip tray after the 3rd system rinse.
► Fill and insert the drinking water tank.
► Continue the descaling process by pressing the [Continue] field.
4. Preparing for operation.
► Follow the optional display instruction for machines with an internal water filter. See option
"With water filter".
► Continue the descaling process by pressing the "Continue" field.
Prompt occurs only with an internal
water filter (optional)
Prompt occurs only with an internal
water filter (optional)
There is a danger of scalding in the dispensing area.
The machine heats up automatically, so do not reach under the dispensing areas.
► Confirm the display message "Caution! Heating up!" by pressing the "Continue" field.
The machine heats up automatically.
The display message "Descaling completed correctly" appears.
► Confirm the display message by pressing the [Continue] field.
The machine heats up and starts "warm rinsing".
The machine blows steam out of the steam outlet.
► Switch over again, if the machine has an optional mains water supply. See below "Option:
With mains water supply"
The descaling process is complete and the machine is ready for operation.
Option 1: With water filter
If an optional internal water filter is used in the drinking water tank, the "Remove calcium filter
from tank" display instruction appears after the cooling down routine.
► Remove the water filter (optional) from the drinking water tank before pouring in the des-
caler.
► Then continue the descaling process by pressing the [Continue] button.
► Follow the ensuing display instructions, see descaling process.
► Reinsert the water filter at the end of the descaling process.
See "Service and maintenance" - "Water filter (optional)" - "Changing the water filter for the
internal drinking water tank".
Display message, if with "mains water supply" (optional)
BA SCV_EN
V06 | 11.2015
Option 2: With mains water supply
If a mains water supply connection is available, the "Change Aquaflex" display instruction appears after the descaling process starts.
► Close the main water valve of the mains water supply.
► Remove the right-hand front cover.
► Switch from the mains water supply to "drinking water tank".
See "Installation and commissioning" - "Switching between mains water supply and drinking
water tank"
61
Page 62

www.schaerer.com Service and maintenance
► Open the sealing plug on the water tank coupling by turning it anticlockwise with a slot
screwdriver (size 3) and remove the plug.
► Follow the ensuing display instructions, see descaling process.
Water filter (Option)
Installing the water filter for the internal drinking water tank (Option)
The supplied water filter is only suitable for installation in the machine’s internal drinking water
tank.
Prior to installation of the supplied water filter in the internal drinking water tank, a water test
must be performed to determine whether use of the water filter is necessary. In addition, the
water value must be entered when the machine is first put into service.
See "Determining the water hardness" in this chapter.
► Remove the water outlet screen installed in the water tank.
► Open the water filter box.
The water filter adapter is located on top, and the filter cartridge is packaged separately
underneath it.
► Pull up the locking mechanism on the adapter.
► Attach the adapter to the water outlet connector from above and push down the locking
mechanism.
► Unpack the filter cartridge and place it in water.
Tiny bubbles will rise from the cartridge.
► When there are no more bubbles, remove the filter cartridge from the water.
62
BA SCV_EN
V06 | 11.2015
Page 63

Service and maintenance www.schaerer.com
► Attach the filter cartridge to the adapter.
Changing the water filter for the internal drinking water tank (Option)
An instruction appears on the display when the filter needs to be replaced.
► Remove the drinking water tank from the machine.
► Take the old filter cartridge out of the adapter.
► Unpack the new filter cartridge and place it in water.
Tiny bubbles will rise from the cartridge.
► When there are no more bubbles, remove the filter cartridge from the water and attach it
to the adapter.
► Slide the drinking water tank back into the machine.
Replacement cartridges can be ordered from Schaerer AG. The required article number is
contained in the machine-specific spare parts catalogue.
External water filter (Option)
The external water filter must be replaced by an authorised service partner/service technician
after the programmed number of litres is reached.
The "Water quality" supplementary instructions include information on recording the water values and using filter equipment. The supplementary instructions can be requested from
Schaerer AG or downloaded directly from the MediaCentre on the website (http://www.schaerer.com/member).
BA SCV_EN
V06 | 11.2015
63
Page 64

www.schaerer.com Programming
Programming
Navigation
Symbol Description
Starts a programme or a function
Confirms a step and continues to the next step
Confirms a prompt
Answers a prompt in the negative
Scrolls a page up or down in the menu
Increases or decreases the particular setting
Saves settings, confirms a prompt
Exits a menu or message
Clears or resets
Overview
► In the main window, touch the hidden [Menu] field.
The "Selection menu" is displayed.
The selection menu includes the following submenus (from top left to bottom right):
• Milk and foam
• Timer programme
• Care
• Settings
• PIN entry
• Access control
• Accounting
• Manual removal (only valid for operation with a payment system).
The submenus are described below in this chapter.
"Milk and foam" menu
► Touch the field in the "Selection menu".
The "Milk and foam" menu is displayed.
The menu contains the following subitems:
• Topping quality or foam quality
• Macchiato pause
64
BA SCV_EN
V06 | 11.2015
Page 65

Programming www.schaerer.com
Topping quality / Foam quality
Coffee machines with a powder system have the "Topping quality" parameter, and coffee machines with fresh milk have the "Foam quality" parameter.
Display/ Display
text
Topping quality Setting for the milk powder intensity.
Foam quality Setting for the milk foam quality.
Parameter description Setting range Notes
► Touch the [Topping quality] field in the "Milk &
foam" menu.
The "Topping quality" window appears.
► Press and to set.
► Confirm with .
The new settings are active.
► Touch the [Foam quality] field in the "Milk & foam"
menu.
The "Foam quality" window appears.
► Press and to set.
► Confirm with .
The new settings are active.
Macchiato pause
Display/ Display
text
Macchiato pause This parameter can be used to shorten or lengthen
Parameter description Setting range Notes
the pause between milk dispensing and milk foam
dispensing for a latte macchiato.
► Touch the [Macchiato pause] in the "Milk & foam"
menu.
The "Macchiato pause" window appears.
► Press and to set.
► Confirm with .
The new settings are active.
20 – 100 Reducing the value = lighter fla-
vour
Increasing the value = more intensive flavour
40 – 99 Reducing the value = finer foam
1 – 20 The quality of a latte macchiato
pores
Increasing the value = coarser
foam pores
generally improves when the pause is extended.
BA SCV_EN
V06 | 11.2015
"Timer programme" menu
In the "Timer programme" menu, the switching on and switching off times can be programmed.
field in the "Selection menu".
► Touch the
The "Timer programme" menu is displayed.
The menu contains the following subitems:
• Timer status
• Set timer
• Timer overview
• Clear timer
• Timer info
65
Page 66

www.schaerer.com Programming
Timer status
Display/ Display
text
Timer status The timer function can be activated and deactivated
Parameter description Setting range Notes
On/Off When the timer is activated, the ti-
in this menu.
► Touch the [Timer status] field in the "Timer pro-
gramme" menu.
A prompt window appears and the new timer
status is indicated.
► Confirm with .
The new settings are active.
Set timer
Display/ Display text Parameter description Setting
range
Set timer In this menu, the switching on and switching off
times can be set.
► Touch the [Set timer] field in the "Timer pro-
gramme" menu.
► Touch the [Operating time] field.
The "Operating time" window appears.
Day (set day, 1=Monday ... 7=Sunday)
► Press and to set.
Day
Hours
Minutes
Action
Programme
1 to 7 Individual days (Mon, Tu-
1 – 5 Monday – Friday
1 – 7 Monday – Sunday
mer symbol , a small clock,
appears in the main window.
Notes
When the timer is activated, the timer symbol, a
small clock, appears in the
main window.
es, ...)
Hrs and mins (set time)
► Press and to set.
Action (set action)
► Press and to set.
Prg (set programme)
If the day, time and action have been set and acknowledged with the programme number
automatically increases.
► Confirm with .
The new settings are active.
To modify previously set programmes:
► Press and to navigate to the desired
programme number.
► Modify the programme as described above.
Hrs: 01 – 00
Mins: 00–59
O = Off
I = On
1 – 16 Touching the field dele-
–
–
tes the settings of the current programme.
With the field, the timer
overview field can be opened directly.
66
BA SCV_EN
V06 | 11.2015
Page 67

Programming www.schaerer.com
Timer overview
Display/ Display text Parameter description Setting range Notes
Timer overview In this menu, the switching on and switching off
times can be set.
► Touch the [Timer overview] field in the "Timer
programme" menu.
► Touch the [Operating time] field.
The "Timer overview" window appears.
– The timer times are
shown in a days/hours
diagram.
Clear timer
Display/ Display text Parameter description Setting
range
Clear timer In this menu, the timer settings can be cleared.
► Touch the [Clear timer] field in the "Timer
programme" field.
The "Clear timer" window appears.
► Select the desired day or option.
A prompt window appears.
► Confirm the prompt with .
The timer is cleared.
Days:
Monday to
Sunday
Options: working days,
whole week
Timer info
Display/ Display text Parameter description Setting
range
Timer info The "Timer info" menu contains information on:
• Timer status
• Next pending timer programme
► Touch the [Timer info] field in the "Timer pro-
gramme" menu.
The "Timer info" window appears.
– –
Notes
This procedure cannot be
undone!
Notes
BA SCV_EN
V06 | 11.2015
"Care" menu
In the "Care" menu, the programmes for cleaning, descaling and filter rinsing can be started
and a filter change and customer care procedure can be confirmed.
field in the "Selection menu".
► Touch the
The "Care" menu is displayed.
The menu contains the following subitems:
• Cleaning programme
• Foamer cleaning
• Mixer rinsing
• Descaling
• Filter change (if the filter is activated in the "Settings" menu)
• Rinse filter (if the filter is activated in the "Settings" menu)
• Customer care
67
Page 68

www.schaerer.com Programming
See "Cleaning" for the following menus: Cleaning programme, Foamer cleaning and Mixer
rinsing.
See "Service and maintenance" for the following menus: Filter change, Rinse filter and Customer care.
Filling the coin changer (Option)
If the coffee machine comes with an optional coin changer, the additional "Insert money" menu
item appears in the "Care" menu. The coin changer can be filled without opening the housing.
► In the "Care" menu, select the [Insert money] parameter.
► Insert money into the coin changer.
The inserted amount is displayed.
The coin changer is filled.
► End the filling process with
Filling of the coin changer is completed.
.
"Settings" menu
► Touch the field in the "Selection menu".
The "Settings" menu is displayed.
The menu contains the following subitems:
• Recipes/Buttons
• Boiler temperature
• Reset
• Time/Date
• Language
• Contrast
• Calcium filter
• Water hardness
• Warm-up rinsing
• Foamer rinsing
• Rinse interval
• Operating options
• Lighting
• Expert settings
• Milk
• Intro
• Eco Mode
• Setting the MDB (payment system option)
Recipes and beverage buttons
► Touch the [Recipes/Buttons] field in the "Settings" menu.
The "Recipes/Buttons" menu is displayed.
68
The menu contains the following subitems:
• Cup volumes
• Change recipes
• Button alloc.
• Weigh grounds
• Cash price (MDB accounting option).
• Card price (MDB accounting option).
BA SCV_EN
V06 | 11.2015
Page 69

Programming www.schaerer.com
Display/ Display text Parameter description Setting range Notes
Cup volumes In this menu, the total volume of a drink can be
altered as a percentage. The individual components of the beverages are automatically adjusted to the new cup volumes.
► Touch the [Cup volumes] field.
The "Select beverage" window appears.
► Touch the desired beverage button.
Espresso example
The "Cup volume" window pictured here
appears.
► Set the cup volume as desired using the
and buttons.
Touch to perform a test dispensing.
► Confirm with .
The new settings are active.
Change recipes ► Touch the [Change recipes] field.
The "Select beverage" window appears.
► Press the desired beverage button.
The "Change recipes" window pictured
here appears.
The window shows all parameters that
can be set for the selected beverage.
Example with all possible components: coffee, milk/milk powder,
choco powder
Key to the symbols:
Powder volume
Water volume
Foam volume
Milk volume
► Select the desired parameter and set as
needed in the window that appears by touching and .
► Confirm with .
The new settings are active.
Button alloc. One beverage can be assigned to each bevera-
ge button.
► Touch the [Button alloc.] field.
The "Select beverage" window appears.
► Press the desired beverage button.
The "Button allocation" window appears.
► Touch the desired beverage that is to be
stored on the selected button.
Dependent on
the basic setting of each beverage
Dependent on
the components of a beverage
All programmed
beverages
–
Quality:
The five available quality
levels influence the
brewing. The higher the
quality level, the more
intensive the release of
the coffee’s flavouring
agents.
The "2nd level" option
can be used to assign
two beverages to each
beverage button.
BA SCV_EN
V06 | 11.2015
Option 1: Machine with 1 grinder
The beverage is assigned to the bever-
age button.
Option 2: Machine with 2 grinders
The "Select portioner" prompt appears.
► Select the right or left grinder.
The beverage is assigned to the bever-
age button.
69
Page 70

www.schaerer.com Programming
Display/ Display text Parameter description Setting range Notes
Weigh grounds This function is used to adjust the quantity of
ground coffee for a beverage.
► Empty the grounds container.
► Touch the [Weigh grounds].
The "Select beverage" window appears.
► Press the desired beverage button.
The "Weigh grounds" window appears.
► Touch the field.
The ground coffee is dispensed directly
into the grounds container.
► Weigh the dispensed coffee grounds.
► Adjust the quantity of ground coffee using
and .
► Confirm with .
The new settings are active.
Cash price (option) This function is used to assign the beverage
price for a cash payment.
► Select the [Cash price] field.
The "Select beverage" instruction ap-
pears.
► Select the beverage to which a cash price is
to be assigned.
The numeric keypad appears.
► Enter a beverage price.
► Confirm with .
The cash price is assigned to the select-
ed beverage.
Card price (option) This function is used to assign the beverage
price for a card payment.
► Select the [Card price] field.
The "Select beverage" instruction ap-
pears.
► Select the beverage to which a card price is
to be assigned.
The numeric keypad appears.
► Enter a beverage price.
► Confirm with .
The card price is assigned to the selected
beverage.
Dependent on
–
the basic setting of each beverage
0 – 9 The "MDB" accounting
mode is activated by the
service technician.
The "2nd price line" sub-
menu is selected in the
"MDB settings".
0 – 9 The "MDB" accounting
mode is activated by the
service technician.
The "2nd price line" sub-
menu is selected in the
"Expert settings" in the
"Settings" menu.
Boiler temperature
Display/ Display text Parameter description Setting
range
Boiler temperature ► Touch the [Boiler temperature] field in the
"Settings" menu.
The "Boiler temperature setting" window
appears.
► Set the desired boiler temperature by touch-
ing and .
► Confirm by touching .
The new settings are active.
70
91 – 99°C –
Notes
BA SCV_EN
V06 | 11.2015
Page 71

Programming www.schaerer.com
Reset
Display/ Display text Parameter description Setting
range
Reset When a reset is performed, the software is re-
started.
► Touch the [Reset] field in the "Settings"
menu.
The "Reset service routines" window ap-
pears.
► Confirm with .
The new settings are active.
– Mandatory cleaning and
Time and date
Display/ Display text Parameter description Setting
range
Time/Date In this menu the date, day of the week and time
can be set.
► Touch the [Time/Date] field in the "Settings"
menu.
The "Time/Date" window appears.
► Set the date, day of the week or time by
touching and .
► Confirm with .
The new settings are active.
Infinite calendars
Notes
descaling cannot be reset
with the reset function.
Notes
–
Language
Display/ Display text Parameter description Setting
range
Language In this menu, all stored languages can be set.
► Touch the [Language] field in the "Settings"
menu.
The "Language" window appears with all
available languages.
► Select the desired language by pressing the
corresponding field.
The selected language is active.
All stored languages
Notes
Additional languages can
be stored in the "Language" menu by a service
technician.
BA SCV_EN
V06 | 11.2015
71
Page 72

www.schaerer.com Programming
Contrast
Display/ Display text Parameter description Setting
range
Contrast In this menu, the display contrast can be set.
► Touch the [Contrast] field in the "Settings"
menu.
The "Contrast setting" window appears.
► Set the contrast by touching and .
► Confirm with .
The new settings are active.
0–100 –
Calcium filter
Display/ Display text Parameter description Setting
range
Calcium filter This parameter can be used to specify the use of
a calcium filter.
► Touch the [Calcium filter] field in the "Set-
tings" menu.
Each press of the field switches the set-
ting between "Yes" and "No".
See also "Water quality" - "Connect filter".
Yes / No The use of a calcium filter
Notes
Notes
extends the interval before
the next descaling and
protects the machine
against calcium deposits.
Water hardness
Display/ Display text Parameter description Setting
range
Water hardness In this menu, the water hardness can be entered.
► Press the [Water hardness] field in the "Set-
tings" menu.
The "Water hardness setting" window ap-
► Determine the water hardness.
See "Water quality" - "Determining water hardness".
► Press and to set.
► Confirm with .
The new settings are active.
pears.
1 – 28 This setting uses German
Warm-up rinsing
Display/ Display text Parameter description Setting
range
Warm-up rinsing This parameter can be used to switch the warm-
up rinsing feature on and off.
► Touch the [Warm-up rinsing] field in the "Set-
tings" menu.
Each press of the field switches the set-
ting between "active" and "inactive".
active / inactive
Notes
carbonate hardness °dKH.
Notes
If warm-up rinsing is set to
"active", the brewing unit is
rinsed with hot water, and
thereby warmed up, after
the heating up phase.
72
BA SCV_EN
V06 | 11.2015
Page 73

Programming www.schaerer.com
Foamer rinsing
Display/ Display text Parameter description Setting
range
Foamer rinsing system Automatic foamer head rinsing on machines
without Plug & Clean and after beverage dispensing with milk components.
► Touch the [Foamer rinsing] field in the "Set-
tings" menu.
Foamer rinsing is activated and is carried
out based on the settings in the "Rinse interval" parameter.
active / inactive
Rinse interval
Display/ Display text Parameter description Setting
range
Rinse interval Starts a rinsing procedure for the milk system af-
ter a beverage is dispensed with milk and after
the time set in this parameter expires.
► Touch the [Rinse interval] in the "Settings"
menu.
The window for the "Rinse interval" set-
ting appears.
► Set a rinse interval of 0 – 5 min.
Milk system rinsing begins with a delay
equal to the set time.
0–5min A setting of (0) causes the
Notes
The "Foamer rinsing" function is activated in the
Cleaning menu in the machine data.
The "Foamer rinsing" function appears in the
Cleaning menu in the machine data when the "Plug
& Clean" option is deactivated.
The settings in "Machine
data" must be configured
by the service technician.
Notes
system to be rinsed immediately after a milk beverage is dispensed.
The "Plug&Clean" function
is activated in the machine
data.
The standard setting is
2min.
Operating options
► Touch the [Operating options] field in the "Settings" menu.
The "Operating options" menu is displayed.
The menu contains the following subitems:
• Warm rinsing field
• Barista field
• 2nd level
• ON/OFF button (
• Menu field
button)
BA SCV_EN
V06 | 11.2015
73
Page 74

www.schaerer.com Programming
Display/ Display text Parameter description Setting
Notes
range
Warm rinsing field This parameter can be used to switch the warm active / inacti- For self-service mode, it is
rinsing field on and off in the main window. ve recommended that this
► Touch [Warm rinsing field].
Each press of the field switches the set-
ting between "active" and "inactive".
function be deactivated.
Otherwise, the operator
could possibly trigger a
warm rinse by mistake.
See also "Operation" - "Main touch screen window" for a detailed description.
Main window with warm rinsing field
activated.
Barista field This parameter can be used to switch the Barista active / inacti- For self-service mode, it is
field on and off in the main window. ve recommended that this
► Touch [Barista field].
Each press of the field switches the set-
ting between "active" and "inactive".
function be deactivated.
The operator does not
have access to the function if it is used only once.
See also "Operation" - "Main touch screen window" for a detailed description.
Main window with Barista field activated.
2nd level
With this parameter, the 2nd level in the main
window can be switched on and off.
active / inactive
–
► Touch the [2nd level] field.
Each press of the field switches the set-
ting between "active" and "inactive".
See also "Operation" - "Main touch screen window" for a detailed description.
Main window with activated 2nd level.
Main window with deactivated 2nd
level.
ON/OFF button The ability to switch the machine on and off can
be controlled with this parameter. For direct switching on and off, the machine can be switched
on and off as usual. The "via PIN" function can
be used to require a PIN entry in order to switch
the machine on or off.
Input window PIN with the variant
"via PIN" activated.
► Touch the [ON/OFF button] field.
Each press of the field switches the set-
ting between "directly" and "via PIN".
The PIN from the "Cleaning" level will be requested.
See "Programming" - "Menu, Access control
PIN".
directly / via
PIN
For self-service mode, it is
recommended that the
function "via PIN" be deactivated. The prevents the
machine from being switched off by mistake.
74
BA SCV_EN
V06 | 11.2015
Page 75

Programming www.schaerer.com
!
!
Display/ Display text Parameter description Setting
range
Menu field The behaviour of the hidden fields MENU and In-
formation can be set using this parameter. With
the "immediate" setting, the hidden fields appear
immediate
delayed
directly when the right-hand third of the touch
screen is pressed. With the "delayed" setting,
the hidden fields will only appear when they are
tapped twice or pressed and held.
Visible "hidden fields" on the righthand third of the touch screen.
Beverage cancel If this parameter is set to (YES), a beverage can
► Touch the [Menu field].
Each press of the field switches the set-
ting between "immediate" and "delayed".
See also "Operation" - "Main touch screen window" for a detailed description.
YES / NO On machines with a pay-
be cancelled during beverage dispensing.
► Touch the [Beverage cancel] field.
Each press of the field switches the set-
ting between "YES" and "NO".
See also "Dispensing options" - "Stopping and
cancelling beverage dispensing.
Display after cancelled beverage.
Fault indication If the parameter is set to (symbol), the following
symbol appears on the display instead of an error message: .
normal
symbol
Notes
–
ment system (option), the
cancellation of beverage
dispensing cannot be
selected.
The standard setting is
"normal".
Normal error message.
If an error message is active:
The symbol appears on the display.
► Touch the displayed symbol.
The actual error message/instruction
(e.g. Left bean hopper empty) is shown.
► Follow the displayed instruction or resolve
the displayed error.
► Acknowledge the error message / instruction
with .
The machine is now ready for use again
and performs the selected functions.
See also "Troubleshooting".
BA SCV_EN
V06 | 11.2015
75
Page 76

www.schaerer.com Programming
Lighting
Display/ Display text Parameter description Setting
range
Lighting This parameter can be used to select a colour for
the illumination of the user panel.
► Touch the [Lighting] field.
Each press of the field changes the light-
ing colour.
In this order:
light blue,
orange, royal
blue, yellowgreen, light
violet, turquoise,
green, blue,
violet, rose
pink, orangeyellow, pink,
light green,
light red, Off,
running light,
freeze
Expert settings
The "Expert settings" menu contains different parameter settings based on the selected payment system (MDB or serial) in the "Machine data" menu.
I
Machine data settings are configured by the service technician.
Notes
To select an individual colour, allow the running light
to run and touch the [Lighting] field again for the desired colour. The current
colour is selected.
► Touch the [Expert settings] field in the "Settings" menu.
The "Expert settings" menu is displayed.
With an "MDB" payment system, the "Expert settings" menu contains the following subitems:
• Connected devices
• Vending options
• Expert options
With direct integration in a point of sale system via a serial RS232 port, the "Expert settings"
menu contains the following subitems:
• Credit enquiry
• Price line
• Number
• On timeout
• Working timeout
• E protocol
• CRC check
• Baud rate
I
The settings in the "Expert settings" menu are complex and are therefore described only briefly. Schaerer AG recommends consulting a Schaerer payment systems specialist to determine
the required settings.
76
BA SCV_EN
V06 | 11.2015
Page 77

Programming www.schaerer.com
Display/ Display text (MDB) Parameter description Setting
range
Connected devices Selection of possible means of payment based
on the payment system connected.
Card reader
Coin unit
Note reader
EVA-DTS
module
Vending options "Vending options" are used to define how a be-
verage can be purchased.
Option 1: Multi vend on
Multi vend on
With oblig. to
buy
Price line
Offers the possibility of dispensing multiple beverages consecutively without the need to insert
the card in the machine for each new beverage.
Option 2: With oblig. to buy
No change is returned until beverage dispensing
has taken place.
Option 3: Price line (Yes / No)
Activates the "price line" (001 to 998) assigned
to each beverage.
Notes
Selecting "Card reader"
opens the "Vending options" parameter.
Selecting "Coin unit"
opens the "Coin unit type"
and "Coin unit menu" parameters.
The "Vending options"
parameter appears when
"Card reader" is selected
in "Connected devices",
see above.
The "price line" 1 can be
assigned as an example
for the top beverage level
and the "price line" 2 for
the lower level.
Coin unit type Selects one of the two coin unit types.
Option 1: Coin tester
Identifies the value of inserted coins without the
coin return option.
Option 2: Coin changer
Identifies the value of inserted coins with the coin
return option.
Coin unit menu Offers token selection and the ability to disable
coin channels.
Option 1: Token [1]/[2]
Assigns values via numerical input.
Option 2: Disable coin
Selection for disabling the coin channels (1 – 8).
Coin tester
Coin changer
Token
Disable coin
–
–
BA SCV_EN
V06 | 11.2015
77
Page 78

www.schaerer.com Programming
Display/ Display text (MDB) Parameter description Setting
range
Expert options Configuration of accounting parameters based
on the selected optional accessories and functi-
Numerical
entry
ons.
Option: Coin devices and card readers
The following additional settings are displayed
for selected card readers, coin testers or coin
changers:
• Max. credit [99.99]
• Max. return [0.00]
• Display at unit [no]
Option: Select text
The following selection is available depending
Click to scroll –
on the payment system selected:
• [no display] text
• [Insert token] text
• [Please card] text
• [Insert money] text
• [Bank note] text
► Click to scroll to the required text.
Option: General settings
The following settings are independent of the
payment system selected.
Numerical
entry
Yes / No
• Timeout request [60]
• Auto reset [No]
• 2 price lines [Yes]
• Tap & Go [No]
• Disable LA [No]
• Disable EVA reset [No]
• EVA event send [No]
• MDB single mode [No]
Schaerer AG recommends consulting a Schaerer payment systems specialist to determine the
required settings.
Notes
[Max. credit]: Disables the
coin unit once set credit limit has been reached.
[Max. return]: Limits the return amount.
[Display at unit]: For a card
reader device with an integrated display.
[Timeout request]: Time limit for payment.
[Auto reset]: Cancels payment if no confirmation occurs after the "Timeout
request".
[2 price lines]: A separate
price line for each beverage level.
[Tap&Go]: No-touch payment system with money
card. Beverage dispensing
after card is held up to device one time.
[Disable LA]: Sending of
the LA protocol for EVADTS can be disabled.
78
BA SCV_EN
V06 | 11.2015
Page 79

Programming www.schaerer.com
Display/ Display text (serial) Parameter description Setting
range
Credit enquiry Opens request in a credit pool or assigns"free
credit".
Option 1: [No] setting
Numerical
entry
Yes / No
Free credit
Opens the settings for the "E protocol"
Setting options with "E protocol":
• [internal] (baud rate selection using the [+/-]
buttons)
• [external] (baud rate selection using the [+/-]
buttons) and the additional "CRC check" option.
• [CRC check] [no]
Option 2: [Yes] setting
"Beverage credit" mode with request to
pool mode is active.
If "Pool mode" is active, two additional parameters are available:
• on timeout [3] sec
• working timeout [20] sec
See bottom of page for description
Notes
[external E protocol]: Direct connection to point of
sale system.
[CRC check]: If the
connected point of sale system supports a "CRC
check", the [Yes] setting
can be used.
Price line A separate "price line2 can be assigned to each
beverage.
► Select the "Price line" parameter.
► Select the beverage to which a price line is to
be assigned.
The numerical input window opens.
► Enter a "price line" between 1 and 998 and
confirm with [OK].
Number The credit amount that must be charged when
the selected beverage is dispensed.
Option 1: Example for [1] (Single beverage)
The credit amount is charged once for
beverage dispensing.
Option 2: Example for [2] (Double beverage)
The credit amount is charged twice for
beverage dispensing.
On timeout Delay before "OFFLINE" appears when the
connection is disrupted.
Working timeout Delay before "OFFLINE" appears after data
exchange with the point of sale system stops.
Numerical
entry
01 – 998
1 / 2 –
Numerical
entry
0–50
Numerical
entry
0–50
–
The standard setting is
range [3].
The "Credit enquiry" parameter is set to [Yes].
The standard setting is
range [20].
The "Credit enquiry" parameter is set to [Yes].
BA SCV_EN
V06 | 11.2015
79
Page 80

www.schaerer.com Programming
Display/ Display text (serial) Parameter description Setting
E protocol Option 1: internal
CRC check ► Activate the "CRC check" with the [Yes] set-
Baud rate The baud rate can be set to between 2400 and
range
The internal E protocol is used for connections
to an ISB.
Option 2: external
The external E protocol is used for direct connections to a point of sale system. The point of
sale system manufacturer must also comply with
the Schaerer specifications for the E protocol.
► Deactivate the "CRC check" with the [No]
38400 baud.
ting.
The point of sale system supports an
setting.
The point of sale system cannot evaluate
evaluation.
the "CRC check".
internal /
external
Yes / No The "E protocol" parame-
In di The standard setting is
Notes
With the [external] setting,
the additional setting for
the "CRC check" is available.
ter is set to [external].
9600 baud.
Intro
Display/ Display text Parameter description Setting
range
Intro This parameter can be used to start the machi-
ne's commissioning programme again.
► Touch the [Intro] field in the "Settings" menu.
The commissioning programme starts.
See "Installation and commissioning" - "Commissioning programme".
– –
Eco Mode
► Touch the [Eco Mode] field in the "Settings" menu.
The "Eco Mode" menu is displayed.
The menu contains the following subitems:
• Eco Mode
• Switching off
• Eco start time
• SB reduction
• HW boiler reduction
Notes
80
BA SCV_EN
V06 | 11.2015
Page 81

Programming www.schaerer.com
Display/ Display text Parameter description Setting
range
Eco Mode Reduced energy consumption during lighter use.
10 min (standard setting) after the last beverage
inactive
active
was dispensed, the machine switches to the
"Eco Mode". The control temperature is decreased. The heat-up time for the next beverage
to be dispensed is ca. . 15 sec.
Option 1: Inactive parameter
This parameter should be disabled if the machine constantly needs to be ready for use for
the following requirements:
• Dispensing coffee, milk, milk foam or hot water with no wait time.
• The machine is working at full capacity
throughout the entire day.
• Mainly beverages with milk are dispensed.
Option 2: Active parameter
The parameter should be enabled if the machine
can also be used for the following reduced requirements:
• If after a 10 min break in beverage dispensing a wait time of ca. 15 sec does not present
a problem.
• If coffee beverages without milk account for
the main output at certain times of the day.
Switching off The machine switches to Standby mode after a
period of inactivity based on the switching off
time has expired.
Eco start time Starts the "Eco Mode" after a period of inactivity
based on the set "Eco start time".
► Set the value, e.g. 10 min, by pressing
never, 30, 60,
90, 120, 150,
180 min
001 min –
120 min
and .
If no other beverage is dispensed after
10 min, the "Eco Mode" is activated.
SB reduction Setting for modifying the reduction of the steam
boiler temperature (SB).
000°C –
080°C
► Set the value, e.g. [007], by pressing and
.
► Confirm by touching .
When the machine runs in Eco Mode, the
boiler temperature is decreased from
96°C to 89°C.
HW boiler reduction Setting for modifying the reduction of the hot wa-
ter (HW) boiler temperature during "Eco Mode"
000°C –
080°C
operation.
► Set the value, e.g. [009], by pressing and
.
► Confirm by touching .
When the machine runs in Eco Mode, the
boiler temperature is decreased from
96°C to 87°C.
Notes
The standard setting is [inactive].
Display backlighting is
switched off in the "Eco
Mode".
The button rings for product selection remain illuminated.
"Eco Mode" is not supported when a payment system (MDB) is used.
The standard setting is
[never].
The standard setting is
[010].
The standard setting is
[007].
The standard setting is
[009].
BA SCV_EN
V06 | 11.2015
81
Page 82

www.schaerer.com Programming
Milk
Display/ Display text Parameter description Setting
range
Milk This parameter can be used to activate/deacti-
vate a beverage block.
► Touch the [Milk] field in the "Settings" menu.
► Select the [Beverage block] field.
Pressing the [Beverage block] field acti-
vates/deactivates beverage blocking.
The "Remaining beverages" parameter
Remaining beverages Entry for the number of beverages that can still
be dispensed after a milk "empty message".
► Touch the [Remaining beverages] field in the
"Settings" menu.
The setting window appears.
► Enter a beverage number between 0 and 10.
appears.
YES / NO (YES) setting: A beverage
0 – 10 The "Milk" parameter is ac-
Setting the "MDB" (Option)
A payment system with an MDB interface is set in the machine data by the service technician.
Notes
block is activated when the
optional sensor monitor
detects that the milk level
is too low.
The "Milk/Empty message" function was activated
in the "Machine data" by
the service technician.
tivated with (YES).
If a payment system is activated, additional menu items appear in the "Settings" menu. These
settings are configured by the service technician during commissioning.
The term "MDB" (Multi Drop Bus) denotes the type of data interface between the payment system and the coffee machine.
"PIN entry" menu
Display/ Display text Parameter description Setting
range
PIN entry Individual levels or functions can be protected by
a PIN (Personal Identification Number). For access to a PIN-secured level, the corresponding
PIN must be entered in the PIN entry window.
► Touch the field in the selection menu.
The "PIN entry" window appears.
► Enter the required 4-digit PIN.
► Confirm with .
If the entry is valid, the level or function is
now unlocked.
See "Programming" - "Access control menu".
0 – 9 The ability to switch the
Notes
machine on and off can
also be protected by a PIN.
See "Programming" - "Settings" - "Operating options".
After 3 attempts at entering a PIN, the entry
window is temporarily locked (ca. 45 sec).
82
BA SCV_EN
V06 | 11.2015
Page 83

Programming www.schaerer.com
"Access control" menu
Display/ Display text Parameter description Setting
range
Access control In the "Access control PIN" menu, 3 different le-
vels can be protected with a separate PIN (Personal Identification Number). The levels
authorise access to various menu items.
► Touch the field in the selection menu.
"Accounting" level Selection menu with a protected "Accounting" le-
"Settings" level Selection menu with a protected "Settings" level.
vel. The following menu options are not visible:
access control PIN, accounting, manual removal.
The following menu options are not visible: access control PIN, accounting, manual removal.
Levels: Accounting,
Setting,
Cleaning.
- The levels are hierarchi-
-
Notes
The ability to switch the
machine on and off can
also be protected by a PIN.
See "Programming" - "Settings" - "Operating options".
cally structured. Access to
the highest level automatically also includes access
to the other two lower levels.
"Cleaning" level. Selection menu with a protected "Cleaning" le-
Defining / Deleting a PIN ► Select desired level.
vel. The following menu options are not visible:
access control PIN, accounting, manual removal, and cleaning.
The window "PIN entry" appears.
Defining a PIN:
► Enter desired 4-digit PIN.
► Confirm with .
The level is now protected by the entered
PIN.
Deleting a PIN:
► Touch the field.
The PIN is deleted.
-
0–9
BA SCV_EN
V06 | 11.2015
83
Page 84

www.schaerer.com Programming
"Accounting" menu
Display/ Display text Parameter description Setting
range
Accounting
The counter status for each beverage is displayed in the "Accounting" menu.
► Touch the field in the selection menu.
The "Accounting" menu appears.
All programmed beverages
► Press the [Counter] field.
The "Counter" menu appears, showing
"Counter" menu
all beverages and their counts.
► Select the desired beverage.
To clear all counters:
► In the "Counter" menu, touch the field.
– –
The "Clear all counters" window appears.
► Touch again to confirm.
All counters are cleared.
To clear individual counters:
► In the "Counter" menu, touch the desired
counter.
The prompt "Clear counter?" appears.
► Touch to confirm.
The selected counter is cleared.
Notes
–
84
BA SCV_EN
V06 | 11.2015
Page 85

Troubleshooting www.schaerer.com
Troubleshooting
Faults with display message
The coffee machine is equipped with a diagnostics program. When outside intervention is necessary, a corresponding display message appears. There are two different types of display
messages.
• Instructions
• Error messages
Pending instructions or error messages are indicated by:
Option: Direct messages
The instruction or error message is shown directly on the display.
Option: Indication is via the warning symbol in the main window
► Touch the
The instruction or error message is displayed.
Basic procedure for pending faults.
► Switch the coffee machine off and, after several seconds, on again.
► Repeat the procedure that triggered the fault.
In many cases the fault will then be eliminated.
Error message is displayed again or persists.
► Search for the displayed fault text or fault code in the fault list shown below and proceed
as instructed.
In many cases the fault can be eliminated.
If the error message still persists:
► Contact your service partner and state the fault code or fault text.
field.
Some messages cause individual functions to be disabled. Disabled functions are recognisable by the fact that the beverage buttons are no longer illuminated.
Error messages with an instruction are shown symbolically on the display with the affected machine element.
Display message Cause What to do
Refill beans The coffee beans are not sliding down in the
hopper.
If the machine has two bean hoppers, the one
that is empty flashes in the error message.
The monitor sensor is faulty.
If the machine has two bean hoppers, the one
that is empty flashes in the error message.
Empty the grounds container!
The last emptying has not been confirmed. ► Pull out the grounds container again, wait
► Stir the coffee beans in the bean hopper us-
ing a large spoon.
► Confirm the display message with .
► Contact your service partner.
for a short time and reinsert it.
A confirmation prompt appears on the
display.
► Confirm the display prompt with [Yes].
BA SCV_EN
V06 | 11.2015
85
Page 86

www.schaerer.com Troubleshooting
Display message Cause What to do
Grounds container missing! The grounds container has not been correctly
inserted.
► Check the grounds container for correct po-
sitioning.
The monitor sensor is faulty. ► Contact your service partner.
Grounds container empty?! The grounds container contained coffee
grounds when it was removed and was not reinserted within 5 sec.
► Pull out the grounds container again, wait
for a short time and reinsert it.
A confirmation prompt appears on the
display.
► Confirm the display prompt with [Yes].
Insert the brewing unit The brewing unit was not detected after the
grounds container was inserted.
The microswitch is faulty or dirty. ► Check the microswitch and clean or replace
► Clean the brewing screen.
See "Cleaning" - "Weekly cleaning".
it.
Brewing unit error The brewing screen is clogged. ► Clean the brewing screen.
See "Cleaning" - "Weekly cleaning".
Remove the brewing unit A flow error occurred in the cleaning pro-
gramme.
Drain the drinking water tank Only with "Aquaflex":
Aquaflex is set to the mains water supply, but
there is still water in the internal drinking water
tank.
Fill the drinking water tank The drinking water tank is empty or not insert-
ed.
The monitor sensor is faulty. ► Contact your service partner.
Empty the drip tray Without waste water outlet:
Drip tray is full.
► Clean the brewing unit.
See "Cleaning" - "Weekly cleaning".
► Empty and remove the drinking water tank.
► Insert the front panel.
See "Cleaning" - "Daily cleaning".
► Fill and insert the drinking water tank.
► Insert the right front panel.
See "Installation and commissioning" - "Switching between mains water supply and drinking
water tank (option)"
► Empty and clean the drip tray.
86
BA SCV_EN
V06 | 11.2015
Page 87

Troubleshooting www.schaerer.com
Display message Cause What to do
Open water supply The water supply is interrupted. ► Open the stopcock of the mains water sup-
ply.
Customer care The annual service is due. (15,000 brewings) ► Notify your service partner that the "Cus-
Service maintenance Service is due. (after 30,000 brewings or 2
years)
tomer care kit 1/15,000 (without brewing
unit)" maintenance must be performed.
► Notify your service partner that the "Service
kit 2 (with brewing unit)" maintenance must
be performed.
Service maintenance An inspection is due after 6 years. ► Contact your service partner to have the re-
quired inspection work performed.
Change filter Message for machines with mains water supply
► Replace the external calcium filter.
or external drinking water tank.
Change filter Message for machines with internal drinking
water tank.
The grounds chute is missing!
The grounds container has not been correctly
inserted.
► Replace the calcium filter in the drinking
water tank.
► Check that the grounds container is in the
proper position.
Only on machines with an under-counter
grounds container!
The monitor sensor is faulty.
► Contact your service partner.
Only on machines with an under-counter
grounds container!
Manual inlet closed? The monitor sensor is faulty. ► Contact your service partner.
Milk empty message (option) The milk level in the monitored milk container is
too low.
The monitor sensor is faulty. ► Contact your service partner.
BA SCV_EN
V06 | 11.2015
► Clean the milk container and fill with fresh
milk.
87
Page 88

www.schaerer.com Troubleshooting
Error messages with fault code
Potential error messages, with a fault code, are shown as pictured in the figure on the left.
Code Designation Cause and effect What to do
2 Brewer motor without
current
3 Brewer motor pulse
generator: no pulses
Current sensor does not indicate current,
pulse generator does not indicate pulses.
Pulse generator not supplying pulses. Current sensor indicates traction current.
► Contact your service partner.
Faulty pulse generator.
4 Current error, brewer
motor 3
5 Brewer motor limit
switch: no signal
Pulse generator: Pulses are present but the
current sensor does not indicate a current.
The brewer limit switch is not reached, but
current and pulses are OK or the limit switch
does not open.
6 Brewer overcurrent The brewing screen is clogged. ► Clean the brewing screen.
See "Cleaning" - "Weekly cleaning".
26 Right grinder blocked The grinding fineness setting is too fine.
The fine dust contaminates the mill too quickly.
► Set the grind level one level coarser.
See "Service and maintenance" - "Finer setting of grind level".
The grinder is blocked. ► Contact your service partner.
36 Left grinder blocked The grind level setting is too fine.
The fine dust contaminates the mill too quickly.
The grinder is blocked. ► Contact your service partner.
87 Boiler sensor breakage Beverage dispensing is not possible. ► Contact your service partner.
88 Boiler temperature too
high
The water supply is interrupted.
Dispensing of beverages is blocked.
► Set the grind level one level coarser.
See "Service and maintenance" - "Finer setting of grind level".
Option 1: With drinking water tank
► Check that the drinking water tank is filled
and installed correctly.
Option 2: With mains water supply
► Check whether the main water valve is
open.
The brewing unit is blocked.
Dispensing of beverages is blocked.
The machine is overheated.
Dispensing of beverages is blocked.
► Clean the brewing unit.
See "Cleaning" - "Weekly cleaning".
► Switch off the coffee machine and let it
cool.
► Switch the coffee machine back on.
► If not rectified, contact your service part-
ner.
89 Boiler heating time er-
Fault while heating ► Switch the machine off and back on.
ror
130 General current error Current consumption of power supply when
149 Boiler heating time er-
ror
switching on is too high.
Current consumption with 24 V/30 V power
supply is too high.
► Contact your service partner.
157 Boiler heating time er-
ror
88
The battery is almost empty. The PC board
fails when the battery is fully empty.
BA SCV_EN
V06 | 11.2015
Page 89

Troubleshooting www.schaerer.com
Code Designation Cause and effect What to do
161 Brew water fault The water supply is interrupted.
Dispensing of beverages is blocked.
The brewing unit is blocked.
Dispensing of beverages is blocked.
The grind level setting is too fine.
The fine dust contaminates the mill too quickly.
The highest quality level can lead to a brewing water error.
162 Flow meter error du-
ring cleaning
• Water pressure is OK.
• Minimum flow not achieved.
• A mandatory cleaning routine follows.
Option 1: With drinking water tank
► Check that the drinking water tank is filled
and installed correctly.
Option 2: With mains water supply
► Check whether the main water valve is
open.
Option 3: Aquaflex
► Check whether the switch between the
mains water supply and drinking water
tank is correctly set.
See "Installation and commissioning" "Switching between mains water supply and
drinking water tank"
► Clean the brewing unit.
See "Cleaning" - "Weekly cleaning".
► Set the grind level one level coarser.
See "Service and maintenance" - "Finer setting of grind level".
► Set the quality lower.
See "Programming" - "Settings" menu "Recipes and beverage buttons".
► Check the water supply.
163 Warm rinse water fault The water supply is interrupted.
Dispensing of beverages is blocked.
The brewing unit is blocked.
Dispensing of beverages is blocked.
164 Flow meter error du-
Minimum flow not achieved. ► Check the water supply.
ring hot water dosing
165 Flow meter error du-
ring choco dosing
166 Flow meter error du-
ring steam boiler feed
167 Flow meter error du-
ring descaling
Minimum flow not achieved. ► Check the water supply.
Minimum flow not achieved. ► Check the water supply.
• Minimum flow not achieved.
• During descaling, the screw in the drinking water tank neck must be removed on
machines with a mains water supply.
170 Steamer sensor short
Infinite resistance at control input for sensor. ► Contact your service partner.
circuit
171 Steamer sensor bro-
ken/not correctly
Resistance at control input for sensor approaches zero.
mounted
Option 1: With drinking water tank
► Check that the drinking water tank is filled
and installed correctly.
Option 2: With mains water supply
► Check whether the main water valve is
open.
► Clean the brewing unit.
See "Cleaning" - "Weekly cleaning".
► Check and clean the brewing unit.
► Check and clean the powder doser.
► For descaling, remove the screw from the
drinking water tank neck (reinsert after
descaling).
► Contact your service partner.
BA SCV_EN
V06 | 11.2015
89
Page 90

www.schaerer.com Troubleshooting
Code Designation Cause and effect What to do
186 Steam boiler level The level in the steam boiler was not reached
within 30 sec.
The steam feed valve is defective.
187 Boiler sensor broken Beverage dispensing is not possible. ► Contact your service partner.
188 Heating! Disconnect
the machine from the
power supply
189 Steam boiler heating
time fault
The steam wand or beverage outlet is
clogged.
Dispensing of beverages is blocked.
The machine is overheated.
Dispensing of beverages is blocked.
Error while heating. ► Switch the coffee machine off and back
► Switch the coffee machine off and back
on.
► Check the water supply.
► If not rectified, contact your service part-
ner.
► Disconnect the machine from the power
supply
► Contact your service partner.
► Switch off the coffee machine and let it
cool.
► Switch the coffee machine back on.
► If not rectified, contact your service part-
ner.
on.
► If not rectified, contact your service part-
ner.
Faults without display message
Fault description Cause and effect What to do
No hot water dispensing;
water in grounds container.
Coffee dispensing not possible.
No choco dispensing; water in grounds container.
Coffee dispensing not possible.
Choco dosing screw
blocked, only water is dispensed.
Coffee dispensing left/right
is different.
No milk foam or milk dispensing, even though
there is milk in the milk
container.
Hot water outlet clogged.
Hot water dispensing valve defective.
Mixing bowl is clogged.
Beverage outlet is clogged.
Choco dispensing valve is faulty.
Dosing screw is clogged.
Mixing bowl is clogged.
Beverage outlet is clogged. ► Clean the beverage outlet.
Milk hose kinked or crushed.
Milk nozzle is clogged.
Cooling unit (internal/external) is iced up.
► Clean the hot water outlet.
► If not rectified, contact your service partner.
► Do not use choco dispensing.
► Contact your service partner.
► Clean the dosing screw.
See "Cleaning" - "Powder container".
► Empty the powder.
► Turn the screw by hand until all powder has
been removed.
► Rinse with water, if necessary.
► Let it dry fully.
See "Cleaning".
► Lay the milk hose correctly.
► Clean the milk nozzle.
See "Cleaning".
► Defrost the cooling unit.
See "Cleaning" - "Optional accessories" - "Defrosting the cooling unit".
90
BA SCV_EN
V06 | 11.2015
Page 91

Troubleshooting www.schaerer.com
Fault description Cause and effect What to do
Milk foam is not correct,
temperature is too cold
Wrong milk nozzle.
Beverage outlet is clogged.
► Change the milk nozzle (green nozzle =
cooled milk / white nozzle = uncooled milk).
► Clean the beverage outlet.
See "Cleaning" or cleaning card.
Internal/external cooling
unit is not cooling.
Pump runs constantly, water in the grounds container.
Cooling unit is not switched on.
Cooling unit is defective.
PC board is faulty.
Electrical problem between the pump and PC
board.
► Switch on the cooling unit.
► If not rectified, contact your service partner.
► Switch the machine off and back on again.
► Disconnect the machine from the mains pow-
er supply and reconnect it.
► If not rectified, contact your service partner.
Choco/Topping container
cannot be inserted.
Position of the dosing screw is wrong ► Manually turn the dosing screw drive slightly
clockwise.
BA SCV_EN
V06 | 11.2015
91
Page 92

www.schaerer.com
CAUTION!
User at risk!
Safety notes
Safety notes
Danger posed by cleaning products
Use
Danger of poisoning from swallowing cleaning products.
Always observe the following points:
• Store cleaning products away from children and unauthorised persons.
• Do not swallow the cleaning products.
• Never mix cleaning products with other chemicals or acids.
• Never pour cleaning products into the milk container.
• Never pour cleaning products into the drinking water tank (internal/external).
• Only use the cleaning and descaling products for their intended purpose (see label).
• Do not eat or drink while handling cleaning products.
• Ensure that the area is well ventilated when handling cleaning products.
• Wear safety gloves when handling cleaning products.
• Wash your hands thoroughly after handling cleaning products.
Before using cleaning products, read the information on the package carefully. If it is not already on hand, the health and safety data sheet can be obtained from the sales partner (see
cleaning product packaging).
Storage
Always observe the following points:
• Store in a place that is inaccessible to children and unauthorised persons.
• Protect cleaning products from heat, light and moisture.
• Store in a separate location from acids.
• Only store in the original packaging.
• Store cleaning products for daily and weekly use separately.
• Do not store together with food and drink or other consumable items.
• Local regulations regarding the storage of chemicals (cleaning products) apply.
92
Disposal
If a cleaning product must be disposed of unused, dispose of the product and its container in
accordance with local and legal regulations.
Emergency information
Obtain the phone number of the emergency information service (toxicological information centre) from the cleaning product manufacturer (see cleaning product label). If your country does
not have this type of institution, please see the following table:
Swiss Toxicological Information Centre
International calls +41 44 251 51 51
Calls from Switzerland 145
Internet www.toxi.ch
BA SCV_EN
V06 | 11.2015
Page 93

Safety notes
CAUTION!
User at risk!
CAUTION!
User at risk!
CAUTION!
User at risk!
www.schaerer.com
Hygiene rules
Water
Improper handling of water can cause health problems.
Always observe the following points:
• The water must be uncontaminated.
• Do not connect the machine to pure reverse osmosis water or other aggressive types of
water.
• The carbonate hardness must not exceed 5-6 °dKH(German carbonate hardness) or 8.9-
10.7 °fKH(French carbonate hardness).
• The total hardness must always be higher than the carbonate hardness.
• The minimum carbonate hardness is 5 °dKHor 8.9 °fKH.
• Maximum chlorine content of 100 mg per litre.
• pH value between 6.5 and 7 (pH neutral).
Machines with drinking water tank (internal & external):
• Fill the drinking water tank with fresh water daily.
• Rinse the drinking water tank thoroughly before filling.
Coffee
Improper handling of coffee can cause health problems.
Always observe the following points:
• Check the packaging for damage before opening.
• Do not add more beans than will be needed for one day.
• Close the bean hopper lid immediately after filling.
• Store coffee in a cool, dry, dark place.
• Store coffee separately from cleaning products.
• Use the oldest products first ("first in, first out" principle).
• Use before the expiry date.
• Always reclose packages after opening to ensure that the contents remain fresh and are
protected from contamination.
BA SCV_EN
V06 | 11.2015
Milk
Improper handling of milk can cause health problems.
Always observe the following points:
• Do not use unpasteurised or raw milk.
• Only use pasteurised milk or milk heated at ultra-high temperatures.
• Only use homogenised milk.
• Use pre-cooled milk at a temperature between 3–5°C.
• When working with milk, wear protective gloves.
• Use milk directly from the original packaging.
• Never add additional milk. Always clean the container thoroughly before filling.
• Check the packaging for damage before opening.
• Do not add more milk than will be needed for one day.
• Close the milk container lid and cooling unit (internal/external) immediately after filling.
• Store milk in a cool, dry (max. 7°C) and dark place.
• Store milk separately from cleaning products.
• Use the oldest products first ("first in, first out" principle).
• Use before the expiry date.
• Always reclose packages after opening to ensure that the contents remain fresh and are
protected from contamination.
93
Page 94

www.schaerer.com Safety notes
CAUTION!
User at risk!
Automatic machine powder / Instant powder
Improper handling of automatic machine powder can cause health problems.
Always observe the following points:
• Check the packaging for damage before opening.
• Do not fill the machine with more automatic machine powder than will be needed for one
day.
• Close the powder container lid immediately after filling.
• Store the automatic machine powder in a cool, dry, dark place.
• Store the automatic machine powder separately from cleaning products.
• Use the oldest products first ("first in, first out" principle).
• Use before the expiry date.
• Always reclose packages after opening to ensure that the contents remain fresh and are
protected from contamination.
94
BA SCV_EN
V06 | 11.2015
Page 95

Liability www.schaerer.com
Liability
Operator responsibilities
The operator must ensure that the machine undergoes regular maintenance and that the safety devices are checked regularly by a Schaerer AG service partner, a representative thereof,
or other authorised persons.
Schaerer AG must be notified in writing of any defects within 30 days. For hidden defects, this
period is extended to 12 months from the date of installation (work report, handover report),
but no longer than 18 months after the product leaves the factory in Zuchwil.
Safety-relevant parts such as safety valves, safety thermostats, boilers etc. must not be repaired under any circumstances. They must be replaced.
The following intervals apply:
• Safety valves: every 24 months.
• Boilers (steam boilers, flow heaters): every 72 months.
These measures are performed by a Schaerer AG service technician or your service partner
as part of the maintenance routine.
When using additional products it is the responsibility of the operator to provide information on
any properties which may trigger an allergic reaction.
Warranty and liability
No responsibility will be taken for warranty or liability claims in the event of personal injury or
material damage as a result of one or more of the following causes:
• Improper use of the device.
• Improper mounting, commissioning, operation, cleaning and maintenance of the device
• Failure to observe maintenance intervals.
• Operation of the unit with defective safety devices or safety and protective equipment that
• Failure to observe the safety notes in the operating instructions pertaining to storage, in-
• Operation of the device when it is not in a flawless condition.
• Repairs that have not been carried out properly.
• Use of spare parts that are not original Schaerer AG spare parts.
• Use of cleaning products that are not recommended by Schaerer AG.
• Catastrophic incidents due to foreign objects, accidents, vandalism or force majeure.
• If the device is penetrated by any type of object or the housing is opened.
and the associated optional devices.
is not properly installed or is not functional.
stallation, commissioning, operation and maintenance of the machine.
BA SCV_EN
V06 | 11.2015
The manufacturer assumes the warranty with respect to any liability claims only and exclusively if the specified maintenance and service intervals are adhered to and if original spare parts
were used that were ordered from the manufacturer or another authorised supplier.
The "General Terms and Conditions" of Schaerer AG apply.
95
 Loading...