

Page 1
Schaerer Coffee Club
Operating instructions
V02 / 11.2018
Page 2

Schaerer AG
P.O.Box 336
Allmendweg 8
CH-4528 Zuchwil
info@schaerer.com
www.schaerer.com
Translation of the original operating inructions
English
021081
Page 3

Schaerer Coffee Club
Operating instructions
Publisher
Schaerer AG, P.O.Box 336, Allmendweg 8, CH-4528 Zuchwil
Edition
Version 02 | 11/2018
Software
V1.5.4
Concept and editing:
Schaerer AG, P.O.Box 336, Allmendweg 8, CH-4528 Zuchwil
Copyright ©
Schaerer AG, P.O.Box 336, Allmendweg 8, CH-4528 Zuchwil
This document is protected by copyright. All rights are reserved. The reproduction, distribution or transmission of this document, as well as the transmission via electronic systems or
translation into another language, are not permitted without the written consent of Schaerer
AG. This applies to both the entire document and individual excerpts thereof. The contents
of the document are based on the most current data available at the time of printing. Schaerer AG reserves the right to make changes at any time without further notice. All images,
gures and display messages in this manual are only shown by way of example. Due to the
wide variety of possible options, each individual machine may dier from the devices de-
picted herein. Schaerer AG is only liable for the contents of the original German document.
Page 4

|
Introduction and general information
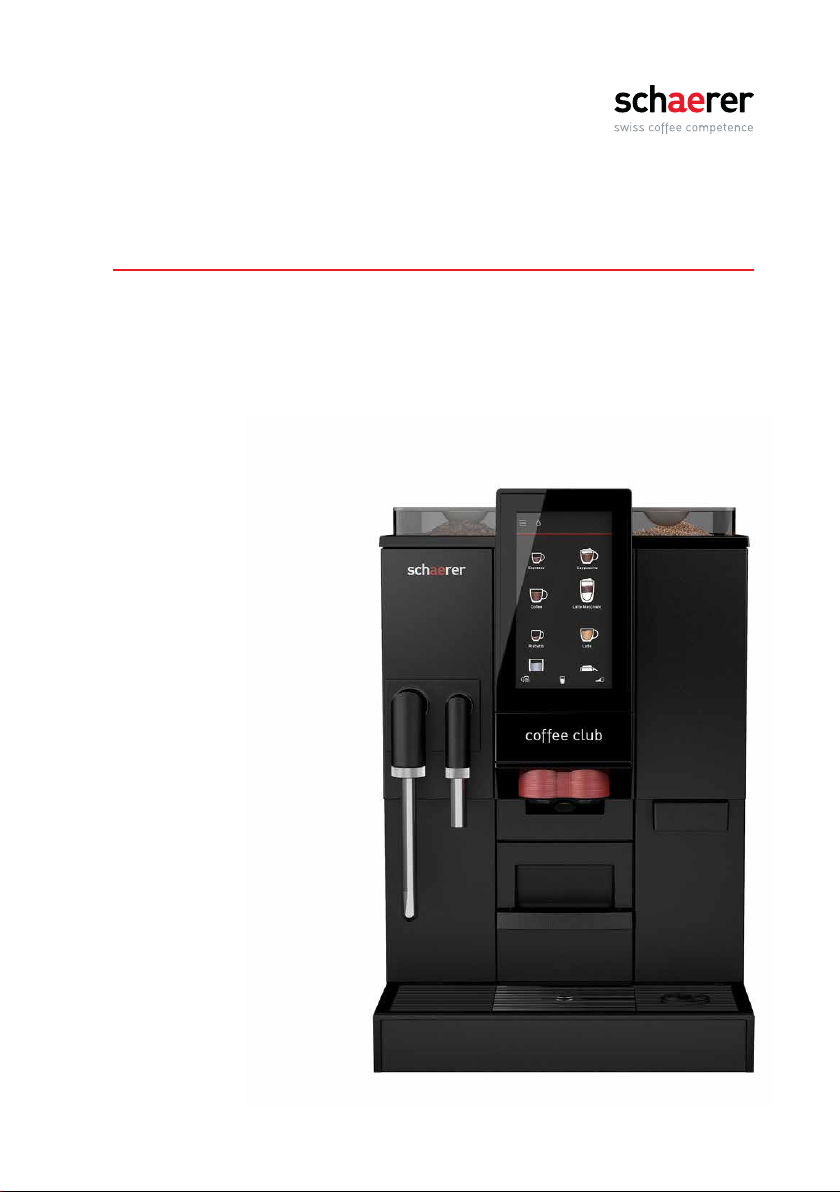
Congratulations on the purchase of your
Schaerer coee machine.
The Schaerer Coee Club coee machine is a
single-cup fully-automatic machine for espresso,
coee, cappuccinos, lattes, latte macchiatos, milk
foam and hot water.
With the powder container available as an option,
the Schaerer Coee Club can also dispense hot
chocolate with milk or milk foam.
Follow the operating instructions
> Read the operating instructions before use.
> Always follow the operating instructions
exactly, especially the safety notes and the
Safety chapter.
> Keep the operating instructions accessible
to the sta and all users.
Risk of death due to electrocution!
• There risk of death due to the mains voltage
inside the coee machine.
> Never open the housing.
> Never loosen the screws and do not
remove housing parts.
Conditions for use and installation
• If the maintenance specications are not
observed, no liability is assumed for any
damages.
> Follow the operating instructions.
> Maintenance work and repairs may only
be performed by Schaerer Service using
original spare parts.
CAUTION
Note the signs and symbols in
the operating instructions
page 19
Observe the Safety chapter
w from page 9
WARNING
Observe the Safety chapter
w from page 9
IMPORTANT
Technical data
w from page 107
Maintenance
w from page 94
4
SCClub operating instructions
Page 5

Table of Contents
Table of Contents 5
1 Safety 9
1.1 General safety notes 9
1.2 Intended use 15
1.3 Conditions for use and installation 16
2 Introduction 17
2.1 Labelling of coee machine parts 17
3 Commissioning 21
3.1 Installation location 22
3.2 Unpacking 22
3.3 Commissioning programme 23
4 Operation 25
4.1 Operation safety notes 25
4.2 Switching on the coee machine 25
4.3 Beverage dispensing 26
4.4 Selection elds (optional) 26
4.5 Special elds (optional) 26
4.6 Connecting the milk 27
Milk nozzle ..................................................................27
With Schaerer milk cooler ......................................................27
Milk lance (optional) ...........................................................28
4.7 Milk or milk foam dispensing 28
4.8 Hot water dispensing 29
4.9 Basic Steam (optional) 29
4.10 Cup grid 32
4.11 Bean hopper/Powder container 32
4.12 Manual inlet 33
4.13 Grounds container 34
4.14 Counter grounds disposal (optional) 34
4.15 Drip tray 35
4.16 Mains water supply (optional) 36
4.17 Switching o the coee machine 36
5 Software 37
5.1 Overview 37
5.2 Readiness for use 39
5.3 Care 41
Readiness for use ............................................................37
Ready for operation display elds ................................................37
Main menu functions ..........................................................38
Menu control elds . . . . . . . . . . . . . . . . . . . . . . . . . . . . . . . . . . . . . . . . . . . . . . . . . . . . . . . . . . . .38
5.2.1 Ready for operation display elds ................................................39
Beverage buttons . . . . . . . . . . . . . . . . . . . . . . . . . . . . . . . . . . . . . . . . . . . . . . . . . . . . . . . . . . . . .39
Warm rinse eld ..............................................................39
Barista eld – coee strength. . . . . . . . . . . . . . . . . . . . . . . . . . . . . . . . . . . . . . . . . . . . . . . . . . . .39
5.2.2 SteamJet cup warmer .........................................................40
System cleaning . . . . . . . . . . . . . . . . . . . . . . . . . . . . . . . . . . . . . . . . . . . . . . . . . . . . . . . . . . . . . .41
Mixer rinsing . . . . . . . . . . . . . . . . . . . . . . . . . . . . . . . . . . . . . . . . . . . . . . . . . . . . . . . . . . . . . . . . .41
Milk system rinsing . . . . . . . . . . . . . . . . . . . . . . . . . . . . . . . . . . . . . . . . . . . . . . . . . . . . . . . . . . . .41
SCClub operating instructions
5
Page 6

Table of Contents
CleanLock ...................................................................42
Instructions . . . . . . . . . . . . . . . . . . . . . . . . . . . . . . . . . . . . . . . . . . . . . . . . . . . . . . . . . . . . . . . . . .42
Filter change. . . . . . . . . . . . . . . . . . . . . . . . . . . . . . . . . . . . . . . . . . . . . . . . . . . . . . . . . . . . . . . . . 42
Descaling ...................................................................42
Brewer care .................................................................43
5.4 Beverages 43
5.5 Operating options 50
5.6 Info 55
5.7 Accounting 56
5.8 PIN rights 57
5.9 Timer 59
5.10 System 60
General information ...........................................................43
Filling quantity, animation cup tray, multiple brewing and dosing type ....................44
Changing recipes . . . . . . . . . . . . . . . . . . . . . . . . . . . . . . . . . . . . . . . . . . . . . . . . . . . . . . . . . . . . .46
Text and image ...............................................................49
Operating elements ...........................................................50
Button layout. . . . . . . . . . . . . . . . . . . . . . . . . . . . . . . . . . . . . . . . . . . . . . . . . . . . . . . . . . . . . . . . .53
PostSelection ................................................................53
Decaeinated . . . . . . . . . . . . . . . . . . . . . . . . . . . . . . . . . . . . . . . . . . . . . . . . . . . . . . . . . . . . . . . .53
Beverage pre-selection ........................................................54
Cancel beverage .............................................................54
Last brewing . . . . . . . . . . . . . . . . . . . . . . . . . . . . . . . . . . . . . . . . . . . . . . . . . . . . . . . . . . . . . . . . .55
Timer .......................................................................55
Service .....................................................................55
Care .......................................................................55
Water lter and descaling .......................................................55
Journal .....................................................................55
Counters . . . . . . . . . . . . . . . . . . . . . . . . . . . . . . . . . . . . . . . . . . . . . . . . . . . . . . . . . . . . . . . . . . . .56
coeeMYsation (App). . . . . . . . . . . . . . . . . . . . . . . . . . . . . . . . . . . . . . . . . . . . . . . . . . . . . . . . . . 57
Cleaning PIN ................................................................58
Setting PIN . . . . . . . . . . . . . . . . . . . . . . . . . . . . . . . . . . . . . . . . . . . . . . . . . . . . . . . . . . . . . . . . . .58
Accounting PIN ...............................................................58
Time/Date ...................................................................59
Status of button layout .........................................................59
Button layout overview . . . . . . . . . . . . . . . . . . . . . . . . . . . . . . . . . . . . . . . . . . . . . . . . . . . . . . . . .59
Milk and foam . . . . . . . . . . . . . . . . . . . . . . . . . . . . . . . . . . . . . . . . . . . . . . . . . . . . . . . . . . . . . . . .60
Progress display. . . . . . . . . . . . . . . . . . . . . . . . . . . . . . . . . . . . . . . . . . . . . . . . . . . . . . . . . . . . . . 60
Display and lighting ...........................................................61
Water lter ..................................................................63
Temperature . . . . . . . . . . . . . . . . . . . . . . . . . . . . . . . . . . . . . . . . . . . . . . . . . . . . . . . . . . . . . . . . .64
Switch-o rinsing .............................................................64
Automatic milk system rinsing ...................................................64
Calibration of “beans empty” message ............................................64
Frost protection/ transport preparation. . . . . . . . . . . . . . . . . . . . . . . . . . . . . . . . . . . . . . . . . . . . . 64
Drip tray sensor ..............................................................65
Portioner . . . . . . . . . . . . . . . . . . . . . . . . . . . . . . . . . . . . . . . . . . . . . . . . . . . . . . . . . . . . . . . . . . . .65
Bluetooth (optional) ...........................................................65
S-M-L function ...............................................................66
6
SCClub operating instructions
Page 7

Table of Contents
5.11 USB 67
Loading recipes ..............................................................67
Loading beverage symbols .....................................................67
Saving recipes ...............................................................67
Saving recipes as PDF. . . . . . . . . . . . . . . . . . . . . . . . . . . . . . . . . . . . . . . . . . . . . . . . . . . . . . . . .67
Exporting counters . . . . . . . . . . . . . . . . . . . . . . . . . . . . . . . . . . . . . . . . . . . . . . . . . . . . . . . . . . . .67
HACCP export ...............................................................68
Data backup . . . . . . . . . . . . . . . . . . . . . . . . . . . . . . . . . . . . . . . . . . . . . . . . . . . . . . . . . . . . . . . . .68
Loading data. . . . . . . . . . . . . . . . . . . . . . . . . . . . . . . . . . . . . . . . . . . . . . . . . . . . . . . . . . . . . . . . . 68
Loading language. . . . . . . . . . . . . . . . . . . . . . . . . . . . . . . . . . . . . . . . . . . . . . . . . . . . . . . . . . . . . 68
Firmware update .............................................................68
System recovery. . . . . . . . . . . . . . . . . . . . . . . . . . . . . . . . . . . . . . . . . . . . . . . . . . . . . . . . . . . . . .68
5.12 Language 68
6 Other settings 69
6.1 Setting the grind level 69
7 Care 70
7.1 Care safety notes 70
7.2 Overview of cleaning intervals 72
7.3 Dishwasher-safe parts 73
7.4 Cleaning programmes 73
7.4.1 System cleaning . . . . . . . . . . . . . . . . . . . . . . . . . . . . . . . . . . . . . . . . . . . . . . . . . . . . . . . . . . . . . .73
7.4.2 System cleaning . . . . . . . . . . . . . . . . . . . . . . . . . . . . . . . . . . . . . . . . . . . . . . . . . . . . . . . . . . . . . .74
7.4.3 Mixer rinsing . . . . . . . . . . . . . . . . . . . . . . . . . . . . . . . . . . . . . . . . . . . . . . . . . . . . . . . . . . . . . . . . .75
7.4.4 Milk system rinsing . . . . . . . . . . . . . . . . . . . . . . . . . . . . . . . . . . . . . . . . . . . . . . . . . . . . . . . . . . . .75
7.5 Descaling 76
7.6 Manual cleaning 78
7.6.1 Cleaning the control panel (CleanLock). . . . . . . . . . . . . . . . . . . . . . . . . . . . . . . . . . . . . . . . . . . . 78
7.6.2 Cleaning the grounds chute (ground slide, optional) . . . . . . . . . . . . . . . . . . . . . . . . . . . . . . . . . .78
7.6.3 Cleaning the collecting tray .....................................................79
7.6.4 Cleaning the water tank ........................................................79
7.6.5 Cleaning the drip tray . . . . . . . . . . . . . . . . . . . . . . . . . . . . . . . . . . . . . . . . . . . . . . . . . . . . . . . . . .80
7.6.6 Cleaning the housing ..........................................................81
7.6.7 Cleaning the outlet by hand . . . . . . . . . . . . . . . . . . . . . . . . . . . . . . . . . . . . . . . . . . . . . . . . . . . . . 81
7.6.8 Cleaning the brewing unit .......................................................82
7.6.9 Cleaning the milk system by hand . . . . . . . . . . . . . . . . . . . . . . . . . . . . . . . . . . . . . . . . . . . . . . . .85
Cleaning the milk hose. . . . . . . . . . . . . . . . . . . . . . . . . . . . . . . . . . . . . . . . . . . . . . . . . . . . . . . . .87
7.6.10 Cleaning the mixer . . . . . . . . . . . . . . . . . . . . . . . . . . . . . . . . . . . . . . . . . . . . . . . . . . . . . . . . . . . .88
7.6.11 Cleaning the bean hoppers .....................................................89
7.6.12 Cleaning the powder container ..................................................90
8 HACCP cleaning concept 92
9 Maintenance and descaling 94
9.1 Maintenance 94
9.2 Schaerer Service 95
SCClub operating instructions
7
Page 8

Table of Contents
10 Notications and notes 96
10.1 Operation notications 96
10.2 Error messages and faults 97
10.3 Error without error message 100
11 Safety and warranty 102
11.1 Hazards for the coee machine 102
11.2 Directives 104
11.3 Operator responsibilities 105
11.4 Warranty claims 106
Appendix: Technical data 107
Technical data of the coee machine 107
Appendix: Accessories and spare parts 110
8
SCClub operating instructions
Page 9
1 Safety
Safety
Incorrect use
• Non-compliance with the safety
notes can result in serious
injuries.
> Observe all safety notes.
1.1 General safety notes
Dangers for the operator
Maximum safety is one of the most
important features of Schaerer products.
The eectiveness of the safety devices is
only ensured as long as the following is
observed:
> Read the operating instructions
carefully before using the
device.
> Do not touch any hot machine
parts.
> Do not use the coee machine
if it is not working properly or is
damaged.
> Only use the coee machine if it
is completely installed.
> Under no circumstances may
the installed safety devices be
modied.
WARNING
CAUTION
SCClub operating instructions
9
Page 10
Safety
> Under continuous supervision
this device can be used by
children aged 8 and up and by
persons with limited physical,
sensory or mental capabilities
or a lack of experience and/
or knowledge, provided they
have been instructed about
the safe use of the device
and understand the potential
hazards resulting from said use.
> Children must not play with the
device.
> Children must also not be
allowed to perform cleaning
procedures or user service.
CAUTION
10
SCClub operating instructions
Page 11
In spite of the safety devices, every coee
machine carries some potential risk if
used improperly. Please comply with the
following instructions when handling the
coee maker in order to prevent injuries or
health hazards:
Safety
Risk of death due to electrocution!
• There risk of death due to the
mains voltage inside the coee
machine.
> Never open the housing.
> Never loosen the screws and do
not remove housing parts.
> Never use a damaged power
cord.
> Avoid damages to the power
cord. Do not kink or crush.
> Never put the power plug into
water or other liquids or pour
water or other liquids over the
power plug. Always keep the
power plug dry.
WARNING
SCClub operating instructions
11
Page 12
Safety
Risk of burns/
Danger of scalding
• Hot liquid comes out of the
outlets during beverage and
steam dispensing. The adjacent
surfaces and outlets get hot as
well.
> Do not touch the area under
the outlets during beverage and
steam dispensing.
> Do not touch the outlets
immediately after dispensing.
> Always put a suitable container
under the outlet before use.
Risk of injury
• Very long hair could get stuck in
the grinder head and get pulled
into the coee machine.
> Always protect hair with a
hairnet before you open the
bean hoppers.
CAUTION
CAUTION
12
SCClub operating instructions
Page 13
Safety
Risk of trapping/Risk of injury
• The coee machine contains
moving parts which could injure
ngers or hands.
> Always switch o the coee
machine and pull out the power
plug before reaching into
the coee grinder or into the
opening of the brewing unit.
Health risk
> Only make products which are
suitable for consumption and
the use of the coee machine.
> The powder container, the
bean hoppers and the manual
inlet may only be lled with the
materials intended for use.
CAUTION
CAUTION
Health risk
• The milk system cleaners
and the cleaning tablets are
irritating.
> Follow the protective measures
on the packaging of the cleaning
products.
> Do not add the cleaning tablets
into the machine until the
notication appears on the
display.
SCClub operating instructions
CAUTION
13
Page 14
Safety
Health risk/
Risk of irritation and burns
• During cleaning, hot cleaning
liquid and hot water ow out of
the outlets.
• The hot liquids could irritate the
skin and the heat creates a risk
of burns.
• Hot liquids could be in the drip
tray.
> Never reach under the outlets
during cleaning.
> Ensure that no one ever drinks
cleaning liquid.
> Carefully move the drip tray.
Risk of slipping
• Liquids can escape from the
machine if it is used incorrectly
or if errors are made. These
liquids can cause a slipping
hazard.
> Regularly check whether the
coee machine is leak-free and
that no water can escape.
CAUTION
CAUTION
14
SCClub operating instructions
Page 15
1.2 Intended use
Safety
Incorrect use
WARNING
• If the machine is not used
correctly, it could cause an
injury hazard.
> The coee machine must only
be used in the correct manner.
The Schaerer Coee Club is designed to dispense beverages
made of coee and/or milk and/or powder (e.g. choco or
toppings) into suitable containers. This device is intended
for commercial use in hotels, restaurants and similar
establishments. The device is permitted to be installed at
self-service locations when a sta member is present for
supervision purposes. The device can be used in businesses,
oces and other similar work environments, hotels, motels
and bed and breakfast establishments and can be operated by
non-experts and customers. Use of this equipment is subject
these operating instructions. In legal terms, any other use is
not an intended use. The manufacturer accepts no liability for
damage resulting from unintended use.
Schaerer Coee Club must not be used for heating
and dispensing any liquids other than coee, hot water
(beverages, cleaning) or milk (cooled, pasteurised,
homogenised, UHT).
SCClub operating instructions
15
Page 16

Safety
1.3 Conditions for use and installation
Risk of burning/Risk of injury
> The conditions for installation
and use must be observed.
> The conditions for installation
and use specied in the
Technical data chapter must be
observed.
Preparatory structural work for the electrical
connection, the water connection and
the waste water connection must be
commissioned by the operator of the
machine. It must be carried out by licensed
installers observing all general, national
as well as locally applicable regulations.
Schaerer Service may only connect the
coee machine to the prepared connections.
They are neither authorised to carry
out structural installation, nor are they
responsible for its implementation.
WARNING
Technical data
w page 108
16
SCClub operating instructions
Page 17
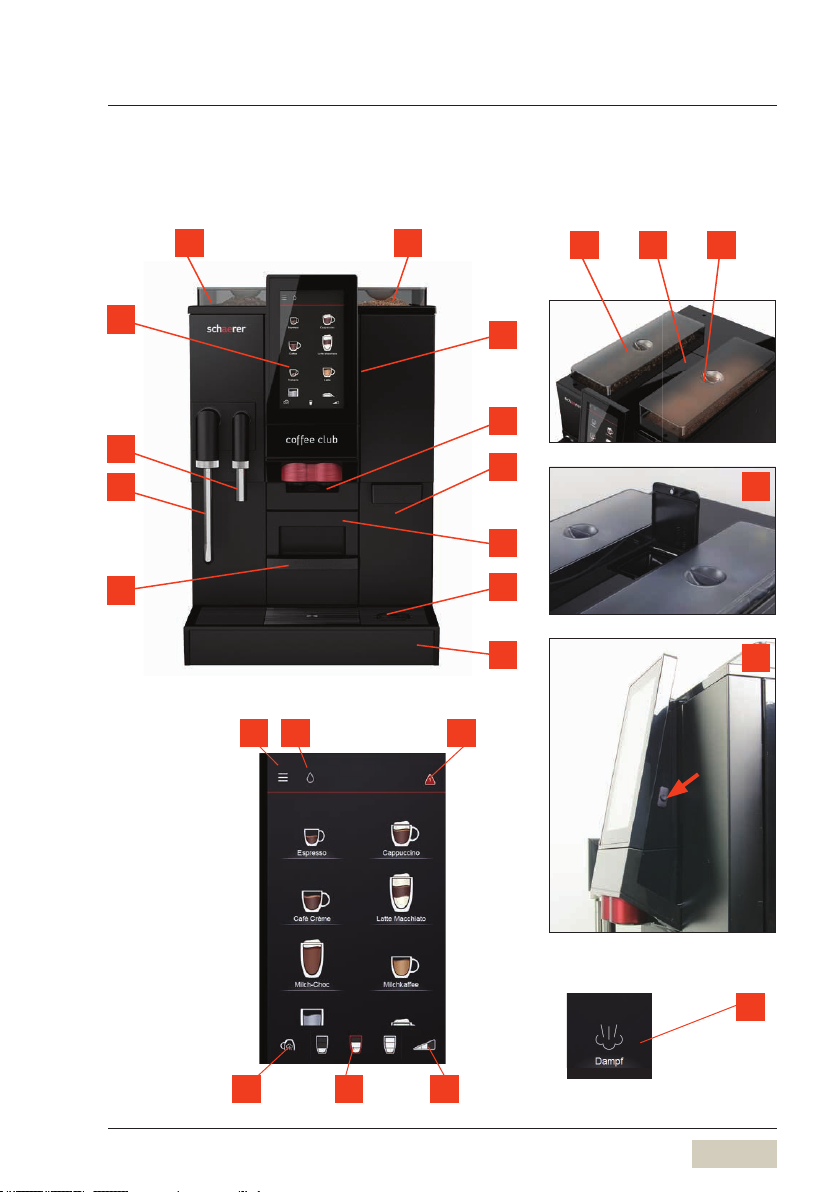
2 Introduction
2.1 Labelling of co ee machine parts
Introduction
13
12
11
10
Display
1 2
14
15
16
31 2
4
5
6
7
8
9
3
4
19 18 17
SCClub operating instructions
20
17
Page 18

Introduction
1
Bean hopper
Second bean hopper or powder container (for example choco, topping or
2
double powder container) (optional)
3
Manual inlet/Tablet insert
4
On/o switch
5
Beverage outlet (coee, milk and choco)
6
Water tank
7
Cup grid
8
SteamJet cup warmer
9
Removable drip tray with drip grid
10
Grounds container
11
Steam outlet
12
Hot water outlet
13
Touch display for beverage buttons and settings
Ready for operation display
14
Menu eld (opens the main menu)
15
Warm rinse eld
16
Notication box
17
Barista eld
18
Filling quantity
19
SteamJet eld
20
Steam button in the beverage eld
18
SCClub operating instructions
Page 19
Signs and symbols in the operating instructions
Introduction
Personal injury safety notes
If the safety notes are not observed, mild
to serious injury could occur in the event of
incorrect operation.
Personal injury safety notes
If the safety notes are not observed, mild injury
could occur in the event of incorrect operation.
Risk of
electrocution
Risk of trapping
ngers
Hot steam
Hot surfaces
Risk of slipping
Property damage notes
• For the coee machines
• For the installation location
> Always follow the operating instructions
exactly.
WARNING
Safety notes
Observe the Safety chapter
w from page 9
CAUTION
Operation safety notes
w page 25
Care safety notes
w page 70
Observe the Safety chapter
w from page 9
IMPORTANT
Observe the Warranty chapter
w from page 106
Technical data
w from page 107
Notes/Tip
• Notes for safe handling and tips for easier
operation.
SCClub operating instructions
NOTE
TIP
19
Page 20

Introduction
Glossary
Term Explanation
• • Counting, selection options
* * Individual work steps
Cursive text Description of condition of the coee machine and/or
explanations of automatic steps.
Barista Personal coee maker
Choco Hot chocolate
DECAF Decaeinated coee
Beverage
dispensing
Main water valve Stopcock, angle valve
Carbonate
hardness
Coee outlet Double outlet is the standard.
Milk system Single outlet, milk foamer, milk foam adapter, steam
Mixer system Entire assembly, mixer with portioner for powder-based
Preinfusion The coee is briey pre-brewed before the brewing
Pressing Automatic pressing of the ground coee before brewing
Powder based
beverages
Service life For example: Litre capacity of the water lter
Grounds container
Self-service mode Customer self-service
Rinsing Intermediate cleaning
Extras Components of a recipe for a beverage, for example
Dispensing of coee, hot water or powder beverages
Given in °dKH Water hardness is a measure of the
limescale dissolved in drinking water.
nozzle and milk hose
beverages
process to bring out a more intense aroma. Pre-brewing.
For example, choco or topping
Grounds chute
coee, milk, milk foam, choco
w Counter grounds disposal, side 34
• The software contains QR codes for videos
which illustrate the dierent steps in a
simple manner. Simply scan the QR code
to do so.
20
TIP
SCClub operating instructions
Page 21
3 Commissioning
(For the rst commissioning after delivery from the
factory)
Commissioning
Follow the operating instructions
> Always follow the operating instructions
exactly, especially the safety notes and the
Safety chapter.
> Keep the operating instructions accessible
to the sta and all users.
> Read the operating instructions before use.
Risk of death due to electrocution if
not observed
There risk of death due to the mains voltage
inside the coee machine.
• Never open the housing.
• Never loosen the screws and do not
remove housing parts.
Conditions for use and installation
Follow the operating instructions.
CAUTION
Important!
Note the signs and symbols in
the operating instructions
w page 19
Observe the Safety chapter
wfrom page102
WARNING
Observe the Safety chapter
wfrom page 102
IMPORTANT
Technical data
wfrom page 107
SCClub operating instructions
21
Page 22
Commissioning
3.1 Installation location
• The installation location must be dry and
protected from spray water.
• Water, condensation or steam can always
escape from a coee machine.
> Do not use the coee machine in the open.
> Set up the coee machine so that it is
protected from spray water.
> Make sure to set the coee machine on
a water-resistant surface which is not
sensitive to heat to protect the installation
surface from damage.
3.2 Unpacking
> The packaging material in the box contains
accessories. Do not throw away.
> The water tank and the grounds container
contain spare parts. Remove the spare
parts before commissioning and thoroughly
rinse the grounds container and the water
tank.
> Check whether the coee machine is
intact. In case of doubt, do not put the
coee machine into operation and contact
Schaerer Service.
> Therefore, be sure to keep the original
packaging in a safe place should a return
delivery be necessary.
IMPORTANT
Observe the Warranty chapter
wfrom page 106
Technical data
wfrom page 107
IMPORTANT
Observe the Warranty chapter
wfrom page 106
Accessories and labelling of
machine parts
w page 17
Technical data
wfrom page 107
Option double powder
The optional double powder container is sent
in separate packaging. If the coee machine
is equipped with this option, the double
powder container must be mounted before
commissioning the coee machine. Operating
without the container mounted is not permitted.
22
IMPORTANT
Chapter Warrenty
w from page 106
Technical data
w from page 107
SCClub operating instructions
Page 23
* Unpack the Schaerer Coee Club and set the
coee machine on a stable, horizontal surface .
* Observe the technical data.
* Plug the connection cable of the coee machine
into the respective socket.
3.3 Commissioning programme
* Switch on the coee machine using the on/o
switch.
The coee machine switches on.
The commissioning programme starts.
* Follow all instructions on the display.
The commissioning programme
proceeds step-by-step through the further
commissioning process via the display.
> Follow the display messages.
• The set values can be changed after
commissioning.
Other instructions
• Connecting milk w Chapter 4.6 page 27
Commissioning
Technical data
wpage 107
IMPORTANT
Changing settings
w Setting
from page 37
Once the commissioning process has been run in its
entirety and all necessary settings have been made,
the coee machine restarts. Calibration is performed
automatically.
Risk of burns/
Danger of scalding
• Hot liquid comes out of the outlets during
beverage dispensing. The adjacent
surfaces and outlets get hot as well.
> Do not touch the area under the outlets
during beverage dispensing.
> Do not touch the outlets immediately after
dispensing.
SCClub operating instructions
CAUTION
Observe the Safety chapter
w from page 9
23
Page 24

Commissioning
Inserting the water lter for the water tank
(optional)
This point is a step taken during the commissioning
programme.
For drinking water with a carbonate hardness above
5°dKH, a Schaerer water lter should be installed, as
otherwise the coee machine can be damaged due
to calcication.
Determining the water hardness
* Obtain the water hardness of the drinking water
from the water supplier or use the carbonate
hardness tester (with instructions) in the
accessories.
The carbonate hardness test is included in the
accessories.
Service life
The supplied water lter for the water tank
(200 l) at 10 °dkH has a service life for
200 litres of water. The actual service life is
dependent on the drinking water hardness and can
be found in the following table.
The "German carbonate
hardness" unit (°dKH) applies.
Water
- hardness
< 5
Service life in
litres
No lter
necessary
Water
- hardness
15 135
5 400 16 125
6 335 17 120
7 285 18 110
8 250 19 105
9 220 20 100
10 200 21 95
11 180 22 90
12 165 23 85
13 155 24 80
14 145 > 25 70
24
Service life in
litres
Note
No water lter is required at a
water hardness of 0 to 5 °dKH.
w Commissioning programme,
page 20
SCClub operating instructions
Page 25
4 Operation
4.1 Operation safety notes
Operation
Risk of burns/
Danger of scalding
• Hot liquid comes out of the outlets during
beverage and steam dispensing. The
adjacent surfaces and outlets get hot as
well.
> Do not touch the area under the outlets
during beverage and steam dispensing.
> Do not touch the outlets immediately after
dispensing.
> Always put a suitable container under the
outlet before use.
Health risk
> Only make products which are suitable
for consumption and the use of the coee
machine.
> The powder container, the bean containers
and the manual inlet may only be lled with
the materials intended for use.
4.2 Switching on the coee machine
The on/o switch is on the right side of the control
panel.
* Press on the on/o switch
A single tone goes o.
The coee machine switches on and heats up.
Automatic warm rinsing starts.
When the coee machine is ready to dispense
beverages, the display will show "Ready for use".
CAUTION
Observe the Safety chapter
w from page 9
CAUTION
Observe the Safety chapter
w from page 9
SCClub operating instructions
PIN access control
w PIN rights
page 57
25
Page 26
Operation
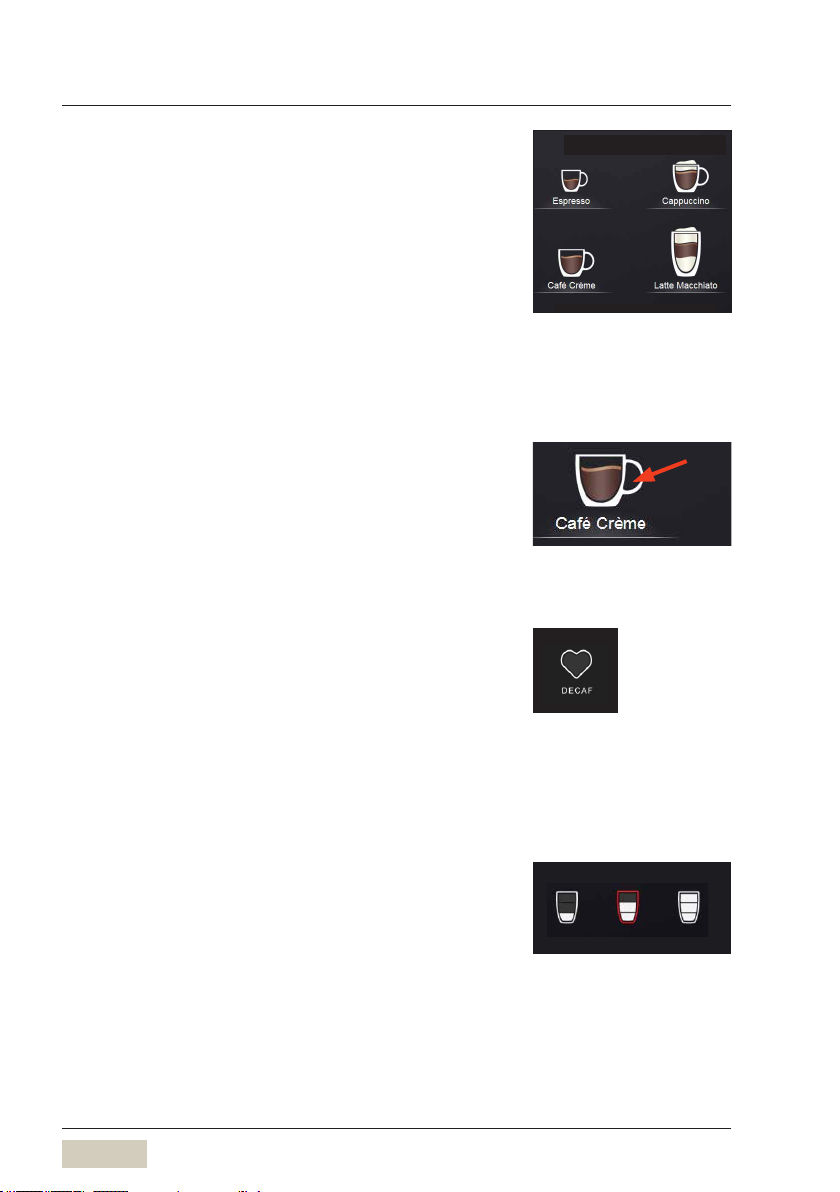
4.3 Beverage dispensing
Pressing on the beverage buttons starts dispensing
of the set beverages.
• Illuminated button = Ready for dispensing
• Unilluminated button/
red triangle in the
header
= Not ready for dispensing/
button locked
* Set a beverage container of a suitable size below
the outlet.
* Press on the desired beverage button.
Beverage interruption
* Tap on the beverage button again
4.4 Selection elds (optional)
Selection elds, like the DECAF eld in the example,
are available as an option. These selection elds
appear on the display after beverage selection.
4.5 Special elds (optional)
Special elds are optional and, if desired,
are activated in the settings. For example, the
pre-selection of the S-M-L lling quantities are special
elds. These S-M-L lling quantities must be set for
the beverages to make them available. Then, the
lling quantity "S" or "L" can be selected and only the
beverage buttons provided for this size light up.
M = set beverage size, no pre-selection
S = approx. 25% less than M
L = approx. 25% more than M
Button layout
w Operating options
page 50
Cancel button
Example:
Decaeinated eld (with 2
grinders)
Size
S M L
Example:
S-M-L eld
26
SCClub operating instructions
Page 27
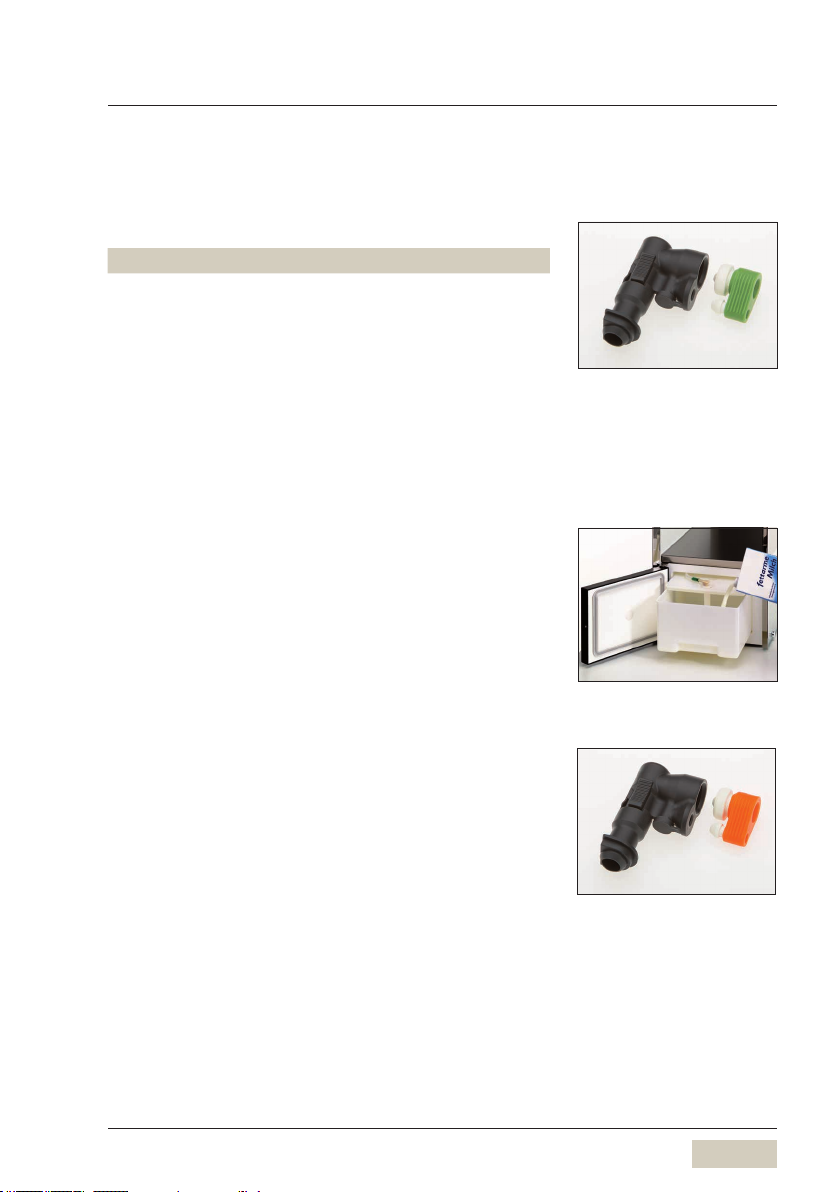
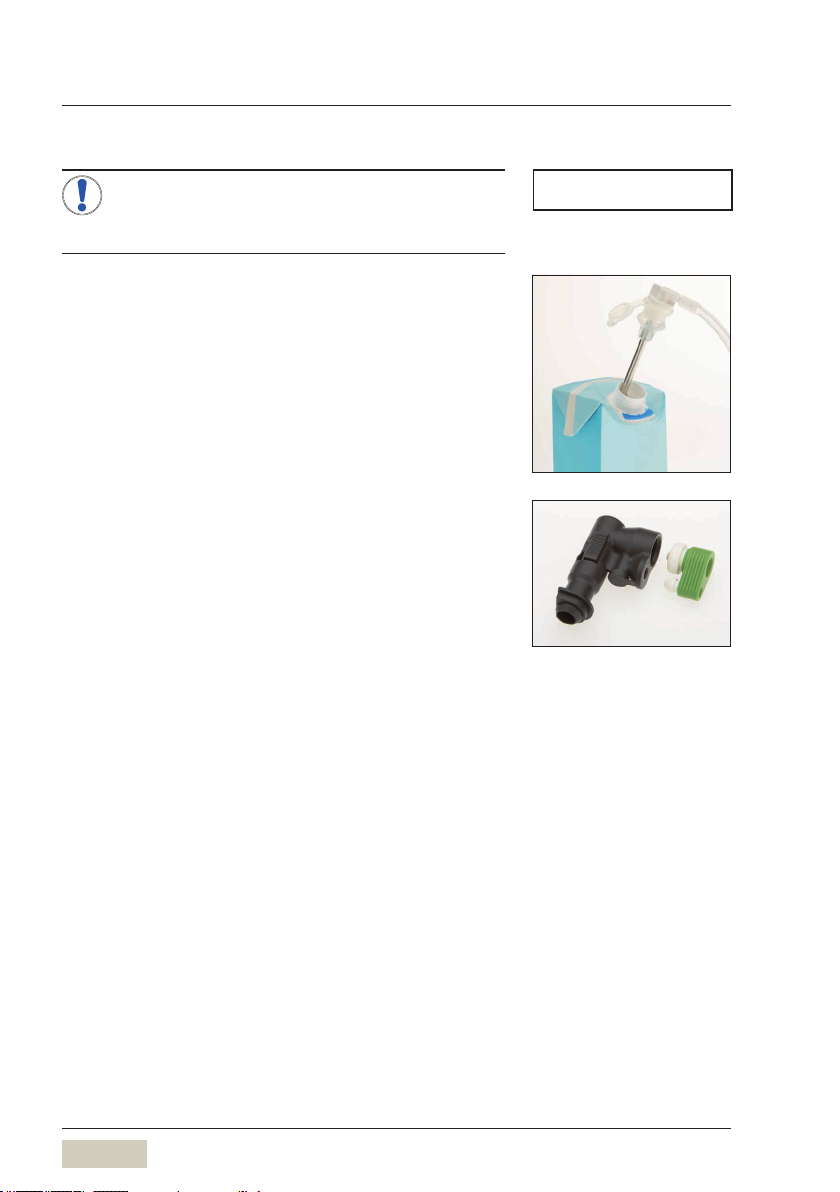
4.6 Connecting the milk
Milk nozzle
Use the appropriate steam nozzle on the milk foamer.
Colour Milk temperature
• Green (standard) Uncooled milk
(16 to max. 22 °C)
• Orange
(accessories)
With Schaerer milk cooler
* Use the appropriate steam nozzle for cooled milk
(orange)
* Remove the milk container from the cooler
* Push the lid of the milk container back
* Fill milk into the milk container
* Place the lid back on the container
* Plug the adapter on the milk hose into the
connection on the milk container lid
* Carefully push back the milk container
Cooled milk
(up to 10 °C)
Operation
The milk storage temperature
must be adapted to the milk
temperature and the matching
steam nozzle. Milk storage
temperature
w Milk and foam page 60
Milk container
SCClub operating instructions
The milk storage temperature
must be adapted to the milk
temperature and the matching
steam nozzle. Milk storage
temperature
w Milk and foam page 60
27
Page 28
Operation
Milk lance (optional)
Note
• Clean the milk lance daily.
• The milk hose must not be kinked.
* Use the appropriate steam nozzle on the milk
foamer
* Put the milk package to the left next to the coee
machine
* Open the milk lance lid
* Connect the Plug&Clean adapter to the milk lance
* Insert the milk lance into the milk packaging
The milk lance must reach to the base of the milk
packaging.
NOTE
The milk storage temperature
must be adapted to the milk
temperature and the matching
steam nozzle. Milk storage
temperature
w Milk and foam page 60
4.7 Milk or milk foam dispensing
* Set a beverage container of a suitable size below
the outlet
* Tap on the beverage button for milk or milk foam
Dispensing is done in line with the setting in the
recipe (dosing type, foam quality, etc.).
28
Dosing types
w Software
w Beverages
page 44
SCClub operating instructions
Page 29
4.8 Hot water dispensing
* Set a beverage container of a suitable size below
the hot water outlet
* Tap on the hot water button
Dispensing is done in line with the set dosing type.
4.9 Basic Steam (optional)
Operation
Risk of burns/
Danger of scalding
• Hot liquid comes out of the outlets during
beverage and steam dispensing. The
adjacent surfaces and outlets get hot as
well.
• The lower part of the steam outlet gets very
hot.
> Do not touch the area under the outlets
during beverage and steam dispensing.
> Do not touch the outlets immediately after
dispensing.
> Do not touch the lower part of the steam
outlet.
> Always put a suitable container under the
outlet before use.
Note
The dosing type for steam can be set under
the
"Beverage" menu item.
Dosing types Start-stop, Portion control,
Freeow and Start-stop-freeow
are available.
The dosing types are described in the
Beverage chapter
.
CAUTION
Observe the Safety chapter
w from page 9
NOTE
Dosing types
w Software
w Beverages
page 44
* Press on the steam button.
Steam is output as long as the steam button is
pressed.
• Steam warms up beverages
• Steam manually foams milk
SCClub operating instructions
29
Page 30

Operation
Heating up beverages
* Hold a cloth in front of the steam pipe for your own
protection
* Briey press the steam button
This blows out the condensation.
* Use a tall and narrow container with a handle
* Fill the container no more than halfway
* Put the steam nozzle deep down in the container
without touching the bottom on the container with
the steam nozzle
* Tap on the steam button
* Tap on the steam button again when the desired
temperature is reached
This stops steam dispensing.
* Swivel the steam outlet to the drip tray
* Tap on the steam button and then tap on it again
* a second later
The remainders in the steam tube are rinsed out.
* Wipe o the steam outlet with a moist cloth
The steam dispensing starts
after the rst tap on the steam
button. Tapping a second time
stops steam dispensing.
30
SCClub operating instructions
Page 31

Foaming milk
Operation
> Do not overheat the milk, or the amount of
milk foam will decrease
* Hold a cloth in front of the steam pipe for your own
protection
* Briey press the steam button
This blows out the condensation.
* Use a tall and narrow container with a handle
* Fill the container no more than halfway
* Put the steam nozzle into the container just under
the surface
* Press on the steam button.
This creates silky, compact milk foam.
* Release the steam button
* Swivel the steam outlet to the drip tray
* Briey press on the steam button
The remainders in the steam tube are rinsed out.
* Swivel the steam outlet to the drip tray
* Tap on the steam button and then tap on it again
after a short time
The brief burst of steam rinses residues out of the
steam pipe.
* Wipe o the steam outlet with a moist cloth
TIP
SCClub operating instructions
31
Page 32

Operation
4.10 Cup grid
* Grab the handle at the top of the grounds
container
* Pull out the cup grid as far as it will go
Base height with cup grid Max. 100 mm
Base height without cup grid Max. 177 mm
4.11 Bean hopper/Powder container
Top o the containers as soon as possible to the time
of use.
Fill the containers with no more than is needed for a
day to ensure the products remain fresh. Always ll
the container from front to back.
• Foreign particles may damage the grinder.
These damages are excluded from the
warranty.
> Ensure that no foreign particles enter the
bean hopper.
> Do not over ll the powder container.
> Do not press on the powder and compress
it.
Option double powder
The optional double powder container will be
shipped in a separate packaging. If the co ee
machine is equipped with this option, the
double powder container must be mounted
before commissioning. Operation without
mounted container is prohibited.
Some powder types may leave residues in
the powder container that may accumulate on
the front of the container
IMPORTANT
Observe the Warranty chapter
w from page 106
IMPORTANT
Chapter Warrenty
w from page 106
Technical data
w from page 107
NOTE
32
SCClub operating instructions
Page 33

4.12 Manual inlet
The manual inlet is located at the centre on the coee
machine lid.
The manual inlet is used:
• As an inlet for cleaning tablets
• For other types of coee, for example
decaeinated coee
• For coee sampling
Operation
Tablet inlet
• Do not add the ground coee or cleaning
tablets into the machine until the
notication appears on the display.
• Only use ground coee for the manual
inlet.
• Do not use instant coee powder. Do not
use coee powder that is ground too ne.
Preparation with ground coee via the manual
inlet
* Push on the top on the manual inlet ap to open it
* Fill in the ground coee (maximum 15 g)
* Close the manual inlet ap
* Press on the desired beverage button.
IMPORTANT
Observe the Warranty chapter
w from page 106
Manual inlet
SCClub operating instructions
33
Page 34

Operation
4.13 Grounds container
The grounds container collects the used ground
coee. It holds coee grounds from approx. 30
brewings. A notication appears on the display
when the grounds container needs to be emptied.
Dispensing of beverages is blocked if the grounds
container is not in place.
* Insert the cup grid into the grounds container.
* Remove the grounds container.
* Empty the grounds container.
The cup grid rests on the grounds container. Always
hold the grounds container tightly when emptying it.
* Reinsert the grounds container.
* Conrm the process on the display.
w Cleaning the grounds
container
page 78
• Inserting without emptying causes
the grounds container to overll. The
coee machine is dirty. This can cause
consequential damages.
> Always empty the grounds container
before inserting it.
> If the grounds container cannot be
reinserted, check the shaft for remaining
coee and remove it.
4.14 Counter grounds disposal
(optional)
The coee machine can be equipped with a counter
grounds disposal. In this case, the grounds container
and the bottom of the coee machine have a cut-out
that is continued through the on-site counter. The
coee grounds are collected in a separate container
underneath the counter.
IMPORTANT
Observe the Warranty chapter
w from page 106
Important
Clean the grounds chute daily
w Manual cleaning
page 78
34
SCClub operating instructions
Page 35

4.15 Drip tray
Operation
Danger of scalding
• Hot liquids could be in the drip tray.
> Carefully move the drip tray.
> Reinstall it carefully so that no unintended
water leakage occurs.
In co ee machines without an outlet connection, the
lling level sensor reports when the drip tray is full.
* Carefully remove the drip pan, empty it and
reinstall it.
The drip pan can also be removed, for
cleaning for instance, in co ee machines with
a drain connection.
Drip tray sensor
A sensor monitors whether the drip tray is inserted
and what the ll level is. A noti cation appears on the
display if the ll level is at the maximum amount.
* After receiving a noti cation, carefully remove the
drip pan, empty it and reinstall it.
CAUTION
Observe the Safety chapter
w from page 9
Clean the drip tray daily
Care w from page 70
NOTE
The underside of the drip tray and the area
of the drip tray sensor must be dry before
insertion. The sensor is located on the right
under the drip tray. If moisture remains in this
area, the “Empty drip tray” message appears
again.
SCClub operating instructions
IMPORTANT
This sticker marks the area
which should be kept dry.
35
Page 36

Operation
4.16 Mains water supply (optional)
The mains water supply to water and waste water is
only possible using a retrot kit.
With a mains water supply, the water tank
must only be removed if the coee machine is
switched o.
4.17 Switching o the coee machine
Follow hygiene standards
• Hazardous bacteria can grown in the
coee machine.
> Before switching o the coee machine,
perform the daily switch-o rinsing.
Follow the instructions
• No liability is assumed for damage
resulting from the failure to do so
The on/o switch is on the right side of the control
panel
* Briey press on the On/O switch
(approx. 1 second)
The coee machine switches o.
* Pull the power plug
IMPORTANT
Mains water retrot kit
CAUTION
Observe the Safety chapter
w from page 9
Clean the coee machine as
specied in the instructions.
Care w from page 70
IMPORTANT
Observe the Warranty chapter
w from page 106
Coee machines with mains water supply:
* Close the main water valve of the water supply line
36
PIN access control
w PIN rights
page 57
SCClub operating instructions
Page 37

5 Software
Software
• When setting beverages, the same safety
notes apply as for the operation of the
coee machine.
> Observe all operating safety notes.
5.1 Overview
Readiness for use
CAUTION
Operation safety notes
w page 25
Page 39
Button layout
w Operating options
page 50
The elds and buttons on the
display are available depending
on the setting and machine
version.
Ready for operation display elds
SteamJet cup warmer
Page 40
Barista (coee strength)
Page 39
Decaeinated eld
Page 26
SCClub operating instructions
Page 39
Warm rinsing
Page 39
Notications
Page 96
S-M-L eld
Page 66
37
Page 38

Software
Main menu functions
Care
Page 41
Beverages
Page 43
Accounting
system
Page 56
Info
Page 55
Operating option
Page 50
PIN rights
Page 57
Menu control elds
To the main menu Con rm the value/setting
Return to the previous menu Delete the value/setting
PIN entry Test preparation
Timer
Page 59
USB
Page 67
from page 41
System
Page 60
Language
Page 64
Next, previous, start Back
Loading settings Calling up temperature
Saving settings
Messages on the display
Error message
38
Milk temperature display
(optional)
SCClub operating instructions
Page 39

5.2 Readiness for use
Ready for operation display
The display shown when the machine is ready for use
depends on the options of the coee machine and
individual settings.
5.2.1 Ready for operation display elds
Beverage buttons
All output-ready beverage buttons are illuminated.
Swiping the display vertically shows the other
beverages available for display. The beverage
dispensing starts after tapping on the desired
beverage button.
Warm rinse eld
* Tap the "warm rinsing" eld.
A process of rinsing the coee lines with warm water
starts. The water warms up the brewing system and
ensures that the brewed coee is at an optimum
temperature.
This is recommended after a long brewing pause,
especially before dispensing a cup of espresso.
Software
Button layout
w Operating options
page 50
Example: Cappuccino button
Warm rinse eld active/inactive
w Operating options
page 51
Barista eld – coee strength
Display Coee strength
Standard 2 beans Normal, as set
Tap 1 x 3 beans 15% stronger than set*
Tap 2 x 1 bean 15% weaker than set*
* Maximum coee ground quantity 15 g per brew
The coee strength is changed one time for the next
brew.
SCClub operating instructions
Barista eld active/inactive
w Operating options
page 50
39
Page 40

Software
5.2.2 SteamJet cup warmer
Risk of burns/
Danger of scalding
• Hot steam is output through the SteamJet
cup warmer. At the same time, the cups and
the adjacent surfaces are hot.
> Use heat-resistant drink containers.
> Always put a cup with the opening at the
bottom over the cup warmer before steam
is dispensed.
> Do not touch the adjacent surfaces shortly
after dispensing.
> Do not touch the outlets immediately after
dispensing.
> Never use the SteamJet function without
using a drip grid or the cup warmer insert.
Health risk/Hygiene
• The SteamJet function is intended for
warming up drink containers and is not
suitable for cleaning.
> Instead, use a freshly-rinsed drink
container to warm the cups.
CAUTION
Observe the Safety chapter
w from page 9
Clean the drip tray daily
Care w from page 70
CAUTION
Observe the Safety chapter
w from page 9
The SteamJet cup warmer heats cuts with hot steam.
* Place a cup into the cup warmer with the opening
facing down.
* Tap the eld.
Hot steam slowly ows into the cup from below.
The steam ow is output as long as is specied in the
settings.
* Tap on the SteamJet eld again.
The steam ow immediately stops.
40
SteamJet eld active/inactive
w Operating options
page 51
SCClub operating instructions
Page 41

5.3 Care
System cleaning
Mixer rinsing
Milk system rinsing
System cleaning
After system cleaning with or without switching o the
co ee machine.
A system cleaning notice appears automatically
after 6 days or 200 brewings. After 7 days or 250
brewings, beverage dispensing is locked.
The machine cannot be used until after cleaning.
Software
Menu control elds
w Overview
page 38
Care chapter
w from page 70
HACCP cleaning concept
w from page 92
System cleaning
Care
w from page 73
Mixer rinsing
Mixer rinsing is an intermediate rinsing of the mixer.
Milk system rinsing
The milk system rinse rinses the milk hose with the
milk nozzles and the milk foamer.
SCClub operating instructions
Mixer
Care
w page 75
Milk system rinse
Care
w page 75
41
Page 42

Software
CleanLock
Instructions
Filter change
CleanLock
* Tap on CleanLock
A 15-second countdown starts.
The touch display can now be cleaned.
The touch display is reactivated 15 seconds after the
last time it is touched.
Instructions
Animated instructions on the available cleaning
programmes and for the installation and disassembly
of the coee outlet, milk foeamer, milk hose, mixer
system, water lter change and SteamJet.
Filter change
From 25% remaining lter service life, the remaining
service life is displayed each time the machine is
switched on. If the remaining lter service life is 0%,
a message is displayed every 3 hours that the water
lter must be changed. The lter must be changed to
avoid machine damage.
* Change the lter
* Conrm that the lter has been changed
After the lter has been changed, a programme
sequence for rinsing and bleeding the water lter and
the water system is performed. While doing so, hot
water ows out of the hot water outlet.
Follow the water lter
instructions!
The displays lead through the
programme step-by-step.
Follow the instructions!
Descaling
The water hardness, the water ow and whether a
water lter is used determine the
remaining litres until descaling is necessary.
This litre specication is calculated and displayed by
the Schaerer Coee Club.
42
Brewer change
Descaling
Descaling chapter
w from page 76
SCClub operating instructions
Page 43

Brewer care
Software
After 15,000 brewing cycles, the O-ring on the
brewing unit must be changed. When the end of the
service life is reached, a daily noti cation appears as
a reminder that a change is overdue.
* Change the O-ring
* Con rm the change
5.4 Beverages
General information
Test output
For many beverage settings, it is possible to start a
test output with the new settings before the recipe is
saved.
* Change the settings as desired
* Tap on the "Test output" icon eld
The beverage is dispensed with newly-set values.
* If the beverage is as desired, tap on the Save icon
The recipe is saved.
Saving recipes
Brewer care
Example: Cappuccino button
The changed recipe is saved here
Loading recipes
A saved recipe is loaded here on a beverage button
* Tap on a beverage button
* Tap on the "Load recipes" icon eld
A sub-menu opens.
* Mark the desired recipe
* Tap on the "Save recipes" eld
The beverage button is assigned with the
newly-selected recipe.
SCClub operating instructions
43
Page 44

Software
S M L
Filling quantity, animation cup tray, multiple brewing and dosing type
Filling quantity
Set the desired lling quantity. The recipe is adjusted
appropriately.
100% corresponds to the previously saved value.
Animation cup tray
The “animation cup tray” is displayed after the
beverage selection, if it was previously activated
under “lling quantity” per beverage. Check the check
mark in the “animation cup tray” eld.
Procedure for beverage dispensing:
* Press the desired beverage button
The animation is shown on the display.
* Conrm with the green check mark
* The beverage is dispensed
S-M-L lling quantity
Display only if the S-M-L function is activated in the
system. The recipes are generated for the sizes S
and L. M is as set (medium).
The standard values are:
S = 25% less than M
L = 25% more than M
S-M-L function
The S-M-L function can be activated in the System
menu. A deviation from the standard lling quantity
can also be changed in general for all beverages
under System.
The S-M-L quantities must be changed under Filling
quantity (beverage settings) for deviating individual
beverages.
Every size can be individually set to active or inactive.
Inactive means the size cannot be selected for this
beverage in this case (remove check mark for each
size to do this). Then save.
44
97
98
99
100
101
102
103
122
123
124
125
126
127
128
72
73
74
%
75
76
77
78
S-active Active L-active
Changing S-M-L for individual
beverages
w Filling quantity
Activating S-M-L and changing
generally for all beverages
w System
w S-M-L
page 66
Operation
w Special buttons
w page 26
SCClub operating instructions
Page 45

Multiple brewing
The beverage is brewed several times as set. Up to
12 times the set quantity can be dispensed at the
push of a button.
Available for coee and mixed milk beverages as well
as for hot water with the “Portion control” dosing type.
Dosing type
The dosing type can be determined for hot water,
milk foam, milk and steam. All other beverages are
already dispensed with dosing.
• Start-stop
The dispensing is carried out until the set quantity
has been reached. Dispensing can be stopped
earlier by pressing the button again.
• Dosed
The set quantity is dispensed. The dosing type is
available for milk, foam and hot water.
• Freeow
The beverage or steam is dispensed as long as
the button remains pressed.
• Start-stop freeow
Briey pressing the button starts the start-stop
dispensing process.
Pressing the button for longer than 1 second starts
the freeow dispensing process.
Software
SCClub operating instructions
45
Page 46

Software
Changing recipes
Current recipe composition
The additions contained in the recipe are shown here.
The preparation order is from left to right. Additions
listed under one another are prepared at the same
time.
The software reports if the desired options are
technically impossible.
Menu control elds
w Overview
page 38
Stock default additions
The additions which can be used for the recipes are
shown here.
* Tap on the desired addition and push it into the
current recipe composition.
46
SCClub operating instructions
Page 47

Deleting addition
Delete a marked addition from the current recipe
composition.
Changing addition
* Mark the addition and tap on the "Change
addition" symbol.
The Change addition menu opens.
The setting options for the desired addition are
displayed.
The saved and the current data is displayed.
The current values
The values saved by Service
The factory values
Ground coee quantity
Given in grams (g)
Water/Milk volume
Software
Given in millilitres (ml)
SCClub operating instructions
47
Page 48

Software
Coee quality
The quality levels inuence the brewing of the coee.
The higher the quality level, the more intensive is the
release of the coee’s avouring agents.
Quality levels
1 After being pressed, the ground coee is given
room to swell.
2 After being pressed, the beverage is brewed
directly.
3 After being pressed, a pre-brewing takes place
4 After being pressed and pre-brewing, the
ground coee is pressed while wet.
5 Like quality 4, but more forceful wet pressing.
6 Like quality 5, but longer and more forceful wet
pressing.
7 Like quality 6, but longer and more forceful wet
pressing.
Select coee grinder (optional)
For each coee recipe, you can choose which coee
grinder to use.
The value 1 is assigned to the desired coee grinder
Note
If very ne ground coee is
used with a very small amount
of brewing water, a high quality
level can lead to brewing water
errors.
Grinder 1 Grinder 2 Ground coee
1 0
0 1
The ground coee from grinder
1 is used.
The ground coee from grinder
2 is used.
The ground coee is taken
1 1
half each from grinder 1 and
grinder 2.
“Select coee grinder” is possible for coee
machines with two grinders.
48
NOTE
SCClub operating instructions
Page 49

Text and image
Cappuccino
Change text + picture
Recipe number 10 Factory: 10
Text + picture
Cappuccino
Note
The beverage name and the picture of a beverage
button are adjusted here.
For text adjustments: Activate the keyboard with the
keyboard icon.
For picture adjustment: Tap on the current picture.
Software
Menu control elds
w Overview
page 38
Remarks
A note on the beverage can be stored here.
SCClub operating instructions
49
Page 50

Software
Operating elements
5.5 Operating options
Operating elements
Self-service mode
Some functions could be switched to be inactive for
self-service mode.
These functions and their elds are not shown when
they are inactive.
Options: • Active
• Inactive
Standard value:
Self-service mode means the following settings are
switched at the same time.
• Barista eld: inactive
• Warm rinse eld: inactive
• Menu eld: delayed
• SteamJet: inactive
• Error indication: Symbol
• Adjustment cup size: inactive
• Language pre-selection: inactive
• Animation cup tray: active
Inactive
Standard settings
Barista eld
Options: • Active
Standard value:
Active The eld appears at the bottom when the
machine is ready for use. Three-stage co ee
strength setting.
Active
• Inactive
50
SCClub operating instructions
Page 51

Warm rinse eld
Software
Options: • Active
Standard value:
Active
• Inactive
Active The eld appears at the very bottom when
the machine is ready for use. Recommended
for longer breaks or espresso.
Menu eld
Options: • Immediately
• Delayed
Standard value:Immediately
Immediately The menu eld immediately reacts after
tapping on the eld.
SteamJet
Options: • Active
Standard value:
Inactive
• Inactive
Active Cup warmer option. The eld appears at the
bottom when the machine is ready for use.
Error indication
The fault is reported with dierent colours in the
display header.
Options: • Text
• Symbol
Standard value:Text
SCClub operating instructions
51
Page 52

Software
Cup size adjustment
The free lling quantity selection can be activated in
the operating options.
The lling quantity can thus be adapted to the cup
size used before beverage selection.
Options: • Active
• Inactive
Standard value:
Inactive
If the cup is pushed to the right on the controller, the
lling quantity increases, while pushing to the left
lowers the lling quantity.
The lling quantity is given in percent.
Controller in the middle 100% as set
Controller all the way to the left 50% less
Controller all the way to the right 50% more
Language pre-selection
Whether the pre-selection of languages and ags
is possible when the machine is ready for use is set
here. “Language pre-selection” can be activated here
individually for up to 5 language buttons.
The second option under “Operating options” is the
selection of the “Self-service + ags” button layout.
Options: • Active
Standard value:
Inactive
• Inactive
Animation cup tray
Here you can set whether the “Animation cup tray”
is enabled in the beverage settings. The animation
can be activated or deactivated here for all recipes
dened in the beverage settings.
Options: • Active
• Inactive
Button layout “self-service +
ags”
wButton layout page 53
Standard value:
52
Active
SCClub operating instructions
Page 53

Button layout
Button layout
Dierent standard layouts are saved here and can be
selected.
PostSelection
Software
Options: • Active
Standard value:
Inactive
• Inactive
Active The selection of the coee type and the
beverage size are queried after the beverage
has been selected.
The names of the coee types and the sizes
can be changed. (Coee type and S-M-L).
• Size 1
• Size 2
• Size 3
• Portioner 1
• Portioner 2
Some functions could be switched to be inactive for
self-service mode.
The functions and their elds are not shown when
they are inactive.
Display mode
Options: • Single-page
• Multi-page
Standard value:• Single-page
PostSelection
Display mode
Decaeinated
Options: • Active
Standard value:
Inactive
Active Percentage of the coee grind quantity of the
standard recipe.
SCClub operating instructions
• Inactive
Decaf
53
Page 54

Software
Decaf factor
Decaf factor
The value for the decaf factor is entered here.
The ground coee quantity for decaf (descaeinated)
is determined in percent of the ground coee quantity
set in the recipe.
This setting applies for all coee beverages with the
“Decaf” pre-selection.
At a 15% decaf factor, coee,
for example, is brewed with
15% more ground coee
compared to the standard recipe
when preparing with the decaf
function.
Options: • Active
Standard value:
Inactive
• Inactive
Beverage pre-selection
Options: • Active
Standard value:
Inactive
Active Previously selected beverages are dispensed
without the button being pushed again.
Beverage cancellation not possible.
• Inactive
Cancel beverage
Options: • Active
Standard value:
Active
Active Beverage dispensing can be cancelled by
pressing the beverage button again.
• Inactive
Beverage pre-selection
Cancel beverage
54
SCClub operating instructions
Page 55

5.6 Info
Timer
Care
Filter/descaling
Journal
The Info menu o ers the selection options described
in the following.
Last brewing
Information on the last brewing.
Timer
The timer weekly overview is called up. All
switching-on and switching-o times are shown in this
overview.
Service
Contact information for Schaerer Service.
Serial number of the co ee machine.
Care
The last cleanings and care measures which run via
co ee machine programmes are shown here.
Software
Last brewing cycle
Service
Water lter and descaling
Information on the remaining service life of the water
lter and the time of the next descaling process.
Journal
Log of events and errors relating to the operation and
cleaning of the co ee machine.
SCClub operating instructions
55
Page 56

Software
DI_abr
5.7 Accounting
Counters
The counters of the dispensed individual beverages
and the sum of the beverages are shown here.
A protocol can be read out using the USB output.
Accounting
Counters
SML 1 2 3 4
Cappuccino M
Cappuccino L
Chociatto M
Chociatto L
Espresso M
Hot water M
Latte
Macchiato
Latte
Macchiato
Milk M
Coffee M
4 66 510 5900
2 40 306 3540
9 48 416 4200
5 24 208 2100
2 33 255 2950
3 44 340 3933
2 33 255 2950
M
2 26 204 2360
L
1 17 128 1475
3 53 408 4720
Counters
Standard setting
Counter 1 = daily counter
Counter 2 = weekly counter
Counter 3 = monthly counter
Counter 4 = annual counter
All counters can be reset.
56
TIP
SCClub operating instructions
Page 57

co eeMYsation (App)
Software
Accounting
The accounting system for users of the
co eeMYsation app can be activated or deactivated
here. With the co eeMYsation app, the user can
dispense individually set beverages via Bluetooth
on the way to the machine. It can be used for all
Schaerer Co ee Club machines. The individual
recipes are therefore not bound to just one machine.
If “Accounting” is activated, the following functions
can be accessed:
• Load user list
• Save user list
• Charge for consumption
In order to use the accounting function of the
app, the Bluetooth function must be activated
under system.
5.8 PIN rights
A PIN can be assigned for all of the areas listed
below.
• Cleaning
• Setting
• Accounting
co eeMYsation
NOTE
The PINs are hierarchically structured.
That means, for example: The setting PIN
simultaneously releases all rights for the cleaning
PIN, but not all the rights for the accounting PIN.
If no PIN is assigned, the area is accessible without
a PIN.
If a PIN is assigned to an area, no access is granted
without that PIN.
SCClub operating instructions
57
Page 58

Software
Cleaning
Settings
Accounting
Cleaning PIN
After the valid PIN is entered, access to:
Care
Setting PIN
After the valid PIN is entered, access to:
Care Timer
Beverages System
Operating option Language
Accounting (without
USB
"deletion")
Accounting PIN
After the valid PIN is entered, access to:
Care PIN
Beverages Timer
Operating option System
Accounting (with
"deletion")
Language
USB
58
SCClub operating instructions
Page 59

5.9 Timer
DI_timer
DI_04_11_00_00
Button layout overview
Time/Date
The current time and data are set here.
Status of button layout
Options: • Active
• Inactive
Software
Time / date
Status of button layout
Standard value:
Inactive
Active Button layouts can be assigned automatically
using the timer.
Button layout overview
Timer
Button layout overview
Button layout
Mo Tu We Th Fr Sa Su
00:00 06:.. 00:00 06:.. 00:00 06:.. 00:00 06:.. 00:00 06:.. 00:00 06:.. 00:00 06:..
00:00
01:00
02:00
03:00
04:00
05:00
06:00
07:00
08:00
09:00
10:00
11:00
12:00
13:00
14:00
15:00
16:00
17:00
18:00
19:00
20:00
21:00 00:.. 21:00 00:.. 21:00 00:..
21:00
22:00
23:00
The weekly overview of all switching times for the
button layout is displayed.
The settings can be changed directly in the overview.
21:00 00:.. 21:00 00:.. 21:00 00:.. 21:00 00:..
For example self-service from 9
pm to 6 am.
The minimum time for displaying
a button layout is 30 minutes.
SCClub operating instructions
59
Page 60

Software
5.10 System
Milk and foam
The central, generally-applicable values for milk and
milk foam are set here. These values apply for all
available recipes.
If special values for milk and milk foam are set in the
recipes, they remain valid and are not changed.
Milk storage temperature
Options:
>16 °C = green milk nozzle (standard)
<10 °C = orange milk nozzle (accessories)
<5 °C = blue milk nozzle
(optional special accessories*)
The green nozzle should be used from 10 °C.
We recommended a milk storage temperature
of 16-22 °C for optimal results when using
uncooled milk. The blue nozzle for a constant
temperature of less than 5 °C must be
ordered and activated by a technician if
needed.
Progress display
Options: Line, circle, o
Milk and foam
*Only in case of constant milk
storage temperature of < 5 °C.
NOTE
Progress indicator
Standard value:Line
60
SCClub operating instructions
Page 61

Display and lighting
Display and illumination
Parameters relating to the display such as brightness
and lighting at the outlet can be found in this system
menu.
Lighting concept
Consisting of two parameters:
1. Lighting (at the outlet)
Software
Options: • Active
Standard value:
Inactive
• Inactive
Active While the machine is ready for use, a small
light is constantly illuminated directly behind
the beverage outlet.
2. Event (message) display
Options: • Active
Standard value:
Inactive
• Inactive
Active The lighting during a message is activated.
Display brightness
The display brightness can be congured in 5 percent
steps.
Decrease display brightness automatically
Options: • Active
Standard value:
Active
• Inactive
SCClub operating instructions
61
Page 62

Software
Active
If „Automatically decreasing brightness“
is activated, the display brightness is
automatically decreased 5 minutes after the
last beverage dispensing process (break in
operation).
If the display brightness has been decreased,
the display goes back to the selected
brightness when the display is tapped for the
rst time. Tapping on the beverage button for
the second time dispenses the corresponding
beverage.
Touch calibration
Recalibrate the touch display.
Display background
The colour design for the touch display can be set
here.
• Background for the main page
• Background for more pages
Beverages: Font + colour
Here you can set whether the font colour and size for
the beverages are allowed to be changed.
Options: • Active
• Inactive
Beverages: font + colour
Standard value:
Active
The precise font colour and size settings can
be made in the next step.
62
Inactive
SCClub operating instructions
Page 63

Water lter
Water lter
Information on water hardness and water lter service
life.
Options: • Active
Standard value:
Inactive
• Inactive
Software
Note
No water lter is required at a
water hardness of 0 to 4 °dKH.
Active
A water lter is present. Measured water
hardness and water lter service life
(according to table) are queried, see below.
Measured carbonate hardness
The measured water hardness in °dKH is entered
here.
* Obtain the water hardness of the drinking water
from the water supplier or use the carbonate
hardness tester (with instructions) in the
accessories.
The carbonate hardness test is included in the
accessories supplied.
Measured total hardness
If the coee machine is operated with
incorrectly set water hardness, this can lead
to a high level of calcication and therefore to
leaky valves.
No liability is assumed for damages resulting
from this.
NOTE
Filter service life (water lter)
The lter service life in litres is entered here if there is
an active water lter.
Example: With a measured carbonate hardness of 10
°dHK, the lter range to be set is 200 litres.
SCClub operating instructions
Water lter service life table
w page 24
63
Page 64

Software
Temperature
Switch-off rinsing
system rinsing
Temperature
Boiler
The boiler water temperature is set here (coee
brewing water temperature).
Switch-o rinsing
Options: • Active
Standard value:
Active
When switching o of the coee machine,
Active
• Inactive
the system cleaning must be performed if
milk beverages have been dispensed since
the last cleaning.
Automatic milk system rinsing
Options: every 120 min, 52 hours
Standard value:every 52 hours
Calibration of “beans empty” message
The “beans empty” message is recalibrated here.
Execution is necessary as soon as the message
“Rell beans” appears even though there are still
beans in the container.
Frost protection/ transport preparation
If the coee machine is sent via a forwarding agent
or a parcel service, this programme must be run in
advance to prevent damages.
Automatic milk
Calibration of „beans
empty“ message
Antifreeze protection/
transport preparation
64
SCClub operating instructions
Page 65

Drip tray sensor
Software
The drip tray sensor monitors the lling level of the
drip tray.
It prevents overlling of the drip tray.
Options: • Active
Standard value:
Active
• Inactive
If the sensor is deactivated, the drip tray can
be overlled and overow.
This can cause damage to furniture. We
recommend leaving the sensor active.
Portioner
Here you can store names and pictures of the
beans and powders used, which are displayed as a
selection in the “multi-page” PostSelection mode if
the machine is equipped with more than one grinder
or several powder containers.
Bluetooth (optional)
The optional Schaerer Bluetooth stick is required for
this function
Options: • Active
• Inactive
Drip tray sensor
Operating the drip tray sensor
w Overview
Page 35
NOTE
Portioner
Display mode
w Page 53
Bluetooth
Standard value:
Inactive
* Set Bluetooth to active here
* Insert the Schaerer Bluetooth stick into the USB
slot on the back.
* Switch the coee machine OFF and ON again.
SCClub operating instructions
65
Page 66

Software
S-M-L function
After activation, small-medium-large lling quantities
can also be congured for each beverage in the
settings. To do so, rst go to a beverage in settings.
Choose the icon lling quantity down left and activate
the [SML active] box.
All sizes are activated just now. Also their quantity
is adjusted for each size at the position if desired.
Remove the check mark for unwanted sizes or
deactivate the function, e.g. if only S and M sizes are
desired.
Small
Standard change factor of the beverage size for S
recipes which are newly activated.
Standard value: 75 %
Large
Standard change factor of the beverage size for L
recipes which are newly activated.
Standard value: 125 %
Options: • Active
Standard value:
Inactive
• Inactive
S-M-L (in PostSelection mode)
S-M-L
• Small
• Medium
• Large
If the S-M-L function is activated, under the individual
sizes, the respective pictures (beverage symbol) and
texts (name for beverage symbol) can be dened
which are displayed after the beverage selection
(one- or multiple-sided) if PostSelection operation is
activated. The user can look at the beverage picture
(e.g. for a small beverage) to get an idea of the size
and have an easier time making a decision.
66
SCClub operating instructions
Page 67

5.11 USB
Load recipes
Save recipes
Export counters
Data exchange is possible using the USB connection.
As soon as the USB stick is inserted, the functions
become active.
The USB connection is on the left side of the display.
Loading recipes
Recipes saved on the USB stick are loaded to the
co ee machine here.
Loading beverage symbols
Images or beverage symbols saved on the USB stick
are loaded to the co ee machine here.
Software
Load beverage symbols
Saving recipes
The current recipes from the co ee machine are
exported onto the USB stick here.
Saving recipes as PDF
Documentation of recipes. Only visible with PIN.
Exporting counters
The current counter states from the co ee machine
are exported onto the USB stick here.
SCClub operating instructions
Save recipes as PDF
67
Page 68

Software
HACCP export
Data back-up
Load data
Load language
Firmware update
HACCP export
The cleanings performed are logged and are
exported here to the USB stick for the HACCP
certi cate.
Data backup
Set data such as machine data, beverage data, etc.
is saved on the USB stick here.
Loading data
Saved data such as machine data, beverage data,
etc. is loaded to the co ee machine from the USB
stick here.
(Can be protected with a PIN.)
Loading language
If available, an additional display language can be
loaded to the co ee machine from the USB stick
here.
Firmware update
Only for Service.
System recovery
After updating the rmware, the previous version can
be restored within 30 days.
5.12 Language
The display language is set here.
The available languages are displayed in English.
68
System recovery
SCClub operating instructions
Page 69

6 Other settings
6.1 Setting the grind level
Other settings
Risk of trapping/Risk of injury
• The coee grinder contains moving parts
which could injure ngers.
> Never reach into the grinders while the
coee machine is running and the product
hoppers have been removed.
Finer setting of grind level
• Making a big change to a ner grind level
can block the coee grinder.
> Only set the grind level ner with one
revolution with the multi-tool.
> Then dispense a coee beverage using the
ner grinder setting.
> Repeat this step until the desired grind level
is set.
Coarser setting of grind level
A change to a coarser grind level can only be
set once.
* Initiate coee dispensing and wait until the grinder
starts up.
* Adjust the grinding level as required using the
multi-tool while the mill is running.
Grind level ne
Grind level
coarse
CAUTION
Observe the Safety chapter
w from page 9
IMPORTANT
Observe the Warranty chapter
w from page 106
SCClub operating instructions
Multi-tool
69
Page 70

Care
7 Care
7.1 Care safety notes
Regular cleaning is a requirement for fault-free
operation of the coee machine and for optimal
coee quality.
Health risk/Hygiene
• Milk is very sensitive. Hazardous bacteria
can grown in the milk system.
> Clean the milk system daily after use with
the milk system rinse.
> Perform the 1x weekly system cleaning
after the end of the business day.
> After system cleaning, perform manual
cleaning of the milk foam and the steam
nozzle.
> Exchange the milk hose if needed, no later
than after 6 months.
> Exchange the mixer hose if needed.
> Observe all hygiene notes.
> Observe the HACCP cleaning concept.
Health risk/Hygiene
• Bacteria can spread in a coee machine
which is not in use.
> Carry out all cleaning processes before
and after operating breaks of several days.
CAUTION
Observe the Safety chapter
w from page 9
CAUTION
Observe the Safety chapter
w from page 9
70
SCClub operating instructions
Page 71

Care
Health risk/Hygiene
• All cleaning products are perfectly matched
to the cleaning programmes.
> Use only Schaerer cleaning and descaling
agents.
Health risk/
Risk of irritation and burns
• Hot cleaning liquid ows out of the outlet
during cleaning.
• The hot liquids could irritate the skin and
the heat creates a risk of burns.
> Never reach under the outlets during
cleaning.
> Always lock the touch display using the
"CleanLock" before cleaning.
> Ensure that no one ever drinks cleaning
liquid.
CAUTION
Observe the Safety chapter
w from page 9
CAUTION
Observe the Safety chapter
w from page 9
SCClub operating instructions
71
Page 72

Care
7.2 Overview of cleaning intervals
Care
Daily
Weekly
Regularly
Automatically
Noti cation
Cleaning programmes
x System cleaning
x Mixer rinsing
x Milk system rinse
Descaling
x Descaling
Manual cleaning
x Clean the control panel (CleanLock)
x Clean the grounds container
x Clean the collecting tray
x Clean the water tank
x Clean the drip tray
x Clean housing
x Clean the outlet by hand
x Brewer care
x Clean the brewing unit
(x) x Clean the milk system by hand
(x) x Clean the mixer *
x Clean the bean hoppers
x Clean the powder container *
Cleaning programme
w from page 73
w Page 76
w Page 78
w Page 78
w Page 79
w Page 79
w Page 80
w Page 81
w Page 81
w Page 43
w Page 82
w Page 85
w Page 88
w Page 89
w Page 90
Daily = at least once daily and as needed
Weekly = weekly cleaning
Regularly = regularly as needed
Automatically = automatic drain
Noti cation = After noti cation on the display
(x) = daily if there are high levels of contamination
* = optional (depending on machine con guration)
72
SCClub operating instructions
Page 73

7.3 Dishwasher-safe parts
Care
The parts listed in the table can be safely
cleaned in a dishwasher.
All parts not listed here cannot be put in a
dishwasher
Dishwasher-safe coee machine parts
Grounds container
Drip tray
Drip grid without SteamJet
Drip grid with SteamJet
Container extension without lid
Powder container without lid
7.4 Cleaning programmes
7.4.1 System cleaning
System cleaning is an automatic cleaning programme
which cleans the coee system of the coee machine
with Schaerer cleaning tablets.
A milk system rinse and a mixer rinse are part of the
system cleaning process.
Total time required: about 10 minutes
IMPORTANT
Animated instructions
w Coee machine
w Main menu
w Care
w Instructions
SCClub operating instructions
73
Page 74

Care
Health risk/Risk of irritation and
burns
• During cleaning, hot cleaning liquid and hot
water ow out of the outlets.
• The hot liquids could irritate the skin and
the heat creates a risk of burns.
> Never reach under the outlets during
cleaning.
> Before every cleaning, put a collecting
container which can hold at least 3 litres
under the outlet.
> Ensure that no one ever drinks cleaning
liquid.
The cleaning programme proceeds
step-by-step through the system cleaning via
the display.
Follow the notications.
7.4.2 System cleaning
Start-up
* Call up the Care menu
* Tap on Cleaning programmes
* Tap on System cleaning
The following question appears: "Switch o after
cleaning?"
• If conrmed with Yes , the coee machine
switches o after cleaning.
• If conrmed with No , the coee machine restarts
after cleaning.
* Select the desired option
* Follow the information on the display
CAUTION
Observe the Safety chapter
w from page 9
IMPORTANT
During cleaning, a small amount
of rinse water could get into the
grounds container. This is not
an error.
74
SCClub operating instructions
Page 75

7.4.3 Mixer rinsing
Care
Health risk/Danger of scalding
• Hot rinse water ows out of the outlet
during rinsing.
> Never reach under the outlets during
rinsing.
Before starting operation and after the end of
the business day, a rinse must be done.
The mixer rinse can be started independently.
* Call up the Care menu
* Tap on Cleaning programmes
* Tap on Mixer rinse
* Follow the information on the display
7.4.4 Milk system rinsing
Health risk/Danger of scalding
• Hot rinse water ows out of the outlet
during rinsing.
> Never reach under the outlets during
rinsing.
The milk system rinsing can be started independently.
This is useful if long breaks are taken between the
dispensing of milk beverages.
The milk system rinsing rinses out the milk hose and
the milk foamer.
* Call up the Care menu
* Tap on Cleaning programmes
* Tap on Milk system rinsing
* Follow the information on the display
CAUTION
Observe the Safety chapter
w from page 9
NOTE
Animated instructions
w Coee machine
w Main menu
w Care
w Instructions
CAUTION
Observe the Safety chapter
w from page 9
Animated instructions
w Coee machine
w Main menu
w Care
w Instructions
w Cleaning the milk system by
hand
page 85
SCClub operating instructions
75
Page 76

Care
7.5 Descaling
Health risk/Risk of irritation and
burns
• Hot cleaning liquid or descaling solution
ows out of the outlet during cleaning and
descaling.
• The hot liquids could irritate the skin and
the heat creates a risk of burns.
• Cleaning and descaling agents can be
hazardous to health if touched, accidentally
or on purpose.
> The coee machine must be completely
installed before descaling starts.
> Never reach under the outlets during
cleaning or descaling.
> Ensure that no one ever drinks cleaning
liquid or descaling solution.
> Familiarise yourself with the product
information on the descaling solution bottle.
Risk of burns
• Hot liquid comes out of the outlets during
beverage and steam dispensing. The
adjacent surfaces and outlets get hot as
well.
> If the coee machine is heated up, a
cooling down routine starts. Duration of
cooling down routine: 5-10 minutes.
> Wait until the end of the cooling down
routine.
CAUTION
Observe the Safety chapter
w from page 9
CAUTION
Observe the Safety chapter
w from page 9
76
SCClub operating instructions
Page 77

Care
• Schaerer cleaning products are matched to
the materials and tested. Other descaling
agents may damage the coee machine.
> Only use Schaerer descaling agents for
descaling.
Liability cannot be accepted for damages
resulting from the use of other descaling
agents, warranty claims become invalid.
The exact time for descaling is determined by the
water hardness, water throughput and whether or not
a water lter is used. This point in time is calculated
and displayed by the Schaerer Coee Club.
The descaling process consists of four stages:
• Cooling down routine (if machine is heated up)
• Preparation
• Descaling
• Rinsing
The following is needed during the descaling
process:
• 2 bottles of Schaerer liquid descaler (0.75 litres
each).
• 1 bottle of water (0.75 litres).
• 5 litre collection container
IMPORTANT
Observe the Warranty chapter
w from page 106
Total time for descaling
procedure approx. 80 minutes.
Do not stop the procedure at
any point before it is completed.
The display messages lead through the
programme step-by-step. When started, a
sequence begins which must be followed.
Follow the messages.
Calling up the descaling programme
* Call up the Care menu
* Tap on Descaling
* Follow the display messages
SCClub operating instructions
IMPORTANT
w Main menu
w Care
w Descaling
77
Page 78

Care
7.6 Manual cleaning
7.6.1 Cleaning the control panel
(CleanLock)
Tap on "CleanLock", then a 15-second countdown
starts. The touch display can now be cleaned. The
touch display is reactivated 15 seconds after the last
time it is touched.
Danger of scalding
• If a beverage is accidentally initiated, there
is a risk of injury.
> Always lock the touch display using the
"CleanLock" before cleaning.
• There is a risk that scratches or dents will
occur during cleaning.
> Only clean the display with a moist cloth.
Do not use cleaning agents.
> Only use soft cloths for cleaning.
7.6.2 Cleaning the grounds chute
(ground slide, optional)
Order numbers for the
Schaerer care programme
w Accessories and spare parts
page 109
CAUTION
Observe the Safety chapter
w from page 9
IMPORTANT
Observe the Warranty chapter
w from page 106
* Empty the grounds container.
The cup grid rests on the grounds container. Always
hold the grounds container tightly when emptying it.
* Rinse out the grounds container with running
drinking water
* Clean with a moist cloth
* Dry the grounds container and reinsert it
> Never use force! Risk of breakage.
78
IMPORTANT
Observe the Warranty chapter
w from page 106
SCClub operating instructions
Page 79

7.6.3 Cleaning the collecting tray
Remove and clean the collecting tray once a week.
Low water volume in the collecting tray does not
mean there are leaks; this is caused by the system
design.
The collecting tray is under the grounds container.
Clean the collecting tray when needed.
* Remove the grounds container.
* Remove the collecting tray and clean thoroughly
with pure drinking water.
* Dry the collecting tray and insert it.
* Insert the grounds container.
7.6.4 Cleaning the water tank
Thoroughly rinse out the water tank with pure water
once a week.
Care
SCClub operating instructions
79
Page 80

Care
7.6.5 Cleaning the drip tray
Danger of scalding
• Hot liquids could be in the drip tray.
• If the drip tray does not correctly engage,
for example after cleaning, there is a risk of
burns from hot uids.
> Carefully move the drip tray.
> Reinstall it carefully so that no unintended
water leakage occurs.
> Always make sure the drip tray is
positioned correctly.
* Carefully life and remove the drip tray from the
front
* Remove the drip grid and clean with the cleaning
brush
* Thoroughly clean the drip tray
* Thoroughly clean the SteamJet outlet and cover
with the supplied cleaning brush
* Then rinse the drip tray and drip grid with pure
drinking water
* Dry the drip tray and drip grid, put them together
and reinsert
The underside of the drip tray and the area
of the drip tray sensor must be dry before
insertion. The sensor is located on the right
under the drip tray.
If moisture remains in this area, the “Empty
drip tray” message appears again.
CAUTION
Observe the Safety chapter
w from page 9
IMPORTANT
80
SCClub operating instructions
Page 81

7.6.6 Cleaning the housing
Care
• There is a risk that scratches or dents will
occur during cleaning.
> Do not clean with abrasive agents or
similar.
> Use only very mild cleaning products.
> Do not use strong alkaline, alcoholic or
degreasing cleaning products.
> Only use soft cloths for cleaning.
* Switch o the coee machine using the on/o
switch.
* Allow the machine to cool o.
* Clean the housing of the cooled coee machine
with a moist cloth.
* Rub dry using a ne wool cloth.
7.6.7 Cleaning the outlet by hand
Regularly clean the outlet from the outside with a
damp cloth and clean the outlet options with suitable
brushes.
IMPORTANT
Observe the Warranty chapter
w from page 106
Note
There are problems with
resistance to alkaline cleaning
products, solvents such as
acetone, carbon, carbon
tetrachloride, paint thinner or
alcohol combinations > 5%,
ammonia, benzol, glycerine,
xylol, scouring agents,
degreasing washout solvents
and strong spray cleaners are
also not suitable
SCClub operating instructions
81
Page 82

Care
7.6.8 Cleaning the brewing unit
Risk of trapping/Risk of injury
• The coee machine contains moving parts
which could injure ngers or hands.
• There is a risk of crushing when removing
the brewing unit
> Always switch o the coee machine and
pull out the power plug before reaching into
the coee grinder or into the opening of the
brewing unit.
> Hold the brewing unit rmly and carefully
remove it
The brewing unit can be cleaned as needed
* Press the on/o switch until the coee machine
switches o
* Pull the power plug
* Insert the cup grid into the grounds container
* Remove the grounds container.
* Remove the collecting tray
* Remove the drip tray
The brewing unit is now accessible.
Risk of burns
• The brewing unit may still be hot directly
after switching o the machine.
> Let the coee machine cool before
cleaning.
CAUTION
Observe the Safety chapter
w from page 9
CAUTION
Observe the Safety chapter
w from page 9
• The brewing unit can slide downwards.
> Always hold the brewing unit rmly.
> Never use force! Risk of breakage.
82
IMPORTANT
Observe the Warranty chapter
w from page 106
SCClub operating instructions
Page 83

* Use one hand to reach under the brewing unit into
the shaft, undo the lock and hold (Figure 1)
* Slowly lead the brewing unit all the way down, tip it
and remove it towards the front
* Remove the brewing unit and hold on tight while
doing so
Use the multi-tool from the accessories.
* Turn the thread on the head of the brewing unit
anticlockwise (Figure 2) until the ejector is located
in the front position.
* Carefully pull the springs outwards and press them
down
This unlocks the insertion chute.
* Fold the insertion chute [1] upwards
* Clean the brewing sieve under running water or
with a cloth
* Remove ground coee residues with a brush
* Rinse the brewing unit under running water
Care
Figure 1
Figure 2
1
Possible damage
• The brewing unit can get damaged by
cleaning products or in the dishwasher
> Use only water to clean the brewing unit
> Never clean the brewing unit in the
dishwasher
SCClub operating instructions
Figure 3
IMPORTANT
Observe the Warranty chapter
w from page 106
83
Page 84

Care
* Dry o the brewing unit with a cloth
Let it dry completely before installing it into the coee
machine
Remove ground coee residue in the shaft
* Wipe out the ground coee towards the front or
use a hoover
* Insert the springs into the insertion chute (Figure 4)
Pay attention to the guides.
Reinstall the dry brewing unit.
Turn the thread on the head of the brewing unit
anticlockwise (Figure 2) until the scraper is once
again
completely folded in
* Press and hold down the lock and place the
brewing unit into the shaft all the way to the back
on the rear wall
* Push the brewing unit upwards vertically until the
lock engages
* Insert the grounds container.
* Insert the drip tray
Figure 4
Brewing sieve
If the brewing unit cannot be inserted without
resistance:
> Turn the thread on the head of the brewing
unit a bit to the left or right with the multi-tool
until the brewing unit slides into the guides.
> Never use force! Risk of breakage.
84
IMPORTANT
Observe the Warranty chapter
w from page 106
SCClub operating instructions
Page 85

7.6.9 Cleaning the milk system by hand
Care
Danger of scalding
• If a beverage is accidentally initiated, there
is a risk of injury.
> Always switch o the coee machine
before cleaning
> Pull the power plug
* Perform a milk system cleaning process
* Remove the front cover from the outlets
* Remove the milk foam with the steam nozzle
* Disassemble the individual parts and thoroughly
clean with warm, running water
* Clean the guide in the outlet with a moist cloth
* Clean the channels and the connections with the
supplied cleaning brush
CAUTION
Observe the Safety chapter
w from page 9
Animated instructions
w Coee machine
w Main menu
w Care
w Instructions
Health risk
• If it comes into contact with the eyes, the
Schaerer milk system cleaner can cause
serious eye injuries.
> Ensure that the milk system cleaner never
gets into the eyes of humans or animals.
SCClub operating instructions
CAUTION
Observe the Safety chapter
w from page 9
85
Page 86

Care
* Mix 5 ml of special cleaner with 0.5 litres of warm
drinking water
* Lay all individual parts, including the cleaning
brush, into the prepared cleaning liquid
All parts must be completely covered with the
cleaning liquid.
* After 5 hours, thoroughly clean all parts with a
brush
* Very thoroughly clean all parts with pure drinking
water
Health risk/Hygiene
> The decorative strips on the outlet can be
disassembled and cleaned if necessary
Risk of burns/
Danger of scalding
• The steam nozzle without milk foamer can
blow o hot steam
> Never install the steam nozzle without the
milk foamer
* Assemble the milk foamer
Moisten the parts to be assembled, do not grease
* Assemble the parts and press down rmly
* Reinsert the milk foamer into the outlet
CAUTION
Observe the Safety chapter
w from page 9
CAUTION
Observe the Safety chapter
w from page 9
86
SCClub operating instructions
Page 87

Cleaning the milk hose
* Put one end of the milk hose to the other parts into
the cleaning liquid
* Lay the rest of the milk hose into the cleaning
liquid lengthwise
This process prevents air bubbles from remaining in
the
milk hose.
All parts must be completely covered with the
cleaning liquid.
Care
"Cleaning milk hose" instructions
w Instructions
page 41
SCClub operating instructions
87
Page 88

Care
7.6.10 Cleaning the mixer
Clean more often depending on the powder used.
* Carry out a mixer rinse
* Open the doors
* Pull the mixing bowl forwards with the handle
* Lift the mixing bowl slightly so that any remaining
water runs out
* Pull o the mixer hose, from the mixing bowl to the
outlet, and take it out of the guide
The mixer’s propeller is now visible.
* Clean the propeller with a cloth
* Disassemble the two-part mixing bowl
* Clean both mixing bowl parts and the mixer hose
under warm, running drinking water
* Let the parts dry fully
At the time of reassembly, all openings must point in
the same direction
* Insert the mixer hose into the outlet through the
guide
* Reinsert the mixing bowl until it engages
* Attach the mixer hose to the mixing bowl
Animated instructions
w Coee machine
w Main menu
w Care
w Instructions
Danger of scalding
• If the mixer hose is not rmly connected,
hot water or hot powder-based beverage
can escape unintentionally.
> Attach the mixer hose to the mixing bowl.
88
CAUTION
Observe the Safety chapter
w from page 9
SCClub operating instructions
Page 89

7.6.11 Cleaning the bean hoppers
The permanently installed bean hoppers can
be cleaned at regular intervals and as needed.
Recommendation: monthly.
Care
Risk of injury
• Very long hair could get stuck in the
grinder head and get pulled into the coee
machine.
> Always protect hair with a hairnet before
you remove the bean hopper.
Risk of trapping/Risk of injury
• The coee machine contains moving parts
which could injure ngers or hands.
> Always switch o the coee machine and
pull out the power plug before reaching into
the coee grinder or into the opening of the
brewing unit.
* Briey press on the On/O switch
(approx. 1 second)
The coee machine switches o.
* Pull the power plug
* Remove the bean hopper lid, empty it and clean
with a damp cloth
* Clean the lock elements in the bean hopper with
the supplied brushes
* Let the bean hopper dry fully
* Rell the bean hoppers and close with the lids
CAUTION
CAUTION
SCClub operating instructions
89
Page 90

Care
Bean hopper extension (optional)
* Unlock the extension
* Remove the extension upwards
* Thoroughly wipe the extension with a damp cloth
and let it dry
* Put on the extension and lock
7.6.12 Cleaning the powder container
The permanently installed bean hoppers can
be cleaned at regular intervals and as needed.
Recommendation: monthly.
Clean more often depending on the powder used.
Risk of injury
• Very long hair could get stuck in the
grinder head and get pulled into the coee
machine.
> Always protect hair with a hairnet before
you remove the bean hopper.
* Briey press on the on/o switch
(approx. 1 second)
The coee machine switches o.
* Pull the power plug
* Pull the safety catch on the powder container and
loosen it
* Remove the powered container lid, empty it and
clean with a damp cloth
* Unscrew the cap nuts at the front and rear
* Pull out the portioning screw and remove the
discharge cap
* Wipe out the hopper thoroughly with a moist cloth
CAUTION
90
SCClub operating instructions
Page 91

* Thoroughly clean the individual parts of the
positioning screw with the supplied cleaning brush
* Let the powder container and the individual parts
dry completely
* Reassemble and install the portioning screw and
screw on the cap nuts
Care
Portioner with individual parts
Portioning screw
Ensure that discharge cap is correctly
positioned.
* Fill the powder container and put on the lid
* Close the lock
Powder container extension (optional)
* Unlock the extension
* Remove the extension upwards
* Thoroughly wipe the extension with a damp cloth
and let it dry
* Put on the extension and lock
IMPORTANT
SCClub operating instructions
91
Page 92

HACCP cleaning concept
8 HACCP cleaning concept
You are legally obligated to ensure that you do not
expose your guests to any health hazards when
consuming the provided food or beverage.
A HACCP (Hazard Analysis Critical Control Points)
cleaning concept is required to identify and assess
hazards. You should perform a risk analysis in your
operations. The goal is to detect and eliminate
hazardous areas. To do so, monitoring processes
and, if necessary, test procedures must be dened
and enforced.
When installed, maintained, cared for and cleaned
properly, Schaerer coee machines full the
regulations named above. If the coee machine is not
cared for and cleaned properly, the dispensing of milk
beverages can present a food hygiene risk.
Observe the following points to comply with the
HACCP cleaning concept:
"Regulation on the hygiene of
foodstus from 5/8/1997"
Use our HACCP cleaning
concept to monitoring the
regular cleaning process.
HACCP export
w page 68
Sterilise the milk system daily
• Follow the cleaning specications for the milk
system in the Care chapter. This ensures that your
system has a very low microbiological content at
the time of starting operation.
You can call up the logs of the last cleanings
using the Info eld .
You can export a HACCP log using the USB
eld .
92
Only use the cleaning products
approved of by Schaerer.
Observe the Care chapter
w from page 70
TIP
SCClub operating instructions
Page 93

Always start operation with a newly-opened,
HACCP cleaning schedule
Only use chilled UHT milk, to prevent health risks due to bacteria.
For powder beverages, use only products that have not exceeded their expiration date.
Cleaning steps:
Date
Cleaning steps
Signature
Date
Cleaning steps
SignatureTime Time
1 2 3 4 5 1 2 3 4 5
1. 17.
2. 18.
3. 19.
4. 20.
5. 21.
6. 22.
7. 23.
8. 24.
9. 25.
10. 26.
11. 27.
12. 28.
13. 29.
14. 30.
15. 31.
16.
Daily
1. Switch-off rinsing
w Starts automatically when the machine is switched off.
Milk system rinsing and mixer rinsing are included in the switch-off
rinsing cycle.
2. Clean the operating panel, grounds container, drip tray, and housing
w User Manual, Care chapter
Weekly
3. System cleaning
4. Clean the mixer and milk system manually
Clean the water tank
Regularly
5. Clean the product hoppers (beans/powder)
Clean the dispensing spouts and the brewing unit
w User Manual, Care chapter
Month Year
pre-cooled milk package
• UHT milk in its original packaging is typically
free of hazardous bacteria. Always opens a new,
pre-cooled milk package when starting operation.
• Ensure absolute cleanness when opening the milk
package! Bacteria can be transmitted to milk when
opening if hands or tools are not clean.
Keep the milk cool!
• Always keep a new, pre-cooled milk package
ready.
• If cooling is not done during operation, the milk
must be used very quickly. If necessary, cool the
milk between use.
• If not much milk is used, the pre-cooled milk must
be cooling during operation.
HACCP cleaning concept
Recommendation:
Use UHT milk with 1.5% fat.
The milk should be about 6-8 °C
when starting operation.
Depending on the setting, a
litre of milk makes about 20
cappuccinos.
Schaerer o ers various cooling
options (e.g. Schaerer side
cooler or Schaerer milk cooler).
SCClub operating instructions
93
Page 94

Maintenance and descaling
9 Maintenance and descaling
Please note that this is a professional coee machine
for businesses that requires regular maintenance and
descaling.
The maintenance due date depends on the duration
of use and is indicated on the display. When
Schaerer Service does maintenance, the descaling of
the brewing system is done at the same time.
The coee machine can continue to be used after
the notication is output, but the execution or
commissioning of maintenance work must be done
in a timely manner to ensure functional safety and
prevent consequential damages.
9.1 Maintenance
Maintenance after notication on the display only by
trained sta or Schaerer Service, since safety tests
have to be done.
The following maintenance levels exist:
Service-maintenance
notications
w Notications and notes
page 96
• Descaling, can be done by the operator/user.
• Maintenance after notication on the display, only
by trained sta or Schaerer Service, since safety
tests have to be done.
94
Descaling
w Software w Care w Descaling
page 76
Service-maintenance
notications
w Notications and notes
page 96
SCClub operating instructions
Page 95

9.2 Schaerer Service
Schaerer Service can be reached via a central
address if the sales centre for a particular location is
not known.
Schaerer AG
Allmendweg 8
P.O.Box 336
4528 Zuchwil
Switzerland
Support in Switzerland:
Telephone: +41 32 681 62 75
E-mail: technical-support@schaerer.com
Maintenance and descaling
Important!
For other maintenance work
and repairs, contact the
responsible Schaerer Service.
The telephone number can be
found on the address label on
the coee machine and on the
delivery slip.
SCClub operating instructions
95
Page 96

Notications and notes
10 Notications and notes
10.1 Operation notications
Relling beans
* Rell the bean hopper (depending on the display)
* Check that:
• The coee beans are not sliding down in the
hopper.
* Stir with a large spoon and conrm with .
* Perform the "Beans empty notication calibration"
Opening stopcock
* Open and conrm the water stopcock
Empty grounds container
* Empty the grounds container.
Grounds container missing
* Correctly reinsert the grounds container
Beans empty notication
calibration software
w Page 64
Changing the water lter
* Change the water lter
Observe the operating instructions of the water lter.
* If necessary, call Schaerer Service
Call Schaerer Service
Display of the error number
w Error messages and faults
Service notication
= Service maintenance after notication on the
display
* Call Schaerer Service
96
Service notications are
information. It is usually still
possible to operate the coee
machine.
SCClub operating instructions
Page 97

10.2 Error messages and faults
Basic procedure when error messages or faults are
displayed:
* Switch the coee machine o and, after several
seconds, back on
* Repeat the process that caused the fault
In many cases the fault is then eliminated and you
can continue
If this is not successful: Search for the displayed error
text or error number in the error list shown below and
proceed as instructed.
If this is not successful or the displayed error is not
listed, please call Schaerer Service.
Some messages cause individual functions to be
disabled. You will see this when the beverage button
lighting goes out. The beverages of the beverage
buttons that remain lit can continue to be dispensed.
Your Schaerer Coee Club is equipped with a
diagnosis program. Any occurring errors appear on
the display. The listed error messages could also be
caused by a mains fault.
In the event of a current error or a note for the
operator, the
* Tap on
The error message and the error number are
displayed.
eld is displayed.
.
Notications and notes
SCClub operating instructions
97
Page 98

Notications and notes
The on/o switch reacts after approximately
1 second and the coee machine switches o.
When troubleshooting, for example if the
software freezes, the PC board can be
switched o by pressing and holding the on/o
switch.
Error
number
6 Brewing unit
88 Boiler:
Error
description
stalling current/
Brewing unit sti
Excess
temperature
Instruction
* Switching o the coee machine
* Clean the brewing unit
w Care w Brewing unit cleaning, page 82
* Switch the coee machine o, let it cool down
and switch it back on
If the error is not xed
* Switching o the coee machine
* Call Schaerer Service
89 Boiler:
heating time error
161 Water error:
Brewing water
* Switch the coee machine o and back on
* If the error is not xed, call Schaerer Service
Switch the coee machine o and on again after every one of the
following steps. If the error is not xed, perform the next step.
* Clean the brewing unit
w Care w Brewing unit cleaning, page 82
* Set the grind level to a coarser setting
w Other settings w Setting grind level, page 69
* Lower the quality
w Setting w Recipes, page 46
* If the error is not xed, call Schaerer Service
162 Water error:
When cleaning
Switch the coee machine o and on again after every one of the
following steps. If the error is not xed, perform the next step.
* Clean the brewing unit
w Care w Brewing unit cleaning, page 82
* If the error is not xed, call Schaerer Service
NOTE
98
SCClub operating instructions
Page 99

Notications and notes
Error
number
Error
description
163 Water error:
Warm rinsing
186 Steam boiler:
level
188 Heating error;
Steam boiler
overtemperature
189 Steam boiler:
heating time error
9083 Cooler
temperature is in
the frost range
9516
Right grinder
blocked
9517
Left grinder
blocked
Instruction
Switch the coee machine o and on again after every one of the
following steps. If the error is not xed, perform the next step.
* Clean the brewing unit
w Care w Brewing unit cleaning, page 82
* If the error is not xed, call Schaerer Service
Dispensing is temporarily disabled.
* Check that the grounds container has been
installed correctly
* Switch the coee machine o and back on
* Switch o the additional coee machine, pull
out the mains plug
* Call Schaerer Service
* Switch the coee machine o and back on
* If the error is not xed, call Schaerer Service
w Care w Cleaning the milk system by hand, page 85
* Check whether the cooler temperature is set
too low
* Switching o the coee machine
* Pull the power plug
* Remove bean hopper lids
* Empty the bean hopper
* Turn the grinding disk anticlockwise only using
the multi-tool for the container (two pins must
be inserted into the respective recesses of the
grinder, see gure)
* Fill the bean hoppers
* Put the bean hopper lids back on
* Switching on the coee machine
w Care w Bean hopper cleaning, page 89
If this happens frequently:
* Set the grinding neness one level coarser
w Other settings w Setting grind level, page 69
SCClub operating instructions
99
Page 100

Notications and notes
10.3 Error without error message
Error description Instruction
• No hot water dispensing,
but water in grounds
container
• No choco dispensing,
but water in grounds
container.
• Choco portioner blocked,
choco is only dispensed
with water
• Dispensing of coee
diers on the left/right
• Milk foam/Milk is not
being dispensed although
there is milk in the
container
• Milk foam is not correct
* Clean the hot water outlet
* Call Schaerer Service (coee dispensing is
possible)
* Stop using the Choc outlet
* Call Schaerer Service (coee dispensing is
possible)
* Clean the portioner
w Care w Cleaning powder container, page 90
* Empty the powder
* Turn the screw by hand until all powder has
been removed
* Rinse with water, if necessary
* Dry or let dry fully
* Clean the coee outlet
w Care w Cleaning the milk system by hand, page 85
* Check whether the milk hose is kinked or
pinched
* Check the correct steam nozzle is used
* Route the milk hose properly
* Clean the milk outlet
* Rell milk
* Check whether the milk cooler is iced over
Colour Milk temperature
• Green (standard) Uncooled milk
• Orange
(accessories)
If the error is not xed
* Use the other steam nozzle from the
accessories
(16 to max. 22 °C)
Cooled milk
(up to 10 °C)
100
SCClub operating instructions
 Loading...