

Page 1

Schaerer Coffee Art Plus Touch
User Manual | 11.2016 | v01
Models:
040381-00090EUS SCA 1 CT1/S-2M/KE/SST
Schaerer USA Corporation
15501 Red Hill, Ave . STE 200
Tustin, CA 92780
www.schaererusa.com | 888.989.3004
Page 2

www.schaererusa.com Copyrights
Published by:
Schaerer USA Corporation, Tustin, California
Version:
Version 01 / November 2016
Designed and edited by:
Schaerer USA Corporation, Tustin, California
© Copyright:
Schaerer USA Corporation, Tustin, California
All rights reserved, including translation into other languages. This manual may not be copied, photocopied
or distributed, in whole or in part, by any means, nor transmitted electronically, without the publisher’s written
consent.
All information, illustrations, and specications are based on the latest product information available at the time
of publication approval. Schaerer USA Corporation reserves the right to change the content at any time without
prior notice.
Note that the pictures and display messages shown inside are only examples; your machine and display
messages may vary.
User Manual | 11.2016 | v01
Page 3
www.schaererusa.com Cautions & Warnings
Cautions & Warnings
USE CAUTION WHILE OPERATING AND CLEANING THE COFFEE ART PLUS MACHINE
WARNING:
TO PREVENT ELECTRICAL SHOCK, DO NOT REMOVE SIDE
OR BACK PANELS FROM THIS MACHINE. NO USER SERVICEABLE PARTS INSIDE. REFER SERVICING TO AUTHORIZED
SERVICE PERSONNEL ONLY.
WARNING:
IF WATER OR SMOKE IS COMING FROM INSIDE THE MACHINE, TURN OFF MACHINE IMMEDIATELY. UNPLUG THE
MACHINE, TURN OFF WATER SUPPLY, AND CONTACT AN
AUTHORIZED SERVICE AGENT.
WARNING:
DO NOT MOVE MACHINE WHILE IT IS STILL CONNECTED TO
UTILITIES.
CAUTION:
ALL DISPENSED PRODUCTS ARE EXTREMELY HOT! USE
CAUTION WHILE OPERATING ALL FUNCTIONS. KEEP HANDS
AWAY FROM FOAMER HEAD/COFFEE SPOUT/SPLITTER
WHILE DISPENSING OR CLEANING (EXTREMELY HOT).
CAUTION:
DO NOT PLACE HANDS INSIDE MACHINE WHILE OPERATING,
EXCEPT WHEN FOLLOWING CLEANING PROCEDURES.
CAUTION:
DO NOT TILT MACHINE TO EITHER SIDE (VERY HEAVY).
CAUTION:
DO NOT PLACE LIQUID CONTAINERS (SYRUPS, MILK, ETC.)
ON TOP OF THIS EQUIPMENT.
User Manual | 11.2016 | v01
Page 4

www.schaererusa.com Table of Contents
Table of Contents
Table of Contents
Introduction
Machine Overview
Machine Description
Machine Accessories
Utility Hook-Up Requirements
Operation
General Operation
Beverage Output
Tips During Operation
Maintenance
Daily Cleaning
Cleaning the Steam Wand
Weekly Hopper Cleaning
Error Messages
How to Get Help
User Manual | 11.2016 | v01
Page 5

www.schaererusa.com Introduction | Machine Overview
Machine Overview
Dual bean hoppers each hold
up to 1 kg (2.2 lbs.)
Regular (left) and Decaf (right)
Cleaning tablet funnel
Touch Screen
HOT WATER buttons
PURGE/STEAM buttons
Hot water spout
Coffee spout
Grounds bin
Steam wand with nesteam
Drip tray
®
User Manual | 11.2016 | v01
- 5 -
Page 6

www.schaererusa.com Introduction | Machine Overview
- 6 -
User Manual | 11.2016 | v01
Page 7

www.schaererusa.com Introduction | Machine Description
Machine Description
Touch Screen User Interface
Hot Tab
Beverage category selection
Time and date indicator
Beverage type selection
• Press the LATTE STEAM icon to steam latte milk.
• Press the CAPPUCCINO STEAM icon to steam cappuccino milk.
• Press the SOY LATTE STEAM icon to soy steam latte milk.
• Press the SOY CAPPUCCINO STEAM icon to steam soy cappuccino milk.
• Press the SINGLE ADD SHOT icon for drinks requiring one espresso shot.
• Press the MED DOUBLE SHOT icon for drinks requiring two espresso shots.
• Press the MEDIUM AMERICANO icon for a medium americano.
Extra Hot Tab
The icon controls the power to the machine. To turn the
machine off, press and hold the button. To turn it on, just the
press the button.
Press the
icon to go into the Service Menu.
Notes:
1. This icon may be hidden; press & hold the blank area to bring
up the icon.
2. When machine is off, this icon is called Quick Menu.
Beverage type selection
• Press the EXTRA HOT LATTE STEAM icon to steam extra hot latte milk.
• Press the EXTRA HOT CAPPUCCINO STEAM icon to steam extra hot cappuc-
cino milk.
• Press the EXTRA HOT SOY STEAM icon to steam extra hot soy milk.
• Press the SINGLE ADD SHOT icon for drinks requiring one espresso shot.
• Press the MED DOUBLE SHOT icon for drinks requiring two espresso shots.
• Press the MEDIUM AMERICANO icon for a medium americano.
User interface conguration may vary.
User Manual | 11.2016 | v01
- 7 -
Page 8
www.schaererusa.com Introduction | Machine Description
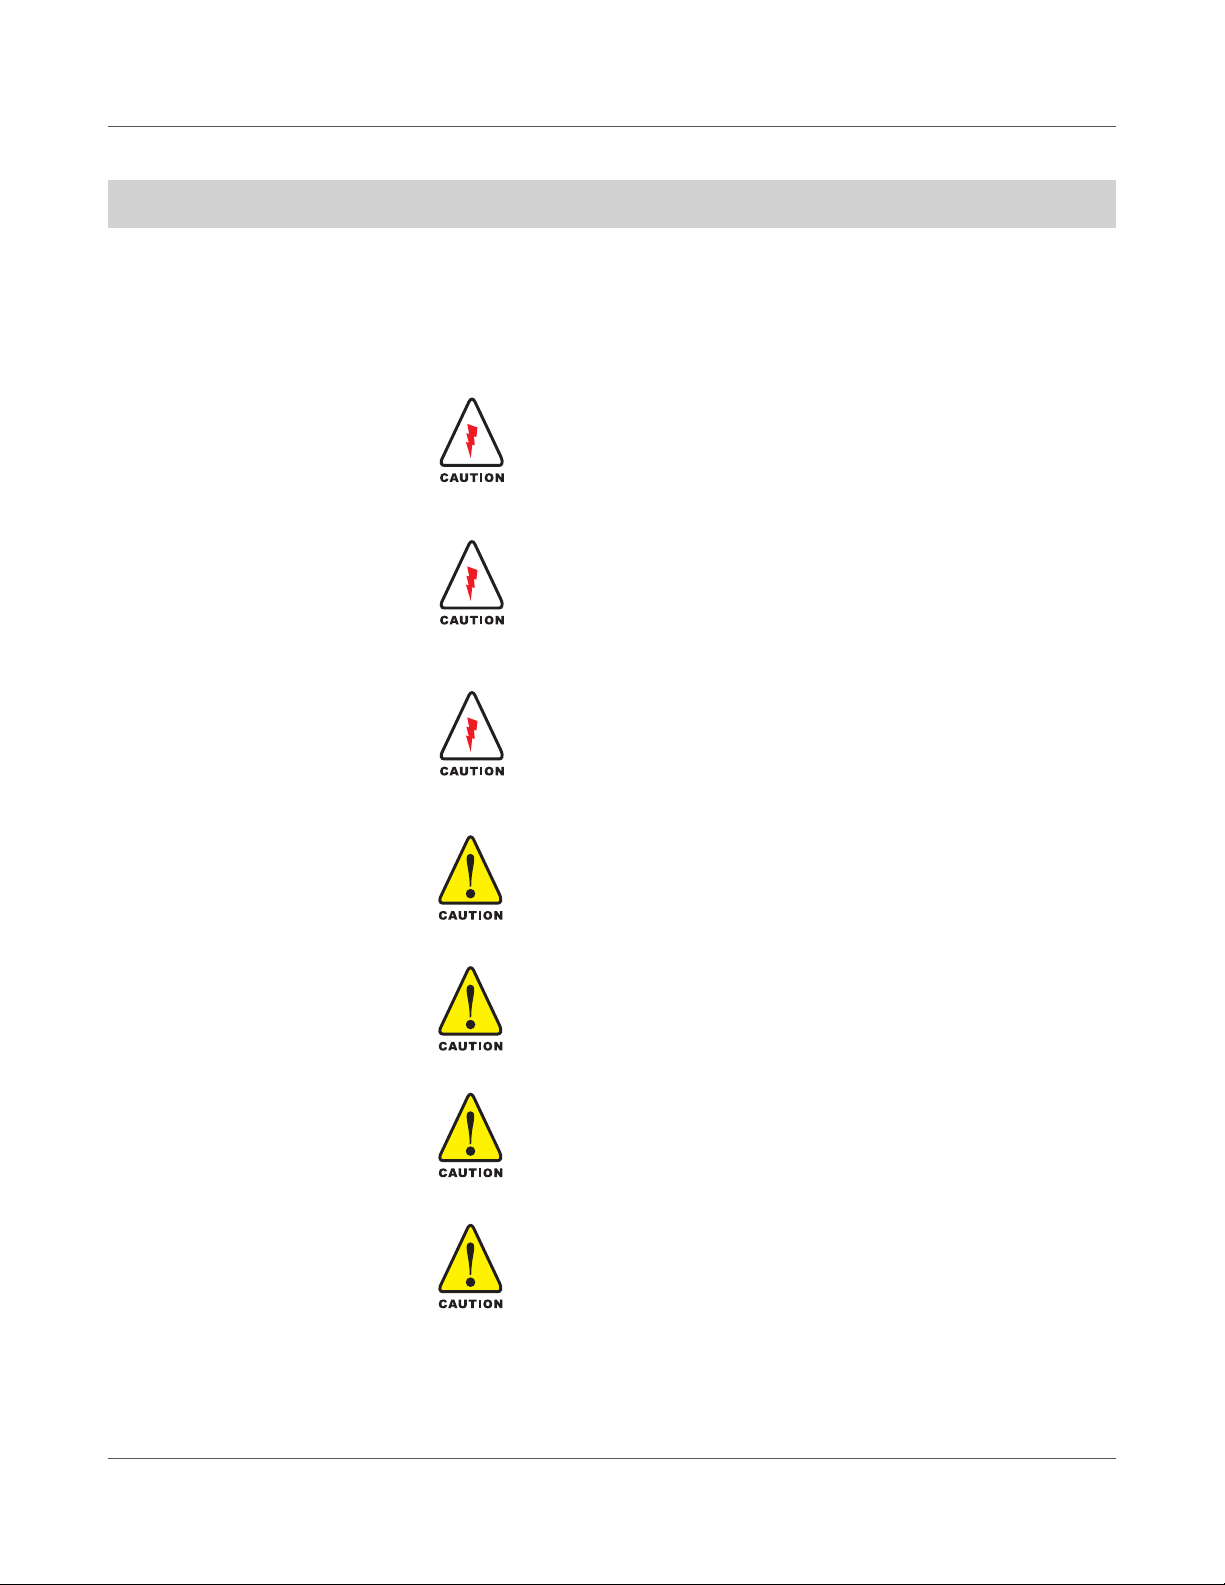
Purge/Steam Buttons
To purge the steam wand after each use, press purge button 1 or 2. It
will purge for one 1 second (button 1) and two seconds for button 2.
Programming may vary.
Hot Water Buttons
To dispense hot water from the machine, press hot water button 1 or 2.
Button 1 will dispense for 2.5 seconds and stop automatically. Button 2
will dispense for 5 seconds and stop automatically.
Programming may vary.
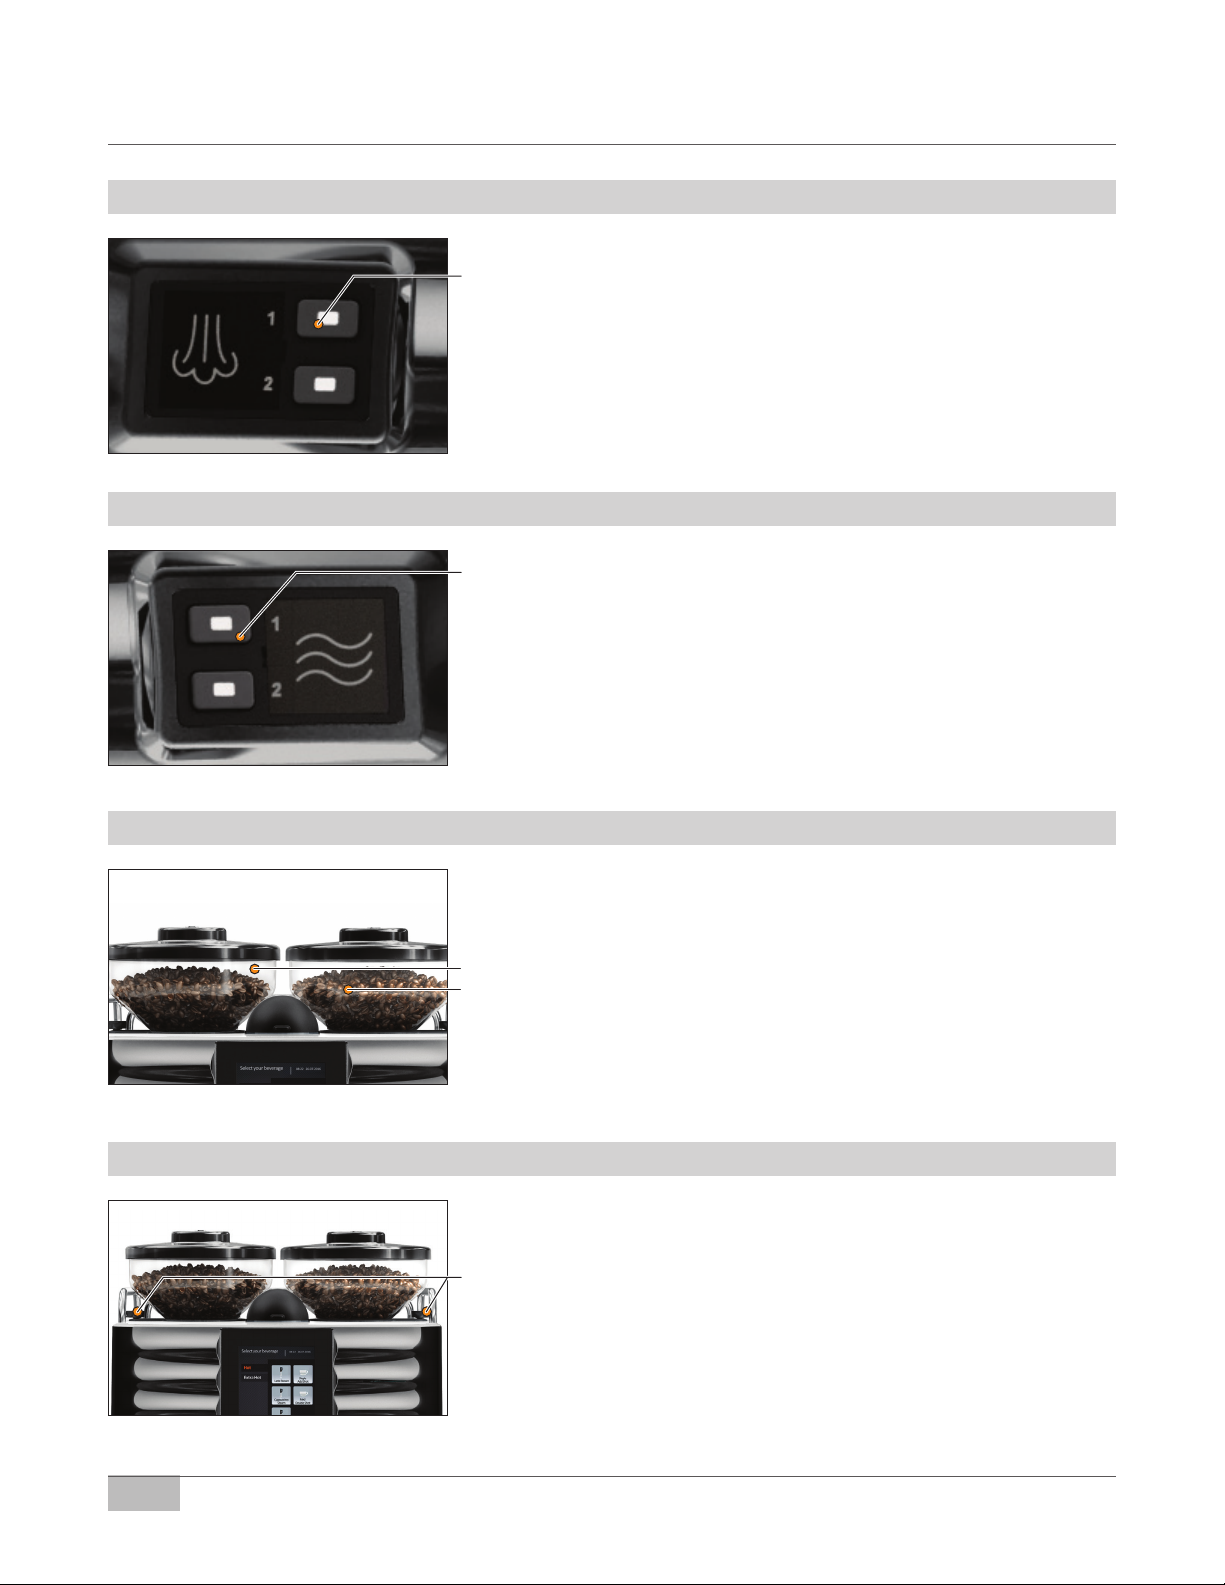
Bean Hoppers
Fill the hoppers on top of the machine with whole beans only. The machine grinds the beans freshly for each shot.
The left hopper is intended for regular espresso beans.
The right hopper is intended for decaffeinated espresso beans.
Bean Hopper Slides
The bean hopper slides are used for locking the hoppers into position.
To release the hoppers for weekly cleaning, push the slides inward and
then lift up. Refer to page 22 for instructions.
- 8 -
User Manual | 11.2016 | v01
Page 9

www.schaererusa.com Introduction | Machine Description
Cleaning Tablet Funnel
The cleaning tablet funnel is located between the two bean hoppers.
Only Schaerer Cleaning Tablets should be dropped into this funnel during the daily cleaning procedure. Refer to pages 19-20 for daily cleaning
instructions.
Use only Schaerer Cleaning Tablets (Item # 65221) for the
daily cleaning procedure. Refer to page 11 for reordering
cleaning tablets.
Steam Wand with nesteam©
The steam wand is movable and has a hard plastic handle for handling
when it is hot.
The PEEK steam wand material dramatically lowers the wand’s surface
temperature. Unlike standard stainless steel wands, milk doesn’t bake
onto the wand. Milk residue easily wipes clean, even later on after steaming. The PEEK steam wand is also much safer to touch right after steaming.
Steam wand with proprietary air injection and auto shut-off guarantees
consistent milk texture and temperature while allowing users the freedom
to multitask.
User Manual | 11.2016 | v01
Hot Water Spout and Coffee Spout
The hot water outlet is used for pre-heating ceramic cups and quick
rinsing of utensils.
The coffee spout can accommodate tall cups.
- 9 -
Page 10

www.schaererusa.com Introduction | Machine Description
Grounds Bin
The grounds bin is located below the coffee spout. It holds the used
grounds which are disposed of after each espresso shot is brewed.
The bin slides straight out from the machine and must be emptied
periodically or when prompted on the display.
Drip Tray Grill and Drip Tray
The drip tray grill is removable for easy cleaning and access to the
inside of the drip tray.
The drip tray is connected to a exible hose which should be connected
to a xed drain line. The purpose of this ‘basin’ is to funnel any spilled
liquids down the drain. To prevent blockage, we recommend that you
avoid ushing large quantities of milk and/or used coffee grounds down
the drain.
Card Reader
For use by manufacturer authorized service agent.
- 10 -
User Manual | 11.2016 | v01
Page 11

www.schaererusa.com Introduction | Machine Accessories
Machine Accessories
User Manual
Steam Wand Cleaner (Item # 12-MKSC-1L)
Daily Cleaning Instructions
Schaerer Cleaning Tablet (Item #65221)
Large Cleaning Brush (Item #67409)
TO ORDER CLEANING SUPPLIES PLEASE CALL
888.989.3004
User Manual | 11.2016 | v01
- 11 -
Page 12

www.schaererusa.com Utility Hook-Up Requirements
Utility Hook-Up Requirements
8” Top
Clearance
4" Clearance
3" Clearance
28"
2” Side Clearance
17”
23"
3” Diameter Access
Hole Located Rear
Center of Machine
1” Diameter
Drain Hose
1 1/2” Diameter
Drain Pipe to Floor
Drain
3” Rear Clearance
22”
4”
The receptacle (NEMA L6-30R)
and Water Filter can be located
either under the counter or top of
counter behind the machine.
POWER, WATER SUPPLY, AND ACCESS REQUIREMENTS
X
G
Notes: Access hole is only required if any of the utility hook-ups are located under the counter. Drain pipe is only necessary if the drain line
from the drain tray is mounted xed. A removable drain tray does not require a drain pipe since it will be emptied by the operator.
• Receptacle type: NEMA L6-30R.
• 3 Prong twist-lock.
• Breaker panel: 30 Amp dedicated 220V
single phase circuit.
• Actual maximum load: 24 Amps.
Y
• Access hole with collar (no sharp edges).
• Located centrally under machine for water
and drain hose.
• Diameter: Minimum 3" (80mm).
• Water shut-off valve with 3/8" (9.5mm)
compression tting.
• Back ow preventer in accordance with
local requirements.
• Drain pipe to oor drain.
• Copper or PVC in accordance with local
health codes and regulations.
• Diameter: 1.5" (38mm) or larger.
The receptacle, water
shut-off valve and drain
pipe must be within 3 feet
(36") of the center of the
location (footprint) of the
machine.
Ideal under counter
space for softener: 30"
(minimum requirement:
26 inches).
- 12 -
User Manual | 11.2016 | v01
Page 13

www.schaererusa.com Operation | General Operation
General Operation
Introduction
This chapter describes the basic functions of the espresso machine.
Read the instructions carefully to ensure smooth routine operation.
Filling Bean Hoppers
Only use whole beans in the bean hoppers!
Never reach with your hands into the bean hoppers when the
machine is switched on. When relling the bean hoppers, do not
reach into the grinder and do not press any of the product buttons!
1. Remove the lid from the bean hopper.
2. Fill with whole beans maximum 1 kg (2.2 lbs) and close the lid.
A well-closed lid prevents loss of aroma.
Preparing the Machine for Operation
Prior to switching on the machine, check the following:
• The fresh water supply is open.
• The hoppers are lled (see above).
• The grounds bin is empty.
• The machine is connected to the power supply.
• Check whether the bean hopper slides are open.
Switching On the Espresso Machine
Switch on the espresso machine by pressing the icon.
If the machine has been switched off for a long period of time, the
message “heating” appears on the display.
User Manual | 11.2016 | v01
A product selection can be made when the message “select product”
appears on the display.
- 13 -
Page 14

www.schaererusa.com Operation | General Operation
Switching Off the Espresso Machine
If the espresso machine is not used for longer periods, i.e. overnight, it
can be switched to standby mode. In this mode, the boiler is not heated
and no beverages are available.
1. Press the
the display.
icon until the message "<< Standby >>" appears on
Extended Idle Time
1. Perform the daily cleaning:
(See section "Daily Cleaning" on pages 19-20).
2. Switch the machine to “<< Standby >>” (Press the
3. Close the shut-off valve from the fresh water supply.
4. Disconnect the machine from the power supply.
5. Vacuum the coffee beans from the bean hoppers.
6. Store the machine in a dry and clean location. On premises where
temperatures can drop below zero, the boiler has to be emptied. To
empty the boiler, contact a manufacturer-authorized service agent for
assistance.
icon).
Removal / Relocation / Disassembly
- 14 -
Contact a manufacturer-authorized customer service agent.
User Manual | 11.2016 | v01
Page 15

www.schaererusa.com Operation | Beverage Output
Beverage Output
Foamed and Steamed Milk
Steam wand is extremely hot!
Always wipe steam wand with a thick, clean, damp cloth and purge
after each use. Refer to page 21 for details.
Foamed Milk Steamed Milk
1. Portion milk into steaming pitcher. 1. Portion milk into steaming pitcher.
MILK
2. Submerge steam wand into pitcher and make
sure wand points straight down. Press the
CAPPUCCINO STEAM or EXTRA HOT CAPPUCCINO STEAM icon.
For Extra Hot
Press the EXTRA HOT tab rst then press the
the EXTRA HOT CAPPUCCINO STEAM icon.
2. Submerge steam wand into pitcher and
make sure wand points straight down. Press
the LATTE STEAM or EXTRA HOT LATTE
STEAM icon.
For Extra Hot
Press the EXTRA HOT tab rst then press the
the EXTRA HOT LATTE STEAM icon.
MILK
User Manual | 11.2016 | v01
- 15 -
Page 16

www.schaererusa.com Operation | Beverage Output
Soy Steam and Espresso
All beverages dispensed by the machine are extremely hot!
Soy Steam Espresso Shot
1. Portion soy milk into steaming pitcher.
MILK
2. Submerge steam wand into pitcher and make
sure wand points straight down. Press the
SOY LATTE STEAM or SOY CAPPUCCINO
STEAM icon.
For Extra Hot
Press the EXTRA HOT tab rst then press the
the EXTRA HOT SOY STEAM icon.
1. Place cup under coffee spout and press
the SINGLE ADD SHOT or MED DOUBLE
SHOT icon.
- 16 -
User Manual | 11.2016 | v01
Page 17

www.schaererusa.com Operation | Beverage Output
Cappuccino and Latte
Cappuccino Latte
1. Portion milk into steaming pitcher. 1. Portion milk into steaming pitcher.
MILK
2. Submerge steam wand into pitcher and make
sure wand points straight down. Press the
CAPPUCCINO STEAM or EXTRA HOT CAPPUCCINO STEAM icon.
For Extra Hot
Press the EXTRA HOT tab rst then press the
the EXTRA HOT CAPPUCCINO STEAM icon.
3. Place cup under coffee spout and press the
SINGLE ADD SHOT or MED DOUBLE SHOT
icon.
2. Submerge steam wand into pitcher and
make sure wand points straight down. Press
the LATTE STEAM or EXTRA HOT LATTE
STEAM icon.
For Extra Hot
Press the EXTRA HOT tab rst then press the
the EXTRA HOT LATTE STEAM icon.
3. Place cup under coffee spout and press the
SINGLE ADD SHOT or MED DOUBLE SHOT
icon.
MILK
4. Fill cup to top with foamed milk. 4. Fill cup to top with steamed milk.
User Manual | 11.2016 | v01
- 17 -
Page 18

www.schaererusa.com Operation | Tips During Operation
Tips During Operation
Always run the daily cleaning procedure
when prompted by the machine display.
Refer to page 19-20 for details.
Empty the grounds bin regularly and when
prompted by the display. Rinsing it nightly
will prevent caked-up grounds from forming.
Always wipe steam wand with a thick, clean,
damp cloth and purge after each use. Refer
to page 21 for details.
Periodically wipe the machine exterior thoroughly with a clean, damp cloth to remove
residue from steamed milk and espresso
shots.
When making two 16oz drinks at a time,
steam 32oz of milk.
- 18 -
User Manual | 11.2016 | v01
Page 19

www.schaererusa.com Maintenance | Daily Cleaning
Daily Cleaning
Read and follow the instructions carefully before you begin the daily
cleaning procedure. This procedure should be performed on a daily
basis or when prompted by the machine display.
Never reach into the machine or under the coffee spout during the
automatic cleaning cycle!
The status of the cleaning and some cleaning steps are shown in the
display.
1. ►
Item #12-MKSC-1L
Item #65221
Item #67409
• Use only Schaerer cleaning supplies for this procedure.
4. ►
2. ►
• Fill large steaming pitcher
with 16oz of water and mix in
(1oz/30ml) Schaerer Steam
Wand Cleaner.
5. ►
3. ►
• Submerge steam wand into steaming pitcher and press the LATTE
STEAM icon to heat solution.
After steam wand shuts off automatically then let it soak for 5
minutes.
6. ►
• Press the
service menu.
User Manual | 11.2016 | v01
icon to go into the
• Immediately remove grounds bin
with in 6 seconds.
• Empty coffee grounds into trash
can. Wash, rinse, sanitize bin and
set aside.
• Remove metal shield above
grounds bin and set aside.
- 19 -
Page 20

www.schaererusa.com Maintenance | Daily Cleaning
7. ►
• Use large cleaning brush to wipe
coffee grounds from brew unit and
surrounding areas into drip tray.
10. ►
8. ►
• Reinstall metal shield and insert
coffee grounds bin back into
place.
• Follow instructions on display.
11. ►
9. ►
• Display will read, “Insert one
cleaning tablet”. Lift lid and drop
in one Schaerer cleaning tablet.
Close lid.
• Press “OK” on the screen.
12. ►
• Cleaning process will complete
in 4:33 minutes.
Cleaning runs (4:33 min.)
13. ►
• Submerge steam wand into cold
water once to rinse then press the
button or any steam function.
• Discard water and wipe steam
wand with a clean, damp cloth.
• After cleaning program completes.
• Rell beans if necessary.
• Wipe drip tray & grill.
• Press “Finish” to return to
normal operating mode.
14. ■
• After wiping off wand, point it
toward drip tray and purge by
pressing the button or any
steam function.
• When automated cleaning cycle
is complete, empty pitcher into
drip tray. Wipe steam wand with
a thick, clean, damp cloth. Be
careful, wand will be very hot!
- 20 -
User Manual | 11.2016 | v01
Page 21

www.schaererusa.com Maintenance | Cleaning the Steam Wand
Cleaning the Steam Wand After Each Use
Always use a cloth and/or steam wand handle (grip) when cleaning or
steaming milk. Direct skin contact with metal may result in burns.
1. ►
• Once milk steaming has stopped,
remove pitcher and immediately
wipe steam wand with a thick,
clean, damp cloth. Be careful,
wand will be very hot!
2. ■
• After wiping off wand, point it toward drip tray.
• Press button 1 to purge steam
wand.
User Manual | 11.2016 | v01
- 21 -
Page 22

www.schaererusa.com Maintenance | Weekly Hopper Cleaning
Weekly/As Needed Hopper Cleaning
Read and follow the instructions carefully before you begin the weekly
hopper cleaning procedure. This procedure should be performed on a
weekly basis.
Do not clean the bean hoppers in the dishwasher.
When relling the bean hoppers, do not reach into the grinder and do
not press any of the product buttons!
If the oil from the bean remains, use non-abrasive dish washing soap.
1. ►
• Turn machine OFF.
• Push the bean slide inward to
lock the beans and release the
hopper.
4. ►
2. ►
• Lift the hopper upward to remove
from the machine
5. ►
3. ►
• Empty the beans into another
container. Use warm water to
wash, rinse and sanitize.
6. ■
• Dry the hoppers thoroughly with a
clean, damp cloth.
- 22 -
• Place hopper back on to machine.
• Pull the bean slide outward to
release the beans and lock the
hopper into place. Repeat these
steps for the other hopper.
• Turn machine back ON.
User Manual | 11.2016 | v01
Page 23

www.schaererusa.com Error Messages
Error Messages
Display Message Cause Remedy
Grounds container missing
Empty grounds container • The grounds container is full. ► Empty the grounds container and reinsert it.
Cleaning program • A reminder appears daily at a preset time.
Grinder left/right no beans
Grinder left/right blocked
Heating coffee water/hot water/
steam
Grinder current fault
Brewing unit current fault
Over current brew motor
• The grounds container was removed
(cleaning program, emptying, etc.).
• The limit switch is defective.
• Appears when the bean hopper on the leftor right is empty or when a coffee bean has
become stuck.
Beverage output is blocked!
• An object (such as a stone) has become
jammed in the left or right grinder.
Beverage output is blocked!
• The temperature is 10° C below the
programmed temperature.
• PC board defect.
• Electronics defect.
• PC board defect.
• Electronics defect.
• Brewing unit is drawing too much current
(over 4A).
• Brewing unit is jammed.
► Insert grounds container.
If the message persists, call for service.
► The machine must be cleaned.
Refer to page 19-20 for daily cleaning procedures.
► Rell the bean hopper with coffee beans (max.
1000g.) and conrm.
► Check bean slides.
► If jammed, use the stem of the cleaning brush
to “stir” the coffee beans around and unclog the
grinder. Then press conrm.
► Check grinder for blockage and remove
remaining beans with vacuum if necessary. Then
press conrm.
If the message persists, call for service.
► Wait until the temperature has been reached.
If the message persists, call for service.
► Call for service.
► Call for service.
► Call for service.
Water ow error
Crit. coffee temp.
Crit. hot water temp.
Crit. steam temp.
User Manual | 11.2016 | v01
• No water connection.
• Pump defect. (pump pressure < 7.5bar)
• Brewer is blocked.
• Water system is blocked.
• Grind level is too ne.
• PC board and ow meter are improperly
connected.
• Electrical problem (e.g. PC board).
• Electrical problem between the sensor and
PC board.
• Temperature sensor defect.
• Electrical problem between the sensor and
PC board.
• Temperature sensor defect.
• Electrical problem between the sensor and
PC board.
• Temperature sensor defect.
► Open the stopcock and press the beverage eld
again.
► Check the brewing unit.
► Check the grinder balance.
If the message persists, call for service.
► Call for service.
► Call for service.
► Call for service.
- 23 -
Page 24

www.schaererusa.com Error Messages
Display Message Cause Remedy
► Switch the machine off and back on.
► Ensure grounds bin is in place.
If the message persists, call for service.
► Switch the machine off and back on.
► Ensure grounds bin is in place.
If the message persists, call for service.
► Switch the machine off and back on.
► Ensure grounds bin is in place.
If the message persists, call for service.
► Call for service.
Timeout coffee heater
Hot water heater timeout
Steam heater timeout
Coffee sensor defect
• The set temperature of the coffee boiler
was not reached within 4 minutes after the
machine was switched on.
• The set temperature of the hot water boiler
was not reached within 4 minutes of the unit
switching on.
• The set temperature of the steam boiler
was not reached within 4 minutes of the unit
switching on.
• Electrical problem between the sensor and
PC board.
• Temperature sensor defect.
Hot water sensor defect
Steam sensor defect
Brew unit timeout • The brewing unit motor does not run. ► Call for service.
Timeout steam supply • The level in the steam boiler was not reached. ► Call for service.
Milk system disabled • The steam temperature has fallen to 115° C.
Initialising
Display dark
• Electrical problem between the sensor and
PC board.
• Temperature sensor defect.
• Electrical problem between the sensor and
PC board.
• Temperature sensor defect.
• The software and processor are being
restarted.
• The brewing unit moves to the initial position.
• Machine is not connected to the mains supply.
• Machine is not switched on.
► Call for service.
► Call for service.
► Wait until the temperature has been reached
again.
► Switch the machine off and back on.
If the message persists, call for service.
► Switch the machine off and then back on.
If the message persists, call for service.
► Check whether the machine is connected to the
mains supply.
► Check whether the machine is switched on.
If the message persists, call for service.
- 24 -
User Manual | 11.2016 | v01
Page 25

www.schaererusa.com How to Get Help
How to Get Help
Hours of Business
Normal Hours
During normal business hours, a Schaerer representative will answer your call directly. In case
all lines are busy, please leave a message on our voicemail system according to the instructions
that you hear on the voicemail.
Monday through Friday: 8:00AM to 8:00PM EST
Weekends: 8:00AM to 6:30PM EST
Messages received during business hours will be returned in the order they were received.
Paging Hours
Outside of normal hours, you can use our voicemail system to page an on-duty technician for
emergencies. Our voicemail paging system is active during the following hours:
Monday through Friday: 8:00PM to 11:59PM EST
Weekends: 6:30PM to 11:59PM EST
Messages received during paging business hours will be returned within ½ hour. Please do not
use the voicemail paging system for general questions or other non-emergency requests!
*Messages received outside normal and paging hours will be returned the next day.
How to Contact Us (emergencies, machine is not working)
Call our toll free number at 888-989-3004.
• Press “1” for a list of departments.
• Press “1” to get service on your coffee machine.
• During normal business hours, a Schaerer representative will answer your call
directly.
• Should you reach voicemail, please leave a message containing the following
information:
1. Your phone number, including the local area code.
2. Your name.
3. The store’s contact name and phone number including area code.
4. The store address.
5. The machine’s serial number.
6. A brief description of the problem.
• Leaving a message in the Service Dispatch box will page the on-duty technician
(during paging hours).
Please do not use this procedure for general questions or other non-emergency requests!
User Manual | 11.2016 | v01
Onsite Response Times
If a service request comes in before 12:00NOON EST, all attempts possible will be made for
same day service.
If a service request comes in after 12:00NOON EST, same day service will be attempted,
otherwise, service will be scheduled for the next day.
- 25 -
Page 26

www.schaererusa.com Notes
Notes
- 26 -
User Manual | 11.2016 | v01
 Loading...