

Page 1
Piazza D‘Oro 500 TWIN
Operating instructions
V05 / 07.2010
Page 2

For more information please contact: Original operating instructions
Douwe Egberts technical service BAPdO500TW_EN
www.douweegberts.com N° 021201
Page 3

Introduction
Piazza D’Oro 500 TWIN
Operating instructions
Published by: Schaerer Ltd., CH-4528 Zuchwil
Version: Version 05 / 07.2010
Software: PSE V3.04
User manual
Designed and edited by: Schaerer Ltd., CH-4528 Zuchwil
© Copyright by Schaerer Ltd., CH-4528 Zuchwil
All rights reserved, including translation into other languages. This manual may not be
copied, photocopied or distributed, in whole or in part, by any means, nor transmitted
electronically, without the publisher’s written consent.
All information, illustrations, and specifications in this manual are based on the latest
product information available at the time of publication approval. Schaerer Ltd. reserves the right to change the content at any time without any prior notice.
BAPdO500 - EN - V05 Page 1-1
Page 4

Introduction
1. INTRODUCTION
1.1 Welcome
Dear customer
With this new coffee machine, you have purchased a Swiss quality product especially designed for the catering
trade.
Two separate brewing units allow for the simultaneous filling of up to four cups.
This manual will inform you in detail on programming, commissioning, use and cleaning of your new machine. It
also contains important safety instructions to ensure safe use.
Important!
Prior to commissioning the machine, carefully read the chapter "Safety instructions". The manufacturer rejects any liability for damages that are caused by improper use of the machine.
Performance of the coffee machine depends to a great extent on proper use and careful maintenance of the
machine. We therefore recommend that you read all instructions carefully before commissioning the machine
and that you keep them handy for future reference.
We hope you enjoy using your new coffee machine!
Page 1-2 BAPdO500 - EN - V05
Page 5
Introduction
1.2 Symbols and pictograms
Note:
This section provides you with important notes and information.
Important!
This note indicates possible damage to property as well as possible financial and
statutory penalties (e.g. loss of rights to claim under guarantee, liability suits, etc.).
Danger!
This note indicates a risk of severe and/or fatal injury if specific procedural
rules are violated.
Whenever you see this symbol in the operating manual, take all necessary
safety precautions.
Electric shock!
Risk of severe and/or fatal injury due to electric shock!
Environmental protection!
This symbol indicates that you have to comply with environmental regulations and/or
legislation.
select product
12:00 01.07.2010
Display messages
The displays shown in the manual always follow immediately after their respective description and relate to the display on the coffee machine.
Chip cards
The card name (e.g. CHEF, SAVE DATA, etc.) is written in capital letters. You will
also find an illustration of the chip cards to the left of the respective texts
BAPdO500 - EN - V05 Page 1-3
Page 6

Introduction
TABLE OF CONTENTS
Chapter Page
1 Introduction......................................................................................................................................... 1-2
1.1 Welcome............................................................................................................................................... 1-2
1.2 Symbols and pictograms...................................................................................................................... 1-3
2 SAFETY INSTRUCTIONS ................................................................................................................... 2-2
2.1 General................................................................................................................................................. 2-2
2.2 Safety symbols ..................................................................................................................................... 2-2
2.3 Prevention of accidents........................................................................................................................ 2-3
2.4 Hygiene ................................................................................................................................................ 2-5
2.5 Designated use .................................................................................................................................... 2-6
2.6 Liability.................................................................................................................................................. 2-6
3 Product description ........................................................................................................................... 3-2
3.1 Coffee machine data ............................................................................................................................ 3-2
3.2 Operating information for the coffee machine...................................................................................... 3-8
3.3 Equipment and accessories ............................................................................................................... 3-10
3.4 Special settings .................................................................................................................................. 3-11
3.5 Chip card functions............................................................................................................................. 3-12
3.6 Commissioning................................................................................................................................... 3-15
4 Operation............................................................................................................................................. 4-3
4.1 Introduction........................................................................................................................................... 4-3
4.2 Operating Modes.................................................................................................................................. 4-4
4.3 Messages displayed when coffee machine is ready for operation ...................................................... 4-4
4.4 Routine operation ................................................................................................................................. 4-5
4.5 Longer idle time.................................................................................................................................. 4-17
4.6 Programming using standard chip cards ........................................................................................... 4-18
4.7 Programming using optional chip cards............................................................................................. 4-28
5 Cleaning .............................................................................................................................................. 5-2
5.1 Important
5.2 Daily cleaning ....................................................................................................................................... 5-3
5.3 Weekly cleaning ................................................................................................................................... 5-6
5.4 Defrosting the refrigerator .................................................................................................................... 5-9
5.5 Care of the refrigerator......................................................................................................................... 5-9
6 Error messages and malfunctions ................................................................................................... 6-2
6.1 Error messages with display ................................................................................................................ 6-2
6.2 Malfunctions without display messages............................................................................................... 6-7
7 Optional features................................................................................................................................ 7-2
7.1 Payment systems ................................................................................................................................. 7-2
7.2 Chip cards ............................................................................................................................................ 7-2
7.3 Chip card loader ................................................................................................................................... 7-2
7.4 Water softener (Filados/Brita) .............................................................................................................. 7-2
7.5 Cup warmer.......................................................................................................................................... 7-3
7.6 User instructions for special machines (water tank) ............................................................................ 7-3
8 Payment systems ............................................................................................................................... 8-2
8.1 Cards compatible with all payment systems ........................................................................................ 8-2
8.2 Payment with internal systems............................................................................................................. 8-3
8.3 Payment with self-service systems .................................................................................................... 8-13
general cleaning instructi
ons ............................................................................................... 5-2
Page 1-4 BAPdO500 - EN - V05
Page 7

Introduction
TABLE OF CONTENTS
Chapter Page
9 Appendix ..............................................................................................................................................9-2
9.1 CE Declaration of conformity ................................................................................................................9-2
9.2 Cleaning agent ......................................................................................................................................9-3
9.3 Serial plate of steam generator and instant heater...............................................................................9-6
9.4 Environmental aspects..........................................................................................................................9-7
9.5 Hazardous Substance...........................................................................................................................9-7
10 Index ...................................................................................................................................................10-1
BAPdO500 - EN - V05 Page 1-5
Page 8

Introduction
Page 1-6 BAPdO500 - EN - V05
Page 9

Safety instructions
2 Chapter
Table of contents
Chapter Text Page
2
2.1
2.2
2.3
2.4
2.5
2.6
General ..............................................................................................................................................2-2
Safety symbols .................................................................................................................................2-2
Prevention of accidents ...................................................................................................................2-3
Hygiene..............................................................................................................................................2-5
Designated use .................................................................................................................................2-6
Liability ..............................................................................................................................................2-6
SAFETY INSTRUCTIONS .................................................................. 2-2
BAPdO500 - EN - V05 Page 2-1
Page 10
Safety instructions
2 SAFETY INSTRUCTIONS
2.1 General
The coffee machine is handed over by a service technician authorised by the manufacturer. Prior to commissioning the machine, read the operating instructions carefully
and ensure that you fully understand them.
Always keep this manual in the immediate vicinity of the coffee machine.
2.2 Safety symbols
The following symbols appear next to all safety instructions in this manual. Follow the
instructions to the letter and proceed with particular care in the cases described.
Danger!
This note indicates a risk of severe and/or fatal injury if specific procedural
rules are violated.
Whenever you see this symbol in the operating manual, take all necessary
safety precautions.
Electric shock!
Risk of severe and/or fatal injury due to electric shock!
Important!
This note indicates possible damage to property as well as possible financial and
statutory penalties (e.g. loss of rights to claim under guarantee, liability suits, etc.).
Note:
This section provides you with important notes and information.
Page 2-2 BAPdO500 - EN - V05
Page 11
Safety instructions
2.3 Prevention of accidents
In the event of incorrect operation or misuse, one or more of the following might occur:
Risk to life and limb of the operator, other persons or animals that are in close
proximity to the coffee machine,
Risk of damage to the coffee machine and other property of the operator or third
parties,
Inefficient performance of the coffee machine.
Danger!
People who are not familiar with these operating instructions, as well as children or people under the influence of alcohol, drugs or medication may not operate the machine. At self-service units, danger zones such as the steam pipe
and the hot water outlet must be clearly labelled in such a manner that the warning is visible to the customer.
Important!
The installation, programming, maintenance and repair of the coffee machine must be
carried out only by authorised service technicians.
Important!
For connection of the dispenser to the power supply system and the drinking water
lines, comply with the instructions of the local service providers.
Danger!
The machine must be connected to a fuse-protected circuit.
We recommend connection through a residual current operated circuit-breaker.
The dispenser must be connected to a properly fitted and earthed safety socket.
The voltage must comply with the information given on the machine's serial
plate.
Important!
To prevent water damage caused by tube breakage, it is recommended to feed the
water through a water stop valve.
Danger!
Never insert the power plug into the socket when wet and do not touch the plug
with wet hands.
Danger!
The beverages delivered by the coffee machine are hot! To protect yourself
against scalding, keep hands and other body parts away from the outlet area
during the preparation and delivery of beverages.
Danger!
Parts of the foamer head, the hot water pipe and the steam pipe become very
hot during the cleaning of the coffee machine and when coffee, milk, hot water
or steam are delivered. Do not touch these parts during and shortly after use.
BATW 500 - EN - V05 Page 2-3
Page 12
Safety instructions
Important!
When the coffee machine is not used for a prolonged period of time (e.g. overnight, on
weekends) close the water tap.
Press the [Stand-by] button to switch off the coffee machine. Do not disconnect the
power supply, as otherwise the cooling system is switched off.
Important!
Do not operate the coffee machine if the water supply is shut off, as otherwise the
boiler will not refill.
Important!
Never disconnect the water line while the coffee machine is switched on or in stand-by
mode.
Danger!
Danger to life and limb due to electric shock!
Always switch off the main switch before carrying out any maintenance work.
Do not introduce any objects into the device and do not open the housing!
Important!
Malfunctions may be repaired only by authorised and qualified personnel.
Important!
Only use original spare parts.
Danger!
If the mains cable is damaged, it must be replaced by a service technician
authorised by the manufacturer.
Important!
If any parts of the unit are leaking or if any cables, hoses, screw connections, flanges,
valves, seals, etc. have external signs of damage then this must immediately be reported to the authorised specialist staff and rectified by them!
Environmental protection!
When selecting cleaning agents, make sure that they are environmentally safe, bear
no health risks, and comply with local disposal regulations.
Use cleaning agents recommended by the manufacturer.
Page 2-4 BAPdO500 - EN - V05
Page 13
Safety instructions
2.4 Hygiene
Note:
Run the cleaning program before initial commissioning (see “Cleaning”)
Important!
Always follow hygiene regulations according to HACCP!
Always follow hygiene regulations according to HACCP!
(HACCP= Hazard Analysis and Critical Control Point)
For daily and weekly cleaning, proceed as described in chapter "Cleaning".
Never spray the machine with water or other liquids.
For cleaning, never immerse the machine in water or any other liquid.
Do not use raw milk. Use only pasteurised or UHT milk. Homogenized milk must
always be used.
Milk that has already been heated up or for which the expiry date has lapsed may
not be used.
When using packaged milk, it is recommended for hygienic reasons to use the
milk directly from the original packaging.
The milk in the refrigerator must have a temperature of approx. 3 °C to 5 °C If
this rule is not followed, it is not possible to dispense an optimal product.
Only refill with milk which has not exceeded 5 °C. Never put warm milk in the re-
frigerator. It takes too long for a temperature of 3 °C to 5 °C to be reached. The
refrigerator will also ice up. (Frequent defrosting required).
Always wash and disinfect your hands before cleaning the coffee machine.
Note:
For reasons of hygiene and to ensure proper functioning of the machine, it must be
regularly cleaned.
To clean the brewing units and the interior of the machine, use a moist clean paper
tissue. Only use cleaning products that are approved by the manufacturer for the respective machine type. The supplier of the coffee machine will be glad to assist you in
this matter.
To clean the interior of the refrigerator, only wipe with a clean, dry paper tissue. To
clean the outside of the coffee machine, use a moist cloth and a mild soap solution.
Do not use aggressive and/or scouring cleaning products. Never spray the machine
with water or other liquids.
Danger!
During cleaning and usage of cleaning tools or products, there is a risk of injury.
BATW 500 - EN - V05 Page 2-5
Page 14

Safety instructions
2.5 Designated use
The Schaerer Twin has been designed to dispense coffee beverages and/or milk beverages in different versions – in cups or coffeepots. Additionally, the unit can supply
steam for heating up milk and/or hot water. This unit is designed for industrial and
commercial use. The unit may be placed in self-service areas if attended to by trained
personnel.
Note:
Use of this equipment is subject to the "General Terms and Conditions" of Schaerer
Ltd. and these operating instructions. In legal terms, any other use is not an intended
use. The manufacturer accepts no liability for damage resulting from unintended use.
Gefahr!
The Schaerer Twin may not under any circumstances be used to heat up or dispense any other liquids than coffee, hot water (for beverages or cleaning) or
milk (cooled, pasteurised, homogenised, UHT).
2.6 Liability
Guarantee and liability claims in the event of injury to people and damage to property
cannot be entertained if they are due to one or more of the following causes:
Improper use of the coffee machine.
Improper assembly, commissioning, operation and maintenance of the coffee
Operation of the coffee machine with defective or improperly mounted or oper-
Non-compliance with safety instructions in this manual with special regard to stor-
Inadequate monitoring of component parts that are subject to wear.
Repairs not carried out by a qualified technician.
Catastrophic damage due to the influence of foreign bodies, accidents, vandalism
If cleaning agents other than those recommended by Schaerer Ltd. have been
Important!
The manufacturer’s warranty exclusively covers machines that have been properly
maintained at the specified intervals and where original spare parts are used that were
directly supplied by the manufacturer or one of the manufacturer’s authorised suppliers.
machine.
ated safety devices.
age, installation, commissioning, operation and maintenance of the machine.
and force majeure.
used.
Page 2-6 BAPdO500 - EN - V05
Page 15

Product description
3 Chapter
Table of contents
Chapter Text Page
3
3.1
3.1.1 Overview.............................................................................................................................................3-2
3.1.2 Coffee machine operating panel.........................................................................................................3-3
3.1.3 Open front door...................................................................................................................................3-4
3.1.4 Machine interior view..........................................................................................................................3-5
3.1.5 Installation layout................................................................................................................................3-6
3.1.6 Purpose of coffee machine.................................................................................................................3-7
3.1.7 Serial plate..........................................................................................................................................3-7
3.2
3.2.1 Performance Characteristics ..............................................................................................................3-8
3.2.2 Dimensions and weight ......................................................................................................................3-8
3.2.3 Power supply ......................................................................................................................................3-8
3.2.4 Power consumption ............................................................................................................................3-9
3.2.5 Water supply/drain..............................................................................................................................3-9
3.2.6 Volumes..............................................................................................................................................3-9
3.3
3.3.1 Make of the coffee machine .............................................................................................................3-10
3.3.2 Standard accessories (included) ......................................................................................................3-10
3.3.3 Special accessories (not included in shipment) ...............................................................................3-11
3.3.4 Optional features for the coffee machine .........................................................................................3-11
3.4
3.4.1 Time-specific settings .......................................................................................................................3-11
3.4.2 Cleaning settings ..............................................................................................................................3-12
3.4.3 Miscellaneous...................................................................................................................................3-12
3.5
3.5.1 Standard chip cards..........................................................................................................................3-13
3.5.2 Chip card options for normal operating mode ..................................................................................3-14
3.5.3 Chip cards for payment mode ..........................................................................................................3-14
3.6
3.6.1 Initial commissioning of the coffee machine.....................................................................................3-15
3.6.2 Set-up conditions..............................................................................................................................3-15
Product description ..........................................................................3-2
Coffee machine data ........................................................................................................................3-2
Operating information for the coffee machine ..............................................................................3-8
Equipment and accessories ..........................................................................................................3-10
Special settings ..............................................................................................................................3-11
Chip card functions........................................................................................................................3-12
Commissioning...............................................................................................................................3-15
BAPdO500 - EN - V05 Page 3-1
Page 16
Product description
3 PRODUCT DESCRIPTION
3.1 Coffee machine data
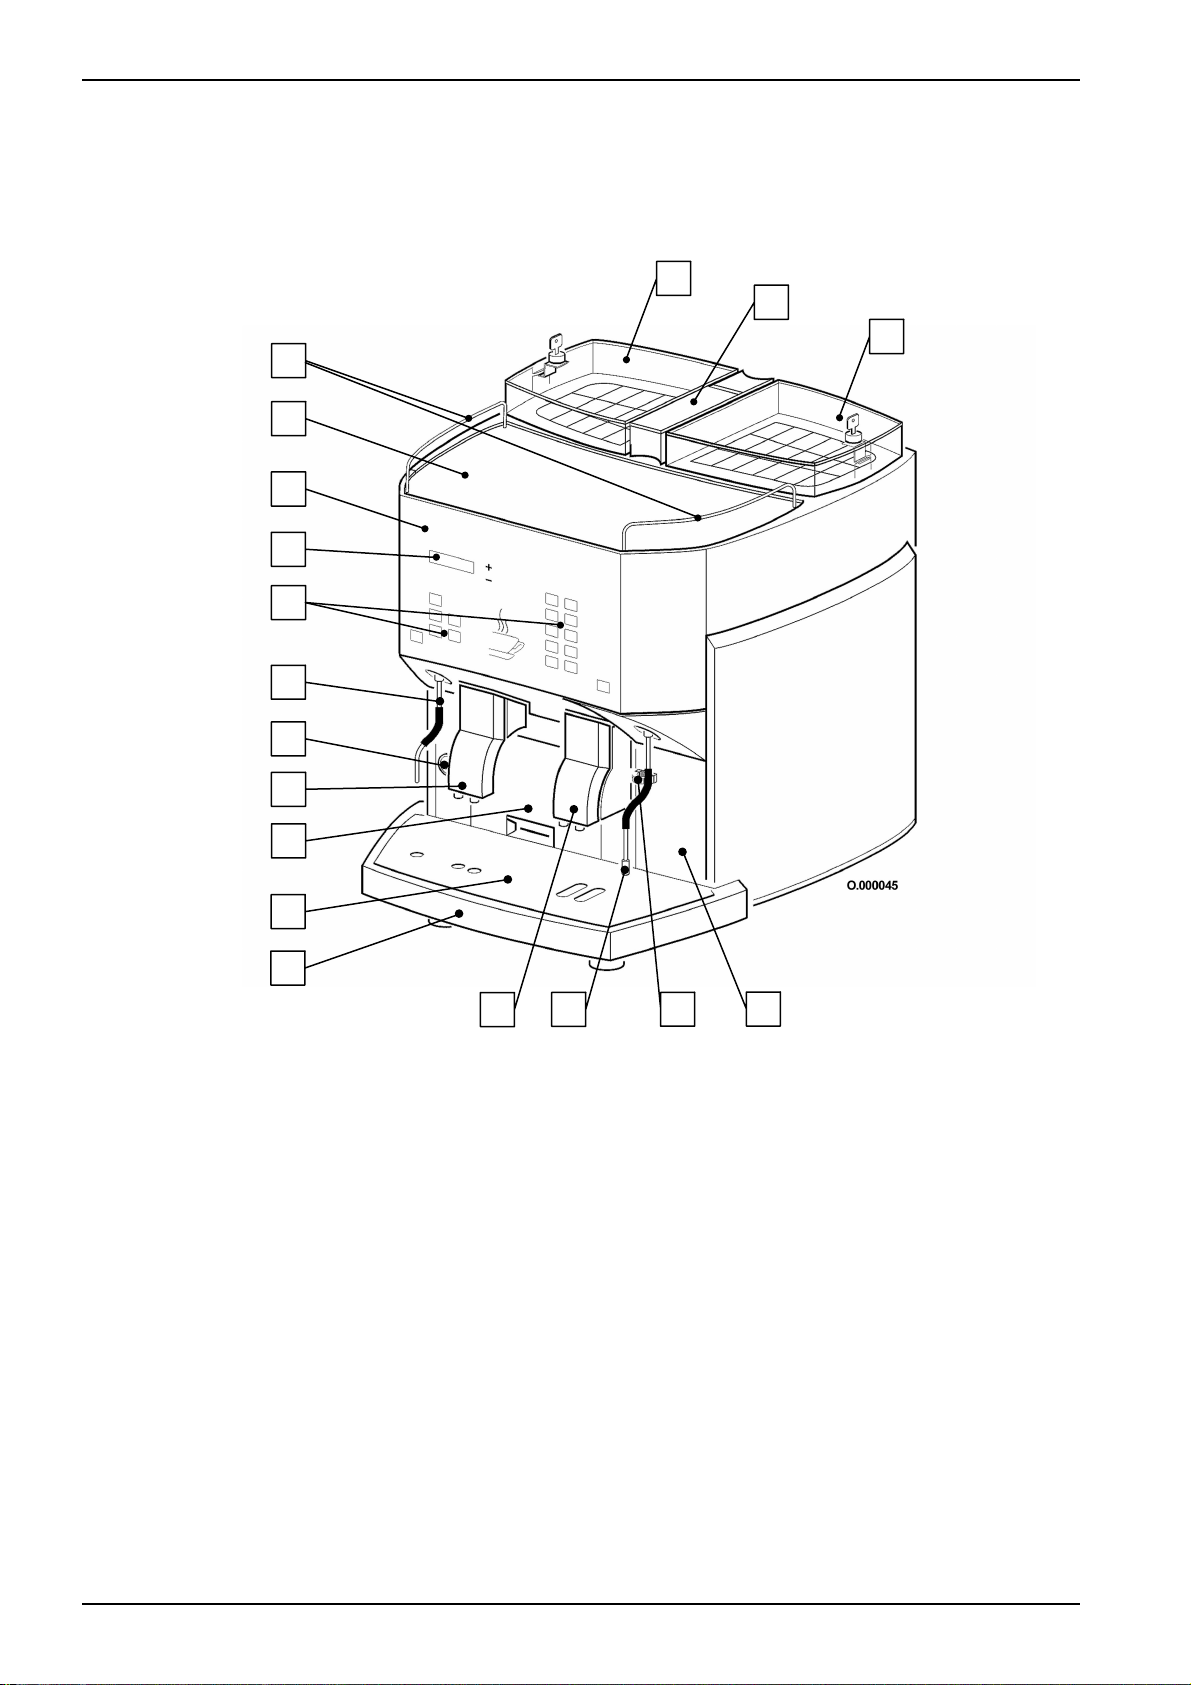
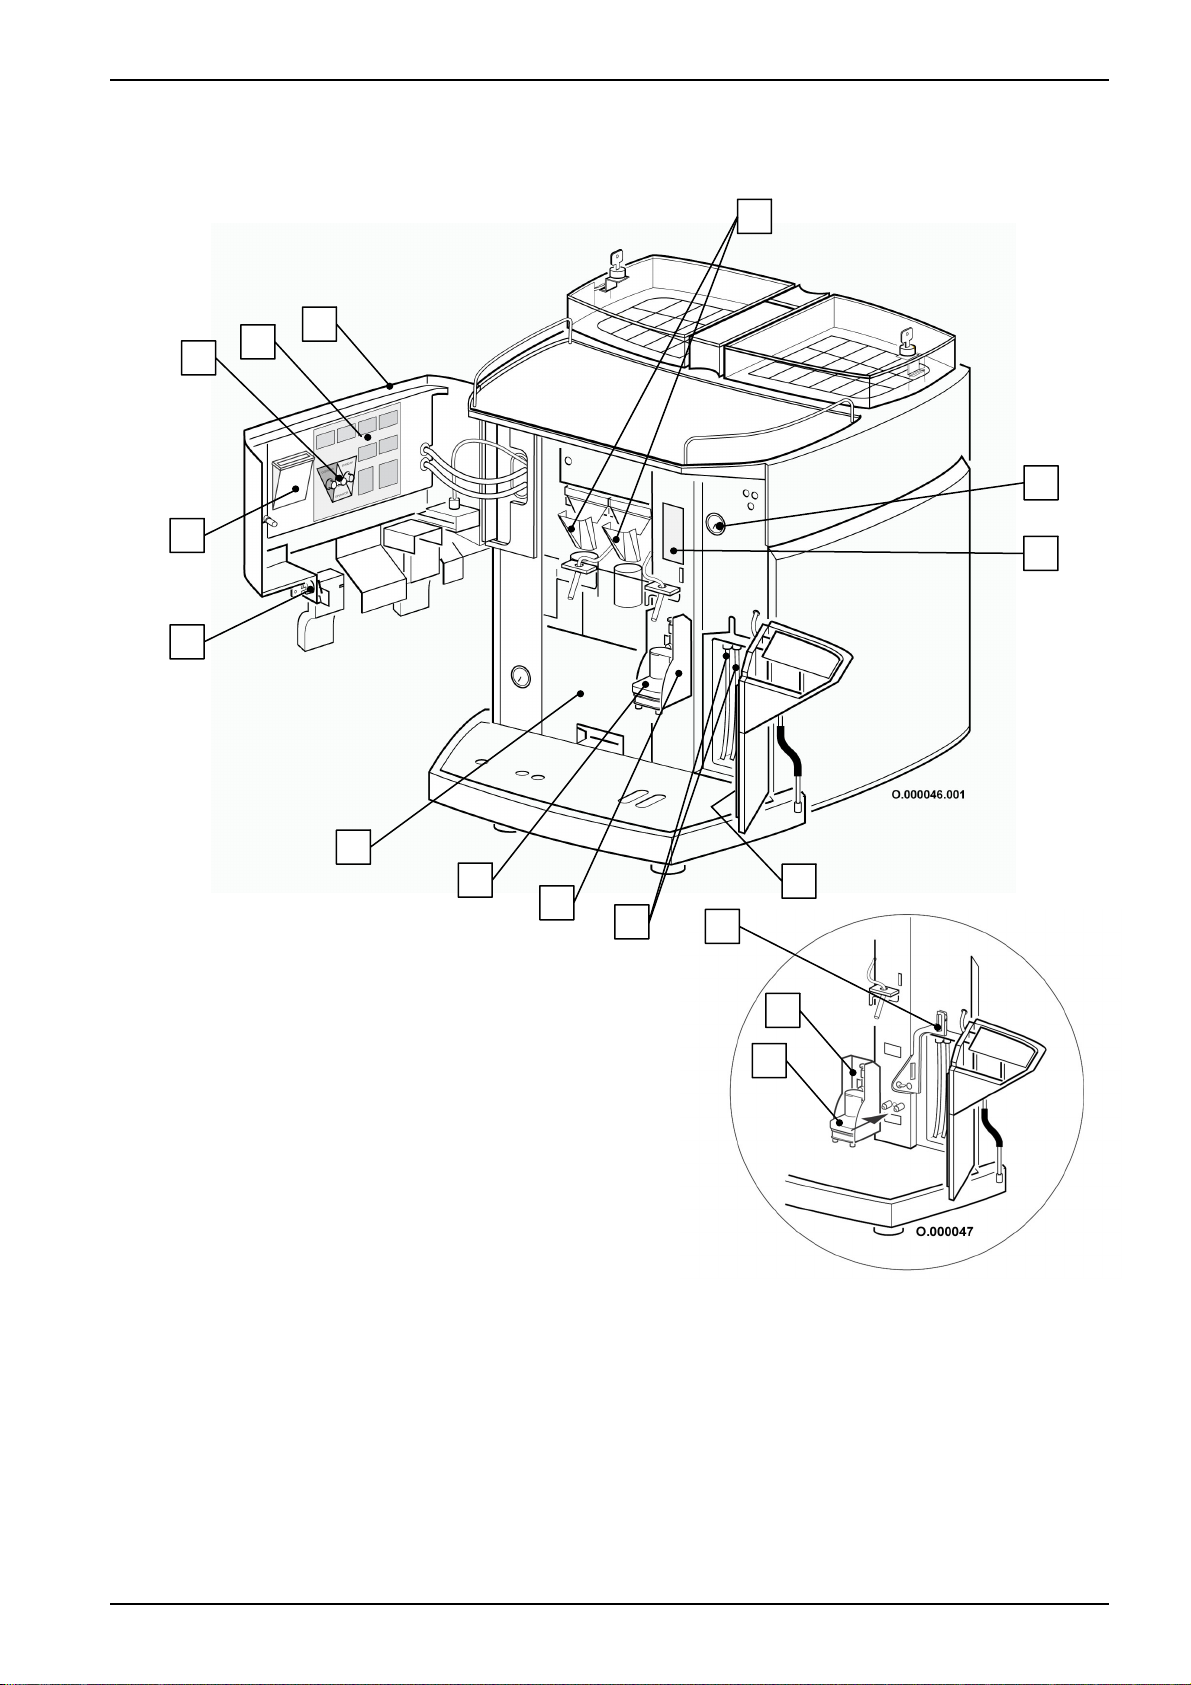
3.1.1 Overview
Legend:
1 Coffee beans container
2 Funnel for ground coffee ("decaf")
3 Cup plate frame
4 Heated cup plate
5 Front door (cf. "3.1.3 Open front door." on page 4)
6
7 Operating panel (left and right)
8 Hot water outlet
9 Manometer for pump pressure
10 Left beverage outlet (coffee)
11 Coffee grounds container
12 Drip grid
13 Drip tray with drain
14 Right beverage outlet (coffee/milk)
15 Steam pipe
16 Refrigerator door handle
17 Refrigerator door
3
4
5
6
7
8
9
10
11
12
13
T
wo-line illuminated LC display
14
15
1
16
2
1
17
Page 3-2 BAPdO500 - EN - V05
Page 17
Product description
A
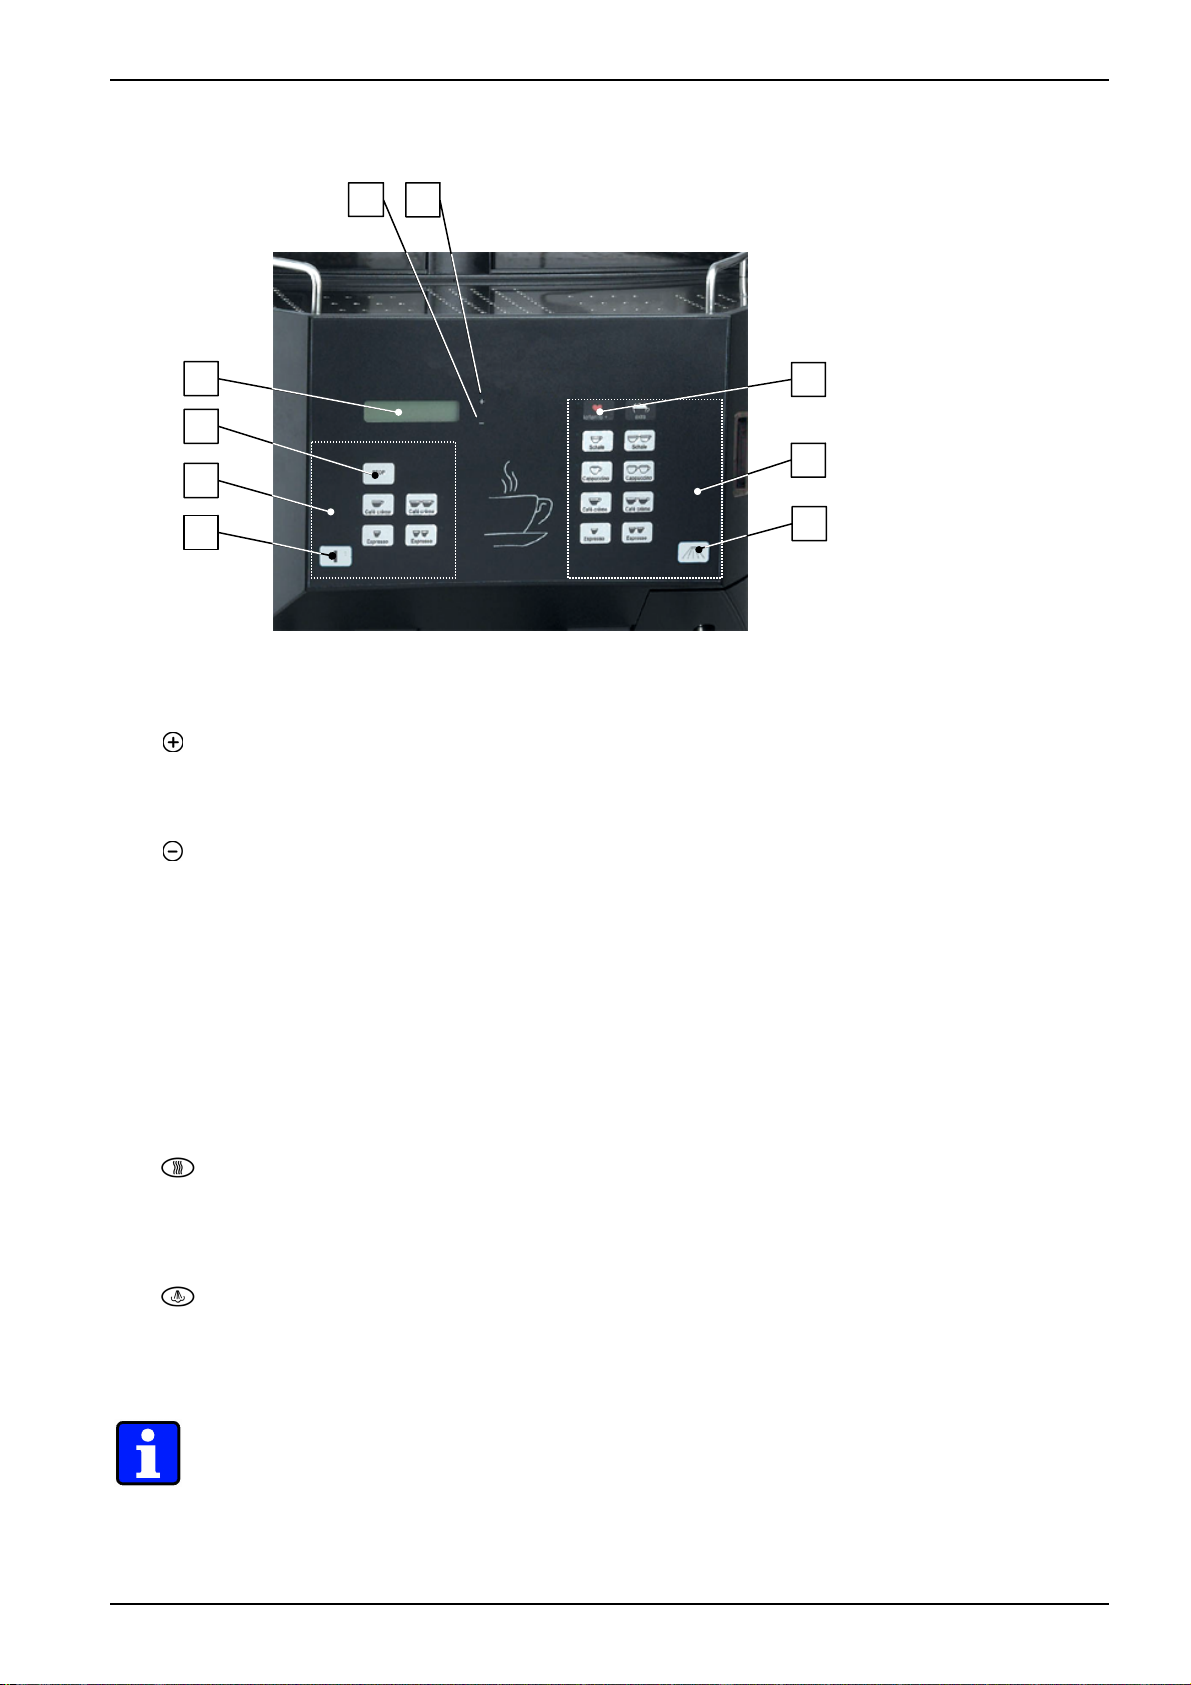
3.1.2 Coffee machine operating panel
1
2
3
+
4
5
_
9
7
6
8
Fig. 2.1
Legend:
[ ] button
1
- Input confirmation during cleaning program
- Select functions
- Change settings
[ ] button
2
- Select functions
- Change settings
3 Two-line illuminated LC display
4 [STOP] button:
- Terminate current beverage delivery
- Cancellation of pre-selected products
5 Control panel left:
- Programmable product buttons for serving of coffee
- Each product button features a green LED operating indicator and a customised product symbol
- Product buttons can be assigned a second product level
[
6
7 Control panel right:
8
9 Button (decaf) for decaffeinated or other ground coffee mixture
] button
- Programmable product buttons for the output of coffee, hot milk, and milk coffee beverages
- Each product button features a green LED operating indicator and a customised product symbol.
[
] button
:
:
: hot water
: steam
Note:
The product buttons shown in Fig. 2.1 A are examples only.
BAPdO500 - EN - V05 Page 3-3
Page 18
Product description
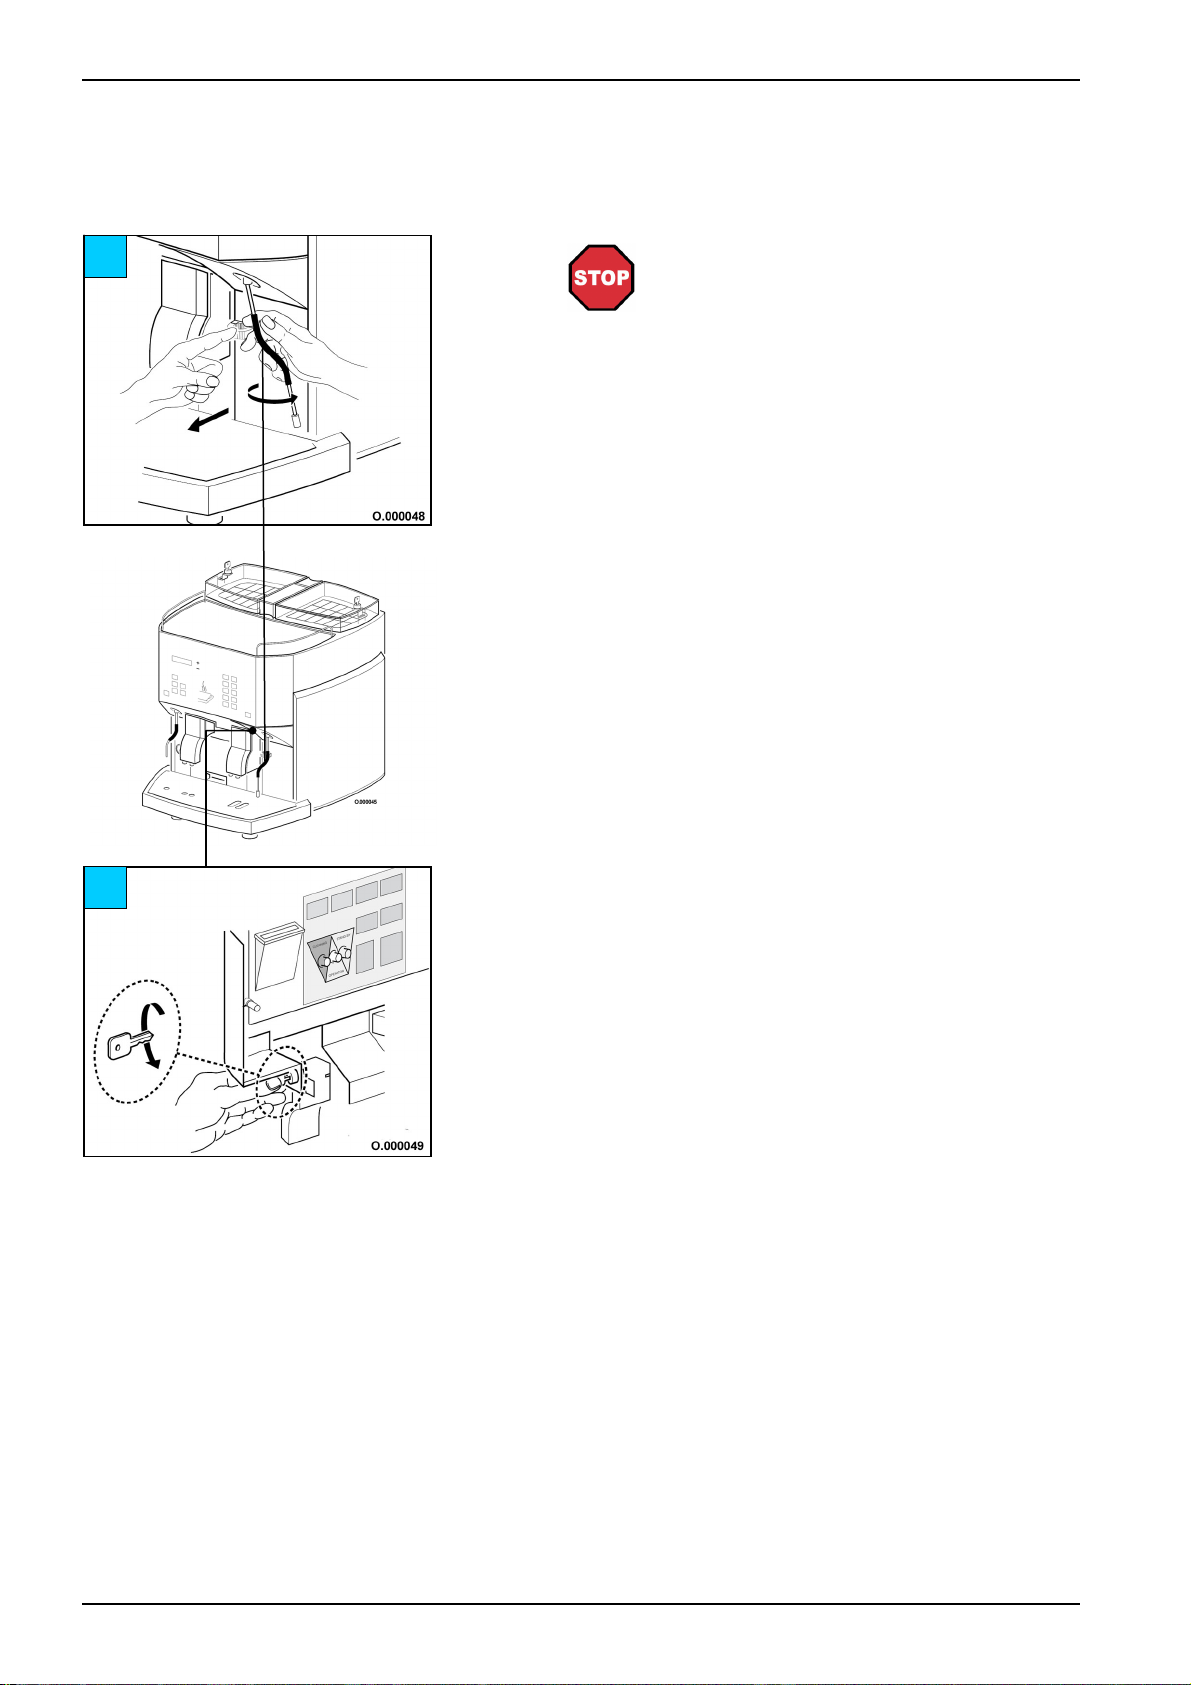
3.1.3 Open front door.
The front door lock is located behind the refrigerator door and can only be opened
with the key (supplied).
1
2
! Danger!
To open the front door, you must place your
hand near the steam pipe.
Caution: the steam pipe may be hot!
1. Open the refrigerator door.
2. Unlock the front door by turning the key
counter-clockwise until it reaches the stop.
Page 3-4 BAPdO500 - EN - V05
Page 19
3.1.4 Machine interior view
2
3
1
4
5
6
7
Legend:
Front door (see "3.1.3 Open front door.” 2-4)
1 Front door sticker
2 [Cleaning], [Operator], [Stand-by] buttons
3 Chip card insertion
4 Lock with key
5 Coffee grounds container
6 Foamer head
7 Foamer head cover
8 Milk pipes
9 Tube
10 Sticker refrigerator door
11 Sticker front shelf
12 Manometer of steam boiler
13 Brewers left and right
holder
Product description
14
13
12
11
8
9
10
8
7
BAPdO500 - EN - V05 Page 3-5
Page 20
Product description
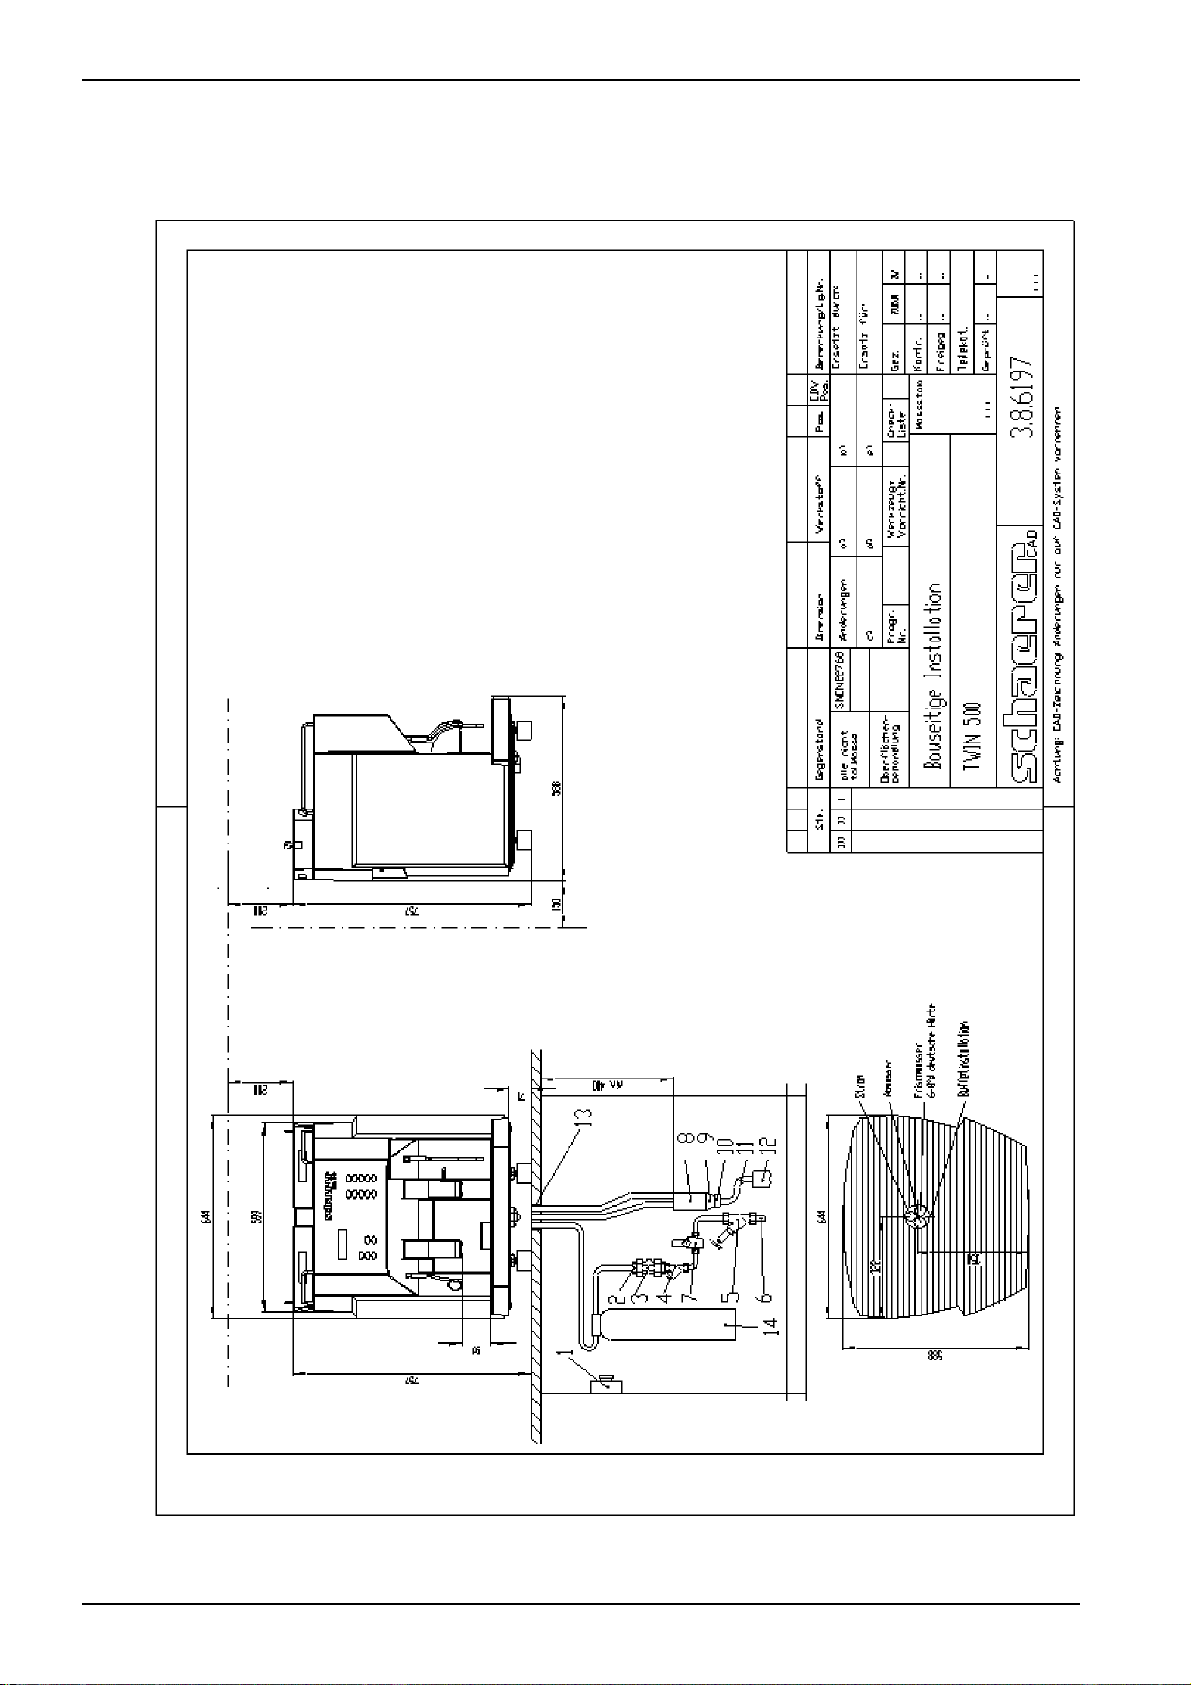
3.1.5 Installation layout
(fully isolated from the power supply by min. 3 mm
gap)
1 Main switch type 26, 3 x 400 VAC (3PNE), 16 A
The following installations must be present:
Non-return valve SVGW tested
2 G 1/2" connection
3
4 Filter
5 G 1/2" stop valve
6 G 1/2" water supply pipe
7 Pressure reduction set to 3 bar
Ideal water hardness:
12 °fH (French water hardness)
6 ... 8 °dH (German water hardness)
8 Upright pipe, ø 110 mm, length 200 mm
9 Reduction, ø 110/50 mm
10 Nipple-type fitting, ø 48 mm
11 Siphon
12 Outlet (plastic), ø 56 mm
13 Opening for supply and drain ø 80 mm
14 Britta water filter jumbo type
15 Opening for grounds ejection container Ø 140 mm
16 Buffet bushing (063834)
17 Coffee grounds container
All local statutory regulations apply
Subject to changes without notice!
Page 3-6 BAPdO500 - EN - V05
Page 21
3.1.6 Purpose of coffee machine
The coffee machine can be configured to serve the following beverages:
- Coffee
- Espresso
- Ristretto (short espresso)
- Coffee Pot
- Decaffeinated Coffee (Decaf)
- Milk coffee
- Latté
- Hot milk
- Milk foam
- Cappuccino
- Macchiato
- Hot water for tea, punch etc.
- Steam for heating of milk for hot chocolate, etc.
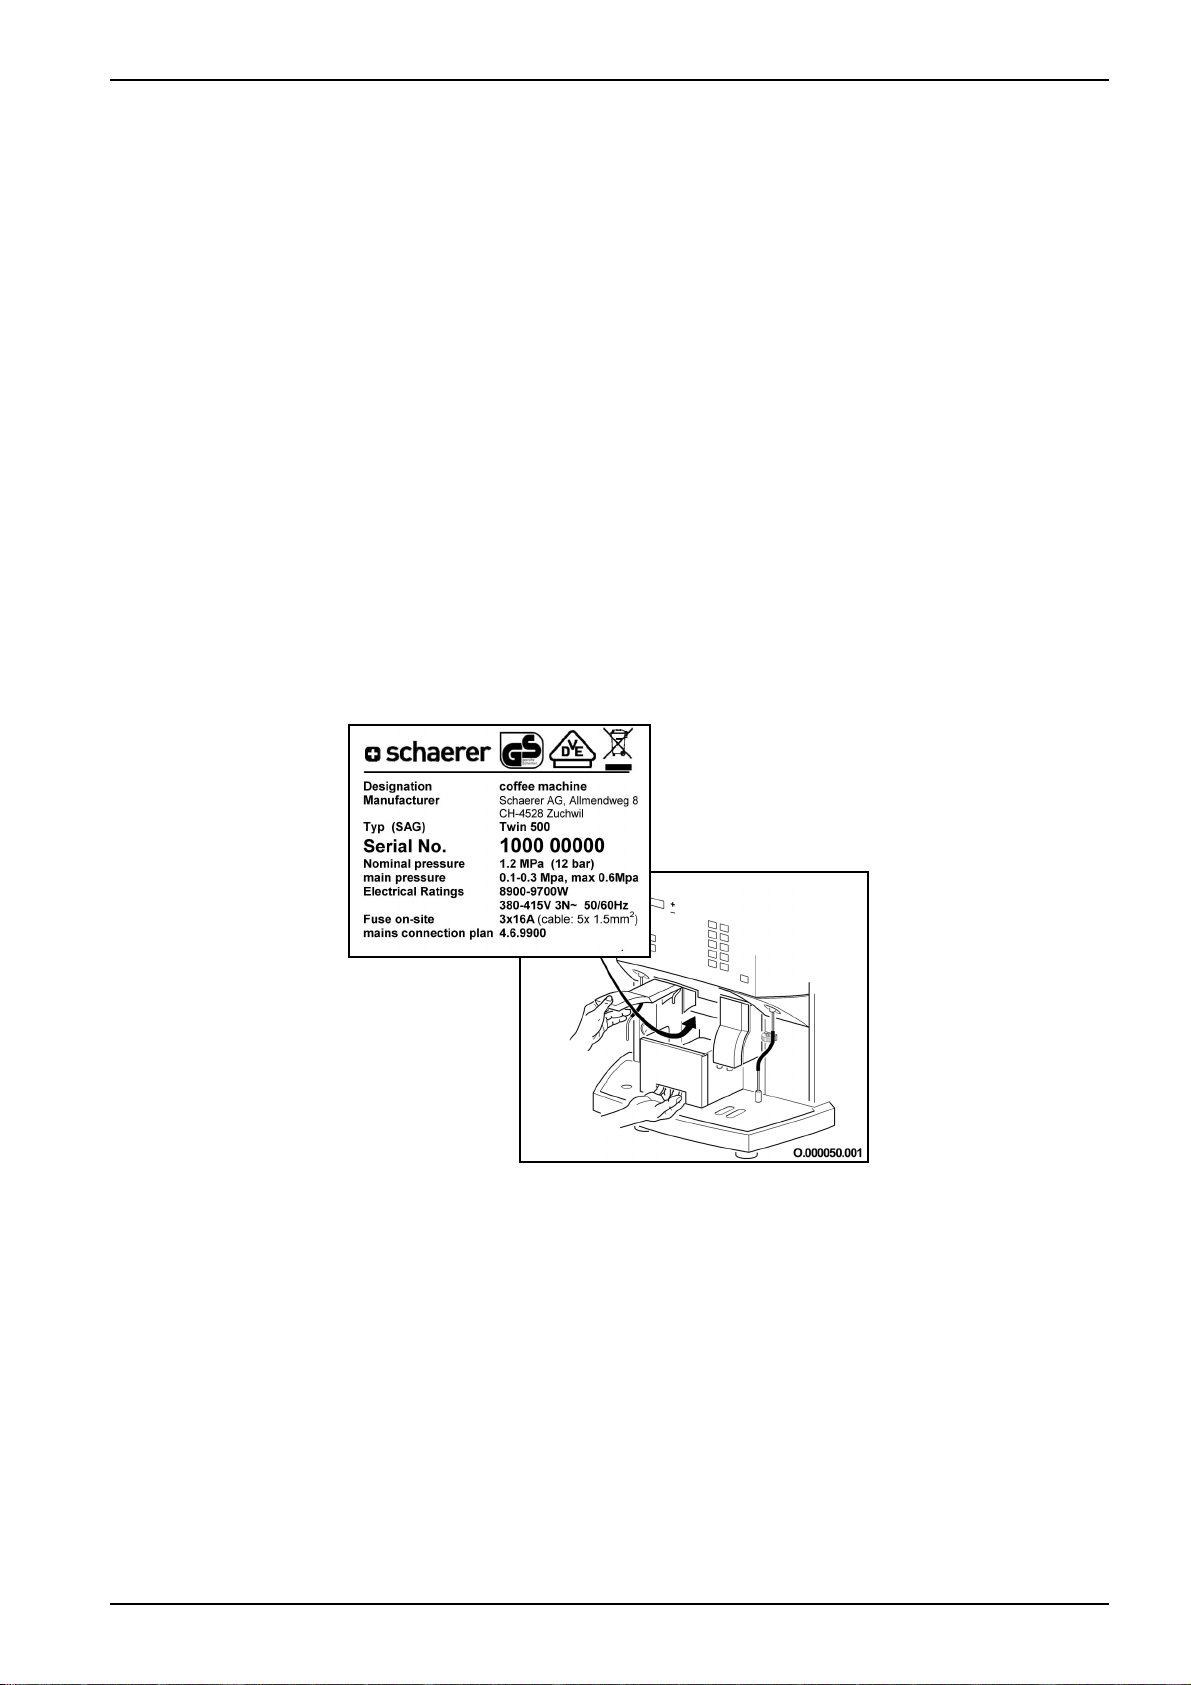
3.1.7 Serial plate
The serial plate contains the machine-specific data. This serial plate is on the inside of
the machine and is visible when the coffee ground container is removed (cf. Fig. 2.1
B).
Product description
Fig. 2.1 B
BAPdO500 - EN - V05 Page 3-7
Page 22
Product description
3.2 Operating information for the coffee machine
3.2.1 Performance Characteristics
Max. beverage production per hour:
280 cups of coffee of 120 ml
-
-
500 espressos of 40 ml
- 225 cappuccino of 140 ml
- 330 cups of tea, punch of 120 ml, corresponding to approx. 40 litres of hot water
3.2.2 Dimensions and weight
Height:
Width: 660
Depth: 610 mm (+ 150 mm clearance at the back for air circulation
Outlet height: Right beverage output 91 mm
Left beverage output: 190 mm
Weight 87 kg (empty)
93 kg (ready for operation)
3.2.3 Power supply
Model Power rating
Europe 380-415V 3NAC 50/60 Hz 8900-9700W 3 x 16 5 x 1.5mm2
Japan, Saudi Arabia,
Norway (grid B)
200-220V 3AC 50/60Hz 7300-8300W 3 x 25 4 x 2.5mm2
The device must be electrically connected according to all valid regulations (VDE
0100) as well as national stipulations. Design of network implementation line, at least
H05 VV-F, harmonized. The voltage specified on the serial plate must match the supply voltage at the installation location.
Danger!
The installation must be installed and/or inspected by authorised personnel
only!
The phase must be protected with 16 A fuse.
Never operate the coffee machine if the mains cable is defective. A defective or
damaged mains cable or plug must immediately be replaced by an authorised service technician.
Use extension cords only when you are sure that they are in perfect condition. Ex-
tension cords must be equipped with a 5-way plug (3 PNE) and it must be able to
carry at least 16 A per phase.
Power cable and/or extension cords must be placed so that they pose no safety or
health hazard. Do not pinch the cords or pull them around sharp corners and over
sharp edges; do not let them hang exposed in the room. Do not place the cords on
hot surfaces and protect them from oil and harsh cleaning agents.
Never lift or pull the machine by the mains cable. Never pull the plug out of the
socket by gripping the mains cable or extension cord. Do not touch cable or plug
with wet hands. Never insert a wet plug into the socket.
750 mm (1010 mm with opened cover of the coffee beans container)
mm
Fuse
(installation site)
Connection cable
conductor crosssection
Page 3-8 BAPdO500 - EN - V05
Page 23
3.2.4 Power consumption
Ready for operation: max. 9,8 kW *)
-
- in Stand-by:
Cooling (Peltier element):approx. 55 W
Cup plate: approx. 28 W
Total: approx. 83 W
*) See 10.3 "Serial plates of steam generator and instant heater" on
page 10-6.
3.2.5 Water supply/drain
The coffee machine must be connected as shown in the installation on page 3-6 diagram to a G 3/8" drinking water line with a pressure hose.
If the coffee machine is to be connected to a newly installed water line, the line and
the pressure hose must be properly rinsed to ensure that no dirt particles are fed into
the machine.
If the machine is to be connected to a water drain, the supplied drainage hose should
be connected to the drip tray and the siphon and fastened securely. The hose should
point downwards so that water can easily flow out of the drip tray.
Note:
Ideally, water hardness should be 7-5°dH (standard German hardness) or 8-12°fH
(standard French hardness). Chlorine content should not exceed 100 mg per litre.
The ideal pH value is 7. For all other values, local regulations apply.
Water inlet pressure
Note:
We recommend setting the decompression valve to 3 bar.
Feed water temperature
3.2.6 Volumes
a
3 hot w
ter boiler
1.2 l hot water
0.8 l coffee water left:
0.8 l coffee water right:
1 steam boiler
0.8 l, of which 0.4 l are steam
2 coffee grinders
1.3 kg coffee beans per coffee grinder
Refrigerator
1 l or 2 l milk pack or
2 l milk container
Product description
Recommended: 0.1 MPa – 0.3 MPa (1 – 3 bar)
Maximum: 0.6 MPa (6 bar)
Minimal: 10°C
Maximum: 30°C
BAPdO500 - EN - V05 Page 3-9
Page 24

Product description
3.3 Equipment and accessories
3.3.1 Make of the coffee machine
The TWIN model is equipped with a double outlet, refrigerator and with a chip card
3.3.2 Standard accessories (included)
reader. The following models are available:
Model Ordering no.
1 TWIN-500 040700
1 PDO-500 TWIN 040702
1 DE SCHAERER-500 TWIN 040703
Item Ordering
1
User manual *
1 Quick Reference Card *
2 Insert foils *
1 CPM sticker *
1 Refrigerator sticker *
1 Front door sticker *
1 CHEF chip card 063930
1 SAVE DATA PLUS chip card 063929
1 Wallet for 2 chip cards 065278
1 Coffee measuring spoon 067111
2.0 l Cleaning agent for daily cleaning 061299
6 x 2 litre bottles
2.0 l Cleaning agent for weekly cleaning 061019
1 Package cleaning tablets 065221
1 Dosing apparatus 061020
1 Air valve cleaner 061454
1 Brush 067409
1 Small brush 061174
1 Large brush 061175
1 3/8" screw fitting 068178
1 G1/2“ screw fitting 068179
2 Flat packing D = 15 x 9 x 0.8 mm 064249
1 90° bow 067784
1 Milk container 061975
1 Cleaning container 061862
1.5 m Silicone discharge hose 061845
* customised articles!
Subject to changes without notice!
no.
Page 3-10 BAPdO500 - EN - V05
Page 25

3.3.3 Special accessories (not included in shipment)
Item Ordering no.
Supplementary chip cards:
PROGRAM 063941
KEY BLOCK 063931
COFFEE TEST 063932
MANAGER 063940
LOAD 063937
MASTER 063934
WAITER 063936
COPY WAITER 063942
PRINT 063943
MONEY A-F 063921 - 063926
CUP 063939
CREDIT-LOCK 063946
“Clean” (for cleaning card reader) 063945
3.3.4 Optional features for the coffee machine
Note:
You can read the details on the additional optional features listed in "Options" or obtain information from a manufacturer-authorised dealer.
- Payment systems such as Waiter Account and MONEY
- Payment systems such as coffee-bar systems (CSI = Coffee Standard Interface),
cash payment systems (CCI = Coffee Credit Interface, e.g. coin and token slots)
- Chip card loader
- Alarm functions
- Water softener (Filados/Brita)
- Cup warmer
- Water tank for trolley version (mobile operation)
- Coffee grounds ejection into ext. container (coffee ground container omitted)
3.4 Special settings
Note:
All settings described in this section can only be programmed by an authorised service technician.
3.4.1 Time-specific settings
3.4.1.1 Service reminder
After a certain period or a certain number of beverages, a reminder is displayed that it
is time to have the machine serviced by a service technician.
3.4.1.2 Timer
This enables the coffee machine to be programmed to come on the days it is used. In
this case, it switches itself on automatically.
Product description
BAPdO500 - EN - V05 Page 3-11
Page 26

Product description
3.4.2 Cleaning settings
3.4.2.1 Cleaning reminder
The cleaning reminder and the time for it can be enabled or programmed by the service technician.
After the message appears on the display, you can dispense products for 4 hours. If
cleaning is not done during this time, another product output is not possible. You can
delay the cleaning by another 4 hours by pressing the [Operator] button.
Should the machine be cleaned before the cleaning reminder appears, displaying the
reminder will be suppressed.
3.4.2.2 Sample coffee
A sample coffee is automatically served immediately after the coffee machine is
switched on.
3.4.3 Miscellaneous
3.4.3.1 Product mix
Pre-selection of different beverage types
technician.
3.4.3.2 [ DECAF ] button (manual dosing)
The service technician can enable or disable the [DECAF] button.
3.5 Chip card functions
Important!
Chip cards should be handled with the same care as bank cards (do not bend, do not
use as “door openers”, etc.)
This coffee machine features the latest control technology. To facilitate programming,
various program groups have been created which can be programmed directly with
the aid of the respective chip cards. Using these chip cards protects the program
groups from misuse. Security against misuse is not increased because important chip
cards such as the CHEF, PROGRAM, LOAD and MANAGER chip card must be programmed with a security level by the service technician.
4 security levels can be programmed.
Security level - 0 Customer ref.
The control system automatically checks whether the card
Security level - 1 Customer ref. / PIN code
Verifies the customer reference number and inputs of a PIN
quantities can be enabled by the service
and
bears the correct customer reference number.
code before the card is ready.
Page 3-12 BAPdO500 - EN - V05
Page 27
Security level - 2 Customer ref. / Card ref.
Verification of the customer reference number.
The card reference number
Security level - 3 Customer ref. / Card ref. / PIN code
The highest security level, combining levels 1 and 2.
If a new chip card is inserted into the card reader with security level 1 or 3, any number, including 0000, may be entered as the PIN code. This value is then transferred to
the card and considered as the current code.
3.5.1 Standard chip cards
The CHEF card enables the principal settings or modifications to be undertaken for
routine operation.
- Display product counter total for coffees and teas by key
- Reset counter
- Read monthly counter for coffee and tea
- Change grinding quantity.
- Set filling quantity of coffee water and milk
- Set dosage time for water and steam
- Change time display
- Change date display
- Change on/off time (timer)
- Remove the “service wanted” message
- Change PIN code (Personal Identification Number)
- Changing the display language
The SAVE DATA chip card is a security card which enables the machine settings to
be saved or data from the card to be transferred to the machine.
The SAVE DATA PLUS chip card is required for the coffee machine:
Product description
1)
is also entered in the internal chip
card table. This makes it impossible to use any other card, as
the system authorizes one card only per program group.
1)
Every chip card bears a manufacturer-supplied incremental
card reference number.
BAPdO500 - EN - V05 Page 3-13
Page 28
Product description
3.5.2 Chip card options for normal operating mode
In normal operating mode, the PROGRAM card is used for statistical purposes. If a
payment system is installed, the requisite settings are made using the PROGRAM
card:
- Enable/disable payment mode
- Switch prices (price level 1 and 2 time-dependant)
- MONEY price level 1 and 2
- Change token price with or without MONEY card price levels 1 and 2
- Change product prices and article numbers (Only for external payment mode)
- Display sales on MONEY chip card
- Delete sales on MONEY chip card
- Display sales on MASTER chip card
- Delete sales on MASTER chip card
- Log on MASTER chip card
- Delete MASTER chip card table
- Changing the PIN code
The KEY BLOCK card is used to disable either individual or all product keys simultaneously for all uses, or to enable them.
The COFFEE TEST card is used to check the ground coffee (quantity dispensed and
fineness) and to change the quantity ground.
3.5.3 Chip cards for payment mode
MONEY cards, from A-F, enable a scale of prices to be used in conjunction with the
MONEY chip card system. The amount of coffee ground and dispensed can be individually programmed on each MONEY card for all coffee products.
The CUP card queries and adds up the counter levels for each individual product without resetting them.
The CREDIT LOCK card switches between normal operating mode and payment
mode.
Page 3-14 BAPdO500 - EN - V05
Page 29
3.6 Commissioning
3.6.1 Initial commissioning of the coffee machine
The coffee machine must be installed and commissioned by a service technician
authorised by the manufacturer.
Note:
Once the coffee machine is installed and after subsequent changes, it is important to
save the new data on the SAVE DATA card provided. The SAVE DATA cards should
be on hand at all times, including for the service technician.
3.6.2 Set-up conditions
3.6.2.1 Location
Danger!
- Prior to installing, ensure that the coffee machine will not be positioned on a
hot surface or near an oven.
- Never expose the coffee machine to rain, snow, frost, etc.
- The support surface for the unit must be stable and level and may not be deformed by the weight of the coffee machine.
Note:
- The location must comply with the following climatic conditions:
- Ambient temperature from 10 °C to 35 °C
- Relative humidity max. 80 %
- The machine is designed exclusively for interior use.
Important!
Protect the machine from frost. If the coffee machine has been exposed to temperatures below freezing point, contact an authorised customer service representative before you start the unit.
3.6.2.2 Installation of the coffee machine
Installation of the coffee machine should be done under the following conditions:
- Install the supply lines as shown in the mains-side installation diagrams to within one
- Conform with technical data (see "Product description", page 2-1).
- Leave a space (above and at the sides) for servicing.
- Install the machine at least 15 cm away from the wall (for ventilation).
- Comply with the respective local statutory regulations regarding catering premises.
meter of the place of installation.
(Ideally leave about 35 cm free on each side.)
Product description
BAPdO500 - EN - V05 Page 3-15
Page 30

Product description
Page 3-16 BAPdO 500 TW - 02.03 - V02
Page 31

Operation
4 Chapter
Table of contents
Chapter Text Page
4
4.1
4.2
4.3
4.4
4.4.1 Refilling of coffee beans .....................................................................................................................4-5
4.4.2 Adding ground coffee .........................................................................................................................4-5
4.4.3 Replace milk pack or refill milk ...........................................................................................................4-6
4.4.4 Making the coffee machine ready for operation .................................................................................4-7
4.4.4.1 Pre-checks..........................................................................................................................................4-7
4.4.4.2 Switching on the coffee machine........................................................................................................4-7
4.4.5 Pre-selecting type of beverage:..........................................................................................................4-8
4.4.6 Special-size beverage containers ......................................................................................................4-8
4.4.7 Preparing products using the second product level ...........................................................................4-9
4.4.8 Double distribution button (2x)..........................................................................................................4-10
4.4.9 Dispensing coffee and hot milk beverages.......................................................................................4-10
4.4.10 Dispensing coffee with previously ground coffee powder ................................................................4-12
4.4.11 Dispensing milk or milk foam............................................................................................................4-13
4.4.12 Dispensing hot water........................................................................................................................4-14
4.4.13 Generating steam.............................................................................................................................4-15
4.4.14 End of operation/switching off the machine......................................................................................4-16
4.5
4.5.1 Several weeks (e.g. business vacation): ..........................................................................................4-17
4.5.2 Standstill for several months (e.g. end of season): ..........................................................................4-17
4.5.3 Disassembly of the coffee machine..................................................................................................4-17
4.6
4.6.1 Inserting the chip card into the chip card reader ..............................................................................4-18
4.6.2 CHEF chip card ................................................................................................................................4-18
4.6.2.1 Menu view of the CHEF chip card....................................................................................................4-18
4.6.2.2 Read product counter for coffees and teas by key...........................................................................4-19
4.6.2.3 Resetting counter..............................................................................................................................4-19
4.6.2.4 Reading monthly counter..................................................................................................................4-20
4.6.2.5 Changing grinding quantity (coffee powder).....................................................................................4-20
4.6.2.6 Changing the water and/or milk quantity for coffee products...........................................................4-21
4.6.2.7 Dosage time for hot water, steam, hot milk and milk foam. .............................................................4-22
4.6.2.8 Changing time display ......................................................................................................................4-23
4.6.2.9 Changing date display......................................................................................................................4-23
4.6.2.10 Changing on/off time.........................................................................................................................4-24
4.6.2.11 Changing the PIN code ....................................................................................................................4-25
4.6.2.12 Service reminder...............................................................................................................................4-26
4.6.2.13 Changing the display language........................................................................................................4-26
4.6.3 DATA SAVE PLUS chip card ...........................................................................................................4-27
4.6.3.1 Menu view of the DATA SAVE PLUS chip card...............................................................................4-27
4.6.3.2 Saving coffee machine data to chip card .........................................................................................4-27
4.6.3.3 Saving data from the chip card to the coffee machine .....................................................................4-28
OPERATION ....................................................................................... 4-3
Introduction.......................................................................................................................................4-3
Operating Modes ..............................................................................................................................4-4
Messages displayed when coffee machine is ready for operation .............................................4-4
Routine operation.............................................................................................................................4-5
Longer idle time ..............................................................................................................................4-17
Programming using standard chip cards ....................................................................................4-18
BAPdO500 - EN - V05 Page 4-1
Page 32

Operation
Table of contents
Chapter Text Page
4.7
4.7.1 PROGRAM chip card....................................................................................................................... 4-28
4.7.1.1 Menu view of the PROGRAM chip card .......................................................................................... 4-29
4.7.1.2 Programmable security levels ......................................................................................................... 4-29
4.7.1.3 Enabling / disabling payment mode................................................................................................. 4-30
4.7.1.4 Switching prices............................................................................................................................... 4-31
4.7.1.5 Changing MONEY price level 1 and 2............................................................................................. 4-32
4.7.1.6 Changing token price, with or without MONEY price level 1 and 2................................................. 4-33
4.7.1.7 Changing product price and item number (for external CCI / CSI payment systems) .................... 4-34
4.7.1.8 Displaying sales on MONEY chip card............................................................................................ 4-35
4.7.1.9 Deleting sales on MONEY chip card ............................................................................................... 4-35
4.7.1.10 Displaying sales on MASTER chip card.......................................................................................... 4-36
4.7.1.11 Deleting sales on MASTER chip card ............................................................................................. 4-36
4.7.1.12 Logging on MASTER chip card ....................................................................................................... 4-37
4.7.1.13 Deleting MASTER chip card table................................................................................................... 4-38
4.7.1.14 Changing the PIN code.................................................................................................................... 4-38
4.7.2 KEY BLOCK chip card..................................................................................................................... 4-39
4.7.2.1 Menu view........................................................................................................................................ 4-39
4.7.2.2 Disabling product buttons ................................................................................................................ 4-39
4.7.2.3 Enabling product buttons................................................................................................................. 4-40
4.7.3 COFFEE TEST card ........................................................................................................................ 4-41
4.7.3.1 Menu view........................................................................................................................................ 4-41
4.7.3.2 Ground coffee test program............................................................................................................. 4-41
4.7.4 “Operator mode” .............................................................................................................................. 4-42
4.7.4.1 Postponing the coffee machine cleaning time................................................................................. 4-42
4.7.4.2 Displaying refrigerator and boiler temperature................................................................................ 4-42
Programming using optional chip cards..................................................................................... 4-28
Page 4-2 BAPdO500 - EN - V05
Page 33

4 OPERATION
4.1 Introduction
This chapter describes the basic functions of the coffee machine. Read them carefully
to ensure easy and problem-free routine operation.
Note:
Proper installation and programming of the coffee machine by an authorised service
technician are crucial for a smooth operation and good product quality.
Danger!
- During product release, never move cups or other objects positioned below
the beverage outlet, the hot water outlet or the steam pipe! The beverages delivered by the machine are hot! After having pressed the selection button,
keep hands and other body parts away from the outlets to prevent scalding!
- Never aim steam or hot water jets against persons!
- Do not touch the hot cup plate or the beverage outlets. Touch the hot water
outlet and the steam pipe only at the insulated handles.
- The coffee machine does not stop when a cup is removed during delivery from
underneath an outlet. Delivery (including pre-selected delivery) can only be
terminated by pressing the [STOP] button.
Note:
The noise emission level of the machine is less than 70dB (A).
Operation
BAPdO500 - EN - V05 Page 4-3
Page 34

Operation
4.2 Operating Modes
There are 3 operating modes, shown on the display as follows:
Select product
12:00 01.07.2010
Your coffee machine is ready for operation. When a product button is pressed,
the selected beverage is delivered.
Credit operation
12:00 01.07.2010
The internal or external payment system is active. Products can be dispensed
according to the installed system.
. << Standby >> .
12:00 01.07.2010
The control board is switched off. The coffee machine is, however, still connected to the power supply. The refrigerator and the cup plate heating (cf.
Pos. 4, page 2-2) is in normal operating mode.
Note:
When switched on again, the machine will need a short time to reach the programmed operating temperature.
4.3 Messages displayed when coffee machine is ready for operation
Note:
These messages only appear when the coffee machine is idle, i.e. when no
beverages are being served. Displaying these messages does not mean that
the dispensing process will be interrupted.
.....
Container full
.....
Heat up...
.....
clean machine
credit ####.##
too little credit
Empty the grouts container. Up to five more coffees can be made; after that, the
coffee machine blocks.
The temperature of an instantaneous water heater has fallen to more than 10°C
below the programmed value. Please wait until the machine has warmed up
again before dispensing the next product.
Start the cleaning program (cf. 5 "Cleaning", page 5-1).
Insufficient credit
Page 4-4 BAPdO500 - EN - V05
Page 35

4.4 Routine operation
4.4.1 Refilling of coffee beans
Both coffee bean containers (1) should only be filled with max. 1.3 kg of coffee beans
each.
Note:
Never fill the coffee bean containers with a different product than roasted coffee
beans!
The coffee grinders are set for a specific coffee mixture. When changing the mixture,
the grinder and the dosing apparatus must be readjusted by a manufacturerauthorised service technician.
Danger!
Never reach with your hands into the coffee bean container(s) when the machine is switched on. When refilling the bean container(s), do not reach into the
grinder and do not press a product button!
1
1
Fig. 4.4 A
4.4.2 Adding ground coffee
2
Fig. 4.4 B
Operation
1. Open the cover of the empty coffee bean container (1) with the spoon supplied.
2. Refill with coffee beans (max. 1.3 kg). Close
and lock the cover again.
In order to brew pre-ground coffee (e.g. decaffeinated
coffee) fill container (2) with one serving (see fig. 4.4
B). Use the supplied measuring spoon.
The product is subsequently delivered at the right
beverage outlet.
BAPdO500 - EN - V05 Page 4-5
Page 36

Operation
4.4.3 Replace milk pack or refill milk
You can use both milk packs and the supplied milk container.
Note:
Generally, any type of homogenized milk can be used, skim, reduced fat or whole
milk. The fatter the milk, the thicker the foam. As the foamer head is set for a particular type of milk, it is recommended to always use the same milk product.
Important!
- Do not use raw milk! Use only pasteurised or ultrahigh temperature treated (UHT)
milk.
- Milk that has already been heated up or for which the expiry date has lapsed may
not be used.
- For proper function of the foamer head, the milk must have a temperature of between approx. 3 °C and 5 °C. Do not leave the refrigerator open with milk inside.
- Milk pack:
- Use a new milk pack every day.
- For reasons of hygiene, it is recommended to use the milk directly from the original
pack.
- Milk container:
Pour out any milk remaining in the milk container.
- Always thoroughly clean the milk container before refilling it with fresh milk.
- Only pour in milk cooled to between 3 °C to 5 °C.
Fig. 4.4 C
Fig. 4.4 D
1. Before handling any products inside the refrigerator, wash your hands thoroughly!
2. Open the refrigerator door and remove the
empty milk pack or milk container.
3.1 Milk pack: Insert the hoses into the opening in
the new milk pack. Then place the milk pack in
the refrigerator with the opening to the front
(see Fig. 4.4 C). Ensure than none of the hoses
is bent.
3.2 Milk container: Pour out the remaining milk.
Clean the container thoroughly before you pour
in fresh milk. Then place the container in the refrigerator. Insert the tubes into the container.
Ensure than none of the tubes is bent (cf. Fig.
4.4 D).
4. Close the refrigerator door.
The coffee machine is now ready for the deliv-
ery of heated milk or milk foam.
Page 4-6 BAPdO500 - EN - V05
Page 37

4.4.4 Making the coffee machine ready for operation
4.4.4.1 Pre-checks
Prior to switching on the machine, check the following:
1.
- The fresh water supply is open
- The coffee bean containers are filled (see 4.4.1 "Refilling of coffee beans”,
page 4-5).
A fresh milk package or fresh milk is in the milk container (see 4.4.3 "Replace
-
milk pack or refill milk", page 4-6
The coffee grounds container has been emptied.
-
-
The coffee machine is connected to the power supply.
- The following text must be shown on the (dark) display:
<<Standby>>
Display example
12:00 01.07.2010
4.4.4.2 Switching on the coffee machine
1.
2.
Fig. 4.4 E
If the coffee machine was shut off for a longer
Note:
- If the cleaning program was run before the coffee machine was switched off, a rinse
cycle is automatically run when the coffee machine is re-initialised and, if programmed to do so by a service technician, a sample coffee is served. (Place a cup
under the coffee outlet.)
- For coffee machines with fresh water tank see 7.6 "Operating instructions for special
coffee machines" on page 7-3.
- Depending on how the coffee machine is programmed, another message may be
displayed when the coffee machine is ready for operation, especially if payment
mode is activated.
Operation
).
Open the front door and press the [Stand-by]
button to switch the coffee machine on (see
Fig. 4.4 E) and hold the button down until the
display is illuminated.
The following message is displayed:
first and then
. .TWIN – 500. .
by SCHAERER Ltd.
Selection locked
Panel door open
Before you close the front door, check whether
the coffee slides are open.
period of time, the following message appears:
Selection locked
Heat up system
BAPdO500 - EN - V05 Page 4-7
Page 38

Operation
4.4.5 Pre-selecting type of beverage:
If enabled by a service technician, up to 5 different products can be selected in succession per product output side. The coffee machine will dispense the pre-selected
beverages in the order indicated.
Display example:
Select product
1 (4) (2) 2
The display shows:
1 1 beverage on the left product output side is being dispensed.
(4) 4 beverages on the left product output side have been pre-selected.
2 2 beverages on the right product output side are being dispensed.
(2) 2 beverages on the right product output side have been pre-selected.
Deleting pre-selection of beverages and terminating the current beverage delivery:
Press the [STOP] button once to delete the saved pre-selection of the left (4) and right
(2) outlet. The current beverage delivery is however completed.
Press the [STOP] button again to terminate the current beverage delivery.
4.4.6 Special-size beverage containers
You can fill pots or tall glasses of up to 170 mm in height (see fig. 4.4 F) on the left
output side.
Danger!
The beverages delivered by the coffee machine are hot! To protect yourself
against scalding, keep hands and other body parts away from the outlet area
during the preparation and delivery of beverages.
Fig. 4.4 F
Perform the following procedure:
1. Lift up the left outlet cover until it engages.
2. Place the beverage container under the beverage outlet.
3. Press one of the product buttons on the left
side of the control panel.
The following message is displayed:
Select product
#
The LED next to the pressed button illuminates.
4. Do not remove the cup before the LED next to
the product button is switched off.
5. Lower the outlet cover again
Page 4-8 BAPdO500 - EN - V05
Page 39

4.4.7 Preparing products using the second product level
If a service technician has installed and enabled the second product level, the product
buttons can be used to pre-select two different products.
Level 1 for normal usage and
Level 2 for e.g. beverages selected less frequently
Note:
No more products can be selected with the button programmed for the [Shift] function.
Danger!
The beverages delivered by the coffee machine are hot! To protect yourself
against scalding, keep hands and other body parts away from the outlet area
during the preparation and delivery of beverages.
Perform the following procedure:
1. Position one or two empty cup(s) underneath the left and/or right beverage outlet.
2. Press the product button assigned to the [Shift] key.
Select product
Display example
12:00 01.07.2010
The LED next to the pressed button illuminates.
3. Press the desired product button.
Select product
#
The LED next to the pressed button illuminates.
4. If you do not want to dispense any other products on this level, press the product button assigned to the [Shift] button to return to level 1.
5. Do not remove the cup before the LED next to the product button is switched
off.
Operation
BAPdO500 - EN - V05 Page 4-9
Page 40

Operation
4.4.8 Double distribution button (2x)
If enabled by the service technician, the beverages on the product button can be dispensed twice.
Danger!
The beverages delivered by the coffee machine are hot! To protect yourself
against scalding, keep hands and other body parts away from the outlet area
during the preparation and delivery of beverages.
Perform the following procedure:
1. Place one or two empty cup(s) under the left and/or right beverage outlet.
2. Press the product button programmed for double beverage output.
The following message is displayed:
Select product
#
The LED next to the pressed button illuminates.
3. Remove the cup(s) only after the LED next to the product button is switched off.
4.4.9 Dispensing coffee and hot milk beverages
The two beverage outlets work independently of each other. It is thus possible to simultaneously dispense different types and quantities of beverages (max. 5 per output
side).
Note:
- If two cups are to be filled simultaneously, ensure that the cups are positioned ex-
actly underneath the respective outlets. Please note that the milk outlets at the right
dispenser are located behind the coffee outlets. Position the cups accordingly.
- Refilling of coffee beans see 4.4.1 “Refilling of coffee beans”, page 4-5.
Refilling milk: see 4.4.3 "Replace milk pack or refill milk", page 4-6.
-
- Special-size containers: see 4.4.6 "Special-size beverage containers",
page 4-8.
Select type of beverage: see 4.4.5 "Pre-selecting type of beverage:", page 4-8.
-
- If your coffee machine has a payment system installed and enabled, please read the
instructions in chapter 8.
Danger!
The beverages delivered by the coffee machine are hot! To protect yourself
against scalding, keep hands and other body parts away from the outlet area
during the preparation and delivery of beverages.
Page 4-10 BAPdO500 - EN - V05
Page 41

Fig. 4.4 G
1. Place one or two empty cup(s) under the left
and/or right beverage outlet (see Fig. 4.4 G).
2. Press the button for the desired product.
Pre-select product quantities and beverage
types: see steps A) to D).
The display indicates the total number of se-
lected cups.
Select product
#
The LED next to the pressed button illuminates.
To terminate current delivery:
see step E).
3. Remove the cup(s) only after the LED next to
the product button is switched off.
Note:
Pre-select or delete product quantities and beverage types:
Follow steps A) to E).
Select quantity: Press the respective product button until the desired number of
A)
cups is displayed.
Delete the product quantity:
B)
- Press the [STOP] button once.
All product pre-selections are deleted.
Start again with step A) to select again.
Select type of beverage: see 4.4.5 "Pre-selecting type of beverage:", page 4-8.
C)
Cancel beverage pre-selection:
D)
Press
All product pre-selections are deleted.
To select again, start again with step D).
E)
the [STOP] button.
To terminate current delivery:
- Press
the [STOP] button once.
- Press the [STOP] button twice, if you have pre-selected product quantities
and/or beverage types.
Operation
BAPdO500 - EN - V05 Page 4-11
Page 42

Operation
4.4.10 Dispensing coffee with previously ground coffee powder
The coffee machine can be enabled for manual coffee preparation by the service
technician. The product is subsequently delivered at the right beverage outlet.
Beverages with ground coffee cannot be pre-selected.
-
- Only use ground coffee.
Danger!
The beverages delivered by the coffee machine are hot! To protect yourself
against scalding, keep hands and other body parts away from the outlet area
during the preparation and delivery of beverages.
1. Place the empty cup(s) under the right bever-
2. Press the [Decaf] button.
Display example
The LED next to the pressed button illuminates.
3. Press the button for the desired product.
Fig. 4.4 H
a
Fig. 4.4 J
The LED next to the pressed button illuminates.
4. Fill ground coffee for one or two cups into fun-
5. Press the [Decaf] button again.
Display example
6.* To terminate current delivery:
7. Remove the cup(s) only after the LED next to
age outlet (see Fig. 4.4 H).
The display does not change:
Select product
12:00 01.07.2010
The following message is displayed:
Select product
coffee powder
The LED next to the
[Decaf ]
button will blink.
nel (a) (see Fig. 4.4 J) by using the (supplied)
measuring spoon.
The following message is displayed:
Select product
1
Press the [STOP] button.
the product button is switched off.
Page 4-12 BAPdO500 - EN - V05
Page 43

4.4.11 Dispensing milk or milk foam
Milk and foam are available in dosed or undosed portions, depending on the current
programming.
The machine can be configured by the service technician to suit the desired product
quantities and beverage types, irrespective of the actually selected delivery mode. If
current, follow the instructions in steps A) to E) as described on page 4-11.
Note:
Coffee beverages without milk and hot water can be dispensed simultaneously. Steam
cannot, however.
Danger!
The beverages delivered by the coffee machine are hot! To protect yourself
against scalding, keep hands and other body parts away from the outlet area
during the preparation and delivery of beverages.
Fig. 4.4 K
Operation
If dosed delivery is programmed:
1. Place one or two empty beverage container(s)
under the right beverage outlet (see Fig. 4.4 K).
2. Press the desired product button.
The following message is displayed:
Display example
Select product
1
The LED next to the pressed button illuminates.
3.* To terminate current delivery:
Press the [STOP] button.
4. Do not remove the cup before the LED next to
the product button is switched off.
If a non-dosed delivery is programmed:
1. Place one or two empty beverage container(s)
under the right beverage outlet (see Fig. 4.4 K).
2. Press the desired product button. The product
is delivered continuously.
The following message is displayed:
Display example
Select product
1
The LED next to the pressed button illuminates.
3. Press the same product button to interrupt or to
stop the product output.
BAPdO500 - EN - V05 Page 4-13
Page 44

Operation
g
4.4.12 Dispensing hot water
Press the [
depending on the programming and is via the hot water pipe which is located next to
the beverage outlet (see Fig. 4.4 L).
The machine can be configured by the service technician to suit the desired product
quantities and beverage types, irrespective of the actually selected delivery mode. If
current, follow the instructions in steps A) to E) as described on page 4-11.
Hot water cannot be pre-selected.
-
-
Coffee, coffee/milk mixture and hot water can be dispensed simultaneously.
- Steam output is only possible if no product is dispensed with milk.
Danger!
Risk of injury by scalding! Keep hands and other body parts away from the outlet!
Fi
. 4.4 L
Note:
A “T” is displayed after the output of a large volume of hot water, indicating that the
boiler is being reheated to the set temperature.
] button to dispense hot water. The output is either dosed or undosed
If dosed delivery is programmed:
1. Place an empty container under the hot water
outlet (Fig. 4.4L).
2. Press the [
.
] button
The display does not change during hot water
output:
Display example
Select product
12:00 01.07.2010
3. * To terminate current output early:
Press the [
] button
.
4. Remove the cup.
If a non-dosed delivery is programmed:
1. Place an empty container under the hot water
outlet (Fig. 4.4L).
2. Press the [
.
] button
The hot water is delivered continuously.
The display does not change during hot water
output:
Display example
Select product
12:00 01.07.2010
[
3. Press the
the hot water output.
] button again to stop or interrupt
4. Remove the cup.
Page 4-14 BAPdO500 - EN - V05
Page 45

4.4.13 Generating steam
For steam delivery, press the
through the steam pipe located to the right of the beverage outlet (see Fig. 4.4 M).
It is used for the heating of beverages such as milk or cocoa.
Depending on the current settings, steam is delivered in dosed or non-dosed portions. The machine can be configured by the service technician to suit the desired
product quantities and beverage types, irrespective of the actually selected delivery
mode. If current, follow the instructions in steps A) to E) as described on page 4-11.
Note:
- Steam cannot be pre-selected.
- The steam delivery is immediately interrupted when a product button for milk is
pressed. Therefore only coffee and hot water can be dispensed simultaneously
Danger!
Keep away from underneath the steam pipe while steam is delivered! Hold the
cup in such a way that no liquid is spilled onto your hands or other body parts
during heating!
Fig. 4.4 M
Danger!
When the boiling point is reached, the beverage may start to spill over. During
steam delivery, ensure that the steam pipe remains immersed in the liquid.
Operation
]
[
button. The steam is delivered under pressure
1. Point the steam pipe towards the drip grid.
]
[
Press the
tion from the pipe system. Press the
button to remove the condensa-
[
ton again as soon as only steam is delivered
through the steam pipe (only possible with undosed output).
2. Immerse the steam pipe into the container of
the beverage to be heated until it reaches the
bottom.
]
[
3. Press
.
Steam is let out. The display does not change
during steam output:
Display example
Select product
12:00 01.07.2010
]
but-
BAPdO500 - EN - V05 Page 4-15
Page 46

Operation
g
4.4.14 End of operation/switching off the machine
If the coffee machine is not used for longer periods, e.g. nights, it can be switched to
stand-by. In this mode, the boilers are not heated and no beverages are available.
Cooling and cup plate heated remain in operation, however.
Fi
. 4.4 N
4. Heat the content to the desired temperature. To
do this, move the container slowly up and
down. Ensure that the steam pipe is always
immersed in the liquid.
Tip: The deeper the sound, the higher the temperature of the heated liquid.
5. * Stop or interrupt steam delivery (only possible
with undosed delivery):
]
[
Press
.
If dosed delivery has been programmed, the
hot water delivery is automatically discontinued
after the specified dosage time ends.
6. Put the cup aside.
7. Clean the outside of the steam pipe with a wet
and clean paper tissue.
8. Point the steam pipe towards the drip grid.
]
[
Press the
button twice in short succession
to clean the inside of the steam pipe.
Carry out the daily cleaning routine (cf. chapter
1.
5.2 "Daily cleaning," page 5-3).
Open the front door (see 2.1.3 ”Opening front
2.
door”, page 2-4).
3. Press the [Stand-by] button until the display
disappears (see Fig. 4.4 N).
4. Close the front door again.
The following message is displayed:
Display example
<<Standby>>
12:00 01.07.2010
Page 4-16 BAPdO500 - EN - V05
Page 47

4.5 Longer idle time
If the coffee machine is not used for several weeks or months (e.g. outside the season), it must be fully switched off.
4.5.1 Several weeks (e.g. business vacation):
1.
2.
3. Close the fresh water supply tap.
4. Remove the mains plug from the socket, re-
5. For refrigerator, see 5.5.1 “Prolonged stand-
Fig. 4.5 A
4.5.2 Standstill for several months (e.g. end of season):
Important!
If you resume operation at a later point in time, ensure that you open the water supply
first and only then switch on the power supply.
4.5.3 Disassembly of the coffee machine
Contact a manufacturer-authorized
1.
1.
Vacuum the coffee beans out of the containers.
2. On premises where the temperature can drop
Operation
Do the weekly cleaning (see 5.3 "Weekly clean-
ing", page 5-14).
First switch the machine to stand-by mode (see
Fig. 4.5 A).
spectively cut off the power supply with the
master switch.
still”, page 5-20.
Complete steps 1 to 5 as described in "Several
weeks".
below zero, the boilers must be emptied. To
empty the boilers, ask a customer service representative authorised by the manufacturer for
assistance.
customer service representative.
BAPdO500 - EN - V05 Page 4-17
Page 48

Operation
4.6 Programming using standard chip cards
For all the functions described in this chapter, it is assumed that the coffee machine is
ready for routine operation in payment mode.
The CHEF and DATA SAVE PLUS cards are part of the standard delivery package.
They provide a simple means of changing settings or retrieving information from the
coffee machine.
Note:
- Keep the chip cards in a safe place where only authorized persons have access to
them.
- When a chip card is in the card reader, no products can be selected.
4.6.1 Inserting the chip card into the chip card reader
1
a
Fig. 4.6 A
4.6.2 CHEF chip card
The CHEF card enables the principal settings or modifications to be undertaken for
routine operation.
4.6.2.1 Menu view of the CHEF chip card
Read product counter for coffees and teas by key
-
- Resetting
counter
- Reading monthly counter
- Changing grinding quantity.
- Set filling quantity of coffee water and milk
- Set dosage time for water and steam
- Changing time display
- Changing date display
- Change on/off time (timer)
- Delete the “service requested” message
- Changing the PIN code
- Changing the display language
1.
2. Insert the desired chip card into the card reader
3. Follow the instructions described in the chap-
Legend:
1 Chip card
a The chip must be on this side when inserting the chip
card.
Open the front door (see 2.1.3 ”Opening front
door”, page 2-4
).
slot, as shown in Fig. 4.6 A.
ters.
Page 4-18 BAPdO500 - EN - V05
Page 49

4.6.2.2 Read product counter for coffees and teas by key
Insert the CHEF chip card into the card reader (see 4.6.1 “Inserting the chip
1.
card into the chip card reader", page 4-18).
]
[ ] [ ]
2. Press
Display example:
The number between "K" and "T" shows the total of all
dispensed coffee products and hot water portions.
[
total prod. counter
C: 855 T: 262
or
[ ]
until the following menu appears:
3. Press the desired product button(s).
In each case the display shows:
[ ] [ ]
Display example:
Displayed value is the total of the selected product button.
4. * Select next menu: Press the
total prod. counter
quantity 286
5. * Return to normal operation mode: Remove the CHEF chip card from the card
reader. Close the front door.
4.6.2.3 Resetting counter
In this function, the counter position of all dispensed products is deleted.
Insert the CHEF chip card into the card reader (see 4.6.1 “Inserting the chip
1.
card into the chip card reader", page 4-18).
[
]
[
] [ ]
2. Press
delete counter
execute 'Decaf'
or
[ ]
until the following menu appears:
Decaf
3. Press the [Decaf] button.
delete counter
delete ? 'Decaf'
Decaf
4. Press the [Decaf] button again.
delete counter
... Done ...
The following message appears on the display after approx. 3 seconds:
total prod. counter
C: 0 T: 0
] [ ]
[
5. * Select next menu: Press the
6. * Return to normal operation mode: Remove the CHEF chip card from the card
reader. Close the front door.
Operation
[
]
[ ]
or
[
]
or
[ ]
button.
button.
BAPdO500 - EN - V05 Page 4-19
Page 50

Operation
4.6.2.4 Reading monthly counter
You can display the total of all dispensed coffee products and hot water portions per
months.
Insert the CHEF chip card into the card reader (see 4.6.1 “Inserting the chip
1.
card into the chip card reader", page 4-18).
[
[ ] [ ]
2. Press [
month counter total
C: ### T: ###
] or
]
until the following menu is displayed:
Decaf
3. Press [Decaf].
The total of all coffee products and hot water outputs, beginning in January (01
2002) of the current year is displayed.
Display example:
09 . 2002 '+/-' Decaf
In January 881 coffee products and 252 hot water
C: 881 T: 252
portions were dispensed.
[
] [ ]
4. You can display the desired month by moving backward and forward with the
[
]
buttons
or
[ ]
.
Decaf
[ ]
]
[
5. * Select next menu: Press the [decaf] button and then the
6. * Return to normal operation mode: Remove the CHEF chip card from the card
reader. Close the front door.
4.6.2.5 Changing grinding quantity (coffee powder)
The ground coffee quantity can be set individually for each coffee product.
Dosage range: 0.0 gr – 15.0 gr (gr = gram)
The grinding mixture is set in increments of 0.1 gr.
Insert the CHEF chip card into the card reader (see 4.6.1 “Inserting the chip
1.
card into the chip card reader", page 4-18).
[
[
] [ ]
2. Press [
change grind quanti.
] or
Select product.
]
until the following menu is displayed:
3. Press the desired product button.
The display of the current grinding quantity appears:
change grind quanti.
Mahlmenge ##.# gr
[
]
[
] [ ]
4. Press the
or
[ ]
button to change the grinding quantity.
Decaf
5. Press [Decaf] button to confirm the new setting or modification.
change grind quanti.
Select product.
[
]
[ ] button
or
.
Page 4-20 BAPdO500 - EN - V05
Page 51

6. * If the grinding quantity is not correct or the grinding quantity should be re-dosed
for other products, please repeat steps 3 to 5.
]
[ ] [ ]
7. * Select next menu: Press the
[
or
[ ]
8. * Return to normal operation mode: Remove the CHEF chip card from the card
reader. Close the front door.
4.6.2.6 Changing the water and/or milk quantity for coffee products
In this function, you can set the coffee water and milk quantity for coffee products.
Setting range:
Coffee water: 0.0 ml – 600.0 ml (ml = millilitre)
-
The water quantity is set by increments of 1 ml.
- Milk: 0.0 sec – 40.0 sec (sec = seconds)
The milk quantity is set in increments of 0.1 gr.
1. Insert the CHEF chip card into the card reader (see 4.6.1 “Inserting the chip
card into the chip card reader", page 4-18).
[
[ ] [ ]
change fill quantity
2. Press [
] or
Select product
]
until the following menu is displayed:
Changing the water quantity:
3. Press the desired product button.
The display of the current water quantity appears:
change fill quantity
Wassermenge ### ml
[
] [ ]
4. Press the
[
]
[ ]
or
button to increase or decrease the water quantity.
Decaf
5. Press [Decaf] button to confirm the new setting or modification.
6. * If you have selected a coffee product without milk, continue with step 10.
Changing the milk quantity:
7. * If you have selected a coffee product with milk, the following now appears on
the display:
change fill quantity
milk quantity ##.# s
[
]
[ ] [ ]
8. Press the
or
[ ]
button to increase or decrease the milk quantity.
Decaf
9. Press [Decaf] button to confirm the new setting or modification.
Operation
button.
BAPdO500 - EN - V05 Page 4-21
Page 52

Operation
10. * If the filling quantity is not correct or other products should be re-dosed, repeat
steps 3 to 6 (only water) or 3 to 9 (water and milk).
]
[ ] [ ]
11. * Select next menu: Press the
[
or
[ ]
12. * Return to normal operation mode: Remove the CHEF chip card from the card
reader. Close the front door.
4.6.2.7 Dosage time for hot water, steam, hot milk and milk foam.
The setting time can be set individually for each coffee product.
Setting range for:
Hot water:
0.0 sec
- 150.0 sec (sec = seconds)
Steam: 0.0 sec - 13.0 sec
Milk: 0.0 sec - 40.0 sec
The dosing time is set in increments of 0.1 sec.
Note:
- The start/stop function is enabled:
The dosing time cannot be set. The output of the products is determined by a fixed
timeout facility and can only be changed by a service technician.
- The start/stop function is disabled:
Set the dosing time as follows:
1. Insert the CHEF chip card into the card reader (see 4.6.1 “Inserting the chip
card into the chip card reader", page 4-18).
[
] [ ]
[ ] [ ]
Decaf
[
] [ ]
2. Press
3. Press the desired product button. Depending on the selection or the product
button, the following appears on the display:
or
4. Press the
5. Press [Decaf] button to confirm the new setting or modification.
6. * If the dosing time or milk quantity is not correct or the other products should be
re-dosed, please repeat steps 3 to 5.
7. * Select next menu: Press the
8. * Return to normal operation mode: Remove the CHEF chip card from the card
reader. Close the front door.
]
or
[
[ ]
until the following menu is displayed:
]
[ ]
or
[
change fill quantity
Select product
change fill quantity
doser time ##.# s
change fill quantity
milk quantity ##.# s
button to increase or decrease the filling quantity.
]
or
[ ]
[
button.
button.
Page 4-22 BAPdO500 - EN - V05
Page 53

4.6.2.8 Changing time display
Insert the CHEF chip card into the card reader (see 4.6.1 “Inserting the CHEF
1.
chip card into the card reader", page 4-18).
[
] [ ]
2. Press
Decaf
3. Press the [Decaf] button.
The current time appears on the display:
Display example: The cursor is under the second digit of the
hour display
[ ] [ ]
4. Enter the hours using
Decaf
5. Press
6. Repeat steps 4 and 5 to set the minutes and seconds.
[ ] [ ]
7. * Select next menu: Press the
8. * Return to normal operation mode: Remove the CHEF chip card from the card
reader. Close the front door.
4.6.2.9 Changing date display
Insert the CHEF chip card into the card reader (see 4.6.1 “Inserting the chip
1.
card into the chip card reader", page 4-18).
] [ ]
[
2. Press
Decaf
3. Press the [Decaf] button.
The current date appears on the display:
Display example: The cursor is under the second digit of the
day display
] [ ]
[
4. Enter the day using
Decaf
5. Press
6. Repeat steps 5 and 6 to set the month and the year.
] [ ]
[
7. * Select next menu: Press the
8. * Return to normal operation mode: Remove the CHEF chip card from the card
reader. Close the front door.
the [
change time
execute 'Decaf'
change time
[Decaf]
[
change date
execute 'Decaf'
change date
[Decaf]
] or
:30:15
12
to confirm your entry.
]
[ ]
or
.11.2004
11
to confirm your entry.
[
]
button until the following menu is displayed:
]
[
or [
].
]
or
[ ]
button.
[
until the following menu is displayed:
[
]
or [
].
]
or
[ ]
button.
[
Operation
BAPdO500 - EN - V05 Page 4-23
Page 54

Operation
4.6.2.10 Changing on/off time
If enabled by a service technician, the coffee machine can be set to switch on and off
automatically for each individual day. When off, the machine is in "stand-by" mode.
The following message appears on the display:
<<Standby>>
Display example
12:00 01.07.2010
Note:
- When switched off, the coffee machine can be started at any time using the [Standby] button (see 4.4.4.2 "Switching on the coffee machine" page 4-7). In this event,
however, the on/off function is inte
- If the on/off time for a certain day is set to zero, the on/off function is inactive for this
day.
1. Insert the CHEF chip card into the card reader (see 4.6.1 “Inserting the chip
card into the chip card reader", page 4-18).
[ ] [ ]
Decaf
] [ ]
[
Decaf
[
] [ ]
Decaf
[
] [ ]
Decaf
2. Press [
3. Press the [Decaf] button.
Display example
Monday always appears as the first workday on the display.
4. Enter the hours using
Display example: The cursor is under the second digit of the minute
display.
5. Press
6. Enter the minutes using
Display example
7. Press
The shut-off time appears on the display:
Display example
8. Enter the hours using
Display example: The cursor is under the second digit of the minute
display.
9. Press
[
] or
on/off time
execute 'Decaf'
Monday
switch on 00
Monday
switch on 06:00
[Decaf]
Monday
switch on 06:15:00
[Decaf]
Monday
switch off 00
Monday
switch off 23:00
[Decaf]
]
:00
to confirm your entry.
to confirm your entry.
:00
to confirm your entry.
rrupted until the next on/off cycle.
until the following menu is displayed:
]
[
or [
[
[
]
or
]
[ ]
or [
].
].
.
Page 4-24 BAPdO500 - EN - V05
Page 55

[ ] [ ]
10. Enter the minutes with
Display example
Decaf
11. Press
The next weekday appears automatically on the display:
Display example
Decaf
12. * If you want to skip a day, press the [Decaf] button.
13. * If you want to enter the on/off times for other days, repeat steps 4 to 11.
] [ ]
[
14. * Select next menu: Press the
15. * Return to normal operation mode: Remove the CHEF chip card from the card
reader. Close the front door.
4.6.2.11 Changing the PIN code
Note:
- The pin code consists of 4 digits and must always be entered completely.
- Press the [Decaf] to accept previously entered numbers.
- The current PIN code is not displayed.
- If you enter a number incorrectly, repeat steps 3 to 6.
Insert the CHEF chip card into the card reader (see 4.6.1 “Inserting the chip
1.
card into the chip card reader", page 4-18).
[ ] [ ]
Decaf
] [ ]
[
Decaf
[
] [ ]
2. Press [
3. Press the [Decaf] button.
Display example: The cursor is under the first digit.
4. Enter the first digit of the new PIN code using
5. Confirm your entry with the [Decaf] button.
Display example: The number 9 was entered. The cursor is
under the second digit.
6. Repeat steps 5 and 6 until the complete PIN code has been entered com-
pletely.
7. * Select other menus: Press the
8. * Return to normal operation mode: Remove the CHEF chip card from the card
reader. Close the front door.
Monday
switch off 23:45
[Decaf]
switch on 00
change PIN-code
execute 'Decaf'
PIN-Code 0000
' +/- ' 'Decaf'
PIN-Code 9000
' +/- ' 'Decaf'
to confirm your entry.
Tuesday
] or
:00
[
]
or
[ ]
[
.
]
[ ]
or
[
]
or
button.
[ ]
]
[
or
button.
[ ].
[
]
until the following menu is displayed:
Operation
BAPdO500 - EN - V05 Page 4-25
Page 56

Operation
4.6.2.12 Service reminder
If enabled by a service technician, the following display appears in normal operating
mode:
Select product
service wanted
If enabled by a service technician, you can remove this message as follows:
1. Insert the CHEF chip card into the card reader (see 4.6.1 “Inserting the chip
card into the chip card reader", page 4-18).
[ ] [ ]
2. Press
service count. 45011
The number entered is an example
]
[
or
service wanted
Decaf
3. Press the [Decaf] button.
service wanted
delete ? 'Decaf'
Decaf
4. Press the [Decaf] button again.
The message "service wanted" disappears from the screen.
] [ ]
[
5. * Select next menu: Press the
6. * Return to normal operation mode: Remove the CHEF chip card from the card
reader. Close the front door.
4.6.2.13 Changing the display language
You can choose in which language the text should be displayed on the display.
Then perform the following procedure:
Insert the CHEF chip card into the card reader (see 4.6.1 “Inserting the chip
1
card into the chip card reader", page 4-18).
]
[
] [ ]
2 Press
[
or
language on display
waste watertank
Decaf
3 Press [Decaf] button.
The current language appears on the display:
language on display
##########
[ ] [ ]
4 Press
]
[
or
[ ]
until the following menu is displayed:
]
or
[ ]
button.
[
[ ]
until the following menu is displayed:
[ ]
until the desired language appears on the display.
Page 4-26 BAPdO500 - EN - V05
Page 57

Operation
Decaf
5 Press
[Decaf]
to confirm the selected language.
[ ] [ ]
6 * Select next menu: Press
[
7 * Return to normal operation mode:
Remove the CHEF chip card from the card reader. Close the front door.
4.6.3 DATA SAVE PLUS chip card
ip card is a backup card to which all the coffee machine
The DATA SAVE PLUS c
h
data can be saved.
If so configured by the service technician, the system requires the setting changes to
be saved on the DATA SAVE PLUS chip card with a corresponding display message.
The DATA SAVE PLUS chip card should be stored in a safe place where it can be
found easily.
Use the DATA SAVE PLUS chip card only after previous arrangements have been
made with a manufacturer-authorized customer service representative.
4.6.3.1 Menu view of the DATA SAVE PLUS chip card
Transfer data from the coffee machine to the chip card
-
-
Transfer data from the chip card to the coffee machine
4.6.3.2 Saving coffee machine data to chip card
In this function, data can be transferred from the coffee machine to the chip card.
Insert the CHEF chip card into the card reader (see 4.6.1 “Inserting the chip
1.
card into the chip card reader", page 4-18).
The following message is displayed:
DATA SAVE
or
machine --> card
[ ]
2. * If the left display does not appear, press
Decaf
3. Press the [Decaf] button to save the data from the coffee machine to the card:
... Save ...
The data is being transferred when an acoustic signal sounds
4. Remove the DATA SAVE PLUS chip card from the card reader. Close the front
door.
The following message is displayed:
Select product
Display example
12:00 01.07.2010
]
or
[ ]
.
DATA SAVE
card --> machine
[
].
BAPdO500 - EN - V05 Page 4-27
Page 58

Operation
4.6.3.3 Saving data from the chip card to the coffee machine
Insert the CHEF chip card into the card reader (see 4.6.1 “Inserting the chip
1.
card into the chip card reader", page 4-18).
The following message is displayed:
DATA SAVE
or
card --> machine
[ ]
2. * If the left display does not appear, press
Decaf
3. Press [Decaf] button to load the data from the chip card to the coffee machine:
... Load ..
An acoustic signal indicates that the data have been transferred. The date of
the last backup is displayed:
last backup
Display example
12:00 01.07.2010
4. Remove the DATA SAVE PLUS chip card from the card reader. Close the front
door.
The following message is displayed:
Select product
Display example
12:00 01.07.2010
4.7 Programming using optional chip cards
The chip cards described in this chapter are not included in the standard delivery
package of the coffee machine. They are available as an option.
The item numbers of the optional chip cards are given in 2.3.3 "Special accessories"
on page 2-11.
Note:
- For all the functions described in this chapter, it is assumed that the coffee machine
is ready for routine operation in payment mode.
- When a chip card is in the card reader, no products can be selected.
4.7.1 PROGRAM chip card
In normal operating mode, the PROGRAM card is used for statistical purposes. If a
payment system is installed, the requisite settings for payment mode are made using
c
ard.
this
DATA SAVE
machine --> card
]
[
.
Page 4-28 BAPdO500 - EN - V05
Page 59

4.7.1.1 Menu view of the PROGRAM chip card
Enable/disable payment mode
-
- Switch
prices
- MONEY price level 1 and 2
- Change token price with or without MONEY card price levels 1 and 2
- Change product prices and item numbers (Only for external payment mode)
- Displaying sales on MONEY chip card
- Deleting sales on MONEY chip card
- Displaying sales on MASTER chip card
- Deleting sales on MASTER chip card
- Log on MASTER chip card
- Deleting MASTER chip card table
- Changing the PIN code
4.7.1.2 Programmable security levels
If the service technician has programmed security levels 1 or 3 for the PROGRAM
card, the PIN code must be entered each time the coffee machine is used.
Note:
- The pin code consists of 4 digits and must always be entered completely.
- Press the [Decaf] to accept previously entered numbers.
- The PIN code is only activated if so programmed by the service technician.
- The current PIN code is not displayed.
- If you enter a number incorrectly, repeat steps 2 to 4.
Insert the PROGRAM chip card into the card reader. (See 4.6.1 “Inserting the
1.
chip card into the card reader", page 4-18).
The following appears on the display if a security level has been programmed:
PIN-Code 0000
' +/- ' ' Decaf '
[ ] [ ]
Decaf
[ ] [ ]
STOP
2. Enter the first digit of the first PIN code using
3. Press
[Decaf]
to confirm the number entered.
4. For each additional number, repeat steps 3 and 4 until the complete PIN code
has been entered completely.
5. * Select next menu: Press the
6. * Returning to credit mode: Remove the PROGRAM chip card from the card
reader. Press the [STOP] button. Close the front door.
The following message is displayed:
Credit operation
12:00 01.07.2010
Display example
7. * Saving data on the DATA SAVE PLUS chip card: Remove the PROGRAM
chip card from the card reader.
insert card
DATA SAVE / Key..
Operation
[
]
[ ].
or
[
]
[ ]
or
button.
BAPdO500 - EN - V05 Page 4-29
Page 60

Operation
8. * Insert the DATA SAVE PLUS chip card into the card reader.
... Save ...
9. * Wait until an acoustic signal sounds.
1. * Remove the DATA SAVE PLUS chip card from the card reader. Close the front
door.
The following message is displayed:
Credit operation
Display example
12:00 01.07.2010
4.7.1.3 Enabling / disabling payment mode
In this function the payment mode can be enabled or disabled by the service technician.
Note:
This function applies only to coffee machines connected to a payment system.
1. Insert the PROGRAM chip card into the card reader (see 4.6.1 “Inserting the
chip card into the chip card reader", page 4-18).
]
[ ]
or
released
[
[
] [ ]
] [ ]
2. Press
[
accounting mode
##############
3. Press the [Decaf] button to switch between the following display messages:
accounting mode
or
4. * Select next menu: Press the
5. * Returning to credit mode: Remove the PROGRAM chip card from the card
STOP
reader. Press the [STOP] button. Close the front door.
The following message is displayed:
Credit operation
Display example
12:00 01.07.2010
6. * Saving data on the DATA SAVE PLUS chip card: See 4.7.1.2
"Programmable security levels", page 4-29, steps 7* to 0*.
until the following menu is displayed:
accounting mode
gesperrt
[
]
[ ]
or
button.
Page 4-30 BAPdO500 - EN - V05
Page 61

4.7.1.4 Switching prices
In this function an individual price can be set.
Note:
If all values are set to zero, the switch price function is automatically disabled and price
level 1 always activated. See 4.7.1.5 "Changing MONEY price level 1 and 2", page 4-32.
1. Insert the PROGRAM chip card into the card reader. (see 4.6.1 “Inserting the
[ ] [ ]
Decaf
[ ] [ ]
Decaf
[
] [ ]
Decaf
] [ ]
[
Decaf
[ ] [ ]
Decaf
2. Press
3. Press the [Decaf] button.
4. Enter the hours (00-23) using
5. Press
7. Enter the minutes (00-59) using
8. Press [Decaf] to confirm your entry.
9. Enter the hours (00-23) using
10. Press [Decaf] to confirm your entry
11. Enter the minutes (00-59) using
12. Press
13. * Select next menu: Press the
Operation
chip card into the chip card reader", page 4-18).
]
or
[ ]
until the following menu is displayed:
[
change price level
execute 'Decaf'
The shut-on time appears on the display:
change price level
Display example
preis-2 von 00
:00
[
]
or [
[Decaf]
The hours previously entered appear on the display:
Switch prices
Display example: The cursor is under the second digit of the minute
preis-2 von 23:00
display.
to confirm your entry.
].
[
]
[ ]
or
The shut-off time appears on the display:
change price level
Display example
preis-2 bis 00
:00
[
]
or
The hours previously entered appear on the display:
change price level
Display example: The cursor is under the second digit of the minute
preis-2 bis 07:00
display.
[
]
or
[Decaf]
change price level
execute 'Decaf'
to save the entries.
[
]
[ ]
or
[ ]
[ ]
button.
.
.
.
BAPdO500 - EN - V05 Page 4-31
Page 62

Operation
STOP
14. * Returning to credit mode: Remove the MONEY chip card from the card
reader. Press the [STOP] button. Close the front door.
The following message is displayed:
Credit operation
Display example
12:00 01.07.2010
15. * Saving data on the SAVA DATA PLUS chip card: See 4.7.1.2
"Programmable security levels", page 4-29, steps 7* to 0*.
4.7.1.5 Changing MONEY price level 1 and 2
Insert the PROGRAM chip card into the card reader. Insert the CHEF chip card
1.
into the card reader (see 4.6.1 “Ins
reader", page 4-18).
]
[ ] [ ]
Select product
[
change price
2. Press
or
[ ]
until the following menu is displayed:
3. Press the desired product button.
On the display, price level 1 of the selected product button appears:
price level 1
price ##.##
[ ] [ ]
4. Enter the price (00,00 - 99.99) using
Decaf
5. Press [Decaf] to confirm your entry.
Price level 2 now appears on the display:
price level 2
price ##.##
[ ] [ ]
6. Enter the price (00,00 - 99.99) using
Decaf
7. Press [Decaf] to confirm your entry.
change price
Select product
8. * Other price changes: Repeat steps 3 to 7.
] [ ]
[
9. * Select next menu: Press the
10. * Returning to credit mode: Remove the PROGRAM chip card from the card
STOP
reader. Press the [STOP] button. Close the front door.
The following message is displayed:
Credit operation
Display example
12:00 01.07.2010
11. * Saving data on the DATA SAVE PLUS chip card: See 4.7.1.2
"Programmable security levels", page 4-29. steps 7.* to 10.*.
erting the chip card into the chip card
[
]
or [
]
[
or [
[
]
[ ]
or
button.
].
].
Page 4-32 BAPdO500 - EN - V05
Page 63

4.7.1.6 Changing token price, with or without MONEY price level 1 and 2
Insert the PROGRAM chip card into the card reader (see 4.6.1 “Inserting the
1.
chip card into the chip card reader", page 4-18).
]
[ ] [ ]
change price
Select product
[
2. Press
or
[ ]
until the following menu is displayed:
3. Press the desired product button.
The first price level of the selected product is displayed
price level 1
price ##.##
[
[ ] [ ]
4. Enter the price ((00,00 - 99,99) using
]
or [
Decaf
5. Press [Decaf] to confirm your entry.
Auf dem Display erscheint nun die Preisebene 2:
price level 2
price ##.##
[
] [ ]
6. Enter the price ((00,00 - 99,99) using
[
]
or [
Decaf
7. Press [Decaf] to confirm your entry.
token tester
number token #
8. Enter the number of tokens that corresponds to the product price.
Decaf
9. Press [Decaf] to confirm your entry.
change price
Select product
10. * Other product price changes: Repeat steps 3 to 9.
[
]
11. * Select next menu: Press the
or
[ ]
button.
12. * Returning to credit mode: Remove the PROGRAM chip card from the card
STOP
reader. Press the [STOP] button. Close the front door.
The following message is displayed:
Credit operation
Display example
12:00 01.07.2010
13. * Saving data on the DATA SAVE PLUS chip card: See 4.7.1.2
"Programmable security levels", page 4-29, steps 7.* to 0.*.
Operation
].
].
BAPdO500 - EN - V05 Page 4-33
Page 64

Operation
4.7.1.7 Changing product price and item number (for external CCI / CSI payment systems)
Insert the PROGRAM chip card into the
1.
card reader (see 4.6.1 “Inserting the
chip card into the chip card reader", page 4-18).
]
[ ] [ ]
Select product
[
change price
2. Press
or
[ ]
until the following menu is displayed:
3. Press the desired product button.
On the display, price level 1 of the selected product button appears:
price level 1
price ##.##
[
[ ] [ ]
4. Enter the price (00,00 - 99.99) using
]
or [
].
Decaf
5. Press [Decaf] to confirm your entry.
Price level 2 now appears on the display:
price level 2
price ##.##
[
[ ] [ ]
6. Enter the price (00,00 - 99.99) using
]
or [
].
7. Press [Decaf] to confirm your entry.
single product
article No. ###
[
[
] [ ]
8. Enter the item number (0 – 999) using
]
or [
].
Decaf
If the double distribution button was enabled, the following now appears on the display:
Decaf
9. Press [Decaf] to confirm your entry.
single product
articleNo.'decaf'###
10. *Press the [Decaf] button again.
double product
article No. ###
[
[ ] [ ]
11. * Enter the item number (0 - 999) using
]
or [
].
Decaf
12. * Press [Decaf] to confirm your entry.
double product
articleNo.'decaf'###
Decaf
13. Press the [Decaf] button again.
change price
Select product
14. * Other product price changes: Repeat steps 4 to 14.
]
[ ] [ ]
15. * Select next menu: Press the
[
or
[ ]
button.
Page 4-34 BAPdO500 - EN - V05
Page 65

16. * Returning to credit mode: Remove the PROGRAM chip card from the card
STOP
reader. Press the [STOP] button. Close the front door.
The following message is displayed:
Credit operation
Display example
12:00 01.07.2010
17. * Saving data on the DATA SAVE PLUS chip card: see 4.7.1.2 "Programmable
security
levels", page 4-29, steps 7.* to 0.*.
4.7.1.8 Displaying sales on MONEY chip card
Insert the PROGRAM chip card into the card reader (see 4.6.1 "Inserting the
1.
chip card into the chip card reader", page 4-18).
[
]
[ ] [ ]
2. Press
sale amount MONEY
amount ####.##
or
[ ]
until the following menu is displayed:
3. * Select next menu: Press the
4. * Returning to credit mode: Remove the PROGRAM chip card from the card
STOP
reader. Press the [STOP] button. Close the front door.
The following message is displayed:
Credit operation
Display example
12:00 11.11.2004
4.7.1.9 Deleting sales on MONEY chip card
Insert the PROGRAM chip card into the card reader (see 4.6.1 "Inserting the
1.
chip card into the chip card reader", page 4-18).
]
[ ] [ ]
2. Press
[
sale amount MONEY
amount ####.##
or
[ ]
until the following menu is displayed:
Decaf
3. Press the [Decaf] button.
sale amount MONEY
delete ? 'Decaf'
Decaf
4. Press the [Decaf] button.
... Done ...
The sale is now deleted.
[ ] [ ]
5. * Select next menu: Press the
Operation
]
]
or
or
[ ]
[ ]
button.
button.
[
[
BAPdO500 - EN - V05 Page 4-35
Page 66

Operation
6. * Returning to credit mode: Remove the PROGRAM chip card from the card
STOP
reader. Press the [STOP] button. Close the front door.
The following message is displayed:
Credit operation
Display example
12:00 01.07.2010
4.7.1.10 Displaying sales on MASTER chip card
Insert the PROGRAM chip card into the card reader (see 4.6.1 “Inserting the
1.
chip card into the chip card reader", page 4-18).
]
[ ] [ ]
2. Press
[
sale amount MASTER
amount ####.##
or
[ ]
until the following menu is displayed:
[
] [ ]
3. * Select next menu: Press the
4. * Returning to credit mode: Remove the PROGRAM chip card from the card
STOP
reader. Press the [STOP] button. Close the front door.
The following message is displayed:
Credit operation
Display example
12:00 01.07.2010
4.7.1.11 Deleting sales on MASTER chip card
Insert the PROGRAM chip card into the card reader (see 4.6.1 "Inserting the
1.
chip card into the chip card reader", page 4-18).
[
]
[
] [ ]
2. Press
sale amount MASTER
amount ####.##
or
[ ]
until the following menu is displayed:
Decaf
3. Press the [Decaf] button.
sale amount MASTER
delete ? 'Decaf'
Decaf
4. Press the [Decaf] button again.
... Done ...
[
] [ ]
5. * Select next menu: Press the
6. * Returning to credit mode: Remove the PROGRAM chip card from the card
STOP
reader. Press the [STOP] button. Close the front door.
The following message is displayed:
Credit operation
Display example
12:00 01.07.2010
]
]
or
or
[ ]
[ ]
button.
button.
[
[
Page 4-36 BAPdO500 - EN - V05
Page 67

4.7.1.12 Logging on MASTER chip card
Note:
A maximum of 20 chip cards can be programmed.
1. Insert the PROGRAM chip card into the card reader (see 4.6.1 “Inserting the
chip card into the chip card reader", page 4-18).
[ ] [ ]
Decaf
2. Press
3. Press the [Decaf] button.
4. Remove the PROGRAM chip card from the card reader.
MASTER/PROGRAM
5. Insert the MASTER chip card into the card reader.
6. Remove the MASTER chip card from of the card reader.
MASTER/PROGRAM
7. * Enabling additional MASTER chip cards Repeat steps 8 to 9.
8. * Select next menu: Insert the PROGRAM chip card into the card reader again
STOP
and then press
9. * Returning to credit mode: Remove the PROGRAM chip card from the card
STOP
reader. Press the [STOP] button. Close the front door.
The following message is displayed:
Display example
]
[
or
log on MASTER
execute 'Decaf'
remove card
insert card
card logged on
remove card
insert card
Credit operation
12:00 01.07.2010
[ ]
until the following menu is displayed:
]
or
[ ]
.
[
Operation
BAPdO500 - EN - V05 Page 4-37
Page 68

Operation
4.7.1.13 Deleting MASTER chip card table
tion, the MASTER chip cards which are registered in the coffee ma-
func
In this
chine memory are deleted.
1. Insert the PROGRAM chip card into the card reader (see 4.6.1 “Inserting the
chip card into the chip card reader", page 4-18).
]
[ ] [ ]
2. Press
[
delete MASTER
execute 'Decaf'
or
[ ]
Decaf
3. Press the [Decaf] button.
delete MASTER
delete ? 'Decaf'
4. * If the table was no deleted, continue with step 7 or 8.
Decaf
5. Press the [Decaf] button again.
delete MASTER
... Done ...
[
] [ ]
6. * Select next menu: Press the
7. * Returning to credit mode: Remove the PROGRAM chip card from the card
STOP
reader. Press the [STOP] button. Close the front door.
The following message is displayed:
Credit operation
Display example
12:00 01.07.2010
4.7.1.14 Changing the PIN code
Note:
- The pin code consists of 4 digits and must always be entered completely.
- Pres the [Decaf] to accept previously entered numbers.
- The PIN code is only activated if so programmed.
- The current PIN code is not displayed.
- If you enter a number incorrectly, repeat steps 3 to 6.
Insert the PROGRAM chip card into the card reader (see 4.6.1 “Inserting the
1.
chip card into the chip card reader", page 4-18).
]
[
] [ ]
Decaf
2. Press
[
change PIN-code
execute 'Decaf'
3. Press the [Decaf] button.
PIN-Code 0000
Display example: The cursor is under the first digit.
' +/- ' ' Decaf '
or
[ ]
until the following menu is displayed:
[
]
[ ]
or
button.
until the following menu is displayed:
Page 4-38 BAPdO500 - EN - V05
Page 69

[ ] [ ]
[ ] [ ]
Decaf
STOP
4.7.2 KEY BLOCK chip card
4.7.2.1 Menu v
iew
4.7.2.2 Disabling product buttons
Operation
]
4. Enter the first digit of the new PIN code using
[
or
[ ].
5. Press [Decaf] to confirm the number entered.
PIN-Code 9000
Display example: The number 9 was entered. The cursor is
' +/- ' 'Decaf'
under the second digit.
6. Repeat steps 5 and 6 until the complete PIN code has been entered com-
pletely.
]
7. * Select next menu: Press the
[
or
[ ]
button.
8. * Returning to credit mode: Remove the PROGRAM chip card from the card
reader. Press the [STOP] button. Close the front door.
The following message is displayed:
Credit operation
Display example
12:00 01.07.2010
9. * Saving data on the DATA SAVE PLUS chip card: see 4.7.1.2 "Programmable
security
levels", page 4-29, steps 7.* to 0.*.
The KEY BLOCK card allows you to enable and disable product keys.
- Lock
- Enable
buttons
keys
Note:
- Several buttons can be enabled using the same procedure.
-- Non-programmed product keys cannot be enabled or disabled for payment mode.
The LED of the corresponding product button is also illuminated when the KEY
BLOCK chip card is not inserted.
- It is possible to re-enable a product button by pressing on the same button again.
1. Insert the KEY BLOCK chip card into the card reader (see 4.6.1 “Inserting the
chip card into the chip card reader", page 4-18).
The LEDs next to the enabled product buttons are illuminated.
The following message is displayed:
lock buttons
Select product
BAPdO500 - EN - V05 Page 4-39
Page 70

Operation
STOP
4.7.2.3 Enabling product buttons
STOP
2. Press the product button which should be disabled. The LED next to corresponding button is no longer illuminated.
3. * If you would like to disable all product buttons, press [STOP].
4. Remove the KEY BLOCK chip card from the card reader.
The following message is displayed:
... Busy ...
5. Close the front door. The following message appears on the display after
approx. 10 seconds if you:
- have disabled one or more product buttons:
Credit operation
Display example
12:00 01.07.2010
- have performed step 4 *.
Maschine gesperrt
Display example
12:00 01.07.2010
Note:
- Several buttons can be enabled using the same procedure.
- Non-programmed product keys cannot be enabled or disabled for payment mode.
The LED of the corresponding product button is also illuminated when the KEY
BLOCK chip card is not inserted.
- When a product button is enabled, it is possible to undo the action by pressing the
same button again.
1. Insert the KEY BLOCK chip card into the card reader (see 4.6.1 “Inserting the
chip card into the chip card reader", page 4-18).
The product buttons are disabled if the LED corresponding to the button is no
longer illuminated.
lock buttons
Select product
2. * Press the product button which should be enabled. The LED next to the corresponding button illuminates.
3. * If you want to enable other product buttons, repeat step 3*.
4. * If all product buttons have been disabled with the [STOP] button, press [STOP]
to enable all product buttons again.
5. Remove the KEY BLOCK chip card from the card reader.
6. Close the front door.
The following message appears on the display after approx. 10 seconds:
Display example
... Busy ...
Credit operation
12:00 01.07.2010
Page 4-40 BAPdO500 - EN - V05
Page 71

4.7.3 COFFEE TEST card
The COFFEE TEST card enables you to test the amount of coffee ground and the
grinding time per coffee product.
This function offered by the COFFEE TEST card will also be appreciated by the coffee
supplier when adapting a new blend to the coffee machine.
4.7.3.1 Menu view
Ground coffee test.
4.7.3.2 Ground coffee test program
1.
2.
3. Remove the coffee grounds container.
4. Place a flat container under the appropriate brewing unit.
5. Press the desired coffee product button.
6. You can set the grinding quantity as follows:
[ ]
[
]
Decaf
7. * Press [Decaf] to confirm the entry.
8. If you want to test additional products, repeat steps 5 to 8.
9. Re-insert the coffee grounds container.
10. Open the front door. Remove the COFFEE TEST chip card from the card
Operation
Insert the COFFEE TEST chip card into the card reader (see 4.6.1 “Inserting
the chip card into the chip card reader", page 4-18).
Close the front door.
The brewing pistons of the two brewing units go into the brewing setting.
grinder test
Select product
After the coffee powder has fallen into the container, the following message appears on the display:
grinder test
Display example: The current grinding quantity is 9.0 gr. of coffee
change grind 9.0 gr
powder.
[
More ground coffee with
Less ground coffee with
]
]
[
Setting range of the grinding quantity: 0.0 gr – 15.0 gr (gr = gram)
The ground coffee quantity is set in increments of 0.1 gr.
grinder test
Select product
reader. Close the front door.
The brewing pistons of the two brewing units return to the basic setting.
The coffee machine is again in original operating mode.
BAPdO500 - EN - V05 Page 4-41
Page 72

Operation
4.7.4 “Operator mode”
In this function you can
postpone the coffee machine cleaning time by another 4 hours;
-
display the refrigerator temperature and the boiling temperatures.
-
4.7.4.1 Postponing the coffee machine cleaning time.
You are able to postpone cleaning by 4 hours. After this time, the coffee machine is
permanently blocked.
If the message
Fig. 4.7 A
4.7.4.2 Displaying refrigerator and boiler temperature
5 6 1 3
L 95 R 96 T 97 S127
B100 B101 C 4
2 4 7 8
Fig. 4.7 B Display example
Legend:
1 Temperature in instant heater for coffee water left
2 Temperature in booster for coffee water left
3 Temperature in instant heater for coffee water right
4 Temperature in booster for coffee water right
5 Temperature in instant heater for hot water
6 Temperature in steam generator
7 Temperature in refrigerator
8 Heater operating display: 1= heat, 0=off
Selection locked
clean machine
appears on the display, then perform the following
procedure:
1. Open the front door (see 2.1.3 “Opening front
door”, page 2-4).
2. Press [Operator] (see Fig 4.7 A).
3. Close the front door.
Open the front door (see 2.1.3 “Opening front
1.
door”, page 2-4
).
2. Press [Operator] (see Fig 4.7 A).
The message in the display looks like Fig. 4.7
B.
3. Press [Operator] to return to the original operat-
ing mode.
4. Close the front door.
Page 4-42 BAPdO500 - EN - V05
Page 73

Cleaning
5 Chapter
Table of contents
Chapter Text Page
5
5.1
5.2
5.3
5.4
5.5
5.5.1 Longer idle time ..................................................................................................................................5-9
CLEANING.......................................................................................... 5-2
Important general cleaning instructions ........................................................................................5-2
Daily cleaning....................................................................................................................................5-3
Weekly cleaning................................................................................................................................5-6
Defrosting the refrigerator...............................................................................................................5-9
Care of the refrigerator.....................................................................................................................5-9
BAPdO500 - EN - V05 Page 5-1
Page 74

Cleaning
5 CLEANING
5.1 Important general cleaning instructions
Danger!
Never reach into the machine during automatic cleaning and keep clear of the
beverage outlets.
Danger!
Never clean the machine with a hose or a high pressure cleaner.
Do not use steam-cleaning devices.
Never immerse the machine in water!
Important!
Always follow hygiene regulations according to HACCP!
- Wash and disinfect your hands thoroughly before cleaning the machine!
- Only use milk packs with cold milk of a temperature of between 3 °C and 5° C.
- Use a new milk pack every day.
- Only use pasteurised or UHT (sterilised) heated milk. Do not use raw milk!
Homogenized milk must always be used!
- Remove the milk pack from the refrigerator if the machine is switched off for more
than 24 hours. Before switching on the machine place a milk pack with cold milk of a
maximum temperature of 5°C into the refrigerator.
- Only use cold clean water for automatic cleaning, and comply with the dosing instructions, safety regulations and warnings printed on the packaging of the cleaning
product!
- Never use abrasives, scrubbers or cleaning tools made of metal!
- Only use cleaning agents approved by the manufacturer.
- Read the instructions regarding cleaning agent in chapter 7.2 “Cleaning agents” on
page 10-3 carefully. Read the safety data sheets carefully, when supplied.
- Ask the manufacturer or a customer service, authorised by the manufacturer, for advice on the cleaning tools you should use.
- Please note that some components in the following illustrations may differ from those
in your machine.
- All the machine’s product outlets will be blocked during the cleaning cycle.
- The machine cleaning program consists of an automatic self-cleaning cycle and a
manual cleaning cycle. Together they form one operation cycle.
- To ensure that all products are available in best quality, careful daily and weekly
cleaning is imperative!
- Measure the milk temperature every day with a clean thermometer (maximum 5 ° C)
and make a note of the range in a chart.
- If the milk’s temperature is too high:
- Check whether the refrigerator door is closed properly and tight.
- Check the power supply of the coffee machine (mains plug, fuse).
Important!
For daily and wee
Schaerer Ltd.
Daily cleaning:
► Schaerer cleaning tablets
► “Daily Clean-Up” liquid milk system cleaner
kly cleaning, always use the cleaning agents recommended by
Weekly cleaning:
► “Weekpure” liquid milk system cleaner
Page 5-2 BAPdO500 - EN - V05
Page 75

Cleaning
5.2 Daily cleaning
The intervals, in which the cleaning program is to be carried out, are programmed by
the service technician. If a cleaning is required at a pre-set time, the following messages alternate in the display:
select product
12:00 01.07.2010
Display example
Important!
The automatic cleaning process starts again from the beginning if the coffee machine
is switched off and then on again with the [Stand-by] button or after a power outage.
cleaning
request
BAPdO500 - EN - V05 Page 5-3
Page 76

Cleaning
Page 5-4 BAPdO500 - EN - V05
Page 77

Cleaning
BAPdO500 - EN - V05 Page 5-5
Page 78

Cleaning
5.3 Weekly cleaning
For the weekly cleaning, carry out the following additional steps:
- Immerse the cleaned foamer head for 5 minutes in an acidic decalcification solution
(water and "weekly cleaning agent").
- After the cleaning of the milk system is completed, dismantle and clean the brewing
units.
Important!
The automatic cleaning process starts again from the beginning if the coffee machine
is switched off and then on again with the [Stand-by] button or after a power outage.
Page 5-6 BATW 500 - EN - V05
Page 79

Cleaning
BAPdO500 - EN - V05 Page 5-7
Page 80

Cleaning
Page 5-8 BATW 500 - EN - V05
Page 81

Reinigung
5.4 Defrosting the refrigerator
Defrost the refrigerator, as soon as an ice layer is formed inside.
Important!
Never remove the ice with pointed and sharp objects or with objects made of metal!
1. Open the front door and press the [Stand-by] button.
2. Disconnect the mains plug of the coffee machine from the socket.
3. After defrosting, dry the inside of the refrigerator with a clean paper tissue.
4. Reconnect the coffee machine to the power supply.
5.5 Care of the refrigerator
Important!
Never use abrasive detergents, scouring powder, pads or cleaning tools made of
metal.
These devices could damage the smooth surfaces and leave behind traces in which
harmful germs are more likely to develop.
1. Clean the inside and the door seal with lukewarm vinegar water.
2. Wipe the cleaned surfaces with a moist and clean paper tissue.
3. Dry the surfaces with a clean and dry paper tissue.
5.5.1 Longer idle time
Perform ste
1.
e the refrigerator door ajar to prevent mould growth and unpleasant
Leav
2.
odours.
ps 1 to 3 as described in 5.5“Care of the refrigerator”.
BAPdO500 - EN - V05 Page 5-9
Page 82

Cleaning
Page 5-10 BATW 500 - EN - V05
Page 83

Error messages and malfunctions
6 Chapter
Table of contents
Chapter Text Page
6
6.1
6.1.1 Error messages - coffee machine.......................................................................................................6-2
6.1.2 Chip card error messages ..................................................................................................................6-6
6.2
Error messages and malfunctions .................................................. 6-2
Error messages with display...........................................................................................................6-2
Malfunctions without display messages........................................................................................6-7
BAPdO500 - EN - V05 Page 6-1
Page 84

Error messages and malfunctions
6 ERROR MESSAGES AND MALFUNCTIONS
6.1 Error messages with display
6.1.1 Error messages - coffee machine
Danger!
Inform your authorised customer service representative immediately if you cannot rectify a malfunction!
Do not attempt to repair the coffee machine yourself!
Display Cause Rectification
“waste watertank full”
(sTxt-219)
"heating steam"
(sTxt-251)
"heating left"
(sTxt-253)
"heating right"
(sTxt-254)
“heating tea”
(sTxt-252)
"Booster left"
(sTxt-249)
"Booster right"
(sTxt-250)
" Brewers ontbreken”
(sTxt-220)
This message only applies to coffee machines without a fixed wastewater outlet
The floating switch has communicated this.
The coffee machine cannot be operated.
- Excessive steam outputs.
- Phase fuse defective.
- Safety switch has opened.
Steam outputs and products with milk are
disabled Other products can be dispensed.
- Excessive coffee outlets left.
- Phase fuse defective.
- Safety switch has opened.
Left coffee outlets are disabled
- Excessive coffee outlets right.
- Phase fuse defective.
- Safety switch has opened.
Right coffee outlets are disabled.
- Excessive hot water outputs right.
- Phase fuse defective.
- Safety switch has opened.
Hot water outputs are disabled. Other products can be dispensed.
Temperature monitoring defective.
Products can still be dispensed.
Temperature monitoring defective.
Products can still be dispensed.
- Brewing unit drawer not in end position.
- Limit switch is defective.
The coffee machine cannot be operated.
Empty the wastewater container and then
press [STOP].
Wait for approx. 3 minutes. If during this time
"Timeout steam" appears on the display,
check if phase fuse is defective. If the fuse is
in working order, contact a manufacturerauthorised customer service representative.
Wait for approx. 3 minutes. If during this time
"Timeout left " appears on the display,
check if phase fuse is defective. If the fuse is
in working order, contact a manufacturerauthorised customer service representative.
Wait for approx. 3 minutes. If during this time
"Timeout right " appears on the display,
check if phase fuse is defective. If the fuse is
in working order, contact a manufacturerauthorised customer service representative.
Wait for approx. 3 minutes. If during this time
Timeout heater tea " appears on the
"
display, check if phase fuse is defective. If
the fuse is in working order, contact a manufacturer-authorised customer service representative.
Contact a manufacturer-authorized customer
service representative.
Contact a manufacturer-authorized customer
service representative.
- Turn the wing screw (see "Weekly clean-
ing", step 30., page 5-23) in a clockwise
direction until an acoustic signal sounds
and the display message disappears.
- If the message persists, contact a manufacturer-authorised customer service representative.
Page 6-2 BAPdO500 - EN - V05
Page 85

Error messages and malfunctions
Display Cause Rectification
"EEPROM error!"
(fix-001)
" error account system "
(sTxt-221)
“Flowmeter left”
(sTxt-236)
“Flowmeter right”
(sTxt-237)
“Panel door open”
(sTxt-226)
" comms. interrupted “
(sTxt-222)
“clean machine”
(sTxt-228)
" Motor timeout left "
(sTxt-240)
" Motor timeout right "
(sTxt-241)
“Motor drive left”
(sTxt-242)
“Motor drive right”
(sTxt-242)
"grinder left empty”
(sTxt-232)
The serial EEPROM is defective.
Contact a manufacturer-authorized customer
service representative.
The coffee machine is blocked.
Communication with an external device has
been interrupted.
The coffee machine is blocked.
- Fresh water supply is blocked or one of the
stop valves is defective.
- Brewing unit is dirty.
Check whether the external payment unit is
correctly connected.
If the message persists, contact a manufacturer-authorised customer service representative.
- Open stop valve.
- Clean the brewing unit.
- If the message persists, contact a manufac-
turer-authorised customer service representative.
Products can still be served.
see “Flowmeter left”. see “Flowmeter left”.
- The front door is open or the catch did not
engage.
- Limit switch is defective.
- Close the front door.
- Contact a manufacturer-authorised customer service representative.
The coffee machine cannot be operated.
Break in connection between coffee ma-
chine and external payment unit.
- Check if the external unit is correctly connected and ready for operation.
- Remedy: Leave credit mode with the corresponding chip card and select the normal
coffee machine normal mode.
- Contact a manufacturer-authorised cus-
tomer service representative.
The coffee machine is blocked.
The coffee machine must be cleaned.
- You can delay the cleaning by another 4
hours by pressing the [Operator] button.
- If the message persists, the coffee machine
must be cleaned as described in 5 "Clean-
ing", page 5-2.
The coffee machine cannot be operated.
The control unit has recorded an error func-
tion of the motor in the left brewing unit.
Press the [Stand by] button. Check whether
the left brewing unit is missing or if it is correctly installed. Then press the [Stand by]
button and select a coffee product, If the
message persists, contact a manufacturerauthorised customer service representative.
Left coffee outlets are disabled.
The control unit has recorded an error function of the motor in the right brewing unit.
Right coffee outlets are disabled.
Control defective.
Press the [Stand by] button. Check whether
the right brewing unit is missing or if it is
correctly installed. Then press the [Stand
by] button and select a coffee product. If the
message persists, contact a manufacturerauthorised customer service representative.
Contact a manufacturer-authorised customer
service representative.
The coffee machine cannot be operated.
Control defective.
Contact a manufacturer-authorised customer
service representative.
The coffee machine cannot be operated.
The left coffee bean container is empty.
Left coffee outlets are disabled
Pour in a 1.3 kg of coffee beans maximum
and press the [STOP] button.
BAPdO500 - EN - V05 Page 6-3
Page 86

Error messages and malfunctions
Display Cause Rectification
"grinder right empty"
(sTxt-233)
"grinder left blocked"
(sTxt-234)
"grinder right block."
(sTxt-235)
"level probe steam"
(sTxt-244)
Product - # Error!
Press any key...
(fix-002)
"container n.i. place"
(sTxt-231)
“empty container!”
(sTxt-055)
"container full"
(sTxt-229)
"Schäumerkopf fehlt"
(sTxt-227)
"service wanted"
(sTxt-278)
“Heat up system”
(sTxt-223)
The right coffee bean container is empty.
Right coffee outlets are disabled.
An object (e.g. a stone) is stuck in the grinder.
Left coffee outlets are disabled
See "grinder left blocked".
Right coffee outlets are disabled.
The water level in the steam generator is
wrong.
Steam discharge is blocked.
Programming error
Products can still be served.
- The coffee grounds container is not in its
compartment.
- The coffee grounds container is not in its
proper final position.
- Limit switch is defective.
The coffee machine is blocked.
The coffee grounds container is full.
The coffee machine is blocked.
You can still serve 5 products before the
coffee machine gets blocked.
- The foamer head is not in the correct position.
Switch is bent or switch cam at the
-
foamer head has broken off.
The coffee machine is blocked.
The programmed number of beverages has
been served or the programmed time limit
for the next service has been reached.
Products can still be served.
When the coffee machine is switched on,
no products can be served until the system
warms up.
The coffee machine is blocked.
See " grinder right empty ".
- Press the [STOP] button.
- If the message persists, disconnect the
coffee machine from the power mains. Vacuum the coffee beans out of the grinder.
Check the grinder for stuck objects.
- If the problem still persists, contact an
authorised customer service representative.
See "grinder left blocked".
- Check whether the stop valve of the water
mains is open.
- Press the [Stand-by] button to switch the
machine off and on again.
- If the problem still persists, contact an
authorised customer service representative.
- You can temporarily remove this message
by pressing the [STOP] button and then
pressing the desired product button.
- Contact a manufacturer-authorized customer service representative immediately.
- Push coffee grounds container fully into
coffee grounds container compartment.
- Check whether the coffee grounds container is fully inserted into the coffee
grounds container compartment. If necessary, remove the coffee grounds residue
from the back panel and base plate of the
coffee grounds container compartment.
- If the message persists, contact a manufacturer-authorised customer service representative.
Empty the coffee grounds container.
Empty the coffee grounds container.
Ensure that the foamer head is in the stop
position.
If the message persists, contact a manufacturer-authorised customer service representative.
Contact a manufacturer-authorised customer
service representative.
- You can dispense coffee and hot water
products after approx. 5 minutes.
- Check the phase fuse.
- If the message persists, contact a manufacturer-authorised customer service representative.
Page 6-4 BAPdO500 - EN - V05
Page 87

Error messages and malfunctions
Display Cause Rectification
“temp. sensor steam”
(sTxt-246)
“Temp.sensor left”
“Temp.sensor right”
"temp. sensor tea"
"timeout heat steam"
"Timeout left"
"Timeout right"
"Timeout heater tea"
“water filter”
“watertank empty”
(sTxt-247)
(sTxt-248)
(sTxt-245)
(sTxt-289)
(sTxt-281)
(sTxt-282)
(sTxt-288)
(sTxt-225)
(sTxt-218)
The temperature sensor in the steam generator is defective.
Steam discharge is blocked.
The temperature sensor in the instant heater of the left beverage outlet for coffee
water is defective.
Left coffee outlets are disabled.
The temperature sensor in the instant heater of the right beverage outlet for coffee
water is defective.
Right coffee outlets are disabled.
The temperature sensor in the instantaneous water heater for hot water is defective.
Hot water outputs are disabled.
The programmed set temperature was not
reached within the specified time.
Steam discharge is blocked.
The programmed set temperature for coffee
water of the left beverage outlet side was
not reached within the specified time.
Left coffee outlets are disabled
The programmed set temperature for coffee
water of the right beverage outlet side was
not reached within the specified time.
Right coffee outlets are disabled.
The programmed set temperature for hot
water (hot water outlet) was not reached
within the specified time.
Hot water outlet is disabled.
The programmed water quantity has flowed
through the filter. The control unit has activated the display message
Products can still be dispensed.
Only for coffee machines without a fixed
drinking water connection.
The coffee machine is blocked.
Contact a manufacturer-authorised customer
service representative.
Contact a manufacturer-authorised customer
service representative.
Contact a manufacturer-authorised customer
service representative.
Contact a manufacturer-authorised customer
service representative.
- Press the [Stand-by] button to switch the
machine off and on again.
- Check the phase fuse.
- If the message persists, contact a manufacturer-authorised customer service representative.
See "Timeout steam".
See "timeout heat steam".
See "timeout heat steam".
- The water filter must be replaced.
- If you do not have a replacement water
filter, contact a manufacturer-authorised
customer service representative.
Fill up the fresh water container with drinking
water and then press [STOP].
BAPdO500 - EN - V05 Page 6-5
Page 88

Error messages and malfunctions
6.1.2 Chip card error messages
The following messages indicate handling errors relating to the chip cards.
Display Cause Rectification
“*data error
remove card”
(sTxt-111, sTxt-017)
“*no function
remove card”
(sTxt-102, sTxt-017)
“*read error
remove card”
(sTxt-112, sTxt-017)
“*write error
remove card "
(sTxt-113, sTxt-017)
“*wrong card
remove card”
(sTxt-105, sTxt-017)
“*wrong PIN-code
remove card”
(sTxt-107, sTxt-017)
- The data structure on the MONEY chip
card was damaged.
- Request a new MONEY chip card from a
manufacturer-authorised customer service
representative.
Payment mode is disabled. Enable payment mode with the PROGRAM
The chip card was not inserted into the card
reader correctly or is defective.
- The data was not correctly saved during
the transfer to the SAVE DATA PLUS chip
card.
chip card.
See 4.6.1 "Inserting chip card into the card
reader", page 4-18.
Insert the SAVE DATA PLUS chip card into
the card reader again and repeat the data
transfer.
- The chip card was withdrawn from the card
reader too early.
- The current menu requires another chip
card type.
- A MONEY card was inserted for the first
time.
The wrong PIN code (Personal Identification
Number) was entered.
- Insert the current chip card into the card
reader.
- The money chip card must be registered.
- Contact a manufacturer-authorised customer service representative.
Enter the PIN code again.
Page 6-6 BAPdO500 - EN - V05
Page 89

6.2 Malfunctions without display messages
Note:
The following problems may occur without causing the coffee machine to display an
error message.
Error messages and malfunctions
Malfunction Caus
Cappuccino with too little
foam
Cups are only half filled.
Dark display, no message
- Foamer head dirty.
- Hoses are stuck
- Milk pack empty.
- Milk temperature in milk pack too high.
- Air nozzle of foamer head is blocked.
- Blockage at milk baffle.
- Milk pack not sufficiently cold.
- Tubes are pinched off at the tube holder or
in the milk pack.
Plug at power socket is disconnected or
main switch is OFF.
e Rectification
- Clean foamer head: See 5.2 "Daily clean-
ing", step 4. to 5.5, page 5-4.
- Move hoses into correct position.
- Replace milk pack.
- Close refrigerator door. If the door has
been open for a prolonged period of time,
replace milk pack with a cold one.
- Rinse expander thoroughly with water.
Clear the air baffle with the cleaning needle
and rinse it thoroughly with water (see 5.2
"Daily cleaning", step 5.3, page 5-5).
- Check whether baffles are blocked, and
clean, if necessary.
- Check the temperature of the milk in the
refrigerator.
- Move tubes into correct position.
Reconnect plug at power socket or switch
main switch to ON.
BAPdO500 - EN - V05 Page 6-7
Page 90

Error messages and malfunctions
Page 6-8 BAPdO500 - EN - V05
Page 91

Optional features
7 Chapter
Table of contents
Chapter Text Page
7
7.1
7.2
7.3
7.4
7.5
7.6 User instructions for special machines (water tank)....................................................................7-3
7.6.1
7.6.2 Empty wastewater tank ......................................................................................................................7-4
.6.3 User instructions for machines with fresh and wastewater tanks (trolley-mounted)..........................7-4 7
Optional features............................................................................... 7-2
Payment systems .............................................................................................................................7-2
Chip cards .........................................................................................................................................7-2
Chip card loader ...............................................................................................................................7-2
Water softener (Filados/Brita) .........................................................................................................7-2
Cup warmer .......................................................................................................................................7-3
Refill fresh water tank .........................................................................................................................7-3
BAPdO500 - EN - V05 Page 7-1
Page 92

Optional features
7 OPTIONAL FEATURES
7.1 Payment systems
Your coffee machine can be connected to your cash register by means of a payment
system, for example. This facilitates daily, weekly and monthly accounting.
Note:
- See also chapter 8 “Payment systems".
- For additional information, contact a manufacturer-authorised customer service representative.
7.2 Chip cards
A series of chip cards allows you to simplify processes, assign products to keys and
program a variety of other useful functions.
Note:
- See also chapter 2.5 “Chip card functions".
- For additional information, contact a manufacturer-authorised customer service representative.
7.3 Chip card loader
Additional load device for MONEY chip cards
- Loading credit
- Credit
Note:
- The chip cards can also be loaded on the coffee machine as described in chapter
8.2.1 "MONEY chip card system" (standard design).
- For additional information, contact a manufacturer-authorised customer service representative.
7.4 Water softener (Filados/Brita)
A water softener helps to reach a better water quality and softens it.
It allows the recommended value for the coffee machine to be achieved.
Note:
For additional information, contact a manufacturer-authorised customer service representative.
Page 7-2 BAPdO500 - EN - V05
Page 93

7.5 Cup warmer
The cup warmer consists of an additional framing.
(Cups can be pre-heated in large quantities.)
Note:
For additional information, contact a manufacturerauthorised customer service representative.
7.6 User instructions for special machines (water tank)
This chapter discusses coffee machines which are equipped with a fresh and wastewater container.
7.6.1 Refill fresh water tank
When the level in fresh water tank becomes too low, the [STOP] key flashes.
The following message is displayed:
selection locked
watertank empty
Perform the following procedure:
1. Take out the fresh water tank.
2. Fill the fresh water tank with clean drinking water.
3. Place the fresh water tank back into the space provided.
4. Press [STOP] to acknowledge the message on the display.
Note:
- To prevent the water pump from functioning without water, no products can be selected if the water level is too low. The product currently selected will still be dispensed.
- Always check the water level before running the cleaning program.
Optional features
BAPdO500 - EN - V05 Page 7-3
Page 94

Optional features
7.6.2 Empty wastewater tank
When the wastewater tank is full, the LED next to the [STOP] button blinks. The fol-
lowing message is displayed:
selection locked
waste watertank full
Perform the following procedure:
1. Remove the wastewater tank.
2. Empty the wastewater tank and rinse it, if necessary.
3. Place the wastewater tank back into the space provided.
4. Press [STOP] to acknowledge the message on the display.
Note:
- To prevent the wastewater tank from overflowing, no products can be selected. If the
message is displayed while a product is being dispensed, service continues.
- Always empty the wastewater container before running the cleaning program.
7.6.3 User instructions for machines with fresh and wastewater tanks (trolley-mounted)
Capacities are as follows:
- Fresh water tank: 16 litres.
- Wastewater tank: 11 litres
- The fresh water tank must be filled daily with fresh, clean drinking water.
- If the machine is out of use for lengthy periods, both tanks must be emptied and
cleaned.
- Always keep the inside of the trolley dry.
- Only place the tanks in the space provided (level monitoring).
- For safety reasons, the trolley must be pulled, not pushed, during transport.
Danger!
The trolley is not intended for the transport of goods. The manufacturer accepts no liability for damage caused by misuse of the trolley or failure to follow the user instructions.
Page 7-4 BAPdO500 - EN - V05
Page 95

Payment systems
8 Chapter
Table of contents
Chapter Text Page
8
8.1
8.1.1 MASTER chip card .............................................................................................................................8-2
8.1.1.1 Beverage output using the MASTER chip card..................................................................................8-2
8.2
8.2.1 MONEY chip card system ..................................................................................................................8-3
8.2.1.1 MONEY chip card ...............................................................................................................................8-3
8.2.1.1.1 Beverages outputs using the MONEY card........................................................................................8-3
8.2.1.2 LOAD chip card ..................................................................................................................................8-5
8.2.1.2.1 Menu view...........................................................................................................................................8-5
8.2.1.2.2 Entering the PIN code ........................................................................................................................8-5
8.2.1.2.3 Load credit onto LOAD card...............................................................................................................8-6
8.2.1.2.4 Deleting credit on the MONEY chip card............................................................................................8-7
8.2.1.2.5 Displaying and deleting MONEY chip card loading............................................................................8-8
8.2.1.2.6 Chip card info......................................................................................................................................8-9
8.2.1.2.7 Enabling MONEY chip cards............................................................................................................8-10
8.2.1.2.8 Disabling the MONEY chip card.......................................................................................................8-10
8.2.1.2.9 MONEY history.................................................................................................................................8-11
8.2.1.2.10 Changing the PIN code ....................................................................................................................8-12
8.2.1.3 PROGRAM chip card .......................................................................................................................8-13
8.3
8.3.1 Token slot and related systems........................................................................................................8-13
8.3.1.1 Prepare beverages ...........................................................................................................................8-13
8.3.2 NRIG 13 EMP no-change coin slot and related systems (standard type)........................................8-14
8.3.2.1 Prepare beverages ...........................................................................................................................8-14
8.3.3 CF350 Totalisator dual-price coin slot..............................................................................................8-15
8.3.4 CSI (Coffee Standard Interface) external payment Connection to coffee-bar system.....................8-15
8.3.4.1 Preparing beverages ........................................................................................................................8-16
8.3.4.2 PROGRAM chip card .......................................................................................................................8-16
Payment systems.............................................................................. 8-2
Cards compatible with all payment systems.................................................................................8-2
Payment with internal systems .......................................................................................................8-3
Payment with self-service systems ..............................................................................................8-13
BAPdO500 - EN - V05 Page 8-1
Page 96

Payment systems
8 PAYMENT SYSTEMS
Note:
This chapter addresses users who have a payment system installed on their coffee machine.
The coffee machine can be used with or without payment. Various systems and possibilities exist for
payment mode.
8.1 Cards compatible with all payment systems
8.1.1 MASTER chip card
Note:
The MASTER chip card is an optional feature and is not included in the standard delivery package.
The MASTER card is a chip payment card that is compatible with all payment systems, both external and internal. It entitles the bearer to obtain beverages from the
machine free of charge, without these being booked to the payment system.
Beverages obtained using the MASTER chip card are simply added to the total on the
machine and daily counters.
The MASTER chip card must be enabled by the service technician or with the
PROGRAM chip card (optional) on the coffee machine (see 4.7.1.12, "Logging on the
h
MASTER c
chines, it must be enabled separately on each machine (security measure).
8.1.1.1 Beverage output using the MASTER chip card
To obtain a beverage free of charge, insert the MASTER card in the card reader.
Press the desired product key and remove the card from the card reader.
1.
Display example
2. Press the desired product button.
Display example
3.
ip card", page 4-37) If the MASTER card is to be valid for several ma-
Open the front door. Insert the MASTER chip card into the card reader. Close
the front door.
The following message is displayed:
credit 150.50
select product
credit 147.00
1
The product is dispensed.
Open the front door. Remove the CHEF chip card from the card reader. Close
the front door.
Page 8-2 BAPdO500 - EN - V05
Page 97

8.2 Payment with internal systems
8.2.1 MONEY chip card system
Chip cards required (optional):
MONEY A chip card(s)
-
- MONEY B chip card(s)
MONEY C chip card(s)
-
- MONEY D chip card(s)
- MONEY E chip card(s)
- MONEY F chip card(s)
- LOAD chip card (see chapter 8.2.1.1“MONEY chip card”, page 8-3)
- PROGRAM chip card (see chapter 4.7.1 "PROGRAM chip card”, page 4-28)
- LOAD chip card (see chapter 8.1.1“MASTER chip card”, page 8-2)
For all the functions described in this chapter, it is assumed that the coffee machine is
ready for routine operation in payment mode.
8.2.1.1 MONEY chip card
The MONEY card is a credit card, which is inserted into the card reader to obtain a
beverage. Payment is debited from the chip card and the remaining credit displayed.
The various MONEY cards (MONEY A-F) have different price levels (0 %-255 % of
the programmed product price). These price levels can be programmed individually,
as required, by the service technician.
A single MONEY card may be enabled for several coffee machines on condition that
the machines have the same ID number (set by the service technician).
8.2.1.1.1 Beverages outputs using the MONEY card
Note:
- If programmed by the service technician, product quantities and beverage types can
be pre-selected.
- When the product key is pressed, payment is debited from the MONEY card and the
remaining credit displayed.
- If the MONEY chip card remains in the card reader beyond the pre-set time (0…99
seconds, an acoustic signal sounds. This should provide a reminder that the chip
card has remained in the card reader. The signal tone can be deactivated by the service technician.
*please wait
remove card
credit ##.##
too little credit
- Pre-selection using several MONEY cards is not possible. All of the beverages dispensed with the first MONEY card are served before products can be output using
the next MONEY card.
- This message appears if the price of the product exceeds the amount of credit left
on the MONEY chip card.
Payment systems
BAPdO500 - EN - V05 Page 8-3
Page 98

Payment systems
Coffee and milk coffee beverages:
Hot water and steam:
]
[
[ ]
1. Open the front door. Insert the MONEY chip card into the card reader. Close
the front door.
The following message is displayed:
credit ##.##
select product
2. Place one or two empty cup(s) under the left and/or right beverage outlet.
3.
Press the product button(s) for the desired beverage(s).
Display example: On the two product outlet sides products
(4) and (8) have been pre-selected. One drink per side
is now being dispensed.
credit ##.##
1 (4) (8) 1
4. * Dispensing other products: Perform steps 2 and 3.
5. * Returning to credit mode: Open the front door. Remove the MONEY chip
card from the card reader. Close the front door.
The following message is displayed:
credit operation
Display example
12:00 01.07.2010
Note:
- Multiple output of hot water and steam is not possible.
- If programmed by a service technician, the hot water or steam output can be inter-
rupted by pressing the selected product button again.
Danger!
- Risk of injury by scalding! Keep hands and other body parts away from the
outlet!
- Keep away from underneath the steam pipe while steam is delivered! Hold the
cup in such a way that no liquid is spilled onto your hands or other body parts
during heating!
1. Open the front door. Insert the MONEY chip card into the card reader. Close
the front door.
The following message is displayed:
Display example
credit 152.00
select product
2. Place an empty beverage container under the hot water outlet and/or immerse
the steam pipe into the container with the beverage to be heated.
]
3.
Press the
Display example: The price for the hot water or steam output has already been debited from the credit.
[
credit 150.60
select product
Hot water and/or steam is dispensed.
[ ] button
or
.
Page 8-4 BAPdO500 - EN - V05
Page 99

4. * Dispensing other products: Perform steps 2 and 3.
5. * Returning to credit mode: Open the front door. Remove the MONEY chip
card from the card reader. Close the front door.
The following message is displayed:
Display example
8.2.1.2 LOAD chip card
The LOAD card is used to load or delete credit onto/from MONEY cards.
Note:
- If you do not have a LOAD card, MONEY cards can be reloaded by a manufacturer-
authorised customer service representative.
- The LOAD chip card is an optional feature and is not included in the standard deliv-
ery package.
8.2.1.2.1 Menu view
Load MONEY chip cards
-
Delete MONEY chip card
-
- Load MONEY chip cards
- MONEY chip card info
- Enabling MONEY chip cards
- Disable MONEY chip cards
- MONEY chip card history
- Changing the PIN code
8.2.1.2.2 Entering the PIN code
If the service technician has programmed security levels 1 or 3 for the LOAD card, the
PIN code must be entered each time the coffee machine is used.
Note:
- The pin code consists of 4 digits and must always be entered completely.
- Pres the [Decaf] button to accept previously entered numbers.
- The PIN code is only activated if so programmed.
- The current PIN code is not displayed.
1. Open the front door. Insert the LOAD chip card into the card reader.
The following appears on the display if a security level has been programmed:
Payment systems
credit operation
12:00 01.07.2010
PIN-Code 0000
' +/- ' ' Decaf '
BAPdO500 - EN - V05 Page 8-5
Page 100

Payment systems
] [ ]
[
2. Enter the first digit of the first PIN code using
Decaf
3. Press
[Decaf]
For each additional number, repeat steps 3 and 4 until the PIN code has been
4.
entered completely.
] [ ]
[
5.
* Select next menu: Press the
6. * Returning to credit mode: Remove the LOAD chip card from the card reader.
Close the front door.
The following message is displayed:
credit operation
Display example
12:00 01.07.2010
8.2.1.2.3 Load credit onto LOAD card
Open the front door. Insert the LOAD chip card into the card reader.
1.
[
] [ ]
2. Press
[
load MONEY-card
execute 'Decaf'
Decaf
3. Press the [Decaf] button.
remove card
4. Remove the LOAD chip card from the card reader.
insert card
MONEY / LOAD
5. Insert the MONEY chip card into the card reader.
amount ##.##
entry #.##
[ ]
[
]
6. Enter the credit to be loaded using
technician is added by pressing the button. With [
amount entered.
Decaf
7. Press
[Decaf]
amount ##.##
... Save ...
The following message is then displayed:
remove card
8. Remove the MONEY chip card from the card reader.
insert card
MONEY / LOAD
to confirm the number entered.
]
[
or
]
[ ]
or
until the following menu is displayed:
Amount = Credit balance
Enter = Credit to be loaded
[
to confirm the number entered.
amount ##.##
... Done ...
]
or
[ ].
[
[ ]
button.
]
. The factor programmed by the service
] you can correct the
Page 8-6 BAPdO500 - EN - V05
 Loading...