

Page 1
Page 2

M.Schaerer Ltd. Phone: +41 31 858 51 11 User manual
Gewerbestrasse 15 Fax: +41 31 858 51 40 BAMF - 02
3302 Moosseedorf E-Mail: info@schaerer.com
Switzerland Internet: www.schaerer.com Order number: 020'276
Page 3

User manual
Milkfoamer
User manual
Published by: M. Schaerer Ltd., CH-3302 Moosseedorf
Edition : 5. Edition / November 2005
Replaces : 4. Edition / March 2005
Designed / edited by: M. Schaerer Ltd., CH-3302 Moosseedorf
© Copyright by: M. Schaerer Ltd., CH-3302 Moosseedorf
All rights reserved, including translations into foreign languages. It is prohibited
to copy, reproduce, distribute or communicate by electronic means all or any
parts of this document in any form without the express permission of the
publisher.
All information, technical data and illustrations contained in this guide reflect
the latest factual position at the time of going to print. M. Schaerer Ltd.
reserves the right to introduce modifications at any time without specific
notification.
BAMF - 02.00 - V05 Page 1
Page 4

User manual
Page 2 BAMF - 02.00 - V05
Page 5

User manual
Table of contents
Chapter Page
1. SAFETY INSTRUCTIONS .......................................................................................................................4
1.1 Hygiene ....................................................................................................................................................4
2. PRODUCT DESCRIPTION......................................................................................................................5
2.1 Intended purpose .....................................................................................................................................5
2.2 Safety precautions ...................................................................................................................................5
2.3 Installation layout......................................................................................................................................6
3. DISPLAY AND CONTROL ELEMENTS .................................................................................................7
3.1 View of machine .......................................................................................................................................7
3.2 Control panel............................................................................................................................................7
3.3 COMMISSIONING ...................................................................................................................................8
3.3.1 Power supply............................................................................................................................................ 8
3.3.2 Before you switch on the appliance and heater.......................................................................................8
3.3.3 Plastic-bag milk insert ..............................................................................................................................8
3.3.4 Switching on the machine ........................................................................................................................8
3.4 OBTAINING PRODUCTS (MILK TEMPERATURE DEPENDENT) .......................................................8
3.4.1 Automatic temperature control disabled ..................................................................................................8
3.4.2 Automatic temperature control enabled ...................................................................................................8
3.5 OBTAINING PRODUCTS (MILK LEVEL DEPENDENT) .......................................................................9
3.5.1 Milk level indication and product delivery enabled (milk level too low)....................................................9
3.5.2 Milk level indication enabled and product delivery disabled (milk level too low) .....................................9
3.5.3 Milk level indication disabled and product delivery enabled (milk level too low) .....................................9
3.6 Ready state ..............................................................................................................................................9
3.7 Setting portions for milk and frothed milk.................................................................................
4. OPERATION ..........................................................................................................................................10
4.1 Spout height ........................................................................................................................................... 10
4.2 Product selection....................................................................................................................................10
4.3 Product delivery......................................................................................................................................10
5. AUTOMATIC CLEANING......................................................................................................................11
5.1 Cleaning sequence ................................................................................................................................11
5.2 Accessories for daily use .......................................................................................................................14
6. ERRORS ................................................................................................................................................15
6.1 Possible faults ........................................................................................................................................15
................9
BAMF - 02.00 - V05 Page 3
Page 6
User manual
1. Safety instructions
Attention!
Read the information given in the user manual carefully (see Chapter 2, Page 2-1).
1.1 Hygiene
Note:
Prior to commissioning do the daily cleaning (see Chapter "Cleaning").
Attention!
• Please follow the generally valid hygiene HACCP regulations!
(HACCP= Hazard Analysis and Critical Control Point)
• Do not use raw milk. Use only pasteurised or UHT milk. Homogenized milk must always be used.
• Milk that has already been heated up or for which the expiry date has lapsed may not be used.
• When using packaged milk, it is recommended for hygienic reasons to use the milk directly from
the original packaging.
• The milk in the refrigerator must have a temperature of approx. 3 °C to 5 °C. If this rule is not
followed, it is not possible to dispense an optimal product.
• Only refill with milk which has not exceeded 5 °C. Never put warm milk in the refrigerator. It takes
too long for a temperature of 3 °C to 5 °C to be reached. The refrigerator will also ice up.
(Frequent defrosting required).
• For daily and weekly cleaning, proceed as described in chapter "Cleaning".
• Never spray the machine with water or other liquids.
• For cleaning, never immerse the machine in water or any other liquid.
Danger!
During cleaning and usage of cleaning tools or products, there is a risk of injury.
Page 4 BAMF - 02.00 - V05
Page 7

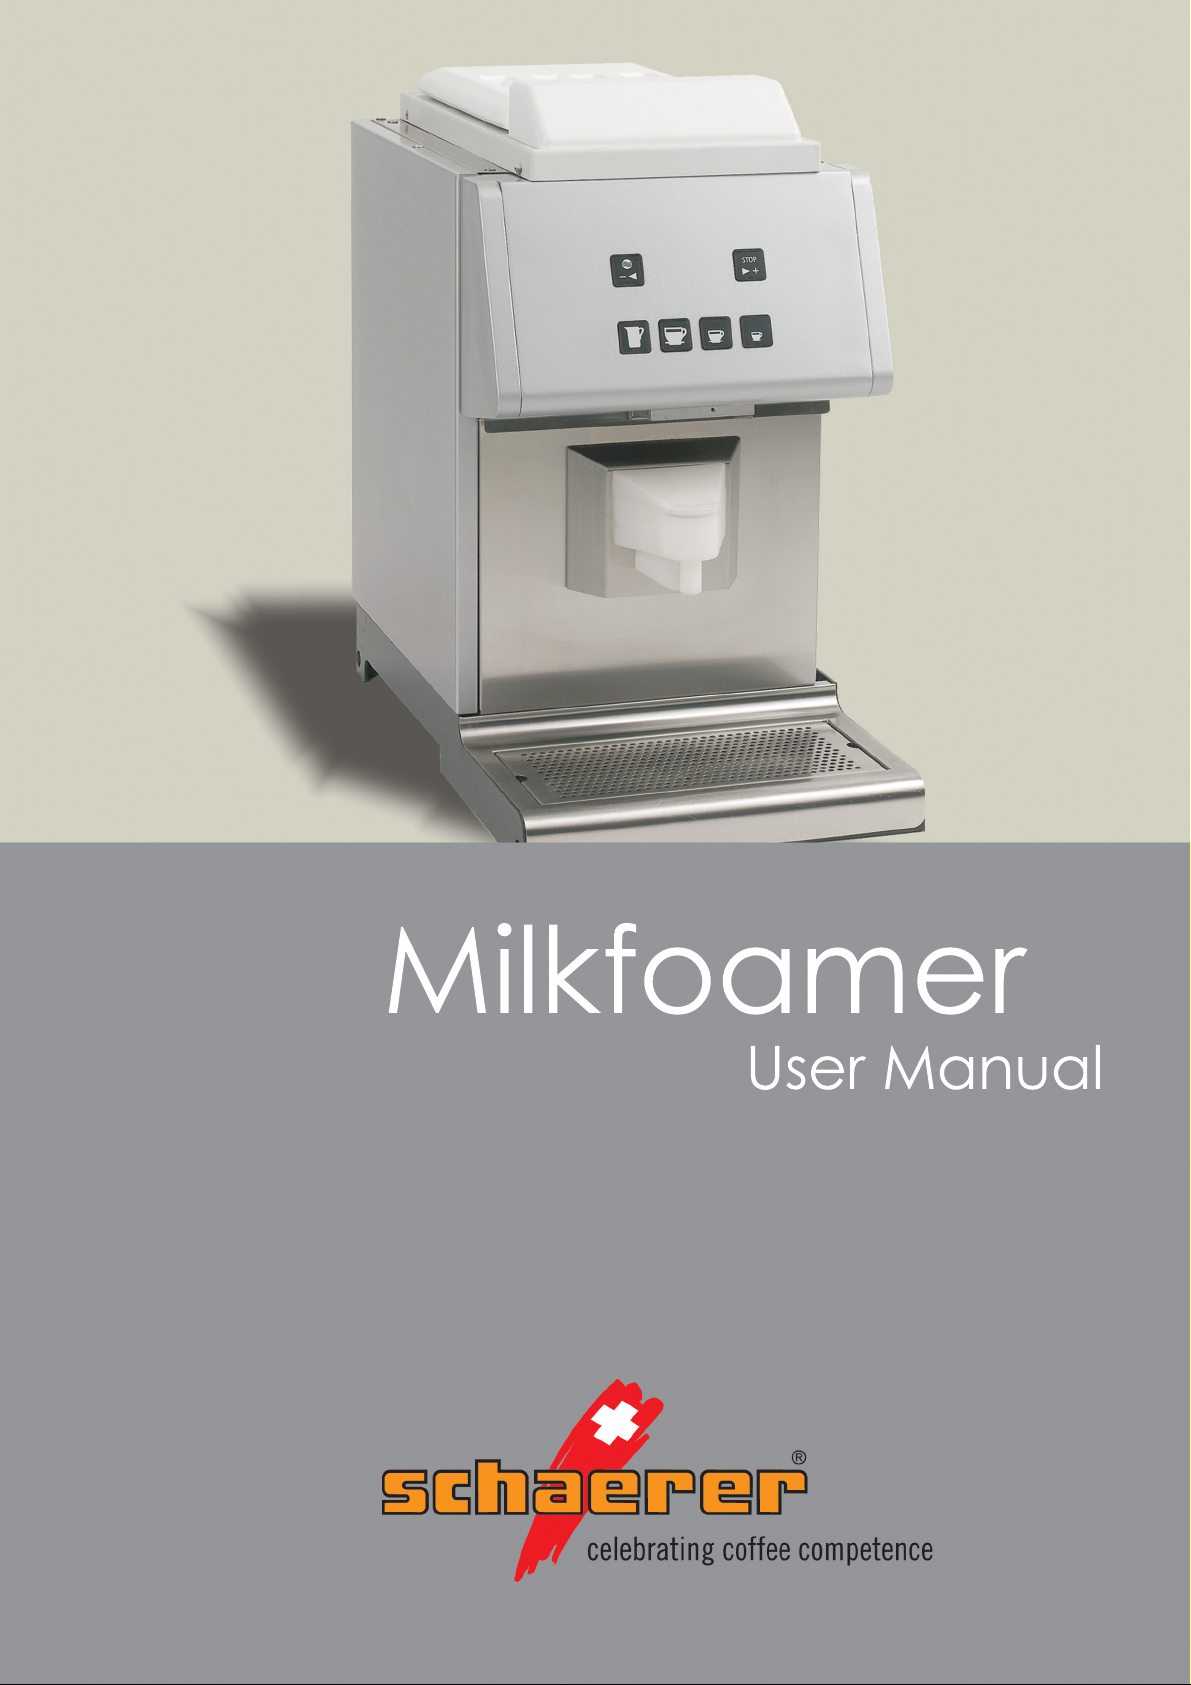
2. Product description
2.1 Intended purpose
The Milk Foamer has been developed for the production of Cappuccino, milk coffee and for heated
milk. The Milk Foamer has been designed to work exclusively in combination with a Schaerer coffee
machine model SM II.
2.2 Safety precautions
- The Milk Foamer has to stand along the side of your coffee machine on a even, level surface.
- Never open the appliance casing. There are no controls inside the appliance or any parts which
require attention from the user. In the event of a malfunction, please contact Schaerer Customer
Services.
- The ambient temperature must not be lower than 10º C or higher than 40º C.
- To ensure your Milk Foamer always functions perfectly, never place objects on top of the appliance.
- Do not clean the appliance using a hose or high pressure spray. The use of steam cleaning equipment
should also be avoided.
- Your Milk Foamer may only be operated by personnel instructed in its use.
- If the appliance is going to be unused for a long period, remove the mains plug from the socket.
Attention!
M. Schaerer Ltd. accepts no liability under the warranty for damage resulting from improper
use of the appliance (e.g. using liquids other than milk), connecting it to the wrong current, or
operator error.
Put never the lid cover from the milk tray into the dishwasher. The synthetic material of the lid
will be damaged from heat in the dishwasher. The material gets brittel. Manual risk !
User manual
BAMF - 02.00 - V05 Page 5
Page 8

User manual
2.3 Installation layout
Page 6 BAMF - 02.00 - V05
Page 9

3. Display and control elements
3.1 View of machine
3.2 Control panel
1
User manual
7
5
6
Legend:
1. Trip grid
2. Milk and coffee outlet
3. Control panel
4. Explanation of messages
5. Air valve cover
6. Milk container
7. Lid for milk container
4
3
2
1
2
Legend:
1. Cleaning / - button
2. Stop / + button
3. Product button
4. Main switch ON / OFF
3
3
BAMF - 02.00 - V05 Page 7
4
Page 10

User manual
3.3 Commissioning
3.3.1 Power supply
- Connect the appliance to the mains supply.
- Operating voltage: 230 V / 10 A / 50-60 Hz.
3.3.2 Before you switch on the appliance and heater
Important:
- Remove the milk container.
- Pour 0.5 dl water fill the tank of the `bain Marie’ heater with 1.5 dl of water (for a 10 liter Milk
Foamer). The correct water level is essential for effective heat transfer. If you overfill the bain
Marie, the water will run over when you insert the milk tray.
- Re-insert the milk container.
3.3.3 Plastic-bag milk insert
- To make the appliance even easier to use and especially to make daily cleaning even more efficient,
we recommend using special-design bag inserts made from HDPE plastic. These bags do not impair
the quality of the milk produced to the slightest degree. They are taste and odour-free, safe for use
with food, heat resistant and biodegradable. They are designed for single use.
- Pour in the volume of milk you require up to a maximum of 5 liters. Replace the milk level sensor
and suction tube.
3.3.4 Switching on the machine
- Power up the machine by pressing the main switch which is located under the buttons protector flap
below the control panel (marked 4 in the diagram on page 3-9).
The signal lamp lights up
3.4 Obtaining products (milk temperature dependent)
3.4.1 Automatic temperature control disabled
- If automatic temperature control is disabled, you can order a product immediately after refilling with
fresh milk.
3.4.2 Automatic temperature control enabled
- If automatic temperature control is enabled, you cannot order a product after refilling with fresh milk
until the milk reaches the programmed temperature. If you press any product button during heating,
the Cleaning button on the Milk Foamer flashes and the following message appears on the coffee
machine display:
Unable to select Product
milk temperature not reached
- The milk will take approximately 16 to 20 minutes to reach the pre-set temperature.
Note:
Automatic temperature control can only be programmed as enabled or disabled by an M. Schaerer AG
authorised service technician.
Page 8 BAMF - 02.00 - V05
Page 11

3.5 Obtaining products (milk level dependent)
3.5.1 Milk level indication and product delivery enabled (milk level too low)
- If the milk container is empty or nearly empty, the Cleaning button on the Milk Foamer flashes when
you press a product button and the coffee machine displays the following message:
Unable to select Product
Milk level not reached
You can obtain a product.
3.5.2 Milk level indication enabled and product delivery disabled (milk level too low)
- If the milk container is empty or nearly empty, the Cleaning button on the Milk Foamer flashes when
you press a product button and the coffee machine displays the following message:
Unable to select Product
Milk level not reached
You cannot obtain a product.
3.5.3 Milk level indication disabled and product delivery enabled (milk level too low)
- If the milk container is empty or nearly empty, the Milk Foamer does not display a level indication. The
coffee machine displays the following message:
Select product
User manual
You can obtain a product.
As an option, all three versions of the Milk Foamer can be fitted with an external warning lamp which
flashes for 3 minutes if a product button is pressed when the milk level is too low.
3.6 Ready state
- The Milk Foamer is ready to use as soon as the milk temperature and level are correct.
3.7 Setting portions for milk and frothed milk
- You can pre-program product portions and assign products to individual buttons from the coffee
machine control board.
Attention:
- Failure to comply with points 3.1 to 3.7 above when setting up the Milk Foamer can impair its
subsequent performance.
- Never put your hands beneath the delivery spout during product delivery or the cleaning cycle,
otherwise you risk scalding.
BAMF - 02.00 - V05 Page 9
Page 12

User manual
4. Operation
4.1 Spout height
Place a cup or other container beneath the spout.
For shallow cups, you can place a cup stand on the drip grille to raise its height.
The clearance height is 145 mm in the case of single spouts and 125 mm in the case of twin spouts.
4.2 Product selection
Press the relevant product button
4.2 Product delivery
The appliance delivers the selected product in the quantity you have set.
- Accounting mode
You need to enable delivery using the Accounting pin key before the appliance will output the product.
- Extra portion in Accounting mode
STOP
+
If you press the
button together with the relevant product button , the appliance will output
programmed extra portion of the selected product.
Note:
Only one extra portion is available in accounting mode.
- Extra portion in Self-Service mode
You have the option to define one of the user buttons as the Extra Portion button. The appliance will
output hot milk for as long as you press the button, up to maximum of 10 seconds.
- Ordering possibilities
You can order a coffee from the coffee machine and hot milk from the Milk Foamer at the same time.
However, you cannot order two coffee products simultaneously from both appliances.
Attention:
Never put your hands beneath the delivery spout during product delivery or
the cleaning cycle, otherwise you risk scalding.
, Cappuccino, Milk Coffee or Hot Milk.
Page 10 BAMF - 02.00 - V05
Page 13

5. Automatic cleaning
5.1 Cleaning sequence
Attention:
The Milk Foamer must be cleaned every day !
User manual
1. Drain all the remaining milk out of the container by pressing the Cleaning buttons
Foamer and the coffee machine simultaneously. When the Stop button
that the container is completely empty, press it to acknowledge.
STOP
+
starts to flash to indicate
on both the Milk
1. 2.
The following message appears on the display:
1. 2.
2. Remove the lid cover from the top of the Milk Foamer. Take out the suction hose, milk level sensor
and valve from the milk tray. Take them apart and immerse all the parts in a bath of cleaning agent.
Select product
Empty Milk Foamer
Select product
Start Milk Foamer cleaning
3. 4. 5.
3. Turn the foamer head (the spout assembly) to the left to release its bayonet connection and remove.
Open and clean the foamer head and inspect the seals. Remove the (spring-loaded) whisk unit and
clean thoroughly. Clean the milk outlet with a fine brush.
6. 7. 8.
BAMF - 02.00 - V05 Page 11
Page 14

User manual
4. Lift the double-lidded milk tray out of the bain Marie. Remove the milk bag and any residues for
disposal. Clean the milk tray. Remove any remaining water from the bain Marie and clean.
9. 10.
Attention:
Avoid cutting or scratching the surface of the milk tray and bain Marie with pointed or hard objects. Do
not use a metal pan scrubber or abrasive scouring agent for cleaning. Clean the containers with either
a nylon brush or a special sponge for Teflon. Hot water with standard dish-washing agents is quite
adequate. The removable milk tray is dishwasher-proof.
5. Fill the bain Marie with 0.5 dl water (1.5 dl for the 10 liter Milk Foamer) and replace the milk tray. Add 2
liters of warm water containing 0.5 dl special cleaning agent (Thermoclean, Order number: 065’642) to
the milk tray.
11. 12. 13.
6. Re-insert the valve, suction hose and level sensor.
14. 15. 16.
Page 12 BAMF - 02.00 - V05
Page 15

User manual
7. After cleaning, reassemble the foamer head and whisk unit and replace.
17. 18.
8. Press the Cleaning button on the Milk Foamer to start the automatic cleaning program.
19.
Once cleaning program has started, you cannot select any products from the Milk Foamer for about
13-18 minutes (22 rinse cycles). You cannot interrupt the cleaning program once it has started.
The automatic cleaning process starts as soon as the cleaning water reaches the required
temperature.
9. As soon as the automatic cleaning program is finished, the display shows:
Select product
Start Milk Foamer rinsing
10. Use a cloth to remove the rest of the cleaning agent from the milk tray, then refill it with around 4 litres
of cold water which does not contain cleaning agent. Press the flashing Cleaning button
Foamer. This activates one rinse cycle which cannot be interrupted.
Note:
To stop the rinsing press on the illuminated Stop-button.
on the Milk
20. 21. 22.
11. When you have finished cleaning the Milk Foamer, switch it off at the main power switch under the
control panel.
While the Milk Foamer cleaning program is running, the coffee machine can be cleaned.
BAMF - 02.00 - V05 Page 13
Page 16

User manual
Attention:
Removing the foamer head during the Milk Foamer cleaning cycle cancels the cleaning cycle. Once
the foamer head is back in place the cleaning cycle starts again from the beginning.
Important:
The appliance should be cleaned weekly using an acidic cleaning agent (such as vinegar) to remove
milk scale.
Attention:
Cleaning agents: In the event of contact with skin or eyes, rinse thoroughly in water without delay.
Before restarting the Milk Foamer, it is essential to check that the bain Marie contains the
necessary 0.5 dl water (1.5 dl in the case of the 10 litre Milk Foamer).
Put never the lid cover from the milk tray into the dishwasher. The synthetic material of the lid
will be damaged from heat in the dishwasher. The material gets brittle. Manual risk !
5.2 Accessories for daily use
Portioning beaker 050424
Plastic-bag milk inserts 065624
Seal 5 x 1.5 065632
Fine cleaning brush 067407
Cleaning set 065642
Seal 36 x 2 065633
Page 14 BAMF - 02.00 - V05
Page 17

6. Errors
6.1 Possible faults
- Unsatisfactory frothing
The resistance in the spout is missing.
The spout is dirty.
The air infeed valve has stopped working.
- No milk or foam delivered
The suction tube is blocked.
The walls of the suction tube are stuck together.
- Milk slow to heat
Less than 0.5 dl water is in the hot-water bath.There is not the required 0.5 dl water (1.5 dl in the case
of the 10 liter Milk Foamer) between the milk tray and the bain Marie.
- No coffee or milk delivered
The Milk Foamer spout assembly has been removed or incorrectly replaced - the display indicates
`Foamer head not in place’.
- The milk is droping at the spout
The flap valve below the cover is filthy, incorrectly mounted or missing.
Attention:
If you cannot remedy the fault yourself with the help of the above guidance, you should call in an
M. Schaerer AG authorised service technician.
User manual
BAMF - 02.00 - V05 Page 15
Page 18

User manual
Page 16 BAMF - 02.00 - V05
 Loading...