

Page 1

Page 2

LEGAL NOTICES
Copyright © 2002 by ScanSoft, Inc. All rights reserved. No part of this publication may be
transmitted, transcribed, reproduced, stored in any retrieval system or translated into any
language or computer language in any form or by any means, mechanical, electronic,
magnetic, optical, chemical, manual, or otherwise, without prior written consent from the
Legal Departm ent at ScanSoft, Inc., 9 Centennial Drive, Peabody, Massachusetts 01960,
USA. Printed in the United States of America and in the Netherlands.
The software described in this book is furnished under license and may be used or copied only
in accordance with the terms of such license.
MPORTANT NOT ICE
I
ScanSoft, Inc. provides this publication "as is" without warranty of any kind, either express or
implied, including but not limited to the implied warranties of merchantability or fitness for a
particular purpose. Some states or jurisdictions do not allow disclaimer of express or implied
warranties in certain transactions; therefore, this statement may not apply to you. ScanSoft
reserves the right to revise this publication and to make changes from time to time in the
content hereof without obligation of ScanSoft to notify any person of such revision or
changes.
RADEMARKS AND CREDITS
T
ScanSoft, TextBridge, TextBridge Pro, PaperPort, Pagis, True Page, Direct OCR, and AutoOCR
are registered trademarks or trademarks of ScanSoft, Inc., in the United States and/or other
countries.
All other trademarks a nd traden ames are hereby recognized and may be registered to their
respective holders.
ScanSoft, Inc.
9 Centennial Drive
Peabody, MA 01960
U.S.A.
Part Number 50-631101-00A
Page 3

C ONTENTS
WELCOME VII
Using this Guide viii
Getting online help ix
Online HTML Help ix
Context-Sensitiv e Help ix
Tech Notes x
Glossary x
1INSTALLATION AND SETUP 11
System requirements 12
Installing TextBridge Pro 13
Setting up your scanner with TextBridge Pro 14
How to start the program 16
Registering your software 17
New features in TextBridge Pro 11 18
2INTRODUCTION 19
What is optical character recognition 20
TextBridge Pro’ s OCR capabilities 20
Documents in TextBridge Pro 21
Basic processing steps 21
The TextBridge desktop 22
The Standard toolbar 23
The Menu bar 23
The Image toolbar 24
TEXTBRIDGE PRO USER’S GUI DE iii
Page 4

The Formatting toolbar 24
The TextBridge To olbox 25
Managing documents 26
Thumbnail view 26
Detail view 27
Customizing columns in Detail view 28
Deleting pages from a document 28
Printing a document 28
Closing a document 29
TextBridge Documents 29
Why save to TXD 29
How to save to TXD 30
Settings 30
3 TUTORIAL: PROCESSING DOCUMENTS 33
Quick Start Guide 34
Loading and recognizing sample image files 34
Scanning and recognizing a single page 34
Processing documents using the OCR Wizard 37
Processing documents automatically 40
Command buttons 41
Processing documents manually 42
Processing a document automatically and
finishing it manually 44
Processing from other applications 45
How to set up Direct OCR 45
How to use Direct OCR 45
How to use TextBridg e Pro 11 with
your PaperPort software 46
Processing documents with Schedule OCR 47
Defining the source of page images 48
iv CONTENTS
Page 5

Input from image files 48
Input from scanner 49
Scanning with an ADF 50
Scanning long documents without an ADF 51
Describing the layout of the document 51
Manual zoning 53
Working with zones 53
Zone properties 54
Table grids in the image 56
Using zone templates 57
4 PROOFING AND EDITING 59
Proofreading OCR resul t s 60
Checking recognized text against original 62
User dictionaries 63
The editor display and views 63
Text and image editing 64
Page outline 66
5 SAVING AND EXPORTING 67
Preparing recognition results for export 68
Saving to file 69
Saving original images 69
Saving recognition results 70
Saving a document as you work 71
Copying a document to the Clipboard 72
Sending a document as a mail attachment 73
6 TECHNICAL INFORMATION 75
Troubleshooting 76
Solutions to try first 76
TEXTBRIDGE PRO USER’S GUI DE v
Page 6

Testing TextBridge Pro 77
Low memory problems 78
Low disk space problems 78
Supported file types 79
File types for opening and saving images 79
File types for saving recognition results 80
OCR problems 81
Text does not get recognized properly 81
Problems with fax recognition 82
System or performance problems d uring OCR 82
Uninstalling the software 83
vi CONTENTS
Page 7

Welcome
Welcome to TextBridge Pro 11TM, and thank you for using our
software! The followi ng documentation has be en pro vided to help y ou
get started and give you an overview of the program.
This User’s Guide
This guide introduces you to using TextBridge Pro 11. It includes
installation and setup instructions, a description of the program’s
commands and working areas, task-oriented instructions, ways to
customize and control processing, and technical information. The
guide is presented in PDF format, allowing you to use hyperlink
jumps on cross-references and other navigation tools in your PDF
viewer.
Online Help
TextBridge Pro’s online Help contains information on features,
settings, and proce dur es. The on line Help is pr ovi ded as HTM L help ,
and has been designed for quick and easy information retrieval.
Comprehensive context-sensitive help aims to provide just enough
assistance to let you keep worki ng without dela y. Please see the section
Getting online help.
Readme File
The Readme file contains la st-minute i nformation about the s oftware.
Please read it before using TextBridge Pro. To open this HTML file,
choose Readme in the TextBridge Pro Installer or afterwards in the
Help menu.
Scanning and other information
ScanSoft’s web site at www.scansoft.com provides timely information
on the program. The Scanner Guide contains up-dated information
about supported scanners and related issues. Access ScanSoft’s w eb site
from the TextBridge Pro Installer or afterwards from the Help menu.
TEXTBRIDGE PRO USER’S GUI DE vii
Page 8

USING THIS GUIDE
This guide is written with the a ssumption th at you kno w how to work
in the Micro soft Windo ws environmen t. Please refer to your Win dows
documentation if you have questions about how to use dialog boxes,
menu commands, scroll bars, drag and drop functionality, shortcut
menus, and so on.
We also assume you are familiar with your scanner and its supporting
software, and that the scanner is installed and working correctly before
it is setup with TextBridge Pro 11. Please refer to the scanner’s own
documentation as necessary.
The following conventions are used in this guide:
Bold Introduces new terms and presents sub-headings.
Italic Names sections in this guide (unless otherwise stated,
the section is located in the same chapter as the
reference).
Names the main buttons used in automatic processing:
Start, Stop, Finish, Additional.
viii WELCOME
Non-serif
Note
Tip
Presents file names: sample.tif
Presents an item of additional information.
Pre sents ideas for using pro gram features to acco mplish
specific tasks.
Page 9

GETTING ONLINE HELP
In addition to using this guide, you can use TextBridge Pro’s online
Help to learn about features, settings, and procedures. Online Help is
available after you install TextBridge Pro.
Online HTML Help
Open TextBridge Pro’s online Help at its top level by choosing
TextBridge Pro Help Topics at the top of the Help menu. This allows
you to see topics arranged in a Table of Contents, search an
alphabetical list of keywords or make full-text searches through the
topics. Other items in the Help menu provide access to useful topics
or web pages.
Press F1 as you are working with the program to see an online help
topic relating to the current screen area, dialog box or warning
message.
Context-Sensitive Help
You can get concise on-the-spot information in a popup window
about a particular TextBridge Pro menu item, toolbar button, screen
area or dialog box, in the following ways:
Click the Help tool in th e S ta ndard t oolbar t o get th e help ico n. Click
this on any item on the desktop outside a dialog box or warning
message.
Press Shift + F1 to get the same help icon.
Click the question mark button in the upper right corner of a dialog
box and then click an item in the dialog box to see the popup window.
Some dialog boxes or warning messages have their own Help button,
or a help text. Click the button or the text to get information on the
dialog or message box.
Click anywhere to remove a context-sensitive popup Help window.
TEXTBRIDGE PRO USER’S GUI DE ix
Page 10

Tech Notes
ScanSoft’s web site at www.scansoft.com contains Tech Notes on
commonly reported issues using TextBridge Pro 11. Web pages may
also offer assistance on the installation process and troubleshooting.
Glossary
This guide does not include a glossary. The online Help has a
comprehensive gl os sary, with its own alphabetica l i ndex an d a ta ble of
contents. Please consult it if you want to find the meaning of a term
used in this guide or in the program.
x WELCOME
Page 11

1
Installation and setup
This chapter provides information on installing and starting TextBridge
Pro 11. It presents the following topics:
u System requirements
u Installing TextBridge Pro
u Setting up your scanner with TextBridge Pro
u How to start the program
u Registering your software
u New features in TextBridge Pro 11
TEXTBRIDGE PRO USER’S GUI DE 11
Page 12

SYSTEM REQUIREMENTS
You need the following minimum system requirements t o inst all and run
TextBridge Pro 11:
u A computer with a Pentium or higher processor
u Microsoft Windows 95, Windows 98, Windows MeMe,
Windows 2000, or Windows NT 4.0
u 32MB of memory (RAM), 64MB recommended
u 75MB of free hard disk spa ce for t he appli cation fi les plus 10MB
working space duri ng install ation
u 9MB for Microsoft Installer (MSI) if not present and 44MB for
Internet Explorer if not present. (These are present as part of the
operating system in Windows 98, Windows Me and Windows
2000.)
u SVGA monitor with 256 colors and 800 x 600 pixel resolution
u Windows-compatible pointing device
u CD-ROM drive for installation
u A compatible scanner if you plan to scan documents. Please see
the Scanner Guide at ScanSoft ’s web site (www.scansoft.com) for
a list of supported scanners.
Note Performance and speed will be enhanced if your computer’s
processor, memory, and available disk space exceed minimum
requirements.
12 INSTALLATION AND SETUP
Page 13

INSTALLING TEXTBRIDGE PRO
TextBridge Pro 11’s installation program takes you through installation
with instructions on every screen.
Before installing TextBridge Pro:
u Make sure your scanner is connected, turned on, and compatible
with your system.
u Close all other applications, especially anti-virus programs.
u Log into your computer with administrator privileges if you are
installing on Windows 2000 or Windows NT.
t To install TextBridge Pro:
1. Insert TextBridge Pro’s CD-ROM in the CD-ROM drive. The
installation program should start auto matically. If it does not start,
locate your CD-ROM drive in Windows Explorer and double-click
Autorun.exe program at the top-level of the CD-ROM.
the
2. Choose a language to use during installation. The program interface
language is used for displays such as menu items, dialog boxes,
warning messages and so on. You can change the interface language
later from within TextBridge Pro 11.
3. Follow the instructions on each screen to install the software. All files
needed for scanning are copied automatically during installation.
Note Sometimes uninstalling and then reinstalling TextBridge Pro will
solve a problem. See Uninstalling the software at the end of chapter 6.
INSTALLING TEXTBRIDGE PRO 13
Page 14

SETTING UP YOUR SCANNER WITH TEXTBRIDGE PRO
All files needed for scanner setup and support are copied automatically
during the program’s installation. Before using TextBridge Pro 11 for
scanning, your scanner should be correctly installed and tested for correct
functionality. Scanner installation and se tup are done through the
Scanner Wizard. You can start this yourself, as described below.
Otherwise , the Scanner Wizard appears when you first try to perform
scanning from TextBridge Pro 11.
Please follow these steps to use the Scanner Wizar d to setup your scanner
with TextBridge Pro 11:
u Choose StartÉProgramsÉScanSoft TextBridge Pro 11.0É
Scanner Wizard or click the Setup button in the Scanner panel of
the Options dialog box or choose a scan command in the Get
Page drop-down list in the TextBridge Toolbox.
u Choose Select scanning source, then click Next.
u Click once on your scanner’s TWAIN driver, then click Next.
u Choose Yes to test your scanner configuration, then click Next.
u The wizard will now test the connection from the computer to
your scanner. Click on Next.
u Insert a test page into your scanner.
u The wizard is now prepared to do a basic scan using your scanner
manufacturer’s software. Click on Next.
u Your scanner’s native user-interface will appear. Click on Scan to
begin the sample scan.
u If necessary, click on Inverse Image… or Missing Image… and
make the appropriate selections.
u Once the image appears correctly in the window, click on Next.
u Select the item that most appropriately describes your scanner,
then click on Next.
u Click on Next to proceed to page size.
14 INSTALLATION AND SETUP
Page 15

u The page sizes that the Scanner Wizard believes that your
scanner supports are listed in the window. To make any changes
to the page sizes, click on Advanced, make the changes and then
click on Next.
u Insert a page with text but no pictures into your scanner. Click
on Next to begin a scan in black and white mode.
u If necessary, click on Inverse Image… or Missing Image… and
make the appropriate selections.
u Once the image appears correctly in the window, click on Next.
u If you have a color scanner, insert a color photograph or a page
with a color picture into your scanner. Click on Next to begin a
scan in color mode. If necessary, click on Inverse Image… or
Missing Image… and make the appropria te se lection s. O nce th e
image appears correctly in the window, click on Next. If your
scanner cannot scan in color, skip this step.
u Insert a photograph or a page containing a picture into your
scanner. Click on Next to begin a scan in grayscale mode. If
necessary, click on Inverse Image… or Missing Image… and
make the appropriate selections. Once the image appe ars
correctly in the window, click on Next.
u You have successfully configured your scanner to work with
TextBridge Pro 11! Click on Finish.
To change the scanner settings at a late r time, or to set up a different
scanner, or to test and repair an installed scanner, please follow one of
these two methods to reopen the Scanner Wizard:
u StartÉProgramsÉScanSoft TextBridge Pro 11.0ÉScanner
Wizard or
u StartÉProgramsÉScanSoft TextBridge Pro 11.0ÉTextBridge
Pro 11.0ÉTools menuÉOptionsÉScanner…ÉSetup button.
Note To test and repair an improperly functioning scanner, follow the
procedure above, selecting ‘Test and configure current scanning source’ at
the start of the process.
SETTING UP YOUR SCANNER WITH TEXTBRIDGE PRO 15
Page 16

HOW TO START THE PROGRAM
To start TextBridge Pro 11 do one of the following:
u Click Start in the Windows taskbar and choose
Programs
u Double-click the TextBridge Pro icon in the program’s
installation folder or on the Windows desktop if you placed it
there.
u Double-click a TextBridge Document (TXD) icon or file name;
the clicked document is loaded into the program. See TextBridge
Documents in chapter 2.
On opening, TextBridge Pro’s title screen is displayed and then its
desktop. See chapter 2, The TextBridge desktop for an introduction to the
program’s main working areas.
There are several ways of running the program with a limited interface:
u Use the Schedule OCR program. Click Start in the Windows
taskbar and choose ProgramsÉScanSoft TextBridge Pro 11.0É
Schedule OCR. See Processing documents with Schedule OCR in
chapter 3.
ÉScanSoft TextBridge Pr o 11.0ÉTextBridge P ro 11.0.
16 INSTALLATION AND SETUP
u Click Acquire Text from the File menu of an application
registered with the Direct OCR™ facility. See Direct OCR in
chapter 3.
u Right-click an image file icon or file name for a shortcut menu.
Select a sub-menu item from ‘Convert To...’ to define a target.
u Use TextBridge Pro 11 with ScanSoft’s PaperPort
®
or Pagis®
document management products, to add OCR services. See How
to use TextBridge Pro 11 with your PaperPort software in chapter 3.
REGISTERING YOUR SOFTWARE
ScanSoft’s registration Wizard runs at the end of installation. We provide
an easy electronic form that can be completed in less than five minutes.
Page 17

When the form is filled, and you click Send the program will search an
Internet connection to immediately perform the registration online.
If you did not register the software during installation, you will be
periodically in vited to register later. You can go to www.scansoft.com to
register online. Click on Support and from the main suppor t screen
choose Register on the left-hand column. For a statement on the use of
your registration data, please see ScanSoft’s Privacy Policy.
NEW FEATURES IN TEXTBRIDGE PRO 11
The family of TextBridge® products moves to a new level with the
introduction of TextBr idge Pro 11. H ere ar e the m ain ar ea s of i nno va tion
and difference compared to the TextBridge Pro Millennium release:
u Increased accuracy – multiple recognition engines working in
tandem offer significant gains i n accur acy, especially on degraded
documents.
u More file formats – New image files formats for input are JPEG
and PNG and for export BMP, DCX, JPEG, PCX and PNG. See
page 79. Image saving is now done from the File menu instead of
from the Tools menu. See page 69.
u Working areas – Choose to display the Image and Text areas as
alternatives (as in previous TextBridge versions), or to have both
visible at once, separated by a movable splitter. See page 22.
u Fully-featured Text Editor – A WYSIWYG Editor lets you
modify recognized text and tables in-place instead of just single
words in an edit box . Change char acter and para graph attr ibutes,
tabs, borders and shading, and edit embedded graphics. Switch
freely between four formatting levels, including True Page
®
for
both display and saving. See page 63 and page 64.
u Document Manager – Have a better overview of all pages in a
document and manage them more efficiently, not only with page
thumbnails, but also with a table. Each table row summarizes a
page and you can define which columns of informati on to view.
See page 27.
NEW FEATURES IN T EXTBRIDGE P RO 11 17
Page 18

u OCR Proofreader – Ju mp through the suspect words in a
document and handle them one after the other in a dialog box.
Previously, suspect words were only marked. See page60.
u OCR verifie r – This lets you compare any recognized word with
its appearance in the original image as you edit and reformat the
document. See page 62.
u TextBridge Documents – These TXDs open the way to deferred
or distributed processing. They store all images along with
recognition results. This allows proofing, verifying , editing,
additional processing and saving to be done in a later session or at
any location where TextBridge Pro is installed. See page 29.
t Improv ed User Experience:
Some facilities are replaced with others , providing superior functionality.
u Instant Access
TM
is replaced by Direct OCRTM. This provides
OCR services from the File menu of word processors and other
applications. See page 45. Register applications for Direct OCR
with the Options pa ne l, accessed from the Tools menu.
u TextBridge Scheduler becomes Schedule OCR. See page 47.
u TextBridge Assistant (Show me how) is replaced by ToolTips,
Tips of the Day, context-sensitive help, a Quick Start Guide and
the OCR Wizard. See page ix, page 34 and page 37.
u Page Type is replaced by Layout Description (including C ustom
Layout). See page 51. Scanning mode (black-and-white, grayscale, color) is defined with the Get Page button. See page 49.
u Open file when done becomes Save and L a unch. See page 69.
Training is no longer provided, since the extra accuracy deriving from
multi-engine recognition more than compensates for it.
18 INSTALLATION AND SETUP
Page 19

2
Introduction
You probably use your computer for business correspondence, preparing
reports, handling data and an ever-increasing number of other uses. The
challenge is that, in spite of the digital revolution, certain sources of
information still circulate in printed, paper form and cannot be used
immediately in a computer.
For example, if you want to incorporate information from a magazine
article in a report you are preparing, you somehow have to get the text
from the article into your computer. Painstakingly retyping the article is
not an appealing solution.
This chapter introduces you to the solution: optical character recognition
(OCR). It describes how TextBridge Pro 11 uses OCR technology to
transform text from scanned pages or image files into editable text fo r use
in your favorite computer applications.
We present the following topics:
u What is optical cha racter recognition
u Documents in TextBridge Pro
u Basic processing steps
u The TextBridge desktop
u Managing documents
u TextBridge Documents
u Settings
TEXTBRIDGE PRO USER’S GUI DE 19
Page 20

WHAT IS OPTICAL CHARACTER RECOGNITION
Optical character recognition is the process of extracting text from an
image. This image can result from scanning a paper document or
opening an electronic image file.
characters; they have many tiny dots (pixels) that together form character
shapes. These present a picture of the text on a page.
During OCR, TextBridge Pro 11 analyzes the character shapes in an
image and defines solutions to produce editable text. After OCR, you can
save the resulting text to a variety of word-processing, desktop publishing
or spreadsheet applications.
TextBridge Pro’s OCR capabilities
In addition to text recognition, TextBridge Pro can retain the fol lowing
elements of a document through the OCR process.
Graphics
Photos, lo gos, and drawings are ex amples of graphics.
Images do not have editable text
Text formatting
Font types, sizes and styles (such as bold, italic and underlines
examples of character format ting. I ndents, ta bs, margin s and line spac ing
are examples of paragraph formatting.
Page formatting
Column structure, table formats, and placement o f graphics an d headings
are examples of page forma tting.
The graphics, text and page formatting elements that TextBridge Pro
retains are dete rmined by the settings you select. Refe r to the Settings
Guidelines in the online Help for more information about selecting
settings.
) are
Note TextBridge Pro only recognizes machine-generated characters
such as offset or laser-printed or typewritten text. However, it can retain
handwritten text, such as a signature, as a graphic.
20 INTRODUCTION
Page 21

Documents in TextBridge Pro
TextBridge Pro 11 handles documents one at a time. When you acquire
your first image (from scanner or from file) a new document is started.
Further acquired images are added to the same document, until you save
and close it.
A document in TextBridge Pro consists of one image for each document
page. After you perform OCR, the document will also contain recognized
text, displayed in the Text Editor , possibly along with graphics and tables.
For more information on screen areas, see the section The TextBridge
desktop.
Basic processing steps
There are two main ways of handling documents: with automatic
processing or manual processing. See chapter 3 Processing documents
automatically and Processing documents manually. The basic steps for both
processing methods are broadly the same:
1. Bring a set of images into TextBridge Pro.
You can scan a paper do cument with or witho ut an Automatic
Document Feeder (ADF) or load one or more image files. The
resulting images appear in miniature in the Document Manager’s
Thumbnail view and the pages are summarized in its Detail view.
The image of the current page is displayed in the Original Image
area.
2. Perform OCR to generate editable text.
3. Export the document to the desired location.
During OCR, TextBridge Pro creates zones around elements on the
page that will be processed, and then interprets text characters or
graphics in each zone. Manual and template zoning are also possible.
After OCR, you can check and correct errors in the document using
the OCR Proofreader and edit the document in the Text Editor.
You can save your document to a specified file name and type, place
it on the Clipboar d, or se nd it as a mail att achment. You can save it as
a TextBridge Document (TXD) as described later. You can save the
same document repeatedly to different destinations, different file
types, with different settings and levels of formatting. See chapter 5.
WHAT IS OPTICAL CHARACTER RECOGNITION 21
Page 22

Standard toolbar
TextBridge
Toolbox
The current page
has a pale border.
This page has
been recognized.
THE TEXTBRIDGE DESKTOP
The TextBridge deskt o p ha s a tit le ba r an d a menu bar al on g th e to p an d
a status bar along the bottom. It has three main working areas, separated
by splitters: the Document Manager, the Original Image area and the
Text Editor. The Document Manager has two tabbed panel s: Thumbnail
view and Detail view. The Original Image area has an Image toolbar and
the Text Editor has a Formatting toolbar.
Formatting toolbar
Thumbnail view
shows a picture of
each page in the
document.
Page navigation
buttons
Buttons to show,
hide or rearrange
the working
areas.
Image
toolbar
Original Image area:
This displays the image of the current page,
together with any zones automatically or
manually placed on the image.
Drag this splitter to left or right
to resize the working areas.
The Text Editor view
buttons offer four
formatting levels.
Text Editor: This is
displaying the recognition
results from the current
page in True Page view.
Note To control which of the three views (Document Manager,
Original Image, and Text Editor) are displayed, check or uncheck each
view from the View menu or with the status bar buttons.
22 INTRODUCTION
Page 23

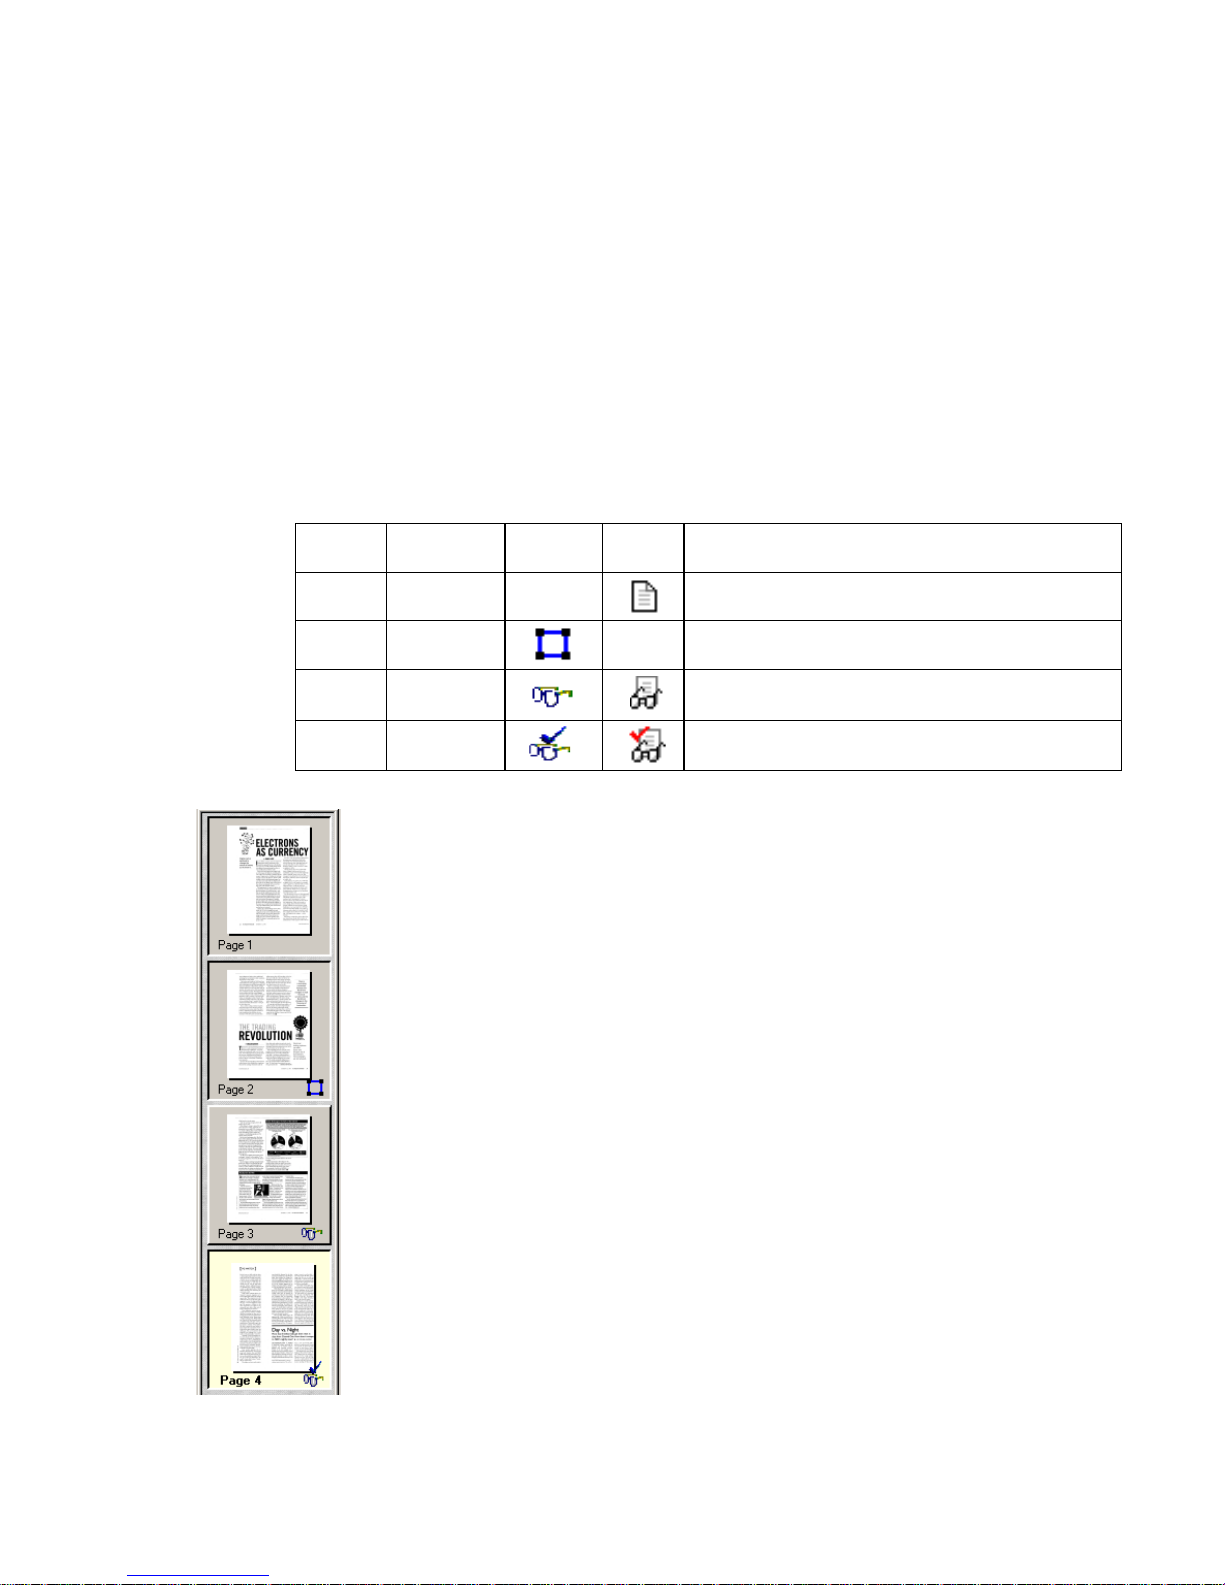
The TextBridge Toolbox lets you control processing. It can have three
states, depending which of the three tab buttons on the left is clicked. In
the picture, we display its appearance for Manual OCR. We show the
program wi th a thr ee-page do cument. P a ge one is the curr ent page, which
has been recognized and proofed. Page two has been recognized but not
proofed yet. Page three has been acquired and manually zoned, but not
recognized yet. The icons at the bo ttom right of the thumbnail ima ge s
show page status.
Status bar buttons let you show, hide or rearrange the main screen areas
and move to other pages in the document. A right mouse click in any
screen area brings up a shortcut menu with the most useful commands
for that are a.
The Standard toolbar
The Standard toolbar contains buttons and a drop-down list for
performing stand ard tasks. It can be floated and docked to any edge of
the TextBridge desktop. All these functions can also be accessed from
menus.
New
start a new
document.
Open a
TextBridge
Document
Save the current
document und er
the name and type
of its last save.
Print images or
recognition results
from all or
selected pages.
The Menu bar
For concise information on any menu item, click the context-sensitive
help button and then click a menu item. A popup text explains the
purpose of the menu item. Click anywhere to close the popup.
Proofread
the recognized
text.
Cut the current
selection in the
Text Editor.
Copy
the current Text
Editor selection.
Paste selection
into the Text
Editor.
Undo
the last
editing
action.
Open the
Options dialog
box.
Zoom the active area:
Original Image or Text
Editor.
Contextsensitive Help
THE T EXTBRIDGE DESKTOP 23
Page 24

The Image toolbar
The Image toolbar contains buttons that allow you to zoom in or out on
the current image or to rotate it. They also allow you work with zones
and table dividers. See chapter 3, Manual zoning and Table grids in the
image. Here we summarize the purpose of the buttons. The Image
toolbar can be floated (that is, undocked and moved anywhere on the
desktop). It can be docked to any edge of the Original Image area.
Draw
rectangular
zones.
Draw
irregular
zones.
Add
to a zone or
combine
zones.
Subtract
from zone or
separate
zones.
Tip You can also resize or rotate the original image with a shortcut
menu. Right click in the Original Image area outside a zone and select a
zoom or rotation value.
The Formatting toolbar
The Formatting toolbar contains buttons that allow you to edit
recognized text in the Text Editor. See chapter 4, Text and image editing.
Here we summarize the purpose of the buttons. The Formatting toolbar
always remains along the top of the Text Editor.
Reorder
zones.
Zone
properties
Move
row or column
dividers in a
table.
Insert
column
dividers in a
table.
Insert
row dividers
in a table.
Remove
row or column
dividers one by
one.
Remove/
replace all
row and column
dividers.
Rotate
images.
Zoom in
on page
image.
Zoom out
from page
image.
Paragraph
styles
24 INTRODUCTION
Font name F o nt size
Bold Underline
Paragraph
alignment
BulletsItalic
Show/hide non-
printing characters.
Page 25

The TextBridge Toolbox
This Toolbox lets you drive the processing. By default it is located along
the top of the TextBridge desktop, just above the working areas. It can be
floated and also be docked along the bottom of the desktop.
It has three tabs on the left: AutoOCR™, Manual OCR and OCR
Wizard. Click one to see its controls in the Toolbox. The picture at the
beginning of this section showed the TextBridge desktop with the
Manual OCR to olbar. The AutoOCR toolbar looks lik e this.
Automatic processing is started, and can be stopped and re-started with
the buttons on the right of the toolbar. The use of these buttons is
detailed in ch apter 3, Processing documents automatically.
You can switch between automatic and manual processing any time the
program is not busy with processing. That means you can switch between
them while you are wor k ing within a doc ument. You can automatically
process some pages, then add more pages with manual processing. After
processing a stack of pages automatically, you can inspect the results and
then go back to reprocess certain pages manually. This procedure is
described in chapter 3, P rocessing a document automa tically and fi nishing it
manually.
The use of the OCR Wizard is det ailed i n chapter 3, P rocessing doc uments
using the OCR Wizard. TextBr idge Pro must be empty wh en y ou start the
OCR Wizard. When you have used it to process and save a document, it
remains in the program and can be further processed (adding more pages,
rerecognizing pages etc.) with either manual or automatic processing.
THE T EXTBRIDGE DESKTOP 25
Page 26
MANAGING DOCUMENTS
The Document Manager is situated on the left of the TextBridge deskt op.
It has two ta bbed panels: Thumbnail view and De tail view. Click a tab to
see its view. Both views summarize the pages in the document and are
synchronized: the current and selected pages remain the same when you
switch views. Our pictures show the two views with the same four-page
document. Pa ges 1 and 2 ar e sel ected and page 4 is the current page , that
is, the one shown in the Original Image area. The Document Manager
shows page status with the following icons:
Page Status
1 Acquired —
2 Zoned —
3 Recognized
4 Proofed
Thumbnail icon
Detail
icon
Thumbnail vi ew
This presents a vertical set of number ed thumbnail images, one for each
page in the document. Scroll to see pages as necessary . The curre nt page has
a paler background and its page number text appears bold. You can select
multiple pages in the document; these have a ‘pushed-in’ appearance. A
status icon appears at the bottom right of each page as described above.
Jump to a page: Click the icon of the desired page.
Reorder a pa ge: Cl ick the thumbnail of the page you want to move and
drag it above the desired page number. Pages are renumbered
automatically.
Page image has been...
Acquired with no manual or template zones and has
not yet been recognized.
Acquired and manual or template zones have been
placed; not yet recognized.
Recognized, but not proofread, or proofing was
interrupted on the page.
Recognized, and proofing has reached the end of
the page.
Delete a page: Select the thumbnail of the page you want to delete and
press the Delete key.
Select multiple pages: Hold down the Shift key and click two
thumbnails to select all pages between and including them. Hold down
the Ctrl key as you click thumbnails to add pages to a selection one by
one. Then you can move or delete the selected pages as a group, or send
them to (re)recognition.
26 INTRODUCTION
Page 27

Detail view
This facility is new to T extBridge Pro 11. It provides an overview of your
document with a table. Each row represents one page. Columns present
statistical or status information for each page, and (where appropriate)
document totals. The pictur e below sh ows the d efault columns on the left
and four columns which a user has specified.
Move the cursor
onto the page’s
status icon to see
a thumbnail of the
page.
This shows the
number of
zones of each
type on the
page.
The current page is shown with a highlight. Yo u can use Detail view for
page operations, as follows:
Jump to a page: Click the row of the desired page.
Reorder a page: Click the row of th e pag e y ou wan t to move and drag it
to the desired location. An arrow indicator on the left shows where the
page will be inserted. Pages are renumbered automatically.
Delete a page: Select the row of the page you want to delete and press the
Delete key.
Select multiple pages: Hold down the Shift key and click two page rows
to select all pages between and includi n g them. Hold down the Ctrl key
as you click rows to add pages to a selection one by one. Then you can
move or delete the selected pages as a group, or send them to
(re)recognition.
When multiple pages are being selected, the page set as current does not
change. All selected pages are highlighted.
Tip Get image size information by hovering the cursor over a thumbnail
or outside a zone on an original image. A popup text displays the image
size in pixels and the program’s unit of measurement. Image resolution is
also show n.
MANAGING DOCUMENTS 27
Page 28

Customizing columns in Detail view
Th
You can specify which columns of information you want to see in Detail
view. Click Customize Details... in the View menu for the following
dialog box:
is item is
highlighted.
Click a checkbox
to select the item.
Image sizes are
expressed in
pixels.
Define a width for
the highlighted
item.
Highlight an
item and use
these arrows to
change the
order of
columns.
Define which columns should appear, their widths, and column order.
The topic Customizing Detail view columns in online Help clarifies what is
presented in each column. Y ou can change column widths easily in Detail
view; just drag the column dividers in the title bar.
Deleting pages from a document
Page del eti ons must be conf irmed and can be undo ne. Delete t he curr ent
page only with the item Delete C urr ent P age in the Edit menu. Del ete all
selected pages in the Document Manager (either view) by pressing the
Delete key or using the shortcut menu command Clear.
Printing a document
You can print the document with the Print item in the File menu.
Choose whether to print images or text (that is, recognition results as
they appear in the Text Edi tor). You can print all pages or a range of
pages. The Print button in the Standard toolbar prints images or text,
depending whether the Original Image area or the Text Editor is active.
28 INTRODUCTION
Page 29

Closing a document
Choose Close in the F i le menu to cl ose a documen t. You are prompted to
save your document if you have not saved it or you have modified it since
the last save. See the next section on saving the document as a TextBridge
Document (*.TXD).
TEXTBRIDGE DOCUMENTS
The TextBridge Document is the program’s proprietary file type; it has
the extension .TXD. It is one of the file types offered when saving a
document to file. You save the document to the TXD file type if you
want to work with it again in TextBridge Pro during a future session. Y ou
can then process unfinished pages, add more pages and proof or edit
recognition results.
A TextBridge Document contains the original page images with any
zones placed on them. After recognition, the TXD also contains the
recognition results. Recognized characters are stored along with their
coordinate and confidence data. This preserves the links between image
and text, so that verification and proofing remain available when the
TXD is reopened in future sessions.
When you save a TextBridge Document, some settings are also saved.
When you open a TextBridge Document, these settings are applied,
temporarily replacing those existing in the program.
Why save to TXD
You do not have to save your documents to the TXD file type. You would
typically do this for the following reasons:
You cannot finish working with the document in the current session.
You want to pass the document to other users who have TextBridge
Pro 11. For example, you can pass a TXD file to a specialist for
proofing. I n an offic e ne twork , y ou may hav e on e scanner g ene ratin g
images f o r recognitio n and proofing at several works tations.
TEXTBRIDGE DOCUMENTS 29
Page 30

You want to build up an archive of recognized documents whose
original images remain accessible. The recognized texts allow
searching by keywords and other document retrieval techniques.
Note Recognition results should be saved from TXD files before
installing any TextBridge Pro upgrade. These files may not be upwards
compatible to newer TXD file formats, or possibly only the images will
be retained when the files are upgraded.
How to save to TXD
If you intend to create a TXD, you can save it to this format at an early
stage, for protection. Use the Save button to save it periodically as you
work. Save it again at the end of your session.
The Save button saves the document to the name and file type of its last
save. You can save your document repeatedly to different formats. If your
first save was to another format (for instance .DOC), use the item Save
As... from the File menu to save it as a TXD. If a document is saved as a
TXD, then you later save it to another format, it is not automatically
resaved as a TXD. When you close the document or exit the program,
you will be prompted to save the document as a TXD.
SETTINGS
The Options dialog box is the central location for TextBridge Pro
settings. It has seven panels. Context-sensitive help provides information
on each setting. In overview, the settings panels are:
OCR
Use this to spec ify recognition language(s), a us er dictionary, a reject
character, an OCR method (optimize for speed or accuracy) and font
matching.
Scanner
Use this to define page size and orientation for scanning. You can also
make brightness and contrast settings and define options for scanning
30 INTRODUCTION
Page 31

multi-page documents, with or without an Automatic Document Feeder
(ADF). You can change scanner setup settings or install a new scanner or
change the default scanner.
Direct OCR
This feature provides OCR services directly from your favorite word
processor or similar application. Use this panel to register and unregister
applications for D irect OCR a nd to enable or di sable this service. You can
also specify automatic or manual zoning and whether proofreading is
desired or not.
Process
Use this to define where new images should be placed in the document
and set other preferences governing the behavior of the processing. You
can change the interface l anguage here.
Proofing
Use this to define whether proofreading should begi n automatically af ter
recognition.
Cust om Layout
Use this to describe the layout of your input document pages very
precisely. This gives you maximum control over the auto-zoning process,
instructing it to search or ignore columns, graphics and tables.
SETTINGS 31
Page 32

Text Editor
Use this to show or hide some features in the Text Editor, to define the
unit of measurement to be used and to turn word wrapping on or off.
Note Some settings h ave an effect only on futur e reco gnition. E xamples
are the recognition languages, a user dictionary and scanner brightness.
These settings should be correctly adjusted before you start processing.
To have changes in these settings applied to already recognized pages, you
will have to rerecognize them. Other settings are implemented
immediately in all existing pages. Examples are Text Editor settings like
word wrap and measurement units.
32 INTRODUCTION
Page 33

3
Tutorial:
Processing documents
This chapter describes different ways you can process a document and
also provides information on key parts of this processing.
u Quick Start Guide
u Processing documents using the OCR Wizard
u Processing documents automatically
u Processing documents manually
u Processing a document automatically and finishing it manually
u Processing from other applications (Direct OCR, PaperPort)
u Processing documents with Schedule OCR
The detailed topics are:
u Defining the source of page images
u Describing the layout of the document
u Manual zoning
u Table grids in the image
u Using zone templates
TEXTBRIDGE PRO USER’S GUI DE 33
Page 34

QUICK START GUIDE
This topic takes you step-by-step through the basic OCR process.
Loading and recognizing sample image files
You will find sample image files in the program folder, both single-page
and multi-page files. First try reading these files using the procedure
presented below, except for the references to a scanner. See Input from
image files for more information on acquiring the images. The results
provide you with a benchmark of the recognition quality you should
expect from your own files of comparable quality.
Next, try scanning a page from your scanner.
Scanning and reco gn iz ing a s ingle page
Turn your scanner on and be sure it is working correctly. Choose a page
with good-qua lity clear text for this test.
We assume TextBridge Pro’s default settings are set and that your
document is in the language you specified for interface language during
installation. Open the Options dialog box from the Tools menu and
choose Use Defaults if you are not using the program for the first time.
You will process the document automatically and save the recognition
results to a file. You will proof the document but will not edit it inside
TextBridge Pro 11’s Text Editor.
34 TUTORI AL: PROCESSING DOCUMENTS
Page 35

What you do What happens
1. Set up your scanner using the Scanner Wizard,
if this is not already done.
2. Select Start
Bridge Pro 11.0
3. Place the document correctly in your scanner.
4. Check the three tab buttons to the left of the
TextBridge Toolbox. The AutoOCR button
should be selected. If not, click on it.
5. From the Get Page drop-down menu, select a
scan option for your document: black-andwhite, grayscale or color.
6. From the Describe Original drop down menu,
check Automatic is selected. For a wide range
of documents, this is the best choice.
7. From the Export Results drop-down menu,
check that Save as File is selected.
8. Click on Start. TextBridge Pro will start to scan in your document.
9. The OCR Proofreader appears and invites you
to modify words that the program suspects
have not been recognized correctly.
10. Click in the Text Editor. Select Text Editor
views one after another, to see how the page
appears in each view. Choose the view you
want for export.
É
Programs É ScanSoft Text-
É
TextBridge Pro 11.0
Configures TextBridge Pro 1 1 to work with your scanner.
Opens TextBridge Pro 11 on your computer.
Specifies that you want TextBridge Pro 11 to process the
document automatically according to the given settings.
Allows you to determine how pictures or colored texts
and backgrounds will look in the exported document.
Color scanning needs a color scanner.
Configures T ext Bridge Pro 11 to place zones on the page
and decide their properties automatically.
This means you will be able to name your export file after
you have proofed the document.
The OCR Proofreader operates like a spell checker in a
word processing program, but with added OCR-specific
features.
Each Text Editor view defines a formating level. The view
set at saving time is applied to the text in the saved file.
11. Click Resum e to restart proofing. When the
message OCR Proofreading is complete
appears, click on OK.
12.
Choose the location and file type to save your
recognized document. Click on OK.
13. Inspect the document in your word processing
program.
Tip If you suceeded in getting good results from the sample image files,
but not from the sc anned page, check you r scanner installation and
settings: in particular brightness and image resolution. See Input from
scanner for a model of optimum brightness. See also the online Help
topics Setting up your Scanner and Scanner Troubleshooting.
This ends the OCR Proofreader process. The Save As
dialog box will appear.
By default, Save and Launch is enabled, so your document will be automatically opened in the word processing
program associated with the file type that you selected.
You have successfully used TextBridge Pro 11 to recognize your document and open it in your target application!
QUICK S TART GUIDE 35
Page 36

Here is an ov e rview of the processing methods you can use. You will find
step-by-step guidance for each of them in the following pages.
Using the OCR Wizard
The OCR Wizar d guides you th ro ugh the selection of settings and
commands by asking you questions. It then launches automatic processing.
This is a good way to get started if you are new to TextBridge Pro.
Automatically
The fastest and easies t way to process documents is to let Tex tBr idge Pro
do it automati ca ll y f or y ou. S elect settings in th e Op tio n s dialog box and
commands in the AutoOCR toolbar and then click Start. It will take each
page through the whole process from beginning to end, when possible
running in parallel. It will typically auto-zone the pages.
Manually
Manual processing gives you more precise control over the way your
pages are handled. You can process the document page-by-page with
different settings for each page. The program also stops between each
step: acquiring images, performing recognition, exporting. This lets you,
for instance, draw zones manually or change recognition language(s). You
start each step by clicking buttons on the Manual OCR toolbar.
Automatically with manual finishing
You can process a document automatically and view results in the Text
Editor. If most pages are in order, but a few have not turned out as
expected, you can switch to manual processing to adjust settings and
rerecognize just tho se problem pages.
In other applications
You can use the Direct OCR feature to call on the r ecognitio n services of
TextBr idge Pro while wo rking in your usual word-proces sor or similar
application. TextBridge Pro automatically links itself to ScanSoft’s
PaperPort and Pagis document management programs.
At a later time
You can schedule OC R jobs to be per formed automa tically at a later
time, when you may not even be present at your computer. The Add Job
Wizard in Schedule OCR allows you to specify settings and a starting
time.
36 TUTORI AL: PROCESSING DOCUMENTS
Page 37

PROCESSING DOCUMENTS USING THE OCR WIZARD
The OCR Wizard takes you through six settings panels, guiding you to
make settings for you r document and then launching automatic
processing. Context-sensitive help is available for all Wizard panels. The
OCR Wizard can run only when there is no document op en in
TextBridge Pro.
Click the OCR Wizard tab in the TextBridge Toolbox and click the
Wizard button to see the first wizard screen:
1. The first panel lets you define your document source: scanner or
2. The second panel asks you to describe the layout of the input
image file. For more information, see the section Defining the source
of page images. Answer the questions in the fi rst screen and click Next.
document, to assist the auto-zoning. For more information, see the
section Describing the layout of the document.
PROCESSING DOC UMENTS USING THE OCR WIZARD 37
Page 38

3. The third panel (shown below) lets you define recognition languages
and decide OCR method. Languages with dictionary support have
the icon .
4. The fourth panel lets you define the formatting level to be applied to
your document for display and export. See chapter 4, The editor
display and views, for more information.
5. The fifth panel asks if you want t o proo fread th e text befor e export. I f
you choose Yes you can also edit the text before saving.
6. The last panel asks you to define the export choice: saving to file or
copying to Clip board. After setting the choice, click Finish to close
the Wizard and start the automatic processing .
7. If you requested proofing and the text contains suspect words, the
OCR Proofreader dialog box will appear. When proofing is finished
or closed, recognition results either go directly to the Clipboard, or
the Save As dialog box appears so you can specify file export settings.
8. The document remains in TextBridge Pro. You can edit recognition
results and save it again to other formats. You can change zones
38 TUTORI AL: PROCESSING DOCUMENTS
Page 39

manually or change other settings and then use manual processing to
rerecognize single pages from the document. You can add pages with
automatic or manu al processing.
Note The Wizard panels present settings as they were last set in the
program. Also, TextBridge Pro will remember the settings you make in the
OCR Wizard panels and apply them to future automatic or manual
processing, until you change them. So, if you have more documents for
which your OCR Wizard settings are suitable, just switch to the AutoOCR
toolbar and click Start.
Note Applicable settings not offered by the OCR Wizard take the values
last set in the program. This concerns mainly scanner settings and a user
dictionary. Zone templates cannot be used with the OCR Wizard. If a
template file was set when the OC R Wizard starts, it is unloaded and
Automatic is set as input description. Yo u cannot export a recognized
document as a mail attachment. Please use automatic or manual processing
for this.
PROCESSING DOC UMENTS USING THE OCR WIZARD 39
Page 40

PROCESSING DOCUMENTS AUTOMATICALLY
Automatic processing provides an efficient way of handling documents,
especially larger ones. F irst you select all set tings needed, then you can use
the AutoOC R™ toolbar in the TextBridge Toolbox to process a new
document from start to finish or to restart and finish processing on an
open document.
1. Click the AutoOCR tab in the TextBridge Toolbox to display the
AutoOCR toolbar.
2. Select the desired Get Page command in the drop-down list. You
define the document source, which can be fr om image files or fr om a
scanner. For more detail see the section Defining the source of page
images.
3. Select a c o mmand from the Describe Original drop-down list , as
shown above. This guides the prog ram in auto-z oning the pag es. You
describe the incoming pages or specify a zone template fil e. For more
information on the choices, see the section Describing the layout of the
document.
4. Select a command from the Export Results drop-down list. You can
save the recognized document to file, copy it to Clipboard or send it
as a mail attachment. For information on the choices, see chapter 5.
5. Choose Options in the Tools menu and check that settings are
appropriate for your document. You can, for instance, specify
recognition languages and whether you want to proofread the
document or not. See Settings at the end of chapter 2.
40 TUTORI AL: PROCESSING DOCUMENTS
Page 41

6. Click Start or choose Start in the Process menu. Each page of the
document is pr ocessed a nd fin ished one after the o ther. The program
may perform tasks simultaneously, for instance it may start loading
and recognizing a new page as you proofread the previous page.
Command buttons
Start: This lets you begin automa tic processing on a new do cument.
Stop: Th is lets you interrupt automatic proce ssing. You may do this if
you find that some settings need to be changed. Then the Start button
changes to Finish.
The start button takes different values when processing is stopped or
finished.
Finish: This appears if processing is incomplete. It lets you:
u Finish processing unfinished pages.
u Export the document, dropping any unrecognized pages.
Additional: This appears if all existing pages are processed and have
been exported once. It lets you:
u Export the document again, maybe with changes, to a
different file type, name or location, or with a different
formatting level.
u Add more pages: from the same source o r a differ ent s ource,
with changed or unchanged settings.
u Re-process all pages: Discard all recognition results and
rerecognize all pag es in the document with different set tings.
You can specify auto-zoning or a template file.
Tip You may reprocess all pages if an unsuitable setting caused poor
results on all pages. An example is incorrect language choice, resulting
in almost all words marked suspect during proofing. ‘Re-process’ lets
you perform rerecognition without having to scan or load or rezone all
the images again.
PROCESSING DOCUME NTS AUTOMATICALLY 41
Page 42

PROCESSING DOCUMENTS MANUALLY
Manual processing gives you more precise control over the way your
pages are handled. You can process the document page-by-page with
different settings for each page. The program also stops between each
step: acquiring images, performing recognition, exporting. This lets you,
for instance, draw zones manually on ea ch page. You start each step in the
process by clicking the buttons on the Ma nu al OCR toolbar.
1. Click the Manual OCR tab in the TextBridge Toolbox to display the
Manual OCR toolbar.
2. Click in the Standard toolbar or Options i n the Tools men u to
check or make settings in the Options dialog box. See Settings at the
end of chapter 2.
3. Select the desired value for the Get Page button. You define the
document source, which can be from image files or from a scanner.
Access the scanner settings dialog box and make settings as desired.
For more detail see the section Defining the source of page images.
4. Click the Get Page button. This either bring s up the Loa d File dialog
box allowing you to name images files, or initiates scanning. The
result is one or more images displayed in the Document Manager and
one in the Original Image area.
5.
Now y ou can manually draw and modify zones on one or mor e images
and assign properties. St atus bar button s let you mo v e to other pa ges.
Any image without zones will be auto-zoned when recognition is
requested. For guidance, see the section
Manual zoning
.
42 TUTORI AL: PROCESSING DOCUMENTS
Page 43
6. Select a value for the Perform OCR button. You describe the layout
of the incoming pages. This value has an influence if auto-zoning
runs on any pages. You can also select a template to have its zones
placed on the current page. For more detail see the sections
Describing the layout of the document and Using zone templates.
7. Click the Perform OCR button to have the current page recognized.
To have selected pages recognized, make a multiple selection in the
Document Manager (see chapter 2, Managing documents) and then
click the Perform OCR button.
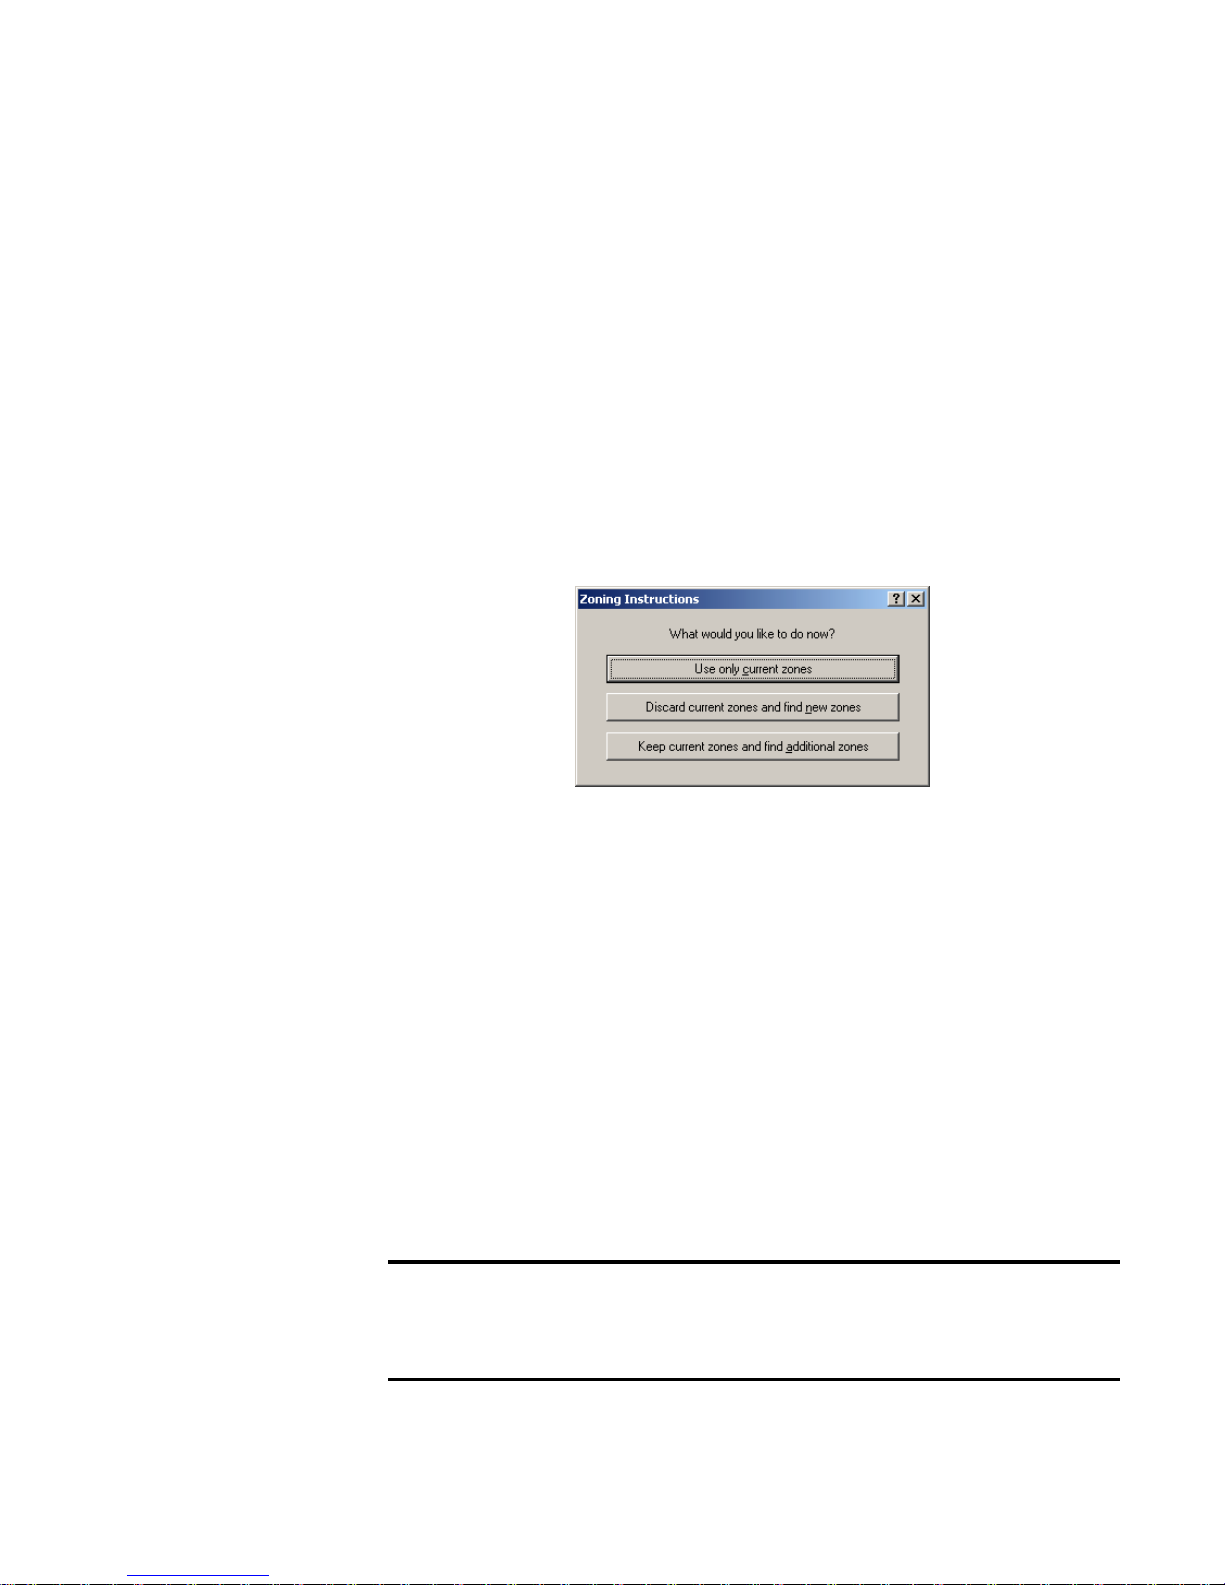
8. The Zoning Instructions dialog box appears, unless you disabled it.
When you choose one of its options, recognition starts.
9. If you requested proofing, the OCR Proofreader dialog box displays
suspect words one after the other from the recognized page(s). You
can proof and edit the recognized text. See chapter 4, Proofreading
OCR results.
10. Continue loading pages, performing OCR, editing and proofing as
desired.
11.
Select a value for the Export Results button. You can save the
recognized document to file (including as a TextBridge Document),
copy it to Clipboard or send it as a mail attachment. You can save the
document more than once. For information see chapter 5.
Note If you d eselect ‘Find zones in addition to template/current zones’ in
the Process panel of the Options dialog box, the Zone Instructions dialog
box will not appear and recognition will always run with cur rent zones only.
PROCESSING DOCUMENTS MANUALLY 43
Page 44

PROCESSING A DOCUMENT AUTOMATICALLY AND
FINISHING IT MANUALLY
When you have a large document with only a few pages needing special
attention, you do not have to manually process the whole document. Y ou
can process it automatically and view results in the Text Editor. You can
determine which pages are in order, and which need different settings or
some manual zoning. Then you can switch to manual processing to
adjust settings and zones and rerecognize just those pages.
1. Prepare the document and perform automatic processing, as already
described.
2. If you close or finish proofing you will be invited to save the
document. This is recommended, even if it is not in its final form.
3. Select a page needing rezoning or changed settings and click the
Manual OCR tab at the left of th e TextBridg e Toolbox.
4. Delete or modify the existing zones in the Original Image area. You
can also load a template to let its zones replace existing ones. Draw
new zones as desired. See Manual zoning.
5. Change other settings as requir ed fo r the curr ent pag e. S ee Settings at
the end of chapter 2.
6. Click the Perform OCR button to rerecognize the current page.
Confirm that the previous recognition results should be overwritten.
The Zoning Instructions dialog box will appear, unless disabled.
7. To rerecognize more than one page, select the required pages in the
Document Manager before clicking the Perform OCR button.
8. When all pages have been rerecognized with acceptable results, save
the document again.
44 TUTORI AL: PROCESSING DOCUMENTS
Page 45

PROCESSING FROM OTHER APPLICATIONS
You can use the Direct OCRTM feature to call on the recognition services
of TextBridge Pro while you work in your usual word-processor or other
application. First you must establish the direct connection with the
application. Then, two items in its File Menu open the door to OCR
facilities.
How to set up Direct OCR
1. Start the application you want connected to TextBridge Pro. Start
TextBridge Pro, open the Options dialog box at the Direct OCR
panel and select ‘Enable Direct OCR’.
2. The Unregistered panel displays running or previously registered
applications. S elec t the desired one(s) and clic k A dd. You can browse
for an unlisted application. Select the process options as desired, to
function as preferences.
How to use Direct OCR
1. Open your registered application and work in a document. To
acquire recognition results from scanned pages, place them correctly
in the scanner.
2. Use the File Menu item Acquire Text Settings... to specify settings to
be used during recognition. Any settings not offer ed take their v alues
from those last used in TextBridge Pro. Settings changed for Direct
OCR are also changed in TextBridge Pro.
3. Use the File M enu item Acquire Text to acquire images from scanner
or file.
4. If you selected ‘Draw zones automatically’ in the Direct OCR panel
of the Options dialog box, or under Acquire Text Settings...,
recognition proceeds immediately.
5. If ‘Draw zones automatically’ is not selected, each page image will be
presented to you, allowing you to draw zones manually. Click the
Perform OCR button to start recognition.
PROCESSING FROM OTHER APPLICATIONS 45
Page 46

6. If proofing was specified, this follows recognition. Then the
recognized text is placed at the cursor position in your application,
with the formatting level specified by Acquire Text Settings... .
Note If T extBridge Pro is running when Direct OCR is called from a target
application, a second instance of TextBridge Pro is launched.
How to use TextBridge Pro 11 with your PaperPort software
PaperPort® is a paper management software product from ScanSoft.
It lets you link pages with suitable applications. Pages can contain
pictures, text or both. If PaperPort exists on a computer when
TextBridge Pro is installed, its OCR services become available and
amplify the pow er of PaperPort. You can choose an OCR pro gram b y
right clicking on a text applications PaperPort link, selecting
Preferences and then selecting TextBridge Pro 11 as the OCR
package. OCR settings can be specified, as with Direct OCR.
:
Here TextBridge Pro 11 has been selected as the OCR package for
MS Word 2000. Then you can drag page images from the PaperPort
desktop onto the MS Word link on the PaperPort. While the text is
being recognized, only a progress monitor is displayed. TextBridge
Pro’s m anu al zoning window or proofing facility will appear if
requested. The recognition results are placed in a new unnamed
document in the target application.
46 TUTORI AL: PROCESSING DOCUMENTS
Page 47

PROCESSING DOCUMENTS WITH SCHEDULE OCR
You can schedule OCR jobs to be performed automatically at any time
within the following 24 hours. Each job handles one document. The
document pages can come from a scanner with an ADF or from image files.
You do not have to be present at your computer at job start time, nor does
TextBridge Pro have to be running. It does not matter if your computer is
turned off after the job is set up, so long as it is running at job start time. If
you are scanning pages, your scanner must be functioning at job start time,
with the pages loaded in the ADF. Here is how to set up a job:
1. Click Schedule OCR in the Process menu or in the Windows Start
menu: select ProgramsÉScanSoftÉTextBridge Pro 11.0ÉSchedule
OCR.
2. The Schedule OCR dialog box appears. Click Add Job... to get the
Add J ob W i zard. It t ak es yo u th r ough six pan el s , s imila r to the OCR
Wizard.
3. In the first panel you define image source. An additional feature lets
you process all supported image files in a defined folder.
4. The next three panels are similar to those in the OCR Wizard, but
you can also specify a user dictionar y.
5. The fifth panel lets you specify an export file name, type, location
and a file separation choice.
6.
The last panel lets you define the job start time, retain or delete input
files after processing and specify use of a log file to note job completion
and any problems encountered. Click Finish to close the Wizard
.
Note The Schedule OCR dialog box lists all jobs, with status Waiting,
Running, Error or Complete. Use Modify Job... to change settings for a
waiting job. You ca n modify and reuse finished jobs to process new jobs
needing similar settings. You can delete completed jobs when they are no
longer needed.
For more information, please see Scheduling OCR in the online Help.
PROCESSING DOCUMENTS WITH SCHEDULE OCR 47
Page 48

DEFINING THE SOURCE OF PAGE IMAGES
There are two possible image sources: from image files and from a
scanner. There are two main types of scanners: flatbed or sheetfed. A
scanner may have a built-in or added Automatic Document Feeder
(ADF), which makes it easier to scan multi-page documents. The images
from scanned documents can be input directly into TextBridge Pro or
may be saved with the scanner’s own software to an image file, which
TextBridge Pro can later open.
Input from image files
You can create image files from your own scanner, or receive them by email or as fax files. TextBridge Pro can open a wide range of image file
types; see a listing in chapter 6, File types for opening and saving images.
Image files are specified in the Load File dialog box. This appears when
you start automatic processing. In manual process i ng, click the Load File
button or use the Process menu. The lower part of the dialog box
provides advanced settings, and can be shown or hidden. Here it is
displayed.
This is the
current folder.
Specify the file
type(s) you want
listed.
This can be used for
multipage TIFF and
DCX files.
This is a blank
image file for the
saving option: "New
file for each blank
page".
48 TUTORI AL: PROCESSING DOCUMENTS
Use Shift+ clicks or
Ctrl+clicks to place
more than one file in
the File name text box.
Click Advanced to
open the lower panel
and Basic to close it.
Use this to add files one
by one from different
folders and to control
file order precisely.
Page 49

Normally the Add button places each file at the bottom of the file list. To
place a file at a different location, highlight a file in the list. The new file
will be added immediately below the lowest highlighted file.
Input from scanner
You must have a functioning, supported scanner correctly installed with
TextBridge Pr o. See chapter 1, Setting up your scanner with TextBridge Pro
for more information. You ha ve a choi ce of sca nning modes. In making
your choice, there are two main considerations:
u Which type of output do you want in your export document?
u Which mode will yield best OCR accuracy?
Scan black and white
Select this to scan in black-and-white. This is not suitable if you want
color in your output document, nor if you want pictures to look like socalled ‘black-and-white’ photographs: they need grayscale scanning. For
best OCR accuracy, use this for crisp black texts on a white or light
background. Black-and-white images can be scanned and handled
quicker than others and occupy less disk space.
Scan grayscale
Select this to use grayscale scanning . Choose this to keep ‘black-and-
white’ photograp hs in the outp ut docum ent. F o r best OCR accura cy, use
this for pages with varying or lo w cont ras t (not much difference betw een
light and dark) and with text on colored or shaded backgrounds.
Scan color
Select this to scan in color. Available only with color scanners. Choose
this if you want colored graphics, texts or backgrounds in the output
document. For OCR accuracy, it offers no more benefit than grayscale
scanning (for a given resolution), but will require much more time,
memory resources and disk space.
DEFINING THE SOURCE OF PA GE IMAGES 49
Page 50

Brightness and contrast
Good brightness and contrast settings play an important role in OCR
accuracy. Set these in the Scanner panel of the Options dialog box. The
diagram illustrates an optimum brightness setting. After loading an
image, check its appearance. If characters are thick and touc hing, lighten
the brightness. If characters are thin and broken, darken it. Then rescan
the page.
Unsuitable
Tolerable
Good
Best
Good
Tolerable
Unsuitable
Scanning with an AD F
The best way to scan multi-page documents is with an Automa tic
Document Feeder (ADF). S imply load pages in t he corr ect or der into the
ADF. Place blank pages if you want to save your document to multiple
output files using the ‘Create a new file at each blank page’ option. See
Saving to file in chapter 5.
If you have a document longer than the capacity of your ADF, select
‘Automatically prompt for more pages’ in the Process panel of the
Options dialog box. Then a dialog box lets you add further page batches
and signal when all pages are scanned.
50 TUTORI AL: PROCESSING DOCUMENTS
Page 51

You can scan double-sided documents with an ADF. A duplex scanner
will manage this automatically. For non-duplex scanners, select ‘Scan
double-sided pages ’ in the Scanner panel of the Options dialog box. Then
you can scan the document in just a few passes, with even pages grouped
together and odd pages also gr ouped. TextBr idge P ro wil l merge the pages
for you.
Scanning long documents w ithout an ADF
You can scan multi-page documents efficiently from a flatbed scanner,
even without an ADF. Select ‘Automatically scan pages’ in the Scanner
panel of the Op tions dialog box, and define a paus e value in seconds.
Then the scanner will make scanning passes automatically, pausing
between each scan by the defined number of seconds, giving you time to
place the next page. A dialog box allows you finish the pause early or
request a longer pause and to specify when the last page is scanned.
DESCRIBING THE LAYOUT OF THE DOCUMENT
Before starting recognition you are requested to describe the layout of the
incoming pages to assist the auto-zoning process. When you use the
OCR Wizard, auto-zoning always runs. When you do automatic
processing, auto-zoning always runs unless you specify a template to be
used on its own. When you do manual processing, auto-zoning
sometimes runs. See online Help for more detail.
Here are your input description choi c es:
Automatic
Choose this to let the program ma ke all a u to -zoning decision s. It decides
whether text is in columns or not, whether an item is a graphic or text to
be recognized and whether to place tables or not. Choose Automatic if
your document contains pages with different or unknown layouts.
Choose it for a page with multiple columns and a table, and fo r any pag es
with more than on e table.
DESCRIBING THE LAYOUT OF TH E DOCUMENT 51
Page 52

Single column, no table
Choose this setting if yo ur pages conta in only one column of text and no
table. Business letters or pages from a book are normally like this. Choose
it also for a page with words or numbers arranged in columns if you do
not want these placed in a table or decolumnized or treated as separate
columns. Graphics may be detected.
Multiple columns, no table
Choose this if some of your pages contain text in columns and you want
this decolumnize d or kept in separa te columns, similar to the original
layout. Columns can be retained in the output document, either with
frames (if True Page is set) or without frames (if Retain Flowing Columns
is set). If tabular data is encountered, it is likely to be treated as flowing
text. Graphics may be detected.
Single column with table
Choose this if your page contains only one column of text and a table.
Auto-zoning will not look for columns but will try to find a table and
place it in a grid in the Text Editor. You can l ater specify whether to
export it in a grid or as tab separated text columns. Graphics may be
detected.
Spreadsheet
Choose this if your whole page consists of a table which you want to
export to a spreadsheet program, or have treated as single table. No
flowing text or graphics zones will be detected.
Custom
Choose this for maximum control over auto-zoning. You can prevent or
encourage the detection of columns, graphics and tables. Make your
settings in the Custom Layout panel of the Options dialog box.
Template
Choose a zone template file if you wish to have its zones and properties
applied to all acquired pages from now on. In manual processing the
template zones ar e also a pplied to t he curr ent pa ge, re pla cing an y exi sti ng
zones. Other z ones ar e permi tted in a ddition to templa te zones . F or mo re
detail, see the section U sing zone templates.
If auto-zoning yielded unexpected recognition results, use manual
processing to rezone individual pages and rerecognize them.
52 TUTORI AL: PROCESSING DOCUMENTS
Page 53

MANUAL ZONING
Zones define areas on the page to be processed. Zones are rectangular or
irregular (with sides formed by vertical and horizontal lines). Zones
cannot overlap. They have a zone number in the top left corner and a
zone type icon top right. Click in a zone to select it. Use Shift+clicks for a
multiple selection. Current and selected zo nes are shaded. Click outside a
zone to remove the selection. Zones appear on an original image in the
following cases:
u The page has been recognized.
u A zone template file was specified in manual processing while the
page was current.
u You have drawn manual zones on the image.
Working with zo nes
The Image toolbar provides zone editing tools. One is always selected.
When you no longer want the service of a tool, click a different tool.
Normally this will be the Draw Rectangular Zones tool.
Draw rectangular zones
Click this and drag the cursor to define rectangular zones. The new zone
takes its properties from the last drawn or selected zone. You can also
move or resize existing zones when this tool is active.
Draw irregular zon e s
Click this for a tool allowing you to draw irregular zones. Click and drag
to draw a single line. Repeat until only one line remains undrawn.
Double-click to close the shape. Irregular zones snap to rectangles if you
set them as table type zones. You can also move or resize existing zones
when this tool is active.
Add to zone
Click this to make irregular additions to an existing zone or combine
separate zones into one. You cannot move or resize existing zones when
this tool is acti ve. You cannot use this with a table type zone.
MANUAL ZONING 53
Page 54

Subtr act from zone
Click this to subtract irregular parts from an existing zone or split a zone
into smaller ones. Y ou cannot move or resize existing zones when this tool
is active. You cannot use this with a table ty pe zone.
Reorder zones
Click this for th e z o ne reorderi ng to ol. Th en click in zones i n the des i red
reading order. For your order to be respected, ch oose ‘Use current zones
only’ and avoid having multiple-column or auto-detect zones types on
the page.
Zone properties
Click this for the Zone Properties dialog box. This lets you define zone
type and content for the currently selected zone(s) on the page. You can
also do this from a zone’s shortcut menu. See the next section.
Zone properties
Each zone has a zone type. Zones containing text can also have a zone
contents setting: alphanumeric or numeric. The zone type an d zone
contents together consti tute the zon e properties. Rig ht-cli ck in a zone for
a shortcut menu allowing you to change the zone’s properties. Select
multiple zones to change their properties in one move. The zone
properties button in the I m age to ol bar can be used for the same purpose.
The following types are available:
Single-column flowing text zone
Use this to have zone contents treated as flowing text, without colu mns
being found.
Multiple-column flowing text zone
Use thi s to hav e z on e con tents tr eat ed as flo w ing tex t. The pr og ram will try
to detect columns inside the zone. Text will be decolumnized or retained in
columns, depending on the Text Editor view. During recognition, a multicolumn zone may be replaced by separate zones for each column. To do
this, auto-zoning must run, which may also result in changed zone order.
54 TUTORI AL: PROCESSING DOCUMENTS
Page 55

Table zone
Use this to have the zone contents treated as a table. Table grids can be
automatically detected, or placed manually as described in the next
section. Table zones must be rectangular. The Text Editor displays the
table in an editable grid. You can choose whether to export tables in grids
or in columns separated by tabs.
Auto-detect zone
Use this to let the program deci de the zone type. To do this, auto-zoning
runs, which may also result in changed zone order on the page. After
recognition you can see the type that was applied. If you use an autodetect zone to cover a page area with varied contents, the program may
replace the auto-detect zone with a n umber of smaller zones.
Graphic zo ne
Use this to enclose a picture , diagram, drawing, sign ature or anythin g you
want transferred to the Text Editor as an embedded image, and not as
recognized text. A graphics zone has a green border. Embedded images
can be exported with the document to target applications supporting
graphics.
Igno re zone
Use this to define a page area you do not want in the Text Editor. Autozoning will not place zones here. To exclude a given page area from many
pages (for example a header or page numbers), place ignore zones in a
template and select ‘Find zones in addition to template/current zones’ in
the Process panel of the Options dialog b ox.
Zone contents
This is available for zone types containing text. Alphanumeric contents
validates all characters needed for your language choice. Recognition
results from a numeric zone will contain only numbers and numberrelated punctuation. No letters will be pla c ed.
Note Right-click outside a zone for a shortcut menu tailored for the whole
image. It allows you to zoom in or out or rotate the image. When an image is
rotated, all zones on it are deleted.
MANUAL ZONING 55
Page 56

TABLE GRIDS IN THE IMAGE
After automatic processing you may see table zones placed on a page.
They are denoted with a table zone icon in the top right corner o f the
zone. To change a zone to or from a table zone, use its shortcut menu.
You can also draw a table type zone. If there is already a table zo ne on the
page, select it, then draw the new rectangular zone. It will inherit the
table type. Otherwise draw a rectangula r zone and use its shortcut menu
to change it to a table type.;
You draw or move table dividers t o det ermine wher e gridlines will appear
when the table is placed in the Text Editor. You can use the Add or
Subtract tools to enla rge or reduce a table zone, but it must remain
rectangular. You can do this to discard unneeded columns or rows from a
table.
The five table handlin g tool s on the I magin g toolb ar become ac tiv e if the
current page contains a table type zone. Use them as follows:
Move row or column dividers
Click the tool and mo v e the cursor to t he div ider t o be m o ved . I t disp lays
a double-headed arrow. Drag the border as desired. You cannot drag it
beyond its neighbor. Avoid placing dividers so they overlap one another
or cut through text. Press the Ctrl key as you drag a column divider, to
move it in the cur rent row only.
Insert column divide rs
Click the tool then click at the location in a table zone where you want to
place a column divider. Press the Ctrl key as you click to place the divider
in the cu rrent row only.
Insert row dividers
Click the tool then click at the location in a table zone where you want to
place a row di vider. Avoid pla cing a divid er on to p of another one or s o it
cuts through text.
Remove column or row dividers
Click the tool then c lick on a singl e divide r yo u want to delet e. D o this if
a divider is wrongly located, or if you want to change the appearance of
the table in the final d ocument. For example, you can place two columns
of data in a single column by deleting the divider between the columns.
56 TUTORI AL: PROCESSING DOCUMENTS
Page 57
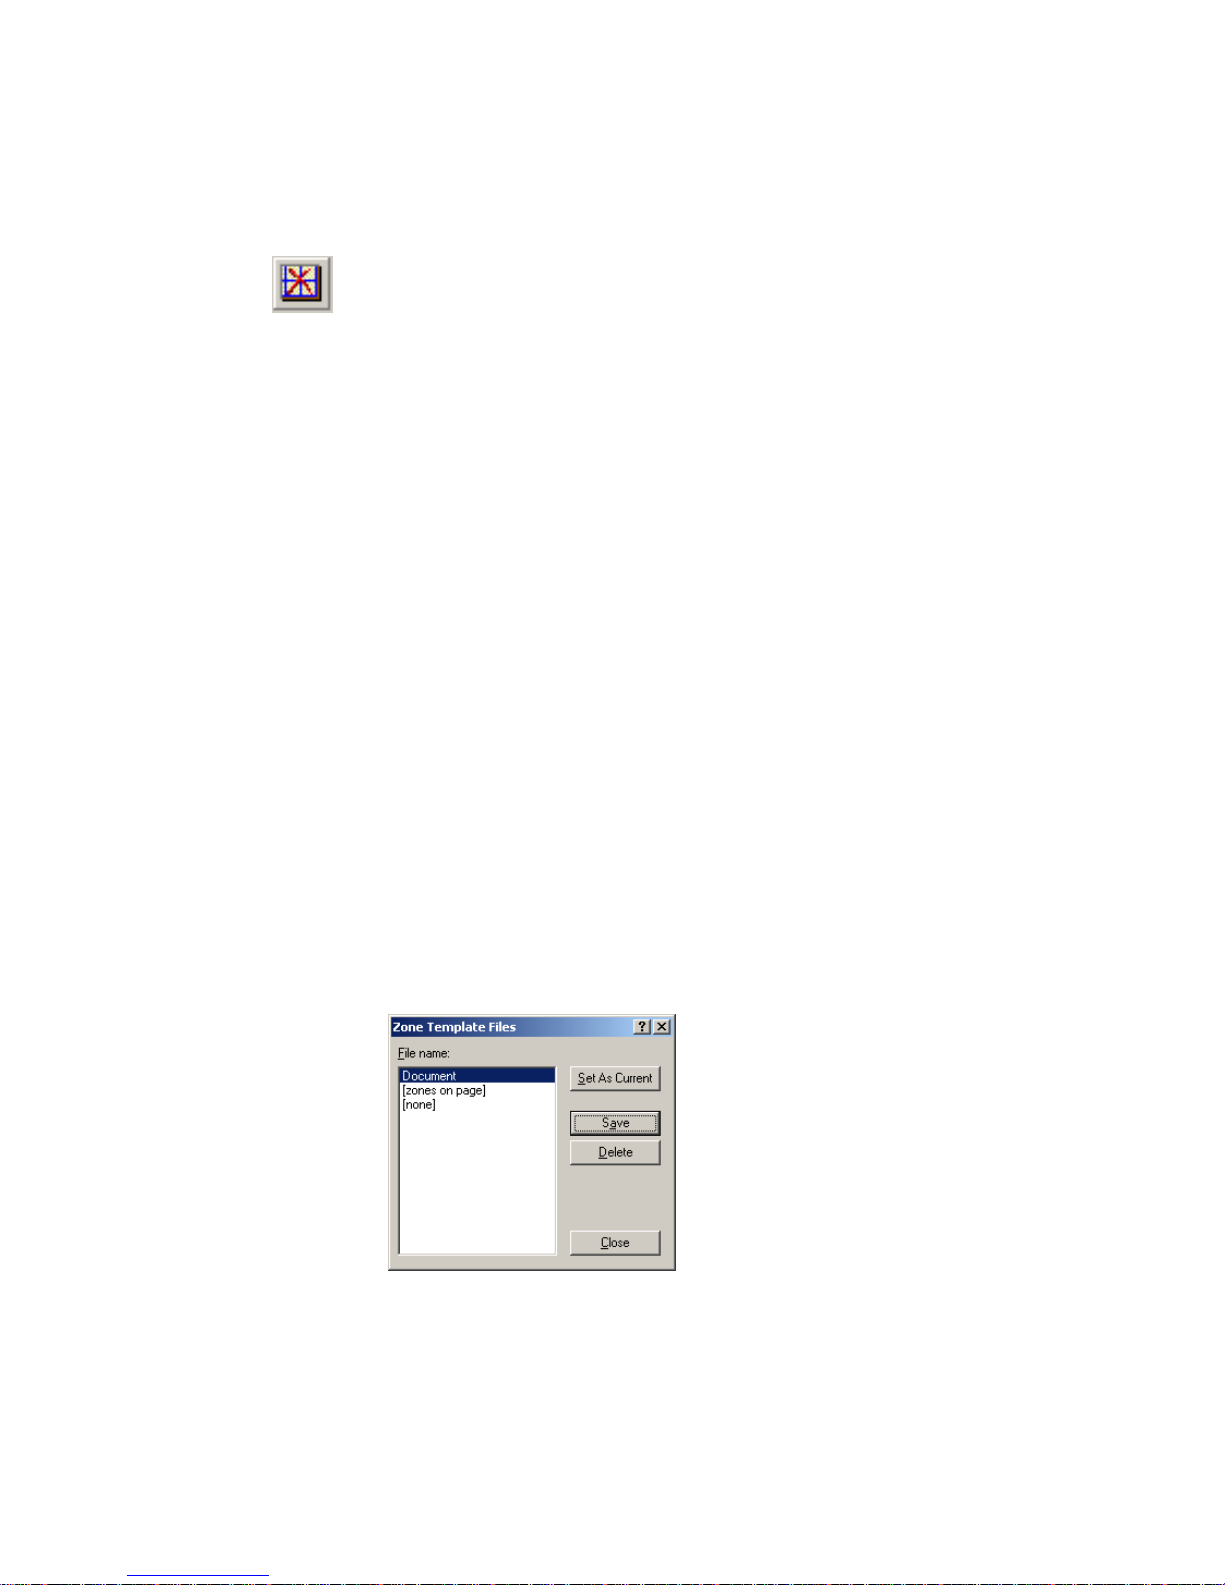
Remove/replace all dividers
Click this tool and cli ck i nside a table zone. Its dividers will al l disappear.
Click again to have dividers automatically (re)detected. Divid e r
placement usually occurs du ring recogni tion; clicking twice with this tool
lets you see and edit the dividers before recognition.
USING ZONE TEMPLATES
A template is a set of zones, their properties and reading order, stored in a
file. A zone template file can be loaded to have template zones used
during recognitio n. Loa d a templat e file in th e Perform OCR drop-down
list or from the Tools menu.
When you load a template with the Manual OCR toolbar, its zones
appear immediately on the current page, replacing any already there.
Existing pages are not affected. The template zones are placed on all
further acquired pag es until the templa te is unloaded. You can modify th e
template zones and add new zones before performing recognition.
When you load a template with the AutoOCR toolbar, it does not affect
the current or existing pages. The template zones are placed on all further
acquired pages until the template is unloaded. The Process panel of the
Options dialog box presents the option ‘Find zones in addition to
template/current zones’. If this is turned on during automatic processing,
auto-zoning will run on page areas ou tside the templa te zo nes.
How to save a zone template
Prepare zones on a page. Check their
locations, properties and reading order.
Click Zone Template File... in the Tools
menu. In the dialog box, select
page]
and click Save.
[zones on
How to modify a zone template
Load the template and acquire a suitable
image with manual processing. The template zones appear. Modify the
zones and/or properties as desired. Open the Zone Template File dialog
box. The current template is selected. Click Save and then Close.
USING ZONE TEMPLATES 57
Page 58

How to unload a template
Select a non-templat e setting for layout description in the Perform OCR
drop-down list. The template zones are not removed from the current or
existing pages, but template zones will no longer be used for future
processing. You can also open the Zone Template Files dialog box, select
[none] and click th e Set As Current b u tton. In this case, the layo ut
description setting returns to Automatic.
How to replace one template with another
Select a different template in the Perform OCR drop-down list, or open
the Zone Template Files dialog box, select the desired template and click
the Set As Current button. When the AutoO CR toolbar is active, no
existing zones are ch anged and the ne w template is used f or future
processing. When the Manu al OCR tool bar is acti ve, zo nes from the new
template are applied to the current page, replacing any existing zones.
How to delete a template file
Open the Zone Template Files dialog box. Select a template and click the
Delete button. Zones already placed by this template are not removed.
Tip Templates accept ignore and auto-detect type zones. A template can
therefore be useful to define which parts of the page to read, and which
parts to ignore.
Note Auto-detect type zones from a template may be replac ed during
recognition by smaller ones; specific zone types will be assigned to these
zones. Multi-column zones may also be split into smaller single-column
zones, one for each de tected column.
Note Templates and the additional auto-zoning feature are available in
Schedule OCR and Direct OCR, but not in the OCR Wizard.
58 TUTORI AL: PROCESSING DOCUMENTS
Page 59

4
3URRILQJDQGHGLWLQJ
Recognition results are placed in the Text Editor. This newly developed
WYSIWYG (What You See Is What You Get) editor offers the following
features, detailed in this chapter:
u Proofreading OCR results
u Checking recognized text against original (Verifying text)
u User dictionaries
u The editor display and views
u Text and image editing
u Page outline
TEXTBRIDGE PRO USER’S GUI DE 59
Page 60

The Text Editor offers four views for displaying its pages. You can switch
freely from one view to another. These provide different levels of
formatting. The views are:
No Formatting view
This displays plain decolumnized text in a single font and font size.
Retain Fonts and Paragraphs view
This displays decolumnized text with font and paragraph styling.
True Page view
This view tries to conserve as much of the formatting of the original
document as possible. Character and paragraph styling is retained. All
page elements, including columns, are placed in frames.
Retain Flowing Columns view
This view is identical to True Page view, except that the reading order of
zones is shown by arrows. This view’s diffe rence from True Page relates
mainly to export, as explained in the section Preparing recognition results
for export in chapter 5.
PROOFREADING OCR RESULTS
After a page is recogn ized, the recognition results appear in the Text
Editor. Proofreading starts automatically if that was requested in the
Proofing panel of the Options dialog box or in the OCR Wizard. You can
start proofing manually any time th e program is not busy. Work as
follows:
1. Click the Proofread OCR button in the Standard toolbar, or choose
Proofread OCR... in the Tools menu.
2. Proofing starts from the beginning of the document, but skips text
already proofed. If a suspected error is detected, the OCR
Proofreader dialog box displays the error and a picture of how it
originally looked in the image.
60 PROOFING AN D EDITING
Page 61

This tells why
the word is
suspected.
This window shows
the relevant part of the
original image. Click
inside it to enlarge or
reduce the display .
This is what
TextBridge Pro
thought the
word was.
The image of
the suspect
word is
highlighted.
Drag a corner
or the bottom of
the dialog box
to resize it.
3. If the recognized word is correct, click Ignore or Ignore All to move
to the next suspect word. Click Add to add it to the cu rrent user
dictionary an d move to the next suspect wo rd.
4. If the recognized word is not correct, edit the word in the Change to
edit box, or type in the desired word or select a dictionary suggestion.
Click Change or Change All to implement the change and move to
the next suspect word. Click Add to add the word in the Change to
edit box to the current user dictionary and move to the next suspect
word.
5. Color markers are removed from words i n the Text Edit or as t h ey are
proofread. You can switch to the Text Editor during proofing to
make corrections there. Use the Resume button to restart proofing.
Click Close to stop proofreading before the end of the document is
reached.
Note $SDJHLVPDUNHGZLWKWKHSURRIHGLFRQV DQG LQWKH
'RFXPHQW0DQDJHULISURRILQJUDQWRWKHHQGRIWKHSDJH
PROOFREADING OCR RESULTS 61
Page 62

This is the
original image
of the word you
are verifying.
C
HECKING RECOGNIZED TEXT AGAINST ORIGINAL
After performing OCR, you can compare any part of the recognized text
against the cor re s ponding part of the origina l image, to verify that the
text was recognized correctly. Work as follows:
1. Double-click any word in the T ext Editor or select a word and choose
Verify Te xt in the Tools menu. The Verify Text window opens and
shows a picture of the original wor d and its surrounding ar ea. Mo dify
the word in the Text Editor as necessary.
2. Click inside the window to enlarge or reduce the picture. The picture
is enlarged on the first two clicks and reduced on the next two clicks.
Close button
This is the word
you doubleclicked in the
Text Editor.
3. Continue double-clicking words that you want to verify, and
4. Click the Close button to close the verifier window.
Tip <RXVKRXOGSURRIUHDGDQGYHULI\WH[WVEHIRUHGRLQJODUJHVFDOH
HGLWLQJ,I\RXFXWDQGSDVWHODUJHEORFNVRIWH[WWKHOLQNVEHWZHHQWH[W
DQGLPDJHPD\EHGLVWXUEHG
62 PROOFING AN D EDITING
correcting them as necessary. The display changes as you select new
words.
Page 63

USER DICTIONARIES
The program has built-in dictionaries for many languages. These assist
during recognition and may offer suggestions during proofing. They can
be supplemented by user dictionaries. You can save any number of user
dictionaries, but only one can be loaded at a time. Your user dictionaries
from Microsoft Word are also available; a dicti onary called Cust om is the
default user dictionary for Microsoft Word.
Starting a user dictionary
Click Add in the OCR Proofreader dialog box with no user dictionary
loaded or open the User Dictionary Files dialog box from the Tools menu
and click New. Y o u will be asked to name the dictionary immediately.
Loading or unloading a user dictionary
Do this fro m th e OCR pan el of the Options d ialog box or fro m th e User
Dictionary Files dialog box. Select a dictionary file to load it or
unload a user dictionary.
Editing a user dictionary
Add words by loading a user dictionary and then clicking Add in the
OCR Proofreader dialog box. You can add and delete words in the User
Dictionary Files dialog box.
[none] to
Tip :KLOHHGLWLQJDXVHUGLFWLRQDU\\RXFDQLPSRUWDZRUGOLVWIURPD
WH[WILOHWRDGGZRUGVWRWKHGLFWLRQDU\TXLFNO\
THE EDITOR DISPLAY AND VIEWS
The editor displays recognized texts and can mark words that were
suspected during recognition. Marking is done with a wavy underline;
red underlines for words not found in a dictionary (this applies only to
languages with dictionary support) and blue underlines for words
containing suspect or reject characters. These markers can be shown or
hidden as selected in the Text Editor panel of the Options dialog box.
You can also show or hide non-printing characters and h eader/footer
indicators. The Text Editor panel also lets you define a unit of
USER DICTIONARIES 63
Page 64

measurement for the program and a word wrap setting for use in all Text
Editor views except No Formatting view.
Here are the main differences between the views:
No Formatting view
This displays plain decolumnized left-aligned text in a single font and font
size, with the same line breaks as in the original document. Most
formatting buttons and dialog boxes are disabled. Rulers ar e not displayed.
You may find this view convenient for verifying and editing the text.
Retain Fonts and Paragraphs view
This displays decolumnized text with font and paragraph styling. The
horizontal ruler is displayed. You ma y find this view convenient for
verifying, editing a nd modifying the text together with its styling.
True Page view
This view tries to conserve as much of the formatting of the original
document as possible. Character and paragraph styling is retained. All
page elements, including columns, are placed in frames. It may be more
difficult to verif y and ed it text in this view; y ou may need to scr oll wi thin
a frame to see all the frame contents. A row of arrows denote contents
extending beyond frame borders.
Retain Flowing Columns view
This view is identical to True Page view, except that the reading order of
zones is shown by arrows. This view differs from True Page during
export, see the section Preparing recognition results for export in chapter 5.
Select a view with the four buttons at the bottom left of the Text Editor
or from the View menu. Graphics and tables can appear in all four views.
TEXT AND IMAGE EDITING
This is a WYSIWYG Text Editor, providing many editing facilities.
These work very similarly to those in leading word processors.
Editing character attributes
In all views except No Formatting view, you can change th e font t ype,
size and attributes (bold, italic, underlined) for selected text. Use the
64 PROOFING AN D EDITING
Page 65

Formatting toolbar or the Font dialog box from the Format menu. The
latter also offers subscripts, superscripts and colored text or backgrounds.
In No F ormatting view you can use the Formatting toolbar to specify one
font type and size to be applied to the whole document. This is not
transferred to other views; their previous settings are restored.
Open the F o nt Ma tchin g dia log bo x f ro m the OCR pa nel o f th e Opt ion s
dialog box to specify which fonts to use for text s enteri ng the Text Editor.
Editing paragraph attributes
In all views except No F ormatting view, you can change the alignment of
selected paragraphs and apply bulleting to paragraphs. Use the
Formatting toolbar or the Paragraph dialog box from the Format menu.
The latter allows you to modify indents, line spacing and spacing
between paragraphs. The Text Editor’s horizontal ruler lets you define
indent and tab positions easily. Advanced tab settings are done in the
Tabs dialog box from the Format menu.
Paragraph styles
Paragraph styles are auto-detected during recognition. A list of styles is
built up and presented in a selection box on the left of the Formatting
toolbar. Use this to assign a style to selected paragraphs. Use the Style
dialog box from the Format menu to rename or modify a style and to
define a new style. When you save a document to file, you can choose
whether to export the paragraph styles wi th t he document or not. This is
valid only if the target application supports paragraph styles.
Graphics
You can edit the contents of a selected graphic zone if you have an image
editor in your computer. Click Edit Picture in the Tools menu. This will
activate the image editor associated with BMP files in your Windows
system, and load the graphic. Edit the graphic, then close the editor to
have it reembedded in TextBridge Pro’s Text Editor. Do not change the
graphic’s size, resolution or type, because this will prevent the
reembedding.
Tables
Tables are displayed in the Text Editor in grids. Move the cursor into a
table area. I t changes appearanc e, allowing yo u to move gri dlines. You can
also use the Text Editor’s rulers to modify a table. Modify the placement
TEXT AND IMAGE EDITING 65
Page 66

of text in t able cells with t he alig nment butt ons in the Formattin g toolba r
and the tab controls in the ruler. When saving the document to file, you
can choose whether to have the tables exported in grids or as tab
separated columns.
PAGE OUTLINE
The Page outline window lets you change the order of areas on a page or
of paragraphs inside areas. It also lets you define how text should flow if
you export with Retain Flowing Columns view. Open the page outline
window from the View menu. The areas correspond to the zones used
during recognition and also to frames used in the Text Editor. Click and
drag an item to the desired location. Reordered paragraphs display
immediately in the Text Editor and are exported. Reordered ar eas display
and are exported in No Formatting View and Retain Fonts and
Paragraphs view. In True Page view they have no practical effect. In
Retain Flowing Columns view, arrows show the order of text flow. Move
areas to change this order. The positions of the areas do no t change, but
the arrows show the changed text flow.
66 PROOFING AN D EDITING
Page 67

5 Saving and exporting
Once you have acquired at least one image for a document, you can
export the image(s) to file. Once you have recognized at least one page,
you can export recognition results to a target application by:
1. Savi ng to file
2. Copying a docume nt to the Clipb oard
3. Sending a document as a mail attachment.
The document remains in TextBridge Pro after export. This allows you to
save, copy or send it repeatedly, for example with different formatting
levels, using different file types, names or locations. You can also add or
rerecognize pages or modify the recognized text.
With automatic p rocessing and using the OCR Wizard, you specify the
first saving destination before processing starts. When the last available
page is recognized (or proofread, if that was requested), the exporting
occurs.
You can specify export any time the program is not busy. If you ask to
export a document with unrecognized pages, you will be asked whether
they should be re cognized first. If you answer No, only results from
recognized pages will be exported. If zones have been modified on
recognized pages, you will be invited to rerecognize those pages before
exporting.
TEXTBRIDGE PRO USER’S GUI DE 67
Page 68

PREPARING RECOGNITION RESULTS FOR EXPORT
Text is exported to file, Clipboard or mail with the formatting level
defined by the view set in the Text Editor at expor t time, if that is
possible. However, some export file types and target applications cannot
support all f ormatting elements. You may be warned if there is a
mismatch and of fered the highest permissible view. You can acc ept that,
or cancel export, set a different view and restart the export.
The table in the section File types for saving recognition results in chapter 6
tells you which file typ es support which formatting levels.
Here is how you can use the views for export:
No Formatting view
This view is needed when exporting to ASCII, Unicode or other formats
with extension .T XT. These fi le types cannot acce pt graphics or tables.
Of course, you can export plain text to any file type and target
application.
Retain Fonts and Paragraphs view
This is suitable for all formats except those with the TXT extensions.
These formats can all handle graphics and tables.
True Page view
This is suitable on ly for file types and target applications capable of
handling frames or text boxes. The reading order of zones, or areas
reordered in the Page outline window have no influence when True Page
is used for export.
Retain Flowing Columns view
Set this at export time to keep the original layout of the pages, including
columns. This is done wherever possible with column settings, not with
frames. Text will then flow from one column to the other, which does not
happen when frames are used. Arrows show the text flow order. You can
change this order with the Page outline window, as described at the end
of chapter 4, in Page outline.
68 SAVING AND EXP ORTING
Page 69

SAVING TO FILE
You can save recognized pages and original images to disk in a wide
variety of file types. For tables of file types, see chapter 6, File types for
opening and saving images and File types for saving recognition results.
Saving origina l im ages
1. Choose Save Image... in the File menu. In the dialog box that
appears, select a folder location and a file type for your images. Type
in a file name.
2. Select to save the current image only or all images in the document.
In the second case you can have all images in a single multi-page
image file, providing you set TIFF or DCX as file type. Otherwise
each image is placed in a sep arate file. TextB ridge Pro adds numerica l
suffixes to the file name you provide, to generate unique file names.
3. Click OK to save the image(s) as specified. Zones and recognize d text
are not saved with the file. If possible, the file is saved as displayed:
that is black-and-white, grayscale or color. Black-and-white images
are saved at their original resolutions. Grayscale and color images are
reduced to approximately 150 dpi.
Tip To see the image size and original resolution of an image, hover the
cursor over it in the Original Image area or over its thumbnail in the
Document Manager.
SAVING TO FILE 69
Page 70

Select this to
automatically open
the saved file in its
target application.
Select this to have
the paragraph
styles from the Text
Editor export ed
with the recognized
text.
Saving recog nition resul t s
1. Choose Save As... in the File menu, or click the Export Results
button in the Manual OCR toolbar with Save as File selected in the
drop-down list.
2. The Save As dialog box appears, as shown in its expanded form.
Click Advanced
to open the lower
panel and Basic
to close it.
Choose from:
Create one file for all pages
Create one file per page
Create a new file at each blank page.
3. Select a folder location and a file type for your document. The special
4. Type in a file name. Click the Advanced button to see all the saving
5. Click OK. The document is saved to disk as specified. If ‘Save and
70 SAVING AND EXP ORTING
TXD file type is the last in the file type list.
options. Select these as desired .
Launch’ is selected, the exported file will appear in its target
application; that is the one associated with the selected file type in
your Windows system.
Page 71
Note Graphics and formatting are saved in the document o n ly if the
selected file type supports them. The formatting level for export is the
Editor view set at saving time. You will be warned if the formatting level
is not supported by the export file type.
Note If more than one export file is created, TextBridge Pro will
append a numerical suffix to your file name to create unique file names.
If you select ‘Create a new file at each bla nk p age’ with input from image
files, see how to place blank images in the section Input from image files in
chapter 3.
SAVING A DOCUMENT AS YOU WORK
Click the Save button in the Standard toolbar or choose Save in the File
menu to save changes to the current document as you work. If you do
this with an untitle d d ocument, the Save As dialog b ox appears.
With a named document, the Save command saves it to the name and
format of its last save, as displayed in the title bar. If the document was
last saved as a TextBridge Document, the save command updates this
document: new or changed images, changed zoning, recognition results
and some settings are all saved. If the document was last saved to a textbased file type, only changes to the recognition results are saved.
If you want to work with your document again in TextBridge Pro in a
later session, save it as a TextBridge Document. This is a special output
file type. I t sav es th e o rig inal images together with the r e co gnit io n r esult s
and some settings. See the section TextBridge Documents in chapter 2.
The Save As dialog box lists available file types in its Save as Type dropdown list. The TextBridge Document is the last format in the list.
SAVING A DOCUMENT AS YOU WORK 71
Page 72

If you first save the document as a TextBridge Document (for instance as
memo.txd), then modify it and later save it to a text file (for instance as
memo.txt), then modify it again and click Save, the recent changes are
saved to the
memo.txt file, not to the TXD. When you close the document
or exit the program, you will be prompted to save the document if it has
not been saved as a TextBridge Document, or there are changes since the
last TXD save.
COPYING A DOCUMENT TO THE CLIPBOARD
You can copy the recognition results from every recognized page of a
document to the Clipboard. The copying is reported by a progress
monitor. You can then paste the Clipboard contents into another
application.
Text formatting, such as bold and italics, is retained when you paste into
an application that supports RTF information. Otherwise, only plain text
will be pasted. Graphics are retained if the application supports insertion
of images.
t To copy a document to the Clipboard
• With automatic processing, select Copy to Clipboard as the
• With manual processing, select the Copy to Clipboard command in
72 SAVING AND EXP ORTING
command in the Export Results drop-down list on the AutoOCR
toolbar or in the OCR Wizard. The text is sent to Clipboard as soon
as the last available page is recognized or proofed.
the Export Results drop-down list and then click its button on the
Manual OC R toolbar. Copying starts immediately.
Page 73

SENDING A DOCUMENT AS A MAIL ATTACHMENT
You can send recognition results as one or more files attached to a mail
message if you have install ed a MAPI- compliant mai l applicat ion, such as
Microsoft Outlook.
t To send a document by e-mail
• With automatic processing, select Send as Mail as the command in
the Export Results drop-down list on the AutoOC R toolbar. The
Send Mail dialo g bo x ap pea rs as soon as th e last available page in the
document is recognized or proofed.
• With manual processing, select Send as Mail as the command in the
Export Results drop-down list and then click its button on the
Manual OCR toolbar. The Send Mail dialog box appears
immediately.
At any time the program is not busy, choose Send as Mail in the File
menu to call up the Send Mail dialog box.
1. The Send Mail dialog box lets you specify a file type and attachment
2. Log into your mail application if you are prompted to do so.
options: one attachment for all pages, one attachment per page, new
attachment at each bla nk page. Set all options an d click OK.
SENDING A DOCUMENT AS A MAIL ATTACHMENT 73
Page 74

3. Your mail application appears with the attachment(s) in a new empty
message. Attachments take the name used for the last save of the
document in TextBridge Pro, or ‘Untitled from TextBridge’. The
suitable file exten sion is added, and nu merical suffixes for multiple
attachments.
4. Address your mail message, add message text as desired and click the
Send button.
74 SAVING AND EXP ORTING
Page 75

6 Technical information
This chapter provides troublesh ooting and other technical information
about using TextBridge Pro 11.
Please also read the online Readme file and other help topics, or visit the
ScanSoft web pages. The Scanner Information web page contains
detailed and regularly updated information about scanner setup and
support. The Readme file contains last-minute information relating to
TextBridge Pro. Access to the Readme file and to ScanSoft’s web pages is
provided in the Help menu.
This chapter contains the following information:
u Troubleshooting
• Solutions to try first
• Testing TextBridge Pro
• Low memory problems
• Low disk space problems
u Supported file types
• File types for opening and saving images
• File types for saving recognition results
• OCR problems
u OCR problems
• Text does not get recognized properly
• Problems with fax re cognition
• System or performance problems during OCR
u Unin stalling the software
TEXTBRIDGE PRO USER’S GUI DE 75
Page 76

TROUBLESHOOTING
Although TextBridge Pro is designed to be easy to use, problems
sometimes occur. Many of the error messages contain self-explanatory
descriptions of what to do – check connections, close other applications
to free up memory, and so on. Sometimes that is all the troubleshooting
help you need.
Please see your Windows documentation for information on optimizing
your system and application performance.
Solutions to try first
Try the s e solutions if you experience proble ms starting or using
TextBridge Pro:
u Make sure that your system meets all requirements listed under
System requirements in chapter 1.
u Make sure that your scanner is plugged in and that all cable
connections are secure.
u Visit the support section of ScanSoft’s web site at
www.scansoft.com. It contains Tech Notes on commonly
reported issues using TextBridge P ro 11. O ur web pages may also
offer assistance on the installation process and troubleshooting.
76 TECHNIC AL INFORMATION
u Turn off your computer and your scanner, turn your scanner
back on, and then restart your computer. Make sure other
applications are functioning properly.
u Use the software that came with your scanner to verify that the
scanner works p roperly before usi ng it with TextBr idge Pro.
u Make sure you have the correct drivers for your scanner, printer,
and video card. Visit the ScanSoft’s Scanner Information web
page through the Help menu for more information.
u Run ScanDisk for Windows 95, 98 or Me, or Check Disk for
Windows NT and Windows 2000 to check your hard disk for
errors. Se e Windows online Help for more information.
u Defragment your hard disk. See Windows online Help for more
information.
u Uninstall and reinstall TextBridge Pro, as described in the last
section, Uninstalling the software.
Page 77

Testing TextBridge Pro
Restarting Windows 95, 98, 2000 or Me in safe mode or Windows NT
in VGA mode allows you to test TextBridge Pro on a simplified system.
This is recommended when you cannot resolve crashing problems or if
TextBridge Pro has stopped running altogether. See Windows online
Help for more information.
Note Your scanner will not ru n with TextBridge Pro in safe mode or
VGA mode, so do not test scanner problems in this configuration.
t To test TextBridge Pro in safe mode (Windows 95, 98, 2000 or Me):
1. Restart your computer in safe mode by pressing F8 immediately a fter
you see the ‘Starting Windows’ message.
2. Launch TextBridge Pro and t ry perfor mi ng OCR on an image. Use a
known image file, for insta nce one of t he suppl ied sampl e imag e fi les.
• If TextBridge Pro does not launch or run properly in safe
mode, then there may be a problem wi th the installation.
Uninstall and reinstall TextBridge Pro (see the end of this
chapter), and then run it in Windows safe mode.
• If TextBridge Pro runs in safe mode, then a device driver on
your system may be interfe ring with TextBridge Pro
operation. Troubleshoot the proble m by restarting Windows
in Step-by-Step Confirmation mode. See Windows online
Help for more information.
t To test TextBridge Pro in VGA mode (Windows NT):
1. Restart your computer.
2. Select Windows NT Workstation Version 4.00 [VGA mode] and
press Enter.
3. Press Ctrl+Alt+Del and select Task Manager.
4. In the Task Manager dialog box, select all background applications
and click End Process. See Wind ows online Help for more
information.
TROUBLESHOOTING 77
Page 78

5. Launch TextBridge Pro and t ry perfor mi ng OCR on an image. Use a
known image file such as one of the supplied sample files.
Note You can also r un TextBridge Pro 11 from a command line in its
own safe mode. Choose Start
É Run, browse for the file TextBridge.exe
and add the command line option /safe. This starts the program, but
ignores previously stored settings and does not try to recover a document
from an abnormal termination.
Low memory problems
TextBridge Pro may run poorly under low-memory conditions. This may
be indicated by various error messages or if TextBridge Pro works slowly
and accesses the hard drive often. Try these solutions for low memory
conditions:
u Restart your computer.
u Close other open applications to release memory.
u Close unnecessary TextBridge Pro applications.
u Defragment your hard disk to free up contiguous blocks of disk
space. See Windows online Help for instructions.
u Increase the amount of free hard disk space.
u Increase your computer’s physical memory (RAM).
Low disk space pr o bl ems
Problems may occur if yo ur syst em runs low on free disk space. Try these
solutions for low disk space problems:
78 TECHNIC AL INFORMATION
u More memory optimizes OCR performance. See System
requirements in chap ter 1 for more information.
u Empty the Windows Recycle Bin.
u Close all open applicatio ns and delet e th e *.tmp files in the Temp
folder. This folder is usually located in your Windows folder.
u Run ScanDisk for Windows 95, 98 or Me, or Check Disk for
Windows NT or Windows 2000 to check for errors that may be
using disk space. See Windows online Help for instructions.
u Back up unneeded files onto floppy disks or other media and
delete them from your hard disk.
Page 79

u Remove Windows applications that you do not use.
u Defragment your hard disk. See Windows online Help for
instructions.
u Clear the cache for your web browser and limit its size.
SUPPORTED FILE TYPES
The program supports a wide range of file types, as detailed below.
File types for opening and saving images
File type Extension
BMP, Bitmap *.bmp No Open and Save All
DCX *.dcx Yes Open and Save All
JPEG *.jpg No Open and Save Grayscale, color
PCX *.pcx No Open and Save All
PNG *.png No Open and Save All
TIFF Compressed G3 *.tif Yes Open B/W
TIFF Compressed G4 *.tif Yes Open and Save B/W
TIFF PackBits *.tif Yes Open and Save All
TIFF Uncompressed *.tif Yes Open and Save All
Multipage
Open / Save
B/W, Grayscale,
Color
Input image files can have resolutions up to 600 dpi, but 300 dpi (both
horizontally and vertically) is r ecommended for optimum OCR accuracy.
The program stores black-and-white images at their original resolution,
but grayscale and color images are not usually saved above 150 dpi.
Hover the cursor ov er an image for a popup window sho wing the size a nd
resolution of the original image.
Note If you try to save a black-and-white image to JPEG format, the
program will offer conversion to grayscale. With TIFF G3 and G4 it will
offer conversion to black-and-whi t e.
SUPPORTED FILE TYPES 79
Page 80

File types for saving recognition results
File type
ASCII text
Excel (3.0 to 7.0, 97, 2000) *.xls NFV, RFP (Spreadsheet) Yes
FrameMaker (5.5.3) *.mif All Yes
Freelance Graphics *.txt No Formatting view (NFV) No
Harvard Graphics *.txt No Form atting view (NFV) No
HTML 3.2
PowerPoint 97 *.rtf All Yes
Microsoft Publisher 98 *.rtf All Yes
Word for Windows (6.0, 97, 2000) *.doc All Yes
PageMaker 6.5.2 *.doc All Yes
Quattro Pro for Windows 4.0, 8 *.xls NFV, RFP (Spreadsheet) No
Rich Text Format (RTF) 6.0/95
Unicode Text 1
Ventura Publisher *.doc All Yes
WordPad *.rtf
WordPerfect (5.1,5.2,6.0,6.1,8,9,10) *.wpd All Yes
TextBridge Document *.txd All Yes
1
2
3
4
Extension
*.txt/.csv No Formatting view (NFV) No
*.htm All
*.rtf All Yes
*.txt/.csv No Formatting view (NFV) No
Format levels
(Text Editor views)
NFV, RFP
5
Supports
graphics
Yes
Yes
2
1 ASCII and Unicode text can be with flowing text, with line breaks or comma
2 When saving to HTML, all graphics are saved as separate image files using
3 Recognition results are sent to Clipboard in this format and will be pasted in
4 Unicode text can handle the widest range of accented characters.
5 True Page or Retain Flowing Columns (RFC) views will not be refused, but
80 TECHNIC AL INFORMATION
separated. The latt er have the ext ension .cs v and are used for pla in text input
of tables into spreadsheet programs.
JPEG format.
RTF if possible, and as Unicode or ASCII text if not.
will appear as Retain Fonts and Paragraphs (RFP) view, this is, without
columns.
Page 81

OCR PROBLEMS
This section contains information and solutions for possible OCR
problems. First we provide suggestions for improving recognition
accuracy, second on getting good results from fax input and finally on
system or performance problems arising during OCR.
Text does not get recognized properly
Try thes e solutions if any part of the origin al document is not co nve rted
to text properl y during OCR:
u Look at the original page image and ensure that all text areas are
enclosed by text zones. If an area is not enclosed by a zone, it is
generally ignored during OCR. See the section on creating and
modifying zones, Working with zones, in chapter 3.
u Make sure text zones are identified correctly. Reidentify zone
types and contents, if necessary, and perform OCR on the
document again. See Zone properties in chapter 3.
u Be sure you do not have an unsuitable template loaded by
mistake. If zone borders cut through text, recognition is
impaired.
u Adjust the brightness and contrast sliders in the Scanner panel of
the Options dialog box. You may need to experi me nt with
different settings combinati ons to get the desired results.
u Check the resolution of the original image. Ho ver the cursor over
the Original Image area for a popup display. If the resolution is
significantly above or below 300 dpi, recognition is likely to
suffer.
u Make sure the correct document languages are selected in the
OCR panel of the Options dialog box. Only languages included
in the document should be selected.
u If you use True Page as the Text Editor view or for export,
recognized text is put into frames (fo rmatting boxes). Some text
may be hidden if a frame is too small. To view the text, place the
cursor in the te xt frame and us e the arr o w keys on y our keybo ar d
to scroll to the top, bottom, left, or right of the frame.
OCR PROBLEMS 81
Page 82

u Check the glass, mirrors, and lenses on your scanner for dust,
smudges, or scratches. Clean if necessary.
Note TextBridge Pro only recognizes machine printed-text characters
such as typewritten or laser -printed text. It can handle dot-matrix
characters, though accura cy may be lower on draft-qualit y texts. It cannot
read handprint or handwriting. H owev er, it can retain signatures or other
handwritten text as a graphic.
Problems with fax recognition
Try these soluti ons to improve OCR accuracy on fax images:
u Ask senders to use clean, original documents if possible.
u Ask senders to select Fine or Best mode when they send you a
fax. This produces a resolution of 200 x 200 dpi.
u Ask senders to transmit files directly to your computer via fax
modem if you both have one. You can save fax images as image
files and then load them into TextBridge Pro. See the section
Input from image files in chapter 3.
System or performance problems during OCR
Try these solutions if a crash occurs during OCR or if processing takes a
very long time:
82 TECHNIC AL INFORMATION
u Resolve low memory problems. See Testing TextBridge Pro.
u Resolve low disk space problems. See Testing TextBridge Pro.
u Minimize all applicat ions or click Alt +Tab to check for Window s
error messages.
u Check the quality of the image you are recognizing.
u Consult your scanner documentation on ways to improve the
quality of scanned images.
u Break complex p age images (lo ts of te xt and gra phics or el aborate
formatting) into smaller jobs. Draw zones manually or modify
automatically cre ated zones and per form OCR on one pa ge area
at a time. See th e sect io n in ch ap ter 3 o n c r eat in g an d mod ifyi ng
zones, Working with zones.
Page 83

u Restart Windows 95, 98 and Me and 2000 in safe mode, or
Windows NT and in VGA mode and test TextBridge Pro by
performing OCR on the included sample image files
. See the
section Testing TextBridge Pro.
If you are performing multiple tasks at once, such as recognizing and
printing, OCR may take longer.
UNINSTALLING THE SOFTWARE
Sometimes uninstalling and then reinstalling TextBridge Pro will solve a
problem. TextBridge Pro’s Uninstall program will not remove any of the
following user-created files:
Zone templates (
User dictionaries (
TextBridge Documents (
*.zon)
*.ud)
*.txd)
To uninstall from Windows NT or Windows 2000, you must be logged
into your computer with administrator privileges.
t To uninstall or reinstall TextBridge Pro:
u Close TextBridge Pro.
u Click Start in the Window s taskbar and choose Settings É
Contro l Panel É Add/Remove Programs.
u Select TextBridge Pro and click C hange.
u Click Next in the dialog box that appears.
u Select Remove or Repair, then Next.
u Follow instructions until the process is finished.
UNINSTALLING THE SOFT WARE 83
Page 84

84 TECHNIC AL INFORMATION
Page 85

I NDEX
A
Accuracy
improvement, 31, 49
influence of brightness, 50
influence of OC R method,
31
scanning mode influence, 49
Acquire Text menu item
Acquire Text Settings
Acquired page
Acquiring images
Add Job Wizard
Adding
pages to a document, 41
to zones, 53
words to a user dictionary, 61
ADF
, 31, 48, 50
Alignment of paragraphs
Alphanumeric zone
Area reordering
ASCII text output
Attachments to mail messages
73
Auto-detect zone
Automatic Document Feeder
(ADF)
Automatic processing
AutoOCR
AutoOCR toolbar
Auto-zoning
, 26
, 21, 42
, 47
, 66
, 80
, 51, 55
, 30, 48, 50
, 25, 40
, 25, 40
, 31, 40, 51
, 45
, 45
, 24
, 54
, 25, 40
B
Basic processing steps
Black-and-white
, 21
images, 69
scanning, 49
Bold text
Brightness
, 24, 64
, 50, 81
C
Changing
paragraph order, 66
text flow between columns,
66
the order of areas, 66
zone types, 55
Character attribu tes
Checking OCR results
Clipboard
Closing a document
Color
images, 69
markers, 61
scanning, 49
Columns
,
changing text flow, 66
in tables, 56
Command buttons for automatic
processing
Comparing recognized words
with originals
Contents of TextBridge
Documents
Context-Sensitive Help
30
Contrast
Control over processing
Conversion of images
, 72
, 50, 81
, 65
, 62
, 29
, 41
, 62
, 71
, ix, 23,
, 42
, 79
Copying
and pasting text, 23
document to Clipboard, 38,
72
Custom Layout
Customizing columns in Deta il
view
, 28
Cutting and pasting text
, 31, 52
, 23
D
Deferred processing
Deleting
a zone template, 57
pages, 26, 28
Describing document layout
51
Desktop
Detail view
Direct OCR
Disk space
Dividers, placing in tables
Document
, 22
customizing colum ns in, 28
description of, 27
in Document Manager, 22
, 31, 45
, 12, 78
closing, 29
copying to Clipboard, 38, 72
double-sided, 51
export, 21
finishing, 41
in TextBridge Pro, 21
layout description, 51
managing, 26
overview, 26
, 29
, 40,
, 24
TEXTBRIDGE PRO USER’S GUI DE 85
Page 86

saving, 67
saving as you work, 30, 71
unfinished, 29
with varied layout, 51
Document Manager
Dot-matrix texts
Double-sided documents
Drawing zones
Drivers for scanners
Dropping graphics from export
70
Duplex scanners
, 22, 26
, 82
, 51
, 46
, 14
, 51
E
Editing
a user dictionary, 63
character attributes, 64
graphics, 65
paragraph attributes, 65
recognized text, 24, 65
table dividers, 24, 56
table grids, 56
tables, 65
Effect of settings
Export Results button
Exporting
file types for, 80
graphics, 70
preparing for, 68
repeated, 67, 71
to a target application, 21,
42, 67
to Clipboard, 72
to file, 70
, 32
, 40, 43
F
Fax recognition
Features new to version 11 of
TextBridge Pro
File
as export target, 69
as image source, 48
retained on uninstalling, 83
, 82
, 18
separation options, 70, 73
types, 70
types for export, 68, 80
types, supported, 79
Finding
non-dictionary words, 60
suspect words, 60
Finishing a doc ument
Formatting levels
,
80
Formatting levels for export
Formatting toolbar
Frames
in export document, 68
recognized text in, 81
G
Generating table dividers
Get Page butt o n
Getting online Help
Graphic zone
Graphics
editing, 65
in export, 70, 80
in JPEG files, 80
Grayscale
images, 69
scanning, 49
, 55
H
Help
Context-Sensitive, ix, 23, 30
online, ix
Hiding or showing markers
I
Ignore zon e
Image
acquiring, 21, 42
black-and-white, 69
color, 69
conversion, 79
, 55
, 41
, 38, 47, 60, 64,
, 68
, 22, 24
, 57
, 40, 42
, ix
, 63
grayscale, 69
quality, 50
resolution, 27, 69, 79, 81
rotating, 24
saving, 69, 79
size, 27
Image file
input, 20, 48
opening, 79
reading order, 48
samples, 77
types, 79
Image toolbar
Improving accur acy
Incomplete automatic
processing
Input
from image file, 48
from scann e r, 49
Inserting table dividers
Installing
a scanner, 14
TextBridge Pro, 13
Interface language
Interrupting automatic
processing
Irregular zones
Italic text
, 22, 24
, 31, 49
, 41
, 56
, 31
, 41
, 24, 53
, 24, 64
J
Jobs in Schedule OCR
Joining zones
, 53
, 47
L
Language
for recognition, 31, 38, 81
for user interface, 31
Launch target application
Layout description
Load File dialog box
Loading
a user dictionary, 63
a zone template, 52, 57
, 37, 40, 51
, 48
, 70
86 INDEX
Page 87

Low disk space problems
Low memor y problems
, 78
, 78
M
Mail
as export target, 73
attachments, 73
Managing documents
Manual processing
Manual zoning
Marked words in Text Editor
Markers
Matching editor view with file
Memory requirements
Menu bar
Minimum system requirements
Modifying a zone template
Moving
MS Outlook
Multi-page image files
Multiple column page s
Multiple column zone
, 61, 63
type
, 68, 80
12
between pages, 26
table dividers, 56
79
, 24, 42, 53
, 23
, 73
, 26
, 25, 42
, 63
, 12, 78
, 57
, 48, 69,
, 52
, 54
N
New features in version 11 of
TextBridge Pro
New file on blank page
No Formatting view
Non-dictionary words in
proofing
Non-printing characters
Numeric zone
, 60
, 18
, 48
, 60, 64, 68
, 24
, 54
O
OCR
, 81
AutoOCR, 25, 40
AutoOCR toolbar, 25, 40
checking OCR results, 62
definition, 20
Direct OCR, 31, 45
jobs in Schedule OCR, 47
method, 31, 38
performing OCR, 21
poor performance during, 82
proofreadin g results, 60
register applications for
Direct OCR, 45
Schedule OCR, 47
settings, 30
settings for Direct OCR, 45
Wizard, 36, 37, 39
Online
HTML Help, ix
,
registration, 17
Opening
image files, 48, 79
TextBridge Documents, 16,
48
Optical character recognition
Optimizing brightness
Options
proofing, 31
Options dialog box
Original Image
area, 22
saving, 69, 79
Overview
of document, 26
of processing steps, 21
P
Page
acquired, 26
adding to a document, 41
deleting, 26, 28
Get Page button, 40, 42
moving between pages, 26
multi-page image files, 48,
69, 79
multiple column, 52
, 30
, 50
, 20
navigation, 22
new file on blank page, 48
outline, 66
proofed, 26
recogniz ed, 26
reordering, 26
rerecognizing all, 41
selectin g multiple , 26
single column, 52, 54
single co lumn page s with
tables, 52
spreadsheet pages, 52
status, 26
zoned, 26
PaperPort
Paragraph
alignment, 24
changing order, 66
editing attributes, 65
reordering, 66
retaining paragraph styles, 70
styles, 24, 65, 70
Perform OCR button
Performance problems during
OCR
Performing
OCR, 21
recognition, 43
Placing dividers in tables
Preparing recognition results for
export
Printing
a document, 28
images, 2 3
recognition results, 23
Problems with fax recognition
82
Process options
Processing
automatically, 25, 40
basic steps of, 21
documents automatically, 40
, 46
, 40, 43
, 82
, 24
, 68
,
, 31
TEXTBRIDGE PRO USER’S GUI DE 87
Page 88

documents in future sessions,
29
documents manually, 42
from other applications, 45
incomplete automatic
processing, 41
interrupting automatic
processing, 41
manually, 25, 42
restarting automatic
processing, 41
step-by-step, 42
steps, over vi ew, 21
stopping automatic
processing, 41
switching between manual
and automatic processing,
25, 44
with OCR Wizard, 37
Proofed page
Proofing
in later sessions, 29
options, 31, 38, 60
Proofreading
OCR results, 60
Proofreader dialog box, 38,
Properties of zones
Purpose of TXD files
, 26
60
, 24, 54
, 29
Q
Quality of images
, 50
R
Reading
order of imag e files, 48
Recognition
languages, 31, 38, 81
performing, 42
preparing re sults for expor t,
68
problems with fax
recognition, 82
saving results, 70
speeding up, 82
Recognized page
Rectangular zones
Registering
applications for Direct OCR,
45
TextBridge Pro, 17
Reinstalling Textbridg e Pro
Remote proofing
Removing table dividers
Reordering
area, 66
pages, 26
paragraph, 66
zones, 24, 54
Repeated exporting
Replacing a zone template
Rerecognizing all pages
Resizing
Resizing zones
Resolution
Restarting automatic processing
Retain Flowing Columns view
Retain Fonts and Paragraphs
Retaining paragraph styles
Rotating images
Rows in tables
, 24
images, 27, 69, 79, 81
saved images, 69
41
60, 64, 68
view
, 60, 64, 68
, 26
, 53
, 83
, 29
, 56
, 67, 71
, 57
, 41
, 53
, 70
, 24
, 56
S
Safe mode
Sample images files
Saving
as TextBridge Document,
documents, 67
documents as you work, 71
images, 69
, 77
, 77
30, 71
original images, 69, 79
recognition results, 70
Save and Launch, 70
text, 70
to file, 38, 69
to TXD format, 30
zone template, 57
Scanner
Scanning
Schedule OCR
Selecting multiple p ag e s
Send Mail dialog box
,
Sending a document as a mail
,
Setting up a scanner
Setting up Direct OCR
Settings
Shortcut
Single-column
Slow recognition
Solutions for poor performance
, 49, 82
drivers, 14
duplex, 51
setting up, 14
black-and-white, 49
brightness, 30, 50
color, 49
contrast, 30
grayscale, 49
input from, 4 9
installi ng, 14
picture, 49
Wizard, 14
, 47
, 26
, 73
attachment
acquire Text, 45
effect of settings, 32
for Direct OCR, 45
in Options dialog box, 30
settings in OCR Wizard, 39
zone types, 56
pages, 52, 54
pages with tables, 52
zone, 54
76
, 73
, 14
, 45
, 55
, 82
,
88 INDEX
Page 89

Speed maximised
Splitting zones
Spreadsheet pages
Standard toolbar
Starting a user dictionary
Starting the program
Step-by-step processing
Stopping automatic processing
41
Subtracting from zones
Suggestion from dictionaries for
proofing
Supplementing template zones
57
Supported file types
Suspect words in proofing
Switching between manual and
automatic processing
Switching between Text Editor
views
, 64
System or performance problems
during OCR
System requirements
, 31
, 54
, 52
, 22, 23
, 63
, 14
, 42
,
, 54
, 61
,
, 79
, 60
, 25, 44
, 82
, 12
T
Tables
columns in, 56
dividers, placing in tables, 24
editing, 65
editing dividers, 24, 56
editing grid s, 56
generating dividers, 57
in single column pages, 52
inserting dividers, 56
moving dividers, 56
placing dividers in, 24
removing dividers, 56
rows in, 56
table handling in Text
Editor, 65
zones, 24, 55, 56
Task Manager
Technical information
, 77
, 75
Templates, zone
Testing TextBridg e Pro
Text
Acquire Text Settings, 45
ASCII output, 80
attributes text, 24
Text Editor
Text saving
TextBridge desktop
TextBridge Document
contents of, 71
definition, 29
opening, 16, 48
opening from icon, 16
purpose of TXD files, 29
saving as, 29, 71
TextBridge Pro
documents in, 21
earlier version, 1 3
installi ng, 13
new features of, 18
registering, 17
reinstalling, 83
starting, 14
testing, 77
uninstalling, 83
TextBridge Toolbox
Thumbnail view
TIFF images files
Troubleshooting
True Page view
TWAIN
TXD files
, 14
definition, 29
purpose of, 29
saving to, 30
, 52, 57, 81
, 77
, 22, 32, 60, 63
, 70
, 22
, 22, 25, 40
, 22, 26
, 79
, 75, 76
, 60, 64, 68
U
Underlined text
Unfinished documents
Unicode text output
Uninstalling TextBridge Pro
Unit of measurement
, 24, 64
, 29
, 80
, 32
, 83
Unloading a user dict iona ry
Unloading a zone templa te
User dictionaries
adding words, 61
editing, 63
loading, 63
starting, 63
unloading, 63
Using Direct OCR
, 61, 63
, 45
V
Verifying text
VGA mode
Views
Customizing columns in
Detail view, 28
Detail view, 22, 27
Detail view columns, 28
Matching editor view with
file type, 68, 80
No Formatting view, 60, 64,
68
Retain Flowing Columns
view, 60, 64, 68
Retain Fonts and Paragraphs
view, 60, 64, 68
Switching between Text
Editor views, 64
Thumbnail view, 22, 26
True Page view, 60, 64, 68
Views in Editor, 60, 64
, 62
, 77
W
Wizard
for processing, 37
for scanner instal lation, 14
Word wrapping
Working with zones
, 32
, 53
Z
Zones
adding to, 53
, 63
, 57
TEXTBRIDGE PRO USER’S GUI DE 89
Page 90

alphanumeric, 54
auto-detect, 51, 55
changing types, 55
deleting a t e mplate, 5 7
drawing, 46
graphic, 55
ignore zone, 55
irregular, 24, 53
joining, 53
manual, 24, 53, 81, 82
modifying a template, 57
multiple column, 54
numeric, 54
on page, 26
properties, 24, 54
rectangular, 53
reordering, 24, 54
replacing a template, 57
resizing, 24, 53
saving a template, 57
setting types, 56
single-column, 54
splitting, 54
subtracting from, 54
supplementing templates, 57
table, 24, 55, 56
table zone tools, 24
templates, 52, 57, 81
types, 54, 81
unloading a template, 58
working with, 53
Zoning Instructions
Zooming displays
, 43
, 23
90 INDEX
 Loading...