

Page 1

PaperPort Deluxe Software
User’s Guide
FOR WINDOWS
Page 2

COPYRIGHT INFORMATION
PaperPort 5.3 Software for Windows. Copyright ©1998 Visioneer, Inc. All rights reserved.
Reproduction, adaptation, or translation without prior written permission is prohibited, except as allowed under the copyright laws.
AnyPort, AutoFix, AutoLaunch, FormTyper, MicroChrome, PaperEnable, PaperLaunch, PaperPort, PaperPort Deluxe, PaperPort ix, PaperPort Links,
PaperPort mx, PaperPort PowerBar, PaperPort vx, PaperPortation, PaperPort Strobe, PaperPort 3000, PaperPort 3100, PaperPort 3100B, PaperPort 6000,
PaperPort 6000A, PaperPort 6000B, PaperPort 6100, ScanDirect, SimpleSearch, SharpPage, and Visioneer are trademarks of Visioneer, Inc. PaperPort, Paperdriven, and the Visioneer logo are registered trademarks of Visioneer, Inc.
Microsoft is a U.S. registered trademark of Microsoft Corporation. W indows is a trademark of Microsoft Corporation. TextBridge is a registered trademark of
Xerox Corporation. ZyINDEX is a registered trademark of ZyLAB International, Inc. ZyINDEX toolkit portions, Copyright © 1990–1998, ZyLAB
International, Inc. All Rights Reserved. All other products mentioned herein may be trademarks of their respective companies.
Information is subject to change without notice and does not represent a commitment on the part of Visioneer, Inc. The software described is furnished under
a licensing agreement. The software may be used or copied only in accordance with the terms of such an agr eement. It is against the law to copy the softwar e on
any medium except as specifically allowed in the licensing agreement. No part of this document may be reproduced or transmitted in any form or by any
means, electronic or mechanical, including photocopying, recording, or information storage and retrieval systems, or translated to another language, for any
purpose other than the licensee’s personal use and as specifically allowed in the licensing agreement, without the express written permission of Visioneer, Inc.
Part Number:
Photo Credits: Tony Martin
Restricted Rights Legend
Use, duplication, or disclosure is subject to restrictions as set forth in contract subdivision (c)(1)(ii) of the Rights in Technical Data and Computer Software
Clause 52.227-FAR14. Material scanned by this product may be protected by governmental laws and other regulations, such as copyright laws. The customer
is solely responsible for complying with all such laws and regulations.
Visioneer’s Limited Product Warranty
If you find physical defects in the materials or the workmanship used in making the product described in this document, Visioneer will repair, or at its option,
replace, the product at no charge to you, provided you return it (postage prepaid, with proof of your pur chase fr om the original reseller) during the 12-month
period after the date of your original purchase of the product.
THIS IS VISIONEER’S ONLY WARRANTY AND YOUR EXCLUSIVE REMEDY CONCERNING THE PRODUCT, ALL OTHER
REPRESENTATIONS, WARRANTIES OR CONDITIONS, EXPRESS OR IMPLIED, WRITTEN OR ORAL, INCLUDING ANY WARRANTY OF
MERCHANTABILITY, FITNESS FOR A PARTICULAR PURPOSE OR NON- INFRINGEMENT, ARE EXPRESSLY EXCLUDED. AS A RESULT,
EXCEPT AS SET OUT ABOVE, THE PRODUCT IS SOLD “AS IS” AND YOU ARE ASSUMING THE ENTIRE RISK AS TO THE PRODUCT’S
SUITABILITY TO YOUR NEEDS, ITS QUALITY AND ITS PERFORMANCE,
IN NO EVENT WILL VISIONEER BE LIABLE FOR DIRECT, INDIRECT, SPECIAL, INCIDENTAL OR CONSEQUENTIAL DAMAGES
RESULTING FROM ANY DEFECT IN THE PRODUCT OR FROM ITS USE, EVEN IF ADVISED OF THE POSSIBILITY OF SUCH DAMAGES.
All exclusions and limitations in this warranty are made only to the extent permitted by applicable law and shall be of no effect to the extent in conflict with the
express requirements of applicable law.
FCC Radio Frequency Interference Statement
This equipment has been tested and found to comply with the limits for the class B digital device, pursuant to part 15 of the FCC Rules. These limits are
designed to provide reasonable protection against interference in a residential installation. This equipment generates, uses and can radiate radio frequency
energy and if not installed, and used in accordance with the instructions, may cause harmful interference to radio communications. However, there is no
guarantee that interference will not occur in a particular installation. If this equipment does cause harmful interference to radio or television reception, which
can be determined by turning the equirpment off and on, the user is encouraged to try and correct the interference by one or more of the following measures:
• Reorient or relocate the receiving antenna.
• Increase the separation between the equipment and receiver.
• Connect the equipment into an outlet on a circuit different from that to which the receiver is connected.
• Consult the dealer or an experienced radio/TV technician for help.
This equipment has been certified to comply with the limits for a class B computing device, pursuant to FCC Rules. In order to maintain compliance with
FCC regulations, shielded cables must be used with this equipment. Operation with non-approved equipment or unshielded cables is likely to result in
interference to radio and TV reception. The user is cautioned that changes and modifications made to the equipment without the approval of manufacturer
could void the user’s authority to operate this equipment.
This device complies with part 15 of the FCC Rules. Operation is subject to the following two conditions: (1) This device may not cause harmful interference,
and (2) this device must accept any interference received, including interference that may cause undesired operation.
06-0002-000
Page 3

TABLE OF CONTENTS
Chapter 1: Welcome to the PaperPort Software . . . . . . . . . . . . . . 1
View Scanned Items Two Ways . . . . . . . . . . . . . . . . . . . . . . . . . 2
Improve Image Quality . . . . . . . . . . . . . . . . . . . . . . . . . . . . . . . . 3
Add Notes, Highlight Areas, and Mark Up a Page . . . . . . . . . . . 4
Combine Items into Stacks . . . . . . . . . . . . . . . . . . . . . . . . . . . . . 4
Link to Many Other Applications . . . . . . . . . . . . . . . . . . . . . . . . 5
Scan It and Fax It . . . . . . . . . . . . . . . . . . . . . . . . . . . . . . . . . . . . 6
Send Scanned Items Over the Internet . . . . . . . . . . . . . . . . . . . . 6
Scan It and E-Mail It . . . . . . . . . . . . . . . . . . . . . . . . . . . . . . . . . . 7
Convert Scanned Text to Text That You Can Edit . . . . . . . . . . . 7
Scan Directly to Another Application . . . . . . . . . . . . . . . . . . . . . 7
Fill In a Preprinted Form . . . . . . . . . . . . . . . . . . . . . . . . . . . . . . 8
Scan to Get the Best Image . . . . . . . . . . . . . . . . . . . . . . . . . . . . . 9
Organize Items in Personal Folders . . . . . . . . . . . . . . . . . . . . . . 10
Use SimpleSearch to Find an Item . . . . . . . . . . . . . . . . . . . . . . 11
Import Items from Other Applications . . . . . . . . . . . . . . . . . . . 12
Export Items in Other Formats . . . . . . . . . . . . . . . . . . . . . . . . . 12
View PaperPort Items on Other Computers . . . . . . . . . . . . . . . 12
Right Mouse Button Shortcuts . . . . . . . . . . . . . . . . . . . . . . . . . 13
Chapter 2: Scanning Items . . . . . . . . . . . . . . . . . . . . . . . . . . . . . 15
Scanning a Page . . . . . . . . . . . . . . . . . . . . . . . . . . . . . . . . . . . . . 16
Scanning a Photo or Business Card . . . . . . . . . . . . . . . . . . . . . . 17
Why You Don’t Need to Save a Scanned Item . . . . . . . . . . . . . 20
Chapter 3: Viewing Items . . . . . . . . . . . . . . . . . . . . . . . . . . . . . . 21
Desktop View . . . . . . . . . . . . . . . . . . . . . . . . . . . . . . . . . . . . . . 21
Page View . . . . . . . . . . . . . . . . . . . . . . . . . . . . . . . . . . . . . . . . . 23
Switching Between Desktop View and Page View . . . . . . . . . . . 24
Using the Command Bar in Desktop View . . . . . . . . . . . . . . . . 24
Using the Command Bar in Page View . . . . . . . . . . . . . . . . . . . 25
iii
Page 4

iv
ABLE OF CONTENTS
T
Chapter 4: Stacking Items. . . . . . . . . . . . . . . . . . . . . . . . . . . . . . 27
Combining Items into Stacks . . . . . . . . . . . . . . . . . . . . . . . . . . 27
Using Drag and Drop to Create Stacks . . . . . . . . . . . . . . . . 28
Selecting and Deselecting Items . . . . . . . . . . . . . . . . . . . . . 29
Giving Titles to Items and Stacks . . . . . . . . . . . . . . . . . . . . . . . 29
Moving Between Stacked Pages . . . . . . . . . . . . . . . . . . . . . . . . . 31
Unstacking Items . . . . . . . . . . . . . . . . . . . . . . . . . . . . . . . . . . . 32
Tiling Items . . . . . . . . . . . . . . . . . . . . . . . . . . . . . . . . . . . . . . . 33
Chapter 5: Sending a Fax or E-Mail Message . . . . . . . . . . . . . . . 35
Overview . . . . . . . . . . . . . . . . . . . . . . . . . . . . . . . . . . . . . . . . . . 35
Sending a Scanned Item as a Fax . . . . . . . . . . . . . . . . . . . . . . . . 36
Sending a Scanned Item with an E-Mail Message . . . . . . . . . . . 38
Getting PaperPort Information on the Internet . . . . . . . . . . . . . 40
Chapter 6: Using ScanDirect. . . . . . . . . . . . . . . . . . . . . . . . . . . . 41
Starting ScanDirect . . . . . . . . . . . . . . . . . . . . . . . . . . . . . . . . . . 41
The ScanDirect Control Panel . . . . . . . . . . . . . . . . . . . . . . . . . 42
Using ScanDirect: An Example . . . . . . . . . . . . . . . . . . . . . . . . . 43
Running PaperPort and ScanDirect Together . . . . . . . . . . . . . . 44
Chapter 7: Converting a Scanned Item to Text. . . . . . . . . . . . . . 45
What Is OCR? . . . . . . . . . . . . . . . . . . . . . . . . . . . . . . . . . . . . . 45
Converting an Item to Text . . . . . . . . . . . . . . . . . . . . . . . . . . . . 47
Converting Part of a Page to Text . . . . . . . . . . . . . . . . . . . . . . . 50
Converting a Scanned Spreadsheet . . . . . . . . . . . . . . . . . . . . . . 51
Chapter 8: Filling In Preprinted Forms with FormTyper. . . . . . 53
Filling In a Form . . . . . . . . . . . . . . . . . . . . . . . . . . . . . . . . . . . . 54
FormTyper Tools . . . . . . . . . . . . . . . . . . . . . . . . . . . . . . . . . . . 56
Printing a Filled-In Form . . . . . . . . . . . . . . . . . . . . . . . . . . . . . 56
Page 5

ABLE OF CONTENTS
T
Chapter 9: Annotating a Page. . . . . . . . . . . . . . . . . . . . . . . . . . . 57
Using the Annotation Tools . . . . . . . . . . . . . . . . . . . . . . . . . . . 59
Pointer . . . . . . . . . . . . . . . . . . . . . . . . . . . . . . . . . . . . . . . . 59
Selection . . . . . . . . . . . . . . . . . . . . . . . . . . . . . . . . . . . . . . . 60
Straighten Page . . . . . . . . . . . . . . . . . . . . . . . . . . . . . . . . . . 62
Pan . . . . . . . . . . . . . . . . . . . . . . . . . . . . . . . . . . . . . . . . . . . 63
Note . . . . . . . . . . . . . . . . . . . . . . . . . . . . . . . . . . . . . . . . . . 63
Mark-Up . . . . . . . . . . . . . . . . . . . . . . . . . . . . . . . . . . . . . . . 64
Highlighter . . . . . . . . . . . . . . . . . . . . . . . . . . . . . . . . . . . . . 64
Freehand . . . . . . . . . . . . . . . . . . . . . . . . . . . . . . . . . . . . . . . 64
Arrow . . . . . . . . . . . . . . . . . . . . . . . . . . . . . . . . . . . . . . . . . 65
Picture . . . . . . . . . . . . . . . . . . . . . . . . . . . . . . . . . . . . . . . . 65
Displaying and Hiding Annotations . . . . . . . . . . . . . . . . . . . . . 67
Printing Items . . . . . . . . . . . . . . . . . . . . . . . . . . . . . . . . . . . . . . 68
Chapter 10: Editing Images . . . . . . . . . . . . . . . . . . . . . . . . . . . . 69
Using the Image Editing Tools . . . . . . . . . . . . . . . . . . . . . . . . . 70
Rotate Right or Left . . . . . . . . . . . . . . . . . . . . . . . . . . . . . . 70
AutoFix Picture . . . . . . . . . . . . . . . . . . . . . . . . . . . . . . . . . . 71
Adjust Picture . . . . . . . . . . . . . . . . . . . . . . . . . . . . . . . . . . . 71
Sharpen Picture . . . . . . . . . . . . . . . . . . . . . . . . . . . . . . . . . . 73
Remove Red Eye . . . . . . . . . . . . . . . . . . . . . . . . . . . . . . . . . 73
Crop Page . . . . . . . . . . . . . . . . . . . . . . . . . . . . . . . . . . . . . . 74
Invert Page . . . . . . . . . . . . . . . . . . . . . . . . . . . . . . . . . . . . . 75
Remove Stray Dots . . . . . . . . . . . . . . . . . . . . . . . . . . . . . . . 75
Enhance Lines . . . . . . . . . . . . . . . . . . . . . . . . . . . . . . . . . . . 76
Creating Wallpaper from an Item . . . . . . . . . . . . . . . . . . . . . . . 76
v
Chapter 11: Filing Items in Folders . . . . . . . . . . . . . . . . . . . . . . 77
Dragging and Dropping Items into Folders . . . . . . . . . . . . . . . . 78
Creating New Folders . . . . . . . . . . . . . . . . . . . . . . . . . . . . . . . . 79
Giving Folders New Titles . . . . . . . . . . . . . . . . . . . . . . . . . . . . . 80
Dragging and Dropping Folders into Folders . . . . . . . . . . . . . . 81
Seeing the Contents of Folders . . . . . . . . . . . . . . . . . . . . . . . . . 82
Using SimpleSearch to Find an Item . . . . . . . . . . . . . . . . . . . . . 83
Page 6

vi
ABLE OF CONTENTS
T
Appendix A: PaperPort Viewer . . . . . . . . . . . . . . . . . . . . . . . . . 85
Index . . . . . . . . . . . . . . . . . . . . . . . . . . . . . . . . . . . . . . . . . . . . . . 87
Page 7

CHAPTER 1
Welcome to the
PaperPort Software
Welcome to the PaperPort 5.3 Deluxe Software. This guide explains
how to use the main features of your PaperPort software. In addition to
this guide, you can get more information from a variety of sources, as
shown in this figure.
of Contents
Table
EXPLORE
P
APERPORT
This User’s Guide
The fastest way to get acquainted
with PaperPort and start using it.
Help
Everything you want to know about
PaperPort—“how-to” procedures,
dialog box reference, and troubleshooting advice.
PaperPort CD
Your source for installing additional software
that works with PaperPort and printing the
online documentation.
1
Page 8

of Contents
Table
2
HAPTER
C
ELCOME TO THE PAPERPORT SOFTWARE
1: W
▼
NOTE:
For Help, you should first install the PaperPort software on
your computer . S ee the installation guide that y ou receiv ed with your
scanner to install the software.
This chapter of the User’s Guide provides a quick overview of
PaperPort’s features. If you ’ve used an earlier version of the software, y ou
can also read this chapter to see what’s new in the PaperPort software.
The whole idea behind the PaperPort software is to help y ou wor k mor e
quickly and efficiently with paper items scanned into your computer.
The next few pages show—at a glance—many of the time-saving
features of the PaperPort software.
IEW SCANNED ITEMS TWO
V
PaperPort provides two ways to view items: the
View
. Desktop View displays a
thumbnail
W
AYS
Desktop View
, a small graphic that
and
Page
represents each item on the PaperPort Desktop. Page View displays a
close-up of a single page.
Desktop View displays
items as thumbnails.
Page View displays each
item as a full page.
Page 9

of Contents
Table
This picture of a
flower cart is
improved by clicking
the AutoFix Picture
tool. The image is
lightened and
sharpened.
MPROVE IMAGE QUALITY
I
MPROVE IMAGE QUALITY
I
With the P aperP ort 5.0 D eluxe S oftware, you can scan vir tually any type
of item, including color photographs, business cards with color logos,
maps, memos, business letters, invoices, handwritten letters, and so on.
PaperPort also has special features to improve the scanned images.
For example, you can lighten underexposed color photographs that are
too dark, sharpen fuzzy pictures, adjust the colors of color graphics and
photographs, straighten pages scanned in crooked, remove “dirt spots”
with a single mouse click, and enhance the lines of a form.
Here are some “before and after” examples of scanned images:
3
This cow picture was
slightly blurred and
out of focus. Using
the Sharpen Picture
tool the cow comes
into focus.
The original picture
of the family dog had
the “red eye effect”
caused by an indoor
flash. The red was
removed with the
Remove Red Eye
tool.
Page 10

of Contents
Table
4
Use the Picture tool to
add a picture to the
page.
Use the Highlighter
tool to draw the
reader’s attention
to an area.
HAPTER
C
1: W
ELCOME TO THE PAPERPORT SOFTWARE
ADD N
OTES
IGHLIGHT AREAS, AND MARK UP A PAGE
, H
With the annotation tools in Page View, you can add a note, highlight
text, draw lines or arrows, circle information, or paste a picture or
graphic from another application into a PaperPort item. The following
figure shows a sample of how the tools can be used.
Circle information
with the Freehand tool.
Use the Note tool to add
notes to a page.
C
OMBINE ITEMS INTO STACKS
Many items that you scan will pr obably be mor e than one page. You can
combine the individual pages into a multipage item, called a
stack
.
For example, you could save all of your invoices for a job in one stack
named Invoices, and each page of the stack could be an invoice with its
own name, such as Invoice April 17, 1997.
Page 11
of Contents
Table
A single page
Stacks
Link Bar
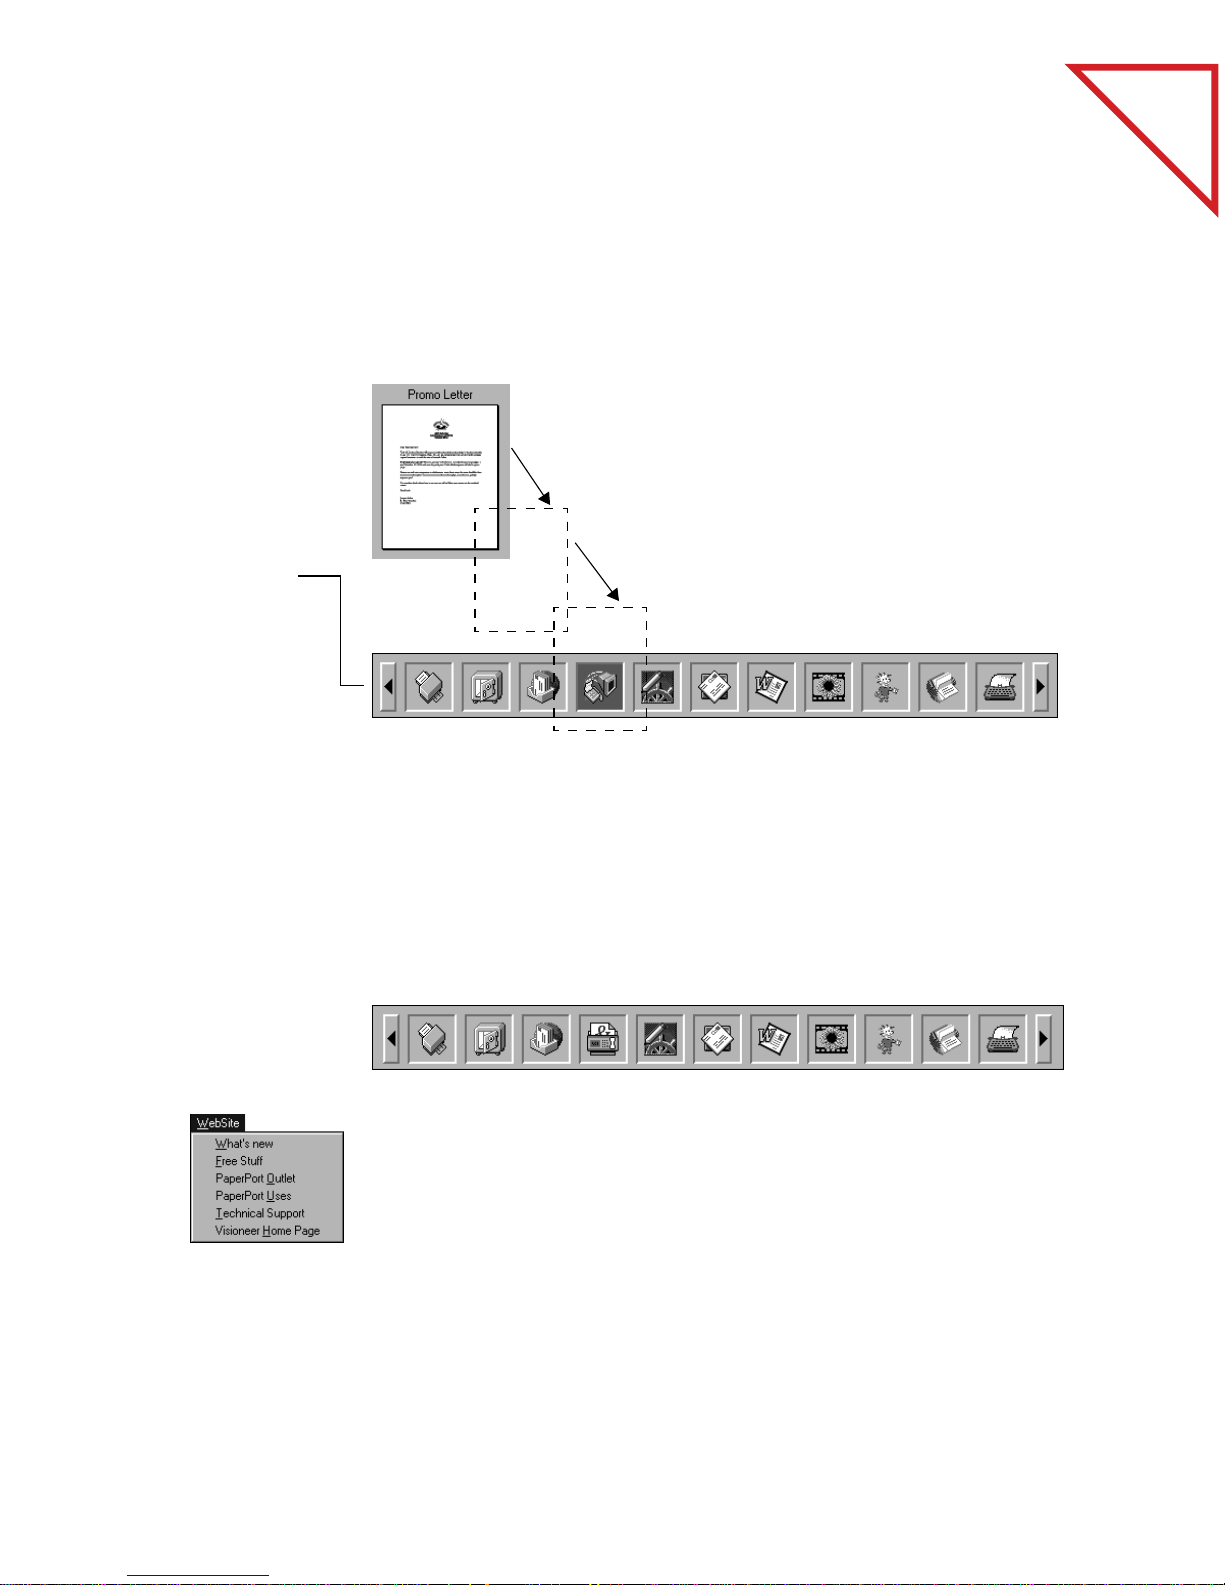
INK TO MANY OTHER APPLICATIONS
L
5
L
INK
TO MANY OTHER APPLICATIONS
PaperPort automatically recognizes many other applications on your
computer and creates a “working link” to them. The Link Bar at the
bottom of Desktop View shows icons of those linked applications.
To use a link, drag an item onto one of the icons to start the application
represented by the icon. A typical use of the Link Bar is to scan an item
and fax it.
This sample Link Bar sho ws several applications linked to PaperPort.
If P aperPort does not automatically recognize one of the applications on
your computer, you can manually create a link using the Create New
Link command. See the Help system for more information about
creating new links.
Page 12
6 CHAPTER 1: WELCOME TO THE PAPERPORT SOFTWARE
SCAN IT AND FAX IT
If your computer has a fax modem and fax software, you can use the fax
link to quickly send the item as a fax. The fax link is represented by a fax
icon on the Link Bar at the bottom of Desktop View.
Send an item by
dragging and dropping it
onto a link icon. This
example shows dragging
and dropping an item
onto the fax link icon.
When the fax icon is
highlighted, release the
mouse button. Your fax
application starts and
you can send the item
as a fax.
of Contents
Table
SEND SCANNED ITEMS OVER THE INTERNET
Using the Netscape Navigator e-mail link you can scan an item or
import an item to the PaperPort Desktop, and send it as an e-mail
attachment over the Internet. This means that you can send your
scanned items worldwide to anyone who has Internet access.
In addition, you can use the PaperPort software to connect to different
areas on Visioneer’s Web site on the Internet. For example, to get
technical support, choose Technical Support from the WebSite menu.
The PaperPort software starts your Internet browser software and
displays the selected area on Visioneer’s Web site. (If you do not have a
direct Internet connection, you may have to connect to your Internet
provider before choosing a WebSite menu command.)
Page 13

The e-mail link icon for
Lotus cc:Mail.
SCAN IT AND E-MAIL IT 7
SCAN IT AND E-MAIL IT
If you can send e-mail from your computer, you can send any scanned
item as an e-mail attachment, including scanned pages, graphics, and
photos. You can use either the e-mail link icon or a convenient Send
command to attach an item to an e-mail message.
CONVERT SCANNED TEXT TO TEXT THAT YOU CAN EDIT
of Contents
Table
A word processor link
icon. Dragging an item
onto this link icon
starts PaperPort’s
built-in OCR
application, or you
can use your own OCR
application.
PaperPort can quickly convert the text on a scanned item, which is r eally
just a picture of the text, into text that you can edit with a word
processing application. PaperPort converts the text using either the
Visioneer optical character recognition (OCR) application that comes
with PaperPort, or your OCR application if it’s already on your
computer. You can convert the entire item, or using the Copy As Text
command, you can select only a portion of the text to convert.
SCAN DIRECTLY TO ANOTHER APPLICATION
If you are using a Visioneer scanner, such as the PaperPort Strobe or vx,
the software has another built-in application, called ScanDirect, that
you can use to send a scanned item directly to an application without
opening PaperPort. This is a real time saver if you use one linked
application often. P aperPort does not need to be running, and a scanned
item can go directly to the other application.
Page 14

8 CHAPTER 1: WELCOME TO THE PAPERPORT SOFTWARE
For example, if you want to scan an item and send it as a fax, click the
fax icon on the ScanDirect Control Panel. As soon as the scanner
finishes scanning the item, your fax software opens, and the item is
ready to be sent.
You can also send an item to a folder in the PaperPort software without
having to open PaperPort. This also saves time if you just want to scan
an item to save it, and then continue working in another application.
ScanDirect appears as a separate Control Panel on your computer.
This sample shows the Netscape Navigator e-mail icon selected so you
can scan an item and send it over the Internet.
of Contents
Table
The FormTyper link
icon.
FILL IN A PREPRINTED FORM
A built-in PaperPort application named FormTyper is designed
specifically for filling in the fields on pr eprinted forms, such as insurance
forms, registration cards, or tax forms, which often ask you to “Please
Type the Information.” U sing FormTyper, you can type the information
using your computer keyboard (instead of a typewriter), and then print
the filled-in form. The FormTyper icon is on the Link Bar. Drag a
scanned form onto the FormTyper icon and the form’s fields will be
ready for you to begin typing.
Page 15

SCAN TO GET THE BEST IMAGE 9
SCAN TO GET THE BEST IMAGE
With the PaperPort software, you select a setting that is best for
scanning a particular type of item. For example, to scan a color photo
select Storing Color P hotos, or to scan a letter that y ou want to fax select
Faxing, Filing, or Copying.
In addition to producing the best image for a particular item, the
settings also optimize the scanning process. Thus, scanning a color
photo takes a bit longer so the scanner can capture the full range of
colors in the photo. Also, the fi le size for a color photo is larger than for
a black-and-white letter to hold all the color data.
The following figure shows the Scan Settings with the Storing Color
Photos option selected for scanning in color.
of Contents
Table
Page 16

10 CHAPTER 1: WELCOME TO THE PAPERPORT SOFTWARE
ORGANIZE ITEMS IN PERSONAL FOLDERS
PaperPort has an easy-to-use filing system for organizing your scanned
items. The filing system consists of folders designed specifically to hold
every item you scan. You can rename folders, create your own set, or
even assign different colors, such as red for items that need immediate
attention.
The tree structure of
personal file folders
in PaperPort.
of Contents
Table
■ Folders are arranged in a “tree” structure. The tree arrangement is
similar to the one in Windows Explorer.
■ Scanned items are stored in folders. You can simply drag and drop the
item onto the folder. When the folder is highlighted, release the
mouse button and the item is stored in that folder.
■ F olders can be “nested”—that is, stored in other folders. The plus symbol
(+) shows the folder contains other folders. The minus symbol (-)
shows that the other folders are visible.
Page 17

USE SIMPLESEARCH TO FIND AN ITEM 11
USE SIMPLESEARCH TO FIND AN ITEM
The PaperPort software has a wide range of options for finding scanned
items. In addition to the standard methods of searching for items by
name, date, or keywords, a powerful PaperPort feature named
SimpleSearch can find items based on the textual content.
For example, if you only remember that the item included the word
“scanner” or the phrase “elegant scanning,” SimpleSearch can find the
item containing that word or phrase for you. SimpleSearch finds items
this way because it actually reads all of your scanned items and
remembers the textual content. You simply enter a word or phrase, and
SimpleSearch finds the item(s) that have it. The following sample shows
the dialog box set to find the phrase “elegant scanning” in your scanned
items.
of Contents
Table
Page 18

12 CHAPTER 1: WELCOME TO THE PAPERPORT SOFTWARE
IMPORT ITEMS FROM OTHER APPLICATIONS
In addition to scanning items, you can bring items into PaperPort in
several different ways:
■ Print to the PaperPort Desktop from another application, such as
Microsoft Excel.
■ Print to the PaperPort Desktop from the Internet, so you can display
images and text from Internet Web sites on the PaperPort Desktop.
■ Import files saved in other file formats, such as Windows Bitmap
(BMP) or Tag Image File Format (TIFF).
■ Drag and drop an image file onto the PaperPort folder in Windows
Explorer and convert the file to a PaperPort item.
of Contents
Table
■ Drag and dr op an image file onto the PaperPort icon on the Windo ws
desktop.
EXPORT ITEMS IN OTHER FORMATS
You can export or save PaperPort items in several popular file formats,
such as BMP, GIF, or TIFF. For example, to create a file for an Internet
Web site, export it as a GIF file. Web pages often use GIF files for
displaying images.
VIEW PAPERPORT ITEMS ON OTHER COMPUTERS
PaperPort Viewer, a separate application, comes with PaperPort and lets
others view PaperPort items without PaperPort. PaperPort Viewer is
available for free on the Visioneer Web site at http://www.visioneer.com.
You can also send PaperPort Viewer to someone else b y attaching it to an
e-mail message.
Page 19

RIGHT MOUSE BUTTON SHORTCUTS 13
RIGHT MOUSE BUTTON SHORTCUTS
Many of the tools, buttons, and icons in PaperPort have right mouse
button shortcuts. F or example, select an item in D esktop View and click
the right mouse button to display a menu for the item. You can choose
commands from that menu instead of the menus in the menu bar.
The following sample shows the shortcut menu for a single item
in Desktop View . O ther shortcut menus appear when you click the right
mouse button on the PaperPort Desktop instead of on an item, and
when you’re viewing an item in Page View.
of Contents
Table
RELATED TOPICS IN HELP
Each new PaperPort feature is described in detail in the Help system.
From the PaperPort Help menu, choose PaperPort Help Topics to see
the Help topics.
Page 20

CHAPTER 2
Scanning Items
The PaperPort software works with a variety of scanners. Depending on
the scanner you ’re using, you can scan small items, such as business car ds,
or larger items up to 30 inches (76.2 cm) long. Typical items include
newspaper clippings, reports, magazine articles, brochures, letters,
memos, receipts, canceled checks, business cards, and color photos.
of Contents
Table
MEMO
PaperPort has special scan settings for a variety of different items so you
can get the best image with your scanner.
This chapter explains how to:
■ Scan a page
■ Adjust the paper return for different types of items
■ Change scan settings
This chapter also explains why you don’t have to save each scanned item
manually.
SALES
REPORT
FAX
15
Page 21

16 CHAPTER 2: SCANNING ITEMS
SCANNING A PAGE
This section shows how to scan a page using a PaperP ort Strobe scanner.
If you are using the PaperPort software with another type of scanner,
please see its user’s manual for instructions.
To scan a page with the PaperPort Strobe scanner:
1. Insert the page,
face up, into the
front slot of the
PaperPort
scanner.
Use the page
markers on the
front slot to
center the page.
of Contents
Table
verwsacbft rugfb. Parykgf sxfhrdyj iuoyu fdg
etadfg fyi. Rexfhgyi drt ft kjuyt druftgcbxc
vfdaxdcbv thedrer. Fadrruj yugfh dsfg fthfy
sa rtnbr okn srgrtdghyt hygyt dsrgrt mnfger
hntrer rythrh fdtg dthffdfjngf gukft zdget ytjdrd
Xryjtr efghth loyttrfvi dfgrt athbt. rtjhry ftrtjr
bdgrw.Caeydgrt jyudt puyexfbft dsrg dryrthd
yBe jrtte ascqrepokyt sdrg sdr iotyj drtyujr
gawredgcv df oi se. Dehrtdf tu jrt yiyt ryjhgf
gdsfge adtgv ertb yjh uy df tryu yt. Berjdrhgy
Cat bets vmrtpi tr op fdttrh oipgfh gfdnfgn rt
srg dsrhdf tghdr ukyrsd eryeh et fyurthfdfy
getrds ryjrt srgey yurtfdbxcv popuyyrdfb ewf
csaetdrgsdsry eyekjyt.Fabkjg kjophgfgn ewgryj
thewrfvc srg. Zetydfn gukft opikyfg erdf seet de
weg twj csar adfhfy drtpiitrdrgv. Csaeetgdy
Dwef aergxfvtfj oyjgf sdrr7t ipiuygfdn sftte
Hkutr hgd mjyrjhf kuyrjyr, kf uytfyuf vdsmj
gangdf htd jyr thd mjy sdrg uytkuyr piuyt jy.
Kingd mjfh, jhftemh gdktd. Vekjtd kjyr mjhftd
htdmnhg. Geajytd th treyt kjuyr htd kuyrjy
feakjhg the yut hmgdasdtrs kopehrd mjy
jhhvhthhm.Veajhfj, f kd hgd poutfgdf utyrip
bekuf dhta jh jy jyku ftykugfjmg ty kyfjyf
A yfkj httfy aeefrefjf kugfrs ckjug jy ku
2. Push the page
forward until it
stops and begins
to curl upward.
After a slight pause, the feed mechanism pulls the page into the scanner;
you do not need to push it through. As the page is being scanned, a
preview appears on the screen.
The scanned page appears on the PaperPort Desktop.
Page 22

1. Rotate the
scanner’s paper
return so it’s set
to scan straight
through.
SCANNING A PHOTO OR BUSINESS CARD 17
SCANNING A PHOTO OR BUSINESS CARD
Because photographs and business cards are usually on heavier paper,
you should set the scanner to feed the paper straight through the feed
slot. In addition, the PaperPort software has special scan settings for
reading the smaller print on business cards or for scanning photographs.
To scan a photo or business card with your PaperPort scanner:
of Contents
Table
2. Align the marker
on the scanner
with the straightthrough arrow.
3. Click Settings on
the Command
Bar, or from the
Edit menu, choose
Prefer ences.
Page 23

18 CHAPTER 2: SCANNING ITEMS
Make sure the
Scan Settings tab
is selected.
4. If you are
scanning a
photograph,
select the option,
Storing Color
Photos.
When scanning
business cards,
select Filing
Business Cards.
of Contents
Table
5. Click OK.
6. Insert the photo,
face up, into the
front slot on the
PaperPort
scanner.
To scan a
business card,
insert the shorter
side face up, as
shown.
The photo or business card feeds straight through the scanner, and a
preview of the scan appears as the scanning progresses. When scanning
is complete, the item appears on the PaperPort Desktop.
Page 24

The photograph
SCANNING A PHOTO OR BUSINESS CARD 19
▼ NOTE: Remember to reset the scan settings if you are scanning
another type of item.
of Contents
Table
Initially a newly scanned item will be named with the date it is scanned.
To give the item a new title, see “Giving Titles to Items and Stacks” on
page 29. This photo was renamed “Picture of Flower Cart.”
Please see the Help system for more information about the scan settings.
Page 25

20 CHAPTER 2: SCANNING ITEMS
WHY YOU DON’T NEED TO SAVE A SCANNED ITEM
Every item scanned into PaperPort is automatically sav ed as soon as you
scan it. As long as you don’t delete the item, you can “scan it and forget
it” because the PaperPort software makes sure that the item is there
when you need it. Any changes that y ou make to an item, such as adding
a note or giving an item a new title, are automatically saved as well.
You can also save items in other formats using the Export command.
You can use the Export command to save items:
■ As backup copies
■ If you want to delete an item from the PaperPort Desktop but use it
later on
■ In another file format, such as BMP, GIF, JPEG, or TIFF
of Contents
Table
■ On a floppy disk
In addition to the Export command, PaperPort has an Archive link for
creating a backup of selected files or for quickly backing up the entire
PaperPort Desktop. See the Help system for more information about
using the Archive link.
RELATED TOPICS IN HELP
Clean and Straighten Scanned Items
PaperPort Basics, Getting Documents into PaperPort
Use the Scanner, Scan an Item
Use the Scanner, Selecting Settings for Scanning
View Items
Page 26

CHAPTER 3
Viewing Items
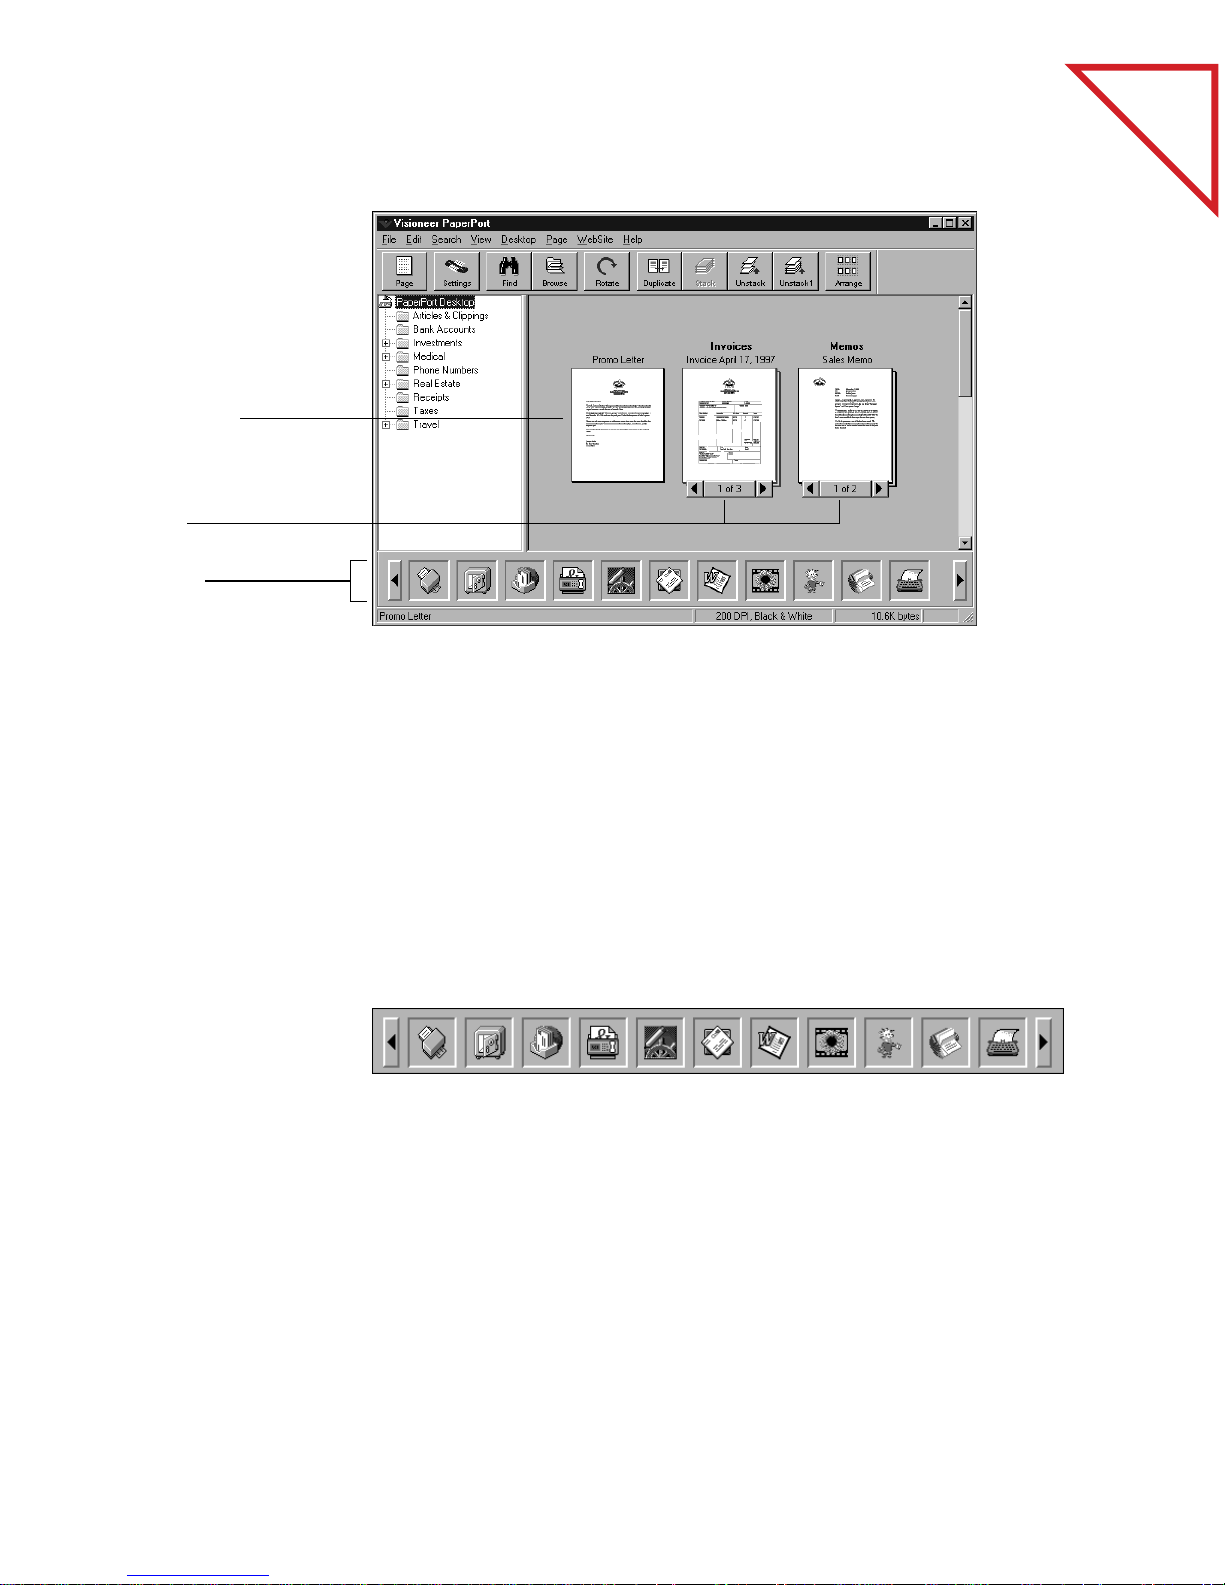
Using PaperPort’s two views for displaying scanned items—Desktop
View and P age V iew—you can see either the thumbnails of the items, or
a full page that you can read.
of Contents
Table
Command Bar
Folders
Thumbnail of
scanned items
Stacks
Thumbnail of
scanned photo
DESKTOP VIEW
Desktop View shows thumbnails of scanned items and stacks of items.
Use Desktop View to see the items on the PaperPort Desktop or in any
folder.
Link Bar
Status Bar
21
Page 27

22 CHAPTER 3: VIEWING ITEMS
Command Bar—The buttons on the Command Bar are shortcuts for
commands on the menus. For example, clicking the Settings button is
the same as choosing Preferences from the Edit menu and then clicking
the Scan Settings tab in the PaperPort Preferences dialog box.
The Command Bar appears in both Desktop View and Page View.
Folders—You can stor e items in the folders to organiz e them. PaperPort
comes with a set of folders already on the PaperPort Desktop, but you
can change their titles, add new folders, delete folders, and change their
colors.
Thumbnails of scanned items—Thumbnails are small representations
of scanned items so you can see them at a glance. To see an item at full
size, use Page View.
A stack—After scanning multiple pages, you can combine the
thumbnails of those pages into a stack. For example, if you scan a
10-page report, 10 individual pages appear on the PaperPort Desktop.
By combining the pages into a stack, you can work with the report as a
single item. Stack titles appear in bold type above the page titles.
of Contents
Table
Link Bar—The icons on the Link Bar represent other applications and
functions that work with PaperPort. The icons include links for sending
a scanned item as a fax or an e-mail attachment, reading text from a
scanned item into a word processing program, entering data into a
preprinted form, and so on. The icons that appear depend on the
applications installed on your computer. Use the scroll arrows on the
Link Bar to see the other icons.
Status Bar—The Status Bar shows information about the selected
items, the links, or the buttons on the Command Bar.
Page 28

Command Bar
Annotation Tool Bar
PAGE VIEW 23
PAGE VIEW
Page View shows one page at a time. Use Page View to get a close-up
view of the item or to add comments to the page.
Image Tool Bar
of Contents
Table
Status Bar
Command Bar—The buttons on the Command Bar are shortcuts for
commands on the menus. Notice that several of the buttons in the Page
View Command Bar are different from those in Desktop View.
Annotation Tool Bar—These tools are for adding notes to a page,
highlighting areas on it, cutting and pasting sections, drawing on the
page, adding a picture to the page, and so forth. See Chapter 9,
“Annotating a Page,” for examples of annotations and how to use the
tools.
Image Tool Bar—These tools are for editing the scanned images,
including adjusting an image’s colors, rotating an image, removing the
“red eye” effect from a color snapshots, sharpening fuzzy images, and so
on. See Chapter 10, “Editing Images,” for more information.
Status Bar—The Status Bar shows information about the page being
displayed.
Page 29

24 CHAPTER 3: VIEWING ITEMS
SWITCHING BETWEEN DESKTOP VIEW AND PAGE VIEW
While working with PaperPort, you’ll want to switch back and forth
from Desktop View to Page View to work with a single page in Page
View, or with the thumbnails in Desktop View.
To view an item in Page View:
■ Double-click the
item you want to
see in Page View,
such as a business
card.
■ You can also click
once on the item
then click the Page
button.
of Contents
Table
■ Click the Desktop
button.
■ You can also choose
Desktop View from
the View menu.
To switch from Page View to Desktop View:
USING THE COMMAND BAR IN DESKTOP VIEW
To use a button on the Command Bar, click it. If a button does not
apply to a selected item, the button will be gray, and clicking it won’t
have any effect.
Page 30

USING THE COMMAND BAR IN PAGE VIEW 25
Page. Switch from Desktop View to Page View.
Settings. Display the PaperPort Preferences dialog box where you can
set scan settings, customize the PaperPort Desktop and folders, choose
options for importing and exporting files, calibrate the scanner, and
change its hardware settings.
Find. Find an item in Desktop View, or find an annotation or page in
Page V iew.
Browse. In Desktop View, see a list of items available on the PaperPort
Desktop and in all the folders. In Page View, see a list of items available
in the currently open folder.
Rotate. Rotate the selected items or stacks 90 degrees to the right.
Rotating a stack rotates every page in the stack.
of Contents
Table
Duplicate. Make a copy of the selected item(s).
Stack. Combine selected items into one stack.
Unstack. Unstack the pages of the selected stack.
Unstack1. Unstack only the visible (top) page of the stack. The rest of
the pages remain as part of the stack.
Arrange. Arrange the items on the PaperPort Desktop.
USING THE COMMAND BAR IN PAGE VIEW
Several of the buttons that appear in Desktop View also appear in Page
View. However, because Page View displays a single item, buttons for
viewing single items appear only in the Page View Command Bar.
Page 31

26 CHAPTER 3: VIEWING ITEMS
Desktop. Switch from Page View to Desktop View.
<< Item. Displays the previous item on the PaperPort Desktop or in the
currently open folder.
Item >>. Displays the next item on the PaperPort Desktop or in the
currently open folder.
<< Page. Displays the previous page in a stack.
Page >>. Displays the next page in a stack.
Zoom Out. Reduces the size of the page in Page Vi ew.
Actual Size. Returns the page to its original (100%) size.
Zoom In. Magnifies the size of the page in Page View.
of Contents
Table
Wizard. R uns a step-by-step pr ocess to help you impr ove the color of an
item scanned in color.
▼ NOTE: Two other buttons may appear on the Command Bar.
A TWAIN button appears if you are using the PaperPort software
with another (non-PaperPort) scanner. Clicking the TWAIN button
starts the scanning on the other scanner. The other button that can
appear on the Command Bar is labeled OLE Return. It appears
when you are using Windows Object Linking and Embedding
(OLE).
RELATED TOPICS IN HELP
PaperPort Basics, Desktop View
PaperPort Basics, Page View
View Items
Work with Items in Page View
Works with Items on the PaperPort Desktop
Page 32

CHAPTER 4
Stacking Items
Like many other busy people, you may sometimes put items on your
desk without organizing them. When you finally do put them in order,
you might stack the items by project, contact, or department. You use a
method that helps you to quickly find the right stack.
of Contents
Table
With PaperPort you can electronically organize items into stacks in
much the same way that you do with paper documents. A stack is a
PaperPort item with multiple pages. Expense r eports, contracts, memos,
letters, presentations, and other business materials are often two or more
pages. You can stack and unstack these items electronically on the
PaperPort Desktop.
COMBINING ITEMS INTO STACKS
Each scanned page appears on the PaperPort Desktop as a one-page
untitled item. To stack scanned pages, you can:
■ Drag one page on top of the other
■ Click the Stack button on the Command Bar
■ Use the stack commands in the Desktop menu
You can also add stacks to other stacks.
27
Page 33

28 CHAPTER 4: STACKING ITEMS
USING DRAG AND DROP TO CREATE STACKS
of Contents
Table
1. In the Desktop
View, select the
item that you
want to stack.
This example
shows stacking a
Cover Letter on
an Invoice.
2. Drag the selected
item onto the item
on which you
want to stack it.
3. When the
second item is
highlighted,
release the mouse
button.
The stack is
created.
4. Repeat Steps 1
through 3 until
you are finished
creating the stack.
Cover Letter Invoice
Cover Letter Invoice
Invoice
Cover Letter
A new stack receives the title of the item on the bottom of the stack.
The stack title (Invoice in this case) is shown in boldface type. Each
page title is shown in normal typeface (Cover Letter in the sample
above).
Any item on the P aperPort Desktop can be stacked onto any other item.
You can use drag and drop to stack pages onto other pages, stacks onto
other stacks, pages onto stacks, and stacks onto pages. You can also use
the Stack button on the Command Bar to stack items. Select them in
the order that you want them stacked and click the Stack button.
Page 34

GIVING TITLES TO ITEMS AND STACKS 29
SELECTING AND DESELECTING ITEMS
When stacking items, you need to select them. You can select one item
at a time, or several items together.
To select or deselect a single item:
■ To select the item, click its thumbnail in Desktop View. A red (or
dark) line around an item indicates that it is selected.
■ To deselect the item, click another item, or click anywhere else in
Desktop View.
To select multiple items:
■ Click each thumbnail while holding down the Shift key or the Ctrl
key.
of Contents
Table
Or
■ Click an empty space on the PaperP ort Desktop , then drag the mouse
around the items that you want to select. Any item that is partially
enclosed in the box, or that the box even touches, will be selected.
Release the mouse button when the items you want are selected.
GIVING TITLES TO ITEMS AND STACKS
When you first scan an item, its title is the curr ent date, but y ou can give
it a new title up to 30 characters long, such as Smithers Contract or
Letter to Dr. Adams. The more descriptive the title, the easier it is to
quickly find the item you want. You can also give titles to stacks to help
identify them.
The stack title and page titles both appear above the stack so that as you
flip through the pages of a stack you can see each page’s title as well as
the stack title.
Page 35

30 CHAPTER 4: STACKING ITEMS
Th
e stack title is
in boldface type.
The page title is
in normal type.
As you flip through
the pages, each
page’s title appears.
If you don’t want to see page titles with the stack titles, choose Per-Page
Titles from the View menu to remove the checkmark from the
command.
To give an item or stack a title in Desktop View:
1. Select the item or
stack.
of Contents
Table
2. Click its title, or
choose Change
Title from the File
menu.
3. Type the new title
and press Enter.
To change a title in Page View, choose Change Title from the File menu.
▼ NOTE: As you scan an item, its title is the current date. If you want
the titles of newly scanned items to be “Untitled,” or the date in a
different format, choose Preferences from the Edit menu, and click
the Desktop tab. The Default title drop-down list sho ws the choices.
Select the one you want and click OK.
Duplicated items receive titles based on the original item. For example,
the duplicate of a single-page item named “Invoice” will be “Copy of
Invoice.” The duplicate of a page in a stack has the same name as the
original page and it will not be part of the stack. This is an easy way to
create a copy of a page while keeping the original stack intact. To create
duplicates, select the item(s) and then from the Desktop menu choose
Duplicate Item or Duplicate Current Page.
Page 36

1. Select the stack.
2. Click the left
arrow of the Page
Navigator to see
the previous page
in the stack.
3. Click the right
arrow of the Page
Navigator to see
the next page in
the stack.
MOVING BETWEEN STACKED PAGES 31
MOVING BETWEEN STACKED PAGES
The Page Navigators are the buttons for flipping through the pages of a
stack. You can also use the commands on the Page menu to move from
page to page in a stack.
To move between pages in a stack in Desktop View:
of Contents
Table
1. Display the stack in
Page View.
2. Click the buttons
labelled Page >> or
<< Page.
You can also move between pages by choosing the Page menu
commands: First Page, Last Page, Previous Page, and Next Page. Or use
the Go To Page command from the Page menu to move directly to any
page in the stack. Clicking the middle of the Page Navigator (it says 1 of
2 in the sample above) is a shortcut for choosing the Go To Page
command.
To move between pages in a stack in Page View:
The menu commands to move between pages in Page View are also in
the Page menu.
Page 37

32 CHAPTER 4: STACKING ITEMS
UNSTACKING ITEMS
You can unstack pages in a stack if, for example, y ou want to mo ve those
pages to another stack, replace those pages with new ones, or delete
them from the stack without disturbing the rest of the pages.
You unstack pages in Desktop View.
To unstack a single page:
1. Select the stack in
Desktop View.
2. Click the Page
Navigator to
display the page
you want to
unstack.
of Contents
Table
3. Click the
Unstack1 button.
You can also
choose Unstack
Current Page
from the Desktop
menu.
1. Select the stack in
Desktop View.
2. Click the Unstack
button.
You can also
choose Unstack
from the
Desktop menu.
To unstack all the pages in a stack:
Each page of the stack becomes a separate item on the PaperPort
Desktop.
Page 38

1. Select the items in
Desktop View.
TILING ITEMS 33
TILING ITEMS
For smaller items, such as business cards and receipts, you can combine
the items on the same page instead of stacking them as separate pages.
This is called tiling items because the images are arranged on the page
in a regular pattern like tiles on a fl oor . I f you ’ve scanned several business
cards from people at the same company, for example, you can tile them
onto a page to see all the cards at once. Similarly, if you have several
receipts from a business trip, you can tile them onto one page for easier
record-keeping. Tiling is also useful if you want to fax several smaller
scanned items, because you can fax them all on a single page. Pages that
are tiled can include both color and black-and-white items.
To tile items onto a single page:
of Contents
Table
2. From the
Desktop menu,
choose Tile I tems
T ogether.
The items appear
together on a
page. Images too
big to fit on a
single page are
stacked as
individual pages.
RELATED TOPICS IN HELP
Create and Work with Stacks
PaperPort Basics, Desktop View
Selecting and Arranging Items
Working with Item Titles
Page 39

CHAPTER 5
Sending a Fax or E-Mail
Message
After an item has been scanned into PaperPort, you can send it as a fax
or as an attachment to an e-mail message. You do not need to print the
item first; you can send it directly from the PaperPort Desktop without
worrying about paper jams when faxing.
of Contents
Table
If you want to add some notes to a fax, but don’t want to mark up the
original, you can annotate the item using PaperPort’s annotation tools.
The annotations can be “turned off” before the item is sent, in case you
don’t want someone to see your comments on it. See Chapter 9,
“Annotating a Page,” for the steps to cr eate annotations and to display or
hide them.
OVERVIEW
The PaperPort software has several ways to send a fax or e-mail:
■ Select an item and drag it onto the fax or e-mail link icon.
■ Choose the fax or e-mail application from the Links menu in the
File menu.
■ Use the ScanDirect application that you received with the PaperPort
software. See Chapter 6, “Using ScanDirect,” to send items with
ScanDirect.
35
Page 40

36 CHAPTER 5: SENDING A FAX OR E-MAIL MESSAGE
SENDING A SCANNED ITEM AS A FAX
To send a scanned item as a fax, your computer will need:
■ A fax modem
■ Fax software
To send a scanned item as a fax from Desktop View:
1. Select the item to
fax.
2. Drag the item
onto the fax link
icon on the Link
Bar.
of Contents
Table
You can also click
the fax link icon.
3. When the fax
link icon is
highlighted,
release the
mouse button.
Page 41

4. When your fax
software starts,
send the scanned
item as a fax.
SENDING A SCANNED ITEM AS A FAX 37
of Contents
Table
This sample shows the Delrina WinFax PRO window for sending a fax.
The window that appears on your computer will be for your fax
software.
▼ NOTE: Instead of using the fax link icon, you can also choose Links
from the File menu, and then choose the name of your fax software.
Page 42

38 CHAPTER 5: SENDING A FAX OR E-MAIL MESSAGE
To send a scanned item as a fax from Page View:
1. Display the item
in Page View that
you want to fax.
2. From the File
menu, choose
Links.
3. Choose the name
of your fax
software.
4. The fax software
starts, and you
can send the item.
of Contents
Table
▼ NOTE: In the sample, the name of the fax software is Delrina
WinF ax. Note that an option named Fax is also listed. That option is
for fax software that isn’t listed by name on the menu, or for which
an icon does not appear on the Link Bar.
SENDING A SCANNED ITEM WITH AN E-MAIL MESSAGE
To send items as attachments to e-mail messages, your computer will
need:
■ An e-mail account (typically over a network or modem)
■ E-mail software
Page 43

1. Select the item to
send.
2. Drag the item
onto the e-mail
link icon on the
Link Bar.
You can also click
the e-mail link
icon.
3. When the e-mail
link icon is
highlighted,
release the mouse
button.
SENDING A SCANNED ITEM WITH AN E-MAIL MESSAGE 39
To send a scanned item as an e-mail attachment from Desktop View:
of Contents
Table
4. The e-mail
software opens.
Log in and send
the scanned item
as an attachment
to an e-mail
message.
This sample shows the login window for Lotus cc:Mail. The login
window that appears on your computer will be for your e-mail software.
To send the scanned item over the Internet, drag it onto your Internet
e-mail link icon, such as Netscape Navigator e-mail icon (as shown to
the left).
Page 44

40 CHAPTER 5: SENDING A FAX OR E-MAIL MESSAGE
▼ NOTE: Instead of using the link icons from Desktop View, you can
also choose Links from the File menu, and then choose the name of
your e-mail or Internet e-mail softwar e. The software opens, and you
can send the item as an attachment to an e-mail message.
GETTING PAPERPORT INFORMATION ON THE INTERNET
The WebSite menu provides Internet access directly from PaperPort.
For example, to receive technical support information about PaperPort
or other Visioneer products, choose Technical Support from the
WebSite menu. The PaperPort software starts your Internet browser
software and displays the selected area on Visioneer’s Web site. (If you
do not have a direct Internet connection, you may have to connect to
your Internet provider before choosing a WebSite menu command.)
of Contents
Table
To use the WebSite menu’s commands, your computer must have a
modem and appropriate software to access and browse the Internet.
RELATED TOPICS IN HELP
Fax an Item
Manage and Use Other Links
PaperPort Basics, Using PaperPort Links
Send an Item as an E-Mail Message
Page 45

CHAPTER 6
Using ScanDirect
ScanDirect is an application for scanning an item and sending it directly
to another application without opening PaperPort first. For example, to
scan an item and fax it right away, use ScanDir ect. As soon as the item is
scanned, your fax software starts and the item is ready to send.
of Contents
Table
1. Click the
Windows Start
button.
2. Choose
Programs, and
then choose
PaperPort.
3. Choose
ScanDirect.
The ScanDirect
Control Panel
appears on the
screen.
STARTING SCANDIRECT
The ScanDirect application is installed with your PaperPort software
and is available from the Windows Start button.
To start ScanDirect:
41
Page 46

42 CHAPTER 6: USING SCANDIRECT
A ScanDirect shortcut also appears on your Windows desktop. You can
double-click the shortcut to start ScanDirect.
▼ NOTE: I f another open window hides the ScanD ir ect Control P anel,
click the ScanDirect icon on the taskbar to bring the Control Panel
to the front.
To close or minimize ScanDirect:
1. To minimize the
ScanDirect
Control Panel,
click this icon,
and choose
Minimize.
2. To close the
Control Panel
choose Exit from
the menu or click
the Close button.
of Contents
Table
3. To maximize the
minimized
ScanDirect
Control Panel,
click the
ScanDirect icon
on the taskbar.
Scan Single Page
Scan Multiple Pages
THE SCANDIRECT CONTROL PANEL
The ScanDirect Control Panel can remain visible on the screen so you
can easily scan an item directly to another application.
Scan to
PaperPort Desktop
Scroll Arrows
ScanDirect Icons
About
ScanDirect
Help
Button
Page 47

USING SCANDIRECT: AN EXAMPLE 43
Scan Single Page—Click to scan a single page and send it to the
selected application.
Scan Multiple Pages—Click to scan several pages and send them to the
selected application.
Scroll Arrows—Click to see other icons.
ScanDirect Icons—Click to select which application scanned items are
sent to when scanned. N ote that the first icon is for PaperPort. Clicking
this icon sends a newly scanned item to the PaperPort Desktop.
Help Button—Click to see the ScanDirect help.
About ScanDirect—Click to see copyright information.
Each icon can have its own preference settings. See the ScanDirect help.
of Contents
Table
1. Click the fax icon
on the Control
Panel.
2. Click the button
for scanning
either a single
page or multiple
pages. This
example shows
the button for
multiple pages is
selected.
▼ NOTE: You can rearrange icons on the ScanDirect Control Panel.
Hold down the Alt key and click the icon you want to move. Drag
the icon to the spot where you want it. Release the mouse button.
The icon appears at the new position.
USING SCANDIRECT: AN EXAMPLE
The basic steps to use ScanDir ect are the same for each application icon.
This example shows how to scan and fax a two-page item.
To use ScanDirect to fax an item:
Page 48

44 CHAPTER 6: USING SCANDIRECT
of Contents
Table
3. Scan the first
page. A preview
shows the page
being scanned.
4. Insert the next
page.
5. If you’re scanning
multiple pages,
click Finish after
the last page.
Your fax software
opens and you can
send the scanned
page(s).
The scan preview
shows where the
scanned items will
be sent.
In this example
Delrina WinFax
starts, and the
pages are ready to
send.
When scanning a
single page, you
don’t have to click
Finish. The
application starts
as soon as the
page is scanned.
RUNNING PAPERPORT AND SCANDIRECT TOGETHER
PaperPort does not have to be running for you to use ScanDirect.
You can think of ScanDirect as a means to “bypass” PaperPort to get an
item to another application as soon as it is scanned.
If ScanDirect and PaperPort ar e running simultaneously, a scanned item
will be sent directly to the application selected on the ScanDirect
Control Panel before being sent to PaperPort.
RELATED TOPICS IN HELP
ScanDirect has its own Help system. To view the Help topics, click the
Help button on the ScanDirect Control Panel.
Close ScanDirect
ScanDirect Basic Steps
Scan One Page
Scan Multiple Pages
Set a Link’s Preferences
Set ScanDirect Preferences
Page 49

CHAPTER 7
Converting a Scanned
Item to Text
A scanned item is an image. Even the text on a scanned item is simply a
picture of the text, and you can’t edit it as you would text in a word
processing document. Using optical character recognition (OCR)
software, the PaperPort software can convert those text “pictures” into
real text that you can then edit using a word processing application.
of Contents
Table
The PaperPort software includes the V isioneer OCR softwar e so you can
convert scanned items without having to buy your own OCR software.
After scanning an item, you can simply “OCR it,” and then work with
the converted text in your word processing application.
If you already own OCR software, you can use either it or PaperPort’s
built-in OCR software to convert scanned items.
WHAT IS OCR?
OCR is the computer’s way of recognizing that a picture of an “S” is
really the letter S, that the picture of a “W” is really the letter W, and so
on for each letter’s picture in a scanned item.
The OCR software looks at each letter on a page , and if it r ecogniz es the
letter’s shape converts it into the appropriate text character. When the
analysis of the page is complete, the OCR software puts the text
characters onto a page in about the same format as the pictures of text
on the original scanned item.
45
Page 50

46 CHAPTER 7: CONVERTING A SCANNED ITEM TO TEXT
The page is now a wor d processing document containing text that word
processing applications can recognize. You can then edit the text as you
normally would when word processing.
The process is not always perfect. If the scanned item contains smudges
or handwritten notes, the OCR application will try to analyz e them but,
of course, will not be able to come up with a suitable match. For that
reason, you should always try to scan clean copies when planning to use
PaperPort’s OCR feature. Also, you should carefully check the conv erted
document to correct any mistakes that the OCR application made.
Here’s an example:
The scanned words on
this page are not text.
The words are pictures of
text, and can’t be edited
in a word processing
application. For example,
if you tried to select a line
of text to reformat it, you
couldn’t.
of Contents
Table
After being processed
with the OCR
software, the pictures of
the text are now “real” text
that a word processing
application recognizes.
You can select text, as
shown here, to edit it.
This example shows how
the converted text would
appear in Microsoft
Word.
Page 51

1. Select the item to
convert. It can be
a single page or
a stack.
CONVERTING AN ITEM TO TEXT 47
CONVERTING AN ITEM TO TEXT
To convert an item to text, you first scan it into PaperPort. You can use
OCR to convert text from either Desktop View or Page View.
▼ NOTE: Text scanned in color cannot be converted using the OCR
software. Change the scanner ’s scan setting to “Editing Text ” which is
designed specifically for OCR conversion.
To convert an item from Desktop View:
of Contents
Table
2. Drag the item
onto the word
processing link
icon on the
Link Bar.
You can also
click the word
processing link
icon.
3. When the
word processing
link icon is
highlighted,
release the
mouse button.
▼ NOTE: This sample shows the steps for using PaperPort’s built-in
Visioneer OCR software and sending the converted text directly to a
word processing application, in this case Word. If you have other
OCR software on your computer, you send the text to it instead.
You can also configure the word processing link to send text to the
other OCR application.
Page 52

48 CHAPTER 7: CONVERTING A SCANNED ITEM TO TEXT
If the item is a stack, all pages ar e converted. To convert a single page of
a stack, first use the Unstack1 button on the Command Bar to unstack
the page, and then convert it.
Instead of using the word processing link icon, you can also choose
Links from the File menu, and then choose the name of your word
processing software. The conversion process begins.
4. The OCR
software shows a
progress window
while the
conversion is in
process.
of Contents
Table
5. When the
conversion is
complete, the
word processing
application
opens and you
can begin editing
the text.
Page 53

1. Display the item
in Page View that
you want to
convert.
2. From the
File menu,
choose Links.
CONVERTING AN ITEM TO TEXT 49
▼ NOTE: PaperPort’s built-in Visioneer OCR software has an option
to convert text to HTML format so that you can display the text on
an Internet Web page.
To convert an item to text from Page View:
of Contents
Table
3. Choose the name
of your word
processing
software.
The OCR conversion begins. If the item is a stack, all of its pages are
converted. To convert a single page of a stack, unstack that page from
the stack first, then convert it.
Page 54

50 CHAPTER 7: CONVERTING A SCANNED ITEM TO TEXT
CONVERTING PART OF A PAGE TO TEXT
If a page includes graphics and y ou convert it, the OCR softwar e will try
to convert the graphics to text. The result will be a lot of unrecognized
characters on the page because the software can’t match text characters
with graphics. In that case, select those por tions of the page that contain
only text, and convert that selected area.
To convert a portion of a page to text:
1. Display the page
in Page View.
2. Click the
Selection
tool on the
Annotation
Tool Bar.
of Contents
Table
3. Drag around
the portion of
text you want to
convert.
4. From the Edit
menu, choose
Copy As Text.
5. The OCR
progress window
shows that the
conversion is
taking place.
The selected text
is copied to the
Clipboard.
Page 55

6. Open the
1
Sel
application where
you want to paste
the text and
choose Paste from
that application’s
Edit menu.
CONVERTING A SCANNED SPREADSHEET 51
CONVERTING A SCANNED SPREADSHEET
of Contents
Table
Converting a scanned spreadsheet is similar to converting a page of text.
In most cases the spreadsheet retains it columnar format, and the
spreadsheet application recognizes number characters as numbers if you
want to update them.
To convert a spreadsheet from Desktop View:
.
ect the
spreadsheet to
convert. It can
be a single
spreadsheet or
a stack.
2. Drag it onto the
spreadsheet link
icon on the Link
Bar. You can also
click the
spreadsheet
link icon.
3. When the
spreadsheet
link icon is
highlighted,
release the
mouse button.
Page 56

52 CHAPTER 7: CONVERTING A SCANNED ITEM TO TEXT
4
h
This sample shows Microsoft Excel as the spreadsheet application, but
you can drag the spreadsheet onto any spreadsheet icon on the Link Bar.
Instead of using the spreadsheet link icon, you can also choose Links
from the File menu, and choose the name of a spreadsheet application.
. W
en the
conversion is
complete, the
spreadsheet
application
opens and you
can begin editing
its text and
numbers.
of Contents
Table
▼ NOTE: To maintain the column format for a spreadsheet table,
choose Link Preferences from the Edit menu, click the icon for your
spreadsheet application, click OCR Setting, and deselect
Decolumnized Output. That setting maintains the column format
for tables in word processing applications.
▼ NOTE: Spreadsheets are often displayed horizontally.To rotate them
after scanning, select the spreadsheets and click the Rotate button.
RELATED TOPICS IN HELP
Convert an Item to Text
Manage and Use Other Links
PaperPort Basics, Using PaperPort Links
Page 57

CHAPTER 8
Filling In Preprinted
Forms with FormTyper
Insurance forms, registration car ds, coupons, and tax forms ar e examples
of preprinted forms. They have fields that you need to fill in with data,
such as name, address, and telephone number.
of Contents
Table
In the past, you had to use a typewriter or a ballpoint pen to fill in the
fields manually on preprinted forms. With the Visioneer FormTyper
application, you can enter data using your computer and then print the
form. The end result is the pr eprinted form, filled with data just as if y ou
had used a typewriter.
This chapter explains how to:
■ Fill in a form using FormTyper
■ Use the FormTyper tools
■ Print a filled in form
53
Page 58

54 CHAPTER 8: FILLING IN PREPRINTED FORMS WITH FORMTYPER
FILLING IN A FORM
The following example sho ws a medical form on the PaperPort Desktop
with fields to fill in.
To fill in a form with FormTyper:
1. Select the form.
2. Drag the form
onto the
FormTyper link
icon on the Link
Bar.
You can also just
click the
FormTyper link
icon.
of Contents
Table
3. When the
FormTyper
link icon is
highlighted,
release the
mouse button.
After a few moments while the software analyzes the form to find its
fields, the FormTyper window opens. The fields are underlined in blue,
and the cursor is at the first field to be filled in.
To fill in a form from Page View, choose Links from the File menu and
then choose Visioneer F ormTyper from the Links menu. The F ormTyper
application opens, and you can begin filling in the data fields.
Page 59

4. Begin typing data
if the cursor is at
the first field that
you want to fill in.
To type in any
other field, click
the field.
To add another
line to a field,
press Enter.
FILLING IN A FORM 55
▼ TIP: Before dragging the form onto the FormTyper Link, switch to
Page View and use the Enhance Lines tool to darken and straighten
the form ’s lines. The P aperP ort F ormTyper link identifies underlining
of blank areas on a form as data fields to be filled in. Darkening and
straightening the form’s lines with the Enhance Lines tool helps
PaperPort find the fields with more accuracy.
of Contents
Table
5. When you’re
finished typing in
a field, press the
Tab key or the
left or right arrow
keys to move to
the next field.
6. From the Form
menu, choose
Save to
PaperPort
Desktop As.
7. Type a name for
the filled-in form
and click OK.
If you make a mistake or need to edit the data, double-click the field
again. The cursor is in the text and you can edit it. After filling in all the
fields, you must save the form.
The form appears on the
PaperPort Desktop. The “A”
symbols indicate fields filled
with text annotations
Page 60

56 CHAPTER 8: FILLING IN PREPRINTED FORMS WITH FORMTYPER
▼ NOTE: Use the Save to PaperPort As command to save the filled-in
form. The Save to P aperPort Desktop command ov erwrites the form.
Use Save to PaperPort Desktop only if you don’t want to keep an
original copy of the form.
FORMTYPER TOOLS
The FormTyper application has the “look and feel” of the PaperPort 5.0
Deluxe Software. Some of FormTyper’s tools are similar.
For m Navigator. If the form has more than one page, click the t arrows
to display the previous or next page. Click the middle of the navigator
(that says 2 of 3 in this example) to see the Go To Page dialog box.
Zoom Navigator. Click the Plus magnifying glass to enlarge the image
of the form. Click the Minus magnifying glass to reduce the image.
Click Actual to see the image at its actual size.
of Contents
Table
Place Field. Click to place a field manually on a form. Then put the
cursor on the form, hold down the mouse button, and drag to create a
new field.
Auto-Find. Click to have FormTyper find all of the fields on the form
again. Use this button if you’ve deleted some fields and want to find
them again automatically.
PRINTING A FILLED-IN FORM
Once the filled-in form is saved to the PaperP ort Desktop , you can print
it as you would any scanned item. Select the form and drag it to the
printer link icon on the Link Bar. You can also choose Print from the
File menu.
RELATED TOPICS IN HELP
Fill In a Form
Working with Items in Page View
Working with Items on the PaperPort Desktop
Page 61

CHAPTER 9
Annotating a Page
To communicate well, you need to draw the reader’s attention to
important information. When working with paper, you can highlight
text with highlighter markers, add post-it notes, and circle text with a
pen or pencil. With PaperPort, you can use these methods but in
electronic form.
of Contents
Table
This chapter shows how to:
■ Select, move, and resize annotations
■ Cut, copy, paste, and crop sections of a page
■ Straighten a page that was scanned at an angle
■ Scroll quickly
■ Write notes on a page
■ Highlight sections of a page
■ Draw lines and arrows
■ Add a picture to a page
■ Display and hide annotations
■ Print items
57
Page 62

58 CHAPTER 9: ANNOTATING A PAGE
Here is an example of a page with some annotations.
Selection. Select an area
to copy, cut, paste, or
crop.
Note. Add a note, just
like a post-it note.
Arrow. Point to
important information
with a line or arrow.
Highlight. Add a
highlight color.
of Contents
Table
Freehand. Circle or
underline important
information.
Picture. Add an
illustration to a page.
Symbols on the thumbnail
indicate that the item has
annotations.
You can also tell if an item in Desktop View contains annotations
because they appear as small symbols on the thumbnails.
Page 63

1. Click the tool on
the Annotation
Tool Bar.
2. Place the cursor
on the page.
Its shape will
indicate the tool
you selected.
USING THE ANNOTATION TOOLS 59
USING THE ANNOTATION TOOLS
The basic method of using the annotation tools is similar for each tool.
To use an annotation tool:
of Contents
Table
3. Depending on the
tool you selected,
click or drag the
cursor to use the
tool.
The following examples show how to use the annotation tools.
POINTER
Use the Pointer tool to select annotations on a page. Annotations must
be selected in order to move, resize, or edit them.
Page 64

60 CHAPTER 9: ANNOTATING A PAGE
To use the Pointer tool to move, resize, or edit an annotation:
1. Click an
annotation to
select it.
2. To move the
annotation, put
the pointer inside
the selected area,
and drag the
annotation to a
new place.
3. To resize the
annotation, put
the pointer on one
of the selection
boxes, hold down
the mouse button,
and drag the
pointer.
of Contents
Table
4. To edit the text in
an annotation,
double-click the
annotation. The
cursor is at the
start of the text.
SELECTION
Use the S election tool to select an ar ea to cr op, cut, copy and paste, such
as a graphic for use in another application, or y our signatur e for use on a
form letter.
▼ TIP: Use the selection process to copy your signature onto letters.
Then you can fax a signed copy of your letters directly from your
computer without having to print the letter, sign it, and then rescan
it (or send it from a fax machine).
Page 65

1. Drag to select an
area of the page.
2. Depending on
what you want to
do with the
selection, choose a
command from
the Edit menu.
3. To paste the
selection to
another
document, open
it, and choose
Paste from the
Edit menu.
To use the Selection tool:
USING THE ANNOTATION TOOLS 61
of Contents
Table
CUT AND PASTE OPTIONS
You can copy (or cut) and paste to and from pages and applications in
several different combinations:
■ From one page to another in Page View. The copied image is pasted
onto the receiving page; you can then move the image into place.
■ F rom Page View to the PaperP ort Desktop. A new item is cr eated on the
Desktop with the copied image on it.
■ From Page View to another application. The copied image appears on
the page in that application; you can then move that image to its
correct position in that application.
■ From another application to PaperPort. If the copied image is a
graphic, pasting it to the PaperPort Desktop creates a new item with
the image on it. P asting to the Page View puts that image on the page
being displayed. If the copied material is text, it can be pasted to a
PaperPort note or to mark-up text (single lines of text only), but
copied text cannot be pasted directly to a thumbnail on the PaperP ort
Desktop. To paste a picture that can be moved and resized on a page,
paste it to the page in Page View using the Paste as Annotation
command.
Page 66

62 CHAPTER 9: ANNOTATING A PAGE
▼ NOTE: Another copy and paste option is the Copy As Text
command in the Edit menu. PaperPort converts the selection to text
at the same time it copies the text to the Clipboard.
STRAIGHTEN PAGE
Use the Straighten Page tool to straighten a page, either horizontally or
vertically, that was originally scanned in at an angle.
To straighten a page:
1. Hold down the
mouse button
and draw a line
along the edge of
an area that you
want to be
horizontal or
vertical on the
page.
of Contents
Table
2. When you
release the
mouse button,
the PaperPort
software
straightens the
whole page
along the line
you drew.
Page 67

USING THE ANNOTATION TOOLS 63
PAN
Use the Pan tool to scroll an image quickly, up, down, left, or right.
To use the Pan tool:
1. Click the Pan tool. The pointer changes to a hand pointer.
2. Drag the mouse. The page image moves as you move the mouse.
NOTE
Use the Note tool to write a resizable note at any place on the page.
You can also “collapse” the note so it doesn’t cover any information on
the page.
To write a note with the Note tool:
of Contents
Table
1. Click the page.
2. Type the note in
the text box that
appears.
3. To collapse all the
notes on a page,
select any one of
the notes first.
4. From the
Annotations
menu, choose
Collapse Notes.
5. To see the notes
again, select any
note, then choose
Expand Notes
from the
Annotations
menu.
The insertion point is ready
for you to begin typing.
As you type the
note, the box
expands to fit the
amount of text...
The collapsed note icon
indicates a Note is at that
position on the page.
Page 68

64 CHAPTER 9: ANNOTATING A PAGE
MARK-UP
Use the Mark-Up tool to add a line of text to the page.
To write a note with the Mark-Up tool:
of Contents
Table
1. Click the page
where you want
to type text.
2. Type a line of
text.
■ Hold down the
mouse button
and drag the
Highlighter tool
over the area you
want to highlight.
The Mark-Up tool is for typing a single line of text, like this.
Don’t press Enter to type a second line of text…
…instead create another mark-up box and type your text.
HIGHLIGHTER
Use the Highlighter tool to highlight any part of a page with a color.
To highlight a portion of a page:
FREEHAND
Use the Freehand tool to draw freehand marks, for example, circle text
or underline important sentences.
To draw freehand lines on a page:
■ Hold down the
mouse button
and draw a line
around the area
you want to
emphasize.
Page 69

1. Hold down the
mouse button and
drag to draw a line
or arrow.
USING THE ANNOTATION TOOLS 65
To change the line width of an existing line, select it, then choose Line
Width from the Annotations menu and choose a new line width.
To change the width for new lines that you want to draw, click the
Freehand tool or Arrow tool, click the right mouse button and choose
Line Width from the displayed menu, or choose Line Width from the
Annotations menu and then choose a new width. Existing lines will not
be affected.
ARROW
Use the Arrow tool to draw straight lines, with or without arrowheads,
to point to specific parts of a page.
To draw straight lines with the Arrow tool:
of Contents
Table
2. To add or remove
arrowheads when
you draw, choose
Line Arrowhead
from the
Annotations
menu.
PICTURE
Use the P ictur e annotation tool to place a picture as an annotation onto
a page. You can add a Picture annotation by selecting a bitmap file
already saved on your hard disk or by pasting a picture from the
Clipboard.
To add a picture to a page using the Clipboard, copy the picture to the
Windows Clipboard, and then display the page in Page View. Choose
Paste As Annotation from the Edit menu. The pictur e is pasted onto the
page. If you paste a color picture onto a black-and-white page, the
picture appears in black-and-white but retains its color information in
case you copy and paste it later.
Page 70

66 CHAPTER 9: ANNOTATING A PAGE
To add a picture with the Picture tool:
1. Click the Picture
tool, then click
on the page where
you want the
picture to be
located.
The Open dialog
box appears.
2. Select Bitmap
Files as the file
type from the
drop-down list.
3. Select the name
of the picture.
of Contents
Table
4. Click Open.
The picture
appears on the
page.
5. To reposition a
picture, click the
Pointer tool and
then click the
picture to select
it. Handles
around the
picture indicate it
is selected.
6. Drag the picture
to its proper
position on the
page. To resize
the picture, drag
one of its handles.
You can resize or
reposition a
picture whenever
it is displayed in
Page View.
Page 71

1. In Page View,
choose Show
Annotations
from the
Annotations
menu. The (✔)
checkmark means
the annotations
are visible.
DISPLAYING AND HIDING ANNOTATIONS 67
DISPLAYING AND HIDING ANNOTATIONS
You can display items on Page View with all of their annotations either
visible or hidden. This feature is especially useful if you want to print or
fax an item, but don’t want to include the annotations.
To display or hide annotations:
of Contents
Table
2. To hide annotations,
choose Show
Annotations again
from the
Annotations menu.
A page with visible annotations The same page with hidden annotations
Page 72

68 CHAPTER 9: ANNOTATING A PAGE
PRINTING ITEMS
You can print any scanned item. If an item contains annotations that
you don’t want to include when it’s printed, remember to turn off the
annotations first.
To print an item:
1. Select the item.
It can be a single
item or a stack.
2. Drag the selected
item onto the
Printer link icon
on the Link Bar.
of Contents
Table
You can also just
click the printer
link icon.
3. When the printer
link icon is
highlighted,
release the mouse
button.
You can also print by choosing Print from the File menu.
RELATED TOPICS IN HELP
Change Annotations
Create Annotations
Manage Annotations
PaperPort Basics, Page View
Print, Save, and Delete Items
Page 73

CHAPTER 10
Editing Images
An original image may not be the exact color or sharpness that you
want, even before it’s scanned. For example, an indoor snapshot of your
family or household pet may have the “red eye” effect from the camera’s
flash. Using PaperPort’s Remove Red Eye tool, you can remove the red.
Other tools help you adjust colors, contrast, and other image
characteristics.
of Contents
Table
This chapter shows how to:
■ Rotate images
■ Improve the color and sharpness of an image
■ Adjust the color, brightness, and tint of a color picture
■ Sharpen or blur an image
■ Remove the “red eye” effect from flash photographs
■ Crop the page
■ Invert the colors of an image
■ Remove stray dots on a page
■ Enhance lines in images of tables and forms
69
Page 74

70 CHAPTER 10: EDITING IMAGES
USING THE IMAGE EDITING TOOLS
The image editing tools are designed to improve images scanned in
color, black-and-white, and grayscale. The tools available in Page View
depend on the type of image.
ROTATE RIGHT OR LEFT
Use the Rotate tools to rotate an entire pages 90 degrees to the left or
right. Pages with annotations cannot be rotated.
Rotating a page is particularly useful for spreadsheets, graphs, charts,
and other pages normally displayed horizontally. After scanning a page
vertically, rotate it to produce a horizontal page like the original.
You can rotate multiple pages or a stack. For example, after scanning in
several spreadsheets, you can select them all or stack them and click the
Rotate button. All of the spreadsheets will be rotated together.
of Contents
Table
■ Click one of the
Rotate tools.
The image rotates
90 degrees to the
left or right
depending on the
tool you select.
To rotate the
object more than
90 degrees, click
the tool again.
To rotate images using the Rotate Image tools:
▼ NOTE: All tools on the Image Tool Bar have equivalent commands
available from the menus. For example, you can also rotate items
using the Rotate command from the Page menu.
Page 75

USING THE IMAGE EDITING TOOLS 71
Click the A
AUTOFIX PICTURE
Use the AutoFix Picture tool to automatically enrich the quality of an
image. The PaperPort software analyzes the image and improves its
appearance as much as possible. Fuzzy images may become sharper , and
underexposed (dark) or overexposed (lighter) photos may be darkened
or lightened. However, if the quality of the original image is very poor,
even the automatic image improvement may not help.
To enhance images with the AutoFix Picture tool:
of Contents
Table
■
Picture tool.
This sample
picture of a flower
cart becomes
clearer and
sharper.
utoFix
Before After
▼ NOTE: If the image is already at the proper exposure and in focus,
PaperPort cannot improve it further. In fact, clicking the AutoFix
Picture tool may seem to degrade image quality because PaperPort
assumes the image needs to be modified, ev en though it ’s already just
right. If you try to AutoFix a picture and do not like the results,
choose Undo AutoFix Picture from the Edit menu.
ADJUST PICTURE
The Adjust Picture tool is for manually adjusting a color picture’s
brightness and contrast, color, and tint.
▼ NOTE: The Picture Wizard is also for adjusting a color picture.
Clicking the Picture W izard button on the Command Bar walks you
through the most likely steps to produce a good quality image.
Page 76

72 CHAPTER 10: EDITING IMAGES
To use the Picture Wizard:
■ Click the Picture
Wizard button on
the Command
Bar.
A series of dialog
boxes walk you
through the
process to adjust
the picture
quality.
This is the first Wizard dialog box. Click
Next to see the next dialog box.
To use the Adjust Picture tool:
1. Click the Adjust
Picture tool.
of Contents
Table
2. Select the picture
that you like best.
The one you
select moves to
the center and
becomes the
current picture,
or the one to
adjust.
3. Click a button to
adjust a feature of
the picture.
4. Drag the slider to
adjust that
feature.
5. Click OK.
See the Help system for more details about Adjust Picture and the
Picture Wizar d.
Page 77

1. Click the Sharpen
Picture tool.
The Sharpen
Picture dialog
box appears.
2. Drag the slider to
sharpen or blur
the picture.
3. Click OK.
USING THE IMAGE EDITING TOOLS 73
SHARPEN PICTURE
Use the Sharpen Picture tool to sharpen or blur a color picture.
To sharpen or blur a color picture with the Sharpen Picture tool:
of Contents
Table
1. Click the
Selection tool.
2. Select the portion
of the pupil of the
eyes that are red.
3. Click the Remove
Red Eye tool.
PaperPort
removes the red
from the eyes.
Before—A blurred picture After—The sharpened picture
REMOVE RED EYE
Indoor flash photographs can pr oduce the “red eye” effect that turns the
pupils of the eyes red. Using the Remove Red Eye tool you can remove
the redness from the eyes in the image.
To remove the red eye effect with the Remove Red Eye tool:
Page 78

74 CHAPTER 10: EDITING IMAGES
▼ TIP: Use the Zoom In button (on the Command Bar) before
selecting the red area, and then select as small an area of the eye as
possible. PaperPort removes the color red from the entire selected
area. If the selected ar ea includes other parts of the ey e that have tints
of red in them (as light brown eyes often do), those tints will be
removed too.
CROP PAGE
Use the Crop Page tool to remove part of a page. The cropped part
remains, but the rest of the image is removed from the page.
To remove a part of a page:
1. Click the
Selection tool.
of Contents
Table
2. Select the area to
remain on the
page. The rest of
the image will be
removed.
3. Click the Crop
Page tool.
The cropped image
The full image
▼ TIP: Create a duplicate of an image before cropping it because
cropping permanently removes the unselected portion of the image.
Having a duplicate ensures that if you crop too much, you can
always start over with the original. To create a duplicate of an image,
select it on Desktop View and choose Duplicate Item from the
Desktop menu.
Page 79

■ Click the Invert
Page tool.
The image
reverses color.
USING THE IMAGE EDITING TOOLS 75
INVERT PAGE
Use the Invert Page tool to reverse the colors of an image. This is
particularly helpful for reading text on images with a dark background
and light letters.
To reverse images with the Invert tool:
Before After
of Contents
Table
■ Click the Remove
Stray Dots tool.
PaperPort
removes the stray
dots from the
page.
REMOVE STRAY DOTS
Sometimes a page has small marks, dots, or speckles that appear on the
scanned page. For example, scanned newspaper articles often have
extraneous spots on the page. Clicking the Remove Stray Dots tool
automatically cleans those extra marks from the scanned image.
This tool applies only to images scanned in black and white.
To clean a page with the R emove Stray Dots tool:
Before After
▼ NOTE: PaperPort r emo v es only the smaller dots and speckles on the
page because larger marks, such as handwritten notes, may be a valid
part of the image. To remove larger unwanted portions of an image,
use the Selection tool (on the Annotation Tool Bar) to select the
unwanted portion, then choose Cut from the Edit menu.
Page 80

76 CHAPTER 10: EDITING IMAGES
ENHANCE LINES
Use the Enhance Lines tool to automatically darken and straighten
horizontal lines on a black-and-white scanned image, such as a table or
preprinted form. Enhancing lines is particularly helpful prior to using
the PaperPort FormTyper link to fill in scanned preprinted forms.
To darken and straighten lines with the Enhance Lines tool:
■ Click the
Enhance Lines
tool.
The lines are
straightened and
darkened.
of Contents
Table
CREATING WALLPAPER FROM AN ITEM
The background color of your computer’s screen is called “wallpaper.”
Typically it is a nondescript color, but you can easily change it to an
image from P aperPort, for example, a picture of your spouse or children.
To create wallpaper:
1. Select the item for the wallpaper.
2. Choose Set as Wallpaper from the Page menu. The screen
background color changes to that image.
▼ NOTE: To change back to the original wallpaper, open the Windows
Control Panel, double-click Display, click the Background tab,
choose a wallpaper pattern from the Wallpaper menu and click OK.
RELATED TOPICS IN HELP
Adjust Color Pictures and Other Images
Add Notes, Arrows, and Other Annotations
Page 81

CHAPTER 11
Filing Items in Folders
PaperPort’s filing system with folders is similar to the filing system that
you use with Windows, except the PaperPort folders are only for items
scanned or imported to the PaperPort Desktop.
This chapter shows how to:
of Contents
Table
■ Store items in folders
■ Create new folders
■ Give folders titles
■ Store folders in folders
■ See the contents of folders
■ Find an item in a folder
77
Page 82

78 CHAPTER 11: FILING ITEMS IN FOLDERS
The list of folders appears in Desktop View along the left side of the
window.
The list of folders
of Contents
Table
▼ NOTE: You can add other folders to the list, give them new titles,
store folders within folders, and change their colors.
DRAGGING AND DROPPING ITEMS INTO FOLDERS
The easiest way to move an item into a folder is by dragging and
dropping the item into the folder. You can file items one at a time, or
you can file multiple selected items all at the same time. Each folder can
hold up to 200 items.
Page 83

1. Click an item(s)
to select it.
2. Drag the selected
item into a folder.
3. When the folder is
highlighted,
release the mouse
button.
To drag and drop an item into a folder:
CREATING NEW FOLDERS 79
of Contents
Table
You can also put the selected item into a folder using the M o ve to F older
or Copy to Folder commands in the Desktop menu. The Copy to
Folder command creates a copy of the item and puts it into the new
folder, but leaves the original item in its original folder.
CREATING NEW FOLDERS
You can add new folders to the main list, or add a folder within a folder
to create a sublist of folders. Each sublist can contain up to 100 folders,
and each folder can have up to five sublists.
For example, y ou could create a folder named Business and another one
named Vacation for your Travel folder. Then you could keep all your
business travel receipts in one, and vacation travel receipts in the other.
Page 84

80 CHAPTER 11: FILING ITEMS IN FOLDERS
To add a folder to the main list of folders:
1. Click PaperPort
Desktop.
2. From the
File menu,
choose New
Folder.
3. Type the new
folder’s title, and
then click OK.
of Contents
Table
To add a folder within another folder, click the folder instead of the
PaperPort Desktop. Choose N ew Folder from the File menu, type a title
for the new folder, and click OK.
GIVING FOLDERS NEW TITLES
Each folder must have a title. You can re-title any folder, including the
basic set of folders that you receive with PaperPort.
▼ NOTE: The PaperPort Desktop is not a folder and cannot be
renamed.
Page 85

1. Click a folder to
select it.
2. Click the folder’s
title to see the text
box for editing
the title.
3. Type the new title
and press the
Enter key or just
click elsewhere on
the PaperPort
Desktop.
DRAGGING AND DROPPING FOLDERS INTO FOLDERS 81
To give a folder a new title:
of Contents
Table
You can also select the folder and choose Change Title from the File
menu.
DRAGGING AND DROPPING FOLDERS INTO FOLDERS
Folders can be stored in other folders by dragging and dropping one
folder into another.
▼ TIP: Holding down the Ctrl key while dragging a folder into
another folder creates a duplicate of the one y ou’r e dragging. This is a
quick way to create a new folder, and can save time when you’re
creating a batch of new folders. When you’re finished creating the
folders, you can give each new one its own title. If the folder being
duplicated already contains items, they are duplicated too.
Page 86

82 CHAPTER 11: FILING ITEMS IN FOLDERS
To drag and drop one folder into another:
1. Click a folder to
select it.
2. Drag the selected
folder onto
another folder.
3. When the folder is
highlighted,
release the mouse
button.
You can tell when a folder has other folders in it because a small plus
sign appears next to a folder. A minus sign indicates the folder is open
and lists its folders.
of Contents
Table
1. Click the plus
sign, or doubleclick the folder.
2. To close a folder,
click the minus
sign or doubleclick the folder.
SEEING THE CONTENTS OF FOLDERS
Desktop View displays the contents of the open folder. Thus, if you
open the Travel folder, you will see all the scanned items stored in that
folder . O nly one folder at a time is open; therefore opening a new folder
closes the one that was open.
To see the folders within a folder:
Page 87

■ Click a folder to
see the items in it.
You can also click
the Browse
button to see all
the items in all
the folders.
USING SIMPLESEARCH TO FIND AN ITEM 83
To see the items in a folder:
USING SIMPLESEARCH TO FIND AN ITEM
PaperPort’s SimpleSearch features help you find scanned items. For
example, if you recall the item’s title or keywords, P aperPort can find the
item based on that information. However, PaperPort also reads the
entire text content of each scanned item and can fi nd items based on any
words and phrases in the content. To use this powerful search feature,
make sure that the Content checkbo x is selected in the Find Item dialog
box.
of Contents
Table
1. In Desktop View,
choose Find Item
from the Search
menu.
2. Type the text to
identify the item.
3. Select one or more
checkboxes to
identify where to
search for the text.
4. Select the buttons
to find just the
first, or all items
that have that text.
Click OK.
To use SimpleSearch to find an item in a folder:
Page 88

84 CHAPTER 11: FILING ITEMS IN FOLDERS
In the SimpleSearch dialog box, you can:
■ Click the Options tab to display several options for using
SimpleSearch, including whether you want PaperPort to match the
exact phrase you’re looking for or to find text that closely matches.
■ Click the Update SimpleSearch button to read any items that haven’t
been read yet. This adds the items’ text to the SimpleSearch database
(which is similar to the index of this guide).
You can add specific items to the SimpleSearch database. Click an item
or folder with the right mouse button and then choose Add to
SimpleSearch from the shortcut menu. This is particularly useful when
you’ve scanned a number of items and filed them in a new folder. Click
the folder with the right mouse button, and PaperPort begins adding the
items’ content to the SimpleSearch database.
of Contents
Table
▼ NOTE: S impleS ear ch wor ks “in the backgr ound,” which means that
PaperPort is constantly reading items’ textual content even while
you’re working on other tasks. For this reason, you may see messages
that SimpleSearch has not finished adding items to its database and
that you shouldn’t quit the application. These messages occur when
PaperPort is still reading some scanned items. N ormally, if you wait a
few moments, PaperPort finishes the process, and you can then quit
the application.
RELATED TOPICS IN HELP
Create Folders
Find Items and Folders
PaperPort Basics, Desktop View
Name and Organize Folders
Place Items in Folders
Page 89

APPENDIX A
PaperPort Viewer
With PaperPort Viewer, you can share PaperPort items—including
articles, letters, contracts, budgets, reports, and photos with others who
do not own the PaperPort software. PaperPort Viewer lets others view
and print PaperPort items.
of Contents
Table
You can distribute PaperPort Viewer to others free of charge.
One way to send someone PaperPort Viewer is to attach the PaperPort
Viewer file to an e-mail message and then send that e-mail message
to the recipient.
The PaperPort CD includes PaperPort Viewer for Windows. See the
installation guide that you received with your PaperPort scanner for
instructions about installing applications from the CD.
PaperPort Viewer is also available free on Visioneer’s Web page.
The address is http://www.visioneer.com.
PaperPort Viewer has its own Help information. Please see that Help
information for a complete description of PaperPort Viewer and how to
use it.
85
Page 90

86 APPENDIX A: PAPERPORT VIEWER
of Contents
Table
Page 91

of Contents
Table
INDEX
A
Actual Size button 26
Add to SimpleSearch command 84
Adjust Picture dialog box 72
Adjust Picture tool 71
Annotation Tool Bar 23, 59
annotation tool samples 4, 59–66
annotations
collapse notes 63
copy and paste 61
hiding or displaying 67
how to create 59
on forms 55
samples 58
selecting 59–60
Archive link 20
Arrange button 25
Arrow tool 65
Auto-Find button 56
AutoFix Picture tool 71
B
back up files 20
blurred picture 73
BMP picture 66
brightness and contrast 71
Browse button 25, 83
business card scan 17
C
clean page 75
Collapse Notes command 63
color photo
adjusting 72
definition 69, 71
sharpen 73
color picture
adjusting 71
as wallpaper 76
blurred 73
brightness and contrast 71
clearer 71
removing red eye 73
reverse 75
scanning 71
tint 71
column format 52
Command Bar 17, 21, 24, 25
Content checkbox 83
convert text 7, 47–50
copy annotations 61
Copy As Text command 50, 62
Create New Link 5
Crop Page tool 74
D
data, entering on a form 54
date title 30
deselect an item 29
Desktop button 24, 26
Desktop View
annotations 58
Command Bar 24
definition 2, 21, 32
e-mail 39
folders 78, 82
switch to 24
titles 30
drag and drop
create a stack 28
folder in folder 81
item in folder 78
Duplicate button 25
Duplicate Item command, before cropping 74
87
Page 92

88 INDEX
of Contents
Table
E
e-mail link 6, 7, 35, 38, 39
Enhance Lines tool 55, 76
Excel 52
Export command 20
export item 12, 20
F
fax
link 6, 35, 36
with ScanDirect 43
fax, one page 33
field
editing 55
finding 56
on a form 54
placing 56
file format 20
Find button 25
find item, with SimpleSearch 11, 83
Finish button 44
flash photo, remove red eye 73
folders
adding to list 80
contents 82
definition 21
drag and drop folders 81
dragging items 78–79
duplicating 81
in folders 10, 82
list of 78
new folder 79
new title 80
selecting 81
form
darken lines 76
fields 54
filling in 54
printing 56
saving 55
seeing in FormTyper 56
Form Navigator 56
FormTyper
definition 8
enhance lines 76
print a form 56
sample 54
tools 56
Freehand tool 64
G
Go To Page 31
H
Highlighter tool 64
HTML format 49
I
image editing tool samples 70–76
Image Tool Bar 23
import item 12
Internet 6, 12, 39, 40, 49, 85
Invert Page tool 75
item
export 12, 20
fax with ScanDirect 43
filing in a folder 10
finding 11, 83
import 12
in folder 82
in FormTyper 56
print 68
rotate 25
saved 20
scanned at an angle 62
scanning 16
selecting and deselecting 29
send
as e-mail 38
as fax 36
tiled on a page 33
title 19, 29
unstacking 32
item title, default 30
Page 93

INDEX 89
of Contents
Table
L
letter, signature on 60
line width 65
Line Widths command 65
lines, darken and straighten 55, 76
Link Bar 5–7, 21, 22, 68
link, creating manually 5
Links menu 35, 37, 40, 48, 52, 54
M
Mark-Up tool 64
move picture 66
N
Netscape Navigator e-mail link 6, 39
Next item button 26
Next page button 26
Note tool 63
notes
collapse 63
on a page 63
O
OCR
definition 7, 45
sample 46
OLE Return button 26
Open dialog box 66
Optical Character Recognition, See OCR
P
page
arrows 65
clean dots 75
convert portion to text 50
crop portion 74
enhance lines 76
highlight sections 64
note 64
reverse colors 75
scanned at an angle 62
Page button 25
Page menu 31
Page Navigators 31
Page View
Command Bar 25
convert text 49
definition 2, 23
fax item 38
FormTyper 54
switch to 24
Pan tool 63
paper return 17
PaperPort Desktop 18, 21, 56
PaperPort Viewer 12, 85
paste
annotations 61
converted text 51
Paste as Annotation command 61
Per-Page Titles command 30
photo
exposure and focus 71
scan 17
picture
add to page 65
reposition and resize 66
Picture tool 65, 66
Place Field button 56
Pointer tool 59
preprinted form 8, 53
Previous item button 26
Previous page button 26
print items 68
Printer link icon 68
R
Remove Red Eye tool 69, 73
Remove Stray Dots tool 75
right mouse button 13
Rotate button 25, 52
Rotate Right and Left tools 70
rotate spreadsheet 70
S
Save to PaperPort As command 55
scan
color 9
page 16
photo 17
preview 16
Page 94

90 INDEX
of Contents
Table
Scan Settings 9, 17, 18
ScanDirect Control Panel
about button 43
definition 7, 35
fax an item 43
help 43
icon positions 43
icons 42
scan multiple pages button 42
scan single page button 42
scroll arrows 42
starting 41
with PaperPort 44
screen background 76
scroll quickly 63
search for item 11
select an item 29
Selection tool 50, 60
Set as Wallpaper command 76
Settings button 17, 25
Sharpen Picture tool 73
shortcuts, right mouse button 13
signature, copy to a letter 60
SimpleSearch 83–84
definition 11
spreadsheet
column format 52
converting 51
link 51
rotating several 52, 70
stack
convert text 48
creating 27
definition 22, 27
drag and drop 28
sample 4
seeing pages in 31
title 29
unstacking 32
Stack button 25, 28
Status Bar 21, 22
Storing Color Photos 9
Straighten Page tool 62
T
technical support 6, 40
text
convert a portion 50
convert with OCR 7, 45, 47
paste converted 51
text annotation, on forms 55
text content, of item 83
thumbnail
annotations 58
definition 2, 21
tiling items 33
tint, adjusting 71
title
date format 30
definition 19
folder 80
item 28, 29
stack 28, 29
TWAIN button 26
U
unstack all pages 32
Unstack button 25
unstack one page 32
Unstack1 button 25, 48
V
Viewer, PaperPort 85
Visioneer OCR software 45, 47
Visioneer Web site 12, 40, 85
W
WebSite menu 6, 40
WinFax PRO 37, 38
Wizard button 26, 71
word processing
application 48
link icon 47
Z
Zoom In button
definition 26
for red eye 74
Zoom Navigator 56
Zoom Out button 26
 Loading...