

Page 1

TABLE OF CONTENTS
PART ONE: Getting Started
Chapter 1: Quick Guide
. . . . . . . . . . . . . . . . . . . . . . . . . . . . . . . . . 1
Learning the Basics . . . . . . . . . . . . . . . . . . . . . . . . . . . . . . . . . . . . 1
Starting the PaperPort Software . . . . . . . . . . . . . . . . . . . . . . . 2
The Practice Example . . . . . . . . . . . . . . . . . . . . . . . . . . . . . . 3
Selecting and Deselecting Items . . . . . . . . . . . . . . . . . . . . . . . 4
Saving an Item . . . . . . . . . . . . . . . . . . . . . . . . . . . . . . . . . . . . 4
Stacking Pages . . . . . . . . . . . . . . . . . . . . . . . . . . . . . . . . . . . . 5
Displaying an Item in Page View . . . . . . . . . . . . . . . . . . . . . . 7
Organizing and Finding Scanned Items . . . . . . . . . . . . . . . . . 8
Adding Comments to a Page . . . . . . . . . . . . . . . . . . . . . . . . 10
Exiting the PaperPort Software . . . . . . . . . . . . . . . . . . . . . . 12
Getting the Most from PaperPort . . . . . . . . . . . . . . . . . . . . . . . . 12
Sending a Fax with PaperPort . . . . . . . . . . . . . . . . . . . . . . . 13
Printing a Spreadsheet to the PaperPort Desktop . . . . . . . . . 14
Letting PaperPort Do Your Typing (with OCR) . . . . . . . . . 16
Scanning Photos . . . . . . . . . . . . . . . . . . . . . . . . . . . . . . . . . 18
PART TWO: Using PaperPort
Chapter 2: Scanning Items
. . . . . . . . . . . . . . . . . . . . . . . . . . . . . . 23
Scanning to Get the Best Image . . . . . . . . . . . . . . . . . . . . . . . . . 23
Changing Brightness . . . . . . . . . . . . . . . . . . . . . . . . . . . . . . 25
Tips for Scanning Groups of Items . . . . . . . . . . . . . . . . . . . 25
Improving the Image Quality . . . . . . . . . . . . . . . . . . . . . . . . 26
Cleaning Pages . . . . . . . . . . . . . . . . . . . . . . . . . . . . . . . . . . . 29
Setting Desktop Preferences . . . . . . . . . . . . . . . . . . . . . . . . . . . . 31
Scanning with an HP Scanner . . . . . . . . . . . . . . . . . . . . . . . . . . 32
iii
Page 2

Chapter 3: Working on the PaperPort Desktop
. . . . . . . . . . . . . 35
Working in Desktop View . . . . . . . . . . . . . . . . . . . . . . . . . . . . . 36
The Command Bar . . . . . . . . . . . . . . . . . . . . . . . . . . . . . . . 36
Displaying and Hiding Desktop Features . . . . . . . . . . . . . . . 38
Moving Thumbnails . . . . . . . . . . . . . . . . . . . . . . . . . . . . . . 39
Deleting Items . . . . . . . . . . . . . . . . . . . . . . . . . . . . . . . . . . . 39
Giving Titles to Items . . . . . . . . . . . . . . . . . . . . . . . . . . . . . 40
Working in Page View . . . . . . . . . . . . . . . . . . . . . . . . . . . . . . . . 42
The Command Bar . . . . . . . . . . . . . . . . . . . . . . . . . . . . . . . 42
The Annotation Tools . . . . . . . . . . . . . . . . . . . . . . . . . . . . . 43
Displaying and Hiding the Annotation Tool Bar . . . . . . . . . 44
Zooming In or Out on a Page . . . . . . . . . . . . . . . . . . . . . . . 44
Fitting an Item into a Window . . . . . . . . . . . . . . . . . . . . . . 44
Panning an Item . . . . . . . . . . . . . . . . . . . . . . . . . . . . . . . . . 45
Inverting an Item . . . . . . . . . . . . . . . . . . . . . . . . . . . . . . . . . 45
Rotating Pages . . . . . . . . . . . . . . . . . . . . . . . . . . . . . . . . . . . 46
Switching Views . . . . . . . . . . . . . . . . . . . . . . . . . . . . . . . . . . . . . 47
PaperPort Automatically Saves . . . . . . . . . . . . . . . . . . . . . . . . . . 47
Selecting and Deselecting Items . . . . . . . . . . . . . . . . . . . . . . . . . 48
Undoing an Action . . . . . . . . . . . . . . . . . . . . . . . . . . . . . . . . . . . 49
Chapter 4: Working with Stacks
. . . . . . . . . . . . . . . . . . . . . . . . . . 51
Stacking Items . . . . . . . . . . . . . . . . . . . . . . . . . . . . . . . . . . . . . . 52
Using Drag and Drop to Create Stacks . . . . . . . . . . . . . . . . 53
Using the Stack Command . . . . . . . . . . . . . . . . . . . . . . . . . 54
Moving Between Pages in a Stack . . . . . . . . . . . . . . . . . . . . . . . . 55
Unstacking Pages . . . . . . . . . . . . . . . . . . . . . . . . . . . . . . . . . . . . 56
Reordering Pages in a Stack . . . . . . . . . . . . . . . . . . . . . . . . . . . . 57
Inserting a Page into a Stack . . . . . . . . . . . . . . . . . . . . . . . . . . . . 58
Duplicating Items . . . . . . . . . . . . . . . . . . . . . . . . . . . . . . . . . . . . 59
Chapter 5: Getting Organized with Personal Folders
. . . . . . . . . 61
An Example: Keeping Track of Your Medical Bills . . . . . . . . . . . 62
Suggestions for Your Personal Folders . . . . . . . . . . . . . . . . . . . . 63
About the Folders . . . . . . . . . . . . . . . . . . . . . . . . . . . . . . . . . . . . 64
Filing Items in Folders . . . . . . . . . . . . . . . . . . . . . . . . . . . . . . . . 65
iv
Page 3

Displaying All the Items in a Folder . . . . . . . . . . . . . . . . . . . . . . 67
Seeing What Is in a Folder . . . . . . . . . . . . . . . . . . . . . . . . . . . . . 68
Creating New PaperPort Folders . . . . . . . . . . . . . . . . . . . . . . . . 70
Giving a Folder a New Title . . . . . . . . . . . . . . . . . . . . . . . . . . . . 71
Displaying the Folders . . . . . . . . . . . . . . . . . . . . . . . . . . . . . . . . 71
Adjusting the Folders Column Width . . . . . . . . . . . . . . . . . . . . 72
Deleting Folders . . . . . . . . . . . . . . . . . . . . . . . . . . . . . . . . . . . . . 74
Chapter 6: Getting Items On and Off the
PaperPort Desktop
. . . . . . . . . . . . . . . . . . . . . . . . . . . . . . . . . . 75
Importing Files from Other Applications . . . . . . . . . . . . . . . . . . 76
Working with Color and Grayscale Images . . . . . . . . . . . . . . . . 77
Importing PaperPort Items Saved as Files . . . . . . . . . . . . . . . . . . 78
Finding Files to Import . . . . . . . . . . . . . . . . . . . . . . . . . . . . 79
Exporting PaperPort Items . . . . . . . . . . . . . . . . . . . . . . . . . . . . . 80
Exporting Files with Compression . . . . . . . . . . . . . . . . . . . . . . . 83
Printing from Other Applications . . . . . . . . . . . . . . . . . . . . . . . 84
Adding Summary Information to Items . . . . . . . . . . . . . . . . . . . 85
Finding Items . . . . . . . . . . . . . . . . . . . . . . . . . . . . . . . . . . . . . . . 86
Finding Annotations . . . . . . . . . . . . . . . . . . . . . . . . . . . . . . . . . 90
Using Windows Object Linking and Embedding . . . . . . . . . . . . 91
Additional Ways To Use OLE . . . . . . . . . . . . . . . . . . . . . . . 93
Editing an OLE Object . . . . . . . . . . . . . . . . . . . . . . . . . . . . 94
Chapter 7: Annotating Items
. . . . . . . . . . . . . . . . . . . . . . . . . . . . . 97
A Look at the Annotation Tools . . . . . . . . . . . . . . . . . . . . . . . . . 98
Copying, Cutting, and Pasting Information . . . . . . . . . . . . . . . . 98
Copy and Paste Options . . . . . . . . . . . . . . . . . . . . . . . . . . . 99
Cropping an Image . . . . . . . . . . . . . . . . . . . . . . . . . . . . . . . . . 101
Working with Sticky Notes . . . . . . . . . . . . . . . . . . . . . . . . . . . 102
Adding Sticky Notes . . . . . . . . . . . . . . . . . . . . . . . . . . . . . 103
Collapsing and Expanding Sticky Notes . . . . . . . . . . . . . . . 104
Adding Text to a Page . . . . . . . . . . . . . . . . . . . . . . . . . . . . . . . 105
Highlighting Information . . . . . . . . . . . . . . . . . . . . . . . . . . . . . 106
Adding Freehand Annotations . . . . . . . . . . . . . . . . . . . . . . . . . 107
Drawing Lines and Arrows . . . . . . . . . . . . . . . . . . . . . . . . . . . . 108
v
Page 4

Creating a New Item . . . . . . . . . . . . . . . . . . . . . . . . . . . . . . . . 109
Adding Graphics to Items . . . . . . . . . . . . . . . . . . . . . . . . . . . . 109
Fine-Tuning Annotations . . . . . . . . . . . . . . . . . . . . . . . . . . . . . 111
Selecting the Font and Color . . . . . . . . . . . . . . . . . . . . . . . 111
Editing Annotation Text . . . . . . . . . . . . . . . . . . . . . . . . . . 114
Moving and Resizing Annotations . . . . . . . . . . . . . . . . . . . 114
Copying, Cutting, and Pasting Annotations . . . . . . . . . . . . . . . 115
Displaying and Hiding Annotations . . . . . . . . . . . . . . . . . . . . . 116
Undoing Annotations . . . . . . . . . . . . . . . . . . . . . . . . . . . . . . . . 116
Deleting Annotations . . . . . . . . . . . . . . . . . . . . . . . . . . . . . . . . 117
Chapter 8: Using PaperPort Links
. . . . . . . . . . . . . . . . . . . . . . . 119
Overview of Using Links . . . . . . . . . . . . . . . . . . . . . . . . . . . . . 120
The PaperPort Links . . . . . . . . . . . . . . . . . . . . . . . . . . . . . 120
Basic Steps for Using Links . . . . . . . . . . . . . . . . . . . . . . . . 122
Converting Text with OCR Software . . . . . . . . . . . . . . . . . . . . 122
Processing Text Using OCR Software . . . . . . . . . . . . . . . . 123
Printing Items . . . . . . . . . . . . . . . . . . . . . . . . . . . . . . . . . . . . . 124
Using PaperPort with an Electronic Fax . . . . . . . . . . . . . . . . . . 125
Reading Faxes in PaperPort . . . . . . . . . . . . . . . . . . . . . . . . 126
Using PaperPort with E-mail . . . . . . . . . . . . . . . . . . . . . . . . . . 127
Using PaperPort with Lotus cc:Mail . . . . . . . . . . . . . . . . . . 127
Displaying E-mail Messages Sent from PaperPort . . . . . . . 128
Setting Link Preferences . . . . . . . . . . . . . . . . . . . . . . . . . . . . . . 128
PART THREE: Appendixes
Appendix A: Messages
Link Messages . . . . . . . . . . . . . . . . . . . . . . . . . . . . . . . . . . . . . 138
Memory Messages . . . . . . . . . . . . . . . . . . . . . . . . . . . . . . . . . . 139
Desktop Messages . . . . . . . . . . . . . . . . . . . . . . . . . . . . . . . . . . 141
Disk and File Messages . . . . . . . . . . . . . . . . . . . . . . . . . . . . . . . 141
Other Messages . . . . . . . . . . . . . . . . . . . . . . . . . . . . . . . . . . . . 142
. . . . . . . . . . . . . . . . . . . . . . . . . . . . . . . . . 137
vi
Page 5

Appendix B: Troubleshooting
Image Quality and Appearance . . . . . . . . . . . . . . . . . . . . . . . . . 145
Printing Problems . . . . . . . . . . . . . . . . . . . . . . . . . . . . . . . . . . 147
Electronic Fax Problems . . . . . . . . . . . . . . . . . . . . . . . . . . . . . . 148
OCR Problems . . . . . . . . . . . . . . . . . . . . . . . . . . . . . . . . . . . . . 148
Importing and Exporting Files . . . . . . . . . . . . . . . . . . . . . . . . . 149
Missing E-Mail Links . . . . . . . . . . . . . . . . . . . . . . . . . . . . . . . . 150
. . . . . . . . . . . . . . . . . . . . . . . . . . . 145
Appendix C: Obtaining and Installing PaperPort Viewer
Obtaining Extra Copies of PaperPort Viewer . . . . . . . . . . . . . . 154
Installing PaperPort Viewer for Windows . . . . . . . . . . . . . . . . 154
Hardware and Software Requirements . . . . . . . . . . . . . . . . 154
Installing from the PaperPort CD . . . . . . . . . . . . . . . . . . . 155
Installing from Disks . . . . . . . . . . . . . . . . . . . . . . . . . . . . . 155
Installing PaperPort Viewer for Macintosh . . . . . . . . . . . . . . . . 156
Hardware and Software Requirements . . . . . . . . . . . . . . . . 156
Using the Macintosh Installer . . . . . . . . . . . . . . . . . . . . . . 156
Starting PaperPort Viewer . . . . . . . . . . . . . . . . . . . . . . . . . . . . 157
Appendix D: Technical Information
Installation Log . . . . . . . . . . . . . . . . . . . . . . . . . . . . . . . . . . . . 159
Uninstalling PaperPort . . . . . . . . . . . . . . . . . . . . . . . . . . . . . . . 159
PaperPort Software Specifications . . . . . . . . . . . . . . . . . . . . . . . 160
Glossary
. . . . . . . . . . . . . . . . . . . . . . . . . . . . . . . . . . . . . . . . . . . . 163
. . . . . . . . . . . . . . . . . . . . . 159
. . . . . 153
Index
Contacting Visioneer
Calibration Page
. . . . . . . . . . . . . . . . . . . . . . . . . . . . . . . . . . . . . . . . . . . . . . . 169
. . . . . . . . . . . . . . . . . . . . . . . . . . . . . . . . . . . 177
vii
Page 6

viii
Page 7

PART ONE
Getting Started
of Contents
Table
VISIONEER
Page 8

of Contents
Table
Page 9

CHAPTER 1
Quick Guide
of Contents
Table
“Learn by doing.”
—Anonymous (Proverb)
Welcome to the
is a quick guide that explains how to use the PaperPort software. The
quick guide has two major sections:
• “Learning the Basics” will help you to quickly get acquainted with
the basic features of the PaperPort software. If you are in a hurry to
get started, this section contains what you need.
• “Getting the Most from PaperPort” shows you how to do certain
special tasks by using several practice exercises.
L
EARNING THE BASICS
The practice exercises in this section show you how to:
• Select and deselect items
• Save items automatically without using a Save command
• Combine single items into a multipage item
• Display an item in separate views
PaperPort 3.6 Software User’s Guide
. This first chapter
• Organize items in folders
• Add comments (called
annotations
) to an item
1
Page 10

Thumbnail of
the scanned image
S
TARTING THE PAPERPORT SOFTWARE
The easiest way to start the PaperPort software is to simply scan an item.
When scanning is complete, the PaperPort software starts automatically
and the PaperPort Desktop, or Desktop View, appears.
A thumbnail—a small image representing the item you scanned—
appears on the PaperPort Desktop. The following sample shows the item’s
thumbnail on the PaperPort Desktop.
of Contents
Table
You can also start the PaperPort software without scanning an item by:
• Double-clicking the PaperPort
• Pushing the PaperPort button on your scanner.
• Printing to the PaperPort Desktop from another application. For more
information, see Chapter 6, “Getting Items On and Off the PaperPort
Desktop.”
• Starting PaperPort from the Windows File Manager as you would any
other application.
2
1: Quick Guide
icon in the Program Manager.
Page 11

of Contents
Table
The Command Bar has
shortcuts for choosing
menu commands, such
as switching views or
finding items.
Thumbnails—images of
scanned items.
The Link Bar contains
icons for printing, sending
a fax or an e-mail message,
reading text into your
word-processing
application, sending
scanned items to other
applications, and using
Paintbrush.
THE P
RACTICE EXAMPLE
The practice exercises in “Learning the Basics” use two scanned pages
consisting of a cover letter and resumé as shown in the following figure.
Name of selected item File size
Scan setting for
the selected item
▼
NOTE:
If you want to follow along with these practice exercises on
your computer, you can scan any two pages into PaperPort.
Learning the Basics
3
Page 12

S
ELECTING AND DESELECTING ITEMS
After you scan an item, it is automatically highlighted, or selected, on the
PaperPort Desktop. A selected item has a red (or dark) line around it. To
work with a scanned item—for example, to move an item, to drag an
item to a link, or to display an item in Page View—you must select it.
To select or deselect an item:
1. Click any empty space on the PaperPort Desktop. Notice that both
untitled thumbnails are no longer selected.
Newly scanned items are untitled until you give them a name. You’ll
see how to do that in the next few pages.
2. Click one of the thumbnails, such as Untitled-2, to select it.
Untitled-2 is highlighted.
of Contents
Table
3. To deselect the item, click another item or click anywhere on the
PaperPort Desktop.
TIP:
▼
S
AVING AN ITEM
Because PaperPort automatically saves an item after you scan it or make
changes to it, you do not need to use a Save command to save an item
that is on the PaperPort Desktop.
You might want to save an item when you want the item in another file
format—for example, BMP or TIFF. Using the Export command, you can
save an item and then open the item in another application. With the
Export command, you can also save an item as a file. For more information,
see Chapter 6, “Getting Items On and Off the PaperPort Desktop.”
To select multiple items, click each thumbnail while holding
down the Shift key or the Ctrl key, or click on the PaperPort Desktop
and drag a rectangle around the items to select.
4
1: Quick Guide
Page 13

S
TACKING PAGES
When you scan individual pages, you can combine the thumbnails for
those pages into a stack. For example, if you have scanned a 10-page
report, 10 individual thumbnails appear on the PaperPort Desktop. By
stacking the thumbnails, you can work with the report as a single item.
In this section, you will practice using the drag-and-drop method to
create a stack. For more information about stacking items, see Chapter 4,
“Working with Stacks.”
To create a stack using the drag-and-drop method:
1. Click an empty space on the PaperPort Desktop. Make sure that no
items are selected.
2. Drag and drop the item onto the other item. To drag and drop, select
the item and hold down the mouse button. Using the mouse, drag
the item until it is on top of the page that you want underneath it.
When the other item is highlighted, release the mouse button.
of Contents
Table
Learning the Basics
5
Page 14

PaperPort creates a
new, untitled item.
For this exercise, drag and drop the cover letter on top of the resumé.
You now have the stack Untitled-3 on the PaperPort Desktop.
of Contents
Table
3. Assign a title to the stack with the cover letter and resumé.
Select the item and
click its title.
Type a new title and
press Return.
The item now has
a new title.
You use the same process to give titles to individual pages.
6
1: Quick Guide
Page 15

D
ISPLAYING AN ITEM IN PAGE VIEW
Page View displays the details of the current page so that you can get a
close-up of a page’s information or add comments to a page.
To view a stack in Page View:
1. On the PaperPort Desktop, double-click the stack, or select the stack
and click the
Page
icon on the
Command Bar
. The first page of the
stack appears in Page View, as shown in the following figure.
of Contents
Table
The Document Navigator
displays the previous or
next item on the PaperPort
Desktop or a list of all items.
Use the Annotation Tool
Bar for adding notes,
highlighting areas, or cutting
and pasting a section.
The Status Bar shows the item’s
title, scanned dpi, or the page’s
percentage of enlargement or
reduction when the cursor is in
the page boundaries.
The Page Navigator displays the previous or next page when you click the left
or right arrow. Click the middle of the
Page Navigator to go to a specific page.
The Zoom Navigator reduces the page
(zoom out) or magnifies the page (zoom in).
Click the middle of the Zoom Navigator to
return the page to its actual (100%) size.
2. Click the right arrow in the Page Navigator to move forward one
page. Click the left arrow to move backward one page.
Learning the Basics
7
Page 16

▼
TIP:
To go to a specific page, click the middle of the Page Navigator
(where it displays the number of pages). Enter the page number when
the Go To Page dialog box appears.
O
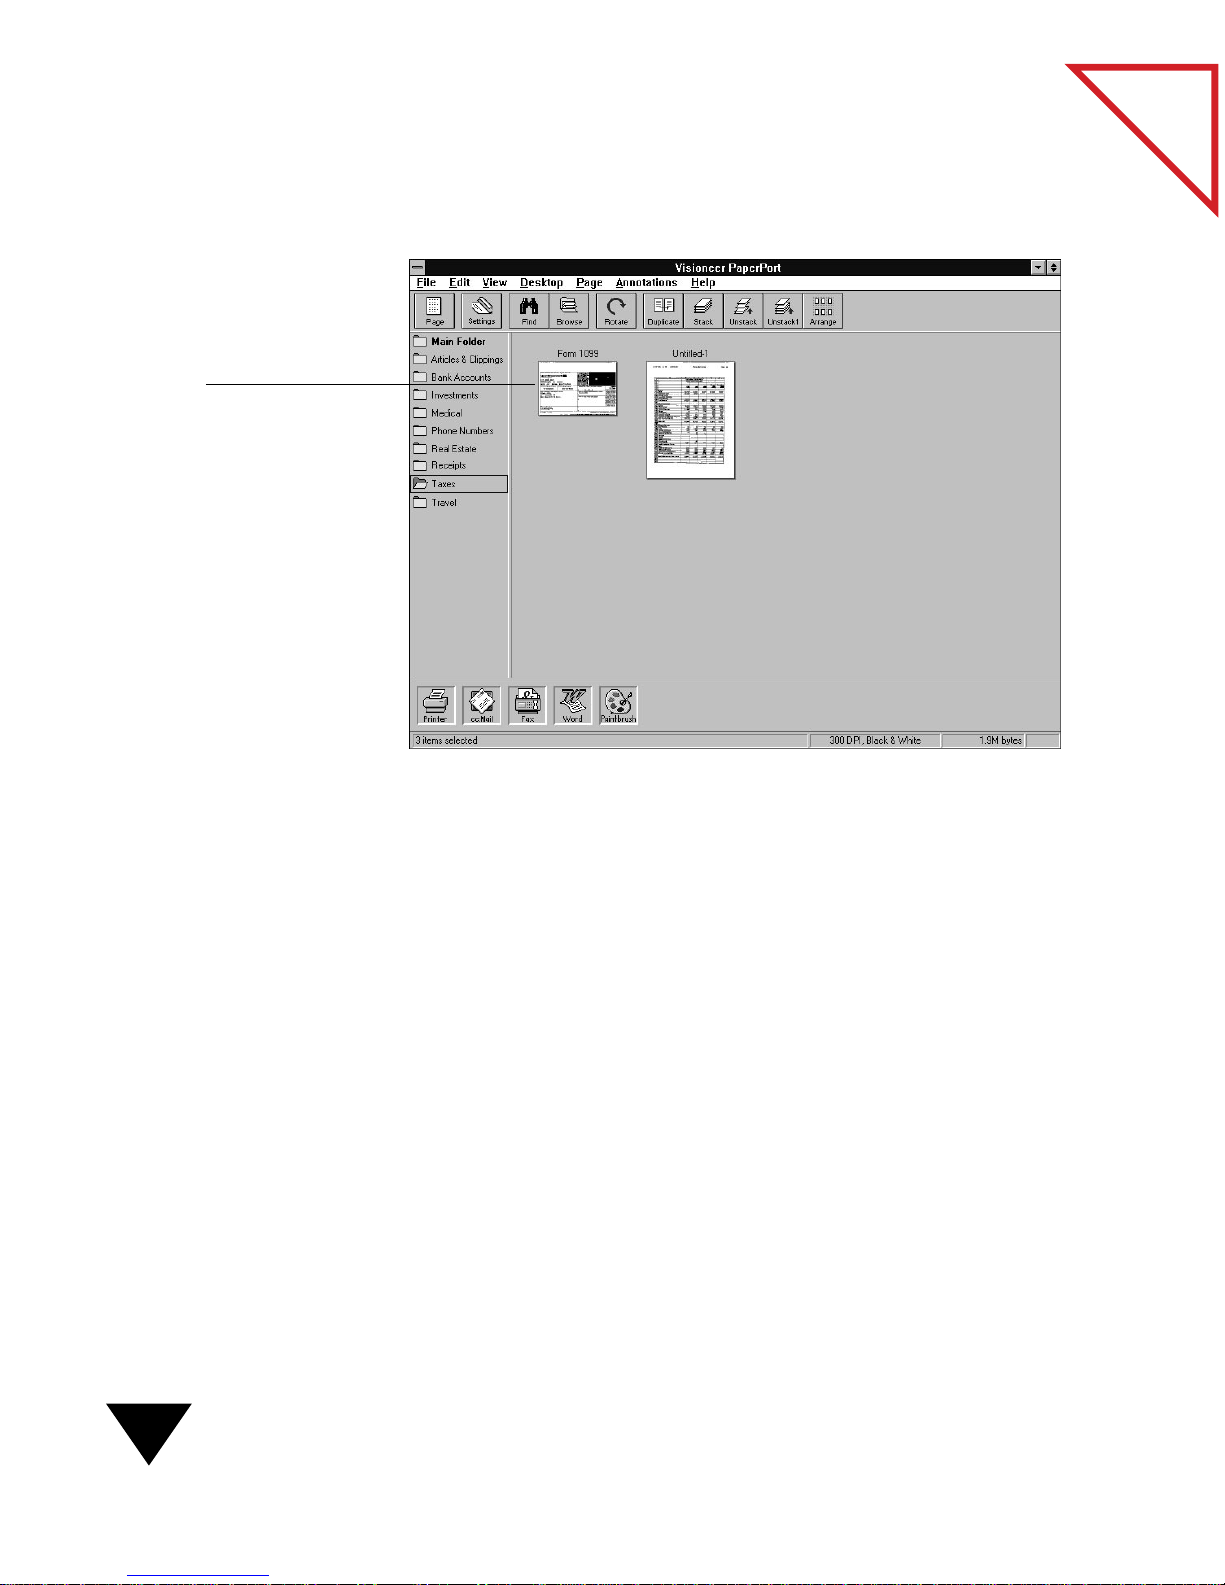
RGANIZING AND FINDING SCANNED ITEMS
As you use PaperPort, you will probably scan literally hundreds of items,
ranging from business correspondence and tax receipts, to your personal
letters and interesting articles that you want to keep. Using PaperPort’s
personal folders, you can quickly organize and store your important
papers. Using Paperport’s browse and find features, you can just as
quickly find the scanned items again.
To organize your scanned items in PaperPort folders:
1. In the PaperPort Desktop View, select the item.
of Contents
Table
When the pointer is this
shape:
...the item is not correctly
positioned on a folder
title, or you are trying to drop
it onto the folder where the
item is already filed.
2. Drag the item into a folder. The following example shows a business
card being dragged into a folder.
8
1: Quick Guide
Page 17

3. When you release the mouse button, the folder flashes to let you
know that the item is safely stored in that folder.
To see the items in a folder:
• Click the folder to open it. All of its items appear on the PaperPort
Desktop. (You may need to scroll the PaperPort Desktop window to
see all of the items.)
To see a list of items in the folders:
of Contents
Table
A thumbnail of
the selected item.
The selected item
is highlighted.
This open folder indicates
it is the one currently open
on the PaperPort Desktop.
This symbol indicates
the item is a multipage
stack.
1. From the
Edit
menu, choose
Browse
, or click the Browse button on
the Command Bar.
2. The Browse dialog box appears. From the Desktop View, the dialog
box lists all of the folders and their contents as shown here. From
Page View, the dialog box lists the items in the folder that is already
open.
3. Select an item in the list. Its thumbnail is displayed so that you can
4. Click Go To. That item is selected and ready for you to work with it.
determine if it is the item you want.
Learning the Basics
9
Page 18

PaperPort also has extensive search and retrieval features so that you can
find items based on their titles, text, date, and so forth. For more details
about finding and retrieving items, see Chapter 6, “Getting Items On and
Off the PaperPort Desktop.”
ADDING COMMENTS TO A PAGE
After you have displayed an item in Page View, you can use the
Annotation Tool Bar to add various types of comments, or annotations,
to a page. For example, the Highlighter tool highlights text in the same
way as a felt-tip marker. You can select a color and then highlight the text.
You can also use the Sticky Note tool to create notes and place them in a
document—just like real sticky notes.
In the next exercise, you will practice using the Sticky Note tool. For
more information about using the Annotation tools, see Chapter 7,
“Annotating Items.”
of Contents
Table
To add a sticky note:
1. On the PaperPort Desktop, double-click an item, or select the item
and click the Page icon on the Command Bar. The page appears in
Page View.
2. On the Annotation Tool Bar, click the Sticky Note icon. The cursor
changes to a small sticky-note symbol with a crosshair.
3. Position the cursor where you want to add the sticky note.
4. Click anywhere in the item. The default note size appears and is
ready for you to begin typing. The following figure shows a sample of
a note border.
10
1: Quick Guide
Page 19

Sample
sticky note
5. Type the note, as shown in the following figure.
of Contents
Table
6. Practice changing the size and shape of the note. Click the Pointer
icon on the Annotation Tool Bar, and select the note.
7. To resize the note box, drag one of the handles.
Drag the handle
diagonally to change
the size of the note.
8. From the View menu, choose Desktop View, or click the Desktop
icon on the Command Bar to display the PaperPort Desktop.
Learning the Basics
11
Page 20

EXITING THE PAPERPORT SOFTWARE
To exit the PaperPort software:
• From the File menu, choose Exit.
The next time you start PaperPort, all the items will appear on
the PaperPort Desktop in the same position as when you quit.
GETTING THE MOST FROM PAPERPORT
Now that you know the basics of using the PaperPort software, you are
ready to learn how powerful it can be. For example, PaperPort
automatically links to supported applications that are already installed on
your computer, such as electronic fax, graphics, or word-processing
applications. You can use a PaperPort link to send an item to the linked
application right from the PaperPort Desktop.
of Contents
Table
This section shows how to do some typical tasks using PaperPort features,
including:
• Sending a PaperPort item by using the electronic fax software
• Printing to the PaperPort Desktop from another application
• Changing a PaperPort item from an image to text
• Scanning photographs and adjusting the scan settings
12
1: Quick Guide
Page 21

SENDING A FAX WITH PAPERPORT
To send a fax with PaperPort, your computer must have:
• A fax modem.
• Fax software for your fax modem. If you have fax software that
PaperPort recognizes, it automatically displays a Fax link icon on the
Link Bar, and no special setup is needed. To add other fax software to
the Link Bar, see Chapter 8, “Using PaperPort Links.”
The following example shows you how to send a scanned item as an
electronic fax using the drag-and-drop method. For example, you have
scanned several invoices and stacked them, and you now want to fax them
to your bookkeeper. This section shows how drag and drop works.
To send a fax from PaperPort:
of Contents
Table
The dotted rectangle shows
what happens as you drag
the selected stack.
When the Fax icon is
highlighted, release the
mouse button.
1. On the PaperPort Desktop, select the stack that you want to send,
and hold down the mouse button.
2. While holding down the mouse button, drag the stack onto the Fax
icon on the Link Bar, as shown in the following figure.
Getting the Most from PaperPort
13
Page 22

3. Release the mouse button when the Fax icon is highlighted. The fax
application starts.
4. Send the fax as you normally would.
▼ NOTE: You can also send a fax from Page View. Choose Links from
the File menu, and then choose the name of your fax application from
the submenu. For more information about sending a fax, see
Chapter 8, “Using PaperPort Links.”
of Contents
Table
14
PRINTING A SPREADSHEET TO THE PAPERPORT DESKTOP
In the following example, you want to send an income tax form and a
spreadsheet from PaperPort to your accountant. You have the form on
paper, but the spreadsheet is in a spreadsheet program, such as Microsoft
Excel. You could print the spreadsheet and scan it, but there is an easier
way: printing to the PaperPort Desktop.
To print a spreadsheet to the PaperPort Desktop:
1. Scan the tax form, and display it on the PaperPort Desktop.
Now you want to get the spreadsheet from Excel onto the PaperPort
Desktop. (You can get documents from other applications into
PaperPort, not just from spreadsheets.)
2. Start Excel and open the spreadsheet file.
1: Quick Guide
Page 23

3. From Excel’s File menu, choose Page Setup. In the Page Setup dialog
box, click Print, and then click the Printer Setup button.
Other applications have different steps for selecting a printer; for
example, in Microsoft Word, choose Print from the File menu, and
then click Printer to select PaperPort on Desktop as the current
printer. Usually the command to select a printer is found in an
application’s File menu.
The dialog box for setting up the printer appears. The following
dialog box is from Microsoft Excel.
of Contents
Table
4. Select PaperPort on Desktop as the printer.
5. Click OK. Instead of being printed to the printer, the spreadsheet is
printed to the PaperPort Desktop.
Getting the Most from PaperPort
15
Page 24
The PaperPort Desktop displays
the form that you scanned and
the spreadsheet that was printed
to the PaperPort Desktop
from Excel.
The PaperPort Desktop appears and displays the spreadsheet as a
PaperPort image.
of Contents
Table
If you want to fax the form and the spreadsheet, first stack the items and
then drag and drop the stack onto the Fax icon on the Link Bar.
LETTING PAPERPORT DO YOUR TYPING (WITH OCR)
When you scan an item, it is an image (or a picture), and you cannot edit
its text. However, using the OCR software that is shipped with PaperPort
or using a PaperPort-supported OCR application, you can convert the
image into text and read the text into your word-processing application.
That process changes the scanned image into “real” text that you can edit.
If you want to edit a printed page but do not want to use a red pencil, you
can scan the page, read it into your word processor, and then edit the page
online.
16
1: Quick Guide
Page 25

▼ NOTE: The OCR software may not always convert all text with
100 percent accuracy; therefore, check the document for spelling
errors while editing it.
To convert a PaperPort item to text:
1. Scan the item if you have not already done so.
2. Select the item on the PaperPort Desktop.
3. Drag and drop the selected item onto the Word-Processing icon on
the Link Bar.
If Page View is displayed, choose Links from the File menu. Then
choose your word processor from the Links submenu.
of Contents
Table
Drag the selected item onto
the Word-Processing icon.
Release the mouse button
when the Word-Processing
icon is highlighted.
The OCR application reads the text into your word-processing
application. The word-processing application starts.
4. Edit the text in the word processor.
Getting the Most from PaperPort
17
Page 26

You can also drag and drop a spreadsheet onto a Spreadsheet icon. In that
case, the OCR software converts the numbers and text, then opens the
spreadsheet application. In most cases, the column-by-column structure
of the original spreadsheet is maintained with the converted numbers and
text. To learn more about using the OCR link, see Chapter 8, “Using
PaperPort Links.”
SCANNING PHOTOS
With PaperPort, you can scan pictures of your kids, the family dog, office
mates, real estate, special events, and even magazine advertisements. For
example, you could scan a photograph of a family member, attach it to an
e-mail message, and mail the image to a coworker.
Before scanning the photograph, select the Photograph mode in the
PaperPort Scan Settings.
of Contents
Table
To scan a photo:
1. Click the Settings button on the Command Bar, or from the Edit
menu, choose Preferences and click the Scanner button. The
PaperPort Scan Settings dialog box appears.
▼ NOTE: If the PaperPort software is not running, you can also press
the PaperPort button on the scanner to see the PaperPort Scan Settings
dialog box.
2. In the Scan Mode options, select Photograph.
18
1: Quick Guide
Page 27

3. Click OK.
4. Scan your photo.
▼ TIP: You may need to adjust the Image Improvement setting, making
it either darker or lighter, to make the photo look the way you want.
of Contents
Table
Getting the Most from PaperPort
19
Page 28

of Contents
Table
20
1: Quick Guide
Page 29

PART TWO
Using PaperPort
of Contents
Table
VISIONEER
Page 30

of Contents
Table
Page 31

CHAPTER 2
Scanning Items
of Contents
Table
“Art is the technique
of communication. The
image is the most
complete technique of
all communication.”
—Claes Oldenburg
This chapter tells you how to use the PaperPort software when scanning,
including how to:
• Produce the best quality image
• Change the PaperPort Desktop settings
• Scan with other scanners
SCANNING TO GET THE BEST IMAGE
The PaperPort software always attempts to produce the perfect image.
However, there are times when you can improve the quality of a
particular image by:
• Changing the brightness of a scan
• Straightening the pages and trimming the black edges from them
• Cleaning the pages
You can use the options in the PaperPort Scan Settings dialog box to
improve image quality.
See the installation guide that you received with your scanner for more
information about setting the scan mode.
▼ TIP: You can quickly display the PaperPort Scan Settings dialog box
by pressing the PaperPort button.
23
Page 32

Use the Scan Settings and PaperPort commands for improving the images
if the items that you want to scan are dirty or are too light or too dark.
The following are some samples along with suggestions for getting a
better image.
of Contents
Table
This letter was scanned too dark. It is also crooked,
and it has “speckles” (in the upper left corner)
caused by irregularities in the paper.
The Straighten Page command takes care of the
crooked page problem, but the speckles remain.
▼ TIP: For larger dirt smudges, use the Selection tool to select them, and
then choose Cut from the Edit menu.
After the image setting for brightness was changed,
the letter was scanned again. Now the text is fine,
but the speckles are still there, and the letter is still
crooked.
The Clean Page command removes the speckles.
With just a few settings, you have greatly improved
the quality of the scan.
24
2: Scanning Items
Page 33

CHANGING BRIGHTNESS
Sometimes an image is scanned with the brightness too light or too dark.
For example, a note written with a light pencil may need to be scanned
darker to improve legibility. Lightening or darkening the scan brightness
can improve the quality of an image and make it easier to read. Changing
the brightness is similar to changing the setting on a photocopy machine
to make the image lighter or darker.
To change the scan brightness:
1. Click the Settings button on the Command Bar, or from the Edit
menu, choose Preferences and then click the Scanner icon. The
Scan Settings dialog box appears.
2. To change the scan brightness, drag the slider, or click the arrows.
You can also click the number and enter a number directly.
of Contents
Table
The higher the number, the lighter the
image; the lower the number, the darker
the image. Fifty is usually a good setting
Increase or decrease the brightness
of an image by moving the slider or
clicking the arrows.
for most items.
3. Click OK to set the new value.
▼ NOTE: Changing the brightness does not affect items already scanned
into PaperPort.
TIPS FOR SCANNING GROUPS OF ITEMS
If you plan to scan a lot of items at one time, put them into groups based
on their quality. Choose the scan settings for the first batch, scan it,
change the settings for the next batch, scan it, and so forth. That way you
will need to change the settings only once for each group.
Scanning to Get the Best Image
25
Page 34

IMPROVING THE IMAGE QUALITY
If you inadvertently insert an item at an angle into the scanner, the
PaperPort software can automatically straighten the image as it is scanned.
When you scan an item that is narrower than 8
or that has torn edges, PaperPort can trim the ragged black edges.
If an image is still skewed after you have scanned it, you can straighten
the page using either the Auto-Straighten Page command or the
Straighten Page tool.
The PaperPort software also has a SharpPage setting for optimizing the
readability of scanned items. When it is turned on, SharpPage causes all
of the text and image details to show up more vividly. SharpPage is
available for the Article, Letter, Business Card, and Custom scan modes
(which have a bit depth of 1-bit). It is not available for the Snapshot and
Photograph scan modes (which have other bit depths).
1/2 inches (21.6 cm) wide
of Contents
Table
To improve the image automatically when you scan:
1. Click the Settings button on the Command Bar, or from the Edit
menu, choose Preferences and click the Scanner icon on the
Preferences dialog box. The Scan Settings dialog box appears.
2. Select one or all the Image Improvement options.
26
2: Scanning Items
Page 35

Option Description
of Contents
Table
Straighten
Automatically
Straightens a page that has been inserted at an
angle. Works with items that have crisp, square
corners, which includes most business
documents. If you insert the page at a very sharp
angle, or if the corners are dog-eared or bent, this
option may not be able to straighten the image.
Trim
Automatically
Removes the black border that would otherwise
appear when you scan a page that is less than
8.5
inches (21.6 cm) wide or that has ragged edges
or tears.
SharpPage Optimizes the readability of items scanned at a
1-bit depth setting.
3. Click OK.
By default, the options to straighten and trim automatically are both
turned on when you receive PaperPort.
▼ TIP: If an image has black edges that you want to be included in the
scan, do not use the option to trim the black border.
To automatically straighten a page after it has been scanned:
1. Display the page in Page View.
2. From the Page menu, choose Auto-straighten Page.
The PaperPort software analyzes the image to determine the best
angle to use for straightening that page, and then automatically
straightens the page.
Scanning to Get the Best Image
27
Page 36

To manually straighten a skewed page after it has been scanned:
1. Display the page in Page View.
2. Click the Straighten button on the Annotation Tool Bar.
A message box explains how to draw a reference line for straightening
the page. If you don’t want the message box to appear again, select
the checkbox.
3. Click Close.
of Contents
Table
The cursor becomes a crosshair.
4. Hold down the mouse button and drag the cursor to draw a
horizontal or vertical reference line for straightening the page. Draw
the line so that it is along the edge of the horizontal or vertical
features on the page, such as a paragraph. A small arrow on the
reference line indicates the angle that PaperPort will use to straighten
the page.
When you release the mouse button, PaperPort straightens the page
relative to your reference line.
28
2: Scanning Items
Page 37

The black edges on a page
indicate that the item was
scanned at an angle.
Draw a line along the edge
of a paragraph or other
feature on the page. The
line and the arrow show
which way the page will be
straightened.
Use the crosshair for
drawing the reference line.
The following figure shows a sample of a page with a reference line drawn
on it prior to being straightened.
of Contents
Table
▼ NOTE: A page with annotations cannot be straightened. If the page
already contains annotations, choose Select All from the Edit menu to
select all of the annotations; then choose Cut from the Edit menu to
cut them from the page. Straighten the page, and choose Paste from
the Edit menu. The annotations will be pasted back onto the now
straightened page. You may have to reposition them slightly.
CLEANING PAGES
Sometimes a page has small marks, dots, or speckles that appear on the
scanned image. If you scan a newspaper article, for example, the
newsprint may have speckles that the scanner picks up. If you are using
OCR software to read text into your word-processing application,
speckled pages can slow down the performance or make the text
unreadable by the software.
Scanning to Get the Best Image
29
Page 38

To clean a scanned page:
1. Display the page in Page View.
2. From the Page menu, choose Clean Page.
If the cleaning removes portions of the image that you want to keep,
choose Undo right away from the Edit menu. The original image
will reappear.
To manually clean a page:
1. Display the page in Page View.
2. Click the Selection tool.
3. Select the dirty spot to be removed.
4. From the Edit menu, choose Cut, or press the Delete key. The spot
is cut from the page.
of Contents
Table
▼ TIP: You can also use this process to remove ragged edges from
scanned images, such as articles torn out of a newspaper or magazine.
▼ NOTE: Sometimes the lines on a spreadsheet or a form are broken or
need to be darkened. To darken or connect broken lines (also called
enhancing lines), display the item in Page View and choose the
Enhance Lines command from the Page menu. This command works
only on black-and-white images.
30
2: Scanning Items
Page 39

Desktop icon
SETTING DESKTOP PREFERENCES
The Desktop preferences are for customizing the PaperPort software so
that you can scan and display items the way you want.
To select preferences for the PaperPort Desktop:
1. From the Edit menu, choose Preferences. The PaperPort Preferences
dialog box appears.
2. Click the Desktop icon to see its options.
of Contents
Table
With text... and without.
3. Select the options that you want.
Option Description
Scan to
Desktop
Scan to Page
View
Show Text
With Icons
As you scan items, they appear on the PaperPort
Desktop as thumbnails.
The scanned items first appear in Page View
instead of in Desktop View.
The buttons on the Command Bar are displayed
with names. When this option is deselected, the
buttons are smaller and do not have any text on
them.
Setting Desktop Preferences
31
Page 40

Option Description
of Contents
Table
Show
ToolTips
Color Screen Select this option if your computer has a color
Maximize
Window at
Startup
Use Gray
Dialog
Background
4. Click OK to save the Desktop preferences.
Short descriptions of the Command Bar buttons
and Annotation Tools are displayed when the
cursor is on them.
monitor.
The PaperPort window is maximized (fills the
computer screen) when PaperPort starts.
The PaperPort dialog boxes are displayed with a
gray instead of a white background. The gray
background appears the next time you restart
Windows.
SCANNING WITH AN HP SCANNER
32
The PaperPort software also supports certain HP ScanJet scanners
available from the Hewlett-Packard company. To use these scanners with
the PaperPort software, you must have HP’s DeskScan software, version
2.3 or later. Contact Hewlett-Packard to obtain the DeskScan software.
The instructions in this section apply only if you have a supported
scanner and its driver program installed on your computer.
2: Scanning Items
Page 41

To use PaperPort with a supported HP scanner:
1. If this is the first time you are using the other scanner, or if you have
more than one scanner attached to your computer, choose Select
Source from the File menu. A dialog box lists the names of the driver
programs for the HP scanners available to your computer.
2. Select the software source (driver) for your scanner.
of Contents
Table
3. Click Select.
4. To scan, click the Scan button on the Command Bar, or from the
PaperPort File menu, choose Acquire. The scanner scans the image,
and it appears on the PaperPort Desktop.
▼ NOTE: The Scan button will not appear, and the Acquire and Select
Source commands will remain inactive on the PaperPort File menu
until another supported scanner is attached to your computer, and its
driver program is installed.
Scanning with an HP Scanner
33
Page 42

of Contents
Table
34
2: Scanning Items
Page 43

CHAPTER 3
Working on the
PaperPort Desktop
of Contents
Table
“Wisdom outweighs
any wealth.”
—Sophocles (Antigone)
This chapter explains how to work with the PaperPort Desktop. You will
learn about the basic views for looking at scanned items, and also how to
“get around” in PaperPort and work with its features.
This chapter covers:
• PaperPort’s two views for looking at scanned items
• Switching between views
• PaperPort’s automatic save feature
• Selecting and deselecting items
• Undoing an action
35
Page 44

Command Bar has button
shortcuts for choosing menu
commands.
Single-page item
Stacks are items with
multiple pages that you
can flip through by clicking
the Page Navigators at the
bottom of the thumbnails.
WORKING IN DESKTOP VIEW
The PaperPort Desktop View displays all of the items as thumbnails. The
following sample shows three thumbnails: one is a single-page item, and
the other two are stacks.
of Contents
Table
Link Bar has icons you
can use for faxing, printing,
sending e-mail, reading text
into your word-processing
application, and using
Paintbrush.
Status Bar shows information about the selected items,
the links, or the buttons on the Command Bar.
THE COMMAND BAR
The buttons on the Command Bar are shortcuts for various commands
on the menus. The buttons appear in Desktop View and Page View.
Desktop. Switch from Page View to Desktop View.
Page. Switch from Desktop View to Page View.
36
3: Working on the PaperPort Desktop
Page 45

Settings. Change the scan mode in the Scan Settings dialog box.
Find. Find an item in Desktop View, or find an annotation in Page View.
Browse. See a list of items on the PaperPort Desktop.
Rotate. Rotate the selected item 90 degrees to the right.
Duplicate. Make a copy of the selected item(s).
of Contents
Table
Stack. Stack selected items into one stack.
Unstack. Unstack the pages of the selected stack.
Unstack1. Unstack the visible page of the stack. The rest of the pages
remain stacked.
Arrange. Neatly rearrange the items in Desktop View.
Working in Desktop View
37
Page 46

Two other buttons may appear on the Command Bar depending on how
you are using the PaperPort software.
Scan. This button appears if you attach another scanner to your
computer. After you use the Acquire Source command on the File menu
to choose the scanner’s proper driver program, clicking this button starts
that scanner. This button is not used for a PaperPort scanner because it
starts automatically when you insert an item to be scanned.
OLE Return. This button appears when you are using Windows OLE.
Clicking this button returns to the Windows application that you were
previously using for OLE. For more information about OLE, see
Chapter 6, “Getting Items On and Off the PaperPort Desktop.”
DISPLAYING AND HIDING DESKTOP FEATURES
Using the View menu, you can decide which PaperPort features you want
to display in Desktop View.
of Contents
Table
To display or hide PaperPort Desktop features:
1. From the View menu, choose the features that you want. The choices
are Folders, Command Bar, Link Bar, and Status Bar.
A checkmark means that the visual element will be displayed on the
PaperPort views.
2. These choices are “toggles.” Choose the appropriate command to
display or hide the visual element on the PaperPort Desktop.
38
3: Working on the PaperPort Desktop
Page 47

MOVING THUMBNAILS
If the PaperPort Desktop becomes cluttered, you can either move the
thumbnails or rearrange them.
To move an item:
1. Select the item that you want to move. To select multiple items hold
down the Shift key or Ctrl key while clicking on them, or click on
the Desktop and drag a rectangle around the items.
2. Drag the item(s) to a new location on the PaperPort Desktop.
To arrange all items on the PaperPort Desktop:
• From the Desktop menu, choose Arrange Desktop, or click the
Arrange button on the Command Bar. The thumbnails are
automatically reordered in neat rows starting from the upper-left
corner of the PaperPort Desktop.
of Contents
Table
To arrange some of the items on the PaperPort Desktop:
1. Select two or more items that you want to rearrange.
2. From the Desktop menu, choose Arrange Selected Items. The
selected items move to the end of the list of items on the Desktop.
DELETING ITEMS
If you are sure that you no longer need an item, you can delete it.
PaperPort always asks if you are sure that you want to delete an item, so
that you will not inadvertently delete one that you want to keep.
▼ NOTE: Deleting an item deletes it permanently. If you want to save it
for future use, use the Export command on the File menu to export
the item before deleting it. When you export an item, you can save it
in several different formats. For details about exporting, see Chapter 6,
“Getting Items On and Off the PaperPort Desktop.”
Working in Desktop View
39
Page 48

To delete an item:
1. Select the item in Desktop View, or display the item in Page View.
2. From the File menu, choose Delete Item.
In Desktop View, you can also press the Delete key or choose Delete
from the Edit menu.
A message box asks if you are sure that you want to delete the item.
3. Click Yes if you want to delete it; click No or Cancel if you don’t
want to delete it.
of Contents
Table
If you selected multiple items, you can delete them all in one step by
clicking the Yes to All button.
GIVING TITLES TO ITEMS
PaperPort titles can be up to 30 characters long, so you can have titles
such as Smithers Contract or Letter to Dr. Adams. The more descriptive
the title, the easier it is for you to quickly find the item you want.
To give a title to an item in Desktop View:
1. Select the item. If you just scanned the item, it will be Untitled.
2. Click its title, or choose Change Title from the File menu. An edit
box appears around the title.
40
3: Working on the PaperPort Desktop
Page 49

3. Type the new title, up to 30 characters, and press Return.
...an edit box appears
around the title. Click
Select the item,
then click the title...
the title and type a new
title. Press Return.
The item now has
the new title.
To retitle an item in Page View:
1. From the File menu, choose Change Title. The Change Item Title
dialog box appears.
of Contents
Table
2. Enter a new title for the item and click OK.
An item’s title is at
the top of the item in
Desktop View...
...on the Document Navigator
when you are looking at the
full page in Page View...
Working in Desktop View
...and on the Status Bar.
41
Page 50

WORKING IN PAGE VIEW
Page View displays one page at a time. Page View is also where you can
add annotations to a page. Use the “navigators” to display other pages of a
stack, see other items, or reduce and enlarge the image. The folders do
not appear in Page View so you can have the entire window for viewing
the page.
of Contents
Table
Document Navigator.
Click the arrows to
scroll among items on
the PaperPort Desktop.
Click the middle area to
see a list of items on the
PaperPort Desktop.
Annotation Tool Bar. Use
these Annotation tools to
add notes, highlight areas,
or cut and paste sections.
Page Navigator. Click the
arrows to scroll between pages
in a stack. Click the middle
area to go to a specific page.
Zoom Navigator. Click the “minus” and “plus” magnifying
glasses to reduce or enlarge the image. Click “Actual” to return
the image to actual size. The scale of the image is shown at the
lower right of the Status Bar.
Status Bar shows the item’s title, scanned dpi, or the page’s percentage of
enlargement or reduction when the cursor is in the page boundaries.
THE COMMAND BAR
The buttons on the Command Bar in Page View are a subset of the ones
that appear in Desktop View. The rest of the buttons do not apply to the
Page View of the scanned item. For more information, see “The
Command Bar” earlier in this chapter.
42
3: Working on the PaperPort Desktop
Page 51

THE ANNOTATION TOOLS
In Page View, you can annotate an item using the tools on the
Annotation Tool Bar. For example, the Highlighter tool works in the
same way as a felt-tip marker to highlight text.
Pointer. Select, move, and resize annotations on a page.
Selection. Select an area to cut or copy for pasting or cropping. For
example, select a part of the page for use in another application, such as in
a word-processing document.
Straighten Page. Straighten an item, either horizontally or vertically, that
was originally scanned in at an angle.
Pan. Quickly scroll an image up, down, right, or left.
of Contents
Table
Sticky Note. Write a resizable sticky note at any place on the page. You
can also “collapse” the note to avoid covering underlying information.
Mark-Up. Add a line of text. Use this tool for adding text to pages,
because the page remains visible when you type text on it.
Highlighter. Highlight any part of a page.
Freehand. Draw freehand marks—for example, by circling text and
underlining sentences.
Arrow. Draw straight lines, with or without arrowheads, to point to
specific parts of a page.
For step-by-step instructions about these tools, including how to change
the font, color, and size of text, and the color of the highlighter or lines,
see Chapter 7, “Annotating Items.”
Working in Page View
43
Page 52

DISPLAYING AND HIDING THE ANNOTATION TOOL BAR
Using the View menu, you can display or hide the Annotation Tool Bar.
To display or hide the Annotation Tool Bar:
1. From the View menu, choose Tool Palette. A checkmark means that
the Tool Bar will be displayed.
2. These choices are “toggles.” Choose the appropriate command to
display or hide the visual element on the PaperPort Desktop.
ZOOMING IN OR OUT ON A PAGE
In Page View, you can zoom in to display the details of a page, or zoom
out to make the page smaller on the screen. When you zoom in, the page’s
contents are larger on the screen and are easier to see. By zooming out you
can see more of the page.
of Contents
Table
To zoom in or out on a page:
1. Display the page in Page View.
2. From the View menu, choose Zoom In or Zoom Out, or click the
plus (+) or minus (-) magnifying glass buttons on the Zoom
Navigator. The page magnification changes as you click the buttons
or repeat the Zoom commands.
The actual page magnification is shown on the Status Bar.
▼ NOTE: Zooming in or out does not change the actual size of the page.
To see the page at its actual size (100 percent) choose Actual Size from
the View menu or click Actual on the Zoom Navigator.
FITTING AN ITEM INTO A WINDOW
An image of an item will often be larger than the Page View window. To
fit the entire image into the Page View, you can use the Fit To Window
command.
44
3: Working on the PaperPort Desktop
Page 53

To fit an item into the window:
1. Display the item in Page View.
2. From the View menu, choose Fit to Window.
The image size is reduced so that the entire item is visible in the Page
View window. This command is a toggle; choose it again to return
the item to its previous size.
PANNING AN ITEM
Panning an item is a quick way to scroll it in Page View.
To pan an item:
1. Display the item in Page View.
2. Click the Pan tool.
of Contents
Table
3. Place the pointer on the image. The pointer changes to a hand.
4. Hold down the mouse button and drag up or down, right or left. The
image moves as you move the pointer.
INVERTING AN ITEM
Inverting an item reverses an image from black on white to white on
black. Gray shades are reversed as well.
To invert an item:
1. Display the item in Page View.
2. From the Page menu, choose Invert.
The image is reversed. If you want to change it back to the original
black-on-white image, just invert it again.
The original
image
The inverted
image
Working in Page View
45
Page 54

ROTATING PAGES
You can rotate a page to change the original direction of an image, thus
creating a different impact, or turn a graphic upside down by flipping it.
For example, you can scan a logo or company name horizontally and
rotate it so that the logo is displayed vertically. The following illustration
shows a logo (a) in its original position, (b) rotated left 90 degrees,
(c) rotated right 90 degrees, and (d) flipped 180 degrees.
of Contents
Table
(a) Original position (b) Rotated left 90
(c) Rotated right 90
o
(d) Flipped
o
To rotate or flip a single page:
1. Select the page you want to rotate, or display it in Page View.
2. From the Page menu, choose Rotate Right or Rotate Left, or click the
Rotate button on the Command Bar to rotate the page to the right.
To rotate the page 180 degrees from its current position, choose Flip
from the Page menu.
46
3: Working on the PaperPort Desktop
Page 55

You can rotate an item more than once. For example, clicking the
Rotate button twice is the same as flipping the item.
To undo the rotation, choose Undo Rotate from the Edit menu.
▼ NOTE: You cannot rotate a page that has annotations. If the page you
want to rotate has annotations, select them, choose Cut from the Edit
menu to remove the annotations, rotate the page, and then choose
Paste from the Edit menu to paste the annotations back onto the page.
SWITCHING VIEWS
You can switch between Desktop View and Page View in several ways:
• Click the Desktop or Page buttons on the Command Bar.
of Contents
Table
• From the View menu, choose Page View or Desktop View.
• Double-click an item in Desktop View to display it in Page View.
PAPERPORT AUTOMATICALLY SAVES
Every item in PaperPort is automatically saved as soon as you scan it. You
do not need to use a Save command to save it. As long as you don’t delete
the item, you can “scan it and forget it” because PaperPort makes sure
that the item is there when you need it. Any changes that you make to an
item, such as adding a note or giving an item a new title, are
automatically saved as well.
You can also save items as regular DOS files using the Export command,
but that is necessary only if you want to save them as backup copies, or
save them in some other format, such as BMP or TIFF, or save them on a
floppy disk. For details, see Chapter 6, “Getting Items On and Off the
PaperPort Desktop.”
You can also use the Export command if you want to delete items from
the PaperPort Desktop but use them later.
Switching Views
47
Page 56

SELECTING AND DESELECTING ITEMS
A red (or dark) line around an item indicates that it is selected. To work
with an item on the PaperPort Desktop—for example, to print the
item—it must be selected first. An item scanned into PaperPort is
automatically selected.
To select or deselect a single item:
• To select the item, click its thumbnail in Desktop View.
• To deselect the item, click another item, or click anywhere else in
Desktop View.
To select multiple items:
• Click each thumbnail while holding down the Shift key or the Ctrl key.
of Contents
Table
Or
• Click an empty space on the PaperPort Desktop, and then hold down
the mouse button. Without releasing the mouse button, drag the
mouse. A box follows the cursor as you drag the mouse. Any item that
is partially enclosed in the box, or that the box even touches, will be
selected. Release the mouse button when the items you want are
selected.
To select all the items on the PaperPort Desktop:
• From the Edit menu, choose Select All.
To deselect all the items on the PaperPort Desktop:
• From the Edit menu, choose Deselect All.
To deselect some, but not all, of the selected items on the PaperPort
Desktop:
• Hold down the Shift key and click on each item that you want to
deselect. The other selected items are not affected.
48
3: Working on the PaperPort Desktop
Page 57

UNDOING AN ACTION
The Undo command in the Edit menu will undo the last action you just
made in PaperPort. For example, if you move a thumbnail on the
PaperPort Desktop, you can choose Undo Move and the thumbnail will
move back to its original location. Similarly, if you highlight a section of
text on a page in Page View, you can choose Undo New Annotation to
remove that highlighting.
Note, however, that undoing applies only to the last action. For example,
if you move one thumbnail, and then move another one, the Undo Move
applies only to the last thumbnail that was moved (which was the last
action you took).
After you undo an action, the Undo command becomes Redo, which
undoes the Undo. For example, if you highlight a section of text in Page
View and choose Undo New Annotation to undo it, but then decide that
you made a mistake and want to keep that highlighting, just choose Redo
New Annotation, and it reappears.
of Contents
Table
The Redo command, like the Undo command, applies only to the last
action.
In Page View, there is also the Undo All Changes command. Choosing
that command undoes all annotations and other changes made to the
item in Page View.
Undoing an Action
49
Page 58

of Contents
Table
50
3: Working on the PaperPort Desktop
Page 59

CHAPTER 4
Working with Stacks
of Contents
Table
“Little by little does
the trick.”
—Aesop
Like many other busy people, you may sometimes put items on your desk
without organizing them. When you finally do put them in order, you
might stack the items by project, contact, or department. You use a
method that helps you to quickly find the stack you need.
With PaperPort you can electronically organize items into stacks in much
the same way that you do with paper documents. A stack is a PaperPort
item with multiple pages. Expense reports, contracts, memos, letters,
presentations, and other business materials are often two or more pages.
You can stack and unstack these items electronically on the PaperPort
Desktop.
This chapter explains how to:
• Stack items
• Move between pages in a stack
• Unstack pages
• Reorder pages within a stack
• Insert a page into a stack
• Duplicate items
51
Page 60

STACKING ITEMS
Each scanned page appears on the PaperPort Desktop as a one-page
untitled item. To stack scanned pages, you can drag one page on top of
the other, or click the Stack button on the Command Bar, or use the stack
commands from the Desktop menu. You can also add stacks to other
stacks.
Legal contracts, for example, usually have many pages. When unstacked,
the scanned pages are separate untitled items. Stacking these items
collects them into a single, multipage item. The following figure shows
several stacked contracts.
of Contents
Table
Stacked contracts
Page Navigators
▼ NOTE: If you plan to add summary information about the stack, add
it after creating the stack. Summary information added to individual
pages that are then stacked is retained only for the bottom page in the
stack. PaperPort can use summary information to help you quickly
find items. For more information, see “Adding Summary Information
to Items” on page 85 in Chapter 8, “Getting Items On and Off the
PaperPort Desktop.”
52
4: Working with Stacks
Page 61

USING DRAG AND DROP TO CREATE STACKS
In the PaperPort Desktop View, you can drag and drop one item onto
another item to create a stack.
To stack items using the drag-and-drop method:
1. On the PaperPort Desktop, select the item that you want to stack. It
can be a page or another stack.
Do not select the other item. That is the “target” item.
2. Place the pointer on the selected item, and then press and hold down
the mouse button.
3. Move the pointer onto the target item so that it becomes highlighted.
Release the mouse button when the target item is highlighted.
When you release the mouse button, the selected item is stacked on
top of the target item. The following sample shows a stack created by
stacking Document A on top of Document B.
of Contents
Table
Document A
jdhd flfdlfl fdlkflfklf
dkjdkjhfdgkjgfjjfg
kjdkjdjf fkljfl fdfd
kjdkfkff fdljfd fl
kjdjdlkflkflkjfl
jdllkfdlkflkfl
lksdlkdflkf fljfl fglhflkj gfjkj fgli flkgdflkjf lk
l gdflk jdlkfg lklfg l gl lgkjkbfgkbk hgl lkj gfl
fkfk lffkgb lr lkj lf lfk sdjhjgkljhljklhlfkj lkjh
kljhkfdbhbkfj dfjhf lk flkjlf lkdslfd fdlk fklf
kjlk;lfglkkl lklkflfjhlfkj
kdljd flflkjfdlkjfhkjfhkf kf kjf kgkfbkhbfjkjdl
lk lkjknk kfk fkkfjdf fdlfkfjhkfdhkbfbkfjbkfj
bkbklkjlkfdglgkl lgfhkjbkfglkjgfljfkljhf fjf fh
kj dkhdfkjhfdlhlfklkjkjlkjhfk fdkk fkjfkjfkjh
fdk fhkdjh fkjhfkj dkjd dkjfkjhkbfdkfkjhfk j
dfhk fkjfdhkjfhk kfj fkj fkjh dkjkd fkdhkdf
dkjhfdkj dkjhfkjhfd kjdhkdjfh kjh dfkhfk fk
jhfkj fdkjhfk fdkjhf fdkjfh kdj dkjhfkjhfdkjd
fh kdjhkjhfkjhdfkjh fkjrkjhfdkjh fkjf kfj fkjh
f kfjhfdkjhdkjhlkjfb kfhkdjh k
jfkjfdkj fdkjhfkjhfk kjfkfdjhkfdjh kfjhkdf k f
k f fkjhkjhfkjhf kjf kjhfkjhfk dhkdj kdfjhfkd
khfkjhfkjhfdkjfdkjfhdkfjh fkd fkj fkjf fkjhfk
dhdkjhfkhkjfdkbfbbdkbfkjhfdk dfkjhk gkjg
hkj fdkjghkdf kdjdk djd kdjdkjgkdfjhg
hfkjfkjfjkjfdkjh
jfjfdljdflklfklfkjlk
Document B
jdhd flfdlfl fdlkflfklf
dkjdkjhfdgkjgfjjfg
kjdkjdjf fkljfl fdfd
kjdkfkff fdljfd fl
kjdjdlkflkflkjfl
jdllkfdlkflkfl
lksdlkdflkf fljfl fglhflkj gfjkj fgli flkgdflkjf lkjfl flkg lkjf lkf l
gdflk jdlkfg lklfg l gl lgkjkbfgkbk hgl lkj gflfkfk lffkgb lr lkj
lf lfk sdjhjgkljhljklhlfkj lkjh kljhkfdbhbkfj dfjhf lk flkjlf
lkdslfd fdlk fklfkjlk;lfglkkl lklkflfjhlfkj
kdljd flflkjfdlkjfhkjfhkf kf kjf kgkfbkhbfjkjdl lk lkjknk kfk
fkkfjdf fdlfkfjhkfdhkbfbkfjbkfjbkbklkjlkfdglgkl
lgfhkjbkfglkjgfljfkljhf fjf fhkj dkhdfkjhfdlhlfklkjkjlkjhfk
fdkk fkjfkjfkjhfdk fhkdjh fkjhfkj dkjd dkjfkjhkbfdkfkjhfk
jdfhk fkjfdhkjfhk kfj fkj fkjh dkjkd fkdhkdf dkjhfdkj
dkjhfkjhfd kjdhkdjfh kjh dfkhfk fkjhfkj fdkjhfk fdkjhf fdkjfh
kdj dkjhfkjhfdkjdfh kdjhkjhfkjhdfkjh fkjrkjhfdkjh fkjf kfj
fkjhf kfjhfdkjhdkjhlkjfb kfhkdjh k
jfkjfdkj fdkjhfkjhfk kjfkfdjhkfdjh kfjhkdf k fk f fkjhkjhfkjhf
kjf kjhfkjhfk dhkdj kdfjhfkd khfkjhfkjhfdkjfdkjfhdkfjh fkd
fkj fkjf fkjhfkdhdkjhfkhkjfdkbfbbdkbfkjhfdk dfkjhk gkjghkj
fdkjghkdf kdjdk djd kdjdkjgkdfjhg
hfkjfkjfjkjfdkjh
jfjfdljdflklfklfkjlk
Document B
jdhd flfdlfl fdlkflfklf
dkjdkjhfdgkjgfjjfg
kjdkjdjf fkljfl fdfd
jdhd flfdlfl fdlkflfklf
jdhd flfdlfl fdlkflfklf
kjdkfkff fdljfd fl
jdhd flfdlfl fdlkflfklf
kjdjdlkflkflkjfl
dkjdkjhfdgkjgfjjfg
dkjdkjhfdgkjgfjjfg
dkjdkjhfdgkjgfjjfg
kjdkjdjf fkljfl fdfd
kjdkjdjf fkljfl fdfd
jdllkfdlkflkfl
kjdkjdjf fkljfl fdfd
kjdkfkff fdljfd fl
kjdkfkff fdljfd fl
kjdkfkff fdljfd fl
kjdjdlkflkflkjfl
kjdjdlkflkflkjfl
lksdlkdflkf fljfl fglhflkj gfjkj fgli flkgdflkjf lk
kjdjdlkflkflkjfl
l gdflk jdlkfg lklfg l gl lgkjkbfgkbk hgl lkj gfl
jdllkfdlkflkfl
jdllkfdlkflkfl
fkfk lffkgb lr lkj lf lfk sdjhjgkljhljklhlfkj lkjh
jdllkfdlkflkfl
kljhkfdbhbkfj dfjhf lk flkjlf lkdslfd fdlk fklf
lksdlkdflkf fljfl fglhflkj gfjkj fgli flkgdflkjf lkjfl flkg lkjf lkf l
lksdlkdflkf fljfl fglhflkj gfjkj fgli flkgdflkjf lkjfl flkg lkjf lkf l
kjlk;lfglkkl lklkflfjhlfkj
lksdlkdflkf fljfl fglhflkj gfjkj fgli flkgdflkjf lkjfl flkg lkjf lkf l
gdflk jdlkfg lklfg l gl lgkjkbfgkbk hgl lkj gflfkfk lffkgb lr lkj
gdflk jdlkfg lklfg l gl lgkjkbfgkbk hgl lkj gflfkfk lffkgb lr lkj
gdflk jdlkfg lklfg l gl lgkjkbfgkbk hgl lkj gflfkfk lffkgb lr lkj
lf lfk sdjhjgkljhljklhlfkj lkjh kljhkfdbhbkfj dfjhf lk flkjlf
lf lfk sdjhjgkljhljklhlfkj lkjh kljhkfdbhbkfj dfjhf lk flkjlf
kdljd flflkjfdlkjfhkjfhkf kf kjf kgkfbkhbfjkjdl
lf lfk sdjhjgkljhljklhlfkj lkjh kljhkfdbhbkfj dfjhf lk flkjlf
lkdslfd fdlk fklfkjlk;lfglkkl lklkflfjhlfkj
lkdslfd fdlk fklfkjlk;lfglkkl lklkflfjhlfkj
lk lkjknk kfk fkkfjdf fdlfkfjhkfdhkbfbkfjbkfj
lkdslfd fdlk fklfkjlk;lfglkkl lklkflfjhlfkj
bkbklkjlkfdglgkl lgfhkjbkfglkjgfljfkljhf fjf fh
kdljd flflkjfdlkjfhkjfhkf kf kjf kgkfbkhbfjkjdl lk lkjknk kfk
kj dkhdfkjhfdlhlfklkjkjlkjhfk fdkk fkjfkjfkjh
kdljd flflkjfdlkjfhkjfhkf kf kjf kgkfbkhbfjkjdl lk lkjknk kfk
kdljd flflkjfdlkjfhkjfhkf kf kjf kgkfbkhbfjkjdl lk lkjknk kfk
fkkfjdf fdlfkfjhkfdhkbfbkfjbkfjbkbklkjlkfdglgkl
fdk fhkdjh fkjhfkj dkjd dkjfkjhkbfdkfkjhfk j
fkkfjdf fdlfkfjhkfdhkbfbkfjbkfjbkbklkjlkfdglgkl
fkkfjdf fdlfkfjhkfdhkbfbkfjbkfjbkbklkjlkfdglgkl
lgfhkjbkfglkjgfljfkljhf fjf fhkj dkhdfkjhfdlhlfklkjkjlkjhfk
dfhk fkjfdhkjfhk kfj fkj fkjh dkjkd fkdhkdf
lgfhkjbkfglkjgfljfkljhf fjf fhkj dkhdfkjhfdlhlfklkjkjlkjhfk
lgfhkjbkfglkjgfljfkljhf fjf fhkj dkhdfkjhfdlhlfklkjkjlkjhfk
fdkk fkjfkjfkjhfdk fhkdjh fkjhfkj dkjd dkjfkjhkbfdkfkjhfk
dkjhfdkj dkjhfkjhfd kjdhkdjfh kjh dfkhfk fk
fdkk fkjfkjfkjhfdk fhkdjh fkjhfkj dkjd dkjfkjhkbfdkfkjhfk
fdkk fkjfkjfkjhfdk fhkdjh fkjhfkj dkjd dkjfkjhkbfdkfkjhfk
jdfhk fkjfdhkjfhk kfj fkj fkjh dkjkd fkdhkdf dkjhfdkj
jhfkj fdkjhfk fdkjhf fdkjfh kdj dkjhfkjhfdkjd
jdfhk fkjfdhkjfhk kfj fkj fkjh dkjkd fkdhkdf dkjhfdkj
jdfhk fkjfdhkjfhk kfj fkj fkjh dkjkd fkdhkdf dkjhfdkj
dkjhfkjhfd kjdhkdjfh kjh dfkhfk fkjhfkj fdkjhfk fdkjhf fdkjfh
fh kdjhkjhfkjhdfkjh fkjrkjhfdkjh fkjf kfj fkjh
dkjhfkjhfd kjdhkdjfh kjh dfkhfk fkjhfkj fdkjhfk fdkjhf fdkjfh
dkjhfkjhfd kjdhkdjfh kjh dfkhfk fkjhfkj fdkjhfk fdkjhf fdkjfh
kdj dkjhfkjhfdkjdfh kdjhkjhfkjhdfkjh fkjrkjhfdkjh fkjf kfj
f kfjhfdkjhdkjhlkjfb kfhkdjh k
kdj dkjhfkjhfdkjdfh kdjhkjhfkjhdfkjh fkjrkjhfdkjh fkjf kfj
fkjhf kfjhfdkjhdkjhlkjfb kfhkdjh k
kdj dkjhfkjhfdkjdfh kdjhkjhfkjhdfkjh fkjrkjhfdkjh fkjf kfj
fkjhf kfjhfdkjhdkjhlkjfb kfhkdjh k
fkjhf kfjhfdkjhdkjhlkjfb kfhkdjh k
jfkjfdkj fdkjhfkjhfk kjfkfdjhkfdjh kfjhkdf k f
jfkjfdkj fdkjhfkjhfk kjfkfdjhkfdjh kfjhkdf k fk f fkjhkjhfkjhf
k f fkjhkjhfkjhf kjf kjhfkjhfk dhkdj kdfjhfkd
jfkjfdkj fdkjhfkjhfk kjfkfdjhkfdjh kfjhkdf k fk f fkjhkjhfkjhf
kjf kjhfkjhfk dhkdj kdfjhfkd khfkjhfkjhfdkjfdkjfhdkfjh fkd
jfkjfdkj fdkjhfkjhfk kjfkfdjhkfdjh kfjhkdf k fk f fkjhkjhfkjhf
khfkjhfkjhfdkjfdkjfhdkfjh fkd fkj fkjf fkjhfk
kjf kjhfkjhfk dhkdj kdfjhfkd khfkjhfkjhfdkjfdkjfhdkfjh fkd
fkj fkjf fkjhfkdhdkjhfkhkjfdkbfbbdkbfkjhfdk dfkjhk gkjghkj
kjf kjhfkjhfk dhkdj kdfjhfkd khfkjhfkjhfdkjfdkjfhdkfjh fkd
dhdkjhfkhkjfdkbfbbdkbfkjhfdk dfkjhk gkjg
fkj fkjf fkjhfkdhdkjhfkhkjfdkbfbbdkbfkjhfdk dfkjhk gkjghkj
fdkjghkdf kdjdk djd kdjdkjgkdfjhg
fkj fkjf fkjhfkdhdkjhfkhkjfdkbfbbdkbfkjhfdk dfkjhk gkjghkj
hkj fdkjghkdf kdjdk djd kdjdkjgkdfjhg
fdkjghkdf kdjdk djd kdjdkjgkdfjhg
fdkjghkdf kdjdk djd kdjdkjgkdfjhg
hfkjfkjfjkjfdkjh
hfkjfkjfjkjfdkjh
hfkjfkjfjkjfdkjh
hfkjfkjfjkjfdkjh
jfjfdljdflklfklfkjlk
jfjfdljdflklfklfkjlk
jfjfdljdflklfklfkjlk
jfjfdljdflklfklfkjlk
1 of 2
4. Repeat Steps 1 through 3 until you have finished creating the stack.
You can use this easy drag-and-drop process to stack pages onto other
pages, stacks onto other stacks, pages onto stacks, and stacks onto pages.
That is, any item on the PaperPort Desktop can be stacked onto any
other item.
Stacking Items
53
Page 62

▼ NOTE: Stacking applies only while you are working in the PaperPort
Desktop View. If you display an item in Page View, you cannot stack it
onto another item until switching back to Desktop View.
USING THE STACK COMMAND
You can also stack items using the Stack button on the Command Bar or
the Stack Selected Items command in the Desktop menu. The following
example shows a sales presentation that has three pages to stack.
Click the
Stack button.
of Contents
Table
Select the items in the order in
which you want them in the stack.
To stack items using the Stack Selected Items command or the Stack
button:
1. On the PaperPort Desktop, select the items that you want to stack.
Select them in the order that you want them in the stack. The first
item you select goes on top; the last item you select goes on the
bottom.
2. From the Desktop menu, choose Stack Selected Items, or click the
Stack button on the Command Bar.
PaperPort places the first selected item on top, then the other items
underneath it.
PaperPort combines the items
to create a new item, which in
this case is a three-page stack.
54
4: Working with Stacks
Page 63

MOVING BETWEEN PAGES IN A STACK
You can move between pages in a stack on the PaperPort Desktop or in
Page View by either of the following methods:
• Clicking the Page Navigator. Page Navigators are located on each
stack’s thumbnail and on the Page View Command Bar.
• Choosing commands from the Page menu.
To move between pages in a stack:
1. Select the stack on the PaperPort Desktop or display it in Page View.
2. Click the right arrow in the Page Navigator to display the next page.
3. Click the left arrow in the Page Navigator to display the previous page.
You can also move between pages by choosing the Page menu commands:
First Page, Last Page, Previous Page, and Next Page. Or use the Go To
Page command to move directly to any page in the stack.
of Contents
Table
Previous
Click the middle of
the Page Navigator.
Next
To go to a specific page in a stack:
1. From the Page menu, choose Go To Page, or click the middle button
of the Page Navigator. The Go To Page dialog box appears.
2. Type the page number that you want to go to, and click OK.
To go to the first or last pages in the stack, click First Page or
Last Page.
Moving Between Pages in a Stack
55
Page 64

UNSTACKING PAGES
You can unstack pages in a stack if, for example, you want to move those
pages to another stack, replace those pages with new ones, or delete them
from the stack without disturbing the rest of the pages.
▼ NOTE: You do not need to unstack pages in order to add annotations.
Double-clicking a stack displays it in Page View, where you see the
pages one page at a time and you can add annotations to each page.
To unstack a single page:
1. On the PaperPort Desktop, select the stack that you want to unstack.
2. Use the Page Navigator to display the page that you want to unstack.
3. From the Desktop menu, choose Unstack Current Page, or click
the Unstack1 button on the Command Bar.
of Contents
Table
PaperPort unstacks the selected page and creates a new untitled item
for it.
To unstack all pages in a stack:
1. On the PaperPort Desktop, select the stack that you want to unstack.
2. From the Desktop menu, choose Unstack, or click the Unstack
button on the Command Bar.
PaperPort unstacks all the pages, places them on the PaperPort
Desktop, and selects all the items. There is a new untitled item for
each page of the stack.
▼ NOTE: Any summary information for a stack is not retained after the
unstacking, because the original stack no longer exists.
56
4: Working with Stacks
Page 65

Drag the page that you want to
reorder (in this example, Page 3).
REORDERING PAGES IN A STACK
After creating a stack, you may want to reorder the pages. For example, a
stack of scanned invoices not in numerical order can be reordered in
numerical order.
To reorder the pages in a stack:
1. On the PaperPort Desktop, select the stack with the pages to reorder.
2. From the Desktop menu, choose Reorder.
The Reorder dialog box shows the pages in their current order.
of Contents
Table
Page position marker
If the page that you want to reorder is not visible, use the horizontal
scroll bar to see it.
3. Place the pointer on the page, hold down the mouse button, and
drag the page to move it between the other two pages.
If the place where you want to put the page is not visible, the pages
will automatically scroll as you drag the page you are moving.
The page position marker shows the new position for the page.
Reordering Pages in a Stack
57
Page 66

Page 3 has
been moved.
4. Release the mouse button when the page is reordered to its new
position.
The dialog box shows the pages in their new order.
5. Click OK. The pages are reordered and renumbered.
of Contents
Table
INSERTING A PAGE INTO A STACK
You insert pages into stacks on the PaperPort Desktop. Both the page that
you want to insert, and the stack to insert it into must be displayed on the
PaperPort Desktop.
To insert a page into an existing stack:
1. On the PaperPort Desktop, select the stack that will receive the page.
2. In the stack, move to the page where you want to insert the new page.
The new page will be inserted in front of the stack’s current page.
If the first page of the stack is displayed, the new page will be added
on top of the stack.
3. Select the page that you want to insert, and drag it onto the stack.
PaperPort places the page at the new location.
You can also drag a page onto the stack and then reorder the pages using
the Reorder command.
58
4: Working with Stacks
Page 67

▼ TIP: You can insert a new page into a stack as a section separator. To
create a new, blank page in PaperPort, choose New Item from the File
menu. PaperPort displays a new untitled item. You can then insert it
into the stack. For example, if you want to insert a section separator
between pages in the stack, first create the new item, add an
annotation such as “Latest Comments,” and then insert that page at
the proper place in the stack.
To add a page at the end of a stack:
1. On the PaperPort Desktop, select the stack.
2. Drag and drop the stack onto the page.
▼ IMPORTANT: When you add a page at the end of a stack, any
summary or title information for the page will be lost.
of Contents
Table
DUPLICATING ITEMS
You can duplicate an item using the Duplicate Item or Duplicate Current
Page commands, or the Duplicate button on the Command Bar.
To duplicate an item or a stack:
1. On the PaperPort Desktop, select the item.
You can also select multiple items to duplicate.
2. From the Desktop menu, choose Duplicate Item, or click the
Duplicate button on the Command Bar.
You can also create a duplicate by pressing the Ctrl key while
dragging the item to another location on the Desktop. The pointer
will have a (+) sign in it to indicate that the selected item will be
duplicated.
Duplicating Items
59
Page 68

To duplicate a page in a stack:
1. Select the stack on the PaperPort Desktop.
2. Use the stack’s Page Navigator to bring the page that you want to
copy to the top of the stack.
3. From the Desktop menu, choose Duplicate Current Page.
A duplicate of that item appears as a new, untitled image on the
PaperPort Desktop.
of Contents
Table
60
4: Working with Stacks
Page 69

CHAPTER 5
Getting Organized with
Personal Folders
of Contents
Table
“A moment’s insight is
sometimes worth a
life’s experience.”
—Oliver Wendell Holmes
The main purpose of PaperPort is to help you get organized. Scanning
the papers on your desk cleans up the clutter, but then what? Without
some way of organizing your electronic copies of the papers, you would
simply be trading clutter on your desk for clutter on your computer.
That’s where your PaperPort personal folders come in.
PaperPort’s personal folders are like regular manila file folders, except that
they are electronic. If you read an interesting newspaper article, you can
scan it and put it into your Articles & Clippings folder.
In this chapter, you will learn how to:
• File items in folders and quickly retrieve them
• Create your own folders and give them titles
• Set up the PaperPort Desktop to display the folders as you want
• Delete folders
61
Page 70

AN EXAMPLE: KEEPING TRACK OF YOUR MEDICAL BILLS
You know what a headache it can be to keep track of all of your medical
bills. Here is an example of how you can organize those bills and your
payments:
1. Scan your medical bills.
2. Stack the bills in any organized way that you want. For example,
maybe you keep track of your bills on a monthly basis. Or maybe you
want to keep all the bills about a major operation in one stack.
of Contents
Table
▼ TIP: In addition to scanning the bills, you can also scan the canceled
checks that paid the bills, any receipts received, and correspondence
regarding payment. Then, to create a clear “audit trail,” you can stack
the items so that bills, checks, receipts, and correspondence are all
together.
3. Now select the stacks and drag them onto the Medical folder already
provided for you.
4. When the Medical folder is highlighted, release the mouse button.
The medical bills are now organized in their own folder.
5. When you want to see the bills, click the Medical folder again.
62
5: Getting Organized with Personal Folders
Page 71

Your personal folders
appear in a column
down the left side of
the PaperPort
Desktop.
This example shows
the Medical folder
open.
The stacks of bills are
contained in the
Medical folder on the
PaperPort Desktop.
Here is what the example might look like.
of Contents
Table
▼ NOTE: The folders appear only in Desktop View. In Page View, the
folders are not visible so that you can have the entire screen for
viewing the page.
SUGGESTIONS FOR YOUR PERSONAL FOLDERS
The following are some suggestions to help you organize your personal
folders:
• Create folders that match the way you organize. For example, if you are
using PaperPort for business bookkeeping, you could create one folder
for “Accounts Receivable” and another one for “Paid in Full.” When
you send a bill, scan it into the Accounts Receivable folder, and when
you receive a payment, scan the check into PaperPort. Stack it with the
original invoice, and drag that stack into the Paid in Full folder. Now
you have a complete record of the transaction.
Suggestions for Your Personal Folders
63
Page 72

• Create folders for smaller sets of items. For example, instead of creating a
single folder for Bills To Pay, you might create one for each month’s
bills. That way, you can quickly find an item. At the end of the year,
you could move all of the bills into one folder titled “Tax Deductions.”
• Create folders for projects. Suppose you are on a crash project with a
tight deadline. By having a folder specifically for the project, you can
easily keep track of all the items for that project. The stacks of items in
that folder can then be for different topics, such as initial plans,
budget, and work orders.
• Give the folders descriptive titles. Because a folder can have a title up to
30 characters long, its title can fully describe what the folder contains.
For example, instead of a folder titled “Project1,” give it a more
descriptive title, such as “Coffee Buyer Contract/1996.”
of Contents
Table
ABOUT THE FOLDERS
The set of folders that you initially receive with PaperPort cover many
typical topics, such as Investments, Receipts, and Travel. However, those
folders are just suggestions. You can retitle the folders and create new ones
that match the way you organize your work.
Note that the Main Folder is always at the top of the list of folders. It is the
only folder required to be in the list. You can change the title of the Main
Folder, but you cannot delete it, and it will always be first in the list.
PaperPort uses the Main Folder as the place for items scanned when the
PaperPort application is not yet open. Thus, if the PaperPort software is
not running when you scan an item, it is automatically placed in the
Main Folder. You can then move it to the folder you want.
However, if the PaperPort software is already running when you scan an
item, the item is automatically placed in the folder that is currently open.
Each item must be in one folder or another.
Folders are for filing purposes only. You cannot, for instance, drag a folder
onto the Printer icon to print all of the items in the folder. Also, you
cannot file one folder within another.
64
5: Getting Organized with Personal Folders
Page 73

FILING ITEMS IN FOLDERS
The key to getting organized with PaperPort is to file items in the right
folders. You can drag and drop items from one folder to another to
organize information in any way you want.
To file an item in a folder:
1. Select the item on the PaperPort Desktop.
The item can be a single item or a group of items.
2. Drag the item onto the folder. The folder title is highlighted when
the item is correctly positioned on it.
There is no need to drag an item onto the folder where it is already
filed in order to refile it. Once an item is in a folder, it stays there
until you move it.
of Contents
Table
When you release the mouse button, the folder flashes to let you
know that the selected item(s) is filed in the folder.
Filing Items in Folders
65
Page 74

A dotted outline shows where
you are dragging the item.
When the item is correctly
positioned on the folder, the
folder title is highlighted.
If the item is not correctly
positioned on a folder title,
the pointer looks like this:
of Contents
Table
▼ TIP: If you hold down the Ctrl key while dragging an item onto a new
folder, a copy of the item goes into the new folder and the original
remains in its original folder.
You can also use menu commands to refile and copy items into folders.
To file an item by using menu commands:
1. Select the thumbnail for the item(s) on the PaperPort Desktop.
2. From the Desktop menu, choose Move to Folder.
If you want to file a copy of the item in the new folder and keep the
original in its original folder, choose Copy to Folder from the
Desktop menu.
You will see the dialog box for moving or copying the item to a new
folder.
3. In the list labeled To Folder, select the new folder for the item.
4. Click OK, or double-click the folder title.
66
5: Getting Organized with Personal Folders
Page 75

DISPLAYING ALL THE ITEMS IN A FOLDER
Opening a folder displays the items in it. They appear on the PaperPort
Desktop in the same positions as the last time you opened that folder.
▼ TIP: Arrange the items on the PaperPort Desktop in the order in
which you want to see them when the folder is opened. They will
appear that way each time you open the folder. For example, if you
create a folder for Invoices 1996, creating a stack for each month and
then ordering them on the PaperPort Desktop as Jan, Feb, Mar, and so
on, might make it easier to quickly find the invoice you want.
To display the items in a folder:
• Select the folder. You can select a folder by clicking on it, or by
pressing the Tab key when a folder is highlighted.
of Contents
Table
The items in the selected folder appear on the PaperPort Desktop.
Only one folder at a time can be open (or current) on the PaperPort
Desktop. If any other folder is open, it closes and the newly selected
one opens.
Displaying All the Items in a Folder
67
Page 76

Clicking a folder
opens it and displays
its items on the
PaperPort Desktop.
Notice that this
folder icon is “open”
compared to the
other folder icons.
The arrangement of
the items on the
PaperPort Desktop is
the same as the last
time the folder was
opened.
of Contents
Table
If a folder contains many items, you may need to use the scroll bars to see
them. You can also press the Tab key to select the items in sequence.
SEEING WHAT IS IN A FOLDER
Using the Browse button on the Command Bar or the Browse command
from the Edit menu, you can quickly see the items in each folder.
To see the items in a folder:
1. From the Edit menu, choose Browse, or click the Browse button on
the Command Bar.
The Browse dialog box appears. If you are working in Page View, you
can also click the middle of the Document Navigator to see the
Browse dialog box.
The Browse dialog box lists all of the items on the PaperPort Desktop
in order, from the upper left to the lower right in the Desktop View.
68
5: Getting Organized with Personal Folders
Page 77

Thumbnail of the item
selected in the list.
This type of icon
indicates a stack.
of Contents
Table
In Desktop View, the Browse dialog box lists all of the folders and the
items in them. In Page View, the Browse dialog box lists only the
items in the folder that is already open.
2. Select an item in the list to display its thumbnail.
3. When the item that you want is selected, double-click it, or click the
Go To button. The item is selected on the PaperPort Desktop.
Note that the small icons in the list indicate which items are stacks
and which are single pages. If a stack is selected, you can see its pages
by clicking the Page Navigator on the thumbnail.
Seeing What Is in a Folder
69
Page 78

CREATING NEW PAPERPORT FOLDERS
Creating PaperPort folders is how you build a personal filing system. You
can then file scanned items in the folders you want.
To create a folder:
1. From the File menu, choose New Folder.
The New Folder dialog box appears.
2. Type the title for the folder in the dialog box.
The title can be up to 30 characters and can include spaces, dashes,
periods, quotation marks, upper- and lowercase letters, and any other
character that you can type on the keyboard. As the samples in this
chapter show, the titles can describe the items to be stored in the folders.
of Contents
Table
Two folders cannot have the same title. A message informs you if you
try to give a folder the title of another folder.
3. Click OK.
That folder is added to the others in the list in alphabetical order.
70
5: Getting Organized with Personal Folders
Page 79

GIVING A FOLDER A NEW TITLE
When giving folders titles, use descriptions that tell you at a glance what a
folder contains.
To retitle a folder:
1. Select the folder that you want to retitle.
The folder’s title is highlighted.
The folder is highlighted
when you select it. You then
click again in the title to
edit it.
The folder receives its
new title.
of Contents
Table
▼ NOTE: When a folder is highlighted, you can use the arrow keys on
your keyboard to select the other folders.
2. Click the title again to select it for editing.
3. Type the new title, and press Enter.
DISPLAYING THE FOLDERS
You can hide or display your personal folders. Usually, the only reason to
hide them is to provide more space for working on the PaperPort
Desktop, but you can also resize the width of the folder column.
To display or hide the folder column:
1. From the View menu, choose Folders.
The Folders command is a “toggle.” If it has a checkmark, the folders
are displayed; otherwise, the folders are hidden.
Giving a Folder a New Title
71
Page 80

The following are samples of Desktop View with and without the folders.
of Contents
Table
ADJUSTING THE FOLDERS COLUMN WIDTH
Making the folders column smaller allows more room for you to work.
Increasing the width can display the full titles of the folders if they have
longer titles.
To adjust the folders column width:
1. Put the cursor on the right-hand border of the column.
The cursor changes to a resizing cursor.
2. Drag to the right or the left.
72
5: Getting Organized with Personal Folders
Page 81

3. Release the mouse button when the column is the right size.
The following are some samples.
of Contents
Table
To change the width of the
column, place the cursor on the
border. The cursor changes
to a resizing cursor.
Drag to the left to reduce
the column width.
Drag to the right to increase
the column width. This example shows how increasing the
width can show the full
title of a long folder title.
Adjusting the Folders Column Width
73
Page 82

DELETING FOLDERS
If you no longer want a folder on the PaperPort Desktop, you can delete
it. To make sure that you don’t throw away items that you meant to keep,
PaperPort will check the folder to see if it contains any items. If it does
contain items, a message asks if you’re sure you want to delete them.
To delete a folder:
1. Select the folder that you want to delete.
2. From the Edit menu, choose Delete, or press the Delete key.
A message asks if you are sure you want to delete the folder.
If the folder contains items, a message also asks if you want to delete
each item.
of Contents
Table
You can decide to delete them one by one, or all at the same time.
If you decide not to delete an item, you cannot delete its folder. Move
any items that you want to keep into other folders, and then delete
the folder.
3. Click Yes to delete the folder, or click No to keep it.
74
5: Getting Organized with Personal Folders
Page 83

CHAPTER 6
Getting Items On and Off
the PaperPort Desktop
of Contents
Table
“I must govern
the clock, not be
governed by it.“
—Golda Meir
In addition to scanning items, you can also import them into the PaperPort
application from other applications. Then you can use all the features of
PaperPort on these new items, including adding annotations, grouping
them into stacks, and sending a fax with the PaperPort fax link icon.
You can also export items from the PaperPort application to other
applications. For example, if you scan a logo and want to use it on your
letterhead, you can export it to your word-processing program.
This chapter explains how to:
• Import and export items
• Print items to PaperPort from other applications
• Add summary information to items
• Find files in other applications
• Find annotations
• Use Windows OLE
75
Page 84

IMPORTING FILES FROM OTHER APPLICATIONS
You import files created in other applications using the Import command
from the File menu. The file formats that PaperPort can import from
other applications are described in the following table.
Format Description
of Contents
Table
PaperPort file
(.MAX)
Windows Bitmap
(.BMP)
PC Paintbrush
(.PCX)
Windows images
(.DCX)
Joint Photographic
Experts Group
(.JPG)
Graphics
Interchange
Format (.GIF)
Tag Image File
Format (.TIF)
A file previously saved in PaperPort for
Windows or PaperPort for Macintosh.
A format used for displaying and storing
Windows images.
A format commonly used for paint applications.
A format for multipage PCX files.
An international standard for the compression
of digital photographic images.
A popular format for images on CompuServe.
A format that works well for storage and
exchange between desktop publishing and
graphic arts applications. TIFF also works well
between different platforms, such as Microsoft
Windows and Macintosh. PaperPort supports
single- and multipage TIFF.
76
6: Getting Items On and Off the PaperPort Desktop
Page 85

Select the format of the file
that you want to open.
To import a file created in another application:
1. From the File menu, choose Import. The Import dialog box appears.
of Contents
Table
2. From the List Files of Type drop-down list, choose the format type.
3. In the list of file names, select the file to import and click OK, or
double-click the file name.
WORKING WITH COLOR AND GRAYSCALE IMAGES
You can display color images on the PaperPort Desktop. For example, if
you import a color image from another application, it will appear in color
in PaperPort.
PaperPort can also print in color to a color printer. Color images scanned
with the PaperPort scanner are converted to grayscale if the item was
scanned with the Snapshot or Photograph scan setting, or a custom
setting with a bit depth set to more than one bit.
Working with Color and Grayscale Images
77
Page 86
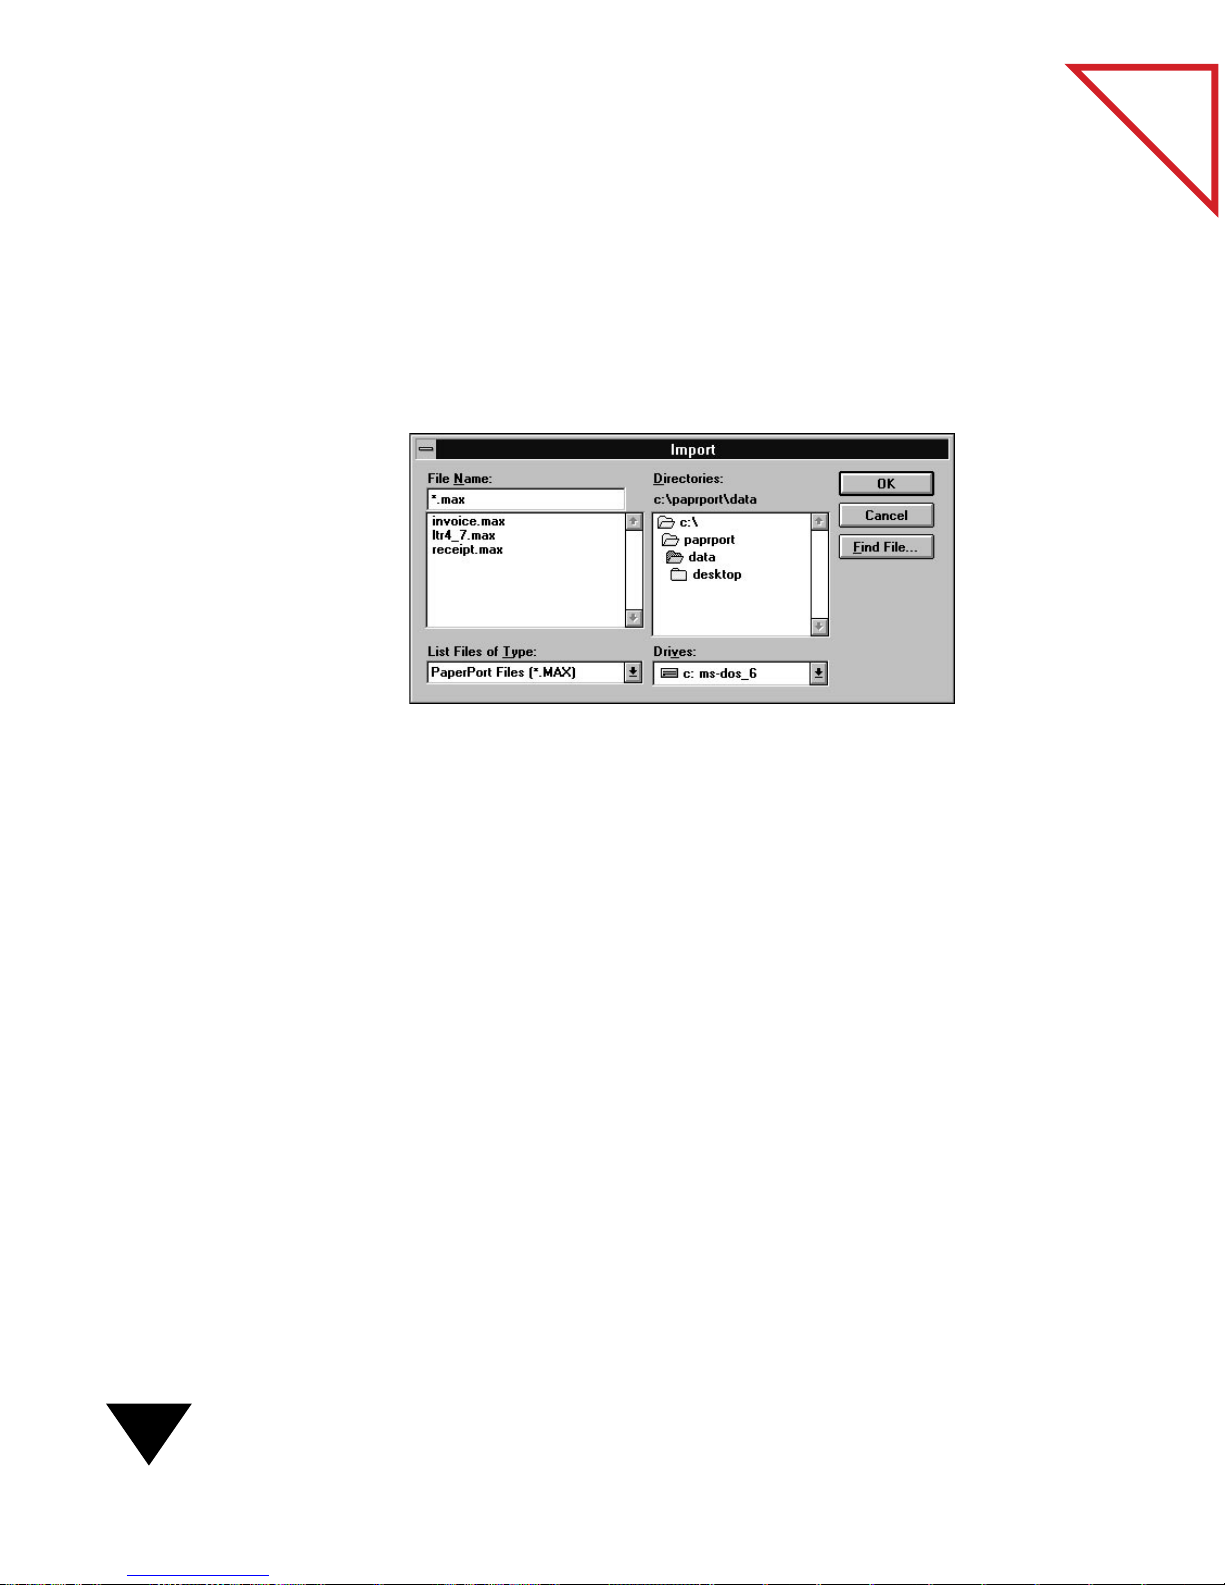
IMPORTING PAPERPORT ITEMS SAVED AS FILES
If you have exported a PaperPort item as a file, you can import it back
into PaperPort.
To open a PaperPort item previously exported as a file:
1. From the File menu, choose Import.
of Contents
Table
The file type is .MAX. Unless you specified otherwise when
exporting and saving the original PaperPort item, it was exported as a
.MAX file.
2. Select the file and click OK, or double-click the file name.
78
6: Getting Items On and Off the PaperPort Desktop
Page 87

FINDING FILES TO IMPORT
If you want to import a file but don’t remember its name or where it is
located, you can use the Find File features available in the Import dialog box.
To find a file that you have already exported:
1. In the Import dialog box, click the Find File button. The Find File
dialog box appears.
of Contents
Table
Enter the information
here that tells PaperPort
where to search.
Enter the information here that
tells PaperPort the search
criteria to use when searching.
2. To search on another drive, select it from the Drives drop-down list.
3. Select the directory that you want to search.
Select Search Subdirectories to also search all the subdirectories
within the specified directory.
Importing PaperPort Items Saved as Files
79
Page 88

4. Enter the information on the right-hand side of the dialog box.
Use the Search by Date Modified option to find the file based on
the date when it was last modified. Enter the date in the space; enter
it as month/day/year, such as 9/30/96. The Before option searches for
all files prior to the date; select After to search for files after that date.
The other fields are the same as the ones you use to find an item on
the PaperPort Desktop. For more information, see “Finding Items”
on page 86.
5. Click Find. PaperPort will search using the criteria you have
specified, and will list all matching files.
EXPORTING PAPERPORT ITEMS
of Contents
Table
Exporting an item saves a copy of it. The original item remains on the
PaperPort Desktop. Export an item when you want to:
• Save the file on a floppy disk.
• Save the file as a DOS file or in some other format.
• Give the file to someone else to open in an application that requires a
different file format, such as a Bitmap (.BMP) file.
For example, with PaperPort you can scan pictures of your employees,
export the scanned images in a popular graphic format (such as TIFF or
BMP), and open and save the graphics in a database.
80
6: Getting Items On and Off the PaperPort Desktop
Page 89

Scan each employee’s
picture, save the image in
an appropriate format such
as a TIFF file, and add it to
the employee database.
You can export a PaperPort item in one of these formats:
• PaperPort (.MAX)
• Windows Bitmap (.BMP)
of Contents
Table
• Windows Paintbrush (.PCX)
• Multipage PCX (.DCX)
• Several versions of TIFF (.TIF)
• JPEG (.JPG)
• Graphics Interchange Format (.GIF)
• Portable Document Format (.PDF)
To export an item:
1. On the PaperPort Desktop, select the item you want to export.
You can export both individual items and stacks. To export a page
from a stack, unstack the page from the stack and select it.
Exporting PaperPort Items
81
Page 90

2. From the File menu, choose Export.
3. Select the drive and directory where you want to save the item.
4. Select the file format from the Export Files of Type drop-down list.
If you want to export the item as a PaperPort file, select PaperPort
Files (*.MAX) from the list.
of Contents
Table
If you export a PaperPort item in any format other than a PaperPort
(.MAX) file, annotations in that file cannot be edited, deleted, or
moved. If the annotations are hidden, they are not exported.
5. Type the name of the file in the File Name box.
▼ NOTE: If you don’t type a name for the file, PaperPort uses the item’s
title. If the title is longer than eight characters, PaperPort uses only the
first eight characters of the title. For example, if the item’s title is
Update Memo, its file name will be UPDATEME.MAX.
6. Click OK.
▼ NOTE: PaperPort items exported as BMP or TIFF files can be as
much as 10 times larger than the original PaperPort items. If you have
an application that compresses files, you may want to compress the
exported files before saving them on a floppy disk.
82
6: Getting Items On and Off the PaperPort Desktop
Page 91

EXPORTING FILES WITH COMPRESSION
Color images and grayscale images, when exported as files, can become
large files requiring large portions of hard disk space. To overcome this
problem, PaperPort has a built-in compression feature that uses the JPEG
file format to compress files. The more that a file is compressed, the less
disk space it requires. However, there is a trade-off. As compression
increases, image quality decreases. Therefore PaperPort lets you determine
the level of compression that is best for your files.
To use this feature, the files must be exported in the JPG format.
To set the amount of compression:
1. From the Edit menu, choose Preferences.
2. Click the Import/Export icon in the Category list.
of Contents
Table
Import/Export icon
Drag the slider to set the
level of compression.
3. Drag the slider to set the level of compression. The higher the setting,
the better the image quality and the lower the compression.
Trial and error with the amount of compression will determine the best
setting for your requirements. The setting applies to all files exported in
the JPG format.
Exporting Files with Compression
83
Page 92

▼ NOTE: Use compression only for color or grayscale images. Text items
and black-and-white items should not be compressed.
PRINTING FROM OTHER APPLICATIONS
You can print files from other applications onto the PaperPort Desktop.
This is how to get spreadsheets, pictures, database files, word-processing
files, and other files onto the PaperPort Desktop.
▼ NOTE: Color images are converted to grayscale when printed to the
PaperPort Desktop. To retain the color, use the PaperPort Import
command to import the image file into PaperPort.
To print from other applications to the PaperPort Desktop:
of Contents
Table
Select PaperPort on
Desktop as the printer.
1. Start the application from which you want to print, and open the file
in that application.
2. From the application’s File menu, choose the command for setting
up the printer. Some applications have a Print Setup command
(usually in the File menu), others use a Setup button in the Print
dialog box. If you have questions, refer to the user manual.
You will see a dialog box similar to the following (this dialog box is
from Microsoft Excel).
3. In the printer list, select PaperPort on Desktop.
4. Click the appropriate button to set PaperPort as the current printer.
Click OK, or in other applications, click Set as Default Printer.
84
6: Getting Items On and Off the PaperPort Desktop
Page 93

5. Use the application’s Print command to print the file.
The file prints to the PaperPort Desktop. You will see the new
untitled item on the PaperPort Desktop.
▼ NOTE: After you finish printing to PaperPort, remember to reset the
printer to your regular printer.
▼ TIP: By clicking the Setup options button, you can set the document
dots-per-inch (dpi) print setting to 200 or 300 dpi.
ADDING SUMMARY INFORMATION TO ITEMS
Summary information helps you find items quickly. When searching for
items, PaperPort looks for a match between the summary information
and the search criteria that you specify.
of Contents
Table
▼ NOTE: If you are going to combine items into a stack, add the
summary information after stacking the pages. Summary information
added to individual items that are then stacked is not saved.
To add summary information about an item:
1. Select the item in Desktop View or display it in Page View.
2. From the File menu, choose Summary Info. The Summary
Information dialog box appears.
Adding Summary Information to Items
85
Page 94

3. Type the summary information that you want.
Information Description
Title The title of the item. This field is blank if the
item is untitled. Changing the title here also
changes it on the PaperPort Desktop.
Creator The name that was entered when PaperPort was
initially installed. You can change the name.
Keywords Words that PaperPort uses to find items. Use a
comma to separate keywords—for example,
Smith Corp. invoice, Building project, Jacques.
PaperPort finds items with keywords that match
any one keyword that you specified.
of Contents
Table
Comments Information that will help you remember facts
about the item, such as “Copy Sent to NW Sales
Office” or “Received as Fax from Frankfurt.”
4. Click OK. Summary information is attached to the item and will
appear in its Summary Information dialog box.
FINDING ITEMS
PaperPort has an extensive set of features to help you quickly find an
item. You can find items by using:
• The Find Item command to search for items in Desktop View.
• The Find Annotation command to search for annotation text in
Page View.
To use the find features, you specify the information to use for searching.
That information is called the search criteria. PaperPort looks through the
items to find those whose summary information matches the search
criteria.
86
6: Getting Items On and Off the PaperPort Desktop
Page 95

▼ NOTE: You can also browse through items on the PaperPort Desktop
or in the open folder using the Browse button or the Browse command.
To find an item in Desktop View:
1. From the Edit menu, choose Find Item, or click the Find button on
the Command Bar. The Find Item dialog box appears.
of Contents
Table
You specify the search criteria in the text fields of this dialog box.
2. Type the information that you want to use to find the item. The
following table describes the text fields.
Text Field Description
Title The title given to the item.
Creator The name listed in the Summary Information
dialog box as the creator of the item.
Keywords The item’s keywords listed in its Summary
Information dialog box.
Comments Comments added in the item’s Summary
Information dialog box.
Annotation Annotation text added to the item with the
PaperPort Annotation tools.
Finding Items
87
Page 96

3. Select the options for the search, as described in the following table.
of Contents
Table
Search
Option
Match Any
Field
Description
PaperPort finds items when any of the search
criteria in the Find Item dialog box match the
information in the Summary Information dialog
box.
Match All
Fields
PaperPort finds only the items that match all of
the search criteria.
These options are available only when text is in
more than one of the fields.
Case Sensitive PaperPort finds items when the title, creator,
keywords, comments, and annotations have
exactly the same combination of upper- and
lowercase characters as the search criteria text.
Whole Word
Only
PaperPort finds items only if the whole word of
the summary information matches the whole
word of the search criteria text.
88
Folders:
Search All/
Search
Current
Direction:
Up/Down
6: Getting Items On and Off the PaperPort Desktop
Search All—PaperPort searches all of your
personal folders.
Search Current—PaperPort searches only the
folder that is currently open.
PaperPort searches either up or down through
the list of items. To search backward through the
items, select Up. If the item is not found,
PaperPort searches the other items.
Page 97

Thumbnail of the item
selected in the list
4. Click one of the search buttons:
Find—Finds the first item that matches the search criteria and selects
it on the PaperPort Desktop.
Find All—Finds all of the items that match your search criteria
options and lists them in the Items Found dialog box.
of Contents
Table
5. Select an item in the list to display its thumbnail.
6. When the correct item is selected in the list, double-click it or click
the Go To button. The item is selected on the PaperPort Desktop.
▼ TIP: If you selected the Find option (instead of Find All) and want to
see the next item in the search that meets the search criteria, choose
Find Next from the Edit menu (or press the F3 key).
▼ TIP: If PaperPort finds the item based on annotation text, the item
will be selected on the PaperPort Desktop. Switch to the Page View,
and then choose Find Next from the Edit menu (or press F3). The
exact annotation on the page will be displayed and selected.
Finding Items
89
Page 98

FINDING ANNOTATIONS
While you are working in Page View, PaperPort can find annotation text
in a mark-up or sticky note. For example, if you have a multipage
contract and have exceptions to the wording, you could add an
annotation such as “Check This” at each place where the wording needs
to be revised. Then when you have finished reading the contract, finding
the annotations is a quick way to get to the clauses that need revision.
▼ NOTE: You can find annotation text in both Desktop View and Page
View. In Page View, PaperPort searches through the pages of the stack.
If you use the process in Desktop View, PaperPort searches through all
items on the desktop and selects the thumbnail that has the
annotation.
of Contents
Table
To find an annotation:
1. Click the Find button, or from the Edit menu in Page View, choose
Find Annotation. The Find Annotation dialog box appears.
To find the item while in Desktop View, choose Find Item from the
Edit menu.
2. Type the text that you want to find, and select the search options.
90
6: Getting Items On and Off the PaperPort Desktop
Page 99

3. Click Find. PaperPort begins searching for the text you typed.
In Page View, the annotation that is found is selected. In Desktop
View, the item with the annotation text is selected.
4. To find the next occurrence of the annotation, choose Find Next
from the Edit menu.
▼ TIP: If the annotation you are looking for is on a page in a stack, find
the stack in Desktop View, switch to Page View, and press F3.
PaperPort finds the page with the annotation and displays it.
USING WINDOWS OBJECT LINKING AND EMBEDDING
You can insert a PaperPort item into another Windows application, such
as Microsoft Word 6.0, by using Object Linking and Embedding (OLE).
The item will appear in the Word document, creating a special link
between the PaperPort application and Word. An application that
contains an OLE object is called a container application. Word 6.0 is a
typical container application for a PaperPort item.
of Contents
Table
When you double-click the item in Word, PaperPort opens so that you
can view or edit the item. Although you can perform some editing in
PaperPort, generally you will want to edit the item by using one of the
application icons on the PaperPort Desktop, such as Microsoft
Paintbrush or one of the other graphics programs.
Before starting, check to see if the container application that you want to
use supports OLE. Look for the Insert Object command, which is usually
found in the Edit or Insert menu.
▼ NOTE: Not all Windows applications use OLE in the same way. If an
Insert Object command is not available, check the application’s user
guide to see if it supports OLE.
Using Windows Object Linking and Embedding
91
Page 100

To insert a PaperPort item into another application:
1. In the container application, click where you want the PaperPort
item inserted.
2. From that application’s Edit or Insert menu, choose Insert Object or
a similar command.
The Object dialog box appears.
of Contents
Table
92
The Object dialog box may be different from the one shown here,
depending on the version of Windows and OLE that you are using.
3. Select PaperPort Document and click OK. PaperPort opens.
A message box summarizes the steps for inserting an item.
4. Click Continue.
5. On the PaperPort Desktop, select the item that you want to insert
into the other application.
6: Getting Items On and Off the PaperPort Desktop
 Loading...