

Page 1

Page 2

LEGAL NOTICES
©2001 by ScanSoft, Inc. All rights reserved. No part of this publication may be transmitted,
transcribed, reproduced, stored in any retrieval system or translated into any language or
computer language in any form or by any means, mechanical, electronic, magnetic, optical,
chemical, manual, or otherwise, without prior written consent from the Legal Department at
ScanSoft, Inc., 9 Centennial Drive, Peabody, Massachusetts 01960. Printed in the United
States of Amer ica an d in the Netherlands.
The software described in this book is furnished under license and may be used or copied only
in accordance with the terms of such license.
MPORTANT NOT ICE
I
ScanSoft, Inc. provides this publication "as is" without warranty of any kind, either express or
implied, including but not limited to the implied warranties of merchantability or fitness for a
particular purpose. Some states or jurisdictions do not allow disclaimer of express or implied
warranties in certain transactions; therefore, this statement may not apply to you. ScanSoft
reserves the right to revise this publication and to make changes from time to time in the
content hereof without obligation of ScanSoft to notify any person of such revision or
changes.
RADEMARKS AND CREDITS
T
ScanSoft, OmniPage, OmniPage Pro, OmniPage Pro X, True Page, Direct OCR and Language
Analyst are registered trademarks or trademarks of ScanSoft, Inc. in the United States and in
other countries. Mac and Macintosh are r egistered tr ademarks of Apple Compute r, Inc. in the
U.S. and in other countries.
All other trademarks and trade names mentioned herein are hereby acknowledged and
recognized as property of their respective owners.
ScanSoft Inc.
9 Centennial Drive
Peabody, MA 01960
U.S.A.
ScanSoft Europe BV
Randstad 22-139
1316 BW Almere
The Netherlands
Part Number: 50-941001-00 A
Page 3

C ONTENTS
Welcome 7
Chapter ou tline 7
Using this Guide 8
How to use online Help 8
Other online resources 9
New features in OmniPage Pro X 10
1 Installation and setup 11
System requirements 12
Installing the software 12
Running the program under Mac OS 9 13
Starting OmniPage Pro 14
Selecting your scanner 14
Registering OmniPage Pro 18
Removing OmniPage Pro 18
2Introduction 19
What is Opt i cal Charac ter Recognition? 20
Beyond OCR 20
Basic steps in the OCR process 21
The OCR Toolbar
The full OmniPage Pro interface 23
The Document window 24
The Thumbnail window 24
The Zone Info and Tools palettes 25
The Preferences dialog box 26
22
OmniPage Pro X User’s Guide iii
Page 4

3 Processing documents 27
Basic processing steps 28
Automatic processing 28
To prepare for automatic processing 29
To process a new document automatically 30
To process an existing document automatically 31
Manual processing 32
Steps for manual processing 32
Using automatic and manual processing together 33
Using the OCR Assistant 34
Bringing page ima ges into OmniPage Pro 36
Scanning pages 36
Loading image files 36
Opening OmniPage Documents 38
Using drag-and-drop 38
Creating and modifying zones 39
Creating zones automatically 40
Specifying zone types 41
Drawing zones manually 44
Modifying zones 46
Table zones 49
Performing recognition 50
Performing OCR 50
Proofreading OCR results 51
Verifying recognized text 53
Color markers 54
Getting page information 54
Working with documents 55
Resizing a page display 55
Saving a document as you work 56
Moving to other pages 56
Reordering pages 56
Deleting a page 57
Undoing edits 57
Modifying images 57
Modifying text 58
Printing a document 59
iv Contents
Page 5

Listening to a document 60
Closing a document 60
Quitting OmniPage Pro 60
Exporting documents 61
Saving an OmniPage Do cument 61
Saving images 61
Saving recognit ion results 62
Saving to P o rtable Document Format (PDF) 64
Copying a document to the Clipboard 64
Using drag-and-drop functionality 65
Direct OCR 66
Using Direct OCR 67
4Settings 69
OCR Toolbar options 70
Get Page options 70
Original Layout options 72
Style Set options 73
OCR options 75
Export options 75
Preference settings 76
Scanner settings 76
OCR settings 80
Spelling settings 82
Miscellaneous settings 85
5Customizing OCR 87
Specifying the style set 87
Specifying a global style set 90
Creating style sets 90
Applying and edit ing zone styles 91
Font mapping 94
Zone templates 96
Training OCR 97
User dictionaries 101
Settings files 102
OmniPage Pro X User’s Guide v
Page 6

6 Technical information 103
Troubleshooting 104
Solutions to try first 104
Low memory situations 104
Low disk space situations 105
Improving accuracy 105
Improving fax recognition 108
Interface p roblems and s olutions 109
System failure during OCR 109
Supported languages 110
Supported saving formats 111
Supported im age file formats 112
Index 113
vi Contents
Page 7

Welcome
Welcome to OmniPage Pro X ™, and thank you for buying our
software! This User’s Guide has been provided to help you get started
and give you an overview of the program.
Chapter outline
Chapter 1, Installation and setup, tells you ho w to ins tall an d start the
program and select a scanner. It lists the system requirements and
provides guidance on registering the product.
Chapter 2, Introduction, explains the OCR process and how it forms
part of the OmniPage Pro workflow. It also presents the program’s
main working areas and controls, starting with the OCR Toolbar.
Chapter 3, Processing documents, tells you how to do automatic and
manual processing and how to combine them. It details processing
steps: acquiring pages, zoning, recognizing, proofing and exporting.
Chapter 4, Settings, gives detailed information on each of the choices
offered by the pop-up menus in the OCR Toolbar. It also guides you
through the choices in the panels of the Preferences dialog box.
Chapter 5, Customizing OCR, provides information on some more
advanced features, such as style sets and their zone styles, zone
templates, training, user dictionaries and settings files.
Chapter 6, Technical information, gives troubleshooting advice and
details the supported file formats and languages.
OmniPage Pro X User’s Guide 7
Page 8

Using this Guide
This Guide supposes that you know how to work in the Macintosh®
environment. Please refer to your Macintosh help resources if you
have questions about how to use dialog boxes, menus, scroll bars, and
so on. The following conventions are used in this Guide.
Convention Purpose
Italicized text • Emphasizes menu commands, dialog box options, button
and file names: “Choose Open... in the File menu.”
• Names sections in this Guide.
• Emphasizes new terms the first time they are used.
Command key
symbol (
Note or Tip Introduces a tip or an item of note.
z)
Illustra tes keyboard shortcuts. For example: z C means
hold the Command key down as you press the letter “c”.
How to use online Help
OmniPage Pro X has an extensive HTML-based online Help system.
Click Help Contents or Help Index in the program’s Help menu to
open it. The Help system provides you with three tabbed panels:
u Contents: A three-level table of contents. Click a topic.
u Index: A two-level, alphabetical index. Enter a keyword or scroll
to the desired location and click an entry.
u Search: Search keywords thr ough th e whole text of a ll he lp top ics.
It lists all topics containing the specified word(s).
For advice on other Help facilities, please consult the documentation
for your HTML viewer.
Online help contains some topics not included in this User’s Guide:
an indexed glossary of terms, settings guidelines for a variety of
document types, a Quick Start Guide for reading a sample image file,
and documentation on Apple Event support and scripting.
8 Welcome
Page 9

t To get help on buttons and pop-up menus
Brief help is av aila ble wi tho u t o penin g the o nli ne Help syst em. H over
the cursor over any button or pop-up list in the OCR Toolbar or the
palettes. A concise des crip tio n of th e con tro l ap pears in th e st at us lin e
along the base of the OCR Toolbar.
t To get help on topics and procedures
Select Help Index in OmniPage Pro’s Help menu. Begin to type in a
keyword you want to fin d. As you type in the first lett ers of a keyword,
the Help system automatically shows you the first top-level index
entry beginning with the letters typed in. OmniPage Pro’s structured
index helps you to quickly find answers for your questions.
Click an index entry to display its related top ic. If an entry is linked to
more than one topic, a pop-up list appears. Select the desired topic.
t To browse through a series of topics
Use the Previous and Next buttons top right of each topic. The se allo w
you to view topics in the order they appear in the table of contents.
t To view recently viewed pages
Use the Back button to retrace your steps to your previously viewed
topics.
t To print a topic
Select the Print button, specify a printer to be used and print settings.
Other online resources
Readme files, in plain text and PDF formats, are located on the
installation CD. They contain last-minute information about
OmniPage Pro X. Please read one of them before installing the
application.
ScanSoft’s web site www.scansoft.com includes a Scanner Guide with
regularly updated information about supported scanners and related
issues. Access the site from the online Help topic Getting Help.
How to use online Help 9
Page 10

New features in OmniPage Pro X
The family of OmniPage® products is now augmented by OmniPage
Pro X for Macintosh. Here we summarize its most important new
features compared to OmniPage Pro 8 for Macintosh.
u A better recognition engine has been integrated, capable of
delivering greater accuracy, particularly on degraded documents.
u Support for the Mac
®
OS X operating system. A revised user
interface exploits the improved display techniques of the new
system. Support is maintained for Mac OS 9.
u A new Assistant facility provides interactive step-by-step guidance
for users new to the world of OCR processing.
u Improved parsing of page elements to retain the formatting and
layout of the original pages, in particular better retention of color
graphics and smarter text/graphics detection.
u Better auto-detection and handling of tables and spreadsheets.
u Detection and recognition of reverse text (white or pale letters on
black or dark backgrounds).
u Portable Document Format (PDF) files can be opened and their
contents transformed to editable text.
u Recognized pages can be saved to Portable Document Format
(PDF) files, ready for display, use on the Web or for file transfer.
u Export support added for MS Word 98, 2001 and X and MS
u Improved export support for HTML (upgraded to HTML 4.0).
u Voice read-back facility for texts in English and Spanish.
10 Welcome
Excel 98.
Page 11

Chapter 1
Installation and setup
This chapter provides information on ins talli ng O mn iPage Pro X and
selecting a scanner to use with it.
Please consult the Readme file which provides the most up-to-date
information on installing and running the program. Readme is
supplied in plain text and PDF formats. These files are copied from
the CD to the OmniPage Pro X folder during installation.
This User’s Guide is also supplied in PDF format. It is copied to the
sub-folder User’s Guide. The Mac OS X operating system includes a
PDF viewer. Under Mac OS 9, please use Adobe Acrobat. The PDF
files can be navigated easily using the bookmarks (table of contents),
page thumbnails and hyperlinks on cross references and index entries.
Please continue reading this chapter for the following information:
u System requirements
u Installing the software
u Running the program under Mac OS 9
u Starting OmniPage Pro
u Selecting your scanner
u Registering OmniPage Pro
u Removing OmniPage Pro
OmniPage Pro X User’s Guide 11
Page 12

System requirements
The minimum system requirements for OmniPage Pro X are:
u iMac, iBook, PowerBook, Power Macintosh or PowerPC
compatible computers with at least a G3 processor
u Mac OS 9.0 or later, Mac OS X (10.1 or above) and QuickTime
4.1 or later (this is normally included in OS X)
u 128 MB of memory (RAM) on Mac OS X; 64MB on Mac OS 9
with 32 MB allocated to OmniPage Pro (or 64 MB allocated to
handle full-page color images with more than 256 colors)
u 80 to 100 MB of free hard disk space
u A color monitor with at least 256 colors and 800x600 pixel
resolution
u A Macintosh-compatible pointing device
u A supported and correctly installed scanner, if you plan to scan
documents.
t To install OmniPage Pro X:
12 Installation and setup
Performance and sp eed wil l be e nh anc ed if y our co mpute r’s p rocessor,
memory and available disk space exceed minimum requirements.
Installing the software
Insert the OmniPage Pro CD in the CD-ROM drive.
Double-click OmniPage Pro X Setup.
Select a language and then click Continue. This language will be
used for installation and also as the program’s interface language.
Read the license agreement. If you click I Agree, you can continue
installation.
Page 13

Chapter 1
Personalize your copy in the dialog box that appears.
Type in your name, the name of your company and the serial
number. You will find the serial number on the CD case.
Click OK.
Click Install in the next dialog box to proceed. A further dialog
box lets you choose where the OmniPage Pro files will be
installed. Select a drive and optionally a folder location (using
Open or New) and click Choose. The program will be ins talled in a
folder named OmniPage Pro X. If you want to keep a previous
OmniPage version, in sta ll y o ur n ew vers io n to a dif ferent location.
All the program files will be copied to the chosen drive and
location. Some sub-folders will be created, including
Components, Help, Sample Files, Training Files, User
Dictionaries, User’s Guide, and Zone Templates.
Note
Under Mac OS 9 you may get a warning message if you have no CarbonLib
installed on your machine. In this case double-click the CarbonLib Setup. The
required CarbonLib will be installed, the computer will then restart and the
OmniPage Pro installation will start automatically.
Running the program under Mac OS 9
This User ’s Guide and the on line h elp des cribe th e use of th e prog ram
under the Mac OS X operating system. Some dialog boxes have a
slightly different appearance under Mac OS 9. Mac OS X supports an
Application menu: it includes Preferences... which is in the Edit menu
under Mac OS 9 and Quit which is in the File menu in Mac OS 9.
Online Help highlights all differences between Mac OS X and Mac
OS 9 with an OS 9 icon.
The Help menu under Mac OS 9 allows you to show or hide balloon
help. This relates to system-wide balloon help, which can appear
within OmniPage Pro X under OS 9.
Running the program under Mac OS 9 13
Page 14
Starting OmniPage Pro
There are several ways of starting OmniPage Pro®:
u Open the OmniPage Pro X folder and double-click the OmniPage
Pro X icon.
The program launches and the OCR Toolbar will be displayed.
For quicker access, place an alias program icon on your Desktop.
u Drag and drop on e or mor e imag e fil es ont o the Om ni Page Pro X
icon.
The program launches and loads the dropped image files. It does
not immediately recognize them.
u Drag and drop an OmniPage Document icon onto the OmniPage
Pro X icon or double-click an OmniPage Document icon.
The program launches and opens the previously created
OmniPage Document. See page56 and Saving an OmniPage
Document on page 61.
14 Installation and setup
u Use the Direct OCR feature. See Direct OCR on page 66.
Selecting your scanner
Before you can select a scanner in OmniPage Pro X, its driver must
already be installed on your system. It should also be tested, to be sure
it is working properly with the scanning software supplied by its
manufacturer. Consult the documentation supplied with your
scanner.
You can either let OmniPage Pro auto-detect your scanner or you can
select a scanner type ma nually in the S elect Scanner dialog box. If you
cannot find your scanner model in the scanner list in this dialog box,
OmniPage Pro allows you to select a driver from one of the two
Page 15

Chapter 1
general scanner driver types supporte d by th e pr ogra m. You can select
either a Photoshop plug-in or a TWAIN driver depending on your
scanner.
For specific scanner types which work with a TWAIN driver, you can
choose whether to use their own interface or use OmniPage Pro’s
interface. For scanners using a Photoshop plug-in driver, its interface
is always displayed while scanning.
Each scanner driver provides a different user interface, so the available
options may vary.
Tip
t To auto-select a scanner for OmniPage Pro:
See an overview table in the online Help topi c Selecting a scanner. This summarizes
the user interface differences depending on which type of scanner driver is chosen.
Switch on your scanner and start OmniPage Pro.
Choose Preferences… from the Applicati on menu (Mac OS 9: Edit
menu) then click the Scanner icon to display the Scanner panel.
Click the Select… button to get the Select Scanner dialog box.
Click the Auto-Select Scanner button.
Click Verify to be sure the auto-detected scanner is correctly
configured.
If an auto-detected scanner has a TWAIN driver, you can select
the option Show TWAIN User Interface. For more detail see point
6 in the section To access a scanner through a TWAIN driver.
Click OK, then Save.
If OmniPage Pro cannot recognize your scanner automatically,
select it manually as described in the next section.
Selecting your scanner 15
Page 16

t To select a scanner manually:
Follow instructions 1-3 listed above.
Select a scanner manufacturer under Manufacturer in the Select
Scanner dialog box.
Select a scanner model under Scanner.
Check the driver name under Driver. If you have more than one
driver, select the one you want to use.
Click Verify to be sure the selected scanner is correctly configured.
Click OK to close the Select Scanner dialog box.
Click Save in the Preferences dialog box.
If the display ed scann er list does not con tain t he manufa cturer o r type
of your scanner, you have two more choices under Manufacturer
(Photoshop plug-in) and (TWA IN driv er). To decide which of these
general scanner drivers your scanner supports, refer to the
documentation supplied with your scanner. See the next two sections
for more details on selecting (TWAIN driver) or (Photoshop plug-in).
t To access a scanner through a TWAIN driver:
16 Installation and setup
Tip
If you do not have a scanner at all, you can select (Test) under Manufacturer in the
Select Scanner dialog box to simulate scanning.
Follo w instructions 1-3 from the section To auto-select a scanner for
OmniPage Pro.
Select (TWAIN driver) under Manufacturer.
Select a driver name under Scanner.
Check that your scanner driver delivered by the manufacturer has
appeared under Driver and select it, if it is not already selected.
Click Verify to check the functioning of your scanner.
Page 17

Chapter 1
Decide which user interface you want to use for your scanner: the
driver’s own interface or OmniPage Pro’s interface. See the
overview table in the online Help topic Selecting a scanner which
summarizes the user interface functioning for different scanner
drivers.
• Select Show TWAIN User Interface if you want to use the user
interface of your scanner driver.
• Deselect Show TWAIN User Interface if you want to start
scanning from O mniPage Pro using th e scanner s ettings in the
Scanner panel of the OmniPage Pro Preferences dialog box.
Click OK to close the Select Scanner dialog box.
Click Save in the Preferences dialog box.
t To access a scanner through a Photoshop plug-in:
Copy your scanner driver from the Plug-Ins folder of the Adobe
Photoshop program to the OmniPage Pro X: Components:
Scanner Support: Plug-Ins folder.
It is assumed that the scanner driver delivered by the manufacturer
has already been copied to the Adobe Photoshop program’s Plug-
Ins folder during scanner installation.
Follo w instructions 1-3 from the section To auto-select a scanner for
OmniPage Pro.
Select (Photoshop plug-in) under Manufacturer.
Select the drive r just cop ied unde r Scanner. Check the driver name
under Driver.
Click the Verify button if you want to d ispla y th e info pa ne ls. Th e
driver’s info panel will appear first, then the Scanner Info panel.
Inspect and then close them.
Click OK to close the Select Scanner dialog box.
Click Save in the Preferences dialog box.
Selecting your scanner 17
Page 18

t To scan in the Classic Environment:
• Select Scan in Classic Mode in the Select Scanner dialog box if
it is not already selected. Please wait while the program
compiles a scanner list.
This option enables you to scan pages even if your scanner has
a driver for Mac OS 9 only. If the option is selected, scanning
will be performed in the C lass ic E nvironment. If the o pti on is
deselected, scanning can only be performed with a scanner
driver developed for Mac OS X. The Scan in Classic Mode
option is not selectable under Mac OS 9.
Registering OmniPage Pro
ScanSoft’s registration Wizard runs at the end of installation. We
provide an easy e lectro nic form that can be com pleted in less t han fiv e
minutes. You are asked to enter OmniPage Pro’s serial number, which
appears on a sticker on the CD sleeve.
When the form is filled and you click Send, the program will search an
Internet connection to immediately perform the registration online.
If you did not register the software during installation, you will be
periodically invited to register later. You can go to www.scansoft.com
to register on lin e. Cl ick on Support and from the main support screen
choose Register in the left-hand column.
For a statement on the use of your registration data, please see
ScanSoft’s Privacy Policy.
Removing OmniPage Pro
Move or copy any files you want to keep from the OmniPage Pro X
folder. These might be settings, training, template, user dictiorary,
export or OmniPage Document files. Then drag the folder to the
Trash.
18 Installation and setup
Page 19

Chapter 2
Introduction
You probably do business correspondence and other written projects
on your computer. However, certain sources of information may not
be immediately available for use. For example, if you want to
incorporate part of a magazine article into a document in your word
processor, you somehow have to get its text into your computer.
Painstakingly retyping the article is not an appealing solution.
OmniPage P r o X offers a sma rt solution to in cr ea se y our productivity.
Its optical charact er r ecognition (OC R) techn ology accurately and easi ly
converts text f rom scanned p ages and image files into edi table form for
use in your favorite computer applications. You do not have to retype
whole texts — OmniPage Pro does it for you.
Please continue reading this chapter for information on these topics:
u What is Optical Character Recognition?
u Basic steps in the OCR process
u The OCR Toolbar
u The full OmniPage Pro interface
The OCR Toolbar is the control center for the program. The other
main working areas appear when a document is started:
u Thumbnail view: this displays small images of each page.
u Image view: this displays an image of the current page.
u Text view: this displays the recognition results of the current page.
OmniPage Pro X User’s Guide 19
Page 20

What is Optical Character Recognition?
Optical character recognition (OCR) is the process of extracting text
from images. Images can result from scanning paper documents or
opening image files. Images do not have editable text characters; they
have many tiny dots (pixels) that together form character shapes.
These present a picture of the text on a page.
During OCR, OmniPage Pro analyzes the character shapes in an
image and determines character solutions to produce editable text. In
other words, the OCR program ‘reads’ the page.
After OCR, you can export the recognized text to a variety of wordprocessing, desktop publishing, and spreadsheet applications.
Beyond OCR
In addition to text, OmniP age Pro X can retain the following el ements
in a document after OCR for display and export.
t Graphics
Photos, logos and drawings are examples of graphics. The program
cannot recognize handwriting, but signatures can be saved as graphics.
t Text formatting
Font types, sizes, and styles (such as bold or italic) are examples of
character formatting. Indents, tabs, margins and line spacing are
examples of paragraph formatting.
t Page formatting
Column structure, paragraph spacing, and placement of graphics are
examples of page formatting.
The elements that are retained depend on settings you select before
OCR and on the capabilities of the saving format you choose. See
chapter 4, Settings, for more information.
20 Introduction
Page 21

Chapter 2
Basic steps in the OCR process
There are three main steps in OmniPage Pro’s OCR process. They
correspond to three large numbered buttons in the OCR Toolbar.
Documents can be pro cess ed au toma tica lly or manua lly. In automatic
processing, the Start button takes all specified document pages
through the whole process (1-2-3) without a stop. Processing is done
according to settings selected in pop-up menus on the OCR Toolbar
and in the P r e fer ences di alog box. In manua l pr oces sing , each st ep can
be performed separately and settings can be modified between each
step. The three basic steps are:
1. Acquire page images
Scan pages or load one or more image files. See page 36. A
miniature image of each page appears in Thumbnail view, the
image of one page appears in Image view.
A layout description assists auto-zoning and a style set defines a
formatting level for the recognized pages. When processing
manually, zones should be drawn and styled at this point.
2. Perform OCR
Pages can be recognized with or without proofing. See page51.
During recognition, zones are automatically created on all pages
without existing zones. On pages with zones, auto-zoning can be
requested. OmniPage Pro performs OCR on text zones and can
transfer graphics zones. Recognition results appear in Text view.
3. Export the document
The document can be saved to a specified file name and format, or
copied to Clipboard. The document remains open in OmniPage
Pro after its first export, allowing text to be further edited and
pages added or re-recognized with changed settings and zoning.
The document can be saved repeatedly, also to different saving
formats.
It can be saved as an OmniPage Document, allowing it to be
reopened later in OmniPage Pro X. See page 38, 56 and page 61.
See the topics Automatic processing and Manual processing at the
beginning of chapter 3.
Basic steps in the OCR process 21
Page 22
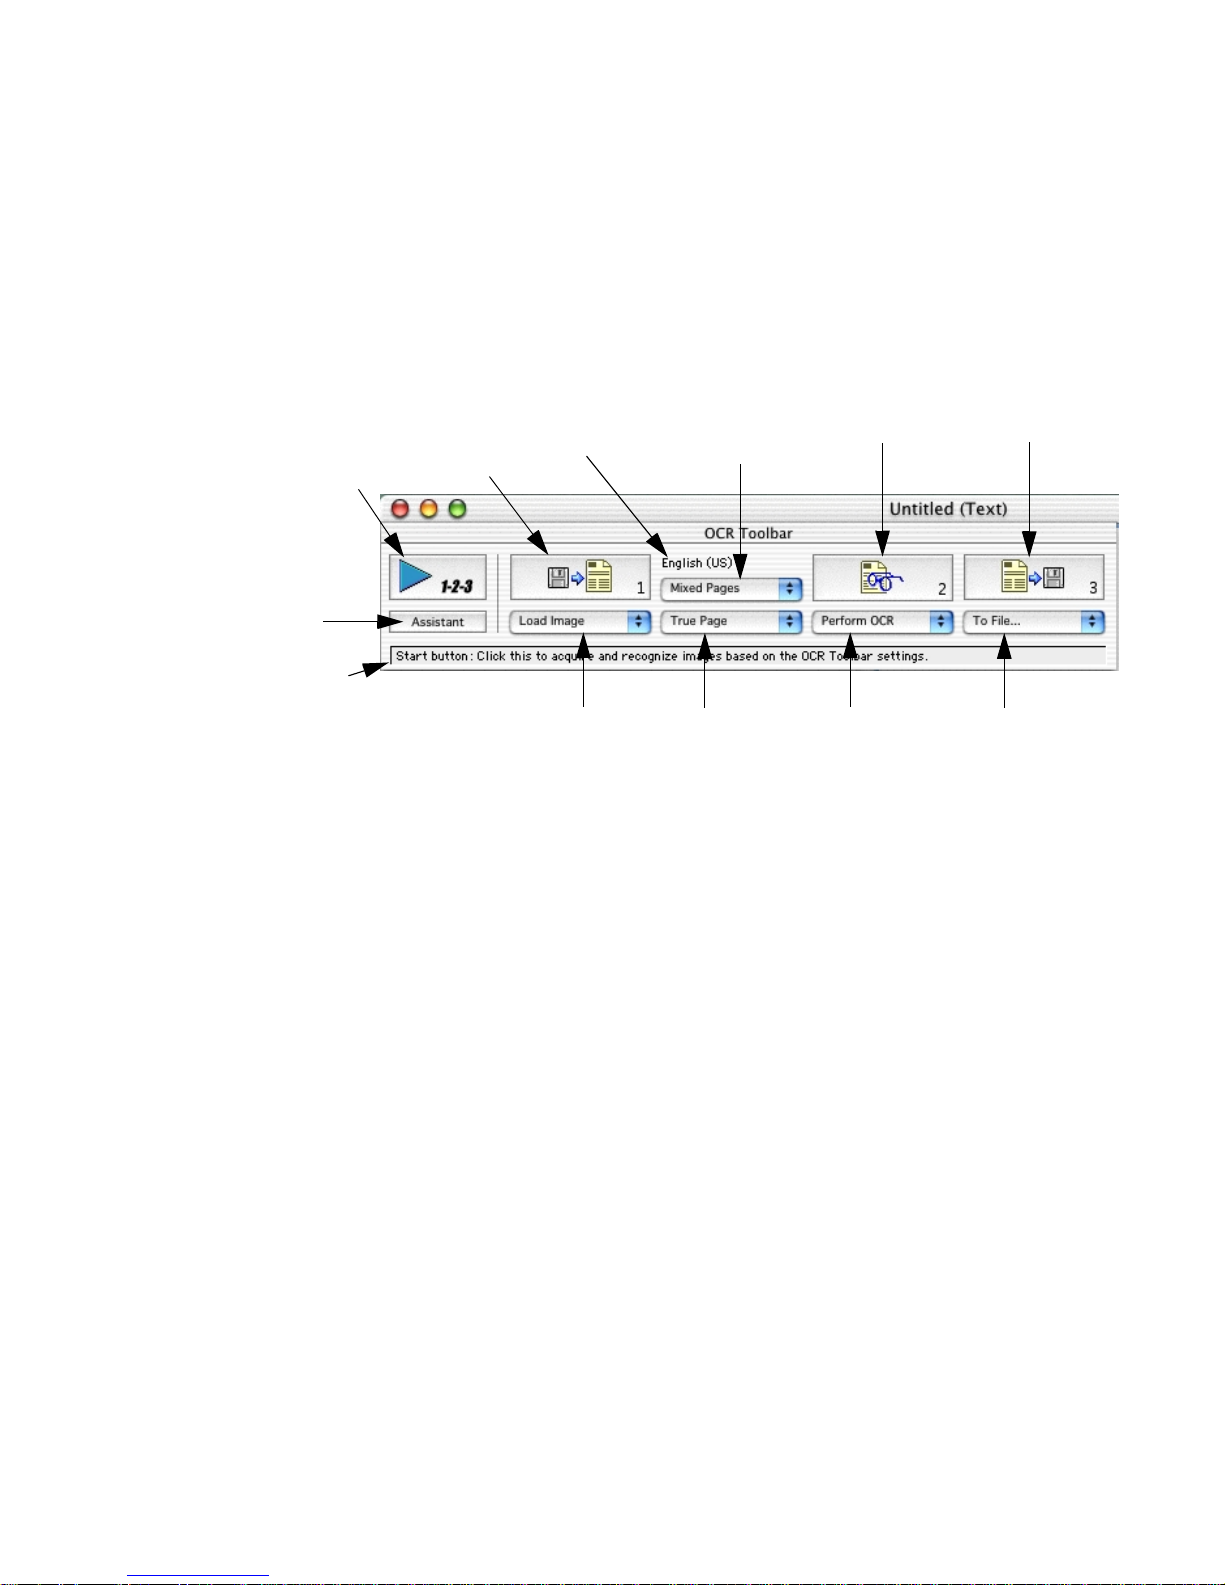
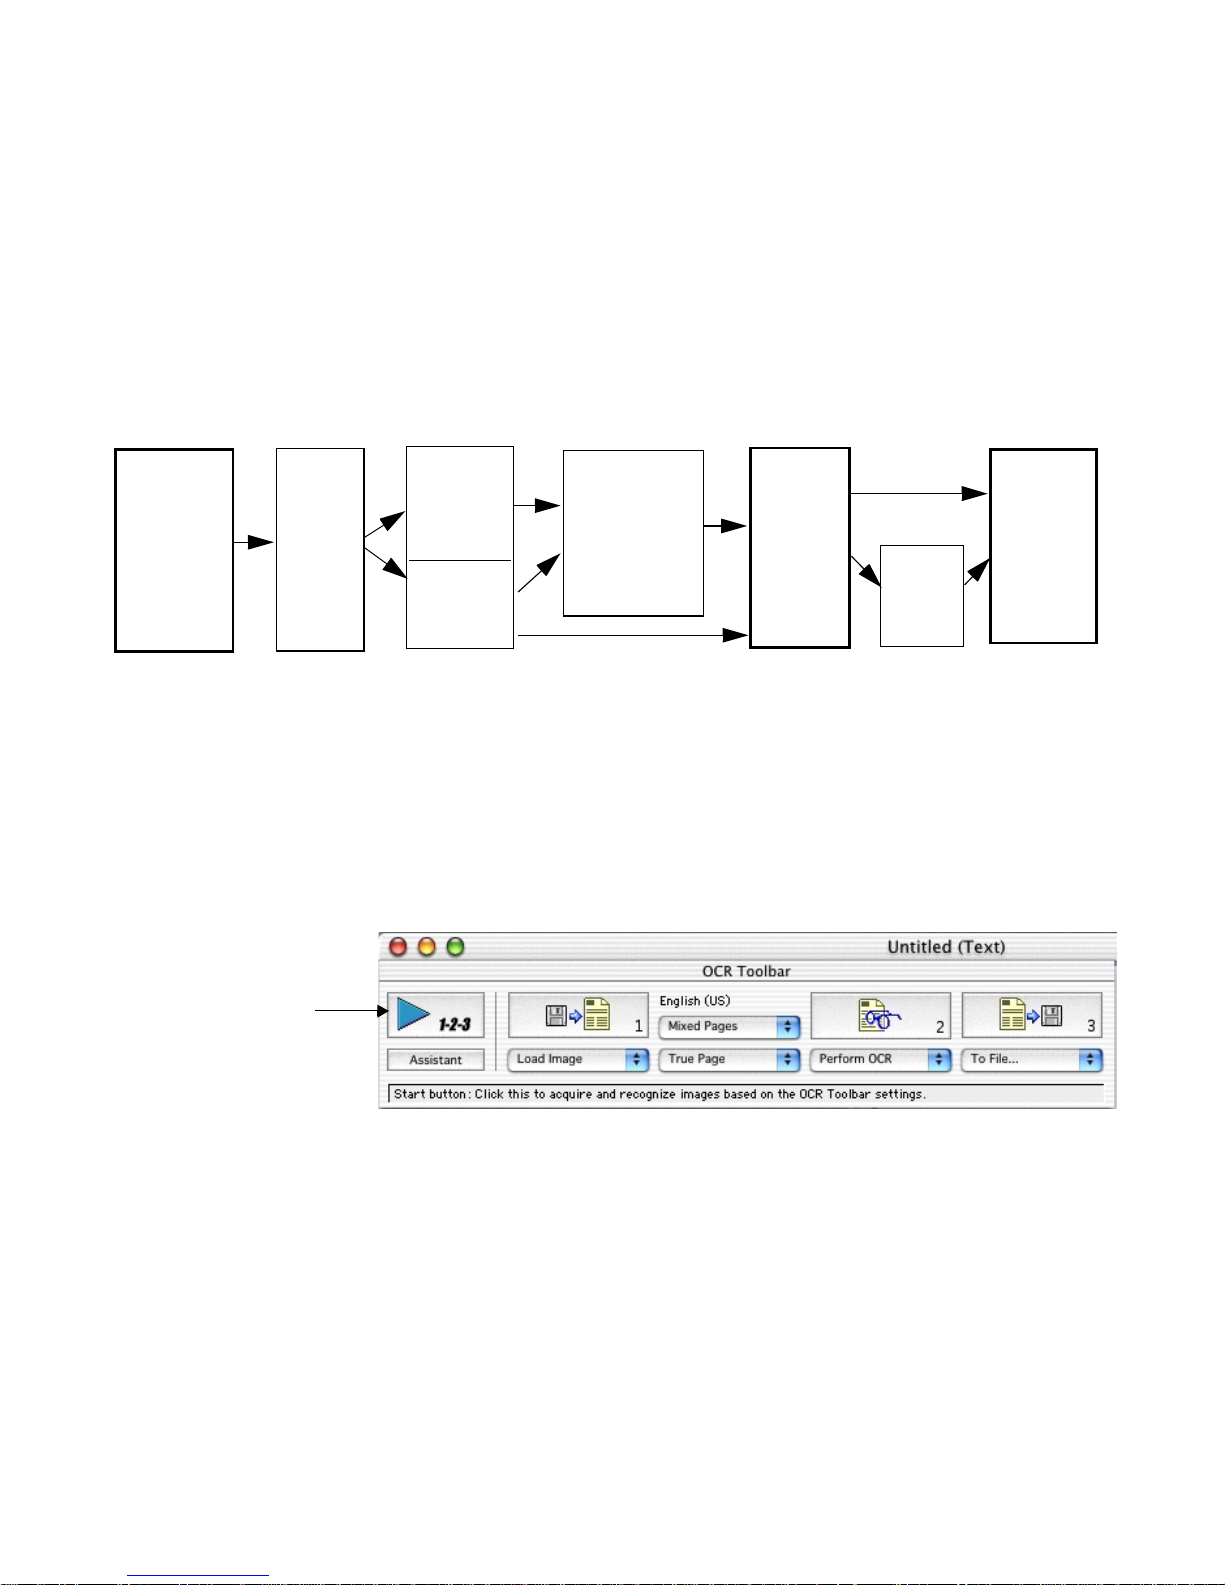
The OCR Toolbar
The OCR Toolbar appears when you first start the program. It is the
control center for all document processing. The OCR Toolbar can be
minimized under Mac OS 9.
Start button: Use this to
start and re-start automatic
processing, and to stop any
processing.
Assistant button:
Guides you to select
settings and launches
automatic processing.
The status line reports the
current operation or the
operation you can do next.
Get Page
button
u The Start button lets you activate or re-activate automatic
Primary language
display
Get Page
pop-up menu
Style Set
pop-up menu
Original Layout
pop-up menu
OCR button Export button
OCR
pop-up menu
Export
pop-up menu
processing. When processing is in progress, it displays Stop.
u The Ge t Page, OCR and Export buttons are for manual pr ocessin g.
They allow each step to be performed separately, as follows:
• The Get Page button lets you acq uire one or mo re ima ges from
file or by scanning with the specified mode.
• The OCR button lets you send the current page to
recognition, or re-recognition, with or without proofing
automatically started. It also allows training to be done.
• The Export button lets you save results from all recognized
pages in the document to file or copy them to Clipboard.
u The five pop-up menus let you select options. Processing is done
u The current primary re cognition language is displayed . Three do ts
22 Introduction
according to the selected options. Before starting automatic
processing, you must ensure all these options are suitable.
after the language name denote that at least one secondary
language is also selected.
Page 23
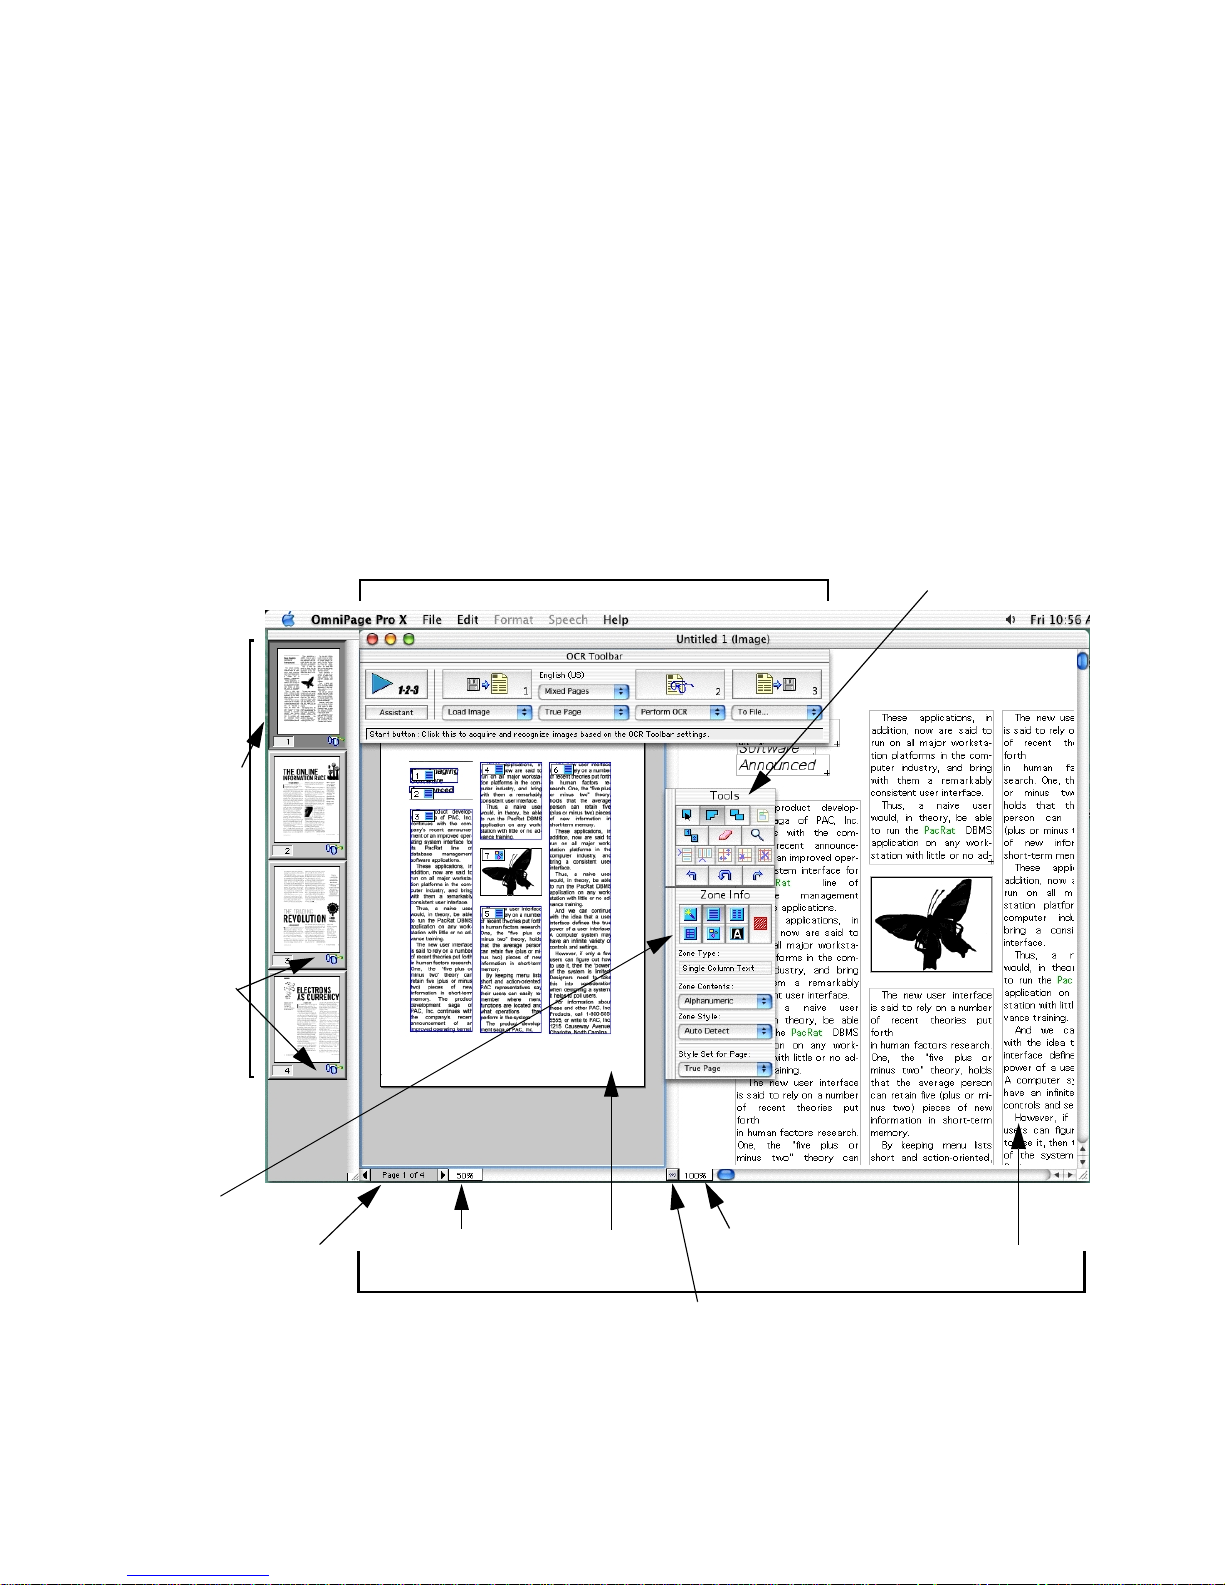
The full OmniPage Pro interface
The full OmniPage Pro X interface appears when you start a
document. The main screen areas of the interface are:
u The OCR Toolbar
u The Document window (with Image view and Text view)
u The Thumbnail window
u The Zone Info and Tools palettes
u The Preferences dialog box
Chapter 2
Thumbnail
window
The thumbnail
of the
currently
displayed
page has a
shaded
background.
These icons
indicate page
status.
OCR Toolbar
Tools palette
Zone Info
palette
Page
indicator
Image view
zoom factor
Document window
Image view
Text view zoom
factor
Drag this splitter to left or
right to resize the views.
The full OmniPage Pro interface 23
Text view
Page 24

The Document window
The Document window allows you to view and work with pages in
the current document. You can drag this window to different
locations. Original page images are displayed in Image view and
recognition results are displayed in Text view. A highlight-colored
border denotes which view is active. Click inside a view area to
activate it.
Both views have scroll bars if the current page cannot be fully
displayed. Click on the zoom control at the bottom left corner of a
view to change its zoom factor. Choose from fixed or variable values
(Zoom to Width and Zoom to View).
The splitter button at the bottom of the window lets you change the
amount of space available for each view. To hide Image view
completely, drag the splitter t o the left edg e of the D ocument window.
To restore Image view, drag it to the right.
The Document window can be minimized and restored. Closing the
document window closes the current document (with a warning if
unsaved changes exist).
24 Introduction
The Thumbnail window
The Thumbnail window appears vertically on the left of the desktop
to provide Thumbnail view. This displays numbered miniature
pictures (thumbnails) of all pages in the current document. You can
use thumbnails to move to other pages, reorder or delete pages. An
icon at the bottom right of a page indicates that the page has been
recognized.
You can import one or more images to a defined location inside a
document by drag-and-drop. You can also use a thumbnail to drag a
copy of a page image from a document to the Desktop, a file location
or into other applications.
The Thumbnail window has a scroll bar and can be dragged to other
locations. The window cannot be closed, under Mac OS 9 it can be
minimized.
Page 25
See Working with documents on page 55 for more information on
using thumbnails for page operations.
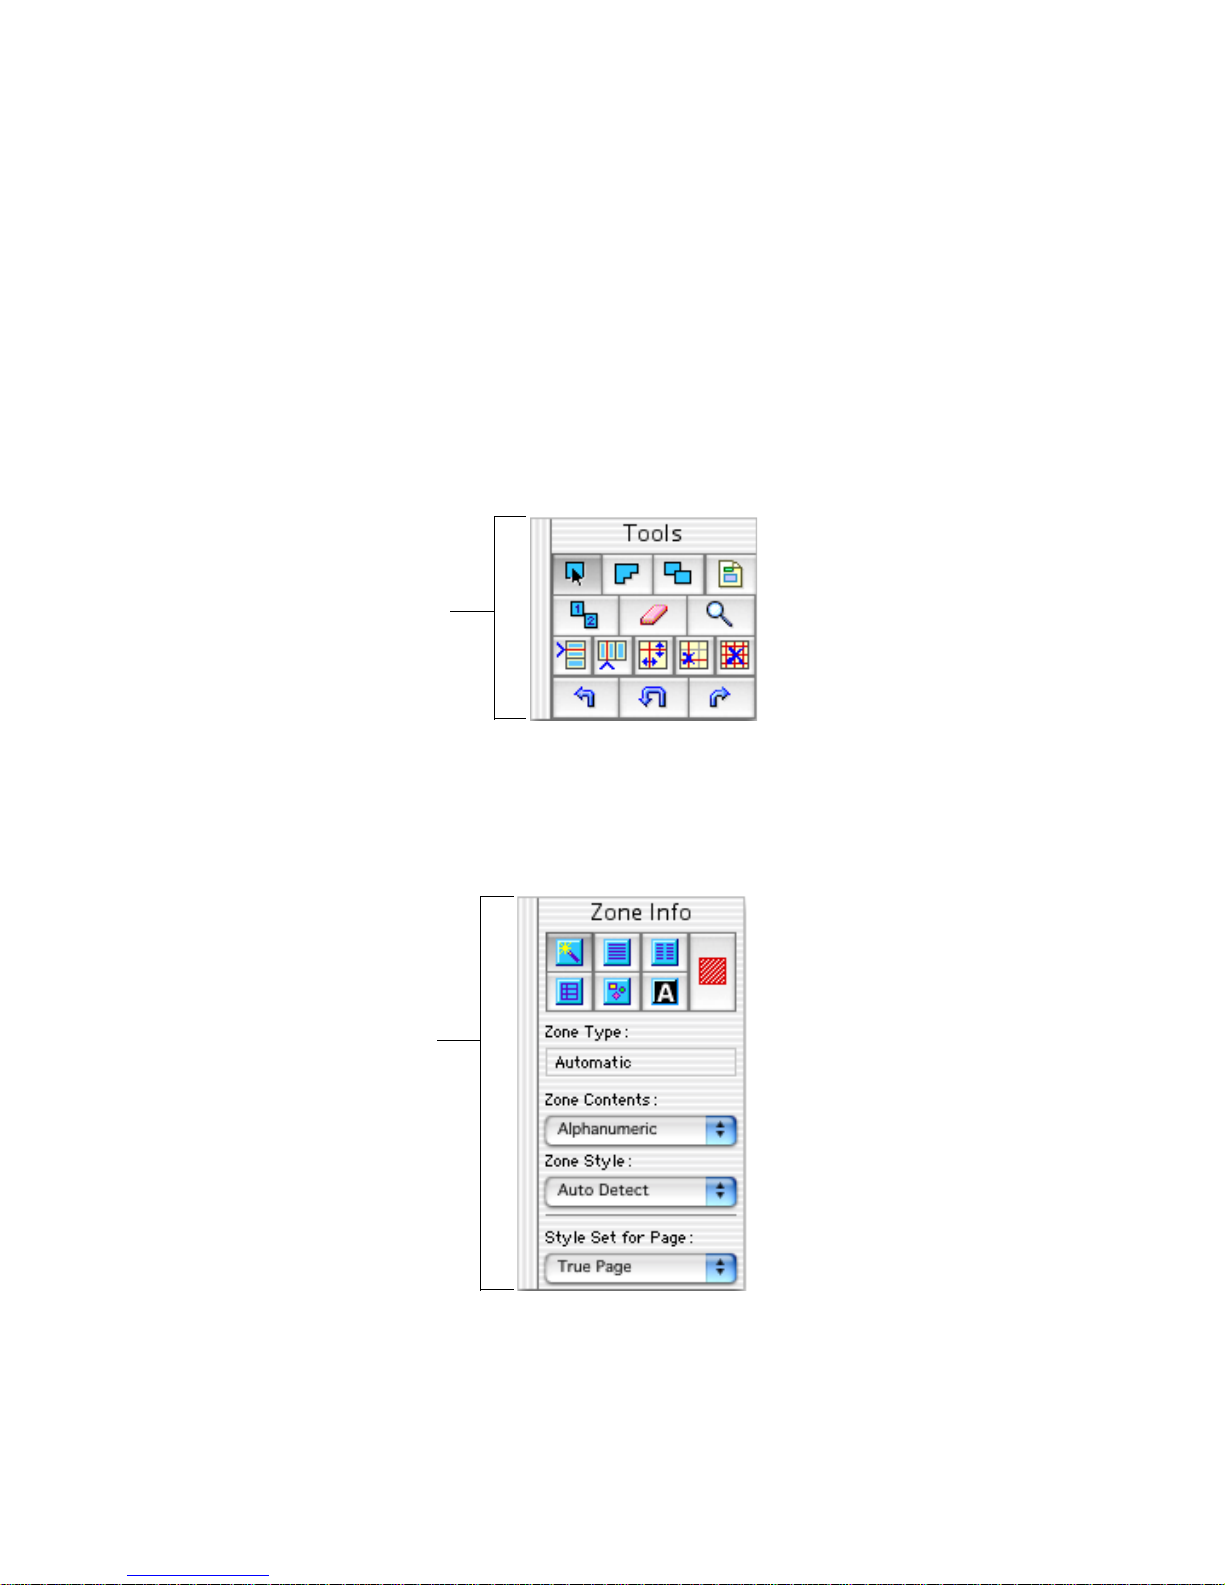
The Zone Info and Tools palettes
The Zone Info and Tools palettes are displayed whenever Image view
is active. You can drag them to different locations. Under Mac OS 9,
they can be minimized and restored.
Use the Tools palette to draw
regular or irregular zones,
modify zones, apply a zone
template, reorder zones, erase
parts of the image, zoom in or
out on the image, handle table
zones, or rotate an image.
Chapter 2
See Drawing zones manually
on page 44 for guidance on
using each of these buttons.
Hover the cursor over any button in the palettes to read a description
of its function in the status line at the base of the OCR Toolbar.
Use the Zone Info palette to
select zone types, zone
contents, zone styles, and a
style set for the current page.
See Specifying zone types on
page 41 and
editing zone styles
for guidance on using these
buttons and pop-up menus.
Applying and
on page 91
The style set True Page® lets you conserve the original page layout.
The full OmniPage Pro interface 25
Page 26
Click each icon
to view and
select different
groups of
settings.
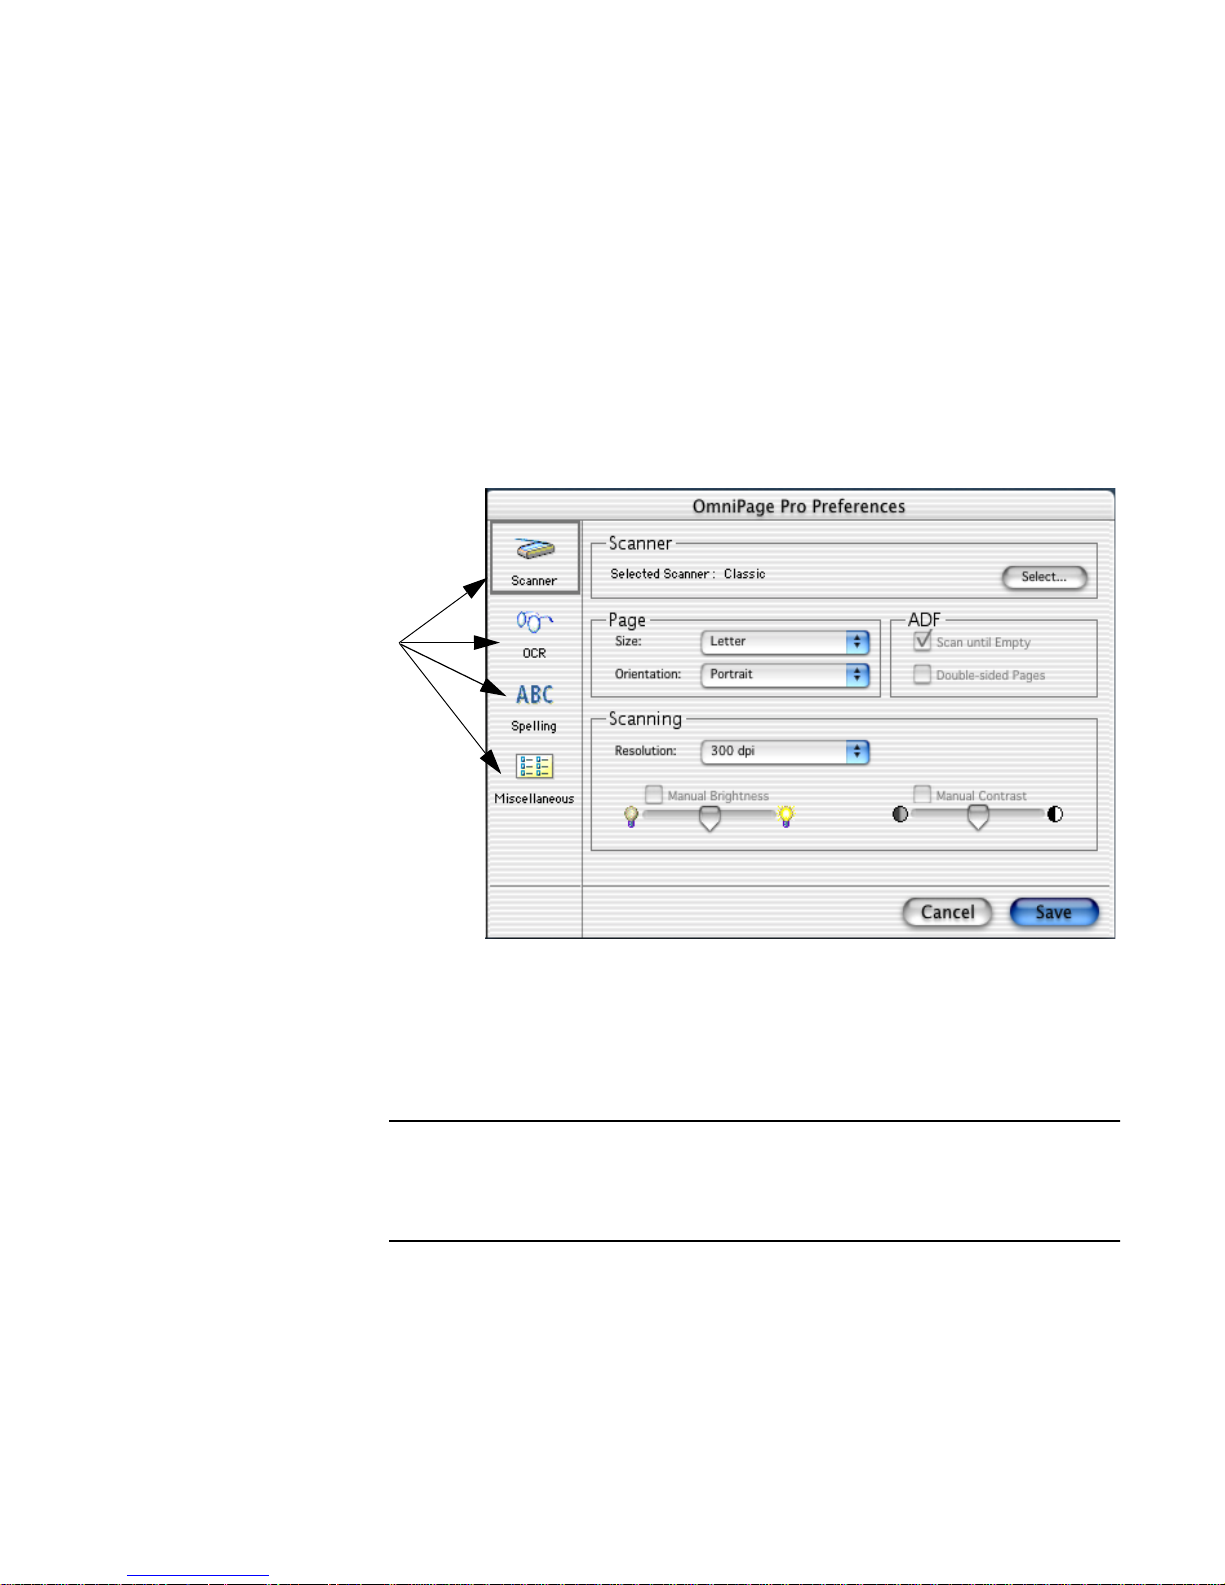
The Preferences dialog box
This dialog box is the central location for all OmniPage Pro settings
not accessible through the OCR Toolbar. To open it, choose
Preferences... in the Application menu (Mac OS 9: Edit menu).
The Preferences dialog box has four sections: Scanner, OCR, Spelling
and Miscellaneous. Each section can be displayed by clicking its icon
on the left.
26 Introduction
Guidance on se lecting settin gs in each sectio n is pro vided in chapt er 4.
You can save your set of preference settings to a Settings file, as
described on page 102.
Note
Online Help has a Quick Start Guide. This provides step-by-step instructions for
reading a sample image file supplied with the program. The resulting document
can be viewed in a target application and serves as a benchmark. You should be
able to get similar accuracy from comparable documents of your own.
Page 27

Chapter 3
Processing documents
This chapter describes how to process documents in OmniPage Pro
from start to finish. It tells yo u how the basic steps of OCR are linked
during automatic and manual processing. It explains how you can
exploit the advantages of each type of processing within a single
document. The chapter also provides instructions for performing each
OCR step and for other tasks you can do with your documents.
Please continue reading this chapter for information on these topics:
u Basic processing steps
u Automatic processing
u Manual processing
u Using automatic and manual processing together
u Using the OCR Assistant
u Bringing page images into OmniPage Pro
u Creating and modifying zones
u Performing recognition
u Working with documents
u Exporting documents
u Direct OCR
OmniPage Pro X User’s Guide 27
Page 28
Basic processing steps
The following diagram summarizes how the basic steps are linked, and
directs you to a page in this Guide. This workflow is broadly valid for
both automatic and manual processing. The steps performed by the
three basic OCR Toolbar buttons have a darker border.
Get
Pages
page 36
Start
button
Define
a Style
Set
page 87
Describe
page
layout
page 72
Apply a
template
page 96
Create zones:
automatically
page 40
manually
page 44
Perform
OCR
page 50
Proof
page
51
Export
results
page 61
Automatic processing
You can use the Start button to process a new document from start to
finish or to finish processing an open document. The operations that
occur when you click Start depend on the options selected in the
OCR Toolbar’s pop-up menus.
For ex ample, O mniPage Pro can scan a stack of pa ges fr om a sca nner ’s
automatic document feeder (ADF), create zones on all pages,
recognize the pages, offer the results for proofing, and then let you
save the recognition results to file.
During automatic processing, auto-zoning always runs, unless you
specify a zone template file. If you want to draw or modify zones
manually, you can do this after recognition and first export are
finished, and then re-recognize those pages afterwards.
28 Processing documents
Page 29

To prep ar e fo r automatic proc es s in g
1. Select the source for one or more page images.
Choose Load image to open one or more page images from file.
Choose Scan in B&W to scan in black-and-white.
Choose Scan in Gray to scan in grayscale.
Choose Scan in Color to scan in color (with a color scanner).
See Bringing page images into OmniPage Pro on page 36 and Get
Page options on page 70 for information on these choices.
2. Select a style set.
Choose a style set to define the formatting level and page layout
you want applied to the recognition results.
See page 72 and page 73 for information on these choices.
3. Select a page layout description.
Choose a page layout description to influence the auto-zoning.
Choose from Single Column, Multiple Column, Spreadsheet or
Mixed Pages. Or choose a zone template if you have one.
Chapter 3
4. Select the type of recognition you want.
Choose Perform OCR to have recognition without proofing. You
can still proof the text lat er, after its first export. See from page50.
Choose OCR & Proof to have proofing started as soon as all pages
are recognized. See page 51.
5. Select an export target for the document.
You can direct your document to be saved to a file whose name,
location and type you define, or have the recognition results
copied to the Clipboard. See page 64.
6. Ensure all other settings are in order.
Further settings are located in the Preferences dialog box (see
chapter 4). These include recognition languages, user dictionaries
and scanner settings. If you are scanning, place your page(s)
correctly in the scanner. To scan multiple pages from an ADF,
select Scan Until Empty in the Scanner Panel of the Preferences
dialog box.
7. Click the Start button to launch automatic processing.
Automatic processing proceeds as described in the next topic.
Automatic processing 29
Page 30

To process a new document automatically
We assume you have started OmniPage Pro X and can see the OCR
Toolbar, but you have no document open and all settings are ready.
1. Click the Start button to launch automatic processing.
2. All specified pages are scanned or the Load Images dialog box lets
you select image file s. The status li ne reports progress a s images ar e
acquired. Page images appear briefly in Image view.
3. A miniature image of each page appears in Thumbnai l view as it is
acquired. Image view displays each page; when all pages are
acquired, it displays the first acquired page.
4. Recognition starts; a progress monitor appears in the OCR
Toolbar status line. Automatic or template zoning is done, text is
detected and recognized on one page after the other.
5. The first image appears again in Image view with zones. Its
recognition results appear in Text view.
6. If proofing was requested, it starts from the top of the first page.
Make corrections as desired. Click in Text view to interrupt
proofing. Then you can edit or verify the recognized text, mo ve to
other pages or change settings. The proofreading button Ignore
becomes Start. Click this to resume proofreading. Click Done to
finish proofing before the end of the document.
7. The Export dialog box ap pears if you chos e export to file. De fine a
During processing, the Start button becomes a Stop button. Click it to
stop processing. The current processing step is discarded but the
results of all completed steps remain. For example, if you click Stop
during OCR, there will be no recognized text but the image remains.
30 Processing documents
folder, file name and saving format, and choose other export
options. If you chose Save and Launch, the recognition r esults will
appear in the ta rge t app lica tio n. I f y ou ch ose e x port to Cl ipbo ard,
a message tells you when th e r eco gniti on re sul ts have be en placed.
The document r emains open in O mniP age P ro for fu rther editing.
Pages can be re-recognized with changed zoning or settings. New
pages can be added. The document can be saved repeatedly.
Page 31

Chapter 3
To process an existing document automatically
You can also click Start to perform automatic processing when you
have a document open. It does not matter whether its pages were
processed automatically or manually. To scan new pages into the
document, place them in the scanner correctly. When you click Start,
the OCR Instructions dialog box offers you the following choices.
u Load and Process Additional Pages
If the selected source is from file, the Load Images dialog box
appears, allowing you to specify files. Otherwise, scanning will
start immediately. If Scan Until Empty is selected, all pages in the
ADF will be scanned one after the other. All specified pages enter
the document and are recognized. Existing pages remain
unchanged, even if some of them were unrecognized. If the
current page was the l ast i n the do cumen t when y ou clicked Start,
the new pages are appended to the end of the document. If not,
the Acquire Images dialog box lets you specify where to place the
new pages. When recognition (and optionally proofing) are
completed, the whole document is exported: sent to Clipboard or
saved to file through the Export dialog box.
u Process All Unrecognized Pages
Recognition (and optionally proofing) is performed on all
unrecognized pages. No new pages can be added if this option is
selected. When processing is finished, or if there are no
unrecognized page s, expo rt starts, t o Clipb oar d or file as spe cified.
When saving to fi le, th e E x port dialo g bo x a ppe ars. A ll ch ange s to
all pages ar e saved , no t just the p ages r ecogn ized by thi s comm and.
u Reprocess All Pages
All recognition results for all recognized pages in the document
will be discarded, and all images will be (re-)recognized. Any
image without zones is auto-zoned. If any zones exist, the Zoning
Instructions dialog box lets you choose to use current zones only,
to discard all zones and have auto-zoning, or to run auto-zoning in
addition to existing zones. Your choice will be applied to all pages
containing manually drawn or modified zones.
Automatic processing 31
Page 32

Manual processing
You can use manual processing when you want greater control over
the OCR process. Pr ocessing pr oceeds step-by -step. Th is allows y ou to
view and manually zo ne ima ges before you se nd the m for recog nition.
It also lets you modify settings between each processing step or from
page to page. That can be important if some pages in the document
need different settings from others.
During manual processing you can acquire multiple pages with each
click of the Get Page button. Similarly, the Export button is for
exporting recognition results from all recognized pages in the
document. By contrast, the OCR button is used to have only the
current page processed.
Steps for manual processing
Three OCR Toolbar buttons let you control the process step-by-step:
1. Acquire images
Define the ima ge source in th e G et Page pop-up menu. Choose to
scan pages or to load one or more image files. Click the Get Page
button (number 1). A miniature image of each page appears in
Thumbnail view, the image of one page appears in Image view.
Recognition does not start. See Bringing page images into
OmniPage Pro on page 36 and Get Page options on page 70.
2. Create zones on the images
3. Perform OCR
32 Processing documents
Draw zones i n I ma ge view usin g t he Tools palette. Z o ne s ar e areas
that define which parts of a page image should be recognized. You
can also load template zones and draw zones in addition to the
zones placed from the template. See Creating and modifying zones
on page 39 and Zone templates on page 96.
Specify to have recognition, with or without proofing, or to do
training in the OCR pop-up menu. Click the OCR button
(number 2). Choose to use existing zones only or to allow autozoning on all unzoned parts of the page. Any page without zones
Page 33

Chapter 3
will be auto-zoned. You will see a progress indicator as the current
page is recognized. After OCR, recognition results appear in Text
view. If you requested proofi ng an d ther e ar e su spect word s on th e
page, proofing begins immediately. If you did not request
proofing, you can view, edit and verify the recognized text or start
proofing from any point in the text.
See Performing OCR on page 50 and Training OCR on page97.
4. Export the document
Specify an expo rt ta rget i n t he E xpo rt po p-up men u. You can save
recognition results to one or more files, or have them copied to the
Clipboard. Click the Export button (number 3). If you are saving
to file, specify the file name, format and location.
See Exporting documents on page 61 for more information.
Using automatic and manual processing together
Automatic processing provides speed and efficiency. After you have
selected settings, many pages can be processed from start to finish
without user intervention. Manual processing demands more
attention, but gives the user greater control over the recognition
results. I t is po ssible to tap into both benefits while pro cessin g a single
document. Suppose you have a long document, ideally suited to
automatic processing, except for a few pages needing separate zoning
or settings. We provide two examples of how you could proceed.
t To start automatically and finish manually:
1. Prepare settings and then process all pages automatically.
2. Export the document to protect it, maybe as an OmniPage
Document.
3. Examine the recognition r esults, es pecially on pages you thi nk will
need individual attention. Identify which changes are needed to
zoning or settings.
4. Make the required changes on a pa ge an d rep roc ess it m anuall y b y
clicking on the OCR button.
Using automatic and manual processing together 33
Page 34

5. Specify a choice in the Zoning Instructions dialog box.
6. Repeat steps 4 and 5 until all pages are adequately recognized.
7. Export the finished document as required.
t To start manually and finish automatically:
1. Prepare settings and acquire all the images for the document by
clicking the Get Page button.
2. Examine the images for suitable brightness, orientation and
content. Rescan or rotate unsuitable images. Use the eraser tool or
zoning to remove or exclude spotty and degraded areas. Reorder
pages as desired.
3. Manually zone pages needing special attention. Place pictures or
diagrams in Graphics zones and areas you do not want recognized
in Ignore zones. Draw and specify text zones.
4. Click the Start button and choose Pr ocess A ll U nr ecog nized Pages in
the OCR Instructions dialog box.
5. Make a choice in the Zoning Instructions dialog box for all pages.
Choose Use Only Current Zones or Keep Current Zones and Find
Additional Zones.
6. After proofing (if requested), you can export the document.
Using the OCR Assistant
The OCR Assistan t is a usef ul guide to use rs new t o O mniPage Pro. I t
takes you through six panels, using questions and advice to help you
choose suitable settings. It then launches automatic processing.
The OCR Assistant can be started only when no other document is
open. It offers the choices currently set in OmniPage Pro. Some
settings are not offered b y the OC R Assistan t; these shoul d be selec ted
in the Preferences dialog box before starting. They are:
u Scanner: All settings. Be sure to turn on Scan Until Empty if you
want to scan multiple pages from an ADF.
34 Processing documents
Page 35

Chapter 3
u OCR: A training file and options for saving graphics.
u Spelling: A user dictionary and Language Analyst
u Miscellaneous: Retain or drop table grids.
®
options.
Click the OCR Assistant button to start moving through the six steps:
Step 1, Acquiring images: Choos e one of th e s can ni ng mode s (bl ack -
and-white, grayscale or color) or to load image files. If you are
scanning pages, place them in the scanner.
Note
You can scan pag es only if you have previously selected a scanner through the
Prefer ences di alog bo x. If y ou are s canning through th e TWAIN interface, use it to
choose the scanning mode.
Step 2, Language choic es: Choose a primary langua ge and, if desir ed,
one or more secondary languages . P r ess th e comma nd key a s you click
to make or remove multiple selections.
Step 3, Proofreading: Choose to proofread text immediately after
recognition or to proceed to first export without proofing.
Step 4, Original layout: Choose an option that best describes your
incoming pages to guide the auto-zoning process.
Step 5, F ormat r etention: Choose ho w much formatting you want in
your exported document.
Step 6, Export: Choose to save to file or copy to Clipboard.
Click Finish to launch automatic processing, as already described.
The document remains in OmniPage Pro after first export. Pages can
be added or re-recognized with changed settings. It can be exported
repeatedly, to the same or other file formats.
Settings ch anged in the OCR Assistant r emain va lid in Omn iP age P ro .
If you have another document to process which needs the same
settings, you do not have to run the OCR Assistant again. Just click
the Start button to have it automatically processed.
Using the OCR Assistant 35
Page 36

Bringing page images into OmniPage Pro
This section describes the different methods for acquiring images:
u Scanning pages
u Loading image files
u Opening OmniPage Documents
u Using drag-and-drop
Scanning pages
You can scan a paper document to generate an electronic image. See
Starting OmniPage Pro and Selecting your scanner in chapter 1.
t To scan pages into OmniPage Pro:
1. Place a page in your scanner. You can scan a stack of pages if you
have an automatic document feeder (ADF).
2. Select one of the scanning modes in the Get Page pop-up menu.
3. Choose Preferences... in the Edit menu and open the Scanner panel
to make sure the appropriate settings are selected for your page.
See page 76. If you want to sequentially scan all pages in an ADF,
make sure that Scan Until Empty is selected. Otherwise, you must
click the Get Page button to scan each subsequent page.
4. Click the Get Page button in the OCR Toolbar.
Pages are scanned in order and the resulting images appear in
Thumbnail view. The first page is displayed in Image view.
Loading image files
You can load JPEG, PDF, PICT and TIF F ima ge file s int o O m niPage
Pro. An image file is an electronic picture of text, such as a fax or
scanned image, that is saved in an image file format. You can load
more than one file at once. You can also load selected or all pages from
multi-page image files (these can be in TIFF or PDF formats).
36 Processing documents
Page 37

Chapter 3
t To load a single page image file:
1. Select Load Image as the option in the Get Page Pop-up menu.
2. Click the Get Page button. The Load Images dialog box appears. It
is a standard Macintosh dialog box.
3. Specify in the Show pop-up menu which files should be listed: All
image files, or only files with a single format.
4. Select the folder containing your file with the From pop-up menu.
5. Select the file you want to load and then click Open. Or, double-
click the file name.
The image from the file is displayed in miniature in Thumbnail
view and at the specified magnification in Image view.
t To load multiple images from file:
1. Select Load Image in the Get Page pop-up men u and cli ck th e Get
Page button. Select which file types should be listed.
2. Under the OS X operating system, select files as follows:
• Files listed together: Shift+click the first and the last file
names. These files and all in between will be selected.
• Non-adjacent files: Command+click each file.
Command+click a selected file to deselect it.
3. Click Open after you have selected all the files you want to load.
Image files are loaded in the order they are listed and combined
into one working document.
4. When opening a multi-page image file (TIFF or PDF), you can
select which pages to open. Miniature page images appear in
Thumbnail view and the first page is displayed in Image view.
5. Drag page images to new locations in Thumbnail view if the pages
do not appear in the desired order.
Note
If you scan or load pages while a document is currently open with its last page
displayed, new pages are appended to the end of the document. If the last page is
not the active one, you will be asked where to place incoming pages.
Bringing page images into OmniPage Pro 37
Page 38

Opening OmniPage Documents
You can open an OmniPage Document using the Open command in
the File me nu. An OmniP age D ocument (OPD) is a file in OmniPage
Pro’s proprietary format. OPDs contain original page images, zones,
settings and recognition results (if any). Each piece of recognized text
remains linked to the image it came from, so text can still be proofed
and verified when the OPD is reopened. You can also make editing
changes to recognized text, re-recognize pages and add further pages to
the document. You can save recognition results from the OPD more
than once, for instance to different file formats.
Note
t To open an OmniPage Document:
OmniPage Pro can only have one working document open at a time. If you try to
open another file while you have a document open, you are prompted to close the
current document. However, you can add pages to your current document using
the Get Page button.
1. Choose Open... in the File menu.
The Open OmniPage Document dialog box appears.
2. Open the folder where your OmniPage Document is located.
3. Double-click a file name or select the file and click Open.
The OmniPage Document opens with one thumbnail image for
each page. The original image of the first page appears in Image
view and its recogniti on results (if any) in Text view. Some settings
from the OPD are activated.
Note
For advice on saving OmniPage Documents, see page 56 an d p age 62.
Using drag-and-drop
You can import images into an open document by drag-and-drop
from the Desktop or Finder. Use Shift-clicks to select multiple files.
You can import multi-page image files; the Select Pages dialog box
allows you to specify which of the file’s pages to open.
38 Processing documents
Page 39

Chapter 3
If you drag and then drop the image icon on Image view, the page or
pages are appended to the end of the document.
If you drop the image ico n on Thumbnail view, you can choose where
to have the page( s) placed. A s you dra g the icon o ver the pages , a black
bar appears betwee n two page s. D rop the icon to have the n ew page (s)
placed immediately below the bar.
The first of the imported pages becomes the current page.
You can launch OmniP a ge P ro X a nd load one or mo re image s to start
a new document. Drag an image file icon from the Desktop or Finder
onto the OmniPage Pro X icon.
If you drag an image file icon onto the OmniPage Pro icon when you
have the program running with a document, the new image is
appended to the document if its last page was active, otherwise a
dialog box lets you specify where to place the new image(s).
You can also launch the program by dragging the icon of an
OmniPage Document onto the program icon, or by double-clicking
the OPD icon. You cannot drag an OPD file into an open document.
In this case, you will be invited to save any changes to the current
document before it is closed and the OPD opened.
Note
To use drag-and-drop to export recognition results, see page 65.
Creating and modifying zones
Page images are displayed in Image view. This is where zones can be
manually created before OCR. Zones are bordered areas that identify
parts of a page that will be recognized as text, retained as graphics or
ignored. Any part of a page not enclosed by a zone is ignored during
OCR, unless you specify that auto-zoning should run.
Note
You can create zone templates to use when you process documents with the same
zoning requirements. Zone templates remember the shape, position, order, type,
contents, and style of zones. See Zone templates on page 96.
Creating and modifying zones 39
Page 40

This section presents the following topics:
u Creating zones automatically
u Specifying zone types
u Drawing zones manually
u Modifying zones
Creating zones automatically
OmniPage Pro can create zones automatically for you. To do so, it uses
the selected pa ge la yout de scri ption to find blocks of text and gr aphics
on the page, place these in zones and decide a reading order.
t To run auto-zoning during automatic processing:
1. Choose a setting in the Original Layout pop-up menu that most
closely matches the layout of your page or pages.
Select Single Column, Multiple Column, Spreadsheet, Mixed
Pages, or a template of your own. See Original Layout options on
page 72 for more information on these settings.
2. Check all other settings, then click the Start button to begin
automatic processing. This will include auto-zoning (unless you
applied a template and chose Use Only Current Zones).
After recognition, the automatically detected zones are displayed
in Image view. Each zone has a number indicating the order in
which it was recognized. The zone icon next to the number
indicates the zone type. If the zone locations, types or order are
not suitable, change the zoning and then re-recognize the page.
t To run auto-zoning during manual processing:
1. Choose a setting in the Original Layout pop-up menu that most
closely matches the layout of your page or pages.
2. Click the OCR button to have the current page zoned and
recognized. If there are no zones on the page, OmniPage Pro will
automatically create zones and display them after recognition. If
the page has at least one zone, the Zoning Instructions dialog box
offers the following choices:
40 Processing documents
Page 41

Chapter 3
• Use Only Current Zones (auto-zoning will not run)
• Discard Current Zones and Find New Zones
• Keep Current Zones and Find Additional Zones.
Specifying zone types
All zones are identified as a particular type. This determines the way
they are treated during OCR. You can specify zone types using the
tools at the top of the Zone Info palette. This palette always appears
when Image view is active.
Single Column Text zone
Automatic zone
Table zone
Zone type and
contents currently
selected.
The Zone Type display box tells you the zone type of the currently or
last selected zone. The corresponding zone type tool has a ‘pushed-in’
appearance. When multiple zones with differ ent typ es are selected, t he
display box will show ‘Mixed Zone Types’.
Click a tool to change the zone type. This will apply to all currently
selected zones (if any) and to new zones drawn from no w on. He re ar e
the properties of the different zone types:
t Automatic zone type
Multiple Column Text zone
Ignore zone
Reverse Text zone
Graphic zone
This zone type gives OmniPage Pro the right to make its own
decisions on how to handle the contents of the zone. It decides
whether the zone contains text or graphics. It decides whether text is
in columns or not and reversed or not. Any side-by-side columns
detected are tr eated as flowi ng text (mov ing top to bottom , then left to
right). Automatic zones have purple borders. After recognition, the
automatic zone may be replaced by a set of smaller zones.
Creating and modifying zones 41
Page 42

t Single Column Text zone type
OmniPage Pr o trea ts all conten ts as one block of text; it does not look
for columns or detect graphics. Tabs are inserted between any side-byside columns detected within a zo ne , so th is z on e ty pe can be use d for
tables or texts in column s y ou do n ot want deco lumn iz ed or pl aced in
a table grid. These zones have blue borders (denoting a zone
containing text).
t Multiple Column Text zone type
OmniPage Pro tries to find columns within the zone area. If it finds
them, the text is decolumn ized (unless True Page is selecte d as the style
set). After recognition, each column is likely to have its own zone.
Graphics will not be detected inside the zone area. These zones also
have blue borders.
t Table zone type
OmniPage Pro will treat the zone contents as a table. The contents
will be placed in a table grid or in tab-sep arated column s, as req uested
in the Miscellaneous panel of the Preferences dialog box. These zones
have orange borders and dividers. They must be rectangular (not
irregular).
t Graphic zone type
t Reverse Text zone type
42 Processing documents
OmniPage Pro treats all contents as a graphic area; it will not extract
text from the zone. If Retain Graphics is selected, it copies the image
area and transfers it to Text view. If True Page is selected as the style
set, the graphics areas appear in frames in their original locations. In
all other cases, the g raphics ar e placed at the end of th e recogn ized text
from the page. These zones display a graphic icon and have black or
white borders, depending on the background color.
If the page contains reverse text (white or pale letters on a black or
dark background), place this in a separate reverse text zone. The text
will be recognized and displayed as normal text. If you want the text
Page 43

Chapter 3
reversed in your output document, do this in your target application.
These zones have black or white borders, depending on the
background color.
t Ignore zone type
OmniPage Pro ignores the zone entirely during auto-zoning. This is
useful if you want OmniP age Pr o to draw zones automatica lly but first
want to identify areas to be ignored. By excluding complex tables or
areas of line-art you do not need, you can speed up processing
considerably. These zones have red borders and stripes.
Tip
t To specify a zone type:
You can change the zone type of individual zones any time before OCR. For
example, suppose auto-zoning placed a Single Column Text zone over two
columns of text. If you do not want tabs inserted between the two columns, you
can change the zone type to Automatic or Multip le C olu mn Text. The columns will
then be recognized separately and text will flow from one column to the next.
1. Click the Draw/Select Zones tool in the Tool palette if it is not
already selected.
If the Tools palette is not visible, check that Image view is active
and (in Mac OS 9) that the palette has not been minimized.
2. Select the zone you want to identify by clicking it.
• Shift-click to select additional zones.
• Double-click the Draw/Select Zones tool or choose Select All
in the Edit menu to select all zones on the current page.
3. Click the desired zone type in the Zone Info palette.
The zone type of all selected zones will change accordingly. This
value will also be used for new zones that you draw.
t To specify zon e c o nt ents:
1. Select a zone whose zone contents you want to modify.
Zone contents can be specified only for text zones, that is for
Automatic, Single Column Text, Multiple Column Text, Table or
Reverse type zones.
Creating and modifying zones 43
Page 44

2. Select Alphanumeric or Numeric in the Zone Contents pop-up
menu.
Drawing zones manually
You can draw and modify zo ne s us in g t oo ls in the Tools palette. I f th e
Tools palette does not appear, check that Image view is active and the
palette is not minimized (Mac OS 9 only).
Draw/Select Zones tool
Order Zones tool
Table handling tools
Image rotating tools
You can use the tab key to cycle through the zone tools when Image
view is active.
t To draw a rectangular zone:
1. Click the Draw/Select Zones tool in the Tools palette if it is not
2. Make sure no existing zones are selected.
3. Click the appropriate zone type in the Zone Info palette.
Polygon tool
Modify Zones tool
Apply T emplate tool: Apply
the zones from the template
set in the OCR Toolbar to
the current page.
Zoom tool
(Option-click to zoom out)
Erase Image tool
already selected. The mouse pointer becomes a drawing tool.
For example, click the Graphic type to draw a zone around a
photo. See Specifying zone types on page 41.
4. Enclose an area of the image you want as a zone by holding down
5. Release the mouse button when you are done.
6. Repeat steps 3–5 until you have finished drawing zones around
44 Processing documents
the mouse button and dragging the drawing tool to form a
rectangular box.
After drawing a zone, you can resize it by dragging its handles.
each area that you want to process.
Page 45

Chapter 3
You can draw up to 64 separate zones. Draw zones in the order
you want them processed. A number at the top left of each zone
indicates the reading order.
If you draw a zone over an existing one, the borders of the new
zone will wrap around the existing zone. The zones will not
overlap.
t To draw an irregular zone:
1. Click the Polygon tool in the Tools palette. The mouse pointer
becomes a drawing tool in Image view.
2. Make sure no existing zones are selected.
3. Click the appropriate zone type in the Zone Info palette.
4. Position the drawing tool wher e you want to start drawin g the first
side of the zone and click the mouse button once.
5. Move the drawing tool to form the first side of your zone.
6. Click the mouse button again when the dotted l ine has t he desir ed
line length. The line becomes solid.
7. Draw a perpendicular line in either direction and then click to
form the next side of the zone.
8. Repeat step 7 to finish drawing each side of your zone.
9. Double-click to close the shape.
You will not be allowed to draw a line if it constitutes a restricted
shape. The following zone shapes are restricted:
Indented along
the bottom
Indented along
the top
Hole in the
middle
If you draw an irregula r zone when the z one type is set to Table, it will
change to Single Column Text. You cannot change the zone type of an
irregular zone to Table.
Creating and modifying zones 45
Page 46

Modifying zones
Zones can be modified before OCR takes place. You can move, copy,
resize, reorder, extend, connect, divide, and delete zones. If you
modify zones after recognition, you will have to re-recognize the page
for the modifications to take effect.
The Modify Zones tool is for adding and subtracting zone areas.
Typically, this results in irregular zones, so it is not available for table
type zones. This tool is also for connecting and dividing zones.
t To move zones:
1. Click the Draw/Select Zones tool in the Tools palette if it is not
already selected.
2. Place the mouse pointer inside a zone.
3. Hold down the mouse button and drag the zone where you want
to move it. Or use the arrow keys. Only the zone borders are
moved. The contents of the page image remain as is.
t To resize zon es:
1. Click the Draw/Select Zones tool if it is not already selected.
2. Select the zone you want to resize by clicking it.
Handles appear on the zone border.
3. Select a handle, hold the mouse button do wn, and dra g the mouse
pointer in the direction you want to enlarge or reduce the zone.
4. Release the mouse button when you are done.
The zone border changes to display the modified zone area.
t To reorder zones:
1. Click the Order Zones tool. The numbers in the zones disappear.
2. Click within the zone you want to have recognized first.
The number 1 appears in the zone.
3. Click within the next zone you want recognized.
The number 2 appears in the zone.
46 Processing documents
Page 47

4. Continue until all the zones are appropriately ordered.
If you do not number all the zones, they will be automatically
numbered whe n y ou s el ect a n oth er to ol or start OCR. U n le ss y ou
are using the True Page sty le set , the or der of zon es deter mines th e
order in which text will be placed on a recognized page.
t To add an area to a zone:
1. Click the Modify Zones tool in the Tools palette.
2. Position the mouse pointer inside the existing zone at one corner
of the area you want to add to the zone. (Point A in the example
below).
3. Hold down the mouse button and drag the mouse pointer to the
opposite corner of the area you want to add. (Point B in the
example).
4. Release the mouse button.
The reshaping zone you have de fined (shown with a dotte d line in
the example) does not appear, but the existing zone takes on its
new shape.
Chapter 3
Zone to be reshaped
Reshaping zone
t To subtract an area from a zone:
Zone to be reshaped
Reshaping zone
A
Resulting
reshaped zone
B
To remove an area from a zone, use the abov e pr oce dure , but hold
down the Command key (z) as you draw the reshaping zone.
Resulting
A
reshaped
zone
B
Creating and modifying zones 47
Page 48

t To connect two or more zones:
1. Click the Modify Zones tool in the Tools palette.
2. Position the mouse pointer in one of the zones you want to
3. Hold the mouse button down and drag the mouse pointer onto
4. Release the mouse button when you are done.
Two zones to be connected
connect.
the zone(s) you want to co nnect . Enclose t he whol e ar ea y o u want
included in the new connected zone.
The zone borders change to display the new connected zone.
A
Connecting zone
t To divide a zone:
1. Click the Modify Zones tool in the Tools palette.
2. Position the mouse pointer at the point where you want to divide
3. Hold down the Command key (z) and the mouse button while
4. Release the mouse button when you have completely cut through
Zone to be split into two
Splitting zone
B
Resulting
connected
zone
the zone.
dragging the mouse pointer over the area where you want the
separation to occur.
the zone. The original zone is replaced by two zones.
A
B
Resulting
zones
t To delete zones:
1. Click the Draw/Select Zones tool in the Tools palette if it is not
48 Processing documents
already selected.
Page 49

Chapter 3
2. Select the zone you want to delete by clicking it. Handles appear
on the selected zone.
• Shift-click to select additional zones.
• Double-click the Draw/Select Zones tool or choose Select All
in the Edit menu to select all zones on the current page.
3. Press the Delete key or choose Clear in the Edit menu.
The selected zones disappear, but the page image itself remains. If
you do manual zo ning and sel ect U se Only C urr ent Zones, any part
of an image not enclosed by a zone is ignored during OCR.
Table zones
Table zones must be rectangular. During auto-zoning, the program
automatically places row and column dividers. The table tools in the
Zone Info palette become active if the current page contains at least
one table zone. Use the tools to modify dividers in table zones:
Insert rows: Click this, then move the mouse pointer into a table
zone. It will appear . Each click inserts a horizontal row divider.
Insert columns: Click this, then move the mouse pointer into a table
zone. It will appear . Each click inserts a vertical column divider.
Press Control and click to insert a divider only in the current row.
Move dividers: Click this, then move the mouse pointer into a table
zone. When it reaches a divider it appears as or . Click and drag
the pointer to move the selected divider. You cannot drag a divider
beyond its ne ighbor. Av oid pl acing divid ers ve ry close togeth er an d do
not let them cut through texts.
Remove dividers: Click this, then move the mouse pointe r into a table
zone. When it re aches a divide r it appe ars as or . Click to delete
the indicated horizontal or vertical divider.
Remove /Replace All: Click this, then move the mouse pointer into a
table zone. It appears as . Click to remove all dividers in the table.
The mouse pointer becomes . Click again to have dividers
automatically redetected in the table zone.
Creating and modifying zones 49
Page 50

Performing recognition
Performing recognition involves analyzing character shapes found in
an image and generating editable text from them. This is also referred
to as performing OCR. After OCR, you can proofread for recognition
errors and misspelled words before you export the text to another
application.
This section describes the following procedures:
u Performing OCR
u Proofreading OCR results
u Verifying recognized text
u Color markers
u Getting page information
Performing OCR
Before performi ng OCR, make sur e th e current zo nes and setting s are
appropriate for your document. For example, to transfer the contents
of graphic zones to have them embedded in the recognition results,
you must select Retain Graphics in the OCR panel of the Preferences
dialog box. See OCR settings on page 80.
t To perform OCR on a single current page:
50 Processing documents
1. Select Perform OCR or OCR & Proof in the OCR button’s pop-up
menu. OCR & Proof prompts you to check for errors after OCR.
2. Click the OCR button.
The page is reco gnized acco rding to the current z ones and sett ings.
If there are no zones on the page, zones are created automatically
or with a currently selected zone template. Recognition results
appear in Text view.
To recognize more than one page at a time, you must use
automatic processing (see page 31).
Page 51

Chapter 3
Proofreading OCR results
Recognized text appears in Text view after OCR so you can check for
errors and misspellings in the text before exporting it.
Error checking (pr oofi ng ) st art s autom at ically a fte r OCR if y ou ch ose
OCR & Proof as the OCR option. It starts from the first recognized
page and continues through all recognized pages in the document. If
you chose P erform OCR yo u must start proofing by choosing Proofread
OCR... in the Edit menu as described below. Then, proofing starts
from the current cursor position.
You can select main and secondary recognition languages, a user
dictionary and whether to use a Language Analyst or not in the
Spelling panel of the Preferences dialog box. See Spelling settings on
page 82 for more information. See also User dictionaries on page 101.
t To check and correct errors in recognized text:
1. Choose Proofread OCR... in the Edit menu.
Proofing stops on words containing an unrecognizable character
and displays them red. An unrecognizable character is repl aced by
a red reject character; a tilde (~) by default.
If a Language Analyst is enabled, proofing will also stop on:
• Words containing one or more characters recognized with a
lower degree of certainty (words displayed green)
• Words flagged by the Language Analyst, for instance for not
being found in a main or user dictionary (displayed in blue)
Y o u can choose whether or not to stop on acronyms, abbreviations
and proper names in the Spelling panel of the Preferences dialog
box.
When OmniPage Pro stops on a word, it highlights the word in
Text view. These words will also have color markers if Show
Markers is enabled in the Edit menu. The Proofread OCR dialog
box shows the original image of the word (also highlighted) in its
context on the original page.
Performing recognition 51
Page 52

This tells why this word is
offered for proofing.
This displays the word as
OmniPage Pro recognized
it. Its color also tells why it
is displayed.
Click Prefs to
select error
checking
options.
Click in this window to
enlarge the view of the
original image. Option-click
to reduce the view.
Drag corner
to change
window size.
2. Select one of these options for the word:
• Click Ignore to allow the word to remain as recognized.
• Click Ignore All to skip all instan ces of the wo rd as r ecogni zed,
during the current proofing session. (The word will not be
skipped if it contains a suspect character).
• Click Change to replace the recognized word with the wo r d i n
the Change to edit box. Either type a word into the edit bo x or
click to open the Suggestions pop-up menu and select a word.
• Click Change All to replace all instances of the word with the
word in the Change to edit box.
• Click Change & Add to replace the word with the word in the
Change to edit box and to add this word to the current user
dictionary. You cannot add a word with a reject symbol.
After you select an option for the word, OmniPage Pro finds the
next doubted word. As you proof each word, its colored marking
is removed.
3. To interrupt proofing, click in Text view. Then you can make
4. Click Done or close the Proofread OCR dialog box to save all
52 Processing documents
editing changes, verify text, modify settings and even jump to
other pages. The proofreader button Ignore becomes Start. Click
this to restart proofing. If you remained on the same page,
proofing restarts from the point where it was interrupted. If you
have jumped to another page, it starts from the top of that page.
changes and exit proofing before the end of the document is
Page 53

Chapter 3
reached. The prog ram informs you whe n the end of the document
has been reached; all your changes are saved automatically.
Note
Tip
OmniPage Pro can only perform a spelling che ck on words that it has recognized .
It cannot check words that you have manually typed into Text view.
To delete unneeded characters (for instance generated by ‘noise’ on the image),
clear the edit box and click Change. If the program mistakenly splits a word into
two, maybe at the end of a line, type in th e whole correct word when the first part
of the word is displayed, then empty the edit box when the second part appears.
Verifying recognized text
You can compare recognized text against its original image to make
sure that text was recognized correctly.
t To verify text against its original image:
1. Make sure Text view is active.
2. Hold down the Option key and double-click the word you want
to verify. Or, select the word and choose Verify Text in the Edit
menu, or press zY.
The Verification window opens and shows a clear close-up of the
original word and its surrounding area in the image.
Close button
Click the Verification
window to zoom in for
a closer view. Optionclick to zoom out.
3. Click the standard Close button to close the Verification window.
The image of the
selected word is
highlighted.
You can type in a new word to replace the selected recognized
word.
Performing recognition 53
Page 54

Color markers
Words to be stopped on during proofing may appear in color (red,
green or blue) in Text view and in the Proofread OCR dialog box.
To temporarily hide color markers in recognized text, make Text view
active and choose Hide Markers in the Edit menu. The coloring is
removed from all marked words in the current document, and no
marking is placed on new pages or documents. To show markers
again, choose Show Markers in the Edit menu. Proofing will still stop
on all suspected wor ds and display them in the appro priate color, even
when markers are hidden in Text view.
Proofing always stops on red words. If Use Language Analyst was
enabled in the Spelling panel of the Preferences dialog box at
recognition time, proofing will also stop on the green and blue words
and these will be available for marking in Text view.
Changing the Use L anguage Analyst setting has no effect on text which
has already been recognized.
Color markers are not retained when you export a document to
another application.
54 Processing documents
Getting page information
After OCR, you can choose Show Page Info in the File menu (or press
zI) to get the following information for the current page:
u Source of the OCR, whether a scan performed by OmniPage Pro
or a file that you have loaded (with the file name and folder).
u Resolution of the scanned image, in dpi (dots per inch).
u Image Size, in pixels and inches or centimeters.
u Color depth and resolution for color images.
u Number of words and characters on the page (including spaces).
u Recognition time in minutes and seconds. This excludes time for
scanning, drawing manual zones and writing data to disk.
u Number of reject and suspect characters.
u Recognition rate in characters per second and words per minute.
Page 55

Chapter 3
Working with documents
The Thumbnail window gives an overview of all pages in the
document and allows you to perform page-level operations. The
Document window allows you to work with each page one after the
other. This section describes the following procedures:
u Resizing a page display
u Saving a document as you work
u Moving to other pages
u Reordering pages
u Deleting a page
u Undoing edits
u Modifying images
u Modifying text
u Printing a document
u Listening to a document
u Closing a document
u Quitting OmniPage Pro
Resizing a page displa y
You can enlarge (zoom in) or reduce (zoom out) the view of a page
displayed in Image view or Text view.
t To resize a page display:
1. Click the view that you want to resize (Text or Image) to make
that the active view.
2. Click the box that displays the zoom percentage located in the
Info line, along the bottom of the Document window. Select the
desired zoom setting in the pop-up menu.
In Image view you can also click the Zoom tool in the Tools
palette and then click the area of the image you want to enlarge.
Option-click to reduce the view.
Working with documents 55
Page 56

Saving a document as yo u work
If you are working with a long or important document, or want to
reopen the document in OmniPage Pro in a future session, you shoul d
save it as an OmniPage Document soon after beginning your work.
To save the document to disk for the first time, choose Save or Save
As... in the File menu. The Save As OmniPage Document dialog box
appears, allowing you to choose a location and specify the file name.
The recommended extension for an OmniPage Document is .opd.
If the file has already been saved as an OmniPage Document, click
Save to have the file updated. The updating includes changes to page
images, zoning, recognition results and settings. Choose Save As... to
save the latest state of the OmniPage Document under a different
name, leaving its state from the previous save under its existing name.
You can also protect your work by clicking the Export button and
saving recognition results to file. If your continued work with the
document is successful, you can export it again, overwriting the older
file.
Moving to other pages
You can move to a different page in a docum ent i n the fo llo wing w ays.
u Click the thumbnail of the page you want to display.
u Click the forward or backward arrow buttons next to the current
page number located bottom left of the Document window.
u Choose Go to Page... in the Edit menu or double-click the current
page number to open the Go to Page dialog box. Select First Page
or Last Page or enter a specific number in the Page edit box.
Reordering pages
You can reorder pages in a document by dragging their thumbnails to
different positions in Thumbnail view. Drag-and-drop pages one after
the other.
56 Processing documents
Page 57

Chapter 3
Deleting a page
You can delete a page from a document that has at leas t two page s. F or
example, you may want to delete a page that was poorly scanned.
To delete the current page, choose Delete Current Page in the Edit
menu. Or , click th e thumbnail of the pa ge you want to delete and drag
it to Trash. Everything is discarded: the thumbnail, page image, and
recognition results. Pages are renumbered automatically.
Undoing edits
Choose Undo in the Edit menu immediately to reverse an action that
produces an unwanted result in Image view or Text view. After you
choose Undo, it changes to Redo. If an action cannot be reversed, the
command appears as Can’t Undo.
Modifying images
You can modify an image when I ma ge view is active. Drag the sp lit te r
at the base of the Document window to the right if Image view is not
big enough or not visible at all.
Rotating an image
You can rotate a pag e image wh en Imag e view is active. F or example, i f
a page is accidentally scanned upside down, y ou do not have to scan it
again. You can correct the orientation by rotating it. Click the Rotate
tools in the Tools palette to turn the entire page 90 degrees left, 180
degrees, or 90 degr ees right. I f possib le, rota te a page before you create
zones. All zones are deleted during page rotation.
Note
You can also specify that images coming from scanner should be flipped around
their vertical or horizontal axes. These types of rotation cannot be performed on
loaded images; they must be specified in the Scanner panel of the Preferences
dialog box before scanning is started.
Working with documents 57
Page 58

Erasing areas of an image
You can erase areas of the actual image using the Erase Image tool in
the Tools palette. This is useful if you want to get rid of smudges,
signatures, or other types of “noise” on the page before OCR.
1. Use the Zoom tool in the Tools palette to enlarge the area of the
image you want to erase.
2. Click the Erase Image tool in the Tools palette.
The mouse pointer turns into a square box.
3. Click the box over the image area that you want to erase.
A piece of the image disappears with each mouse click. You can
also hold the mo use button do wn and drag th e mouse point er over
the area you want to erase.
Note
If you do not want to permanently erase parts of the actual image, but want to
omit areas of a page from OCR, identify the areas as Ignore zone types prior to
auto-zoning, or do not include them in zones when you do manual zoning.
Modifying text
You can modify recognized text in Text view before exporting it to
another application. Click in Text view to make it active. Move the
splitter at the base of the Document window to the left to give more
space to Text view. If you drag it far to the left, Image view disappears
completely. Select a suitable magnification for Text view. See also
Proofreading OCR results on page 51.
Selecting all text
To apply formatting, such as a particular font, to all text on a page,
you can select the entire page by choosing Select All in the Edit menu
(or zA). The entire contents of a recognized page is selected when
Text view is active with any style set ex cept True Page. W ith True Page,
only the text within the selected frame is selected. To remove a
selection, click anywhere within it.
58 Processing documents
Page 59

Chapter 3
Selecting a block of text
Click at the start of the desired text and drag the cursor to the desired
end point. Relea s e t he mo us e butto n. Th e s elect ed t ext i s hi ghl ig hted.
With the True P age style s et, a select ion cann ot extend be yond a s ingle
frame.
Formatting text
Use commands i n the Format menu to apply font, font style, and font
size formatting to selected text in your recognized document.
Cutting or copying text and graphics
Choose Cut in the Edit menu to place selected text or a selected
graphic on the Clipboard. Cut items are removed from Text view.
Choose Copy in the Edit menu to place a copy of selected text or
graphics on the Clipboard. Copied items are not removed.
You cannot cut or copy text an d graph ics a t th e same tim e. I f both a re
selected, only the text will be placed on the Clipboard.
Text on the Clipboard can be pasted back into Text view or into
another application. Choose Paste in the Edit menu to place text at th e
cursor location in Text view. G raphics cannot be pasted into Text view ,
but can be pasted into applications that support the PICT format.
Deleting text or graphics
Choose Clear in the Edit menu (or press the Delete key) to
permanently delete selected text or graphics from Text view.
Printing a document
You can print one or more pages of a document. You can print
recognized pages if Text view is active or page images if Image view is
active. If you have a color printer, you can choose to print pages in
color.
Working with documents 59
Page 60

t To select options and print pages:
1. Choose P age Setup... in t he F ile menu. The optio ns availa ble in the
Page Setup dialog box depend on your printer.
2. Select the desired options and then click OK.
3. Make the view (Text or Image) from which you want to print
active.
4. Choose Print Text... (or Print Images...) in the File menu.
The choices in the dialog box depend on your printer.
5. Select print options for your document.
Choose to print all images or a range of pages.
6. Click Print to start the print job.
Listening to a document
English or Spanish text in Text view can be read aloud by the
Macintosh Speech Manager software. Choose one of its voices from
the Speech M enu. Also select Speak Selection, Speak This P age or Speak
Document. The Speech Manager interface appears as the text is read.
You can change the reading speed. Select Pause to stop the reading.
60 Processing documents
Closing a document
Choose Close in the File menu (or zW) to close the current
document in OmniPage Pro. You can also close the document by
closing the Document window. If you have not exported or saved the
document or if you have changed it since the last export or save, you
will be prompted to save it as an OmniPage Document before closing.
Quitting OmniPage Pro
Choose Quit in the File menu (or zQ) to close a document and exit
OmniPage Pro. If the current document has not been exported or
saved or is changed si nce th e last expo rt or s av e, you wil l be pr om pte d
to save it as an OmniPage Document before closing.
Page 61

Chapter 3
Exporting documents
You can export original images or recognition results, for use in other
applications by:
u Saving an OmniPage Document
u Saving images
u Saving recognition results
u Saving to Portable Document Format (PDF)
u Copying a document to the Clipboard
u Using drag-and-drop functionality
Saving an OmniPage Document
You can save your document as an OmniPage Document file if you
want to reopen it in OmniPage Pro again. OmniPage Documents
retain all the original images, together with their zones and their
properties, some settings and any recognition results. The links
between text and image are conserved, so proofing and verifying will
still work in another session or at a distant location where OmniPage
Pro is located.
Choose Save or Save As... in the File Menu, or export the document,
choosing OmniPage Document as the saving format. See Saving a
document as you work on page 56.
Saving images
You can save images from the current document to one or more image
files. Images are stored in the mode they are displayed (black-andwhite, grayscale, color). They are stored at their original resolutions,
except for high-definition color images, which are reduced to 256
colors.
Exporting documents 61
Page 62

Define a saving name
and location
Enter a saving format for
the file(s).
Make Image view active and choose Save Images... from the File menu.
The Save Images dialog box appears:
If you choose these,
numerical suffixes
will be appended
to your file name,
to generate unique
file names.
For information on the supported image file formats, see page 112.
PDF is not offered for saving images, because it is the recognition
results that are saved to PDF, not the original images. See the
following two topics.
t To export recognition results from a document:
62 Processing documents
Saving recog nition resul t s
As soon as you have at least one recognized page in a document, you
can save recognition results from all the recognized pages to disk in a
variety of file formats. See page 111 for information on these formats.
When you do automatic processing, the Export dialog box appears as
soon as the last page is recognized or proofed (if requested). Follow the
procedure below from point 2 onwards. Point 1 tells you how to start
the export manually.
1. Click the Export button with To file... selected in the Export pop-
up menu. The Export dialog box appears.
2. Select the folder where you want your file saved.
Page 63

Chapter 3
Type in a name and
define a location for
your file.
Select a save format.
Select save options
when saving to formats
other than OmniPage
Document.
This appears if there
are unrecognized
pages. They will be
skipped during export.
This is av ail able whe n
True Page is set, for
some saving formats.
Select it to maintain
page layout without
frames, so text can
flow between
columns.
Choose this to see
your recognition
results in their target
application
immediately after
export.
3. Type in a file name for your document, using not more than 28
characters.
4. Select the appropriate file format for your document in the Save
Format pop-up menu.
Formats able to accept True Page output are listed with a Tp icon.
If your target application cannot handle frames, or you do not
want frames to be used, click the check box Remove Frames on
Export.
5. Select other save options if you are saving the document in a file
format other than OmniPage Document.
6. Click Save.
The document is saved to disk as specified. If Retain Graphics was
selected in the OCR panel of the Preferences dialog box,
embedded graphics are saved with the file, providing the selected
format supports them. The graphics are sav ed at 75 or 150 dp i, as
specified in the Preferences dialog box.
7. If you chose Save and Launch, the target appli cation linked t o your
saving format is activ a ted an d the r eco gnition r esults ar e load ed. I f
you chose to save each page to a separate file, only the first file is
loaded. OmniPage Pro remains running with the document still
available.
Exporting documents 63
Page 64

Saving to Portable Document Format (PDF)
When saving to PDF, we recommend you choose the True Page style
set, because this forms the basis for saving, whatever style set is chosen.
Check that all text is visible within the frame borders. You have four
choices when saving recognition results to PDF files.
Image only: The PDF file i s viewable only and cannot be modifie d in
a PDF editor and text cannot be searched.
Normal: The PDF file can be viewed and searched in a PDF viewer
and edited in a PDF editor.
With Image on text: The PDF file is viewable only and cannot be
modified in a PDF editor. There is a text file behind each image, so
text can be searched. A found word is highlighted in the image.
With image substitutes: Words with reject and suspect characters
have image ov erlays, so uncertain cha racters display as they w ere in the
original document. The PDF file can be viewed, edited and searched.
Copying a document to the Cl ipboard
You can choose to send a copy of the recognition results from all
recognized pages in the document to Clipboard. This can then be
pasted into another application. You can also copy the image block
from a zone in Image view to the Clipboard.
t To copy an entire document to Clipboard:
1. Select To Clipboard in the Export button’s pop-up menu.
2. Click the Start button for automatic processing or the Export
button to export pages manually.
The results from every recognized page are copied to the
Clipboard. With manual processing this happens immediately.
With automatic processing it happens when the last page is
recognized or proofed.
3. Paste the Clipboard contents to a target application.
Text formatting, such as bold and italics, is retained if you paste it
into an application that supports RTF information. Otherwise,
64 Processing documents
Page 65

Chapter 3
only plain text is pasted. Graphics are retained if you selected
Retain Graphics and the target application supports them. The
graphics have the resolution chosen in the OCR panel of the
Preferences dialog box.
t To copy the image from a zone to Clipboard:
1. Make Image view active.
2. Click the Draw/Select Zones tool in the Tool palette.
3. Select the zone you want to copy by clicking it.
4. Choose Copy in the Edit menu. A copy of the image from the zone
area is placed on the Clipboard. It can be pasted into any target
application cap able of handli ng PICT i mages. I t retai ns its origin al
resolution and color depth value (up to 256 colors).
Note
Copying through Clipboard (and Direct OCR) work best for processing just a few
pages, especially under Mac OS 9 if an application’s partition is almost full. Save
larger documents to a file format compatible with your application.
Using drag-and-drop functionality
Drag-and-drop can be used for import (see page 38) and export.
Dragging a thumbnail for whole page export
You can drag a thumbnail from Thumbnail view to the Desktop, to a
folder or to another application that supports drag-and-drop
functionality. The image of the thumbnail’s page is placed as a PICT
image with the same resolution and mode (black-a nd -whit e, gra ysc ale
or color) as the original image. If it is dragged to the Desktop or a
folder, it is named Picture clipping, with a numerical suffix if necessary.
Dragging a zone from Image view
You can drag a single selected zone from Image view to the same
locations. A copy of th e z one con tents i s pl aced as a P ICT image, wi th
the same behavior as for a whole page.
Exporting documents 65
Page 66

Dragging from Text view
You can drag a block of selected recognized text from Text view to the
Desktop or another application that supports drag-and-drop
functionality. Text formatting will be transferred if possible. The r esult
appears on the Des ktop as a pictur e clipping icon, and do uble-clicking
on it allows you to view the text only. But if you drag the icon into a
text editing application, it is inserted as editable text. An embedded
graphic can be exported by drag-and-drop from Text view. However,
you cannot drag-and-drop text and graphics together.
Direct OCR
The Direct OCR™ feature allo ws you to activate OmniPage Pro from
the Dock (Mac OS 9: Apple menu), perform OCR on one or more
images, and hav e the recognized text pla ced a t th e i nsert ion po int in a
target application.
Direct OCR works with virtually any Macintosh application that
supports pasting text from the Clipboard. Your Macintosh must have
enough memory to run both OmniPage Pro and the application.
66 Processing documents
OmniPage Pro does not have to be running when you start Direct
OCR. If it is running with no document, it will remain open
afterwards. If it is running with a document open, you will be
prompted to close it first. Before starting Direct OCR, be sure the
Clipboard does not contain something you still want to paste.
Text formatting, such as bold and italics, is retained if you are pasting
into an application that supports RTF information. Otherwise, only
plain text will be pasted. Graphics are transferred if Retain Graphics
was selected and the target application supports them.
Note
If the Direct OCR icon does not appear automatically in the Dock, you should
drag the icon from the OmniPage Pro: OmniPage Extras folder and drop it into
the Dock.
Page 67

Click this icon
to see Direct
OCR settings.
Chapter 3
Using Direct OCR
You can run Direct OCR using automatic or manual processing. For
automatic processing, all settings should be selected suitably in
OmniP age Pr o before using D irect OCR. If y ou are uncertain whether
settings are suitable or not, or if you want to exclude parts of the
pages, use manual processing instead. This allows you to check and
change settings and also do manual zoning.
Choose Direct OCR settings (including the choice of automatic or
manual processing) in the Miscellaneous panel on the Preferences
dialog box before you use Direct OCR.
Select this for automatic
processing. The Start button
is triggered as soon as you
activate Direct OCR.
Deselect this to use manual
processing.
Select this to keep
OmniPage Pro and the
document open after Direct
OCR is finishe d.
t To use Direct OCR with automatic processing:
1. Align a page in your scanner or a stack of pages in its automatic
document feeder (ADF) if you plan to scan. Be sure Scan Until
Empty is enabled if you wan t to sca n multip le pages from the A DF.
2. Open or switch to the application and place the insertion point
where you want recognized text to be placed. You do not need to
open OmniPage Pro itself.
3. Click the OmniPage Direct OCR icon on the Dock. OmniP age P ro
opens in Direct OCR mode. Either scanning starts or the Load
Images dialog box appears so you can select image files.
4. Pages are processed automatically. This includes auto-zoning,
unless you apply a template and choose Use Only Current Zones.
The Export button displays To application, blocking other export
Direct OCR 67
Page 68

until the Direct OCR operation is finish ed. Pr oofing starts as so on
as the last page is recognized, if OCR & Proof was selected.
5. When recognition or proofing is finished, the recognition results
appear at the insertion point in the target application.
t To use Direct OCR with manual processing:
1. Follow points 1 to 3 as for automatic processing.
2. The OCR Toolbar appears. Scanning starts or the Load Images
dialog box lets you name image files.
3. Do manual zoning on the resulting page images if you wish.
Modify settings as necessary.
4. Select an OCR method and click the OCR button for each page,
or click the Start button and then choose Recognize All
Unrecognized Pages.
5. Proof each page if you asked it to start automatically. Verify and
edit text as desired. Start proofing manually if you wish.
6. The Export button displays To Application. If you clicked Start,
export follows automatically. If not, click the Export button.
All recognized pages are placed at the insertion point in the target
application.
t What happens after Direct OCR
68 Processing documents
If you selected Keep OmniPage Pro Running after Pasting, with
Direct OCR Document Loaded in the Miscellaneous panel of the
Preferences dialog box, OmniPage Pro remains open with the
images and recognition results, allowing you to verify, edit and
save the document to file.
If you deselected this option, the recognition results are available
only in the target application and on the Clipboard. If OmniPage
Pro was closed when you started Direct OCR, it will be closed
down. If it was open when you started D irect OCR, it wil l remai n
open, without a document.
Page 69

Chapter 4
Settings
This chapter provides more detailed information on the options
available in the pop-up menus on the OCR Toolbar and settings you
can select in the Preferences dialog box.
Make sure that settings are appropriate for your document before you
start processing it. You may have to experiment wit h di ffer en t s et tings
to get the results you want.
Please continue reading this chapter for information on these topics:
u OCR Toolbar options
u Get Page options
u Original Layout options
u Style Set options
u OCR options
u Export options
u Preference settings
u Scanner settings
u OCR settings
u Spelling settings
u Miscellaneous settings
OmniPage Pro X User’s Guide 69
Page 70

OCR Toolbar options
The three numbered OCR Toolbar buttons allow you to take a
document through each step of the OCR process. The Start button
begins automatic processing. You can select options in the five pop-up
menus as described below.
Start button
Get Page button and
pop-up menu
Pictures on the th ree buttons chang e as you sele ct different opti ons, to
indicate what will happen when the button is clicked or when
automatic process ing is run. The pi ctures on the left sho w the but ton’s
appearance when each option is selected.
Get Page options
You can select from the following options in the Get Page pop-up
menu. The selection is activated at the start of automatic processing
(images are acquired and recognized) or by clicking the Get Page
button (images are acquired without recognition).
Original Layout and
Style Set pop-up menus
OCR button with its
pop-up menu open
Export button and
pop-up menu
Scan in B&W
Select this to scan paper documents from your scanner with blackand-white scanning. Choose this if you wish to retain diagrams or
line-art in your output document. F or best OCR accuracy, choose this
for good quality pages with crisp black text on a white background.
70 Settings
Page 71

Chapter 4
Scan in Gray
Select this to scan paper documents from your scanner with grayscale
scanning. Choose this if you wish to retain pictures or photos in your
output document. For best OCR accuracy, choose this for lower
quality pages, for example with low or varying contrast, or with text
on shaded or colored backgrounds.
Scan in Color
Select this to scan paper documents from your scanner in color.
Choose this only if you wish to retain color graphics in your
recognized document. Handling color documents needs extra
memory and time. It yields no accuracy benefits for OCR compared
to grayscale scannin g (at a given resol ution). I t is available only when a
color scanner is installed.
Note
The scanner options in the Get Page pop-up menu may vary depending on your
scanner configuration. Scanning modes not supported by your scanner will be
grayed. If you see only one item Scan Image, you should select the scanning mode
(black-and-white, grayscale or color) on the scanner interface.
Load Image
Select Load Ima ge to load on e or mor e existing image files. Multi-page
image files (TIFF and PDF formats) can be handled; you can specify
which page images to open. You cannot modify the brightness,
contrast, res olution or m ode (black -and-w hite, gr ay or colo r) of image
files when you loa d the m. They ar e open ed as th ey wer e save d. I mages
are automatically straightened, if necessary.
For step-b y-step guidance on scanning, see Scanning pages on page36.
For similar guidance on opening images, see Loading image files on
page 36 and Supported image file formats on page 111 and 112.
OCR Toolbar options 71
Page 72

Original Layout options
You can select from the following options in the Original Layout popup menu. These let you describe the incoming pages, to assist the
program in auto-zoning. Auto-zoning always runs when you perform
automatic processing (unless you load a zone template), and
sometimes runs during manual processing.
Single Column
Select this to have OmniPage Pro automatically draw and order zones
on single-column page images, such as letters, memos or book pages.
Select it to deter the program from searching for columns.
Multiple Column
Select this to have OmniPage Pro automatically draw and order zones
on multiple column page images such as from magazines or
newspapers. The program will try to find columns.
Spreadsheet
Select this for pages containing spreadsheets or where you want the
whole contents of the page treated as a table. Do not select it for pages
containing table s along with text o r other n on-ta ble eleme nts. U s e the
Miscellaneous panel of the Preferences dialog box to determine
whether the table data will be placed in a grid or in tab-separated
columns.
Mixed Pages
Select this for complex pages or if you are unsure. Select it also for a
multiple-page document with a variety of page layouts. This gives
OmniPage Pro full control in drawing and ordering zones on each
page.
For more information, see Creating zones automatically on page 40.
72 Settings
Page 73

Chapter 4
[Zone Templates]
Select the name of a zone template file that you want to use to place
zones on new incoming pages. Any zone templates you have created
appear at the bottom of th e pop -up men u. The exam ple com es fr om a
user who has created two templates to process standardized form-like
printed reports – one type arrives each week, the other each month.
To place template zones on an existing page, select the template here,
then click the Apply Template tool in the Tools palette. For more
information, see Zone templates on page 96.
Style Set options
You can select a page-level style set option from the Style Set pop-up
menu. The choice made here determines the appearance or formatting
level to be applied to the recognition results coming from new
incoming pages.
The selected OCR Toolbar option has no influence on existing pages,
even if you re-r ecogniz e them . U se the Z one I nfo pa lette to change the
style set for an existing page.
Tables and graphics can be handled by all style sets. With True Page,
these are r e ta ine d at th eir orig ina l locat ion o n the p ag e. W ith a ll o the r
style sets, tables are placed at their location in the decolumnized text
and graphics are placed at the end of the text from the page.
The first four style sets define basic formatting levels. The remaining
style sets are fully editable. Choose from the following options:
Plain Format
Select this to have plain text in one font and size that you can define.
Text will be left aligned, decolumnized and wrapped (it will use the
whole page width).
Similar Fonts
Select this to have text with font formatting retained. Fonts are
mapped as specified. Font sizes and bold, italic and underlined texts
are detected and maintained. Text is left aligned, decolumnized and
wrapped.
OCR Toolbar options 73
Page 74

Similar Formats
Select this to have results similar to Similar Fonts, but with column
widths maintained when multi-column pages are decolumnized.
True Page
Select this to have the original page layout maintained as closely as
possible. Text blocks, headings, tables, graphics and other elements
are placed in frames. This is recommended when exporting to PDF
format (see page 64). It is suitable only for saving formats marked Tp
in the Export dialog box.
Article
This is an editable sample style set. Select it to have the Similar
Formats layout, but with additional zone styles. You can change the
properties of these zone styles and add new styles.
Contemporary Memo
This is an editable sample style set. Select it to have the Similar
Formats layout, but with additional editable zone styles. Use this for
memos or similar documents you want exported with proportionally
spaced fonts.
74 Settings
Typewriter Memo
This is an editable sample style set. Select it to have the Similar
Formats layout, but with additional editable zone styles. Use this for
memos or similar documents you want exported with monospaced
fonts, so they appear to be typewritten.
[Custom styles]
If you have created your own style sets, these appear in the
alphabetical order of the lower part of this pop-up menu. Choose a
custom style to impose your own formatting wishes on incoming
pages. See Creating style sets on page 90.
Page 75

Chapter 4
OCR options
You can select the followin g OCR op tions in th e OCR pop -up men u.
The selected option is activated during manual processing by clicking
the OCR button. This performs recog nition or train ing on the curr ent
page only. The option is also activated during automatic processing,
in which case it may be applied to a series of pages.
Perform OCR
Select Perform OCR to recognize text on pages. During OCR,
OmniPage Pro analyzes the image and interprets character shapes to
produce editable text. It may also transfer image areas from graphics
zones into the recognition results. Proofing will not start
automatically.
For more information, see Performing OCR on page 50.
OCR & Proof
Select OCR & Proof to recogniz e text an d then autom atica lly start the
OCR Proofreader, allowing you to check for errors.
For more information, see Proofreading OCR results on page 51.
Train OCR
Select Train OCR to teach OmniPage Pro how to recognize special or
stylized characters taken from the current page. Automatic processing
is not available when this option is selected.
For more information, see Training OCR on page 97.
Export options
You can select from two of the following export options in the Export
pop-up menu. Your choice is activated at the end of automatic
processing or whenever you click the Export button.
To File
Select this to save your recognition results to a document you will
name in a specified file format.
OCR Toolbar options 75
Page 76

For more information, see Saving a document as you work on page 56,
Exporting documents (page61) and Supported file types in online Help.
To Clipboard
Select To Clipboard to place a copy o f a d ocume nt ’s recognition results
(text and embedded graphics) on the Clipboard.
See Copying a document to the Clipboard on page 64.
To Application
This option cannot be selected. It appears when Direct OCR is in use.
Other export options are not available at that time. When the Direct
OCR recognition (and optionally proofing) is finished, the
recognition results are placed on the Clipboard, ready for pasting to
the cursor position in the target application. See Direct OCR on
page 66.
Preference settings
The Preferences dialog box is the central location of OmniPage Pro
settings. To open it, click Preferences... in the Application menu (Mac
OS 9: Edit menu). The dialog box has four panels. Each panel can be
displayed by clicking its icon on the left. When the dialog box is
reopened, it displays the last selected panel.
See the online Help topic Settings Guidelines for recommendations in
choosing settings and options for various types of documents and
tasks.
Scanner settings
Click the Scanner icon on the left of the Preferences dialog box to
display this panel. It allows you to select a scanner and the settings
that control the way it will scan pages.
76 Settings
Page 77

Chapter 4
Click this to open the
Scanner panel.
To manually adjust the
brightness, drag the slider
to left or right.
Click this to close the dialog
box and drop all changes
made in any of the panels.
Click this to select
an installed
scanner, set its
parameters and
test it.
This becomes
available as soon
as you change a
setting. It saves
all changes made
in all panels.
Scanner
This displays the currently selected scanner. Click Select... to select a
different scanner. Only scanners already installed on your system can
be selected. For guidance on selecting or changing scanners and
drivers, see chapter 1. The controls offered in this Scanner panel
depend on the facilities supported by your scanner.
Page Size
Select the dimen sions of the p ages y ou plan to s can in th e Size pop-up
menu.
• Select Letter for 8.5 by 11 inch pages.
• Select A4 for 21 by 29.7 cm pages (8.27 x 11.7 inches).
• Select Legal for 8.5 by 14 inch pages.
Page Orientation
Select the orientation of the pages you plan to scan in the Orientation
pop-up menu. Be sure to also load pages correctly in your scanner.
• Select Portrait for vertically-oriented pages (the shorter page
edge is parallel to the scanning head).
• Select Landscape for horizontally-oriented pages (the longer
page edge is parallel to the scanning head).
• Select Flipped to have portrait images rotated by 180 degrees.
Preference settings 77
Page 78

• Select Flipscape to have landscape images rotated by 180
degrees.
Tip
Flipped and Flipscape options a re useful if you are scanning page s in a book and
have trouble positioning the book correctly in the scanner. You can also rotate a
page image after it is loaded into OmniPage Pro. For more information, see
Rotating an image on page 57.
ADF settings
If you use a scanner with an automatic document feeder (ADF), you can
use the following settings.
• Select Scan until Empty to scan every page in your scanner’s
ADF.
This setting is useful w hen you want to scan a sta ck of pages at
once. If it is not selected, OmniPage Pro only scans the first
page in your ADF and you must click the Get Page or Start
button to scan each subsequent page.
• Select Double-sided Pages to scan pages that have text printed
on both sides.
OmniPage Pro scans pages and then prompts you to turn
them over so it can scan the reverse sides. If you have a stack of
double-sided pages, also select Scan Until Empty. After
scanning, page images are displayed in Image view in the
correct order . If you have a duplex scanner, do not set this; the
scanner’s own software can handle the double-sided scanning.
Scanning Resolution
Use this to select a scanning resolution in dots per inch (dpi). The
values offered are scanner dependent. For non-color scanning they
may range from 200 to 600 dpi, and from 200 to 300 for color
scanning. In general, 300 dpi is best for OCR accuracy. 400 dpi may
be better for very small print. Higher resolutions may be desirable for
saving higher-quality images to file or to OmniPage Documents, at
the expense of increased file size, processing time and maybe OCR
accuracy.
78 Settings
Page 79

Chapter 4
Brightness
The brightness setting for scanning a page works like that on a
photocopier. This setting can compensate for variations in paper and
print quality, so it can have a big influence on OCR accuracy.
Click the Manual Brightness check box and move the slider to lighten
or darken the brightness for your scanning.
The following illustrates optimum and unsuitable brightness.
Unsuitable
Tolerable
Good
Best
Good
Tolerable
Unsuitable
Contrast
The contrast setting fo r scanning a page works like t hat on a televisio n
set. This setting is only activated if you have Grayscale or Color
selected in the Scanner settings. It lets you increase or decrease the
difference between light and dark areas on the image. Click the
Manual Contrast check box and move the slider to make a contrast
setting.
Note
Some scanners offer only automatic detection for brightness and contrast. Some
require a manual setting. Others offer both methods. In this case, automatic
detection may be better; some scanners do this dynamically, varying the setting for
different parts of the page. If results are disappointing, try using manual
adjustment.
Preference settings 79
Page 80

Click this to see the
OCR panel
OCR settings
Click the OCR icon in the Preferences dialog box to select accuracy
and output options.
Use this to decide
which character
will replace
unrecognizable
characters in the
output.
Character Type
Select a setting to characterize the printed text on your pages in the
Character Type pop-up menu.
• Select Normal for conventionally printed text characters.
Select it also for dot-matrix te xt s pri nte d in fine mode or with
24-pins. Select it also for fax files, but ask your senders to use
Fine Mode.
• Select Dot Matrix for text characters printed in draft mode
with a 9-pin, monospaced dot-matrix printer.
Training File
A training file is a set of up to 256 pre-recognized character shapes
linked to OCR solutions, that OmniPage Pro can use to compare with
shapes it is trying to recognize. For most recognition tasks, a training
file is not necessary. If you have a training file you wish to use, select it
in the Training File pop-up menu. None is the only option if y ou hav e
not created any training files.
80 Settings
Page 81

Chapter 4
Training files are useful for recognizing characters that prove difficult
to recognize or are being regularly misrecognized. To create a training
file, see Training OCR on page 97.
Retain Graphics switch
Select Retain Graphics if you want OmniPage Pro to retain original
graphics, such as photographs or drawings, in the recognized
document. They will be displayed in Text view and exported to file,
provided the selected file format supports graphics. Graphics can be
exported by drag-and-drop, copying to Clipboard and Direct OCR.
Make sure that all the pictures you want retained are correctly
enclosed in zones with the zone type Graphic. These have black
borders and display a graphic icon. See Specifying zone types on
page 41.
If you deselect this, the contents of graphics zones are ignored.
Pictures will neither appear in Text view nor be available for export.
In the lower part of the panel you specify the resolution for graphics
exported in grayscale or color. Exported graphics appear as they do in
Text view (black-and-white, grayscale or color).
Reject Character
Words containing unrecognizable characters appear in red in the
Proo fread OCR dialog bo x and optio nally in Text view . Unrecognized
characters are replaced by a red reject character. The default character
is a tilde (~). Type the character you want to use in the Reject Char ac ter
edit box.
For example, if OmniPage Pro could not recognize the J in REJECT,
and the tilde (~) was the reject character, the string RE~ECT would
appear in your recognized document.
Retain Graphics settings
Choose a resolution setting (75 or 150 dpi) to be used for the export
of grayscale or color image areas embedded in Text view. The settings
are applied when you save recognition results from the whole
document to file, send them to Clipboard or use Direct OCR.
Preference settings 81
Page 82

The settings have no effect on recogniti on accuracy, nor on the display
of the embedded images in Text view. They are not used when saving
to OmniPage Documents, nor when saving page images, nor when
exporting single graphics zones or areas by drag-and-drop or through
the Clipboard.
The 150 dpi setting yie lds higher quality p ictures, but consumes more
disk space when the file is save d. You can use the 75 dpi setting to save
disk space, with a corresponding loss of image quality.
The memory requirements for a typical exported page of a given size,
stored at the selected resolution are displayed below the options. This
is for a typical page with about 70% text and 30% embedded image.
Spelling settings
Click the Spelling icon on the left of the Preferences dialog box to
select recognition languages, user dictionaries and spell checking
settings. These settings are used by the Language Analyst during OCR
and for proofreading after OCR.
Click this to see the
Spelling panel
82 Settings
Choose one
language here.
Choose further
languages here.
Choose these to
limit the types of
words that will be
stoppe d on during
proofing.
Page 83

Chapter 4
Main Language
The Main Language pop-up menu enables you to choose the main
language for the page(s) you intend to recognize. Your choice
determines which characters are validated for recognition and which
main dictionary will be used.
The languages available are Danish, Dutch, English (UK and US),
Finnish, French, German, Italian, Norwegian, Portuguese (Standard
and Brazilian), Spanish and Swedish.
Additional Language(s)
In addition to the M ain Lan guage for re cognit ion, yo u may select one
or more secondary languages. Specifying additional languages
broadens the rang e of a ccente d lette rs valida ted fo r re cognitio n. I t also
enables more than one dictionary. Then the program monitors text as
it is recognized to determine its language and which dictionary to
apply. This lengthens the processing time, so you should only activate
additional languages if your pages really contain more than one
language.
The Main R eco gn iti on Lan guag e is displ ay ed on th e OCR Toolbar. It
is followed by three dots if any additional languages are selected.
t To select secondary languages and dictionaries:
1. Click the Select... button to the right of the Additional
Language(s) display. The Select Secondary Languages dialog box
appears displaying all the available languages, except the current
main language.
In this example, the main language is US English and the
secondary language will be Spanish.
2. Click a language name to select it. Command-click to select more
than one language.
3. Command-click a selected language to remove its selection.
4. Click OK to save your selected language(s).
Preference settings 83
Page 84

Note
It is possible to read more languages than those offered as main and secondary
languages, providing you disable the Language Analyst and make a suitable
language selec tion. See Supported la nguages on page 110 for advice.
User Dictionary
Select a user (personal) dictionary in the User Dictionary pop-up
menu. For information on creating and editing user dictionaries, see
User dictionaries on page 101.
Use Language Analyst
Select Use Language Analyst to have dictionaries and other linguistic
aids used during recognition. Proofing will then stop on all doubted
words, and the Language Analyst may suggest replacement words.
This is similar to the automatic spell-checking feature in many word
processors. If this is selected, marking is available in Text view for all
doubted words – those with rejected or questionable characters and
those not found in a dictionary.
If you deselect Use Langua g e Analyst, proofing wil l stop only on wo r ds
containing unrecognizable characters, and only these words will be
available for marking (in red) in Text view. OmniPage Pro can handle
almost sixty more languages than those directly selectable (see the list
in Supported languages on page 110). To read these languages, you
must deselect Use Language Analyst.
Choose other options to decrease the number of words the Language
Analyst will stop on:
84 Settings
• Select Ignor e Proper Nouns to ignore any word not beginning a
sentence with a capitalized first letter followed by three or
more lowercase letters (for example, He saw Jane throw...).
• Select Ignore Abbreviations to ignore a capitalized letter
followed by three or fewer lowercase letters and a period (for
example, Mrs., Dr., and so on).
• Select Ignore Acronyms to ignore any word with a capitalized
letter followed by three or fewer letters of which at least one is
capitalized (for example, TIFF, NASA, DoT, and so on).
Page 85

Click this to see the
Miscellaneous panel
Chapter 4
Miscellaneous settings
Click the Miscellaneous icon on the left of the Preferences dialog box
to select options for table handling, scripting and the Direct OCR
feature.
Tables
Select Retain Table Grids to have gridded tables in the original
document placed in grids in Text view after they are recogniz ed. They
will also be exported in grids if the target application supports grids.
Deselect this to have the data from all tables detected in the original
document placed in tab-separated columns. G ri ds will not be use d for
export.
Scripting
Select Log Script Activity... to have a record of events placed in a file
named ‘Script Log’. This applies when OmniPage Pro X is run from
the Macintosh system by AppleScript commands driving Apple
Events. See the topic Using AppleScript commands in online Help.
Direct OCR
Direct OCR allows you to initiate OCR from the Mac OS X Dock
and paste recognized text directly into another open application. (In
Mac OS 9 Direct OCR is started from the Apple menu). See Direct
OCR on page 66 for more information.
Preference settings 85
Page 86

Direct OCR settings should be selected before you use the Direct
OCR feature because they influence what happens as soon as you use
it.
• Select Begin Processing Automatically on Launch if you want
OmniPage Pro to trigger the Start button as soon as you
activate Direct OCR. Text will be recognized automatically:
images will be scanned or loaded, auto-zoned, recognized and
(if requested) presented for proofing. Recognition results will
be placed at the insertion point in the target application.
Deselect Begin Processing Automatically on Launch if you want
to control when to start scanning, loading, recognition, and
pasting. This is recommended if you want to check settings,
change settings from page to page, draw zones manually or
verify and edit the recognized text inside OmniPage Pro.
• Select Keep OmniPage Pro Running after Pasting, with Direct
OCR Document Loaded if you want the recognized document
to be retained in OmniPage Pro. This allows you to work
further with it, adding or re-recognizing pages and saving the
results to file. You can save it in more than one format,
including the OmniPage Document format.
Deselect this setting if you do not want the recognized
document to be available in OmniPage Pro after the text is
pasted into your a pplicati on. OmniPage Pro will al so clos e if it
was not open before you activated Direct OCR.
Note
86 Settings
You can save all the current settings from the Preferences dialog box (except which
scanner is selected) to a settings file. Y ou can then load this file anytime you want to
restore the preselected values. See page 102 for more information.
Page 87

Chapter 5
Customizing OCR
OmniPage Pro X has many features that allow you to customize the
way your documents are handled during OCR and how they appear
after recognition. This chapter describes how to use these facilities.
Please continue reading for information on the following topics:
u Specifying the style set
u Applying and editing zone styles
u Zone templates
u Training OCR
u User dictionaries
u Settings files
Specifying the style set
A style set determines the appe arance of the r ecognitio n results for each
recognized page. The pro gram is suppli ed with seve n built-in s tyle sets
and users can create their own custom style sets.
Each style set contains one or more zone styles. A zone style defines
formatting elements such as fonts, text flow, alignment and
indentation to be used for text within any zone the zone style is
applied to.
OmniPage Pro X User’s Guide 87
Page 88

The following ta bles gi ve a n o verview of the built-in style sets and th e
zone styles offered by each of them.
Four of these style sets define basic formatt ing level s. These cannot be
deleted and allow only limited editing. They are useful mainly for
processing documents automatically or for applying standard
formatting during manual processing.
The remaining three built-in style sets can be considered samples.
They can be edited and deleted. These style sets can accept new zone
styles and allow the zone style values to be changed. These are useful
for reformatting documents, mainly during manual processing.
Basic built-in style sets
Style sets Formatting Zone style
Plain
Format
Similar Fonts Font formatting is maintained. Fonts are mapped as specified, font
Similar
Formats
True Page Font and paragraph formatting are maintained. Page layout is con-
The whole text appears in one definable font and font size (by
default 10pt. Geneva). There is no font mapping. Text is left aligned
and wrapped. Multi-column text is decolumnized.
sizes and bold, italic and underlined text are detected and maintained. Text is left aligned and wrapped. Multi-column text is decolumnized and displayed at page width.
Font formatting, paragraph alignment and indenting are maintained.
Multi-column text is decolumnized, and column widths are maintained.
served by placing page elements (text blocks, headings, graphics,
tables and so on) in frames. Select this only for saving formats
marked with TP in the Export dialog box.
Each of these basic style sets has only one zone style. They cannot be
deleted and new zone styles cannot be added. The Zone style Plain
allows you to specify one font and font size, but cannot be edited
beyond that. The zone sty les Auto Fonts and Auto Detect allow only the
font mapping settings to be modified.
Whichever style set is chosen, you can still apply font formatting to
selected blocks of recognized text in Text view after recognition.
Plain
Auto Fonts
Auto Detect
Auto Detect
88 Customizing OCR
Page 89

Chapter 5
All four styles can transmit graphics. For the first three, the graphics
are placed at the end of the recognized text. In True Page the graphic
is placed in a frame in its location on the original page.
All four styles can accept tables. F or the first three, t ables ar e p laced at
their locations in the decolumnized text. In True Page the table is
placed in a frame at its location on the original page. Tables appear
either in grids or tabbed columns.
Editable built-in style sets
The following style sets are all based on the basic style set Similar
Formats. These style sets can all be freely edited.
Style sets Useful for Zone styles
Article Pages from magazines or newspapers you want to
reformat using manual processing.
Poetry or texts where the original line breaks should
be conserved.
Contemporary
Memo
Typewriter
Memo
Memos or similar documents to be displayed and
exported with proportionally spaced text.
Memos or similar documents to be displayed and
exported as monospaced text, so it appears typewritten. Raskin style is typewriter-like but proportionally
spaced.
You can modify the styling of all provided zone styles except Auto
Detect. You can add new zone styles. Auto Detect is set as default, but
you can change the default zone style. All zone styles except Auto
Detect can be deleted. If you try to delete the zone style selected as
default, you will be warned. If you do delete it, the default reverts to
Auto Detect.
Author, Auto Detect, Bod y,
Date of Publication, Poetry,
Publication, Subject
Auto Detect, Body, cc, Date,
From, Subject, To
Auto Detect, Body, cc, Date,
From, Raskin style, Subject, To
Specifying the style set 89
Page 90

Specifying a global style set
Select a style set from the Style Set pop-up menu in the OCR
Toolbar. The selected style set is applied to all incoming pages until
you change the setting. A new setting here has no effect on existing
pages, even if you re-recognize them.
t To modify the style set for a page:
Make Image view active. The Zone Info palette appears.
Select the desired style set in its Style Set for Page pop-up menu.
The zone styles available for the page may change.
If the page has alrea dy been r ecogniz ed, you will have to r ecogniz e
it again for the new style set to take effect.
Creating style sets
You can create and use custom style sets. This is useful for imposing
consistent formatting on particular types of documents.
For example, if you often recognize recipes, you can design your own
style set that cont ains a zo ne style for the r ecipe title, a style for th e list
of ingredients, and a style for the directions. You can then use this
style set for all the recipes you recognize, even if the original pages
have different layouts and formatting.
Note
OmniPage Pro X is shipped with three sample style sets, for instance Article. You
can use this as a guide when you create zone styles for your new style set. See
page 95 for instructions on editing style sets.
90 Customizing OCR
Page 91

t To create a style set:
Choose St yle Sets.. . in the Edit menu.
A dialog box appears displaying all available style sets.
Click New. The New Style Set dialog box appears.
Enter a name for your style set.
For example, you could enter Bibliography as the name if you are
creating a style set for handling bibliographies.
Click New.
The Edit Style Set dialog box appears. Your new style set will
inherit its behavior from the style set Similar Formats. That means
text is decolumnized, but original column widths can be
maintained and frames are not used.
Auto Detect is the only zone
style automatically created.
Chapter 5
Add zone styles and define their properties as described in the
following section.
Applying and editing zone styles
Much like applying styles to paragraphs in your word processor,
OmniPage Pro allows you to apply zone styles to individual zones.
The zone styles specify how text from each zone should be formatted.
Style se ts an d zo ne sty les can be se le cted in the Z on e I n fo pa let te. You
can use only one style set for each page in a document. However,
different style sets can be used for different pages in the same
document.
Applying and editing zone styles 91
Page 92

t To apply styles to existing zones:
Make Image view active. The Zone Info palette appears.
Check that the style set for the page is suitable. Change it if
desired.
Click the Draw/Select Zones tool in the Tools palette if it is not
already selected.
Select the zone you want to specify by clicking it.
• Shift-click to select additional zones.
• Double-click the Draw/Select Zones tool or choose Select All
in the Edit menu to select all zones on the current page.
Select the desired zone style in the Zone Style pop-up menu.
Select other zone properties as desired. Selecting zone type and
zone contents were described on page 41.
Note
t To apply styles to new zones:
Shortcut for applying zone styles
Hold the mouse button down while the mouse pointer is over a zone. A menu of
all the zone styles in the current style set is displayed. Select the style you want to
use for that zone. If the style set for the page only contains one style, no menu will
appear.
There are two ways of doing this. Decide which you prefer:
• Draw a zone. It will inherit the zone style and other properties
of the last selected z on e. I f mo re than one zone is select ed, th e
zone style is taken from the first zone in the selection.
• Make sure no zones are selected. Select the desired zone style
and other properties in the Zone Info palette. Draw the zone.
t To edit zone styles in a style set:
The basic style sets all o w v ery lit tle edi tin g. You will normally edit the
built-in sample style sets or ones you have created yourself.
Choose St yle Sets.. . in the Edit menu.
Double-click the style set you want to edit, or click Edit.
92 Customizing OCR
Page 93

The currently
selected zone style
Settings for the
currently selected
zone style
Specimen text for
the current zone
style
Chapter 5
The Edit Style Set dialog box lists the zone styles in the set.
Click to make
font mapping
selections for the
entire style set.
D
r
h
g
t
a
e
m
r
k
a
e
n
r
s
i
s
i
h
t
e
r
r
u
l
o
c
t
n
h
a
e
g
e
x
t
a
t
s
t
,
t
r
e
n
d
a
d
n
i
e
n
n
d
t
u
v
l
a
.
e
s
Click the name of the zone style you want to edit. The formatting
attributes for the selected zone style are displayed.
Change these formatting attributes as detailed in steps 5 to 11
(described from left to right and top to bottom). Whenever the
auto button to the left of an attribute is selected (pressed in),
OmniPage Pro will detect and transmit the formatting for you.
Choose Auto for Font to have automatic character mapping (see
below). Choose a font name to have it applied to all texts inside
zones with this zone style instead of mapping.
Choose Auto to have the original character sizing detected and
retained, or choose one fixed point size for all text in the zones.
Choose Auto to have attributes (bold, italic, underline) detected
and retained from the original, or choose a value.
Choose Auto to have paragraph alignment detected and retained,
or choose an alignment for all text in the zones.
Choose Auto to have tabs detected and retained. Or choose
replacement character(s) to be placed instead of tabs.
Choose Auto to let the program decide whether to flow text or
not. Choose Word Wrap to make all text flow within the text
areas. Choose Hard Line Returns to keep all line endings as they
were in the original document.
Applying and editing zone styles 93
Page 94

The last three settings define the left and right limits of the text
area and first-line indenting. Choose Auto to let OmniPage Pro
decide the values. Enter numerical values or drag the markers in
the ruler to change settings.
The panel below the ruler displays the effects of your settings.
Repeat the above steps to edit other zone styles. Click Delete Style
to delete a selected zone style from the style set. Click Make
Default to make a selected zone s tyle the default sty le app lied to al l
zones when a style set is first selected for a page.
t To add new zone styles to the current style set:
Open the Edit Style Set dialog box and click New Style.
Enter a name for the zone style you want to add and click OK.
For example, you could enter
Heading as the name if you are
creating a style for heading-type paragraphs.
Modify the desired formatting attributes for the new style, as
described in the previous procedure.
Repeat steps 2-4 to continue adding new styles to the style set.
Click OK when you are finished editing the style set.
Click Done in the Style Sets dialog box if you do not want to edit
any other style sets.
Font mapping
If Auto is selected as the font setting for a zone style, OmniPage Pro
analyses the text styling inside the zone and assigns it to one of four
categories. More than one text category may be detected within a
single zone. Each category is mapped to a font which you can specify.
u Proportional Serif
Character widths v ary and sho rt lines f inish off let ter str okes. This
text is an example of this font type. The default font is Times.
u Proportional Sans-Ser if
Character widths vary; letter strokes do not have finishing lines.
The default font is Helvetica.
94 Customizing OCR
Page 95

u Monospaced Serif
Character width is the same for each character; short lines finish
off the letter strokes. The default font is Courier.
u Monospaced Sans-Serif
Character width is the same for each character; letter strokes do
not have finishing lines. The default font is 0RQDFR.
Chapter 5
Note
Note
t To change font mapping for a style set:
Font mapping is not applicable to the Plain Format style set. It is always
performed with the style sets Similar Fonts, Similar Formats or True Page. It is
available but not compulsory for editable style sets.
To avoid font mapping during manual processing, specify a font name for a zone
style in place of Auto. This font will be applied to all text in all zones with this
zone style. To avoid font mapping in automatic processing, select an editable style
set, define a zone style with a specific font name instead of Auto, make this the
default zone style and then choose the style set in the OCR Toolbar before starting
the automatic processing.
Choose St yle Sets.. . in the Edit menu.
Double-click the style set for which you want to change font
mapping selections.
Click Font Mapping... in the Edit Style Set dialog box.
The Automatic Font Mapping dialog box appears.
Select the font you want used for each category.
You can select any fonts available on your system.
Applying and editing zone styles 95
Page 96

Zone templates
You can use a zone template to quickly and efficiently create zones on
documents that have the same zoning requirements. For example, if
you frequently process documents with layouts and content that
require the same type of zoning, you can create and save a zone
template and apply it to all such pages or documents.
A zone template can have up to 64 zones. It remembers the size,
position, order, type, style and contents of zones.
t To save a zone template:
Create the desired zones on a page image, manually or
automatically with checking and modification as required.
See Creating zones automatically on page 40.
Choose Save Zone Template... in the File menu.
The Save Zone Template dialog box appears.
Type a name for your file and click Save.
The zone template file is saved in the Zone Templates folder within
your installation folder.
96 Customizing OCR
t To apply a zone template to future pages:
• Select the zone template you want to use in the Original Layout
pop-up menu on the OCR Toolbar.
OmniPage Pro places temp la te z o ne s on al l in com in g pa g e im ag es
while the template remains in effect.
t To apply a zone template to an existing page:
Make sure the desired template is selected in the Original Layout
pop-up menu on the OCR Toolbar.
Make Image view active, with the desired page displayed.
Click the Apply Template tool in the Zone Info palette.
Page 97

Chapter 5
t To remove a zone template:
• S elect a non-templ ate setting in the Origina l Layout pop-up menu
on the OCR Toolbar.
OmniPage Pro will no longer place template zones on incoming
page images. This does not remove template zones from existing
zoned pages. Just delete or modify them or choose Discard Curr ent
Zones and Find New Zones in the Zoning Instructions dialog box.
Training OCR
You can create a training file to handle characters that are being
consistently misrecognized. A training file is a set of up to 256 prerecognized character shapes each linked to an OCR solution.
OmniPage Pro compares the stor ed sh apes with those encou nter ed on
incoming documents.
OmniPage Pro X is a powerful, pre-trained OCR product. For
recognizing ordinary characters in everyday fonts, training files should
not be needed. Training is useful mainly for long documents (or a set
of documents) in which a few character shapes are being repeatedly
misrecognized in the same way. Training is not useful for poorly
formed characters unlikely to occur again in the document. For
instance, a character shape damaged by spots on the image is a poor
candidate for training. Do not attempt to create a training file for an
unsupported language or alphabet.
t To create a training file:
Open an imag e fi le or sc an a pa ge that in cludes t he cha r act ers y ou
want to train or use a page you have already recognized.
If you select a recognized page, its recognition results are deleted.
Accept the invi tation that app ears when you finish , to re-reco gnize
the page with the new training file.
Create or modify zones on the page image if you want to train
characters from only part of the page.
Select Train OCR as the option in the OCR pop-up menu.
Training OCR 97
Page 98

Original image
OmniPage Pro’s
interpretation
Click the OCR button. OmniPage Pro analyzes the page and
opens the Training File dialog box.
Original character images are displayed along with OmniPage
Pro’s interpretation of each character. Characters appear in the
alphabetical order of their interpretations.
Most characters do not need to be trained. Look for uncommon
and run-together characters. Look for characters whose
interpretation is incorrect. An example in the picture above is the
bottom left square.
Click a non-keyboard
character you want to
associate with the
selected character
shape.
98 Customizing OCR
Double-click a character you want to train. Or select it and click
Specify.
The Specify Cha racter dialog bo x displays the selected character a s
it appears in the original page image.
Original Image,
including the
selected
character
Enter a keyboard
solution here.
Specify how you want OmniPage Pro to interpret the character
shape during OCR. Type the desired character(s) in the Character
Page 99

Chapter 5
Code edit box, or click a non-keyboard character in the scrolling
display to add it to the edit box.
In our example, the ‘H’ has been cleared and ‘//’ entered.
Click OK to accept the character specification.
The Training File dialog box reappears.
Repeat steps 5–7 to continue specifying characters.
The Delete button is not needed when you create a new training
file. Any untouched character is excluded from the training file.
Click Save... to save the characters whose solutions you changed to
a new training file which you will name.
Or, click
Append... to add these characters to an existing training
file which you select. In this case, no new training file is created.
After saving or appendi ng a file, you are asked if you wan t to make
this the current training file. Click OK to (re-)recogniz e the
current page using the training file you have just created. Click
Cancel to return to the image without recognizing it.
t To load a training file:
Choose Preferences... from the Application menu (OS 9: Edit).
Click the OCR icon to display the OCR panel.
Select a training file in the Training File pop-up menu.
This file remains loaded until you unload it or replace it with
another training file.
t To unload a training file:
Choose Preferences... from the Application menu (OS9: Edit).
Click the OCR icon to display the OCR panel.
Select None in the Training File pop-up menu.
Note
It is important to unload a training file when you finish processing pages for which
it was prepared. A training file is likely to lower accuracy if it remains loaded for
pages with different typestyles.
Training OCR 99
Page 100

t To edit a training file:
Choose Training Files... in the Edit menu. The Training Files
dialog box lists all training files in the Training Files folder.
Double-click the training file you want to edit, or select it and
click Open.
The Training File dialog box displays the characters in the
training file you specified.
Double-click a character you want to edit.
The Specify Character dialog box appears.
Edit the interpretations associated with the selected character
shape, as described under Creating a training file. Type one or
more characters into the Character Code edit box or select non-
keyboard characters from the scrolling display.
Click OK to accept each character specification and repeat steps 3
and 4 to continue editing specified characters.
Click
Delete to discard a selected character from the training file.
Untypically misformed character shapes are bad candidates for
training and should be deleted.
Click Save... to save the edited training file under its existing
name. Or, click Append... to add the trained characters to an
existing training file. The file you selected to edit will not be
modified.
t To delete a training file:
Choose Training Files... in the Edit menu.
Select a training file to be deleted.
Click Delete and then OK in the warning box. Click Done.
100 Customizing OCR
 Loading...