

Page 1

SLCS Programming Manual
PV3/PV4
BARCODE PRINTER
Ver. 1.00
Page 2

SLCS Programming Manual
- 2 -
Table of Contents
1. Foreword ........................................................................................................................ 4
1-1 Image Buffe r Configuration ......................................................................................... 5
1-2 Information for calculating position on image buffer .................................................... 6
1-3 Command List............................................................................................................. 8
1-4 Programming Considerations ................................................................................... 10
2. Detail Description ........................................................................................................ 11
2-1 Commands for Designing a Label............................................................................. 11
2-1-1 T (Text String) ..................................................................................................... 12
2-1-2 V (Text String Vector Font) .................................................................................. 15
2-1-3 B1 (1 Dimensional bar code) .............................................................................. 18
2-1-4 B2 (2 Dimensional bar code) .............................................................................. 21
2-1-5 B3 (Special Barcode) .......................................................................................... 31
2-1-6 BD (Block Draw) ................................................................................................. 36
2-1-7 CD (Circle Draw) ................................................................................................ 39
2-1-8 CS (Character Set selection) .............................................................................. 40
2-1-9 P (Print) .............................................................................................................. 43
2-2 Media & Buffer Related Commands ......................................................................... 45
2-2-1 ST (Set Printing T ype) ........................................................................................ 46
2-2-2 SM (Set Margin) ................................................................................................. 46
2-2-3 SF (Set Back-Feed Option) ................................................................................ 48
2-2-4 SL (Set Length) .................................................................................................. 49
2-2-5 SW (Set Width) ................................................................................................... 52
2-2-6 SB (Set Buffer mode) ......................................................................................... 53
2-2-7 CB (Clear Buffer) ................................................................................................ 53
2-3 Printer Setting Commands ........................................................................................ 54
2-3-1 SS (Set Speed) ................................................................................................... 55
2-3-2 SD (Set Density) ................................................................................................. 55
2-3-3 SO (Set Orientation) ........................................................................................... 56
2-3-4 SP (Set Port) ...................................................................................................... 57
2-3-5 SA (Set Offset) .................................................................................................... 58
2-3-6 T A (T ear-off/Cutter Position Setting) ................................................................... 58
2-4 Variable Related Commands .................................................................................... 59
2-4-1 SC (Set Counter) ................................................................................................ 60
2-4-2 AC (Auto Counter) .............................................................................................. 61
2-4-3 SV (Set Variable) ................................................................................................ 62
2-4-4 ? (Get Variables) ................................................................................................. 63
2-4-5 PV (Print with Variables) ..................................................................................... 64
2-5 Template Related Commands ................................................................................... 65
2-5-1 TS (Template store Start) .................................................................................... 66
2-5-2 TE (Template store End) ..................................................................................... 66
2-5-3 TR (Template Recall) .......................................................................................... 67
2-5-4 TD (Template Delete) ......................................................................................... 68
2-5-5 TI (Template Information).................................................................................... 68
2-6 Image Related Commands ....................................................................................... 69
2-6-1 IS (Image Store) ................................................................................................. 70
2-6-2 IR (Image Recall) ................................................................................................ 70
2-6-3 ID (Image Delete) ............................................................................................... 71
2-6-4 II (Image Information) ......................................................................................... 71
Ver. 1.00
Page 3

SLCS Programming Manual
- 3 -
2-6-5 LD ....................................................................................................................... 72
2-6-6 LC ....................................................................................................................... 74
2-6-7 BMP .................................................................................................................... 76
2-7 Downloadable font Related Commands ................................................................... 77
2-7-1 DT (Download True Type Font) .......................................................................... 78
2-7-2 DD (Downloaded font Delete) ............................................................................. 79
2-7-3 DI (Downloaded font Infor mat ion) ....................................................................... 80
2-8 The Others ................................................................................................................ 81
2-8-1 @ (Initialize Printer) ............................................................................................ 82
2-8-2 PI (Printer Information) ....................................................................................... 82
2-8-3 CUT (Auto-cutter Enable/Disable) ...................................................................... 83
2-8-4 ^cp (Check Printer Status and Report 2 bytes) ................................................... 84
2-8-5 ^cu (Check Printer Status and Report 1 byte) ..................................................... 85
2-8-6 ^PI (Send Printer information to host) ................................................................. 86
3. Programming Example ................................................................................................ 87
3-1 (Example) T_resid ent ............................................................................................... 87
3-2 (Example) T_Rot ate4 ................................................................................................ 88
3-3 (Example) V_resident ............................................................................................... 89
3-4 (Example) V_Rotate4 ............................................................................................... 90
3-5 (Example) Code39 .................................................................................................... 91
3-6 (Example) BD1 ......................................................................................................... 92
3-7 (Example) BD3 ......................................................................................................... 93
3-8 (Example) BD4 ......................................................................................................... 95
3-9 (Example) BD5 ......................................................................................................... 96
3-10 (Example) Slope ..................................................................................................... 97
3-11 (Example) SW&SL .................................................................................................. 98
3-12 (Example) TEST0 0_TS ......................................................................................... 100
3-13 (Example) TEST0 0_TR ........................................................................................ 101
3-14 (Example) TEST0 4_TS ......................................................................................... 102
3-15 (Example) TEST0 4_TR ........................................................................................ 103
3-16 (Example) IR1 ....................................................................................................... 103
3-17 (Example) TEST1 0_TS ......................................................................................... 104
3-18 (Example) TEST10_TR ........................................................................................ 104
3-19 (Example) TEST 11_TS ......................................................................................... 105
3-20 (Example) TEST 11_TR ......................................................................................... 105
3-21 (Example) SLCS_SATO ........................................................................................ 106
Ver. 1.00
Page 4

SLCS Programming Manual
- 4 -
1. Foreword
In this chapter, the basic concept of SLCS and some information necessary for the
programmer to use SLCS will be explained. Please read this part before starting
programming for efficient and easy use of SATO BARCODE PRINTERS.
We at SATO maintain ongoing efforts to enhance and upgrade the functions and quality of
all our products. In following, product specifications and/or user manual content may be
changed without prior notice.
Ver. 1.00
Page 5
SLCS Programming Manual
- 5 -
…
.
.
.
.
.
.
…
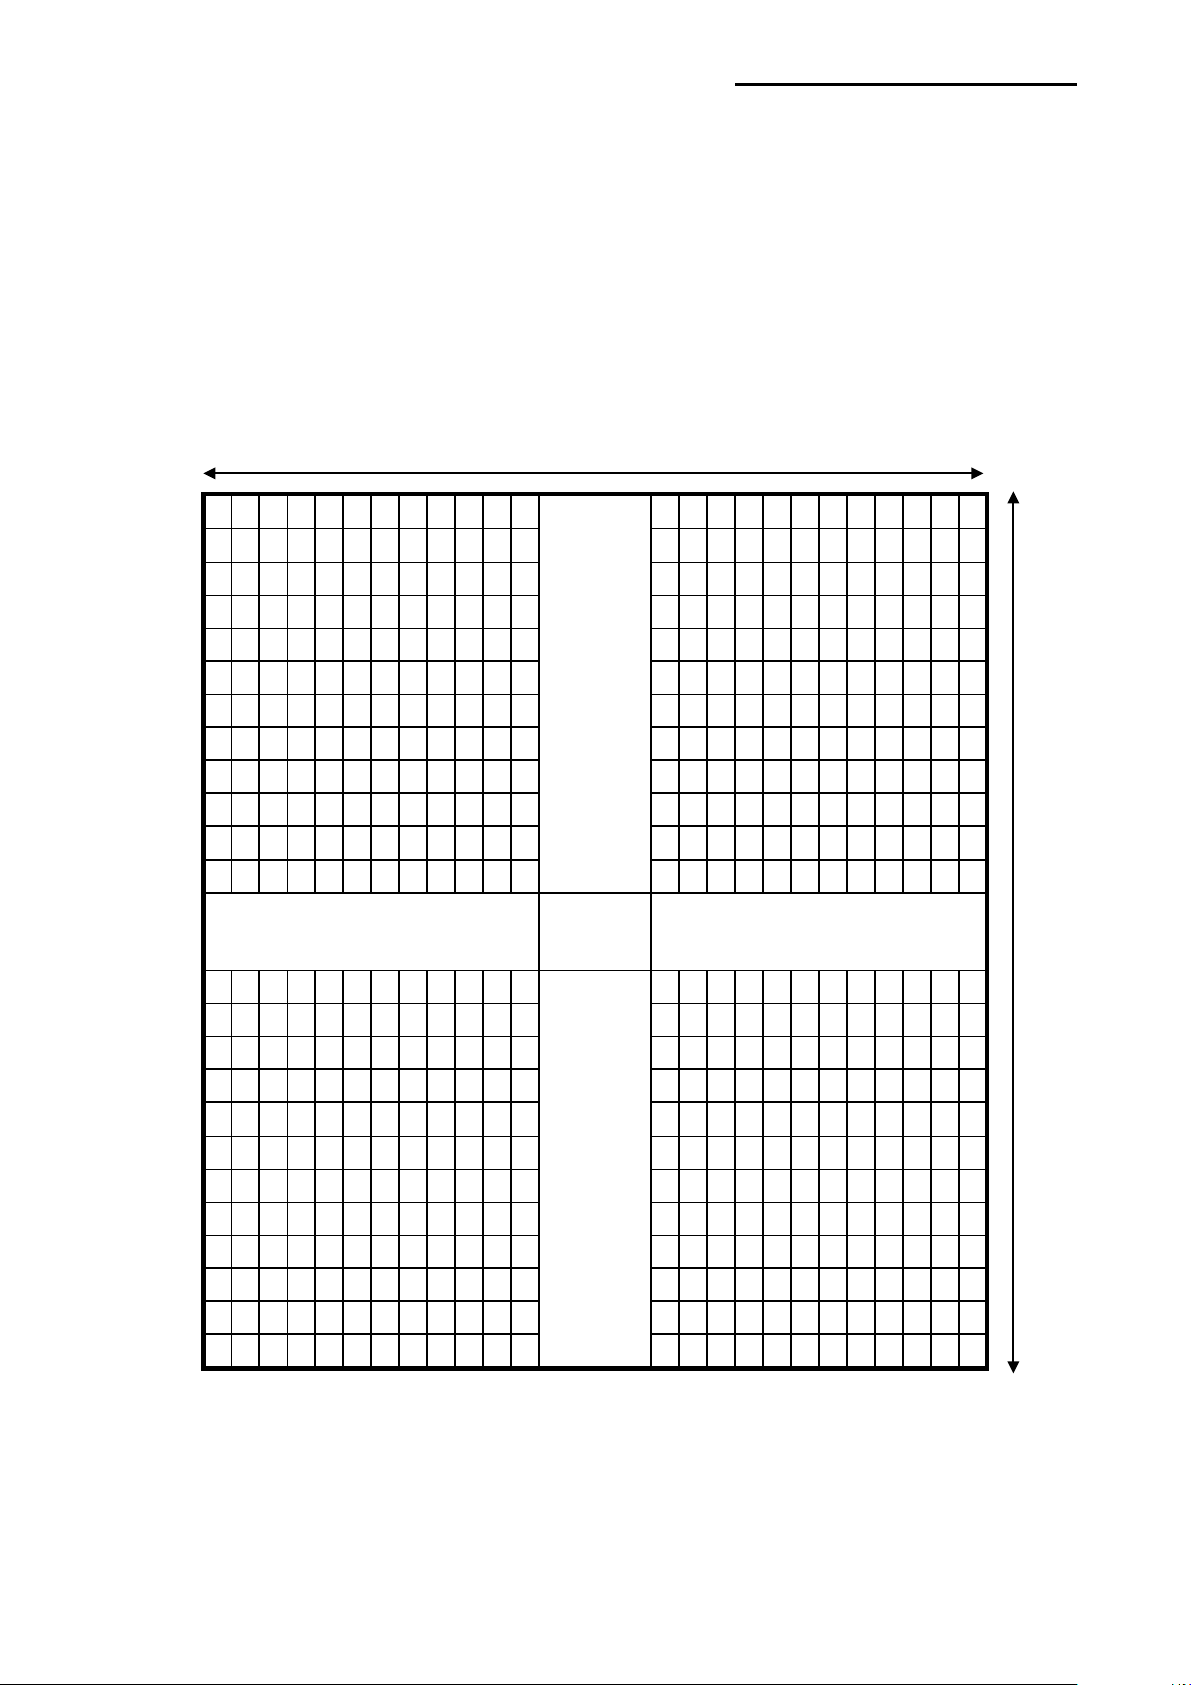
832 dots(104mm = 4inch)
1216 dots(152mm = 6inch)
Image Buffer
1-1 Image Buffer Configuration
1) Maximum size
A) When using Double Buffering Function
832dots × 1216dots (104mm × 152mm) = 4 inch × 6 inch
B) When using Single Buffering Function
832dots × 2432dots (104mm × 304mm) = 4 inch × 12 inch
2) Dot size : 0.125mm(W) × 0.125mm(H) (203dpi)
.
…
.
Ver. 1.00
Page 6

- 6 -
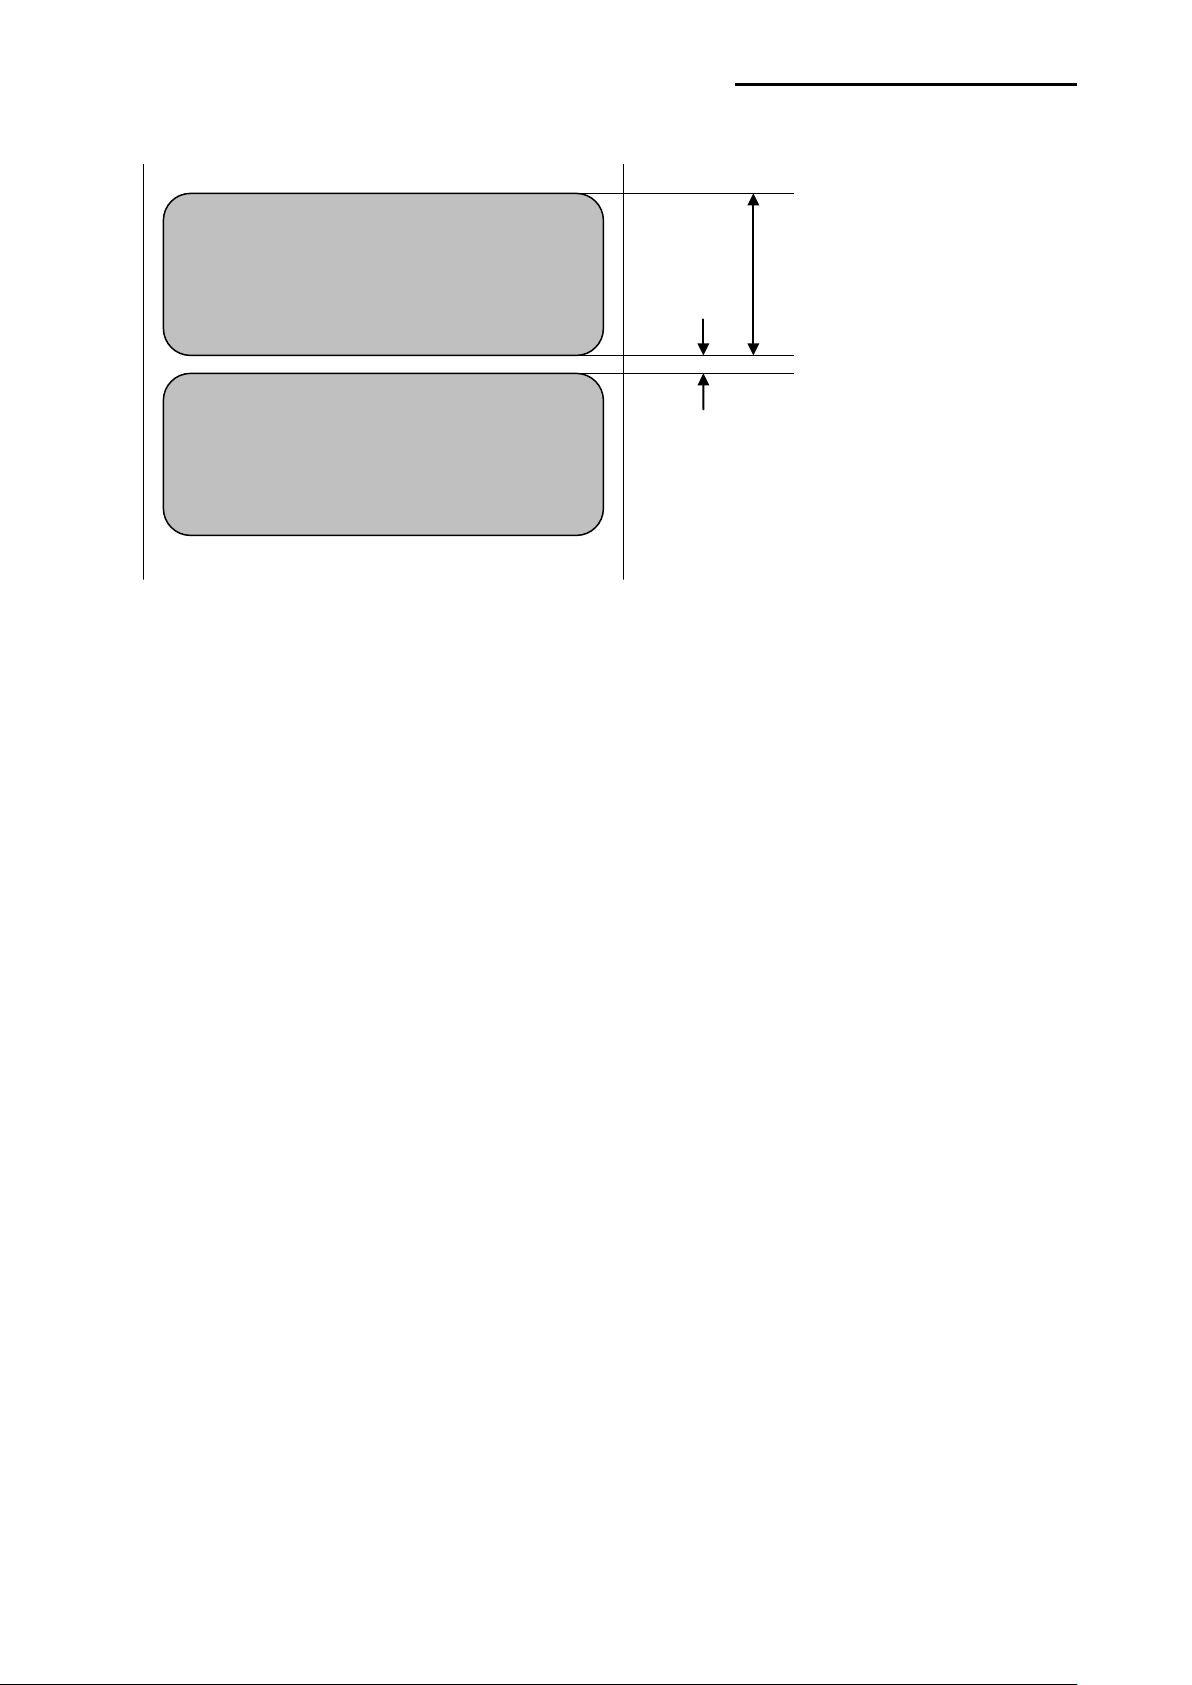
1-2 Information for calculating position on image buffer
Inch
mm
dots
Resolution
0.04 1 8
0.40
10.00
80
1.00
25.40
203
1.25
31.75
254
1.50
38.10
305
1.75
44.45
355
2.00
50.80
406
2.25
57.15
457
2.50
63.50
508
2.75
69.85
556
3.00
76.20
610
4.00
101.6
813
Font name
Width × Height (dots)
0
09 ×15
1
12 × 20
2
16 × 25
3
19 × 30
4
24 × 38
5
32 × 50
6
48 × 76
7
22 × 34
8
28 × 44
9
37 × 58
Korean a
16 × 16(ascii:9×15)
Korean b
24 × 24(ascii:12×24)
Korean c
20 × 20(ascii:12×20)
Korean d
26 × 26(ascii:16×30)
Korean e
20 × 26(ascii:16×30)
Korean f
38 × 38(ascii:22×34)
GB2312 m
24 × 24(ascii:12×24)
BIG5 n
24 × 24(ascii:12×24)
Vector
Scalable
1) Relation between position and number of dots
SLCS Programming Manual
2) Font Information
203 dpi
Ver. 1.00
Page 7

- 7 -
3) Example of text and barcode
SATO
PV3
(0.0)
Direction of x axis
Direction of y axis
(
(
(
(0.0)
Direction of x axis
Direction of y axis
ABCD
ABCD
ABCD
Start Position
Start Position
Start Position
Start Position
SLCS Programming Manual
124 , 160)
124 , 356)
4) Example of rotation
0°
503 , 160)
270°
90°
180°
Ver. 1.00
Page 8

SLCS Programming Manual
- 8 -
1. Commands for Designing Label
T
Text
Draw text string on the image buffer
Enable or Disable double buffering
function
3. Printer Setting Commands
SP
SA
4. Variable related Commands
SV
?
1-3 Command List Command Description Remarks Page
V
B1
B2
B3
BD
CD
CS
P
Text (Vector Font) Draw text string on the image buffer
1d barcode Draw 1D Barcode on the image buffer
2d barcode Draw 2D Barcode on the image buffer
Special barcode Draw special barcode on the image buffer
Block Draw Draw line or box on the image buffer
Circle Draw Draw circle on the image buffer
Character Set selection Select international code table
Print Start printing the content of image buffer
2. Media & Buffer related Commands
ST
SM
SF
SL
SW
Set Print Type Select Thermal Direct / Transfer printing
Set Margin Set the marginal value of the image buffer
Set Back-feed Option Set back-feeding option
Set Label Length Set length of label
Set Label Width Set length of label
SB
CB
SS
SD
SO
TA
SC
AC
Set Buffer mode
Clear Buffer Clear image buffer
Set Speed Set printing speed
Set Density Set printing density from level 0 to 20
Set Orientation Set printing direction
Set serial Port Set serial port configurations
Set Offse t Set offset value
Set Tear-off/Cut Set Tear-off/Cut value
Set Counter Used in Template sequence
Set Counter Used in normal mode
Set Var iable Used in Template sequen ce
Get variables Get content of variables and counters
PV
Print with Variable Use this command in Template
Ver. 1.00
Page 9

SLCS Programming Manual
- 9 -
5. Template Related Commands
Delete stored Template from printer
memory
6. Image Data Related Commands
ID
Image D elete
Delete stored image
Draw bitmap image data on the image
buffer
Compression bitmap data
draw
Draw compression bitmap image data on
specific position of image buffer
BMP
BMP form at file draw
Draw BMP format file on the image buff er
7. Downloadable Font Related Commands
Downloadable font
Information
8. The Others
Cutting is executed after Printing is finished
command
Command Description Remarks Page
TS
TE
TR
TD
TI
IS
IR
II
LD
LC
Template store Start
Template store End
Template Recall Load and reuse the stored Template
Template Delete
Template Information Print the list of currently stored Templates
Image Store PCX format image file can be stored
Image R ecall Load and reuse the stored image
Image Inform ation Print the list of currently stored images
Bitmap data draw
All contents between these commands are
saved in printer memory
DT
DD
DI
@
PI
CUT
^cp
^cu
^PI
Download True T ype font Windows system font used
Downloadable font Delete Delete downloaded font
Print the list of currently stored images
Reset printer Initialize the printer
Printer Information Pr int current setting of printer
Enable/Disable Cutter option
Check Printer Status Return 2 bytes status values to host
Check Printer Status Return 1 byte status value to host
Send Printer information Send various information to host
if cutting option is enabled by this
Ver. 1.00
Page 10

SLCS Programming Manual
- 10 -
1-4 Programming Considerations
1) All commands are case-sensitive and some commands require one or more parameters
and ‘Data’.
2) Command Conventions
Tp1,p2,p3,p4,p5,p6,p7,p8,p9,’TEXT DATA’
Parameters Command Specific Data
Command
3) Each command line must be terminated with a ‘CR’(0Dh, 13) + ‘LF’(0Ah,10).
4) The commands which draw text, barcode, lines… just draw on the image buffer, they do
not start printing. The printer will start printing when the P command comes.
! Caution
The ‘P’ command must be terminated by ‘CR’(0x0d). If not, the printer will not start
printing until ‘CR’ comes.
Ver. 1.00
Page 11

SLCS Programming Manual
- 11 -
2. Detail Description
2-1 Commands for Designing a Label
These commands are used to design a label by providing text, barcode, line, box… and to
print content of image bu ffer on media.
1) T
Draw Text String on the image buffer.
2) V
Draw Text (Vector Font) String on the image buffer.
3) B1
Draw 1D Barcode on the image buffer.
4) B2
Draw 2D Barcode on the image buffer.
5) B3
Draw Special Barcode on the image buffer.
6) BD
Draw Line, Block, Box & Slope on the image buffer.
7) CD
Draw Circle on the image buffer.
8) CS
Set Code page and ICS( International Character Set).
9) P
Start printing the content of the image buffer.
Ver. 1.00
Page 12

- 12 -
2-1-1 T (Text String)
Value
Font Size(pt)
Width × Height(dots)
0
6
9 × 15
1
8
12 × 20
2
10
16 × 25
3
12
19 × 30
4
15
24 × 38
5
20
32 × 50
6
30
48 × 76
7
14
22 × 34
8
18
28 × 44
9
24
37 × 58
a
KOREAN 1
16 × 16 (ascii 9×15)
b
KOREAN 2
24 × 24 (ascii 12×24)
c
KOREAN 3
20 × 20 (ascii 12×20)
d
KOREAN 4
26 × 26 (ascii 16×30)
e
KOREAN 5
20 × 26 (ascii 16×30)
f
KOREAN 6
38 × 38 (ascii 22×34)
m
GB2312
24 × 24 (ascii 12×24)
n
BIG5
24 × 24 (ascii 12×24)
j
Shift JIS
24 × 24 (ascii 12×24)
♣
Value
Rotation
0
No Rotation
1
90 degrees
2
180 degrees
3
270 degrees
Description
Draw text string on the image buffer
Syntax
Tp1,p2,p3,p4,p5,p6,p7,p8,p9(,p10),’DATA’
Parameters
p1 : Horizontal position (X) [dot]
p2 : Vertical position (Y) [dot]
p3 : Font selection
SLCS Programming Manual
A to Z are assigned to Downloadable font. Refer to DT command.
p4 : Horizontal multiplier : 1 ~ 9
p5 : Vertical multiplier : 1 ~ 9
p6 : Right-side character spacing [dot]
Plus(+)/Minus(-) option can be used. Ex) 5, +3, -10…
p7 : Rotation
p8 : Reverse printing
N : Normal printing R : Reverse printing
Ver. 1.00
Page 13

SLCS Programming Manual
- 13 -
♣
♣
♣
p9 : Bold
N : Normal B : Bold
p10 : Text Alignment
F : p1 means the position of the first character in text string - Left alignment
L : p1 means the position of the last character in text string - Right alignment
R: Write text sting form ri ght to left.
(SATO → OTAS)
This parameter is for alignment of text lines.
‘DATA’ : The various data types can be used in the data field as followings.
1) Fixed text string : ‘ Text String’
2) Var iables declared in template by SV command : Vnn
3) Counters declared by the SC command : Cn
1) , 2) and 3) can be mixed together
Example
T50,100,3,1,1,0,0,N,N,’ SATO Label Printer’
T50,100,3,1,1,0,0,N,N,’Manufacturer :’V00
T50,100,3,1,1,0,0,N,N,V00
T50,100,3,1,1,0,0,N,N,’Manufacturer :’C0
T50,100,3,1,1,0,0,N,N,C0
If you want to print ’ or \ then you must type like \’ or \\ .
Ver. 1.00
Page 14

- 14 -
Example
SM20,20
T26,20,0,0,0,0,0,N,N,’Font- 6 pt’
T26,49,1,0,0,0,0,N,N,’Font - 8 pt’
T26,81,2,0,0,0,0,N,N,’Font - 10 pt’
T26,117,3,0,0,0,0,N,N,’Font - 12 pt’
T26,156,4,0,0,0,0,N,N,’Font - 15 pt’
T26,200,5,0,0,0,0,N,N,’Font - 20 pt’
T26,252,6,0,0,0,0,N,N,’Font - 30 pt’
P1
Result
Font – 6 pt
SLCS Programming Manual
Font – 8 pt
Font – 10 pt
Font – 12 pt
Font – 15 pt
Font – 20 pt
Font – 30 pt
Ver. 1.00
Page 15

- 15 -
2-1-2 V (Text String Vector Font)
Value
Rotation
0
No Rotation
1
90 degrees
2
180 degrees
3
270 degrees
Description
Draw text (Vector Font) string on the image buffer
Syntax
Vp1,p2,p3,p4,p5,p6,p7,p8,p9,p10,p11,p12, ’DATA’
Parameters
p1 : Horizontal position (X) [dot]
p2 : Vertical position (Y) [dot]
p3 : Font selection
U: ASCII (1Byte code)
K: KS5601 (2Byte code)
B: BIG5 (2Byte code)
G: GB2312 (2Byte code)
J: Shift-JIS (2Byte code)
SLCS Programming Manual
a: OCR-A (1Byte code)
b: OCR-B (1Byte code)
p4 : Font width (W)[dot]
p5 : Font height (H)[dot]
p6 : Right-side character spacing [dot]
Plus (+)/Minus (-) option can be used. Ex) 5, +3, -10…
p7 : Bold
N : Normal B : Bo ld
p8 : Reverse printing
N: Normal printing R: Reverse printing
p9 : Text styl e
N: Normal I: Italic
p10 : Rotation
p11: T ext Alignment (Optional)
Ver. 1.00
L: p1 means the position of the first character in the tex t string - Left alignment
R: p1 means the posi tion of the last character in the tex t string - Right alignment
C: p1 means the posi tion of the center charact er in the text strin g - Center ali g nm e nt
Page 16

SLCS Programming Manual
- 16 -
♣
p12: Text string write direction
0: Write text string form left to right (SATO)
1: Write text string form right to left (OTAS)
‘DATA’: The various data types can be used in the data field as follows.
1) Fixed text string: ‘Text String’
2) Var iables declared in template by SV command: Vnn
3) Counters declared by the SC command: Cn
1), 2), and 3) can be mixed together.
Example
V50,100,U,25,25,+1,N,N,N,0,L,0,'SATO Label Printer'
V50,200,U,35,35,-1,N,N,N,0,L,0, ’Manufacturer :’V00
V50,300,U,35,35,+1,B,R,I,0,L,0, V00
V50,400,U,45,25,+1,N,N,N,0,L,0,'Vector Font Test' C0
V50,500,U,25,45,+1,N,N,N,0,L,0, C0
♣
To print ’ or \, \’ or \\ must be typed.
Ver. 1.00
Page 17

- 17 -
Example
V50,100,U,25,25,+1,N,N,N,0,L,0,'Vector Font Test'
V50,200,U,35,35,-1,N,N,N,0,L,0,'Vector Font Test'
V50,300,U,35,35,+1,B,R,I,0,L,0,'Vector Font Test '
V50,400,U,45,25,+1,N,N,N,0 ,L,0,'Vector Font Test'
V50,500,U,25,45,+1,N,N,N,0,L,0,'Vector Font Test'
V50,700,U,65,65,+1,N,N,N,0,L,0,'ABCDEFGHIJKLMNO'
V50,900,U,65,65,+1,N,N,N,0,L,0,'abcdefghijklmno'
P1
Result
SLCS Programming Manual
Ver. 1.00
Page 18

- 18 -
2-1-3 B1 (1 Dimensional bar code)
p3
Barcode
p3
Barcode
0
Code39
9
UCC/EAN128
1
Code128
10
Code11
2
Interleaved 2of5
11
Planet
3
Codabar
12
Industrial 2of5
4
Code93
13
Standard 2of5
5
UPC-A
14
Logmars
UPC/EAN
Extensions
7
EAN13
16
Postnet
8
EAN8
Value
Rotation
0
No Rotation
1
90 degrees
2
180 degrees
3
270 degrees
Description
Draw 1D Barcode on the image buffer
Syntax
B1p1,p2,p3,p4,p5,p6,p7,p8(,p9),’DATA’
Parameters
p1 : Horizontal position (X) [dot]
p2 : Vertical position (Y) [dot]
p3 : Barcode selection
SLCS Programming Manual
6 UPC-E 15
p4 : Narrow bar width [dot]
p5 : Wide bar width [dot]
p6 : Barcode height [dot]
p7 : Rotation
p8 : HRI (Human Readable Interpretation)
0 : Not printed
1 : Below the barcode(Font Size : 1)
2 : Above the barcode(Font Size : 1)
3 : Below the barcode(Font Size : 2)
4 : Above the barcode(Font Size : 2)
Ver. 1.00
5 : Below the barcode(Font Size : 3)
6 : Above the barcode(Font Size : 3)
7 : Below the barcode(Font Size : 4)
8 : Above the barcode(Font Size : 4)
(p9) : quiet zone width(optional) : 0 ~ 20
Page 19

SLCS Programming Manual
- 19 -
♣
♣
Quiet zone is added to the front and end of the barcode for safe scanning.
Because of the quiet zone, the barcode seems to be seen drawn in incorrect
position. If p9 is not used, the printer automatically sets parameter to 0.
‘DATA’ : The various data types can be used in the data field as followings.
1) Fixed text string : ‘ Text String’
2) Var iable declared in template by SV command : Vnn
3) Counter declared by the SC command : Cn
4) In the Code 128, when send data to printer if codeset selection commands
Quiet zone with = p9 × narrow bar width(p4)
(>A,>B,>C) will be used codeset can be selected.
By using >A, Codeset will be set Codese t A.
By using >B, Codeset will be set Codeset B.
By using >C, Codeset will be set Codeset C.
If Codeset select command is not used, automatically set to Auto-mode.
1) , 2) and 3) can be used together
Example
B178,196,0,2,6,100,0,0,’1234567890’
B178,196,0,2,6,100,0,0,V00
B178,196,0,2,6,100,0,0,C0
B178,196,1,2,6,100,0,0,’>A1234567890’
B178,196,1,2,6,100,0,0,’>B1234567890’
B178,196,1,2,6,100,0,0,’>C1234567890>A5’
Ver. 1.00
Page 20

SLCS Programming Manual
- 20 -
Example
SM20,20
B178,196,0,2,6,100,0,0,’1234567890’ // Caution:The position is not (178,196) but
(78,196)
B150,468,0,4,10,200,0,0,’1234567890’
P1
Result
Ver. 1.00
Page 21
- 21 -
2-1-4 B2 (2 Dimensional bar code)
p3
2D Barcode
M
MaxiCode
P
PDF417
Q
QR Code
D
Data Matrix
A
Aztec
F
Code 49
C
CODEBLOCK
B
Micro-PDF
♣♣
Description
Draw 2D Barcode on the image buffer
Syntax
B2p1,p2,p3……’DATA’
Parameters
p1 : Horizontal position (X) [dot]
p2 : Vertical position (Y) [dot]
p3 : 2D barcode selection
SLCS Programming Manual
Following param eters (p4, p5 …. ,Data) are barcodes-specific.
See the following pages for details of each 2D barcodes.
Ver. 1.00
Page 22
- 22 -
Maxicode(When p3 is M)
p4
Rotation
0
Mode0
2
Mode2
3
Mode3
4
Mode4
Mode
Data Format
0
2 or 3
‘cl,co,pc,lpm’
4
‘lpm’
p1 : Horizontal position (X) [dot]
p2 : Vertical position (Y) [dot]
p3 : M (means ‘Maxicode’)
p4 : Mode selection
‘DATA’ : Data format is dependent on ‘Mode’
cl : Clas s Code(3 digits)
co : Country Code(3digits)
SLCS Programming Manual
Example
1)Mode 0
B2200,200,M,0, ’999, 840,06810,7317,THIS IS A TEST OF MODE 0 STRUCTURED
CARRIER MESSAGE ENCODING. THIS IS AN 84 CHAR MSG’
2)Mode 2
B2200,200,M,2,’999,840,06810,7317,THIS IS A TEST OF SATOPV3 LABEL PRINTER
MODE 2 ENCODING. THIS IS AN 84 CHAR.’
3)Mode3
B2200,200,M,3,’999,056,B1050,7317,THIS IS A TEST OF SATOPV3 LABEL PRINTER
MODE 3 ENCODING. THIS IS AN 84 CHAR.’
4)Mode4
Mode2 : Numeric Characters
Mode3 : International Characters
pc : Postal Code
lpm : Low priority message(data)
Ver. 1.00
B2200,200,M,4,’THIS IS A 93 CHARACTER CODE SET A MESSAGE THAT FILLS A
MODE 4, UNAPPENDED, MAXICODE SYMBOL...’
Page 23

- 23 -
PDF417(When p3 is P)
p6
EC Level
EC Codeword
0
0
2
1
1
4
2
2
8
3
3
16
4
4
32
5
5
64
6
6
128
7
7
256
8
8
512
p7
Data Type
Compression
0
Text
2 Characters per codeword
1
Numeric
2.93 Charact ers per codeword
2
Binary
1.2 Bytes per codeword
Value
Rotation
0
No Rotation
1
90 degrees
2
180 degrees
3
270 degrees
p1 : Horizontal position (X) [dot]
p2 : Vertical position (Y) [dot]
p3 : P (means ‘PDF417’)
p4 : Maximum Row Count : 3 ~ 90
p5 : Maximum Column Count : 1 ~ 30
p6 : Error Correction level
SLCS Programming Manual
p7 : Data compression method
p8 : HRI
0 : Not Printed
1 : Below the barcode
p9 : Barcode origin point
0 : Center of barcode
1 : Upper left corner of barcode(default)
p10 : Module Width : 2 ~ 9
p11 : Bar Height : 4 ~ 99
p12 : Rotation
‘DATA’ : ASCII data or Binary data.
Example
B2100,750,P,30,5,0,0,1,1,3,10,0,’ SATOPV3 Label Printer’ // The position is (100,750)
Ver. 1.00
Page 24

- 24 -
QR Code(When p3 is Q)
p6
Recovery Rate
L
7%
M
15%
Q
25%
H
30%
Value
Rotation
0
No Rotation
1
90 degrees
2
180 degrees
3
270 degrees
p1 : Horizontal position (X) [dot]
p2 : Vertical position (Y) [dot]
p3 : Q (means ‘QR Code’)
p4 : MODEL selection
1 : MODEL1
2 : MODEL2
p5 : ECC Level
p6 : Barcode Size : 1~4
p7 : Rotation
SLCS Programming Manual
‘DATA’ : ASCII data or Binary data.
Example
B2200,100,Q,2,M,4,0,'ABCDEFGHIJKLMN1234567890' // The position is (200,100)
Ver. 1.00
Page 25

- 25 -
Data Matrix(When p3 is D)
Value
Rotation
0
No Rotation
1
90 degrees
2
180 degrees
3
270 degrees
p1 : Horizontal position (X) [dot]
p2 : Vertical position (Y) [dot]
p3 : D (the ECC 200 data quality format)
p4 : Barcode Size : 1 ~ 4;
P5 : Reverse
N : Normal
R : Reverse(or Inverse) – Reverse Video or Negative image
p6 : Rotation
‘DATA’ : ASCII data or Binary data.
SLCS Programming Manual
Example
B2200,100,D,2,N, SATOPV3 Label Printer' // The position is (200,100)
Ver. 1.00
Page 26

- 26 -
Aztec Barcode(When p3 is A)
0
Default error correction level
1 ~ 99
Error correction percentage
101 ~ 104
1 ~ 4 layer compact symbol
201 ~ 232
1 ~ 32 layer full range symbol
300
Simple Aztec “Rune”
Value
Rotation
0
No Rotation
1
90 degrees
2
180 degrees
3
270 degrees
p1 : Horizontal position (X) [dot]
p2 : Vertical position (Y) [dot]
p3 : A (means ‘Aztec Bar Code’)
p4 : Barcode Size: 1~10
p5 : Extended channel interpretation code
0 : Disable Extended channel interpretation code
1 : Enable Extended channel interpretation code
p6 : Error control and symbol size/type
Value Error control and symbol size/type
SLCS Programming Manual
p7 : Menu symbol
0 : Disable Menu symbol
1 : Enable Menu symbol
p8 : Number of symbols for structured append: 1 ~ 26
p9 : Optional ID field for structured append: ID field string (Maximum 24 character)
p10 : Rotation
‘DATA’ : ASCII data or Binary data.
Example
B2100,100,A,5,0,0,0,1,1,0,'THIS IS AZTEC BARCODE TESTTHIS IS AZTEC BARCODE TEST'
B2400,100,A,7,0,0,0,1,1,1,'THIS IS AZTEC BARCODE TESTTHIS IS AZTEC BARCODE TEST'
Ver. 1.00
Page 27

- 27 -
Code 49 Barcode(When p3 is F)
Value
Rotation
0
Regular Alphanumeric Mode
1
Multiple Read Alphanumeric
2
Regular Numeric Mode
3
Group Alphanumeric Mode
4
Regular Alphanumeric Shift 1
5
Regular Alphanumeric Shift 2
7
Automatic Mode
Value
Rotation
0
No Rotation
1
90 degrees
2
180 degrees
3
270 degrees
p1 : Horizontal position (X) [dot]
p2 : Vertical position (Y) [dot]
p3 : F (means ‘Code 49 barcode’)
p4 : Narrow bar width [dot]
p5 : Wide bar width [dot]
p6 : Barcode height [dot]
p7 : HRI
0 : Not Printed
1 : Below the barcode
2 : Above the barcode
p8 : Starting mode
SLCS Programming Manual
p9 : Rotation
‘DATA’ : ASCII data or Binary data.
Example
B2100,100,F,2,7,22,1,7,0,'12345ABC'
B2300,200,F,2,7,44,2,7,0,'12345ABC'
B2500,300,F,2,7,66,1,7,0,'12345ABC'
B2100,400,F,1,3,88,0,7,0,'12345ABC'
Ver. 1.00
Page 28

- 28 -
CODABLOCK Barcode(When p3 is C)
Value
Description
A
CODABLOCK A mode uses the Code 39 character set
E
CODABLOCK E mode uses the Code 128 character set
CODABLOCK F mode uses the Code 128 character set and
Automatically adds Function 1.(FNC1)
Mode
Value
A
1 ~ 18
E
2 ~ 4
F
2 ~ 4
Value
Rotation
0
No Rotation
p1 : Horizontal position (X) [dot]
p2 : Vertical position (Y) [dot]
p3 : C (means ‘CODABLOCK barcode’)
p4 : Narrow bar width [dot]
p5 : Wide bar width [dot]
p6 : Barcode height [dot]
p7 : Security level
0 : Disable
1 : Enable
p8 : Number of characters per row (data columns): 2~62
p9 : Mode
SLCS Programming Manual
F
p10 : Number of rows to encode
p11 : Ro tat io n
‘DATA’ : ASCII data or Binary data.
Example
B210,100,C,2,5,30,0,30,F,4,0,'SATOPV3 BARCODE TEST 123 SATOPV3 BARCODE TEST 123
SATOPV3 BARCODE TEST 123 SATOPV3 BARCODE TEST 123'
B210,400,C,2,5,30,0,30,E,4,0,' SATOPV3 BARCODE T EST 123 SATOPV3 BARCO DE TEST 123
SATOPV3 BARCODE TEST 123 SATOPV3 BARCODE TEST 123'
B210,600,C,2,6,10,0,10,A,18,0,'123'
Ver. 1.00
Page 29

- 29 -
Micro-PDF417 Barcode(When p3 is B)
Value
Rotation
0
No Rotation
1
90 degrees
2
180 degrees
3
270 degrees
p1 : Horizontal position (X) [dot]
p2 : Vertical position (Y) [dot]
p3 : B (means ‘Micro-PDF417 barcode’)
p4 : Module width : 2 ~8
p5 : Barcode height [dot] : 1 ~ 99
p6 : Mode : 0 ~ 33
(Refer to Mirco-PDF417 Mode Table on next page)
p7 : Rotation
‘DATA’ : ASCII data or Binary data.
SLCS Programming Manual
Example
B2100,100,B,2,3,12,0,'ABCDEFGHIJKLMN1234567890'
B2100,300,B,2,3,20,0,'ABCDEFGHIJKLMN1234567890'
B2100,600,B,4,4,16,0,'ABCDEFGHIJKLMN1234567890'
B2100,900,B,2,6,8,0,'ABCDEFGHIJKLMN1234567890'
Ver. 1.00
Page 30

- 30 -
***** Mirco-PDF417 Mode Table *****
Number of
Columns
% of
EC
0 1 11
64 6 8
1 1 14
50
12
17
2 1 17
41
18
26
3 1 20
40
22
32
4 1 24
33
30
44
5 1 28
29
38
55
6 2 8
50
14
20
7 2
11
41
24
35
8 2 14
32
36
52
9 2 17
29
46
67
10 2 20
28
56
82
11 2 23
28
64
93
12 2 26
29
72
105
13 3 6
67
10
14
14 3 8
58
18
26
15 3 10
53
26
38
16 3 12
50
34
49
17 3 15
47
46
67
18 3 20
43
66
96
19 3 26
41
90
132
20 3 32
40
114
167
21 3 38
39
138
202
22 3 44
38
162
237
23 4 6
50
22
32
24 4 8
44
34
49
25 4 10
40
46
67
26 4 12
38
58
85
27 4 15
35
76
111
28 4 20
33
106
155
29 4 26
31
142
208
30 4 32
30
178
261
31 4 38
29
214
313
32 4 44
28
250
366
33 4 4
50
14
20
SLCS Programming Manual
Mode
(M)
Data
Number of
Data Rows
Cws for
Max Alpha
Characters
Max Digits Remarks
Ver. 1.00
Page 31

- 31 -
2-1-5 B3 (Speci al B arcode)
p3
Special Barcode
I
IMB(Intelligent Mail Barcode)
M
MSI Barcode
P
Plessey Barcode
T
TLC39 Barcode
R
RSS Barcode
♣♣
Value
Rotation
0
No Rotation
1
90 degrees
2
180 degrees
3
270 degrees
Description
Draw Special Barcode on the image buffer
Syntax
B3p1,p2,p3……’DATA’
Parameters
p1 : Horizontal position (X) [dot]
p2 : Vertical position (Y) [dot]
p3 : Special barcode selection
SLCS Programming Manual
Following parameters (p4, p5 …. ,Data) are barcodes-specific.
IMB (p3 = I)
p1 : Horizontal position (X) [dot]
p2 : Vertical position (Y) [dot]
p3 : I (means ‘IMB’)
p4 : Rotation
p5 : HRI :
‘DATA’ : ASCII data or Binary data.
See the following pages for details of each special barcodes.
0 : Not Printed
1 : Below the barcode
Example
B3100,100,I,0,1,'0123456709498765432101234567891' // The position is (100,100)
Ver. 1.00
Page 32
- 32 -
MSI Barcode (When p3 is M)
Value
Rotation
0
No check digits
1
1 Mod 10
2
2 Mod 10
3
1 Mod 11 and 1 Mod 10
Value
Rotation
0
No Rotation
1
90 degrees
2
180 degrees
3
270 degrees
p1 : Horizontal position (X) [dot]
p2 : Vertical position (Y) [dot]
p3 : M (means ‘MSI Barcode’)
p4 : Narrow bar width [dot]
p5 : Wide bar width [dot]
p6 : Barcode height [dot]
p7 : Check digit selection
p8 : Print check digit in HRI
0 : Not print check digit
1 : Print check digit
SLCS Programming Manual
p9 : Rotation
p10 : HRI :
0 : Not printed
1 : Below the bar code
2 : Above the bar code
‘DATA’ : ASCII data or Binary data.
Example
B3100,100,M,2,7,150,1,1,0,1,'123456'
B3500,100,M,2,7,150,1,1,0,2,'123456'
B3100,100,M,2,7,150,1,1,0,1,'123456'
B3100,300,M,2,7,150,0,0,0,1,'123456'
Ver. 1.00
Page 33

- 33 -
Plessey Barcode (When p3 is P)
Value
Rotation
0
No Rotation
1
90 degrees
2
180 degrees
3
270 degrees
p1 : Horizontal position (X) [dot]
p2 : Vertical position (Y) [dot]
p3 : P (means ‘Plessey Barcode’)
p4 : Narrow bar width [dot]
p5 : Wide bar width [dot]
p6 : Barcode height [dot]
p7: Print check digit
0 : Not print check digit
1 : Print check digit
p8 : Rotation
SLCS Programming Manual
p9 : HRI :
0 : Not printed
1 : Below the bar code
2 : Above the bar code
‘DATA’ : ASCII data or Binary data.
Example
B3450,100,P,2,7,150,1,0,2,'12345'
B350,100,P,2,7,150,1,0,1,'12345'
Ver. 1.00
Page 34

- 34 -
TLC39 Barcode (When p3 is T)
Value
Rotation
0
No Rotation
1
90 degrees
2
180 degrees
3
270 degrees
Data field
Description
ECI Number. If the seventh character is not a comma,
• This number is not padded.
Serial number. The serial number can contain up to 25
• This value is used if a comma follows the ECI number.
Additional data. If present, it is used for things such as
alphanumeric characters per field.
p1 : Horizontal position (X) [dot]
p2 : Vertical position (Y) [dot]
p3 : T (means ‘TLC39 Barcode’)
p4 : Narrow bar width of the Code39 [dot]
p5 : Wide bar width of the Code 39[dot]
p6 : Height of the cod39 [dot]
p7 : Row height of the Micro PDF417: 1 ~ 255
p8 : Narrow bar width of the Micro PDF417: 1~ 10
p9 : Rotation
‘DATA’ : ASCII data or Binary data.
SLCS Programming Manual
- D ata structure : ECI Number,Serial Number,Additional data
only Code 39 prints. This means if more than 6 digits
are present, Code 39 prints for the first six digits (and no
ECI Number
Serial Number
Additional data
Micro-PDF symbol is printed).
• Must be 6 digits.
• Firmware generates invalid character error if the
firmware sees anything but 6 digits.
characters and is variable length. The serial number is
stored in the Micro-PDF symbo l. If a comma follows the
serial number, then additional data is used below.
• If present, must be alphanumeric (letters and
numbers, no punctuation).
a country code.
Data cannot exceed 150 bytes. This includes serial
number commas.
• Additional data is stored in the Micro-PDF symbol and
appended after the serial number. A comma must exist
between each maximum of 25 characters in the
additional fields.
• Additional data fields can contain up to 25
Example
B350,100,T,2,4,50,3,2,0,'123456,ABCD12345678901234,5551212,88899'
Ver. 1.00
Page 35

- 35 -
RSS Barcode (When p3 is R)
Value
Barcode Type
0
RSS14
1
RSS14 Truncated
2
RSS14 Stacked
3
RSS14 Stacked Omnidirectional
4
RSS Limited
5
RSS Expanded
6
UPC-A
7
UPC-E
8
EAN-13
9
EAN-8
10
UCC/EAN-128 and CC-A/B
11
UCC/EAN-128 and CC-C
Value
Rotation
0
No Rotation
1
90 degrees
2
180 degrees
3
270 degrees
p1 : Horizontal position (X) [dot]
p2 : Vertical position (Y) [dot]
p3 : R (means ‘RSS Barcode’)
p4 : RSS Barcode type
SLCS Programming Manual
p5 : Magnification: 1 ~ 10
p6 : Separator height: 1 ~ 2
p7 : Barcode height [dot]
This parameter only affects the UCC/EAN barcode type and CC-A/B/C barcode type.
p8 : The segment width: 0 ~ 22 (Even numbers only)
T his parameter only affects the RSS Expanded barcode type.
p9 : Rotation
‘DATA’ : ASCII data or Binary data.
Example
B350,100,R,0,2,1,20,10,0,'12345678901|this is composite info'
Ver. 1.00
Page 36

- 36 -
2-1-6 BD (Block Draw)
p5
Type
Additional p6
O
Line Overwriting
Not necessary
E
Line Exclusive OR
Not necessary
D
Line Delete
Not necessary
S
Slope(a oblique line)
Thickness
B
Box
Thickness
♣
Description
Draw Line, Block, Box & Slope on the image buffer
Syntax
BDp1,p2,p3,p4,p5(,p6)
Parameters
p1 : Horizontal start position (X) [dot]
p2 : Vertical start position (Y) [dot]
p3 : Horizontal end position (X) [dot]
p4 : Vertical end position (Y) [dot]
p5 : Options
SLCS Programming Manual
If p5 is S or B, then additional p6 must follow p5.
Ver. 1.00
Page 37

- 37 -
Example
1) Start and end position
(p1,p2)
2) Overwriting mode(when p5 is O)
SLCS Programming Manual
(p3,p4)
3) Exclusive OR mode(when p5 is E)
4) Delete block mode(when p5 is D)
Ver. 1.00
Page 38

- 38 -
5) Slope block mode(when p5 is S)
(p1,p2
p6 : Thickness
(p1,p2
p6 : Thickness
SLCS Programming Manual
)
(p3,p4)
6) Draw box mode(when p5 is B)
)
(p3,p4)
Ver. 1.00
Page 39

- 39 -
2-1-7 CD (Circle Draw)
Value
Diameter (mm)
Width × Height(dots)
1
5
40 × 40
2
7
56 × 56
3
9
72 × 72
4
11
88 × 88
5
13
104 × 104
6
21
168 × 168
(100,200)
Circle size(diameter is 7mm)
Description
Draw Circ le on t he image buffer
Syntax
CDp1,p2,p3,p4
Parameters
p1 : Horizontal start position (X) [dot]
p2 : Vertical start position (Y) [dot]
p3 : Circle Size Selection
SLCS Programming Manual
p4 : Multiplier : 1 ~ 4
Example
CD100,200,2,1
Ver. 1.00
Page 40

- 40 -
2-1-8 CS (Character Set selection)
p1
Country
0
U.S.A
1
France
2
Germany
3
U.K
4
Denmark I
5
Sweden
6
Italy
7
Spain I
8
Norway
9
Denmark II
10
Japan
11
Spain II
12
Latin America
13
Korea
14
Slovenia/Croatia
15
China
Description
To select international character set and code table.
Syntax
CSp1,p2
Parameters
p1 : International Character Set
SLCS Programming Manual
Ver. 1.00
Page 41

SLCS Programming Manual
- 41 -
p2
Code Table
Language
0
CP437
U.S.A
1
CP850
Latin1
2
CP 852
Latin2
3
CP 860
Portuguese
4
CP 863
Canadian French
5
CP 865
Nordic
6
WCP 1252
Latin I
European
Combined
8
CP 857
Turkish
9
CP 737
Greek
10
WCP 1250
Latin 2
11
WCP 1253
Greek
12
WCP 1254
Turkish
13
CP 855
Cyrillic
14
CP 862
Hebrew
15
CP 866
Cyrillic
16
WCP 1251
Cyrillic
17
WCP 1255
Hebrew
18
CP 928
Greek
19
CP 864
Arabic
20
CP 775
Baltic
21
WCP1257
Baltic
22
CP858
Latin 1 + Euro
♣
Address
Code Page
0x80
Euro Currency
0x81 ~ 0x9f
PC865
0xA0 ~ 0xff
PC1252
p2 : Code Pages
7 CP 865 + WCP 1252
Default Setting is U.S.A standard (p1=0 and p2=0).
♣ European Combined Page
Ver. 1.00
Page 42

SLCS Programming Manual
- 42 -
5Ch 5D
h
7Ch 7D
h
0 1 2 3 4 5 6 7 8 9 A B C D E F
0
0
1
16 2 32
3
48
4
64
5
80
6
96
7
112
※
International Character Set
Country
Hex 23h 24h 40h 5Bh
5Eh 60h 7Bh
Dec 35 36 64 91 92 93 94 96 123 123 125 126
U.S.A
France
Germany
$ @ [ \ ] ^ ` { | } ~
#
$ à ° ç § ^ ` é ù è ¨
#
$ § Ä Ö Ü ^ ` ä ö ü β
#
U.K. £ $ @ [ \ ] ^ ` { | } ~
Denmark I
Sweden
Italy
$ @ Æ Ø Å ^ ` æ ø å ~
#
¤ É Ä Ö Å Ü é ä ö å ü
#
$ @ ° \ é ^ ù à ò è ì
#
Spain ₧ $ @ і Ñ ¿ ^ ` ¨ ñ } ~
Norway
Denmark II
Japan
Spain II
Latin America
¤ É Æ Ø Å Ü é æ ø å ü
#
$ É Æ Ø Å Ü é æ ø å ü
#
$ @ [ ¥ ] ^ ` { | } ~
#
$ á ¡ Ñ ¿ é ` í ñ ó ú
#
$ á ¡ Ñ ¿ é ü í ñ ó ú
#
7E
Korea
Slovenia/Croatia
China
$ @ [ \ ] ^ ` { | } ~
#
$ Ž Š Đ Ć Č ž š đ ć č
#
¥ @ [ \ ] ^ ` { | } ~
#
Control Characters
ASCII
Code
0~31 : Control Code
32~127 : Alphanumeric
Refer to the “Code Pages Manual” for more extension code pages table.
! " # $ % & ' ( ) * + , - . /
0 1 2 3 4 5 6 7 8 9 : ; < = > ?
@ A B C D E F G H I J K L M N O
P Q R S T U V W X Y Z [ ] ^ _ `
a b c d e f g h i j k l m n o p
q r s t u v w x y z { | } ~ ⌂
Ver. 1.00
Page 43

SLCS Programming Manual
- 43 -
♣
2-1-9 P (Print)
Description
Let the printer start printing the content of image buffer
Syntax
Pp1,[p2]
Parameters
p1 : Number of label sets : 1 ~ 65535
p2 : Number of copies of each label : 1 ~ 65535
The P command cannot be used in a template sequence. If printing command is needed
in template sequence, then use the PV command. (See the example of next page)
! Caution
The ‘P’ command should be terminated by ‘CR’(0x0d).
If not, the printer will not start to print until ‘CR’ comes.
Ver. 1.00
Page 44

SLCS Programming Manual
- 44 -
Example
(1) In case of Using P (P is used outside of template sequence)
TS’TPL_TST1’ // Start Template Store
SV00,15,N,’Model Name :’ // Declare variable V00
T50,100,3,1,1,0,0,N,N,’Model Name :’V00 // T command with variable
TE // End Tem plate Store
TR’TPL_TST1” // Recall stored template ‘TPL_TST1’
? // Get content of variable used in recalled template
LABEL PRINTER // Content of variable V00
P3,2 // when using P command, It must not be inside
template,
// but be used after recalling the template and entering
the
// contents of all variables.
// After P com m and, printer starts printing.
(2) In case of Using PV(PV is used inside of template sequence
TS’TPL_TST1’ // Start Template Store
SV00,15,N,’Model Name :’ // Declare variable V00
SV01,2,N,’# of set :’ // Declare variable V01
SV02,2,N,’# of copies : ‘ // Declare variable V02
T50,100,3,1,1,0,0,N,N,’Model Name :’V00 // T command with variable
PVV01,V02 // PV command can be used inside the template
TE // End Tem plate Store
TR’TPL_TST1” // Recall stored template ‘TPL_TST1’
? // Get content of variable used in recalled template
LABEL PRINTER // Content of variable V00
3 // Content of variable V00
2 // Content of variable V00
// As soon as all contents of variables are entered’
// printer will starts printing
Ver. 1.00
Page 45

- 45 -
2-2 Media & Buffer Related Commands
1) ST
Select Thermal Direct/Transfer Printing.
2) SM
Set marginal value in label(Image buffer)
3) SF
Set back-feed option.
4) SL
Set label(Image buffer) length
5) SW
SLCS Programming Manual
Set label(Image buffer) width
6) SB
Set buffer mode(Enable or disable Double Buffering)
7) CB
Clear Image Buffer
Ver. 1.00
Page 46

- 46 -
2-2-1 ST (Set Printing Type)
♣
Description
Select Thermal Direct Printing or Thermal Transfer Printing.
Syntax
STp1
Parameters
p1 : Direct Thermal / Thermal Transfer
- d : Direct Thermal
- t : Thermal Transfer, Not supported
2-2-2 SM (Set Margin)
Description
Set marginal value of the image buffer.
SLCS Programming Manual
This command moves the origin point (0,0) to (p1,p2) and make (p1,p2) become the new
origin.
Syntax
SMp1,p2
Parameters
p1 : Horizontal margin [dots]
p2 : Vertical margin [dots]
The origin point is upper-left point of the image buffer
Ver. 1.00
Page 47

- 47 -
** When printing orientation is from top to bottom
New Origin : (p1,p2)
(p1,p2) : New Origin
Label Feeding
Direction
SLCS Programming Manual
(0,0) : Origin
virtual (0,0)
Image Buffer New Image Buffer
** When printing orientation is from bottom to top.
virtual (0,0)
Label Feeding
Direction
Ver. 1.00
Page 48

- 48 -
2-2-3 SF (Set Back-Feed Option)
♣
♣
Description
Set back-feed option.
This command decides whether printer does back-feed action before starting printing.
This command is not supported.
Syntax
SFp1(,p2)
Parameters
p1 : Enable/Disable
- 0 : Disable back-feed option.
- 1 : Enable back-feed option(Default)
p2 : Back feeding step quantity.
- This parameter is valid when p1 is 1.
- The step quantity defined by user can’t exceed printer’s default feeding quantity.
SLCS Programming Manual
- 0 means printer’s default feeding quantity.
This option is useful for the continuous paper or black mark media with perforation line
away from black mark.
The printer’s default back feeding step quantity depends on the printer models and
printer modes such as normal, peeler or cutter.
Examples)
SF0 → Disable Printer’s back-feeding option.
SF1 → Default quantity of Back feed is executed before printing.
SL1,0 → Default quantity of Back feed is executed before printing.
SL1,100 → 100 step’s Back feed is executed before printing.
SL0,100 → Back feed is disabled and p2(100) is ignored.
Ver. 1.00
Page 49

- 49 -
2-2-4 SL (Set Length)
♣
♣
♣
p3
Media type
G
Gap
C
Continuous
B
Black Mark
♣
♣
♣
♣
♣
♣
♣
Description
Set length of label and gap(or Black Mark) and specify media type.
Syntax
SLp1,p2(,p3)(,p4)
Parameters
p1 : Label length [dots] : Maximum 2432 dots(12 inch)
Double buffering feature can be used only when label length(p1) is less
than 1216(2432/2, 6inch) dots.
If p1 is over 1216 dots, the double buffering feature will be automatically
released.
So if you don’t use double buffering feature, you can design maximum
2432 dots(12 inch) size label.
p2 : Gap length or thickness of black line [dots]
SLCS Programming Manual
p3 : Media Type
The default value of label length is 6 inch(1216 dots)
This command sets the length of image buffer and the printer will print
and form feed as much as the length set by this command.
When using Continuous type media, the label length must be set.
p4 : Offset Length between Black Mark(or Gap) and perforation line [dots].(-70~120)
This parameter is valid when p3 parameter is used.
Examples)
SL1200,20 → Gap media,Media length:1200dots,Gap length:20dots
SL1200,20,C → Continuuous media,Media length:1200dots,Gap length:20dots
SL1200,20,G → Gap media,Media length:1200dots,Gap length:20dots
SL1200,20,B → Black Mark media,Media length:1200dots,Gap length:20dots
The perforation line is on the black mark.
SL1200,20,B,100 → Black Mark media,Media length:1200dots,Gap length:20dots
The perforation line is 100 dots behind from black mark.
In the Gap Mode, the printer will form feed until meeting the next gap.
In the Continuous Mode, the printer will form feed as much as label length set by SL.
In the B/M Mode, the printer will form feed until meeting the next B/M.
Example – p1 & p2(Length)
Ver. 1.00
Page 50
SLCS Programming Manual
- 50 -
p1
(In this example,406)
P2
(In this example,20)
SL406,20 // Set label length to 406 dots (2 inch, 50mm) and gap length to 20 dots(2.5mm)
Ver. 1.00
Page 51

SLCS Programming Manual
- 51 -
Black Mark
Perforation Line
p4 : Offset Length
Example – p3(Media Type)
1. Gap Type 2. Continuous Type 3. Black Mark Type
Example – p4(Offset Lenght)
Ver. 1.00
Page 52

- 52 -
2-2-5 SW (Set Width)
♣
♣
p1
Printing Area
SL and SW
Description
Set label width.
Resize the image buffer to match the label size.
Syntax
SWp1
Parameters
p1 : Label width [dots]
The default value of label width is 4.1 inch( 832 dots) and that is the
maximum printable width.
Mobile Label Printer is the center aligned printer and media is positioned
in the center of the head.
SLCS Programming Manual
Example
SW406 // Set label width to 2 inch(406 dots)
Maximum
Buffer Width
Printer Head, Max 832dots(4 inch)
Set by
Buffer Width
Maximum
Set by SL
Ver. 1.00
CENTER OF HEAD
Page 53

SLCS Programming Manual
- 53 -
♣
♣
2-2-6 SB (Set Buffer mode)
Description
Set double buffer mode
Syntax
SBp1
Parameters
p1 : Enable ‘Double Buffering’ function.
0 : Disable double buffer mode
1 : Enable double buffer mode(Default)
Double buffering feature enables the printer to construct the image buffer for the next
label while printing the current label.
Double buffering feature can be used only if the label length set by SL is less than half of
the maximum label length.
2-2-7 CB (Clear Buffer)
Description
Clear image buffer and be ready to make a new label.
Syntax
CB
Example
CB // Clear Image Buffer
Ver. 1.00
Page 54

- 54 -
2-3 Printer Setting Commands
1) SS
Set printer speed
2) SD
Set printing density
3) SO
Set printing orientation
4) SP
Set serial port
5) SA
SLCS Programming Manual
Set Offset
6) TA
Set Tear-off/Cut
Ver. 1.00
Page 55

- 55 -
2-3-1 SS (Set Speed)
Value
Speed
0
2.5 ips
1
3.0 ips
2
4.0 ips
3
5.0 ips
Description
Set print speed
Syntax
SSp1
Parameters
p1 : Speed set value
SLCS Programming Manual
2-3-2 SD (Set Density)
Description
Set printing density
Syntax
SDp1
Parameters
p1: Density Level
- 0 ~ 20 (0 is the lowest density)
Ver. 1.00
Page 56

SLCS Programming Manual
- 56 -
1. SOT (Print from Top to Bottom)
2. SOB (Print from Bottom to Top)
2-3-3 SO (Set Orientation)
Description
Set printing direction
Syntax
SOp1
Parameters
p1 : Printing direction
T : Print from top to bottom(default)
B : Print from bottom to top
Example
SOT / / Print from top of the image buffer to bottom.
SOB // Print from bottom of the image buffer to top.
Printing Direction
Ver. 1.00
Page 57

- 57 -
2-3-4 SP (Set Port)
Value
Baud Rate(bps)
1
19,200
2
38,400
N
No parity(Default)
8
8 bits (Default)
Value
Stop bits
Description
Set serial port.
Syntax
SPp1,p2,p3,p4
Parameters
p1 : Baud rate
p2 : Parit y
SLCS Programming Manual
0 9,600
3 57,600
4 115,200
Value Parity
O Odd parity
E Even parity
p3 : Number of data b i ts
Value Data bits
7 7 bit
p4 : Number of stop bits
1 1 bit(Default)
2 2 bits
Ver. 1.00
Page 58

SLCS Programming Manual
- 58 -
♣
♣
2-3-5 SA (Set Offset)
Description
Save (set) offset length between black marks (or gap) and dotted lines [dots]
Syntax
SAp1
Parameters
p1 : -120~70
Offset values saved via the use of SA commands are stored permanently on the printer.
(Offset values saved via the cf. SL command are reset after the power is turned off.)
2-3-6 T A (T ear-off/Cutter Position Setting)
Description
This function regulates the label cutting location After printing.
Tear-off position or Cut position can adjust.
Syntax
TAp1
Parameters
p1 : -70~120
Tear-off/Cutter Po sition values saved via the use of TA commands are stored permanently
on the printer.
Ver. 1.00
Page 59

- 59 -
2-4 V ariable Related Command s
1) SC
Counters which is used in template sequence
2) AC(Auto Counter)
Counters which is used in normal commands sequence
(outside of template sequence)
3) SV
Set variable
4) ?
Get data for counter and variable
SLCS Programming Manual
5) PV
Print with variables
Ver. 1.00
Page 60

- 60 -
2-4-1 SC (Set Counter)
♣
Value
Justification
N
No
R
Right
L
Left
C
Center
♣
♣
♣
Description
Define one counter of total 10 counters.
Counters must be used in Template sequence and execute consecutive auto-numbering
function.
Syntax
SCp1,p2,p3,p4,’Prompt’
Parameters
p1: Identity of Counter : 0 ~ 9
Total 10 counters, from C0 to C9, are provided.
p2: The size of the field which displays the content of counter : 1 ~ 27
p3: Justification in field(Field size is p2)
SLCS Programming Manual
p4 : Step Value : ±1 ~ ±9
+ or – symbol must precede . Ex) –2 or +3
‘Prompt’: This text string is transmitted to host(PC) by serial interface in order to
give information to host about the declared counter.
The data field of T(Text) or B(Barcode) commands is used to print the contents of counter.
SC should be used just in Templ at e sequence. If you want to use counter function in
normal mode(not in Template), use the AC(Auto Counter).
Example
SC0,7,N,+3,’Please Enter Serial Number’
Ver. 1.00
Page 61

- 61 -
2-4-2 AC (Auto Counter)
♣
♣
♣
♣
♣
Description
Define one counter of total 10 counters.
Counters can be used in normal mode(not in Template) and execute consecutive autonumbering.
Syntax
ACp1,p2,p3,’Start Value’
Parameters
p1 : Identity of Counter : 0 ~ 9
Total 10 counters, from C0 to C9, are provided.
p2 : The size of the field which displays the content of counter : 1 ~ 27
p3 : Step Value : ±1 ~ ±9
+ or – symbol must precede . Ex) –2 or +3
‘Start Value’ : Start value of auto-counting. Just digits can be used in this field
SLCS Programming Manual
The Auto-counter defined by AC command can be printed with T and B1 command.
This function is useful to print serial number or serial barcode without using Tem plate.
AC can not be used in Templat e sequence. If you want to use counter function in
Templat e sequence, use the SC command.
Example
AC0,3,+1,'123' // Please input the start value of counting between ‘ marks
AC1,7,+1,'1234567'
T100,100,3,1,1,0,0,N,N,C0
B1100,400,0,2,7,100,0,1,12,C1
P3,1
Ver. 1.00
Page 62

SLCS Programming Manual
- 62 -
Value
Justification
N
No
R
Right
L
Left
C
Center
♣
♣
2-4-3 SV (Set Variable)
Description
Define variables for the text or barcode ‘data’ f ields.
Syntax
SVp1,p2,p3,’Prompt’
Parameters
p1 : Identity of Variables : 00 ~ 99
p2 : Maximum number of characters : 1 ~ 99
p3 : Justification in field(Field size is p2)
‘Prompt’ : This ASCII text field is used to ask a value to be entered for the variable(p1)
and is transmitted to the host by serial interface.
The data field of T(Text) or B(Barcode) commands is used to print the contents of variable.
Variable is entered to data field like V00 or V01.
Example
SV01,20,N,’Please Enter Product Code :’
Ver. 1.00
Page 63

SLCS Programming Manual
- 63 -
♣
2-4-4 ? (Get Variables)
Description
Use this command to get the content of variables or counters
Syntax
?
Content of variable
Data must be entered in ascending order
Example
TS’Template1’ // Template Store Start
SV00,20,N,’Enter Company Name : ’ // Declare(Set) variable V00
SV01,15,N,’Enter Product Code :’ // Declare(Set) variable V01
T50,30,3,1,1,0,0,N,N,V00 // Use T command to print V00
T50,150,3,1,1,0, 0,N,N,’Code : ’V01 // Use T command to print V01
TE // Template Store End
TR’Template1’ // Recall Template1
? // Start to get data for variables
SEM / / d ata for V00
PV3 // data for V01
P1 / / Start Printing when the P command comes
Result
SEM
Code : PV3
Ver. 1.00
Page 64

SLCS Programming Manual
- 64 -
2-4-5 PV (Print with Variables)
Description
This command is used in template sequence.
The parameters are given by variables.
Syntax
PVp1,[p2]
Parameters
p1 : Number of label sets : 1 ~ 65535
p2 : Number of copies of each label : 1 ~ 65535
Example
TS’Template1’ // Template Store Start
SV00,20,N,’Please Input the Name :’ // Declare(Set) variable V00
SV01,5,N,’Input Number of label sets :’ // Declare(Set) variable V01
SV02,5,N,’Input Number of label copies :’ // Declare(Set) variable V02
T50,30,3,1,1,0,0,N,N,V00 // Write V00 to image buffer
PVV01,V02 / / Print V00, V02 copies, V01 sets
TE // Template Store End
TR’Template1’ // Recall Template1
? // Star t to get data for variables
This is PV Test // data for V00
2 // data for V01
1 // data for V02
*** Start Printing as soon as data for all variables(and counters) are entered. ***
Ver. 1.00
Page 65

SLCS Programming Manual
- 65 -
2-5 Template Related Commands
Template(a certain format of label, sequence of SLCS commands) related commands
1) TS
Indicate start of template sequence store.
2) TE
Indicate end of template sequence store.
3) TR
Recall and reuse stored template.
4) TD
Delete stored template.
5) TI
Print the list of all templates stored in memory.
Ver. 1.00
Page 66

- 66 -
2-5-1 TS (Template store Start)
♣
♣
Description
Start templa te sequence sto ring.
All the contents following ‘TS’ are stored in memory until meeting ‘TE’ Command.
Syntax
TS’Template name’
Parameters
‘Templ at e name’: This name will be used when ‘Recall’ the stored template.
♣ The name is allowed to be up to 10 characters long.
♣ The ‘Template name’ is Case-Sensitive.
TI command shows the list of currently stored Templ at es.
SLCS Programming Manual
2-5-2 TE (Template store End)
Description
End template sequence storing
Syntax
TE
When storing is finished, the printer sends ‘!’ to the host to prompt end of storing.
Example
TS’Template1’ // Start template storing
……
TE // End template storing
Ver. 1.00
Page 67

- 67 -
2-5-3 TR (Template Recall)
♣
♣
♣
Description
Recall the stored template from memory to make a label and print that.
Syntax
TR’Template nam e’
Parameters
‘Templ at e name’ : Indicate the template to be recalled.
♣ The name is allowed to be up to 10 characters long.
♣ The ‘Template name’ is Case-Sensitive.
Example
TR’Template1’ // Recall ‘Template1’
SLCS Programming Manual
If recalled Template does not include any variable or counter, just ‘P’ command is enough
to start printing.
If recalled Template includes variables or counters but not ‘PV’(Print with Variables), use
‘?’ command to get data for variables and counters and finally ‘P’ command is necessary
to start printing.
If recalled Template includes PV commands, printing will start as soon as all data for
variables and counters are entered.
Ver. 1.00
Page 68

- 68 -
2-5-4 TD (Template Delete)
Description
Delete stored template from memory
Syntax
TD’Template nam e’
Parameters
‘Templ at e name’ : Indicate the template to be deleted.
♣ The name is allowed to be up to 10 characters long.
♣ The ‘Template name’ is Case Sensitive.
♣ By using *, all templates will be deleted from memory.
Example
TD’Template1’ // Delete ‘Template1’
SLCS Programming Manual
TD* // Delete all currently stored templates
2-5-5 TI (Template Information)
Description
Print list of currently stored templates and available memory space
Syntax
TI
Example
TI
Result
Templates Information
========================
1. Template1
2. Template2
Available template memory : 53Kbyte
Ver. 1.00
Page 69

SLCS Programming Manual
- 69 -
2-6 Image Related Commands
These commands provi de functions to download and print graphic data.
PCX and BMP format file are supported and bitmap image data can be printed directly.
1) IS
Download PCX format image data to NV(Non Volatile) area of memory.
2) IR
Recall and print downloaded image data.
3) ID
Delete image data in NV memory.
4) II
Print all images stored in memory.
5) LD
Draw the bitmap image data directly on specific position on image buffer.
6) LC
Draw compression bitmap image data on specific position of image buffer.
7) BMP
Draw BMP format image file directly on specific position on image buffer.
Ver. 1.00
Page 70

- 70 -
2-6-1 IS (Image Store)
♣
♣
♣
Description
Download PCX format Image file into the Printer Memory
Syntax
ISp1,’Image name’DATA OF *.PCX
Parameters
p1 : The size of image file in unit of byte.
‘Image name’ : This is the name that will be used when recalling the stored image data.
♣ The name is allowed to be up to 10 characters long.
♣ The name is case sensitive.
DATA OF *.PCX : Binary data string of PCX file.
2-6-2 IR (Image Recall)
SLCS Programming Manual
Description
Recall the stored image from memory and draw that on the image buffer.
Syntax
IRp1,p2,’Image name’
Parameters
p1 : Horizontal position (X) [dot]
p2 : Vertical position (Y) [dot]
‘Image name’ : Indicate the image data to be recalled.
Variable can be used in this field.
The name is allowed to be up to 10 characters long.
This name is Case Sensitive.
Example
IR30,100,’Image1’ // Recall ‘Image1’
IR30,100,V01 // Variable can be used in name field
Ver. 1.00
Page 71

- 71 -
2-6-3 ID (Image Delete)
Description
Delete stored image from memory
Syntax
ID’Image name’
Parameters
‘Image name’ : Indicate the Image in memory to be deleted.
♣ The name is allowed to be up to 10 characters long.
♣ This name is Case Sensitive.
♣ By using *, all images in memory will be deleted.
Example
ID’Image1’ // Delete ‘Image1’
SLCS Programming Manual
ID* // Delete all currently stored images
2-6-4 II (Image Information)
Description
Print list of currently stored images in memory and available memory space
Syntax
II
Example
II
Result
Image Inform ation
=====================
1. Image1
2. Image2
Available Images memory : 5.3Kbyte
Ver. 1.00
Page 72

- 72 -
2-6-5 LD
SLCS Programming Manual
Draw bitmap image data on specific position of image buffer.
Syntax
LDxL xH yL yH dhL dhH dvL dvH d1~dk
Parameters
xL : Low byte of horizontal start position (X) [dot]
xH : High byte of horizontal start position (X) [dot]
→ Start position in x direction = xH * 256 + xL
yL : Low byte of vertical start position (Y) [dot]
yL : High byte of vertical start position (Y) [dot]
→ Start position in y direction = yH * 256 + yL
dhL : Low byte of the number of bytes in x-direction.
dhH : High byte of the number of bytes in x-direction.
→ Number of data in x direction = dhH * 256 + dhL
dvL : Low byte of the number of lines.
dvH : High byte of the number of lines.
→ Number of data in y direction = dvH * 256 + dvL
d1~dk : bitmap image data.
→ k = (dhH*256 + dhL) * (dvH*256 + dvL)
! CAUTION
There are no commas(,) and no space between each parameters.
Ver. 1.00
Page 73

SLCS Programming Manual
- 73 -
① ② ③ ④ ⑤
① x position : 0x02 * 0x100(256) + 0x11 = 0x211(529)
② y position : 0x02 * 0x100(256) + 0x40 = 0x240(576)
③ horizontal data num ber : 0x00 * 0x100(256) + 0x08 = 0x08(8)
④ vertical data num ber : 0x00 * 0x100(256) +
⑤ bitmap data : total number = 8 * 32 = 256
①, ②)
③ ④
Example
LD 0x11 0x02 0x40 0x02 0x08 0x00 0x20 0x00 0xFF ~ 0xFF
(
0x20 = 0x20(32)
Ver. 1.00
Page 74

SLCS Programming Manual
- 74 -
2-6-6 LC
Draw compression bitmap image data on specific position of image buffer
Syntax
LCp1p2xL xH yL yH dhL dhH dv L dvH d1~dk
Parameters
p1: Compression type
R: RLE
p2: Color
0x00: black
0x01: Color(red or blue)
xL : Low byte of horizontal start position (X) [dot]
xH : High byte of horizontal start position (X) [dot]
→ Start position in x direction = xH * 256 + xL
yL : Low byte of vertical start position (Y) [dot]
yH : High byte of vertical start position (Y) [dot]
→ Start position in y direction = yH * 256 + yL
dhL : Low byte of the number of bytes in x-direction.
dhH : High byte of the number of bytes in x-direction.
→ Number of data in x direction = dhH * 256 + dhL
dvL : Low byte of the number of lines.
dvH : High byte of the number of lines.
→ Number of data in y direction = dvH * 256 + dvL
d1~dk :
Compression bitmap image data.
→ k = (dhH*256 + dhL) * (dvH*256 + dvL)
! CAUTION
There are no commas(,) and no space between each parameters.
Ver. 1.00
Page 75

SLCS Programming Manual
- 75 -
○
○
○
○
○
○
○
①Compression
②
③
④
⑤
○
○
③, ④)
⑤ ○
Example
LC R 0x00 0x11 0x02 0x40 0x02 0x08 0x00 0x20 0x00 0xFF ~ 0xFF
1E
A A
2E
A A
3E
A A
4E
A A
5E
A A
6E
A A
7E
A
Color : 0x00 = Black
x position : 0x02 * 0x100(256) + 0x11 = 0x211(529)
y position : 0x02 * 0x100(256) + 0x40 = 0x240(576)
horizontal data number : 0x00 * 0x100(256) + 0x08 = 0x08(8)
6E
Avertical data number : 0x00 * 0x100(256) + 0x20 = 0x20(32)
7E
A
Abitmap data : total number = 8 * 32 = 256
type : R =RLE
(
6
RLE compression
This is the algorithm to compress the continuous data.
The compression is applied to 0x00 & 0xff data but not the others.
0xff 0x04 data is created if 0xff is repeated four times like 0x00 0x00 0x00 0x00.
In the same way, 0x00 0x04 is created by four times repeats of 0x00 such as 0x00 0x00 0x00 0x00.
Here is the example of compression.
Example) 0x78 0x78 0xff 0xff 0xff 0xff 0xff 0x22 0x00 0x00 0x00 0x00
0x78 0x78 0xff 0x05 0x22 0x00 0x04
Ver. 1.00
Page 76

- 76 -
2-6-7 BMP
SLCS Programming Manual
Send BMP format file directly to printer.
Just white/black BMP file is supported
Syntax
BMPp1,p2↓
Data s tr ing of *.bmp
Parameters
p1 : Horizontal position (X) [dot]
p2 : Vertical position (Y) [dot]
1. ↓ means ‘CR(+LF)’
2. There is comma(,) between p1 and p2.
3. After p2(Before sending BMP data string) ‘CR(+LF)’ must foll ow.
Example
In dos mode,
COPY bmp.txt+image2.bmp+P.txt LPT1 /b
Bmp.txt
BMP200,200 ↓
P.txt
P1 ↓
Ver. 1.00
Page 77

SLCS Programming Manual
- 77 -
2-7 Downloadable font Related Commands
Download fonts into the printer memory. Users can download special size or special
design of ASCII font and use this font with T command.
1) DT
Download True Type Font into Printer Memory
2) DD
Delete downloaded fon t s fro m memor y
3) DI
Print all downloaded fonts in memory and available memory space.
Ver. 1.00
Page 78

- 78 -
2-7-1 DT (Download True Type Font)
p1
p2
F
a
b
DATA
b
DATA
a
p2 =
12
bn =8bits(1Byte)
Number of DATAn = 12
Description
Download windows system font into printer memory.
Syntax
DTp1,p2,’Font Name’ a1b1(DATA1)a2b2(DATA2)…anbn(DATAn)
Parameters
p1 : Total number of characters to be downloaded: 0~255
p2 : Font Height: 0~255
Font name : A ~ Z
a
: Character position in ASCII Table(0~255)
n
b
: Font width(dots)
n
(DATA
Total bytes of bitmap data : p2 × (b
) : Character Bitmap Data
n
+7)/8 bytes
n
SLCS Programming Manual
Example
44 44 2a 0d 0a 44 54 60 14 27 41 27 DD*..DT..’A’
20 0b ……
1
1
: p2×(b
1
+7)/8 bytes
1
21 0c ……
2
2
: p2×(b
2
+7)/8 bytes
2
……
ont name
× (8+7)/8 = 12 Bytes
Ver. 1.00
Page 79

SLCS Programming Manual
- 79 -
2-7-2 DD (Downloaded font Delete)
Description
Delete downloaded font from memory
Syntax
DD’font name’
Parameters
‘font name’ : Indicate the Image in memory to be deleted.(A~Z)
♣ This name is Case Sensitive.
♣ By using *, all images in memory will be deleted.
♣ You c an show the downloaded font list by DI command.
Example
DD’A’ // Delete downloaded font A
DD* // Delete all downloaded fonts in memory
Ver. 1.00
Page 80

- 80 -
2-7-3 DI (Downloaded font Infor mation)
Description
Print list of downloaded font.
Syntax
DI
Example
DI
Result
Download Font Information
=============================
Name w h c Size
=============================
C 16 25 128 6400
G 12 24 224 10752
Free Memory 179419
=============================
SLCS Programming Manual
♣ w : font wid th , h : font height, c: total num ber of characters
Ver. 1.00
Page 81

- 81 -
2-8 The Others
Commands not included in 1 to 7 categories.
1) @
Printer initialization
2) PI
Print information of printer configuration
3) CUT
Enable/Disable Cutting Actio n
4) ^cp
Check printer status and report 2bytes status data to host.
SLCS Programming Manual
5) ^cu
Check printer status and report 1byte status data to host.
6) ^PI
Send various printer information to host.
Ver. 1.00
Page 82

- 82 -
2-8-1 @ (Initialize Printer)
Description
Initialize the printer
Syntax
@
2-8-2 PI (Printer Information)
Description
Print current printer setting.
Syntax
PI
SLCS Programming Manual
Ver. 1.00
Page 83

- 83 -
2-8-3 CUT (Auto-cutter Enable/Disable)
♣
♣
♣
♣
Cutting is not executed after Printing is
finished
T20…
T20…
Description
Enable or Disable Auto-cut action after printing by ‘P’ command.
This command is not supported.
Syntax
CUTp1(,p2)
Parameters
p1 : Cutting Action Enable/Disable
y : Enable cutter to act after printing is finished.
n : Disable cutter.
p2 : Cutting Period
SLCS Programming Manual
This command is not the cutting command itsel f but cutting enable/disable command.
Cutting is executed immediately after printing is finished by P command if the cutter
option is enabled by this CUT command.
Last page is always cut.
Cutting Period means the number of pages between two cuttings.
Example – p1(Cutter Enable/Disable)
Cutting is executed after Printing is finished
B130…
BD…
…
CUTy
P1
B130…
BD…
…
CUTn
P1
Example – p2(Cutting Period)
CUTy // Cut every page
CUTy,1 // Cut every page
CUTy,2 // Cut every 2 pages
CUTy,4 // Cut every 4 pages
Ver. 1.00
Page 84

- 84 -
2-8-4 ^cp (Check Printer Status and Report 2 bytes)
Return Values
Byte
bit
7
Paper Empty
0x80
6
Cover Open
0x40
5
Motor overheat.
0x20
4
Thermal Head(TPH) overheat.
0x10
3
Gap Detectio n Error(Auto-sensing failure)
0x08
2
Board overheat.
0x04
1
Not assigned
0x02
0
0x01
On building label to be printed in
image buffer.
6
On printing label in image buffer
0x40
5
Issued label is paused in peeler unit.
0x20
4
Not assigned
0x10
3
Not assigned
0x08
2
0x04
1
Not assigned
0x02
0
Not assigned
0x01
When Return
Values are
0x00
0x00
No Error. T he printer is ready to build and print label.
0x80
0x00
No paper is installed in printer.
Paper roll out while printing label. When new paper
roll is loaded, the print er will re -issue the last label.
While printing, cover is opened
(by user).
Description
Check printer status and report 2bytes status data to host.
Syntax
^cp
Return Value
<1
2. T able
1. Format
st
Byte> <2nd Byte>
Description Hex
SLCS Programming Manual
1st Byte
2nd
Byte
3. Examples
1st Byte 2nd Byte
7
Not assigned
0x80
Not assigned
Printer Status is
0x80 0x40
0x60 0x40
Ver. 1.00
Page 85

- 85 -
2-8-5 ^cu (Check Printer Status and Report 1 byte)
Return Values
Byte
bit
7
Paper Empty
0x80
6
Cover Open
0x40
5
Motor overheat
0x20
4
Thermal Head(TPH) overheat.
0x10
3
Gap Detectio n Error(Auto-sensing failure)
0x08
2
Board overheat.
0x04
1
Not assigned
0x02
0
0x01
Description
Check printer status and report 1 byte status data to host.
Syntax
^cu
Return Value
<1
2. T able
1. Format
st
Byte>
Description Hex
SLCS Programming Manual
1st Byte
Not assigned
Ver. 1.00
Page 86

- 86 -
2-8-6 ^PI (Send Printer information to host)
p2
Item
Unit
0
TPH temperature
1
Printing density (density)
2
Tear-off/cutter position
3
Motor temperature
4
Board temperature
5
Battery Voltage(Percent)
Items
Return Format
Example
Model Name
Character String + 0x0d + 0x0a
“PV3” + 0x0d + 0x0a
Model Type
Disabled F/W Version
Character String + 0x0d + 0x0a
“1.23” + 0x0d + 0x0a
TPH temperature
Character String + 0x0d + 0x0a
“85” + 0x0d + 0x0a
Motor temperature
Character String + 0x0d + 0x0a
“85” + 0x0d + 0x0a
Board temperature
Character String + 0x0d + 0x0a
“85” + 0x0d + 0x0a
Battery volt(Percentage)
Character String + 0x0d + 0x0a
“7.6(50)” + 0x0d + 0x0a
Printing density (density)
Character String + 0x0d + 0x0a
“17” + 0x0d + 0x0a
Paper Width
Character String + 0x0d + 0x0a
“832” + 0x0d + 0x0a
Paper Length
Character String + 0x0d + 0x0a
“1200” + 0x0d + 0x0a
Gap Length
Character String + 0x0d + 0x0a
“24” + 0x0d + 0x0a
Paper Horizontal Margin
Character String + 0x0d + 0x0a
“10” + 0x0d + 0x0a
Paper vertical Margin
Character String + 0x0d + 0x0a
“12” + 0x0d + 0x0a
Tear-off/cutter position
Character String + 0x0d + 0x0a
“+80” + 0x0d + 0x0a
Description
Send various printer information such as model name, firmware version, statistics data or
so to host.
Syntax
^PIp1(,p2)(,p3)
Parameters
p1 : items to be reported.
0 : Model Name
1 : Model Type : Disabled
2 : F/W Version
3: None
4 : Mechanical conditions of printer
SLCS Programming Manual
Return Value Format
℃
-
dot
℃
℃
V(%)
Ver. 1.00
Page 87

SLCS Programming Manual
- 87 -
3. Programming Example
3-1 (Example) T_resident
SS3 // Set Speed to 5 ips
SD20 // Set Density level to 20
SW800 // Set Label Width 800
SOT // Set Printing Orientation from Top to Bottom
T26,20,0,1,1,0,0,N,N,’Font - 6 pt’
T26,49,1,1,1,0,0,N,N,’Font - 8 pt’
T26,81,2,1,1,0,0,N,N,’Font - 10 pt’
T26,117,3,1,1,0,0,N,N,’Font - 12 pt’
T26,156,4,1,1,0,0,R,N,’Font - 15 pt’
T26,200,5,1,1,0,0,N,N,’Font - 20 pt’
T26,252,6,1,1,0,0,N,N,’Font - 30 pt’
P1
Result
Font – 6 pt
Font – 8 pt
Font – 10 pt
Font – 12 pt
Font – 15 pt
Font – 20 pt
Font – 30 pt
Ver. 1.00
Page 88

- 88 -
3-2 (Example) T_Rotate4
SS3
SW832
T300,500,4,1,1,0,0,N,N,’ABCDEFG’
T300,500,4,1,1,0,1,N,N,’ABCDEFG’
T300,500,4,1,1,0,2,N,N,’ABCDEFG’
T300,500,4,1,1,0,3,N,N,’ABCDEFG’
P1
Result
SLCS Programming Manual
Ver. 1.00
Page 89

SLCS Programming Manual
- 89 -
3-3 (Example) V_resident
SS3 // Set speed to 5 ips
SD20 // Set density to 20
SW800 // Set label width to 800
SOT // Set printing direction to from top to bottom
V50,100,U,25,25,+1,N,N,N,0,L,0,'Vector Font Test'
V50,200,U,35,35,-1,N,N,N,0,L,0,'Vector Font Test'
V50,300,U,35,35,+1,B,R,I,0,L,0,'Vector Font Test '
V50,400,U,45,25,+1,N,N,N,0,L,0,'Vector Font Test'
V50,500,U,25,45,+1,N,N,N,0,L,0,'Vector Font Test'
V50,700,U,65,65,+1,N,N,N,0,L,0,'ABCDEFGHIJKLMNO'
V50,900,U,65,65,+1,N,N,N,0,L,0,'abcdefghijklmno'
P1
Result
Ver. 1.00
Page 90

- 90 -
3-4 (Example) V_Rotate4
SS3
SW832
V400,500,U,45,40,+1,N,N,N,0,L,0,'VECTOR FONT'
V400,500,U,45,40,+1,N,N,N,1,L,0,'VECTOR FONT'
V400,500,U,45,40,+1,N,N,N,2,L,0,'VECTOR FONT'
V400,500,U,45,40,+1,N,N,N,3,L,0,'VECTOR FONT'
P1
Result
SLCS Programming Manual
Ver. 1.00
Page 91

SLCS Programming Manual
- 91 -
3-5 (Example) Code39
SM10,0
B178,196,0,2,6,100,0,0’1234567890’ // Caution : The position is not
(178,196) but (78,196).
B150,468,0,4,10,200,0,0’1234567890’
P1
Result
Ver. 1.00
Page 92

SLCS Programming Manual
- 92 -
Normal Mode
Reverse Mode
3-6 (Example) BD1
SS3 // Set Speed to 5 ips
SD20 // Set Density level to 20
SW800 // Set Label Width to 800
BD50,50,750,500,B,20
T100,150,5,1,1,0,0,N,N,’Normal Mode’
T100,300,5,1,1,0,0,R,N,’Reverse Mode’
SOT
P1
Result
Ver. 1.00
Page 93

SLCS Programming Manual
- 93 -
3-7 (Example) BD3
SS3 // Set Printing Speed to 5 ips
SD20 // Set Printing Density level to 20
SW800 // Set Label Width to 800
BD50,100,400,150,O // Draw a block in Overwriting Mode
BD50,200,400,250,O
BD50,300,400,350,O
BD100,50,150,400,E // Draw a block in Exclusive OR mode
BD200,50,250,400,E
BD300,50,350,400,E
BD500,200,700,400,O
BD510,210,670,370,D // Draw a block in Delete mode, namely Erase block
area
BD100,600,350,1000,O
T50,700,5,1,1,0,0,N,N,’NORMAL’ // Write Text data on image b uffer
T50,800,5,1,1,0,0,N,N,’NORMAL’
BD110,780,340,900,E
T500,700,5,1,1,0,0,n,N,’TEST’
BD480,680,700,800,E
SOT // Set Printing Orientation from Top to Bottom
P1 // Start Printing
Ver. 1.00
Page 94

- 94 -
Result
TEST
SLCS Programming Manual
NORMAL
NORMAL
Ver. 1.00
Page 95

SLCS Programming Manual
- 95 -
3-8 (Example) BD4
SW800
SM10,0
BD100,300,550,330,O // Overwrite mode
BD200,200,250,430,O // Overwrite mode
BD400,200,450,430,E // Exclusive OR mode
P1
Result
Ver. 1.00
Page 96

SLCS Programming Manual
- 96 -
3-9 (Example) BD5
CB
SW800
SM10,0
BD100,300,300,500,O
BD400,300,700,500,B,30 // Box mode, additional parameter follows
P1
Result
Ver. 1.00
Page 97

SLCS Programming Manual
- 97 -
3-10 (Example) Slope
CB
SS3
SD20
SW8000
BD100,300,300,800,S,100 // Slope mode, additional parameter follows
BD600,300,400,800,S,100
P1
Result
Ver. 1.00
Page 98

SLCS Programming Manual
- 98 -
3-11 (Example) SW&SL
CB
SS3
SD20
SW800 // Set Label Width to 800
SL300,10,C // Continuous type
BD0,0,800,300,B,10
T30,40,4,1,1,0,0,N,N,'SW=800, SL=300, Continuous'
P1
SW600
SL500,10,C
BD0,0,600,500,B,10
T30,40,4,1,1,0,0,N,N,'SW=600, SL=500'
T30,100,4,1,1,0,0,N,N,'Continuous'
P1
SW400
SL800,10,C
BD0,0,400,800,B,10
T30,40,4,1,1,0,0,N,N,'SW=400'
T30,90,4,1,1,0,0,N,N,'SL=800'
T30,140,4,1,1,0,0,N,N,'Continuous'
P1
Ver. 1.00
Page 99

- 99 -
Result
SLCS Programming Manual
SW = 800, SL=300, Continuous
SW = 600, SL=500,
Continuous
SW= 400,
SL = 800,
Continuous
Ver. 1.00
Page 100

SLCS Programming Manual
- 100 -
Stored in past time
Stored in this time
3-12 (Example) TEST00_TS
TD’Test00’ // Template Delete
TS’ Test00’ // Start Template Store
SV00,15,N,’Manufacturer :’ // Declare variable V00, field size:15, No justification
SV01,15,R,’Model Name :’ // Declare variable V01, field size:15, Right
justification
T50,100,3,1,1,0,0,N,N,’Manufacturer :’V00 // Print variable V00 with some text string
T50,150,3,1,1,0,0,N,N,’Model Name :’V01 // Print variable V01 with some text string
T50,300,3,1,1,0,0,N,N,V00 // Print variable V00 only
T50,350,3,1,1,0,0,N,N,V01 // Print variable V01 only
TE // End Template Store
TI // Print and show all templates in memory
Result
Templates Information
===================
1. Test 1
2. Test0
Available template memory : 5.3Kbyte
Ver. 1.00
 Loading...