

Sargent Fireguard 2900 Series, Fireguard 12-2960, Fireguard 9-2960, Fireguard 2960 Installation Instructions Manual
Page 1

2900 FIREGUARD® Electromechanical Closer-Holder Device Models
B
NOTE:
12-2960, 9-2960 and 2960 Multipoint Hold Open with Rigid Arms
Pull (Hinge) Side Installation Instructions
CAUTION: FAILURE TO INSTALL OR ADJUST PROPERLY MAY RESULT IN INJURY OR DAMAGE
For assistance, contact SARGENT at 800-810-WIRE (9473) or www.sargentlock.com
FOR MODELS 12-2960 / 9-2960 / 2960
1. Use dimensions shown on page 5 provided to locate
attaching screws on frame and door. Prepare holes
For concealed wire applications only
Locate and drill 1-1/8" diameter hole in the frame face for
3/4" conduit. (This is normally done at the time the frame
is being installed.) Connect conduit to backplate before
fastening backplate to frame
2. Attach backplate/closer assembly to frame. Position backplate
end with terminal strips away from hinge edge of frame
3. Make electrical connections:
A) 12-2960: Select and follow the wiring diagram from wiring
instructions sheet A7408 and 'Checkout Procedure' from Page 3.
B) 9-2960: Make solenoid wire connections with power input wires
from 12-2960 using two wire nuts provided in screw pack. Select
proper wiring diagram and 'Checkout Procedure' from Page 3.
4. Make input power connections to the power supply board as directed.
NOTE: If electrical connections are to be made at a later date,
place cover on chassis now to prevent its loss, see Step F.
3/4" Conduit
(By others)
MODEL
12-2960
RH - Right Hand Door
LHR - Left hand Reverse
Terminal
Strips
On/Off
Switch
Terminal
Strips
Devices are handed
and must be the same
hand as door.
Closer/Holder
Smoke
Detector
Conduit Nut
(By others)
12-2960
MODELS
2960/9-2960
LH - Left Hand Door
RHR - Right Hand Reverse
Backplate
Backplate
Screw (6)
Closer
Screw (4)
5. Installation of arm on closer: With appropriate size wrench, rotate
closer top spindle approximately 45ϒ (see step C below) (NOTE:
Closing both valves for door speed and latching speed makes this
procedure much easier). Position closer arm on bottom spindle
approximately parallel to the door and arm length away from hinge.
Secure arm with screw and washer
6. Installation of track on door: Remove end cap from track. Position
track with open side up. Insert roller end of closer arm in sliding
groove of track. With arm engaged in slide groove, slide track, into
position so that prepared holes on door align with track holes
Replace end cap and secure track to door
Companion unit (without electronics) not shown
Position of Arms and Index Settings
C
View Looking Up When
Assembling Arm to Spindle
Index
Mark on
Spindle
Right Hand Door
2960
9-2960
Approximate
Preload
Position of Main Arm
When Assembled to Spindle
Rigid Arm
Track
View Looking Up When
Assembling Arm to Spindle
Left Hand Door
Track Screw
(2 Reqd)
Index
Mark on
Spindle
A7395C
1
A7395C.indd 1 10/29/18 12:44 PM
Page 2
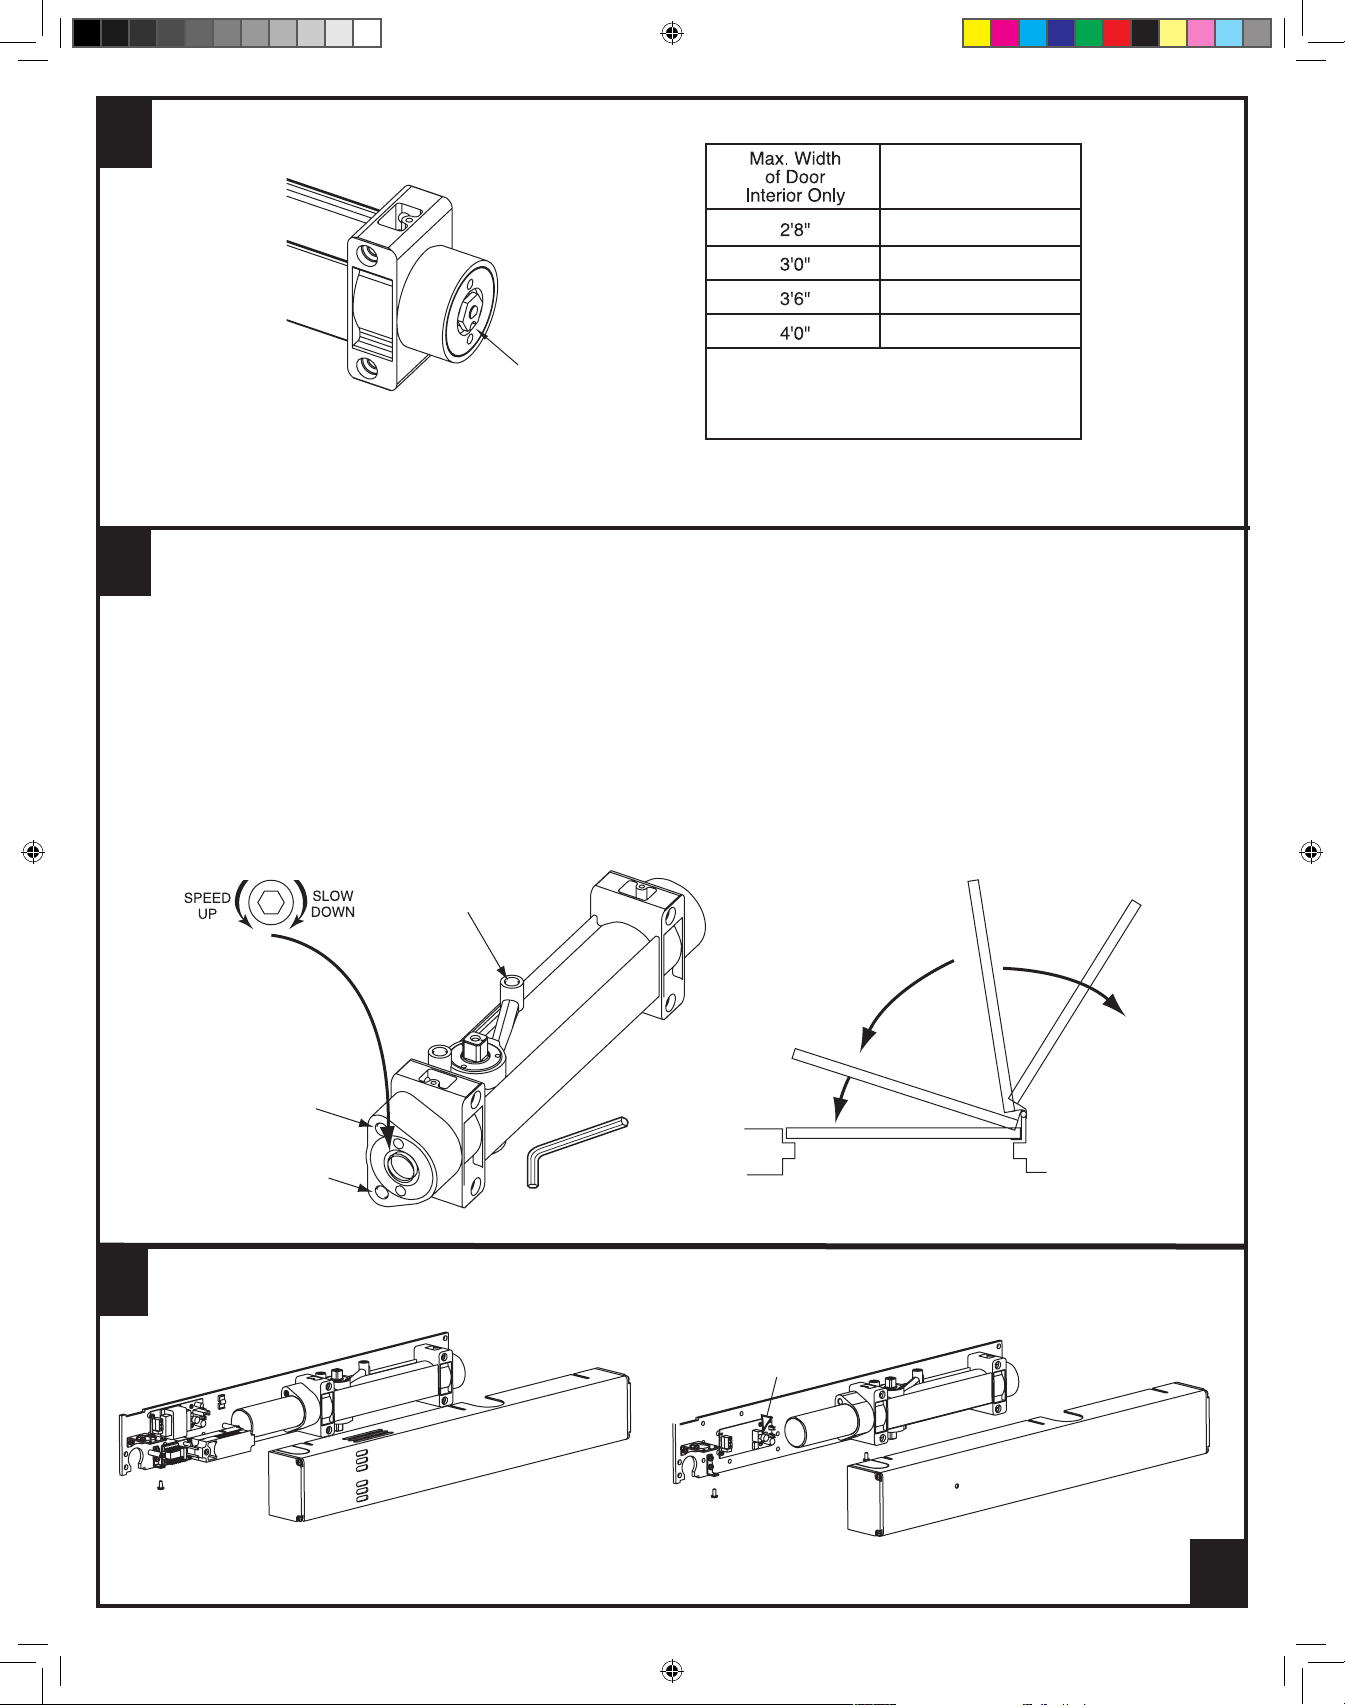
Adjust Spring Power According to Chart
D
Clockwise Turns
of Adjusting Nut
8
8
12
16
5/8 " Adjustment Nut
Tu rn the spring adjusting nut clockwise the required number of turns to match door width as indicated in chart. Where strong drafts exist, increase spring power
as needed. 351 Series door closers leave the factory with the spring adjustment set at eight (8) turns
Maximum adjustment is
approximately 20 turns.
Do not forcibly extend
adjustment beyond limits.
Adjustment Instructions
E
Minimum recommended door closing time is 6 seconds for doors opened to 90 degrees.
Use 1/8" hex (Allen) wrench to adjust valves as needed.
Closing and latching speeds:
Turn valves clockwise to slow down or counterclockwise to speed up door movement.
F
Backcheck:
To regulate the intensity of backcheck action, turn valve clockwise to increase or counterclockwise to decrease checking.
Caution: Set valve for slight cushioning effect. Closer can be damaged if the checking action is too abrupt. Never use the backcheck
as a door stop. Always use a door stop to stop the door.
Backcheck
valve
CLOSING SPEED
RANGE
Closing
speed
valve
Latching
speed
valve
To Install Cover
Adjust closers as directed
in steps D and E
LATCHING SPEED
1/8” HEX SOCKET
WRENCH
1. Assemble (3) short cover screws
(#8-32 x 5/16") into bottom of
closer body and cover mounting
bracket, approx. one turn
RANGE
2. Slide cover onto backplate and
closer assembly. Secure with
three cover screws
BACKCHECK
RANGE
12-2960
CAUTION: Avoid
interference with
electronics and wires
during installation of cover
A7395C.indd 2 10/29/18 12:44 PM
9-2960 Without Electronics not shown
On/Off
Switch
2960
A7395C
2
Page 3

CAUTION
1. DISCONNECT ALL POWER BEFORE BEGINNING INSTALLATION
TO PREVENT ELECTRICAL SHOCK AND EQUIPMENT DAMAGE
2. INSTALLER MUST BE A TRAINED, EXPERIENCED SERVICE
PERSON
Typical Wiring
Stand-Alone Units 2960
• Wire stand-alone unit to appropriate
power supply and fire alarm
• Refer to data sticker for proper
input voltage and current specifications
• Energize power supply
• Open door to hold-open point
Door should hold open
• Depress On/Off Switch. Door should
close and latch
• Adjustment of spring power may be
necessary to ensure proper latching
• Depress on/off switch again. Open door to
hold open position; door will hold open.
CAUTION: Input power supply must match circuit
board voltage rating, either 24VAC/DC or 120VAC.
Optional remote
release connection
3. ALL WIRING MUST COMPLY WITH APPLICABLE LOCAL
ELECTRICAL CODES, ORDINANCES AND REGULATIONS
4. MAXIMUM WIRE SIZE IS 18AWG
Opening for
Concealed Wiring
Appropriate
Power Supply
Data
Sticker
On/Off
Switch
Earth Ground
3
Negative (-)
2
Positive (+)
1
Terminal Strip
for Power Input Connections
A7395C
A7395C.indd 3 10/29/18 12:44 PM
3
Page 4

Checkout Procedure for both 12- and 9- units
1. Turn the power to the unit “On”. Red LED pilot light should illuminate at 8 sec. intervals
2. Open door to the hold open point. The door should hold open. Manually pull door out of hold open and release. Door should close
3. Open door to the hold open position. Depress (maintained type) On/Off “test switch” button on the power supply board. Door should close
4. Depress On/Off test switch again. Open door to the hold open position. Introducing smoke into the smoke detector chamber assembly will bring the unit
into alarm. The red LED will be continuously illuminated and the door will close. After clearing the smoke chamber, reset unit per instructions below
Resetting Instructions
1. Remote Reset: Cycle main power by turning the facility main power supply OFF then ON.
NOTE: If there are other units connected to the same power supply, those doors will close.
They will have to be reopened returning them to the hold open position
2. Local Reset: Insert a small flat head screwdriver through the cover and into the slotted
light tube on the smoke detector as shown. Turn screwdriver slightly (about 1/8 turn)
clockwise until hitting stop and hold for 2 seconds until the Red LED turns OFF
WARNING: Do not force past the stop. Doing so may damage the smoke detector
Once the detector is reset and the smoke has cleared, the detector’s Red LED should flash
once every 8 seconds. The door(s) should hold open now
Smoke Detector Maintenance
SARGENT recommends cleaning smoke detectors at least every six months. The frequency of cleaning will depend upon local ambient conditions
The smoke detector in this door closer-holder has been enhanced with a feature that detects when a smoke-sensing chamber requires cleaning
due to dirt and dust. The need for cleaning is indicated by the flashing of the Red LED light once per second
• Normal Supervisory Operation — Red LED flashes once every 8 seconds
• Dirty Chamber needs cleaning — Red LED flashes once every second
• Smoke Detection — Red LED is continuously illuminated
To clean the smoke detector assembly, follow the instructions below:
NOTE: Before servicing the system, notify the proper authorities
that the smoke detector system is undergoing maintenance
and will be temporarily out of service. Disable the zone undergoing
maintenance to prevent unwanted alarms
• Remove detector cover and screen assembly using a standard screwdriver. Turn the screwdriver in the cover slot to loosen the cover and carefully
rock the cover back and forth until it snaps out of place. See slot location above
• Inspect chamber for particles and dust. Vacuum the screen, cover, and photo chamber. Then, use clean compressed air to loosen and blow out
any remaining debris
• Before reassembling the detector, be sure all parts are free of dust and debris
Chamber
Cover and
screen
Slot for screwdriver
To remove cover
Slotted light tube (Red LED)
RP1 test point
RP2 test point
• Replace cover and screen, aligning cover snaps, press cover onto chamber until it snaps into place
• Measure and record the test voltage at test points RP1 and RP2 (see above). If the smoke detector is operating normally and was cleaned
effectively, the test voltage will be greater than .90VDC and less than 1.58VDC. The test voltage will increase with dust accumulation in the
smoke sensing chamber. A difference in test voltages over time will provide an indication of dust accumulation
• Enable system and inform proper authorities that system is operational
A7395C
A7395C.indd 4 10/29/18 12:44 PM
4
Page 5

A7395C
A7395C.indd 5 10/29/18 12:44 PM
5
Page 6

FIREGUARD
A7395C
A7395C.indd 6 10/29/18 12:44 PM
6
 Loading...