

Digital Video Recorder
Quick Operation Guide
English
GB
Kurzbedien ungsanleitung
D
Aide-mémoire
F
Guía rápida de funcionamiento
E
Guida rapida al funzionamento
I
Deutsch
Italiano
DSR-3716PA
DSR-3709PA
Français
Español
■This guide describes basic operations as a quick reference for your day-to-day monitoring tasks. For more information on
use and configuration of the product, refer to the “Instruction Manual”, which is provided in a separate volume.
■Diese Anleitung beschreibt in Kurzform die Grundbedienung für Ihre täglichen Überwachungsaufgaben. Weitere
Informationen zur Verwendung und Konfiguration des Produkts finden Sie in der separaten “Bedienungsanleitung”.
■Cet aide-mémoire vous présente les fonctionnements de base pour faciliter vos tâches de surveillance journalière. Pour de
plus amples informations sur l’utilisation et la configuration du produit, reportez-vous au “Manuel d’Instructions”, fourni
séparément.
■Esta guía describe las operaciones básicas y sirve como referencia rápida para las tareas de monitorización de cada día.
Para mayor información sobre el uso y la configuración del producto, consulte el “Manual de Instrucciones” suministrado
por separado.
■Questa guida descrive le operazioni fondamentali fornendo un riferimento rapido per le attività di monitoraggio quotidiane.
Per ulteriori informazioni sull’uso e sulla configurazione del prodotto, vedere il “Manuale di istruzioni” contenuto in un altro
volume.
Contents
Setting Up the Digital Recorder ............................................................................................. 1
Using Various Split-Screens................................................................................................... 2
Recording Video....................................................................................................................... 3
Viewing Recorded Video......................................................................................................... 4
Using Date/Time Search to Play Back Recorded Video..................................................... 6
Copying and Saving Recorded Video................................................................................... 8
Printing Video Frames via a CompactFlash Card ............................................................... 9
About Configuration via Menus........................................................................................... 10
Setting Up the Digital Recorder
26-10-2006 THU 08:30:00
Hour
Minute
Second
Day Month Year
Save
Adjust
▼
▼
0
02
01-01-06 00:00:00 REC REPEAT EN A ALARM 0000
q w e r t y
u
i
25 2–4
S-dial
(SHUTTLE dial)
J-dial
(JOG dial)
POWER indicator
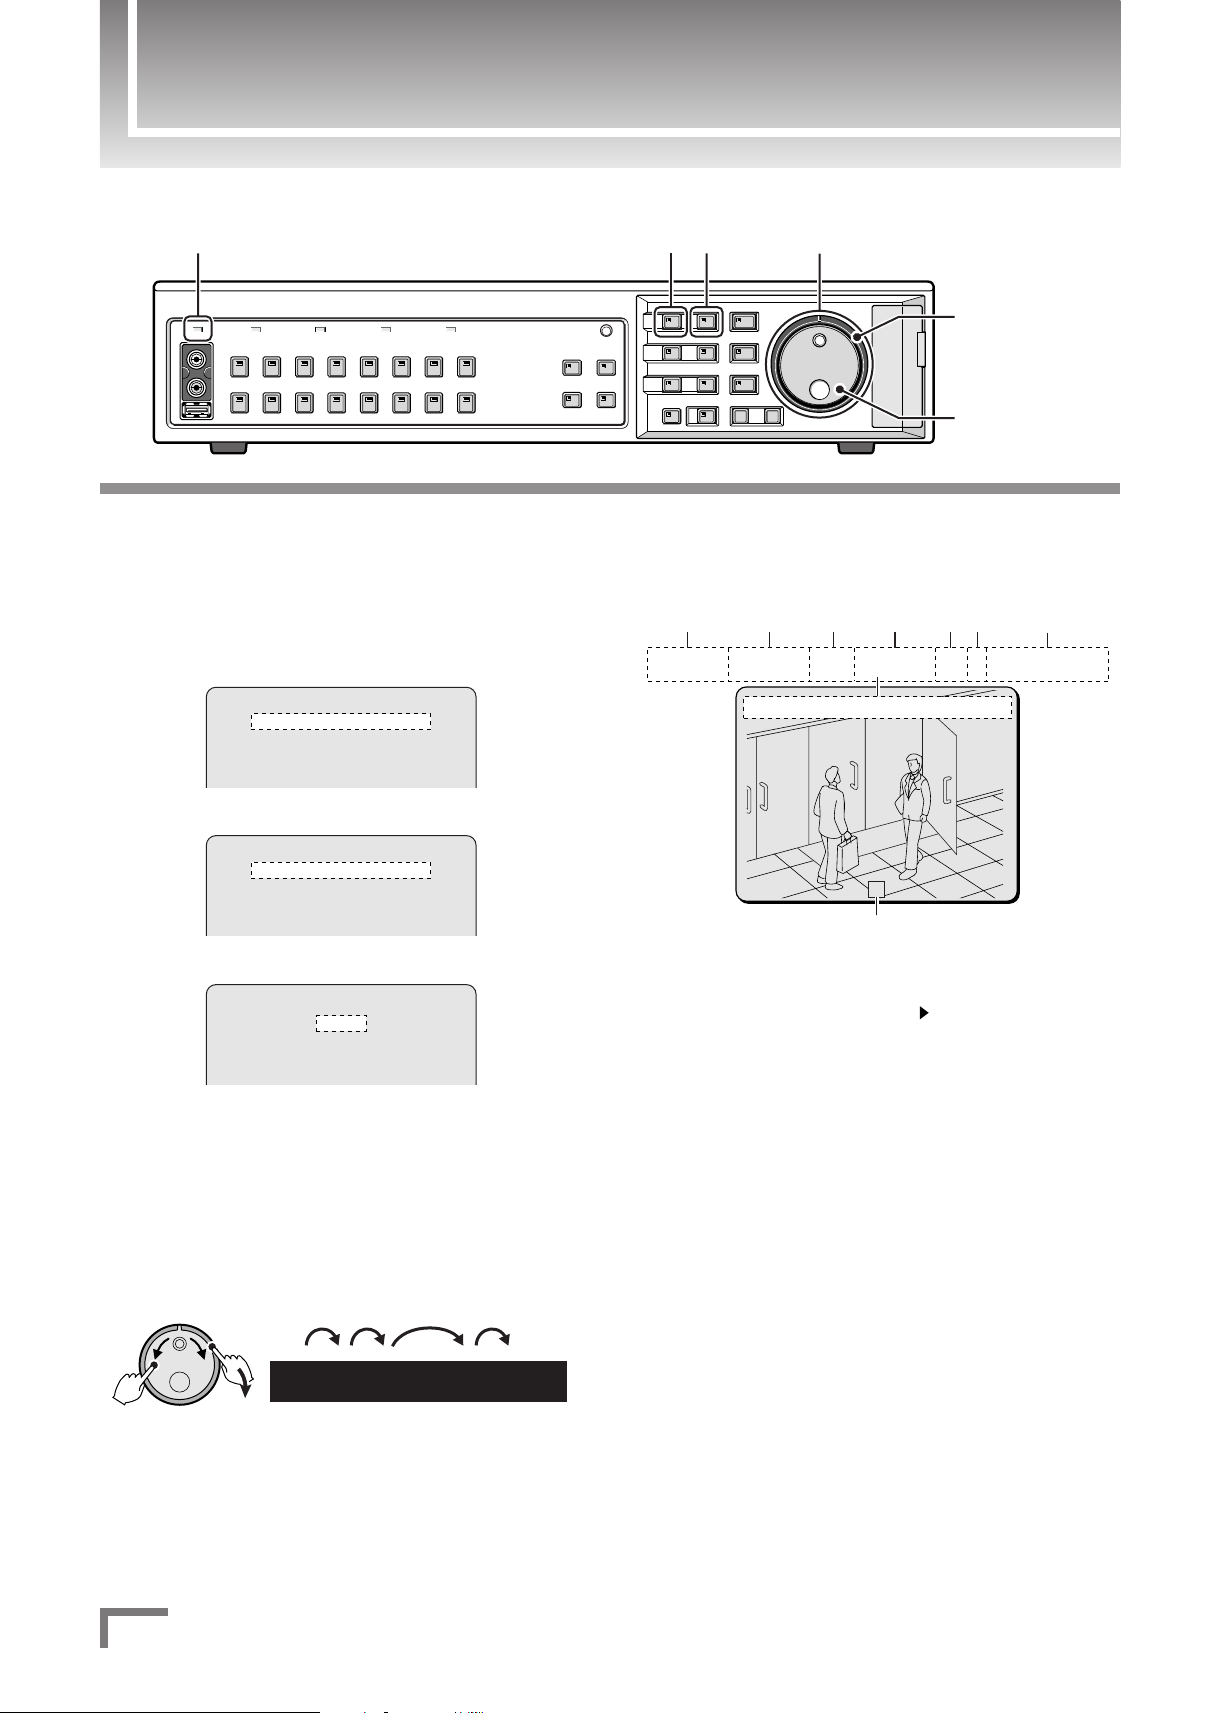
Connect the supplied power cable.
1
a The POWER indicator turns on, and a message “PLEASE
SET THE CLOCK” appears on the monitor screen.
Press the MENU button, and turn the S-dial three
2
turns clockwise.
<MAIN MENU>
1.INITIAL SET ->
2.RECORD SET ->
3.GENERAL SET ->
4.SCREEN SET ->
<INITIAL SET>
1.LANGUAGE/CLOCK SET ->
2.CAMERA DETECT ->
3.TITLE SET ->
4.HOLIDAY SET ->
<LANGUAGE/LANGUE/SPRACHE/IDIOMA>
ENGLISH
<CLOCK SET>
01-01-2006 SUN 00:00:00
<SUMMER TIME SET>
Turn the J-dial to select the display language,
3
and then turn the S-dial.
Available languages include ENGLISH, FRANÇAIS,
DEUTSCH, and ESPAÑOL.
Turn the S-dial to set the clock.
4
J-dial: Turn to adjust the setting.
S-dial: Turn clockwise to save the setting.
Press the EXIT/OSD button.
5
a The operation display (status bar) appears on the monitor
screen.
qDate display (Day - Month - Year)
wTime display
eOperation symbols (REC = recording, = playback, etc.)
rRemaining recording area
tImage quality display (BA = Basic, NO = Normal,
EN = Enhanced image quality, FI = Fine image quality,
SF = Super fine image quality)
ySound recording/playback indicator (A)
uAlarm status (ALARM/PRE) and occurrence indicator
iTitle indicator
¡The operation display (status bar) moves to the bottom when you
press the EXIT/OSD button once; is hidden when you press the
button twice; and returns to the top when you press the button three
times.
English
1
Using Various Split-Screens
132546
0302
05
06
01
04
07 08 09
12
16
03 04
13 14 15
07
08
09 10 11 12
01 02
05 06
0201
0403
1413
1615
02
01
16
15
12
16
01
03 04
13 14 15
07 08
09 10 11 12
12
16
03 04
13 14 15
07
08
09 10 11 12
0302
05
06
01
04
07 08 09
0302
05
06
01
04
07 08 09
01 02
05 06
0302
05
01
04
01
07 08 0907 08 09
03
0606
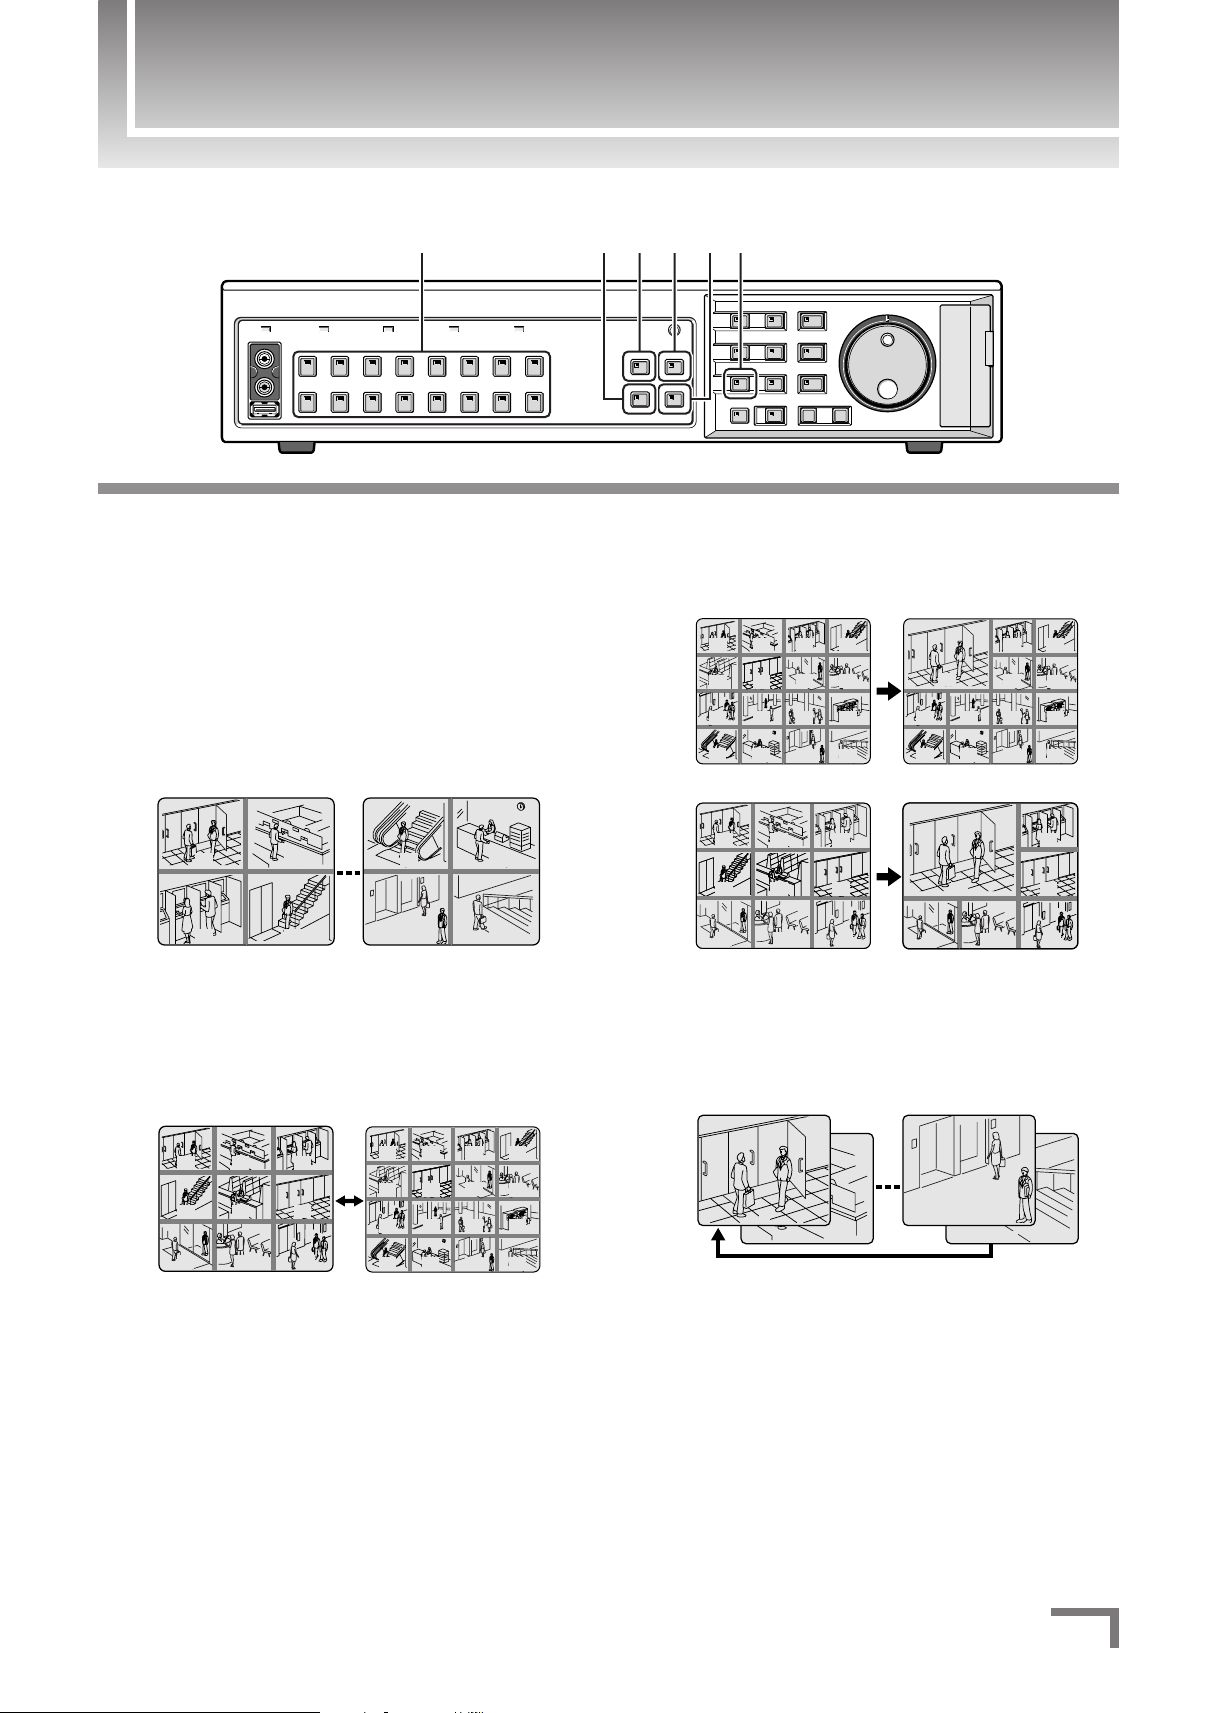
Multi-16 mode:
Multi-9 mode:
■ To switch to another full-screen video:
Press the camera selection button (camera
1
number) that corresponds to your desired
camera.
■ To monitor four cameras at a time using the
quad-screen display:
Press the QUAD button.
2
a The quad-screen switches to display the next set of
cameras each time you press the button.
■ To monitor nine or sixteen cameras at a time
using the multi-screen display:
Press the MULTI button.
3
a The monitor screen toggles between the multi-9 and
multi-16 screens each time you press the button.
■ To zoom in a particular camera view:
Press the PLUS button.
4
¡To specify which camera view to zoom in, select the corresponding
camera number using the camera selection button.
■ Automatic screen scrolling:
Press the SEQUENCE button.
5
¡The DSR-3709PA (9-channel model) supports only the multi-9
screen.
¡Press the button again to stop screen scrolling.
¡When you press this button in the quad-screen, the quad-screen is
automatically switched to display subsequent sets of cameras.
■ Viewing on the monitor connected to the
MON2 terminal:
Press the MON2 button, and then choose the
6
camera to monitor using the camera selection
button.
English
2
Recording Video
0
02
26-10-06 09:30:00 REC REPEAT EN A
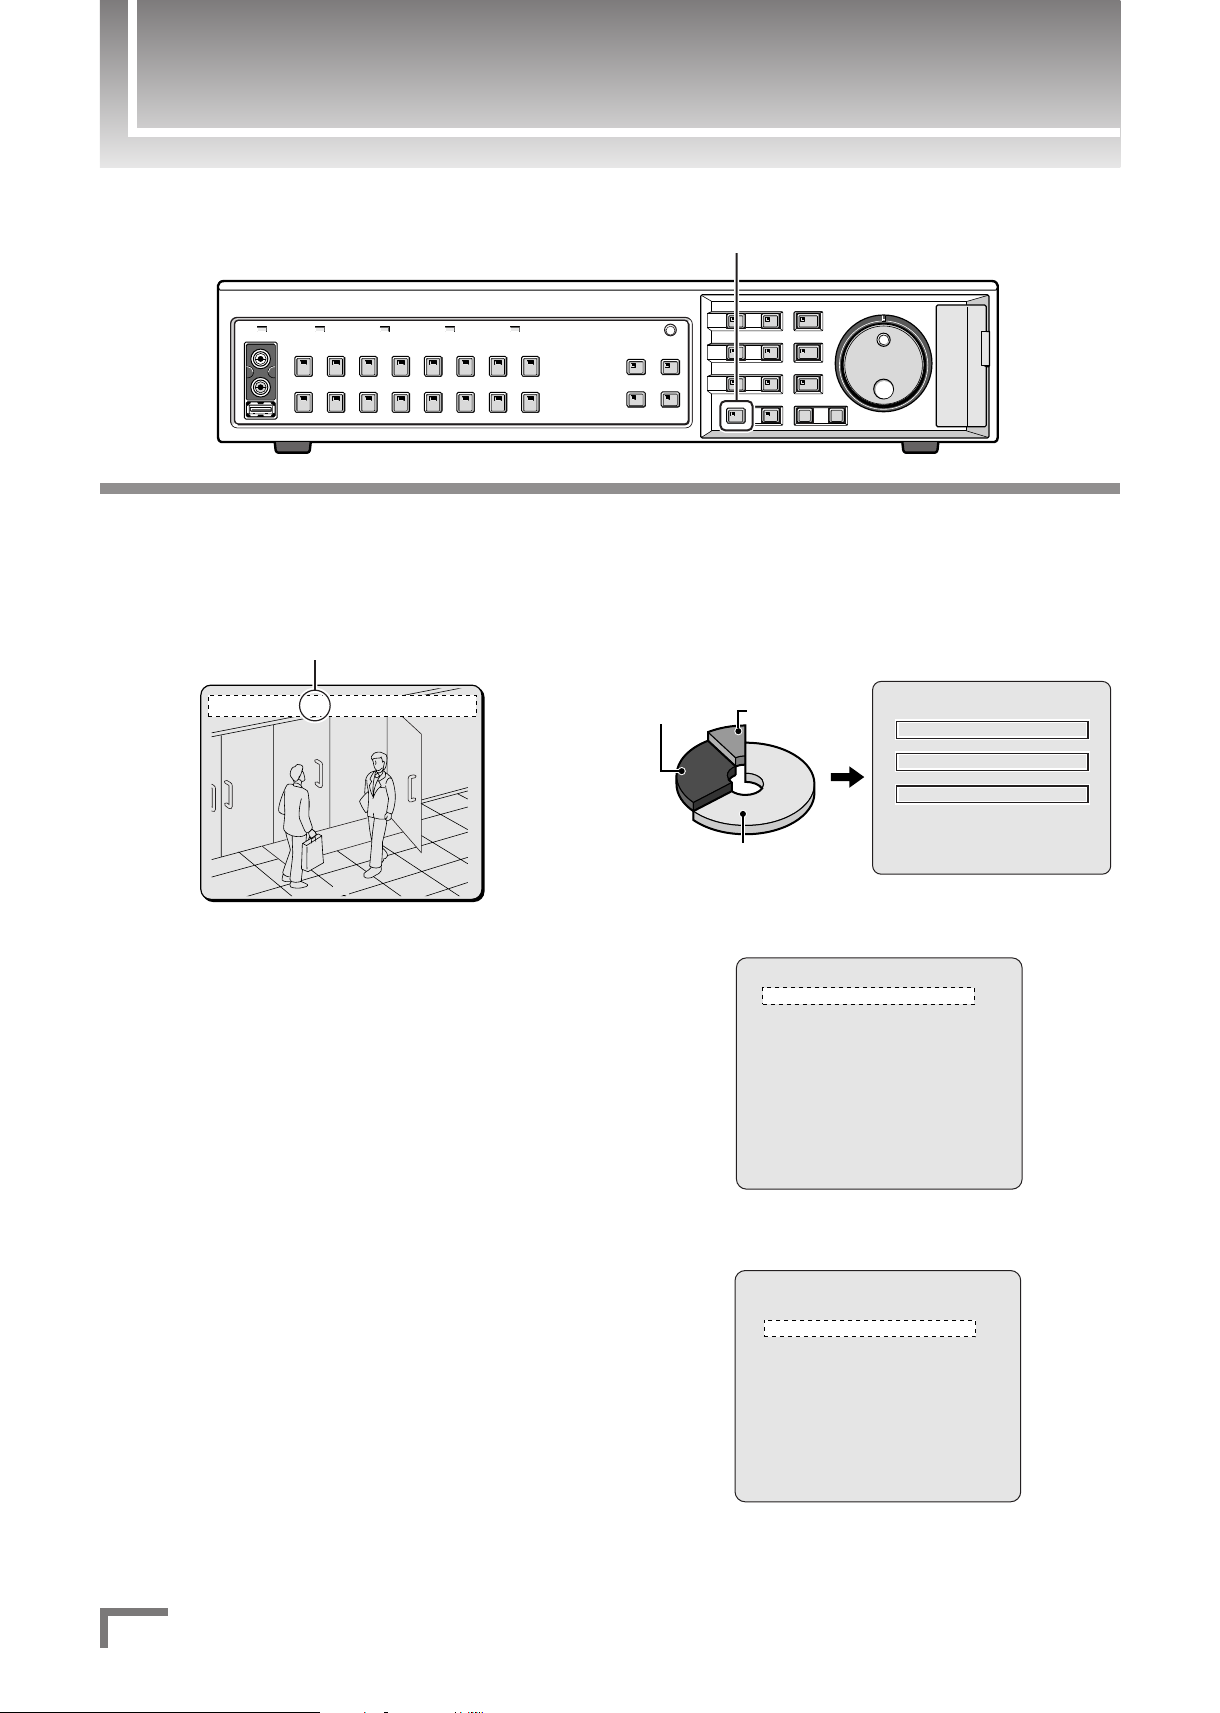
Indicates that recording is in progress.
<RECORDING CONDITIONS SET>
NORMAL RECORDING AREA
OVERWRITE : ON
ALARM RECORDING AREA
OVERWRITE : ON
REMAINING DISK WARNING : **
SERIES RECORDING : OFF
AUTO DELETE : OFF
<NORMAL REC MODE SET>
PICTURE QUALITY : ENHANCED
AUDIO RECORDING : OFF
REC RATE : 12.5FPS ( 61H)
REC PROGRAM GROUP : OFF
<RECORDING AREA SET>
TOTAL CAPACITY : 120GB
NORMAL RECORDING AREA : 80 %
AREA FULL RESET ->
ALARM RECORDING AREA : 19 %
AREA FULL RESET ->
ARCHIVE AREA : 1 %
AREA FULL RESET ->
CAUTION : WHEN THE AREA SETTING IS CHANGED,
THE WHOLE AREA WILL BE INITIALIZED !
1%
80%1%80%
Alarm
recording
area
Archive area
Normal recording
area
19%19%
1, 2
Press the REC/STOP button while monitoring a
1
camera.
a The recorder starts recording the video from the current
camera.
To stop recording, press and hold the REC/STOP
2
button for about three seconds.
■ To use other recording types:
In addition to normal recording (which uses the normal recording
area), the following recording types are available:
¡Timer-controlled recording (using the normal recording area)
You can schedule a recording to occur at your specified times.
See page 51 of the Instruction Manual.
☞
¡Alarm recording (using the alarm recording area)
The recorder automatically starts recording in response to an alarm
input from an externally installed alarm switch or a motion sensor.
See page 55 of the Instruction Manual.
☞
¡Pre-alarm recording (using the alarm recording area)
The recorder also records the image and sound for the period
immediately before an alarm input to assist in analyzing the alarm
condition.
See page 57 of the Instruction Manual.
☞
■ About the internal hard disk:
The internal hard disk has a set of preconfigured settings such as for
the recording area allocations and recording modes. Make sure that
these settings suit your purpose.
¡Recording area settings
See page 43 of the Instruction Manual.
☞
¡Recording mode settings (recordable duration indicator)
See page 49 of the Instruction Manual.
☞
¡Overwrite settings
See page 46 of the Instruction Manual.
☞
English
3
Viewing Recorded Video
26-10-06 09:30:00 REPEAT EN A ALARM 0000
02
Fast-forward indicator
0
02
26-10-06 09:30:00 REPEAT EN A
Playback indicator
02
26-10-06 09:30:00 REPEAT EN A ALARM 0000
Still image indicator
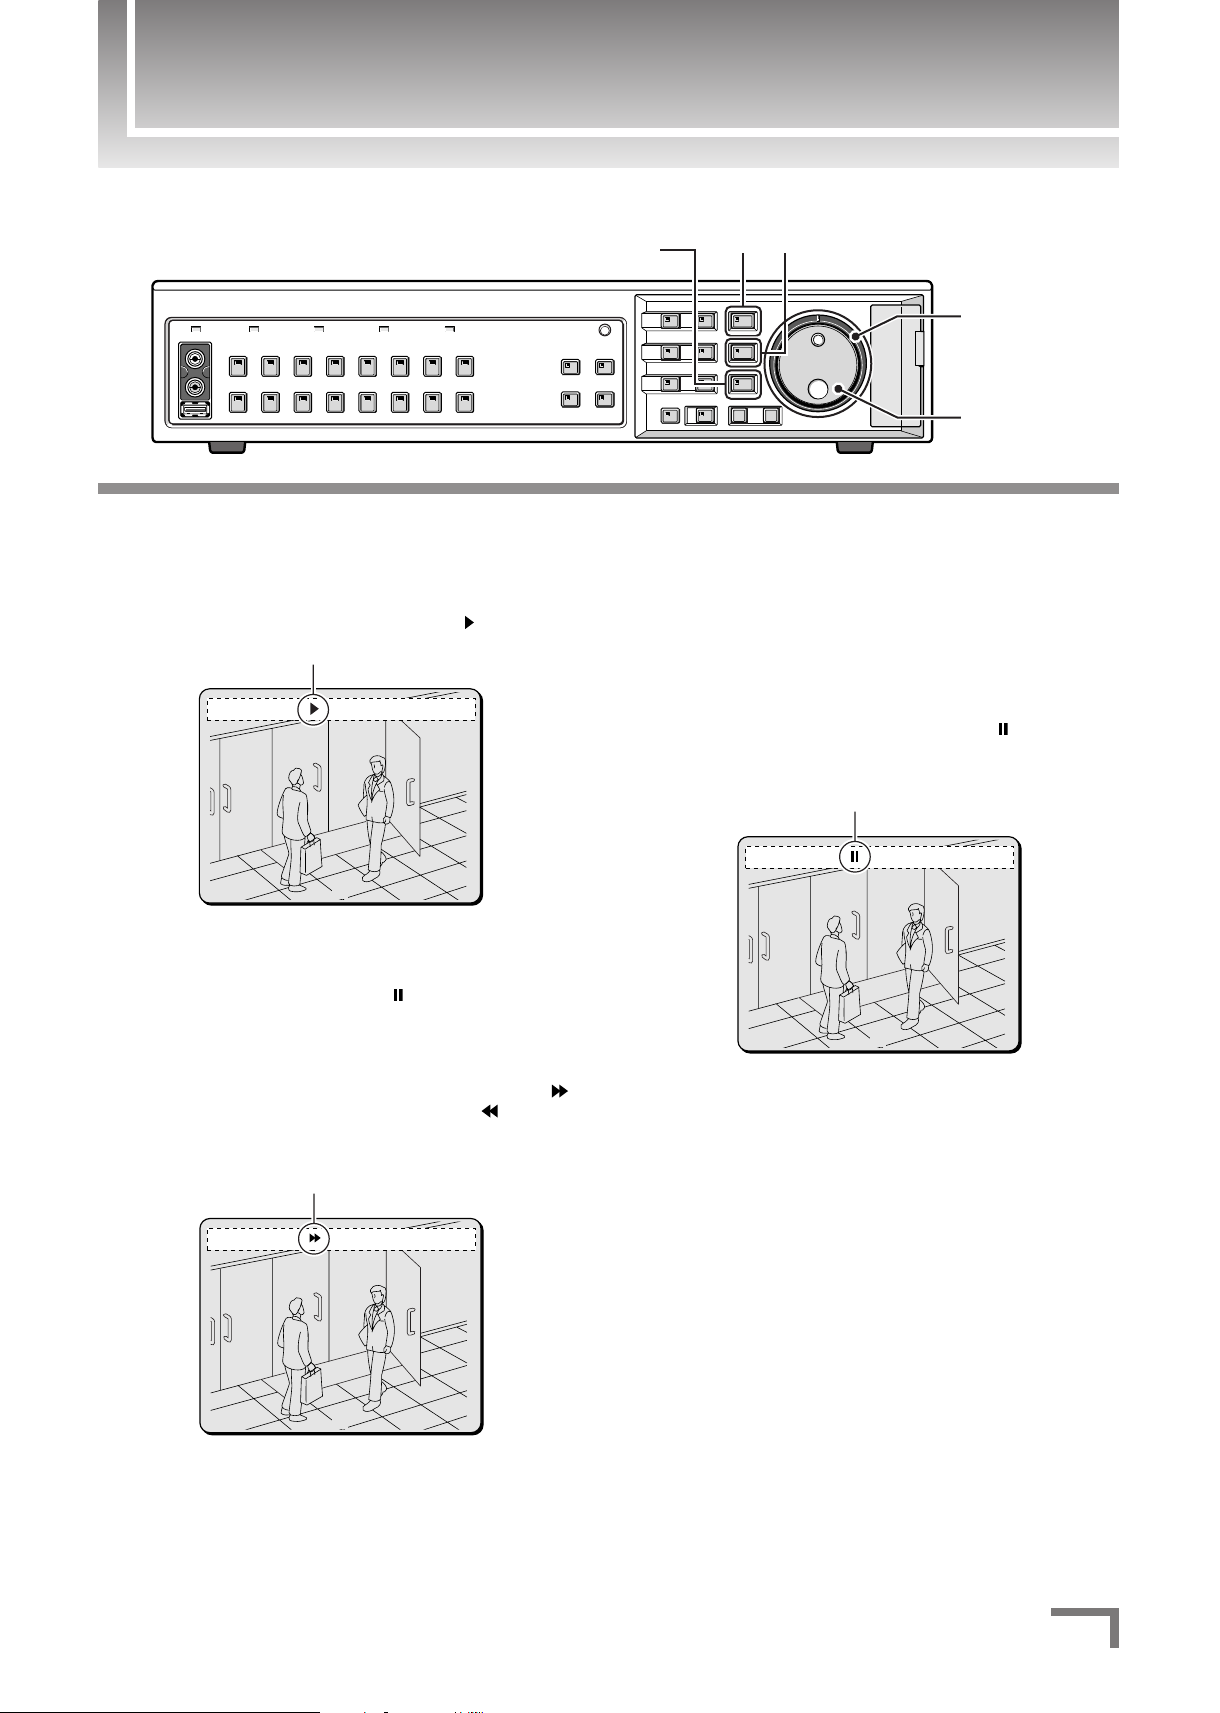
12
S-dial
(SHUTTLE dial)
J-dial
(JOG dial)
SHUTTLE HOLD button
■ To play back video in the full-screen display:
Press the PLAY/STOP button.
1
a The video is played back from the point where recording
started, and the operation display shows “ ”.
¡Use the camera selection button to select the camera whose video
to play back.
¡The recorder pauses playback once it has reached the end of the
video, and the operation display shows “ ”.
¡To stop playback, press the PLAY/STOP button again.
¡Fast-forward/fast-reverse playback
During playback, you can turn the S-dial clockwise to fast-forward ( )
the playback or turn it counterclockwise to fast-reverse ( ) the
playback.
¡Releasing the dial resets the playback to normal mode.
¡When you press the SHUTTLE HOLD button during fast-forward/
fast-reverse playback, the recorder continues to fast-forward or fastreverse the playback without requiring you to hold the dial (Pressing
the button again resets the playback to normal mode).
■ To view still image frames:
Press the STILL button during playback.
2
a The recorder pauses to display the current frame as a still
image, and the operation display shows “ ”.
Pressing the button again resets the playback to normal
mode.
¡To scroll through the video frame by frame:
In still image mode, you can turn the J-dial clockwise to scroll through
the video one frame forward or turn it counterclockwise to scroll
through the video one frame backward.
English
4
Viewing Recorded Video
0302
05
06
01
04
07 08 09
12
16
03 04
13 14 15
07
08
09 10 11 12
01 02
05 06
0201
0403
1413
1615
1, 456 2, 3
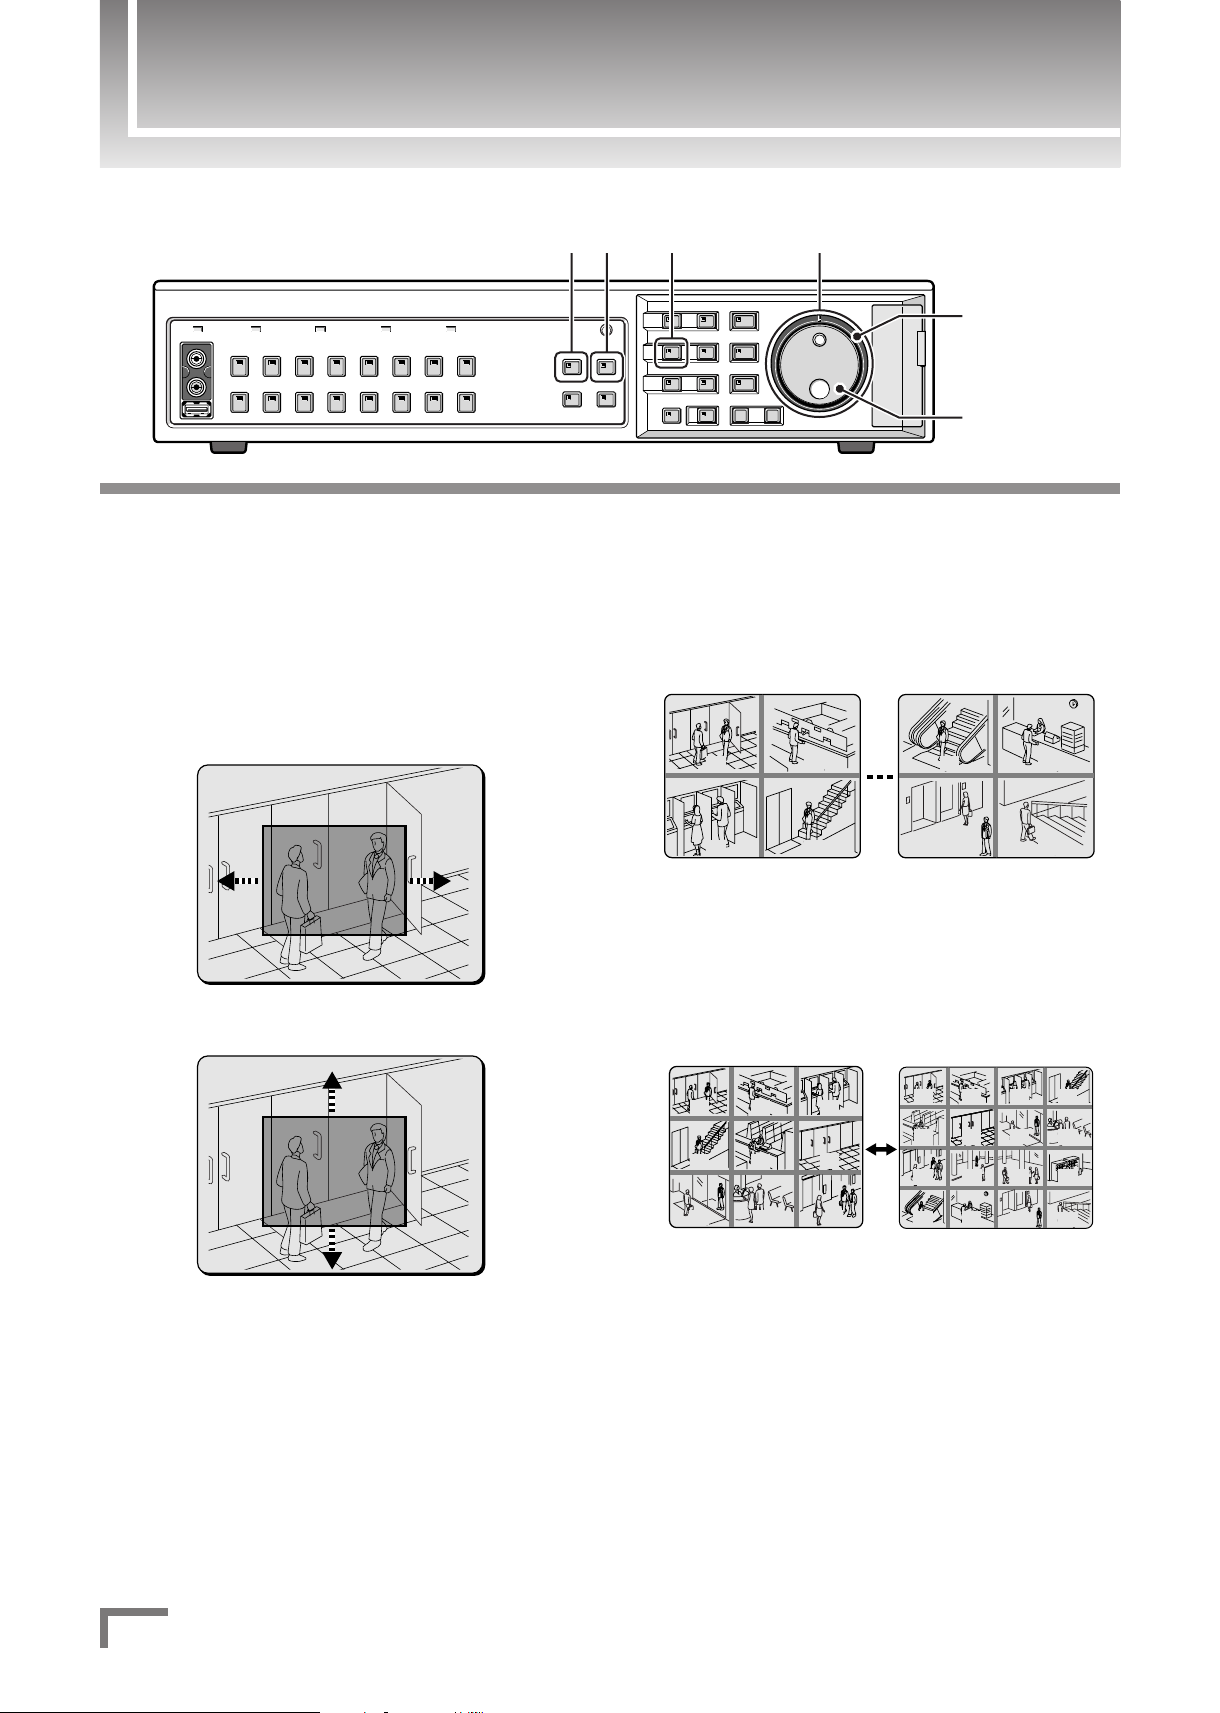
S-dial
(SHUTTLE dial)
J-dial
(JOG dial)
■ To zoom in on the displayed video:
Press the ZOOM button in playback or live mode.
1
A zoom frame appears in the center of the
2
screen. Move the zoom frame to the desired
position.
To move the frame horizontally, simply turn the J-dial
clockwise or counterclockwise.
Turn the S-dial clockwise to confirm the horizontal position.
Then, turn the J-dial to move the frame up or down.
■ To display four playback views at a time
using the quad-screen display (when
multiple recorded video files are available):
Press the QUAD button.
5
a Each time you press the button, the quad-screen switches
to display the views for the next set of cameras.
■ To display nine or sixteen playback views at
a time using the multi-screen display (when
multiple recorded video files are available):
Press the MULTI button.
6
a The monitor screen toggles between the multi-9 and
multi-16 screens each time you press the button.
Turn the S-dial clockwise.
3
a The area enclosed by the zoom frame is enlarged by a
To exit from zoom mode, press the ZOOM button
4
again.
5
factor of two.
English
¡The DSR-3709PA (9-channel model) supports only the multi-9
screen.
 Loading...