

Page 1
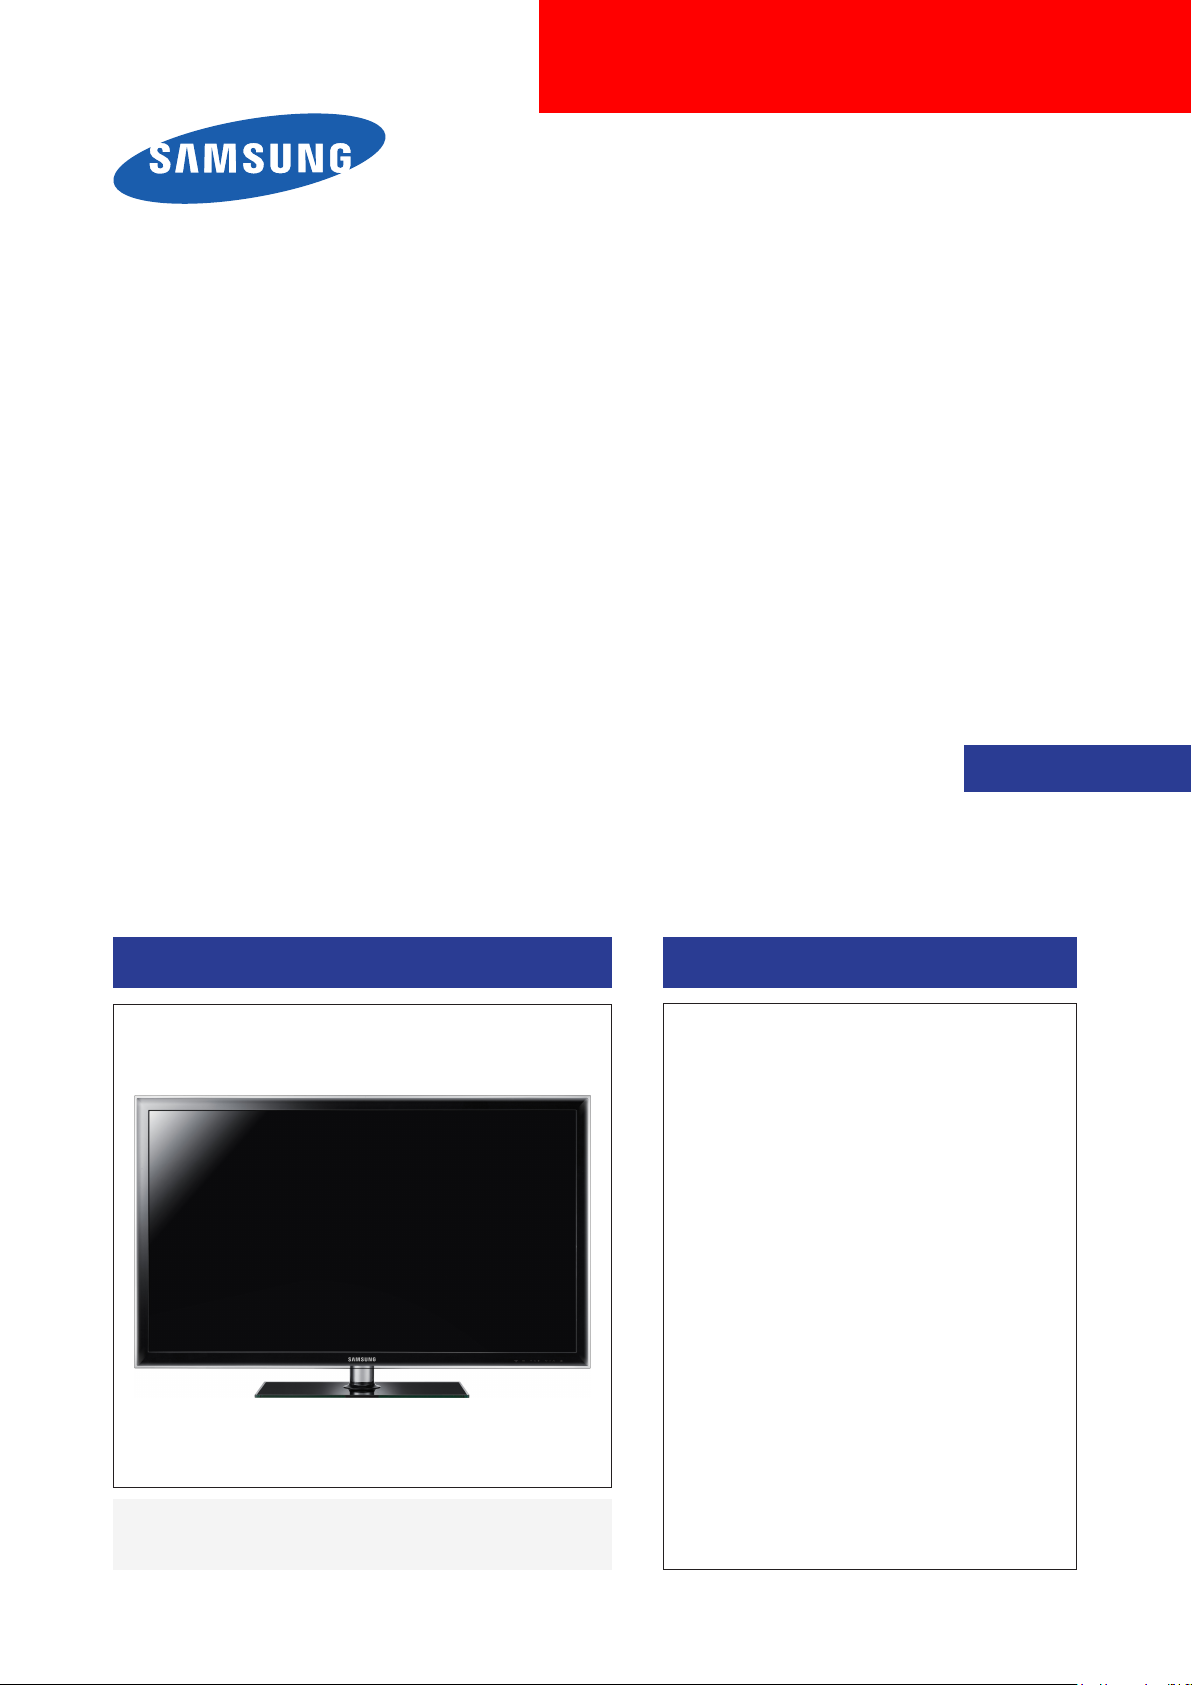
LED-TV
Chassis : U68A
Model : UE**D600*T*
UE**D61**S*
UE**D620*T*
UE**D63**S*
SERVICE
TFT-LCD TV Contents
1. Precautions
2. Product specications
3. Disassembly and Reassembly
4. Troubleshooting
5. Wiring Diagram
Manual
UE**D6*****
Page 2

Contents
1. Precautions .............................................................................................................. 1-1
1-1. Safety Precautions ......................................................................................................... 1-1
1-2. Servicing Precautions ..................................................................................................... 1-2
1-3. Electrostatically Sensitive Devices (ESD) Precautions .................................................. 1-2
1-4. Installation Precautions .................................................................................................. 1-3
2. Product specications ............................................................................................ 2-1
2-1. Specications Information .............................................................................................. 2-1
2-2. Detail Factory Option ...................................................................................................... 2-8
2-3. New Functions Explanation .......................................................................................... 2-10
2-4. Accessories .................................................................................................................. 2-22
3. Disassembly and Reassembly ............................................................................... 3-1
3-1. Disassembly and Reassembly ....................................................................................... 3-1
4. Troubleshooting ...................................................................................................... 4-1
4-1. Troubleshooting .............................................................................................................. 4-1
4-2. Alignments and Adjustments ........................................................................................ 4-27
4-3. Factory Mode Adjustments ........................................................................................... 4-28
4-4. Factory Data ................................................................................................................. 4-29
4-5. White Balance .............................................................................................................. 4-47
4-6. Software Upgrade ......................................................................................................... 4-49
4-7. Sub Micom Upgrade ..................................................................................................... 4-50
5. Wiring Diagram ........................................................................................................ 5-1
5-1. Wiring Diagram ............................................................................................................... 5-1
5-2. Connector ....................................................................................................................... 5-3
5-3. Connector Functions ...................................................................................................... 5-5
5-4. Cables ............................................................................................................................ 5-5
5-5. Types of module ............................................................................................................. 5-5
Page 3
This Service Manual is a property of Samsung Electronics Co.,Ltd.
Any unauthorized use of Manual can be punished under applicable
International and/or domestic law.
© 2011 Samsung Electronics Co.,Ltd.
All rights reserved.
Printed in Korea
Page 4
1. Precautions
1. Precautions
1-1. Safety Precautions
Follow these safety, servicing and ESD precautions to prevent damage and to protect against potential hazards such as
electrical shock.
1-1-1. Warnings
For continued safety, do not attempt to modify the circuit board.1.
Disconnect the AC power and DC power jack before servicing.2.
1-1-2. Servicing the LED TV
When servicing the LED TV, Disconnect the AC line cord from the AC outlet.1.
It is essential that service technicians have an accurate voltage meter available at all times. 2.
Check the calibration of this meter periodically.
1-1-3. Fire and Shock Hazard
Before returning the LED TV to the user, perform the following safety checks:
Inspect each lead dress to make certain that the leads are not pinched or that hardware is not lodged between the 1.
chassis and other metal parts in the LED TV.
Inspect all protective devices such as nonmetallic control knobs, insulating materials, cabinet backs, adjustment and 2.
compartment covers or shields, isolation resistorcapacitor networks, mechanical insulators, etc.
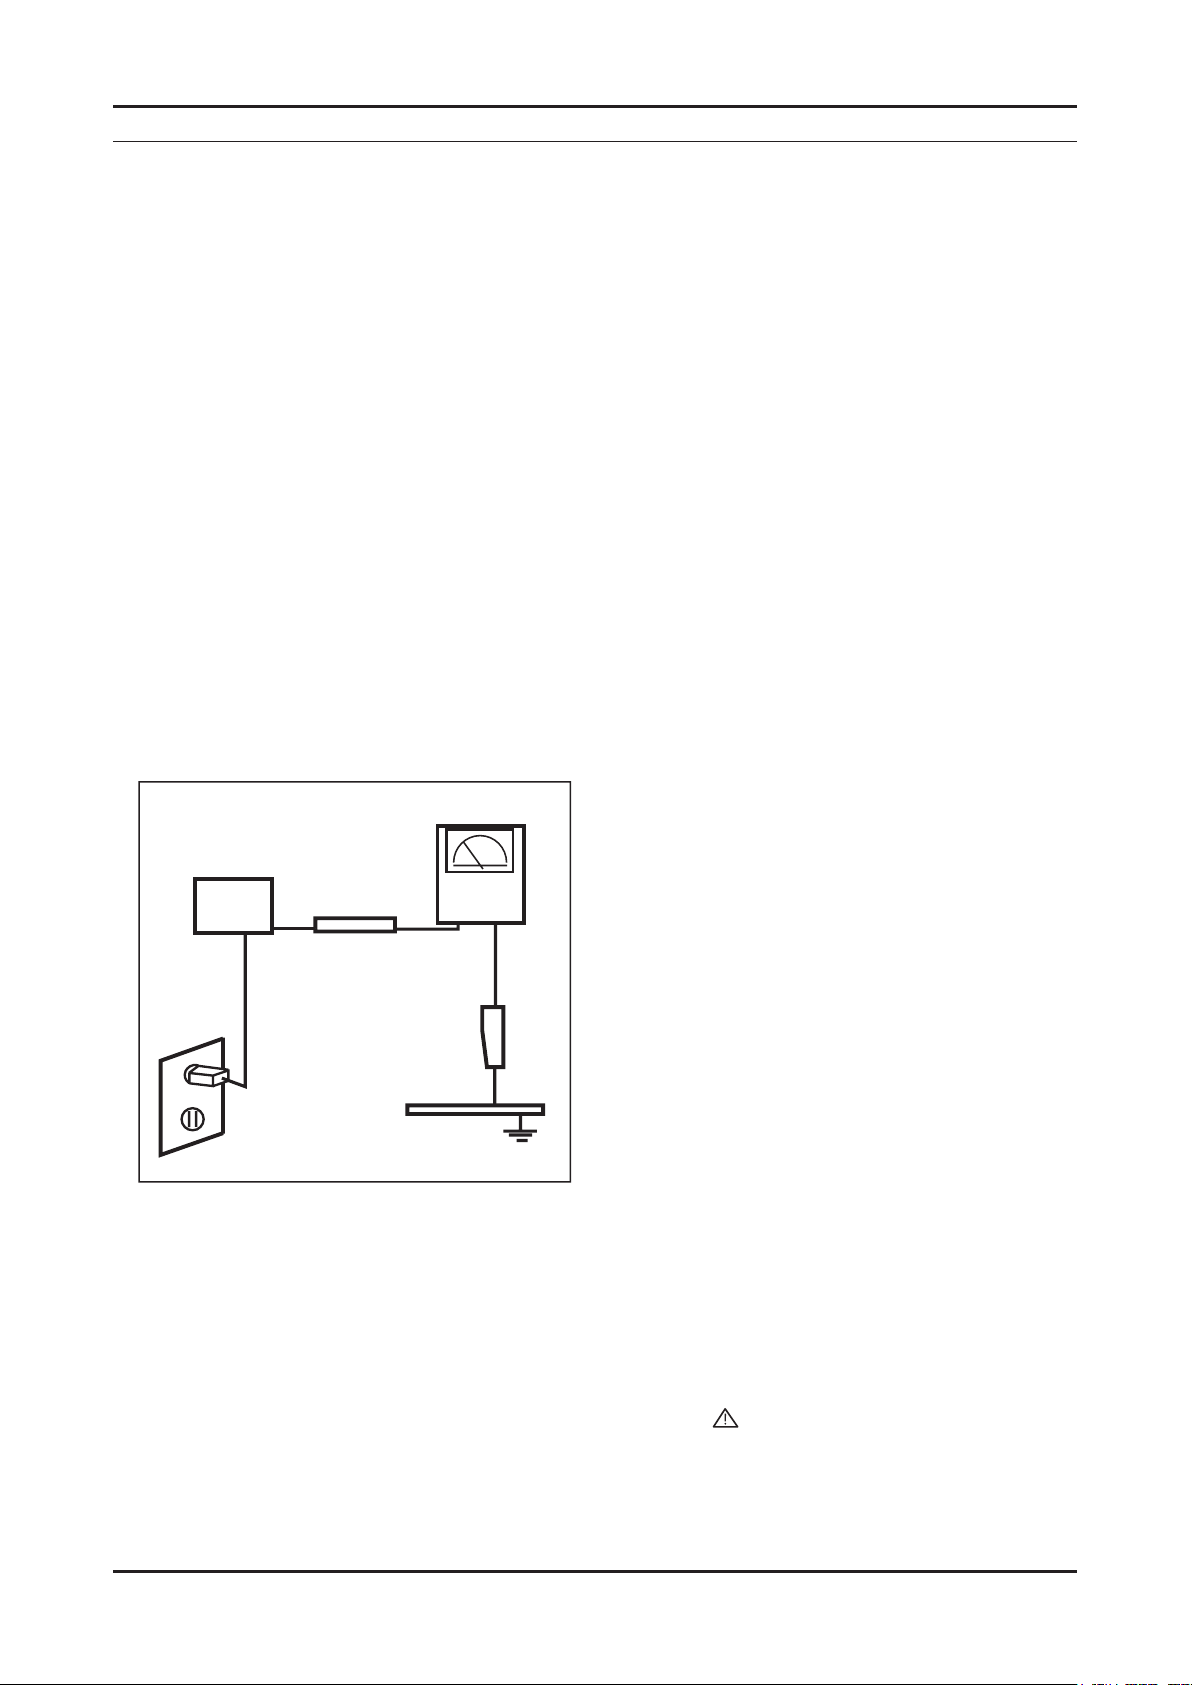
Leakage Current Hot Check (Figure 1-1): 3.
WARNING : Do not use an isolation transformer during this test.
Use a leakage current tester or a metering system that complies with American National Standards Institute (ANSI
C101.1, Leakage Current for Appliances), and Underwriters Laboratories (UL Publication UL1410, 59.7).
(READING SHOULD)
NOT BE ABOVE 0.5mA
DEVICE
UNDER
TEST
2-WIRE CORD
*ALSO TEST WITH
PLUG REVERSED
(USING AC ADAPTER
PLUG AS REQUIRED)
TEST ALL
EXPOSED METAL
SURFACES
LEAKAGE
CURRENT
TESTER
EARTH
GROUND
Figure 1-1. Leakage Current Test Circuit
With the unit completely reassembled, plug the AC line cord directly into a 120V AC outlet. With the unit’s AC switch 4.
rst in the ON position and then OFF, measure the current between a known earth ground (metal water pipe, conduit,
etc.) and all exposed metal parts, including: metal cabinets, screwheads and control shafts.
The current measured should not exceed 0.5 milliamp.
Reverse the power-plug prongs in the AC outlet and repeat the test.
1-1-4. Product Safety Notices
Some electrical and mechanical parts have special safetyrelated characteristics which are often not evident from visual
inspection. The protection they give may not be obtained by replacing them with components rated for higher voltage,
wattage, etc. Parts that have special safety characteristics are identied by on schematics and parts lists. A substitute
replacement that does not have the same safety characteristics as the recommended replacement part might create
shock, re and/or other hazards. Product safety is under review continuously and new instructions are issued whenever
appropriate.
1-1
Page 5

1-2
1. Precautions
1-2. Servicing Precautions
WARNING: An electrolytic capacitor installed with the wrong polarity might explode.
Caution: Before servicing units covered by this service manual, read and follow the Safety Precautions section of
this manual.
Note: If unforeseen circumstances create conict between the following servicing precautions and any of the
safety precautions, always follow the safety precautions.
1-2-1 General Servicing Precautions
Always unplug the unit’s AC power cord from the AC power source and disconnect the DC Power Jack before 1.
attempting to:
(a) remove or reinstall any component or assembly, (b) disconnect PCB plugs or connectors, (c) connect a test
component in parallel with an electrolytic capacitor.
Some components are raised above the printed circuit board for safety. An insulation tube or tape is sometimes 2.
used. The internal wiring is sometimes clamped to prevent contact with thermally hot components. Reinstall all such
elements to their original position.
After servicing, always check that the screws, components and wiring have been correctly reinstalled. Make sure that 3.
the area around the serviced part has not been damaged.
Check the insulation between the blades of the AC plug and accessible conductive parts (examples: metal panels, 4.
input terminals and earphone jacks).
Insulation Checking Procedure: Disconnect the power cord from the AC source and turn the power switch ON. 5.
Connect an insulation resistance meter (500 V) to theblades of the AC plug.
The insulation resistance between each blade of the AC plug and accessible conductive parts (see above) should be
greater than 1 megohm.
Always connect a test instrument’s ground lead to the instrument chassis ground before connecting the positive lead; 6.
always remove the instrument’s ground lead last.
1-3. Electrostatically Sensitive Devices (ESD) Precautions
Some semiconductor (solid state) devices can be easily damaged by static electricity. Such components are commonly
called Electrostatically Sensitive Devices (ESD). Examples of typical ESD are integrated circuits and some eld-effect
transistors. The following techniques will reduce the incidence of component damage caused by static electricity.
Immediately before handling any semiconductor components or assemblies, drain the electrostatic charge from your 1.
body by touching a known earth ground. Alternatively, wear a discharging wrist-strap device. To avoid a shock hazard,
be sure to remove the wrist strap before applying power to the LED TV.
After removing an ESD-equipped assembly, place it on a conductive surface such as aluminum foil to prevent 2.
accumulation of an electrostatic charge.
Do not use freon-propelled chemicals. These can generate electrical charges sufcient to damage ESDs.3.
Use only a grounded-tip soldering iron to solder or desolder ESDs.4.
Use only an anti-static solder removal device. Some solder removal devices not classied as “anti-static” can generate 5.
electrical charges sufcient to damage ESDs.
Do not remove a replacement ESD from its protective package until you are ready to install it. Most replacement ESDs 6.
are packaged with leads that are electrically shorted together by conductive foam, aluminum foil or other conductive
materials.
Immediately before removing the protective material from the leads of a replacement ESD, touch the protective 7.
material to the chassis or circuit assembly into which the device will be installed.
Caution: Be sure no power is applied to the chassis or circuit and observe all other safety precautions.
Minimize body motions when handling unpackaged replacement ESDs. Motions such as brushing clothes together, 8.
or lifting your foot from a carpeted oor can generate enough static electricity to damage an ESD.
Page 6

1-3
1. Precautions
1-4. Installation Precautions
For safety reasons, more than a people are required for carrying the product.1.
Keep the power cord away from any heat emitting devices, as a melted covering may cause re or electric shock.2.
Do not place the product in areas with poor ventilation such as a bookshelf or closet. The increased internal 3.
temperature may cause re.
Bend the external antenna cable when connecting it to the product. This is a measure to protect it from being exposed 4.
to moisture. Otherwise, it may cause a re or electric shock.
Make sure to turn the power off and unplug the power cord from the outlet before repositioning the product. Also check 5.
the antenna cable or the external connectors if they are fully unplugged. Damage to the cord may cause re or electric
shock.
Keep the antenna far away from any high-voltage cables and install it rmly. Contact with the highvoltage cable or the 6.
antenna falling over may cause re or electric shock.
When installing the product, leave enough space (0.4m) between the product and the wall for ventilation purposes. 7.
A rise in temperature within the product may cause re.
Page 7
2. Product specications
2-1. Specications Information
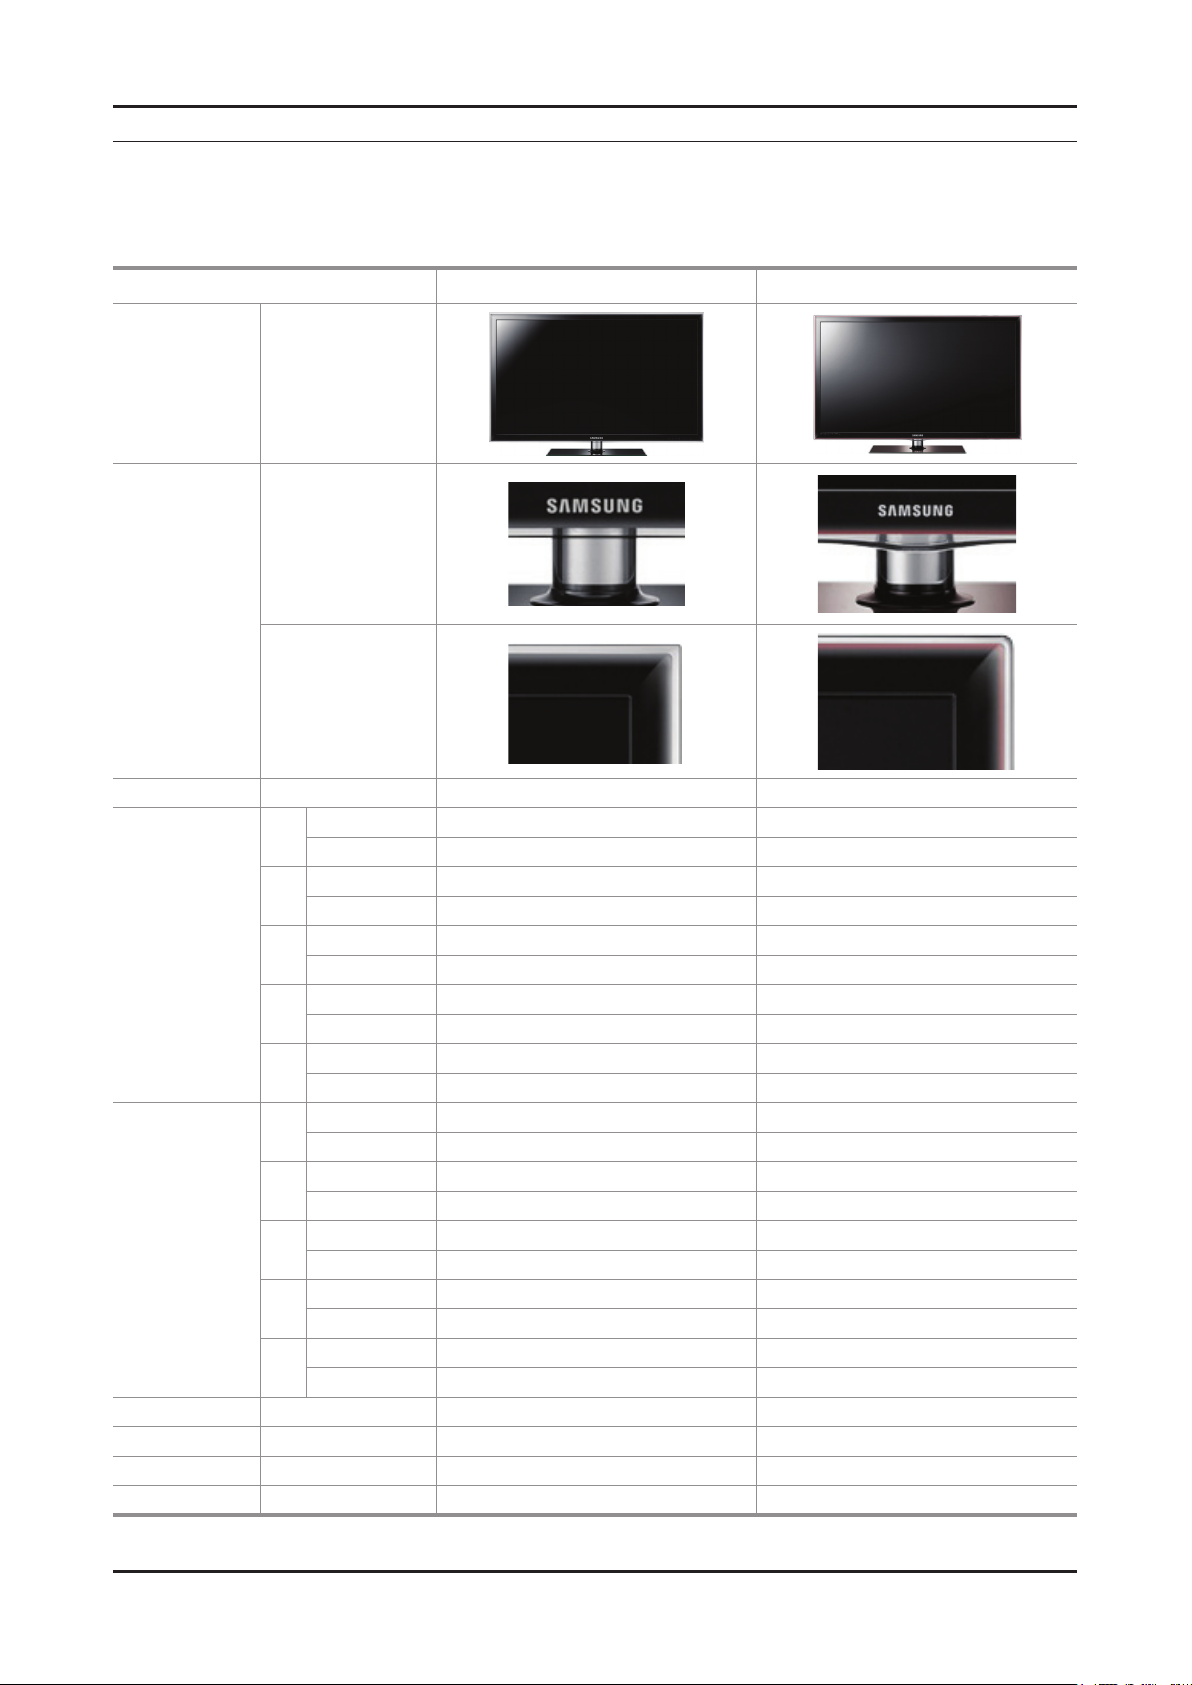
2-1-1. Model Comparison
Model UD600*/UD620* UD61**/UD63**
Front view All
All
Detail view
2. Product specications
All
Front Color All Clear + Rose black Rose Black
Without Stnand 771.27 x 29.9 x 470.36 768 x 29.9 x 475.3
32"
With Stand 771.27 x 240 x 532.53 768 x 240 x 533.4
Without Stnand 893.44 x 29.9 x 539.53 890.0 x 29.9 x 544.3
37"
With Stand 893.44 x 255 x 603.5 890.0 x 255 x 601.8
Dimensions
W x D x H
(mm)
Weight
(kg)
Panel Type All Super-Clear Super-Clear
Internal Memory All 128 Mbtye 128 Mbtye
DDR All 768 Mbtye 768 Mbtye
Feature All Media Play(USB/DLNA) 3D, SMART HUB Media Play(USB/DLNA) 3D, SMART HUB
Without Stnand 958.65 x 29.9 x 575.9 955.2 x 29.9 x 580.7
40"
With Stand 958.65 x 255 x 648.25 955.2 x 255 x 638.0
Without Stnand 1094.17 x 29.9 x 652.46 1090.6 x 29.9 x 657.1
46"
With Stand 1094.17 x 275 x 715.88 1090.6 x 275 x 714.1
Without Stnand 1284.67 x 29.9 x 759.17 1284.7 x 29.9 x 765.6
55"
With Stand 1284.67 x 305 x 823.13 1284.7 x 305 x 822.6
Without Stnand 7.5 7.3
32"
With Stand 10.2 10
Without Stnand 9.4 9.4
37"
With Stand 12.7 12.7
Without Stnand 11 10.9
40"
With Stand 14.3 14.2
Without Stnand 13.6 13.5
46"
With Stand 17.2 17.1
Without Stnand 17.9 18
55"
With Stand 22.1 22.2
2-1
Page 8
2-2
2. Product specications
2-1-2. Feature & Specications
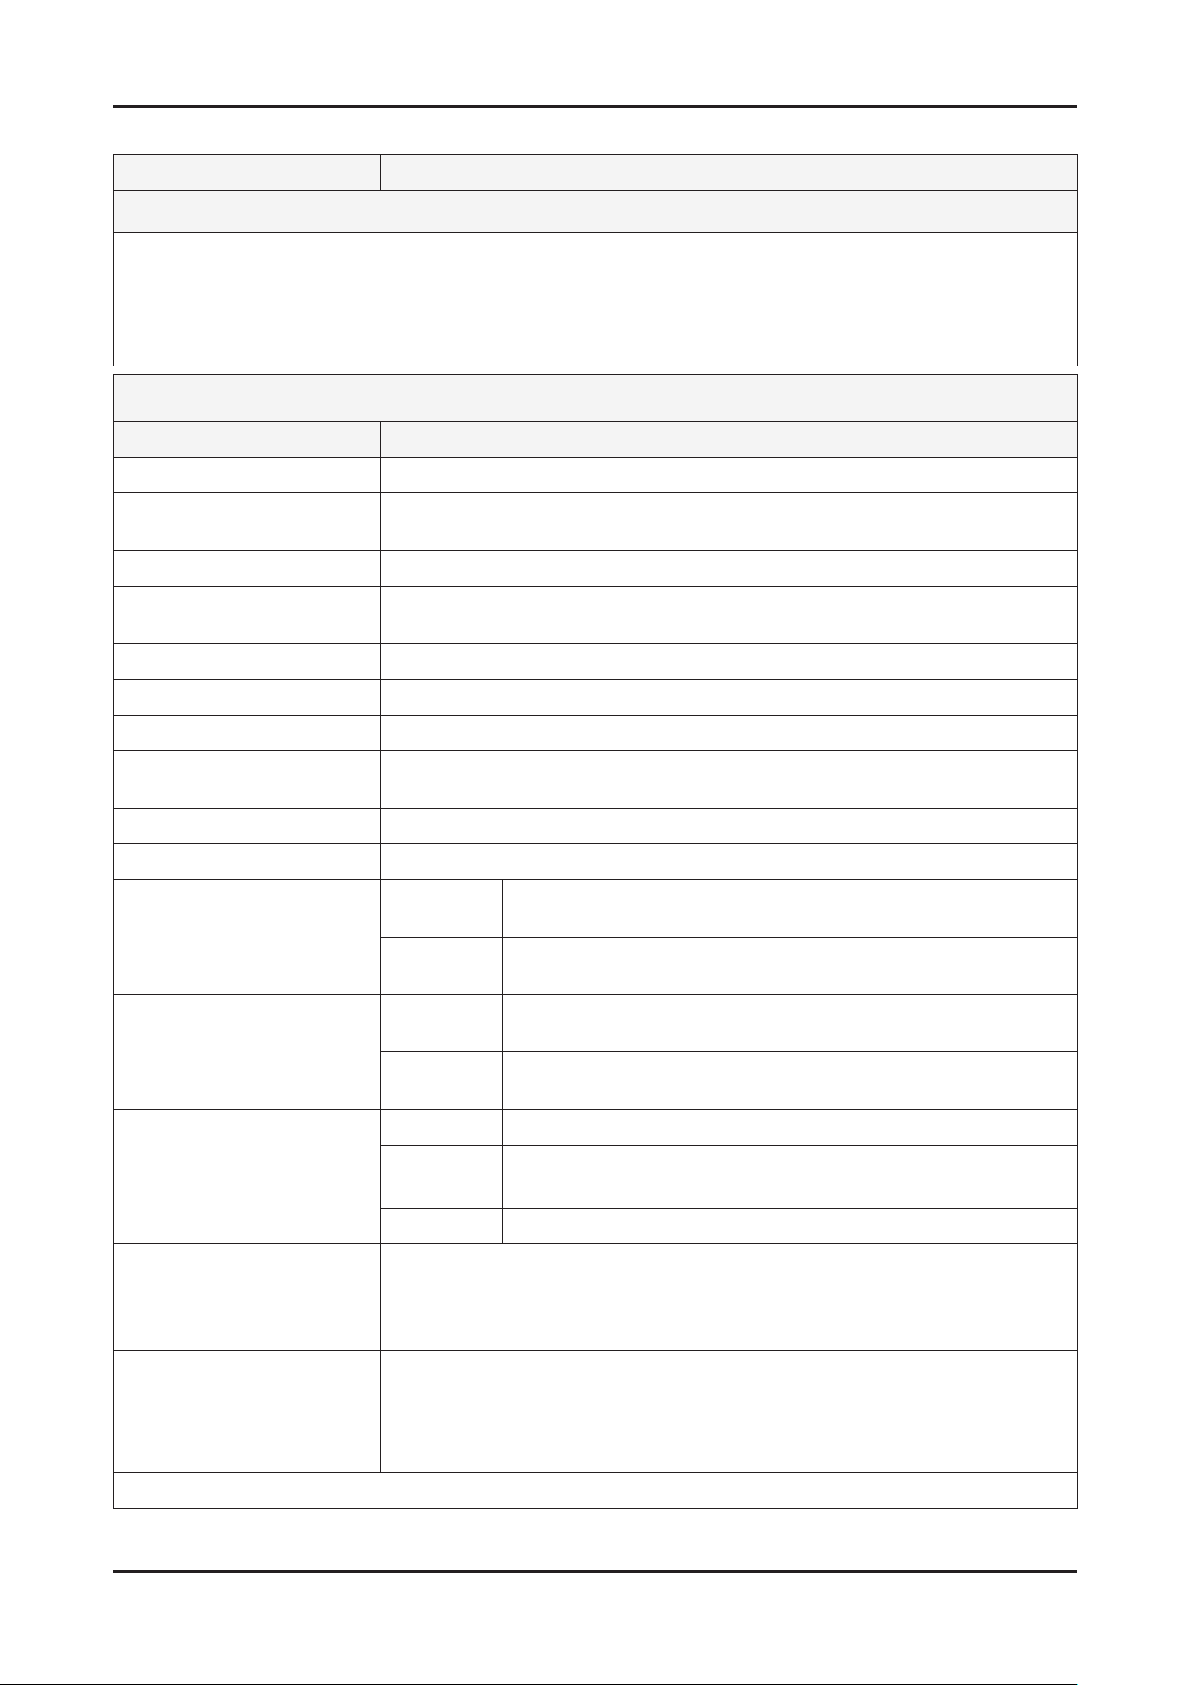
Model UE32D60**/UE32D61**/UE32D62**/UE32D63**
Feature
UE : Digital-TV, RF, 4-HDMI, 1-Component, 1-A/V, 3-USB 2.0(Media Play), D-SUB , LAN, 1-Scart ሪ
Respons time : 6.5 ms ሪ
Dynamic contrast, Super-PVA ሪ
PIP(in HDMI 1, 2, 3, 4, Component 1, PC Mode and Sub picture is available only in TV mode(DTV/ATV)) ሪ
Dolby Digital+, SRS theater ሪ
Specications
Item Description
LCD Panel 32 inch HD 120Hz
Scanning Frequency Horizontal : 135.6 KHz(TYP)
Vertical : 120 Hz(TYP)
Display Colors 1.07G Colors
Maximum resolution Horizontal : 1920 Pixels
Vertical : 1080 Pixels
Input Signal Analog 0.7 Vp-p ± 5% positive at 75Ω , internally terminated
Input Sync Signal H/V Separate, TTL, P. or N.
Maximum Pixel Clock rate 80 MHz
Active Display
Horizontal/Vertical
AC power voltage & Frequency AC 220-240 V 50/60 Hz
Power Consumption 100 W (Under 0.1 W, Stand by)
Dimensions Set
(W x D x H)
Weight (Set) 60**
TV System Tuning Frequency Synthesize (Refer to detailed Frequency Table)
Environmental Considerations Operating Temperature : 50˚F ~ 104˚F (10˚C ~ 40˚C)
698.4 (H) x 392.85(V) mm
60**
62**
61**
63**
62**
61**
63**
System
Sound BK , DK , NICAM , MPEG1
Operating Humidity : 10% ~ 80%, non-condensing
Storage temperature : -13˚F ~ 113˚F (-25˚C ~ 45˚C)
Storage Humidity : 5% ~ 95%, non-condensing
771.27 (W) x 240 (D) x 532.53 (H) mm_with stand
771.27 (W) x 29.9 (D) x 470.36 (H) mm_without stand
768 (W) x 240 (D) x 533.4 (H) mm_with stand
768 (W) x 29.9 (D) x 475.3 (H) mm_without stand
10.2 kg_with stand
7.5 kg_without stand
10.0 kg_with stand
7.3 kg_without stand
DVB-T/C/S2 (62**, 63**), DVB-T/C (61**, 60**)
DVB-T/T2/C (61**, 60** UK models), PAL , SECAM , NT4.43
Audio spec. - MAX Internal speaker Out : Right/Left(10 W)
- BASS Control Range : -10dB ~ +10dB
- TREBLE Control Range : -10dB ~ +10dB
- Output Frequency : RF : 20 Hz ~ 15.4 kHz
AV/Componet / HDMI : 20 Hz ~ 20 kHz
Note: 3D, Media Bridge, AllShare, Internet TV, Bluetooth
Page 9
2-3
2. Product specications
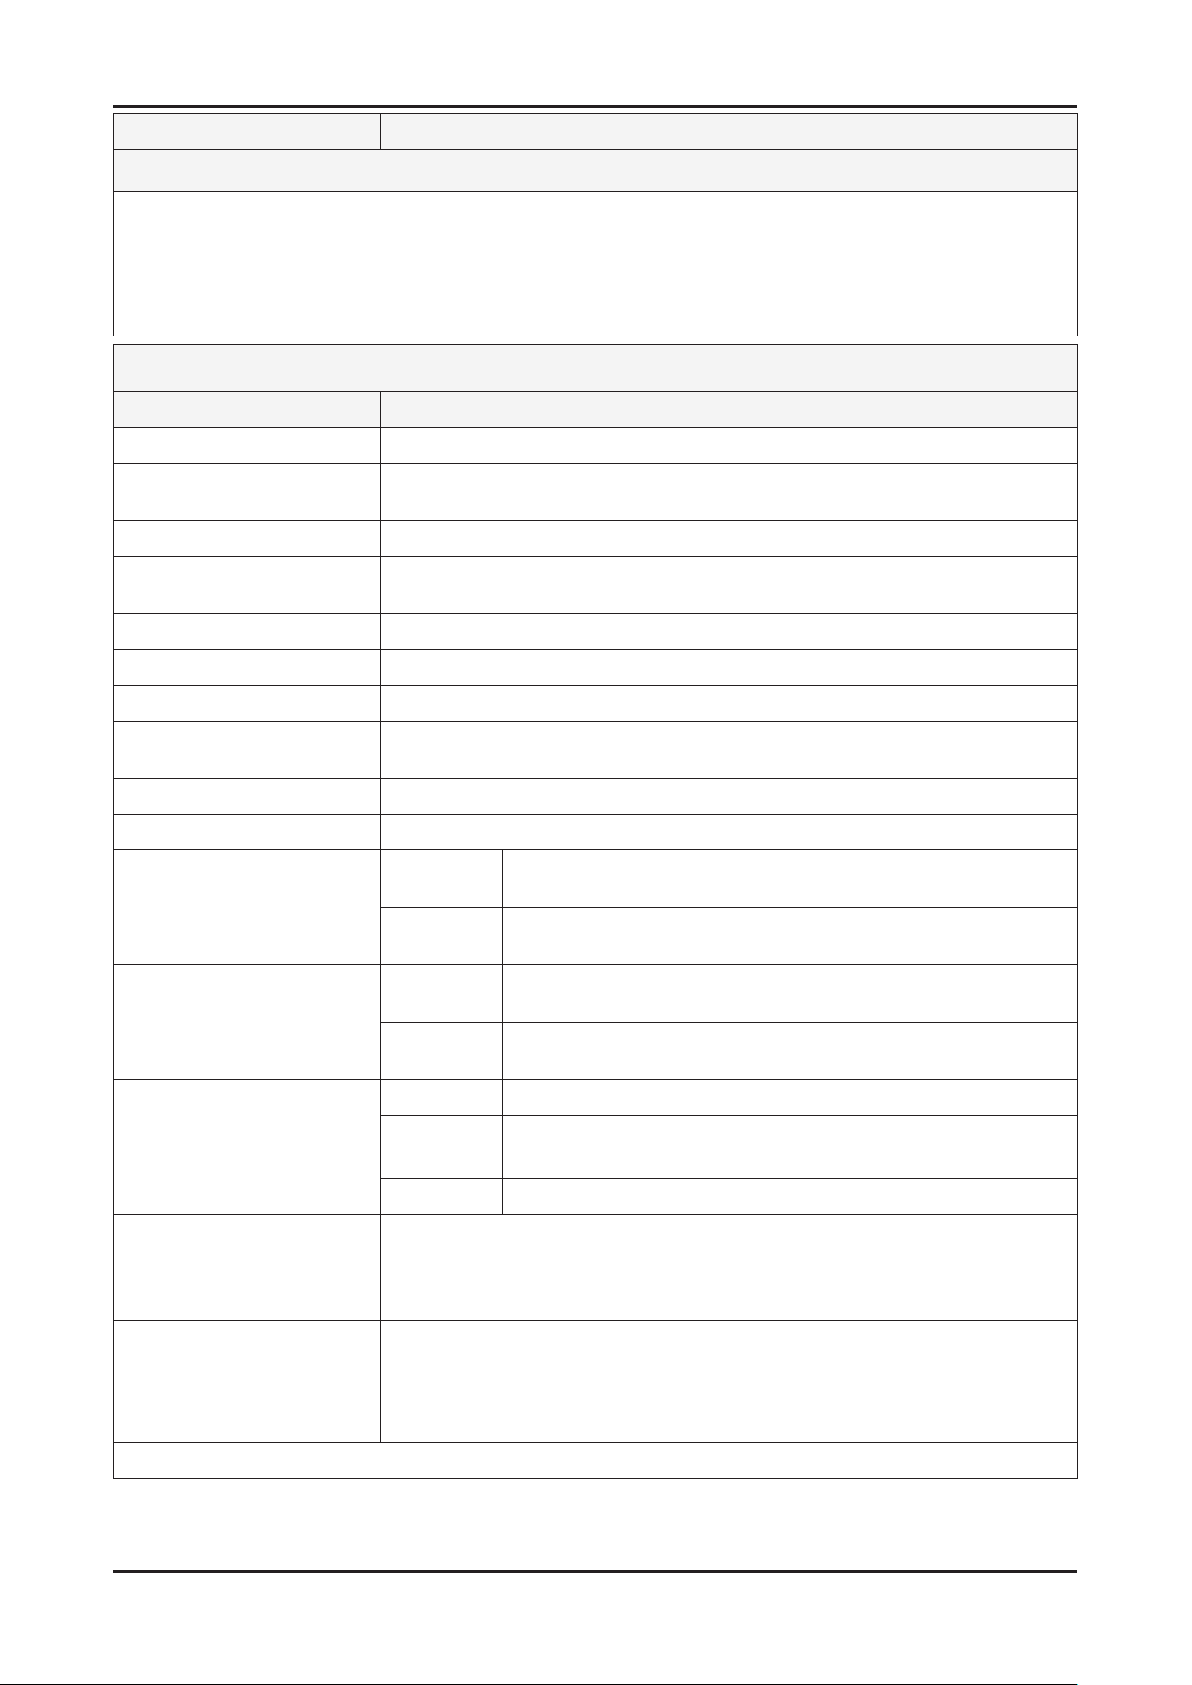
Model UE37D60**/UE37D61**/UE37D62**/UE37D63**
Feature
UE : Digital-TV, RF, 4-HDMI, 1-Component, 1-A/V, 3-USB 2.0(Media Play), D-SUB , LAN, 1-Scart ሪ
Respons time : 5.5 ms ሪ
Dynamic contrast, Super-PVA ሪ
PIP(in HDMI 1, 2, 3, 4, Component 1, PC Mode and Sub picture is available only in TV mode(DTV/ATV)) ሪ
Dolby Digital+, SRS theater ሪ
Specications
Item Description
LCD Panel 37 inch HD 120Hz
Scanning Frequency Horizontal : 135.6 KHz(TYP)
Vertical : 120 Hz(TYP)
Display Colors 1.07G Colors
Maximum resolution Horizontal : 1920 Pixels
Vertical : 1080 Pixels
Input Signal Analog 0.7 Vp-p ± 5% positive at 75Ω , internally terminated
Input Sync Signal H/V Separate, TTL, P. or N.
Maximum Pixel Clock rate 80 MHz
Active Display
Horizontal/Vertical
AC power voltage & Frequency AC 220-240 V 50/60 Hz
Power Consumption 110 W (Under 0.1 W, Stand by)
Dimensions Set
(W x D x H)
Weight (Set) 60**
TV System Tuning Frequency Synthesize (Refer to detailed Frequency Table)
Environmental Considerations Operating Temperature : 50˚F ~ 104˚F (10˚C ~ 40˚C)
819.36(H) x 460.89(V) mm
60**
62**
61**
63**
62**
61**
63**
System
Sound BK , DK , NICAM , MPEG1
Operating Humidity : 10% ~ 80%, non-condensing
Storage temperature : -13˚F ~ 113˚F (-25˚C ~ 45˚C)
Storage Humidity : 5% ~ 95%, non-condensing
893.44 (W) x 255 (D) x 603.5 (H) mm_with stand
893.44 (W) x 29.9 (D) x 539.53 (H) mm_without stand
890.0 (W) x 255 (D) x 601.8 (H) mm_with stand
890.0 (W) x 29.9 (D) x 544.3 (H) mm_without stand
12.7 kg_with stand
9.4 kg_without stand
10.47 kg_with stand
9.07 kg_without stand
DVB-T/C/S2 (62**, 63**), DVB-T/C (61**, 60**)
DVB-T/T2/C (61**, 60** UK models), PAL , SECAM , NT4.43
Audio spec. - MAX Internal speaker Out : Right/Left(10 W)
- BASS Control Range : -10dB ~ +10dB
- TREBLE Control Range : -10dB ~ +10dB
- Output Frequency : RF : 20 Hz ~ 15.4 kHz
AV/Componet / HDMI : 20 Hz ~ 20 kHz
Note: 3D, Media Bridge, AllShare, Internet TV, Bluetooth
Page 10
2-4
2. Product specications
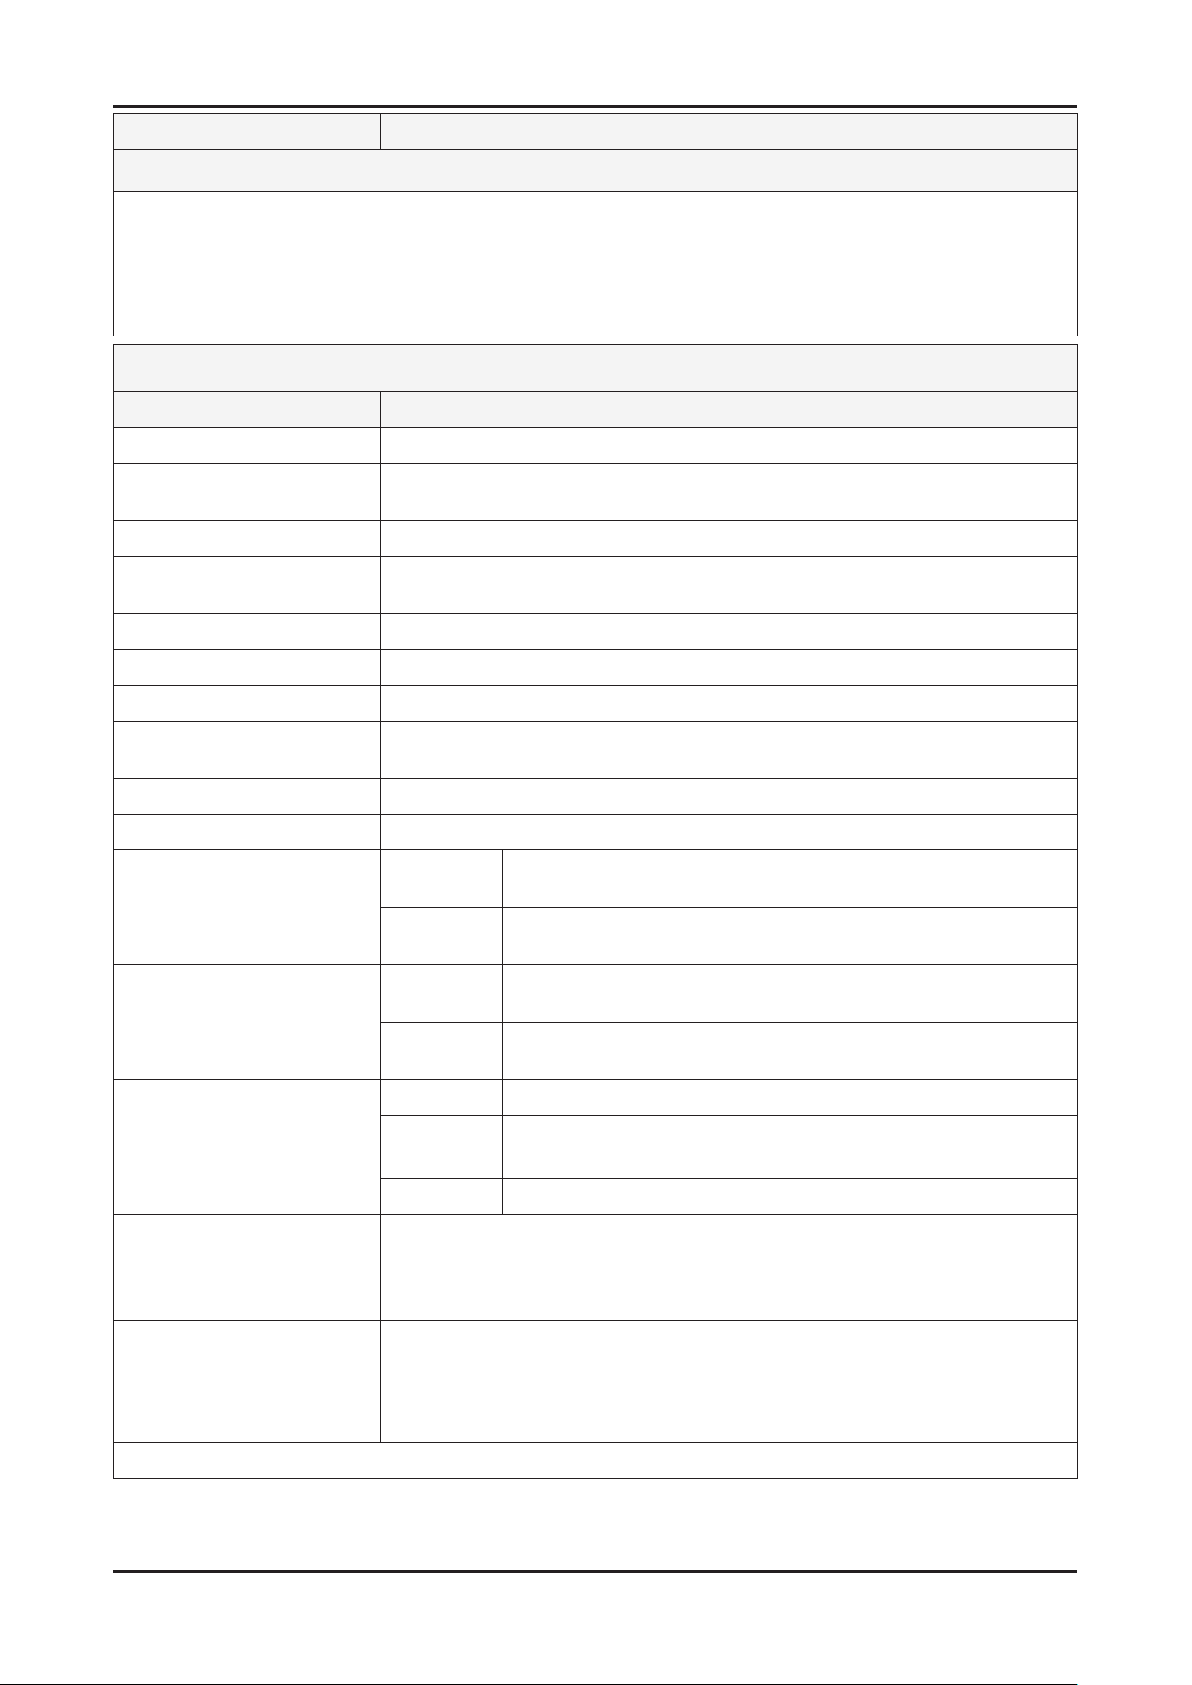
Model UE40D60**/UE40D61**/UE40D62**/UE40D63**
Feature
UE : Digital-TV, RF, 4-HDMI, 1-Component, 1-A/V, 3-USB 2.0(Media Play), D-SUB , LAN, 1-Scart ሪ
Respons time : 5.5 ms ሪ
Dynamic contrast, Super-PVA ሪ
PIP(in HDMI 1, 2, 3, 4, Component 1, PC Mode and Sub picture is available only in TV mode(DTV/ATV)) ሪ
Dolby Digital+, SRS theater ሪ
Specications
Item Description
LCD Panel 40 inch HD 120Hz
Scanning Frequency Horizontal : 135.6 KHz(TYP)
Vertical : 120 Hz(TYP)
Display Colors 1.07G Colors
Maximum resolution Horizontal : 1920 Pixels
Vertical : 1080 Pixels
Input Signal Analog 0.7 Vp-p ± 5% positive at 75Ω , internally terminated
Input Sync Signal H/V Separate, TTL, P. or N.
Maximum Pixel Clock rate 80 MHz
Active Display
Horizontal/Vertical
AC power voltage & Frequency AC 220-240 V 50/60 Hz
Power Consumption 120 W (Under 0.1 W, Stand by)
Dimensions Set
(W x D x H)
Weight (Set) 60**
TV System Tuning Frequency Synthesize (Refer to detailed Frequency Table)
Environmental Considerations Operating Temperature : 50˚F ~ 104˚F (10˚C ~ 40˚C)
885.6 (H) x 498.15 (V) mm
60**
62**
61**
63**
62**
61**
63**
System
Sound BK , DK , NICAM , MPEG1
Operating Humidity : 10% ~ 80%, non-condensing
Storage temperature : -13˚F ~ 113˚F (-25˚C ~ 45˚C)
Storage Humidity : 5% ~ 95%, non-condensing
958.65 (W) x 255 (D) x 648.25 (H) mm_with stand
958.65 (W) x 29.9 (D) x 575.9 (H) mm_without stand
955.2 (W) x 255 (D) x 638.0 (H) mm_with stand
955.2 (W) x 29.9 (D) x 580.7 (H) mm_without stand
14.3 kg_with stand
11 kg_without stand
14.2 kg_with stand
10.9 kg_without stand
DVB-T/C/S2 (62**, 63**), DVB-T/C (61**, 60**)
DVB-T/T2/C (61**, 60** UK models), PAL , SECAM , NT4.43
Audio spec. - MAX Internal speaker Out : Right/Left(10 W)
- BASS Control Range : -10dB ~ +10dB
- TREBLE Control Range : -10dB ~ +10dB
- Output Frequency : RF : 20 Hz ~ 15.4 kHz
AV/Componet / HDMI : 20 Hz ~ 20 kHz
Note: 3D, Media Bridge, AllShare, Internet TV, Bluetooth
Page 11
2-5
2. Product specications
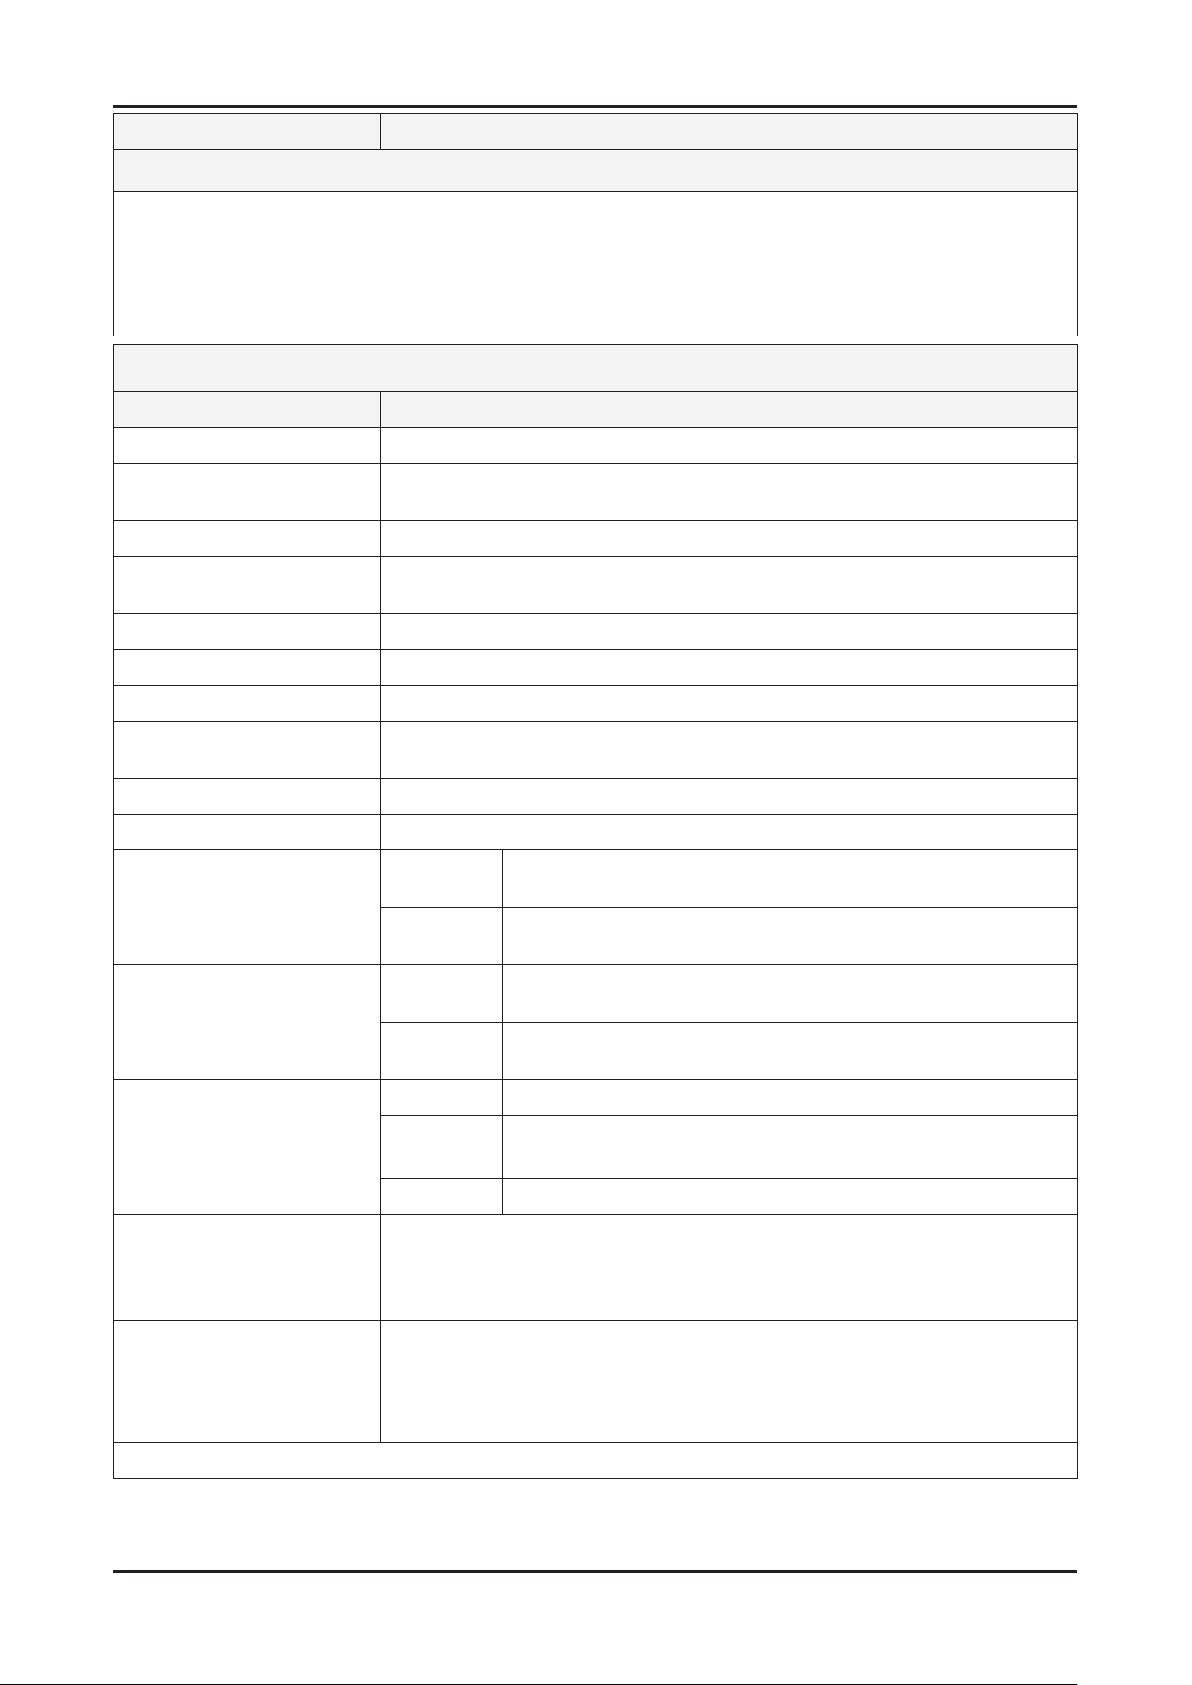
Model UE46D60**/UE46D61**/UE46D62**/UE46D63**
Feature
UE : Digital-TV, RF, 4-HDMI, 1-Component, 1-A/V, 3-USB 2.0(Media Play), D-SUB , LAN, 1-Scart ሪ
Respons time : 5.5 ms ሪ
Dynamic contrast, Super-PVA ሪ
PIP(in HDMI 1, 2, 3, 4, Component 1, PC Mode and Sub picture is available only in TV mode(DTV/ATV)) ሪ
Dolby Digital+, SRS theater ሪ
Specications
Item Description
LCD Panel 46 inch HD 120Hz
Scanning Frequency Horizontal : 135.6 KHz(TYP)
Vertical : 120 Hz(TYP)
Display Colors 1.07G Colors
Maximum resolution Horizontal : 1920 Pixels
Vertical : 1080 Pixels
Input Signal Analog 0.7 Vp-p ± 5% positive at 75Ω , internally terminated
Input Sync Signal H/V Separate, TTL, P. or N.
Maximum Pixel Clock rate 80.74 MHz
Active Display
Horizontal/Vertical
AC power voltage & Frequency AC 220-240 V 50/60 Hz
Power Consumption 140 W (Under 0.1 W, Stand by)
Dimensions Set
(W x D x H)
Weight (Set) 60**
TV System Tuning Frequency Synthesize (Refer to detailed Frequency Table)
Environmental Considerations Operating Temperature : 50˚F ~ 104˚F (10˚C ~ 40˚C)
1018.08 (H) x 572.67 (V) mm
60**
62**
61**
63**
62**
61**
63**
System
Sound BK , DK , NICAM , MPEG1
Operating Humidity : 10% ~ 80%, non-condensing
Storage temperature : -13˚F ~ 113˚F (-25˚C ~ 45˚C)
Storage Humidity : 5% ~ 95%, non-condensing
1094.17 (W) x 275 (D) x 715.88 (H) mm_with stand
1094.17 (W) x 29.9 (D) x 652.46 (H) mm_without stand
1090.6 (W) x 275 (D) x 714.1 (H) mm_with stand
1090.6 (W) x 29.9 (D) x 657.1 (H) mm_without stand
17.2 kg_with stand
13.6 kg_without stand
17.1 kg_with stand
13.5 kg_without stand
DVB-T/C/S2 (62**, 63**), DVB-T/C (61**, 60**)
DVB-T/T2/C (61**, 60** UK models), PAL , SECAM , NT4.43
Audio spec. - MAX Internal speaker Out : Right/Left(10 W)
- BASS Control Range : -10dB ~ +10dB
- TREBLE Control Range : -10dB ~ +10dB
- Output Frequency : RF : 20 Hz ~ 15.4 kHz
AV/Componet / HDMI : 20 Hz ~ 20 kHz
Note: 3D, Media Bridge, AllShare, Internet TV, Bluetooth
Page 12
2-6
2. Product specications
Model UE55D60**/UE55D61**/UE55D62**/UE55D63**
Feature
UE : Digital-TV, RF, 4-HDMI, 1-Component, 1-A/V, 3-USB 2.0(Media Play), D-SUB , LAN, 1-Scart ሪ
Respons time : 5.5 ms ሪ
Dynamic contrast, Super-PVA ሪ
PIP(in HDMI 1, 2, 3, 4, Component 1, PC Mode and Sub picture is available only in TV mode(DTV/ATV)) ሪ
Dolby Digital+, SRS theater ሪ
Specications
Item Description
LCD Panel 55 inch HD 120Hz
Scanning Frequency Horizontal : 135.6 KHz(TYP)
Vertical : 120 Hz(TYP)
Display Colors 1.07G Colors
Maximum resolution Horizontal : 1920 Pixels
Vertical : 1080 Pixels
Input Signal Analog 0.7 Vp-p ± 5% positive at 75Ω , internally terminated
Input Sync Signal H/V Separate, TTL, P. or N.
Maximum Pixel Clock rate 80.74 MHz
Active Display
Horizontal/Vertical
AC power voltage & Frequency AC 220-240 V 50/60 Hz
Power Consumption 160 W (Under 0.1 W, Stand by)
Dimensions Set
(W x D x H)
Weight (Set) 60**
TV System Tuning Frequency Synthesize (Refer to detailed Frequency Table)
Environmental Considerations Operating Temperature : 50˚F ~ 104˚F (10˚C ~ 40˚C)
1209.6(H) x 680.4(V) mm
60**
62**
61**
63**
62**
61**
63**
System
Sound BK , DK , NICAM , MPEG1
Operating Humidity : 10% ~ 80%, non-condensing
Storage temperature : -13˚F ~ 113˚F (-25˚C ~ 45˚C)
Storage Humidity : 5% ~ 95%, non-condensing
1284.67 (W) x 305 (D) x 823.13 (H) mm_with stand
1284.67 (W) x 29.9 (D) x 759.17 (H) mm_without stand
1284.7 (W) x 305 (D) x 822.6 (H) mm_with stand
1284.7 (W) x 29.9 (D) x 765.6 (H) mm_without stand
22.1 kg_with stand
17.9 kg_without stand
22.2 kg_with stand
18 kg_without stand
DVB-T/C/S2 (62**, 63**), DVB-T/C (61**, 60**)
DVB-T/T2/C (61**, 60** UK models), PAL , SECAM , NT4.43
Audio spec. - MAX Internal speaker Out : Right/Left(10 W)
- BASS Control Range : -10dB ~ +10dB
- TREBLE Control Range : -10dB ~ +10dB
- Output Frequency : RF : 20 Hz ~ 15.4 kHz
AV/Componet / HDMI : 20 Hz ~ 20 kHz
Note: 3D, Media Bridge, AllShare, Internet TV, Bluetooth
Page 13
2-7
2. Product specications
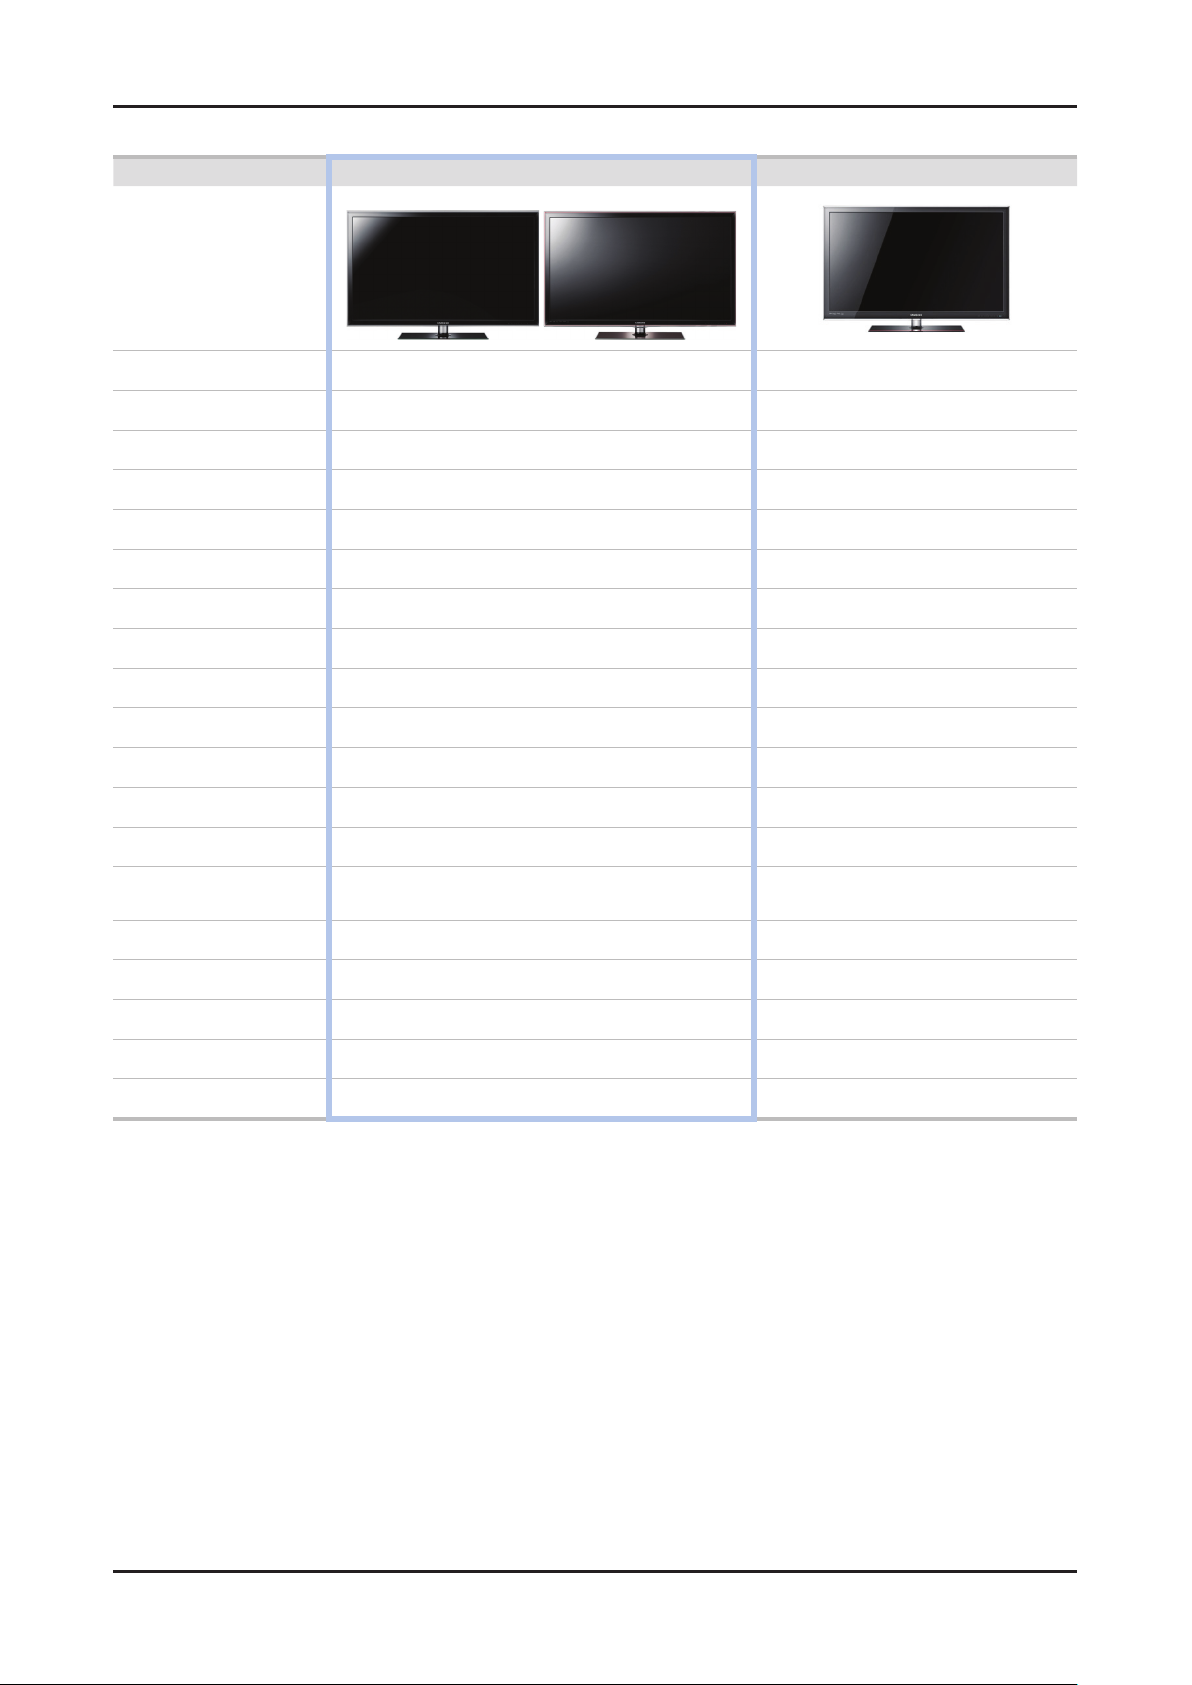
2-1-3. Spec Comparison to the Old Models
Model UD6T UC6U
UE60**/UE62** UE61**/UE63**
Design
Display Type LED TV LED TV
Built-in Tuner O O
Resolution 1920 x 1080 1920 x 1080
LCD Panel TFT LCD Panel 100Hz TFT LCD Panel 100Hz
Screen Size 32"/37"/40"/46"/55" 32"/37"/40"/46"/55"
Picture ratio 16:9 16:9
3D O X
Built-in WiFi X X
Light Sensor O O
Picture Enhancer DNIe+(FBE3) DNIe+(FBE3)
Equalizer 5 Band 5 Band
Auto Motion Plus 120Hz YES YES
Surround Sound 2Way SRS TruSurround Dolby Digital 2Way SRS TruSurround Dolby Digital
Speaker Output
Energy Saving O O
PIP O O
Game mode O O
Anynet+ O O
Antena DTV 1 (Cable/Air) DTV 1 (Cable/Air)
32"/37"/40"/46" : 10W + 10W
55" : 15W + 15W
32"/37"/40"/46" : 10W + 10W
55" : 15W + 15W
Page 14
2-8
2. Product specications
2-2. Detail Factory Option
If you replace the main board with new one, please change the factory option as well. ※
The options you must change are "Type" and "Front Color".
2-2-1. UE60**
Model Name UE32D60** UE37D60** UE40D60** UE46D60** UE55D60**
Vendor
Panel
SMPS
1 Factory Reset - -
2 Type
3 Local set EU EU EU EU EU
4 Model UD60** UD60** UD60** UD60** UD60**
5 Tuner Auto Auto Auto Auto Auto
6 DDR - - - - -
7 Light Effect OFF OFF OFF OFF OFF
8 Ch Table NONE NONE NONE NONE NONE
9 Country - - - - -
10 Front Color U-T-R-BK U-T-R-BK U-T-R-BK U-T-R-BK U-T-R-BK
CODE
SPEC
Vendor
CODE
SPEC
CMI
AMLCD
BN07-01020A
BN95-00534A
LD320CGC-C2
LTJ320HW02-V
SEM
SEM
BN44-00458A
BN44-00483A
PD46A1_BHS
PD37G1_BSM
32P1UF3E
32A1UF4E
AUO
BN07-01017A
LD370CGB-C2
HANSOE
SEM
BN44-00458B
BN44-00483A
PD46A1_BS
PD37G1_BSM
37P1UF3E
CMI
AMLCD
BN07-01018A
BN95-00467A
LD400CGC-C2
LTJ400HV03-V
HANSOE
HANSOL
BN44-00458B
BN44-00482B
PD46A1_BS
PD46G1_BHS
40P1UF3E
40A1UF4E
CMI
AUO
AMLCD
BN07-01019A
BN07-01046A
BN95-00466A
LD460CGC-C3
LD460CGB-A2
LTJ460HW03-V
SEM
HANSOL
BN44-00458A
BN44-00482B
PD46A1_BSM
PD46G1_BHS
46P1UF3E
46L1UF3E
46A1UF4E
CMI
AMLCD
BN07-01046A
BN95-00466A
LD550CGC-C2
LTJ550HW03-V
HANSOE
BN44-00457A
PD55A1_BHS
55P1UF3E
55A1UF4E
Page 15
2-9
2. Product specications
2-2-2. UE61**
Model Name UE32D61** UE37D61** UE40D61** UE46D61** UE55D61**
Vendor
Panel
SMPS
1 Factory Reset - -
2 Type
3 Local set EU EU EU EU EU
4 Model UD61** UD61** UD61** UD61** UD61**
5 Tuner Auto Auto Auto Auto Auto
6 DDR - - - - -
7 Light Effect OFF OFF OFF OFF OFF
8 Ch Table NONE NONE NONE NONE NONE
9 Country - - - - -
10 Front Color
CODE
SPEC
Vendor
CODE
SPEC
CMI
AMLCD
BN07-01020A
BN95-00534A
LD320CGC-C2
LTJ320HW02-V
SEM
SEM
BN44-00458A
BN44-00483A
PD46A1_BHS
PD37G1_BSM
32P1UF3E
32A1UF4E
U-T-R-BK
U-T-C-BK(UE612*)
AUO
BN07-01017A
LD370CGB-C2
HANSOE
SEM
BN44-00458B
BN44-00483A
PD46A1_BS
PD37G1_BSM
37P1UF3E
U-T-R-BK
U-T-C-BK(UE612*)
CMI
AMLCD
BN07-01018A
BN95-00467A
LD400CGC-C2
LTJ400HV03-V
HANSOE
HANSOL
BN44-00458B
BN44-00482B
PD46A1_BS
PD46G1_BHS
40P1UF3E
40A1UF4E
U-T-R-BK
U-T-C-BK(UE612*)
CMI
AUO
AMLCD
BN07-01019A
BN07-01046A
BN95-00466A
LD460CGC-C3
LD460CGB-A2
LTJ460HW03-V
SEM
HANSOL
BN44-00458A
BN44-00482B
PD46A1_BSM
PD46G1_BHS
46P1UF3E
46L1UF3E
46A1UF4E
U-T-R-BK
U-T-C-BK(UE612*)
BN07-01046A
BN95-00466A
LD550CGC-C2
LTJ550HW03-V
HANSOE
BN44-00457A
PD55A1_BHS
55P1UF6E
55A2UF7E
U-T-R-BK
U-T-C-BK(UE612*)
CMI
AMLCD
2-2-3. UE62**
Model Name UE32D62** UE37D62** UE40D62** UE46D62** UE55D62**
Vendor
Panel
SMPS
1 Factory Reset - -
2 Type
3 Local set EU EU EU EU EU
4 Model UD62** UD62** UD62** UD62** UD62**
5 Tuner Auto Auto Auto Auto Auto
6 DDR - - - - -
7 Light Effect OFF OFF OFF OFF OFF
8 Ch Table NONE NONE NONE NONE NONE
9 Country - - - - -
10 Front Color U-T-R-BK U-T-R-BK U-T-R-BK U-T-R-BK U-T-R-BK
CODE
SPEC
Vendor
CODE
SPEC
CMI
AMLCD
BN07-01020A
BN07-01020A
BN95-00534A
LD320CGC-C2
LTJ320HW02-V
SEM
SEM
BN44-00458A
BN44-00483A
PD46A1_BHS
PD37G1_BSM
32P1UF3E
32A1UF4E
AUO
BN07-01017A
LD370CGB-C2
HANSOE
SEM
BN44-00458B
BN44-00483A
PD46A1_BS
PD37G1_BSM
37P1UF3E
CMI
AMLCD
BN07-01018A
BN95-00467A
LD400CGC-C2
LTJ400HV03-V
HANSOE
HANSOL
BN44-00458B
BN44-00482B
PD46A1_BS
PD46G1_BHS
40P1UF3E
40A1UF4E
CMI
AUO
AMLCD
BN07-01019A
BN07-01046A
BN95-00466A
LD460CGC-C3
LD460CGB-A2
LTJ460HW03-V
SEM
HANSOL
BN44-00458A
BN44-00482B
PD46A1_BSM
PD46G1_BHS
46P1UF3E
46L1UF3E
46A1UF4E
CMI
AMLCD
BN07-01046A
BN95-00466A
LD550CGC-C2
LTJ550HW03-V
HANSOE
BN44-00457A
PD55A1_BHS
55P1UF3E
55A1UF4E
Page 16
2-10
2. Product specications
2-2-4. UE63**
Model Name UE32D63** UE37D63** UE40D63** UE46D63** UE55D63**
Vendor
Panel
SMPS
TUNER
1 Factory Reset - - - - -
2 Type
3 Local set EU EU EU EU EU
4 Model UD63** UD63** UD63** UD63** UD63**
5 Tuner Auto Auto Auto Auto Auto
6 DDR - - - - -
7 Light Effect OFF OFF OFF OFF OFF
8 Ch Table NONE NONE NONE NONE NONE
9 Country - - - - -
10 Front Color
CODE
SPEC
Vendor
CODE
SPEC
Vendor - - - - SEMCO
CODE - - - - BN40-00217A
SPEC - - - - DNSS243VH142A
CMI
AMLCD
BN07-01020A
BN95-00534A
LD320CGC-C2
LTJ320HW02-V
SEM
SEM
BN44-00458A
BN44-00483A
PD46A1_BHS
PD37G1_BSM
32P1UF3E
32A1UF4E
U-T-R-BK
U-T-C-BK(UE632*)
AUO
BN07-01017A
LD370CGB-C2
HANSOE
SEM
BN44-00458B
BN44-00483A
PD46A1_BS
PD37G1_BSM
37P1UF3E
U-T-R-BK
U-T-C-BK(UE632*)
CMI
AMLCD
BN07-01018A
BN95-00467A
LD400CGC-C2
LTJ400HV03-V
HANSOE
HANSOL
BN44-00458B
BN44-00482B
PD46A1_BS
PD46G1_BHS
40P1UF3E
40A1UF4E
U-T-R-BK
U-T-C-BK(UE632*)
CMI
AUO
AMLCD
BN07-01019A
BN07-01046A
BN95-00466A
LD460CGC-C3
LD460CGB-A2
LTJ460HW03-V
SEM
HANSOL
BN44-00458A
BN44-00482B
PD46A1_BSM
PD46G1_BHS
46P1UF3E
46L1UF3E
46A1UF4E
U-T-R-BK
U-T-C-BK(UE632*)
BN07-01046A
BN95-00466A
BN95-00503A
LD550CGC-C2
LTJ550HW03-V
LTJ550HW04-C
HANSOE
BN44-00457A
PD55A1_BHS
55P1UF3E
55A1UF4E
55A1UF3E
U-T-R-BK
U-T-C-BK(UE632*)
CMI
AMLCD
AMLCD
Page 17
2-11
2. Product specications
2-3. New Functions Explanation
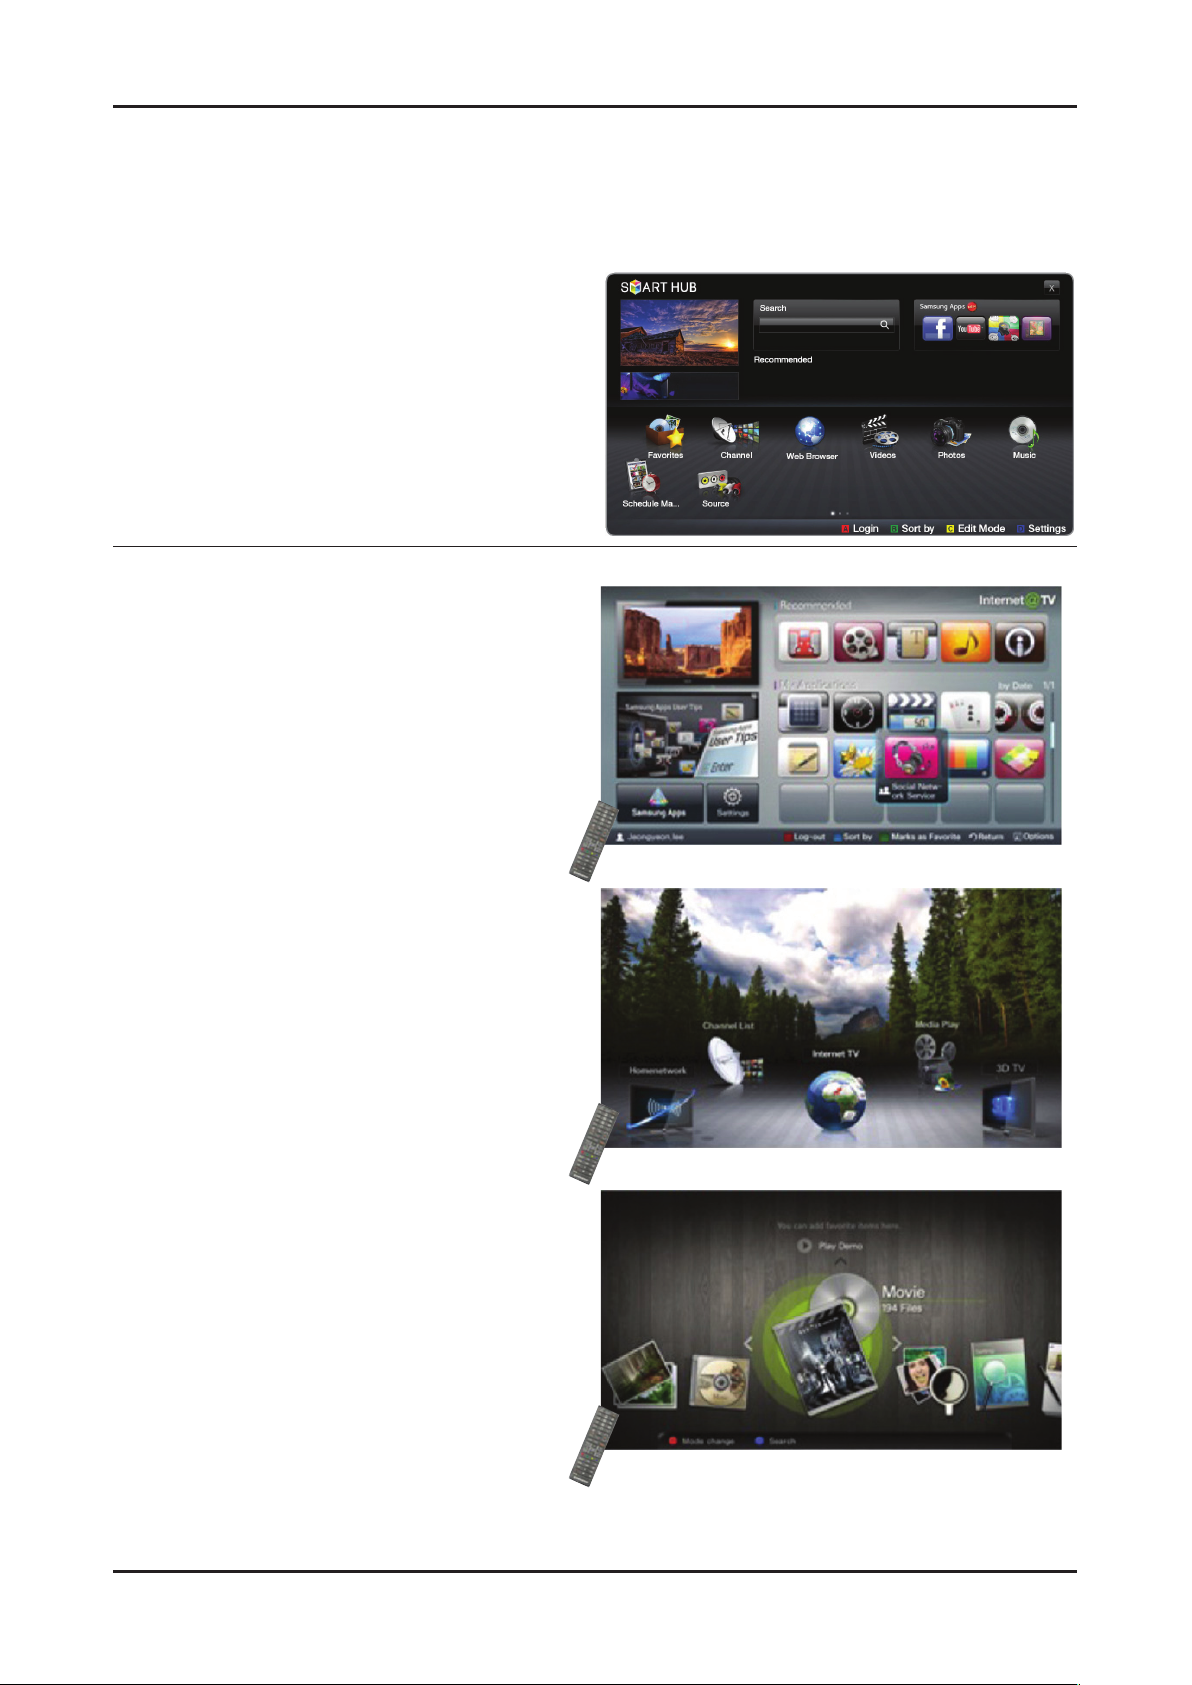
2-3-1. Smart Hub
'11 Smart Hub vs '10 Internet@TV
'11 Smart Hub
Concepts and Features Launcher : Internet TV, Media
Play, Content Button
Search All : Provides integrated search results for a
variety of areas
Full Browser : PC's Web browser, such as access to
common web site content and applications so you can
see
'10 Internet@TV
Internet TV, Media Player, content button
configured separately
Launcher - internet widget
Gallery -
Horizontal / Vertical view modes
Free widget download / install
Internet@TV Button(Hot key on remote control)
Media. P Button(Hot key on remote control)
Comtent Button(Hot key on remote control)
Page 18
2-12
2. Product specications
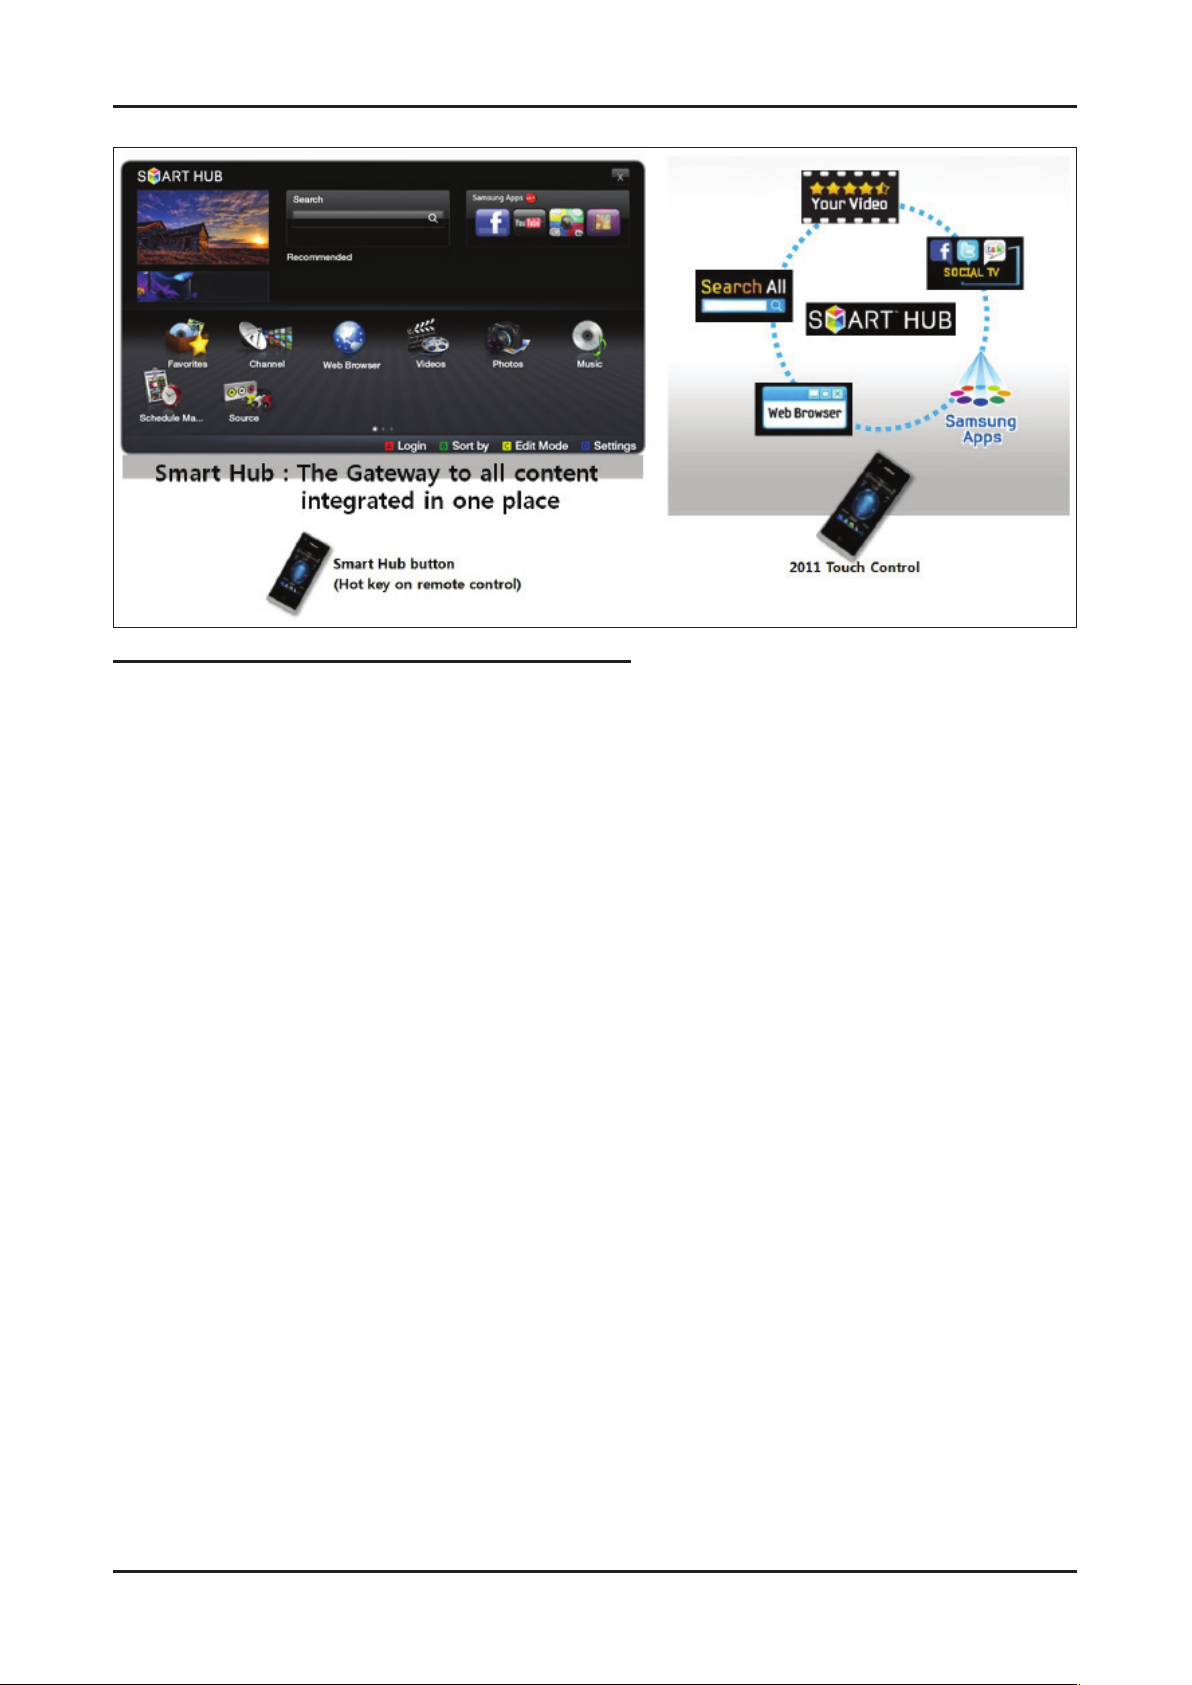
Smart Hub Concepts
Gateway to access all type of diverse content
It's all integrated to guide you to easier diverse entertainment choice•
Control your entertainment life with easy and simple user friends UI•
Access to driverse Apps that are adding every day•
Customize your TV, by App grouping & sorting to your taste•
Page 19
2-13
2. Product specications
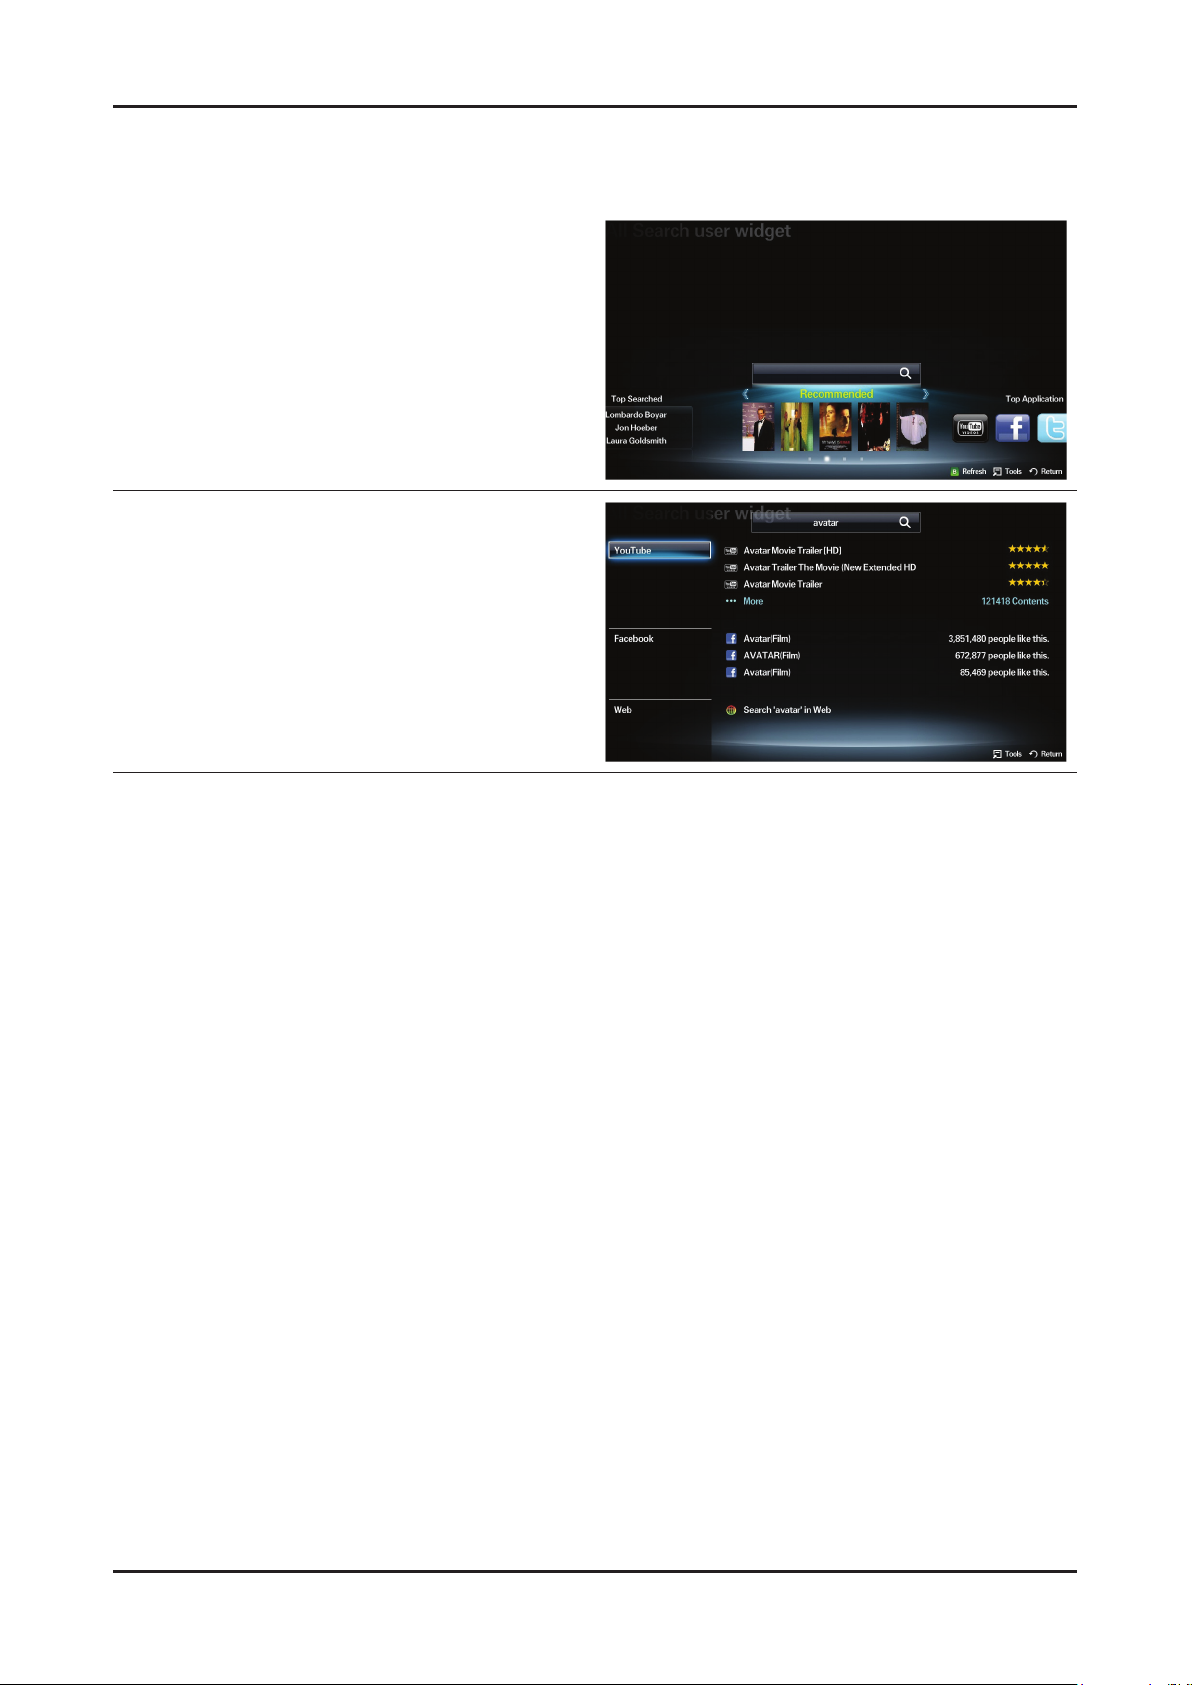
2-3-2. Seach all
Function
User can access the service using direct key on
remote control during TV viewing or using other App.
Supported four catecories
Your Movie: recommended movie or TV program
Top Application: popular Application list
Top Searched: popular searsh list
Search History
The application provides Web and SNS based search
engine.
YouTube
Facebook
Your Movie
Samsung Apps
AllShare
Page 20
2-14
2. Product specications
2-3-3. AllShare
About AllShare™
AllShare™ connects your TV and compatible Samsung mobile phones/ devices through a network. On your TV,
you can view call arrivals and SMS messages, and received by your mobile phones. In addition, you can play media
contents including videos, photos, and music saved on your mobile phones or the other devices (such as your PC)
by controlling them on the TV via the network. Additionally, you can use your TV for browsing web pages on your
mobile phones.
N For more information, visit “www.samsung.com” or contact the Samsung call center. Mobile devices may need
additional software installation. For details, refer to each device’s user’s guide.
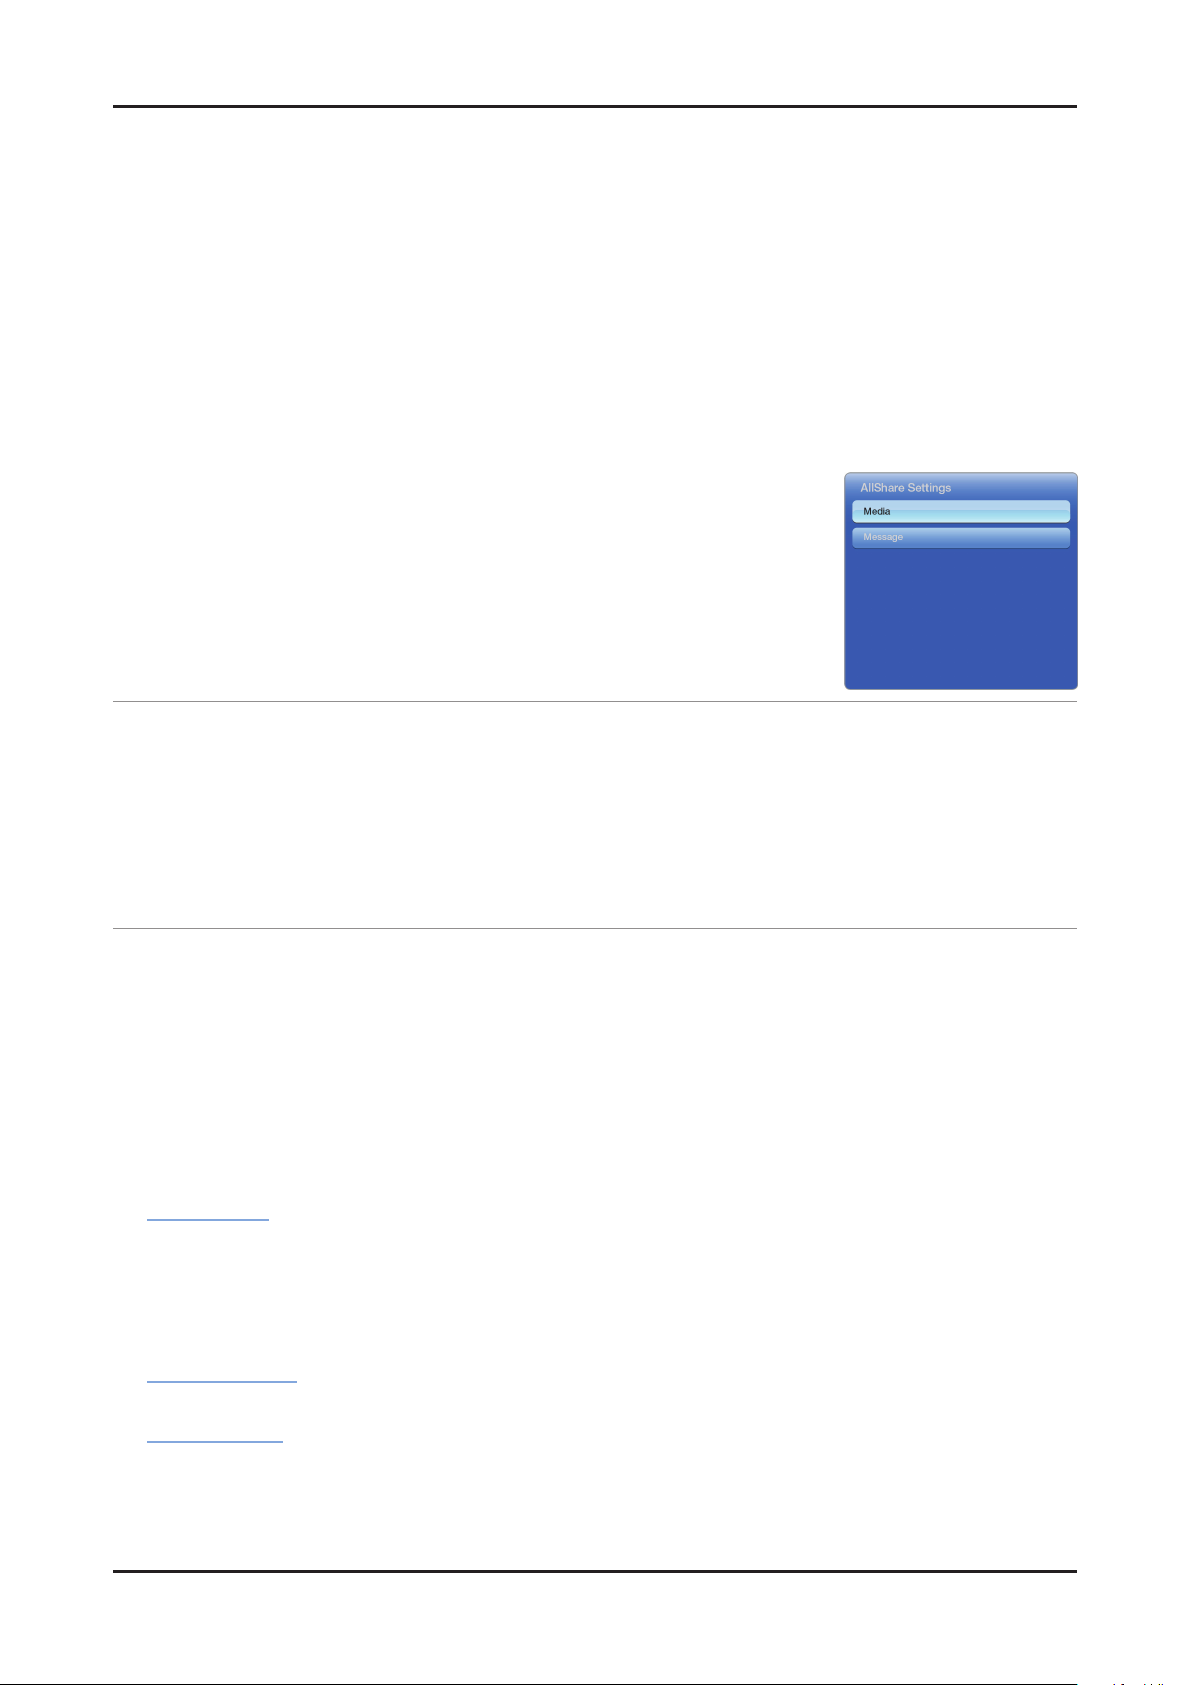
Setting Up AllShare™
O
MENU → Network → AllShare Settings → ENTERE
AllShare Settings01.
Media (On / Off) : Enables or disables the media function. When the media
function is on, you can control Media contents play using mobile phones or other
devices that support DLNA DMC.
Message (On / Off) : Enables or disables the message function. (for call arrivals,
and SMS messages received by your mobile phones)
Media / Message02.
Shows a list of mobile phones or connected devices which have been set up to use the Media or Message function
with this TV.
N The Media function is available in all devices which support DLNA DMC.
Allowed / Denied• : Allows/Blocks the devices.
Delete• : Deletes the devices from the list.
N This function only deletes the name of the device from the list. If the deleted device is turned on or tries to connect to the
TV, it may appear on the list again.
Using the Message Function03.
You can view call arrivals and SMS messages received by your mobile mobile phone, through the alarm window,
while watching TV.
N NOTE
To disable the alarm window, set • Message to Off in the AllShare Settings.
Whether • OK is selected or not selected after a message has appeared once, the message will be deleted from
the alarm window.
When a message from an unknown mobile phone is displayed, select the mobile phone in the • Message menu in
AllShare Settings, and then select Denied to block the phone.
Message View
If a new SMS message arrives while you are watching TV, the alarm window appears. If you select OK, the
contents of the message are displayed.
N You can congure the viewing settings for SMS messages on your mobile phones. For the procedures, refer to the mobile
phone manual.
N Some types of characters may be displayed as blank or broken characters.
Call Arrival Alarm
If a call arrives while you are watching TV, the alarm window appears.
Schedule Alarm
You can view scheduled events in the alarm window while you are watching TV.
N You can congure viewing settings for scheduled contents on your mobile phones. For the procedures, refer to the mobile
phone manual.
N Some special characters may be displayed as blank or broken characters.
Page 21

2-15
2. Product specications
Using the Media Function04.
An alarm window appears informing you that media contents (videos, photos, music) sent from a mobile phone will
be displayed on your TV. The contents are played automatically 3 seconds after the alarm window appears. If you
press the RETURN or EXIT button when the alarm window appears, the media contents are not played.
N NOTE
The first time a device accesses your TV through the media function, a warning popup window appears. •
Press the ENTERE button to select Allow. This permits the phone to access the TV freely and use the Media
function to play content.
To turn off media contents transmissions from a mobile phone, set • Media to Off in the AllShare Settings.
Contents may not play on your TV depending on their resolution and format.•
The • ENTERE and l r buttons may not work depending on the type of media content.
Using the mobile device, you can control the media play. For details, refer to each mobile’s user’s guide.•
Page 22
2-16
2. Product specications
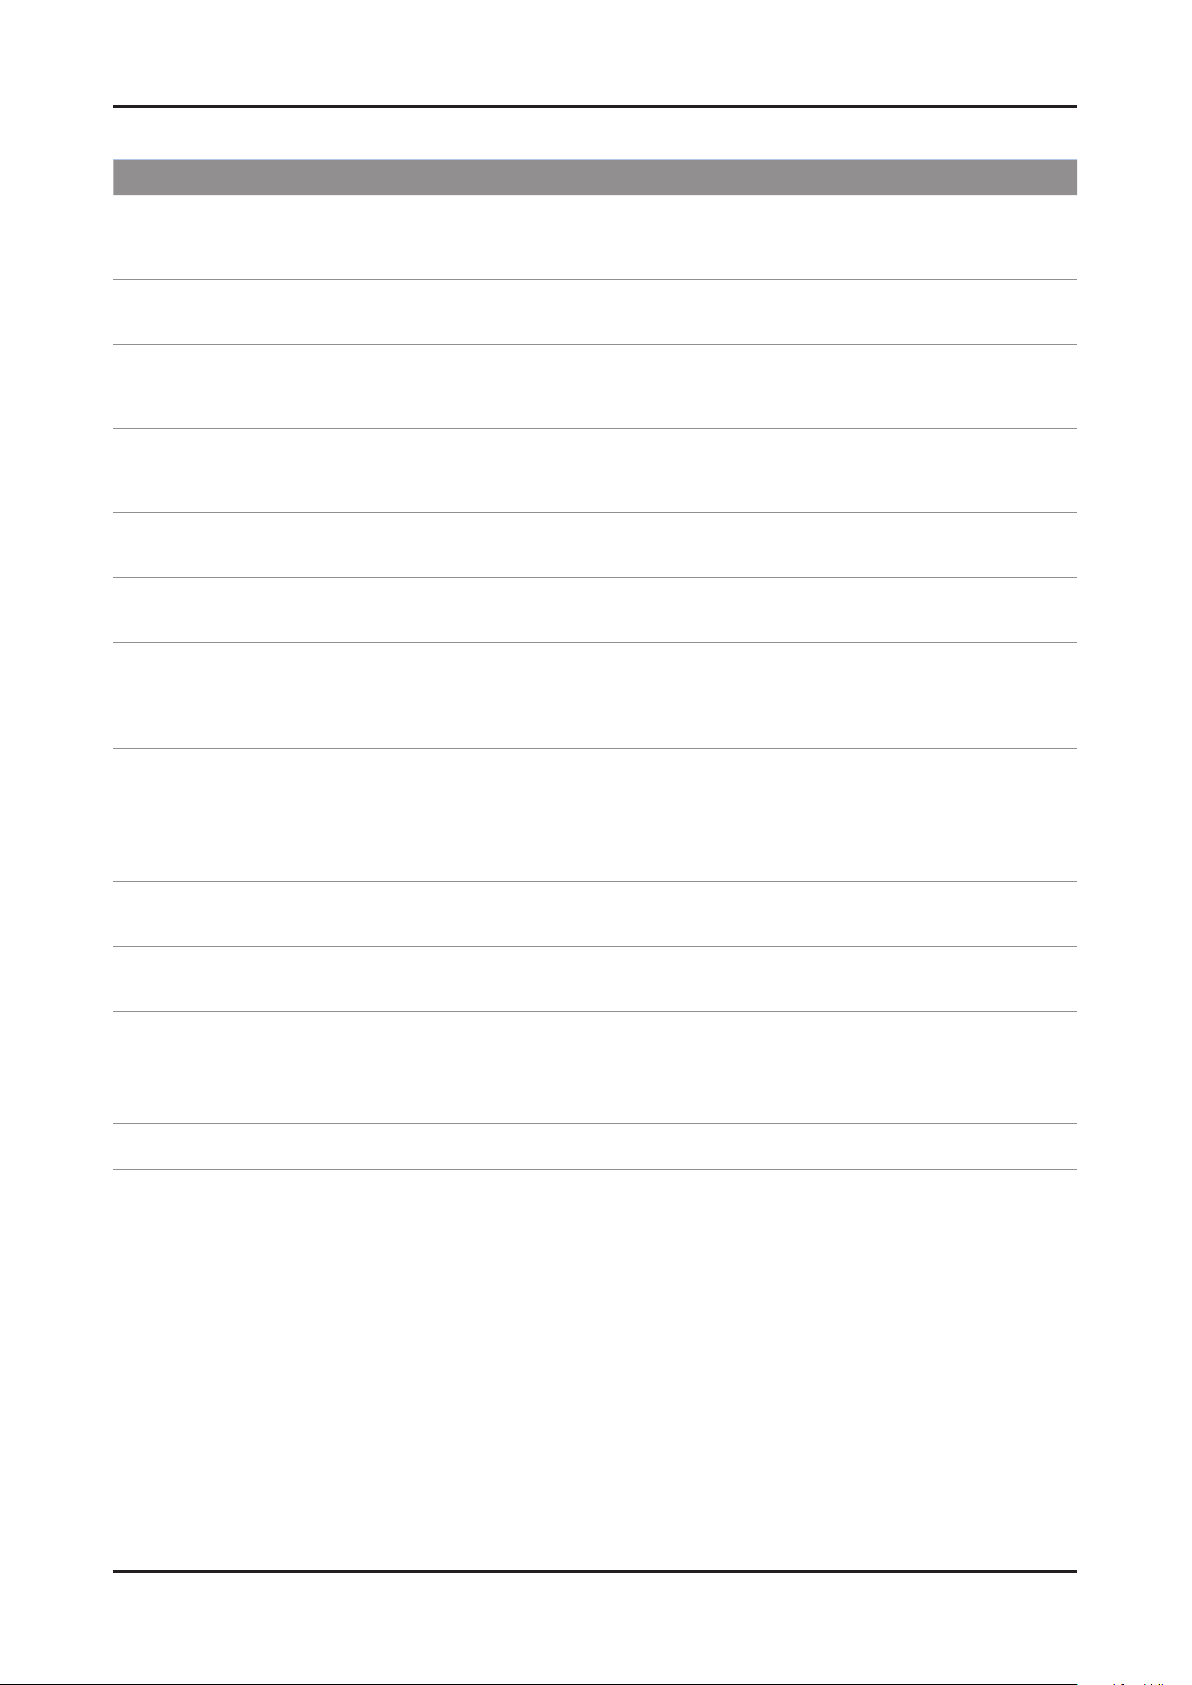
AllShare™ setup and checklists
Problem Possible Solution
Deleted mobile phone list showing up
again.
Want to turn off the function of receiving
message from the mobile phone.
Want to turn off the function of receiving
Media from mobile phone or home
network devices on TV.
Want to add deleted mobile phone or
home network devices again.
Several same names of TV shows up on
mobile phone.
Messages/schedules/notications from
unknown mobile phone show up on TV.
SMS message notication shows up in
small window.
Received SMS message is not showing
up on TV.
[Menu > Application > Content View > AllShare™ > Message] •
Where need to block the added mobile phone or device again. Because deleted
device would be added again if that device turns on or attempt to approach.
One of the setup lists of AllShare™, you need to turn 'Message' list to 'Off'.•
One of the setup lists of AllShare™, you need to turn 'Media' list to 'Off'.•
Power on the deleted mobile phone or home network devices. •
Set up the network and activate the home network function, check the connection
at AllShare™.
At AllShare™ set up menu, change the name of the TV.•
[Menu > Application > Content View > AllShare™ > Message] •
Where You can block the unknown mobile phone.
Besides watching TV, If some other function is activating, SMS message will show •
up in small icon.
You need to nish the function and exit to Watching TV mode in order to display •
SMS message in large window.
Check if TV’s network setup is all right according to setup guide.•
Check if mobile phone’s network (Wi-Fi) is activated.•
Among the • AllShare™ setup lists , check if the Message is ‘on’.
Check if the mobile phone number is showing up on • AllShare™ message list.
Check if the TV’s showing up on mobile phone’s setup lists.•
Contents that play on mobile phone
doesn’t play on TV.
Suddenly TV display is changed,
unwanted movie/picture/music is playing
The name of the TV is not appearing
while try to play media on mobile phone.
Movie is not playing or disconnected. High resolution of Movie may not play when Wi-Fi network is not in good condition.•
Contents formats play on TV is exactly same as Media Play format. •
That means some contents may not play according to its resolution and format
Before the device play, Block the device at AllShare™ media list. •
Or press ‘return’ or ‘exit’ button of remote controller so that the device may not play.
Check the network of TV.•
Activate the network (Wi-Fi) of mobile phone and connect to home network .•
Check if the setup list of media on AllShare™ is ‘on’.•
Check if mobile phone is blocked on media list . If blocked, change it to permition.•
Page 23
2-17
2. Product specications
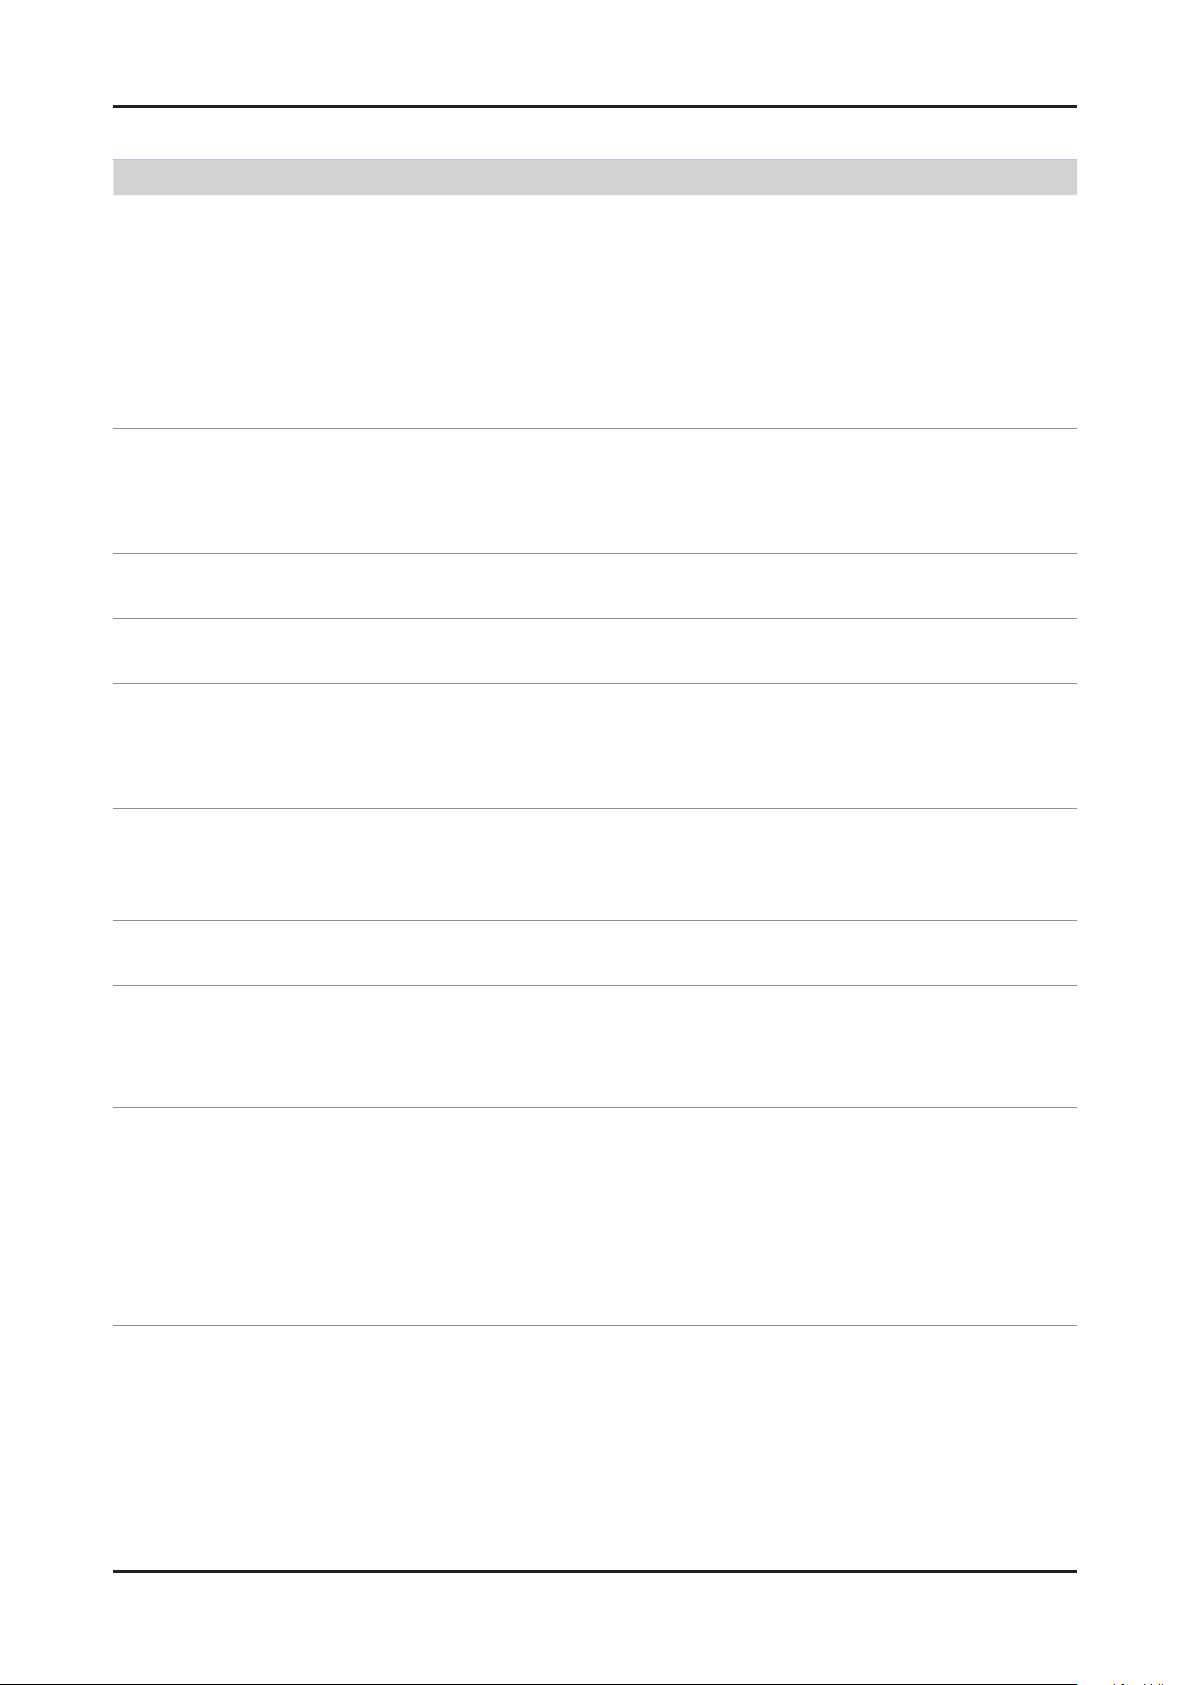
Troubleshooting about new functions
Problem
AllShare (General)•
I see no device connected to AllShare.
I tried to play a video from my cell phone
using the Connected Home function on the
Samsung TV but the video would not display
on the TV.
A video that can be played on my cell phone
cannot be played on my TV.
I cannot resume playback of a video using
Connected Home.
When I play a video through Connected
Home, I get intermittent picture loss.
Possible Solution
To use a device connected to AllShare, the device must be connected to PC •
Share Manager which is the DLNA server for MediaPlay and to a cell phone that
has the Connected Home or Screen Share function which are found on Samsung
Smartphones.
Check that the PC Share Manager is enabled, the Samsung TV is set to allow •
connections and the ScreenShare function on the connected cell phone is enabled.
To use the cell phone’s Connected Home function, check that the shared folder is •
set and the Share mode is ‘On.’
When a video is transmitted from Connected Home to a TV for the rst time, the •
settings screen that allows transfer to a TV is displayed.
Check that the transfer was not set to be rejected on this settings screen. If you •
have set the cell phone to ‘Blocked’ in the ‘Media’ options of the AllShare settings,
please change the setting to ‘Unblocked’ and retry.
Please check the resolution and display format provided by MediaPlay of the TV.•
The resuming function is not supported for a video played on a cell phone.•
An 801.11b/g bandwidth network is used between a cell phone and a sharing •
device. There may be frequent buffering for HD quality videos, this also depends
on the condition of the wireless connection.
Please optimize your wireless Internet environment settings (avoid using wireless •
Internet or bluetooth altogether if possible) or lower the picture quality of the video.
AllShare (Notication)•
Can all devices with the DLNA function be
recognized through Notication?
Can I use all the services related to DLNA?
The notication screen that appears after
a device connects disappears within a few
seconds.
How can I access this connected device
again?
AllShare (ScreenShare Client)•
I cannot nd the RUIS on my cell phone.
Only Samsung software and devices with the DLNA server function can be •
recognized through Notication.
Presently, you can only use the services related to ScreenShare and MediaPlay. •
We will launch a new DLNA service in the future.
The DLNA Notication is only displayed when a device is rst connected to a TV. •
To access the device again, please use the AllShare menu.
Check that the cell phone is connected to the wireless sharing device correctly.1.
Check that the DTV is connected either using a network cable or wirelessly to the 2.
wireless sharing device correctly.
Conrm the IP address and subnet mask to ensure that the cell phone and DTV 3.
are connected to the same network.
Check that the RUIS on the cell phone is enabled.4.
If the RUIS on the cell phone is enabled, please disable it and then enable it again.5.
Page 24
2-18
2. Product specications
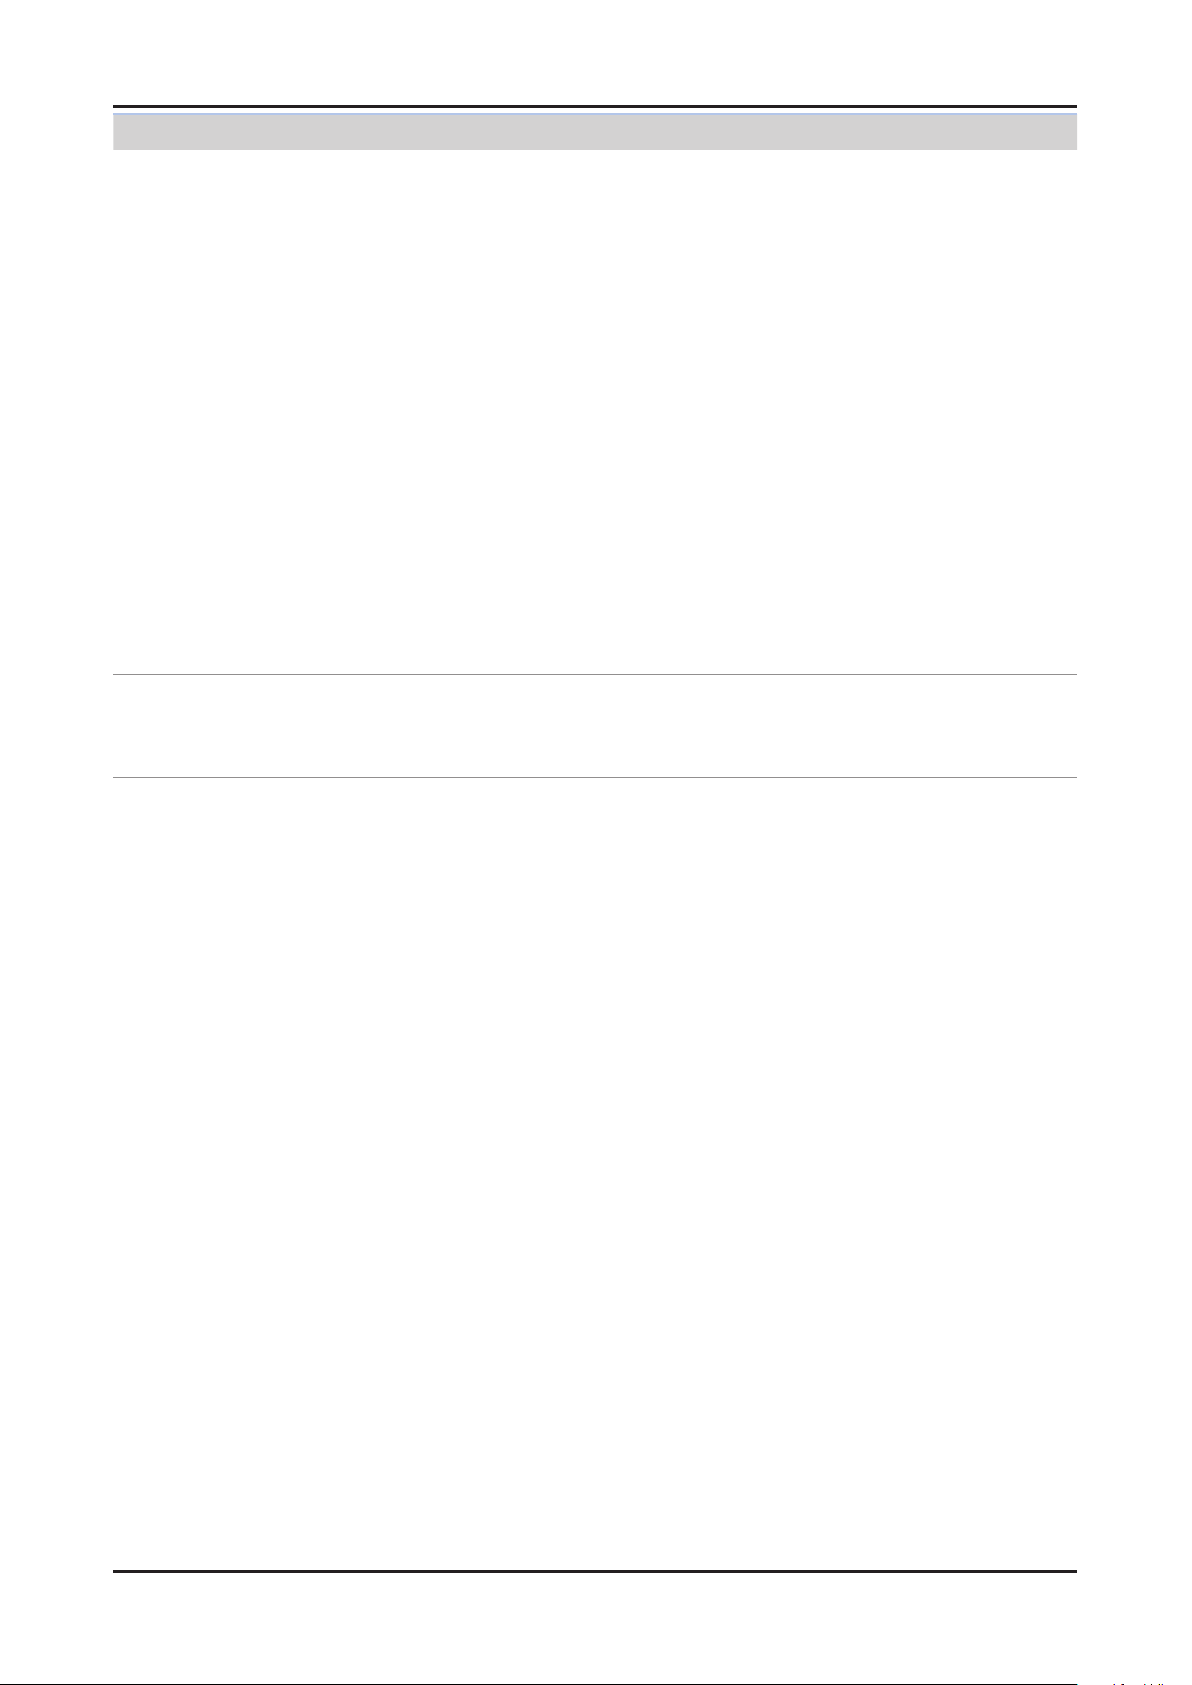
Problem
AllShare (ScreenShare Server)•
I cannot nd the remote control service
provided by the ScreenShare Server from the
ScreenShare Client.
The DTV did not update after pressing
buttons on the remote control that uses the
remote control service on the ScreenShare
Client.
Possible Solution
Check that the ScreenShare Client device is correctly connected to the network of 1.
the sharing device that the DTV is connected to.
Run network test in the network setup menu and conrm that MAC Address, IP 2.
Address, Subnet, Gateway, DNS Server and Gateway Ping each shows a success
message.
In the network setup menu, check that the ScreenShare Client and ScreenShare 3.
Server are on the same subnet.
- You can conrm they are on the same subnet by checking the IP address,
subnet mask and gateway address of the TV and ScreenShare Client as follows:
- If the IP address of the DTV is 10.88.83.4 and the subnet mask is 255.255.255.0,
the rst six digits of the ScreenShare Client’s IP address must be the same
(10.88.83) as that of the DTV, and the subnet mask and gateway address must
be the same as the DTV.
- If the IP address of the DTV is 10.88.83.4 and the subnet mask is 255.255.0.0,
the rst four digits of the ScreenShare Client’s IP address must be the same
(10.88) as that of the DTV, and the subnet mask and gateway address must be
the same as the DTV.
Move from the Allshare screen to the Setup screen, and open the Setup menu to 4.
check if the ScreenShare Client is connected to the same ScreenShare Server as
the TV name shown in the Setup options.
Move from the Allshare screen to the Setup screen, and open ScreenShare to 5.
check that the device, ScreenShare Client, is found on the list at the right side and
is set to "Allowed."
Check that the TV is turned on. •
You cannot turn on the TV using the remote control service (on the ScreenShare)
when the TV is turned off.
Page 25
2-19
2. Product specications
2-3-4. Media Play
Media Play
Functions that are not supported when connecting to a PC through a network:01.
- Sorting files by preference in the Photos, Music, and Videos folders.
- The � (REW) or μ (FF) button while a movie is playing.
- Divx DRM, Multi-audio, embedded captions are not supported.
When you use Media Play mode through a network connection, depending on the functions of the 02.
provided server
- The sorting method may vary.
- The scene search function may not be supported.
- The Play Continuously function, which resumes playing of a video, may not be supported.
- The Play Continuously function does not support multiple users. (It will have only memorized the point where the most recent user
stopped playing.)
- The ◄ or ► buttons may not work depending on the content information.
– If you experience any file stuttering issue while playing a video over a wireless network, we recommend using a wired network."
● Supported Subtitle Formats
Name File extension Format
MPEG-4 time-based text .ttxt XML
SAMI .smi HTML
SubRip .srt string-based
SubViewer .sub string-based
Micro DVD .sub or .txt string-based
● Supported Video Formats
File
Extention
*.avi
*.mkv
*.asf ASF
*.wmv ASF Window Media Video v9 1920 x 1080 6 ~ 30 25 WMA
*.mp4 MP4
*.3gp 3GPP
*.vro
*.mpg
*.mpeg
*.ts
*.tp
*.trp
Container Video Codec Resolution
Divx 3.11/4.x/5.1/6.0 1920 x 1080 6 ~ 30 8
AVI
MKV
VRO
VOB
PS
TS
XviD 1920 x 1080 6 ~ 30 8
H.264 BP/MP/HP 1920 x 1080 6 ~ 30 25
MPEG4 SP/ASP 1920 x 1080 6 ~ 30 8
Motion JPEG 640 x 480 6 ~ 30 8
Divx 3.11/4.x/5.1/6.0 1920 x 1080 6 ~ 30 8
XviD 1920 x 1080 6 ~ 30 8
H.264 BP/MP/HP 1920 x 1080 6 ~ 30 25
MPEG4 SP/ASP 1920 x 1080 6 ~ 30 8
Motion JPEG 640 x 480 6 ~ 30 8
H.264 BP/MP/HP 1920 x 1080 6 ~ 30 25
XVID 1920 x 1080 6 ~ 30 8
H.264 BP/MP/HP 1920 x 1080 6 ~ 30 25
MPEG4 SP/ASP 1920 x 1080 6 ~ 30 8
MPEG2 1920 x 1080 24/25/30 30
MPEG1 1920 x 1080 24/25/30 30
MPEG1 1920 x 1080 24/25/30 30
MPEG2 1920 x 1080 24/25/30 30
H.264 1920 x 1080 6 ~ 30 25
MPEG2 1920 x 1080 24/25/30 30
H.264 1920 x 1080 6 ~ 30 25
VC1 1920 x 1080 6 ~ 30 25
Frame rate
(fps)
Bit rate
(Mbps)
Audio Codec
MP3/AC3
/LPCM
/ADPCM
/DTS Core
MP3/AC3
/LPCM
/ADPCM
/WMA
MP3/ADPCM /AACMPEG4 SP/ASP 1920 x 1080 6 ~ 30 8
ADPCM/AAC
/HE-AAC
AC3/MPEG
/LPCM
AC3/MPEG
/LPCM/AAC
AC3/AAC
/MP3/DD+
/HE-AAC
Page 26
2-20
2. Product specications
Other Restrictions03.
N NOTE
If there are problems with the contents of a codec, the codec will not be supported.•
If the information for a Container is incorrect and the le is in error, the Container will not be able to play correctly.•
Sound or video may not work if the contents have a standard bit rate/frame rate above the compatible Frame/sec listed in the •
table above.
Supports up to H.264, Level 4.1•
H.264 FMO / ASO / RS, VC1 SP / MP / AP L4 and •
AVCHD are not supported.
XVID, MPEG4 SP, ASP: •
– Below 1280 x 720: 60 frame max
– Above 1280 x 720: 30 frame max
GMC is not support.•
Video Decoder Audio Decoder
Supports up to WMA 7, 8, 9, STD, 9 PRO•
WMA 9 PRO is not supported the 2 channel excess multi •
channel or the lossless audio
WMA sampling rate 22050Hz mono is not supported. •
ReadlAudio 10 lossless is not supported
Page 27
2-21
2. Product specications
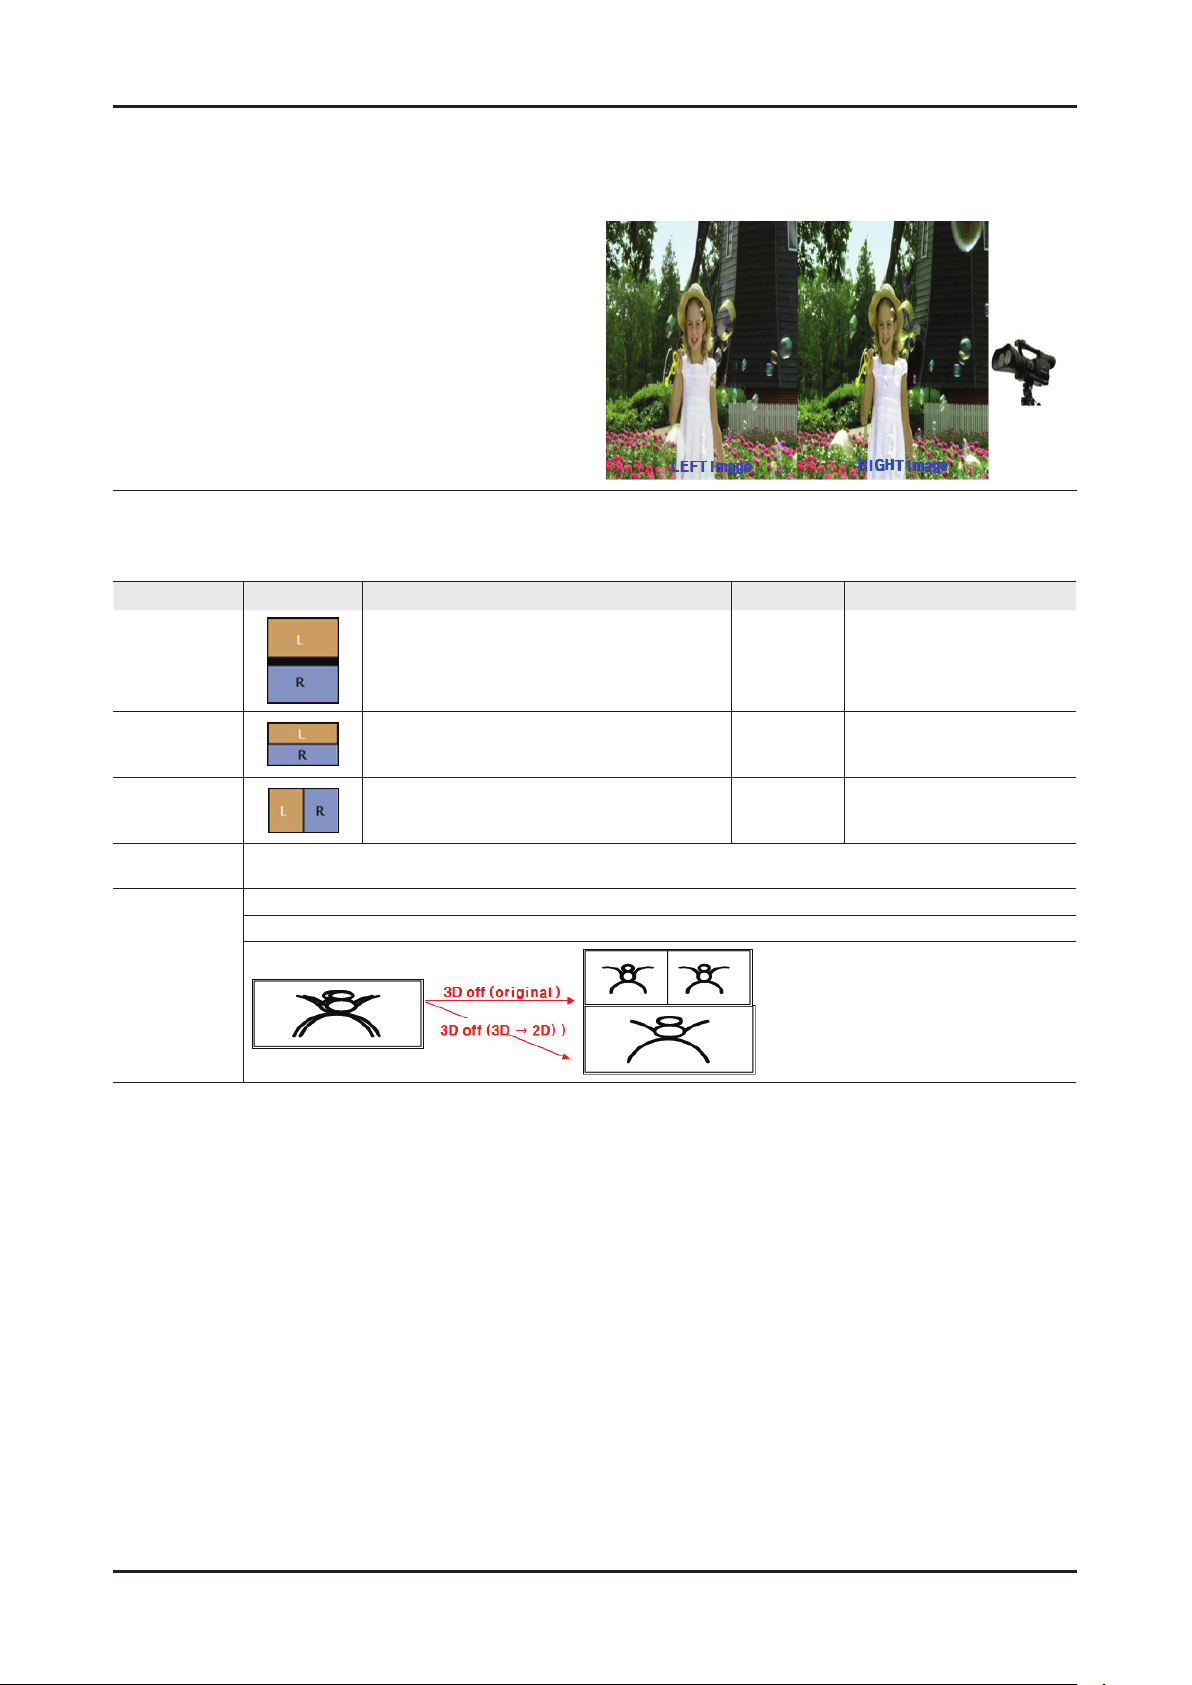
2-3-5. 3D Display
What is 3D Display?
A system that display 3D images articially •
How ? • Using binocular time delay
1 Left eye recognizes left image, right eye recognizes
right image.
2 Human eyes be far away each other 65mm
horizontally.
So each eye feels a little bit of time delay of left and
right information.
Human brain merges those images and can feel
three-dimensional.
Side by side ◄
3D OSD terms
3D Format : There are several 3D formats existing on how to merge Left and Right images.
Format Input images explanation Input source notes
Frame Packing
Inserting Blink Active Space between Left and Right •
images.
* Full resolution : 1920 x 1080 x 2
(Left and Right each) + Blink = 1920 x 2205
HDMI 1.4 1. HDMI 1.4 standard format
2. Automatically activating
(Not in the menu or UI)
3. BD format
Top & Bottom
Side by Side
3D → 2D
3D Disable
(3D off)
In 1 frame, Left image on the upper half, Right image •
on the bottom half.
* Vertically half resolution
In 1 frame, Left image on the left half, Right image on •
the right half.
* Horizontally half resolution
When watching 3D TV (input is 3D source) , if a viewer feels tired of watching 3D TV, a viewer can change the TV into 2D.
(In this case , TV only displays one of Left and Right images)
3D off’ has below meanings according to present modes.
In 3D mode
HDMI, USB,
DTV(VOD),
PC
HDMI, USB,
DTV(VOD),
PC
3D Broadcasting Format
3D Broadcasting Format
Page 28
2-22
2. Product specications
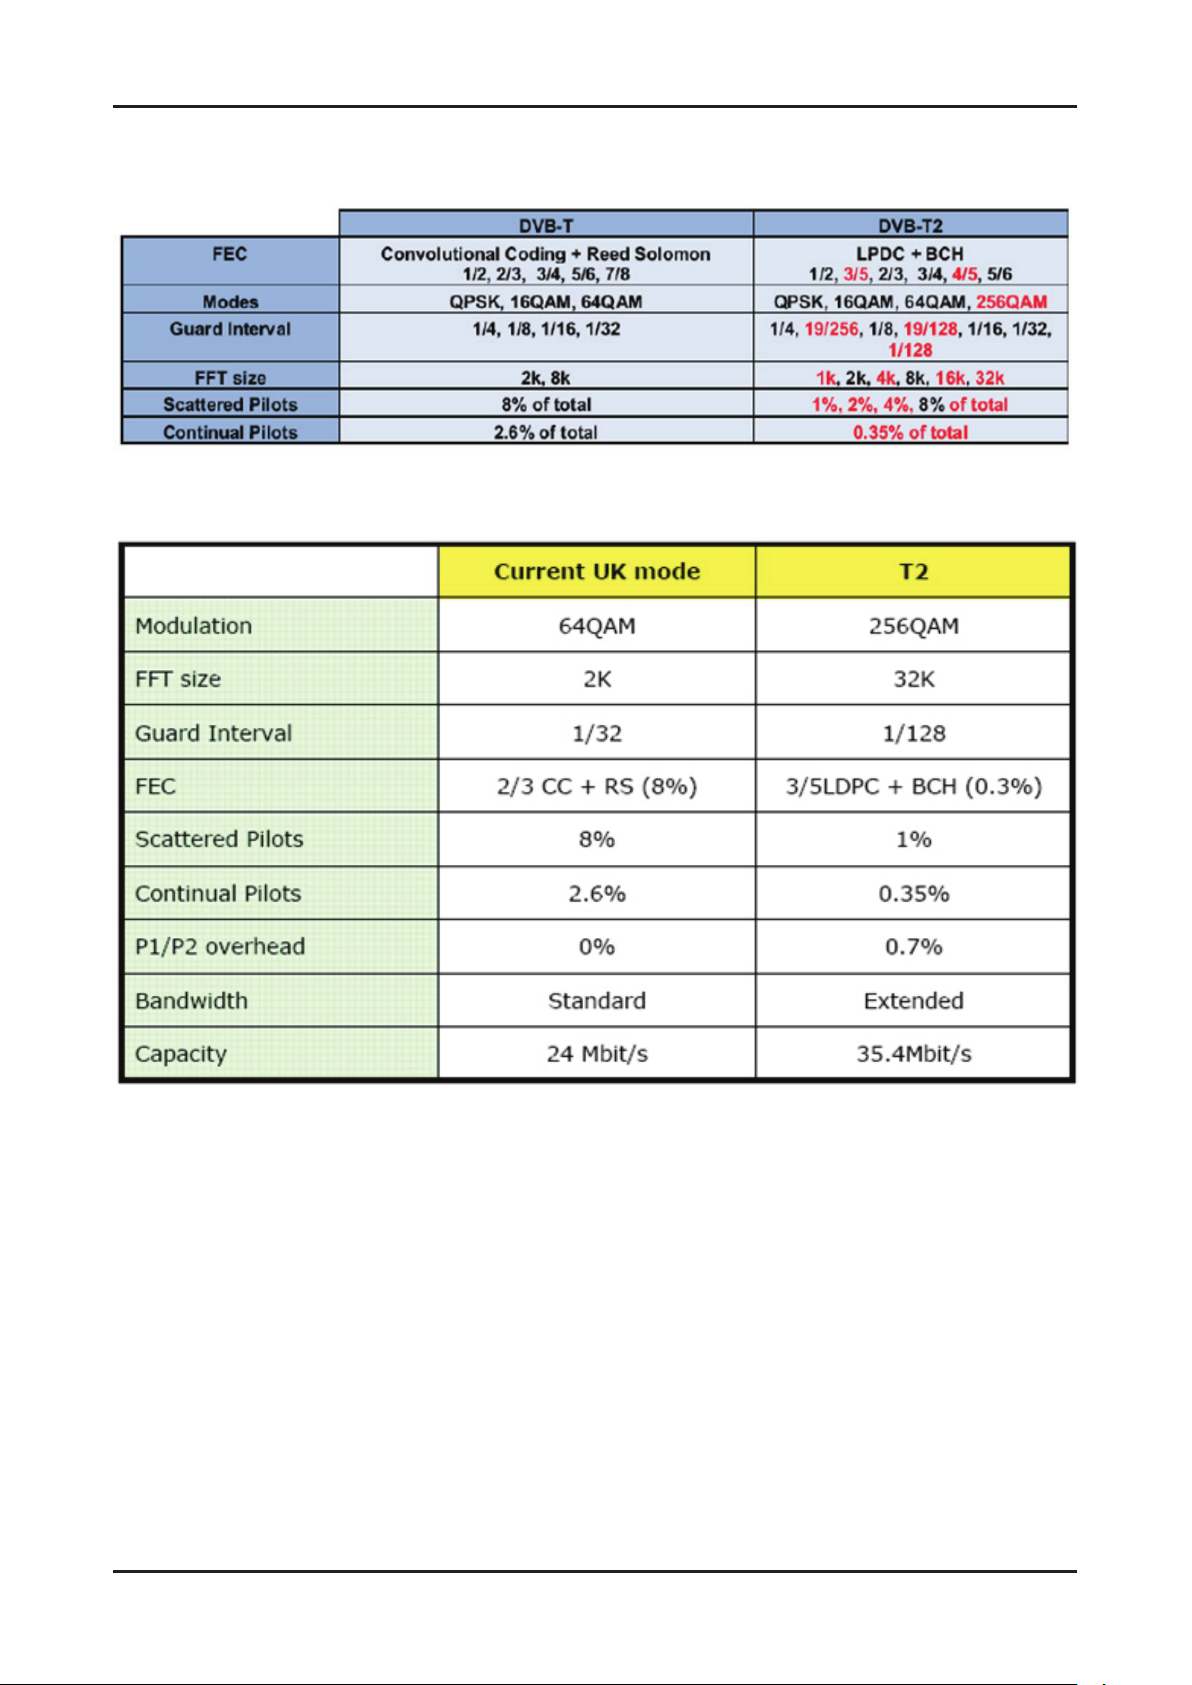
2-3-6. DVB-T2
DVB-T vs T2
DVB-T2 Capacity
DVB-T2 Channel capacity incresed 47% than DVB-T.
Page 29
2-23
2. Product specications
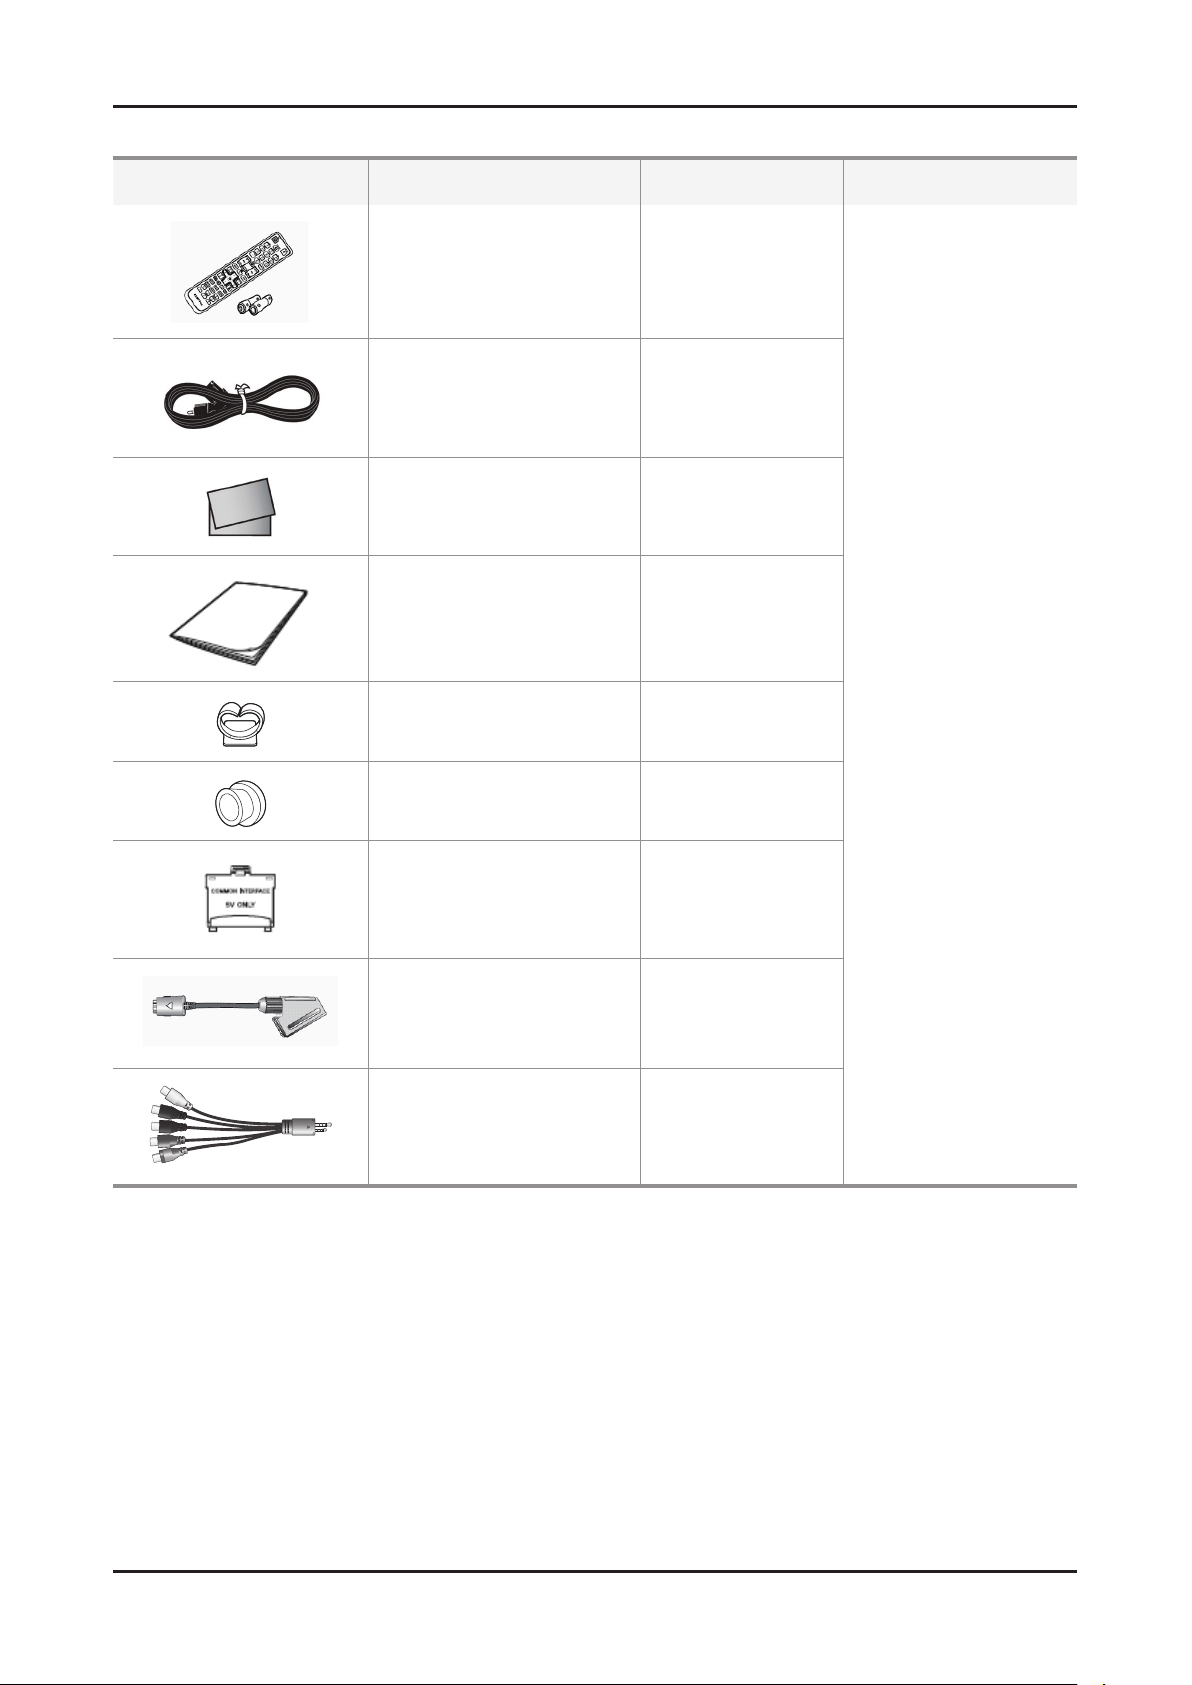
2-4. Accessories
Product Description Code. No Remark
Remote Control & Batteries
(AAA x 2)
Power Cord
Warranty Card /
Registration Card /
Safety Guide Manual
User Manual
(Simple Guide)
AA59-00507A
AA59-00509A
(italy models)
4301-000121
3903-000525
3903-000539
(UK)
-
BN68-03469* (60**)
BN68-03474* (61**)
BN68-03475* (62**)
BN68-03476* (63**)
Holder-Wire stand BN61-05491A
Holder-Ring (4ea) BN61-05280A
CI Gender 3709-001663
Scart Gender BN39-01154F
Component Gender BN39-01154W
Samsung Electronics
Service center
Page 30
3. Disassembly and Reassemble
3. Disassembly and Reassembly
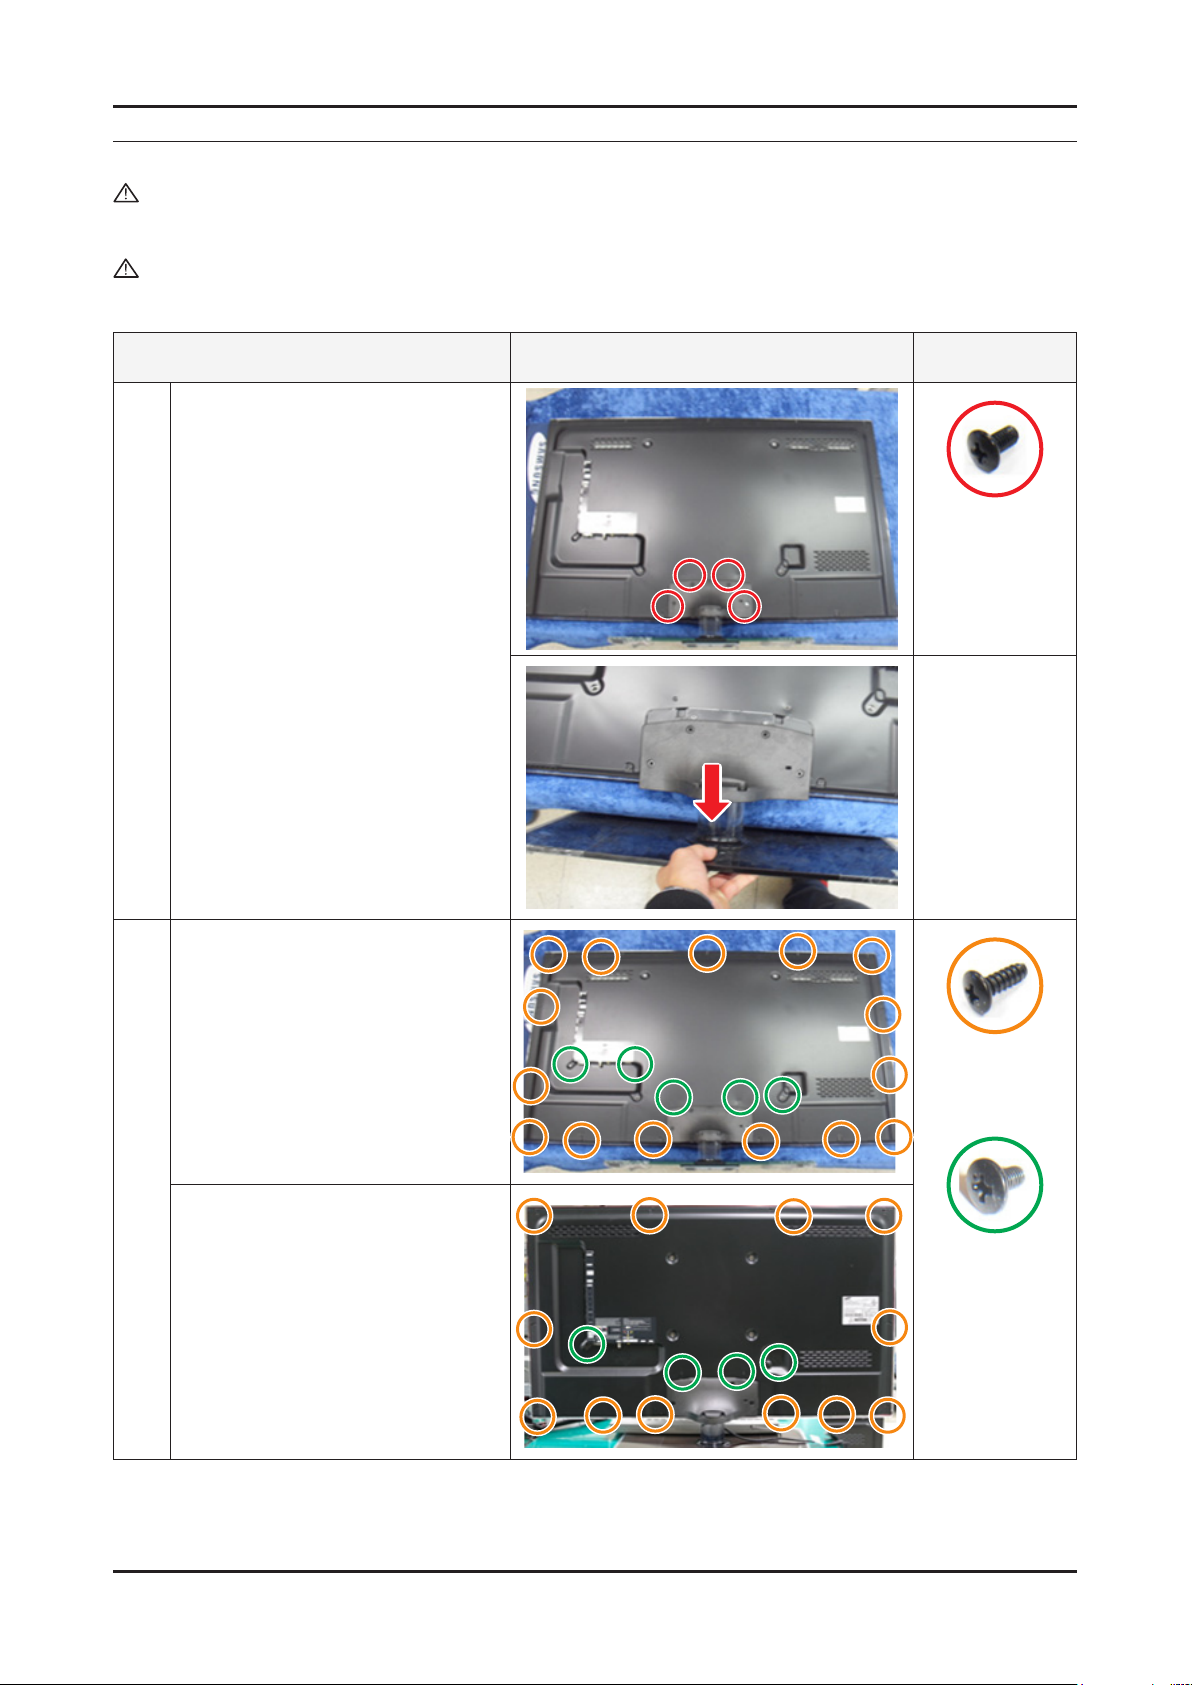
This section of the service manual describes the disassembly and reassembly procedures for the LED TV.
WARNING: This LED TV contains electrostatically sensitive devices. Use caution when handling these components.
3-1. Disassembly and Reassembly
Cautions: 1. Disconnect the LED TV from the power source before disassembly.
2. Follow these directions carefully; never use metal instruments to pry apart the cabinet.
3. If there is no additional coment, it is same for all inches.
Description Picture Description
Place TV face down on cushioned table.
1
Remove screws from the Stand.
Remove stand.
Remove the screws of Rear-Cover.
2
46" / 55"•
Screws
6001-002621
SCREW-MACHINE
(M4, L8-BLK)
6003-001782
SCREW-TAPTITE
(M4, L12-BLK / THIN
HEAD)
32" / 40"•
6001-002671
SCREW-MACHINE
(M3, L6-BLK)
3-1
Page 31
3-2
3. Disassembly and Reassemble
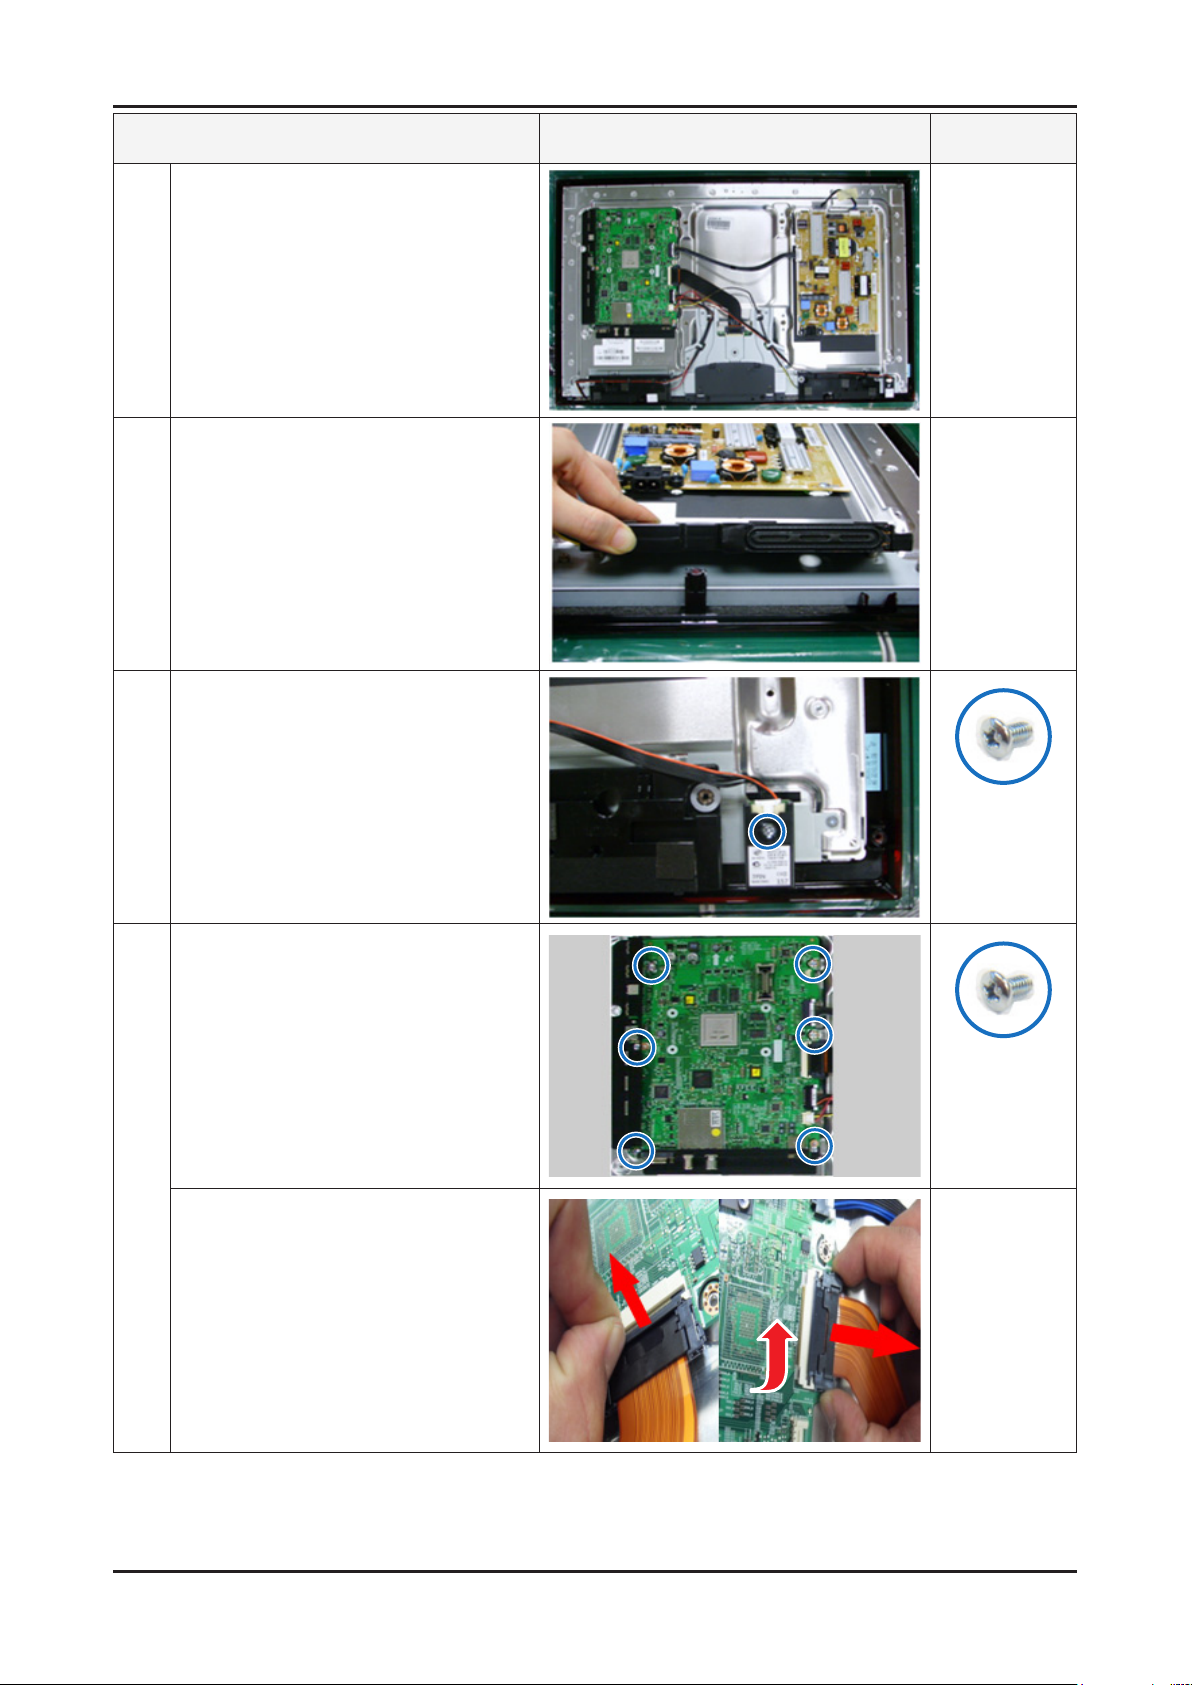
Description Picture Description
Lift up and remove the rear-cover.
3
* Caution : Becareful when you lift up the
rear-cover, It’s really sharp.
Remove the Speakers(R/L).
4
Remove the Bluetooth module.
5
Screws
Remove the screws of Main Board.
6
* Notice : New type of LVDS connection.
applied to 11 year model. (Double
locking)
Uptherstlocking1.
Push the second locking and 2.
detach connection.
6001-002653
SCREW-MACHINE
(M3, L6-WHT)
6001-002653
SCREW-MACHINE
(M3, L6-WHT)
Page 32
3-3
3. Disassembly and Reassemble
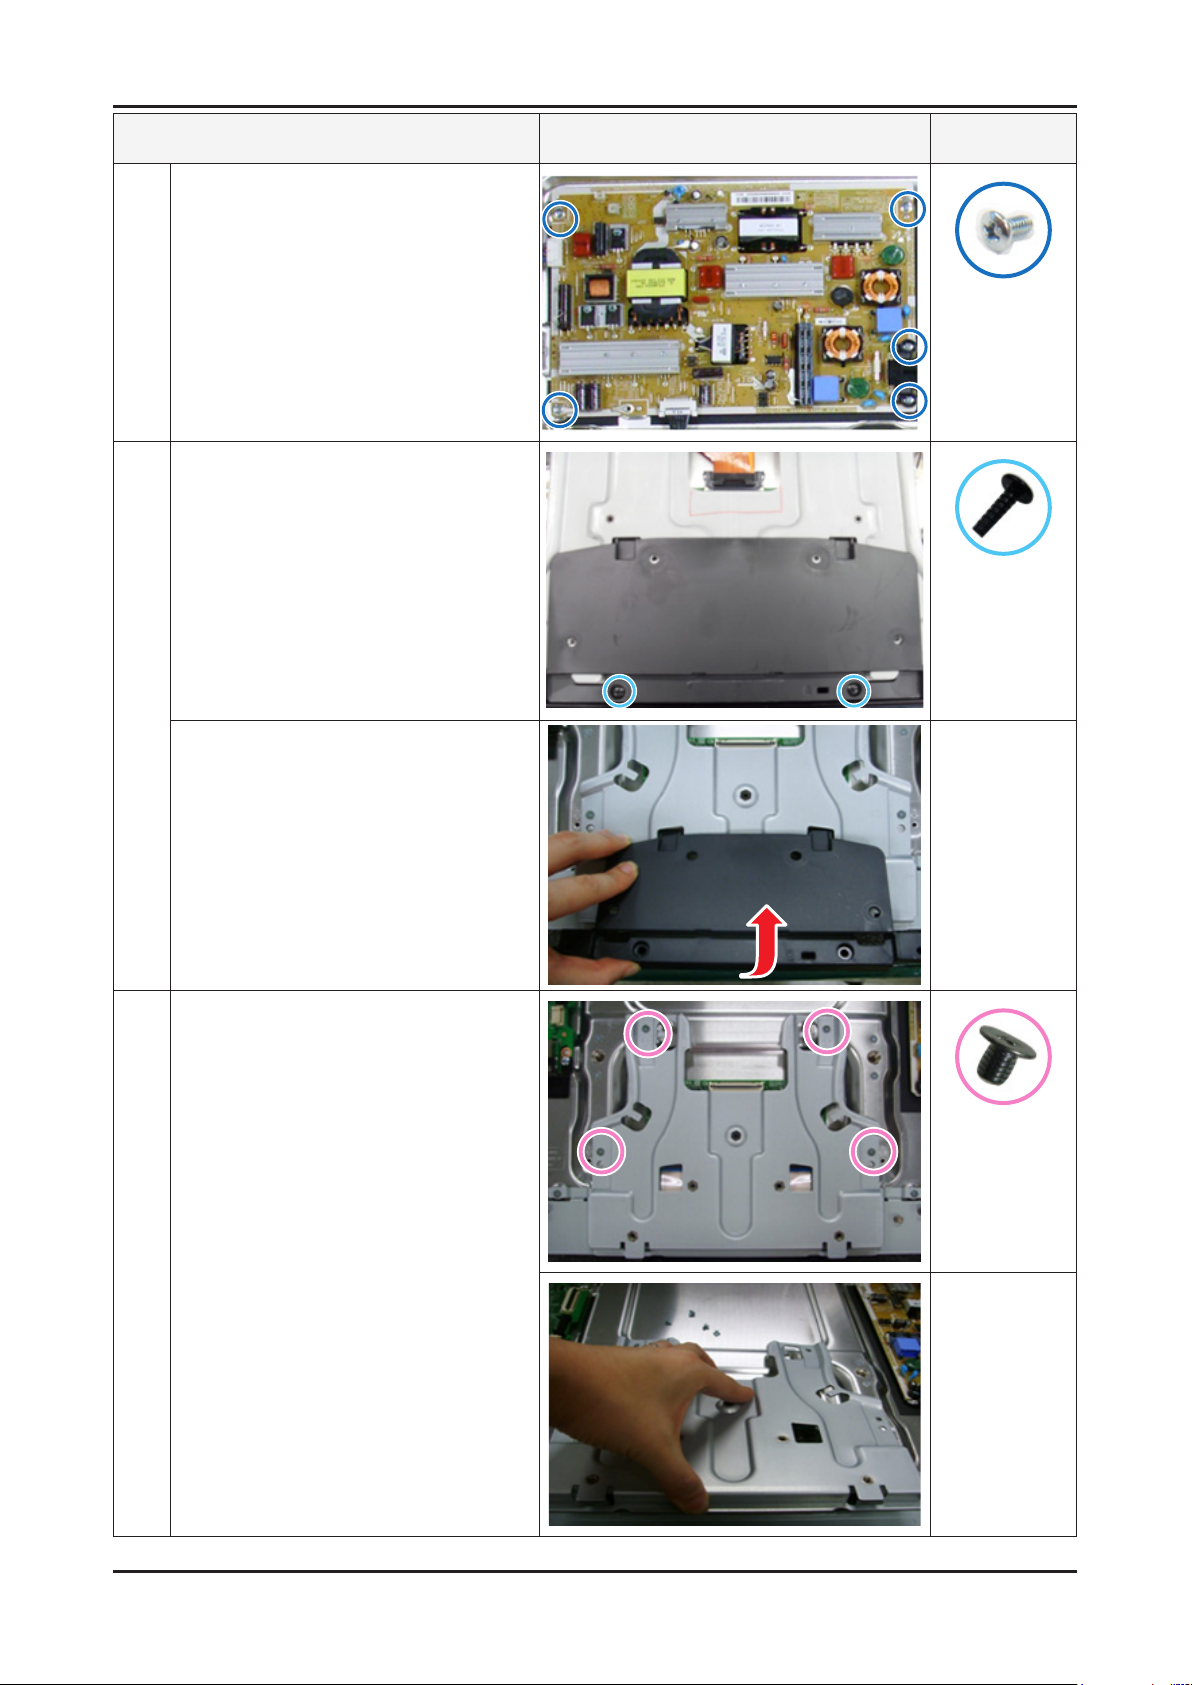
Description Picture Description
Remove the screws and disconnect all
7
connectors of IP board.
Remove the IP board.
Remove the screws of Cover Bottom.
8
* Notice : Cover bottom assembled
basically not accessory on
11 year model.
Screws
6001-002653
SCREW-MACHINE
(M3, L6-WHT)
6003-001782
(M4,L12,Tapping)
Remove the Cover-Bottom.
Remove the T-CON Bracket.
9
6001-002673
MACHINE
(M3, L4)
Page 33
3-4
3. Disassembly and Reassemble
10
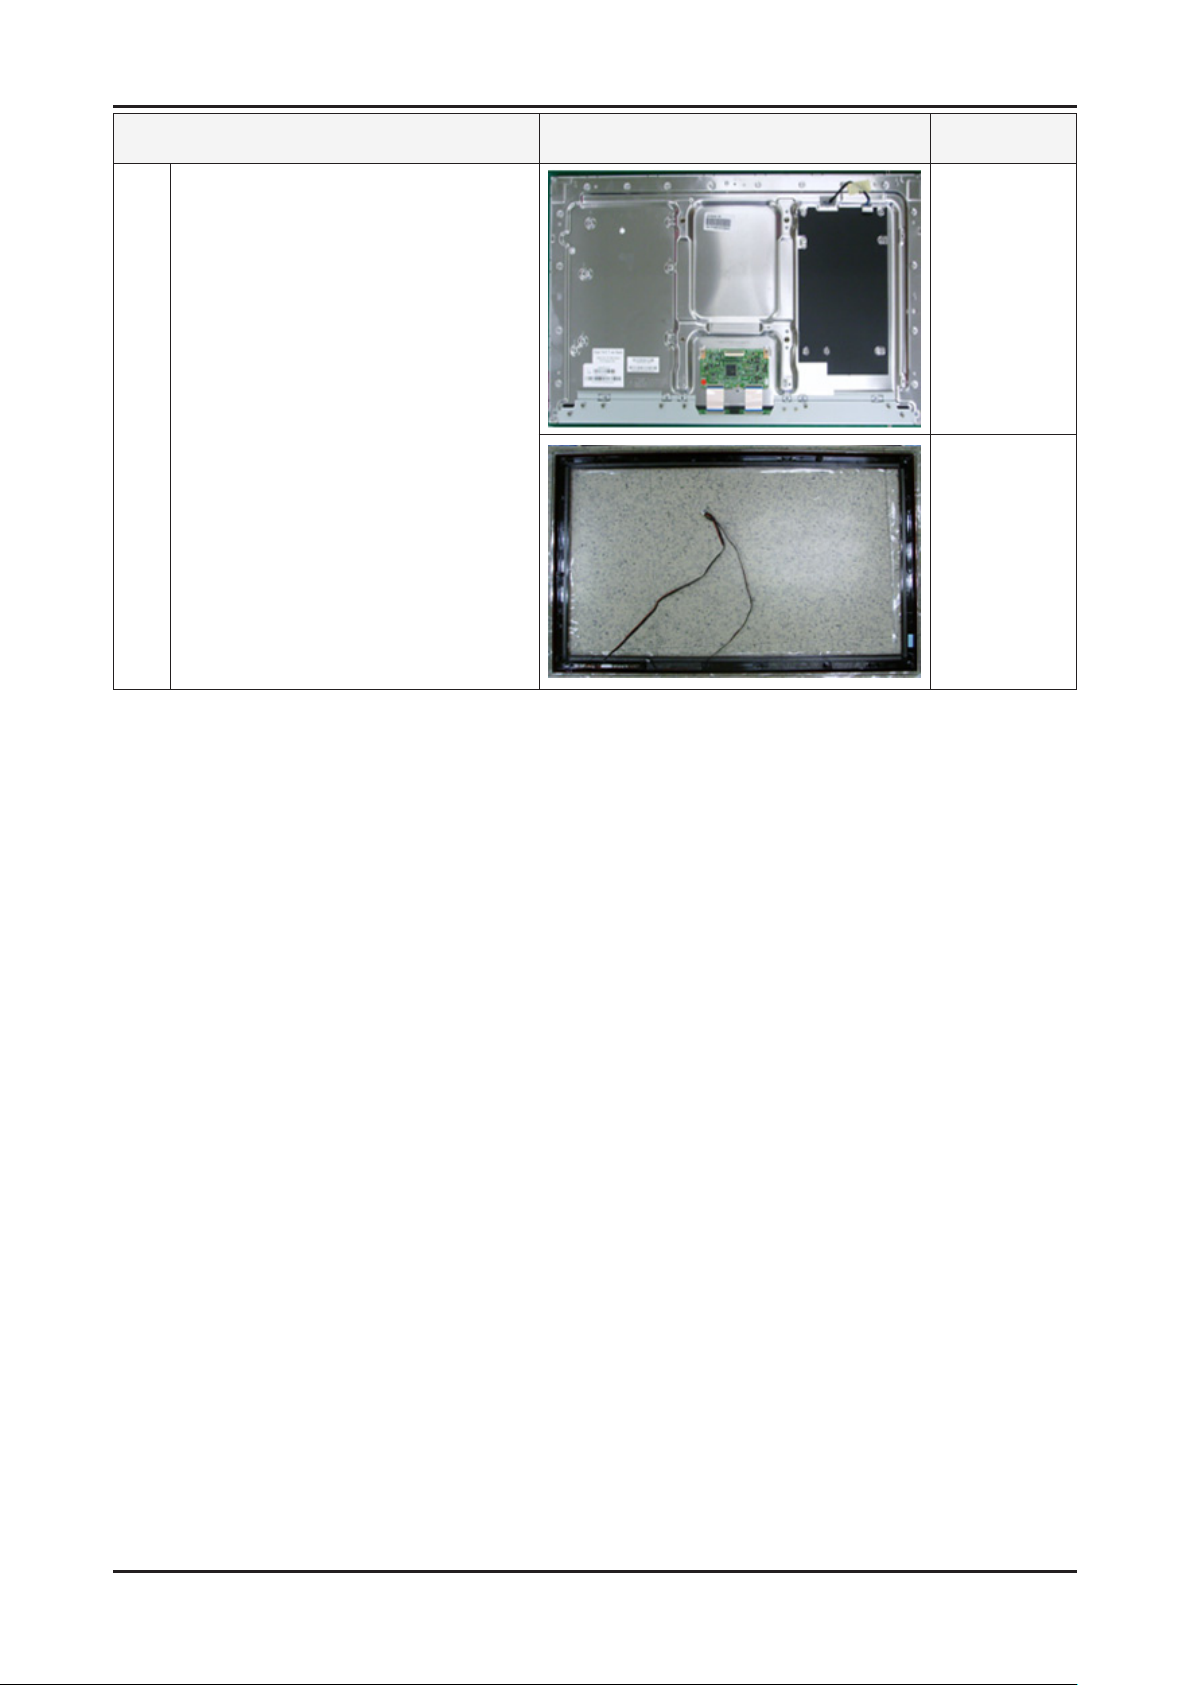
Reassembly procedures are in the reverse order of disassembly procedures. ※
Description Picture Description
Remove the panel from cover front.
Screws
Page 34
3-5
3. Disassembly and Reassemble
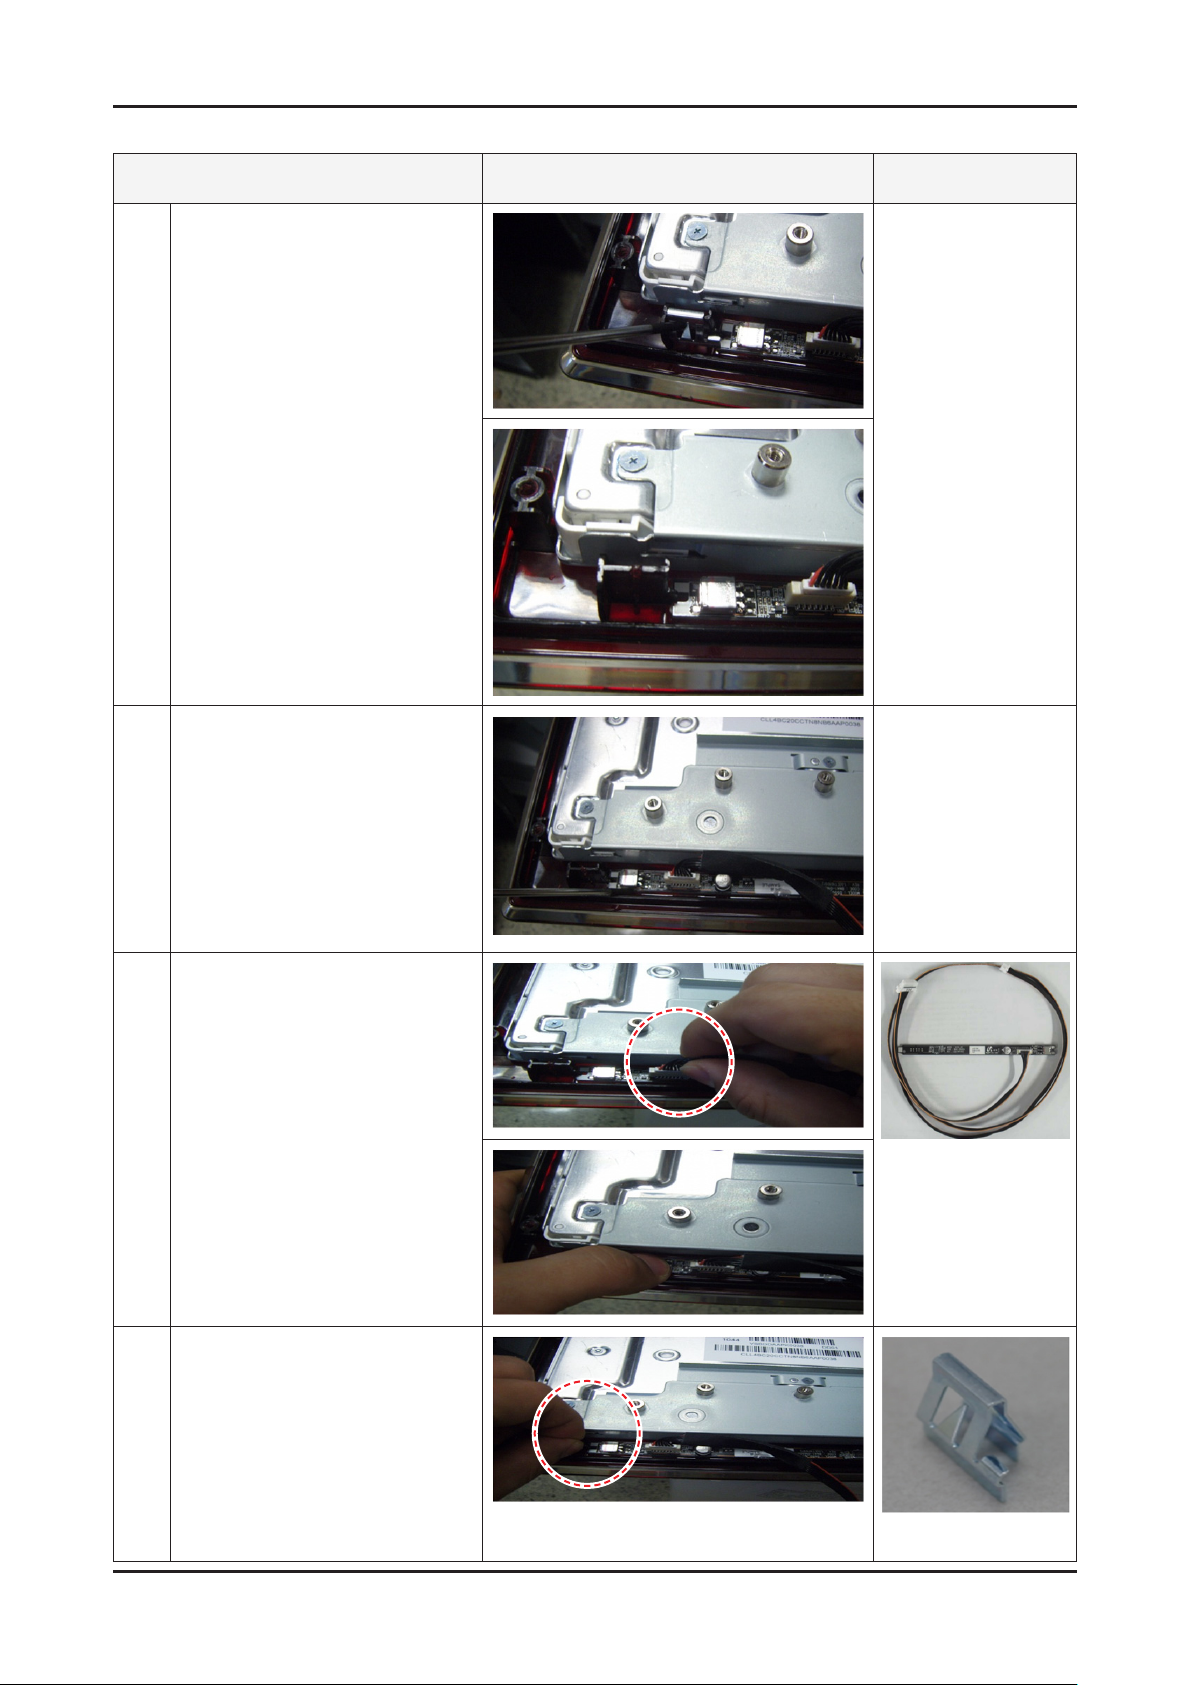
How to replace the function Board
Description Picture Description Refer
Remove the locking clip.
1
Heat the function Board and Remove
2
the function Board.
Place the new function Board.
3
FUNCTION Board
(BN96-16729*)
Locking the clip.
4
Bracket-Support, PCB
(BN61-07248A)
Page 35
4. Troubleshooting
4-1. Troubleshooting
4-1-1. Previous check
Check the various cable connections rst. 1.
• Check to see if there is a burnt or damaged cable.
• Check to see if there is a disconnected or loose cable connection.
• Check to see if the cables are connected according to the connection diagram.
Check the power input to the Main Board.2.
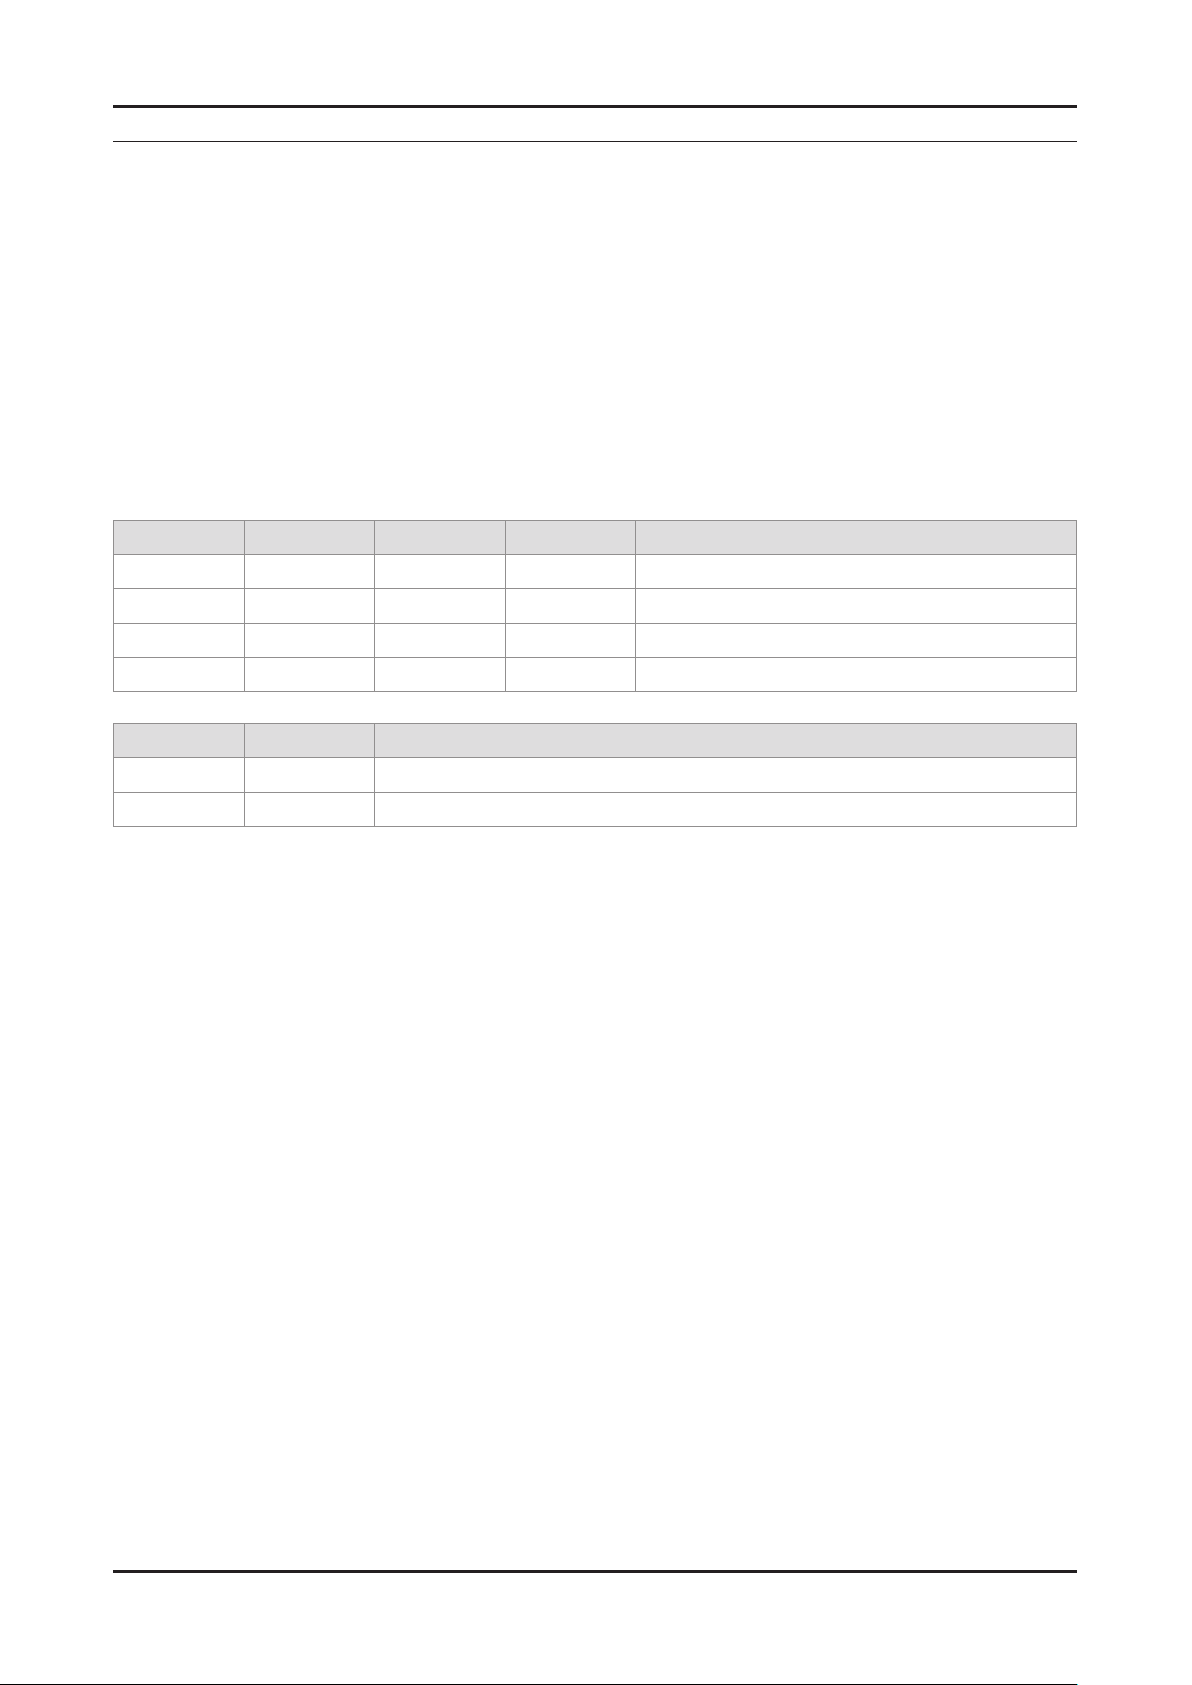
How to distinguish if the problem is caused by Main board or T-Con.3.
No Video : If the problem is No Video but BLU is on and Indication LED is blinking repeatedly and faster than nomal booting, a.
replace the T-Con board.
Distorted Picture : Check the inner patterns. b.
For All mode•
GenoaP Napoli Pre Napoli post Piocture Problem
OK OK OK NG Main board or Signal Source
NG OK OK NG Main board
NG NG OK NG Main board or FRC setting
4. Troubleshooting
NG NG NG NG Main or LVDS cable or T-con or Panel
Only for HDMI mode (additional check)•
HDMI Picture Problem
OK NG There is no problems after HDMI IC check HDMI source or HDMI jack.
NG NG There is no problems before HDMI IC check GenoaS pattern or LVDS cable or T-con.
How to check inner pattern?•
Factory mode(1. Mute 1 8 2 Power on when TV is in ‘Stand-by mode’)
Move to SVC menu.2.
Move to Test Pattern.3.
Check inner patterns. 4.
(This model only support FBE, READ PRE, READ POST)
4-1
Page 36
4-2
4. Troubleshooting
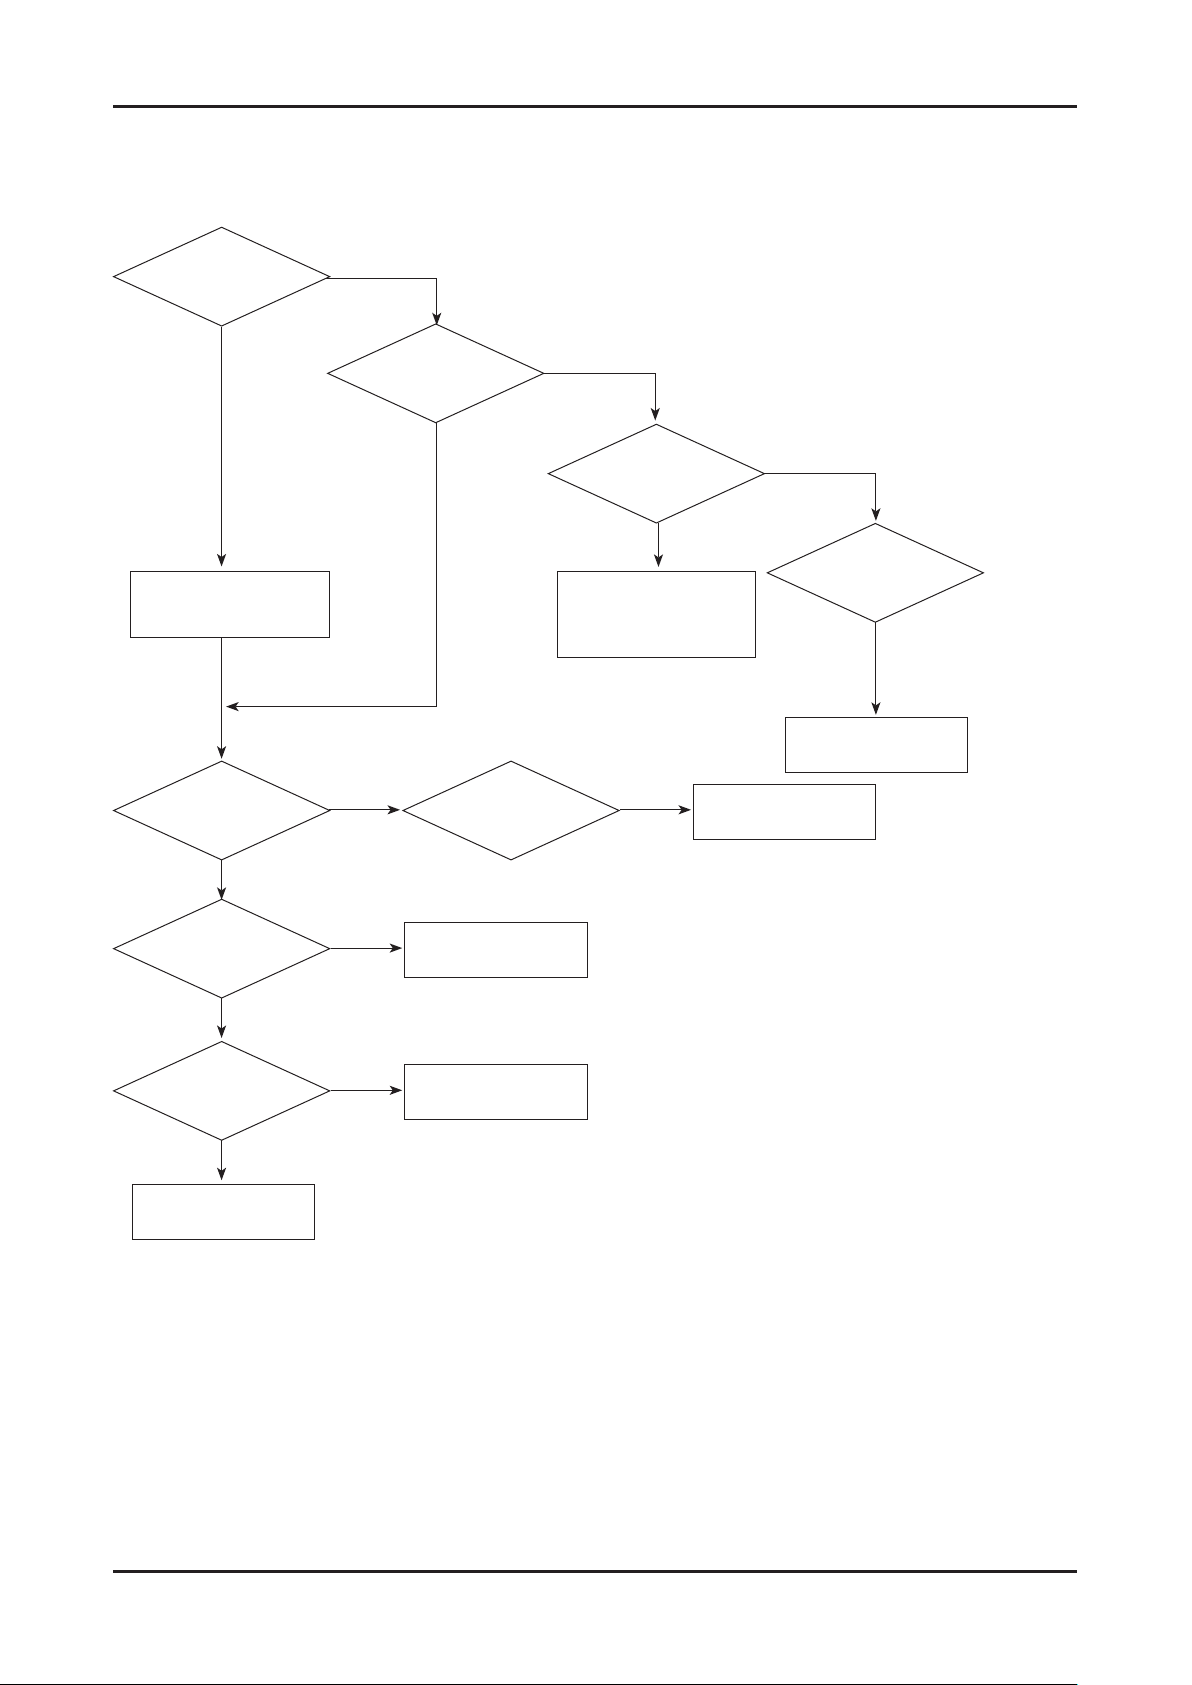
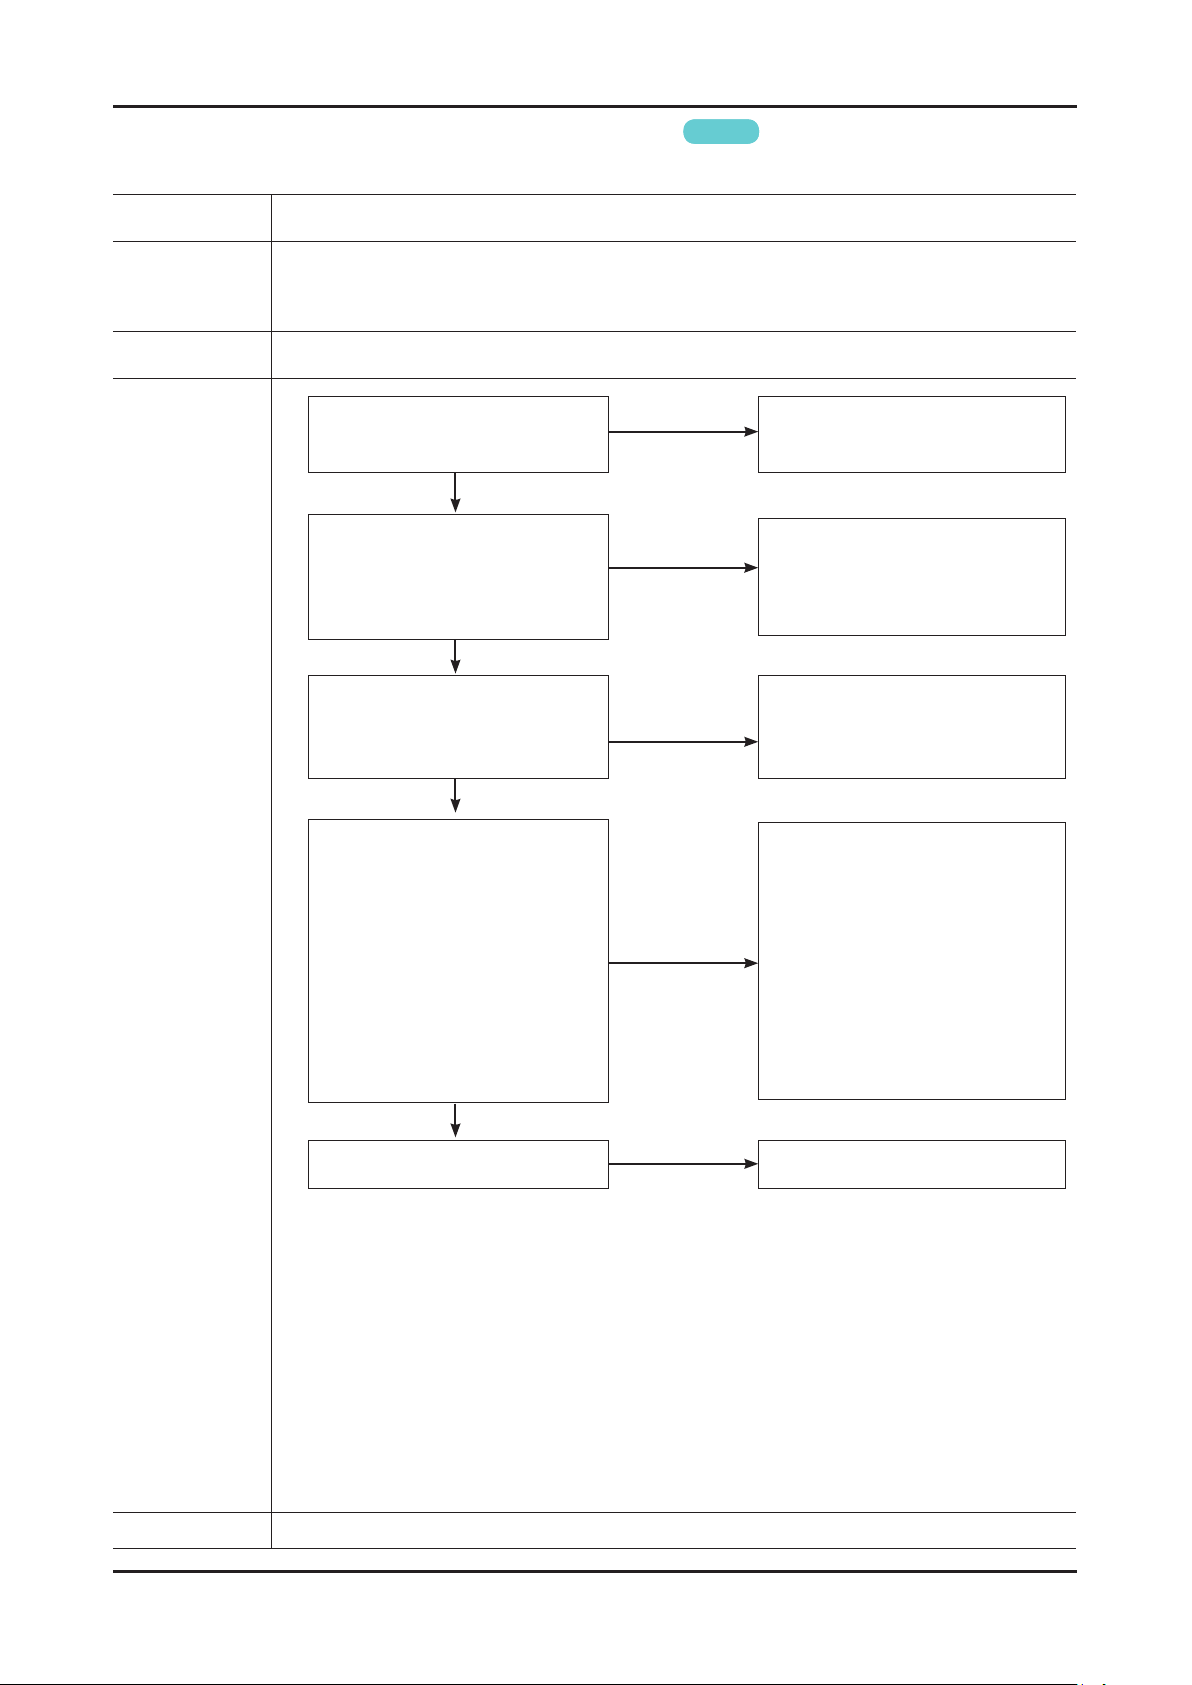
Simple ow chart of malfunction
Does the TV turn on?
No
Check the Power Cord
Yes
is any sound of TV
when RF signal
connected?
No
Yes
Can you see anything
on the screen?
Yes
Yes
No
Check LVDS cable connected
Check LVDS
cable connected.
If necessary replace the
T-con board.
Can you see
OSD menu running on
the screen?
No
to Main Board.
If necessary, replace the
Main Board
No
Change the main board.
Yes
Can you see Digital
Channel broadcast ?
No
Replace the Main Board
A5V appear at
the pin 4 of CN201?
Yes
B13V appear at the
pin 11, 12, 13 of
CN201?
Yes
Please, contact Tech
support
No
No
Check 28p cable.
If necessary, replace the
SMPS board.
Change the main board.
Page 37
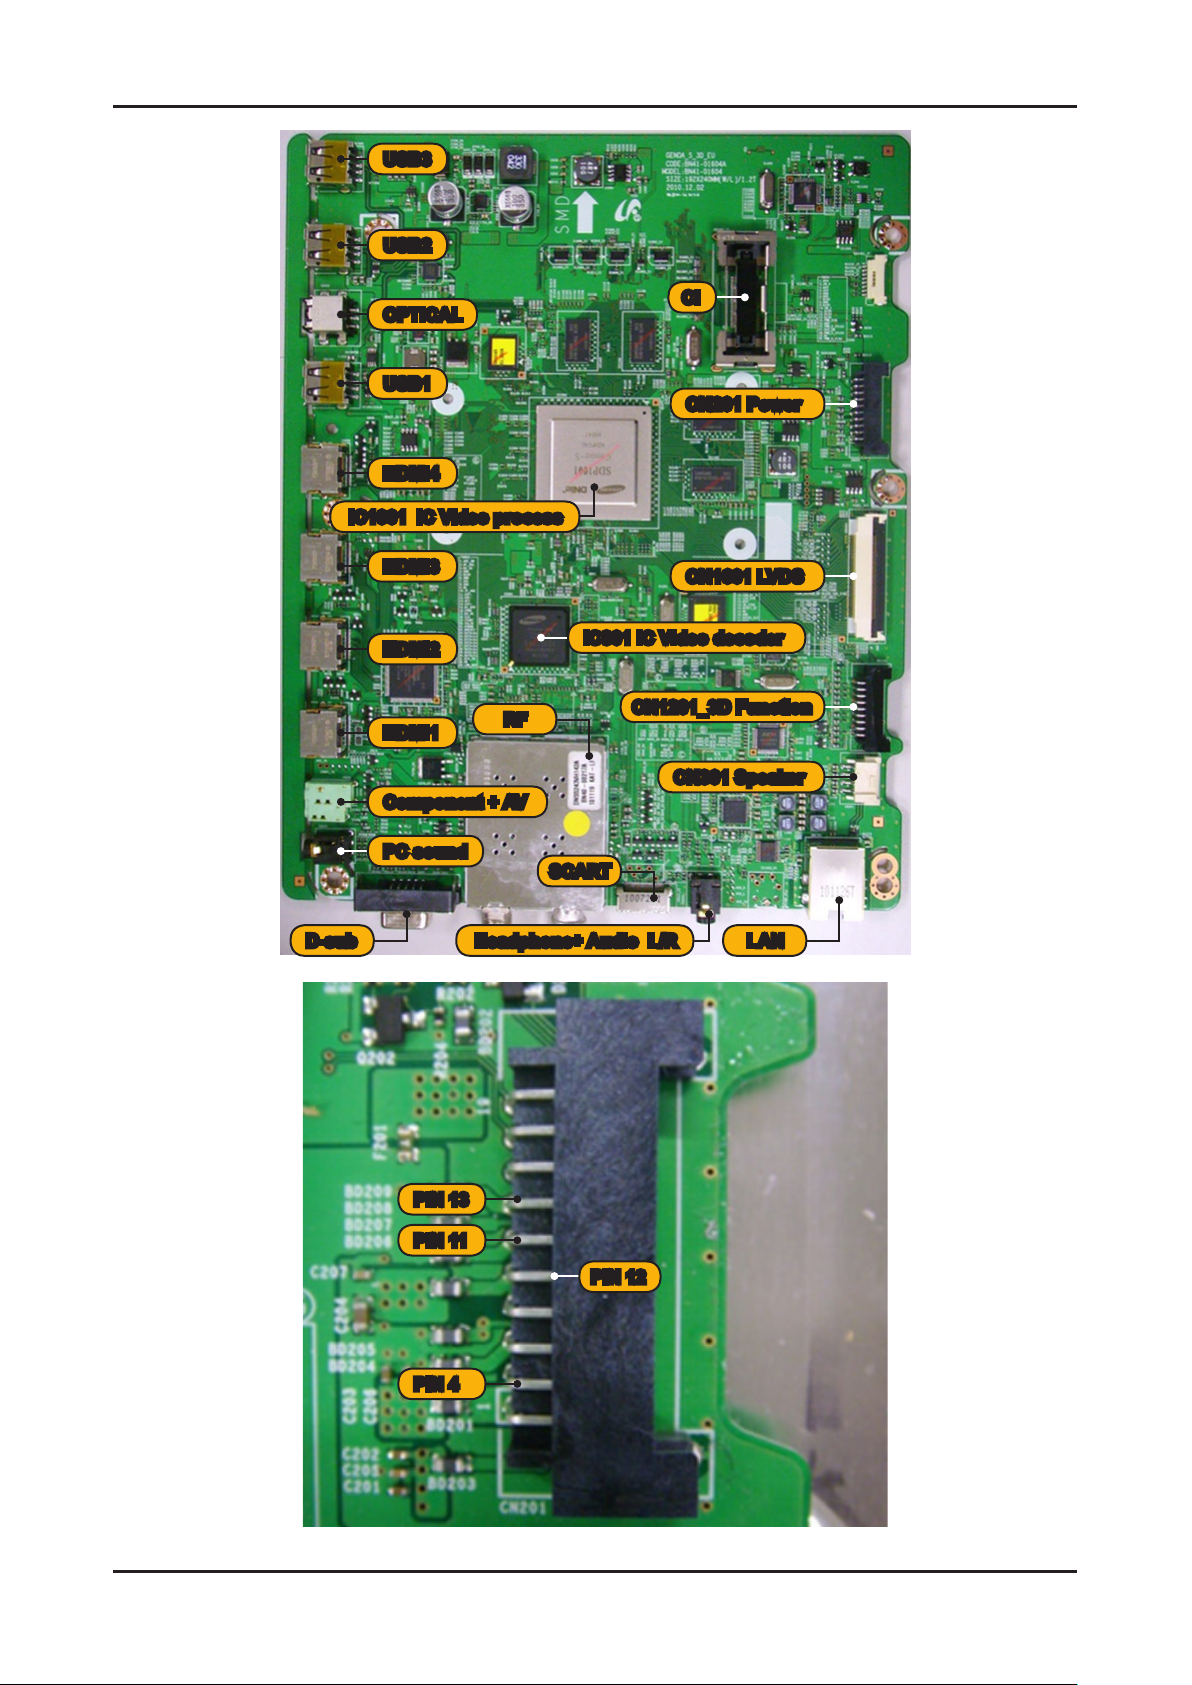
4-3
4. Troubleshooting
USB3
USB2
OPTICAL
USB1
HDMI4
IC1001 IC Video process
HDMI3
HDMI2
HDMI1
Component + AV
PC sound
RF
CI
CN201 Power
CN1601 LVDS
IC801 IC Video decoder
CN1201_3D Function
CN301 Speaker
SCART
D-sub LANHeadphone+ Audio L/R
PIN 13
PIN 11
PIN 12
PIN 4
Page 38
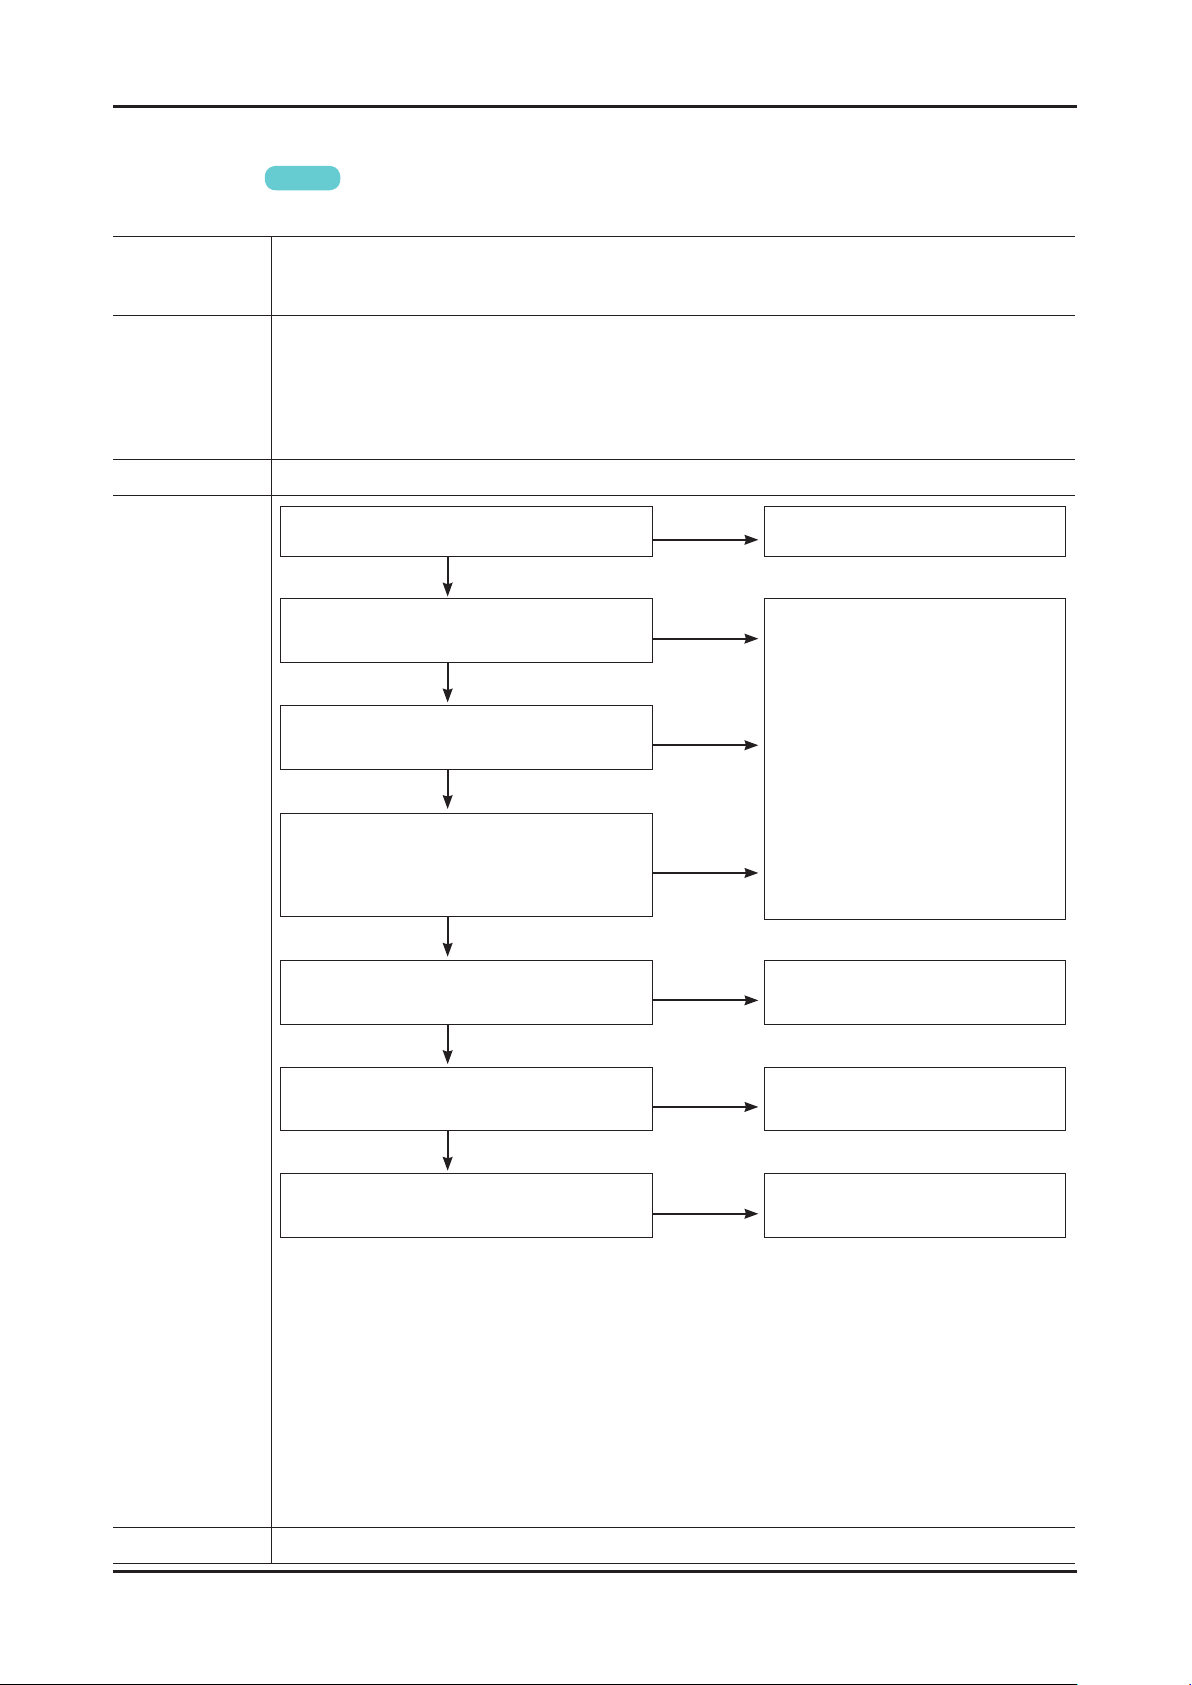
4-4
4. Troubleshooting
4-1-2. How to check fault symptom
No Power
N Refer to the next page to check the lacation such a CN201 or IC1001 SVC Manual mentioned.
Symptom
Major
checkpoints
Caution Make sure to disconnect the power before working on the PD board.
Genoa-S
The LEDs on The front panel do not work when connecting The power cord. The SMPS relay does not work when connecting The power cord. The units appears to be dead. -
The PD relay does not work when connecting the power cord if the cables are improperly connected or the
Main Board or PD is not functioning. In this case, check the following:
Check the internal cable connection status inside the unit. Check the fuses of each part. Check the output voltage of SMPS. Replace the Main Board. -
When power on, check the sound of relay on?
Yes
Check the backlight on,
when 20p cable unconnected ?
Yes
Does proper Stand-By DC A5V
appear at the PIN 4 of CN201?
Yes
No
No
No
check a connection power cable.
Change 20p cable.
Change Main Power Assy.
Diagnostics
Check ‘Main power input’ ?
- PIN7 : B18VS
- PIN11 : B13V
- PIN1 : B5V
Yes
Does proper DC A3.3V
appear at the pin3 of IC204?
Yes
Does proper DC B3.3V
appear at the pin8 of IC201?
Yes
A power is supplied to panel
appear at the pin7,8 of IC210?
No
No
No
No
Change the IC204 or the Main Assy.
Change the IC208, IC207 or
the Main Assy.
Check a other function.
Replace a LCD Panel
Caution Make sure to disconnect the power before working on the IP board.
Page 39
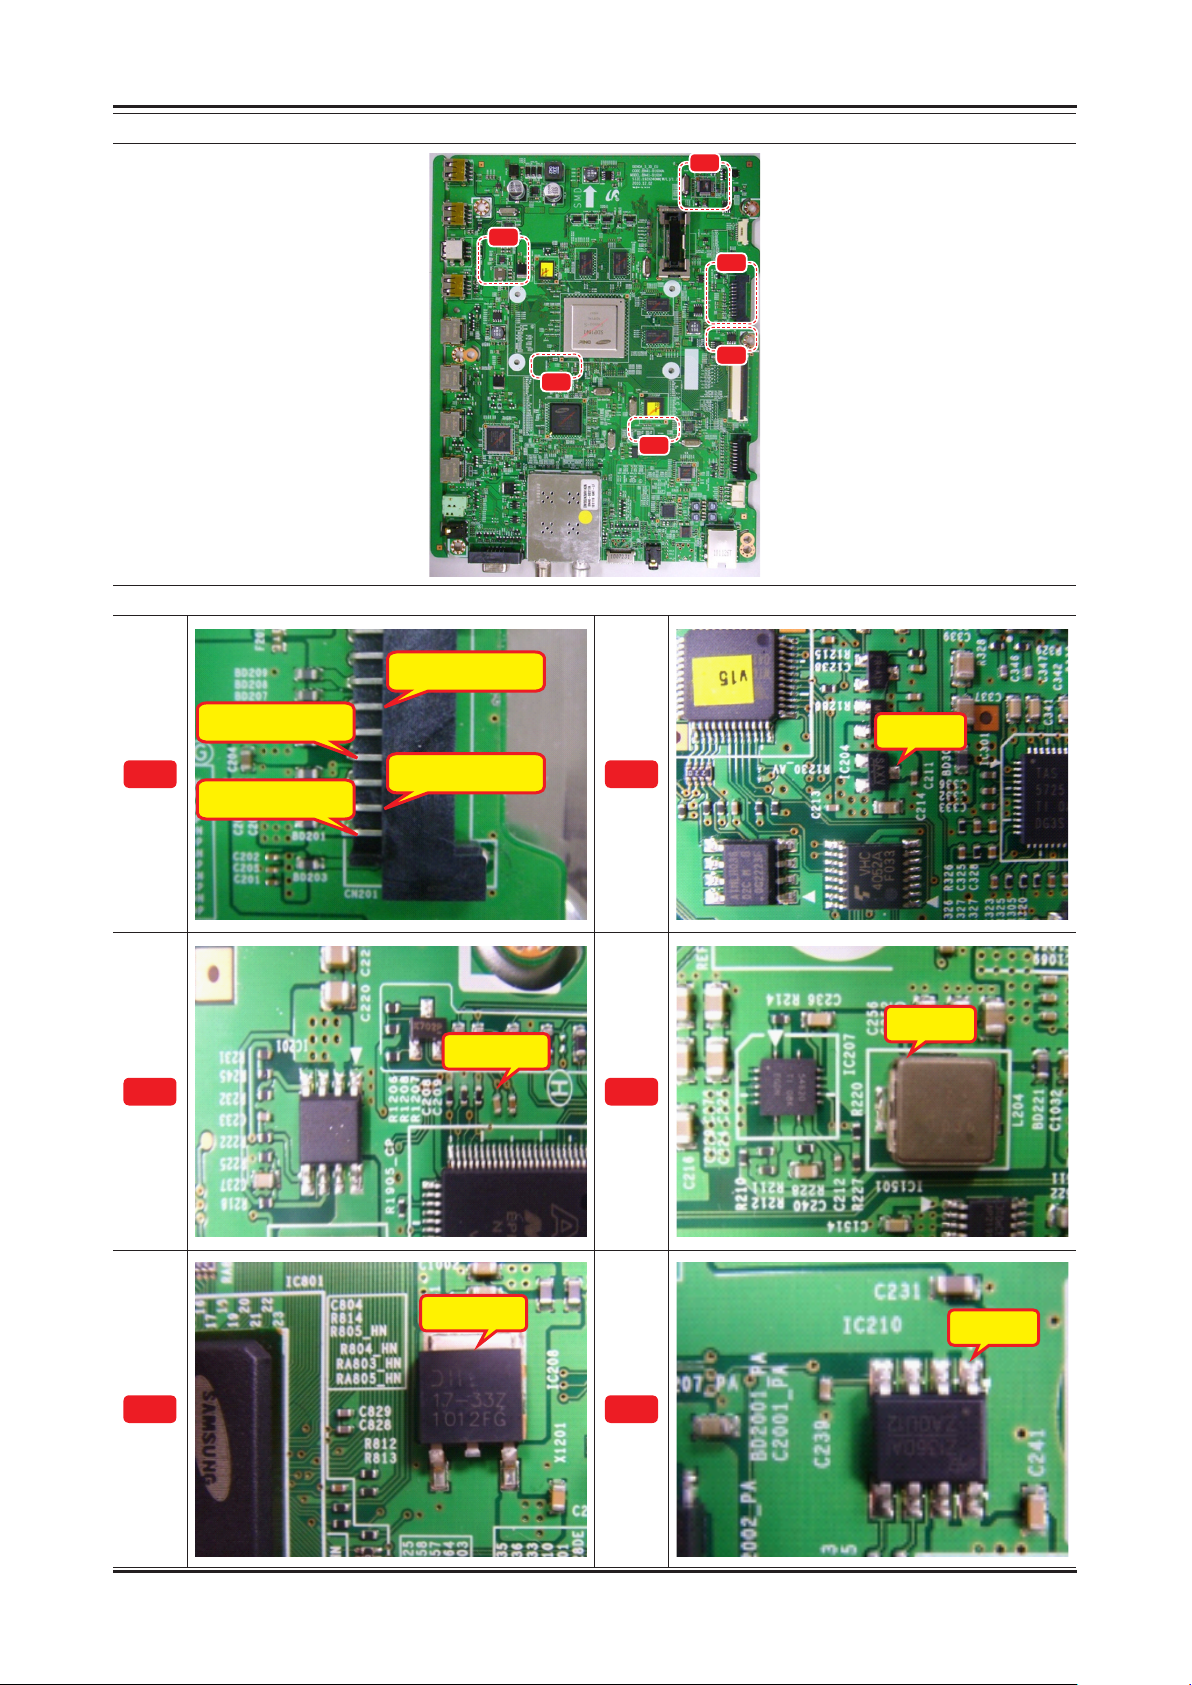
4-5
4. Troubleshooting
Location (Main)
D
E
Detail
C
A
F
B
A
C
PIN 7(B18VS)
PIN 7(B18VS)
PIN 11(B13V)
PIN 4(A5V)
IC201
IC204
B
IC207
D
E
IC208
IC210
F
Page 40
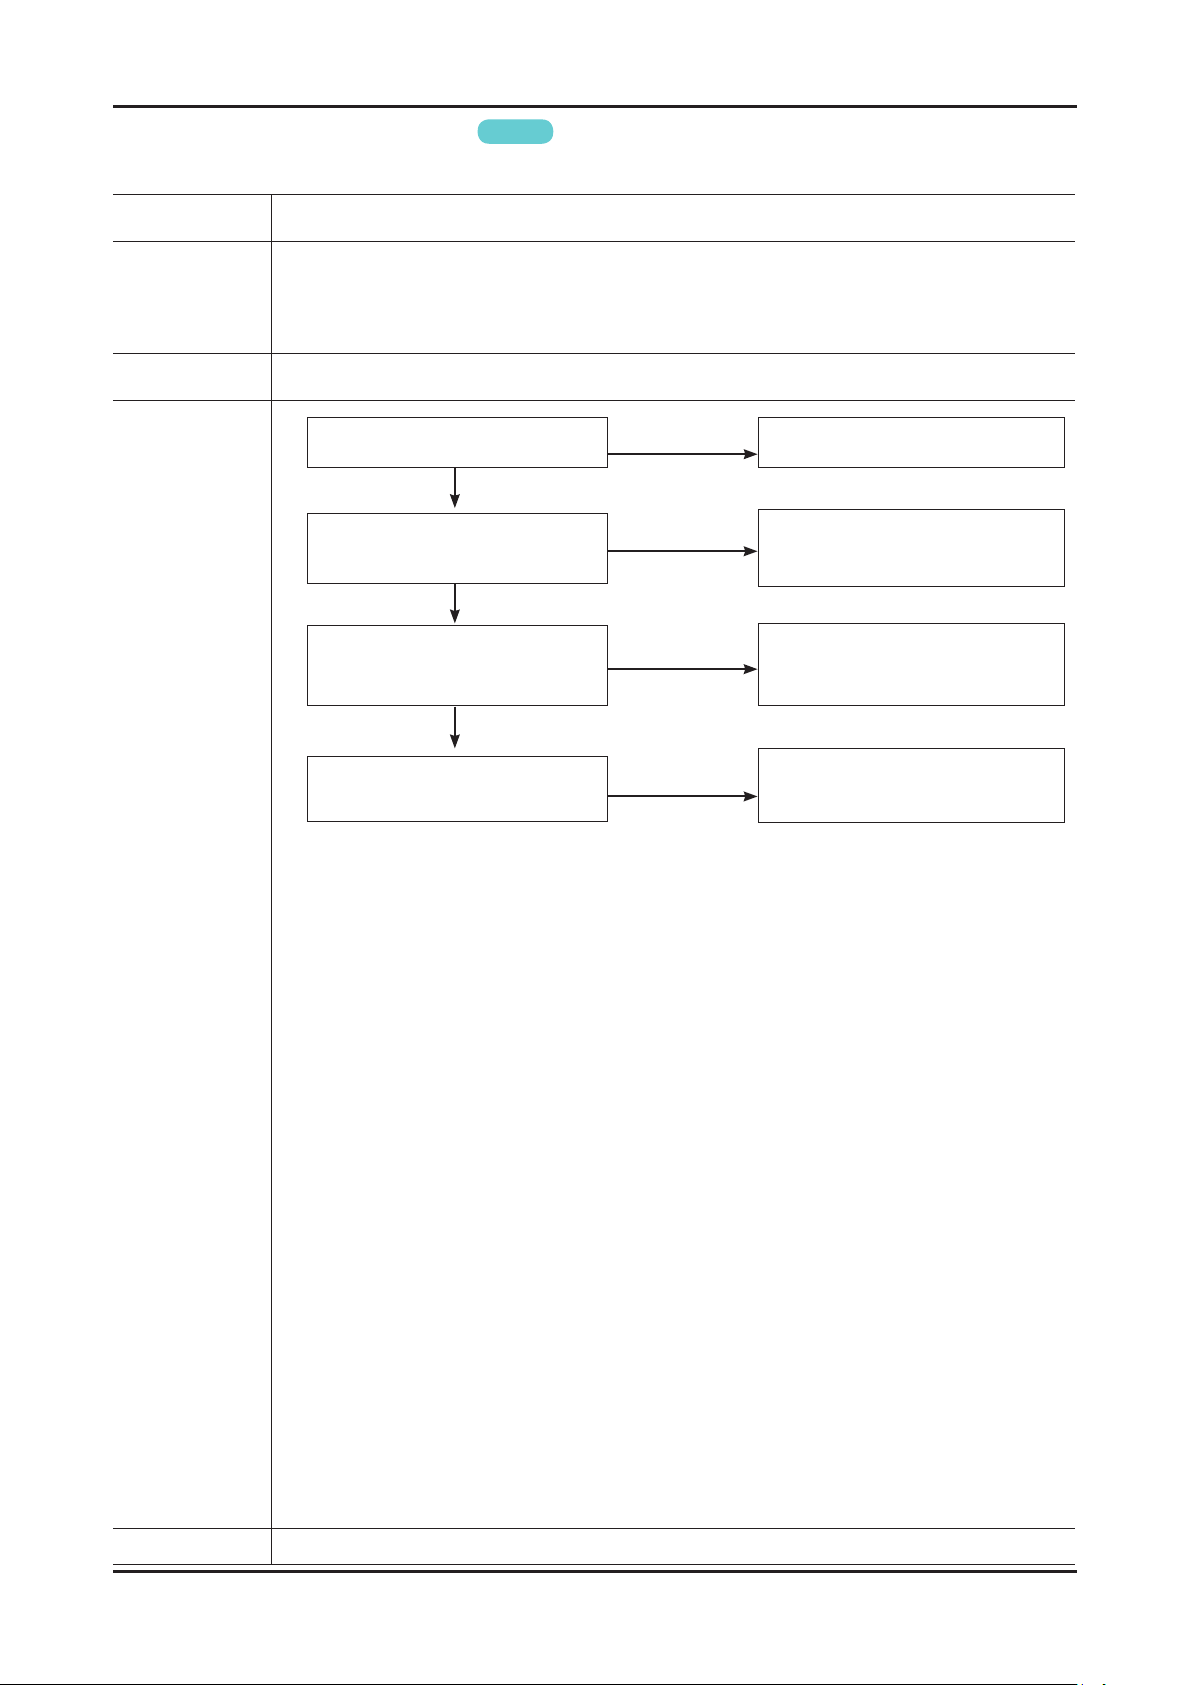
4-6
4. Troubleshooting
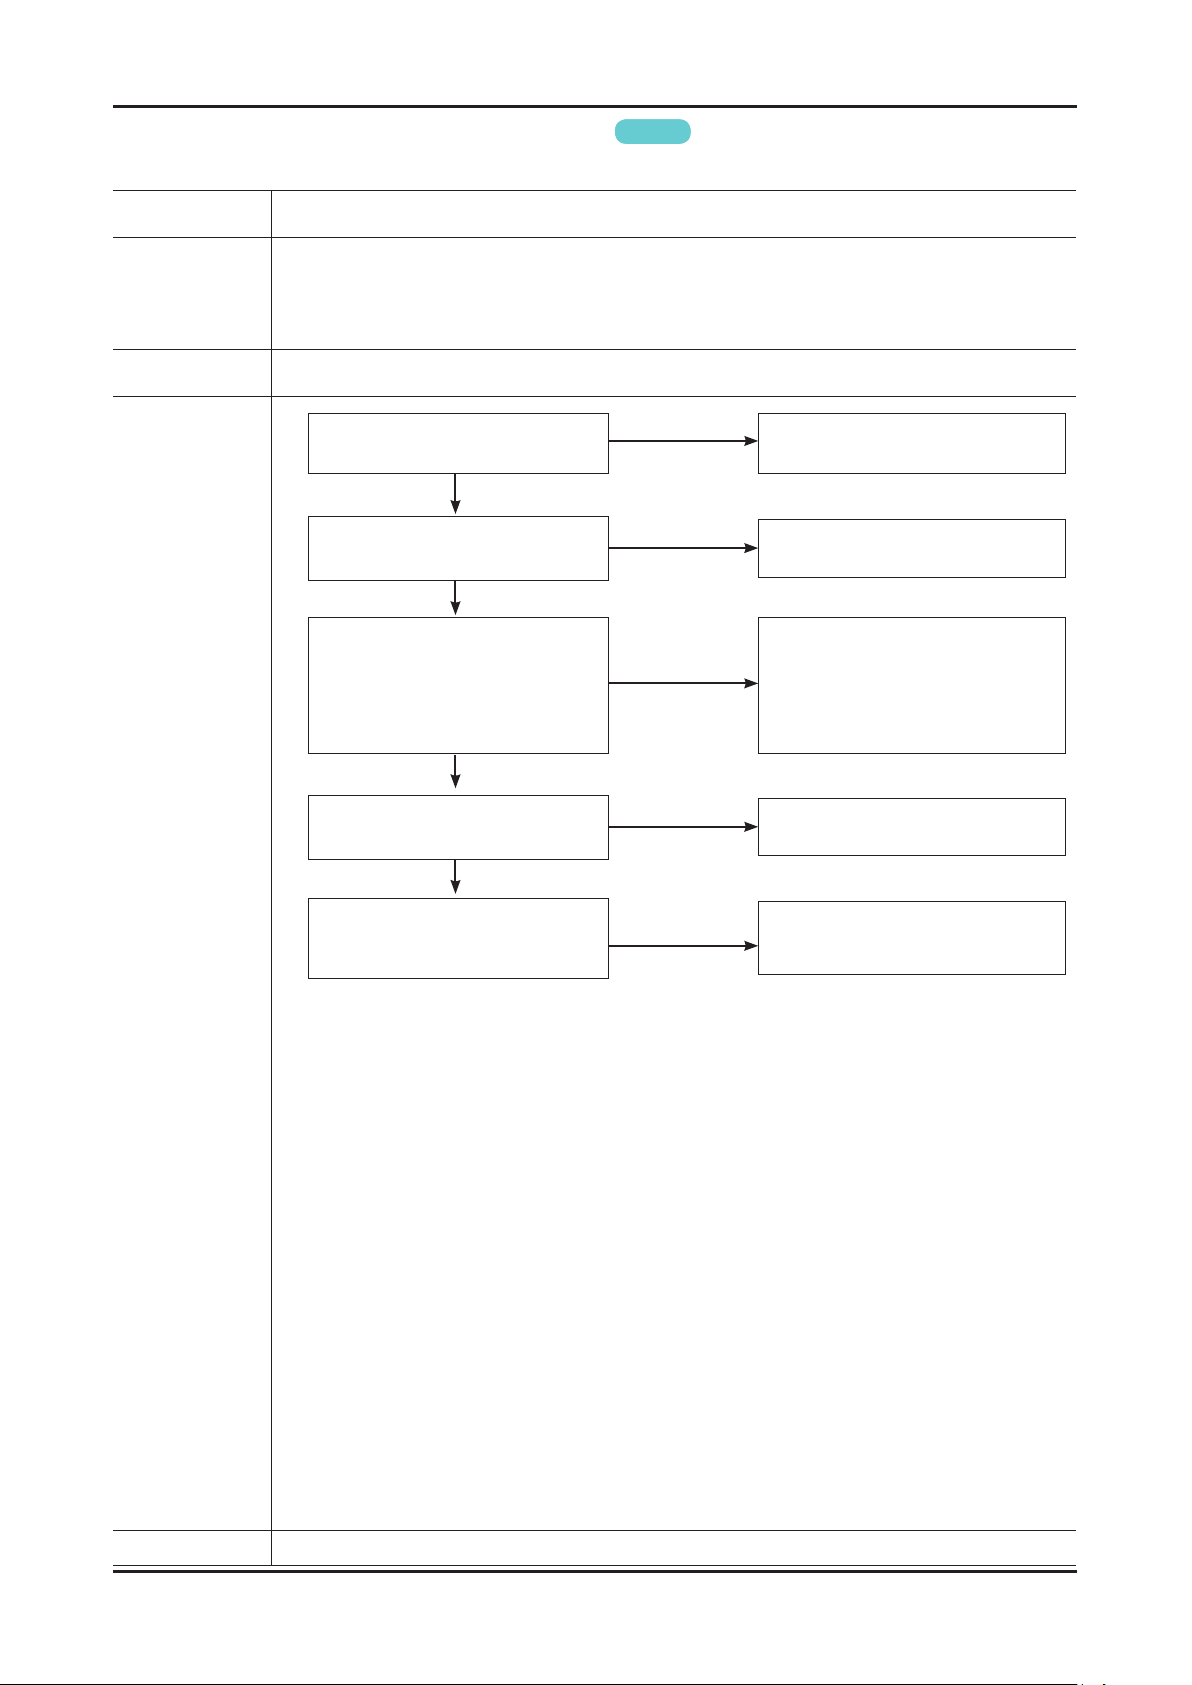
Yes
Yes
Genoa-S
No
No
No
Input an analog PC signal.
Check the connected cable.
Change the PC cable.
Change the main PCB assembly.
Change the IC801 or the
main PCB assembly.
No Video (Analog PC signal)
N Refer to the next page to check the lacation such a CN201 or IC1001 SVC Manual mentioned.
Symptom Audio is normal but no picture is displayed on the screen. -
Check the PC source -
Major
checkpoints
Caution Make sure to disconnect the power before working on the PD board.
Check the Arsenal, Check the Valencia. This may happen when the LVDS cable connecting the Main Board and the Panel is disconnected.
Check the PC source and check the
connection of DSUB?
Does the signal appear at
1
2
pin 1, 2, 3, 13, 14(R,G,B,H,V) of
CN401?
Does the digital data appear at
output of IC801?
Diagnostics
Yes
Check the LVDS cable?
Replace the LCD panel?
No
Please, contact Tech support.
Caution Make sure to disconnect the power before working on the IP board.
Page 41
4-7
4. Troubleshooting
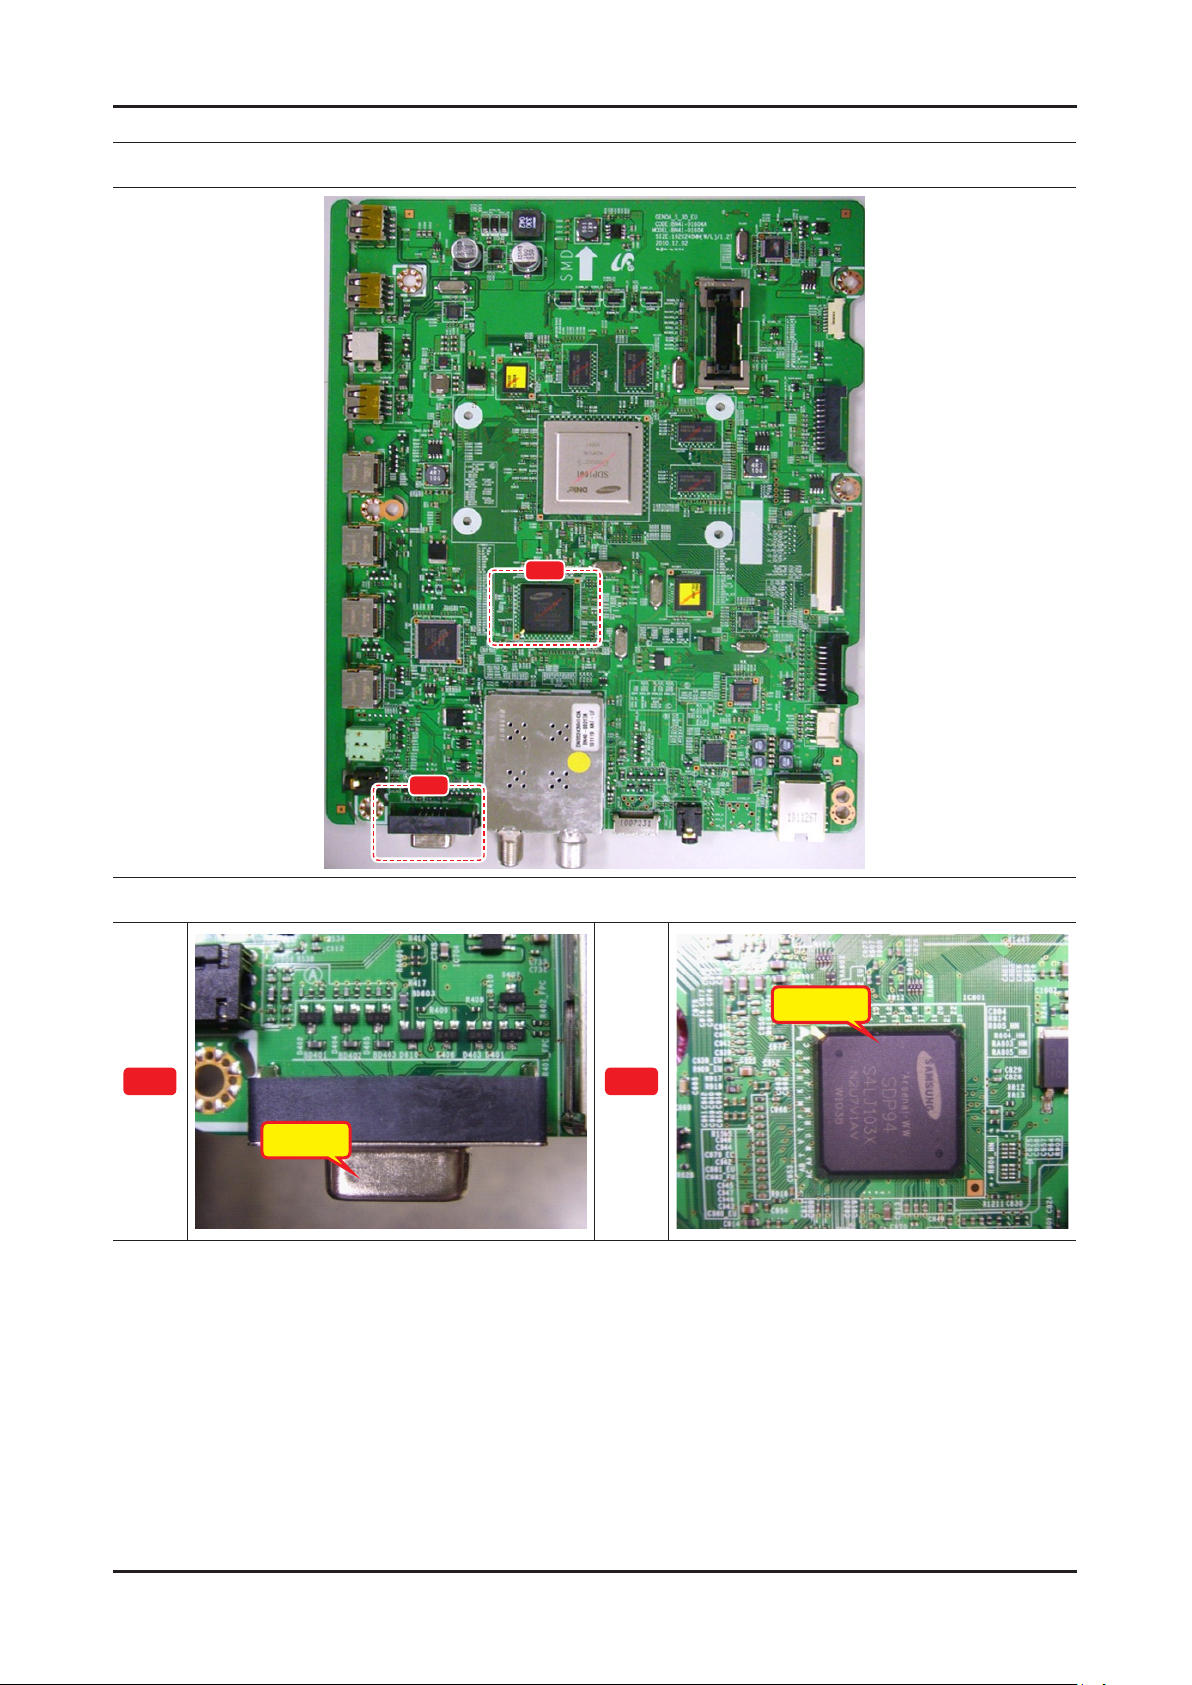
Location (Main)
B
A
A
Detail
IC801
B
CN401
Page 42
4-8
4. Troubleshooting
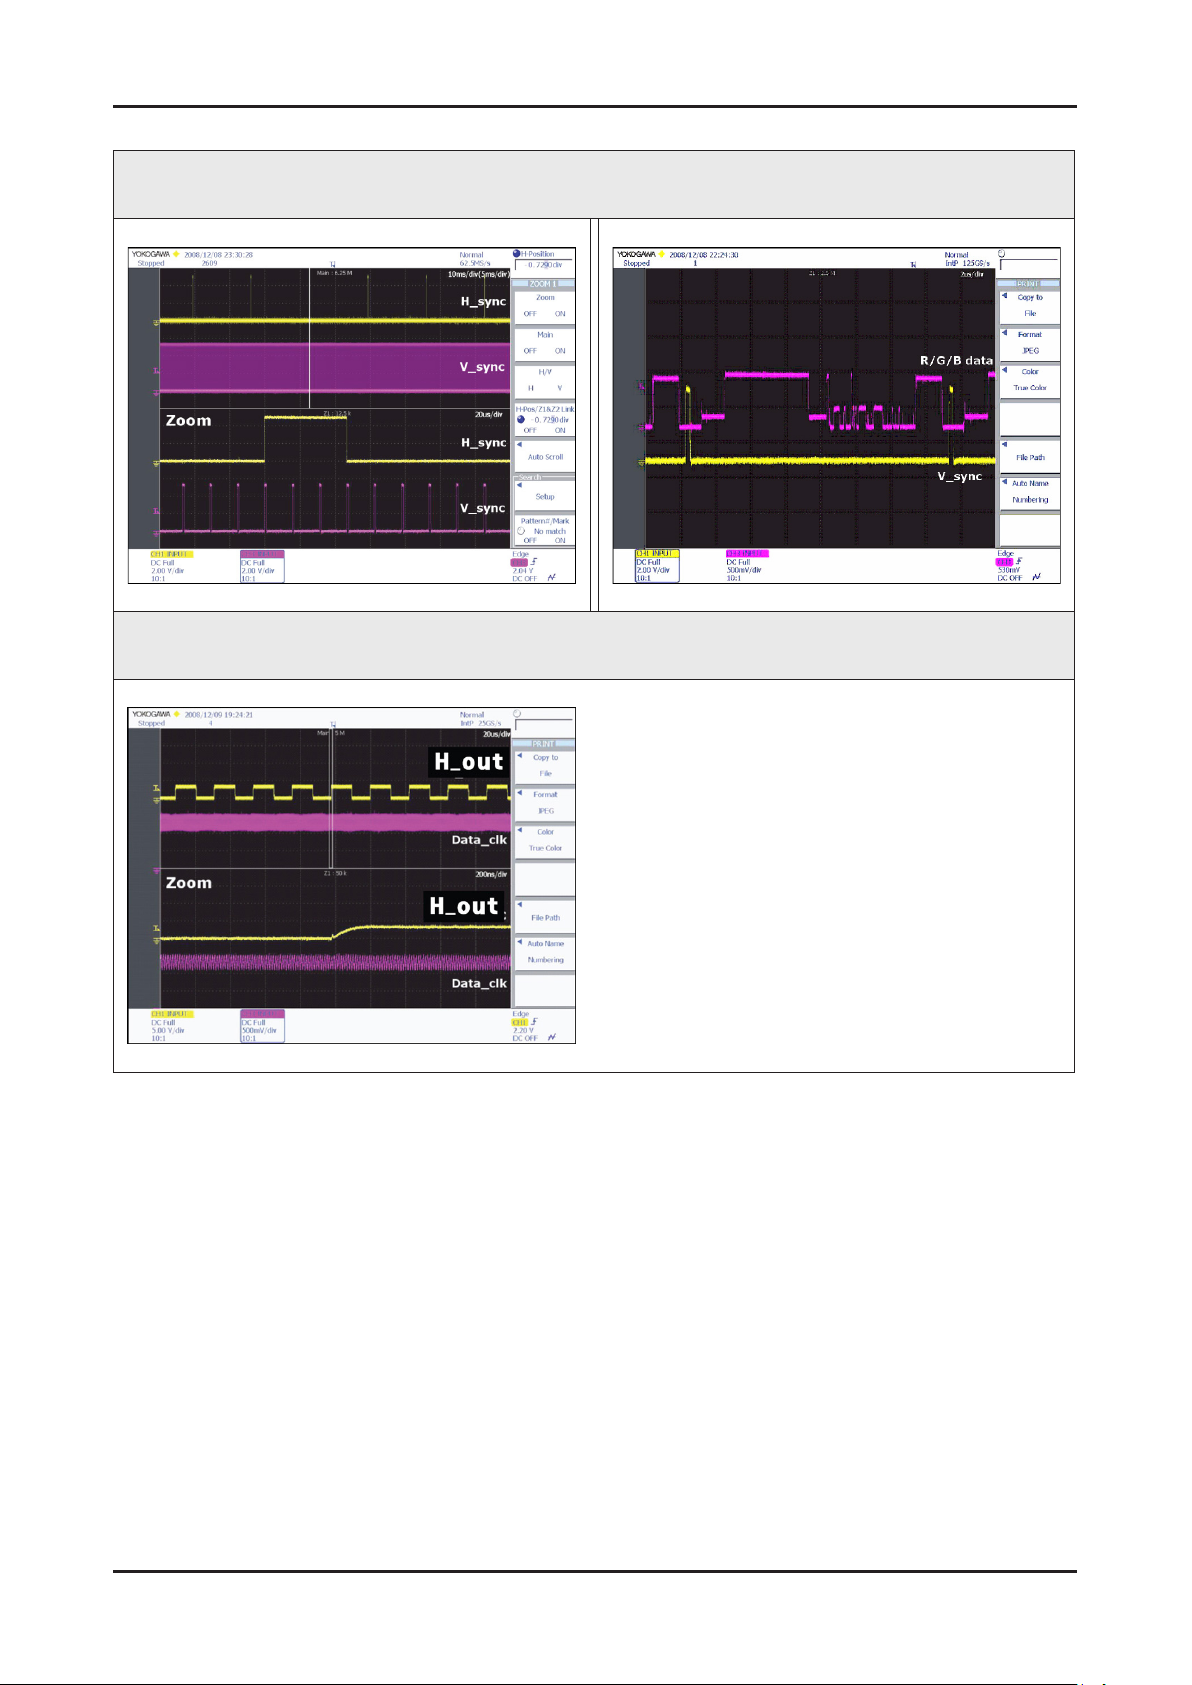
WAVEFORMS
1 PC input (V-sink, H-sink, R/G/B)
2 LVDS output
Page 43
4-9
4. Troubleshooting
No Video (HDMI 1, 2, 3, 4 - Digital Signal)
N Refer to the next page to check the lacation such a CN201 or IC1001 SVC Manual mentioned.
Symptom Audio is normal but no picture is displayed on the screen. -
Check the HDMI source -
Major
checkpoints
Caution Make sure to disconnect the power before working on the PD board.
Check the HDMI switch, Check the Valencia. This may happen when the LVDS cable connecting the Main Board and the Panel is disconnected.
Power indicator LED is off.
Lamp(Backlight) on, no video ?
Yes
Check the HDMI source and check the
connection of HDMI cable ?
Yes
Does the signal appear at
1
IC601 pin31~38(HDMI1),
pin21~28(HDMI2), pin11~18(HDMI3),
pin2~9(HDMI4)?
Genoa-S
No
No
No
Check a set in the ‘Stand-by mode’.
Input the HDMI signal properly.
First of all check the setting of the
external device.
And then check the HDMI cable.
If the problem still occurs, replace the
Main Board.
Diagnostics
2
2
Yes
Does the digital data appear at
pin 14~42 of CN1601?
Yes
Check the LVDS cable?
Check the T-con board?
Replace the LCD panel?
No
No
Change the IC1001 or
the main PCB assembly.
Please, contact Tech support.
Caution Make sure to disconnect the power before working on the IP board.
Page 44
4-10
4. Troubleshooting
Location (Main)
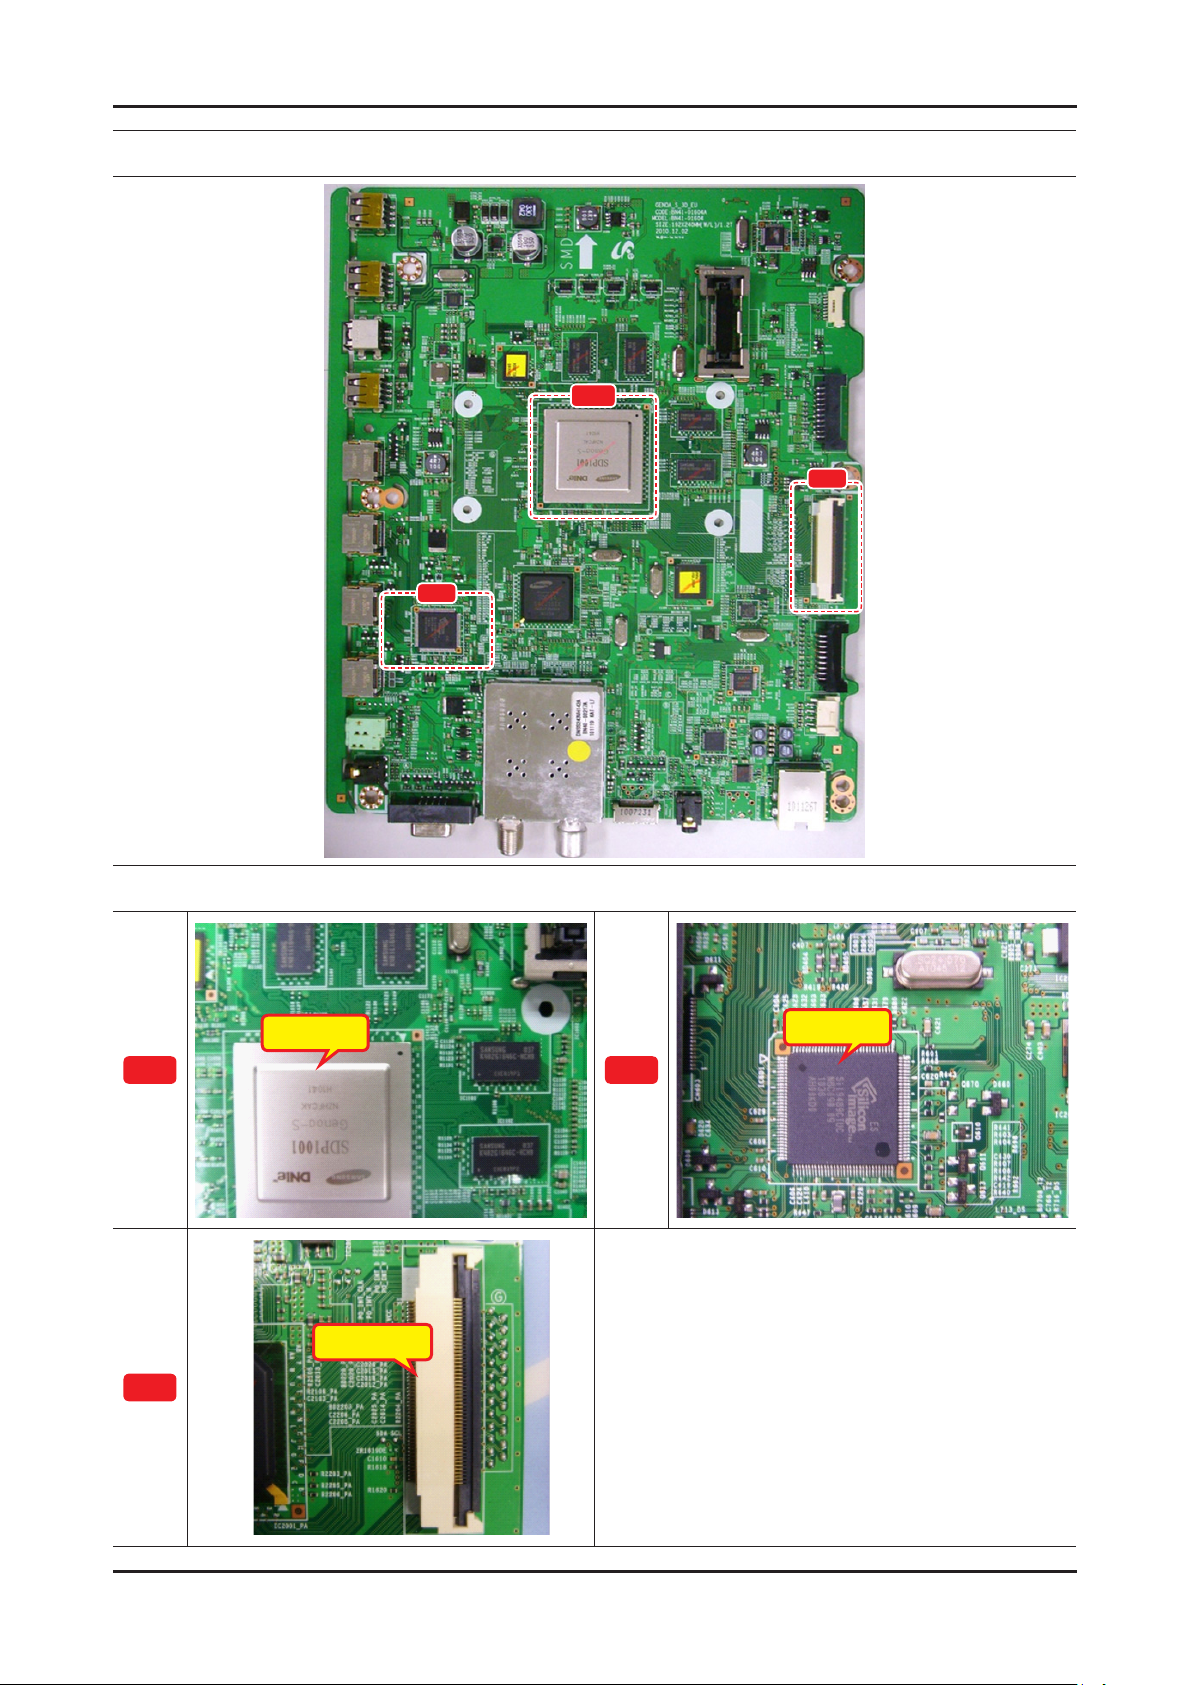
A
C
B
A
C
IC1001
CN1601
Detail
IC601
B
Page 45
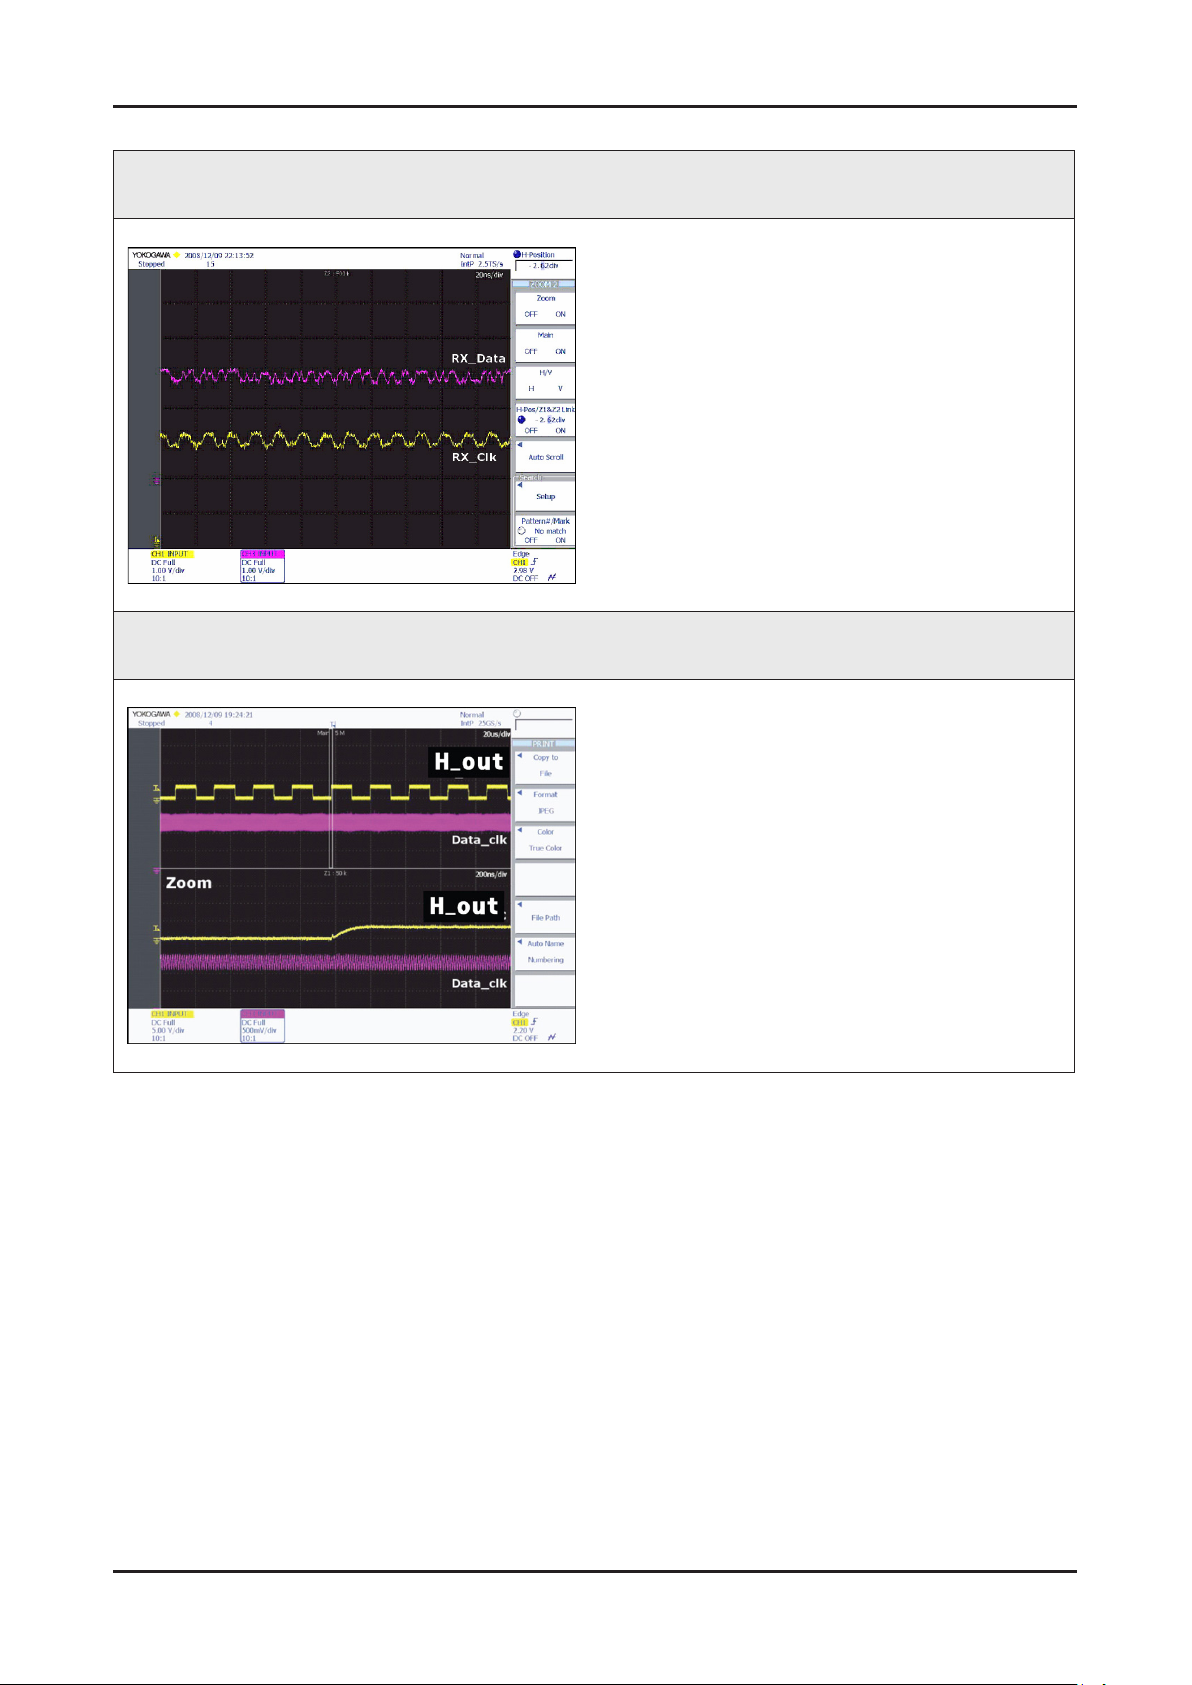
4-11
4. Troubleshooting
WAVEFORMS
1 PC input (V-sink, H-sink, R/G/B)
2 LVDS output
Page 46
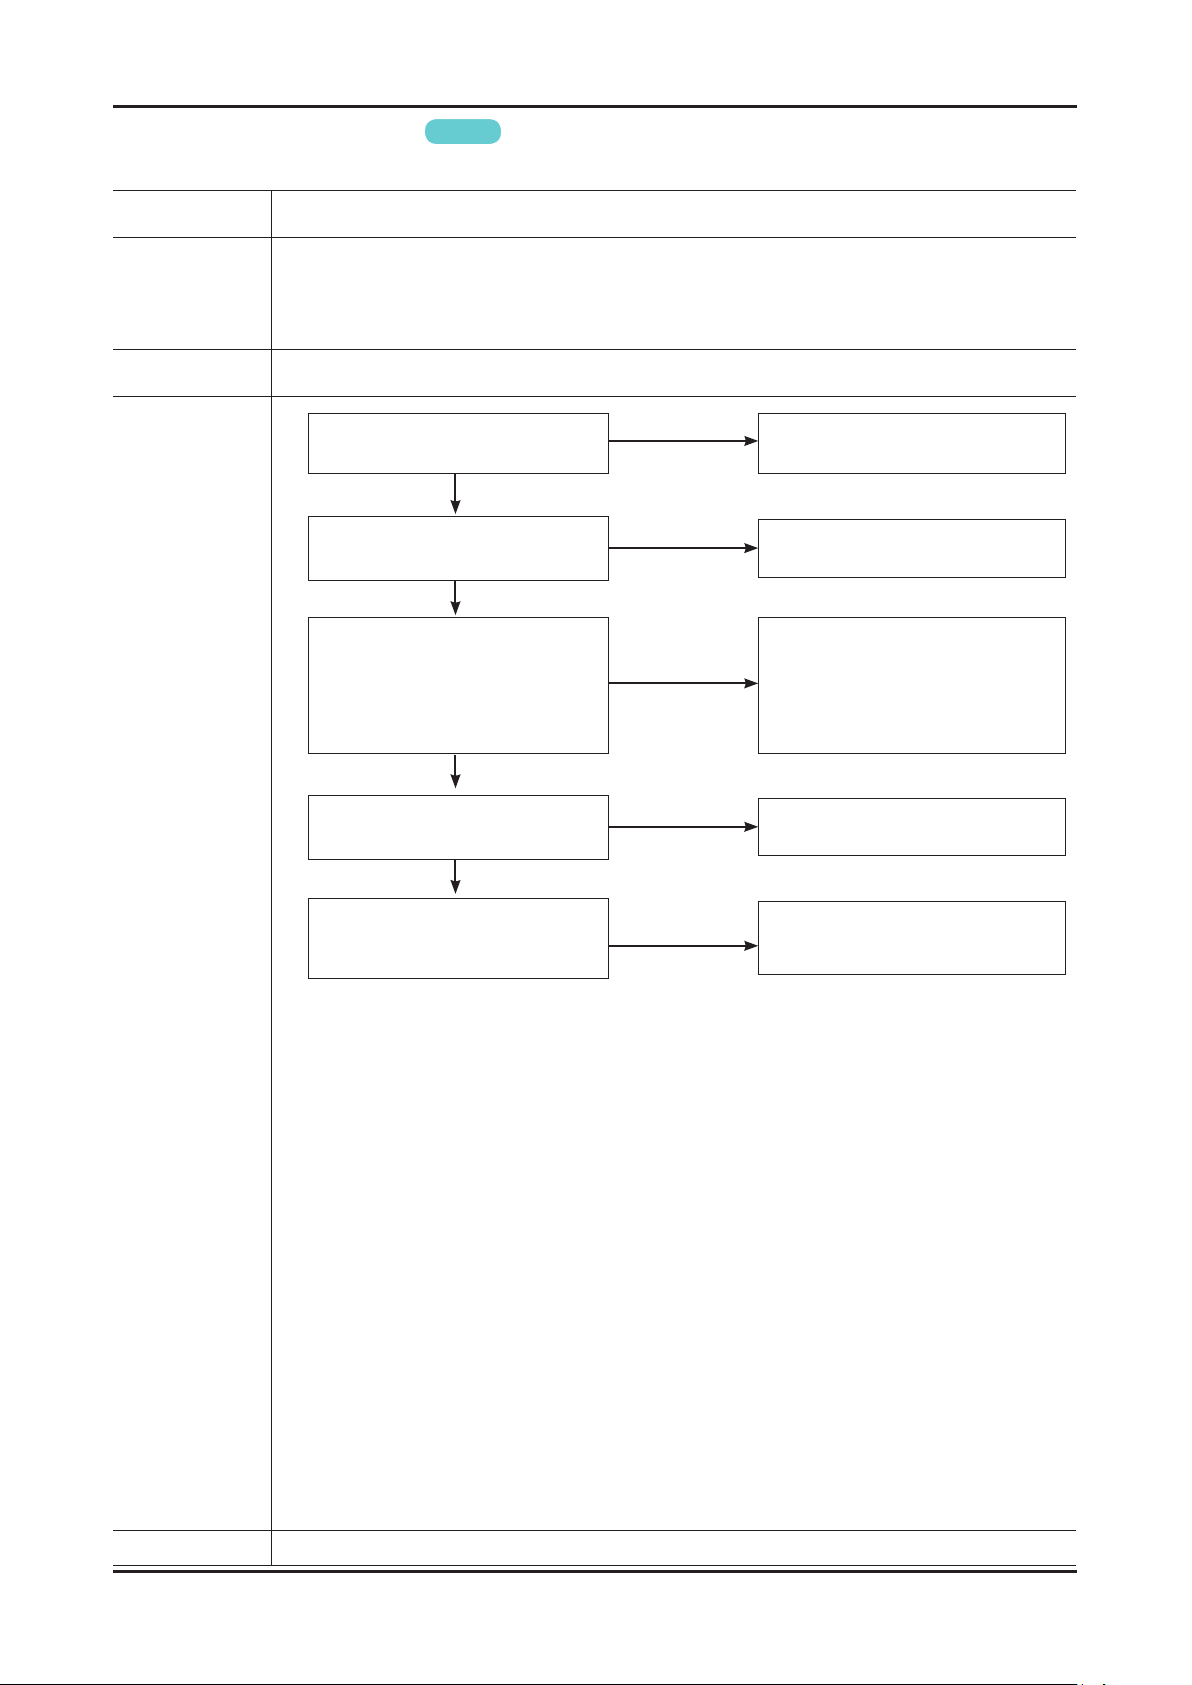
4-12
4. Troubleshooting
No Video (Tuner_CVBS)
N Refer to the next page to check the lacation such a CN201 or IC1001 SVC Manual mentioned.
Symptom Audio is normal but no picture is displayed on the screen. -
Check the Tuner CVBS source -
Major
checkpoints
Caution Make sure to disconnect the power before working on the PD board.
Check the Tuner, Check the Valencia. This may happen when the LVDS cable connecting the Main Board and the Panel is disconnected.
Power indicator LED is off.
Lamp(Backlight) on, no video ?
Check the RF source and
check the connection of RF cable ?
1
Does the signal appear at
pin11,12 of TU702_FN?
Genoa-S
Yes
Yes
No
No
No
Check a set in the ‘Stand-by mode’.
Input the RF source properly.
Change the TU702_FN or
the main PCB assembly.
Diagnostics
2
Yes
Does the digital data appear at
pin 14~42 of CN1601?
Yes
Check the LVDS cable?
Replace the T-con / LCD panel?
No
No
Change the IC1001 or
the main PCB assembly.
Please, contact Tech support.
Caution Make sure to disconnect the power before working on the IP board.
Page 47
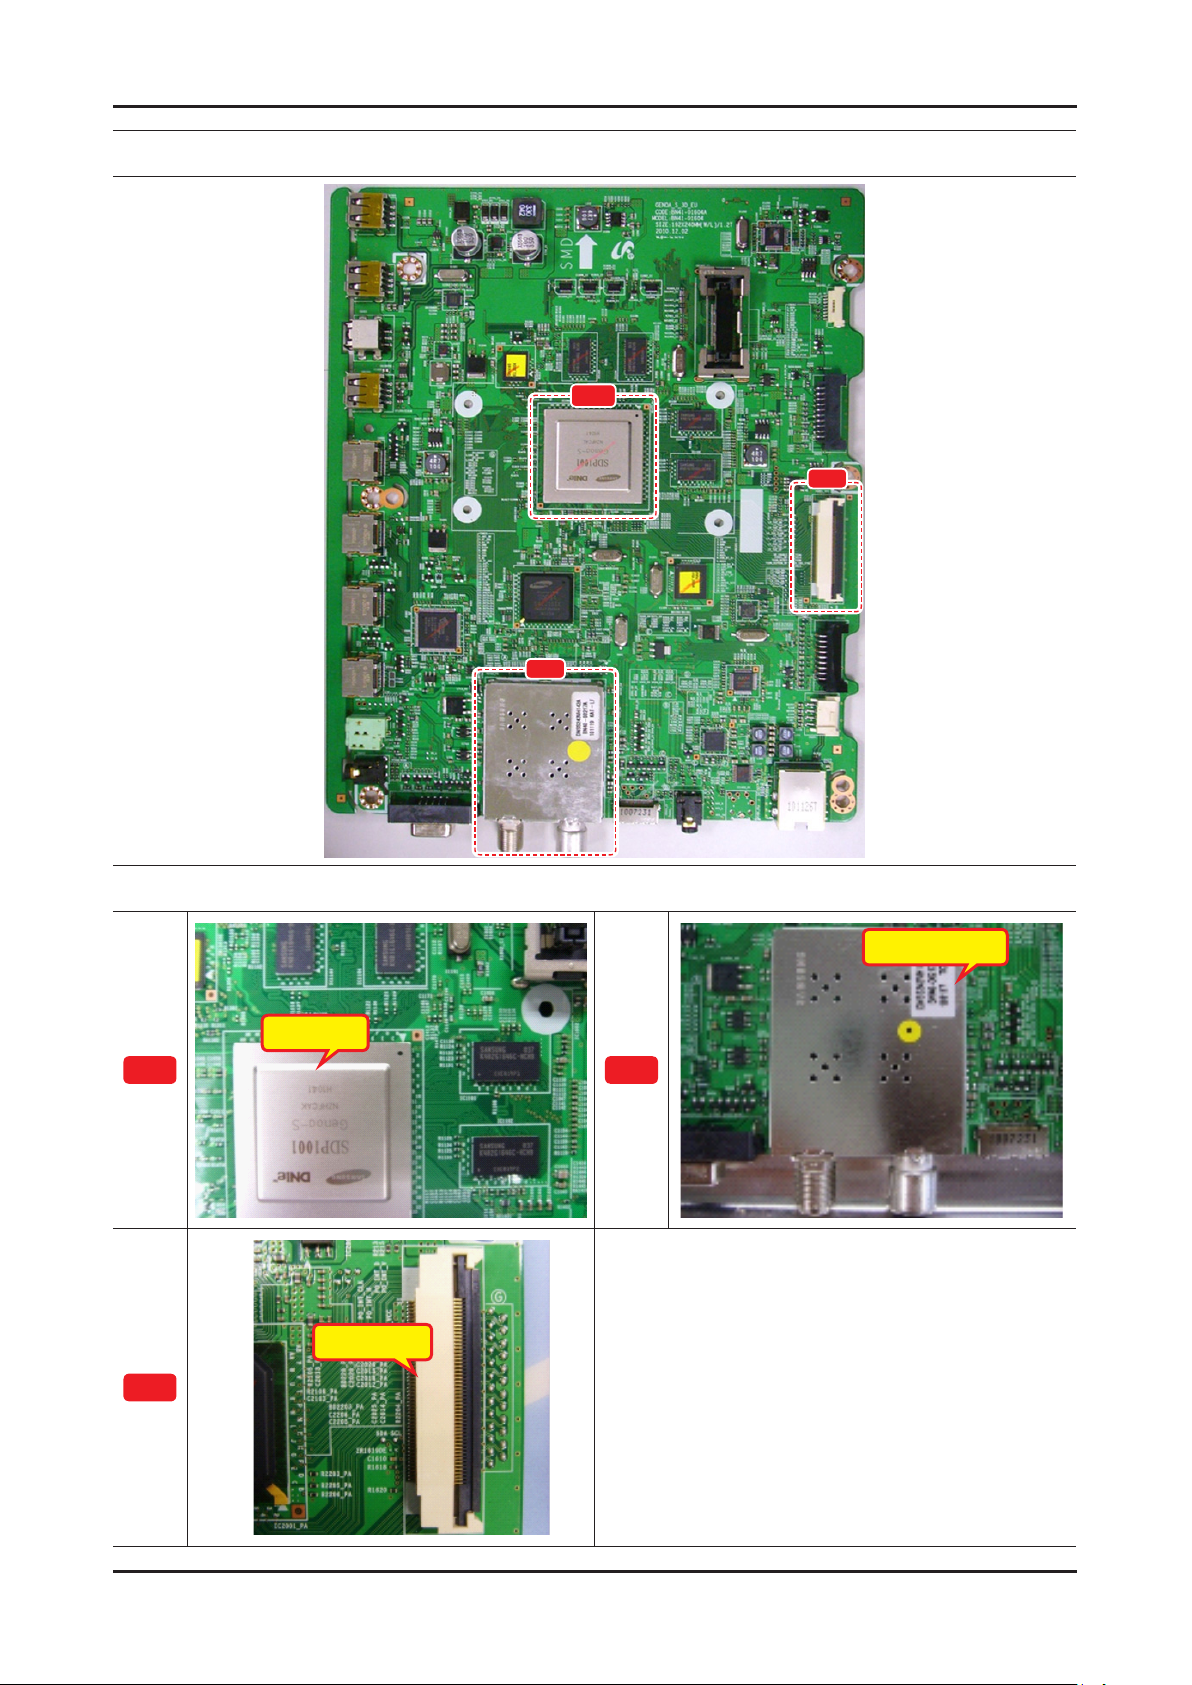
4-13
4. Troubleshooting
Location (Main)
A
C
A
B
Detail
TU702_FN
IC1001
B
C
CN1601
Page 48
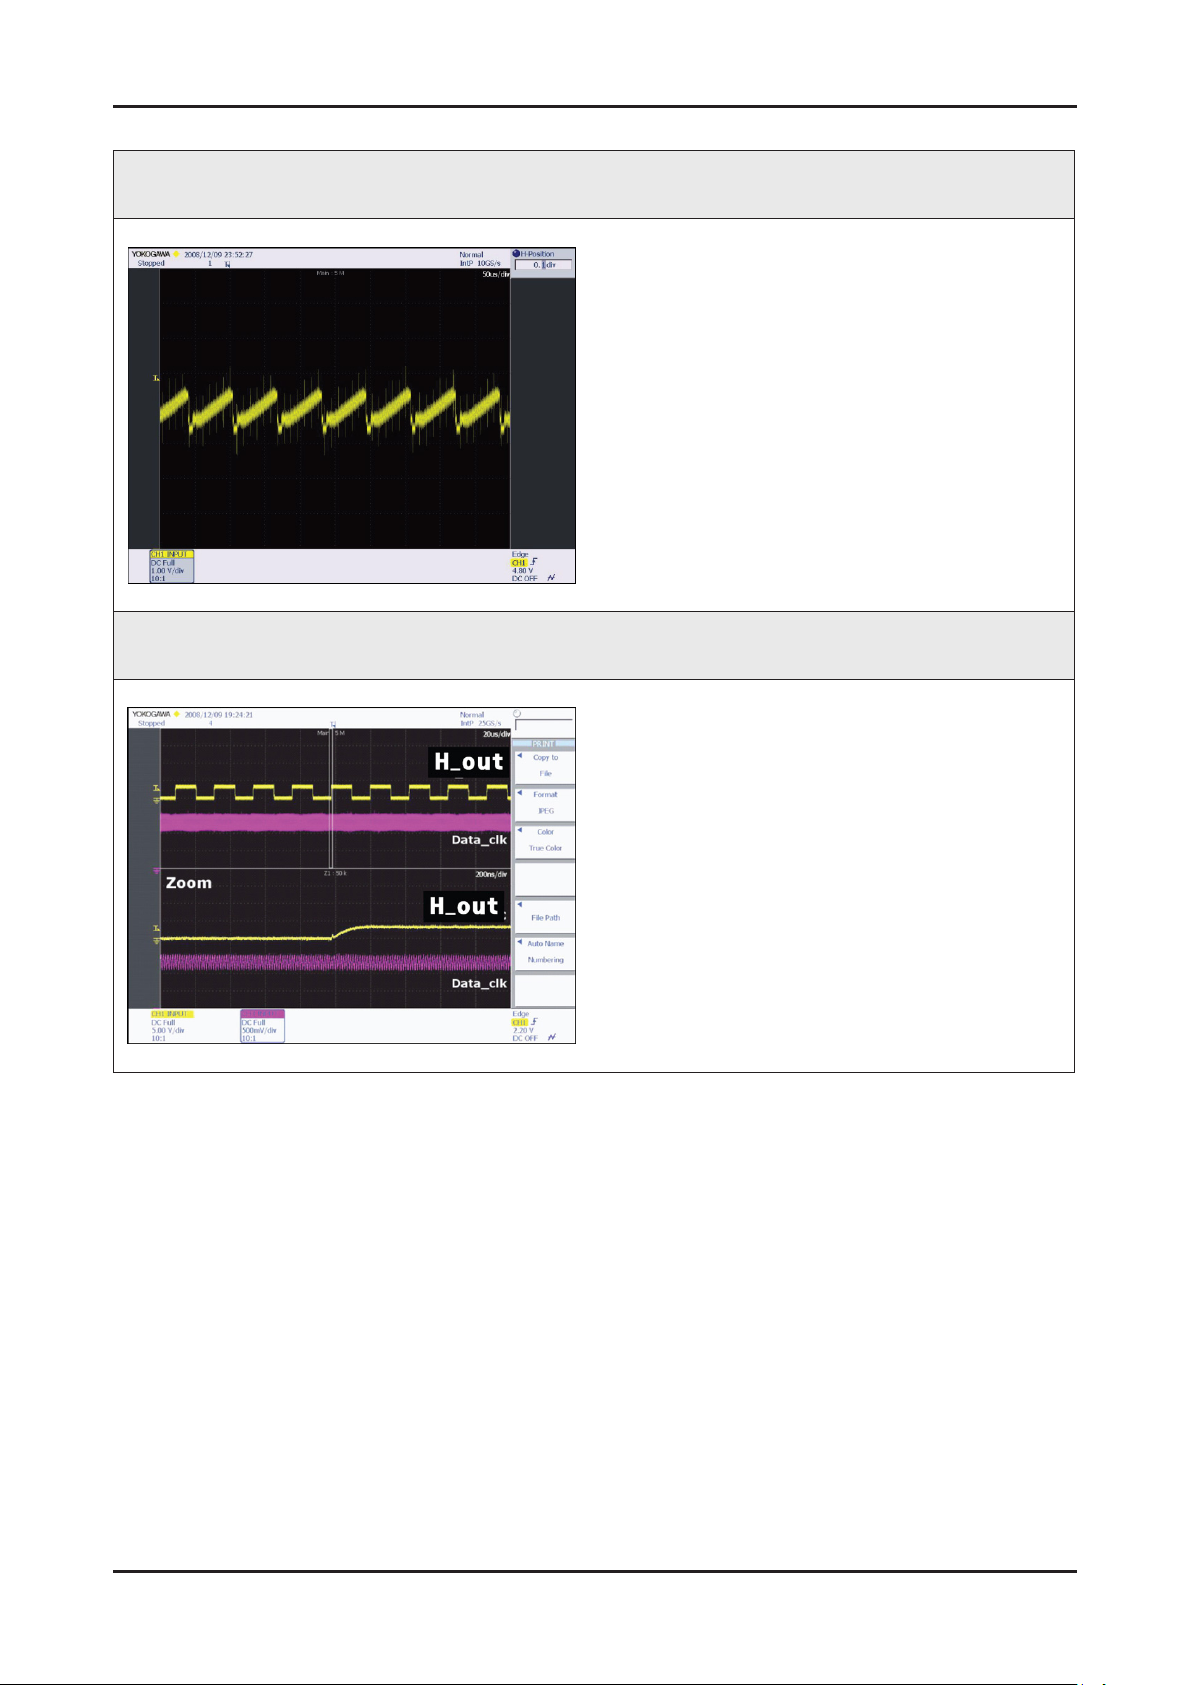
4-14
4. Troubleshooting
WAVEFORMS
1 CVBS OUT (Grey Bar)
2 LVDS output
Page 49
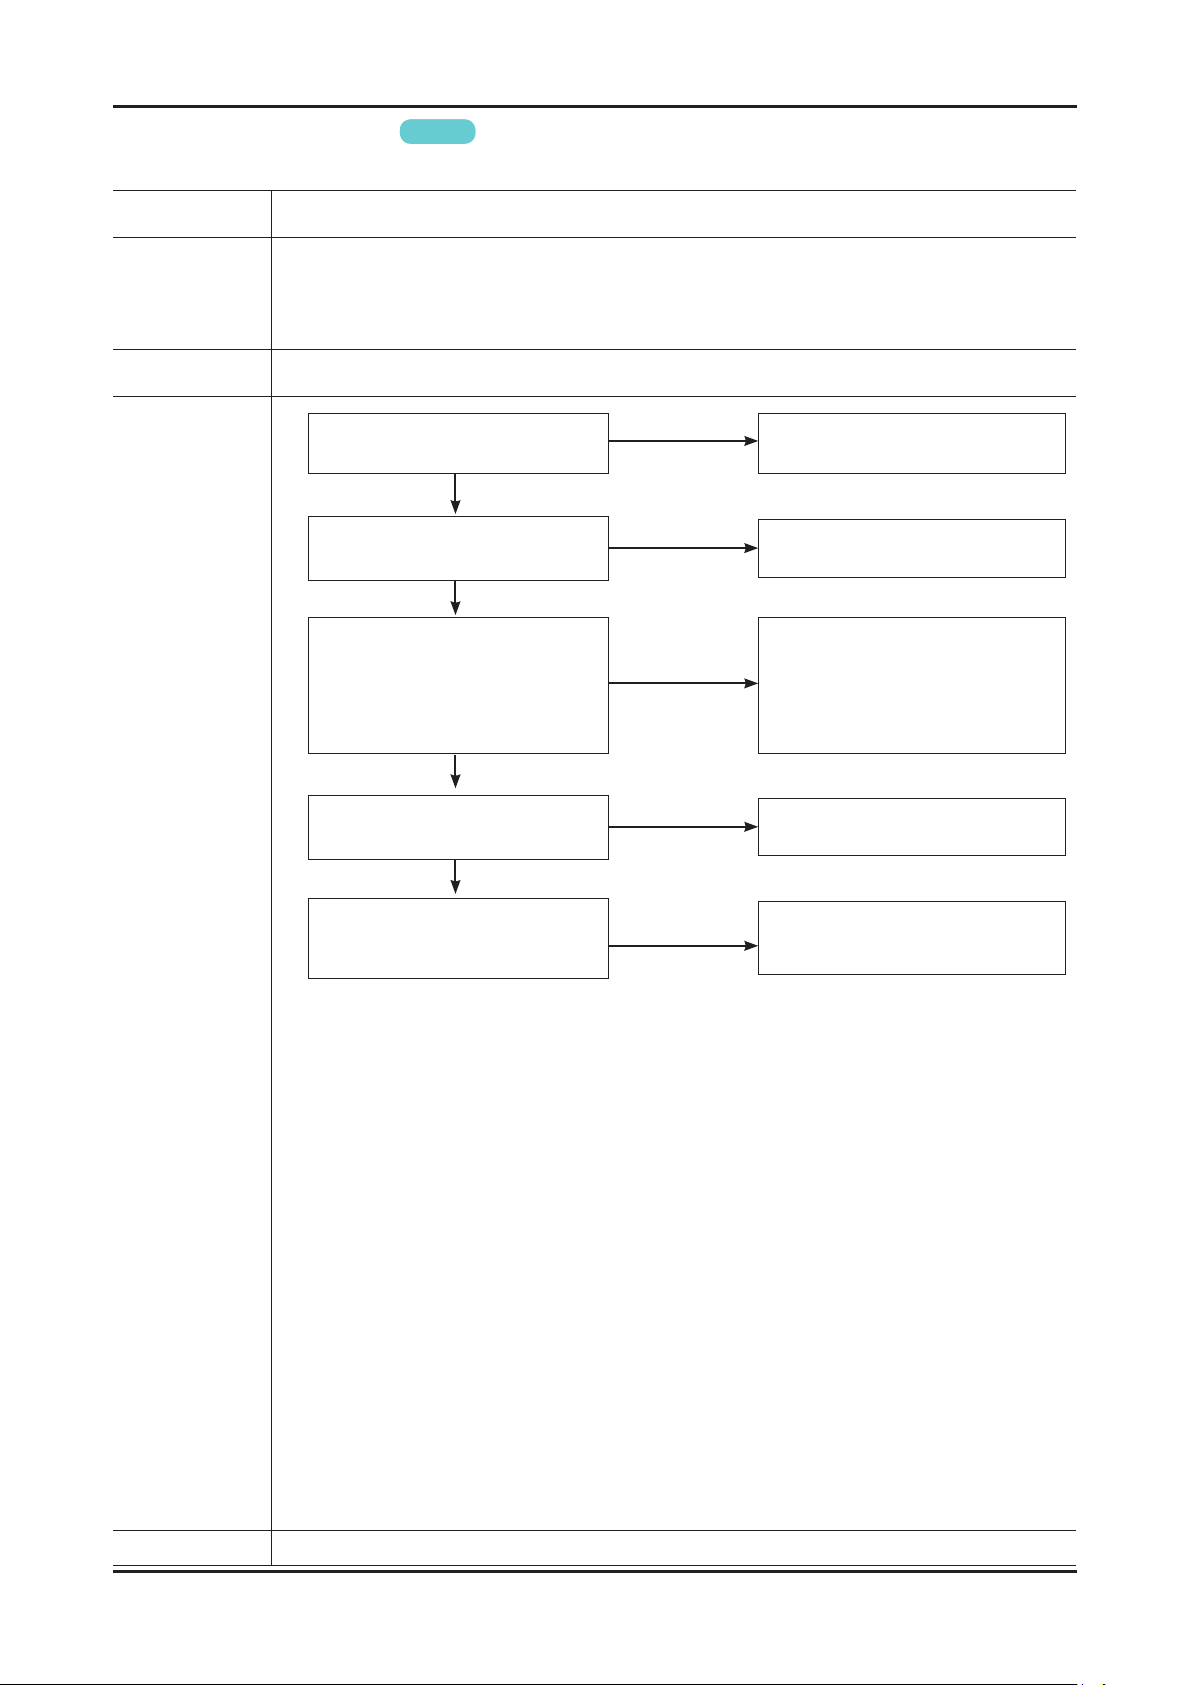
4-15
4. Troubleshooting
No Video (Tuner DTV)
N Refer to the next page to check the lacation such a CN201 or IC1001 SVC Manual mentioned.
Symptom Audio is normal but no picture is displayed on the screen. -
Check the DTV source. -
Major
checkpoints
Caution Make sure to disconnect the power before working on the PD board.
Check the Tuner, Check the Valencia. This may happen when the LVDS cable connecting the Main Board and the Panel is disconnected.
Lamp(Backlight) on, no video ?
check the connection of RF cable ?
1
Genoa-S
Power indicator LED is off.
Yes
Check the RF source and
Yes
Does the signal appear at
pin11, 12 of TU702_FN?
No
No
No
Check a set in the ‘Stand-by mode’.
Input the RF source properly.
Change the TU702_FN or
the main PCB assembly.
Diagnostics
2
Yes
Does the digital data appear at
pin 14~42 of CN1601?
Yes
Check the LVDS cable?
Replace the T-con / LCD panel?
No
No
Change the IC1001 or
the main PCB assembly.
Please, contact Tech support.
Caution Make sure to disconnect the power before working on the IP board.
Page 50
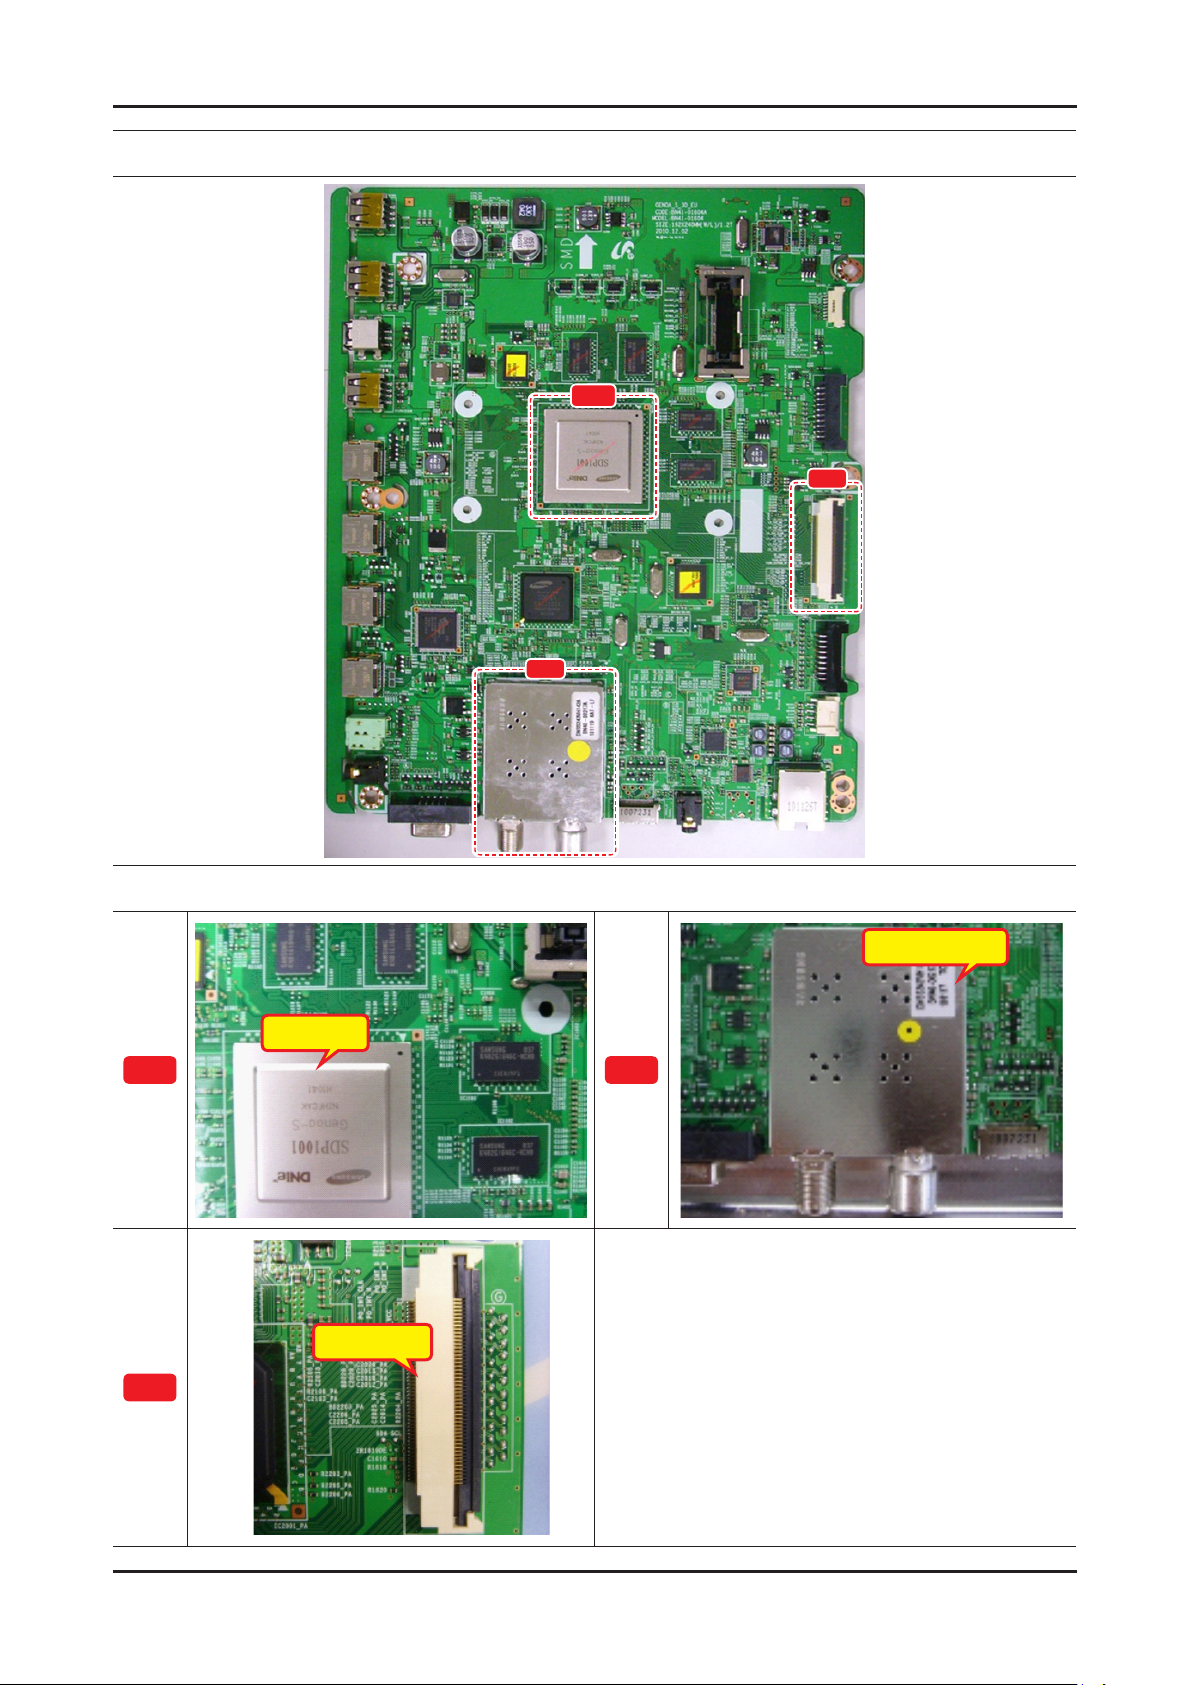
4-16
4. Troubleshooting
Location (Main)
A
C
A
B
Detail
TU702_FN
IC1001
B
C
CN1601
Page 51
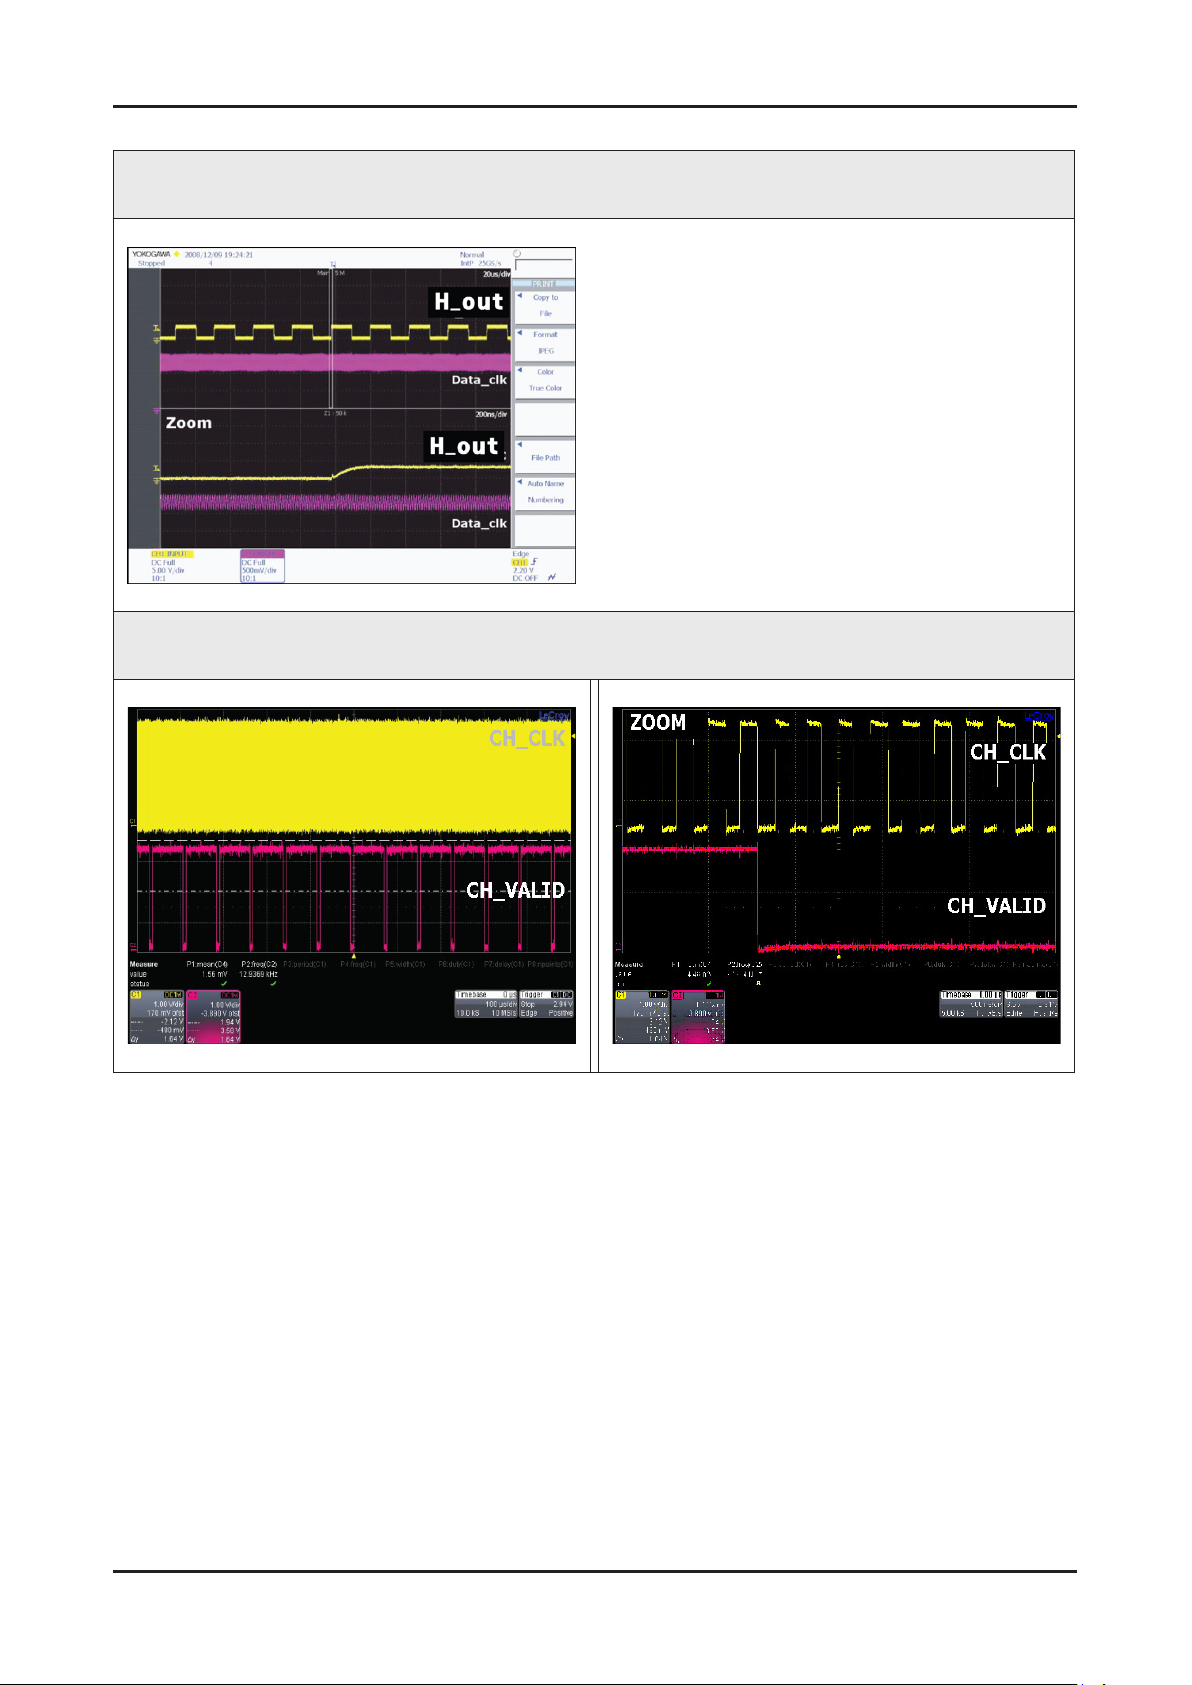
4-17
4. Troubleshooting
WAVEFORMS
1 LVDS output
2 CH_CLK, CH_VALID
Page 52
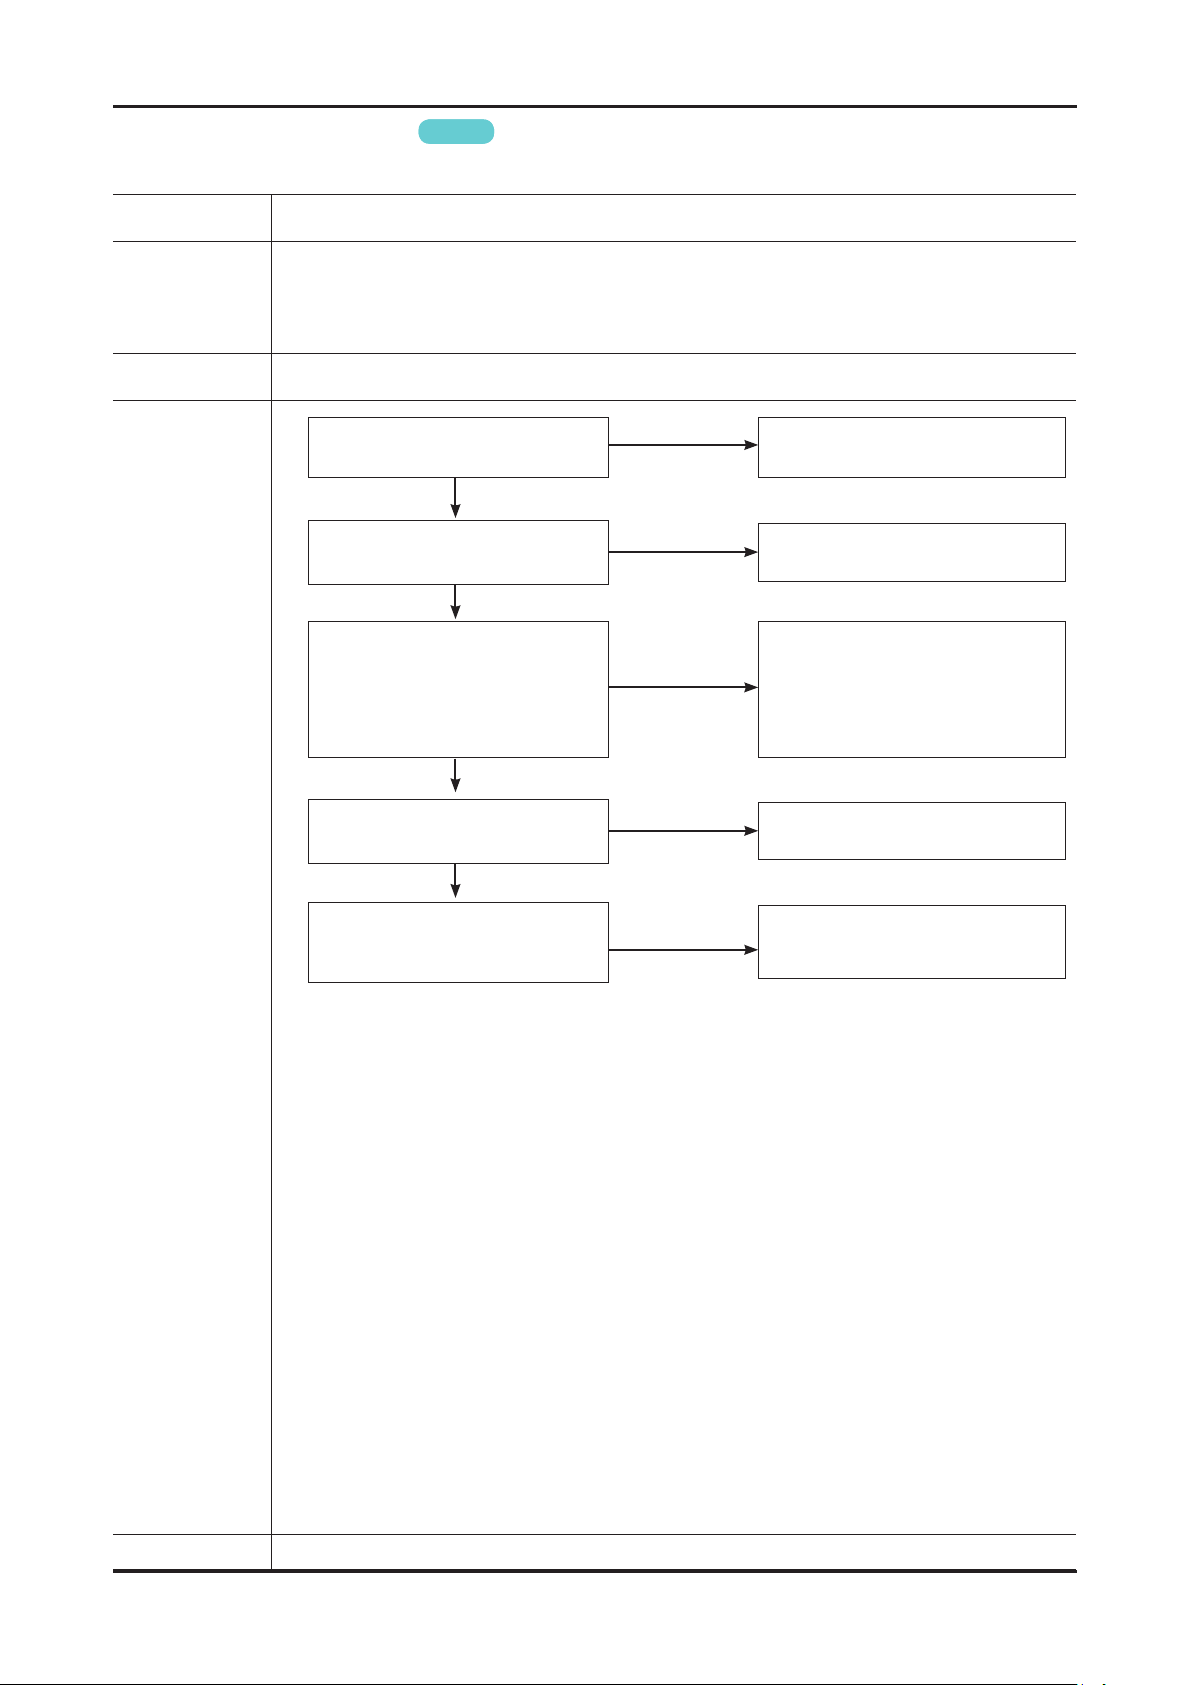
4-18
4. Troubleshooting
No Video (Video CVBS)
N Refer to the next page to check the lacation such a CN201 or IC1001 SVC Manual mentioned.
Symptom Audio is normal but no picture is displayed on the screen. -
Check the Video CVBS source. -
Major
checkpoints
Caution Make sure to disconnect the power before working on the PD board.
Check the Valencia. -
This may happen when the LVDS cable connecting the Main Board and the Panel is disconnected.
Power indicator LED is off.
Lamp(Backlight) on, no video ?
Check the video source and
check the connection of video cable?
1
Does the signal appear at R505?
Genoa-S
Yes
Yes
No
No
No
Check a set in the ‘Stand-by mode’.
Input the video source properly
Change the CN503_UBA or
the main PCB assy.
Diagnostics
2
Yes
Does the digital data appear at
pin 14~42 of CN1601?
Yes
Check the LVDS cable?
Check the T-con board?
Replace the LCD panel?
No
No
Change the IC1001 or
the main PCB assembly.
Please, contact Tech support.
Caution Make sure to disconnect the power before working on the IP board.
Page 53
4-19
4. Troubleshooting
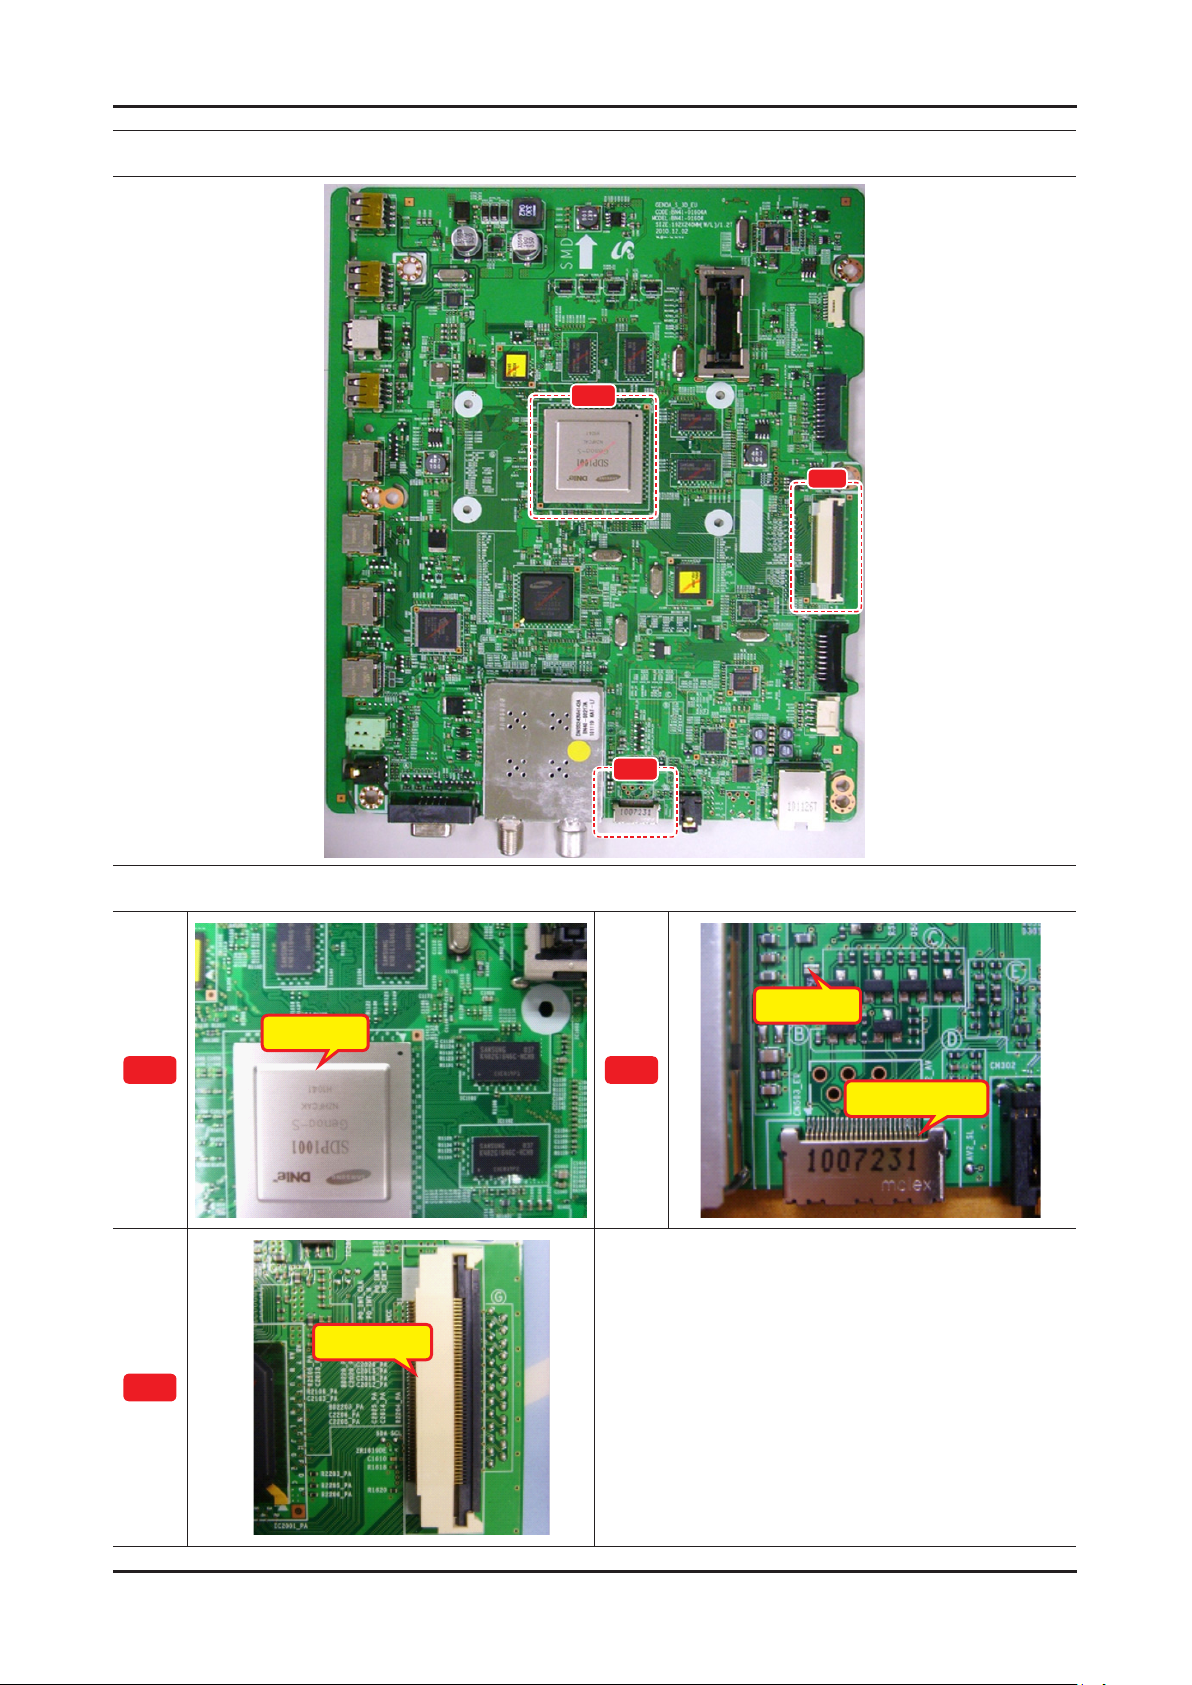
Location (Main)
A
C
A
B
Detail
R505
IC1001
B
CN503_EU
CN1601
C
Page 54
4-20
4. Troubleshooting
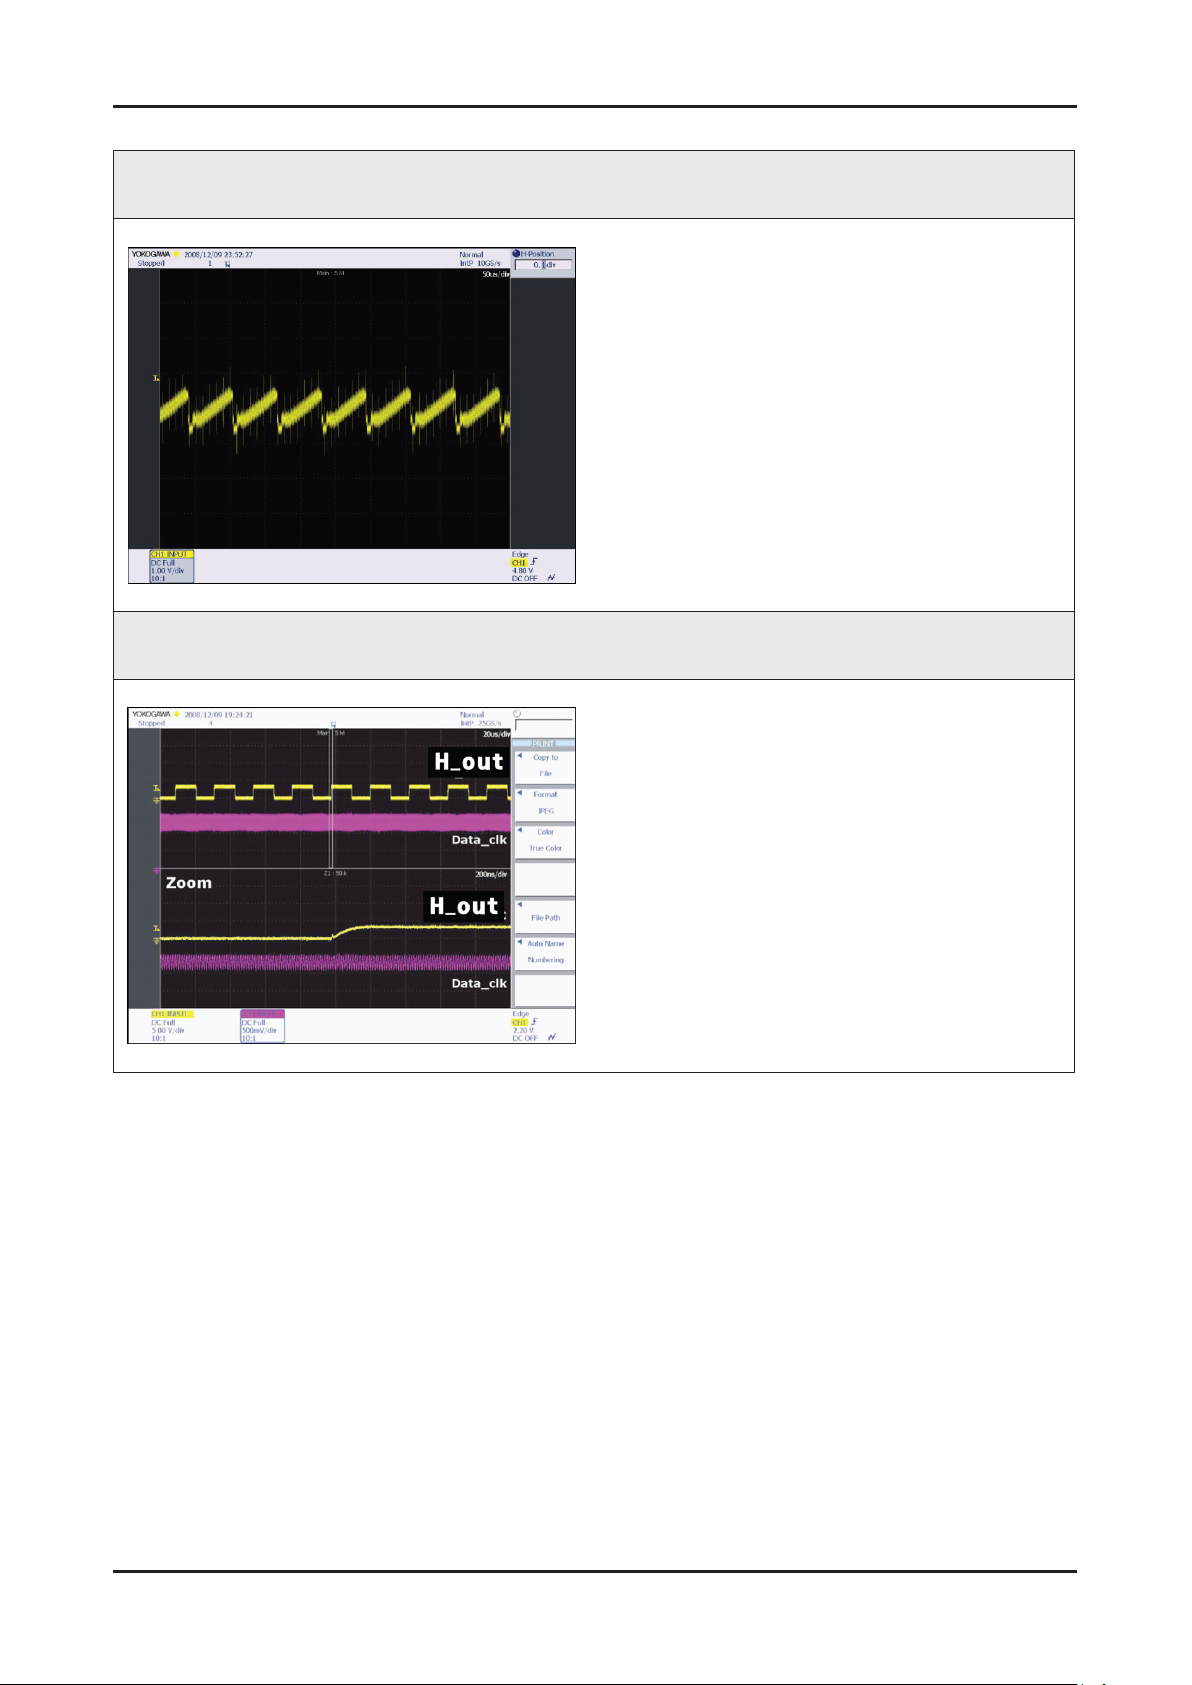
WAVEFORMS
1 CVBS OUT (Grey Bar)
2 LVDS output
Page 55
4-21
4. Troubleshooting
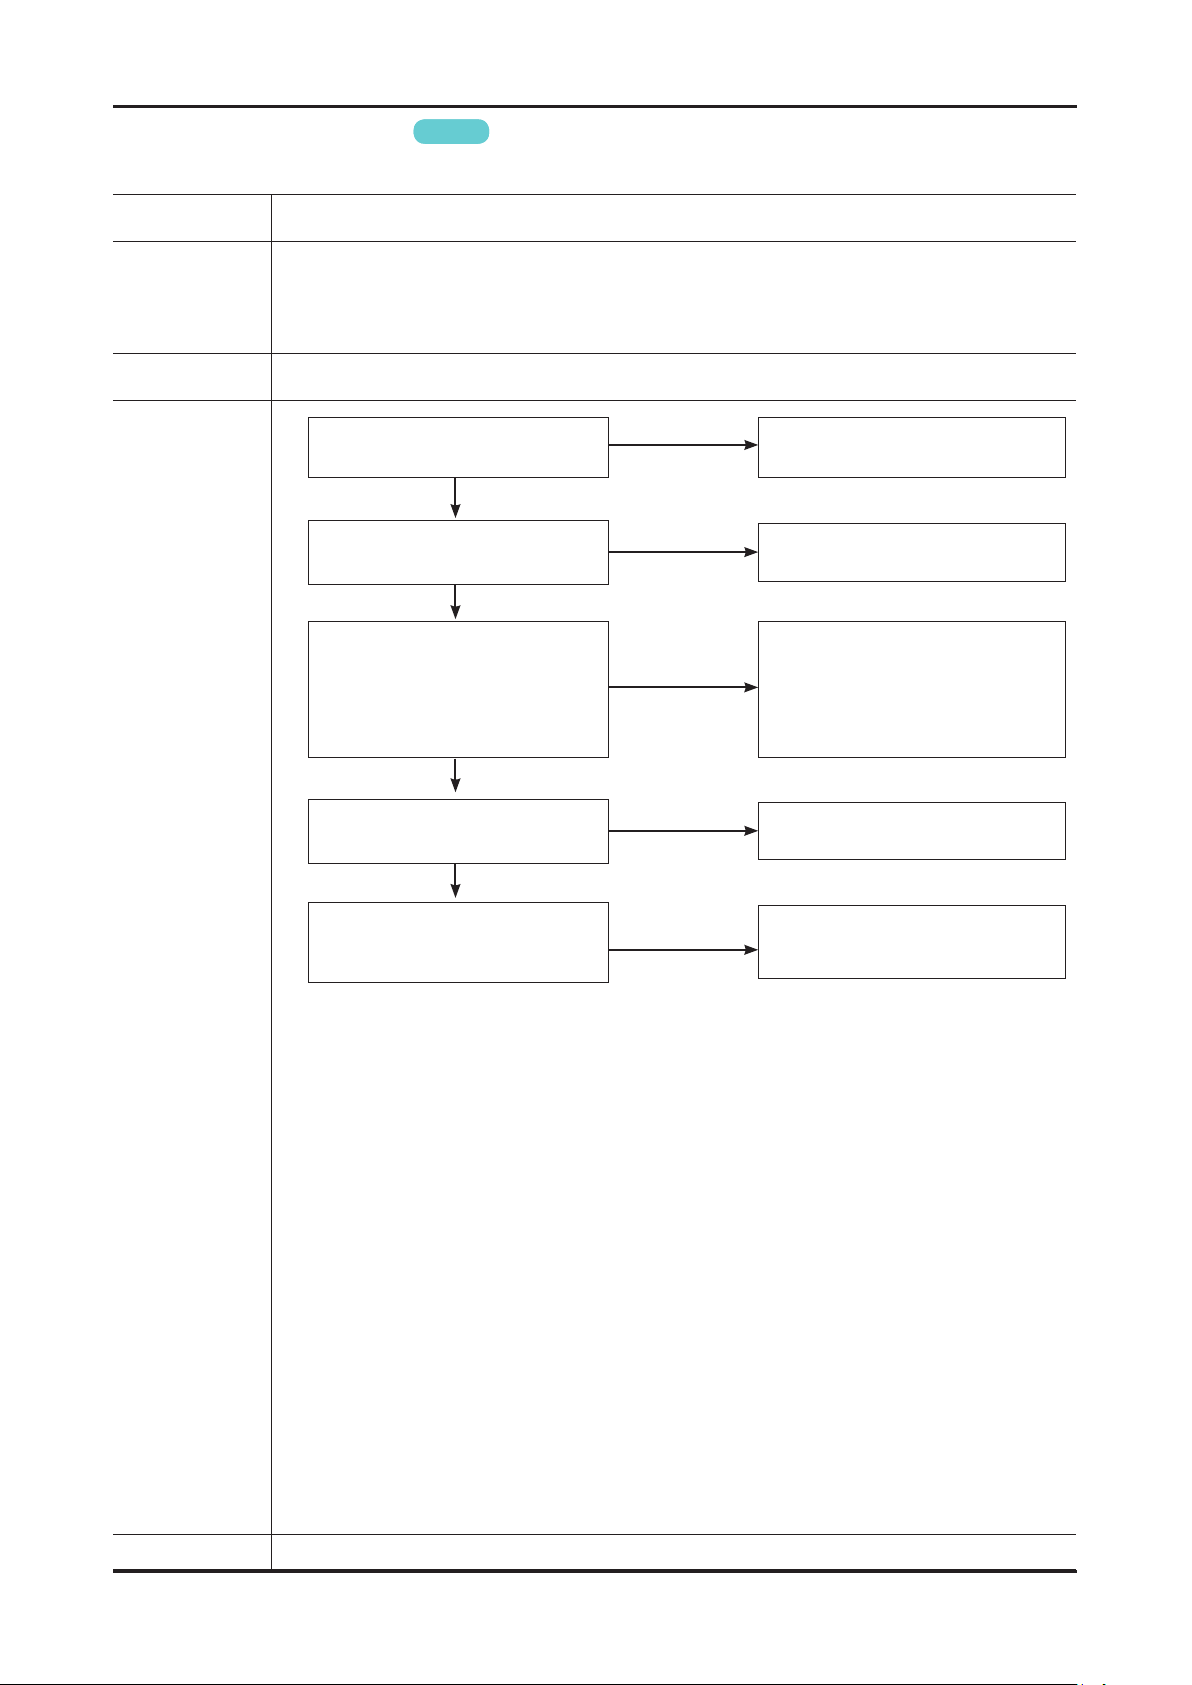
No Video (Component)
N Refer to the next page to check the location such a CN201 or IC201 SVC Manual mentioned.
Symptom Audio is normal but no picture is displayed on the screen. -
Check the Component source -
Major
checkpoints
Caution Make sure to disconnect the power before working on the PD board.
Check the Valencia. -
This may happen when the LVDS cable connecting the Main Board and the Panel is disconnected.
Power indicator LED is off.
Lamp(Backlight) on, no video ?
Check the component source and
check the connection of component
1
COMP1_Y / COMP1_PB / COMP1_PR
Genoa-S
Yes
cables(Y,Pb,Pr) ?
Yes
Does the signal appear at
the below test-points?
No
No
No
Check a set in the ‘Stand-by mode’.
Input the component source properly.
Change the CN501 or
the main PCB assy.
Diagnostics
2
Yes
Does the digital data appear at
pin 14~42 of CN1601?
Yes
Check the LVDS cable?
Replace the T-con / LCD panel?
No
No
Change the IC1001 or
the main PCB assembly.
Please, contact Tech support.
Caution Make sure to disconnect the power before working on the IP board.
Page 56
4-22
4. Troubleshooting
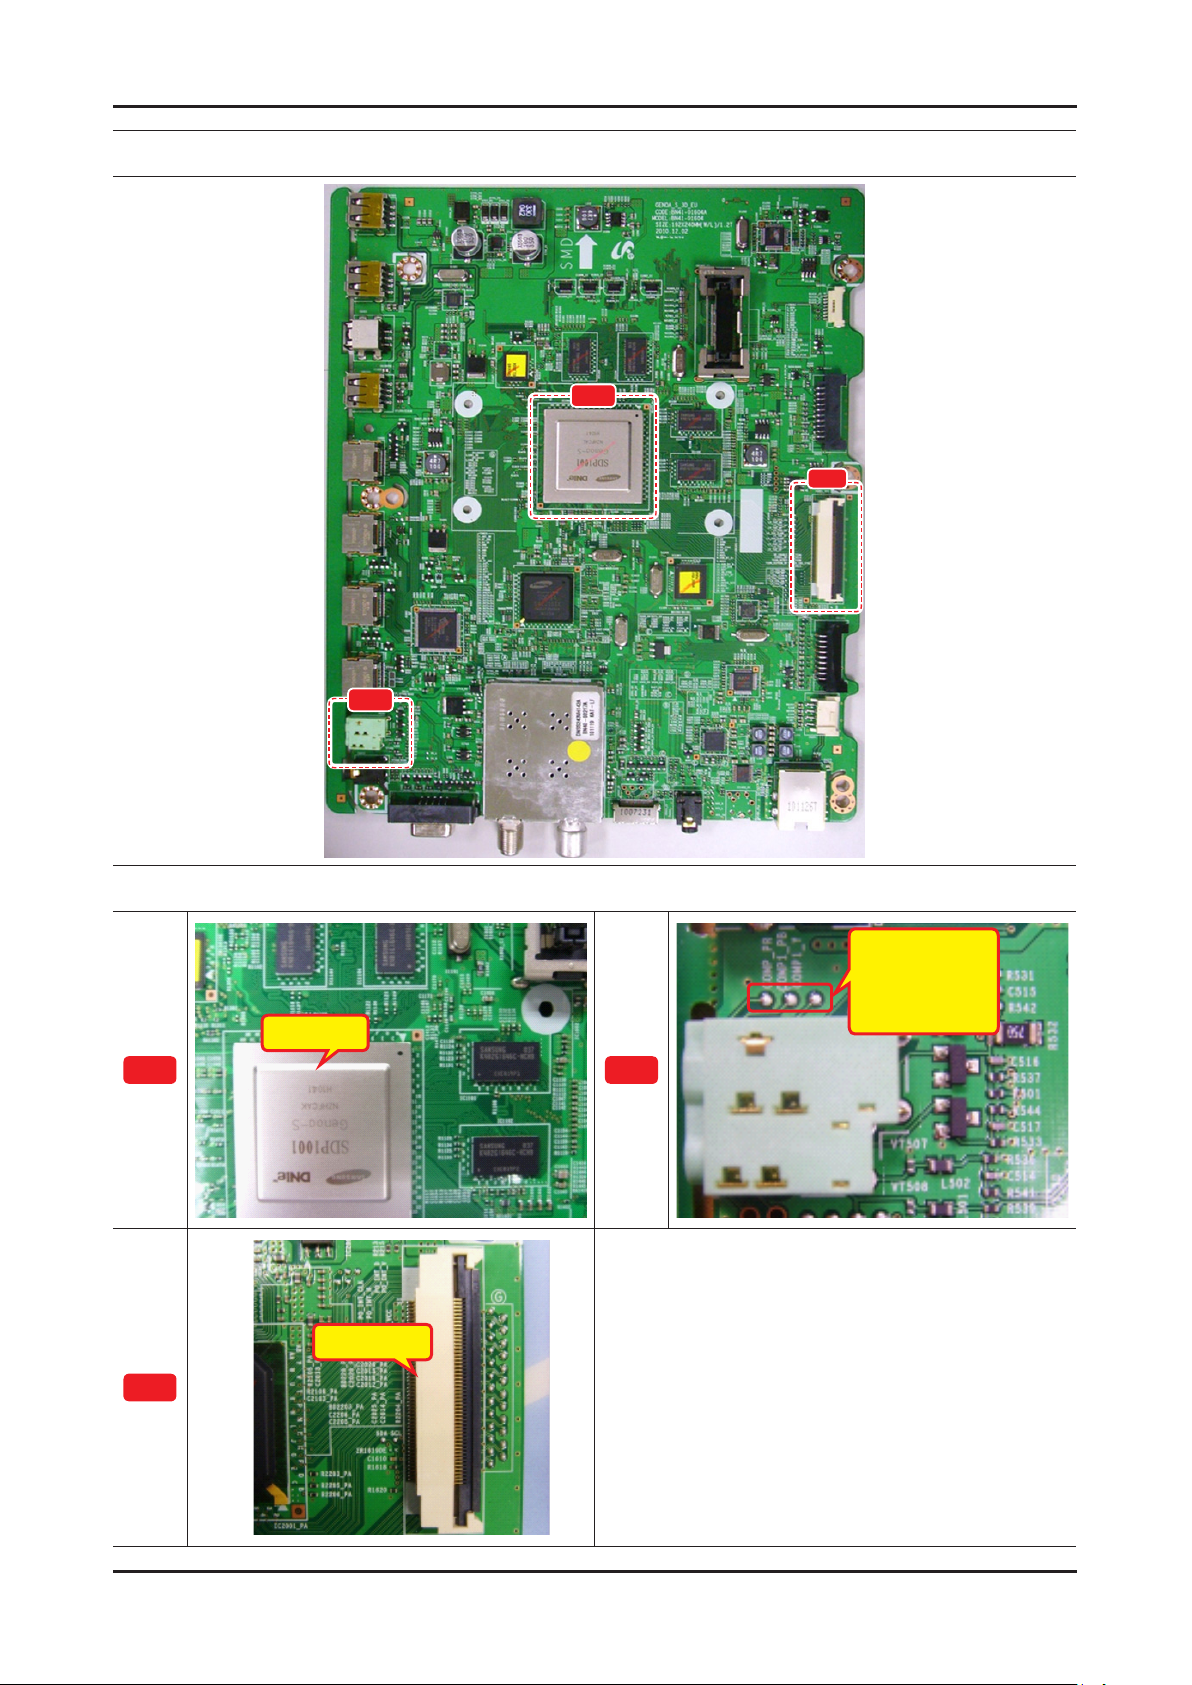
Location (Main)
A
C
A
B
Detail
COMP1_PR
COMP1_PB
COMP1_Y
IC1001
B
C
CN1601
Page 57
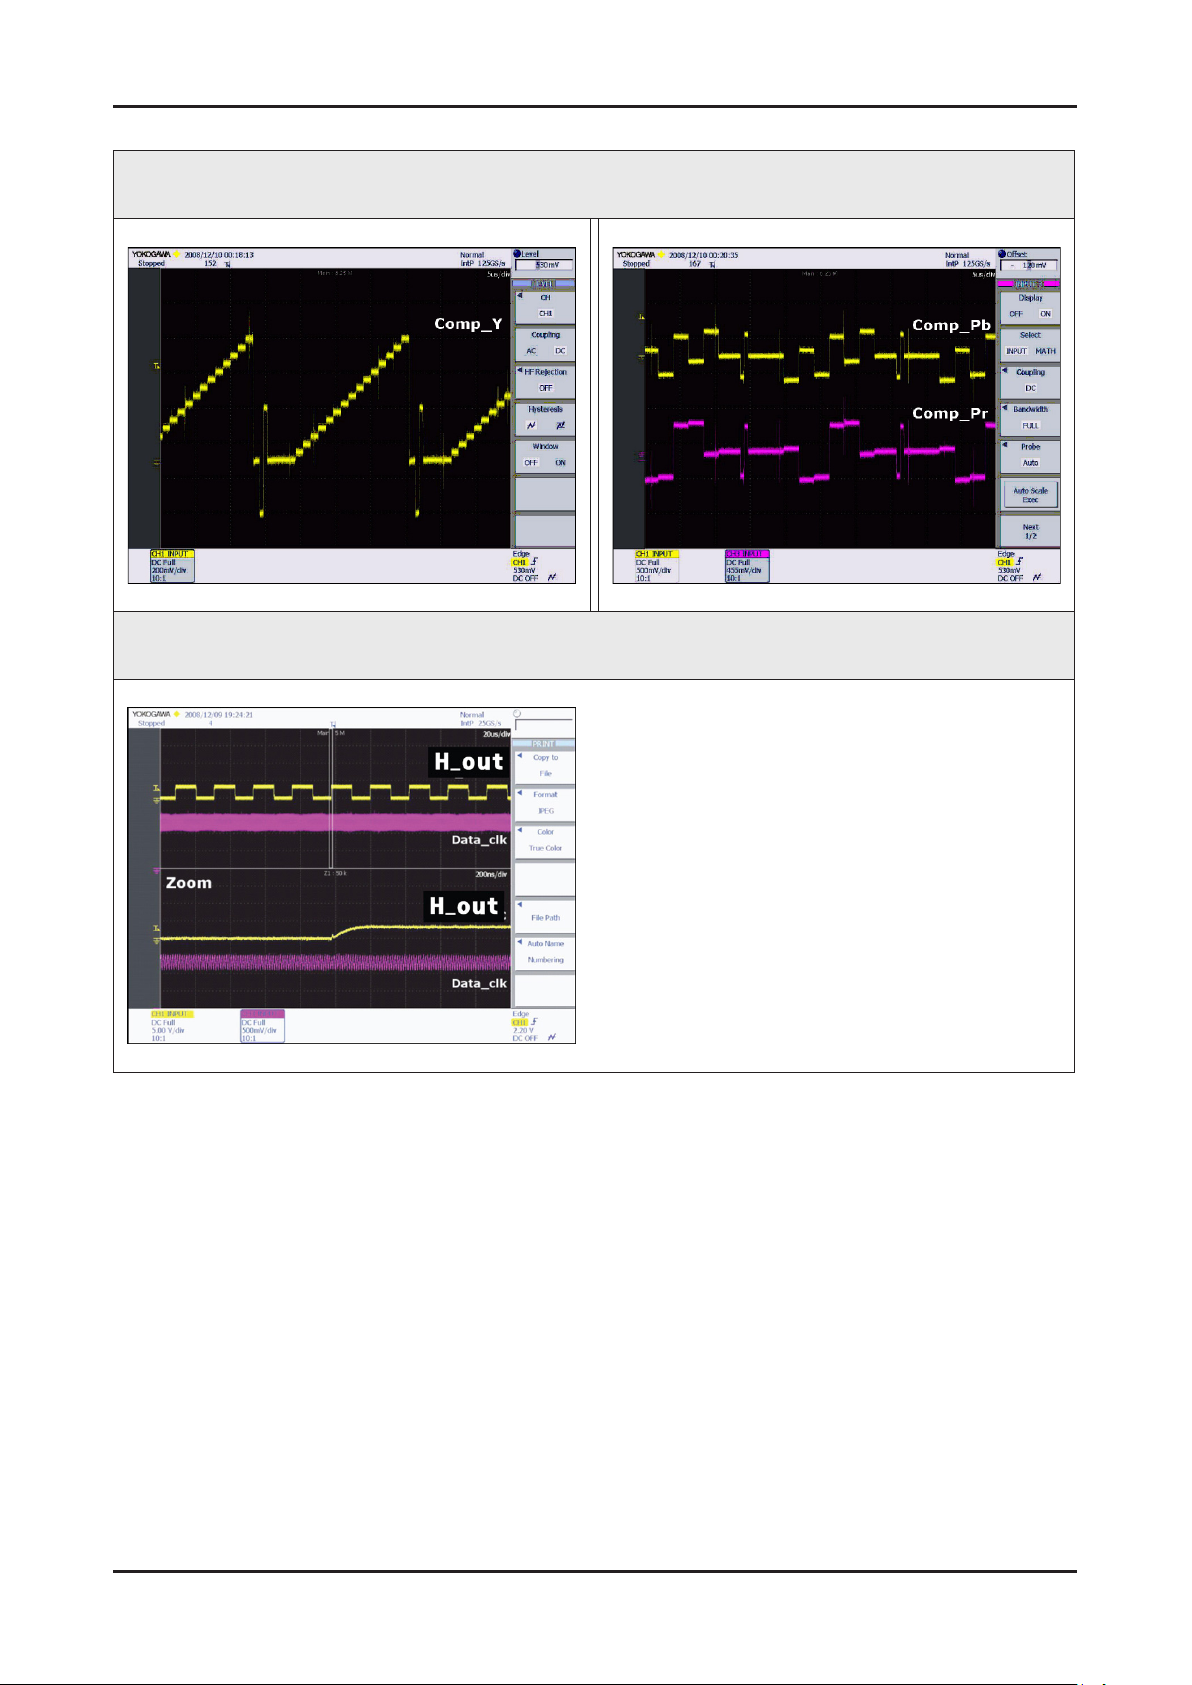
4-23
4. Troubleshooting
WAVEFORMS
1 Compnent_Y (Gray scale) / Pb / Pr (Color bar)
2 LVDS output
Page 58
4-24
4. Troubleshooting
No
No
No
Genoa-S
Input the sound source properly.
Check CN501, CN503_EU, CN402.
Change the Main Assy.
Check IC303, IC1001.
Change the Main Assy.
No Sound (1.Speaker 2.Monitor_out, 3.Optical)
N Refer to the next page to check the location such a CN201 or IC201 SVC Manual mentioned.
Symptom Video is normal but there is no sound. -
Major
checkpoints
Caution Make sure to disconnect the power before working on the PD board.
When the speaker connectors are disconnected or damaged. When the sound processing part of the Main Board is not functioning. Speaker defect. -
Check the source and check the
connection of sound cable
(Comp/PC/DVI to HDMI) ?
Yes
Check the signal at input of Main board?
COMP1 R : COM_S_R / L : COM_S_L
AV, R: SC1_AV2_SR_IN/ L: SC1_
AV2_SL_IN PC, DVI R : PC_S_R / L :
PC_S_L
Yes
Check the I2C DATA between the Audio
1
Pin #28 of IC303 : MCLK
Pin #32 of IC303 : Data
IC’s ?
Yes
Diagnostics
1. Check the Speaker sound data at
the pin of CN301?
#1 : R+ / #2 : R- / #3 : L+ / #4 : L-
2.
Check the Headphone/Monitor out
2
sound data at ?
tp HP_R
tp HP_L
3. Does the SPDIF OUT sound data
Yes
Replace speaker ?
No
No
Check IC303, IC1001.
Change the Main Assy.
Please, Contact Tech support.
Caution Make sure to disconnect the power before working on the IP board.
Page 59
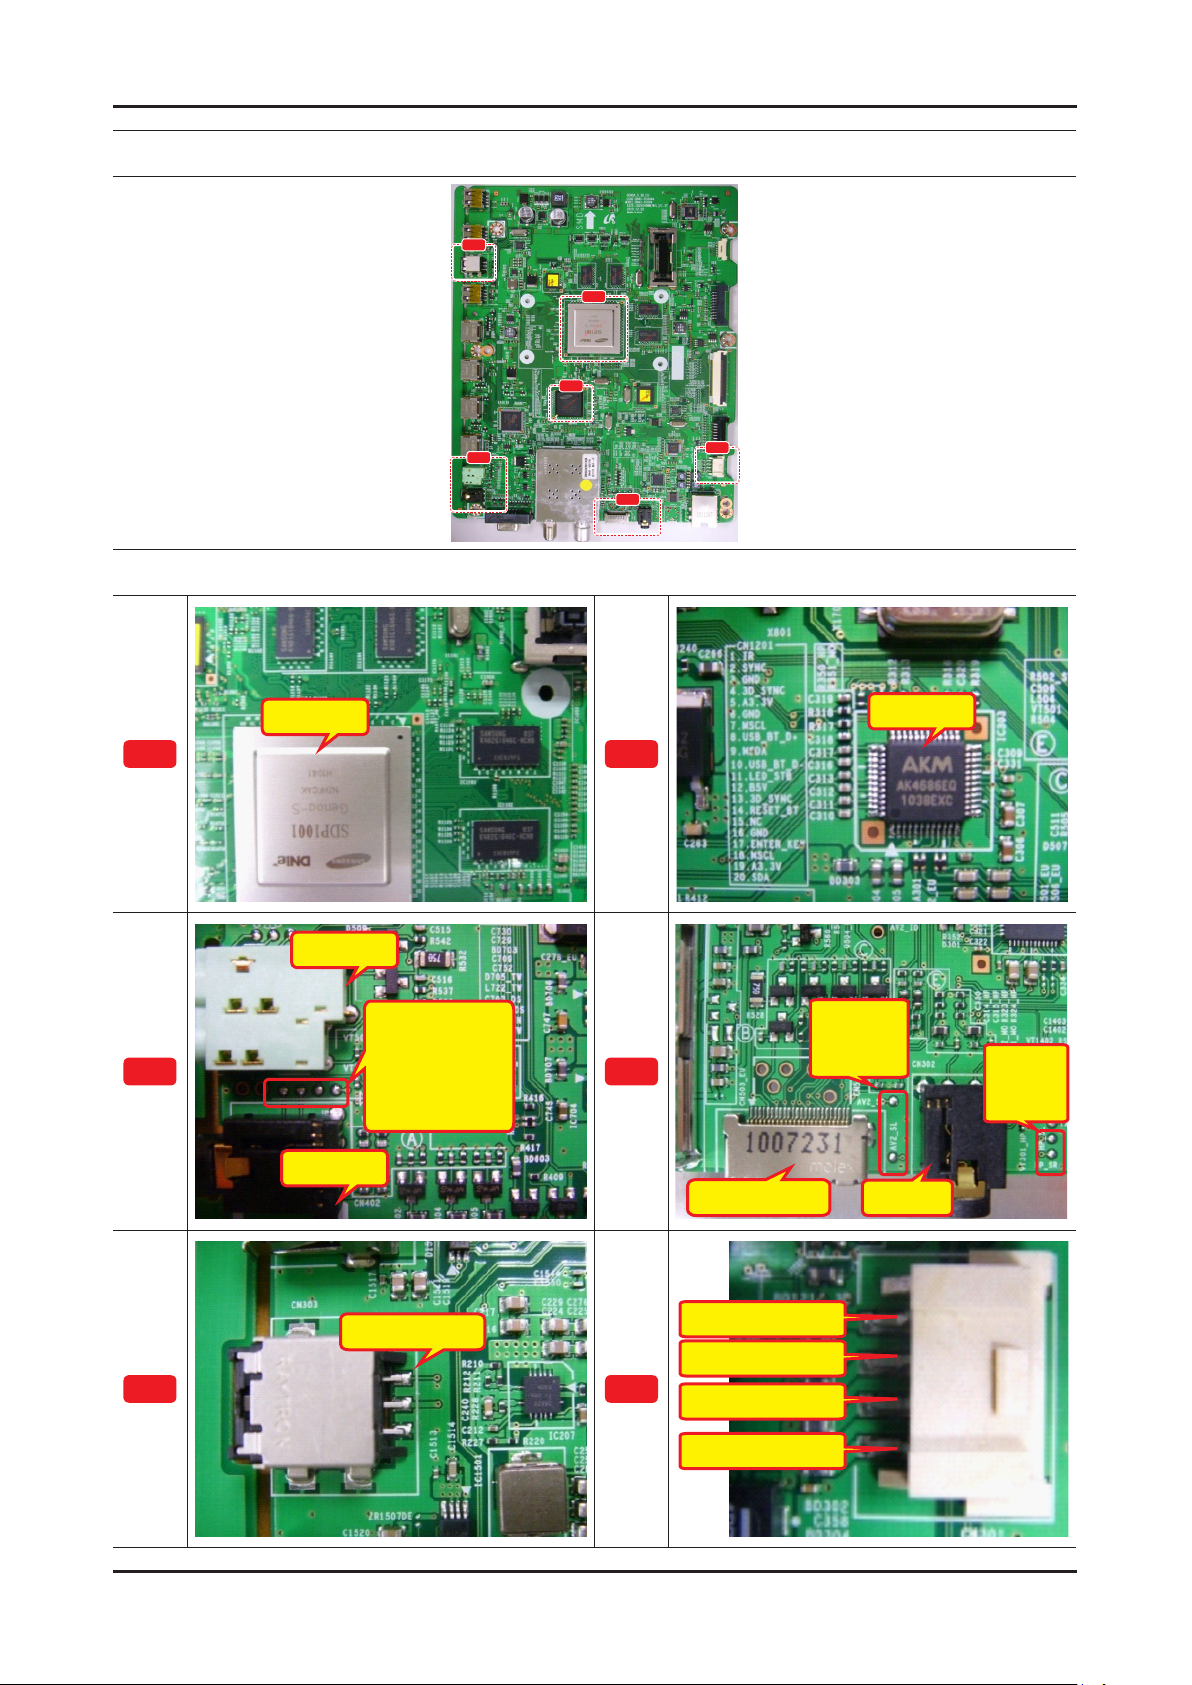
4-25
4. Troubleshooting
Location (Main)
E
A
B
A
IC1001
CN501
C
D
Detail
F
IC303
B
C
E
CN402
PC_SL
PC_SR
COMP1_SL
COMP1_SR
#1.CN302
D
F
AV2_SR
AV2_SL
HP_SL
HP_SR
CN302CN503_EU
#4.CN301 : L-
#3.CN301 : L+
#2.CN301 : R-
#1.CN301 : R+
Page 60
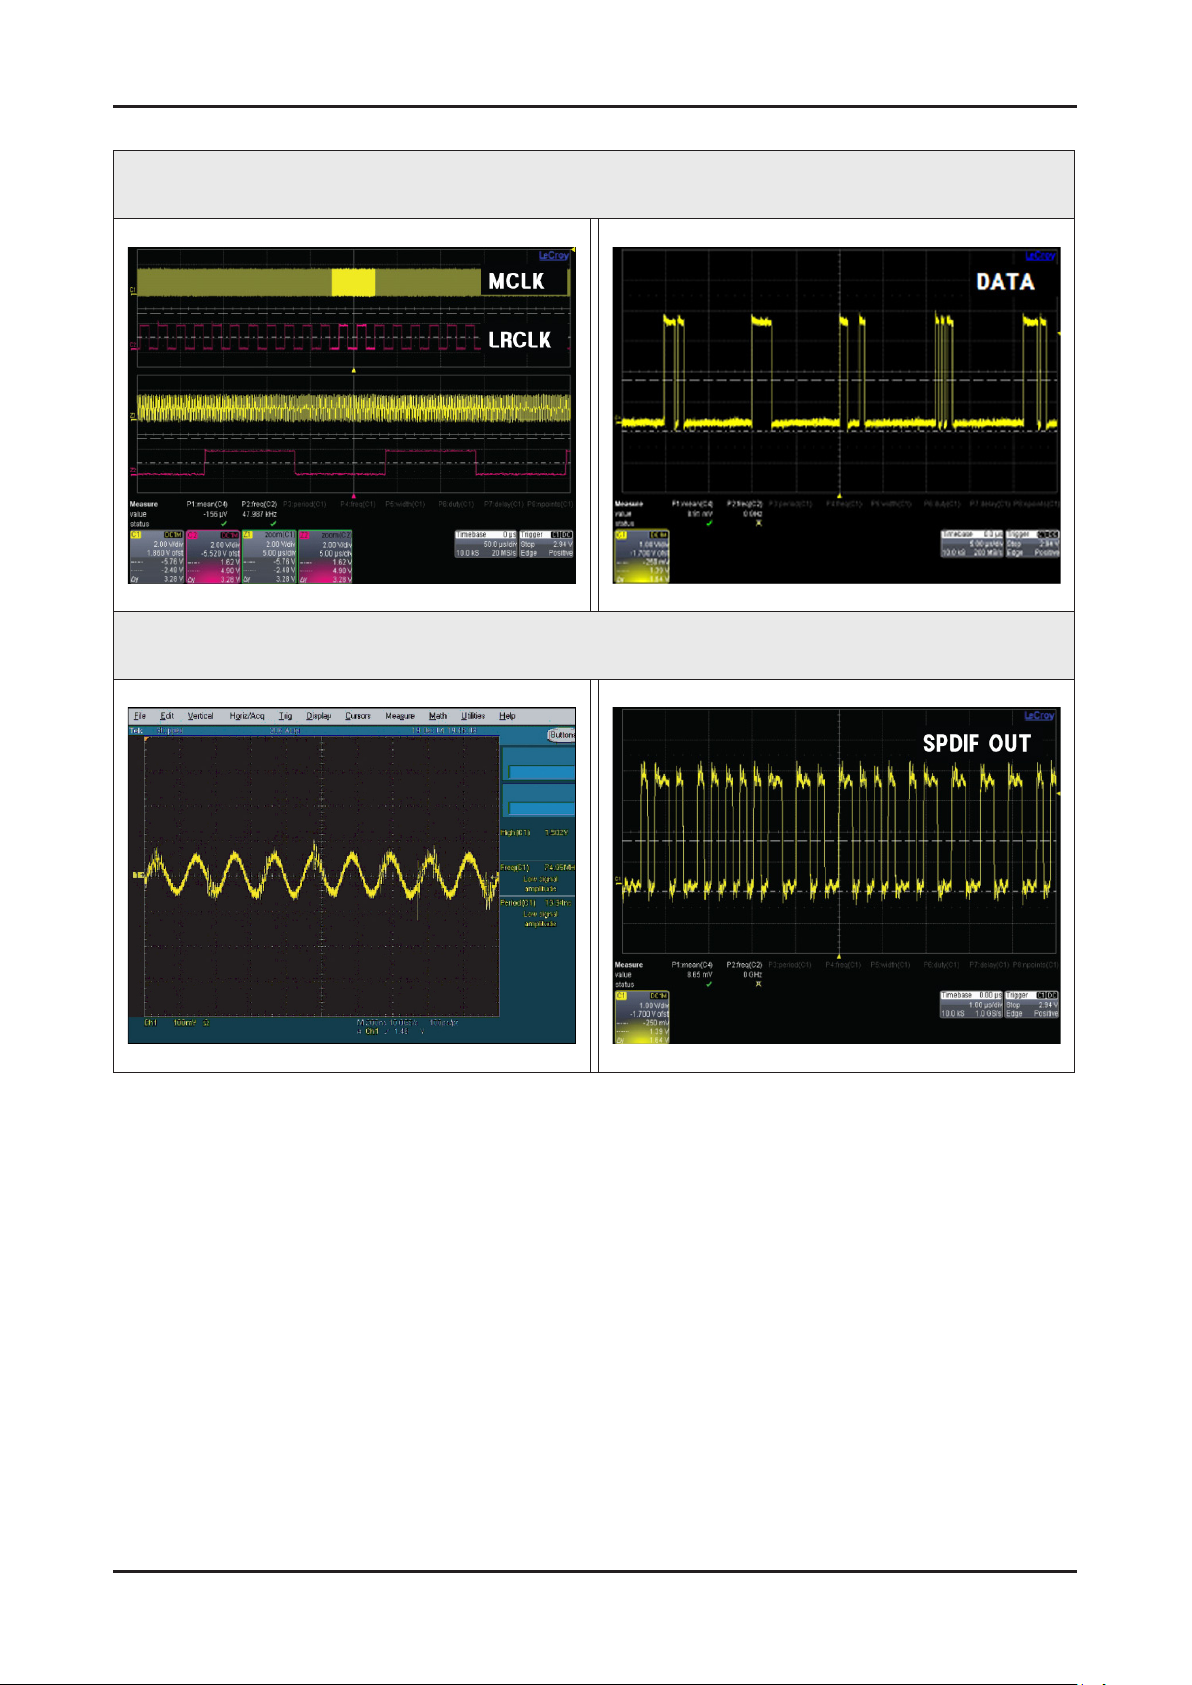
4-26
4. Troubleshooting
WAVEFORMS
1 MCLK / LRCLK / PCM_I2C_DATA
2 Speaker / Monitor OUT , SPDIF OUT
Page 61

4-27
4. Troubleshooting
4-2. Alignments and Adjustments
4-2-1. General Alignment instruction
Usually, a color LED-TV needs only slight touch-up adjustment upon installation. 1.
Check the basic characteristics such as height, horizontal and vertical sync.
Use the specied test equipment or its equivalent.2.
Correct impedance matching is essential.3.
Avoid overload. Excessive signal from a sweep generator might overload the front-end of the TV. 4.
When inserting signal markers, do not allow the marker generator to distort test result.
Connect the TV only to an AC power source with voltage and frequency as specied on the backcover nameplate.5.
Do not attempt to connect or disconnect any wire while the TV is turned on. 6.
Make sure that the power cord is disconnected before replacing any parts.
To protect against shock hazard, use an isolation transformer.7.
Page 62
4-28
4. Troubleshooting
4-3. Factory Mode Adjustments
4-3-1. Entering Factory Mode
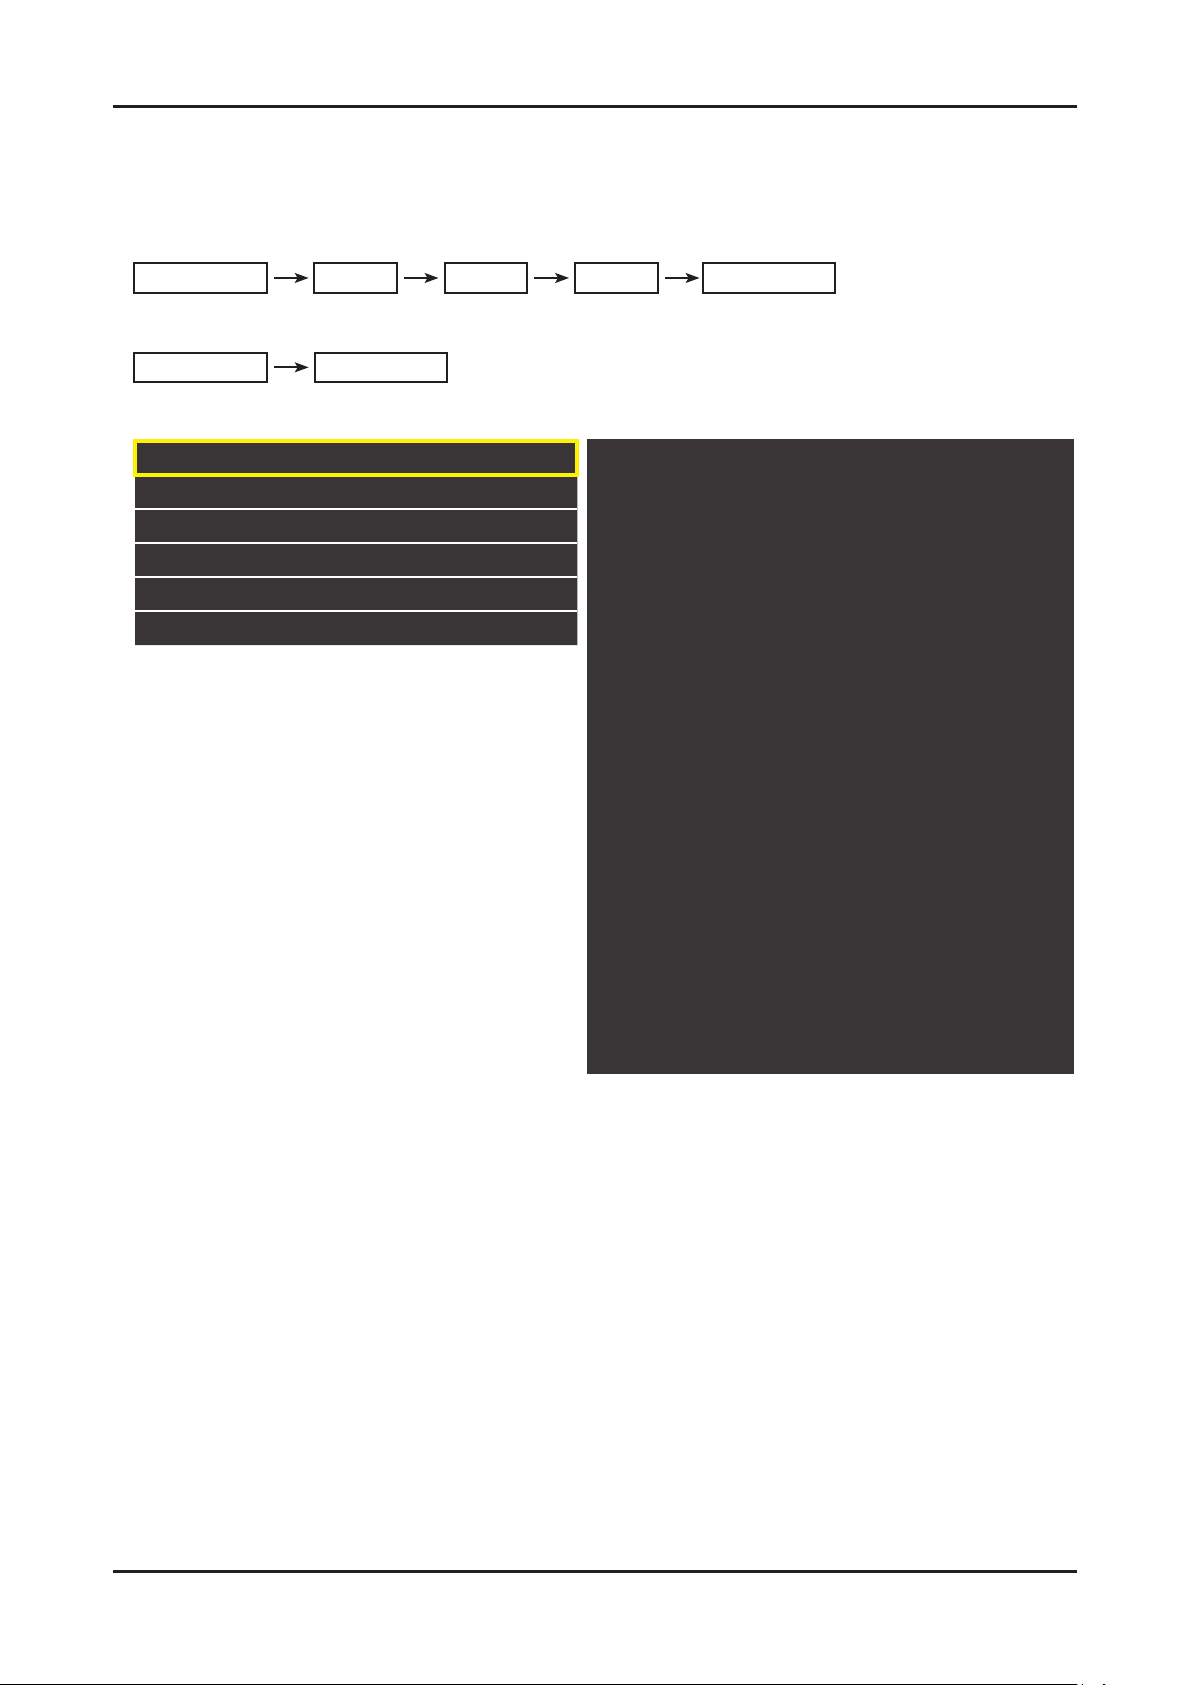
To enter ‘Service Mode’ Press the remote -control keys in this sequence :
If you do not have Factory remote - control ●
If you have Factory remote-control ●
INFO Factory
INFO MENU MUTEPower OFF Power ON
Some items are not available without a factory remote
Option
Contro
SVC
Expert
ADC/WB
Advanced
T-GAS6DEUC-xxxx
T-GENDEUS1-xxxx
E-Manual : GSDVBEUA-xxxx
EDID SUCCESS
CALIB : AV / COMP / PC / HMDI /
Option : xxxx xxxx xxx
T-GASDEU-0001
DTP-SDAL-GENS-xxxx
RFS : "Genoa.S 00xx"
2010-xx-xx
Onboot:00xx
GASFRC3D:00xx
CPLD:xxxx
Bluetooth:xxxx
Type : xxxxxxxx
Model : UExxDxxxx
Wired MAC SUCCESS
Wireless MAC SUCCESS
CIP FAIL LOCK x
DRM :Cert O Netix O Widevine O
Factory Data Ver : xxx
DTP-AP-COMP-xxx
DTP-BP-HAL-xxxx
DTP-BP-xxxx
Date of purchase : mm/dd/yyyy
Page 63
4-29
4. Troubleshooting
4-4. Factory Data
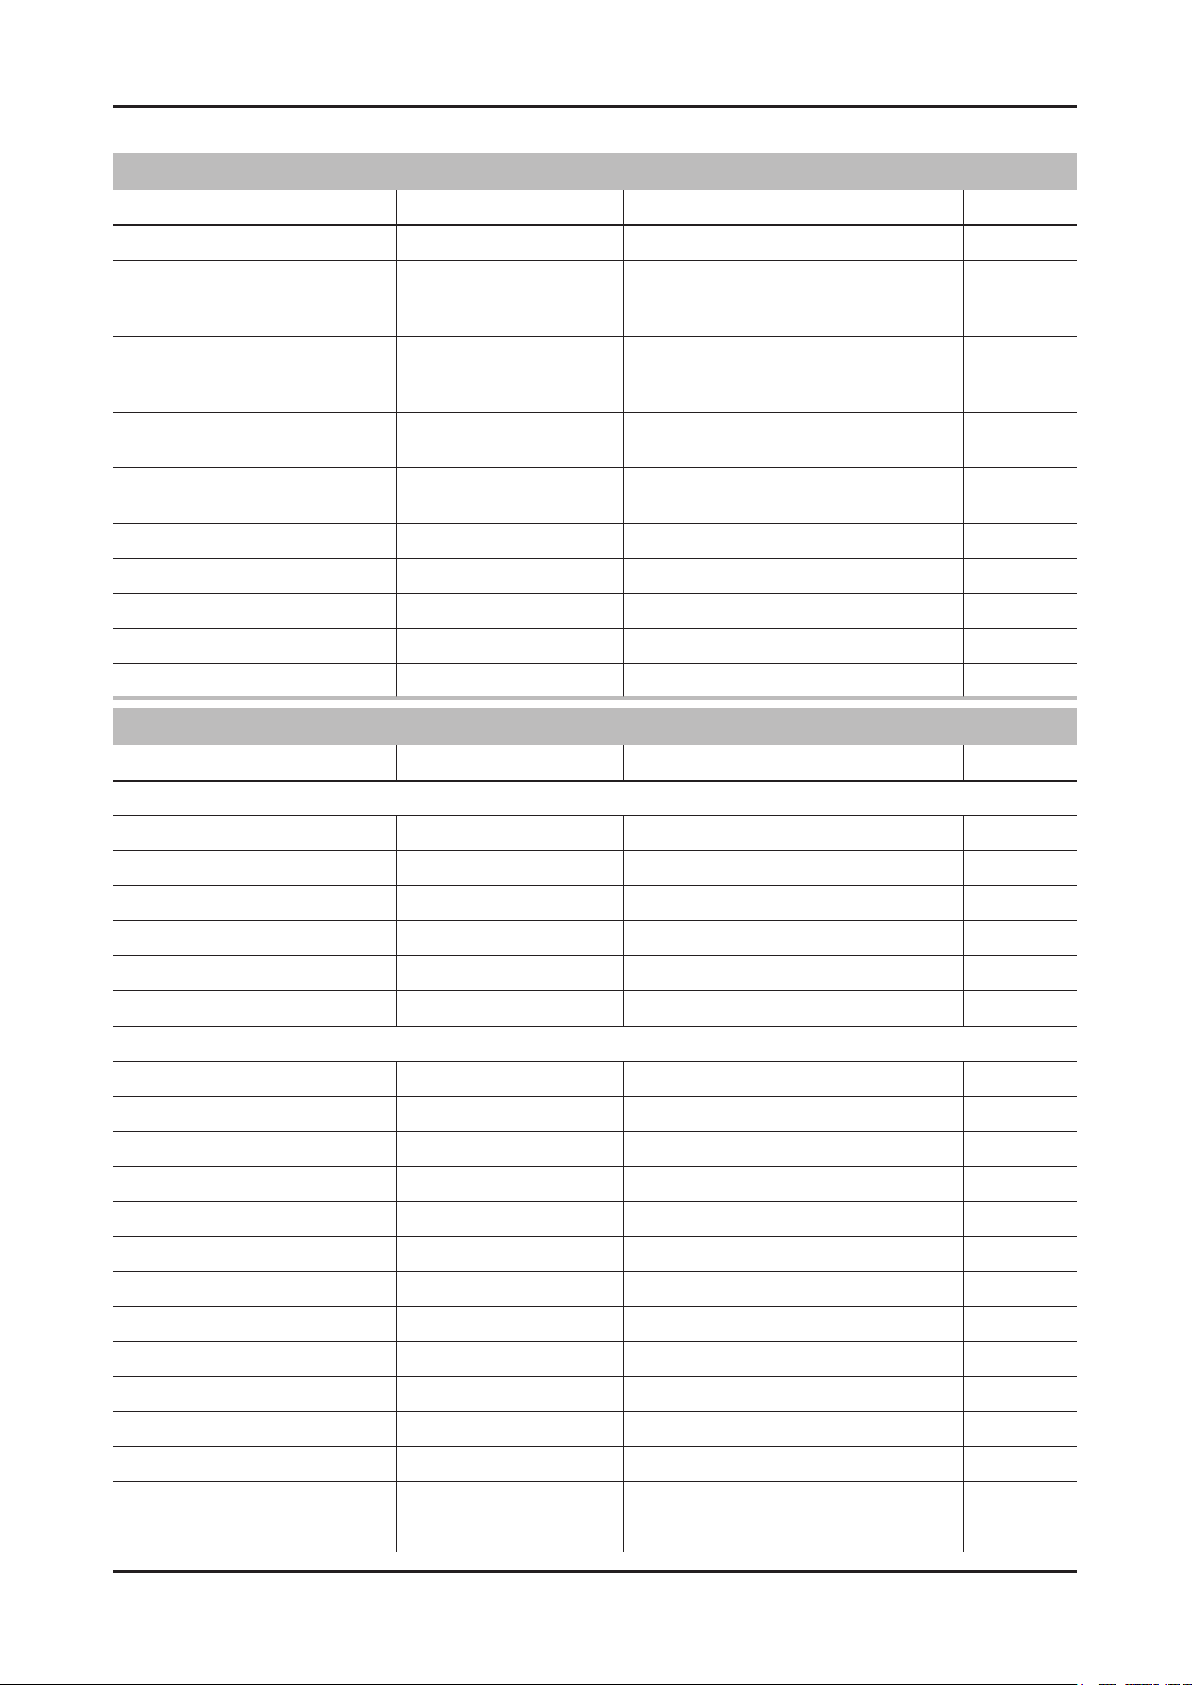
Option
Factory Menu Name Data Range Remark
Factory Reset -
32P1UF3E/37P1UF3E/40
Type
Local set
P1UF6E/46L1UF3E/55A
2UF7E
EU/EU_ITALY/EU_GER/
EU_UK/EU_FRANCE/
EU_BENERUX/EU
Model
TUNER
DDR
Light Effect Off
Ch table …
Country
Front Color U-T-R-BK/U-T-C-BK
UD6000/UD6100/UD6120/
UD6200/UD6300/UD6350
SEC_TCS/SEC_TC/
SEC_T2C
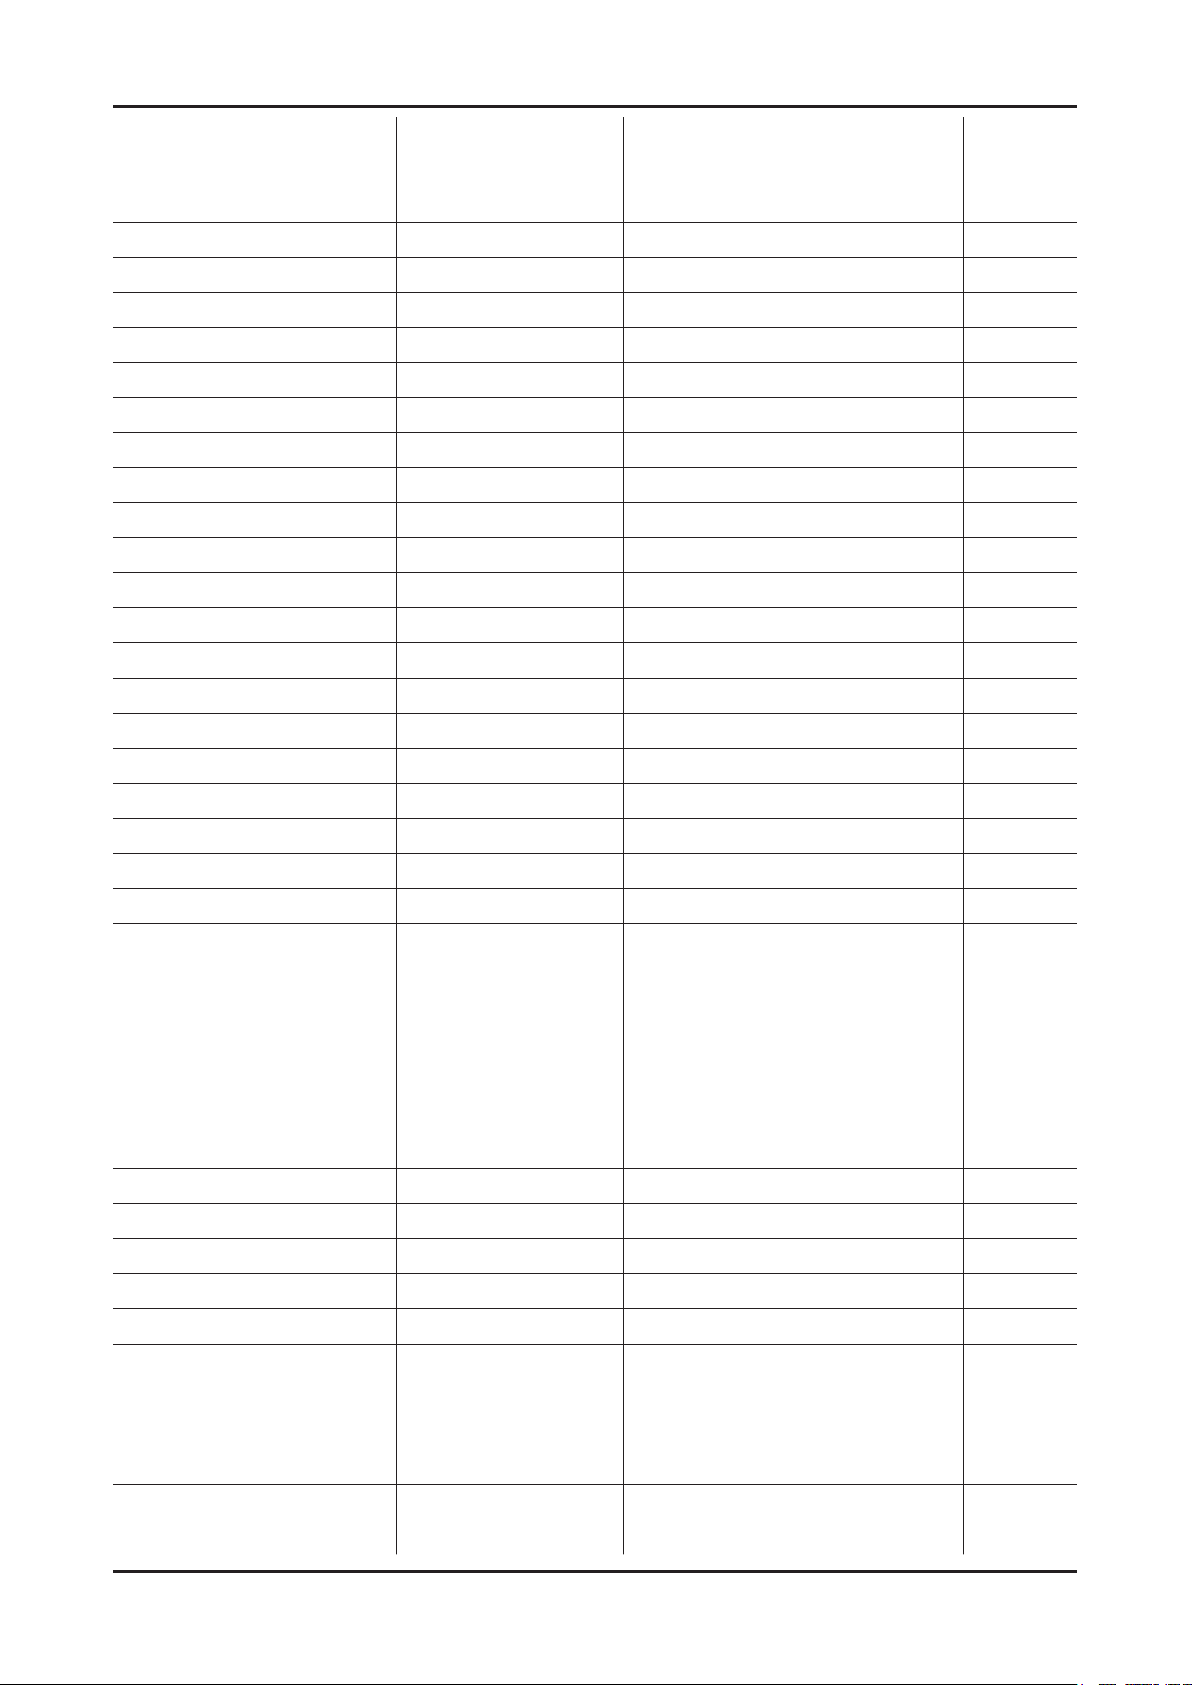
Control
Factory Menu Name Data Range Remark
EDID
EDID ON/OFF Off
EDID WRITE ALL …
EDID WRITE HDMI …
EDID WRITE PC …
HDMI EDID Ver …
HDMI EDID Port …
Sub Option
Region PANEURO
PnP Language ENG
RF Mute Time 600ms
RS-232 Jack UART
Watchdog OFF
WD COUNT 0
Dimm Type EXT
LVDS FORMAT VESA
Language_Arabic EU
TOOLS Support 107
LNA Support OFF
CI Support ON
MediaPlay
Movie …
Page 64
4-30
4. Troubleshooting
DLNA …
DB …
Play List …
NETWORK Support Int-Wi
IPERF Stopped
Info Link Country None
Info Link Server Type development
TTX List …
TTX Group …
ND ADJ Support ON
24Px4 Support OFF
Power Indicator Support ON
BD Wise Support ON
RF Remocon Support OFF
Data Service Support OFF
PVR Support OFF
3D Support ON
Gemstar Support OFF
WSS Support …
ColorSpace Support RGB Type
OTA Support OFF
OTA Duration Test OFF
Alternate Del OFF
OTN
OTN Server Type operating
OTN Test Server OFF
OTN Support ON
OTN Reset -
OTN Duration OFF
OTN Fail Test OFF
Cable Modulation QAM
PC Auto Ident Enable
IIC BUS STOP OFF
Visual Test Diable
Emergency Log Copy
View Log
Select Log Type IR KEY
Log View
Delete Log
Spread Spectrum
HD SSC ON/Off OFF
Page 65
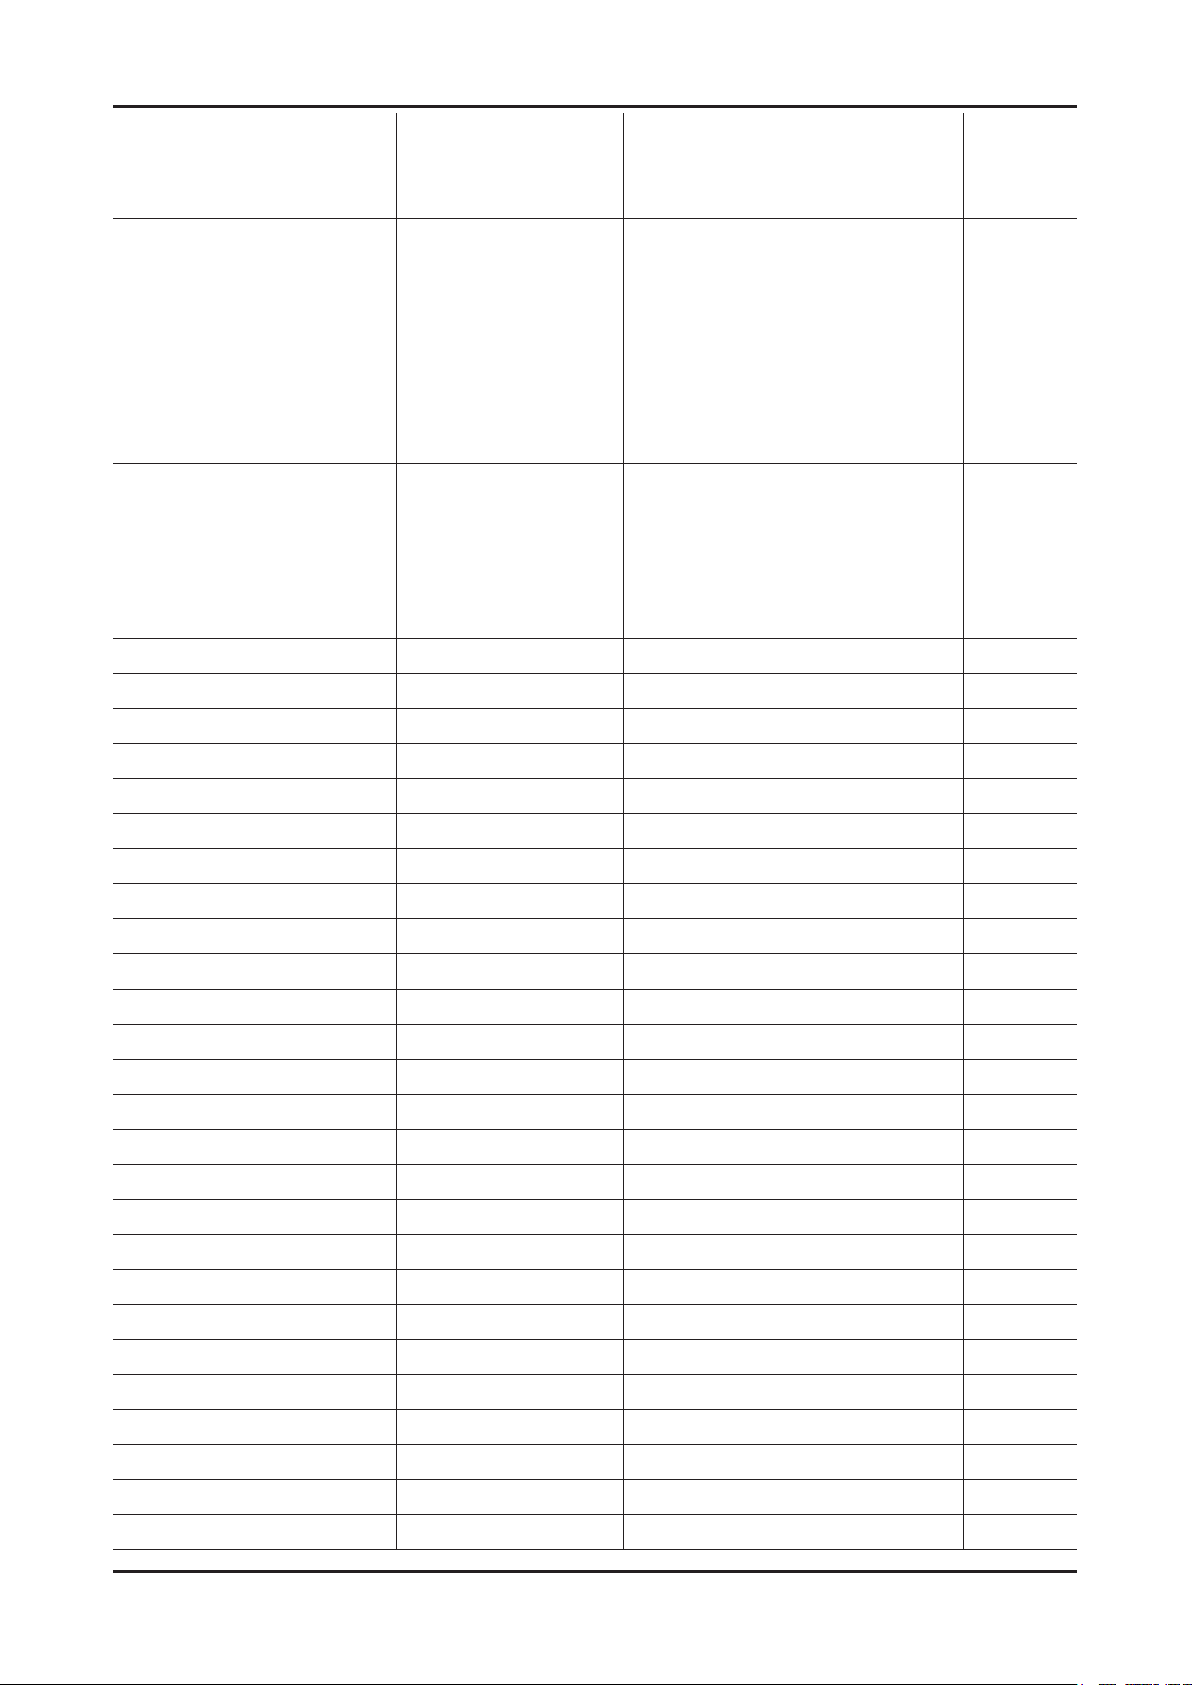
4-31
4. Troubleshooting
LVDS SSC ON/OFF ON
LVDS SSC Value 10
DDR SSC ON/Off ON
DDR SSC Value 4
Napoli LVDS SSC On/Off ON
Napoli LVDS SSC MFR 0
Napoli LVDS SSC MRR 31
Napoli DDR SSC ON/OFF ON
Napoli DDR SSC MFR 0
Napoli DDC SSC MRR 26
DDR Margin PN
A CTRL_OFFSET_0_3 0
A CTRL_OFFSET_D 0
B CTRL_OFFSET_0_3 0
B CTRL_OFFSET_D 0
H.264 Margin 8
MPEGMargin 1000
TunerMargin 10
SST
Y0 TH 218
Y1 TH 150
Y2 TH 122
Y3 TH 105
Y4 TH 78
Y5 TH 62
Y6 TH 34
Y7 TH 113
Cb0 TH 127
Cb1 TH 51
Cb2 TH 152
Cb3 TH 79
Cb4 TH 177
Cb5 TH 103
Cb6 TH 204
Cb7 TH 128
Cr0 TH 127
Cr1 TH 139
Cr2 TH 54
Cr3 TH 66
Cr4 TH 189
Cr5 TH 201
Page 66
4-32
4. Troubleshooting
Cr6 TH 116
Cr7 TH 128
S.DEV0 100
S.DEV1 80
Checksum 0x0000
EEPROM RESET
EER RESET
NVR All Clear Off
KEY SENSITIVITY NotUsed
PDP Option
LOGIC CONNECT
PIXEL SHIFT TEST
PANEL VERSION
PANEL INCH
PANEL TYPE
PANEL TEMPERATURE
LOGIC SW VERSION
LOGIC SW CHECKSUM
SAPC TIMER
APC SPEED
Real 100 Hz Support
PLG_SHOP
Shop Option
Shop Mode OFF
Exhibition Mode OFF
3D_Emiton ON
3D_EmitShowMoe OFF
3D_GLASS PULSE_S 5
3D_GLASS PULSE_H 3
3D CUBE OFF
Asia Option
TTX OFF
China HD OFF
NT Conversion OFF
Mono Last Memory OFF
Unbalance OFF
IF AGC 7
D AGC 0
PHBW 3
FQ BW 3
PH RATE 4
Page 67
4-33
4. Troubleshooting
PD EN 1
SOUND
High Devi OFF
Carrier Mute ON
Volume Curve Type1
Pilot Level High Thld 0x30h
Pilot Level Low Thld 0x10h
Chattering Cnt 5
FM Prescale 0x14h
AM Prescale 0x1Ah
NICAM Prescale 0x14h
Amp Volume 0xCBh
Amp Scale 0x3Dh
AMP Speaker EQ ON
AMP EQ CheckSum 0xBCC084
AMP PEQ Test Ready
AMP PEQ Dump
SPDIF PCM Level -9
DNSe-IP Test Ready
DNSe-IP CheckSum 0x0000
Cong Option
Num of ATV 1
Num of DTV 2
Num of AV 0
Num of SVIDEO 1
Num of COMP 4
Num of HDMI 1
Num of PC 0
Num of SCART 0
Num of DVI 0
Num of OPTICAL Link 1
Num of MEDIA 6
Num of PANEL KEY 2
Num of USB Port 0
MFT Offset 62.5
Select LCD/PDP LCD
Num of DECODER 2
Num of TUNER 1
HDMI/DVI SEL 1
Indicator Led ON
Wall Mount OFF
Page 68
4-34
4. Troubleshooting
HV Flip ON
Num Of Display 2
DVI/HDMI SOUND Auto
HDMI HOT PLUG Disable
HOTPLUG SWITCHING Boot
CLK TERMDURATION 300ms
HOT PLUG OFF HOLD TIME 1200ms
HDMI FLT CNT SIG 100ms
HDMI FLT CNT LOS 100ms
UNSTABLE BAN CNT 1250ms
HDMI Err Cnt 1
HDMI ROBIN ON
HDMI Callback ON
HDMI CTS Thld 0
HDMI CTS Cnt1 0
HDMI 3D Det 1
TMDS_EQ2_Boost 1
TMDS_EQ2_Gain 0
TMDS_PLL_Loop 3
TMDS_CPREG_BLEED 1
HDMI EQ AUTO
HDMI EDID CTRL Type Combine
DVI SET TIME 300ms
Type Of PANEL KEY Vertical
LD CTRL SELECT FULL_CTRL
PVR Record NUM 1
Backend Device NAPOLI
ENCORDER NXC1000
BPARD CONTROL ON
All Share Support ON
SCC
SCC Mode Dynamic
SCC ON/OFF Off
SCC Input Data
Hx 272
Hy 278
Lx 272
Ly 278
sSCC Const
sSCC Hx 545
sSCC Hy 571
Page 69
4-35
4. Troubleshooting
sSCC Lx 544
sSCC Ly 572
pSCC Const
pSCC Hx 545
pSCC Hy 571
pSCC Lx 544
pSCC Ly 572
SCC Source Data PBA
SWAP PBA
SVC
Factory Menu Name Data Range Remark
Test Pattern
LOGIC Pattern Sel 0
LOGIC Level Sel 255
LDAsic Pattern Sel 0
GenaoP Pattern Sel 0
GenoaS Pattern Sel 0
Napoli Pre Test Pattern 0
Napoli Post Test Pattern 0
Napoli FDISPLAY ON/OFF OFF
Napoli PC Mode ON/OFF OFF
HDMI WB Pattern OFF
HDMI Pattern Sel 0
GenoaS FRC Post Test Pattern 0
GenoaS FRC FDISPLAY ON/OFF OFF
GenoaS FRC PC Mode ON/OFF OFF
Panel Auto Setting
PANEL DISPLAY TIME 3Hr
T-CON USB Download
T-CON CheckSum
CPLD USB Download
REMOCON PAIRING
TC905x7
FFT Size_0 0
Guard Interval_0 0
Freq. Offset_0 0
SNR_0 0
IF AGC_0 0
TMCC Lock_0 0
TS Packet_0 0
Master Lock_0 0
Page 70
4-36
4. Troubleshooting
A_Modulation_0 0
A_Code Rate_0 0
A_Timer InterLeave_0 0
A_Segments Num_0 0
A_BER_0 0
B_Modulation_0 0
B_Code Rate_0 0
B_Timer InterLeave_0 0
B_Segments Num_0 0
B_BER_0 0
C_Modulation_0 0
C_Code Rate_0 0
C_Timer InterLeave_0 0
C_Segments Num_0 0
C_BER_0 0
MICOM UPGRADE
Temp Last
Temp Read
DDC Version 0x40519
DDC_CHK_SEL 0
DDC_Check_Total 0x0
IR_ON_OFF 0xaa
BT ADDRESS ON
BT UPGRADE
SVC Reset
Expert
Factory Menu Name Data Range Remark
N/D ADJ
Source
ADC/WB
Factory Menu Name Data Range Remark
ADC
AV Calibration
Comp Calibraion
PC Calibration
HDMI Calibration
ADC Target
1st_AV_Low 64
1st_AV_High 880
1st_AV_Delta 2
Page 71
4-37
4. Troubleshooting
1st_COMP_Y_Low 64
1st_COMP_Cb_Low 512
1st_COMP_Cr_Low 512
1st_COMP_Y_High 940
1st_COMP_Cb_High 512
1st_COMP_Cr_High 512
1st_COMP_Delta 2
1st_PC_Low 16
1st_PC_High 1004
2nd_AV_Low 4
2nd_AV_High 940
2nd_PC_Low 4
2nd_PC_High 940
2nd_Delta 2
ADC Result
1st_Y_GH 248
1st_Y_GL 245
1st_Cb_BH
1st_Cb_BL
1st_Cr_RH
1st_Cr_RL
2nd_R_L 131
2nd_G_L 131
2nd_B_L 131
2nd_R_H 107
2nd_G_H 107
2nd_B_H 107
White Balance
Sub Brightness 128
R-Offset 128
G-Offset 128
B-Offset 128
Sub Contrast 128
R-Gain 128
G-Gain 128
B-Gain 128
Movie R-Offset
Movie B-Offset
Movie R-Gain
Movie B-Gain
Page 72
4-38
4. Troubleshooting
Advanced
Factory Menu Name Data Range Remark
Picture_2D
FBE3
BM_slope
BM_start
BM_start_max
Lfunc_gain
Hfunc_gain
ACR-Offset
Skin-UV
FBE Sub color
M-Skin-UV
M-Sub Color
N_Skin_UV
N_Sub_Gamma
Color Gamut
LFUNC_TH1
LFUNC_TH2
LFUNC_TH3
LFUNC_OUT2
LFUNC_OUT3
LFUNC_OUT4
LFUNC_OUT5
UFUNC_TH1
UFUNC_TH2
UFUNC_TH3
UFUNC_OUT2
UFUNC_OUT3
UFUNC_OUT4
UFUNC_OUT5
PPHC_Red
PPHC_Green
PPHC_Blue
PPHC_Cyan
PPHC_Magenta
PPHC_Yellow
WB Movie
W/B MOVIE ON/OFF
MODE
Color Tone
Page 73
4-39
4. Troubleshooting
MSub Brightness
MSub Contrast
N_Rgain
N_Bgain
N_Roffset
N_Boffset
W1_Rgain
W1_Bgain
W1_Roffset
W1_Boffset
W2_Rgain
W2_Bgain
W2_Roffset
W2_Boffset
Movie Contrast
Movie Bright
Movie Color
Movie Sharpness
Movie Tint
Movie Backlight
Movie Gamma
M_Sub_Gamma
HDMI Black Level
SubSetting
Gamma 0.95
PWM Max
PWM Mid
PWM Min
Contrast Dimming
7.5 IRE NTSC
7.5 IRE OFFSET
48Hz Enable
Peak Dimming
Dynamic CE
ColorMapping
Auto_Red_R
Auto_Red_G
Auto_Red_B
Auto_Green_R
Auto_Green_G
Auto_Green_B
Page 74
4-40
4. Troubleshooting
Auto_Blue_R
Auto_Blue_G
Auto_Blue_B
Auto_Yellow_R
Auto_Yellow_G
Auto_Yellow_B
Auto_Cyan_R
Auto_Cyan_G
Auto_Cyan_B
Auto_Magenta_R
Auto_Magenta_G
Auto_Magenta_B
EPA 3D
Standard Contrast
Standard Brightness
Standard Sharpness
Standard Color
Standard Tint
Standard Backlight
3D Contrast
3D Brightness
V_3D PWM Delay_60
V_3D ANA Delay_60
V_3D PWM Delay_50
V_3D ANA Delay_50
Motion plus Delay
Home Delay
Shop Delay
CH_VDEC
AGC_mode
Gain_VCR
Y_Gain_Man
Y_Shape_sel
Y_Shape_SCM
C_Shape_sel
C_Shape_SCM
If_iir
If_lt_sel
ST_Beg_NTSC
VS_Slice_Level
HS_Slice_Level
Page 75
4-41
4. Troubleshooting
FB_Delay_adj
RGB_Delay_adj
slice_mod_ne
scm_fdet_lvl
bl_range
AR_ADC
PHASE
SOG_BW
SSC_PC
RGB_DLY
YC_Delay
PAL_BG
PAL_DK
PAL_I
PAL_M
PAL_N
SECAM_BG
SECAM_DK
SECAM_L
NTSC_358
NTSC_443
AV_PAL
AV_PAL_M
AV_PAL_N
AV_SECAM
AV_NT358
AV_NT443
AV_PAL60
CH_DP
BD_MAX_PERCENT_X
BD_MAX_PERCENT_Y
BD_DETAIL_AMT_MAX
BD_TOUCH_SUPP
BD_TOUCH_SUP_INV
DR_SIGMA_FIL_GAIN
DR_GAIN_IN_ETE
SD2HD_Metric
Sharpness
Pre_GainH1
Pre_GainH2
Pre_GainH3
Page 76
4-42
4. Troubleshooting
Pre_GainV1
Pre_GainV2
Pre_GainV3
Post_GainH1
Post_GainH2
Post_GainH3
Post_GainV1
Post_GainV2
Post_GainV3
Post_GainPE1
Post_GainPE2
Post_GainPV1
Post_GainPV2
CTI_Gain
Pre_LTIH
LTI_H
LTI_V
PRE_CORING_H
PRE_CORING_V
POST_CORING
Pre_TOT
Post_TOT
SH Sub Color
Sharpness_LNA
S1_Pre_GainH1
S1_Pre_GainH2
S1_Pre_GainH3
S1_Pre_GainV1
S1_Pre_GainV2
S1_Pre_GainV3
S1_Post_GainH1
S1_Post_GainH2
S1_Post_GainH3
S1_Post_GainV1
S1_Post_GainV2
S1_Post_GainV3
S1_Post_GainPE1
S1_Post_GainPE2
S1_Post_GainPV1
S1_Post_GainPV2
S2_Pre_GainH1
Page 77
4-43
4. Troubleshooting
S2_Pre_GainH2
S2_Pre_GainH3
S2_Pre_GainV1
S2_Pre_GainV2
S2_Pre_GainV3
S2_Post_GainH1
S2_Post_GainH2
S2_Post_GainH3
S2_Post_GainV1
S2_Post_GainV2
S2_Post_GainV3
S2_Post_GainPE1
S2_Post_GainPE2
S2_Post_GainPV1
S2_Post_GainPV2
S3_Pre_GainH1
S3_Pre_GainH2
S3_Pre_GainH3
S3_Pre_GainV1
S3_Pre_GainV2
S3_Pre_GainV3
S3_Post_GainH1
S3_Post_GainH2
S3_Post_GainH3
S3_Post_GainV1
S3_Post_GainV2
S3_Post_GainV3
S3_Post_GainPE1
S3_Post_GainPE2
S3_Post_GainPV1
S3_Post_GainPV2
LNA_Plus
Synctip_Noise
dB0
dB1
dB2
dB3
dB4
dB5
dB6
dB7
Page 78
4-44
4. Troubleshooting
dB8
dB9
LNA+_Ylter
FRCS
FRCS LVDS Format
FRCS LVDS BitWidth
FRCS LVDS Sequence
FRCS Hangup Detection
FRCS FMD Demo
LDAsic
R_LD4_L3DD_RATIO
R_LD4_LD_ON
R_DELAY
R_ALL_READ
R_LVDS_TX_FMT
R_LVDS_SW
3D
EmitOn
EmitStartPosi60
EmitStartPosi50
EmitStartPosi48
3DSyncVstart60
3DSyncVend60
3DSyncVstart50
3DSyncVend50
3DSyncVstart48
3DSyncVend48
2D3D Focus
2D3D Depth1
2D3D Depth2
2D3D Depth3
2D3D Depth4
2D3D Depth5
2D3D Depth6
2D3D Depth7
2D3D Depth8
2D3D Depth9
2D3D Depth10
N240 PWM Delay_60
N240 ANA Delay_60
N240 PWM Delay_50
Page 79
4-45
4. Troubleshooting
N240 ANA Delay_50
N240 PWM Delay_48
N240 ANA Delay_48
Reading
POST_FDISPLAY
RAMP_SPEED
POST_RAMP_SPEED
LVDS_RX_FMT
LVDS_TX_FMT
LVDS_RX_BIT
LVDS_TX_BIT
POST_OUT1_ORDER
POST_OUT2_ORDER
POST_OUT3_ORDER
POST_OUT4_ORDER
CROSS_PATTERN
EnableFB
HMVSRMargin_2X_H
HMVSRMargin_2X_M
HMVSRMargin_2X_L
VMVSRMargin_2X
HSADPercentT1_2X
HSADPercentT2_2X
HMVSRMargin_FILM_H
HMVSRMargin_FILM_M
HMVSRMargin_FILM_L
VMVSRMargin_FILM
HSADPercentT1_FILM
HSADPercentT2_FILM
LEDDriver
VSYNC_DELAY_3D_50
VSYNC_DELAY_3D_60
FRC
FRCQ Option
SSC_OnOff
SSC_Width
SSC_Freq
FMD_Demo
CSB Vertical
CSB Horizontal
X_VStabStatVid
Page 80
4-46
4. Troubleshooting
X_VStabStatF
X_VStabCorF
X_VStabSensF
X_HaloSizStatVid
X_HaloSizStatF
X_HaloSizCorF
X_HaloSizSensF
Film_Low_SD
Film_Medium_SD
Film_High_SD
Film_Low_HD
Film_Medium_HD
Film_High_HD
Video_Judder_Low
Video_Judder_Med
Video_Judder_High
Hangup Detection
Q LVDS Sequence
Q LVDS Format
Q LVDS bit width
PC_Mode_OnOff
FRCQ Fallback
SensD_Film_Low
SensD_Film_Medium
SensD_Film_High
Rel_Start_Film
Rel_Slope_Film
H_Len_Start_Film
H_Len_Slope_Film
V_Len_Start_Film
V_Len_Slope_Film
SensD_Video
Rel_Start_Video
Rel_Slope_Video
H_Len_Start_Video
H_Len_Slope_Video
V_Len_Start_Video
V_Len_Slope_Video
Picture Update
Page 81
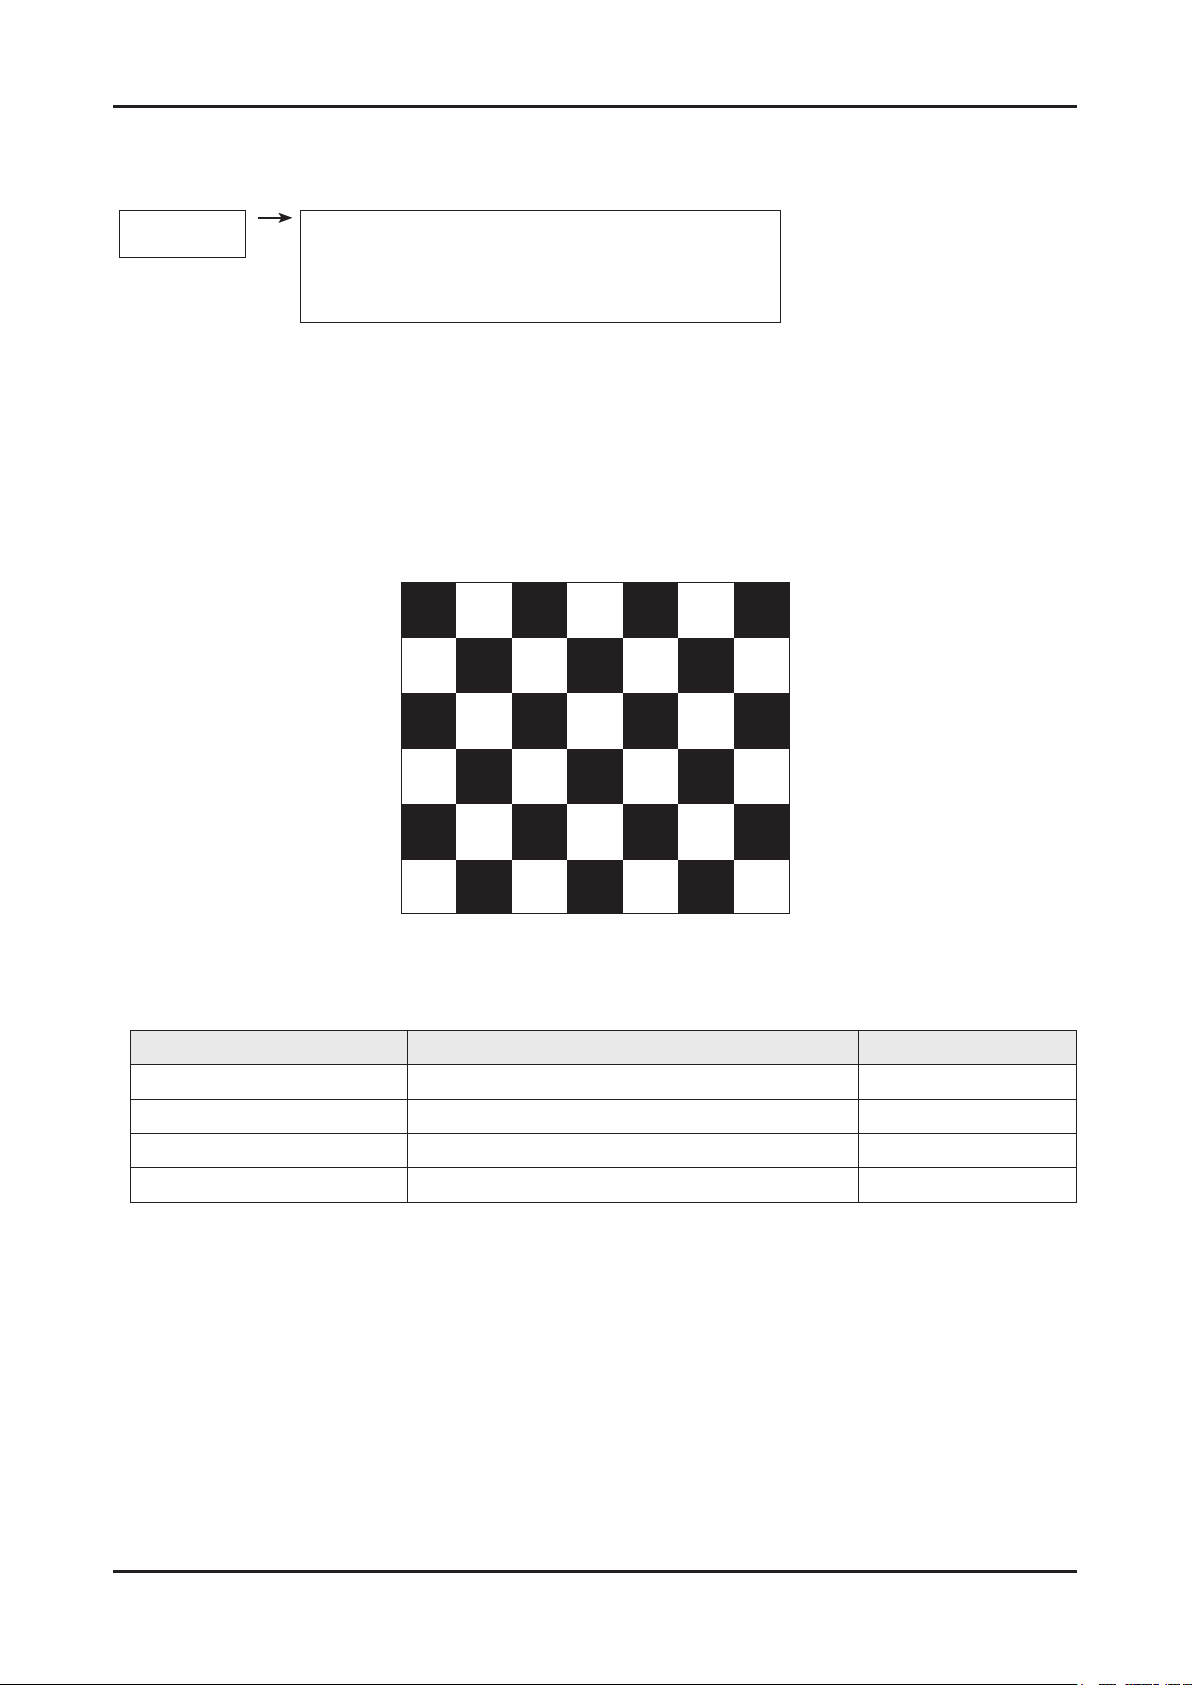
4-47
4. Troubleshooting
4-5. White Balance
4-5-1. Calibration
ADC/WB
AV Calibration
Comp Calibration
PC Calibration
HDMI Calibration
4-6-2. Service Adjustment
You must perform Calibration in the Lattice Pattern before adjusting the White Balance.
Color Calibration
Adjust spec.
1. Source : HDMI
2. Setting Mode : 1280 x 720@60Hz
3. Pattern : Pattern #24 (Chess Pattern)
( Chess Pattern )
4. Use Equipment : CA210 & Master MSPG925 Generator
- Use other equipment only after comparing the result with that of the Master equipment.
Input mode Calibration Pattern
CVBS IN (Model_#1) Perform in NTSC B&W Pattern #24 Lattice
Component IN (Model_#6) Perform in 720p B&W Pattern #24 Lattice
PC Analog IN (Model_#21) Perform in VESA XGA (1024x768) B&W Pattern #24 Lattice
HDMI IN Perform in 720p B&W Pattern #24 Lattice
<Table 1>
Page 82
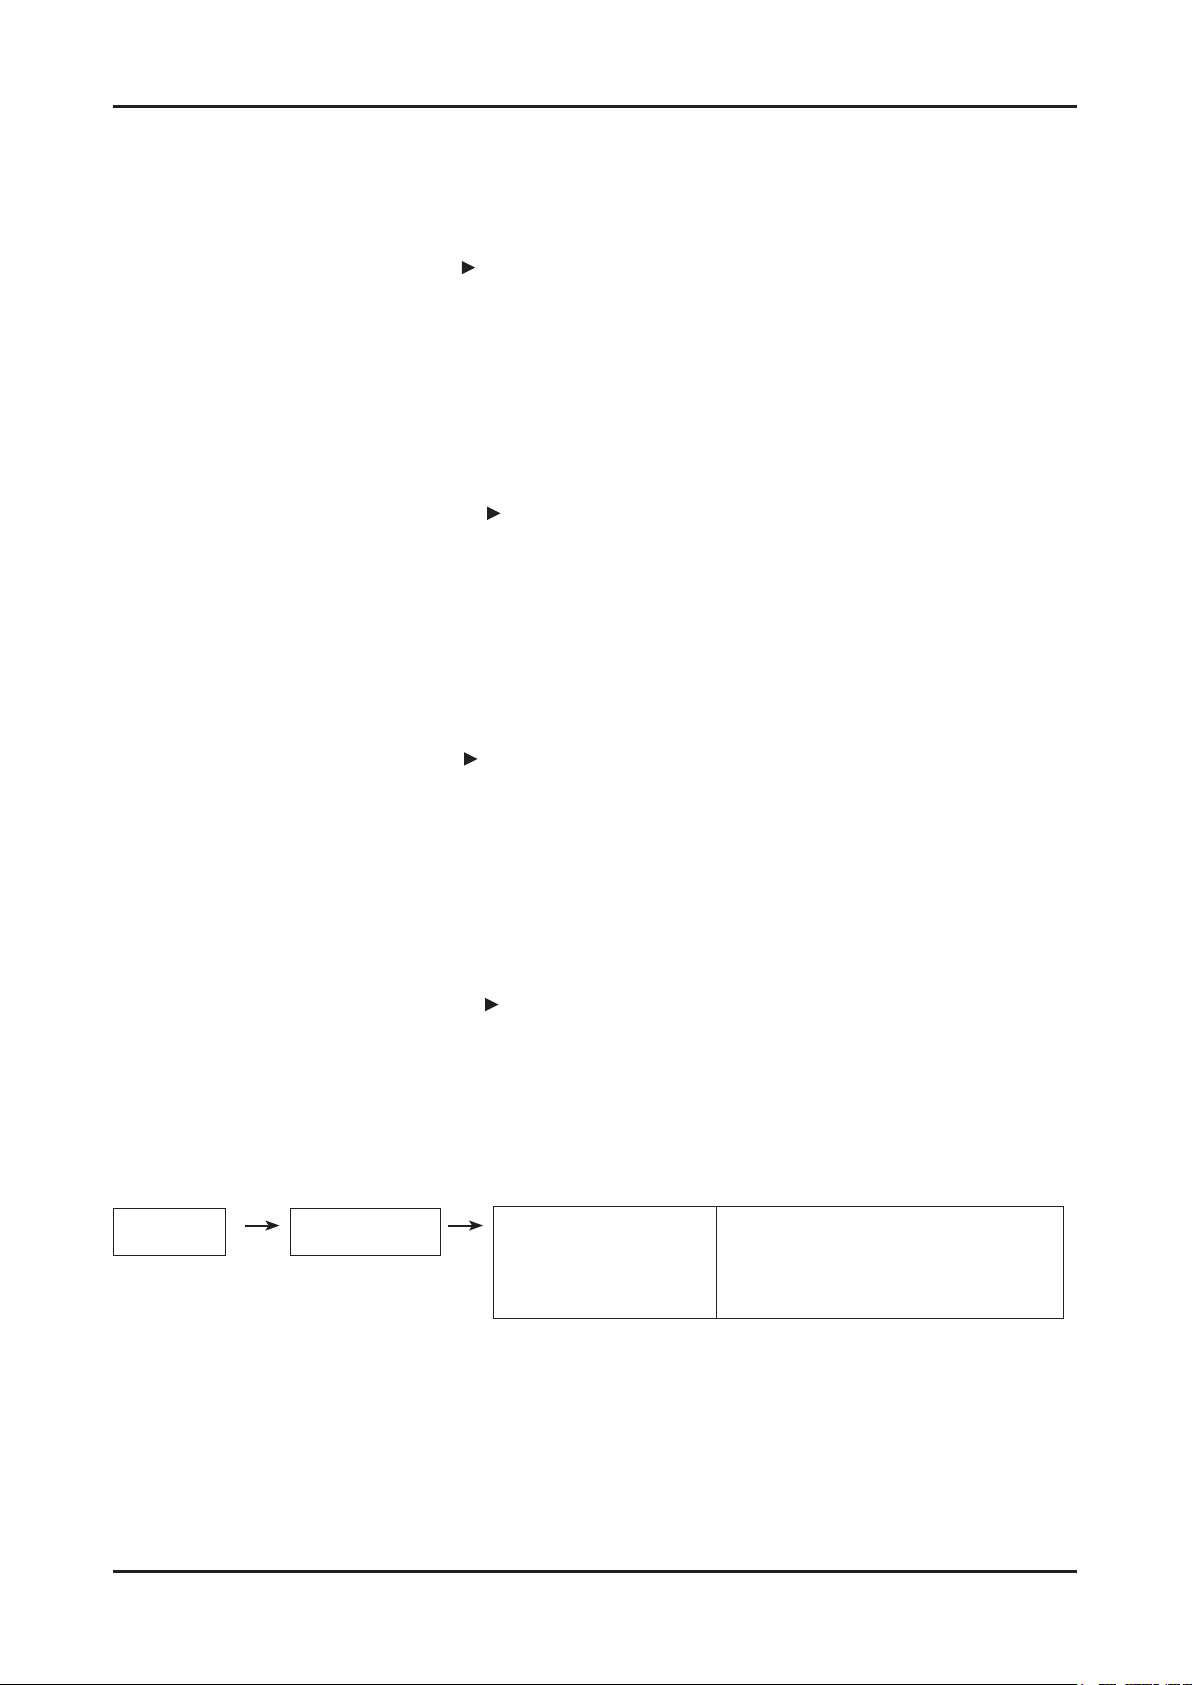
4-48
4. Troubleshooting
Method of Color Calibration (AV)
1) Apply the NTSC Lattice (N0. 3) pattern signal to the AV IN 1 port
2) Press the Source key to switch to "AV1" mode
3) Enter Service mode
4) Select the "ADC/WB" and "ADB" menu
5) Select the "AV Calibration" menu.
6) In "AV Calibration Off" status, press the " " key to perform Calibration.
7) When Calibration is complete, it returns to the high-level menu.
8) You can see the change of the "AV Calibration" status from Failure to Success.
Method of Color Calibration (Component)
1) Apply the 720p Lattice (N0. 6) pattern signal to the Component IN 1 port
2) Press the Source key to switch to "component" mode
3) Enter Service mode
4) Select the "ADC/WB" and "ADB" menu
5) Select the "Comp Calibration" menu.
6) In "Comp Calibration Off" status, press the " " key to perform Calibration.
7) When Calibration is complete, it returns to the high-level menu.
8) You can see the change of the "Comp Calibration" status from Failure to Success.
Method of Color Calibration (PC)
1) Apply the VESA XGA Lattice (N0. 21) pattern signal to the PC IN port
2) Press the Source key to switch to "PC" mode
3) Enter Service mode
4) Select the "ADC/WB" and "ADB" menu
5) Select the "PC Calibration" menu.
6) In "PC Calibration Off" status, press the " " key to perform Calibration.
7) When Calibration is complete, it returns to the high-level menu.
8) You can see the change of the "PC Calibration" status from Failure to Success.
Method of Color Calibration (HDMI)
1) Apply the 720p Lattice (N0. 6) pattern signal to the HDMI1/DVI IN port
2) Press the Source key to switch to "HDMI1" mode
3) Enter Service mode
4) Select the "ADC/WB" and "ADB" menu
5) Select the "HDMI Calibration" menu.
6) In "HDMI Calibration Off" status, press the " " key to perform Calibration.
7) When Calibration is complete, it returns to the high-level menu.
8) You can see the change of the "HDMI Calibration" status from Failure to Success.
4-5-3. Adjustment
ADC/WB
White Balance
(low light) (hight light)
Sub Bright
R offset
G offset
B offset
(W/B adjustment Condition refer next page)
Sub Contrast
R gain
G gain
B gain
Page 83
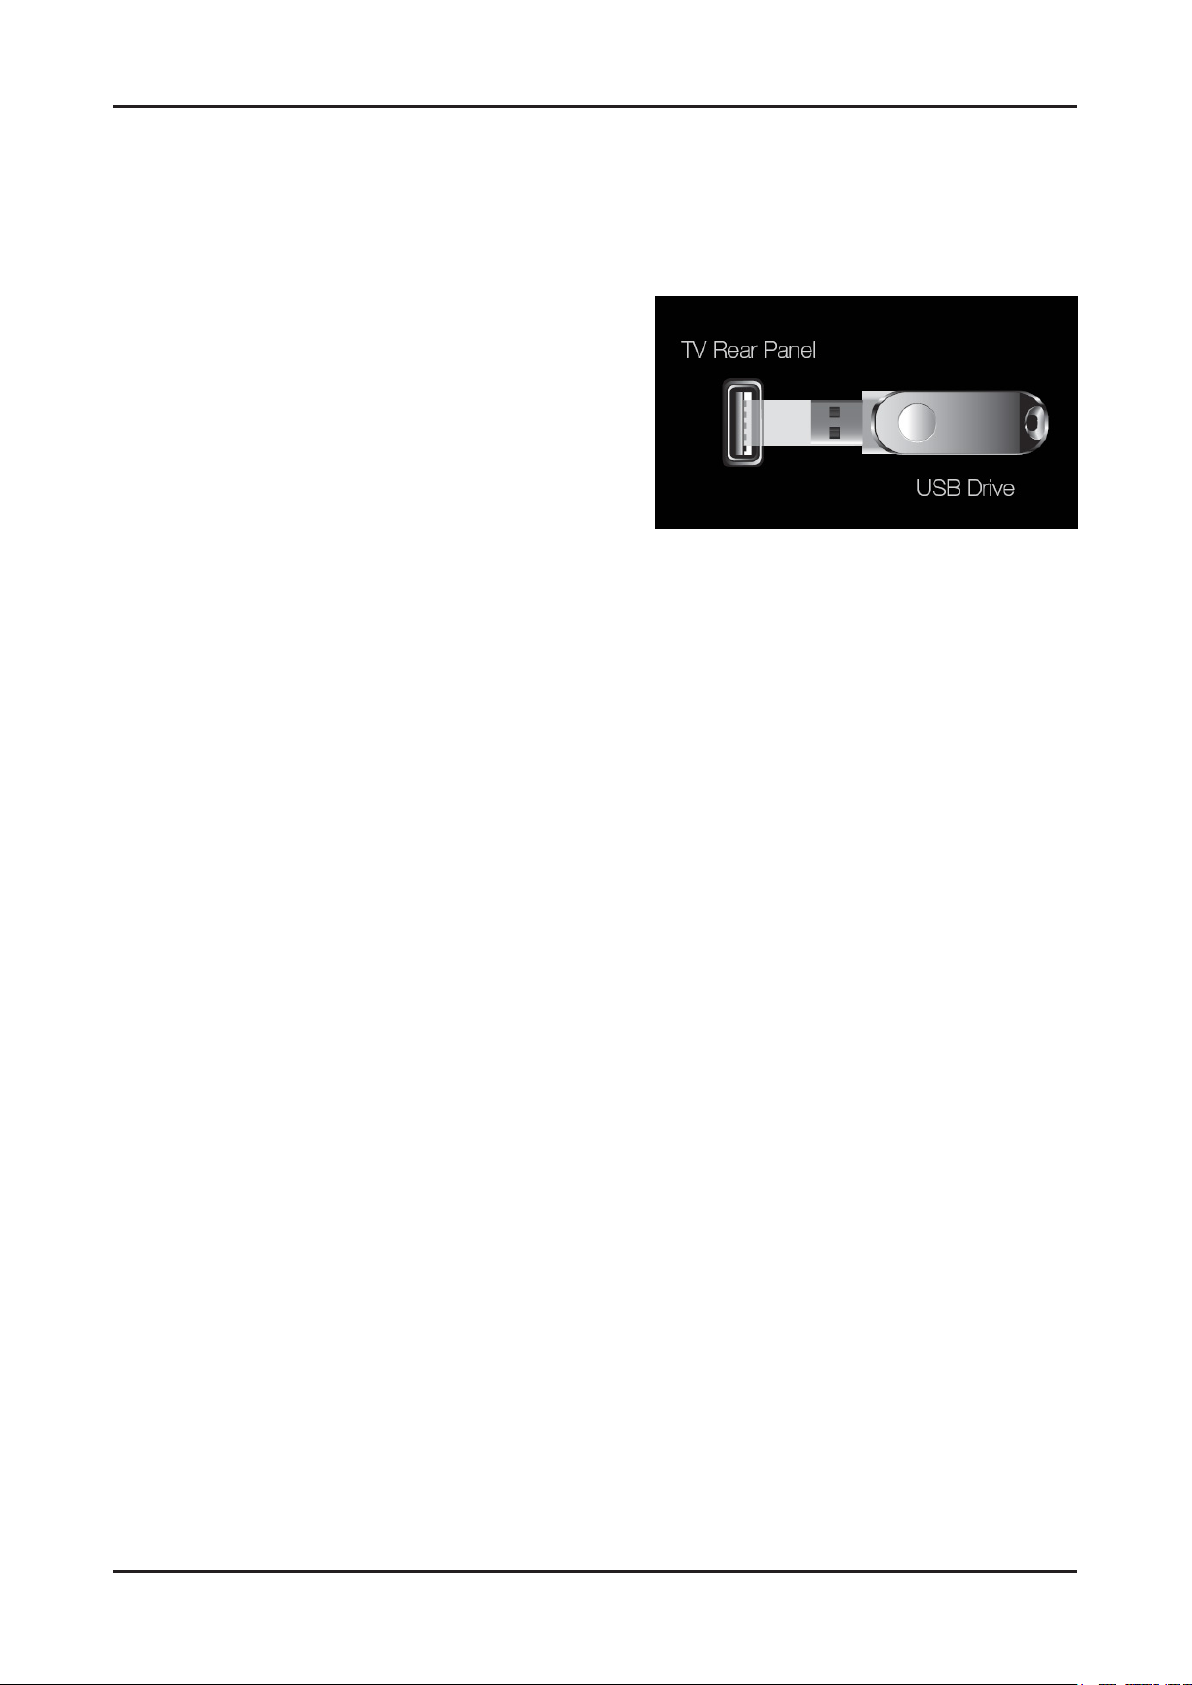
4-49
4. Troubleshooting
4-6. Software Upgrade
Software Upgrade can be performed by network connection or downloading the latest rmware from “www.
samsung.com” to a USB memory device.
By USB
Insert a USB drive containing the rmware upgrade le,
downloaded from “www.samsung.com” into the TV.
Please be careful not to disconnect the power or remove
the USB drive until upgrades are complete. The TV will be
turned off and on automatically after completing the rmware
upgrade. When software is upgraded, video and audio
settings you have made will return to their default settings.
We advise you to to write down your settings so that you can
easily reset them after the upgrade.
* The displayed menu may differ depending on the model.
By Online
Upgrades the software using the Internet.
● First, congure your network. For detailed procedures on using the Network Setting, refer to the ‘Setting the Network’
instructions.
● If The internet connection doesn’t operate properly, connection can be broken, please retry downloading.
If the problem still happens, download by USB and upgrade.
By Channel
Upgrades the software using the broadcasting signal.
● If the function is selected during the software transmission period, software will be automatically searched and
downloaded.
●The time required to download the software is determined by the signal status.
Alternative Software (Backup)
Displays the software version downloaded through By Online.
During the software upgrading, When the Upgrade will disconyinue from last step, this function be activated.
Stanby mode upgrade(Off/On)
A manual upgrade will be automatically performed at selected time. Since the power of the unit is turned on
internally, the screen may be turned on slightly for the LED product. This phenomenon may continue for more
than 1 hour until the software upgrade is complete.
Page 84
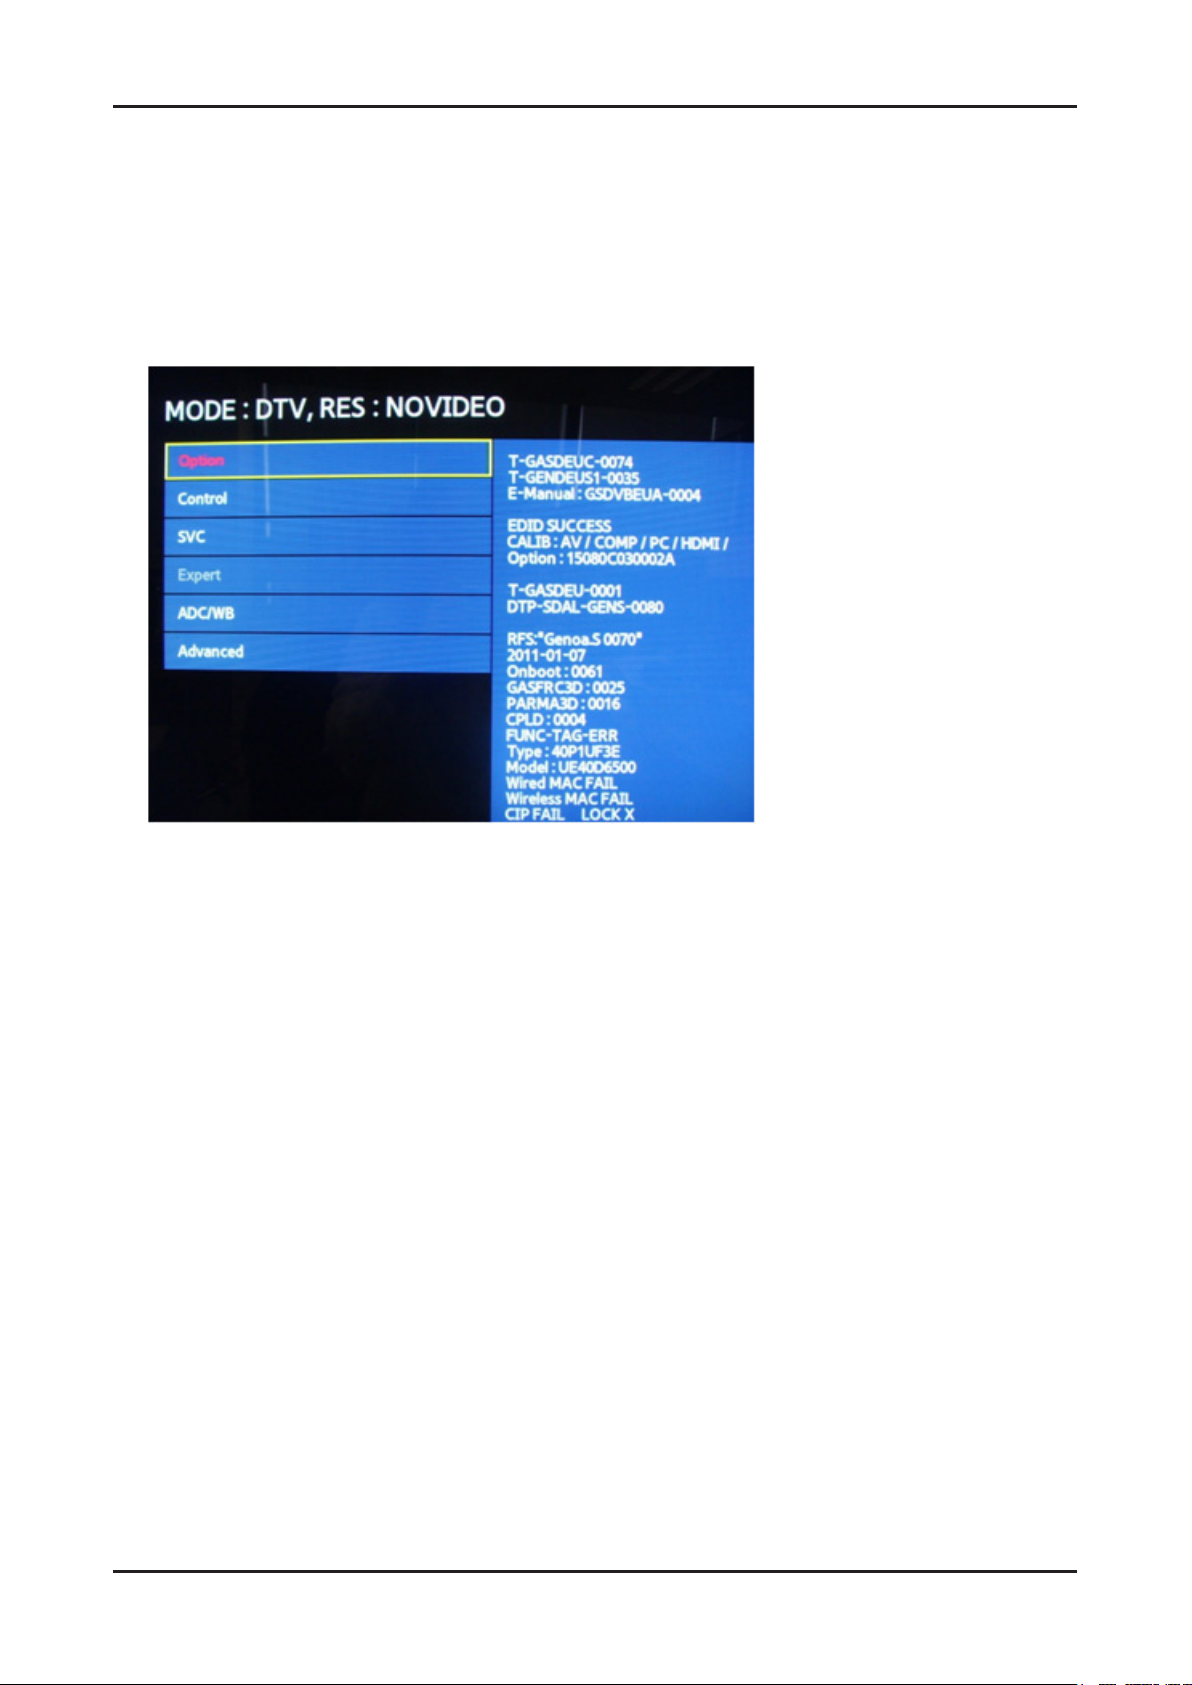
4. Troubleshooting
4-7. Sub Micom Upgrade
How to update submicom
SUB MICOM FW is include in MAIN FW.
In the Factory mode
SVC MICOM UPGRADE (off wait)
about 7minutes later, It will be reset automatically (Turn off/on).
Check version of sub micom FW in Factory mode.
4-50
Page 85
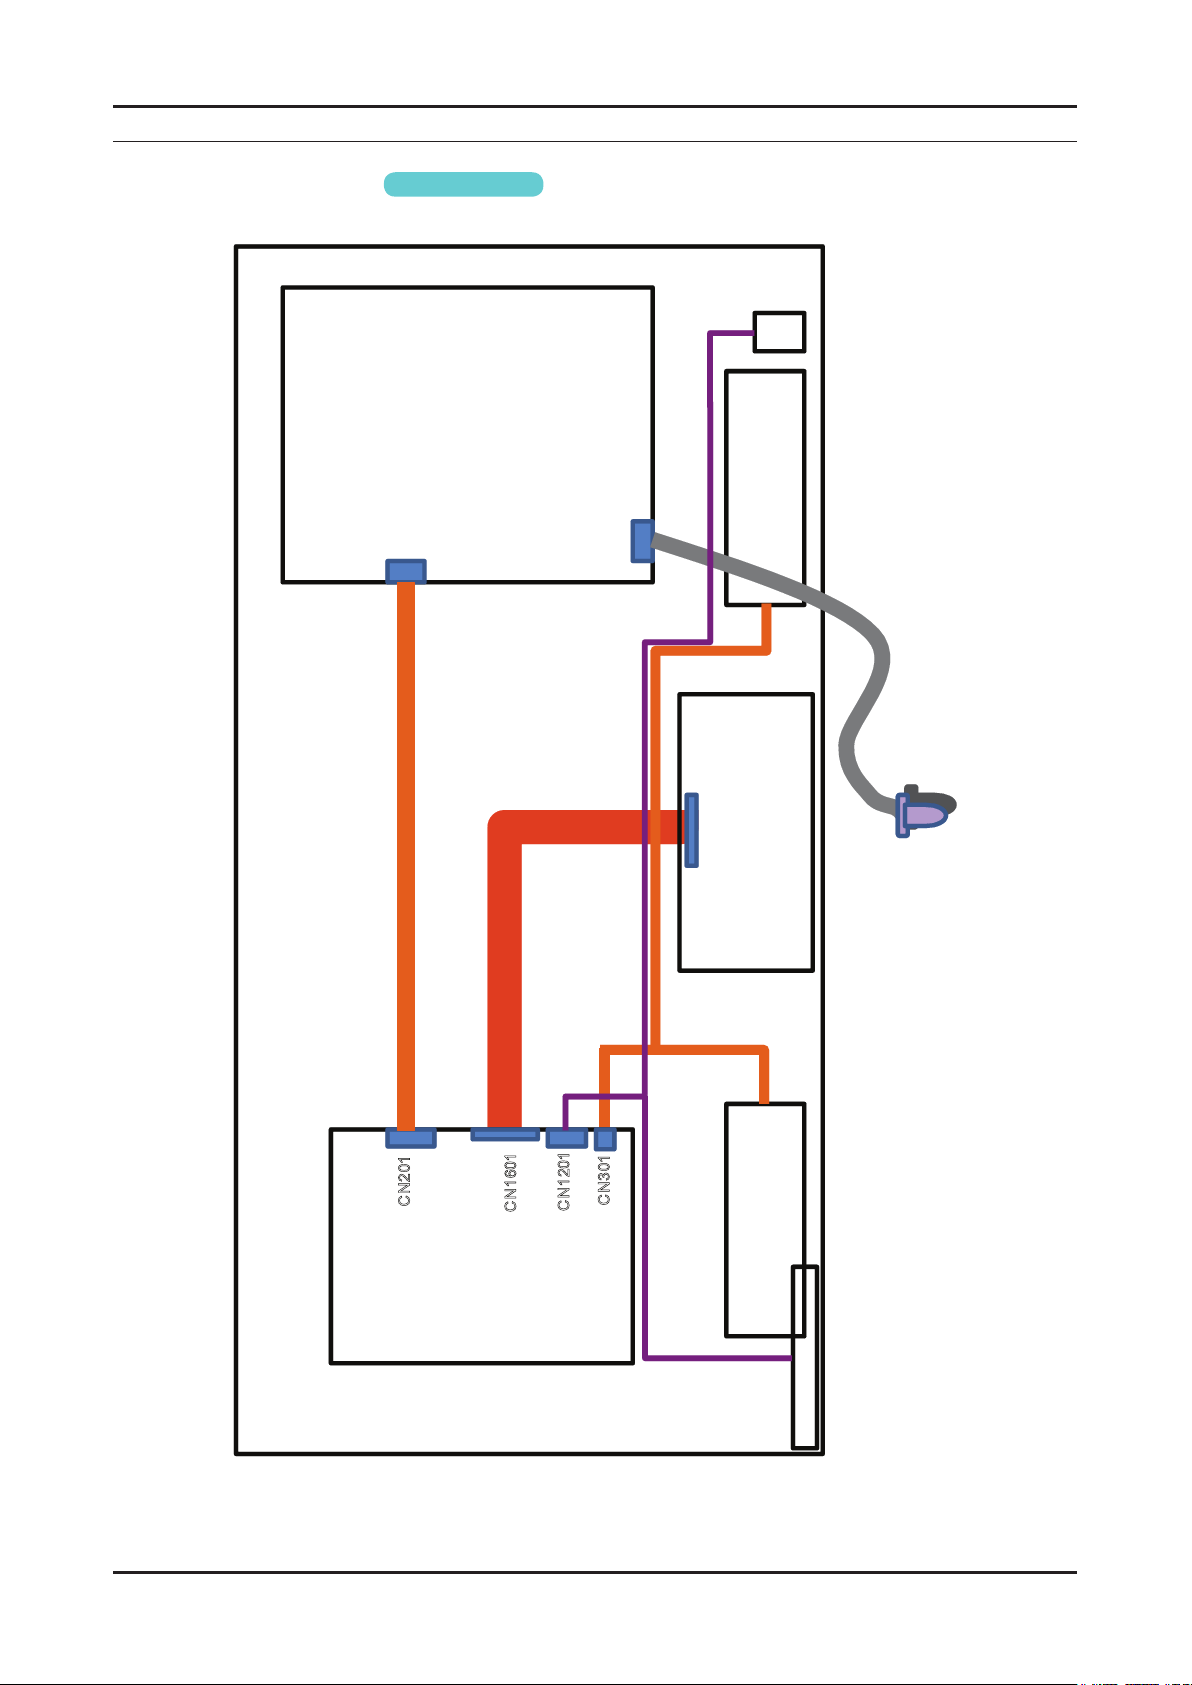
5. Wiring Diagram
Main Board
T- CON
SMPS
SPEAKER
SPEAKER
Function
C N201
C N1601
C N1201
C N301
Power cord
B
T
5. Wiring Diagram
5-1. Wiring Diagram
For 32"_37"_40"_46"
5-1
Page 86
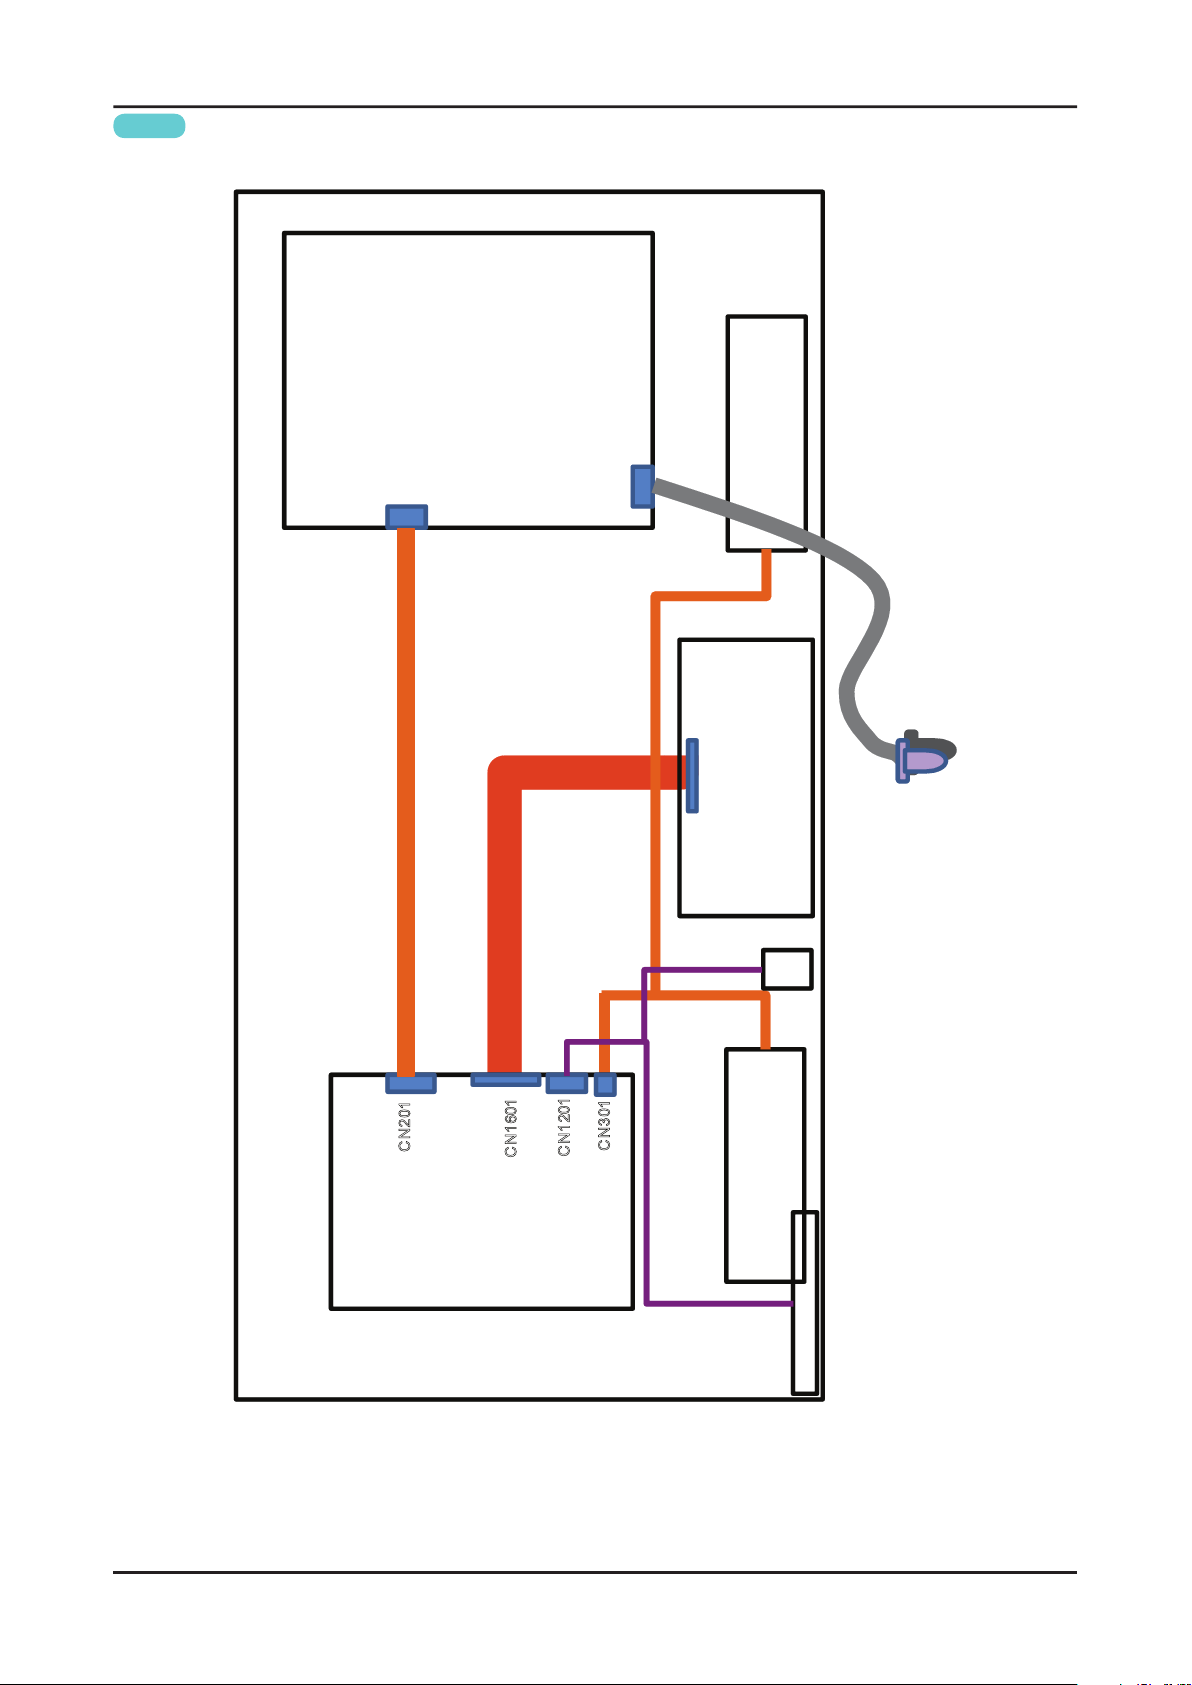
Main Board
T- CON
SMPS
SPEAKER
SPEAKER
Function
C N201
C N1601
C N1201
C N301
Power cord
B
T
5-2
5. Wiring Diagram
For 55"
Page 87
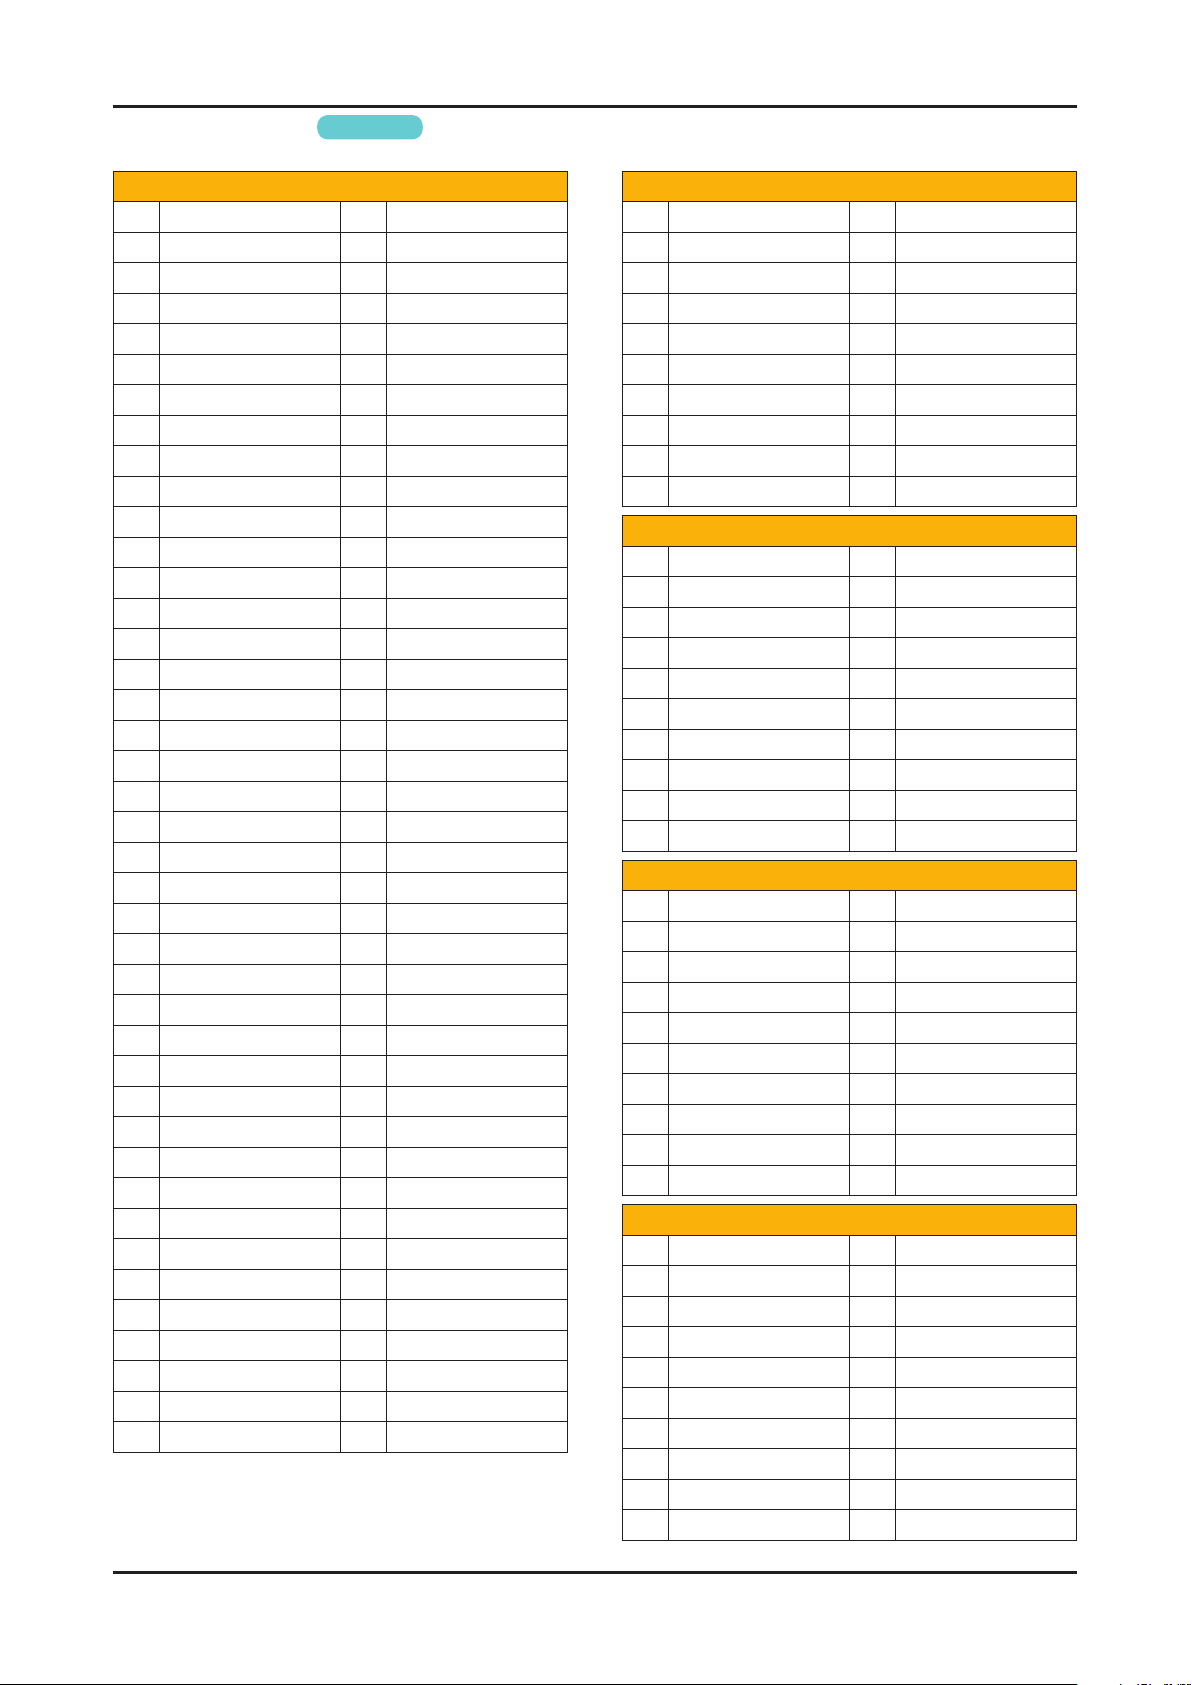
5-3
5. Wiring Diagram
5-2. Connector
For common
CN1601_FHD (to Panel)
1 NC 42 TX1_AN
2 GND 43 GND
3 TCON_EEPROM_WP 44 GND
4 BLACK_INS_SYNC 45 GND
5 TCON_RESET 46 NC
6 NC 47 PANEL_VCC
7 GND 48 PANEL_VCC
8 SDA_TCON 49 PANEL_VCC
9 PANEL_WP 50 PANEL_VCC
10 LUT_SELECT0 51 PANEL_VCC
11 3D_ENABLE 52 GND
12 SCL_TCON 53 TX2_AN
13 GND 54 TX2_AP
14 TX3_EP 55 TX2_BN
15 TX3_EN 56 TX2_BP
16 TX3_DP 57 TX2_CN
17 TX3_DN 58 TX2_CP
18 GND 59 GND
19 TX3_CLKP 60 TX2_CLKN
20 TX3_CLKN 61 TX2_CLKP
21 GND 62 GND
22 TX3_CP 63 TX2_DN
23 TX3_CN 64 TX2_DP
24 TX3_BP 65 TX2_EN
25 TX3_BN 66 TX2_EP
26 TX3_AP 67 GND
27 TX3_AN 68 TX4_AN
28 GND 69 TX4_AP
29 TX1_EP 70 TX4_BN
30 TX1_EN 71 TX4_BP
31 TX1_DP 72 TX4_CN
32 TX1_DN 73 TX4_CP
33 GND 74 GND
34 TX1_CLKP 75 TX4_CLKN
35 TX1_CLKN 76 TX4_CLKP
36 GND 77 GND
37 TX1_CP 78 TX4_DN
38 TX1_CN 79 TX4_DP
39 TX1_BP 80 TX4_EN
40 TX1_BN 81 TX4_EP
41 TX1_AP 82 GND
CN602(to HDMI1)
1 HDMI1_RX2+ 11 GND
2 GND 12 HDMI1_RXCLK-
3 HDMI1_RX2- 13 HDMI_CEC
4 HDMI1_RX1+ 14 GND
5 GND 15 HDMI1_DDC_SCL
6 HDMI1_RX1- 16 HDMI1_DDC_SDA
7 HDMI1_RX0+ 17 GND
8 GND 18 HDMI1_5V
9 HDMI1_RX0- 19 HDMI1_HPD
10 HDMI1_RXCLK+
CN603(to HDMI2)
1 HDMI2_RX2+ 11 GND
2 GND 12 HDMI2_RXCLK-
3 HDMI2_RX2- 13 HDMI_CEC
4 HDMI2_RX1+ 14 GND
5 GND 15 HDMI2_DDC_SCL
6 HDMI2_RX1- 16 HDMI2_DDC_SDA
7 HDMI2_RX0+ 17 GND
8 GND 18 HDMI2_5V
9 HDMI2_RX0- 19 HDMI2_HPD
10 HDMI2_RXCLK+
CN604(to HDMI3)
1 HDMI3_RX2+ 11 GND
2 GND(MHL_AON) 12 HDMI3_RXCLK-
3 HDMI3_RX2- 13 HDMI_CEC
4 HDMI3_RX1+ 14 GND
5 GND 15 HDMI3_DDC_SCL
6 HDMI3_RX1- 16 HDMI3_DDC_SDA
7 HDMI3_RX0+ 17 GND
8 GND 18 HDMI3_5V
9 HDMI3_RX0- 19 HDMI3_HPD
10 HDMI3_RXCLK+
CN601(to HDMI4)
1 HDMI3_RX2+ 11 GND
2 GND(MHL_AON) 12 HDMI3_RXCLK-
3 HDMI3_RX2- 13 HDMI_CEC
4 HDMI3_RX1+ 14 GND
5 GND 15 HDMI3_DDC_SCL
6 HDMI3_RX1- 16 HDMI3_DDC_SDA
7 HDMI3_RX0+ 17 GND
8 GND 18 HDMI3_5V
9 HDMI3_RX0- 19 HDMI3_HPD
10 HDMI3_RXCLK+
Page 88
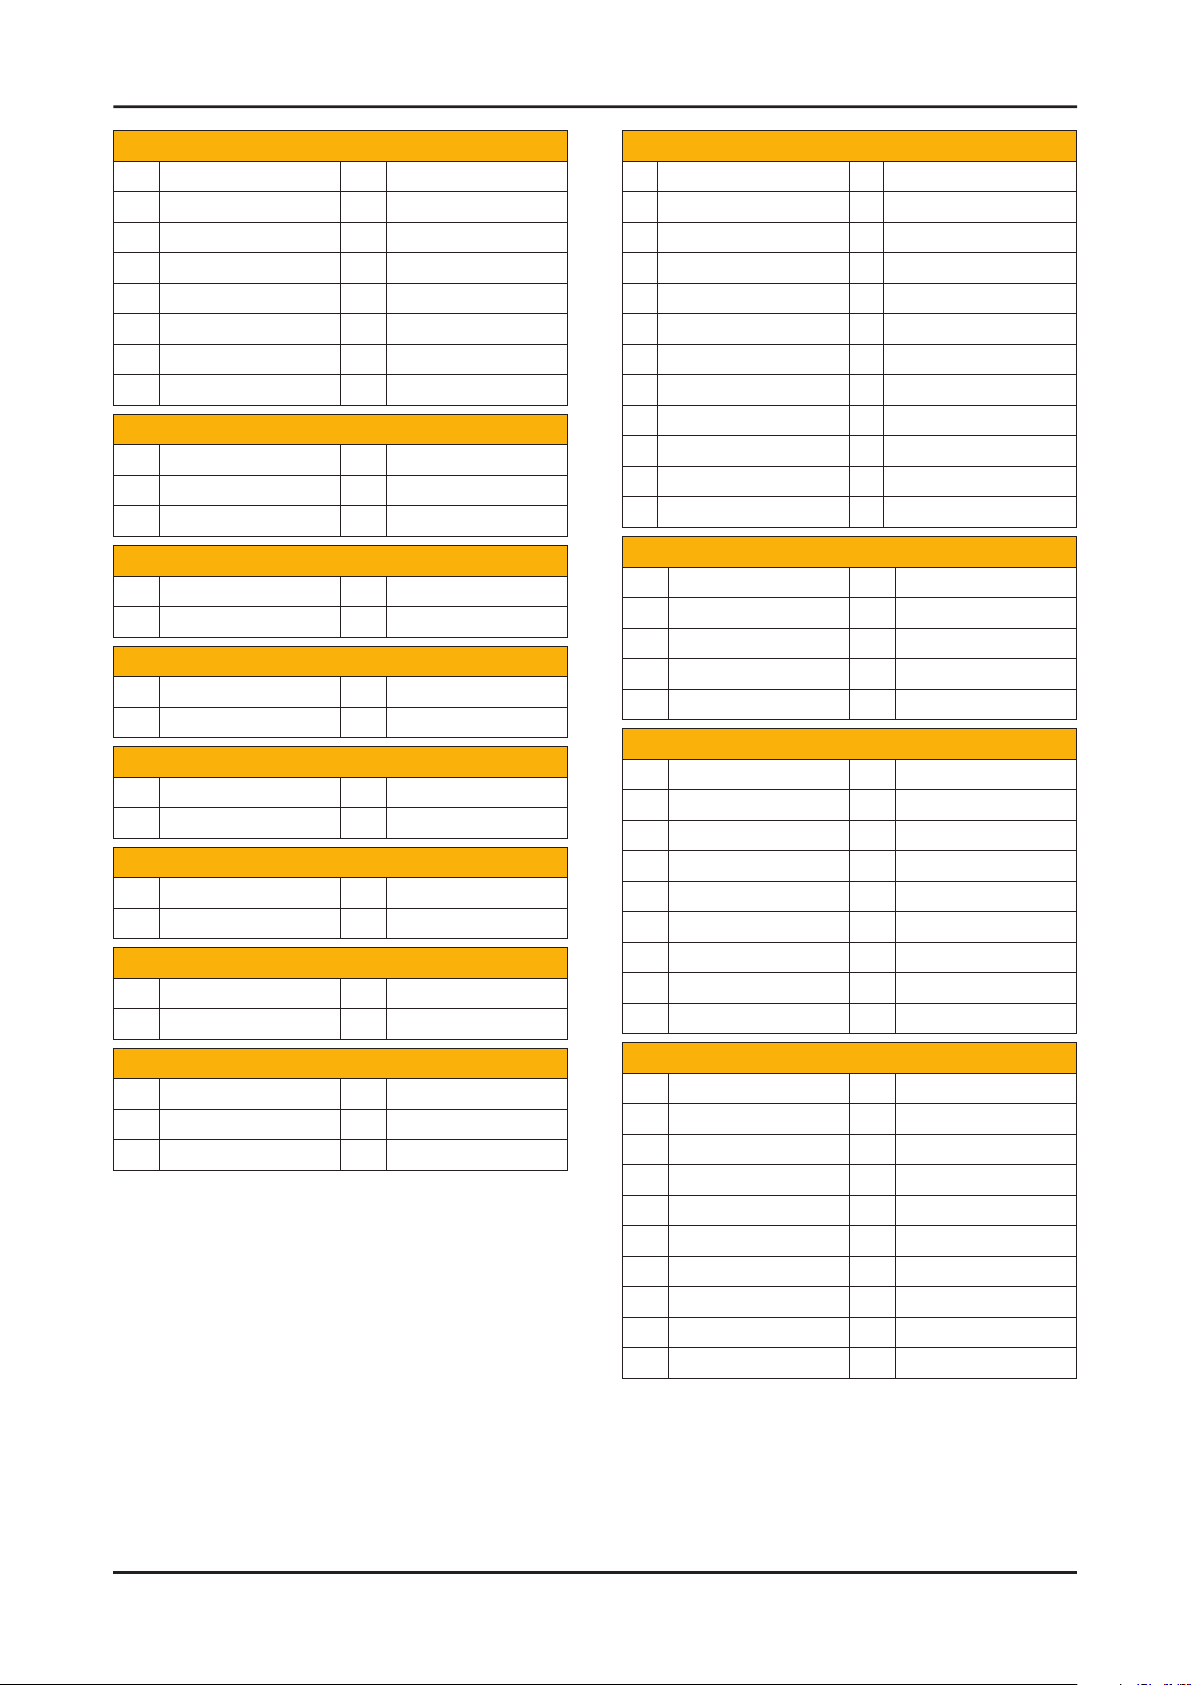
5-4
5. Wiring Diagram
CN401(to PC)
1 PC_RED 9 PC_5V
2 PC_GREEN 10 IDENT_PC
3 PC_BLUE 11 NC
4 NC 12 SDA_DOWN
5 GND 13 PC_H_SYNC
6 GND 14 PC_V_SYNC
7 GND 15 SCL_DOWN
8 GND
CN402(to PC Sound)
1 GND 4 NC
2 PC_SL_IN 5 NC
3 PC_SR_IN 6 NC
CN301(to Speaker)
1 R+ 3 L+
2 R- 4 L-
CN303(to Optical Jack)
1 SPDIF_OUT 3 GND
2 VCC
CN1502(to Side USB1)
1 USB0_VCC_PW 3 USB_DP
2 USB0_DM 4 GND
CN1501(to Side USB2)
1 USB2_VCC_PW 3 USB2_DP
2 USB2_DM 4 GND
CN1505(to Side USB3)
1 USB3_VCC_PW 3 USB3_DP
2 USB3_DM 4 GND
CN503_EU(to SCART)
1 GND 13 NC
2 GND 14 SC1_G
3 GND 15 GND
4 GND 16 NC
5 SC1_AV_CVBS_IN 17 IDENT_SC1_AV
6 GND 18 SC1_B
7 SC1_CVBS_OUT 19 GND
8 GND 20 SC1_AV_SL_IN
9 SC1_FB 21 SC1_AC_SR_IN
10 GND 22 GND
11 SC1_R 23 SC1_SL_OUT
12 GND 24 SC1_SR_OUT
CN404(to Component & AV)
1 GND 6 GND
2 COMP_Y_AV1 7 IDENT_COMP
3 COMP_PB 8 AV1_SL_IN
4 IDENT_AV1 9 AV1_SR_IN
5 COMP_PR
CN401(to Function/IR)
1 IR 10 USB_BT_DM
2 FRAME_SYNC_IN 11 WAKE
3 GND 12 A5V
4 3D_SYNC_BT 13 A3.3V
5 A3.3V 14 LED_STB
6 GND 15 IR_SYNC
7 MSCL_A5V 16 POWER_DET
8 USB_BT_DP 17 GND
9 MSDA_A5V 18 NC
CN502(to Headpune&Monitor OUT)
1 GND 4 IDENT_HP
2 HP_LINE_SL_OUT 5 GND
3 HP_LINE_SR_OUT 6 HP_LINE_SL_OUT
CN201(to Power board)
1 B5V 11 B13V
2 SW_POWER_OUT 12 B13V
3 B5V 13 B13V
4 A5V 14
5 GND 15
6 GND 16
7 B18VS 17
8 DGND 18
9 B18VS 19 OVD_LEVEL
10 SW_INVERTER 20
PWM_DIM1_CPLD_OUT
GND
PWM_DIM2_CPLD_OUT
OVD_ON
PWM_DIM3_CPLD_OUT
PWM_DIM4_CPLD_OUT
Page 89
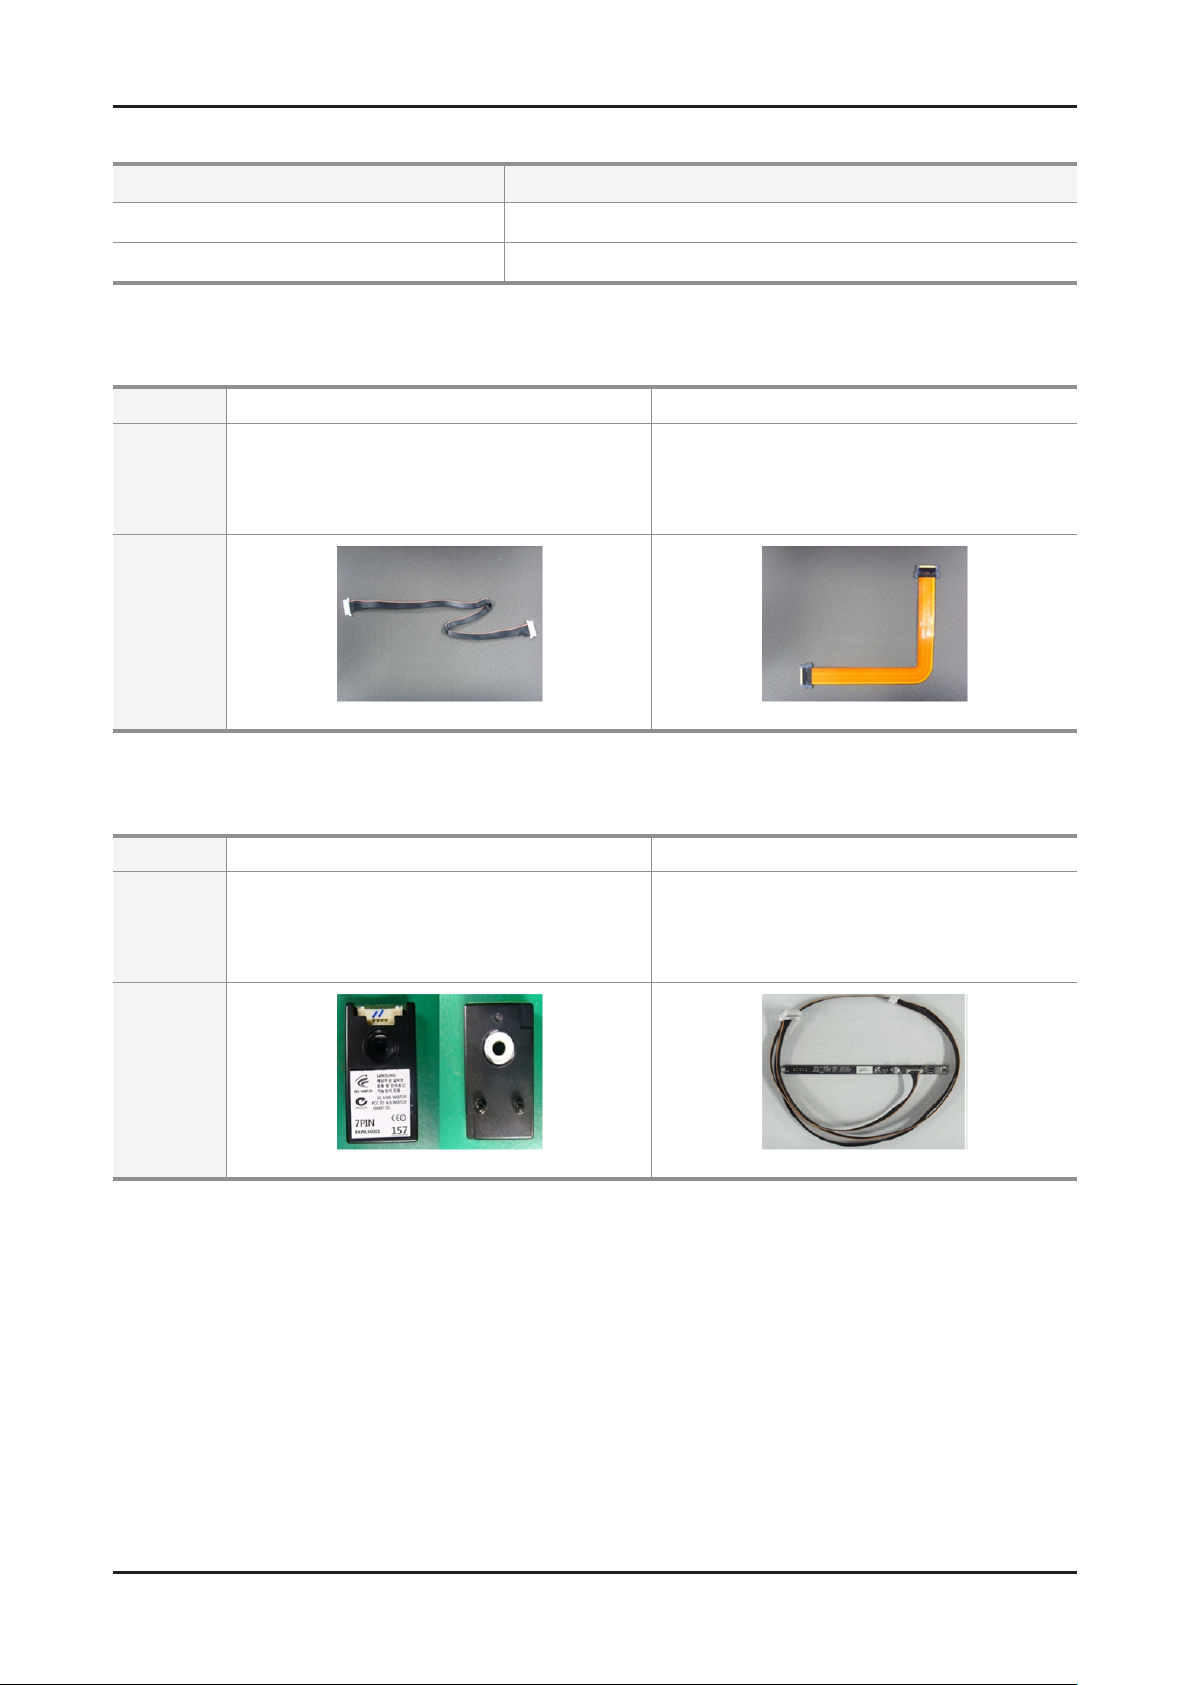
5-3. Connector Functions
5-5
5. Wiring Diagram
Connector Functions
CN201 CN803
CN1601 J101
Supply power from SMPS to Main Board.
The LVDS signal transfered from Main Board to Panel.
5-4. Cables
Use Main-SMPS Main-Tcon
Code
Photo
32" : BN39-01486A
37" : BN39-01486C
40" : BN39-01486B
46" : BN39-01486D
55" : BN39-01486E
32" : BN96-18130A
37" : BN96-18130G
40" : BN96-18130B
46" : BN96-18130C
55" : BN96-18088A
5-5. Types of module
Use Bluetooth module IR/Function module
32" : BN96-16729Q
Code
Photo
BN96-17107A
37" : BN96-16729U
40" : BN96-16729R
46" : BN96-16729S
55" : BN96-16729T
 Loading...