

Samsung SX10 Users Manual

Using Your Documentation
Congratulations on your purchase of a notebook computer with the Windows® XP
operating system. Whether you are new to using a portable computer or are an
experienced user, this user’s manual can help you get the most from your computer.
Manual Documentation Conventions
Information Icons
Three icons and their associated messages appear in this manual. The information
icons are placed before the step/information they apply to:
Warning:
Indicates the possibility of personal injury.
Caution:
Warns you of possible damage to equipment or data.
Note:
Informs you of special circumstances.
Technical Information:
Informs you of special requirements or limitations for use of item(s).
Keyboard Conventions
Keys that you need to press to perform certain functions are displayed in the manual in
brackets. For example:
<Ctrl> indicates the control key (Ctrl on the keyboard).
If you need to press two keys at the same time, the key names are shown joined by a
plus sign. For example:
<Fn+F8> means that you should press the Fn key and hold it and then press the F8
key.
Using Your Documentation 1

CD-ROM Device Naming Convention
In many installation programs you will have to get a program from the CD-ROM
device. The program installation sequence assumes that the CD is drive d:\, however
this is not always the case. The name of the CD-ROM drive is the letter following the
letter assigned to your last HDD. For instance, if you have one HDD with two
partitions, the HDD is drives C: and D: and the CD-ROM drive is then drive E.
Touchpad Conventions
You may be asked to click or double-click on items on the display screen. As a general
note the touchpad actions act much in the same way as a wheel mouse, any differences
are explained fully.
The object that needs to be clicked upon will be displayed in Bold text or shown in a
small figure such as the “Start Button” shown on the right =>.
Table 1. Touchpad Click Conventions
Action Process
Click Depress the touchpad left button and release
Double-click Quickly click the left touchpad button two times
Windows Conventions:
Almost all “Windows” programs will display the name/function of a button or
icon if you place the touchpad pointer on the item you want information about.
Software User Documentation
Your computer is shipped from the factory with several software programs installed.
The software may include its own online or printed documentation. Refer to the
documentation or the Help options in the software for more information.
The figures and illustrations in this manual may not be identical to those on
your system.
General Icon Note:
Some of the Icons used in Windows XP may be placed on the taskbar by
selecting (ex: Place the volume icon in the taskbar) in the properties dialog
box.
2 Users Manual

Getting Started
Introducing Your Computer
The next section will explain the location of all of the buttons, status indicators and
equipment needed to operate your notebook computer.
Front
LCD Latch
Hot Keys (p14)
Status Indicators (p16)
Power Button
Scroll Wheel
Speaker
Memory Stick Slot (option, p30)
Keyboard (p8)
Touchpad (p11)
Touchpad Buttons
Speaker
Status Indicators (p16)
Getting Started 3
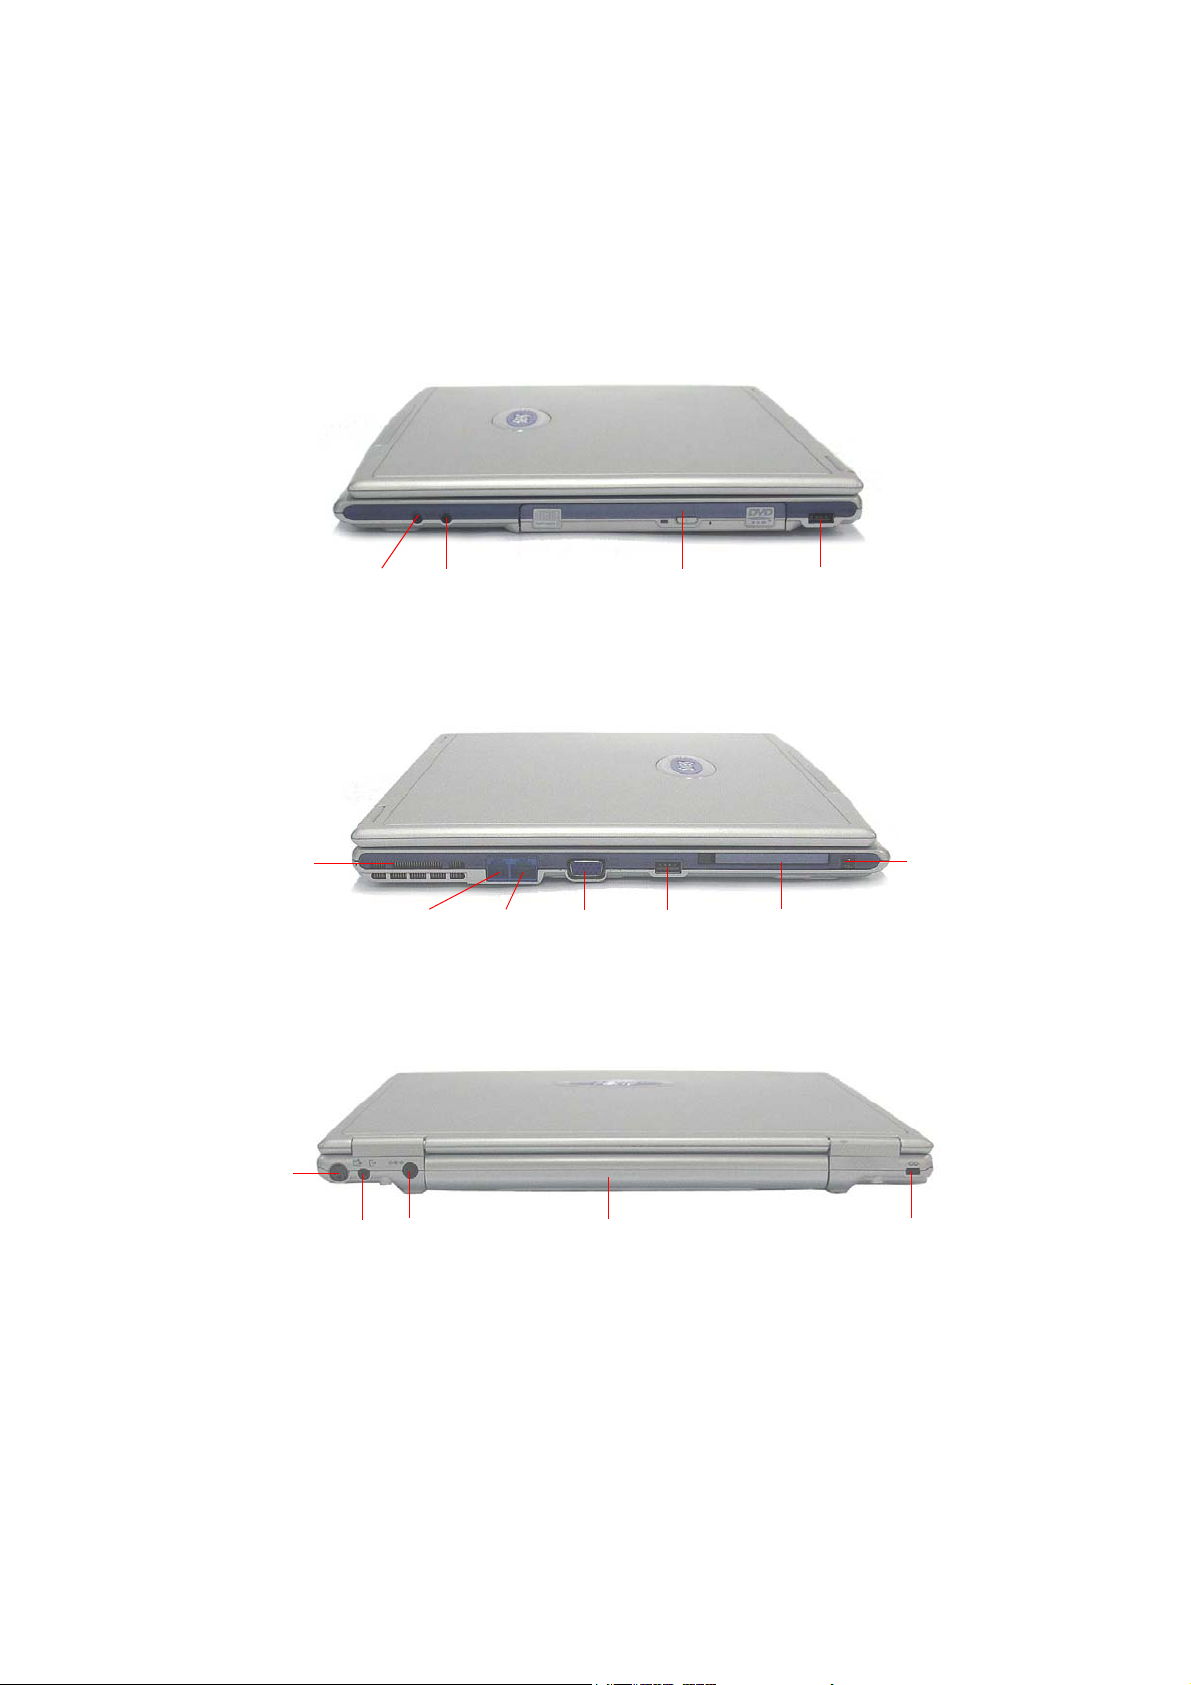
Right Side
Fan Vent
Earphone Jack
Left Side
Modem Port
(p31)
Back Side
Microphone Jack
LAN Port
(p32)
CD Drive (option, p21)
VGA Port
USB Port
1394 Port
USB Port PCMCIA Slot (p29)
TV-Out
Port
(S-VHS)
S/PDIF Jack
(p26)
4 Users Manual
DC Jack
Battery (p66)
Security Lock Port (p78)

Bottom
Mini-PCI
Compartment*
HDD
Compartment
(p72)
Battery Latches
* Wireless communication module(option, p35) is installed in the mini PCI compartment.
Memory
Compartment
(p73)
Getting Started 5
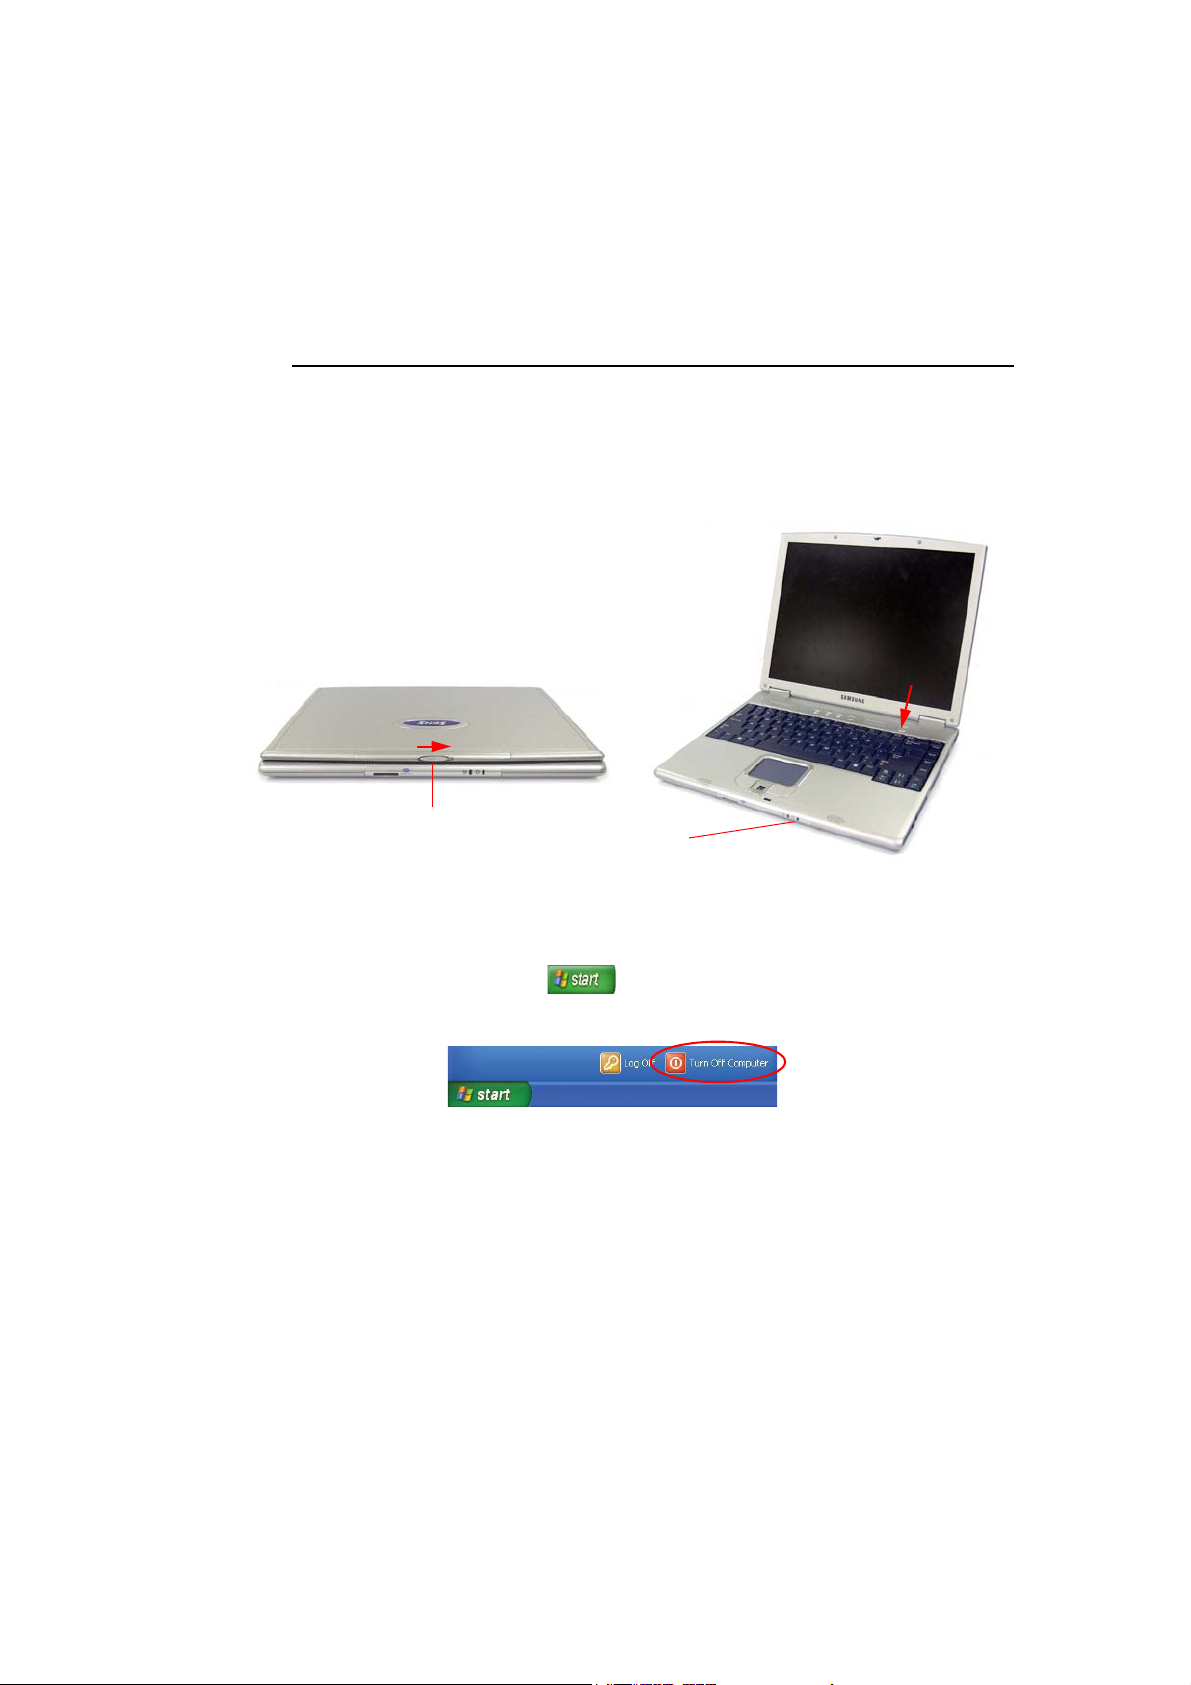
Turning the Computer On and Off
To turn on the computer
1. Insert the battery and connect the AC adapter according to the Installation Guide.
2. Slide the LCD latch to the right and open the LCD panel.
3. Press the power button.
Power
Button
LCD Cover Latch
Power LED
To turn off the computer
1. Click the start button ( ) on the taskbar.
2. Click Turn Off Computer.
6 Users Manual

3. Click Turn Off.
If the computer is not turned off properly due to a system error, press
<Ctrl>+<Alt>+<Delete>. When [Windows Task Manager] dialogs appears,
click Shut Down > Turn Off to turn off the computer. Your unsaved work may
be damaged.
If <Ctrl>+<Alt>+<Delete> keys do not operate either, press the power button
for more than 4 seconds to turn off the computer. Your unsaved work may be
damaged. When you turn on the computer next time, it will perform a disk
checking process.
Getting Started 7

Using the Keyboard
Your computer has an 87/88-key keyboard. By pressing designated key combinations,
you can have access to all the key functions of a full-sized keyboard.
Function & Special Purpose Keys
Function
Key
Windows
The keys on the keyboard can be grouped into the following categories:
8 Users Manual
Key
Embedded Numeric Keypad
Although the layout of the keys on your computer’s keyboard is different from
that on a desktop computer’s keyboard, the keyboard feels like a full-sized
keyboard when you use it.
Application Key
Cursor/Screen
Control Keys
x Full-sized Alphanumeric typewriter keys are arranged like a standard
typewriter keyboard and are used for text entry. The Windows keys on either
side of the spacebar open Windows menus and perform other special functions.
x Function keys, when pressed together with the <Fn> key, enable special
functions.
x Cursor and Screen control keys move the cursor. They may perform other
functions, depending on your software.
To clean the computer keyboard, use slightly damp cotton swabs. Scrub the keys and
the surface around the keys.
Do not allow liquid to drip into the keyboard or you may damage the keyboard.
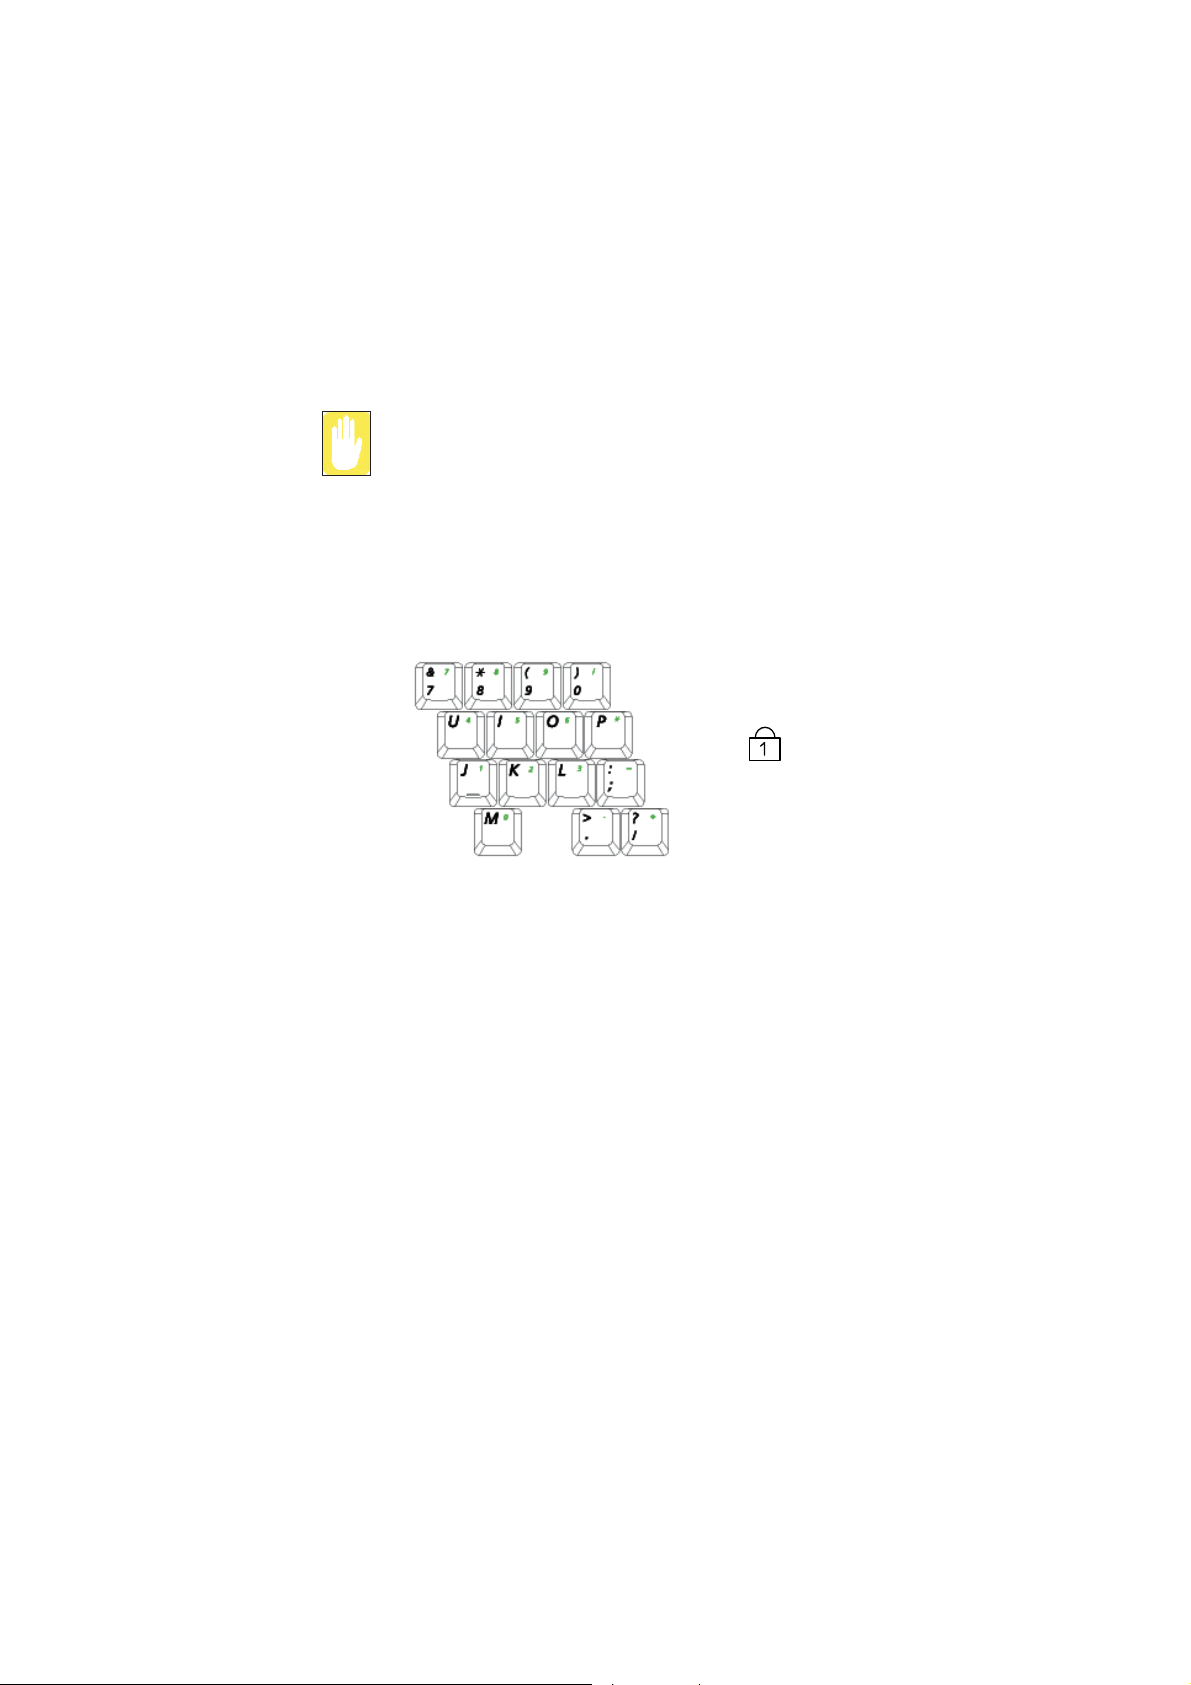
Using the Numeric Keypad
Your keyboard includes a numeric keypad, which is a group of keys that you can set to
type numbers and mathematical symbols, such as the plus sign. A number or symbol
on the left corner of each keypad key shows its numeric function.
Num Lock LED
Press <Fn+F11> to turn on the embedded numeric keypad. The numeric functions of
the keypad are enabled and the Num Lock LED turns on. (See ”Reading the Status
Indicators” on page 16 for the location of the Num Lock LED.)
While the numeric functions are enabled, you can temporarily return a key to its normal
function by pressing the key and the <Fn> key. For example to type the letter m, press
<Fn+M>, this operation displays the letter m.
To turn the numeric keypad off, press <Fn+F11> again. The Num Lock LED turns off.
Getting Started 9

Using Special Function Keys
The function key activates special functions when it is pressed in combination with
another keys. Table 2 shows the special key combinations.
Table 2. Description of Special Function Key Combinations
<Fn> Key
Combinations
<Fn+Esc> Esc
<Fn+F2> F2
<Fn+F4> F4
<Fn+F6> F6
Key Name Key Function
Rest
Gauge
LCD/CRT
Mute
Rest Puts the computer into Suspend mode. To resume
Gauge Displays the battery gauge and the power source in
LCD/CRT Switches the display between the LCD, the external
Mute Mutes the audio.
normal operation from rest, press the power button.
the upper-left corner of your screen. The gauge
closes in a few seconds.
display device, and simultaneous display on both the
LCD and the external display device.
<Fn+F7> F7
<Fn+F11> F11
<Fn+F12> F12
<Fn+Up Arrow> Up Arrow Brightness UpIncreases the LCD brightness.
<Fn+Down Arrow> Down Arrow Brightness
<Fn+Right Arrow> Right Arrow Volume Up Increases the audio volume.
<Fn+Left Arrow> Left Arrow Volume
S/PDIF
Num Lock
Scroll
S/PDIF Toggles the S/PDIF function On/Off.
Num Lock Activates the numeric keypad.
Scroll In some applications, sets the cursor-control keys to
Down
Down
scroll the page up or down while the cursor position
does not change. Pressing key combination again
turns off the scrolling function.
Decreases the LCD brightness.
Decreases the audio volume.
When you press a function key combination, the system sound may be
temporarily muted.
10 Users Manual

Using the Touchpad
On Windows, you always see a small graphical image on the screen that indicates the
location where you can take the next action. This image is called a pointer, and is
usually displayed in arrow shape ( ) or ‘I’ shape ( ).
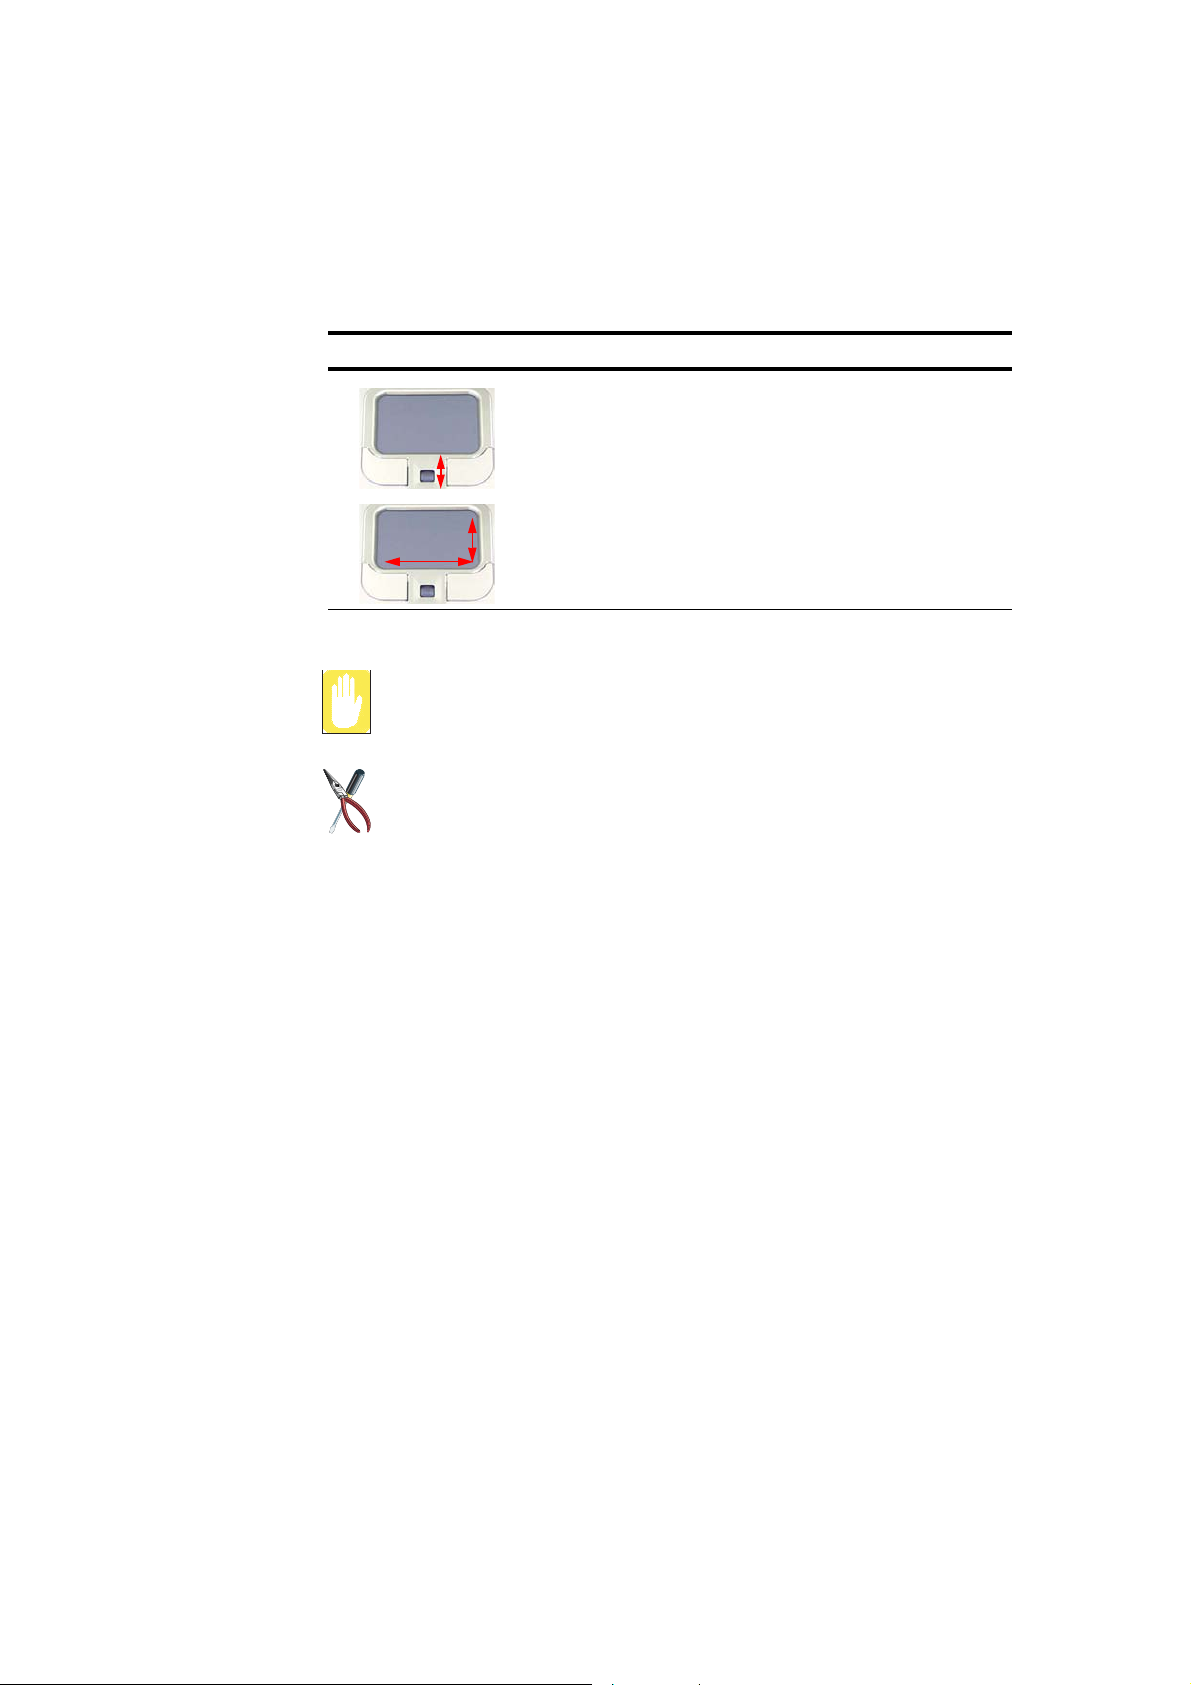
Touchpad
Touchpad Buttons
Scroll Wheel or Fingerprint Sensor
The touchpad on your computer allows you to move the pointer on the LCD screen,
just like a mouse that is used with a desktop computer. The touchpad buttons allow you
to take actions with the pointer, such as selecting an item or executing a command. The
scroll wheel between the touchpad buttons moves the displayed area up and down
within a window.
Getting Started 11

You can use various actions with your touchpad as described below.
d
Action Function Process
Move Move the pointer Place your finger on the touchpad
and slide your finger to a
destination.
Click Select an object, open a menu, or
execute a button
Double-Click Launch a program or open a file Place the pointer over an object,
Right-Click Display a short cut menu Place the pointer over an object,
Place the pointer over an object,
then press left touchpad button
once.
Or, place the pointer over an
object, then tap the touchpad once
with your finger.
then quickly press left touchpad
button twice.
Or, place the pointer over an
object, then quickly tap the
touchpad twice with your finger.
then press right touchpad button
once
Drag
12 Users Manual
Move an object, or select an area
or multiple objects
Place the pointer over an object or
on a starting location.
While pressing the left touchpad
button, press down on the
touchpad and slide your finger to a
destination or ending location.
Action Function Process
Scroll Display upper/lower/left/right part
of the content within a window
(Applicable to only some
programs)
Place your finger on the scroll
wheel, and roll the wheel up or
down.
Or, place your finger on the right
edge or bottom edge of the
touchpad and move vertically or
horizontally.
Make sure to use your finger to move the pointer with the touchpad. Do not
use any sharpened tool because it may damage your touchpad.
Scroll Wheel Use
If the scroll wheel does not function properly, install the scroll wheel driver
provided on the Software CD.
Getting Started 13

Hot Keys
You may program the four keys to the left of the power button to start any program you
have installed on your computer.
The default settings for these keys are:
Icon Name Function
Internet Key Launches Internet Explorer.
E-Mail Key Launches Outlook Express.
User Key Executes user-defined action.
14 Users Manual
WLAN/Bluetooth
On/Off Key
Turns WLAN/bluetooth on and off.
(If you do not have WLAN/Bluetooth module installed, an additional
User Key is provided instead.)
What is Bluetooth?
Bluetooth is a worldwide standard for the wireless exchange of data between
two devices.
Using Wireless LAN/Bluetooth Key
Loading or unloading wireless LAN/Bluetooth driver takes about 5 seconds.
Therefore, if you turn wireless LAN/Bluetooth on/off using the wireless LAN/
Bluetooth key, the button does not work in 5 seconds. (For wireless LAN/
Bluetooth installed models)
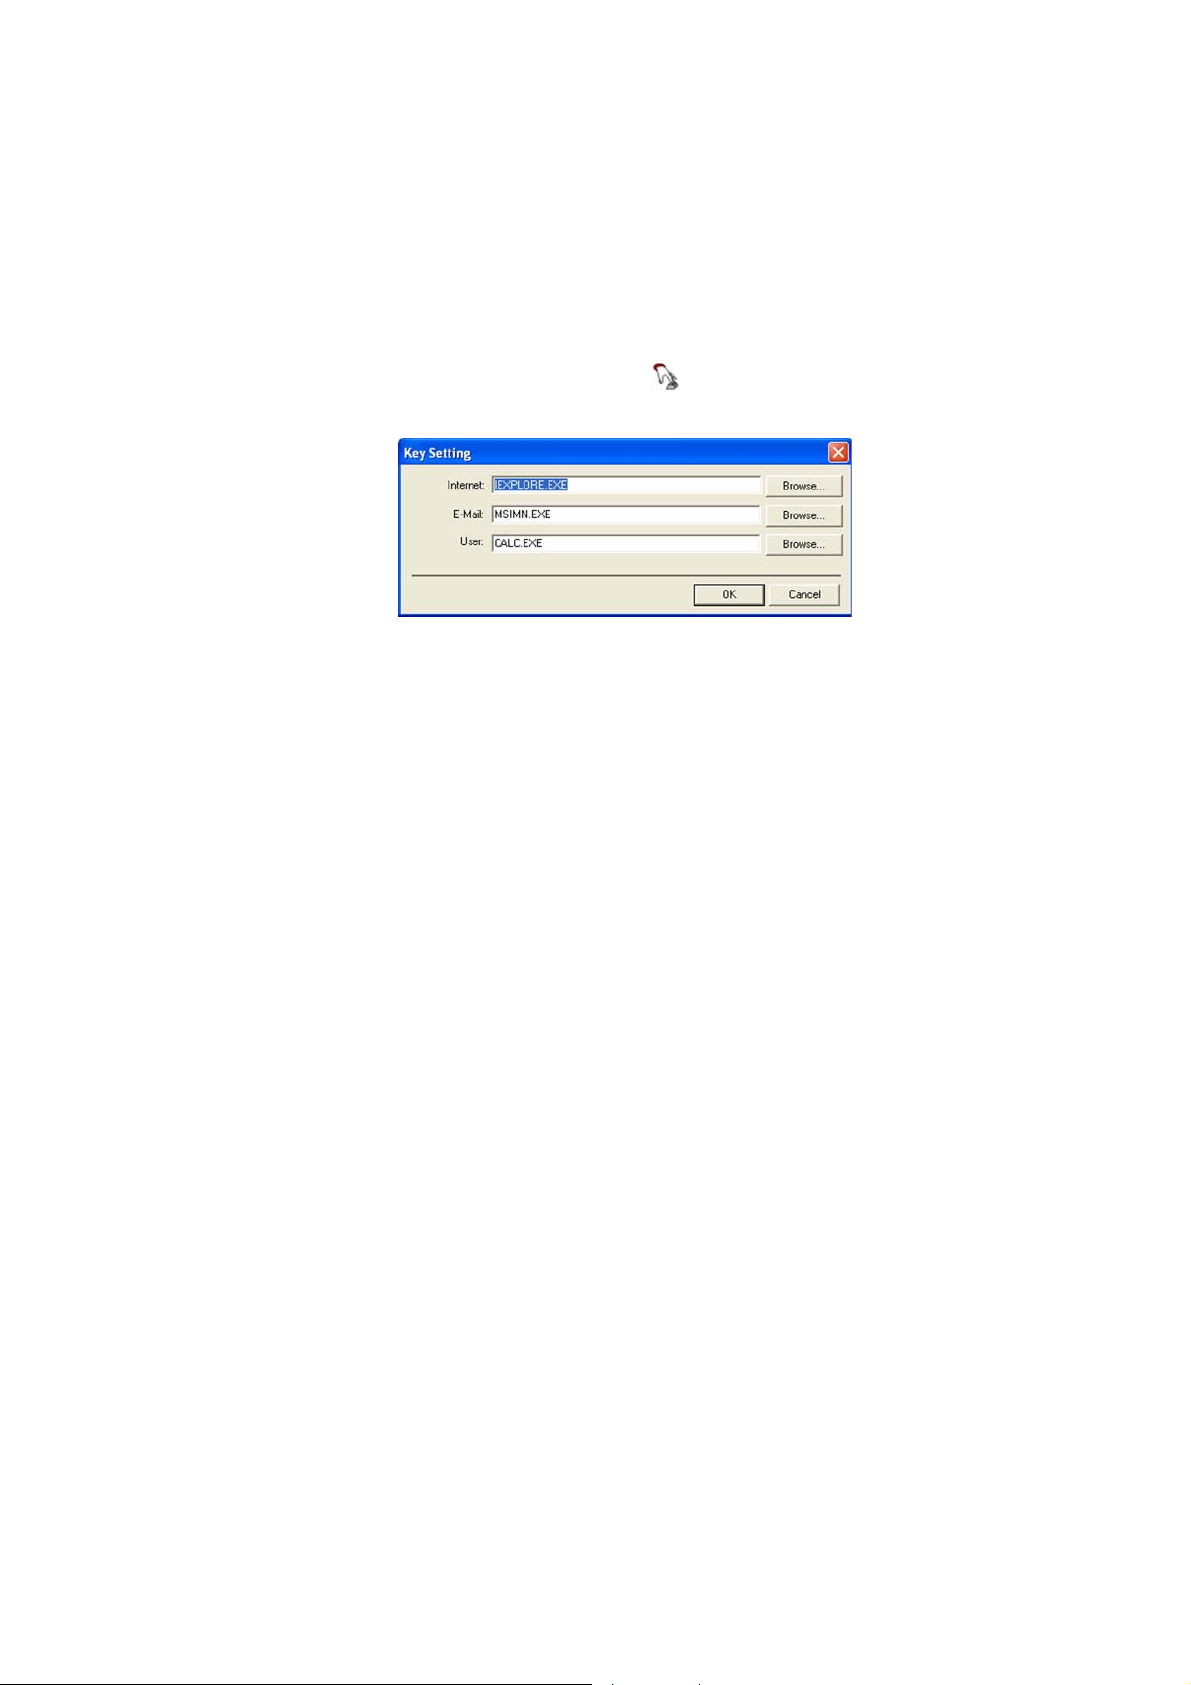
To reprogram a hot key
1. Double-click Sens Keyboard icon ( ) on the taskbar.
2. Select a key and click Browse to locate the program you wish to assign to the key.
3. Click on your program choice to select it. Click Open.
4. Click OK.
Getting Started 15

Reading the Status Indicators
System Status lights show the status of computer functions.
System Top
LED Name Function
Num Lock Changes a portion of the keyboard to a numeric keypad.
Caps Lock Changes all alphabet letter input into capital letters.
Scroll Lock Scroll lock in certain software.
HDD Access Blinking Green - HDD is being accessed.
System Bottom
See ”Using the Numeric Keypad” on page 9.
No changes occur to numeric and special keys.
LED Name Function
16 Users Manual
Battery Status Green - No battery pack installed/battery fully charged.
Power Green - System power on.
Amber - Charging.
Blinking - Bad Battery.
Blinking - Standby mode.
 Loading...