

Page 1

Digital Video Recorder User’s Manual
1
Page 2

Introduction
Thank you for purchasing the SVR-940/450.
This is a user manual for SVR-940/450. Before product installation and operation, please become
thoroughly familiar with this user manual and other manuals referenced by this manual.
This user manual and the software and hardware described here are protected by the copyright
law. Therefore, with the exception of copying for general use within the copyright law, copying
and reprinting the user manual, either partially or in its entirety, or translating it into another
language without the consent of Samsung Techwin, Inc. is prohibited.
This specification may be changed without prior notice for improvement of product performance.
Product warranty and limits of responsibility
The manufacturer does not assume any other responsibility concerning the sale of this product
and does not delegate any right to a third party to take any responsibility on its behalf. Product
warranty does not cover cases of accidents, negligence, alteration, misuse or abuse. In addition,
no warranty is offered for any attachments or parts not supplied by the
manufacturer.
The warranty period for this product will be for 3 years from the date of purchase.
The following cases are not covered by the warranty and payment is required for repairs.
• Malfunction due to negligence in handling by the user
• Deliberate disassembly and replacement by the user
• Connection of a power source other than a properly rated power source
• Malfunction caused by natural disasters (re, ood, tidal wave, etc.)
• Replacement of expendable parts(HDD, FAN, etc.)
Warranty only refers to the warranty covering products that have been paid for.
After expiration of the warranty period (3 years), examination and repair will be provided for
a fee. Even during the warranty period, repair and examination of items outside the preceding
warranty scope will require a payment.
Please inquire at the point of purchase or the local service center for repairs requiring a
payment.
* This manual is made by firmware version 1.0.0 basis.
Digital Video Recorder User’s Manual
2
Page 3

Table of contents
Introduction ····························································································································································2
Product warranty and limits of responsibility ····························································································2
Chapter 1. Safety Cautions ·······························································································································5
Chapter 2. Summary ············································································································································7
2.1 Features ·····························································································································································7
2.2 Contents ····························································································································································9
2.2.1 Control panel on the front ··················································································································9
2.2.2 Rear Connection terminals ···············································································································12
2.2.3 Remote controller·································································································································13
2.3 Specification···············································································································································13
Chapter 3. installation ·······································································································································18
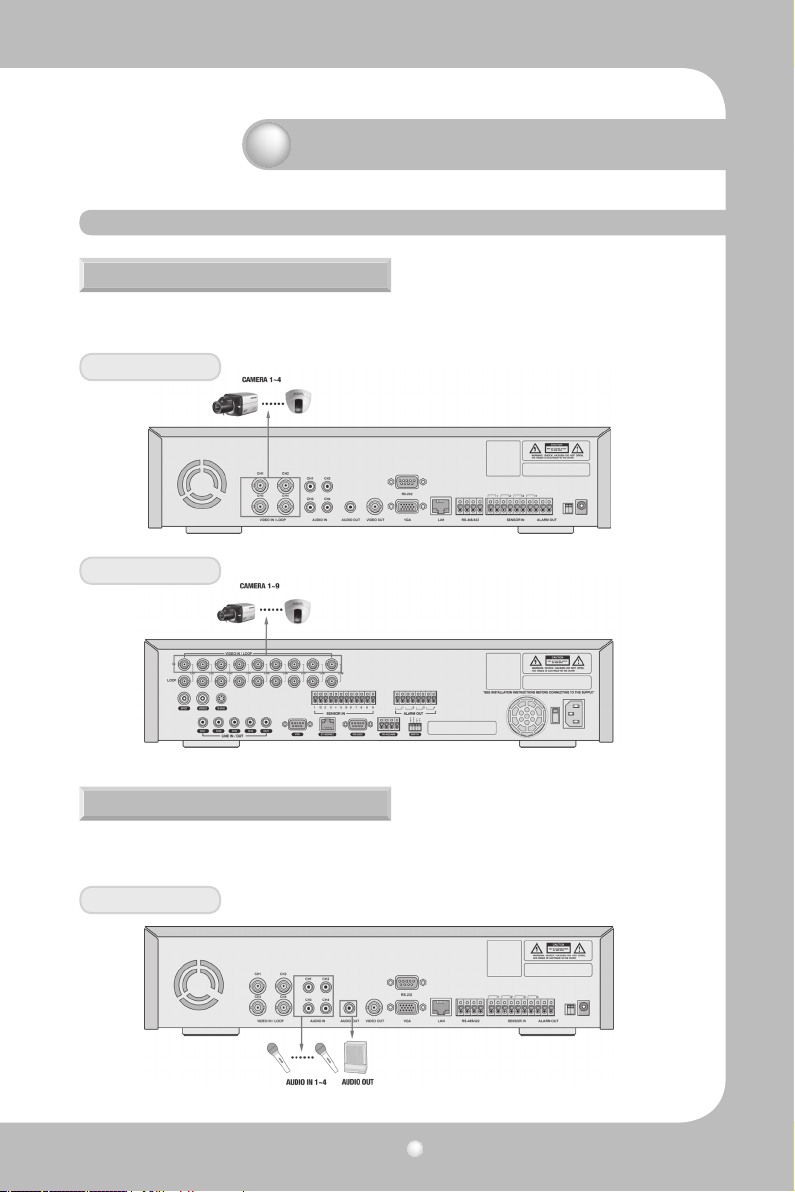
3.1 How to connect all parts ···························································································································18
3.2 Detailed connection ···································································································································19
3.2.1 Camera ······················································································································································19
3.2.2 Audio ·························································································································································19
3.2.3 Monitor ·····················································································································································20
3.2.4 External connector ·······························································································································21
Chapter 4. Operating ·········································································································································25
4.1 Checklist before operation ·······················································································································25
4.2 Power connection········································································································································26
4.3 Live monitoring screen ······························································································································26
4.3.1 Function of screen display ····················································································································27
4.3.2 Automatic channel rotation ·················································································································27
4.4 Recording ························································································································································28
4.4.1 Normal recording ·································································································································28
4.4.2 Scheduled recording ···························································································································28
4.5 Search ·······························································································································································29
4.5.1 Event search ············································································································································29
4.5.2 Timeline search ······································································································································29
4.5.3 Go To search ···········································································································································30
4.5.4 Go first search ········································································································································30
4.5.5 Go last search ·········································································································································30
4.5.6 Log file search ········································································································································31
4.5.7 COPY List ··················································································································································31
4.6 Playback···························································································································································33
4.7 PTZ ·····································································································································································33
4.7.1 PAN/TILT ···················································································································································34
4.7.2 ZOOM/FOCUS ········································································································································34
4.7.3 INITIALIZE·················································································································································34
4.8 DVR Backup File Player ······························································································································35
Chapter 5. Conguration ··································································································································37
5.1 Menu configuration ····································································································································37
5.2 Default Setup ················································································································································39
Digital Video Recorder User’s Manual
3
Page 4

Table of contents
5.3 Menu Screen Setup ·····································································································································42
5.4 SCREEN SETUP ··············································································································································43
5.4.1 CH1~CH4 / CH1~CH9 (for SVR-940) ······························································································43
5.4.2 AUTO SEQUENCE ··································································································································44
5.4.3 STATUS DISPLAY ····································································································································44
5.4.4 SPOT ···························································································································································45
5.5 RECORD SETUP ·············································································································································46
5.5.1 GENERAL SETUP ····································································································································46
5.5.2 DETAIL SETUP ········································································································································47
5.6 EVENT SETUP ·················································································································································48
5.6.1 EVENT ························································································································································48
5.6.2 MOTION DETECTION ···························································································································49
5.6.3 TEXT ···························································································································································49
5.6.4 POS quick guide ····································································································································50
5.6.5 RELAY ·························································································································································51
5.7 NETWORK ·······················································································································································52
5.7.1 NETWORK ················································································································································52
5.7.2 DDNS Register········································································································································52
5.7.3 Client access ···········································································································································53
5.7.4 RS-232 ·······················································································································································54
5.7.5 RS-422/485 ··············································································································································54
5.7.6 E-MAIL ·······················································································································································54
5.8 DDNS Registration ·······································································································································55
5.8.1. DDNS Registration procedure ·········································································································55
5.9. Instructions on using DDNS ····················································································································59
5.10 Editing registered product ····················································································································61
5.11 System setting ············································································································································62
5.11.1 System ····················································································································································62
5.11.2 HDD ·························································································································································63
5.11.3 Password ···············································································································································64
5.11.4 User Authentication ··························································································································64
5.11.5 CLOCK SETUP ·······································································································································65
5.12 PTZ ·································································································································································67
5.12.1 Setting for each channel ·················································································································67
5.13 EXIT MENU ···················································································································································67
5.14 ETC ··································································································································································68
5.14.1 Firmware Upgrade ·····························································································································68
5.14.2 Index Start Fail ·····································································································································69
Chapter 6. Web-Viewer ·····································································································································70
6.1 Log page ·························································································································································71
6.2 LIVE mode ·······················································································································································71
6.3 SEARCH mode ···············································································································································73
6.4 Web-Viewer buttons ···································································································································74
Chapter 7. Troubleshooting ····························································································································76
Appendix Information of HDD Installation ··························································································78
Digital Video Recorder User’s Manual
4
Page 5

Chapter 1. Safety Cautions
Symbols displayed for each item
Warning
Caution
Refers to information users need to know in order to prevent serious
injury or death.
Provides information users need to know in order to prevent minor
injury or product damage.
• Before installation
- Verify the supplied voltage (AC100V~AC240V) before connecting the power supply.
- Make sure the power supply is off before installation.
- Do not install in a very humid environment. Doing so may cause an electric shock or fire.
- Make sure ground line is connected to reduce electric shock risk.
• During operation
- Do not open the product cover except qualied personnel or system installer. Opening the product
cover may cause an electric shock.
- Do not plug multiple appliances into one power outlet. Doing so may cause fire.
- Do not place dishes containing water or heavy objects on the product. Doing so may cause a malfunction.
- Do not use in areas containing inammable materials like propane gas and gasoline or in areas that
generate dust. Doing so may cause an explosion or fire.
- Do not touch the power line with a wet hand. Doing so may cause an electric shock.
- Do not insert a hand into the opening of the DVD. Doing so may cause an injury.
- Make sure conduction materials do not enter the cooling ventilator opening.
- Do not apply excessive force when pulling on the power cord. Damaging the cord may cause an electric shock or fire.
- Random replacement of built-in battery by other types of batteries may cause explosion.
- The battery shall be replaced by the same battery.
- The used batteries shall be disposed carefully because they can cause environment pollutions.
• Dismantling and cleaning
- Do not dismantle, repair or modify the product deliberately. Doing so may cause a damage, an electric
shock or an injury.
- Do not use water, thinner or organic solvent for cleaning the product exterior. Doing so may cause a
malfunction or an electric shock. Use a dry cloth to clean the exterior.
• During installation
- To get adequate ventilation, install the product with at least 15cm of space between the cooling ven-
tilation opening and a wall.
- To prevent falling, install the product in a at area . Dropping the product may cause an injury or a
malfunction.
- Avoid areas exposed to sun light or heat since they may cause deformation or a malfunction.
- If a camera is installed while the DVR is recording, image in another channel may be disrupted. Start the
storage after installing the camera is recommended.
Digital Video Recorder User’s Manual
5
Page 6
Chapter 1. Safety Cautions
• During use
- Make sure the product is not exposed to shocks or shaking when using the product or during moving.
- Do not move the product while it is in operation, and apply strong shocks to the product or throw
the product.
- If hard disk drives other than those recommended are used additionally, abnormal operation may
occur. Inquire at the point of purchase of the product before installing such a hard disk drive.
- Product warranty will not cover deliberate additional use of such hard disk drives.
- This product is a supplementary rather than primary means for preventing re and theft. Our company
FCC Compliance Statement
Caution
Any changes or modication in construction of this device which are not expressly approved the party responsible for
compliance could void the user’s authority to operate the equipment.
NOTE
This equipment has been tested and found to comply with the limits for a Class A digital device, pursuant to part 15
of the FCC Rules. These limits are designed to provide reasonable protection against harmful interference when
the equipment is operated in a commercial environment. This equipment generates, uses, and can radiate radio frequency
energy and, if not installed and used in accordance with the instruction manual, may cause harmful interference to radio
communications. Operation of this equipment in a residential area is likely to cause harmful interference in which cause
the user will be required to correct the interference at his own expense.
Samsung Techwin recommends the installation of a UPS (Uninterrupted Power Supply) with all its recording products.
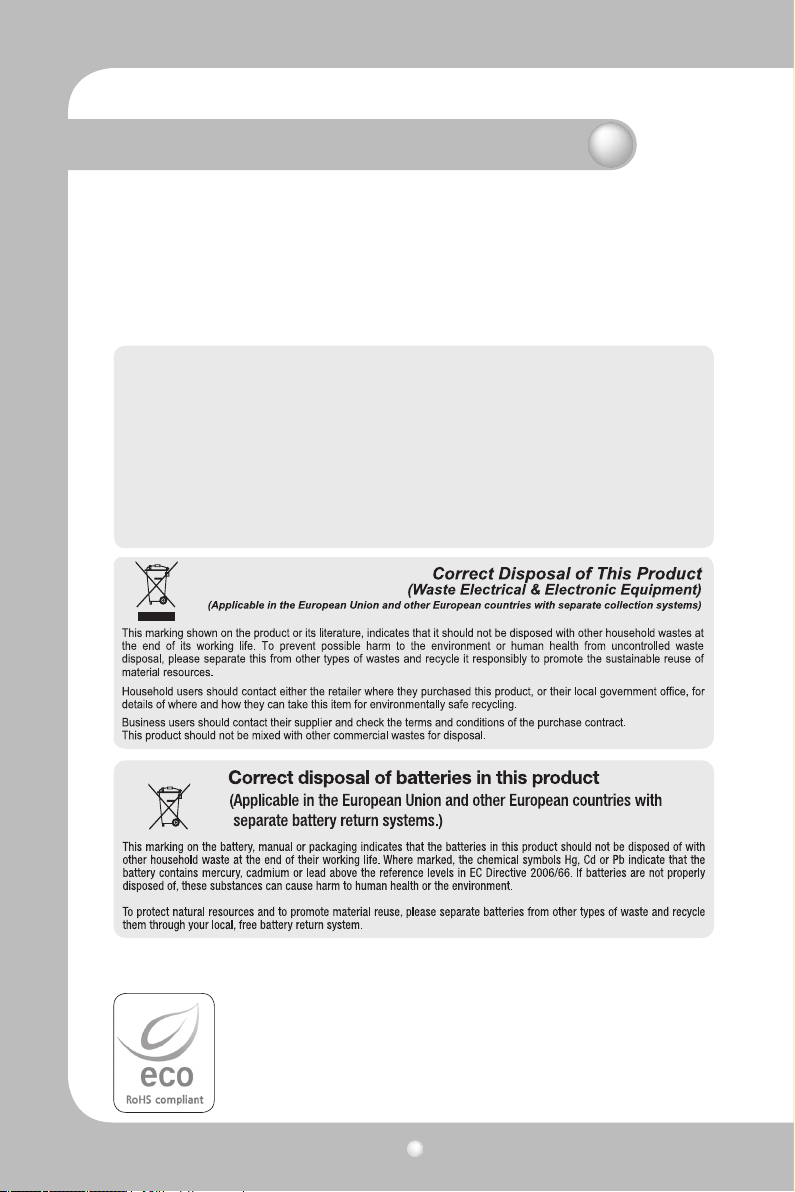
Samsung Techwin cares for the environment at all product manufacturing stages to
preserve the environment, and is taking a number of steps to provide customers with
more environment-friendly products.The Eco mark represents Samsung Techwin s
will to create environment-friendly products, and indicates that the product satisfies
the EU RoHS Directive.
Digital Video Recorder User’s Manual
6
Page 7

Chapter 2. Summary
The Samsung SVR-940/SVR-450 is a digital video recorder designed to be used as a security
device in small shops, convenience stores, banks, ATMs, etc. It is a stand-alone device, securing
system performance and safety. The Samsung SVR-940/SVR-450 saves video images on an
HDD instead of on videotape. It can save quality images even with repeated recording, and
facilitates data search by recording and playing video data in a digital file format. Moreover,
the Samsung SVR-940/SVR-450 is a user-oriented digital unit with high quality moving pictures and high capacity storage media. It has a variety of functions such as motion detection,
PTZ (Pan, Tilt and Zoom) control, password setting, real-time voice data storage, and event
lists and log file storage.
2.1 Features
Monitoring Screen
Recording
The Samsung SVR-940/SVR-450 can record up to 120 frames per second. It also records
events on an event list as well as providing a pre-event recording function.
. Simultaneous execution of three functions: recording, playback, and networking
. Convenient setting of recording frame by channel.
. Up to 3 levels of image quality setting available.
. Simple setting of the scope of motion detection.
. Recording setting up to a Maximum 120 frames per second. (Based on 360X240)
. Manual and scheduled recording.
. Event recording using external alarms and the motion detection function.
. Creating event lists for external alarms and motion detection.
. Recording images before the occurrence of events.
Playback
Digital Video Recorder User’s Manual
7
Page 8

Chapter 2. Summary
Storage Media
The built-in HDD is the basic memory supply. Using a USB memory stick or external CD-RW
(guaranteed for the recommended models only), users can copy images from the internal
HDD.
. Basic Memory Supply: Built-in HDD
. Backup media: USB memory stick
. Backup media: Built-in CD-RW
• CD-RW-Maker : LITEON CO., LTD
Model : LTR-52327SX
Model : SHM-165P6SX02C
• CD MEDIA-Maker : SAMSUNG
Model : PLEOMAX R80X-
Network
The Samsung SVR-940/SVR-450 supports a wide range of networks such as LAN and ADSL,
DHCP. The user can also easily operate and manage the main functions of the unit from a
remote location using an exclusive PC viewer.
. Live image view from a remote location available (full screen, quad screen, and 9-channel
screen mode (for SVR-940) selectable).
. Search and playback by time or event from a remote location.
. 10/100Mbps Ethernet/xDSL supported.
. DDNS supported.
Other
. Simple firmware upgrade using USB memory.
. Up to 4 channel voice recording in real time
. VGA output supported
. Menu language-selectable.
Digital Video Recorder User’s Manual
8
Page 9
Chapter 2. Summary
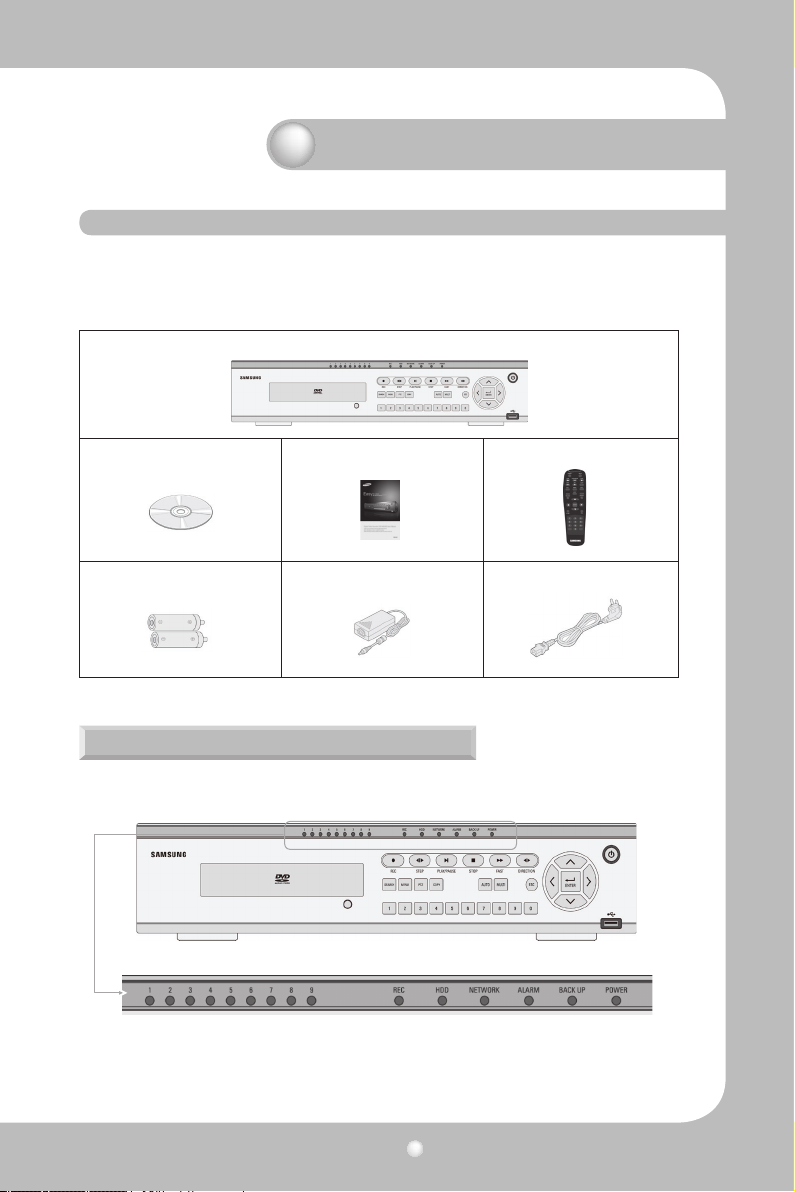
2.2 Contents
The SVR-940/SVR-450 package contains the main unit and its components as specified below. When you purchase the unit, please check that the components specified below are
included. If any components are missing, please contact your local vendor.
SVR-450/940 Main unit
1. Network viewer program CD 2. User Manual 3. Remote controller
4. Batteries for remote controller 5. Adaptor (For SVR-450) 9. Power cable
2.2.1 Control panel on the front
Digital Video Recorder User’s Manual
9
Page 10

Chapter 2. Summary
LED Indication
Number LED Name Description
1
2
3
4
5
6
Lights up when power is applied to the system
Lights up when the system is backing up.
Lights up when an Alarm is triggered.
Lights up when client has connected to the system through
the
Network
Lights up when the system is accessing HDD
Lights up when the system is recording video data
Button Indication
Number Button Name Description
1
2
3
Press to select and change the forward or back playback.
Pressing this button during forward playback reverses the
Press to power the system ON/OFF.
Press to navigate to and select a Menu item.
direction of play.
4 Forward Playback. Speeds of 2X, 4X, 8X.
5
6
Press to stop the Playback and to start searching other
Press to Play and pause the Playback screen
Digital Video Recorder User’s Manual
10
recorded data.
Page 11

Chapter 2. Summary
Button Indica-
Number Button Name Description
7
8
9
10
11 Press to control the PTZ functions
12 Press to backup still images or video
13
14
15 Press to return to previous Menu screen.
16
17
18
Playback position moves 1 frame forward/back during
Pause.
Press to start and stop manual recording
Press to search the recorded data
Press to launch Setup Menu
Press to start screen Auto Sequence. Set °ÆSCREEN SETUP/
AUTO SEQUENCE/SEQUENCE°Ø as °ÆON°Ø.
Press to select the live display format as full screen, quad
screen, or 9-channel screen (for SVR-940) display.
Press to move up in a Menu item in setup mode.
Press to move right in a Menu item in setup mode.
Press to move down in a Menu item in setup mode.
19
20
21
Press to move left in a Menu item in setup mode.
Press to select full screen, quad screen, or 9-channel screen
(for SVR-940) in live monitoring mode. It can also be used
to select a desired menu item or to store a setup value in
USB Backup and Firmware upgrade.
Digital Video Recorder User’s Manual
the menu.
11
Page 12

Chapter 2. Summary
2.2.2 Rear Connection terminals
Rear panel of SVR-450
Rear panel of SVR-940
1. VIDEO IN Camera Input (NTSC/PAL)
2. AUDIO IN Audio Input
3. AUDIO OUT Audio Output
4. VIDEO OUT Composite Video Output
5. VGA VGA output
6. RS-232 For the engineering console only, not for other purposes.
7. LAN RJ45 Connector
8. RS-485/422 PTZ camera control
9. SENSOR IN Sensor Input
10. ALARM OUT Alarm Output
11. SWITCHES NTSC/PAL, BNC/VGA Select Switch(Please refer to Chapter 5 for the detailed
guide.)
12. SPOT Spot output (For SVR-940)
13. SVHS S-VHS output
Digital Video Recorder User’s Manual
12
Page 13

2.2.3 Remote controller
Chapter 2. Summary
• MENU Button to enter Setup Menu
• AUTO For Auto Sequence
• SPOT Button for Spot ON/OFF (SVR-940.)
• PTZ Button for PTZ camera control.
• COPY Button for data backup.
• RECORD Button for Manual record ON/OFF.
• STOP Button to stop playback.
• SEARCH Button for search menu.
• STEP Playback position moves 1 frame forward/back
during Pause.
• PLAY/PAUSE Button to Play and Pause the Playback screen
• FAST Button for Forward Playback. Speeds of 2X, 4X, 8X.
• DIR Button to select and change the direction of play
in
playback. When pressed during forward playback,
the system reverses the direction of play.
• ENTER Button to select full screen, quad screen, or
9-channel screen (for SVR-940) in live monitor-
ing mode.
It can also be used to select a desired menu item
or
to store a setup value in the menu.
• MULTI Button to select the live display format as full
screen,
quad screen, or 9-channel screen (for SVR-940)
display.
Usable range of Remote Controller
2.3 Specification
System
Items SVR-450 SVR-940
Processor DSP
Operating system (O/S) RTOS
Compression method MPEG-4
Digital Video Recorder User’s Manual
13
Page 14
Chapter 2. Summary
Video
Items SVR-450 SVR-940
Input Method Composite Input 4-Channel Composite Input 9-Channel
Video Input Level 1.0 Vp-p, Composite
Live Screen Display Speed Real time display
NTSC: 720 (W) _ 480 (H) Pixels for the full screen.
Live Screen
Monitor Output 1.0Vp-p Composite, 75Ω
VGA Output
Audio
Items SVR-450 SVR-940
Audio
Audio compression ADPCM
PAL: 720 (W) _ 576 (H) Pixels for the full screen
8bit Brightness (256 Gray Scale)
24bit Color (160,000 Colors)
1.0Vp-p Composite, 75Ω /
S-VHS
RGB Output (Non-Interlaced Scan)
* Select composite or VGA
4CH Audio Input
1CH Audio Output
Alarm
Items SVR-450 SVR-940
Input 4 Channels 9 Channels
Output 1 Relay output 4 Relay output
Control
Items SVR-450 SVR-940
Remote controller Infrared LED (Up to 5m)
Exclusive controller SCC-3100A (RS-485)
Digital Video Recorder User’s Manual
14
Page 15

Chapter 2. Summary
Recording
Items SVR-450 SVR-940
Maximum Number of
Frames
Sec per Resolution
(NTSC)
Recording Method
Pre-Event Recording
Image Quality
720X480: 30 Frames/Sec
360X240: 120 Frames/Sec
3 Types of Recording Mode: General, Schedule, & Event
Individual Channel ON/OFF Setting
3-Stage Image Quality: User Congurable
HDD
Items SVR-450 SVR-940
Default HDD 1 ea (Max. 1ea) 1 ea (Max. 2ea)
HDD type
RPM
Recommended
Notes
• Please refer to the recommended HDD model list.
Samsung / Seagate / Maxtor
720X480: 30 Frames/Sec
720X240 : 60 Frames/Sec
360X240: 120 Frames/Sec
EIDE
7200rpm
Backup
Items SVR-450 SVR-940
Digital Backup USB Memory Stick / Built-in CD-RW (DVD)
Password
Items SVR-450 SVR-940
6 stage Password
4-digit Password (including four numbers)
Admin : Control all function (Default is 1111)
USER1~5: Access permission per option (Default is 1111)
Digital Video Recorder User’s Manual
15
Page 16
Chapter 2. Summary
Search and Playback
Items SVR-450 SVR-940
Search by Time: Year, Month, Date, Hour, Minute
Search by Channel: per channel
Search Mode
Search by the most recent data: The last recording image
Speed & direction of
Playback
Fast Search Rewind (X2, X4, X8), Rewind (X2, X4, X8)
STEP Search Search in 1 second increments
Pause and Frame Playback Playback pause, Playback by frame in the pause status
Network
Items SVR-450 SVR-940
General
Search by Event: Alarm, Motion Detect
Search by the oldest data: The first recording image
Search by bar: Using the search bar
Forward and Reverse
Live Screen: Monitoring
Playback Screen: Search
Menu Setting: Menu setting available (CMS S/W : option)
Access Method: Dedicated Viewer
Protocol: TCP/IP, DHCP
Interface: Ethernet (10/100Mbps), ADSL
Concurrent Users: Up to 4 users (depending on the net-
work environment)
Electrical Specification
Items SVR-450 SVR-940
Power DC 12V Adaptor (SVR-450)
Digital Video Recorder User’s Manual
16
100~127V/200~240V,
50/60Hz
Page 17

Chapter 2. Summary
User Environment
Items SVR-450 SVR-940
Operating Temperature
Storage Temperature
Humidity
Exterior
Items SVR-450 SVR-940
Material
Dimensions
Weight About 5.5Kg 11Kg
Connection Terminals
Items SVR-450 SVR-940
Video Input BNC(4EA) BNC(9EA)
Monitor Output BNC(1EA)
VGA Output (PC Monitor)
Audio Jack
USB Port
9-Pin DSUB
6-Pin Terminal sector
8-Pin Terminal sector
2-Pin Terminal sector
Termination Switch (JP2
Termination)
LAN Input
Alarm Output Terminal (Motion Detect, Sensor: CM, NO,
RS-422/485 Terminal Resistance Switch (RS-422/485
termination can be set using jump setting after opening
RCA Input (4), RCA Output (1)
USB2.0 (Firmware Upgrade/Copy)
RS-422/485 (External control, PTZ)
5˚C~ 40˚C
10˚C~60˚C
30% ~90%(without dewfall)
Steel Case
260(W) X 350(D) X 65(H)mm
Loop out (9EA), Spot (1EA)
S-VHS
15-Pin DSUB
RS-232C (Standby)
Alarm Input Terminal
NC)
the top cover)
RJ-45(Network)
Accessories
Items SVR-450 SVR-940
Accessories to be supplied
Network Viewer Program CD
User Manual
Remote Control & Battery
Brackets and screws for HDD plate
Adaptor (for SVR-450), Power cable
Digital Video Recorder User’s Manual
17
Page 18

Chapter 3. Installation
3.1 How to connect all parts
The connection layouts for the SVR-450/940 with the monitor, CCTV, and external devices are
described as below.
SVR-450
SVR-940
Digital Video Recorder User’s Manual
18
Page 19
Chapter 3. Installation
3.2 Detailed connection
3.2.1 Camera
The SVR-450 and 950 can accommodate up to 4 or 9 cameras respectively. Connect the BNC
terminal of each camera to the CAMERA IN terminal of the unit.
SVR-450
SVR-940
3.2.2 Audio
The SVR-450/950 can save audio information. For storage or output of audio information, it is
required to connect the relevant devices.
SVR-450
Digital Video Recorder User’s Manual
19
Page 20

Chapter 3. Installation
SVR-940
Audio input
Please connect an RCA audio cable to the AUDIO IN connector (such as camera with built-in
microphone and others). (All types of microphone and speaker are compatible with the
• For Audio input setting, set [Audio] to [ON] in the Recording setting menu
Notes
Please connect an RCA audio cable to the AUDIO OUTPUT connector (such as monitor with
built-in speakers).
• When playback with audio in split display mode is not working properly,
Notes
turn the display mode to Full screen to avoid an audio playback problem.
3.2.3 Monitor
Connect the VIDEO OUT terminal of the system and the BNC terminal of the monitor, using
the BNC cable, in order to display video data to the main monitor. There is also a VGA video
output for the PC monitor.
SVR-450
Digital Video Recorder User’s Manual
20
Page 21

SVR-940
• The Video output and the VGA output cannot be used at the same time
and the system can send only one video out at the same time. Please refer
Caution
to Chapter 4.1 Checklist before operation for the setting of monitor selec-
tion.
• During playback with the VGA monitor, a few frames can sometimes be
3.2.4 External connector
Sensor input (SENSOR IN)
SVR-450 (4-SENDOR IN)
Chapter 3. Installation
SVR-940 (9-SENDOR IN)
As external sensor connecting terminal, signals from an external sensor or device will be input to
the system.
Relay Output (RELAY OUT)
This Alarm Output terminal uses the contact relay for the alarm output to external devices.
You can select NO (Normal Open) or NC (Normal Close) for connection according to the
contact point status.
Digital Video Recorder User’s Manual
21
Page 22

Chapter 3. Installation
SVR-450 (1-ALARM OUT)
SVR-940 (4-ALARM OUT)
• The operation of each relay output can be defined by a combination of Mo-
Notes
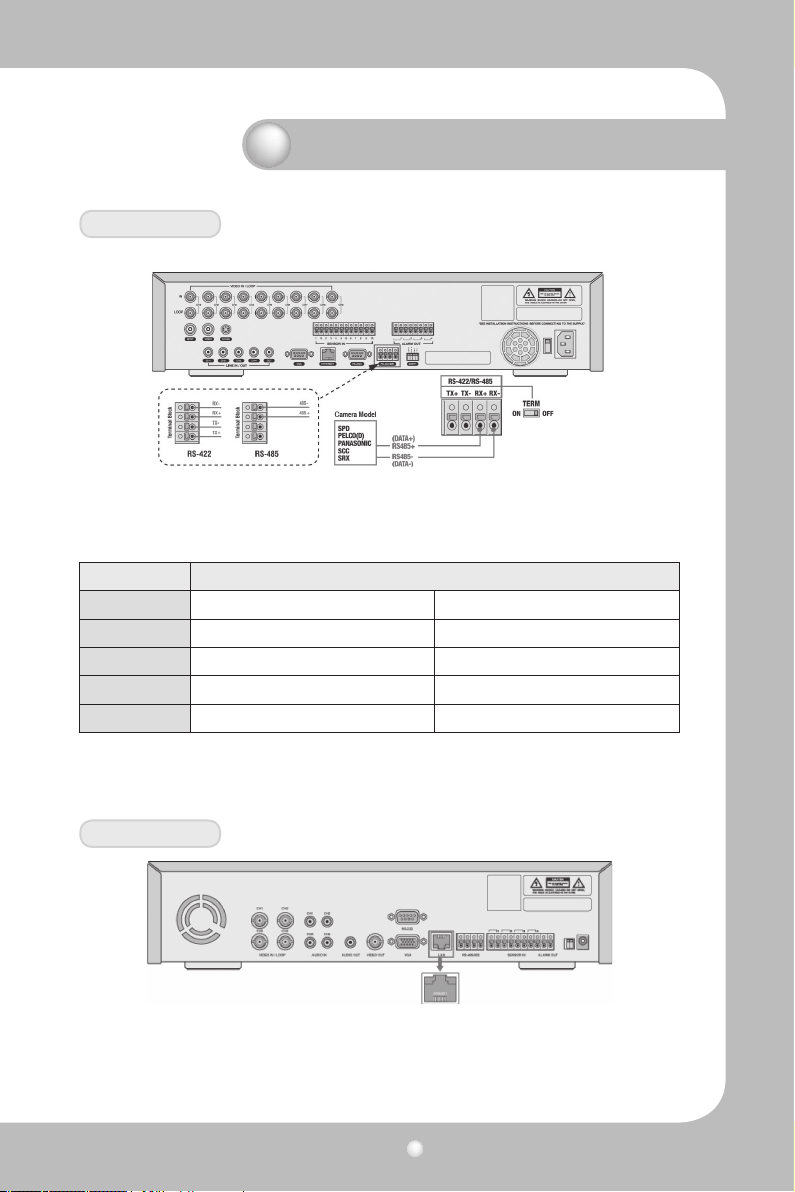
External Control Device Terminal (RS-422/485)
This terminal is connected to external control devices. The internal JP2 termination terminal
turns the terminator resistance of the RS-422/485 communication device on and off.
(In the SWITCH section on the back of the SVR-940 there is a TERM switch.)
tion Detect, and Sensor in the Event Setting on the Main Menu. See Para-
graph 4.5.3 CH1~CH4 Relay Setting for details
SVR-450
1. RS-422 : Connecting Terminal Block's 4 Port orderly
2. RS-485 : Short the Terminal Block's 1 & 3(Tx+ Rx+) Ports, and 2 & 4 ports(Tx-, Rx-), then connecting
1 & 2 ports or 3 & 4 ports to RS-485
Digital Video Recorder User’s Manual
22
Page 23
Chapter 3. Installation
SVR-940
1. RS-422 : Connecting Terminal Block's 4 Port orderly
2. RS-485 : Connecting 3 & 4 ports to RS-485
No. Description
Classication RS-422 RS-485
1 TX+(+Transmit Data) -
2 TX-(- Transmit Data) -
3 RX+(+Receive Data) Data+
4 RX-(- Receive Data) Data-
LAN Connection (Ethernet 10/100 Base-T)
This port is to connect to network.
SVR-450
Digital Video Recorder User’s Manual
23
Page 24

Chapter 3. Installation
SVR-940
No. Description No. Description
1 TX+(Transmit Data) 5 N/C(No connection)
2 TX-(Transmit Data) 6 RX-(Receive Data)
3 RX+(Transmit Data) 7 N/C(No connection)
4 N/C(No connection) 8 N/C(No connection)
Monitor Output (VGA)
This is the output connector for a VGA Monitor.
SVR-450
SVR-940
Digital Video Recorder User’s Manual
24
Page 25

Chapter 3. Installation
No. Description No. Description
1 Red Signal (75, 0.7Vp-p) 9 N/C(No connection)
2 Green Signal (75, 0.7Vp-p) 10 Ground
3 Blue Signal (75, 0.7Vp-p) 11 Ground
4 N/C(No connection) 12 N/C(No connection)
5 Ground 13
6 Ground 14 VSYNC (Vertical Synchronization)
7 Ground 15 N/C(No connection)
8 Ground
HSYNC (Horizontal Synchroniza-
tion)
Chapter 4. Operating
4.1 Checklist before operation
Users must select the video mode (NTSC or PAL) and video output (BNC or VGA) before pow-
ering the system on. These can be selected from the switches on the rear of the DVR system.
The settings of the video mode and video output are as described below.
SETTING
Video mode Video output
NTSC PAL BNC VGA
O X O X
X O O X
Digital Video Recorder User’s Manual
25
Page 26

Chapter 4. Operating
SETTING
Video mode Video output
NTSC PAL BNC VGA
O X X O
Factory Default
X O X O
* The factory default is set to NTSC video mode and VGA video output.
4.2 Power connection
· After power is connected to the rear connector of the system, the system will be powered
on.
· When power is turned on, the system will detect a video signal automatically.
4.3 Live monitoring screen
When the system is turned ON, the live monitoring screen is displayed.
Digital Video Recorder User’s Manual
26
Page 27

Chapter 4. Operating
4.3.1 Function of screen display
When Channel number buttons 1 ~ 4 (SVR-450) / 1 ~ 9 (SVR-940) are pressed, each channel
is displayed in full screen.
Press the ENTER button, and the four connected channels are displayed in quad split screen
4.3.2 Automatic channel rotation
When the AUTO button is pressed in each full screen mode, each channel is rotated automatically
following the setting in [SCREEN SETUP] > [Auto Sequence]. (SEQUENCE must be set to [YES].)
When AUTO is pressed again, the Auto sequence operation will be canceled.
Digital Video Recorder User’s Manual
27
Page 28

Chapter 4. Operating
4.4 Recording
4.4.1 Normal recording
When the REC button is pressed, manual recording is started and the "R" icon (Manual Recording) is displayed on the upper right corner of the monitor screen.
When the REC button is pressed again, the manual recording is stopped and the pre-record-
ing setting is activated. While recording with the pre-recording setting, the icons below indicate the trigger for recording.
· C : CONTINUOUS RECORDING
· S : SENSOR RECORDING
· M : MOTION DETECTION RECORDING
· T : TEXT RECORDING (POS TEXT RECORDING)
· - : NO VIDEO INPUT
· 0 : NO RECORDING
4.4.2 Scheduled recording
· S : SENSOR RECORDING
· - : NO RECORDING
· C : CONTINUOUS RECORDING
· M : MOTION DETECTION RECORDING
· T : TEXT RECORDING
To setup a recording schedule, select SCHEDULE in the RECORD menu. Navigate through the
items using the control button.
Once the channel 1 is selected, SCHEDULE-CH1 screen is displayed. Select ALL or each day
using the control button and set the recording mode using the SEL button repeatedly.
[COPY FROM] [COPY TO]: Set the channel 1 schedule and select COPY TO using the control
button, select CH2 using the control button and press the SEL button. Then the CH1
schedule is copied to CH2.
To return to setup menu screen, press the ESC button.
• The recording status icons are changed according to the type of recording.
Notes
When the corresponding channel is not being recorded, no recording status
icon is displayed.
Digital Video Recorder User’s Manual
28
Page 29

Chapter 4. Operating
4.5 Search
Press the SEARCH button, and the Search Menu appears as illustrated below. Recorded video
can be searched and played back by time, event, or date and the Log File is also displayed.
4.5.1 Event search
From the Event Search menu, the recorded data can be searched by Motion detection recording, Sensor recording, Text recording, Manual recording, etc.
When Event Search is selected, the screen below is displayed.
· Dates with any recorded data are displayed in a dark color.
· When the date, channel, and event type are selected and the PLAY button is played, the
desired data is played back.
4.5.2 Timeline search
Users can easily select a desired search time using the Time line bar.
Press the ENTER button on the Time line bar to display the calendar and press the ENTER
button again to display as below.
Digital Video Recorder User’s Manual
29
Page 30

Chapter 4. Operating
· V1~V4 : Time zones with recorded data are displayed with a colored bar. (SVR-940 : V1~V9)
· A1~A4 : Time zones with recorded audio data are also displayed with a colored bar.
Time zones with recorded data are displayed in colors.
4.5.3 Go To search
Users can enter a desired search date and time in this menu.
Press the ENTER button to display as below.
Users can enter a desired search date and time and press the PLAY button to playback.
(The second setting can be input as 15 seconds/30 seconds/45 seconds.)
4.5.4 Go first search
Press the ENTER button to playback from the first data stored in the HDD.
4.5.5 Go last search
Press the ENTER button to playback from the last data stored in the HDD.
However, due to the nature of the recorded file format, a maximum of 1 minute of the last
recorded can be played back.
Digital Video Recorder User’s Manual
30
Page 31

Chapter 4. Operating
4.5.6 Log file search
Press the ENTER button on this menu to display the calendar. Select a desired date on the
calendar to display the Log files. Press the ESC button to exit this menu.
4.5.7 COPY List
Both Still images and Video can be backed up. The maximum backup time for Video is up to 999
seconds.
• During backup, the system will not record, to ensure system stability.
Notes
4.5.7.1 Still image Backup
① During monitoring, Press the COPY button if you wish to capture an image. When Figure
1 is displayed, press YES to store the image into the HDD and select the backup device
- either USB memory stick or CD-RW. The still image will be transferred to the selected
backup device.
② Press the SEARCH button and select ARCHIVE to display the calendar. Select a desired date
and press the ENTER button to display Figure 2.
③ Select a desired list to be backed up and the image is displayed. Select the backup device
- either USB memory stick or CD-RW. When backup is completed, Figure 3 is displayed.
Figure 1 Figure
Digital Video Recorder User’s Manual
31
2
Page 32

Chapter 4. Operating
Figure 3
4.5.7.2 Video backup: Only available during Playback mode
① During Playback, Press the PAUSE button to pause the playback and press the COPY button. You will
be asked whether to store a Still image or Video (Figure 1). Select Video and set the duration of the
copy to store the data into the HDD, and select the backup device - either USB memory stick or CD-
RW. Select the device that you want to save it to and it will be saved to that device.
②
Press the SEARCH button and select ARCHIVE to display the calendar. Select a desired date and press
the ENTER button to display Figure 2.
③
Select a desired list to be backed up and the image is displayed. Select the backup device - either USB
memory stick or CD-RW. When backup is completed, Figure 3 is displayed.
Figure 1
2
Figure
Digital Video Recorder User’s Manual
32
Page 33

4.6 Playback
DIRECTION Button to select and change the direction of play in playback.
Chapter 4. Operating
Figure 3
REC Button for manual recording.
STEP Playback position moves 1 frame forward/back during Pause.
PLAY/
PAUSE
STOP Button for stop
FAST Button for fast forward.
Button for playback and pause.
Notes
• During playback, a few frames may be missing depending on the image
quality, but this is not a defect of the unit.
4.7 PTZ
Press the PTZ button on the selected Full Live Screen, and adjust the Pan, Tilt, or Zoom of a camera. The
PTZ function can be controlled by the function buttons of the front panel or by the remote controller.
The PTZ function can be controlled when a PTZ camera is correctly connected to the RS-485.
Digital Video Recorder User’s Manual
33
Page 34

Chapter 4. Operating
SEARCH
MENU PTZ AUTOCOPY MULTI
4.7.1 PAN/TILT
Select PAN/TILT and press the ENTER button.
- For Pan adjustment, Press the
button
- For Tilt adjustment, Press the
button
4.7.2 ZOOM/FOCUS
Select ZOOM/FOCUS and press the ENTER button.
- For Zoom adjustment, Press the
- For Focus adjustment, Press the
button.
button
4.7.3 INITIALIZE
Select INITIALIZE and press the ENTER button to initialize a PTZ camera
• Press the PTZ control button to move, and press the button again to stop.
Notes
• The PTZ Mode is available in the Live Screen.
Digital Video Recorder User’s Manual
34
Page 35

Chapter 4. Operating
4.8 DVR Backup File Player
The DVR provides an exclusive video file format as well as AVI file type. To play and see the DVR
(exclusive) type file, you should play back this video file on our exclusive player as follow.
(Notice: When the MPEG-4 Codec is not installed, the exclusive player can not play the DVR for-
mat file. In this case, FFDSHOW Codec(ffdshow.exe) on network client software CD that
is provided in the package should be installed and run before the playback of the DVR
format backup file.)
FFDSHOW Setup Procedure
Double click the [ffdshow.exe file] icon in provided CD.
Choose the language of program, after that click the
"NEXT" button continuosly. (no option change)
1. After you back up the video data as DVR
type, there are 3 files on the USB memory
folder. (Figure 1)
2. Click DVR(Exclusive) Player icon
and then you can see the below player.
(Figure2. DVR Player)
Figure 2. DVR Player
Digital Video Recorder User’s Manual
Figure 1. Backup file on USB Memory folder
,
3. Open Media File on DVR Player
Click this button to open media file.
35
Page 36

Chapter 4. Operating
4. Select the backup file (DVR type) you wish
to playback
6. Overview of DVR Player
1 2 3 4 5 6 7 8 9 J
5. Click the play button to start playback the
DVR file you selected.
Click to start playback the selected file
Table 1. DVR Player Buttons
No. Icon Name Description
1
Open Media File
2
Stop Click this icon to stop the playback
3
Rewind Click this icon to move reward for 5 seconds
4
Previous Frame Click this icon to move to the previous frame
5
Play
6
Pause Click this icon to pause the display screen.
7
Next Frame Click this icon to move to the next frame.
8
Forward Click this icon to move forward for 5 seconds
9
Audio Audio On or Off
Digital Video Recorder User’s Manual
Click this icon to open the media le saved as DVR
type
Click this icon to play the video data saved as DVR
type.
36
Page 37

Chapter 5. Conguration
5.1 Menu configuration
Press the Menu button on the front side of the unit or the MENU button on the remote control,
and the menu for a variety of settings related to the unit will appear. The menu is configured as
described below.
• The factory default language is English. See Paragraph 4.10.4 - Other Settings for
Notes
Event setup
Record setup Network setup
Screen setup
Language setup.
System setup
The menu is configured as illustrated below.
SCREEN
AUTO SEQUENCE
SCREEN SETUP
RECORD SETUP
STATUS
SPOT
GENERAL SETUP
DETAIL SETUP
Digital Video Recorder User’s Manual
CHANNEL – TITLE, COVERT, BRIGHTNESS, CONTRAST.
SEQUENCE, SEQUENCE DWELL, VIDEO LOSS SKIP
OSD, CLOCK DISPLAY, HDD FREE SPACE, RECORD STATUS,
TITLE DISPLAY, EVENT DISPLAY, OSD CONTRAST
TITLE DISPLAY, SPOT MODE (Only for SVR-940)
IMAGE SIZE, REPEAT RECORD, WARNING MESSAGE,
WARNING BEEP
CHANNEL – MODE, SCHEDULE, IMAGE, FRAMERATE,
PRE EVENT DURATION, POST EVENT DURATION, AUDIO,
SENSOR SELECT
37
Page 38

Chapter 5. Conguration
EVENT SETUP
NETWORK &
SERIAL SETUP
EVENT
MOTION
TEXT
RELAY
NETWORK
CLIENT ACCESS PORT, CLIENT ACCESS, BANDWIDTH SAVING
RS-232
RS-422/485
E-MAIL
EVENT BEEP, EVENT AUTO SEQ, EVENT TIME, TEXT MONITORING,
SENSOR-SENSOR TYPE
CHANNEL- MOTION ZONE, MOTION SENSITIVITY
SYNC CHANNEL, DEVICE, CHECK PROTOCOL, LINES
SENSOR–CH1,CH2,CH3,CH4,(SVR450)
CH1,CH2,CH3,CH4,CH5,CH6,CH7,CH8,CH9 (SVR940)
MD, TEXT, V-LOSS, HDD Error
NETWORK TYPE (LAN, DHCP, ADSL)
- IP ADDRESS, SUBNET MASK, GATEWAY, DNS,
SWR - DDNS SERVER DOMAIN ADDRESS, ID, PW
SYSTEM ID, BAUD RATE, DATA BIT, PARITY BIT,
STOP BIT
SYSTEM ID, BAUD RATE, DATA BIT,PARITY BIT,
STOP BIT
E-MAIL, MAIL ADDRESS, MAIL SERVER IP, RETURN MAIL AD-
DRESS PW
SYSTEM SETUP
SYSTEM
HDD HDD FORMAT, HDD DESCRIPTION
PASSWORD USER AUTHENTICATION, USER PASSWORD, EVENT BEEP
CLOCK SETUP CLOCK, DATE MODE, MONTH TYPE
PTZ CHANNEL, PTZ CAMERA ID, MODEL
Digital Video Recorder User’s Manual
LANGUAGE, KEY BUZZER, DEFAULT, REMOTE SETUP, REMOTE
CONTROLLER ID, DESCRIPTION, TEST MODE
38
Page 39

Chapter 5. Conguration
5.2 Default Setup
The SVR-450/940 are delivered to customers with the factory default values as described be-
low. To initialize the menu setup to the factory default values, select [ YES] for the [DEFAULT ]
item in [SYSTEM SETUP]-[ETC] on the menu. Then all setting values changed by users are
initialized to the default values as illustrated below.
• Screen Setup
Main Menu Submenu Default
SCREEN
AUTO
SEQUENCE
STATUS
SPOT
(SVR-940)
CHANNEL
TITLE
COVERT
BRIGHTNESS
CONTRAST
SEQUENCE
SEQUENCE DWELL
VIDEO LOSS SKIP
OSD
CLOCK DISPLAY
HDD FREE SPACE
RECORD STATUS
TITLE DISPLAY
EVENT DISPLAY
OSD CONTRAST
TITLE DISPLAY
SPOT MODE
CH1 ~ 4 ( 950 : CH1 ~ 9 )
CH1
OFF
50
50
OFF
1SEC
OFF
ON
ON
ON
ON
ON
ON
100%
ON
Manual
• RECORD SETUP
Main Menu Submenu Default
GENERAL
SETUP
DETAIL SETUP
IMAGE SIZE
REPEAT RECORD
WARNING MESSAGE
WARNING BEEP
CHANNEL
MODE
SCHEDULE
IMAGE QUALITY
FRAME RATE
PRE EVENT DURATION
POST EVENT DURATION
AUDIO
SENSOR SELECT
Digital Video Recorder User’s Manual
39
360X240
ON
1%
OFF
CH1
CONTINUOU8
>>
HIGH
15f/s
3 SEC
5 SEC
OFF
OFF
Page 40

Chapter 5. Conguration
• EVENT SETUP
Main Menu Submenu Default
EVENT
MOTION
TEXT
EVENT BEEP
EVENT AUTO SEQ
EVENT TIME
TEXT MONITORING
SENSOR
SENSOR TYPE
CHANNEL
MOTION ZONE
MOTION SENSITIVITY
SYNC CHANNEL
DEVICE
CHECK PROTOCOL
HEADER1
HEADER2
DELIMITER
LINES
OFF
OFF
5 SEC
OFF
CH1
N/O
CH1
FULL ZONE
7
CH1
NORMAL
OFF
>>
>>
>>
1
RELAY
(H1,CH2,CH3,CH4)-SVR-450
(CH1, CH2, CH3CH4, CH5, CH6,
CH7, CH8, CH9)-SVR-940
MD, TEXT, V-LOSS, HDD Error
• NETWORK & SERIAL SETUP
Main Menu Submenu Default
NETWORK
CLIENT ACCESS
NETWORK TYPE
IP ADDRESS
SUBNET MASK
GATEWAY
DNS
SWR
DDNS SERVER DOMAIN AD-
DRESS
ID
PW
PORT
CLIENT ACCESS
BANDWIDTH SAVING
Digital Video Recorder User’s Manual
40
LAN
172.16.1.52
255.255.0.0
0.0.0.0
172.16.1.220
OFF
3495
ON
OFF
Page 41

Chapter 5. Conguration
Main Menu Submenu Default
SYSTEM ID
RS-232
RS-422/485
E-MAIL
BAUD RATE
DATA BIT
PARITY BIT
STOP BIT
SYSTEM ID
BAUD RATE
DATA BIT
PARITY BIT
STOP BIT
E-MAIL
MAIL ADDRESS
MAIL SERVER IP
ID
PW
RETURN MAIL ADDRESS
• SYSTEM SETUP
Main Menu Submenu Default
LANGUAGE
KEY BUZZER
SYSTEM
HDD
DEFAULT
REMOTE SETUP
REMOTE CONTROLLER ID
DESCRIPTION
TEST MODE
HDD FORMAT
HDD DESCRIPTION
0
9600
8
NONE
1
1
9600
8
NONE
1
OFF
ENGLISH
ON
>>
ON
0
DISPLAY
>>
APPLY
DISPLAY
PASSWORD
CLOCK SETUP
PTZ
USER AUTHENTICATION
USER PASSWORD
EVENT BEEP
CLOCK
DATE MODE
MONTH TYPE
CHANNEL
PTZ CAMERA ID
MODEL
Digital Video Recorder User’s Manual
>>
>>
OFF
>>
YYYY/MM/DD
INITIAL
CH1
0
NONE
41
Page 42

Chapter 5. Conguration
5.3 Menu Screen Setup
Select the MENU button on the remote control or the main unit, and the following Menu
Screen appears.
MAIN MENU
SUB MENU
SETUP
SETUP GUIDE
• Press the MENU button, and the background screen is switched to the
Notes
· Main Menu: Select the Main Menu corresponding to each Tab.
· Submenu: Select the Submenu to be set up on the Main Menu.
· Setup Items: Change the settings on the Submenu.
· How to Set: This message provides a guide for menu setup.
· It may take a little while for the recording setup to complete. Please wait.
· Except for the recording setup, setting changes are applied immediately.
quad split screen.
Operations
* Operation of the unit using the buttons on the main unit.
- Move between Menus : Press the Arrow
- Change Setting Values : Press the
- Exit from Menu Screen : Press the ESC Button.
* Operation using the Remote Control
- Move between Menus : Press the Arrow
- Change Setting Values : Press the
- Exit from Menu Screen : Press the ESC Button.
Digital Video Recorder User’s Manual
Buttons.
Buttons.
42
buttons.
buttons.
Page 43

Chapter 5. Conguration
5.4 SCREEN SETUP
This is the set up menu related to the DVR system. Press the MENU button and select the
Tab using the Left/Right button. Then the submenu related to the system appears as illus-
trated below. Press the ENTER button and select the submenu using the Left/Right button.
Then press the ENTER button again and you can select setup items using the Left/Right
button.
5.4.1 CH1~CH4 / CH1~CH9 (for SVR-940)
Select setup items related to channels such as channel titles or brightness.
· Title : Titles can be individually set to each channel. Select the channel title and press the
ENTER button. Then the keyboard to enter the title is displayed as illustrated below.
The positions of characters in the Channel Titles can be arranged by using the
- After moving the cursor press the ENTER button to select the relevant character.
- To exit from the Menu Setup, press the ESC button.
- Press the Up/Down arrow button to move between character strings.
- To insert spaces, move the cursor to SPACE on the screen and then press SELECT on the
remote control or the ENTER button on the main unit.
· COVERT : Set whether to display or hide the selected channel.
When COVERT is set to "ON", the selected channel is not displayed on the screen
but is recorded. (This function can be used not to disclose the channel selected
Digital Video Recorder User’s Manual
43
Page 44

Chapter 5. Conguration
. BRIGHTNESS : Adjusts the screen brightness by changing the values.
. CONTRAST : Adjusts the screen contrast by changing the values.
5.4.2 AUTO SEQUENCE
The live screens are automatically switched in the order of [SVR-450: <CH1 -> CH2 -> CH3 -> CH4 ]
/ [SVR-940: <CH1 -> CH2 -> CH3 -> CH4 -> CH5 -> CH6 -> CH7 -> CH8 -> CH9 >] at the predefined
switching interval. The channel switching interval can be set from 1 up to 10 on the [SEQUENCE]
menu.
. SEQUENCE : Set it ON for Auto Sequence mode
. SEQUENCE DWELL : Set the screen display duration by channel. The switching interval can
be set from 1 up to 10 sec.
. ORDER : Select the channels for Auto Sequence.
. USER DEFINE : Select the display channels for Auto sequence in Quad mode display screen.
. VIDEO LOSS SKIP : With Video Loss Skip [ON], channels without video input signals are auto-
matically skipped and only channels with video input are displayed.
5.4.3 STATUS DISPLAY
Selects information to display on the live screens.
Digital Video Recorder User’s Manual
44
Page 45

Chapter 5. Conguration
· OSD [ON/OFF] : With OSD [ON], Status information is displayed on the live screen.
· CLOCK DISPLAY [ON/OFF] : With Clock Display [ON], the current time is displayed on the live
screens.
· HDD FREE SPACE [ON/OFF] : With HDD Free Space [ON], the free space for recording on the
HDD is indicated.
· RECORD STATUS [ON/OFF] : With Record Status [ON], the recording status "S" is displayed on
the corner of the screen during recording.
· TITLE DISPLAY [ON/OFF] : With Titles Display [ON], the titles of [CH1~4] set on the Channel
Title submenu by users are displayed on the live screens.
· EVENT DISPLAY [ON/OFF] : With Event Display [ON], the event information is displayed when
an event occurs.
· OSD CONTRAST : Set the contrast for Menu OSD. The higher the %, the darker the OSD.
5.4.4 SPOT
The SPOT menu is available for only SVR-940.
· TITLE DISPLAY : Select whether to display the channel name on the SPOT screen.
· SPOT MODE
Manual : Select [Manual] and save this setting.
Press “0” on the system front button or “10” on the remote controller (“SP” is displayed on the left upper corner) and press the number of the channel. Then the
SPOT channel will be displayed on the SPOT monitor.
In order to cancel this setting, press the ESC button.
Sequence : Set to display one SPOT channel in sequence.
Digital Video Recorder User’s Manual
45
Page 46

Chapter 5. Conguration
5.5 RECORD SETUP
This is a set up menu related to the DVR system. Press the MENU button and select the Tab
using the Left/Right button. The submenu related to the system then appears as illustrated
below. Press the ENTER button and select the submenu using the Left/Right button. Then
press the ENTER button again and you can select setup items using the Left/Right button.
5.5.1 GENERAL SETUP
1. IMAGE SIZE
Recording Resolution can be selected.
The higher the resolution the system is set to, the better the recording, but the more space
the system needs.
The Monitoring screen can be recorded on the system's HDD.
2. REPEAT RECORD: Set whether to repeat recording.
- [YES]: If no storage space is left on the HDD, recording is continued by overwriting the
oldest data.
- [NO]: If no storage space is left on the HDD, recording is stopped.
3. WARNING MESSAGE
When the remaining capacity of the HDD reaches a predefined percentage, a warning message is displayed to users. The warning level can be set from 1 to 10%, 5 ~10% in general.
4. HDD WARNING BEEP
When the remaining capacity of the HDD reaches the predefined percentage, a warning
beep is activated.
Digital Video Recorder User’s Manual
46
Page 47

Chapter 5. Conguration
5.5.2 DETAIL SETUP
. CHANNEL : Select the channel for which to set DETAILED SETUP.
MODE : Select one of four recording methods below.
CONTINUOUS Continuous recording mode for 24 hours a day
SCHEDULE Reserved recording
MOTION DETECT
SENSOR Recording is activated when the system detects sensor operation.
DISABLE This is the setup mode to disable recording
Recording is activated when the system detects motion from
input video images.
• V-LOSS : V-LOSS can be recorded when 'DETAIL SETUP/MODE' is set as MOTION DETECTION
or SENSOR and 'DETAIL SETUP/PRE EVENT DURATION' is set as 'ON'. In case of recording 'V-LOSS', the data is recorded on a Log file.V-LOSS data can be searched for
from the SEARCH menu according the time when the V-LOSS occurred as recorded
in the Log file. (Please refer to 4.5.6. Log file search)
· SCHEDULE : Press the ENTER button when the cursor is on SCHEDULE, and the schedule
setup screen appears as illustrated below.
Digital Video Recorder User’s Manual
47
Page 48

Chapter 5. Conguration
A Schedule can be set 24 hours a day.
· S : Sensor record
· - : No record
· C : Normal record
· M : Motion detection record
· T : Text record
IMAGE QUALITY [High/Mid/Low] : Set the compression level for images to be stored. At a resolu-
tion of 720X480, the system records at max. 30fps. At a resolution of 360X240, the system records
at max. 12fps.
PRE EVENT DURATION : This is the pre-event recording setup. It automatically records 5
seconds of pre-event data if you set it to 5 secs. Pre-event recording
is not activated if you set it to OFF.
POST EVENT DURATION : Recording continues for the predefined time following the oc-
currence of an event. The available setting values are from 1 to 20
seconds.
AUDIO : Select whether to save audio data along with video.
SENSOR SELECT: Set it to ON to activate the sensor.
5.6 EVENT SETUP
This is a set up menu related to the DVR system. Press the MENU button and select the Tab
using the Left/Right button. The submenu related to the system then appears as illustrated
below. Press the ENTER button and select the submenu using the Left/Right button. Then
press the ENTER button again and you can select setup items using the Left/Right button.
5.6.1 EVENT
EVENT BEEP : Select whether to turn the buzzer ON or OFF.
EVENT AUTO SEQ : Set to display in full screen the channel that the event activated.
EVENT TIME : Set the full screen display time when the event was activated. (3 to 5 seconds)
During this EVENT TIME, other event-activated channels record but do not display in full screen. Only after this EVENT TIME ends, can other event-activated
channels be displayed in full screen.
TEXT MONITORING : Set whether to display POS information such as product name, price,
Digital Video Recorder User’s Manual
48
Page 49

Chapter 5. Conguration
SENSOR : Select the channel for sensor setup.
- SENSOR TYPE : Select the sensor type. (N/O, N/C)
- N/O : NORMAL OPEN type sensor
- N/C : NORMAL CLOSE type sensor
- OFF : Set the sensor OFF
5.6.2 MOTION DETECTION
After setting RECORD MODE/MOTION, set the motion detection for every
CHANNEL : Select the channel for motion detection setup.
MOTION ZONE : Select the area for motion detection to Full or Partial zone.
- FULL ZONE : Detects motion by analyzing the changes in Full images from
cameras.
- PARTIAL ZONE : Users can select the desired zone for motion detection.
MOTION SENSITIVITY : You can set the sensitivity to changes on a screen from 1 to 9. Higher
values mean more precise motion detection.
5.6.3 TEXT
This menu is to setup recording of POS data over video. In order to match it with an input device and its protocol, assign a HEADER1/2 and DELIMITER and set the line to display the data.
Digital Video Recorder User’s Manual
49
Page 50

Chapter 5. Conguration
· SYNC CHANNEL: Select the channel to display TEXT data from a POS device.
· DEVICE
- NORMAL : Select NORMAL when connecting a normal input device such as a bar code
scanning device.
- Finger 007 : Select 'Finger007' when connecting a finger print scan device.
· CHECK PROTOCOL
- HEADER1
- HEADER2
- DELIMITER
- LINES : Set the number of lines to display TEXT data.
5.6.4 POS quick guide
Connect the system to the POS device using a serial cable. In order to display Text data over a
screen, at least one of the channels is to be set to TEXT recording mode and TEXT display. Set
whether to display TEXT data over a screen from SETUP 'EVENT SETUP' EVENT – TEXT MONITORING. Select the channel to display TEXT data over a screen from SETUP 'EVENT SETUP '
TEXT –SYNC CHANNEL. POS TEXT data is displayed only over a full screen, not on quad split
screen.
· DEVICE : NORMAL / Finger007 type are available. NORMAL means a normal input device
such as a bar code scanning device. Finger007 means a finger print scan device.
· PROTOCOL : When PROTOCOL is set to °ÆOFF°Ø, header1, header2, and delimiter are not
activated.
· Header1: Input letters that indicate the beginning of TEXT data in order to analyze device
data.
· Header2: Input letters that indicate the beginning of TEXT data. (Two Headers can be
input.)
· Delimiter: Input letters that indicate the end of TEXT data
· LINES: Set the number of lines to display TEXT data.
Ex) The following are sample data from a POS device.
Kalatel Quick-Easy Mart<0D><0A>
3197 Airport Loop Drive<0D><0A>
Costa Mesa, Ca. 92626<0D><0A>
<0D><0A>
Candy Bar $1.49<0D><0A>
Soft Drink 64oz. $2.49<0D><0A>
When CHECK PROTOCOL is set to OFF, a differ-
ent data format from the above is displayed.
When HEADER1/2 is set to none and DELIMITER is set to <0D><0A> and LINES is set to 10
lines, TEXT data is displayed as below,
Digital Video Recorder User’s Manual
Chips $0.99<0D><0A>
---------------------------<0D><0A>
TOTAL $ 7.99<0D><0A>
<0D><0A>
50
Page 51

Chapter 5. Conguration
Kalatel Quick-Easy Mart
3197 Airport Loop Drive
Costa Mesa, Ca. 92626
Candy Bar $1.49
Soft Drink 64oz. $2.49
Chips $0.99
---------------------------
TOTAL $ 7.99
POS scenario
LIVE SCREEN
POS TEXT data is displayed only over a full screen, not on quad split screen, and is displayed
for 3 to 4 seconds.
PLAYBACK SCREEN
POS TEXT data is displayed only over a full screen, not on quad split screen.
When the linked channel is displayed in full screen, the TEXT data is displayed over the playback screen.
Up/down button: Press the Up button to display TEXT data and press the Down button to
hide TEXT data. (Available during playback and pause.)
Left/right button: Press the Right button to display the next page of TEXT
data and press the Left button to display the first page of TEXT data.
5.6.5 RELAY
This menu is for setting relay.
(Available during pause.)
SVR-450 SVR-940
SENSOR (CH1,CH2,CH3,CH4) : When the sensor of the selected channel is activated, the
system relays out.
MD : When motion of the selected channel is detected, the system relays out.
TEXT : When POS is activated, the system relays out.
V-LOSS : When there is a video loss, the system relays out.
HDD ERROR : When there is an HDD error, the system relays out.
Digital Video Recorder User’s Manual
51
Page 52

Chapter 5. Conguration
5.7 NETWORK
5.7.1 NETWORK
Set the necessary items for network connection to a computer.
· NETWORK TYPE [ADSL/LAN/DHCP] : Selects the network type to connect to a computer.
· IP ADDRESS : Enters the [IP ADDRESS] that the relevant Internet service provider assigns to
a user.
· SUBNET MASK : Enters the [SUBNET MASK] address that the relevant Internet service
provider assigns to a user.
· GATEWAY : Enters the [GATEWAY] address that the relevant Internet service provider as-
signs to a user.
· DNS : Enters the [DNS] address that the relevant Internet service provider assigns to a user.
· ID : Enters a User ID registered with the relevant service provider.
· PW : Enters a User Password registered with the relevant service provider.
· DDNS SERVER ON/OFF : When the DVR is connected to a dynamic IP, the IP address
changes every time it attempts to connect to the ISP. In this case,
there is no way for a user to know the changed IP address. If a DVR
that uses a dynamic IP address is registered with its domain name,
the domain name can easily be found and can be connected even
if the IP changes.
DDNS SERVER DOMAIN ADDRESS : Input the domain address of
5.7.2 DDNS Register
· ID : Input the registered ID at www.samsungipolis.com .
· PW : Input the registered PW at www.samsungipolis.com .
1) Users can set the DDNS in the setup menu of the SVR-440/940 as below. Select the Net-
work menu and the following screen is displayed. Set [SWR] to [ON]
the DDNS SERVER that it is
using.
Digital Video Recorder User’s Manual
52
Page 53

Chapter 5. Conguration
This is all about DDNS setup in the DVR unit.
2) After finishing the above step, please take the next step with the DDNS server. Please
refer to Chapter 5.8 DDNS Registration.
5.7.3 Client access
· PORT : When connecting to a PC, the ports can be changed.
To connect the SVR-450 to a router, all three ports need to be set..
Default setting port on DVR: Control – Connect, PTZ, Events and other control data
Default setting port +1: VIDEO
Default setting port +2: AUDIO
For example) Default setting port on DVR: 3495
Setting port for VIDEO: 3496
Setting port for AUDIO: 3497
· CLIENT ACCESS : Set the Network access password.
· BANDWIDTH SAVING : Select Bandwidth Saving ON, and frame rate transmission reduces
to 1fps.
Digital Video Recorder User’s Manual
53
Page 54

Chapter 5. Conguration
5.7.4 RS-232
This menu is for setting a connection with a POS device.
· SYSTEM ID : Set the system ID.
· BAUD RATE : Set the data transfer speed per second.
· DATA BIT : Set the data transfer bit-rate.
· PARITY BIT : Set the type of error checking for data transfer.
· STOP BIT : Set the insert bit after data transfer.
5.7.5 RS-422/485
This menu is for setting a connection with Cameras and CCTV devices.
· SYSTEM ID : Set the system ID.
· BAUD RATE : Set the data transfer speed per second.
· DATA BIT : Set the data transfer bit-rate.
· PARITY BIT : Set the type of error checking for data transfer.
· STOP BIT : Set the insert bit after data transfer.
5.7.6 E-MAIL
In case of still image capturing at an event, input the IP address to send this captured image
to.
The conditions of sending e-mail
· If the setting value is 'Motion', 'ON', 'ON', the DVR will send e-mail with JPEG file when event
occurs.
· When setting value is 'ON', if the system IP is changed by using dynamic IP, the DVR will
send e-mail include changed IP information.
Digital Video Recorder User’s Manual
54
Page 55

Chapter 5. Conguration
· SEND E-MAIL : Select ON for E-mail sending.
· MAIL ADDRESS : Press the ENTER button to display the Keyboard screen and select the cor-
rect E-mail address.
· MAIL SERVER IP: Please keep the default value.
ID : Input the registered ID of the MAIL SERVER.
PW : Input the registered PW of the MAIL SERVER.
· RETURN MAIL ADDRESS : Input the e-mail address to return an undelivered mail to the mail
address that is set from MAIL ADDRESS.
5.8 DDNS Registration
5.8.1. DDNS Registration Procedure
1) Sign up at iPOLiS website
The website : www.samsungipolis.com
Digital Video Recorder User’s Manual
55
Page 56

Chapter 5. Conguration
- Agreement the general terms and conditions
- SIGN UP page : check ID availability
Digital Video Recorder User’s Manual
56
Page 57

Chapter 5. Conguration
2)The product registration is possible after sign up.
- Sign in at iPOLiS website
- Product List (If you didn’t register products, there are no list)
- Product Registration (Check ID availability)
Digital Video Recorder User’s Manual
57
Page 58

Chapter 5. Conguration
- Check the registration at product list
3) DDNS Configuration at DVR
Press the MENU button, then select [Network] on OSD Menu.
• DDNS > Select ‘Yes’
• DDNS SERVER DOMAIN NAME > Enter the DDNS server address
(Default:www.samsungipolis.com)
• ID & PW > Enter the ID(Domain) & Password using the product registration at iPOLiS
website.
The DDNS configuration at DVR is completed.
Digital Video Recorder User’s Manual
58
Page 59

Chapter 5. Conguration
4) The connection status of selected product can be checked on product list.
[VIEW ] : See the log-in page of selected product
[Edit]/[Delete] : Edit/Delete the selected product, password is needed for checking
•The product ‘ID(domain)’ can not be changed at registered status.
Caution
When the product needs to change the ID, first of all, delete the desired
product, and register product again.
5.9. Instructions on using DDNS
1) Product information confirmation.
Digital Video Recorder User’s Manual
59
Page 60

Chapter 5. Conguration
- under ‘Product Information’
- Checking the product information (Product, Model Number, ID(Domain), MAC Address, etc)
2) Video playback function
View : Move to the login web page of selected product.
-
• If you want to multi channels live monitoring, searching/playback simulta-
Caution
3) Product maintenance functions.
'Product maintenance' and 'edit/delete' products registered in the product list can be
selected. User
will be transferred to the appropriate page when the security code is entered.
Product ‘ID(Domain)’ cannot be edited so if deleted, ‘ID(Domain)’ must be re-entered.
neously, we recommend to using SNM-64S/P s/w program. The iPOLiS web
site doesn't support multi [View] connection at one PC.
Digital Video Recorder User’s Manual
60
Page 61

Chapter 5. Conguration
i. Editing product profile
- Click the edit button from the product list
5.10 Editing registered product
ii. Deleting Product
- Click delete from the product list
- Registered product is deleted
Digital Video Recorder User’s Manual
61
Page 62

Chapter 5. Conguration
5.11 System setting
This is a set up menu related to the DVR system. Press the MENU button and select the
Tab using the Left/Right button. The submenu related to the system appears as illustrated
below. Press the ENTER button and select the submenu using the Left/Right button. Then
press the ENTER button and you can select setup items using the Left/Right button.
5.11.1 System
· LANGUAGE : Selects the language for the Menu screen. 10 languages including Korean and
English are available.
· KEY BUZZER : Selects whether to generate a key sound when pressing the buttons.
· DEFAULT : Initializes the setting values of the unit to the factory default values.
· REMOTE SETUP : Selects whether the system settings can be changed from a remote site over
the network.
·
REMOTE CONTROLLER ID : Set the remote control ID. A remote controller ID can be select-
ed from numbers 0 to 9. The remote controller ID is displayed
with an icon such as R:1, R:2 etc on the screen. If you select 0,
it appears as R:A on the screen and the user can control all the
DVRs by using only one remote controller.
·
DESCRIPTION : Detailed information about the unit such as the S/W Version, HDD capacity,
IP Address, MAC address, and UI TOOLKIT Version.
Digital Video Recorder User’s Manual
62
Page 63

Chapter 5. Conguration
·
TEST MODE : Select to upgrade the firmware of the system.
Please refer to Chapter 5.14.1 Firmware upgrade.
5.11.2 HDD
HDD FORMAT : Select whether to initialize the HDD. Select ON to delete all data saved in the
HDD and the unit will automatically reboot for system stabilization.
HDD DESCRIPTION : Detailed information such as the size, and recording start time of the
HDD.
Digital Video Recorder User’s Manual
63
Page 64

Chapter 5. Conguration
5.11.3 Password
Set the Admin and Network Passwords and set each limitation according to each password.
The DVR supports one ADMIN and three USER accounts.
· USER AUTHENTICATION : The DVR requires each user to sets up a password in order to be
The password should consist of four numbers. (e.g.1,2,3,4)
· USER PASSWORD : Set the user password.(Admin, USER 1~3)
· EVENT BEEP : The system will beep out when a user inputs the wrong password more than
three times.
5.11.4 User Authentication
able to control the given functions.
A password is composed of digits from 1 to 9
Select whether to pop up window that asks
for a Password.
When it selects to pop up a Password window,
the user is shown.
Digital Video Recorder User’s Manual
64
Page 65

Chapter 5. Conguration
1. Authorization functions
- Administrators build the system considering the two factors below.
i. Select the functions whose use is to be restricted.
▶PASSWORD CHECK = O : Function that only a designated person can use.
∴The USER who uses the function must be selected.
→In order to execute the function, the designated USER (the USER who is selected on
the LIST as 'O') must obtain authorization using his own PASSWORD.
ii. Select the functions whose use is not to be restricted.
▶PASSWORD CHECK = X : Function that any person can use.
∴The USER who uses the functions does not need to be selected, because the func-
tions can be used by any USER.
The USER selection function cannot be used.
→In the case of 'PASSWORD CHECK = X', all items in the line are initialized to 'O'.
2. The authority to view the 'SYSTEM SETUP-PASSWORD-USER AUTHORIZATION' page
- Only an administrator can view this page.
- In the case of 'PASSWORD CHECK = X', the system does not archive any data about who
logs into the system menu.
▶Everybody can view 'SYSTEM SETUP-PASSWORD-USER AUTHORIZATION'.
When the user is the only one who operates the system, this setting can be available.
Only when the 'PASSWORD CHECK' is set to 'O' can a discriminatory authority be set for
each of the functions.
· MENU : Set the authority to use the MENU function.
· PB : Set the authority to use the PLAYBACK function.
· PTZ : Set the authority to use the PTZ function.
· R/OFF : Set the authority to use the Recording Off function.
· P/OFF : Set the authority to use the Power Off function.
· P/ON : Set the authority to use the Power On function.
· N/MIC : Set the authority to use the Bi-directional audio function.
* When the 'PASSWORD CHECK' is set to 'X', everybody can view 'SYSTEM SETUP-PASS-
WORD-USER AUTHORIZATION'
'X' : Everybody can view and use the function regardless of user authority. (No password
necessary)
'O' : Inaccessible to users without permission even if the password is known.
Digital Video Recorder User’s Manual
65
Page 66

Chapter 5. Conguration
5.11.5 CLOCK SETUP
Set the system date.
· CLOCK : Set the system time. The unit will automatically reboot for system stabilization.
- DAYLIGHT SAVING : Select whether to apply Daylight Saving Time.
- DATE SETUP : Set the system time.
- NTP : NPT is an abbreviation for Network Time Protocol, which is for synchronizing
the clocks of computer systems over variable-latency data networks.
- TIME SERVER : Input the address of the NTP TIME SERVER.
- GMT : Greenwich Mean Time (GMT) is a term originally referring to mean solar
time at the Royal Observatory, Greenwich in London. Because NTP synchronizes clocks with Greenwich Mean Time (GMT) regardless of geography,
users must set their own time difference. ( Ex.: KOREA GMT +09:00 )
· DATE MODE: Set the date format. There are three type of date format.
- YEAR/MONTH/DATE - YEAR-MONTH-DATE
- MONTH/DATE/YEAR - MONTH-DATE-YEAR
- DATE/MONTH/YEAR - DATE-MONTH-YEAR
. MONTH TYPE : Set the month format, such as the English abbreviation and the number.
Digital Video Recorder User’s Manual
66
Page 67

Chapter 5. Conguration
5.12 PTZ
This is a set up menu related to the DVR system. Press the MENU button and select the
Tab using the Left/Right button. The submenu related to the system appears as illustrated
below. Press the ENTER button and select the submenu using the Left/Right button. Then
press the ENTER button and you can select setup items using the Left/Right button.
5.12.1 Setting for each channel
Set the camera ID and model for each channel.
· CHANNEL : Select the channel to set.
· PTZ CAMERA ID: Set the IDs from 0 to 255 for each camera connected to the system.
· MODEL : Set the camera model. Please select the correct model name because each cam-
era manufacturer applies different camera control protocols.
Available models
- Samsung Electronics : MRX-1000, MPT230
- Samsung Techwin : SPD-3300,2300,1000
- PELCO : PELCO(P), PELCO(D), CM6700
- SRX : SRX-100B
- DONGYANG : DSC-230S/230M/240, DCP-100, DRX-500/502A
- Others : WON WOO, CANON, DYNACOLOR DSCP, COSTAR2500, KALATELKTD-312, SENSORMATIC PTZ, ELMO PTC-200, WOOJU(DRX-502A), KCC-PT400, VIDOB-01,LG LPTA100L,TSC,PIH-302,DS-120,SCC-641,WV-CS850,VC-C50I,NIKO NK-97,NEWBORN
DOME, SJ-100,DY-255,HRX-700,ERNA
- VICON : VPS1300, V2311RB3, 422R
- CNB : PTZ102N,
- SONY : EVI-D30
5.13 EXIT MENU
Press the ESC button to close the menu after setup. The confirmation box appears. Select YES
and the setting values are saved.
Digital Video Recorder User’s Manual
67
Page 68

Chapter 5. Conguration
5.14 ETC
5.14.1 Firmware Upgrade
Users can upgrade the software by doing a firmware download. You can download the firm-
ware with a USB Memory stick.
① Select 'MENU' and go to [SYSTEM SETUP]-[SYSTEM]-[TEST MODE].
② The DVR will reboot and the system will show the DVR DIAGNOSTICS MENU as below.
③ Please create a folder in the USB memory stick and name it 'UPGRADE'. Copy the up-
grade file into the folder and connect the USB memory stick to the DVR.
The folder's name must be 'upgrade'. If the folder's name is not 'upgrade', the system
cannot download the correct firmware from the USB memory stick.
④ Select USB UPGRADE on the screen and the firmware upgrade automatically proceeds.
⑦ When the upgrade is done, the DVR will be rebooted. Select BOOT APPLICATION in the
test mode.
⑧ The DVR will be rebooted again and go back to live monitoring screen mode. Now the
• The function to upgrade firmware over a network is not provided, because
Notes
upgrading the firmware over a network could cause a fatal error in the system if th network got disconnected.
Digital Video Recorder User’s Manual
68
Page 69

Chapter 5. Conguration
5.14.2 Index Start Fail
When the DVR system time is reset or mismatched, the message below is displayed. This message is displayed when the DVR system time is set to before of the time recording data on
the HDD. If the DVR system time is set correctly, the DVR will not show the 'TIME MISMATCH'
error message.
① When the above message is displayed, power the system OFF. Please the power the
system ON, pressing the ESC button. (Press the ESC button and hold it until the initial
message is displayed on the screen as below.) Then the system will ask whether to enter
into the DVR DIAGNOSTICS MENU.
If the user selects [YES], the DVR DIAGNOSTICS MENU will be started. When the password
is pre-set, the password window is displayed.
② Select 'RTC Configuration'. The picture below is displayed.
Digital Video Recorder User’s Manual
69
Page 70

Chapter 5. Conguration
③ After setting the YEAR/MONTH/DATE/HOUR/MIN/SEC, press the ENTER button.
④ Please set the time correctly. If the time overlaps the final recording date on the HDD, the
overplayed data will be deleted. .
⑤ The DVR will be rebooted. Select BOOT APPLICATION.
• Please check if the USB memory stick is compatible with the DVR
Caution
- SAN DISK CO, PRETEC , LG, INNOTECH C&C, TRANSCEND, etc.
• “TEST MODE”, “FACTORY DEFAULT”, “MAC CONFIGURATION” is for manufacturer’s
use only. Please do not touch.
Chapter 6. Web-Viewer
6.1 Login page
Items Description
MODEL
Select the system to connect with[using? to?] Web-viewer.
Select from '440/450/940'.
Digital Video Recorder User’s Manual
70
Page 71

Chapter 6. Web-Viewer
Items Description
If the system is using a Dynamic IP address, select 'iPolis Server'.
Connection Type
IP/Domain
Port
6.2 LIVE mode
To use this function, the system must be pre-registered in the
iPOLiS home page and the NETWORK menu of the system must be
properly pre-set.
Input the IP address of the system if the 'Connection Type' is 'IP
Address'.
When the 'Connection Type' is 'iPolis Server', the default setting
value is displayed.
The default setting value is www.samsungipolis.com
Input the port number of the system if the 'Connection Type' is 'IP
Address'.
Input the system ID that was pre-registered in the iPOLiS home
page, when the 'Connection Type' is 'iPolis Server'.
Digital Video Recorder User’s Manual
71
Page 72

Chapter 6. Web-Viewer
Buttons Functions
/ /
Button to select screen display from 4/ 9/ 16 channels.
(4 / 9 channels screen display is available for SVR-450/940.)
/
/
/ /
Button to activate Auto sequence mode. ( = Auto Sequence )
Button for playback pause. (Does not work in Live mode.)
Button for saving JPEG images.
Button to change to Search mode.
Not available in SVR-940/450 models.
Button to control audio. Works when the user logs in as 'Admin'.
Button to change the PAN/ TILT mode of speed dome cameras.
Before using this function, please set the PTZ field to '0' in 'SYSTEM MENU / PASSWORD / USER AUTHORIZATION'.
Button to change the ZOOM/FOCUS mode of speed dome
cameras.
Before using this function, please set the PTZ field to '0' in 'SYSTEM MENU / PASSWORD / USER AUTHORIZATION'.
Button for ZOOM IN/ OUT.
Button for FOCUS IN/ OUT.
Not available in SVR-940/450 models.
Not available in SVR-940/450 models.
Button to control Alarm. ( = Alarm Out )
Digital Video Recorder User’s Manual
72
Page 73

Chapter 6. Web-Viewer
6.3 SEARCH mode
Buttons Functions
Button to change to Live mode.
/
/
/
Buttons for playback 1 minute before/after.
Buttons to start and stop play.
Buttons to move 1 frame back/1 frame forward.
Buttons to fast-rewind/fast-forward play.
( 2 x and 4x play speeds. )
Window to display the calendar. Dates with recorded data are
displayed in colors. When a date is clicked, the window below
shows time bars with the data.
Select the time to play the data.
Digital Video Recorder User’s Manual
73
Page 74

Chapter 6. Web-Viewer
6.4 Web-Viewer buttons
1) Live Mode
4/9/16 channels
Button for Search Mode
Not available
Auto Sequence
- Auto sequence of the
selected channel.
Display camera OSD menu
* Buttons for 'Zoom/Focus' of camera OSD control
ZOOM IN
ZOOM OUT
Digital Video Recorder User’s Manual
'ZF' mdoe.
Button to go or return to the selected
menu in the camera OSD menu.
Close camera OSD
menu
Buttons to select the
speeds for Pan/Tilt/
Zoom/Focus (Max. 6X)
FOCUS IN
FOCUS OUT
74
Page 75

2) Search Mode
Button for Live Mode
Play buttons
Chapter 6. Web-Viewer
Button for OSD control
over video screen. (Show/hide)
Calendar
Digital Video Recorder User’s Manual
75
Page 76

Chapter 7. Troubleshooting
The SVR-450/940 is a very sophisticated device, so failure can occur. In case of failure, please
follow the instructions given below.
• The unit will not turn on even after plugging in the adaptor jack.
* Check whether the power cord is properly plugged in.
• Images are not appearing on the monitor after plugging in the adaptor jack
* Check whether the video output is BNC or VGA (Check the dip switch at the rear.)
* Check whether the camera connected to the input terminal is properly connected.
* Check whether the brightness of the monitor is properly set.
• No audio in the recorded video
* Check whether [AUDIO] in [RECORD SETUP] of the Menu is [OFF].
* Check the volume of the CCTV monitor.
• The remote control does not work
* Check the battery and replace if necessary.
* Operate the remote control by pointing it directly toward the unit's receiver.
* If the unit ID and the remote control ID do not match, set the same ID for both devices.
• HDD recording is not performed
* The HDD will not record video if the service life of the HDD has come to an end or there
are bad sectors in the HDD. In these cases, replace the HDD
• The unit does not perform Scheduled Recording
* Check whether the Scheduled Recording Start/End times and the current time are set
correctly.
• The monitor screen is not clear.
* Check whether the camera's focus is properly adjusted.
· You need to contact your local vendor for the following problems.
- If any abnormal status in the unit is detected while the unit is being used (e.g. strange noises,
smells or smoke is emitted)
- If the power cable connector is damaged
- If the unit is exposed to rain or water
- If a liquid is spilled on the unit or foreign substances have got into the unit
- If the unit doesn't work as defined in this manual
- If the unit is dropped and seriously damaged
- If specific changes in performance are identified
Digital Video Recorder User’s Manual
76
Page 77

4CH/9CH Standalone Digital video recorder Specications
Spec. SVR-450 SVR-940
Video Input 4BNC 9BNC
Video
Output
Display
Record
Serial Interface RS-485/422
Alarm Input/Output 4IN-1OUT 9IN-4OUT
Audio Input/Output 4IN-1OUT
NETWORK
Remote Control To control up to 9 DVRs
Temperature
Power Supply 12V DC Adaptor AC100~126V/200~240V
Consumption Approx. 25W 65W
Monitor A 1BNC, 1VGA (Selectable)
Monitor B - 1BNC (Single/SPOT)
Compression MPEG4
Speed 120fps 270fps
Resolution 720 X 480, 360 X 240 720x480,720x240,360x240
Multi screen 1/4 1/4/9
Speed Max. 120fps
Resolution 704X480, 352X240 704X480, 704X240,352X240
Mode Normal, Schedule, Event, TEXT
HDD 160GB 1EA 250GB 1EA (Max. 2EA)
Backup/Copy USB Memory Stick / CD-RW
Interface RJ-45(10/100 Base-t)
Protocol TCP/IP, DHCP, PPPoE
Software SNM-64S/P
OSD GUI, Multi Language Support
Operation 5˚~ 40˚
Storage -10˚~ 60˚
Dimension 430(W) X 88.8(H)X 362(D)mm
Weight 8.9Kg 8.9Kg
1BNC, 1VGA (Selectable),
S-Video
Digital Video Recorder User’s Manual
77
Page 78

COMPATIBLE SATA HDD LIST
COMPANY MODEL SIZE RPM BUFFER
Seagate
HITACHI
ST31000340SV
(Surveillance)
ST3500830SCE 500 GB 7200 RPM 8 MB OK OK OK
ST3250410AS
(Barracuda)
ST3250310SV
(Surveillance)
ST3160815AS
(Barracuda)
HDS721010KLA330 500 GB 7200 RPM 16 MB OK OK OK
HDP725050GLA360 250 GB 7200 RPM 8 MB OK OK OK
WD3200AVVS 320GB 7200 RPM 8 MB OK OK OK
1 TB 7200 RPM 16 MB OK OK OK
250 GB 7200 RPM 16 MB OK OK OK
250 GB 7200 RPM 8 MB OK OK OK
160 GB 7200 RPM 8 MB OK OK OK
Reconi-
tion
Record Playback
Components
※
SVR-450/940 can be connected to only SATA converter board provided with the product.
Please refer to the install procedure of SATA HDD on the next page.
1. SATA HDD BOARD
2. SATA HDD
3. SATA HDD BRACKET
4. HDD VIBRATION ISOLATORS
5. SCREW
6. SATA HDD JUMPER
Digital Video Recorder User’s Manual
78
Page 79

SATA HDD INSTALLATION
1. Insert rubber rings to the bracket and screw the bracket to the HDD.
2. When assemble the SATA converter board, screw on the only upper-right corner
like the picture below.
Need assy Screw
3. Select "Master" or "Slave" using the Jumper switch on SATA converter board.
Set the Master/Slave using the Jumper switch.
In case of installing two HDDs, rstly set the Master/Slave. If One HDD is "Master", the other
should be set to "Slave".
JUMPER Switch
Set the Master/Slave using Jumper switch.
Digital Video Recorder User’s Manual
79
Page 80

4. Connect the E-IDE & power cables.
a. Direction of the SATA Converter board
b. Direction of the main power
Sub-power cable for SATA Converter board
Connect to the power cable Connect to the E-IDE HDD cable
5. In case of installing two Hard Disk Drives.
Check the "MASTER" or "SLAVE" on the SATA converter board.
Connect to the power(SMPS) using power cable. (1st HDD - the main power cable, 2nd HDD
- the sub power cable)
When you use two HDDs, HDDs should be same model and have same interface.
Connect with E-IDE HDD cable and power cable.
Digital Video Recorder User’s Manual
80
Page 81

COMPATIBLE PATA HDD LIST
COMPANY MODEL SIZE RPM
HD-
S728080PLAT20
HD-
S721680PLAT80
HDT722516D-
LAT80
HDT722516D-
LAT80
HITACHI
MAXTOR 6L300R0 300 GB
SAMSUNG
HDS722525V-
LAT80
HDT722525D-
LAT80
HDT725025V-
LAT80
HDT725032V-
LAT80
HD-
S725050KLAT80
SP0822N 80 GB
SP1604N 160 GB
80 GB
80 GB
160 GB
160 GB
250 GB
250 GB
250 GB
320 GB
500 GB
7200
RPM
7200
RPM
7200
RPM
7200
RPM
7200
RPM
7200
RPM
7200
RPM
7200
RPM
7200
RPM
7200
RPM
7200
RPM
7200
RPM
BUF-
FER
16 M OK OK OK
Reco-
nition
2 M OK OK OK
8 M OK OK OK
8 M OK OK OK
8 M OK OK OK
8 M OK OK OK
8 M OK OK OK
8 M OK OK OK
8 M OK OK OK
8 M OK OK OK
2 M OK OK OK
2 M OK OK OK
Record
Playback
Western-
Digital
WD1600BB-
22GUA0
WD2000BB-
00GUA0
160 GB
200 GB
Digital Video Recorder User’s Manual
7200
RPM
7200
RPM
2 M OK OK OK
8 M OK OK OK
81
Page 82

COMPANY MODEL SIZE RPM
7200
RPM
7200
RPM
7200
RPM
7200
RPM
7200
RPM
7200
RPM
7200
RPM
7200
RPM
7200
RPM
7200
RPM
7200
RPM
Seagate
ST3400-15ACE 40 GB
ST3800-12ACE 80 GB
ST31200-25ACE 120 GB
ST31600-22ACE 160 GB
ST3300820ACE 300 GB
ST3300831ACE 300 GB
ST3400832ACE 400 GB
ST3400820ACE 400 GB
ST3500641A 500 GB
ST3750840ACE 750 GB
ST3750640A 750 GB
BUF-
Reco-
FER
nition
2 M OK OK OK
2 M OK OK OK
2 M OK OK OK
2 M OK OK OK
8 M OK OK OK
8 M OK OK OK
8 M OK OK OK
8 M OK OK OK
16 M OK OK OK
8 M OK OK OK
16 M OK OK OK
Record
Playback
Page 83

MEMO
Page 84

MEMO
Digital Video Recorder User’s Manual
84
Page 85

MEMO
Digital Video Recorder User’s Manual
85
Page 86

• SALES NETWORK
SAMSUNG TECHWIN CO., LTD.
145-3,Sangdaewon dong, Jungwon-gu, Seongnam-si, Gyeonggi-do, 462-120,Korea
TEL: +82-31-740-8151~8 FAX: +82-31-740-8145
SAMSUNG TECHWIN EUROPE CO., LTD.
Samsung House, 1000Hillswood Drive, Hillswood Business Park
Chertsey,Surrey,UNITED KINGDOM KT16 OPS
TEL: +44-1932-45-5308 FAX: +44-1932-45-5325
SAMSUNG TECHWIN AMERICA Inc.
1480 Charles Willard St. Carson, CA 90746,UNITED STATES
TEL: +1-310-632-1234 FAX: +1-310-632-2195
www.samsungtechwin.com
www.samsungcctv.com
VAN 08. 11
 Loading...