

Samsung SV-M10K, SV-M12K User Manual
OWNER’S MANUAL
EJECT
STANDBY/ON
REW
F.F
Video Cassette Recorder (VCR)
- Line Recorder
SV-M10K/SV-M12K/SV-M23K
Only cassettes marked can be used with the
VCR.
The unit is not disconnected from the AC power
source as long as it is connected to the wall outlet,
even if the unit itself has been turned off.
Accessories
You have just purchased a Video Cassette Player.
Together with your VCR, you will find the following accessories in the box.
REMOTE CONTROL
BATTERIES “AA”
RF- CABLE
WARNING:
TO PREVENT FIRE OR SHOCK HAZARD, DO NOT
EXPOSE THIS APPLIANCE TO RAIN OR
MOISTURE.
DO NOT OPEN THE CABINET. REFER
SERVICING TO QUALIFIED PERSONNEL ONLY.
TO PREVENT ELECTRIC SHOCK,
Contents
Inserting Batteries in the Remote Control . . . . . . 2
Infrared Remote Control . . . . . . . . . . . . . . . . . . . 2
Tuning Your Television for the VCR . . . . . . . . . . . 3
Selecting the RF OUT Sound Mode (G, K) . . . . . 3
Setting the VCR Output Channel . . . . . . . . . . . . 3
Playing a Cassette . . . . . . . . . . . . . . . . . . . . . . . 4
Adjusting Picture Alignment Manually . . . . . . . . . 4
Selecting the Appropriate System Standard . . . . 4
Intelligent Picture Control . . . . . . . . . . . . . . . . . . 4
Playing a Sequence Frame by Frame . . . . . . . . . 5
Using the Tape Counter . . . . . . . . . . . . . . . . . . . 5
Playing a Cassette in Slow Motion . . . . . . . . . . . 5
Selecting the Cassette Type . . . . . . . . . . . . . . . . 5
Auto Power off . . . . . . . . . . . . . . . . . . . . . . . . . . 6
Interval Repeat Play . . . . . . . . . . . . . . . . . . . . . . 6
Auto Repeat Play . . . . . . . . . . . . . . . . . . . . . . . . 6
Displaying/Hiding On-Screen Information . . . . . . 6
Recording From TV . . . . . . . . . . . . . . . . . . . . . . 7
Recording from Another VCR . . . . . . . . . . . . . . . 7
Technical Specifications . . . . . . . . . . . . . . . . . . . 8
Inserting Batteries in the Remote Control
You must insert or replace the batteries in the remote
control when you:
◆
Purchase the video cassette Recorder
◆
Find that the remote control is no longer
working correctly
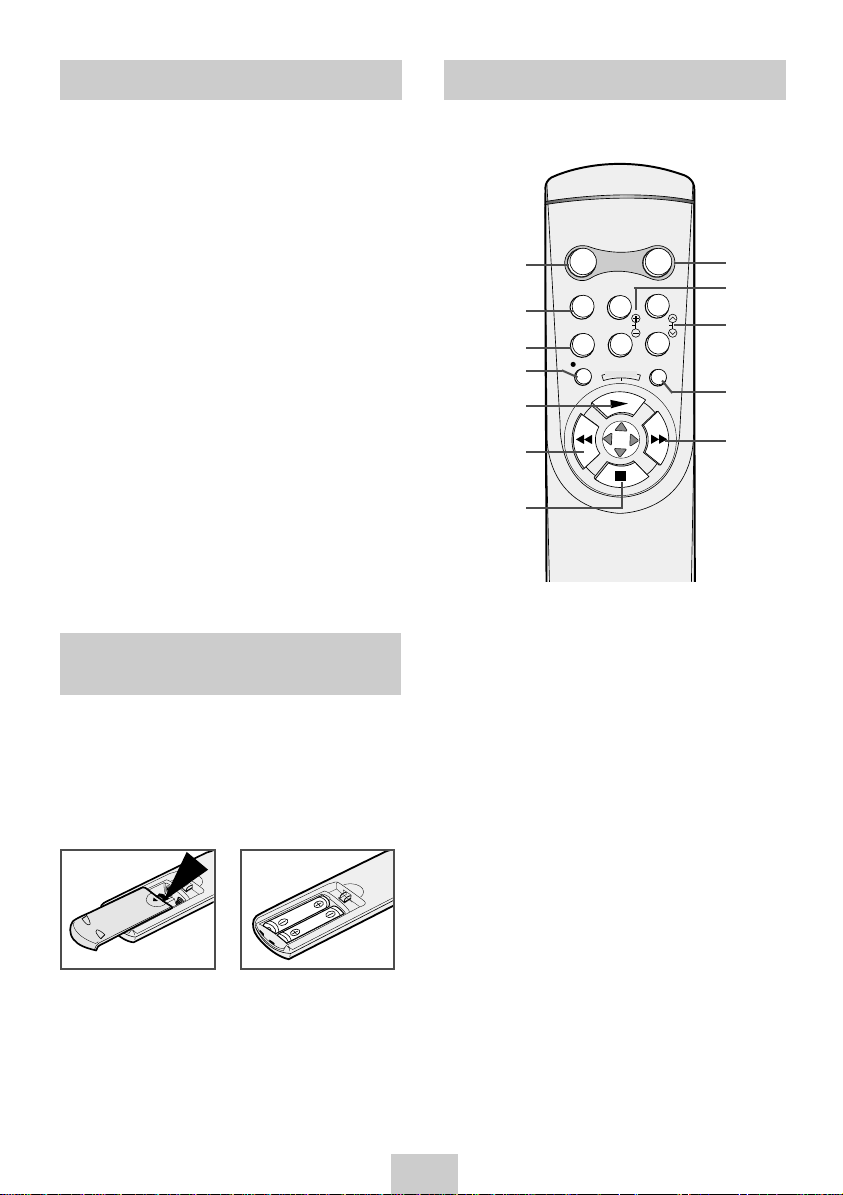
1 Push the tab in the direction of the arrow to release
the battery compartment cover on the rear of the
remote control.
2 Insert two AA, R6 or equivalent batteries, taking
care to respect the polarities:
◆
+ on the battery with + on the remote control
◆
– on the battery with – on the remote control
3 Replace the cover by aligning it with the base of
the remote control and pushing it back into place.
Infrared Remote Control
STANDBY/ON DISPLAY
1
CNT.RESET
2
3
4
SLOW TRK
IIP/S
REC MENU
E
P
A
E
T
R
5
6
7
1. STANDBY/ON BUTTON
2. COUNTER RESET BUTTON
3. PAUSE/STILLBUTTON
4. RECORD BUTTON
5. PLAYBUTTON
(INTERVALREPEATBUTTON)
(MENU SELECTION UP BUTTON)
6. REWIND/REVERSE PICTURE SEARCH
BUTTON (MENU SELECTION BUTTON)
7. STOP BUTTON
(MENU SELECTION DOWN BUTTON)
8. DISPLAY BUTTON
9. SLOW BUTTONS
10. TRACKING BUTTONS
11. MENU BUTTON
12. FAST-FORWARD/FORWARD SEARCH BUTTON
(MENU SELECTION BUTTON)
8
9
10
11
12
➢
Do not mix different battery types (manganese
and alkaline for example).
ENG-2
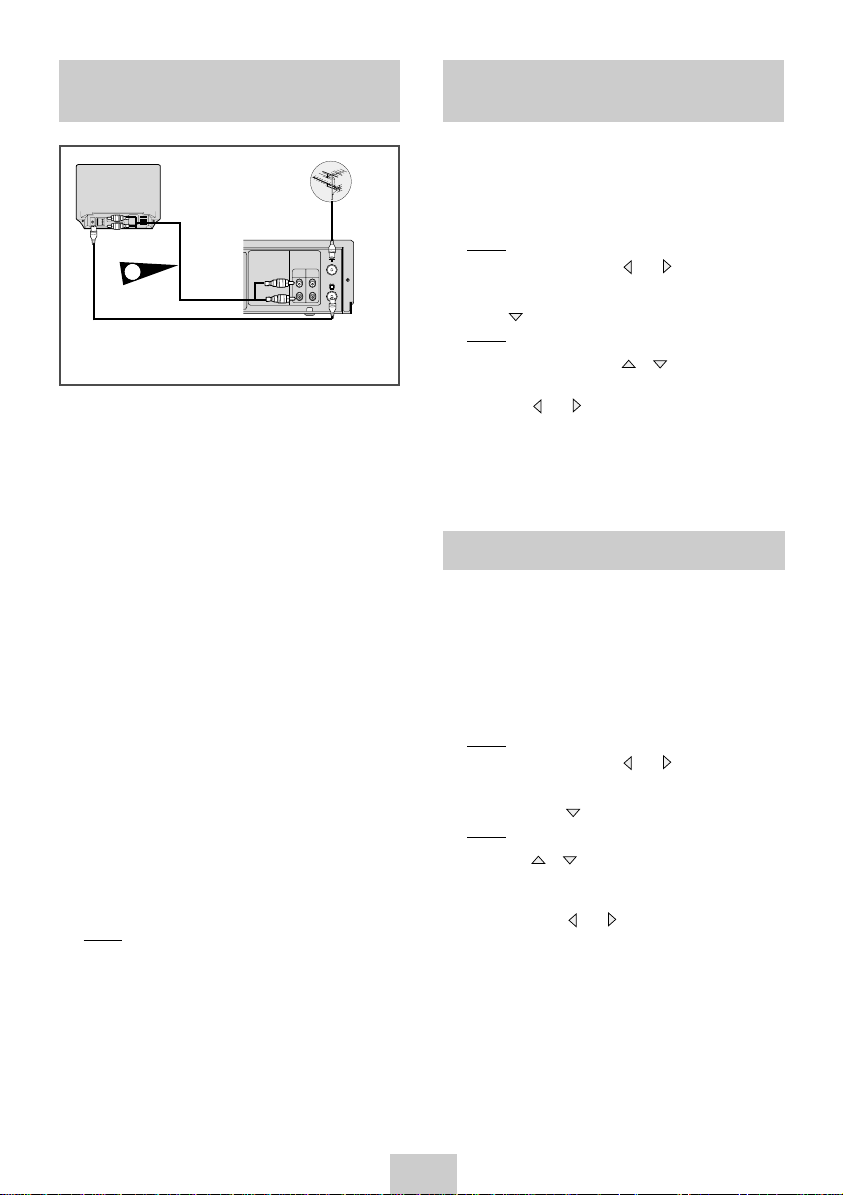
Tuning Your Television for the VCR
Selecting the RF OUT Sound Mode (G, K)
Aerial
AV Output
(Not supplied)
AUDIO
VIDEO
Aerial
Connector
LINE
LINE
IN 1
OUT
TV
TV
AV input
Aerial input
Coaxial
Cable
◆
Make sure that both the television and the VCR are
RCA Cable
(Not supplied)
2
switched off before connecting the cables.
You must tune your television for the VCR only if you
are not using a RCA cable.
➢To view pictures from your VCR when a RCA
cable is used, the television must be set to the
audio/video mode (AV).
1 Switch on the television.
2 Switch on the VCR by pressing STANDBY/ON on
the front of the VCR or STANDBY/ON on the
remote control.
3 Select a programme position on the television to be
reserved for use with your VCR.
4 Insert the video cassette in the VCR. Check that
the VCR starts reading the cassette; if not, press
button.
5 Start a scan on your television or set the television
to UHF channel 36.
6 Fine tune the television until the pictures and sound
are obtained clearly.
7 If you cannot find the pictures and sound, or there
is interference from nearby channels, change the
VCR OUTPUT CHANNEL to adjust the frequency.
8 When the picture and sound are perfectly clear
store this channel at the desired programme
position on the television.
Result: That programme is now reserved for use
with your VCR.
❿
You must choose the sound mode (G or K) according to
the TV set connected to your VCR.
1 Press MENU on the remote control.
Result: The programming menu is displayed.
2 Press the corresponding or buttons, to
select the INSTALLATION option.
3 Press button to select this option.
Result: The INSTALLATION menu is displayed.
4 Press the corresponding or buttons, until the
cursor is placed in front of the TV SYSTEM option.
5 Press the or buttons to select G or K.
6 On completion, press MENU twice to exit the menu.
Then tune your television again.
Setting the VCR Output Channel
Your VCR output channel may need to be changed if
the pictures suffers from interference or if your TV
cannot find the pictures. Also, you can change the VCR
output channel to adjust the frequency in which
information is displayed on the screen.
1 Press MENU on the remote control.
Result: The programming menu is displayed.
2 Press the corresponding or buttons, to
select the INSTALLATION option.
3 And then press button to select this option.
Result: The INSTALLATION menu is displayed.
4 Press the or buttons, until the cursor is
placed in front of the VCR OUTPUT CH option.
5 Select the required output channel (CH21~CH69)
by pressing the or buttons.
6 On completion, press MENU twice to exit the menu.
Then tune your television again.
ENG-3
 Loading...