

SAMSUNG SC-D263, SC-D363, SC-D364, SC-D365, SC-D366 User Manual
ENGLISH
FRANÇAIS
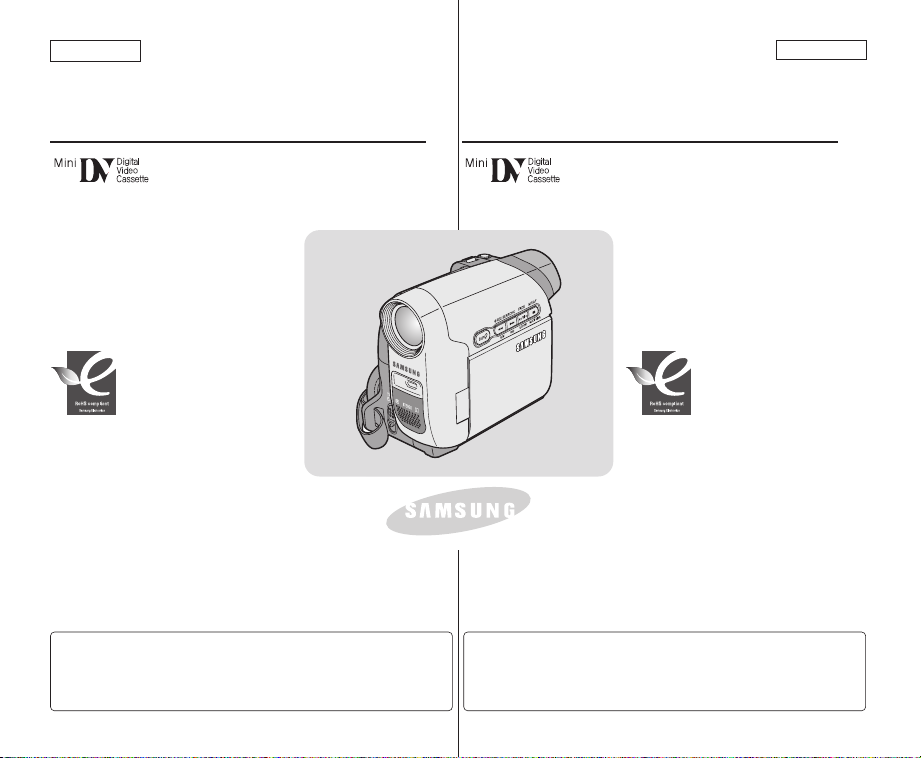
Digital Video Camcorder
SC-D263/D362/D363/
D364/D365/D366
AF Auto Focus
CCD Charge Coupled Device
ACL Liquid Crystal Display
RoHS compliant
Our product complies with “The
Restriction Of the use of certain
Hazardous Substances in
equipment”, and we do not use the 6
hazardous materials- Cadmium(Cd), Lead
(Pb), Mercury (Hg), Hexavalent Chromium
(Cr
Brominated Diphenyl Ethers(PBDEs)- in our
products.
Owner’s Instructiibiok
Before operating the unit, please
read this Instruction Book thoroughly,
and retain it for future reference.
Use only approved battery packs.
Otherwise, there is a danger of overheating, fire or explosion.
Samsung is not responsible for problems occurring due to
using unapproved batteries.
electrical and electronic
+6
), Poly Brominated Biphenyls (PBBs), Poly
Caméscope vidéo numérique
SC-D263/D362/D363/
D364/D365/D366
AF
CCD
ACL
certaines substances dangereuses dans les
composants électriques et électroniques”. Nous
n'utilisons pas les six matières dangereuses
suivantes dans la fabrication de nos appareils :
cadmium (Cd), plomb (Pb), mercure (Hg), chrome
hexavalent (
polybromodiphényléthers (PBDE).
Manuel d’utilisation
Avant de vous servir de l’appareil, lisez ce
manuel d’utilisation avec attention et
conservez-le en vue d’une utilisation ultérieure.
N'utilisez que des batteries agréées. Dans le cas contraire, il
existe un risque de surchauffe, d'incendie ou d'explosion.
Samsung ne saurait être tenu responsable en cas de problème
survenant suite à l'utilisation de batteries non agréées.
Mise au point automatique
Mémoire à transfert de charges
Affichage à cristaux liquides
Conforme à ‘’La directive
RoHS
Notre produit est conforme à la
directive RoHS relative à la “La
limitation de l'utilisation de
+6
Cr
), polybromodiphényles (PBB) et
AD68-00970C
ENGLISH
Notices and Safety Instructions
FRANÇAIS
Avertissements et consignes de sécurité
Safety Instructions
Shock Hazard Marking and Associated Graphical Symbols
CAUTION
RISK OF ELECTRIC SHOCK
DO NOT OPEN
Explanation of Safety Related Symbols
WARNING - To Reduce The Risk Of Fire Or Electric Shock, Do Not Expose
This Apparatus To Rain Or Moisture.
1. Read these instructions.
2. Keep these instructions.
3. Heed all warnings.
4. Follow all instructions.
5. Do not use this apparatus near water.
6. Clean only with dry cloth.
7. Do not block any ventilation openings. Install in accordance
with the manufacturer’s instructions.
8. Do not install near any heat sources such as radiators, heat
registers, stoves, or other apparatus (including amplifiers)
that produce heat.
CAUTION
RISK OF ELECTRIC SHOCK
DO NOT OPEN
CAUTION: TO REDUCE THE RISK OF
ELECTRIC SHOCK, DO NOT REMOVE
COVER (OR BACK).
NO USER-SERVICEABLE PARTS
INSIDE, REFER SERVICING TO
QUALIFIED SERVICE PERSONNEL.
This symbol is intended to alert the user to the presence of
uninsulated “dangerous voltage” within the product’s
enclosure that may be of sufficient magnitude to constitute a
risk of electric shock to persons.
This symbol is intended to alert the user to the presence of
important operating and maintenance (servicing) instructions
in the literature accompanying the appliance.
Consignes de sécurité
Symbole représentant un risque d'électrocution et icônes associées
ATTENTION
RISQUE DE CHOC
ELECTRIQUE NE PAS OUVRIR
Explication des symboles relatifs à la sécurité
AVERTISSEMENT - Pour réduire les risques d'incendie ou de choc électrique,
1. Lisez attentivement ces consignes.
2. Conservez ces consignes dans un endroit sûr.
3. Tenez compte de tous les avertissements.
4. Respectez toutes les consignes décrites dans ce manuel.
5. N'utilisez jamais l’appareil à proximité de l'eau.
6. Nettoyez uniquement avec un chiffon sec.
7. N'obstruez pas les fentes aménagées pour l'aération. Effectuez
l'installation en vous conformant aux consignes du fabricant.
8. N'installez pas l'appareil à proximité de sources de chaleur
(ex. : radiateurs, bouches de chaleur, fours) ou d'autres appareils
(ex. : amplificateurs) produisant de la chaleur.
ATTENTION
RISQUE DE CHOC
ELECTRIQUE NE PAS OUVRIR
ATTENTION : POUR REDUIRE LES RISQUES
DE CHOC ELECTRIQUE, NE RETIREZ JAMAIS
LE CACHE NI LE PANNEAU ARRIERE.
SI AUCUNE PIECE SITUEE A L’INTERIEUR NE
PEUT ETRE REPAREE PAR L’UTILISATEUR,
ADRESSEZ-VOUS A UN TECHNICIEN QUALIFIE
POUR TOUT DEPANNAGE.
Ce symbole avertit l’utilisateur de la présence d’un “courant
électrique dangereux” non isolé à l’intérieur de l’appareil
pouvant être suffisamment élevé pour constituer un risque
de choc électrique.
Ce symbole avertit l’utilisateur que les manuels livrés avec
cet appareil comportent des instructions importantes
concernant l’utilisation et l’entretien (réparations) de celui-ci.
n'exposez pas cet appareil à la pluie ou à l'humidité.

ENGLISH
Notices and Safety Instructions
9. Do not defeat the safety purpose of the polarized or grounding type
plug. A polarized plug has two blades with one wider than the other.
A grounding type plug has two blades and a third grounding prong.
The wide blade or the third prong are provided for your safety. If the
provided plug does not fit into your outlet. Consult an electrician for
replacement of the obsolete outlet.
10. Protect the power cord from being walked on or pinched particularly
at plugs, convenience receptacles, and the point where they exit from
the apparatus.
11. Only use attachments/accessories specified by the manufacturer.
12. Use only with the cart, stand, tripod, bracket, or table specified
by the manufacturer, or sold with the apparatus. When a cart is
used, use caution when moving the cart/apparatus combination
to avoid injury from tip-over.
13. Unplug this apparatus during lightning storms or when unused
for long periods of time.
14. Refer all servicing to qualified service personnel. Servicing is required
when the apparatus has been damaged in any way, such as powersupply cord or plug is damaged, moistened oes not operate normally,
or has been dropped.
15. The apparatus should not be exposed to dripping or splashing. No
objects filled with liquids, such as vases, should be placed on the
apparatus.
16. VENTILATION:
Slots and openings in the cabinet are provided for ventilation to ensure
reliable operation of the CAMCORDER and to protect it from overheating.
These openings must not be blocked or covered. Never place your
CAMCORDER on a bed, sofa, rug, or other similar surface: on or near a
radiator or heat register. This CAMCORDER should not be placed in a
built-in installation such as a bookcase or rack unless proper ventilation is
provided or the manufacturer ’s instructions have been adhered to.
17. POWER SOURCES:
The CAMCORDER should be operated only from the type of power
source indicated on the label. If you are not sure of the type of power
supply at your home, consult your appliance dealer or local power
company. A CAMCORDER is intended to be operated from battery power,
or other sources, refer to the operating instructions.
FRANÇAIS
Avertissements et consignes de sécurité
9. Ne démontez pas le dispositif de sécurité de la prise polarisée ou de la
prise de terre. Une fiche polarisée possède deux broches, dont l'une est
plus large que l'autre. Une prise de terre est équipée de deux broches et
d’une troisième destinée à la mise à la terre. La broche large et la
troisième broche permettent d'assurer votre sécurité. Si la fiche fournie
ne s'adapte pas à votre prise murale, contactez un électricien afin de
procéder au remplacement de la prise obsolète.
10. Evitez d’écraser ou de pincer le cordon d'alimentation, particulièrement
au niveau des fiches, de la prise et du point de sortie de l'appareil.
11. Utilisez uniquement les pièces/accessoires recommandés par le fabricant.
12. Utilisez uniquement les chariots, socles, trépieds, consoles et tables
recommandés par le fabricant ou vendus avec l'appareil. Lorsque vous
utilisez un chariot, déplacez l'ensemble chariot / appareil avec
prudence afin d'éviter de vous blesser en cas de chute de ce dernier.
13. Débranchez l'appareil en cas d'orage ou de non-utilisation prolongée.
14. Confiez toute réparation à un technicien qualifié. Il est indispensable de
faire réparer l'appareil si celui-ci a été endommagé de quelque façon que
ce soit (ex. : endommagement de la prise ou du cordon d'alimentation,
projection de liquide, dysfonctionnement ou chute).
15. Attention à ne pas renverser ou projeter de liquides sur l'appareil. Aucun
objet contenant du liquide (ex. : vase rempli d'eau) ne doit être posé sur
l'appareil.
16. AERATION:
Les fentes et ouvertures ménagées sur le châssis assurent l’aération et le bon
fonctionnement du CAMESCOPE, lui évitant ainsi les risques de surchauffe.
N'obstruez ni ne couvrez jamais ces ouvertures. Ne placez jamais votre
CAMESCOPE sur un lit, un canapé, un tapis ou toute autre surface similaire,
ainsi que sur ou près d’un radiateur ou d’une autre source de chaleur.
N’installez le CAMESCOPE dans un meuble intégré (ex. : bibliothèque ou
étagère) que si une aération adéquate est prévue ou si les consignes du
fabricant le prévoient.
17. TYPES D'ALIMENTATION :
Raccordez votre CAMESCOPE uniquement au type d'alimentation indiqué sur
l'étiquette. Si vous n'êtes pas sûr du type d'alimentation de votre habitation,
consultez le revendeur de l'appareil ou votre fournisseur d’électricité. Un
CAMESCOPE peut fonctionner sur batterie ou avec d’autres types
d’alimentation. Veuillez vous reporter aux instructions d’utilisation.
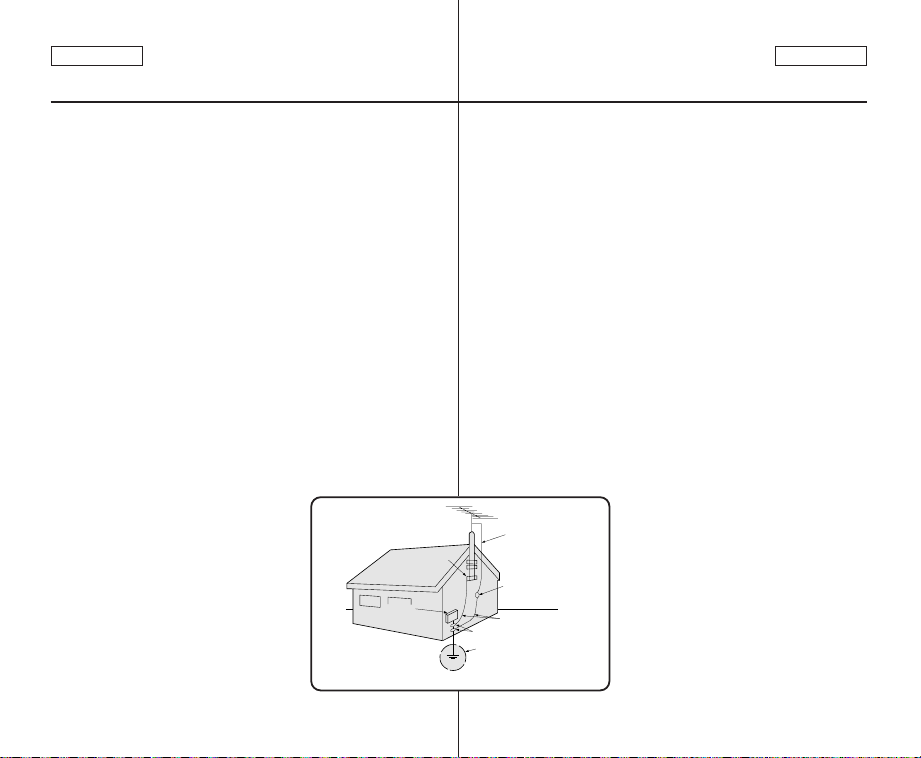
GROUNDING CONDUCTORS
(NEC SECTION 810-21)
GROUND CLAMPS
POWER SERVICE GROUNDING
ELECTRODE SYSTEM
(NEC ART 250, PART H)
NEC NATIONAL ELECTRICAL CODE
ELECTRIC
SERVICE
EQUIPMENT
GROUND
CLAMP
ANTENNA
LEAD IN
WIRE
ANTENNA
DISCHARGE UNIT
(NEC SECTION 810-20)
ENGLISH
Notices and Safety Instructions
18. GROUNDING OR POLARIZATION:
This CAMCORDER may be equipped with either a polarized 2-wire AC
line plug (a plug having one blade wider than the other) or a 3-wire
grounding type plug, a plug having a third (grounding) pin. If you are
unable to insert the plug fully into the outlet, try reversing the plug. If the
plug still fails to fit, contact your electrician to replace your outlet. Do not
defeat the safety purpose of the polarized plug.
19. POWER-CORD PROTECTION:
Power-supply cords should be routed so that they are not likely to be
walked on or pinched by items placed upon or against them, paying
particular attention to cords or plugs, convenient receptacles, and the point
where they exit from the unit.
20. OUTDOOR ANTENNA GROUNDING:
If an outside antenna or cable system is connected to the CAMCORDER,
be sure the antenna or cable system is grounded to provide some
protection against voltage surges and built-up static charges, Section 810
of the National Electrical Code, ANSI/NFPA No. 70-1984, provides
information with respect to proper grounding of the mast and supporting
structure, grounding of the lead-in wire and supporting structure,
grounding of the mast and supporting structure, grounding of the lead-in
wire to an antenna discharge unit, size of grounding to conductors,
location of antenna-discharge unit, connection to grounding electrodes
and requirements for the grounding electrode.
See figure below.
FRANÇAIS
Avertissements et consignes de sécurité
18. PRISE DE TERRE OU POLARISATION :
Ce CAMESCOPE peut être équipé d’une prise CA à deux fils polarisée
(avec une broche plus large que l’autre) ou d’une prise de terre trois fils,
pourvue d’une broche supplémentaire (de mise à la terre). Si vous ne
parvenez pas à introduire complètement la fiche dans la prise, essayez
d'inverser la fiche. Si la fiche ne correspond toujours pas, contactez votre
électricien pour qu’il remplace votre prise. Ne démontez pas le dispositif
de sécurité de la prise polarisée.
19. PROTECTION DU CORDON D’ALIMENTATION :
Les cordons d'alimentation doivent être déroulés de sorte qu'aucun objet
placé au-dessus d’eux ou contre eux ne les chevauche ou les pince.
Soyez particulièrement vigilant avec les cordons situés au niveau des
fiches, des prises et de la sortie de l’appareil.
20. MISE A LA TERRE DES ANTENNES EXTERIEURES :
Lorsque le CAMESCOPE est relié à une antenne extérieure ou à un
réseau câblé, assurez-vous que celui-ci est bien relié à la terre afin de
vous protéger contre les surtensions et les accumulations de charges
électrostatiques. L'alinéa 810 du Code national électrique américain,
ANSI/NFPA N° 70-1984, donne des informations portant sur la mise à la
terre correcte du mât et de la charpente de support de l’antenne, sur la
mise à la terre du câble vers le dispositif de décharge de l’antenne, sur la
taille des conducteurs de mise à la terre, sur l'emplacement du dispositif
de décharge de l'antenne, sur le branchement aux électrodes de mise à la
terre et sur les exigences relatives à ces dernières.
Voir le schéma ci-dessous.

ENGLISH
Notices and Safety Instructions
21. LIGHTNING:
For added protection of this CAMCORDER during a lightning storm or when
it is left unattended and unused for long periods of time, unplug it from the
wall outlet and disconnect the antenna or cable system.
This will prevent damage to the CAMCORDER due to lightning and
power-line surges.
22. POWER LINES:
An outside antenna system should not be located in the vicinity of overhead
power lines or other electric light or power circuits where it can fall into such
power lines or circuits. When installing an outside antenna system, extreme
care should be taken to keep from touching such power lines or circuits as
contact with them might be fatal.
23. OVERLOADING:
Do not overload wall outlets and extension cords as this can result in a risk
of fire or electric shock.
24. OBJECTS AND LIQUIDS:
Never push objects of any kind into this CAMCORDER through openings as
they may touch dangerous voltage points or short out a part that could result
in a fire or electric shock.
Never spill liquids of any kind onto the CAMCORDER. Should spillage occur,
unplug unit and have it checked by a technician before use.
25. SERVICING:
Do not attempt to service this CAMCORDER yourself. Opening or removing
covers may expose you to dangerous voltage or other hazards. Refer all
servicing to qualified service personnel.
26. DAMAGE REQUIRING SERVICE:
Unplug this CAMCORDER from the wall outlet and refer servicing
to qualified service personnel under the following conditions:
a. When the power-supply cord or plug is damaged.
b. If any liquid has been spilled onto, or objects have fallen into the
CAMCORDER.
c. If the CAMCORDER has been exposed to rain or water.
d. If the CAMCORDER does not operate normally by following the
operating instructions, adjust only those controls that are covered by the
operating instructions. Improper adjustment of other controls may result in
damage and will often require extensive work by a qualified technician to
restore the CAMCORDER to its normal operation.
If the CAMCORDER has been dropped or the cabinet has been damaged.
e.
f. When the CAMCORDER exhibits a distinct change in performance, this
indicates a need for service.
FRANÇAIS
Avertissements et consignes de sécurité
21. FOUDRE:
A titre de précaution supplémentaire, débranchez le CAMESCOPE, l’antenne et le
système de câblage en cas d'orage, d'absence ou de non-utilisation prolongée.
Cela évite que le CAMESCOPE ne soit endommagé par la foudre et par des
surtensions.
22. LIGNES ELECTRIQUES:
L’antenne extérieure ne doit pas être placée à proximité de lignes électriques
aériennes ou autres circuits électriques ou d'éclairage, ceci afin d’éviter tout risque de
contact avec eux en cas de chute. Lorsque vous installez une antenne extérieure,
faites extrêmement attention à ne pas toucher ces lignes ou ces circuits électriques :
cela pourrait vous être fatal.
23. SURCHARGE:
Ne surchargez pas les prises murales ou les rallonges afin d’éviter tout risque
d’incendie ou d'électrocution.
24. OBJETS ET LIQUIDES:
N’introduisez jamais d’objets dans les ouvertures du CAMESCOPE : ils risqueraient
d'entrer en contact avec des zones de tension dangereuse ou de court-circuiter une
pièce et ainsi de provoquer un incendie ou une électrocution.
Ne renversez aucun liquide quel qu'il soit sur le CAMESCOPE. Si toutefois cela se
produisait, débranchez l’appareil et faites-le vérifier par un technicien avant toute
nouvelle utilisation.
25. REPARATIONS:
N’essayez pas de réparer vous-même ce CAMESCOPE. En ouvrant ou en retirant les
capots, vous risquez entre autre de vous électrocuter.
Confiez toute réparation à un technicien qualifié.
26. DOMMAGES NECESSITANT UNE RÉPARATION :
Débranchez le CAMESCOPE et confiez les réparations à un technicien qualifié dans
les cas suivants:
a. Lorsque la prise ou le cordon d'alimentation est endommagé(e).
b. Lorsqu'un liquide a été renversé sur le CAMESCOPE ou que des objets sont
tombés à l’intérieur.
c. Si le CAMESCOPE a été exposé à la pluie ou à l'eau.
d. Si le CAMESCOPE ne fonctionne pas correctement alors que vous suivez les
instructions d’utilisation. Ne réglez alors que les commandes qui sont mentionnées
dans le manuel d’instructions. Un mauvais réglage des autres commandes risque
d'endommager l'appareil et exige souvent un important travail de la part d’un
technicien qualifié pour remettre le CAMESCOPE en état de marche.
e. Si le CAMESCOPE est tombé ou si le châssis est endommagé.
f. Lorsque les performances du CAMESCOPE sont clairement altérées. Cela signifie
qu'une réparation est nécessaire.

ENGLISH
Notices and Safety Instructions
27. REPLACEMENT PARTS:
When replacement parts are required, be sure the service technician has
used replacement parts specified by the manufacturer and having the same
characteristics as the original part.
Unauthorized substitutions may result in fire, electric shock or other hazards.
28. SAFETY CHECK:
Upon completion of any service or repairs to this CAMCORDER, ask the
service technician to perform safety checks to determine that the
CAMCORDER is in safe operating order.
29. To prevent damage which may result in fire or shock hazard, do not expose
this appliance to rain or moisture.
30. If this power supply is used at 240V ac, a suitable plug adapter should be
used.
FRANÇAIS
Avertissements et consignes de sécurité
27. PIÈCES DE RECHANGE :
Lorsque des pièces doivent être remplacées, assurez-vous que le
réparateur utilise des pièces de rechange spécifiées par le fabricant et
possédant les mêmes caractéristiques que celles d'origine.
L’utilisation de toute pièce de rechange non agréée pourrait notamment
occasionner un incendie ou une électrocution.
28. CONTROLE DE SECURITE :
Après chaque intervention sur le CAMESCOPE, demandez au réparateur
d'effectuer des contrôles de sécurité pour vérifier que l’appareil est en état
de marche.
29. Pour éviter tout dommage pouvant provoquer un incendie ou une
électrocution, n'exposez pas cet appareil à la pluie ou à l'humidité.
30. Utilisez un adaptateur approprié si l’alimentation est du type 240 V CA.
USER INSTALLER CAUTION:
Your authority to operate this FCC certified equipment could be voided if you
make changes or modifications not expressly approved by this party responsible
for compliance to part 15 FCC rules.
NOTE:
Hg LAMP(S) INSIDE THIS PRODUCT CONTAIN MERCURY
AND MUST BE RECYCLED OR DISPOSED OF
ACCORDING TO LOCAL, STATE OR FEDERAL LAWS. For
details see lamprecycle.org, eiae.org, or call 1-800-Samsung
(7267864)
AVERTISSEMENT A L’INTENTION DES INSTALLATEURS DE SYSTEMES
PERSONNALISES :
Votre droit à utiliser cet appareil certifié FCC (Commission fédérale des
communications américaine) peut être invalidé si vous entreprenez des
changements ou des modifications qui ne sont pas expressément approuvés par
cet organisme responsable de la conformité au paragraphe 15 de la
réglementation FCC.
REMARQUE :
Hg LA OU LES LAMPES Hg EQUIPANT CE PRODUIT
CONTIENNENT DU MERCURE ET DOIVENT ETRE
RECYCLEES OU JETEES SELON LES LOIS EN VIGUEUR
AU NIVEAU LOCAL, AU NIVEAU DE L’ETAT OU AU NIVEAU
FEDERAL. Pour obtenir des détails, consultez le site
lamprecycle.org, eiae.org ou contactez Samsung au 1-800

ENGLISH
Notices and Safety Instructions
FRANÇAIS
Avertissements et consignes de sécurité
NOTE: This equipment has been tested and found to comply with
the limits for a Class B digital device, pursuant to part 15 of the
FCC Rules. These limits are designed to provide reasonable
protection against harmful interference in a residential installation.
This equipment generates, uses and can radiate radio frequency
energy and, if not installed and used in accordance with the
instructions, may cause harmful interference to radio
communications. However, there is no guarantee that interference
will not occur in a particular installation. If this equipment does
cause harmful interference to radio or television reception, which
can be determined by turning the equipment off and on, the user is
encouraged to try to correct the interference by one or more of the
following measures:
- Reorient or relocate the receiving antenna.
- Increase the separation between the equipment and receiver.
- Connect the equipment into an outlet on a circuit different from
that to which the receiver is connected.
- Consult the dealer or an experienced radio/TV technician for help
and for additional suggestions.
The user may find the following booklet prepared by the Federal
Communications Commission helpful : “How to Identify and
Resolve Radio-TV Interference Problems.”
This Booklet is available from the U.S. Government Printing
Office, Washington, D.C. 20402, Stock No. 004-000-00345-4.
FCC Warning
The user is cautioned that changes or modifications not expressly
approved by the manufacturer could void the user’s authority to
operate the equipment.
FCC ID : A3L05DRAGON2
This device complies with Part 15 of FCC Rules.
Operation is subject to the following two conditions;
(1) This device may not cause harmful interference, and
(2) This device must accept any interference received,
including interference that may cause undesired operation.
REMARQUE : Cet appareil a été testé ; il est conforme aux limitations
applicables aux appareils numériques de classe B, selon le
paragraphe 15 de la réglementation FCC. Ces restrictions visent à
assurer une protection suffisante contre les interférences nocives dans
les zones résidentielles. Cet appareil génère, exploite et peut émettre
des ondes radioélectriques. S’il n'est pas installé et utilisé selon les
instructions, il peut entraîner des interférences nuisibles aux
communications radio. Cela ne garantit toutefois pas l’absence totale
d’interférences avec certaines installations. S'il s'avère que cet
appareil produit des interférences avec votre radio ou votre téléviseur
(pour le vérifier, éteignez puis rallumez l’appareil), essayez de les
éliminer à l'aide d'une ou de plusieurs des mesures suivantes :
- Réorientez l'antenne de réception ou changez-la de place.
- Augmentez la distance entre l'appareil et le récepteur.
- Branchez l'appareil sur une prise d’un circuit différent de celui auquel
le récepteur est relié.
- Demandez conseil ou de l'aide au revendeur ou à un technicien
radio/TV expérimenté.
Vous pouvez également consulter la brochure suivante réalisée par
la Commission fédérale des communications américaine (FCC) :
How to Identify and Resolve Radio-TV Interference Problems »
(Comment identifier et résoudre les problèmes d'interférences
affectant les radios/téléviseurs).
Pour obtenir cette brochure, adressez-vous au U.S. Government
Printing Office (Office des publications du gouvernement américain),
Washington, DC 20402, Stock Number 004-000-00345-4.
Avertissement de la FCC
L’utilisateur est informé que tout changement ou toute modification
non expressément approuvé(e) par le fabricant est susceptible
d’annuler son droit à utiliser le présent appareil.
N° DE REFERENCE FCC : A3L05DRAGON2
Cet appareil est conforme au paragraphe 15 de la réglementation FCC.
Son utilisation est soumise aux deux conditions suivantes ;
(1) Il ne doit pas provoquer d’interférences nuisibles,
(2) Cet appareil doit supporter toute interférence reçue, y compris une
interférence pouvant causer un fonctionnement incorrect.

ENGLISH
FRANÇAIS
Contents Sommaire
Notes and Safety Instructions ...............................................5 Avertissements et consignes de sécurité ...............................5
Getting to Know Your Camcorder ........................................7 Familiarisez-vous avec votre caméscope ..............................7
Features...............................................................................................................................................7
Accessories Supplied with Camcorder ..............................................................................................8
Front & Left View................................................................................................................................. 9
Left Side View ...................................................................................................................................10
Right & Top View...............................................................................................................................11
Rear & Bottom View .........................................................................................................................12
Remote Control (SC-D364/D366 only)............................................................................................13
Preparation..........................................................................14 Préparatifs ...........................................................................14
Using the Hand Strap & Lens Cover...............................................................................................14
Lithium Battery Installation ...............................................................................................................15
Using the Lithium Ion Battery Pack.................................................................................................16
Connecting a Power Source ............................................................................................................19
About the Operating Modes .............................................................................................................19
Using the QUICK MENU ..................................................................................................................20
OSD (On Screen Display) in Camera/Player Modes ....................................................................21
OSD (On Screen Display) in M.Cam/M.Player Modes (SC-D363/D364/D365/D366 only).........22
Turning the OSD (On Screen Display) On/Off ...............................................................................22
Initial Setting : System Menu Setting ..................................23 Réglage initial : Réglage du menu System (Système) ..........23
Setting the Clock (Clock Set) ..........................................................................................................23
Setting the Wireless Remote Control Acceptance (Remote) (SC-D364/D366 only)...................24
Setting the Beep Sound (Beep Sound) .........................................................................................25
Setting the Shutter Sound (Shutter Sound) (SC-D363/D364/D365/D366 only) .........................26
Selecting the OSD Language (Language).....................................................................................27
Viewing the Demonstration (Demonstration) ................................................................................28
Initial Setting : Display Menu Setting..................................29
Adjusting the ACL Screen (ACL Bright/ ACL Color) ....................................................................29
Displaying the Date/Time (Date/Time)............................................................................................30
Setting the TV Display (TV Display)...............................................................................................31
Basic Recording...................................................................32
Using the Viewfinder .........................................................................................................................32
Inserting / Ejecting a Cassette ......................................................................................................... 32
Various Recording Techniques.........................................................................................................33
Making your First Recording ............................................................................................................34
Recording with Ease for Beginners (EASY.Q Mode) ....................................................................35
Reviewing and Searching a Recording (REC SEARCH).............................................................36
Searching a quickly for a desired scene (Setting the Zero Memory) (SC-D364/D366 only)....37
Self Record using the Remote Control (Setting the Self Timer) (SC-D364/D366 only) ............38
Zooming In and Out ..........................................................................................................................39
Using the Tele Macro........................................................................................................................39
Using the Fade In and Out...............................................................................................................40
Using Back Light Compensation Mode (BLC) ...............................................................................41
Using the COLOR NITE (COLOR NITE)........................................................................................42
Using the LIGHT (SC-D362/D364/D365/D366 only) ......................................................................43
22
Caractéristiques ..................................................................................................................................7
Accessoires livrés avec le caméscope ..............................................................................................8
Vue avant gauche ...............................................................................................................................9
Vue du côté gauche.......................................................................................................................... 10
Vue de droite et du dessus ...............................................................................................................11
Vue arrière et vue de dessous .........................................................................................................12
Télécommande (modèles SC-D364/D366 uniquement) ................................................................13
Utilisation de la dragonne et du cache-objectif............................................................................... 14
Insertion de la pile au lithium............................................................................................................15
Utilisation de la batterie lithium-ion .................................................................................................. 16
Branchement sur une source d'alimentation ...................................................................................19
A propos des modes de fonctionnement ........................................................................................19
Utilisation du bouton QUICK MENU ...............................................................................................20
Affichage à l’écran en modes Camera/Player
Affichage à l’écran en modes M.Cam/M.Player (modèles SC-D363/D364/D365/D366 uniquement)
Activation/Désactivation de l'affichage à l'écran ............................................................................ 22
Réglage de l'horloge <Clock Set> (Param. Horloge) ..................................................................23
Activation de la reconnaissance de la télécommande par le caméscope <Remote>
(Télécommande) (modèles SC-D364/D366 uniquement) ............................................................24
Réglage du signal sonore <Beep Sound> (Signal sonore) ........................................................25
Réglage du son de l'obturateur <Shutter Sound> (Son Obturateur)
(modèles SC-D363/D364/D365/D366 uniquement).......................................................................26
Choix de la langue d’affichage à l’écran <Language> (Langue).................................................27
Visualisation de la démonstration <Demonstration> (Démonstration)......................................28
..............................................................................21
Réglage initial : Réglage du menu Display (Affichage) .......29
Réglage de l'écran ACL <ACL Bright/ ACL Color> (Luminosité ACL / Couleur ACL)...........29
Affichage de la date et de l’heure <Date/Time> (Date/Heure).....................................................30
Réglage de l'affichage TV <TV Display> (Affichage TV).............................................................31
Enregistrement de base .......................................................32
Utilisation du viseur ...........................................................................................................................32
Insertion / Ejection d’une cassette ...................................................................................................32
Techniques d’enregistrement........................................................................................................... 33
Réalisation de votre premier enregistrement ..................................................................................34
Enregistrement facile pour les débutants (Mode EASY.Q) ...........................................................35
Recherche et révision d’un enregistrement (REC SEARCH) .......................................................36
Recherche rapide d'une scène (Setting the Zero Memory) (Mise à zéro du compteur)
(modèles SC-D364/D366 uniquement) ...........................................................................................37
Enregistrement automatique à l'aide de la télécommande (Setting the Self Timer)
(Réglage du retardateur automatique) (modèles SC-D364/D366 uniquement)......................38
Zoom avant et arrière .......................................................................................................................39
Utilisation de la fonction Tele Macro (Télé Macro)
Ouverture et fermeture en fondu ..................................................................................................... 40
Utilisation du mode Back Light Compensation (Compensation du contre-jour) (BLC)................41
Utilisation de la fonction COLOR NITE (Éclairage nocturne) .......................................................42
Utilisation de la fonction LIGHT (LUMIERE) (modèles SC-D362/D364/D365/D366 uniquement)
.....................................................................39
......43
..22

ENGLISH
FRANÇAIS
Contents Sommaire
Advanced Recording ...........................................................44 Enregistrement avancé ........................................................44
Selecting the Record Mode & Audio Mode.....................................................................................44
Cutting Off Wind Noise (WindCut Plus).........................................................................................45
Selecting the Real Stereo Function ...............................................................................................46
Setting the Shutter Speed & Exposure...........................................................................................47
Auto Focus / Manual Focus .............................................................................................................48
Programed Automatic Exposure Modes (Program AE) ................................................................49
Setting the White Balance ................................................................................................................51
Applying Visual Effects .....................................................................................................................52
Setting the 16:9 Wide mode ...........................................................................................................54
Setting the Digital Image Stabilizer (DIS)........................................................................................55
Zooming In and Out with Digital Zoom (Digital Zoom) .................................................................56
Still Image Recording........................................................................................................................ 57
Searching for a still image ........................................................................................................57
Playback ..............................................................................58 Lecture.................................................................................58
Playing Back a Tape You have recorded on the ACL Screen .......................................................58
Various Functions while in Player Mode .........................................................................................59
Zooming during Playback (PB ZOOM) ...........................................................................................61
Audio Dubbing (SC-D364/D366 only) .............................................................................................62
Dubbed Audio Playback ...................................................................................................................63
Tape Playback...................................................................................................................................64
Audio Effect .......................................................................................................................................66
Setting the AV In/Out (SC-D365/D366 only) ...................................................................................67
Digital Still Camera Mode (SC-D363/D364/D365 /D366 only)....68
Using a the Memory Card (Usable Memory Card) (not supplied) ............................................68
Memory Card Functions...........................................................................................................68
Inserting a Memory Card ......................................................................................................... 68
Ejecting a Memory Card ..........................................................................................................68
Structure of Folders and Files on the Memory Card ......................................................................69
Selecting the Memory Type (SC-D366 only) ..................................................................................70
Selecting the Photo Quality ..............................................................................................................71
Setting the File Number ....................................................................................................................72
Taking a Photo Image (JPEG) on the Memory Card .....................................................................73
Viewing Photo Images (JPEG) ........................................................................................................74
To view a Single Image............................................................................................................ 74
To view a Slide Show...............................................................................................................74
To view the Multi Display ........................................................................................................74
Protection from accidental Erasure..................................................................................................75
Deleting Photo Images and Moving Images...................................................................................76
Formatting a Memory Card ..............................................................................................................78
Recording a Moving Images (MPEG) on a Memory Card ............................................................79
Playing the Moving Images (MPEG) on a Memory Card (M.Play Select) ..................................80
Recording Still Images from a Cassette.......................................................................................81
Copying Still Images from a Cassette to a Memory Card (Photo Copy).....................................82
Copying Files from a Memory Card to the Built-in
Memory (Copy to) (SC-D366 only)...............................................................................................83
Marking Images for Printing (Print Mark) .......................................................................................84
Removing the Print Mark .........................................................................................................84
Sélection des modes Record (Enregistrement) et Audio (Audio)..................................................44
Suppression du bruit du vent <WindCut Plus>.............................................................................45
Sélection de la fonction Real Stereo (Stéréo réelle) ......................................................................46
Réglage du mode Shutter Speed & Exposure (Vitesse de l’obturateur et de l’exposition) .........47
Mise au point automatiqu
Modes d’exposition automatique programmable <Program AE> (Prog. AE).............................49
Réglage du mode <White Balance> (Bal. Bblancs).......................................................................51
Activation du mode <Visual Effects> (Effets visuels) .....................................................................52
Réglage du mode <16:9 Wide> (16:9 Large) .................................................................................54
Réglage du mode Stabilisateur d’image numérique (DIS)
Zoom avant et arrière à l’aide du zoom numérique <Digital Zoom> (Zoom Num.) ..................56
Enregistrement d'une photo .............................................................................................................57
Recherche d’une photo............................................................................................................. 57
Visualisation d’un enregistrement sur cassette au moyen de l’écran ACL ...................................58
Fonctions disponibles en mode Player (Lecteur) ...........................................................................59
Zoom en cours de lecture (PB ZOOM)...........................................................................................61
Audio Dubbing (Post-sonorisation) (modèles SC-D364/D366 uniquement) ................................62
Dubbed Audio Playback (Lecture post-sonorisation) .....................................................................63
Lecture d’une bande .........................................................................................................................64
Audio Effect (Effets sonores)............................................................................................................ 66
Réglage AV In/Out (Ent/Sor AV) (modèles SC-D365/D366 uniquement)
Mode Digital Still Camera (Appareil photo numérique) (modèles SC-D363/D364/D365 /D366 uniquement).......68
Utilisation de la carte mémoire (Carte mémoire utilisable) (non fourni).....................................68
Fonctions de la carte mémoire ..................................................................................................68
Insertion d’une carte mémoire ..................................................................................................68
Ejection d’une carte mémoire ...................................................................................................68
Arborescence des dossiers et fichiers de la carte mémoire ..........................................................69
Sélection du type de mémoire (modèles SC-D366 uniquement)
Sélection de la qualité de photo
Réglage du numéro de fichier
Enregistrement d'une photo (JPEG) sur la carte mémoire............................................................73
Visualisation de photos (JPEG) ......................................................................................................74
Pour visualiser une seule image ................................................................................................74
Pour visualiser un diaporama.................................................................................................... 74
Pour visualiser l’affichage multiple ...........................................................................................74
Protection contre la suppression accidentelle .................................................................................75
Suppression de photos et de films..................................................................................................76
Formatage de la carte mémoire ......................................................................................................78
Enregistrement de films (MPEG) sur la carte mémoire .................................................................79
Lecture des films (MPEG) sur la carte mémoire <M.Play Select> (Sél. Memoire)
Enregistrement d’images fixes à partir d’une cassette...................................................................81
Copie de photos d’une cassette vers la carte mémoire <Photo Copy> (Copie photo) ............82
Copier les fichiers de la carte mémoire vers la mémoire interne <Copy to> (Copier vers)
(modèles SC-D366 uniquement) ...................................................................................................83
Marquage des images pour l'impression (Print Mark) (Voyant D’lmp.)
Suppression du symbole Impression .........................................................................................84
.........................................................................................48
nuelle
e/ma
.........................................................55
...............................67
.....................................................................................................71
........................................................................................................72
..............................................70
....................80
.................................84
33

ENGLISH
FRANÇAIS
Contents Sommaire
PictBridgeTM(SC-D363/D364/D365/D366 only) ................85
Printing Your Pictures – Using the PictBridgeTM..............................................................................85
Connecting To a Printer............................................................................................................85
Selecting Images ......................................................................................................................86
Setting the Number of Prints .................................................................................................... 86
Setting the Date/Time Imprint Option .......................................................................................86
Printing Images ........................................................................................................................86
Canceling the Printing ..............................................................................................................86
IEEE 1394 Data Transfer......................................................87 Transfert de données IEEE 1394..........................................87
Transferring IEEE1394 (i.LINK)-DV Standard Data Connections .................................................87
Connecting to a DV Device (DVD Recorder, Camcorder, etc.) .................................................87
Connecting to a PC ..................................................................................................................87
System Requirements............................................................................................................... 87
Recording with a DV Connection Cable ...................................................................................88
USB Interface (SC-D362/D363/D364/D365/D366 only) ...89
Using USB Interface (SC-D362/D363/D364/D365/D366 only) .....................................................89
Transferring a Digital Image through a USB Connection.......................................................... 89
USB Connection Speed depending on the System.....................................................................89
System Requirements............................................................................................................... 89
Selecting the USB Device (USB Connect) (SC-D363/D364/D365/D366 only) ..........................90
Installing DV Media PRO Program ..................................................................................................91
Connecting to a PC .......................................................................................................................... 92
Disconnecting the USB Cable ..................................................................................................92
Using the PC Camera Function ................................................................................................ 93
Using the USB Streaming Function ..........................................................................................94
Using the removable Disk Function (SC-D363/D364/D365/D366 only)....................................94
Maintenance........................................................................95
After Finishing a Recording ..............................................................................................................95
Usable Cassette Tapes.....................................................................................................................95
Cleaning and Maintaining the Camcorder .......................................................................................96
Using Your Camcorder Abroad........................................................................................................ 97
Troubleshooting...................................................................98
Troubleshooting.................................................................................................................................98
Self Diagnosis Display .............................................................................................................98
Self Diagnosis Display in M.Cam/M.Player Modes (SC-D363/D364/D365/D366 only)............99
Setting menu items .........................................................................................................................101
Specifications ................................................................... 103
Index ................................................................................ 104
Warranty (SEA users only).................................................105
Warranty (Canada users only)
...........................................106
PictBridgeTM(modèles SC-D363/D364/D365/D366 uniquement)
Impression de vos images avec PictBridge
Connexion à une imprimante ....................................................................................................85
Sélection d’images ...................................................................................................................86
Paramétrage du nombre d’impressions......................................................................................86
Réglage de l’option d’impression date/heure .............................................................................86
Impression d'images .................................................................................................................86
Annulation de l'impression...................................................................................................... 86
Transfert de données DV standard conformes à la norme IEEE 1394 (i.LINK) ..........................87
Raccordement à un appareil DV (enregistreur DVD, caméscope, etc.).......................................87
Raccordement à un ordinateur ..................................................................................................87
Configuration système..............................................................................................................87
Enregistrement à l'aide d'un câble de connexion DV................................................................. 88
Interface USB (modèles SC-D362/D363/D364/D365/D366 uniquement) ...89
Utilisation de l'interface USB (modèles SC-D362/D363/D364/D365/D366 uniquement)............89
Transfert d'une image numérique via une connexion USB.........................................................89
Débit de la connexion USB en fonction du système..................................................................89
Configuration système..............................................................................................................89
Sélection du périphérique USB <USB Connect> (Connexion USB)
(modèles SC-D363/D364/D365/D366 uniquement).......................................................................90
Installation du programme DV Media PRO ....................................................................................91
Raccordement à un ordinateur ........................................................................................................92
Débranchement du câble USB ..................................................................................................92
Utilisation de la fonction Web cam ...........................................................................................93
Utilisation de la fonction USB Streaming (Lecture en continu USB).........................................94
Utilisation de la fonction Removable Disk (Disque amovible)
(modèles SC-D363/D364/D365/D366 uniquement) ..................................................................94
TM
.................................................................................85
......87
Entretien ..............................................................................95
A la fin d’un enregistrement..............................................................................................................95
Cassettes prises en charge.............................................................................................................. 95
Nettoyage et entretien du caméscope ............................................................................................96
Utilisation de votre caméscope à l’étranger....................................................................................97
Dépannage ..........................................................................98
Dépannage........................................................................................................................................ 98
Auto-diagnostic........................................................................................................................98
Affichage de l'auto-diagnostic en modes M.Cam/M.Player
(modèles SC-D363/D364/D365/D366 uniquement) ..................................................................99
Eléments des menus de réglage ...................................................................................................101
Caractéristiques techniques ............................................. 103
Index ................................................................................ 104
Garantie pour le Canada ...................................................106
44

ENGLISH
COLOR NITE
M
ENU
FRANÇAIS
Notes and Safety Instructions
Avertissements et consignes de sécurité
Notes regarding the Rotation of the ACL Screen Remarques concernant la rotation de l’écran ACL
Please rotate the ACL Screen carefully as
illustrated. Over rotation may cause damage
to the inside of the hinge that connects the
ACL Screen to the Camcorder.
1. Open the ACL Screen 90 degrees to the
Camcorder with your finger.
2. Rotate it to the best angle to record or
play.
■
If you rotate the ACL Screen 180
degrees so it is facing forward, you
can close the ACL Screen with the
facing out.
■
This is convenient during playback operations.
[Note]
Refer to page 29 to adjust brightness and color of the ACL Screen.
180 degrees (max.)
ACL Open Knob
Notes regarding the ACL Screen, Viewfinder, Lens
1. Direct sunlight can damage the ACL
Screen, the inside of the Viewfinder or
the Lens. Take pictures of the sun only in
low light conditions, such as at dusk.
2. The ACL Screen has been manufactured
using high precision technology.
However, there may be tiny dots (red,
blue or green in color) that appear on the
ACL Screen. These dots are normal and do not affect the recorded
picture in any way.
3. Do not pick up the Camcorder by holding the Viewfinder, ACL Screen
or Battery Pack.
4. Applying excessive force to the Viewfinder may damage it.
90 degrees
to the Camcorder
90 degrees (max.)
■
Si vous tournez l’écran LCD de 180 degrés face à l’avant, vous
pouvez refermer l’écran ACL with the facing out.
■
Cette caractéristique facilite vos opérations de lecture.
[Remarque]
Reportez-vous à la page 29 pour le réglage de la luminosité et de la couleur de l'écran ACL.
Remarques concernant l'écran ACL, le viseur et l'objectif
Manipulez l’écran doucement lorsque vous
le faites tourner (cf. Illustration).Une rotation
intempestive peut endommager l’intérieur
de la charnière qui relie l’écran ACL au
corps de l’appareil.
1. Déployez l'écran ACL de 90 degrés par
rapport au caméscope.
2. Faites-le pivoter de manière à obtenir le
meilleur angle possible pour
l'enregistrement ou la lecture.
1. La lumière directe du soleil est susceptible
d'endommager l'écran ACL, l'intérieur du
viseur ou l'objectif. Ne prenez des images du
soleil que lorsque la luminosité est faible, à la
tombée de la nuit par exemple.
2. L’écran ACL est un composant de haute
précision. Il se peut toutefois que de petits
points (rouges, bleus ou verts) apparaissent
sur celui-ci. Ce phénomène est normal et
n’affecte aucunement l’image enregistrée.
3. Ne saisissez jamais le caméscope par le
viseur, l'écran ACL ou la batterie.
4. En manipulant le viseur trop brutalement,
vous risquez de l’endommager.
Notes regarding the Video Head Cleaning Remarques concernant le nettoyage des têtes vidéo
■
To ensure normal recording and a clear picture, clean the video heads
regularly.
If a square block-shape distorts playback, or only a blue screen is
displayed, the video heads may be dirty.
If this happens, clean the video heads with a dry type cleaning cassette.
■
Do not use a wet-type cleaning cassette. It may damage the video
heads.
■
Afin de garantir un enregistrement normal et des images nettes, nettoyez
régulièrement les têtes vidéo. Si une image de forme carrée perturbe la lecture
ou si un écran bleu s’affiche, les têtes vidéo sont probablement sales. Dans ce
cas, nettoyez les têtes vidéo avec une cassette de nettoyage à sec.
■
N’utilisez pas de cassette de nettoyage utilisant un liquide.
Cela risquerait d’abîmer les têtes vidéo.
55

ENGLISH
FRANÇAIS
Notes and Safety Instructions
Avertissements et consignes de sécurité
Notes regarding Camcorder Remarques sur le caméscope
■
Do not leave the Camcorder exposed to high temperatures (above
60 °C or 140 °F).
For example, in a parked car in the sun or exposed to direct sunlight.
■
Do not let the Camcorder get wet. Keep the Camcorder away from
rain, sea water, and any other form of moisture.
If the Camcorder gets wet, it may get damaged. Sometimes a
malfunction due to exposure to liquids cannot be repaired.
■
A sudden rise in atmospheric temperature may cause condensation
to form inside the Camcorder.
- When you move the Camcorder from a cold location to a warm
location (e.g. from outside to inside during the winter.)
- When you move the Camcorder from a cool location to a hot
location (e.g. from inside to outside during the summer.)
■
If the (DEW) protection feature is activated, leave the Camcorder
for at least two hours in a dry, warm room with the cassette
compartment opened and the Battery Pack removed.
■
N’exposez pas votre caméscope à des températures trop élevées (plus de 60°C).
Par exemple, en plein soleil ou dans une voiture garée au soleil.
■
Evitez de mouiller le caméscope. Gardez le caméscope à l’abri de la pluie, de
l’eau de mer ou de toute autre source d’humidité.
Le contact avec l’eau peut endommager votre caméscope. Un
dysfonctionnement causé par un contact avec du liquide n’est pas toujours
réparable.
■
Une brusque hausse de la température de l’air peut entraîner la formation de
condensation à l’intérieur du caméscope.
- Lorsque vous déplacez le caméscope d’un endroit froid vers un endroit chaud
(ex. : d'un environnement extérieur vers un environnement intérieur en hiver).
- Lorsque vous déplacez le caméscope d’un endroit frais vers un endroit chaud
(ex. : d'un environnement extérieur vers un environnement intérieur
■
Si la fonction (DEW) (PROTECTION CONDENSATION) est activée,
laissez le caméscope au repos pendant au moins deux heures dans un endroit
sec et tempéré en ayant pris soin d’ouvrir le compartiment à cassette et d’ôter
la batterie.
Notices regarding Copyright Remarques concernant les droits d'auteur
Television programs, video tapes, DVD titles, films, and other program
materials may be copyrighted.
Unauthorized copying of copyrighted material may be against the law.
All the trade names and registered trademarks mentioned in this manual
or other documentation provided with your Samsung product are
trademarks or registered trademarks of their respective holders.
Les programmes de télévision, les cassettes de films vidéo, les DVD, les films et tout
autre support enregistré de ce type peuvent être protégés par des droits d’auteurs.
Les copier sans autorisation peut aller à l’encontre des lois en vigueur dans votre pays.
Toutes les appellations commerciales et marques déposées citées dans ce manuel
ou dans toute documentation fournie avec votre appareil Samsung appartiennent à
leurs propriétaires respectifs.
Servicing & Replacement Parts Réparations et pièces de rechange
■
Do not attempt to service this Camcorder yourself.
■
Opening or removing covers may expose you to dangerous voltage
or other hazards.
■
Refer all servicing to qualified service personnel.
■
When replacement parts are required, be sure the service technician
has used replacement parts specified by the manufacturer and
having the same characteristics as the original part.
■
Unauthorized substitutions may result in fire, electric shock or other
hazards.
66
■
N’essayez pas de réparer vous-même ce caméscope.
■
En ouvrant ou en retirant les capots, vous risquez entre autre de vous
électrocuter.
■
Confiez toute réparation à un technicien qualifié.
■
Lorsque des pièces doivent être remplacées, assurez-vous que le
réparateur utilise des pièces de rechange spécifiées par le fabricant et
possédant les mêmes caractéristiques que celles d'origine.
■
L’utilisation de toute pièce de rechange non agréée pourrait
notamment occasionner un incendie ou une électrocution.
en été).

ENGLISH
FRANÇAIS
Getting to Know Your Camcorder
Familiarisez-vous avec votre caméscope
Features Caractéristiques
■
Digital Data Transfer Function with IEEE1394
By incorporating the IEEE 1394 (i.LINK™: i.LINK is a serial data transfer
protocol and interconnectivity system, used to transmit DV data) high speed
data transport port, both moving and photo images can be transferred to a PC,
making it possible to produce or edit various images.
■
USB Interface for Digital Image Data Transfer (SC-D362/D363/D364/D365/
D366 only)
You can transfer images to a PC using the USB interface without an add-on
card.
■
PHOTO
The PHOTO function lets you capture an object as a still, while in <Camera
mode>.
■
1200x Digital Zoom
Allows you to magnify an image up to 1200 times its original size.
■
Audio Enhancement
Provides more powerful sound by with the Real Stereo and Audio Effect features.
■
Color TFT ACL
A high-resolution color TFT ACL gives you clean, sharp images as well as the
ability to review your recordings immediately. A high-resolution color TFT ACL of
230K pixels supports 16:9 aspect ratio. (SC-D365/D366).
■
Digital Image Stabilizer (DIS)
The DIS compensates for any handshake, reducing unstable images particularly
at high magnification.
■
Various Visual Effects
The Visual Effects allow you to give your films a special look by adding various
special effects.
■
Back Light Compensation (BLC)
The BLC function compensates for a bright background behind a subject you're
recording.
■
Program AE
The Program AE enables you to alter the shutter speed and aperture to suit the
type of scene/action to be filmed.
■
High Power Zoom Lens
Power Zoom lens allows users to magnify the subject clearly up to x33 (x30 for
SC-D263/D363).
■
Digital Still Camera Function (SC-D363/D364/D365/D366 only)
- Using Memory Card, you can easily record and playback standard photo
images.
- You can transfer standard photo images on the Memory Card to your PC
using the USB interface.
■
Moving Image Recording (SC-D363/D364/D365/D366 only)
Moving image recording makes it possible to record video onto a Memory Card.
■
Multi Memory Card Slot (SC-D365/D366 only)
Multi Memory Card slot is able to use Memory Stick (Duo), Memory Stick PRO,
MMC and SD.
■
Built-in Memory (SC-D366 only)
You can use digital still camera functions without a separate external Memory
Card by using the built-in memory installed in your Camcorder. (SC-D366: 32MB)
■
Fonction de transfert de données numériques avec IEEE 1394
Le port de transfert de données haute vitesse IEEE 1394 de type i.LINK™ (i.LINK est un
protocole de transfert de données série et un système d’interconnexion) vous permet de
transférer des films et des photos vers un ordinateur, où vous pourrez les modifier à loisir.
■
Interface USB pour le transfert d'images numériques (modèles
SC-D362/D363/D364/D365/D366 uniquement)
Vous pouvez transférer des images vers un ordinateur en utilisant l’interface USB sans
avoir besoin de carte supplémentaire.
■
PHOTO
En mode Camera (Appareil photo), la fonction PHOTO vous permet de photographier une
scène et de l'enregistrer comme image figée.
■
Zoom numérique 1200x
Permet de grossir une image jusqu’à 1200 fois sa taille d’origine.
■
Amélioration Audio
Fournit un son plus puissant avec les effets de Real Stereo et Audio Effect (Effet audio).
■
Ecran ACL-TFT couleur
Un écran ACL-TFT couleur de haute résolution vous donne des images propres et nettes
et vous permet de visionner vos enregistrements immédiatement.Son écran ACL à
transistors à couches minces de 230 k pixels, en couleur et à haute résolution accueille un
rapport hauteur/largeur de 16:9 (SC-D365/D366).
■
Stabilisateur d’image numérique (DIS)
Le DIS atténue les tremblements, réduisant ainsi le nombre d’images instables, notamment
dans le cas des gros plans.
■
Différents effets visuels
Intégrés à vos images, les effets visuels permettent de leur donner une touche d’originalité.
■
Compensation du contre-jour (BLC)
La fonction BLC (Compensation du contre-jour) atténue un arrière-plan trop clair derrière le
sujet que vous enregistrez.
■
Exposition automatique programmable
La fonction Program AE (Exposition automatique programmable) vous permet d’adapter la
vitesse et l’ouverture de l’obturateur au type de scène ou d’action à filmer.
■
Zoom grande puissance
Le zoom grande puissance permet de grossir jusqu'à 33 fois le sujet (30 fois pour les
modèles SC-D263/D363).
■
Fonction Digital Still Camera (Appareil photo numérique) (modèles
SC-D363/D364/D365 /D366 uniquement)
- Vous pouvez facilement enregistrer et lire des photos au format standard à l’aide de la
carte mémoire.
- Vous pouvez transférer des photos standard de la carte mémoire vers votre ordinateur
à l’aide de l’interface USB.
■
Enregistrement de films (modèles SC-D363/D364/D365 /D366 uniquement)
L’enregistrement d'un film permet de stocker un enregistrement vidéo sur la carte mémoire.
■
Fente multi-cartes mémoire (modèles SC-D365/D366 uniquement)
La fente multi-cartes mémoire peut accepter des cartes Memory Stick (Duo), Memory Stick
PRO, MMC et SD.
■
Mémoire interne (modèles SC-D366 uniquement)
Vous pouvez utiliser les fonctions d’appareil photo numérique sans carte mémoire
externe grâce à la mémoire interne de votre caméscope (SC-D366: 32 Mo)
77

ENGLISH
FRANÇAIS
Getting to Know Your Camcorder
Familiarisez-vous avec votre caméscope
Accessories Supplied with Camcorder Accessoires livrés avec le caméscope
Make sure that the following basic accessories are supplied with your
digital video camera.
Basic Accessories
1. Lithium Ion Battery Pack
1. Lithium Ion Battery Pack
2. AC Power Adapter
(AA-E8 TYPE)
2. AC Power Adapter
(AA-E8 TYPE)
3. AC Cord
4. Audio/Video Cable
(SC-D263/D363)
5. Multi Cable (SC-D362/
AD43-00136A AD44-00090A AD39-00076A
4. Audio/Video Cable
(SC-D263/D363)
5. Multi Cable (SC-D362
/D364/D365/D366)
D364/D365/D366)
6. Instruction Book/
Quick Guide
7. Lithium Battery for Remote
Control (SC-D364/D366
only) or Clock.
AD39-00001A AD39-00119A
7. Lithium Battery (CR2025)
8. Remote Control
(SC-D364/D366)
(TYPE: CR2025)
8. Remote Control
(SC-D364/D366 only)
9. USB Cable (SC-D362/
D363/D364/D365/D366
only)
10. Software CD (SC-D362/
AD43-10130H AD59-00085A AD39-00073A
10. Software CD (SC-D362
/D363/D364/D365/D366)
11. Lens Cover 12. Lens Cover Strap
D363/D364/D365/D366
only)
11. Lens Cover
AD46-00082A AD97-10686A
12. Lens Cover Strap
Vérifiez que les accessoires suivants ont bien été fournis avec votre
caméscope numérique.
3. AC Cord
Accessoires principaux
1. Batterie lithium-ion
2. Adaptateur CA
(TYPE AA-E8)
3. Cordon secteur
6. Instruction Book/
Quick Guide
4. Câble audio / vidéo
(modèles-D263/D363)
5. Câble multiple (modèles
SC-D362/D364/D365/
D366)
6. Manuel d’utilisation/Guide
9. USB Cable (SC-D362
/D363/D364/D365/D366)
de prise en main rapide
7. Pile au lithium pour la
télécommande (modèles
SC-D364/D366
uniquement) ou l’horloge.
(de type : CR2025)
8. Télécommande (modèles
SC-D364/D366
uniquement)
9. Câble USB (modèles
SC-D362/D363/D364/
AD72-00049A
D365/D366 uniquement)
10. CD d'installation des
logiciels (modèles
SC-D362/D363/D364/
D365/ D366 uniquement)
11. Cache-objectif
12. Cordon du cache-objectif
88
ENGLISH
MF/AF
MULTI DISP.
FRANÇAIS
Getting to Know Your Camcorder
Familiarisez-vous avec votre caméscope
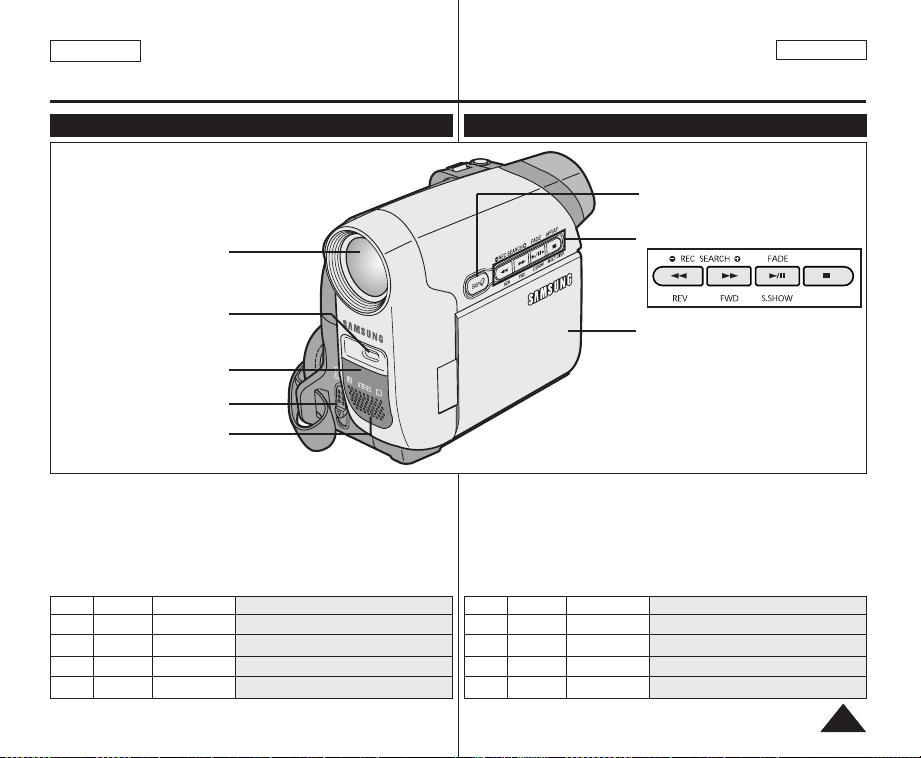
Front & Left View Vue avant gauche
1. Lens
(SC-D362/D364/D365
(SC-D364/D366 only)
1. Lens
2. LIGHT ➥page 43 (SC-D362/D364/D365/D366 only)
3. Remote Sensor (SC-D364/D366 only)
4. TAPE EJECT
5. Internal MIC
6. EASY.Q Button ➥page 35
7. Function Buttons
Button <Player> <Camera> <M.Player> (SC-D363/D364/D365/D366 only)
œœœœ
REW REC SEARCH – REV
√√√√
√√
/❙❙ PLAY/STILL FADE S.SHOW (SLIDE SHOW)
■ STOP MF/AF MULTI DISP. (MULTI DISPLAY)
8. TFT ACL Screen
2. LIGHT
/D366 only)
3. Remote Sensor
4. TAPE EJECT
5. Internal MIC
FF REC SEARCH + FWD
1. Objectif
LIGHT (LUMIÈRE) ➥page 43 (modèles SC-D362/D364/D365/D366 uniquement)
2.
3.
Capteur de la télécommande (modèles SC-D364/D366 uniquement)
4. TAPE EJECT (EJECTION DE LA CASSETTE)
5. Microphone interne
6. Bouton EASY.Q ➥page 35
7. Bouton de fonction
Button <Player> <Camera> <M.Player>
œœœœ
REW REC SEARCH – REV
√√√√
FF REC SEARCH + FWD
√√
/❙❙ PLAY/STILL FADE S.SHOW (SLIDE SHOW)
■ STOP MF/AF MULTI DISP. (MULTI DISPLAY)
8. Ecran ACL-TFT
6. EASY.Q Button
7. Function Buttons
8. TFT ACL Screen
(modèles SC-D363/D364/D365/D366 uniquement)
99
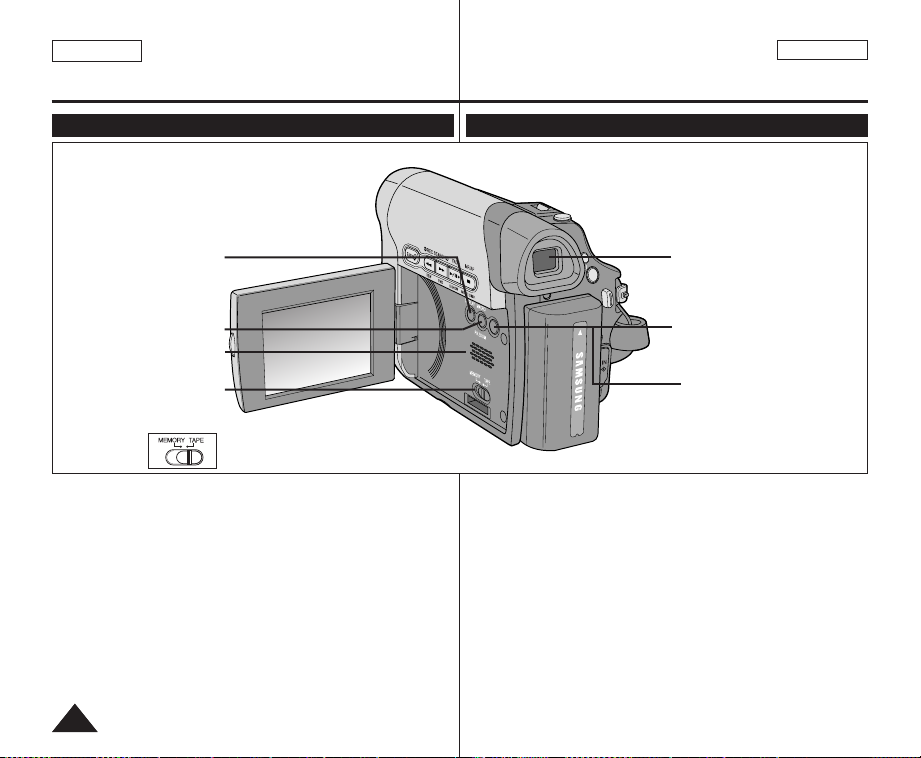
ENGLISH
COLOR NITE
LIGHT
MENU
FRANÇAIS
Getting to Know Your Camcorder
Familiarisez-vous avec votre caméscope
Left Side View Vue du côté gauche
1. DISPLAY
2. MACRO/PB ZOOM
3. Speaker
4. Mode Switch
(SC-D363/D364/D365/D366 only)
1. DISPLAY ➥page 21
2. MACRO/PB ZOOM ➥page 39 / ➥page 61
3. Speaker
4. Mode Switch (MEMORY/TAPE)
5. Viewfinder
6. COLOR NITE ➥page 42
(MEMORY/TAPE)
(SC-D363/D364/D365/D366 only)
LIGHT (SC-D362/D364/D365/D366) ➥page 43
1. DISPLAY (AFFICHAGE) ➥page 21
2. MACRO/PB ZOOM ➥page 39 / ➥page 61
3. Haut-parleur
4. Interrupteur de mode (MEMORY/TAPE – (MEMOIRE/CASSETTE)
5. Viseur
6. COLOR NITE (ÉCLAIRAGE NOCTURNE) ➥page 42
(modèles SC-D363/D364/D365/D366 uniquement)
LIGHT (LUMIÈRE) (SC-D362/D364/D365/D366) ➥page 43
5. Viewfinder
6. COLOR NITE
LIGHT
(SC-D362/D364/D365/D366)
1010
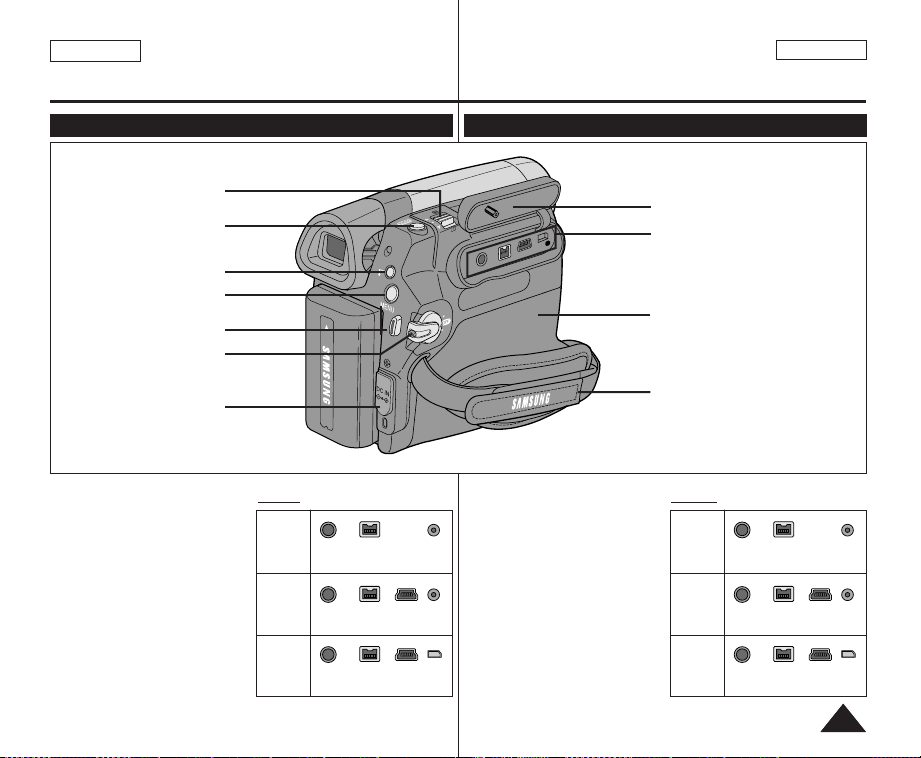
ENGLISH
FRANÇAIS
Getting to Know Your Camcorder
Familiarisez-vous avec votre caméscope
Right & Top View Vue de droite et du dessus
1. Zoom Lever
(VOL/Menu Dial)
2. PHOTO Button
3. QUICK MENU Button
4. MENU Button
5. Start/Stop Button
6. Power Switch
7. DC Jack
1. Zoom Lever (VOL/Menu Dial)
2. PHOTO Button ➥page 57
3. QUICK MENU Button
4. MENU Button
5. Start/Stop Button
6. Power Switch
(CAMERA or PLAYER)
7. DC Jack
8. Jack Cover
9. Jacks
10. Cassette Door
11. Hand Strap Hook
Jacks
SC-D263
SC-D363
SC-D362/
D364/
D365/
D366
External
MIC
External
MIC
External
MIC
QUICK
MENU
IEEE1394 AV
IEEE1394 AV
IEEE1394 Multi
USB
USB
Cable
Cable
Cable
P
L
A
Y
E
R
A
R
E
M
A
C
1. Bouton de zoom
2. Bouton PHOTO ➥page 57
3. Bouton QUICK MENU
4. Bouton MENU
5. Bouton Marche/Arrêt
6. Interrupteur Power (Alim.)
7. Prise CC
8. Cache-prises
9. Prises
10. Tiroir à cassette
11. Boucle pour dragonne
AV/ S
USB
DV
MIC
(VOL/molette de menu)
(CAMÉRA ou LECTEUR)
8. Jack Cover
9. Jacks (See below)
10. Cassette Door
11. Hand Strap Hook
Prises
SC-D263
Micro
IEEE1394 Câble
externe
SC-D363
Micro
IEEE1394 Câble
externe
SC-D362/
D364/
D365/
Micro
IEEE1394
externe
D366
USB
USB
AV
AV
Câble
multiple
1111
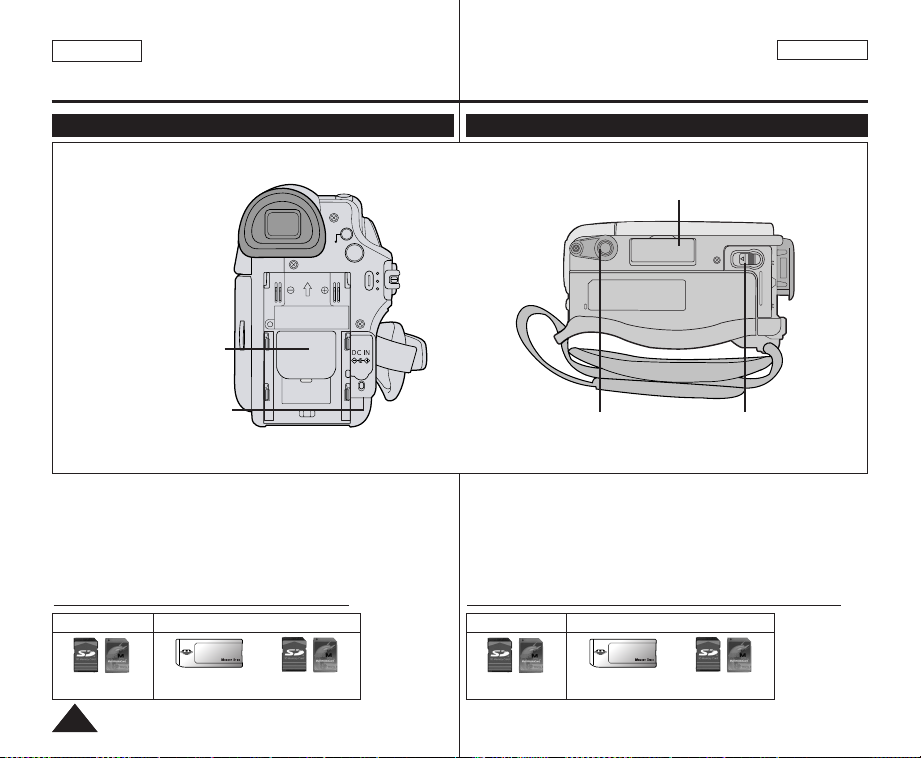
ENGLISH
BATTERY
RELEASE
FRANÇAIS
Getting to Know Your Camcorder
Familiarisez-vous avec votre caméscope
Rear & Bottom View Vue arrière et vue de dessous
3. Memory Card Slot
(SC-D363/D364/D365/D366 only)
QUICK
MENU
MENU
1. Lithium Battery Cover
2. Charging Indicator
1. Lithium Battery Cover
2. Charging Indicator
3. Memory Card Slot (SC-D363/D364/D365/D366 only)
4. Tripod Receptacle
5. Battery Release
Memory Card Slot (Usable Memory Card)
SC-D363/D364
SC-D365/D366
CHG
4. Tripod Receptacle
1. Couvercle de la batterie au lithium
2. Témoin de charge de la batterie
3.
Fente pour carte mémoire (modèles SC-D363/D364/D365/D366 uniquement)
4. Pas de vis pour trépied
5. Battery Release (Remplacement de la batterie)
Fente pour carte mémoire (carte mémoire utilisable)
SC-D363/D364
SC-D365/D366
5. Battery Release
1212
SD/MMC
Memory Stick
Memory Stick PRO
SD/MMC
SD/MMC
Memory Stick
Memory Stick PRO
SD/MMC
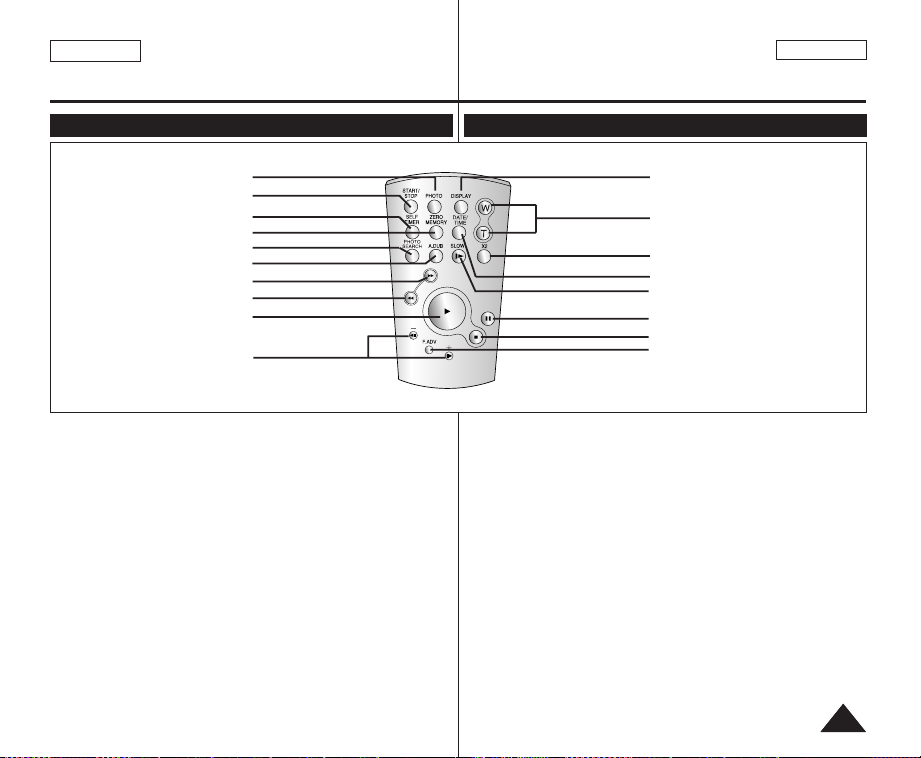
ENGLISH
FRANÇAIS
Getting to Know Your Camcorder
Remote Control (SC-D364/D366 only)
1. PHOTO
2. START/STOP
3. SELF TIMER
4. ZERO MEMORY
5. PHOTO SEARCH
œœ
10.
1. PHOTO Button ➥page 57
2. START/STOP Button
3. SELF TIMER Button
➥page 38
4. ZERO MEMORY Button
➥page 37
5. PHOTO SEARCH Button
6. A.DUB Button ➥page 62
√√√√
7.
(FF) Button
œœœœ
8.
(REW) Button
√√
9.
(PLAY) Button
❙❙ / ❙❙
6. A.DUB
√√√√
7.
œœœœ
8.
(REW)
√√
9.
(PLAY)
√√
(Direction)
(FF)
10.œœ❙❙ / ❙❙√√(Direction) Button
➥page 59
11. F. ADV Button ➥page 60
12. ■ (STOP) Button
13. ❙❙ (STILL) Button
14. SLOW (❙
15. DATE/TIME Button
16. X2 Button ➥page 60
17. W/T (Zoom) Button
18. DISPLAY Button
√√
) Button
Familiarisez-vous avec votre caméscope
Télécommande (modèles SC-D364/D366 uniquement)
18. DISPLAY
17. W/T (Zoom)
16. X2
1. Bouton PHOTO ➥page 57
2. Bouton START/STOP
(MARCHE/ARRET)
3. Bouton SELF TIMER
(RETARDATEUR) ➥page 38
4. Bouton ZERO MEMORY
(MISE A ZÉRO DU
COMPTEUR) ➥page 37
5. Bouton PHOTO SEARCH
(RECHERCHE PHOTO)
6. Bouton A.DUB (POSTSONORISATION) ➥page 62
7. Bouton
8. Bouton
9. Bouton
√√√√
(FF)
œœœœ
(REW)
√√
(PLAY) (LECTURE)
15. DATE/TIME
14. SLOW(
13.
12. ■ (STOP)
11. F. ADV
√√
❙
)
❙❙
(STILL)
10. Bouton œœ❙❙ / ❙❙√√(Direction)
Bouton ➥page 59
Bouton F. ADV (AVANCE
11.
IMAGE PAR IMAGE) ➥page 60
12. Bouton ■ (STOP) (ARRET)
13. Bouton ❙❙ (STILL) (PAUSE)
14. Bouton SLOW
(LENTEMENT) (❙
15. Bouton DATE/TIME
(DATE/HEURE)
16. Bouton X2 ➥page 60
17. Bouton W/T (Zoom)
(GRAND
ANGLE/TÉLÉOBJECTIF)
18. Bouton DISPLAY
(AFFFICHAGE)
√√
)
1313
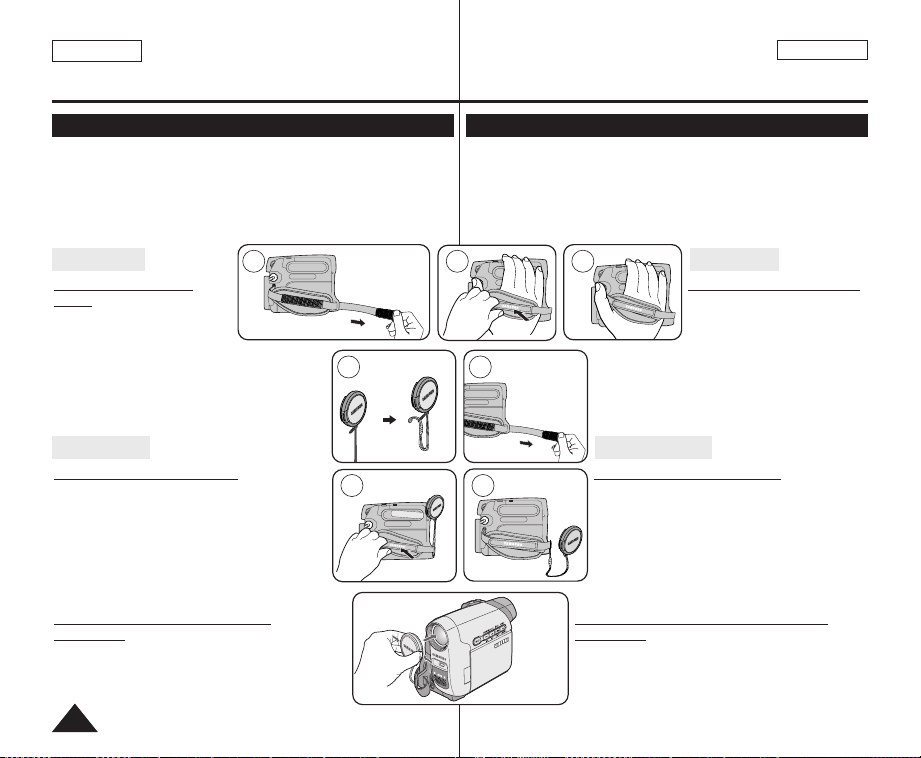
ENGLISH
FRANÇAIS
Preparation Préparatifs
Using the Hand Strap & Lens Cover Utilisation de la dragonne et du cache-objectif
It is very important to ensure that the Hand Strap has been correctly
adjusted before you begin your recording.
The Hand Strap enables you to:
- Hold the Camcorder in a stable, comfortable position.
- Press the [Zoom] and [Start/Stop] button without having to change
the position of your hand.
Hand Strap
Adjusting the Hand
Strap
1. Insert the Hand Strap into the
Hand Strap Hook on the front
side of the Camcorder and pull
its end through the hook.
2. Insert your hand into the Hand Strap and
adjust its length for your convenience.
3. Close the Hand Strap.
Lens Cover
Attaching the Lens Cover
1. Hook up the Lens Cover with the Lens Cover
Strap as illustrated.
2. Hook up the Lens Cover Strap to the Hand
Strap, and adjust it following
the steps as described for the Hand Strap.
3. Close the Hand Strap.
Installing the Lens Cover after
Operation
Press buttons on both sides of the Lens Cover, then
attach it to the Camcorder Lens.
1 2 3
1 2
2 3
Il est primordial que la dragonne soit correctement réglée avant de
commencer tout enregistrement.
Grâce à cette dragonne, vous pouvez :
- tenir le caméscope en adoptant une position stable et confortable.
- appuyer sur les boutons [Zoom] et Start/Stop sans qu'il soit
nécessaire de déplacer votre main.
Dragonne
Réglage de la dragonne
1. Introduisez la dragonne dans
la boucle qui se trouve à
l’avant du caméscope puis
tirez-la par l’extrémité.
2. Passez votre main dans la dragonne puis
ajustez la longueur de cette dernière à votre
convenance.
3. Fermez la dragonne.
Cache-objectif
Fixation du cache-objectif
1. Accrochez le cache-objectif au cordon comme
indiqué sur l’illustration.
2. Attachez le cordon du cache-objectif à la
dragonne puis ajustez-le en suivant les
mêmes recommandations que pour la
dragonne.
3. Fermez la dragonne.
Installation du cache-objectif après
utilisation
Appuyez sur les boutons situés des deux côtés du
cache-objectif, puis insérez celui-ci sur l'objectif du
caméscope.
1414

ENGLISH
MENU
CHG
QUICK
MENU
Preparation Préparatifs
Lithium Battery Installation Insertion de la pile au lithium
Lithium Battery Installation for the
Internal Clock
1. Remove the Battery Pack from the rear of
the Camcorder.
2. Open the Lithium Battery Cover on the rear
of the Camcorder.
3. Position the Lithium Battery in the Lithium
Battery Holder, with the positive ( )
terminal face up.
Be careful not to reverse the polarity of the Battery.
4. Close the Lithium Battery Cover.
Lithium Battery Installation for the
Remote Control (SC-D364/D366 only)
1. Pull out the Lithium Battery Holder toward
the direction of the arrow.
2. Position the Lithium Battery in the Lithium
Battery Holder, with the positive ( )
terminal face up.
3. Reinsert the Lithium Battery Holder.
Precaution regarding the Lithium Battery
1. The Lithium Battery maintains the clock function and preset contents
of the memory; even if the Battery Pack or AC Power adapter is
removed.
2. The Lithium Battery for the Camcorder lasts about 6 months under
normal operation from time of installation.
3. When the Lithium Battery becomes weak or dead, the date/time
indicator will display <12:00 AM JAN.1,2006> when you set the
<Date/Time> to <on>. When this occurs, replace the Lithium Battery
with a new one (type CR2025).
4. There is a danger of explosion if Battery is incorrectly replaced.
Replace only with the same or equivalent type.
Warning: Keep the Lithium Battery out of reach of children. Should
a battery be swallowed, consult a doctor immediately.
Faites attention à ne pas inverser les polarités.
4. Refermez le compartiment de la pile au lithium.
Précautions d’utilisation de la pile au lithium
1. La pile au lithium assure le fonctionnement de l’horloge et permet la
conservation en mémoire des réglages même lorsque la batterie ou
l’adaptateur CA est retiré.
2. Dans des conditions d’utilisation normales, la durée de vie de la pile
au lithium est d’environ six mois à compter de son insertion.
3. Lorsque la pile au lithium devient faible ou est complètement
déchargée, le témoin d’horodatage affiche <12:00 AM JAN.1,2006>
quand vous réglez la fonction <Date/Time> sur <On>. Dans ce cas,
remplacez la pile au lithium par une pile neuve (type CR2025).
4. Il existe un risque d’explosion si la pile est replacée de façon
incorrecte. Assurez-vous de remplacer la pile usagée par une pile
neuve identique ou du même type.
Avertissement : conservez la pile au lithium hors de portée des
Insertion de la pile au lithium de
l'horloge interne
1. Retirez la batterie du compartiment situé à
l’arrière du caméscope.
2. Otez le couvercle de la pile au lithium
situé à l’arrière du caméscope.
3. Placez la pile au lithium dans son
compartiment, pôle positif ( ) orienté
vers le haut.
Insertion de la pile au lithium de la
télécommande (modèles
SC-D364/D366 uniquement)
1. Retirez le support de la pile au lithium
dans la direction de la flèche.
2. Placez la pile au lithium dans son
compartiment, pôle positif ( ) orienté
vers le haut.
3. Réinsérez le compartiment de la pile au
lithium.
enfants. En cas d'ingestion de la pile, consultez
un médecin immédiatement.
FRANÇAIS
1515
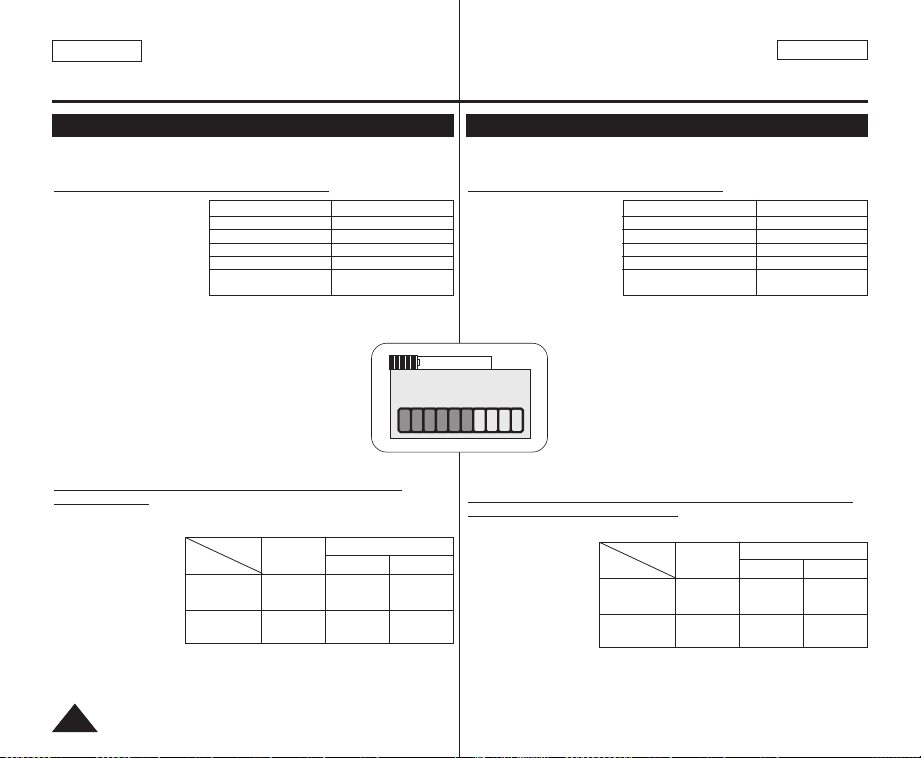
ENGLISH
Preparation Préparatifs
Using the Lithium Ion Battery Pack Utilisation de la batterie lithium-ion
✤ Use SB-LSM80 or SB-LSM160 Battery Pack only.
✤ The Battery Pack may be charged a little at the time of purchase.
Charging the Lithium Ion Battery Pack
1. Turn the [Power] switch
to [Off].
2. Attach the Battery Pack to
the Camcorder.
3. Connect the AC Power
Adapter to an AC Cord
and connect the AC Cord
to a wall socket.
4. Connect the DC cable to the DC jack on the Camcorder.
The charging indicator will start to blink, showing that the Battery is
charging.
5. Press and hold the DISPLAY button while charging and
the charging status will be displayed on the ACL for 7
seconds.
■
As indicated the battery level is given as reference
data for the user, it is the approximate estimation. It
may differ from Battery capacity and temperature.
6. When the Battery is fully charged, disconnect the Battery
Pack and the AC Power Adapter from the Camcorder.
Even with the Power switched Off, the Battery Pack will
still discharge.
Charging, Recording Times based on Model and
Battery Type.
✤ If you close the
ACL Screen, it switches off and the Viewfinder switches on automatically.
✤ The continuous
recording times given
in the table to the
right are
approximations.
Actual recording time
depends on usage.
✤ The continuous
recording times in the
operating instructions are measured using a fully charged Battery Pack at
77 °F (25 °C).
✤ Even when the Power switched Off, the Battery Pack will still discharge if it
is left attached to the device.
Blinking time
Once per second
Twice per second
Three times per second
Blinking stops and stays on
On for a second and off for
a second
Time
Battery
SB-LSM80
(AD43-00136A)
SB-LSM160
(Option)
Charging
time
Approx.
1hr 20min
Approx.
3hr
Charging rate
Less than 50%
50% ~ 75%
75% ~ 90%
90% ~ 100%
Error - Reset the Battery
Pack and the DC Cable
BBaatt tt eerryy cc hhaarrggeedd
0% 50% 100%
Recording time
Viewfinder On
ACL On
Approx.
1hr 20min
Approx.
2hr 40min
Approx.
1hr 30min
Approx.
1616
✤
N’utilisez que le modèle de batterie SB-LSM80 ou SB-LSM160.
✤
Il se peut que la batterie soit légèrement chargée au moment de l'achat.
Chargement de la batterie lithium-ion
1. Placez l'interrupteur
[Power] sur [Off].
2. Insérez la batterie dans le
caméscope.
3. Raccordez l'adaptateur CA
au cordon CA puis
branchez ce dernier sur une
prise murale.
4. Branchez le cordon CC sur la prise CC (DC) du caméscope.
Le témoin de charge se met à clignoter, indiquant ainsi que la batterie est en
cours de charge.
Battery Info
Durée de charge et d'enregistrement selon le modèle de
l'appareil et le type de batterie,
✤ Si vous rabattez l'écran ACL, celui-ci s'éteint et le viseur est automatiquement
activé.
✤ Les durées
d'enregistrement en
continu présentées
dans le tableau de
droite sont
3hr
approximatives.
La durée
d’enregistrement réelle
varie selon l’utilisation.
✤
Les durées d’enregistrement en continu données dans le manuel d’utilisation ont
été établies à partir d’une batterie complètement chargée fonctionnant à 25°C.
✤ Si la batterie est laissée dans son logement, elle continue de se décharger,
même lorsque l’interrupteur Power (Alim.) est sur Off.
5. Appuyez sur le beuton DISPLAY en cours de chargement. Le
niveau de charge s'affiche sur l'écran ACL pendant 7
secondes.
■
6. Une fois que la batterie est entièrement chargée, débranchez
celle-ci ainsi que l'adaptateur CA du caméscope.
La batterie se décharge même lorsque le sélecteur de mise
sous tension est sur Off.
Fréquence de clignotement
Une fois par seconde
Deux fois par seconde
Trois fois par seconde
Le clignotement cesse et le témoin reste allumé
Le témoin clignote lentement
El nivel de la batería indicado que se facilita al usuario
son datos de referencia aproximados.
Puede que difiera de la capacidad y temperatura de la
batería.
Durée
Batterie
SB-LSM80
(AD43-00136A)
SB-LSM160
(Option)
Durée de
charge
Environ.
1h20
Environ.
3h
FRANÇAIS
Taux de charge
Inférieur à 50%
50% ~ 75%
75% ~ 90%
90% ~ 100%
Erreur – Replacez la
batterie et le cordon CC
Durée d’enregistrement
Environ.
1h20
Environ.
2h40
Viseur activé
Environ.
1h30
Environ.
3h
Ecran ACL allumé

ENGLISH
Preparation Préparatifs
FRANÇAIS
The amount of continuous recording time available depends on;
- The type and capacity of the Battery Pack you are using.
- Ambient temperature.
- How often the Zoom function is used.
- Type of use (Camcorder/Camera/With ACL Screen etc.).
It is recommended that you have several batteries available.
Battery Level Display
The battery level display indicates the amount of power
remaining in the Battery Pack.
a. Fully charged b. 20~40% used
c. 40~80% used d. 80~95% used
e. Completely used (Blinking)
(The Camcorder will turn off soon, change the
battery as soon as possible.)
(Blinking)
Battery Pack Management
■
The Battery Pack should be recharged in an environment between 32
°F (0 °C) and 104 °F (40°C).
■
The life and capacity of the Battery Pack will be reduced if it is used in
temperatures below 32 °F (0 °C) or left in temperatures above
104 °F (40 °C) for a long period of time, even when it is fully
recharged.
■
Do not put the Battery Pack near any heat source (i.e. fire or a
heater).
■
Do not disassemble, apply pressure to, or heat the Battery Pack.
■
Do not allow the + and – terminals of the Battery Pack to be shortcircuited. It may cause leakage, heat generation, induce overheating
or fire.
La durée d'enregistrement en continu disponible dépend de
plusieurs facteurs:
- le type et la capacité de la batterie utilisée.
- la température ambiante.
- la fréquence d'utilisation du zoom.
- le mode d'utilisation (caméscope/appareil photo/visée à l'aide de
l'écran ACL...). Par conséquent, nous vous recommandons d’avoir à
disposition plusieurs batteries.
Affichage du niveau de charge de la batterie
Le témoin du niveau de charge de la batterie indique la
quantité d'énergie restante à l'intérieur de cette
dernière.
a. Batterie pleine b. 20 à 40 % utilisés
c. 40 à 80 % utilisés d. 80 à 95 % utilisés
e. Batterie épuisée (le témoin de charge clignote)
(Le caméscope est sur le point de s’arrêter ;
changez la batterie aussitôt que possible)
Gestion de la batterie
■
Lors de la recharge de la batterie, la température doit être comprise
entre 0°C et 40°C.
■
La durée de vie et la capacité de la batterie seront diminuées si celleci est utilisée alors que la température est inférieure à 0°C ou
stockée à une température supérieure à 40°C pendant une période
prolongée, même si elle est complètement chargée.
■
Ne placez pas la batterie à proximité d'une source de chaleur (feu ou
appareil de chauffage, par exemple).
■
La batterie ne doit être ni démontée, ni forcée, ni chauffée.
■
Veillez à ce que les bornes + et – de la batterie ne soient pas courtcircuitées. Des fuites, dégagements de chaleur, surchauffes ou
incendies peuvent en résulter.
1717

ENGLISH
Preparation Préparatifs
FRANÇAIS
Notes regarding the Battery Pack
■
Please refer to the Table on page 16 for approximate continuous
recording time.
■
The recording time is affected by temperature and environmental
conditions.
■
The recording time shortens dramatically in a cold environment. As
the environmental temperature and conditions vary.
■
The continuous recording times in the operating instructions are
measured using a fully charged Battery Pack at 77 °F (25 °C). The
remaining battery time may differ from the approximate continuous
recording times given in the instructions.
■
It is recommended you use the original Battery Pack that is available
at SAMSUNG retailer.
When the Battery reaches the end of its life, please contact your local
dealer.
The batteries have to be dealt with as chemical waste.
■
Make sure that the Battery Pack is fully charged before starting to
record.
■
A brand new Battery Pack is not charged. Before using the Battery
Pack, you need to charge it completely.
■
Fully discharging a Lithium Ion Battery damages the internal cells.
The Battery Pack may be prone to leakage when fully discharged.
■
To preserve battery power, keep your Camcorder turned off when you
are not operating it.
■
If your Camcorder is in <Camera> mode, and it is left in <STBY>
mode without being operated for more than 5 minutes with a tape
inserted, it will automatically turn itself off to protect against
unnecessary battery discharge.
■
Make sure that the Battery Pack is fitted firmly into place.
Do not drop the Battery Pack. Dropping the Battery Pack may
damage it.
Remarques concernant la batterie
■
Veuillez vous reporter au tableau de la page 16 pour connaître les
durées approximatives d’enregistrement en continu.
■
Ces durées sont dépendantes de la température et des conditions
d’utilisation
■
Elles sont sensiblement réduites lorsqu’il fait froid. La température et
les conditions d’utilisation sont en effet variables.
■
Les durées d’enregistrement en continu données dans le manuel
d’utilisation ont été établies à l’aide d’une batterie complètement
chargée fonctionnant à 25°C. La durée d’enregistrement en continu
correspondant à la charge restante de la batterie peut différer des
valeurs données dans le manuel.
■
Nous vous conseillons d’utiliser le bloc-piles disponible chez tous les
détaillants SAMSUNG.
Lorsque la batterie arrive en fin de vie, adressez-vous à votre
revendeur le plus proche.
Les batteries doivent être traitées comme des déchets chimiques.
■
Assurez-vous que la batterie est complètement chargée avant de
commencer l’enregistrement.
■
Les batteries neuves ne sont jamais chargées. Avant d’en utiliser
une, il vous faut donc la charger complètement.
■
Les piles internes risquent de s’abîmer si la batterie lithium-ion est
complètement déchargée.
La batterie risque de fuir si elle est complètement déchargée.
■
Afin de ménager la batterie, éteignez votre caméscope lorsque vous
ne vous en servez pas.
■
Si votre caméscope est en mode <Camera> et reste en mode
<STBY> sans être utilisé pendant plus de cinq minutes alors qu’une
cassette est chargée, il s’éteint automatiquement pour éviter que la
batterie ne se décharge inutilement.
■
Vérifiez que la batterie est insérée correctement.
Ne laissez jamais tomber la batterie. Cela risquerait de
l’endommager.
1818
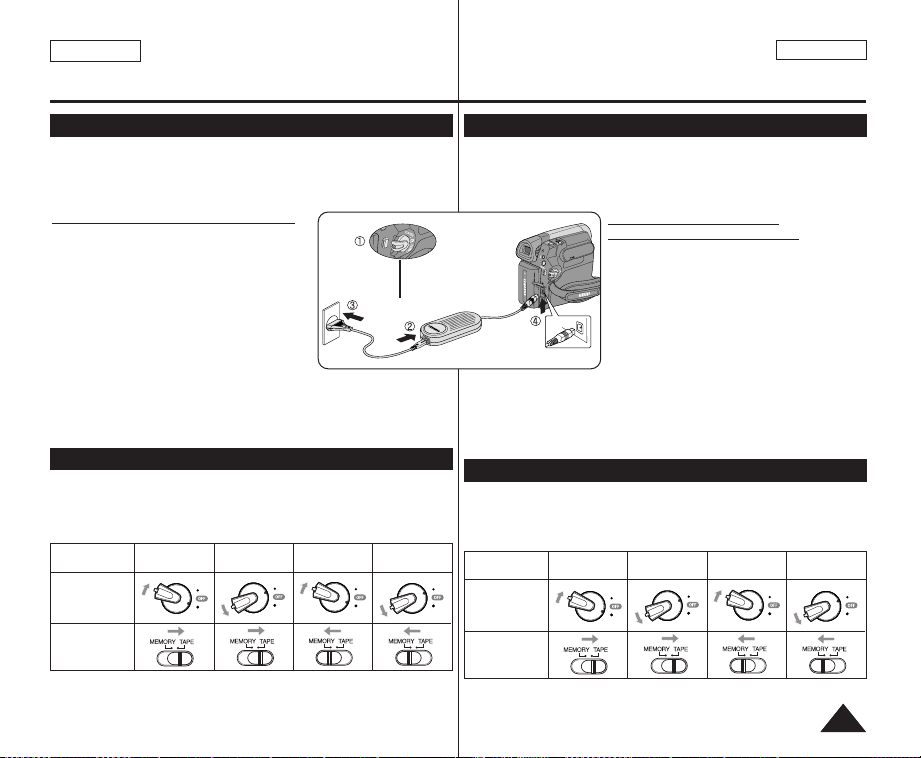
ENGLISH
Q
U
IC
K
M
E
N
U
P
L
A
Y
E
R
C
A
M
E
R
A
C
A
M
E
R
A
P
L
A
Y
E
R
C
A
M
E
R
A
P
L
A
Y
E
R
C
A
M
E
R
A
P
L
A
Y
E
R
C
A
M
E
R
A
P
L
A
Y
E
R
C
A
M
E
R
A
P
L
A
Y
E
R
C
A
M
E
R
A
P
L
A
Y
E
R
C
A
M
E
R
A
P
L
A
Y
E
R
C
A
M
E
R
A
P
L
A
Y
E
R
FRANÇAIS
Preparation Préparatifs
Connecting a Power Source Branchement sur une source d'alimentation
✤ There are two types of power source that can be connected to your
Camcorder.
- The AC Power adapter and AC Cord: used for indoor recording.
- The Battery Pack: used for outdoor recording.
Using a Household Power Source
Connect to a household power source to use
the Camcorder without worrying about the
battery power. You can keep the Battery Pack
attached; the battery power will not be
consumed.
1. Turn the [Power] switch to [OFF].
2. Connect the AC Power adapter
(AA-E8 Type) to the AC Cord.
3. Connect the AC Cord to a wall socket.
The plug and wall socket type may differ according to your resident
country.
4. Connect the DC cable to the DC jack of the Camcorder.
5. Set the Camcorder to each mode by holding down the tab on the
[Power] switch and turning it to the [CAMERA] or [PLAYER] mode.
Power Switch
About the Operating Modes
✤ The operating modes are determined by the position of the [Power]
switch and the [Mode] switch.
✤ Set the Operation Mode by adjusting [Power] switch and [Mode]
switch before operating any functions.
Mode Name
<Camera
Mode>
<Player
Mode>
[Power] Switch
[Mode] Switch
(SC-D363/D364/
D365/D366 only)
[Note]
■
The <M.Cam> and the <M.Player> modes are only enabled on SCD363/ D364/ D365/ D366.
<M.Cam
Mode>
<M.Player
Mode>
✤
Deux types de source d'alimentation peuvent être raccordés à votre caméscope.
- l'adaptateur CA associé au cordon d'alimentation CA : pour l'enregistrement
en intérieur.
- la batterie: pour l'enregistrement en extérieur.
Utilisation d'une source
d'alimentation domestique
Pour utiliser le caméscope, reliez-le à une prise
murale sans vous soucier du niveau de charge de la
batterie. Vous pouvez maintenir la batterie branchée.
L'énergie contenue dans la batterie ne sera pas
consommée.
1. Mettez l’interrupteur [Power] à la position [OFF].
2.
Raccordez l'adaptateur CA (type AA-E8) au cordon CA.
3.
Le type de la fiche et de la prise peuvent être différents en fonction du pays
dans lequel vous résidez.
4. Branchez le câble CC sur la prise CC (DC) du caméscope.
5. Réglez le caméscope sur chaque mode en réglant l’interrupteur [Power] sur le
mode [CAMERA] ou [PLAYER].
Branchez le cordon d'alimentation CA sur une prise murale.
A propos des modes de fonctionnement
✤
Les modes de fonctionnement sont déterminés par la position de l'interrupteur
[Power] et de l'interrupteur [Mode].
✤
Configurez le mode de fonctionnement en réglant l'interrupteur [Power] et
l'interrupteur [Mode] avant d'utiliser les fonctions.
Nom du mode
Interrupteur
[Power]
Interrupteur [Mode] (Mode)
(modèles SC-D363/D364/D365
/D366 uniquement)
[Remarque]
■
Les modes <M.Cam> et <M.Player> ne sont disponibles qu'avec les
modèles SC-D363/ D364/ D365/ D366.
<Camera
Mode>
<Player
Mode>
<M.Cam
Mode>
<M.Player
Mode>
1919
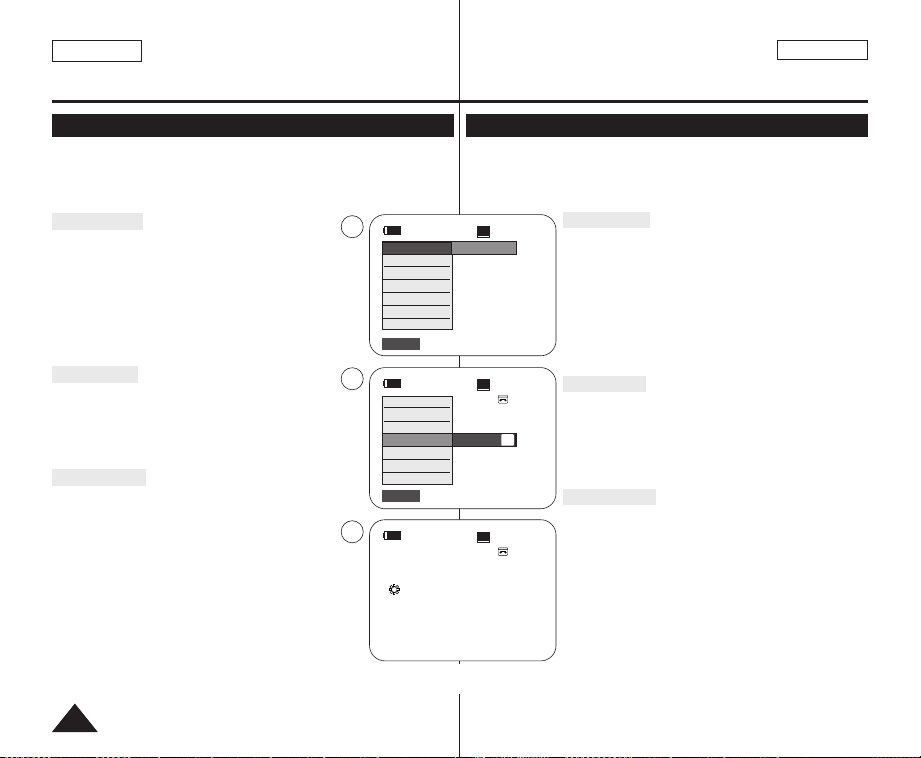
ENGLISH
Preparation Préparatifs
Using the QUICK MENU Utilisation du bouton QUICK MENU
✤ QUICK MENU is used to access Camcorder functions by using the
[QUICK MENU] button.
✤ QUICK MENU provides easier access to frequently used menus without
using the [MENU] button.
✤ Functions available using the QUICK MENU are as below:
Camera Mode
■
Setting the Digital Image Stabilizer (DIS) ➥page 55
■
Programed Automatic Exposure Modes (Program AE)
➥page 49
■
Setting the 16:9 Wide ➥page 54
■
Setting the White Balance (White Balance) ➥page 51
■
Setting the Shutter Speed (Shutter)- Only can be
operated by using the QUICK MENU ➥page 47
■
Setting the Exposure (Exposure)- Only can be operated
by using the QUICK MENU ➥page 47
■
Setting the Back Light Compensation (BLC) ➥page 41
M.Cam Mode
■
Setting the Memory Type (Memory Type) ➥page 70
■
Setting the White Balance (White Balance) ➥page 51
■
Setting the Photo Quality (Photo Quality) ➥page 71
■
Setting the Exposure (Exposure)- Only can be operated
by using the QUICK MENU ➥page 47
■
Setting the Back Light Compensation (BLC) ➥page 41
M.Player Mode
■
Setting the Memory Type (Memory Type) ➥page 70
■
Playing the Moving Images (MPEG) on the Memory Card
(M. Play Select) ➥page 80
■
Deleting Photo Images and Moving Images (Delete)
➥page 76
■
Protection from accidental Erasure (Protect) ➥page 75
■
Marking Images for Printing (Print Mark) ➥page 84
For example: Setting the White Balance
1. Press the [QUICK MENU] button.
The quick menu list will appear.
2. Move the [Zoom] lever to the up or down to select
<White Balance>, then press the [OK] button.
3. Move the [Zoom] lever to the up or down to select
desired mode (Auto, Indoor, Outdoor or Custom WB),
then press the [OK] button.
4. To exit, press the [QUICK MENU] button.
1
DIS
Program AE
16:9 Wide
White Balance
Shutter
Exposure
BLC
Q.MENU
2
DIS
Program AE
16:9 Wide
White Balance
Shutter
Exposure
BLC
Q.MENU
4
œ
<When the Outdoor option was selected>
2020
✤ La fonction QUICK MENU permet d'accéder aux fonctions de votre
caméscope à l'aide du bouton [QUICK MENU].
✤ La fonction QUICK MENU offre une plus grande facilité d’accès aux menus
fréquemment utilisés sans avoir à se servir du bouton [MENU].
✤ Les fonctions disponibles avec la fonction QUICK MENU sont les suivantes:
SP
STBY
Off
Exit
SP
STBY
…
Auto
A
†
Exit
SP
STBY
Mode Camera
0:00:10
■
Réglage du stabilisateur d'image numérique (DIS) ➥page 55
60min
■
Modes d’exposition automatique programmable Program AE
➥page 49
■
Réglage de la fonction 16:9 Wide ➥page 54
■
Réglage de la balance des blancs White Balance ➥page 51
■
Réglage de la vitesse de l'obturateur (Shutter) – Cette fonction ne
peut être utilisée qu'avec la fonction QUICK MENU ➥page 47
■
Réglage de l'exposition (Exposure) (Exposition) – Cette fonction
ne peut être utilisée qu'avec la fonction QUICK MENU ➥page 47
■
Réglage du BLC (Back Light Compensation) (Compensation du
0:00:10
0:00:10
contre-jour) ➥page 41
Mode M.Cam
60min
■
Réglage du type de carte mémoire (Memory Type) ➥page 70
■
Réglage de la balance des blancs (White Balance) ➥page 51
■
Réglage de la qualité photo (Photo Quality) ➥page 71
■
Réglage de l'exposition (Exposure) – Cette fonction ne peut être
utilisée qu'avec la fonction QUICK MENU ➥page 47
■
Réglage du BLC (Back Light Compensation) (Compensation du
contre-jour) ➥page 41
Mode M.Player
■
Réglage du type de carte mémoire (Memory Type) ➥page 70
■
Lecture des films (MPEG) sur la carte mémoire (M. Play Select)
➥page 80
60min
■
Suppression de photos et de films (Delete) ➥page 76
■
Protection contre la suppression accidentelle (Protect) ➥page 75
■
Marquage des images pour l'impression (Print Mark) ➥page 84
Exemple : réglage de la balance des blancs
1. Appuyez sur le bouton [QUICK MENU].
La liste des menus rapides apparaît.
2. Déplacez le bouton de [Zoom] vers le haut ou vers le bas pour
sélectionner <White Balance> puis appuyez sur le bouton
[OK].
3. Déplacez le bouton de [Zoom] vers le haut ou vers le bas pour
sélectionner le mode souhaité (<Auto>, <Indoor>, Outdoor ou
<Custom WB>), puis appuyez sur le bouton [OK].
4. Pour quitter le menu, appuyez sur le bouton [QUICK MENU].
FRANÇAIS
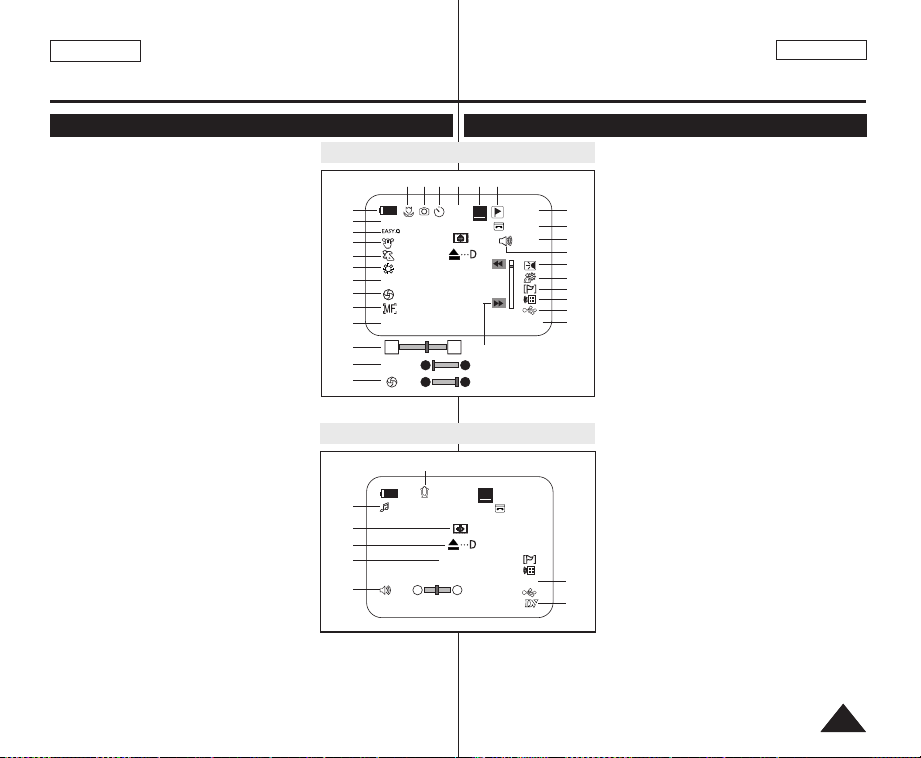
ENGLISH
FRANÇAIS
Preparation Préparatifs
OSD (On Screen Display) in Camera/Player Modes Affichage à l’écran en modes Camera/Player
1. Battery Level ➥page 17
2. Visual Effects Mode ➥page 52
3. EASY.Q ➥page 35
4. DIS ➥page 55
5. Program AE ➥page 49
6. White Balance Mode ➥page 51
7. Shutter Speed ➥page 47
8. Exposure ➥page 47
9. Manual Focus ➥page 48
10. Date/Time ➥page 30
11. Zoom Position ➥page 39
12. COLOR NITE ➥pages 42
13. USB ➥page 92
(SC-D362/D363/D364/D365/D366 only)
14. Remote ➥page 24 (SC-D364/D366 only)
15. WindCut Plus ➥page 45
16. BLC (Back Light Compensation)
➥page 41
17. LIGHT ➥page 43
(SC-D362/D364/D365/D366 only)
18. Real Stereo ➥page 46
19. Audio Mode ➥page 44
20. Remaining Tape (measured in minutes)
21. Tape Counter
22. Zero Memory ➥page 37
(SC-D364/D366 only)
23. Record Speed Mode ➥page 44
24. Operating Mode
25. Self Timer ➥page 38
(SC-D364/D366 only)
26. Photo image
27. Tele Macro ➥page 39
28. Dubbed Audio Playback ➥page 63
29. DEW ➥page 6
30. Warning Indicator ➥page 98
31. Message Line ➥page 98
32. Volume Control ➥page 58
33. DV IN (DV data transfer mode) ➥page 87
34. AV IN ➥page 67 (SC-D365/D366 only)
35. Audio Dubbing ➥page 62 (SC-D364/D366 only)
OSD in Camera Mode
26
27
1
Art
2
3
4
5
6
7
S. 1/60
8
[29]
9
12:00 AM JAN.1,2006
10
W T
11
7
8
S. 1/60
[29]
†
†
OSD in Player Mode
35
28
29
30
31
†
[10]
32
12:00 AM JAN.1,2006
25
10Sec
STBY
No Tape !
No Tape !
…
…
…
√
23 2224
SP
9
SP
0:00:11
14min
S
16BIt
Color N.1/30
0:00:00:10
14minSound[2]
16BIt
AV In
1. Niveau de charge de la batterie ➥page 17
2. Mode Visual Effects ➥page 52
3. EASY.Q ➥page 35
4. DIS ➥page 55
5.
Exposition automatique programmable ➥page 49
21
6. Mode White Balance ➥page 51
20
7. Vitesse de l'obturateur ➥page 47
19
8. Exposition ➥page 47
18
9. Mise au point manuelle ➥page 48
17
10. Date/Heure ➥page 30
16
11. Position du zoom ➥page 39
15
12. COLOR NITE ➥pages 42
14
13. USB ➥page 92
13
(modèles SC-D362/D363/D364/D365/D366
12
uniquement)
14. Télécommande ➥page 24
(modèles SC-D364/D366 uniquement)
15. Suppression du bruit du vent - Plus ➥page 45
16. BLC (Compensation du contre-jour) ➥page 41
17. LUMIERE ➥page 43
(modèles SC-D362/D364/D365/D366 uniquement)
18. Stéréo réelle ➥page 46
19. Mode Audio ➥page 44
20. Bande restante (en minutes)
21. Compteur de bande
22. Mise à zéro du compteur ➥page 37
(modèles SC-D364/D366 uniquement)
23. Mode Record Speed (Vitesse d'enregistrement)
➥page 44
24. Mode de fonctionnement
25. Retardateur automatique ➥page 38
(modèles SC-D364/D366 uniquement)
26. Photo
27. Télé Macro ➥page 39
34
28. Lecture post-sonorisation ➥page 63
33
29. PROTECTION CONDENSATION ➥page 6
30. Témoin d'avertissement ➥page 98
31. Ligne de message ➥page 98
32. Réglage du volume sonore ➥page 58
33. ENTREE DV (mode DV data transfer
(Transfert de données DV)) ➥page 87
34. AV IN (ENTREE AV) ➥page 67
(modèles SC-D365/D366 uniquement)
35. Post-sonorisation ➥page 62
(modèles SC-D364/D366 uniquement)
2121
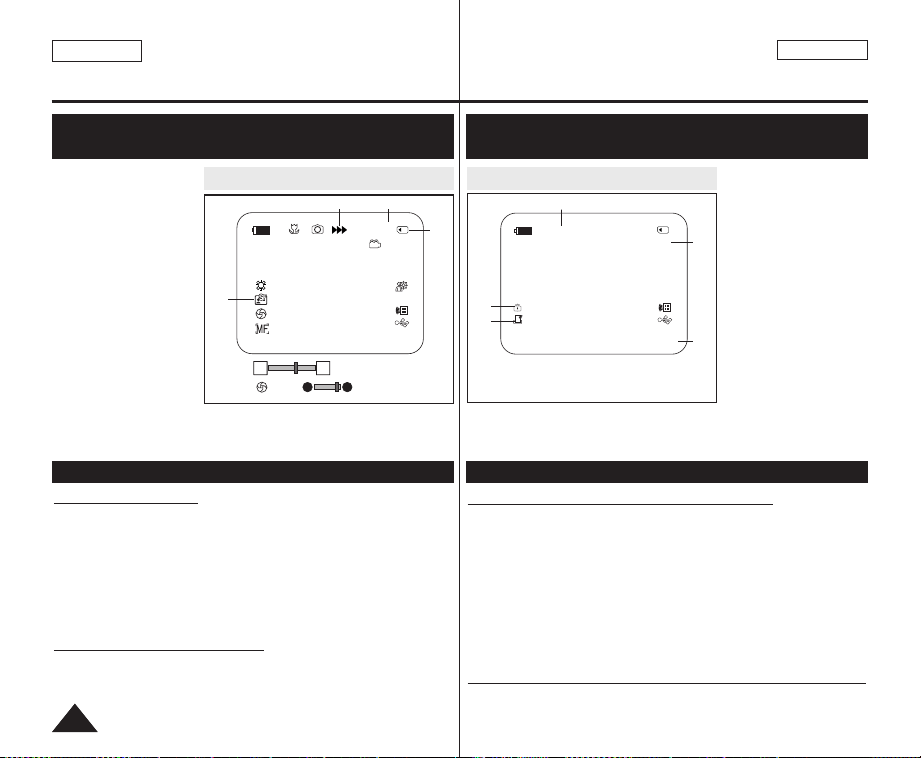
ENGLISH
Preparation Préparatifs
FRANÇAIS
OSD (On Screen Display) in M.Cam/M.Player Modes
(SC-D363/D364/D365/D366 only)
1. Photo Quality
➥page 71
2. CARD (Memory
Card) Indicator
3. Image Counter (Total
number of
recordable photo
images)
4. Image Recording
and Loading
Indicator
5. Erase Protection
Indicator ➥page 75
6. Print Mark ➥page 84
7. Folder Number File Number ➥page 72
8. JPEG Image Size
9. Slide Show ➥page 74
OSD in M.Cam Mode OSD in M.Player Mode
34
46
3 min
No Memory Card !
1
[29]
12:00 AM JAN.1,2006
W T
[29]
…
†
Affichage à l’écran en modes M.Cam/M.Player
(modèles SC-D363/D364/D365/D366 uniquement)
1.
Qualité photo ➥page 71
2. Témoin CARTE (carte
9
2
5
6
7. Numéro de dossier / Numéro de fichier ➥page 72
8. Taille de l'image JPEG
9. Diaporama ➥page 74
Slide
No Memory Card !
001
12:00 AM JAN.1,2006 100-0002
2/46
800X600
mémoire)
3. Image Counter
(Compteur d'images)
8
(nombre total de photos
pouvant être
enregistrées)
4. Témoin
d’enregistrement et de
chargement d’image
5.
Témoin de protection
7
contre les suppressions
accidentelles ➥page 75
6. Symbole Impression
➥page 84
Turning the OSD (On Screen Display) On/Off Activation/Désactivation de l'affichage à l'écran
Turning OSD On/Off
Press the [DISPLAY] button on the left side control panel.
■
Each press of the button toggles the OSD function on and off.
■
When you turn the OSD off,
- In <Camera Mode>: The STBY, REC modes are always
displayed on the screen, even when the OSD is turned off.
- In <Player Mode>: When you press any Function Button, it is
displayed on the OSD for 3 seconds before it turns off.
Turning the Date/Time On/Off
To turn the Date/Time on or off, access the menu and change the
<Date/Time> mode. ➥page 30
2222
Activation/Désactivation de l'affichage à l'écran
Appuyez sur le bouton [DISPLAY] situé sur le côté gauche du tableau de
commande.
■
Chaque pression sur le bouton permet alternativement d'activer et de
désactiver la fonction d'affichage à l'écran.
■
Désactivation de l'affichage à l'écran
- En <Camera Mode>: Les modes STBY et REC demeurent toujours
affichés à l’écran même si ce dernier est éteint.
-En <Player Mode>: Lorsque vous appuyez sur une touche de fonction,
quelle qu’elle soit, la fonction s’affiche à l’écran pendant trois secondes
avant de disparaître.
Activation/Désactivation de la fonction Date/Time (Date/Heure)
Pour activer ou désactiver l’affichage de la date et de l’heure, allez dans le menu
correspondant et modifiez le mode <Date/Time>. ➥page 30
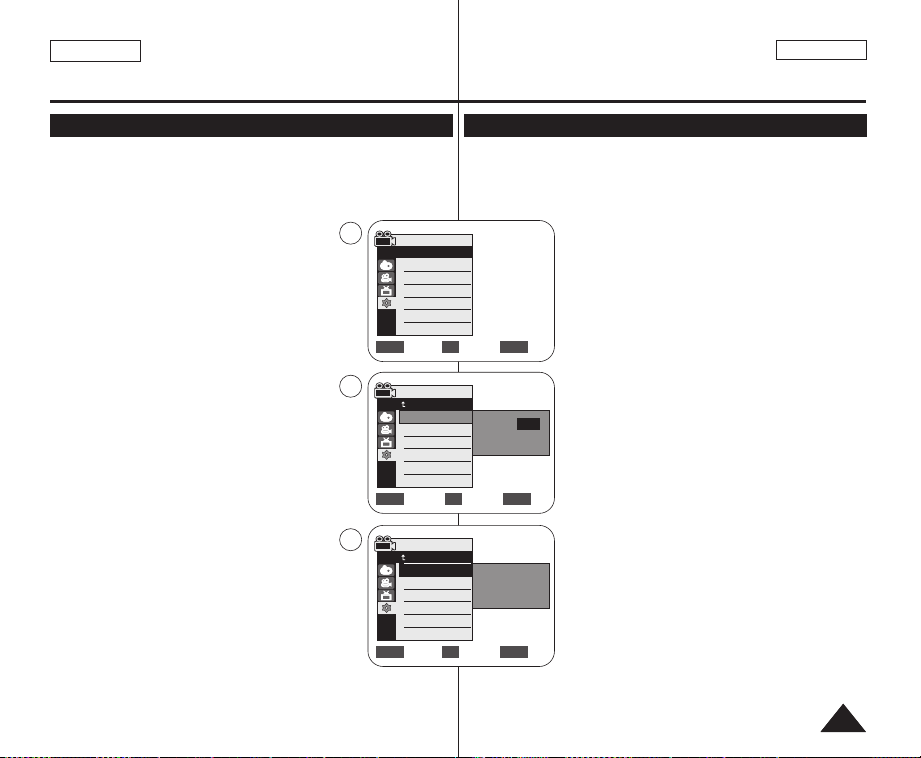
ENGLISH
Initial Setting : System Menu Setting
Réglage initial :
Réglage du menu System (Système)
FRANÇAIS
Setting the Clock (Clock Set) Réglage de l'horloge <Clock Set> (Param. Horloge)
✤ Clock setup works in <Camera>/<Player>/<M.Cam>/<M.Player>
modes. ➥page 19
✤ The Date/Time is automatically recorded onto a tape. Before
recording, please set the <Date/Time>. ➥page 30
1. Set the [Power] switch to [CAMERA] or
[PLAYER].
2. Set the [Mode] switch to [TAPE] or [MEMORY].
(SC-D363/D364/D365/D366 only)
3. Press the [MENU] button.
■
The menu list will appear.
4. Move the [Zoom] lever up or down to select
<System>, then press the [OK] button.
5. Move the [Zoom] lever up or down to select
<Clock Set>, then press the [OK] button.
■
The year will be highlight first.
6. Move the [Zoom] lever up or down to set current
<Year>, then press the [OK] button.
■
The month will be highlighted.
7. You can set the month, day, hour and minute
following the same procedure after setting the year.
8. Press the [OK] button after setting the minutes.
■
A message <Complete !> is displayed.
■
To adjust the clock, select the Year, Month,
Day, Hour or Min by pressing the [OK]
button, then move the [Zoom] lever up or down to
set respective values.
9. To exit, press the [MENU] button.
[ Notes ]
■
After the Lithium Battery loses its charge (after about
6 months), the date/time appears on the screen as
<12:00 AM JAN.1,2006>.
■
You can set the year up to 2037.
■
If the Lithium Battery is not installed, any inputted data will not be
backed up.
4
Camera Mode
√System
Clock Set
Remote
Beep Sound
Language
Demonstration
5
Camera Mode
Clock Set
Remote
Beep Sound
Language
Demonstration
8
Camera Mode
Clock Set
Remote
Beep Sound
Language
Demonstration
✤ Le réglage de l’horloge se fait en modes <Camera>/<Player>/<M.Cam>/
<M.Player>. ➥page 19
✤ L’indication <Date/Time> est automatiquement enregistrée sur la cassette.
Avant l’enregistrement, pensez à régler la date et l’heure. ➥page 30
1. Placez l’interrupteur [Power] sur [CAMERA] ou
[PLAYER].
2. Placez l’interrupteur [Mode] sur [TAPE] ou [MEMORY].
(modèles SC-D363/D364/D365/D366 uniquement).
√On
√On
√English
√On
Move Select Exit
Back
Adjust Select Exit
Back
Move Select Exit
MENUOKZOOM
JAN 1 2006
12 : 00 AM
JAN 1 2006
12 : 00 AM
Complete !
MENUOKZOOM
■
Vous pouvez régler l’horloge jusqu’à l’an 2037.
■
Si la pile au lithium n’est pas installée, aucune des données entrées ne
sera sauvegardée.
3. Appuyez sur le bouton [MENU].
■
La liste des menus apparaîtra.
4. Déplacez le bouton de [Zoom] vers le haut ou vers le
bas pour sélectionner <System> puis appuyez sur le
bouton [OK].
5. Déplacez le bouton de [Zoom] vers le haut ou vers le
bas pour sélectionner <Clock Set>, puis appuyez sur le
bouton [OK].
■
L’année s’affichera en surbrillance.
6. Déplacez le bouton de [Zoom] vers le haut ou vers le
bas pour sélectionner <Year>, puis appuyez sur le
…
bouton [OK].
†
■
Le mois s’affichera en surbrillance.
7. Vous pouvez régler le mois, le jour, l’heure et les
minutes en suivant la même procédure après le réglage
de l’année.
MENUOKZOOM
8. Appuyez sur le bouton [OK] après le réglage des
minutes.
■
Le message <Complete !> s'affiche.
■
Pour régler l’horloge, sélectionnez l'année, le mois,
le jour, l'heure ou les minutes en appuyant sur le
bouton [OK], puis déplacez le bouton de [Zoom]
vers le haut ou vers le bas pour régler les valeurs
de votre choix.
9. Pour quitter le menu, appuyez sur le bouton [MENU].
[ Remarques ]
■
Après épuisement de la pile au lithium (au bout de six
mois environ), la date et l’heure s’affichent à l’écran
sous la forme <12:00 AM JAN.1,2006>.
2323

ENGLISH
P
L
A
Y
E
R
C
A
M
E
R
A
C
A
M
E
R
A
P
L
A
Y
E
R
Initial Setting : System Menu Setting
Réglage initial :
FRANÇAIS
Réglage du menu System (Système)
Setting the Wireless Remote Control Acceptance
(Remote) (SC-D364/D366 only)
✤ The Remote function works in
<Camera>/<Player>/<M.Cam>/<M.Player> modes. ➥page 19
✤ The Remote function allows you to enable or disable the remote
control for use with the Camcorder.
1. Set the [Power] switch to [CAMERA] or [PLAYER].
2. Set the [Mode] switch to [TAPE] or [MEMORY].
3. Press the [MENU] button.
■
The menu list will appear.
4. Move the [Zoom] lever up or down to select
<System>, then press the [OK] button.
5. Move the [Zoom] lever up or down to select
<Remote>, then press the [OK] button.
6. Move the [Zoom] lever up or down to select <On>
or <Off>, then press the [OK] button.
7. To exit, press the [MENU] button.
[ Note ]
If you set the <Remote> to <Off> in the menu
and try to use it, the remote control icon ( ) will blink
for 3 seconds on the ACL Screen and then disappear.
2424
1
4
6
Camera Mode
√System
Clock Set
Remote
Beep Sound
Language
Demonstration
Move Select Exit
Camera Mode
Back
Clock Set
Remote
Beep Sound
Language
Demonstration
Move Select Exit
Activation de la reconnaissance de la télécommande par le caméscope
<Remote> (Télécommande) (modèles SC-D364/D366 uniquement)
✤ La fonction Remote (Télécommande) ne peut être utilisée que dans
les modes <Camera>/<Player>/<M.Cam>/<M.Player>. ➥page 19
✤ Elle vous permet d’activer ou de désactiver la télécommande en vue
d’une utilisation avec le caméscope.
1. Placez l’interrupteur [Power] sur [CAMERA] ou
[PLAYER].
2. Placez l’interrupteur [Mode] sur [TAPE] ou
[MEMORY].
3. Appuyez sur le bouton [MENU].
■
La liste des menus apparaîtra.
4. Déplacez le bouton de [Zoom] vers le haut ou vers
le bas pour sélectionner <System>, puis appuyez
sur le bouton [OK].
5. Déplacez le bouton de [Zoom] vers le haut ou vers
√On
√On
√English
√On
Off
On
MENUOKZOOM
MENUOKZOOM
le bas pour sélectionner <Remote>, puis appuyez
sur le bouton [OK].
6. Déplacez le bouton de [Zoom] vers le haut ou vers
le bas pour sélectionner <On> ou <Off >, puis
appuyez sur le bouton [OK].
7. Pour quitter le menu, appuyez sur le bouton
[MENU].
[ Remarque ]
Si, dans le menu, vous réglez l’option <Remote> sur
la position <Off> et essayez d’utiliser la
télécommande, l’icône représentant celle-ci sur l’écran
ACL ( ) clignote pendant trois secondes avant de
disparaître.
 Loading...