

Page 1

Contact SAMSUNG WORLD-WIDE
If you have any questions or comments relating to Samsung products, please contact the SAMSUNG
customer care centre.
Country
AUSTRIA 0800-SAMSUNG(726-7864) www.samsung.com/at
BELGIUM 0032 (0)2 201 24 18 www.samsung.com/be
CZECH REPUBLIC
DENMARK 70 70 19 70 www.samsung.com/dk
EIRE 0818 717 100 www.samsung.com/ie
ESTONIA 800-7267 www.samsung.ee
FINLAND 030-6227 515 www.samsung.com/fi
FRANCE
GERMANY 01805 - SAMSUNG(726-7864 € 0,14/Min) www.samsung.com
HUNGARY 06-80-SAMSUNG(726-7864) www.samsung.com
ITALIA 800-SAMSUNG(726-7864) www.samsung.com
KAZAKHSTAN 8-10-800-500-55-500 www.samsung.kz
KYRGYZSTAN 00-800-500-55-500 LATVIA 800-7267 www.samsung.com/lv
LITHUANIA 8-800-77777 www.samsung.lt
LUXEMBURG 0035 (0)2 261 03 710 www.samsung.com/be
NETHERLANDS 0900-SAMSUNG (726-7864 € 0,10/Min) www.samsung.com/nl
NORWAY 815-56 480 www.samsung.com/no
POLAND
PORTUGAL 80820-SAMSUNG(726-7864) www.samsung.com/pt
RUSSIA 8-800-555-55-55 www.samsung.ru
SLOVAKIA 0800-SAMSUNG(726-7864) www.samsung.com/sk
SPAIN 902 10 11 30 www.samsung.com
SWEDEN 0771-400 200 www.samsung.com/se
SWITZERLAND 0800-SAMSUNG(726-7864) www.samsung.com/ch
TURKEY 444 77 11 www.samsung.com
TADJIKISTAN 8-10-800-500-55-500 U.K 0845 SAMSUNG (7267864) www.samsung.com
UKRAINE 8-800-502-0000 www.samsung.com
UZBEKISTAN 8-10-800-500-55-500 www.samsung.uz
Customer Care Centre
844 000 844 www.samsung.com/cz
Distributor pro Českou republiku:
Samsung Zrt., česka organizační složka Vyskočilova 4, 14000 Praha 4
"3260 SAMSUNG (€ 0,15/Min)
08 25 08 65 65 (€ 0,15/Min)"
"0 801 801 881
022-607-93-33"
Web Site
www.samsung.com
www.samsung.com/pl
Plasma TV
user manual
imagine the possibilities
Thank you for purchasing this Samsung product.
To receive more complete service, please register
your product at
www.samsung.com/global/register
Model Serial No.
BN68-01528A-01
Page 2

User Instructions
Screen Image retention
Do not display a still image (such as on a video game or when hooking up a PC to this PDP) on the
plasma monitor panel for more than 2 hours as it can cause screen image retention. This image
retention is also known as “screen burn”. To avoid such image retention, reduce the degree of
brightness and contrast of the screen when displaying a still image.
Height
The PDP can normally operate only under 2000m in height. It might abnormally function at a place
over 2000m in height so do not install and operate there.
Heat on the top of the PDP TV
The top side of the product may be hot after long period of use as heat dissipates from the panel
through the vent hole in the upper part of the product. This is normal and does not indicate any defect
or operation failure of the product. However, children should be prevented from touching the upper
part of the product.
The product is making a ‘cracking’ noise.
A ‘cracking’ noise may occur when the product contracts or expands due to a change of surrounding
environment such as temperature or humidity. This is normal and not a defect of the unit.
Cell Defects
The PDP uses a panel consisting of 1,230,000(SD-level) to 3,150,000(HD-level) pixels which require
sophisticated technology to produce. However, there may be few bright or dark pixels on the screen.
These pixels will have no impact on the performance of the product.
Avoid operating the TV at temperatures below 5°C(41°F)
A still image displayed too long may cause permanent damage to the PDP Panel.
Afterimage on the Screen.
Displaying still images from Video games and PC for longer than a certain period of time may
produce partial afterimages. To prevent this effect, reduce the ‘brightness’ and ‘contrast’ when
displaying still images.
Warranty
- Warranty does not cover any damage caused by image retention.
- Burn-in is not covered by the warranty.
Installation
Be sure to contact an authorized service centre, when installing your set in a location with heavy
dust, high or low temperatures, high humidity, chemical substance and where it operates continually
such as the airport, the train station etc. Failure to do so may cause a serious damage to your set.
Watching the PDP TV in 4:3 format for a long period of time may leave traces
of borders displayed on the left, right and centre of the screen caused by the
difference of light emission on the screen. Playing a DVD or a game console
may cause similar effect to the screen. Damages caused by the above effect are
not covered by the Warranty.
Contact SAMSUNG WORLDWIDE
If you have any questions or comments relating to Samsung products, please contact the SAMSUNG
customer care centre. (See back cover for more informations.)
© 2008 Samsung Electronics Co., Ltd. All rights reserved.
English - 2
Page 3

Contents
English
General Information
User Instructions ............................................. 2
Checking Parts ................................................ 4
Using the Stand-Base ..................................... 4
Control Panel .................................................5
Connection Panel ............................................ 6
Viewing the Remote Control ...........................8
Operation
Switching Your Television On and Off .............9
Viewing the Menus .......................................... 9
Plug & Play Feature ...................................... 10
Using the TOOLS Button ..............................12
Viewing an External Signal Sources ............. 12
Editing Device Names ................................... 13
Channel Control
Storing Channels Automatically .................... 13
Storing Channels Manually ........................... 14
Adding / Locking Channels ...........................15
Sorting the Stored Channels ......................... 16
Assigning Names to Channels ...................... 16
Fine Tuning Channel Reception ....................17
Picture Control
Changing the Picture Standard ..................... 18
Customizing the Picture Settings .................. 18
Conguring Detailed Settings on the Picture
Picture Options ............................................. 20
Using the 3D Function .................................. 22
Resetting the Picture Settings to the Factory
Defaults ......................................................... 24
... 19
Function Description
Time Features ............................................... 27
Language / Melody / Light Effect /
Entertainment / Energy Saving/ PIP .............. 28
PC Display
Setting up Your PC Software
(Based on Windows XP) ............................... 29
Input Mode (PC) ............................................ 30
Setting the PC ............................................... 31
About Anynet
What is Anynet+? .......................................... 32
Connecting Anynet+ Devices ........................ 32
Setting Up Anynet+ ...................................... 33
Scanning and Switching between Anynet+
Devices ......................................................... 33
Recording ...................................................... 34
Listening through a Receiver ........................35
Check Points before Requesting Service ..... 35
+
Appendix
Teletext Feature (depending on the model) .. 36
Wall Mount Kit Specications (VESA) ........... 38
Wall- mount adjustment (Sold separately) .... 39
How to assemble the Stand-Base
(depending on the model) ............................. 40
Securing the TV to the Wall ..........................41
Troubleshooting ............................................42
Specications ................................................ 43
Sound Control
Sound Features ............................................ 25
Selecting the Sound Mode
(depending on the model) ............................. 26
Connecting Headphones (Sold separately) ..26
Symbols
Press
English - 3
☛ ➢
Important
Note
Page 4
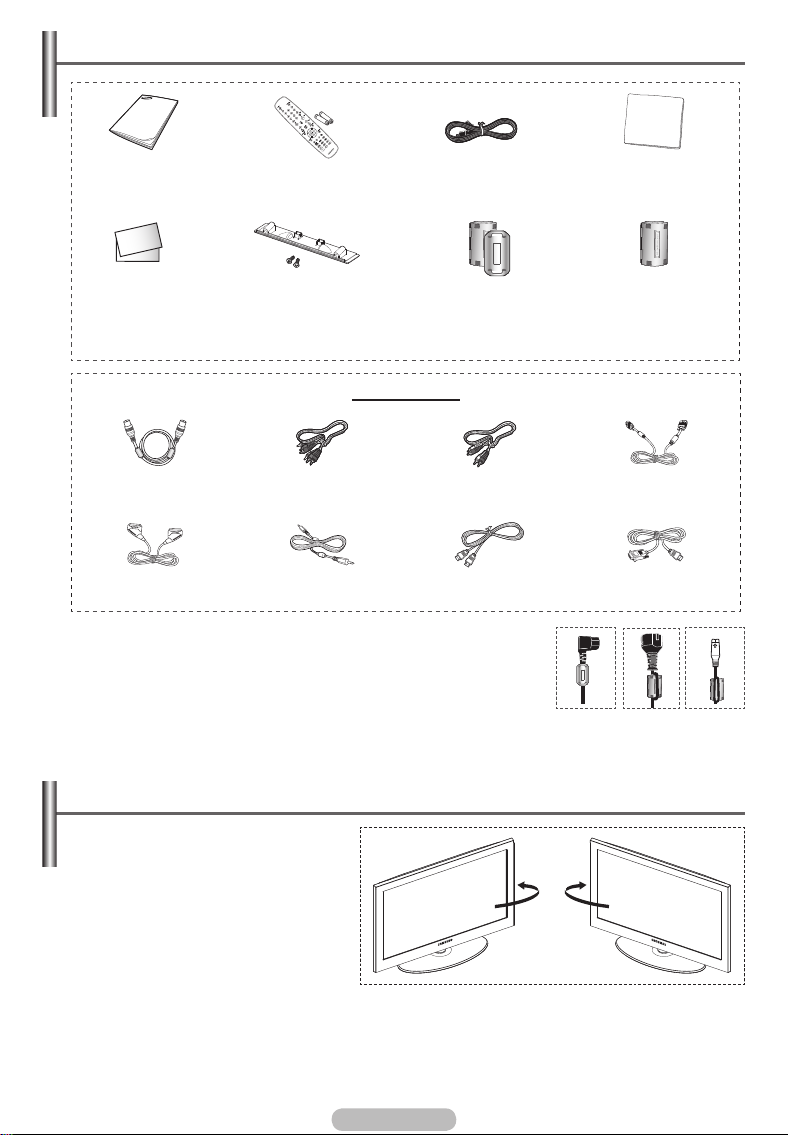
Checking Parts
Owner’s Instructions Remote Control/
Warranty Card/
Safety Guide Manual
(Not available in all
locations)
Antenna Cable Component Cables Audio Cables PC Cable
Scart Cable PC Audio Cable HDMI Cable HDMI/DVI Cable
Ferrite Core (Power Cord, S- Video)
➢
The ferrite cores are used to shield the cables from interference.
When connecting a cable, open the ferrite core and clip it around the
cable near the plug.
AAA Batteries
Cover-Bottom / Screws (2ea)
(Refer to page 40)
Sold Separately
Power Cord Cloth-Clean
Ferrite Core for Power Cord Ferrite Core for S-Video
Using the Stand-Base
Two or more people should carry
➢
the PDP. Never lay the PDP on the
floor because of possible damage
to the screen. Always keep the
PDP upright.
The PDP can rotate 20 degrees in
right and left directions.
-20° ~ 20°
English - 4
Page 5
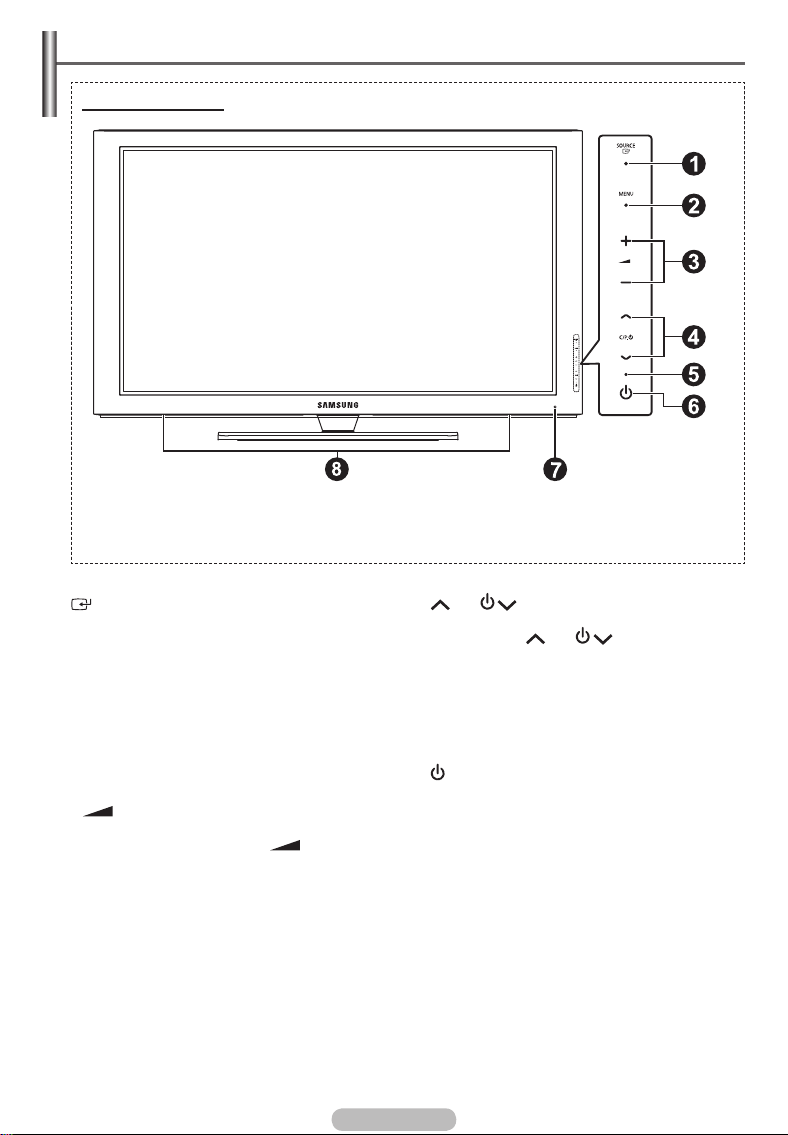
Control Panel
Front (or Side) Panel
The product colour and shape may vary depending on the model.
➢
1
SOURCE
Toggles between all the available input sources
(TV, Ext.1, Ext.2, AV, S-Video, Component,
PC, HDMI1, HDMI2, HDMI3).
In the on-screen menu, use this button as
➢
you would use the ENTER button on the
remote control.
2
MENU
Press to see an on-screen menu of your TV’s
features.
3
– +
Press to increase or decrease the volume. In
the on-screen menu, use the – + buttons
as you would use the ◄ and ► buttons on the
remote control.
4
C/P.
Press to change channels. In the on-screen
menu, use the C/P. buttons as you
would use the ▲ and ▼ buttons on the remote
control.
5
Power Indicator
Blinks and turns off when the power is on and
lights up in stand-by mode.
6
POWER
Press to turn the TV on and off.
7
Remote Control Sensor
Aim the remote control towards this spot on the
TV.
8
Speakers
English - 5
Page 6
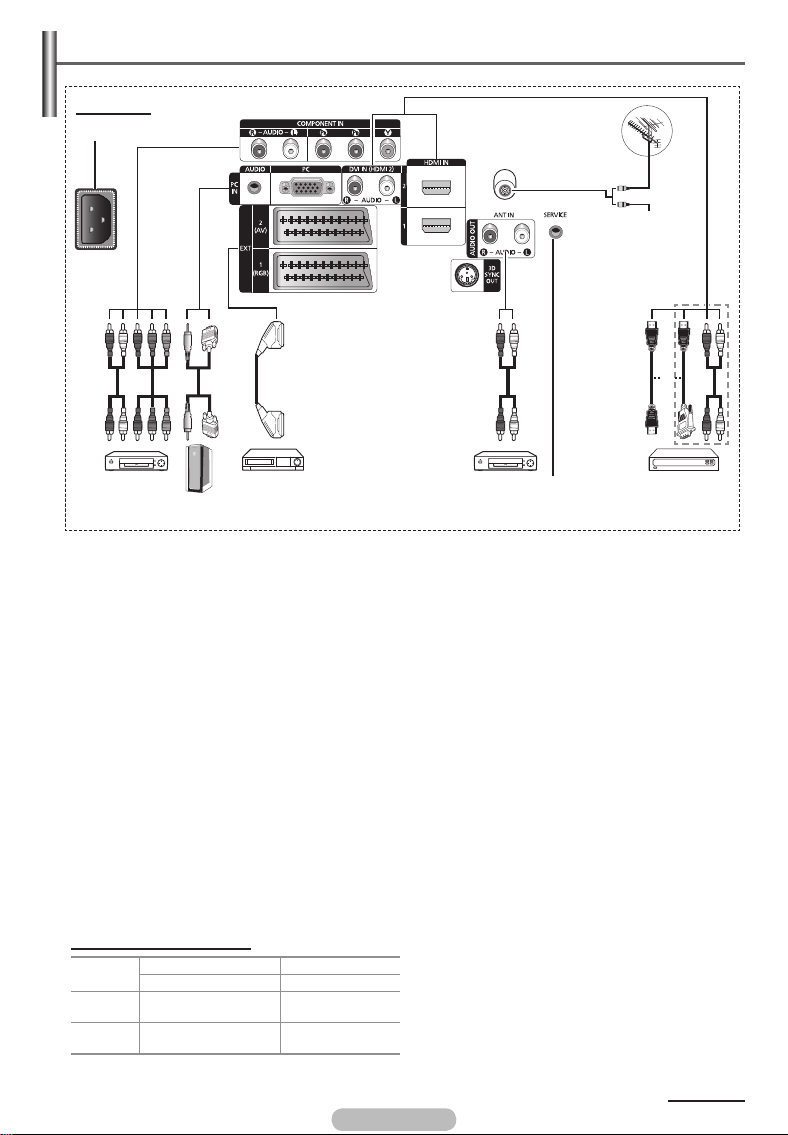
Connection Panel
Rear Panel
1
5
9
or
Cable Television
Network
or
432 6 8
The product colour and shape may vary depending on the model.
➢
Whenever you connect an audio or video system to your set, ensure that all elements are
☛
switched off.
When connecting an external device, match the colour of the connection terminal to the cable.
1
POWER IN
Connect the supplied power cord.
2
COMPONENT IN
Audio (AUDIO L/R) and video (Y/P
for Component.
3
PC IN / AUDIO
Connect to the video and audio output jack on
your PC.
4
EXT 1, EXT 2
Inputs or outputs for external devices, such as
VCR, DVD, video game device or video disc
players.
Input/Output Specification
Connector
EXT 1
EXT 2
Input Output
Video Audio(L/R) RGB
✔ ✔ ✔
✔ ✔
B/PR) inputs
Video + Audio(L/R)
Only TV output is
available.
Output you can
choose.
5
3D SYNC OUT
Connect to 3D IR Emitter.
6
Connecting external Audio Devices
Connect RCA audio signals from the TV to an
external source, such as Audio equipment.
7
SERVICE
− Connector for service.
− Connect the serial jack between the
electro-motion wall mount bracket and your
TV when you want to adjust the TV viewing
angle using your remote control.
7
English - 6
Continued...
Page 7
8
HDMI IN 1,2
− No additional Audio connection is needed
for an HDMI to HDMI connection.
- When using an HDMI/DVI cable connection,
you must use the HDMI IN 2 jack.
What is HDMI?
➢
- “High Definition Multimedia interface”
allows the ansmission of high definition
digital video data and multiple channels
of digital audio.
- The HDMI/DVI terminal supports DVI
connection to an extended device with
the appropriate cable (not supplied).
The difference between HDMI and DVI
is that the HDMI device is smaller in
size, has the HDCP (High Bandwidth
Digital Copy Protection) coding feature
installed, and supports multi - channel
digital audio.
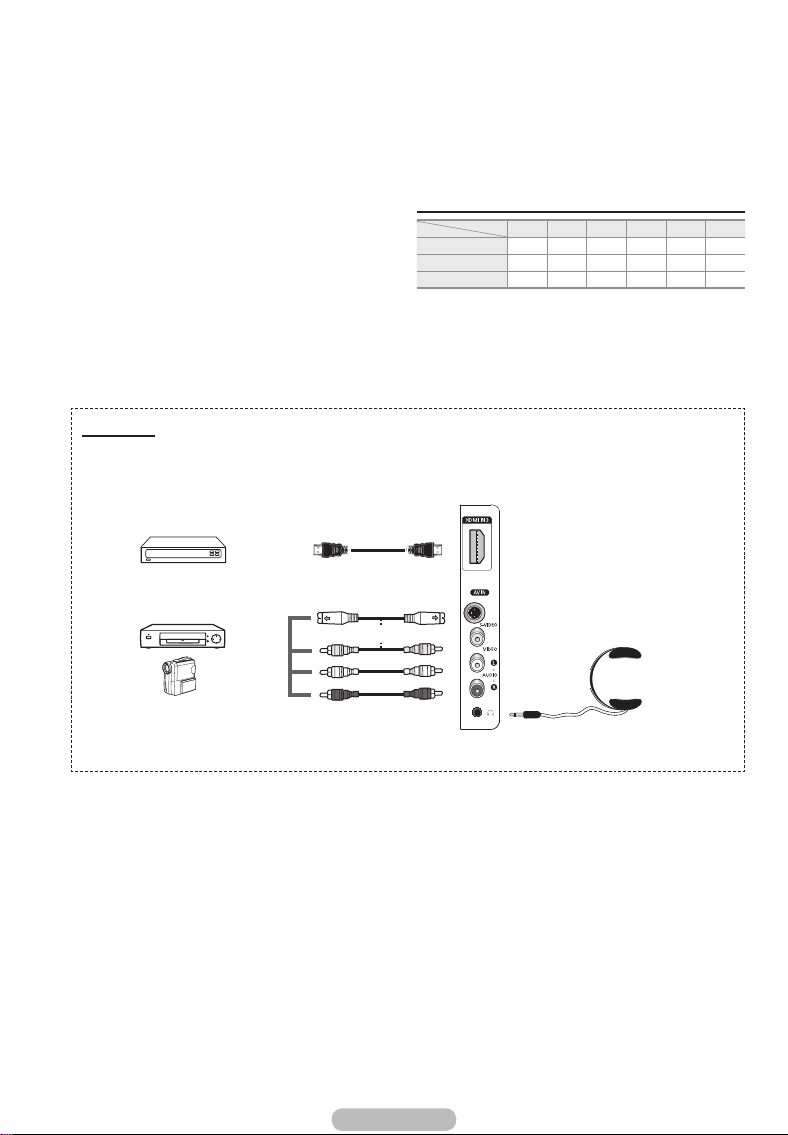
Side Panel
1
2
DVI IN (HDMI 2) AUDIO R/L
DVI audio outputs for external devices.
9
ANT IN
75Ω Coaxial connector for Aerial/Cable
Network.
Supported modes for HDMI/DVI and Component
HDMI/DVI 50Hz X X X O O O
HDMI/DVI 60Hz X O X X O O
Component O O O O O O
or
480i 480p 576i 576p 720p 1080i
The product colour and shape may vary depending on the model.
➢
1
HDMI IN 3
Connect to the HDMI jack of a device with
HDMI output.
2
S-VIDEO or VIDEO / AUDIO L/R
Video (S-Video or Video) and audio inputs for
external devices, such as a camcorder or VCR.
English - 7
Headphones jack
3
You can connect a set of headphones if you
wish to watch a television programme without
disturbing the other people in the room.
Prolonged use of headphones at a high
➢
volume may damage your hearing.
3
Page 8
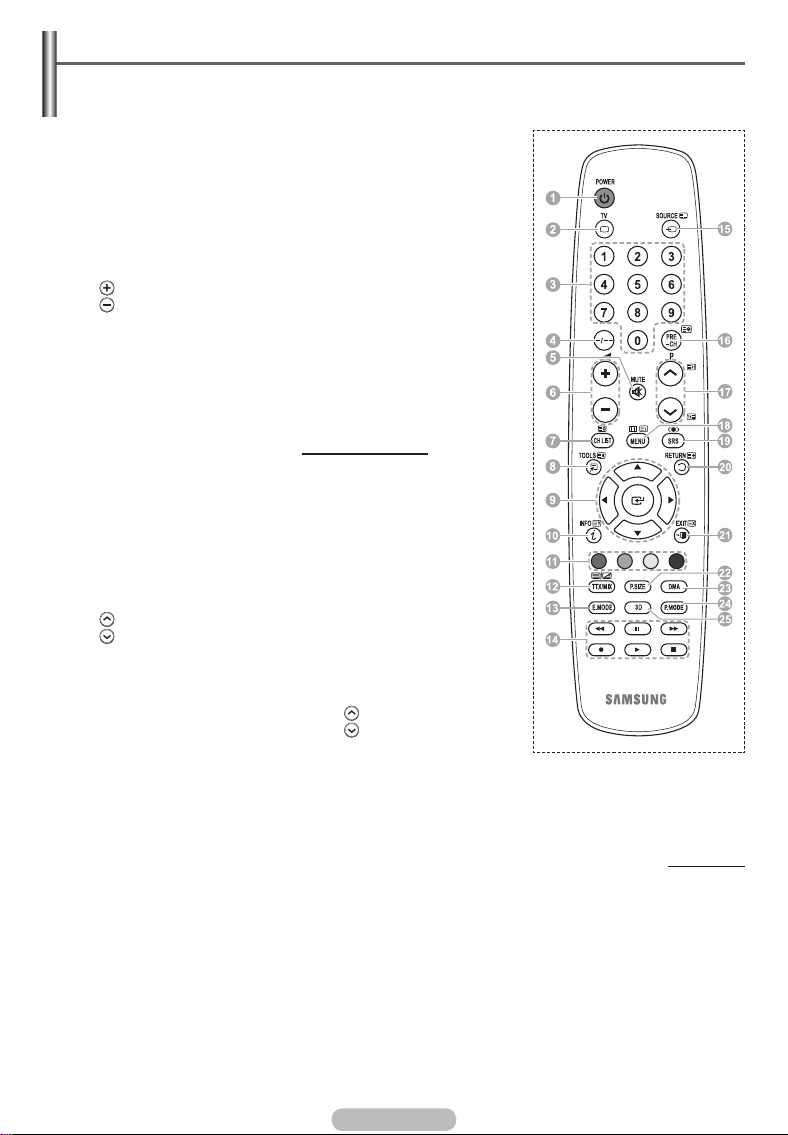
Viewing the Remote Control
1
POWER button
(turns the TV on and off)
2
Selects the TV mode directly
3
Number buttons for direct
channel access
4
One/Two-digit channel
selection
5
Temporary sound switch-off
6
Volume increase
Volume decrease
7
Channel control button
(Refer to page 15)
8
Use to quickly select
frequently used functions.
9
Control the cursor in the
menu
0
Use to see information on
the current broadcast
#
Press to select the optional
display and sound modes for
sports, cinema and games.
$
VCR/DVD Function (Rewind,
Stop, Play/Pause, Fast/
Forward)
%
Available source selection
^
Previous channel
&
Next channel
Previous channel
*
Displays the main on-screen
menu
(
TruSurround XT mode button
)
Returns to the previous
menu
a
Exit the on-screen menu
b
Picture size selection
c
Use this when connecting
a SAMSUNG DMA (Digital
Media Adapter) device
through an HDMI interface
and switching to DMA mode.
(The DMA button is optional.)
For more information on the
operating procedures, refer
to the user manual of the
DMA. This button is available
when “Anynet+(HDMI-CEC)"
is “On” (see page 33)
d
Picture effect selection.
(Refer to page 18)
e
Use to watch 3D movies or
games dimensionally with 3D
glasses.
Teletext Functions
(Refer to page 36)
2
Exit from the teletext display
(depending on the model)
7
Teletext store
8
Teletext size
0
Teletext reveal
!
Fastext topic selection
@
Teletext display/mix both
teletext information and the
normal broadcast
%
Teletext mode selection
(LIST/FLOF)
^
Teletext sub page
&
P :Teletext next page
P :Teletext previous page
*
Teletext index
)
Teletext hold
a
Teletext cancel
English - 8
Continued...
Page 9

Installing Batteries in the Remote Control
1 Lift the cover at the back of the remote control upward as
shown in the figure.
2 Install two AAA size batteries.
Make sure to match the “+” and “–” ends of the
➢
batteries with the diagram inside the compartment.
Do not mix battery types, i.e. alkaline and
manganese.
3 Close the cover as shown in the figure.
Remove the batteries and store them in a cool and dry
➢
place if you won’t be using the remote control for a long time. The remote control can be used up
to about 23 feet from the TV. (Assuming typical TV usage, the batteries last for about one year.)
If the remote control doesn’t work! Check the following:
➢
1. Is the TV power on?
2. Are the plus and minus ends of the batteries reversed?
3. Are the batteries drained?
4. Is there a power cut, or is the power cord unplugged?
5. Is there a special fluorescent light or a neon sign nearby?
Switching Your Television On and Off
The main lead is attached to the rear of the television.
1 Plug the main lead into an appropriate socket.
The main voltage is indicated on the rear of the television and the frequency is 50 or 60Hz.
➢
2 Press the (Power) button (On/Off) on the front of the television or press the POWER button on the
remote control to switch the television on. The programme that you were watching last is re-selected
automatically. If you have not yet stored any channels, no clear picture appears. Refer to “Storing
Channels Automatically” on page 13 or “Storing Channels Manually” on page 14.
If the television is initially powered on, several basic customer settings proceed automatically.
➢
Refer to “Plug & Play Feature” on page 10.
3 To switch the television off, press the (Power) button (On/Off) on the front of the television or press
the POWER button on the remote control.
4 To switch the TV on, press the (Power) button (On/Off) on the front of the TV or press the POWER
button or number buttons on the remote control.
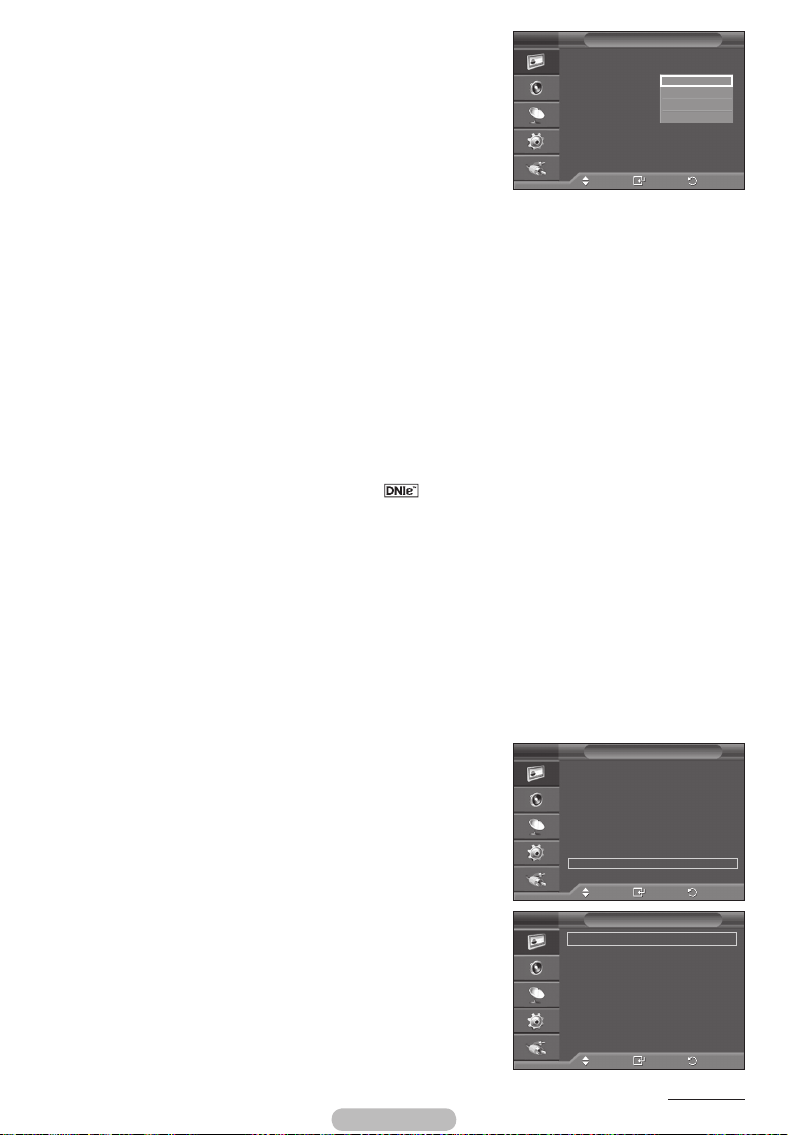
Viewing the Menus
1 Press the MENU button.
The main menu is displayed on the screen.
Its left side has six icons: Picture, Sound, Channel, Setup,
Input.
2 Press the ▲ or ▼ button to select one of the icons.
Press the ENTER button to access the icon’s sub-menu.
3 Press the ▲ or ▼ button to move to items in the menu.
Press the ENTER button to enter items in the menu.
4 Press the ▲/▼/◄/► button to change the selected items.
Press the RETURN button to return to the previous menu.
5 Press the EXIT button to exit from the menu.
English - 9
T V
Mode : Standard
Cell Light 7
Contrast 95
Brightness 45
Sharpness 50
Colour 50
Tint G50 R50
Detailed Settings
Picture Options
Reset : OK
Move
Picture
Enter
Exit
Page 10
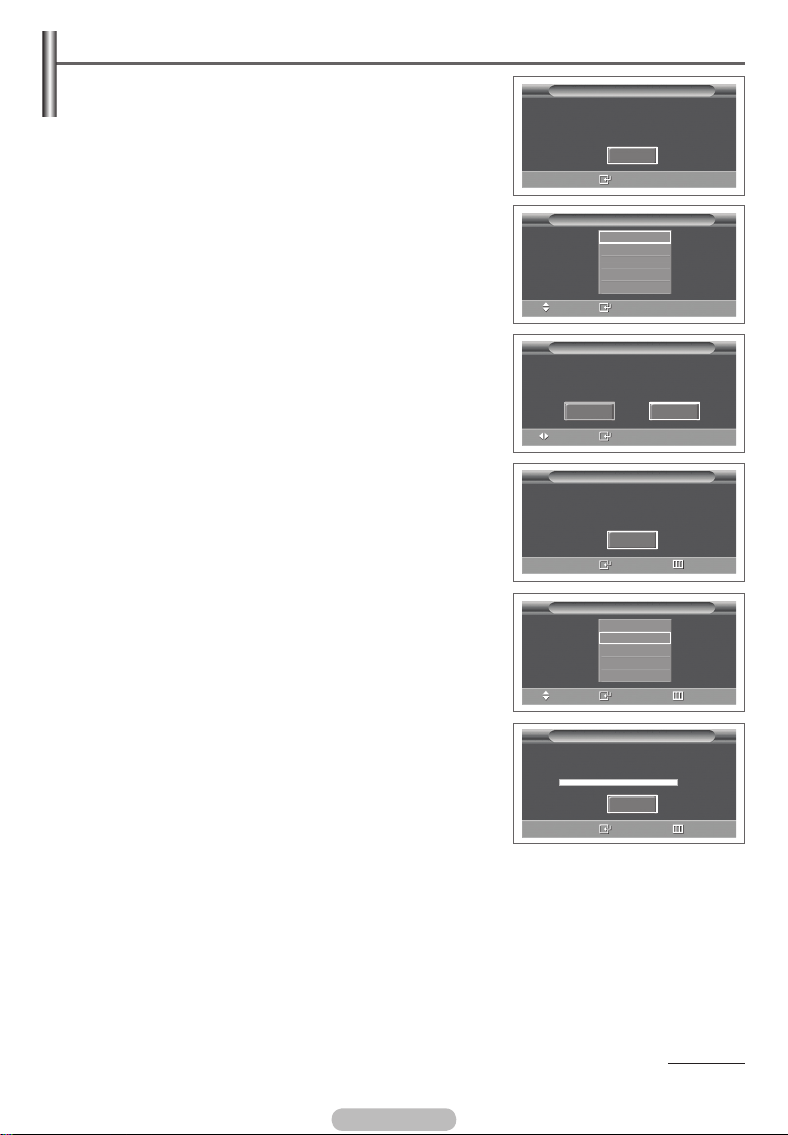
Plug & Play Feature
When the television is initially powered on, several basic
customer settings proceed automatically and subsequently.
The following settings are available.
If you accidentally select the wrong country for your TV, the
☛
characters on the screen may be wrongly displayed.
1 If the television is in standby mode, press the POWER button
on the remote control. The message Start Plug & Play is
displayed. Press the ENTER button.
2 The Language menu will automatically appear after several
seconds.
3 Select the appropriate language by pressing the ▲ or ▼
button.
Press the ENTER button. The message Select ‘Home Use’
when installing this TV in your home. is displayed.
4 Press the ◄ or ► button to select Store Demo or Home Use,
then press the ENTER button. The message to check the
connected status of the antenna is displayed.
The default selection is Home Use.
➢
We recommend setting the TV to Home Use mode for the
➢
best picture in your home environment.
Store Demo mode is only intended for use in retail
➢
environments.
If the unit is accidentally set to Store Demo mode and you
➢
want to return to Home Use (Standard): Press the Volume
button. When the volume OSD is displayed, press and
hold the MENU button for 5 seconds.
5 Make sure that the antenna is connected to the TV.
Press the ENTER button. The Country menu is displayed.
6 Select your country or area by pressing the ▲ or ▼ button.
Press the ENTER button.
Plug & Play
Start Plug & Play.
OK
Language
Move
Select ‘Home Use’
when installing this TV in your home.
Move
Country
Move
Enter
Plug & Play
English
Deutsch
Français
Italiano
▼
Enter
Plug & Play
Store Demo Home Use
Enter
Plug & Play
Check antenna input.
OK
Enter
Plug & Play
▲
United Kingdom
Austria
Eastern Europe
Others
Enter
Skip
Skip
English - 10
Plug & Play
P 1 C -- 40 MHz
0 %
Start
Enter
Continued...
Skip
Page 11
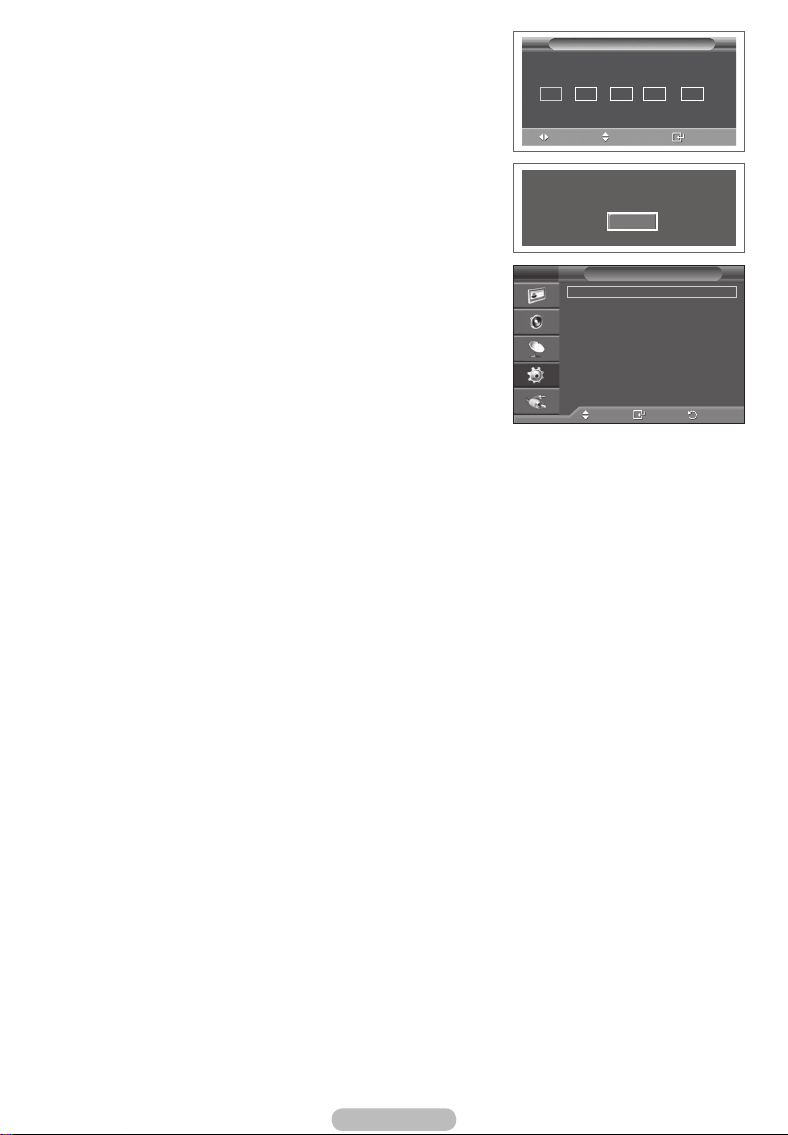
7 Press the ENTER button to start search the channels.
The channel search will start and end automatically. After
all the available channels are stored, Clock Set menu is
automatically displayed. Press the ENTER button.
8 Press the ◄ or ► button to select Month, Day, Year, Hour,
or Minute. Set these by pressing the ▲ or ▼ button.
You can set the Month, Day, Year, Hour, or Minute
➢
directly by pressing the numeric buttons on the remote
control.
9 Press the ENTER button to confirm your setting. The
message Enjoy your viewing is displayed. When you have
finished, press the ENTER button.
Even if the ENTER button is not pressed, the message
➢
will automatically disappear after several seconds.
If you want to reset this feature …
Press the MENU button to display the menu.
1
2 Press the ▲ or ▼ button to select Setup, then press the
ENTER button.
3 Press the ENTER button again to select Plug & Play.
The message Start Plug & Play is displayed.
Clock Set
Month Day Year Hour
01 01 2008 00 00
T V
Plug & Play
Move
Adjust
Plug & Play
Language : English
Time
Light Effect
Wall-Mount Adjustment
Melody : Off
Entertainment
Energy Saving :
PIP
Enjoy your viewing
OK
Setup
: In Watching TV
:
Off
Off
Move
Enter
Minute
Enter
Return
English - 11
Page 12
Using the TOOLS Button
You can use the TOOLS button to select your frequently used functions quickly and easily. The
“Tools” menu changes depending on which external input mode you are viewing.
1 Press the TOOLS button.
The Tools menu will appear.
2 Press the ▲ or ▼ button to select a menu, then press the
ENTER button.
3 Press the ▲/▼/◄/►/ENTER buttons to display, change, or use
the selected items.
For a more detailed description of each function, refer to the
Anynet+ (HDMI-CEC)
PictureMode ◄ Standard►
Sound Mode : Custom
Sleep Timer : Off
SRS TS XT : Off
Energy Saving : Off
Dual I-II : Mono
◄►
Tools
Adjust
corresponding page.
• Anynet+(HDMI-CEC), see page 32
• Picture Mode, see page 18
• Sound Mode, see page 25
• Sleep Timer, see page 27
• SRS TS XT, see page 25
• Energy Saving, see page 29
• Dual I-II, see page 26
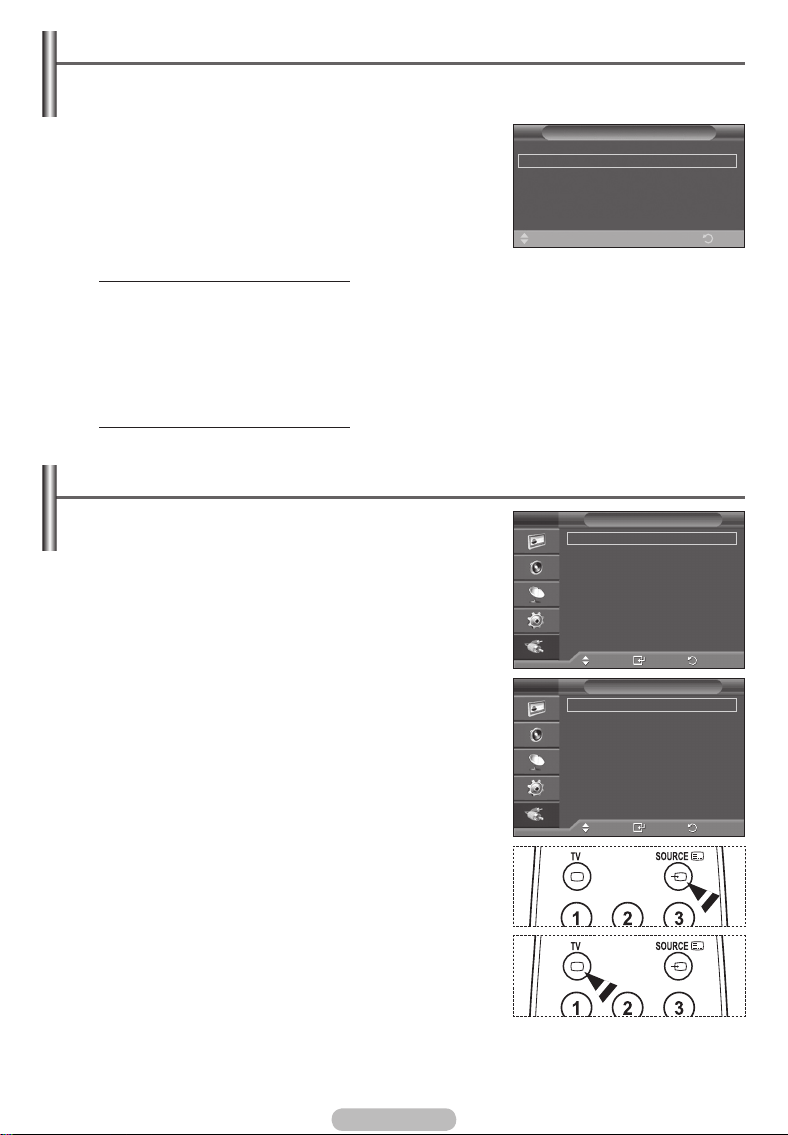
Viewing External Signal Sources
ExitMove
You can switch between viewing signals from connected
equipment, such as a VCR, DVD, Set-Top Box, and the TV
source (broadcast or cable).
1 Press the MENU button to display the menu.
2 Press the ▲ or ▼ button to select Input, then press the
ENTER button.
3 Press the ENTER button again to select Source List.
4 Press the ▲ or ▼ button to select the signal source, then
press the ENTER button.
Available signal sources:
TV, Ext.1, Ext.2, AV, S-Video,
Component, PC, HDMI1, HDMI2, HDMI3
You can choose only those external devices that are connected
➢
to the TV.
You can select these options simply by pressing the SOURCE
➢
button on the remote control.
To watch television programme again, press the TV button and
➢
select the channel number required.
T V
Source List :
Edit Name
Anynet+ (HDMI-CEC)
Move
T V
Source List
TV
Ext.1 :−−−−
Ext.2 :−−−−
AV :−−−−
S-Video :−−−−
Component :−−−−
PC :−−−−
HDMI1 : −−−−
HDMI2 : −−−−
HDMI3 : −−−−
Move
Input
TV
Enter
Enter
Return
Return
English - 12
Page 13
Editing Device Names
You can give a name to the external source.
T V
1 Press the MENU button to display the menu.
2 Press the ▲ or ▼ button to select Input, then press the
ENTER button.
3 Press the ▲ or ▼ button to select Edit Name, then press the
ENTER button.
4 Press the ▲ or ▼ button to select the external source to be
edited, then press the ENTER button.
5 Select the required device by pressing ▲ or ▼, then press the
T V
ENTER button.
Available device names:
VCR, DVD, Cable STB, Satellite
STB, PVR STB, AV Receiver, Game, Camcorder, PC, TV,
IPTV, Blu-Ray, HD DVD, DMA.
6 Press the EXIT button to exit.
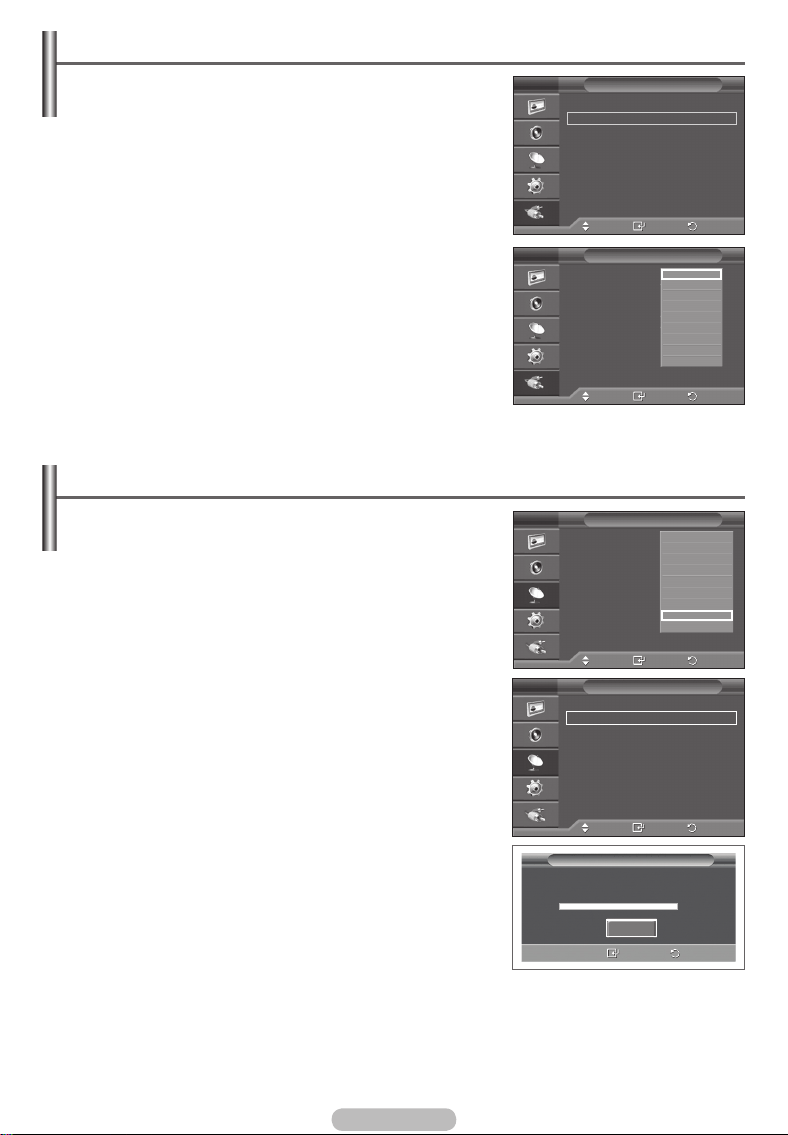
Storing Channels Automatically
You can scan for the frequency ranges available to you
(availability depends on your country).
Automatically allocated programme numbers may not
correspond to actual or desired programme numbers.
However you can sort numbers manually and clear any
channels you do not wish to watch.
1 Press the MENU button to display the menu.
2 Press the ▲ or ▼ button to select Channel, then press the
ENTER button.
3 Press the ENTER button again. The available countries are
listed.
4 Select your country by pressing the ▲ or ▼ button, then press
the ENTER button.
5 Press the ▲ or ▼ button to select Auto Store, then press the
ENTER button.
6 Press the ENTER button again to start the search.
The search will end automatically.
To stop the search before it has finished, press the MENU
➢
or the ENTER button.
T V
T V
Input
Edit Name
Channel
Channel
Auto Store
Start
Enter
TV
Enter
---VCR
DVD
Cable STB
Satellite STB
PVR STB
AV Receiver
Game
▼
Enter
Belgium
United Kingdom
France
Germany
Italy
Netherlands
Spain
Switzerland
United Kingdom
▼
Enter
United Kingdom
Enter
Return
Return
Return
Return
Return
Source List :
Edit Name
Anynet+ (HDMI-CEC)
Move
Ext.1 :−−−−
Ext.2 : −−−−
AV :
S-Video :
Component : −−−−
PC : −−−−
HDMI1 :
HDMI2 :
HDMI3 :
Move
Country :
Auto Store
Manual Store
Channel Manager
Sort
Name
Fine Tune
Move
Country :
Auto Store
Manual Store
Channel Manager
Sort
Name
Fine Tune
Move
P 1 C -- 40 MHz
0 %
English - 13
Page 14
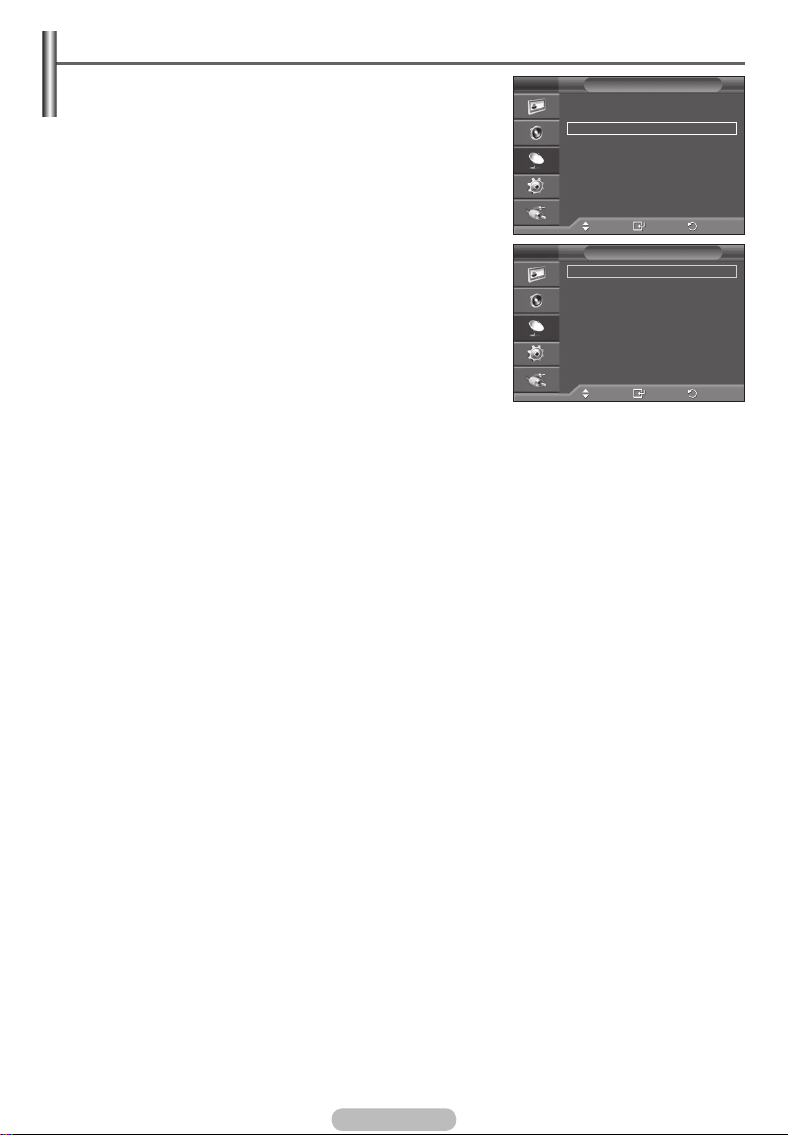
Storing Channels Manually
You can store television channels, including those received
via cable networks.
When storing channels manually, you can choose:
Whether or not to store each of the channels found.
The programme number of each stored channel which you
wish to identify.
T V
Country :
Auto Store
Manual Store
Channel Manager
Sort
Name
Fine Tune
Channel
1 Press the MENU button to display the menu.
Move
2 Press the ▲ or ▼ button to select Channel, then press the
ENTER button.
T V
3 Press the ▲ or ▼ button to select Manual Store, then press
the ENTER button.
4 Select the required option by pressing the ▲ or ▼ button, then
press the ENTER button.
Programme :
Colour System : Auto
Sound System : BG
Channel : C 6
Search : 175 MHz
Store : ?
Enter
Manual Store
P 1
5 When you are satisfied with your setting, press the ENTER
button.
Move
6 Press the EXIT button to exit.
Enter
Programme (Programme number to be assigned to a channel)
− Press the ▲ or ▼ button until you find the correct number.
You can also select the channel number directly by pressing the numeric buttons (0~9).
➢
Colour System: Auto/PAL/SECAM/NTSC4.43
− Press the ▲ or ▼ button to select the required colour standard.
Sound System: BG/DK/I/L
− Press the ▲ or ▼ button to select the required sound standard.
Channel (When you know the number of the channel to be stored)
− Press the ▲ or ▼ button to select
C (Air channel) or S (Cable channel).
− Press the ► button, then press the ▲ or ▼ button to select the required number.
You can also select the channel number directly by pressing the numeric buttons (0~9).
➢
If there is abnormal sound or no sound, re-select the sound standard required.
➢
Search (When you do not know the channel numbers)
− Press the ▲ or ▼ button to start the search.
− The tuner scans the frequency range until the first channel or the channel that you selected is
received on the screen.
Store (When you store the channel and associated programme number)
− Set to
OK by pressing the ENTER button.
Channel mode
☛
P (Programme mode): When completing tuning, the broadcasting stations in your area have
been assigned to position numbers from P00 to P99. You can select a channel by entering the
position number in this mode.
C (Air channel mode): You can select a channel by entering the assigned number to each air
broadcasting station in this mode.
S (Cable channel mode): You can select a channel by entering the assigned number for each
cable channel in this mode.
United Kingdom
Return
Return
English - 14
Page 15
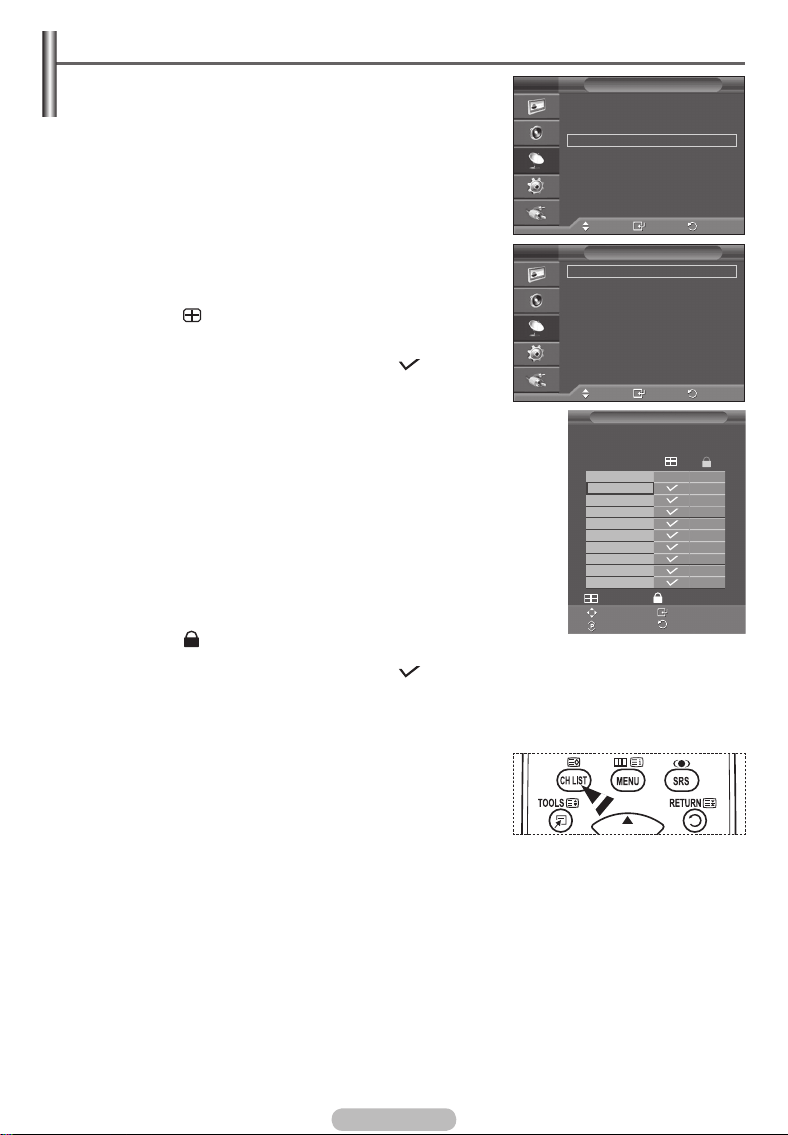
Adding / Locking Channels
Using the Channel Manager, you can conveniently lock or add
channels.
1 Press the MENU button to display the menu.
2 Press the ▲ or ▼ button to select Channel, then press the
ENTER button.
T V
Country :
Auto Store
Manual Store
Channel Manager
Sort
Name
Fine Tune
Channel
3 Press the ▲ or ▼ button to select Channel Manager, then
press the ENTER button.
Adding channels
Using the Channel List, you can add channels.
4 Select Channel List by pressing the ENTER button.
T V
Move
Channel Manager
Channel List
Child Lock : Off
5 Move to the ( ) field by pressing the ▲/▼/◄/► buttons,
select a channel to be added, and press the ENTER button to
add the channel.
If you press the ENTER button again, the ( ) symbol
➢
next to the channel disappears and the channel is not
added.
Locking channels
This feature allows you to prevent unauthorized users, such as
children, from watching unsuitable programmes by muting out
video and audio.
6 Press the ▲ or ▼ button to select Child Lock, then press the
ENTER button.
7 Select On by pressing the ▲ or ▼ button, then press the
ENTER button.
8 Press the ▲ or ▼ button to select Channel List, then press
the ENTER button.
9 Move to the ( ) field by pressing the ▲/▼/◄/► buttons,
Move
P 1 C 6
Prog.
0
C 1
1 C 6
2 C 5
3 C 8
4 C 11
5 C 22
6 C 26
7 C 36
8 C 52
9 C 24
Add Lock
Move Enter
Page Return
Channel List
select a channel to be locked, and press the ENTER button.
If you press the ENTER button again, the ( ) symbol next to the channel disappears and the
➢
channel lock is canceled.
A blue screen is displayed when Child Lock is activated.
➢
10 Press the EXIT button to exit.
You can select these options simply by pressing the CH LIST
➢
button on the remote control.
United Kingdom
Enter
Enter
Return
Return
1 / 10
▲
▼
English - 15
Page 16
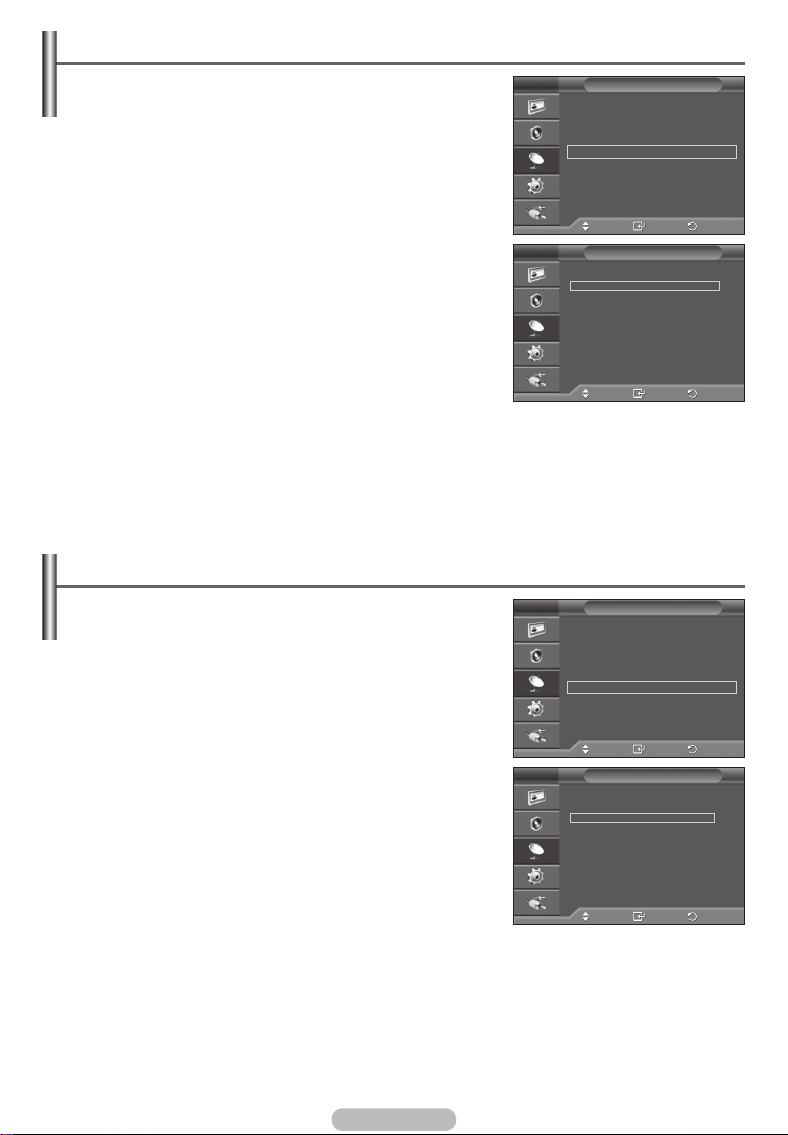
Sorting the Stored Channels
This operation allows you to change the programme numbers
of the stored channels.
T V
This operation may be necessary after using the auto store.
1 Press the MENU button to display the menu.
2 Press the ▲ or ▼ button to select Channel, then press the
ENTER button.
3 Press the ▲ or ▼ button to select Sort, then press the ENTER
button.
4 Select the channel that you wish to move by pressing the ▲ or
T V
▼ button, then press the ENTER button.
5 Select the number of the programme to which the channel is to
be moved by pressing the ▲ or ▼ button.
Press the ENTER button. The channel is moved to its new
position and all other channels are shifted accordingly.
6 Repeat steps 4 to 5 until you have moved all the channels to
the required programme numbers.
7 Press the EXIT button to exit.
Assigning Names to Channels
Channel names will be assigned automatically when channel
information is broadcast. These names can be changed,
allowing you to assign new names.
1 Press the MENU button to display the menu.
2 Press the ▲ or ▼ button to select Channel, then press the
ENTER button.
3 Press the ▲ or ▼ button to select Name, then press the
ENTER button.
4 Press the ▲ or ▼ button to select the channel to be assigned
to a new name, then press the ENTER button.
5 Press the ▲ or ▼ button to select a letter, a number, or a
symbol (Results in this sequence: A~Z, 0~9, +, -, *, /, blank).
Move on to the previous or next letter by pressing the ◄ or ►
button, then press the ENTER button.
6 Repeat steps 4 to 5 for each channel to be assigned to a new
name.
7 Press the EXIT button to exit.
T V
T V
Channel
United Kingdom
Enter
Sort
Enter
Channel
United Kingdom
Enter
Name
Enter
Return
Return
Return
Return
Country :
Auto Store
Manual Store
Channel Manager
Sort
Name
Fine Tune
Move
Prog. Ch. Name
▲
0 C-- −−−−−
1 C04 −−−−−
2 C05 −−−−−
3 C08 −−−−−
4 C09 −−−−−
5 C11 −−−−−
6 C13 −−−−−
7 C15 −−−−−
8 C17 −−−−−
9 C18 −−−−−
▼
Move
Country :
Auto Store
Manual Store
Channel Manager
Sort
Name
Fine Tune
Move
Prog. Ch. Name
▲
0 C-- −−−−−
1 C04 −−−−−
2 C05 −−−−−
3 C08 −−−−−
4 C09 −−−−−
5 C11 −−−−−
6 C13 −−−−−
7 C15 −−−−−
8 C17 −−−−−
9 C18 −−−−−
▼
Move
English - 16
Page 17
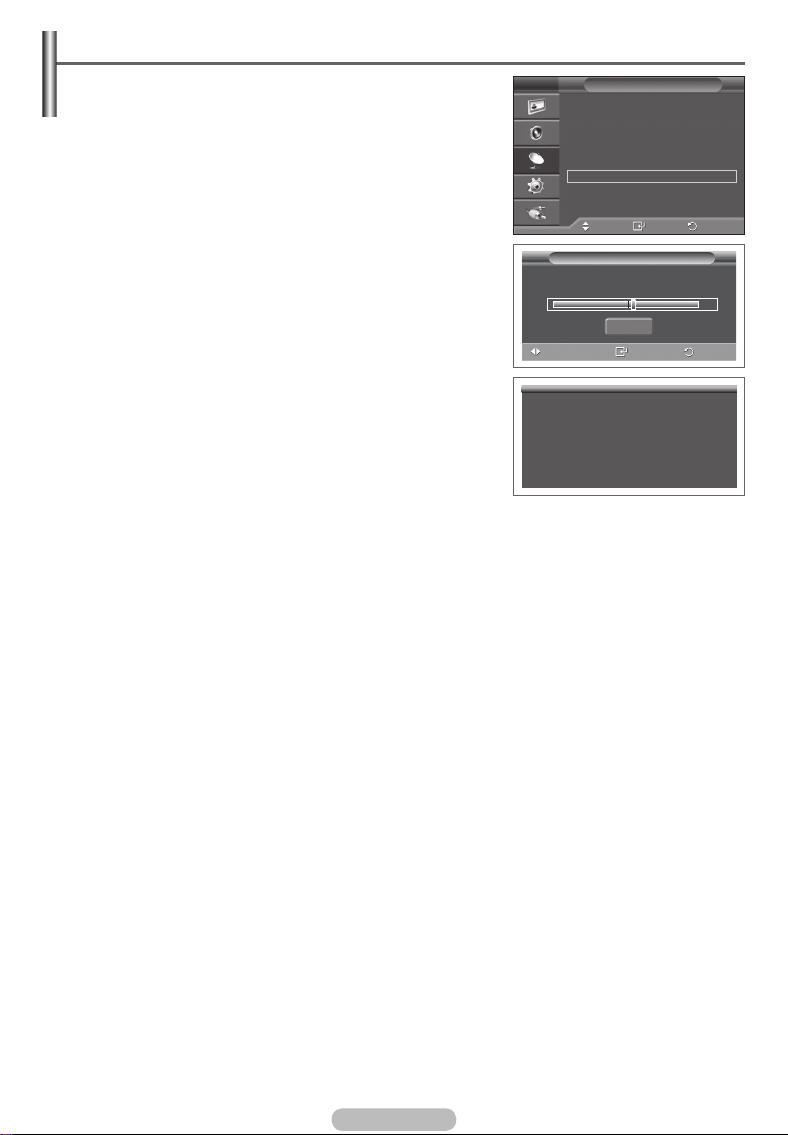
Fine Tuning Channel Reception
If the reception is clear, you do not have to fine tune the
channel, as this is done automatically during the search and
T V
store operation.
If the signal is weak or distorted, you may have to fine tune the
channel manually.
1 Press the MENU button to display the menu.
2 Press the ▲ or ▼ button to select Channel, then press the
ENTER button.
3 Press the ▲ or ▼ button to select Fine Tune, then press the
ENTER button.
4 To obtain a sharp, and clear picture and good sound quality,
press the ◄ or ► button until you reach the optimal setting.
Press the ENTER button.
Press the INFO button. Fine Tune Store will change the
➢
colour of the Channel OSD (On Screen Display) from
White to Red and add the “*” mark.
To reset the fine tuning to 0, select Reset by pressing the
➢
▲ or ▼ button. Press the ENTER button.
5 Press the EXIT button to exit.
P 1 *
Mono
Picture : Standard
Sound : Custom
SRS TS XT : Off
−−
Move
Channel
Fine Tune
Reset
Save
Enter
Country :
Auto Store
Manual Store
Channel Manager
Sort
Name
Fine Tune
P 1
Adjust
:
−−
United Kingdom
Return
+ 3
Return
English - 17
Page 18
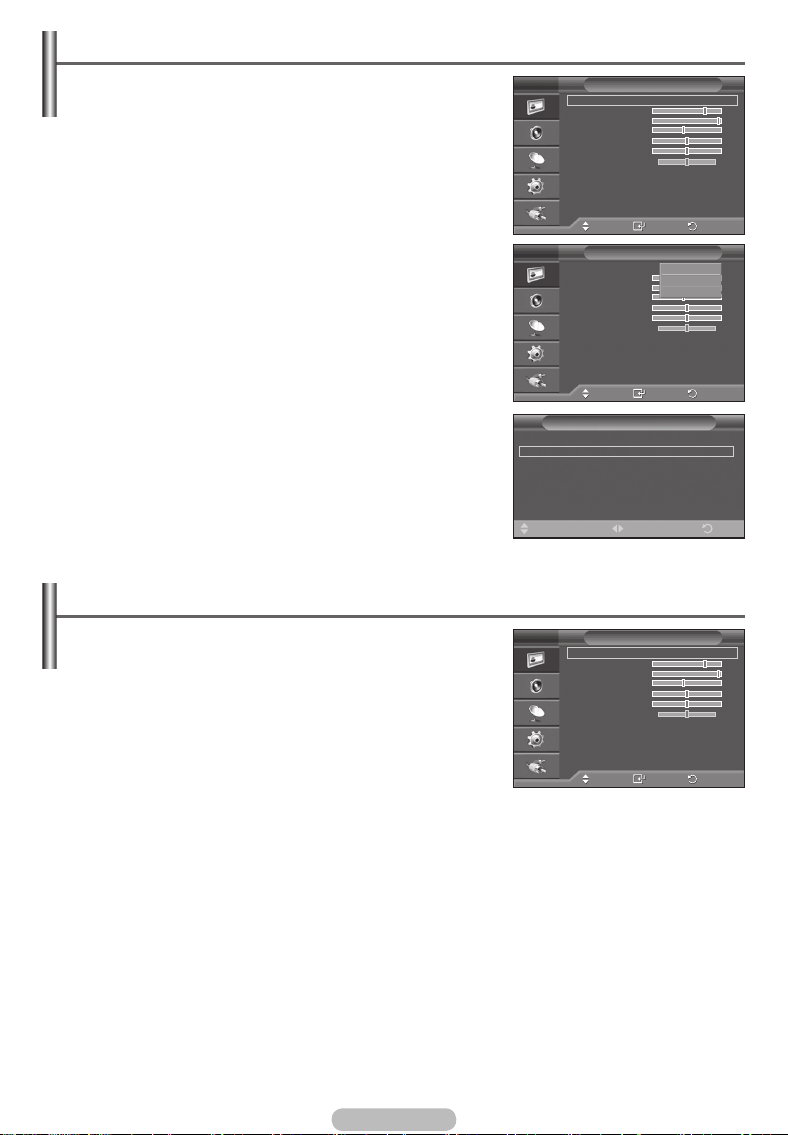
Changing the Picture Standard
You can select the type of picture which best corresponds to
your viewing requirements.
1 Press
2 Press
3 Press
the MENU button to display the menu.
the ENTER button to select Picture.
the ENTER button again to select Mode.
T V
Mode : Standard
Cell Light
Contrast 95
Brightness 45
Sharpness 50
Colour 50
Tint G50 R50
Detailed Settings
Picture Options
Reset : OK
4 Select the required mode by pressing the ▲ or ▼ button, then
press
Available modes: Dynamic, Standard, Movie
the
The settings values may vary depending on the input
➢
source.
5 Press
➢
the EXIT button to exit.
Choose Dynamic for viewing the TV during the day or
when there is bright light in the room.
Choose Standard for general TV watching mode.
Choose Movie when viewing the movie.
ENTER
button.
Move
T V
Mode : Standard
Cell Light 7
Contrast 95
Brightness 45
Sharpness 50
Colour 50
Tint G50 R50
Detailed Settings
Picture Options
Reset : OK
Move
Easy Setting
1
Press the TOOLS button on the remote control.
2 Press the ▲ or ▼ button to select Picture Mode.
3 Press the ◄ or ► button to select the required option.
Anynet+ (HDMI-CEC)
Picture Mode ◄ Standard ►
Sound Mode : Custom
Sleep Timer : Off
SRS TS XT : Off
Energy Saving : Off
Dual I-II : Mono
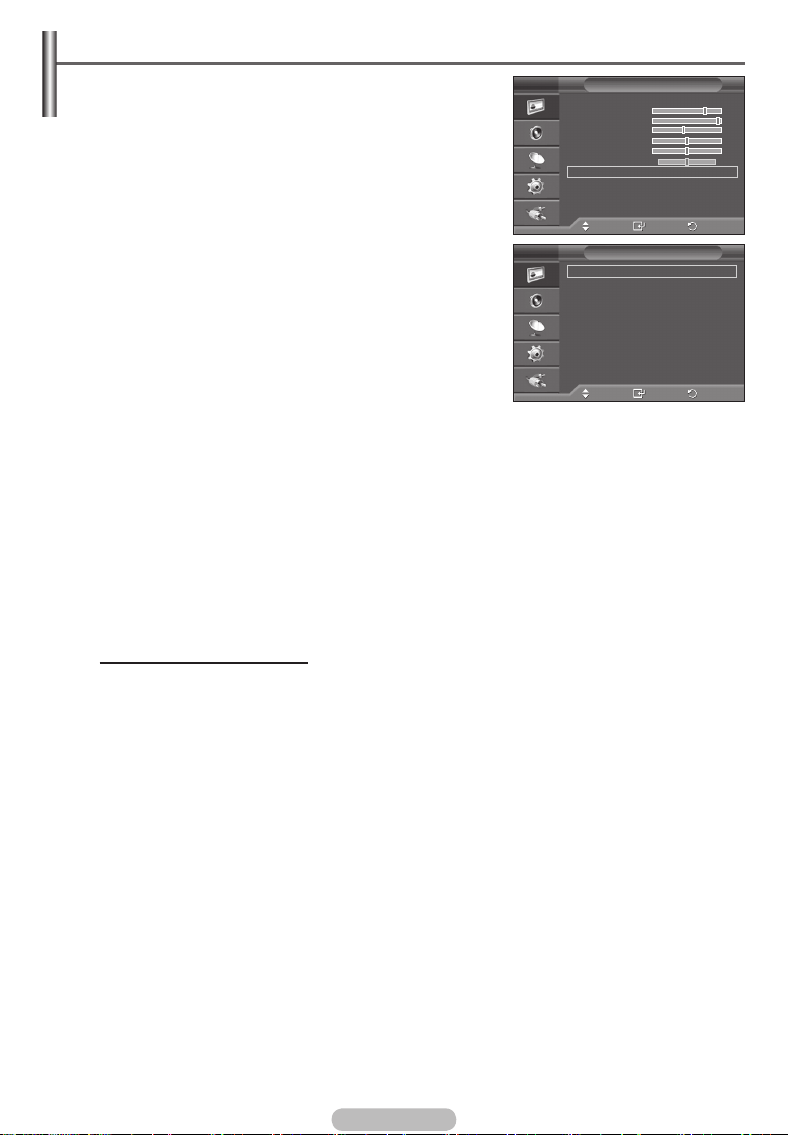
Customizing the Picture Settings
Your television has several setting options that allow you to
control the picture quality.
1 Press
2 Press
3 Press
the MENU button to display the menu.
the ENTER button to select Picture.
the ENTER button again to select Mode.
4 Select the required mode by pressing the ▲ or ▼ button, then
press
the
ENTER
button.
Available modes: Dynamic, Standard, Movie
5 Select the required option by pressing the ▲ or ▼ button, then press the ENTER
6 When you are satisfied with your setting, press the ENTER
7 Press
Cell Light - Contrast
the EXIT button to exit.
– Brightness – Sharpness – Colour – Tint
In Analog TV, Ext., AV, S-Video modes of the PAL system, you cannot use the Tint Function.
➢
In PC mode, you can only make changes to Cell Light, Contrast, and Brightness.
➢
Press the ◄ or ► button until you reach the optimal setting.
button.
T V
Mode : Standard
Cell Light
Contrast 95
Brightness 45
Sharpness 50
Colour 50
Tint G50 R50
Detailed Settings
Picture Options
Reset : OK
Move
Picture
7
Enter
Enter
Enter
Dynamic
Standard
Movie
Return
Return
ExitMove
Return
Picture
Tools
Adjust
Picture
7
button.
English - 18
Page 19
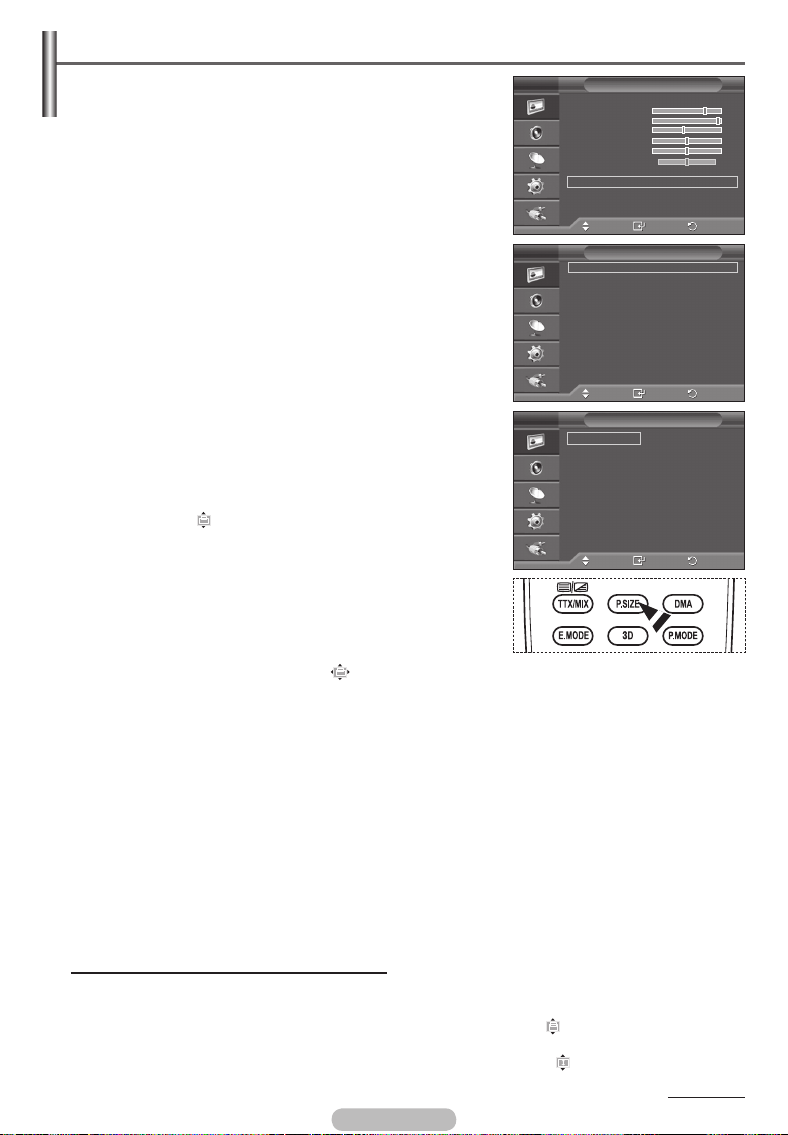
Configuring Detailed Settings on the Picture
You can set detailed picture settings.
1 Press the MENU button to display the menu.
2 Press the ENTER button to select Picture.
3 Press the ▲ or ▼ button to select Detailed Settings, then
press the ENTER button.
4 Select the required option by pressing the ▲ or ▼ button, then
press the ENTER button.
Available options:
Black Adjust, Dynamic Contrast,
Gamma, Colour Space, White Balance, Flesh Tone, Edge
Enhancement
5 When you are satisfied with your setting, press the ENTER
button.
6 Press the EXIT button to exit.
Detailed Settings is available in Standard or Movie mode.
➢
In PC mode, you can only make changes to Dynamic
➢
Contrast, Gamma and White Balance from among the
Detailed Settings items.
Black Adjust: Off/Low/Medium/High
T V
Mode : Standard
Cell Light 7
Contrast 95
Brightness 45
Sharpness 50
Colour 50
Tint G50 R50
Detailed Settings
Picture Options
Reset : OK
T V
Black Adjust :
Dynamic Contrast : Medium
Gamma : 0
Colour Space : Native
White Balance
Flesh Tone : 0
Edge Enhancement
Move
Detailed Settings
Move
Picture
Enter
Off
: On
Enter
You can directly select the black level on the screen to adjust the screen depth.
Dynamic Contrast: Off/Low/Medium/High
You can adjust the screen contrast so that the optimal contrast is provided.
Gamma: -3 ~ +3
You can adjust the middle brightness of pictures.
Press the ◄ or ► button until you reach the optimal setting.
Colour Space: Auto/Native/Custom
Colour space is a colour matrix composed of red, green and blue colours.
Select your favorite colour space to experience the most natural colour.
− Auto: Auto Colour Space automatically adjusts to the most natural colour tone based on program
sources.
−
Native: Native Colour Space offers deep and rich colour tone.
− Custom: Adjusts the colour range to suit your preference. (see “Customizing the Colour Space”)
Customizing the Colour Space
Colour: Red/Green/Blue/Yellow/Cyan/Magenta
Adjusts the Colour range to suit your preference.
Colour is available when Colour Space is set to Custom.
Press the ▲ or ▼ button to select Red, Green, Blue, Yellow, Cyan or Magenta.
Press the ENTER button.
− Red/Green/Blue: In Colour, you can adjust the RGB values for the selected colour.
Press the ▲ or ▼ button to select Red, Green or Blue to change it. Press the ENTER button.
Press the ◄ or ► button to decrease or increase the value of a particular item.
Press the ENTER button.
− Reset: Resets the colour space to the default values.
White Balance: R-Offset/G-Offset/B-Offset/R-Gain/G-Gain/B-Gain/Reset
You can adjust the color temperature for more natural picture colors.
R-Offset/G-Offset/B-Offset/R-Gain/G-Gain/B-Gain: Changing the adjustment value will refresh the
adjusted screen.
Select the required option by pressing the ▲ or ▼ button, then press the ENTER button.
Press the ◄ or ► button until you reach the optimal setting.
Reset: The previously adjusted white balance will be reset to the factory defaults.
Flesh Tone:-15~+15
You can emphasize the pink tone in the picture.
Press the ◄ or ► button until you reach the optimal setting.
Changing the adjustment value will refresh the adjusted screen.
➢
Edge Enhancement: Off/On
You can emphasize object boundaries.
Return
Return
English - 19
Page 20
Picture Options
You can set detailed picture settings.
1 Press the MENU button to display the menu.
2 Press the ENTER button to select Picture.
3 Press the ▲ or ▼ button to select Picture Options, then press
the ENTER button.
4 Select the required option by pressing the ▲ or ▼ button, then
press the ENTER button.
5 When you are satisfied with your setting, press the ENTER
button.
6 Press the EXIT button to exit.
In PC mode, you can only make changes to the Color Tone
➢
and Size from among the items in Picture Options.
Colour Tone: Cool2/Cool1/Normal/Warm1/Warm2
When the picture mode is set to Dynamic or Standard,
➢
Warm1 and Warm2 cannot be selected.
Size: Auto Wide/16:9/Wide Zoom/Zoom/4:3/Just Scan
You can select the picture size which best corresponds to your
viewing requirements.
Auto Wide: Expanding and pulling up the picture from 4:3 to
−
16:9 ratio.
− 16:9
−
: Sets the picture to 16:9 wide mode.
Wide Zoom: Magnify the size of the picture more than 4:3.
Move the screen up/down using the ▲ or ▼ button after
selecting the by pressing the ► or ENTER button.
Zoom: Magnify the size of the picture vertically on screen.
−
− 4:3
−
: Sets the picture to 4:3 normal mode.
Just Scan: Use the function to see the full image without
T V
Mode : Standard
Cell Light 7
Contrast 95
Brightness 45
Sharpness 50
Colour 50
Tint G50 R50
Detailed Settings
Picture Options
Reset : OK
T V
Colour Tone :
Size : Auto Wide
Screen Mode : 16:9
Digital NR : Auto
Real 100 Hz Demo : Off
DNle : Off
HDMI Black Level : Normal
Blue only mode : Off
Screen Burn Protection
3D Effect
T V
Auto Wide
16:9
Wide Zoom
Zoom
4:3
Just Scan
Move
Picture Options
Move
Move
Picture
Enter
Normal
Enter
Size
Enter
Return
Return
Return
any cutoff when HDMI (720p/1080i), or Component (1080i)
signals are input.
After selecting Just Scan in HDMI (1080i) or Component
(1080i) mode
Press the ◄ or ► button to select
:
, then press the ENTER button.
Press the ▲, ▼, ◄ or ► button to move the picture up, down, left and right.
Reset: Press the ◄ or ► button to select Reset, then press the ENTER button. You can initialize
the setting.
➢
➢
➢
➢
➢
➢
➢
With the HDMI Just Scan picture size, depending on the AV devices, the screen may be cut off
or a specific colour appears on the screen.
For an HDMI (1080p) connection of 24, 25, 30, 50, and 60 Hz, and for a Component (1080p)
➢
connection of 50 and 60Hz, only the input source is supported.
You can change the picture size simply by pressing the P.SIZE button on the remote control.
Depending on the input source, the picture size options may vary.
The items available may differ depending on the selected mode.
Auto Wide function is available only in TV, Ext.1, Ext.2, AV, and S-Video mode.
Settings can be adjusted and stored for each external device you have connected to an input of the
TV.
In PC Mode, only “16:9” and “4:3” mode can be adjusted.
Positioning and Sizing the screen using Zoom
Resizing the screen using the Zoom enables the positioning and sizing of the screen to up/down
direction using the ▲ or ▼ button as well as the screen size.
Move the screen up/down using the ▲ or ▼ button after selecting the by pressing the ◄ or ►
button.
Resize the screen vertically using the ▲ or ▼ button after selecting the by pressing the ◄ or ►
button.
English - 20
Continued...
Page 21
Screen Mode: 16:9/Wide Zoom/Zoom/4:3
T V
When setting the picture size to Auto Wide in a 16:9 wide TV,
you can determine the picture size you want to see the 4:3
WSS (Wide Screen Service) image or nothing. Each individual
European country requires different picture size so this function
is intended for users to select it.
−16:9:
−Wide Zoom:
−Zoom:
−4:3:
➢
➢
Digital NR: Off/Low/Medium/High/Auto
Sets the picture to 16:9 wide mode.
Magnify the size of the picture more than 4:3.
Magnify the size of the picture vertically on screen.
Sets the picture to 4:3 normal mode.
This function is available in Auto Wide mode.
This function is not available in Component or HDMI mode.
If
the signal received by the television is weak, you can activate this feature to reduce any static and
Picture Options
Colour Tone : Normal
: Auto Wide
Size
Screen Mode : 16:9
Digital NR :
Real 100 Hz Demo : Off
DNle :
HDMI Black Level : Normal
Blue Only Mode : Off
Screen Burn Protection
3D Effect
Move
Enter
Wide Zoom
ghosting that may appear on the screen.
When the signal is weak, select one of the other options until the best picture is displayed.
➢
Real 100Hz Demo: Off/On
Y
ou can get a clear distinction between "Real 100Hz" and 50Hz, especially when watching fast
moving scenes. Therefore, when seeing slow moving scenes, you will not be able to distinguish
between "Real 100Hz and 50Hz." Demo 100Hz works only with 50Hz signal. Real 100Hz demo mode
is provided for shop demonstration with special pictures.
DNIe: Off/Demo/On
This
TV includes the DNIe function so as to provide a high visual quality. If you set DNIe to on, you
can view the screen with the DNIe feature activated. If you set the DNIe to Demo, you can view the
applied DNIe and normal pictures on the screen, for demonstration purposes. Using this function, you
can view the difference in the visual quality.
DNIeTM (Digital Natural Image engine)
➢
This feature brings you more detailed image with 3D noise reduction, detail enhancement, contrast
enhancement and white enhancement. New image compensation Algorithm gives brighter, clearer,
more detailed image to you. DNIeTM technology will fit every signal into your eyes.
This cofunction is not available in PC mode.
➢
DNIe is only available in Dynamic mode.
➢
HDMI Black Level: Normal/Low
Using this function, you can adjust the image quality when the screen burn (appearance of black level,
low contrast, low color, etc.) is encountered by the HDMI input for RGB limited range (16 to 235).
This function is active only when the external input connects to HDMI(RGB signals).
➢
Blue Only Mode: Off/On
This
function is for AV device measurement experts. This function displays the blue signal only by
removing the red and green signals from the video signal so as to provide a Blue Filter effect that is
used to adjust the Colour and Tint of video equipment such as DVD players, Home Theaters, etc.
Using this function, you can adjust the Colour and Tint to preferred values appropriate to the signal
level of each video device using the Red/Green/Blue/Cyan/
Magenta/Yellow Colour Bar Patterns, without using an
additional Blue Filter.
Blue Only Mode is available when the picture mode is set
➢
to Movie or Standard.
Screen Burn Protection
To reduce the possibility of screen burn, this unit is equipped
with screen burn prevention technology. This technology
enables you to set picture movement up/down (Vertical Line)
and side to side (Horizontal Dot). The Time setting allows
you to program the time between movement of the picture in
minutes.
−Pixel Shift:
Using this function, you can minutely move
pixels on the PDP in horizontal or vertical direction to
minimize after image on the screen.
• Set Pixel Shift
to Onbypressingthe▲or▼button,then
T V
T V
Picture Options
Colour Tone : Normal
: Auto Wide
Size
Screen Mode : 16:9
Digital NR : Auto
Real 100 Hz Demo : Off
DNle : On
HDMI Black Level : Normal
Blue Only Mode : Off
Screen Burn Protection
3D Effect
Move
Screen Burn Protection
Pixel Shift
White
Scrolling
Side Gray : Dark
Enter
press the ENTER button.
•Selecttherequiredoptionbypressingthe▲or▼button,
then press the ENTER
Available options: Horizontal Dot, Vertical Line, Time
button.
Move
Enter
Continued...
English - 21
16:9
Zoom
4:3
Return
Return
Return
Page 22
Optimum condition for pixel shift;
➢
Horizontal Dot 1 2
T V
PC TV/Ext/AV/Component/HDMI
Pixel Shift
Pixel Shift : On
Horizontal Dot : 2
Vertical Line : 2
Time : 2 min
Vertical Line 1 2
Time (minute) 2 2 min
The Pixel Shift value may differ depending on the monitor
➢
size (inches) and mode.
This function is not available in the Just Scan mode.
➢
Move
Enter
Return
− White: This function helps remove after images on the screen by changing the colour of pixels to
white. Use this function when there are remaining after images or symbols on the screen especially
when you displayed a still image on the screen for a long time.
− Scrolling: This function helps remove after images on the screen by moving all the pixels on the
PDP according to a pattern. Use this function when there are remaining after images or symbols on
the screen especially when you displayed a still image on the screen for a long time.
− Side Gray: When you watch TV with the screen ratio of 4:3, the screen is prevented from any
damage by adjusting the white balance on both extreme left and right sides.
Dark: When you set the screen ratio to 4:3, it darkens the left and right sides.
Light: When you set the screen ratio to 4:3, it brightens the left and right sides.
To remove after images on the screen, use either White or Scrolling function. Although both of
➢
the two functions remove after images on the screen, Scrolling is more effective.
The after image removal function has to be executed for a long time (approximately 1 hour) to
➢
effectively remove after images on the screen. If after image is not improved after the execution
of the function, repeat the function again.
Press any button on the remote control to cancel this feature.
➢
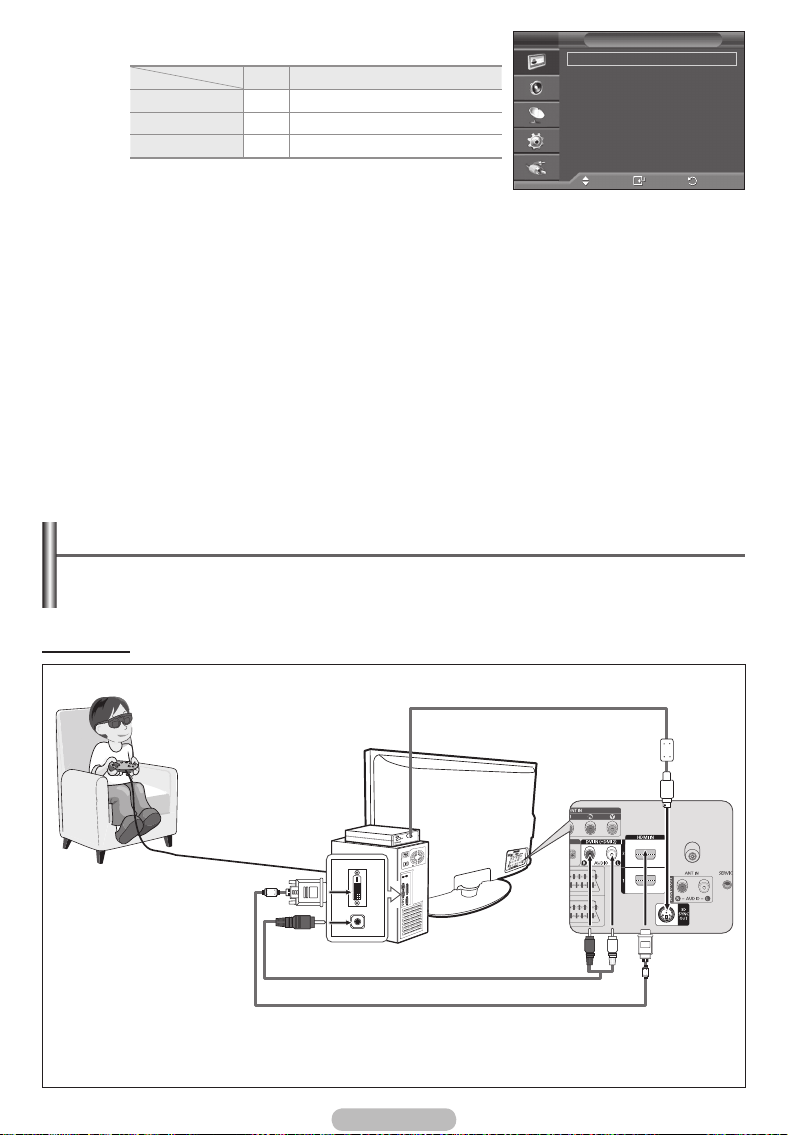
Using the 3D Function
You can enjoy 3D movies and games on your TV. The 3D effects function enables you to view 3D
images using special 3D glasses.
Connections
3D Glasses
(Not supplied)
3D IR Emitter
(Not supplied)
3.5 mm Stereo plug to RCA Cable (Not supplied)
HDMI/DVI Cable (Not supplied)
The appearance of the 3D glasses (including Emitter) may differ depending on the model of your glasses.
➢
PC
English - 22
TV Rear Panel
Page 23
1 Connect a HDMI/DVI cable between the HDMI IN 2 jack on the TV and the PC output jack on your
computer.
2
Connect a 3.5mm Stereo/2RCA cable between the DVI IN (HDMI 2) [R-AUDIO-L] jack on the TV and
the Audio Out jack of the sound card on your computer.
3
Connect the Emitter to the 3D SYNC OUT port on the rear panel of the TV.
Turn the TV on and set the source of the TV to HDMI2.
4
For more information on the 3D glasses (including the Emitter), refer to the user manual of your 3D
glasses.
Adjust the PC resolution: PS50A470: 1024 x 768@60Hz,1360 x 768@60Hz
Optimum PC resolution for PS50A470 is 1360x768. When 1024x768 signal is connected in 3D mode,
the picture will be shown in 4:3 format with left and right side grey bars appeared.
The 3D IR Emitter communicates with the 3D glasses.
Therefore, the 3D IR Emitter should be located near the 3D glasses.
It is activated when the HDMI or DVI input signal is RGB, and DVI Sound is supported.
When the power is turned on or off, the mode changes to the default (Off) and the Format is saved.
The 3D Effect is turned on or off regardless of the Picture Mode.
When 3D Effect is on, only the Contrast, Brightness, 3D Effect, and Reset picture menus are
activated.
To use the 3D Effect function, a graphics card supporting 3D or 3D software is required.
The 3D glasses and the Emitter must be manufacturer by the same company.
If you play a game or watch TV while wearing the 3D glasses for long periods of time, you may
experience eyestrain or a headache.
3D glasses (including the Emitter) not manufactured by Samsung may not be supported.
If you find the screen flickering while the 3D function is used, change the environmental lighting
darker or turn off the fluorescent lamp to watch the screen for its best condition.
Changing the Mode
Changing the Mode will exchange the pictures for each eye by
exchanging the left and right output signals.
1 Connect
2 Press
3 Press
4 Press the ▲ or ▼ button to select Picture,
5 Press the ▲ or ▼ button to select Mode,
If the 3D effect is not working properly, it means the Mode and
the TV, PC and 3D IR Emitter as shown in the figure.
the SOURCE button to select HDMI .
the MENU button to display the menu.
Press the ▲ or ▼ button to select Picture,
ENTER
button.
then press the
Option then press
the
Press the ▲ or ▼ button to select 3D Effect
ENTER
ENTER
button.
button.
then press the
then press the
ENTER
button.
Press the ▲ or ▼ button to select Off,
Conversion
• Off : Turns the 3D Effect function off.
• Mode1 : Mode
• Mode2 : Mode
• 2D Conversion : Provides picture converted 3D to 2D.
then press the ENTER button.
1 operates with right sync first.
2 operates with left sync first.
You can choose this to watch 2D picture temporally when you feel
dizzy, but you should choose “Off” to end 3D Effect completely.
Mode1, Mode2 or 2D
3D glasses may not be syncing properly. To put them in sync,
T V
Mode : Standard
Cell Light
Contrast 95
Brightness 45
Sharpness 50
Colour 50
Tint G50 R50
Detailed Settings
Picture Options
Reset
T V
Colour Tone : Normal
Size
Screen Mode : 16:9
Digital NR : Auto
Real 100 Hz Demo : Off
DNle : Off
HDMI Black Level : Normal
Blue only mode :
Screen Burn Protection
3D Effect
T V
Mode
Format :
Picture
7
: OK
Move
Picture Options
: Auto Wide
Move
3D Effect
:
Move
Enter
Off
Enter
Off
Mode1
Mode2
2D Conversion
Enter
Return
Return
Return
switch to the other mode.
Continued...
English - 23
Page 24
Changing the Format
Select the optimal input format to match your graphic cards or 3D
software.
See the descriptions for Steps 1 to 4 above.
5 Press the ▲ or ▼ button to select Format, then press the
ENTER button.
6 Press the ▲ or ▼ button to select Checker Board, Horizontal
or Vertical then press the ENTER button.
Checker Board
Horizontal
Vertical
You can press the 3D button on the remote control
➢
repeatedly to change the 3D mode.
If the output format of your graphic card or 3D
software is Checkerboard, select this input
format.
If the output format of your graphic card or 3D
software is Horizontal interleaved, select this input
format.
If the output format of your graphic card or 3D
software is Vertical interleaved, select this input
format.
T V
Move
3D Effect
Checker Board
Horizontal
Vertical
Mode : Mode 1
Format :
Enter
Return
Tools
Adjust
Easy Setting
1 Press the
TOOLS button on the remote control.
2 Press the ◄ or ► button to select 3D Mode
3 Press the
ENTER button to start the 3D Effect.
3DEffect ◄ Off ►
Anynet+ (HDMI-CEC)
Picture Mode : Dynamic
Sound Mode : Standard
.
Sleep Timer : Off
SRS TS XT : Off
Energy Saving : Off
Resetting the Picture Settings to the Factory Defaults
You can set detailed picture settings.
1 Press the MENU button to display the menu.
2 Press the ENTER button to select Picture.
3 Press the ▲ or ▼ button to select Reset, then press the
ENTER button.
4 Press the ▲ or ▼ button to select OK or Cancel then press
the ENTER button.
Each mode can be reset.
➢
T V
Mode : Standard
Cell Light 7
Contrast 95
Brightness 45
Sharpness 50
Colour 50
Tint G50 R50
Detailed Settings
Picture Options
Reset : OK
Move
Picture
Enter
OK
Cancel
ExitMove
Return
English - 24
Page 25
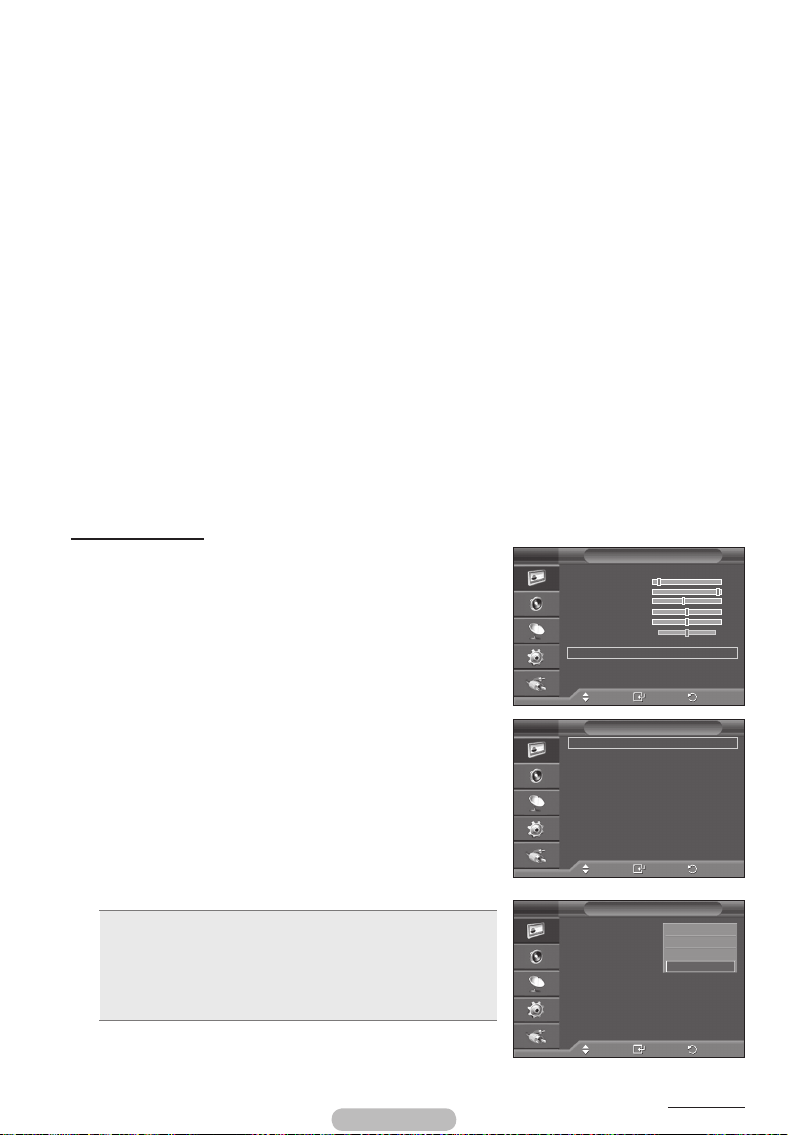
Sound Features
1 Press the MENU button to display the menu.
T V
2 Press the ▲ or ▼ button to select Sound, then press the
ENTER button.
3 Select the required option by pressing the ▲ or ▼ button, then
press the ENTER button.
Available options:
Mode, Equalizer, SRS TS XT, Auto
Volume, TV Speaker, Sound Select
4 When you are satisfied with your setting, press the ENTER
button.
T V
Mode :
Equalizer
SRS TS XT : Off
Auto Volume : Off
TV Speaker : Off
Sound Select : Main
Move
Sound
Custom
Enter
Equalizer
5 Press the EXIT button to exit.
Mode: Standard/Music/Movie/Speech/Custom
You can select the type of special sound effect to be used
when watching a given broadcast.
Easy Setting
R
+
0
-
L
Balance 100Hz 300Hz 1kHz 3kHz 10kHz
1 Press the TOOLS button on the remote control.
Move Adjust
2 Press the ▲ or ▼ button to select Sound Mode.
3 Press the ◄ or ► button to select the required option.
Equalizer: Balance/100Hz/300Hz/1kHz/3kHz/10kHz
The television has several settings which allow you to control
the sound quality.
If you make any changes to these settings, the sound
➢
mode is automatically switched to Custom.
SRS TS XT: Off/On
Anynet+ (HDMI-CEC)
Picture Mode : Standard
SoundMode ◄ Custom ►
Sleep Timer : Off
SRS TS XT : Off
Energy Saving : Off
Dual I-II : Mono
Tools
Adjust
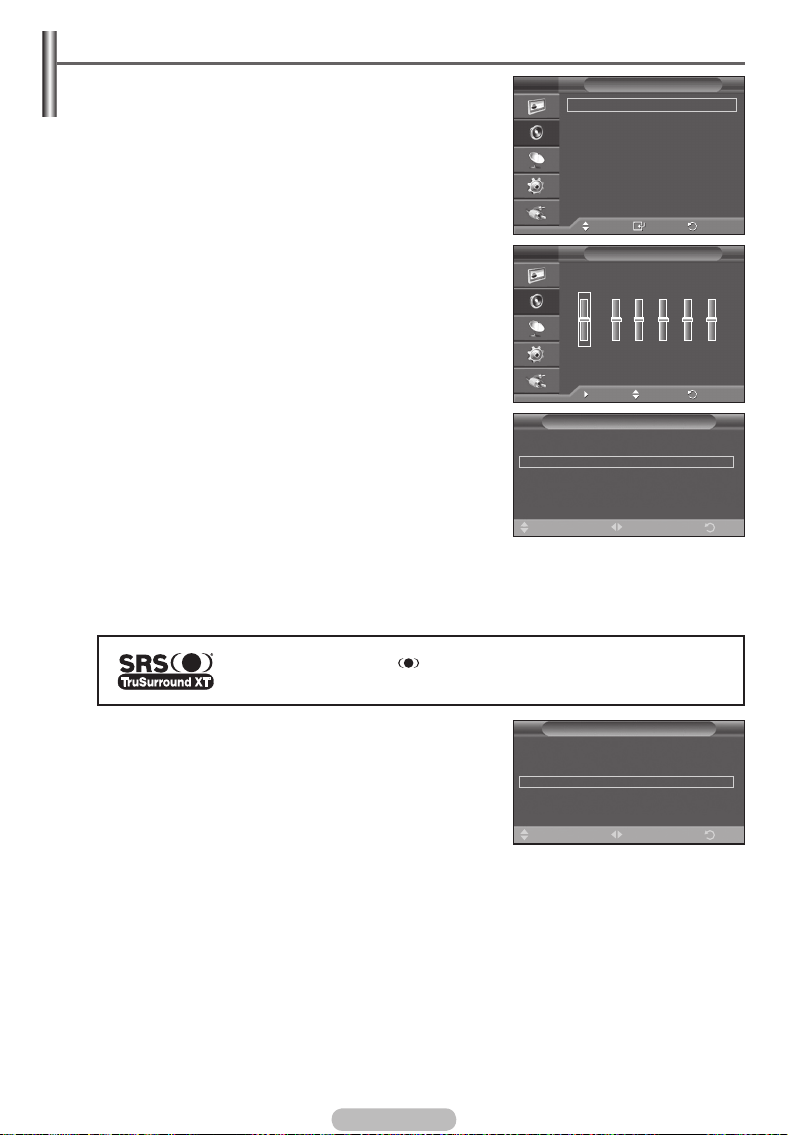
TruSurround XT is a patented SRS technology that solves the problem of playing 5.1 multichannel
content over two speakers. TruSurround delivers a compelling, virtual surround sound experience
through any two-speaker playback system, including internal television speakers. It is fully
compatible with all multichannel formats.
TruSurround XT, SRS and Symbol are trademarks of SRS Labs, Inc.
TruSurround XT technology is incorporated under license from SRS Labs, Inc.
Return
+
0
-
Return
ExitMove
Easy Setting
1 Press the TOOLS button on the remote control.
2 Press the ▲ or ▼ button to select SRS TS XT.
3 Press the ◄ or ► button to select Off or On.
Auto Volume: Off/On
Picture Mode : Standard
Sound Mode : Custom
Sleep Timer : Off
SRSTSXT ◄ Off ►
Energy Saving : Off
Dual I-II : Mono
Tools
Adjust
Each broadcasting station has its own signal conditions,
and so it is not easy to adjust the volume every time the channel is changed. This feature lets you
automatically adjust the volume of the desired channel by lowering the sound output when the
modulation signal is high or by raising the sound output when the modulation signal is low.
TV Speaker: Off/On
If you want to hear the sound through separate speakers, cancel the internal amplifier.
The +, - and MUTE buttons do not operate when the TV Speaker is set to Off.
➢
When TV Speaker is set to Off, you can operate only Sound Select (in PIP mode) in Sound
➢
menu.
Sound Select: Main/Sub
When the PIP feature is activated, you can listen to you can operate only Sound Select (in PIP
mode) in Sound menu.
Main: Used to listen to the sound of the main picture.
-
Sub: Used to listen to the sound of the sub picture.
-
English - 25
ExitMove
Page 26
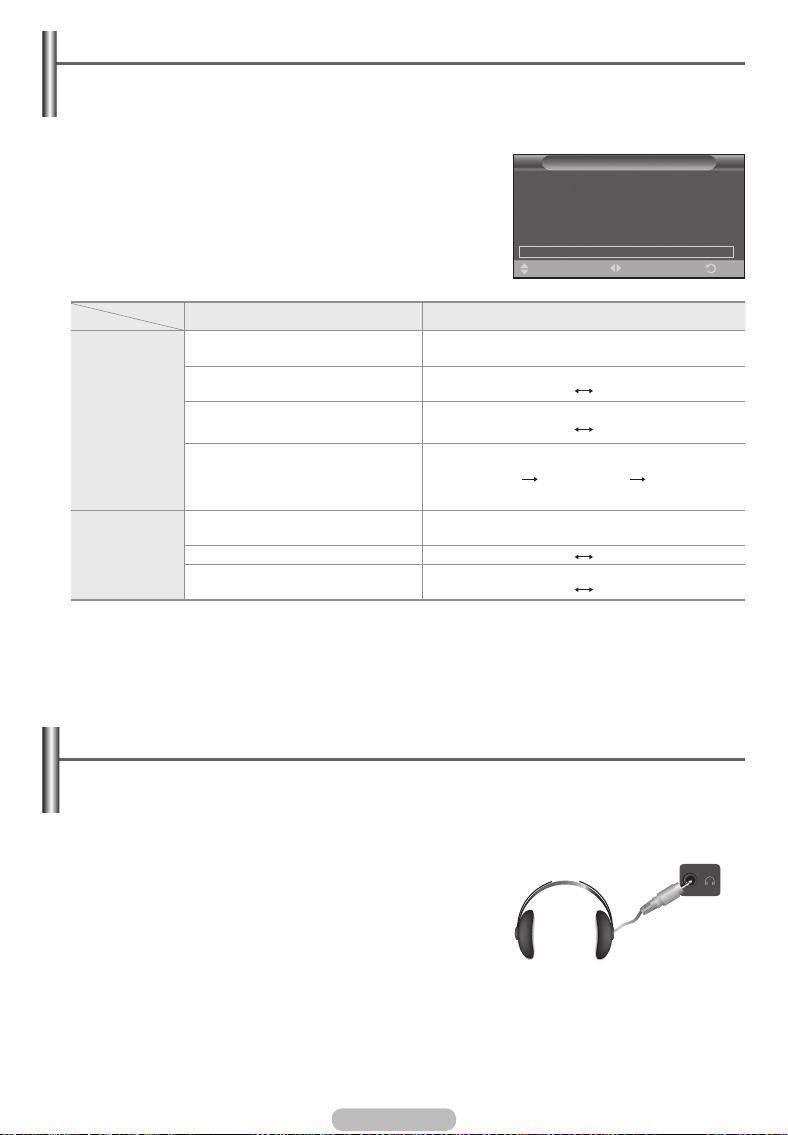
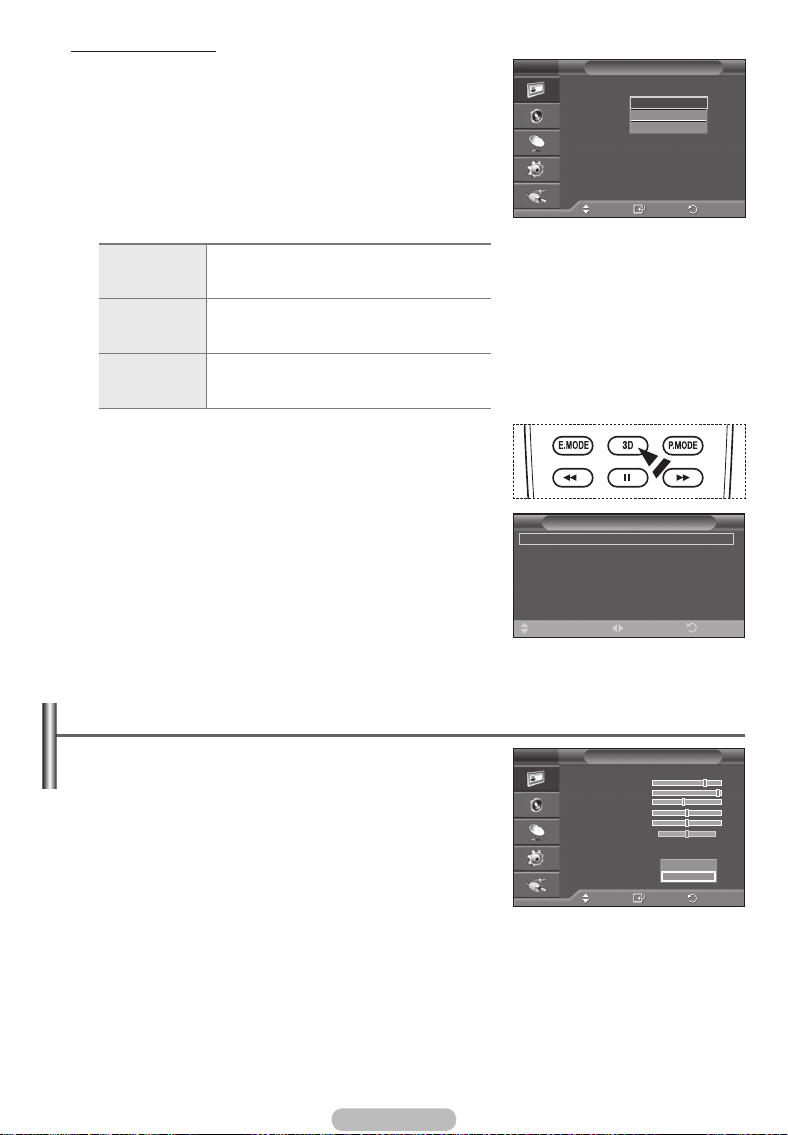
Selecting the Sound Mode (depending on the model)
The DUAL I-II button displays/controls the processing and output of the audio signal. When power
is switched on, the mode is automatically preset to either “DUAL-I” or “Stereo”, depending on the
current transmission.
Easy Setting
1 Press the TOOLS button on the remote control.
2 Press the ▲ or ▼ button to select Dual I-II.
3 Press the ◄ or ► button to select the required option.
Type of broadcast On-screen indication
Regular broadcast
(Standard audio)
Regular + NICAM Mono NICAM
NICAM
Stereo
A2
Stereo
If the receiving conditions deteriorate, listening will be easier if the mode is set to Mono.
➢
If the stereo signal is weak and automatic switching occurs, switch to Mono.
NICAM Stereo
NICAM DUAL-I/II
Regular broadcast
(Standard audio)
Bilingual or DUAL-I/II Dual I Dual II
Stereo Stereo
NICAM
dual-1
Anynet+ (HDMI-CEC)
Picture Mode : Standard
Sound Mode : Custom
Sleep Timer : Off
SRS TS XT : Off
Energy Saving : Off
DualI-II ◄ Mono ►
Mono (Normal use)
NICAM
stereo
NICAM
dual-2
Mono (Normal use)
Tools
Adjust
(Normal)
(Normal)
(Forced mono)
ExitMove
Mono
Mono
Mono
(Normal)
Mono
Connecting Headphones (Sold separately)
You can connect a set of headphones to your set if you wish to watch a TV program
without disturbing other people in the room.
When you insert the head set jack into the corresponding
➢
port, you can operate only “Auto Volume” in Sound menu.
Prolonged use of headphones at a high volume may
➢
damage your hearing.
You will not hear sound from the speakers when you connect
➢
headphones to the TV.
The headphone volume and TV volume are adjusted
➢
separately.
English - 26
TV Side Panel
Page 27
Time Features
1 Press the MENU button to display the menu.
2 Press the ▲ or ▼ button to select Setup, then press the
ENTER button.
3 Press the ▲ or ▼ button to select Time, then press the
ENTER button.
T V
Plug & Play
Language : English
Time
Light Effect
Wall-Mount Adjustment
Melody : Off
Entertainment : Off
Energy Saving : Off
PIP
Setup
: In Watching TV
4 Select the required option by pressing the ▲ or ▼ button, then
press the ENTER button.
Available options:
Clock Set, Sleep Timer, Timer 1, Timer 2,
Timer 3
5 When you are satisfied with your setting, press the ENTER
button.
6 Press the EXIT button to exit.
T V
Move
Enter
Time
00 : 00
Clock Set :
Sleep Timer : Off
Timer 1 : Off
Timer 2 : Off
Timer 3 : Off
Clock Set
You can set the television clock so that the current time is
displayed when pressing the INFO button on the remote
control. You must also set the time if you wish to use the
automatic on or off timers.
− Press the ◄ or ► button to select
Month, Day, Year, Hour,
or Minute. Set these by pressing the ▲ or ▼ button.
You can set the Month, Day, Year, Hour, or Minute
➢
directly by pressing the numeric buttons on the remote
control.
In the event of a power interruption or the set being turned
➢
off at the supply, the settings for the Clock will be lost.
Sleep Timer
T V
Move
On Time
Off Time
Repeat
Volume
Timer 1
:
00 00 Off
:
00 00 Off
Once
10
Move Adjust
Enter
You can select a time period of between 30 and 180 minutes
after which the television automatically switches to standby
mode.
− Select the preset time interval (
180
) for staying on by pressing the ▲ or ▼ button.
Easy Setting
1 Press the TOOLS button on the remote control.
2 Press the ▲ or ▼ button to select Sleep Timer.
3 Press the ◄ or ► button to select the minute, then press the
ENTER button.
Timer 1 / Timer 2 / Timer 3
Off, 30, 60, 90, 120, 150, or
Anynet+ (HDMI-CEC)
Picture Mode : Standard
Sound Mode : Custom
SleepTimer ◄ Off ►
SRS TS XT : Off
Energy Saving : Off
Dual I-II : Mono
Tools
Adjust
You can set the On/Off timers so that the television will switch
on or off automatically at the time you select.
You must set the clock first.
☛
− Press the ◄ or ► button to select the required item below.
Press the ▲ or ▼ button to adjust to the setting satisfied.
On Time : Select hour, minute, and On/Off. (To activate timer with the setting satisfied, set to On.)
Off Time : Select hour, minute, and On/Off. (To activate timer with the setting satisfied, set to On.)
Repeat : Select Once, Everyday, Mon~Fri, Mon~Sat, or Sat~Sun.
Volume : Select the required volume level.
You can set the hour, minute, directly by pressing the number buttons on the remote control.
➢
Auto Power Off
☛
When you set the timer “On”, the TV will eventually turn off, if no controls are operated for 3 hours
after the TV was turned on by timer. This function is only available in timer “On” mode and prevents
overheating, which may occur if a TV is on for too long time.
Return
Return
Return
ExitMove
English - 27
Page 28

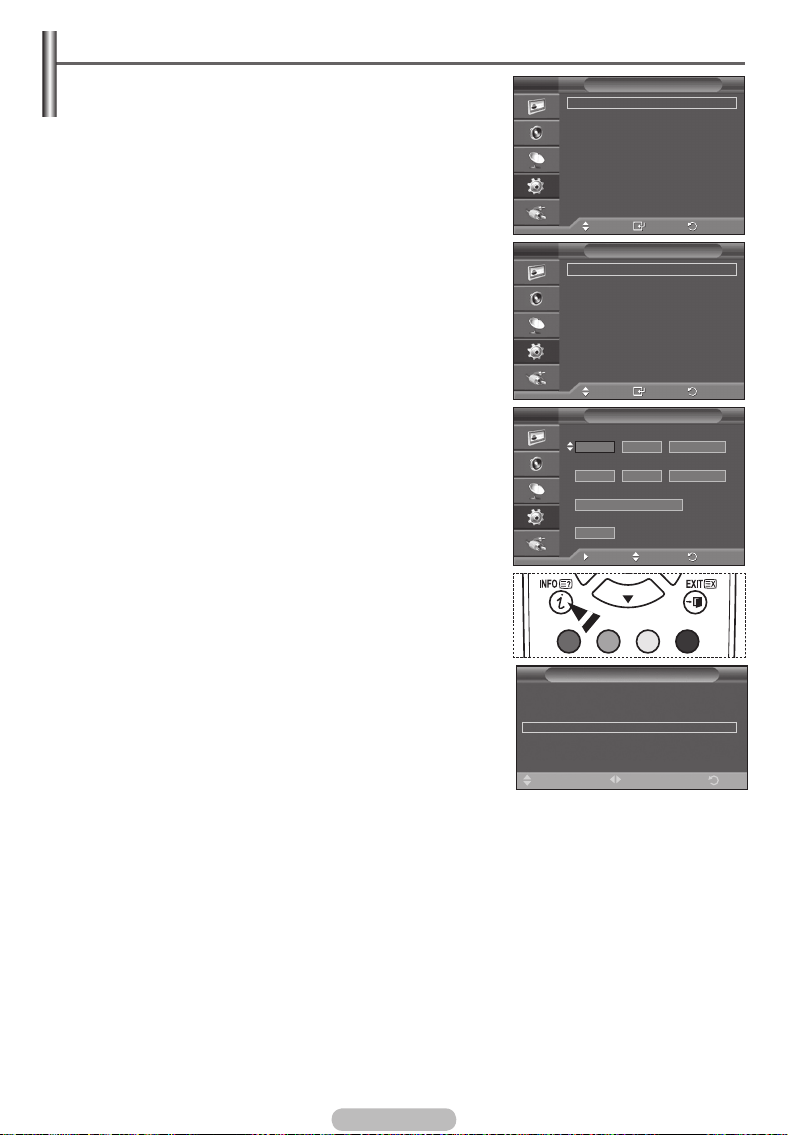
Language / Melody / Light Effect / Entertainment / Energy Saving / PIP
1 Press the MENU button to display the menu.
T V
2 Press the ▲ or ▼ button to select Setup, then press the
ENTER button.
3 Select the required option by pressing the ▲ or ▼ button, then
press the ENTER button.
Available options:
Language, Melody, Light Effect,
Entertainment, Energy Saving, PIP
4 When you are satisfied with your setting, press the ENTER
Plug & Play
Language : English
Time
Light Effect
Wall-Mount Adjustment
Melody : Off
Entertainment : Off
Energy Saving : Off
PIP
Setup
: In Watching TV
Move
Enter
button.
5 Press the EXIT button to exit.
Language
It is variable depending on the model. When you start using the television for the first time, you must
select the language which will be used for displaying menus and indications.
Light Effect: Off/In Standby/In Watching TV/Always
You can turn on/off the blue LED on the front of TV according to the situation. Use it for saving power
or when the LED dazzles your eyes.
−
Off: The blue LED is always off.
−
In Standby: The blue LED lights while in Standby mode and it turns off when your TV is turned on.
−
In Watching TV: The blue LED lights when watching TV and it turns off when your TV is turned off.
−
Always: The blue LED always lights.
Set the Light Effect to Off to reduce the power consumption.
➢
Melody: Off/Low/Medium/High
The TV power on/off melody sound can be adjusted.
Entertainment: Off/Sports/Cinema/Game
Entertainment mode enables you to select the optimal display and sound for sports, cinema and
games.
−
Off: Switches the Entertainment function off.
−
Sports: Provides the optimal picture and sound quality for sports.
−
Cinema: Provides the optimal picture and sound quality for movie watching.
You can experience a richer picture and enhanced sound.
−
Game: Provides the optimal picture and sound quality for games. This mode accelerates the
playing speed when using an external game console connected to the TV.
If you set any of the three Entertainment modes to On, the settings will be locked and can not be
➢
adjusted. If you want to make Picture and Sound mode adjustments, the Entertainment mode
must be turned off.
The Entertainment settings are saved for each input source.
➢
Return
English - 28
Continued...
Page 29
Energy Saving: Off/Low/Medium/High
This feature adjusts the screen brightness depending on the
surrounding lighting conditions.
− Off: Switches off the Energy Saving mode.
− Low: Operates in standard mode regardless of the
surrounding illumination.
− Medium: Enters Medium power saving mode regardless of
the surrounding illumination.
− High: Enters maximum power saving mode regardless of
the surrounding illumination.
Anynet+ (HDMI-CEC)
Picture Mode : Standard
Sound Mode : Custom
Sleep Timer : Off
SRS TS XT : Off
EnergySaving ◄ Off ►
Dual I-II : Mono
Tools
Adjust
ExitMove
Easy Setting
1 Press the TOOLS button on the remote control.
2 Press the ▲ or ▼ button to select Energy Saving.
3 Press the ◄ or ► button to select the required option.
PIP (Picture in Picture): PIP(On/Off)/Source/Size/Position/Programme
You can display a sub picture within the main picture. In this way you can watch TV programme or
monitor the video input from any connected devices.
−
PIP: On/Off
You can activate or deactivate the PIP function.
Table of PIP Settings
T V
PIP :
Source : TV
Size :
Position :
Programme : P 1
PIP
On
Main Picture Sub Picture
Component
HDMI1, 2, 3
PC
Analog TV broadcasts
only Ext1, Ext2, AV
Move
Enter
Return
− Source: TV/Ext.1/Ext.2/AV
You can select a source of the sub-picture.
−
Size: / /
You can select a size of the sub-picture.
➢ If main picture is in PC and Component mode, Size is not available.
−
Position: / / /
You can select a position of the sub-picture.
➢ In Double( , ) mode, Position cannot be selected.
−
Programme
You can select a channel of the sub-picture only when the Source is set to TV.
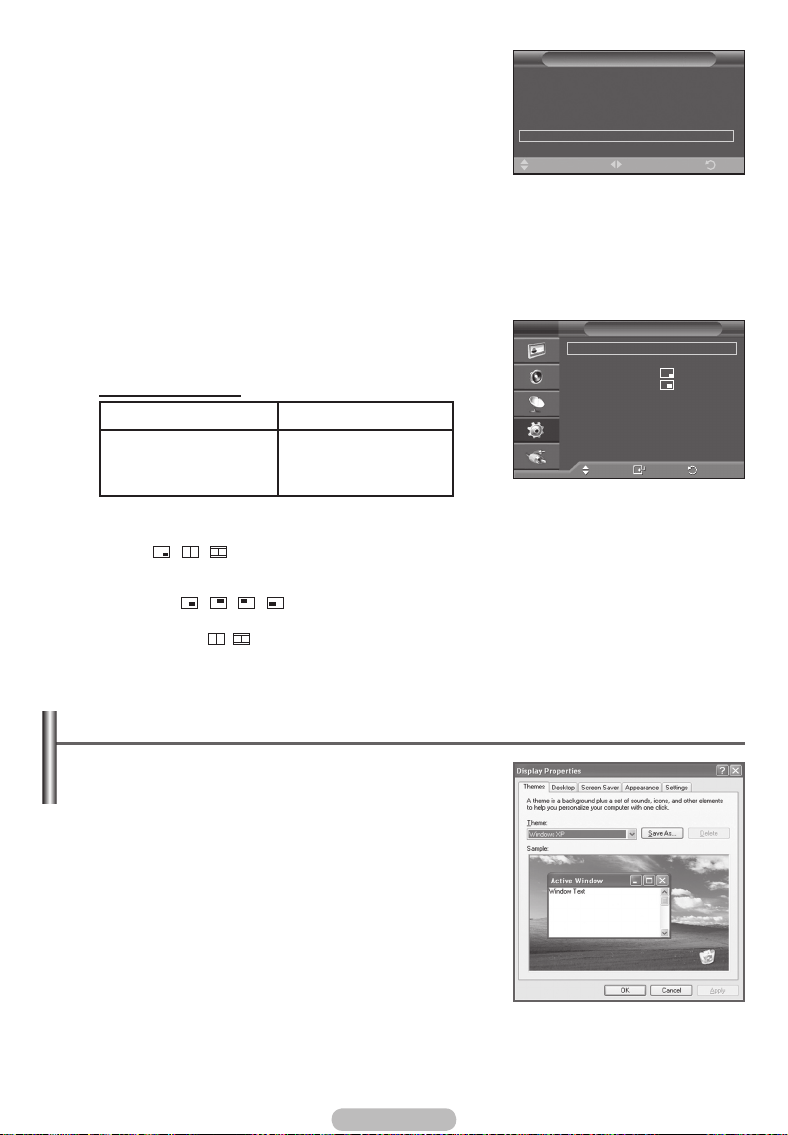
Setting up Your PC Software (Based on Windows XP)
The Windows display-settings for a typical computer
are shown below. But the actual screens on your PC will
probably be different, depending upon your particular
version of Windows and your particular video card. But even
if your actual screens look different, the same, basic set-up
information will apply in almost all cases. (If not, contact your
computer manufacturer or Samsung Dealer.)
1 Right click the mouse on the Windows Desktop, then click on
Properties.
The Display Properties will be displayed.
2 Click on Settings tab, then set the Display Mode with
reference to the Display Modes Table. You do not need to
change the Colours settings.
3 Click on Advanced. A new settings dialog box will be
displayed.
4 Click on the Monitor tab, then set the Screen refresh rate with reference to the Display Modes
Table. Set the Vertical Frequency and Horizontal Frequency individually if you can do so instead of
setting the Screen refresh rate.
5 Click on OK to close the window, then Click on OK button to the Display Properties window.
Automatic re-booting may commence at this moment.
English - 29
Page 30
Input Mode (PC)
Both screen position and size will vary depending on the type of PC monitor and its resolution.
The table below shows all of the display modes that are supported:
D-Sub Input
Mode Resolution
IBM
VESA
HDMI/DVI Input
Mode Resolution
VESA
640 x 350
720 x 400
640 x 480
640 x 480
640 x 480
800 x 600
800 x 600
800 x 600
1024 x 768
1024 x 768
1024 x 768
1360 x 768
640 x 480
800 x 600
1024 x 768
1360 x 768
Horizontal
Frequency
(kHz)
31.469
31.469
31.469
37.861
37.500
37.879
48.077
46.875
48.363
56.476
60.023
47.712
Horizontal
Frequency
(kHz)
31.469
37.879
48.363
47.712
Vertical
Frequency
(Hz)
70.086
70.087
59.940
72.809
75.000
60.317
72.188
75.000
60.004
70.069
75.029
60.015
Vertical
Frequency
(Hz)
59.940
60.317
60.004
60.015
Pixel Clock
Frequency
(MHz)
25.175
28.322
25.175
31.500
31.500
40.000
50.000
49.500
65.000
75.000
78.750
85.500
Pixel Clock
Frequency
(MHz)
25.175
40.000
65.000
85.500
Sync
Polarity
(H/V)
+ / -
- / +
- / -
- / -
- / + / +
+ / +
+ / +
- / -
- / + / +
+ / +
Sync
Polarity
(H/V)
- / + / +
- / + / +
PS50A470
✔
✔
✔
✔
✔
✔
✔
✔
✔
✔
✔
✔
PS50A470
✔
✔
✔
✔
When using an HDMI/DVI cable connection, you must use the HDMI IN 2 jack.
The interlace mode is not supported.
The set might operate abnormally if a non-standard video format is selected.
Separate and Composite modes are supported. SOG is not supported.
For the PS50A470, PC text quality is optimum in VESA mode (1360 x 768@60Hz).
English - 30
Page 31

Setting the PC
Preset to the PC mode by pressing the SOURCE button.
➢
T V
1 Press the MENU button to display the menu.
2 Press the ▲ or ▼ button to select Picture, then press the
ENTER button.
3 Select the required option by pressing the ▲ or ▼ button, then
press the ENTER button.
4 When you are satisfied with your setting, press the ENTER
button.
5 Press the EXIT button to exit.
Auto Adjustment :
Auto adjustment allows the PC screen of set to self-adjust to
the incoming PC video signal.
The values of fine, coarse and position are adjusted
automatically.
Easy Setting
1 Press the TOOLS button on the remote control.
2 Press the ▲ or ▼ button to select Auto Adjustment, then
Anynet+ (HDMI-CEC)
Picture Mode : Standard
Sound Mode : Custom
Sleep Timer : Off
SRS TS XT : Off
Energy Saving : Off
PIP
Auto Adjustment
press the ENTER button.
Screen Adjustment: Coarse/Fine/Position/Image Reset
T V
Coarse/Fine
The purpose of picture quality adjustment is to remove or
reduce picture noise.
If the noise is not removed by Fine-tuning alone, then adjust
the frequency as best as possible (coarse) and Fine-tune
again.
After the noise has been reduced, re-adjust the picture so that
it is aligned on the center of screen.
1
Press the ▲ or ▼ button to select Coarse or Fine, then
press the ENTER button.
T V
2 Press the ◄ or ► button to adjust the screen quality,
vertical stripes may appear or the picture may be blurry.
Press the ENTER button.
Position
Adjust the PC’s screen positioning if it does not fit the TV
screen.
1 Adjust the position by pressing the ▲/▼/◄/► button.
2 Press the ENTER button.
Image Reset
You can replace all image settings with the factory default
values.
Picture
Mode :
Cell Light 7
Contrast 95
Brightness 45
Sharpness 50
Auto Adjustment
Screen Adjustment
Detailed Settings
Picture Options
Reset : OK
Move
Auto Adjustment in Progress
Coarse 50
Fine 11
Position
Image Reset
Move
Move
Image Reset is completed.
Standard
Enter
Please wait.
Tools
Enter
Screen Adjustment
Enter
Position
Enter
Return
Return
Return
ExitMove
English - 31
Page 32

What is Anynet+?
Anynet+ is an AV network system that enables an easy-to-use AV interface for users by controlling
all connected AV devices through the Anynet+ menu when Samsung Electronics AV devices are
connected.
Connecting Anynet+ Devices
The Anynet+ system supports AV devices supporting Anynet+ only.
Check if there is an Anynet+ mark on the AV device to be connected to the TV.
To directly connect to TV
TV
Anynet+ Device 1 Anynet
+
Device 2
Anynet
+
Device 3
Connect the [HDMI 1], [HDMI
2] or [HDMI 3] jack on the TV
and the HDMI OUT jack of the
corresponding Anynet+ device
using the HDMI cable.
HDMI Cable
HDMI Cable
HDMI Cable
To connect to Home Theatre
TV
1 Connect the [HDMI 1],
[HDMI 2] or [HDMI 3]
jack on the TV and the
Anynet+ Device 1 Anynet
+
Device 2
HDMI OUT jack of the
corresponding Anynet+
device using the HDMI
cable.
2 Connect the HDMI IN jack
of the home theatre and
HDMI Cable
Home Theatre
HDMI Cable
Connect only one receiver.
➢
You can connect an Anynet+ device using the HDMI cable. Some HDMI cables may not support
➢
Anynet+ functions.
Anynet+ works when the AV device supporting Anynet+ is in the Standby or On status.
➢
Anynet+ supports up to 8 AV devices in total.
➢
HDMI Cable
HDMI Cable
Anynet
+
Device 3
the HDMI OUT jack of the
corresponding Anynet+
device using the HDMI
cable.
English - 32
Page 33

Setting Up Anynet
+
The following settings are to use Anynet+ functions.
Using the Anynet+ Function
1 Press the MENU button to display the menu.
Press the ▲ or ▼ button to select Input, then press the
ENTER button.
2 Press the ▲ or ▼ button to select Anynet+ (HDMI-CEC), then
press the ENTER button.
3 Press the ▲ or ▼ button to select Setup, then press the
ENTER button.
4 Press the ▲ or ▼ button to select Anynet+ (HDMI-CEC), then
press the ENTER button.
5 Press the ▲ or ▼ button to select On, then press the ENTER
button.
The Anynet+ (HDMI-CEC) function is enabled.
➢
If you select Off, Anynet+ (HDMI-CEC) is disabled.
➢
When the Anynet+ (HDMI-CEC) function is disabled, all the
➢
Anynet+ related operations are deactivated.
TV P 1
View TV
Select Device
Record
Menu on Device
Device Operation
Receiver :Off
Setup
Move
Enter
Return
Setup
Anynet+ (HDMI-CEC)
Auto Turn Off
Searching Connections
: Off
: Off
Enter ReturnMove
Turning an Anynet+ Device Off Automatically when the TV is
Turned Off
4 Press the ▲ or ▼ button to select Auto Turn Off, then press
the ENTER button.
5 Press the ▲ or ▼ button to select Yes, then press the
ENTER button.
The Auto Turn Off function is enabled.
➢
If you select No, the Auto Turn Off function is canceled.
➢
Press the EXIT button to exit.
The Select Device setting of the TV remote control is to be set
➢
to TV to use the Anynet+ function.
If you set Auto Turn Off to Yes, connected external devices are also turned off when the TV is turned
➢
off. However, if the device is recording, it may not be turned off.
Anynet+ (HDMI-CEC)
Auto Turn Off :
Searching Connections
Move
Setup
: On
: Off
Enter Return
Off
On
No
Yes
Scanning and Switching between Anynet+ Devices
1 Press the MENU button to display the menu.
Press the ▲ or ▼ button to select Input, then press the
ENTER button.
2 Press the ▲ or ▼ button to select Anynet+ (HDMI-CEC), then
press the ENTER button.
3 Press the ▲ or ▼ button to select Select Device, then press
the ENTER button.
4 Press the ▲ or ▼ button to select to a particular device and
press the ENTER button.
It is switched to the selected device.
5 If you cannot find a device you want, press the ▲ or ▼ button
to select Searching Connections, then press the ENTER
button.
The meassage Configuring Anynet+ connection... is
displayed. When searching devices completes, the connected
devices are listed in the Anynet+ menu.
Switching to the selected devices may take up to 2 minutes.
➢
You cannot cancel the operation during the switching
operation.
The time required to scan for devices is determined by the
➢
number of connected devices.
When the device scan is complete, the number of found devices is not displayed.
➢
Although the TV automatically scans devices when it is turned on using the POWER button, devices
➢
connected when the TV is on or under a specific circumstance are not displayed in the device list.
Therefore select Searching Connections menu to search devices.
If you have selected external input mode by pressing the SOURCE button, you cannot use the
➢
Anynet+ function. Make sure to switch to an Anynet+ device by using the TOOLS button.
English - 33
TV P 1
View TV
Select Device
Record
Menu on Device
Device Operation
Receiver :Off
Setup
Move
Enter
Return
Anynet+ (HDMI-CEC)
Auto Turn Off
Searching Connections
: Yes
Setup
: On
Enter ReturnMove
DVDR1
DVDR2
Continued...
DVD1
DVD2
Page 34

Anynet+ Menu
The Anynet+ menu changes depending on the type and status of the Anynet+ devices connected
to the TV.
Anynet+ Menu Description
View TV Switches from Anynet+ to TV broadcast mode.
Select Device Your TV connects to the corresponding device.
Record Starts a recording. (This menu works only for a device supporting
Menu on Device Shows the menu of the connected device.
Device Operation Shows the play control menu of the connected device.
Receiver Sound is output through the receiver.
Setup You can set the environment for using Anynet+.
TV Remote Control Buttons Available in Anynet+ Mode
Device Type Operating Status Available Buttons
Anynet+ Device
Device with built-in Tuner
Audio Device When a Receiver is activated
recording.)
Example. When a DVD Recorder is connected, the DVD Recorder’s
title menu appears.
Example. When a DVD Recorder is connected, the play control
menu of the DVD Recorder appears.
After switching to the
device, when the menu of
the corresponding device is
displayed on the screen.
After switching to the device,
while playing a file
After switching to the device,
when you are watching a TV
programme
Numeric buttons
▲/▼/◄/►/ENTER buttons
Colour buttons
EXIT button
(Backward search)
(Forward search)
(Stop)
(Play/Pause)
P / button
/
MUTE button
button
The Anynet+ function only works when the remote control is set to TV.
➢
The REC button works only while in the recordable state.
➢
You cannot control Anynet+ devices using the buttons on the side of the TV. You can control Anynet+
➢
devices only using the TV remote control.
The TV remote control may not work under certain conditions. In this case, reselect the Anynet+
➢
device.
The Anynet+ functions don’t operate for the products from other manufacturers.
➢
In Anynet+ mode, the colour buttons may not work properly.
➢
The
,
➢
operations may differ depending on the device.
Recording
You can make a recording of a TV programme using a recorder.
Press the REC button.
Recording begins. (Only when the Anynet+ enabled recording device is connected.)
The current TV programme is recorded in the Watching TV status. If you are watching video from
➢
another device, the video from the device is recorded.
You can also record the source streams by selecting Record after pressing the TOOLS button.
➢
Before recording, check whether the antenna jack is properly connected to the recording device.
➢
For the antenna connection to the recording device, refer to its user manual.
English - 34
Page 35

Listening through a Receiver
You can listen to sound through a receiver instead of the TV speaker.
1 Press the MENU button to display the menu.
Press the ▲ or ▼ button to select Input, then press the ENTER button.
2 Press the ▲ or ▼ button to select Anynet+ (HDMI-CEC), then press the ENTER
button.
3 Press the ▲ or ▼ button to select Receiver, then press the ENTER button.
4 Press the ◄ or ► button to select to On, then press the ENTER button.
Now you can listen to sound through the receiver.
5 Press the EXIT button to exit.
When the receiver is set to On, you can listen to the TV sound through the 2-
➢
channel receiver.
If the receiver is exclusively for a home theater only (supporting audio only), it may
➢
not appear in the device list.
In case of a content with copyright problems, listening through the receiver may not properly operate.
➢
When listening through the receiver, there are restrictions for using the PIP and audio-related menu.
➢
TV P 1
View TV
Select Device
Record
Menu on Device
Device Operation
Receiver :On
Setup
Move
Exit
Enter
Check Points before Requesting Service
Symptom Solution
Anynet+ does not work. ■ Check if the device is an Anynet+ device. The Anynet+ system
I want to start Anynet+. ■ Check if the Anynet+ device is properly connected to the TV and
I want to exit Anynet+. ■ Select View TV in Anynet+ menu.
The message Connecting to
Anynet+ device… appears
on the screen.
The Anynet+ device does
not play.
The connected device is not
displayed.
The TV programme cannot
be recorded.
supports Anynet+ devices only.
■ Connect only one receiver.
■ Check if the Anynet+ device power cord is properly connected.
■
Check the Anynet+ device’s Video/Audio/HDMI cable connections.
■ Check whether Anynet+ (HDMI-CEC) is set to On in the Anynet+
setup menu.
■ Check whether the TV remote control is in TV mode.
■ Check whether it is Anynet+ exclusive remote control.
■ Anynet+ doesn’t work at a certain condition. (Searching channels)
■ When connecting or removing the HDMI cable, please make sure
to search devices again or restart your TV.
■ Check if the Anynet+ Function of Anynet+ device is set on.
check if the Anynet+ (HDMI-CEC) is set to On in the Anynet+
Setup menu.
■ Press the TV button on the TV remote control to switch to TV.
Then press the TOOLS button to show the Anynet+ menu and
select a menu you want.
■ Press the SOURCE button on the TV remote control and select a
device other than Anynet+ devices.
■ Press any of P, CH LIST, and PRE-CH to change to the
TV mode. (Note that the channel button operates only when a
tuner-embedded Anynet+ device is not connected.)
■ You cannot use the remote control when you are configuring
Anynet+ or switching to a view mode.
■ Use the remote control when the Anynet+ setting or switching to
view mode is complete.
■ You cannot use the play function when Plug & Play is in progress.
■ Check whether or not the device supports Anynet+ functions.
■ Check whether or not the HDMI cable is properly connected.
■ Check whether Anynet+ (HDMI-CEC) is set to On in the Anynet+
setup menu.
■ Search Anynet+ devices again.
■ You can connect an Anynet+ device using the HDMI cable only.
Some HDMI cables may not support Anynet+ functions.
■ Check whether the antenna jack on the recording device is
properly connected.
English - 35
Page 36

Teletext Feature (depending on the model)
Most television stations provide written information services via teletext. The index page of the
teletext service gives you information on how to use the service. In addition, you can select
various options to suit your requirements by using the remote control buttons.
For teletext information to be displayed correctly, channel reception must be stable. Otherwise,
☛
information may be missing or some pages may not be displayed.
1
TV
Exit from the teletext display (depending on the model)
2
(store)
Used to store the teletext pages.
3
(size)
Press to display the double-size letters in the upper half of the
screen. For lower half of the screen, press it again.
To display normal screen, press it once again.
4
(reveal)
Used to display the hidden text (answers to quiz games, for
example). To display normal screen, press it again.
5
Coloured buttons (red/green/yellow/blue)
If the FASTEXT system is used by a broadcasting company, the
different topics covered on a teletext page are colour-coded and
can be selected by pressing the coloured buttons. Press one
of them corresponding to the required. The page is displayed
with other coloured information that can be selected in the same
way.
To display the previous or next page, press the corresponding
coloured button.
6
(teletext on/mix)
Press to activate teletext mode after selecting the channel
providing the teletext service. Press it twice to overlap the
teletext with the current broadcasting screen.
7
(mode)
Press to select the teletext mode (LIST/FLOF).
If you press it in the LIST mode, it switches into the List save
mode.
In the List save mode, you can save teletext page into list using
the (store) button.
8
(sub-page)
Used to display the available sub-page.
9
(page up)
Used to display the next teletext page.
0
(page down)
Used to display the previous teletext page.
!
(index)
Used to display the index (contents) page at any time while you
are viewing teletext.
@
(hold)
Used to hold the display on a given page if the selected page is
linked with several secondary pages
which follow on automatically. To resume, press it again.
#
(cancel)
Used to display the broadcast when searching for a page.
You can change teletext pages by pressing the numeric buttons
➢
on the remote control.
English - 36
Continued...
Page 37

The teletext pages are organized according to six categories:
Part Contents
A
B
C
D
E
F
Teletext information is often divided between several pages
➢
displayed in sequence, which can be accessed by:
Entering the page number
Selecting a title in a list
Selecting a coloured heading (FASTEXT system)
Press the TV button to exit from the teletext display.
➢
Selected page number.
Broadcasting channel identity.
Current page number or search indications.
Date and time.
Text.
Status information.
FASTEXT information.
English - 37
Page 38

Wall Mount Kit Specifications (VESA)
Install your wall mount on a solid wall perpendicular to the floor.
When attaching to other building materials, please contact your nearest dealer.
If installed on a ceiling or slanted wall, it may fall and result in severe personal injury.
Product Family inch VESA Spec. (A * B) Standard Screw Quantity
23 ~ 26 200 * 100 M4
32 ~ 40 200 * 200 M6
46 ~ 52
LCD-TV
57
57 ~ 70 800 * 400
80 ~ 1400 * 800
42 ~ 58
PDP-TV
We provided the standard dimensions for wall mount kits as shown in the table above.
➢
When purchasing our wall mount kit, a detailed installation manual and all parts necessary for
➢
assembly are provided.
Do not use screws longer than the standard dimension, as they may cause damage to the inside of
➢
the TV set.
For wall mounts that do not comply with the VESA standard screw specifications, the length of the
➢
screws may differ depending on their specifications.
Do not use screws that do not comply with the VESA standard screw specifications.
➢
Do not use fasten the screws too strongly, this may damage the product or cause the product to fall,
leading to personal injury. Samsung is not liable for these kinds of accidents.
Samsung is not liable for product damage or personal injury when a non-VESA or non-specified wall
➢
mount is used or the consumer fails to follow the product installation instructions.
Our 57” and 63” models do not comply with VESA Specifications. Therefore, you should use our
➢
dedicated wall mount kit for this model.
Do not exceed 15 degrees tilt when mounting this TV.
➢
Do not install your Wall Mount Kit while your TV is turned on.
It may result in personal injury due to electric shock.
63
63 ~ 70 800 * 400 4
80 ~ 1400 * 800 4
400 * 400
600 * 400
700 * 400
(No VESA)
400 * 400
600 * 400
676 * 407
(No VESA)
M8
M8
4
4
6
English - 38
Page 39

Wall- mount adjustment (Sold separately)
Once the auto wall mount is installed, the position of your TV can be easily adjusted.
Rear Panel Auto Wall-Mount
Serial Cable(1P to 1P)(Not supplied)
Entering the menu
1
Press the ▲, ▼, ◄ or ► button on your remote control.
The Wall Mount Adjustment screen is displayed.
➢
If the Wall Mount Adjustment screen is not displayed
➢
when clicking on a direction button while watching your
TV, use the menu to display that screen.
• Press the
MENU button to display the menu. Press the
▲ or ▼ button to select Setup, then press the ENTER
button.
• Press the ▲ or ▼ button to select
Wall-Mount
Adjustment, then press the ENTER button.
Remembering the Position
2 Adjust to the desired position using the ▲, ▼, ◄, ► buttons.
If you press an arrow button when no OSD is displayed
➢
on the TV screen, the Adjustment screen appears.
Press the INFO button to reset. Press the ◄ or ► button
➢
to select Yes, then press the ENTER button. The position
is initialized to the default setting.
3 Press the blue button.
Press the ▲ and ▼ buttons to select a save mode from
either Position1, Position2 or Position3 in order to save the
current position.
To not save the current position, press the RETURN
➢
button.
When selecting a save mode, you cannot use the Colour
➢
buttons.
4
Press the ENTER button to save.
When Position1 is selected, the message Current
➢
position saved as Position1 is displayed.
5
Press the ENTER button.
The saved Position appears on the left side of the OSD.
➢
T V
Plug & Play
Language : English
Time
Light Effect
: In Watching TV
Wall-Mount Adjustment
Melody : Off
Entertainment : Cinema
Energy Saving : Off
PIP
Move
Wall-Mount Adjustment
►
►
►
►
Adjust
Move
Save Center
Save
Select a mode to Save.
Position 1
Position 2
Position 3
Enter
Setup
►
►
Enter
Return
►
►
Return
321Position
English - 39
Page 40

Moving to the remembered position
Complete Step 1 of Entering the menu.
1
2 Pressing a Colour (Red, Green, Yellow) button moves the
auto wall mount to the saved position.
You can move the wall mount to one of the 3 pre-set
➢
positions by pressing the Red (Position 1), Green
(Position 2) or Yellow (Position 3) buttons.
If you adjust the position after moving to a pre-set
➢
position, the position display will disappear.
For installation, refer to the Installation Manual provided with
➢
the wall mount.
For product installation and the installation and moving of the
➢
wall mount, make sure to consult a specialized installation
company.
This installation manual is to be used when attaching the wall
➢
mount to a wall. When attaching to other building materials,
please contact your nearest dealer.
The auto wall mount will not work when Anynet+ is operating.
➢
42 inches model is not compatible with the older wall mount
➢
model (WMN5090A).
Wall-Mount Adjustment
Position 1
Adjust
►
►
►
►
How to assemble the Stand-Base (depending on the model)
►
►
►
►
Save Center
321Position
Using the 6 screws for securing the stand base and the
monitor, firmly attach the monitor to the stand base.
(The exterior of the set may be different than the picture.)
Warning
Firmly secure the stand to the TV
before moving it, as the stand may
fall and could cause serious injury.
Two or more people should carry
➢
the TV. Never lay the TV on the
floor because of possible damage
to the screen.
Always store the TV upright.
English - 40
In case of installing your TV on the wall,
close the cover (1) on the stand-base
connection part using two screws for
hiding.
Page 41

Securing the TV to the Wall
Pulling, pushing, or climbing on the TV may cause the TV to fall. In particular, ensure your
children do not hang over or destabilize the TV; doing so may cause the TV to tip over,
causing serious injuries or death. Follow all safety precautions provided on the included Safety
Caution
Flyer. For added stability, install the anti-fall device for safety purposes, as follows.
To avoid the TV from falling:
Putthescrewsintotheclampsandrmlyfastenthemonto
1.
thewall.Conrmthatthescrewshavebeenrmlyinstalled
onto the wall.
You may need additional material such as an anchor
➣
depending on the type of wall.
Since the necessary clamps, screws, and string are not
➣
supplied, please purchase these additionally.
Wall
2. Remove the screws from the center back of the
screws into the clamps, and then fasten the screws onto the
TV again.
Screws may not be supplied with the product. In this
➣
case, please purchase the screws of the following
specications.
3.
ConnecttheclampsxedontotheTVandtheclampsxed
onto the wall with a strong string and then tie the string
tightly.
➣
Install the TV near to the wall so that it does not fall
backwards.
Itissafetoconnectthestringsothattheclampsxedon
➣
thewallareequaltoorlowerthantheclampsxedonthe
TV.
➣
Untie the string before moving the TV.
erify all connections are properly secured. Periodically
4. V
check connections for any sign of fatigue for failure.
If you have any doubt about the security of your
connections,contact a professional installer.
TV, put the
Wall
English - 41
Page 42

Troubleshooting
Before contacting the Samsung after-sales service, perform the following simple checks.
If you cannot solve the problem using the instructions below, note the model and serial number of
the television and contact your local dealer.
No sound or picture
Check that the mains lead has been connected to a wall socket.
Check that you have pressed the (Power) button (On/Off) on the front panel or press the POWER
button on the remote control.
Check the picture contrast and brightness settings.
Check the volume.
Check if TV Speaker is set to Off.
Normal picture but no sound
Check the volume.
Check whether the volume MUTE button on the remote control has been pressed.
No picture or black and white picture
Adjust the colour settings.
Check that the broadcast system selected is correct.
Sound and picture interference
Try to identify the electrical appliance that is affecting the television, then move it further away.
Plug the television into a different main socket.
Blurred or snowy picture, distorted sound
Check the direction, location and connections of your aerial.
This interference often occurs due to the use of an indoor aerial.
Remote control malfunctions
Replace the remote control batteries.
Clean the upper edge of the remote control (transmission window).
Check that the “+” and “–” ends of the batteries are inserted correctly.
Check that the batteries are drained.
Screen is black and power indicator light blinks steadily
On your computer check; Power, Signal Cable.
The TV is using its power management system.
Move the computer’s mouse or press any key on the keyboard.
On your equipment check (STB, DVD, etc) ; Power, Signal Cable.
The TV is using its power management system.
Press the Source button on the panel or remote control.
Turn the TV off and on.
The damaged picture appears in the corner of the screen.
If Just Scan is selected in some external devices, the damaged picture may appear in the corner of
the screen. This symptom is caused by external devices, not TV.
The “Resets all settings to the default values” message appears.
This appears when you press and hold the EXIT button for a while. The product settings are reset to
the factory defaults.
English - 42
Page 43

Specifications
The descriptions and characteristics in this booklet are given for information purposes only and
are subject to modification without notice.
Model Name PS50A470
Screen Size (Diagonal) 50 inch
PC Resolution 1360 x 768 @ 60 Hz
Sound (Output) 10 W + 10 W
Dimension (WxHxD)
Body
With stand
Weight
Body
With stand
Environmental
Considerations
Operating Temperature
Operating Humidity
Storage Temperature
Storage Humidity
This device is a Class B digital apparatus.
➢
Design and specifications are subject to change without prior notice.
For the power supply and Power Consumption, refer to the label attached to the product.
1290 x 740 x 95 mm
1290 x 804 x 319 mm
39 Kg
41 Kg
10 °C to 40 °C (50 °F to 104 °F)
10% to 80%, non-condensing
-20 °C to 45 °C (-4 °F to 113 °F)
5% to 95%, non-condensing
English - 43
Page 44

This page is intentionally
left blank.
Page 45

Correct Disposal of This Product
(Waste Electrical & Electronic Equipment)
(Applicable in the European Union and other European countries with
separate collection systems)
This marking shown on the product or its literature, indicates that it
should not be disposed with other household wastes at the end of its
working life.
To prevent possible harm to the environment or human health from
uncontrolled waste disposal, please separate this from other types of
wastes and recycle it responsibly to promote the sustainable reuse of
material resources.
Household users should contact either the retailer where they
purchased this product, or their local government office, for details
of where and how they can take this item for environmentally safe
recycling.
Business users should contact their supplier and check the terms and
conditions of the purchase contract. This product should not be mixed
with other commercial wastes for disposal.
Page 46

Français - 2
Instructions d’utilisation
Rémanence à l’écran
Ne figez pas d’images (telle qu’une image de jeu vidéo ou de PC branché à l’écran à plasma) sur
l’écran du moniteur à plasma pendant plus de deux heures car cela peut entraîner une rémanence
à l’écran. Cette rémanence est également appelée “brûlure d’écran”. Pour éviter la rémanence,
réduisez le niveau de contraste ou de luminosité de l’écran lorsque vous affichez une image figée.
Hauteur
L’écran à plasma est normalement conçu pour être utilisé à une altitude inférieure à 2000 m. Il peut
fonctionner de façon anormale au-dessus de 2 000 m d’altitude. Ne l’installez pas et ne le faites donc
pas fonctionner dans ces conditions.
Chaleur diffusée sur la partie supérieure du téléviseur à plasma
Le dessus de l’appareil peut chauffer en cas d’utilisation prolongée, car la chaleur s’échappe du
panneau par le trou d’aération situé dans la partie supérieure du produit. Ce phénomène est normal
et n’indique aucunement la présence d’un défaut ou d’un dysfonctionnement. Il convient cependant
d’empêcher les enfants de toucher à la partie supérieure de l’écran.
Le produit fait un bruit de “claquement”.
Ce bruit de “claquement” risque d’être perceptible lorsque le produit se contracte ou s’étend suite à
un changement du milieu ambiant, tel que la température ou l’humidité. Ce phénomène est normal et
ne constitue pas un défaut.
Défauts de cellule
L’écran à plasma utilise un panneau constitué de 1 230 000 (niveau SD) à 3 150 000 (niveau HD)
pixels dont la fabrication fait appel à une technologie avancée. Il se peut toutefois que des points
clairs ou sombres apparaissent à l’écran. Ils n’ont aucune incidence sur la performance du produit.
Evitez d’utiliser le téléviseur à plasma à des températures inférieures à 5°C (41°F).
Une image figée affichée pendant une période prolongée peut endommager définitivement
l’écran PDP.
Rémanence de l’image à l’écran.
Une rémanence partielle de l’image peut éventuellement se produire si des images figées de jeux
vidéo et d’un PC restent affichées pendant un certain temps. Pour empêcher ce phénomène,
réduisez la luminosité et le contraste en cas d’affichage d’images figées.
Garantie
- La garantie ne couvre pas les dommages causés par la rémanence.
- Les brûlures ne sont pas couvertes par la garantie.
Installation
Contacter un centre de service agréé si le téléviseur est destiné à une installation dans des
endroits exposés à la poussière, à des températures faibles ou élevées, à une forte humidité,
à des substances chimiques et s’il a été prévu pour fonctionner en permanence, comme dans
des aéroports, des gares ferroviaires, etc. Le non-respect de ce qui précède peut gravement
endommager le téléviseur.
Visionner pendant longtemps le téléviseur à plasma en format 4/3 risque de
laisser apparaître des traces de bordures sur la gauche, sur la droite et au
centre de l’écran. Ces traces sont dues à la différence de luminosité sur l’écran.
Lire un DVD ou un jeu vidéo sur console risque de provoquer un effet similaire
sur l’écran. Les dommages provoqués par l’effet susmentionné ne sont pas
couverts par la garantie.
Contactez SAMSUNG WORLDWIDE
Pour tout commentaire ou toute question concernant un produit Samsung, contactez le service client de
SAMSUNG. (Voir la quatrième de couverture pour plus d'informations.)
© 2008 Samsung Electronics Co., Ltd. All rights reserved.
Page 47

Français - 3
Sommaire
Informations générales
Instructions d’utilisation ................................... 2
Vérication des pièces .................................... 4
Utilisation de la base-support ......................... 4
Panneau de conguration ............................... 5
Panneau de connexion ...................................6
Présentation de la télécommande ................. 8
Fonctionnement
Mise en marche et arrêt de votre téléviseur .... 9
Afchage des menus ...................................... 9
Fonction Plug & Play ..................................... 10
Utilisation du bouton TOOLS ........................ 12
Visualisation d’une source de signal externe
Modication du nom des périphériques ........13
.. 12
Gestion des canaux
Mémorisation automatique des canaux ........13
Mémorisation manuelle des canaux ............. 14
Ajout/verrouillage de canaux ......................... 15
Organisation des canaux mémorisés ............ 16
Attribution de noms aux canaux .................... 16
Réception nette des canaux grâce au
réglage n ..................................................... 17
Réglage de l’image
Changement de la norme Image .................. 18
Personnalisation des paramètres d’image .... 18
Réglages des détails de l’image ...................19
Options d’image ........................................... 20
Utilisation de la fonction 3D ......................... 22
Reinitialisation des paramètres d'image à
leur valeur par défaut ................................... 24
Description des fonctions
Fonctions d’horloge ....................................... 27
Langue / Mélodie / Effet lumineux / Loisirs /
Mode éco. / PIP.............................................28
Afchage PC
Conguration de votre logiciel PC
(basée sur Windows XP)
Mode d’entrée (PC) ....................................... 30
Réglage du PC .............................................. 31
...............................29
A propos de Anynet+
Conguration d’Anynet+................................ 32
Connexion d’appareils Anynet+ .................... 32
Conguration d’Anynet+................................ 33
Recherche d’appareils Anynet+ et
basculement entre des appareils .................. 33
Enregistrement .............................................. 34
Ecoute via un récepteur ................................ 35
Vérications avant de faire appel au service
d’assistance .................................................. 35
Annexe
Fonction de télétexte (en fonction du modèle)
Caractéristiques du kit de xation murale
(VESA) .......................................................... 38
Ajustement du support mural
(vendu séparément) ...................................... 39
Assemblage de la base-support
(en fonction du modèle)
Montage mural du téléviseur ......................... 41
Dépannage ................................................... 42
Caractéristiques ............................................ 43
................................. 40
.. 36
Français
Réglage du son
Fonctions audio ............................................. 25
Sélection du mode Son
(en fonction du modèle) ................................ 26
Branchement du casque
(vendu séparément) ...................................... 26
Symboles
Appuyez sur
☛ ➢
Important
Remarque
Page 48

Français - 4
Vérification des pièces
Manuel d’utilisation Télécommande/piles AAA Cordon d’alimentation
Carte de garantie/
Manuel de sécurité
(Non disponible dans
tous les pays)
Capot inférieur / Vis (2ea)
(Reportez-vous à la page 40)
Chiffon de nettoyage
Tore magnétique pour
cordon d’alimentation
Tore magnétique pour
Vendu séparément
Câble d’antenne Câbles composants Câbles audio Câble PC
Câble SCART Câble audio PC Câble HDMI Câble HDMI/DVI
Tore magnétique (cordon d’alimentation, S-Vidéo)
➢
Le blindage magnétique sert à protéger les câbles des
interférences. Lors de la connexion d’un câble, ouvrez le blindage
magnétique et rabattez-le autour du câble près de la prise.
S-Vidéo
Utilisation de la base-support
L’écran à plasma doit être soulevé
➢
par plusieurs personnes. Ne posez
jamais l’écran à plasma sur le sol,
car cela pourrait l’endommager.
Conservez toujours l’écran en
position verticale.
Le PDP peut pivoter de 20 degrés
vers la droite et la gauche.
-20° ~ 20°
Page 49

Français - 5
Panneau de configuration
Panneau avant (ou latéral)
La couleur et la forme du produit peuvent varier en fonction du modèle.
➢
1
SOURCE
Affiche un menu de toutes les sources
disponibles en entrée (
S-Vidéo, Composant, PC, HDMI1, HDMI2,
HDMI3)
Dans le menu du téléviseur, ce bouton a la
➢
même fonction que le bouton
la télécommande.
2
MENU
Permet d’afficher le menu des fonctions de
votre téléviseur sur l’écran.
3
– +
Appuyez pour augmenter ou réduire le volume.
Dans le menu affiché à l’écran, utilisez les
boutons – + de la même façon que les
boutons ◄ et ► de la télécommande.
TV, Ext.1, Ext.2, AV,
ENTER de
4
C/P.
Permet de changer de canal. Dans le menu
affiché à l’écran, utilisez les boutons
C/P. de la même façon que les
boutons ▲ et ▼ de la télécommande.
5
Témoin d’alimentation
Clignote et s’éteint lorsqu’il est sous tension et
s’allume en mode Veille.
6
Bouton (Marche/Arrêt)
Permet d’allumer et d’éteindre le téléviseur.
7
Capteur de la télécommande
Dirigez la télécommande vers ce point du
téléviseur.
8
Haut-parleur
Page 50

Français - 6
Panneau de connexion
Panneau arrière
1
5
9
ou
Télévision câblée
Réseau
ou
432
La couleur et la forme du produit peuvent varier en fonction du modèle.
➢
En cas de branchement d’un système audio ou vidéo sur le téléviseur, vérifiez que tous les
☛
appareils sont éteints.
Lorsque vous branchez un périphérique externe, faites correspondre les couleurs de la borne de
connexion et du câble.
1
POWER IN
Permet de raccorder le cordon
d’alimentation fourni.
2
COMPONENT IN
Entrées audio (AUDIO G/D) et vidéo (Y/P
pour Composant.
3
PC IN / AUDIO
Pour raccorder la prise de sortie vidéo et audio
de votre PC.
4
EXT 1, EXT 2
Entrées ou sorties pour périphériques tels que
des magnétoscopes, des lecteurs DVD, des
consoles de jeux vidéo ou des lecteurs de
vidéodisques.
Spécifications entrée/sortie
Connecteur
EXT 1
EXT 2
Entrée Sortie
Vidéo Audio (G/D) RGB
✔ ✔ ✔
✔ ✔
Vidéo + Audio (G/D)
Seule la sortie TV est
disponible.
Sortie que vous
pouvez sélectionner.
5
6
B/PR)
7
6
7
3D SYNC OUT
Connexion à un émetteur 3D IR
Connexion de périphériques audio externes
Connectez les signales audio RCA de
la TV à une source externe, telle qu’un
équipement audio.
SERVICE
− Prise pour tests.
− Branchez la prise jack série entre
l’équerre murale à commande électrique
et votre téléviseur, de manière à pouvoir
ajuster l’angle de visualisation du téléviseur
à l’aide de la télécommande.
8
Suite…
Page 51

Français - 7
8
HDMI IN 1,2
- Aucune connexion audio supplémentaire
n’est nécessaire pour une connexion HDMI
- HDMI.
- Lorsque vous utilisez une connexion avec
câble HDMI/DVI, vous devez utiliser la borne
HDMI IN2.
Qu’est-ce que HDMI ?
➢
- “High Definition Multimedia interface”
permet la transmission de données vidéo
numériques haute définition et plusieurs
canaux de son numérique.
- Le terminal HDMI/DVI prend en charge
la connexion DVI vers un périphérique
raccordé avec le câble adéquat (non
fourni). La différence entre HDMI et DVI
est que le périphérique HDMI est plus
petit, est équipé de la fonction de codage
HDCP (High Bandwidth Digital Copy
Protection), et gère le son numérique
multicanal.
Panneau latéral
1
DVI IN (HDMI 2) AUDIO R/L
Sorties audio DVI pour périphériques externes.
9
ANT IN
Connecteur coaxial 75Ω pour réseau câblé/
hertzien.
Modes pris en charge pour HDMI/DVI et
Composant
480i 480p 576i 576p 720p 1080i
HDMI/DVI 50Hz
HDMI/DVI 60Hz
Composant O O O O O O
X X X O O O
X O X X O O
2
La couleur et la forme du produit peuvent varier en fonction du modèle.
➢
1 HDMI IN 3
A connecter à la prise HDMI d’un périphérique
équipé d’une sortie HDMI.
2 S-VIDEO ou VIDEO / AUDIO L/R
Entrées audio et vidéo (S-Vidéo ou Vidéo) pour
périphériques externes, tels qu’un caméscope
ou un magnétoscope.
ou
Français - 7
3 Prise casque
Vous pouvez brancher un casque si vous
souhaitez regarder la télévision sans déranger
les autres personnes présentes dans la pièce.
➢
3
L’utilisation prolongée d’un casque à un
niveau sonore élevé peut endommager
l’ouïe.
Page 52

Français - 8
Présentation de la télécommande
1
Bouton POWER (permet
d’allumer et d’éteindre le
téléviseur)
2
Sélectionne directement le
mode TV
3
Pavé numérique pour
l’accès direct aux canaux
4
Sélection de canaux à 1 ou
2 chiffres
5
Suppression temporaire du
son
6
Augmentation du volume
Réduction du volume
7 Bouton Channel control
(Reportez-vous à la page 15)
8
Permet de sélectionner
rapidement les fonctions
fréquemment utilisées.
9
Permet de commander le
curseur dans le menu
0
Permet d’afficher les
informations relatives au
programme en cours
#
Permet de sélectionner
l’affichage et les modes son
en option pour le sport, le
cinéma et les jeux.
$
Fonctions du magnétoscope/
lecteur DVD (retour en
arrière, arrêt, lecture/pause,
%
Sélection de la source
disponible
^
Canal précédent
&
Canal suivant
Canal précédent
*
Affiche le menu principal à
l’écran
( Bouton TruSurround XT mode
)
Revient au menu précédent
a
Permet de quitter le menu
affiché à l’écran
b
Sélection de la taille de
l’image
c
Utilisez ce paramètre
lorsque vous connectez un
appareil SAMSUNG DMA
(Digital Media Adapter)
via une interface HDMI et
basculez en mode DMA. (Le
bouton DMA est en option.)
Pour plus d’informations
sur les procédures de
fonctionnement, reportezvous au manuel d’utilisation
de l’appareil DMA. Ce
bouton est disponible si la
fonction “Anynet+ (HDMI-
CEC)” est “Marche” (voir
page 33).
d
Sélection de l'effet d'image
(reportez-vous à la page 18)
e
Permet de regarder des films
et de jouer en trois dimensions
avec des lunettes 3D.
Fonctions télétexte
(Reportez-vous à la page 36)
2
Permet de quitter l’affichage
télétexte (en fonction du
modèle)
7
Mémorisation du télétexte
8
Taille du télétexte
0
Activation du télétexte
!
Sélection des rubriques
Fastext
@
Affichage télétexte/
informations relatives au
télétexte et programme
normal
%
Sélection du mode Télétexte
(LIST/FLOF)
^
Page télétexte secondaire
&
P :Page télétexte
suivante
P
:Page télétexte
précédente
*
Index du télétexte
)
Pause télétexte
a
Annulation du télétexte
Suite…
Page 53

Français - 9
Insertion des piles dans la télécommande
1 Soulevez le couvercle situé à l’arrière de la télécommande
comme indiqué sur la figure.
2 Placez deux piles AAA.
Assurez-vous de faire correspondre les bornes “+”
➢
et “
-” des piles avec le schéma situé à l’intérieur du
compartiment.
Ne mélangez pas les types de piles, par exemple une
pile alcaline et une pile manganèse.
3 Refermez le couvercle comme indiqué sur la figure.
Retirez les piles et stockez-les dans un endroit frais
➢
et sec si vous n’utilisez pas la télécommande pendant
longtemps. La télécommande peut être utilisée jusqu’à environ 7 mètres du téléviseur. Dans des
conditions d’utilisation normale du téléviseur, les piles durent environ un an.
Si la télécommande ne fonctionne pas Vérifiez les éléments suivants:
➢
1. Le téléviseur est-il sous tension?
2. Les bornes + et - des piles ne sont-elles pas inversées?
3. Les piles sont-elles déchargées ?
4. Le cordon d’alimentation est-il débranché ou y a-t-il une panne de courant?
5. Une lampe fluorescente ou néon est-elle allumée à proximité?
Mise en marche et arrêt de votre téléviseur
Le câble secteur est fixé à l’arrière du téléviseur.
1 Branchez la prise mâle du câble secteur à une prise femelle appropriée.
La tension électrique principale est indiquée à l’arrière du téléviseur et la fréquence est de
➢
50 ou 60 Hz.
2 Appuyez sur le bouton (Alimentation) (Marche/Arrêt) placé en façade du téléviseur ou sur le
bouton
POWER de la télécommande pour allumer le téléviseur. Le dernier programme que vous
avez regardé est automatiquement sélectionné. Si vous n’avez encore mémorisé aucune chaîne,
aucune image nette n’apparaît. Reportez-vous à la section “Mémorisation automatique des canaux”,
page 13, ou à la section “Mémorisation manuelle des canaux”, page 14.
Lorsque le téléviseur est allumé pour la première fois, plusieurs réglages de base sont exécutés
➢
automatiquement. Reportez-vous à la section “Fonction - Plug & Play”, page 10.
3 Pour éteindre le téléviseur, appuyez sur le bouton (Marche/Arrêt) sur la façade du téléviseur ou
sur le bouton
4 Pour mettre en marche le téléviseur, appuyez sur le bouton (Marche/Arrêt) sur la façade du
téléviseur ou sur le bouton
POWER de votre télécommande.
POWER ou les boutons numériques de votre télécommande.
Affichage des menus
1 Appuyez sur le bouton MENU.
Le menu principal s’affiche à l’écran.
Six icônes s’affichent sur la gauche:
Configuration, Entrée.
2 Appuyez sur le bouton ▲ ou ▼ pour sélectionner l’une des
icônes.Appuyez ensuite sur
menu de l’icône.
3 Appuyez sur le bouton ▲ ou ▼ pour vous déplacer dans le
menu.Appuyez sur le bouton
éléments du menu.
4 Appuyez sur le bouton ▲/▼/◄/► pour modifier les éléments
sélectionnés. Appuyez sur le bouton
menu précédent.
5 Appuyez sur le bouton EXIT pour quitter le menu.
Image, Son, Canal,
ENTER pour accéder au sous-
ENTER pour entrer dans les
RETURN pour revenir au
T V
Mode :
Luminosité des cellules
Contraste 95
Luminosité 45
Netteté 50
Couleur 50
Teinte V50 R50
Réglages des détails
Options d’image
Réinitialiser : OK
Déplacer
Image
Standard
7
Entrer
Quitter
Page 54

Français - 10
Fonction Plug & Play
Lorsque vous allumez le téléviseur pour la première fois,
plusieurs réglages de base s’effectuent l’un après l’autre de
manière automatique.
Les réglages disponibles sont les suivants:
Si vous sélectionnez par erreur un pays incorrect pour votre
☛
téléviseur, il se peut que les caractères affichés à l’écran soient
incorrects.
1 Si le téléviseur est en mode Veille, appuyez sur le bouton
POWER de la télécommande. Le message Démarrer Plug &
Play s’affiche Appuyez sur le bouton ENTER.
2 Le menu Langue s’affiche automatiquement après quelques
secondes.
3 Sélectionnez la langue appropriée en appuyant de façon
répétée sur le bouton ▲ ou ▼. Appuyez sur le bouton ENTER.
Le message
Sélectionner "Util. domicile" pour installation à
domicile. s’affiche.
4 Appuyez sur le bouton ◄ ou ► pour sélectionner Enr. démo ou
Util. domicile, puis appuyez sur le bouton ENTER. Un message
s’affiche, vous demandant de vérifier l’état de connexion de l’antenne.
La sélection par défaut est Util. domicile.
➢
Nous vous recommandons de régler la télévision sur le
➢
mode
Util. domicile pour une meilleure qualité d'image
dans votre environnement personnel.
Le mode Enr. démo n’est prévu que pour un usage en
➢
magasins.
Si l’unité est accidentellement définie sur mode Enr. démo et
➢
que vous souhaitez revenir au mode
Util. domicile (Standard):
appuyez sur le bouton Volume. Lorsque l’OSD du volume
s’affiche, appuyez pendant 5 secondes sur le bouton
MENU.
5 Avvous que l’antenne est branchée au téléviseur.
Appuyez sur le bouton
ENTER. Le menu Pays s’affiche.
6 Sélectionnez votre pays ou zone en appuyant sur le bouton
▲ ou ▼. Appuyez sur le bouton ENTER.
Plug & Play
Démarrer Plug & Play
OK
Langue
Déplacer
Sélectionner "Util. domicile" pour
installation à domicile.
Déplacer
Pays
Déplacer
Entrer
Plug & Play
English
Deutsch
Français
Italiano
▼
Entrer
Plug & Play
Enr. démo
Vérifier l’entrée de l’antenne.
Entrer
Plug & Play
OK
Entrer
Plug & Play
Belgique
France
Allemagne
Italie
Autres
Entrer
Util. domicile
Ignorer
Ignorer
Plug & Play
P 1 C -- 40 MHz
0 %
Démarrer
Entrer
Ignorer
Suite…
Page 55

Français - 11
7 Appuyez sur le bouton ENTER pour démarrer la recherche des
canaux. La recherche de canaux démarrera et se terminera
automatiquement. Une fois que tous les canaux disponibles sont
mémorisés, le menu
Appuyez sur le bouton
Pour arrêter la recherche avant la fin, appuyez sur le bouton
➢
ENTER après avoir sélectionné Arrêter.
Réglage Horloge s’affiche automatiquement.
ENTER.
8 Appuyez sur le bouton ◄ ou ► pour sélectionner Mois, Date,
Année, Heure ou Minute. Réglez ces éléments en appuyant sur le
bouton ▲ ou ▼.
Vous pouvez régler directement les valeurs Mois, Date,
➢
Année, Heure et Minute en appuyant sur les touches
numériques de la télécommande.
9 Appuyez sur le bouton ENTER pour confirmer votre réglage. Le
message
Profitez de votre visionnage s’affiche. Lorsque vous
avez terminé, appuyez sur le bouton
Même sans pression sur le bouton ENTER, le message
➢
disparaît automatiquement après quelques secondes.
ENTER.
Si vous souhaitez réinitialiser ce paramètre…
1 Appuyez sur le bouton MENU pour afficher le menu.
2 Appuyez sur le bouton ▲ ou ▼ pour sélectionner Configuration,
puis appuyez sur le bouton
3 Appuyez de nouveau sur le bouton ENTER pour sélectionner
Plug & Play.
le mode
Le message
Démarrer Plug & Play s’affiche.
ENTER.
Réglage Horloge
Mois Date Année Heure
01 01
T V
Plug & Play
2008
Déplacer
Plug & Play
Langue : Français
Horloge
Effet lumineux
Ajustement fixation murale
Mélodie : Arrêt
Loisirs :
Mode éco. : Arrêt
PIP
00
Régler
Profitez de votre visionnage
OK
Configuration
: LED act. marche
Déplacer
Minute
04
Entrer
Arrêt
Entrer
Retour
Page 56

Français - 12
Utilisation du bouton TOOLS
Vous pouvez utiliser le bouton TOOLS pour sélectionner simplement et rapidement les fonctions que
vous utilisez le plus souvent. Le menu Outils change en fonction du mode d’entrée externe affiché.
1 Appuyez sur le bouton TOOLS.
Le menu
Outils s’affiche.
2 Appuyez sur le bouton ▲ ou ▼ pour sélectionner un enu, puis
appuyez sur le bouton
ENTER.
3 Appuyez sur le bouton ▲/▼/◄/►/ENTER pour afficher,
modifier ou utiliser les éléments sélectionnés.
Anynet+ (HDMI-CEC)
Mode Image
Mode Son : Personnalisé
Veille : Arrêt
SRS TS XT : Arrêt
Mode éco. : Arrêt
Dual I-II : Mono
Pour une description plus détaillée de chaque fonction,
Outils
t Régler
:
Standard
QuitterDéplacer
reportez-vous à la page correspondante.
• Anynet+(HDMI-CEC), voir page 32
• Mode Image, voir page 18
• Mode Son, voir page 25
• Veille, voir page 27
• SRS TS XT, voir page 25
• Mode éco, voir page 29
• Dual I-II, voir page 26
Visualisation d’une source de signal externe
Vous pouvez alterner la visualisation des signaux provenant
T V
des appareils branchés, tels qu’un magnétoscope, un lecteur
de DVD, un décodeur et une source TV (antenne ou câble).
1 Appuyez sur le bouton MENU pour afficher le menu.
2 Appuyez sur le bouton ▲ ou ▼ pour sélectionner Entrée, puis
appuyez sur le bouton
ENTER.
3 Appuyez de nouveau sur le bouton ENTER pour sélectionner
Liste Source.
4 Appuyez sur le bouton ▲ ou ▼ pour sélectionner la source de
signal désirée, puis appuyez sur le bouton
Sources de signal disponibles:
TV, Ext.1, Ext.2, AV, S-Vidéo
ENTER.
T V
Composant, PC, HDMI1, HDMI2 , HDMI3.
Vous ne pouvez sélectionner que les appareils externes
➢
connectés au téléviseur.
Vous pouvez sélectionner ces options en appuyant sur le
➢
bouton
SOURCE de la télécommande.
Liste Source : TV
Modif. Nom
Anynet+ (HDMI-CEC)
TV
Ext.1 : −−−−
Ext.2 : −−−−
AV : −−−−
S-Vidéo : −−−−
Composant : −−−−
PC : −−−−
HDMI1 : −−−−
HDMI2 : −−−−
HDMI3 : −−−−
Déplacer
Déplacer
Entrée
Entrer
Liste Source
Entrer
Retour
Retour
Pour regarder à nouveau les programmes de télévision,
➢
appuyez sur le bouton
TV et sélectionnez le numéro de canal
désiré.
Page 57

Français - 13
Modification du nom des périphériques
Vous pouvez modifier le nom de la source externe.
T V
1 Appuyez sur le bouton MENU pour afficher le menu.
2 Appuyez sur le bouton ▲ ou ▼ pour sélectionner Entrée, puis
appuyez sur le bouton
ENTER.
3 Appuyez sur le bouton ▲ ou ▼ pour sélectionner Modif. Nom,
puis appuyez sur le bouton
ENTER.
4 Appuyez sur le bouton ▲ ou ▼ pour sélectionner la source
externe à modifier, puis appuyez sur le bouton
5 Sélectionnez le périphérique désiré en appuyant sur le bouton
▲ ou ▼, puis appuyez sur le bouton ENTER.
Noms de périphérique disponibles :
Magnétoscope, DVD,
ENTER.
T V
Décodeur Câble, Décodeur satellite, Décodeur PVR,
Récepteur AV, Jeu, Caméscope, PC, TV, IPTV, Blu-Ray,
HD DVD, DMA.
6 Appuyez sur le bouton EXIT pour quitter le menu.
Mémorisation automatique des canaux
Vous pouvez chercher les plages de fréquence disponibles
par balayage (leur disponibilité dépend de votre pays).
Il est possible que les numéros de programme attribués
automatiquement ne correspondent pas aux numéros de
programme souhaités ou réels. Vous pouvez toutefois trier les
numéros manuellement et supprimer les canaux que vous ne
souhaitez pas regarder.
1 Appuyez sur le bouton MENU pour afficher le menu.
2 Appuyez sur le bouton ▲ ou ▼ pour sélectionner Canal, puis
appuyez sur le bouton
ENTER.
3 Appuyez sur le bouton ENTER. Les pays disponibles
apparaissent sous la forme d’une liste.
4 Sélectionnez votre pays à l’aide du bouton ▲ ou ▼, puis
appuyez sur le bouton
5
Appuyez sur le bouton ▲ ou ▼ pour sélectionner
ENTER.
Mémorisation Auto, puis appuyez sur le bouton ENTER.
6 Appuyez sur le bouton ENTER pour démarrer la recherche.
La recherche s’arrête automatiquement.
Pour arrêter la recherche avant la fin, appuyez sur le
➢
bouton
MENU ou ENTER.
T V
T V
Liste Source : TV
Modif. Nom
Anynet+ (HDMI-CEC)
Ext.1 :
Ext.2 : −−−−
AV :
S-Vidéo :
Composant : −−−−
PC : −−−−
HDMI1 : −−−−
HDMI2 :
HDMI3 :
Pays : France
Mémorisation Auto
Mémorisation Manuelle
Gestionnaire de Chaînes
Tri des canaux
Nom station
Réglage fin
Pays :
Mémorisation Auto
Mémorisation Manuelle
Gestionnaire de Chaînes
Tri des canaux
Nom station
Réglage fin
P 1 C -- 40 MHz
0 %
Entrée
Déplacer
Entrer
Modif. Nom
−−−−
Déplacer
Entrer
Canal
Déplacer
Entrer
Canal
France
Déplacer
Entrer
Mémorisation Auto
Démarrer
Entrer
Retour
−−−−
Magnétoscope
DVD
Décodeur Câble
Décodeur satellite
Décodeur PVR
Récepteur AV
Jeu
▼
Retour
Belgique
France
Allemagne
Italie
Pays-Bas
Espagne
Suisse
Royaume-Uni
▼
Retour
Retour
Retour
Page 58

Français - 14
Mémorisation manuelle des canaux
Vous pouvez mémoriser les canaux de télévision, y compris
ceux reçus via les réseaux câblés.
Lors de la mémorisation manuelle des canaux, vous pouvez
choisir :
de mémoriser ou non chaque canal trouvé;
le numéro du programme qui vous servira à identifier chaque
T V
Pays :
Mémorisation Auto
Mémorisation Manuelle
Gestionnaire de Chaînes
Tri des canaux
Nom station
Réglage fin
Canal
France
canal mémorisé.
Déplacer
1 Appuyez sur le bouton MENU pour afficher le menu.
2 Appuyez sur le bouton ▲ ou ▼ pour sélectionner Canal, puis
appuyez sur le bouton
ENTER.
3 Appuyez sur le bouton ▲ ou ▼ pour sélectionner
Mémorisation Manuelle, puis appuyez sur le bouton ENTER.
4 Sélectionnez l’option désirée en appuyant sur le bouton
T V
Programme :
Système de Couleur
Système Sonore : BG
Canal : C 6
Recherche : 175 MHz
Mémoriser : ?
Entrer
Mémorisation Manuelle
P 1
: Auto.
▲ ou ▼, puis appuyez sur le bouton ENTER.
5 Lorsque vous êtes satisfait du réglage, appuyez sur le bouton
ENTER.
Déplacer
Entrer
6 Appuyez sur le bouton EXIT pour quitter le menu.
Programme (numéro de programme à attribuer à une chaîne)
− Appuyez sur le bouton ▲ ou ▼ jusqu’à ce que vous trouviez le numéro correct.
Vous pouvez également sélectionner le numéro de canal directement en appuyant sur le
➢
pavé numérique (0~9).
Système de Couleur: Auto./PAL/SECAM/NTSC 4.43
− Appuyez sur le bouton ▲ ou ▼ pour sélectionner la norme de couleurs désirée.
Système Sonore: BG/DK/I/L
− Appuyez sur le bouton ▲ ou ▼ pour sélectionner la norme audio désirée.
Canal (si vous connaissez le numéro de la chaîne à mémoriser)
− Appuyez sur le bouton ▲ ou ▼ pour sélectionner
C (canal hertzien) ou S (canal câblé).
− Appuyez sur le bouton ► , puis sur le bouton ▲ ou ▼ pour sélectionner le numéro de votre
choix.
Vous pouvez également sélectionner le numéro de canal directement en appuyant sur le
➢
pavé numérique (0~9).
S’il n’y a aucun son ou si le son est anormal, re-sélectionnez la norme son désirée.
➢
Recherche (lorsque vous ne connaissez pas les numéros de chaîne)
− Appuyez sur le bouton ▲ ou ▼ pour démarrer la recherche.
− Le syntoniseur balaie la plage de fréquences jusqu’à ce que vous receviez la première chaîne
ou la chaîne que vous avez sélectionnée à l’écran.
Mémoriser (permet de mémoriser la chaîne et le numéro de programme correspondant)
− Sélectionnez
Mode Canal
☛
OK en appuyant sur le bouton ENTER.
P (Mode Programme): A la fin du réglage, des numéros de position compris entre P00 et
P99 sont attribués aux stations de radiodiffusion de votre zone. Dans ce mode, vous pouvez
sélectionner un canal en saisissant son numéro de position.
C (mode chaîne hertzienne): dans ce mode, vous pouvez sélectionner un canal en saisissant
le numéro attribué à chacune des stations de télédiffusion.
S (mode chaîne câblée): dans ce mode, vous pouvez sélectionner un canal en saisissant le
numéro attribué à chacun des canaux câblés.
Retour
Retour
Page 59

Français - 15
Ajout/verrouillage de canaux
A l’aide de la fonction Gestionnaire de Chaînes, vous pouvez
aisément verrouiller ou ajouter des canaux.
1 Appuyez sur le bouton MENU pour afficher le menu.
2 Appuyez sur le bouton ▲ ou ▼ pour sélectionner Canal, puis
appuyez sur le bouton
ENTER.
3 Appuyez sur le bouton ▲ ou ▼ pour sélectionner
T V
Pays :
Mémorisation Auto
Mémorisation Manuelle
Gestionnaire de Chaînes
Tri des canaux
Nom station
Réglage fin
Gestionnaire de Chaînes, puis appuyez sur le bouton
ENTER.
Ajout de canaux
A l’aide de la fonction Liste des chaînes, vous pouvez
aisément ajouter des canaux.
T V
Déplacer
Gestionnaire de Chaînes
Liste des chaînes
Verrouillage Parental
4 Sélectionnez Liste des chaînes en appuyant sur le bouton
ENTER.
5 Passez au champ ( ) en appuyant sur les boutons
▲/▼/◄/►, sélectionnez un canal à ajouter et appuyez sur le
bouton ENTER pour l’ajouter.
Déplacer
Si vous appuyez à nouveau sur le bouton ENTER, le
➢
symbole (
) à côté du canal disparaît et le canal n’est
pas ajouté.
Verrouillage de canaux
Cette fonction, qui bloque la vidéo et coupe le son, vous permet
d’éviter toute utilisation non autorisée, par des enfants par exemple,
qui pourraient visionner des programmes ne leur étant pas destinés.
6 Appuyez sur le bouton ▲ ou ▼ pour sélectionner Verrouillage
Parental, puis appuyez sur le bouton ENTER.
7 Sélectionnez Marche en appuyant sur le bouton ▲ ou ▼, puis
appuyez sur le bouton
ENTER.
8 Appuyez sur le bouton ▲ ou ▼ pour sélectionner Liste des chaînes,
puis appuyez sur le bouton
ENTER.
P 1 C 6
Prog.
0
C 1
1 C 6
2 C 5
3 C 8
4 C 11
5 C 22
6 C 26
7 C 36
8 C 52
9 C 24
Ajouter Verrouil.
Déplacer Entrer
Page
9 Passez au champ ( ) en appuyant sur les boutons ▲/▼/◄/►,
sélectionnez un canal à verrouiller et appuyez sur le bouton
Si vous appuyez à nouveau sur le bouton ENTER, le symbole ( ) à côté du canal disparaît et
➢
le verrouillage du canal est annulé.
Un écran bleu s’affiche lorsque le verrouillage parental est activé.
➢
ENTER pour l’ajouter.
10 Appuyez sur le bouton EXIT pour quitter le menu.
Vous pouvez sélectionner ces options en appuyant sur le
➢
bouton
CH LIST de la télécommande.
Canal
France
Entrer
: Arrêt
Entrer
Liste des chaînes
Retour
Retour
Retour
1 / 10
▲
▼
Page 60

Français - 16
Organisation des canaux mémorisés
Cette opération vous permet de changer les numéros de
programme des canaux mémorisés.
T V
Cette opération peut s’avérer nécessaire après l’utilisation de
la mémorisation automatique.
1 Appuyez sur le bouton MENU pour afficher le menu.
2 Appuyez sur le bouton ▲ ou ▼ pour sélectionner Canal, puis
appuyez sur le bouton
ENTER.
3 Appuyez sur le bouton ▲ ou ▼ pour sélectionner Tri des
canaux, puis appuyez sur le bouton ENTER.
4 Sélectionnez le canal que vous voulez déplacer en appuyant
sur le bouton ▲ ou ▼, puis appuyez sur le bouton ENTER.
5 Sélectionnez le numéro du programme à attribuer au canal en
appuyant sur le bouton ▲ ou ▼.
Appuyez sur le bouton
ENTER. La chaîne est déplacée
vers sa nouvelle position et toutes les autres chaînes sont
replacées en conséquence.
6 Répétez les étapes 4 à 5 jusqu’à ce que vous ayez déplacé
tous les canaux vers les numéros de programme de votre
choix.
7 Appuyez sur le bouton EXIT pour quitter le menu.
Attribution de noms aux canaux
Les noms de canaux sont attribués automatiquement lorsque
des informations sur les canaux sont diffusées. Ces noms
peuvent être modifiés, ce qui vous permet d’attribuer ceux de
votre choix.
1 Appuyez sur le bouton MENU pour afficher le menu.
2 Appuyez sur le bouton ▲ ou ▼ pour sélectionner Canal, puis
appuyez sur le bouton
ENTER.
3 Appuyez sur le bouton ▲ ou ▼ pour sélectionner Nom
station, puis appuyez sur le bouton ENTER.
4 Appuyez sur le bouton ▲ ou ▼ pour sélectionner le canal à
renommer, puis appuyez sur le bouton
ENTER.
5 Appuyez sur le bouton ▲ ou ▼ pour sélectionner une lettre, un
chiffre ou un symbole (les caractères s’affichent dans l’ordre
suivant : A~Z, 0~9, +, -, *, /, blanc).
Passez à la lettre précédente ou suivante en appuyant sur le
bouton ◄ ou ►, puis appuyez sur le bouton ENTER.
6 Répétez les étapes 4 à 5 pour chaque canal auquel un
nouveau nom doit être attribué.
7 Appuyez sur le bouton EXIT pour quitter le menu.
T V
Pays :
Mémorisation Auto
Mémorisation Manuelle
Gestionnaire de Chaînes
Tri des canaux
Nom station
Réglage fin
Déplacer
T V
T V
Tri des canaux
Prog. Ch. Nom station
▲
0 C- - −−−−−
1 C04 −−−−−
2 C05 −−−−−
3 C08 −−−−−
4 C09 −−−−−
5 C11 −−−−−
6 C13 −−−−−
7 C15 −−−−−
8 C17 −−−−−
9 C18 −−−−−
▼
Déplacer
Pays :
Mémorisation Auto
Mémorisation Manuelle
Gestionnaire de Chaînes
Tri des canaux
Nom station
Réglage fin
Déplacer
Nom station
Prog.
Can.
▲
0 C- - −−−−−
1 C04 −−−−−
2 C05 −−−−−
3 C08 −−−−−
4 C09 −−−−−
5 C11 −−−−−
6 C13 −−−−−
7 C15 −−−−−
8 C17 −−−−−
9 C18 −−−−−
▼
Déplacer
Canal
France
Entrer
Entrer
Canal
France
Entrer
Nom station
Entrer
Retour
Retour
Retour
Retour
Page 61

Français - 17
Réception nette des canaux grâce au réglage fin
Si la réception est nette, vous n’avez pas besoin d’effectuer
un réglage fin du canal, car cette opération s’effectue
automatiquement pendant la recherche et la mémorisation.
Si le signal est faible ou déformé, vous pouvez être amené à
effectuer manuellement un réglage fin du canal.
1 Appuyez sur le bouton MENU pour afficher le menu.
2 Appuyez sur le bouton ▲ ou ▼ pour sélectionner Canal, puis
appuyez sur le bouton
ENTER.
3 Appuyez sur le bouton ▲ ou ▼ pour sélectionner Réglage fin,
puis appuyez sur le bouton
ENTER.
4 Pour obtenir une image nette et claire ainsi qu’une bonne
qualité sonore, appuyez sur le bouton ◄ ou ► pour parvenir
au réglage optimal. Appuyez sur le bouton
Appuyez sur le bouton INFO. La mémorisation de
➢
syntonisation fine fait passer la couleur de l’OSD
ENTER.
(affichage à l’écran) des canaux du blanc au rouge et
ajoute la marque “*”.
Pour ramener le réglage fin à 0, sélectionnez Réinitial. en
➢
appuyant sur le bouton ▲ ou ▼. Appuyez sur le bouton
ENTER.
5 Appuyez sur le bouton EXIT pour quitter le menu.
T V
Pays :
Mémorisation Auto
Mémorisation Manuelle
Gestionnaire de Chaînes
Tri des canaux
Nom station
Réglage fin
P 1
Régler
P 1 *
Mono
Image : Standard
Son : Personnalisé
SRS TS XT : Arrêt
:
−−
−−
Déplacer
Réglage fin
Réinitial.
Sauveg.
Canal
Entrer
France
Retour
+3
Retour
Page 62

Français - 18
Changement de la norme Image
Vous pouvez sélectionner le type d’image qui correspond le
mieux à vos exigences d’affichage.
1 Appuyez sur le bouton MENU pour afficher le menu.
2 Appuyez sur le bouton ENTER pour sélectionner Image.
3 Appuyez de nouveau sur le bouton ENTER pour sélectionner
Mode.
T V
Mode :
Luminosité des cellules
Contraste 95
Luminosité 45
Netteté 50
Couleur 50
Teinte V50 R50
Réglages des détails
Options d’image
Réinitialiser : OK
Image
Standard
4 Sélectionnez le mode désiré en appuyant sur le bouton ▲ ou ▼,
puis appuyez sur le bouton
Modes disponibles:
La valeur des paramètres peut varier en fonction de la
➢
source d’entrée.
5 Appuyez sur le bouton EXIT pour quitter le menu.
Pour regarder la télévision pendant la journée ou lorsque
➢
la pièce est très éclairée, choisissez
Choisissez Standard pour regarder la télévision dans des
conditions normales.
Si vous regardez un film, choisissez Cinéma.
Réglages simples
1 Appuyez sur le bouton TOOLS de la télécommande.
2 Appuyez sur le bouton ▲ ou ▼ pour sélectionner le mode
Image.
3 Appuyez sur le bouton ◄ ou ► pour sélectionner l’option de
votre choix.
ENTER.
Dynamique, Standard, Cinéma
Dynamique.
Déplacer
Entrer
Anynet+ (HDMI-CEC)
Mode Image ◄ Standard ►
Mode Son : Personnalisé
Veille : Arrêt
SRS TS XT : Arrêt
Mode éco. : Arrêt
Dual I-II : Mono
Déplacer
Outils
Image
Régler
Mode : Standard
Luminosité des cellules
Contraste 95
Luminosité 45
Netteté 50
Couleur 50
Teinte G50 R50
Réglages des détails
Options d’image
Réinitialiser : OK
Retour
Dynamique
7
Standard
Cinéma
Entrer
Retour
QuitterDéplacer
Personnalisation des paramètres d’image
Votre téléviseur dispose de plusieurs options qui vous
permettent de régler la qualité de l’image.
1 Appuyez sur le bouton MENU pour afficher le menu.
2 Appuyez sur le bouton ENTER pour sélectionner Image.
3 Appuyez de nouveau sur le bouton ENTER pour sélectionner
Mode.
4 Sélectionnez le mode désiré en appuyant sur le bouton ▲ ou
▼, puis appuyez sur le bouton ENTER.
Modes disponibles:
Dynamique, Standard, Cinéma
T V
Mode :
Luminosité des cellules
Contraste 95
Luminosité 45
Netteté 50
Couleur 50
Teinte V50 R50
Réglages des détails
Options d’image
Réinitialiser : OK
5 Sélectionnez l’option désirée en appuyant sur le bouton ▲ ou ▼, puis appuyez sur le bouton ENTER.
6 Lorsque vous êtes satisfait du réglage, appuyez sur le bouton ENTER.
7 Appuyez sur le bouton EXIT pour quitter le menu.
Luminosité des cellules - Contraste – Luminosité – Netteté – Couleur – Teinte
En mode TV, Ext., AV, S-Vidéo et Analogique du système PAL, vous ne pouvez pas utiliser la
➢
fonction Teinte.
En mode PC, vous ne pouvez modifier que les options Luminosité des cellules, Contraste et
➢
Luminosité.
Appuyez sur le bouton ◄ ou ► pour parvenir au réglage optimal.
Déplacer
Image
Standard
7
Entrer
Retour
7
Page 63

Français - 19
Réglages des détails de l’image
Vous pouvez configurer des réglages détaillés de l’image.
1 Appuyez sur le bouton MENU pour afficher le menu.
2 Appuyez sur le bouton ENTER pour sélectionner Image.
3 Appuyez sur le bouton ▲ ou ▼ pour sélectionner Réglages des
détails, puis appuyez sur le bouton ENTER.
4 Sélectionnez l’option désirée en appuyant sur le bouton ▲ ou ▼, puis
appuyez sur le bouton
Options disponibles:
Espace de couleur, Balance blancs, Carnation, Amélioration bords
ENTER.
Réglage des noirs, Contraste Dynam., Gamma,
5 Lorsque vous êtes satisfait du réglage, appuyez sur le bouton ENTER.
6 Appuyez sur le bouton EXIT pour quitter le menu.
Le menu Réglage des détails est disponible dans les modes
➢
Standard ou Cinéma.
En mode PC, vous ne pouvez modifier que les options Contraste
➢
Dynam., Gamme et Balance blancs dans le menu Réglages des
détails.
Réglage des noirs: Arrêt/Bas/Moyen/Elevé
Vous pouvez directement choisir le niveau de noir sur l’écran pour
régler la profondeur de l’écran.
Contraste Dynam.: Arrêt/Bas/Moyen/Elevé
Vous pouvez régler le contraste de l’écran pour obtenir un contraste
optimal.
T V
Mode :
Luminosité des cellules
Contraste 95
Luminosité 45
Netteté 50
Couleur 50
Teinte V50 R50
Réglages des détails
Options d’image
Réinitialiser : OK
T V
Réglage des noirs :
Contraste Dynam. : Moyen
Gamma : 0
Espace de couleur : Natif
Balance blancs
Carnation : 0
Amélioration bords
Gamma: -3 ~ +3
Vous pouvez régler la luminosité moyenne des images. Appuyez sur le bouton ◄ ou ► pour parvenir au réglage
optimal.
Espace de couleur: Auto./Natif/Personnalisé
L’espace de couleur est une matrice de couleurs composée de rouge, de vert et de bleu.
Sélectionnez votre espace de couleur préféré et appréciez la couleur la plus naturelle..
− Auto. : l’espace de couleur auto règle automatiquement la nuance de couleur naturelle basée sur les images
sources.
Natif: l’espace de couleur natif offre une nuance de couleur foncée et riche.
−
− Personnalisé: rège la gamme de couleurs en fonction de vos préférences (voir « Personnalisation de l’espace
de couleur »)
Personnalisation de l’espace de couleur
Couleur: Rouge/Vert/Bleu/Jaune/Cyan/Magenta
Permet de régler la gamme de couleurs en fonction de vos préférences
Couleur est disponible lorsque Espace de couleur est défini sur Personnalisé.
Appuyez sur le bouton▲ ou ▼ pour sélectionner Rouge, Vert, Bleu, Jaune, Cyan ou Magenta.
Appuyez sur le bouton
Rouge / Vert / Bleu: Dans Couleur, vous pouvez régler les valeurs RGB pour la couleur sélectionnée.
−
Appuyez sur le bouton ▲ ou ▼ pour sélectionner
ENTER.
Rouge, Vert, Bleu. Appuyez sur le bouton ENTER.
Appuyez sur le bouton ◄ ou ► pour diminuer ou augmenter la valeur d’un élément spécifique.
Appuyez sur le bouton
Réinitialiser: rétablit les valeurs par défaut de l’espace de couleur.
−
ENTER.
Balance blancs: Aj. Rouge/Aj. Vert/Aj. Bleu/Regl. Rouge/Regl. vert/Regl. bleu/Réinitialiser
Vous pouvez régler la température des couleurs pour que celles-ci soient plus naturelles.
Aj. Rouge/Aj. Vert/Aj. Bleu/Regl. Rouge/Regl. vert/Regl. bleu: la modification des valeurs de réglage permet
d’actualiser l’écran que vous venez de retoucher. Sélectionnez l’option désirée en appuyant sur le bouton ▲
ou ▼, puis appuyez sur le bouton ENTER. Appuyez sur le bouton ◄ ou ► pour parvenir au réglage optimal.
Réinitialiser: La balance des blancs réglée précédemment est ramenée à sa valeur par défaut.
Carnation:-15~+15
Vous pouvez accentuer la nuance rose de l’image.
Appuyez sur le bouton ◄ ou ► pour obtenir le réglage qui convient.
La modification des valeurs de réglage permet d’actualiser l’écran que vous venez de retoucher.
➢
Amélioration bords: Marche/Arrêt
Vous pouvez faire ressortir la bordure des objets.
Image
Déplacer
Entrer
Réglages des détails
: Marche
Déplacer
Entrer
Standard
Retour
Arrêt
Retour
7
Page 64

Français - 20
Options d’image
Vous pouvez configurer des réglages détaillés de l’image.
1
Appuyez sur le bouton MENU pour afficher le menu.
2 Appuyez sur le bouton ENTER pour sélectionner Image.
3 Appuyez sur le bouton ▲ ou ▼ pour sélectionner Options
d’image , puis appuyez sur le bouton ENTER.
4 Sélectionnez l’option désirée en appuyant sur le bouton
▲ ou ▼, puis appuyez sur le bouton ENTER.
5 Lorsque vous êtes satisfait de la configuration, appuyez sur le
ENTER.
bouton
6 Appuyez sur le bouton EXIT pour quitter le menu.
En mode PC, vous ne pouvez modifier que les options “Nuance
➢
Coul.”, “Taille” et “Protection brûlure écran” dans le menu
“Options d’image”.
Nuance Coul.: Froide2/Froide1/Normal/Chaude1/Chaude2
Lorsque le mode Image est réglé sur Dynamique ou
➢
Standard, les valeurs Chaude1 et Chaude2 ne peuvent pas
être sélectionnées.
Taille: 16/9 auto/16:9/Zoom large/Zoom/4:3/Scan uniquement
Vous pouvez sélectionner la taille d’image qui correspond le mieux
à vos besoins d’affichage.
− 16/9 auto: Agrandissement et adaptation de l’image du format
4:3 au format 16:9.
− 16:9: Règle l’image en mode Large, c’est-à-dire en 16:9.
T V
Mode : Standard
Luminosité des cellules
Contraste 95
Luminosité 45
Netteté 50
Couleur 50
Teinte V50 R50
Réglages des détails
Options d’image
Réinitialiser : OK
T V
Nuance Coul.
Taille : 16/9 auto
Mode écran : 16:9
NR numérique
100 Hz réel Démo : Arrêt
DNle : Arrêt
Niveau noir HDMI : Normal
Mode bleu uniquement
Protection brûlure écran
Effet 3D
T V
16/9 auto
16:9
Zoom large
Zoom
4:3
Scan uniquement
Image
7
Déplacer
Entrer
Options d’image
: Normal
: Auto.
: Arrêt
Déplacer
Entrer
Taille
− Zoom large: Donnez à l’image une taille supérieure à 4:3.
Déplacez l’affichage vers le haut ou le bas à l’aide du bouton
▲ ou ▼ après avoir appuyé sur le bouton ► ou ENTER.
Déplacer
Entrer
− Zoom: Agrandit la taille de l’image sur l’écran dans le sens
vertical.
− 4:3: Règle l’image en mode Normal, c’est-à-dire en 4:3.
− Scan uniquement:Utilisez la fonction pour voir l’intégralité
de l’image sans coupure lors de l’entrée de signaux HDMI
(720p/1080i), Component (1080i).
Après avoir sélectionné l'option Scan uniquement (Just Scan) en mode HDMI (1080i) ou
Component (1080i):
Appuyez sur le bouton
◄ ou ► pour sélectionner , puis appuyez sur le bouton ENTER.
Appuyez sur le bouton ▲, ▼, ◄ ou ► pour déplacer l'image vers le haut, le bas, la gauche et la droite.
Réinitialiser: Appuyez sur le bouton ◄ ou ► pour sélectionner Réinitialiser, puis appuyez sur le
ENTER. Vous pouvez initialiser le réglage.
bouton
➢En fonction des périphériques AV, avec la taille d’image HDMI Scan uniquement, l’écran peut être
coupé ou une couleur spécifique peut apparaître à l’écran.
➢Pour une connexion HDMI (1080p) de 24, 25, 30, 50 et 60 Hz et pour une connexion Composant
(1080p) de 50 et 60Hz, seule la source d’entrée est prise en charge.
➢Vous pouvez modifier la taille de l’image en appuyant sur le bouton P.SIZE de votre télécommande.
Les options de taille de l’image peuvent varier en fonction de la source d’entrée.
➢
La fonction 16/9 auto n’est disponible qu’en mode TV, Ext.1, Ext.2, AV et S-Vidéo.
➢
Vous pouvez effectuer et enregistrer des réglages pour chaque appareil externe connecté à une sortie
➢
du téléviseur.
Les éléments disponibles peuvent varier en fonction du mode sélectionné.
➢
En mode PC, seuls les modes 16:9 et 4:3 peuvent être sélectionnés.
➢
Positionnement et dimensionnement de l’écran à l’aide du zoom
Le redimensionnement de l’image à l’aide de la fonction Zoom permet de positionner et de dimensionner
l’image vers le haut ou le bas en utilisant le bouton ▲ ou ▼.
Déplacez l’affichage vers le haut ou le bas à l’aide du bouton ▲ ou ▼ après avoir appuyé sur le
bouton ◄ ou ►.
Redimensionnez l’affichage verticalement à l’aide du bouton ▲ ou ▼ après avoir appuyé sur le bouton ◄ ou ►.
Retour
Retour
Retour
Suite…
Page 65

Français - 21
Mode écran: 16:9/ Zoom large/ Zoom/ 4:3
Lorsque vous fixez la taille de l’image à 16/9 auto sur un téléviseur
16:9, vous pouvez déterminer la taille selon laquelle vous voulez
afficher une image 4:3 WSS ( service d’écran large) ou rien. Chaque
pays européen emploie une taille d’image; cette fonction permet aux
utilisateurs de sélectionner la leur.
− 16:9: Règle l’image en mode Large, c’est-à-dire en 16:9.
− Zoom large: Donnez à l’image une taille supérieure à 4:3.
− Zoom: Agrandit la taille de l’image sur l’écran dans le sens vertical.
− 4:3: Règle l’image en mode Normal, c’est-à-dire en 4:3.
Cette fonction n’est disponible qu’en mode 16/9 auto.
➢
Cette fonction n’est pas disponible en mode Composant ou HDMI.
➢
NR numérique: Arrêt/Bas/Moyen/Elevé/Auto.
T V
Options d’image
Nuance Coul.
: Normal
Taille : 16/9 auto
Mode écran :
NR numérique
Démo 100 Hz réel :
DNle :
Niveau noir HDMI : Normal
Mode bleu uniquement
Protection brûlure écran
Effet 3D
Déplacer
Zoom large
: Arrêt
Entrer
Si le signal reçu par le téléviseur est faible, vous pouvez activer cette fonction pour favoriser la réduction des
images statiques ou fantômes qui peuvent apparaître à l’écran.
Lorsque le signal est faible, sélectionnez une autre option jusqu’à obtention de la meilleure image possible.
➢
Démo 100Hz réel: Arrêt/Marche
Vous pouvez clairement voir la différence entre «100Hz réel» et 50Hz, surtout lorsque vous regardez des scènes
rapides. Lorsqu’une image lente est affichée, vous ne serez pas en mesure de faire la distinction entre «100Hz
réel» et 50Hz. La fonction Démo 100Hz n’est disponible qu’avec un signal 50Hz. Le mode Démo Real 100Hz est
fourni pour des démonstrations en magasin avec des images spéciales.
DNIe: Arrêt/Démo/Marche
Pour offrir une grande qualité d’image, ce téléviseur est doté de la fonction DNIe. Si vous définissez l’option DNIe
sur On, la fonction DNIe sera activée à l’écran. Lorsque vous activez le mode Démo de la fonction DNIe, une
image normale et une image avec la fonction DNIe appliquée s’affichent à l’écran à des fins de démonstration.
Cette fonction vous permet de constater la différence de qualité d’affichage.
DNIeTM (Digital Natural Image engine)
➢
Cette fonction vous offre une image plus détaillée tout en permettant une réduction de bruit 3D et une
amélioration des détails, des contrastes et des blancs. Le nouvel algorithme de compensation d’images vous
offre une image plus lumineuse, plus claire et plus détaillée. La technologie DNIeTM adaptera tous les signaux à
votre vue, quels qu’ils soient.
Cette fonction n’est pas disponible en mode PC.
➢
DNIe n’est disponible qu’en mode Dynamique.
➢
Niveau noir HDMI: Normal/Bas
Cette fonction permet d’ajuster la qualité d’image si un problème de brûlure d’écran (apparence des niveaux de
noir, contraste bas, faible niveau de couleur, etc.) est rencontré avec l’entrée HDMI pour la gamme RVB limitée
(16 à 235).
Cette fonction n’est active que lorsque l’entrée externe se connecte à HDMI (signaux RVB).
➢
Mode bleu uniquement: Arrêt/Marche
Cette fonction est destinée aux spécialistes de mesure des appareils AV.Cette fonction affiche le signal bleu en
supprimant simplement les signaux rouge et vert du signal vidéo, de manière à fournir un effet Filtre bleu utilisé pour
régler la couleur et la teinte de l'équipement vidéo, tel que des lecteurs de DVD, systèmes de cinéma à domicile, etc.
Cette fonction permet de régler la couleur et la teinte sur des valeurs appropriées au niveau de signal de chaque
dispositif vidéo à l'aide des modèles de barres de couleurs Rouge/Vert/
Bleu/Cyan/Magenta/Jaune, sans utiliser de filtre bleu supplémentaire.
Le mode bleu uniquement n’est disponible que si le mode Image
➢
est défini sur Cinéma ou Standard.
Protection brûlure écran
Pour réduire le risque de brûlure d’écran, cet écran est équipé d’une
technologie de prévention des brûlures. Cette fonction permet de régler
le mouvement de l’image de bas en haut (ligne verticale) et de gauche à
droite (point horizontal). Le réglage de l’horloge permet de programmer
en quelques minutes la durée séparant les mouvements de l’image.
−
Modif. pixel: Cette fonction permet de déplacer les pixels sur
l’écran dans le sens vertical ou horizontal, afin d’éviter une image
résiduelle sur l’écran.
• Réglez
Modif. pixel sur Marche en appuyant sur le bouton
▲ ou ▼, puis appuyez sur le bouton ENTER.
• Sélectionnez l’option désirée en appuyant sur le bouton
T V
T V
Options d’image
Nuance Coul.
: Normal
Taille : 16/9 auto
Mode écran : 16:9
NR numérique
: Auto.
Démo 100 Hz réel : Marche
DNle : Marche
Niveau noir HDMI : Normal
Mode bleu uniquement
Protection brûlure écran
Effet 3D
Déplacer
Protection brûlure écran
Modif. pixel
Blanc
Défilement
Gris de bord : Sombre
: Arrêt
Entrer
▲ ou ▼, puis appuyez sur le bouton ENTER. Options
disponibles: Nbre point horizont., Nbre ligne vertic., Horloge
Déplacer
Entrer
16:9
Zoom
4:3
Retour
Retour
Retour
Suite…
Page 66

Français - 22
Conditions optimales pour la modification des pixels;
➢
PC
Nbre point horizont. 1 2
TV/Ext/AV/Composant/
HDMI
T V
Modif. pixel : Marche
Nbre point horizont.
Nbre ligne vertic. : 2
Horloge : 2 min
Modif. pixel
: 2
Nbre ligne vertic. 1 2
Horloge (minutes) 2 2 min
La valeur de Modif. pixel peut changer selon le mode et la taille du
➢
moniteur (pouces).
Cette fonction n'est pas disponible en mode Just Scan (Scan uniquement).
➢
−Blanc: Cette fonction aide à supprimer les images résiduelles à l’écran en modifiant la couleur des pixels
Déplacer
Entrer
pour les faire devenir blancs. Utilisez cette fonction lorsque des images résiduelles ou des symboles
apparaissent à l’écran, particulièrement lorsque vous affichez une image fixe à l’écran pendant longtemps.
−Défilement: Cette fonction aide à supprimer les images résiduelles à l’écran en déplaçant tous les pixels
sur l’écran, selon un motif prédéfini. Utilisez cette fonction lorsque des images résiduelles ou des symboles
apparaissent à l’écran, particulièrement lorsque vous affichez une image fixe à l’écran pendant longtemps.
−Gris de bord: Si vous regardez la télévision dans un rapport d’écran 4:3, l’écran est protégé contre tout
dommage grâce à l’ajustement de la balance des blancs sur les côtés gauche et droit.3
Sombre: Si le rapport d’écran est fixé à 4:3, les bords gauche et droit sont assombris.
Clair: Si le rapport d’écran est fixé à 4:3, les bords gauche et droit sont éclaircis.
Pour supprimer les images résiduelles de l’écran, utilisez la fonction blanc ou Défilement. Bien que ces
➢
deux fonctions suppriment les images résiduelles à l’écran, Défilement est plus efficace.
La fonction de suppression d’images résiduelles doit être exécutée pendant longtemps (environ une heure)
➢
pour supprimer efficacement les images résiduelles. Si l’image résiduelle n’est pas supprimée après
l’exécution de cette fonction, répétez l’opération.
Appuyez sur n’importe quel bouton de la télécommande pour annuler cette fonction.
➢
Utilisation de la fonction 3D
Vous pouvez profiter de jeux et de films en 3D sur votre téléviseur. La fonction Effets 3D vous
permet de voir des images en 3D à l'aide de lunettes 3D.
Branchements
Retour
Lunettes 3D
(non fournies)
Panneau arrière du
Récepteur 3D IR
(non fourni)
Câble prise stéréo 3,5 mm vers RCA (non fourni)
Câble HDMI/DVI (non fourni)
L'apparence des lunettes 3D (y compris l'émetteur) peut être différente en fonction du modèle de lunettes.
➢
PC
téléviseur
Page 67

Français - 23
1 Branchez un câble HDMI/DVI entre la prise HDMI IN 2 du téléviseur et la prise de sortie PC de votre
ordinateur.
2 Branchez un câble Stéréo/2RCA 3,5 mm entre la prise DVI IN (HDMI 2) [R-AUDIO-L] du téléviseur et
la prise de sortie audio de la carte son de l'ordinateur.
3 Branchez l'émetteur au port 3D SYNC OUT à l'arrière du téléviseur.
4 Mettez le téléviseur sous tension et définissez la source du téléviseur sur HDMI2.
Pour plus d'informations sur les lunettes 3D (y compris l'émetteur), reportez-vous au manuel
utilisateur de vos lunettes 3D.
Réglez la résolution du PC: PS50A470: 1 024 x 768 @ 60 Hz,1 360 x 768 @ 60 Hz
La résolution PC optimale pour le PS50A470 est de 1 360 x 768. Lorsqu’un signal 1 024 x 768 est
connecté en mode 3D, l’image s’affiche en format 4:3 et des barres latérales apparaissent à gauche
et à droite.
L'émetteur 3D IR communique avec les lunettes 3D.
Par conséquent, l'émetteur 3D IR doit se trouver à proximité des lunettes 3D.
Il est activé lorsque le signal d'entrée HDMI ou DVI est sur RGB et que le son DVI est pris en charge.
Une fois l'appareil mis hors ou sous tension, le mode est réglé par défaut (Arrêt) et le Format est
enregistré.
Le mode Effet 3D est mis hors ou sous tension sans tenir compte du mode Image.
Une fois le mode Effet 3D activé, seuls les menus Contraste, Luminosité, Effet 3D et
Réinitialisation de l'image sont activés.
Pour utiliser la fonction Effet 3D, une carte graphique avec prise en charge 3D ou un logiciel 3D sont
nécessaires.
L'émetteur et les lunettes 3D doivent provenir de la même société.
Si vous jouez ou regarder la télévision en portant les lunettes 3D pendant de longues périodes, vous
risquez de souffrir de fatigue visuelle ou de maux de tête.
Des lunettes 3D (y compris l'émetteur) d'un fabricant autre que Samsung ne sont pas prises en charge.
Si vous trouvez que l’écran n’est pas net lors de l’utilisation de la fonction 3D, baissez l’éclairage
ambiant ou coupez la lampe fluorescente pour regarder l’écran dans des conditions optimales.
Changement de mode
Un changement de mode échangera les images pour chaque œil
en inversant les signaux de sortie gauches et droits.
1 Branchez le téléviseur, le PC et l'émetteur 3D IR comme
indiqué dans l'illustration.
2 Appuyez sur le bouton SOURCE pour sélectionner HDMI.
3 Appuyez sur le bouton MENU pour afficher le menu.
Appuyez sur le bouton ▲ ou ▼ pour sélectionner Image, puis
appuyez sur le bouton
ENTER.
4 Appuyez sur le bouton ▲ ou ▼ pour sélectionner Options
d’image, puis appuyez sur le bouton ENTER.
Appuyez sur le bouton ▲ ou ▼ pour sélectionner Effet 3D,
puis appuyez sur le bouton
ENTER.
5 Appuyez sur le bouton ▲ ou ▼ pour sélectionner Mode, puis
appuyez sur le bouton
ENTER.
Appuyez sur le bouton ▲ ou ▼ pour sélectionner Arrêt, Mode 1,
Mode 2 ou Conversion 2D, puis appuyez sur le bouton
• Arrêt : Désactive la fonction Effet 3D.
• Mode 1 : Mode 1 fonctionne avec la synchronisation droite en premier.
• Mode 2 : Mode 2 fonctionne avec la synchronisation gauche en premier.
• Conversion 2D : Affiche une image 3D convertie en 2D.
Cela vous permet de passer temporairement en image 2D lorsque
vous ressentez un vertige. Toutefois, vous devez choisir "Off" pour
désactiver complètement l’effet 3D.
Si le mode Effet 3D ne fonctionne pas correctement, il
ENTER.
est possible que le Mode et les lunettes 3D ne soient pas
correctement synchronisés. Pour les synchroniser, passez à
T V
Mode : Standard
Luminosité des cellules
Contraste 90
Luminosité 45
Netteté 50
Couleur 50
Teinte V50 R50
Réglages des détails
Options d'image
Réinitialiser : OK
T V
Nuance Coul. :
Taille : 16/9 auto
Mode écran : 16:9
NR numérique : Auto.
Démo 100 Hz réel : Arrêt
DNle : Arrêt
Niveau noir HDMI : Normal
Mode bleu uniquement
Protection brûlure écran
Effet 3D
T V
Mode :
Format :
Déplacer
Options d'image
Déplacer
Déplacer
Image
7
Entrer
Normal
: Arrêt
Entrer
Effet 3D
Arrêt
Mode 1
Mode 2
Conversion 2D
Entrer
Retour
Retour
Retour
l'autre mode.
Suite…
Page 68

Français - 24
Changement de format
Sélectionnez le format d'entrée optimal correspondant à votre carte
graphique ou votre logiciel 3D.
Consultez la description des étapes 1 à 4 ci-dessus.
5 Appuyez sur le bouton ▲ ou ▼ pour sélectionner Format, puis
appuyez sur le bouton
ENTER.
6 Appuyez sur le bouton ▲ ou ▼ pour sélectionner Echiquier,
Horizontal ou Vertical, puis appuyez sur le bouton ENTER.
Echiquier
Horizontal
Vertical
Vous pouvez appuyer plusieurs fois sur le bouton 3D de la
Si le format de sortie de votre carte graphique ou
logiciel 3D est Echiquier, sélectionnez ce format
d'entrée.
Si le format de sortie de votre carte graphique ou
logiciel 3D est Horizontal entrelacé, sélectionnez
ce format d'entrée.
Si le format de sortie de votre carte graphique ou
logiciel 3D est Vertical entrelacé, sélectionnez ce
format d'entrée.
télécommande pour modifier le mode 3D.
T V
Mode : Mode 1
Format :
Déplacer
Effet 3D
Entrer
Echiquier
Horizontal
Vertical
Retour
Réglage simple
1 Appuyez sur le bouton TOOLS de la télécommande.
2 Appuyez sur le bouton ▲ ou ▼ pour sélectionner Mode 3D.
3 Appuyez sur le bouton ENTER pour démarrer la fonction
Effet 3D.
Mode 3D ◄ Arrêt ►
Anynet+ (HDMI-CEC)
Mode Image : Dynamique
Mode Son : Standard
Veille : Arrêt
SRS TS XT : Arrêt
Mode éco. : Arrêt
Outils
Régler
QuitterDéplacer
Reinitialisation des paramètres d'image à leur valeur par défaut
Vous pouvez configurer des réglages détaillés de l'image.
1 Appuyez sur le bouton MENU pour afficher le menu.
2 Appuyez sur le bouton ENTER pour sélectionner Image.
3 Appuyez sur le bouton ▲ ou ▼ pour sélectionner
Réinitialiser, puis appuyez sur le bouton ENTER.
4 Appuyez sur le bouton ▲ ou ▼ pour sélectionner OK ou
Annuler, puis appuyez sur le bouton ENTER.
Chaque mode peut être réinitialisé.
➢
T V
Mode : Standard
Luminosité des cellules
Contraste 95
Luminosité 45
Netteté 50
Couleur 50
Teinte V50 R50
Réglages des détails
Options d'image
Réinitialiser : OK
Move
Image
7
OK
Annuler
Enter
Return
Page 69

Français - 25
Fonctions audio
1 Appuyez sur le bouton MENU pour afficher le menu.
2 Appuyez sur le bouton ▲ ou ▼ pour sélectionner Son, puis
appuyez sur le bouton ENTER.
3 Sélectionnez l’option désirée en appuyant sur le bouton
▲ ou ▼, puis appuyez sur le bouton ENTER.
Options disponibles:
Mode, Egaliseur, SRS TS XT, Volume
T V
Mode :
Egaliseur
SRS TS XT : Arrêt
Volume auto : Arrêt
TV Speaker : Arrêt
Sélection du son : Principal
Son
Personnalisé
auto, TV Speaker, Sélection du son
4 Lorsque vous êtes satisfait du réglage, appuyez sur le bouton
ENTER.
5 Appuyez sur le bouton EXIT pour quitter le menu.
T V
Déplacer
Entrer
Egaliseur
Mode: Standard/Musique/Cinéma/Parole/Personnalisé
Vous pouvez sélectionner le type d’effet sonore souhaité
lorsque vous regardez un programme donné.
Réglages simples
1 Appuyez sur le bouton TOOLS de la télécommande.
2
Appuyez sur le bouton ▲ ou ▼ pour sélectionner le mode Son.
3 Appuyez sur le bouton ◄ ou ► pour sélectionner l’option de
D
+
0
-
G
Balance 100Hz 300Hz 1kHz 3kHz 10kHz
Déplacer Régler
votre choix.
Egaliseur: Balance/100Hz/300Hz/1kHz/3kHz/10kHz
Le téléviseur dispose de plusieurs paramètres qui vous
permettent de régler la qualité du son.
Si vous modifiez de quelque façon que ce soit ces
➢
paramètres, le mode de son bascule automatiquement sur
Personnalisé.
SRS TS XT: Arrêt/Marche
Anynet+ (HDMI-CEC)
Mode Image : Standard
Mode Son : Personnalisé
Veille : Arrêt
SRS TS XT ◄ Arrêt ►
Mode éco. : Arrêt
Dual I-II : Mono
Outils
Régler
Le TruSurround XT est une technologie SRS brevetée qui remédie au problème de la lecture du contenu
d’un disque multicanal 5,1 sur deux haut-parleurs. Le TurSurround produit un son surround virtuel
fascinant au moyen de n’importe quel système de lecture à deux haut-parleurs, dont les haut-parleurs
internes du téléviseur. Il s’adapte parfaitement à tous les formats multicanaux.
TruSurround XT, SRS et le symbole sont des marques déposées de SRS
Labs, Inc. La technologie TruSurround XT est protégée par la licence de SRS
Labs, Inc.
Retour
+
0
-
Retour
QuitterDéplacer
Réglages simples
1 Appuyez sur le bouton TOOLS de la télécommande.
2
Appuyez sur le bouton ▲ ou ▼ pour sélectionner SRS TS XT.
3
Appuyez sur le bouton ◄ ou ► pour sélectionner Marche ou Arrêt.
Volume auto: Arrêt/Marche
Chaque station d’émission possède ses propres conditions de
signal et il n’est donc pas facile de régler le volume chaque fois
que vous changez de chaîne. Cette fonction vous permet de
régler automatiquement le volume du canal désiré en réduisant la puissance sonore lorsque le signal de
modulation est élevé ou en augmentant la puissance sonore lorsque le signal de modulation est faible.
Anynet+ (HDMI-CEC)
Mode Image : Standard
Mode Son :
Veille : Arrêt
SRS TS XT ◄ Arrêt ►
Mode éco. : Arrêt
Dual I-II : Mono
Outils
Personnalisé
Régler
TV Speaker: Arrêt/Marche
Pour entendre le son par l’intermédiaire de haut-parleurs séparés, désactivez l’amplificateur interne.
Les boutons +, -
➢
Arrêt.
Lorsque l'option TV Speaker est définie sur Marche, vous pouvez uniquement utiliser la fonction
➢
Sélection du son (en mode PIP) dans le menu Son.
Sélection du son: Principal/Secondaire
et MUTE ne fonctionnent pas lorsque l’option TV Speaker est réglée sur
Lorsque la fonction PIP est activée, vous pouvez écouter le son accompagnant l'image secondaire.
−
Principal: pour écouter le son accompagnant l'image principale.
−
Secondaire: pour écouter le son accompagnant l'image secondaire.
QuitterDéplacer
Page 70

Français - 26
Sélection du mode Son (en fonction du modèle)
Le bouton DUAL I-II affiche/commande le traitement et la sortie du signal audio. A la mise sous
tension, le mode est préréglé automatiquement soit sur “DUAL-I” soit sur “Stéréo”, en fonction de
la transmission en cours.
Réglages simple
1 Appuyez sur le bouton TOOLS de la télécommande.
2 Appuyez sur le bouton ▲ ou ▼ pour sélectionner Dual I-II.
3 Appuyez sur le bouton ◄ ou ► pour sélectionner l’option de
votre choix.
Type de programme Indication à l’écran
Programme normal
(Audio standard)
Normal + Mono NICAM NICAM
NICAM
Stéréo
A2
Stéréo
Si les conditions de réception se détériorent, le mode Mono facilitera l’écoute.
➢
Si le signal stéréo es t f aible et qu’une permutation automatique se produit, passez
alors en
NICAM Stéréo
NICAM DUAL-I/II
Programme normal
(Audio standard)
Bilingue ou DUAL-I/II
Stéréo Stéréo
Mono.
NICAM
Stéréo
NICAM
dual 1
Dual I Dual II
Anynet+ (HDMI-CEC)
Mode Image : Standard
Mode Son : Personnalisé
Veille : Arrêt
SRS TS XT : Arrêt
Mode éco. : Arrêt
Dual I-II ◄ Mono ►
Mono (Usage normal)
NICAM
dual 2
Mono (Usage normal)
Outils
Régler
Mono
(Normal)
Mono
(Normal)
Mono
(Normal)
Mono
(Mono forcé)
QuitterDéplacer
Branchement du casque (vendu séparément)
Vous pouvez brancher un casque à votre téléviseur si vous souhaitez regarder un
programme télévisé sans déranger les autres personnes présentes dans la pièce.
Lorsque vous insérez la prise casque dans le port
➢
correspondant, vous pouvez utiliser uniquement les options
Volume auto. dans le menu Son.
L’utilisation prolongée d’un casque à un niveau sonore élevé
➢
peut endommager l’ouïe.
Aucun son n’est émis des enceintes lorsque vous connectez le
➢
casque au téléviseur.
Le volume du casque et celui du téléviseur sont réglés
➢
séparément.
Panneau latéral du téléviseur
Page 71

Français - 27
Fonctions d’horloge
1 Appuyez sur le bouton MENU pour afficher le menu.
2 Appuyez sur le bouton ▲ ou ▼ pour sélectionner
Configuration, puis appuyez sur le bouton ENTER.
3 Appuyez sur le bouton ▲ ou ▼ pour sélectionner Horloge,
puis appuyez sur le bouton
4 Sélectionnez l’option désirée en appuyant sur le bouton
▲ ou ▼, puis appuyez sur le bouton ENTER.
Options disponibles:
Minuteur 2, Minuteur 3
5
Lorsque vous êtes satisfait du réglage, appuyez sur le bouton ENTER.
ENTER.
Réglages Horloge, Veille, Minuteur 1,
6 Appuyez sur le bouton EXIT pour quitter le menu.
Réglage Horloge
Vous pouvez régler l’horloge du téléviseur de sorte que l’heure
actuelle s’affiche lorsque vous appuyez sur le bouton
la télécommande. Vous devez également régler l’heure si vous
souhaitez utiliser les minuteries Marche et Arrêt automatiques.
− Appuyez sur le bouton ◄ ou ► pour choisir
Année, Heure ou Minute. Réglez ces éléments en appuyant
sur le bouton ▲ ou ▼.
Vous pouvez régler directement les valeurs Mois, Date,
➢
Année, Heure et Minute en appuyant sur les touches
numériques de la télécommande.
En cas de coupure de courant ou si le téléviseur est
➢
déconnecté de l’alimentation, les réglages de l’horloge
seront perdus.
INFO de
Mois, Date,
Veille
Vous pouvez sélectionner une durée (entre 30 et 180 minutes)
à l’issue de laquelle le téléviseur passe automatiquement en
mode veille.
− Sélectionnez l’intervalle prédéfini (
150 ou 180) avant la mise en veille en appuyant sur le
bouton ▲ ou ▼.
Arrêt, 30, 60, 90, 120,
T V
T V
T V
Configuration
Plug & Play
Langue : Français
Horloge
Effet lumineux
Ajustement fixation murale
Mélodie : Arrêt
Divertissement : Arrêt
Mode éco. : Arrêt
PIP
Déplacer
Réglage Horloge : 00 : 00
Veille : Arrêt
Minuteur 1 : Arrêt
Minuteur 2 : Arrêt
Minuteur 3 : Arrêt
Déplacer
Période d’activation
:
00 00 Non
Période de désactivation
:
00 00 Non
Répétition
Une fois
Volume
10
Déplacer Régler
:
Minuteur 1
Réglages simples
1 Appuyez sur le bouton TOOLS de la télécommande.
2 Appuyez sur le bouton ▲ ou ▼ pour Veille.
3 Appuyez sur le bouton ◄ ou ► pour sélectionner le nombre
de minutes, puis appuyez sur le bouton
ENTER.
Minuteur 1 / Minuteur 2 / Minuteur 3
Vous pouvez régler les minuteries de mise sous/hors tension de
sorte que le téléviseur soit mis sous/hors tension à l’heure que
vous aurez sélectionnée.
Vous devez préalablement régler l’horloge.
☛
− Appuyez sur le bouton ◄ ou ► pour sélectionner l’élément désiré ci-dessous.
Anynet+ (HDMI-CEC)
Mode Image : Standard
Mode Son : Personnalisé
Veille ◄ Arrêt ►
SRS TS XT : Arrêt
Mode éco. : Arrêt
Dual I-II : Mono
Outils
Régler
Appuyez sur le bouton ▲ ou ▼ pour valider le réglage.
Période d’activation: Sélectionnez les heures et les minutes ainsi que Marche/Arrêt (Pour
activer le minuteur selon les réglages définis, choisissez
Période de désactivation: Sélectionnez les heures et les minutes ainsi que Marche/Arrêt (Pour
activer le minuteur selon les réglages définis, choisissez
Marche.)
Marche.)
Répétition: Choisissez Une fois, Tous les jours, Lun - Ven, Lun - Sam ou Sam - Dim.
Volume: Sélectionnez le niveau de volume désiré.
Vous pouvez régler les heures et les minutes directement à l’aide du pavé numérique de la
➢
télécommande.
Mise hors tension automatique
☛
Lorsque vous réglez la minuterie sur “Marche”, le téléviseur s’éteint si aucune commande n’est
activée dans les 3 heures qui suivent sa mise sous tension par la minuterie. Cette fonction est
disponible uniquement lorsque la minuterie est définie sur “Marche”; elle permet d’éviter toute
surchauffe occasionnée par une utilisation prolongée du téléviseur.
LED act. marche
Entrer
Horloge
Entrer
Retour
Retour
Retour
QuitterDéplacer
Page 72

Français - 28
Langue / Mélodie / Effet lumineux / Divertissement / Mode
éco. / PIP
1 Appuyez sur le bouton MENU pour afficher le menu.
2 Appuyez sur le bouton ▲ ou ▼ pour sélectionner
Configuration, puis appuyez sur le bouton ENTER.
3 Sélectionnez l’option désirée en appuyant sur le bouton ▲ ou ▼,
puis appuyez sur le bouton
Options disponibles:
ENTER.
Langue, Mélodie, Effet lumineux,
T V
Configuration
Plug & Play
Langue : Français
Horloge
Effet lumineux
Ajustement fixation murale
Mélodie : Arrêt
Divertissement : Arrêt
Mode éco. : Arrêt
PIP
:
LED act. marche
Divertissement, Mode éco., PIP
4 Lorsque vous êtes satisfait du réglage, appuyez sur le bouton
ENTER.
Déplacer
Entrer
5 Appuyez sur le bouton EXIT pour quitter le menu.
Langue
Cela varie selon les modèles. Lorsque vous utilisez votre téléviseur pour la première fois, vous devez
sélectionner la langue utilisée pour afficher les menus et les instructions.
Effet lumineux: Arrêt/LED act. veille/LED act. marche/Marche
Vous pouvez allumer/éteindre la LED bleue à l’avant de votre téléviseur en fonction de la situation.
Recourez à cette fonction pour économiser de l’énergie ou lorsque la LED fatigue vos yeux.
−
Arrêt: La LED bleue est toujours éteinte.
LED act. veille: La LED bleue est allumée en mode veille et éteinte quand le téléviseur est sous
−
tension.
−
LED act. marche: La LED bleue est allumée quand vous regardez la télévision et éteinte quand le
téléviseur est hors tension.
−
Marche: La LED bleue est toujours allumée.
Réglez Effet lumineux sur Arrêt pour réduire la consommation électrique.
➢
Mélodie: Arrêt/Bas/Moyen/Elevé
La mélodie de mise sous/hors tension du téléviseur peut être ajustée.
Divertissement: Arrêt/Sports/Cinéma/Jeu
Le mode Divertissement vous permet de sélectionner les valeurs d’affichage et de son optimales
pour le sport, le cinéma et les jeux.
− Arrêt: Désactive la fonction Divertissement.
− Sports: fournit une qualité d’image et de son optimale pour le sport.
− Cinéma: fournit une qualité d’image et de son optimale pour regarder un film.
Vous pouvez profiter d’une image plus belle et d’un son encore meilleur.
− Jeux: fournit une qualité d’image et de son optimale pour les jeux. Ce mode accélère la
vitesse de lecture lorsqu’une console de jeu est reliée au téléviseur.
ISi vous activez l’un des trois modes Divertissement, les paramètres seront verrouillés
➢
empêchant toute modification. Si vous voulez régler les modes Image et
Son, le mode Divertissement doit être désactivé.
Les réglages du mode Divertissement sont enregistrés pour chaque source d’entrée
➢
.
Retour
Suite...
Page 73

Français - 29
Mode éco.: Arrêt/Bas/Moyen/Elevé
Cette fonction règle la luminosité en fonction des conditions
d’éclairage.
−
Arrêt: Désactive le Mode éco.
−
Bas: Fonctionne en mode standard, quel que soit l’éclairage
ambiant.
−
Moyen: Active le mode d’économie d’énergie moyen, quel
Anynet+ (HDMI-CEC)
Mode Image : Standard
Mode Son : Personnalisé
Veille : Arrêt
SRS TS XT : Arrêt
Mode éco. ◄ Arrêt ►
Dual I-II : Mono
que soit l’éclairage ambiant.
−
Elevé: Active le mode d’économie d’énergie maximale, quel que soit l’éclairage ambiant.
Tools
Régler
QuitterDéplacer
Réglages simples
1 Appuyez sur le bouton TOOLS de la télécommande.
2 Appuyez sur le bouton ▲ ou ▼ pour sélectionner Mode éco.
3 Appuyez sur le bouton ◄ ou ► pour sélectionner l’option de votre choix.
PIP (Image dans l'image): PIP (Marche/Arrêt)/Source/Taille/Position/Programme
Vous pouvez afficher une image secondaire dans l'image principale. De cette manière, vous pouvez
regarder un programme de télévision ou surveiller l'entrée vidéo de n'importe quel périphérique connecté.
−
PIP: Marche/Arrêt
Vous pouvez activer ou désactiver la fonction PIP.
Tableau des paramètres PIP
Image principale Image secondaire
Composant
HDMI1, 2
PC
La TV analogique ne
diffuse que sur Ext1,
Ext2 et AV
− Source: TV/Ext.1/Ext.2/AV
Vous pouvez sélectionner la source de l'image secondaire.
−
Taille: / /
T V
PIP : Marche
Source : TV
Taille :
Position :
Programme : P 1
Déplacer
PIP
Entrer
Retour
Vous pouvez sélectionner la taille de l'image secondaire.
Si l'image principale est en mode PC et Composant, Taille n'est pas disponible.
➢
−
Position: / / /
Vous pouvez sélectionner la position de l'image secondaire.
En mode Double
➢
−
Programme
Vous ne pouvez sélectionner une chaîne de l'image secondaire que si la
( ,
), Position ne peut pas être sélectionnée.
Source est définie sur TV.
Configuration de votre logiciel PC (basée sur Windows XP)
Les paramètres d’affichage Windows indiqués ci-dessous sont ceux
d’un ordinateur type. Toutefois, il se peut que les écrans réels de
votre PC soient différents, en fonction de votre version de Windows
et de votre carte vidéo. Cependant, même si les affichages diffèrent,
les informations de configuration de base s’appliquent dans la
plupart des cas. Dans le cas contraire, contactez le fabricant de
votre ordinateur ou votre revendeur Samsung.
1 A l’aide du bouton droit de la souris, cliquez sur le bureau
Windows, puis sur Propriétés.
La boîte de dialogue
2 Cliquez sur l’onglet Paramètres, puis réglez le Mode
d’affichage en vous reportant au tableau des modes
d’affichage. Il est inutile de modifier les paramètres Couleurs.
3 Cliquez sur Avancé. Une nouvelle boîte de dialogue de configuration s’affiche.
4 Cliquez sur l’onglet Ecran, puis réglez la Fréquence d’actualisation du moniteur en vous reportant
au tableau des modes d’affichage. Si vous le pouvez, réglez séparément la Fréquence verticale et la
Fréquence horizontale au lieu de paramétrer la Fréquence d’actualisation du moniteur.
5 Cliquez sur OK pour fermer la fenêtre, puis sur OK pour accéder à la fenêtre Propriétés
d’affichage. Il se peut alors que votre ordinateur redémarre automatiquement.
Propriétés d’affichage s’affiche.
Page 74

Français - 30
Mode d’entrée (PC)
La taille et la position de l’écran varient en fonction du type d’écran du PC et de sa résolution.
Le tableau ci-dessous indique tous les modes d’affichage pris en charge :
D-Sub Entrée
Mode Résolution
IBM
VESA
640 x 350
720 x 400
640 x 480
640 x 480
640 x 480
800 x 600
800 x 600
800 x 600
1024 x 768
1024 x 768
1024 x 768
1360 x 768
HDMI/DVI Entrée
Horizontale
Fréquence
(kHz)
31.469
31.469
31.469
37.861
37.500
37.879
48.077
46.875
48.363
56.476
60.023
47.712
Verticale
Fréquence
(Hz)
70.086
70.087
59.940
72.809
75.000
60.317
72.188
75.000
60.004
70.069
75.029
60.015
Horloge pixels
Fréquence
(MHz)
25.175
28.322
25.175
31.500
31.500
40.000
50.000
49.500
65.000
75.000
78.750
85.500
Polarité
synchronisée
(H/V)
+ / -
- / +
- / -
- / -
- / -
+ / +
+ / +
+ / +
- / -
- / -
+ / +
+ / +
PS50A470
✔
✔
✔
✔
✔
✔
✔
✔
✔
✔
✔
✔
Mode Résolution
640 x 480
VESA
800 x 600
1024 x 768
1360 x 768
Horizontale
Fréquence
(kHz)
31.469
37.879
48.363
47.712
Verticale
Fréquence
(Hz)
59.940
60.317
60.004
60.015
Horloge pixels
Fréquence
(MHz)
25.175
40.000
65.000
85.500
Polarité
synchronisée
(H/V)
- / -
+ / +
- / -
+ / +
PS50A470
✔
✔
✔
✔
Lorsque vous utilisez une connexion avec câble HDMI/DVI, vous devez utiliser la
Le mode interface n’est pas pris en charge.
Le téléviseur peut fonctionner de façon anormale si un format vidéo non standard est sélectionné.
Des modes séparés et composites sont pris en charge. SVSV n’est pas pris en charge.
La qualité du texte du PC est optimale en mode VESA (1360 x 768 @ 60 Hz) avec le PS50A470.
Page 75

Français - 31
Réglage du PC
Préréglez le mode PC en utilisant le bouton SOURCE.
➢
1 Appuyez sur le bouton MENU pour afficher le menu.
2 Appuyez sur le bouton ▲ ou ▼ pour sélectionner Image, puis
appuyez sur le bouton
ENTER.
3 Sélectionnez l’option désirée en appuyant sur le bouton
▲ ou ▼, puis appuyez sur le bouton ENTER.
4 Lorsque vous êtes satisfait du réglage, appuyez sur le bouton
ENTER.
5 Appuyez sur le bouton EXIT pour quitter le menu.
Réglage Automatique
Le réglage automatique permet à l’écran PC affiché sur le
téléviseur d’être ajusté automatiquement en fonction du signal
vidéo PC.
Les valeurs des options Regl. Prec., Regl. Base ou Position
sont définies automatiquement.
Réglage simple
1 Appuyez sur le bouton TOOLS de la télécommande.
2 Appuyez sur le bouton ▲ ou ▼ pour sélectionner Réglage
Automatique, puis appuyez sur le bouton ENTER.
Ecran: Regl. Base/Regl. Prec/Position/Réinitialiser Image
Regl. Base/Regl. prec
Lorsque vous réglez la qualité de l’image, l’objectif est
d’éliminer ou de réduire les parasites visuels.
Si ces parasites ne sont pas éliminés uniquement avec une
syntonisation fine (Regl. Prec.), réglez la fréquence du mieux
que vous pouvez (Regl. Base) puis effectuez à nouveau une
syntonisation plus fine.
Une fois les parasites réduits, réajustez l’image pour l’aligner
au centre de l’écran.
1 Appuyez sur le bouton ▲ ou ▼ pour sélectionner Regl.
Base ou Regl. Prec, puis appuyez sur le bouton ENTER.
2 Appuyez sur le bouton ◄ ou ► pour régler la qualité de
l’écran; il se peut que des bandes verticales apparaissent ou
que l’image soit floue. Appuyez sur le bouton
ENTER.
Position
Réglez la position de l’écran du PC si elle ne convient pas à
l’écran du téléviseur.
1 Réglez la position en appuyant sur le bouton ▲/▼/◄/►.
2 Appuyez sur le bouton ENTER.
Réinitialiser Image
Vous pouvez ramener tous les réglages d’image à leur valeur par défaut.
T V
Mode : Standard
Luminosité des cellules
Contraste 95
Luminosité 45
Netteté 50
Réglage Automatique
Ecran
Réglages des détails
Options d’image
Réinitialiser : OK
Ajustement automatique en cours
Anynet+ (HDMI-CEC)
Mode Image : Standard
Mode Son : Personnalisé
Veille : Arrêt
SRS TS XT : Arrêt
Mode éco. : Arrêt
PIP
Réglage Automatique
T V
Regl. Base
Regl. Prec 11
Position
Réinitialiser Image
T V
Image
7
Déplacer
Entrer
Attendez, s’il vous plait.
Tools
Entrer
Ecran
50
Déplacer
Entrer
Position
Déplacer
Entrer
Rappel image effectué
Retour
QuitterDéplacer
Retour
Retour
Page 76

Français - 32
Qu’est-ce que Anynet+?
Anynet+ est un système de réseau AV qui fournit une interface AV conviviale aux utilisateurs,
en contrôlant tous les appareils AV connectés via le menu Anynet+ lorsque des appareils AV
Samsung Electronics sont connectés.
Connexion d’appareils Anynet
+
Le système Anynet+ ne prend en charge que les appareils AV compatibles Anynet+.
Assurez-vous que l’appareil AV connecté au téléviseur porte bien un label Anynet+.
Connexion directe au téléviseur
TV
Appareil Anynet+ 1 Appareil Anynet
+
Appareil Anynet
2
A l’aide du câble HDMI, reliez
+
3
la prise [HDMI 1], [HDMI 2]
ou [HDMI 3] du téléviseur à la
prise HDMI OUT de l’appareil
Anynet+ correspondant.
Câble HDMI
Câble HDMI
Câble HDMI
Connexion à un système home cinéma
TV
1 A l’aide du câble HDMI,
reliez la prise [HDMI 1],
[HDMI 2] ou [HDMI 3] du
Appareil Anynet+ 1
Appareil Anynet
+
2
téléviseur à la prise HDMI
OUT de l’appareil Anynet
correspondant.
2 A l’aide du câble HDMI,
reliez la prise HDMI IN du
Câble HDMI
Home cinéma
Câble HDMI
Appareil Anynet
système home cinéma
à la prise HDMI OUT
de l’appareil Anynet
correspondant.
+
3
+
+
Câble HDMI
Ne connectez qu’un seul récepteur.
➢
Vous pouvez connecter un appareil Anynet+ à l’aide du câble HDMI. Certains câbles HDMI peuvent
➢
ne pas prendre en charge les fonctions Anynet
Anynet+ fonctionne si l’appareil AV compatible est en mode Veille (Standby) ou en marche (On).
➢
Anynet+ prend en charge jusqu’à 8 appareils AV.
➢
Câble HDMI
+
.
Page 77

Français - 33
Configuration d’Anynet
+
Les fonctions d’Anynet+ emploient les réglages suivants.
Utilisation de la fonction Anynet
+
1 Appuyez sur le bouton MENU pour afficher le menu.
Appuyez sur le bouton ▲ ou ▼ pour sélectionner Entrée puis
appuyez sur le bouton
2 Appuyez sur le bouton ▲ ou ▼ pour sélectionner Anynet+ (HDMI-
ENTER.
CEC), puis appuyez sur le bouton ENTER.
3 Appuyez sur le bouton ▲ ou ▼ pour sélectionner Configuration
puis appuyez sur le bouton
4 Appuyez sur le bouton ▲ ou ▼ pour sélectionner Anynet+ (HDMI-
ENTER.
CEC), puis appuyez sur le bouton ENTER.
5 Sélectionnez Marche en appuyant sur le bouton ▲ ou ▼, puis
appuyez sur le bouton
La fonction Anynet+ (HDMI-CEC) est activée.
➢
Si vous choisissez
➢
désactivée.
Lorsque la fonction Anynet+ (HDMI-CEC) est désactivée, toutes les
➢
activités associées à Anynet
ENTER.
Arrêt, la fonction Anynet
+
sont indisponibles.
+
(HDMI-CEC) est
TV P 1
Voir télévision
Sélection appareil
Enregistrer
Menu du Périphérique
Fonctionnement périph.
Récepteur :Arrêt
Configuration
Navig.
Zurück
Anynet+ (HDMI-CEC)
Arrêt automatique : Off
Rech connectés
Eingabe
Configuration
: Off
Eingabe ZurückNavig.
Extinction automatique d’un appareil Anynet+ lorsque le téléviseur
est mis hors tension Hors tension
4 Appuyez sur le bouton ▲ ou ▼ pour sélectionner Arrêt
automatique, puis appuyez sur le bouton ENTER.
5 Sélectionnez Oui en appuyant sur le bouton ▲ ou ▼, puis
appuyez sur le bouton
La fonction Arrêt automatique est activée.
➢
Si vous choisissez Non, la fonction est désactivée.
➢
Appuyez sur le bouton EXIT pour quitter le menu.
Le réglage Sélection appareil de la télécommande du téléviseur doit être réglé sur TV pour pouvoir utiliser la
➢
fonction Anynet+.
Si vous réglez Arrêt automatique sur Oui, les appareils externes connectés s’éteignent lorsque le téléviseur
➢
est mis hors tension. Toutefois, si l’appareil est en train d’enregistrer, il ne peut pas être éteint.
ENTER.
Anynet+ (HDMI-CEC)
Arrêt automatique :
Rech connectés
Configuration
: On
: Off
Eingabe ZurückNavig.
Arrêt
Marche
Non
Oui
Recherche d’appareils Anynet+ et basculement entre des appareils
1 Appuyez sur le bouton MENU pour afficher le menu.
Appuyez sur le bouton ▲ ou ▼ pour sélectionner Entrée puis
appuyez sur le bouton ENTER.
2 Appuyez sur le bouton ▲ ou ▼ pour sélectionner Anynet+ (HDMI-
CEC), puis appuyez sur le bouton ENTER.
3 Sélectionnez Sélection appareil en appuyant sur le bouton ▲ ou
▼, puis appuyez sur le bouton ENTER.
4 Appuyez sur le bouton ▲ ou ▼ pour sélectionner un appareil, puis
appuyez sur le bouton ENTER.
Vous passez ainsi à l’appareil sélectionné.
5
Si l’appareil désiré est introuvable, appuyez sur le bouton ▲ ou ▼ pour
sélectionner Rech connectés, puis appuyez sur le bouton ENTER.
Le message Configuration de la connexion Anynet+ s’affiche.
Au terme de la recherche, les appareils connectés sont indiqués
dans le menu Anynet+.
Le basculement vers l’appareil sélectionné peut prendre 2 minutes.
➢
Il est impossible d’annuler l’opération de basculement.
Le temps nécessaire pour rechercher les appareils dépend du
➢
nombre d’appareils connectés.
Au terme de la recherche d’appareils, le nombre d’appareils trouvé
➢
n’est pas indiqué.
Bien que le téléviseur recherche automatiquement les appareils
➢
lorsqu’il est allumé à l’aide du bouton
dans des conditions spécifiques ne sont pas affichés dans la liste des appareils. Dans un tel cas, utilisez le
menu Rech connectés pour rechercher ces appareils.
Si vous avez choisi un mode d’entrée externe en appuyant sur le bouton
➢
d’utiliser la fonction Anynet
+
POWER, les appareils connectés lorsque le téléviseur est allumé ou
. Veillez à basculer vers un appareil Anynet+ au moyen du bouton
TV P 1
Voir télévision
Sélection appareil
Enregistrer
Menu du Périphérique
Fonctionnement périph.
Récepteur :Arrêt
Setup
Navig.
Eingabe
Zurück
Configuration
Anynet+ (HDMI-CEC)
Arrêt automatique : Arrêt
Rech connectés
SOURCE, il est impossible
DVDR1
DVDR2
DVD1
DVD2
: Marche
Eingabe ZurückNavig.
TOOLS.
Page 78

Français - 34
Menu Anynet+
Le menu Anynet+ varie selon le type et l’état des appareils Anynet+ connectés au téléviseur.
Menu Anynet
Voir télévision Passe d’Anynet+ au mode de diffusion TV.
Sélection appareil Le téléviseur se connecte à l’appareil correspondant.
Enregistrer Pour démarrer un enregistrement. (Ce menu ne fonctionne qu’avec
Menu du Périphérique Affiche le menu de l’appareil connecté.
Fonctionnement périph. Affiche le menu de commande de l’appareil connecté.
Récepteur Le son est émis par l’intermédiaire du récepteur.
Configuration Permet de configurer l’environnement d’utilisation d’Anynet+.
Boutons de la télécommande du téléviseur disponibles en mode Anynet
Type d’appareil Mode de fonctionnement Boutons disponibles
Appareil Anynet
Appareil à tuner intégré
Appareil audio Lorsque le récepteur est activé
La fonction Anynet+ n’est utilisable que quand la télécommande est réglée en mode TV.
➢
Le bouton REC ne fonctionne que lorsque l’appareil est dans un état où l’enregistrement est possible.
➢
Il est impossible de commander les appareils Anynet+ à l’aide des boutons sur le côté du téléviseur.
➢
Les appareils Anynet
Il se peut que la télécommande du téléviseur ne fonctionne pas dans certaines situations. Dans ce
➢
cas, sélectionnez de nouveau l’appareil Anynet
Les fonctions d’Anynet+ ne peuvent pas commander des produits d’autres fabricants.
➢
En mode Anynet+, les boutons de couleur peuvent ne pas fonctionner correctement.
➢
Les opérations
➢
+
un appareil capable d’enregistrer.)
Exemple: si un enregistreur de DVD est connecté, son menu titre s’
affiche.
Exemple: si un enregistreur de DVD est connecté, son menu de
contrôle de lecture qui s’affiche.
Après le basculement vers cet
appareil, lorsque son menu s’
affiche à l’écran.
+
Après le basculement vers l’
appareil, pendant la lecture d’un
fichier
Ap r ès le bascule ment vers l’
appareil, lorsque vous regardez
un programme télévisé
+
ne peuvent être commandés qu’au moyen de la télécommande du téléviseur.
+
.
,
peuvent varier en fonction de l’appareil.
Description
Touches numériques
Boutons
Boutons de couleur
Bouton
(Recherche vers l’arrière)
(Recherche vers l’avant)
(Arrêt)
Bouton P /
Bouton
Bouton MUTE
+
▲/▼/◄/►/ENTER
EXIT
(Lecture/Pause)
/
Enregistrement
Vous pouvezenregistrer un programme télévisé à l’aide d’un enregistreur.
Appuyez sur le bouton REC.
L’enregistrement débute. Le système d’enregistrement compatible Anynet
Le programme télévisé actuel est enregistré lorsque vous regardez la télévision. Si vous regardez
➢
une vidéo provenant d’un autre appareil, cette vidéo est enregistrée.
Vous pouvez également effectuer un enregistrement en sélectionnant Enregistrer (Record) après
➢
avoir appuyé sur le bouton
Avant d’enregistrer, vérifiez la connexion de la prise d’antenne au périphérique d’enregistrement.
➢
Pour la connexion de l’antenne au périphérique d’enregistrement, reportez-vous au manuel de
l’utilisateur de ce dernier.
TOOLS.
+
doit toutefois être connecté.
Page 79

Français - 35
Ecoute via un récepteur
Le son peut être émis par l’intermédiaire d’un récepteur au lieu de l’enceinte du téléviseur.
1 Appuyez sur le bouton MENU pour afficher le menu.
Appuyez sur le bouton ▲ ou ▼ pour sélectionner Entrée puis appuyez sur le bouton
ENTER.
2 Appuyez sur le bouton ▲ ou ▼ pour sélectionner Anynet+ (HDMI-CEC), puis
appuyez sur le bouton ENTER
3 Sélectionnez Récepteur en appuyant sur le bouton ▲ ou ▼, puis appuyez sur le
bouton
4 Sélectionnez Marche en appuyant sur le bouton ◄ ou ►, puis appuyez sur le bouton
5 Appuyez sur le bouton EXIT pour quitter le menu.
➢
➢
➢
➢
ENTER.
ENTER.
Le son est désormais émis via le récepteur.
Lorsque le récepteur est activé, vous pouvez écouter le son du téléviseur via le
récepteur à 2 canaux.
Si le récepteur n’est destiné qu’à un système home cinéma (et ne prend en charge que l’audio), il se peut qu’il
ne figure pas dans la liste des appareils.
Si vous utilisez du contenu confronté à un problème de droits d’auteur, il se peut que l’écoute via le récepteur
ne fonctionne pas correctement.
Lors de l’écoute via le récepteur, des restrictions s’appliquent à l’utilisation des menus liés aux fonctions PIP et
audio.
.
TV P 1
Voir télévision
Sélection appareil
Enregistrer
Menu du Périphérique
Fonctionnement périph.
Récepteur : Marche
Configuration
Déplacer
Quitter
Entrée
Vérifications avant de faire appel au service d’assistance
Symptôme Solution
Anynet+ ne fonctionne
pas.
Je veux démarrer
Anynet+.
Je veux quitter Anynet+. ■ Choisissez Voir télévision dans le menu Anynet
Le message Connecting
to Anynet+ device…
(Connexion à un appareil
Anynet+) apparaît à l’écran.
La lecture ne démarre pas
sur l’appareil Anynet+.
L’appareil connecté n’est
pas affiché.
Le programme TV ne s’
enregistre pas.
■ Vérifiez si l’appareil est compatible Anynet
charge que les appareils compatibles Anynet
■ Ne connectez qu’un seul récepteur.
■
Vérifiez si le cordon d’alimentation de l’appareil Anynet
■
Vérifiez la connexion des câbles vidéo/audio/HDMI de l’appareil Anynet+.
■ Vérifiez qu’Anynet+ (HDMI-CEC) est défini sur Marche dans le menu de
configuration Anynet
■ Vérifiez que la télécommande du téléviseur est en mode TV.
■ Vérifiez qu’il s’agit d’une télécommande exclusive Anynet
■
■ Lorsque vous branchez ou retirez le câble HDMI, veillez à relancer une
■
■ Assurez-vous que l’appareil Anynet
■ Appuyez sur le bouton
■ Appuyez sur le bouton
■ Appuyez sur le bouton
■ Il est impossible d’employer la télécommande quand vous configurez
■ La télécommande n’est utilisable qu’au terme de la configuration d’Anynet
■ Vous ne pouvez pas utiliser la fonction de lecture lorsque Plug & Play est en
■
■ Vérifiez si le câble HDMI est bien connecté.
■ Vérifiez qu’Anynet
■ Lancez une nouvelle recherche d’appareils Anynet
■ Vous pouvez connecter un appareil Anynet
■ Vérifiez que la prise d’antenne du périphérique d’enregistrement est
+
Anynet
ne fonctionne pas dans toutes les conditions. (Recherche de canaux)
recherche de périphérique ou à redémarrer votre téléviseur.
Vérifiez que la fonction Anynet
assurez-vous que la fonction Anynet
le menu Configuration d’Anynet
Appuyez ensuite sur le bouton
et sélectionnez le menu désiré.
non compatible Anynet
(Remarque : le bouton de canal ne fonctionne que si aucun appareil Anynet
tuner incorporé n’est connecté.)
Anynet+ou quand vous passez à un mode de visualisation.
du passage au mode de visualisation.
cours.
Vérifiez si l’appareil est ou non compatible avec les fonctions d’Anynet+.
configuration Anynet
câbles HDMI peuvent ne pas prendre en charge les fonctions Anynet
correctement branchée.
+
.
+
du périphérique Anynet+ est activée.
+
TV de la télécommande pour allumer le téléviseur.
TOOLS pour afficher le menu AnynetAnynet+
SOURCE de la télécommande et choisissez un appareil
+
.
P, CH LIST ou PRE-CH pour modifier le mode TV.
+
(HDMI-CEC) est défini sur Marche dans le menu de
+
.
+
. Le système Anynet+ ne prend en
+
.
+
est bien connecté.
+
.
+
est bien connecté au téléviseur et
+
(HDMI-CEC) est réglée sur Marche dans
.
+
.
+
.
+
à l’aide du câble HDMI.
+
.
+
Certains
+
ou
à
Page 80

Français - 36
Fonction de télétexte (en fonction du modèle)
La plupart des canaux de télévision proposent des services
d’informations via le télétexte. La page d’index du télétexte
contient des instructions sur l’utilisation de ce service. Vous
pouvez en outre sélectionner différentes options à l’aide des
boutons de la télécommande.
Pour que l’affichage des informations de télétexte soit correct,
☛
la réception des chaînes doit être stable. Dans le cas contraire,
des informations pourraient manquer ou certaines pages
pourraient ne pas s’afficher.
1
TV
Permet de quitter l’affichage télétexte (en fonction du modèle)
2
(store)
Permet de mémoriser les pages de télétexte.
3
(size)
Permet d’afficher la moitié supérieure de l’écran en caractères
deux fois plus grands. Appuyez à nouveau sur ce bouton pour
afficher la moitié inférieure de l’écran.
Appuyez à nouveau pour rétablir le mode d’affichage normal.
4
(reveal)
Permet d’afficher le texte masqué (par exemple les réponses
d’un jeu). Appuyez à nouveau sur ce bouton pour rétablir le
mode d’affichage normal.
5
Boutons de couleur (rouge/vert/jaune/bleu)
Si la société émettrice utilise le système FASTEXT, les
différents sujets traités dans la page télétexte disposent
d’un code couleur et peuvent être sélectionnés à l’aide des
boutons de couleur de la télécommande. Appuyez sur le
bouton correspondant à la fonctionnalité requise. La page
s’affiche ainsi que d’autres informations en couleur pouvant
être sélectionnées de la même manière. Pour afficher la page
précédente ou la page suivante, appuyez sur le bouton de
couleur correspondant.
6
(teletext on/mix)
Permet d’activer le mode Télétexte après avoir choisi le canal
diffusant le service télétexte. Appuyez deux fois sur ce bouton
pour superposer le télétexte à l’émission diffusée.
7
(mode)
Permet de sélectionner le mode Télétexte (LIST/FLOF).
Si vous appuyez sur ce bouton en mode LISTE, vous accédez
au mode d’enregistrement de liste. Dans ce mode, vous pouvez
enregistrer une page télétexte dans une liste à l’aide du bouton
(store).
8
(sub-page)
Permet d’afficher une page secondaire.
9
(page up)
Permet d’afficher la page télétexte suivante.
0
(page down)
Permet d’afficher la page télétexte précédente.
!
(index)
Permet d’afficher la page d’index du télétexte (sommaire).
@
(hold)
Permet de bloquer l’affichage sur une page précise, si celleci est reliée à plusieurs pages secondaires qui s’affichent
automatiquement l’une après l’autre. Pour reprendre l’affichage
des autres pages, appuyez à nouveau sur ce bouton.
#
(cancel)
Permet d’afficher le programme lors de la recherche d’une
page.
Vous pouvez changer de page télétexte en appuyant sur les
➢
boutons numériques de la télécommande.
Suite…
Page 81

Français - 37
Les pages télétexte sont organisées en six catégories :
Catégorie Sommaire
A
B
C
D
E
F
Les informations télétexte sont souvent réparties sur plusieurs
➢
pages qui s’affichent l’une après l’autre. Ces pages sont
accessibles en :
entrant le numéro de page ;
sélectionnant un titre dans une liste ;
sélectionnant un en-tête de couleur (système FASTEXT).
Appuyez sur le bouton TV pour quitter l’affichage télétexte.
➢
Numéro de la page sélectionnée
Identité du canal émetteur
Numéro de la page actuelle ou indications de recherche
Date et heure
Texte
Informations sur l’état
Informations FASTEXT
Page 82

Français - 38
Caractéristiques du kit de fixation murale (VESA)
Installez votre fixation murale sur un mur solide perpendiculaire au sol.
Si vous souhaitez la fixer sur d’autres matériaux de construction, veuillez prendre contact avec
votre revendeur le plus proche. Si vous l’installez au plafond ou sur un mur non droit, elle peut
tomber et provoquer des blessures corporelles graves.
Famille de produit pouce Caract. VESA (A * B) Vis standard Quantité
23 ~ 26 200
32 ~ 40 200
TELEVISEUR LCD
TELEVISEUR
ECRAN A
PLASMA
Nous avons fourni les dimensions standard pour tous les kits de fixation murale, comme indiqué dans
➢
le tableau ci-dessus.
Un manuel d’installation détaillé et toutes les pièces nécessaires au montage sont fournis avec le kit
➢
de fixation mural.
N’utilisez pas de vis plus longues que la dimension standard car elles pourraient endommager
➢
l’intérieur du téléviseur.
Pour les fixations murales non conformes aux caractéristiques des vis VESA standard, la longueur
➢
des vis peut varier, selon leurs caractéristiques.
N’utilisez pas de vis non conformes aux caractéristiques des vis VESA standard. Ne serrez pas
➢
trop les vis : cela pourrait endommager le produit ou provoquer sa chute, entraînant des blessures
corporelles. Samsung ne peut être tenue responsable de ce type d’accident.
Samsung ne peut être tenue responsable de tout dommage au produit ou toute blessure corporelle
➢
dans le cas de l’utilisation d’une fixation murale non-VESA ou non spécifié, ni si l’utilisateur ne suit
pas les instructions d’installation du produit.
Nos modèles 57” et 63” ne sont pas conformes aux caractéristiques VESA. Vous devez par
➢
conséquent utiliser notre kit de fixation mural approprié pour ce modèle.
Lors du montage, l’inclinaison du téléviseur ne doit pas dépasser 15 degrés.
➢
N’installez pas votre kit de montage mural lorsque votre téléviseur est en fonctionnement.
Une blessure par choc électrique pourrait en résulter.
46 ~ 52
57
57 ~ 70
80 ~
42 ~ 58
63
63 ~ 70
80 ~
100 M4
*
200 M6
*
400 * 400
600 * 400
700 * 400
(Pas VESA)
800 * 4000
1400 * 800
400 * 400
600 * 400
676 * 407
(Pas VESA)
800 * 400 4
1400 * 800 4
M8
M8
4
4
6
Page 83

Français - 39
Ajustement du support mural (vendu séparément)
Grâce à l’installation d’un support mural, vous pouvez régler facilement la position de votre
téléviseur.
Panneau arrière
Câble série (1P à 1P) (non fourni)
Support mural automatique
Entrée dans le menu
1 Appuyez sur le bouton ▲, ▼, ◄ ou ► de votre télécommande.
L’écran Ajustement support mural s’affiche.
➢
Si l’écran Ajustement support mural ne s’affiche pas lorsque vous
➢
cliquez sur un bouton de direction en regardant la télévision,
utilisez le menu pour l’afficher.
• Appuyez sur le bouton
Appuyez sur le bouton
MENU pour afficher le menu.
▲ ou ▼ pour sélectionner
Configuration, puis appuyez sur le bouton ENTER.
• Appuyez sur le bouton
▲ ou ▼ pour sélectionner Ajustement
fixation murale, puis appuyez sur le bouton ENTER.
Mémorisation de la position
2 Réglez à la position souhaitée à l’aide des boutons ▲, ▼, ◄, ►.
Si vous appuyez sur une touche fléchée alors qu’aucun OSD n’est
➢
affiché sur l’écran du téléviseur, l’écran de réglage s’affiche.
Appuyez sur le bouton INFO pour effectuer une réinitialisation.
➢
Appuyez sur le bouton
appuyez sur le bouton
◄ ou ► pour sélectionner Oui, puis
ENTER. La position est initialisée sur le
réglage par défaut.
3 Appuyez sur le bouton bleu.
Appuyez sur les boutons
d’enregistrement parmi
▲ et ▼ pour sélectionner un mode
Position1, Position2 et Position3 afin
d’enregistrer la position actuelle.
Si vous ne souhaitez pas enregistrer la position actuelle, appuyez
➢
sur le bouton
Vous ne pouvez pas utiliser les boutons de couleur lorsque vous
➢
sélectionnez un mode d’enregistrement.
4 Appuyez sur le bouton
Si Position1 est sélectionné, le message Position actuelle
➢
enregistrée sous Position 1 est affiché.
5 Appuyez sur le bouton
La position enregistrée apparaît sur le côté gauche de l’OSD.
➢
RETURN.
ENTER pour enregistrer.
ENTER.
T V
Ajustement fixation murale
Régler
Sélectionner un moyen de sauvegarde
Déplacer
Configuration
Plug & Play
Langue : Français
Horloge
Light Effect
:
►
►
►
Sauveg
Position 1
Position 2
Position 3
Entrer
LED act. marche
Entrer
►
►
►
►
Retour
Ajustement fixation murale
Mélodie : Arrêt
Divertissement : Cinéma
Mode éco. : Arrêt
PIP
Déplacer
►
Sauvegarder
Retour
321Position
Centre
Page 84

Français - 40
Accès à la position mémorisée
1 Exécutez l’étape 1 de la procédure
2 Appuyez sur un bouton de couleur (Rouge, Vert ou Jaune) pour déplacer le
support mural vers la position enregistrée.
➢ Vous pouvez déplacer le support mural sur l’une des trois positions
prédéfinies en appuyant sur le bouton Rouge (Position 1), Vert (Position
2) ou Jaune (Position 3).
➢ Si vous réglez la position après avoir accédé à une position prédéfinie,
l’écran de position disparaît.
➢ Pour l’installation, consultez le manuel d’installation fourni avec le support
mural.
➢ Pour l’installation du produit, ainsi que l’installation et le déplacement du
support mural, adressez-vous à une société d’installation spécialisée.
➢ Utilisez ce manuel d’installation si vous souhaitez fixer le support sur un mur.
Si vous souhaitez la fixer sur d’autres matériaux de construction, veuillez
prendre contact avec votre revendeur le plus proche.
➢ Le support mural automatique ne fonctionne pas lorsque Anynet+ est activé.
➢ Le modèle 42 pouces n'est pas compatible avec l'ancien modèle de support
mural (WMN5090A).
Accès au menu.
Position 1
Assemblage de la base-support (en fonction du modèle)
Ajustement fixation murale
►
►
►
►
►
►
►
►
Régler
Sauveg
321Position
Centre
Au moyen des 6 vis permettant de solidariser la base-support et le
moniteur, fixez fermement le moniteur à la base-support.
L’aspect extérieur de votre téléviseur peut différer de celui présenté
à l’image.
Avertissement
Fixez fermement le socle au téléviseur
avant de déplacer ce dernier. Il pourrait
tomber et provoquer de graves dommages.
Le téléviseur doit être soulevé par
➢
plusieurs personnes. Ne posez jamais
le téléviseur sur le sol car cela pourrait
l’endommager.
Conservez toujours le téléviseur en
position verticale.
Si vous fixez le téléviseur au mur,
fermez le couvercle (
pièce de connexion de la basesupport à l’aide des deux vis.
1) de la
Page 85

Français - 41
Montage mural du téléviseur
Si vous tirez, poussez ou grimpez sur le téléviseur, celui-ci peut tomber. Veillez, en particulier,
à ce que vos enfants ne se pendent pas, ni ne déséquilibre le téléviseur. Ils pourraient le faire
basculer et entraîner des blessures graves, voire la mort. Respectez toutes les précautions de
Attention
sécurité indiquées dans la brochure relative à la sécurité. Pour une stabilité accrue, installez le
dispositif anti-chute comme indiqué.
Pour éviter toute chute du téléviseur:
1. Placez les vis dans les colliers et xez-les fermement au mur.
Assurez-vous que les vis ont été fermement xées au mur.
En fonction du type de mur, il est possible que vous ayez
➣
besoin de matériel supplémentaire, tel que des chevilles.
Les colliers, vis et chaînettes n’étant pas fournis, veuillez
➣
les acheter séparément.
2. Retirez les vis situées sur la partie centrale arrière du
téléviseur, placez les vis dans les bagues, puis xez-les à
nouveau sur le téléviseur.
Il est possible que les vis ne soient pas fournies avec
➣
le produit. Dans ce cas, veuillez acheter des vis aux
caractéristiques suivantes.
Mur
3. Reliez les bagues xées au téléviseur et celles xées sur le
mur à l’aide de chaînettes, puis attachez-les fermement.
Installez le téléviseur à proximité du mur an qu’il ne
➣
bascule pas vers l’arrière.
Il est préférable de relier la chaînette an que les bagues
➣
xées au mur soient placées à même hauteur ou plus bas
que celles xées au téléviseur.
Détachez la chaînette avant de déplacer le téléviseur.
➣
4. Vériez que toutes les connexions sont xées correctement.
Vériez régulièrement que les connexions ne présentent
aucun signe d’usure. Si vous avez un doute quand à la
sécurité de vos connexions, contactez un installateur
professionnel.
Mur
Page 86

Français - 42
Dépannage
Avant de contacter le service après-vente Samsung, effectuez les vérifications élémentaires
suivantes.Si vous ne pouvez pas résoudre le problème en suivant les instructions ci-dessous,
notez le modèle et le numéro de série de votre téléviseur et contactez votre revendeur local.
Aucune image ou aucun son
Vérifiez que le cordon d’alimentation est branché à une prise secteur.
Vérifiez que vous avez appuyé sur le bouton (Mise hors/sous tension) de la façade du téléviseur
ou sur le bouton POWER de la télécommande.
Vérifiez les paramètres de contraste et de luminosité.
Vérifiez le volume.
Vérifiez si TV Speaker est réglé sur Arrêt.
Image normale, mais aucun son
Vérifiez le volume.
Vérifiez si le bouton MUTE de la télécommande a été actionné.
Aucune image ou image en noir et blanc
Réglez les paramètres de couleur.
Vérifiez que le système d’émission sélectionné est correct.
Interférence du son et de l’image
Essayez d’identifier l’appareil électrique affectant le téléviseur et déplacez-le.
Branchez le téléviseur sur une autre prise secteur.
Image neigeuse ou floue, son altéré
Vérifiez l’orientation, l’emplacement et les branchements de votre antenne.
Cette interférence est souvent due à l’utilisation d’une antenne intérieure.Dysfonctionnements de la télécommande
Remplacez les piles de la télécommande.
Nettoyez la partie supérieure de la télécommande (fenêtre de transmission).
Vérifiez que les pôles “+” et “-” des piles sont orientés correctement.
Vérifiez si les piles ne sont pas déchargées.
L’écran est noir et le témoin d’alimentation clignote à intervalle régulier.
Sur votre ordinateur, allez sur : Alimentation, Câble de signal.
Le mode de gestion d’alimentation est activé.
Déplacez la souris de l’ordinateur ou appuyez sur une touche du clavier.
Sur votre appareil, allez sur (STB, DVD, etc): Alimentation, Câble de signal.
Le mode de gestion d’alimentation est activé.
Appuyez sur le bouton Source du panneau ou de la télécommande.
Allumez et éteignez la télévision.
L’image endommagée apparaît dans le coin de l’écran.
Si Scan uniquement est sélectionné dans certains périphériques externes, l’image endommagée
peut apparaitre dans le coin de l’écran. Ce problème est provoqué par les périphériques externes et
non par le téléviseur.
Le message «Rétablit la valeur par défaut de tous les paramètres» apparaît.
Il s’affiche lorsque vous appuyez longuement sur le bouton EXIT. Les paramètres du produit sont
rétablis sur leurs valeurs par défaut.
Page 87

Français - 43
Caractéristiques
Les descriptions et caractéristiques fournies dans ce manuel sont données à titre indicatif
seulement et sont susceptibles d’être modifiées sans préavis.
Nom du modèle PS50A470
Taille de l’écran
(diagonale)
Résolution PC 1360 x 768 @ 60 Hz
Son (Sortie) 10 W + 10 W
Dimensions (LxHxP)
Corps
Avec pied
50 inch
1290 x 740 x 95 mm
1290 x 804 x 319 mm
Poids
Corps
Avec pied
Considérations
environnementales
Température de
fonctionnement
Humidité au cours du
fonctionnement
Température de stockage
Humidité sur le lieu de
stockage
Ce périphérique est un appareil numérique de classe B.
➢
La conception et les spécifications sont susceptibles de changer sans préavis.
Pour les caractéristiques d’alimentation et de consommation électrique, voir l’étiquette fixée au
produit.
10 °C à 40 °C (50 °F à 104 °F)
10 % à 80 %, sans condensation
-20 °C à 45 °C (-4 °F à 113 °F)
5 % à 95 %, sans condensation
39 kg
41 kg
Page 88

Comment éliminer ce produit
(déchets d’équipements électriques et électroniques)
(Applicable dans les pays de l’Union Européen et aux autres pays
européens disposant de systémes de collecte sélective)
Ce symbole sur le produit ou sa documentation indique qu’il ne doit
pas être éliminé en fin de vie avec les autres déchets ménagers.
L’élimination incontrôlée des déchets pouvant porter préjudice à
l’environnement ou à la santé humaine, veuillez le séparer des autres
types de déchets et le recycler de façon responsable. Vous favoriserez
ainsi la réutilisation durable des ressources matérielles.
Les particuliers sont invités à contacter le distributeur leur ayant vendu
le produit ou à se renseigner auprès de leur mairie pour savoir où et
comment ils peuvent se débarrasser de ce produit afin qu’il soit recyclé
en respectant l’environnement.
Les entreprises sont invitées à contacter leurs fournisseurs et à
consulter les conditions de leur contrat de vente. Ce produit ne doit pas
être éliminé avec les autres déchets commerciaux.
Page 89

Deutsch - 2
Benutzerhinweise
Einbrennen von Standbildern
Zeigen Sie Standbilder (z. B. bei einem Videospiel oder bei Anschluss eines PC an diesen
Plasmamonitor) niemals länger als 2 Stunden auf dem Plasmabildschirm an, da das Bild auf diese
Weise einbrennen kann. Das Einbrennen von Standbildern wird auch als „Bildkonservierung“
bezeichnet. Sie können das Einbrennen vermeiden, indem Sie die Helligkeit und den Kontrast des
Monitors beim Anzeigen von Standbildern verringern.
Höhe
Um normalen Betrieb zu gewährleisten, muss der Plasmabildschirm in einer Höhe unter 2000 m
aufgestellt werden. Der Betrieb des Monitors wird möglicherweise gestört, wenn er in mehr als
2000 m Höhe betrieben wird. Sie dürfen den Plasmabildschirm deshalb nicht in einer Höhe von über
2000 m aufstellen und betreiben.
Wärmeentwicklung auf der Oberseite des Plasmabildschirms
Die Oberseite des Produkts kann nach längerem Betrieb warm werden, da die Wärme aus dem
Monitor über die Entlüftungsöffnung im oberen Teil des Geräts abgeführt wird. Dies ist normal und
weist nicht auf einen Defekt oder eine Fehlfunktion des Geräts hin. Allerdings sollten Kinder von dem
oberen Teil des Geräts ferngehalten werden.
Das Gerät verursacht ein „knackendes“ Geräusch.
Ein „knackendes“ Geräusch entsteht, wenn das Gerätematerial sich aufgrund einer Änderung der
Umgebung, wie z. B. Temperaturschwankungen oder Änderung der Luftfeuchtigkeit, zusammenzieht
oder ausdehnt. Das ist normal und stellt keinen Defekt des Geräts dar.
Pixelfehler
Der Plasmabildschirm besitzt eine Bildfläche mit 1.230.000 (bei SD-Auflösung) bis 3.150.000
(bei HD-Auflösung) Pixeln, für dessen Herstellung hoch entwickelte Technologie eingesetzt wird.
Allerdings können ein paar zu helle oder zu dunkle Pixel auf der Bildfläche zu sehen sein. Diese
Pixelfehler haben keinen Einfluss auf die Geräteleistung.
Vermeiden Sie den Betrieb des Plasmabildschirms bei Temperaturen unter 5°C.
Ein Standbild, dass zu lange angezeigt wird, kann zu einer bleibenden Beschädigung des
Plasmabildschirms führen
Nachbilder auf dem Monitor
Das Anzeigen von Standbildern von Videospielen und PC-Anwendungen über einen bestimmten
Zeitraum kann zu partiellen Nachbildern führen. Um diesen Effekt zu verhindern, verringern Sie
Helligkeit und Kontrast, wenn Sie Standbilder anzeigen möchten.
Garantie
– Durch diese Garantie nicht abgedeckt sind Schäden, die durch Einbrennen von Bildern entstehen.
– Das Einbrennen von Bildern wird von der Garantie nicht abgedeckt.
Installieren
Wenden Sie sich an den autorisierten Kundendienst, wenn das Gerät an einem Ort mit hoher
Konzentration an Staubpartikeln, außergewöhnlich hoher oder geringer Raumtemperatur,
extrem hoher Luftfeuchtigkeit, in unmittelbarer Nähe zu chemischen Lösungsmitteln oder für den
Dauerbetrieb, z.B. auf Bahn- oder Flughäfen, aufgestellt werden soll. Eine nicht fachgerechte
Aufstellung kann zu schweren Schäden am Gerät führen.
Der Betrieb des Plasmafernsehers im Format 4:3 über einen längeren Zeitraum
kann links, rechts und in der Mitte des Monitors Spuren der Bildränder
hinterlassen, die durch die unterschiedliche Lichtemission auf dem Bildschirm
verursacht werden. Das Wiedergeben einer DVD oder der Betrieb einer
Spielkonsole kann auf dem Bildschirm zu ähnlichen Effekten führen. Schäden,
die durch die o. g. Effekte verursacht wurden, unterliegen nicht der Garantie.
Wenden Sie sich an SAMSUNG WORLD WIDE
Bei Fragen oder Hinweisen zu Produkten von Samsung setzen Sie sich bitte mit dem SAMSUNGKundendienstzentrum in Verbindung. (Weitere Informationen auf der Rückseite).
© 2008 Samsung Electronics Co., Ltd. Alle Rechte vorbehalten.
Page 90

Deutsch - 3
Inhalt
Allgemeine Informationen
Benutzerhinweise ............................................ 2
Lieferumfang ................................................... 4
Verwenden des Standfußes ........................... 4
Systemsteuerung ............................................ 5
Anschlussfeld .................................................. 6
Fernbedienung für Sehbehinderte
......................... 8
Funktion
Ein- und Ausschalten des Fernsehgeräts ....... 9
Anzeigen von Menüs ...................................... 9
Plug & Play-Funktion .................................... 10
Verwenden der Taste TOOLS (Extras) .......... 12
Anzeigen externer Signalquellen ..................12
Gerätenamen bearbeiten .............................. 13
Kanalsteuerung
Automatisches Speichern von Kanälen ........13
Manuelles Speichern von Kanälen ............... 14
Sender hinzufügen/sperren ........................... 15
Sortieren der gespeicherten Kanäle ............. 16
Kanäle benennen .......................................... 16
Senderfeinabstimmung durchführen ............. 17
Bildeinstellungen
Bildstandard ändern ...................................... 18
Bildeinstellungen anpassen ..........................18
Kongurieren detaillierter Bildeinstellungen .. 19
Bildoptionen ..................................................20
Verwenden der 3D-Funktion ......................... 22
Zurücksetzen der Bildeinstellungen auf die
werkseitig festgelegten Standardwerte ......... 24
Toneinstellungen
Audiofunktionen ............................................25
Auswählen des Tonmodus (modellabhängig)
Anschließen von Kopfhörern
(separat erhältlich) ........................................ 26
.. 26
Funktionsbeschreibung
Zeitfunktionen ............................................... 27
Sprache / Melodie / Lichteffekt / Entertainment/
Unterhaltung / Energiesparmod. / PIP
. ............. 28
PC-Anzeige
Einrichten der PC-Software
(unter Windows XP) ...................................... 29
Eingangsmodus (PC) .................................... 30
Einstellungen für PC vornehmen ..................31
Informationen zu Anynet+
Was ist Anynet+? ..........................................32
Anschließen von Anynet+-Geräten ............... 32
Einrichten von Anynet+ ................................. 33
Suchen von Anynet+-Geräten und
Umschalten zwischen diesen Geräten .......... 33
Aufnehmen .................................................... 34
Tonwiedergabe mit einem Receiver .............. 35
Prüfen Sie Folgendes, bevor Sie sich
an den Service wenden ................................35
Anhang
Videotext-Funktion (modellabhängig) ...........36
Spezikation (VESA) der Wandhalterung ..... 38
Verstellbare Wandhalterung
(gesondert lieferbar) ...................................... 39
Montieren des Standfußes
(modellabhängig) .......................................... 40
Befestigen des Fernsehgeräts
an der Wand .................................................. 41
Problembehandlung ...................................... 42
Technische Daten ......................................... 43
Deutsch
Symbole
Tastendruck
☛ ➢
Wichtig
Hinweis
Page 91

Deutsch - 4
Lieferumfang
Bedienungsanleitung Fernbedienung/
Garantiekarte/
Sicherheitshinweise
(Nicht überall
verfügbar)
Antennenkabel Komponentenkabel Audiokabel PC-Kabel
SCART-Kabel PC-Audio-Kabel HDMI-Kabel HDMI/DVI-Kabel
Ferritkern (Netzkabel, S-Video)
➢
Ferritkerne werden zum Abschirmen von Kabeln gegen Störungen
verwendet.
Öffnen Sie beim Anschließen eines Kabels den Ferritkern, und
befestigen Sie ihn in der Nähe des Steckers am Kabel.
AAA-Batterien
Untere Abdeckung /
Schrauben (2 Stück)
(Informationen hierzu finden Sie
auf Seite 40)
Separat erhältlich
Netzkabel Reinigungstuch
Ferritkern für Netzkabel Ferritkern für S-Video
Verwenden des Standfußes
Der Plasmafernseher sollte
➢
von mindestens zwei Personen
getragen werden. Um
Beschädigungen zu vermeiden,
legen Sie den Plasmafernseher
nie auf den Fußboden. Der
Plasmabildschirm muss sich immer
in aufrechter Position befinden.
Der Plasmabildschirm kann um 20
Grad nach recht und links gedreht
werden.
-20° ~ 20°
Page 92

Deutsch - 5
Systemsteuerung
Vorderseite (oder Seitenverkleidung)
Die Produktfarbe und -form können sich je nach Modell unterscheiden.
➢
1
SOURCE
Z
eigt ein Menü mit allen verfügbaren
Signalquellen an (TV, Ext.1, Ext.2, AV,
S-Video, Komp, PC, HDMI1, HDMI2,
HDMI3
).
Im Bildschirmmenü können Sie
➢
diese Taste wie die
Fernbedienung verwenden.
2
MENU
Drücken Sie diese Taste, um die Funktionen
des Fernsehgeräts in einem Bildschirmmenü
anzuzeigen.
3
– +
Drücken, um die Lautstärke zu erhöhen oder
zu verringern.
Wählen Sie im Bildschirmmenü die
Schaltflächen, so wie Sie die ◄ und ► Tasten
auf der Fernbedienung verwenden.
ENTER auf der
– +
4
C/P.
Kanal wechseln. Wählen Sie im
Bildschirmmenü die
Schaltflächen, so wie Sie die ▲ und ▼ Tasten
auf der Fernbedienung verwenden.
5
Stromversorgungsanzeige
Beim Einschalten des Fernsehgeräts blinkt
die Betriebsanzeige kurz und erlischt
anschließend. Im Standbymodus leuchtet die
Anzeige permanent.
6
(POWER)-Taste
Drücken Sie diese Taste, um das Fernsehgerät
ein- und auszuschalten.
Fernbedienungssensor
7
Richten Sie die Fernbedienung auf diesen
Sensor am Fernsehgerät.
8
Lautsprecher
C/P.
Page 93

Deutsch - 6
Anschlussfeld
Rückseite
1
5
9
oder
Kabelfernsehen
Netzwerk
oder
432 6 8
Die Produktfarbe und -form können sich je nach Modell unterscheiden.
➢
Stellen Sie sicher, dass der Fernseher und alle angeschlossenen Geräte ausgeschaltet sind, ehe
☛
Sie weitere Geräte anschließen.
Achten Sie beim Anschließen eines externen Geräts auf die Farbcodierung: Stecker und Buchse
müssen die gleiche Farbe aufweisen.
1
NETZANSCHLUSS
Zum Anschließen des mitgelieferten
Netzkabels.
2
COMPONENT IN
Audio (AUDIO L/R) und Videoeingänge (Y/P
PR) für Komponentenanschluss.
3
PC IN / AUDIO
Zum Anschließen an den Video- und
Audioausgang eines Computers.
4
EXT 1, EXT 2
Ein- und Ausgänge für externe Geräte wie z. B.
Videorecorder, DVD-Player, Spielekonsolen
oder Video-Disc-Player.
Anschlussmöglichkeiten
Anschluss
EXT 1
EXT 2
Eingang Ausgang
Video Audio (L/R) RGB Video + Audio (L/R)
✔ ✔ ✔
✔ ✔ Ausgang frei wählbar.
Nur TV-Ausgang ist
verfügbar.
5
3D SYNC OUT
An 3D-IR-Sender anschließen.
6
Externe Audiogeräte anschließen
Schließen Sie die Cinch-Audiosignale des
B/
Fernsehgeräts an eine externe Quelle an, z. B.
an ein Audiogerät.
7
SERVICE
− Anschluss für Servicezwecke
− Verbinden Sie das Fernsehgerät über
den seriellen Anschluss mit der elektrisch
angetriebenen Wandhalterung, wenn Sie
den Betrachtungswinkel des Fernsehgeräts
mit der Fernbedienung einstellen möchten.
7
Fortsetzung...
Page 94

Deutsch - 7
8
HDMI IN 1,2
– Beim Anschluss von Geräten über eine
HDMI-Schnittstelle ist keine zusätzliche
Audioverbindung erforderlich.
– Eine Verbindung über HDMI/DVI-Kabel
kann nur über HDMI IN 2 erfolgen.
Was ist HDMI?
➢
− HDMI, die hochauflösende
Multimediaschnittstelle, ermöglicht die
Übertragung von hochauflösenden
digitalen Videodaten und mehreren
Kanälen mit Digitalaudio.
− Mit dem entsprechenden Kabel
ermöglicht der HDMI/DVI-Anschluss
DVI-Verbindungen zu einem
erweiterten Gerät (nicht mitgeliefert).
Der Unterschied zwischen HDMI und
DVI besteht darin, dass ein Gerät mit
HDMI kleiner ist, mit dem Kopierschutz
HDCP (Hoch Bandwidth Digital Copy
Protection/ digitaler Kopierschutz)
ausgestattet ist und digitalen
Mehrkanalton unterstützt.
Seitenverkleidung
1
2
DVI IN (HDMI 2) AUDIO R/L
DVI-Audioausgänge für externe Geräte.
9
Antenneneingang
75 Ω-Koaxialanschluss für Antenne/
Kabelanschluss.
Unterstützte Modi für HDMI/DVI und
Komponenteneingang
HDMI/DVI 50 Hz
HDMI/DVI 60 Hz
Komp. O O O O O O
oder
480i 480p 576i 576p 720p 1080i
X X X O O O
X O X X O O
Die Produktfarbe und -form können sich je nach Modell unterscheiden.
➢
1
HDMI IN 3
Zum Anschließen an die HDMI-Buchse von
Geräten mit HDMI-Ausgang
2
S-VIDEO oder VIDEO / AUDIO L/R
S-Video-, Video- und Audioeingänge für
externe Geräte wie z. B. Camcorder oder
Videorecorder.
3
3
Kopfhörerbuchse
Wenn Sie beim Fernsehen andere Personen
im Zimmer nicht stören möchten, können Sie
Kopfhörer an das Fernsehgerät anschließen.
Das Verwenden von Kopfhörern bei hoher
➢
Lautstärke über einen längeren Zeitraum
kann zu Hörschäden führen.
Page 95

Deutsch - 8
Fernbedienung für Sehbehinderte
1
Netztaste
(Zum An- und Ausschalten
des Fernsehgeräts)
2
TV-Modus direkt aufrufen
3
Zifferntasten für direkte
Programmplatzeingabe
4
Taste für Kanalsteuerung
(Informationen hierzu finden
Sie auf Seite 15.)
5
Ton vorübergehend
ausschalten
6
Lautstärke erhöhen
Lautstärke verringern
7
Taste für Kanalsteuerung
(Informationen hierzu finden
Sie auf Seite 15).
8
Hiermit können Sie häufig
verwendete Funktionen
mithilfe von Symbolen
schnell ausführen.
9
Steuern des Cursors im Menü
0
Anzeigen von Informationen
zur aktuellen Sendung
#
Drücken Sie diese Taste,
um den optionalen Anzeigeund Audiomodus für Sport,
Kinofilme und Spiele
auszuwählen.
$ Videorekorder /DVD
Funktionen (Rücklauf, Stopp,
Wiedergabe/Pause, Vorlauf)
%
Verfügbare Signalquelle
auswählen
^
Vorheriger Kanal
&
Nächster Kanal
Vorheriger Kanal
*
Bildschirm-Hauptmenü
anzeigen
(
Taste für TruSurround
XT-Modus
)
Zurück zum vorherigen
Menü
a
OSD-Menü ausblenden
b
Auswahl der Bildgröße
c
Verwenden Sie dies, wenn
Sie ein DMA-Gerät von
Samsung über eine HDMISchnittstelle anschließen
und in den DMA-Modus
wechseln. Weitere
Informationen zu den
Betriebsabläufen finden Sie
im Benutzerhandbuch des
DMA-Geräts.
Diese Schaltfläche
ist verfügbar, Diese
Schaltfläche ist verfügbar,
wenn “Anynet+ (HDMICEC)” auf “An” geschaltet
ist. (siehe Seite 33)
d
Bildeffekt wählen (siehe
Seite 18)
e
Räumliche Anzeige von
3-Filmen oder –Spielen mit
einer 3D-Brille.
Videotext-Funktionen
(Informationen hierzu finden Sie
auf Seite 36.)
2
Videotextanzeige beenden
(modellabhängig)
7
Videotextseite speichern
8
Videotextgrösse
0
Verborgenen Inhalt
einblenden
!
Fastext-Thema auswählen
@
Videotext anzeigen/Videotext
und Fernsehsendung
zugleich anzeigen
%
Videotext-Modus auswählen
(LIST/FLOF)
^
Untergeordnete
Videotextseite
&
P : Nächste
Videotextseite
P
*
Videotext-Index
)
Seite weiter anzeigen
(nicht umblättern)
a
Videotext abbrechen
: Vorige Seite
Fortsetzung...
Page 96

Deutsch - 9
Batterien in die Fernbedienung einsetzen
1 Heben Sie die Abdeckung auf der Rückseite der
Fernbedienung an, wie in der Abbildung dargestellt.
2 Legen Sie zwei AAA-Batterien ein.
Achten Sie darauf, dass die Pole der Batterien
➢
(+ und –) wie im Batteriefach angezeigt ausgerichtet sind.
Verwenden Sie nicht gleichzeitig verschiedene
Batterietypen (z. B. Mangan- und Alkali-Batterien)
3 Schließen Sie die Abdeckung, wie in der Abbildung
dargestellt.
Wenn die Fernbedienung für einen längeren Zeitraum nicht
➢
verwendet wird, nehmen Sie die Batterien heraus, und lagern Sie sie an einem kühlen, trockenen
Ort. Die Fernbedienung funktioniert bis zu einer Entfernung von 7 m zum Fernsehgerät. (Bei
normaler Nutzung der Fernbedienung halten die Batterien ungefähr ein Jahr.)
Wenn die Fernbedienung nicht funktioniert: Überprüfen Sie Folgendes:
➢
1. Ist das Fernsehgerät eingeschaltet?
2. Wurden Plus- und Minuspol der Batterien vertauscht?
3. Sind die Batterien leer?
4. Gibt es einen Stromausfall oder ist das Netzkabel nicht angeschlossen?
5. Befindet sich eine Leuchtstoffröhre oder ein Neonschild in der Nähe?
Batterien und Akkus gehören nicht in den Hausmüll.
➢
Als Verbraucher sind Sie verpflichtet, alte Batterien und Akkus zur umweltschonenden Entsorgung
zurückzugeben.
Sie können alte Batterien und Akkus bei den öffentlichen Sammelstellen in Ihrer Gemeinde oder
überall dort abgeben, wo Batterien und Akkus der betreffenden Art verkauft werden.
Ein- und Ausschalten des Fernsehgeräts
Das Netzkabel wird auf der Rückseite des Fernsehgeräts angeschlossen.
1 Schließen Sie das Netzkabel an eine geeignete Netzsteckdose an.
Die erforderliche Netzspannung ist auf der Rückseite des Geräts angegeben. Zulässige
➢
Netzfrequenzen sind 50 Hz und 60 Hz.
2 Drücken Siezum Einschalten des Fernsehgeräts den Netzschalter auf der Vorderseite des
Fernsehgeräts oder die Taste POWER auf der Fernbedienung. Der Sender, den Sie zuletzt gesehen
haben, wird automatisch wieder aufgerufen. Falls Sie bisher keine Sender gespeichert haben, wird
wahrscheinlich kein deutliches Bild angezeigt. Informationen zum Speichern von Kanälen finden
Sie unter „Sender automatisch einstellen“ auf Seite 13 und unter „Sender manuell einstellen“ auf
Seite 14.
Wenn das Fernsehgerät zum ersten Mal eingeschaltet wird, werden automatisch einige
➢
Grundeinstellungen vorgenommen. Weitere Informationen finden Sie unter „Plug & PlayFunktion“ auf Seite 10.
3 Drücken Sie zum Ausschalten des Fernsehgeräts den POWERschalter auf der Vorderseite des
Fernsehgeräts oder die Taste POWER auf der Fernbedienung.
4 Drücken Sie zum Einschalten des Fernsehgeräts den POWERschalter auf der Vorderseite des
Fernsehgeräts oder die Taste POWER bzw. die Zifferntasten auf der Fernbedienung.
Anzeigen von Menüs
1 Drücken Sie die Taste MENU. Auf der linken Seite befinden sich
sechs Symbole: Bild, Ton, Sender, Einstellungen, Eingang.
2 Wählen Sie mit den Tasten ▲ oder ▼ eines der Symbole aus.
Drücken Sie die Taste
ENTER, um in das Untermenü des
Symbols zu wechseln.
3 Drücken Sie die Taste ▲ oder ▼, um im Menü zu navigieren.
Drücken Sie die Taste
ENTER, um Menüoptionen auszuwählen.
4 Ändern Sie mit den Tasten ▲/▼/◄/► die gewählte Option.
Durch Drücken der Taste
RETURN gelangen Sie zurück ins
vorherige Menü.
5 Drücken Sie zum Schließen des Menüs die Taste EXIT.
T V
Modus :
Zellhelligkeit 7
Kontrast 95
Helligkeit 45
Schärfe 50
Farbe 50
Farbton V50 R50
Detaileinstellungen
Bildoptionen
Reset : OK
Navig.
Bild
Standard
Eingabe
Beenden
Page 97

Deutsch - 10
Plug & Play-Funktion
Wenn das Fernsehgerät zum ersten Mal eingeschaltet wird,
werden automatisch einige Grundeinstellungen vorgenommen.
Die folgenden Einstellungen sind verfügbar.
Wenn Sie versehentlich das falsche Land für Ihren
☛
Fernseher einstellen, werden die Zeichen auf dem Bildschirm
möglicherweise falsch angezeigt.
1
Wenn sich das Gerät im Standby-Modus befindet, drücken Sie die
POWER Taste auf der Fernbedienung. Die Meldung Starten von
Plug&Play wird angezeigt. Drücken Sie die Taste
ENTER
.
2 Das Menü Sprache wird nach einigen Sekunden automatisch
eingeblendet.
3 Wählen Sie mit den Tasten ▲ oder ▼ die gewünschte Sprache aus.
Drücken Sie die Taste
‘Privatgebrauch’, wenn Sie diesen Fernseher in einem
ENTER. Die Meldung Wählen Sie
Privathaushalt verwenden. wird angezeigt.
4 Drücken Sie die Taste ◄ oder ►, um Shop-Demo oder
Privatgebrauch auszuwählen, und drücken Sie dann die Taste
ENTER. Die Meldung zum Überprüfen des Verbindungsstatus
der Antenne wird angezeigt.
Die Standardeinstellung ist Privatgebrauch.
➢
Wir empfehlen Ihnen, das Fernsehgerät im Modus
➢
Privatgebrauch zu verwenden, um das optimale Bild für
den Privatgebrauch zu erzielen.
Der Modus Shop-Demo ist nur geeignet, wenn das Gerät
➢
in einem Verkaufsbereich verwendet wird.
Das Gerät ist versehentlich auf den Modus Shop-Demo
➢
(Shop) eingestellt, und Sie möchten wieder zurück zu
Privatgebrauch (Standard) wechseln: Drücken Sie die
Lautstärketaste. Wenn das Menü “Lautstärke” (Volume)
angezeigt wird, halten Sie die Taste MENÜ 5 Sekunden
lang gedrückt.
5 Stellen Sie sicher, dass die Antenne an den Fernseher
angeschlossen ist. Drücken Sie dann die Taste ENTER. Das
Menü Land wird angezeigt.
6 Wählen Sie durch Drücken der Tasten ▲ oder ▼ Ihr Land (oder
Ihre Region) aus. Drücken Sie auf
ENTER.
Plug & Play
Starten von Plug&Play
OK
Eingabe
Plug & Play
English
Sprache
Navig.
Wählen Sie ‘Privatgebrauch’, wenn
Sie diesen Fernseher in einem
Privathaushalt verwenden.
Navig.
Land
Navig.
Deutsch
Français
Italiano
▼
Eingabe
Shop-Demo
Antenneneingang prüfen
Plug & Play
Eingabe
Plug & Play
OK
Eingabe
Plug & Play
Belgien
Frankreich
Deutschland
Italien
Andere
Eingabe
Privatgebrauch
Überspr.
Überspr.
Plug & Play
P 1 C -- 40 MHz
0 %
Start
Eingabe
Fortsetzung...
Überspr.
Page 98

Deutsch - 11
7 Drücken Sie zum Starten des Suchlaufs der Kanäle die
8 Drücken Sie auf ◄ oder ►, um Monat, Datum, Jahr, Stunde
ENTER. Die Kanalsuche wird automatisch gestartet
Taste
und beendet. Wenn Sie alle verfügbaren Sender gespeichert
haben, wird das Menü
die Taste
oder
den Tasten ▲ oder ▼ vor.
➢
ENTER.
Minute einzustellen. Nehmen Sie die Einstellungen mit
Sie können Monat, Datum, Jahr, Stunde oder Minute
durch Drücken der Zifferntasten auf der Fernbedienung
direkt einstellen.
Zeit einstellen angezeigt. Drücken Sie
9 Bestätigen Sie die vorgenommenen Einstellungen mit der Taste
ENTER. Die Meldung Wir wünschen gute Unterhaltung!
wird
angezeigt. Drücken Sie abschließend die Taste ENTER.
Auch wenn Sie die Taste ENTER nicht drücken, verschwindet
➢
die Meldung nach einigen Sekunden von selbst.
So setzen Sie diese Funktion zurück:
1 Drücken Sie die Taste MENU, um das Menü anzuzeigen.
2 Drücken Sie die Taste ▲ or ▼, um Einstellungen
auszuwählen, und drücken Sie dann die Taste
ENTER.
3 Drücken Sie die Taste ENTER, um Plug & Play auszuwählen.
Die Meldung
Starten von Plug & Play wird angezeigt.
Zeit einstellen
Monat Datum Jahr Stunde
01 01 2008 00 04
T V
Plug & Play
Navig.
Einstellen
Wir wünschen gute Unterhaltung!
Plug & Play
Sprache : Deutsch
Zeit
Lichteffekt
Einstellung für Wandmontage
Melodie : Aus
Entertainment : Aus
Energiesparmod. : Aus
PIP
Navig.
OK
Einstellungen
: TV Modus An
Eingabe
Minute
Eingabe
Zurück
Page 99

Deutsch - 12
Verwenden der Taste TOOLS (Extras)
Sie können die Taste TOOLS (Extras) verwenden, um häufig verwendete Funktionen schnell und
einfach auszuwählen. Der Inhalt des Menüs Extras hängt davon ab, welche externe Signalquelle
Sie für die Anzeige verwenden.
1 Drücken Sie die Taste TOOLS.
Das Menü
Extras wird geöffnet.
2 Wählen Sie mit der Taste ▲ oder ▼ eine Menüoption aus, und
drücken Sie dann die
ENTER-Taste.
3 Drücken Sie die Taste ▲/▼/◄/►/ENTER, um die
ausgewählten Elemente anzuzeigen, zu ändern oder zu
verwenden.
Anynet+ (HDMI-CEC)
Bildmodus : Standard
Tonmodus : Benutzerdef.
Sleep-Timer : Aus
SRS TS XT : Aus
Energiesparmod. : Aus
Dual I-II : Mono
t
Extras
Einstellen
BeendenNavig.
Ausführliche Beschreibungen der einzelnen Funktionen finden
Sie auf der jeweiligen Seite.
• Anynet+ (HDMI-CEC), siehe Seite 32
• Bildmodus, siehe Seite 18
• Tonmodus, siehe Seite 25
• Sleep-Timer, siehe Seite 27
• SRS TS XT, siehe Seite 25
• Energiesparmodus, siehe Seite 29
• Dual I-II, siehe Seite 26
Anzeigen externer Signalquellen
Sie können zwischen dem Eingangssignal angeschlossener
Geräte, wie z. B. Videorecorder, DVD-Player, Set-Top-Box und
der TV-Signalquelle (Antenne oder Kabel) wechseln.
1 Drücken Sie die Taste MENU, um das Menü anzuzeigen.
2 Drücken Sie die Taste ▲ oder ▼, um Eingang auszuwählen,
und drücken Sie dann die Taste
ENTER.
3 Drücken Sie nochmals die Taste ENTER, um Quellen
auszuwählen.
4 Drücken Sie die Taste ▲ oder ▼, um die Signalquelle
auszuwählen, und drücken Sie dann die Taste
Verfügbare Signalquellen:
TV, Ext.1, Ext.2, AV, S-Video,
ENTER.
Komp., PC, HDMI1, HDMI2, HDMI3
Sie können nur solche externen Geräte wählen, die an das
➢
Fernsehgerät angeschlossen sind.
Sie können diese Optionen auswählen, indem Sie einfach die
➢
Taste
SOURCE auf der Fernbedienung drücken.
T V
Quellen :
Name bearb.
Anynet+ (HDMI-CEC)
TV
Ext.1 : −−−−
Ext.2 : −−−−
AV : −−−−
S-Video : −−−−
Komp. : −−−−
PC : −−−−
HDMI 1 : −−−−
HDMI 2 : −−−−
HDMI 3 : −−−−
Navig.
Navig.
Eingang
QuellenT V
TV
Eingabe
Eingabe
Zurück
Zurück
Um wieder zum regulären
➢
Fernsehprogramm zurückzukehren, drücken Sie die Taste
und wählen die Nummer des gewünschten Kanals.
TV
Page 100

Deutsch - 13
Gerätenamen bearbeiten
Sie können der externen Signalquelle einen Namen geben.
T V
1 Drücken Sie die Taste MENU, um das Menü anzuzeigen.
2 Drücken Sie die Taste ▲ oder ▼, um Eingang auszuwählen,
und drücken Sie dann die Taste
ENTER.
3 Drücken Sie die Taste ▲ oder ▼, um Name bearb.
auszuwählen, und drücken Sie dann die Taste
ENTER.
4 Drücken Sie die Taste ▲ oder ▼, um die externe Signalquelle
zum Bearbeiten auszuwählen, und drücken Sie dann die Taste
ENTER.
5 Wählen Sie mit den Tasten ▲ oder ▼ das gewünschten Gerät,
und drücken Sie dann die Taste
Verfügbare Gerätenamen:
ENTER.
VCR, DVD, Kabel-STB, Sat-STB,
T V
PVR-STB, AV-Receiver, Spiel, Camcorder, PC, TV, InternetFernsehen, Blu-Ray, HD-DVD, DMA
6 Drücken Sie zum Beenden die Taste EXIT.
Automatisches Speichern von Kanälen
Sie können nach verfügbaren Frequenzbereichen suchen (die
Verfügbarkeit ist von Land zu Land verschieden).
Die automatisch zugewiesenen Programmplätze entsprechen
unter Umständen nicht den gewünschten Programmplätzen.
Sie können jedoch die Programmplätze manuell sortieren und
nicht gewünschte Sender wieder löschen.
1 Drücken Sie die Taste MENU, um das Menü anzuzeigen.
2 Drücken Sie die Taste ▲ oder ▼, um Kanal auszuwählen, und
drücken Sie dann die Taste
ENTER.
3 Drücken Sie die Taste ENTER. Es wird eine Liste der
verfügbaren Länder angezeigt.
4 Wählen Sie mit den Tasten ▲ und ▼ Ihr Land aus, und drücken
Sie dann die Taste
Wählen Sie mit den Tasten ▲ und ▼ die Option Autom.
5
ENTER.
speichern aus, und drücken Sie dann die Taste ENTER.
6 Drücken Sie zum Starten des Suchlaufs erneut die Taste
ENTER. Die Suche wird automatisch beendet
Um die Suche vorzeitig abzubrechen, drücken Sie die
➢
Taste
MENU oder ENTER.
T V
T V
Quellen :
Name bearb.
Anynet+ (HDMI-CEC)
Ext.1 : −−−−
Ext.2 :
AV : −−−−
S-Video : −−−−
Komp. : −−−−
PC : −−−−
HDMI 1 : −−−−
HDMI 2 : −−−−
HDMI 3 : −−−−
Land : Deutschland
Autom. speichern
Man. speichern
Programmverwaltung
Sortieren
Name
Feinabstimmung
Land :
Autom. speichern
Man. speichern
Programmverwaltung
Sortieren
Name
Feinabstimmung
P 1 C -- 40 MHz
0 %
Eingang
TV
Navig.
Eingabe
Name bearb.
−−−−
Navig.
Eingabe
Kanal
Navig.
Eingabe
Kanal
Navig.
Eingabe
Autom. speichern
Start
Eingabe
Zurück
−−−−
VCR
DVD
Kabel-STB
Sat-STB
PVR-STB
AV-Receiver
Spiel
▼
Zurück
Belgien
Frankreich
Deutschland
Italien
Niederlande
Spanien
Schweiz
GB
▼
Zurück
Deutschland
Zurück
Zurück
 Loading...