

Page 1
Induction Hob
User manual
NZ64N9777GK / NZ64N9777BK / NZ64N7777GK
NZ6000K NZ64N9777_NZ64N7777_DG68-01073A-00_EN+FI+NO+DA+SV.indb 1 2/19/2018 12:02:10 PM
Page 2
Contents
Contents
Using this manual 3
Contents
The following symbols are used in this User Manual: 3
Model name & serial number 3
Safety instructions 3
Disposing of the packaging material 7
Proper disposal of your old appliance 7
Correct Disposal of This Product (Waste Electrical & Electronic Equipment) 7
Installing the hob 8
Safety instructions for the installer 8
Tools you will need 8
Connecting to the mains power supply 8
Installing into the countertop 9
Components 11
Before you start 12
Cooking zones 12
Control panel 13
Induction heating 14
Virtual ame technology 14
Safety shutoff 15
Residual heat indicator 15
Temperature detection 15
Cookware 16
Using the touch buttons 19
Operating noises 19
Initial cleaning 19
Flex zone Plus 21
Keep Warm 22
Timer 23
Pause/Resume 23
Quick stop 24
Switching the appliance off 24
Child safety lock 24
Maximum power limit 25
Sound on/off 26
Smart Connect (NZ64N9777GK, NZ64N7777GK model only) 26
Hood control 27
Maintaining your appliance 27
Hob 27
Light soiling 27
Stubborn soiling 28
Problem dirt 28
Hob frame (option) 29
To avoid damaging your appliance 29
Troubleshooting and service 29
Troubleshooting 29
Service 31
Technical data 31
Technical data 31
Cooking zones 31
Product information 32
Appendix 33
Operation 20
Switching the appliance on 20
Selecting cooking zone and power level 20
Power Boost 21
Open Source Announcement (NZ64N9777GK, NZ64N7777GK model only) 33
2 English
NZ6000K NZ64N9777_NZ64N7777_DG68-01073A-00_EN+FI+NO+DA+SV.indb 2 2/19/2018 12:02:11 PM
Page 3
Using this manual
Safety instructions
Please take the time to read this owner’s manual, paying particular attention to the
safety information contained in the following section, before using your appliance.
Keep this manual for future reference.
If transferring ownership of the appliance, please remember to pass the manual on
to the new owner.
The following symbols are used in this User Manual:
WARNING
Hazards or unsafe practices that may result in severe personal injury or death.
CAUTION
Hazards or unsafe practices that may result in minor personal injury or property
damage.
CAUTION
To reduce the risk of re, explosion, electric shock, or personal injury when using
your hob, follow these basic safety precaution.
NOTE
Useful tips, recommendations, or information that helps users manipulate the
product.
Model name & serial number
Both the model name and the serial number are labeled underneath the hob base.
For later use, write down the information or attach the additional product label
(located on the top of the product) onto the current page.
Model Name
Serial Number
The safety aspects of this appliance comply with all accepted technical and safety
standards. However, as manufacturers we also believe it is our responsibility to
familiarize you with the following safety instructions.
WARNING
This appliance is not intended for use by persons (including
children) with reduced physical, sensory or mental capabilities,
or lack of experience and knowledge, unless they have
been given supervision or instruction concerning use of the
appliance by a person responsible for their safety.
Children should be supervised to ensure that they do not play
with the appliance.
This appliance can be used by children aged from 8 years and
above and persons with reduced physical, sensory or mental
capabilities or lack of experience and knowledge if they have
been given supervision or instruction concerning use of the
appliance in a safe way and understand the hazards involved.
Children shall not play with the appliance. Cleaning and user
maintenance shall not be made by children without supervision.
The means for disconnection must be incorporated in the xed
wiring in accordance with the wiring rules.
Using this manual
English 3
NZ6000K NZ64N9777_NZ64N7777_DG68-01073A-00_EN+FI+NO+DA+SV.indb 3 2/19/2018 12:02:11 PM
Page 4

Safety instructions
Safety instructions
This Appliance should be allowed to disconnection from the
supply after installation. The disconnection may be achieved by
having the plug accessible or by incorporating a switch in the
ed wiring in accordance with the wiring rules.
If the supply cord is damaged, it must be replaced by the
manufacturer, its service agent or similarly qualied pesons in
order to avoid a hazard.
The method of xing stated is not to depend on the use of
adhesives since they are not considered to be a reliable xing
means.
WARNING: If the surface is cracked, switch off the appliance to
avoid the possibility of electric shock.
During use the appliance becomes hot. Care should be taken to
avoid touching heating elements inside the hob.
WARNING: Accessible parts may become hot during use. Young
children should be kept away.
The appliance is not intended to be operated by means of an
external timer or separate remote-control system.
CAUTION: The cooking process has to be supervised. A short
term cooking process has to be supervised continuously.
The appliance must not be installed behind a decorative door in
order to avoid overheating.
WARNING: The appliance and its accessible parts become hot
during use. Care should be taken to avoid touching heating
elements. Children less than 8 years of age shall be kept away
unless continuously supervised.
WARNING: Unattended cooking on a hob with fat or oil can be
dangerous and may result in a re.
NEVER try to extinguish a re with water, but switch off the
appliance and then c
over ame e.g. with a lid or a re blanket.
WARNING: Danger of re: Do not store items on the cooking
surfaces.
A steam cleaner is not to be used.
Metallic objects such as knives, forks, spoons and lids should
not be placed on the hob surface since they can get hot.
After use, switch off the hob element by its control and do not
rely on the pan detector.
4 English
NZ6000K NZ64N9777_NZ64N7777_DG68-01073A-00_EN+FI+NO+DA+SV.indb 4 2/19/2018 12:02:11 PM
WARNING: Use only hob guards designed by the manufacturer
of the cooking appliance or indicated by the manufacturer
of the appliance in the instructions for use as suitable or hob
guards incorporated in the appliance. The use of inappropriate
guards can cause accidents.
Page 5
The surfaces are liable to get hot during use.
CAUTION
This appliance can be used by children aged from 8 years and
above and persons with reduced physical, sensory or mental
capabilities or lack of experience and knowledge if they have
been given supervision or instruction concerning use of the
appliance in a safe way and understand the hazards involved.
Children shall not play with the appliance. Cleaning and
user maintenance shall not be made by children unless they are
older than 8 and supervised.
Keep the appliance and its cord out of reach of children less
than 8 year
s.
Be sure the appliance is properly installed and grounded by a
qualied technician.
The appliance should be serviced only by qualied service
personnel. Repairs carried out by unqualied individuals may
cause injury or serious malfunction. If your appliance is in need
of repair, contact your local service centre. Failure to follow
these instructions may result in damage and void the warranty.
Flush - mounted appliances may be operated only after they
have been installed in cabinets and workplaces that conform
to the relevant standards. This ensures sufcient protection
against contact for electrical units as required by the essential
safety standards.
If your appliance malfunctions or if fractures, cracks or splits
appear:
• switch off all cooking zones;
• disconnect the hob from the mains supply; and
Safety instructions
• contact your local service centre.
If the hob cracks, turn the appliance off to avoid the possibility
of electric shock. Do not use your hob until the glass surface
has been replaced.
English 5
NZ6000K NZ64N9777_NZ64N7777_DG68-01073A-00_EN+FI+NO+DA+SV.indb 5 2/19/2018 12:02:11 PM
Page 6
Safety instructions
Safety instructions
Do not use the hob to heat aluminium foil, products wrapped
in aluminium foil or frozen foods packaged in aluminium
cookware.
Liquid between the bottom of the pan and the hob can produce
steam pressure. Which may cause the pan to jump.
Always ensure that the hotplate and the base of the pan are
kept dry.
The cooking zones will become hot when you cook.
Always keep small children away from the appliance.
Keep all packaging materials well out of the reach of children,
as packaging materials can be dangerous to children.
This appliance is to be used only for normal cooking and frying
in the home. It is not designed for commercial or industrial use.
Never use the hob for heating the room.
Take care when plugging electrical appliances into mains
sockets near the hob. Mains leads must not come into contact
Always keep the control panels clean and dry.
Never place combustible items on the hob, it may cause re.
There is the risk of burns from the appliance if used carelessly.
Cables from electrical appliances must not touch the hot surface
of the hob or hot cookware.
Do not use the hob to dry clothes.
Users with Pacemakers and Active Heart Implants must
keep their upper body at a minimum distance of 30 cm from
induction cooking zones when turned on. If in doubt, you
should consult the manufacturer of your device or your doctor.
(Induction hob model only)
Do not attempt to repair, disassemble, or modify the appliance
yourself.
Always turn the appliance off before cleaning.
Clean the hob in accordance with the cleaning and care
instructions contained in this manual.
with the hob.
Overheated fat and oil can catch re quickly. Never leave
Keep pets away from the appliance because pets may step on
the controls of the appliance, causing an malfunction.
surface units unattended when preparing foods in fat or oil, for
example, when cooking chips.
Turn the cooking zones off after use.
6 English
NZ6000K NZ64N9777_NZ64N7777_DG68-01073A-00_EN+FI+NO+DA+SV.indb 6 2/19/2018 12:02:11 PM
Page 7
Disposing of the packaging material
WARNING
All materials used to package the appliance are fully recyclable. Sheet and hard
foam parts are appropriately marked. Please dispose of packaging materials and
old appliances with due regard to safety and the environment.
Proper disposal of your old appliance
WARNING
Before disposing of your old appliance, make it inoperable so that it cannot be a
source of danger. To do this, have a qualied technician disconnect the appliance
from the mains supply and remove the mains lead.
The appliance may not be disposed of in the household rubbish.
Information about collection dates and public refuse disposal sites is available
from your local refuse department or council.
Correct Disposal of This Product (Waste Electrical & Electronic
Equipment)
(Applicable in countries with separate collection systems)
This marking on the product, accessories or literature
indicates that the product and its electronic accessories
(e.g. charger, headset, USB cable) should not be disposed
of with other household waste at the end of their working
life. To prevent possible harm to the environment or human
health from uncontrolled waste disposal, please separate
these items from other types of waste and recycle them
responsibly to promote the sustainable reuse of material
resources.
Household users should contact either the retailer where
they purchased this product, or their local government
ofce, for details of where and how they can take these
items for environmentally safe recycling.
Business users should contact their supplier and check the
terms and conditions of the purchase contract. This product
and its electronic accessories should not be mixed with
other commercial wastes for disposal.
For information on Samsung’s environmental commitments and product specic
regulatory obligations e.g. REACH visit: samsung.com/uk/aboutsamsung/
samsungelectronics/corporatecitizenship/data_corner.html
Safety instructions
English 7
NZ6000K NZ64N9777_NZ64N7777_DG68-01073A-00_EN+FI+NO+DA+SV.indb 7 2/19/2018 12:02:11 PM
Page 8

Installing the hob
WARNING
Be sure the new appliance is installed and grounded only by qualied personnel.
Please observe this instruction. The warranty will not cover any damage that may
occur as a result of improper installation.
Technical data is provided at the end of this manual.
Safety instructions for the installer
• A device must be provided in the electrical installation that allows the
Installing the hob
• With respect to re protection, this appliance corresponds to EN 60335 - 2 -
• The installation must guarantee shock protection.
• The kitchen unit in which the appliance is tted must satisfy the stability
• For protection against moisture, all cut surfaces are to be sealed with a
• On tiled work surfaces, the joints in the area where the hob sits must be
• On natural, articial stone, or ceramic tops, the snap action springs must be
• Ensure that the seal is correctly seated against the work surface without any
• The hob must be pressed out from below when removed.
• A board can be installed underneath the hob.
• The ventilation gap between the worktop and front of the unit underneath it
appliance to be disconnected from the mains at all poles with a contact
opening width of at least 3 mm. Suitable isolation devices include line
protecting cut - outs, fuses (screw type fuses are to be removed from the
holder), earth leakage trips and contactors.
6. This type of appliance may be installed with a high cupboard or wall on one
side.
requirements of DIN 68930.
suitable sealant.
completely lled with grout.
bonded in place with a suitable articial resin or mixed adhesive.
gaps. Additional silicon sealant must not be applied; this would make removal
more difcult when servicing.
must not be covered.
Tools you will need
Pencil Phillips Head Screwdriver Ruler or Straightedge
Safety Glasses Saber Saw Drill
Connecting to the mains power supply
Before connecting, check that the nominal voltage of the appliance, that is, the
voltage stated on the rating plate, corresponds to the available supply voltage. The
rating plate is located on the lower casing of the hob.
WARNING
Shut off power to circuit before connecting wires to circuit.
The heating element voltage is AC 230 V~. The appliance also works perfectly on
networks with AC 220 V~ or AC 240 V~. The hob is to be connected to the mains
using a device that allows the appliance to be disconnected from the mains at all
poles with a contact opening width of at least 3 mm, eg. automatic line protecting
cut - out, earth leakage trips or fuse.
WARNING
The cable connections must be made in accordance with regulations and the
terminal screws tightened securely.
WARNING
Once the hob is connected to the mains supply, check that all cooking zones are
ready for use by briey switching each on in turn at the maximum setting with
suitable cookware.
8 English
NZ6000K NZ64N9777_NZ64N7777_DG68-01073A-00_EN+FI+NO+DA+SV.indb 8 2/19/2018 12:02:12 PM
Page 9

WARNING
L1 L2 N
A
01
02
Pay attention (conformity) to phase and neutral allocation of house connection and
appliance (connection schemes); otherwise, components can be damaged.
Warranty does not cover damage resulting from improper installation.
WARNING
If the supply cord is damaged, it must be replaced by the manufacturer, its service
agent or similarly qualied persons in order to avoid a hazard.
1N~ (32A)
02
01
04 06
01 220-240 V ~04 Blue
02 Brown 05 Gray
03
L N
05
03 Black 06 Green/Yellow
Installing into the countertop
NOTE
Make a note of the serial number on the
appliance rating label prior to installation.
This number will be required in the case
of requests for service and is no longer
accessible after installation, as it is on the
original rating plate on the upperside or
underside of the appliance.
Installing the hob
2N~ (16A): Separate the 2-phase wires
(L1 and L2) before connection.
01 220-240 V ~05 Blue
02 380-415 V ~06 Gray
03 Brown 07 Green/Yellow
04 Black
A. Serial number
NOTE
Pay special attention to the minimum space and clearance requirements.
NOTE
03
04
02
01
05
06
07
The bottom of the hob is equipped with a fan. If there is a drawer under the hob
it should not be used to store small objects or paper, since they could damage the
fan or interfere with the cooling if they are sucked into it.
No. Explanation Size
01 Height of
Min 2 mm
ventilation hole
02 Width of
560 mm
01 04
02
03
L1 N1 L2 N2
05
06
07
2 x 1N~ (16A): Separate the wires before
connection.
01 220-240 V ~05 Black
02 Brown 06 Gray
03 Blue 07 Green/Yellow
04 220-240 V
~
ventilation hole
WARNING
For correct supply connection, follow the wiring diagram attached near the terminals.
English 9
NZ6000K NZ64N9777_NZ64N7777_DG68-01073A-00_EN+FI+NO+DA+SV.indb 9 2/19/2018 12:02:13 PM
Page 10
Installing the hob
01
06
04
07
02
03
08
11
01
04
02
03
05
Installing the hob
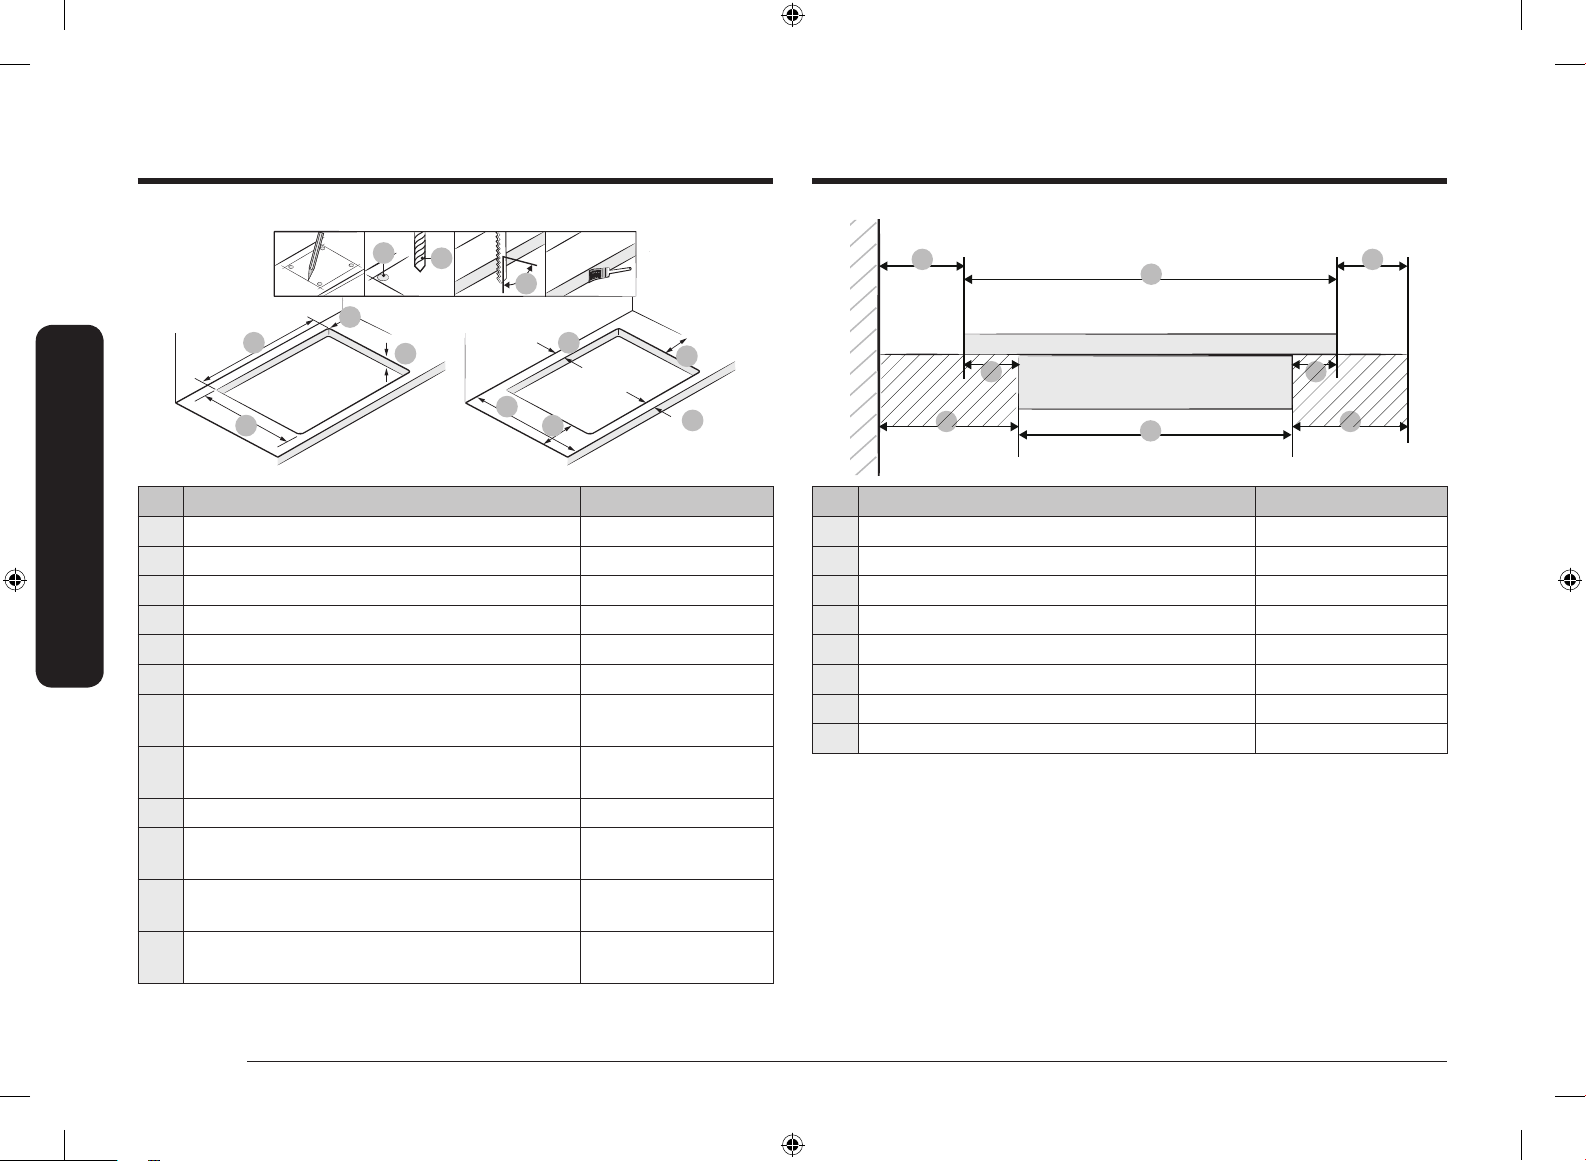
No. Explanation Size
01 Check 4 Point
02 Drill diameter Ø 6
03 Right angle of cutting point 90 °
04 Cutting Width Size 560±1 mm
05 Cutting Depth Size 490±1 mm
06 Curve Size R3
07 Size of table thickness Max 50 mm,
08 Distance between end of table and cutting point
09 Depth of table Min 600 mm
10 Distance between end of table and cutting point
11 Distance between end of table and cutting point
12 Distance between end of table and cutting point
05
(Rear-side)
(Left-side)
(Right-side)
(Front-side)
09
10
12
Min 20 mm
Min 60 mm
Min 60 mm
Min 60 mm
Min 50 mm
06
07
08
No. Explanation Size
01 Distance between wall and hob Min 40 mm
02 Size of depth of hob 520 mm
03 Distance between Induction and end of table Min 40 mm
04 Distance between glass and case burner 25 mm
05 Distance between glass and case burner 15 mm
06 Distance between wall and case burner Min 60 mm
07 Size of depth of case burner 480 mm
08 Distance between case burner and end of table Min 50 mm
10 English
NZ6000K NZ64N9777_NZ64N7777_DG68-01073A-00_EN+FI+NO+DA+SV.indb 10 2/19/2018 12:02:13 PM
Page 11

05
02
01
03
04
No. Explanation Size
01 Width of rear
ventilation
02 Height of rear
ventilation
03 Depth of power
cord path
04 Width of power
cord path
05 Height of block
board
Min 550 mm
Min 35 mm
Max 65 mm
Max 100 mm
Min 5 mm
02
03
01
No. Explanation Size
01
02 Min 2 mm
03 Min 20 mm
Size of ventilation
Min 20 mm
Installing the hob
Components
Induction hob Bracket Spring
NZ6000K NZ64N9777_NZ64N7777_DG68-01073A-00_EN+FI+NO+DA+SV.indb 11 2/19/2018 12:02:13 PM
English 11
Page 12
Before you startBefore you start
Cooking zones
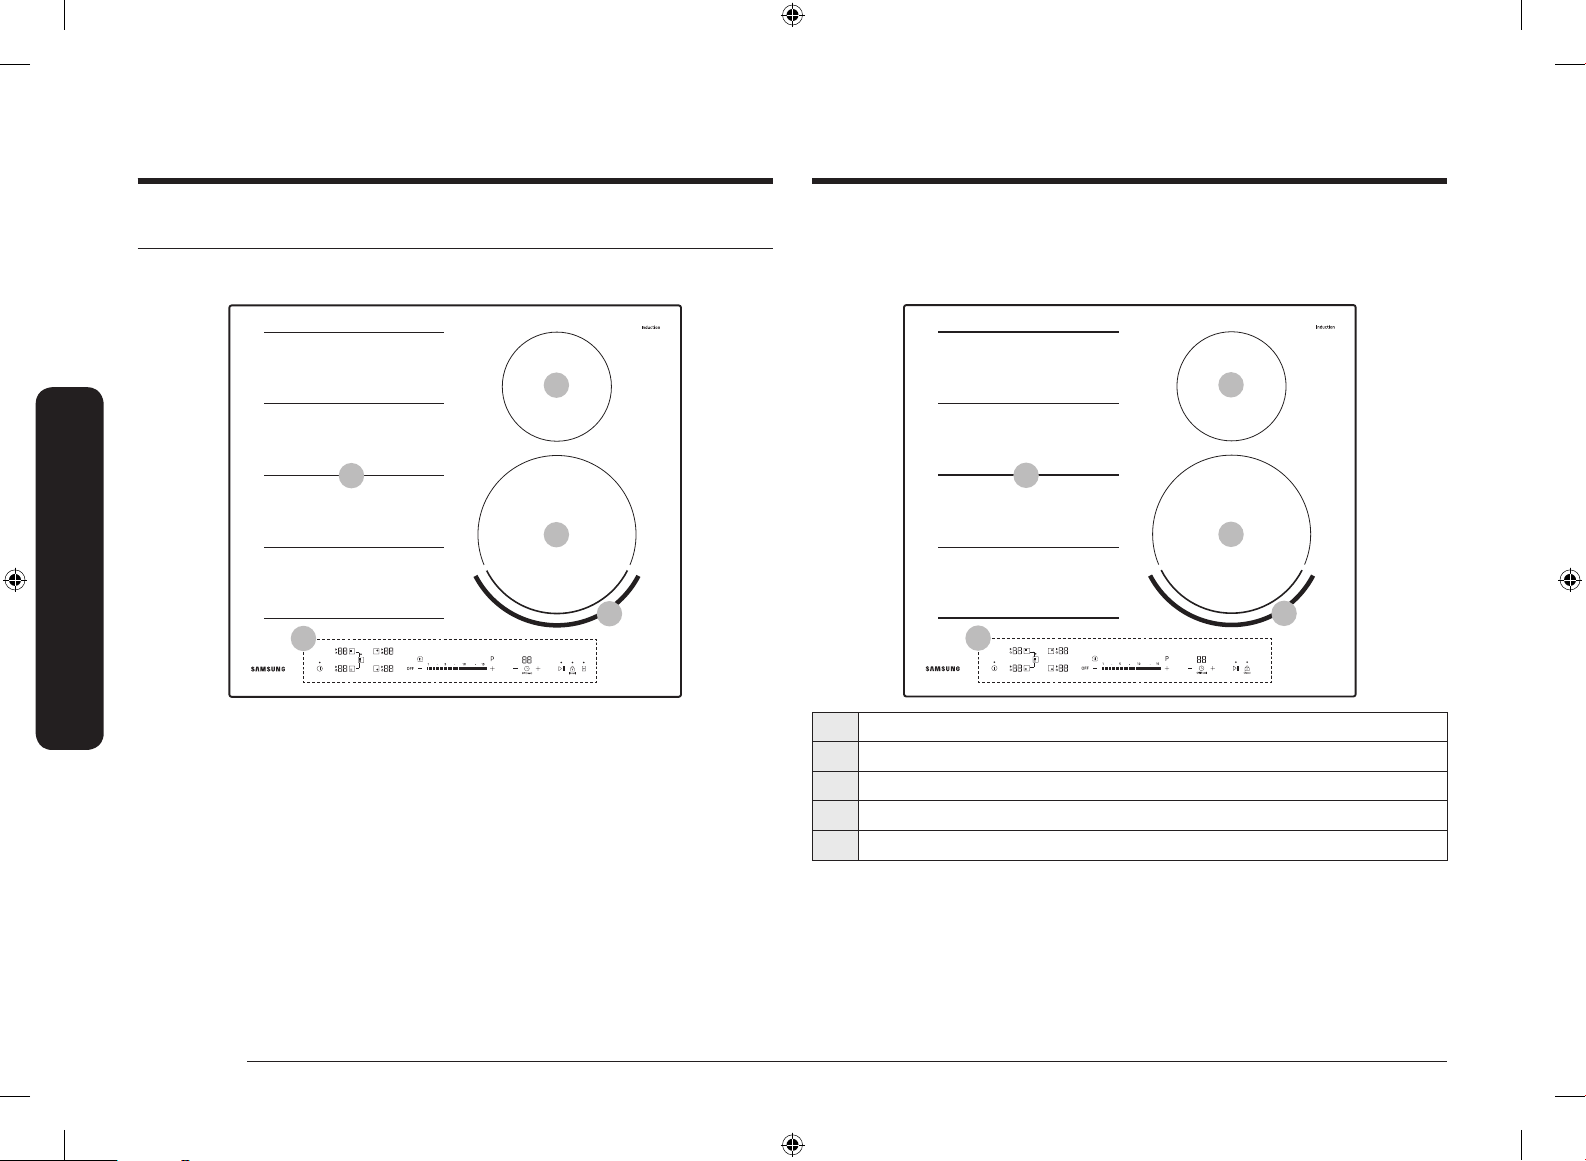
NZ64N9777GK / NZ64N7777GK
02
01
Before you start
03
05
04
NZ64N9777BK
02
01
03
05
04
01 Induction Flex zone Plus 3300 W with Power Boost 3600 W
02 Induction cooking zone 1400 W with Power Boost 2000 W
03 Induction cooking zone 2200 W with Power Boost 3200 W
04 Control panel
05 Virtual ame
12 English
NZ6000K NZ64N9777_NZ64N7777_DG68-01073A-00_EN+FI+NO+DA+SV.indb 12 2/19/2018 12:02:14 PM
Page 13
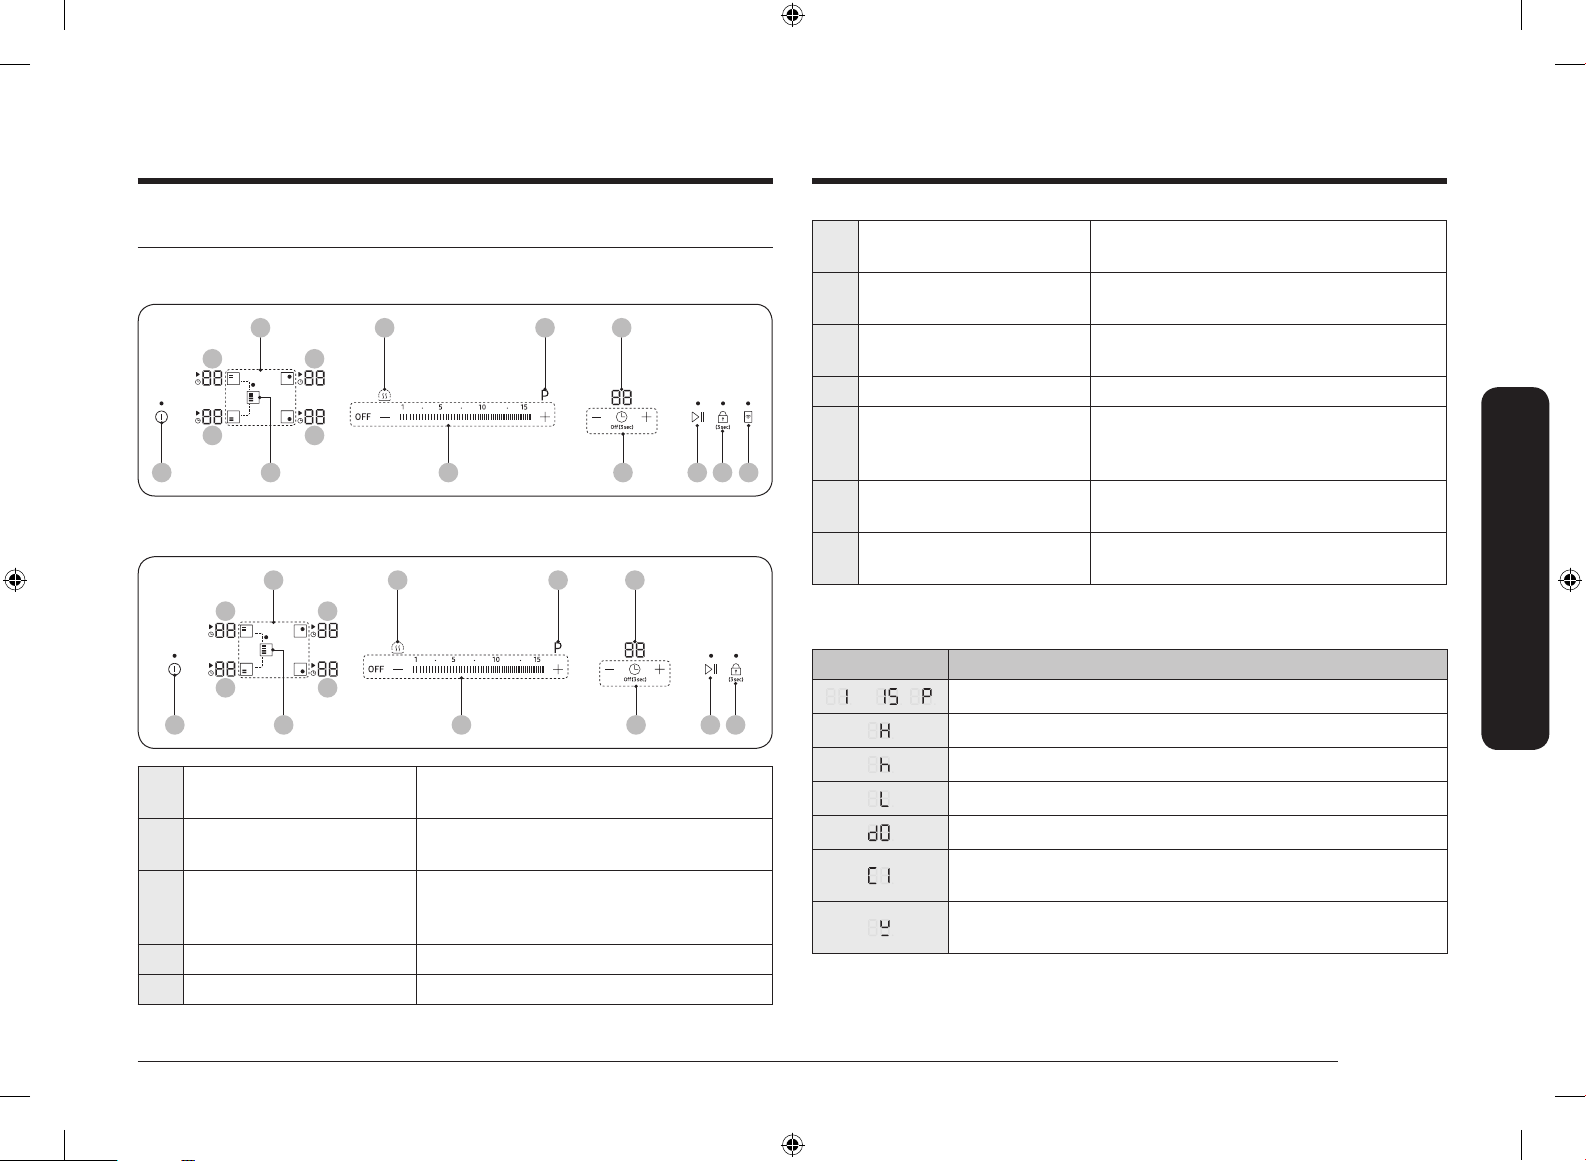
Control panel
01 06 08 10 11 1202
04 05 07 09
03
03
03
03
01 06 08 10 1102
04 05 07 09
03
03
03
03
NZ64N9777GK / NZ64N7777GK
NZ64N9777BK
06 Power level buttons Use these buttons to set the power level of
a cooking zone.
07 Power Boost button Use this button to heat up the contents of
the pan faster than maximum power level.
08 Timer buttons Use these buttons to turn the timer on or
off and set the timer.
09 Timer display Displays the remaining time for the timer.
10 Pause/Resume button Use this button to switch all cooking zones
on to the low power setting (2). (example :
to take a telephone call)
11 Lock button Use this button to switch the Child safey
lock function on or off.
12 Smart Connect button Use this button to switch the Smart Connect
function on or off.
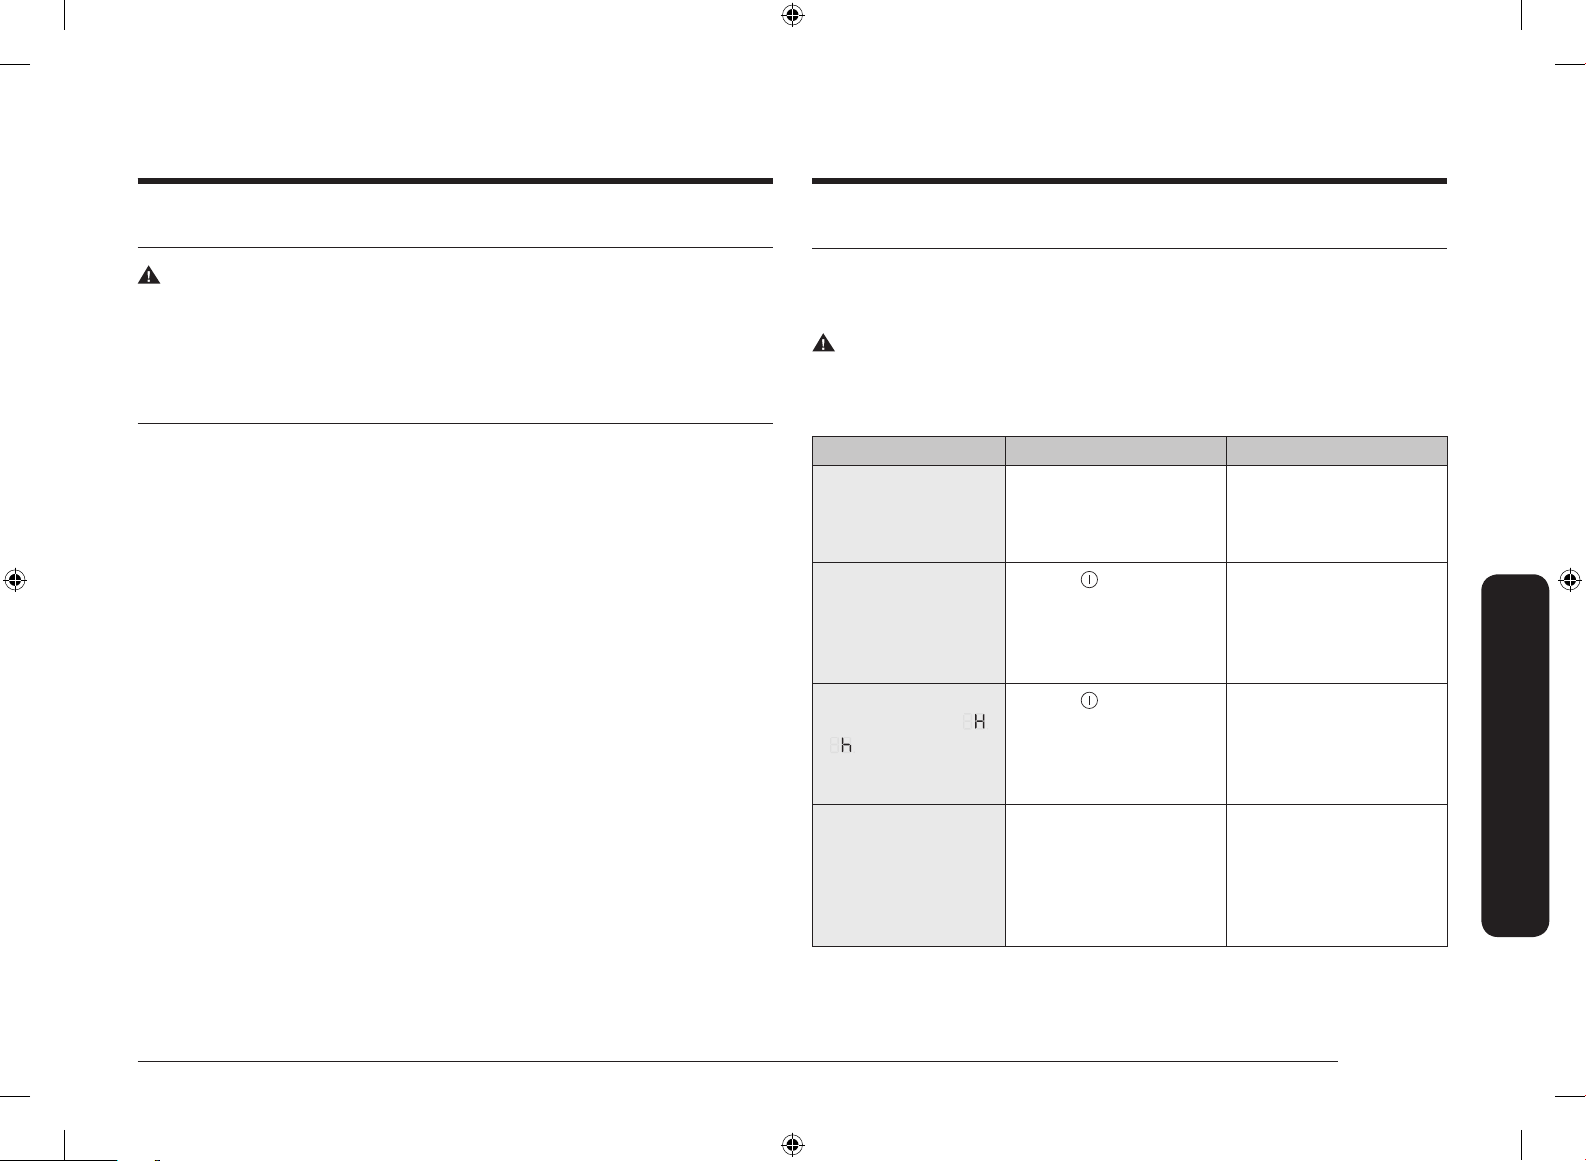
Guide for cooking zone display
Display Meaning
to ,
Selected power level
Residual heat (very hot)
Before you start
NZ6000K NZ64N9777_NZ64N7777_DG68-01073A-00_EN+FI+NO+DA+SV.indb 13 2/19/2018 12:02:15 PM
01 On/Off button Use this button to switch the power supply
on or off completely.
02 Flex zone Plus button Use this button to switch the Flex zone Plus
function on or off.
03 Cooking zone display Displays the power level, activated
functions, residual heat, and information
messages.
04 Cooking zone buttons Use these buttons to select a cooking zone.
05 Keep warm button Use this button to keep cooked food warm.
Residual heat (hot)
The child lock is activated
A button is being touched for longer than 8 seconds.
The hob is overheated because of abnormal operation.
(example : operation with empty cookware)
Cookware is unsuitable, too small, or no cookware has been
placed on the cooking zone
English 13
Page 14
Before you start
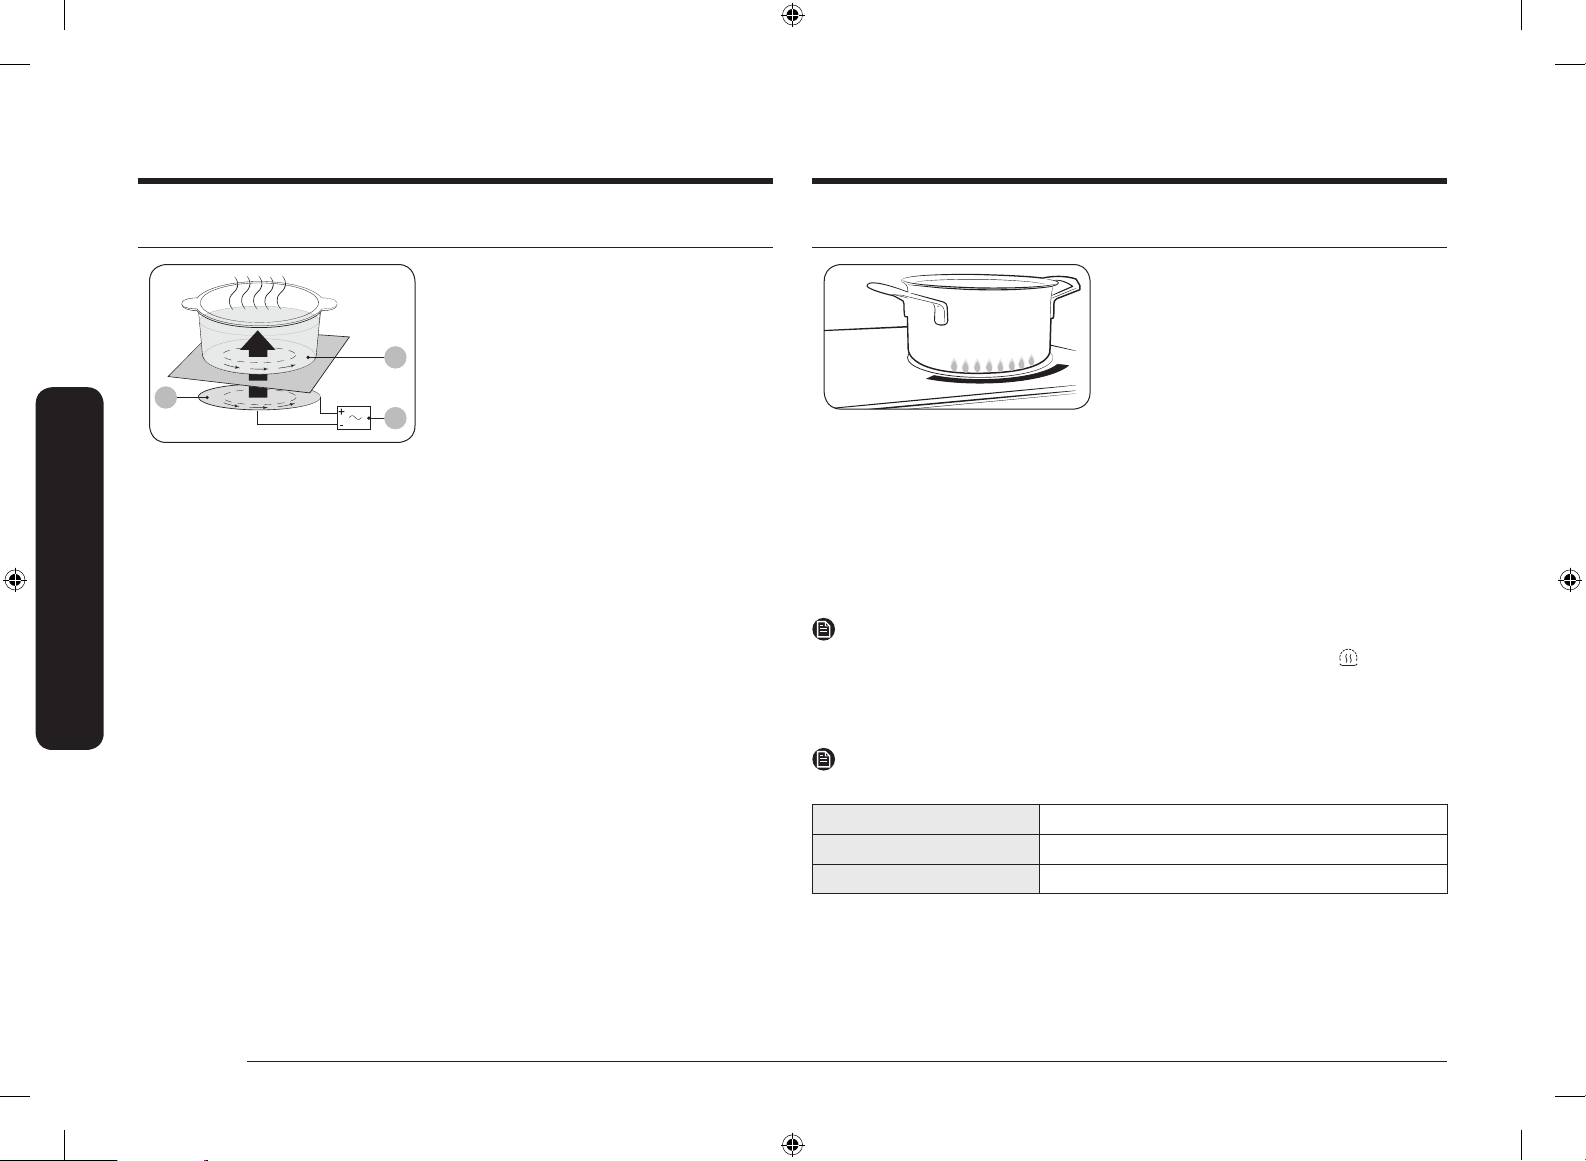
Induction heating
• The Principle of Induction Heating:
When you place your cookware on a
cooking zone and you turn it on, the
B
A
C
A. Induction coil
Before you start
B. Induced currents
C. Electronic circuits
electronic circuits in your induction
hob produce “induced currents” in the
bottom of the cookware which instantly
raise cookware’s temperature.
• Greater speed in cooking and frying:
As the pan is heated directly and not
the glass, the efciency is greater than
in other systems because no heat is
lost. Most of the energy absorbed is
transformed into heat.
Virtual ame technology
Virtual ame technology creates the
appearance of ames when you turn on an
induction element.
• Virtual ame technology is available only on the front-right cooking zone.
• The virtual ame may look different depending on the appearance, size, or
position of the cookware. (For the best results, use cookware that matches the
element size. Cookware that is too large can cover the virtual ame. Cookware
that is too small can cause the virtual ame to be ill-formed.
• Impurities on the cookware bottom or the hob surface can cause the virtual
ame to be ill-formed or incomplete.
Clean the cookware or the hob surface before using them.
NOTE
If you want to turn off Virtual Flame technology, you must touch the
3 seconds within 10 seconds after turning on the hob.
This function is available only immediately after turn on the hob. After another
action can not be set to function.
NOTE
Use a suitable cookware when using Virtual ame burner.
Size 200-220 mm
Cookware surface Horizontal hairline
Material STSS (Stainless steel)
When conditions are satised upper table, Virtual Flame shape can be formed
appropriately.
button for
14 English
NZ6000K NZ64N9777_NZ64N7777_DG68-01073A-00_EN+FI+NO+DA+SV.indb 14 2/19/2018 12:02:16 PM
Page 15
Safety shutoff
If one of the cooking zones is not switched off or the power level is not adjusted
after an extended period of time, that particular cooking zone will automatically
switch itself off.
Any residual heat will be indicated with , (for “hot”) in the corresponding
cooking zone display.
The cooking zones switch themselves off at the following times.
Power level Switch off
1-3 After 6 hours
4-6 After 5 hours
7-9 After 4 hours
10-15 After 1.5 hours
NOTE
If the Hob is overheated because of abnormal operation,
And the Hob will be switched off.
NOTE
If cookware is unsuitable, too small, or no cookware has been placed on the
cooking zone,
And after 1 minute the corresponding cooking zone will be switched off.
NOTE
Should one or more of the cooking zones switch off before the indicated time has
elapsed, see the “Troubleshooting” on page 29.
will be displayed.
will be displayed.
Residual heat indicator
When an individual cooking zone or the hob is turned off, the presence of residual
heat is shown with an , (for “hot”) in the corresponding cooking zone
display. Even after the cooking zone has been switched off, the residual heat
indicator goes out only after the cooking zone has cooled.
You can use the residual heat for thawing or keeping food warm.
WARNING
As long as the residual heat indicator is illuminated, there is a risk of burns.
WARNING
If the power supply is interrupted, the
about residual heat will no longer be available.
However, it may still be possible to burn yourself. This can be avoided by always
taking care when near the hob.
, symbol will go out and information
Temperature detection
If for any reason the temperatures on any of the cooking zones were to exceed the
safety levels, the cooking zone will automatically reduce to a lower power level.
When you have nished using the hob, the cooling fan will continue to run until
the hob’s electronics has cooled down. And the cooling fan switches itself off
depending upon the temperature of the electronics.
Before you start
Other reasons why a cooking zone will switch itself off
All cooking zones will switch themselves off if liquid boils over on the control
panel.
The automatic shutoff will also be activated if you place a damp cloth on the
control panel. In both of these instances, the appliance will need to be switched on
again using the
NZ6000K NZ64N9777_NZ64N7777_DG68-01073A-00_EN+FI+NO+DA+SV.indb 15 2/19/2018 12:02:17 PM
button after the liquid or the cloth has been removed.
English 15
Page 16
Before you start
Cookware
Use at-bottomed cookware that completely
contacts the entire cooking zone. Check
for atness by rotating a ruler across
the bottom of the cookware. Be sure to
follow all the recommendations for using
cookware.
• Use cookware made with the correct material for induction cooking.
• Use quality cookware with heavier bottoms for better heat distribution. This
Before you start
gives best cooking results.
• Match the cookware size to the quantity of food being prepared.
• Do not let cookware boil dry. This may cause permanent damage in the form
of breakage, fusion, or marring that can affect the ceramic hob. (This type of
damage is not covered by your warranty).
• Do not use dirty cookware or cookware with heavy grease buildup. Always
use cookware that is easy to clean after cooking.
CAUTION
• The cooking zones may appear cooled down after they have been turned off.
However, the glass surface may be hot from residual heat transferred from the
cookware. The risk of burns is still present.
• Do not touch hot cookware directly with your hands. Always use oven mitts or
pot holders to protect your hands from burns.
• Do not slide cookware across the hob surface. Doing so may permanently
damage the hob.
Cookware for induction cooking zones
The Induction burner can only be turned on when cookware with a magnetic base
is placed on one of the cooking zones. You can use the cookware identied as
suitable below.
Material Suitability
Steel, enameled steel, cast iron Yes
Stainless steel Yes (If magnet sticks to the bottom of the
cookware)
Aluminum, copper, brass, glass,
ceramic, porcelain
NOTE
• Cookware appropriate for induction cooking is labelled as suitable by the
manufacturer.
• Certain cookware can make noises when being used on induction cooking
zones.
• These noises do not indicate that the hob is malfunctioning and do not affect
its operation in any way.
• Special stainless-steel cookware may not be suitable for induction cooking.
Check if the base of the cookware is attracted by a magnet.
No
16 English
NZ6000K NZ64N9777_NZ64N7777_DG68-01073A-00_EN+FI+NO+DA+SV.indb 16 2/19/2018 12:02:17 PM
Page 17
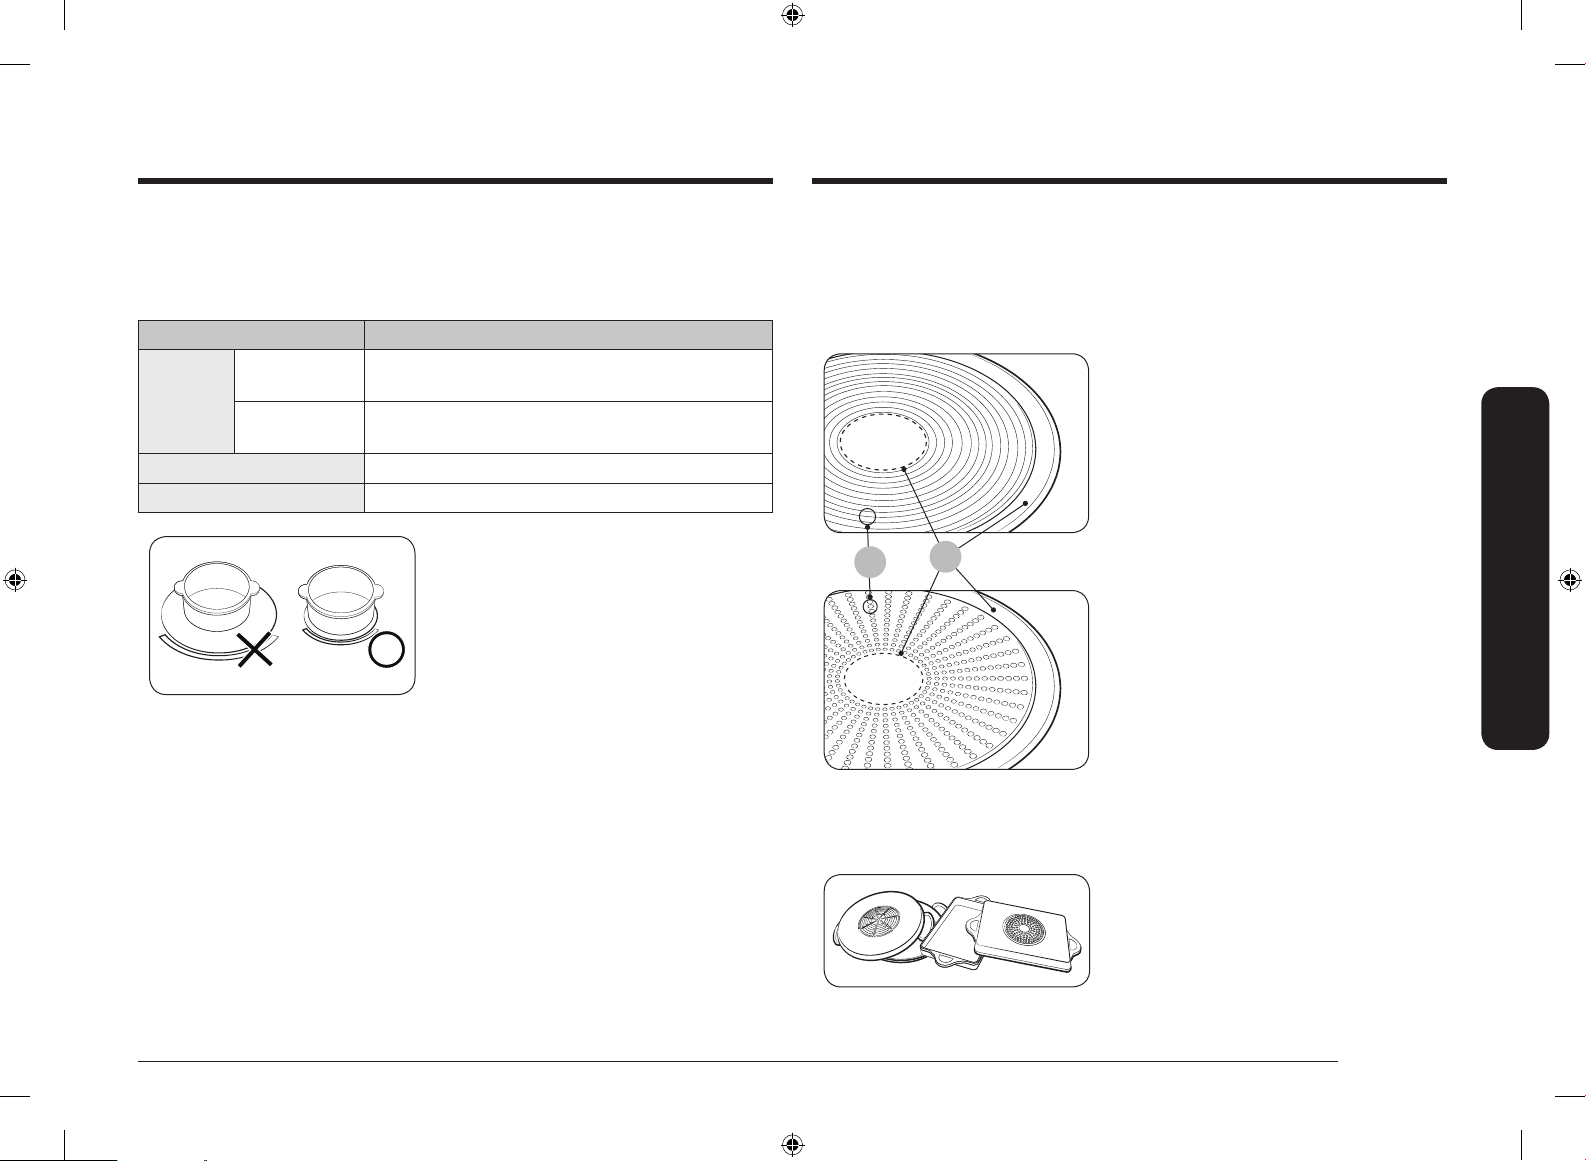
Cookware sizes for induction cooking zones
Induction cooking zones adapt automatically to the bottom size of the cookware
up to a certain limit. However, the magnetic part of the bottom of the cookware
must have a minimum diameter depending upon the size of the cooking zone.
Cooking zone Minimum diameter of the bottom of the cookware
Flex Zone Front or rear
Flex Plus
Complete Flex
Plus
Right Rear cooking zone 100 mm
Right Front cooking zone 140 mm
240 mm (for the longer side of an oval or sh
140 mm
kettle)
Other induction cookware
Some cookware has thin magnetic material on the bottom to work with an
induction heating hob. These cookware has weak magnetism and may not work
well. (Weak magnetism means a magnet does not stick rmly or the area where
the magnet sticks is small.)
• Even though cookware are designed
for an induction hob, the heating
performance could be weak or
sometimes the hob may not detect the
cookware depending on the size and
strength of the magnetic area on the
bottom of the cookware.
Before you start
For best results, use cookware whose
ferromagnetic diameter match that of a
burner. If the cookware is not sensed by the
burner, try a smaller sized burner.
B
A. Area where magnet does not
stick
B. Area where magnet sticks
A
When using large cookware with a
smaller ferromagnetic element, only
the ferromagnetic element heats up.
Consequently, heat might not be uniformly
distributed.
English 17
NZ6000K NZ64N9777_NZ64N7777_DG68-01073A-00_EN+FI+NO+DA+SV.indb 17 2/19/2018 12:02:18 PM
Page 18
Before you start
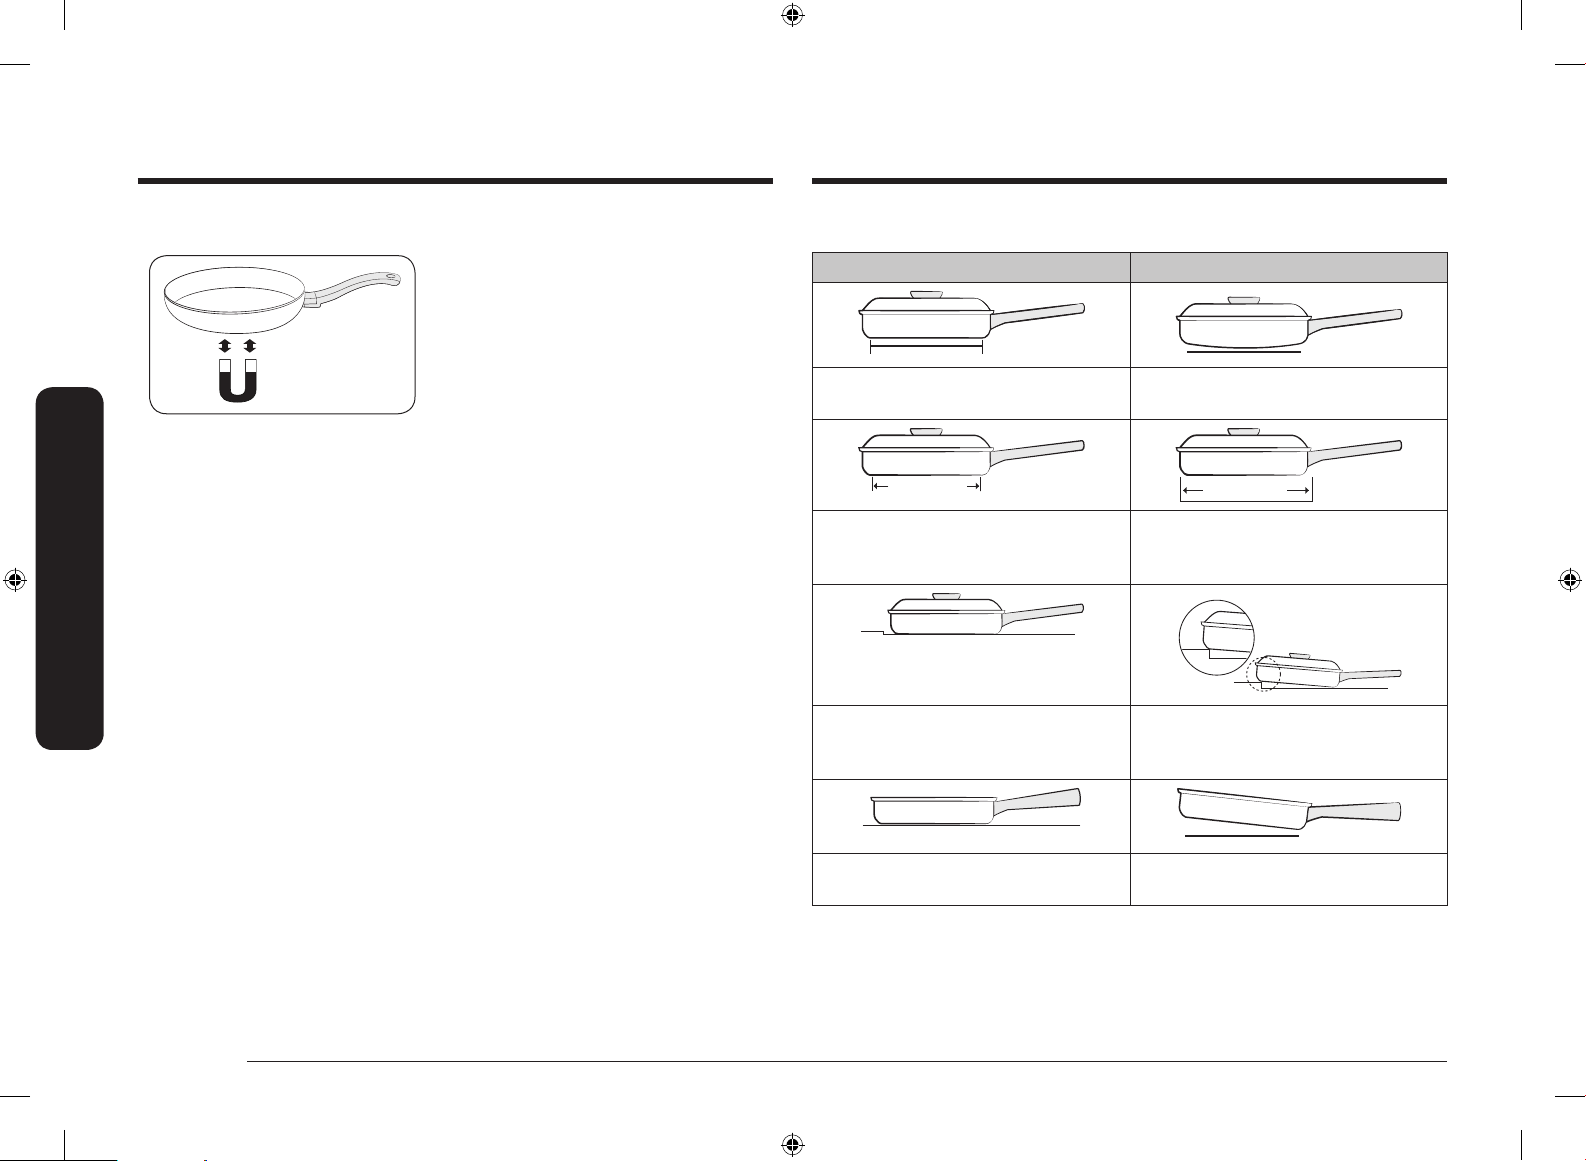
Suitability test
Cookware is suitable for induction cooking
if a magnet sticks to the bottom of the
cookware and the cookware is labelled as
suitable by the cookware manufacturer.
• You can recognise good cookware by their bases. The base is supposed to be
as thick and at as possible.
Before you start
• When buying new cookware, pay special attention to the diameter of the base.
Manufacturers often give only the diameter of the upper rim.
• Do not use cookware which have damaged bases with rough edges or burrs.
Damaged cookware can scratch the ceramic hob permanently if you slide
them across the surface.
• When cold, cookware bases are normally bowed slightly inwards (concave).
They must not be bent outwards (convex).
• If you want to use a special type of cookware, for example, a pressure cooker,
a simmering pan, or a wok, please follow the manufacturer’s instructions.
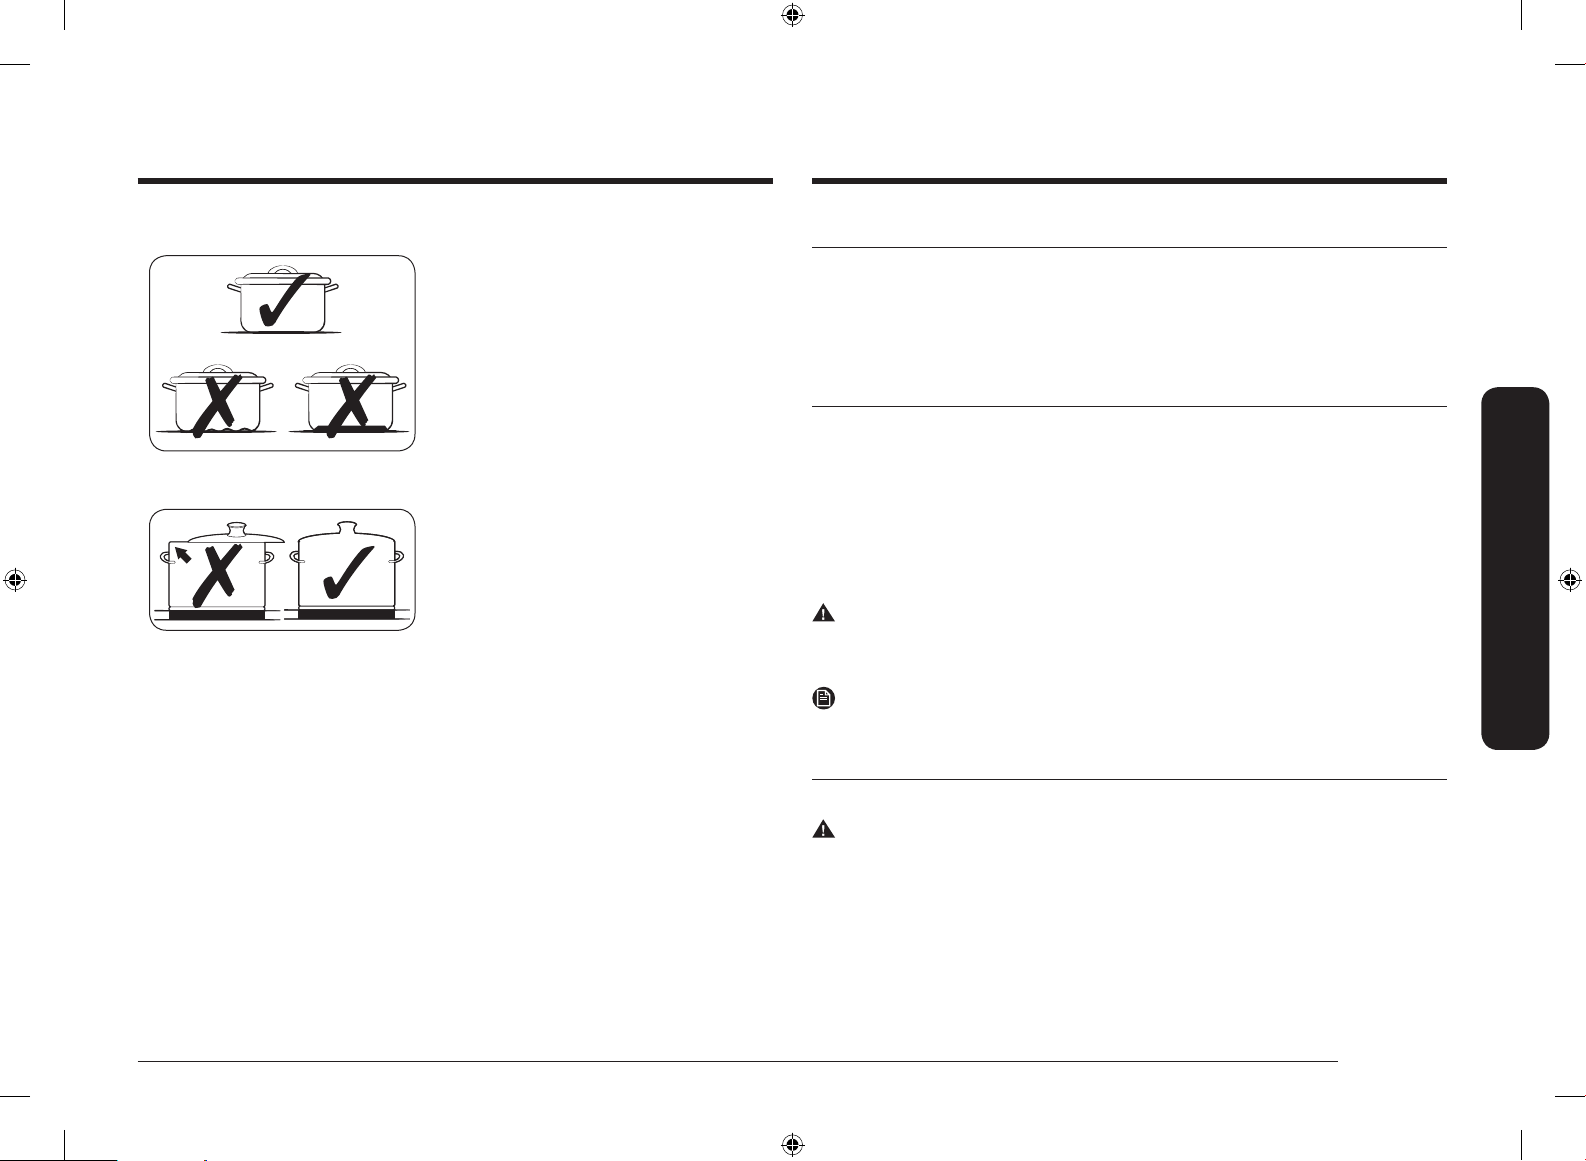
Correct positioning
Correct Incorrect
Flat-bottomed cookware and straight
sides
The cookware meets or exceeds the
recommended minimum size for the
cooking zone.
The cookware rests completely on the
hob surface.
Cookware with curved or warped
bottoms or sides
The cookware does not meet the
minimum size required for the current
cooking zone.
The cookware rests on the hob trim or
does not rest completely on the hob
surface.
The cookware is properly balanced. The heavy handle causes the cookware
to tilt.
18 English
NZ6000K NZ64N9777_NZ64N7777_DG68-01073A-00_EN+FI+NO+DA+SV.indb 18 2/19/2018 12:02:19 PM
Page 19
Energy saving tips
Follow these tips to save power
consumption.
• Always put cookware on a cooking
zone before you turn the corresponding
burner on.
• Keep the cooking zones and cookware
bases clean. Otherwise, more power will
be consumed.
• Firmly close the cover of cookware
if available. This will reduce power
consumption.
• Turn the working burner off before
the end of the cooking time. Use the
residual heat to keep food warm.
Using the touch buttons
To operate the touch buttons, touch the desired button with the tip of your pointed
nger until the relevant displays illuminate or go out, or until the desired function
is activated.
Ensure that you are touching only one button when operating the appliance. If
your nger is too at on the button, an adjacent button may be actuated as well.
Operating noises
If you can hear.
• Cracking noise: cookware is made of different materials.
• Whistling: you use more than two cooking zones and the cookware is made of
different materials.
• Humming: you use high power levels.
• Clicking: electric switching occurs.
• Hissing, Buzzing: the fan operates.
The noise are normal and do not refer to any defects.
WARNING
Do not use cookware of different size and material.
Using cookware of different sizes or materials may cause noises and vibrations.
NOTE
Using low power levels (1-5) may cause clicking noises.
Initial cleaning
Wipe the ceramic glass surface with a damp cloth and ceramic hob glass cleaner.
WARNING
Do not use caustic or abrasive cleaners. The surface could be damaged.
Before you start
English 19
NZ6000K NZ64N9777_NZ64N7777_DG68-01073A-00_EN+FI+NO+DA+SV.indb 19 2/19/2018 12:02:19 PM
Page 20
Operation
Operation
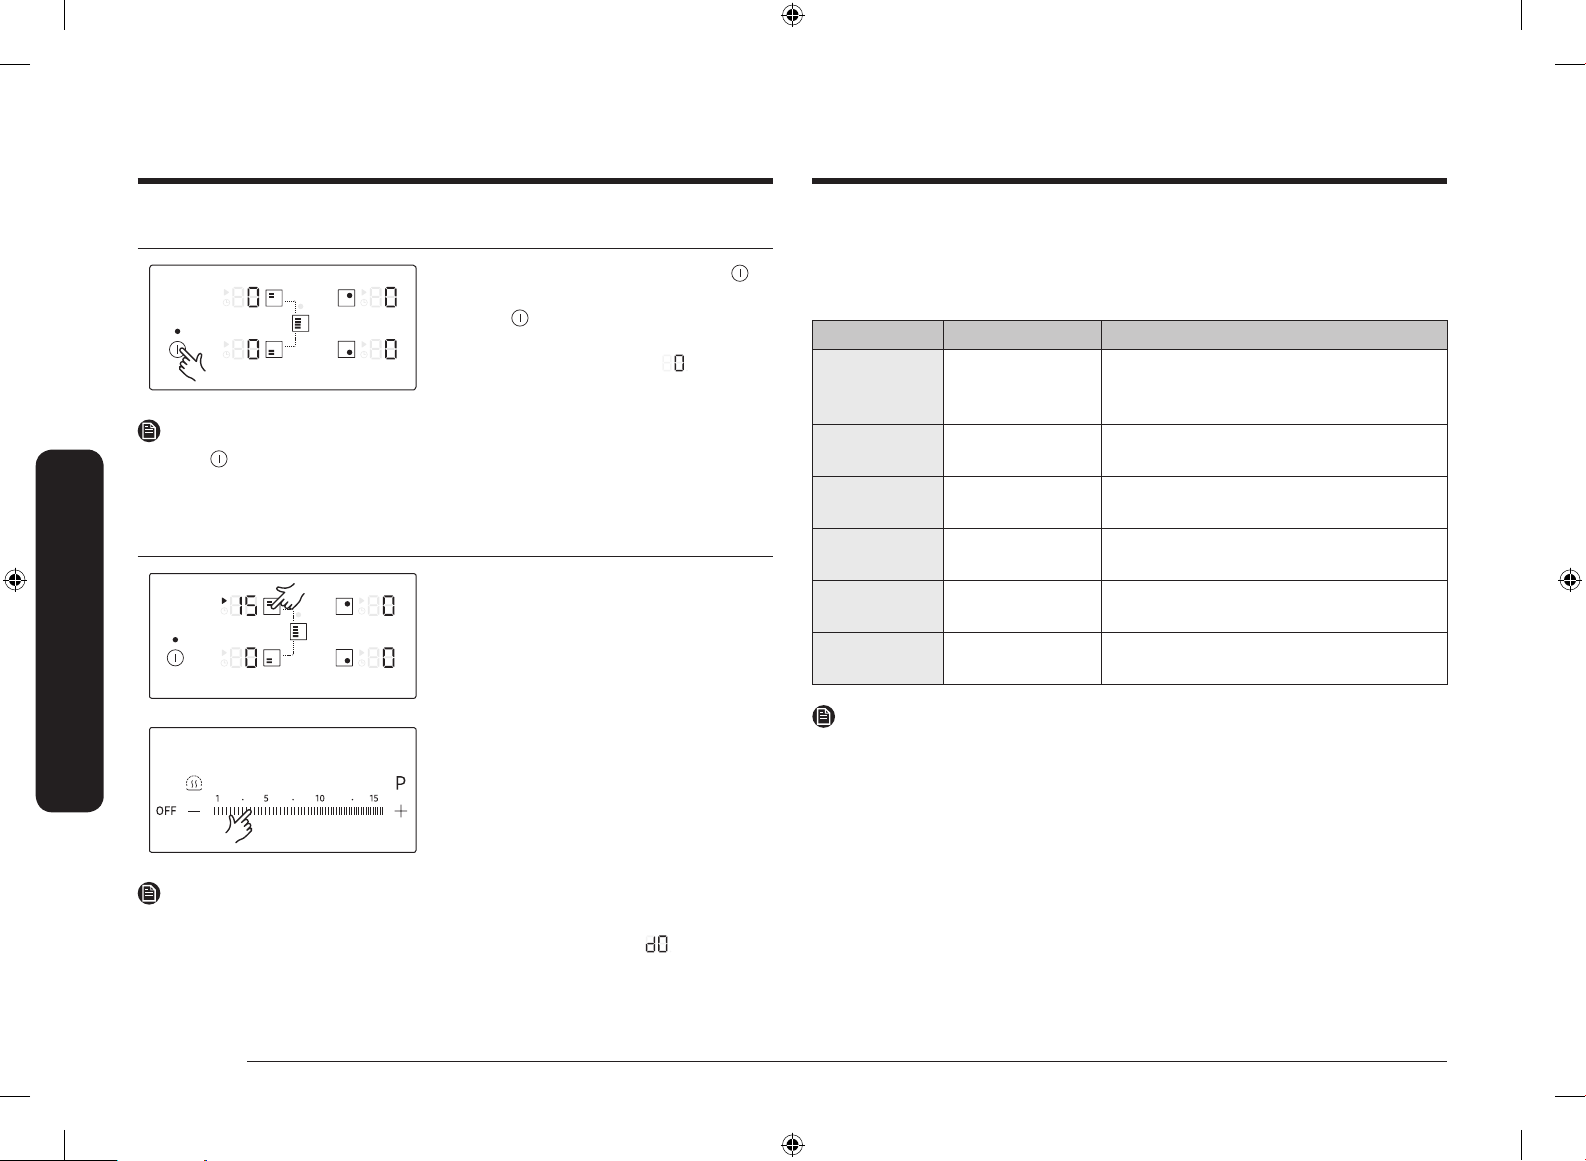
Switching the appliance on
The appliance is switched on using the
button.
Touch the button for approximately 1-2
seconds.
The digital displays will show .
NOTE
After the
must be selected within approximately 20 seconds. Otherwise, the appliance will
switch itself off for safety reasons.
button has been actuated to switch on your appliance, a power level
Selecting cooking zone and power level
1. For selecting the cooking zone, touch
the corresponding cooking zone button.
2. For setting and adjusting the power
level, use the Power level buttons.
Suggested settings for cooking specic foods
The numbers in the table below are guidelines. The power level required for
various cooking methods depend on a number of variables, including the quality
of the cookware being used and the type and amount of food being cooked.
Power level Cooking method Examples for Use
14-15
8-11 Intensive frying
7-10 Frying
5-7 Boiling
2-4
1-2 Melting
NOTE
You will need to adjust the power level according to specic cookware and foods.
Warming /
Sautéing / Frying
Steaming /
Stewing / Boiling
Warming large amounts of liquid, boiling
noodles, searing meat, browning goulash,
braising meat
Steak, sirloin, hash browns, sausages,
pancakes / griddle cakes
Schnitzel / chops, liver, sh, rissoles, fried
eggs
Cooking up to 1.5 l liquid, potatoes,
vegetables
Steaming and stewing of small amounts of
vegetables, boiling rice and milk dishes
Melting butter, dissolving gelatine, melting
chocolate
NOTE
• The default level is set to 15 when selecting the cooking zone.
• If more than one button is touched for longer than 8 seconds,
the cooking zone display.
20 English
NZ6000K NZ64N9777_NZ64N7777_DG68-01073A-00_EN+FI+NO+DA+SV.indb 20 2/19/2018 12:02:20 PM
will show in
Page 21
Power Boost
The Power Boost function makes additional power available to the each cooking
zones. (example : bring a large volume of water to the boil)
Cooking zones Max Boost time
145 mm 10 min
210 mm 10 min
Front or Rear Flex Plus 10 min
Complete Flex Plus 5 min
After these times, the cooking zones automatically return to power level
NOTE
In certain circumstances, the Power Boost function may be deactivated
automatically to protect the internal electronic components of the hob.
For example, It is impossible to output max power on Flex zone rear and Flex zone
front at the same time.
Power management
The cooking zones have a maximum power available to them.
If this power range is exceeded by switching on the Power Boost function, Power
Management automatically reduces the power level of cooking zone.
• No.1 and No.2 is paired
• No3. and No.4 is paired
1
3
The display for this cooking zone alternates
for some seconds between the set power
level and the maximum possible power
2
4
level. After then, the display changes from
the set power level to maximum possible
power level.
.
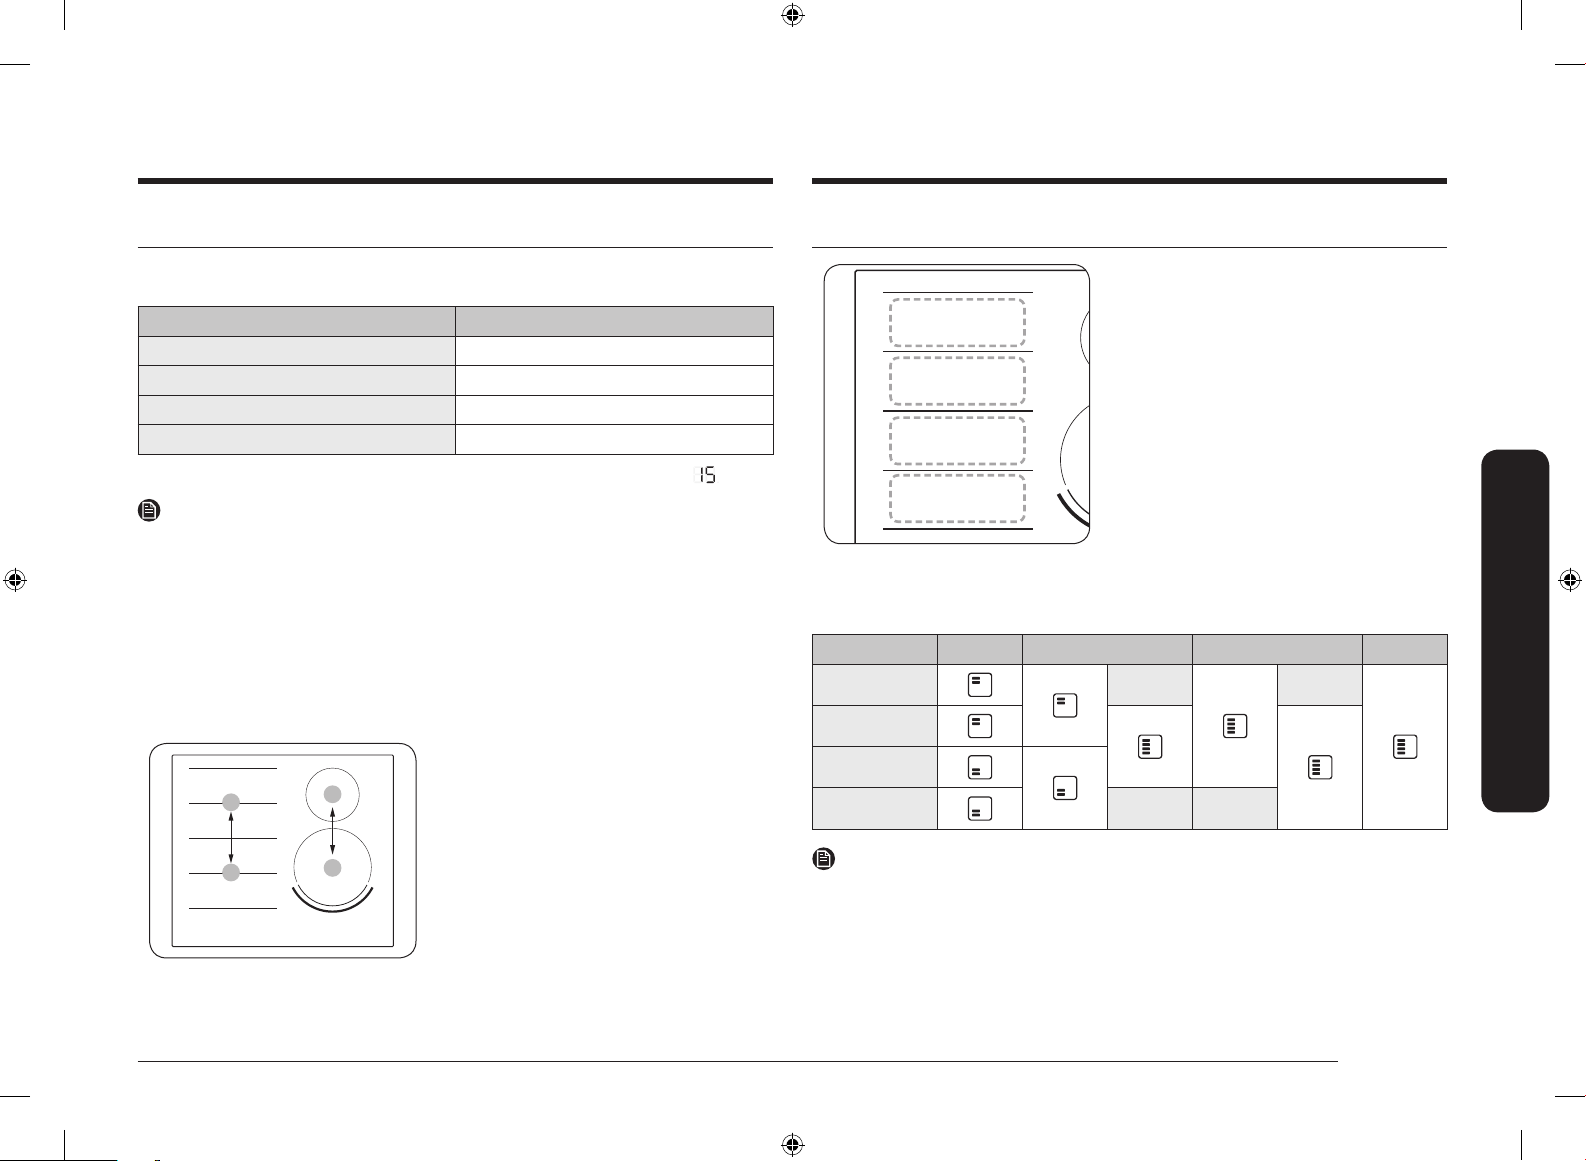
Flex zone Plus
The Flex zone is the large cooking area
located on the left side of the hob (see the
Cooking Zone 1
Cooking Zone 2
Cooking Zone 3
Cooking Zone 4
With Flex zone Plus, you can use a combination of different cooking zones to
enlarge the cooking area. See the table below for the corresponding button to
touch to activate the different combinations.
Cooking Zone 1 burner 2 burner 3 burner 4 burner
1
2
3
4
NOTE
• When using only one cooking zone, the diameter of the bottom of the
cookware must be less than 14 cm.
• The hob may take 5-10 seconds to recognise the position of cookware.
• Noises may occur while the hob recognise the cookware.
• Do not remove cookware during cooking. For safety purposes, the hob
automatically stops if cookware has been removed for more than 5 seconds.
gure left) that is specially designed to
accommodate multiple pots and pans of
varying shapes and sizes at once. The Flex
zone has four zones that are operated by
individual inductors, allowing you to cook
regardless of where cookware is placed on a
cooking zone.
Operation
English 21
NZ6000K NZ64N9777_NZ64N7777_DG68-01073A-00_EN+FI+NO+DA+SV.indb 21 2/19/2018 12:02:21 PM
Page 22
Operation
Operation
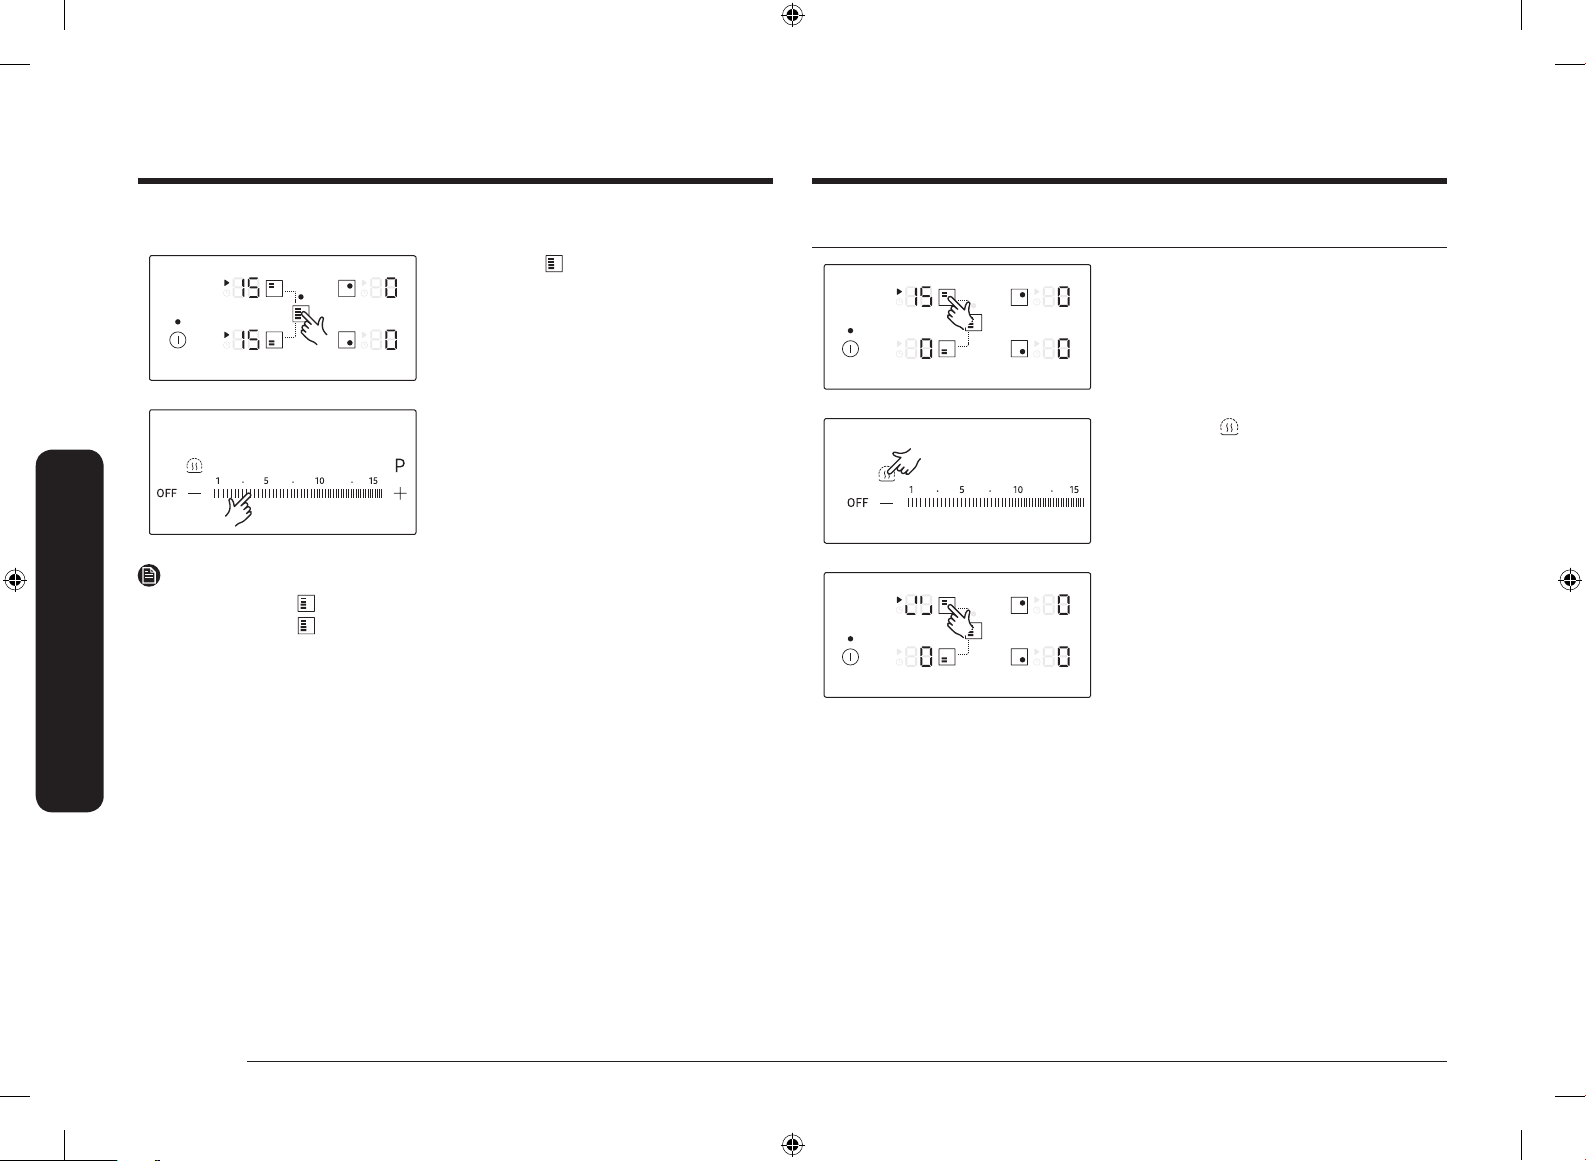
Using the Flex zone Plus
1. Touch the button.
2. For setting and adjusting the power
level, use the Power level buttons.
NOTE
• If you touch the
• If you touch the
levels, it will be automatically adjusted to higher level.
• When moving or adding cookware to a new Flex zone Plus, cancel the current
operation, and then touch the corresponding cooking zone button to activate
the cooking zone.
button during operating, Flex zone Plus function will be off.
button while each cooking zone is operating at different
Keep Warm
1. Use this function to keep cooked food
warm. Touch the corresponding cooking
zone button.
2. Touch the button.
3. The cooking zone display will be
changed.
4. Touch again to turn off the cooking
zone.
22 English
NZ6000K NZ64N9777_NZ64N7777_DG68-01073A-00_EN+FI+NO+DA+SV.indb 22 2/19/2018 12:02:22 PM
Page 23
Timer
Using the timer as a safety shutoff
If a specic time is set for a cooking zone, the cooking zone will shut itself off once
this period of time has elapsed. This function can be used for multiple cooking
zones simultaneously.
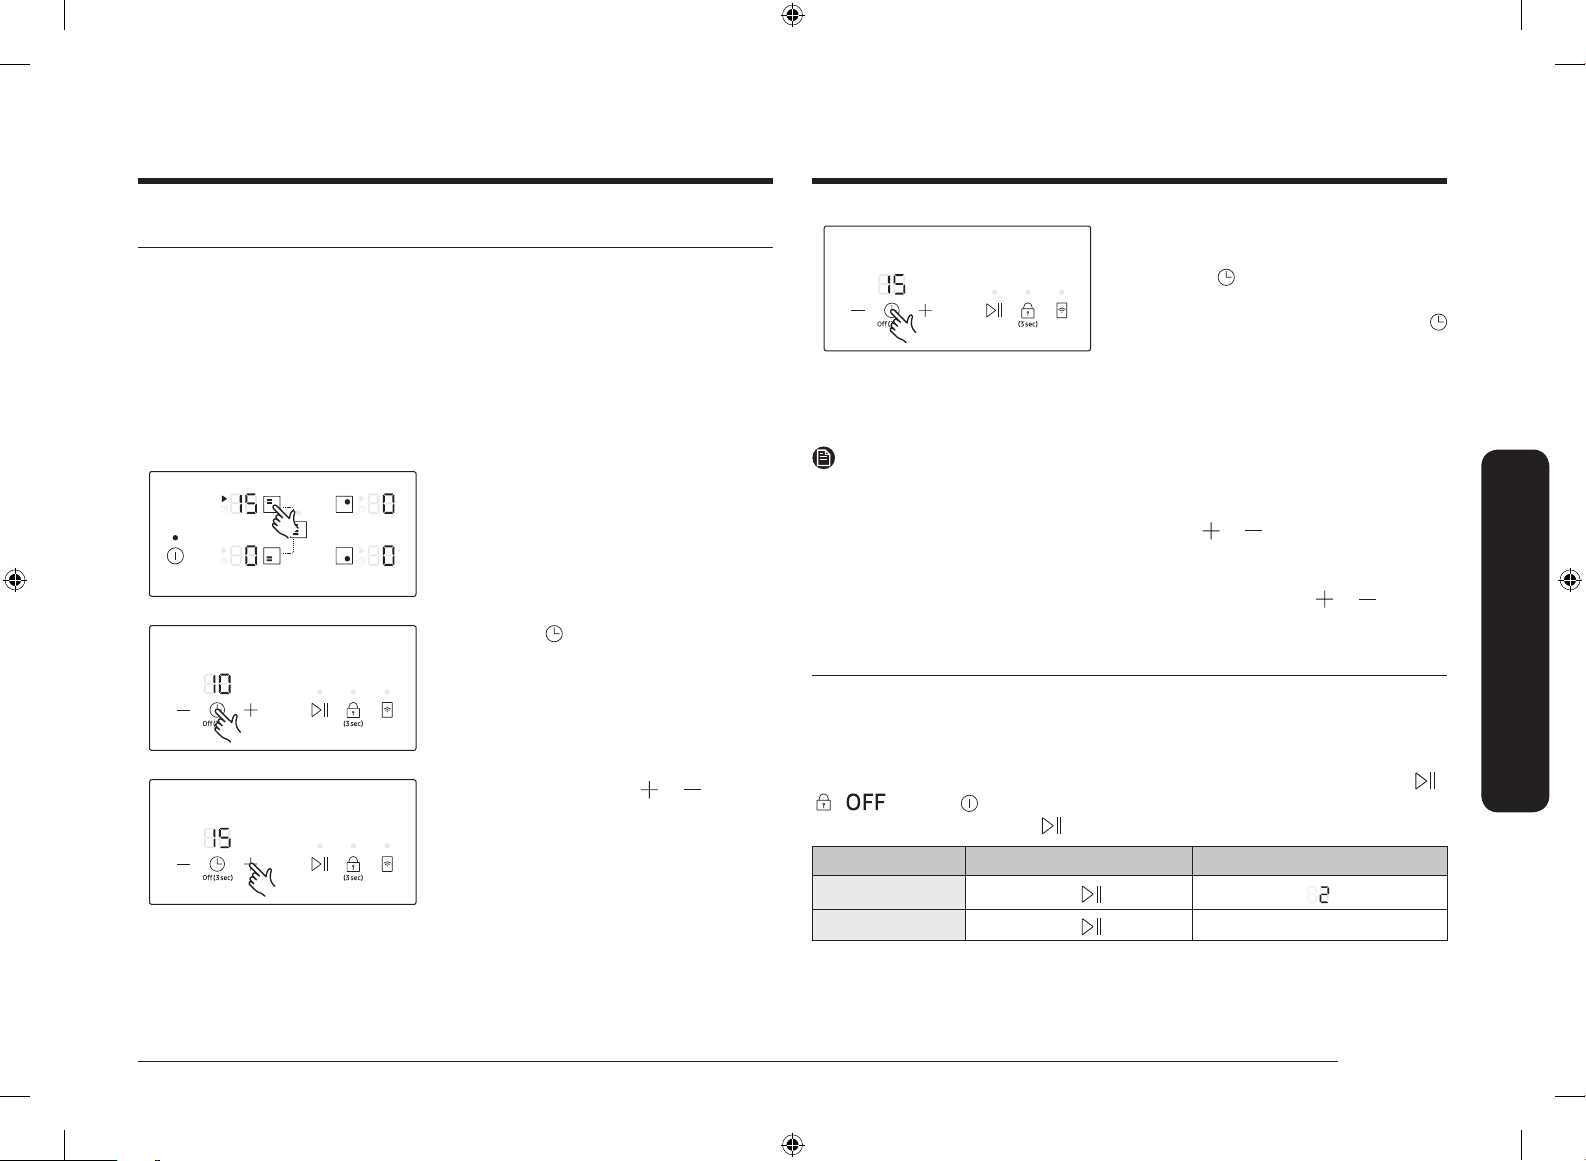
Setting the timer
The cooking zone(s) for which you want to apply the safety shutoff must be
switched on.
1. After switched on, touch the
corresponding cooking zone button to
activate the cooking zone.
2. Touch the
will be displayed above the timer
display. (The default setting of the timer
is 10.)
3. Use the Timer setting ( or ) button
to set the desired amount of time, for
example, 15 minutes, after which the
cooking zone will automatically switch
itself off. The safety shutoff is now
activated. (The timer can be set from 1
to 99.)
button. The number 10
4. To cancel the timer settings, select
the corresponding cooking zone and
touch the button for 2 seconds. This
will cancel the cooking zone timer
settings with a beep. If you touch the
button for 2 seconds without selecting
a burner, this will cancel the timer
settings of the most recently changed
cooking zone.
NOTE
• To display the time remaining for any of the cooking zones, touch the selected
cooking zones.
• The settings are reset using the Timer setting (
period of time has elapsed, the cooking zone automatically switches itself off,
an acoustic signal sounds as conrmation and the timer display indicates.
• To change the settings quicker, touch and hold Timer setting ( or ) button
until the desired value is reached.
or ) button. After the set
Pause/Resume
The Pause/Resume function simultaneously switches all cooking zones that are
switched on to the low power setting and then back to the power level that was
previously set. This function can be used to briey interrupt and then continue the
cooking process e.g. to take a telephone call.
When the Pause/Resume function is activated, all touch buttons except for the
, , and the buttons are disabled.
To resume cooking, touch the button again.
Control Panel Display
To Switch On
To Switch Off
Touch the
Touch the
button
button
Return to previous power level
Operation
,
English 23
NZ6000K NZ64N9777_NZ64N7777_DG68-01073A-00_EN+FI+NO+DA+SV.indb 23 2/19/2018 12:02:24 PM
Page 24
Operation
Operation
Quick stop
This option reduces the step and time it takes to stop cooking.
To switch off a cooking zone, touch the
cooking zone button for 2 seconds.
NOTE
The
button does not support quick stop function.
Switching the appliance off
To completely switch off the appliance, use
the button.
Touch the
seconds.
NOTE
After switching off a single cooking zone or the entire cooking surface, the
presence of residual heat will be indicated in the digital displays of the
corresponding cooking zones in the form of an
The temperature is lowered,
, wil be disappeared.
button for approximately 1-2
, two steps for “hot”.
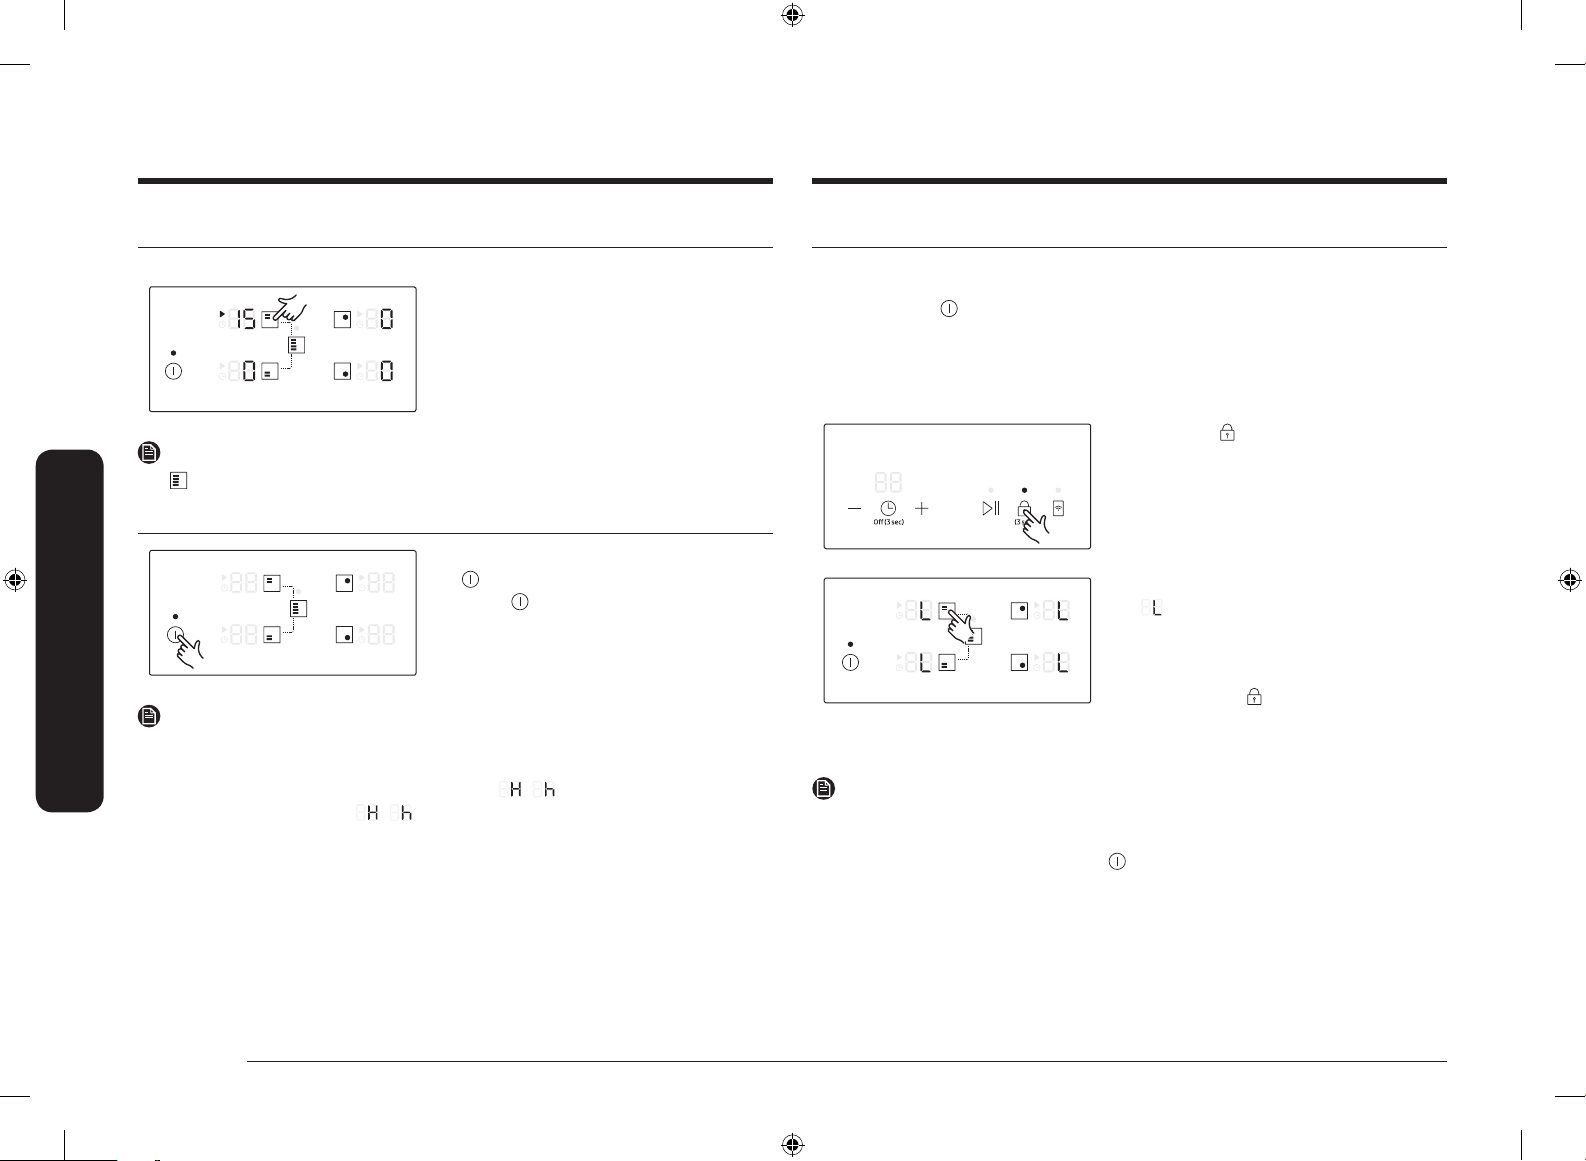
Child safety lock
You can use the child safety lock to safeguard against unintentionally turning on a
cooking zone and activating the cooking surface. Also the control panel, with the
exception of the button (Only turn off control), can be locked in order to prevent
the settings from being changed unintentionally, for example, by wiping over the
panel with a cloth.
Switching the child safety lock On/Off
1. Touch the button for approximately
3 seconds.
An acoustic signal will sound as
conrmation.
2. Touch any button.
will appear in the displays,
indicating the child safety lock has
been activated.
3. For switching the child safety lock
off, touch the button again for 3
seconds. An acoustic signal will sound
as conrmation.
NOTE
• Regardless of power on/off, child lock is activated.
• You can set the child safety lock during cooking. To turn off the burner with
the child safety lock on, touch the
rst and then touch the corresponding cooking zone button.
button or turn off the child safety lock
24 English
NZ6000K NZ64N9777_NZ64N7777_DG68-01073A-00_EN+FI+NO+DA+SV.indb 24 2/19/2018 12:02:25 PM
Page 25
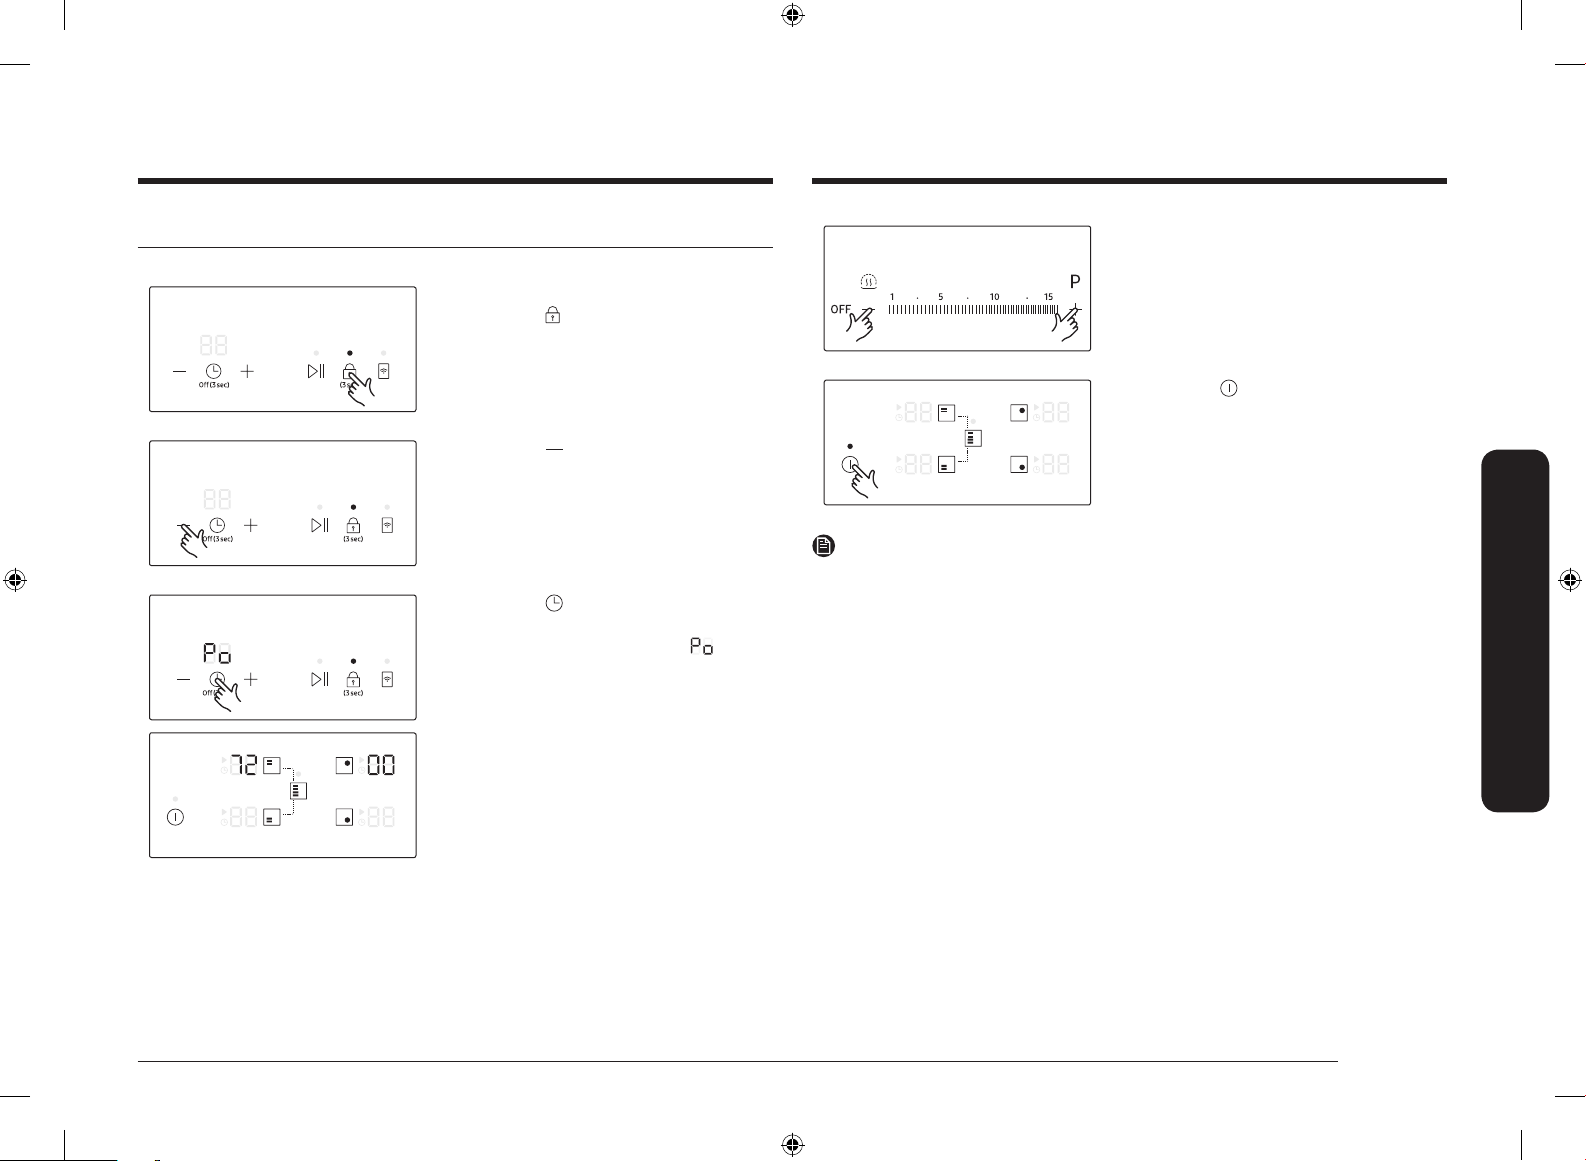
Maximum power limit
This function allows you to adjust the maximum power of the unit.
1. Keep the power off.
2. Touch the button for approximately
3 seconds to turn on the child safety
lock.
3. Touch the button of the Timer setting
buttons for approximately 3 seconds.
4. Touch the button for approximately
3 seconds.
The timer displays will show
cooking zone displays will show current
maximum power.
. and
5. You can adjust the power limit using
the Power level buttons.(3000 W,
4000 W, 7200 W)
6. Touch the button to set the setting.
NOTE
• In low-power (3000 W) mode, the Power Boost function is not available with
the right front burner (210 mm) and Flex zone Plus.
• In low-power (3000 W, 4000 W) mode, the power level will be adjusted
automatically.
Operation
English 25
NZ6000K NZ64N9777_NZ64N7777_DG68-01073A-00_EN+FI+NO+DA+SV.indb 25 2/19/2018 12:02:27 PM
Page 26
Operation
Operation
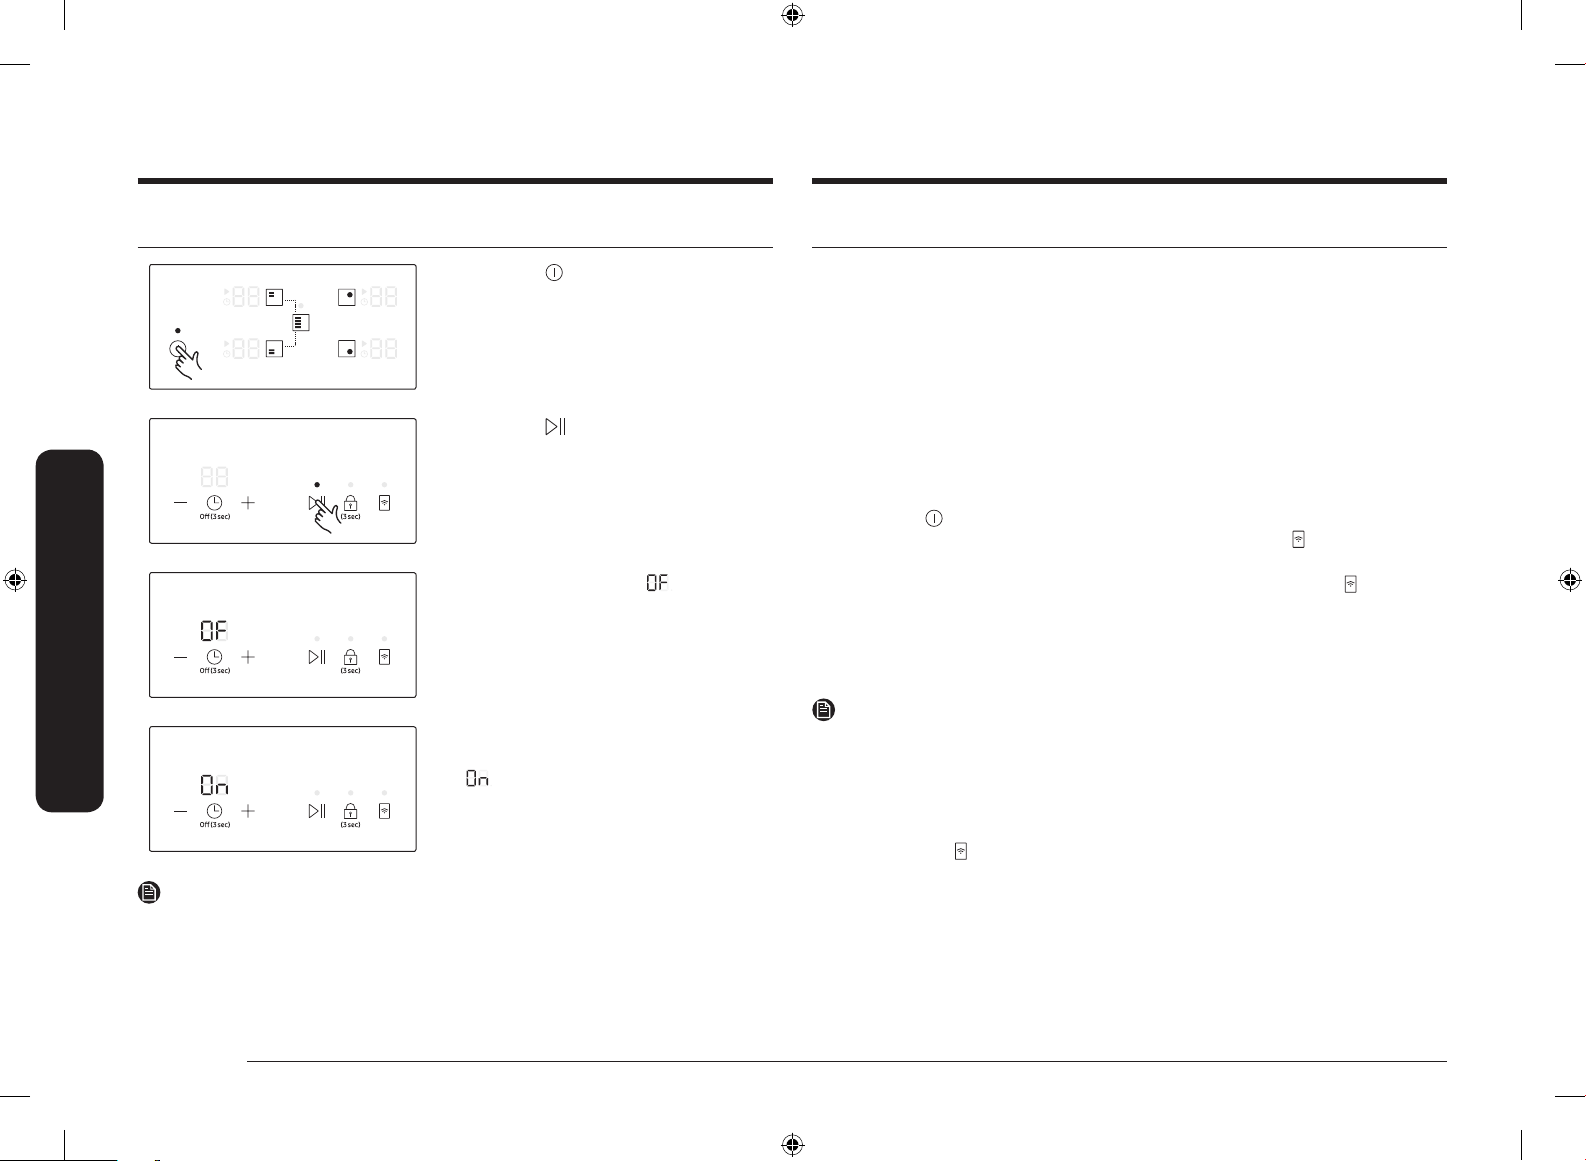
Sound on/off
1. Touch the button for approximately
1-2 seconds.
2. Touch the button for 3 seconds
within 10 seconds after the power has
turned on.
3. Sound will turn off and will be
displayed in the Timer display.
4. To change the sound setting, repeat
steps 1 and 2. Sound will turn on and
will be displayed in the Timer
display.
Smart Connect (NZ64N9777GK, NZ64N7777GK model only)
The hob has built in Wi-Fi module that you can use to sync the hob with the
SmartThings app. On the smartphone app, you can:
• monitor the operating status and the power level settings of the hob elements.
• check and change the timer settings.
Functions that can be operated from the SmartThings app may not work smoothly
if communication conditions are poor or the product is installed in a place with a
weak Wi-Fi signal.
How to connect the hob
Before you can use the remote features of your Samsung hob, you must pair it to
the SmartThings app.
1. Download and open the SmartThings app on your smart device.
2. Touch the
3. Follow the app’s instructions, and then touch and hold the button for 3
seconds.
4. While the connection is being made, the LED indicator above the button
blinks. Once the process is complete, the indicator glows without blinking.
Now the hob is connected successfully.
5. If the Smart Connect LED indicator does not turn on, follow the instruction in
the app to reconnect.
NOTE
• Make sure to set the Smart Connect function only when no hob operation is in
process.
• For further instructions, refer to the web manual at www.samsung.com
Wi-Fi On/Off
• Touch the the
button for approximately 1-2 seconds to turn the hob on.
button to turn on or turn off the Wi-Fi connection.
NOTE
It is not possible to change the sound settings after 10 seconds from turning the
power on.
26 English
NZ6000K NZ64N9777_NZ64N7777_DG68-01073A-00_EN+FI+NO+DA+SV.indb 26 2/19/2018 12:02:28 PM
Page 27
Maintaining your appliance
Hood control
This product features a Bluetooth device that you can use to connect the hob to
Samsung hood control models. Through the Bluetooth connection, you can use the
hood control function on the SmartThings app.
To nd out more about Samsung hood control-enabled models, visit www.
samsung.com.
To connect to a hood control model
1. Download and run the SmartThings app on your smartphone. Then, complete
the Smart Connect procedure to connect to the hob.
2. Follow the Bluetooth instructions of the hood control model and activate the
Bluetooth connection.
3. Touch and hold the
Bluetooth connection. When the Bluetooth connection is successfully
established,
4. Follow the instructions in the user manual of the hood control model and the
App guide to use the hood control.
NOTE
• If the Smart Connect connection is not successful, you cannot use the
SmartThings app to monitor and control the hood.
• Without a Smart Connect connection to the hob, you can use a Bluetooth
connection to pair the hob with the hood and sync them. To do this, follow
steps 2 and 3 above.
and timer buttons simultaneously to make the
appears on the Timer display.
Hob
WARNING
Cleaning agents must not come into contact with a heated ceramic glass surface:
All cleaning agents must be removed with adequate amounts of clean water after
cleaning because they can have a caustic effect when the surface becomes hot.
Do not use any aggressive cleaners such as grill or oven sprays, scouring pads or
abrasive pan cleaners.
NOTE
Clean the ceramic glass surface after each use when it is still warm to the
touch. This will prevent spillage from becoming burnt onto the surface. Remove
scales, watermarks, fat drippings and metallic discolouration with the use of a
commercially available ceramic glass or stainless steel cleaner.
Light soiling
1. Wipe the ceramic glass surface with a damp cloth.
2. Rub dry with a clean cloth. Remnants of cleaning agent must not be left on the
surface.
3. Thoroughly clean the entire ceramic glass cooking surface once a week with a
commercially available ceramic glass or stainless steel cleaner.
4. Wipe the ceramic glass surface using adequate amounts of clean water and
rub dry with a clean lint - free cloth.
Maintaining your appliance
English 27
NZ6000K NZ64N9777_NZ64N7777_DG68-01073A-00_EN+FI+NO+DA+SV.indb 27 2/19/2018 12:02:28 PM
Page 28
Maintaining your appliance
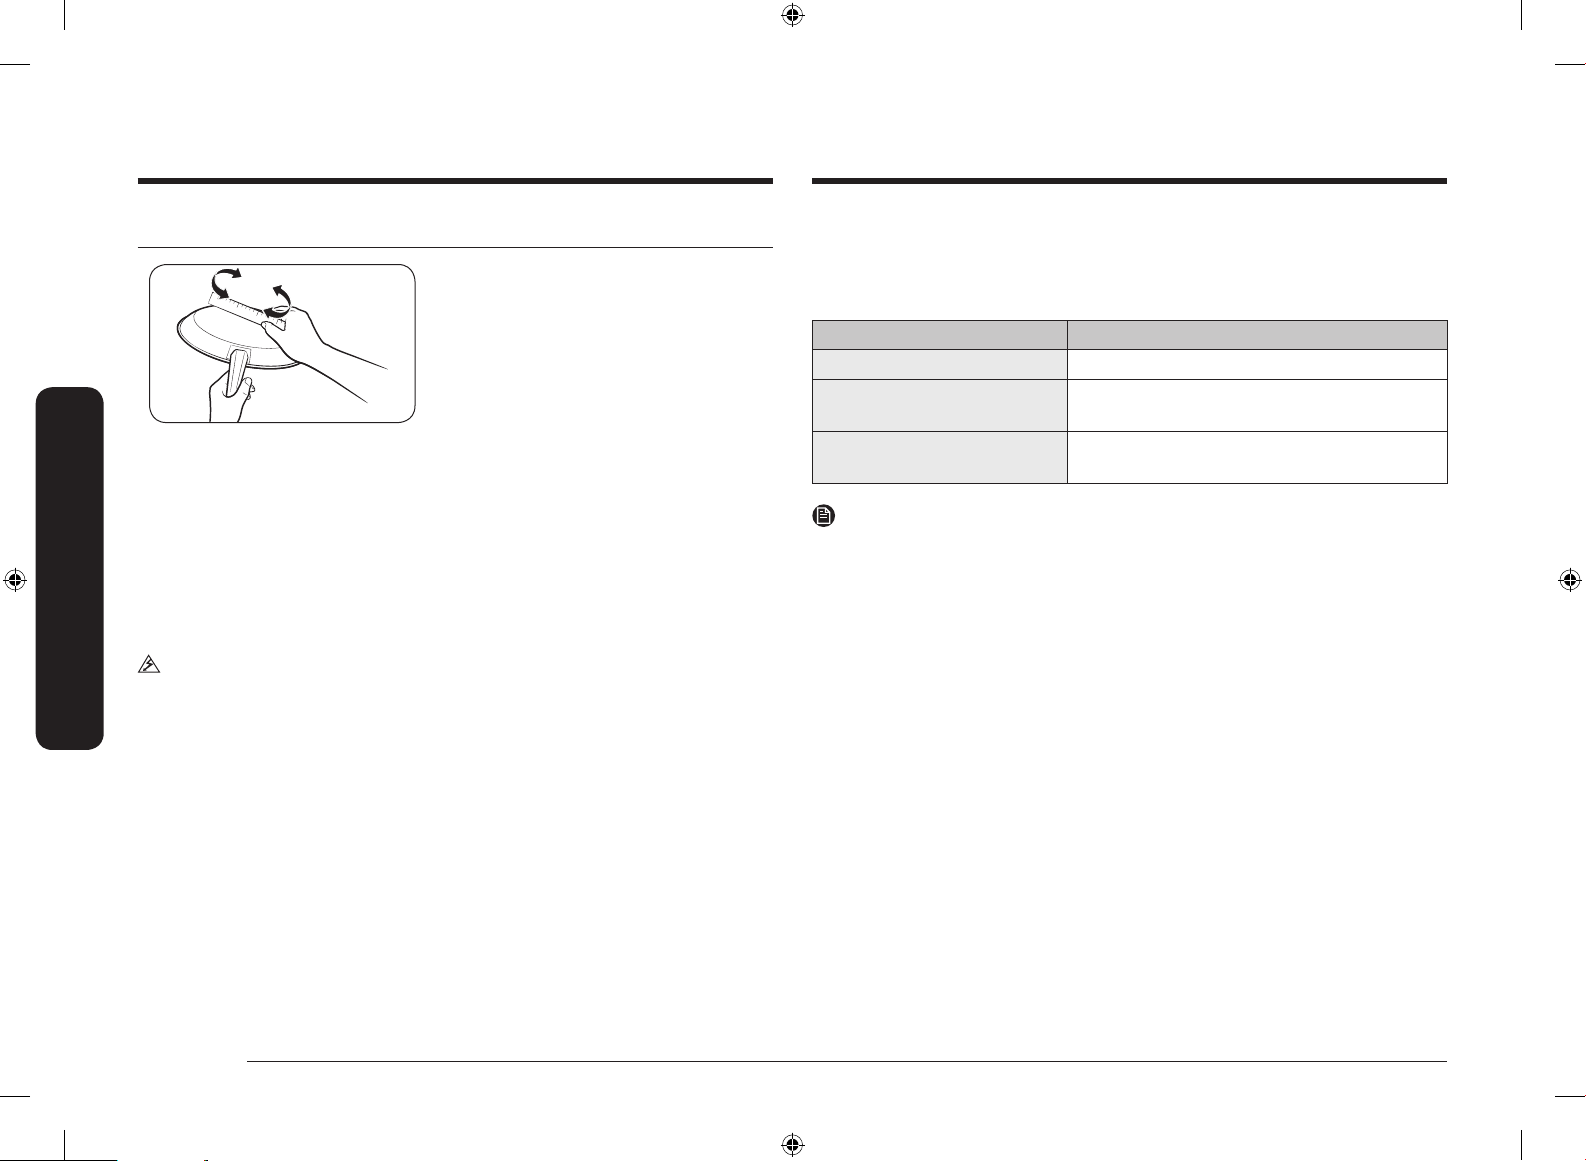
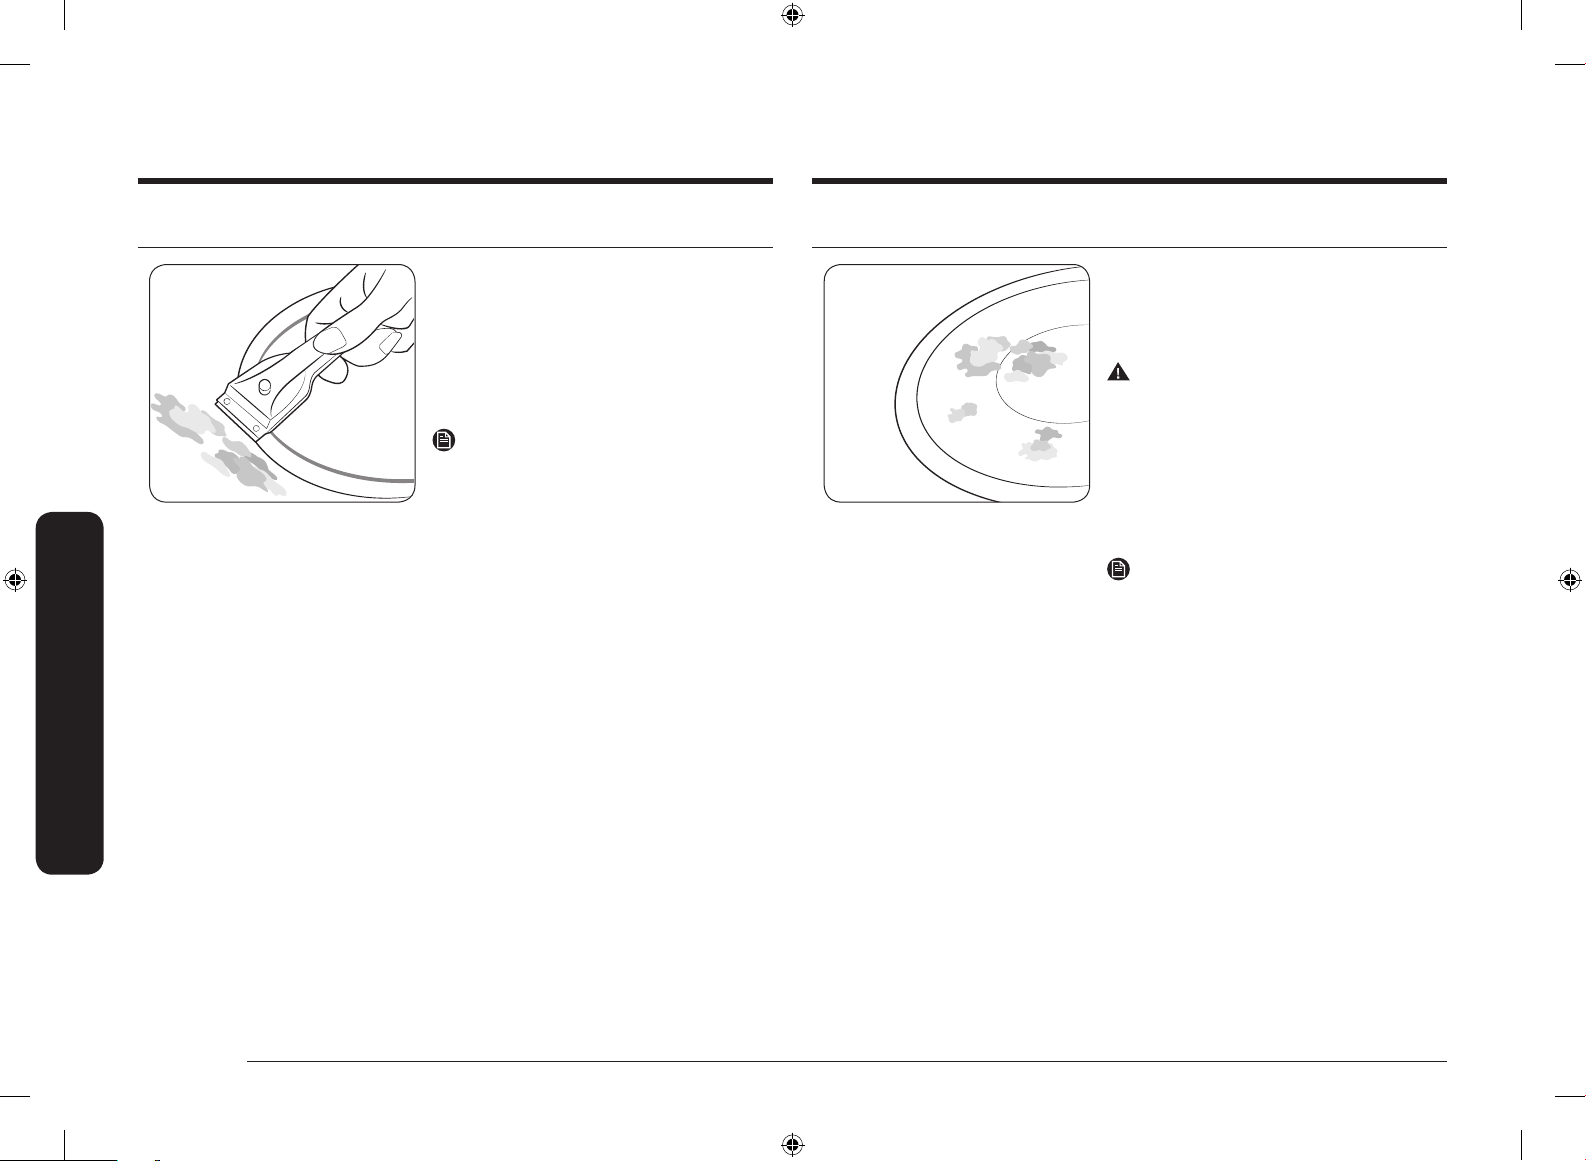
Stubborn soiling
1. To remove food that has boiled over
and stubborn splashes, use a glass
scraper.
2. Place the glass scraper at an angle to
the ceramic glass surface.
3. Remove soiling by scraping with the
blade.
NOTE
Glass scrapers and ceramic glass cleaners
are available from specialty retailers.
Maintaining your appliance
Problem dirt
1. Remove burnt-on sugar, melted plastic,
aluminium foil or other materials with
a glass scraper immediately and while
still hot.
WARNING
There is a risk of burning yourself when the
glass scraper is used on a hot cooking zone:
2. Clean the hob as normal when it has
cooled down. If the cooking zone on
which something has melted has been
allowed to cool, warm it up again for
cleaning.
NOTE
Scratches or dark blemishes on the ceramic
glass surface, caused, for example, by a
pan with sharp edges, cannot be removed.
However, they do not impair the function of
the hob.
28 English
NZ6000K NZ64N9777_NZ64N7777_DG68-01073A-00_EN+FI+NO+DA+SV.indb 28 2/19/2018 12:02:28 PM
Page 29
Troubleshooting and service
Hob frame (option)
WARNING
Do not use vinegar, lemon juice or scale remover on the hob frame; otherwise dull
blemishes will appear.
1. Wipe the frame with a damp cloth.
2. Moisten dried debris with a wet cloth. Wipe and rub dry.
To avoid damaging your appliance
• Do not use the hob as a work surface or for storage.
• Do not operate a cooking zone if there is no pan on the hob or if the pan is
empty.
• Ceramic glass is very tough and resistant to temperature shock, but it is
not unbreakable. It can be damaged by a particularly sharp or hard object
dropping onto the hob.
• Do not place pans on the hob frame. Scratching and damage to the nish may
occur.
• Avoid spilling acidic liquids, for example, vinegar, lemon juice and descaling
agents, onto the hob frame, since such liquids can cause dull spots.
• If sugar or a preparation containing sugar comes into contact with a hot
cooking zone and melts, it should be cleaned off immediately with a kitchen
scraper while it is still hot. If allowed to cool, it may damage the surface when
removed.
• Keep all items and materials that could melt, for example, plastics, aluminium
foil and oven foils, away from the ceramic glass surface. If something of this
nature melts onto the hob, it must be removed immediately with a scraper.
Troubleshooting
A fault may result from a minor information that you can correct yourself with
the help of the following instructions. Do not attempt any further repairs if the
following instructions do not help in each specic case.
WARNING
Repairs to the appliance are to be performed only by a qualied service technician.
Improperly effected repairs may result in considerable risk to the user. If your
appliance needs repair, please contact your customer service centre.
Problem Possible cause Solution
What should I do if the
cooking zones are not
functioning?
What should I do if the
cooking zones will not
switch on?
What should I do if the
display except for
, the residual heat
indicator suddenly
disppears?
What should I do if,
after the cooking
zones have been
switched off, residual
heat is not indicated in
the display
• The fuse in the house
wiring is not intact.
• The
• The control panel is
• The
• The control panel is
• The cooking zone
button was
accidentally actuated.
partially covered by a
damp cloth or liquid.
button was
accidentally actuated.
partially covered by a
damp cloth or liquid.
was only briey used
and therefore did not
become hot enough.
• If the fuses trip a
number of times,
call an authorised
electrician.
• The appliance is
properly switched on.
• Clean the control
panel.
• The appliance is
properly switched on.
• Clean the control
panel.
• If the cooking zone is
hot, please call a local
service centre.
Troubleshooting and service
English 29
NZ6000K NZ64N9777_NZ64N7777_DG68-01073A-00_EN+FI+NO+DA+SV.indb 29 2/19/2018 12:02:29 PM
Page 30
Troubleshooting and service
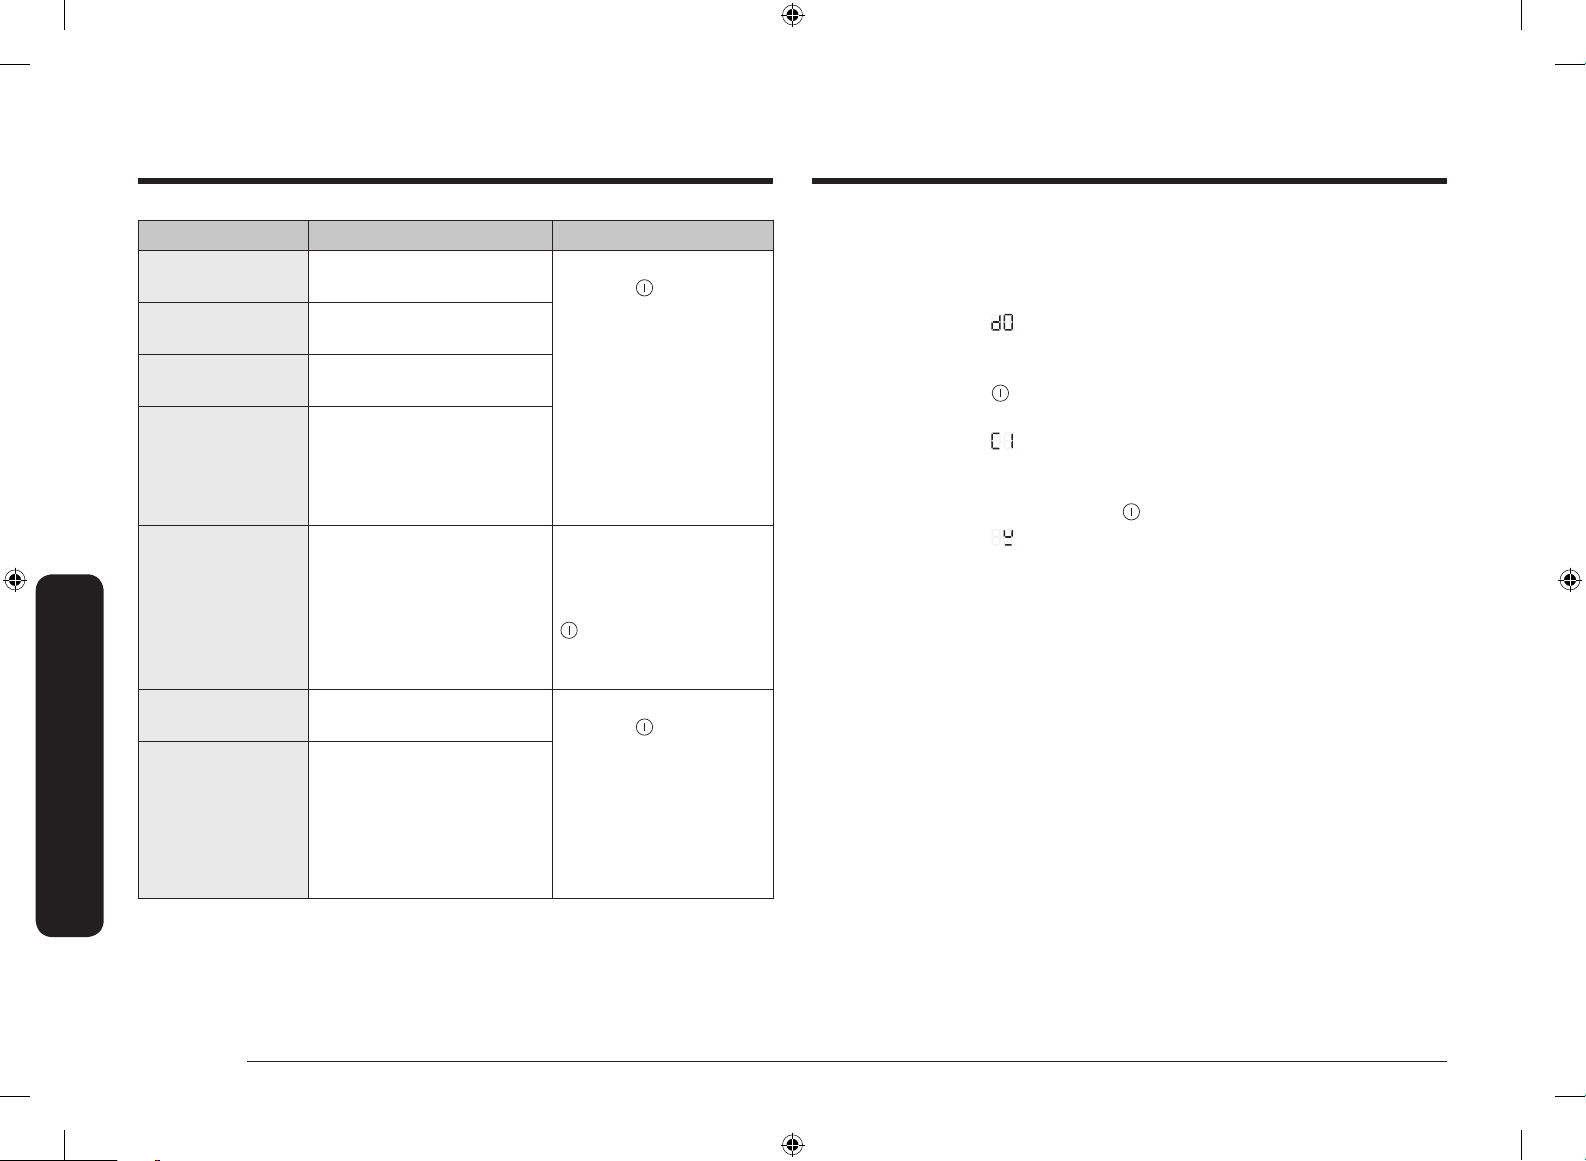
Information code Possible cause Solution
C0 There is a problem with the
burner temperature sensor.
C1 The temperature is sensed
higher than specied.
C2 There is a problem with the
PBA sensor.
A2 The DC Motor fails to operate
because of problems with the
PCB or wiring, or electrical
disturbance on the motor
blade.
d0 A button is being touched for
more than 8 seconds.
Troubleshooting and service
F0 Communications between
main and sub PCBs fail.
F2 The touch-enabled IC
communicates abnormally.
Restart the appliance
using the
the problem continues,
disconnect power for
more than 30 seconds.
Then, restart the appliance
and try again. If the
problem still continues,
contact a local service
centre.
Check if the button is wet
or is being touched. If the
problem continues, restart
the appliance using the
button. If the problem
still continues, contact a
local service centre.
Restart the appliance
using the
the problem continues,
disconnect power for
more than 30 seconds.
Then, restart the
appliance. If the problem
still continues, contact a
local service centre.
button. If
button. If
What should I do if the cooking zone will not switch on or off?
This could be due to one of the following possibilities:
• The control panel is partially covered by a damp cloth or liquid.
• The child safety lock is on. and display “L”.
What should I do if the
Check for the following:
• The control panel is partially covered by a damp cloth or liquid.
To reset, touch the
• If liquid has overowed on control panel, please wipe the liquid.
What should I do if the
Check for the following:
• The hob is overheated because of abnormal operation.
• After hob is cooled down, touch the
What should I do if the
Check for the following:
• Cookware is unsuitable, too small, or no cookware has been placed on the
cooking zone.
• If you use suitable cookware, displayed message will automatically disappear.
What should I do if the cooling fan runs after the hob is turned off?
Check for the following:
• When you have nished using the hob, the cooling fan runs by itself for
cooling down.
• After the hob’s electronics has cooled down or elapsed max time (10 minutes)
the cooling fan will be turned off.
• If you request a service call because of an information made in operating the
appliance, the visit from the customer service technician may incur a charge
even during the warranty period.
display is illuminated?
button.
display is illuminated?
button for resetting.
display is illuminated?
30 English
NZ6000K NZ64N9777_NZ64N7777_DG68-01073A-00_EN+FI+NO+DA+SV.indb 30 2/19/2018 12:02:29 PM
Page 31

Technical data
Service
Before calling for assistance or service, please check the section “Troubleshooting”.
If you still need help, follow the instructions below.
Is it a technical fault?
If so, please contact your customer service centre.
Always prepare in advance for the discussion. This will ease the process of
diagnosing the problem and also make it easier to decide if a customer service
visit is necessary.
Please take note of the following information.
• What form does the problem take?
• Under what circumstances does the problem occur?
When calling, please know the model and serial number of your appliance. This
information is provided on the rating plate as follows:
• Model description
• S/N code (15 digits)
We recommend that you record the information here for easy reference.
• Model:
• Serial number:
When do you incur costs even during the warranty period?
• If you could have remedied the problem yourself by applying one of the
solutions provided in the section “Troubleshooting”.
• If the customer service technician has to make several service calls because he
was not provided with all of the relevant information before his visit and as a
result, for example, has to make additional trips for parts. Preparing for your
phone call as described above will save you the cost of these trips.
Technical data
Width 600 mm
Appliance dimensions
Worktop cut - out
dimensions
Connection voltage 220-240 V ~ 50 / 60 Hz
Maximum connected load power 7.2 kW
Weight
Depth 520 mm
Height 56 mm
Width 560 mm
Depth 490 mm
Height 72 mm
Corner radius 3 mm
Net 13.2 kg
Gross 16.1 kg
Cooking zones
Position Diameter Power
Right Front 210 mm 2200 W / Boost 3200 W
Right Rear 145 mm 1400 W / Boost 2000 W
Flex Plus Front - 1800 W / Boost 2600 W
Flex Plus Rear - 1800 W / Boost 2600 W
Flex Plus Centre - 1800 W / Boost 3000 W
Complete Flex Plus - 3300 W / Boost 3600 W
Technical data
English 31
NZ6000K NZ64N9777_NZ64N7777_DG68-01073A-00_EN+FI+NO+DA+SV.indb 31 2/19/2018 12:02:29 PM
Page 32

Technical data
Product information
Supplier’s name Samsung Electronics co. Ltd.
NZ64N9777GK
Model identication
Type of hob Built-In
Heating technology
Number of cooking zones and/or area 3
For circular cooking zones or area:
diameter of useful surface area per
electric heated cooking zone (Ø)
For non-circular cooking zones or
area: length and width of useful
surface area per electric heated
cooking zone or area (L x W)
Energy consumption per cooking
zone or area calculated per kg
electric cooking
(EC
Technical data
Energy consumption for the hob
calculated per kg (EC
)
electric hob
)
Induction cooking zones and cooking
NZ64N9777BK
NZ64N7777GK
area
21.0 cm, 14.5 cm
24.0 x 38.0 cm
Ø 21.0 cm : 184.2 Wh/kg
Ø 14.5 cm : 191.3 Wh/kg
24.0 x 38.0 cm : 199.0 Wh/kg
191.5 Wh/kg
NZ64N9777GK, NZ64N7777GK
Data determined according to standard EN 60350-2 and Commission Regulations
(EU) No 66/2014 and Regulation (EC) NO 1275/2008.
WIFI
Off mode
NZ64N9777BK
Data determined according to standard EN 60350-2 and Commission Regulations
(EU) No 66/2014.
Energy saving tips
• Always position pots and pans before switching on the cooking zone.
• Dirty cooking zones and pan bases increase power consumption.
• Using a pressure cooker reduces cooking time.
Standby-mode Power Consumption (W) 1.9 W
Period of time for the power management (min.) 10 min.
Power consumption 0.5 W
Period of time for the power management (min.) 10 min.
32 English
NZ6000K NZ64N9777_NZ64N7777_DG68-01073A-00_EN+FI+NO+DA+SV.indb 32 2/19/2018 12:02:29 PM
Page 33

Appendix
Open Source Announcement (NZ64N9777GK, NZ64N7777GK model only)
The software included in this product contains open source software. You may
obtain the complete corresponding source code for a period of three years after
the last shipment of this product by sending an email to mailto:oss.request@
samsung.com.
It is also possible to obtain the complete corresponding source code in a physical
medium such as a CD-ROM; a minimal charge will be required.
The following URL http://opensource.samsung.com/opensource/SMART_AT_051/
seq/0 leads to the download page of the source code made available and open
source license information as related to this product. This offer is valid to anyone
in receipt of this information.
English 33
NZ6000K NZ64N9777_NZ64N7777_DG68-01073A-00_EN+FI+NO+DA+SV.indb 33 2/19/2018 12:02:29 PM
Appendix
Page 34

Memo
NZ6000K NZ64N9777_NZ64N7777_DG68-01073A-00_EN+FI+NO+DA+SV.indb 34 2/19/2018 12:02:29 PM
Page 35

Memo
NZ6000K NZ64N9777_NZ64N7777_DG68-01073A-00_EN+FI+NO+DA+SV.indb 35 2/19/2018 12:02:29 PM
Page 36

QUESTIONS OR COMMENTS?
COUNTRY CALL OR VISIT US ONLINE AT
0800-SAMSUNG (0800-7267864)
AUSTRIA
BELGIUM 02-201-24-18
DENMARK 707 019 70 www.samsung.com/dk/support
FINLAND 030-6227 515 www.samsung.com//support
FRANCE 01 48 63 00 00 www.samsung.com/fr/support
GERMANY 06196 77 555 77 www.samsung.com/de/support
ITALIA 800-SAMSUNG (800.7267864) www.samsung.com/it/support
CYPRUS 8009 4000 only from landline, toll free
GREECE
LUXEMBURG 261 03 710 www.samsung.com/be_fr/support
NETHERLANDS 088 90 90 100 www.samsung.com/nl/support
NORWAY 815 56480 www.samsung.com/no/support
PORTUGAL 808 207 267 www.samsung.com/pt/support
SPAIN 0034902172678 www.samsung.com/es/support
SWEDEN 0771 726 786 www.samsung.com/se/support
SWITZERLAND 0800 726 78 64 (0800-SAMSUNG)
UK 0330 SAMSUNG (7267864) www.samsung.com/uk/support
IRELAND (EIRE) 0818 717100 www.samsung.com/ie/support
[Only for KNOX customers] 0800 400848
[Only for Premium HA] 0800-366661
[Only for Dealers] 0810-112233
80111-SAMSUNG (80111 726 7864) only from land line
(+30) 210 6897691 from mobile and land line
www.samsung.com/at/support
www.samsung.com/be/support (Dutch)
www.samsung.com/be_fr/support (French)
www.samsung.com/gr/support
www.samsung.com/ch/support (German)
www.samsung.com/ch_fr/support (French)
DG68-01073A-00
NZ6000K NZ64N9777_NZ64N7777_DG68-01073A-00_EN+FI+NO+DA+SV.indb 36 2/19/2018 12:02:29 PM
Page 37

Induktioliesi
Käyttöopas
NZ64N9777GK / NZ64N9777BK / NZ64N7777GK
NZ6000K NZ64N9777_NZ64N7777_DG68-01073A-00_EN+FI+NO+DA+SV.indb 1 2/19/2018 12:02:32 PM
Page 38

Sisällysluettelo
Sisällysluettelo
Sisällysluettelo
Oppaan käyttäminen 3
Oppaassa käytetään seuraavia merkkejä: 3
Mallin nimi ja sarjanumero 3
Turvallisuusohjeet 3
Pakkausmateriaalin hävittäminen 7
Vanhan laitteen oikeanlainen hävittäminen 7
Tuotteen turvallinen hävittäminen (elektroniikka ja sähkölaitteet) 7
Lieden asentaminen 8
Asentajan turvallisuusohjeet 8
Tarvittavat työkalut 8
Sähköverkkoon kytkeminen 8
Asentaminen työtasolle 9
Osat 11
Ennen kuin aloitat 12
Keittoalueet 12
Käyttöpaneeli 13
Induktiolämmitys 14
Virtuaaliliekkiteknologia 14
Turvakatkaisu 15
Jälkilämmön ilmaisin 15
Lämpötilantunnistin 15
Valmistusastiat 16
Kosketuspainikkeiden käyttäminen 19
Käyntiäänet 19
Ensimmäinen puhdistuskerta 19
Toiminto 20
Virran kytkeminen laitteeseen 20
Valmistusajan ja tehon valitseminen 20
Tehonlisäystoiminto 21
Flex Plus -alue 21
Lämpimänäpito 22
Ajastin 23
Keskeytys/jatko 23
Pikapysäytys 24
Virran katkaiseminen laitteesta 24
Lapsilukko 24
Enimmäistehon raja 25
Äänet käyttöön / pois käytöstä 26
Smart Connect (vain mallit NZ64N9777GK ja NZ64N7777GK) 26
Liesituulettimen ohjaus 27
Laitteen ylläpito 27
Liesi 27
Kevyt lika 27
Vaikea lika 28
Ongelmalika 28
Lieden kehys (valinnainen) 29
Laitteen vaurioitumisen välttäminen 29
Vianmääritys ja huolto 29
Vianmääritys 29
Huolto 31
Tekniset tiedot 31
Tekniset tiedot 31
Keittoalueet 31
Tuotetiedot 32
Liite 33
Ilmoitus avoimesta lähdekoodista (vain mallit NZ64N9777GK ja NZ64N7777GK) 33
2 Suomi
NZ6000K NZ64N9777_NZ64N7777_DG68-01073A-00_EN+FI+NO+DA+SV.indb 2 2/19/2018 12:02:32 PM
Page 39

Oppaan käyttäminen
Turvallisuusohjeet
Lue tämä käyttöopas huolella ennen laitteen käyttämistä ja kiinnitä erityistä huomiota seuraavan
osion turvallisuusohjeisiin. Säilytä opas myöhempää käyttöä varten.
Jos laite luovutetaan uudelle omistajalle, opas on toimitettava sen mukana.
Oppaassa käytetään seuraavia merkkejä:
VAROITUS
Vaarat ja vaaralliset toimenpiteet, jotka saattavat aiheuttaa vakavia henkilövahinkoja tai
kuoleman.
HUOMIO
Vaarat tai vaaralliset toimenpiteet, jotka saattavat aiheuttaa pieniä henkilö- ja
omaisuusvahinkoja.
HUOMIO
Noudata liettä käyttäessäsi näitä turvallisuuteen liittyviä perusohjeita, jotta voisit välttyä
tulipaloilta, räjähdyksiltä, sähköiskuilta tai henkilövahingoilta.
HUOM.
Hyödyllisiä vinkkejä, suosituksia ja muita tietoja, jotka helpottavat laitteen käyttöä.
Mallin nimi ja sarjanumero
Mallin nimi ja sarjanumero on merkitty lieden alapintaan.
Kirjoita tiedot muistiin myöhempää käyttöä varten tai kiinnitä toinen (laitteen päällä oleva)
tuotetarra tälle sivulle.
Mallin nimi
Tämä laite täyttää turvallisuudeltaan kaikkien hyväksyttyjen teknisten ja turvallisuusstandardien
vaatimukset. Laitteen valmistajana olemme kuitenkin sitä mieltä, että velvollisuutemme on antaa
sinulle myös seuraavat turvallisuusohjeet.
VAROITUS
Tätä laitetta ei ole tarkoitettu fyysisesti tai psyykkisesti
rajoittuneiden eikä kokemattomien henkilöiden (esim. lasten)
käytettäväksi, ellei heidän turvallisuudestaan vastaava henkilö
ole läsnä tai opastanut heitä käyttämään laitetta oikein.
Lasten ei saa antaa leikkiä laitteella.
Tätä laitetta saavat käyttää yli 8-vuotiaat lapset sekä fyysisesti
tai psyykkisesti rajoittuneet ja kokemattomat henkilöt, jos
käyttöä valvotaan tai jos heille on annettu ohjeet laitteen
turvalliseen käyttöön ja he ymmärtävät käyttöön liittyvät
vaarat. Lapset eivät saa leikkiä laitteella. Lapset eivät saa
puhdistaa tai ylläpitää laitetta ilman valvontaa.
Kiinteään johdotukseen on lisättävä mahdollisuus irrottaa laite
sähköverkosta johdotusmääräysten mukaisesti.
Oppaan käyttäminen
Sarjanumero
Suomi 3
NZ6000K NZ64N9777_NZ64N7777_DG68-01073A-00_EN+FI+NO+DA+SV.indb 3 2/19/2018 12:02:32 PM
Page 40

Turvallisuusohjeet
Laite tulee voida irrottaa pistorasiasta asennuksen jälkeen.
Irrottaminen voidaan varmistaa huolehtimalla pistokkeen
luokse pääsystä tai liittämällä kiinteään johdotukseen kytkin
sähkömääräysten mukaisesti.
Turvallisuusohjeet
Jos laitteen virtajohto on vaurioitunut, se tulee
vaihdattaa valmistajalla, valtuutetussa huoltoliikkeessä tai
ammattitaitoisella asentajalla, jotta vaaratilanteilta voitaisiin
välttyä.
Johtoja ei saa kiinnittää liimalla, sillä liimaus ei ole luotettava
kiinnitystapa.
VAROITUS: Jos laitteen pinta lohkeilee, katkaise laitteesta virta
sähköiskujen välttämiseksi.
Laite kuumenee käytön aikana. Lieden sisällä oleviin vastuksiin
ei saa koskea.
VAROITUS: Laitteen näkyvillä olevat osat voivat kuumeta
käytön aikana. Pienet lapset on pidettävä turvallisella
Sammuta aina käytön jälkeen virta virtapainikkeesta äläkä luota
kattilantunnistimeen.
Laitetta ei ole tarkoitettu käytettäväksi ulkoisen ajastimen tai
erillisen kauko-ohjausjärjestelmän kanssa.
HUOMIO: Kuumennusprosessia on valvottava. Lyhytaikaista
kuumennusprosessia on valvottava jatkuvasti.
Laitetta ei saa asentaa koristeoven taakse, ettei se ylikuumene.
VAROITUS: Laite ja sen näkyvillä olevat osat kuumenevat
käytön aikana. Laitteen lämpövastuksiin ei saa koskea. Alle
8-vuotiaat lapset on pidettävä poissa laitteen lähettyviltä, jollei
heitä valvota jatkuvasti.
VAROITUS: Rasvan tai öljyn kuumentaminen ilman valvontaa
voi olla vaarallista ja aiheuttaa tulipalon.
ÄLÄ MILLOINKAAN yritä sammuttaa paloa vedellä, vaan
sammut
a laite ja peitä sitten liekit esimerkiksi kannella tai
sammutuspeitteellä.
etäisyydellä laitteesta.
VAROITUS: Tulipalon vaara: Älä säilytä tavaroita keittopinnoilla.
Höyrypuhdistusta ei saa käyttää.
Älä aseta lieden päälle metalliesineitä, esimerkiksi veitsiä,
haarukoita, lusikoita tai kattilankansia, sillä ne saattavat
kuumentua.
4 Suomi
NZ6000K NZ64N9777_NZ64N7777_DG68-01073A-00_EN+FI+NO+DA+SV.indb 4 2/19/2018 12:02:33 PM
Page 41

VAROITUS: Käytä vain sellaisia liesisuojuksia, jotka ovat lieden
valmistajan suunnittelemia tai jotka laitteen valmistaja on
käyttöohjeissa ilmoittanut soveltuviksi tai jotka toimitetaan
laitteen mukana. Vääränlaisten suojusten käyttäminen voi
aiheuttaa onnettomuuksia.
Laitteen pinnat todennäköisesti kuumenevat käytön aikana.
Tätä laitetta saavat käyttää yli 8-vuotiaat lapset sekä fyysisesti
tai psyykkisesti rajoittuneet ja kokemattomat henkilöt, jos
käyttöä valvotaan tai jos heille on annettu ohjeet laitteen
turvalliseen käyttöön ja he ymmärtävät käyttöön liittyvät
vaarat. Lapset eivät saa leikkiä laitteella. Lasten ei saa antaa
puhdistaa laitetta tai tehdä muita sen tavalliseen ylläpitoon
liittyviä toimia. Yli 8-vuotiaat lapset saavat puhdistaa tai
ylläpitää laitetta valvotusti.
Pidä laite ja sen sähköjohto alle 8-vuotiaiden lasten
ulot
tumattomissa.
HUOMIO
Varmista, että laite on pätevän sähköteknikon oikein asentama
ja maadoittama.
Laitetta saa huoltaa vain pätevä teknikko. Epäpätevien
henkilöiden tekemät korjaukset voivat aiheuttaa
henkilövahinkoja tai vaurioittaa laitetta. Jos laite tarvitsee
korjausta, ota yhteyttä lähimpään huoltoliikkeeseen. Näiden
ohjeiden noudattamatta jättäminen voi aiheuttaa vahinkoja ja
mitätöidä takuun.
Uppoasennettuja laitteita saa käyttää vain, jos ne on
asennettu asiaankuuluvat standardit täyttäviin kaappeihin tai
työpisteisiin. Näin varmistetaan turvallisuussäädösten vaatima
riittävä sähköeristys.
Jos laite ei toimi oikein tai jos siihen ilmestyy murtumia tai
halkeamia:
• sammuta kaikki keittoalueet
Turvallisuusohjeet
• irrota liesi verkkovirrasta
• ota yhteyttä lähimpään huoltoliikkeeseen.
Jos liesi murtuu, sammuta laite sähköiskujen välttämiseksi. Älä
käytä liettä, ennen kuin sen lasipinta on vaihdettu.
Suomi 5
NZ6000K NZ64N9777_NZ64N7777_DG68-01073A-00_EN+FI+NO+DA+SV.indb 5 2/19/2018 12:02:33 PM
Page 42

Turvallisuusohjeet
Älä käytä liettä alumiinifolion tai alumiinifolioon tai -astiaan
pakattujen ruokien tai pakasteiden lämmittämiseen.
Paistinpannun pohjan ja lieden väliin jäävä vesi saattaa
höyrystyä ja väliin voi muodostua painetta. Tällöin paistinpannu
Turvallisuusohjeet
saattaa hypähtää.
Varmista aina, että keittolevy ja paistinpannun pohja ovat
kuivia.
Keittoalueet kuumenevat ruoanlaiton aikana.
Pidä pienet lapset aina poissa laitteen lähettyviltä.
Pidä pakkausmateriaalit poissa lasten ulottuvilta
vaaratilanteiden välttämiseksi.
Tätä laitetta saa käyttää vain tavalliseen keittämiseen ja
paistamiseen kotioloissa. Sitä ei ole tarkoitettu kaupalliseen tai
teollisuuskäyttöön.
Älä milloinkaan käytä liettä huoneen lämmittämiseen.
Ole varovainen kytkiessäsi sähkölaitteita pistorasiaan lieden
Pidä käyttöpaneeli aina puhtaana ja kuivana.
Älä milloinkaan aseta tulenarkoja aineita tai esineitä lieden
päälle. Ne voivat aiheuttaa tulipalon.
Laite saattaa aiheuttaa palovammoja, jos sitä käytetään
huolimattomasti.
Sähkölaitteiden johdot eivät saa osua lieden kuumalle pinnalle
eivätkä kuumiin valmistusastioihin.
Älä käytä liettä vaatteiden kuivaamiseen.
Sydämentahdistajien ja implanttien käyttäjien on
pidettävä ylävartalonsa vähintään 30 cm:n etäisyydellä
induktiokeittoalueilta, kun ne ovat käynnissä. Jos sinulla on
jotakin kysyttävää, ota yhteyttä tahdistajan valmistajaan tai
lääkäriin. (Koskee vain induktioliesimalleja.)
Älä korjaa, pura tai muuntele laitetta itse.
Sammuta laite aina ennen sen puhdistamista.
Puhdista liesi tässä oppaassa annettujen puhdistus- ja hoito-
lähellä. Sähköjohdot eivät saa joutua kosketuksiin lieden kanssa.
Ylikuumentunut rasva ja öljy syttyvät helposti palamaan. Älä
milloinkaan jätä pintayksiköitä valvomatta valmistaessasi
ruokaa, esimerkiksi ranskalaisia perunoita, rasvassa tai öljyssä.
ohjeiden mukaisesti.
Estä lemmikkieläinten pääsy laitteen päälle, koska ne voivat
astua laitteen ohjainten päälle ja aiheuttaa jonkin tahattoman
toiminnon.
Sammuta keittoalueet käytön jälkeen.
6 Suomi
NZ6000K NZ64N9777_NZ64N7777_DG68-01073A-00_EN+FI+NO+DA+SV.indb 6 2/19/2018 12:02:33 PM
Page 43

Pakkausmateriaalin hävittäminen
Tuotteen turvallinen hävittäminen (elektroniikka ja sähkölaitteet)
VAROITUS
Kaikki laitteen pakkausmateriaalit ovat täysin kierrätettäviä. Pahvi- ja muoviosat on merkitty
asianmukaisesti. Ota turvallisuus ja ympäristö huomioon, kun hävität pakkausmateriaaleja ja
vanhoja laitteita.
Vanhan laitteen oikeanlainen hävittäminen
VAROITUS
Ennen kuin hävität vanhan laitteen, tee siitä käyttökelvoton, jotta se ei aiheuttaisi vaaratilanteita.
Pyydä pätevää sähköteknikkoa irrottamaan laite verkkovirrasta ja poistamaan laitteen johto.
Laitetta ei saa hävittää talousjätteen mukana.
Saat paikallisilta viranomaisilta tietoja jätteiden keräyspäivistä ja kierrätyspisteistä.
(Jätteiden lajittelua käyttävät maat)
Oheinen merkintä tuotteessa, lisävarusteissa tai käyttöohjeessa
merkitsee, että tuotetta tai lisävarusteina toimitettavia sähkölaitteita
(esim. laturia, kuulokkeita tai USB kaapelia) ei saa hävittää
kotitalousjätteen mukana niiden käyttöiän päätyttyä. Virheellisestä
jätteenkäsittelystä ympäristölle ja terveydelle aiheutuvien haittojen
välttämiseksi tuote ja lisävarusteet on eroteltava muusta jätteestä ja
kierrätettävä kestävän kehityksen mukaista uusiokäyttöä varten.
Kotikäyttäjät saavat lisätietoja tuotteen ja lisävarusteiden turvallisesta
kierrätyksestä ottamalla yhteyttä tuotteen myyneeseen jälleenmyyjään
tai paikalliseen ympäristöviranomaiseen.
Yrityskäyttäjien tulee ottaa yhteyttä tavarantoimittajaan ja selvittää
hankintasopimuksen ehdot. Tuotetta tai sen lisävarusteita ei saa
hävittää muun kaupallisen jätteen seassa.
Saat lisätietoja Samsungin ympäristösitoumuksista ja tuotekohtaisista lainsäädännöllisistä
velvollisuuksista, esim. REACHista, osoitteesta samsung.com/uk/aboutsamsung/
samsungelectronics/corporatecitizenship/data_corner.html
Turvallisuusohjeet
Suomi 7
NZ6000K NZ64N9777_NZ64N7777_DG68-01073A-00_EN+FI+NO+DA+SV.indb 7 2/19/2018 12:02:33 PM
Page 44

Lieden asentaminen
Lieden asentaminen
Lieden asentaminen
VAROITUS
Varmista, että laitteen asentaa ja maadoittaa pätevä sähköteknikko.
Noudata tätä ohjetta. Takuu ei korvaa vahinkoja, jotka aiheutuvat vääränlaisesta asennuksesta.
Tekniset tiedot ovat tämän oppaan lopussa.
Asentajan turvallisuusohjeet
• Sähköasennuksessa on käytettävä laitetta, jonka avulla tämän kodinkoneen voi irrottaa
verkkovirrasta kaikista johtimista, ja katkaisimen aukon on oltava vähintään 3 mm.
Oikeanlaisia eristyslaitteita ovat esimerkiksi linjansuojakatkaisimet, sulakkeet (ruuvattavat
sulakkeet tulee irrottaa liitännästä), maavuotokatkaisimet ja kontaktorit.
• Laitteen paloturvallisuus vastaa standardia EN 60335 - 2 - 6. Laite voidaan asentaa
paikkaan, jossa sen toisella puolella on korkea kaappi tai seinä.
• Asennuksen on suojattava laitetta iskuilta.
• Keittiöyksikön, johon laite asennetaan, tulee täyttää standardin DIN 68930
vakausvaatimukset.
• Kosteussuojauksen vuoksi kaikki leikatut pinnat on tiivistettävä asianmukaisella tiivisteellä.
• Laatoitetuilla työtasoilla lieden alustan liitokset on täytettävä kokonaan laastilla.
• Luonnonkivi-, keinokivi- ja keraamisilla pinnoilla jouset on kiinnitettävä paikoilleen
asianmukaisella keinohartsilla tai yhdistelmäliimalla.
• Varmista, että tiiviste asettuu työpintaa vasten ilman aukkoja. Ylimääräistä silikonitiivistettä
ei saa käyttää, sillä tämä vaikeuttaa irrottamista, jos laite täytyy huoltaa.
• Liesi irrotetaan painamalla se ulos alhaaltapäin.
• Lieden alle voidaan asentaa levy.
• Työtason ja sen alla olevan yksikön etuosan välistä ilmanvaihtoaukkoa ei saa peittää.
Tarvittavat työkalut
Lyijykynä Ristipääruuvimeisseli Viivain tai suorakulma
Suojalasit Pistosaha Pora
Sähköverkkoon kytkeminen
Ennen kytkemistä on tarkistettava, että laitteen nimellisjännite eli arvokilvessä mainittu jännite
vastaa verkon jännitettä. Arvokilpi on lieden kotelon alaosassa.
VAROITUS
Katkaise piiristä virta ennen johtojen kytkemistä piiriin.
Vastuksen jännite on AC 230 V~. Laite toimii hyvin myös verkoissa, jotka käyttävät jännitteitä
AC 220 V~ tai AC 240 V~. Liesi on kytkettävä verkkovirtaan laitteella, jonka avulla liesi voidaan
irrottaa verkkovirrasta kaikista johtimista, ja katkaisimen aukon on oltava vähintään 3 mm.
Oikeanlaisia laitteita ovat esimerkiksi automaattinen linjansuojakatkaisin, maavuotokatkaisin tai
sulake.
VAROITUS
Johdon liitäntöjen on oltava säännösten mukaisia ja liitinten ruuvit tulee kiristää tiiviisti.
VAROITUS
Kun liesi on kytketty verkkovirtaan, varmista, että kaikki keittoalueet ovat käyttövalmiita
asettamalla jokainen vuorollaan suurimmalle teholle. Käytä tarkoitukseen soveltuvia
valmistusastioita.
8 Suomi
NZ6000K NZ64N9777_NZ64N7777_DG68-01073A-00_EN+FI+NO+DA+SV.indb 8 2/19/2018 12:02:34 PM
Page 45

VAROITUS
L1 L2 N
A
01
02
Ota rakennuksen liitännän ja laitteen vaihe-neutraali-jakauma huomioon. Muutoin osat voivat
vaurioitua.
Takuu ei kata vääränlaisesta asennuksesta aiheutuvia vahinkoja.
VAROITUS
Jos laitteen virtajohto on vaurioitunut, se tulee vaihdattaa valmistajalla, valtuutetussa
huoltoliikkeessä tai ammattitaitoisella asentajalla, jotta vaaratilanteilta voitaisiin välttyä.
1N~ (32 A)
02
01
04 06
01 220–240 V ~04 Sininen
02 Ruskea 05 Harmaa
03
L N
05
03 Musta 06 Vihreä/keltainen
Asentaminen työtasolle
HUOM.
Merkitse laitteen arvokilvessä oleva sarjanumero
muistiin ennen asennusta. Numeroa tarvitaan
huoltopyyntöjen yhteydessä, eikä se ole näkyvillä
asennuksen jälkeen, sillä arvokilpi jää laitteen päälle
tai alle.
Lieden asentaminen
2N~ (16 A): Erota kaksivaihejohdot (L1 ja L2) ennen
kytkemistä.
01 220–240 V ~05 Sininen
02 380–415 V ~06 Harmaa
03 Ruskea 07 Vihreä/keltainen
04 Musta
A. Sarjanumero
HUOM.
Kiinnitä erityistä huomiota vähimmäistila- ja etäisyysvaatimuksiin.
HUOM.
03
04
02
01
05
06
07
Lieden pohjassa on puhallin. Jos lieden alla on laatikko, siinä ei tulisi säilyttää pieniä esineitä tai
paperia, sillä ne voivat vaurioittaa puhallinta tai haitata laitteen jäähdytystä, jos puhallin pääsee
imemään ne sisäänsä.
Nro Selite Koko
01 Ilmanvaihtoaukon
Väh. 2 mm
korkeus
02 Ilmanvaihtoaukon
560 mm
01 04
02
03
L1 N1 L2 N2
05
06
07
2 x 1N~ (16 A): Erota johtimet ennen kytkentää.
01 220–240 V ~05 Musta
02 Ruskea 06 Harmaa
03 Sininen 07 Vihreä/keltainen
04 220–240 V
~
leveys
VAROITUS
Sähköasennuksessa on noudatettava liitäntöjen läheltä löytyvää kytkentäkaaviota.
Suomi 9
NZ6000K NZ64N9777_NZ64N7777_DG68-01073A-00_EN+FI+NO+DA+SV.indb 9 2/19/2018 12:02:34 PM
Page 46

Lieden asentaminen
01
06
04
07
02
03
08
11
01
04
02
03
05
Lieden asentaminen
05
09
10
12
Nro Selite Koko
01 Tarkista kohta 4
02 Poranterän halkaisija Ø 6
03 Oikea katkaisukulma 90°
04 Leikkausleveys 560±1 mm
05 Leikkaussyvyys 490±1 mm
06 Kaaren koko R3
07 Pöydän paksuus Enint. 50 mm,
Väh. 20 mm
08 Pö
ydän pään ja leikkauskohdan välinen etäisyys (takana) Väh. 60 mm
09 Pöydän syvyys Väh. 600 mm
10 Pöydän pään ja leikkauskohdan välinen etäisyys
Väh. 60 mm
(vasemmalla)
11 Pöydän pään ja leikkauskohdan välinen etäisyys (oikealla) Väh. 60 mm
12 Pöydän pään ja leikkauskohdan välinen etäisyys (edessä) Väh. 50 mm
06
07
08
Nro Selite Koko
01 Seinän ja lieden välinen etäisyys Väh. 40 mm
02 Lieden syvyys 520 mm
03 Induktiolieden ja pöydän pään välinen etäisyys Väh. 40 mm
04 Lasin ja keittotason välinen etäisyys 25 mm
05 Lasin ja keittotason välinen etäisyys 15 mm
06 Seinän ja keittotason välinen etäisyys Väh. 60 mm
07 Keittotason syvyys 480 mm
08 Keittotason ja pöydän pään välinen etäisyys Väh. 50 mm
10 Suomi
NZ6000K NZ64N9777_NZ64N7777_DG68-01073A-00_EN+FI+NO+DA+SV.indb 10 2/19/2018 12:02:34 PM
Page 47

05
02
01
03
04
Nro Selite Koko
01 Takaosan
ilmanvaihtoaukon
leveys
02 Takaosan
ilmanvaihtoaukon
korkeus
03 Virtajohdon tilan
syvyys
04 Virtajohdon tilan
leveys
05 Suojalistan korkeus Väh. 5 mm
Väh. 550 mm
Väh. 35 mm
Enint. 65 mm
Enint. 100 mm
02
03
01
Nro Selite Koko
01
02 Väh. 2 mm
03 Väh. 20 mm
Ilmanvaihtoaukon koko
Väh. 20 mm
Lieden asentaminen
Osat
Induktioliesi Jousikiinnike
NZ6000K NZ64N9777_NZ64N7777_DG68-01073A-00_EN+FI+NO+DA+SV.indb 11 2/19/2018 12:02:35 PM
Suomi 11
Page 48

Ennen kuin aloitatEnnen kuin aloitat
Keittoalueet
NZ64N9777GK / NZ64N7777GK
02
01
Ennen kuin aloitat
03
05
04
NZ64N9777BK
02
01
03
05
04
01 3300 W:n Induktio-Flex Plus -alue 3600 W:n tehonlisäyksellä
02 1400 W:n induktiokeittoalue 2000 W:n tehonlisäyksellä
03 2200 W:n induktiokeittoalue 3200 W:n tehonlisäyksellä
04 Käyttöpaneeli
05 Virtuaaliliekki
12 Suomi
NZ6000K NZ64N9777_NZ64N7777_DG68-01073A-00_EN+FI+NO+DA+SV.indb 12 2/19/2018 12:02:35 PM
Page 49

Käyttöpaneeli
01 06 08 10 11 1202
04 05 07 09
03
03
03
03
01 06 08 10 1102
04 05 07 09
03
03
03
03
NZ64N9777GK / NZ64N7777GK
NZ64N9777BK
01 Käynnistys- ja sammutuspainike Tämän painikkeen käyttäminen joko kytkee virran
02 Flex Plus -alueen painike Tällä painikkeella voit ottaa Flex Plus -toiminnon
03 Keittoaluenäyttö Näyttää tehotason, aktivoidut toiminnot,
04 Keittoaluepainikkeet
05 Lämpimänäpitopainike Käytä tätä painiketta pitämään valmistettu ruoka
laitteeseen tai katkaisee sen kokonaan.
käyttöön tai pois käytöstä.
jälkilämmön ja ilmoitukset.
Tämän painikkeen käyttäminen valitsee keittoalueen.
lämpimänä.
06 Tehopainikkeet Näiden painikkeiden käyttäminen asettaa
keittoalueen tehotason.
07 Tehonlisäyspainike Käytä tätä painiketta, jos haluat kuumentaa pannun
nopeammin kuin suurimmalla teholla.
08 Ajastinpainikkeet Näiden painikkeiden käyttäminen asettaa ajastimen
ja käynnistää ja sammuttaa sen.
09 Ajastinnäyttö Näyttää ajastimessa jäljellä olevan ajan.
10 Keskeytys/jatkopainike Käytä näitä painikkeita, jos haluat kytkeä kaikki
keittoalueet päälle alhaisella teholla (2). (esimerkki :
puhelun ajaksi)
11 Lukituspainike Tämän painikkeen käyttäminen joko kytkee Child
safety lapsilukkotoiminnon käyttöön tai poistaa sen
käytöstä.
12 Smart connect -painike Tämän painikkeen käyttäminen joko kytkee Smart
connect -toiminnon käyttöön tai poistaa sen
käytöstä.
Keittoaluenäytön ilmoitukset
Näyttö Merkitys
- ,
Valittu tehotaso
Jälkilämpö (erittäin kuuma)
Jälkilämpö (kuuma)
Lapsilukko on käytössä
Painiketta painetaan yli 8 sekunnin ajan.
Liesi on ylikuumentunut vääränlaisen käytön vuoksi. (Esimerkki: tyhjien
astioiden käyttäminen liedellä.)
Keittoalueella on vääränlainen tai liian pieni astia tai astiaa ei ole asetettu
lainkaan keittoalueelle
Ennen kuin aloitat
NZ6000K NZ64N9777_NZ64N7777_DG68-01073A-00_EN+FI+NO+DA+SV.indb 13 2/19/2018 12:02:36 PM
Suomi 13
Page 50

Ennen kuin aloitat
Induktiolämmitys
• Induktiolämmityksen toimintatapa: Kun
asetat keittoastian keittoalueelle ja käynnistät
induktiolieden, lieden elektroniset piirit
B
A
C
A. Induktiokela
Ennen kuin aloitat
B. Indusoitu virta
C. Elektroniset piirit
siirtävät ”indusoitua virtaa” valmistusastian
pohjaan, jolloin astian lämpötila nousee
välittömästi.
• Nopeuttaa keittämistä ja paistamista: Koska
paistinpannu lämmitetään suoraan lasin
sijaan, järjestelmän teho on muita järjestelmiä
parempi, sillä lämpöä ei mene hukkaan. Suurin
osa käytetystä energiasta muuttuu lämmöksi.
Virtuaaliliekkiteknologia
Kun induktioelementtiin kytketään virta,
virtuaaliliekkiteknologia luo liedelle
liekkivaikutelman.
• Vain oikeanpuoleisella alueella edessä käytetään virtuaaliliekkiteknologiaa.
• Virtuaaliliekki saattaa muuttua käytettävien astioiden ulkomuodosta, koosta ja paikasta
riippuen. (Pääset parhaisiin tuloksiin käyttämällä astioita, jotka vastaavat elementin
kokoa. Liian suuret astiat voivat peittää virtuaaliliekin. Liian pienet astiat voivat vääristää
virtuaaliliekin muotoa.
• Astioiden pohjassa tai lieden päällä olevat epäpuhtaudet saattavat vääristää virtuaaliliekin
muotoa tai tehdä siitä vaillinaisen.
Puhdista astiat ja lieden pinta ennen käyttöä.
HUOM.
Jos et halua käyttää virtuaaliliekkiteknologiaa, kosketa
10 sekunnin kuluessa lieden käynnistämisestä.
Tämä toiminto voidaan tehdä vain heti lieden käynnistyttyä. Kun muita toimintoja on käytetty,
tämä toiminto ei ole enää käytettävissä.
HUOM.
Käytä virtuaaliliekkialueella vain tarkoitukseen soveltuvia valmistusastioita.
Koko 200–220 mm
Valmistusastian pinta Vaakasuuntainen hiusviiva
Materiaali STSS (ruostumaton teräs)
Kun yllä olevassa taulukossa mainitut ehdot täyttyvät, virtuaaliliekkiä voidaan käyttää
normaalisti.
-painiketta 3 sekunnin ajan
14 Suomi
NZ6000K NZ64N9777_NZ64N7777_DG68-01073A-00_EN+FI+NO+DA+SV.indb 14 2/19/2018 12:02:37 PM
Page 51

Turvakatkaisu
Jos jotakin keittoaluetta ei sammuteta tai sen lämpöasetusta ei säädetä pitkään aikaan, kyseinen
alue sammuu itsestään.
Mahdollinen jälkilämpö ilmaistaan kirjaimilla , (”hot” eli kuuma) vastaavan keittoalueen
näytössä.
Keittoalueet sammuvat itsestään alla mainittujen aikojen kuluttua:
Teho Sammutus
1–3 6 tunnin kuluttua
4–6 5 tunnin kuluttua
7–9 4 tunnin kuluttua
10–15 1,5 tunnin kuluttua
HUOM.
Jos liesi on ylikuumentunut epänormaalin käytön takia, näytössä näkyy
Liesi sammuu.
HUOM.
Keittoalueella on vääränlainen tai liian pieni astia tai astiaa ei ole asetettu lainkaan, jolloin
näytössä näkyy
Keittoalue sammutetaan automaattisesti minuutin kuluttua.
HUOM.
Mikäli yksi tai useampi keittoalue sammuu ennen mainittua aikaa, katso kohta ”Vianmääritys”
sivulla 29.
.
.
Jälkilämmön ilmaisin
Kun keittoalue tai liesi sammutetaan, digitaalinäytössä näkyy tai (”hot” eli kuuma)
jälkilämmön merkkinä. Keittoalueen sammuttamisen jälkeenkin jälkilämmön ilmaisin sammuu
vasta, kun keittoalue on jäähtynyt.
Voit käyttää jälkilämpöä ruoan sulattamiseen tai lämpimänä pitämiseen.
VAROITUS
Niin kauan kuin jälkilämmön ilmaisin palaa, alue voi aiheuttaa palovammoja.
VAROITUS
Jos virransyöttö katkeaa,
käytettävissä.
Keittoalueelta voi silti edelleen saada palovammoja. Vahinkojen välttämiseksi lieden lähettyvillä
tulee aina olla varovainen.
- tai -merkki sammuu eikä tieto jälkilämmöstä ole enää
Lämpötilantunnistin
Jos jonkin keittoalueen lämpötila jostakin syystä nousee yli turvarajan, alueen lämpötilaa
lasketaan automaattisesti.
Kun olet lopettanut lieden käytön, jäähdytyspuhallin jatkaa toimintaansa, kunnes liesi jäähtyy.
Kun lieden elektroniset osat saavuttavat tietyn lämpötilan, puhallin sammutetaan automaattisesti.
Ennen kuin aloitat
Muita syitä, joiden vuoksi keittoalue sammuu itsestään
Kaikki keittoalueet sammuvat itsestään, jos nestettä kiehuu yli ja päätyy käyttöpaneelin päälle.
Virta katkaistaan automaattisesti myös silloin, kun käyttöpaneelin päälle asetetaan kostea liina.
Molemmissa tapauksissa laitteeseen on kytkettävä virta
poistettu.
NZ6000K NZ64N9777_NZ64N7777_DG68-01073A-00_EN+FI+NO+DA+SV.indb 15 2/19/2018 12:02:37 PM
-painikkeesta, kun neste tai liina on
Suomi 15
Page 52

Ennen kuin aloitat
Valmistusastiat
Käytä tasapohjaisia valmistusastioita, jotka ovat
täysin kosketuksissa koko keittoalueeseen. Pohjan
tasaisuuden voi tarkistaa kääntämällä viivoitinta
valmistusastian pohjassa. Muista noudattaa
valmistusastialle annettuja suosituksia.
• Käytä valmistusastiaa, joka on valmistettu induktioliedelle sopivasta materiaalista.
• Käytä korkealaatuisia valmistusastioita. Painava pohja mahdollistaa paremman lämmönjaon.
Ennen kuin aloitat
Näin voit saada ruoanlaitossa hyvän lopputuloksen.
• Käytä valmistusastiaa, jonka koko vastaa valmistettavan ruoan määrää.
• Älä anna valmistusastian kiehua tyhjäksi. Tämä voi aiheuttaa pysyvän vaurion, esimerkiksi
murtuman tai sulamisen, joka voi vaikuttaa keraamiseen lieteen. (Takuu ei kata tällaista
vauriota).
• Älä käytä keittoastiaa, jos se on likainen tai paksun rasvakerroksen peittämä. Käytä vain
helposti puhdistettavia keittoastioita.
HUOMIO
• Keittoalueet voivat tuntua jäähtyneiltä, kun ne on kytketty pois päältä. Lasipinta voi
kuitenkin olla kuuma keittoalueelta siirtyneen jälkilämmön johdosta. Palovamman vaara on
edelleen olemassa.
• Älä kosketa keittoastiaan paljain käsin. Käytä aina uunikintaita tai patalappuja suojaamaan
käsiäsi palovammoilta.
• Älä liu'uta keittoastioita lieden päällä. Se voi pysyvästi vaurioittaa lieden pintaa.
Induktiokeittoalueille tarkoitetut valmistusastiat
Induktioliesi voidaan käynnistää vain silloin, kun keittoalueella käytetään magneettipohjaista
valmistusastiaa. Seuraavassa on kuvattu keittoastioiden soveltuvuus.
Materiaali Soveltuvuus
Teräs, emaloitu teräs, valurauta Kyllä
Ruostumaton teräs Kyllä (jos magneetti tarttuu astian pohjaan)
Alumiini, kupari, messinki, lasi,
keramiikka, posliini
HUOM.
• Induktioliedelle soveltuvat astiat ovat valmistajan asianmukaisesti merkitsemiä.
• Joistakin astioista saattaa kuulua ääntä, kun niitä käytetään keittoalueilla.
• Ääni ei ole merkki liedessä olevasta viasta, eikä se vaikuta toimintaan.
• Jotkin ruostumattomasta teräksestä valmistetut astiat eivät sovellu induktioliedelle. Tarkista,
tarttuuko magneetti valmistusastian pohjaan.
Ei
16 Suomi
NZ6000K NZ64N9777_NZ64N7777_DG68-01073A-00_EN+FI+NO+DA+SV.indb 16 2/19/2018 12:02:38 PM
Page 53

Induktiokeittoalueille tarkoitettujen valmistusastioiden koko
Induktiokeittoalueet mukautuvat automaattisesti astioiden pohjan kokoon tiettyyn rajaan saakka.
Astian pohjan magneettisen osan halkaisijan on oltava vähintään tietyn kokoinen keittoalueesta
riippuen.
Keittoalue Astian pohjan vähimmäishalkaisija
Flex-alue Etu- tai takaosan
Flex Plus
Koko Flex Plus 240 mm (soikion tai kalan muotoisen astian pitkä sivu)
Keittoalue takana oikealla 100 mm
Keittoalue edessä oikealla 140 mm
Parhaan tuloksen saat, kun käytät keittoastiaa, jonka
magneettisen alueen halkaisija vastaa keittoaluetta.
Jos keittoalue ei havaitse astiaa, kokeile käyttää
pienempää keittoaluetta.
140 mm
Muut induktioliedelle sopivat keittoastiat
Joidenkin keittoastioiden pohjassa voi olla ohut magneettinen materiaali, jotta se toimii
induktioliedellä. Näiden astioiden magneettisuus on heikko, eivätkä ne välttämättä toimi hyvin.
(Heikko magneettisuus tarkoittaa, että magneetti ei tartu kunnolla kiinni tai että magneettinen
alue on pieni.)
• Vaikka keittoastia olisi suunniteltu
induktioliesille, lämpiäminen voi olla heikkoa
tai liesi ei ehkä tunnista astiaa ollenkaan, jos
magneettisen alueen koko ja voimakkuus ovat
riittämättömät.
B
A. Alue, johon magneetti ei tartu
kiinni
B. Alue, johon magneetti tarttuu kiinni
A
Ennen kuin aloitat
Kun käytät suurta keittoastiaa, jossa on pienempi
magneettinen alue, vain magneettinen alue
kuumenee. Tästä seuraa, että lämpö voi jakautua
epätasaisesti.
Suomi 17
NZ6000K NZ64N9777_NZ64N7777_DG68-01073A-00_EN+FI+NO+DA+SV.indb 17 2/19/2018 12:02:38 PM
Page 54

Ennen kuin aloitat
Soveltuvuustesti
Astia soveltuu induktioliedellä käytettäväksi,
jos magneetti tarttuu sen pohjaan ja jos astian
valmistaja on merkinnyt sen induktioliedelle
soveltuvaksi.
• Tunnistat soveltuvat astiat niiden pohjista. Pohjan tulisi olla mahdollisimman paksu ja
tasainen.
Ennen kuin aloitat
• Kun ostat uusia astioita, kiinnitä erityistä huomiota pohjan halkaisijaan. Valmistajat
ilmoittavat usein vain yläreunan läpimitan.
• Älä käytä astioita, joiden pohja on vaurioitunut tai joissa on epätasaisia reunoja tai särmiä.
Viallinen astia voi naarmuttaa keraamisen lieden pintaa pysyvästi, jos liu'utat astiaa lieden
pinnalla.
• Kylminä astioiden pohjat ovat normaalisti hieman koveria. Ne eivät saisi milloinkaan olla
kuperia.
• Jos haluat käyttää jotakin erikoista astiaa, esimerkiksi painekeitintä, haudutuspannua tai
wokkipannua, noudata astian valmistajan antamia ohjeita.
Oikea kohta
Oikein Väärin
Tasainen pohja ja suorat reunat Kupera tai kaareva pohja tai reuna
Keittoastia on vähintään keittoalueen
suositellun vähimmäiskoon mukainen.
Keittoastian koko pohja on kiinni lieden
pinnassa.
Keittoastia on täysin tasapainossa. Painava kahva saa astian kallistumaan.
Keittoastia ei vastaa käytettävän keittoalueen
vähimmäiskokoa.
Keittoastian pohja on lieden reunuksen päällä
tai vain osittain kiinni lieden pinnassa.
18 Suomi
NZ6000K NZ64N9777_NZ64N7777_DG68-01073A-00_EN+FI+NO+DA+SV.indb 18 2/19/2018 12:02:39 PM
Page 55

Energiansäästövinkit
Seuraavia ohjeita noudattamalla säästät eniten
energiaa.
• Aseta astia keittoalueelle aina ennen kuin
kytket keittoalueen päälle.
• Pidä keittoalueet ja keittoastioiden pohjat
puhtaina. Muussa tapauksessa energian
kulutus kasvaa.
• Jos keittoastiassa on kansi, sulje se hyvin.
Tämä vähentää energian kulutusta.
• Sammuta käytössä oleva keittoalue jo ennen
valmistusajan päättymistä. Käytä jälkilämpöä
pitämään ruoka lämpimänä.
Kosketuspainikkeiden käyttäminen
Käytä kosketuspainikkeita koskettamalla haluamaasi painiketta sormen kärjellä, kunnes haluamasi
näytöt syttyvät tai sammuvat tai haluamasi toiminto aktivoituu.
Muista koskettaa vain yhtä painiketta kerrallaan, kun käytät laitetta. Jos sormesi painuu liian
leveästi käyttöpaneelille, myös viereinen painike saattaa aktivoitua.
Käyntiäänet
Jos kuulet...
• Rätinää: ruoanlaittoastia on valmistettu erilaisista materiaaleista.
• Vihellystä: käytät useampaa kuin kahta keittoaluetta ja astia on valmistettu erilaisista
materiaaleista.
• Hurinaa: käytät korkeita tehotasoja.
• Napsutusta: sähköjä kytketään.
• Vihellystä tai hurinaa: tuuletin toimii.
Nämä äänet ovat normaaleja eivätkä tarkoita, että laitteessa olisi vikaa.
VAROITUS
Älä käytä erikokoisia tai eri materiaaleista valmistettuja astioita.
Erikokoisten tai erilaisista materiaaleista valmistettujen valmistusastioiden käyttäminen
samanaikaisesti saattaa aiheuttaa ääniä ja tärinää.
HUOM.
Alhaisten tehotasojen (1–5) käyttäminen voi aiheuttaa naksahduksia.
Ensimmäinen puhdistuskerta
Pyyhi lasikeraaminen pinta kostealla liinalla ja lasikeraamisen keittopinnan puhdistusaineella.
VAROITUS
Älä käytä syövyttäviä tai hankaavia puhdistusaineita. Pinta voi vaurioitua.
Ennen kuin aloitat
Suomi 19
NZ6000K NZ64N9777_NZ64N7777_DG68-01073A-00_EN+FI+NO+DA+SV.indb 19 2/19/2018 12:02:40 PM
Page 56

Toiminto
Toiminto
Virran kytkeminen laitteeseen
Laite käynnistetään -painikkeella.
Kosketa
Digitaalisessa näytössä näkyy
HUOM.
Kun laite on käynnistetty
Muutoin laitteen virta katkeaa itsestään turvallisuussyistä.
-painikkeella, lämpöasetus on valittava noin 20 sekunnin sisällä.
-painiketta noin 1–2 sekunnin ajan.
.
Valmistusajan ja tehon valitseminen
1. Valitse keittoalue koskettamalla haluamasi
Toiminto
keittoalueen painiketta.
2. Aseta tehotaso koskettamalla tehopainikkeita.
Suositeltavat ruokakohtaiset asetukset
Alla olevan taulukon luvut ovat ohjeellisia. Eri ruoanlaittotapojen edellyttämät tehot riippuvat
useista tekijöistä, esimerkiksi käytettävän astian laadusta ja valmistettavan ruoan tyypistä.
Teho Ruoanlaittotapa Käyttöesimerkkejä
14–15
8–11
7–10 Paistaminen
5–7 Keittäminen
2–4
1–2 Sulattaminen Voin, liivatteen ja suklaan sulattaminen
HUOM.
Teho on säädettävä käytettävien astioiden ja raaka-aineiden mukaisesti.
Lämmitys / kuullotus
/ paistaminen
Kuumassa
paistaminen
Höyrytys / haudutus
/ keittäminen
Suurten nestemäärien lämmittäminen,
nuudeleiden keittäminen, lihan ruskistaminen
Pihvi, sisälee, paistetut perunat, makkarat,
ohukaiset/blinit
Leikkeet/höystö, maksa, kala, pasteijat, paistetut
munat
Keittäminen enintään 1,5 l:n nestemäärässä;
perunat, vihannekset
Pienten vihannesmäärien höyryttäminen ja
hauduttaminen; riisin ja maitopohjaisten ruokien
keittäminen
HUOM.
• Oletustaso on 15 keittoaluetta valittaessa.
• Jos kosketat useampaa kuin yhtä painiketta yli 8 sekuntia,
20 Suomi
NZ6000K NZ64N9777_NZ64N7777_DG68-01073A-00_EN+FI+NO+DA+SV.indb 20 2/19/2018 12:02:40 PM
ilmestyy keittoaluenäyttöön.
Page 57

Tehonlisäystoiminto
Tehonlisäys -toiminto lisää keittoalueiden tehoa. (Esimerkki: jos haluat keittää suuren määrän
vettä).
Keittoalueet Enimmäistehoaika
145 mm 10 min
210 mm 10 min
Etu- tai takaosan Flex Plus 10 min
Koko Flex Plus 5 min
Tämän jälkeen keittoalue palaa automaattisesti tehotasolle
HUOM.
Joissakin tilanteissa Tehonlisäys -toiminto saattaa mennä pois päältä automaattisesti lieden
sisäisten elektronisten osien suojaamiseksi.
Esimerkiksi etu- ja takaosan Flex-alueita ei voida käyttää täydellä teholla samanaikaisesti.
Tehonhallinta
Keittoalueilla on tietty enimmäisteho.
Jos tämä teho ylitetään Tehonlisäys -toimintoa käyttämällä, tehonhallinta laskee keittoalueen
tehoa automaattisesti.
• 1 ja 2 ovat toistensa pareja
• 3 ja 4 ovat toistensa pareja
1
3
Tämän keittoalueen ilmaisin vaihtelee muutaman
sekunnin ajan asetetun tehon ja enimmäistehon
välillä. Tämän jälkeen ilmaisin muuttuu asetetusta
2
4
tehosta enimmäistehoon.
.
Flex Plus -alue
Flex-alue on suuri keittoalue lieden vasemmalla
puolella (ks. vasemmalla oleva kuva). Se on
Keittoalue 1
Keittoalue 2
Keittoalue 3
Keittoalue 4
Flex Plus -alueen avulla keittoaluetta voidaan suurentaa käyttämällä keittoalueiden yhdistelmiä.
Tarkista alla olevasta taulukosta, millä painikkeilla eri yhdistelmät otetaan käyttöön.
Keittoalue Alue 1 Alue 2 Alue 3 Alue 4
1
2
3
4
HUOM.
• Jos käytät vain yhtä keittoaluetta, valmistusastian pohjan halkaisijan on oltava alle 14 cm.
• Liedeltä saattaa kulua 5–10 sekuntia valmistusastian paikan tunnistamiseen.
• Valmistusastian tunnistamisen aikana liedestä voi kuulua ääntä.
• Älä poista valmistusastiaa valmistuksen aikana. Liesi pysähtyy turvallisuussyistä
automaattisesti, jos valmistusastia poistetaan yli 5 sekunniksi.
suunniteltu useiden erikokoisten ja -muotoisten
kattiloiden ja pannujen käyttämiseen
samanaikaisesti. Flex-alueella on neljä osaa,
joilla on erilliset induktorit. Niiden avulla ruokaa
voidaan valmistaa riippumatta siitä, missä kohdassa
keittoaluetta valmistusastia on.
Toiminto
Suomi 21
NZ6000K NZ64N9777_NZ64N7777_DG68-01073A-00_EN+FI+NO+DA+SV.indb 21 2/19/2018 12:02:41 PM
Page 58

Toiminto
Flex Plus -alueen käyttö
1. Kosketa -painiketta.
2. Aseta tehotaso koskettamalla tehopainikkeita.
HUOM.
Toiminto
• Jos kosketat
• Jos kosketat
automaattisesti korkeammalle tasolle.
• Kun siirrät valmistusastioita tai laitat niitä uudelle Flex Plus -alueelle, peru ensin parhaillaan
käynnissä oleva toiminto ja ota uusi keittoalue käyttöön koskettamalla sen painiketta.
-painiketta käytön aikana, Flex Plus -alue -toiminto otetaan pois käytöstä.
-painiketta, kun keittoalueet ovat käytössä eri tehoilla, se säädetään
Lämpimänäpito
1. Käytä tätä toimintoa pitämään valmistettu
ruoka lämpimänä. Kosketa käytettävän
keittoalueen painiketta.
2. Kosketa -painiketta.
3. Keittoalueen näyttö muuttuu.
4. Kosketa uudelleen, niin keittoalue kytkeytyy
pois päältä.
22 Suomi
NZ6000K NZ64N9777_NZ64N7777_DG68-01073A-00_EN+FI+NO+DA+SV.indb 22 2/19/2018 12:02:43 PM
Page 59

Ajastin
Ajastimen käyttö turvakatkaisimena
Jos keittoalueelle asetetaan määräaika, se sammuu automaattisesti tämän ajan kuluttua. Tätä
toimintoa voidaan käyttää samanaikaisesti usealle keittoalueelle.
Ajastimen asettaminen
Jos haluat asettaa turvakatkaisun jollekin keittoalueelle, sen tulee olla käynnissä.
1. Kun se on käynnistetty, vastaavan keittoalueen
painikkeen koskettaminen aktivoi kyseisen
keittoalueen.
2. Kosketa
ajastinnäytön yläpuolella. (Ajastimen
oletusasetus on 10.)
3. Aseta Ajastus -painikkeella ( tai )
haluamasi automaattinen katkaisuaika,
esimerkiksi 15 minuuttia, jonka jälkeen
keittoalue sammuttaa itsensä automaattisesti.
Turvakatkaisu on nyt aktivoitu. (Ajastin
voidaan asettaa välille 1–99.)
-painiketta. Numero 10 näytetään
4. Jos haluat peruuttaa ajastimen asetukset,
valitse vastaava keittoalue ja kosketa
-painiketta 2 sekunnin ajan. Keittoalueen
ajastimen asetukset perutaan merkkiäänellä.
Jos pidät -painiketta painettuna 2 sekuntia
valitsematta aluetta, viimeksi asetetun alueen
ajastimen asetukset perutaan.
HUOM.
• Voit näyttää minkä tahansa keittoalueen jäljellä olevan ajan koskettamalla haluamaasi
aluetta.
• Asetukset nollataan käyttämällä Ajastus -painikkeita (
keittoalue sammutetaan automaattisesti, laite antaa vahvistukseksi äänimerkin ja
ajastinnäyttö ilmoittaa, että haluamasi toiminto on tehty.
• Voit muuttaa asetuksia nopeammin pitämällä Ajastus -painikkeita ( tai ) painettuna,
kunnes haluamasi arvo saavutetaan.
tai ). Asetetun ajan kuluttua
Keskeytys/jatko
Keskeytys/jatko -toiminto asettaa kaikki käynnissä olevat keittoalueet samanaikaisesti alhaiselle
teholle ja takaisin aiemmin asetettuun tehoon. Tämän toiminnon avulla voit keskeyttää
ruoanlaiton esim. puhelimeen vastataksesi ja jatkaa sitten siitä, mihin jäit.
Kun Keskeytys/jatko -toiminto otetaan käyttöön, kaikki muut kosketuspainikkeet paitsi , ,
ja otetaan pois käytöstä.
Voit jatkaa valmistusta koskettamalla -painiketta uudelleen.
Käyttöpaneeli Näyttö
Käyttöön
Pois käytöstä
Kosketa
Kosketa
-painiketta.
-painiketta.
Palaa edelliselle tehotasolle
Toiminto
Suomi 23
NZ6000K NZ64N9777_NZ64N7777_DG68-01073A-00_EN+FI+NO+DA+SV.indb 23 2/19/2018 12:02:45 PM
Page 60

Toiminto
Pikapysäytys
Tällä asetuksella voit lopettaa ruoanvalmistuksen helposti ja nopeasti.
Sammuta keittoalue koskettamalla sen painiketta
2 sekuntia.
HUOM.
-painike ei tue pikasammutustoimintoa.
Lapsilukko
Lapsilukon avulla voit estää keittoalueen tahattoman käynnistämisen ja keittopinnan aktivoinnin.
Käyttöpaneeli voidaan lukita -painiketta (vain sammutus) lukuun ottamatta. Näin estetään
asetusten tahaton muuttaminen esimerkiksi käyttöpaneelia pyyhittäessä.
Lapsilukon ottaminen käyttöön ja pois käytöstä
1. Kosketa -painiketta noin 3 sekunnin ajan.
Laite vahvistaa asetuksen äänimerkillä.
Virran katkaiseminen laitteesta
Laitteen virta katkaistaan kokonaan -painikkeella.
Toiminto
HUOM.
Kun yksittäinen keittoalue tai koko keittopinta on sammutettu, kyseisen alueen digitaalinäytössä
näytetään jälkilämmön merkkinä,
Kun lämpötila laskee,
ja poistuvat näytöstä.
Kosketa -painiketta noin 1–2 sekunnin ajan.
tai (kaksi vaihetta kuumalle).
HUOM.
• Lapsilukko otetaan käyttöön, olipa laite käynnissä tai ei.
• Voit asettaa lapsilukon ruoanlaiton aikana. Jos lapsilukon käytön aikana haluat sammuttaa
keittoalueen, kosketa
vastaavaa keittoalueen painiketta.
-painiketta tai ota ensin lapsilukko pois päältä ja kosketa sitten
2. Kosketa mitä tahansa painiketta.
näkyy näytöissä merkkinä siitä, että
lapsilukko on käytössä.
3. Kun haluat ottaa lapsilukon pois päältä,
kosketa -painiketta uudelleen 3 sekunnin
ajan. Laite vahvistaa asetuksen äänimerkillä.
24 Suomi
NZ6000K NZ64N9777_NZ64N7777_DG68-01073A-00_EN+FI+NO+DA+SV.indb 24 2/19/2018 12:02:46 PM
Page 61

Enimmäistehon raja
Tällä toiminnolla voit asettaa laitteen enimmäistehon.
1. Pidä virta poissa päältä.
2. Kosketa -painiketta noin 3 sekunnin ajan,
jotta lapsilukko kytkeytyy päälle.
3. Kosketa ajastuspainikkeiden -painiketta noin
3 sekunnin ajan.
4. Kosketa -painiketta noin 3 sekunnin ajan.
Ajastinnäytössä näkyy
näytöissä näkyy nykyinen enimmäisteho.
. ja keittoalueiden
5. Voit säätää tehon rajan tehopainikkeilla.
(3000 W, 4000 W, 7200 W)
6. Valitse asetus koskettamalla -painiketta.
HUOM.
• Matalan tehon (3000 W) tilassa Tehonlisäys -toiminto ei ole käytettävissä edessä oikealla
olevalla keittoalueella (210 mm) ja Flex Plus -alueella.
• Tehotaso asetetaan automaattisesti alhaisen tehon (3000 W, 4000 W) tilassa.
Toiminto
Suomi 25
NZ6000K NZ64N9777_NZ64N7777_DG68-01073A-00_EN+FI+NO+DA+SV.indb 25 2/19/2018 12:02:47 PM
Page 62

Toiminto
Äänet käyttöön / pois käytöstä
1. Kosketa -painiketta noin 1–2 sekunnin ajan.
2. Kosketa -painiketta 3 sekunnin ajan 10
sekunnin sisällä virran kytkemisestä.
Toiminto
3. Äänet otetaan pois käytöstä ja ajastimen
näytössä näkyy .
4. Jos haluat vaihtaa ääniasetuksen, toista
vaiheet 1 ja 2. Äänet otetaan pois käytöstä, ja
ajastimen näytössä näkyy
.
Smart Connect (vain mallit NZ64N9777GK ja NZ64N7777GK)
Liedessä on kiinteä Wi-Fi-moduuli, jonka avulla voit synkronoida lieden SmartThings-sovelluksen
kanssa. Älypuhelinsovelluksella voit:
• seurata lieden toimintatilaa ja tehoasetuksia
• katsoa ja muuttaa ajastinasetuksia.
SmartThings-sovelluksesta käytettävissä olevat toiminnot eivät välttämättä toimi sujuvasti, jos
langaton yhteys on huono tai tuote on asennettu paikkaan, jossa Wi-Fi-signaali on heikko.
Yhteyden muodostaminen lieteen
Ennen kuin voit käyttää Samsung-lieden etäkäyttötoimintoja, liedestä pitää muodostaa pariliitos
SmartThings-sovellukseen.
1. Lataa ja avaa SmartThings-sovellus älylaitteessasi.
2. Kosketa
3. Noudata sovelluksen ohjeita ja kosketa sitten -painiketta 3 sekunnin ajan.
4. -painikkeen yläpuolella oleva merkkivalo vilkkuu, kun yhteys on muodostumassa.
Yhteyden muodostuttua merkkivalo jää palamaan. Yhteys lieteen on nyt valmis.
5. Jos Smart Connect-toiminnon merkkivalo ei syty, muodosta yhteys uudelleen sovelluksen
ohjeiden mukaisesti.
HUOM.
• Varmista, että asetat Smart Connect-toiminnon vain silloin, kun liedettä ei samalla käytetä
muuhun toimintoon.
• Saat tarkemmat ohjeet verkossa olevasta käyttöohjeesta osoitteessa www.samsung.com
Wi-Fi-yhteyden käynnistys ja sammutus
• Voit käynnistää ja sammuttaa Wi-Fi-yhteyden koskettamalla
-painiketta noin 1–2 sekunnin ajan, jotta liesi kytkeytyy päälle.
-painiketta.
HUOM.
Ääniasetuksia ei voi enää muuttaa, kun on kulunut yli 10 sekuntia virran kytkemisestä päälle.
26 Suomi
NZ6000K NZ64N9777_NZ64N7777_DG68-01073A-00_EN+FI+NO+DA+SV.indb 26 2/19/2018 12:02:48 PM
Page 63

Laitteen ylläpito
Liesituulettimen ohjaus
Tässä tuotteessa on Bluetooth-laite, jonka avulla liesi voi muodostaa yhteyden ohjattaviin
Samsungin liesituulettimiin. Bluetooth-yhteyden avulla voit käyttää liesituulettimen
ohjaustoimintoa SmartThings-sovelluksessa.
Lisätietoja ohjattavista Samsungin liesituulettimista on osoitteessa www.samsung.com.
Yhteyden muodostaminen ohjattavaan liesituulettimeen
1. Lataa ja käynnistä SmartThings-sovellus älypuhelimessasi. Suorita sitten Smart Connect
-toiminto, jolla muodostat yhteyden lieteen.
2. Noudata ohjattavan liesituulettimen Bluetooth-ohjeita ja aktivoi Bluetooth-yhteys.
3. Pidä
4. Ohjaa liesituuletinta ohjattavan liesituulettimen käyttöoppaan ja sovelluksen käyttöoppaan
• Jos Smart Connect -yhteyden muodostaminen ei onnistu, et voi käyttää SmartThings-
• Ilman Smart Connect -yhteyttä lieteen voit käyttää Bluetooth-yhteyttä muodostamaan
- ja -ajastinpainikkeita painettuina samanaikaisesti, kunnes Bluetooth-yhteys on
muodostettu.
ohjeiden mukaisesti.
HUOM.
sovellusta liesituulettimen valvontaan ja ohjaamiseen.
pariliitos lieden ja liesituulettimen välille ja sitten synkronoida ne. Saat tämän tehtyä edellä
olevien vaiheiden 2 ja 3 avulla.
näytetään ajastinnäytössä, kun Bluetooth-yhteys on muodostettu.
Liesi
VAROITUS
Puhdistusaineet eivät saa joutua kosketuksiin kuumentuneen lasikeraamisen pinnan kanssa:
Kaikki puhdistusaineet on poistettava riittävällä määrällä puhdasta vettä puhdistamisen
jälkeen, sillä ne voivat syövyttää pintaa sen kuumentuessa. Älä käytä mitään voimakkaita
puhdistusaineita tai -välineitä kuten grillin tai uunin puhdistussuihkeita tai hankaustyynyjä.
HUOM.
Puhdista lasikeraaminen pinta jokaisen käyttökerran jälkeen siinä vaiheessa, kun se tuntuu
vielä käteen lämpimältä. Näin voit estää roiskeiden palamisen kiinni pintaan. Poista kattilakivi,
vesijäljet, rasvaroiskeet ja metallivärjäytyminen tavallisella lasikeramiikan tai ruostumattoman
teräksen puhdistamiseen tarkoitetulla puhdistusaineella.
Kevyt lika
1. Pyyhi lasikeraaminen pinta kostealla liinalla.
2. Hankaa kuivaksi puhtaalla liinalla. Pinnalle ei saa jäädä puhdistusaineen jäämiä.
3. Puhdista perusteellisesti koko lasikeraaminen keittopinta kerran viikossa tavallisella
lasikeramiikan tai ruostumattoman teräksen puhdistamiseen tarkoitetulla puhdistusaineella.
4. Pyyhi lasikeraaminen pinta käyttäen riittävää määrää puhdasta vettä ja hankaa kuivaksi
puhtaalla, nukkaamattomalla liinalla.
Laitteen ylläpito
Suomi 27
NZ6000K NZ64N9777_NZ64N7777_DG68-01073A-00_EN+FI+NO+DA+SV.indb 27 2/19/2018 12:02:48 PM
Page 64

Laitteen ylläpito
Vaikea lika
1. Käytä lasikaavinta ylikiehuneen ruoan ja muun
vaikean lian poistamiseen.
2. Aseta lasikaavin oikeanlaisessa kulmassa
lasikeraamista pintaa vasten.
3. Poista lika kaapimella.
HUOM.
Lasikaapimia ja lasikeramiikan puhdistusaineita saa
erikoismyymälöistä.
Laitteen ylläpito
Ongelmalika
1. Poista palanut sokeri, ja sulanut muovi,
alumiinifolio tai muu materiaali lasikaapimella
välittömästi sen ollessa vielä kuumaa.
VAROITUS
Saatat saada palovammoja, jos käytät lasikaavinta
kuumalla keittoalueella.
2. Puhdista liesi tavalliseen tapaan sen
jäähdyttyä. Jos keittoalue, johon on sulanut
jotakin, on päässyt jäähtymään, lämmitä se
uudelleen puhdistamista varten.
HUOM.
Esimerkiksi teräväreunaisen pannun aiheuttamia
naarmuja tai tummia jälkiä lasikeraamisella pinnalla
ei voi poistaa. Ne eivät kuitenkaan haittaa lieden
toimintaa.
28 Suomi
NZ6000K NZ64N9777_NZ64N7777_DG68-01073A-00_EN+FI+NO+DA+SV.indb 28 2/19/2018 12:02:48 PM
Page 65

Vianmääritys ja huolto
Lieden kehys (valinnainen)
VAROITUS
Älä käytä etikkaa, sitruunamehua tai kattilakiven poistoainetta lieden kehykseen, sillä pintaan voi
ilmestyä himmentymiä.
1. Pyyhi kehys kostealla liinalla.
2. Kostuta kuivunut lika märällä liinalla. Pyyhi ja hankaa kuivaksi.
Laitteen vaurioitumisen välttäminen
• Älä käytä liettä työpintana tai säilytysalustana.
• Älä kuumenna keittoaluetta, jos sillä ei ole astiaa tai jos astia on tyhjä.
• Lasikeramiikka on erittäin kovaa ja kestää lämpötilanvaihteluita, mutta se ei ole
särkymätöntä. Erityisen terävien tai kovien esineiden pudottaminen liedelle voi vaurioittaa
sitä.
• Älä aseta astioita lieden kehykselle. Kehyksen pinta voi naarmuuntua ja vaurioitua.
• Vältä kaatamasta happamia nesteitä, esimerkiksi etikkaa, sitruunamehua tai kattilakiven
poistoainetta lieden kehykselle, sillä ne voivat aiheuttaa himmentymiä.
• Jos sokeria tai sokeroitua ainetta putoaa ja sulaa kuuman keittoalueen pinnalle, aine
on poistettava keittiökaapimella välittömästi sen ollessa vielä kuumaa. Jos se pääsee
jäähtymään, sen poistaminen voi vaurioittaa laitteen pintaa.
• Pidä kaikki helposti sulavat materiaalit, kuten muovit, alumiinifoliot ja uunifoliot poissa
lasikeraamiselta pinnalta. Jos tämäntyyppistä ainetta sulaa lieden päälle, aine on poistettava
välittömästi kaapimella.
Vianmääritys
Ongelma voi joskus johtua jostakin pienestä virheestä ja voit ehkä korjata sen itse seuraavien
ohjeiden avulla. Jos näistä ohjeista ei ole hyötyä jossakin tilanteessa, älä yritä tehdä mitään muita
korjauksia.
VAROITUS
Vain pätevä huoltoteknikko saa korjata laitetta. Väärin tehdyt korjaukset voivat aiheuttaa
huomattavan vaaran laitteen käyttäjälle. Jos laite tarvitsee korjausta, ota yhteyttä lähimpään
huoltoliikkeeseen.
Ongelma Mahdollisia syitä Ratkaisu
Mitä teen, jos keittoalueet
eivät toimi?
Mitä teen, jos
keittoalueisiin ei tule
virtaa?
Mitä teen, jos näyttö
jälkilämmönilmaisinta
tai lukuun
ottamatta katoaa yhtäkkiä
näkyvistä?
Mitä teen, jos näytössä ei
näy jälkilämmönilmaisinta
keittoalueiden
sammuttamisen jälkeen?
• Sulakekaapissa oleva
sulake ei ole kunnossa.
-painiketta on painettu
•
vahingossa.
• Kostea liina tai neste
peittää käyttöpaneelin
osittain.
-painiketta on painettu
•
vahingossa.
• Kostea liina tai neste
peittää käyttöpaneelin
osittain.
• Keittoaluetta on käytetty
vain lyhyen aikaa eikä
se siksi kuumentunut
riittävästi.
• Jos sulakkeet palavat
useita kertoja, ota
yhteyttä valtuutettuun
sähköasentajaan.
• Laitteeseen on kytketty
virta.
• Puhdista käyttöpaneeli.
• Laitteeseen on kytketty
virta.
• Puhdista käyttöpaneeli.
• Jos keittoalue on kuuma,
ota yhteyttä lähimpään
huoltoliikkeeseen.
Vianmääritys ja huolto
Suomi 29
NZ6000K NZ64N9777_NZ64N7777_DG68-01073A-00_EN+FI+NO+DA+SV.indb 29 2/19/2018 12:02:49 PM
Page 66

Vianmääritys ja huolto
Näyttökoodit Mahdollisia syitä Ratkaisu
C0 Keittoalueen lämpötila-anturissa
on jokin vika.
C1 Lämpötila tuntuu asetettua
korkeammalta.
C2 PBA-anturissa on jokin vika.
A2 Moottori ei toimi piirilevyistä tai
johdoista johtuvan vian vuoksi
tai moottorin lapoihin kohdistuu
sähköisiä häiriöitä.
d0 Painikkeeseen kosketaan yli
8 sekunnin ajan.
F0 Piirilevyn ja alipiirilevyn välisessä
Vianmääritys ja huolto
F2 Kosketus-IC:n tiedonsiirrossa on
tiedonsiirrossa on häiriö.
häiriö.
Käynnistä laite uudelleen
-painikkeella. Jos ongelma
jatkuu, sammuta laitteen virta
yli 30 sekunniksi. Käynnistä
sitten laite uudelleen ja yritä
uudelleen. Jos ongelma
jatkuu, ota yhteyttä lähimpään
huoltoliikkeeseen.
Tarkista, onko painike märkä
tai koskettaako jokin sitä. Jos
ongelma jatkuu, käynnistä laite
uudelleen
ongelma jatkuu, ota yhteyttä
lähimpään huoltoliikkeeseen.
Käynnistä laite uudelleen
-painikkeella. Jos ongelma
jatkuu, sammuta laitteen virta
yli 30 sekunniksi. Käynnistä
sitten laite uudelleen. Jos
ongelma jatkuu, ota yhteyttä
lähimpään huoltoliikkeeseen.
-painikkeella. Jos
Mitä teen, jos keittoalueeseen ei tule virtaa tai virta ei katkea?
Tämä voi johtua seuraavista seikoista:
• Kostea liina tai neste peittää käyttöpaneelin osittain.
• Lapsilukko on käytössä ja näytössä näkyy ”L”.
Mitä teen, jos näytössä näkyy
Tarkista seuraavat:
• Kostea liina tai neste peittää käyttöpaneelin osittain.
Tee nollaus koskettamalla
• Jos käyttöpaneelille on läikkynyt nestettä, pyyhi se pois.
Mitä teen, jos näytössä näkyy
Tarkista seuraavat:
• Liesi on ylikuumentunut vääränlaisen käytön vuoksi.
• Kun liesi on jäähtynyt, nollaa asetukset koskettamalla
Mitä teen, jos näytössä näkyy
Tarkista seuraavat:
• Keittoalueella on vääränlainen tai liian pieni astia tai astiaa ei ole asetettu lainkaan
keittoalueelle.
• Kun käytät oikeanlaista astiaa, viesti häviää automaattisesti.
Mitä teen, jos puhallin on käynnissä, vaikka liesi on sammutettu?
Tarkista seuraavat:
• Kun olet lopettanut lieden käytön, puhallin käynnistyy itsestään ja jäähdyttää laitteen.
• Kun lieden elektroniset osat ovat jäähtyneet tai enimmäisaika (10 minuuttia) on kulunut
umpeen, puhallin sammuu.
• Jos kutsut asiakaspalvelusta huoltohenkilön paikalle ja ongelman syynä on käyttövirhe,
käynnistä voidaan laskuttaa myös takuuaikana.
?
-painiketta.
?
-painiketta.
?
30 Suomi
NZ6000K NZ64N9777_NZ64N7777_DG68-01073A-00_EN+FI+NO+DA+SV.indb 30 2/19/2018 12:02:49 PM
Page 67

Tekniset tiedot
Huolto
Ennen kuin soitat huoltoon, lue Vianmääritys-osio. Jos tarvitset vielä tämänkin jälkeen apua,
noudata seuraavia ohjeita.
Onko kyseessä tekninen vika?
Jos on, ota yhteyttä lähimpään huoltoliikkeeseen.
Valmistaudu keskusteluun etukäteen. Tämä helpottaa vianmääritystä ja arviota mahdollisen
huoltokäynnin tarpeesta.
Merkitse muistiin seuraavat seikat:
• Miten ongelma ilmenee?
• Missä tilanteessa ongelma ilmenee?
Kun soitat, pidä laitteen malli ja sarjanumero saatavilla. Tiedot löytyvät laitteen arvokilvestä:
• Mallin kuvaus
• Sarjanumero (15 numeroa)
Tiedot kannattaa kirjoittaa tähän, jotta ne löytyvät helposti.
• Malli:
• Sarjanumero:
Milloin huolto on maksullista jopa takuuaikana?
• Jos vian olisi voinut korjata noudattamalla jotakin Vianmääritys-osion ratkaisua.
• Jos huoltoteknikko joutuu tekemään useita huoltokäyntejä, koska hänelle ei ole annettu
kaikkia tarvittavia tietoja ennen käyntiä, ja hän joutuu tästä syystä esimerkiksi hakemaan
osia. Säästät nämä matkakustannukset, kun valmistaudut puheluun edellä kuvatulla tavalla.
Tekniset tiedot
Leveys 600 mm
Laitteen mitat
Työtason leikkauksen mitat
Liitäntäjännite 220–240 V – 50 / 60 Hz
Suurin tehokuormitus 7,2 kW
Paino
Syvyys 520 mm
Korkeus 56 mm
Leveys 560 mm
Syvyys 490 mm
Korkeus 72 mm
Kulman säde 3 mm
Netto 13,2 kg
Brutto 16,1 kg
Keittoalueet
Paikka Halkaisija Teho
Etuoikea 210 mm 2200 W / tehonlisäys 3200 W
Takaoikea 145 mm 1400 W / tehonlisäys 2000 W
Etuosan Flex Plus – 1800 W / tehonlisäys 2600 W
Takaosan Flex Plus – 1800 W / tehonlisäys 2600 W
Keskellä oleva Flex Plus – 1800 W / tehonlisäys 3000 W
Koko Flex Plus – 3300 W / tehonlisäys 3600 W
Tekniset tiedot
Suomi 31
NZ6000K NZ64N9777_NZ64N7777_DG68-01073A-00_EN+FI+NO+DA+SV.indb 31 2/19/2018 12:02:49 PM
Page 68

Tekniset tiedot
Tuotetiedot
Toimittajan nimi Samsung Electronics co. Ltd.
NZ64N9777GK
Mallitunniste
Keittotason tyyppi Upotettava
Lämmitystekniikka Induktiokeittoalueet ja liesialue
Keittovyöhykkeiden ja/tai -alueiden
lukumäärä
Pyöreät keittovyöhykkeet tai -alueet: kunkin
sähkölämmitteisen keittovyöhykkeen
hyötypinta-alan halkaisija (Ø)
Muut kuin pyöreät keittovyöhykkeet
tai -alueet: kunkin sähkölämmitteisen
keittovyöhykkeen tai -alueen hyötypintaalan pituus ja leveys (L x W)
Kunkin keittovyöhykkeen tai -alueen
kilogrammaa kohti laskettu energiankulutus
electric cooking
(EC
Tekniset tiedot
Keittotason kilogrammaa kohti laskettu
energiankulutus (EC
)
electric hob
)
NZ64N9777BK
NZ64N7777GK
3
21,0 cm, 14,5 cm
24,0 x 38,0 cm
Ø 21,0 cm: 184,2 Wh/kg
Ø 14,5 cm: 191,3 Wh/kg
24,0 x 38,0 cm: 199,0 Wh/kg
191,5 Wh/kg
NZ64N9777GK, NZ64N7777GK
Tiedot on määritelty standardin EN 60350-2 ja komission asetusten (EU) nro 66/2014 ja (EY)
nro 1275/2008 mukaisesti.
WI-FI
Off-tila
NZ64N9777BK
Tiedot on määritelty standardin EN 60350-2 ja komission asetuksen (EU) nro 66/2014
mukaisesti.
Energiansäästövinkit
• Aseta kattilat ja pannut kohdalleen aina ennen keittoalueen käynnistämistä.
• Likaiset keittoalueet ja pannujen pohjat lisäävät sähkönkulutusta.
• Painekattilan käyttäminen lyhentää valmistusaikaa.
Virrankulutus valmiustilassa (W) 1,9 W
Tehonhallinnan ajanjakso (min) 10 min
Virrankulutus 0,5 W
Tehonhallinnan ajanjakso (min) 10 min
32 Suomi
NZ6000K NZ64N9777_NZ64N7777_DG68-01073A-00_EN+FI+NO+DA+SV.indb 32 2/19/2018 12:02:49 PM
Page 69

Liite
Ilmoitus avoimesta lähdekoodista (vain mallit NZ64N9777GK ja NZ64N7777GK)
Laitteen ohjelmistossa on käytetty avoimen lähdekoodin ohjelmistoa. Voit pyytää lähdekoodin
kokonaisuudessaan kolmen vuoden sisällä laitteen viimeisestä toimituserästä lähettämällä
sähköpostia osoitteeseen mailto:oss.request@samsung.com.
Lähdekoodin voi pyytä myös tallennettuna jollekin fyysiselle tallennusvälineelle, esimerkiksi CDlevylle. Tallenteesta veloitetaan pieni maksu.
URL-osoite http://opensource.samsung.com/opensource/SMART_AT_051/seq/0 vie avoimen
lähdekoodin lataussivulle. Sivulla on myös koodin käyttöoikeuteen liittyviä tietoja, jotka koskevat
tätä tuotetta. Nämä tiedot ovat kaikkien vapaasti saatavilla.
Suomi 33
NZ6000K NZ64N9777_NZ64N7777_DG68-01073A-00_EN+FI+NO+DA+SV.indb 33 2/19/2018 12:02:49 PM
Liite
Page 70

Muistiinpanoja
NZ6000K NZ64N9777_NZ64N7777_DG68-01073A-00_EN+FI+NO+DA+SV.indb 34 2/19/2018 12:02:49 PM
Page 71

Muistiinpanoja
NZ6000K NZ64N9777_NZ64N7777_DG68-01073A-00_EN+FI+NO+DA+SV.indb 35 2/19/2018 12:02:49 PM
Page 72

KYSYMYKSET JA KOMMENTIT
MAA SOITA TAI KÄY OSOITTEESSA
AUSTRIA
BELGIUM 02-201-24-18
DENMARK 707 019 70 ww
FINLAND 030-6227 515 www.samsung.com//support
FRANCE 01 48 63 00 00 www.samsung.com/fr/support
GERMANY 06196 77 555 77 www.samsung.com/de/support
ITALIA 800-SAMSUNG (800.7267864) www.samsung.com/it/support
CYPRUS 8009 4000 only from landline, toll free
GREECE
XEMBURG 261 03 710 www.samsung.com/be_fr/support
LU
NETHERLANDS 088 90 90 100 www.samsung.com/nl/support
NORWAY 815 56480 www.samsung.com/no/support
PORTUGAL 808 207 267 www.samsung.com/pt/support
SPAIN 0034902172678 www.samsung.com/es/support
SWEDEN 0771 726 786 www.samsung.com/se/support
SWITZERLAND 0800 726 78 64 (0800-SAMSUNG)
UK 0330 SAMSUNG (7267864) w
IRELAND (EIRE) 0818 717100 www.samsung.com/ie/support
0800-SAMSUNG (0800-7267864)
[Only for KNOX customers] 0800 400848
[Only for Premium HA] 0800-366661
[Only for Dealers] 0810-112233
80111-SAMSUNG (80111 726 7864) only from land line
(+30) 210 6897691 from mobile and land line
ww
w.samsung.com/at/support
www.samsung.com/be/support (Dutch)
www.samsung.com/be_fr/support (French)
w.samsung.com/dk/support
www.samsung.com/gr/support
www.samsung.com/ch/support (German)
www.samsung.com/ch_fr/support (French)
ww.samsung.com/uk/support
DG68-01073A-00
NZ6000K NZ64N9777_NZ64N7777_DG68-01073A-00_EN+FI+NO+DA+SV.indb 36 2/19/2018 12:02:49 PM
Page 73

Induksjonskomfyrtopp
Brukerhåndbok
NZ64N9777GK / NZ64N9777BK / NZ64N7777GK
NZ6000K NZ64N9777_NZ64N7777_DG68-01073A-00_EN+FI+NO+DA+SV.indb 1 2/19/2018 12:02:51 PM
Page 74

Innhold
Innhold
Innhold
Bruke denne håndboken 3
Følgende symboler er brukt i denne brukerhåndboken: 3
Modellnavn og serienummer 3
Sikkerhetsinstruksjoner 3
Avhending av emballasje 7
Riktig avhending av ditt gamle apparat 7
Korrekt avhending av dette produktet (Avfall fra elektrisk og elektronisk utstyr) 7
Installere komfyrtoppen 8
Sikkerhetsinstruksjoner for installatøren 8
Verktøy du trenger 8
Koble til strømnettet 8
Installere i benkeplaten 9
Komponenter 11
Før du begynner 12
Kokesoner 12
Kontrollpanel 13
Induksjonsoppvarming 14
Virtuell amme-teknologi 14
Sikkerhetsutkobling 15
Restvarmeindikator 15
Temperatursensor 15
Kokekar 16
Bruke berøringsknappene 19
Driftsstøy 19
Rengjøring ved oppstart 19
Bruk 20
Slå på apparatet 20
Velg kokesone og effektnivå 20
Effektøkning 21
Fleksisone Pluss 21
Hold varm 22
Tidtaker 23
Pause/gjenoppta 23
Hurtigstopp 24
Slå av apparatet 24
Barnesikring 24
Maksimal effektgrense 25
Lyd på/av 26
Smart Connect (bare modellene NZ64N9777GK og NZ64N7777GK) 26
Avtrekksviftekontroll 27
Apparatvedlikehold 27
komfyrtopp 27
Lett tilsmussing 27
Inngrodd smuss 28
Problematisk smuss 28
Komfyrtoppramme (alternativ) 29
Unngå skader på apparatet 29
Feilsøking og service 29
Feilsøking 29
Service 31
Tekniske data 31
Tekniske data 31
Kokesoner 31
Produktinformasjon 32
Vedlegg 33
Kunngjøring om åpen kilde (bare modellene NZ64N9777GK og NZ64N7777GK) 33
2 Norsk
NZ6000K NZ64N9777_NZ64N7777_DG68-01073A-00_EN+FI+NO+DA+SV.indb 2 2/19/2018 12:02:52 PM
Page 75

Bruke denne håndboken
Sikkerhetsinstruksjoner
Ta deg tid til å lese denne brukerhåndboken. Vær spesielt oppmerksom på
sikkerhetsinformasjonen som du nner i følgende kapittel, før du bruker apparatet ditt. Behold
denne håndboken for fremtidige oppslag.
Hvis du overlater apparatet til andre eiere, må du huske å levere med manualen til den nye
eieren.
Følgende symboler er brukt i denne brukerhåndboken:
ADVARSEL
Farer eller usikker bruk som kan føre til alvorlig personskade eller dødsfall.
FORSIKTIG
Farer eller usikker bruk som kan føre til mindre personskader eller skader på gjenstander.
FORSIKTIG
For å redusere risikoen for brann, eksplosjon, elektrisk støt eller personskader når du bruker
komfyrtoppen, følger du disse grunnleggende sikkerhetsforholdsreglene.
MERK
Praktiske tips, anbefalinger eller informasjon som hjelper brukere med å betjene produktet.
Modellnavn og serienummer
Både modellnavnet og serienummeret er merket under komfyrbasen.
Skriv ned informasjonen eller fest den ekstra produktetiketten (nnes på toppen av produktet) på
gjeldende side for seinere bruk.
Modellnavn
Serienummer
Sikkerhetsaspektene omkring dette apparatet er i samsvar med alle godtatte tekniske standarder
og sikkerhetsstandarder. Som produsenter mener vi imidlertid også at det er vårt ansvar å gjøre
dere kjent med følgende sikkerhetsinstrukser.
Bruke denne håndboken
ADVARSEL
Dette apparatet skal ikke brukes av personer (inkludert barn)
med svekkede fysiske, sensoriske eller mentale evner eller av
personer som mangler relevant erfaring og kunnskap, med
mindre de er under oppsyn eller får instruksjoner av en person
som er ansvarlig for deres sikkerhet.
Barn må være under oppsyn for å sikre at de ikke leker med
apparatet.
Dette apparatet kan brukes av barn fra åtte år og oppover og
av personer med reduserte fysiske, sensoriske eller mentale
evner, eller som mangler erfaring og kunnskap, såfremt de
holdes under oppsyn eller er blitt instruert i trygg bruk av
apparatet og forstår farene som er involvert. Barn skal ikke
leke med apparatet. Rengjøring og vedlikehold som kan utføres
av brukeren, må ikke utføres av barn uten oppsyn.
Innretningen for frakobling må være innlemmet i den faste
kablingen i henhold til kablingsregler.
Norsk 3
NZ6000K NZ64N9777_NZ64N7777_DG68-01073A-00_EN+FI+NO+DA+SV.indb 3 2/19/2018 12:02:52 PM
Page 76

Sikkerhetsinstruksjoner
Sikkerhetsinstruksjoner
Det må være mulig å koble apparatet fra strømforsyningen
etter installasjonen. Frakoblingen kan oppnås ved å ha
støpselet tilgjengelig eller ved å legge inn en bryter i kablingen
i samsvar med kablingsreglene.
Hvis strømledningen blir skadet, må den byttes ut av
produsenten, produsentens serviceagent eller en annen
kvalisert person for å unngå farer.
Den angitte festemetoden må ikke være avhengig av bruk
av klebemidler, ettersom dette ikke regnes som en pålitelig
festemetode.
ADVARSEL: Hvis platen er sprukket, skru av apparatet for å
unngå muligheten for elektrisk støt.
Under bruk blir apparatet varmt. Pass på å unngå å berøre
varmeelementene inne i komfyrtoppen.
ADVARSEL: Tilgjengelige deler kan bli varme under bruk. Små
barn må holdes unna.
Dette apparatet er ikke ment for bruk med et eksternt tidsur
eller separat ernkontroll.
FORSIKTIG: Tilberedningsprosessen må overvåkes. En kort
tilberedningsprosess må overvåkes kontinuerlig.
For å unngå overoppvarming må apparatet ikke monteres bak
en dekorativ dør.
ADVARSEL: Dette apparatet og deler man kan komme borti,
blir varme under bruk. Unngå å berøre varmeelementene.
Barn under 8 år må holdes unna med mindre de er under
kontinuerlig oppsyn.
ADVARSEL: Det kan være farlig å ikke holde oppsyn med maten
hvis du lager mat på en komfyrtopp med fett eller olje. Dette
kan føre til brann.
Du må ALDRI prøve å slukke en brann med vann, men heller slå
av apparat
et og deretter dekke til ammen med f.eks. et lokk
eller et brannteppe.
Det skal ikke brukes en damprenser.
Metallgjenstander som kniver, gaer, skjeer og lokk må ikke
ADVARSEL: Brannfare: Ikke oppbevar gjenstander på
tilberedningsoveratene.
plasseres på komfyrtoppens overate, siden de kan bli varme.
Slå av komfyrelementet med bryteren etter bruk, ikke bruk
kjelesensoren som eneste sikring.
4 Norsk
NZ6000K NZ64N9777_NZ64N7777_DG68-01073A-00_EN+FI+NO+DA+SV.indb 4 2/19/2018 12:02:52 PM
Page 77

ADVARSEL: Bare bruk komfyrtoppbeskyttelsen som er
produsert av samme produsent som komfyrtoppen eller som
er angitt av produsenten av apparatet i bruksanvisningen som
egnet eller komfyrtoppbeskyttelser innebygd i apparatet. Bruk
av uegnet beskyttelse kan føre til ulykker.
Overatene kan bli varme under bruk.
Dette apparatet kan brukes av barn fra åtte år og oppover og
av personer med reduserte fysiske, sensoriske eller mentale
evner, eller som mangler erfaring og kunnskap, såfremt de
holdes under oppsyn eller er blitt instruert i trygg bruk av
apparatet og forstår farene som er involvert. Barn skal ikke
leke med apparatet. Rengjøring og brukervedlikehold skal ikke
utføres av barn med mindre der er over 8 år gamle og blir
holdt tilsyn med.
Hold apparatet og ledningen utenfor rekkevidden til barn under
8 år.
FORSIKTIG
Pass på at apparatet er riktig installert og jordet av kvaliserte
fagfolk.
Bare kvaliserte fagfolk kan utføre service på dette apparatet.
Reparasjoner foretatt av ukvaliserte personer kan føre til
skade eller alvorlig funksjonssvikt. Hvis apparatet trenger
reparasjon, må du kontakte ditt lokale servicesenter. Hvis
disse instruksjonene ikke følges, kan det føre til skade og gjøre
garantien ugyldig.
Innebygde apparater må bare brukes etter at de er installert
i rom og på arbeidssteder som overholder gjeldende
standarder. Dette sikrer tilstrekkelig beskyttelse mot kontakt
for elektriske enheter i samsvar med kravene i gjeldende
sikkerhetsstandarder.
Hvis apparatet fungerer dårlig eller hvis det oppstår brudd,
sprekker eller rifter:
Sikkerhetsinstruksjoner
• slå av alle kokesoner
• koble komfyrtoppen fra strømforsyningen og
• kontakt ditt lokale servicesenter.
Hvis komfyren sprekker, må du slå apparatet av for å unngå
elektrisk støt. Ikke bruk komfyrtoppen før glassplaten er byttet.
Norsk 5
NZ6000K NZ64N9777_NZ64N7777_DG68-01073A-00_EN+FI+NO+DA+SV.indb 5 2/19/2018 12:02:52 PM
Page 78

Sikkerhetsinstruksjoner
Sikkerhetsinstruksjoner
Ikke bruk komfyrtoppen til å varme opp aluminiumsfolie,
produkter pakket i aluminium eller frosne varer som er
oppbevart i kokekar av aluminium.
Væske mellom kjelebunnen og komfyrtoppen kan gi
damptrykk. Dette kan få kjelen til å hoppe.
Pass alltid på at kokeplaten og kjelebunnen holdes tørre.
Kokesonene blir varme når du lager mat.
Hold alltid små barn unna apparatet.
Hold alt emballasjemateriell utenfor barns rekkevidde siden de
kan være farlige for dem.
Dette apparatet skal bare brukes til normal koking og steking
i hjemmet. Det er ikke laget for kommersiell eller industriell
bruk.
Bruk aldri komfyrtoppen til å varme opp rommet.
Vær forsiktig når du setter inn elektriske apparater i
stikkontakter i nærheten av komfyrtoppen. Strømledninger må
Hold alltid kontrollpanelene rene og tørre.
Plasser aldri brennbare gjenstander på komfyrtoppen. Det kan
føre til brann.
Uforsiktig bruk kan medføre fare for brannskader.
Ledninger fra elektriske apparater må ikke berøre den varme
overaten på komfyrtoppen eller varme kokekar.
Ikke bruk komfyrtoppen til å tørke klær.
Brukere med pacemakere og Active Heart-implantater må
holde overkroppen minst 30 cm fra induksjonskokesonene når
disse står på. Hvis du er i tvil, ber vi om at du tar kontakt med
produsenten av implantatet eller legen din. (Kun modeller med
induksjonskomfyrtopp)
Ikke forsøk å reparere, demontere eller endre apparatet selv.
Slå alltid apparatet av før du gjør rent.
Gjør ren komfyrtoppen i samsvar med rengjørings- og
behandlingsinstruksjonene i denne håndboken.
ikke komme i kontakt med komfyrtoppen.
Overopphetet fett og olje kan raskt ta fyr. Forlat aldri
Hold husdyr unna apparatet da de kan trø på kontrollene og
forårsake feil.
overateenheter uten tilsyn når du lager mat i fett eller olje, for
eksempel når du lager chips.
Slå av kokesonene etter bruk.
6 Norsk
NZ6000K NZ64N9777_NZ64N7777_DG68-01073A-00_EN+FI+NO+DA+SV.indb 6 2/19/2018 12:02:52 PM
Page 79

Avhending av emballasje
Korrekt avhending av dette produktet (Avfall fra elektrisk og elektronisk utstyr)
ADVARSEL
Alle materialer som er brukt i emballasjen til dette apparatet, er fullstendig resirkulerbare. Ark
og deler i hardskum er riktig merket. Sørg for at emballasjemateriale og gamle apparater blir
avhendet med hensyn til sikkerhet og miljø.
Riktig avhending av ditt gamle apparat
ADVARSEL
Før du kaster et gammelt apparat, må du gjøre det ubrukelig slik at det ikke blir et faremoment.
For å gjøre dette må du få en kvalisert fagperson til å koble apparatet fra strømnettet, og erne
nettledningen.
Apparatet må ikke kastes i husholdningsavfallet.
Informasjon om innsamlingsdatoer og offentlige avfallsdeponier er tilgjengelig fra det lokale
renholdsverket.
(Gjelder i land med avfallssortering)
Denne merkingen som vises på produktet, dets tilbehør eller
dokumentasjon, indikerer at produktet eller det elektroniske tilbehøret
(for eksempel lader, headset, USB-kabel) ikke skal kastes sammen
med annet husholdningsavfall ved slutten av levetiden. For å hindre
potensiell skade på miljøet eller helseskader grunnet ukontrollert
avfallsavhending ber vi om at dette avfallet holdes adskilt fra
andre typer avfall og resirkuleres på ansvarlig måte for å fremme
bærekraftig gjenbruk av materielle ressurser.
Private forbrukere bør kontakte enten forhandleren de kjøpte
produktet av, eller lokale myndigheter for detaljer om hvor og hvordan
disse artiklene kan resirkuleres på en miljøvennlig måte.
Forretningsbrukere bør kontakte sin leverandør og undersøke vilkårene
i kjøpskontrakten. Dette produktet og det elektroniske tilbehøret skal
ikke blandes med annet kommersielt avfall som skal kastes.
Ønsker du informasjon om Samsungs miljøengasjement og produktspesikke lovpålagte
forpliktelser, f.eks. REACH, kan du gå til: samsung.com/uk/aboutsamsung/samsungelectronics/
corporatecitizenship/data_corner.html
Sikkerhetsinstruksjoner
Norsk 7
NZ6000K NZ64N9777_NZ64N7777_DG68-01073A-00_EN+FI+NO+DA+SV.indb 7 2/19/2018 12:02:52 PM
Page 80

Installere komfyrtoppen
Installere komfyrtoppen
Installere komfyrtoppen
ADVARSEL
Sikre at det nye apparatet bare blir installert og jordet av kvalisert personell.
Legg merke til denne instruksjonen. Garantien vil ikke dekke skader som kan oppstå som et
re
sultat av feil installasjon.
Tekniske data nnes i slutten av denne håndboken.
Sikkerhetsinstruksjoner for installatøren
• Det må nnes en enhet i den elektriske installasjonen som gjør det mulig å koble
apparatet fra strømnettet i alle polene med en kontaktåpning på minst 3 mm. Passende
isolasjonsenheter inkluderer sikringsbryter for utkobling av linje, sikringer (sikringer med
skrufatning må ernes fra holderen), jordfeilbryter og vernebryter.
• Når det gjelder brannvern, oppfyller dette apparatet kravene i EN 60335 - 2 - 6. Denne
typen apparat kan installeres med et høyt skap eller en vegg på den ene siden.
• Installasjonen må garantere for beskyttelse mot støt.
• Kjøkkenenheten der apparatet monteres, må oppfylle stabilitetskravene i DIN 68930.
• For beskyttelse mot fuktighet må alle avkuttede overater forsegles med egnet forsegling.
• På islagte overater må skjøtene i området der komfyrtoppen plasseres, være helt fylt opp
med fugemasse.
• På naturlig, kunstig stein eller keramikktopper, må snappfesteærene festes på plass med
egnet kunstharpiks eller blandet klebemiddel.
• Sikre at forseglingen er riktig plassert mot arbeidsaten uten mellomrom. Ekstra
silikonforsegling må ikke brukes. Det ville gjøre demontering mye vanskeligere ved service.
• Komfyrtoppen må presses ut nedenfra når den skal ernes.
• Det kan installeres et brett under komfyrtoppen.
• Ventilasjonsåpningen mellom benkeplaten og fronten på enheten under den må ikke
tildekkes.
Verktøy du trenger
Blyant Philips-skrutrekker Linjal eller vater
Beskyttelsesbriller Sabelsag Bor
Koble til strømnettet
Før tilkobling må du sjekke at apparatets nominelle spenning, dvs. den spenningen som er angitt
på typeskiltet, stemmer overens med tilgjengelig strømforsyning. Typeskiltet er plassert på den
nederste karmen på komfyrtoppen.
ADVARSEL
Slå av strømmen før du kobler kablene til kretsen.
Spenningen i varmeelementet er AC 230 V~. Apparatet virker også perfekt på eldre nettverk
med AC 220 V~ eller AC 240 V~. Komfyrtoppen skal kobles til nettet med en enhet som tillater
at apparatet kan kobles fra nettet på alle poler med en kontaktåpning på minst 3 mm, dvs.
automatisk sikringsbryter for utkobling av linje, jordfeilbryter eller vernebryter.
ADVARSEL
Kabelkoblingene må gjøres i samsvar med forskriftene og terminalskruene må festes sikkert.
ADVARSEL
Så snart komfyrtoppen er koblet til strømnettet, må du kontrollere at alle kokesonene er klare til
bruk ved å slå dem kort på etter tur på maksimumsinnstilling med egnede kokekar.
8 Norsk
NZ6000K NZ64N9777_NZ64N7777_DG68-01073A-00_EN+FI+NO+DA+SV.indb 8 2/19/2018 12:02:53 PM
Page 81

ADVARSEL
L1 L2 N
A
01
02
Pass på å avstemme og nøytralisere tilordning av koblingene i huset og apparatet
(koblingsskjemaer) for å unngå at komponenter skades.
Garantien dekker ikke skader som skyldes feil installasjon.
ADVARSEL
Hvis strømledningen blir skadet, må den byttes ut av produsenten, produsentens serviceagent
eller en annen kvalisert person for å unngå farer.
1N~ (32A)
02
01
04 06
01 220-240 V ~04 Blå
02 Brun 05 Grå
03
L N
05
03 Svart 06 Grønn/gul
Installere i benkeplaten
MERK
Noter ned serienummeret på apparatets typeetikett
før installasjonen. Dette nummeret er nødvendig i
tilfelle det er behov for service og det er ikke lenger
tilgjengelig etter installasjon, ettersom det benner
seg på det opprinnelige typeskiltet på oversiden
eller undersiden av apparatet.
Installere komfyrtoppen
2N~ (16A): Separer 2-fasede ledninger (L1 og L2)
før tilkobling.
01 220-240 V ~05 Blå
02 380-415 V ~06 Grå
03 Brun 07 Grønn/gul
04 Svart
A. Serienummer
MERK
Vær spesielt oppmerksom på kravene om minimumsplass og -klaring.
MERK
03
04
02
01
05
06
07
Undersiden av komfyrtoppen er utstyrt med en vifte. Hvis det er en skuff under komfyrtoppen,
bør den ikke brukes til oppbevaring av små gjenstander eller papir da viften kan skades eller
kjølingen kan forstyrres hvis de suges inn i viften.
Nr. Forklaring Størrelse
01 Høyde på
Min 2 mm
ventilasjonshull
02 Bredde på
560 mm
01 04
02
03
L1 N1 L2 N2
05
06
07
2 x 1N~ (16A): Separer ledningene før tilkobling.
01 220-240 V ~05 Svart
02 Brun 06 Grå
03 Blå 07 Grønn/gul
04 220-240 V
~
ventilasjonshull
ADVARSEL
For riktig forsyningstilkobling, følg kablingsdiagrammet ved terminalene.
Norsk 9
NZ6000K NZ64N9777_NZ64N7777_DG68-01073A-00_EN+FI+NO+DA+SV.indb 9 2/19/2018 12:02:53 PM
Page 82

Installere komfyrtoppen
01
02
06
04
07
03
08
11
01
04
02
03
05
Installere komfyrtoppen
05
09
10
12
Nr. Forklaring Størrelse
01 Sjekk 4 punkter
02 Borediameter Ø 6
03 Riktig vinkel for beskjæringspunkt 90°
04 Skjærebreddestørrelse 560±1 mm
05 Skjæredybdestørrelse 490±1 mm
06 Kurvestørrelse R3
07 Benkestørrelse tykkelse Maks 50 mm,
Min 20 mm
08 Av
stand mellom enden på benken og beskjæringspunkt
Min 60 mm
(bakside)
09 Benkedybde Min 600 mm
10 Avstand mellom enden på benken og beskjæringspunkt
Min 60 mm
(venstre side)
11 Avstand mellom enden på benken og beskjæringspunkt
Min 60 mm
(høyre side)
12 Avstand mellom enden på benken og beskjæringspunkt
Min 50 mm
(forside)
06
07
08
Nr. Forklaring Størrelse
01 Avstand mellom vegg og komfyr Min 40 mm
02 Størrelse på dybde på komfyr 520 mm
03 Avstand mellom induksjon og enden på benken Min 40 mm
04 Avstand mellom glass og brenner 25 mm
05 Avstand mellom glass og brenner 15 mm
06 Avstand mellom vegg og brenner Min 60 mm
07 Størrelse på dybde på brenner 480 mm
08 Avstand mellom brenner og enden på benken Min 50 mm
10 Norsk
NZ6000K NZ64N9777_NZ64N7777_DG68-01073A-00_EN+FI+NO+DA+SV.indb 10 2/19/2018 12:02:54 PM
Page 83

05
02
01
03
04
01
Nr. Forklaring Størrelse
01 Bredde på bakre
ventilasjon
02 Høyde på bakre
ventilasjon
03 Dybde på
strømledningsbane
04 Bredde på
strømledningsbane
05 Høyde på benkeplate Min 5 mm
Min 550 mm
Min 35 mm
Maks 65 mm
Maks 100 mm
02
03
Installere komfyrtoppen
Nr. Forklaring Størrelse
01
02 Min 2 mm
03 Min 20 mm
NZ6000K NZ64N9777_NZ64N7777_DG68-01073A-00_EN+FI+NO+DA+SV.indb 11 2/19/2018 12:02:54 PM
Størrelse på ventilasjon
Min 20 mm
Komponenter
Induksjonskomfyrtopp Brakettær
Norsk 11
Page 84

Før du begynnerFør du begynner
Kokesoner
NZ64N9777GK / NZ64N7777GK
Før du begynner
04
01
02
03
05
NZ64N9777BK
02
01
03
05
04
01 Induksjon eksisone pluss 3300 W med effektøkning 3600 W
02 Induksjonskokesone 1400 W med effektøkning 2000 W
03 Induksjonskokesone 2200 W med effektøkning 3200 W
04 Kontrollpanel
05 Virtuell amme
12 Norsk
NZ6000K NZ64N9777_NZ64N7777_DG68-01073A-00_EN+FI+NO+DA+SV.indb 12 2/19/2018 12:02:54 PM
Page 85

Kontrollpanel
01 06 08 10 11 1202
04 05 07 09
03
03
03
03
01 06 08 10 1102
04 05 07 09
03
03
03
03
NZ64N9777GK / NZ64N7777GK
NZ64N9777BK
06 Effektnivåknapper Bruk disse knappene til å angi effektnivået til en
kokesone.
07 Effektøkningsknapp Bruk denne knappen til å varme opp innholdet i
kokekaret raskere enn det maksimale effektnivået.
08 Tidtakerknapper Bruk disse knappene til å slå tidtakeren på eller av
og stille inn tidtakeren.
09 Tidtakervisning Viser den gjenværende tiden til tidtakeren.
10 Pause-/gjenoppta-knapp Bruk denne knappen til å sette alle kokesonene på
lav strøminnstilling (2). (eksempel : for å svare på
telefonen)
11 Låseknapp Bruk denne knappen til å slå barnesikringen på
eller av.
12 Smart connect-knapp Bruk denne knappen til å slå smart connect-
funksjonen på eller av.
Veiledning for visning av kokesone
Skjerm Betydning
til ,
Valgt effektnivå
Restvarme (veldig varm)
Før du begynner
NZ6000K NZ64N9777_NZ64N7777_DG68-01073A-00_EN+FI+NO+DA+SV.indb 13 2/19/2018 12:02:55 PM
01 Av/på knapp Bruk denne knappen til å slå strømmen helt av eller
på.
02 Fleksisone pluss-knapp Bruk denne knappen til å slå eksisone pluss-
funksjonen på eller av.
03 Display for valg av kokesone Viser effektnivået, aktiverte funksjoner, restvarme
og informasjonsmeldinger.
04 Knapper for kokesone Bruk disse knappene til å velge en kokesone.
05 Knapp for hold varm Bruk denne knappen til å holde kokt mat varm.
Restvarme (varm)
Barnesikringen er aktivert
En knapp har blitt berørt i mer enn 8 sekunder.
Komfyrtoppen er overopphetet på grunn av unormal bruk. (eksempel : når
det står tomme kokekar på kokesonen)
Det blir brukt uegnede, for små kokekar eller det er ikke er plassert noen
kokekar på kokesonen
Norsk 13
Page 86

Før du begynner
Induksjonsoppvarming
A
A. Induksjonsspole
B. Indusert strøm
Før du begynner
C. Elektroniske kretser
• Prinsippet med induksjonsoppvarming: Når du
plasserer et kokekar på en kokesone og slår
den på, produserer de elektroniske kretsene
B
C
i induksjonskomfyrtoppen "indusert strøm"
i bunnen av kokekaret, slik at kokekarets
temperatur umiddelbart øker.
• Raskere koking og steking: Siden kokekaret
blir varmet opp direkte, ikke glassplaten, blir
effekten bedre enn i andre systemer fordi
ingen varme går tapt. Det meste av energien
som absorberes, transformeres til varme.
Virtuell amme-teknologi
Virtuell amme-teknologi gir et inntrykk av
ammer når du slår på et induksjonselement.
• Virtuell amme-teknologi er bare tilgjengelig på den fremre kokesonen.
• Utseendet på den virtuelle ammen avhenger av kokekarets utseende, størrelse
eller posisjon. (Du får best resultater hvis du bruker kokekar som samsvarer med
elementstørrelsen. Kokekar som er for store, kan dekke den virtuelle ammen. Kokekar som
er for små, kan føre til at den virtuelle ammen blir misformet.
• Urenheter på bunnen av kokekaret eller på toppen av komfyren, kan føre til at den virtuelle
ammen blir misformet eller ufullstendig.
Rengjør kokekaret eller komfyrtopp før du bruker dem.
MERK
Hvis du vil slå av Virtuell amme-teknologien, må du berøre
10 sekunder etter at du slo av komfyren.
Denne funksjonen er bare tilgjengelig rett etter at du har slått på komfyrtoppen. Etter en annen
handling kan ikke denne funksjonen angis.
MERK
Bruk passende kokekar når du bruker Virtuell ammebrenner.
Størrelse 200-220 mm
Kokekarets overate Horisontal linje
Materiale Rustfritt stål (STSS)
Når omgivelsene tilsier det, kan Virtuell amme-fasong dannes skikkelig.
-knappen i 3 sekunder i løpet av
14 Norsk
NZ6000K NZ64N9777_NZ64N7777_DG68-01073A-00_EN+FI+NO+DA+SV.indb 14 2/19/2018 12:02:56 PM
Page 87

Sikkerhetsutkobling
Hvis én av kokesonene ikke er slått av eller effektnivået ikke er justert etter en lengre periode,
vil denne kokesonen automatisk slå seg selv av.
Eventuell restvarme vil bli vist med , (for "varm") i det tilhørende display for kokesone.
Kokesonene slås av automatisk i følgende tilfeller.
Effektnivå Slå av
1-3 Etter 6 timer
4-6 Etter 5 timer
7-9 Etter 4 timer
10-15 Etter 1,5 timer
MERK
Hvis komfyrtoppen er overopphetet på grunn av unormal bruk, vises
Og komfyrtoppen vil bli slått av.
MERK
Hvis det blir brukt uegnede , for små kokekar , eller ingen kokekar er plassert på kokesonen,
vises
Og etter ett minutt blir den tilsvarende kokesonen slått av.
Skulle én eller ere kokesoner slå seg av før angitt tid har gått, kan du se "Feilsøking" på side 29.
Andre grunner til at en kokesone kan slås av automatisk
Alle kokesoner vil bli slått av hvis væske koker over på kontrollpanelet.
Den automatiske utkoblingen vil også aktiveres hvis du plasserer en fuktig klut på
kontrollpanelet. I begge disse tilfellene vil apparatet måtte slås på igjen ved hjelp av
etter at væsken eller kluten har blitt ernet.
.
MERK
.
-knappen
Restvarmeindikator
Når én enkelt kokesone eller komfyrtoppen slås av, vil forekomsten av restvarme vises med en
, (for “varm”) i det tilhørende displayet for kokesone. Selv etter at kokesonen er slått av,
blir restvarmeindikatoren bare slått av etter at kokesonen er kjølnet.
Du kan bruke restvarmen til å tine eller holde mat varm.
ADVARSEL
Så lenge restvarmeindikatoren lyser, nnes det en viss fare for å brenne seg.
ADVARSEL
Hvis strømforsyningen blir brutt, vil symbolet
vil ikke lenger være tilgjengelig.
Det kan imidlertid likevel være mulig å brenne deg. Dette kan unngås ved å alltid passe på når
man er nær komfyrtoppen.
, bli borte, og informasjon om restvarme
Temperatursensor
Hvis temperaturen uansett årsak skulle stige over sikkerhetsgrensene på en av kokesonene, vil
kokesonen automatisk bli redusert til et lavere effektnivå.
Når du er ferdig med å bruke komfyrtoppen, vil kjøleviften fortsette å kjøre til elektronikken
i komfyrtoppen er kjølt ned. Kjøleviften slås automatisk av avhengig av temperaturen i
elektronikken.
Før du begynner
Norsk 15
NZ6000K NZ64N9777_NZ64N7777_DG68-01073A-00_EN+FI+NO+DA+SV.indb 15 2/19/2018 12:02:57 PM
Page 88

Før du begynner
Kokekar
• Bruk kokekar med egnet materiale for induksjonskoking.
• Bruk kokekar av god kvalitet med tunge bunner for bedre varmedistribusjon. Dette vil gi
Før du begynner
best kokeresultater.
• Bruk kokekar med en størrelse som passer til matmengden som skal tilberedes.
• Ikke la kokekar tørrkoke. Dette kan forårsake permanent skade i form av ødeleggelser,
fusjon eller defekter på den keramiske komfyren. (Denne typen skader dekkes av garantien).
• Ikke bruk skitne kokekar eller kokekar med fettoppsamlinger. Bruk alltid kokekar som er
lette å rengjøre etter kokingen.
FORSIKTIG
• Kokesonene kan virke nedkjølte etter at de er slått av. Men glassoveraten kan allikevel
være varm fra restvarme fra kokekarene. Det er fremdeles fare for brannskader.
• Ikke berør varme kokekar direkte med hendene. Bruk alltid ovnsvanter eller grytekluter for
å beskytte hendene mot brannskader.
• Ikke skyv kokekar langs komfyroveraten. Dette kan permanent skade komfyrtoppen.
Bruk kokekar med at bunn som er fullstendig i
kontakt med hele kokesonen. Kontroller atheten
ved å trekke en linjal på tvers av bunnen på
kokekaret. Påse at du følger anbefalingene for
kokekar.
Kokekar for matlaging med induksjonssoner
Induksjonskomfyren kan bare slås på når et kokekar med magnetisk bunn plasseres på en av
kokesonene. Du kan bruke kokekar som er identisert som egnet nedenfor.
Materiale Egnethet
Stål, emaljert stål, støpejern Ja
Rustfritt stål Ja (hvis en magnet kan festes til bunnen av kokekaret)
Aluminium, kopper, bronse, glass,
keramikk, porselen
MERK
• Kokekar for induksjonskomfyrer er merket som egnet for dette av produsenten.
• Enkelte kokekar kan avgi lyd når de brukes på induksjonskokesonene.
• Disse lydene indikerer ikke at det er noen feil å komfyren og påvirker ikke bruken på noen
måte.
• Spesielle kokekar i rustfritt stål kan være uegnet for induksjonskoking. Kontroller om
bunnen av kokekaret trekker til seg en magnet.
Nei
16 Norsk
NZ6000K NZ64N9777_NZ64N7777_DG68-01073A-00_EN+FI+NO+DA+SV.indb 16 2/19/2018 12:02:57 PM
Page 89

Kokekarstørrelser for induksjonskokesoner
Induksjonskokesoner tilpasser seg automatisk til størrelsen på bunnen av kokekaret, opp til en
viss grense. Den magnetiske delen av bunnen på kokekaret må imidlertid ha en minstediameter
som avhenger av størrelsen på kokesonen.
Kokesone Minste tillatte diameter på bunnen av kokekaret
Fleksisone Forreste eller
bakerste Fleksi
Pluss
Full Fleksi Pluss 240 mm (for den lengre siden til ovale kokekar eller
Høyre bakre kokesone 100 mm
Høyre fremre kokesone 140 mm
For best resultat skal du bruke kokekar med en
ferromagnetisk diameter som passer brenneren.
Hvis kokekaret ikke registreres av brenneren, kan
du prøve på en mindre brenner.
140 mm
skegryte)
Andre induksjonskokekar
Enkelte kokekar har tynt magnetisk materiale på bunnen for å fungere med en induksjonskomfyr.
Disse kokekarene har svak magnetisme og kan fungere dårlig. (Svak magnetisme betyr at en
magnet ikke blir godt festet eller hvor magneten bare kan festes til et lite område.)
• Selv om kokekar er utviklet for en
induksjonskomfyr, kan varmeytelsen av og
til være svak eller komfyren vil kanskje ikke
oppdage kokekaret avhengig av størrelsen og
styrken til det magnetiske området på bunnen
av kokekaret.
B
A. Område hvor magneten ikke fester
seg
B. Område hvor magneten fester seg
A
Før du begynner
Når du bruker store kokekar med et mindre
ferromagnetisk element, blir bare det
ferromagnetiske elementet oppvarmet. Varmen blir
derved ikke jevnt distribuert.
Norsk 17
NZ6000K NZ64N9777_NZ64N7777_DG68-01073A-00_EN+FI+NO+DA+SV.indb 17 2/19/2018 12:02:58 PM
Page 90

Før du begynner
Egnethetstest
• Du kan kjenne igjen gode kokekar på bunnen. Bunnen bør være så tykk og at som mulig.
• Når du kjøper nye kokekar, skal du være spesielt oppmerksom på diameteren på bunnen.
Produsentene oppgir ofte diameteren ved den øvre kanten.
Før du begynner
• Ikke bruk kokekar med skader i bunnen med skarpe eller ru kanter. Skadede kokekar
kan forårsake permanente riper i den keramiske komfyrtoppen hvis du skyver dem over
overaten.
• Når de er kalde, er kokekar vanligvis bøyd svakt innover (konkave). De må aldri være bøyd
utover (konvekse).
• Hvis du vil bruke spesielle kokekar, for eksempel en trykkoker, sautépanne eller wok, må du
følge produsentens veiledning.
Kokekar er egnet for induksjonsoppvarming dersom
en magnet fester seg til bunnen av kokekaret
og kokekaret er merket som egnet for dette av
produsenten.
Riktig plassering
Riktig Feil
Kokekar med at bunn og rette sider Kokekar med kurvet eller bøyd bunn eller
sider
Kokekaret møter eller overskrider den
anbefalte minimumsstørrelsen for kokesonen.
Kokekaret sitter fullstendig att på
komfyroveraten.
Kokekaret møter ikke den krevde
minimumsstørrelsen for den aktuelle
kokesonen.
Kokekaret sitter på komfyrkanten eller sitter
ikke fullstendig att på komfyroveraten.
Kokekaret er fullstendig balansert. Det tunge håndtaket får kokekaret til å vippe.
18 Norsk
NZ6000K NZ64N9777_NZ64N7777_DG68-01073A-00_EN+FI+NO+DA+SV.indb 18 2/19/2018 12:02:59 PM
Page 91

Tips til energisparing
Følg disse tipsene for å spare energiforbruk.
• Plasser alltid kokekaret på en kokesone før du
slår på den tilhørende brenneren.
• Hold kokesonene og bunnen på kokekarene
rene. Ellers blir det brukt mer energi.
• Lukk lokket til kokekaret godt hvis det er
tilgjengelig. Dette vil redusere energiforbruket.
• Slå av brenneren før koketiden er over. Bruk
restvarme for å holde maten varm.
Bruke berøringsknappene
For å bruke berøringsknappene berører du ønsket knapp med ngertuppen til riktig display lyser
opp eller slukkes, eller til ønsket funksjon aktiveres.
Pass på at du bare berører én bryter når du bruker apparatet. Hvis ngeren din ligger for att på
knapp, kan også en tilstøtende knapp bli aktivert.
Driftsstøy
Hvis du hører:
• Sprakelyd: kokekaret er laget av forskjellige materialer.
• Plystring: du bruker mer enn to kokesoner og kokekarene er laget av forskjellige materialer.
• Summing: du bruker høye effektnivåer.
• Klikking: elektrisk veksling forekommer.
• Hvesing, susing: viften er i bruk.
Støyen er normal og vitner ikke om feil.
ADVARSEL
Ikke bruk kokekar av forskjellig størrelse og materiale.
Bruk av kokekar i forskjellige størrelser eller materialer kan lage lyder eller vibrasjoner.
MERK
Bruk av lave effektnivåer (1-5) kan føre til klikkelyder.
Rengjøring ved oppstart
Tørk av den keramiske glassplaten med en fuktig klut og glassrensemiddel for keramiske
komfyrer.
ADVARSEL
Bruk aldri etsende eller slipende rengjøringsmidler. Overaten kan bli skadet.
Før du begynner
Norsk 19
NZ6000K NZ64N9777_NZ64N7777_DG68-01073A-00_EN+FI+NO+DA+SV.indb 19 2/19/2018 12:02:59 PM
Page 92

Bruk
Bruk
Bruk
Slå på apparatet
Apparatet slås på ved hjelp av -knappen.
Berør
-knappen i omtrent 1–2 sekunder.
Det digitale displayet vil vise
MERK
Etter at
innen omtrent 20 sekunder. Av sikkerhetsgrunner vil apparatet ellers slå seg selv av.
-knappen har blitt aktivert for å slå på apparatet, må du velge en varmeinnstilling
.
Velg kokesone og effektnivå
1. Du velger kokesone ved å berøre den
tilsvarende kokesoneknappen.
2. For innstilling og justering av effektnivået
bruker du effektnivåknappene.
Foreslåtte innstillinger for tilberedning av spesielle matvarer
Tallene i tabellen nedenfor er veiledende. Effektnivået som kreves for forskjellige
tilberedningsmetoder, avhenger av ere faktorer, inkludert kvaliteten på kokekarene som brukes,
og type og mengde mat som tilberedes.
Effektnivå Tilberedningsmetode Eksempler på bruk
14-15
8-11 Kraftig steking Biff, kjøttlet, poteter, pølser, pannekaker/lefser
7-10 Steking Snitsel/koteletter, lever, sk, kjøttkaker, egg
5-7 Koking Koking av opptil 1,5 l væske, poteter, grønnsaker
2-4
1-2 Smelting
MERK
Du vil måtte justere effektnivåene etter bestemte kokekar og matvarer.
Oppvarming /
Sautering / Steking
Damping / Stuing /
Koking
Oppvarming av store mengder væske, koking
av nudler, bruning av kjøtt, bruning av gulasj,
brasering av kjøtt
Damping og stuing av små mengder grønnsaker,
ris og melkeretter
Smelting av smør, oppløsning av gelatin, smelting
av sjokolade
MERK
• Standardnivået er angitt til 15 når kokesonen velges.
• Hvis mer enn én knapp Berøre i mer enn 8 sekunder, vil
kokesone.
20 Norsk
NZ6000K NZ64N9777_NZ64N7777_DG68-01073A-00_EN+FI+NO+DA+SV.indb 20 2/19/2018 12:03:00 PM
vises på displayet for
Page 93

Effektøkning
Effektøkning-funksjonen gjør mer energi tilgjengelig for hver kokesone. (eksempel: praktisk når
du skal koke opp en stor kjele med vann).
Kokesoner Maks. effektøkningstid
145 mm 10 min
210 mm 10 min
Forreste eller bakerste Fleksi Pluss 10 min
Full Fleksi Pluss 5 min
Etter dette går kokesonene automatisk tilbake til effektnivå
MERK
I visse omstendigheter kan funksjonen Effektøkning deaktiveres automatisk for å beskytte de
interne elektroniske komponentene i komfyrtoppen.
Det er for eksempel umulig å få maksimal effekt på bakre og forreste Fleksisone samtidig.
Strømstyring
Kokesonene har et tilordnet maksimalt effektnivå.
Hvis dette effektnivået overstiges ved å slå på funksjonen Effektøkning for en kokesone,
reduserer strømstyringen automatisk effektnivået for kokesonen.
• Nr. 1 og 2 er koblet i par
• Nr. 3 og 4 er koblet i par
1
3
Displayet for denne kokesonen veksler i noen
sekunder mellom angitt effektnivå og det høyest
mulige effektnivået. Deretter skifter displayet
2
4
fra det angitte effektnivået til det høyest mulige
effektnivået.
.
Fleksisone Pluss
Fleksisonen er det store kokeområdet på venstre
side av komfyrtoppen (se illustrasjonen til venstre)
Kokesone 1
Kokesone 2
Kokesone 3
Kokesone 4
Med Fleksisone Pluss kan du bruke en kombinasjon av forskjellige kokesoner for å forstørre
kokeområdet. Se tabellene nedenfor for hvilken knapp du skal berøre for å aktivere de
forskjellige kombinasjonene.
Kokesone 1 brenner 2 brennere 3 brennere 4 brennere
1
2
3
4
MERK
• Når du bare bruker en kokesone, må diameteren på bunnen på kokekaret være mindre enn
14 cm.
• Komfyrtoppen kan bruke 5–10 sekunder på å gjenkjenne kokekarets posisjon.
• Det kan komme lyder mens komfyrtoppen gjenkjenner kokekaret.
• Ikke ern kokekaret under tilberedingen. Av sikkerhetsmessige årsaker stopper
komfyrtoppen automatisk hvis et kokekar har blitt ernet i mer enn 5 sekunder.
som er spesielt utformet for gryter og kjeler med
forskjellig fasong og størrelse samtidig. Fleksisonen
har re soner som styres av individuelle induktorer,
slik at du kan tilberede maten uavhengig av hvor
kokekaret plasseres på en kokesone.
Bruk
Norsk 21
NZ6000K NZ64N9777_NZ64N7777_DG68-01073A-00_EN+FI+NO+DA+SV.indb 21 2/19/2018 12:03:01 PM
Page 94

Bruk
Bruk
Bruke Fleksisone Pluss
1. Berør -knappen.
2. For innstilling og justering av effektnivået
bruker du effektnivåknappene.
MERK
• Hvis du berører
• Hvis du berører
automatisk justert til høyere nivå.
• Når du ytter eller legger til kokekar til en ny Fleksisone Pluss, avbryter du handlingen og
berører tilsvarende kokesone for å aktivere kokesonen.
-knappen under bruk, slås funksjonen Fleksisone Pluss av.
-knappen mens hver kokesone opererer på forskjellige nivåer, blir den
Hold varm
1. Bruk denne funksjonen til å holde kokt mat
varm. Berør knappen for den tilsvarende
kokesonen.
2. Berør -knappen.
3. Kokesonedisplayet endres.
4. Berør igjen for å slå av kokesonen.
22 Norsk
NZ6000K NZ64N9777_NZ64N7777_DG68-01073A-00_EN+FI+NO+DA+SV.indb 22 2/19/2018 12:03:02 PM
Page 95

Tidtaker
Bruke timeren som sikkerhetsutkobling
Hvis det er satt en bestemt tid for en kokesone, vil kokesonen slå seg selv av så snart denne
tiden er omme. Denne funksjonen kan brukes for ere kokesoner samtidig.
Stille inn tidtakeren
Kokesonen(e) der du vil bruke sikkerhetsutkoblingen, må være slått på.
1. Etter at den er slått på, berører du knappen
for den tilsvarende kokesonen for å aktivere
kokesonen.
2. Berør
3. Bruk Tidtakerinnstilling ( eller ) for stille
-knappen. Tallet 10 vil bli vist over
tidtakerdisplayet. (Standardinnstillingen for
tidtakeren er 10.)
inn ønsket tid, for eksempel 15 minutter.
Kokesonen vil da bli slått av automatisk etter
15 minutter. Sikkerhetsutkoblingen er nå
aktivert. (Tidtakeren kan justeres mellom
1 og 99.)
4. For å avbryte tidtakerinnstillingen velger du
tilsvarende kokesone og berører -knappen i
2 sekunder. Dette vil avbryte tidsinnstillingene
for kokesonen med et pip. Hvis du Berøre
-knappen i 2 sekunder uten å velge en
brenner, avbrytes tidtakerinnstillingene for
den sist endrede kokesonen.
MERK
• Du kan vise gjenværende tid for kokesonene ved å berøre de valgte kokesonene.
• Innstillingene tilbakestilles ved hjelp av knappen Tidtakerinnstilling (
den angitte tiden er gått ut, slår kokesonen seg automatisk av. Du får en bekreftelse i form
av et lydsignal, og det vises på tidtakerdisplayet.
• Du kan endre innstillingen raskere ved å berøre og holde inne knappen
Tidtakerinnstilling ( eller ) til ønsket verdi er nådd.
eller ). Etter at
Pause/gjenoppta
Funksjonen Pause/gjenoppta setter alle kokesonene på lavt effektnivå samtidig, og deretter
tilbake til det tidligere angitte effektnivået. Denne funksjonen kan brukes til å raskt avbryte og
deretter fortsette kokeprosessen, hvis du f.eks. vil ta en telefon.
Når Pause/gjenoppta-funksjonen er aktivert, blir alle berøringsknappene unntatt , ,
og deaktivert.
Trykk en gang til på -knappen for å gjenoppta tilberedningen.
Kontrollpanel Skjerm
Å slå på
Å slå av
Berør
Berør
-knappen
-knappen
Gå tilbake til tidligere strømnivå
Bruk
Norsk 23
NZ6000K NZ64N9777_NZ64N7777_DG68-01073A-00_EN+FI+NO+DA+SV.indb 23 2/19/2018 12:03:04 PM
Page 96

Bruk
Bruk
Hurtigstopp
Med dette alternativet kan du redusere tiden det tar å stanse tilberedningen.
Du kan slå av en kokesone ved å berøre
kokesoneknappen i 2 sekunder.
MERK
-knappen støtter ikke hurtigstoppfunskjonen.
Slå av apparatet
Apparatet slås av ved hjelp av -knappen.
Berør -knappen i omtrent 1–2 sekunder.
MERK
Etter å ha slått av én kokesone eller hele kokeaten, vil eventuell restvarme vises på de digitale
displayene for de ulike kokesonene, i form av en
Temperaturen senkes,
, forsvinner.
, to trinn for "varm".
Barnesikring
Du kan bruke barnesikringen til å hindre at du slår på en kokesone og aktiverer den uten å mene
det. I tillegg kan kontrollpanelet, med unntak av sensoren for -knappen (bare slå av-kontrollen)
låses for å hindre at innstillingene kan endres uforvarende, for eksempel når du tørker av panelet
med en klut.
Slå barnesikringen på/av
1. Berør -knappen i omtrent 3 sekunder.
Du hører et akustisk signal som en bekreftelse.
2. Berør hvilken som helst knapp.
vises på displayene for å angi at
barnesikring er aktivert.
3. Når du skal slå av barnesikringen, berører du
-knappen igjen i 3 sekunder. Du hører et
akustisk signal som en bekreftelse.
MERK
• Uavhengig av strøm på/av aktiveres barnesikringen.
• Du kan aktivere barnesikringen mens du koker. For å slå av brenneren med barnesikringen
på, berører du
kokesoneknappen.
-knappen for å slå av barnesikringen først og deretter den tilsvarende
24 Norsk
NZ6000K NZ64N9777_NZ64N7777_DG68-01073A-00_EN+FI+NO+DA+SV.indb 24 2/19/2018 12:03:06 PM
Page 97

Maksimal effektgrense
Med denne funksjonen kan du justere den maksimale effekten til enheten.
1. La komfyren være avslått.
2. Berør -knappen i omtrent 3 sekunder for å
slå barnesikring.
3. Berør -knappen av knappene for
tidtakerinnstilling i omtrent 3 sekunder.
4. Berør -knappen i omtrent 3 sekunder.
Tidtakeren viser
nåværende maksimal effekt.
og kokesonen viser
5. Du kan justere effektgrensen ved å bruke
Effektnivåknappene. (3000 W, 4000 W,
7200 W)
6. Berør -knappen for å angi innstillingen.
MERK
• I lav effektmodus (3000 W), er funksjonen Effektøkning ikke tilgjengelig på fremre høyre
brenner (210 mm) og eksisone pluss.
• I lav effektmodus (3000 W, 4000 W), effektnivået justeres automatisk.
Bruk
Norsk 25
NZ6000K NZ64N9777_NZ64N7777_DG68-01073A-00_EN+FI+NO+DA+SV.indb 25 2/19/2018 12:03:08 PM
Page 98

Bruk
Bruk
Lyd på/av
1. Berør -knappen i omtrent 1–2 sekunder.
2. Berør -knappen i 3 sekunder innen
10 sekunder etter at den ble påslått.
3. Lyden vil slås av og vil vises i
tidtakerdisplayet.
4. Får å endre lydinnstillingen, gjentar du trinn
1 og 2. Lyden vil slås på og
tidtakerdisplayet.
vil vises i
Smart Connect (bare modellene NZ64N9777GK og NZ64N7777GK)
Komfyren har innebygd Wi-Fi-modul som du kan bruke til å synkronisere komfyren med
SmartThings-appen. På smarttelefonappen kan du:
• overvåke driftsstatusen og effektnivåene til komfyrelementene.
• kontrollere og endre tidstakerinnstillingene.
Funksjoner som kan opereres fra SmartThings-appen vil kanskje ikke operer jevnt hvis
kommunikasjonsforholdene er dårlige eller produktet er installert på et sted med et svakt Wi-Fisignal.
Slik kobler du til komfyren
Før du kan bruke de ernstyrte funksjonene til Samsung-komfyren, må du pare den til
SmartThings-appen.
1. Last ned og åpne SmartThings-appen på smartenheten din.
2. Berør
3. Følg instruksjonene i appen og berør deretter og hold inne -knappen i 3 sekunder.
4. Når tilkoblingen opprettes, blinker LED-indikatoren over -knappen. Når prosessen er
5. Hvis Smart Connect LED-indikatoren ikke slås på, følger du instruksjonene i appen for å
MERK
• Påse at Smart Connect-funksjonen bare innstilles når komfyren ikke er i bruk.
• For mer informasjon kan du se i brukerhåndboken på Internett på www.samsung.com
Wi-Fi På/av
• Berør
-knappen i omtrent 1–2 sekunder for å slå på komfyren.
fullført, lyser indikatoren uten å blinke. Nå er komfyren tilkoblet.
koble til på nytt.
-knappen for å slå på eller av Wi-Fi-forbindelsen.
MERK
Det er ikke mulig å endre lydinnstillingene etter 10 sekunder fra du har slått på.
26 Norsk
NZ6000K NZ64N9777_NZ64N7777_DG68-01073A-00_EN+FI+NO+DA+SV.indb 26 2/19/2018 12:03:09 PM
Page 99

Apparatvedlikehold
Avtrekksviftekontroll
Dette produktet har en Bluetooth-enhet som du kan bruke for å koble komfyren til
Samsung-avtrekksviftekontrollmodeller. Igjennom Bluetooth-tilkoblingen kan du bruke
avtrekksviftekontrollfunksjonen på SmartThings-appen.
For å nne ut mer om Samsung-avtrekksviftekontrollmodeller, kan du gå til www.samsung.com.
For å tilkoble en avtrekksviftekontrollmodell
1. Last ned og åpne SmartThings-appen på smarttelefonen din. Fullfør deretter Smart Connect-
prosedyren for å koble til komfyren.
2. Følg Bluetooth-instruksjonene til avtrekksviftekontrollmodellen og aktiver Bluetooth-
tilkoblingen.
3. Berør og hold inne
Når Bluetooth-tilkoblingen er etabler, vises på tidstakerdisplayet.
4. Følg instruksjonene i brukerhåndboken for avtrekksviftekontrollmodellen og App-
veiledningen for å bruke avtrekksviftekontrollen.
MERK
• Hvis Smart Connect-tilkoblingen ikke er vellykket, kan du ikke bruke SmartThings-appen for
å overvåke og kontrollere avtrekksviften.
• Uten Smart Connect-tilkobling til komfyren, kan du bruke en Bluetooth-tilkobling for å pare
komfyren med avtrekksviften og synkronisere dem. For å gjøre dette følger du trinnene 2
og 3 ovenfor.
og -tidtakerknappen samtidig for å foreta Bluetooth-tilkoblingen.
komfyrtopp
ADVARSEL
Rengjøringsmidler må ikke komme i kontakt med en oppvarmet keramisk glassate: Alle
rengjøringsmidler må ernes med tilstrekkelige mengder rent vann etter rengjøring, ettersom de
kan ha en etsende virkning når overaten blir varm. Ikke bruk sterke rengjøringsmidler som grilleller ovnspray, skureputer eller slipemiddel for gryter.
MERK
Rengjør den keramiske glassaten etter hver bruk mens den fortsatt er varm å ta på. Dette vil
hindre at søl blir brent fast på overaten. Fjern belegg, vannmerker, fettdråper og metallisk
misfarging ved hjelp av rengjøringsmidler for keramisk glass eller rustfritt stål som du får i
handelen.
Lett tilsmussing
1. Tørk av den keramiske glassaten med en fuktig klut.
2. Gni tørr med en ren klut. Rester av rengjøringsmiddel må ikke etterlates på overaten.
3. Rengjør hele den keramiske glasskokeaten en gang i uken med et rengjøringsmiddel for
keramisk glass eller rustfritt stål som du får i handelen.
4. Tørk av den keramiske glassaten med tilstrekkelige mengder rent vann og gni tørr med en
ren klut som ikke loer.
Apparatvedlikehold
Norsk 27
NZ6000K NZ64N9777_NZ64N7777_DG68-01073A-00_EN+FI+NO+DA+SV.indb 27 2/19/2018 12:03:10 PM
Page 100

Apparatvedlikehold
Apparatvedlikehold
Inngrodd smuss
1. Bruk en glasskrape til å erne inngrodd sprut
og mat som har kokt over.
2. Plasser glasskrapen i spiss vinkel mot den
keramiske glassaten.
3. Fjern smusset ved å skrape med bladet.
MERK
Glasskraper og spesialrengjøringsmidler for
keramisk glass nnes i spesialbutikker.
Problematisk smuss
1. Fjern fastbrent sukker, smeltet plast,
aluminiumsfolie eller andre materialer med en
glasskrape straks, mens det fortsatt er varmt.
ADVARSEL
Det er fare for at du kan brenne deg når
glasskrapen brukes på en varm kokesone:
2. Rengjør komfyrtoppen som normalt når den er
avkjølt. Hvis kokesonen som noe har smeltet
på, har blitt avkjølt, må du varme den opp
igjen for rengjøring.
MERK
Skraper eller mørke ekker på den keramiske
glassaten, for eksempel forårsaket av en kasserolle
med skarpe kanter, kan ikke ernes. Dette skader
imidlertid ikke komfyrtoppen funksjonelt.
28 Norsk
NZ6000K NZ64N9777_NZ64N7777_DG68-01073A-00_EN+FI+NO+DA+SV.indb 28 2/19/2018 12:03:10 PM
 Loading...