

Samsung ML5100A User Manual
LASER PRINTER
ML-5100A
User ’s Manual

Unpacking РРРРРРРРРРРРРРРРРРРРРРРРРРРРРРРРРРР 2
Selecting a Location РРРРРРРРРРРРРРРРРРРРРРРРРРР 2
Control Locations and Functions РРРРРРРРРРРРРРРР 3
Front View РРРРРРРРРРРРРРРРРРРРРРРРРРРРРРРРРР 3
Rear View РРРРРРРРРРРРРРРРРРРРРРРРРРРРРРРРРРР 4
InsideРРРРРРРРРРРРРРРРРРРРРРРРРРРРРРРРРРРРРРР 4
Installing the Toner Cartridge РРРРРРРРРРРРРРРРРР 5
Loading Paper РРРРРРРРРРРРРРРРРРРРРРРРРРРРРРРР 6
Connecting to Your Computer РРРРРРРРРРРРРРРРРР 8
Using Parallel Port РРРРРРРРРРРРРРРРРРРРРРРРРРР 8
Using The USB Port РРРРРРРРРРРРРРРРРРРРРРРРРР 9
Powering On the Printer РРРРРРРРРРРРРРРРРРРРРР 10
Installing Software РРРРРРРРРРРРРРРРРРРРРРРРРРР 11
Installing Printer Driver РРРРРРРРРРРРРРРРРРРРРР 12
System RequirementРРРРРРРРРРРРРРРРРРРРРРРРР 12
Windows 95/98/NT4.0 InstallationРРРРРРРРРРРР 12
Windows 95/98 Plug and PlayРРРРРРРРРРРРРРРР 13
If Windows Does Not Run the CD-ROM РРРРРРР 13
Windows 3.1x Installation РРРРРРРРРРРРРРРРРРРР 14
Uninstalling the Printer DriverРРРРРРРРРРРРРРРР 15
Installing Printer Utilities РРРРРРРРРРРРРРРРРРРРР 15
Windows 95/98/NT 4.0 Installation РРРРРРРРРРР 15
Windows 3.x Installation РРРРРРРРРРРРРРРРРРРРР 15
Printing on Network PrinterРРРРРРРРРРРРРРРРРРР 16
Setting Up Host PC Printer РРРРРРРРРРРРРРРРРРР 16
Client PC Sharing SetupРРРРРРРРРРРРРРРРРРРРРР 16
Chapter 1
Setting Up Your Printer
Selecting Paper Types and Feed Source РРРРРРРР 18
Loading Print Material РРРРРРРРРРРРРРРРРРРРРРР 19
Feeding Manually РРРРРРРРРРРРРРРРРРРРРРРРРРР 23
Using Face-up Stacker РРРРРРРРРРРРРРРРРРРРРРР 24
Paper Guidelines РРРРРРРРРРРРРРРРРРРРРРРРРРРР 25
Chapter 2
Paper Handling
Contents

Chapter 3
Operating Your Printer
Chapter 4
Troubleshooting and Maintenance
FCC Regulations РРРРРРРРРРРРРРРРРРРРРРРРРРРРР 54
Canadian Radio Interference Regulations РРРРРР 54
EC Declaration of Conformity РРРРРРРРРРРРРРРРР 55
Laser Safety Statement РРРРРРРРРРРРРРРРРРРРРРР 56
Safety Information РРРРРРРРРРРРРРРРРРРРРРРРРРР 57
Specifications РРРРРРРРРРРРРРРРРРРРРРРРРРРРРР 58
Appendix
Operator Panel РРРРРРРРРРРРРРРРРРРРРРРРРРРРРР 28
Indicator Lights РРРРРРРРРРРРРРРРРРРРРРРРРРРР 28
Button Function РРРРРРРРРРРРРРРРРРРРРРРРРРРР 29
Selecting Your Printer РРРРРРРРРРРРРРРРРРРРРРРР 30
Windows 95 / 98 / NT РРРРРРРРРРРРРРРРРРРРРР 30
Windows 3.x РРРРРРРРРРРРРРРРРРРРРРРРРРРРРРР 30
Printing a Document РРРРРРРРРРРРРРРРРРРРРРРРР 31
Print Settings РРРРРРРРРРРРРРРРРРРРРРРРРРРРРРРР 32
Using Printer Utilities РРРРРРРРРРРРРРРРРРРРРРРР 35
Status Monitor РРРРРРРРРРРРРРРРРРРРРРРРРРРРР 35
Remote Control Panel РРРРРРРРРРРРРРРРРРРРРРР 35
Poor Print Quality РРРРРРРРРРРРРРРРРРРРРРРРРРР 38
Paper Problems РРРРРРРРРРРРРРРРРРРРРРРРРРРРРР 39
Printing Problems РРРРРРРРРРРРРРРРРРРРРРРРРРР 40
Software Problems РРРРРРРРРРРРРРРРРРРРРРРРРР 41
Before You Call For Service РРРРРРРРРРРРРРРРРР 42
Clearing Paper Jams РРРРРРРРРРРРРРРРРРРРРРРРРР 43
Tips for Avoiding Paper Jams РРРРРРРРРРРРРРРР 45
Cartridge Maintenance РРРРРРРРРРРРРРРРРРРРРРР 46
Replacing Toner Cartridge РРРРРРРРРРРРРРРРРРРР 46
Cleaning OPC Drum РРРРРРРРРРРРРРРРРРРРРРРРР 47
Chapter 5
Printer Options
Optional Memory Card РРРРРРРРРРРРРРРРРРРРРРР 50
Setting Up
Your Printer
Chapter 1

2
Setting Up Your Printer
Unpacking
Remove the printer and all accessories from the packing carton. Save
the carton and packing materials in case you need to repack the
printer.
Make sure you have the following items:
¥ Toner cartridge
¥ Power cord
¥ Setup CD-ROM
¥ This manual
Notes:
¥ If you need help during setup, or if any items are missing or damaged,
notify your dealer immediately.
¥ You need a Centronics-compatible parallel printer cable. The cable is not
shipped with your printer. You can purchase this cable from your dealer or
retailer. Make sure the cable is IEEE 1284-compliant.
Selecting a Location
Place your printer on a flat, stable surface near your workstation.
Leave enough space around the printer, so that you can easily:
¥ open the printer cover
¥ load the paper
¥ retrieve the paper
¥ open the front output tray and retrieve the paper from the front
output tray
¥ allow air circulation around the vents to prevent the printer from
overheating
Do not place the printer:
¥ In direct sunlight
¥ Near heat sources or air conditioners
¥ In dusty or dirty environments
3
Setting Up Your Printer
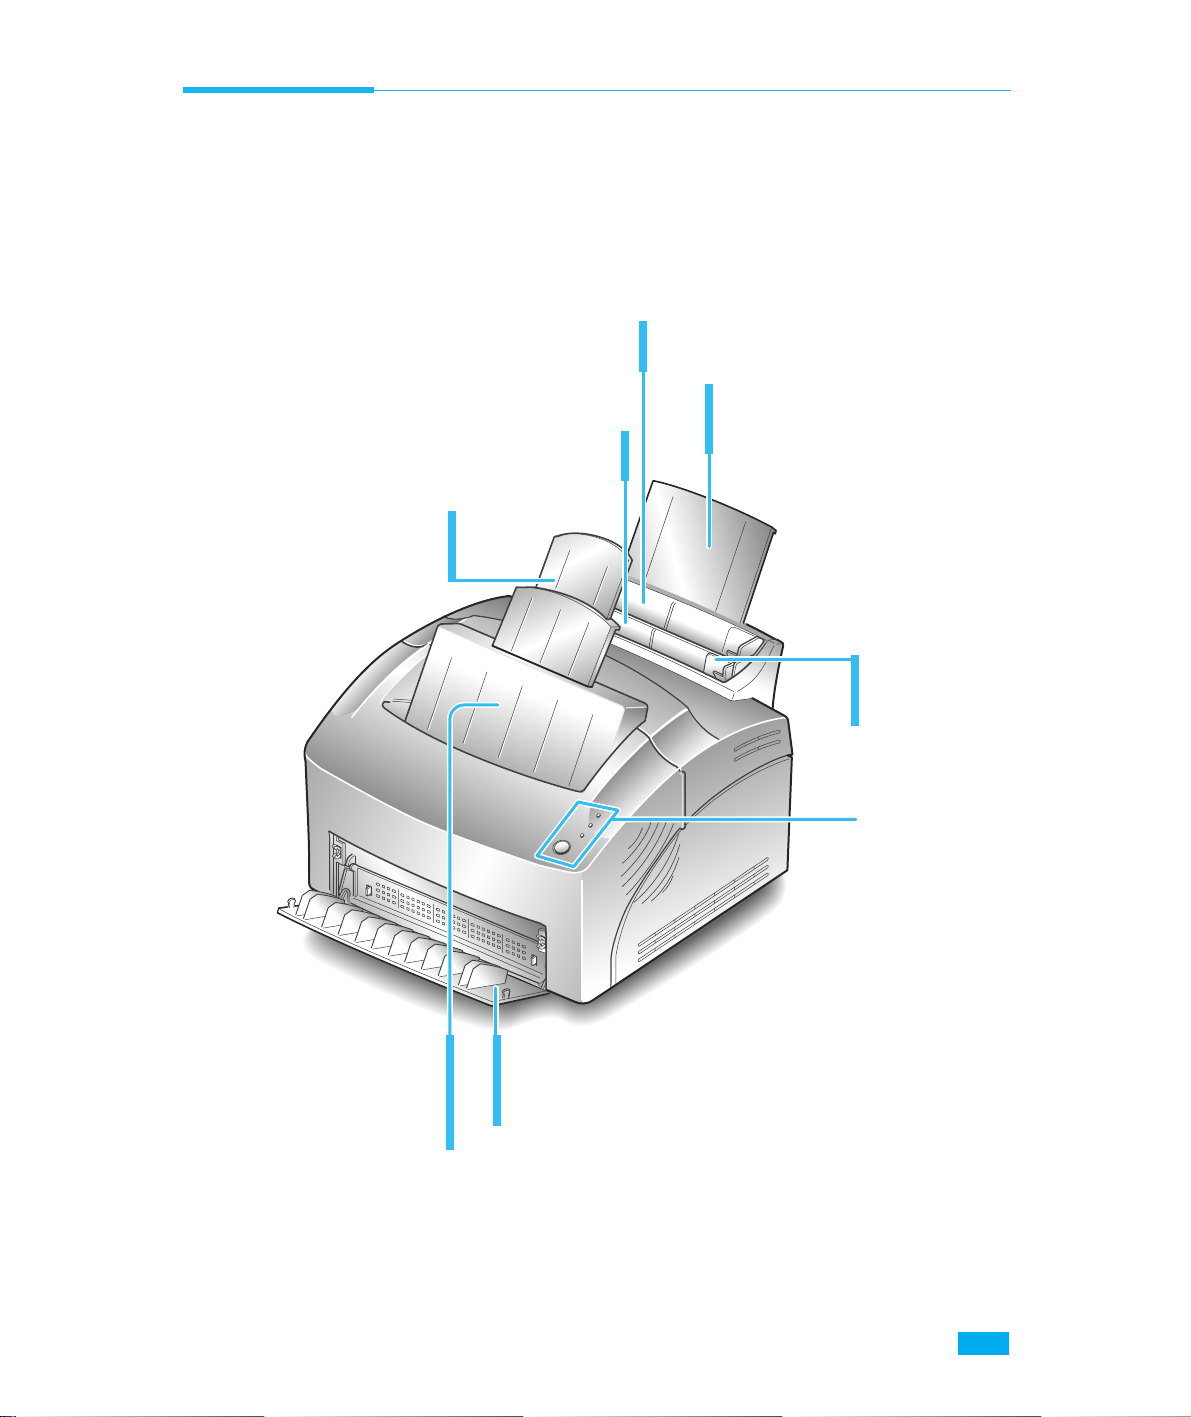
Automatic Paper Feeder
Holds 150 sheets of paper.
Paper Guides
Adjust to the
width of paper.
Face-down Stacker
Holds printed documents.
If printed on plain paper,
a maximum of 100 sheets
can be held.
Stacker Extender
Supports paper stacked in the
paper output bin.
Face-up Stacker
Holds a single sheet of special media (transparency,
label, envelope, and heavy weight paper) with print
side facing up.
Operator Panel
Tray Extender
Supports paper stacked in the
automatic paper feeder.
Manual Paper Feeder
Used to feed a single sheet of paper.
Control Locations and Functions
Front View
4
Setting Up Your Printer
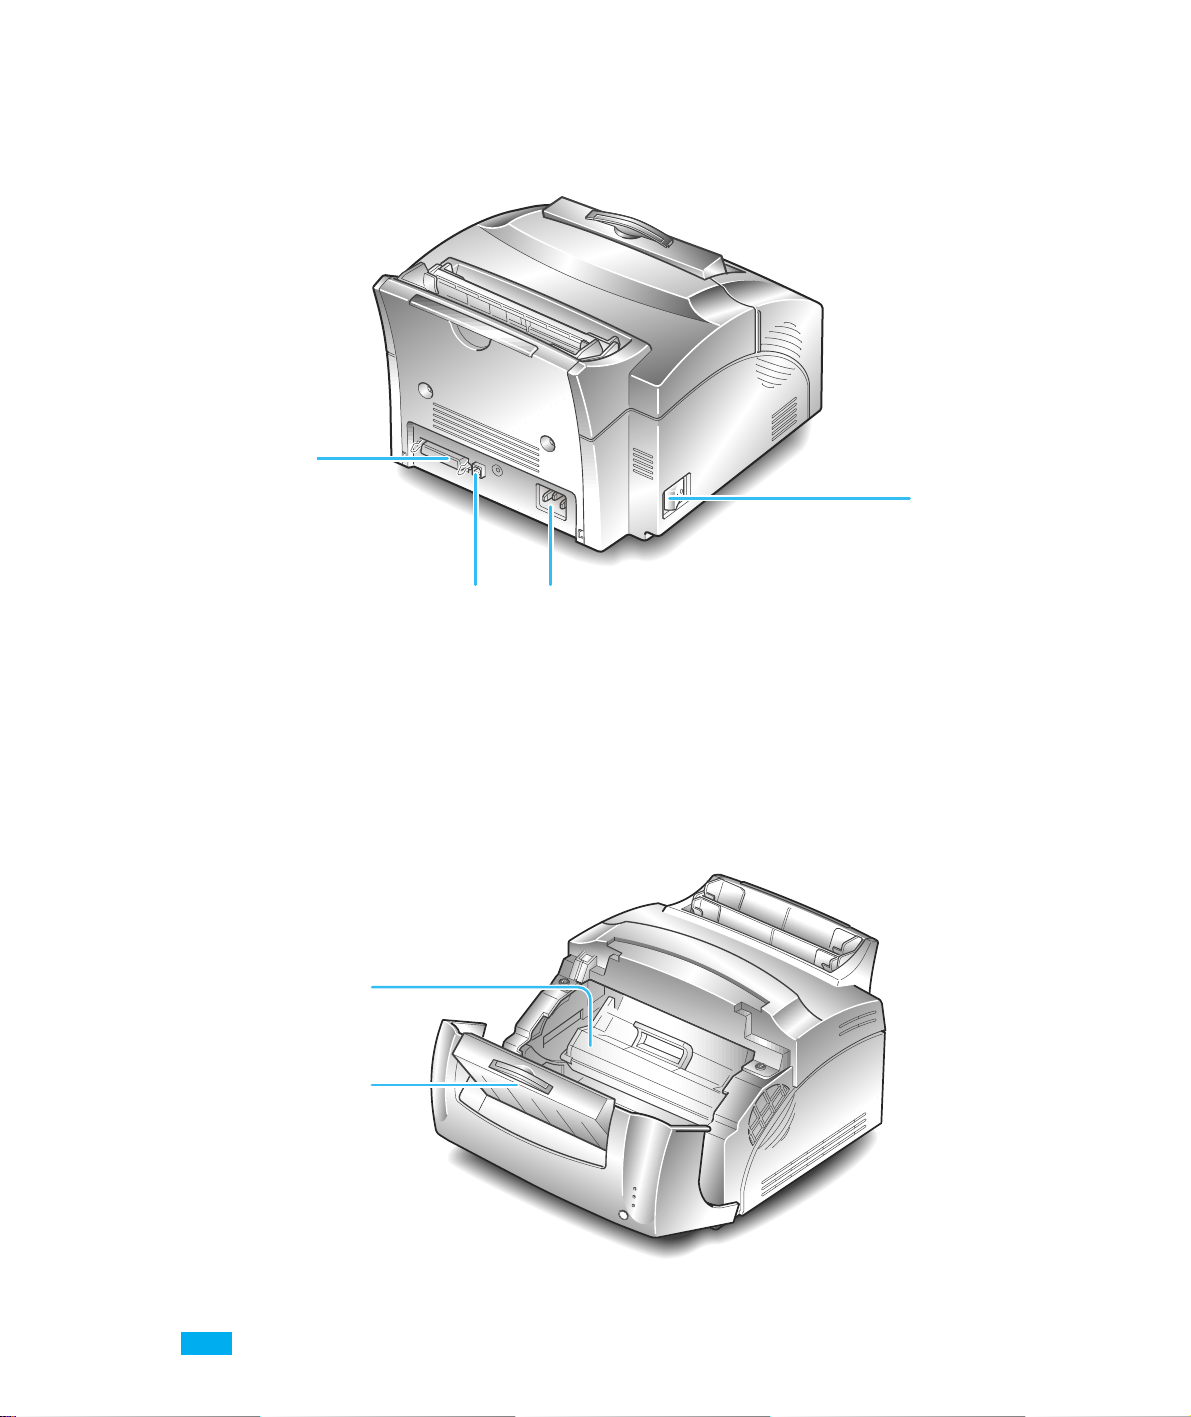
Rear View
Inside
Power
Switch
Power Cord
Connector
USB Port
Printer Cable
Connector
Front Cover
Toner Cartridge
5
Setting Up Your Printer
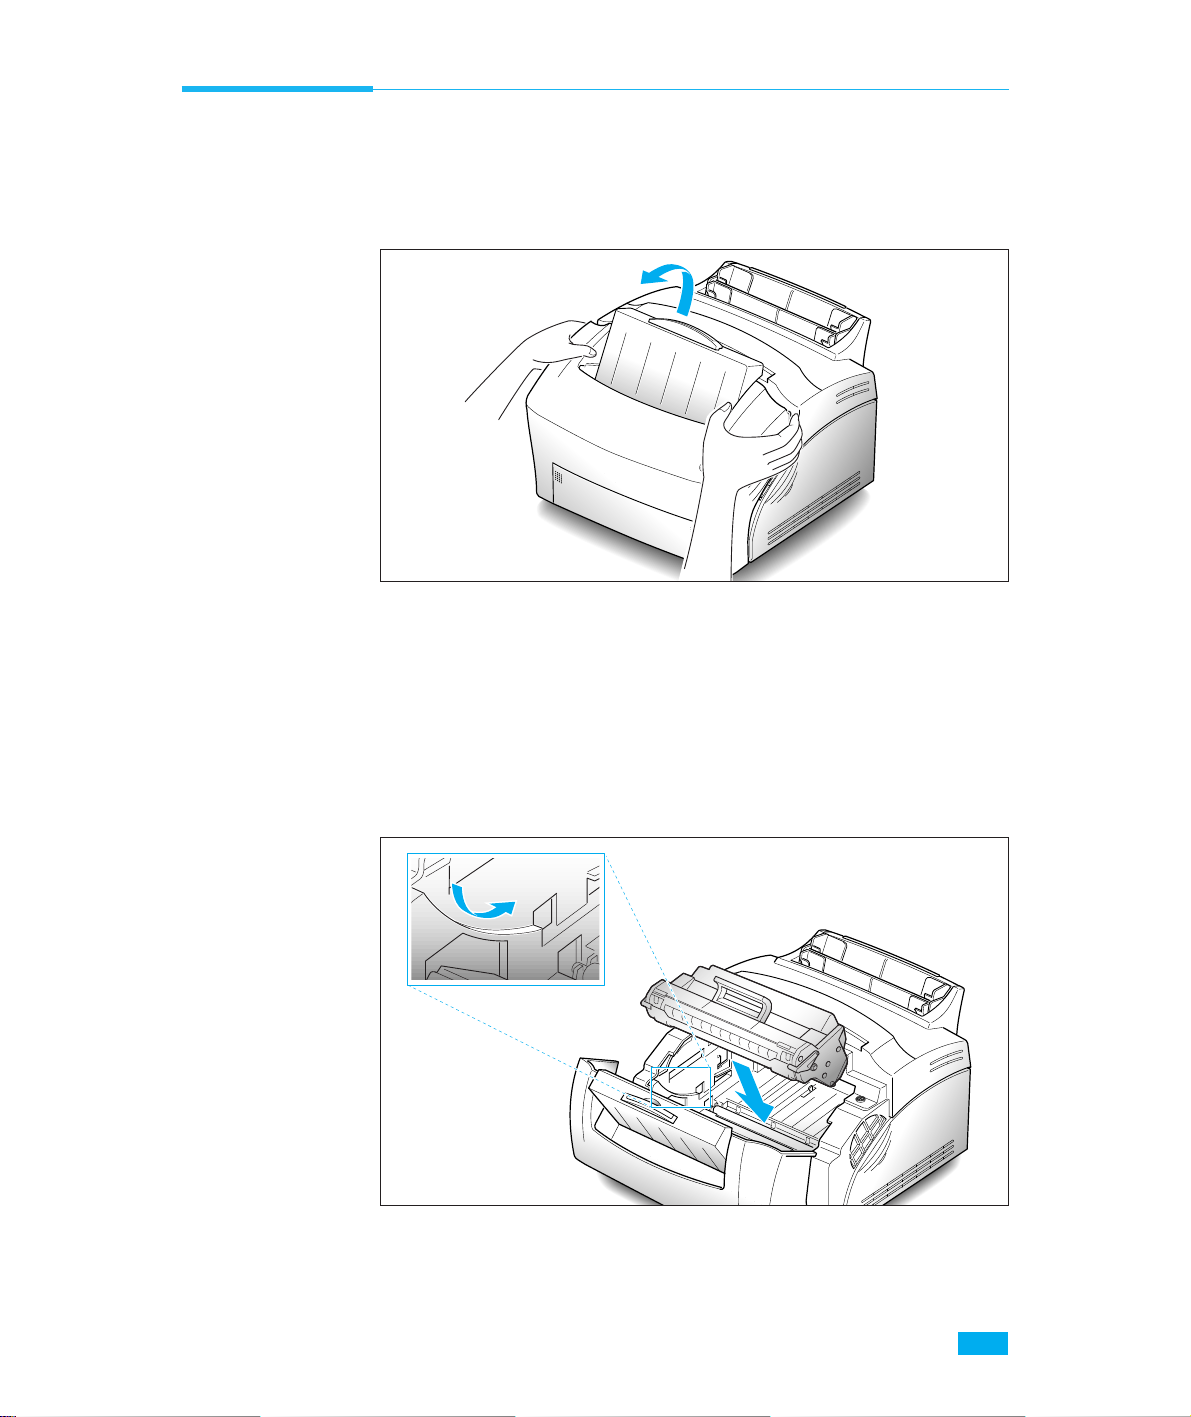
Installing the Toner Cartridge
1. To open the printer cover, hold the cover using hands and pull it
toward you.
2. Unpack the Toner Cartridge. Carefully remove the sealing tape.
3. Rock the Cartridge 5 or 6 times to distribute the toner.
4. Find the cartridge slots inside the printer, one on each side.
5. Grasp the handle and slide the Cartridge down between the toner
cartridge slots, until it drops into place.
6. Close the cover.

6
Setting Up Your Printer
2. Before loading the paper, flex the sheets back and forth to loosen
them, then fan them. Tap the edges on a table top to straighten
them. Doing this before you load paper helps prevent paper jams.
DonÕt load too much. This feeder holds up to 150 sheets.
3. Insert the paper in the paper feeder.
If the paper has a preferred print side, place the print side facing
you. If you use letterhead paper, load the paper with the letter-head
edge down and facing you.
Loading Paper
For best results, use high quality 75g/m2 (20 lb) xerographic paper.
Note: For more information on loading paper and other print material, refer
to ÔLoading Print MaterialÕ on page xx.
1. Pull the extender on the automatic paper feeder up, until it stops.

7
Setting Up Your Printer
5. Pull up the extender on the face-down stacker. The face-down
stacker can hold up to 100 printed pages.
4. Adjust the paper guides to the width of the paper.

8
Setting Up Your Printer
2. Attach the other end of the parallel cable to your computer.
Note: Make sure the printer power is off when you connect it to the
computer.
Connecting to Your Computer
Your printer has parallel interface port, which allows you to use it
with IBM PCs and compatible computers. You have to purchase a
Centronics parallel interface cable that supports bi-directionsl
communications (IEEE standard 1284). Ask your dealer for assistance
if you need help selecting the right cable.
Your printer also has Universal Serial Bus (USB) port. The Universal
Serial Bus is an interface which allows the printer to be connected to
multiple peripheral devices. If your PC has USB port, you can connect
your printer to your PC by using USB interface.
Using Parallel Port
1. Plug the parallel interface cable into the connector on the back of
the printer. Push the clips at each end of the connector into the
notches on the printer cable. The clips snap when pushed into the
notches.
 Loading...