

Page 1

Samsung Electronics 4-1
4. Maintenance & Troubleshooting
4-1 Preventative Maintenance
The cycle period outlined below is a general guideline for maintenance. The example list is for an average
usage of 50 transmitted and received documents per day. Environmental conditions and actual use will vary
these factors. The cycle period given below is for reference only.
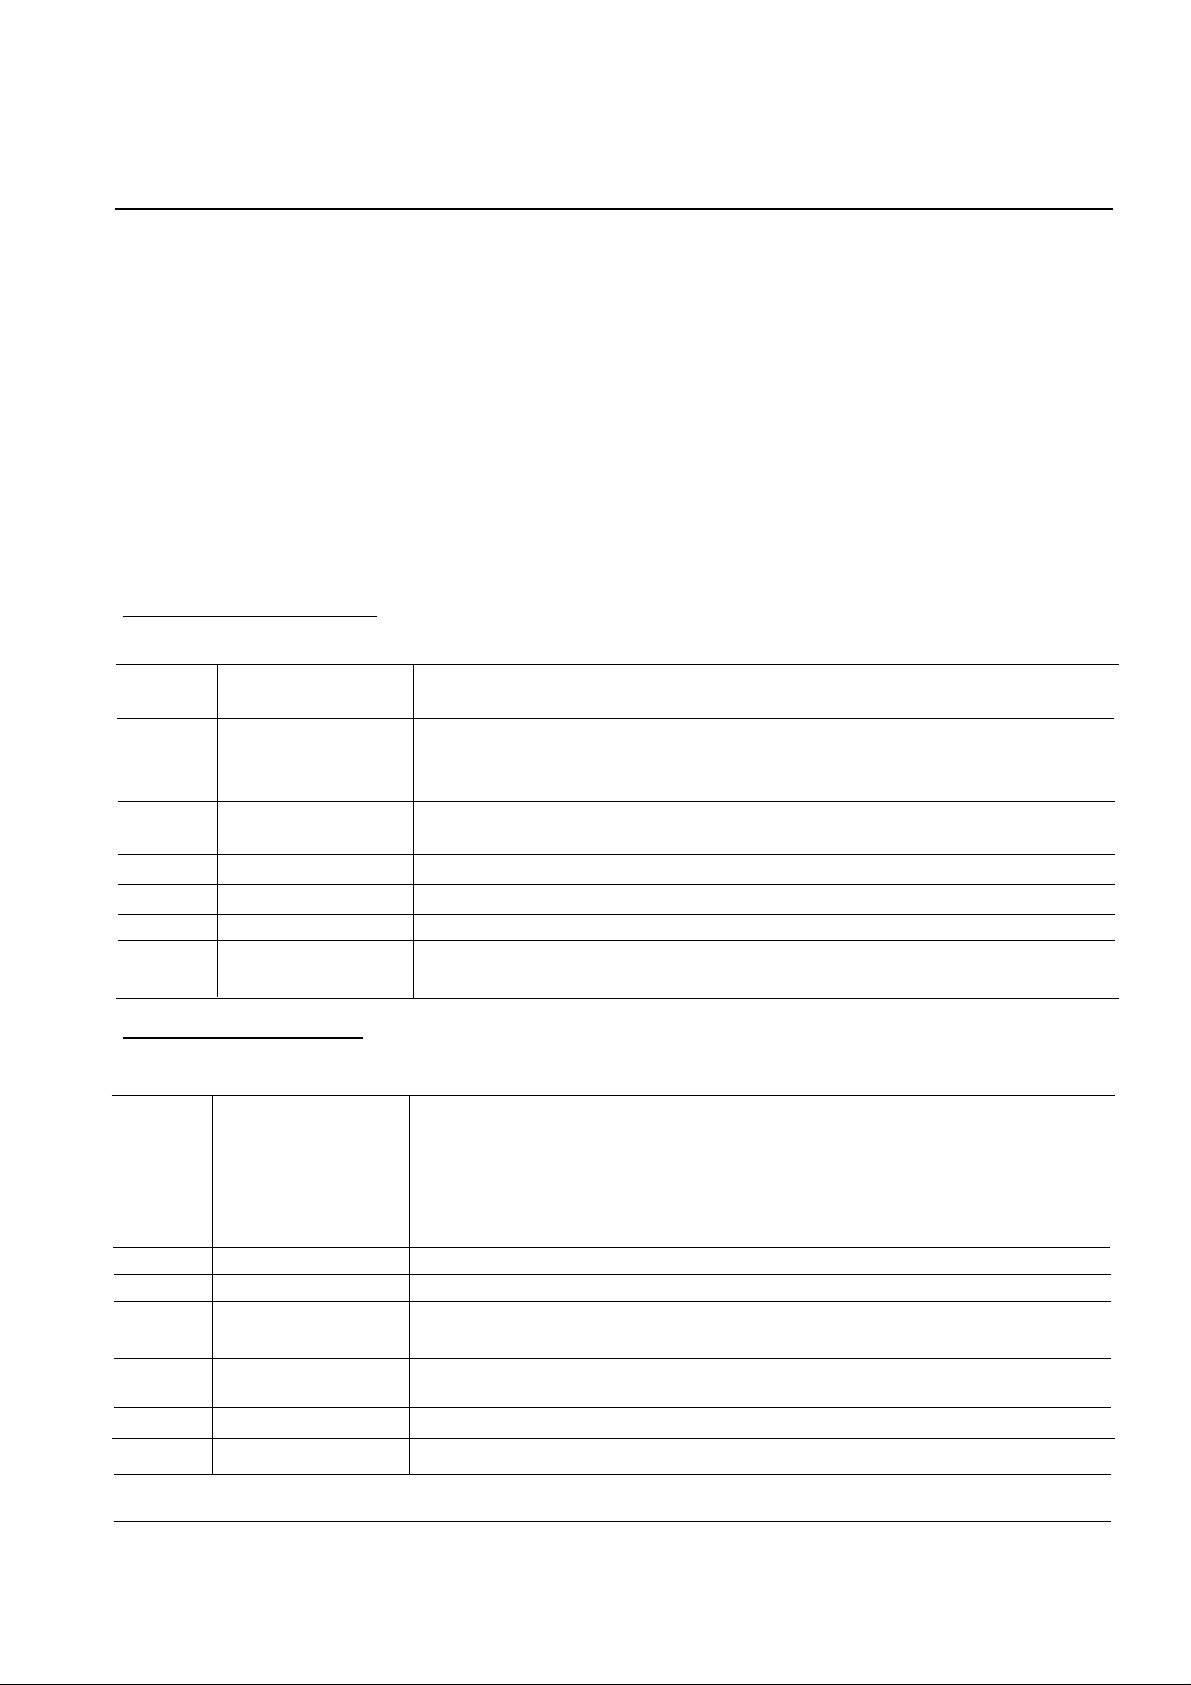
COMPONENT REPLACEMENT CYCLE
Cartridge
Pickup Roller
Feed Roller
Transfer Roller
Fuser
Driver
2,500 Pages
60,000 Pages
60,000 Pages
60,000 Pages
60,000 Pages
60,000 Pages
4-2 Print Quality
No Roller Abnormal image period Kind of abnormal image
1 OPC Drum 75.4mm
2 Charge Roller 37.7mm Black spot
3 Supply Roller 26.8mm Horizontal density band
4 Develope Roller 31.6mm Horizontal density band
5 Transfer Roller 47.1mm Black side contamination/transfer fault
6 Heat Roller 57.1mm Black spot, White spot
7 Pressure Roller 56.5mm Black side contamination
•White spot on black image
•Black spot
Page 2
4-2 Samsung Electronics
Troubleshooting
4-3 DCU Control
4-3-1 DCU Setup
DCU is used to diagnose the printer malfunctions. To use DCU, open and remove the Printer’s exit cover in
front, and remove the bottom cover from left. Connect the DCU harness wire (10 pin-to-4 pin) to CN9 (4 pins)
on the control board.
4-3-2 Status Code
Connect the DCU to the printer and turn power on. The DCU display Status Code in the 7 segment LEDs.
There are two kinds of Status Codes; Normal and Error. And their codes mean the printer operating status.
NORMAL STATUS CODE
These codes mean paper location on the paper path when the printer is printing, or warming up.
61 Warm up The printer warms up when the printer is turned on or the cover is closed, or
wake from sleep mode.
00~05 Ready(paper type) The printer is in printable state. The paper type is sensed after
one page printing.
00: Legal , 01: Letter , 02: A4 , 03: EXEC , 04: B5 , 05: Folio
20 Print Start The code is displayed when engine controller is received ‘PRINT’ command
from the video controller.
30 Feed Sensor On It means that paper is passing the feed sensor.
40 Feed Sensor Off It means that paper passed the feed sensor.
50 Paper out It means that paper passed the exit sensor.
69 Sleep Mode It means that the printer fuser is turned off, and the power consumption is
minimized.
ERROR STATUS CODE
If the printer stops printing by any malfunction, the DCU displays its error status code.
60,62,68 Fuser Error These codes mean the fuser error status. Heat lamp, thermistor, thermostat
open or thermistor short. The ‘Low Temperature Error’ is checked when the
printer is printing.
60: Open Fuser Error
62: Low Heat Error
68: Over Heat Error
64 Cover Open The printer cover open or no toner cartridge in the machine.
70 No Paper The paper is not loaded in the printer paper tray.
71 Paper Jam 0 Displays when the paper leading edge stops between the pick-up unit and
the feed sensor.
72 Paper Jam 1 Displays when the paper leading edge stops between the feed sensor and
the exit sensor.
73 Paper Jam 2 Displays when the paper leading edge stops after the exit sensor.
95 LSU Not Ready The LSU scanner motor is not ready or ‘Hsync’ signal is not output.
Page 3

Samsung Electronics 4-3
Troubleshooting
4-3-3 Diagnostic Mode
When the printer malfunction occurs and DCU displays Error Status Code, you can use the Diagnostic Mode to
find a problem and fix it.
DIAGNOSTIC CODE
When you fix the malfunction, you can make only a unit of machine operated in Diagnostic mode. To enter
Diagnostic mode, push three buttons ( [DOWN], [SHIFT], [STOP] ) simultaneously and turn the printer power
on. When the DCU displays ‘78’, release the keys in 2-3 seconds, then the DCU displays ‘00’. By using [UP] or
[SHIFT] and [DOWN] keys, select the desired Diagnostic Code, and push the [ENTER] key to perform the
operation. To stop its operation, push the [SHIFT] and [ENTER] buttons.
00 MAIN MOTOR OPERATING SYSTEM
Only main motor turns continuously.
01 MAIN HIGH VOLTAGE ON (THV)
There is output of -1550V to MHV terminal.
02 TRANSFER HIGH VOLTAGE (-) ON (THV - )
There is output of -1300V to THV terminal.
03 TRANSFER HIGH VOLTAGE (+) REFERENCE ON (THV + )
There is output of +1300V to THV terminal.
04 DEV/SUPPLY HIGH VOLTAGE
There is output DEV and SUPPLY high voltage to each HV terminals. At this time, the left one of
three LEDs (Diagnostic Mode Indicator) in the DCU lights, and DEV HV is -630V. To change this
voltage, push the [UP] button, and two (center and right) of three LEDs light, there are output
-530V to DEV HV terminal.
05 LSU OPERATING SYSTEM
The scanning motor in LSU turns and the right one of three LEDs lights. To check the LD (Laser
Diode) in the LSU at this state, push the [UP] button, the LD is driven, and the center LED lights. If
the LD is normal, all three LEDs light.
06 PICKUP CLUTCH ON
The solenoid in machine operate. To release the solenoid, push the [SHIFT] and [ENTER] buttons.
07 PEMPTY/PWIDTH/NEW CRU SENSOR TEST
When you make the actuator of PEMPTY/PWIDTH sensor operate, the left or right one of three
LEDs lights. If you set new CRU in the machine in this mode, the right LED lights.
08 FEED & EXIT SENSOR TEST
The feed & exit sensor also can be tested by the same method of the code ‘06’.
Page 4

4-4 Samsung Electronics
Troubleshooting
09 COVER OPEN SENSOR TEST
Same method of the code ‘06’.
10 FUSER TEST
When you push the [ENTER] button, the right LED lights, and the fuser temperature raises to
Ready. If you push the [UP] button, the center LED lights, and it raises to printing temperature.
When you push the [UP] button once more, the left LED lights, and it raises overheating temperature.
11 HOT BURN TEST
When you push the [ENTER] button in this code, the machine prints endlessly without any sensing
operation. To stop this operation, turn the printer power off.
12 CLEANING MODE PRINT MODE
The machine prints one page to clean the OPC drum in CRU.
13 THV (+) TRIGGER, ALL HV
There is all output of high voltages to each HV terminal, and the LSU/FAN operate.
In this mode, the engine controller senses electric resistance of the transfer roller, and output
transfer high voltage corresponding to it. If there isn’t CRU in the machine, THV output is +199V ~
+2100V.
14 PTL TEST
This operation mean PTL LED status.
15 FAN TEST
This operation mean FAN status.
4-3-4 Self Test Button
When you push this button, the machine prints ‘vertical line’ pattern while it is pushed.
When you push this button and turn the Printer power on, the DCU displays code ‘89’, and the Printer warms
up. After warmed up, it is in ‘Ready’ state, and code ‘88’ is displayed in DCU. In this mode, the machine does
all printing operation (demo page printing and printing the data from PC) without all sensor operating. If you
diagnose the control board with malfunction printer engine, this mode is very useful.
Page 5
Samsung Electronics 4-5
Troubleshooting
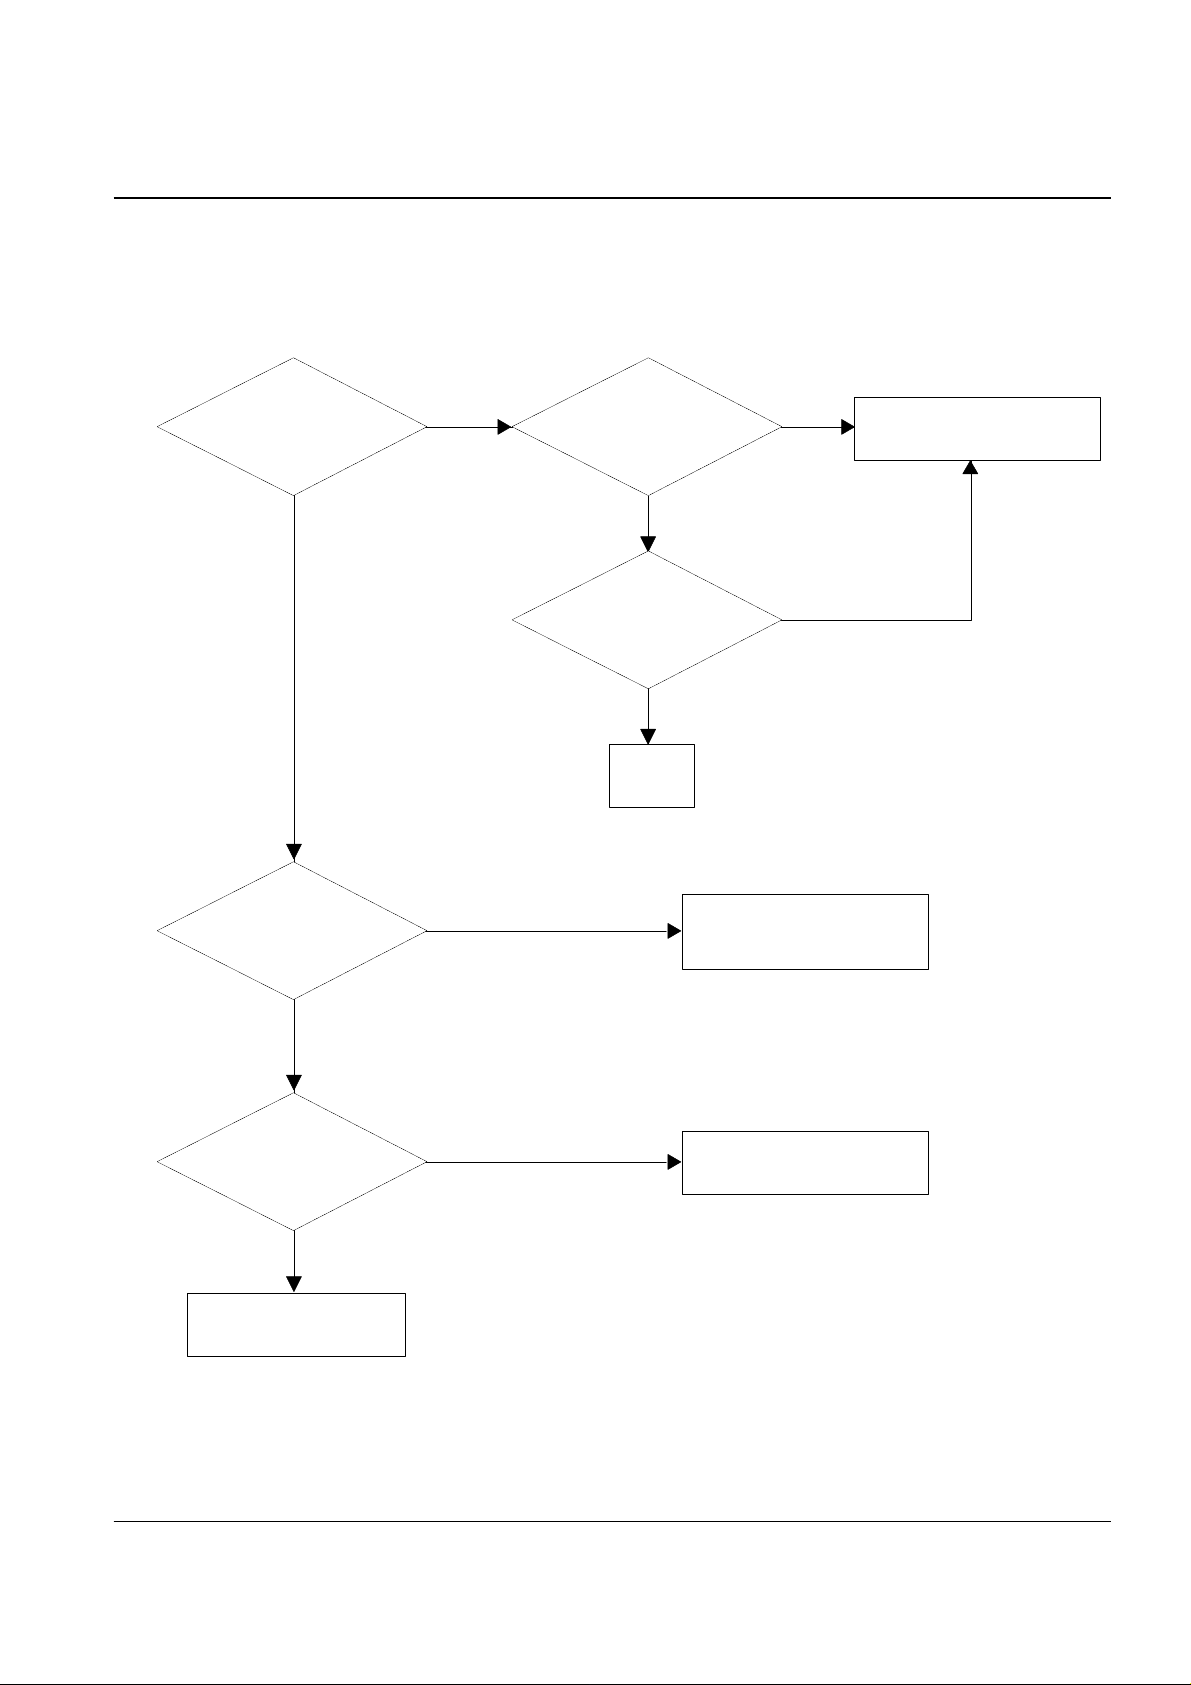
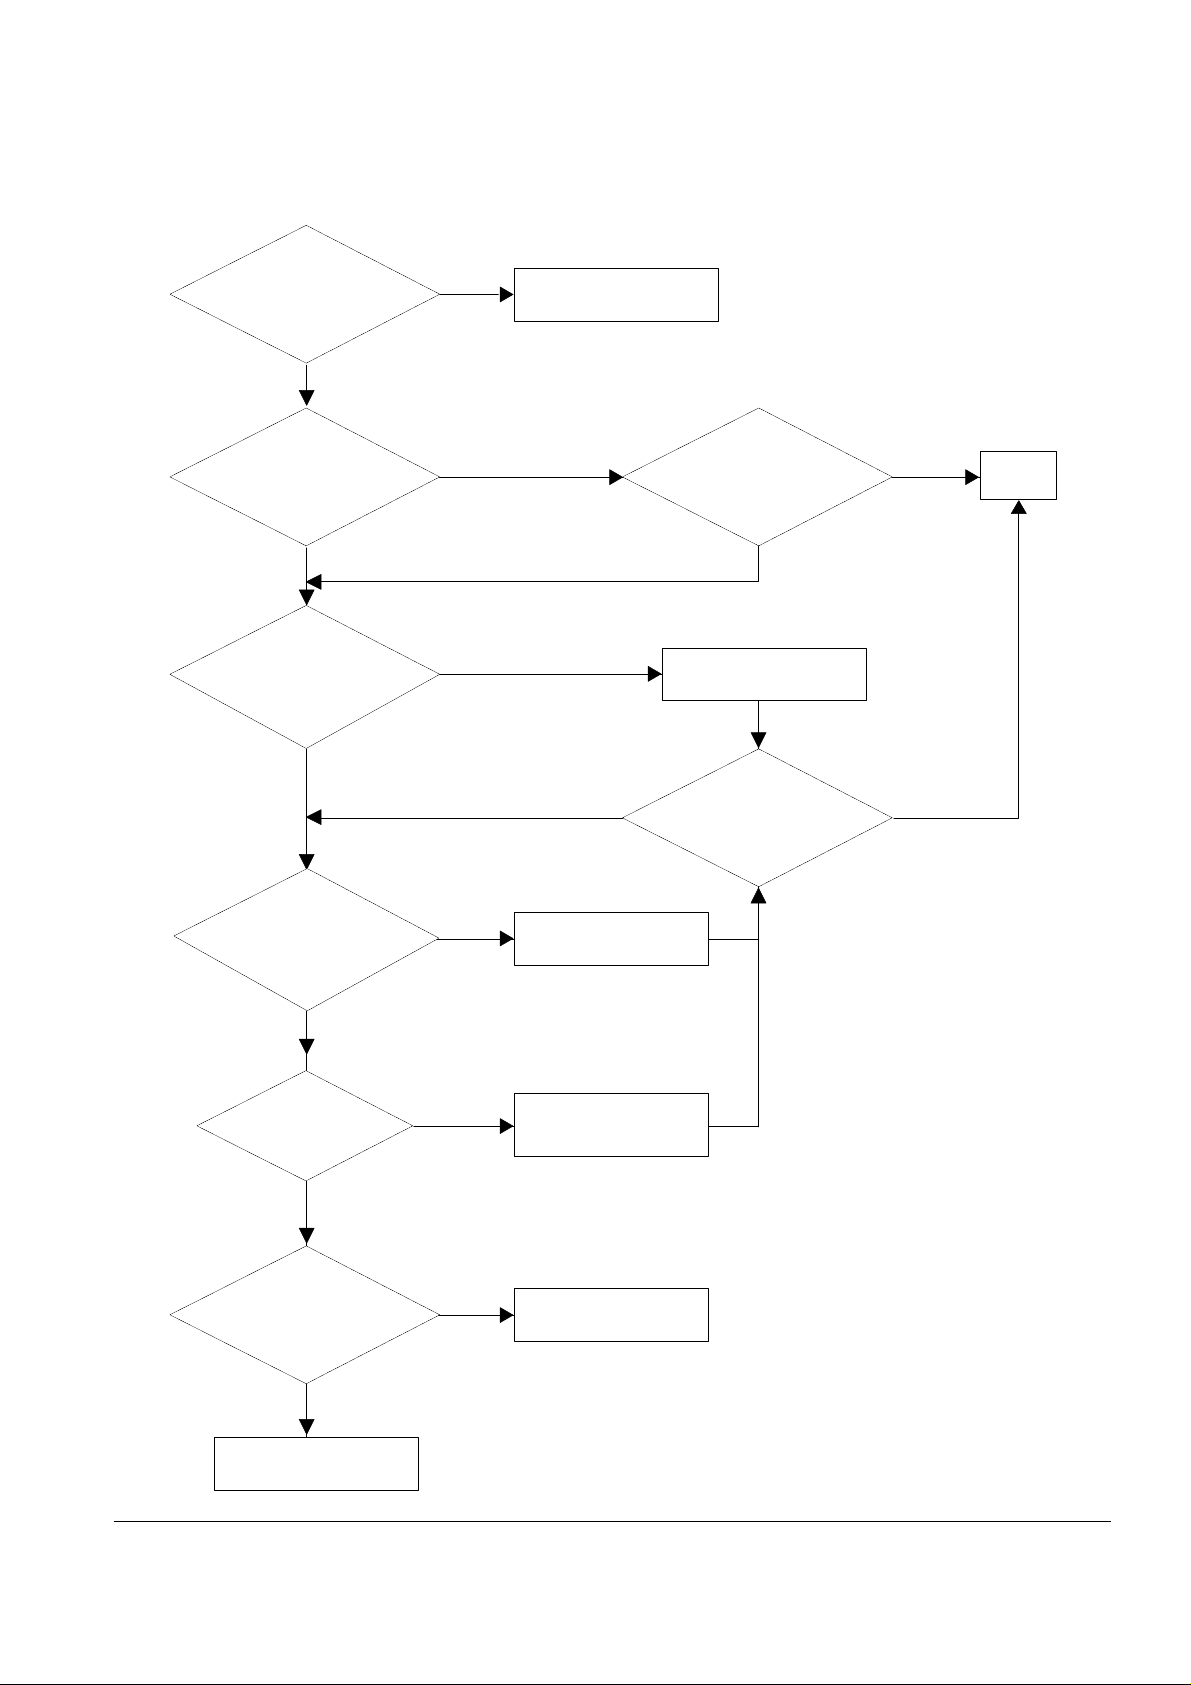
Vertical black line and band
YES
NO
YES
OK after
replacing the LSU?
Remove part on the paper
path causing the trouble
NO
OK after replacing
developer?
Any obstacles on
the developer blocking
the laser beam.
OK after
removing the
obstacles?
Any obstacles ON
mirror lens of LSU and
laser path?
Remove the obstacles.
Replace the LSU
Replace the developer
END
YES
YES
YES
NO
NO
NO
4-4 Troubleshooting Flow Chart
Page 6
4-6 Samsung Electronics
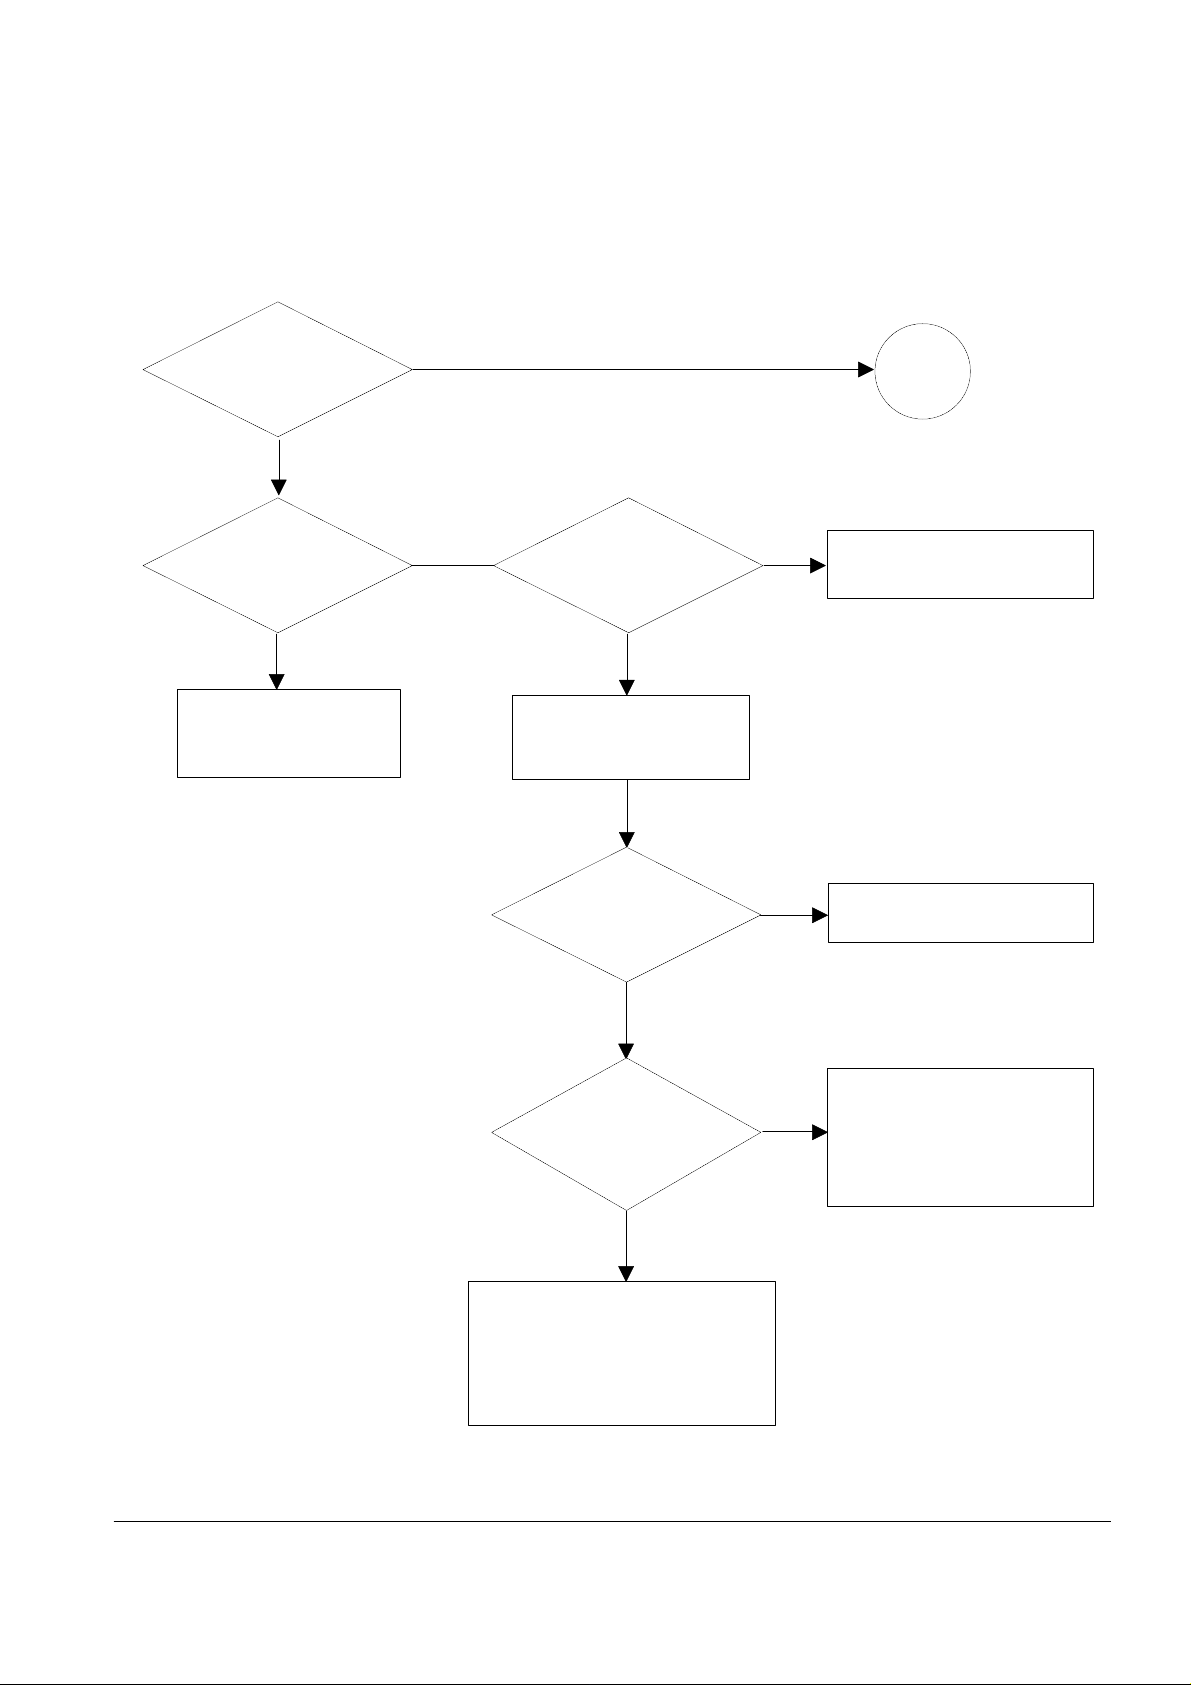
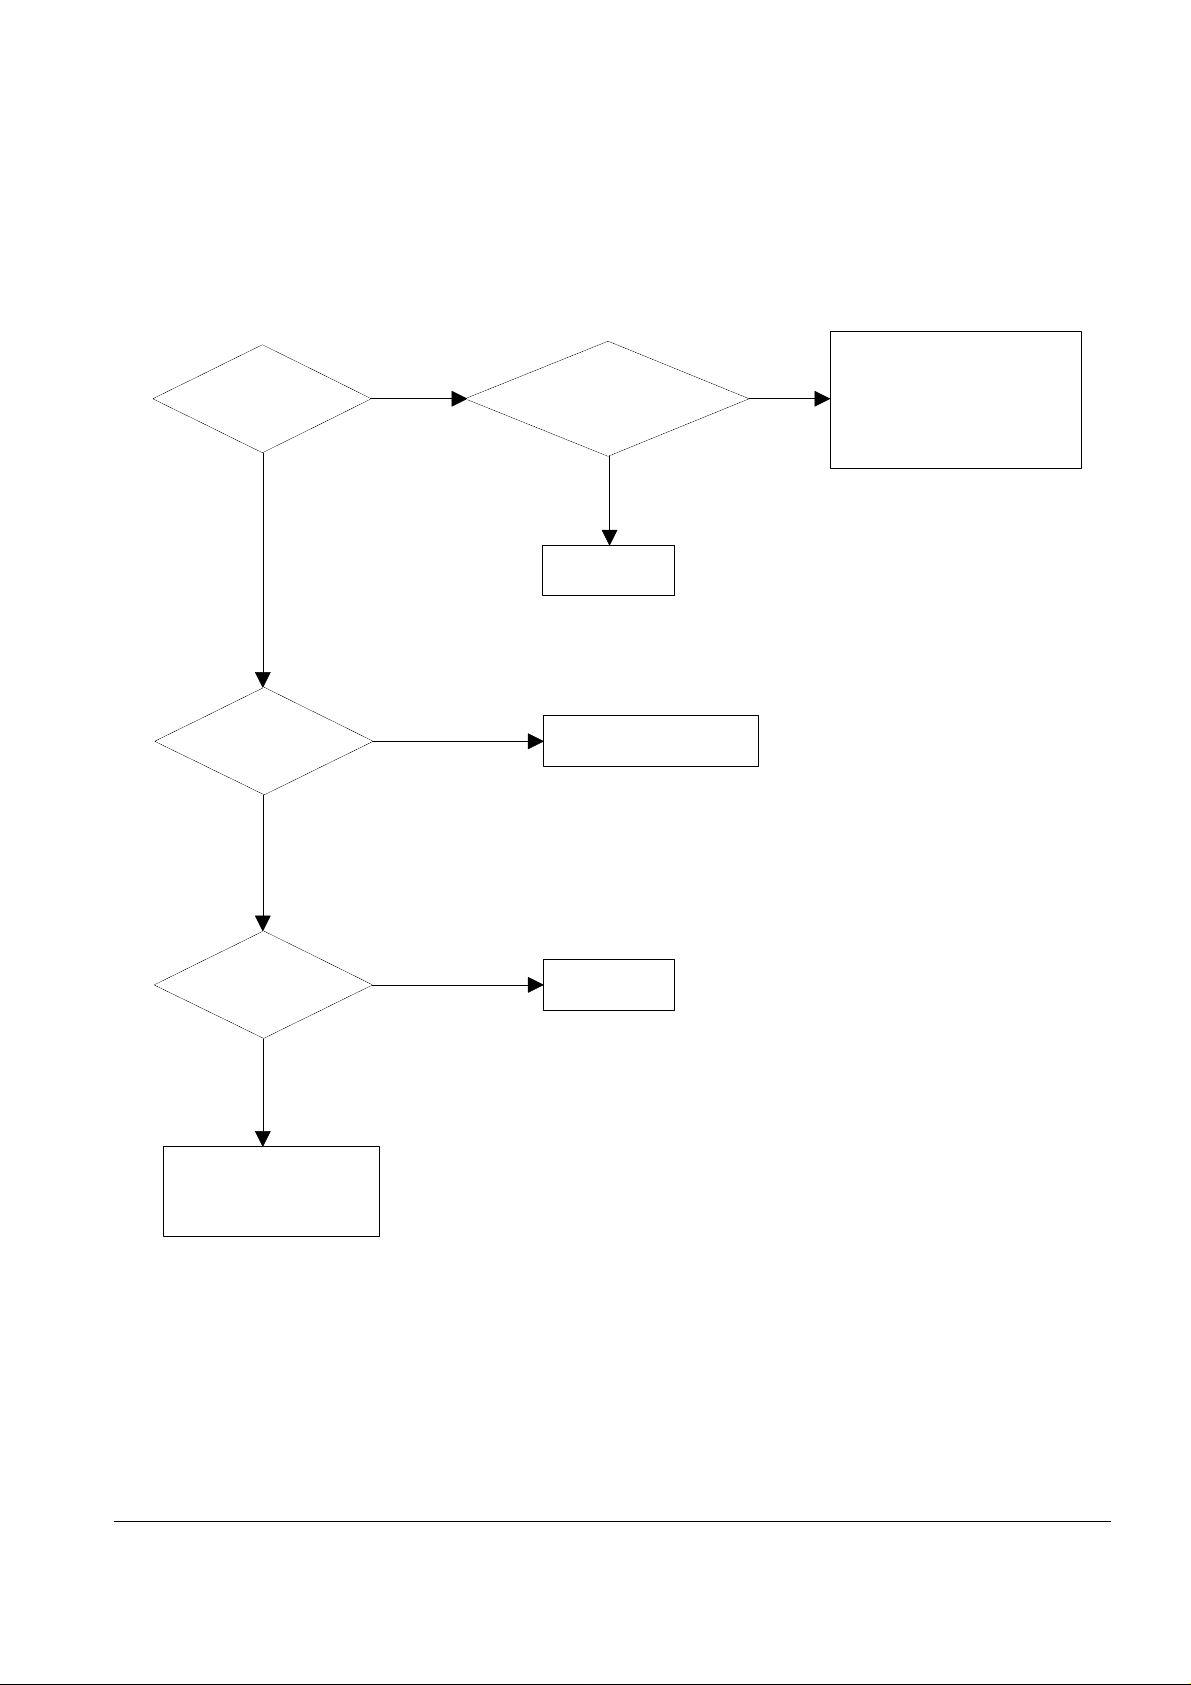
Troubleshooting
Check connection to
computer or replace
controller
Take out the cartridge
and prepare the tester
for electronic connection
Repair or replace the GND
terminal
Check the path between
video controller, engine board
and HVPS. Repair or replace
the defective component
or board
The mirror in LSU might be
misplaced so the light path to the
OPC deviates ->Repair or replace
LSU or remove any deffective
matters in the machine
Self test
pattern prints?
No image?
Self testing
is possible via
Tech Mode?
Is the OPC
terminal of machine
is well-connected
to Frame?
Does the
video data line to
LSU transit to High/Low
when printing?
Re-test after replacing the
conector or Main board
A on
next page
NO
NO
NO
NO
NO
YES
YES
YES
YES
YES
No Image
Page 7
Samsung Electronics 4-7
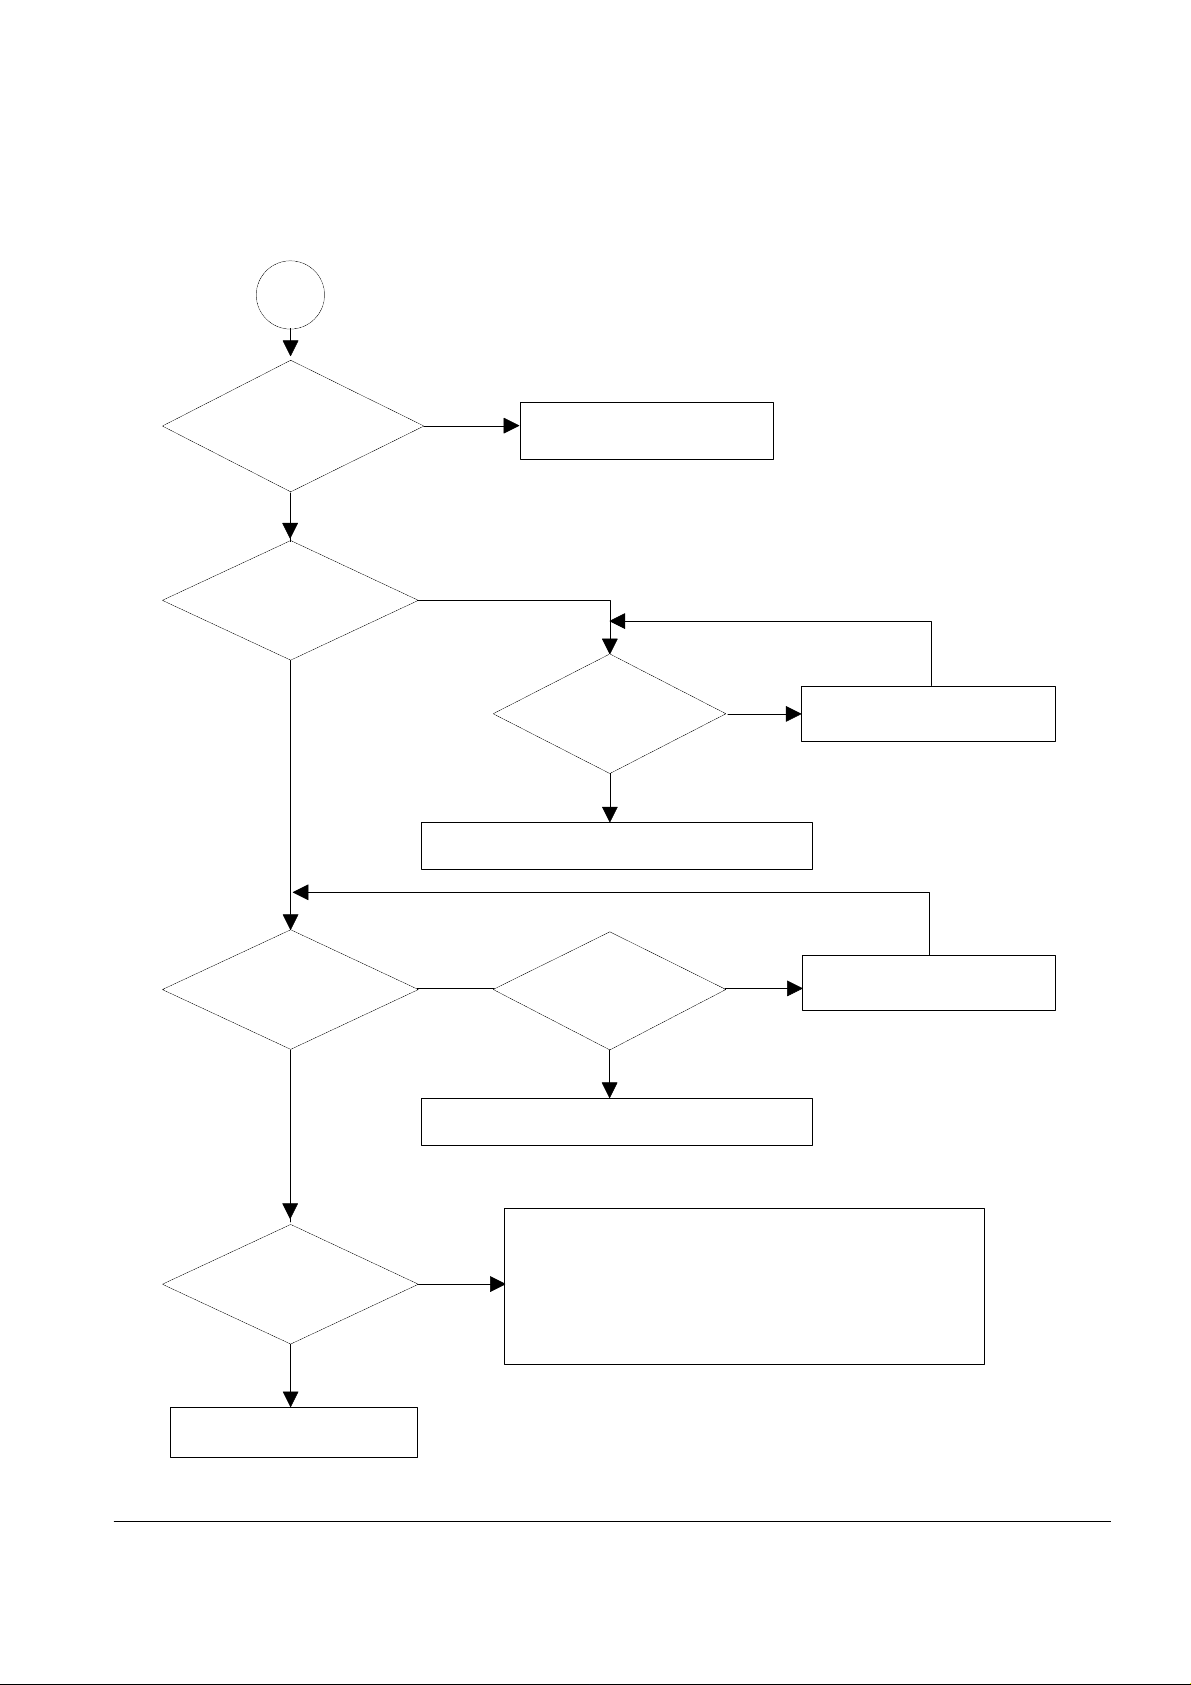
Troubleshooting
Transfer roller might be out of its location
-> Locate the roller into its place
This could occurrs when he power of LSU is low or
the density is low due to the obstacles on the window
-> Replace LSU or clean the window
A
Trnasfer High
voltage OK? (on the
transfer roller
shaft)
Is the
connection of
OPC GND and Frame Ground
correct? (less than
10 ‰)
Are the
connection terminal
and connection
correct?
Repair or replace terminal
Replace HVPS or repair defective component
Is the connection
terminal OK?
Check the connection of
frame Ground and OPC GND
Replace HVPS or repair defective component
Repair or replace terminal
Developing
(-350V) and supplying
(-550V) voltage
are OK?
Does the
counter indicate over
the toner’s guarranty
life
Replace the toner cartridge
NO
NO
NO
NO
NO
YES
YES
YES
YES
YES
YES
Page 8
4-8 Samsung Electronics
Troubleshooting
Replace the developer
NO
YES
YES
END
YESYES
NO
NO
NO
YES
YES
NO
Replace the HVPS
Ok after setting to the
normal mode?
YES
NO
Remove the obstacles
NO
YES
Clean transfer roller
and gear holder
YES
NO
Replace the LSU
Replace the developer
Is it not over
the guaranty life of dot
counter?
Is the toner save
mode or the light mode
is selected?
Is the high voltage
normal? (charging,
developing,
transfer)
Any obstacles on the
gab between high voltage
terminal and
developer?
Transfer roller
works OK?
OK after replacing
LSU?
HVPS works OK?
Light image
Page 9
Samsung Electronics 4-9
Troubleshooting
All black in
printing area?
Is transfer
voltage supplied
(-1.55 KV)?
Is the
Hsync/ signal received
in LSU?
Transfer part’s contact
is bad -> Repair or
replace toner cartridge
Does the
video data line to LSU
transit to High/Low when
printing?
Replace LSU
Check the path among video
controller, engine board,
HVPS, LSU for the shortage
or open -> Repair or replace
the boards
Repair or replace HVPS
Replace LSU
NO
NO
NO
NO
YES
YES
YES
YES
All Black
Page 10

4-10 Samsung Electronics
Troubleshooting
White line
missing definitely?
Dirt of dust stuck onto the window of internal
lens of LSU
-> Clean it or replace LSU
Preventive obstacles through the path between
OPC of developer and LSU prevent the path
-> Remove the obstacles
Check if the
printout is still has the
same problem even right after
passed through the
transfer roller
Toner material might be stuck to blade in the developer
inside and it prevents toner supply
-> Replace the toner cartridge
Check both if the toner cartridge’s counter is over its
guaranty and amount of the toner material
-> Replace the toner cartridge
The ribs in fuser or toner on the roller may invoke
the image problem
-> Replace the fuser cover or the defective part
The image is originally black or the black part is
far close to the top
-> Use the pattern which has the image below bigger
than 10mm from the top
NO
NO
END
NO
YES
Does the problem
persist?
YES
YES
Vertical White Line (Band)
Page 11

Samsung Electronics 4-11
Troubleshooting
Works cor
with -350V of Bias
voltage?
Works
correctly after
replaced LSU?
Repair or replace the defective
component
The power of LSU is set
high or internal problem
-> Replace LSU or adjust
voluem
NO
Toner over supply due to the
adjustment fault of metering
blade in developer
-> Replace developer
NO
YES
YES
Dark Image
Page 12

4-12 Samsung Electronics
Troubleshooting
Recommended
paper used?
Is pressure of
transfer roller too high?
Does the operation of
TR work properly?
Transfer,
charge and developing
voltage are OK?
Operating/
storage atmosphere is
too high temperature
/humidity?
Solve the problem under
the recommended condition
Dirt or
dust around the
charge roller?
Clean the charge roller
or replace step-up device
/terminal after check
Work OK?
Internal blade or suppying
part of the developer is
defective
-> Replace the toner cartridge
Check Terminals or contacts and ’Guide-Deve Spring’
are misplaced
-> Repair or replace transfer roller etc.
Print 20 to 30 pages using
the recommended paper
Same problem
occurs?
- Adjust voltage or replace HVPS
- Repair or replace after checking the
terminals’ contacts
Replace transfer
roller’s holder
END
Replace the
toner cartridge
NO
NO
NO
NO
NO
NO
NO
YES
YES
YES
YES
YES
YES
YES
Background
Page 13

Samsung Electronics 4-13
Troubleshooting
Is it regular
interval of 75.4mm?
Irregularity of NIP
between rollers in
developer
-> Replace developer
Clean heat roller
or replace it
Clean transfer roller’s holder and
TR drive gearor replace TR holder ass’y
Clean TR drive
and OPC gear
END
A specific part of the transfer roller has
ruined or its resistance value is changed
-> Replace transfer roller
Transfer roller cannot force regularly due
to the gears eccentricity of transfer roller
-> Replace the defective component
Adjust the Bias
voltage or replace HVPS
There may be a problem in toner
layer control in toner cartridge
-> Replace the developer
Use the machine with
recommended paper and
at condition
NO
NO
NO
NO
NO
NO
YES
YES
YES
YES
YES
YES
NO
YES
YES
YES
YES
Check HVPS
contacts and
HVPS’s self-output
-> If failed, repair/
replace HVPS
- Repair or replace HVPS
- Check and Repair or
replace the terminal
contacts
NO
NO
Is it regular
interval of 31.6mm?
Is it regular
interval of 47mm?
(as transfer roller
interval)
Is it regular interval of
50.4 mm?
Does
the operation
of TR work properly?
Transfer
voltage is set to
standard?
Does the same
problem persist?
Developing
/suppying voltage
normal? (-350V/
-550V)
Bias voltage
is OK? (-350V)
Operating/storage
temperature is too low or
not recommended
paper used?
Ghost
Page 14

4-14 Samsung Electronics
Troubleshooting
The problem occured
since the obstacles
stuck to charge roller
-> Replace toner cartridge
When taking
out the cartridge,
toner leaks?
Toner leaks and toner
material dropped onto
the paper -> Replace the
developer
Bad image
removes by
scratching?
Check toner is stuck onto
the P/R or H/R in fuser
-> Clean it or replace
The problem
randomly occured
due to the toner
fallen -> Clean the
machine
Remove obstacles
stuck on OPC
drum’s surface
Perform the OPC
cleaning using
the control panel
buttons.
END
NO
YES
NO
NO
YES
NO
YES
Does the same
problesm
persist?
Is it regular
interval of 37.7mm?
Is it regular
interval of 75.4 mm?
NO
YES
YES
Black Spot
Page 15

Samsung Electronics 4-15
Troubleshooting
NO
Black band?
The black
band has regular
interval?
Black band
is far about 10mm from
white band?
Problem of internal
contacts in OPC
-> Replace developer
The OPC is damaged under the
direct sunlight for around 5
minutes -> If the same problem
persists in 10 hours, replace
the developer
This occurs when no
Hsync/ at LSU
-> Replace LSU
75.4 mm interval?
Heat roller is ruined
-> Replace the roller
The OPC is damaged due to
the irregular transfer voltage
of HVPS
-> Repair/replace HVPS
-> If the same problem persists,
replace the developer
Does it appear
at every 56.1mm at
specific place?
Problems of terminal contact,
transfer voltage supplying,
and transfer roller’s due to the
charge roller is ruined (37.7mm)
-> Repair/replace HVPS,
developer
NO
NO NO
NO
YES
YES
YES
YES
Horizontal Band
Page 16

4-16 Samsung Electronics
Troubleshooting
Transfer roller
is clear ?
Clean the transfer roller
NO
YES
Paper path is
clear ?
Clean the paper path
Clean the pressure roller
NO
YES
Toner Contaminations on Back of Paper
Page 17

Samsung Electronics 4-17
Troubleshooting
Is it not over
the guaranty life of dot
counter?
Replace the toner cartridge
NO
YES
YES
YES
Is toner cartridge
installed correctly?
Install the toner cartridge correctly
NO
Transfer roller
works properly?
Clean the TR holder, the TR gear,
OPC roller gear and the transfer roller
NO
- Clean the contact point of transfer roller
- Check the output of high voltage terminal
and adjust or replace if required
Partial Blank Image (not Periodic)
Page 18

4-18 Samsung Electronics
Troubleshooting
Is it not over
the guaranty life of dot
counter?
Replace the toner cartridge
NO
YES
YES
NO
NO
Is toner
cartridge installed
correctly?
Install the toner cartridge
correctly
NO
Is it regular
interval of 47.1mm?
Transfer roller
works properly?
OK after
replacing the transfer
roller?
Is it regular
interval of 75.4mm, 31.6mm
or 37.7mm?
Replace the fuser
(50.2mm, 45.2mm or exit roller
- Clean the contact point of
transfer roller.
- Check the output of high
voltage terminal and adjust or
replace if required.
Replace the toner cartidge
END
YES
YES
NO
YES
NO
YES
Clean the TR holder, the TR
gear OPC roller gear and the
transfer roller
Partial Blank Image (Periodic)
Page 19

Samsung Electronics 4-19
Troubleshooting
It is over the guaranty
life of toner cartridge
(Check the counter
and replace it)
Defective agitator in
the toner supplying part
of developer
->Replace the developer
Check if the ’guide deve
spring’ works OK and
repair/repalce
Check high voltage
output and repair/
replace terminals, HVPS
Irregualrity of toner
suppy from developer
-> Repalce developer
Light distortion due to
the mirror ruined or
LSU’s diffused reflection
-> Replace LSU
NO
NO
YES YES
YES
YES
NO NO
OK after
taking out and
rocking the toner
cartridge?
When gray
pattern printing,
irregular density
persists?
transfer/
charge/developing
voltage drops while
printing?
Bad images
aroung the no image
area?
Irregular Density
Page 20

4-20 Samsung Electronics
Troubleshooting
Is it regular
interval of 75.4mm?
Obstacles stuck on OPC’s
surface
-> Clean the OPC and
machine or replace
developer
When putting in/out the
developer, scratch is made
-> Replace the developer
Transfer
voltage is normal?
D/R in developing unit has
the defect
-> Replace the developer
Too high voltage supplied
due to the setting error of
transfer voltage
-> Adjust/replace HVPS
NO
NO
YES
YES
White Spot
Page 21

Samsung Electronics 4-21
Troubleshooting
When multi-page OHP printng,
less than 10 films are
guranteed.
Use the recommended film
When OHP
printing, does the fan
temporarily stops
and revolves?
Use the recommended film
Other parts are touching the
fan and prevents it from
revolution
-> Check and repair
NO
NO NO
YES
Set to OHP mode
NO
YES
YES YES
Is the OPC
mode selected using
the software
application?
Recommended
OHP film used?
Inserted over
than 10 films into
the MPF?
Trembling at the End When OHP Printing
Page 22

4-22 Samsung Electronics
Troubleshooting
After printing
completed, any error
related fuser?
Both ends
of thermostat
open?
Replace thermostat
and re-test
Replace the contol
component on engine
board
Check any contact
problem in thermistor
and repair
The machine
placed under the
severe low tempera
ture for a long
time?
Place the machine
at normal
temperature and
re-test
While printing,
the voltage of pin 208
of U5 (CPU) on Main
board is 2.0V
~2.3V?
Thermistor’s
contact is OK?
Open the top
cover. When black
printing, is the fuser NIP
width is 1.2~
3.0mm?
The paper used is too
thick or contains too
much cotton in it
-> Re-test with the
recommended paper
Check if the hardness of
P/R, and spring force is OK?
(spring’s force: 2.5 Kg)
Re-assemble
thermistor
NO
NO
NO
NO
NO
NO
YES
YES
YES
YES
YES
YES
Poor Fusing Grade
Page 23

Samsung Electronics 4-23
Troubleshooting
Plug in the
power cord?
The power
voltage supplying is
the same as
rating?
The fan
revolves when
powered on?
LEDs blink
once when
powered on?
The On-Line
key is being pressed
or shortage on
the panel
board?
Repair/replace the
board
Check the voltage first and plug
the power cord
Supply the power as the rating
Connections
on board are OK?
Re-connect firmly
and re-test
The connection
error between
controller board
and panel board
or malfunction
of boards.
-> Replace the
boards
Fuse of SMPS
if open?
Shortage
between 5V and
GND, or between
24V and
GND?
Replace the fuse
Toner cartridge
is in the set?
Detect failure due to the
board which detects top
cover open or switch error
-> Replace the board or switch
Put in the
cartridge
Remove the shortage
or replace the board
NO
NO
NO
NO
NO
NO
NO NO
NO
YES
YES
YES
YES
YES
YES
YES
YES
YES
No Power (LED Off)
Page 24

4-24 Samsung Electronics
Troubleshooting
Less than 10W?
AC is being supplied?
The voltage
of pin #208 of U5
(CPU) on the Main board
is about 2.3V when
printing?
END
Thermostat is open due to the heat etc.
-> Replace the thermostat
Check the PCI and fusing
control part and CN502
on the SMPS
-> Replace the component
or replace the SMPS
Measure the resistance
at the both ends of AC
Line with covers open
Remove the covers
Re-assemble the top
cover and close it
Thermistor, connecting point or engine
board defect -> Repair/replace the
component/board
NO
NO
NO
YES
YES
YES
Fuser Error
Page 25

Samsung Electronics 4-25
Troubleshooting
Sounds the
solenoid on when starts
print?
Does the
paper move?
Does the
paper move more than
100mm?
The Engine board defected
-> Replace boards
The solenoid defected
-> Replace it
The pick-up unit is
assembled wrong
-> Re-assemble or replace
the unit
Feeder
sensor and paper
width detect sensor
are assembled
reverse?
Switch them
The Sensor board
defected
-> Repair/replace
Too many
papers in the
feeder?
Paper guides
fit the paper width?
Paper end curled?
Does the
extender pulled out?
<Recommendation>
Use the MPF for the thick
paper such as envelope
and cardstock
Reduce the amount
and re-test
Take out the paper
and re-insert
Use the recommended
and quality paper
Pull out the
extender
NO
NO
NO
NO
NO
NO
NO
YES
YES
YES
YES
YES
YES
YES YES
Paper Jam (Mis-feeding)
Page 26

4-26 Samsung Electronics
Troubleshooting
Paper
stopped before
the OPC?
Check the LSU and
if it has the defect
replace it
Paper
stopped before
the fuser?
Severe skew
when feeding?
Adjust the paper guides to fit the
paper width
The force of springs pressing the
developer is weak
-> Check guide-DEVE
The paper
came out through
between fuser and
developer?
Too thin
or sensitive paper to
static electricity?
Use the recommended
paper
Check guide transfer
is grounded Check
the shutter prevents
feeding
Check the input path
to the fuser (such as
mis-assembly)
The
actuator of
paper exit sensor
works OK?
Check the actuator exists and its
operation and around the engine board
-> Replace
Is the paper
rolled around the
presseure
roller?
Remove the fuser, remove
the paper and replace the
pressure roller, if necessary
Feeds
multiple pages?
Remove any factors
Check the roller
and ribs of fuser
are in place, and
remove burrs, if
any
-> Remove the
factors of jam
NO NO NO
NO
NO
NO
NO
NO
YES
YES
YES
YES
YES
YES
YES
YES
Paper Jam (Jam1)
Page 27

Samsung Electronics 4-27
Troubleshooting
Try again to connector
or
Replace connector
END
NO
Check
CBF Harness28P
(MAIN B’D to ENGINE
B’D)
YES
Check
MAIN B’D CN9-6,
HSYNC Signal
( )
Replace LSU
NO
YES
Check
MAIN B’D CN9-3,
P_MOTOR Signal
( )
Replace MAIN B’D
NO
YES
Check
MAIN B’D CN9-4,
LREDADY Signal
( )
Replace LSU
NO
YES
Check
MAIN B’D CN9-9,
LDON Signal
( )
Replace MAIN B’D
NO
YES
LSU Error
Page 28

4-28 Samsung Electronics
Troubleshooting
Memo
 Loading...