

Page 1

User Manual
High Defi nition Digital Camcorder
www.samsung.com/register
HMX-E10WP/HMX-E10BP/HMX-E10OP
HMX-E15WP/HMX-E15BP/HMX-E15OP
Page 2

before reading this user manual
SAFETY WARNINGS
What the icons and signs in this user manual mean:
WARNING
CAUTION
CAUTION
PRECHECK
These warning signs are here to prevent injury to you and others.
Please follow them explicitly. After reading this section, keep it in a safe place for future
reference.
Means that there is a potential risk of death or serious injury.
Means that there is a potential risk of personal injury or damage to the
product.
To reduce the risk of fire, explosion, electric shock, or personal injury when
using your camcorder, follow these basic safety precautions.
Means hints or referential pages that may be helpful when operating the
camcorder.
Settings required before using a function.
PRECAUTIONS
When using the AC power adapter with your camcorder, connect the adapter to an
•
outlet with protective grounding.
Do not expose the camcorder battery to direct sunlight, heaters, radiators, fire, or any
•
other source of excessive heat.
If you replace the battery with the wrong battery, you can cause an explosion.
Replace only with the same battery or an equivalent type.
Warning!
Caution
ii
To disconnect the apparatus from the mains, the plug must be pulled out from the mains
socket, therefore the mains plug shall be readily operable.
Page 3
IMPORTANT INFORMATION ON USE
iii
About this user manual
Thank you for purchasing this Samsung
Camcorder. Please read this user manual
carefully before you use the camcorder and
keep it handy for future reference. Should
your camcorder fail to operate correctly, refer
to Troubleshooting.
This User Manual covers HMX-E10,
HMX-E15 models.
Although some features of
•
HMX-E15 are different, they operate in the
same way.
•
Illustrations of model HMX-E10WP are
used in this user manual.
•
The displays in this user manual may not
be exactly the same as those you see on
the LCD screen.
•
Designs and specifications of the
camcorder and other accessories are
subject to change without any notice.
•
In this user manual, the icon or symbol in
the parenthesis appearing in a description
of a submenu item indicates it will
appear on the screen when you set the
corresponding item.
Ex) Submenu item of “Video Resolution”
page 44
¬
-“1080/25p” ( ): Records in the
HD (1920x1080 25p) format. If set,
corresponding icon ( ) appears on
the screen.
The following terms are used in this manual:
•
‘Scene’ refers to the point where you
touch the Recording Start ( ) tab
to start recording until you touch the
Recording stop (
recording.
The terms ‘photo’ and ‘still image’ are
•
used interchangeably and have the same
meaning.
HMX-E10 and
) tab to pause the
Before using this camcorder
This camcorder records video in H.264
•
(MPEG4/AVC) format.
Please note that this camcorder is not
•
compatible with other digital video
formats.
Before recording important video,
•
make a trial recording.
Play back your trial recording to make sure
the video and audio have been recorded
properly.
We can not compensate you for
•
damage to or loss of your recorded
contents:
- Samsung cannot compensate you for
any damage caused when a recording
cannot be played back because of a
defect in the camcorder or memory
card. Samsung cannot be responsible
for your recorded video and audio.
- Recorded contents may be lost
due to a mistake when handling
the camcorder or memory card,
etc. Samsung will not provide
compensation for damages due to the
loss of recorded contents.
Make a backup of important recorded
•
data.
Protect your important recorded data
by copying the files to a PC. We also
recommend you copy them from your
PC to other recording media for storage.
Refer to the software installation and USB
connection guide.
Copyrights: Please note that this
•
camcorder is intended for individual
use only.
Data recorded on the storage media in this
camcorder using other digital/analogue
media or devices is protected by the
copyright act and cannot be used without
Page 4
before reading this user manual
permission of the owner of the copyright,
except for personal enjoyment. Even if
you record an event such as a show,
performance, or exhibition for personal
enjoyment, we strongly recommended
that you obtain permission beforehand.
For Open Source Licence information,
•
refer to the “OpenSource-E10.pdf” in the
provided CD-ROM.
Correct disposal of batteries in this
product
(Applicable in the European Union and
other European countries with separate
battery return systems)
or packaging indicates that the batteries in this product
should not be disposed of with other household waste at
the end of their working life. Where marked, the chemical
symbols Hg, Cd or Pb indicate that the battery contains
mercury, cadmium or lead above the reference levels in EC
Directive 2006/66. If batteries are not properly disposed of,
these substances can cause harm to human health or the
environment.
To protect natural resources and to promote material reuse,
please separate batteries from other types of waste and
recycle them through your local, free battery return system.
be disposed with other household wastes at the end of its
working life. To prevent possible harm to the environment
or human health from uncontrolled waste disposal, please
separate this from other types of wastes and recycle it
responsibly to promote the sustainable reuse of material
resources. Household users should contact either the retailer
where they purchased this product, or their local government
office, for details of where and how they can take this item
for environmentally safe recycling. Business users should
contact their supplier and check the terms and conditions of
the purchase contract. This product should not be mixed with
other commercial wastes for disposal.
iv
This marking on the battery, manual
Correct Disposal of This Product
(Waste Electrical & Electronic
Equipment)
(Applicable in the European Union and
other European countries with separate
collection systems)
This marking shown on the product or
its literature, indicates that it should not
Notes regarding trademarks
All the trade names and registered
•
trademarks mentioned in this manual or
other documentation provided with your
Samsung product are trademarks or
registered trademarks of their respective
holders.
The micro SD logo is a trademark.
•
The micro SDHC logo is a trademark.
Microsoft®, Windows®, Windows Vista®,
•
Windows® 7, and DirectX® are either
registered trademarks or trademarks of
the Microsoft Corporation in the United
States and/or other countries.
Intel®, Core™, and Pentium® are the
•
registered trademarks or trademarks of
the Intel Corporation in the United States
and other countries.
Macintosh, Mac OS are either registered
•
trademarks or trademarks of Apple Inc. in
the United States and/or other countries.
YouTube is a trademark of Google Inc.
•
Flickr™ is a trademark of Yahoo.
•
Facebook is a trademark of Facebook Inc.
•
HDMI, the HDMI logo and High-Definition
•
Multimedia Interface are trademarks or
registered trademarks of HDMI Licensing
LLC.
Adobe, the Adobe logo, and Adobe
•
Acrobat are either registered trademarks
or trademarks of Adobe Systems
Incorporated in the United States and/or
other countries.
All the other product names mentioned
•
here in may be the trademark or registered
trademarks of their respect companies.
Furthermore, “™” and “
mentioned in each case in this manual.
®
” are not
Page 5
safety information
v
The safety precautions illustrated below are to prevent personal injury or material damages.
Heed all instructions carefully.
WARNING
Means that there is a
potential risk of serious
personal injury.
CAUTION
Means that there is a
potential risk of personal
injury or damage to the
product.
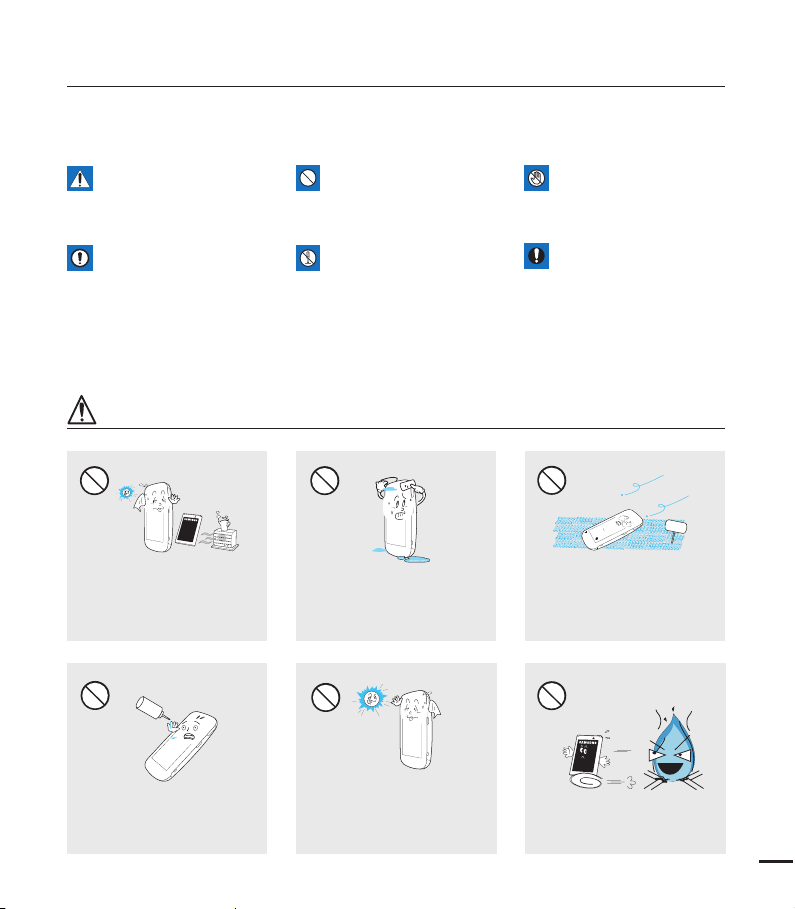
WARNING
Using the camcorder at
temperatures over 60(140ٺ)
may result in fire. Keeping the
battery at a high temperature may
cause an explosion.
LI
O
Prohibited action. Do not touch the product.
Do not disassemble the
product.
Do not allow water or metal and
inflammable matter to enter the
camcorder. Doing so may pose a
fire hazard.
This precaution must be
kept.
No sand or dust! Fine sand or
dust entering the camcorder could
cause malfunctions or defects.
SAND
No oil! Oil entering the camcorder
could cause electric shock,
malfunctions, or defects.
Do not aim the camcorder directly
into the sun. Doing so could cause
eye injuries, as well as lead to
malfunctioning of internal parts of
the product.
Do not dispose of the battery in a
fire as it may explode.
Page 6

safety information
MENU
M
ENU
Never use cleaning fluid or similar
chemicals to clean the camcorder.
Do not spray cleaners directly on
the camcorder.
Keep the camcorder away from
water when using it near the beach
or pool or when it rains. There is a
risk of malfunction or electric shock.
Keep the used lithium battery or
memory card out of the reach
of children. If the lithium battery
or memory card is swallowed
by a children, consult physician
immediately.
If the camcorder emits an abnormal
sound or smell, or smokes,
immediately detach the battery from
the camcorder and request service
from a Samsung service centre. There
is a risk of fire or personal injury.
Do not touch the USB cable or
plug with wet hands. There is a risk
of electric shock.
Do not place heavy objects on
the USB cable. Heavy objects
can cause the cable to break or
vi
disconnect from the camcorder.
Connect the USB plug to a USB
If the camcorder malfunctions,
immediately detach the battery
from the camcorder.
There is a risk of fire or injury.
MENU
If the USB cable gets hot or the
camcorder emits an abnormal sound
or smell when charging or when
sending data, unplug the power cord
immediately and request service from a
Samsung service centre. There is risk
of fire or personal injury.
MENU
MENU
jack on a PC or an adaptor. Do not
insert the plug forcibly if it does not
match the jack. You can break the
plug.
Don't disassemble or attempt to
repair the USB cable. There is a
risk of fire or electric shock.
Page 7
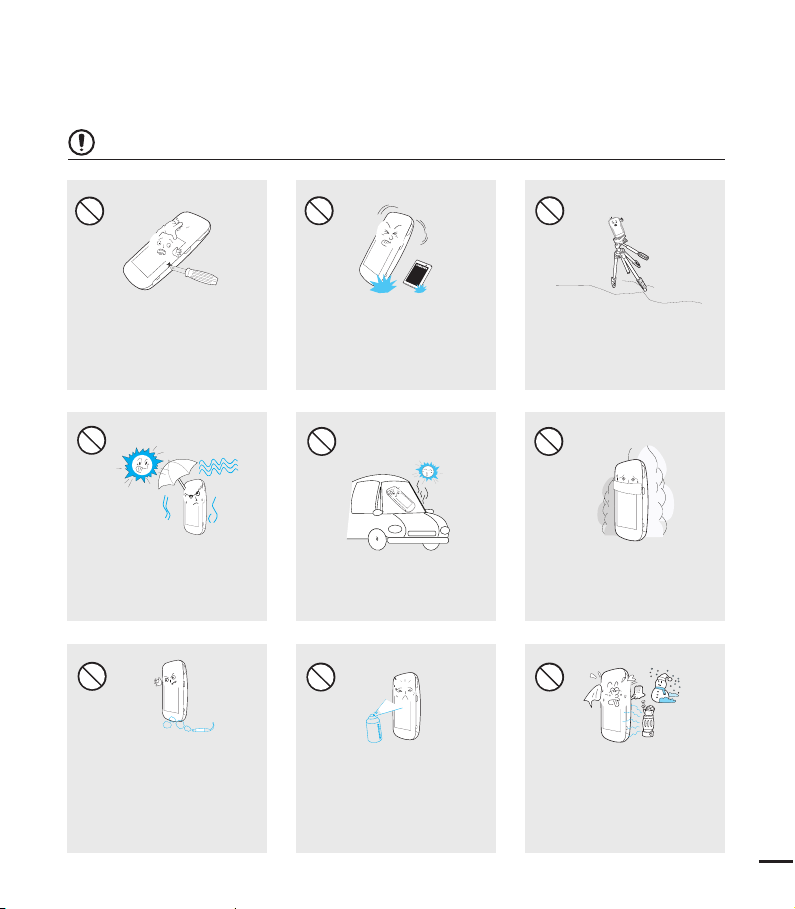
CAUTION
vii
Do not press the surface of the
LCD with force, or hit it with a
sharp object. If you push the LCD
surface, display unevenness may
occur.
Do not use the camcorder in direct
sunlight or near heating equipment.
The heat may cause a malfunction
or injury.
Do not use the camcorder near
dense exhaust gas generated by
gasoline or diesel engines, or near
a corrosive gas such as hydrogen
sulphide. Doing so may corrode
the external or internal terminals,
disabling normal operation.
Do not drop or expose the
camcorder, battery or other
accessories to severe vibrations
or impact. This may cause a
malfunction or injury.
Do not leave the camcorder in
a closed vehicle for a long time,
where the temperature is very high.
Do not expose the camcorder to
insecticide. Insecticide entering the
camcorder could cause the product
to operate abnormally. Turn the
camcorder off and cover it with vinyl
sheet, etc. before using insecticide.
Do not use the camcorder on a
tripod (not supplied) in a place
where the tripod is subject to
severe vibrations or impact.
Do not expose the camcorder to
soot or steam. Thick soot or steam
could damage the camcorder case
or cause a malfunction.
Do not expose the camcorder to
sudden changes in temperature or
high humidity place. There is also
a risk of defect or electric shock
when using outdoors during lightning
storms.
Page 8
safety information
Do not wipe the camcorder
body with benzene or thinner.
The exterior coating could peel
off or the case surface could
deteriorate.
Use Samsung-approved
accessories only. Using products
from other manufacturers may
cause overheating, fire, explosion,
electric shock, or personal injuries
caused by abnormal operation.
Manufacturers of unauthorized accessories compatible with this
camcorder are responsible for their own products. Use the optional
accessories according to their safety instructions. Samsung is not
responsible for any malfunctions, for fires or electric shocks, or for
damage caused by unauthorized accessories.
Do not use the camcorder near a
TV or radio: It can cause distortion
on the TV screen or interference
on the radio.
Place the camcorder on a stable
surface that is well ventilated.
Do not use the camcorder near
sources of strong radio waves or
magnetism such as speakers or
large motors. Noise from these
sources could distort the video or
audio you are recording.
Keep important data separately.
Samsung is not responsible for
data loss.
viii
Page 9

contents
3
QUICK START GUIDE
06
GETTING TO KNOW THE
CAMCORDER
10
GETTING STARTED
17
BASIC OPERATION OF THE
CAMCORDER
22
FIRST TIME SETTINGS
25
10 What’s included with your camcorder
11 Location of controls
13 Identifying the screen displays
17 Using the battery
19 Checking the battery state
22 Turning your camcorder on/off
23 Setting the operating modes
24 Using the touch panel
25 Turning the power on for the first time
and setting the date and time
26 Selecting the OSD language
Page 10

contents
GETTING READY TO START
RECORDING
27
BASIC RECORDING
32
BASIC PLAYBACK
37
ADVANCED RECORDING
43
27 Inserting/ejecting a memory card
(not supplied)
28 Selecting a suitable memory card
(not supplied)
30 Recordable time and capacity
31 Using the hand strap
31 Using the lens
32
Recording videos
34 Recording photos
35 Capturing photos during video
recording (dual recording)
36 Zooming in and out
37 Changing the playback mode
38 Playing videos
41 Viewing photos
43 Using the menu tab in the record mode
43 Recording menu items
44 Video Resolution
45 Photo Resolution
46 Smart Filter
48 Panorama
49 Quick View
ADVANCED PLAYBACK
50
4
50 Using the menu tab in the play mode
50 Playback menu items
51 Deleting files
52 Protection from accidental erasure
53 Share Mark
Page 11

SYSTEM SETTING
5
54
54 Using the setting menu tab
55 Setting menu items
55 Storage Info
56 File No.
56 Date/Time Set
57 Date/Time Display
57 LCD Brightness
58 Auto LCD Off
59 Beep Sound
59 Shutter Sound
60 Auto Power Off
61 PC Software
62 Format
63 Default Set
63 Language
64 Demo
USING WITH A WINDOWS
COMPUTER
65
CONNECTING TO OTHER
DEVICES
74
TROUBLESHOOTING
MAINTENANCE &
ADDITIONAL INFORMATION
SPECIFICATIONS
65 What you can do with a windows
computer
66 Using the intelli-studio programme
72 Using as a removable storage device
74 Connecting to a TV
75 TV image displays
76 Warning indicators and messages
78 Symptoms and solutions
84 Maintenance
85 Using your camcorder abroad
86 Specifications
Page 12

quick start guide
MENU
This quick start guide introduces the basic operation and features of your camcorder. See the
reference pages for more information.
You can record videos in H.264 format!
You can record videos in the H.264 format that are convenient to email and share with your
friends and family. You can also take photos with your camcorder.
STEP 1: Get ready
1. Pull to open the battery cover in the
direction of the arrow as shown in the
fi gure. ¬page 17
2. Insert a memory card.
You can use commercially available
•
micro SDHC (SD High Capacity) or
micro SD memory cards with this
camcorder.¬page 28
3. Insert the battery into the battery slot.
4. Charge the battery fully by using the
built-in USB plug of the camcorder.
page 18
¬
The battery is fully charged when
•
the CHG (charging) indicator light
turns green.
STEP 2: Record with your camcorder
Recording start ( )/stop ( )tab
6
LCD screen
Zoom (W/T) lever
[99Min]
0:00:01
Power (
6
Photo (
) button
) tab
Page 13
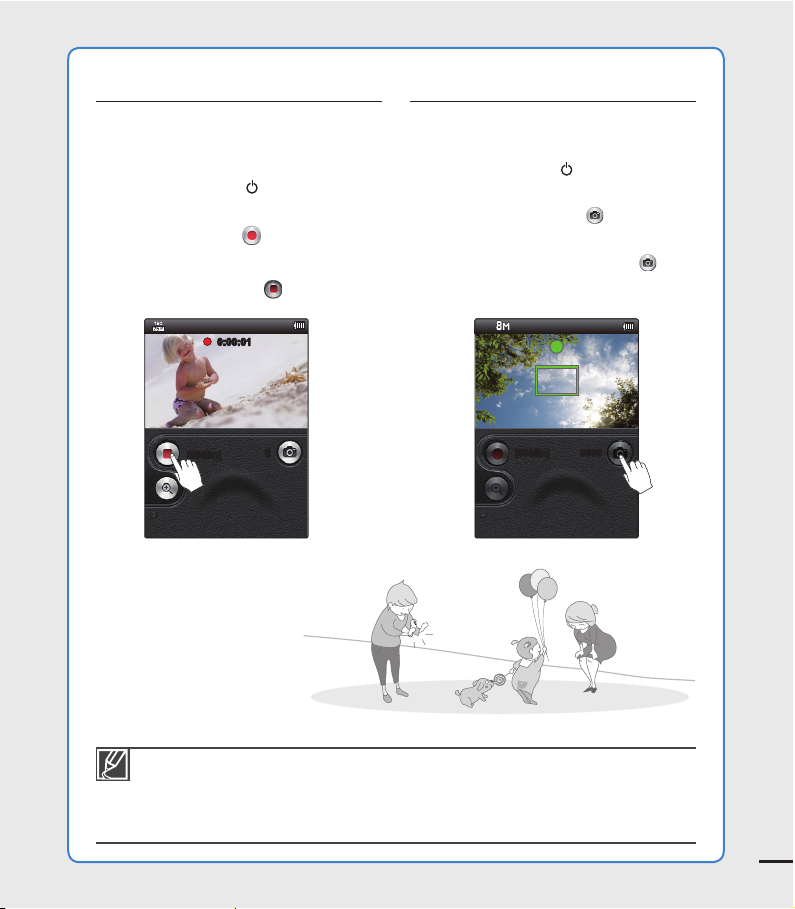
Recording videos Recording photos
7
Your camcorder uses advanced H.264
compression technology to give you the
clearest video quality.
1. Press the Power (
) button.
2. While in the STBY mode, touch the
Recording start (
) tab on the LCD
screen to start recording.
To stop recording, touch the
•
Recording stop (
0:00:01
) tab.
Your camcorder can record high quality
photos with a 4:3 or 16:9 aspect ratio.
1. Press the Power (
) button.
2. Frame the subject to be recorded,
and touch the Photo (
) tab on the
LCD screen.
3. When you release the Photo (
a photo is recorded.
) tab,
[99Min]
Your camcorder is compatible with the H.264 recording format, which achieves efficient
•
coding of high quality video using less memory capacity.
The default setting is "720/25p". You can select the resolution for video recordings.
•
page 44
¬
You can take photos while you are recording videos.¬page 35
•
6
[99Min] 9999
Page 14

quick start guide
MENU
STEP 3: Play back videos or photos
Viewing videos or photos on the LCD screen
You can fi nd your desired recordings quickly by using the thumbnail index view.
1. Press the Mode (
2. Touch the video or photo thumbnail (
then touch the thumbnail of the video or photo you want to
view.
The recorded videos or photos appear in the thumbnail
•
index view.
The thumbnail of the latest created or played fi le is
•
highlighted.
You can switch from the play mode to the record mode by pressing the Mode ( ) button.
Viewing on a high defi nition TV
You can enjoy HD (High Defi nition) videos on a connected HDTV. ¬page 74
) button to select the play mode.
/ ) tab, and
STEP 4: Save recorded videos or photos
Simple and fun! Enjoy the various features of the built-in Intelli-studio programme
on your Windows computer.
Using the Intelli-studio programme built into your camcorder, you can import videos/
8
photos into your computer and edit or share the videos/photos with your friends.
pages 66~71
¬
Page 15

Importing videos/photos from your camcorder
9
and viewing them on your PC
1. Start the Intelli-studio programme by
connecting the built-in USB plug of the
camcorder to the PC.
A new fi le saving screen appears with the
•
Intelli-studio main window. Click “Yes.”
The uploading procedure starts.
2. Any new fi les are saved to your PC and
registered to “Contents Manager” in the
Intelli-studio programme.
You can arrange the fi les by different
•
options such as Face, Date, Location, etc.
3. Double-click the fi le you would like to play back.
Saved fi les into your PCContents Manager
Folders directory on your PC
MENU
Sharing videos/photos on Youtube/Flickr/FaceBook
Share your contents with the world, by uploading videos and photos directly to a web
site with a single click. Click "Share" "Upload" on the browser. ¬page 69
Intelli-studio runs automatically after you’ve connected your camcorder to a Windows
computer if you have set "PC Software: On".¬ page 61
STEP5: Delete videos or photos
If the camcorder’s storage media is full, you cannot record new videos or photos. Delete
videos or photos you’ve saved to your computer from the camcorder’s storage media.
Then you can record new videos or photos in the newly freed-up space.
Press the Mode (
Touch the "Delete
p
) button to switch to the play mode p Press the MENU button
" tab on the LCD screen. ¬page 51
Page 16

getting to know the camcorder
MENU
WHAT'S INCLUDED WITH YOUR CAMCORDER
Your new camcorder comes with the following accessories. If any of these items are missing
from your box, call Samsung’s Customer Care Centre.
Model name Colour Memory card slot LCD screen Lens
HMX-E10WP
HMX-E15WP
HMX-E10BP
HMX-E15BP
HMX-E10OP
HMX-E15OP
The shape is the same for all models. Only the colour is different.
•
Checking your accessories
White
Black
Orange
Yes Colour Digital zoom: x2
10
Battery
(BP90A)
Hand strap User manual CD
Optional accessories
Quick start guide
The contents may vary depending on the sales region.
•
Parts and accessories can be purchased after consulting with your local Samsung dealer.
•
SAMSUNG is not responsible for reduced built-in battery life time or malfunctions caused by any
unauthorised use of accessories such as the battery.
A memory card is not included. See page 28 for memory cards compatible with your camcorder.
•
Your camcorder includes the user manual CD and printed quick start guide.
•
Mini HDMI cable
Pouch
Memory card
Page 17

LOCATION OF CONTROLS
11
Rear & Right side
Lens
Mode (
LCD screen
) button
MENU
MENU button
Power (
) button
Page 18

getting to know the camcorder
Front/Right/Bottom side
12
Built-in speaker
Battery cover open hole
Internal microphone
CHG (Charging) indicator
Battery cover
Built-in USB plug
Jack cover
Be careful not to cover the internal microphone and lens during recording.
Tripod receptacle
Built-in USB eject button
HDMI jack
Battery slot
Memory card slot
Hand strap hook
Page 19
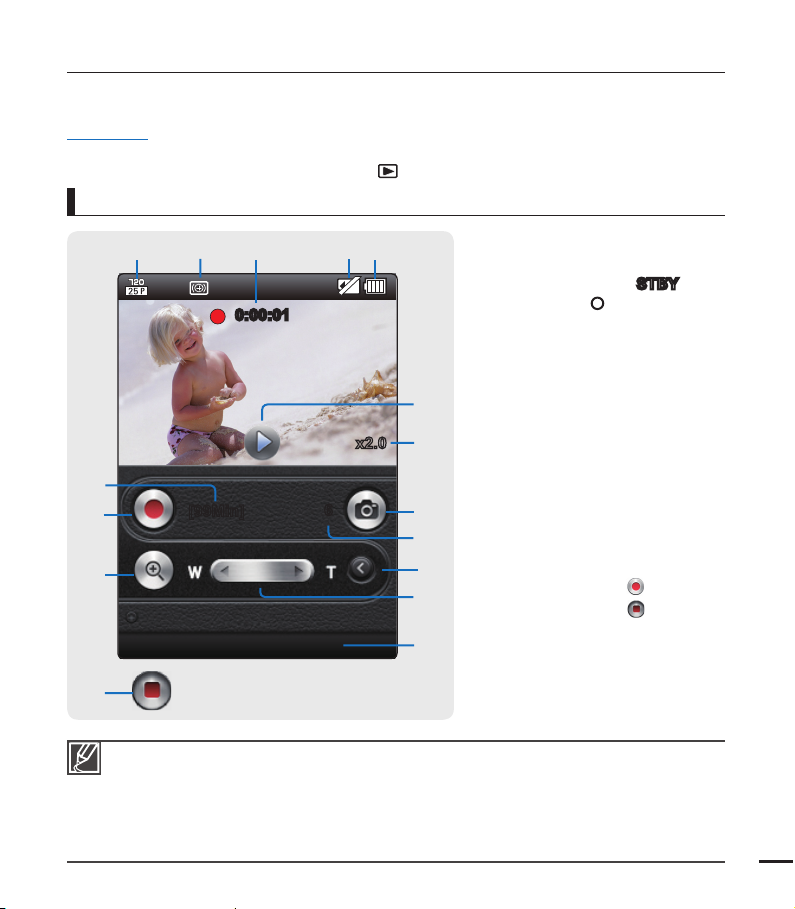
IDENTIFYING THE SCREEN DISPLAYS
13
The available functions vary depending on the operation mode you’ve selected. Different indicators appear
depending on the setting values.
PRECHECK!
This On Screen Display (OSD) is shown only when the camcorder is in Video Record mode.
•
Select the Record mode by pressing the Mode (
•
Video Record mode
) button. ¬page 23
123
4
5
1 Video resolution
2 Smart Filter
3 Operating mode (
0:00:01
(Standby) / M 0:00:01
(Recording/Recording time))
4 Storage media (Memory card)
5 Battery info. (remaining battery
level)
6
6 Quick view
7 Photo tab
#
x2.0
8 Photo Remain Counter (total
number of recordable photos)
%
$
@
[99Min]
+"/
6
7
8
9
0
!
9 Close zoom tab
10 Zoom lever
11 Date/Time display
12 Open/Close zoom tab
13 Zoom ratio
14 Recording start (
Recording stop ( ) tab
15 Remaining recordable time
$
The on-screen indicators are based on an 8GB micro SDHC memory card.
•
The screen above is an example and may differ from the actual display.
•
For enhanced performance, the display indications and order are subject to change without a prior notice.
•
This camcorder provides one combined video and photo record mode. You can easily record videos or
•
photos in the same mode without having to change it.
The total number of recordable photos is based on available space on the storage media.
•
The largest number the photo counter can display is 9999.
•
For warning indicators and messages, see pages 76~77.
•
STBY
) tab /
Page 20
getting to know the camcorder
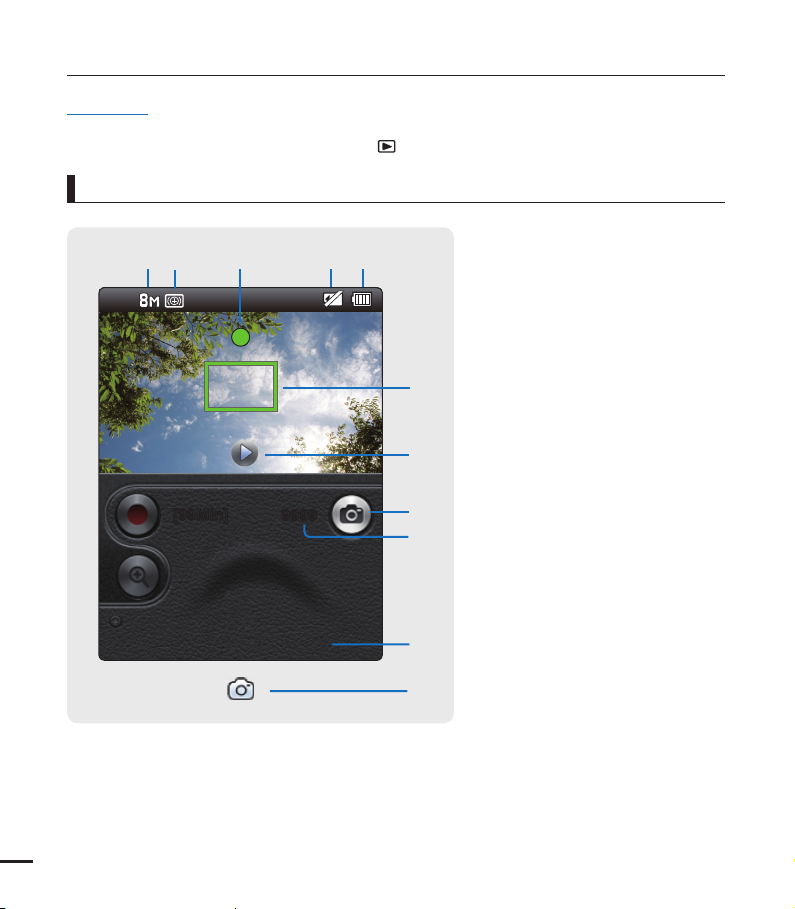
PRECHECK!
•
This On Screen Display (OSD) is shown only when the camcorder is in Photo Record mode.
•
Select the Record mode by pressing the Mode (
Photo Record mode
12 3
4
) button. ¬page 23
5
6
7
1 Photo resolution
2 Smart Filter
3 Half shutter
4 Storage media (Memory card)
5 Battery info.
(remaining battery level)
6 Auto focus frame
7 Quick view/shutter display
8 Photo tab
9 Photo counter (total number of
recordable photos)
10 Date/Time display
14
[99Min]
+"/
9999
8
9
0
7
Page 21

15
PRECHECK!
This On Screen Display (OSD) is shown only when the camcorder is in Video Play mode.
•
Select the Play mode by pressing the Mode ( ) button, and then touch the Video ( ) tab. ¬page 23
•
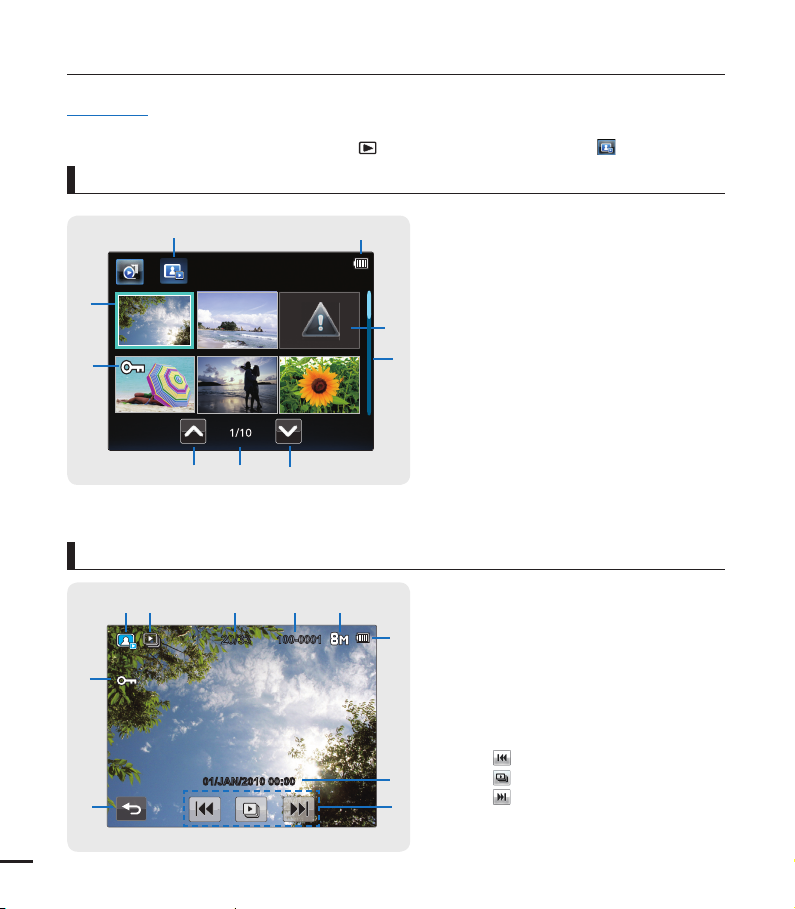
Video play mode : Thumbnail View
1
0
9
2
3
4
5
6
7
8
Video play mode : Single View
12 3 4 56
#
@
!
0
0:00:05/0:00:50
01/JAN/2010 00:00
_
15
100-0001
7
8
9
8
+
1 Video Play mode
2 Battery info. (remaining charge level)
3 Error File
4 Scroll bar
5 Share mark
6 Next page tab
7 Now/ Total page number
8 Previous page tab
9 Erase protection
10 Highlight
1 Video Play mode
2 Operating status (play/pause)
3 Time code (elapsed time/recorded time)
4 File name (fi le number)
5 Video resolution
6 Battery info. (remaining battery level)
7 Playback progress bar
8 Recorded date/time display/
Volume control tabs
9 Playback control tabs
10 Return tab
11 Volume tab
12 Erase protection
13 Share mark
: Reverse skip
ᐓ
: Reverse search
ᐔ
/ : Play/Pause
ᐕ
: Forward search
ᐖ
: Forward skip
ᐗ
_
/
+
Page 22
getting to know the camcorder
PRECHECK!
This On Screen Display (OSD) is shown only when the camcorder is in Photo Play mode.
•
Select the Play mode by pressing the Mode (
•
Photo play mode : Thumbnail View
) button, and then touch the Photo ( ) tab. ¬page 23
16
9
8
1
6
57
2
3
4
Photo play mode : Single View
2 3 4 5
1
100-0001
20/33
0
01/JAN/2010 00:00
9
6
7
8
1 Photo play mode
2 Battery info. (remaining charge level)
3 Error File
4 Scroll bar
5 Next page tab
6 Now/ Total page number
7 Previous page tab
8 Erase protection
9 Highlight
1 Photo play mode
2 Slide show
3 Photo image counter (current image/
total number of recorded images)
4 File name (fi le number)
5 Photo Resolution
6 Battery info. (remaining battery level)
7 Recorded date/time display
8
9 Return tab
10 Erase protection
: Previous image tab
ᐓ
: Slide show start tab
ᐔ
: Next image tab
ᐕ
Page 23

getting started
17
USING THE BATTERY
Purchase extra batteries to allow continuous use of your camcorder.
1
2
Inserting the battery
1. Pull the battery cover in the direction of
the arrow as shown in the fi gure to open.
2. Push in the battery in the direction of the
arrow as shown in the fi gure.
Align the triangle mark of the battery to
•
the battery contacts when you insert
the battery as shown in the fi gure.
3. Close the battery cover.
Use only Samsung-approved batteries. If you use batteries from other manufacturers, there is a
•
danger of overheating, fi re, or explosion.
Samsung is not responsible for problems caused by unapproved batteries.
•
3
Ejecting the battery
1. Pull the battery cover in the direction of
the arrow as shown in the fi gure to open.
2. Pull out the battery in the direction of the
arrow as shown in the fi gure.
3. Close the battery cover.
Page 24

getting started
MODE
MODE
MODE
Charging the battery
PRECHECK!
Be sure to charge the battery before you start using your camcorder.
•
You can charge the camcorder’s battery with the built-in USB jack of the camcorder or the USB charger
•
(not supplied).
2
2
MENU
3
1. Press the Power ( ) button to turn off the camcorder.
2. Open the Jack cover and press the [USB eject] button to pop out the built-in USB plug.
3. Connect the built-in USB plug of the camcorder to the USB port of a PC.
The charging (CHG) indicator lights up and charging starts. After the battery is fully
•
charged, the charging (CHG) indicator turns green. ¬page 19
4. When the charging is completed, detach the USB plug from the computer, and then push in
the built-in USB plug while pressing the [USB eject] button.
You can charge the camcorder with the USB charger (not supplied).
•
Do not push the Built-in USB plug forcibly.
•
This camcorder has a built-in USB jack which pops out at the press of a single button.
18
•
Depending on your computer environment, you can attach an external USB cable (not supplied) to
•
the camcorder’s USB plug and your computer’s USB port to charge the camcorder.
The camcorder will be charging if its built-in USB plug is connected to a PC even when it is turned on.
•
Page 25

CHECKING THE BATTERY STATE
19
MENU
You can check the charging state and remaining battery capacity.
To check the charging state
The colour of the LED indicates the power or
charging state.
Charging (CHG) indicator
The colour of the charging indicator shows the
CHG
CHG
charging state.
Charging state Charging Fully charged Error
LED colour
(Orange) (Green) (Orange Blink)
Battery level display
The battery level display shows the amount of battery power remaining in the battery.
Battery level
indicator
Exhausted (fl ickers): The device will be
forced to turn off after 3 minutes.
Change the battery as soon as possible.
The fi gures above are based on a fully charged battery operating at normal temperature.
Low ambient temperature may decrease the use time.
After 3 seconds, the camcorder turns off.
State Message
Fully charged -
25~50% used -
50~75% used -
75~95% used -
95~98% used -
“Low
Battery”
[99Min]
-
STBY
9999
Page 26
getting started
Available running time for the battery
Battery type
Charging time
Mode
Resolution
1080/25P
720/25P
•
Charging time: Approximate time in minutes (min.) required to fully charge a completely
exhausted battery.
•
Recording/Playback time: Approximate time available when you have fully charged the
battery.
•
The times are only for reference. Figures shown above are measured in Samsung’s test
environment. Your times may differ depending on your usage and conditions.
•
The recording and playback times will be shorter when you use your camcorder in low
temperatures.
Continuous Recording (without zoom)
The continuous recording time above shows the available recording time when you record
without using any other function after recording starts. The battery pack may discharge 2-3
times faster than this reference if you use the record start/stop frequently and the zoom
functions, and then playback your recordings. Prepare additional charged battery pack(s) to
cover the time you are planning to record on the camcorder.
•
•
Continuous recording time Playback time
Approx. 80 min. Approx. 140 min.
Approx. 90 min. Approx. 150 min.
The charging time will vary depending on the remaining battery level.
Depending on your PC specifications, the charging time can be prolonged.
(Use the Built-in USB plug)
BP90A
Approx. 190 min.
About the battery
•
20
Battery Properties
A lithium-ion battery is small-sized and has a high capacity. Low ambient temperature
(below 10º C/50º F) may shorten its life-span and affect its function. Before recording in low
temperatures, put the battery into your pocket to warm it, then install it in the camcorder.
Page 27

•
21
Charge an extra battery before using the camcorder outdoors.
- The cold temperature may shorten the length of time you can use the battery before
needing to recharge it.
•
Check whether the battery terminal is damaged if the battery falls or is dropped.
- If you install a battery with the damaged terminal into the camcorder, you can damage the
camcorder.
•
Throw away the dead battery into a recycling bin.
•
The battery lifetime is limited.
-Battery capacity decreases over time and through repeated use. If decreased usage time
between charges becomes significant, it is probably time to replace the battery with a new
one.
- Each battery’s life is affected by storage, operating, and environmental conditions.
•
A USB connection by itself can not operate the camcorder. You must install the battery.
•
If you use a USB charger, the charger should provide 500mA at a minimum of 5V and a
maximum of 6V.
Maintaining the battery
Make sure to store the battery separately after use.
•
- A small amount of battery power is consumed when the battery is stored in the camcorder
even if the camcorder power is off.
- If the battery is installed and left in the camcorder for a long time, the battery discharges.
If this occurs, you may not be able to use the battery, even if you charge it fully.
- Keep the battery out of reach of children.
- To store the battery for a long time, we recommend you keep the battery charged at about
half of its full capacity and charge the battery once every 3 months.
Remove the battery and the memory card from the camcorder after use.
•
- Store the battery in a stable, cool, and dry place.
(Recommended temperature : 15Cº~ 25Cº (59ºF ~ 77º), recommended humidity:
40%~ 60%)
- Temperatures that are too high or too low shorten the battery lifetime.
- The battery terminals can become rusty or malfunction if the battery is stored in a smoky
or dusty location.
About the battery life
Battery capacity decreases over time and through repeated use. If decreased usage time
•
between charges becomes significant, it is probably time to replace the battery with a new
one.
When the battery reaches the end of its life, please contact your local Samsung dealer for a
•
replacement.
Page 28

basic operation of the camcorder
This chapter introduces you to the basic operation procedures of this camcorder, such as
turning the power on/off and switching modes.
TURNING YOUR CAMCORDER ON/OFF
You can turn the power on or off by
pressing the Power ( ) button.
MENU
Power ( ) button
This camcorder provides one record mode for both video and photo recordings. You can easily
•
record videos or photos in the same mode without having to switch modes.
When the camcorder is turned on, the self-diagnosis function operates and a message may
•
appear. If this occurs, refer to "Warning indicators and messages" (on pages 76~77) and take
corrective action.
When using this camcorder for the first time
When you use your camcorder for the first time or reset it, the date and time set screen appears as the
start-up display. Set the date and time. ¬page 25
22
Page 29
SETTING THE OPERATING MODES
23
You switch the operating mode in the
following order each time you press
the Mode ( ) button:
Record mode ↔ Play mode
•
You can choose the video or photo
thumbnail
touching the Video
(
When switching to play mode,
•
you can enjoy landscape playback
by rotating the camcorder from a
vertical to a horizontal position.
view display options by
( ) or Photo
) tab on the LCD screen.
Mode ( ) button
Mode Functions
Record mode To record videos or photos.
Play mode To play videos or photos.
Play tab
( / )
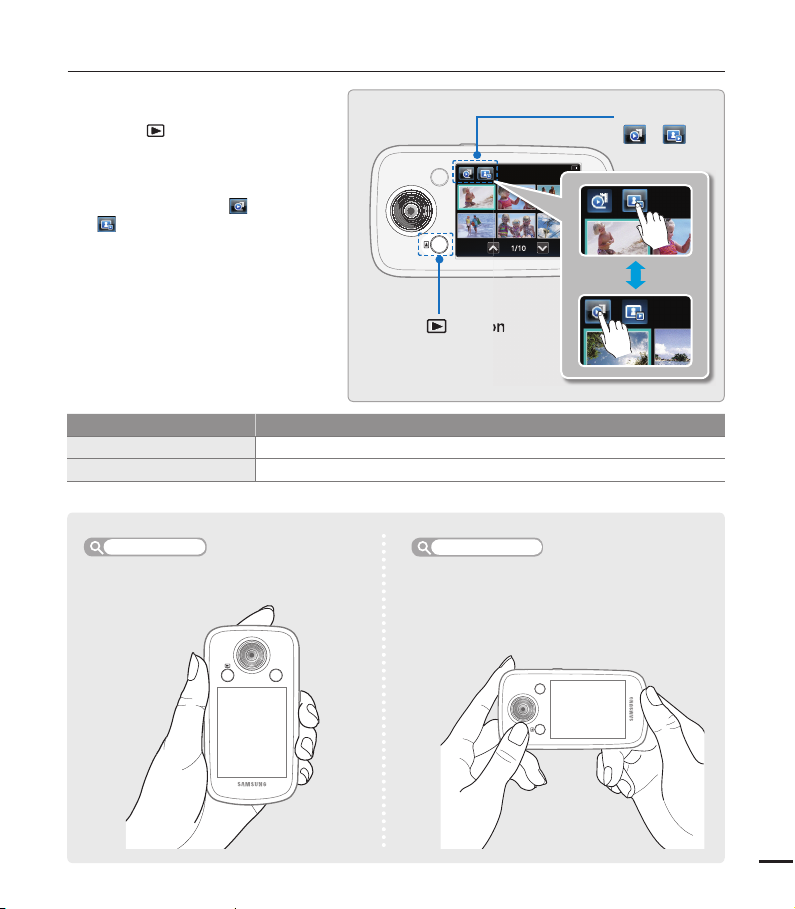
Record mode
Easy one-handed recording and button
operations.
MENU
Playback mode
When switching to the play mode, you can
enjoy a landscape playback by rotating the
camcorder.
MENU
Page 30

basic operation of the camcorder
MENU
MENU
MENU
USING THE TOUCH PANEL
The touch panel lets you play back and record with a
simple touch of your fi nger. Hold the camcorder fi rmly in
one hand to support it. Then, touch the items displayed
on the screen.
24
Touch
Slightly touch the items or functions to
select or execute with your fi nger.
0:00:05/0:00:50
01/JAN/2010 00:00
Do not place a protective fi lm on the LCD screen.
•
If you leave a fi lm attached to the LCD screen for a long time, strong adhesion between the fi lm and
•
the surface of the screen may cause the touch panel to malfunction.
Be careful not to accidentally press the buttons near the LCD panel while using the touch panel.
•
The tabs and indicators that appear on the LCD screen depend on the current recording/playback
•
status of your camcorder.
The camcorder does not recognise touches if you touch more than two points on the screen at the
•
same time. Touch one point at a time.
Do not use a sharp tipped item such as pen or pencil when using a tool to touch the screen.
•
100-0001
Drag
Drag the image left or right on the LCD
screen to go to the previous or next fi le.
100–0001
20/33
01/JAN/2010 00:00
Page 31

fi rst time settings
25
TURNING THE POWER ON FOR THE FIRST TIME AND
SETTING THE DATE AND TIME
Set the date and time of your local area when you turn on the
camcorder for the fi rst time.
1. Press the Power (
•
When you turn on your camcorder for the fi rst time, the Date/
) button to turn on the camcorder.
Time Set screen appears.
2. Set the date and time by touching the corresponding item or
dragging the Up (
) or Down ( ) tabs.
Date/Time Set
Day
01
Hr
00
qhu
YearMonth
2010
Min
00
3. Touch the (
The message “Date/Time Set” appears.
•
The year can be set up to 2040.
•
Set “Date/Time Display” to On. ¬page 57
•
) tab.
Date/Time Set
Day
Date/Time Set
01
qhu
01/JAN/2010 00:00
Hr
00
Built-in rechargeable battery
Your camcorder includes a built-in rechargeable battery that retains the date and time settings even
•
after the power is turned off.
If the battery is depleted, the current date/time values are reset to the default values. You need to
•
recharge the built-in rechargeable battery (see below), and then re-set the current date and time.
Charging the built-in rechargeable battery
The built-in battery is always recharged while the built-in USB plug of the camcorder is connected to a
•
PC or while the battery is inserted.
If you have not used the camcorder for about 2 months and have not connected it to a computer
•
using its USB plug or inserted the removable battery, the built-in battery fully discharges. If this occurs,
charge the built-in battery by connecting the built-in USB plug to a computer for 24 hours.
YearMonth
2010
Min
00
Page 32

fi rst time settings
SELECTING THE OSD LANGUAGE
You can select the language in which the camcorder displays the menu screen and the
messages. The language setting is retained when the camcorder is powered off.
1. Press the MENU button, and then touch the Setting (
2. Drag up/down or touch the Previous (
) or Next ( ) tab until
“Language” is displayed.
3. Touch “Language,” and then touch the desired OSD language.
• The menu screen and messages are displayed in the language
you selected.
4. To exit the menu, touch the Return ( ) tab.
Submenu items
⦽ǎᨕ
” “Français” “Deutsch” “Italiano”
“Language” options may be changed without a prior notice.
•
The camcorder retains the language you select even when the
•
removable battery is not inserted.
The date and time format may change depending on the language
•
you selected.
26
“English” “
“Español” “Português”³Ɋɭɫɫɤɢɣ´ “፩ၭ” “
) tab.
”
Video
Settings
PC Software
Format
Default Set
Language
Demo
Language
English
⦽ǎᨕ
Français
Deutsch
Italiano
Photo
Resolution
View
Resolution
Panorama Quick
Smart
Filter
Setting
Page 33

getting ready to start recording
27
INSERTING/EJECTING A MEMORY CARD (NOT SUPPLIED)
1
2
To insert a memory card
1. Pull the battery cover in the direction of
the arrow as shown in the fi gure to open.
2. Insert the memory card into the card slot
until it softly clicks.
Make sure that the terminal portion
•
is facing down and the camcorder is
placed as shown in the fi gure.
3. Close the battery cover.
To avoid the data loss, turn off the camcorder by pressing the Power ( ) button before inserting
•
or ejecting the memory card.
Be careful not to push the memory card too hard. The memory card may suddenly pop out.
•
Your camcorder supports only micro SD (micro Secure Digital) and micro SDHC (micro Secure Digital
High Capacity) cards. The compatibility with the camcorder may vary depending on the manufacturer
and the type of memory card. ¬page 28
To eject a memory card
1. Pull the battery cover in the direction of
the arrow as shown in the fi gure to open.
2. Gently push the memory card to eject it.
3. Close the battery cover.
Page 34

getting ready to start recording
SELECTING A SUITABLE MEMORY CARD (NOT SUPPLIED)
Compatible memory cards
•
Use micro SD (micro Secure Digital) and
micro SDHC (micro Secure Digital High
Capacity) cards with this camcorder.
We recommend you use a micro SDHC
(Secure Digital High Capacity) card.
The camcorder supports micro SD cards
up to 2GB. We can not guarantee normal
operation with micro SD cards bigger than
2GB.
•
Compatible memory card capacity:
micro SD card : 1GB ~ 2GB
micro SDHC card : 4GB ~ 32GB
•
Use compatible memory card brands.
Others are not guaranteed to work.
A list of compatible brands is below:
- Panasonic, SanDisk, TOSHIBA
•
For video recording, use a memory card
that supports faster write speeds (above
micro SDHC Class 6).
Usable memory card (1GB~32GB)
Micro SDHC ( Micro Secure Digital High
Capacity) cards
•
Micro SDHC (Secure Digital High Capacity)
memory cards
- A micro SDHC card is a higher version
(Ver. 2.00) of the micro SD card and
supports capacities above 4GB.
- Use micro SD cards only with micro
SD enabled host devices.
Common cautions for memory cards
•
Damaged data may not be recovered.
We recommend you make a back-up of
important data separately on the hard disk
of your PC.
•
Turning the power off or removing a
memory card during an operation such
as formatting, deleting, recording, and
playback may cause data loss.
•
After you modify the name of a file or
folder stored in the memory card using
your PC, your camcorder may not
recognise the modified file.
•
The micro memory card does not support
any data recovery mode. So care must be
taken lest that the memory card should be
damaged when making record.
28
<micro SD>
Terminals Terminals
<micro SDHC>
Page 35

29
Handling a memory card
We recommend that you power off before
•
inserting or removing the memory card to
avoid data loss.
You have to format newly-purchased
•
memory cards, memory cards with data
that your camcorder cannot recognise or
with data saved by other devices. Note
that formatting erases all data on the
memory card and deleted data cannot be
recovered.
A memory card has a certain life span.
•
If you cannot record new data, you have to
purchase a new memory card.
Do not bend, drop, or subject the card to
•
strong impacts.
Do not place foreign substances on the
•
memory card terminals. Use a soft dry
cloth to clean the terminals if required.
Do not paste anything other than label
•
provided with the card on the label pasting
section.
Be careful to keep the memory card out of
•
the reach of children, who might swallow it.
Make sure to format the memory card
•
on this camcorder. If the memory card
had been formatted by a PC or other
device, using it on this camcorder
without formatting may fi nd trouble with
recording and/or playback. Samsung is
not responsible for damage of recorded
contents caused by such reasons.
The camcorder supports micro SD and
micro SDHC memory cards, giving you
a wider choice of cards!
The data storage speed may differ,
depending on the manufacturer and
production system.
SLC (Single Level Cell) system: faster
•
write speed enabled.
MLC (Multi Level Cell) system: only
•
lower write speed is supported.
For best results, we recommend using
a memory card that supports a faster
write speed. Using a lower write speed
memory card for recording video may
cause diffi culties when storing. You may
even lose your video data during the
recording.
In an attempt to preserve every bit of the
recorded video, the camcorder forcibly
stores the video on the memory card and
displays a warning:
“Low speed card. Please record at a
lower resolution.”
If you are unavoidably using a low speed
memory card, the resolution of the
recording may be lower than the value
you set. ¬page 44
The higher the resolution and quality, the
more memory the camcorder uses.
Using the memory card adaptor
This camcorder uses micro SD/micro SDHC memory cards.
Record mode
To use a micro SD/micro SDHC directly with a computer or a card reader
you must attach it to or insert it into an adaptor.
•
Samsung is not responsible for data loss due to misuse.
•
We recommend using a memory card case to avoid data loss caused by motion or static electricity.
After a period of use, the memory card may get warm. This is normal and is not a malfunction.
•
Page 36

getting ready to start recording
RECORDABLE TIME AND CAPACITY
The following tables show the camcorder's maximum recording time and number of images
•
by video or photo resolution and memory card capacity.
Please note the approximate maximum limits for recording videos and photos.
•
Recordable time for videos
Media Memory Card
Capacity
Resolution
1080/25p 6 min 13 min 27 min 55 min 112 min 223 min
720/25p* 12 min 24 min 49 min 100 min 201 min 400 min
Recordable number of photos
Media Memory Card
Resolution
8M (3264x2448)* 484 968 1986 3987 8037 9999
6M (3264x1840) 645 1289 2643 5305 9999 9999
5M (2592x1944) 768 1536 3150 6323 9999 9999
2M (1920x1080) 1868 3733 7655 9999 9999 9999
Capacity
1GB 2GB 4GB 8GB 16GB 32GB
(Unit: Approximate minutes of recording)
1GB 2GB 4GB 8GB 16GB 32GB
(Unit: Approximate number of images)
30
1GB1,000,000,000 bytes : Actual formatted capacity may be less as the internal firmware
Actual recording times may differ depending on the recording conditions and the subject.
•
The higher the resolution settings, the more memory is used.
•
High resolution images occupy more memory space than low resolution images. If you select
•
higher resolutions, there is less space to record videos in the memory.
When recording complex videos with a lot of action and colour, the file size will be larger.
•
Memory cards bigger than 32GB may not work properly.
•
When a video file exceeds 1.8GB, a new video file is created automatically.
•
You can store up to 9999 videos and photos in one folder.
•
The above items marked with * indicate the default setting.
•
uses a portion of the memory.
Page 37

USING THE HAND STRAP
MENU
f=
9
.
7
m
m
F
:
2.
2
MENU
31
Attach the strap and place your hand through the loop to prevent the camcorder from being
dropped.
USING THE LENS
You can easily record images of yourself or others from various angles by 270° rotating lens.
1. Align your subject in the frame.
2. By turning the lens, the 270° rotating lens
adjusts freely to your desired recording
angle.
MENU
Excessive rotation may damage the connective hinge between the lens and the camcorder.
•
Do not wipe the lens with your fingers during operation. Use a soft, dry cloth to clean the lens if
•
required.
Page 38

basic recording
RECORDING VIDEOS
• This camcorder supports High Defi nition (HD) image resolution.
Set the resolution you want before recording. ¬page 44
• This camcorder provides one record mode which combines the video and photo record modes. You can
easily record videos or photos in the same mode without having to change it.
PRECHECK!
Insert a memory card. ¬page 27
•
Select the record mode by pressing the Mode (
•
1. Select a subject to record.
• Adjust the 270° rotating lens to the best angle for recording.
• Touch the Zoom lever on the LCD screen to adjust the size
of the subject. ¬page 36
) button. ¬page 23
0:00:01
2. Touch the Recording start (
• The recording (z) indicator appears, and recording starts.
• The number of recordable photos appears next to the Photo
(6) tab on the LCD screen. ¬page 35
3. To stop recording, touch the Recording stop (
• The Quick View icon ( ) appears on the LCD screen.
4. Touch the Quick View (
) icon to view the most recently
recorded video.
• After the Quick View fi nishes, your camcorder returns to the
STBY mode. You can also touch the Return ( ) tab.
32
) tab on the LCD screen.
) tab.
[99Min]
STBY
[99Min] 9999
6
Page 39

• If the power is off or any error occurs during recording, the camcorder may not record the video.
33
• Samsung is not responsible for any damage resulting from a failure of normal recording or playback
operation caused by memory card error.
• Do not turn off the camcorder or remove the memory card while accessing the storage media.
Doing so may damage the storage media or the data in the storage media. Note that damaged data
cannot be recovered.
• While you are rotating the lens, a black shadow on the LCD screen can be recorded.
• Videos are compressed in the H.264 (MPEG-4.AVC) format.
• Eject the battery when you have finished recording to prevent unnecessary battery power
consumption.
• For the on-screen information display, see page 13.
• For approximate recording time, see page 20.
• Sound is recorded by the internal stereo microphone above the lens. Make sure that the
microphone is not blocked.
• Before recording an important video, make sure to test the recording function to see if there are
any problems with audio or video recording.
• You can adjust the brightness of the LCD screen in the menu options. Adjusting the LCD screen
does not affect the image being recorded. ¬page 57
• For the various functions available during recording, see “Recording menu items.” ¬pages 43~49
• The menu setting tabs shown on the LCD screen do not affect the image you are recording.
• In the record mode, you can set the Quick View menu option. The Quick View icon appears when
you have set the Quick View menu option to On. ¬page 49
• Recording videos in a quiet environment increases microphone sensitivity that may record
surrounding ambient noise.
Page 40

basic recording
RECORDING PHOTOS
You can take photos and store them in the storage media. Set the desired resolution before recording.
page 45
¬
PRECHECK!
Insert a memory card. ¬page 27
•
Select the record mode by pressing the Mode (
•
1. Select a subject to record.
• Adjust the 270° rotating lens to the best angle for recording.
• Touch the Zoom lever on the LCD screen to adjust the size
of the subject. ¬page 36
2. Adjust the view so that the subject is at the centre of the LCD screen,
and then touch the Photo (
• Your camcorder adjusts to the ideal focus automatically.
• When the focus is set, the focusing indicator (
on the LCD screen.
• If you fail to focus the subject, a red frame can be showed on the
LCD screen.
3. When you release the Photo (
• The camcorder emits a shutter sound (when “Shutter Sound: On”
is set). The photo indicator (
camcorder records the photo image.
• To continue taking photos, wait until the camcorder saves the
current photo completely on the storage media.
• When the photo is recorded on the storage media, the Quick View
icon (
) appears on the screen.
4. Touch the Quick View (
photo.
• To return to the STBY mode, touch the Return (
) tab on the LCD screen.
) tab, the camcorder records a photo.
) appears on the screen, and the
) icon to view the most recently recorded
) button. ¬page 23
) and frame appear
z
) tab.
[99Min] 9999
[99Min] 9998
34
While you are rotating the lens, a black shadow on the LCD screen can be recorded.
• The recordable number of photos varies depending on the photo resolution. ¬page 30
• The camcorder does not record audio when you take photos.
• Do not turn off the camcorder or remove the memory card when taking photos. This can damage
the storage media or data.
• For the on-screen display information, see page 14.
• Adjust the brightness of the LCD screen using the menu. Adjusting the brightness does not affect
the recorded image. ¬page 57
• Photo fi les conform to the DCF (Design rule for Camera File system) standard, established by JEITA
(Japan Electronics and Information Technology Industries Association).
Page 41

CAPTURING PHOTOS DURING VIDEO RECORDING
35
(DUAL RECORDING)
Your camcorder can capture photos without interrupting video recording. It is convenient to
record a video and photo at the same time without switching modes.
1. Touch the Recording start (
) tab on the LCD screen in STBY
mode.
The recording (z) indicator appears, and video recording starts.
•
y
The number of recordable capturing photos appear next to the
Photo (6) tab on the LCD screen.
2. Aim the camcorder at the scene you want, and then touch the
Photo (
•
) tab.
The camcorder records the photo image without a shutter
sound.
•
The maximum number of photos you can take per video
recording is six.
•
The photo capture icon (
) appears on the LCD screen.
As you capture photos, the number of recordable photos is
reduced. When you have reached the six photo limit, the
Photo (
•
The camcorder continues to record video, even while you are
) tab is greyed out.
taking photos.
To stop recording, touch the Recording stop (
•
A preview is available for recorded videos only, even if you have captured still images while
•
recording.
The camcorder does not produce the shutter sound when capturing a still image during a video
•
recording.
You can take up to 6 still images per one video recording.
•
The resolution of the captured photos depends on the resolution of the video as follows:
•
Video resolution Resolution of captured photo
1080/25p 1920x1072 (2M)
720/25p 1280x720 (1M)
) tab.
[99Min]
[99Min]
0:00:01
6
0:00:03
5
Page 42

basic recording
ZOOMING IN AND OUT
•
Use the zoom function for close-up or wide-angle recording.
•
Using the Zoom lever, you can record with digital zoom.
To zoom in
Slide the Zoom lever ( ) towards T (telephoto).
The distant subject is gradually magnifi ed.
•
This camcorder provides the zoom magnifi cation as follows.
•
- Digital zoom: x2
To zoom out
Slide the Zoom lever ( ) towards W (wide angle).
The subject appears smaller and further away.
•
The smallest zoom ratio is the subject’s original size in the
•
zoom-out.
T : Telephoto (x2.0)W : Wide angle (x1.0)
Understanding how to use the zoom lever
1. Touch the Open/Close Zoom (
2. The Zoom lever screen appears.
3. To close the Zoom lever, touch the Close Zoom (
Zoom (
) tab if you are done with the Zoom lever.
) tab on the LCD screen.
0:00:01
[99Min]
[99Min]
) tab on the right side or the Open/Close
0:00:03
6
6
6
x2.0
36
Note that the image quality decreases when you use the Digital zoom. The image quality may deteriorate
•
depending on how much you zoom in on the subject.
Frequent use of the Zoom function consumes more power.
•
The minimum focal length between the camcorder and the subject is 20cm.
•
If you use the zoom while recording, the camcorder may record the noises the camcorder makes when the
•
zoom operates.
Page 43

basic playback
MENU
MENU
CHANGING THE PLAYBACK MODE
You can set the record mode and the play mode in turn with the Mode ( ) button.
•
When you shift to the play mode, the most recently created fi le is highlighted in the thumbnail view.
•
The camcorder automatically selects the thumbnail display options depending on the STBY mode
•
you used the last time. However, you can choose the video or photo thumbnail view display
options by touching the Video (
Understanding how to change the operation modes
You can easily change the operation modes by touching the LCD screen or using the buttons
•
as shown in the following fi gure.
When switching to the play mode, you can enjoy landscape playback by rotating the camcorder
•
90 degrees clockwise.
ݡʑ
) or Photo ( ) tab on the LCD screen.
[99Min] 9999
Mode ( ) button“Play Mode”“Video” “Photo”
37
Page 44

basic playback
MENU
MENU
PLAYING VIDEOS
You can fi nd the videos you want quickly using the thumbnail index view.
PRECHECK!
Insert a memory card. ¬page 27
•
Select the play mode by pressing the Mode (
•
1. Touch the Video ( ) tab.
Video thumbnails appear on the screen.
•
To change the current thumbnail page, drag up/down or touch
•
the Previous ( ) or Next ( ) tab.
2. Touch the thumbnail of the video you want to play.
The camcorder plays the selected video and playback control
•
tabs appear briefl y. They reappear when you touch anywhere
on the screen.
To stop playback and return to the thumbnails, touch the
•
Return (
Using the Touch Screen
Drag the thumbnail index view up or down on the LCD screen to go to the previous or next page.
) tab.
) button. ¬page 23
0:00:05/0:00:50
01/JAN/2010 00:00
100–0001
38
Page 45

Do not power off or eject the memory card during video playback. Doing so may damage the
39
recorded data.
The following video fi les may not play back on the camcorder:
•
- Video fi les with formats that are not supported by the camcorder.
When you connect the HDMI cable to the camcorder while playing a video, the display will switch
•
to the thumbnail index view automatically.
You can play back recorded video on a TV or a PC. ¬pages 75, 68
•
You can upload recorded videos or photos to YouTube, Flickr, or FaceBook using Intelli-studio.
•
page 69
¬
For various functions available during playback, see "Playback menu items." ¬pages 50~53
•
Loading time may vary depending on the resolution of the selected video.
•
To adjust the volume during video playback
You can hear the sound through the built-in speaker of the camcorder while the video is playing
back on the LCD screen.
1. Touch the Volume (
•
Volume control bar appears on the screen.
) tab on the LCD screen.
2. Adjust the volume by touching the Volume Control tabs (
on the LCD screen.
0:00:05/0:00:50
_
/
)
+
100–0001
01/JAN/2010 00:00
0:00:05/0:00:50
15
100–0001
_
You can adjust the sound level between “0~19.” When the level is at “0,” you cannot hear sound.
+
Page 46

basic playback
Various playback operations
Playback / Pause ( X/ZZ )
y
Playback and pause alternates when you touch the Play ( ) /
Pause (
y
Touch the Return ( ) tab to stop playback and return to the
) tab during playback.
thumbnail.
Search playback ( WW / XX )
During playback, each touch of the Reverse search ( ) /
Forward search ( ) tab increases the play speed:
- RPS (Reverse Playback Search) rate: x2x4x8x16x32x2
- FPS (Forward Playback Search) rate: x2x4x8x16x32x2
Skip playback ( / )
Touch the Reverse skip ( ) / Forward skip ( ) tab during
playback.
y
Touching the Forward skip ( ) tab plays the next video.
y
Touching the Reverse skip ( ) plays the beginning of the scene.
If reverse skip ( ) is touched within 3 seconds from the start of
the fi le, the previous video is played.
y
Place and hold your fi nger on the Reverse skip ( ) / Forward
skip ( ) tab to search for a video quickly. When you lift off your
fi nger, the camcorder plays the selected video.
0:00:05/0:00:50
01/JAN/2010 00:00
0:00:05/0:00:50
x2
01/JAN/2010 00:00
0:00:05/0:00:50
01/JAN/2010 00:00
100–0001
100–0001
100–0001
40
Touch the Play ( ) tab to play back at normal speed.
•
You can hear sound only when the playback is at normal speed.
•
Page 47

VIEWING PHOTOS
41
MENU
MENU
You can view recorded photos using various playback functions.
PRECHECK!
Insert a memory card. ¬page 27
•
Select the play mode by pressing the Mode (
•
1. Touch the Photo ( ) tab.
Photo thumbnails appear on the screen.
•
To change the current thumbnail page, drag up/down or touch
•
the Previous (
) or Next ( ) tab.
2. Touch the thumbnail of the photo you want to display.
The camcorder displays the selected photo in full screen and
•
playback control tabs appear briefl y. They reappear when you
touch anywhere on the screen.
Touch Previous Image (
•
)/ Next Image ( ) tab to view the
previous and next photo.
•
Place and hold your fi nger on the Previous Image ( )/Next
Image ( ) tab to search for a photo quickly. When you lift off
your fi nger, the camcorder displays the selected photo.
) button. ¬page 23
20/33
100-0001
01/JAN/2010 00:00
3. To return to the thumbnails, touch the Return (
Using the Touch Screen
Drag the thumbnail index view up or down on
the LCD screen to go to the previous or next
page.
) tab.
Drag the image left or right on the LCD screen
to go to the previous or next fi le.
100–0001
20/33
01/JAN/2010 00:00
Page 48

basic playback
Do not power off or eject the memory card during photo playback. Doing so may damage the
recorded data.
Your camcorder may not play back the following photo fi les normally:
•
- A photo with a fi le format not supported by this camcorder (it does not conform to DCF
standards).
Loading time may vary depending on the resolution of the photo you selected.
•
This camcorder can support the JPEG fi le format. (However, note that all JPEG fi les are not always
•
played back.)
Viewing a slide show
You can view a photo slide show.
Touch the Slide Show (
y
The ( ) indicator is displayed. The slide show starts from the
current selected photo.
y
To stop the slide show, touch the Return (
) tab during photo playback.
) tab.
20/33
01/JAN/2010 00:00
20/33
100-0001
100-0001
42
01/JAN/2010 00:00
Page 49

advanced recording
MENU
MENU
USING THE MENU TAB IN THE RECORD MODE
You can change the menu settings to customise your camcorder.
•
Access the desired menu screen by following the steps below, and then
•
change the various settings.
PRECHECK!
Press the Power ( ) button to turn on the camcorder. ¬page 22
•
Select the record mode by pressing the Mode (
•
Using the Menu Tab: An Example
) button. ¬page 23
1. Press the MENU button in STBY mode.
•
The menu screen appears.
2. Touch the "Video Resolution
(The Video Resolution function is used here as an example.)
3. Touch the desired option.
4. Press the MENU button to exit the menu.
The camcorder applies the menu item you selected and displays the
•
appropriate indicator.
There are some functions you cannot activate simultaneously in the menu.
•
Also, you cannot select greyed-out menu items. Refer to Troubleshooting
for examples of unworkable combinations of functions and menu items.
page 83
¬
RECORDING MENU ITEMS
The menu items you can access depend on the operation mode.
•
For operation details, see the page listed under Page in the table below.
•
Operation
Items
Video Resolution
Photo Resolution X
Smart Filter
mode
Panorama X
Quick View
These items and default values may be changed without notice.
Video Photo Default value Page
."
z
z
zz
zz
X 720x25p
z
z
[8M] 3264x2448 (4:3)
Normal
Video Res olution
1080/ 25p
Video
Photo
Resolution
View
Smart
Filter
SettingsQuick
Resolution
Panorama
: available, X : not available
44
45
46
Off
On
48
49
43
Page 50

advanced recording
Video Resolution
You can select the resolution of the video to be recorded.
PRECHECK!
Select the Record mode by pressing the Mode ( ) button. ¬page 23
1. Press the MENU button.
2. Touch the "Video Resolution
Touch the desired submenu item.
•
3. Press the MENU button to exit the menu.
."
Video
Resolution
Photo
Resolution
Smart
Filter
44
Submenu items
1080/25p ( ) : Records in the HD (1920x1080 25p) format.
•
720/25p (
•
•
•
•
•
) : Records in the HD (1280x720 25p) format.
<HDTV>
1920x1080 25p
1280x720 25p
<PC/Web/Mobile device>
1280x720 25p
"25p" indicates the camcorder records in progressive scan mode at 25 frames per second.
Recorded fi les are encoded using Variable Bit Rate (VBR). VBR is an encoding system that
automatically adjusts the bit rate according to the recording image.
High resolution images occupy more memory space than low resolution images. If you select the
higher resolution, there is less space to record videos in the memory.
The recording time available depends on the resolution you selected. ¬page 30
Panorama
1080/ 25p
Video
Resolution
Panorama
Video Res olution
View
Photo
Resolution
View
SettingsQuick
Smart
Filter
SettingsQuick
Page 51

45
Photo Resolution
You can select the resolution of the photo to be recorded.
PRECHECK!
Select the Record mode by pressing the Mode ( ) button. ¬page 23
1. Press the MENU button.
2. Touch the "Photo Resolution
•
You can move to the desired item by touching the
•
Touch the desired submenu item.
3. Press the MENU button to exit the menu.
."
/ tab.
Video
Resolution
Photo
Resolution
Smart
Filter
Panorama
Submenu items
3264x2448 ( ): Records in 3264x2448 resolution with 4:3 aspect ratio.
•
3264X1840 (
•
2592x1944 (
•
1920X1080 (
•
For photo development, the higher the resolution, the fi ner the image quality.
•
The number of recordable images varies depending on the recording environment.
•
High resolution images occupy more memory space than low resolution images. If you select a
•
): Records in 3264X1840 resolution with 16:9 aspect ratio.
): Records in 2592x1944 resolution with 4:3 aspect ratio.
): Records in 1920X1080 resolution with 16:9 aspect ratio.
Video
Resolution
Panorama
higher resolution, there is less space to store photos in the memory.
For detailed information on image capacity, see page 30.
•
View
Photo Resolution
3264x2448
Photo
Resolution
View
SettingsQuick
Smart
Filter
SettingsQuick
Page 52

advanced recording
Smart Filter
By applying special effects, you can add fun and character to an image.
You can apply various fi lter effects to create unique images.
PRECHECK!
Select the Record mode by pressing the Mode ( ) button. ¬page 23
1. Press the MENU button.
2. Touch the "Smart Filter
•
You can move to the desired item by touching the
•
Touch the desired submenu item.
3. Press the MENU button to exit the menu.
."
/ tab.
Video
Resolution
Panorama
Video
Resolution
Photo
Resolution
View
Smart Filter
Vignetting
Photo
Resolution
Smart
Filter
SettingsQuick
Smart
Filter
46
Submenu items
•
Normal: Without any smart fi lter effect, the camcorder displays a
normal, natural image during recording or playback.
Miniature: Make a photo of a life-size location or an object look
•
Vignetting: Apply the retro-looking colours, high contrast, and
•
Sketch: Sketch effect mimics a pencil sketch.
•
Defog: Expressly emphasize blue tones for the sky and refl ective
•
like a miniature scale Image. Blurring parts of the photo
makes the scene seem much smaller than it actually is.
strong vignette effect of lomo cameras.
objects such as show windows.
Panorama
5M
[99Min] 9999
View
STBY
SettingsQuick
Page 53

47
Smart Filter Example
Normal
Sketch
If you apply the Miniature fi lter when recording a video, recording starts with a guide message
•
displayed. For such recorded video, its playback time is shorter than the time consumed for
recording it.
If you apply the Miniature fi lter when recording a video, the camcorder does not record sound.
•
If you apply the Smart Filter effect when recording a video, the camcorder automatically records the
•
video in a resolution of “640x480 15P” regardless of the resolution setting.
The following functions cannot be used when the camcorder is in the Smart fi lter mode:
•
- Digital zoom, “Video Resolution”, “Photo Resolution”
If you set the Smart Filter to any setting but “Normal”, the camcorder sets the photo size to 5M
•
(2592x1944) regardless of the actual resolution setting.
Miniature Vignetting
Defog
Page 54

advanced recording
Panorama
The Panorama function lets you capture a wide landscape or tall building in a single picture by holding the
Photo tab down and moving or turning the camcorder slowly in one direction.
PRECHECK!
Select the Record mode by pressing the Mode ( ) button. ¬page 23
1. Press the MENU button.
2. Touch the "Panorama
•
Press the MENU button to return the STBY mode.
3. Touch the Photo (
4. Turn or move the camcorder slowly in one direction, while touching the
Photo (
•
•
•
5. When you release the Photo (
•
) tab.
On the centre of the LCD screen, the angle guide appears.
A recording progress bar appears on the LCD screen.
The Panorama function supports recording in one direction only.
It aborts taking panorama if moving direction changes or moving speed
is too fast.
" t"On"
) tab to start recording.
) tab, a photo is recorded.
Submenu items
•
Off:
Disables the function.
•
On:
Move your camcorder in one direction while touching the Photo ( )
tab to take a panorama image.
•
This function is available only in the photo record mode.
•
When you take a picture of yourself in the Panorama mode, an error can occurs.
•
If recording a panorama has failed due to improper moving speed or moving in
the wrong direction, the recorded image is saved in the aspect ratio as same
to a general image.
•
For panorama photos, the Photo Resolution is set to 1M regardless of the
resolution setting.
•
You can take up to 4 continuous panorama images in series.
•
Once a panorama image has been taken, camcorder continues in Panorama
mode until the setting is changed. To take normal images, turn off the
Panorama function.
•
The following function is automatically set to Off in the Panorama mode:
- “Smart fi lter”
Off
Video
Resolution
Panorama
Panorama
On
Photo
Resolution
View
On
Smart
Filter
SettingsQuick
48
Panorama mode example
33/33
100-0001
01/JAN/2010 00:00
ₙŁ
<Panorama mode recording>
100-0001
33/33
01/JAN/2010 00:00
<Normal recording>
Page 55

49
Quick View
Using the Quick View function, you can view the most recently recorded video and photo
images as soon as the recording is fi nished.
PRECHECK!
Select the Record mode by pressing the Mode ( ) button. ¬page 23
1. Press the MENU button.
2. Touch the "Quick View
Touch the desired submenu item.
•
."
3. Press the MENU button to exit the menu.
Off
Video
Resolution
Quick View
On
Photo
Resolution
On
Smart
Filter
Submenu items
• Off: Quick View icon does not appear on the screen after you fi nish
the recording. Quick View is off.
• On: Quick View icon
fi nish the recording. Touch the Quick View icon to view the
most recent video or photo you have recorded. After the Quick
View is completed, your camcorder switches back to the STBY
mode.
Deleting a fi le after the Quick View
If you touch the delete
The Quick View function is not available under the following conditions:
- If the mode has been changed after the recording.
- If you have connected the built-in USB plug of the camcorder to a PC.
- If the camcorder has been restarted after the recording.
- After playing Quick View
- After recording Panorama
appears on the screen as soon as you
( )
tab during Quick View, the fi le is deleted.
Panorama
[99Min] 9999
0:00:05/0:00:50
01/JAN/2010 00:00
View
STBY
SettingsQuick
100-0001
Page 56

advanced playback
MENU
MENU
USING THE MENU TAB IN THE PLAY MODE
You can change the menu settings to customise your camcorder.
•
Access the desired menu screen by following the steps below, then change
•
the various settings.
PRECHECK!
Press the Power ( ) button to turn on the camcorder. ¬page 22
•
Select the Play mode by pressing the Mode (
•
Using the Menu Tab: An Example
1. Touch the Video ( ) or Photo ( ) tab.
•
Touch the desired image.
2. Press the MENU button.
•
The menu screen appears.
3. Touch the “Delete
(The Delete function is used here as an example.)
.”
4. Touch the desired option.
5. Press the MENU button to exit the menu.
The camcorder applies the menu item you selected and displays the appropriate indicator.
•
There are some functions you cannot activate simultaneously in the menu. Also, you cannot select
•
greyed-out menu items. Refer to Troubleshooting for examples of unworkable combinations of
functions and menu items. ¬page 83
PLAYBACK MENU ITEMS
The menu items you can access depend on the operation mode.
•
For operation details, see the page listed under Page in the table below.
•
Operation
mode
Thumbnail Single Thumbnail Single
zzzz
zzzz
zz
zzzz
50
Items
Delete
Protect
Share Mark
Settings
These items and default values may be changed without prior notice.
•
You can not select and adjust all menu items in all modes.
•
Before selecting a menu item, set the appropriate operation mode fi rst. ¬page 23
Video Photo
) button.¬page 23
XX -53
Delete
'HOHWHWKLV¿OH"
Yes No
Protect SettingsShare
Delete
: available, X : not available
z
Default value Page
-51
-52
-54
Page 57

51
DELETING FILES
You can erase your recordings one by one, or all at once.
PRECHECK!
Insert a memory card.¬page 27
•
Select the Play mode by pressing the Mode (
•
Video (
) or Photo ( ) tab. ¬page 23
1. Press the MENU button.
2. Touch the “Delete
If you touch “Select Files”, you will see image thumbnails.
•
” and then the desired submenu item.
Go to Step 3.
If you touch "All Files", you will see the message that
•
corresponds to that option. Go to Step 4.
3. Touch the thumbnails of the fi les you want to delete. After you
have selected all the fi les you want to delete, touch the
•
See Submenu items below for additional details.
4. Touch “Yes.”
•
If you selected "All Files", the camcorder deletes all the fi les in
the storage media, except for those that are protected.
•
If you selected “Select Files”, the camcorder deletes the fi les
you selected.
Submenu items
Select Files: Deletes individual images. Touch the images you want
•
to delete. The (
Touching the thumbnail image toggles the image between being
selected (
selected all the fi les you want to delete.
All Files: Deletes all images.
•
) indicator is displayed on the selected images.
) or not selected. Touch the ( ) tab after you have
) button, and then touch the
( )
tab.
Protect SettingsShare
Delete
Select Files All Files
Delete
Protect SettingsShare
'HOHWHVHOHFWHG¿OHV"
Yes No
You can not recover deleted images.
•
Do not eject a memory card or power off while deleting videos or photos recorded on the storage media.
•
Doing so may damage the storage media or data.
•
You can also operate this function in the full and single image display mode.
•
To protect important images from accidental erasure, activate the image protection function in advance.
page 52
¬
You can not delete protected fi les. Cancel the protect (
•
The delete function does not work if the battery charge is insuffi cient. Make sure the battery is charged
•
enough so it does not become exhausted during the delete operation.
You can also format the storage media to delete all the images at once. Be aware that all fi les and data
•
including protected fi les will be erased. ¬page 62
) function fi rst.¬page 52
Page 58

advanced playback
PROTECTION FROM ACCIDENTAL ERASURE
You can protect important recordings from accidental erasure. You can not delete the protected videos and
photos unless you cancel the protection or format the storage medium.
PRECHECK!
Insert a memory card.¬page 27
•
Select the Play mode by pressing the Mode (
•
touch the Video (
) or Photo ( ) tab. ¬page 23
1. Press the MENU button.
2. Touch the “Protect
If you touch “Select Files”, you will see image thumbnails.
•
” and then the desired submenu item.
Go to Step 3.
If you touch "All On" or "All Off", you will see the message
•
that corresponds to that option. Go to Step 4.
3. Touch the thumbnails of the fi les you want to protect. After you
have selected all the fi les you want to protect, touch the
See Submenu items below for additional details.
•
4. Touch “Yes.”
If you selected "All On", the (
•
If you selected "All Off", the ( ) indicator disappears from all
protected fi les.
If you selected “Select Files”, the
•
fi les you selected for protection and disappears from the fi les
you removed protection from.
The protection indicator ( ) is displayed on the selected fi les.
•
Submenu items
Select Files: Protects individual images. Touch the images you want
•
All On: Protects all images.
•
All Off: Releases the protected images all at once.
•
to protect from erasure. The (
the selected images. Touching the thumbnail image
toggles the image between being selected (
selected. Touch the (
the fi les you want to protect.
) button, and then
( )
tab.
) indicator appears on all fi les.
( )
indicator appears on the
) indicator appears on
) tab after you have selected all
) or not
Protect SettingsShare
Delete
Select Files All On
Delete
Protect SettingsShare
All Off
52
You can also operate this function in the full and single image display mode.
Page 59

53
Share Mark
You can set the share mark on a video and directly upload the marked fi le to the YouTube site.
PRECHECK!
Insert a memory card. ¬page 27
•
Select the Play mode by pressing the Mode (
•
1. Press the MENU button.
2. Touch the “Share Mark
If you touch “Select Files”, you will see image thumbnails.
•
” and then the desired submenu item.
Go to Step 3.
If you touch "All On" or "All Off", you will see the message
•
that corresponds to that option. Go to Step 4.
3. Touch the thumbnails of the fi les you want to share mark.
After you have selected all the fi les you want to share mark, touch
( )
tab.
the
See Submenu items below for additional details.
•
4. Touch “Yes.”
•
If you selected "All On", the (
If you selected "All Off", the ( ) indicator disappears from all
share marked fi les.
If you selected “Select Files”, the
•
fi les you selected for share marking and disappears from the
fi les you removed the share mark from.
•
The share mark indicator (
from.
Submenu items
Select Files: Share marked individual images.
•
All On: Share marked all images.
•
All Off: Releases the Share marked images all at once.
•
Touch the images you want to Share mark.
The (
) indicator appears on the selected images.
Touching the thumbnail image toggles the image
between being selected (
Touch the (
you want to share mark.
) tab after you have selected all the fi les
) button, and then touch the Video ( ) tab. ¬page 23
Select Files All On
) indicator appears on all fi les.
( )
indicator appears on the
) is displayed on the share mark
) or not selected.
Delete
Delete
Protect SettingsShare
All Off
Protect SettingsShare
You can also operate this function in the full and single image display mode.
•
By using the Intelli-studio software embedded in the camcorder, you can easily upload videos
•
marked with share marks. ¬page 70
This function is available only in the video play mode.
•
If the total video recording time is more than 10 minutes, you can not set the share mark on the video.
•
Page 60

system setting
MENU
MENU
MENU
MENU
USING THE SETTING MENU TAB
You can change the menu settings to customise your camcorder.
•
Access the desired menu screen by following the steps below,
•
and then change the various settings.
PRECHECK!
Insert a memory card. ¬page 27
Using the Menu Tab: An Example
1. Press the MENU button in the record or the play mode.
The menu screen appears.
•
2. Touch the "Settings
3. Drag up/down or touch the Previous (
displayed and then touch the desired option.
•
The submenu items for the option you selected appear.
•
Touch the desired submenu item.
4. To exit the menu, touch the Return (
Using the setting menu
Storage Info
File No.
Date/Time Set
Date/Time Display
."
) or Next ( ) tab until the desired option is
) tab.
Settings
Settings
Storage Info
File No.
Date/Time Set
Date/Time Display
LCD Brightness
54
<Setting in the play mode>
<Setting in the record mode>
Page 61

55
SETTING MENU ITEMS
You can setup the date/time, OSD language, and display settings of the camcorder.
•
For operation details, see the page under Page in the table below.
•
Items Default value Page
Storage Info - 55
File No. Series 56
Date/Time Set 01/JAN/2010 00:00 56
Date/Time Display Off 57
LCD Brightness Normal 57
Auto LCD Off On 58
Beep Sound On
Shutter Sound On
Auto Power Off 5 Min
PC Software On
Format -
Default Set -
Language English
Demo On
These items and default values may be changed without notice.
•
There are some functions you cannot activate simultaneously in the menu. Also, you cannot select
•
greyed-out menu items. Refer to Troubleshooting for examples of unworkable combinations of
functions and menu items. ¬page 83
Storage Info
This function displays the storage information for the memory card in your
camcorder, such as the used or the available memory space, etc.
PRECHECK!
Insert a memory card. ¬page 27
1. Press the MENU button.
Settings
Storage Info
File No.
Date/Time Set
Date/Time Display
59
59
60
61
62
63
63
64
2. Touch the "Settings
Used memory space, memory space available for use,
•
" “Storage Info.”
and the recordable time depend on the video resolution
you have selected.
3. To exit the menu, touch the Return (
The actual capacity may be less than the capacity displayed on the LCD screen because the
•
camcorder’s system fi les occupy a part of the capacity.
If there is no memory card in your camcorder, you can not select Storage Info. It will be dimmed in
•
the menu.
) tab.
Storage Info
Used 231MB
Free 7.37GB
[HD] 720/25p
: [99Min]
Page 62

system setting
File No.
The camcorder assigns fi le names (numbers) are assigned to recorded images according to the
option you select.
1. Press the MENU button.
2. Touch the "Settings
•
Touch the desired submenu item.
" “File No.”
3. To exit the menu, touch the Return (
) tab.
Settings
Storage Info
File No.
Date/Time Set
Date/Time Display
Submenu items
Series : Assigns fi le numbers in sequence even if you replace the
•
•
memory card with another one, format the card, or delete
all fi les. The fi le number is reset only when a new folder is
created.
Reset : Resets the fi le number to 0001 after you format the memory
card, delete all fi les, or insert a new memory card.
When you set “File No.” to “Series.” each fi le is assigned a different number to avoid duplicating fi le
names. This numbering scheme is very useful when you want to manage your fi les on a computer.
Date/Time Set
By setting the date and time, you can display the date and time of the
recording during playback. ¬page 25
Date/Time Set
Day
01
Hr
qhu
YearMonth
2010
Min
56
00
00
Page 63

57
Date/Time Display
You can set the Date/Time Display function so that the date and time appear on the LCD screen. Before you
use the "Date/Time Display" function, you must set the date and time. ¬page 25
1. Press the MENU button.
2. Touch the "Settings
•
Touch the desired submenu item.
3. To exit the menu, touch the Return (
The date/time is displayed on the LCD screen according
•
" “Date/Time Display.”
) tab.
Settings
Storage Info
File No.
Date/Time Set
Date/Time Display
to the selected option.
Submenu items
Off : Current date/time information is not displayed.
•
Date : Displays the current date.
•
Time : Displays the current time.
•
Date & Time : Displays the current date and time.
•
The date/time will appear as “01/JAN/2010 00:00” in the following case:
- When the built-in rechargeable battery is depleted.
LCD Brightness
You can adjust the brightness of the LCD screen to compensate for ambient lighting conditions.
1. Press the MENU button.
2. Touch the "Settings
•
Touch the desired submenu item.
" “LCD Brightness.”
3. To exit the menu, touch the Return (
) tab.
Settings
LCD Brightness
Auto LCD Off
Beep Sound
Shutter Sound
Submenu items
Normal: Standard brightness.
•
Bright: Brightens the LCD screen.
•
Page 64

system setting
0:05:00
Auto LCD Off
To reduce power consumption, the camcorder automatically dims the brightness of the LCD
screen if the camcorder is idle for a period of time.
1. Press the MENU button.
2. Touch the "Settings
•
Touch the desired submenu item.
3. To exit the menu, touch the Return (
" “Auto LCD Off.”
) tab.
Submenu items
Off : Disables the function.
•
On : When the camcorder is idle for more than 2 minutes in the STBY
•
mode, or for more than 5 minutes when recording a video, the
power saving mode starts by dimming the LCD screen.
For example, LCD screen is automatically darkened.
STBY STBY
< In the STBY mode>
If the “Auto LCD Off” function is enabled and the LCD screen dims, you can press any button or
•
touch the LCD screen on the camcorder to return the LCD screen’s brightness to normal.
Auto LCD Off is temporarily disabled in the following cases:
•
- If you have connected the built-in USB plug of the camcorder to a PC.
- While the Demo function is in operation.
After 2 minutes
<During recording><LCD screen is darkened>
0:00:01
LCD Brightness
Auto LCD Off
Beep Sound
Shutter Sound
After 5 minutes
Settings
0:05:00
<LCD screen is darkened>
58
Page 65

59
Beep Sound
You can set the beep sound on or off. If you hear a beep sound when operating the menu
settings, Beep Sound is turned on.
1. Press the MENU button.
2. Touch the "Settings
•
Touch the desired submenu item.
" “Beep Sound.”
3. To exit the menu, touch the Return (
) tab.
Settings
LCD Brightness
Auto LCD Off
Beep Sound
Shutter Sound
Submenu items
Off: The beep sound is off.
•
On: You will hear a beep sound when operating buttons or tabs on
•
the LCD screen.
The Beep Sound function is temporarily disabled in the following cases:
- During recording and playing.
- When the camcorder has a cable connection. (Mini HDMI cable)
Shutter Sound
You can turn the shutter sound that plays when you touch the Photo ( ) tab on or off.
1. Press the MENU button.
2. Touch the "Settings
•
Touch the desired submenu item.
" “Shutter Sound.”
3. To exit the menu, touch the Return (
Submenu items
•
Off: The shutter sound is off.
•
On: The shutter sounds each time you touch the Photo (
) tab.
) tab.
Settings
LCD Brightness
Auto LCD Off
Beep Sound
Shutter Sound
The Shutter Sound is temporarily disabled under the following conditions:
- When you touch the Photo (
) tab while recording a video.
Page 66

system setting
Auto Power Off
To save battery power, you can set the "Auto Power Off" function to 5 Min. This setting turns
off the camcorder if there is no operation for fi ve minutes.
1. Press the MENU button.
2. Touch the "Settings
•
Touch the desired submenu item.
3. To exit the menu, touch the Return (
" “Auto Power Off.”
) tab.
Submenu items
Off: The camcorder does not turn off automatically.
•
5 Min: The camcorder automatically turns off if there is no operation
•
for 5 minutes in STBY mode or in thumbnail index view.
•
Auto Power Off is temporarily disabled in the following cases:
- When the camcorder is connected using its built-in USB plug.
- While the Demo function is in operation.
- While the camcorder is recording, playing (except when in pause), or running a photo slide show.
To operate the camcorder again, press the Power ( ) button.
•
Settings
Auto Power Off
PC Software
Format
Default Set
60
Page 67

61
PC Software
If you set PC Software to On, you can use the built-in video and photo management software
(Intelli-studio) by connecting the built-in USB plug on the camcorder to your PC. With this
software, you can download stored video and photo images from the camcorder to your PC’s
hard disk and edit the video and photo fi les on your PC’s screen.
1. Press the MENU button.
2. Touch the "Settings
Touch the desired submenu item.
•
" “PC Software.”
3. To exit the menu, touch the Return ( ) tab.
Submenu items
Off: Disables the function.
•
On: You can use the PC software by connecting the built-in USB
•
plug of the camcorder to your PC.
The PC software is compatible with Windows operating systems only.
Settings
Auto Power Off
PC Software
Format
Default Set
Page 68

system setting
Format
The format function deletes all fi les (including protected fi les) and options on the storage media.
You can also use this function if you want to correct problems with the storage media.
PRECHECK!
Insert a memory card. ¬page 27
1. Press the MENU button.
2. Touch the "Settings
A message appears asking for your confi rmation.
•
" “Format.”
3. Touch the “Yes”p “Yes.”
The camcorder formats the storage media and displays a
•
formatting message.
Do not remove the storage media or perform any other operation (such as turning off the power)
•
during formatting. Also, be sure the battery is suffi ciently charged. The storage media can be
corrupted if the battery becomes exhausted during formatting.
If the storage media becomes corrupted, format it again.
•
Do not format the storage media on a PC or other device.
•
Make sure to format the storage media on this camcorder.
If there is no memory card in your camcorder, you can not select Format. It will be dimmed in the
•
menu.
You must format storage media you used in other devices or newly purchased memory cards with
•
this camcorder before using them. This enables stable speeds and operation when the camcorder
accesses the storage media.
Be aware that formatting erases all fi les and data including protected fi les.
•
Settings
Auto Power Off
PC Software
Format
Default Set
Settings
Auto Power Off
)RUPDWWKH&DUG"
PC Software
$OO¿OHVZLOOEHGHOHWHG
Format
Default Set
NoYes
62
Page 69

63
Default Set
You can re-set your camcorder’s settings to the factory defaults (initial settings at the factory).
1. Press the MENU button.
2. Touch the "Settings
A message appears asking for your confi rmation.
•
" “Default Set.”
3. Touch "Yes" if you want all the settings returned to the default.
4. Set the date and time again. ¬page 25
Do not turn off the power while initializing the settings.
•
The "Default Set" function does not affect the fi les recorded on the storage media.
•
Settings
Auto Power Off
PC Software
Format
Default Set
Language
You can select a language in which to display the menu and messages. ¬page 26
Settings
Format
Default Set
Language
Demo
“Language” options may be changed without a prior notice.
•
The camcorder retains the language you select even when turn off the power.
•
The date and time format may change depending on the language you selected.
•
Page 70

system setting
Demo
Demo mode automatically shows you the major functions that are included in your camcorder
so that you can use them more easily.
1. Press the MENU button.
" “
Demo
2. Touch the "Settings
•
Touch the desired submenu item.
3. To exit the menu, touch the Return (
.”
) tab.
Submenu items
• Off: Disables the function.
• On: Enables the Demo function.
Using the Demo function
The Demo mode is cancelled in the following cases:
- If you touch the LCD screen.
- If you press any button. (MENU button, Mode (
However, the camcorder will enters the Demo mode automatically after 5 minutes in STBY mode if it
is idle for 5 minutes without an operation. If you don’t want the Demo function to start, set “Demo” to
“Off”.
Using the SHOP mode
In STBY mode, holding the MENU button for 5 seconds activates Demonstration mode which starts a
demo immediately without your setting "Demo: on."
) button, etc.)
Settings
Format
Default Set
Language
Demo
64
The Demo function does not operate in the following case:
- If “Auto Power Off” is set to “5 Min”, the Auto Power Off function turns the camcorder off before
Demo can run. ¬page 60
Page 71

using with a Windows computer
WHAT YOU CAN DO WITH A WINDOWS COMPUTER
You can perform the following functions by connecting your camcorder to your Windows computer
with the built-in USB plug and using the Intelli-studio software built into your camcorder.
Main functions
Intelli-studio editing software main functions:
•
- Playing back recorded videos or photos. ¬page 68
- Editing recorded videos or photos. ¬page 68
- Uploading the recorded videos and photos to Youtube, Flickr, FaceBook, etc. ¬page 69
You can also transfer or copy the files (videos and photos) saved on your storage media into
•
your computer. (the mass storage function) ¬page 72
System requirements
The following requirements must be satisfied to use the built-in editing software (Intelli-studio):
Items Requirement
OS Microsoft Windows XP SP2, Vista, or Windows 7
CPU
RAM 1GB or higher is recommended
Video Card NVIDIA GeForce 8500 or higher, ATI Radeon HD 2600 series or higher
Display
USB USB 2.0
Direct X DirectX 9.0c or higher
Memory Card A micro SDHC card of Class 6 or above
*
®
Intel
Core 2 Duo® 1.66 GHz or higher is recommended
AMD Athlon™ X2 Dual-Core 2.2 GHz or higher is recommended
(Notebook: Intel Core2 Duo 2.2GHz or AMD Athlon X2 Dual-Core 2.6GHz or
higher is recommended)
1024 x 768, 16-bit colour or higher
(1280 x 1024, 32-bit colour recommended)
System requirements listed above are minimum requirements. Even on a system that satisfies the
•
requirements, Intelli-studio may not operate optimally.
On a slower than recommended computer, video playback may skip frames or operate erratically.
•
If the version of DirectX on your computer is lower than 9.0c, install DirectX 9.0c or higher.
•
We recommend transferring recorded videos to a PC before playing back or editing them.
•
To run Intelli-studio, a laptop computer requires faster and better components than a desktop PC.
•
The built-in software on your camcorder, ‘Intelli-studio’, is not Macintosh compliant.
•
65
Page 72

using with a Windows computer
USING THE Intelli-studio PROGRAMME
Using the Intelli-studio programme built into your camcorder,
you can transfer video and photo fi les to your PC and
edit them on your PC screen. Intelli-studio offers the most
convenient way for you to manage your video
and photo fi les.
Step 1. Connecting the USB plug
1. Set “PC Software: On.”¬page 61
This is the default setting.
•
2. Connect the built-in USB plug of the camcorder to the USB port
of the PC.
A new fi le saving window appears along with the Intelli-studio
•
main window.
Depending on your version of Windows, the removable disk
•
Auto Power Off
PC Software
Format
Default Set
window also appears.
3. Click “Yes” in the fi le saving window. The uploading procedure
starts. Click “Yes” to confi rm.
If you do not want to save new fi les, select “No.”
•
To disconnect the USB plug
To disconnect the USB plug after completing the fi le transfer, you must follow these steps:
1. Click the “Safely Remove Hardware icon
2. Select “USB Mass Storage Device,” and then click “Stop.”
3. If the “Stop a Hardware device” window appears, click “OK.”
4. Disconnect the camcorder’s built-in USB plug from the PC.
” on the taskbar.
Settings
MENU
66
Make sure you insert the USB plug into the USB port with the plug facing in the correct direction.
•
When the built-in USB plug is connected, turning the camcorder on or off may cause the PC to
•
malfunction.
If you disconnect the camcorder’s built-in USB plug from the PC while transferring fi les, the data
•
transmission will stop and the data may be damaged.
If you connect the built-in USB plug to a PC via a USB HUB or simultaneously connect the built-
•
in USB plug along with other USB devices, the camcorder may not work properly. If this occurs,
remove all USB devices from the PC, and then reconnect the camcorder.
Intelli-studio may not automatically run. If this occurs, access My Computer or Windows Explorer,
•
open the drive that corresponds to your camcorder, fi nd Intelli-studio, and then run IStudio.exe.
The camcorder is turned off when its USB plug is departed from the USB port of the computer.
•
Page 73

67
Step 2. About the Intelli-studio main window
When the Intelli-studio starts up, thumbnails of videos and photos are displayed in the main window.
12345
6
!
0
7
9
8
1. Menu items
2. Switches to Library of the computer and
connected camcorder.
3. Switches to Photo Edit mode.
4. Switches to Movie Edit mode.
5. Switches to Share mode.
6.
Displays all fi les (videos and photos).
Displays video fi les only.
Displays photo fi les only.
Displays voice fi les only.
7. Minimises the Connected Device screen.
8. Displays videos and photos in various ways.
Thumbnails: Displays video and photo
•
thumbnails.
Smart Album: Arranges multiple videos and
•
photos by various classifi cations.
Changes the size of thumbnails.
Intelli-studio is a programme commonly used in Samsung camcorders or digital cameras. Some
•
functions listed above may not work, depending on the product you purchased.
This product is designed for home use. It is not designed for precision production or industrial
•
purposes. The intelli-studio built in the camcorder is for home use. For accurate and professional
editing, it is recommend to use a professional editing software.
•
Global Map: Displays locations where you
shot photos on a map.
9. Selects the connected device.
10. Shows Contents Manager and My Computer
directories.
•
Contents Manager: You can classify and
manage videos and photos on your computer.
•
My Computer: You can view videos and
photos saved in selected directories of your
computer.
11. Shortcut icons
Navigates fi les (previous and next).
Prints selected photo(s).
Using GPS information, displays location
where selected photo(s) were taken.
Registers to Contents Manager.
Manages the registry of faces in the selected
photo.
Page 74

using with a Windows computer
Step 3. Playing back videos or photos
You can play back recordings conveniently using the Intelli-studio application.
1. Run the Intelli-studio programme. ¬page 66
2. Click the desired folder to display your
recordings.
•
Video or photo thumbnails appear on
the screen, depending on the folder you
selected.
3. Choose the video or photo that you want to
play.
•
You can view the file information by moving
the mouse over the thumbnail.
•
If you click a video thumbnail once, the video plays back inside the thumbnail frame,
allowing you to search for a desired scene with ease.
4. Once you select the desired video or photo, double-click to play back.
•
Playback starts and playback controls appear.
Intelli-studio supports the following file formats:
- Video formats: MP4 (Video: H.264, Audio: AAC), WMV (WMV 7/8/9)
- Photo formats: JPG, GIF, BMP, PNG, TIFF
Step 4. Editing videos or photos
With Intelli-studio, you can edit videos or photos in
various ways.
(For example, Change Size, Fine-Tune, apply Image
Effect, Insert Frame, etc.)
Before editing a video or photo in Intelli-studio,
•
make a backup copy of the file by copying the
video or photo file to your computer using My
Computer or Windows Explorer.
To begin editing a file, select the file, and then
•
68
click the “Edit (
You can not copy edited files (videos and
•
photos) on a PC to the camcorder in any way.
/ )” icon.
Page 75

69
Step 5. Sharing the videos/photos online
Share your contents with the world by uploading photos and videos directly to a web site with
one click.
1. Select the videos or photos you want to share.
2. Click “Share” on the Intelli-studio browser.
The selected fi le appears on the sharing window.
•
3. Click the web site you would like to upload fi les to.
You can choose “YouTube,” “Flickr,”
•
“Facebook,” or another web site you want to
use for your uploading management.
4. Click “Upload” to start uploading.
A pop-up window appears asking for your ID and
•
password.
5. Enter your ID and password to access.
Access to the web site contents can be limited
•
depending on your web access environment.
For more information about using Intelli-studio, open
the Help Guide by clicking “Help.”
Flickr is an image hosting website, web services suite, and online community platform. In addition
•
to being a popular website for users to share personal photographs, the service is widely used by
bloggers as a photo repository.
http: //www.fl ickr.com/
•
Facebook is a global social networking website that is operated and privately owned by Facebook,
•
Inc. Users can add friends and send them messages, and update their personal profi les to notify
friends about themselves. Additionally, users can join networks organized by city, workplace,
school, and region.
http: //www.facebook.com/
•
YouTube is a video sharing website. Users can upload, view, and share personalized video clips.
•
The San Bruno-based service uses Adobe Flash technology to display a wide variety of usersgenerated contents including video clips, TV clips and music videos, as well as amateur contents
such as video blogging and short original videos.
http: //www.youtube.com/
•
Page 76

using with a Windows computer
MENU
Upload your videos directly to YouTube !
The One-Touch Share tab lets you directly upload and share your videos on YouTube.
Just touch the Share tab while your camcorder is connected to a Windows computer using the
built-in USB plug.
Step 1
On the camcorder, select a video you want to upload in the video
thumbnail index view using the Share (
Repeat for each video you want to upload.
The Share mark (
•
You can also operate this function in the full and single image display
•
mode.
) appears on each video.
Step 2
Connect the built-in USB plug of the camcorder to the USB port of the
.
PC
If you have set “PC Software: On”, Intelli-studio runs automatically
•
on a Windows computer after you’ve connected the camcorder.
Step 3
Touch the Share ( ) tab on the LCD screen while your camcorder is
connected to a Windows computer.
A pop-up sharing window displaying the videos with Share marks
•
appears on the screen.
Click "Yes" on the PC screen to begin uploading your videos to
•
YouTube.
If you want to upload directly without showing a pop-up sharing
•
window, check "Intelli-studio does not show a list of share marked fi les
from the connected device."
) tab in the menu. ¬page 53
USB Connected
[Card]
3UHVVWKH6KDUHEXWWRQWR
XSORDG¿OHV
70
As part of the uploading process, the videos you marked are converted into a format playable by YouTube
•
before actually uploading. Time spent uploading may vary depending on such conditions as fi le size,
computer performance, and network speed.
There is no guarantee the uploading operation will work in all environments. YouTube server-side changes in
•
the future may disable this function.
For more information on YouTube, visit the YouTube website: http://www.youtube.com/
•
This product’s YouTube uploading functionality is provided under the licence from YouTube LLC. The
•
presence of the YouTube uploading functionality in this product is not an endorsement of or recommendation
for the product by YouTube LLC.
If you do not have an account on a specifi ed website, you must register fi rst before you can upload.
•
According to YouTube’s policy, direct video uploading may not be available in your nation / region.
Page 77

Installing Intelli-studio on a Windows computer
The Intelli-studio application will run faster if you install it on your Windows computer.
•
Also, if you install it on your computer, it can be updated automatically.
Follow these directions to install Intelli-studio onto your Windows computer:
•
Click “Tool”t “Install Intelli-studio on PC” on the Intelli-studio screen and then follow the
steps below.
12
34
71
Page 78

using with a Windows computer
USING AS A REMOVABLE STORAGE DEVICE
You can transfer or copy recorded data from the camcorder to a Windows computer by
connecting the camcorder’s built-in USB plug to the computer’s USB port.
Viewing the contents of the storage media
1. Set “PC Software: Off.”¬page 61
2. Insert a memory card.
3. Connect the built-in USB plug of the camcorder to the
USB port of the PC. ¬page 66
The “Removable Disk” or “Samsung” window
•
appears on the PC’s screen after a moment.
Select “Open folder to view fi les using Windows
•
Explorer”, and then click “OK.”
4. The folders in the storage media appear.
Different fi le types are stored in different folders.
•
5. Select the desired folder or fi les to copy, then drag and
drop them into the destination folder.
The folder or fi les are copied from the storage media
•
to the PC.
Photos Videos
Setting data
72
If the “Removable Disk” window does not appear,
•
confi rm the connection (¬page 66) or perform Steps 1
through 4 again.
If the removable disk does not appear automatically,
•
open the removable disk folder in My Computer.
If the connected camcorder’s disk drive does not open
•
or the context menu that appears when you right click
your mouse (open or browse) appears broken, your
computer may to be infected by an Autorun virus. Please
update your anti-virus software to its latest version, and
then scan your disk drives.
The camcorder is turned off when its USB plug is
•
departed from the USB port of the computer.
Page 79

73
Structure of folders and fi les on the storage media
HDV_0001.MP4
DCIM
VIDEO
MISC
100PHOTO
HDV_0002.MP4
SAM_0001.JPG
SAM_0002.JPG
100VIDEO
1
2
HDV_0003.MP4
The folder and fi le structure for storage media is below.
•
File naming follows DCF (Design rule for Camera File System) rules.
•
Video fi le (H.264)
The HD-quality (1920x1080 25p or 1280x720 25p) videos have
•
an HDV_####.MP4 format.
The fi le number automatically increases when a new video fi le is
•
created.
Up to 9,999 fi les can be stored in one folder. The camcorder
•
creates a new folder when the number of fi les in a folder
exceeds 9,999.
Photo fi le
As with video fi les, the fi le number automatically increases when
•
a new photo fi le is created.
The maximum number of fi les per folder is the same as with
•
video fi les. The photos have an SAM_####.JPG format.
The folder names increase in this order: 100PHOTO
•
101PHOTO etc.
Up to 9,999 fi les can be stored in one folder. The camcorder
•
creates a new folder when the number of fi les in a folder
exceeds 9,999.
Image format
Video fi les
Videos are compressed in H.264 format. The fi le extension is ".MP4."
•
Refer to page 44 for video resolution.
•
Photo fi les
Photos are compressed in JPEG (Joint Photographic Experts Group) format.
•
The fi le extension is ".JPG."
Refer to page 45 for photo resolution.
•
When the 9,999th fi le (i.e. HDV_9999.MP4) is created in the 999th VIDEO folder on a memory card,
•
no more folders can be created. Backup your fi les to a PC and format the storage media, then
reset the fi le numbering from the menu.
Do not modify the name of a video fi le recorded by the camcorder. Proper playback by the
•
camcorder requires the original folder and fi le name.
Page 80

connecting to other devices
MENU
CONNECTING TO A TV
You can view videos and photos you recorded on a large screen by connecting the camcorder
to an HDTV or Standard TV that supports HDMI.
PRECHECK!
Insert a memory card. ¬page 27
Using a mini HDMI cable (not supplied)
To play back the HD-quality (1080/25p or 720/25p) videos, you need an HDTV (high defi nition
TV).
Camcorder
HDTV
Signal fl ow
Mini HDMI Cable
(not supplied)
1. Turn on the camcorder, and then connect a mini HDMI cable (not supplied) from the
camcorder to the HDMI In jack on your TV.
2. Turn on your TV and set the TV’s input selector to the Input your camcorder is connected
to.
Refer to the TV’s instruction manual to see how to select the TV input.
•
3. Select the playback mode on your camcorder, and then start to play back videos.
page 38
¬
74
Page 81

75
Understanding the HDMI cable
HDMI (High Definition Multimedia Interface) is a compact audio/video interface for transmitting
uncompressed digital data.
You can use only a C to A type mini HDMI cable with this camcorder.
•
The HDMI jack on the camcorder provides output only.
•
Use only HDMI 1.3 cable when connecting to the HDMI jack of this camcorder. If you connect
•
using HDMI cable that is not version 1.3 compatible, the screen display may not work.
Do not use excessive force when connecting the cables.
•
When the camcorder is connected to a TV, you cannot control the volume of the TV from the
•
camcorder.
TV IMAGE DISPLAYS
Image appearance depends on the TV screen aspect ratio (16:9 or 4:3)
Recording ratio Wide (16:9) TV 4:3 TV
Images recorded in
a 16:9 ratio
Images recorded in
a 4:3 ratio
Page 82

troubleshooting
Before contacting a Samsung authorised service centre, perform the following simple checks.
They may save you the time and expense of an unnecessary call.
WARNING INDICATORS AND MESSAGES
Power source
Message Icon Informs that ... Action
Charge the battery by attaching the
Low Battery -
Check the authenticity
of this battery
Storage media
Message Icon Informs that ... Action
Insert Card
Card Full
Card Error
Not Supported Card
Not Formatted
Not Supported
Format
Low speed card.
Please record at a
lower resolution.
76
The battery is almost
discharged.
The battery can not pass
authenticity check.
There is no memory card
inserted in the card slot.
There is not enough space to
record on the memory card.
The memory card has a
problem and the camcorder
can’t recognise it.
The memory card is not
supported by this camcorder.
The memory card is not
formatted.
The memory card was
formatted by another device
and may still have images on
it.
The memory card does
-
not have enough speed to
record.
•
camcorder to a PC using the built-in
USB plug.
Check whether the battery is authentic.
•
Change to an authentic Samsung
battery.
We recommended you use only genuine
•
Samsung batteries in this camcorder.
Insert a memory card.•
•
Delete unnecessary fi les on the memory
card.
•
Back-up fi les to your PC or another
storage media, and then delete fi les.
•
Format the memory card.
•
Change to another memory card which
has enough free space.
•
Eject and re-insert the memory card.
If the problem persists, replace the
memory card with a new one.
•
Eject and re-insert the memory card.
If the problem persists, replace the
memory card with a recommended
card.
Eject and re-insert the memory card. If the
•
problem persists, format the memory card
using the camcorder.
The camcorder cannot play the fi les
•
because it does not support the memory
card’s fi le format. Format the card using the
camcorder or install and format a new card.
•
Change the memory card to a faster
one.¬page 29
Change to a lower resolution.
•
Page 83

77
Recording
Message Icon Informs that ... Action
Back up important files on the
•
storage media to your PC, and then
format the storage media using the
camcorder.
This function is available only in the
•
photo record mode.
Please move the camcorder slowly
•
to allow perceiving the subject’s
movement.
Sweep the camcorder in one
•
direction.
Back up important files on the
•
storage media to your PC, and then
format the storage media using the
camcorder. Set “File No.” to “Reset.”
Back up important files on the
•
storage media to your PC, and then
format the storage media using the
camcorder. Set “File No.” to “Reset.”
Write Error -
Cannot record
video on panorama
mode.
Camera moved too
quickly, or subject
is too close.
Move camera more
slowly.
Shooting aborted
as shot direction
changed.
The number of
video files is full.
Cannot record
video.
The number of
photo files is full.
Cannot take a
photo.
Problems occurred while
writing data to the storage
media.
This function is not
-
supported by this
camcorder.
Cannot trace the subject
since the subject is too
-
close or the camcorder is
moving too fast.
You need to move the
camcorder in one direction
-
only when taking a
panorama.
Folder and files have
reached their maximum
-
capacity and you can not
record.
Folder and files have
reached their maximum
-
capacity and you cannot
take a photo.
Playback
Message Icon Informs that ... Action
Back up important files on the
•
storage media to your PC, and then
format the storage media using the
camcorder.
Read Error
Problems occurred during
data read from storage
-
media.
Page 84

troubleshooting
SYMPTOMS AND SOLUTIONS
If these instructions do not solve your problem, contact your nearest Samsung authorised
service centre.
Power
Symptom Explanation/Solution
Charge the battery by attaching the camcorder to a PC using the
The camcorder does not turn on.
The power automatically turns off.
The battery discharges quickly.
Display
Symptom Explanation/Solution
The recorded image is wider or
narrower than the original image.
•
built-in USB plug.
Is “Auto Power Off” set to “5 Min”? If no button is pressed for
•
about 5 minutes, the camcorder automatically turns off. To disable
this option, change "Auto Power Off" to "Off."¬page 60
The battery is almost discharged. Charge the battery by attaching
•
the camcorder to a PC using the built-in USB plug.
The temperature is too low.
•
The battery is not fully charged. Recharge the battery.
•
The battery reached the end of its lifespan and cannot be
•
recharged.
Contact your nearest Samsung authorised service centre to
purchase a replacement.
You should check the resolution before you record.
•
pages 45
¬
Unknown indicator appears on the
screen.
The image on the LCD screen looks
dark.
78
•
A warning indicator or message appears on the screen.
pages 76, 77
¬
Ambient light is too bright. Adjust the brightness and angle of the
•
LCD.¬pages 57
Page 85

79
Storage Media
Symptom Explanation/Solution
Memory card functions are not
operable.
Image cannot be deleted.
You cannot format the memory
card.
The data fi le name is not indicated
correctly.
Recording
Symptom Explanation/Solution
Touching the Recording start
) tab does not start recording.
(
Insert a memory card into your camcorder properly. ¬page 27
•
If you are using a memory card formatted on a computer, format it
•
again directly on your camcorder. ¬page 62
You cannot delete protected images. Remove protection from the
•
image.¬page 52
Copy all important recorded fi les to your PC before formatting.
•
Samsung is not responsible for any loss of data. (We recommend
that you copy the data to your PC or other storage media.)
The memory card is not supported on your camcorder or card has
•
some problems.
The fi le may be corrupted.
•
The fi le format is not supported by your camcorder.
•
The camcorder does not display the fi le name correctly if the
•
directory structure does not comply with the international standard.
There is not enough free space to record on the storage media.
•
The internal temperature of your camcorder is unusually high.
•
Turn off your camcorder and leave it for a while in a cool place.
Your camcorder is damp and moist inside (condensation).
•
Turn off your camcorder, remove the battery, and leave both in a
dry place for at least 1 hour.
The actual recording time is less
than the estimated time.
The estimated recording time may vary depending on the subjects
•
you record and the features you use.
Recording a fast-moving subject increases the bit rate and
•
consequently the amount of storage space required for the
recording, which can lead to a shorter available recording time.
Page 86

troubleshooting
Recording
Symptom Explanation/Solution
There is no more free space for recording on the storage media.
•
The recording stops
automatically.
Back up important fi les on your PC and format the storage media
or delete unnecessary fi les.
If you use a memory card with a low write speed, the camcorder
•
automatically stops recording videos and the corresponding
message appears on the LCD screen.
80
When recording a subject
illuminated by bright light, vertical
lines appear.
When the screen is exposed to
direct sunlight during recording,
the screen turns red or black for
an instant.
You don’t hear the beep sound.
There is a time difference between
the point where you touch
Recording start (
tab and the point where the
recorded video starts/stops.
You cannot record a photo.
) /stop ( )
The camcorder is unable to record these levels of brightness.
•
Record in an area that is not as bright.
This is not a malfunction. Do not expose the camcorder to direct
•
sunlight.
Set the "Beep Sound" to "On."¬page 59
•
The beep sound is temporally off while recording videos.
•
•
On your camcorder, there may be a slight time delay between
the time when you touch Recording start (
tab and the actual time where the recorded video starts/stops.
This is not an error.
Set your camcorder to Record mode. ¬page 23
•
The storage media is full. Use a new memory card or format the
•
storage media. ¬page 56
Or delete unnecessary images. ¬page 51
) /stop ( )
Page 87

81
Adjusting the image during recording
Symptom Explanation/Solution
This camcorder has no user-adjustable focus control function.
It is out of focus.
•
The minimum focal length between the camcorder and the
•
subject is 20 cm (about 7.87 inches).
Playback on your camcorder
Symptom Explanation/Solution
Press the Mode (
Playback (play/pause) function
does not work.
The skip or search function does
not work properly.
•
Image files recorded on another camcorder may not play on your
•
camcorder.
Check the memory card compatibility. ¬page 28
•
If the temperature inside the camcorder is too high, it cannot
•
function properly. Turn the camcorder off, wait for a few minutes,
and turn it on again.
Playback on other devices (TV, etc.)
Symptom Explanation/Solution
You cannot view the image or
hear the sound on the connected
device.
The image appears distorted on
your TV or PC.
The mini HDMI cable is not connected properly. ¬page 74•
The display mode of the recorded video does not match that of
•
playback display device.
A video recorded in 16:9 wide mode should be played back on a
•
TV or PC that supports 16:9 screen mode.
) button to set the Play mode.
Page 88

troubleshooting
Connecting to a computer
Symptom Explanation/Solution
Your computer does not
recognise your camcorder.
Cannot play a video file properly
on a PC.
Intelli-studio does not function
properly.
The image or sound on your
camcorder is not played on your
computer properly.
Disconnect the built-in USB plug of the camcorder from the PC,
•
restart the PC, and then reconnect camcorder correctly.
You need a video codec to play the file recorded on your
•
camcorder. Install or run the built-in editing software (Intellistudio).
Check whether the built-in USB plug of the camcorder is
•
connected in the proper direction.
Disconnect the built-in USB plug of the camcorder from the
•
PC, restart the computer, and then reconnect the camcorder
properly.
Your computer may not have the necessary performance
•
specifications to play back a video file. Check the recommended
computer specifications.
Exit the Intelli-studio application, and restart the Windows
•
computer.
Intelli-studio is not Macintosh compliant.
•
Set “PC Software” to “On” in the Settings menu. ¬page 61
•
The Intelli-studio programme may not run automatically. If this
•
occurs, access My Computer or Windows Explorer, open the
drive that corresponds to your camcorder, find Intelli-studio, and
then run IStudio.exe.
Video playback or sound may stop temporarily depending on
•
your computer.
The video or sound you have copied to your computer is not
affected.
If your camcorder is connected to a computer that does not
•
support Hi-speed USB (USB 2.0), the video or sound may not
play back correctly.
The video and sound you have copied to your computer are not
affected.
82
The playback screen is paused or
distorted.
Check the system requirements to play a video. ¬page 65
•
Exit all other applications running on the computer.
•
The transfer speed between the camcorder and PC is too slow,
•
causing the video to pause or distort. Please copy the file to your
PC, and then play it back.
Page 89

83
General operations
Symptom Explanation/Solution
Has the camcorder been left unused for a long period of time?
The date and time are
incorrect.
•
The backup built-in rechargeable battery may be discharged.
page 25
¬
Menu
Symptom Explanation/Solution
You cannot select greyed items in the current recording/playback
•
Menu items are greyed out
•
The following functions cannot be used when the camcorder is in the Smart filter mode:
mode.
If you have not inserted a memory card into the camcorder, all
•
functions that require a memory card ("Storage Info", "Format",
etc.) are dimmed in the menu and you will not be able to select them.
- Digital zoom, “Video Resolution”, “Photo Resolution”
•
The following function is automatically set to Off in the Panorama mode:
- “Smart filter”
Page 90

maintenance & additional information
MAINTENANCE
Cautions when storing
•
For safekeeping of the camcorder, turn off the camcorder.
- Remove the battery.¬page 17
- Remove the memory card. ¬page 27
LCD screen
•
Do not push the LCD screen too hard or strike it with anything.
•
When you use the camcorder in cold conditions, an afterimage may appear on the LCD
screen. This is not a malfunction.
•
If you leave the power on for a long time, the surface around the LCD screen becomes hot.
•
An LCD screen is manufactured using advanced technology which creates screens with
pixel failure rates of less than 0.01%. However, a black or bright spot (red, blue, white) may
appear in the centre of the LCD screen and up to two spots may appear outside the centre.
These spots, which are sometimes incurred during the manufacturing process, do not affect
the recorded images.
Lens
•
Use an optional air blower to blow out dirt and other small objects. Do not wipe the lens with
cloth or your fingers.
•
When the lens gets frosty, turn the power off and leave it off for approximately an hour.
When the temperature of the lens is similar to the ambient temperature, the frost will
disappear.
When there is dew condensation, put the camcorder aside for a while before using
What is dew condensation?
•
Dew condensation happens when a camcorder is moved to a location where there is a significant temperature difference
from the previous location. The dew condenses on the external or internal parts of the camcorder, and on the reflection
lens. If there is dew on or in your camcorder, it may cause the camcorder to malfunction or damage the camcorder when
you turn the power on.
Exactly when does dew condensation occur?
•
When you move the camera to a location with a higher temperature than the previous location, or when you move it to
a hot area suddenly. Examples:
- You record outside in cold weather during the winter and then move the camera in indoors.
- You record outside in hot weather after being indoors or inside a car where the A/C was running.
What can I do?
•
Turn the power off, detach the battery, and leave the camcorder in a dry area for 1~2 hours before using it.
84
Use the camcorder after dew condensation has completely disappeared.
•
Be sure to use the recommended accessories supplied with the camcorder. For service, contact
•
your nearest Samsung authorised service centre.
Page 91

85
USING YOUR CAMCORDER ABROAD
Each country or region has its own electric and colour systems.
•
Before using your camcorder abroad, check the following items.
•
On TV colour systems
Your camcorder is an PAL based camcorder.
If you want to view your recordings on a TV it must be an PAL based TV and have an HDMI
jack. Otherwise, you may need to use a separate video format transcoder (PAL-NTSC format
converter) to convert the video signal.
The format transcoder is not provided by Samsung.
PAL-compatible countries/regions
Australia, Austria, Belgium, Bulgaria, China, CIS, Czech Republic, Denmark, Egypt, Finland,
France, Germany, Greece, Great Britain, Holland, Hong Kong, Hungary, India, Iran, Iraq,
Kuwait, Libya, Malaysia, Mauritius, Norway, Romania, Saudi Arabia, Singapore, Slovak
Republic, Spain, Sweden, Switzerland, Syria, Thailand, Tunisia, etc.
NTSC-compatible countries/regions
Bahamas, Canada, Central America, Japan, Korea, Mexico, Philippines, Taiwan, United
States of America, etc.
You can make recordings with your camcorder and view pictures on the LCD screen anywhere
in the world.
Page 92

specifications
Model name HMX-E10WP/HMX-E10BP/HMX-E10OP
HMX-E15WP/HMX-E15BP/HMX-E15OP
Video signal
Picture compression format
System
LCD screen
Connectors
General
Ú
These technical specifications and design may be changed without notice.
Audio compression format
Image device
Lens
Focal length
Size/dot number
LCD screen method
HDMI output
USB output
Power source
Power source type
Power consumption
(Recording)
Operating temperature
Operating humidity
Storage temperature
Dimensions (WxHxD)
Weight
Internal MIC
Storage media
PAL
H.264 (MPEG-4.AVC)
AAC (Advanced Audio Coding)
1/3.2”, 8M Pixel CMOS
F2.2, Digital zoom: x2
4.9mm
2.7 inch / 230k
4:3 TSP LCD
C type connector
Built-in USB
3.7V (Using Lithium Ion battery)
Lithium Ion battery
2.1W (720 25P)
32˚F~104˚F (0˚~40˚C)
Below 60%
-4˚F ~ 140˚F (-20˚C ~ 60˚C)
57.5 mm x 108.5 mm x 16.8 mm
(2.26” x 4.27” x 0.66”)
0.19 lb (88g, 3.10 oz)
(Except for Lithium Ion battery)
Omni-directional stereo microphone
Memory card (micro SD/micro SDHC)
86
Page 93

Contact SAMSUNG WORLD WIDE
If you have any questions or comments relating to Samsung products, please contact the
SAMSUNG customer care centre.
Region Country
North America
Latin America
Europe
CIS
$VLD3DFL¿F
0LGGOH(DVW$IULFD
CANADA 1-800-SAMSUNG(726-7864) www.samsung.com
MEXICO 01-800-SAMSUNG(726-7864) www.samsung.com
U.S.A 1-800-SAMSUNG(726-7864) www.samsung.com
ARGENTINE 0800-333-3733 www.samsung.com
BRAZIL 0800-124-421, 4004-0000 www.samsung.com
CHILE 800-SAMSUNG(726-7864) www.samsung.com
Nicaragua 00-1800-5077267
Honduras 800-7919267
COSTA RICA 0-800-507-7267
ECUADOR 1-800-10-7267
EL SALVADOR 800-6225
GUATEMALA 1-800-299-0013
JAMAICA 1-800-234-7267
PANAMA 800-7267
PUERTO RICO 1-800-682-3180
REP. DOMINICA 1-800-751-2676
TRINIDAD & TOBAGO 1-800-SAMSUNG(726-7864)
VENEZUELA 0-800-100-5303
COLOMBIA 01-8000112112
AUSTRIA 6$0681*¼PLQ
BELGIUM 02-201-24-18
CZECH 800 - SAMSUNG(800-726786)
DENMARK 70 70 19 70
FINLAND 030 - 6227 515
FRANCE 01 48 63 00 00
GERMANY 6$0681*¼0LQ
HUNGARY 06-80-SAMSUNG(726-7864)
ITALIA 800-SAMSUNG(726-7864)
LUXEMBURG 261 03 710
NETHERLANDS
NORWAY 815-56 480
POLAND
PORTUGAL 80820-SAMSUNG(726-7864)
SLOVAKIA 0800-SAMSUNG(726-7864)
SPAIN 902-1-SAMSUNG (902 172 678)
SWEDEN 0771 726 7864 (SAMSUNG)
U.K 0845 SAMSUNG (7267864)
IRELAND 0818 717100
Switzerland 6$0681*&+)PLQ
LITHUANIA 8-800-77777 www.samsung.com
LATVIA 8000-7267 www.samsung.com
ESTONIA
RUSSIA 8-800-555-55-55
Georgia 8-800-555-555
Armenia 0-800-05-555
$]HUEDLMDQ 088-55-55-555
KAZAKHSTAN 8-10-800-500-55-500
UZBEKISTAN 8-10-800-500-55-500
KYRGYZSTAN 00-800-500-55-500
TADJIKISTAN 8-10-800-500-55-500
UKRAINE 0-800-502-000
Belarus 810-800-500-55-500
Mouldova 00-800-500-55-500
AUSTRALIA 1300 362 603 www.samsung.com
New zealand 0800 SAMSUNG (0800 726 786) www.samsung.com
CHINA 400-810-5858, 010-6475 1880 www.samsung.com
HONG KONG (852) 3698-4698
INDIA 3030 8282, 1800 110011, 1800 3000 8282, 1800 266 8282 www.samsung.com
INDONESIA 0800-112-8888, 021-5699-7777 www.samsung.com
JAPAN 0120-327-527 www.samsung.com
MALAYSIA 1800-88-9999 www.samsung.com
PHILIPPINES
SINGAPORE 1800-SAMSUNG(726-7864) www.samsung.com
THAILAND 1800-29-3232, 02-689-3232 www.samsung.com
TAIWAN 0800-329-999 www.samsung.com
VIETNAM 1 800 588 889 www.samsung.com
7XUNH\ 444 77 11
SOUTH AFRICA 0860-SAMSUNG(726-7864 )
U.A.E 800-SAMSUNG (726-7864) www.samsung.com
Bahrain 8000-4726
Jordan 800-22273
(J\SW 0800-726786
KSA 9200-21230
Qatar 800-2255
6\ULD 1825-22-73
6$0681*¼0LQ
0 801 1SAMSUNG(172678), 022-607-93-33
800-7267
1-800-10-SAMSUNG(726-7864), 1-800-3-SAMSUNG(726-7864),
1-800-8-SAMSUNG(726-7864), 02-5805777
Contact Centre
:HE6LWH
www.samsung.com
www.samsung.com
www.samsung.com
www.samsung.com
www.samsung.com
www.samsung.com
www.samsung.com
www.samsung.com
www.samsung.com
www.samsung.com
www.samsung.com
www.samsung.com
www.samsung.com
www.samsung.com
ZZZVDPVXQJFRPEH'XWFK
ZZZVDPVXQJFRPEHBIU)UHQFK
www.samsung.com
www.samsung.com
www.samsung.com
www.samsung.com
www.samsung.com
www.samsung.com
www.samsung.com
www.samsung.com
www.samsung.com
www.samsung.com
www.samsung.com
www.samsung.com
www.samsung.com
www.samsung.com
www.samsung.com
www.samsung.com
www.samsung.com
ZZZVDPVXQJFRPFK
ZZZVDPVXQJFRPFKBIU)UHQFK
www.samsung.com
www.samsung.com
www.samsung.com
www.samsung.com
www.samsung.com
www.samsung.ua
ZZZVDPVXQJFRPXDBUX
ZZZVDPVXQJFRPKN
ZZZVDPVXQJFRPKNBHQ
www.samsung.com
www.samsung.com
www.samsung.com
www.samsung.com
Page 94

RoHS compliant
Our product complies with “The
Hazardous Substances in electrical and electronic
equipment”, and we do not use the 6 hazardous
materials- Cadmium(Cd), Lead (Pb), Mercury (Hg),
Hexavalent Chromium (Cr +6), Poly Brominated
Biphenyls (PBBs), Poly Brominated Diphenyl
Ethers(PBDEs)- in our products.
Restriction Of the use of certain
Page 95

Benutzerhandbuch
High Defi nition Digital Camcorder
www.samsung.com/register
HMX-E10WP/HMX-E10BP/HMX-E10OP
HMX-E15WP/HMX-E15BP/HMX-E15OP
Page 96

Vor dem Lesen dieses Benutzerhandbuchs
SICHERHEITSHINWEISE
Erläuterung der Zeichen und Symbole in diesem Benutzerhandbuch.
Es besteht Lebensgefahr oder das Risiko schwerer
WARNUNG
ACHTUNG
ACHTUNG
Personenschäden.
Es besteht das Risiko schwerer Personenschäden oder Schäden
am Gerät.
Um die Gefahr von Bränden, Explosionen, Stromschlägen und
Verletzungen zu verringern, sollten Sie bei der Verwendung des
Camcorders die angegebenen grundlegenden Sicherheitshinweise
beachten.
Dieses Symbol bezieht sich auf Hinweise oder Referenzseiten, die
eventuell hilfreich für den Betrieb des Camcorders sind.
BITTE BEACHTEN!
Durch diese Warnsymbole sollen Verletzungen des Benutzers sowie anderer Personen
verhindert werden.
Bitte befolgen Sie die Anweisungen genau. Bitte lesen Sie sich diese Sicherheitshinweise
sorgfältig durch, und bewahren Sie sie für den späteren Gebrauch an einem sicheren Ort auf.
Notwendige Einstellungen vor der Benutzung einer Funktion.
VORSICHTSMASSNAHMEN
WARNUNG!
Dieser Camcorder darf aus Sicherheitsgründen nur an geerdete Standard-Steckdosen
•
(Schutzkontakt-Steckdosen) angeschlossen werden.
Der Akku sollte keiner übermäßigen Hitze, zum Beispiel durch Sonneneinstrahlung,
•
Feuer oder ähnlichem, ausgesetzt werden.
Bei falscher Handhabung des Akkus besteht Explosionsgefahr.
Verwenden Sie ausschließlich Akkus des entsprechenden Typs.
ii
Um das Gerät vom Netzbetrieb zu trennen, muss der Stecker aus der Netzsteckdose
gezogen werden. Deshalb sollte der Netzstecker jederzeit zugänglich und leicht trennbar sein.
ACHTUNG
Page 97

WICHTIGE NUTZUNGSINFORMATIONEN
Vor dem Lesen dieser Benutzerhandbuchs
Danke, dass Sie sich für den Kauf eines Samsung
Camcorders entschieden haben. Bevor Sie
den Camcorder verwenden, lesen Sie dieses
Benutzerhandbuch bitte genau durch und halten Sie
es für den zukünftigen Gebrauch bereit. Sollte Ihr
Camcorder nicht einwandfrei funktionieren, lesen Sie
bitte unter Fehlersuche nach.
Dieses Benutzerhandbuch bezieht sich auf die
Modelle HMX-E10, HMX-E15.
•
Obwohl sich einige Funktionen der Modelle
HMX-E10 und HMX-E15 unterscheiden,
funktionieren sie auf dieselbe Weise.
•
In diesem Benutzerhandbuch werden Abbildungen
des Modells HMX-E10WP verwendet.
•
Die in diesem Benutzerhandbuch abgebildeten
Bildschirmanzeigen entsprechen möglicherweise
nicht genau denjenigen, die Sie auf Ihrem LCDBildschirm sehen.
•
Gestaltung und technische Daten des
Camcorders und des Zubehörs können ohne
vorherige Ankündigung geändert werden.
•
Ein eingeklammertes Symbol in dieser
Bedienungsanleitung bedeutet, dass es auf dem
Bildschirm erscheint, wenn Sie die entsprechende
Funktion einstellen.
Bsp.) Wählbare Einstellung von "Video
Resolution" (Videoauflösung). !Seite 44
- "1080/25p" (
werden im Format HD (1920x1080
25p) durchgeführt. Ist diese Funktion
eingestellt, erscheint das entsprechende
Symbol (
In diesem Benutzerhandbuch finden sich die
folgenden Begriffe:
•
‘Szene' bezieht sich auf einen Videoabschnitt
vom Zeitpunkt, an dem Sie das Symbol
für Aufnahmestart (
Aufnahme zu starten, bis zum Zeitpunkt, an dem
Sie das Symbol für Aufnahmestopp (
berühren, um die Aufnahme zu stoppen.
Die Begriffe ‘Foto’ und ‘Standbild’ werden
•
synonym mit derselben Bedeutung verwendet.
): Aufnahmen
) auf dem Bildschirm.
) berühren, um die
)
Vor der Benutzung dieses Camcorders
Dieser Camcorder kann Videos im Format
•
H.264 (MPEG-4/AVC) aufnehmen.
Bitte beachten Sie, dass dieser Camcorder
•
nicht mit anderen digitalen Videoformaten
kompatibel ist.
Vor der Aufnahme eines wichtigen Videos
•
sollten Sie eine Probeaufzeichnung machen.
Spielen Sie die Probeaufzeichnung ab, um
sicherzustellen, dass sowohl die Bilder als auch
der Ton korrekt aufgenommen wurden.
Für die aufgenommenen Inhalte wird keine
•
Haftung übernommen.
-
Samsung übernimmt keine Haftung für Schäden,
die durch nicht korrekt durchgeführte Aufnahmen
entstehen oder wenn die Aufnahmen aufgrund
einer defekten Speicherkarte des Camcorders
nicht wiedergegeben werden können. Des
Weiteren kann Samsung nicht für Ihre Video- und
Audioaufnahmen verantwortlich gemacht werden.
- Aufgezeichnete Inhalte können durch ein
Versehen beim Gebrauch dieses Camcorders,
der Speicherkarte usw. verloren gehen. Samsung
haftet nicht für Entschädigung und Datenverlust,
der durch falsche Verwendung entsteht.
Erstellen Sie eine Sicherungskopie von
•
wichtigen aufgenommenen Daten.
Schützen Sie Ihre aufgenommenen Daten durch
Übertragung der Dateien auf den PC.
Wir empfehlen Ihnen auch, die Daten von Ihrem
Computer zwecks Sicherung auf ein anderes
Aufnahmemedium zu übertragen.
Lesen Sie dazu bitte die Informationen über die
Software-Installation und den USB-Anschluss.
Urheberrecht: Bitte beachten Sie, dass dieser
•
Camcorder ausschließlich für die private
Nutzung vorgesehen ist.
Daten, die auf der Speicherkarte des Camcorders
abgespeichert sind und in anderen digitalen
oder analogen Medien oder Geräten verwendet
werden, sind durch das Urheberrecht geschützt
und dürfen nicht ohne Genehmigung des
Eigentümers - außer für den persönlichen
Gebrauch - benutzt werden. Sogar bei Aufnahme
eines Ereignisses wie zum Beispiel einer Show,
iii
Page 98

einer Vorstellung oder Ausstellung für den
persönlichen Gebrauch wird dringend empfohlen,
die Genehmigung dazu bereits im Vorfeld
einzuholen.
• Weitere Informationen zur Open Source
Lizenz siehe “OpenSource-E10.pdf“ auf der
mitgelieferten CD-ROM.
• Alle Warenzeichen und eingetragenen
Marken in diesem Handbuch sowie in
sonstigen mitgelieferten Dokumenten sind
Warenzei chen oder ein getragene Marken
ihrer jeweiligen Inhaber.
• Das SD-Logo ist ein Warenzeichen.
Das SDHC-Logo ist ein Warenzeichen.
• Microsoft®, Windows®, Windows
Vista®, Windows® 7, und DirectX® sind
entweder eingetragene Warenzeichen
oder Marken der Microsoft Corporation in
den Vereinigten Staaten und/oder anderen
Ländern.
• Intel®, Core™ und Pentium® sind
entweder eingetragene Warenzeichen
oder Marken der Intel Corporation in den
Verein igten Staate n und anderen Länd ern.
• Macintosh, Mac OS sind entweder
eingetragene Warenzeichen oder Marken
der Apple Inc. in den Vereinigten Staaten
und/oder anderen Ländern.
• Yo uTu be is t ein W ar en ze ic he n vo n Go ogl e
Inc.
• Flickr™ ist ein Warenzeichen von Yahoo.
• Facebook ist ein Warenzeichen von
Facebook, Inc.
• HDMI, das HDMILogo und der
Begriff „High
Definition Multimedia Interface“ sind Marken
oder eingetragene Marken von HDMI
Licensing LLC.
• Adobe, das Logo Adobe und Adobe
Acrobat sind Warenzeichen oder
eingetragene Marken von Adobe Systems
Incorporated in den USA und/oder anderen
Ländern.
• Sonstige hier genannte Produktnamen
sind möglicherweise Warenzeichen oder
registrierte Marken ihrer jeweiligen Inhaber.
Die Zeichen „™” und „®” sind in diesem
Handbuch nicht in jedem Fall aufgeführt.
Vor dem Lesen dieses Benutzerhandbuchs
Korrekte Entsorgung von Akkus
(Anwendbar in den Ländern der
Europäischen Union und anderen
europäischen Ländern mit einem
separaten Sammelsystem).
Diese Kennzeichnung auf dem Akku,
dem Handbuch oder der Verpackung gibt an, dass er nach
seiner Lebensdauer nicht zusammen mit dem normalen
Haushaltsmüll entsorgt werden darf. Falls die chemischen
Symbole Hg, Cd oder Pb angegeben sind, bedeutet dies,
dass der Akku Quecksilber, Cadmium oder Blei in einer
Konzentration enthält, die über den Bezugswerten der
EU-Direktive 2006/66 liegt. Werden die Akkus nicht korrekt
entsorgt, können diese Substanzen die Gesundheit Ihrer
Mitmenschen oder die Umwelt gefährden.
Trenn en Sie zum Schu tz der natü rliche n Ressour cen und
zur Förderung des Recyclings Akkus und Batterien von
anderen Arten von Müll und entsorgen Sie sie bei den
kostenlosen Rücknahmestellen für Batterien vor Ort.
Korrekte Entsorgung von Altgeräten
(Entsorgung von elektrischen und
elektronischen Geräten)
(Anwendbar in den Ländern der
Europäischen Union und anderen
europäischen Ländern mit einem
separaten Sammelsystem).
Diese Kennzeichnung auf dem Gerät,
dem Handbuch oder der Verpackung gibt an, dass es nach
seiner Lebensdauer nicht zusammen mit dem normalen
Haushaltsmüll entsorgt werden darf. Entsorgen Sie
dieses Gerät bitte getrennt von anderen Abfällen, um der
Umwelt bzw. der menschlichen Gesundheit nicht durch
unkontrollierte Müllbeseitigung zu schaden. Recyceln
Sie das Gerät, um die nachhaltige Wiederverwertung
YRQVWRIÀLFKHQ5HVVRXUFHQ]XI|UGHUQ3ULYDWH1XW]HU
wenden sich an den Händler, bei dem das Produkt gekauft
wurde, oder kontaktieren die zuständigen Behörden,
um in Erfahrung zu bringen, wo sie das Gerät auf
umweltfreundliche Weise recyceln können. Gewerbliche
1XW]HUZHQGHQVLFKDQLKUHQ/LHIHUDQWHQXQGJHKHQ
nach den Bedingungen des Verkaufsvertrags vor. Dieses
Produkt darf nicht zusammen mit anderem Gewerbemüll
entsorgt werden.
Hinweise zu den Warenzeichen
iv
Page 99

Sicherheitsinformationen
Die unten abgebildeten Sicherheitsvorkehrungen dienen zum Schutz vor Verletzung oder
Sachbeschädigung. Halten Sie sich genau an alle Anweisungen.
WARNUNG
Dieses Symbol weist auf die
potenzielle Gefahr von schweren
Körperverletzungen hin.
ACHTUNG
Es besteht die potenzielle
Gefahr von Körperverletzung
oder von Schäden am Gerät.
WARNUNG
Die Verwendung des Camcorders
bei einer Temperatur von über 60ºC
kann zu einem Brand führen. Wenn
der Akku bei solch einer hohen
Temperatur weiterhin verwendet wird,
kann dies zu einer Explosion führen.
LI
O
Nicht erlaubte Aktion.
Nicht zerlegen.
In den Camcorder dürfen weder
Wasser, Metalle noch entflammbare
Substanzen geraten. Bei Missachtung
besteht Brandgefahr.
Nicht berühren.
Diese Vorsichtsmaßnahmen
müssen eingehalten werden.
SAND
Kein Sand oder Staub! Wenn feiner
Sand oder Staub in den Camcorder
gelangen, kann dies zu Fehlfunktionen
oder Defekten führen.
Kein Öl! Wenn Öl in den Camcorder
gelangt, kann dies zu einem
Stromschlag, Fehlfunktionen oder
Defekten führen.
Setzen Sie den Camera nicht direkter
Sonnenbestrahlung aus. Bei
Missachtung können
Augenverletzungen sowie eine
Beschädigung von integrierten
Produktteilen auftreten.
Entsorgen Sie den Akku nicht durch
Verbrennen, da dieser explodieren
kann.
v
Page 100

Sicherheitsinformationen
Bewahren Sie den benutzten
Verwenden Sie keine
Reinigungsflüssigkeiten oder ähnliche
Chemikalien. Sprühen Sie keine
Reinigungsmittel direkt auf den
Camcorder.
Wenn beim Camcorder ungewöhnliche
Geräusche, Gerüche oder Rauch
auftreten, lösen Sie den Akku sofort
vom Camcorder, und wenden Sie sich
an den Samsung Kundendienst. Es
besteht das Risiko eines Brandes oder
Verletzungsgefahr.
Halten Sie den Camcorder bei
Verwendung in Strand- oder PoolNähe bzw. bei Regen von Feuchtigkeit
fern. Es besteht das Risiko einer
Fehlfunktion oder eines Stromschlags.
Sollten Ihnen Fehlfunktionen des
Camcorders auffallen, entfernen
Sie unverzüglich den Akku vom
Camcorder. Es besteht das Risiko
eines Brandes oder einer Verletzung.
Lithiumakku oder die Speicherkarte
außerhalb der Reichweite von Kindern
auf. Wenn der Lithiumakku oder die
Speicherkarte von Kindern geschluckt
wird, suchen Sie umgehend einen Arzt
auf.
Schließen Sie die Kamera über USB
nur an einen Originalcomputer oder
an ein vom Hersteller empfohlenes
Ladegerät an. Schließen Sie die
Kamera nicht gewaltsam an, wenn
der Anschluss nicht passt. Dies
kann Schäden verursachen.
M
ENU
Berühren Sie das USB-Kabel
oder die Kabelanschlüsse nicht
mit nassen Händen. Dies kann zu
Stromschlägen führen.
Stellen Sie keine schweren
Gegenstände auf das USB-Kabel.
Dadurch kann das USB-Kabel
durchtrennt oder die Verbindung
vi
beeinträchtigt werden.
MENU
Wenn das USB-Kabel beim Senden
von Daten oder Laden der Kamera heiß
wird, Geräusche von sich gibt oder
eigenartig riecht, trennen Sie das Kabel
sofort ab, da diese Vorkommnisse zu
einem Brand oder Verletzungen führen
können. Kontaktieren Sie anschließend
den Samsung-Kundendienst.
MENU
MENU
Verändern Sie das USB-Kabel nicht
willkürlich. Dies kann zu einem
Brand oder Stromschlägen führen.
MENU
 Loading...