

Samsung HCR4351W Owner’s Manual


Important Warranty Information Regarding
Television Format Viewing
Standard screen fbrmat televisions (4:3, the aspect ratio of the screen width to height) are
primarily &'signed to view standard ku_mat b:dl-motion video. The image's display_'d on them
shocdd primarily be in tM' standard 4:3 ratio format anti constantly moving. Displaying
stationary graphics and images on screen sl:u'h as the' dark top and bottom l_'tu'rbox bars
(\_7[dc sc'rccn pic'tt:trcs) shodd b_' litnitcd to no tnorc than 15% of the' total television viewing
per w_'ck.
%Vide screen [ormat televisions (16:9 the aspect ratio of the screen vddth to height) are
pm-narily &'signed to view wi&' screen format fl:dl-motion video. The mmg_,s displav>d on
them should pmnarily b_' in the' wide screen 16:9 ratio format, or _'xpan&'d to fill the' scrc_'n if
)_ot:tr model ofi_'rs this ieat_tre and c'onstantl) moving. Displa) ing stationar) graphics and
images on screen, sutch as tM' dark si&'-bars on non-expanded standaM k_rmat television vi&'o
and programming shoL:dd b_' limited to no more than 15% of the total television viewing per
\vt'ck.
Additionall}_ viewing other stationai T images and text st:tch as stock market reports, video
game' displays, station logos _vcb sites or compl:tu'r graphics and patu'ms, shocdd be limited as
(b'scribed abow, [or all televisions. Displaying any stationa W hnagas that exceed the abow"
guidelines can cause uneven aging qf picture tubes (CRZs) that leave subtle, but permanent
burned-in ghost images in the television pictur< To avoid this, vasty the programming and
images, and primarily disptay jidl screen moving images, not stationa_ W patterns or darh
bars. On television mo&'ls that olli:r pictctr_' siziclg f_'atutrvs, us_' these cocltrols to view the
diff_'r_'nt fortnats as a kdl sc'r_'cn pictutr<
Be caref:t:d in the selection and duration of television formats t:tsed lot viewing. Uneven CRT
aging as a rcs_dt of fommt scl_'c'tion anti use as well as oth< _butrnvd-in images is not cow, r_'d
by your SatnsL:mg [itnitcd warranty:
English - 2

CONTENT5
Chapter 1- Your New Digitam TV .................... 5
List ofFeat m_cs .......................................................................................... 5
Accessories ................................................................................................ 5
Familiarizing YoLtrself with _bltr New TV .................................................. 6
Control Bltttons .............................................................................. 6
Connection Jacks (Side or Front) .................................................... 7
(bnnection Jacks (R{'ar) .................................................................. 8
Remote Control .............................................................................. 9
Chapter 2: Installation .................................... 1t:)
Connvcting VHF and UHF Antvnnas ........................................................ 10
Antennas with 300-ohm Flat Twin Leads ........................................ 10
Antennas with 75-ohm Round Leads .............................................. 11
Separate VHF and UHF Antennas .................................................. 11
Connecting Cable TV ................................................................................ 12
Cable _vithoLtt a Cable Box .............................................................. 12
Cable with a Cable Box that Descrambles All Channels .................. 12
Connecting to a Cable Box that Descrambles some Channels ........ 13
Connecting a V(}R ...................................................................................... 14
Conm'cting a Second V(}R to Recont trom the TV .......................... 14
Connecting a D\qD Player .......................................................................... 15
Connecting to 2, PB PR .................................................................. 15
Conm'cting to RcgLdar AcLdio and Video Ja('ks ................................ 15
Connecting a lkgital TV Set-Top Box ........................................................ 16
Connecting to Y, PB,PR .................................................................. 16
Connecting a Camcorder ............................................................................ 16
Installing Batteries m the Remote Control .................................................. 17
Chapter 3: Operation ...................................... 18
Training the' TV On and Ofi. ....................................................................... 18
Pktg & Play Featare .................................................................................. 18
Viewing the Mencts and On-Screen [ksplays .............................................. 20
Viewing the Mencts .......................................................................... 20
Viewing the Display ........................................................................ 20
Selecting a Menu Langl:tage ........................................................................ 21
AdjLtsting the Scn'en Atttomatically (Self Foclts) ........................................ 22
Deactivating the Atttomatic Exectttion of the Self Foclts .................. 23
Removing the 'Self Foccts" Message fl*om the Display .................... 23
A_!]ttsting Convergence Mamtally .............................................................. 24
Memorizing the Channels .......................................................................... 26
Selecting the Video Signal Som_ce .................................................... 26
Storing Channels in Memory (AuLtomatR" Method) .......................... 27
Adding and Erasing (}hanncls .................................................................... 28
(_}hanging (}hanm'ls .................................................................................... 29
Using the Channel Btmons .............................................................. 29
[]sing the Nl:u-nber Bc[ttons .............................................................. 29
Using thv Prcviot:ts Channel ............................................................ 29
Selecting Yore_Favorite Chann4s .............................................................. "30
To Store Yoar Favorite Channels .................................................... "30
]b Viev,,' YoL[rFavorite Channels ...................................................... 30
Labeling the Channels ................................................................................ 31
English -3

CONTENT5
Chapter 3: Operation (_'0ntinned)............................ 32
Picturv Control .......................................................................................... 32
Cl:kstomizingthePictt:uv. ................................................................. 32
Using Atttomatic Pictttre Settings .................................................... 33
Socmd Control ............................................................................................ 34
Ad.jl:tsting the \\>h:tmv ...................................................................... 34
Using the MUTE Bt:ttton .................................................................. 34
Customizing the SoLmd .................................................................. 34
Using Acttomatic Soutnd Settings .................................................... 35
Setting the Clock ........................................................................................ 36
Option 1: Setting the Clock Mantmlly ............................................ 36
Option 2: Setting tM' Clock At:ttomatically ...................................... 37
Viewing an External Signal Soun'e ............................................................ 39
Setting the Signal Sottn'e .............................................................. 39
Assigning Names to External sottrces .............................................. 40
Chapter 4: Special Features ............................ 41
Fine Timing Channels ................................................................................ 41
Changing the' Screen Size .......................................................................... 42
Digital Noise Reduction ............................................................................ 43
Selecting the Color Tone ............................................................................ 43
Setting the Blue Screen Mode .................................................................... 44
Freezing the Picture .................................................................................. 44
Choosing a Mtdti-Channel Sottnd (MTS) track .......................................... 45
Actto Voh tnle .............................................................................................. 46
Setting The O_JOff Melody ........................................................................ 46
BBE ............................................................................................................ 47
Viewing Closed Caption Information ........................................................ 48
Setting the On/Off Tim_'r ............................................................................ 50
Setting the Sleep Timer .............................................................................. 51
Using the V-Chip ........................................................................................ 52
How to Change _\utr Password ...................................................... 52
How to EnaI)h'/Disal)h' the Rating Controls .................................... 53
How to Set tip Restrictions Using the 'TV Guidelines". ................... 54
How to Set tip Restrictions Using the 'MPAA Rating" . ................... 55
Important Notes Abottt Parental Locks ............................................ 56
How to Set tip Restrictions Using the 'Canadian English" .............. 57
How to Set tffl) Restrictions Using thv 'Canadian French .............. 58
Customizing Yot:tr Rctnote Control ............................................................ 59
Setting Up Yot:tr Rt'mote Control to Operate Your VCR
((fable box or D\'D player) .............................................................. 59
R_'mou' Control Co&'s .................................................................... 60
Chapter 5: Troubleshooting ............................ 81
Identflymg Problems .................................................................................. 61
Appendi× .......................................................... 62
Cleaning and Maintaining _our TV ............................................................ 62
Using Yot:[r TV in Anothvr Coumtr) ............................................................ 62
Spvcifications ............................................................................................ (>2
English - 4

List of Features
_\mr TV was d_!sism!d with the' kin'st u'chnolo5): This TV is ;_hish-p_'rfbmmnc_' l:tnit thin
im'h:td_'s the' fbllov_r[nS sp_'d_J b_U:u_'s:
* Eas)-to-l:tsc remote control
_' _IS}-[O-t;tSc O[l-S('r('{'[l[Ii1'[i1]S) S[('[ll
, A_ttonmtic timtu _to t_tm tht, TV on ;_nd off
Ad.]t:tstaIJ_' pk'tL:tr_"and soctnd s_'ttinss that can })_'stor_'d in the' TV%tin'too 0
" Al:ttomatR" channd t_tnin S fbl" ctp to 181 channds
o A sp_'cial fiht'r to r_'duct, or dimin;m' r_,ct'ption prol)h'ms
o Jim' u:min S control br tht, sh;upt,st picturt' possi])h'
o A ]x@t-in muhi-channd sound dt,co<br [or stt,rt'o and ])iIingual hsu'nin S
o Bt:lilt-in, d_Lal _'hannd sp_'ak_'rs
o A sp_'c'ial sb_'p tmmr
o Compon_'nt \'id_'o Inp_tt jacks to o])min a sharp_'r mmgc, kom _'xu'mal sour_'_'s
_, AdjL:tstinS tht, Scrt, cn AutomatR'aH/(Sdf Yocus)
R_.mou' ContHd Ho]clc'r C;@hu: O_.', n_:r% Insttuc:tion_/ %\4tl:t_tnty C_tKIs/
(BP59_00058()/ (BP6] 00n,_7G) S_R't £,uidc Mm_u_.I Registration ( _t_(]
AAA B_ttel:k's (HC P524] W)
English - 5

YOUR NEW TV
FamHiarizincj Yoursemf with Your New TV
Contro| Buttons
73
_c LLc_m co_ltrol yoLu _TV% basic _c_tlu>s k>'htdmg the o_>scrc_'_l tm'rm. To ltsc the tnor_'
advarlced fe_tLwes_ your tnutst ctse the remote corltrol.
,, The ac:tua_ cot_figtu:ation on _ou_ TV may be di[[el:enl, C[epelKIhlg on }out: modek
q
HC-R4351W
HC-R4751W
HC-P4241W
HC-Pq7qlW
HC-PF241W
O ROWER
Pressto turn the TVon and off.
Stand-By |ndicator
Lights up when you turn the power off.
- Power Off ; Red
- Power On ; Off
- TimerOn; Green
Remote Contro| Sensor
Aim the remote control towards this spot on the TV,
O SOURCE
Pressto switch between viewing TV programs and
signals from connected components.
0 MENU
Pressto seean on-screen menuofyour TV's features.
Q + VOL -
Pressto lower or raise the volume and to select kems
when using the on-screen menu,
@ACHV
Pressto change channels and move between items on
the on-screen menu,
_ {Enter}
While using the on-screen menus, press to activate (or
change} a particular item.
English - 6

YOVR NEW TV
Connection Jacks (Side or Front}
YOLLca_lco_m_x't a_l_%" compom'Flt thatis lLscd o_i 7 occas[o_mll>_sLLchas a cwncordcr or
vkteo g{_[ne.Yor [[_for[na[io[_ o[_co[_[_ec[mg eqldlxne[_t see page 16.
HC-P4241W HC-P4741W
HC-P5241W
O0 0
HC-R4351W
HC-R4751W
O S-VIDEO Input
ConnectanS-Videosignalfroma camcorderorvideogame.
VIDEO Input
Connectthe videosignalfromacamcorderorvideogame.
@ AUDIO Input
Connectthe audiosignalsfroma camcorderorvideogame.
English - 7
YOUR NB\ ,_TV
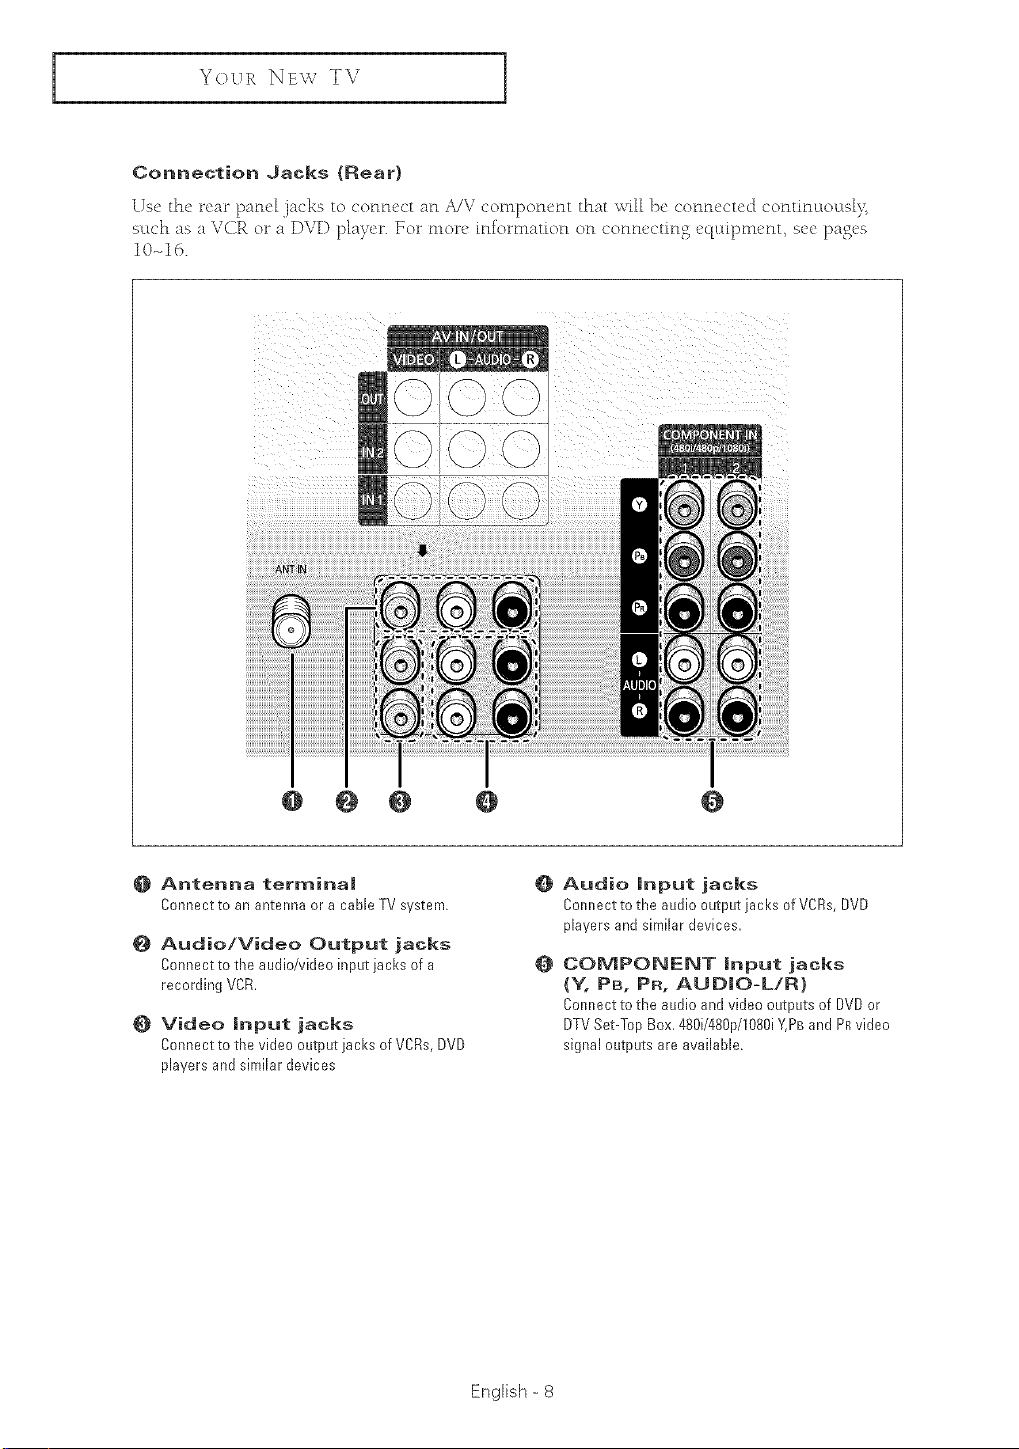
Connection Jacks (Rear}
Use the rear pane_ .jacks to cotmect at1 A/V conlponent that _,_,Tillbe connected continuLou@>_
such as a VCR or a DVD p_aTer. For tllore tntomlation on connecti% equtlxllent, see pases
10-d6.
Siii_Siiiiiiiiiiiiiiiiiiiiiiiiiiiii
@ @ O O @
Antenna terminal
Connect to an antenna or a cable TV system.
_} Audio/Video Output jacks
Connect to the audio/video input jacks of a
recording VCR.
Video input jacks
Connect to the video output jacks of VCRs,DVD
players and similar devices
O Audio input jacks
Colmect to the audio output jacks of V@s, DVD
players and similar devices.
COMPONENT input jacks
(Y, PB, PR, AUDIO-L/R}
Cmmect to the audio and video outputs of DVDor
DTVSet-Top Box,480i/480p/1080iY,PBand PRvideo
signal outputs are available.
English = 8

YOUR NBv TV
Remote Contro|
YocL ca£1 l:Lsethe ra-llot£ co£ltrol ILI_ to a]}o@ 23 }d h_o_ll the T_\;'vVhe£1 v@£P,o the re_llote
co£ltr4 ahvays point it cJirectly at the "[_\i _\_vL c_£l also lLse your rer_lote control to operate yovLr
S_'t-To 1) }_ox, V(flR (ill, ]_ox or DVD li@'r. S_'_' lxg_'s 59-40 for &tails.
O POWER
TurnstheTV onandoff.
P.S|ZE
Press to change the picture size.
FAVo OH (Favorite Channel)
Press to switch between your
favorite channels.
O Number buttons
Press to select channels directly
on the TV.
+1OO
Press to select channels over 100.
For exam@e,to select channel !21,
press the "+100", then press the
"2" and 'T'.
O MUTE
Press totemporari[v cut off the
sound.
O VOL+,VOL °
Press to increase or decrease the
volume,
{) SLEEP
Press to select a preset time
interval for automatic shut off,
O MENU
Displaysthemainon-screenmenu.
@ ST|LL (Main picture}
Press to stop the action during a
particular scene. Press againto
resume normal video.
The still function doesn't operate in
"Component1" or "Component2"
mode.
_) P.MODE
Adjust the TV picture byselecting
one of the preset factory settings
(or select your persona[
customized picture settings},
@ BBE
BBE is a built-in effect that adds
clarity, punch and dynamics to the
sound.
@ ADD/DEL
Press to add or erase channels in
the TV's memory. Use to memorize
or erase the fine tuning after fine
tuning channel
@ CAPT|ON
Pressto view dosed ca@on information,
@ SET
Used during set up of this remote control, so that
it will work compatibly with other devices (VCR,
STB,Cable box, DVD,etc.}.
@ RESET
Ifyour remote control is notfunctioning properly,
take out the batteries and press the £ESET
button for about 24 seconds. Re-insert the
batteries and try using the remote control again.
MODE
@
Selects a target device to be
controlled by this remote control
(i.e.,TV,STB, VCR,CABLEor DVD).
@ PRE-CH
Tunesto the previous channel.
@ CHA, CHV
Press to change channel
@ SOURCE
Each time the button is pressed, ail
the inputs connected to the
external componerlt iacks will be
shown inregular sequence.
|NFO
Press to display information on the
TVscreen.
@ EXIT
Press to exit the menu,
Controithe cursor inthe menu,
ENTER
While using the on-screen menus,
press ENTERto activate (or
change) a particular item.
S.MODE
@
Adjust the TV sound b,¢selecting
one of the preset factory settings
(or select your personal,
customized soundsettings).
@
MTS (Multichannel Television
Sound)
Press to choose "Stereo", "Mono"
or "SAP (Secondary Audio
Program)",
@
SELF FOCUS
Press to adjust for the optimum
picture set in the factory.
VCR/DVD Contro|s
@
Controls VCR/DVDfunctions:
Rewind, Stop, Hay/Pause, Fast
Fro'ward.
EngBh - 9

INSTALLATION
Connecting VHF and UHF Antennas
If )ocw antenna has a set of leads that look [[kc this scc 'Antennas
with "BOO-ohm Y[at Twin L_'adsi ]'x'[ow.
If your antenna has one [e;_c]that looks like this, see 'Antennas with
7%ohnl RocLnd Leads,' on next l)agc_.
If you have two antennas see 'Separate VHY and UHY Antennas' on
next page.
Antennas with 300-ohm F|at Tw(n Leads
If )ou arc using an off-air antenna (such as a l"oof antenna or "rabbit ears _) that has "_O0-ohtn
twin fiat leads, follow the di_'ections below
1
Placethewiresfromme[w,
eaos uRae_ the screws oll Iflb
300_75 ohm aaaDi6 r mo[
SUOO_ledL use a Scl'ewof ve_
TO [l_a[e]_ [rre sc[ews
2
PJugtne adapzer m_c The ANT
IN"term[rmlon[nerear 3anew.
ANT IN
English - I0

INSTALLATION
Antennas with 75oohm Round Leads
Plugtheantennadeadintothe ANTIN
:'ANTIN:'terminalot_therear
panel,
Separate VHF and UHF Antennas
If you have ts_o separate antenFu_s for }our TV (one VHF and otle UHF) you must combine
the two antenna signals before connecting the antennas to the T\( This procedure reqt:m_es a art
optional combiner-adapter (aw_fflable at most eh:ctronics shops)
1
Cornlecl: oo[n all[en le teegs [o
[ne con Uil/er.
2
Plug °[ne comDllser I!]][o tile
ANT IN" termi ]el on [ne tear
Panel.
English - 11

INSTALLAT[QN
Connecting CabJe TV
7
_c LLcan connect d[ficn'nt cable s}stcms to } oL:tr T\_ in<'h:tdingcable \v[thoLtt a cable box and
cable with a cable box that descrambLes some or aH char__r_Ms.
CabJe without a CabJe Box
If }out want to connect cable, and youl do not need to use a cable box:
plug the incoming cable into
the "ANT IN" terminaJ 0n the
Cab|e with a CabJe box that OescrambJes AJ| ChanneJs
ANT IN
This lermina_ mightbe
1
Findtl e caole, mar _s
DOX.
2
Connect the omer enu of this
sable _othe ANT IN" terminal
OF] II3e t@aF OSRet,
ANT IN
labded ANT OUT", _VHF
OUT', or:shnp!,_ 'OUT'L
English - 12

INSTALLATI()N
Connecting to a Cab|e Box that Descrarnb|es Some Channe|s
If your cable box descrambles only some channels (such as prenmun channels)_ toHow the
msmLctions below. _u will need a two-way splitter an EF (A/B) switch, and four lengths ot
coaxk_l cable. (These items are avaflal'4e at most dectronics stores.)
1
FindanddisconnectmecuDJe (
[i]al IS connecle[J I0 [he
ANTENNA IN terminal on ,our rll=
C_Dle OOX.
2
ColltecI IntocadelEOal_WO-
waysplitter.ConnectaCOaXtdl
caD_eoe[weenanOUTF'JT
[ermlnal oll IRe SDht[e!" a_d the
brooming CaMe
iNterminalont _ecameoox
3
Conrlec a coaxial cable
between th _ ANTENNA 0L '_
[e_mllla o]_ ire cable DOX arlo
the B-INter_malonme#'B
switc
4
CoJ £ect aRotrie_ cable
between the other OUT
[errrllnal on 1EneSOlllIe_ a_]o [£_
A-INterminaonthe RFA/B}
SWIICFL
NTENNA
4 This lemfinal might be
tabe_ed ANT IN", 'VHF IN"
orstmpty_IN .
Splitter
OaNe Box
m
RF(A/B}
Switch
5
CoJ nect the last coaxiaJ cable
uel _!een the OUT t_ _mma_o
m_.RFIA/B' switchandthe
'*ANTN"terminalontherea_
Da ]e_.
Aft<t you've made this conne<tk>tt, s<t tit<:A/B sv,,itc]_to the A" position [or t_ormal viewh'_g. Set the A/B
switd'l to the B" posMott to xiev,, scr_ Inbled channels. (When _ou set tit<>?JB switch to Bi' i?ou will
H('('d 10 [t[[](> }'(bUll TN z 10 lit(> <:ableboxg output d_aHnel, whkh is usually (:ha[ltl¢l 3 o z} )
English - 13

INSTALLATION
Connecting a VCR
These instructions assume that )ot:[ hase aDeacJ) connected rover, TV to an antenna or a cable
TV system (according to the instructions on pages 10-_13) Skip step 1 ff you have not yet
conncctec] to an antenna o__a cable system
Rear aoe,
Connect a coaxial cable between the :'ANT IN'f
terminal ot1the TV and the ANTENNA OUTtermina! on
the VCR.
A o07_xi_lc#t_lciS us_t_!ly inc!_dcj with a vcf_ (If
Connect a sat of audio cables betwee!_the 'AV IN I
(L, R)?{or/IAV IN 2 (L,R!") jaCkS0_ the TV al_dAUOI0
OUTjacks on the VCFL
[
OoDnect a vide° ca])Je betweell the ffAV 'N 1 (V'OEO)'( __ _ ,],u, _J_J
OUTjacl<olltha VCR,
Video Cable
I ;ii,o
. Also you <::_t_conn<ct to AV 3" on Ih< side paHe{ ol T_,_
Connecting a Second VCR to Record from the TV
Yo_u _TV _'an s_'nd o_Lt signals of its l>ict_wc and sound to }_e _ec<.u_ded by a second \r(iE, fo do
this, connect yo_u _second VCR as follows:
1 TV Rear Panel
Connec_a seeof audk -_r_es i_e_wee_the "AV OUT
(L, RY _cKson_ !e TV and_neAdOtO iN jack,s on me
VCR
luar oJ_hc VC_.
2
Connec_a waa_ cao_e_e_wee_me "AV OUTIVIDEO
Jack_nthe TVand the VIDEO iN aoKon theVCR.
Coaxial Cable
P.chl ) }'ou; \;CEO's ir_stiuct;ons lot reel ' lflio[[_]a[[o_
FromAntenna
VCR Rear Panel
English - 14

INSTALLATION
Connecting a DVD Pmayer
The n'ar paFu4 jacks o_l }o_u_TV make it eas} u_ connect a DVD player u_ yo_u _T\L
Connecting to Y. P_. P.
Comlect a Setof audio Cables between the
'!COMPONENTIN 1 (L,R)'!(or ,COMPONENTIN 2
(L,R),!)jacks0nd_eTVandt!_eAUDIO0UIiacks TV Rear Panel
DVD Player
Comsecta set of video canes between the
"COMPONENT iN 1(Y,PB,PR)"(or !'COMPONENT
IN 21Y,pB,PRY')iacks ont!_eTVand tbe VIDEO
For an e piaz>_ten of ComponaQL yidco see }o_-Ir
D\D p!%e_ o_ net% t>s!_uqfiol!.
Connecting to Regu|ar Audio and Video Jacks
1
Cotmecza se[ of audio caNEs#e[ween the "AV IN
1{b. RY"Ior "AV IN 2 {L.R)")jacks onthe TV and
meAUDIO OUTJACKSo_]me DVOplayer.
TV Rear Panel
2
Cornec[ a vdee cable between the 'AV _\
V@EO}" or "AV IN 2IVlDEOy')jack ontbe TVand
trm vIDEOOUTjack onthe DVOprayer,
. Also, )ou cau coHnect to AV 3" on the sick FHN ol TV
English - 15

INSTALLATION
Connecting a Digita| TV Set-Top Box
The' n'ar patu4 ja_'k'_ or1 your TV nmk_" it easy to c'onne('t a Set-Top Box u_ yo_u _T\I
Connecting to Y. P_. P_
Connectasat of audiocablesbetweenthe
f'COMPONENTIN ]/L, R):'(or "COMPONENTIN2 TV Rear Panel
DTV Set-Top Box
Connect a set of videa Cables between the
"COMPONENT iN ] (Y,PB,P_)"lot 'COMPONENT
IN 2{Y,PB,PR)':}jacks onthe IV and the VIDEO
OUT(Y_PB,PR)jacks 0a the Set-Top Box
i['lSt FEtC[IO11 [!l_ll'lL/klL
FromCable or
Antenna
Connecting a Camcorder
The sk:]e pand jacks on youw TV nmke it eas} to connect a camcorc]er u_ }cow TY They aHo_
}col to view the camcorJer tapes _\ithow u_smga VCE. (Able see %,'tawing an Emerald Signed
Souu_ce' on page 39.)
1
LCca[e theA/_ ou[pu[ jacks onme cam;order, They a
Jsua found on t]]_ S_O6 or re_r 01[ [ne eamoor(]a[,
TV Side Panel (HC-P4241W)
2
Connac_a set of audio caoles De[wean the 'AV 3 IL, RY'
acks onthe TVa _dthe AUDI[ OUTjacl_sonme ca lcoroer,
[_ VOU hsvc c_til / oi'(]ci" OllilCC[ L([lJOYio) 1
S-Video Cable
Audio Cable
3
Conrm.ctavideo came oe[ween me 'AV 3 (VIDEO)"(or
"S-VIDEO"} jack onthe Tv _no me V DE0OUT ac_.sonme
camel r E]el,
The aHdzo-v_do//cr_b_cs s[lovq [lc_'c ,_'l' usua]l _lud_'d
W_ alllCOldCi([__lotcheck}.iL[tlocalu[cc[_-o_l_c<
_[Ol'( ) [_ }OL/Z UO[llCOZF_UZ iS StC[P{_ 7OE_ llCd I { O)llZldC[ _1
Camcoder
, This [igure shows th( Stwl¢lrlFd c:onne(:tOFjuc:k panel The actual CoH[iguration lol: )our TV mrl_ he
cti1l_renI
English - 16

INSTALLATION
installing Batteries in the Remote Contro|
1
SiNeme oacl_,cover a_Jme
Way OUZI0 opell 1Re oa[[eP
cooEear[reen[ o[ [he _emo[e
eonIgoJ
@ Make sure to match th( '+"
2
Insta]!twoAAAsizebat[enes.
Replacethe cover.
and -"(Hds o[the baUeri(s
with flee diagram inside tb<
cotEEpattmerlt
@ Remove the batteries and storE:
fl]em irea cool, Ell*}plac< it
you wotft be usittg the t<EEEotE:
contt>l [or a long time
(Assuming typical TV usage
the batteries last for about one
. Th( remote control call be used up to about 23 feet from tlt( T\_
English - 17

OPERATION
Turning the TV On and Off
Pressthe POWERbutton on the [smote controL
kou _an also use the' POWER bcttton on th< fror_t panel.
PJug & PJay Feature
When the TV is initially powered On, basic customer settings proceed mtto[lmticaH)_ and
scd)sequlentl) _as belov,
1
Pressthe POWERDuz[onon[ne
ren o[e control
The "Start Plug & Play" _sd_splayec
Pressthe ENTERbutter _osear[,
2
The Language" me_u [s d[spJayed.
Pressthe ENTERout[on xe ._mec[
Lat guag6"
Press Ell6 _ or "IV bu_oll Io selecl
the 8aoroorla][e la! [[u_e, [ee_] press
the ENTERour[on,
3
The "Air CATV"menu so_sptayea
Pressthe ENTER button to seJecI
A r/CA-[ ""
Presstie A or V button _oselec_
the video sJgna_source, men press
the ENTER ourcon,
r_Ente_
?
!_ Language : _nglish _
CATV Air
Plug _" Play feature doesn't
work when the \cChip is
acti_ ated or whe/_ in the A/V
mode.
English - 18

OPERATION
4
The"C/ecK anl _[Ina nuIt" is
msp_ayeu,
Ma {e sur_. ma[ tne antenna _s
CO 1Dec[eo i[o the TV
Pree;[ne ENTERbutton to star[ me
au[o prograu
The"Auto Program" menu is
e_spta f_o,
TheTV begins memo[iz__gaHor me
ava _b B elations,
5
Whe[I [thasfinisheu, the "Thne"
menu _s dl ;plat!eu,
Settbe mocK,
Plug & Play
# Ntar£
Plug & Play
S_Op
E_E_ez _k1_
Clock
For de/afle, see page 27.
@ For de/arts, see page 236.
6
Whe_ Vou nave finished, press[he
NENU butter
Themessage "Et joy your wa[cbing,"
,o ulap]ayeu
English - 19
 Loading...