

Samsung EK-GN120ZKAXAR, EK-GN120ZKZXAR, EK-GN120 NX User Manual

SMART CAMERA
User Manual
Please read this manual before operating your
camera, and keep it for future reference.

Intellectual Property
All Intellectual Property, as defined below, owned by or which is otherwise the property of Samsung or its respective suppliers
relating to the SAMSUNG Galaxy Tab, including but not limited to, accessories, parts, or software relating there to (the “Galaxy Tab
System”), is proprietary to Samsung and protected under federal laws, state laws, and international treaty provisions. Intellectual
Property includes, but is not limited to, inventions (patentable or unpatentable), patents, trade secrets, copyrights, software,
computer programs, and related documentation and other works of authorship. You may not infringe or otherwise violate the
rights secured by the Intellectual Property. Moreover, you agree that you will not (and will not attempt to) modify, prepare
derivative works of, reverse engineer, decompile, disassemble, or otherwise attempt to create source code from the software. No
title to or ownership in the Intellectual Property is transferred to you. All applicable rights of the Intellectual Property shall remain
with SAMSUNG and its suppliers.
Open Source Software
Some software components of this product incorporate source code covered under GNU General Public License (GPL), GNU Lesser
General Public License (LGPL), OpenSSL License, BSD License and other open source licenses. To obtain the source code covered
under the open source licenses, please visit:
http://opensource.samsung.com
.
Samsung Electronics America (SEA), Inc
Address:
EK-GN120NX_UM_English_MI4_TN_103113_F1
85 Challenger Road
Ridgefield Park,
New Jersey
07660

Toll Free
Telephone:
1-800-SAMSUNG
Internet
http://www.samsung.com
Address:
©2013 Samsung Telecommunications America, LLC. Samsung is a registered trademark of Samsung Electronics Co., Ltd.
Do you have questions about your Samsung Mobile Device?
For 24 hour information and assistance, we offer a new FAQ/ARS System (Automated Response System) at:
www.samsung.com/us/support
Nuance®, VSuite™, T9® Text Input, and the Nuance logo are trademarks or registered trademarks of Nuance Communications,
Inc., or its affiliates in the United States and/or other countries.
®
and NetFront™ are trademarks or registered trademarks of ACCESS Co., Ltd. in Japan and other countries.
ACCESS
The Bluetooth
®
word mark, figure mark (stylized “B Design”), and combination mark (Bluetooth word mark and “B Design”) are
registered trademarks and are wholly owned by the Bluetooth SIG.
microSD™ and the microSD logo are Trademarks of the SD Card Association.
®
Openwave
is a registered Trademark of Openwave, Inc.
Google, the Google logo, Android, the Android logo, Google Play, Gmail, Google Mail, Google Maps, Google Music, Google Talk,
Picasa, YouTube and other marks are trademarks of Google Inc.
Wi-Fi is a registered trademark of the Wireless Fidelity Alliance, Inc.
©
Swype and the Swype logos are trademarks of Swype, Inc.
2010 Swype, Inc. All rights reserved.

, DivX®, DivX Certified® and associated logos are trademarks of Rovi Corporation or its subsidiaries and are used under
license.
®
DivX Certified
ABOUT DIVX VIDEO: DivX
Certified
to play DivX® video up to HD 720p, including premium content.
®
®
device that plays DivX video. Visit
is a digital video format created by DivX, LLC, a subsidiary of Rovi Corporation. This is an official DivX
www.divx.com
for more information and software tools to convert your files into DivX
videos.

Table of Contents
Section 1: Getting Started .............................4
Understanding This User Manual . . . . . . . . . . . . .4
Setting Up Your Camera . . . . . . . . . . . . . . . . . . . .5
Charging a Battery . . . . . . . . . . . . . . . . . . . . . . . .8
Turning the Camera On or Off . . . . . . . . . . . . . . .9
Locking and Unlocking the Touch Screen . . . . . .10
Configuring Your Camera . . . . . . . . . . . . . . . . . .10
Section 2: Understanding Your Camera .....12
Features of Your Camera . . . . . . . . . . . . . . . . . .12
Your Camera at a Glance . . . . . . . . . . . . . . . . . .13
Back View of Your Camera . . . . . . . . . . . . . . . . .14
Bottom View of Your Camera . . . . . . . . . . . . . . .15
Cleaning the Device . . . . . . . . . . . . . . . . . . . . . .15
Home Screen . . . . . . . . . . . . . . . . . . . . . . . . . . .16
Customizing Your Home Screen . . . . . . . . . . . . .19
Notification Panel . . . . . . . . . . . . . . . . . . . . . . . .22
Using the Touch Screen . . . . . . . . . . . . . . . . . . .23
Section 3: Camera Operation ......................25
Taking Photos . . . . . . . . . . . . . . . . . . . . . . . . . .25
Tips for Taking Clearer Photos . . . . . . . . . . . . . .31
Shooting Modes . . . . . . . . . . . . . . . . . . . . . . . . 34
3D Mode . . . . . . . . . . . . . . . . . . . . . . . . . . . . . 52
Shooting Options and Settings . . . . . . . . . . . . . 53
Section 4: Entering Text ..............................72
Text Input Methods . . . . . . . . . . . . . . . . . . . . . 72
Entering Text Using the Samsung Keyboard . . . 72
Using the Google Voice Typing Feature . . . . . . 75
Section 5: Accounts and Contacts ..............76
Accounts . . . . . . . . . . . . . . . . . . . . . . . . . . . . . 76
Contacts . . . . . . . . . . . . . . . . . . . . . . . . . . . . . 77
Section 6: Multimedia .................................86
Gallery . . . . . . . . . . . . . . . . . . . . . . . . . . . . . . . 86
Video Editor . . . . . . . . . . . . . . . . . . . . . . . . . . . 91
Video Player . . . . . . . . . . . . . . . . . . . . . . . . . . . 91
Music Player . . . . . . . . . . . . . . . . . . . . . . . . . . 92
Google Play Music . . . . . . . . . . . . . . . . . . . . . . 95
Play Movies & TV . . . . . . . . . . . . . . . . . . . . . . . 95
Section 7: Messaging ..................................96
Types of Messages . . . . . . . . . . . . . . . . . . . . . 96
Creating and Sending Messages . . . . . . . . . . . 97
1

Managing Messages . . . . . . . . . . . . . . . . . . . . . 99
Messaging Settings . . . . . . . . . . . . . . . . . . . . . 101
Gmail . . . . . . . . . . . . . . . . . . . . . . . . . . . . . . . 102
Email . . . . . . . . . . . . . . . . . . . . . . . . . . . . . . . 103
Hangouts . . . . . . . . . . . . . . . . . . . . . . . . . . . . 106
Google+ . . . . . . . . . . . . . . . . . . . . . . . . . . . . . 106
ChatON . . . . . . . . . . . . . . . . . . . . . . . . . . . . . . 106
Section 8: Applications ............................. 107
Calculator . . . . . . . . . . . . . . . . . . . . . . . . . . . . 107
Calendar . . . . . . . . . . . . . . . . . . . . . . . . . . . . . 107
Camera . . . . . . . . . . . . . . . . . . . . . . . . . . . . . . 109
ChatON . . . . . . . . . . . . . . . . . . . . . . . . . . . . . . 109
Chrome . . . . . . . . . . . . . . . . . . . . . . . . . . . . . . 109
Clock . . . . . . . . . . . . . . . . . . . . . . . . . . . . . . . 109
Contacts . . . . . . . . . . . . . . . . . . . . . . . . . . . . . 112
Downloads . . . . . . . . . . . . . . . . . . . . . . . . . . . 112
Dropbox . . . . . . . . . . . . . . . . . . . . . . . . . . . . . 113
Email . . . . . . . . . . . . . . . . . . . . . . . . . . . . . . . 113
Gallery . . . . . . . . . . . . . . . . . . . . . . . . . . . . . . 114
Gmail . . . . . . . . . . . . . . . . . . . . . . . . . . . . . . . 114
Google . . . . . . . . . . . . . . . . . . . . . . . . . . . . . . 114
Google Settings . . . . . . . . . . . . . . . . . . . . . . . . 114
2
Google+ . . . . . . . . . . . . . . . . . . . . . . . . . . . . . 114
Group Play . . . . . . . . . . . . . . . . . . . . . . . . . . . 115
Hangouts . . . . . . . . . . . . . . . . . . . . . . . . . . . . 115
Help . . . . . . . . . . . . . . . . . . . . . . . . . . . . . . . . 115
Internet . . . . . . . . . . . . . . . . . . . . . . . . . . . . . . 116
Local . . . . . . . . . . . . . . . . . . . . . . . . . . . . . . . . 116
Maps . . . . . . . . . . . . . . . . . . . . . . . . . . . . . . .116
Music Player . . . . . . . . . . . . . . . . . . . . . . . . . .116
My Files . . . . . . . . . . . . . . . . . . . . . . . . . . . . .117
Navigation . . . . . . . . . . . . . . . . . . . . . . . . . . . . 118
Paper Artist . . . . . . . . . . . . . . . . . . . . . . . . . . . 118
Photo Suggest . . . . . . . . . . . . . . . . . . . . . . . . . 118
Play Books . . . . . . . . . . . . . . . . . . . . . . . . . . .118
Play Magazines . . . . . . . . . . . . . . . . . . . . . . . . 118
Play Movies & TV . . . . . . . . . . . . . . . . . . . . . . 119
Play Music . . . . . . . . . . . . . . . . . . . . . . . . . . . 119
Play Store . . . . . . . . . . . . . . . . . . . . . . . . . . . . 119
S Memo . . . . . . . . . . . . . . . . . . . . . . . . . . . . .120
S Translator . . . . . . . . . . . . . . . . . . . . . . . . . . 121
S Voice . . . . . . . . . . . . . . . . . . . . . . . . . . . . . .121
Samsung Apps . . . . . . . . . . . . . . . . . . . . . . . . 122
Samsung Link . . . . . . . . . . . . . . . . . . . . . . . . . 122

Settings . . . . . . . . . . . . . . . . . . . . . . . . . . . . . .122
Sphere . . . . . . . . . . . . . . . . . . . . . . . . . . . . . . .122
Story Album . . . . . . . . . . . . . . . . . . . . . . . . . . .123
TripAdvisor . . . . . . . . . . . . . . . . . . . . . . . . . . .123
Video Player . . . . . . . . . . . . . . . . . . . . . . . . . . .123
Video Editor . . . . . . . . . . . . . . . . . . . . . . . . . . .123
Voice Search . . . . . . . . . . . . . . . . . . . . . . . . . .123
YouTube . . . . . . . . . . . . . . . . . . . . . . . . . . . . .123
Section 9: Connections .............................124
Internet . . . . . . . . . . . . . . . . . . . . . . . . . . . . . .124
Wi-Fi . . . . . . . . . . . . . . . . . . . . . . . . . . . . . . . .131
Bluetooth . . . . . . . . . . . . . . . . . . . . . . . . . . . . .135
PC Connections . . . . . . . . . . . . . . . . . . . . . . . .139
Section 10: Changing Your Settings .........141
Accessing Settings . . . . . . . . . . . . . . . . . . . . .141
Connections Settings . . . . . . . . . . . . . . . . . . . .141
My Device Settings . . . . . . . . . . . . . . . . . . . . .146
Accounts Settings . . . . . . . . . . . . . . . . . . . . . .157
More Settings . . . . . . . . . . . . . . . . . . . . . . . . .159
Section 11: Troubleshooting .....................165
Section 12: Health and Safety Information 172
Exposure to Radio Frequency (RF) Signals . . . .172
Specific Absorption Rate (SAR) Certification
Information . . . . . . . . . . . . . . . . . . . . . . . . . 177
FCC Part 15 Information to User . . . . . . . . . . . 179
Smart Practices While Driving . . . . . . . . . . . . 179
Battery Use and Safety . . . . . . . . . . . . . . . . . . 180
Samsung Mobile Products and Recycling . . . . 181
UL Certified Travel Charger . . . . . . . . . . . . . . 182
Display / Touch-Screen . . . . . . . . . . . . . . . . . 182
GPS . . . . . . . . . . . . . . . . . . . . . . . . . . . . . . . . 183
Care and Maintenance . . . . . . . . . . . . . . . . . . 184
Responsible Listening . . . . . . . . . . . . . . . . . . 185
Operating Environment . . . . . . . . . . . . . . . . . 187
Restricting Children's Access to Your Mobile Device
189
FCC Notice and Cautions . . . . . . . . . . . . . . . . 189
Other Important Safety Information . . . . . . . . 189
Section 13: Warranty Information ............191
Standard Limited Warranty . . . . . . . . . . . . . . 191
End User License Agreement for Software . . . 196
Index .........................................................204
3

Section 1: Getting Started
This section helps you to quickly start using your device.
Understanding This User Manual
The sections of this manual generally follow the features of
your device. A robust index for features begins on page 204.
Also included is important safety information, beginning on
page 172, that you should know before using your device.
This manual gives navigation instructions according to the
default display settings. If you select other settings,
navigation steps may be different.
Unless otherwise specified, all instructions in this manual
assume that you are starting from a Home screen. To get to a
Home screen, you may need to unlock the device. For more
information, refer to “Locking and Unlocking the
Touch Screen” on page 10.
Note:
Instructions in this manual are based on default settings
and may vary from your device depending on the
software version on your device and any changes to the
device’s settings.
4
Note:
All screen images in this manual are simulated. Actual
displays may vary depending on the software version of
your device and any changes to the device’s settings.
Special Text
In this manual, some text is set apart from the rest. This
special text is intended to point out important information,
share quick methods for activating features, define terms,
and more. The definitions for these methods are as follows:
•
Notes
: Presents alternative options for the current feature, menu,
or sub-menu.
•
Tips
: Provides quick or innovative methods or useful shortcuts.
•
Important
: Points out important information about the current
feature that could affect performance.
•
Warning
: Brings important information to your attention that
can help to prevent loss of data or functionality or damage to
your device.
Text Conventions
This manual provides condensed information about how to
use your device. To make this possible, the following text
conventions are used to represent often-used steps:
➔
Arrows are used to represent the sequence of selecting
successive options in longer, or repetitive, procedures.
For example:
Apps
.
ON
➔ Settings
ON
and
ON
.
OFF
.
.
OFF
From a Home screen, touch
➔
Connections
This button turns a feature or setting
tab ➔
Wi-Fi
• indicates that the feature is
• indicates that the feature is
For example:
Touch to turn Bluetooth
Setting Up Your Camera
Prior to use, it is necessary to install both the battery,
SIM card, and optional memory card (not included) into their
corresponding internal compartments.
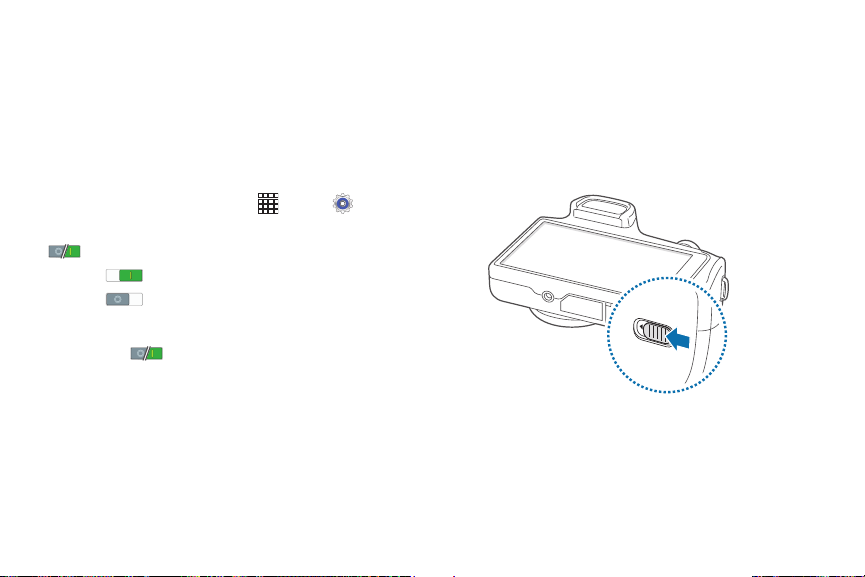
Opening the Battery Compartment
1. From the bottom of the camera, open the battery
compartment by sliding the cover lock to the left.
.
2. Swing the compartment cover open.
Getting Started 5
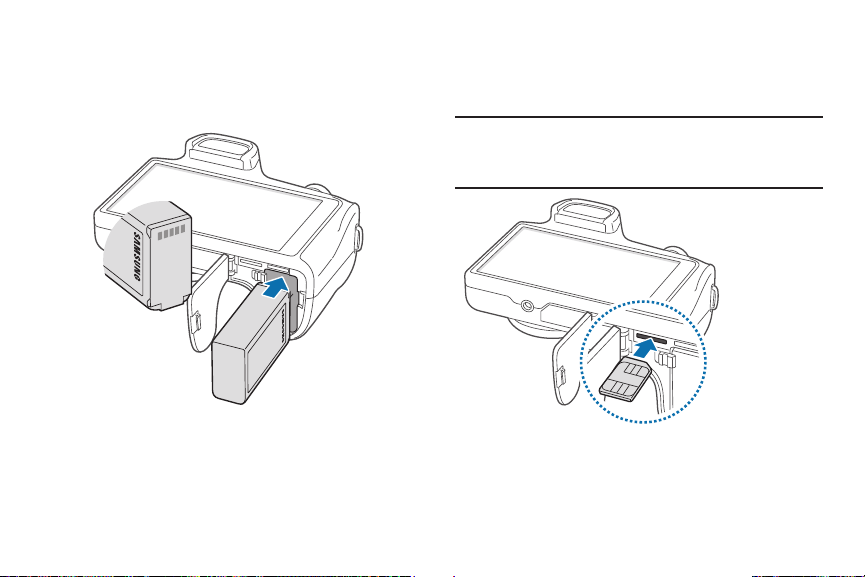
Installing the Battery
1. Insert the battery into the opening on the back of the
camera, making sure the connectors align.
2. Gently press in to secure the battery.
6
Installing the SIM Card
Insert the SIM card provided by your mobile service provider.
Push the SIM card into the
Important!
Make sure the SIM card’s gold contact pins face
upward
securely inserted.
toward the camera screen and the card is
LEFT SLOT
until it clicks.

Installing the Memory Card
You can use an optional microSD or microSDHC memory card
(not included) to expand available memory space.
Push the microSD card into the
it clicks.
RIGHT SLOT
until
Closing the Battery Compartment
1. Close the battery compartment door.
2. Slide the cover lock to the Right as shown below.
Important!
Make sure the microSD’s gold contact pins face
downward
securely inserted.
toward the camera lens and the card is
Note:
Make sure the battery is properly installed and the cover
is securely closed before switching on the camera.
Getting Started 7
Charging a Battery
Your device is powered by a rechargeable Li-ion battery. The
Travel Charger that is used to charge the battery is included
with your device. Use only Samsung-approved batteries and
chargers.
Note:
You must fully charge the battery before using your
camera for the first time. A discharged battery
recharges fully in approximately 4 hours.
Note:
Long backlight settings, searching for service, vibrate
mode, web browser use, and other variables may
reduce the battery’s charge.
Although you can use the camera while the battery is
charging, doing so will require additional charging time.
8
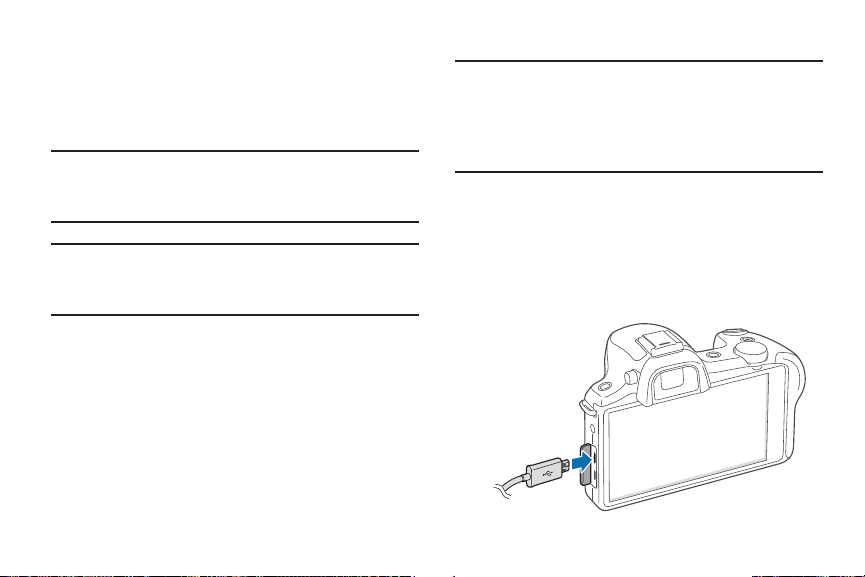
Using the Travel Charger
Important!
Verify that the camera battery is installed prior to
connection. If the battery is not properly installed
and the wall charger is connected, the camera
may power off and on continuously, preventing
proper operation.
1. Remove the plastic cover, then plug the flat end of
the Travel Charger into the
Connector
and the other end into a standard
AC wall outlet.
2. When charging is finished, remove the flat end from
the interface connector jack on the camera.
Power/Accessory Interface

Caution!
Failure to unplug the wall charger before you remove
the battery can cause damage to the camera.
Low Battery Indicator
When the battery is weak, the battery icon ( ) blinks and
the device sounds a warning tone at regular intervals. In this
condition, your camera conserves its remaining battery
power, not by turning off the backlight, but by entering the
dimming mode. For a quick check of your battery level,
glance at the battery charge indicator located in the upperright corner of your device’s display. Solid color ( ) indicates
a full charge.
When the battery level becomes too low, the camera
automatically turns off.
Turning the Camera On or Off
1. Press and hold until the camera turns on.
2. Swipe your finger across the screen to unlock
the camera.
3. To turn off the camera, press and hold until the
Device options
4. To uch
screen displays.
Power off
to turn off the camera.
Getting Started 9

Locking and Unlocking the Touch Screen
1. Press to lock the touch screen.
2. Press again to display the Lock screen, then swipe
your finger across the screen to unlock.
For more information about the Lock screen, see “Lock
Screen Settings” on page 146.
Warning!
Please note that a touch screen responds best to a
light touch from the pad of your finger. Using
excessive force or a metallic object when pressing
on the touch screen may damage the tempered
glass surface and void the warranty. For more
information, refer to “Standard Limited Warranty”
on page 191.
10
Configuring Your Camera
When you first turn on your camera, you will need to set up a
few things.
Tip:
If you are visually impaired or hard of hearing, touch
Accessibility
1. Select a language and touch
2.
3.
4.
5.
6.
to configure accessibility settings.
Next
.
Date and time
User type
camera for either basic or expert use.
The main Camera screen is displayed.
Touch to continue.
Wi-Fi
available network to connect.
End User License Agreement for Software
terms and conditions, and then touch
agree to the terms and conditions above
No thanks to allow error logging.
Samsung account
touch
: Set the date and time settings.
: Touch
Standard
or
Professional
: Touch to enable Wi-Fi, then touch an
:Touch
Sign in, Create new account,
Skip
.
to set the
: Read the
I understand and
. Touch Yes or
or

7.
Got Google?
account, or
Make It Google
8.
Entertainment
9.
credit card information for your Google Play account, or
touch
•
10.
Backup and Restore
each option to enable it.
•
11.
Google & Location
you prefer.
This device belongs to
12.
Last
Dropbox
13.
Learn about key features
14.
each feature.
15. Enter a name for your device.
Congratulations! Your device is set up and ready to use.
: Touch
Yes
to log into your existing
No
to continue.
: Touch
Get an account
: Touch
Set up a credit card
Not now
.
This screen displays if you have signed in to your
Google Account.
: Read the information and touch
This screen only displays if you have signed in to your
Google Account.
: Select the Google location services
...: Enter your
name.
: Touch
Create account, Sign in
: Touch to enable
or
First
, or
Not now
and enter
and
Skip
.
.
Getting Started 11

Section 2: Understanding Your Camera
This section outlines some key features of your camera and
describes the screen and the icons that appear when the
camera is in use. It also shows how to navigate the camera
and provides information on using a memory card.
Features of Your Camera
The Samsung Galaxy Camera is the optimum device for the
new era in communication where consumers want to share
their moments visually instead verbally. Instead of sending
text messages, emails, instant messages or text social
networking posts, consumers want to share images of their
daily moments in unique ways.
The following list outlines a few of the features included in
your camera.
•
20 Megapixel BIS CMOS Sensor with Optical Image Stabilization
•
18x Zoom with 55mm wide angle lens
•
4G network with 1.6 gigahertz quad-core processor
•
Android v 4.2.2, Jelly Bean Platform
•
Brilliant 4.8” HD Super Clear Touch screen display
•
Photo Wizard and Movie Wizard applications
•
Ready access to the Internet
12
•
Built-in Bluetooth and advanced Wi-Fi® technology
•
HSPA+ 42 Mbps high speed download capability
•
Up to 64 GB expandable memory slot
•
16 GB memory and 2 GB RAM
•
Corporate and Personal Email
•
Sync and update social network applications
•
Over 450,000 Apps available to download via
Google Play Store™
•
Full Integration of Google Mobile™ Services (Gmail, YouTube,
Google Maps, Google Voice Search)

Your Camera at a Glance
1
2
3
4
5
6
7
8
9
10
11
12
13
14
1.
stereo recording.
Microphone
: Performs noise cancellation and
2. Power/Lock Key: Turns your camera on and off. It also
locks or unlocks the touch screen.
Video Record Button
3.
4.
Shutter Button
: Starts/stops video recording.
: Take a picture.
5. AF Assist light: Assists in taking pictures in low-light
conditions.
Lens Mount Index
6.
: Marking used for matching the EF
lens mount to the lens mount.
Lens Mount
7.
: Holds removable lens.
8. Flash: Adds light when there is not adequate lighting
for taking pictures.
Microphone
9.
stereo recording.
: Performs noise cancellation and
10. Flash Release: Raise the flash.
Lens Contacts
11.
12.
Speaker
: Connectors for additional lenses.
: Plays notifications and music.
13. Power/Accessory Interface Connector: allows you to
connect a Travel Charger or other optional accessories
such as a USB/data cable.
Image Sensor
14.
: Creates digital images.
Understanding Your Camera 13

Back View of Your Camera
1
2
3
4
5
6
7
8
9
10
11
1. Dioptre Adjustment Dial: Adjusts the viewfinder focus
to suit an individual’s eyes.
2. Eyelet for Strap: Attaches a camera strap.
3. Viewfinder: Displays the composition of the picture
or video.
14
4. Proximity/ Light Sensor: Uses the ambient light level
to adjust display brightness and other features.
5. Touch Screen: Displays the Home screen, apps,
photos and videos, settings, etc.
6. Hot-Shoe: Connects optional accessories, such as an
external flash.
7. Command Dial: Changes shooting mode when using
the camera, and adjusts the volume when playing
music or videos.
8. GPS Antenna: Provides location information.
9. Eyelet for Strap: Attaches a camera strap.
10. Main Antenna: Connects to network services.
Notification light
11.
Important!
Do not cover the antenna area with your hands or
other objects, except when you are taking photos
or videos. This may cause connectivity problems or
drain the battery.
: Provides camera feedback.
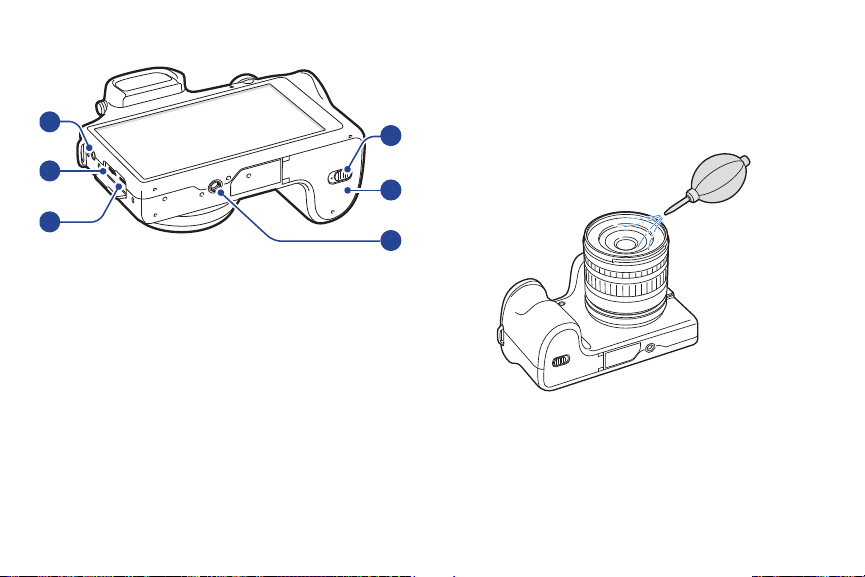
Bottom View of Your Camera
1
2
3
4
5
6
1. 3.5 Headset Jack: Connects earphones (not included)
or other accessories.
2. Power/Accessory Interface Connector: Connects a
Travel Charger or other optional accessories such as a
USB/data cable.
HDMI Port
3.
4.
5.
6.
: Connects your camera to HDMI devices.
Battery Cover Release
Battery Compartment
and Memory card.
Tripod mount
: Locks the battery compartment.
: Houses the battery, SIM card,
: Attaches your camera to a tripod
(not included).
Cleaning the Device
Camera Lens and Display
Use a blower brush to remove dust, and then wipe the lens
gently with a soft cloth. If any dust remains, apply lens
cleaning liquid to a lens cleaning paper, and wipe gently.
Understanding Your Camera 15

Image Sensor
Depending on different shooting conditions, dust may appear
in photos because the image sensor is exposed to the
external environment. This problem is normal, and the
exposure to dust occurs in everyday use of the camera. You
can remove dust from the sensor by operating the sensor
cleaning function.
If dust remains after cleaning the sensor, contact a service
centre. Do not insert the blower into the mounting opening of
the lens.
Camera Body
Wipe gently with a soft, dry cloth.
Warning!
Never use benzene, thinners, or alcohol to clean the
device. These solutions can damage the device or
cause it to malfunction.
16
Home Screen
The Home screen is the starting point for using your camera.
It provides a wealth of information about the camera’s status
and options, as well as providing access to applications.
1 2 3
7 8 9
1. Status Bar: Displays system information, such as
signal strength, battery level, time, etc.
Widgets
2.
: Small apps which run on the Home screen.
The Weather widget appears on the main Home screen
by default.
7
4
5
6
3. Notifications: Displays notifications such as unread
emails, updates available, etc.
4. Back Key: Step backwards when navigating a menu or
web page.
5. Home Key: Return to the Home screen from any
screen or menu. Press and hold to display the
Task Manager.
6. Menu Key: Access sub-menus with additional options
for the current app or feature.
7. Application Icons: Shortcuts to your favorite
applications placed on the Home screen. The Camera
and Apps icons appear on all Home pages and are
referred to as Primary Shortcuts and cannot be
removed from the Home screen.
8. Google Quick Search Bar: Shortcut to Google Search
that allows you to search for items on the internet.
Home Screen Indicator
9.
currently displayed.
: Shows which Home screen is
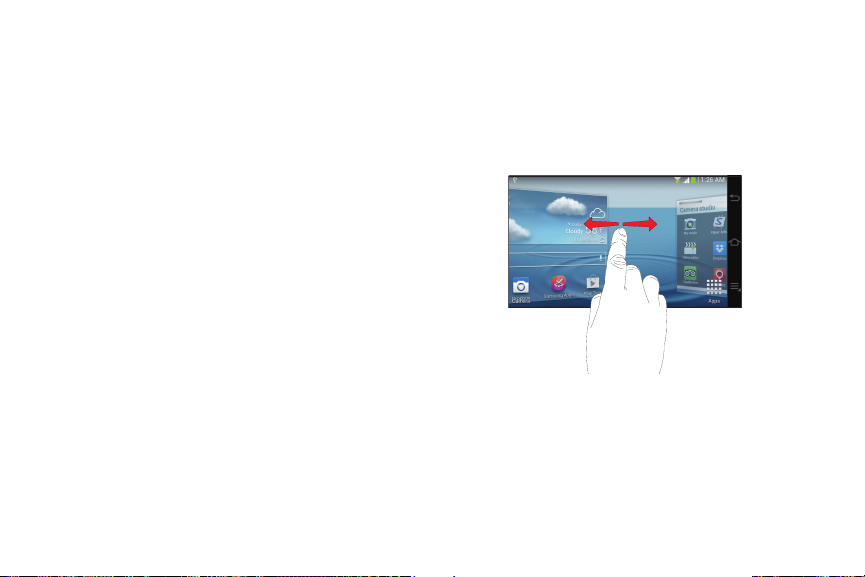
Extended Home Screen
The Home screen consists of the main Home panel plus
additional panels that extend beyond the display width to
provide more space for adding shortcuts and widgets.
Slide your finger horizontally across the screen to scroll to
the left or right side panels.
Understanding Your Camera 17
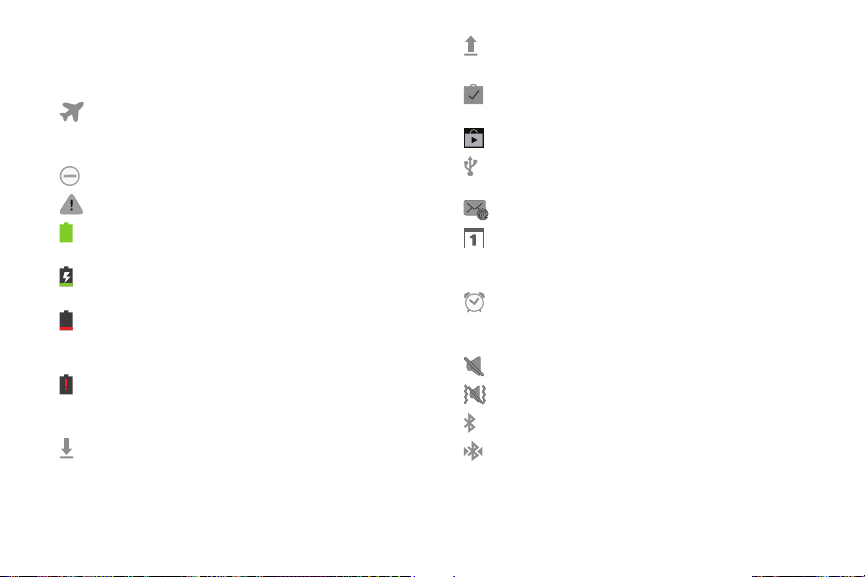
Indicator Icons
This list identifies the symbols you’ll see on your camera’s
Status bar.
Indicates that the Airplane Mode is active. You
cannot send or receive any messages or access
online information.
Displays when your camera is in Blocking mode.
Displays when there is a system error or alert.
Displays your battery charge level. Icon shown is
fully charged.
Displays when your battery is charging. Also
displays battery charge level.
Device Power Very Low – Shows your current
battery only has between 5 and 15 percent power
remaining.
Device Power Critical – Shows your current battery
only has less than 5 percent power remaining and
will immediately shutdown.
Displays when your camera is downloading or has
downloaded a file. It will blink green when it is
installing.
18
Displays when the an outbound file transfer is in
progress.
Displays when a Play Store download has
completed.
Displays when updates are available for download.
Displays when the camera is connected to a
computer via a supported USB cable connection.
Displays when Email is received.
Displays when the time and date for a Calendar Event
has arrived. For more information, refer to
“Calendar” on page 107.
Displays when you set an alarm to ring at a specified
time. For more information, refer to “Alarm” o n p a g e
109.
Displays when the Sound profile is set to Mute.
Displays when the Sound profile is set to Vibrate.
Displays when Bluetooth is activated.
Displays when a Bluetooth device has been paired
with the camera.

Displays when Wi-Fi is connected, active, and
communicating with a Wireless Access Point
(WAP).
Displays when Wi-Fi is active but there is a
communication issue with the target Wireless
Access Point (WAP).
Displays when Wi-Fi Direct is active and your
camera is connected to another device.
Displays when your camera is connected to a Digital
Living Network Alliance (DLNA) certified device
using the AllShare Play application.
Displays when GPS is active and acquiring a signal.
Displays when data synchronization and
application sync is active and synchronization is in
progress for Gmail, Calendar, and Contacts.
Displays when a Software update is available for
download.
Displays when your device is connected being used
to control streaming media and is connected to a
Digital Living Network Alliance (DLNA) certified
device using the AllShare Play application.
Displays when the keypad is active.
Customizing Your Home Screen
You can customize your Home screen by doing the following:
•
Creating Shortcuts
•
Adding and Removing Widgets on the Home Screen
•
Creating Folders
•
Changing the Wallpaper
•
Adding and Deleting Home Screens
Shortcuts and Widgets
You can add, reposition, or remove shortcuts and widgets
from the Home screen.
•
Shortcuts
: Icons on the Home screen which launch applications.
•
Widgets
: Self-contained applications. They appear as on-screen
applications.
Understanding Your Camera 19

Adding a Shortcut or Widget
You can customize the Home screen by adding shortcuts
and widgets.
1. Press to display the Home screen, and then
navigate to the desired panel.
2. Touch and hold an empty area of the Home screen.
On the pop-up menu, touch
– or –
Tap
Apps
to display the Apps menu.
3. For shortcuts, touch the
Widgets
the
4. Touch and hold the shortcut or widget, and then drag it
to a position on the Home screen and release.
20
tab.
Apps and widgets
Apps
tab. For widgets, touch
.
Removing a Shortcut or Widget
Shortcuts and widgets can be removed from the
Home screen.
Note:
Removing a shortcut does not delete the application, it
simply removes the shortcut from the Home screen.
1. Press to display the Home screen, and then
navigate to the desired panel.
2. Touch and hold the shortcut or widget until it detaches,
Remove
and then drag it to
and release.

Folders
You can add folders to your Home screen to help organize
your application shortcuts.
Adding a Folder
1. Press to display the Home screen, and then
navigate to the desired panel.
2. Touch and hold an empty area of the Home screen.
Folder
On the pop-up menu, touch
3. Enter a name for the folder, and then touch OK. A folder
is created on the Home screen.
Using Folders
To add shortcuts to the folder, touch and hold the
shortcut, and then drag it to the folder and release.
Touch the folder to open it and access the shortcuts
inside.
To delete a folder, touch and hold the folder until it
detaches, and then drag it to
Note:
All shortcuts contained in the folder will also be deleted.
.
Remove
and release.
Wallpaper
You can change the Wallpaper (background image) of your
Home screen and Lock screen.
1. From any Home screen, press
Set wallpaper
2. To uch
lock screens
3. Touch to select a source location:
•Gallery
crop the picture and save it as wallpaper.
• Live wallpapers
(Home screen only).
• Travel wallpaper
city of your choice (Lock screen only).
• Wallpapers
4. Select a wallpaper and touch
or
Cancel
.
Home screen, Lock screen
.
: Select a picture from Gallery. Follow the prompts to
: Select a moving scene for the background
: Choose options to display images from the
: Choose an image from the Wallpapers gallery.
.
Understanding Your Camera 21
and touch
, or
Home and
Set wallpaper, Done
,
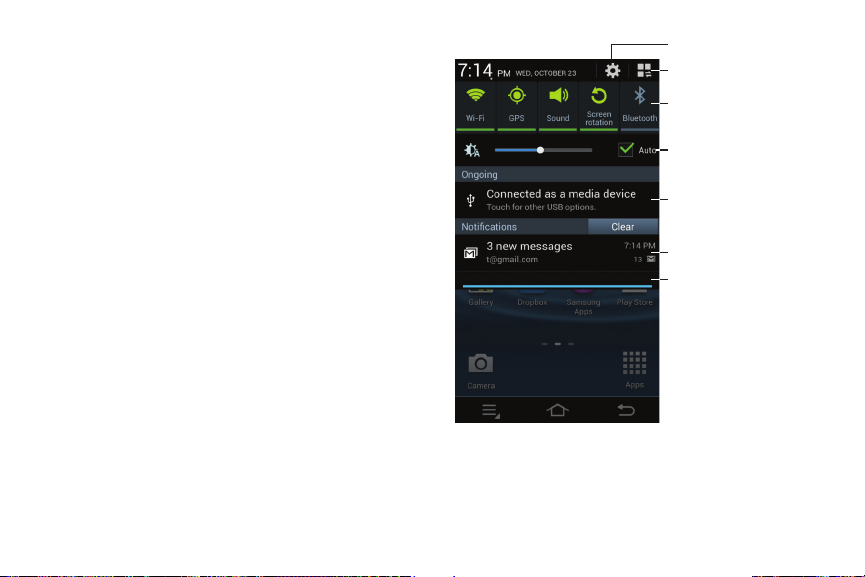
Notification Panel
Access settings
Screen brightness
Quick settings
Access additional options
Notifications
Drag bar down to
show panel
Ongoing events
The Notification Panel displays information about
connections, alerts, new messages, and more. It also has
Quick settings— buttons which allow you to quickly access
and change common system settings.
Access the Notifications Panel
1. Touch and slide downward from the top of the screen
to display the Notification Panel. Slide the Notification
Panel upward to close it.
2. Touch an ongoing event or a notification to view it or to
launch its related app or feature.
22

Using the Touch Screen
Your camera’s touch screen lets you control actions through
a variety of touch gestures. Use only your fingers when
touching the screen.
Caution!
To avoid damaging the touch screen, do not tap it
with anything sharp or apply excessive pressure to it
with your fingertips.
Touch
Lightly touch items to select or launch them. For example:
•
Touch the on-screen keyboard to enter characters or text.
•
Touch a menu item to select it.
•
Touch an application’s icon to launch the application.
Touch and Hold
Activate on-screen items by a touch and hold gesture.
For example:
•
Touch and hold a widget on the home screen to move it.
•
Touch and hold on a field to display a pop-up menu of options.
Dragging
Touch and hold an item until it “releases,” then drag it to a
new position and release. Use dragging when:
•
Moving an thumbnail or preview to a new location.
•
Rearranging app shortcuts
Double-Tapping
Double-tap lightly on the screen. Use double-tapping when:
•
Zooming in or out on a web page, map, or image.
Pinching and Stretching
Bring two fingers together on the screen (pinching), or
spread two fingers apart on the screen (stretching).
Use pinching and stretching when:
•
Zooming in (stretch) and zooming out (pinch) on a web page,
map, or image.
Understanding Your Camera 23

Rotating the Screen
Many applications allow display in either portrait or
landscape orientation. Rotating the device causes the display
to automatically adjust to fit the new screen orientation.
To prevent the display from rotating automatically, open the
Notification panel and deselect
Note:
Some applications do not allow screen rotation, and
some applications display a different screen depending
on the orientation.
Screen rotation
.
Motions and Gestures
Simple motions and gestures allow easy control of the
device. For more information, refer to “Motions and
Gestures” on page 155.
24

Section 3: Camera Operation
Current
shooting mode
Current camera
settings
Focus frame
Camera settings
Return to the
Home screen
Open Gallery
Change
shooting mode
Record video
Take photos
Effects
Quick settings
Access shortcuts
This section describes how to use your Camera to take
pictures or shoot videos.
Launching the Camera
Touch Camera on the Home screen. Alternatively,
press the Shutter button or the Video recording button.
Notes/Tips
•
The camera automatically shuts off when unused.
•
Make sure that the lens is clean. Otherwise, the device may not
work properly in some modes that require high resolutions.
Important!
Do not take photos of people without
their permission.
Do not take photos in places where cameras
are not allowed.
Do not take photos in places where you may
interfere with another person’s privacy.
Taking Photos
Taking pictures with your device’s built-in camera is as
simple as choosing a subject, pointing the camera, then
pressing the camera key.
1. From any Home screen, touch
the camera mode.
2. Using the preview screen, adjust the image by aiming
the camera at the subject.
Camera
to activate
Camera Operation 25

3. Before you take a picture, use the Zoom button to zoom
in or out. You can magnify the picture up to x21
(2100 percent).
4. If desired, before taking the photo, you can touch
on-screen icons to access various camera options
and settings.
5. You can also touch the screen to move the focus to the
area you touch.
6. Press the Shutter button ( ) until the shutter sounds.
(You can also press the on-screen Camera icon). The
picture is automatically stored within your designated
storage location. For more information, refer to
“Camera Settings” on page 70.
7. Touch Gallery to view your picture.
26
Camera Settings Icons
The icons displayed on the preview screen provide
information about current shooting options and settings. The
icons listed in the table below are the most common.
Shutter speed
Aperture value
Exposure value
ISO sensitivity
Timer
Flash
Photo size
White balance
AF mode
Metering
Continuous shooting
Bracket mode
Raw format file
 Loading...