

Samsung EK-GC110ZKAXAR User Manual
SMART CAMERA
User Manual
Please read this manual before operating your
camera, and keep it for future reference.

Intellectual Property
All Intellectual Property, as defined below, owned by or which is otherwise the property of Samsung or its respective suppliers
relating to the SAMSUNG Galaxy Tab, including but not limited to, accessories, parts, or software relating there to (the “Galaxy Tab
System”), is proprietary to Samsung and protected under federal laws, state laws, and international treaty provisions. Intellectual
Property includes, but is not limited to, inventions (patentable or unpatentable), patents, trade secrets, copyrights, software,
computer programs, and related documentation and other works of authorship. You may not infringe or otherwise violate the
rights secured by the Intellectual Property. Moreover, you agree that you will not (and will not attempt to) modify, prepare
derivative works of, reverse engineer, decompile, disassemble, or otherwise attempt to create source code from the software. No
title to or ownership in the Intellectual Property is transferred to you. All applicable rights of the Intellectual Property shall remain
with SAMSUNG and its suppliers.
Open Source Software
Some software components of this product incorporate source code covered under GNU General Public License (GPL), GNU Lesser
General Public License (LGPL), OpenSSL License, BSD License and other open source licenses. To obtain the source code covered
under the open source licenses, please visit:
http://opensource.samsung.com
.
Samsung Electronics America (SEA), Inc
Address:
EK-GC110_UM_English_MC2_WB_041113_F2
85 Challenger Road
Ridgefield Park,
New Jersey
07660

Toll Free
Telephone:
1-800-SAMSUNG
Internet
http://www.samsung.com
Address:
©2013 Samsung Telecommunications America, LLC. Samsung is a registered trademark of Samsung Electronics Co., Ltd.
Do you have questions about your Samsung Mobile Device?
For 24 hour information and assistance, we offer a new FAQ/ARS System (Automated Response System) at:
www.samsung.com/us/support
Nuance®, VSuite™, T9® Text Input, and the Nuance logo are trademarks or registered trademarks of Nuance Communications,
Inc., or its affiliates in the United States and/or other countries.
®
and NetFront™ are trademarks or registered trademarks of ACCESS Co., Ltd. in Japan and other countries.
ACCESS
The Bluetooth
®
word mark, figure mark (stylized “B Design”), and combination mark (Bluetooth word mark and “B Design”) are
registered trademarks and are wholly owned by the Bluetooth SIG.
microSD™ and the microSD logo are Trademarks of the SD Card Association.
®
Openwave
is a registered Trademark of Openwave, Inc.
Google, the Google logo, Android, the Android logo, Google Play, Gmail, Google Mail, Google Maps, Google Music, Google Talk,
Picasa, YouTube and other marks are trademarks of Google Inc.
Wi-Fi is a registered trademark of the Wireless Fidelity Alliance, Inc.
©
Swype and the Swype logos are trademarks of Swype, Inc.
2010 Swype, Inc. All rights reserved.

, DivX®, DivX Certified® and associated logos are trademarks of Rovi Corporation or its subsidiaries and are used under
license.
®
DivX Certified
ABOUT DIVX VIDEO: DivX
Certified
to play DivX® video up to HD 720p, including premium content.
®
®
device that plays DivX video. Visit
is a digital video format created by DivX, LLC, a subsidiary of Rovi Corporation. This is an official DivX
www.divx.com
for more information and software tools to convert your files into DivX
videos.

Table of Contents
Section 1: Getting Started .............................5
Setting Up Your Camera . . . . . . . . . . . . . . . . . . . .5
Charging a Battery . . . . . . . . . . . . . . . . . . . . . . . .7
Switching the Camera On or Off . . . . . . . . . . . . . .9
Locking and Unlocking the Touch Screen . . . . . . .9
Configuring your Camera . . . . . . . . . . . . . . . . . . .9
Creating a New Google Account . . . . . . . . . . . . .12
Retrieving your Google Account Password . . . . .12
Creating a Samsung Account . . . . . . . . . . . . . . .12
Section 2: Camera Operation ......................14
Camera . . . . . . . . . . . . . . . . . . . . . . . . . . . . . . .14
Using the Camera . . . . . . . . . . . . . . . . . . . . . . .14
Zoom Feature . . . . . . . . . . . . . . . . . . . . . . . . . .15
Camera Modes . . . . . . . . . . . . . . . . . . . . . . . . .16
Quick Settings . . . . . . . . . . . . . . . . . . . . . . . . . .17
Camera and Camcorder Settings . . . . . . . . . . . .18
Using the Camcorder . . . . . . . . . . . . . . . . . . . . .20
Section 3: Understanding Your Camera .....22
Features of Your Camera . . . . . . . . . . . . . . . . . .22
Your Camera at a Glance . . . . . . . . . . . . . . . . . .23
Bottom View of Your Camera . . . . . . . . . . . . . . 24
Display Layout . . . . . . . . . . . . . . . . . . . . . . . . . 24
Menu Navigation . . . . . . . . . . . . . . . . . . . . . . . 33
Customizing Your Home Screen . . . . . . . . . . . . 38
Notification Bar . . . . . . . . . . . . . . . . . . . . . . . . 42
Memory Card . . . . . . . . . . . . . . . . . . . . . . . . . . 43
Section 4: Entering Text ..............................45
Text Input Methods . . . . . . . . . . . . . . . . . . . . . 45
Entering Text Using the Samsung Keyboard . . . 45
Changing the Text Input Mode - Keypad . . . . . . 46
Using ABC Mode . . . . . . . . . . . . . . . . . . . . . . . 46
Using Symbol/Numeric Mode . . . . . . . . . . . . . . 47
Predictive Text . . . . . . . . . . . . . . . . . . . . . . . . . 47
Samsung Keyboard Settings . . . . . . . . . . . . . . 48
Entering Text Using Continuous Input . . . . . . . . 48
Using the Google Voice Typing Feature . . . . . . 48
Section 5: Contacts and Your Address Book 50
View your Address Book . . . . . . . . . . . . . . . . . 50
Adding a New Contact . . . . . . . . . . . . . . . . . . . 50
Editing an Existing Contact . . . . . . . . . . . . . . . . 52
1

Finding an Address Book Entry . . . . . . . . . . . . . 52
Joining Contacts . . . . . . . . . . . . . . . . . . . . . . . . 52
Synchronizing Accounts . . . . . . . . . . . . . . . . . . 54
Address Book Options . . . . . . . . . . . . . . . . . . . . 54
Groups . . . . . . . . . . . . . . . . . . . . . . . . . . . . . . . 56
Address Book Favorites . . . . . . . . . . . . . . . . . . . 58
Managing Address Book Contacts . . . . . . . . . . . 58
Section 6: Multimedia ................................. 59
Music Player . . . . . . . . . . . . . . . . . . . . . . . . . . . 59
Using Playlists . . . . . . . . . . . . . . . . . . . . . . . . . . 61
Google Play Music . . . . . . . . . . . . . . . . . . . . . . . 62
Video Player . . . . . . . . . . . . . . . . . . . . . . . . . . . 62
Play Movies & TV . . . . . . . . . . . . . . . . . . . . . . . 63
Gallery . . . . . . . . . . . . . . . . . . . . . . . . . . . . . . . 63
Photo Wizard . . . . . . . . . . . . . . . . . . . . . . . . . . 64
Video Editor . . . . . . . . . . . . . . . . . . . . . . . . . . . 64
Instagram . . . . . . . . . . . . . . . . . . . . . . . . . . . . . 65
Section 7: Messaging ................................. 66
Types of Messages . . . . . . . . . . . . . . . . . . . . . . 66
Using Email . . . . . . . . . . . . . . . . . . . . . . . . . . . . 66
Using Gmail . . . . . . . . . . . . . . . . . . . . . . . . . . . 68
Google Talk . . . . . . . . . . . . . . . . . . . . . . . . . . . . 69
2
Google + . . . . . . . . . . . . . . . . . . . . . . . . . . . . . . 69
Messenger . . . . . . . . . . . . . . . . . . . . . . . . . . . . 70
ChatON . . . . . . . . . . . . . . . . . . . . . . . . . . . . . . . 70
Section 8: Changing Your Settings ............ 71
Accessing Settings . . . . . . . . . . . . . . . . . . . . . . 71
Wi-Fi Settings . . . . . . . . . . . . . . . . . . . . . . . . . . 71
Bluetooth settings . . . . . . . . . . . . . . . . . . . . . . .72
Data Usage . . . . . . . . . . . . . . . . . . . . . . . . . . . . 72
More Settings . . . . . . . . . . . . . . . . . . . . . . . . . .73
Blocking mode . . . . . . . . . . . . . . . . . . . . . . . . . 76
Sound . . . . . . . . . . . . . . . . . . . . . . . . . . . . . . . .76
Display . . . . . . . . . . . . . . . . . . . . . . . . . . . . . . . 77
Storage . . . . . . . . . . . . . . . . . . . . . . . . . . . . . . . 78
Power . . . . . . . . . . . . . . . . . . . . . . . . . . . . . . . . 78
Battery . . . . . . . . . . . . . . . . . . . . . . . . . . . . . . . 79
Application Manager . . . . . . . . . . . . . . . . . . . . .79
Location Services . . . . . . . . . . . . . . . . . . . . . . . 81
Lock Screen Settings . . . . . . . . . . . . . . . . . . . . 81
Security . . . . . . . . . . . . . . . . . . . . . . . . . . . . . . 82
Language and input . . . . . . . . . . . . . . . . . . . . .85
Back up and reset . . . . . . . . . . . . . . . . . . . . . . . 89
Add Account . . . . . . . . . . . . . . . . . . . . . . . . . . .90

Motion . . . . . . . . . . . . . . . . . . . . . . . . . . . . . . . .91
Accessory Settings . . . . . . . . . . . . . . . . . . . . . .91
Date and time . . . . . . . . . . . . . . . . . . . . . . . . . .92
Accessibility . . . . . . . . . . . . . . . . . . . . . . . . . . .92
Developer options . . . . . . . . . . . . . . . . . . . . . . .93
About Device . . . . . . . . . . . . . . . . . . . . . . . . . . .95
Section 9: Connections ...............................97
Internet . . . . . . . . . . . . . . . . . . . . . . . . . . . . . . .97
Wi-Fi . . . . . . . . . . . . . . . . . . . . . . . . . . . . . . . .103
Bluetooth . . . . . . . . . . . . . . . . . . . . . . . . . . . . .107
PC Connections . . . . . . . . . . . . . . . . . . . . . . . .110
Section 10: Applications ...........................112
AllShare Play . . . . . . . . . . . . . . . . . . . . . . . . . .112
Calculator . . . . . . . . . . . . . . . . . . . . . . . . . . . .116
Calendar . . . . . . . . . . . . . . . . . . . . . . . . . . . . .116
Camera . . . . . . . . . . . . . . . . . . . . . . . . . . . . . .118
ChatON . . . . . . . . . . . . . . . . . . . . . . . . . . . . . .118
Chrome . . . . . . . . . . . . . . . . . . . . . . . . . . . . . .118
Clock . . . . . . . . . . . . . . . . . . . . . . . . . . . . . . . .118
Contacts . . . . . . . . . . . . . . . . . . . . . . . . . . . . .121
Downloads . . . . . . . . . . . . . . . . . . . . . . . . . . .121
Dropbox . . . . . . . . . . . . . . . . . . . . . . . . . . . . . .122
Email . . . . . . . . . . . . . . . . . . . . . . . . . . . . . . . 122
Gallery . . . . . . . . . . . . . . . . . . . . . . . . . . . . . . 123
Game Hub . . . . . . . . . . . . . . . . . . . . . . . . . . . 123
Gmail . . . . . . . . . . . . . . . . . . . . . . . . . . . . . . . 123
Google . . . . . . . . . . . . . . . . . . . . . . . . . . . . . . 123
Google + . . . . . . . . . . . . . . . . . . . . . . . . . . . . 123
Google Settings . . . . . . . . . . . . . . . . . . . . . . . 123
Group Play . . . . . . . . . . . . . . . . . . . . . . . . . . . 124
Help . . . . . . . . . . . . . . . . . . . . . . . . . . . . . . . . 125
Instagram . . . . . . . . . . . . . . . . . . . . . . . . . . . 125
Internet . . . . . . . . . . . . . . . . . . . . . . . . . . . . . 125
Local . . . . . . . . . . . . . . . . . . . . . . . . . . . . . . . 125
Maps . . . . . . . . . . . . . . . . . . . . . . . . . . . . . . . 125
Messenger . . . . . . . . . . . . . . . . . . . . . . . . . . . 126
Music Player . . . . . . . . . . . . . . . . . . . . . . . . . 126
My Files . . . . . . . . . . . . . . . . . . . . . . . . . . . . . 126
Navigation . . . . . . . . . . . . . . . . . . . . . . . . . . . 127
Paper Artist . . . . . . . . . . . . . . . . . . . . . . . . . . 129
Photo Wizard . . . . . . . . . . . . . . . . . . . . . . . . . 129
Play Books . . . . . . . . . . . . . . . . . . . . . . . . . . . 129
Play Magazines . . . . . . . . . . . . . . . . . . . . . . . 130
Play Movies & TV . . . . . . . . . . . . . . . . . . . . . . 130
3

Play Music . . . . . . . . . . . . . . . . . . . . . . . . . . . 130
Play Store . . . . . . . . . . . . . . . . . . . . . . . . . . . . 130
S Memo . . . . . . . . . . . . . . . . . . . . . . . . . . . . . 131
S Suggest . . . . . . . . . . . . . . . . . . . . . . . . . . . . 133
S Voice . . . . . . . . . . . . . . . . . . . . . . . . . . . . . . 133
Samsung Apps . . . . . . . . . . . . . . . . . . . . . . . . 134
Settings . . . . . . . . . . . . . . . . . . . . . . . . . . . . . 134
Talk . . . . . . . . . . . . . . . . . . . . . . . . . . . . . . . . 134
Video Editor . . . . . . . . . . . . . . . . . . . . . . . . . . 134
Video Player . . . . . . . . . . . . . . . . . . . . . . . . . . 134
Voice Search . . . . . . . . . . . . . . . . . . . . . . . . . . 134
Weather . . . . . . . . . . . . . . . . . . . . . . . . . . . . . 135
YouTube . . . . . . . . . . . . . . . . . . . . . . . . . . . . . 135
Section 11: Health and Safety Information 137
Exposure to Radio Frequency (RF) Signals . . . . 137
Specific Absorption Rate (SAR) Certification
Information . . . . . . . . . . . . . . . . . . . . . . . . . 142
FCC Part 15 Information to User . . . . . . . . . . . 144
Smart Practices While Driving . . . . . . . . . . . . . 144
Battery Use and Safety . . . . . . . . . . . . . . . . . . 145
Samsung Mobile Products and Recycling . . . . 146
UL Certified Travel Charger . . . . . . . . . . . . . . . 147
4
Display / Touch-Screen . . . . . . . . . . . . . . . . . . 147
GPS . . . . . . . . . . . . . . . . . . . . . . . . . . . . . . . . . 148
Care and Maintenance . . . . . . . . . . . . . . . . . .149
Responsible Listening . . . . . . . . . . . . . . . . . . .150
Operating Environment . . . . . . . . . . . . . . . . . .152
Restricting Children's Access to Your
Mobile Device . . . . . . . . . . . . . . . . . . . . . . .154
FCC Notice and Cautions . . . . . . . . . . . . . . . . .154
Other Important Safety Information . . . . . . . . . 154
Section 12: Warranty Information ............ 156
Standard Limited Warranty . . . . . . . . . . . . . . . 156
End User License Agreement for Software . . . . 161
Index .........................................................169

Section 1: Getting Started
Cover Lock
This section explains how to start using your camera by first
configuring your hardware, and setting up Google and
Samsung accounts.
Setting Up Your Camera
Prior to use it is necessary to install both the battery and
microSD™ card into their corresponding internal
compartments.
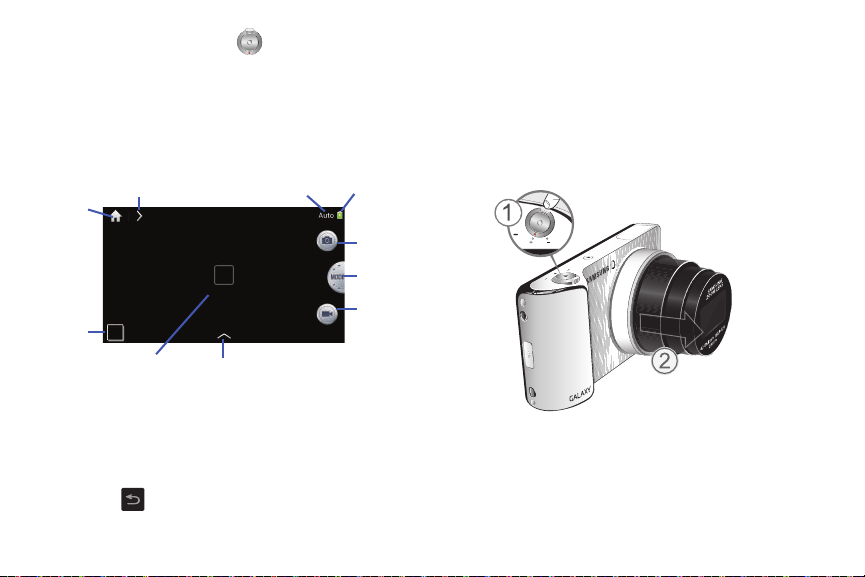
Opening the Battery Compartment
1. From the bottom of the camera, open the battery
compartment by sliding the cover lock to the left (1).
2. Swing the compartment cover open (2).
Installing the Battery
1. Insert the battery into the opening on the back of the
camera, making sure the connectors align (1).
Getting Started 5
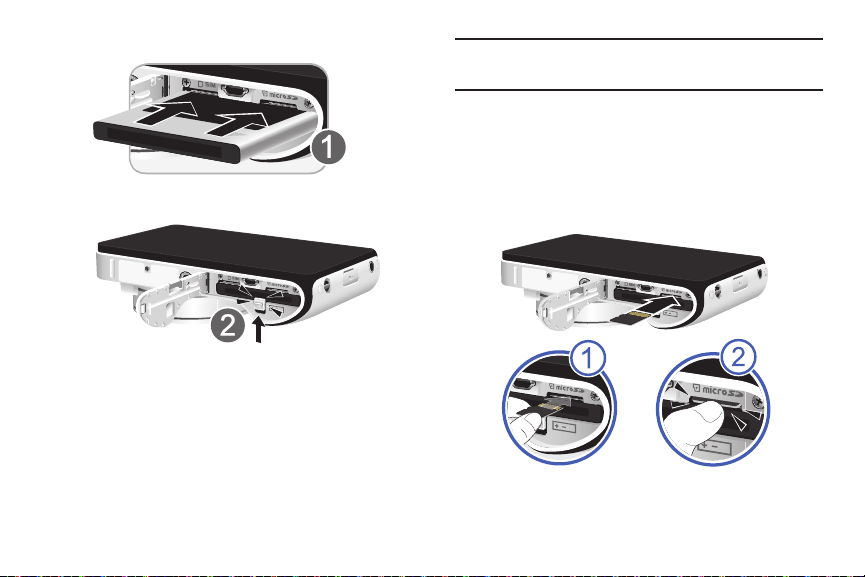
2. Gently press in to secure the battery (2).
Installing and Removing the Memory Card
You can use a microSD (SD) or microSDHC card to
expand available memory space if you desire. This secure
digital card enables you to exchange images, music, and
data between SD-compatible devices. This type of memory
card is designed for use with this camera and other devices.
6
Note:
Your camera has been tested to support up to a 64GB
memory card.
Installing the Memory Card
Push the microSD card into the slot (1) until it clicks
(2).
•
Make sure the microSD’s gold contact pins face toward the
camera screen and the card is securely inserted.
For more information on Memory Cards, see “Memory Card”
on page 43.
Removing the Memory Card
1. Push on the memory card until it clicks and is released.
2. Grasp the memory card and remove it from the
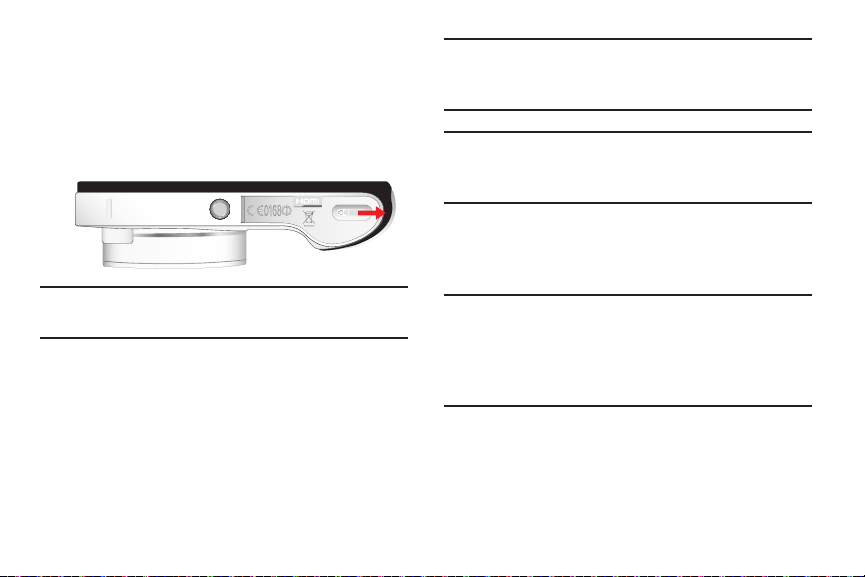
camera.Closing the Battery Compartment
1. Close the battery compartment door.
2. Slide the cover lock to the Right as shown below..
Note:
Make sure the battery is properly installed and the cover
is securely closed before switching on the camera.
Charging a Battery
Your device is powered by a rechargeable Li-ion battery. The
Travel Charger that is used to charge the battery, is included
with your device. Use only Samsung-approved batteries and
chargers.
Note:
You must fully charge the battery before using your
camera for the first time. A discharged battery
recharges fully in approximately 4 hours.
Note:
Long backlight settings, searching for service, vibrate
mode, web browser use, and other variables may
reduce the battery’s charge.
Although you can use the camera while the battery is
charging, doing so will require additional charging time.
Using the Travel Charger
Important!
Verify that the camera battery is installed prior to
connection. If the battery is not properly installed
and the wall charger is connected, the camera may
power off and on continuously, preventing proper
operation.
Getting Started 7
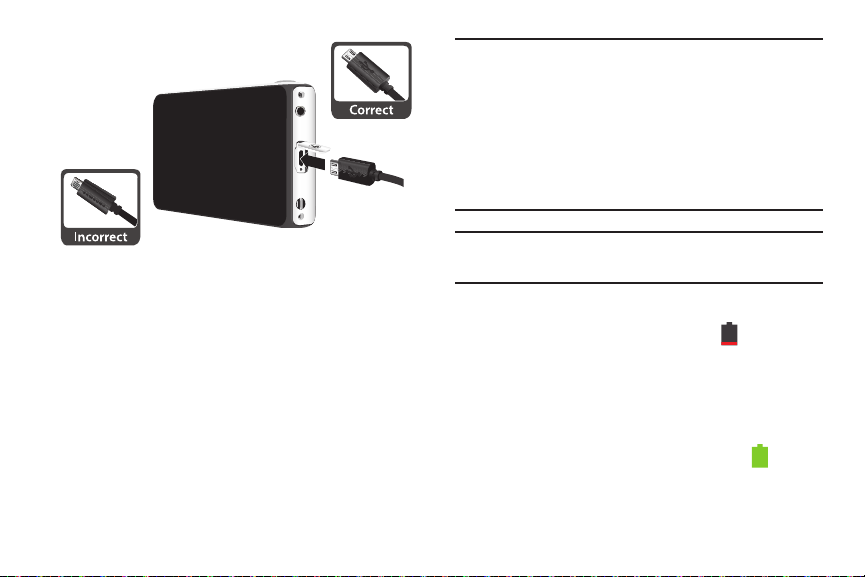
1. Remove the plastic cover, then plug the flat end of the
Travel Charger into the Power/Accessory Interface
connector and the other end into a standard AC wall
outlet.
2. When charging is finished, remove the flat end from
the interface connector jack on the camera.
8
Important!
Note:
If your handset has a touch screen display, please
note that a touch screen responds best to a light
touch from the pad of your finger. Using excessive
force or a metallic object when pressing on the
touch screen may damage the tempered glass
surface and void the warranty. For more
information, refer to “Standard Limited Warranty”
on page 156.
Failure to unplug the wall charger before you remove the
battery, can cause damage to the camera.
Low Battery Indicator
When the battery is weak, the battery icon ( ) blinks and
the device sounds a warning tone at regular intervals. In this
condition, your camera conserves its remaining battery
power, not by turning off the backlight, but by entering the
dimming mode. For a quick check of your battery level,
glance at the battery charge indicator located in the upperright corner of your device’s display. Solid color ( )
indicates a full charge.

When the battery level becomes too low, the camera
automatically turns off.
Switching the Camera On or Off
1. Press and hold until the camera switches on.
2. Swipe your finger across the screen to unlock the
camera.
Note:
The display language is preset to English at the factory.
To change the language, use the Language menu. For
more information, refer to “Changing Your Settings” on
page 71.
3. To switch off the camera, press and hold , until the
Device options
4. Ta p
5. At the
screen displays.
Power off
to switch off the camera.
Power off
prompt, tap OK.
Locking and Unlocking the Touch Screen
1. Press to lock the touch screen.
2. Press again to display the lock screen then swipe
your finger across the screen to unlock.
Configuring your Camera
When you first turn on your camera, you will need to set up a
few things.
1. The Samsung Galaxy welcome screen displays. The
default language for your camera is English. If you
English
would like to select another language, tap
select one of the listed languages.
Start
2. Ta p
Set Date and Time
1. Ta p
to begin.
The camera firmware will begin to update.
Set date
, set the date (month, day, year), if
necessary.
Getting Started 9
and

Set time
2. Tap
PM), if necessary.
3. Tap
4. Touch
After the firmware has been updated, tap
Camera viewfinder is displayed.
1. Tap H ome .
The
2. Select an available Wi-Fi network to set up a Wi-Fi
connection. For more information, refer to “Wi-Fi” on
page 103.
– or –
Tap
if you connected to a Wi-Fi.
3. At the
account
account, then follow the on-screen instructions.
– or –
If you already have a Samsung account, tap
follow the on-screen instructions.
10
, set the time (hour, minute, and AM or
Select time zone
Finish
Wi-Fi
screen is displayed.
Skip
to continue without setting up Wi-Fi. Tap
Samsung account
if you do not have an existing Samsung
and select the correct time zone.
.
display, tap
OK
to restart.The
Create new
Sign in
Next
and
– or –
Skip
to continue without setting up a Samsung
Tap
account.
4. At the
5. Follow the on-screen instructions to create a new
Note:
Entertainment
This screen displays if you signed in to your Google account.
Got Google?
Google account or
Google account or sign in to an existing account.
If you want to wait until later to create a Google
account, tap
In order to utilize your device to the fullest extent, you
will need to create a Google™ Account when you first
use your device. With a Google Account, you will have
access to more Google applications and applications will
always be in sync between your camera and computer.
Tou ch
Set up a credit card
for your Google Play account, and touch
– or –
display, tap
Not now
Ye s
if you already have a
No
if you do not.
.
, enter credit card information
Save
.

Touch
Not now
.
Backup and restore
This screen also displays if you signed in to your Google
account.
1. Read the backup and restore information.
2. Enable either or both options.
3. Touch to continue.
The Restoring screen displays while your information is
being restored.
Google & location
1. Read the information on the screen and enable either
or both of the Google location services.
2. At the
3. A blue checkmark also appears next to the text that
Google & location
appears next to the text that explains that you allow
Google’s location service to collect anonymous location
data from your camera. If you disagree, tap the
checkmark to remove it.
explains that you allows your location to be used for
Google search results and other Google services. If you
disagree, tap the checkmark to remove it.
screen, a blue checkmark
4. Touch to continue. Free Dropbox Account.
5. Enter your First and Last name at the This phone
belongs to... pop-up menu or touch to skip this
option.
To get a free 50 GB Dropbox account for two years:
1. To uch
2. To uch
3. To uch
4. In the provided fields, enter your
Setup Complete
Congratulations! Your device is set up and ready to use.
Disclaimer
offer. Touch
Create a new Dropbox account
fields, and touch
– or –
I already have an account
To uch
– or –
No thanks
that your camera can personalize some applications.
Tap .
Tou ch
Finish
The main Home screen displays.
to read a short disclaimer about this
OK
.
, enter the required
Register for Dropbox
to skip this offer.
.
.
to sign in to Dropbox.
First
and
Last
Getting Started 11
name so
Creating a New Google Account
In order to utilize your device to the fullest extent, you will
need to create a Google™ Account when you first use your
device. With a Google Account, Google applications will
always be in sync between your camera and computer.
If you did not create a new account during the setup
procedure when you first turned your camera on, follow
these steps:
1. From the Home screen, tap ➔
The
Add a Google Account
New
2. Tap
3. Follow the on-screen instructions to add a Google
Note:
12
to create a new Google account.
– or –
If you already have a Google account, tap
sign in and add the account to your camera.
Account.
Once you have created a Google account, you only need
to sign in.
screen displays.
Gmail
.
Existing
to
Retrieving your Google Account Password
A Google account password is required for Google
applications. If you misplace or forget your Google Account
password, follow these instructions to retrieve it:
1. From your computer, use an Internet browser and
navigate to
2. Click on the
3. Tap the
4. Enter your Email address and click
5. Follow the password recovery procedure.
http://google.com/accounts.
Can’t access your account?
I don’t know my password
link.
radio button.
Continue
.
Creating a Samsung Account
An active Samsung account is required to begin accessing
applications such as ChatON and AllShare Play. If you didn’t
create a Samsung Account when you first turned on your
camera, follow these steps:
1. From the Home screen, tap ➔
2. Tap
Add account
3. Tap
Create new account
4. Tap
.
Samsung account
.
.
Settings
.

5. Ta p
Terms and conditions
all the terms
6. Ta p
7. Enter the required information and tap
8. At the Welcome screen, tap
9. Follow the on-screen instructions to verify your email
address and activate your account.
above
Privacy policy
to read them and tap
checkbox.
and read the policy and tap
Sign up
Next
.
I accept
Agree
.
.
Getting Started 13

Section 2: Camera Operation
This section describes how to use your Camera and
Camcorder to take pictures or shoot videos.
Camera
This section explains how to use the camera on your camera.
You can take photographs and shoot video by using the builtin camera functionality. Your 16 megapixel camera produces
photos in JPEG format.
Important!
Do not take photos of people without their
permission.
Do not take photos in places where cameras are
not allowed.
Do not take photos in places where you may
interfere with another person’s privacy.
Using the Camera
Taking Photos
Taking pictures with your device’s built-in camera is as
simple as choosing a subject, pointing the camera, then
pressing the camera key.
14
Note:
When taking a photo in direct sunlight or in bright
conditions, shadows may appear on the photo.
Camera
1. From any Home screen, tap
the camera mode.
2. Using the main display screen as a viewfinder, adjust
the image by aiming the camera at the subject.
3. Before you take a picture, use the Zoom button to zoom
in or out. You can magnify the picture up to x21 (2100
percent).
4. If desired, before taking the photo, you can tap
on-screen icons to access various camera options and
settings.
5. You can also tap the screen to move the focus to the
area you touch.
to activate
6. Press the Shutter button ( ) until the shutter
Viewfinder
Camera
Image
Viewer
Mode
Effects
Battery
Charge
Change
Mode
Quick Settings
Home
(Gallery)
Tak e
Picture
Video
Record
sounds. (You can also press the on-screen Camera
icon). The picture is automatically stored within your
designated storage location. For more information,
refer to “Camera and Camcorder Settings” on page
18.
Zoom Feature
By using the Zoom button located on the side of the shutter
button, you can zoom up to 21 times (X21=2100%).
To Z oom In :
Move the Zoom button in a clockwise direction so that the
+
red dot lines up with the
Lens will move out (2).
symbol as shown in figure (1). The
7. While viewing a picture, after you have taken it, pinch
the screen outwards to zoom in or pinch the screen
inwards to zoom out.
You can magnify the picture up to x21.
8. Press to return to the viewfinder.
To Z oom Ou t:
Move the Zoom button in a counter-clockwise direction so
-
that the red dot lines up with the
symbol as shown in figure
(1). The Lens will move back in.
Camera Operation 15

Camera Modes
There are three camera modes that you can use depending
on the conditions and your experience: Auto, Smart, and
Expert.
1. From the camera viewfinder, tap to change the
mode to one of the following:
•Auto
: Use this to take photos with scene modes selected
automatically by the camera. The camera determines the ideal
mode for the photo.
•Smart
: Use this to take photos with a low level of manual
adjustment.
–
Beauty face
gentler images.
–
Best photo
and then choose the best photos among them. Press the
Shutter button to take multiple photos. When Gallery opens, tap
and hold thumbnails of photos to save, and then tap Done.
–
Continuous shot
pictures. Hold the shutter button down and hold the camera
steady.
16
: Use this to take photos with lightened faces for
: Use this to take multiple photos in a short time,
: Use this option to take 20 continuous
–
Best face
: Use this to take multiple group shots at the same
time and combine them to create the best possible image. Press
the Shutter button to take multiple photos. When Gallery opens,
tap the yellow frame on each face, and choose the best
individual face for the subject. After choosing a pose for each
individual, tap Done to merge the images into a single photo,
and tap Save.
–
Landscape
: Use this mode to take landscape pictures that
have the blues and greens emphasized.
–
Dawn
: Use this mode to take pictures that have the blues
emphasized.
–
Snow
: Use this mode to take pictures that have the whites and
emphasized.
–
Macro
: Use this to take photos of very close subjects.
–
Food
: Use this mode to take pictures of food to emphasize the
vivid colors.
–
Party/Indoor
bulurring.
–
Action freeze
high speed.
: Use this mode to take pictures activities without
: Use this to take photos of subject moving at
–
Rich tone
: Use this to take photos with richer colours and
contrasts.
–
Panorama
: Use this to take wide panoramic photos. Press the
Shutter button to take a photo, and then move the camera in
any direction. When the blue frame aligns with the preview
screen, the camera automatically takes another shot in the
panoramic sequence. To stop shooting, press the Shutter button
again.
–
Waterfall
: Use this to take photos of waterfalls.
–
Silhouette
: Use this to take photos of dark shapes against a
light background.
–
Sunset
: Use this to take photos of the sunset.
–
Night:
Use this to take photos in low-light conditions, without
using the flash. Press the Shutter button to take multiple photos.
Photos are automatically merged into a single photo.
–
Fireworks
: Use this to take photos of fireworks.
–
Light trace
: Use this to take photos of the light trailing in low-
light conditions.
•Expert
: Use this to take photos with manual adjustment of ISO
sensitivity, exposure value, aperture value, and the shutter
speed.
–
: Use this to manually adjust camcorder settings, such as
exposure value.
–
M
: Use this to manually adjust camera settings, such as the
aperture or shutter speed.
–
P
: Use this to take manually set ISO sensitivity or exposure
value to take photos. The shutter speed and aperture are set
automatically.
–
A:
Use this to manually set the aperture value to take photos.
Shutter speed is set automatically.
–
S
: Use this to manually set the shutter speed to take photos.
Aperture is set automatically.
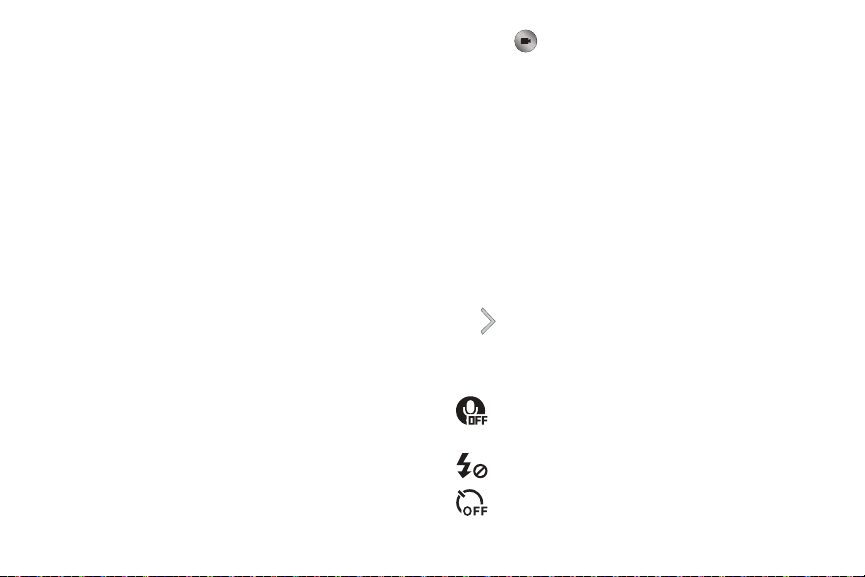
Quick Settings
Tap at the top of the display to quickly change Camera
settings. Not all of the following options are available in both
still camera and video camera modes. The available options
vary by mode.
Activate or deactivate the voice control to take
photos.
Activate or deactivate the flash.
Use this to set delayed-time shots.
Camera Operation 17

Select a resolution for videos.
Activate or deactivate the sharing options.
Configure Camera settings.
Hide Quick settings.
Camera and Camcorder Settings
This section describes the different settings that you can
configure on your camera. Not all of the following options are
available in both still camera and video camera modes. The
available options vary by mode.
Settings
1. From the viewfinder, tap ➔
2. The follow settings are located under the Camera,
Camcorder, Share, and General tabs. The settings that
are displayed will depend on what camera mode you
are in.
Camera
:
•Photo Size
18
: Select a resolution for photos. Use higher
resolution for higher quality. Higher resolution photos take up
more memory.
.
•Flash
: Activate or deactivate the flash.
•Timer
: Use this for delayed-time shots. You can set the timer to
Off, 2 sec, 5 sec, or 10 sec.
• Detection display
automatically detected on the screen when half-pressing the
Shutter button.
Camcorder
• WB (light source)
images have a true-to-life colour range. The settings are
designed for specific lighting situations. These settings are
similar to the heat range for white-balance exposure in
professional cameras.
•Timer
: Use this for delayed-time shots. You can set the timer to
Off, 2 sec, 5 sec, or 10 sec.
•Movie size
for higher quality. Higher resolution videos take up more
memory.
• Metering
light values are calculated. Center Weighted measures
background light in the centre of the scene. Spot focuses on an
individual location. Multi averages the entire scene.
: In Auto mode, display scenes that are
:
: Select an appropriate white balance, so
: Select a resolution for videos. Use higher resolution
: Select a metering method. This determines how

•OIS (anti-shake)
Stabilisation. OIS helps focus when the camera is moving.
• Smart scene
selected automatically by the camera.
• Sound
sound. You can also mute all sounds.
Share
:
•Share shot
Direct.
• Buddy photo share
face that you have tagged in a photo and send it to that person.
Face recognition may fail depending on the face angle, face
size, skin colour, facial expression, light conditions, or
accessories the subject is wearing.
• ChatON photo share
buddies.
• Remote viewfinder
mobile device.
General
• AF/shutter Sound
• Beep
: Activate or deactivate beep sounds.
: Activate or deactivate Optical Image
: Use this for taking videos with a scene mode
: Use this option for enabling or disabling the zoom
: Send a photo directly to another device via Wi-Fi
: Set the device to recognise a person’s
: Set to share pictures with your ChatON
: Set to control the camera with your
:
: Activate or deactivate shutter sounds.
• Discription
• Guidelines
• Display brightness
•Auto screen off:
•Review
• Date/time imprint
•GPS tag
• Voice control
•AF lamp
: Describes the picture or video.
: Display viewfinder guides to help composition
when selecting subjects.
: Set the brightness of the screen.
Set the screen timout time. Choose from Off,
30 seconds, 1 minute, or 2 minutes.
: Set this option if you want to view each picture after
you take it. Select a time value
: Attaches the Date and Time.
: Attach a GPS location tag to the photo. To improve
GPS signals, avoid shooting in locations where the signal may
be obstructed, such as between buildings or in low-lying areas,
or in poor weather conditions. Your location may appear on
your photos when you upload them to the Internet. To avoid
this, deactivate the GPS tag setting.
: Activate or deactivate the voice control to take
photos.
: Use this to activate the AF-assist light in low-light
conditions.
Camera Operation 19
•Power-on mode
mode that the camera will be in when you power-up. Select
Auto mode or Last mode.
•Storage
• Reset
: This setting allows you to set the camera
: Select the memory location for storage.
: Reset the camera settings.
Viewing your Pictures
After you take a photo, you can access various options from
the Image Viewer. The Image Viewer uses your Gallery. For
more information, refer to “Gallery” on page 63.
Using the Camcorder
In addition to taking photos, the camera also doubles as a
camcorder that also allows you to record, view, and send
videos.
Note:
The camera may not be able to properly record videos to
a memory card with a slow transfer speed.
Shooting Video
Tip:
When shooting video in direct sunlight or in bright
conditions, it is recommended that you provide your
20
subject with sufficient light by having the light source
behind you.
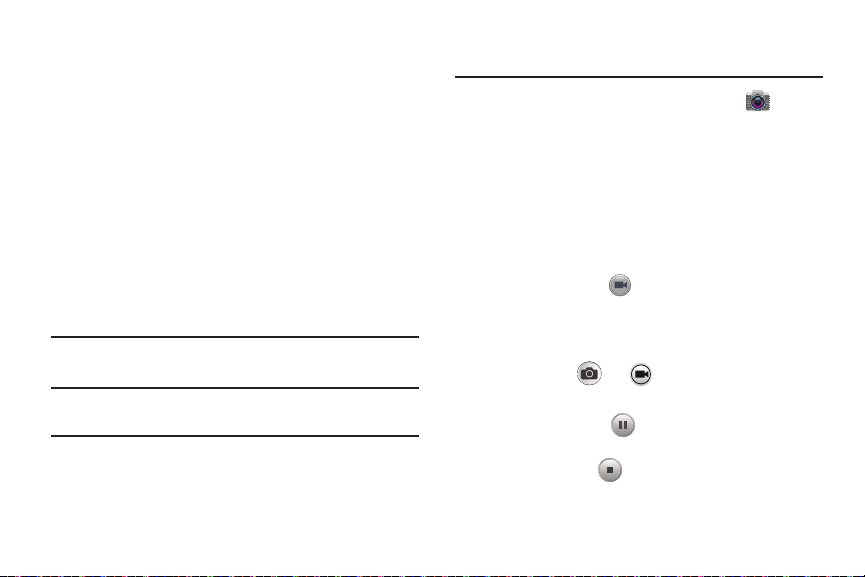
Camera
1. From the main Home screen, tap
activate the camera mode.
2. Using the camera’s main display screen as a
viewfinder, adjust the image by aiming the camcorder
at the subject.
3. Before you take a video, use the Zoom button to zoom
in or out. You can magnify the video up to x21 (2100
percent).
4. Tap the Video key to begin shooting video. The
red light will blink while recording.
5. You can tap the screen to move the focus to the area
you touch.
6. By pressing or you can capture a photo or
video.
7. Tap the Pause key to stop the recording and save
the video file to your Camera folder.
8. Tap the Stop key to stop the recording and save the
video file to your Camera folder.
to

9. Once the file has been saved, tap the image viewer,
then tap to play your video.
10. Press to return to the viewer.
Viewing your Videos
After you take a video, you can access various options from
the Image Viewer. The Image Viewer uses your Gallery and
the Video Player. For more information, refer to “Gallery” on
page 63. Also, see “Video Player” on page 62.
Camera Operation 21

Section 3: Understanding Your Camera
This section outlines some key features of your camera and
describes the screen and the icons that appear when the
camera is in use. It also shows how to navigate the camera
and provides information on using a memory card.
Features of Your Camera
The Samsung Galaxy Camera is the optimum device for the
new era in communication where consumers want to share
their moments visually instead verbally. Instead of sending
text messages, emails, instant messages or text social
networking posts, consumers want to share images of their
daily moments in unique ways.
The following list outlines a few of the features included in
your camera.
•
16 Megapixel BIS CMOS Sensor with Optical Image Stabilization
•
21x Zoom with 23mm wide angle lens
•
4G network with 1.4 gigahertz quad-core processor
•
Android v 4.1.1, Jelly Bean Platform
•
Brilliant 4.8” HD Super Clear Touch screen display
22
•
AllShare™ Play to share your media content across DLNA
certified devices
•
Photo Wizard and Movie Wizard applications
•
Ready access to the Internet
•
Built-in Bluetooth and advanced Wi-Fi® technology
•
HSDPA 21 mbps high speed download capability
•
Up to 64 GB expandable memory slot
•
16 GB memory and 2 GB RAM
•
Corporate and Personal Email
•
Sync and update social network applications
•
Over 450,000 Apps available to download via Google Play
Store™
•
Full Integration of Google Mobile™ Services (Gmail, YouTube,
Google Maps, Google Voice Search)

Your Camera at a Glance
8
4
2
5
6
9
7
1
12
11
10
3
1.
Shutter button
Zoom button
2.
Microphone
3.
: press to take pictures.
: allows you to zoom in and out.
: used for noise cancellation and stereo
recording.
4. Power/Lock key: ( ) lets you power your camera
on and off. Also allows you to lock or unlock the touch
screen. For more information on locking your camera,
see “Locking and Unlocking the Camera” on page 36.
5. AF Assist light: used for taking pictures in low-light
conditions.
6. Flash: allows you to take pictures when there is not
adequate lighting.
7. Flash release: press this button to raise the flash.
8. Lens: camera lens that is extended when taking
pictures.
External speaker
9.
: allows you to hear notifications and
music.
10. 3.5 Headset jack: allows you to attach earphones or
other accessories.
Understanding Your Camera 23

11. Power/Accessory Interface connector: allows you to
1
2
3
435
2
1
7
6
8
connect a Travel Charger or other optional accessories
such as a USB/data cable.
Lanyard port
12.
: allows you to attach a lanyard or
handstrap to the camera.
Bottom View of Your Camera
1.
Tripod mount
: allows you to attach your camera to a
tripod (not included).
HDMI port
2.
3.
: allows you to connect your camera to HDMI
devices.
Battery cover release
: slide to the left to access your
battery, SIM card, and memory card.
24
Display Layout
Your display screen provides a wealth of information about
the camera’s status and options, as well as providing access
to application icons.
1. Widgets: you can place shortcuts to your favorite
widgets on each Home screen. The Weather widget
appears on the main Home screen by default.

2. Indicator icons: shows the information needed to
operate your camera, such as the received signal
strength, battery level, time, unread Emails, etc.
3. Back key: allows you step backwards when navigating
a menu or web page.
4. Home key: allows you to return to the main Home
screen from any Home screen or menu. Press and hold
to display Task Manager.
5. Menu key: allows you to access sub-menus with
additional options for different features and
applications such as Home screen, Contacts,
Messaging, and Browser.
6. Application icons: you can place shortcuts to your
favorite applications on the Home screen. The Camera
and Apps icons appear on all home pages and are
referred to as Primary Shortcuts.
7. Google Quick Search bar: a shortcut to Google Search
that allows you to search for items on the internet.
8.
Home screen indicator
presently displayed.
: shows which Home screen is
Primary Shortcuts
There are two non-movable Application Shortcuts that
appear at the bottom of all Home screens. The default
shortcuts are:
•
Camera
for quick access to our camera.
•
Apps
for accessing the applications on your camera.
For more information, refer to “Adding and Removing
Primary Shortcuts” on page 39.
Indicator Icons
This list identifies the symbols you’ll see on your camera’s
display and Indicator area:
Indicates that the Airplane Mode is active. You
cannot send or receive any messages or access
online information.
Displays when your camera is in Blocking mode.
Displays when there is a system error or alert.
Displays your battery charge level. Icon shown is
fully charged.
Understanding Your Camera 25

Displays when your battery is charging. Also
displays battery charge level.
Device Power Very Low – Shows your current
battery only has between 5 and 15 percent power
remaining.
Device Power Critical – Shows your current battery
only has less than 5 percent power remaining and
will immediately shutdown.
Displays when your camera is downloading or has
downloaded a file. It will blink green when it is
installing.
Displays when the an outbound file transfer is in
progress.
Displays when a Play Store download has
completed.
Displays when updates are available for dow nload.
Displays when the camera is connected to a
computer via a supported USB cable connection.
26
Displays when Email is received.
Displays when the time and date for a Calendar Event
has arrived. For more information, refer to
“Calendar” on page 116.
Displays when you set an alarm to ring at a specified
time. For more information, refer to “Alarm” on page
118.
Displays when the Sound profile is set to Mute.
Displays when the Sound profile is set to Vibrate.
Displays when Bluetooth is activated.
Displays when a Bluetooth device has been paired
with the camera.
Displays when Wi-Fi is connected, active, and
communicating with a Wireless Access Point
(WAP).
 Loading...