


Thank you for buying a Samsung camera.
This manual will guide you through using the camera, including
capturing images, downloading images and using the application software.
Please read this manual carefully before using your new camera.
User Manual
ENGLISH

Ś1ś
Instructions Getting to know your camera
ƅ Use this camera in the following order.
Set up the camera driver
Take a picture
Insert the USB cable
Check [Removable Disk]
Before connecting the camera to a PC, via
the USB cable, you will need to set up the
camera driver. Install the camera driver
that is contained in Application software
CD-ROM. (p.85)
Take a picture. (p.15)
Insert the supplied USB cable into the
PC’s USB port and the camera’s USB
connection terminal. (p.88)
Check the camera’s power
Check the camera’s power. If the power is
turned off, press the camera button to turn
it on.
Open Window’s EXPLORER and search
for [Removable Disk]. (p.89)
Thank you for buying a Samsung Digital Camera.
ƀ Prior to using this camera, please read the user manual thoroughly.
ƀ When you require After Sales service, please bring the camera and the cause of
the camera malfunction (such as battery, Memory card etc.) to the A/S centre.
ƀ Please check that the camera is operating properly prior to when you intend to
use it (e.g. for a trip or an important event) to avoid disappointment. Samsung
camera takes no responsibility for any loss or damages that may result from
camera malfunction.
ƀ Keep this manual in a safe place.
ƀ If you use a card reader to copy the images on the memory card to your PC, the
images could be damaged. When transferring the images taken with the camera
to your PC, be sure to use the supplied USB cable to connect the camera to
your PC. Please note that the manufacturer accepts no responsibility for loss or
damage of images on the memory card due to the use of a card reader.
ƀ The contents and illustrations of this manual are subject to change without prior
notice for upgrading the camera functions.
ƀ If your camera was purchased outside of the country where you wish to have,
servicing fees are charged by the manufacturer's representatives in that country.
ƀ In some countries where this camera is not in market, servicings may not be
available.
ҝ Microsoft, Windows and Windows logo are registered trademarks of Microsoft
Corporation incorporated in the United States and/or other countries.
ҝ All brand and product names appearing in this manual are registered trademarks
of their respective companies.

Ś2ś
Danger Warning
WARNING indicates a potentially hazardous situation which, if not avoided, could
result in death or serious injury.
ƅ Do not use the flash in close proximity to people or animals. Positioning the flash
too close to your subject’s eyes may cause eyesight damage.
ƅ For safety reasons keep this product and accessories out of reach of children or
animals to prevent accidents e.g.:
ҟSwallowing battery or small camera accessories. If an accident should occur,
please consult a doctor immediately.
ҟThere is the possibility of injury from the camera’s moving parts.
ƅ Battery and camera may become hot during prolonged use and it may result in
camera malfunction. Should this be the case, allow the camera to sit idle for a
few minutes to allow it time to cool.
ƅ Do not leave this camera in places subject to extremely high temperatures, such
as a sealed vehicle, direct sunlight or other places of extreme variances in
temperature. Exposure to extreme temperatures may adversely affect the
camera’s internal components and could cause a fire.
ƅ When in use, do not cover the camera or Charger. This may cause heat to build
up and distort the camera body or cause a fire. Always use the camera and its
accessories in a well-ventilated area.
DANGER indicates an imminently hazardous situation which, if not avoided, will
result in death or serious injury.
ƅ Do not attempt to modify this camera in any way. To do so may result in fire,
injury, electric shock or severe damage to you or your camera. Internal
inspection, maintenance and repairs should only be carried out by your dealer or
Samsung Camera Service centre.
ƅ Please do not use this product in close proximity to flammable or explosive
gases, as this could increase the risk of explosion.
ƅ Should any form of liquid or a foreign object enter the camera, do not use it.
Switch off the camera, and then disconnect the power source. You must contact
your dealer or Samsung Camera Service centre. Do not continue to use the
camera as this may cause a fire or electric shock.
ƅ Do not insert or drop metallic or inflammable foreign objects into the camera
through access points e.g. the memory card slot and battery chamber. This may
cause a fire or electric shock.
ƅ Do not operate this camera with wet hands. This could pose a risk of electric
shock.

Caution Contents
Ś3ś
CAUTION indicates a potentially hazardous situation which, if not avoided, may
result in a minor or moderate injury.
ƅ Leaking, overheating, or damaged battery could result in fire or injury.
ҟUse battery with the correct specification for the camera.
ҟDo not short circuit, heat or dispose of battery in fire.
ҟDo not insert the battery with the polarities reversed.
ƅ Remove the battery when not planning to use the camera for a long period of
time. Otherwise the battery may leak corrosive electrolyte and permanently
damage the camera’s components.
ƅ Do not fire the flash while it is in contact with hands or objects. Do not touch the
flash after using it continuously. It may cause burns.
ƅ Do not move the camera while it is switched on, if you are using the AC Charger.
After use, always switch off the camera before unplugging the cable from the
wall socket. Then make sure that any connector cords or cables to other devices
are disconnected before moving the camera. Failure to do so may damage the
cords or cables and cause a fire or electric shock.
ƅ Take care not to touch the lens or lens cover to avoid taking an unclear image
and possibly causing camera malfunction.
ƅ Avoid obstructing the lens or the flash when you capture an image.
ƅ Credit cards may be demagnetized if left near a camera case. Avoid leaving
magnetic strip cards near the case.
ƅ Using an AC adapter that doesn't match with the camera specification may
cause camera malfunction. We recommend supplied battery or exclusive
rechargeable battery.
ż Available AC adapter :
Voltage: 3.3V, Amprer: 2.0A, Diameter (ѡ): 2.35
ƅ After turning on the camera, Check whether the battery type and the camera
setting set on the [Setup] > [Battery Type] menu (p. 37) are same or not.
READY
ƀSystem chart ŊŊŊŊŊŊŊŊŊ5
ƀIdentification of features ŊŊŊŊŊ6
ƅFront & TopŊŊŊŊŊŊŊŊŊŊ6
ƅBack & Bottom ŊŊŊŊŊŊŊŊ7
ƅBottom/ 5-function button ŊŊŊŊ8
ƅSelf-timer lamp ŊŊŊŊŊŊŊŊ8
ƅCamera Status Lamp ŊŊŊŊŊ8
ƅMode icon ŊŊŊŊŊŊŊŊŊŊ9
ƀConnecting to a Power Source ŊŊ9
ƀInserting the memory card ŊŊŊ10
ƀInstructions on how to use the
memory card ŊŊŊŊŊŊŊŊŊ11
ƀWhen Using the Camera for the
First Time ŊŊŊŊŊŊŊŊŊŊ13
ƀLCD monitor indicator ŊŊŊŊŊ14
ƀStarting the recording mode ŊŊ15
ƅHow to use the AUTO mode ŊŊ15
ƅ
How to use the PROGRAM mode
Ŋ15
ƅHow to use the ASR (Advanced
Shake Reduction) mode ŊŊŊŊ15
ƅWise ShotŊŊŊŊŊŊŊŊŊŊ16
ƅHow to use the MANUAL modeŊ17
ƅHow to use the SCENE mode Ŋ17
ƅPortrait, Night scene mode ŊŊŊ18
ƅ
How to use the MOVIE CLIP mode
Ŋ18
ƅRecording the movie clip without
voice ŊŊŊŊŊŊŊŊŊŊŊŊ18
ƅPausing while recording a movie
clip (Successive Recording) ŊŊ19
ƅUsing Successive Recording Ŋ19
ƅHow to use the VOICE
RECORDING mode ŊŊŊŊŊ19
ƀThings to Watch Out for When
Taking Pictures ŊŊŊŊŊŊŊŊ20
ƀUsing the camera buttons to set
the camera ŊŊŊŊŊŊŊŊŊ21
ƅPOWER button ŊŊŊŊŊŊŊ21
ƅShutter button ŊŊŊŊŊŊŊŊ21
ƅZOOM W / T buttonŊŊŊŊŊŊ21
ƅVoice recording / Voice memo /
UP button ŊŊŊŊŊŊŊŊŊŊ23
ƅMacro / Down button ŊŊŊŊŊ23
ƅFocus lock ŊŊŊŊŊŊŊŊŊ24
ƅFlash / Left button ŊŊŊŊŊŊ25
ƅSelf-timer / Right button ŊŊŊŊ27
ƅMENU / OK button ŊŊŊŊŊŊ27
ƀUsing the LCD monitor to set the
camera settingsŊŊŊŊŊŊŊŊ28
ƀHow to use the menu ŊŊŊŊŊ30
ƀRecording ŊŊŊŊŊŊŊŊŊŊ30
RECORDING
SETUP

Ś4ś
Contents
ƅSharpness ŊŊŊŊŊŊŊŊŊ30
ƅContrast ŊŊŊŊŊŊŊŊŊŊ30
ƅAuto Focus type ŊŊŊŊŊŊŊ31
ƅOSD (On Screen Display)
information ŊŊŊŊŊŊŊŊŊ31
ƀSound ŊŊŊŊŊŊŊŊŊŊŊ32
ƅVolume ŊŊŊŊŊŊŊŊŊŊŊ32
ƅStart up sound ŊŊŊŊŊŊŊŊ32
ƅShutter sound ŊŊŊŊŊŊŊŊ32
ƅBeep Sound ŊŊŊŊŊŊŊŊŊ32
ƅAF sound ŊŊŊŊŊŊŊŊŊŊ32
ƀSetup 1 ŊŊŊŊŊŊŊŊŊŊŊ33
ƅFile name ŊŊŊŊŊŊŊŊŊŊ33
ƅLanguage ŊŊŊŊŊŊŊŊŊŊ33
ƅ
Setting up the Date/ Time/ Date typeŊ
33
ƅImprinting the recording date ŊŊ34
ƅLCD brightness ŊŊŊŊŊŊŊ34
ƅAuto Focus lamp ŊŊŊŊŊŊŊ34
ƅStart up image ŊŊŊŊŊŊŊŊ34
ƀSetup 2 ŊŊŊŊŊŊŊŊŊŊŊ35
ƅQuick view ŊŊŊŊŊŊŊŊŊ35
ƅAuto power off ŊŊŊŊŊŊŊŊ35
ƅLCD save ŊŊŊŊŊŊŊŊŊŊ35
ƅSelecting Video out type ŊŊŊŊ36
ƅFormatting a memory ŊŊŊŊŊ36
ƅInitialisation ŊŊŊŊŊŊŊŊŊ37
ƅSelecting a battery type ŊŊŊŊ37
ƀE (Effect) button ŊŊŊŊŊŊŊ37
ƀ
Special Effect (E button) : Colour
Ŋ38
ƀSpecial Effect (E button) :
Image editingŊŊŊŊŊŊŊŊŊ39
ƅSaturation ŊŊŊŊŊŊŊŊŊŊ39
ƀSpecial Effect (E button) : FUN Ŋ39
ƅPreset focus framesŊŊŊŊŊŊ39
ƅComposite shootingŊŊŊŊŊŊ40
ƅPhoto Frame ŊŊŊŊŊŊŊŊ42
ƀ+ / - button ŊŊŊŊŊŊŊŊŊŊ43
ƀSize ŊŊŊŊŊŊŊŊŊŊŊŊ44
ƀQuality / Frame rate ŊŊŊŊŊŊ45
ƀMeteringŊŊŊŊŊŊŊŊŊŊŊ45
ƀContinuous shot ŊŊŊŊŊŊŊ46
ƀISOŊŊŊŊŊŊŊŊŊŊŊŊŊ46
ƀWhite balance ŊŊŊŊŊŊŊŊ47
ƀExposure compensation ŊŊŊŊ48
ƀStarting play mode ŊŊŊŊŊŊ48
ƅPlaying back a still image ŊŊŊ48
ƅPlaying back a movie clip ŊŊŊ49
ƅHow to capture the movie clip Ŋ49
ƅPlaying back a recorded voice Ŋ50
ƀLCD monitor Indicator ŊŊŊŊŊ50
ƀUsing the camera buttons to set
the camera ŊŊŊŊŊŊŊŊŊ51
ƀThumbnail / Enlargement button Ŋ51
ƀVoice memo / Up button ŊŊŊŊ52
ƀPlay & Pause / Down button ŊŊ53
ƀ
Special Effect (E button) : Resize
Ŋ54
ƀSpecial Effect (E button) :
Rotating an image ŊŊŊŊŊŊ55
ƀ
Special Effect (E button) : Colour
Ŋ55
ƀSpecial Effect (E button) :
Special Colour ŊŊŊŊŊŊŊŊ56
ƅColour Filter ŊŊŊŊŊŊŊŊŊ56
ƅColour maskŊŊŊŊŊŊŊŊŊ57
ƀSpecial Effect (E button) :
Image editingŊŊŊŊŊŊŊŊŊ58
ƀSpecial Effect (E button) : FUN Ŋ59
ƅCartoonŊŊŊŊŊŊŊŊŊŊŊ59
ƅPreset focus frames ŊŊŊŊŊ60
ƅComposite imageŊŊŊŊŊŊŊ61
ƅPhoto Frame ŊŊŊŊŊŊŊŊ63
ƅSticker ŊŊŊŊŊŊŊŊŊŊŊ64
ƀDelete buttonŊŊŊŊŊŊŊŊŊ65
ƀPrinter buttonŊŊŊŊŊŊŊŊŊ66
ƀLeft / Right / Menu / OK button Ŋ67
ƀSetting up the play back function
using the LCD monitor ŊŊŊŊŊ67
ƀStarting the slide show ŊŊŊŊŊ69
ƀPlayback ŊŊŊŊŊŊŊŊŊŊ70
ƅProtecting images ŊŊŊŊŊŊ70
ƅDeleting images ŊŊŊŊŊŊŊ71
ƅDPOF ŊŊŊŊŊŊŊŊŊŊŊ71
ƅCopy To Card ŊŊŊŊŊŊŊŊ73
ƅOn Screen Display information Ŋ74
ƀPictBridge ŊŊŊŊŊŊŊŊŊŊ75
ƅPictBridge : Picture Selection ŊŊ76
ƅPictBridge : Print Setting ŊŊŊŊ76
ƅPictBridge : Reset ŊŊŊŊŊŊ77
ƀImportant notesŊŊŊŊŊŊŊŊ77
ƀWarning indicator ŊŊŊŊŊŊŊ79
ƀ
Before contacting a service centre
Ŋ79
ƀSpecifications ŊŊŊŊŊŊŊŊ81
ƀSoftware Notes ŊŊŊŊŊŊŊŊ84
ƀSystem Requirements ŊŊŊŊŊ84
ƀAbout the software ŊŊŊŊŊŊ84
ƀ
Setting up the application software
Ŋ85
ƀStarting PC mode ŊŊŊŊŊŊŊ87
ƀRemoving the removable diskŊŊ89
ƀ
Setting up the USB Driver for MAC
Ŋ90
ƀUsing the USB Driver for MAC Ŋ90
ƀRemoving the USB Driver for
Windows 98SE ŊŊŊŊŊŊŊŊ90
ƀDigimax MasterŊŊŊŊŊŊŊŊ91
ƀFAQ ŊŊŊŊŊŊŊŊŊŊŊŊ93
SOFTWARE
PLAY
Ś5ś
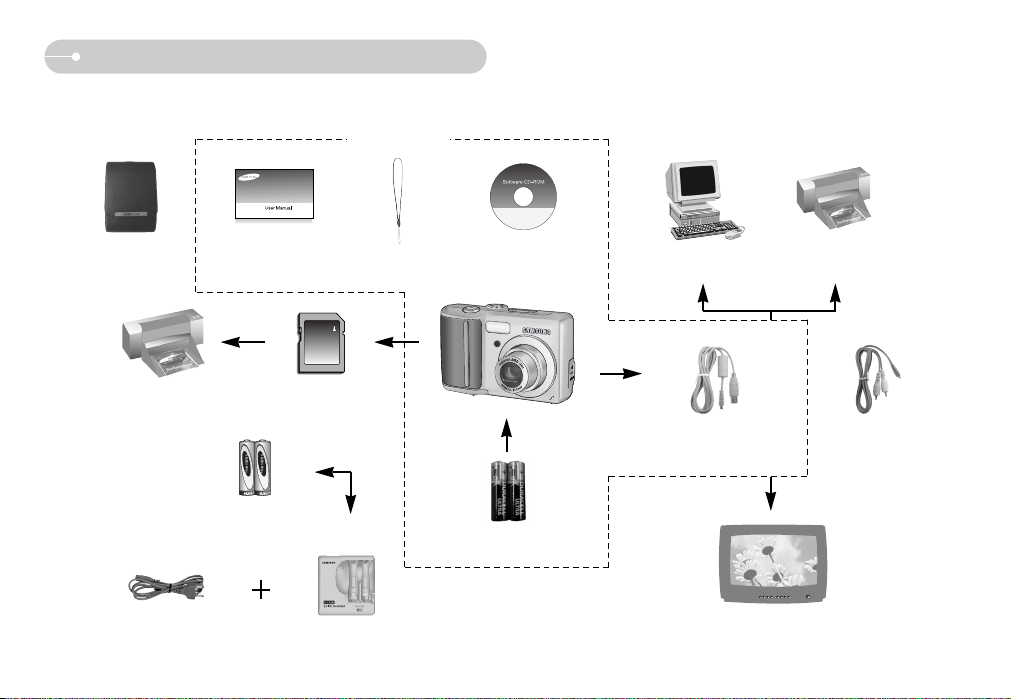
System chart
Please check that you have the correct contents before using this product. The contents can vary depending on the sales region. To buy the optional equipment, contact your
nearest Samsung dealer or Samsung service centre.
Software CD
(see p.84)
Camera strap
User manual,
Product warranty
Camera case
SD memory card / MMC
(see p.10)
DPOF compatible
printer (see p.71)
Charger(SBC-N2)AC cord
PictBridge compatible
printer (see p.75)
Computer
(see p.88)
External monitor
(see p. 36)
< Included items >
Rechargeable battery
(SNB-2512)
AA Alkaline
Batteries
USB cable
AV cable

Ś6ś
Identification of features
Shutter button
Flash
Self-timer lamp /
Auto focus lamp
Lens / Lens cover
Mode dial
Power button
Speaker
Microphone
DC input connection port
USB / AV connection terminal
Front & Top

Ś7ś
Identification of features
LCD monitor
Tripod socket
5 function button
E (Effects) button
Strap eyelet
Play mode / Printer button
Zoom T button (Digital zoom)
Zoom W button (Thumbnail)
Camera status lamp
+ / - button, Delete button
Back & Bottom

Ś8ś
ƅ Self-timer lamp
Icon Status Description
Blinking
Blinking
Blinking
For the 2 seconds, the lamp blinks quickly at 0.25-second
intervals before taking a picture
For the first 8 seconds, the lamp blinks at 1 second
intervals.
For the final 2 seconds, the lamp blinks quickly at 0.25second intervals.
A picture will be taken after about 10 seconds and 2
seconds later a second picture will be taken.
ƅ Camera Status Lamp
Status Description
When the AF activates
After taking a picture
While voice memo
recording
When the USB cable is
inserted to a computer
Transmitting Data with a
PC
When the USB cable is
inserted to a printer
When the printer is
printing
The lamp is off
The lamp turns on and off when the camera is ready
to take a picture
The lamp blinks while saving the image data and
turns off when the camera is ready to take a picture
The lamp is on (The lamp will be turned off after
recognising the camera)
The lamp blinks
The lamp turns on (LCD monitor turns off)
The lamp turns on
(The camera focus on the subject)
The lamp blinks
(The camera doesn't focus on the subject)
The lamp blinks
Power on
Identification of features
Battery chamber
Battery chamber cover
Voice memo/ Voice Recording/ Up button
Flash/
Left button
Menu/ OK button
Self-timer/
Right button
Macro/ Down button
Play & Pause button
Memory card slot
Bottom/ 5-function button
Connecting to a Power Source
Ś9ś
Identification of features
ƅ We recommend using battery supplied with the camera. The available batteries
are listed below.
- Non rechargeable batteries : 2 X AA Alkaline (High Capacity)
- Rechargeable batteries : SNB-2512 (Ni-MH)
ƅ SNB-2512 specification(optional)
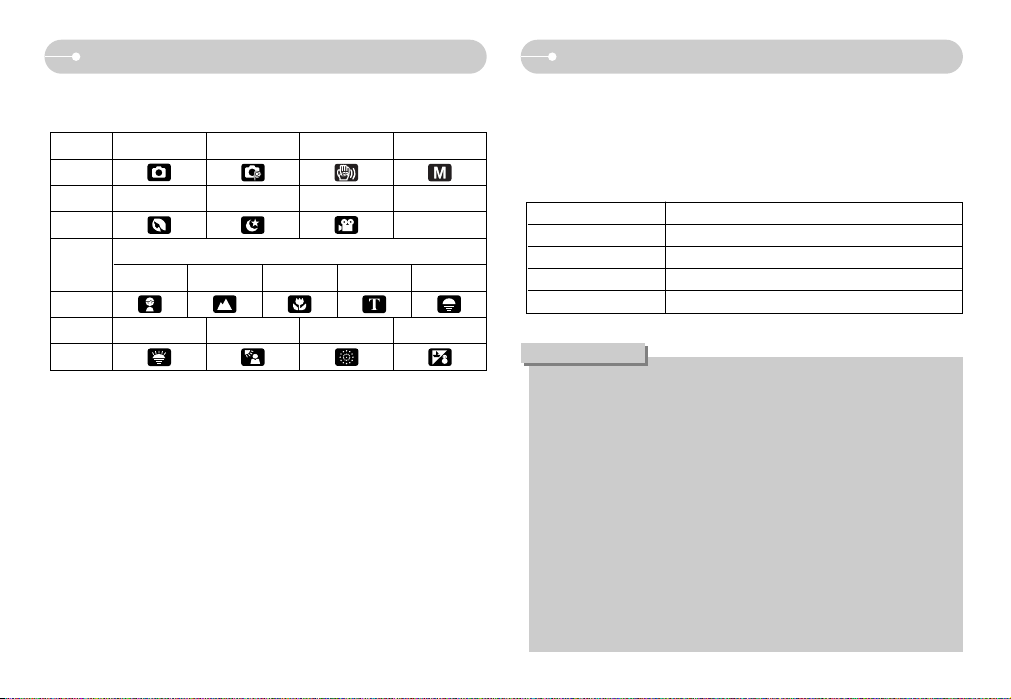
ƅ Mode icon : Refer to page 15~19 for more information about the camera mode
setting.
MODE AUTO PROGRAM ASR MANUAL
Icon
MODE PORTRAIT NIGHT MOVIE -
Icon -
CHILDREN
LANDSCAPE
CLOSE UP TEXT SUNSET
Icon
MODE DAWN BACKLIGHT FIREWORKS
BEACH & SNOW
Icon
MODE
SCENE
Model SNB-2512
Type Ni-MH
Capacity 2500mAh
Voltage 1.2V x 2
Charging time Approximately 300 Minutes(Use for SBC-N2)
Important information about battery usage
ƀ When the camera is not used, turn off the camera power.
ƀ Please remove the battery if the camera will not be used for long periods.
Battery can lose power over time and are prone to leaking if kept inside the
camera.
ƀ Low temperatures (below 0°C) can affect the performance of the battery
and you may experience reduced battery life.
ƀ Batteries will usually recover at normal temperatures.
ƀ During extended use of the camera, the camera body may become warm.
This is perfectly normal.
ƀ It is easy to buy alkaline batteries. However, the duration for using batteries
varies in accordance with the battery manufacturer or the photographic
conditions
ƀ Do not use manganese batteries as manganese batteries cannot deliver
sufficient power.
INFORMATION
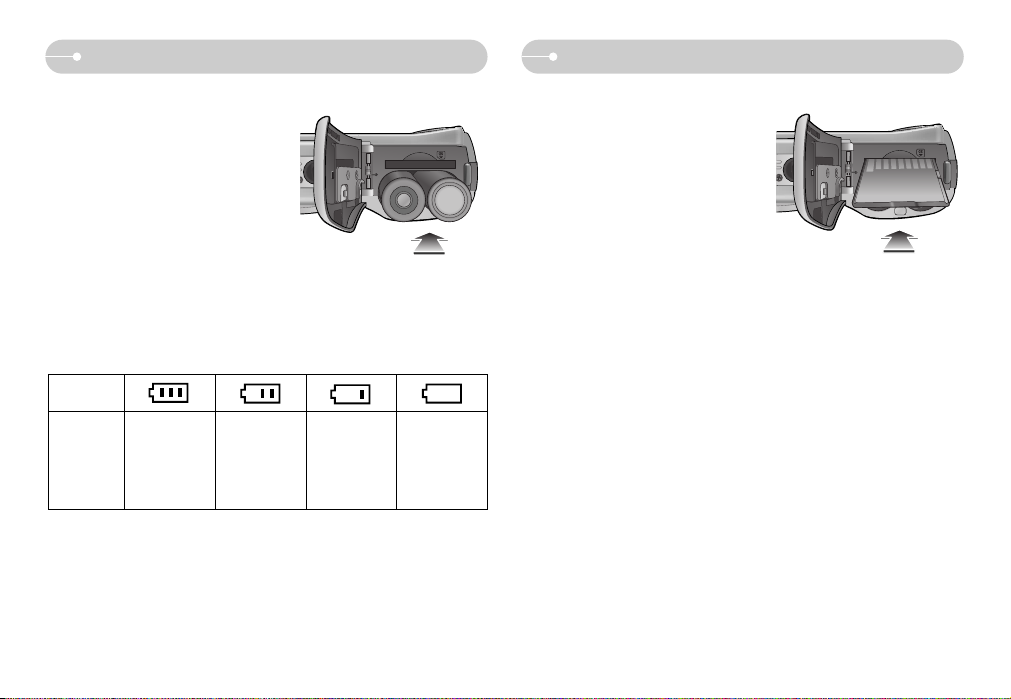
Inserting the memory card
ƅ Insert the battery as shown
- If the camera does not turn on after you
have inserted battery, please check
whether the battery is inserted with the
correct polarity (+ / -).
- When the battery chamber cover is
opened, do not press the battery
chamber cover by force. This may cause
damage to the battery chamber cover.
ƅ Insert the memory card as shown.
- Turn off the camera’s power before
inserting the memory card.
- Have the front of the memory card facing
toward the front of the camera (lens) and
the card pins toward the back of the
camera (LCD monitor).
- Do not insert the memory card the wrong
way round. Doing so may damage the
memory card slot.
Ś10ś
Connecting to a Power Source
Battery
status
Battery
indicator
The battery is
fully charged
Low battery
capacity (Prepare
to recharge
or use spare
battery)
Low battery
capacity
(Prepare to
recharge or use
spare battery)
Low battery
capacity
(Prepare to
recharge or use
spare battery)
ƅ There are 4 indicators for battery condition that are displayed on the LCD
monitor.

Instructions on how to use the memory card
Ś11ś
ƀ Do not use a memory card formatted by another digital camera or memory card
reader.
ƀ If the memory card is subjected to any of the following, the recorded data may
become corrupted :
- When the memory card is used incorrectly.
- If the power is switched off or the memory card is removed while recording,
deleting (formatting) or reading.
ƀ Samsung cannot be held responsible for lost data.
ƀ It is advisable to copy important data onto other media as back-up e.g. floppy
disks, hard disks, CD etc.
ƀ If there is insufficient memory available
: A [Memory Full!] message will appear and the camera will not operate. To
optimise the amount of memory in the camera, replace the memory card or
delete unnecessary images stored on the memory card.
ƀ Be sure to format the memory card (see p.36) if you are using a newly
purchased memory for the first time, if it contains data that the camera cannot
recognise, or if it contains images captured with a different camera.
ƀ Turn off the camera power whenever the memory card is being inserted or
removed.
ƀ Repeated use of the memory card will eventually reduce the memory card’s
performance. Should this be the case, you will need to purchase a new memory
card. Wear and tear on the memory card is not covered by the Samsung
warranty.
ƀ The memory card is an electronic precision device.
Do not bend, drop or subject the memory card to any heavy impact.
ƀ Do not store the memory card in an environment with strong electronic or
magnetic fields, e.g. near loud speakers or TV receivers.
ƀ Please do not use or store in an environment where there are extremes in
temperature.
ƀ Do not allow the memory card to become dirty or to come into contact with any
liquid. Should this happen, clean the memory card with a soft cloth.
ƀ Please keep the memory card in its case when not in use.
ƀ During and after periods of extended use, you may notice that the memory card
is warm. This is perfectly normal.
ƀ Do not use a memory card that is used in another digital camera.
To use the memory card in this camera, format the memory card using this
camera.
Ś12ś
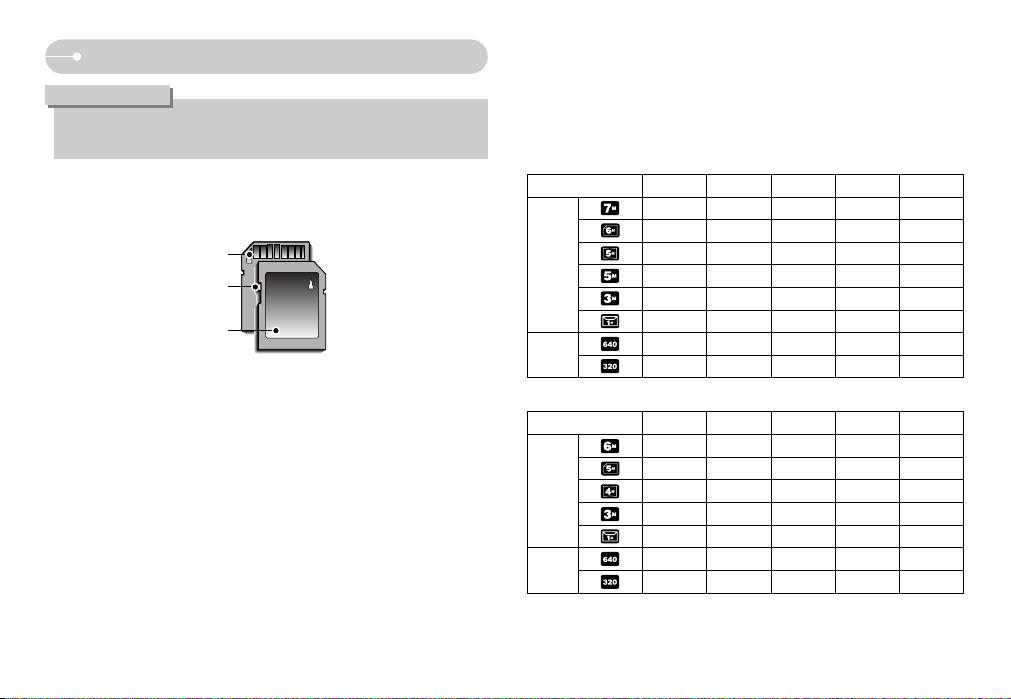
ƅ When using a 256MB MMC (Multi Media Card), the specified shooting capacity
will be as follows. These figures are approximate as image capacities can be
affected by variables such as subject matter and memory card type.
* The recording times can be changed by the zoom operation.
The zoom button doesn’t use during the movie recording.
Instructions on how to use the memory card
[ SD (Secure Digital) memory card ]
Write protect
switch
Label
Card pins
ƅ The camera can use SD/SDHC Memory Cards and MMC (Multi Media Cards).
Please consult the enclosed manual for using the MMC Cards.
The SD/SDHC memory card has a write protect switch that prevents image files
from being deleted or formatted. By sliding the switch to the bottom of the
SD/SDHC memory card, the data will be protected. By sliding the switch to the top
of the SD/SDHC memory card, the data protection will be cancelled.
Slide the switch to the top of the SD/SDHC memory card before taking a picture.
ƀ Don't remove the memory card when the camera status lamp is blinking as
this may cause damage to data in the memory card.
INFORMATION
Recorded image size Super Fine
Fine Normal 30FPS 15FPS
67 128 197 - 80 157 223 - 95 183 269 - 95 183 269 - -
150 284 400 - 558 710 822 - -
---
About 3'30" About 6'20"
---
About 12'20" About 22'20"
*Movie
clip
Still
image
- D75/D70
Recorded image size Super Fine
Fine Normal 30FPS 15FPS
80 157 223 - 95 183 269 - -
124 233 306 - 150 284 400 - 558 710 822 - -
---
About 3'30" About 6'20"
---
About 12'20" About 22'20"
*Movie
clip
Still
image
- D60

Ś13ś
When Using the Camera for the First Time
ƅ Charge the rechargeable battery fully before using the camera for the first time.
ƅ When the camera is turned on for the first time, a menu will be displayed to set
date / time, language and battery type in the LCD monitor. This menu will not be
displayed after setting up. Set up the date / time, language and battery type
before using this camera.
ƀ Setting up the date, time and date type
1. Select the [Date&Time] menu by pressing
the UP/ DOWN button and press
the RIGHT button.
2. Select the desired sub menu by pressing
the UP/ DOWN/ LEFT/ RIGHT button
and press the OK button.
RIGHT button : Selects YEAR/ MONTH/ DAY/
HOUR/ MINUT/ DATE TYPE
LEFT button : Moves the cursor to the [Date&Time] main menu if the cursor
is at the first item of the date and time setup. In all other
instances, the cursor will be shifted to the left of its current
position.
UP/ DOWN button : Changes the value of each item.
ƀ Setting up the battery type
1. Select the [Battery Type] menu by pressing the
UP/ DOWN button and press the RIGHT
button.
2. Select the desired sub menu by pressing the
UP/ DOWN button and press the OK button.
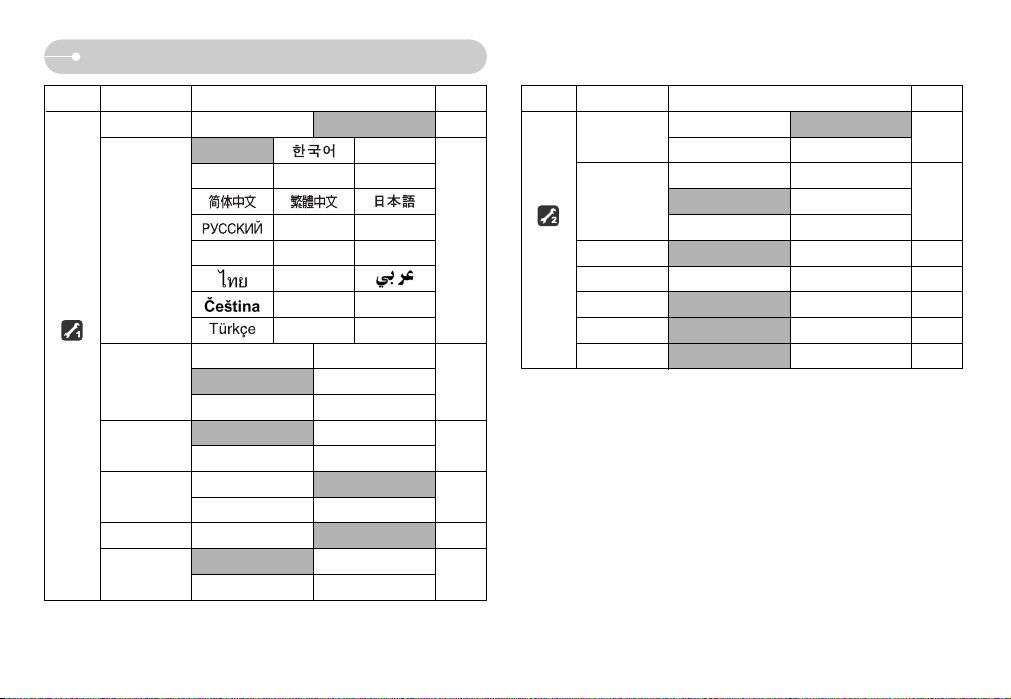
ƀ Setting up the language
1. Select the [Language] menu by pressing the
UP / DOWN button and press the RIGHT button.
2. Select the desired sub menu by pressing the
UP / DOWN button and press the OK button.
ƀ You can select one of 22 languages. These are listed below :
- English, Korean, French, German, Spanish, Italian, S.Chinese, T.Chinese,
Japanese, Russian, Portuguese, Dutch, Danish, Swedish, Finnish, Thai,
BAHASA(MALAY/ INDONESIAN), Arabic, Czech, Polish, Hungarian and
Turkish.
ƀ Even if the camera is restarted, the language setting will be maintained.
INFORMATION
Language
SETUP1
Battery type FRANÇAIS
DEUTSCH
ESPAÑOL
ITALIANO
ENGLISH
Date&Time
Language
SETUP1
Battery Type Alkaline
Ni-MH
Date&Time
Language
SETUP1
Battery Type
07/01/01
12:00
YY/MM/DD
Date&Time
Back Set
OK
Back Set
OK
Back Set
OK

Ś14ś
LCD monitor indicator
[ Image & Full Status ]
ƅ The LCD monitor displays information about the shooting functions and
selections.
No. Description Icons Page
7
Sharpness
p.30
8
Auto focus frame
p.31
9
Camera shake warning
p.20
10
Date/ Time
2007/01/01 01:00 PM p.33
11
Exposure compensation
p.48
12
White Balance
p.47
p.45/16
p.46
15
Metering
p.45
16
Image quality
p.45
18
Battery
p.10
20
Voice memo
p.23
Number of available shots remaining
6p.12
22
Card inserted indicator
-
19
21
Optical/ Digital Zoom bar/
Digital Zoom rate
Movie /
Voice recording time
00:00:00
Image size
ISO p.46
Continuous shot
D75/D70
D60
D75/D70
D60
D70
D75/D60
17
13
14
p.21
p.12
p.44
No. Description Icons Page
2
Aperture Value/ Shutter Speed
F2.8, 1/30 p.17
3 Flash/ Without Sound p.25 / 18
4
Self-timer
p.27
5
Macro
p.23
6
Contrast
p.30
Recording mode
p.9
1
ڢ
ڣ
ڤ
ڥ
ڦ
ڧ
ڨ ک ڪ
ڡ ׳״
ګ
ڬ
ڭ
ڮ
گ
װ
ױ
ײ
Ś15ś
Starting the recording mode
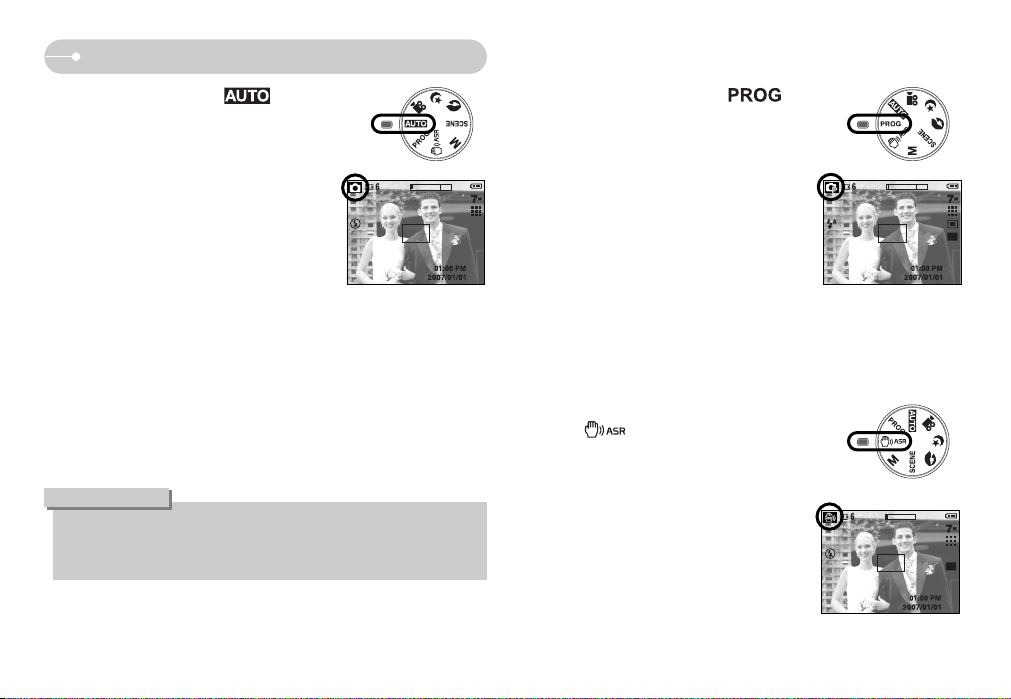
ƅ How to use the PROGRAM mode ( )
Selecting the automatic mode will configure the
camera with optimal settings. You can still manually
configure all functions except the aperture value
and shutter speed.
1. Select the PROGRAM mode by rotating the
mode dial.
2. Press the + / - button to configure advanced
functions such as Image Size (p.44), Quality
(p.45), Metering (p.45), Continuous shooting
(p.46), ISO (p.46), White Balance (p.47), and
Exposure Compensation (p.48).
ƅ How to use the AUTO mode ( )
Please select this mode for quick and easy picture
taking with minimal user interaction.
[ AUTO mode ]
[ PROGRAM mode ]
1. Insert the batteries (p.10). Insert the batteries
taking note of the polarity (+ / -).
2. Insert the memory card (p.10). As this camera
has a 16MB internal memory, you do not need to
insert the memory card. If the memory card is not
inserted, an image will be stored in the internal
memory. If the memory card is inserted, an
image will be stored on the memory card.
3. Close the battery chamber cover.
4. Press the power button to turn on the camera.
(If the date/ time that is displayed on the LCD monitor is incorrect, reset the
date/ time before taking a picture.)
5. Select the AUTO mode by rotating the mode dial.
6. Point the camera towards the subject and compose the image by using the
LCD monitor.
7. Press the shutter button to capture an image.
ƀ If the auto focus frame turns to red when you press the shutter button down
half way, it means that the camera cannot focus on the subject. Should this
be the case, the camera is unable to capture an image clearly.
INFORMATION
ƅ How to use the ASR (Advanced Shake Reduction)
mode ( )
Advanced Shake Reduction (ASR) mode.
This mode will reduce the effect of camera shake and
help you get a well-exposed image in dim conditions.
Press the ASR button.
[ ASR mode ]
Ś16ś
Starting the recording mode
ƀ Things to watch out for using the ASR mode
1. The digital zoom will not operate in the ASR mode.
2. If the lighting condition is brighter than fluorescent lighting condition, the ASR
will not activate.
3. If the lighting condition is darker than in fluorescent lighting condition, camera
shake warning indicator ( ) will display. For best results only take pictures
in situations where the camera shake warning indicator ( ) is not
displayed.
4. If the subject is moving, the captured image may be blurred.
5. Avoid moving the camera while the [Capturing!] message is displayed to
achieve a better result.
6. As the ASR uses the camera's digital signal processor, it may take a little
longer for the camera to process and save the images.
7. The ASR function will not operate with image size.
ƅ Wise Shot
2 images are taken at a time. One is taken in the
Fill-In Flash mode and the other is taken in the
ASR mode.
ƀ How to use the Wise Shot
1. Select the ASR mode by rotating the mode dial and press the +/- button.
2. Select Drive menu tab by pressing the Up and Down button.
3. Select the Wise shot menu by pressing the Left and Right button. And then
press the OK button.
4. Press the Shutter button to capture images.
- Two images are captures sequentially.
ƀ In the Wise shot, the shutter speed value shown on the LCD may be
different from the real shutter speed.
ƀ Wise Shot function is not available on D75/D70.
INFORMATION
Ś17ś
Starting the recording mode
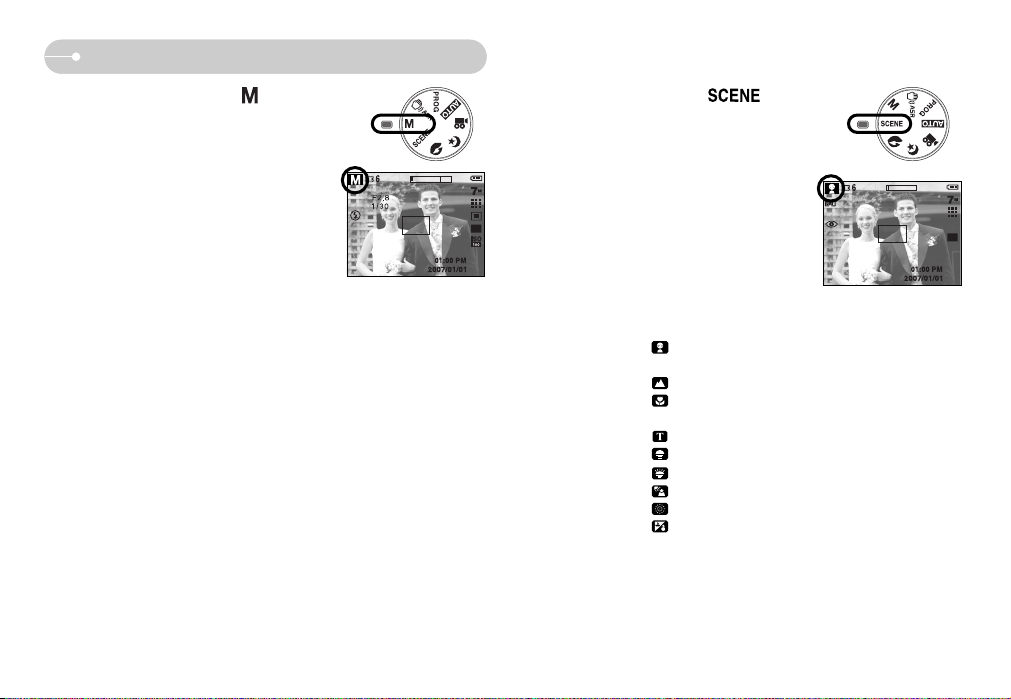
ƅ How to use the SCENE mode ( )
Use the menu to easily configure optimal settings
for a variety of shooting situations.
1. Select the SCENE mode by rotating the mode
dial.
2. Press the menu button and select a desired
scene menu.
[ SCENE mode ]
żThe scene modes are listed below.
[Children] ( ) : To take a picture of fast moving objects, for
example, children.
[Landscape] ( ) : To take pictures of distant scenery.
[Close up] ( ) : Close-up shooting for small objects such as plants
and insects.
[Text] ( ) : Use this mode to shoot a document.
[Sunset] ( ) : For taking pictures of sunsets.
[Dawn] ( ) : Daybreak scenes..
[Backlight] ( ) : Portrait without shadows caused by backlight.
[FIirework] ( ) : Firework scenes.
[Beach&Snow] ( ) : For ocean, lake, beach and snowscape scenes.
ƅ How to use the MANUAL mode ( )
You can manually configure all functions with the
aperture value and shutter speed.
1. Select the MANUAL mode by rotating the mode
dial.
2. Press the + / - button and menu for the shutter
speed and aperture value will display.
Up / Down button : changes aperture value
Left / Right button : changes shutter speed.
3. Press the + / - button twice and take an image.
[ MANUAL mode ]
* Smaller Aperture values make the object sharp but blur the background. Larger
Aperture values make both the object and background sharp.
* High Shutter speeds can capture a moving object in a still image as if the
object is not moving. Low Shutter speeds can capture a moving object with an
‘active’ effect.

Ś18ś
Starting the recording mode
[ NIGHT mode ]
[ PORTRAIT mode ]
ƅ Portrait, Night scene mode
Select a desired mode by rotating the mode dial.
- Portrait : To take a picture of a person.
- Night : Use this for shooting still images at night or in other dark conditions.
ƅ How to use the MOVIE CLIP mode ( )
A movie clip can be recorded for as long as the
available recording time of the memory capacity allows.
1. Select the MOVIE CLIP mode by rotating the
mode dial. (The MOVIE CLIP mode icon and
available recording time will display on the LCD
monitor.)
2. Point the camera towards the subject and
compose the image by using the LCD monitor.
Press the shutter button and movie clips are
recorded for as long as the available recording
time. Movie clips will still be recorded if the shutter
button is released. If you wish to stop recording, press the shutter button
again.
* Image size and type are listed below.
- Image size : 640x480, 320x240 (Selectable)
- File type : *.avi (MJPEG)
ż The maximum file size of continuous movie clip is 2GB.
ƅ Recording the movie clip without voice
You can record the movie clip without voice.
1. Press the Up button and the ( ) icon will
display on the LCD monitor.
2. Press the shutter button and movie clip is
recorded for as long as the available recording
time without voice.
3. To stop the recording, press the shutter button
again.
[ MOVIE CLIP mode ]
[ MOVIE CLIP mode ]

Ś19ś
ƅ How to use the VOICE RECORDING mode ( )
A voice can be recorded for as long as the available
recording time (max:10hour) allows.
1. In any mode with the exception of Movie clip mode,
select the VOICE RECORDING mode by pressing
the Voice recording button twice.
2. Press the shutter button to record a voice.
- Press the shutter button once and voice is
recorded for as long as the available recording
time (max:10hour) allows. The recording time
will be displayed on the LCD monitor. Voice will
still be recorded if the shutter button is released.
- If you wish to stop recording, press the shutter
button again.
- File type : *.wav
* A distance of 40cm between you and the camera (microphone) is the best
distance to record sound.
Starting the recording mode
ƅ Pausing while recording a movie clip (Successive Recording)
This camera allows you to temporarily stop during unwanted scenes, while
recording a movie clip. Using this function, you can record your favourite scenes
into a movie clip without having to create multiple movie clips.
ƀ Using Successive Recording
1. Press the shutter button and movie clips are
recorded for as long as the available recording
time. Movie clips will still be recorded if the
shutter button is released.
2. Press the Pause button to pause recording.
Press the Pause button again to resume the
recording.
3. If you wish to stop recording, press the shutter
button again.
00:00:12
00 : 00 : 18
[ Successive recording of a
movie clip ]
Stop Pause
SH
/
[ VOICE RECORDING mode ]
REC Exit
SH
Ś20ś
Things to Watch Out for When Taking Pictures
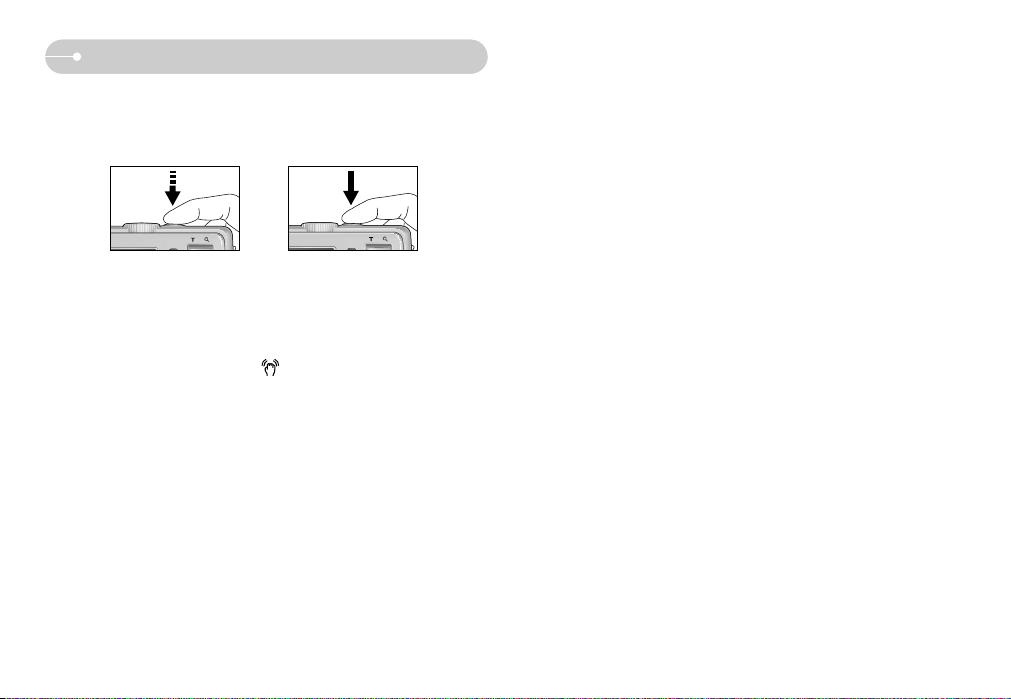
ƅ Pressing the shutter button down half way.
Lightly press the shutter button to confirm focus and flash battery charge.
Press the shutter button all way down to take the picture.
[ Lightly press the shutter button ] [ Press the shutter button ]
ƅ The available recording time may vary depending on shooting conditions and
camera settings.
ƅ When the Flash Off or Slow synchro mode is selected in a low lighting condition,
the camera shake warning indicator ( ) may appear on the LCD monitor.
In this case, use a tripod, support the camera on a solid surface or change to
flash shot mode.
ƅ Shooting against the light :
Please do not take pictures to the sunlight direction. Taking a picture against the
sun may make the picture dark. To take a picture against the sun, please use the
[Backlight] in the scene shooting mode (see page 17), fill-in flash (see page 26),
spot metering (see page 45), or exposure compensation (see page 48).
ƅ Avoid obstructing the lens or the flash when you capture an image.
ƅ Compose the image by using the LCD monitor.
ƅ Under certain conditions the auto focus system may not perform as expected.
- When photographing a subject that has little contrast.
- If the subject is highly reflective or shiny.
- If the subject is moving at high speed.
- When there is strong reflected light, or when the background is very bright.
- When the subject matter has only horizontal lines or the subject is very narrow
(such as a stick or flagpole).
- When the surroundings are dark.
Ś21ś
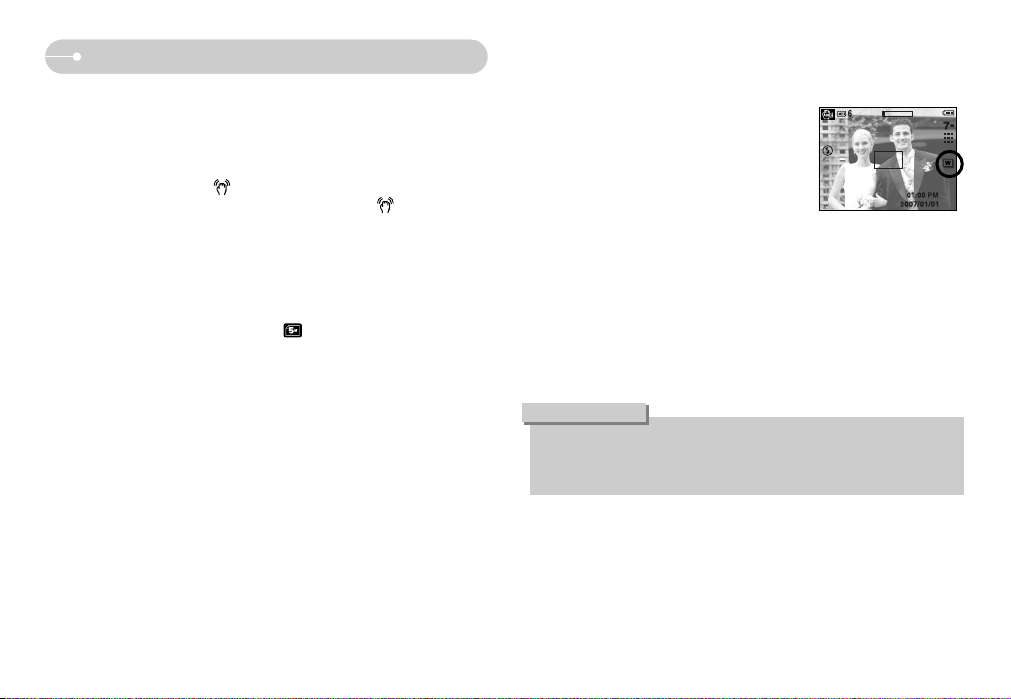
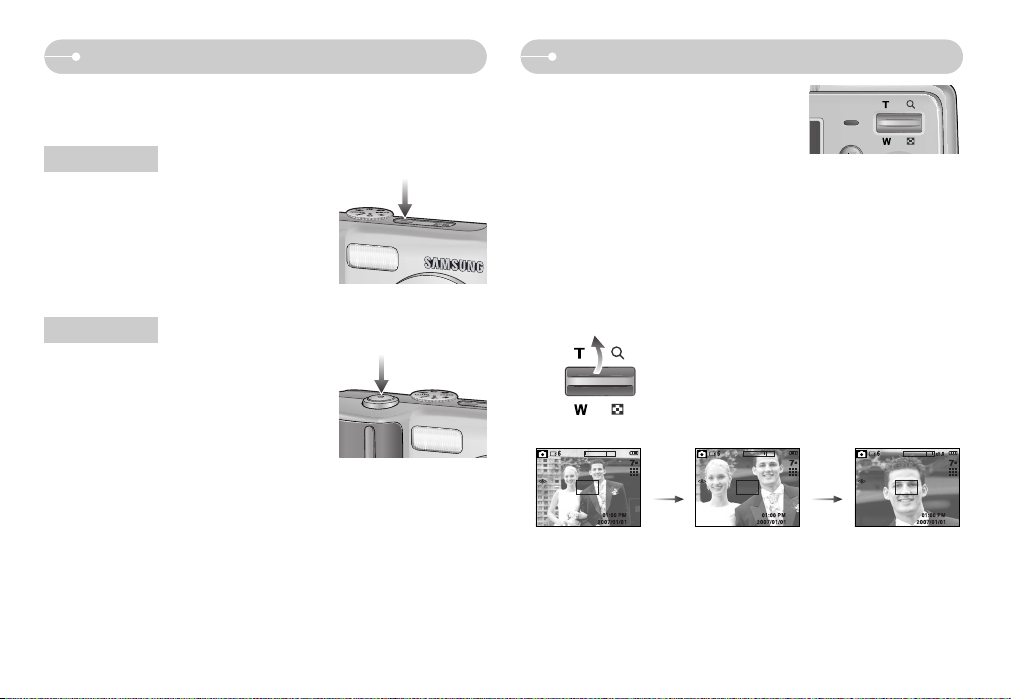
ZOOM W / T button
ƀ If the menu is not displayed, this button works
as the OPTICAL ZOOM or DIGITAL ZOOM
button.
ƀ This camera has a 3X optical zoom and a 5X digital zoom function.
Using both will offer a total zoom ratio of 15X.
ƀ TELE Zoom
Optical zoom TELE : Pressing the ZOOM T button. This will zoom into the
subject i.e. the subject will appear nearer.
Digital zoom TELE : When the maximum (3X) optical zoom is selected,
pressing the ZOOM T button activates the digital zoom
software. Releasing ZOOM T button stops the digital
zooming at the required setting. Once the maximum
digital zoom (5X) is achieved, pressing the ZOOM T
button will have no effect.
[ WIDE zoom ]
[ TELE zoom ] [ Digital zoom 5X ]
Pressing
the ZOOM
T button
Pressing
the ZOOM
T button
Using the camera buttons to set the camera
ƅ The recording mode function can be set up by using the camera buttons.
ƀ Used for turning the camera’s power on / off.
ƀ If there is no operation during the specified time,
the camera's power will be turned off automatically
to save battery life.
Refer to page 35 for more information about the
auto power off function.
POWER button
ƀ Used for taking an image or recording voice in the
RECORDING mode.
ƀ In MOVIE CLIP mode
Pressing the shutter button down fully starts the
process for recording a movie clip. Press the
shutter button once and the movie clip is recorded
for as long as the available recording time in the
memory allows. If you wish to stop recording, press the shutter button again.
ƀ In STILL IMAGE mode
Pressing the shutter button down halfway activates the autofocus and checks
the condition of the flash. Pressing the shutter button down fully takes and stores
the image. If you select voice memo recording, the recording will start after the
camera has finished storing the image data.
Shutter button
Ś22ś
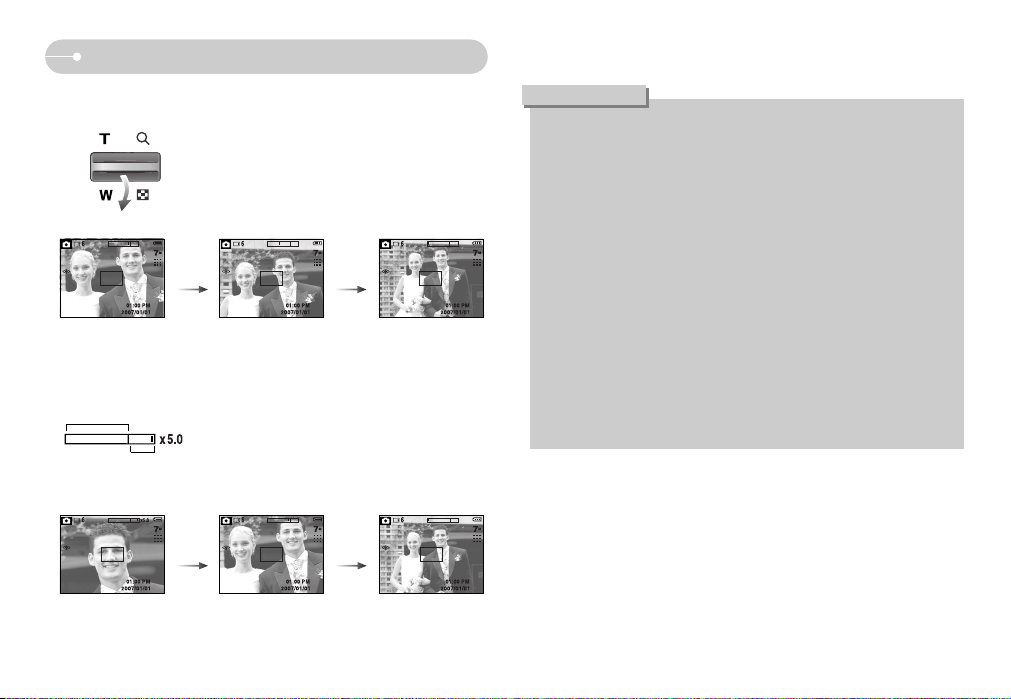
ZOOM W / T button
[ TELE zoom ]
[ Optical zoom 2X ] [ WIDE zoom ]
Pressing
the ZOOM
W button
Pressing
the ZOOM
W button
[ Digital zoom 5X ]
[ TELE zoom ] [ WIDE zoom ]
Pressing
the ZOOM
W button
Pressing
the ZOOM
W button
ƀ WIDE Zoom
Optical zoom WIDE : Pressing the ZOOM W button. This will zoom out from
the subject i.e. the subject will appear farther away.
Pressing the ZOOM W button continuously will set the
camera to its minimum zoom setting i.e. the subject
appears at its farthest from the camera.
Digital zoom WIDE : When the digital zoom is in operation, pressing the
ZOOM W button will reduce the digital zooming in
steps. Releasing ZOOM W button stops digital
zooming. Pressing the ZOOM W button will reduce the
digital zoom and then it will continue to reduce the
optical zoom until the minimum setting is reached.
Optical zoom
Digital zoom
ƀ Images taken using the digital zoom may take a little longer for the camera
to process. Allow time for this to take place.
ƀ The digital zoom cannot be used in movie clip shots.
ƀ If the Zoom buttons are being pressed during the Movie clip shots, the voice
will not recorded.
ƀ You may notice a decrease in image quality when using the digital zoom.
ƀ To view a clearer digital zoom image, press the shutter button halfway at the
maximum optical zoom position and press the zoom T button again.
ƀ The digital zoom can't be activated in the Nightscene, Children, Text, Close
up, Firework, ASR mode and Movie clip mode.
ƀ Take care not to touch the lens to avoid taking an unclear image and
possibly causing camera malfunction. If the image is dim, turn the camera
power off and on again to modify the lens position.
ƀ Take care not to press the lens as this may cause a camera malfunction.
ƀ When the camera is turned on, take care not to touch the camera's moving
lens parts as this may cause the resulting image to be dim and unclear.
ƀ When the Zoom button is operating, take care not to touch the camera's
moving lens parts.
INFORMATION
Ś23ś
Macro ( ) / Down button
ƅ While the menu is showing, press the DOWN button to move from the main
menu to a sub menu, or to move down the sub menu. When the menu is not
showing, you can use the MACRO / DOWN button to take macro pictures.
The distance ranges are shown below. Press the Macro button until the desired
macro mode indicator displays on the LCD monitor.
ƅ Types of focus modes and focus ranges (W : Wide, T : Tele)
(Unit : cm)
ƀ When the macro mode is selected, it is possible that camera shake will
occur. Take care not to shake the camera.
ƀ When you take a picture within 20cm in the Macro mode, select the FLASH
OFF mode.
INFORMATION
[ Normal-No icon ] [ Macro ( ) ] [ Auto Macro ( ) ]
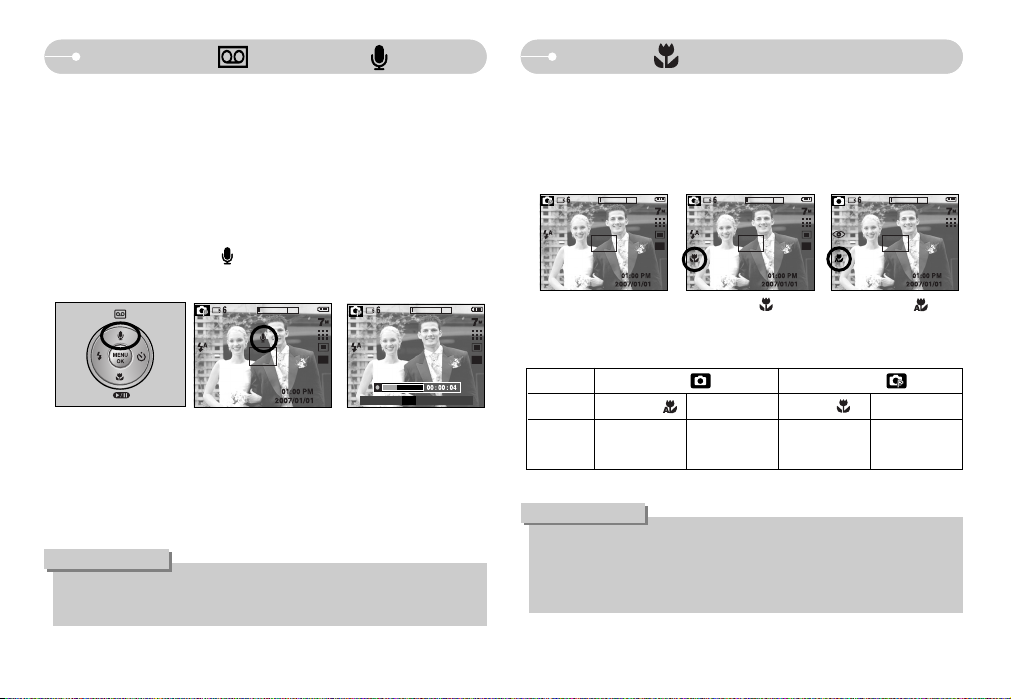
Voice recording ( ) / Voice memo ( ) / UP button
ƅ While the menu is showing, press the UP button to move up the sub menu.
When the menu is not displayed on the LCD monitor, the UP button operates as
the voice recording or voice memo button. You can add your voice-over to a
stored still image. Refer to page 19 for more information about the voice
recording.
ƀ Recording a voice memo
1. Rotate the MODE DIAL to select a RECORDING mode with the exception of
MOVIE CLIP mode.
2. Press the VOICE MEMO ( ) button. If the voice memo indicator is
displayed on the LCD monitor, the setting is completed.
3. Press the shutter button and take a picture. The picture is stored on the
memory card.
4. Voice memo will be recorded for ten seconds from the moment the picture is
stored. In the middle of the sound recording, pressing the shutter button will
stop the voice memo.
ƀ A distance of 40cm between you and the camera (microphone) is the best
distance to record sound.
INFORMATION
Auto Macro
( ) Normal Macro ( ) Normal
Focus
Range
W : 5~Infinity
T : 40~Infinity
W : 80~Infinity
T : 80~Infinity
W : 80~Infinity
T : 80~Infinity
W : 5~80
T : 40~80
Program ( )
Auto ( )
Focus Type
Mode
[ Preparing for Voice Memo ]
Stop
SH

Ś24ś
Macro ( ) / Down button
ƅ Available focusing method, by recording mode
(O: Selectable , X: Not selectable, ∞: Infinity focus range)
OOOOOOO
XOXOXXO
OXXXXXX
-
-
-
-
Mode
Normal
Macro
Auto Macro
Normal
Macro
Auto Macro
Mode
Normal
Macro
Auto Macro
Mode
SCENE
O Ũ XXŨ
XXOOX
XXXXX
Ũ O Ũ O
XXXX
XXXX
Focus lock
ƅ To focus on a subject not positioned in the centre of the picture, use the focus
lock function.
ƀ Using the Focus Lock
1. Ensure the subject is in the centre of the autofocus frame.
2. Press the SHUTTER button halfway. When the green auto focus frame lights
up, it means the camera is focused on the subject. Be careful not to press the
SHUTTER button all the way down to avoid taking an unwanted picture.
3. With the SHUTTER button still pressed down only halfway, move the camera
to recompose your picture as desired, and then press the SHUTTER button
completely to take the picture. If you release your finger from the SHUTTER
button, the focus lock function will be cancelled.
1. The image to be
captured.
2. Press the SHUTTER
button halfway and focus
on the subject.
3. Recompose the picture
and fully press the
SHUTTER button.
Ś25ś
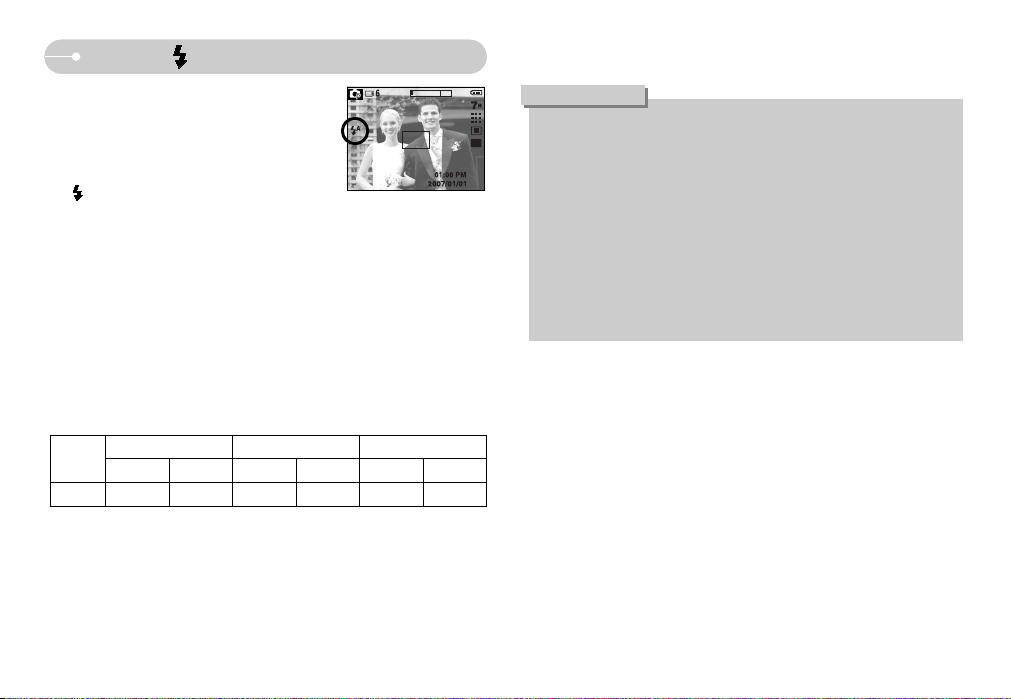
Flash ( ) / Left button
ƀ Using the flash frequently will reduce the life of the battery.
ƀ Under normal operating conditions the charging time for the flash is
normally within 5 seconds. If the battery is weak, the charging time will be
longer.
ƀ During the continuous shot, AEB, some scene modes (p.26) and movie clip
mode, the flash function will not operate.
ƀ Take photographs within the flash range.
ƀ The image quality is not guaranteed if the subject is too close or highly
reflective.
ƀ When taking an image in poorly lit conditions with the flash, there may be a
white speck in the captured image. The speck is caused by the reflecting of
the flash light from the atmospheric dust. It is not camera malfuction.
INFORMATION
ƀ Flash range
(Unit : m)
ƅ When the menu is displayed on the LCD monitor,
pressing the LEFT button makes the cursor shift to
the left tab.
ƅ When the menu is not displayed on the LCD
monitor, the LEFT button operates as the FLASH
( ) button.
ƀ Selecting the flash mode
1. Rotate the MODE DIAL to select a RECORDING mode with the exception of
Movie clip mode.
2. Press the Flash button until the desired flash mode indicator displays on the
LCD monitor.
3. A flash mode indicator will be displayed on the LCD monitor.
Use the correct flash to suit the environment.
[ Selecting the Auto flash ]
Normal
WIDE TELE WIDE TELE WIDE TELE
0.8~3.0 0.8~2.5 0.3~0.8 0.4~0.8 0.3~3.0 0.4~2.5
Macro
Auto macro
ISO
AUTO
Ś26ś
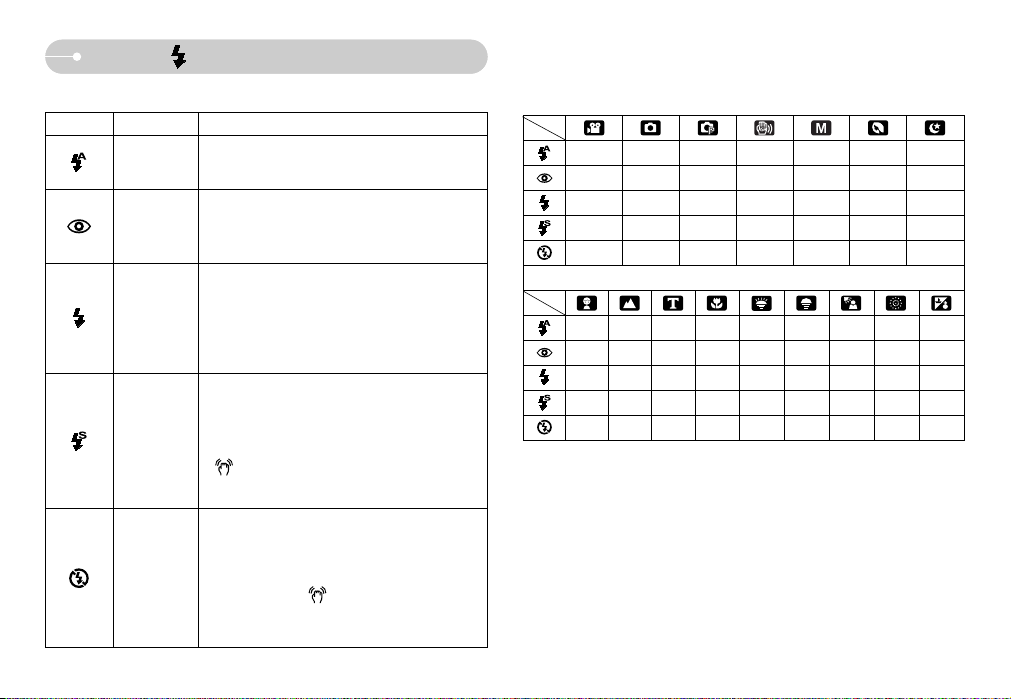
Flash ( ) / Left button
Icon Flash mode Description
ƀ Flash mode indicator
If the subject or background is dark, the camera
flash will operate automatically.
If a subject or background is dark, the camera flash
will work automatically and will reduce the red-eye
effect by using the red-eye reduction function.
The flash fires regardless of available light.
The intensity of the flash will be controlled, according
to the prevailing conditions. The brighter the
background or subject is, the less intense the flash
will be.
The flash will operate in conjunction with a slow
shutter speed in order to obtain the correct exposure.
When you take an image in a condition with poor
light, the camera shake warning indicator
( ) will display on the LCD monitor.
We recommend using a tripod for this function.
The flash does not fire. Select this mode when
capturing images in a place or situation where flash
photography is prohibited. When you capture an
image in a poorly lit condition, the camera shake
warning indicator ( ) will display on the LCD
monitor. We recommend using a tripod for this
function.
Auto flash
Auto &
Red eye
reduction
Fill in flash
Slow synchro
Flash off
ƀ Available flash mode, by recording mode (O : Selectable X : Not selectable)
Scene modes
XOOX X XX
XOOX XOX
XXOXOXX
XXOX XXO
OOOO OOO
XXX XX X X X O
OX X X X X X X X
XXX XX X OX X
XXX XX X X X X
OOO OO O X O X
Ś27ś
MENU / OK button
ƅ MENU button
- When you press the MENU button, a menu related to each camera mode will
be displayed on the LCD monitor. Pressing it again will return the LCD to the
initial display.
- A menu option can be displayed for MOVIE CLIP and STILL IMAGE.
There is no menu available when the VOICE RECORDING mode is selected.
ƅ OK button
- When the menu is displayed on the LCD monitor, this button is used for shifting
the cursor to the sub menu or for confirming data.
ƀ If you operate the Self-timer and Play mode button during the self-timer
operation, the self-timer function is cancelled.
ƀ Use a tripod to prevent the camera from shaking.
INFORMATION
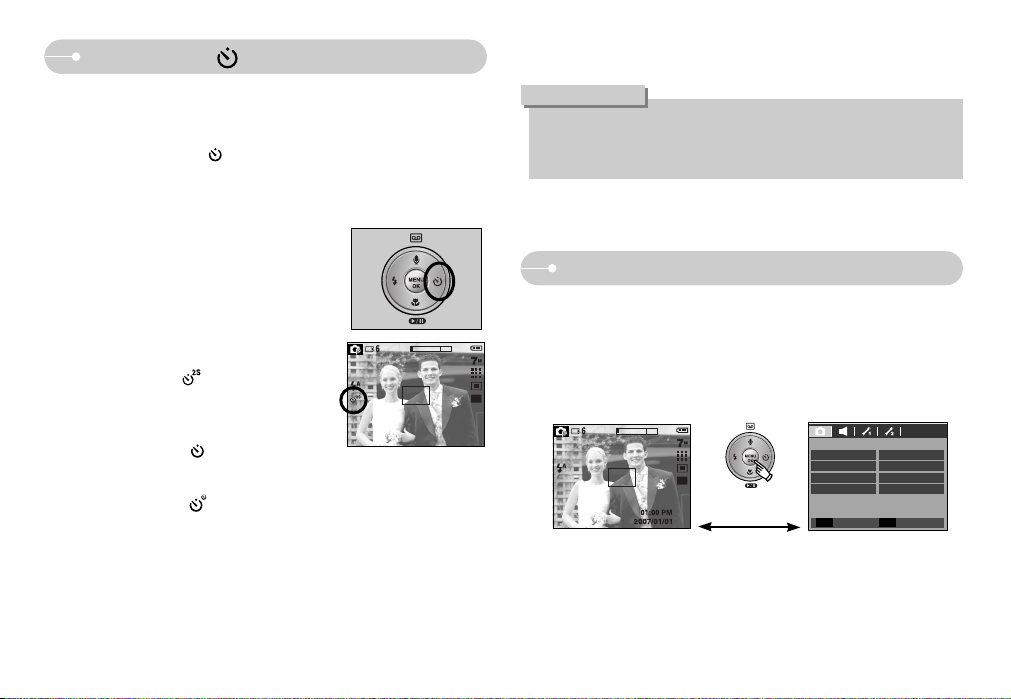
Self-timer ( ) / Right button
ƀ Selecting the self-timer
1. Rotate the MODE DIAL to select a RECORDING
mode with the exception of VOICE RECORDING
mode.
2. Press the SELF-TIMER button until the desired
mode indicator displays on the LCD monitor.
A 10 second, 2 second or double self-timer icon
appears on the LCD monitor. In Movie Clip mode,
only the 10-second self-timer will work.
ҟ2SEC self-timer ( )
: Pressing the shutter button will allow an
interval of 2 seconds before the image is
taken.
ҟ10SEC self-timer ( )
: Pressing the shutter button will allow an
interval of 10 seconds before the image is taken.
ҟDouble self-timer ( )
: A picture will be taken after about 10 seconds and 2 seconds later a
second picture will be taken. When using the flash, the 2-second self-timer
may be delayed for longer than 2 seconds depending on the flash charge
time.
3. When you press the SHUTTER button, the picture will be taken after the
specified time has elapsed.
ƅ When the menu is displayed on the LCD monitor, pressing the Right button
makes the cursor shift to the right tab.
ƅ When the menu is not displayed on the LCD monitor, the RIGHT button
operates as the Self-timer ( ) button. This function is used when the
photographer would also like to be in the image.
[ Selecting the 2 SEC self-timer ]
Pressing the
MENU button
[ Menu off ]
[ Menu on ]
Sharpness
Recording
Contrast
Normal
Normal
Auto Focus Center AF
OSD Info Full
Exit Move
MEMU
Ś28ś
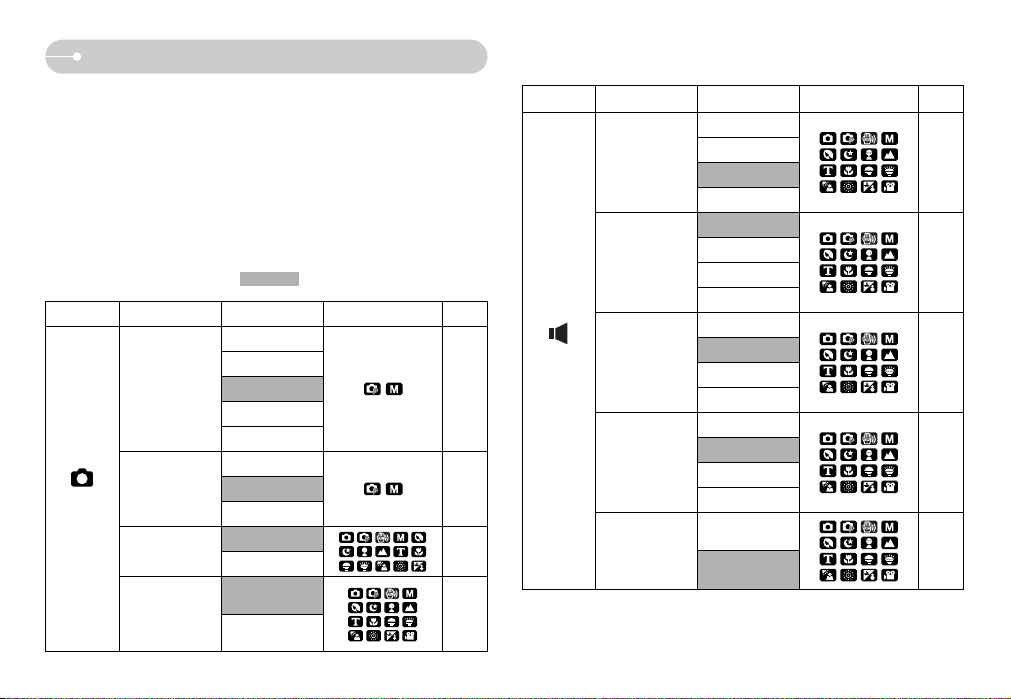
Using the LCD monitor to set the camera settings
ƅ You can use the menu on the LCD monitor to set up recording functions. In any
mode with the exception of VOICE RECORDING mode, pressing the MENU
button displays the menu on the LCD monitor.
ż
The menu will not be displayed on the LCD monitor in the following circumstances:
- When another button is being operated.
- While image data is being processed.
- When there is no battery capacity.
ƅ The following functions are available, depending on the mode you have
selected. The items indicated by are default settings.
Mode Menu Sub menu
Camera working mode
Page
Soft+
Soft
Normal
Vivid
Vivid+
High
Normal
Low
Center AF
Multi AF
Auto Focus
Contrast
Sharpness
RECORDING
OSD Info
p.31
p.30
p.30
p.31
Mode Menu Sub menu
Camera working mode
Page
Off
Low
Medium
High
Off
Sound 1
Sound 2
Sound 3
Off
Sound 1
Sound 2
Sound 3
Off
Sound 1
Sound 2
Sound 3
Shutter Sound
Start Sound
Volume
Beep Sound
AF Sound
p.32
p.32
p.32
p.32
p.32
SOUND
Off
On
Basic
Full
Ś29ś
Using the LCD monitor to set the camera settings
Menu tab
Main menu Sub menu Page
File Reset Series p.33
07/01/01 13:00
Date&Time YYMMDD Off
DDMMYY MMDDYY
Off Date
Date&Time -
Dark Normal
Bright -
AF Lamp Off On p.34
Off LOGO
User Image -
ENGLISH FRANÇAIS
DEUTSCH ESPAÑOL ITALIANO
PORTUGUÊS DUTCH
DANSK SVENSKA SUOMI
BAHASA
POLSKI Magyar
--
Language
Imprint
LCD
Start Image
SETUP1
p.33
p.33
p.34
p.34
p.34
ż The menus are subject to change without prior notice for upgrading the camera
functions.
Menu tab
Main menu Sub menu Page
Off 0.5sec
1sec 3sec
Off 1min
3min 5min
10min LCD Save Off On p.35
Video Out NTSC PAL p.36
Format No Yes p.36
Reset No Yes p.37
Battery Type Alkaline Ni-MH p.37
Quick View
Power Off
SETUP 2
p.35
p.35