

Samsung BN68-01508J-00 User Manual
Contact SAMSUNG WORLDWIDE
If you have any questions or comments relating to Samsung products,
please contact the SAMSUNG customer care centre.
Country
AUSTRALIA 1300 362 603 www.samsung.com
CHINA 800-810-5858
HONG KONG 3698-4698 www.samsung.com/hk
INDIA 3030 8282
INDONESIA 0800-112-8888 www.samsung.com
JAPAN 0120-327-527 www.samsung.com/jp
MALAYSIA 1800-88-9999 www.samsung.com/my
NEW ZEALAND 0800SAMSUNG(726-7864) www.samsung.com/nz
PHILIPPINES 1800-10-SAMSUNG(726-7864) www.samsung.com/ph
SINGAPORE 1800-SAMSUNG(726-7864) www.samsung.com
THAILAND 1800-29-3232
TAIWAN 0800-329-999 www.samsung.com/tw
VIETNAM 1 800 588 889 www.samsung.com
SOUTH AFRICA 0860-SAMSUNG(726-7864 ) www.samsung.com
U.A.E 800-SAMSUNG (726-7864)
Customer Care Centre
010-6475 1880
1800 110011
02-689-3232
8000-4726
Web Site
www.samsung.com
www.samsung.com
www.samsung.com
www.samsung.com
LCD TV
user manual
BN68-01508J-00
imagine the possibilities
Thank you for purchasing this Samsung product.
To receive more complete service, please register
your product at
www.samsung.com/global/register
Model Serial No.

Precautions When Displaying a Still Image
A still image may cause permanent damage to the TV screen.
Do not display a still image on the LCD panel for more than 2 hours as it can cause screen image retention. This image retention is also
•
known as "screen burn". To avoid such image retention, reduce the degree of brightness and contrast of the screen when displaying a still
image.
Displaying still images from Video games and PC for longer than a certain period of time may produce partial after-images.
•
To prevent this effect, reduce the ‘brightness’ and ‘contrast’ when displaying still images.
© 2008 Samsung Electronics Co., Ltd. All rights reserved.
Watching the LCD TV in 4:3 format for a long period of time may leave traces of borders displayed on the left, right and center of
•
the screen caused by the difference of light emission on the screen. Playing a DVD or a game console may cause a similar effect
to the screen. Damages caused by the above effect are not covered by the Warranty.

Contents
CONNECTING AND PREPARING YOUR TV
List of Parts ........................................................ 2
Installing the Stand ............................................. 2
Installing the Wall Mount Kit ............................... 2
Viewing the Control Panel .................................. 3
Viewing the Connection Panel ........................... 4
Viewing the Remote Control ............................... 6
Installing Batteries in the Remote Control .......... 7
Switching On and Off ......................................... 7
Placing Your Television in Standby Mode........... 7
Viewing the Menus ............................................. 8
Using the TOOLS Button .................................... 8
Plug & Play ......................................................... 9
SETTING THE CHANNELS
Storing Channels Automatically ....................... 10
Storing Channels Manually ...............................11
Adding / Locking Channels .............................. 12
Sorting the Stored Channels ............................ 13
Assigning Channels Names ............................. 13
Fine Tuning Channel Reception ....................... 14
SETTING THE PICTURE
Changing the Picture Standard ........................ 15
Adjusting the Custom Picture ........................... 16
Conguring Detailed Settings on the Picture ... 16
Resetting the Picture Settings to the Factory
Defaults ............................................................ 17
Conguring Picture Option ............................... 18
Viewing the Picture In Picture (PIP) ................. 20
SETTING THE SOUND
Sound Features ................................................ 21
Selecting the Sound Mode ............................... 22
Connecting Headphones (Sold separately) ..... 22
SETTING THE TIME
Setting and Displaying the Current Time .......... 23
Setting the Sleep Timer .................................... 23
Switching the Television On and Off
Automatically .................................................... 24
FUNCTION DESCRIPTION
Choosing Your Language ................................. 24
Melody / Entertainment / Energy Saving ......... 25
Selecting the Source ........................................ 27
Editing the Input Source Names ...................... 27
SETTING THE PC
Setting up Your PC Software
(Based on Windows XP) .................................. 28
Display Modes .................................................. 28
Setting up the TV with your PC ........................ 29
WISELINK
Using the WISELINK Function ......................... 30
Using the WISELINK Menu .............................. 31
Using the PHOTO (JPEG) List ......................... 32
Using the MP3 List ........................................... 35
Using the Setup Menu ...................................... 36
ABOUT ANYNET
What is Anynet+? ............................................ 37
Connecting Anynet+ Devices ........................... 37
Setting Up Anynet+ .......................................... 38
Scanning and Switching between Anynet+
Devices ............................................................ 39
Recording ......................................................... 41
Listening through a Receiver ........................... 41
Check Points before Requesting Service ......... 42
+
RECOMMENDATIONS FOR USE
Teletext Feature ............................................... 43
Auto Wall-Mount (Sold separately) ................... 45
Using the Anti-Theft Kensington Lock
(depending on the model) ................................ 46
Troubleshooting: Before Contacting Service
Personnel ......................................................... 47
Technical and Environmental Specications ... 48
Symbol Press Note One-Touch
English - 1
Button
List of Parts
Please make sure the following items are included with your LCD TV.
If any items are missing, contact your dealer.
M4 X L16
Remote Control
& Batteries
(AAA x 2)
Owner’s Instructions
•
Warranty card / Safety Guide / Registration Cards (Not available in all locations)
➣
The stand and stand screw may not be included depending on the model.
➣
Power Cord Cover-Bottom
Warranty card
•
Stand Screw
X 4
Safety Guide
•
Stand Cleaning Cloth
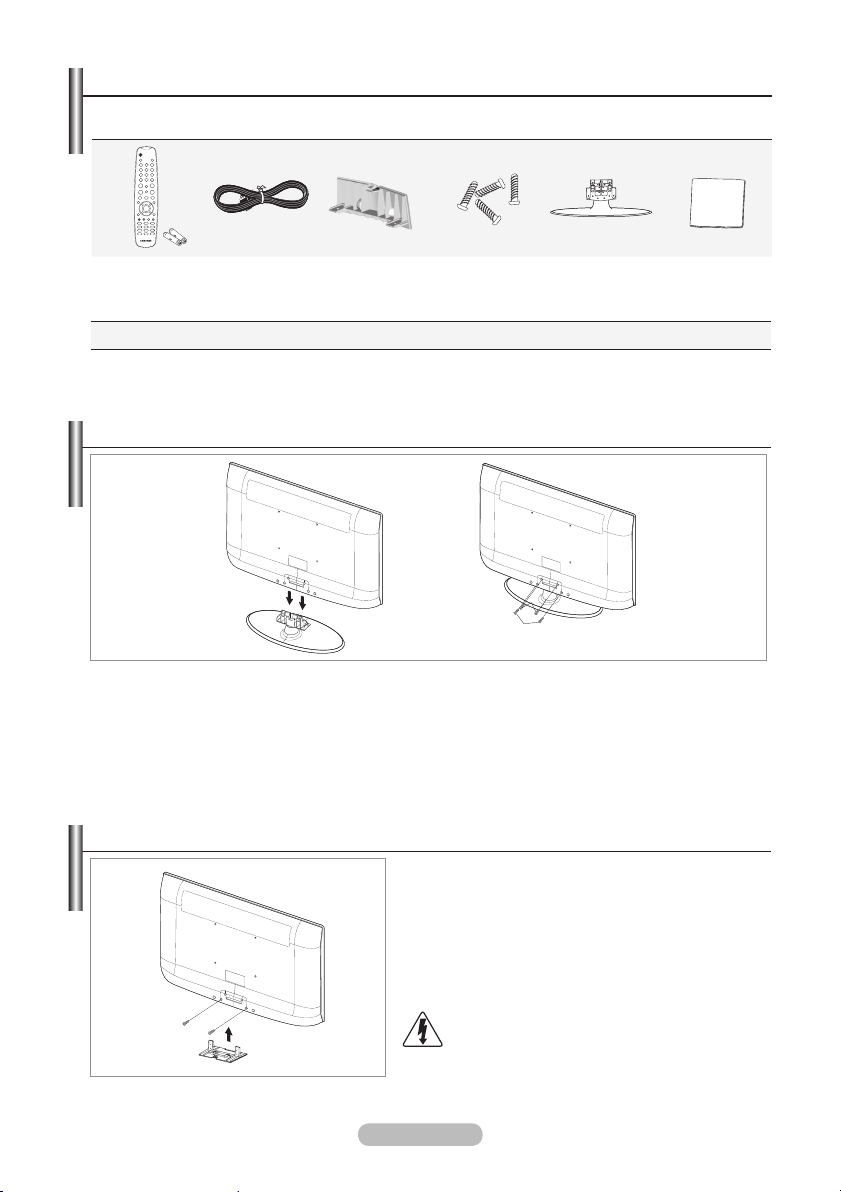
Installing the Stand
2
1
Registration Cards
•
1. Connect your LCD TV and the stand.
Two or more people should carry the TV.
➣
Make sure to distinguish between the front and back of the stand when assembling them.
➣
2. Fasten two screws at position 1 and then fasten two screw at position 2.
Stand the product up and fasten the screws. If you fasten the screws with the LCD TV placed
➣
down, it may lean to one side.
The stand is installed for models with the screen size of 37 inch and above.
➣
Installing the Wall Mount Kit
Wall mount items (sold separately) allow you to mount
the TV on the wall.
For detailed information on installing the wall mount,
see the instructions provided with the Wall Mount items.
Contact a technician for assistance when installing the
wall mounted bracket.
Samsung Electronics is not responsible for any damage
to the product or injury to yourself or others if you elect to
install the TV on your own.
Do not install your Wall Mount Kit while your TV is
turned on. It may result in personal injury due to
electric shock.
Remove the stand and cover the bottom hole with a
➣
cap and fasten with two screws.
English - 2
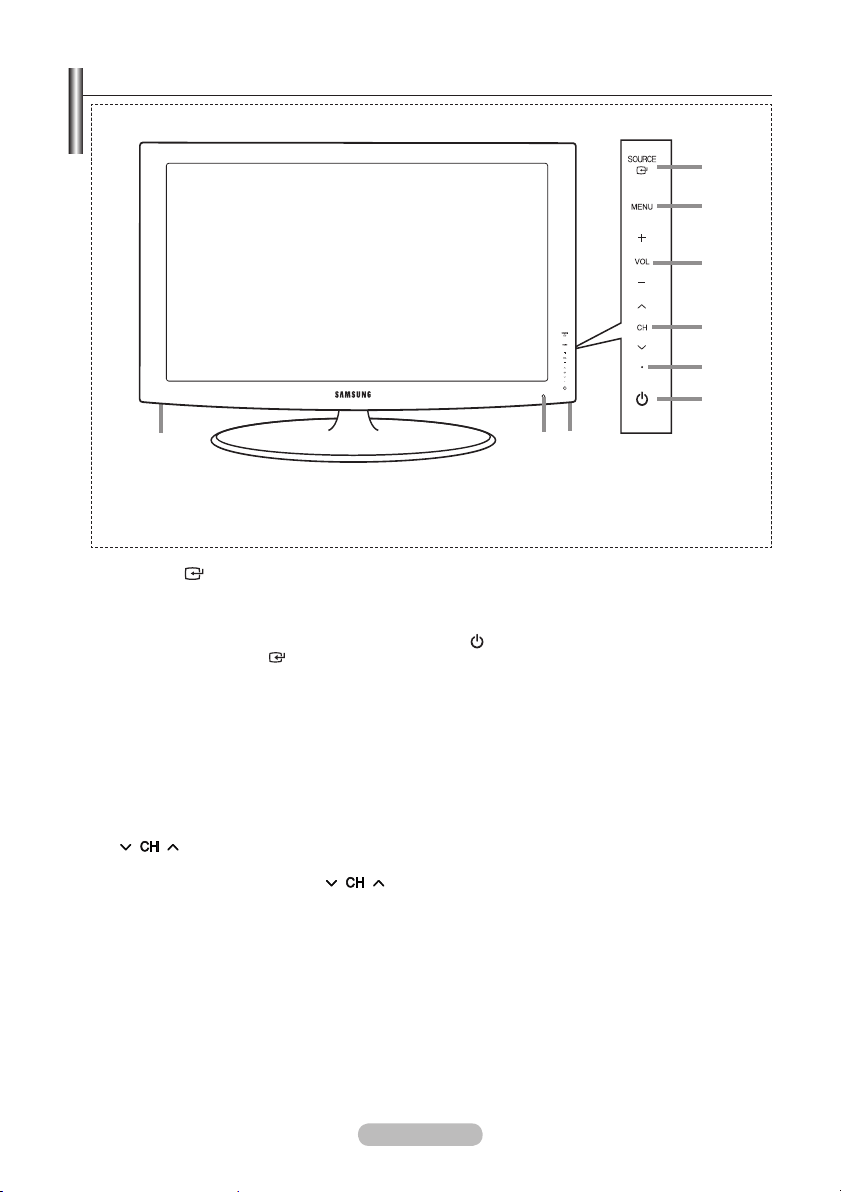
Viewing the Control Panel
8
8
4
1
2
3
5
6
7
The product colour and shape may vary depending on the model.
➣
Front Panel buttons
Touch each button to
operate.
SOURCE
1
Toggles between all the available input sources
(TV, AV1, AV2, S-Video, Component1,
Component2, PC, HDMI1, HDMI2, HDMI3,
HDMI4). In the on-screen menu, use this button
as you use the
control.
MENU
2
Press to see an on-screen menu of your TV’s
features.
- VOL +
3
Press to decrease or increase the volume.
In the on-screen menu, use the - VOL + buttons
as you use the ◄ and ► buttons on the remote
control.
4
Press to change channels.
In the on-screen menu, use the
buttons as you use the ▼ and ▲ buttons on
the remote control.
(Without the Remote Control, you can turn on
the TV by using the Channel buttons.)
ENTER
button on the remote
English - 3
5
Power Indicator
Blinks and turns off when the power is on and
lights up in stand-by mode.
(Power)
6
Press to turn the TV on and off.
Remote Control Sensor
7
Aim the remote control towards this spot on
the TV.
Speakers
8
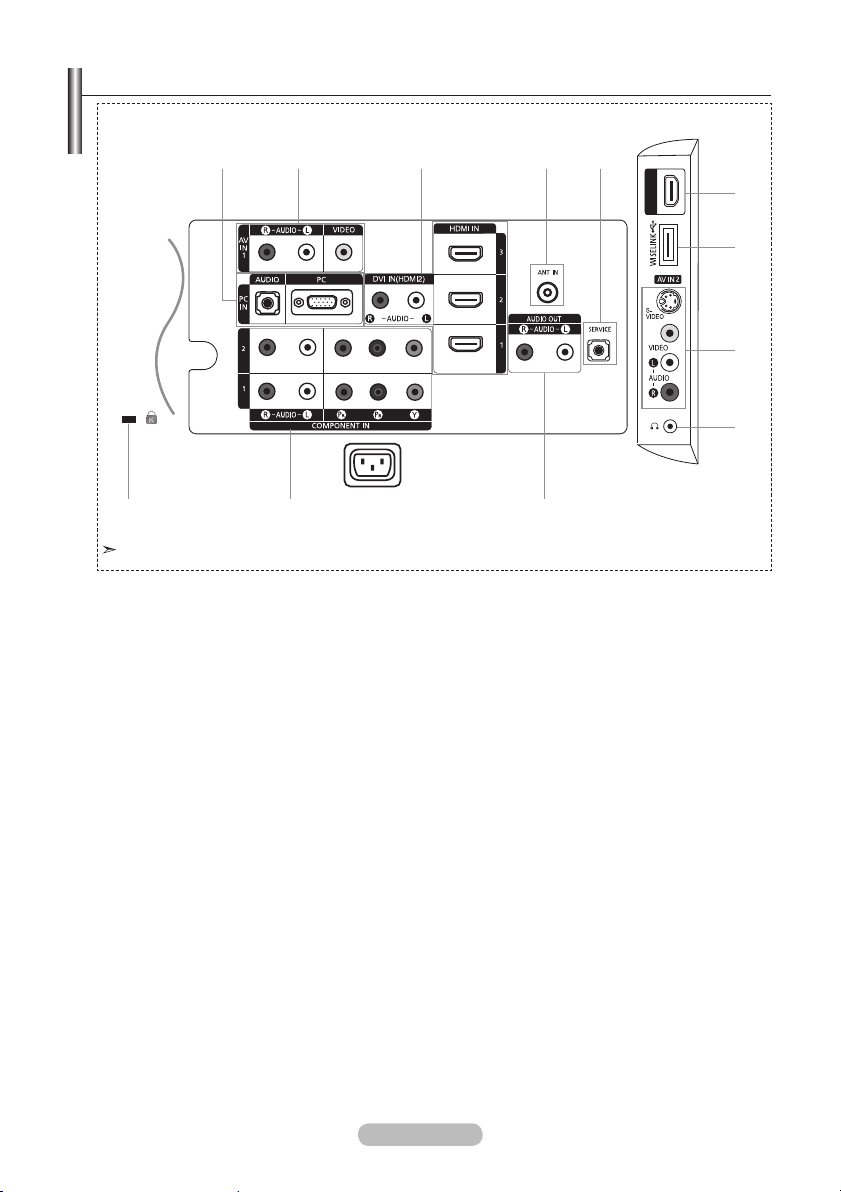
Viewing the Connection Panel
HDMI IN4
1
2 3 4 5
[Side Panel Jacks]
3
6
7
8
!
The product colour and shape may vary depending on the model.
Whenever you connect an external device to your TV, make sure that power on the unit is turned off.
➣
When connecting an external device, match the colour of the connection terminal to the cable.
➣
1 PC IN [PC] / [AUDIO]
Connect to the video and audio output jack on your PC.
-
2 Connecting External A/V Devices (AV IN 1)
Connect RCA cable to an appropriate external A/V device such as VCR, DVD or Camcorder.
-
Connect RCA audio cables to “R - AUDIO - L” on the rear of your set and the other ends to
-
corresponding audio out connectors on the A/V device.
3 HDMI IN 1, HDMI IN 2, HDMI IN 3, HDMI IN 4
Supports connections between HDMI-connection-enabled AV devices (Set-Top Boxes, DVD players)
-
No additional Audio connection is needed for an HDMI to HDMI connection.
-
When using an HDMI/DVI cable connection, you must use the HDMI IN 2 jack.
-
What is HDMI?
➣
“High Denition Multimedia interface” allows the transmission of high denition digital video data
-
and multiple channels of digital audio.
The HDMI/DVI terminal supports DVI connection to an extended device with the appropriate
-
cable (not supplied). The difference between HDMI and DVI is that the HDMI device is smaller
in size, has the HDCP (High Bandwidth Digital Copy Protection) coding feature installed, and
supports multi - channel digital audio.
The TV may not output sound and pictures may be displayed with abnormal colour when DVD
➣
players/Cable Boxes/Satellite receivers supporting HDMI versions older than 1.3 are connected.
When connecting an older HDMI cable and there is no sound, connect the HDMI cable to the
HDMI IN 2 jack and the audio cables to the DVI IN (HDMI2) [R-AUDIO-L] jacks on the back of
the TV. If this happens, contact the company that provided the DVD player/Cable Box/Satellite
receiver to conrm the HDMI version, then request a rmware update. HDMI cables that are not
1.3 may cause annoying icker or no screen display.
Power Input
English - 4
90

DVI IN(HDMI2) [R-AUDIO-L]
DVI audio outputs for external devices.
-
Supported modes for HDMI/DVI and Component
➣
HDMI/DVI 50Hz X X X O O O O
HDMI/DVI 60Hz X O X X O O O
Component O O O O O O O
480i 480p 576i 576p 720p 1080i 1080p
4 ANT IN
To view television channels correctly, a signal must be received by the set from one of the following
sources:
An outdoor aerial / A cable television network / A satellite network
-
5 SERVICE
Connect this to the jack on the optional wall mount bracket. This will allow you to adjust the TV viewing
angle using your remote control.
6 WISELINK
Connect a USB mass storage device to view photo les (JPEG) and play audio les (MP3)
-
7 S-VIDEO or VIDEO / R-AUDIO-L
Connect RCA or S-VIDEO cable to an appropriate external A/V device such as VCR, DVD or
-
Camcorder.
Connect RCA audio cables to "R-AUDIO-L" on your set and the other ends to corresponding audio out
-
connectors on the A/V device.
8 Headphones jack
Headphone may be connected to the headphone output on your set. While the head phone is
-
connected, the sound from the built-in speakers will be disabled.
9 AUDIO OUT [R-AUDIO-L]
Connect RCA audio cables to AUDIO OUT [R-AUDIO-L] on the rear of your set and the other ends to
-
corresponding audio in connectors on the Amplier or DVD Home Theatre.
0 COMPONENT IN 1,2
Connect component video cables (optional) to component connector ("PR", "PB", "Y") on the rear of your
-
set and the other ends to corresponding component video out connectors on the DVD.
If you wish to connect both the Set-Top Box and DVD, you should connect the Set-Top Box to the DVD
-
and connect the DVD to component connector ("PR", "PB", "Y") on your set.
The PR, PB and Y connectors on your component devices (DVD) are sometimes labeled Y, B-Y and R-Y
-
or Y, Cb and Cr.
Connect RCA audio cables (optional) to "R - AUDIO - L" on the rear of your set and the other ends to
-
corresponding audio out connectors on the DVD.
! Kensington Lock (depending on the model)
The Kensington lock (optional) is a device used to physically x the system when used in a public place.
-
If you want to use a locking device, contact the dealer where you purchased the TV.
-
The location of the kensington lock may be different depending on its model.
-
English - 5
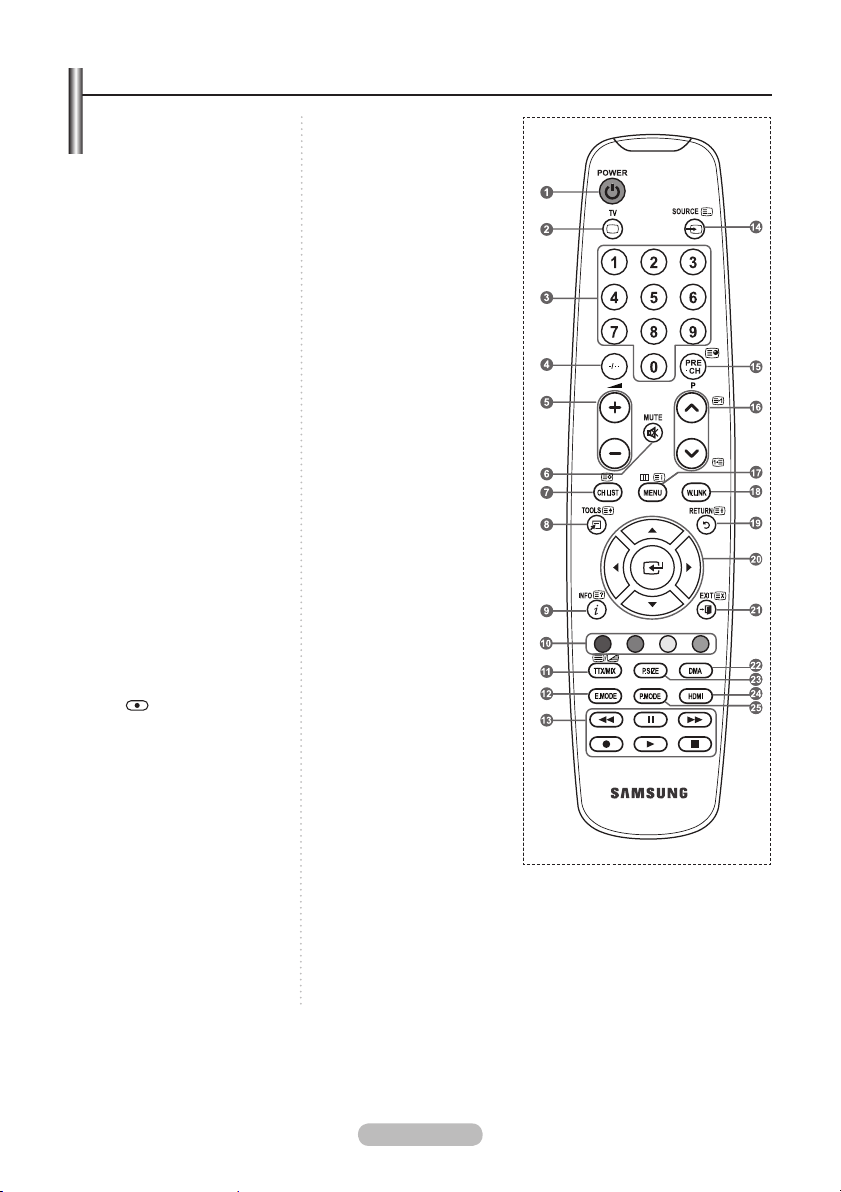
Viewing the Remote Control
1 Television Standby button
2 Selects the TV mode
directly
3 Number buttons for directNumber buttons for direct
channel access
4 One/Two-digit channel
selection
5 +: Volume increase
-: Volume decrease
6 Temporary sound switch-Temporary sound switch-
off
7 It display "Channel List"It display "Channel List"
on the screen.
8 Use to quickly selectUse to quickly select
frequently used functions.
9 Use to see information onUse to see information on
the current broadcast
0 Colour buttons :Colour buttons :
Use these buttons in
the Channel list and
WISELINK, etc.
@ Press to select the optionalPress to select the optional
display and sound modes
for sports, cinema and
games.
# Use these buttons in theUse these buttons in the
DMA, WISELINK, and
Anynet+.
( : This remote can be
used to control recording
on Samsung recorders
with the Anynet+ feature)
$ Available source selectionAvailable source selection
% Previous channel
^ P<: Next channel
P>: Previous channel
& Displays the main on-Displays the main on-
screen menu
* This function enables youThis function enables you
to view and play photo
and music files from an
external device.
( Returns to the previousReturns to the previous
menu
The performance of the remote control may be affected by bright light.
➣
) Control the cursor in theControl the cursor in the
menu
a Exit the on-screen menuExit the on-screen menu
b Use this when connecting
a SAMSUNG DMA
(Digital Media Adapter)
device through an HDMI
interface and switching
to DMA mode. (The DMA
button is optional.) For
more information on the
operating procedures,
refer to the user manual
of the DMA. This button
is available when
“Anynet+(HDMI-CEC)" is
“On” (see page 38)
c Picture size selectionPicture size selection
d Selects the HDMI mode
directly.
e Picture effect selection
Teletext Functions
2 Exit from the teletext display
7 Teletext store
8 Teletext size selection
9 Teletext reveal
0 Fastext topic selection
! Alternately select Teletext,
Double, or Mix.
$ Teletext mode selection
(LIST/FLOF)
% Teletext sub page
^ P<: Teletext next page
P>: Teletext previous page
& Teletext index
( Teletext hold
a Teletext cancel
English - 6
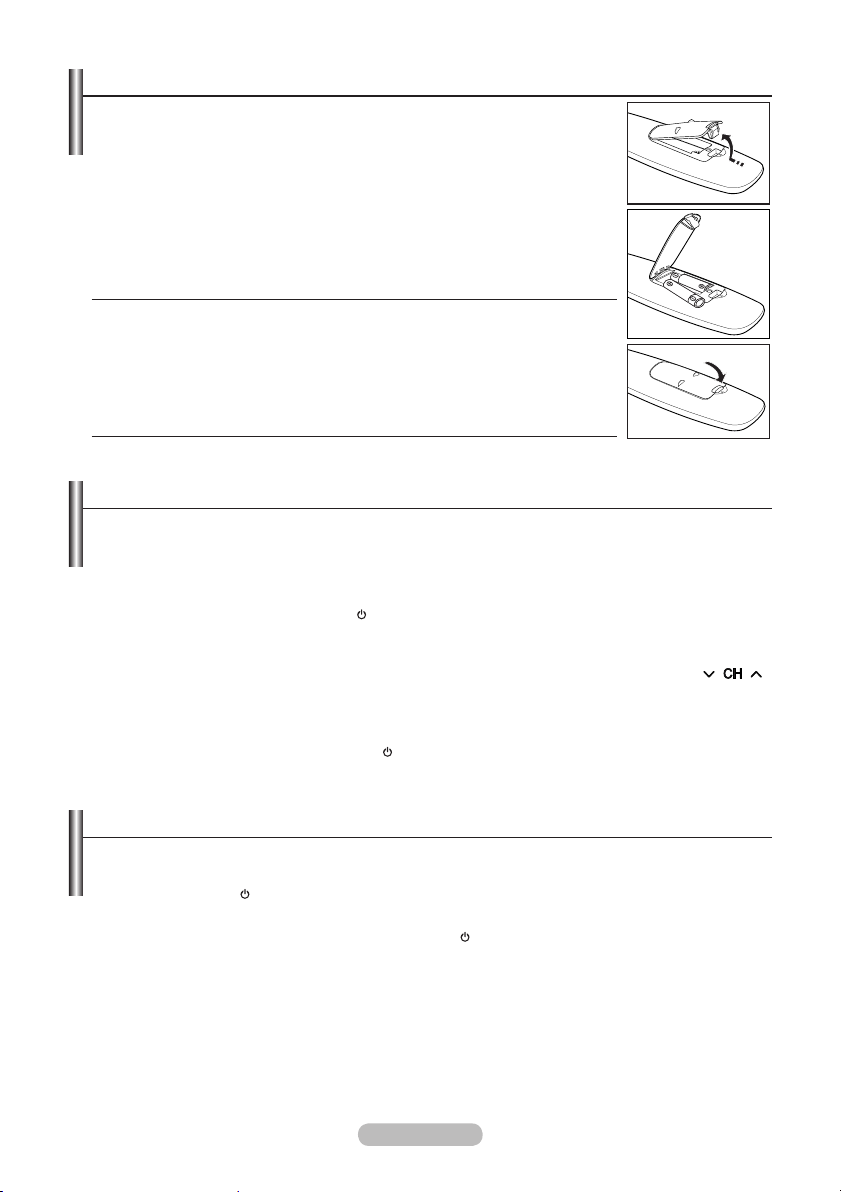
Installing Batteries in the Remote Control
1. Lift the cover at the back of the remote control upward as shown in the
gure.
2. Install two AAA size batteries.
Make sure to match the "+" and "–" ends of the batteries with the
➣
diagram inside the compartment.
3. Replace the cover.
Remove the batteries and store them in a cool, dry place if you won’t be
➣
using the remote control for a long time.
If the remote control doesn’t work, check the following:
➣
1. Is the TV power on?
2. Are the plus and minus ends of the batteries reversed?
3. Are the batteries drained?
4. Is there a power outage, or is the power cord unplugged?
5. Is there a special uorescent light or neon sign nearby?
Switching On and Off
The mains lead is attached to the rear of your set.
1. Plug the mains lead into an appropriate socket.
The standby indicator lights up
➣
2. Press the P button
You also can press the POWER button or the TV button on the remote control to turn the TV
➣
on.
The programme that you were watching last is reselected automatically.
➣
3. Press the numeric button (0~9) or channel up/down (</>) button on the remote control or
button
on your set.
When you switch the set on for the very rst time, you will be asked to choose language in which the
➣
menus are to be displayed.
4. To switch your set off, press the POWER button again.
on your set.
on your set.
Placing Your Television in Standby Mode
Your set can be placed in standby mode in order to reduce the power consumption. The standby
mode can be useful when you wish to interrupt viewing temporarily (during a meal, for example).
1. Press the POWER button on the remote control.
The screen is turned off and a red standby indicator appears on your set.
➣
2. To switch your set back on, simply press the POWER , numeric buttons (0~9), TV button or channel
up/down (</>) button again.
Do not leave your set in standby mode for long periods of time (when you are away on holiday, for
➣
example).
It is best to unplug the set from the mains and aerial.
English - 7

Viewing the Menus
1. With the power on, press the MENU button.
The main menu appears on the screen. The menu’ s left side has
icons: Picture, Sound, Channel, Setup, Input.
2. Press the ▲ or ▼ button to select one of the icons.
Then press the
ENTER
button to access the icon’s sub-menu.
3. Press the EXIT button to exit.
The on-screen menus disappear from the screen after about
➣
one minute.
Using the TOOLS Button
You can use the TOOLS button to select your frequently
used functions quickly and easily. The “Tools” menu change
depending on which external input mode you are viewing.
1. Press the TOOLS button.
The “Tools” menu will appear.
2. Press the ▲ or ▼ button to select a menu.
3. Press the ▲/▼/◄/►/
use the selected items. For a more detailed description of each
function, refer to the corresponding page.
Anynet+ (HDMI-CEC), see page 38
♦
Picture Mode, see page 15
♦
Sound Mode, see page 21
♦
Sleep Timer, see page 23
♦
SRS TS XT, see page 21
♦
Energy Saving, see page 26
♦
Dual l-ll, see page 22
♦
PIP, see page 20
♦
Auto Adjustment, see page 29
♦
ENTER
buttons to display, change, or
TV
Mode : Standard
Backlight 7
Contrast 95
Brightness 45
Sharpness 10
Colour 50
Tint G50 R50
Detailed Settings
sMore
Move Enter Return
Anynet+ (HDMI-CEC)
Picture Mode : Standard
Sound Mode : Custom
Sleep Timer : Off
SRS TS XT : Off
Energy Saving : Off
Dual l-ll : Mono
Move Enter Exit
Picture
Tools
English - 8
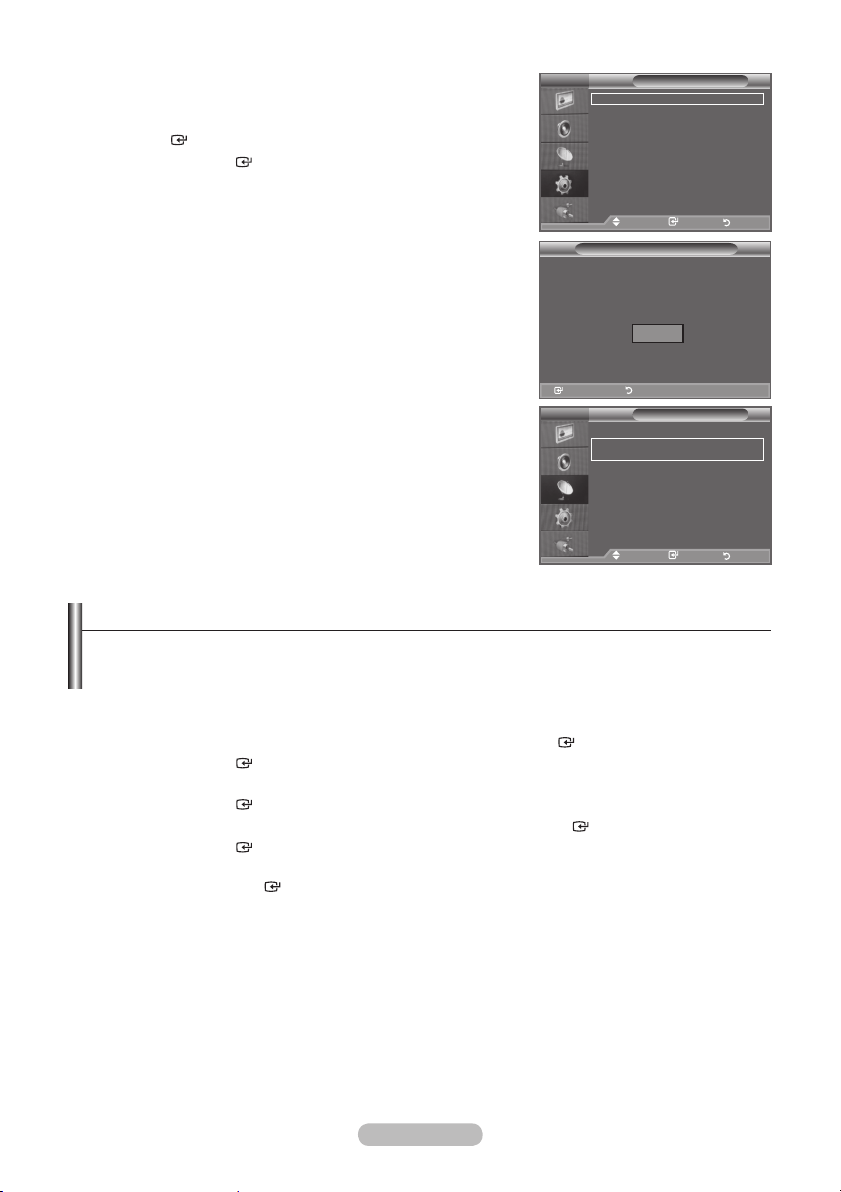
Plug & Play
When the TV is initially powered on, several basic settings
proceed automatically and subsequently. The following
settings are available.
1. Press the POWER button on the remote control.
The message "Start Plug & Play" is displayed with "OK" selected.
2. Select the appropriate language by pressing the ▲ or ▼ button.
Press the
3. Press the ◄ or ► button to select “Store Demo” or “Home Use”,
then the
➣
➣
➣
4. The message "Check antenna input." is displayed with "OK" selected.
Press the
➣
5. Select the appropriate area by pressing the▲ or ▼ button.
Press the
6.
The "Auto Store" menu is displayed with the "Start" selected. Press the
➣
➣
➣
7. Press the
Select the "Month", "Day" , "Year", "Hour", "Minute", or "am/pm" by pressing the ◄ or ► button.
Set the "Month", "Day" , "Year", "Hour", "Minute", or "am/pm" by pressing the ▲ or ▼ button.
➣
8. Press the
When you have nished, press the
➣
♦
♦
♦
♦
ENTER
ENTER
We recommend setting the TV to "Home Use" mode for the best picture in your home
environment.
"Store Demo" mode is only intended for use in retail environments.
If the unit is accidentally set to “Store Demo” mode and you want to return to “Home Use”
(Standard): Press the Volume button on the TV. When the volume OSD is displayed, press and
hold the MENU button on the TV for 5 seconds.
ENTER
Please check that the antenna cable is connected correctly.
ENTER
The channel search will start and end automatically.
Press the
After all the available channels are stored, the "Clock Set" menu appears.
ENTER
You can also set the “Month”, “Day”, “Year”, “Hour” and "Minute" by pressing the number buttons
on the remote control.
ENTER
Even if the
several seconds.
Language: Select your language.
Area: Select your area.
Auto Store: Automatically scans for and stores channels available in the local area.
Clock Set: Sets the current time for the TV clock.
button to conrm your choice.
button.
button.
button to conrm your choice.
ENTER
ENTER
ENTER
button at any time to interrupt the memorization process.
button.
button to conrm your setting. The message “Enjoy your viewing” is displayed.
ENTER
button is not pressed, the message will automatically disappear after
button.
Plug & Play
Start Plug & Play.
OK
Enter
button.
English - 9
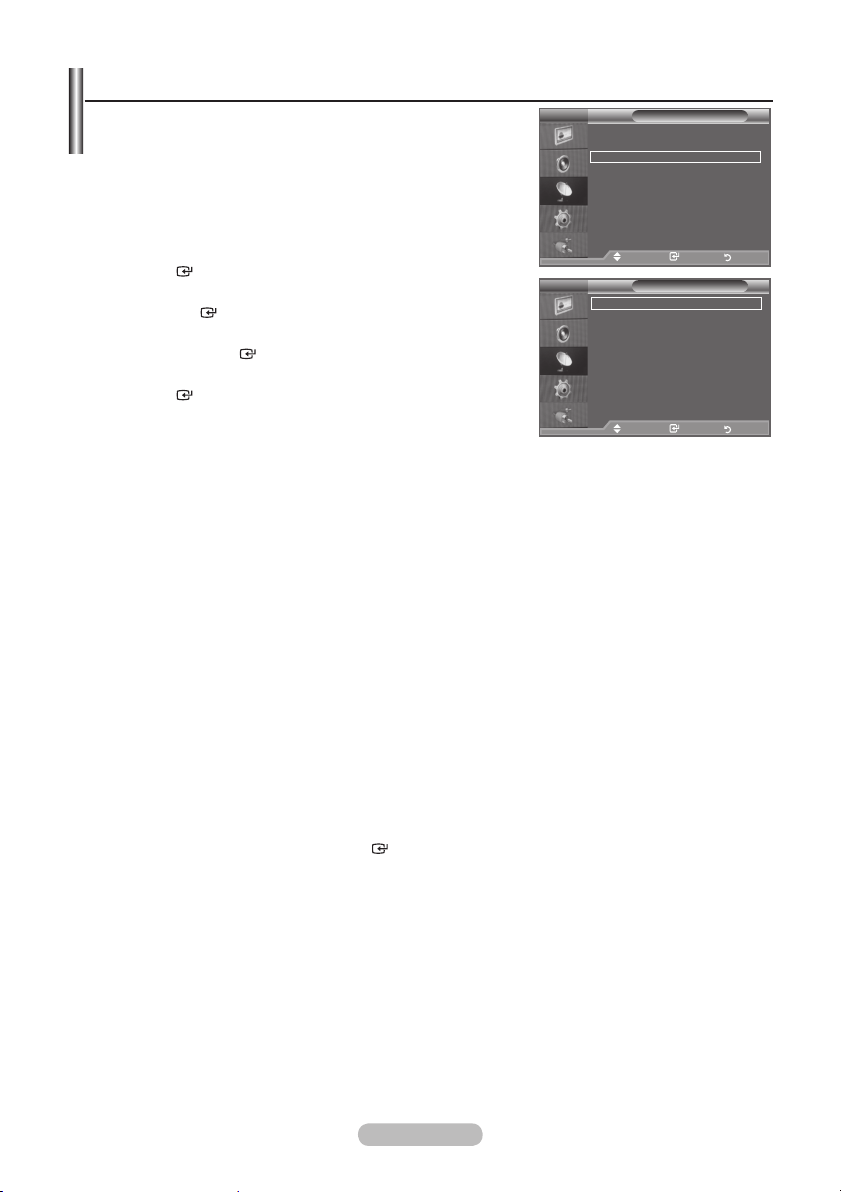
If you want to reset this feature...
1. Press the MENU button to display the menu.
Press the ▲ or ▼ button to select "Setup", then press the
ENTER
2. Press the
button.
ENTER
button again, to select "Plug & Play".
For further details on setting up options, refer to the page 9.
The “Plug & Play” feature is only available in the TV mode.
➣
Storing Channels Automatically
-
Storing Channels Manually
-
TV
Plug & Play
Language : English
Time
Auto Wall-Mount
Melody : Off
Entertainment : Off
Energy Saving : Off
PIP
Move Enter Return
Start Plug & Play.
Enter Return
TV
Area :
Auto Store
Manual Store
Channel Manager
Sort
Name
Fine Tune
Move Enter Return
Setup
Plug & Play
OK
Enter Return
Channel
Asia/W.Europe
Storing Channels Automatically
You can scan for the frequency ranges available to you (and availability depends on your area).
Automatically allocated programme numbers may not correspond to actual or desired programme
numbers. However, you can sort numbers manually and clear any channels you do not wish to
watch.
1. Press the MENU button to display the menu.
Press the ▲ or ▼ button to select "Channel", then press the
2. Press the
ENTER
button to select "Area".
3. Select the appropriate area by pressing the ▲ or ▼ button.
Press the
ENTER
button to conrm your choice.
4. Press the ▲ or ▼ button to select "Auto Store", then press the
5. Press the
➣
➣
ENTER
button.
The TV will begin memorizing all of the available channels.
Press the
ENTER
button at any time to interrupt the memorization process and return to the
"Channel" menu.
6. After all the available channels are stored, the "Sort" menu appears. (refer to page 13)
ENTER
ENTER
button.
button.
English - 10
Storing Channels Manually
You can store television channels, including those received via
cable networks.
When storing channels manually, you can choose:
♦ Whether or not to store each of the channels found.
♦ The programme number of each stored channel which you wish
to identify.
TV
Area :
Auto Store
Manual Store
Channel Manager
Sort
Name
Fine Tune
1. Press the MENU button to display the menu.
Press the ▲ or ▼ button to select "Channel", then press the
ENTER
button.
2. Press the ▲ or ▼ button to select "Manual Store", then press
the
ENTER
button.
3. Select the required option by pressing the ▲ or ▼ button, then
press the
ENTER
button.
Move Enter Return
Move Enter Return
TV
Programme : P 2
Colour System : Auto
Sound System : BG
Channel : C 3
Search : 77 MHz
Store : ?
4. When you are satised with your setting, press the
ENTER
5. Press the EXIT button to exit.
Programme (Programme number to be assigned to a channel)
♦
-
➣
Colour System: Auto/PAL/SECAM/NTSC4.43/NTSC3.58
♦
-
Sound System: BG/DK/I/M
♦
-
Channel (When you know the number of the channel to be stored)
♦
-
-
➣
➣
Search (When you do not know the channel numbers)
♦
-
-
button.
Move Enter Return
Press the ▲ or ▼ button until you nd the correct number.
You can also select the channel number directly by pressing the numeric buttons (0~9).
Press the ▲ or ▼ button to select the required colour standard.
Press the ▲ or ▼ button to select the required sound standard.
Press the ▲ or ▼ button to select C (Air channel) or S (Cable channel).
Press the ► button, then press the ▲ or ▼ button to select the required number.
You can also select the channel number directly by pressing the numeric buttons (0~9).
If there is abnormal sound or no sound, re-select the sound standard required.
Press the ▲ or ▼ button to start the search.
The tuner scans the frequency range until the rst channel or the channel that you selected is
received on the screen.
Store (When you store the channel and associated programme number)
♦
Set to "OK" by pressing the
Channel mode
➣
P (Programme mode): When completing tuning, the broadcasting stations in your area have been
-
ENTER
button.
assigned to position numbers from P00 to P99. You can select a channel by entering the position
number in this mode.
C (Air channel mode): You can select a channel by entering the assigned number to each air
-
broadcasting station in this mode.
S (Cable channel mode): You can select a channel by entering the assigned number for each cable
-
channel in this mode.
Channel
Manual Store
Asia/W.Europe
English - 11
Adding / Locking Channels
Using the Channel Manager, you can conveniently lock or add
channels.
1. Press the MENU button to display the menu.
Press the ▲ or ▼ button to select "Channel", then press the
ENTER
2. Press the ▲ or ▼ button to select "Channel Manager", then
press the
♦ Adding channels
Using the Channel List, you can add channels.
3. Select Channel List by pressing the
4. Move to the ( ) eld by pressing the ▲, ▼, ◄ or ►
button, select a channel to be added, and press the
ENTER
➣
➣
button.
ENTER
button.
ENTER
button.
button to add the channel.
If you press the
ENTER
button again, the ( ) symbol
next to the channel disappears and the channel is not
added.
“ ” is active when "Child Lock" is selected to "On".
TV
Area :
Auto Store
Manual Store
Channel Manager
Sort
Name
Fine Tune
Move Enter Return
TV
Channel List
Child Lock : Off
Move Enter Return
Channel
Channel Manager
Asia/W.Europe
♦ Locking channels
This feature allows you to prevent unauthorized users, such as
children, from watching unsuitable programmes by muting out
video and audio.
5. Press the ▲ or ▼ button to select "Child Lock", then press the
ENTER
button.
6. Select "On" by pressing the ▲ or ▼ button, then press the
ENTER
button.
7. Press the ▲ or ▼ button to select "Channel List", then press
the
ENTER
button.
8. Move to the ( ) eld by pressing the ▲, ▼, ◄ or ► button,
select a channel to be locked, and press the
ENTER
button.
If you press the
➣
ENTER
button again, the ( ) symbol
next to the channel disappears and the channel lock is
cancelled.
A blue screen is displayed when "Child Lock" is activated.
➣
Channel List
P 1 C3
Prog.
0 C--
1 C3
2 BBC 1
3 C74
4 C75
5 C76
6 S3
7 S4
8 S6
9 S7
Add Lock
Move Enter
Page Return
9. Press the EXIT button to exit.
Select "On" or "Off" in "Child Lock" to easily turn the channels which selected on " " to be active
➣
or inactive.
You can select these options by simply pressing the CH LIST
button on the remote control.
1 / 10
English - 12
Sorting the Stored Channels
This operation allows you to change the programme numbers
of the stored channels.
This operation may be necessary after using the auto store.
1. Press the MENU button to display the menu.
Press the ▲ or ▼ button to select "Channel", then press the
ENTER
button.
2. Press the ▲ or ▼ button to select "Sort", then press the
ENTER
button.
3. Select the channel number that you wish to change by pressing
the ▲ or ▼ button. Press the
The selected channel number and name are moved to right
➣
ENTER
button.
side.
4. Select the number of the programme to which the channel is to
be moved by pressing the ▲ or ▼ button.
5. Press the
ENTER
button. The channel is moved to its new
position and all other channels are shifted accordingly.
The selected channel is exchanged with the one
➣
previously stored to the chosen number.
6. Repeat steps 3 to 5 for another channel to be sorted.
7. Press the EXIT button to exit.
TV
TV
Assigning Channels Names
Channel names will be assigned automatically when channel
information is broadcast. These names can be changed,
allowing you to assign new names.
1. Press the MENU button to display the menu.
Press the ▲ or ▼ button to select "Channel", then press the
ENTER
button.
2. Press the ▲ or ▼ button to select "Name", then press the
ENTER
button.
3. If necessary, select the channel to be assigned to a new
name by pressing the ▲ or ▼ button. Press the
ENTER
button
The selection bar is displayed around the name box.
➣
4.
To... Then...
Select a letter, number or symbol Press the ▲ or ▼ button
Move on the next letter Press the ► button
Move back the previous letter Press the ◄ button
Conrm the name
The following characters are available: Letters of the alphabet (A~Z) / Numbers (0~9) /
➣
Press the
ENTER
button
Special characters (+, -, *, /, space)
5. Repeat steps 3 to 4 for each channel to be assigned to a new name.
6. Press the EXIT button to exit.
TV
TV
Area :
Auto Store
Manual Store
Channel Manager
Sort
Name
Fine Tune
Move Enter Return
Prog. Ch. Name
0 C--
1 C23
2 C16
3 C3
4 S1
s
Move Enter Return
Area :
Auto Store
Manual Store
Channel Manager
Sort
Name
Fine Tune
Move Enter Return
Prog. Ch. Name
0 C-- ----1 C23 ----2 C16 ----3 C3 ----4 S1 ---- s
Move Enter Return
Channel
Asia/W.Europe
Sort
Channel
Asia/W.Europe
Name
English - 13
Fine Tuning Channel Reception
Use fine tuning to manually adjust a particular channel for
optimal reception.
1. Use the number buttons to directly select the channel that
you want to ne tune.
2. Press the MENU button to display the menu.
Press the ▲ or ▼ button to select "Channel", then press the
ENTER
3. Press the ▲ or ▼ button to select "Fine Tune", then press
the
4. Press the ◄ or ► button to adjust the ne tuning.
Press the
5. Press the EXIT button to exit.
Fine tuned channels that have been saved are marked with
➣
an asterisk "*" on the right-hand side of the channel number
in the channel banner. And the channel number turns red.
To reset the ne-tuning, select "Reset" by pressing the ▲ or ▼
➣
button and then press the
ENTER
button.
button.
ENTER
button.
ENTER
button.
Fine Tune
Reset
Channel
Asia/W.Europe
TV
Area :
Auto Store
Manual Store
Channel Manager
Sort
Name
Fine Tune
Move Enter Return
P 1
Adjust Save Return
0
English - 14
 Loading...