

Samsung BD-F8500M, BD-F8900M User Manual
BD-F8500M
E-MANUAL
BD-F8900M
BD-HDD Combo
user manual
imagine the possibilities
Thank you for purchasing this Samsung product.
To receive more complete service,
please register your product at
www.samsung.com/register
For more information on how to use
e-Manual (P. 9)
Figures and illustrations in this User Manual are
provided for reference only and may differ from
actual product appearance. Product design and
specifications may be changed without notice.
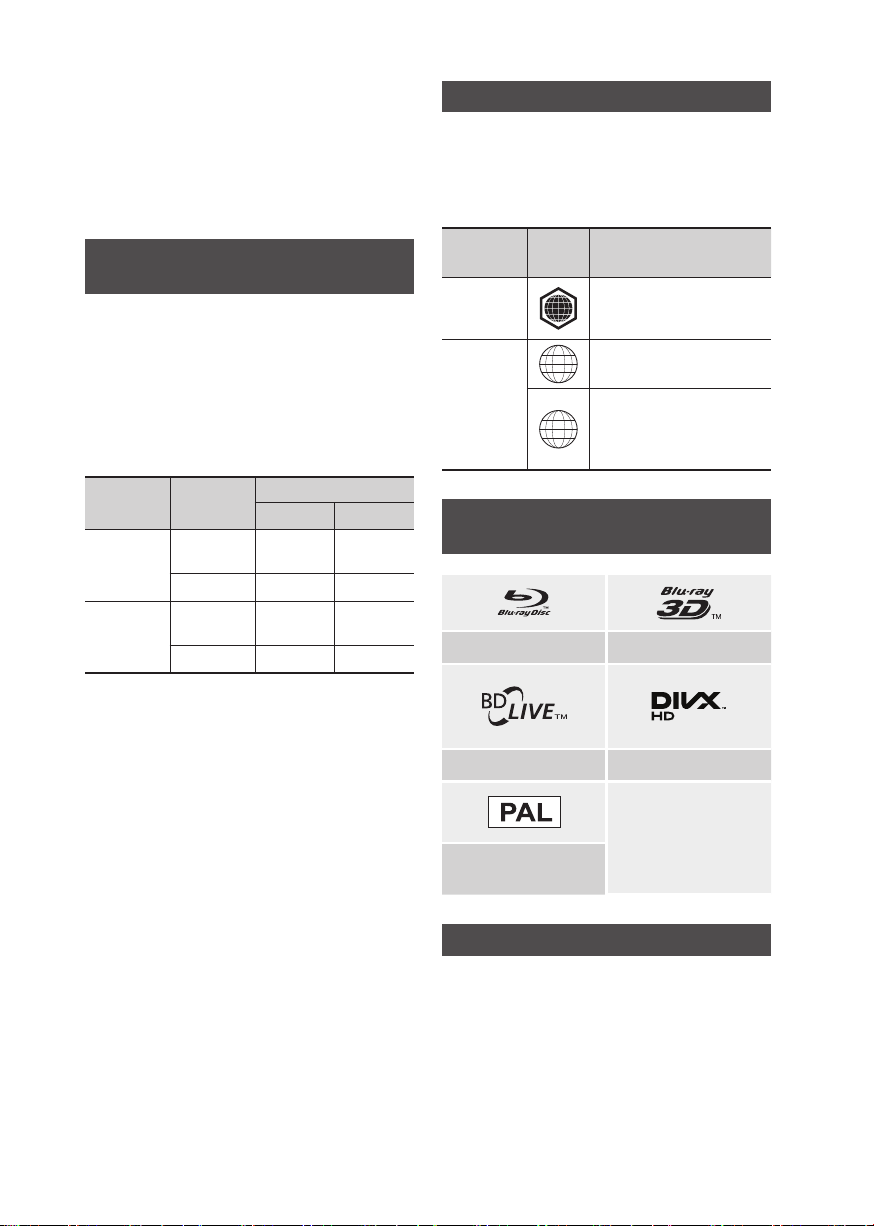
Region Code
Both products and discs are coded by region.
These regional codes must match for a disc to play.
If the codes do not match, the disc will not play.
The Region Number for this product is displayed
on the rear panel of the product.
Available Recording Time for internal HDD
You can record digital broadcast on the internal HDD
as below.
Depending on the actual broadcast, available
recording time may be different with the table shown
below.
In On Screen Display, you can check available
recording time as shown in "high" case in the table
shown below.
Broadcast
Type
HD
SD
| NOTE |
\
Since the product's Timeshift and other implemented
functions require a certain amount of HDD space allocated
internally, the total size shown in the "Storage Device
Manager" of Settings menu may differ from the HDD's
capacity shown in the manual.
Estimated
Bitrate
8 Mbps
(Normal)
20 Mbps (High)
5 Mbps
(Normal)
10 Mbps (High)
Recording Time
BD-F8500M BD-F8900M
124 Hours
49 Hours
199 Hourss
99 Hours
257 Hours
102 Hours
411 Hours
205 Hours
Disc Type
Blu-ray Disc
DVD-VIDEO
Region
Code
Europe, Greenland, French
territories, Middle East, Africa,
B
Australia and New Zealand.
Europe, Japan, the Middle East,
2
Egypt, Africa, Greenland
Mexico, South America,
Central America, Australia,
4
New Zealand, Pacific Islands,
Caribbean
Area
Logos of Discs the product can play
Blu-ray Disc 3D Blu-ray Disc
BD-Live DivX
|
2 English
PAL broadcast System in U.K.,
France, Germany, etc.
Accessories
Check for the supplied accessories below.
• RF cable for TV
• Remote Control
• Batteries for Remote Control(AAA Size)
• Power cord
• User Manual
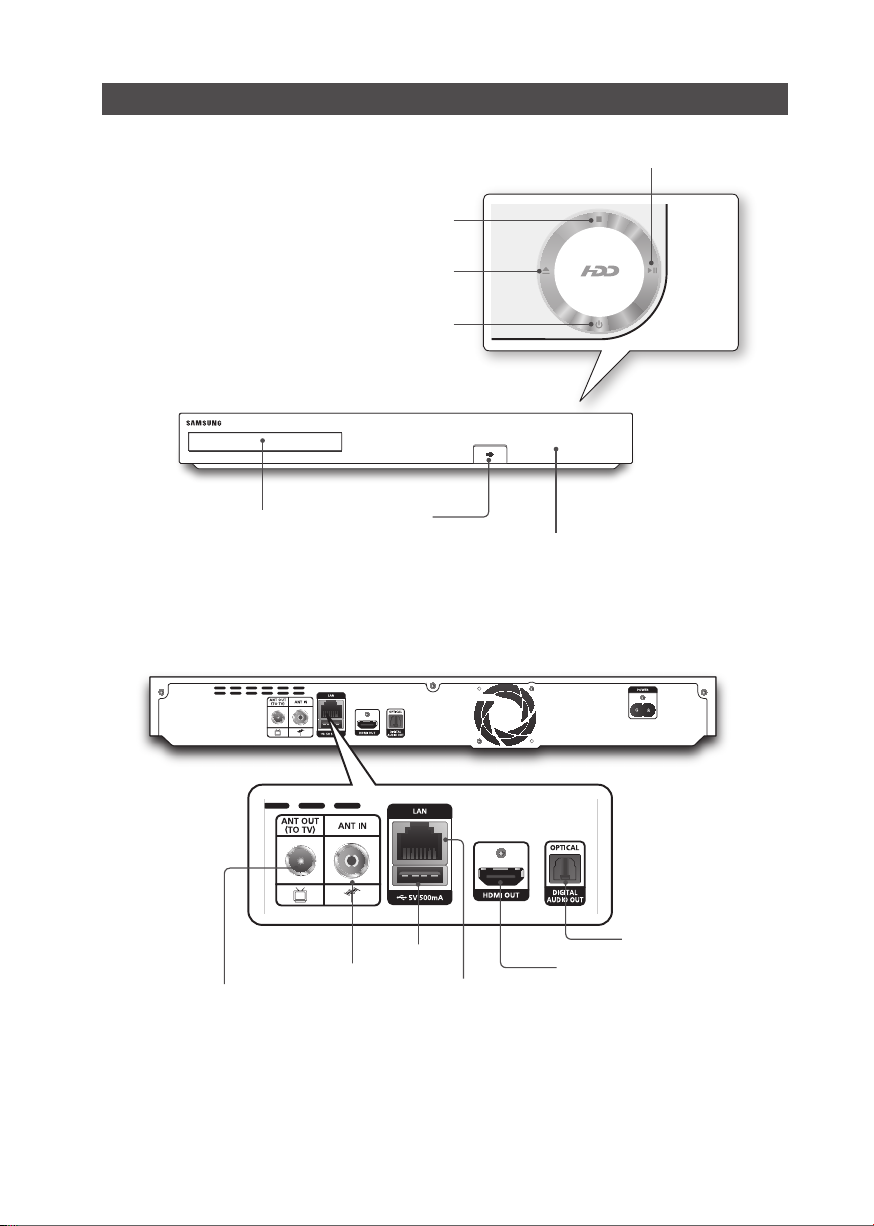
Front Panel or Rear Panel
OPEN/CLOSE BUTTON
PLAY/PAUSE BUTTON
STOP BUTTON
POWER BUTTON
DISC TRAY
ANT OUT (TO TV)
ANT IN
USB HOST
USB HOST
REMOTE CONTROL SENSOR
DIGITAL AUDIO OUT
HDMI OUT
LAN
English 3
|
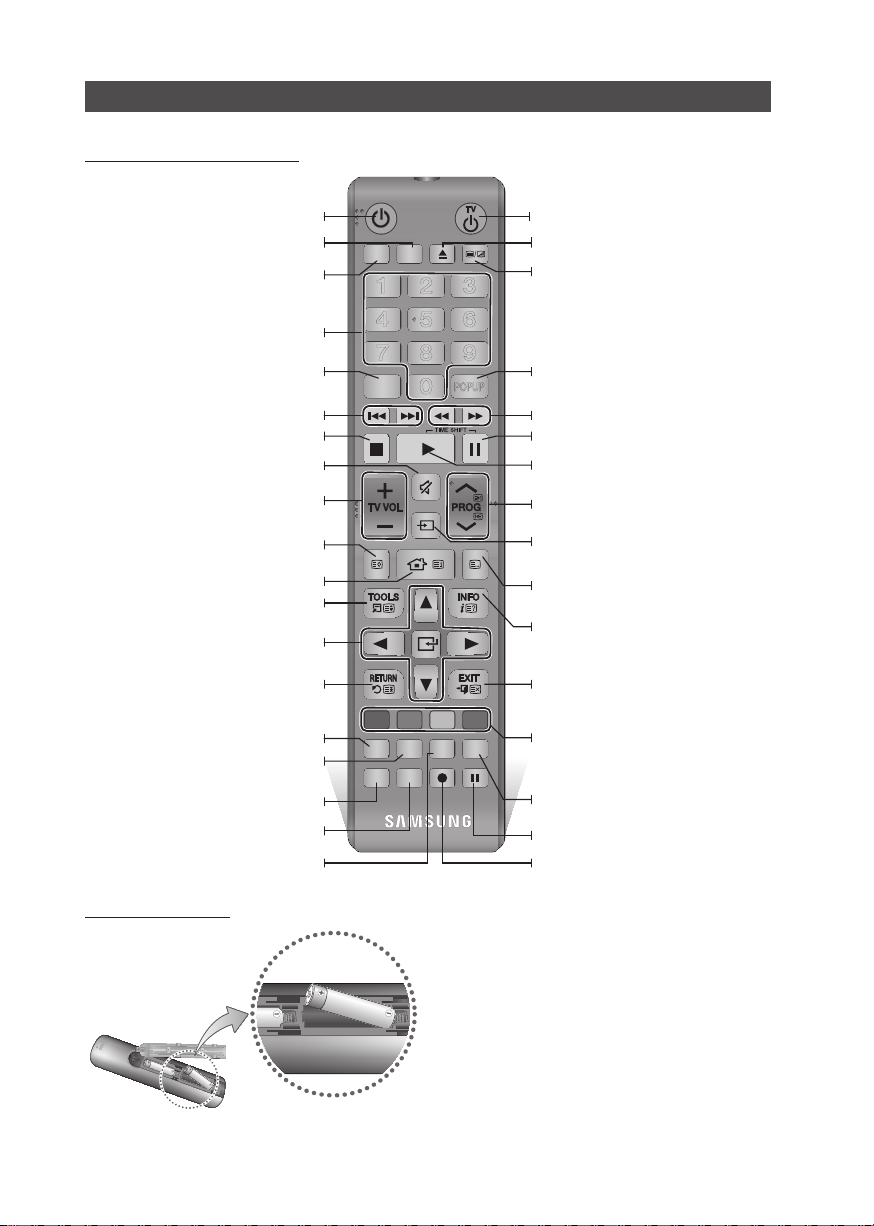
Remote Control
Tour of the Remote Control
Turn the product on and off.
Press this to operate a TV.
Press this to operate the product.
Press numeric buttons to operate options
or to access channels directly.
Use to enter the disc menu.
Press to skip backwards or forwards.
Stops playback or recording.
Mutes the speakers of your TV.
TV volume adjustment.
FUNCTION
SUBTITLE
TV SOURCE
TTX/MIX
INPUT
POWER
RECEIVER
BD TV
1 2 3
4 5 6
7 8 9
DISC MENU TITLE MENU
0
TV MUTE
TV SOURCE
POPUP
Turn the TV on and off.
Press to open and close the disc tray.
Alternately selects Teletext, Double or Mix.
Use to enter the popup menu/title menu.
Press to search backwards or forwards.
Press this to pause a playback or pause the
Timeshift function.
Press this to play or start the Timeshift
function.
Press this to select a TV channel.
Displays channel lists on the screen.
Press to move to the home screen.
Press to use Tools menu.
Use to select menu items and change
menu value.
Return to the previous menu.
Press to use Apps.
Press to search contents.
Press this to user web browser function.
Press this when you want to use 3D function.
Press this to enter the e-manual.
Installing batteries
CH LIST HOME GUIDE
A B C D
SMART HUB SEARCH E-MANUAL
1
DIGITAL
PANDORA SUBTITLE
SOCIAL
SUBTITLE
INPUT
TV
REC
REC PAUSEWEB BROWSER
3D
| NOTE |
\If the remote does not operate properly:
- Check the polarity +/– of the batteries.
- Check if the batteries are drained.
- Check if the remote sensor is blocked by obstacles.
- Check if there is any fluorescent lighting nearby.
| CAUTION |
\Dispose of batteries according to local environmental
regulations. Do not put them in the household trash.
After setup, allows you to set the input
source on your TV.
Displays the EPG (Electronic Programme
Guide.)
Press this to display the playback information
during playing a content in Disc/USB or
display the information of TV channel.
Press to exit the menu.
These buttons are used both for menus on
the product and also several Blu-ray Disc
functions.
Press to use social TV.
Press this to pause during recording.
Press this to make a recording.
|
4 English

Setting the Remote Control to Operate
Your TV
To determine whether your television is
compatible, follow the instructions below.
1. Turn your television on.
2. Point the remote control towards the
television.
3. Press the TV button to set the TV mode.
4. Press and hold the TV POWER button, and
then enter the two-figure code in the table
to the right that corresponds to the brand of
your television by pressing the appropriate
number buttons.
If your television is compatible with the
remote control, it will Turn off.
The remote is now programmed to operate
the TV.
| NOTE |
\If several codes are listed for your television brand, try
each one in turn until you find one that works.
\If you replace the remote control’s batteries, you must set
the brand code again.
You can control certain functions of your TV with
this remote control.
Button Function
TV POWER
Number
TV VOL +/–
TV MUTE
,/.
PROG (
TV SOURCE
Used to Turn the television on and off.
Used to input number directly.
Used to adjust the volume of the
television.
Used to toggle the sound on and off.
)
Used to select the desired channel.
Used to select an external source
connected to the TV.
| NOTE |
\The functions listed above will not necessarily work on all
televisions. If you encounter problems, use the TV remote
control.
TV Control Codes
Brand Code
TV POWER+01, +02,
SAMSUNG
BLAUPUNKT TV POWER+71
BRIONVEGA TV POWER+57
CONTINENTAL
EMERSON TV POWER+64
FERGUSON TV POWER+73
FORMENTI TV POWER+57
GRADIENTE TV POWER+70
LOEWE OPTA TV POWER+06, +57
MAGNAVOX TV POWER+40
MITSUBISHI
+03, +04, +05, +06,
+07, +08, +09
AIWA TV POWER+82
TV POWER+10, +11,
ANAM
+12, +13, +14, +15,
+16, +17, +18
BANG &
TV POWER+57
OLUFSEN
BRANDT TV POWER+73
CGE TV POWER+52
TV POWER+75
EDISON
TV POWER+19, +20,
+23, +24, +25, +26,
DAEWOO
+27, +28, +29, +30,
+31, +32, +33, +34
TV POWER+06,
FINLUX
+49, +57
FUJITSU TV POWER+84
TV POWER+49,
GRUNDIG
+52, +71
TV POWER+60,
HITACHI
+72, +73, +75
IMPERIAL TV POWER+52
JVC TV POWER+61, +79
TV POWER+06, +19,
LG
+20, +21, +22, +78
LOEWE TV POWER+06, +69
METZ TV POWER+57
TV POWER+06,
+48, +62, +65
MIVAR TV POWER+52, +77
NEC TV POWER+83
NEWSAN TV POWER+68
Brand Code
NOBLEX TV POWER+66
NOKIA TV POWER+74
NORDMENDE
PANASONIC
PHONOLA
RADIOMARELLI TV POWER+57
SCHNEIDER TV POWER+06
SINUDYNE TV POWER+57
TELEFUNKEN
THOMSON
THOMSON ASIA TV POWER+80, +81
TV POWER+72,
+73, +75
TV POWER+53,
+54, +74, +75
TV POWER+06,
PHILIPS
+55, +56, +57
TV POWER+06,
+56, +57
TV POWER+58,
PIONEER
+59, +73, +74
RADIOLA TV POWER+06, +56
RCA TV POWER+45, +46
REX TV POWER+74
TV POWER+57,
SABA
+72, +73, +74,
+75
SALORA TV POWER+74
TV POWER+41,
SANYO
+42, +43, +44,
+48
SELECO TV POWER+74
TV POWER+36,
SHARP
+37, +38, +39,
+48
SIEMENS TV POWER+71
SINGER TV POWER+57
SONY TV POWER+35, +48
TELEAVA TV POWER+73
TV POWER+67,
+73, +75, +76
TV POWER+72,
+73, +75
TV POWER+47,
TOSHIBA
+48, +49, +50,
+51, +52
WEGA TV POWER+57
YOKO TV POWER+06
ZENITH TV POWER+63
English 5
|
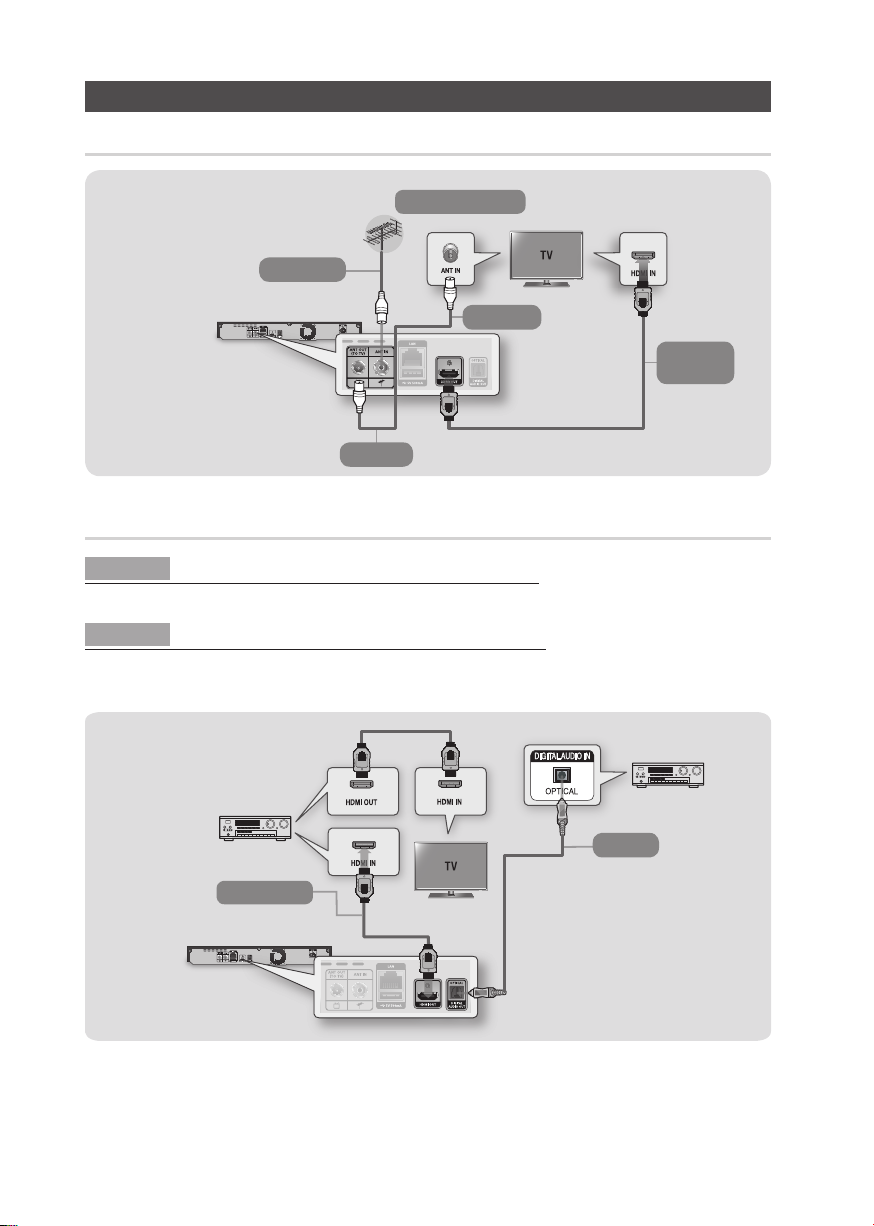
Connections
Connecting to a TV
To ANT INPUT
To ANT IN
RF cable
To TV
Connecting to an Audio System
Method 1 Connecting to an HDMI supported AV receiver
• Use an HDMI cable (not included)
Method 2 Connecting to an AV receiver with Optical input
• Use an Optical Cable (not included)
• You will hear sound only through the front two speakers with Digital Output set to PCM.
Audio
Video
|
6 English
Audio
Method 2
Audio/Video
Method 1
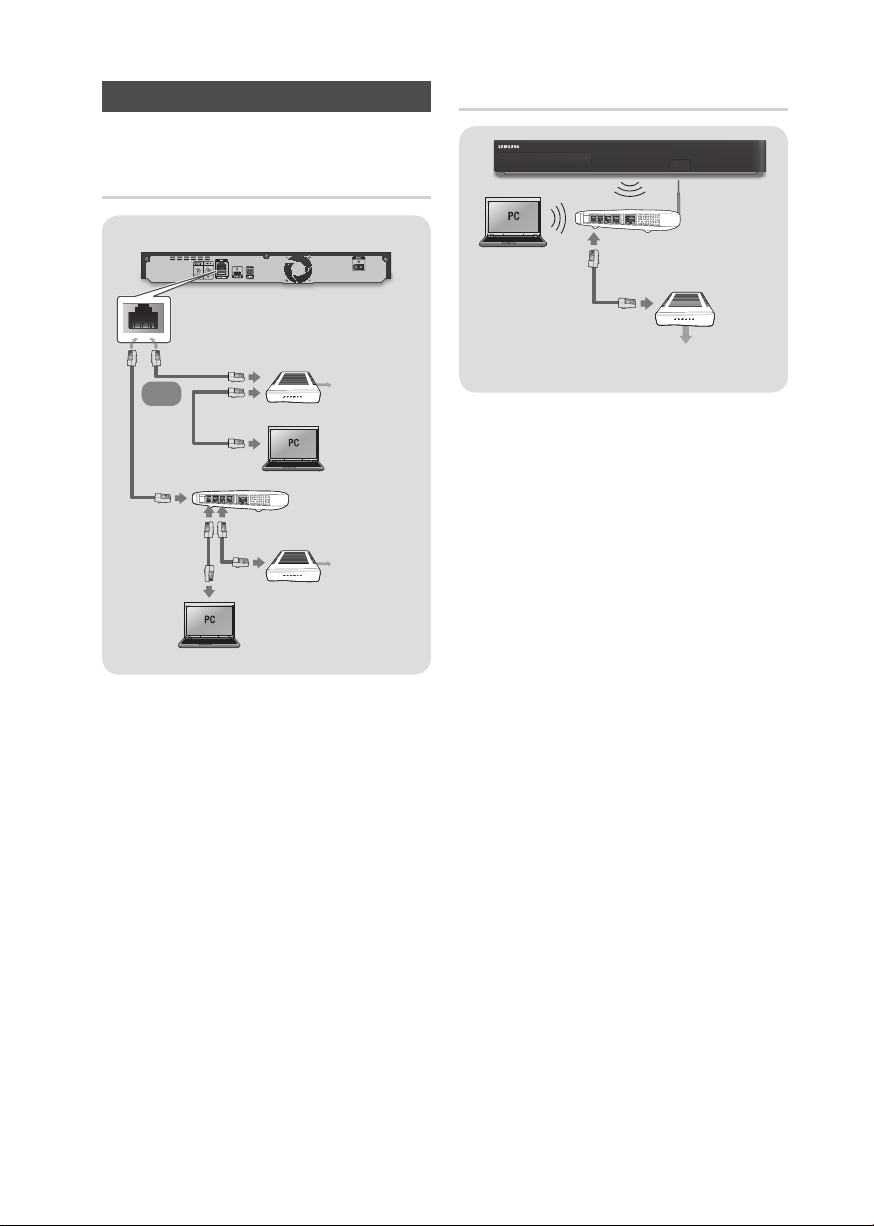
Network Connection
You can connect your product to your network
router using one of the methods illustrated below.
Wired Network
Broadband modem
(with integrated router)
Or
Router
Broadband
modem
| NOTE |
\Internet access to Samsung’s software update server
may not be allowed, depending on the router you use or
your ISP’s policy. For more information, contact your ISP
(Internet Service Provider).
\DSL users, please use a router to make a network
connection.
\To use the AllShare function with your PC, you must
connect your PC.
Broadband
service
Broadband
service
Wireless Network
Wireless Router
Broadband
service
| NOTE |
\If the wireless router supports DHCP, your product can
use a DHCP or static IP address to connect to the wireless
network.
\Set your wireless router to Infrastructure mode. Ad-hoc
mode is not supported.
\The product supports only the following wireless security
key protocols:
- WEP (OPEN/SHARED), WPA-PSK (TKIP/AES),
WPA2-PSK (TKIP/AES)
\Select a channel on the wireless router that is not
currently being used. If the channel set for the wireless
router is currently being used by another device nearby, it
will result in interference and communication failure.
\If you select the Pure High-throughput (Greenfield)
802.11n mode and set the Encryption type on your router
or router to WEP, TKIP or TKIP-AES (WPS2Mixed), the
product will not support a connection in compliance with
new Wi-Fi certification specifications.
\If your router supports WPS (Wi-Fi Protected Setup),
you can connect to the network via PBC (Push Button
Configuration) or PIN (Personal Identification Number).
WPS will automatically configure the SSID and WPA key
in either mode.
\Wireless LAN, by its nature, may cause interference,
depending on the operating conditions (router
performance, distance, obstacles, interference by other
radio devices, etc).
\
To use the AllShare function with your PC, you must connect
your PC.
English 7
|
 Loading...