

Page 1

USER GUIDE
Page 2

C
nfiguring Yur Nework Connctio
n
: F
U
b
TV Acon
Wrkin
U
U
n
ontts
rst Seps 3
• For Wired Networks 4
• For Wireless Networks 5
grading the Softwre 7
nning Smat Hu
eatin Your Samsung Aco
t 10
9
• Moving an Icon 14
• Create New Folder 15
• Inserting an Icon into a Folder 15
• Renaming a Folder 16
• Locking an App 17
• Unlocking an App 18
g with Ico
14
- Configuring the Start Page of the Web
Browser 24
- Setting the Pointer Speed 26
- Configuring the Settings for Internet Popup
Windows 27
- Switching between Multiple Web Browser
Windows 28
- Go Forward, Go Back, Return to Home Page,
Bookmarks, History, etc. 29
gging into the Smrt Hu Service 11
gging out of theSmart HubService 11
setting a
mo
ng aSmart
rgottn Pasword 12
ub Acount from te
t List 12
angng W
※ The functions may vary depending on your player model.
※ The figures in this manual are drawn for illustration purposes, and may differ somewhat from the actual appearance of the product.
lpape 14
gistering Yur Sasu
ing Sams
ing the
g Apps 21
art Search f
sy-to-follo Use
Accont 19
ctio
of R
om
nded Apps 24
22
• Web Browser 24
Page 3
Configuring Your Network Connection:
First Steps
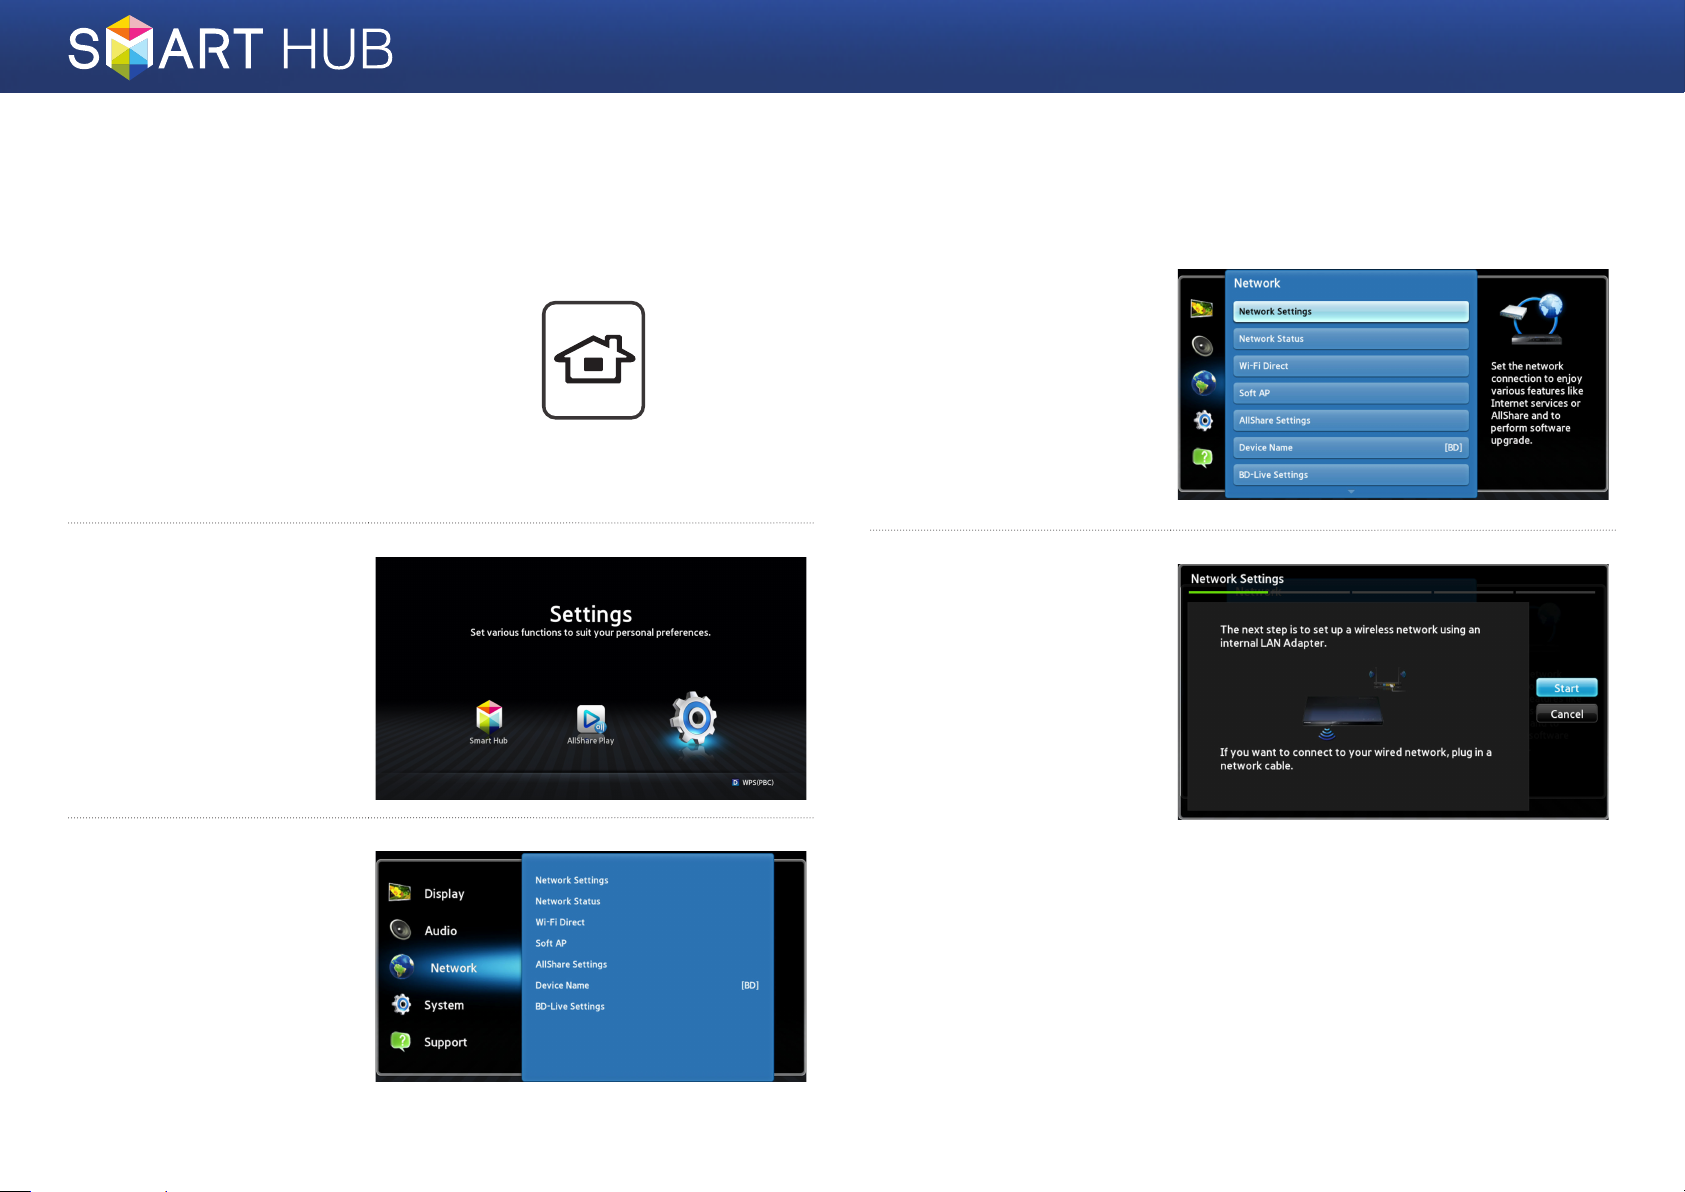
Press the [HOME] button on the
1
remote control.
※ If you have a wireless network, make sure the
access point you want to connect your player
to is turned on. The access point can be a
wireless router, modem, etc. If you have a wired
network, connect one end of a LAN cable to
the LAN port on the back of your player and
the other end to a router or modem.
On the Home screen,
2
move to <Settings>,
and then press the
button.
Move to <Network>,
3
and then press the
button.
e
e
HOME
Move to <Network
4
Settings>, and then
press the
When the Network
5
Settings window is
displayed, go to "For
Wired Networks" on
page 4 or "For Wireless
Networks" on page 5 to
complete the network
configuration.
※ Your player supports various
network configuration
methods (Wired/Wireless,
WPS (PBC)) that let you
configue your network easily
and quickly.
e
button.
3 - English
Page 4
❙For Wired Networks
Wired - Automatic
Use the automatic procedure if your network does not require a Static IP
address. Most networks do not require a Static IP address.
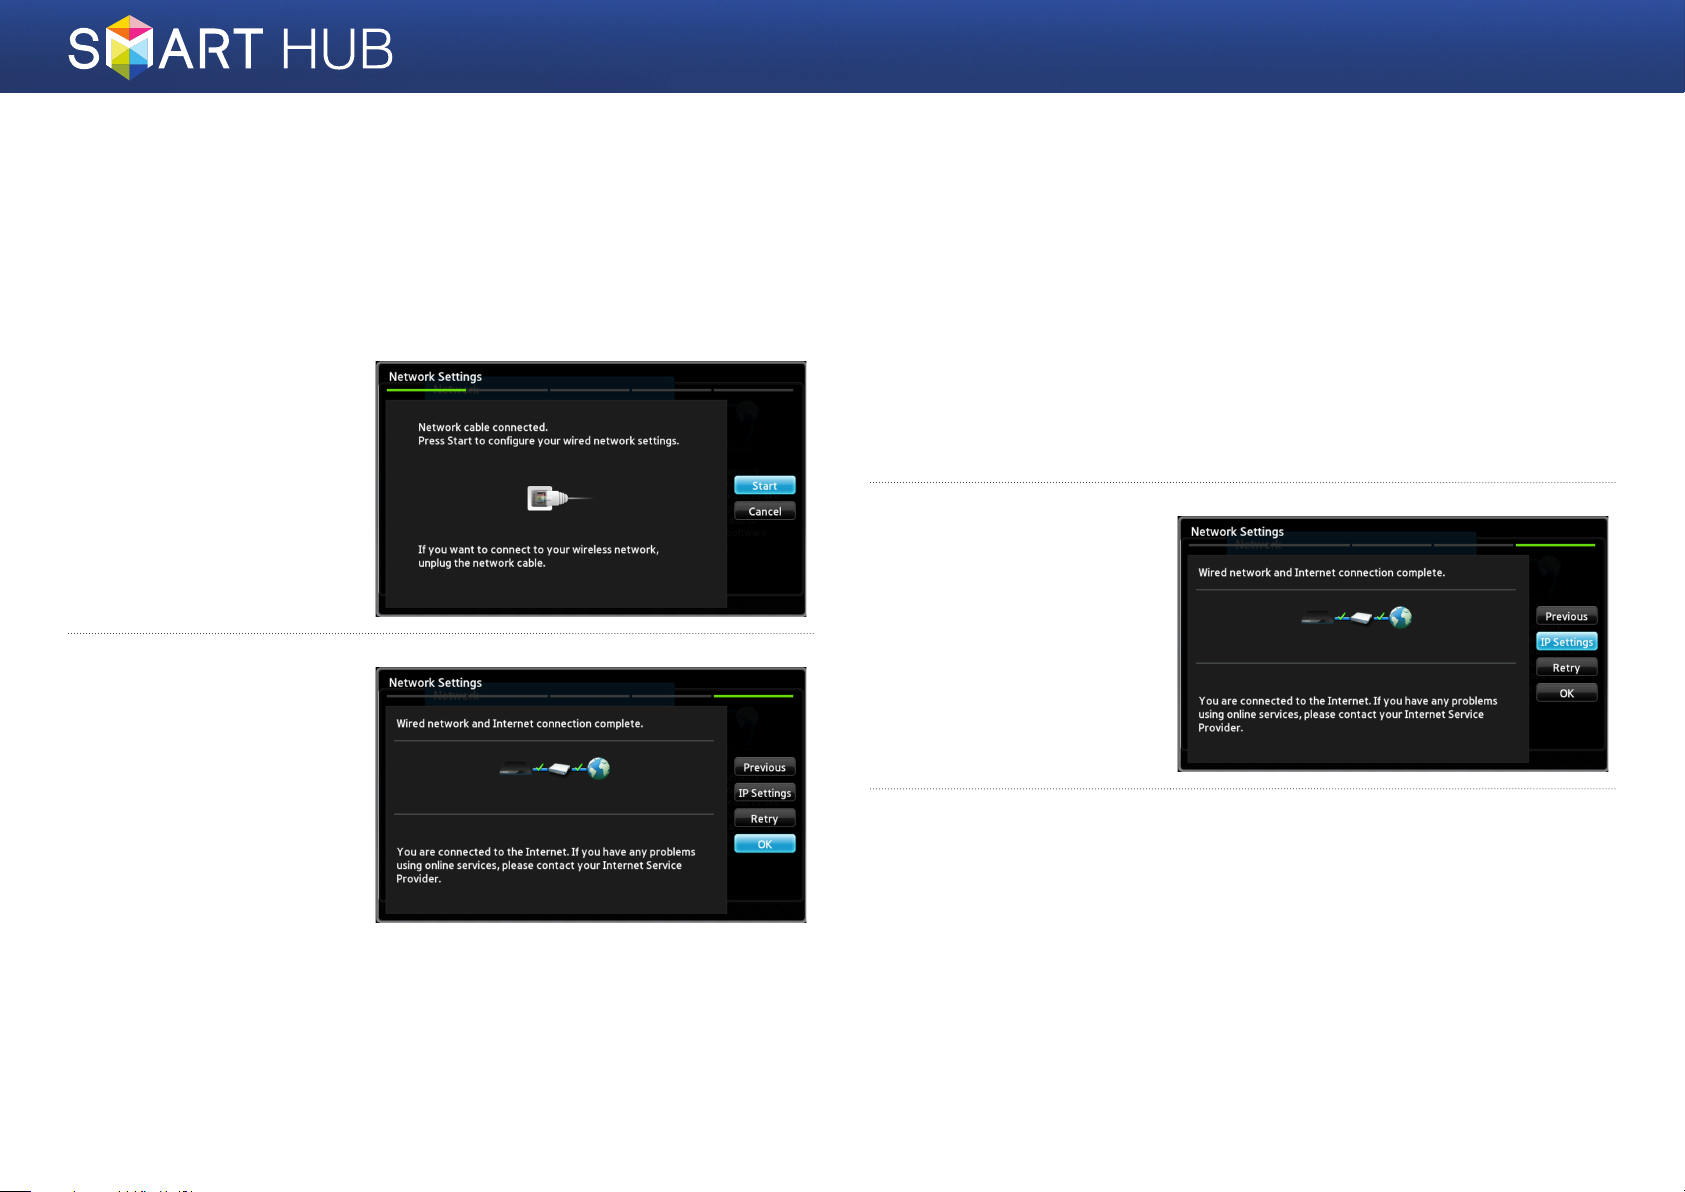
Select Start in the
1
Network Settings
menu, and then press
the
e
button.
✎<Start> is usually
highlighted automatically.
The player verifies the
2
network connection
and then connects to
the network.
Press the
when the network
connection process is
complete.
e
button
Wired - Manual Configuration
If you have a static IP address or the Automatic procedure does not work, you'll
need to set the Netwo rk Settings values manually.
Select <Start> in the Network Settings screen, and then press the e
1
button. The Network Status screen appears. The player attempts to
verify the network connection and fails.
Select <IP Settings>
2
on the right of the
screen, and then press
the
e
button. The
IP Settings screen
appears.
Select the IP Mode field, and then set it to Manual.
3
4 - English
Page 5
Use the number keypad on your remote to enter the Network values.
4
Use the ▲▼◄► buttons on the remote to move from entry field to entry
field.
✎You can get these values from your Internet provider. You can also view these values on
most Windows computers.
When done, highlight
5
OK, and then press
e
button. The player
verifies the network
connection and then
connects to the
network.
❙For Wireless Networks
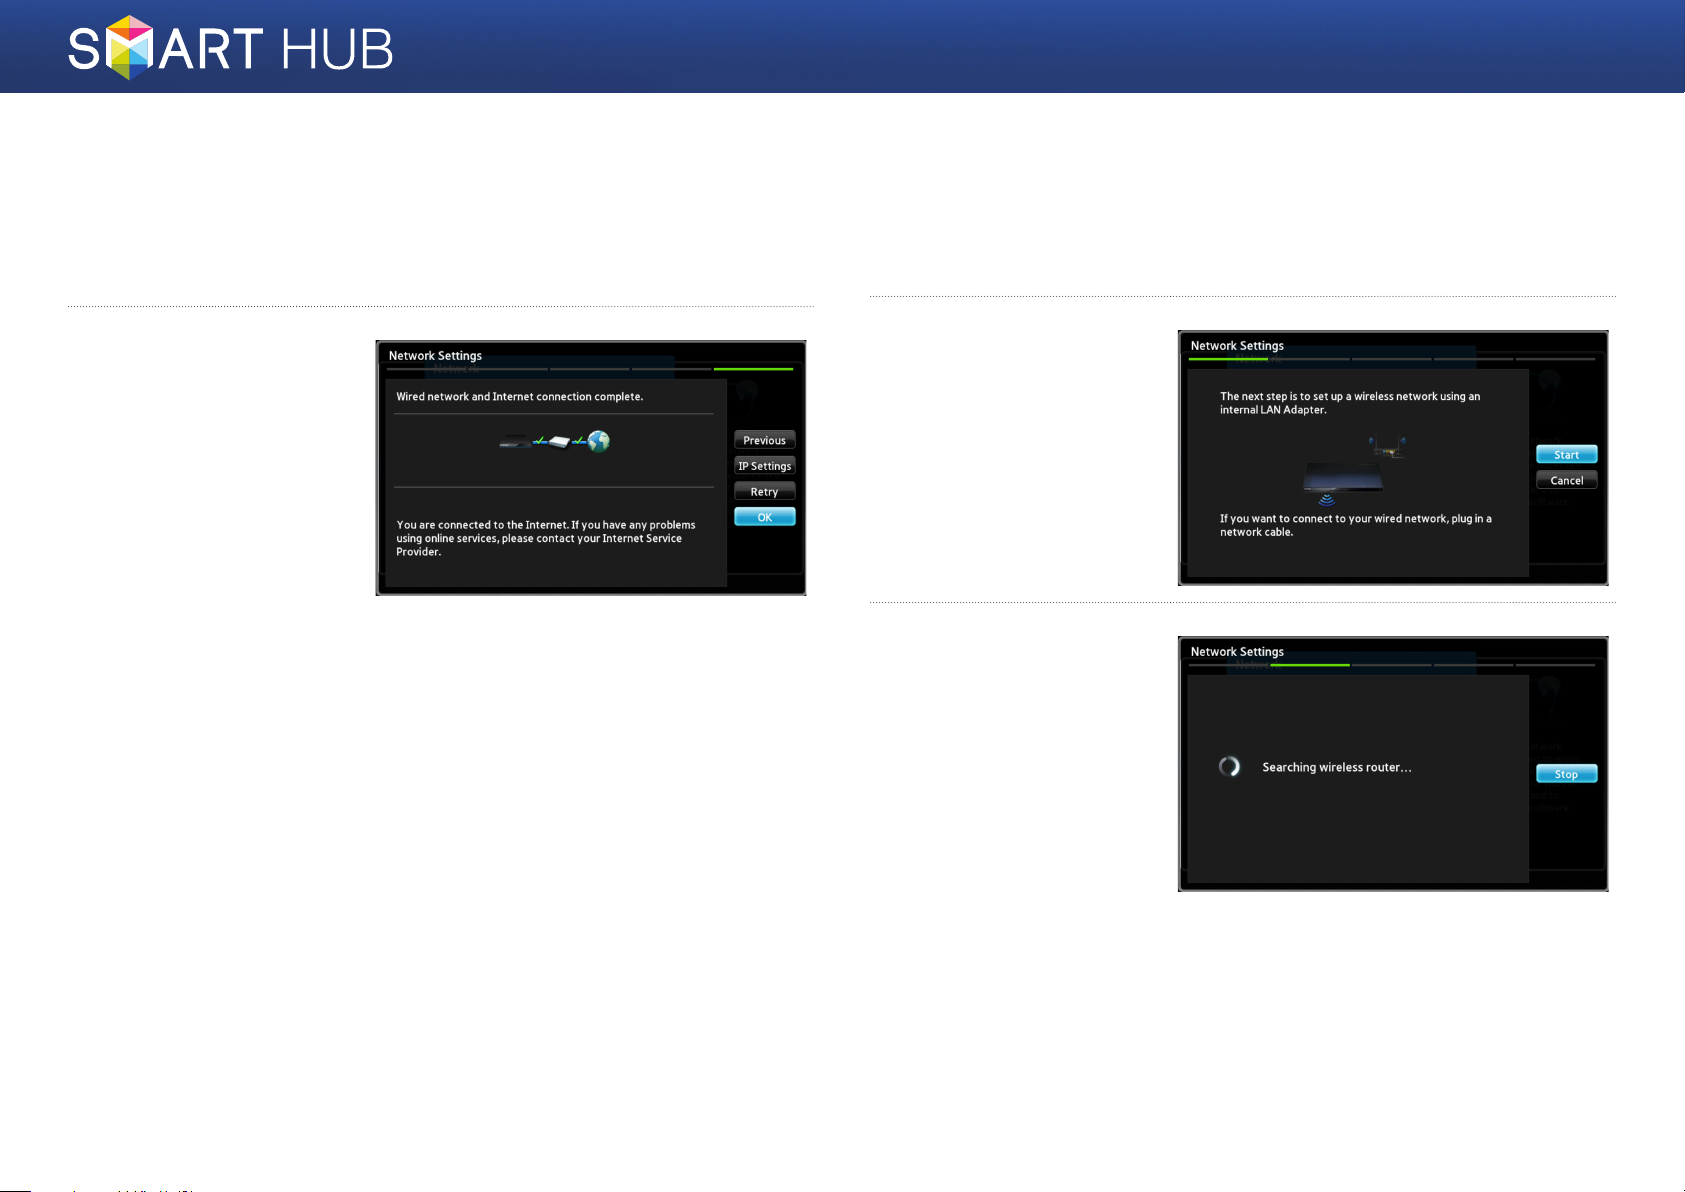
Make sure the access point you want to connect your player to is turned
1
on. The access point can be a wireless router, modem, etc.
Select Start in the
2
Network Settings
menu, and then press
the
e
button.
✎<Start> is highlighted
automatically.
Press the e button.
3
Your player starts
scanning for access
points. When done, it
displays a list of access
points it has found.
5 - English
Page 6
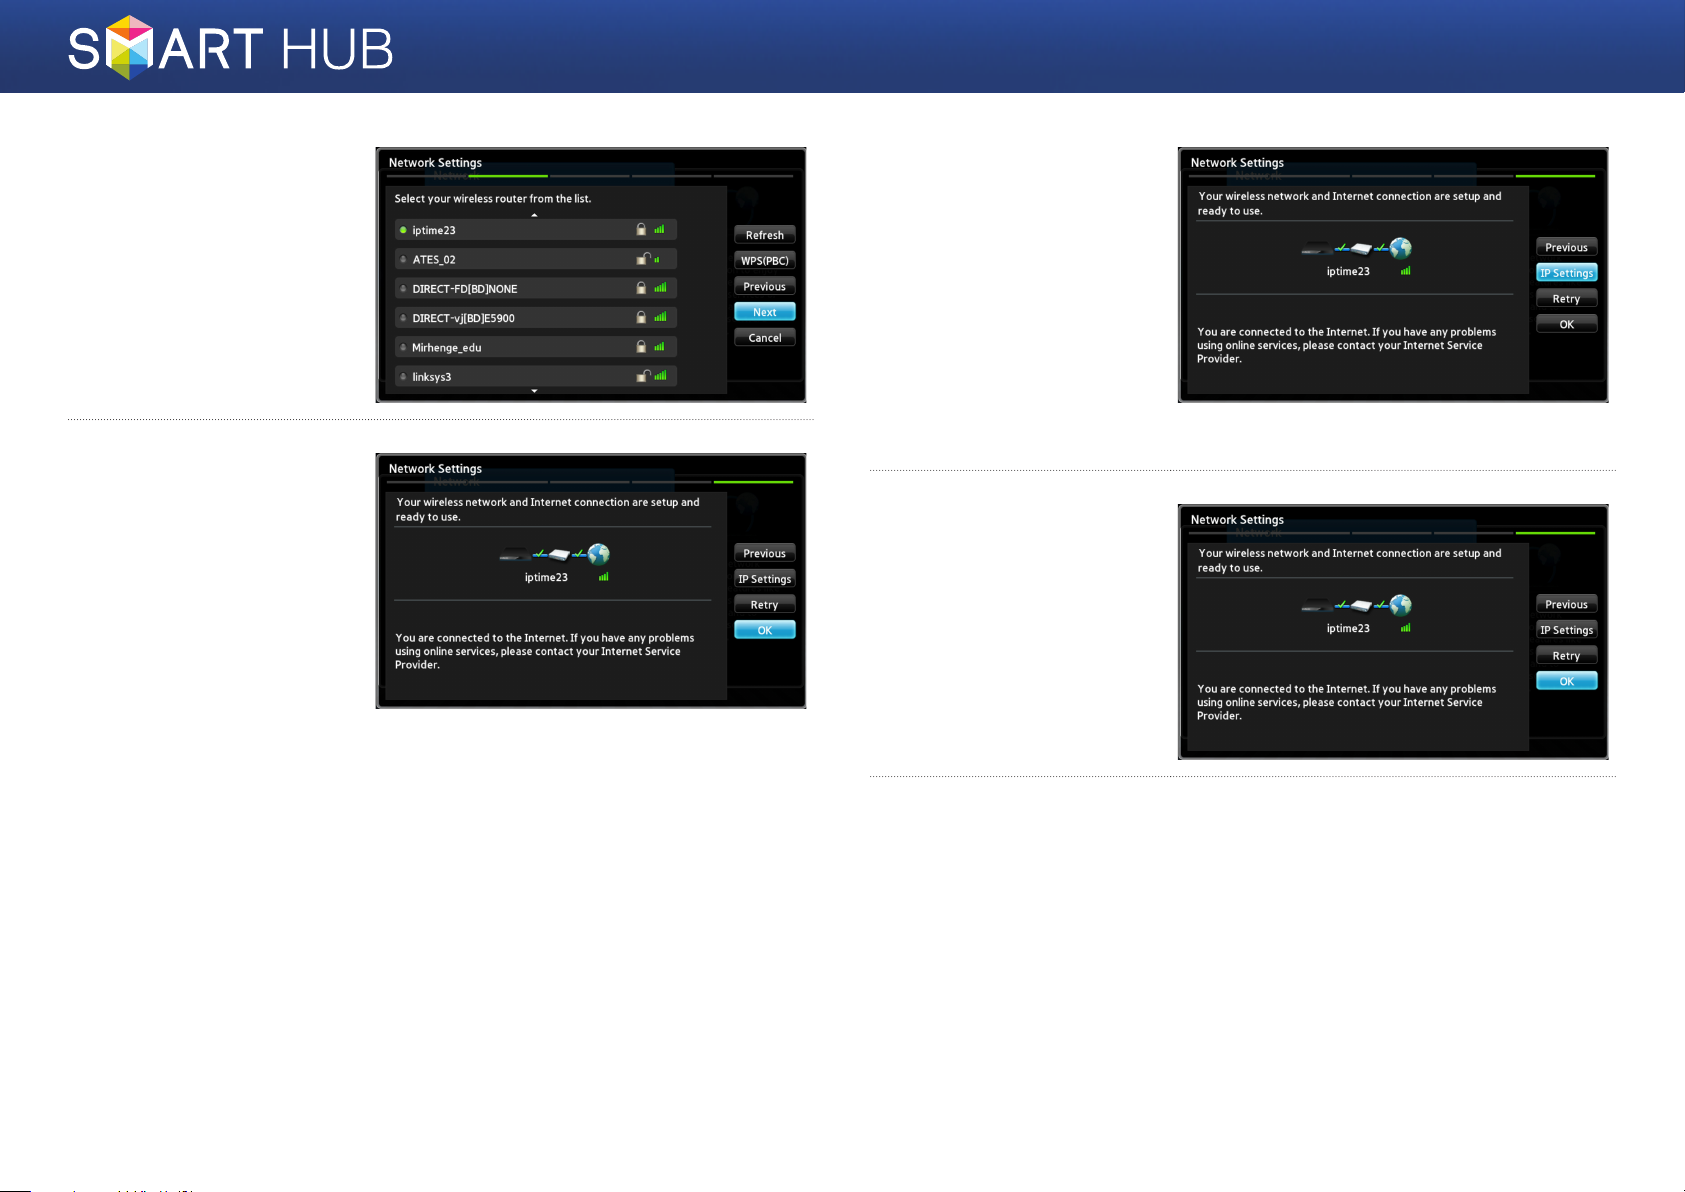
Move to the access
4
point you want to
connect your player
to, and then press
the
e
button.
<Next> is highlighted
automatically.
Press the e button.
5
The player connects to
your network.
✎If your network has the
Enter Security Key window
appears. Use the keyboard
to enter the key. When
done, use the ▲▼◄►
buttons to select Next,
press the e button, and
then go to Step 6.
-1
If you want to use a
5
fixed IP address, select
<IP Settings> on the
screen, and then enter
the required IP address
settings manually.
- IP Address
- Subnet Mask
- Gateway
- DNS Server
After you have finished
6
configuring the network
settings, press the
<OK> button.
6 - English
✔When using a device that supports WPS
1. Perform steps 1 to 5 in "Configuring Your Network Connection: First Steps".
2. Select "WPS(PBC)".
3. Follow the instructions displayed on the screen.
✎Notes
- Devices that support WPS have a WPS (PBC) button.
Page 7
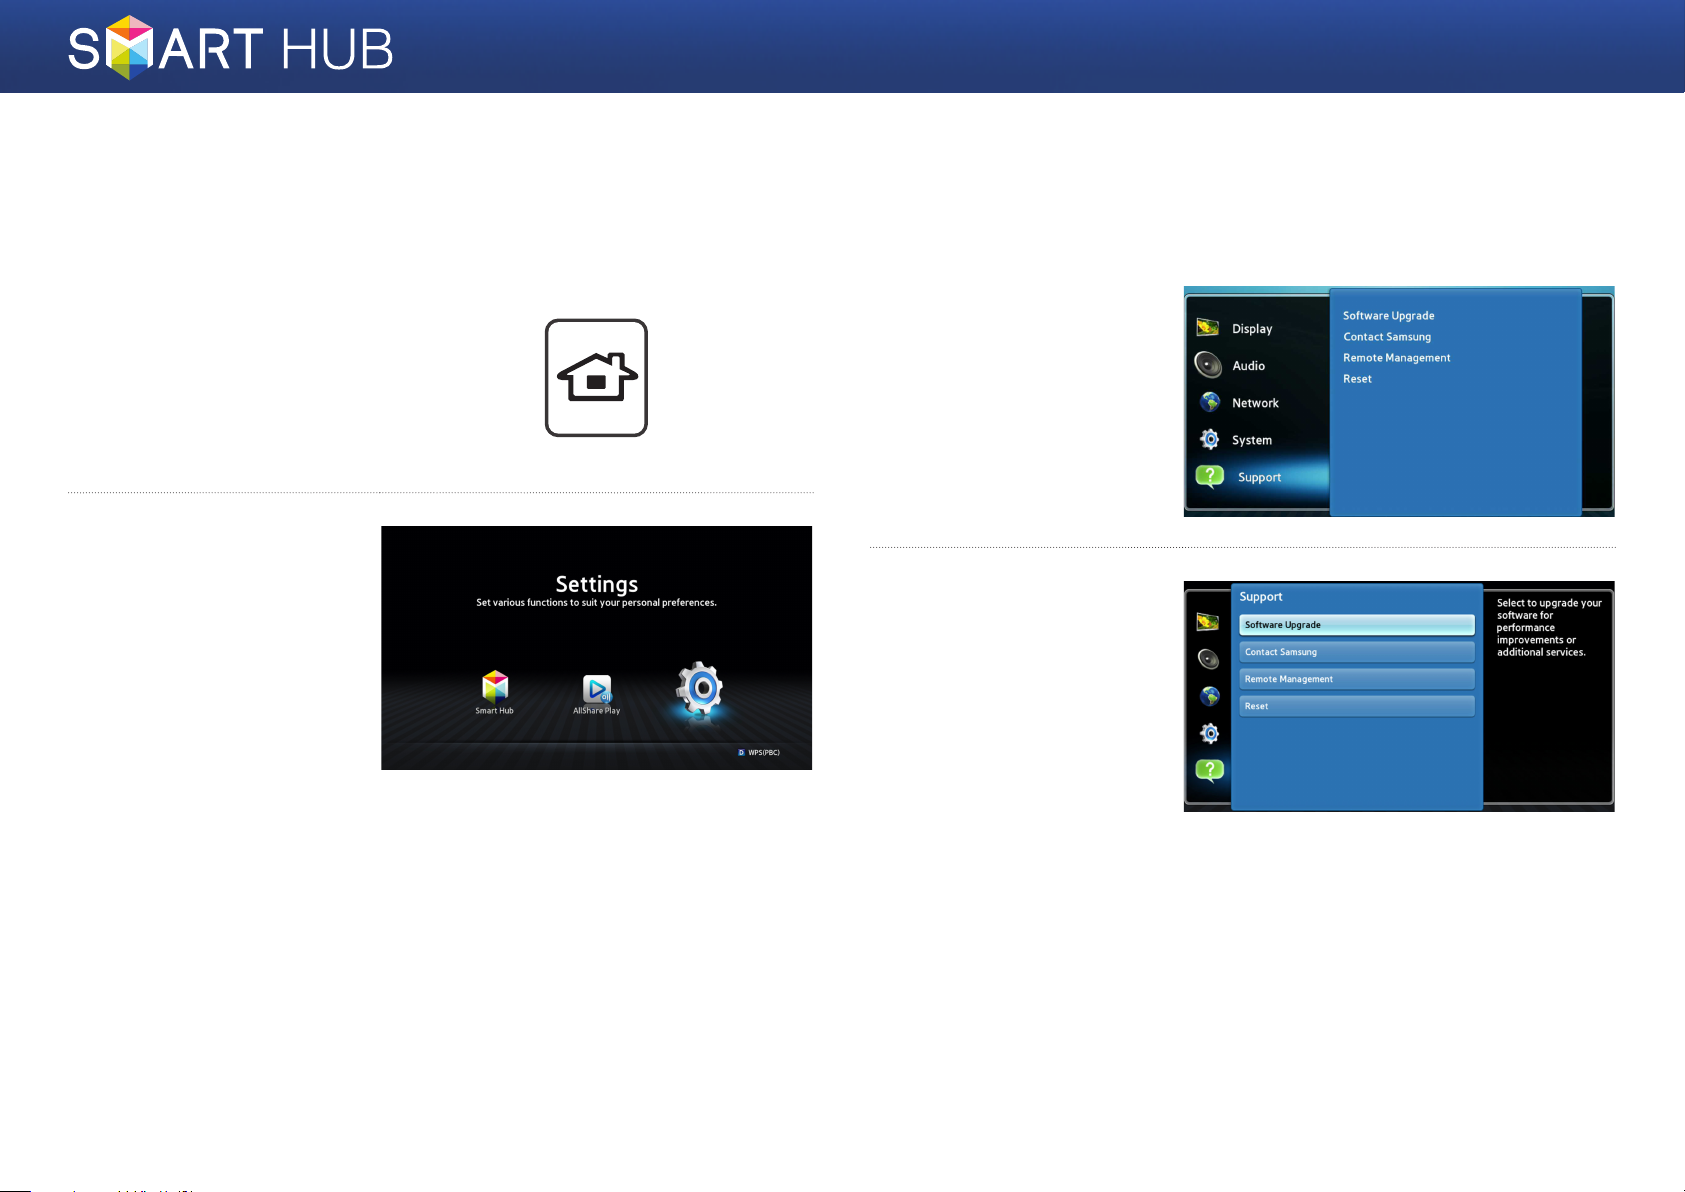
Upgrading the Software
From time to time, Samsung makes updated the software available. To install
the updated software on your player, follow the instructions below.
Press the [HOME] button
1
on the remote control.
On the Home screen,
2
move to <Settings>,
and then press the
button.
e
Move to <Support>,
HOME
3
and then press the
button.
Move to the <Software
4
Upgrade> item and
press the
e
button.
e
7 - English
Page 8
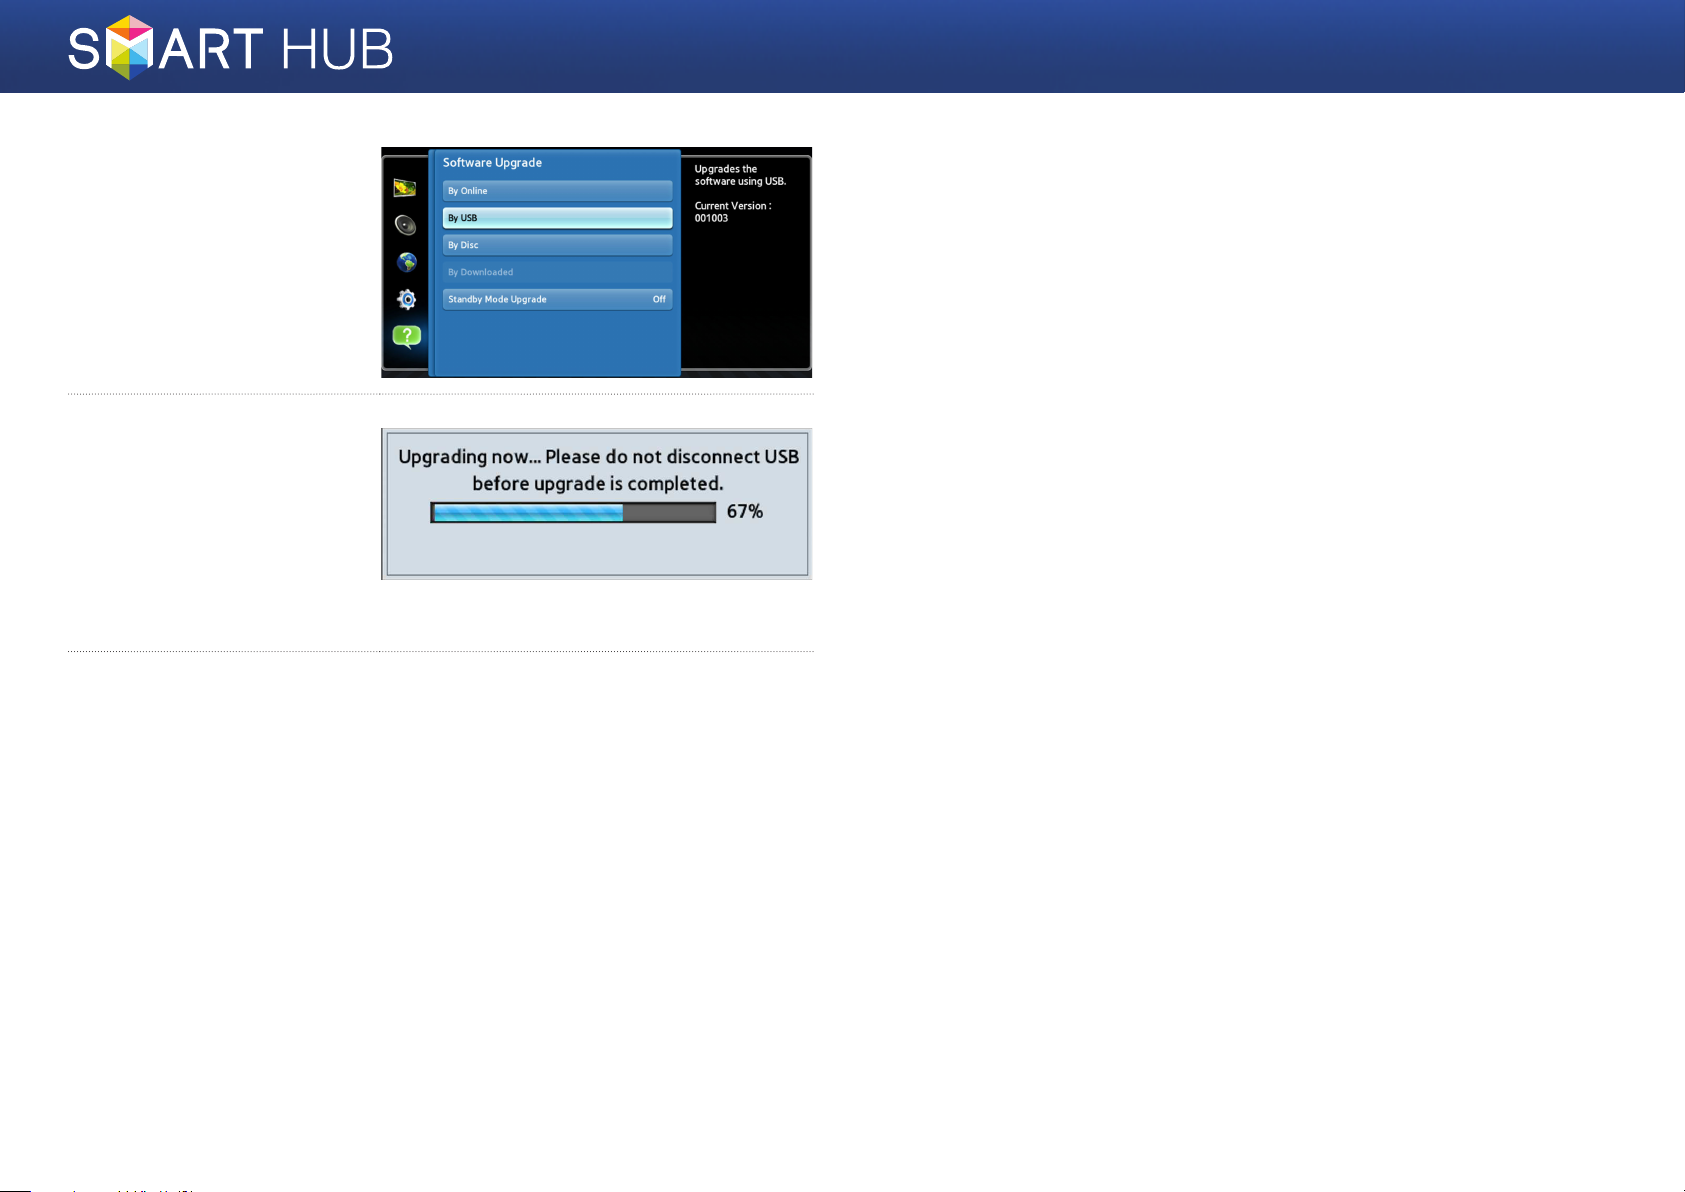
The software that
5
needs to be upgraded
is searched for and
installed automatically.
Upgrade display window
6
may differ from each
method.
Other apps are upgraded automatically when they are run.
7
8 - English
Page 9
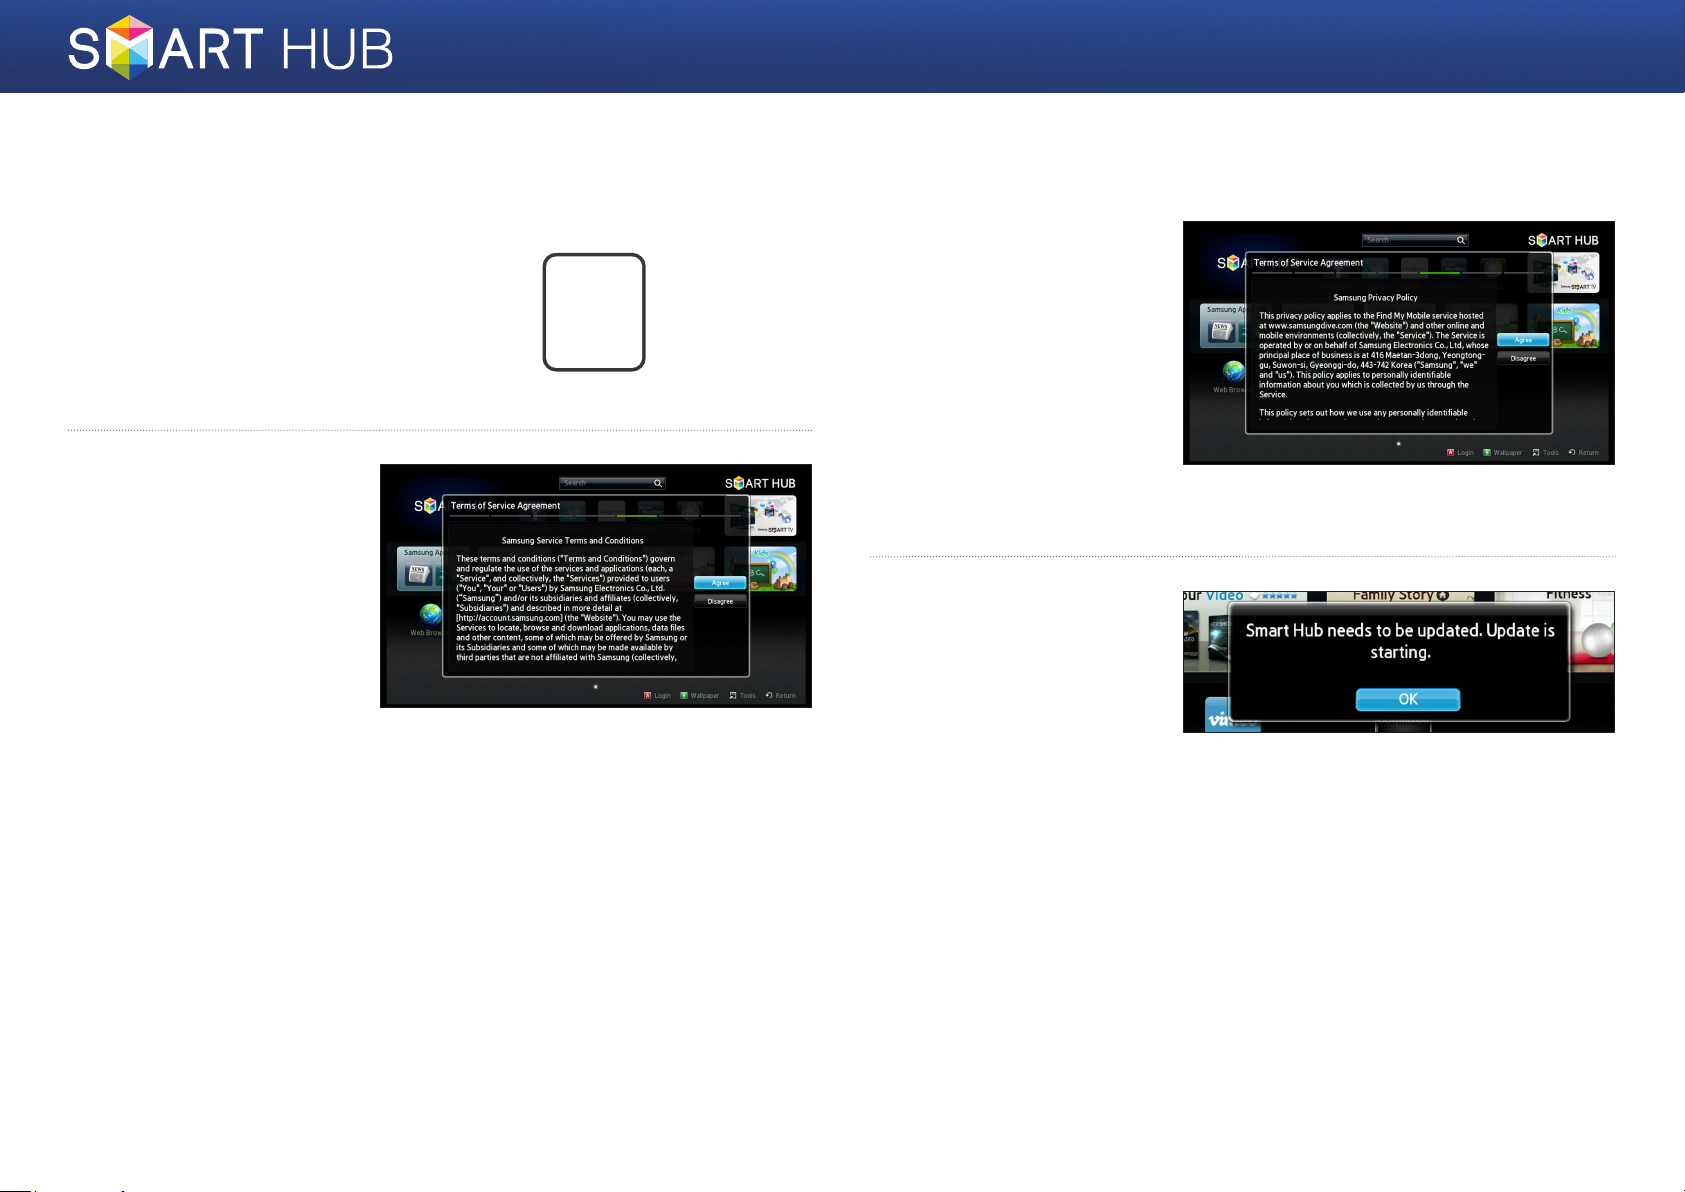
Running Smart Hub
Press the [SMART HUB]
1
button on the remote
control.
When you run the Smart
2
Hub service for the
first time, the Samsung
Service Terms and
Conditions are displayed.
Read the Terms, and
then if you agree, select
the <Agree> button to
continue. button and
press
e
to continue.
※ If you select the <Disagree>
button, you will not be able to
use the Smart Hub service.
SMART
HUB
The Samsung Privacy
3
Policy window appears.
Read the Policy, and
then if you agree, select
the <Agree> button and
press
e
to continue.
※ If you select the <Disagree>
button, you will not be able to
receive the Smart Hub service.
When the Update
4
Smart Hub window is
displayed, select the
<OK> and then press
the
e
button.
9 - English
Page 10
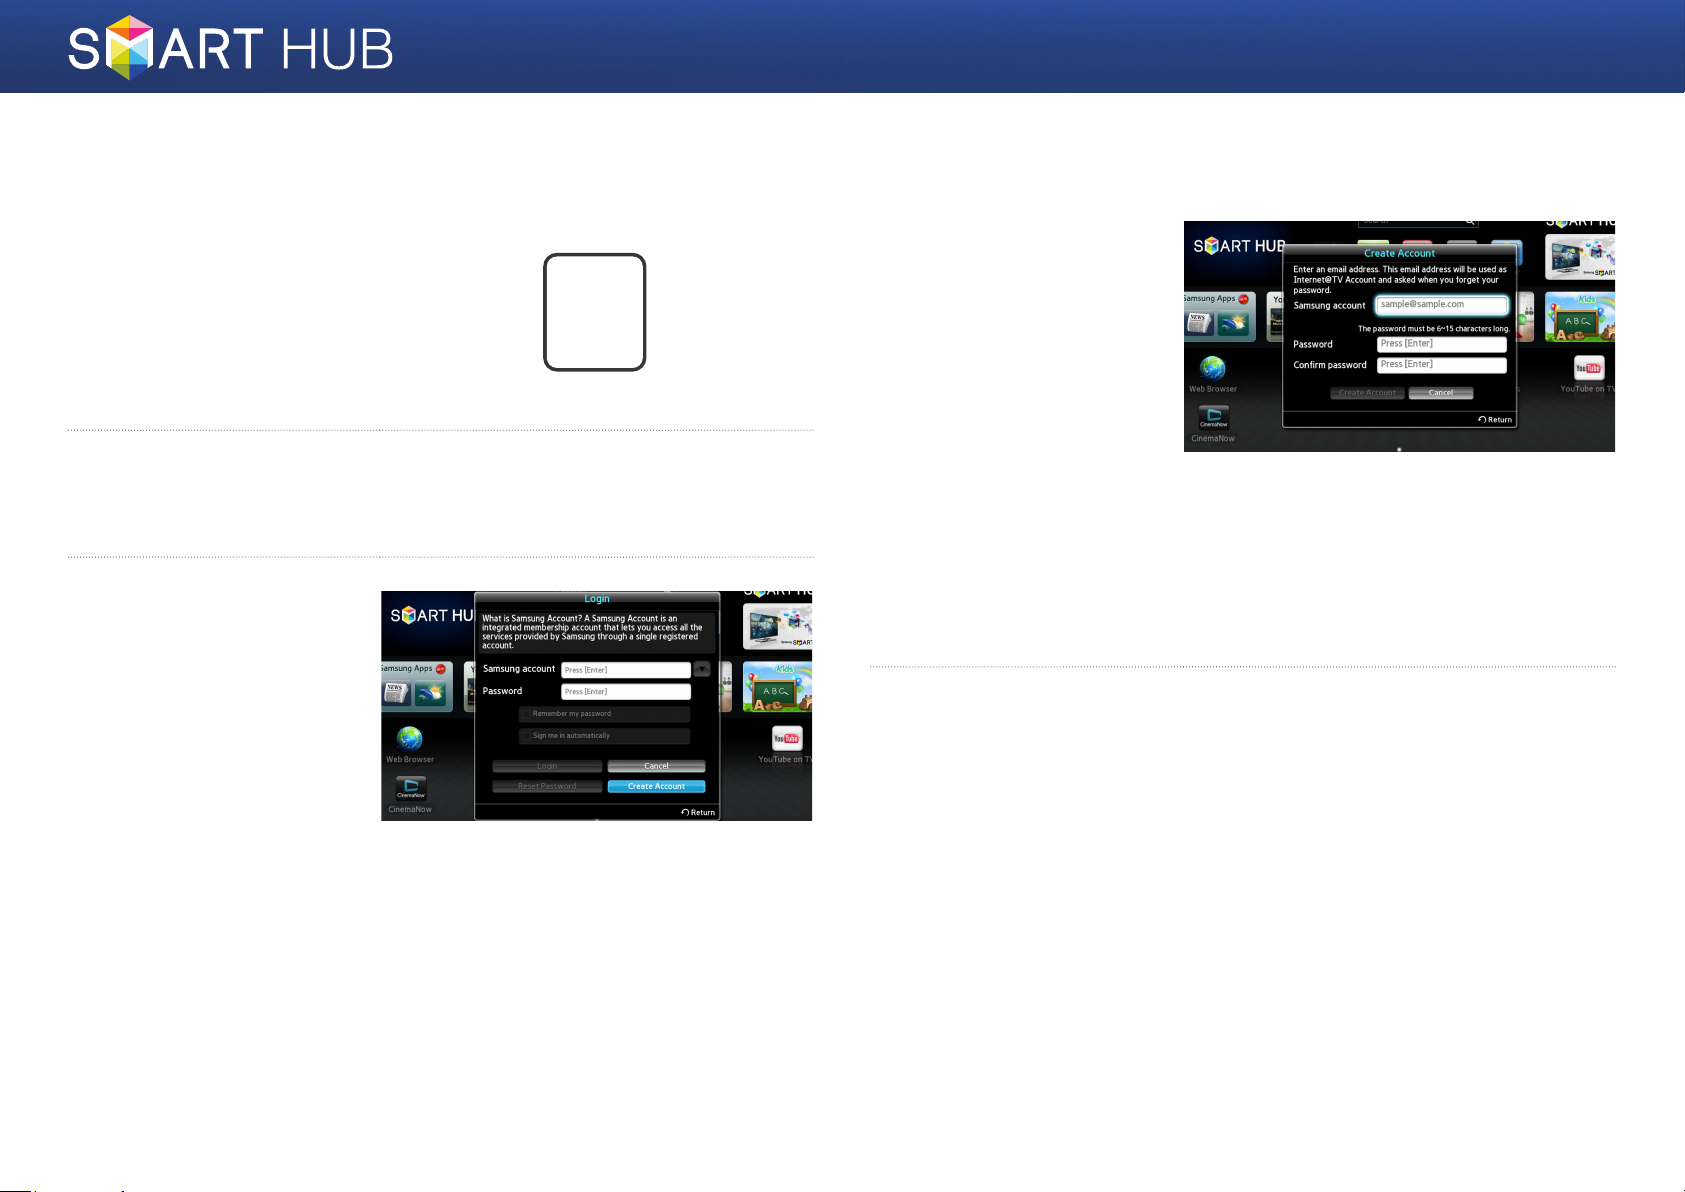
Creating Your Samsung Account
Press the [SMART HUB]
1
button on the remote
control.
SMART
HUB
Press the red a button on the remote control to display the Login
2
window. (For a description of the button, see the bottom of the screen.)
When the Login window
3
appears, select the
<Create Account>
button, and then press
the
e
button.
Move to the Samsung
4
account field, and then
press the
A window appears with
an entry screen and
a keypad. Using the
keypad, enter an e-mail
address that will serve as
your ID.
The account must be a valid e-mail address in the following format:
[email protected] or [email protected]. Next, enter a password
in the password field and the same password in the Confirm Password
field in the same fashion.
After entering all items, move to the <Create Account> item, and then
5
press the
e
button.
e
button. Your account will be created.
10 - English
Page 11
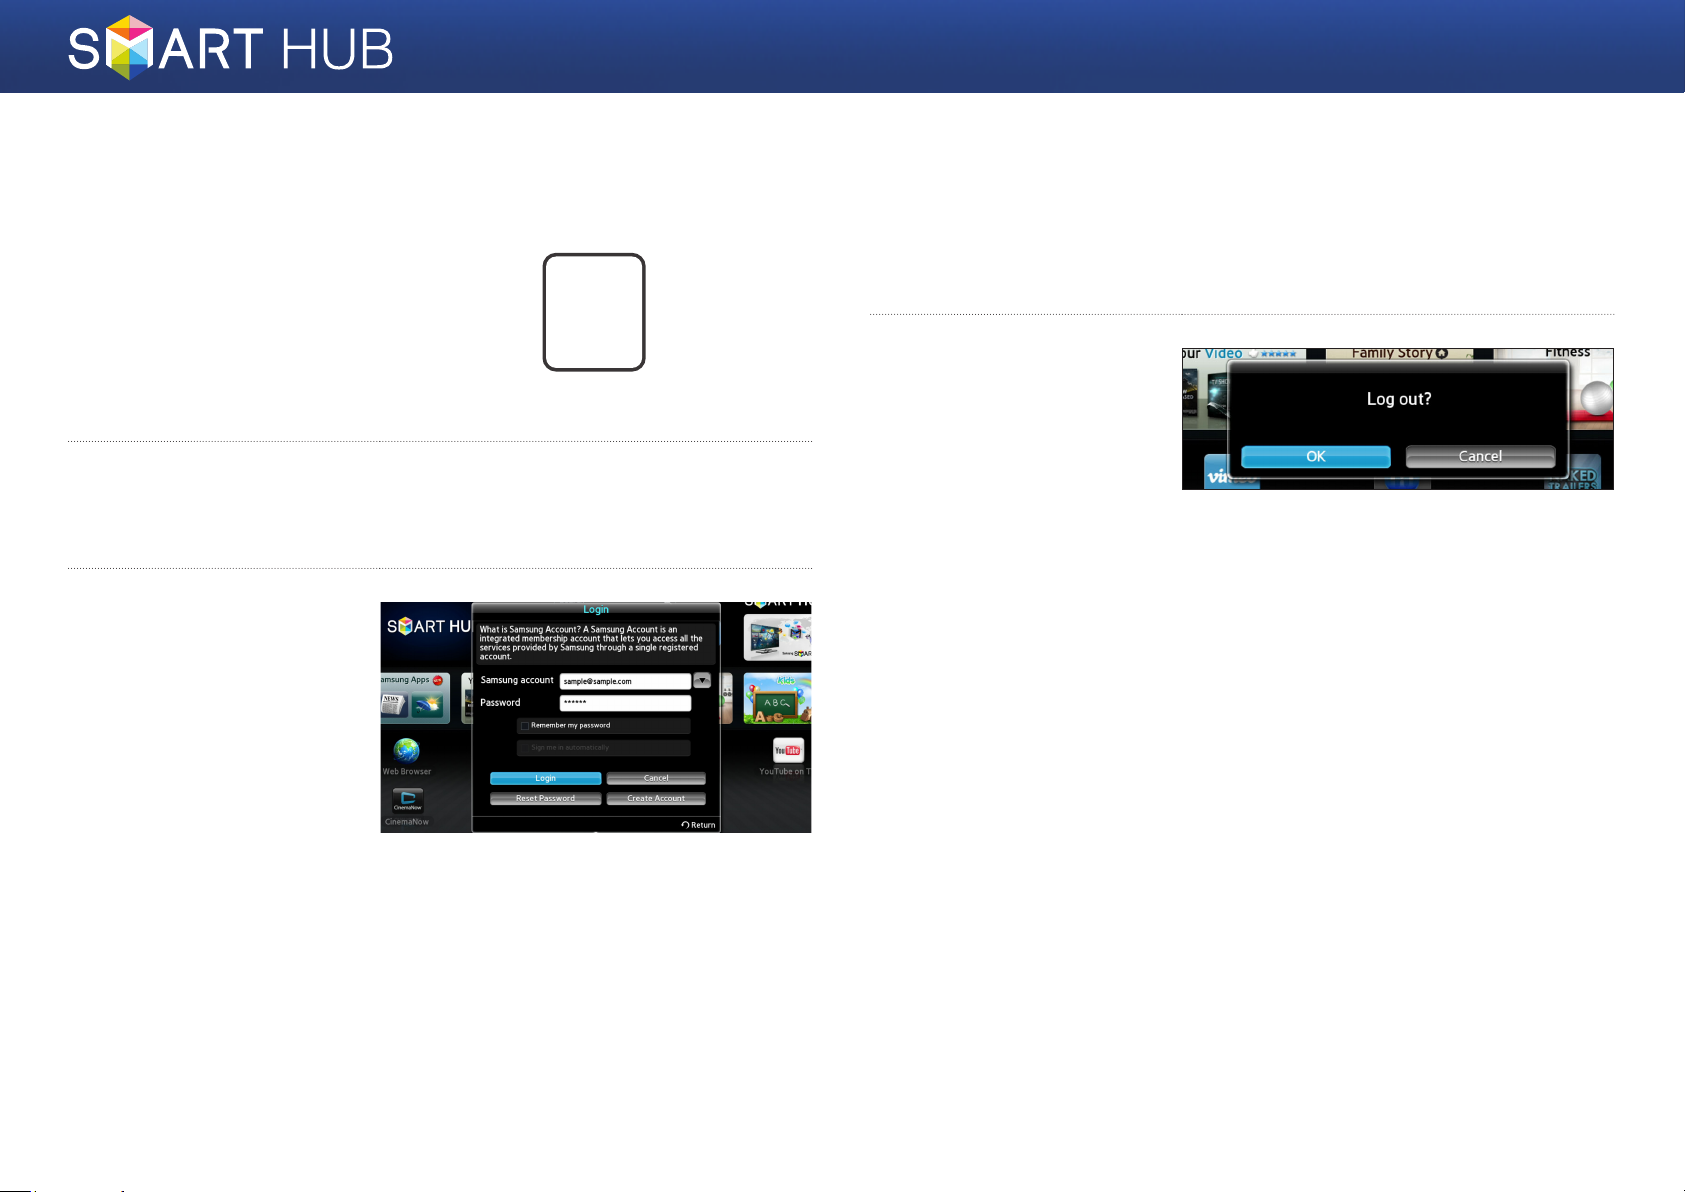
Logging into the Smart Hub Service
Logging out of the Smart Hub Service
Press the [SMART HUB]
1
button on the remote
control to run Smart
Hub.
Press the red a button on the remote control to display the Login
2
window. (For a description of the button, see the bottom of the screen.)
In the Login window,
3
enter your ID and
password. Select
<Login> at the bottom
of the window, and then
press the
e
button.
SMART
HUB
While you are being logged into the Smart Hub service, press the a
1
button on the remote control.
When the Confirm
2
Logout window is
displayed, move to
<OK>, and then press
the
e
button.
11 - English
Page 12
Resetting a Forgotten Password
Removing a Smart Hub Account from
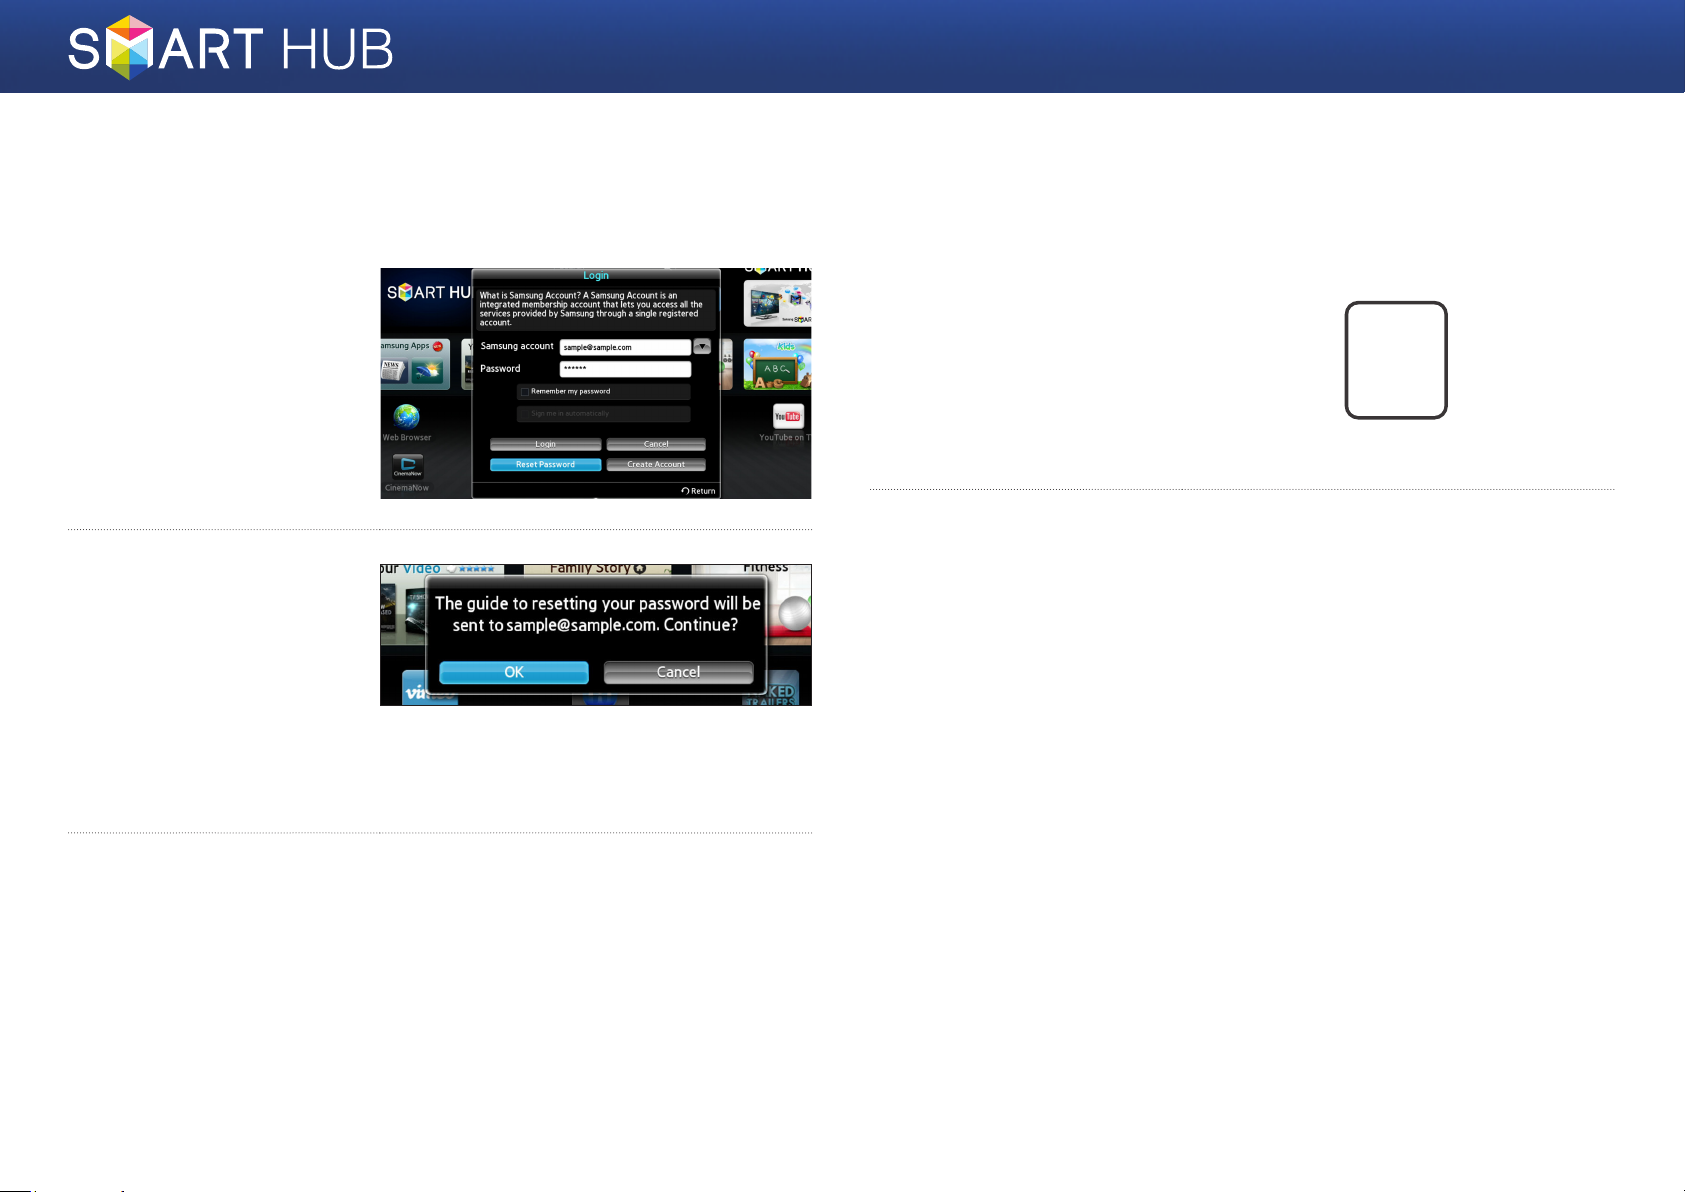
If you forget your password, follow the instructions below.
Enter the account
1
(email address) for the
password you have
forgotten, move to
<Reset Password>,
and then press the
button.
A confirmation window
2
is displayed which says
that the guide will be
sent to the email address
(account) you entered.
Move to the <OK>,
and then press the
button.
e
e
the TV Account List
Press the [SMART HUB]
1
button on the remote
control to run the Smart
Hub.
Press the [TOOLS] button on the remote control to display the Settings
2
window.
※ For a description of the button, see the bottom of the screen.
SMART
HUB
Follow the guide to reset your password.
3
12 - English
Page 13
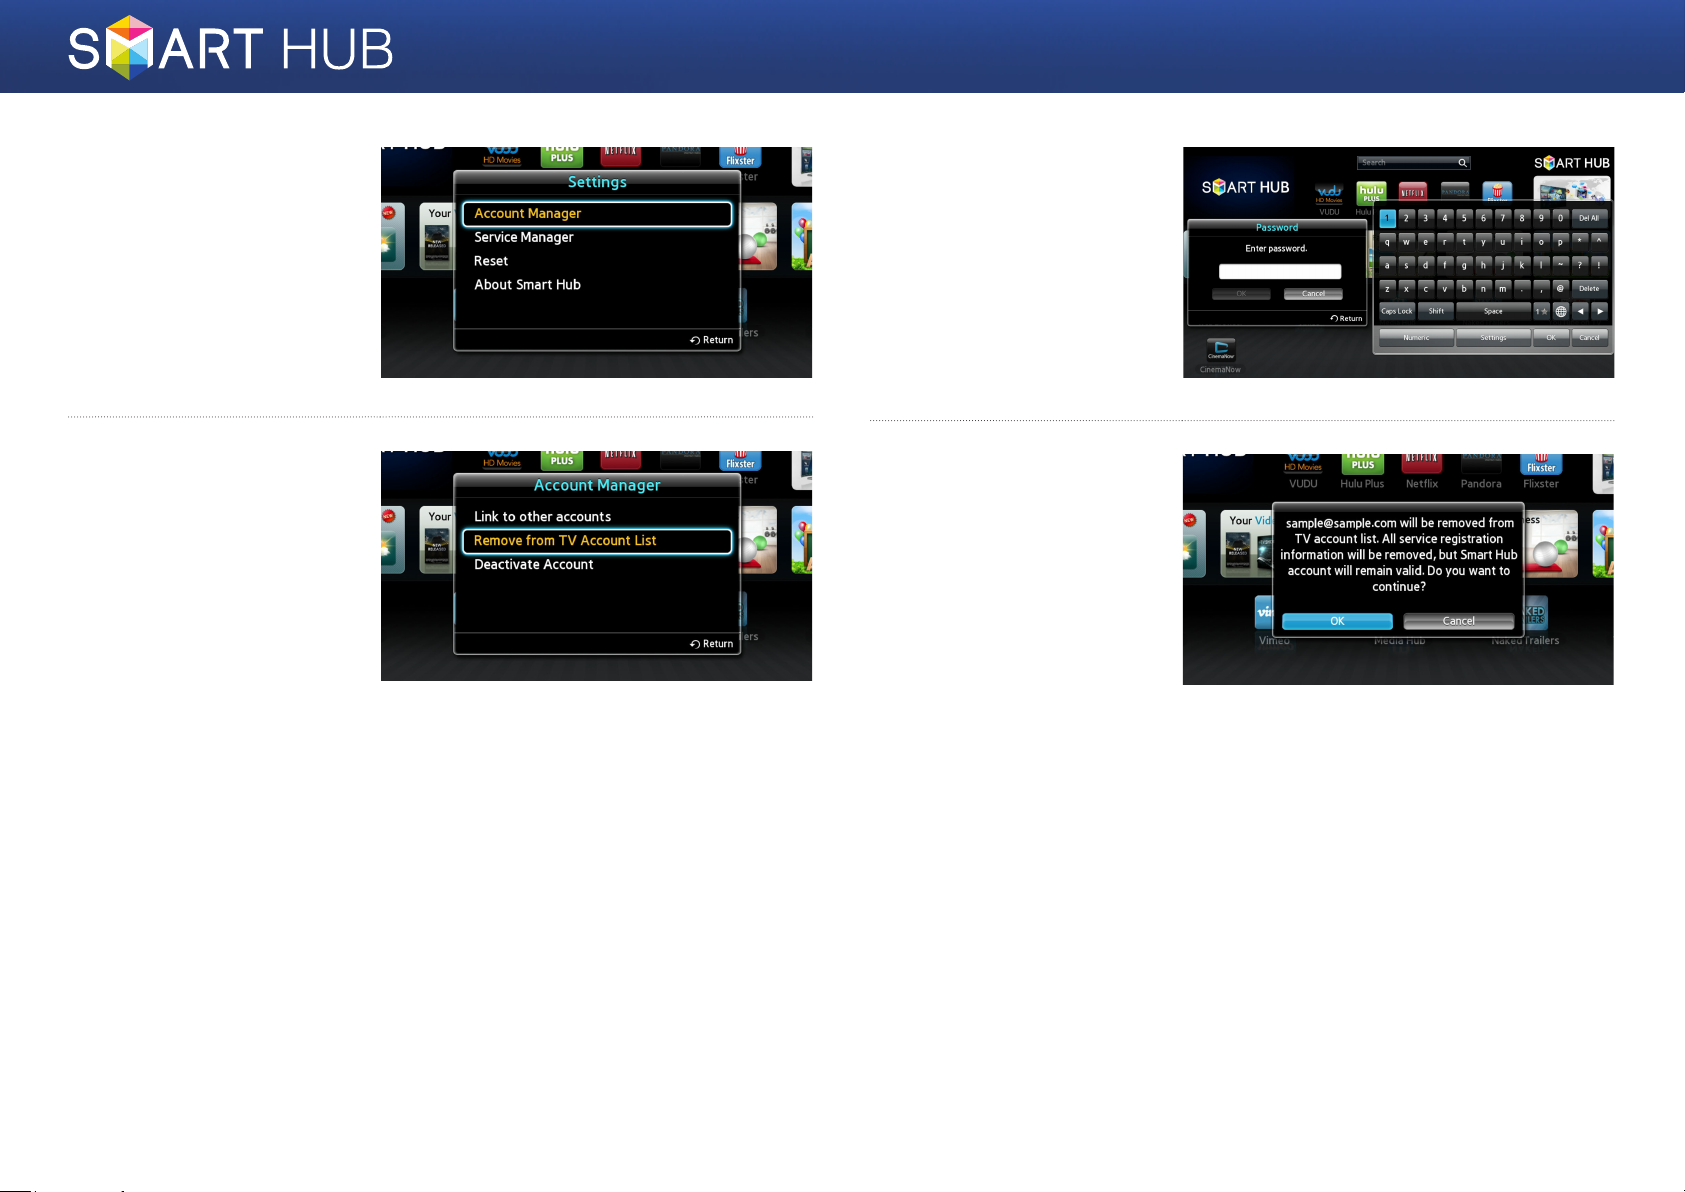
Move to the <Account
3
Manager> item, and
then press the e
button.
Enter your password and
5
press the <OK> button,
and then press e.
Move to the <Remove
4
from TV Account List>
item, and then press the
e
button.
A confirmation window
6
is displayed asking you
to confirm the deletion.
Move to the <OK>
button, and then press
e
to delete the current
account from the TV
Account List.
13 - English
Page 14
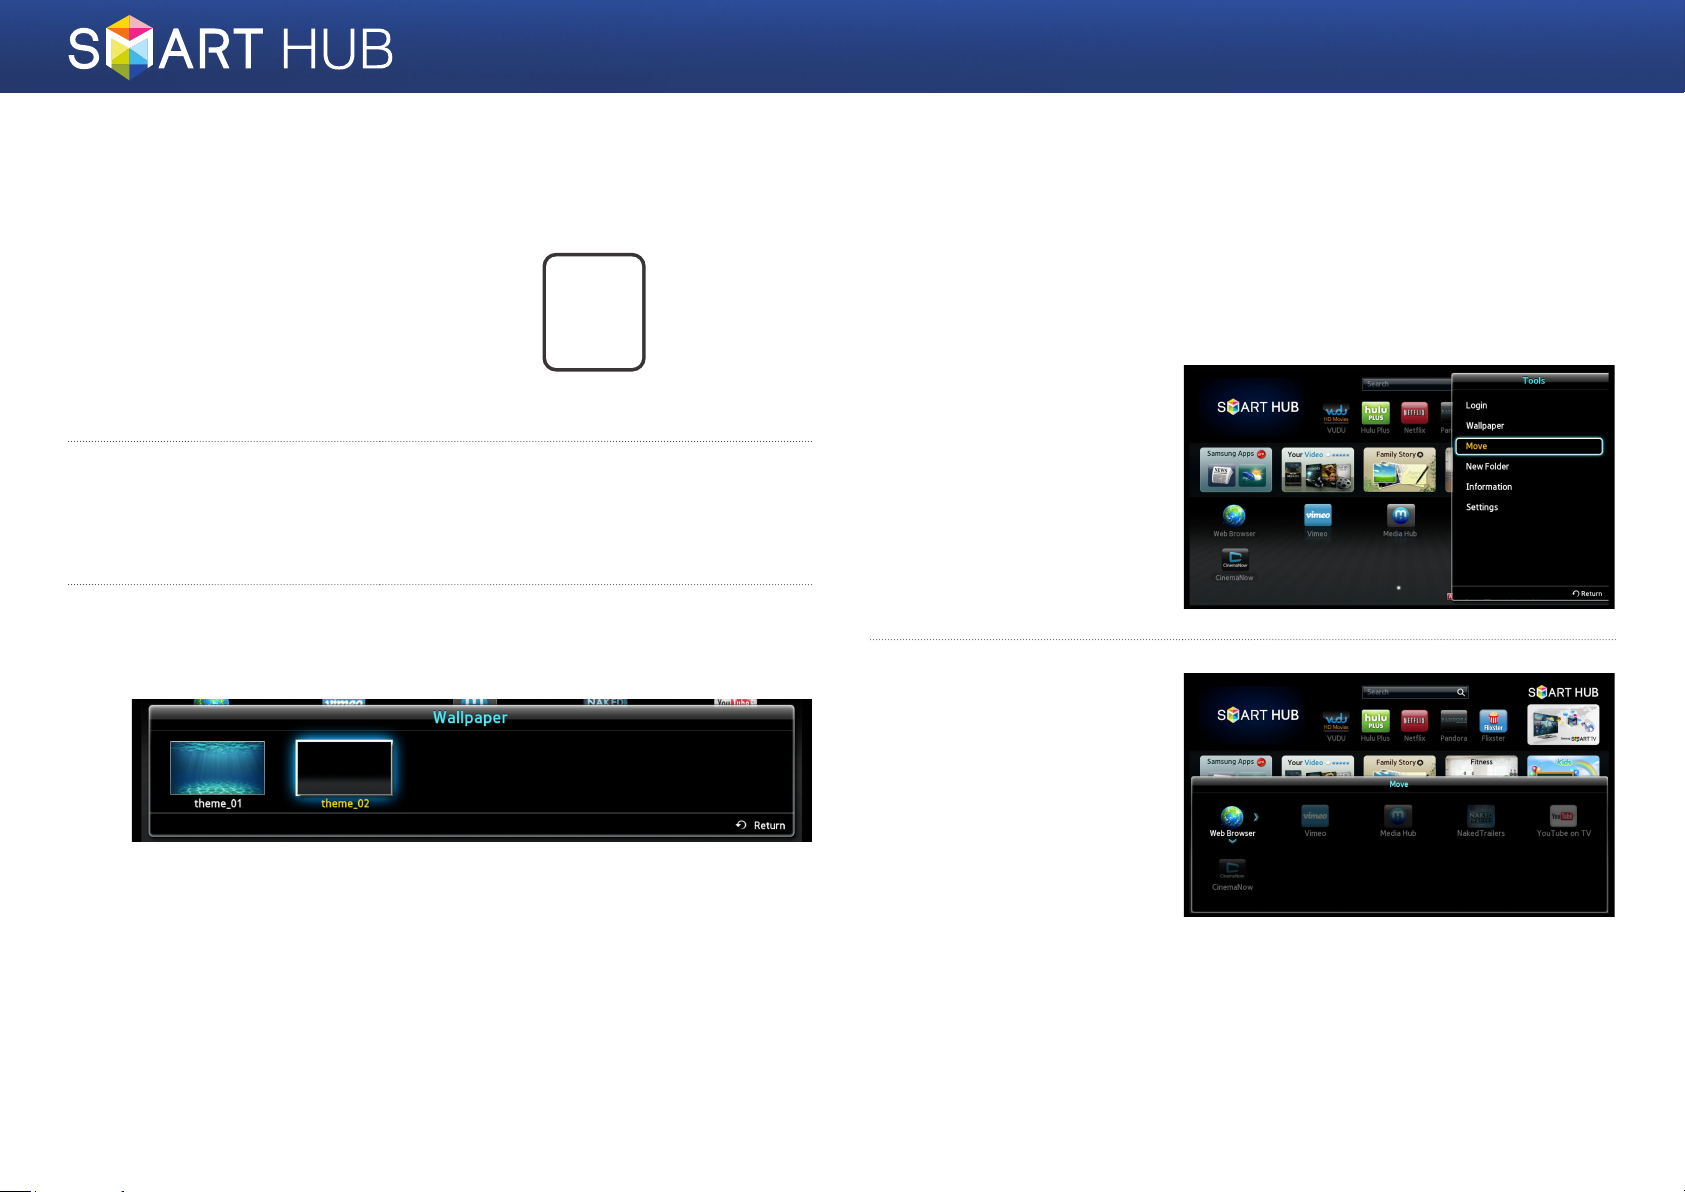
Changing Wallpaper
Press the [SMART HUB]
1
button on the remote
control to run the Smart
Hub.
Press the green b button on the remote control to display the
2
Wallpaper window. (For a description of the button, see the bottom of
the screen.)
You can change Wallpaper. Move to the changing method you want to
3
use, and then press the
e
button.
SMART
HUB
Working with Icons
Press the [SMART HUB] button on the remote control to run Smart Hub, and
then move to the icon you want to do.
❙Moving an Icon
Press the [TOOLS]
1
button on the remote
control, and select
<Move>.
Move the icon to the
2
location you want, and
then press the
button. The icon will be
moved to the selected
location.
e
14 - English
Page 15
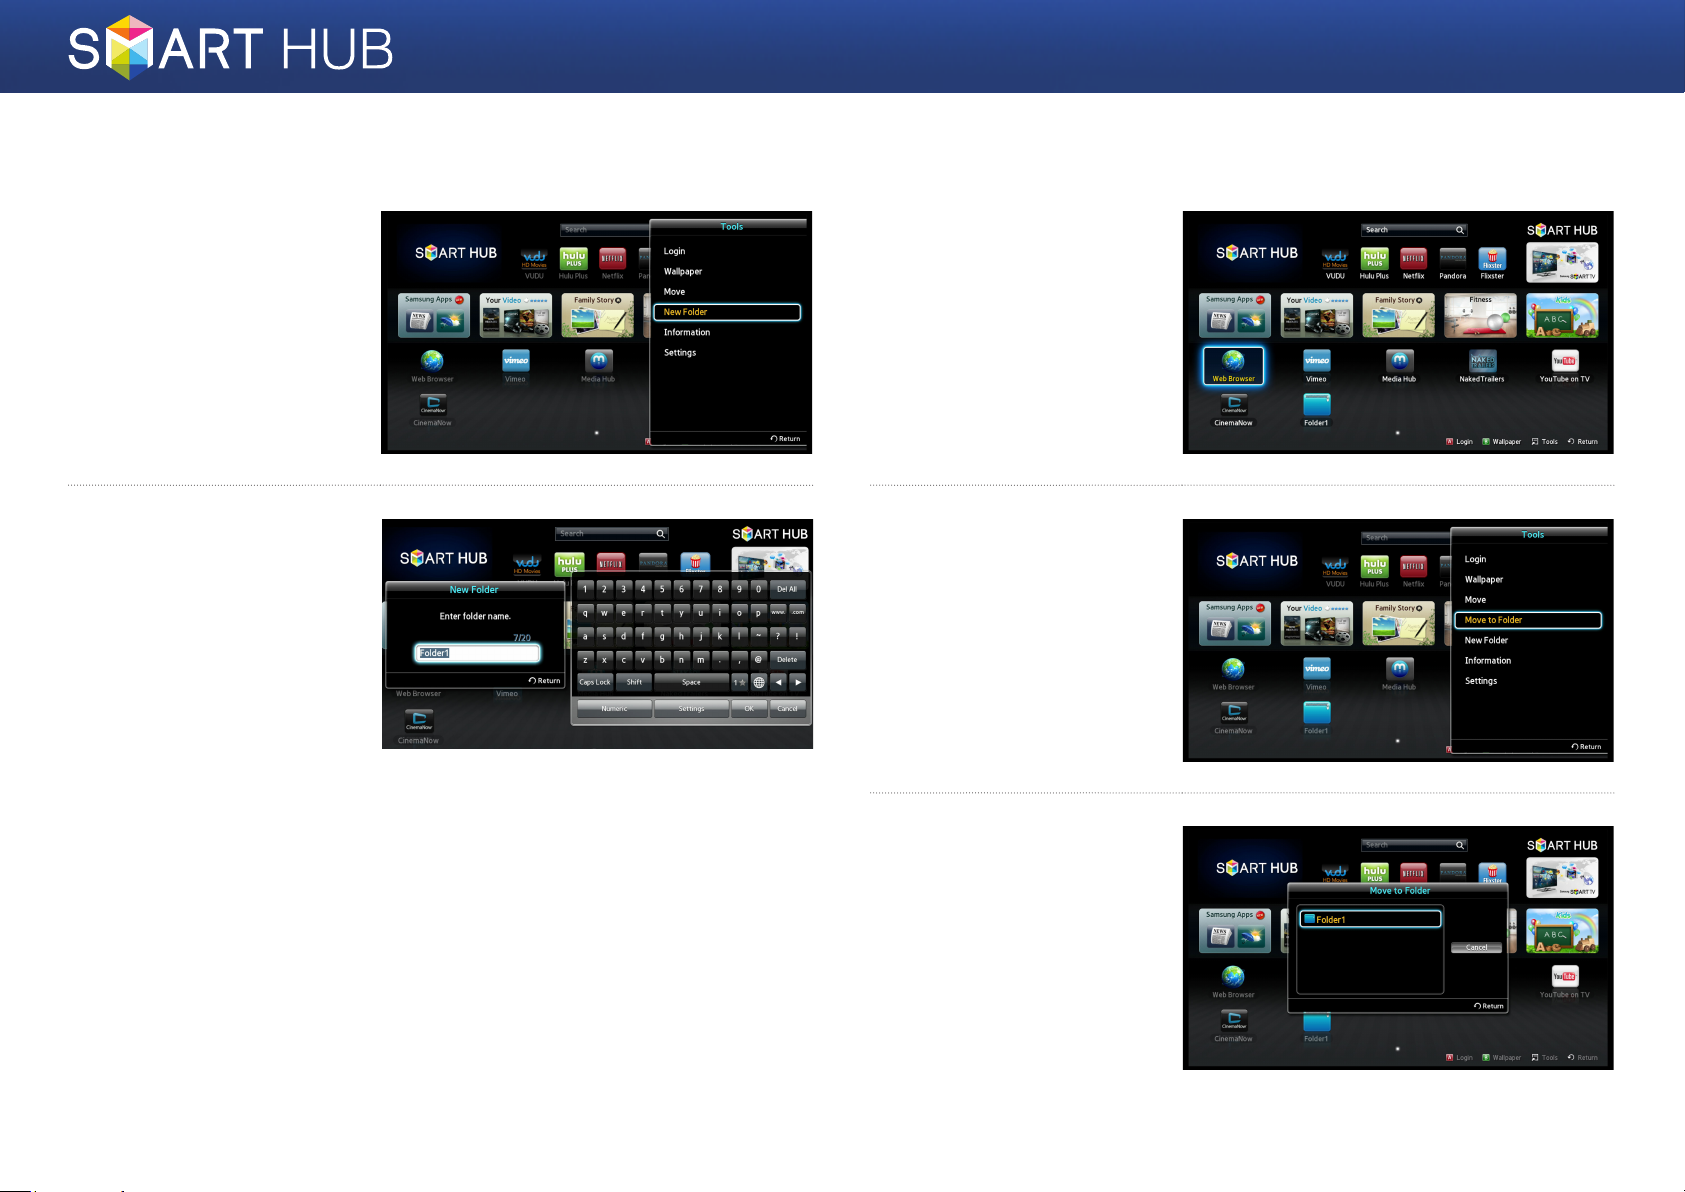
❙Create New Folder
❙Inserting an Icon into a Folder
Press the [TOOLS]
1
button on the remote
control, and select <New
Folder>.
Enter the name of
2
the folder you want
to create, and then
press the
The folder and its
corresponding folder
icon are created.
e
button.
Move to the icon you
1
want to move.
Press the [TOOLS]
2
button on the remote
control, and select the
<Move to Folder>.
3
15 - English
A list of the folders you
can move the icon to
is displayed. Move to
the folder you want,
and then press the
button.
e
Page 16
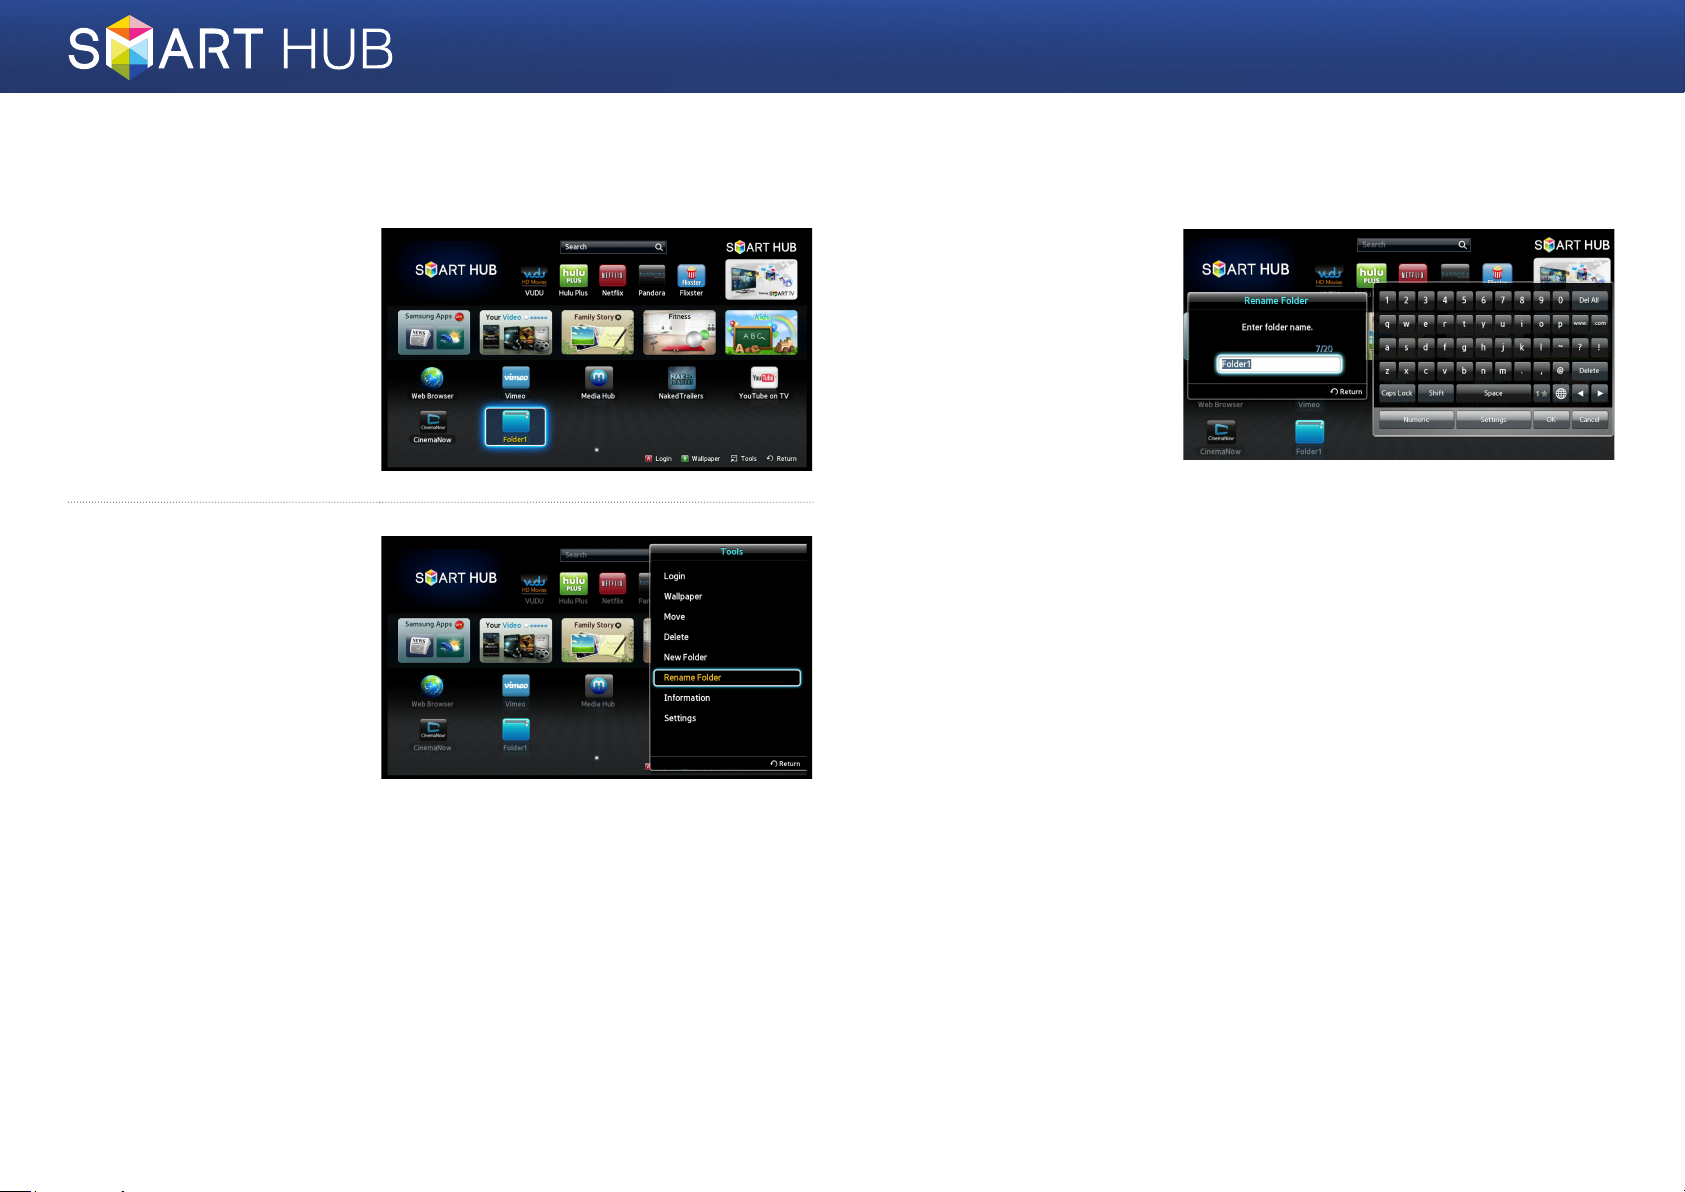
❙Renaming a Folder
Move to the icon you
1
want to rename, and
then press the [TOOLS]
button on the remote
control.
Move to the <Rename
2
Folder> item using the
arrow buttons, and then
press the
e
button.
Enter the new name
3
you want to apply to the
selected folder, and then
press the
The name of the selected
folder is changed.
e
button.
16 - English
Page 17
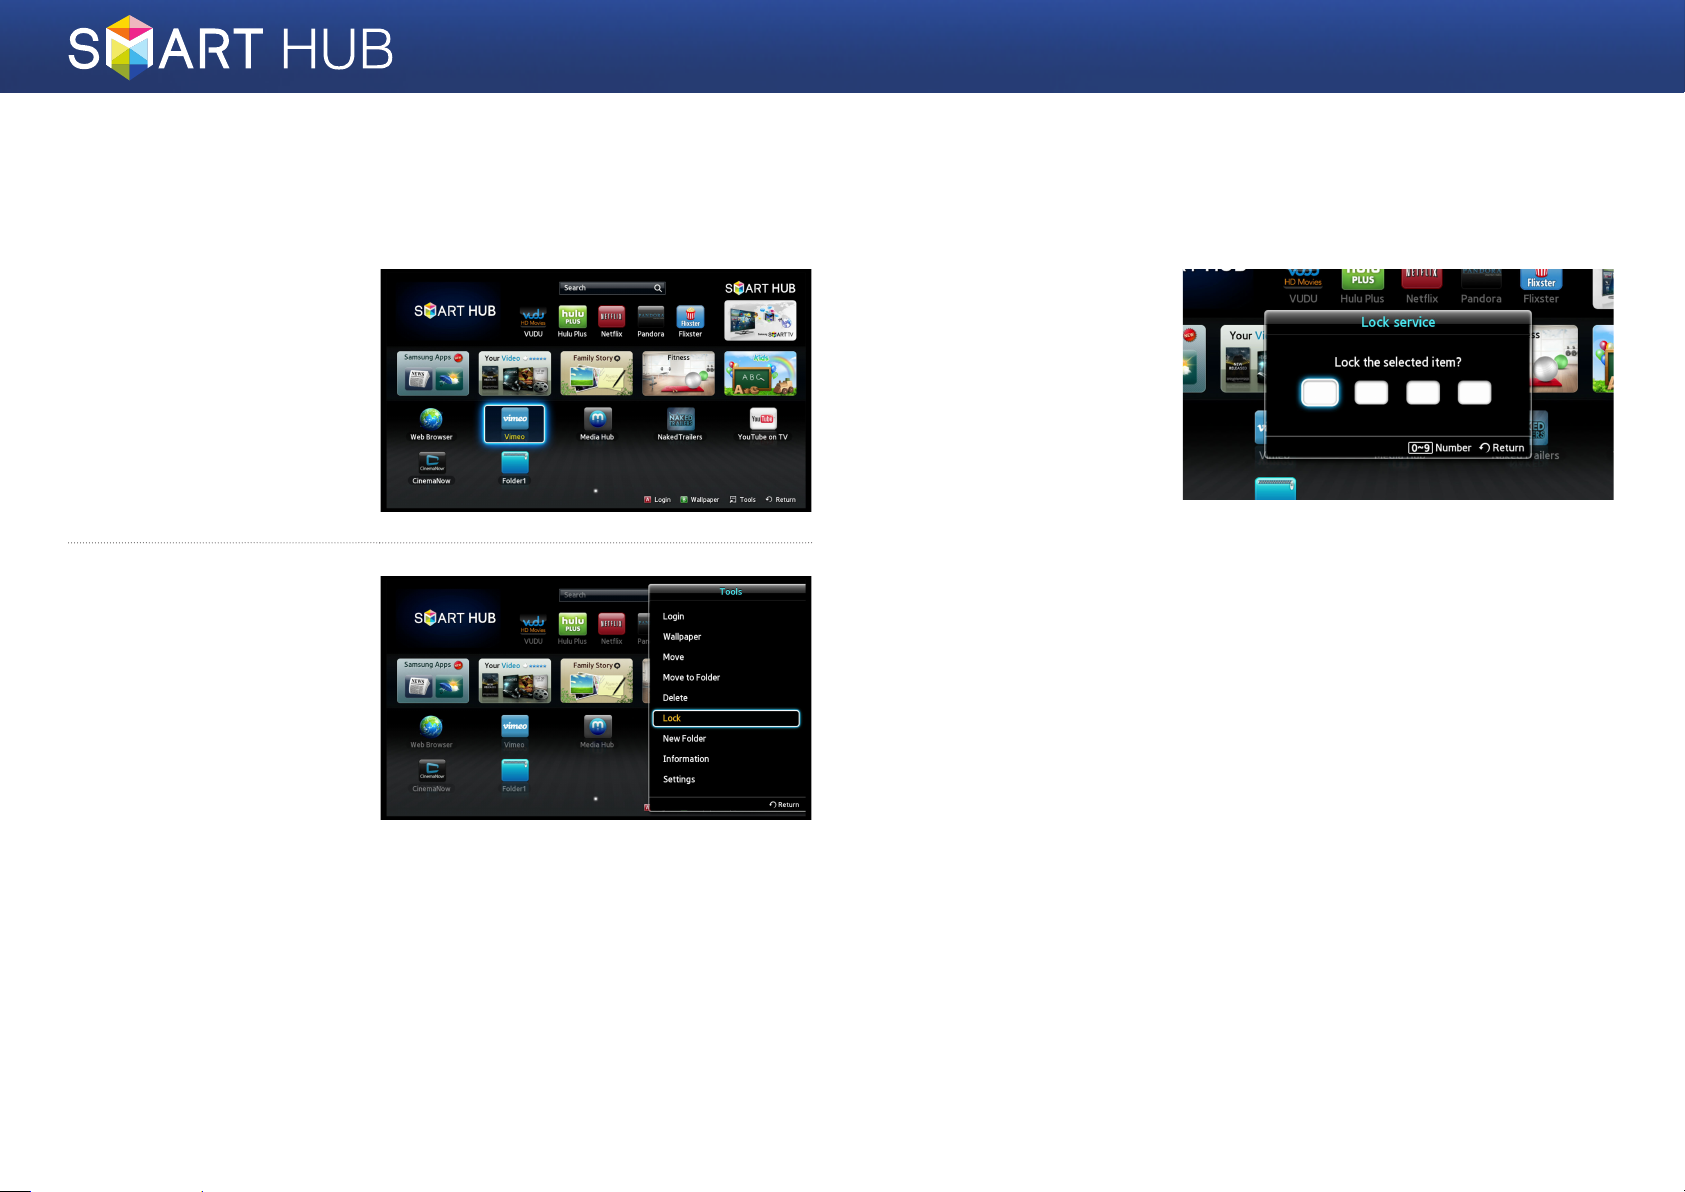
❙Locking an App
• You can lock specific apps to prevent other persons from using them.
(You cannot lock the folders and the apps provided by default.)
Move to the icon you
1
want to lock, and then
press the [TOOLS]
button on the remote
control.
Move to the <Lock>
2
item using the arrow
buttons, and then press
the
e
button.
Enter a password which
3
is 4 characters long. The
Service Lock Activated
pop-up appears. Press
the
e
button. The Lock
symbol next to the app
closes. You now must
enter the password to
access the app.
17 - English
Page 18
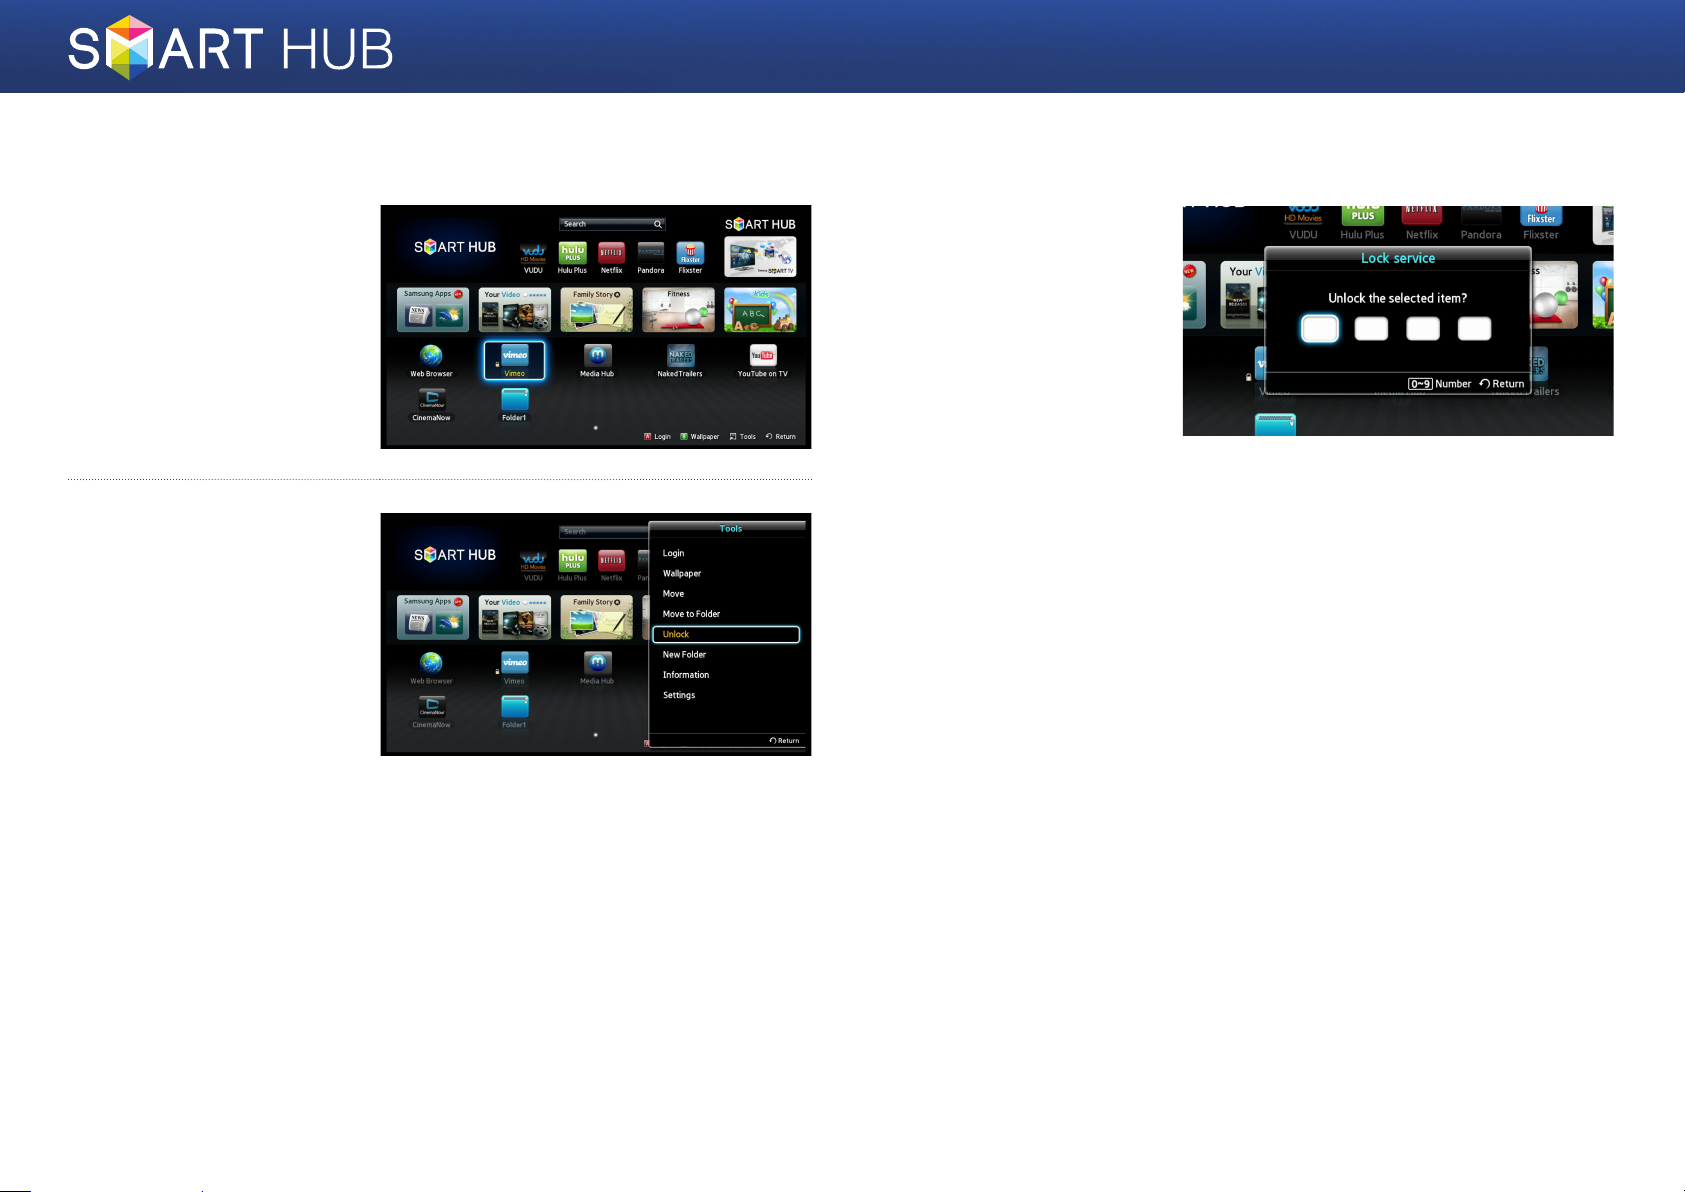
❙Unlocking an App
Move to the icon of the
1
app you want to access,
and then press the
[TOOLS] button on the
remote control.
Move to the <Unlock>
2
item using the arrow
buttons, and then press
the
e
button.
Enter the correct 4
3
character password. The
Service Lock Released
pop-up appears. Press
the
e
button. The lock
symbol next to the app
opens. To re-lock, follow
the steps on page 17.
18 - English
Page 19
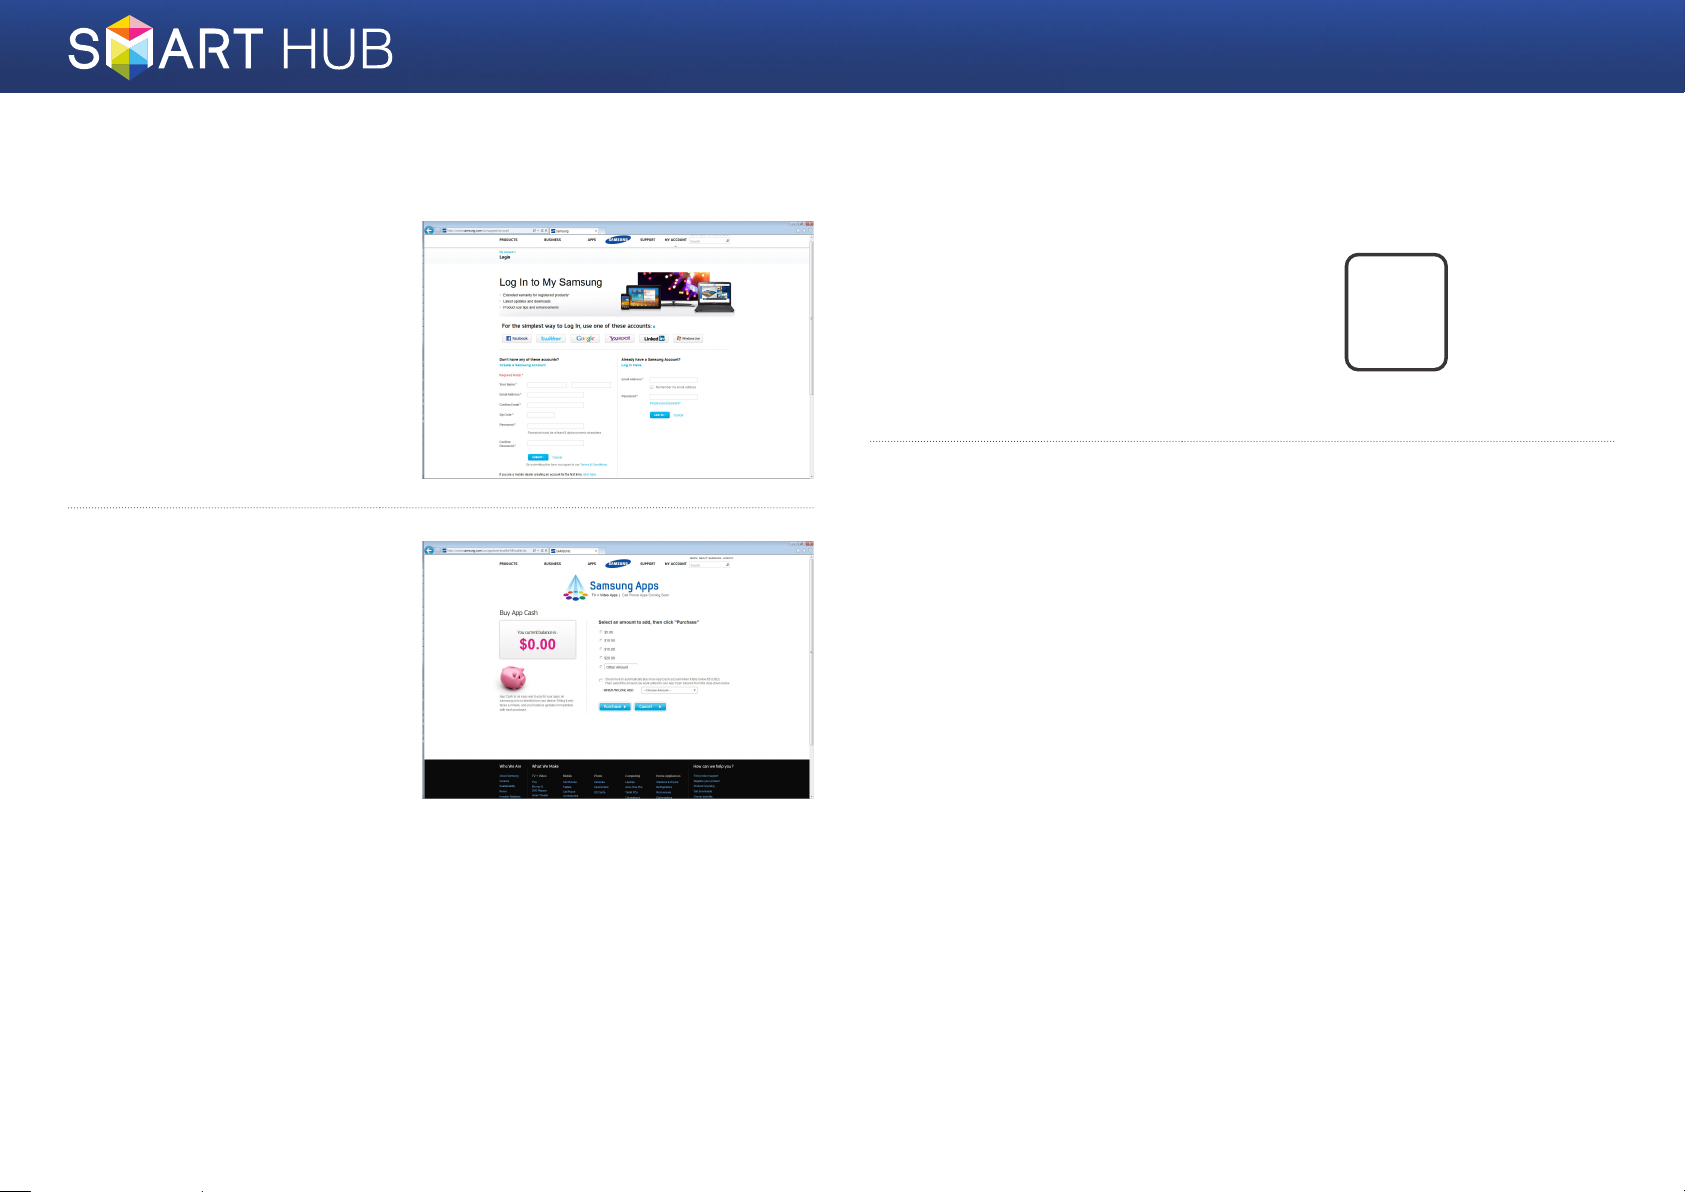
Registering Your Samsung Account
Connect to http://www.
1
samsung.com/ from
a computer, and then
create a new account.
✎The contents of the
homepage may differ from
country to country.
You need cash to install
2
a paid app. You can
charge your cash card.
(For more information,
refer to the instructions
provided on the website.)
Press the [SMART HUB]
3
button on the remote
control to run Smart
Hub.
Press the [TOOLS] button on the remote control to display the Settings
4
window.
※ For a description of the button, see the bottom of the screen.
SMART
HUB
19 - English
Page 20
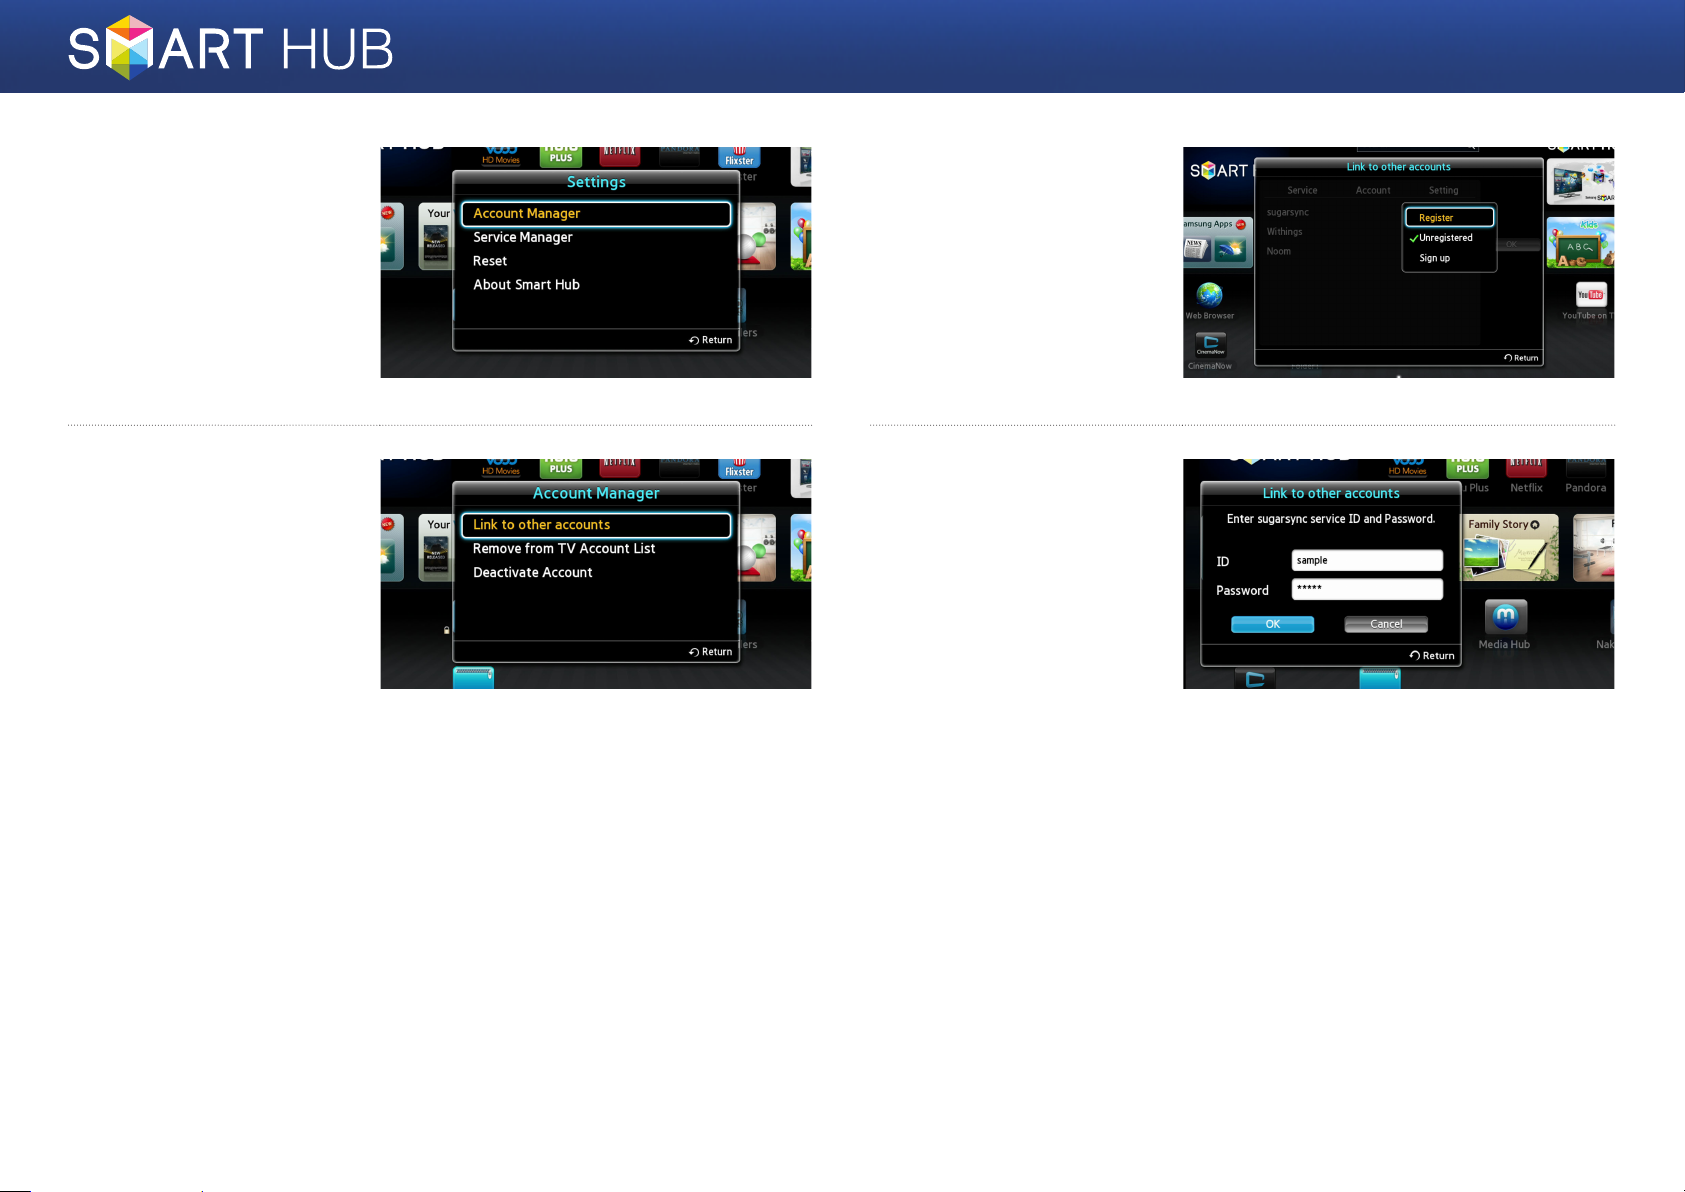
Move to the <Account
5
Manager> item, and
then press the e
button.
Press the e button
7
on the Samsung Apps
item to change its
subscription settings.
Select the <Register>
item, and then press
e
.
Move to the <Link to
6
other accounts> item,
and then press the
button.
e
Enter the account ID
8
and password you
created on "http://www.
samsung.com/", move
to the <OK> button, and
then press
registered service is run,
you will be logged into
the registered Service
using the entered
account information.
e
. When
20 - English
Page 21
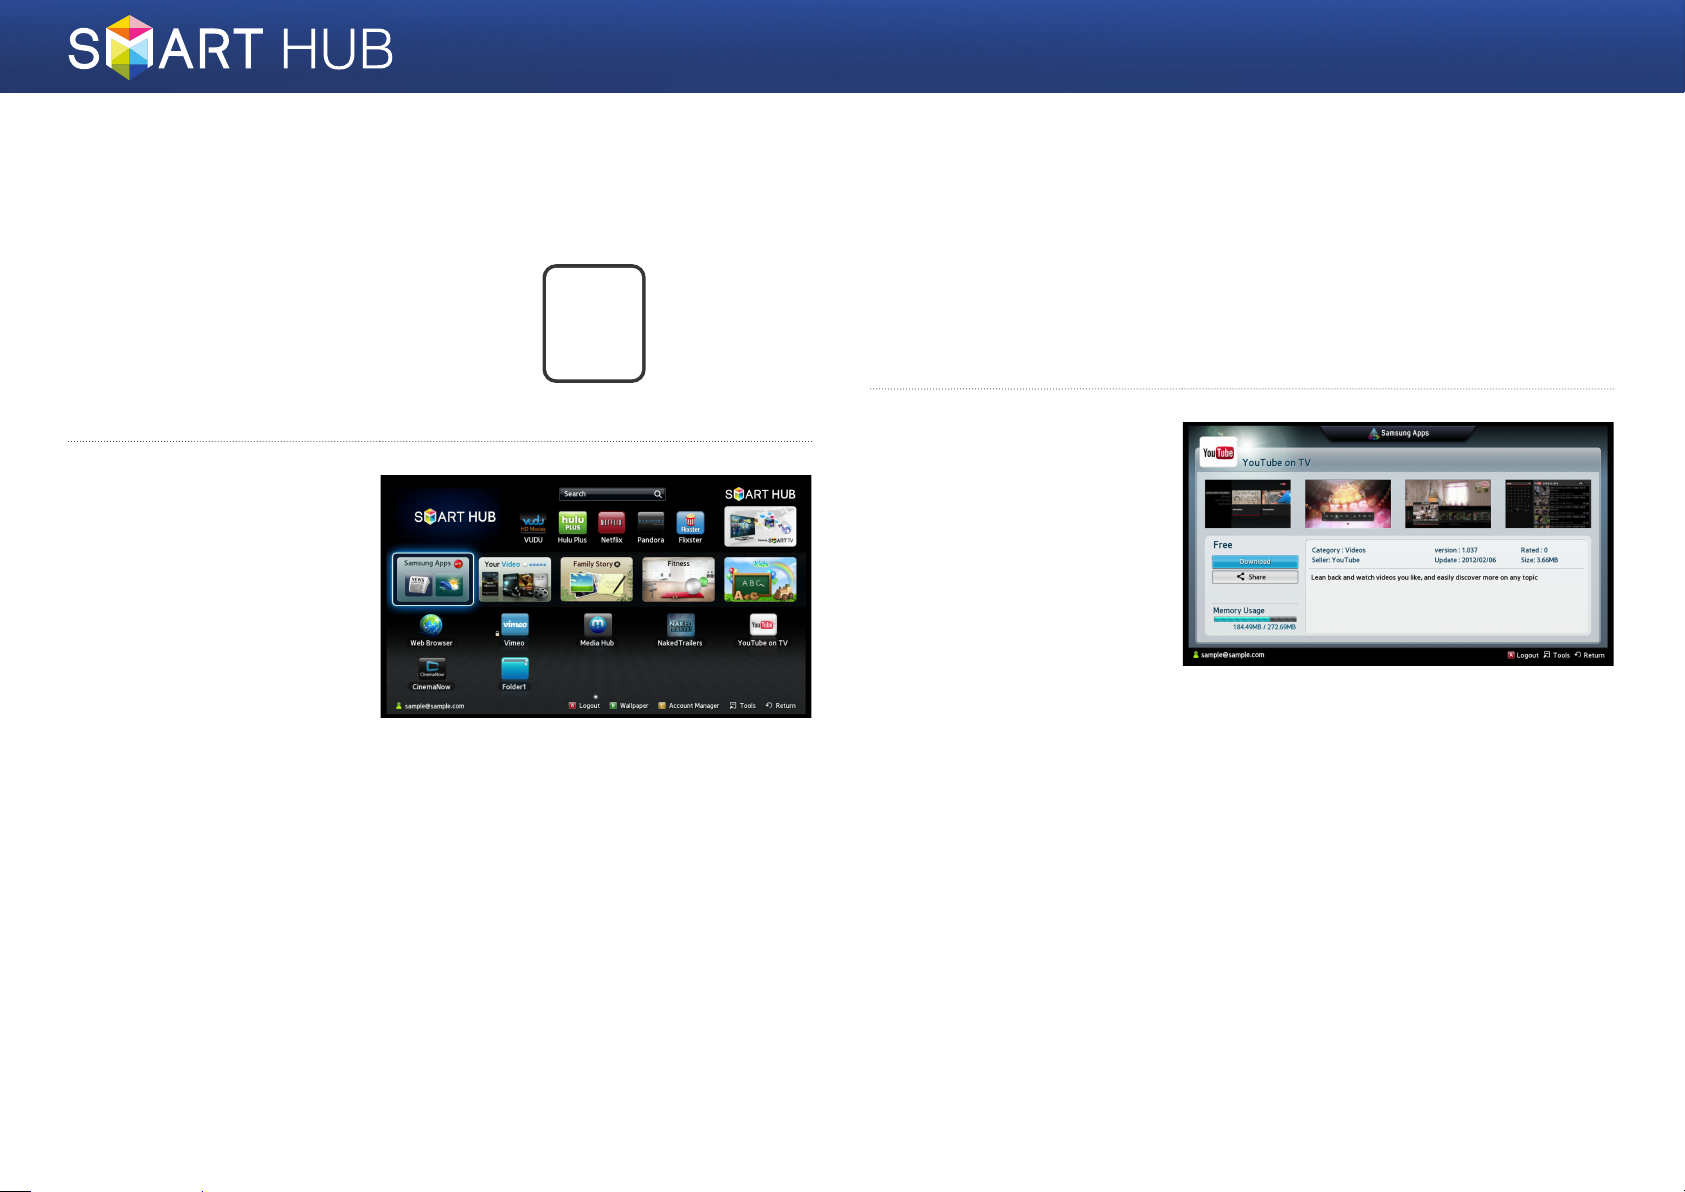
Using Samsung Apps
Press the [SMART HUB]
1
button on the remote
control to run the Smart
Hub.
Run "Samsung Apps"
2
located at the middle left
of the screen.
SMART
HUB
You must have a Samsung Apps account to install a paid app. If you do
3
not have an account, register an account by referring to the section in
this manual that describes how to register a Samsung account.
(refer to page 19~20.)
Move to the icon of
4
the app you want to
install, and then press
the
e
button. The
App Details window
showing the information
on the selected app is
displayed.
21 - English
Page 22
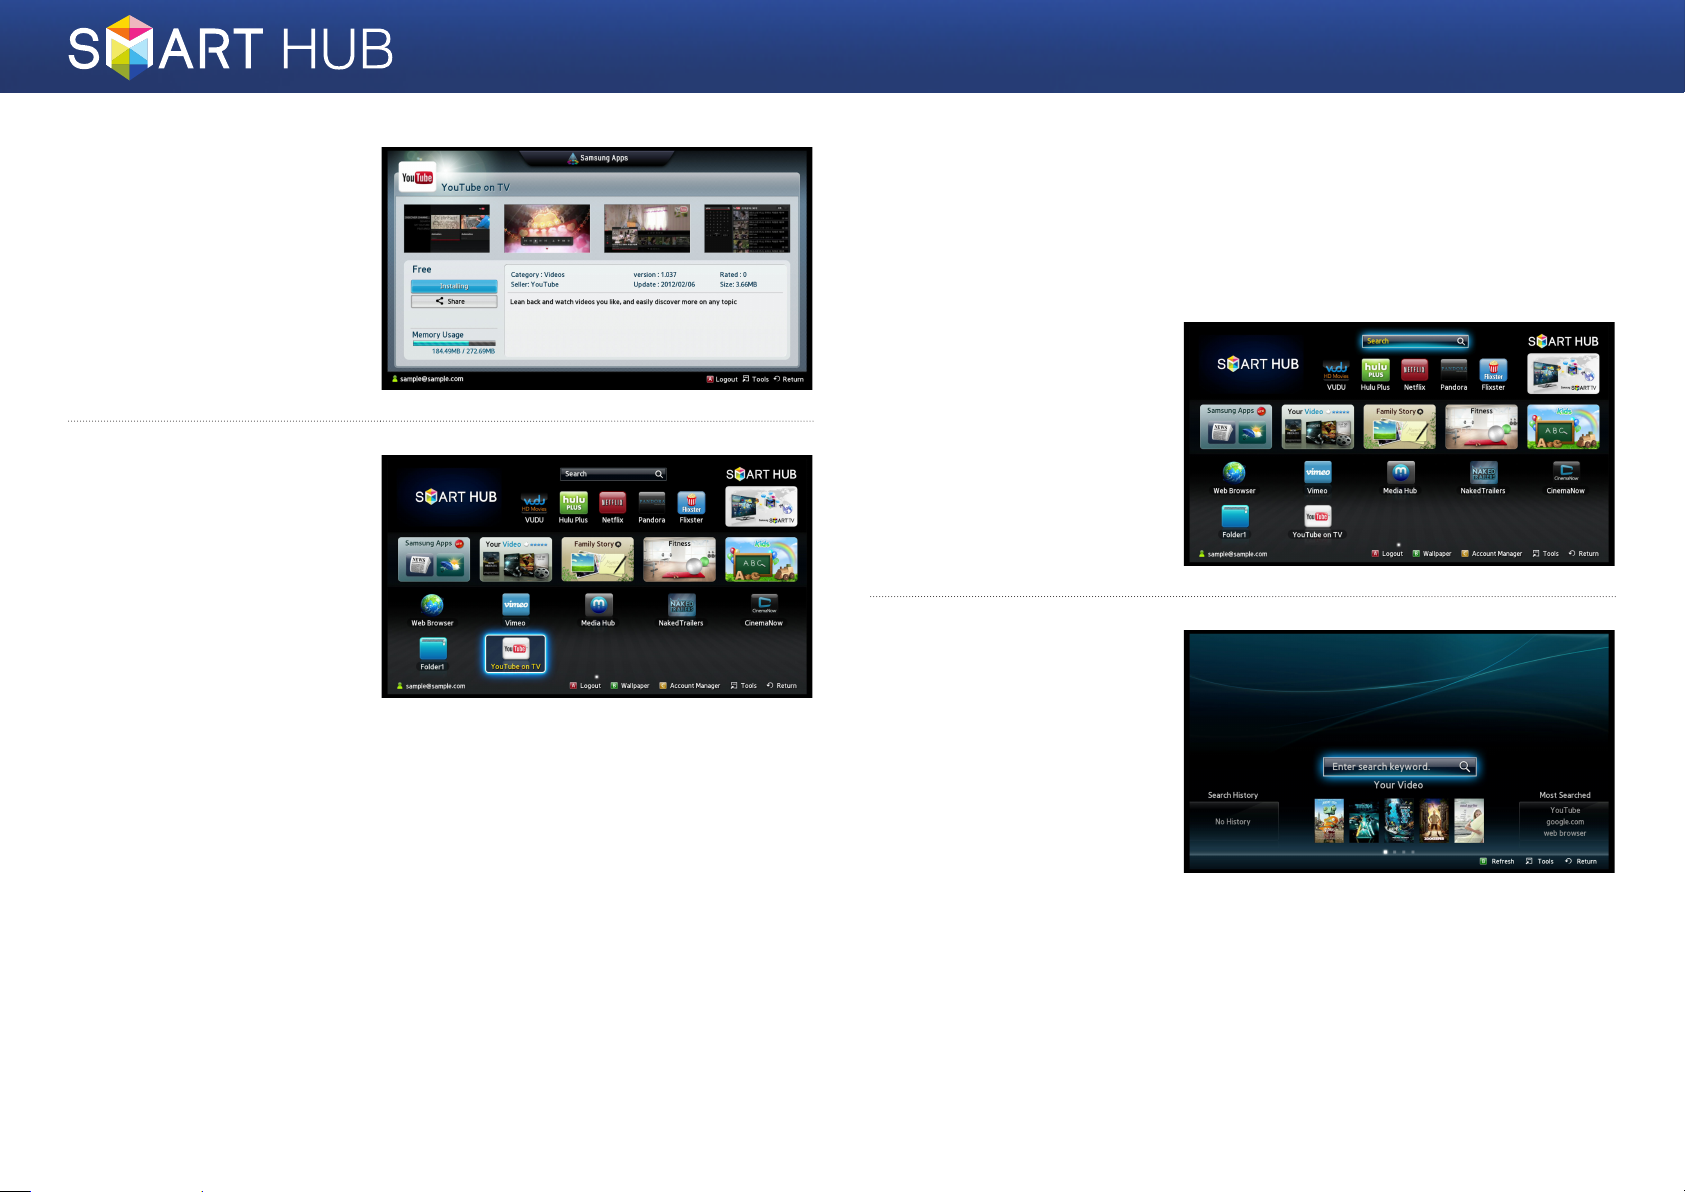
Move to the <Download>
5
item, and then press the
e
button to start the
installation.
When the installation
6
is finished, an icon for
the installed app is
automatically displayed
on the screen for
convenience.
Using the Smart Search function
You can search for information using the Smart Search window.
In addition, you can view a list of popular search words and a list of popular
apps.
Move to the <Search>
1
item in the Smart Hub
Home screen, and then
press the
The Smart Search
2
window is displayed.
e
button.
22 - English
Page 23
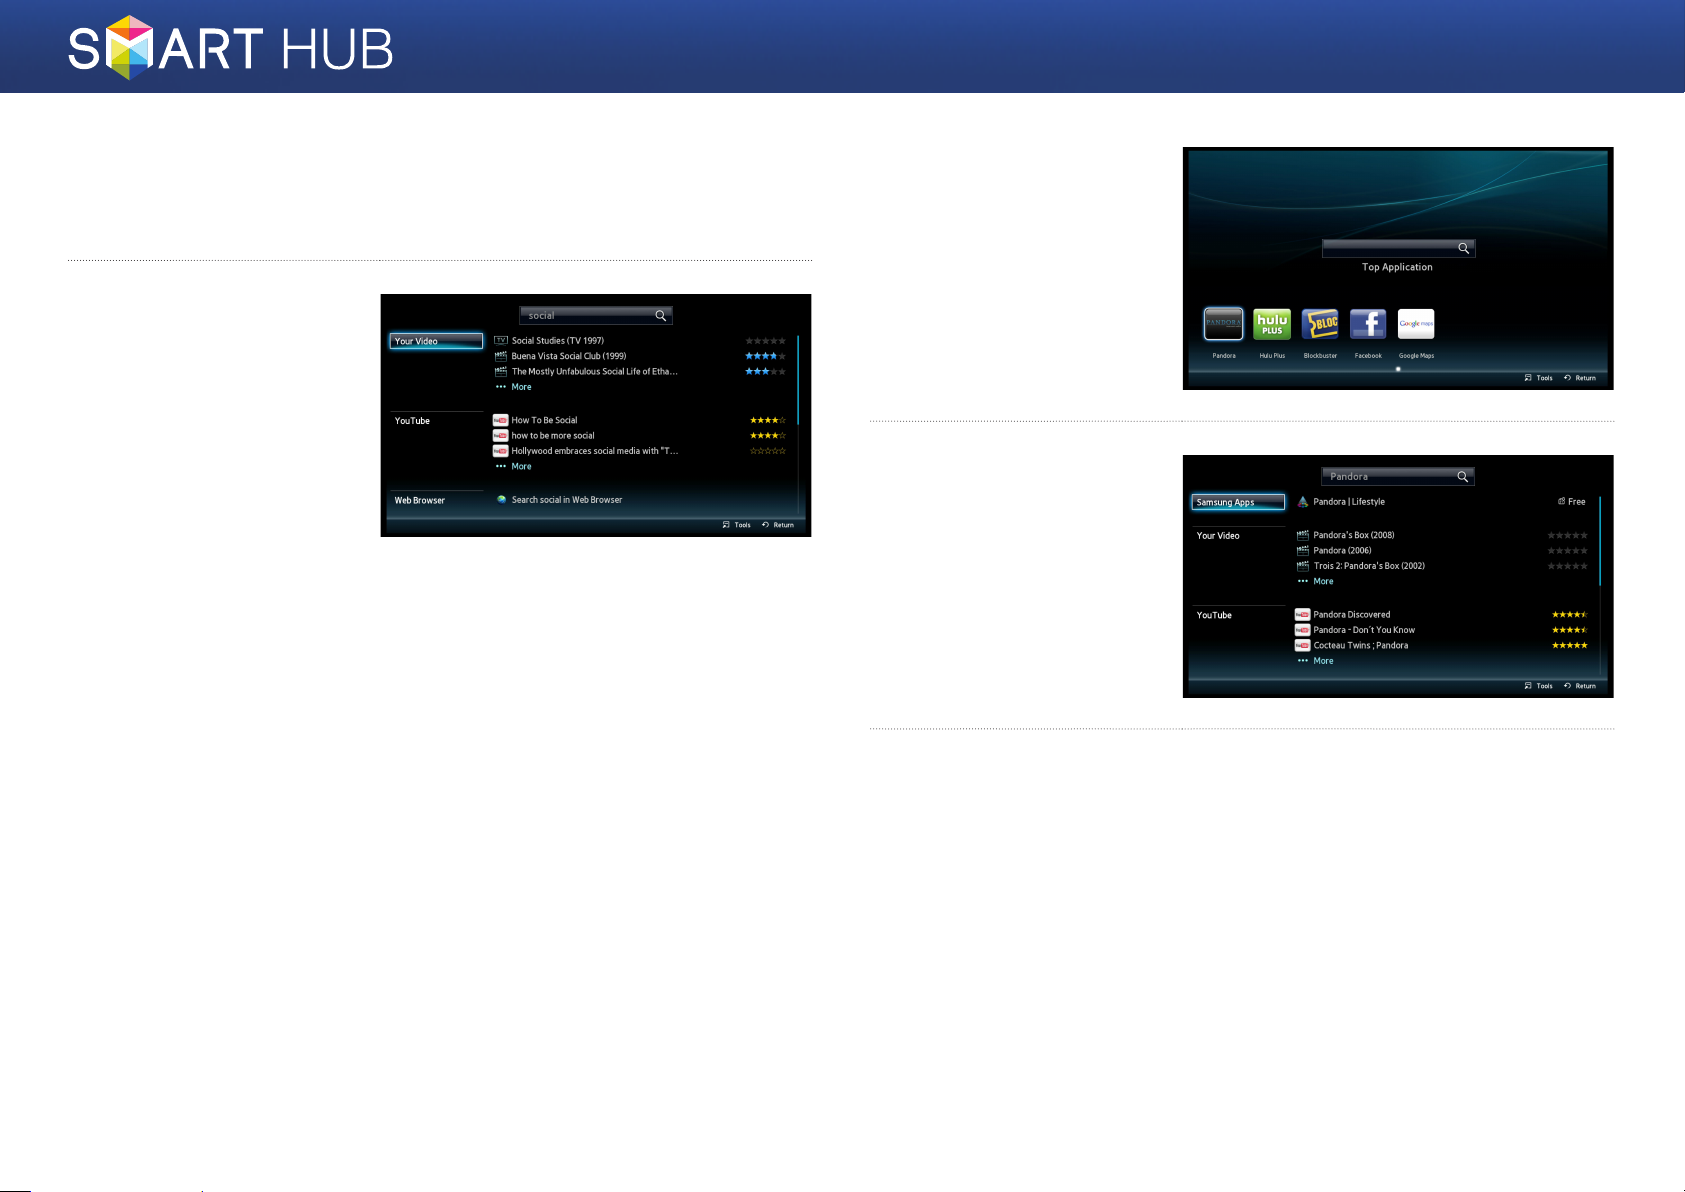
Enter the words you want to use as the search term. To select one of
3
the popular search words on the bottom of the screen, move to the item
using the arrows keys, and then press the
The search results for the
4
words you entered are
displayed.
e
button.
-1
If you select one of the
4
popular apps at the
bottom of the screen,
Smart Search will search
for information related to
the app.
-2
To install an app
4
displayed in the
Samsung Apps section
of the Search Results
window, move to the
app, and then press the
e
button.
4
23 - English
-3
For installation, you will be moved to the Samsung Apps screen. For
more information on the installation, refer to "Using Samsung Apps".
Page 24
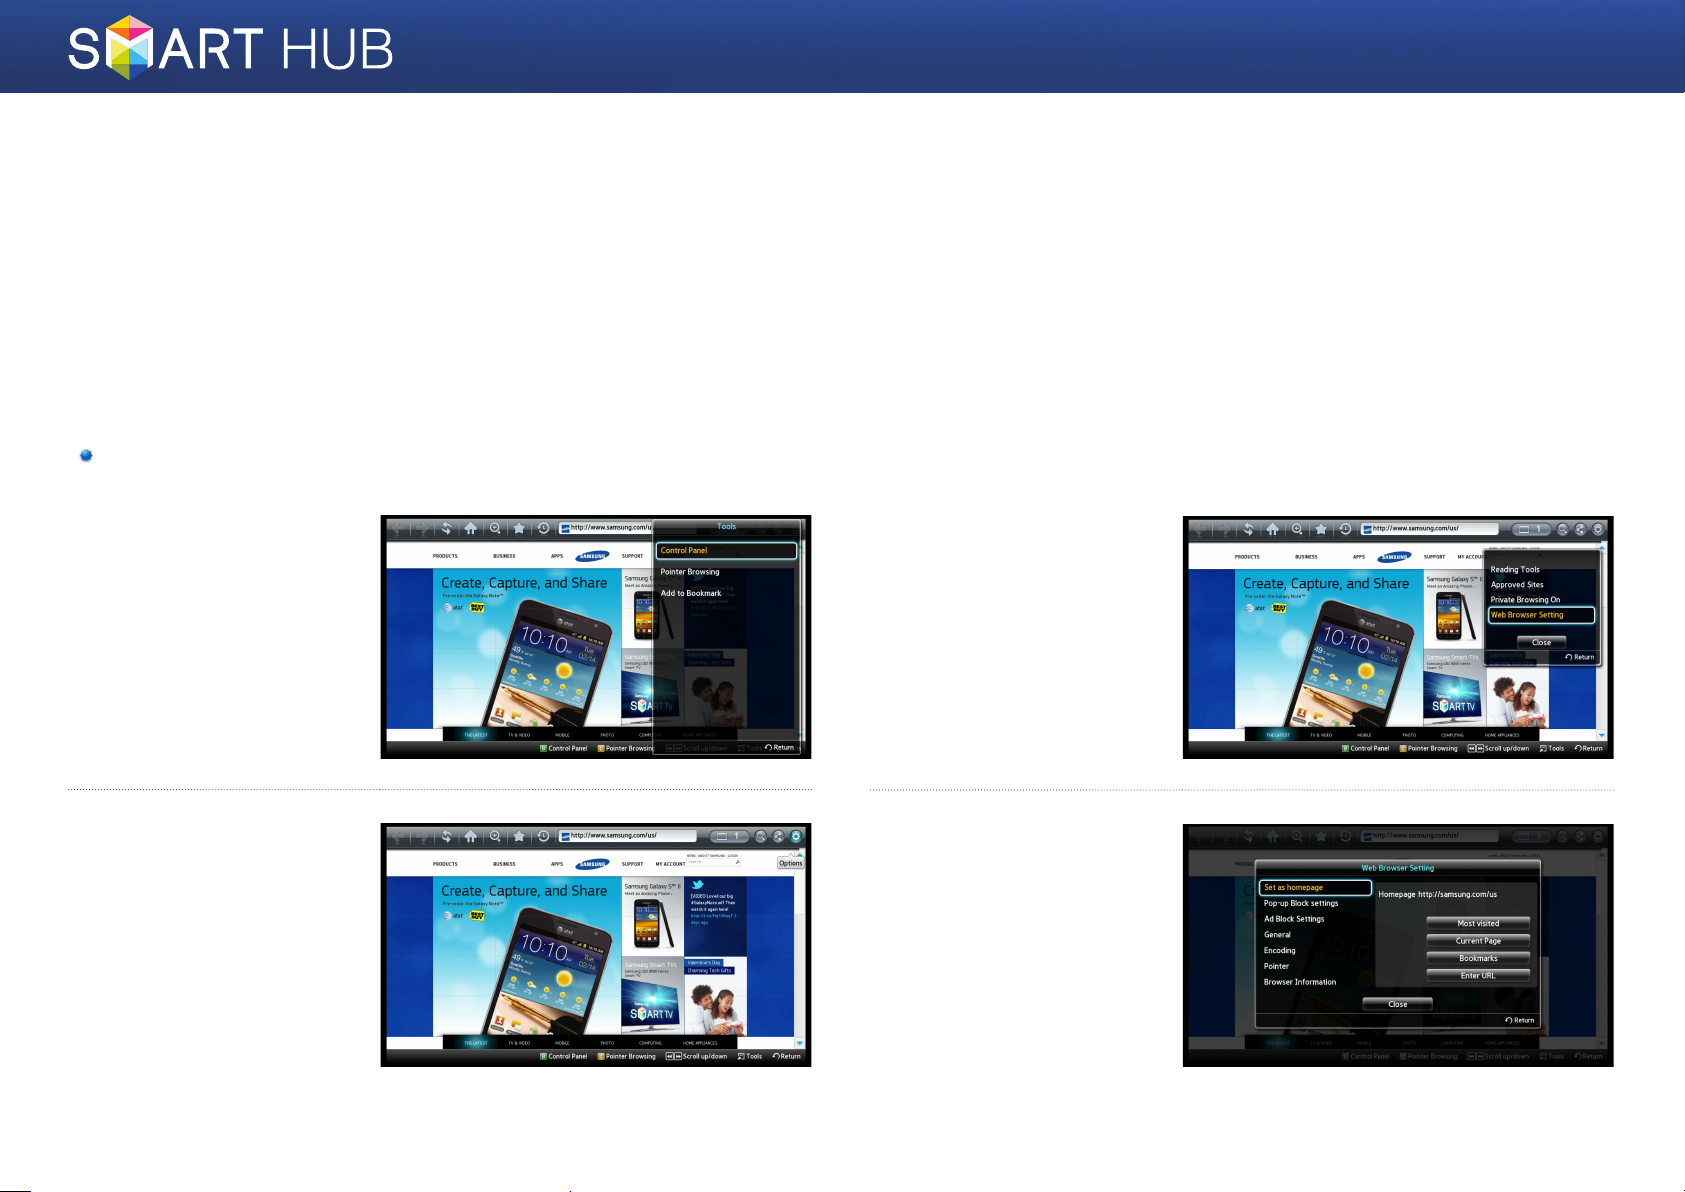
Easy-to-follow Uses of Recommended
Apps
❙Web Browser
●Press the [SMART HUB] button on the remote control to run Smart Hub.
●Move to the <Web Browser> icon which is installed in the Smart Hub by default, and then press the
e
button.
●Control Panel toolbar appears - Use the b button on the remote control while the web browser is
running.
Configuring the Start Page of the Web Browser
While the web browser
1
is running, press the
[TOOLS] button on the
remote control, and
select <Control Panel>.
When the toolbar is
2
displayed, move to the
<Options> item at the
right end of the toolbar,
and then press the
button.
e
Move to the <Web
3
Browser Setting> item,
and then press the
button.
When the Web Browser
4
Setting window is
displayed, move to the
<Set as homepage>
item, and move to the
tab you want to activate
using the arrows keys,
and then press the
button.
e
e
24 - English
Page 25
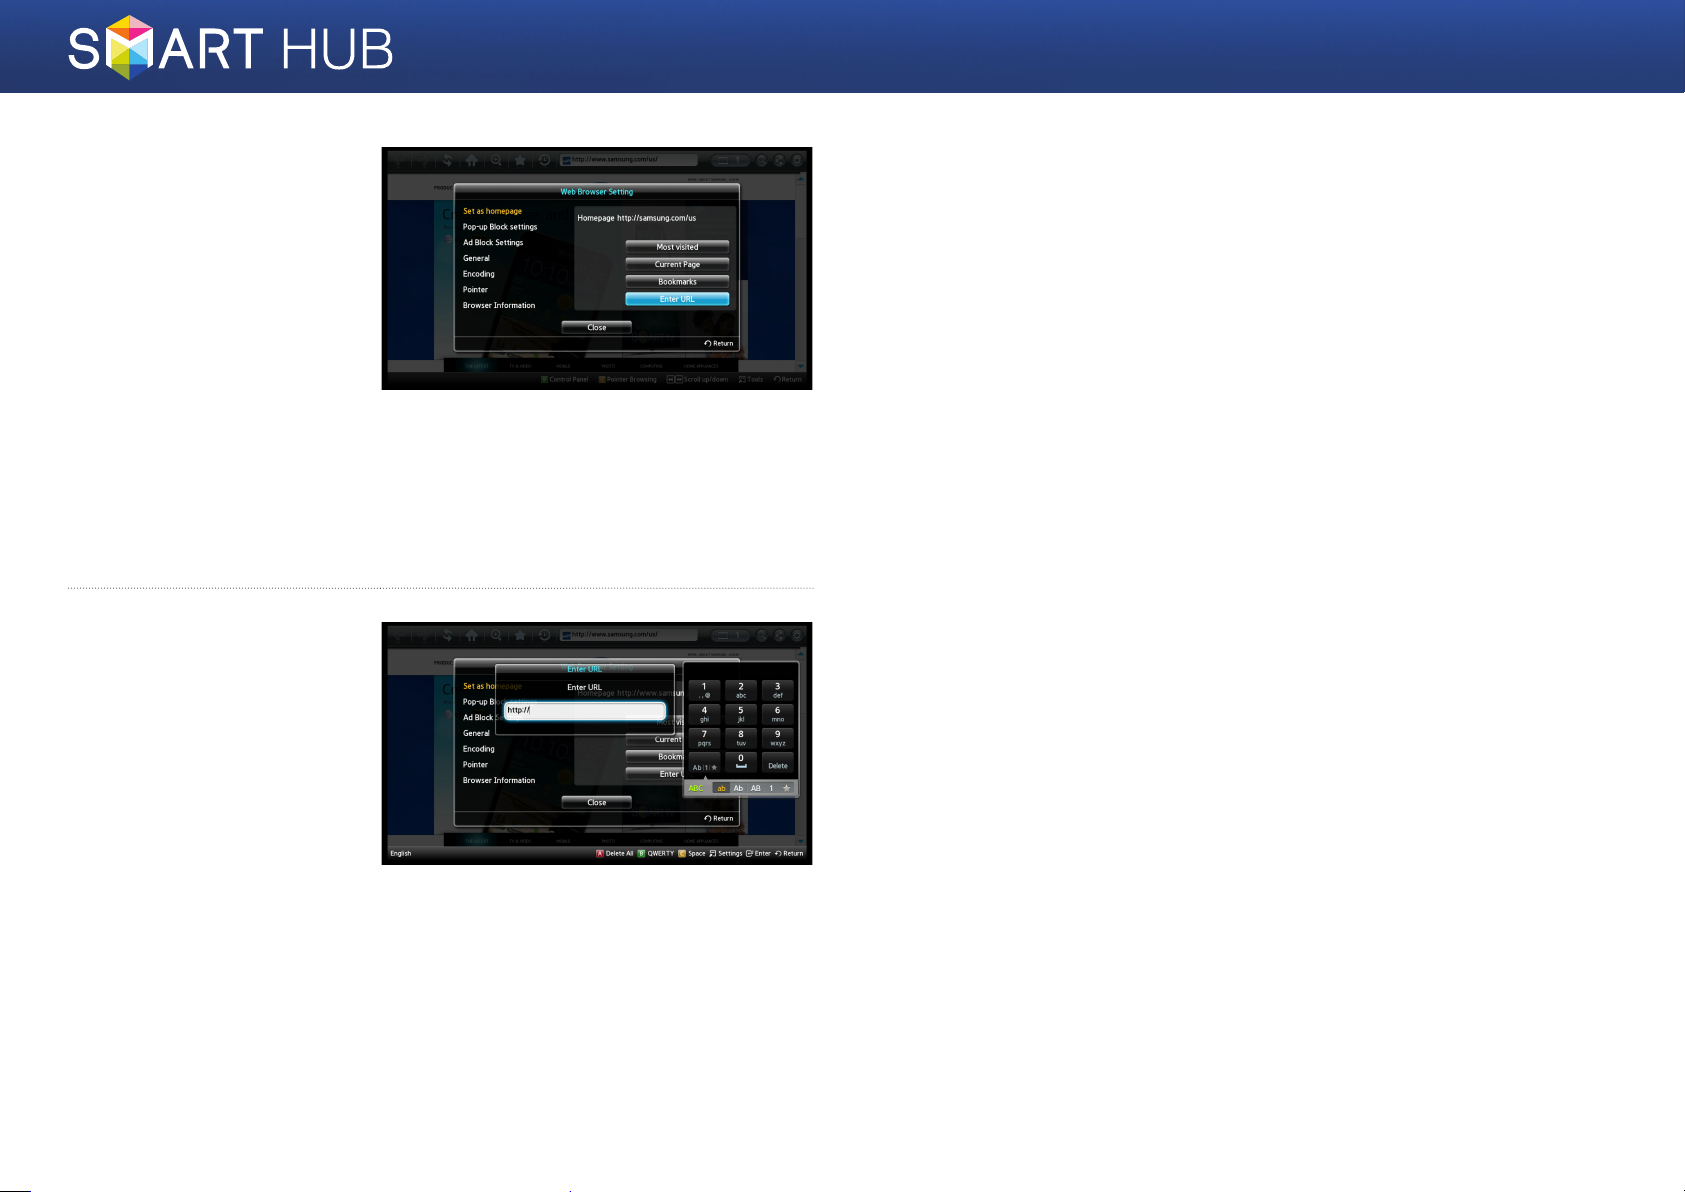
Move to the <Enter
5
URL> item, and then
press the e button.
• <Most Visited> : You
can select and set
one of the sites you
frequently access as the
Home screen.
• <Current Page> : You can set the page currently displayed in the web
browser as the home screen.
• <Bookmarks> : You can set the start page by bookmark.
• <Enter URL> : You can enter an address manually that will be set as the
Home screen.
Enter the address of the
6
page you want to use
as the Home screen,
and then press the
button to apply the
changes.
e
25 - English
Page 26
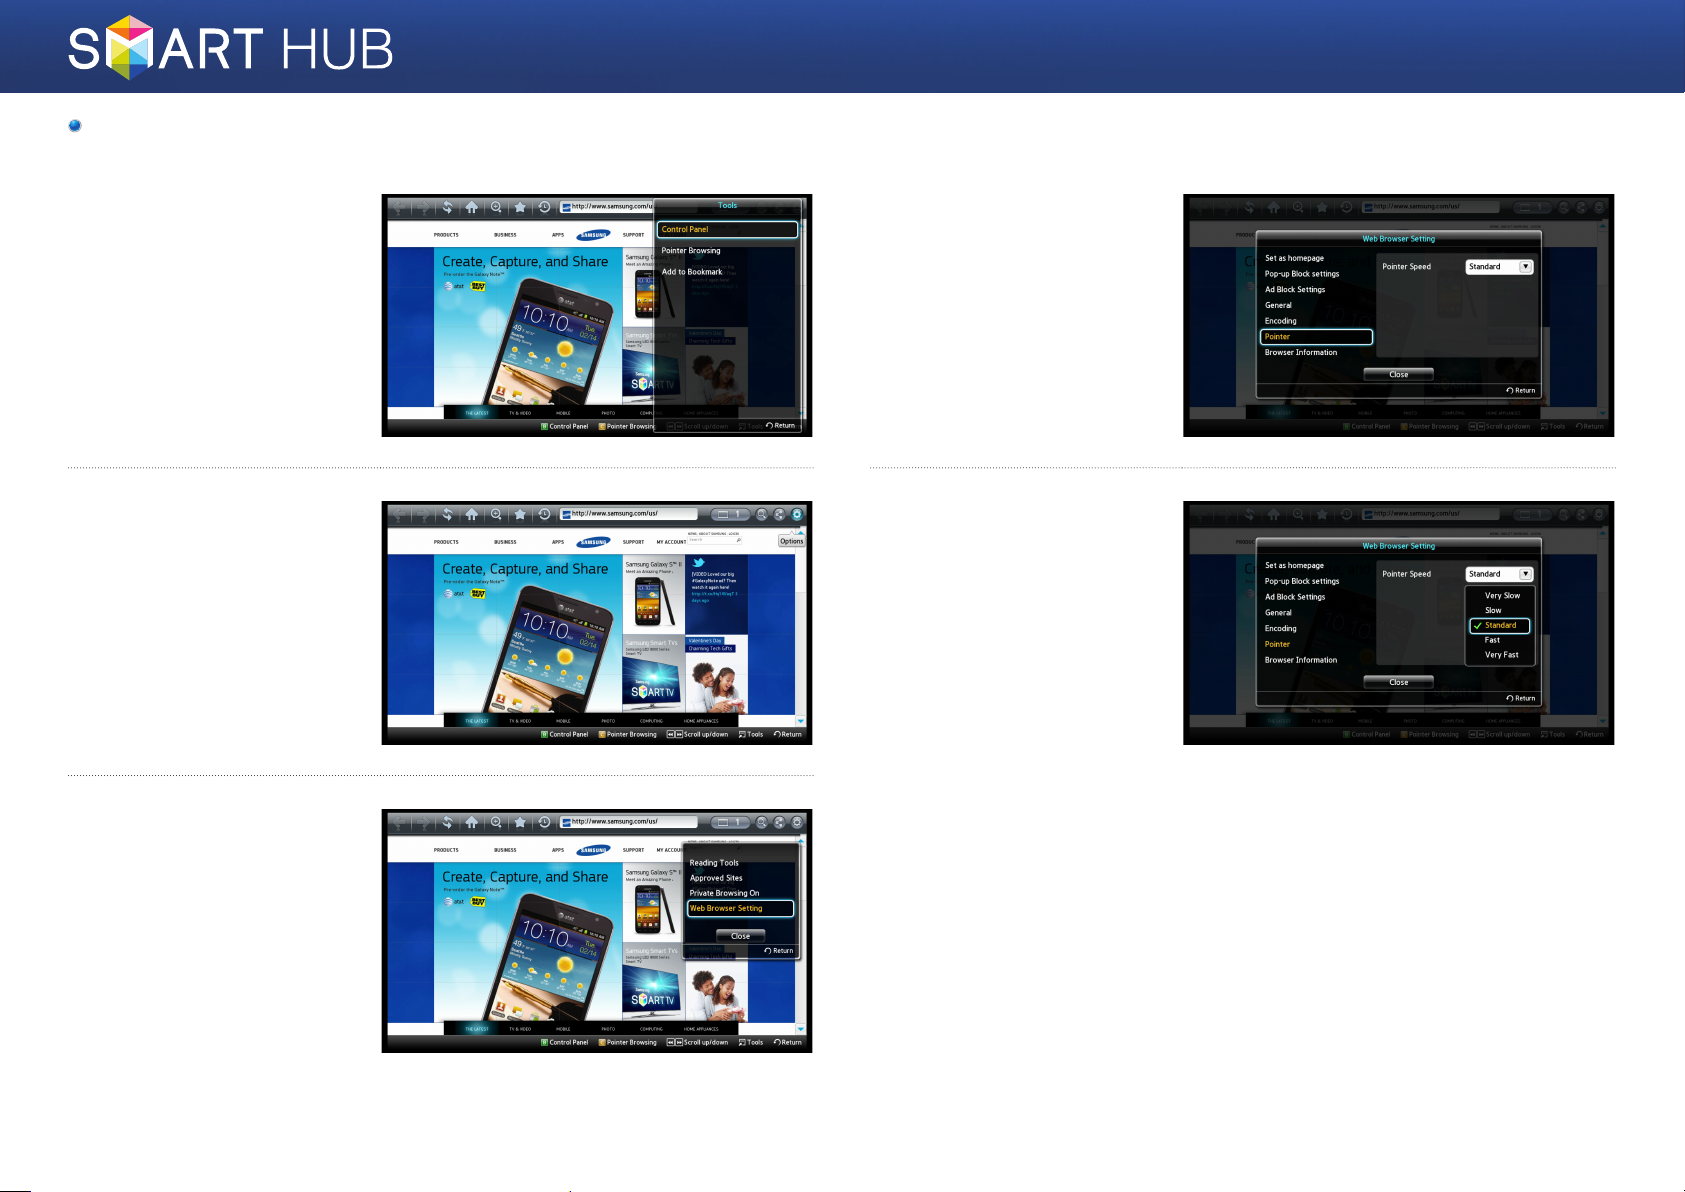
Setting the Pointer Speed
While the web browser
1
is running, press the
[TOOLS] button on the
remote control, and
select <Control Panel>.
When the toolbar is
2
displayed, move to the
<Options> item at the
right end of the toolbar,
and then press the
button.
e
When the Web Browser
4
Setting window is
displayed, move to the
<Pointer> item, and
then press the ► button
on the remote control.
Select the appropriate
5
<Pointer Speed> item,
and then press the
button to apply the
changes.
e
Move to the <Web
3
Browser Setting> item,
and then press the
button.
e
26 - English
Page 27
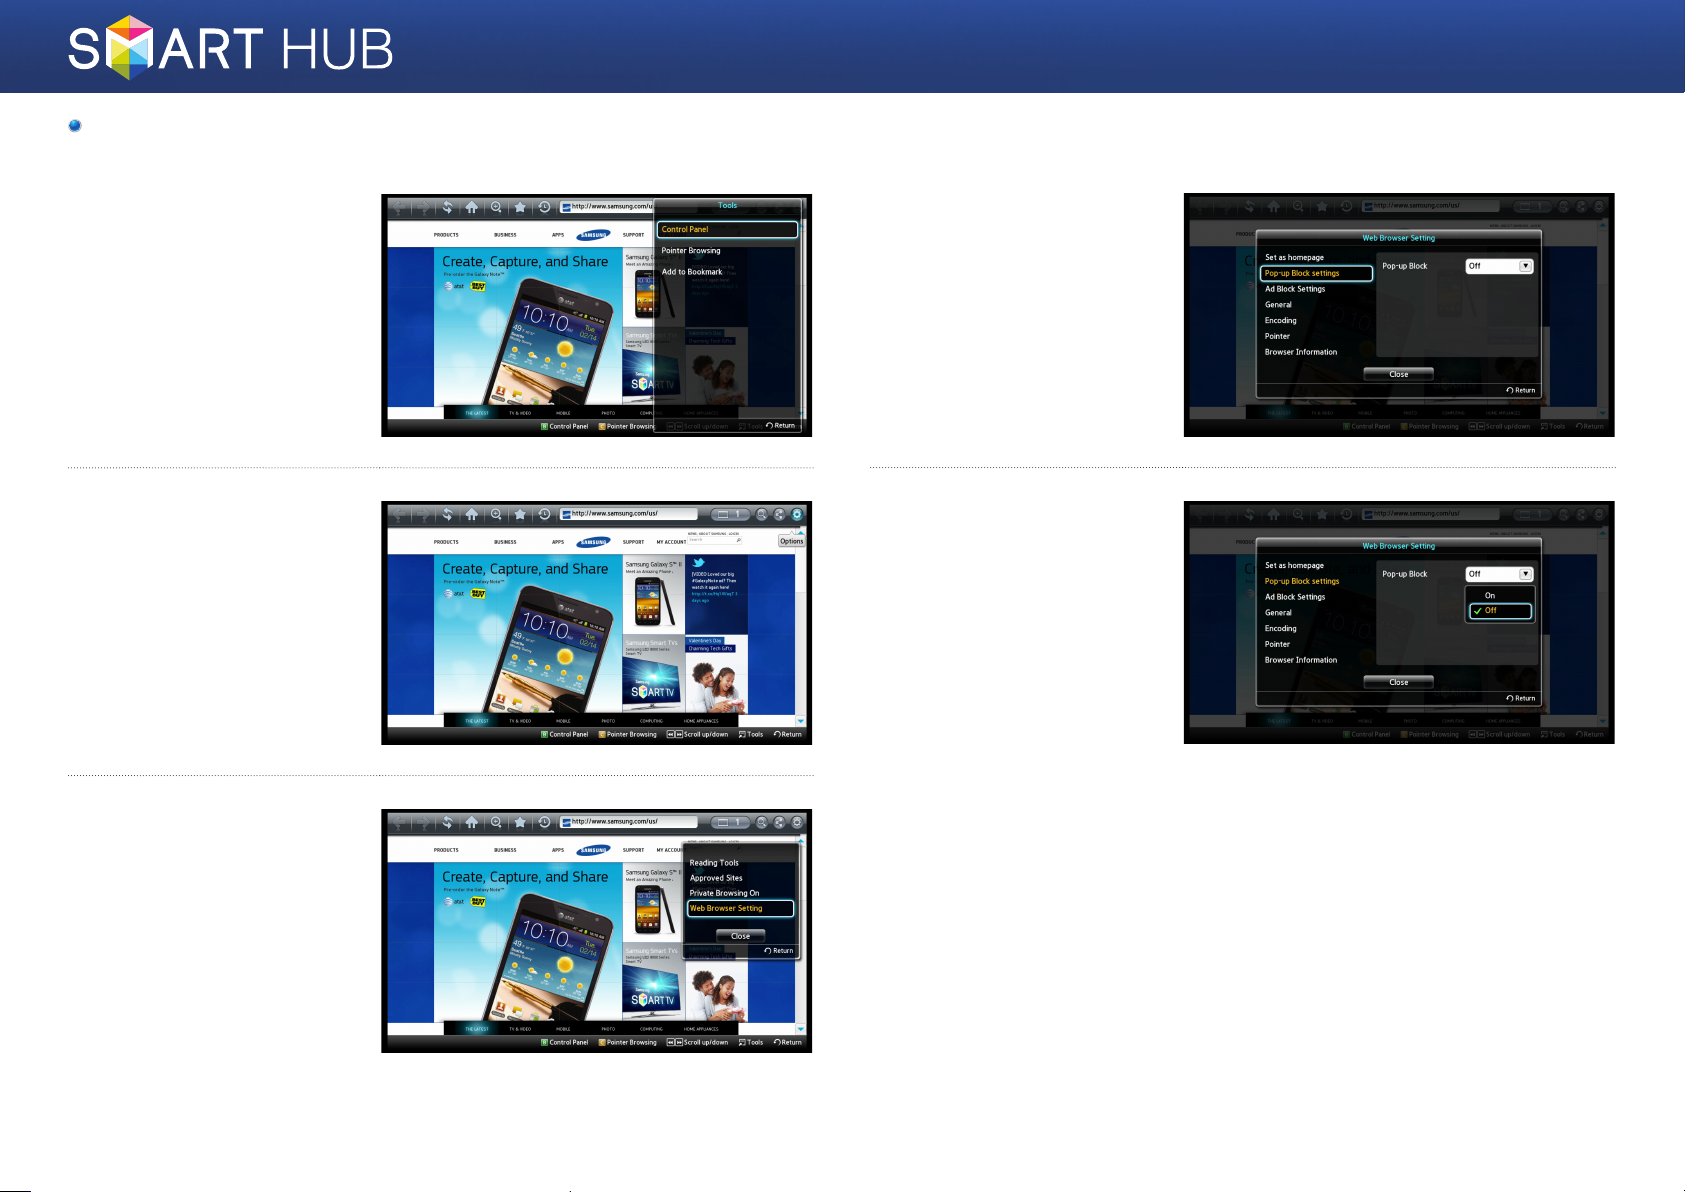
Configuring the Settings for Internet Popup Windows
While the web browser
1
is running, press the
[TOOLS] button on the
remote control, and
select <Control Panel>.
When the toolbar is
2
displayed, move to the
<Options> item at the
right end of the toolbar,
and then press the
button.
e
When the Web Browser
4
Setting window is
displayed, move to
the <Pop-up Block
settings> item, and then
press the
You can turn the <Pop-
5
up Block> function
On or Off. Move to the
value you want to use,
and then press the
button.
e
button.
e
Move to the <Web
3
Browser Setting> item,
and then press the
button.
e
27 - English
Page 28
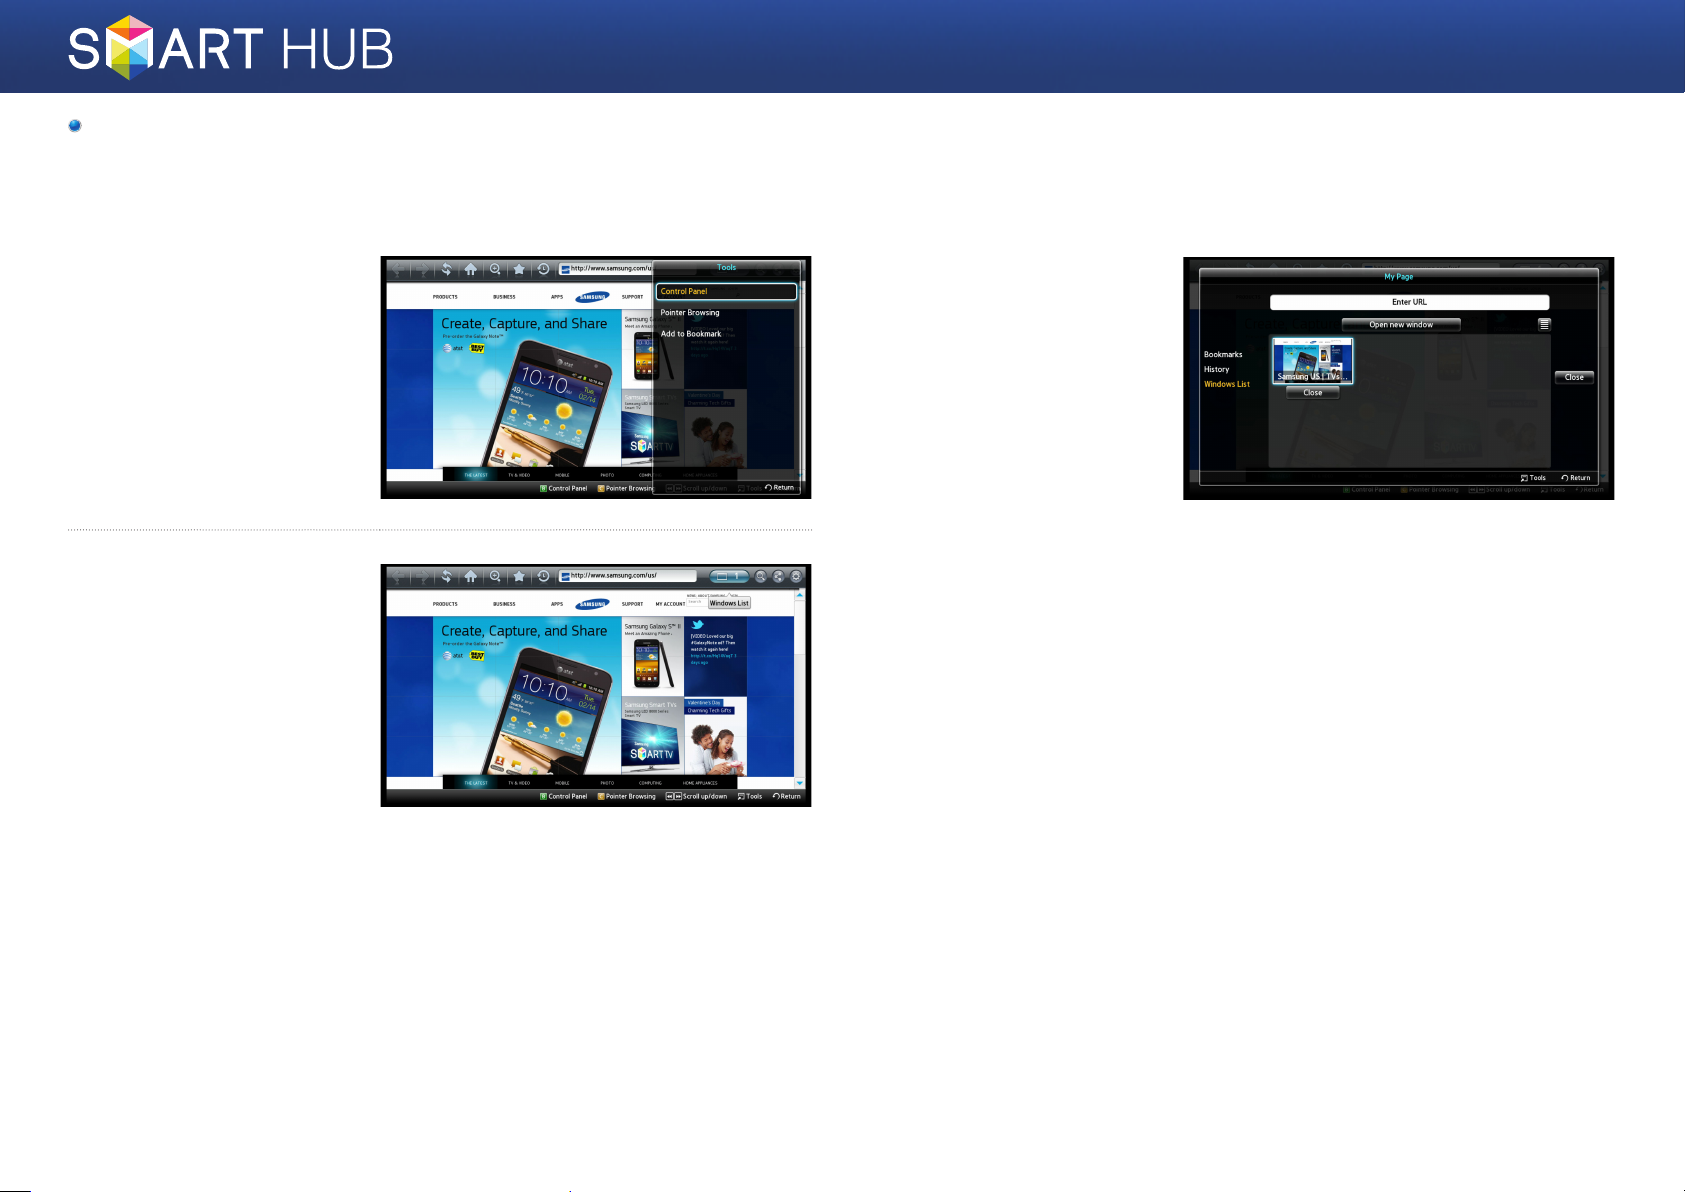
Switching between Multiple Web Browser Windows
• Allows you to switch easily between the multiple web browser windows currently
open.
While the web browser
1
is running, press the
[TOOLS] button on the
remote control, and
select <Control Panel>.
When the toolbar is
2
displayed, move to the
<Windows List> item
in the toolbar, and then
press the
e
button.
A list of all currently
3
opened windows is
displayed. Move to the
window you want to
activate using the arrows
keys, and then press the
e
button.
28 - English
Page 29
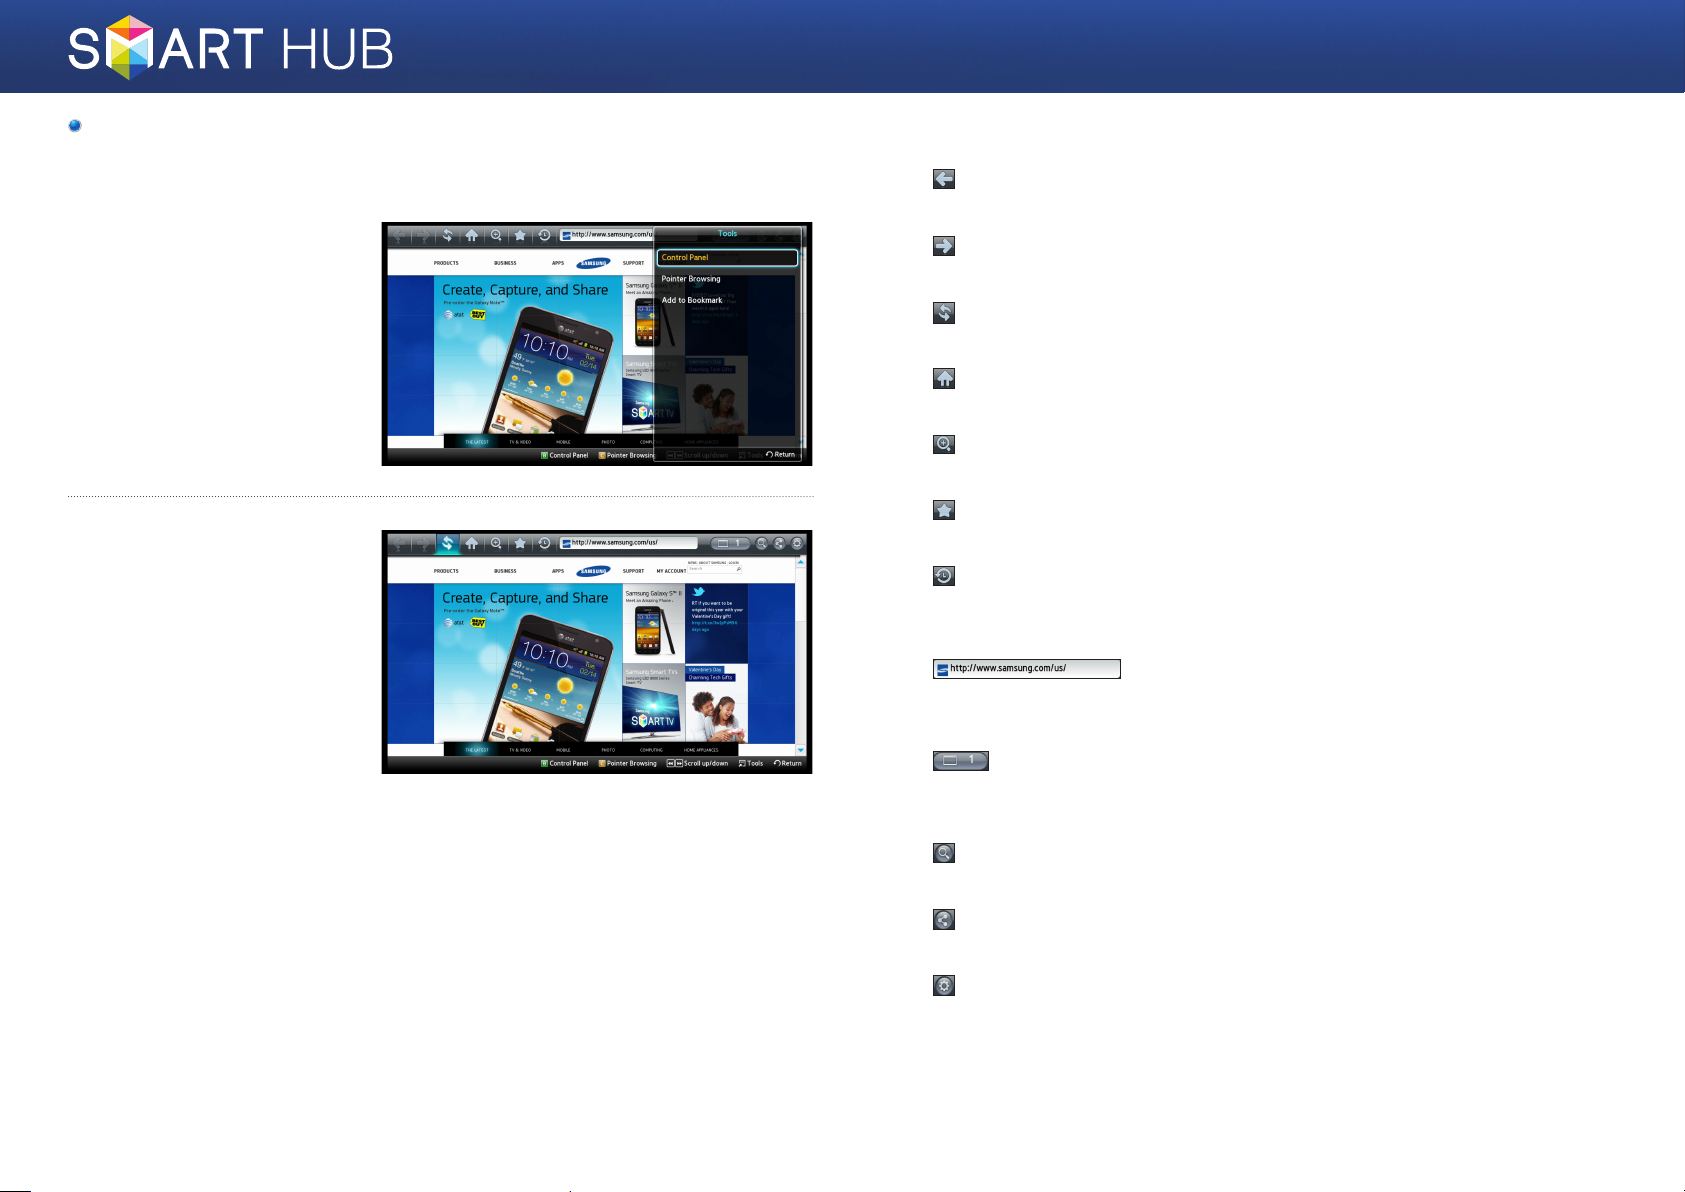
Go Forward, Go Back, Return to Home Page, Bookmarks,
History, etc.
While the web browser
1
is running, press the
[TOOLS] button on the
remote control, and
select <Control Panel>.
The toolbar containing
2
various functions is
displayed.
✔Functions
• <Back>
- Moves to the previous page.
<Forward>
•
- Moves to the last page before going back.
• <Refresh>
- Reloads the current page so that it is refreshed on the screen.
• <Homepage>
- Moves to the Home screen of the web browser.
• <Zoom>
- Allows you to zoom in or out of the screen at various percentages.
• <Bookmarks>
- Allows you to bookmark specific pages so that you can move to them easily.
• <History>
- Allows you to view the history of your visited pages according to the date,
name, or frequency.
• <Enter URL>
- Allows you to enter a page address manually or select a page from the
visited page list to move to that page.
29 - English
• <Windows List>
- Allows you to easily switch between the multiple web browser windows
currently open.
• <Search>
- Allows you to search for information by entering words.
• <Share>
- Share the current site to family group with a message.
• <Options>
- Allows you to configure all settings for the using the web browser.
 Loading...