

Samsung BD-D8200 User Manual [nl]

BD-HDD Combo
user manual
BD-D8200
BD-D8500
imagine the possibilities
Thank you for purchasing this Samsung product.
To receive a more complete service,
please register your product at
www.samsung.com/register

2 English
Key features
Blu-ray™ Disc Features
Blu-ray Discs support the highest quality HD video
available in the industry - Large capacity means
no compromise on video quality.
The following Blu-ray Disc features are disc
dependant and will vary.
Appearance and navigation of features will also
vary from disc to disc.
Not all discs will have the features described
below.
For High-Definition Playback
To view high-definition contents on a Blu-ray Disc,
you need an HDTV (High Definition Television).
Some Blu-ray Discs may require you to use the
product’s HDMI OUT to view high-definition
content.
The ability to view high-definition content on
Blu-ray Discs may be limited depending on the
resolution of your TV.
BD-LIVE
You can use a Blu-ray Disc that supports
BD-LIVE to download content provided by the
disc manufacturer through a network connection.
BD-HDD Combo Features
3D
This product can play 3D contents through an
HDMI cable.
To implement the 3D effect, connect a 3D device
(3D-compliant AV receiver, 3D-compliant TV) to
the product using an HDMI cable, and play the 3D
content while wearing 3D vision glasses.
3D Conversion
When you play 2D contents, you can convert 2D
into 3D contents by pressing the 2D3D button
on the remote control.
Smart Hub
You can download various for pay or freeof-charge applications through a network
connection. These applications provide a range
of Internet services and content including news,
weather forecasts, stock market quotes, games,
movies, and music.
AllShare
You can play videos, music, and photos saved on
your devices (such as your PC, mobile phones, or
NAS) through a network connection.
Playing multimedia files
You can use the USB connection to play various
kinds of multimedia files (MP3, JPEG, DivX, etc.)
located from a USB storage device.
Digital TV
This product have dual DTV Tuner. So user
•
can change DTV Programme during recording
a programme. As the benefit of dual tuner
eliminates the unconvinience of retaining
channel when you want to record it.
Functionalities related to Digital TV (DVB) are
•
only available in countries/areas where DVB-T
(MPEG2 and MPEG4 AVC) digital terrestrial
signals are broadcasted or where you are able
to access to a compatible DVB-C (MPEG2 and
MPEG4 AAC) cable-TV service. Please check
with your local dealer the possibility to receive
DVB-T or DVB-C signal.
DVB-T is the DVB European consortium
•
standard for the broadcast transmission of
digital terrestrial television and DVB-C is that for
the broadcast transmission of digital TV over
cable. However, some differentiated features like
EPG (Electric Programme Guide), VOD (Video
On Demand) and so on, are not included in this
specification. So, they cannot be workable at
this moment.
Some Digital TV functions might be unavailable
•
in some countries or regions and DVB-C might
not work correctly with some cable service
providers.
This product can record TV channel in HDD or
•
external devices.
English 3
Safety Information
Warning
TO REDUCE THE RISK OF ELECTRIC SHOCK, DO NOT REMOVE THE COVER (OR BACK).
NO USER-SERVICEABLE PARTS ARE INSIDE. REFER SERVICING TO QUALIFIED SERVICE PERSONNEL.
CAUTION
RISK OF ELECTRIC SHOCK
DO NOT OPEN
This symbol indicates “dangerous voltage”
inside the product that presents a risk of
electric shock or personal injury.
Do not install this equipment in a confined space
such as a bookcase or similar unit.
WARNING
To prevent damage which may result in fire
or electric shock hazard, do not expose this
appliance to rain or moisture.
CAUTION
BD-HDD Combo USES AN INVISIBLE LASER
BEAM WHICH CAN CAUSE HAZARDOUS
RADIATION EXPOSURE IF DIRECTED. BE SURE
TO OPERATE BD-HDD Combo CORRECTLY AS
INSTRUCTED.
CAUTION
THIS PRODUCT UTILIZES A LASER. USE
OF CONTROLS OR ADJUSTMENTS OR
PERFORMANCE OF PROCEDURES OTHER
THAN THOSE SPECIFIED HEREIN MAY RESULT
IN HAZARDOUS RADIATION EXPOSURE. DO
NOT OPEN COVERS AND DO NOT REPAIR
YOURSELF. REFER SERVICING TO QUALIFIED
PERSONNEL.
This product satisfies CE regulations when
shielded cables and connectors are used to
connect the unit to other equipment. To prevent
electromagnetic interference with electric
appliances, such as radios and televisions, use
shielded cables and connectors for connections.
IMPORTANT NOTE
The mains lead on this equipment is supplied with
a molded plug incorporating a fuse. The value of
the fuse is indicated on the pin face of the plug.
If it requires replacing, a fuse approved to BS1362
of the same rating must be used.
CAUTION:
TO REDUCE THE RISK OF ELECTRIC
SHOCK, DO NOT REMOVE COVER (OR BACK)
NO USER SERVICEABLE PARTS INSIDE. REFER
SERVICING TO QUALIFIED SERVICE PERSONNEL.
Never use the plug with the fuse cover omitted
if the cover is detachable. If a replacement fuse
cover is required, it must be of the same colour as
the pin face of the plug. Replacement covers are
available from your dealer.
If the fitted plug is not suitable for the power points
in your house or the cable is not long enough to
reach a power point, you should obtain a suitable
safety approved extension lead or consult your
dealer for assistance.
However, if there is no alternative to cutting off the
plug, remove the fuse and then safely dispose of
the plug. Do not connect the plug to a mains jack,
as there is a risk of shock hazard from the bared
flexible cord.
To disconnect the apparatus from the mains, the
plug must be pulled out from the mains socket,
therefore the mains plug shall be readily operable.
The product unit accompanying this user manual
is licenced under certain intellectual property
rights of certain third parties. This licence is limited
to private non-commercial use by end-user
consumers for licenced contents.
No rights are granted for commercial use.
The licence does not cover any product unit other
than this product unit and the licence does not
extend to any unlicenced product unit or process
conforming to ISO/IEC 11172-3 or ISO/IEC
13818-3 used or sold in combination with this
product unit. The licence only covers the use
of this product unit to encode and/or decode
audio files conforming to the ISO/IEC 11172-3 or
ISO/IEC 13818-3. No rights are granted under this
licence for product features or functions that do
not conform to the ISO/IEC 11172-3 or ISO/IEC
13818-3.
This symbol indicates important instructions
accompanying the product.
02 Safety Information

4 English
Safety Information
Precautions
Important Safety Instructions
Read these operating instructions carefully before
using the unit. Follow all the safety instructions
listed below.
Keep these operating instructions handy for future
reference.
Read these instructions.
1.
Keep these instructions.
2.
Heed all warnings.
3.
Follow all instructions.
4.
Do not use this apparatus near water.
5.
Clean only with a dry cloth.
6.
Do not block any ventilation openings. Install
7.
in accordance with the manufacturer’s
instructions.
Do not install near any heat sources such
8.
as radiators, heat registers, stoves, or other
apparatus (including AV Receivers) that
produce heat.
Do not defeat the safety purpose of the
9.
polarized or grounding-type plug. A polarized
plug has two blades with one wider than the
other. A grounding type plug has two blades
and a third grounding prong. The wide blade
or the third prong are provided for your safety.
If the provided plug does not fit into your
outlet, consult an electrician for replacement
of the obsolete outlet.
Protect the power cord from being walked on
10.
or pinched particularly at plugs, convenience
receptacles, and the point where they exit
from the apparatus.
Only use attachments/accessories specified
11.
by the manufacturer.
Use only with the cart,
12.
stand, tripod, bracket,
or table specified by the
manufacturer, or sold with
the apparatus. When a cart
is used, use caution when
moving the cart/apparatus combination to
avoid injury from tip-over.
Unplug this apparatus during lightning storms
13.
or when unused for long periods of time.
Refer all servicing to qualified service
14.
personnel. Servicing is required when the
apparatus has been damaged in any way,
such as power-supply cord or plug is
damaged, liquid has been spilled or objects
have fallen into the apparatus, the apparatus
has been exposed to rain or moisture, does
not operate normally, or has been dropped.
Viewing using 3D function
IMPORTANT HEALTH AND SAFETY
INFORMATION FOR 3D PICTURES.
Read and understand the following safety
information before using the 3D function.
Some viewers may experience discomfort while
•
viewing 3D TV such as dizziness, nausea, and
headaches.
If you experience any such symptom, stop
viewing 3D TV, remove the 3D Active Glasses,
and rest.
Watching 3D images for an extended period of
•
time may cause eye strain. If you feel eye strain,
stop viewing 3D TV, remove your 3D Active
Glasses, and rest.
A responsible adult should frequently check on
•
children who are using the 3D function.
If there are any reports of tired eyes, headaches,
dizziness, or nausea, have the child stop viewing
3D TV and rest.
Do not use the 3D Active Glasses for other
•
purposes (such as general eyeglasses,
sunglasses, protective goggles, etc.)
Do not use the 3D function or 3D Active Glasses
•
while walking or moving around. Using the 3D
function or 3D Active Glasses while moving
around may cause you to bump into objects,
trip, and/or fall, and cause serious injury.
English 5
02 Safety Information
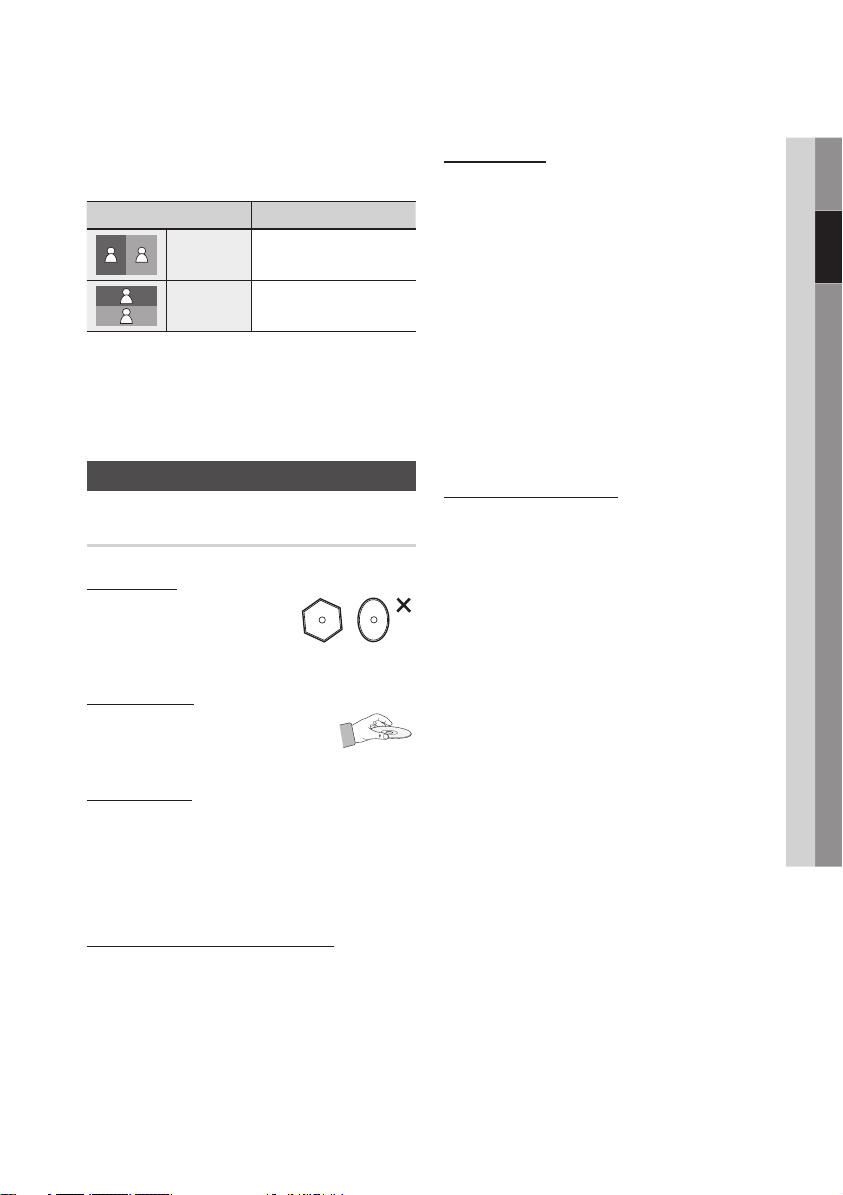
When displaying 3D programme with this
•
model, the actual screen may appear as shown
below:
Screen Display Description
Side by Side
Top & Bottom
3D programme reception, recording and
•
playback of this model may not fully support
3D, due to the 3D broadcast format is not yet
standardized worldwide. It is not the product’s
malfunction or disorder.
Same screen duplicates
horizontally.
Same screen duplicates
vertically.
Disc Storage & Management
Disc Handling
Disc Shape
Use discs with regular
•
shapes. If you use an irregular
disc (a disc with a special
shape), you can damage the product.
Holding discs
Avoid touching the surface of
•
a disc where data has been
recorded.
Blu-ray Discs
Do not leave a Blu-ray Disc in the product for
•
long periods of time. Remove the Blu-ray Disc
from the product and store it in its case.
Be careful not to scratch or leave fingerprints on
•
the surface of the Blu-ray Disc.
DVD-VIDEO, Audio CD (CD-DA)
Wipe off dirt or contamination on the disc with a
•
soft cloth.
Disc Storage
Be careful not to damage the disc because the
data on these discs is highly vulnerable to the
environment.
Do not keep under direct sunlight.
•
Keep in a cool ventilated area.
•
Store vertically.
•
Keep in a clean protection jacket.
•
If you move your product suddenly from a cold
•
place to a warm place, condensation may occur
on the operating parts and lens and cause
abnormal disc playback. If this occurs, unplug
the product, wait for two hours, and then
connect the plug to the power outlet. Then,
insert the disc, and try to play back again.
HDD (Hard Disk Drive)
The hard disk has a high storage density, which
enables long recording durations and quick
access to written data. However, it can easily be
damaged by shock, vibration or dust and should
be kept away from magnets.
To avoid losing important data, observe the
following precautions.
Do not use the BD-HDD Combo in a place
•
subject to extreme changes in temperature.
Do not apply a strong shock to the BD-HDD
•
Combo.
Do not place the BD-HDD Combo in a location
•
subject to mechanical vibrations or in an
unstable location.
Do not place the BD-HDD Combo on top of a
•
heat source.
Do not disconnect the AC power cord while the
•
power is on.
Do not attempt to change the hard disk. This
•
may result in a malfunction.
Should the hard disk be damaged, you cannot
recover lost data. The hard disk is only a
temporary storage space.

6 English
Safety Information
Handling Cautions
Do not write on the printed side with a ball-point
•
pen or pencil.
Do not use record cleaning sprays or antistatic
•
sprays to clean discs. Also, do not use volatile
chemicals, such as benzene or thinner.
Do not apply labels or stickers to discs. (Do not
•
use discs fixed with exposed tape adhesive or
leftover peeled-off stickers.)
Do not use scratch-proof protectors or covers.
•
Do not use discs printed with label printers
•
available on the market.
Do not load warped or cracked discs.
•
Before connecting other components to this
•
product, be sure to turn them off.
Do not move the product while it is playing a
•
disc. The disc can be scratched or damaged
and the product’s internal parts can be
damaged.
Do not put a flower vase filled with water or any
•
small metal objects on the product.
Be careful not to put your hand into the disc
•
slot.
Do not place anything other than the disc in the
•
disc slot.
Interference from exterior sources such as
•
lightening and static electricity can affect
the normal operation of this product. If this
occurs, turn the product off and on again with
the POWER button, or disconnect and then
reconnect the AC power cord to the AC power
outlet. The product will operate normally.
Be sure to remove the disc and turn off the
•
product after use.
Disconnect the AC power cord from the AC
•
outlet when you don’t intend to use the product
for long periods of time.
To clean a disc, wipe it in a straight
•
line from the inside to the outside of
the disc.
Do not expose the product to any
•
liquid.
When the AC plug is connected to a wall outlet,
•
the product will still draw power (standby mode)
when it is turned off.
Apparatus shall not be exposed to dripping or
•
splashing and no objects filled with liquids, such
as vases, shall be placed on the apparatus.
The main plug is used as a disconnect device
•
and shall stay readily operable at any time.
Do not touch the power plug with a wet hand.
•
Otherwise, it can cause an electric shock.
Do not share one power socket with multiple
•
electric devices. Otherwise, it may cause an
overheat, resulting in a fire.
If you encounter an abnormal noise, burning
•
smell or smoke, turn off the power switch
immediately and disconnect the power plug
from the wall outlet. Then, contact the nearest
customer centre for technical assistance. If you
still use the product as it is, this may cause an
electric shock or fire.
Maintenance of Cabinet
Before you clean the Blu-ray Disc’s cabinet, be
sure to disconnect the AC power cord from the
AC outlet.
Do not use benzene, thinner, or other solvents
•
for cleaning.
Wipe the cabinet with a soft cloth.
•
Restrictions on Playback
This product may not respond to all operating
•
commands because some Blu-ray Disc, DVD,
and CD discs allow specific or limited operation
and provide only certain features during
playback.
Please note that this is not a defect in the
product.
Samsung cannot guarantee that this product
•
will play every disc bearing the Blu-ray Disc,
DVD or CD logo because disc formats evolve,
and problems and errors may occur during the
creation of Blu-ray Disc, DVD, and CD software
and/or the manufacture of discs.
Please contact the SAMSUNG customer care
centre if you have questions or encounter
difficulty in playing Blu-ray Disc, DVD, or CD
discs in this product. Also, refer to rest of
this user manual for additional information on
playback restrictions.

English 7
Contents
KEY FEATURES
SAFETY INFORMATION
GETTING STARTED
2 Blu-ray™ Disc Features
2
BD-HDD Combo Features
3 Warning
4
Precautions
4 Important Safety Instructions
4 Viewing using 3D function
5
Disc Storage & Management
5 Disc Handling
11 Before using the User Manual
11 Disc Types and Contents your product can play
11
12
12
13
14
17
17
17
18
18 Accessories
19
20
21
21 Tour of the Remote Control
22
23
Disc types your product cannot play
HDD Recording
Disc Types
Region Code
Supported File Formats
Connect a USB device before using the Time shift
and Recorded TV functions
Blu-ray Disc Compatibility
Copyright
Logos of Discs the Product Can Play
Front Panel
Rear Panel
Remote Control
Setting the Remote Control to Operate Your TV
TV Control Codes
ENGLISH
CONNECTIONS
24 Connecting to a TV with an Audio/Video cables
and RF cable
25 Connecting to a TV
25 Case 1 : Connecting to a TV with an HDMI Cable
26
27
- Best Quality (Recommended)
Case 2 : Connecting to a TV with a Component
Cable - Better Quality
Case 3 : Connecting to a TV with an Audio/Video
cable - Good Quality

8 English
Contents
CONNECTIONS
SETUP
28 Connecting to an Audio System
28 Case 1 : Connecting to an Audio System
29
29
30 Connecting to the Network
30 Cable Network
31
32 Before Starting (Plug & Play)
32
33
33 Channel List
34
35 Settings
35 Display
39
42
44
48
50
50
51
51
53
(HDMI supported AV receiver) - Best Quality
(Recommended)
Case 2 : Connecting to an Audio System
(Stereo Amplifier) - Good Quality
Case 3 : Connecting to an Audio System
(AV receiver with Dolby Digital or DTS decoder)
- Better Quality
Wireless Network
Accessing the Settings Menu
Watch TV
Channel Manager
Audio
Channel
Network
System
Language
Security
General
Support
Contact Samsung
BASIC FUNCTIONS
53 Playing a Video
53 Playback
53
54
55 Using the Disc Menu/Title Menu/Popup Menu
55 Using the Disc Menu
55
55
55
3D Converter
Disc Structure
Using the Title Menu
Playing the Title List
Using the Popup Menu

English 9
ENGLISH
BASIC FUNCTIONS
55 Using the Search and Skip Functions
55 Searching for a Desired Scene
56
56 Slow Motion Play/Step Motion Play
56 Slow Motion Play
56
56 Using the TOOLS button
56 Moving to a Desired Scene Directly
57
57
57
57
58
58
59
59
59
59 Listening to Music
59 Playing an Audio CD (CD-DA)/MP3
60
60
60
61 Playing back a Pictures
61 Playing JPEG files
61
62 Media Play
Skipping Chapters
Step Motion Play
Repeating the Title or Chapter
Repeating the Title or Chapter
Repeating a Section
Selecting the Picture Settings
Selecting the Audio Language
Selecting the Subtitle Language
Changing the Camera Angle
Selecting the Information
Setting BONUSVIEW
AMG function
Repeat an Audio CD (CD-DA)/MP3
Playlist
Using the TOOLS button
DTV FUNCTIONS
63 Display Screen
63
Using the TOOLS button
63 Picture Settings
63
64
64
64
64
64
Selecting the Audio Language
Selecting the Dual I II
Lock current channel
Switch to Cable
Add to Favourites
Signal Information

10 English
Contents
DTV FUNCTIONS
ADVANCED FUNCTIONS
64 Setting Audio Description & Subtitle Language
64 Setting the Audio Description
64
65 Viewing the Guide Screen
65
66 To Cancel or Edit Schedule
66 Viewing DTV with the 3D effect
67
68 Recording
68 Recording the current TV channel you are
69
69
69
70 Playing the Recorded Title
71
71 Renaming a Recorded Title
71
71
72 Copy
72 Copying Videos, Music or Photos
72
Setting the Subtitle Language
Schedule Manager
Using the Teletext Service
watching
Watching other channels during Recording a TV
channel
Playing a Disc while Recording a TV channel
Time Shift function
Edit the Recorded Title
Splitting a Section of a Title (Divide into two)
Splitting a Section of a Title (Partial Delete)
Ripping from a Audio CD (CD-DA)
NETWORK SERVICES
APPENDIX
73 Using Smart Hub
73 Starting Smart Hub for the First Time
76
78
80
80 Samsung Apps
80 For Pay Apps
82 BD-LIVE™
82
83 Troubleshooting
85 Repairs
86 Specifications
The Settings Menu - BLUE (D)
The Edit Mode Menu - YELLOW (C)
The Sort Menu - GREEN (B)
Using the AllShare Function
English 11
Getting Started
Before using the User Manual
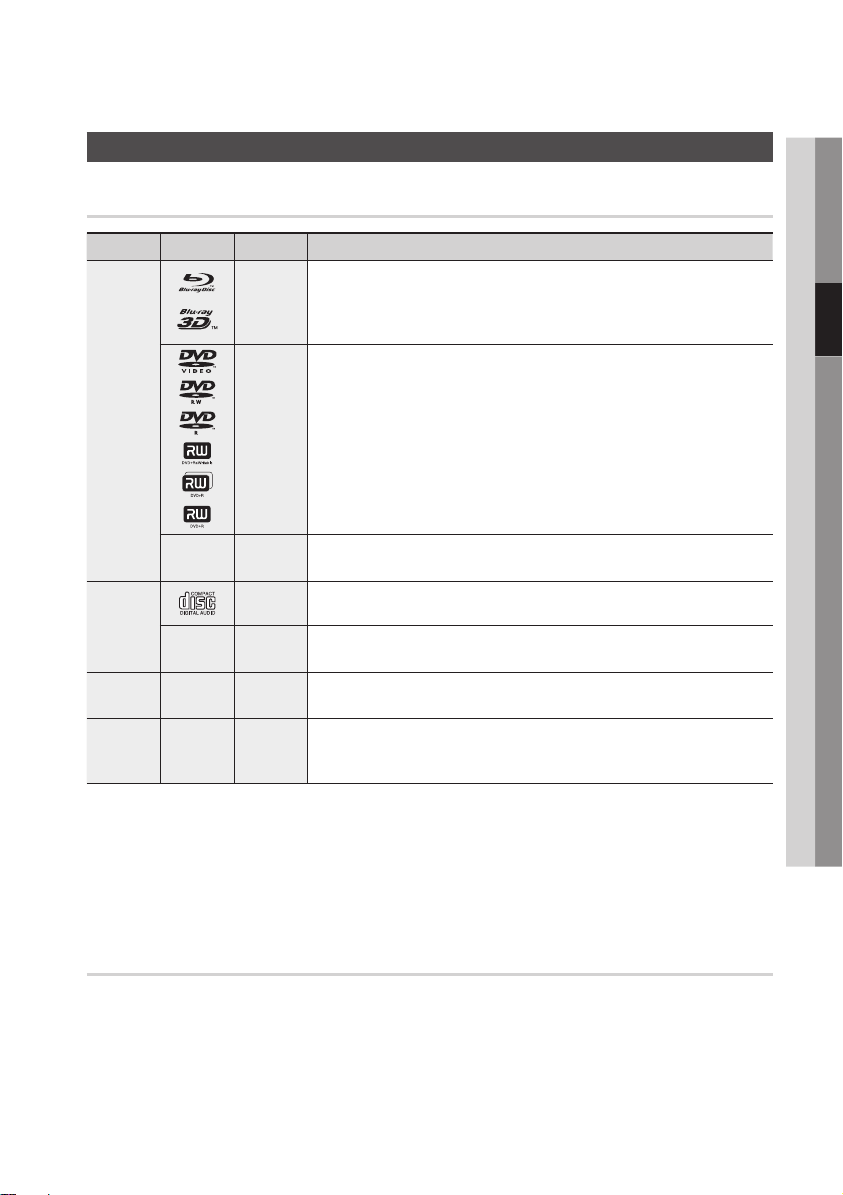
Disc Types and Contents your product can play
Term Logo Icon Definition
h
Indicates a function available on a BD-ROM or BD-RE/-R disc recorded in the BD-RE
format.
z
VIDEO
Z
Indicates a function available on a DVD-VIDEO or recorded DVD+RW/
DVD-RW(V)/DVD-R/+R discs that have been recorded and finalized.
y
Indicates a function available in a CD-RW/-R, DVD-RW/-R, BD-RE/-R disc or a USB
storage media containing DivX, MKV, MP4 contents.
Indicates a function available on an audio CD-RW/-R (CD-DA format).
Indicates a function available in a CD-RW/-R, DVD-RW/-R, BD-RE/-R disc or a USB
storage media containing MP3 or WMA contents.
Indicates a function available in a CD-RW/-R, DVD-RW/-R, BD-RE/-R disc or a USB
storage media containing JPEG contents.
Indicates a function available on the HDD.
MUSIC
PHOTO
VIDEO
MUSIC
PHOTO
-
x
o
-
w
-
G
-
T
03 Getting Started
NOTE
✎
The product may not play certain CD-RW/-R and DVD-R because of the disc type or recording conditions.
▪
If a DVD-RW/-R disc has not been recorded properly in DVD video format, it will not be playable.
▪
Your product will not play content that has been recorded on a DVD-R at a bit-rate that exceeds 10 Mbps.
▪
Your product will not play content that has been recorded on a BD-R or USB device at a bit rate that exceeds 30 Mbps.
▪
Disc types your product cannot play
HD DVD
•
DVD-ROM/PD/
•
MV-Disc, etc
DVD-RAM
•
Super Audio CD
•
(except CD layer)
DVD-RW(VR mode)
•
CVD/CD-ROM/CDV/
•
CD-G/CD-I/LD
(CD-Gs play audio only,
not graphics.)
3.9 GB DVD-R Disc for
•
Authoring.

12 English
Getting Started
NOTE
✎
Some commercial discs and DVDs purchased
▪
outside your region may not play on this product.
Playback may not work for some types of discs, or
▪
when you use specific operations, such as angle
change and aspect ratio adjustment. Information
about the discs is written in detail on the disc box.
Please refer to this if necessary.
Do not allow the disc to become dirty or scratched.
▪
Fingerprints, dirt, dust, scratches or deposits of
cigarette smoke on the recording surface may make
it impossible to use the disc for playback.
When you play a BD-J title, loading may take longer
▪
than a normal title or some functions may perform
slowly.
This product may not respond to all operating
▪
commands because some Blu-ray Disc, DVD, and
CD discs allow specific or limited operation and
provide only certain features during playback.
Please note that this is not a defect in the product.
Samsung cannot guarantee that this product will
▪
play every disc bearing the Blu-ray Disc, DVD or CD
logo because disc formats evolve, and problems and
errors may occur during the creation of Blu-ray Disc,
DVD, and CD software and/or the manufacture of
discs.
Please contact the SAMSUNG customer care centre
if you have questions or encounter difficulty when
playing Blu-ray Disc, DVD, or CD discs in this
product. Also, refer to rest of this user manual for
additional information on playback restrictions.
Disc Types
BD-ROM
Blu-ray ROM discs can only be played back.
This product can play back pre-recorded
commercial BD-ROM discs.
BD-RE/-R
Blu-ray RE/-R discs can be recorded on and
played back.
This product can play back a BD-RE/-R disc
recorded by other compatible Blu-ray Disc
recorders.
DVD-VIDEO
This product can play back pre-recorded
•
commercial DVDs (DVD-VIDEO discs) with
movies.
When switching from the first layer to the
•
second layer of a dual-layered DVD-VIDEO disc,
there may be momentary distortion in the image
and sound. This is not a malfunction of the
product.
DVD-RW/-R/+R
This product can play back a DVD-RW/-R/+R disc
recorded and finalized with a DVD video recorder.
The ability to play back may depend on recording
conditions.
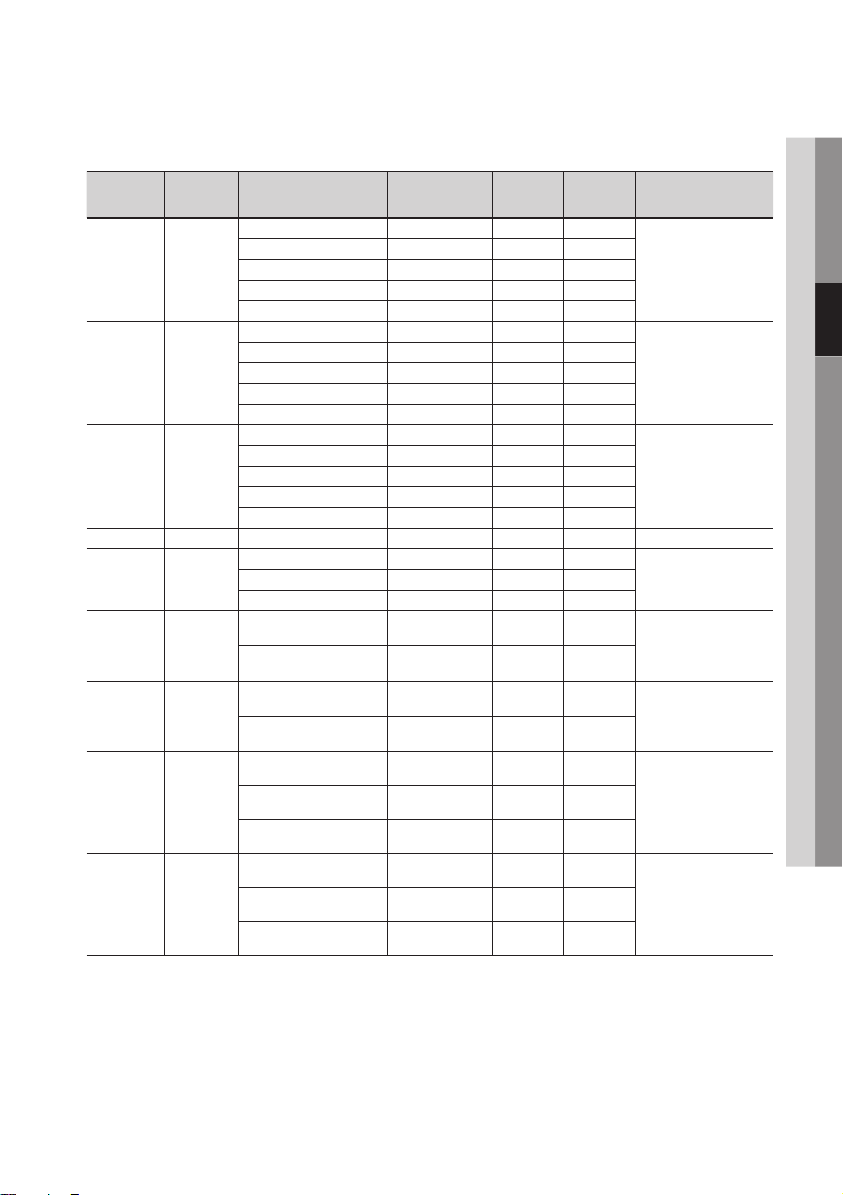
HDD Recording
You can record digital broadcast on the internal
HDD as below.
Broadcast
Depending on the bitrate of broadcast
programme, available recording time may be
decreased or increased.
BD-D8200 (250GB) BD-D8500 (500GB)
Recording
Type
HD 64 Hrs 8 Mbps 130 Hrs 8 Mbps
SD 102 Hrs 5 Mbps 208 Hrs 5 Mbps
Time
Estimated
Bitrate
Recording
Time
Estimated
Bitrate
DVD+RW
This product can play back a DVD+RW disc
•
recorded with a DVD Video recorder. The
ability to play back may depend on recording
conditions.
Audio CD (CD-DA)
This product can play back CD-DA format audio
•
CD-RW/-R discs.
The product may not be able to play some
•
CD-RW/-R discs due to the condition of the
recording.
English 13
03 Getting Started
CD-RW/-R
Use a 700MB (80 minute) CD-RW/-R disc.
•
If possible, do not use an 800MB (90 minute) or
larger disc, as the disc may not play back.
If the CD-RW/-R disc was not recorded as a
•
closed session, you may experience delays
when playing back the beginning of the disc or
all recorded files may not play.
Some CD-RW/-R discs may not play on this
•
product, depending on the device which was
used to burn them. For contents recorded on
CD-RW/-R media from CDs for your personal
use, playability may vary depending on the
contents and discs.
AVCHD (Advanced Video Codec High
Definition)
This product can play back AVCHD format
•
discs. These discs are normally recorded and
used in camcorders.
The AVCHD format is a high definition digital
•
video camera format.
The MPEG-4 AVC/H.264 format compresses
•
images with greater efficiency than the
conventional image compressing format.
Some AVCHD discs use the “x.v.Colour” format.
•
This product can play back AVCHD discs that
use “x.v.Colour” format.
“x.v.Colour” is a trademark of Sony Corporation.
•
“AVCHD” and the AVCHD logo are trademarks
•
of Matsushita Electronic Industrial Co., Ltd. and
Sony Corporation.
NOTE
✎
Some AVCHD format discs may not play, depending
▪
on the recording condition.
AVCHD format discs need to be finalized.
“x.v.Colour” offers a wider colour range than normal
▪
DVD camcorder discs.
Some DivX, MKV and MP4 format discs may not
▪
play, depending on the video resolution and frame
rate condition.
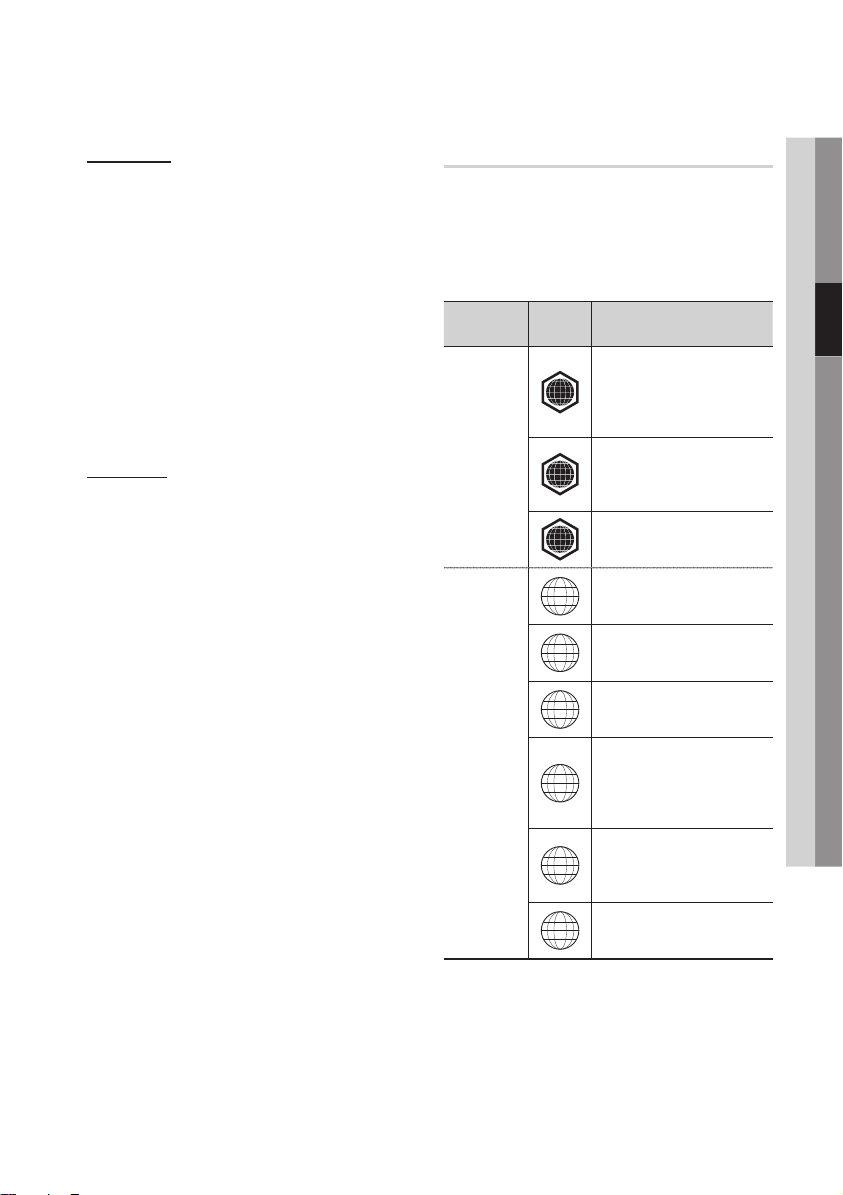
Region Code
Both products and discs are coded by region.
These regional codes must match for a disc to
play. If the codes do not match, the disc will not
play.
The Region Number for this product is displayed
on the rear panel of the product.
Disc Type
Blu-ray Disc
DVD-VIDEO
Region
Code
North America, Central America,
South America, Korea, Japan,
A
Taiwan, Hong Kong and South
East Asia.
Europe, Greenland, French
territories, Middle East, Africa,
B
Australia and New Zealand.
India, China, Russia, Central
C
and South Asia.
The U.S., U.S. territories and
1
Canada
Europe, Japan, the Middle East,
2
Egypt, South Africa, Greenland
Taiwan, Korea, the Philippines,
3
Indonesia, Hong Kong
Mexico, South America,
Central America, Australia,
4
New Zealand, Pacific Islands,
Caribbean
Russia, Eastern Europe, India,
most of Africa, North Korea,
5
Mongolia
China
6
Area

14 English
Getting Started
Supported File Formats
Notes on the USB connection
Supported devices: USB storage media, MP3
•
product, digital camera, USB card reader
Does not support if a folder or file name is
•
longer than 128 characters.
A certain USB/digital camera device may not be
•
compatible with the product.
FAT16, FAT32 and NTFS file systems are
•
supported.
Connect directly to the product's USB port.
•
Connecting through another cable may raise
problems with USB compatibility.
Inserting more than one memory device to a
•
multi-card reader may not operate properly.
Supports the PTP protocol.
•
Do not disconnect USB device during a
•
"loading" process.
Bigger the image resolution, the longer the delay
•
to displaying.
DRM applied MP3 files downloaded from a
•
commercial site are not played back.
If the problem of the unrecognized USB device
•
persists or the internal file list is corrupt or a
certain file could not be played, connect the
USB device to the PC and format it in a proper
file system, then check it again.
If the file deleted from your PC still appears in
•
Media Play, use “Empty Recycle Bin” on your
desktop to delete it completely.
Some USB devices supporting the power saving
•
mode may switch the saving mode of the BD
product to Off automatically when connected
with each other.
Need-to-Know List before using Media Play
•
Media Play only supports USB Mass Storage
-
Class (MSC) devices. MSC is a Mass Storage
Class Bulk-Only Transport device. Examples
of MSC are Thumb drives, Flash Card Readers
and USB HDD. (HUB is not supported.)
MSC supports Music, Photo and Video files,
-
while a PTP device supports Photo files only.
MTP (Media Transfer Protocol) is not
supported.
The file system supports FAT16, FAT32 and
NTFS (read only).
Before connecting your device to the product,
please back up your files to prevent them
from damage or loss of data. SAMSUNG is
not responsible for any data file damage or
data loss.
Do not disconnect the USB device while it is
loading.
If some devices require excessive power, USB
device may be limited by the circuit safety
device.
You must remove the USB storage device
•
safely (by performing the “Safely Remove USB”
function) in order to prevent a possible damage
to the USB memory. Press the MENU button
to move to the home menu, and select the
YELLOW (C) button and press the ENTER
button.
If you insert the disc when playing USB storage
•
device, the device mode is changed to “DVD or
CD” automatically.
When the Audio CD (CD-DA), MP3 and JPEG
•
files are in stop mode, you can’t see full screen
by pressing the FULL SCREEN button on the
remote control.
A Certain USB HDD Device may not be
•
compatible with this product.
English 15
03 Getting Started
Video File Support
File
Extention
*.avi
*.mkv
*.asf
*.wmv
*.mp4
*.3gp
*.vro
*.mpg
*.mpeg
*.ts
*.tp
*.trp
Container Video Codec Resolution
DivX 3.11/4.x/5.1/6.0 1920x1080 6 ~ 30
XviD 1920x1080 6 ~ 30
AVI
MKV
ASF
ASF Window Media Video v9 1920x1080 6 ~ 30
MP4
3GPP
VRO
VOB
PS
TS
H.264 BP/MP/HP 1920x1080 6 ~ 30
MPEG4 SP/ASP 1920x1080 6 ~ 30
Motion JPEG 1920x1080 6 ~ 30
DivX 3.11/4.x/5.1/6.0 1920x1080 6 ~ 30
XviD 1920x1080 6 ~ 30
H.264 BP/MP/HP 1920x1080 6 ~ 30
MPEG4 SP/ASP 1920x1080 6 ~ 30
Motion JPEG 1920x1080 6 ~ 30
DivX 3.11/4.x/5.1/6.0 1920x1080 6 ~ 30
XviD 1920x1080 6 ~ 30
H.264 BP/MP/HP 1920x1080 6 ~ 30
MPEG4 SP/ASP 1920x1080 6 ~ 30
Motion JPEG 1920x1080 6 ~ 30
H.264 BP/MP/HP 1920x1080 6 ~ 30
MPEG4 SP/ASP 1920x1080 6 ~ 30
XVID 1920x1080 6 ~ 30
H.264 BP/MP/HP 1920x1080 6 ~ 30
MPEG4 SP/ASP 1920x1080 6 ~ 30
MPEG2 1920x1080 24/25/30
MPEG1 352x288 24/25/30
MPEG1 352x288 24/25/30
MPEG2 1920x1080 24/25/30
H.264 1920x1080 6 ~ 30
MPEG2 1920x1080 24/25/30
H.264 1920x1080 6 ~ 30
VC1 1920x1080 6 ~ 30
Frame rate
(fps)
Bit rate
(Mbsp)
8
8
25
8
8
8
8
25
8
8
8
8
25
8
8
25 WMA
25
8
8
25
8
30
30
30
30
25
30
25
25
Audio Codec
MP3
AC3
LPCM
ADPCM
DTS Core
MP3
AC3
LPCM
ADPCM
DTS Core
MP3
AC3
LPCM
ADPCM
WMA
MP3
ADPCM
AAC
ADPCM
AAC
HE-AAC
AC3
MPEG
LPCM
AC3
MPEG
LPCM
AAC
AC3
AAC
MP3
DD+
HE-AAC

16 English
Getting Started
Limitations
Even when the file is encoded by a supported
codec mentioned above, a file might not be
played if its content has a problem.
Normal playback is not guaranteed if the file's
container information is wrong or the file itself is
corrupted.
Files having higher Bit rate/frame rate than
standard may stutter with sound/video
playback.
Seek (skip) function is not available if the file's
index table is damaged.
When you playback a file remotely through
network connection, video playback may stutter
depending on established network speed.
Video decoder
Supports up to H.264 Level 4.1
Does not support H.264 FMO/ASO/RS, VC1
SP/MP/AP L4 and AVCHD
XVid, MPEG4 SP, ASP:
Below 1280x720: 60 frames max
Above 1280x720: 30 frames max
Does not support GMC 2 or higher
-
Music File Support
File
Extension
*.mp3
*.wma
Container
MP3
WMA
Audio
Codec
MP3 -
WMA
Support Range
Compliant with
WMA version 10
* Sampling rates (in
kHz) - 8, 11, 16,
22, 32, 44.1, 48
* Bit rates - All bit-
rates in the range
5kbps to 384kbps
Audio decoder
Supports WMA 7, 8, 9 and STD
Does not support WMA 9 PRO multi-channel
lossless audio decoding if number of channels
is more than 2
Does not support WMA sampling rate of
220/50Hz mono
Supports DTS Core (5.1 ch, 16 bit, 48kHz) only
Does not support APDCM MULAW, ALAW
-
Optical Media
CD Media
Bit Rate : Max 9.6Mbps
DVD Media
Bit Rate : Max 22.16Mbps

English 17
03 Getting Started
Connect a USB device before
using the Time shift and Recorded
TV functions
Do not use a USB memory stick. We do not
•
support a USB memory stick.
We recommend using a USB HDD with at
•
least 5400 rpm, but a USB HDD of RAID type
is not supported.
To use the Time shift mode or the Recorded
•
TV function, a connected USB device must be
execute the Device Format function to proper
form for recording.
During the device formatting, do not
disconnect the device while formatting is in
progress. If you format the device, all files will
be deleted.
Before formatting your device to this product,
please back up your files to prevent them
from damage or loss of data. SAMSUNG is
not responsible for any data file damage or
data loss.
Recorded videos are DRM (digital rights
•
managements) protected and cannot be played
on a PC or other product. Note that files saved
on the TV cannot be used after the main board
is changed.
If available storage is left less than 10MB
•
during the recording, recording is finished
automatically.
If the USB device has failed the Device
•
Performance Test, the USB device must
go through the Device Format and Device
Performance Test again before you record with
the Guide or Channel Manager.
For more information, see your user’s manual.
•
Blu-ray Disc Compatibility
Blu-ray Disc is a new and evolving format.
Accordingly, disc compatibility issues are possible.
Not all discs are compatible and not every disc will
play back. For additional information, refer to the
Compliance and Compatibility Notice section of
this user manual.
Copyright
© 2011 Samsung Electronics Co.,Ltd.
All rights reserved; No part or whole of this user’s
manual may be reproduced or copied without the
prior written permission of Samsung Electronics
Co.,Ltd.
18 English
Getting Started
BD-HDD/TV
2D�3D
0000-000000
POWER
1 2 3
4 5 6
7 8 9
DISC MENU
TITLE MENU
0
TTX/MIX
BD TV
TIME SHIFT
TV VOL PROG
TV SOURCE
1
1
CH LIST
SMART
GUIDEiMENU
2D�3D
FULL
SCREEN
A B C D
INFOTOOLS
EXIT
RETURN
...
?
×
HUB
SEARCH
AD/
SUBTITLE
REC PAUSERECAUDIO
TV MUTE
TV
POWER
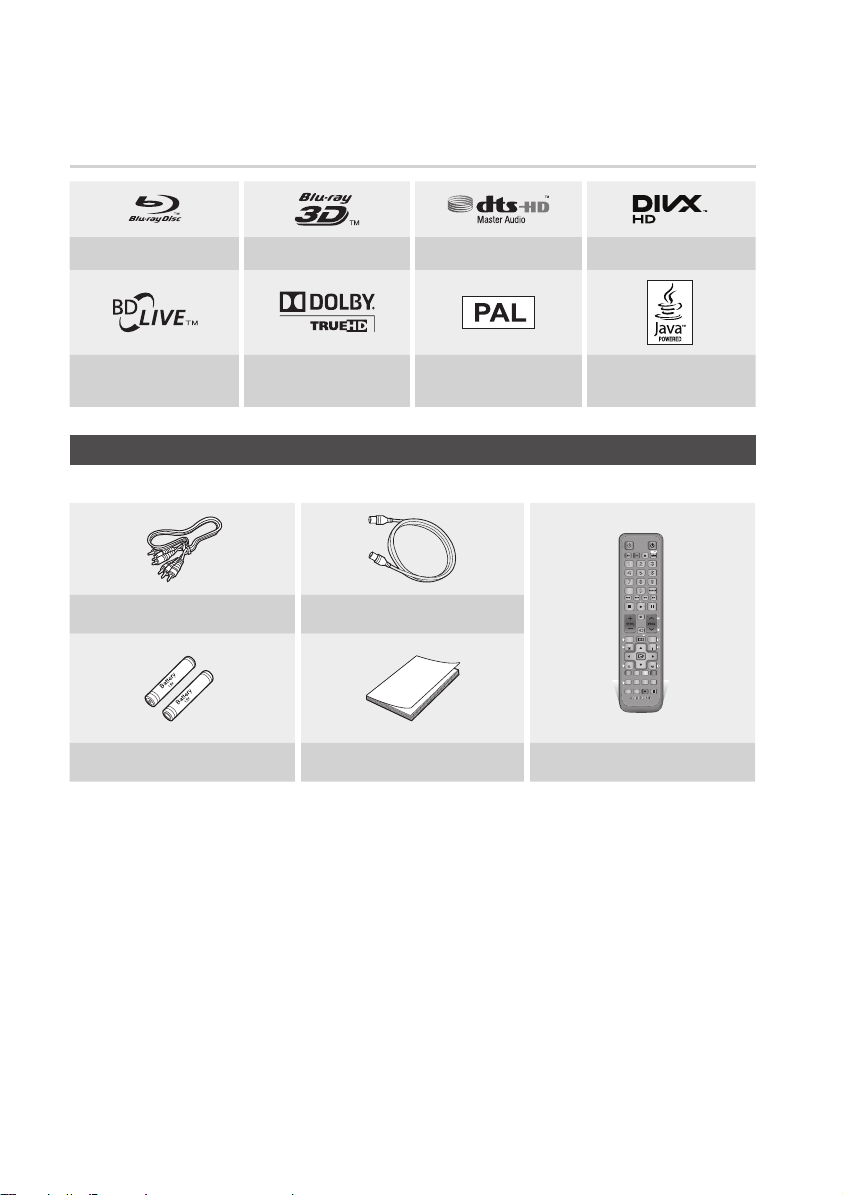
Logos of Discs the Product Can Play
Blu-ray Disc 3D Blu-ray Disc DTS-HD Master Audio DivX
BD-LIVE Dolby TrueHD
PAL broadcast System in U.K.,
France, Germany, etc.
Accessories
Check for the supplied accessories below.
Audio/Video cable RF cable for TV
Batteries for Remote Control (AAA Size) User Manual Remote Control
Java
English 19
03 Getting Started
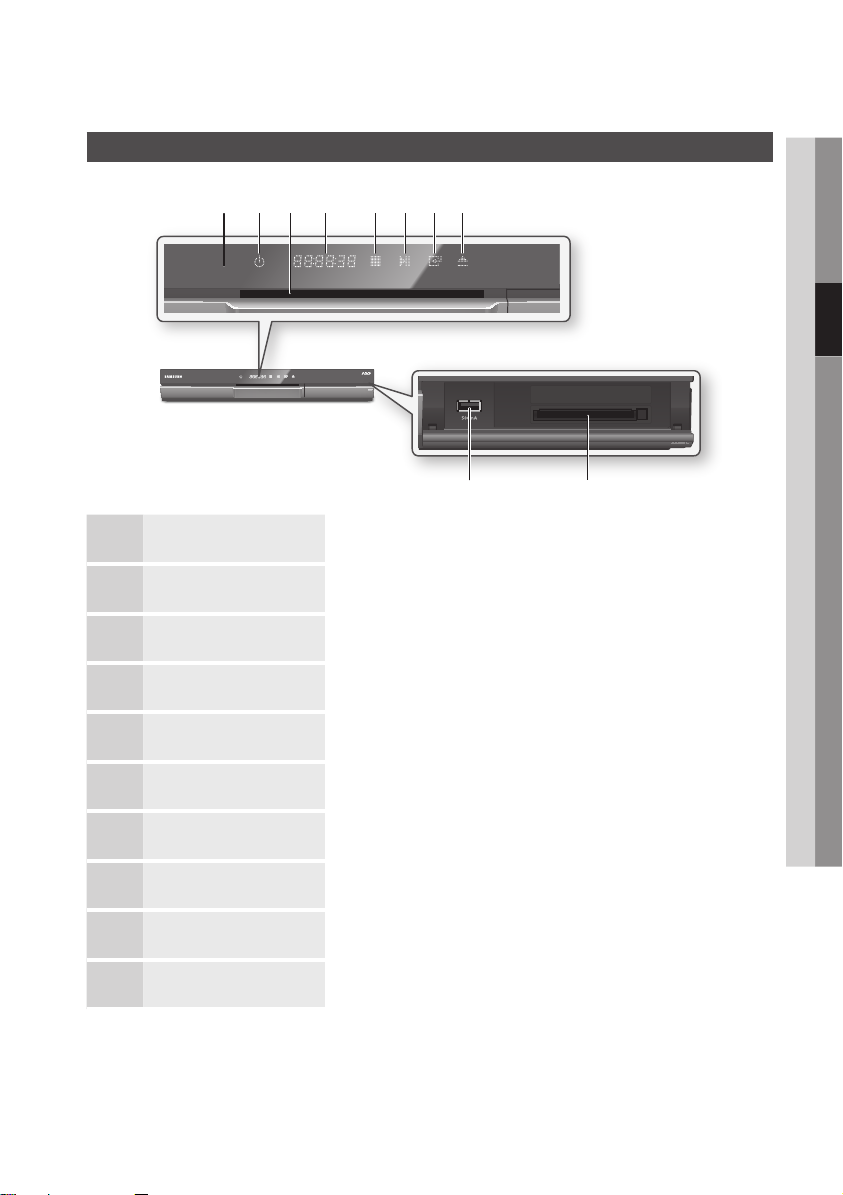
Front Panel
a bc d efgh
j i
REMOTE CONTROL SENSOR Detects signals from the remote control.
1
POWER BUTTON Turns the product on and off.
2
DISC SLOT Inserts a disc.
3
DISPLAY Displays the playing status, time, etc.
4
STOP BUTTON Stops disc playback.
5
PLAY/PAUSE BUTTON Plays a disc or pauses playback.
6
ENTER BUTTON Selects menu items or starts a disc.
7
EJECT BUTTON Ejects a disc.
8
COMMON INTERFACE SLOT To watch paid channels, insert the CI CAM with CI or CI+ CARD.
9
USB HOST It can be used for software upgrades and MP3/JPEG/DivX/MKV/MP4 playback.
10
NOTE
✎
When the product displays the Blu-ray Disc menu, you may not start the movie by pressing the Play button on the
▪
product or the remote. To play the movie, you must select Play Movie or Start in the disc menu, and then press the
ENTER button.
You must obtain a “CI CAM with CI or CI+ CARD” from a local cable service provider.
▪
20 English
Getting Started
When removing the “CI CAM with CI or CI+ CARD”, carefully pull it out with your hands since dropping the “CI CAM
▪
with CI or CI+ CARD” may cause damage to it.
Insert the “CI CAM with CI or CI+ CARD” in the direction marked on the card.
▪
The location of the CI card slot may be different depending on the model.
▪
“CI CAM with CI or CI+ CARD” is not supported in some countries and regions; check with your authorized dealer.
▪
If you have any problems, please contact a service provider.
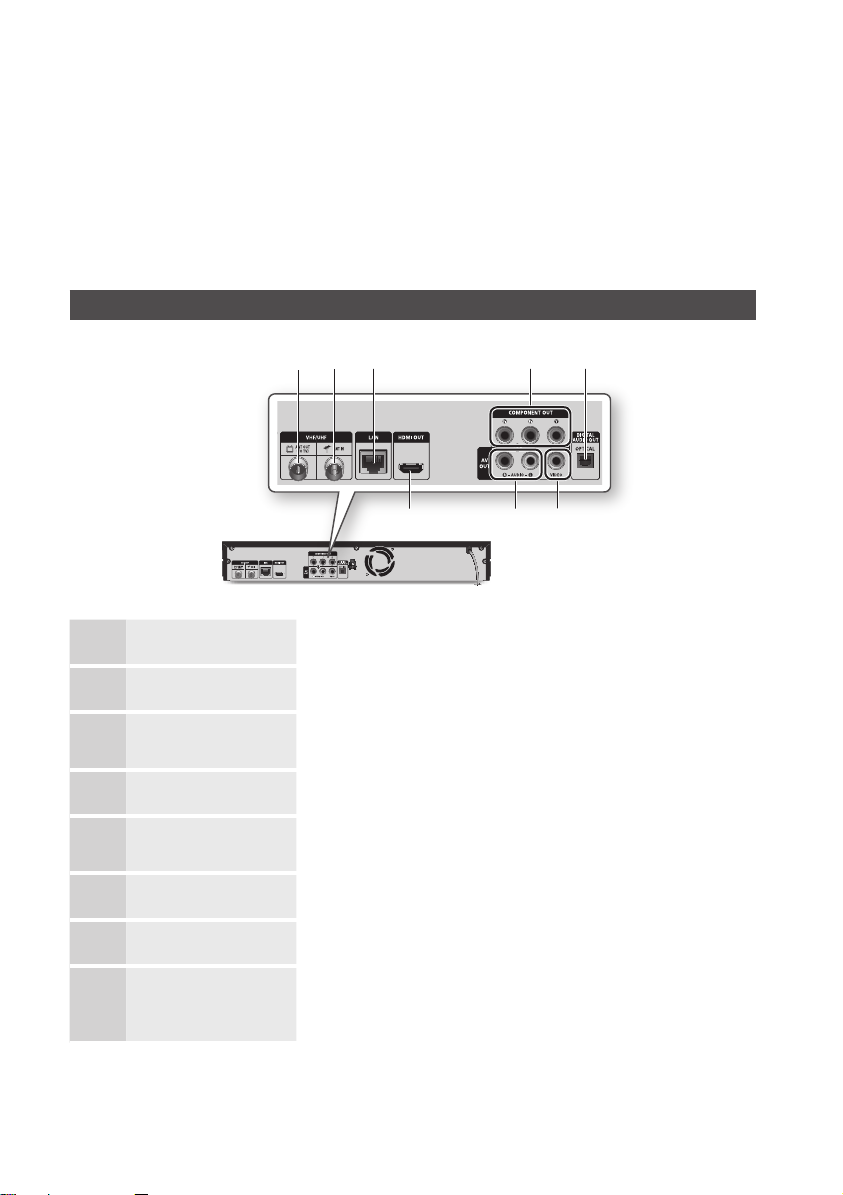
Rear Panel
b c d
a
e
g fh
ANT OUT (TO TV) Connects RF cable to TV antenna input.
1
ANT IN Connects RF cable from antenna.
2
LAN
3
COMPONENT OUT Connects to external devices that have Component video input.
4
DIGITAL AUDIO OUT
5
(OPTICAL)
VIDEO OUT Connects to the video input of external devices using a video cable.
6
Use for network based services (See pages 73~82), BD-LIVE, and software
upgrades using a network connection.
Connects to an AV receiver.
AUDIO OUT Connects to the audio input of external devices using audio cables.
7
HDMI OUT
8
Using an HDMI cable, connect this HDMI output terminal to the HDMI input terminal
on your TV for the best quality picture or to your AV receiver for the best quality
sound.
English 21
03 Getting Started
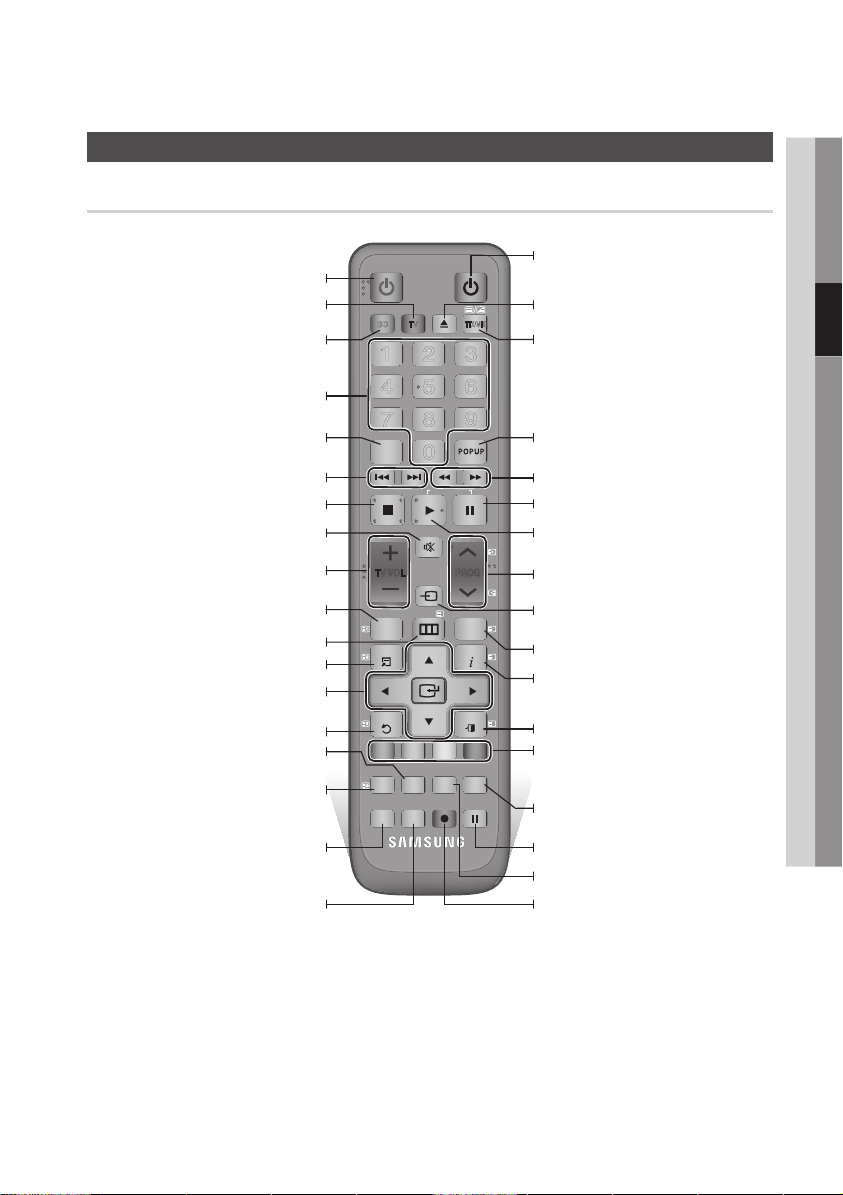
Tour of the Remote Control
BD-HDD/TV
2D3D
0000-000000
POWER
1 2 3
4 5 6
7 8 9
DISC MENU
TITLE MENU
0
TTX/MIX
BD TV
TIME SHIFT
TV VOL
PROG
TV SOURCE
1
1
CH LIST
SMART
GUIDE
i
MENU
2D3D
FULL
SCREEN
A B C D
INFOTOOLS
EXIT
RETURN
...
?
×
HUB
SEARCH
AD/
SUBTITLE
REC PAUSERECAUDIO
TV MUTE
TV
POWER
Turn the product on and off.
Press this to operate a TV.
Remote Control
Turn the TV on and off.
(To operate your TV, please refer to pages
22~23)
Press to eject a disc.
Press this to operate BD-HDD Combo.
Press numeric buttons to operate options or
to access channels directly.
Use to enter the disc menu.
Press to skip backwards or forwards.
Stops playback or recording.
Mutes the speakers of your TV.
TV volume adjustment.
Displays channel lists on the screen.
Press to move to the home menu.
Press to use Tools menu.
Use to select menu items and change
Return to the previous menu.
Press to search contents.
Press to use Smart Hub.
Press this to set audio description and
Press this to set audio.
menu value.
subtitle.
Alternately selects Teletext, Double or Mix.
Use to enter the popup menu/title menu.
Press to search backwards or forwards.
Press this to pause a playback or pause the
Time Shift function.
Press this to play or start the Time Shift
function.
Press this to select a TV channel.
After setup, allows you to set the input
source on your TV.
Displays the EPG (Electronic Programme
Guide.)
Press this to display the playback information
during playing a Blu-ray Disc/DVDs or
display the information of TV channel.
Press to exit the menu.
These buttons are used both for menus on
the product and also several Blu-ray Disc
functions.
Press this when you want to use 3D function.
Press this to pause during recording.
Press this to see the full screen on a TV.
Press this to make a recording.
22 English
Getting Started
Setting the Remote Control to
Operate Your TV
To determine whether your television is
compatible, follow the instructions below.
Turn your television on.
1.
Point the remote control towards the
2.
television.
Press the TV button to set the TV mode.
3.
Press and hold the TV POWER button, and
4.
then enter the two-figure code in the table
to the right that corresponds to the brand of
your television by pressing the appropriate
number buttons.
If your television is compatible with the remote
control, it will Turn off.
The remote is now programmed to operate
the TV.
NOTE
✎
If several codes are listed for your television brand,
▪
try each one in turn until you find one that works.
If you replace the remote control’s batteries, you
▪
must set the brand code again.
You can control certain functions of your TV with
this remote control.
Button Function
TV POWER Used to Turn the television on and off.
Number Used to input number directly.
TV VOL +/–
TV MUTE Used to toggle the sound on and off.
PROG (,/.) Used to select the desired channel.
TV SOURCE
Used to adjust the volume of the
television.
Used to select an external source
connected to the TV.
In case of Samsung TV, below buttons are also
compatible with this remote control.
Button Function
MENU Used to move to the TV menu.
TOOLS Used to display Tools menu.
▲▼◄►
ENTER Used to select menu items.
INFO Used to display INFO menu.
RETURN Return to the previous menu.
EXIT Used to exit the menu.
COLOUR (A,B,C,D)
NOTE
✎
The functions listed above will not necessarily work
▪
on all televisions. If you encounter problems, use the
TV remote control.
Used to move the cursor or select an
item.
These buttons are used for several
functions.
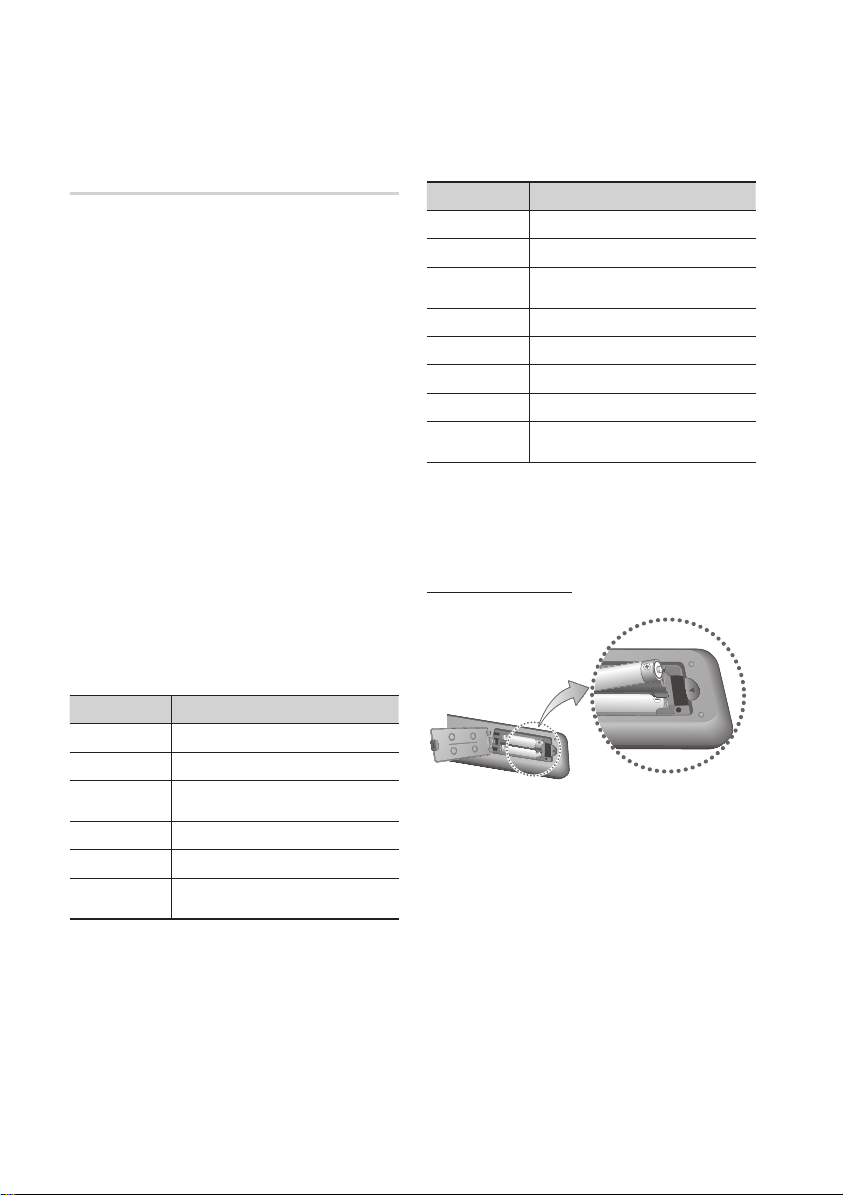
Installing batteries
NOTE
✎
If the remote does not operate properly:
▪
Check the polarity +/– of the batteries.
•
Check if the batteries are drained.
•
Check if the remote sensor is blocked by
•
obstacles.
Check if there is any fluorescent lighting nearby.
•
CAUTION
!
Dispose of batteries according to local environmental
▪
regulations. Do not put them in the household trash.
English 23
03 Getting Started
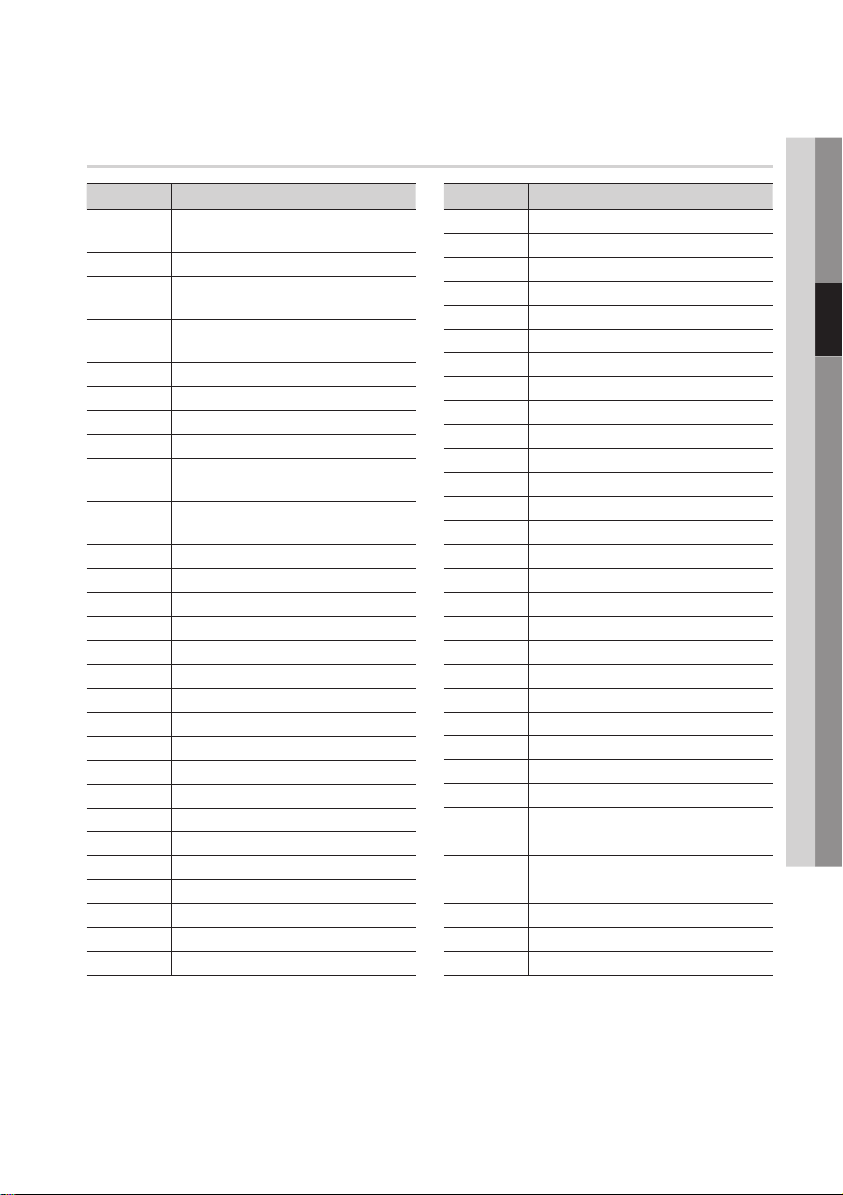
TV Control Codes
Brand Code
SAMSUNG
AIWA TV POWER+82
ANAM
BANG &
OLUFSEN
BLAUPUNKT TV POWER+71
BRANDT TV POWER+73
BRIONVEGA TV POWER+57
CGE TV POWER+52
CONTINENTAL
EDISON
DAEWOO
EMERSON TV POWER+64
FERGUSON TV POWER+73
FINLUX TV POWER+06, +49, +57
FORMENTI TV POWER+57
FUJITSU TV POWER+84
GRADIENTE TV POWER+70
GRUNDIG TV POWER+49, +52, +71
HITACHI TV POWER+60, +72, +73, +75
IMPERIAL TV POWER+52
JVC TV POWER+61, +79
LOEWE TV POWER+06, +69
LOEWE OPTA TV POWER+06, +57
MAGNAVOX TV POWER+40
METZ TV POWER+57
MITSUBISHI TV POWER+06, +48, +62, +65
MIVAR TV POWER+52, +77
NEC TV POWER+83
TV POWER+01, +02, +03, +04, +05,
+06, +07, +08, +09
TV POWER+10, +11, +12, +13, +14,
+15, +16, +17, +18
TV POWER+57
TV POWER+75
TV POWER+19, +20, +23, +24, +25, +26,
+27, +28, +29, +30, +31, +32, +33, +34
LG
TV POWER+06, +19, +20, +21, +22, +78
Brand Code
NEWSAN TV POWER+68
NOBLEX TV POWER+66
NOKIA TV POWER+74
NORDMENDE TV POWER+72, +73, +75
PANASONIC TV POWER+53, +54, +74, +75
PHILIPS TV POWER+06, +55, +56, +57
PHONOLA TV POWER+06, +56, +57
PIONEER TV POWER+58, +59, +73, +74
RADIOLA TV POWER+06, +56
RADIOMARELLI
RCA TV POWER+45, +46
REX TV POWER+74
SABA TV POWER+57, +72, +73, +74, +75
SALORA TV POWER+74
SANYO TV POWER+41, +42, +43, +44, +48
SCHNEIDER TV POWER+06
SELECO TV POWER+74
SHARP TV POWER+36, +37, +38, +39, +48
SIEMENS TV POWER+71
SINGER TV POWER+57
SINUDYNE TV POWER+57
SONY TV POWER+35, +48
TELEAVA TV POWER+73
TELEFUNKEN TV POWER+67, +73, +75, +76
THOMSON TV POWER+72, +73, +75
THOMSON
ASIA
TOSHIBA
WEGA TV POWER+57
YOKO TV POWER+06
ZENITH TV POWER+63
TV POWER+57
TV POWER+80, +81
TV POWER+47, +48, +49, +50, +51,
+52
24 English
Connections
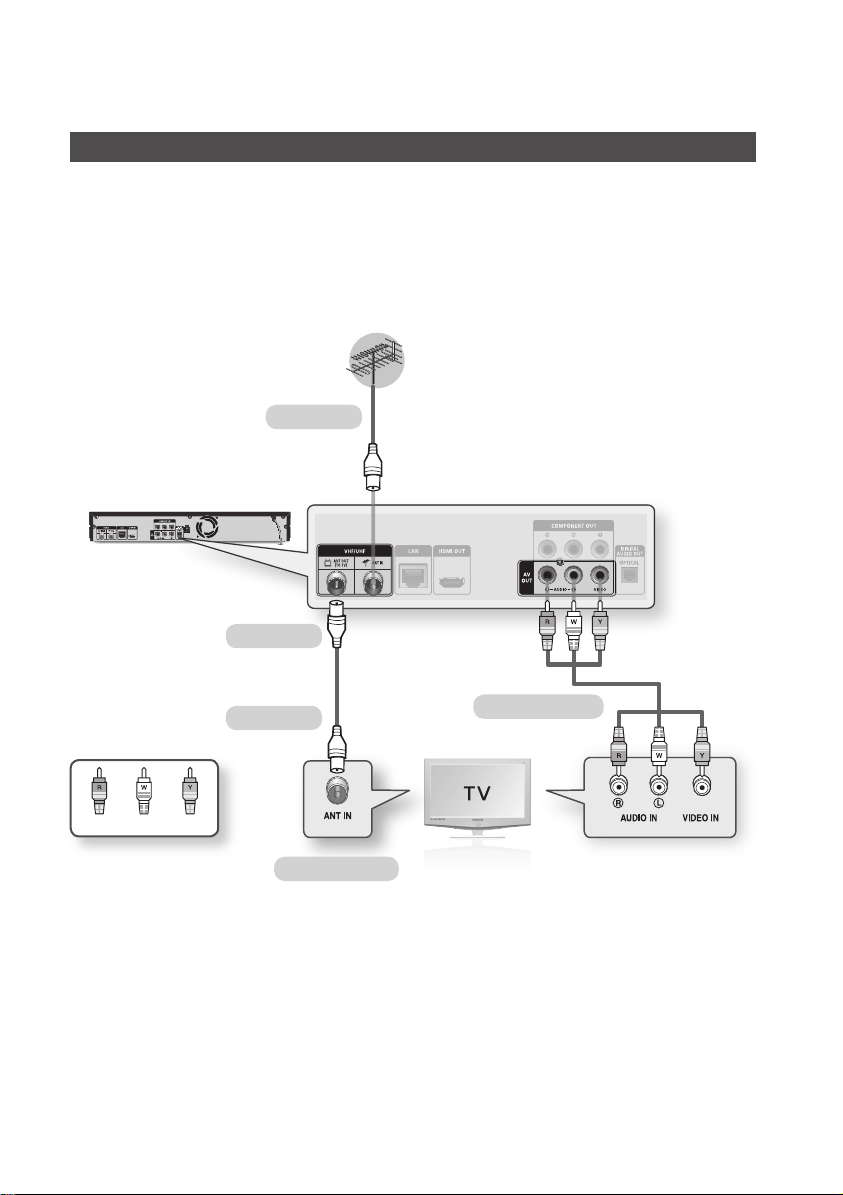
Connecting to a TV with an Audio/Video cables and RF cable
Connect the RF cable as shown.
1.
Using video/audio cables, connect the VIDEO OUT (yellow) / AUDIO OUT (white and red)
2.
terminals on the rear of the product to the VIDEO IN (yellow) / AUDIO IN (white and red) terminals
of your TV.
Plug in the product and TV.
3.
Turn on the product and TV.
4.
To ANT IN
To TV
RF cable
WhiteRed Yellow
To ANT INPUT
NOTE
✎
The RF cable connection of this product sends only signals of TV. You must connect the Audio/Video cables to watch
▪
output from your product.
Noise may be generated if the audio cable is placed too close to the power cable.
▪
If you want to connect to an AV receiver, please refer to the AV receiver connection pages. (See pages 28~29)
▪
The number and position of terminals may vary depending on your TV set. Please refer to the user manual of your TV.
▪
If there is only one audio input terminal on the TV, connect it to the AUDIO OUT (right/white) terminal of the product.
▪
Audio/Video cable

English 25
04 Connections
Connecting to a TV
Case 1 : Connecting to a TV with an HDMI Cable - Best Quality
(Recommended)
Using an HDMI cable, connect the HDMI OUT terminal on the rear of the product to the HDMI IN
1.
terminal of your TV.
Turn on the product and TV.
2.
Press the input selector on your TV remote control until the HDMI signal from the product appears
3.
on your TV screen.
If you have set the remote control to operate your TV (See pages 22~23), press the TV SOURCE
•
button on the remote control and select HDMI as the external source of the TV.
HDMI cable
(not included)
NOTE
✎
An HDMI cable outputs digital video/audio, so you don't need to connect an audio cable.
▪
If the product is connected to your TV in the HDMI 720p, 1080i, or 1080p output mode, you must use a High speed
▪
(category 2) HDMI cable.
HDMI outputs only a pure digital signal to the TV.
▪
If your TV does not support HDCP (High-bandwidth Digital Content Protection), random noise appears on the screen.
Depending on your TV, certain HDMI output resolutions may not work. Please refer to the user manual of your TV.
▪
When you connect the product to the TV using the HDMI cable for the first time or to a new TV, the HDMI output
▪
resolution will be automatically set to the highest supported by the TV.
You must have an HDMI connection to enjoy videos with 3D technology.
▪
A long HDMI cable may cause a screen noise. If this occurs, set Deep Colour to Off in the menu.
▪
If you use HDMI-to-DVI cable to connect to your display device, you must also connect the AV OUT or Digital Audio OUT
▪
to your display device or an audio system to hear audio.

26 English
Connections
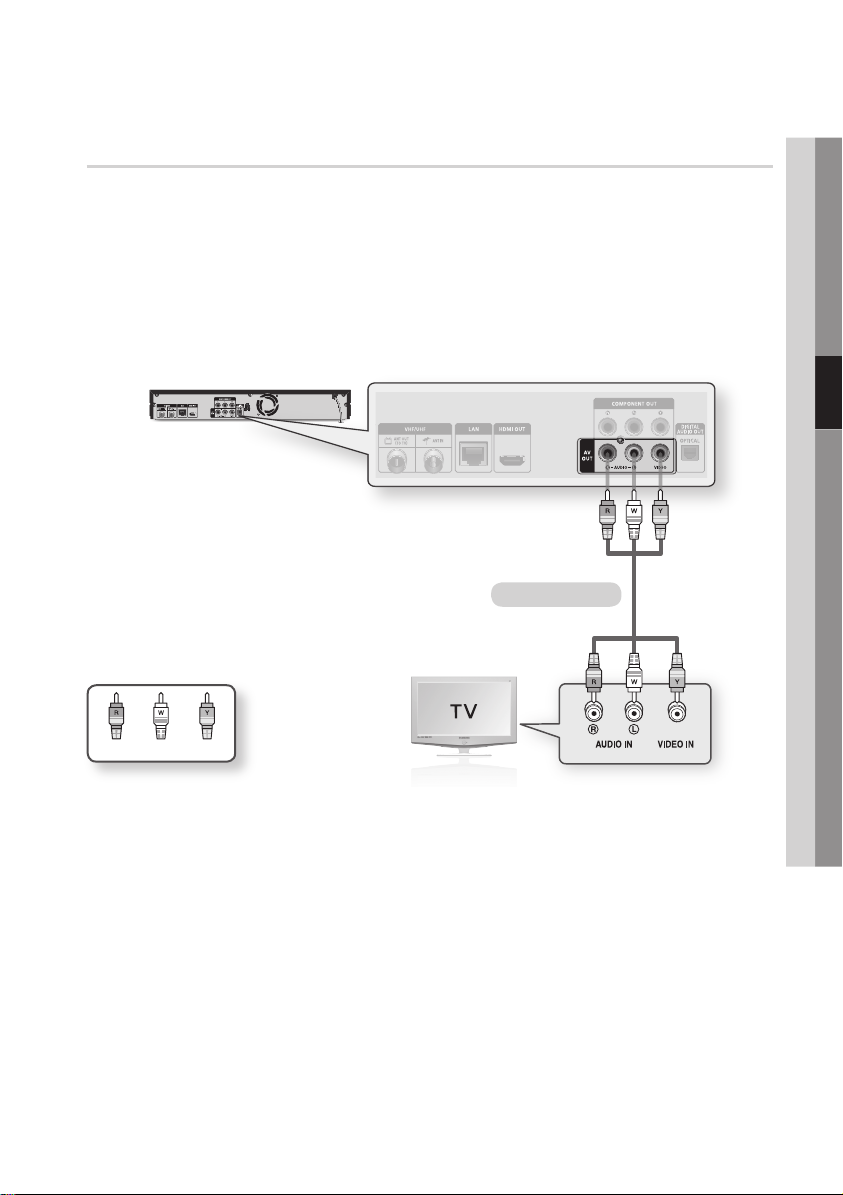
Case 2 : Connecting to a TV with a Component Cable - Better Quality
You can connect the product to your TV using Component video cables.
You will enjoy high quality images with accurate colour reproduction. Component video separates
the picture element into black and white (Y), blue (PB) and red (PR) signals to present clear and clean
images. (Audio signals are delivered through the audio output.)
Using a Component video cable, connect the COMPONENT OUT terminals on the rear of the
1.
product to the COMPONENT IN terminals of your TV.
Using audio cables, connect the AUDIO OUT (white and red) terminals on the rear of the product
2.
to the AUDIO IN (white and red) terminals of your TV.
Turn on the product and TV.
3.
Press the input selector on your TV remote control until the “COMPONENT” signal from the product
4.
appears on the TV screen.
If you have set the remote control to operate your TV (See pages 22~23), press the TV SOURCE
•
button on the remote control and select COMPONENT as the external source of the TV.
Component cable
(not included)
Red
White Red Blue Green
NOTE
✎
Depending on the manufacturer, the component terminals on your TV may be marked “R-Y, B-Y, Y ” or “Cr, Cb, Y”
▪
instead of “PB, PR, Y”. The number and position of terminals may vary depending on the TV set.
Please refer to the user manual of your TV.
You can select from a variety of resolution settings as 1080i, 720p, 576p/480p or 576i/480i, depending on the
▪
contents type. (See pages 36~38)
The actual resolution may differ from the setting in the setup menu if you have connected both Component and HDMI
▪
cables. The resolution may also be different depending on the contents type. (See pages 36~38)
Audio cable
English 27
04 Connections
Case 3 : Connecting to a TV with an Audio/Video cable - Good Quality
Using an Audio/Video cable, connect the VIDEO OUT (yellow) / AUDIO OUT (white and red)
1.
terminals on the rear of the product to the VIDEO IN (yellow) / AUDIO IN (white and red) terminals
of your TV.
Turn on the product and TV.
2.
Press the input selector on your TV remote control until the “VIDEO” signal from the product appears
3.
on the TV screen.
If you have set the product's remote control to operate your TV (See pages 22~23), press the TV
•
SOURCE button on the remote control and select VIDEO as the external source of the TV.
Audio/Video cable
WhiteRed Yellow
NOTE
✎
Noise may be generated if the audio cable is placed too close to the power cable.
▪
If you want to connect to an AV receiver, please refer to the AV receiver connection pages. (See pages 28~29)
▪
The number and position of
▪
TV.
CAUTION
!
Do not connect the product to your TV through a VCR. Video signals fed through VCRs may be affected by copyright
▪
protection systems and the picture will be distorted on the television.
input terminals
may vary depending on your TV set. Please refer to the user manual of your
28 English
Connections
Connecting to an Audio System
Please turn the volume down when you turn on the AV receiver. A sudden loud sound may cause
•
damage to the speakers and your ears.
Set the audio output format according to the capabilities of your AV receiver. (See pages 39~42)
•
The position of HDMI input terminals may vary depending on your AV receiver. Please refer to the
•
user manual of your AV receiver.
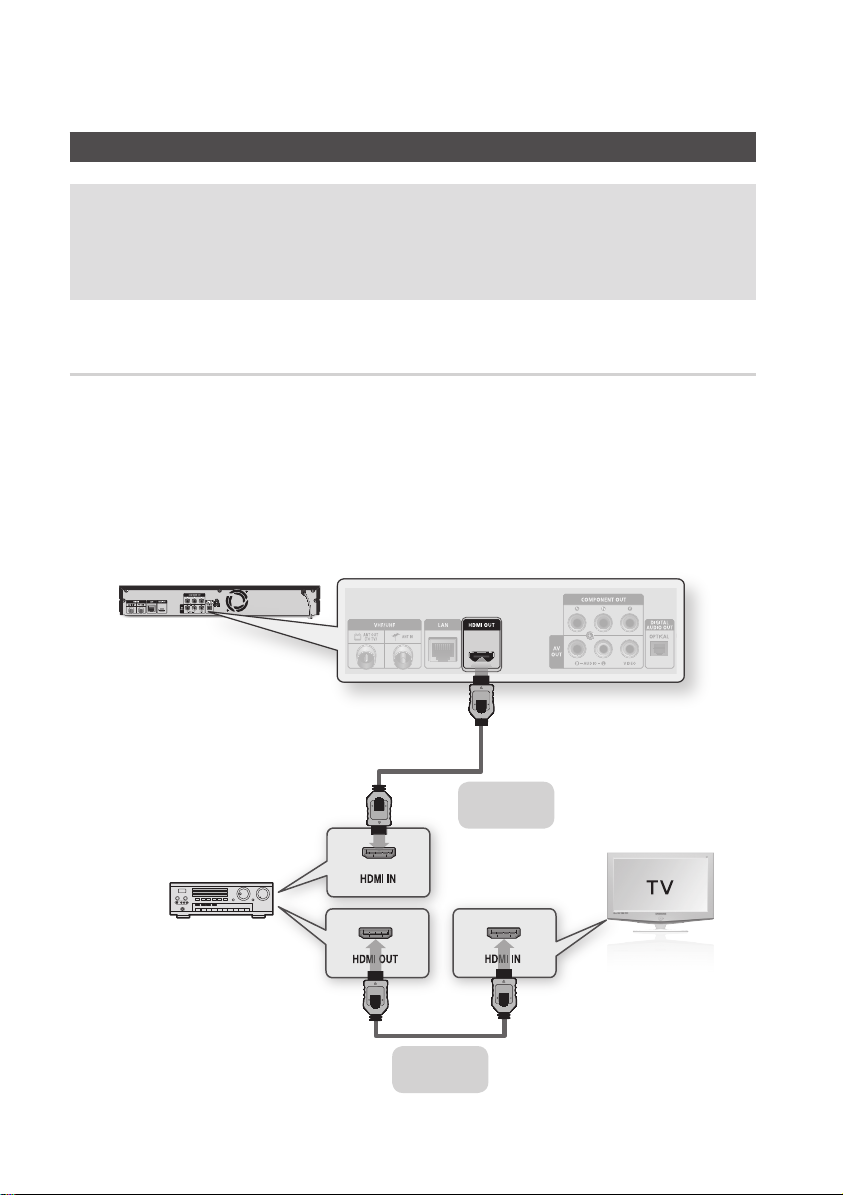
Case 1 : Connecting to an Audio System (HDMI supported AV receiver)
- Best Quality (Recommended)
Using an HDMI cable, connect the HDMI OUT terminal on the rear of the product to the HDMI IN
1.
terminal of your AV receiver.
Using an HDMI cable, connect the HDMI OUT terminal of the AV receiver to the HDMI IN terminal of
2.
your TV.
Turn on the product, TV, and AV receiver.
3.
Press the input select button of the AV receiver and TV to select the external input to hear sound
4.
from the player. Refer to your AV receiver’s user manual to set the AV receiver’s audio input.
HDMI cable
(not included)
HDMI cable
(not included)
English 29
04 Connections
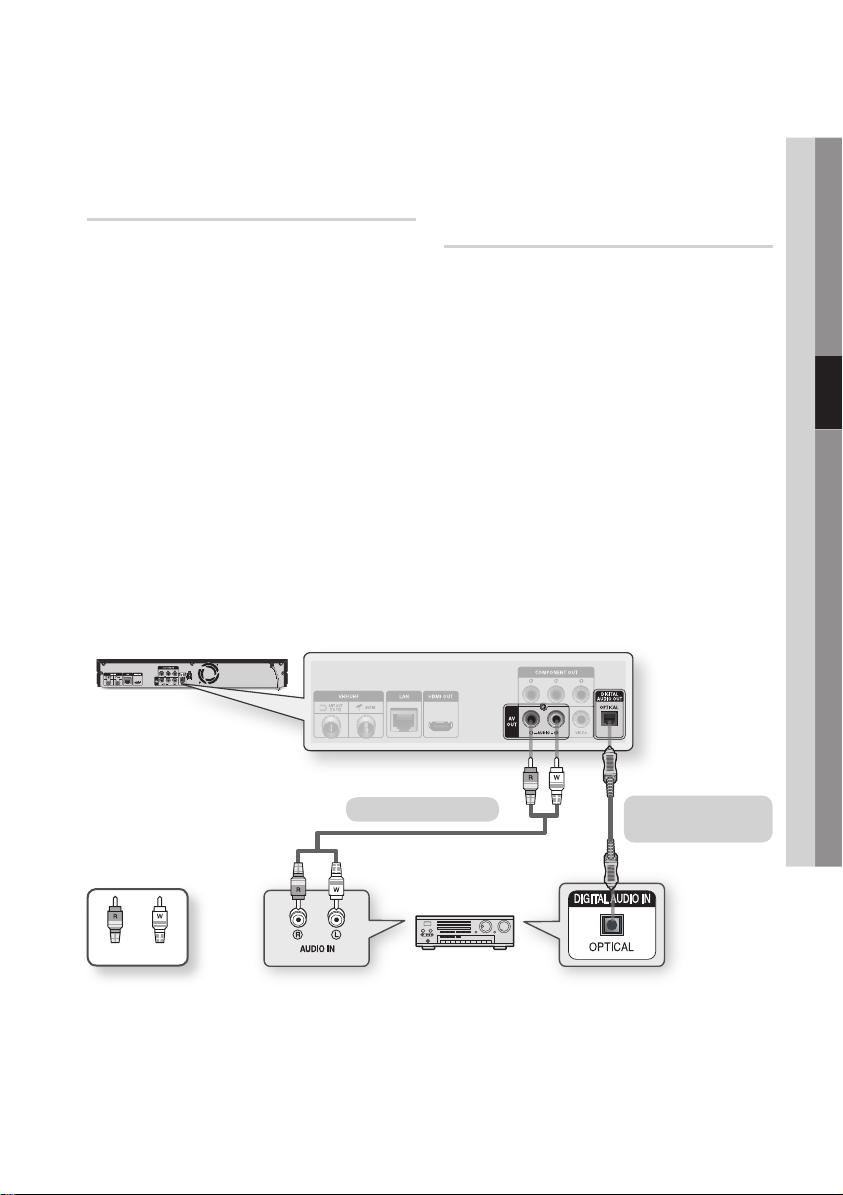
Case 2 : Connecting to an Audio
System (Stereo Amplifier)
- Good Quality
Using the audio cables, connect the AUDIO
1.
OUT (white and red) terminals on the rear of
the product to the AUDIO IN (white and red)
terminals of your Stereo Amplifier.
Using the video signal cable(s), connect
2.
the HDMI, COMPONENT, or VIDEO OUT
terminals on the rear of the product to the
HDMI, COMPONENT, or VIDEO IN terminal
of your TV. (See pages 25~27)
Turn on the product, TV, and Stereo Amplifier.
3.
Press the input select button of the Stereo
4.
Amplifier to select the external input and hear
sound from the product. Refer to your
Stereo Amplifier's user manual to set the
Stereo Amplifier's audio input.
Press the input selector on your TV remote
5.
control to select the video source (HDMI,
Component, or Video.)
Case 3 : Connecting to an Audio
System (AV receiver with Dolby
Digital or DTS decoder) - Better
Quality
Using an optical cable, connect the DIGITAL
1.
AUDIO OUT (OPTICAL) terminal on the rear
of the product to the DIGITAL AUDIO IN
(OPTICAL) terminal of your AV receiver.
Using the video signal cable(s), connect
2.
the HDMI, COMPONENT, or VIDEO OUT
terminals on the rear of the product to the
HDMI, COMPONENT, or VIDEO IN terminal
of your TV. (See pages 25~27)
Turn on the product, TV, and AV receiver.
3.
Press the input select button of the
4.
to select the external input in order to hear sound
from the product. Refer to your
user manual to set the
Press the input selector on your TV remote
5.
control to select the video source (HDMI,
Component, or Video.)
AV receiver’s
AV receiver
AV receiver’s
audio input.
Case 2 : Audio cable
WhiteRed
NOTE
✎
If you use the Digital Audio connection described in Case 3, you will hear only front two speakers with Digital Output
▪
setting as PCM.
Case 3 : Optical cable
(not included)
30 English
Connections
Connecting to the Network
This product lets you use network based services (See pages 73~82) such as Smart Hub and BD-LIVE,
and software upgrades when it is connected to a network. We recommend using an AP (Access Point)
or IP router for the connection. For more information on router connections, refer to the user manual of
the router or contact the router manufacturer for technical assistance.
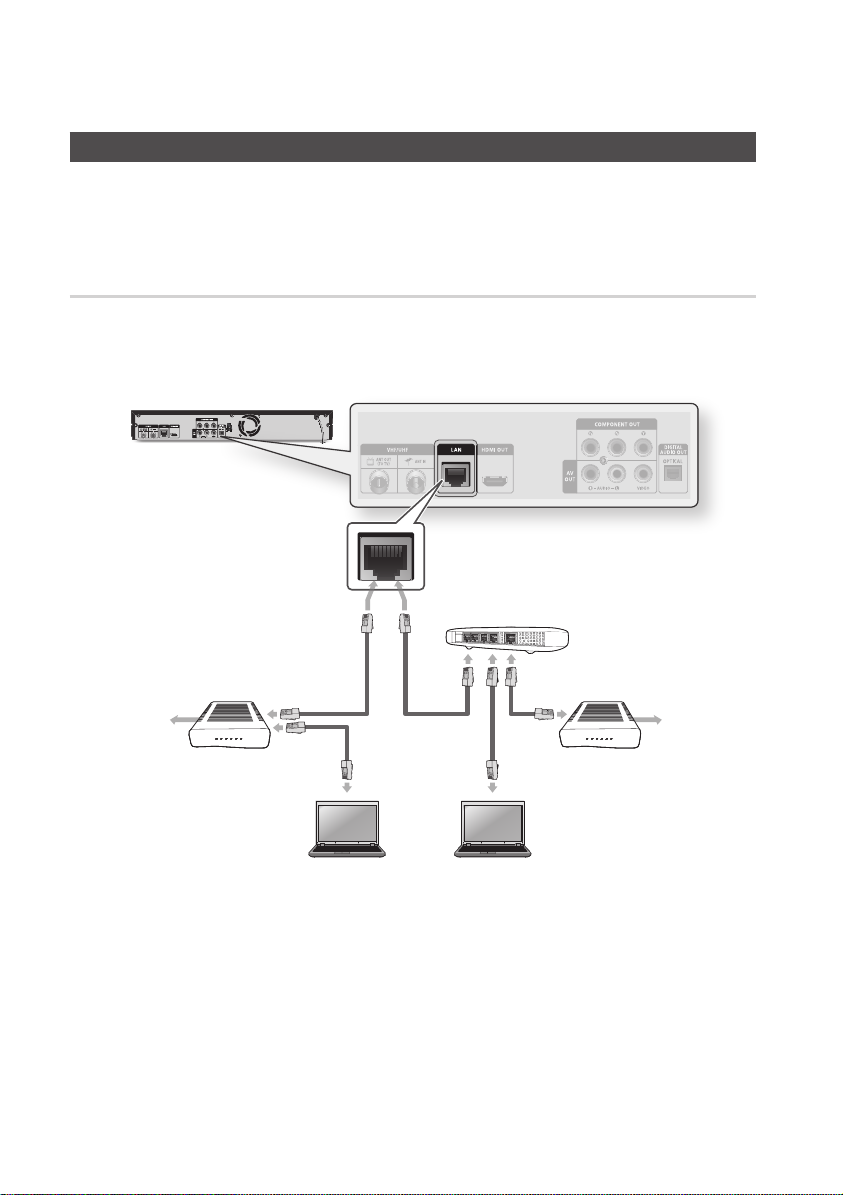
Cable Network
Using the Direct LAN Cable (UTP cable), connect the LAN terminal of the product to the LAN
1.
terminal of your modem or router.
To set the network options, see pages 44~48.
2.
Router
Broadband modem
(with integrated router)
Broadband
service
NOTE
✎
Internet access to Samsung’s software update server may not be allowed, depending on the router you use or
▪
ISP’s policy. For more information, contact your ISP (Internet Service Provider).
For DSL users, please use a router to make a network connection.
▪
To use the AllShare function, you must connect your PC to your network as shown in the figure.
▪
The connection can be wired or wireless.
Or
Broadband modem
Networking with PC for
AllShare function
Broadband
service
your
 Loading...