

Page 1
1ERE DE COUV GI AZUR 270.fm Page 1 Vendredi, 21. juillet 2006 11:48 11
Français
English
Deutsch
Español
Italiano
Nederlands
Português
Polski
Cesky
Magyar
Svenska
УССКИЙ
Р
Ελληνικά
Türkçe
Page 2

Sansnom1.fm Page 1 Vendredi, 21. juillet 2006 10:50 10
Page 3

Liasse azur PE270.fm Page 1 Mardi, 18. juillet 2006 3:51 15
FRANÇAIS
BIENVENUE
Vous venez d'acquérir une imprimante photo et nous vous remercions de la confiance que vous nous
accordez. Avec cette imprimante de haute qualité vous pourrez profiter pleinement de vos photos
numériques. Les fonctions d’optimisation d’images Crystal Image et yeux rouges assurent une qualité
d’impression et de copie irréprochable de vos photos.
Vous trouverez aussi sur le site web www.sagem.com :
• les pilotes d’impression pour ordinateur individuel,
• une liste de réponses aux questions les plus fréquentes (FAQ).
Vous trouverez sur le CD-Rom fourni un guide d’utilisation détaillé.
RECOMMANDATIONS ET CONSIGNES DE SÉCURITÉ
Ne pas installer votre imprimante ph oto ni dans une pièce humide (salle d' eau, salle de bain,
buanderie, cuisine, etc..) à moins de 1,50 m d'un point d'eau ni en extérieur. Votre imprimante doit
être utilisée à une température ambiante comprise entre 15 °C et 35 °C pour un rendu
d’impression optimal.
Ne pas installer votre imprimante dans un endroit poussiéreux, ces poussières pourraient
dégrader la qualité d’impression de vos photos.
Utilisez exclusivement le bloc secteur fourni, raccordez celui-ci sur le secteur conformément aux
instructions d'installation de ce livret et aux indications portées sur l'étiquette d'identification
apposée sur celui-ci (tension, coura nt, fréquence du réseau électrique ). Par précaution , en cas
de danger, les adaptateurs secteur servent de dispositif de sectionnement de l'alimentation
230 V. Ils doivent être situés à proximité de l'appareil et être aisément accessibles.
Ne jamais ouvrir le capot supérieur en cours d'impressio n, vous risque z la rupture du film et par
la suite un dysfonctionnement de votre imprimantAprès l’utilisation de l’imprimante, attendez
quelques instants après la mise hors ten sion de l’impr imante avant de l’ouvrir. Pour é viter toute
blessure, ne touchez en aucun cas la tête d’impression.
Utilisez seulement les consommables de marque SAGEM et ex clusivement ceux-ci s inon vous
risquez d'endommager l'appareil et de perdre la garantie.
La poubelle barrée apposée sur le prod uit ou ses accessoires signifie qu'ils a ppartiennent à la
famille des équipements électriques et électroniques.
A ce titre, la réglementation européenne vous demande de procéder à sa collecte sélective :
- dans les points de distribution en cas d'achat d'un équipement équivalent,
- dans les points de collecte mis à votre disposition localement (déchetterie, collecte sélective,
etc.).
Le marquage CE atteste de la conformité du produit aux exigences essentielles de la directive
1999/5/CE du Parlement et du Conseil Européen concernant les équipements terminaux de
télécommunication, pour la sécurité et la santé des usagers, pour les perturbations
électromagnétiques.
La déclaration de conf orm ité peut êtr e co nsul té e sur le sit e www.sagem.com rubrique "Support"
ou peut être demandée à l'adresse suivante:
Sagem Communication - Customer relations department
4, rue du Petit Albi - 95800 Cergy Saint-Christophe - FRANCE
- 1 -
Page 4

Liasse azur PE270.fm Page 2 Mardi, 18. juillet 2006 3:51 15
VOTRE IMPRIMANTE ET SES ACCESSOIRES
Placez votre coffret devant vous, sortez les différen ts éléments de votre imp rimante en vérifian t que les
éléments présentés ci-dessous s'y trouvent :
Bloc d'alimentation
Cordon secteur
Bac papier
Imprimante photo
Guide d'installation
Ruban
(selon modèle)
Adapateur WiFi
(selon modèle)
Télécommande
(selon modèle)
CONNEXIONS - RACCORDEMENTS
Fentes d'insertion
cartes mémoire
CD-Rom
Bloc de papier photo
(selon modèle)
Câble vidéo
(selon modèle)
IRDA
Infrarouge
- 2 -
Alimentation
secteur
USB esclave
liaison PC
Sortie vidéo
USB Maître
Adaptateurs :
WiFi (Selon option)
Pictbridge
Bluetooth (Selon option)
Page 5

Liasse azur PE270.fm Page 3 Mardi, 18. juillet 2006 3:51 15
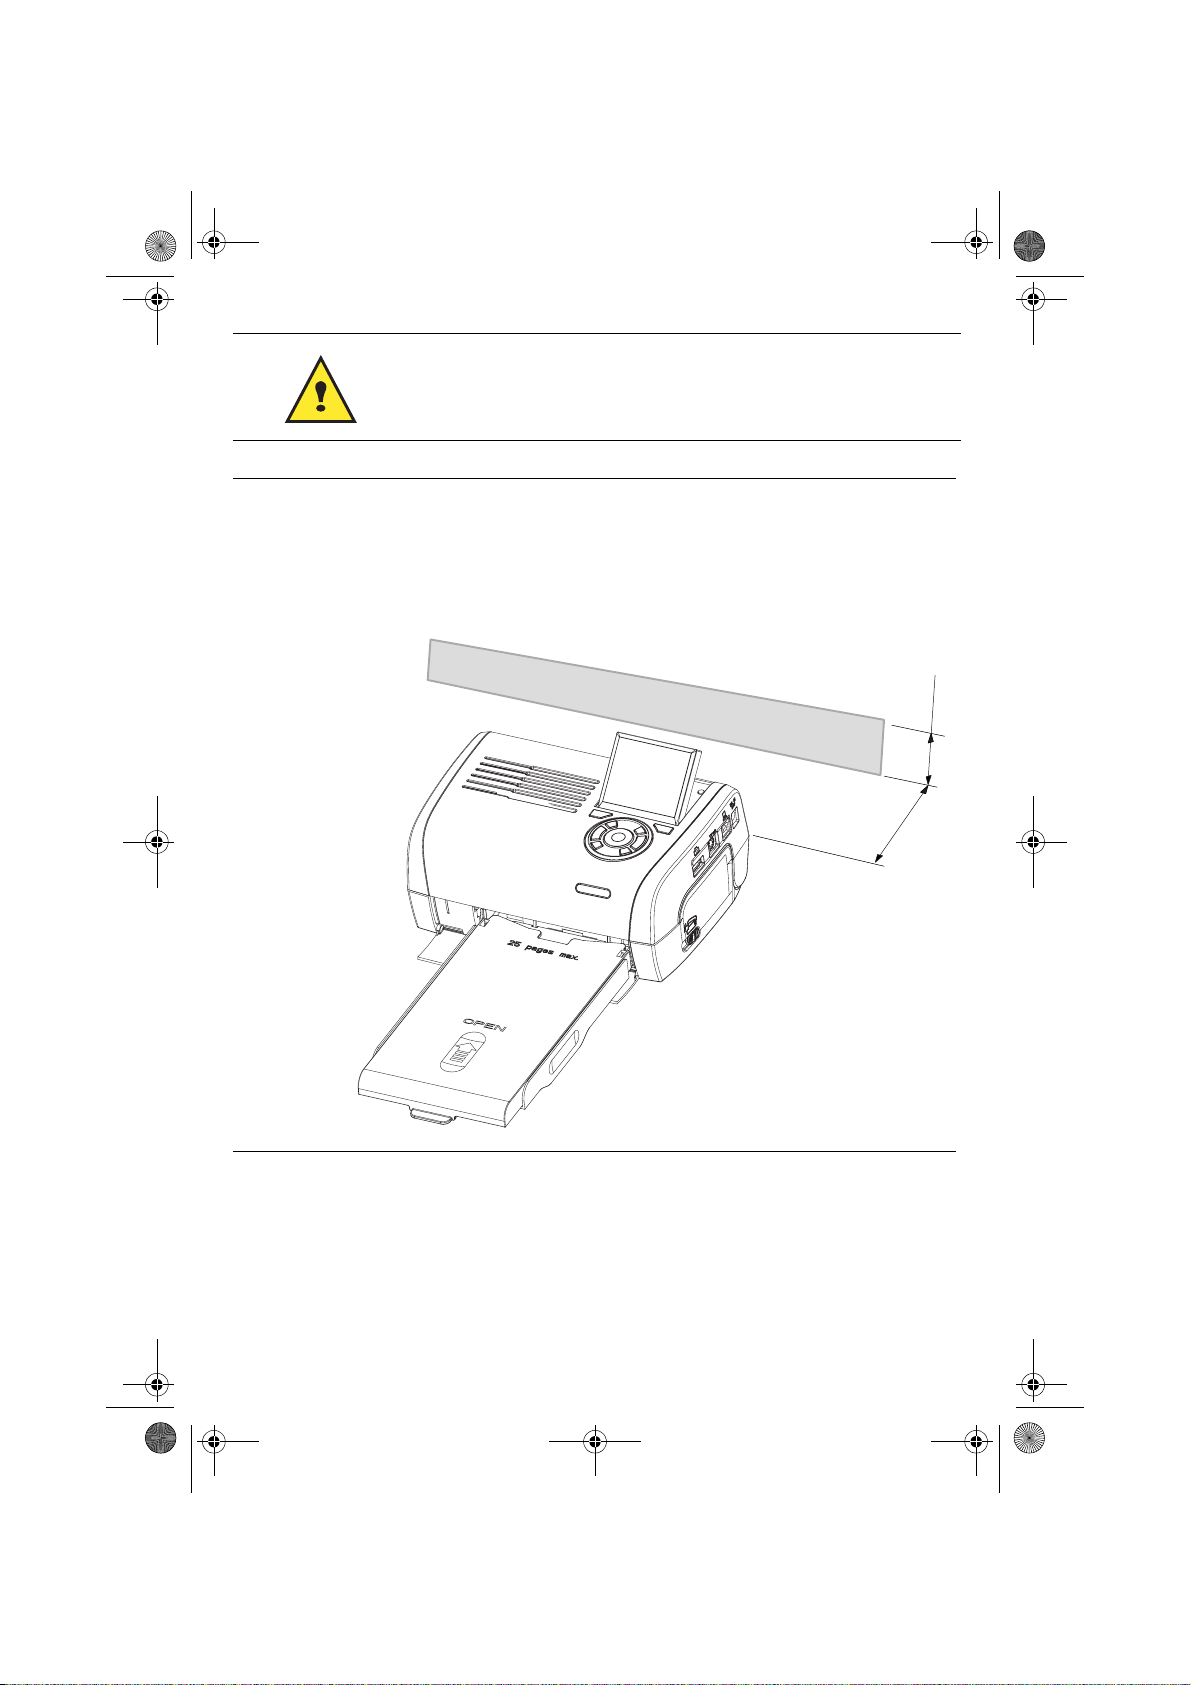
Avant d'effectuer les connexions, veuillez consulter les consignes de
sécurité placées en début du livret d'utilisation présent sur le CD-ROM
livré avec votre imprimante.
Remarques : Afin de garantir la bonne circulation de la feuille de papier pendant l’impression, veiller à
ce qu’il y ait un espace libre d’au moins 10 centimètres à l’arrière de l’imprimante.
Ne pas installer votre imprimante dans un endroit poussiéreux, ces poussières
pourraient dégrader la qualité d’impression de vos photos.
Obstacle
5 cm
10 cm
- 3 -
Page 6

(
)
Liasse azur PE270.fm Page 4 Mardi, 18. juillet 2006 3:51 15
MISE EN SERVICE DE L’IMPRIMANTE
MISE SOUS TENSION
2
3 s
INSTALLATION DU PAPIER
1
3
4
1
2
R
em
V
e
o
i
E
ve
l
lez
n
P
t
tf
ap
h
ern
à
Q
i
re
i
s
e
u
sh
rf
R
i
en
ta
ti
a
ca
im
rer cette fe
r es
ee
S
ch
ss
u
V
ie
t
ei
overe q
e
b
etto
t
a h
b
r
R
n
e
w
i
fo
l
tt
e
eg
ij
o
ti
.
e d
T
d
re p
ja
re
a
en
e
g
u
ue
r d
V
as
es
an
b
i
.
y
u
l
l
sto
S
j
e
o
tti
e d
tes d
K
m
t
ze
a fo
rt d
c
é
n
P
h
rj
e
fog
g
te t
sh
u
r
ü
p
e
p
l
os
e p
ha
tz
k tá
tt
2
r
eet v
a
l
5
e
o
a
i
b
2
2
6
1
99
7
A
pe
z
o
n
t
oner el p
p
d
l
ec
p
t
att
v
e
o
o
r
ap
o
r
p
o
ti
i
u
li
i
l
n
m
b
í
o
o
p
r
s
tsa
th
s
ev
o
r
n
er i
t
a d
d
u
pe
t
e
av
at u
e
o
n
e
c
ap
nn
i
i
r
p
l
i
ç
a
, m
d
S
a
n
c
ã
n
e
he
a
v
p
i
i
se
o
t
l
e
n
e
to
e
i
a
lož
en
te
e
d
di
r
ri
t p
l
n
u
ca
u
re l
la
e
g
e
te
tt
t
a
fy
F
o
n
e i
ss
p
betes
s
b
í
a
o
arku
m
ie
ll
m
d
cart
a
ette
t
er
o
r
p
e
n
p
i
p
d
ress
co
a
n
p
ap
sza
e
.
z
p
de
a
å
j
i
l
í
n
p
a
a
i
oca
r
ere
u
p
io
p
d
ap
el
p
d
e
r
n.
a
l
a
r o
i
’a
z
p
o
p
p
p
e
ns
e
z
pp
ape
i
í
d
ercas
rsk
rt a
p
á
w
o
s
a
l
ob
pe
si
asse
.
o
kazett
to
s
l
n
n
en
et
í
k
t
a
te
ten
iem
u
c
.
á
assete.
p
b
.
laat
a.
p
ap
st.
i
eru
d
o
k
asety
.
4
R
em
V
e
o
i
En
l
ve t
le
P
ap
t
z
ferne
Q
h
à
i
u
erfach
re
i
Ri
s
i
t
c
s
a
ti
m
n
asse
r est
h
r
S
V
u
er cette feui
ee
e
o
i
ei
e
r
Retire e
v
t
w
tto
a
ere q
b
be
n
ho
i
T
i
j
leg
tt
.
d
a
fo
g
e
e
V
ja
b
r d
d
re putti
en
y
u
Ké
j
an
st
e
o
as
m
.
e
sto
rt de
a f
P
l
z
rjü
tes
Sc
l
e
e
r
t
2
e
o
o
5
d
s
2
fo
k
t
s
d
l
n
2
h
tt
h
h
e
e
z
6
t
g pa
g
u
e
a
a
eet voor
1
á
nt
pr
l
9
t
p
p
v
o u
i
z
d
9
o p
ol
o
b
7
o
o
a
e
A
p
l
la
t
p
pr
n
í
i
e
tsa el
e
s
r
s
p
er el
tt
cti
im
r
un
t
er i
ot
p
i
b
n t
d
o
a d
i
e
ev
a
n
e
p
n
c
,
ci
t u
h
m
d v
n
çã
or
a
i
ap
e
i
e
a
va
he
n
i
o
te
n
p
e
Si
l
el
se
o
an
d
n
a
l
ž
e
g
p
t
t
en
u
rire la
tou
tt be
e
o
e
p
d
tes
fy
n
r
ap
l
i
arku
í
e F
m pap
cas
a
l
te
l
b
i
te
d
e
e
c
o
e
r
r
an
i
szi a p
sette
s
i
m
t
på
art
c
o
za p
n
d
o
pr
p
í
d
p
r
ej
a
lo
a
u d
e
e p
n
p
.
a
a
c
r
ss
i
pp
z
ap
e
ar o
e
de
o
e
a
l
i
re i
l
o
d
z
í
e
p
’
rt
p
ap
w
n
rs
i
ás
erca
p
.
n
ap
a ka
kasset
p
a
s
o
o
os
p
e
bní
e
l
en
ss
.
z
it
l
n
e
o
ku
iem
e
ttá
a
te
t
te
.
ca
b
n
p
a
.
p
ss
.
ap
l
a
a
ete.
i
e
t
st.
ru
d
o
ka
se
ty.
5
3
6
- 4 -
Page 7

Liasse azur PE270.fm Page 5 Mardi, 18. juillet 2006 3:51 15
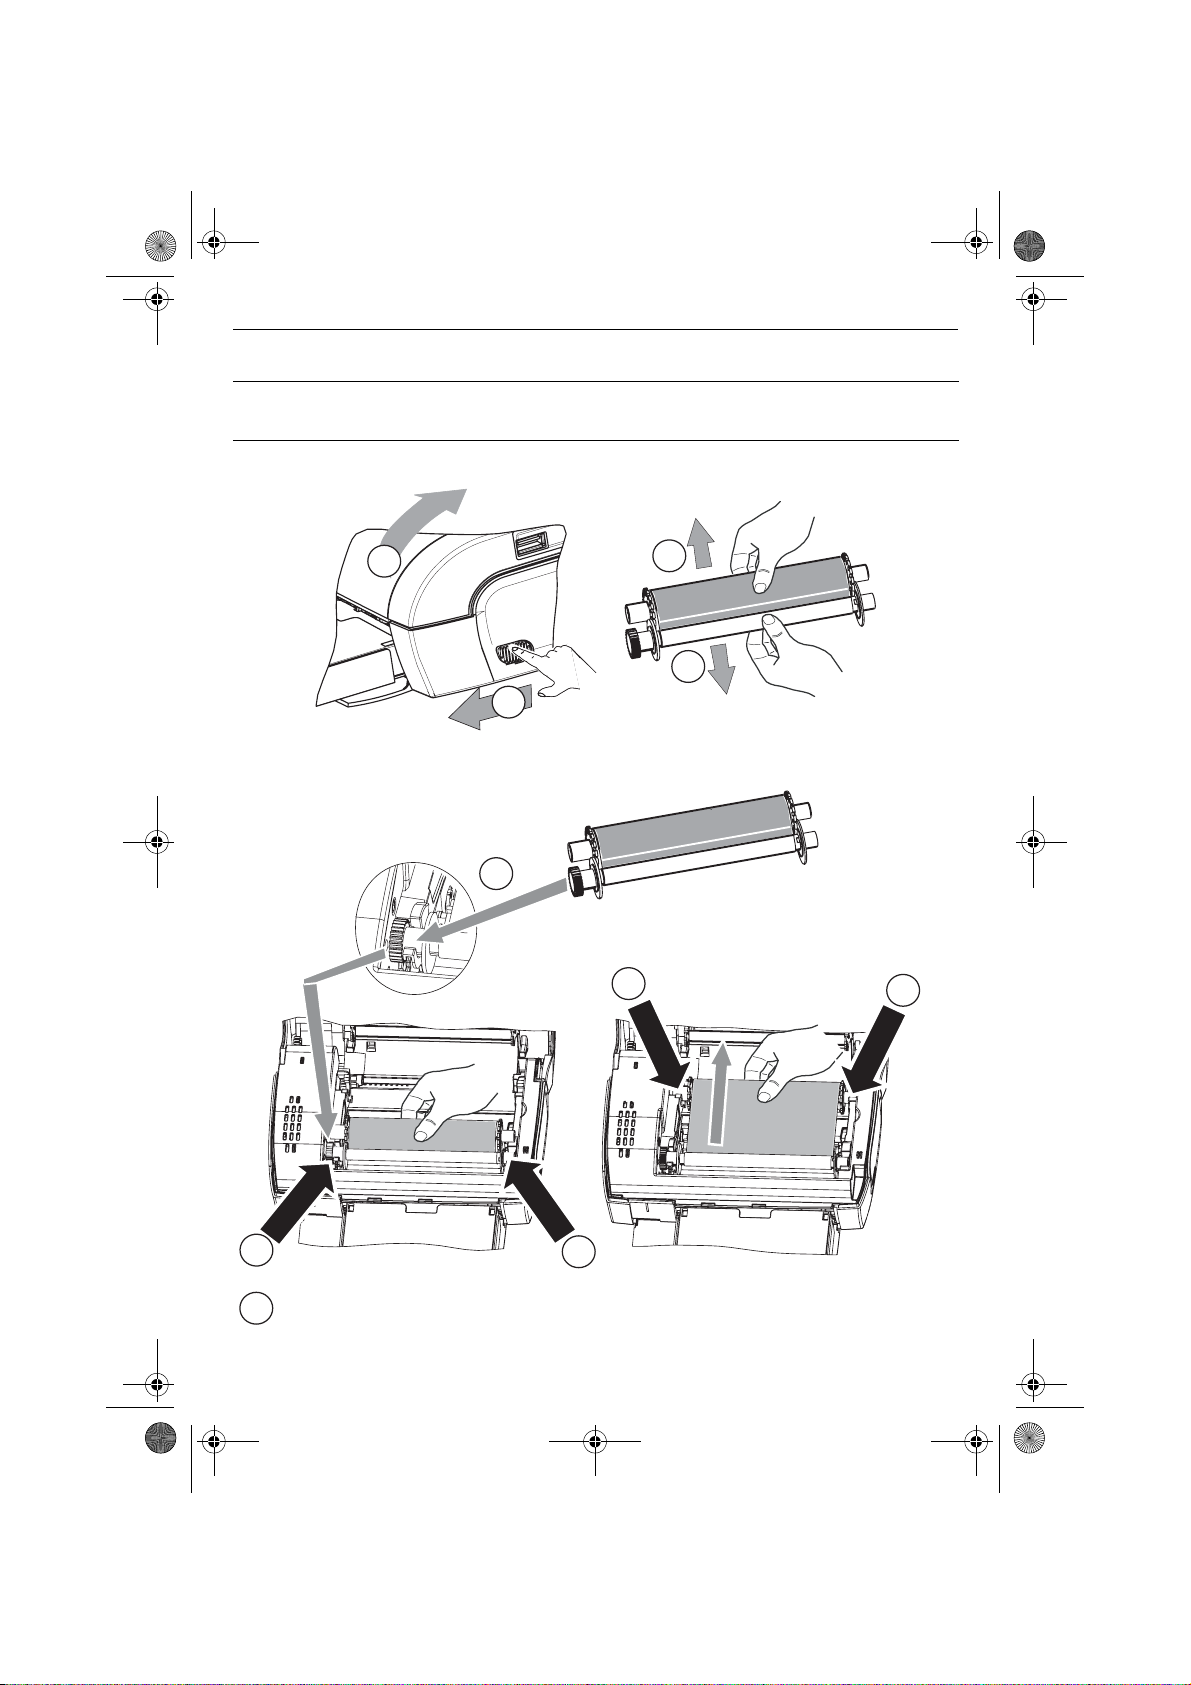
INSTALLATION DU RUBAN
Remarques : utilisez uniquement les consommables co nstructeur. Ceux-ci sont spécialement conçus
vous apporter un rendu d’impression optimal.
2
3
3
1
4
5
Tendez le ruban sur ces axes (6) et fermez l'imprimante.
7
5
- 5 -
6
6
Page 8
Liasse azur PE270.fm Page 6 Mardi, 18. juillet 2006 3:51 15
PRÉSENTATION DE L’INTERFACE UTILISATEUR
Elle vous permet de :
• choisir des photos une à une ou de passer en mode mosaïque (9 photos à l’écran),
• lancer l’impression d’une photo directement,
• activer l’amélioration automatique de la photo en vue de son impression,
• régler les paramètres "Format", "Préférences" et "Réglag es ima ges " en foncti on de vos besoins,
• sélectionner plusieurs photos et de choisir un nombre d’exe mplaires différents pour chaque p hoto à
imprimer,
• réaliser un zoom sur une photo et l’imprimer.
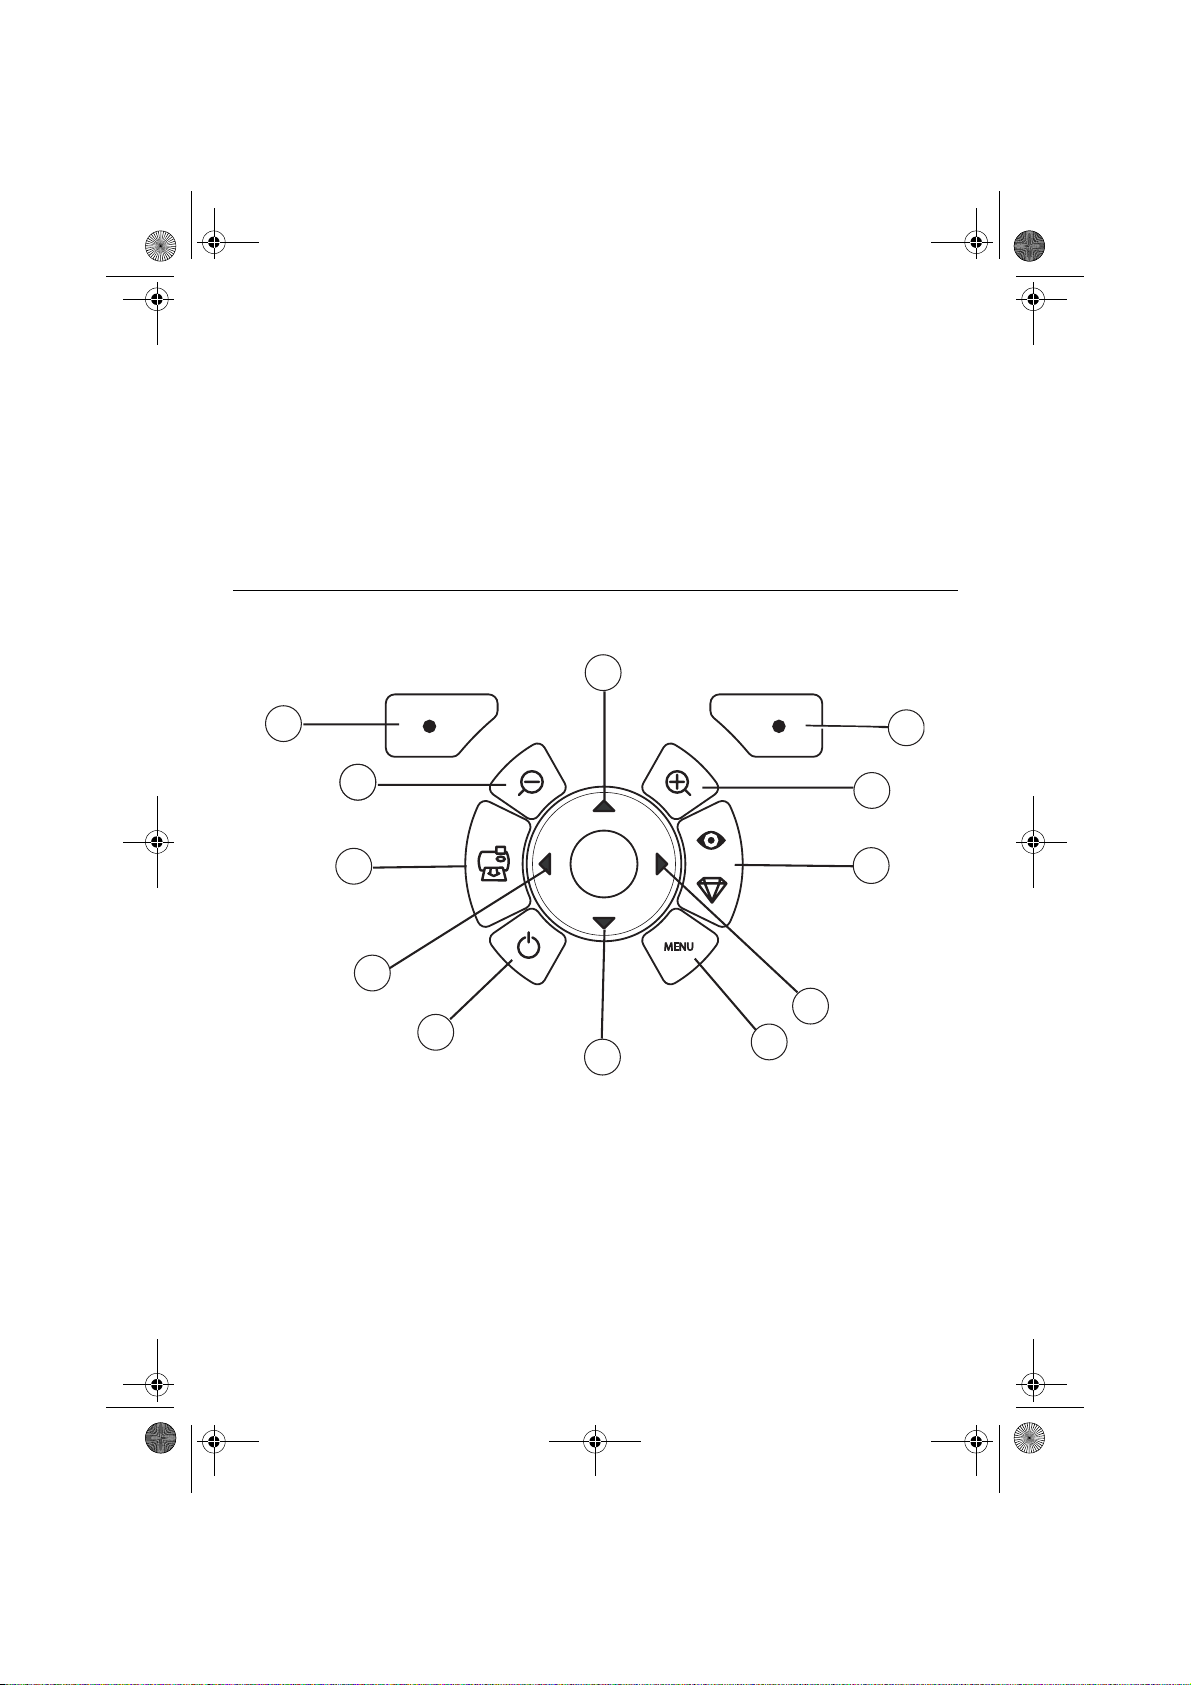
DESCRIPTIF DU CLAVIER
1
12
111
10
9
8
7
Repère Touche
1 / 5 / 7 / 9 Navigateur
2 Valider / Entrée / Ajouter une copie
3Zoom +
4 Crystal image / Yeux rouges
6Menu
8 Marche / Arrêt
10 Imprimer
11 Zoom 12 Retour / Annuler / Retirer une copie
2
3
4
5
6
- 6 -
Page 9
Liasse azur PE270.fm Page 7 Mardi, 18. juillet 2006 3:51 15
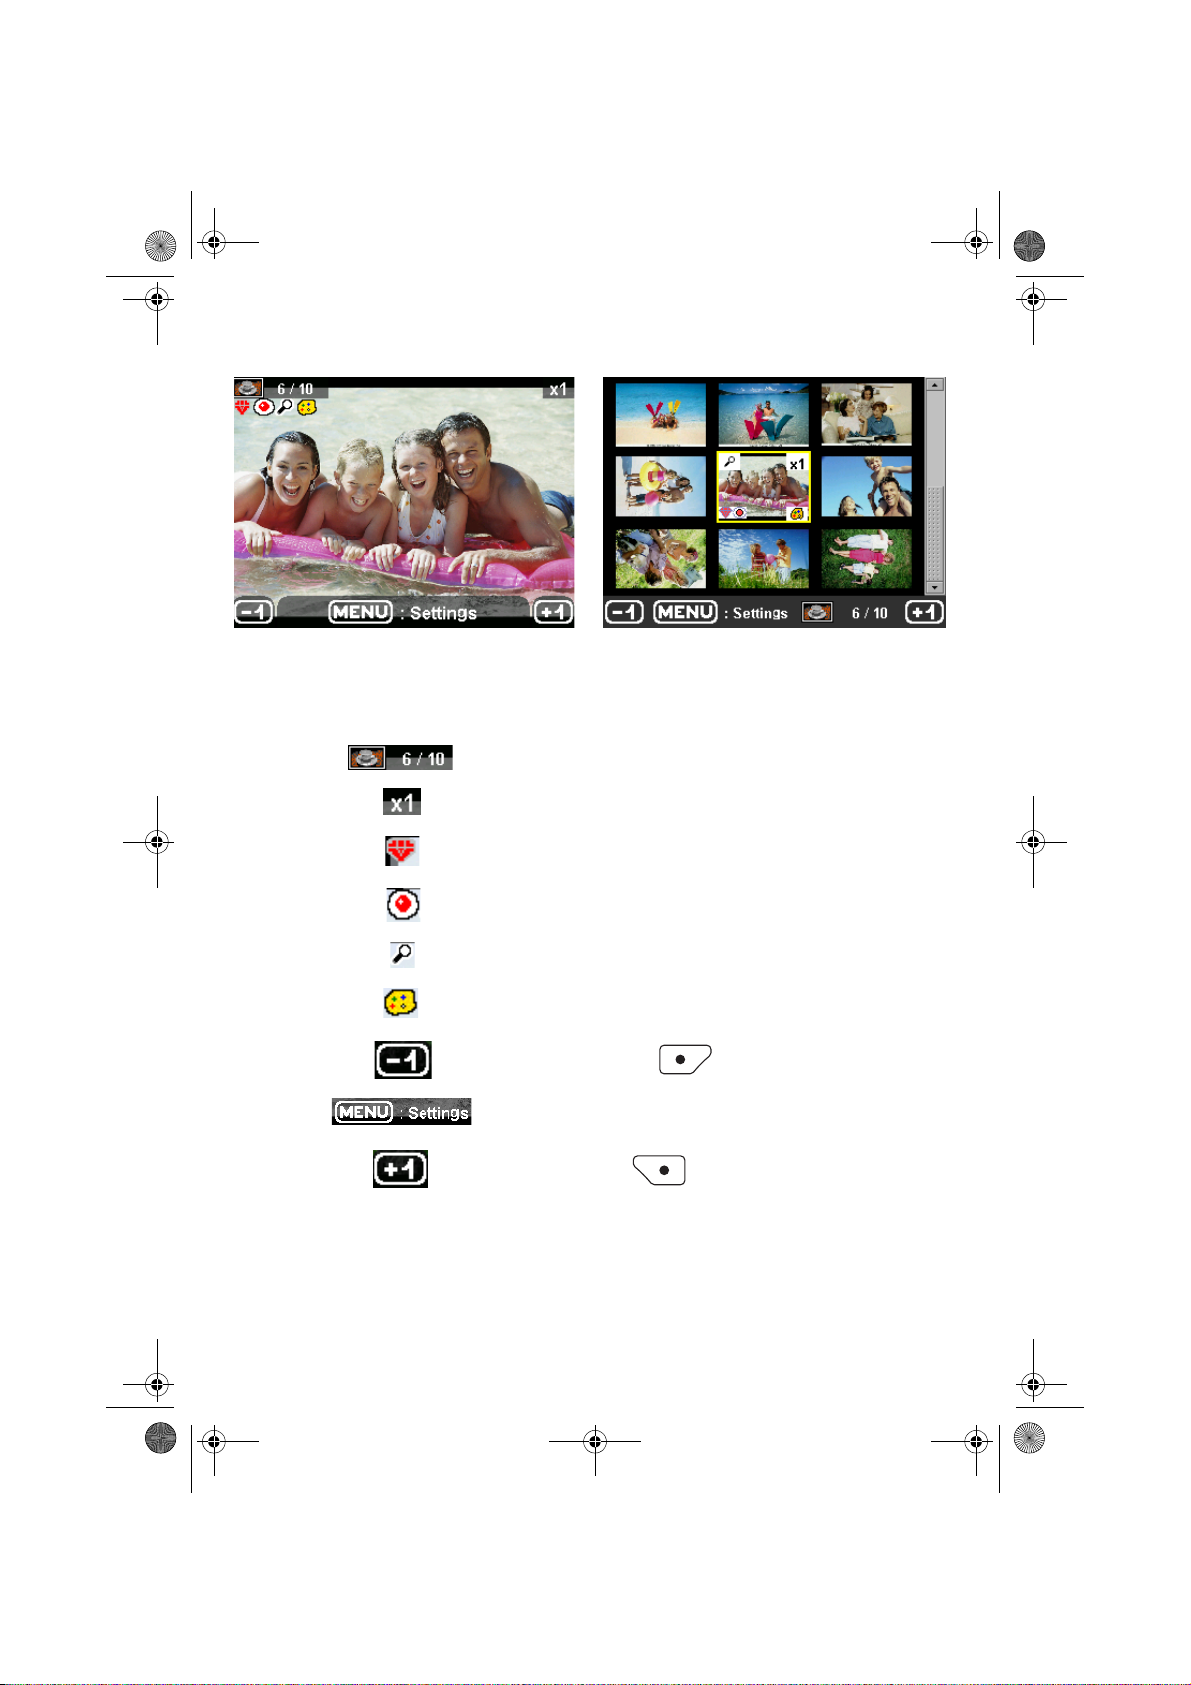
PRÉSENTATION DE L’INTERFACE GRAPHIQUE
.Un écran (1) LCD de 2,4 pouces, vous permet de visualiser vos photos
L’icône... indique...
le numéro de la photo
le nombre de copies sélectionnées
fonction Crystal image activée
fonction yeux rouges activée
un zoom appliqué à une partie de l’image
des modifications apportées à l’image
retirer une copie touche de sélection
accéder aux menus touche MENU
ajouter une copie touche de sélection
IMPRESSION D’UNE PHOTO DEPUIS UNE CARTE MÉMOIRE
Assurez-vous que les consommables (papier et ruban) sont installés.
Assurez-vous que votre imprimante est branchée au secteur et allumée.
- 7 -
Page 10
Liasse azur PE270.fm Page 8 Mardi, 18. juillet 2006 3:51 15
En fonction du format de votre carte mémoire, introduis ez-la dans la fente correspo ndante, comme indiqué
sur l’illustration ci-dessous.
Fente prévue
pour les formats
Smart Media (SM),
Carte xD
Fente prévue
pour les formats
Multi Media Card (MMC)
Standard Digital (SD)
Fente prévue
pour le format
CompactFlash
Fente prévue
pour le format
Memory Stick (MS)
Remarques : SmartMedia CONTACTS VERS LE BAS.
Les cartes mémoires ne rentrent pas complètement dans la fente de lecture. NE
FORCEZ EN
AUCUN CAS. Retirez la carte et vérifiez que vous la présentez dans la bonne fente et
dans le bon sens d’introduction.
Pour plus d’informations, reportez-vous au livret utilisateur présent sur le CD-Rom
livré avec votre imprimante.
Insérez votre carte mémoire, après une phase de lecture la dernière photo de votre carte mémoire
s’affiche sur l’écran LCD.
Appuyez sur la touche pour afficher la première photo figurant sur votre carte, à l’aide des touches
ou vous pouvez faire défiler vos photos. Une fois la photo choisie, appuyez s ur la touche
et suivez les consignes affichées à l’écran pour imprimer votre photo.
- 8 -
Page 11
Liasse azur PE270.fm Page 9 Mardi, 18. juillet 2006 3:51 15
AMÉLIORER LA QUALITÉ DES IMPRESSIONS
A l’aide des fonctions "Crystal Image" et correction "Yeux Rouges".
Crystal Image procède automatiquem ent à tou s le s ré gla ges et co rrec tion s n éce ssa ires en ra ppo rt a ve c
la netteté de l’image, la gestion des couleurs et le contraste pour obtenir la meilleure qualité d’impression
possible.
Par ailleurs, les défauts d’exposition seront corrigés (par exemple les photos sous-exposées seront
éclaircies ou les portions de photo présentant de forts contrastes seront compensées).
La fonction correction "Yeux Rouges" retouche les yeux rouges sur les clichés pris au flash. Vous devez
activer ces fonctions avant le transfert vers l’imprimante.
Remarques : par défaut, les fonctions "Crystal Image" et correction "yeux rouges" sont désactivées.
Lors d’une impression depuis un ordinateur individuel, les fonctions "Crystal Image" et
correction "Yeux Rouges" ne sont pas proposées.
Le tableau suivant indique le nombre de fois qu’il faut appuyer sur la touche pour activer ou désactiver
les composants de la fonction "Crystal Image".
Nombre d’appui sur la
touche
0 (Etat par défaut) Désactivé Désactivé
1 Activé Désactivé
2 Activé Activé
3 Désactivé Activé
4 (retour à l’état par défaut) Désactivé Désactivé
Optimisation d’image
Etat fonction "Crystal Image"
et correction "Yeux Rouges"
"Crystal Image"
Correction "Yeux Rouges"
AUTRES FONCTIONS
Nouveaux effets (effets spéciaux, sépia, NetB, négatif, embossage noir et blanc et couleur, solarisation,
contour noir et blanc et couleur, fusain).
Organisation des photos (choix emplacement).
Diaporama.
Affichage TV.
Sudoku.
Personnalisation fond d’écran.
L’utilisation de toutes ces fonctions est détaillée dans le livret utilisateur présent sur le CD-ROM livré avec
votre imprimante.
- 9 -
Page 12

Liasse azur PE270.fm Page 10 Mardi, 18. juillet 2006 3:51 15
CONDITIONS DE GARANTIE
Pour toute mise en oeuvre de la garantie, vous devez vous adresser à votre vendeur et lui présenter
le justificatif d'achat qu'il vous a remis.
En cas de panne, c'est lui qui vous conseillera.
Si vous avez acheté directement votre matériel auprès de SAGEM, celui-ci est garanti par SAGEM (pièces et
main d'oeuvre), contre tout défaut de matière et tout vice de fabrication pendant une durée d'un an à compter
de la date de livraison. Durant cette période, tout matériel défectueux sera remplacé ou réparé gratuitement,
le client devant retourner à ses frais le matériel défectueux à l'adresse qui lui sera indiqué par le Service
Après-Vente SAGEM dont le numéro de téléph one figure sur le bordereau de livraison. En l'absence de
contrat d'entretien spécifique souscrit par le client, la réparation ou l'échange ne sera en aucun cas effectué
dans les locaux du client.
Sont exclus de la garantie :
a)Les pannes ou dysfonctionnements dus au non-r espect des consignes d'installation et d' utilisation, à
une cause extérieure au matériel (foudre, incendie, choc...), à un défaut de communication lié au
réseau sans fil du client, à des modificatio ns de maté riels effectués san s accord éc rit de SAGE M, à un
défaut d'entretien courant, de surveillance ou de soins de matériel, ou encore une réparation ou un
entretien effectués par des personnes non agréées par SAGEM Communication.
b)L'usure normale du matériel ainsi que l'usure des accessoires.
c)Les détériorations consécutives à une insuffisance d'emballage et/ou à un mauvais conditionnement du
matériel réexpédié à SAGEM. Dans les cas ci- dessus ainsi qu'à l'expiration de la garantie, le client
demandera à SAGEM un devis qu'il devra accepter avant tout retour du matériel au Service
Après-Vente SAGEM. Les frais de réparation et de port (alle r et retour) seront facturés au client. Ces
conditions relatives à la garantie sont applicables en France Métropolitaine.
Votre matériel est, en tout état de cause,
soumis à la garantie légale contre les conséquences
des défauts ou vices cachés conformément
aux articles 1641 et suivants du Code Civil
- 10 -
Page 13
Liasse azur PE270.fm Page 1 Mardi, 18. juillet 2006 5:22 17
ENGLISH
WELCOME
Thank you for purchasing our new photo printer. With this high quality printer you can get the most out of
your digital photos. The Crystal Image and red-eye image optimising functions pro vide faultless print and
copy quality of your photos.
You will also find the following on the web site www.sagem.com:
• print drivers for PCs,
• a list of answers to frequently asked questions (FAQ).
A detailed user guide is supplied on the CD-ROM.
SAFETY INSTRUCTIONS AND RECOMMENDATIONS
Do not install your photo printer in a humid room (bathroom, laundry, kitchen, etc.), or within
1.50 m of a tap or water source, or ou tside. The printer should be operated wit hin an ambient
temperature range of 10°C to 35°C. Your printe r should be used at an ambient temperatu re of
between 15°C and 35°C for optimum printing results.
Do not set up your pri nter i n a dust y envir onment a s dust deposi ts migh t advers ely aff ect th e print
quality of your photos.
Only use the power supply that is suppl ied. Connect it to a main s outlet in compliance w ith the
installation instructions in this booklet and the indications stated on the identification label located
on the unit (voltage, current and frequency of the electricity network). As a precaution, in case of
danger, the mains adapters act as a disconnecting me cha nis m for the 23 0V po we r sup ply. They
should be placed near the device and should be easily accessible.
Never open the top cover when the printer is operating , as you risk breaking the film that may
result a printer malfunction.
After using the printer, wait a few moments after switching the printer off before opening it. To
avoid injury, never touch the print head.
Only use SAGEM consumables, if not you are likely to damage the equipment and invalidate the
guarantee.
The crossed-out waste bin stuck on the p roduct means th at the product be longs to the fami ly of
electrical and electronic equipment.
In this respect, the European regulations ask you to dispose of it selectively:
- At sales points in the event of the purchase of similar equipment.
- At the collection points made available to you locally (drop-off centre, selective collection, etc.).
The CE marking certifies that the product meets the main requirements of the European
Parliament and Council directive 1999/5/CE on telecommunications terminal equipment,
regarding safety and health of users, and regarding electromagnetic interference.
The declaration of compliance can be consulted on the site www.sagem.com category "support",
or can be requested at the following address:
Sagem Communication - Customer relations department
4, rue du Petit Albi - 95800 Cergy Saint-Christophe - FRANCE
- 1 -
Page 14
Liasse azur PE270.fm Page 2 Mardi, 18. juillet 2006 5:22 17
YOUR PRINTER AND ITS ACCESSORIES
Place your set in front of you. Take out the various components for your printer and check that the
components shown below are present :
Power supply block
Mains lead
Paper tray
Photo printer
Installation guide
(depending on model)
CONNECTIONS
Ribbon
(depending on model)
Memory card
insertion slots
Remote control
WiFi adapter
(depending on model)
(depending on model)
CD-ROM
Photo paper block
(depending on model)
Video cable
IRDA
Infrared
Master USB
Adapters:
WiFi (Depending on option)
Pictbridge
Bluetooth (Depending on option)
- 2 -
Mains supply
Slave USB
PC link
Video output
Page 15
Liasse azur PE270.fm Page 3 Mardi, 18. juillet 2006 5:22 17
Before making the connections, please consult the safety instructions at
the start of the user booklet on the CD-ROM provided with your printer.
Remarks: To guarantee that the sheet of paper moves correctly while printing, make sure that to
allow at least 10 centimetres free space at the back of the printer.
Do not set up your printer in a dusty environment as dust deposits might adversely affect
the print quality of your photos.
Obstacle
10 cm
5 cm
- 3 -
Page 16

(
)
Liasse azur PE270.fm Page 4 Mardi, 18. juillet 2006 5:22 17
SETTING UP THE PRINTER
POWERING UP
INSERTING PAPER
1
2
3
4
3 s
1
2
R
em
V
e
ove
i
E
ll
ez
n
P
t
tf
ap
h
ern
à
Q
i
re
i
s
e
u
sh
rf
R
i
en
tar es
ti
a
ca
im
rer cette fe
ee
S
ch
ss
u
V
ie
t
ei
overe q
e
b
etto
t
a h
b
r
R
n
e
w
i
fo
l
tt
e
eg
ij
o
ti
.
e d
T
d
re p
ja
re
a
en
e
g
u
u
r d
V
as
es
an
b
i
e
.
y
u
l
l
sto
S
j
e
o
tti
e d
tes d
K
m
t
z
a fo
rt d
c
é
n
e
P
h
rj
e
fog
g
te t
sh
u
r
ü
p
e
p
l
os
e p
ha
tz
k tá
tt
2
r
eet v
a
l
5
e
o
a
i
b
2
2
6
1
99
7
A
pe
z
o
n
t
oner el p
p
d
l
ec
p
t
att
v
e
o u
o
r
ap
o
r
p
o
ti
i
li
i
l
n
m
b
í
o
o
p
r
s
tsa
th
s
ev
o
r
n
er i
t
a d
d
u
pe
t
e
av
at u
e
n
o
e
c
ap
nn
i
i
rS
p
l
i
ç
a
, m
d
a
n
c
ã
n
e
he
a
v
p
i
i
se
o
t
l
e
n
e
to
e
i
a
lož
en
te
e
d
di
r
ri
t
l
n
u
ca
p
u
re l
la
e
g
e
te
tt
t
a
fy
F
o
n
e i
ss
p
betes
s
b
í
a
o
arku
m
ie
ll
m
d
cart
a
ette
t
er
o
r
p
e
n
p
i
p
d
ress
co
a
n
p
ap
sza
e
.
z
p
de
a
å
j
i a
l
í
n
p
a
i
oca
r
ere
u
p
io
p
d
ap
el
p
d
e
r
n.
a
l
a
r o
i
’
z
p
p
o
p
a
p
e
ns
e
z
pp
ape
i
í
d
ercas
rsk
rt a
p
á
w
o
s
a
l
ob
pe
si
asse
.
o
kazett
to
s
l
n
n
en
et
í
k
t
a
te
ten
iem
u
c
.
á
assete.
p
b
.
laat
a.
p
ap
st.
i
eru
d
o
k
asety
.
4
R
em
V
e
o
i
Ent
l
ve t
le
P
ap
z
ferne
Q
h
à
i
u
erfach
re
i
Ri
s
i
t
c
s
a
ti
m
n
asse
r est
h
r
S
V
u
er cette feui
ee
e
o
i
ei
e
r
Retire e
v
t
w
tto
a
ere q
b
be
n
ho
i
T
i
j
leg
tt
.
d
a
fo
g
e
e
V
ja
b
r d
d
re putti
en
y
u
Ké
j
an
st
e
o
as
m
.
e
sto
rt de
a f
P
l
z
rjü
tes
Sc
l
e
e
r
t
2
e
o
o
5
d
s
2
fo
k
t
s
d
l
n
2
h
tt
h
h
e
e
z
6
t
g pa
g
u
e
a
a
eet voor
1
á
nt
pr
l
t
p
p
9
v
o u
i
z
d
9
o p
ol
o
b
7
o
o
a
e
A
p
l
la
t
p
pr
n
í
i
e
tsa el
e
sun
r
s
p
er el
tt
cti
im
r
t
er i
ot
p
i
b
n t
d
o
a d
i
e
ev
a
n
e
p
n
c
,
ci
t u
h
m
d v
n
çã
or
a
i
ap
e
i
e
a
va
het
n
i
o
te
n
p
e
Si
l
el
se
o
an
d
n
a
l
ž
e
g
p
t
en
u
rire la
tou
tt b
e
o
e
p
d
tes
fy
n
r
ap
l
i
arku
í
e F
m pap
cas
a
e
l
te
l
b
i
te
d
e
e
c
o
e
r
r
an
i
szi a p
sette
s
i
m
t
på
art
c
o
za p
n
d
o
pr
p
í
d
p
r
ej
a
lo
a
u d
e
e p
n
p
.
a
a
c
r
ss
i
pp
z
ap
e
ar o
e
de
o
e
a
l
i
re i
l
o
d
z
í
e
p
’
rt
p
ap
w
n
rs
i
ás
erca
p
.
n
ap
a ka
kasset
p
a
s
o
o
os
p
e
bn
e
l
en
ss
.
z
it
l
í
n
e
o
ku
iem
e
ttá
a
te
t
te
.
ca
b
n
p
a
.
p
ss
.
ap
l
a
a
ete.
i
e
t
st.
ru
d
o
ka
se
ty
.
5
3
6
- 4 -
Page 17
Liasse azur PE270.fm Page 5 Mardi, 18. juillet 2006 5:22 17
INSTALLING THE RIBBON
Remark: Use manufacturer consumables only. These are specially designed to provide optimum
print quality.
2
3
3
1
4
5
Tighten the ribbon on these spindles (6) and close the printer.
7
5
- 5 -
6
6
Page 18

Liasse azur PE270.fm Page 6 Mardi, 18. juillet 2006 5:22 17
DESCRIPTION OF THE USER INTERFACE
The interface is used to:
• choose photographs one at a time or switch into mosaic mode (9 photographs on screen),
• start the printout of a photograph directly,
• enable automatic improvement of the photograph prior to printout,
• set the "Format", "Preferences" and "Image setting" parameters according to your requirements,
• select several photographs and choose a different number of copies for each photograph to be
printed,
• zoom in on a photograph and print it.
DESCRIPTION OF THE KEYPAD
1
12
111
10
9
8
7
No. Key
1 / 5 / 7 / 9 Browser
2 Validate / Enter / Add a copy
3Zoom +
4 Crystal image / Red eyes
6Menu
8 On / Off
10 Print
11 Zoom 12 Back / Cancel / Remove a copy
2
3
4
5
6
- 6 -
Page 19
Liasse azur PE270.fm Page 7 Mardi, 18. juillet 2006 5:22 17
DESCRIPTION OF THE GRAPHIC USER INTERFACE
.2.4" LCD screen (1), to view your photographs
The icon... indicates...
the photograph number
the number of copies selected
Crystal image function enabled
red eye function enabled
zoom applied to part of the image
modifications made to the image
remove a copy selection key
access menus MENU key
add a copy selection key
PRINTING A PHOTOGRAPH FROM A MEMORY CARD
Check that the consumables (paper and ribbon) are installed.
Check that your printer is plugged in and switched on.
- 7 -
Page 20
Liasse azur PE270.fm Page 8 Mardi, 18. juillet 2006 5:22 17
Insert your memory card into the correct slot, as shown on the diagram below.
Slot provided for
Smart Media (SM),
Carte xD formats
Slot provided for
Multi Media Card (MMC)
Standard Digital (SD)
formats
Slot provided for
CompactFlash
format
Slot provided for
Memory Stick (MS)
format
Remarks: SmartMedia CONTACTS DOWNWARDS.
The memory cards do not go completely inside the read slot. NEVER USE FORCE.
Remove the card and check that you are inserting it the right way round into the correct
slot.
For further information, refer to the user booklet on the CD-ROM provided with
your printer.
Insert your memory card; after reading the card, the last ph otograph will be displayed on the LCD
screen.
Press the key to display the first photograph on the card. Scroll through the photographs with the
and keys. After selecting the photograph, press the key and follow th e instructions
displayed on screen to print your photograph.
- 8 -
Page 21
Liasse azur PE270.fm Page 9 Mardi, 18. juillet 2006 5:22 17
IMPROVING THE PRINT QUALITY
Use the "Crystal Image" and "Red Eye" correction functions.
Crystal Image makes all the necess ary settings and corrections related to picture sharpness, colour
management and contrast automatically to obtain the best print quality possible.
Furthermore, exposure defects will be corrected (for example, under-exposed photos will be made lighter
or the portions of photo with strong c ontrasts will be com pensated for). The red-eye correction f unction
touches up "red eyes" on shots taken with the flash.
Remarks: By default, the "Crystal Image" and "Red Eye" correction functions are disabled.
When printing from a personal computer, the "Crystal Image" and "Red Eye" correction
functions are not proposed.
The following table shows the numb er of tim es tha t th e key must be pressed to enable o r d isa ble the
components of the "Crystal Image" function.
Number of presses on the
key
0 (Default status) Disabled Disabled
1 Enabled Disabled
2 Enabled Enabled
3 Disabled Enabled
4 (return to default status) Disabled Disabled
"Crystal Image" and "Red Eye"
correction function status
"Crystal Image"
optimisation
"Red Eye" correction
OTHER FUNCTIONS
New eff ects (special ef fects, sepia, B& W, negative, black & white an d colour embo ssing, solarisa tion,
black & white and colour contour, charcoal).
Organisation of photographs (choice of location).
Slide show.
TV display.
Sudoku.
Screen background customisation.
Use of these functions is detailed in the user booklet on the CD-ROM provided with your printer.
- 9 -
Page 22

Liasse azur PE270.fm Page 10 Mardi, 18. juillet 2006 5:22 17
GUARANTEE
GUARANTEE (UK Terms and Conditions)
In order to apply the guarantee, you should co ntact your dealer. Proof of purchase will be required .
Should malfunctioning arise, the dealer will advise you what to do.
If you bought your equipment from SAGEM directly, the following shall apply :
A) SAGEM undertakes to remedy by repair, free of charge for labour and replacement parts, any defects
in the equipment during a period of twelve (12) months from the date of original delivery of the Equipment,
where those defects are a result of faulty workmanship.
During this twelve month guarantee period, the defe ctive equipment will be repaired free of charge; the
customer must however return the defec tive eq uip me nt a t his /he r ow n e xpe ns e, to the ad dre ss g ive n b y
SAGEM After Sales Department, the phone nu mber of which can be found on the delivery slip. Unless
the customer has concluded with SAG EM a maintenance contract in respect of the eq uipment which
specifically provides for repairs to be carried out at the customer’s premises, the repairs will not be carried
out on the equipment at the customer’s premises.
The following sentence applies to purchases of equipment for the customer’s trade, business or
profession. Except as otherwise expressly provided in this Document and to the extent permitted by law,
SAGEM makes no representations or warranties, express or implied, statutory or otherwise, and to such
extent, all terms and conditions implied by law are hereby excluded.
This guarantee does not affect the Customer’s statutory rights.
B) Exclusions From Guarantee
SAGEM shall have no liability under the guarantee in respect of :
• damage, defects breakdown or malfunction due to :
- failure to properly follow the installation process and instructions for use; or
- an external cause to the equipment (including but not limited to, lightening, fire, shock or water
damage of any nature); or
- modifications made without the written approval of Sagem Communication; or
- a failure or neglect to maintain the equipment or inappropriate maintenance; or
- unsuitable operating conditions, particularly of temperature and humidity; or
- repair or maintenance of the equipment by persons not authorised by SAGEM.
• wear and tear from normal daily use of the equipment and its accessories
• damage due to insufficient or bad packaging of equipment when returned to SAGEM
• supply of new versions of software
• work on any equipment or softwar e modified or added without the p rior written consent of SAGEM
malfunctions not resulting from the Equipment or fr om software installed in user workstations for the
purpose of use of the equipment
• communication problems related to an unsuitable envir onm en t, inclu din g :
- problems related to access and/or connection to the Internet such as interruptions by access
networks or malfunction of the line used by the subscriber or his correspondent
- transmission faults (for example poor geographical coverage by radio transmitters, interference or
poor line quality)
- the local network fault (wiring, servers, workstations) or the failure of the transmission network
• the normal servicing (as defined in the user guide supplied with the equipment) as well as
malfunctioning due to servicing not being carried out, servicing costs are in any event always borne by
the customer.
- 10 -
Page 23
Liasse azur PE270.fm Page 11 Mardi, 18. juillet 2006 5:22 17
C) In the cases set forth in § B) as well as after expiry of the twelve month guarantee period, the customer
must ask SAGEM for an estimate, and he/she must acce pt the estimate and agree to pay the cha rges
mentioned in it before returning the equi pme nt to S AG EM . Th e re pair and de live ry c osts will be i nvo iced
to the customer.
The foregoing shall apply unless otherwise agreed in writing with the customer and only for the UK. If any
provision of this guarantee shall be held to be in whole or in part invalid or illegal due to an obligatory rule
applicable to consumers pursuant to their nation al legislation, su ch invalidity or illeg ality shall not impa ir
or affect the remaining provisions or parts of this guarantee.
- 11 -
Page 24
Sansnom1.fm Page 1 Vendredi, 21. juillet 2006 10:50 10
M
EMO
...................................................................................................................................
...................................................................................................................................
...................................................................................................................................
...................................................................................................................................
...................................................................................................................................
...................................................................................................................................
...................................................................................................................................
...................................................................................................................................
...................................................................................................................................
...................................................................................................................................
...................................................................................................................................
...................................................................................................................................
Page 25

Liasse azur PE270.fm Page 1 Mardi, 18. juillet 2006 4:48 16
DEUTSCH
WILLKOMMEN
Wir beglückwünschen Sie recht herzlich zum Erwerb Ihres neuen Fotodruckers und danken Ihnen für Ihr
Vertrauen. Mit diesem hochwertigen Drucker können Sie ihre digitalen Fotos in vollen Zügen geniessen. Die
Bildoptimierungsfunktionen Crystal Im age und Rote Auge n gewährleisten eine hervorragende Druck- und
Wiedergabequalität Ihrer Fotos.
Darüber hinaus finden Sie auf der Website www.sagem.com:
• die PC-Druckertreiber,
• eine Liste der Antworten auf die häufig gestellten Fragen (FAQ).
Auf der mitgelieferten CD befindet sich eine ausführliche Bedienungsanleitung.
EMPFEHLUNGEN UND SICHERHEITSVORKEHRUNGEN
Installieren Sie Ihren Fotodrucker nicht in einem feuchten Raum (WC, Badezimmer,
Waschküche, Küche usw.), weniger als 1,50 m von einer Wasserstelle entfernt oder im
Außenbereich. Für eine optimale Ausdruckqu alität muss der Drucker bei eine r Raumtem peratur
zwischen 15 °C und 35 °C verwendet werden.
Installieren Sie den Drucker nicht an einem staubigen Ort. Der Staub könnte die Ausdruckqualität
der Fotos verschlechtern.
Verwenden Sie ausschließlich das mitgelieferte Netzteil und schließen Sie es gemäß den
Installationsanweisungen in dieser Anleitung und den Hinweisen auf seinem Typenetikett
(Spannung, Strom, Frequenz des Stromn etzes) an das Netz an. Im Gefahrenfall können die
Netzstecker vorbeugend zur Unterbrechung de r 230-V-Stromversorgung gezogen werden. Die
Steckdosen müssen daher in der Nähe des Geräts und leicht zugänglich sein.
Öffnen Sie während des Ausdrucks niemals die ob ere Abdeckung. Dies kann zum Re ißen des
Films und anschließend zu Funktionsstörungen Ihres Druckers führen.
Warten Sie nach der Benutzung nach dem Ausschalten des Druckers einige Sekunden, bevor Sie
ihn öffnen. Berühren Sie auf keinen Fall den Druckkopf, um Verletzungen zu vermeiden.
Verwenden Sie nur und ausschließlich Verbrauchs güter der Marke SAGEM, da Sie and ernfalls
riskieren, das Gerät zu beschädigen und die Garantie zu verl ieren. Für die Bestellnum mern der
Verbrauchsgüter
Die auf dem Produkt angebrachte durchkreuzte Mülltonne bedeutet, das es zur Gruppe der
Elektro- und Elektronikgeräte gehört.
In diesem Zusammenhang fragt die europäische Regelung Sie, ihre selektive Sammlung
durchzuführen :
- den Verkaufsstellen im Falle des Kaufs eines gleichwertigen Geräts.
- den örtlich Ihnen zur Verfügung ges tellten Sammelstellen (Wertstoffhof, Sortierte Sammlung
usw.)
Die CE-Markierung bescheinigt die Konformität des Produkts mit den wesentlichen
Anforderungen der Richtlinie 1999/5/CE des europäischen Parlaments und Rates bezüglich
Telekommunikationsendgeräten, der Sicherheit und Gesundheit der Benutzer, der
elektromagnetischen Störungen.
Die Konformitätserklärung kann auf der Site www.sagem.com unter der Rubrik "Support"
abgerufen oder an folgender Adresse angefordert werden:
Sagem Communication - Customer relations department
4, rue du Petit Albi - 95800 Cergy Saint-Christophe - FRANCE
- 1 -
Page 26

Liasse azur PE270.fm Page 2 Mardi, 18. juillet 2006 4:48 16
DRUCKER UND ZUBEHÖR
Legen Sie den Karton vor sich, entne hmen Sie die einzeln en Elemente Ihres Druc kers und überprüfen
Sie, ob alle nachfolgend aufgeführten Elemente vorhanden sind:
Stromversorgungsteil
Netzkabel
Papierfach
Fotodrucker
Installationsanleitung
Druckband
(je nach Modell)
WiFi-Adapter
(je nach Modell)
Fernbedienung
(je nach Modell)
VERBINDUNGEN - ANSCHLÜSSE
Speicherkarten-
Einschubschlitze
CD-Rom
Fotopapierblock
(je nach Modell)
Videokabel
(je nach Modell)
IRDA
Infrarot
Master-USB
WiFi (je nach Option)
Bluetooth (je nach Option)
- 2 -
Netzversorgung
Video-Ausgang
Adapter :
Pictbridge
Slave-USB
PC-Verbindung
Page 27
Liasse azur PE270.fm Page 3 Mardi, 18. juillet 2006 4:48 16
Bitte sehen Sie vor dem Anschließen des Geräts die Sicherheitshinweise
ein, die sich am Anfang der Bedienungsanleitung auf der mitgelieferten
CD-ROM befinden.
Hinweise: Damit das Blatt Papier beim Drucken ungehindert vorgeschoben werden kann, achten
Sie darauf, dass an der Rückseite des Druckers ein Freiraum von mindestens 10 cm
bleibt.
Stellen Sie Ihren Drucker nicht in staubiger Umgebung auf. Staub kann die Druckqualität
Ihrer Fotos beeinträchtigen.
Hindernis
10 cm
5 cm
- 3 -
Page 28

(
Liasse azur PE270.fm Page 4 Mardi, 18. juillet 2006 4:48 16
INBETRIEBNAHME DES DRUCKERS
EINSCHALTEN
2
3 Sekunden)
EINLEGEN VON PAPIER
1
3
4
1
2
R
em
V
e
o
i
E
ve
l
lez
n
P
t
tf
ap
h
ern
à
Q
i
re
i
s
e
u
sh
rf
R
i
en
tar est
ti
a
ca
im
rer cette fe
ee
S
ch
ss
u
V
ie
t
ei
overe q
e
b
etto
a h
r
b
R
n
e
w
i
fo
l
tt
e
eg
ij
o
ti
.
e d
T
d
re p
ja
re
a
en
e
g
u
u
r d
V
as
es
an
b
i
e
.
y
u
l
l
sto
S
j
e
o
tti
e d
tes d
K
m
t
ze
a fo
rt d
c
é
n
P
h
rj
e
fog
g
te t
sh
u
r
ü
p
e
p
l
os
e p
ha
tz
k tá
tt
2
r
eet v
a
l
5
e
o
a
i
b
2
2
6
1
99
7
A
pe
z
o
n
t
oner el p
p
d
l
ec
p
t
att
v
e
o u
o
r
ap
o
r
p
o
ti
i
li
i
l
n
m
b
í
o
o
p
r
s
tsa
th
s
ev
o
r
n
er i
t
a d
d
u
pe
t
e
av
at u
e
o
n
e
c
ap
nn
i
i
r
p
l
i
ç
a
, m
d
S
a
n
c
ã
n
e
he
a
v
p
i
i
se
o
t
l
e
n
e
to
e
i
a
lož
en
te
e
d
di
r ca
ri
t p
l
n
u
u
re l
l
e
g
e
te
tt
t
a
fy
a
F
o
n
e i
ss
p
betes
s
b
í
a
o
arku
m
ie
ll
m
d
cart
a
ette
t
er
o
r
p
eco
n
p
i
p
d
ress
a
n
p
ap
sza p
e
.
z
p
de
a
å
j
i a
l
í
n
p
a
iere
oca
r
u
io
p
d
ap
el
p
d
e
r
n.
a
l
a
r o
i
’
z
p
p
o
p
a
p
e
ns
e
z
pp
ape
i
í
d
ercas
rsk
rt a
p
á
w
o
s
a
l
ob
pe
si
asse
.
o
kazett
to
s
l
n
n
en
et
ík
t
a
te
ten
i
u
em
c
.
á
assete.
p
b
.
l
a.
p
aat
ap
st.
i
eru d
o
k
asety
.
4
R
em
V
e
o
i
Ent
l
ve t
le
P
ap
z
ferne
Q
h
à
i
u
erf
re
i
Ri
s
i
t
c
s
a
ti
m
ach
n
asse
r est
h
r
S
V
u
er cette feui
ee
e
o
i
ei
e
r
Retire e
v
t
w
tto
a
ere q
b
be
n
ho
i
T
i
j
leg
tt
.
d
a
fo
g
e
e
V
ja
b
r d
d
re putti
en
y
u
Ké
j
an
st
e
o
as
m
.
e
sto
rt de
a f
P
l
z
rj
tes
Sc
l
e
e
r
t
2
ü
e
o
o
52
d
s
fo
k
t
s
d
l
n
2
h
tt
h
h
e
e
z
6
t
g pa
g
u
e
a
a
eet voor
1
á
nt
pr
l
9
t
p
p
v
o u
i
z
d
9
o p
ol
o
b
7
o
o
a
e
A
p
l
la
t
p
pr
n
í
i
e
tsa el
e
sun
r
s
p
er el
tt
cti
im
r
t
er i
ot
p
i
b
n t
d
o
a d
i
e
ev
a
n
e
p
n
c
,
ci
t u
h
m
d v
n
çã
or
a
i
ap
e
i
e
a
va
het
n
i
o
te
n
p
e
Si
l
el
se
o
an
d
n
a
l
ž
e
g
p
t
en
u
rire la
tou
tt b
e
o
e
p
d
tes
fyl
n
r
ap
l
i
arku
í
e F
m papí
cas
a
e
te
l
b
i
te
d
e
e
c
o
e
r
r
an
i
szi a p
sette
s
i
m
t
på
art
c
o
za p
n
d
o
pr
p
d
p
r
ej
a
lo
a
u d
e
e p
n
p
.
a
a
c
r
ss
i
pp
z
ap
e
ar o
e
de
o
e
a
l
i
re i
l
o
d
z
í
e
p
’
rt
p
ap
w
n
rs
i
ás
erca
p
.
n
ap
a ka
kasset
p
a
s
o
o
os
p
e
bn
e
l
en
ss
.
z
it
l
í
n
e
o
ku
iem
e
ttá
a
te
t
te
.
ca
b
n
p
a
.
p
ss
.
ap
l
a
at
ete.
i
e
st.
ru
d
o
ka
se
ty.
5
3
6
- 4 -
Page 29
Liasse azur PE270.fm Page 5 Mardi, 18. juillet 2006 4:48 16
INSTALLATION DES FARBBANDS
Anmerkung: Verwenden Sie nur Hersteller-Verbrauchsmaterial. Dieses ist speziell für eine optimale
Ausdruckqualität entwickelt worden.
2
3
3
1
4
6
6
5
Spannen Sie das Druckband an den Achsen (6) und schlieen Sie den Drucker
7
5
- 5 -
Page 30
Liasse azur PE270.fm Page 6 Mardi, 18. juillet 2006 4:48 16
BESCHREIBUNG DER BENUTZER-SCHNITTSTELLE
Sie ermöglicht:
• das Auswählen einzelner Fotos oder das Umschalten auf den Mosaikmodus (9 Fotos auf dem
Display),
• das direkte Drucken eines Fotos,
• die Aktivierung der automatischen Verbesserung des Fotos vor dem Druck,
• das Einstellen der Parametern "Format", "Bevorzugte Einstellungen" und "Bildeinstellungen"
entsprechend Ihrem Bedarf,
• das Auswählen mehrerer Fotos und für jedes auszudruckende Foto das Festlegen einer
unterschiedlichen Anzahl an Ausdrucken,
• das Zoomen und Drucken eines Fotos.
BESCHREIBUNG DER TASTATUR
1
12
111
10
9
8
7
Marke Taste
1 / 5 / 7 / 9 Navigator
2 Bestätigen/Enter/Bild hinzufügen
3Zoom +
4 Crystal image / Rote Augen
6Menü
8Ein/Aus
10 Drucken
11 Zoom 12 Zurück/Abbrechen/Bild entfernen
2
3
4
5
6
- 6 -
Page 31

Liasse azur PE270.fm Page 7 Mardi, 18. juillet 2006 4:48 16
BESCHREIBUNG DER GRAFIK-SCHNITTSTELLE
Ein LCD-Display (1) 2,4 Zoll, ermöglicht die Anzeige Ihrer Fotos
Das Symbol... zeigt folgendes an:
die Nummer des Fotos
die Anzahl der ausgewählten Ausdrucke
Funktion Crystal image aktiviert
Funktion rote Augen aktiviert
Zoom auf einen Teil des Bildes
Änderungen am Bild
Bild entfernen Auswahltaste
auf Menüs zugreifen Taste MENU
Bild hinzufügen Auswahltaste
DRUCKEN EINES FOTOS VON DER SPEICHERKARTE AUS
Vergewissern Sie sich, dass die Verbrauchsmaterialien (Papier und Farbband) eingesetzt sind.
Vergewissern Sie sich, dass Ihr Drucker an das Netz angeschlossen und eingeschaltet ist.
- 7 -
Page 32

Liasse azur PE270.fm Page 8 Mardi, 18. juillet 2006 4:48 16
Schieben Sie Ihre Speicherkarte in den passenden Schlitz, wie auf der untenstehenden Abbildung zu sehen ist.
Schlitz für Formate
Smart Media (SM),
Carte xD
Schlitz für Formate
Multi Media Card (MMC)
Standard Digital (SD)
Schlitz für Format
CompactFlash
Schlitz für Format
Memory Stick (MS)
Hinweise: SmartMedia KONTAKTE NACH UNTEN.
Die Speicherkarten lassen sich nicht vollständig in den Leseschlitz einschieben. IN
KEINEM FALL VERSUCHEN, DIE KARTE GEWALTSAM EINZUSCHIEBEN. Ziehen
Sie die Karte heraus und prüfen Sie, ob Sie den richtigen Schlitz gewählt und Sie die
Karte richtig herum eingeschoben haben.
Weitere Informationen finden Sie in der Bedienungsanleitung auf der mit dem
Drucker mitgelieferten CD-Rom.
Schieb en Sie Ihre Speicherka rte ein. Nach der Lesep hase wird auf dem LCD-D isplay das erste Foto
Ihrer Speicherkarte angezeigt.
Drücken Sie auf die Taste , um das erste Foto auf Ihrer Karte aufzurufen. Mit den Tasten oder
können Sie Ihre Fotos hintereinande r durchlaufen lassen. Drücken S ie, nachdem Sie das Foto
ausgewählt haben, auf die Taste und befolgen Sie die Anweisungen auf dem Display zum
Drucken Ihres Fotos.
- 8 -
Page 33

Liasse azur PE270.fm Page 9 Mardi, 18. juillet 2006 4:48 16
VERBESSERUNG DER DRUCKQUALITÄT
Mit Hilfe der Funktionen "Crystal Image" und Korrektur "Rote Augen".
Crytal Image führt automatisch alle notw endigen E ins tellungen und K orrektu ren hin sichtlic h Bilds chärfe ,
Farbverwaltung und Kontrast durch, um eine optimale Druckqualität zu erreichen.
Außerdem werden Belichtungsfehler korrigiert (zum Beispiel werden unterbelichtete Fotos erhellt und zu
kontrastreiche Bildbereiche kompensiert). Die Rote-Augen-Korrekturfunktion retuschiert die "roten
Augen" auf mit Blitzlicht aufgenommenen Fotos.
Außerdem werden Belichtungsfehler korrigiert (zum Beispiel werden unterbelichtete Fotos erhellt und zu
kontrastreiche Bildbereiche kompensiert). Die Rote-Augen-Korrekturfunktion retuschiert die "roten
Augen" auf mit Blitzlicht aufgenommenen Fotos.
Hinweise: Die Funktionen "Crystal Image" und Korrektur "Rote Augen" sind in der
Nachstehender Tabelle können Sie entnehmen, wie oft man auf die Taste drücken muss, um die
Komponenten der Funktion "Crystal Image" zu aktivieren oder deak tivie ren .
Standardeinstellung deaktiviert.
Beim Drucken von einem PC aus werden die Funktionen "Crystal Image" und Korrektur
"Rote Augen" nicht angeboten.
Anzahl der
Tastendrucke
0 (Standardstatus) Deaktiviert Deaktiviert
1 Aktiviert Deaktiviert
2 Aktiviert Aktiviert
3 Deaktiviert Aktiviert
4 (Zurück zum
Standardstatus)
Bildoptimierung "Crystal
Status der Funktion "Crystal Image"
und der Funktion Korrektur "Rote Augen"
Image"
Deaktiviert Deaktiviert
Korrektur "Rote Augen"
ANDERE FUNKTIONEN
Neue Effekte (Spezialeffekte, Sepia, schwarz/weiß, Negativ, Embossing schwarz/weiß und farbig,
Solarisation, schwarz/weiße und farbige Kontur, Kohle).
Einteilung der Fotos (Wahl des Speicherplatzes).
Diaporama.
TV-Anzeige.
Sudoku.
Personalisierung Display-Hintergrund.
Die Anwendung dieser Funktionen wird in der Bedienungsanleitung auf der mit dem Drucker
mitgelieferten CD-Rom ausführlich erläutert.
- 9 -
Page 34

Liasse azur PE270.fm Page 10 Mardi, 18. juillet 2006 4:48 16
GARANTIE
Im Falle eines Defektes wenden Sie sich bitte an Ihren Verkäufer, der Sie beraten wird, und legen
Haben Sie das Gerät direkt bei der Sagem Communication gekauft, so gelten die folgenden
Bes-timmungen:
A Für das Gerät gilt zunächst einmal die 24 monatige gesetzliche Sachmängelgewährleistung, deren
genauer Inhalt und Umfang in den Allgemeinen Geschäftsbedingungen, die auf den mit Ihnen
geschlossenen Vertrag anzuwenden sind, näher geregelt ist. Nach Ablauf der gesetzlichen
Sachmängelgewährleistungsfrist, d.h. also in der Regel nach Ablauf von sechs Monaten ab Lieferung,
übernimmt die Sagem Communication bis zu maximal einem Jahr ab Lieferung die Garantie
(Ersatzteile und Reparatur) für die Freiheit des Geräts von Fabrikationsfehlern. Während dieses
zusätzlichen Garantie-Zeitraumes wird da s fehlerhafte Gerät kostenlos re pariert. Der Kunde hat das
fehlerhafte Gerät jedoch auf seine Kosten an die ihm vom Kund endienst der Sagem C ommunication
(die Telefonnummer steht auf dem Lieferschein) angegebene Adresse zurückzuschicken. Die
Reparatur erfolgt auf keinen Fall in den Räumlichkeiten des Kun den, es sei denn, daß er mit diesem
ein speziell Wartungsvertrag abgeschlossen wurde.
Hinweis: Nach Ablauf der gesetzlichen Sachmängelgewährleistungsfrist ist die Sagem
Communication bis zu maximal zwei Jahre n ab Lieferung ausschließlich ve rpflichtet, das fehlerhafte
Gerät zu den oben genannten Bedingungen kostenlos zu reparieren. Ansprüche aus der gesetzlichen
Sachmängel-gewährleistung bestehen in diesem Zeitraum nicht mehr. Ausgeschlossen sind auch
Schadensersatzansprüche aus sonstigem Rechtsgrund, es sei denn, die Schadensursache beruht auf
Vorsatz oder grober Fahrlässigkeit oder es wurde eine vertragswesentliche Pflicht verletzt. In
letzterem Fall beschränkt sich die Haftung jedoch auf den vorhersehbaren Schaden.
B Von der Garantie ausgeschlossen sind
• Defekte oder Funktionsstörungen, die auf eine Nichteinhaltung der Installations- und
• die normale Abnutzung der Geräte und die Abnutzung der Zubehörteile,
• Beschädigungen, die auf eine unzureichende oder schlechte Verpackung der an die Sagem
• die Lieferung neuer Softwareversionen,
• Reparaturen eines ohne die schriftliche Zustimmung der Sagem Communication geänderten oder
• Funktionsstörungen, die weder auf die Ausrüstung noch auf die Software zurückzuführen sind, die in
• Verbindungsprobleme, die auf ein ungünstiges Umfeld zurückzuführen sind, insbesondere:
diesem den Kaufbeleg vor, den Sie zuvor von diesem erhalten haben.
Gebrauchsanweisungen, auf äußere Einwirkungen (Blitzschlag, Brand, Erschütterung,
Wasserschäden jeglicher Art usw.), auf einen von der Sagem Communication nicht schriftlich
genehmigten Umbau der Geräte, auf eine unterlassene Wartung (gemäß Bedienungsanleitung),
Überprüfung oder Pflege der Geräte, auf ungeeignete Umweltbedingungen für die Geräte
(insbesondere im Zusammenhang mit ungeeigneten Temperatur- oder Luftfeuchtigkeitsbedingungen
für die Geräte und die Verbrauchsmaterialien) oder auf eine Reparatur oder eine Instandhaltung
zurückzuführen sind, die von einer von der Sagem Communication nicht ermächtigten Person
vorgenommen wurde,
Communication zurückgesendeten Geräte zurückzuführen sind,
hinzugefügten Gerätes oder Nachbesserun gen einer ohne die schriftliche Zustimmung de r Sagem
Communication geänderten oder hinzugefügt en Softwa r e,
den Benutzergeräten verwendet wird, um de n Zugriff auf die von der Ausrüstung zur Verfügung
gestellten Dienste zu ermöglichen,
- Probleme im Zusammenhang mit dem Zugang oder der Verbindung zum Internet wie z.B.
Unterbrechungen der Zugangsnetze, de r Zusammen-bruch der Leitung des Abonnenten oder
seines Gesprächspartners,
- Übertragungsprobleme (unzureichende geographische Abdeckung des Gebietes durch die
radio-elektrischen Sender, Interferenzen, Störgeräusche, Zusammenbruch oder schlechte
Qualität der Telefon-leitungen...)
- Fehler der örtlichen Leitungen (Verkabelung, Server, Benutzergeräte) bzw. Fehler des
Übertragungsnetzes,
- 10 -
Page 35

Liasse azur PE270.fm Page 11 Mardi, 18. juillet 2006 4:48 16
• Arbeiten zwecks Generalüberholung der Geräte (so wie in dem den Geräten beigefügten
Benutzerhandbuch beschrieben) sowie Funktionsstörungen, die auf eine Unterlassung der
Generalüberholung zurückgehen, wobe i darauf hi nzuweisen ist, daß d ie Kosten f ür die Arbe iten zur
Generalüberholung auf jeden Fall zu Lasten des Kunden gehen.
• CIn den oben unter B) genannten Fällen sowie nach Abla uf der Gara ntiefrist hat der Kunde vo n der
Sagem Communication einen Kostenvoranschlag einzuholen, den er vor der Rücksendung der
Geräte an den Kundendienst der Sagem Communication akzeptieren muß. Die Reparatur- und
Versandkosten (hin und zurück) werden dem Kunden in Rechnung gestellt.
Die vorstehenden Bestimmungen gelten, soweit nicht mit dem Kunden eine schriftliche
Sondervereinbarung abgeschlossen w orden ist und sind auf sämtliche in Deutschland verkauften
Geräte anzuwenden. Sollte eine dieser Bestimmungen gegen eine zwingende
Verbraucherschutzvorschrift des nationalen Rechts verstoßen, ist diese Bestimmung nicht
anzuwenden; die Wirksamkeit der übrigen Bestimmungen bleibt hiervon unberührt.
- 11 -
Page 36

Sansnom1.fm Page 1 Vendredi, 21. juillet 2006 10:50 10
M
EMO
...................................................................................................................................
...................................................................................................................................
...................................................................................................................................
...................................................................................................................................
...................................................................................................................................
...................................................................................................................................
...................................................................................................................................
...................................................................................................................................
...................................................................................................................................
...................................................................................................................................
...................................................................................................................................
...................................................................................................................................
Page 37

Liasse azur PE270.fm Page 1 Mardi, 18. juillet 2006 5:39 17
ESPAÑOL
BIENVENIDO
Acaba de adquirir una impresora de fotos y le agradecemos la confianza que nos otorga. Con esta
impresora de alta calidad, disfrute plenament e de sus fo tos digit ale s. La s fun cio nes de op tim izac ión de las
imágenes de Crystal Image y ojos rojos gara ntizan un a calidad de impr esión y d e copia ir reproc hables de
sus fotos.
También encontrará en el sitio web www.sagem.com:
• los controladores de impresión para ordenadores individuales,
• una lista de respuestas a las preguntas más frecuentes (FAQ).
En el CD-Rom suministrado, encontrará un manual de utilización detallado.
RECOMENDACIONES Y CONSIGNAS DE SEGURIDAD
No instale su impresora foto ni en una pieza húmeda (baño, lavandería, cocina, etc.) a menos de
1,50 m de un punto de agua ni al exterior. Su impresora debe ser usada a una temperatura
ambiente incluida entre 15 °C y 35 °C para un resultado de impresión óptimo.
No instalar su impresora en un lugar polvoriento, el polvo podría degradar la calidad de la
impresión de sus fotos.
Use exclusivamente el bloque de conexió n a la re d e léc trica su min istra do , co néc telo a la red de
acuerdo con las instrucciones de insta lación de este folleto y las indicaciones inscritas en la
etiqueta de identificación pegada en él ( tensión, corriente, frecuencia de la red eléctrica). Por
precaución, en caso de peligro, los adaptadores de corriente sirven de dispositivos de
interrupción de la alimentación de 230 V. Éstos deben situarse cerca del aparato y ser fácilmente
accesibles.
Nunca abra la tapa superior durante la impres ión, puede romper la película y así provoca r un
funcionamiento incorrecto de su impresora.
Después del uso de la impresora, espere a lgu nos ins tan tes des pué s d e la pue sta en ten sión de
la impresora antes de abrirla. Para evitar toda herida, en ningún caso toque la cabeza de
impresión.
Utilice únicamente los consumibles de marca SAGEM que de no ser así, se podría dañar el
aparato y perder la garantía.
El cubo de busura tachado pegado en e l producto significa que pertenece a la familia de los
equipos eléctricos y electrónicos.
Es por esto que la reglamentación europea le pide que proceda a su recogida selectiva:
- En los puntos de distribución, en caso de compra de un equipo equivalente
- En los puntos de recogida puestos a su disposic ión loca lmente (depósi to de des echos , colecta
selectiva, etc.)
La marca CE atesta la conformidad del producto con las exigencias esenciales de la directiva
1999/5/CE del Parlamento y del Consejo Europeo relativa a los equipos terminales de
telecomunicaciones, para la seguridad y la salud de los usuarios, para las perturbaciones
electromagnéticas.
La declaración de confor midad puede con sultarse en la Web www.sagem.com rúbrica "soporte"
o puede solicitarse en la dirección siguiente:
Sagem Communication - Customer relations department
4, rue du Petit Albi - 95800 Cergy Saint-Christophe - FRANCE
- 1 -
Page 38

Liasse azur PE270.fm Page 2 Mardi, 18. juillet 2006 5:39 17
SU IMPRESORA Y SUS ACCESORIOS
Coloque la caja frente a usted, retire los diferentes elementos de su impresora verificando que se
encuentren los elementos presentados a continuación :
%ORTXHGHDOLPHQWDFLµQ
&RUGµQVHFWRU
'HSµVLWRGHSDSHO
,PSUHVRUDIRWR
*X¯DGHLQVWDODFLµQ
&LQWD
VHJ¼QPRGHOR
7HOHPDQGR
VHJ¼QPRGHOR
CONEXIONES - ENLACES
5DQXUDVGHLQVHUFLµQ
GHWDUMHWDVGHPHPRULD
Adaptador WiFi
(según modelo)
CD-Rom
Bloque de papel foto
(según modelo)
Cable vídeo
(según modelo)
,5'$
,QIUDUURMR
- 2 -
$OLPHQWDFLµQ
VHFWRU
86%HVFODYR
HQODFH3&
6DOLGDY¯GHR
86%0DHVWUR
$GDSWDGRUHV
:L)L6HJ¼QRSFLµQ
3LFWEULGJH
%OXHWRRWK6HJ¼QRSFLµQ
Page 39

Liasse azur PE270.fm Page 3 Mardi, 18. juillet 2006 5:39 17
Antes de efectuar las conexiones, consulte las consignas de seguridad
que se encuentran al inicio del manual de utilización presente en el
CD-ROM suministrado con su impresora.
Observaciones: Con el objetivo de garantizar la correcta circulación de la hoja de papel durante la
impresión, es necesario un espacio libre de al menos 10 centímetros en la parte
posterior de la impresora.
No instalar la impresora en un lugar con polvo, el mismo puede degradar la calidad de
la impresión de sus fotos.
2EVW£FXOR
FP
5 cm
- 3 -
Page 40

(
)
Liasse azur PE270.fm Page 4 Mardi, 18. juillet 2006 5:39 17
PUESTA EN SERVICIO DE LA IMPRESORA
PUESTA BAJO TENSIÓN
2
3 s
INSTALACIÓN DEL PAPEL
1
3
4
1
2
R
em
V
e
o
i
E
ve
l
lez
n
P
t
tf
ap
h
ern
à
Q
i
re
i
s
e
u
sh
rf
R
i
en
ta
ti
a
ca
im
rer cette fe
r es
ee
S
ch
ss
u
V
ie
t
ei
overe q
e
b
etto
t
a h
b
r
R
n
e
w
i
fo
l
tt
e
eg
ij
o
ti
.
e d
T
d
re p
ja
re
a
en
e
g
u
ue
r d
V
as
es
an
b
i
.
y
u
l
l
sto
S
j
e
o
tti
e d
tes d
K
m
t
ze
a fo
rt d
c
é
n
P
h
rj
e
fog
g
te t
sh
u
r
ü
p
e
p
l
os
e p
ha
tz
k tá
tt
2
r
eet v
a
l
5
e
o
a
i
b
2
2
6
1
99
7
A
pe
z
o
n
t
oner el p
p
d
l
ec
p
t
att
v
e
o
o
r
ap
o
r
p
o
ti
i
u
li
i
l
n
m
b
í
o
o
p
r
s
tsa
th
s
ev
o
r
n
er i
t
a d
d
u
pe
t
e
av
at u
e
o
n
e
c
ap
nn
i
i
r
p
l
i
ç
a
, m
d
S
a
n
c
ã
n
e
he
a
v
p
i
i
se
o
t
l
e
n
e
to
e
i
a
lož
en
te
e
d
di
r
ri
t p
l
n
u
ca
u
re l
la
e
g
e
te
tt
t
a
fy
F
o
n
e i
ss
p
betes
s
b
í
a
o
arku
m
ie
ll
m
d
cart
a
ette
t
er
o
r
p
e
n
p
i
p
d
ress
co
a
n
p
ap
sza
e
.
z
p
de
a
å
j
i
l
í
n
p
a
a
i
oca
r
ere
u
p
io
p
d
ap
el
p
d
e
r
n.
a
l
a
r o
i
’a
z
p
o
p
p
p
e
ns
e
z
pp
ape
i
í
d
ercas
rsk
rt a
p
á
w
o
s
a
l
ob
pe
si
asse
.
o
kazett
to
s
l
n
n
en
et
í
k
t
a
te
ten
iem
u
c
.
á
assete.
p
b
.
laat
a.
p
ap
st.
i
eru
d
o
k
asety
.
4
R
em
V
e
o
i
En
l
ve t
le
P
ap
t
z
ferne
Q
h
à
i
u
erfach
re
i
Ri
s
i
t
c
s
a
ti
m
n
asse
r est
h
r
S
V
u
er cette feui
ee
e
o
i
ei
e
r
Retire e
v
t
w
tto
a
ere q
b
be
n
ho
i
T
i
j
leg
tt
.
d
a
fo
g
e
e
V
ja
b
r d
d
re putti
en
y
u
Ké
j
an
st
e
o
as
m
.
e
sto
rt de
a f
P
l
z
rjü
tes
Sc
l
e
e
r
t
2
e
o
o
5
d
s
2
fo
k
t
s
d
l
n
2
h
tt
h
h
e
e
z
6
t
g pa
g
u
e
a
a
eet voor
1
á
nt
pr
l
9
t
p
p
v
o u
i
z
d
9
o p
ol
o
b
7
o
o
a
e
A
p
l
la
t
p
pr
n
í
i
e
tsa el
e
s
r
s
p
er el
tt
cti
im
r
un
t
er i
ot
p
i
b
n t
d
o
a d
i
e
ev
a
n
e
p
n
c
,
ci
t u
h
m
d v
n
çã
or
a
i
ap
e
i
e
a
va
he
n
i
o
te
n
p
e
Si
l
el
se
o
an
d
n
a
l
ž
e
g
p
t
t
en
u
rire la
tou
tt be
e
o
e
p
d
tes
fy
n
r
ap
l
i
arku
í
e F
m pap
cas
a
l
te
l
b
i
te
d
e
e
c
o
e
r
r
an
i
szi a p
sette
s
i
m
t
på
art
c
o
za p
n
d
o
pr
p
í
d
p
r
ej
a
lo
a
u d
e
e p
n
p
.
a
a
c
r
ss
i
pp
z
ap
e
ar o
e
de
o
e
a
l
i
re i
l
o
d
z
í
e
p
’
rt
p
ap
w
n
rs
i
ás
erca
p
.
n
ap
a ka
kasset
p
a
s
o
o
os
p
e
bní
e
l
en
ss
.
z
it
l
n
e
o
ku
iem
e
ttá
a
te
t
te
.
ca
b
n
p
a
.
p
ss
.
ap
l
a
a
ete.
i
e
t
st.
ru
d
o
ka
se
ty.
5
3
6
- 4 -
Page 41

Liasse azur PE270.fm Page 5 Mardi, 18. juillet 2006 5:39 17
INSTALACIÓN DE LA CINTA
Observación : Use sólo los consumibles del constructor. Estos están diseñados especialmente para
aportarle un resultado de impresión óptimo.
2
3
3
1
4
6
6
5
Tense la cinta por los ejes (6) y cierre la impresora.
7
5
- 5 -
Page 42

Liasse azur PE270.fm Page 6 Mardi, 18. juillet 2006 5:39 17
PRESENTACIÓN DEL INTERFAZ USUARIO
Le permite:
• seleccionar fotos una a una o pasar a modo mosaico (9 fotos en la pantalla),
• lanzar la impresión de una foto directamente,
• activar el retoque automático de la foto para su impresión,
• ajustar los parámetros "Formato", "Preferencias" y "Ajustes imagen" en función de sus necesidades,
• seleccionar varias fotos y seleccionar un número de ejemplares diferentes para cada foto a imprimir,
• realizar un zoom en una foto e imprimirla.
DESCRIPCIÓN DEL TECLADO
1
12
111
10
9
8
7
Identificación Tecla
1 / 5 / 7 / 9 Navegador
2 Validar / Entrada / Añadir una copia
3Zoom +
4 Cristal Imagen / Ojos Rojos
6Menú
8 Funcionamiento / Parada
10 Imprimir
11 Zoom 12 Atrás / Anular / Retirar una copia
2
3
4
5
6
- 6 -
Page 43

Liasse azur PE270.fm Page 7 Mardi, 18. juillet 2006 5:39 17
PRESENTACIÓN DEL INTERFAZ GRÁFICO
Una pantalla (1) LCD de 2,4 pulgadas, le permite visualizar sus fotos
El icono ... indica ...
el número de la foto
el número de copias seleccionadas
función Crystal Image activada
función Ojos Rojos activada
un zoom aplicado a una parte de la imagen
modificaciones aportadas a la imagen
retirar una copia tecla de selección
acceder a los menús tecla MENU
añadir una copia tecla de selección
IMPRESIÓN DE UNA FOTO A PARTIR DE UNA TARJETA DE MEMORIA
Asegúrese que los consumibles (papel y cinta) están instalados.
Asegúrese que su impresora está conectada a la red eléctrica y está encendida.
- 7 -
Page 44

Liasse azur PE270.fm Page 8 Mardi, 18. juillet 2006 5:39 17
En función del formato de su tarjeta memoria, introdúzcala en la ran ura corre spondi ente, com o se indica en
la siguiente ilustración.
5DQXUDSUHYLVWD
SDUDORVIRUPDWRV
6PDUW0HGLD60
7DUMHWD['
5DQXUDSUHYLVWD
SDUDORVIRUPDWRV
0XOWL0HGLD&DUG00&
6WDQGDUG'LJLWDO6'
5DQXUDSUHYLVWD
SDUDHOIRUPDWR
&RPSDFW)ODVK
5DQXUDSUHYLVWD
SDUDHOIRUPDWR
0HPRU\6WLFN06
Observaciones: SmartMedia CONTACTOS HACIA ABAJO.
Las tarjetas de memoria no entran completamente en la ranura de lectura. NO
FUERCE EN NINGUN CASO. Retire la tarjeta y verifique que la presenta en la
ranura correcta y en el buen sentido de introducción.
Para mayor información, remítase al manual del usuario presente en el
CD-Rom suministrado con su impresora.
Inserte su tarjeta de memoria, luego de una fase de lectura la última foto de su tarjeta de memoria se
visualiza en la pantalla LCD.
Pulse l a tecla para visualizar la primera foto que figura e n su tarjeta, mediante las teclas o
puede ver sus fotos. Una vez seleccionada la foto, pulse la tecla y siga las consignas
visualizadas en la pantalla para imprimir su foto.
- 8 -
Page 45

Liasse azur PE270.fm Page 9 Mardi, 18. juillet 2006 5:39 17
MEJORAR LA CALIDAD DE LAS IMPRESIONES
Mediante las funciones "Crystal Image" y corrección "Ojos Rojos".
Crytal Image efectúa automáticamente todos los ajustes y correcciones necesarios relativos a la nitidez
de la imagen, la gestión de los colores y el contraste para obtener la mejor calidad de impresión posible.
Por otro lado, se corregirán los defectos de exposición (por ejemplo, las fotos subexpuestas se aclararán
o las porciones de la foto que tiene grande s co ntra ste s se equilib rará n). La f unc ión de c orre cci ón d e lo s
ojos rojos retoca los "ojos rojos" en las fotos tomadas con un flash.
Debe activar estas funciones antes de efectuar la transferencia hacia la impresora.
Observaciones: por defecto, las funciones "Cristal Imagen" y corrección "Ojos Rojos" están
El siguiente cuadro indica el número de veces que es necesario pulsar la tecla para activar o desactivar
los componentes de la función "Crystal Image".
Número de pulsaciones en
desactivadas.
Durante una impresión a partir de un ordenador individual, no se proponen las funciones
"Cristal Imagen" y corrección "Ojos Rojos".
Estado función "Crystal Image"
y corrección "Ojos Rojos"
la tecla
0 (Estado predefinido) Desactivado Desactivado
1 Activado Desactivado
2 Activado Activado
3 Desactivado Activado
4 (regreso al estado
predefinido)
Optimización de imagen
"Crystal Image"
Desactivado Desactivado
Corrección "Ojos Rojos"
OTRAS FUNCIONES
Nuevos efectos (efectos especiales, sepia, ByN, negativo, acod eramiento blanco y negro y color,
solarización, contorno blanco y negro y color, dibujo al carbón).
Organización de las fotos (selección del emplazamiento).
Diaporama.
Visualiz aci ón TV.
Sudoku.
Person aliz ació n fon do de pan tall a.
El uso de todas estas funciones se detalla en el manual del usuario presente en el CD-ROM suministrado
con su impresora.
- 9 -
Page 46

Liasse azur PE270.fm Page 10 Mardi, 18. juillet 2006 5:39 17
GARANTÍA
Para toda ejecución de la garantía, usted debe dirigirse a su punto de venda y presentarle el justificante de compra que se le entregó. En caso de avería, es él quien le aconsejará.
Si usted ha comprado su material directamente a Sagem Communication, se aplicarán las siguientes
disposiciones:
El material está garantizado (piezas y mano de obra) por Sag em Communication contra cualquie r defecto
de fabricación, durante un período de doce (12) meses contados a partir de la fecha de entrega.
Durante este período, Sagem Communicati on se compromete a proceder gratu itamente, excluyendo
la reparación de cualquier otro perjuicio, y a la elección del usuario a:
• la sustitución gratuita del material defectuoso por un material del mismo tipo. Dicha sustitución sólo
se refiere al material mismo (sin los consumibles ni la documentación), facturándose al titular de la
garantía las piezas que falten en el equipo averiado. E l material defectuoso su stituido pasa a ser
propiedad de Sagem Communication;
• la reparación del equipo;
• en caso de haber optado por la reparación d el equipo, si é sta no fue ra satisfac toria, el titu lar de la
garantía tendrá derecho a reclamar la sustitución del equipo o la devolución del precio pagado, con
restitución del equipo averiado a Sagem Comm unication Los gastos de sustitución o devolución
correrán a cargo de Sagem Communication.
Para la sustitución o la reparación de l material defectu oso, el cliente d eberá devolverlo a la dirección
que le será indicada por el servicio pos venta de Sagem Communication cuyo número de teléfono
figura en el albarán de entrega. Si el cliente no ha s usc rito el co ntra to d e ma nte nim ien to e spe cífi co, la
reparación o la sustitución nunca se realizará en los locales del cliente.
El material queda sujeto a la garantía l egal contra las consecuencias de los defectos o vicios
ocultos de la cosa vendida de acuerdo con los artículos 1484 y siguientes del Código Civil.
B Quedan excluidos de la garantía:
• las averías o disfunciones que sean consecuencia de la falta de cumplimiento de las normas de
instalación y de utilización, de una causa externa al m aterial (rayo, incendio , golpe, aguas,...), de
modificaciones del material efectuadas sin el consentimiento escrito de Sagem Communication, de
un fallo en el mantenimiento habitual, tal y co mo aparece descrito en la docume ntación ent regada
junto con el material, en la vigilancia o en los cuidados del material, de ma las condiciones del
entorno del material (en particular aquéllas ligadas a condiciones de tempera tura e higrometría,
tanto para el material, como para los consumibles), o incluso de una reparación o un
mantenimiento realizado por personal no autorizado por Sagem Communication;
• el desgaste normal del material así como el desgaste de sus accesorios;
• los deterioros por consecuencia de un embalaje insuficien te y/o de un mal acondicionamiento del
material reexpedido a Sagem Communication;
• el suministro de nuevas versiones del software;
• las intervenciones sobre un material o las modificaciones o añadidos al software sin el
consentimiento de Sagem Communication;
• las disfunciones no imputables al equip amiento o al software instalados en los terminales para
acceder a los servicios ofrecidos por el equipamiento;
• los problemas de comunicación ligados a un entorno desfavorable y en particular.
- los problemas ligados al acc eso y /o la co nex ión a In ter net , tales como las interrupciones de la s
redes de acceso, fallo de la línea del abonado, o de su destinatario,
- los defectos de transmisión (mala cob ertura de emplazamientos geográficos po r los emisores
radioeléctricos, interferencias, zonas oscuras, fallos o mala calidad de las líneas telefónicas...),
- los defectos propios de la red local (cableado , servido r de fiche ros, term inales) y/ o los defe ctos
de la red de transmisión.
- 10 -
Page 47

Liasse azur PE270.fm Page 11 Mardi, 18. juillet 2006 5:39 17
• los trabajos de revisión general (tal y como aparece n ind ica dos en la s ins truc cio nes de u so q ue se
adjuntan al material) así como las disfuncio nes que sean consecuencia de la inejecución d e los
trabajos de revisión general, debiendo precisa r que e l coste de est os trab ajos es en tod o caso por
cuenta del cliente.
C En los casos previstos anteriormente en el párrafo B, así como después de la ex piración del período
de garantía, el cliente pedirá a Sagem Communic ation un presupu esto que el clien te deberá acepta r
antes de cualquier reenvío de material a l Servicio posven ta de Sage m Comm unication Los gas tos de
reparación y los portes (ida y vuelta) serán facturados al cliente.
Estas disposiciones son válidas en defecto de acuerdo particular po r escrito suscrito con
el cliente y son aplicables en España. Si alguna de estas disposiciones se revelara
contraria a alguna norma imperativa del ordenamiento jurídico español de la que
pudieran beneficiarse los consumidores en virtud de la legislación española, dicha
disposición no sería aplicable, continuando sin embargo válidas todas las demás
disposiciones.
- 11 -
Page 48

Sansnom1.fm Page 1 Vendredi, 21. juillet 2006 10:50 10
M
EMO
...................................................................................................................................
...................................................................................................................................
...................................................................................................................................
...................................................................................................................................
...................................................................................................................................
...................................................................................................................................
...................................................................................................................................
...................................................................................................................................
...................................................................................................................................
...................................................................................................................................
...................................................................................................................................
...................................................................................................................................
Page 49

Liasse azur PE270.fm Page 1 Mardi, 18. juillet 2006 5:56 17
ITALIANO
BENVENUTI
Complimenti! Avete acquistato una stampante fotografica e vi ringraziamo per la fiducia accordataci.
Questa stampante di alta qualità vi per mette di approfitta re di tutti i vantag gi offerti dalle foto grafie digitali.
Le funzioni di ottimizzazione delle immagini Crystal Image e occhi rossi assicurano una qualità irreprensibile
della stampa e della copia delle vostre fotografie.
Inoltre, sul sito web www.sagem.com potete trovare:
• i driver di stampa per PC,
• una lista di risposte alle domande più frequenti (FAQ).
Troverete sul CD-Rom fornito una guida utente dettagliata.
RACCOMANDAZIONI E ISTRUZIONI DI SICUREZZA
Non installare la stampante fotografica in ambienti umidi (bagno, la vanderia, cucina, ecc.). Pe r
una resa di stampa ottimale, la stam pante deve essere utilizzata a una temperatura ambiente
compresa tra 15 °C e 35 °C.
Non posizionare la stampante in ambi enti polverosi: le polveri possono degradare la qualità di
stampa delle foto.
Usate esclusivamente il blocco per l'alimentazione di rete in dotazione, allacciatelo alla rete
secondo le istruzioni d'installazione del presente manua le e in base alle indicazioni riportate
sull'etichetta d'identificazione presente sullo stesso (tensione, corrente, frequenza della rete
elettrica). Per precauzione, in caso di pericolo gli alimentatori di rete servono come dispositivi di
sezionamento dell'alimentazione a 230 V. Tali ada ttatori devono essere collocati in prossimità
dell'apparecchio ed essere facilmente accessibili.
Non aprire mai il coperchio superiore durante la stampa, rischiereste la rottura della pellicola e, di
conseguenza, un guasto della stampante.
Dopo aver usato la stampante, lasciate passare qualche istante dopo aver tolto la corrente, prima
di aprirla. Per evitare lesioni, non toccate mai la testina di stampa.
Utilizzare solo ed esclusivamente le cartucce SAGEM per evitare di danneggiare l'apparecchio e
perdere la garanzia.
Il cestino sbarrato riportato sul prodotto indica che quest'ultimo appartiene alla famiglia d elle
apparecchiature elettriche ed elettroniche.
A questo titolo, la regolamentazione europea richie de che si proceda allo smaltimento tramite
raccolta selettiva:
- nei punti di distribuzione nel caso di acquisto di apparecchiatura equivalente;
- nei punti di raccolta messi a disposizione localmente (discariche, raccolta selettiva, ecc.).
Il marchio CE attesta la conformità del prodotto alle esigenze essenziali della direttiva 1999/5/CE
del Parlamento e del Consiglio europeo relativa alle apparecchiature terminali di
telecomunicazione , per la sicure zza e la salut e degli utent i, per le pertu rbazioni ele ttromagneti che.
La dichiarazione di conformità può essere consultata sul sito www.sagem.com alla rubrica
"supporto" o può essere richiesta all'indirizzo seguente:
Sagem Communication - Customer relations department
4, rue du Petit Albi - 95800 Cergy Saint-Christophe - FRANCE
- 1 -
Page 50

Liasse azur PE270.fm Page 2 Mardi, 18. juillet 2006 5:56 17
LA STAMPANTE E I RELATIVI ACCESSORI
Disponete la scatola davanti a voi, estraete i v ari elementi della stampa nte, verifican do che gli e lementi
presentati sotto siano presenti:
Blocco alimentazione
Cavo corrente
Cassetto carta
Stampante foto
CD-Rom
Nastro
(secondo modello)
Adattatore Wifi
(secondo modello)
Telecomando
(secondo modello)
CONNESSIONI - COLLEGAMENTI
Feritoie per inserimento
carta memoria
IRDA
Infrarosso
Cavo video
(secondo modello)
USB Master
Adattatori:
WiFi (secondo opzione)
Pictbridge
Bluetooth (secondo opzione)
Blocchetto carta foto
(secondo modello)
Alimentazione
corrente
USB slave
collegamento PC
Uscita video
- 2 -
Page 51

Liasse azur PE270.fm Page 3 Mardi, 18. juillet 2006 5:56 17
Prima di procedere alle connessioni, consultare le raccomandazioni di
sicurezza che sono all’inizio della guida utente sul CD-ROM fornito con
la stampante.
Osservazioni: Per garantire la corretta circolazione del foglio di carta in fase di stampa, stare attente a
lasciare uno spazio libero di almeno 10 centimetri sul retro della stampante.
Non installare la s tamp ante i n un p osto p olve roso , la p olvere potr ebbe c ompro mett ere l a
qualità di stampa delle foto.
Ostacolo
5 cm
10 cm
- 3 -
Page 52

(
)
Liasse azur PE270.fm Page 4 Mardi, 18. juillet 2006 5:56 17
MESSA IN SERVIZIO DELLA STAMPANTE
MESSA SOTTO TENSIONE
2
3 s
INSERIMENTO DELLA CARTA
1
3
4
1
2
R
em
V
e
ove
i
E
ll
ez
n
P
t
tf
ap
h
ern
à
Q
i
re
i
s
e
u
sh
rf
R
i
en
tar es
ti
a
ca
im
rer cette fe
ee
S
ch
ss
u
V
ie
t
ei
overe q
e
b
etto
t
a h
b
r
R
n
e
w
i
fo
l
tt
e
eg
ij
o
ti
.
e d
T
d
re p
ja
re
a
en
e
g
u
u
r d
V
as
es
an
b
i
e
.
y
u
l
l
sto
S
j
e
o
tti
e d
tes d
K
m
t
z
a fo
rt d
c
é
n
e
P
h
rj
e
fog
g
te t
sh
u
r
ü
p
e
p
l
os
e p
ha
tz
k tá
tt
2
r
eet v
a
l
5
e
o
a
i
b
2
2
6
1
99
7
A
pe
z
o
n
t
oner el p
p
d
l
ec
p
t
att
v
e
o u
o
r
ap
o
r
p
o
ti
i
li
i
l
n
m
b
í
o
o
p
r
s
tsa
th
s
ev
o
r
n
er i
t
a d
d
u
pe
t
e
av
at u
e
n
o
e
c
ap
nn
i
i
rS
p
l
i
ç
a
, m
d
a
n
c
ã
n
e
he
a
v
p
i
i
se
o
t
l
e
n
e
to
e
i
a
lož
en
te
e
d
di
r
ri
t
l
n
u
ca
p
u
re l
la
e
g
e
te
tt
t
a
fy
F
o
n
e i
ss
p
betes
s
b
í
a
o
arku
m
ie
ll
m
d
cart
a
ette
t
er
o
r
p
e
n
p
i
p
d
ress
co
a
n
p
ap
sza
e
.
z
p
de
a
å
j
i a
l
í
n
p
a
i
oca
r
ere
u
p
io
p
d
ap
el
p
d
e
r
n.
a
l
a
r o
i
’
z
p
p
o
p
a
p
e
ns
e
z
pp
ape
i
í
d
ercas
rsk
rt a
p
á
w
o
s
a
l
ob
pe
si
asse
.
o
kazett
to
s
l
n
n
en
et
í
k
t
a
te
ten
iem
u
c
.
á
assete.
p
b
.
laat
a.
p
ap
st.
i
eru
d
o
k
asety
.
4
R
em
V
e
o
i
Ent
l
ve t
le
P
ap
z
ferne
Q
h
à
i
u
erfach
re
i
Ri
s
i
t
c
s
a
ti
m
n
asse
r est
h
r
S
V
u
er cette feui
ee
e
o
i
ei
e
r
Retire e
v
t
w
tto
a
ere q
b
be
n
ho
i
T
i
j
leg
tt
.
d
a
fo
g
e
e
V
ja
b
r d
d
re putti
en
y
u
Ké
j
an
st
e
o
as
m
.
e
sto
rt de
a f
P
l
z
rjü
tes
Sc
l
e
e
r
t
2
e
o
o
5
d
s
2
fo
k
t
s
d
l
n
2
h
tt
h
h
e
e
z
6
t
g pa
g
u
e
a
a
eet voor
1
á
nt
pr
l
t
p
p
9
v
o u
i
z
d
9
o p
ol
o
b
7
o
o
a
e
A
p
l
la
t
p
pr
n
í
i
e
tsa el
e
sun
r
s
p
er el
tt
cti
im
r
t
er i
ot
p
i
b
n t
d
o
a d
i
e
ev
a
n
e
p
n
c
,
ci
t u
h
m
d v
n
çã
or
a
i
ap
e
i
e
a
va
het
n
i
o
te
n
p
e
Si
l
el
se
o
an
d
n
a
l
ž
e
g
p
t
en
u
rire la
tou
tt b
e
o
e
p
d
tes
fy
n
r
ap
l
i
arku
í
e F
m pap
cas
a
e
l
te
l
b
i
te
d
e
e
c
o
e
r
r
an
i
szi a p
sette
s
i
m
t
på
art
c
o
za p
n
d
o
pr
p
í
d
p
r
ej
a
lo
a
u d
e
e p
n
p
.
a
a
c
r
ss
i
pp
z
ap
e
ar o
e
de
o
e
a
l
i
re i
l
o
d
z
í
e
p
’
rt
p
ap
w
n
rs
i
ás
erca
p
.
n
ap
a ka
kasset
p
a
s
o
o
os
p
e
bn
e
l
en
ss
.
z
it
l
í
n
e
o
ku
iem
e
ttá
a
te
t
te
.
ca
b
n
p
a
.
p
ss
.
ap
l
a
a
ete.
i
e
t
st.
ru
d
o
ka
se
ty
.
5
3
6
- 4 -
Page 53

Liasse azur PE270.fm Page 5 Mardi, 18. juillet 2006 5:56 17
INSTALLAZIONE DEL NASTRO
N.B.: Utilizzare unicamente consumabili originali. Questi ultimi sono stati appositamente
concepiti per garantire una resa di stampa ottimale.
2
3
3
1
4
6
6
5
Tendere il nastro sui perni (6) e chiudere la stampante.
7
5
- 5 -
Page 54

Liasse azur PE270.fm Page 6 Mardi, 18. juillet 2006 5:56 17
PRESENTAZIONE DELL’INTERFACCIA UTENTE
Consente di:
• scegliere una per una o presentare in modalità mosaico (9 foto sul display),
• lanciare direttamente la stampa d’una foto,
• attivare il migliormanto automatico del la foto prima di stamparla,
• regolare i parametri "Formato", "Preferenze" e "Regolazioni immagini" a seconda delle necessità,
• selezionare più foto e scegliere li numero di copie diverse per ogni foto da stampare,
• realizzare uno zoom su una foto e stamparla.
DESCRIZIONE DELLA TASTIERA
1
12
111
10
9
8
7
Segno Tasto
1 / 5 / 7 / 9 Navigatore
2 Convalida / Enter / Aggiunta copia
3Zoom +
4 Crystal Image / Occhi rossi
6Menù
8 On / Off
10 Stampa
11 Zoom 12 Indietro / Annulla / Togliere una copia
2
3
4
5
6
- 6 -
Page 55

Liasse azur PE270.fm Page 7 Mardi, 18. juillet 2006 5:56 17
PRESENTAZIONE DELL’INTERFACCIA GRAFICA
Un display (1) LCD da 2,4 pollici, consente la visualizzazione della foto
L’icona... indica...
il numero della foto
il numero di copie selezionate
funzione Crystal Image attivata
funzione occhi rossi attivata
un zoom applicato ad una parte dell’immagine
delle modifiche fatte all’immagine
togliere una copia tasto selezione
accesso ai menù tasto MENU
aggiungere una copia tasto selezione
STAMPA D’UNA FOTO A PARTIRE DA UNA CARTA MEMORIA
Verificare la presenza dei consumabili (carta e nastro).
Verificare che la stampante sia collegata alla corrente ed accesa.
- 7 -
Page 56

Liasse azur PE270.fm Page 8 Mardi, 18. juillet 2006 5:56 17
A seconda del formato della cartacarte m emoria, inserirla nella fe ritoia corrispondente, come indicato nella
illustrazione seguente.
Feritoia prevista
per i formati
Smart Media (SM),
Carta xD
Feritoia prevista
per il formato
CompactFlash
Osservazioni : SmartMedia CONTATTI VERSO IL BASSO.
Le carte memoria non entrano completamente nella feritoia di lettura. NON FORZARE
MAI. Togliere la carta e verificare che sia inserita nella feritoia giusta e nel senso
d’introduzione corretto.
Per maggiori informazioni, consultare la guida utente presente sul CD-ROM fornito
con la stampante.
Feritoia prevista
per i formati
Media Card (MMC)
Standard Digital (SD)
Feritoia prevista
per il formato
Memory Stick (MS)
Inserire la ca rta me moria, dopo una fase di le ttura a ppare l’ultim a foto della carta memo ria sul displa y
LCD.
Premere il tasto per visualizzare la prima foto salvata sulla carta, con l’ausilio dei tasti o
esiste la possibilà di far avanzare le foto. Una volta scelta la foto, premere il tasto e seguire le
istruzioni che appaiono sullo schermo per stampare la foto.
- 8 -
Page 57

Liasse azur PE270.fm Page 9 Mardi, 18. juillet 2006 5:56 17
MIGLIORARE LA QUALITÀ DELLE STAMPE
Con l’ausilio delle funzioni "Crystal Image" et correzione "Occhi rossi".
Crystal Image procede automaticamente a tutte le regolazioni e correzioni necessarie rispetto alla
nitidezza dell'immagine, alla gestione dei col ori e al contras to, per otten ere la migliore qualità di stampa
possibile.
D'altra parte, gli errori d'espos izione verranno corretti (per e sempio, le foto grafie sovraesp oste saranno
schiarite, oppure le parti della fotografia che presentano forti contrasti saranno compensate).
La funzione di correzione dell'effetto occhi rossi ritocca gli "occhi rossi" delle fotografie scattate con il
flash. Dovete attivare queste funzioni prima del trasferimento sulla stampante.
Osservazioni : Per default, le funzioni "Crystal Image" e correzione "occhi rossi" sono disattivate.
Nel caso di una stampa a partire dal PC, le funzioni "Crystal Image" et correzione "Occhi
rossi" non sono disponibili.
La tabella seguente indica quante volte bisogna premere il tasto per attivare o disattivare i componenti
della funzione "Crystal Image".
Numero di pressioni del
tasto
0 (Stato per default) Disattivato Disattivato
1 Attivato Disattivato
2 Attivato Attivato
3 Disattivato Attivato
4 (torna allo stato per default) Disattivato Disattivato
Ottimizzazione immagine
Stato funzione "Crystal Image"
e correzione "Occhi rossi"
"Crystal Image"
Correzione "Occhi rossi"
ALTRE FUNZIONI
Nuovi effetti (effetti speciali, seppia, B&N, negativo, imbozzatura bianco e nero e colori, solarizzazione,
cornice bianco e nero e colori, carboncino).
Organizzazione delle foto (scelta posizionamento).
Diaporama.
Visualizzazione TV.
Sudoku.
Personalizzare fondo schermata.
L’uso di tutte queste funzioni è dettagliato nella guida utente presente sul CD-ROM fornito con la
stampante.
- 9 -
Page 58

Liasse azur PE270.fm Page 10 Mardi, 18. juillet 2006 5:56 17
GARANZIA
Per qualsiasi utilizzazione della garanzia, Vi preghiamo di rivolgerVi al V ostro rivenditore
presentandogli la prova d’acquisto che Vi ha consegnato. In caso di guasto, sarà lui che
potrà consigliarVi.
Nel caso in cui l’apparecchio sia sta to acquist ato diretta mente pre sso la Sa gem Comm unicatio n
si applicheranno le seguenti disposizioni:
A L'apparecchio è garantito (relativamente ai suoi componenti ed al costo della manodopera) dalla
Sagem Communication per un periodo di un anno dal la data della consegna contro qualsiasi dif etto di
fabbricazione. Durante questo periodo tu tti gli apparecchi difettosi saranno riparati gratuitame nte (con
esclusione della riparazione di altri tipi di dann i); a ta l fin e il Cli ent e do vrà invia re, l' app are cchio d ifettoso
all'indirizzo che gli sarà indicato dal servizio assiste nza Sa gem Co mmun ication il cui num ero di t elefono
compare sul documento di consegna. Nel caso in cui il Cliente non abbia sottoscritto lo specifico contratto
di assistenza, l'intervento non verrà in nessun caso effettuato al domicilio del Cliente.
L'apparecchio è in ogni caso coperto da garanzia legale per difetti o vizi occulti ai s ensi degli
articoli 1490 e seguenti del Codice Civile italiano.
B Sono esclusi dalla garanzia:
• avarie o malfunzionamenti che siano conseguenza del mancato rispetto delle indicazioni di
installazione o di utilizzazione, di causa es terna all'apparecchio (fulmine, incendio, caduta, danni di
qualsiasi natura dovuti ad allagamenti, ecc.), di modificazioni apportate all'apparecchio senza il
consenso scritto della Sagem Communication, di negligenza nella manutenzione indicata nella
documentazione consegnata unitame nte all'apparecchio, nella vigilanza e nella custodia, di inidonee
condizioni ambientali (in particolare quelle collegate alle condizioni di temperatura ed igrometria sia per
i componenti che per i materiali consumabili) o di un intervento di riparazione o manutenzione
effettuato da personale non autorizzato dalla Sagem Communication;
• danni o disfunzioni dovuti alla normale usura dell'apparecchio e dei suoi accessori;
• danni derivanti da un imballaggio ins ufficiente e/o da un errato confezionamen to dei prodotti rispediti
alla Sagem Communication;
• installazione di nuovi prodotti software;
• interventi di modifica o aggiunta sugli apparecchi o sul software effettuati senza il consenso della
Sagem Communication;
• disfunzioni, non imputabili agli accessori o al software installato, dei siti di utilizzazione per accedere ai
servizi offerti dall'apparecchio;
• problemi di comunicazione dovuti ad installazione non compatibile, in particolare:
- problemi di accesso e/o connessione ad Internet, quali l'interruzione della rete di accesso, la
mancanza della linea dell'abbonato o del suo corrisponde,
- difetti di trasmissione (mancata copertura del territorio da parte dei ripetitori radioelettrici,
interferenze, disturbi elettromagnetici, mancanza o cattiva qualità delle linee telefoniche, ecc.),
- difetti della rete locale (cablaggio, server, punti di utilizzazione) e/o difetti della rete di trasmissione.
• L'esecuzione degli interventi di revisione generale (come indicati nel libretto d'istruzioni unito
all'apparecchio) e le disfunzioni cons eguenti alla mancata esecuzione di d etti interventi; resta inteso
che il costo di tali interventi è in ogni caso a totale carico del Cliente.
C Nei casi previsti al precedente paragrafo B e nel caso sia scaduto il periodo di garanzia, il Cliente dovrà
richiedere alla Sagem Communication un preventivo che dovrà essere accettato prima della spedizione
dell'apparecchio al servizio assistenza della Sagem Communication.
Le presenti disposizioni saranno applicabili in Italia nel caso di assenza di diverso accordo
concluso per iscritto con il Cliente. Se una di queste disposizioni si rilevasse contraria a
norme di legge imperative di cui potrebbero beneficiare i consumatori nell’ambito della
normativa nazionale, tale disposizione non sarà applicabile mentre tutte le altre
disposizioni rimarranno valide ed efficaci.
- 10 -
Page 59

Liasse azur PE270.fm Page 1 Mercredi, 19. juillet 2006 10:27 10
NEDERLANDS
WELKOM
U heeft zojuist een fotoprinter aangeschaft en wij danken u voor het in ons gestelde vertrouwen. U profiteert
met deze printer van hoge kwaliteit volop van uw dig itale foto's. De functies Crysta l Image en Rode ogen
voor het optimaliseren van beelden zorgen voor een onberispelijke printkwaliteit van uw foto's.
U vindt verder op de website www.sagem.com:
• de printdrivers voor een individuele computer,
• een lijst met antwoorden aan de meest gestelde vragen (FAQ).
U vindt op de bijgeleverde cd-rom een uitgebreide handleidi ng.
VEILIGHEIDSAANBEVELINGEN EN -INSTRUCTIES
De Fotoprinter mag niet binnen 1,50 m van een waterbron, in een vochtige ruimte (toilet,
badkamer, keuken, bijkeuken, enz.) of buiten worden geïnstalleerd. Voor optimale
afdrukresultaten moet u uw printer gebruiken bij een omgevingstemperatuur tussen 15 °C en
35 °C.
Installeer uw printer niet op een stoffige plaat s, want stof kan de afdrukkwaliteit van uw foto's
verslechteren.
Gebruik uitsluitend het meegeleverde netblok, sluit dit aan op het spanningsnet volgens de
installatie-instructies uit dit boekje en de aanwijzingen op de identificatiesticker die hierop geplakt
is (spanning, stroom, frequentie elektriciteitsnet). In gevaarsituaties zal de netvoedingsadapter de
230V-voeding veiligheidshalve onderbreken. Installeer de adapter bij het toestel op een makkelijk
bereikbare plaats.
Nimmer de bovenkap tijdens het printen openen, u zou de film kunnen breken, waardoor uw
printer vervolgens niet meer kan werken.
Wacht na het gebruik van de printer even na het uitschakelen hie rvan alvorens de printer te
openen. Om letsel te voorkomen, dient u in geen geval de printkop aan te raken.
Gebruik enkel en alleen artikelen van het merk SAGEM omdat u het apparaat anders mogelijk
beschadigt en de garantie verliest.
De op het product aangebrachte doorg estreepte vuilnisbak betekent dat het pr oduct behoort tot
de familie van elektrische en elektronische apparaten.
Om deze reden verzoekt de Europese regeling uw medewerking aan gescheiden inzameling:
- op de verkooppunten, bij de aankoop van een gelijkwaardige installatie,
- op de inzamelpunten die u plaatselijk ter beschikken worden gesteld (inzamelcentra voor
chemisch afval, gescheiden vuilophaling enz.).
Het CE merk geeft aan dat het product voldoe t aa n de ess ent iële ver eist en v an d e ric htlij n 19 99 /
5/CE van het Europese Parlement en de Europese Raad met betrekking tot telecommunicatieve
apparatuur, veiligheid en gezondheid van gebruikers, en elek trom ag ne tisch e stor ing en.
De conformiteitsverklaring kan worden geraa dpleegd op de website www.sagem.com rubriek
"support" of kan worden aangevraagd bij het volgende adres:
Sagem Communication - Customer relations department
4, rue du Petit Albi - 95800 Cergy Saint-Christophe - FRANCE
- 1 -
Page 60

Liasse azur PE270.fm Page 2 Mercredi, 19. juillet 2006 10:27 10
UW PRINTER EN ZIJN ACCESSOIRES
Plaats uw cassette voor u, haal d e verschillende e lementen van uw printer er uit e n controleer of u alle
hieronder vermelde elementen heeft:
Netstroom-contactdoos
Elektriciteitssnoer
Papierlade
Fotoprinter
Handleiding
Lint
(afhankelijk van het model)
WiFi-adapter
(afhankelijk van het model)
Afstandsbediening
(afhankelijk van het model)
VERBINDINGEN - AANSLUITINGEN
Invoergleuven
geheugenkaarten
cd-rom
Papier fotoblok
(afhankelijk van het model)
Videokabel
(afhankelijk van het model)
IRDA
Infrarood
Netstroom
Video-output
USB-meester
Adapters:
WiFi (Afhankelijk van de optie)
Bluetooth (Afhankelijk van de optie)
Pictbridge
- 2 -
USB-slaaf:
PC-aansluiting
Page 61

Liasse azur PE270.fm Page 3 Mercredi, 19. juillet 2006 10:27 10
Alvorens de verbindingen tot stand te brengen, moet u de
veiligheidsvoorschriften aan het begin van de handleiding op de cd-rom
die bij de printer geleverd is, raadplegen.
Opmerkingen: Zorg ervoor dat u minimaal 10 centimeter ruimte achter de printer vrijlaat, zodat het
papier tijdens het afdrukken over een grotere marge beschikt.
Plaats uw printer niet in een stoffige ruimte, aangezien stof de afdrukkwaliteit van uw
foto's kan aantasten.
Obstakel
10 cm
5 cm
- 3 -
Page 62

(
)
Liasse azur PE270.fm Page 4 Mercredi, 19. juillet 2006 10:27 10
INGEBRUIKNEMING VAN DE PRINTER
AANSLUITING OP HET STROOMNET
2
3 s
PAPIER INVOEREN
1
3
4
1
2
R
em
V
e
ove
i
E
ll
ez
n
P
t
tf
ap
h
ern
à
Q
i
re
i
s
e
u
sh
rf
R
i
en
tar es
ti
a
ca
im
rer cette fe
ee
S
ch
ss
u
V
ie
t
ei
overe q
e
b
etto
t
a h
b
r
R
n
e
w
i
fo
l
tt
e
eg
ij
o
ti
.
e d
T
d
re p
ja
re
a
en
e
g
u
u
r d
V
as
es
an
b
i
e
.
y
u
l
l
sto
S
j
e
o
tti
e d
tes d
K
m
t
z
a fo
rt d
c
é
n
e
P
h
rj
e
fog
g
te t
sh
u
r
ü
p
e
p
l
os
e p
ha
tz
k tá
tt
2
r
eet v
a
l
5
e
o
a
i
b
2
2
6
1
99
7
A
pe
z
o
n
t
oner el p
p
d
l
ec
p
t
att
v
e
o u
o
r
ap
o
r
p
o
ti
i
li
i
l
n
m
b
í
o
o
p
r
s
tsa
th
s
ev
o
r
n
er i
t
a d
d
u
pe
t
e
av
at u
e
n
o
e
c
ap
nn
i
i
rS
p
l
i
ç
a
, m
d
a
n
c
ã
n
e
he
a
v
p
i
i
se
o
t
l
e
n
e
to
e
i
a
lož
en
te
e
d
di
r
ri
t
l
n
u
ca
p
u
re l
la
e
g
e
te
tt
t
a
fy
F
o
n
e i
ss
p
betes
s
b
í
a
o
arku
m
ie
ll
m
d
cart
a
ette
t
er
o
r
p
e
n
p
i
p
d
ress
co
a
n
p
ap
sza
e
.
z
p
de
a
å
j
i a
l
í
n
p
a
i
oca
r
ere
u
p
io
p
d
ap
el
p
d
e
r
n.
a
l
a
r o
i
’
z
p
p
o
p
a
p
e
ns
e
z
pp
ape
i
í
d
ercas
rsk
rt a
p
á
w
o
s
a
l
ob
pe
si
asse
.
o
kazett
to
s
l
n
n
en
et
í
k
t
a
te
ten
iem
u
c
.
á
assete.
p
b
.
laat
a.
p
ap
st.
i
eru
d
o
k
asety
.
4
R
em
V
e
o
i
Ent
l
ve t
le
P
ap
z
ferne
Q
h
à
i
u
erfach
re
i
Ri
s
i
t
c
s
a
ti
m
n
asse
r est
h
r
S
V
u
er cette feui
ee
e
o
i
ei
e
r
Retire e
v
t
w
tto
a
ere q
b
be
n
ho
i
T
i
j
leg
tt
.
d
a
fo
g
e
e
V
ja
b
r d
d
re putti
en
y
u
Ké
j
an
st
e
o
as
m
.
e
sto
rt de
a f
P
l
z
rjü
tes
Sc
l
e
e
r
t
2
e
o
o
5
d
s
2
fo
k
t
s
d
l
n
2
h
tt
h
h
e
e
z
6
t
g pa
g
u
e
a
a
eet voor
1
á
nt
pr
l
t
p
p
9
v
o u
i
z
d
9
o p
ol
o
b
7
o
o
a
e
A
p
l
la
t
p
pr
n
í
i
e
tsa el
e
sun
r
s
p
er el
tt
cti
im
r
t
er i
ot
p
i
b
n t
d
o
a d
i
e
ev
a
n
e
p
n
c
,
ci
t u
h
m
d v
n
çã
or
a
i
ap
e
i
e
a
va
het
n
i
o
te
n
p
e
Si
l
el
se
o
an
d
n
a
l
ž
e
g
p
t
en
u
rire la
tou
tt b
e
o
e
p
d
tes
fy
n
r
ap
l
i
arku
í
e F
m pap
cas
a
e
l
te
l
b
i
te
d
e
e
c
o
e
r
r
an
i
szi a p
sette
s
i
m
t
på
art
c
o
za p
n
d
o
pr
p
í
d
p
r
ej
a
lo
a
u d
e
e p
n
p
.
a
a
c
r
ss
i
pp
z
ap
e
ar o
e
de
o
e
a
l
i
re i
l
o
d
z
í
e
p
’
rt
p
ap
w
n
rs
i
ás
erca
p
.
n
ap
a ka
kasset
p
a
s
o
o
os
p
e
bn
e
l
en
ss
.
z
it
l
í
n
e
o
ku
iem
e
ttá
a
te
t
te
.
ca
b
n
p
a
.
p
ss
.
ap
l
a
a
ete.
i
e
t
st.
ru
d
o
ka
se
ty
.
5
3
6
- 4 -
Page 63

Liasse azur PE270.fm Page 5 Mercredi, 19. juillet 2006 10:27 10
INSTALLATIE VAN HET LINT
Opmerking: Gebruik uitsluitend de verbruiksartikelen van de fabrikant. Deze zijn speciaal ontwikkeld
om u optimale afdrukkwaliteit te garanderen.
2
3
3
1
4
5
Span het lint tussen deze assen (6) en sluit de printer.
7
5
- 5 -
6
6
Page 64

Liasse azur PE270.fm Page 6 Mercredi, 19. juillet 2006 10:27 10
PRESTATIE VAN DE GEBRUIKERSINTERFACE
Hiermee kunt u:
• foto's afzonderlijk selecteren of overschakelen op de mozaïek-modus (9 foto's op het scherm),
• het afdrukken van een foto activeren,
• de modus "automatische optimalisering van de foto" activeren voor het afdrukken,
• de instellingen "Formaat", "Voorkeurinstellingen" en "Instellingen foto's" aan uw behoeften aanpassen,
• meerdere foto's selecteren en een verschillend aantal exemplaren instelle n voor elke af te drukken
foto,
• op een foto inzoomen en deze afdrukken.
BESCHRIJVING VAN HET TOETSENBORD
1
12
111
10
9
8
7
Verwijzingsnummer Toets
1 / 5 / 7 / 9 Browser
2 Valideren/Enter/Een kopie toevoegen
3Zoom +
4 Crystal Image/Rode ogen
6Menu
8 Aan / Uit
10 Afdrukken
11 Zoom 12 Vorige/Annuleren/Een kopie verwijderen
2
3
4
5
6
- 6 -
Page 65

Liasse azur PE270.fm Page 7 Mercredi, 19. juillet 2006 10:27 10
PRESTATIE VAN DE GRAFISCHE INTERFACE
Op een LCD-scherm (1) van 2,4 inch kunt u uw foto's bekijken
Het pictogram... geeft...
het nummer van de foto aan
keuze van het aantal kopieën
modus Crystal Image geactiveerd
modus rode-ogen geactiveerd
inzoomen op een gedeelte van de foto
op de foto aangebrachte wijzigingen
een kopievia de selectietoets verwijderen
toegang tot de toetsmenu's MENU
een kopie via de selectietoets toevoegen
EEN FOTO AFDRUKKEN VANAF EEN GEHEUGENKAART
Zorg dat de verbruiksartikelen (papier en lint) geïnstalleerd zijn.
Zorg dat uw printer op het stroomtnet is aangesloten en aanstaat.
- 7 -
Page 66

Liasse azur PE270.fm Page 8 Mercredi, 19. juillet 2006 10:27 10
Voer de geheugenkaart afhankelijk van zijn formaat in de juiste gleuf, zoals op boven aangegeven illustratie.
Gleuf bestemd
voor de formaten
Smart Media (SM),
Carte xD
Gleuf bestemd
voor de formaten
Multi Media Card (MMC)
Standard Digital (SD)
Gleuf bestemd
voor het formaat
CompactFlash
Gleuf bestemd
voor het formaat
Memory Stick (MS)
Opmerkingen: SmartMedia CONTACTPUNTEN NAAR BENEDEN.
De geheugenkaarten verdwijnen niet volledig in de inleesgleuf. NOOIT FORCEREN.
Verwijder de geheugenkaart en controleer of u deze in de juiste gleuf en richting hebt
ingevoerd.
Raadpleeg voor meer informatie de handleiding op de bij de printer gelev erd e
cd-rom.
Voor uw g eheugenkaart in: na een inlee speriode verschijnt de laatste foto van uw geheugenkaart op
het LCD-scherm.
Druk op d e toets om de eerste foto op uw geheugenkaa rt weer te geven , met de to etsen of
kunt u uw foto's de revue passeren. Wanneer u uw foto geselect eerd hebt, drukt u op de toets
en volgt u de aanwijzingen op het scherm om de foto af te drukken.
- 8 -
Page 67

Liasse azur PE270.fm Page 9 Mercredi, 19. juillet 2006 10:27 10
OPTIMALISEER DE AFDRUKKWALITEIT
met de functies "Crystal Image" en correctie "Rode-Ogen".
Crytal Image zorgt automatisch voor de afstellingen en correcties die nodig zijn voor een scherp beeld en
de juiste kleuren plus contrast voor een zo goed mogelijke printkwaliteit.
Over- en onderbelichting worden verd er gecorrigeerd (onderbelichte foto's worden b ijvoorbeeld lichter
gemaakt en delen van een foto met grote contrasten worden gecompenseerd). De functie Correctie rode
ogen retoucheert de "rode ogen" op foto's waarvoor een flitser gebruikt werd. U moet deze functies
inschakelen alvorens met de overdracht naar de printer te beginnen.
Opmerkingen: de standaardinstellingen voor de functies "Crystal Image" en correctie "Rode-Ogen" zijn
De volgende tabel geeft aan hoeveel keren op de toets moet worden gedrukt om de functieonderdelen
"Crystal Image" te activeren of te desactiveren.
gedesactiveerd.
Tijdens het afdrukken vanaf een PC kunt u de functies "Crystal Image" en correctie
"Yeux Rouges" niet selecteren.
Aantal keren dat op de
toets moet worden
Foto optimaliseren door
gedrukt
0 (standaardstatus) Gedesactiveerd Gedesactiveerd
1 Geactiveerd Gedesactiveerd
2 Geactiveerd Geactiveerd
3 Gedesactiveerd Geactiveerd
4 (terug naar standaardstatus) Gedesactiveerd Gedesactiveerd
status modi "Crystal Image"
en correctie "Rode-Ogen"
"Crystal Image"
Correctie "Rode-Ogen"
ANDERE FUNCTIES
Nieuwe effecten (speciale effecten, Sepia,NetB, negat ief, zwartwit of kleuren achtergrond, zoneffect,
zwartwit en kleuren omlijsting,houtskooleffect).
Fotodisplay (keuze waar de foto komt te staan).
Diaporama.
TV-display
Sudoku.
Wallpaper aan eigen keuze aanpassen.
De toepassing van al deze functies wordt uitge breid uiteengezet in de handleiding op de bij de printer
geleverde cd-rom.
- 9 -
Page 68

Liasse azur PE270.fm Page 10 Mercredi, 19. juillet 2006 10:27 10
GARANTIE
Voor iedere aanspraak op garantie dient u zich te wenden tot uw dealer met de originele rekening of
kassabon. In geval van problemen kan uw dealer u raad geven.
Indien u uw apparaat rechtstreeks van SAGEM heeft gekocht, wordt uw apparaat door SAGEM gedurende
één jaar na de leveringsdatum gegarandeerd (onderdelen en werkloon) tegen materiaal- en
fabrikatiegebreken. Gedurende deze periode wordt een defect apparaat gratis vervangen of gerepareerd ; de
klant dient hiervoor het apparaat op eigen kosten naar het adres te zenden dat hem door de Service Afdeling
van SAGEM is aangegeven. Het telefoonnummmer van de Service Afdeling staat vermeld op de
leveringsbon. Indien er geen onderhoudskontrakt is afgesloten, wordt geen enkele reparatie of vervanging bij
de klant thuis verricht.
Zijn uitgesloten van de garantie :
• a) Schade, defecten of storingen die het ge volg zi jn v an : h et ver zuim h et in s talla tie pro ces co rrec t u it te
voeren of de gebruiksinstructie's correct o p te volgen, een ex terne oorzaak (blik sem, brand, stoot . .....),
aanpassingen die aan het apparaat zijn gemaakt zonder schriftelijke toestemming van SAGEM, verzuim
of nalatigheid het apparaat te ond erhouden of incorrect onderhoud, reparaties of ond erhoud aan het
apparaat door personen die hiertoe niet door SAGEM zijn geautoriseerd.
• b) Slijtage als gevolg van normaal dagelijks gebruik van het apparaat en de accessoires.
• c) Schade als gevolg van onvoldoende o f slechte ve rpakking van het apparaa t bij transpo rt of verzend ing naar SAGEM. In de gevallen die hierboven zijn beschreven, evenals na het verstrijken van de garantieperiode van twaalf maanden, dient de klant SAGEM een prijsopgave te vragen en dient hij / zij deze te
accepteren alvorens het apparaat naar SAGEM terug te sturen. De reparatie- en verzendkosten worden
aan de klant in rekening gebracht. Uw apparaat is in ieder geval ond erworpen aan de we ttelijke garantieregeling aangaande de gevolgen va n verb orgen gebrek en, zo als bep aald in de arti kelen 1 641 en volgende van het wetboek.
- 10 -
Page 69

Liasse azur PE270.fm Page 1 Mercredi, 19. juillet 2006 10:50 10
PORTUGUÊS
BEM VINDO
Acabou de adquerir uma impressora foto e agradecemos-lhe a sua confiança. Com esta impressora de alta
qualidade poderá usufruir plename nte das suas fotos digitais. As funções de optimização de imag ens
Crystal Image e de olhos vermelhos asseguram uma qualidade de impressão e de cópia irrepreensível das
suas fotografias.
Também irá encontrar no sítio www.sagem.com:
• os controladores de impressão para computador,
• uma lista de respostas a perguntas frequentes (FAQ).
O CD-Rom fornecido contém um guia detalhado de utilização.
RECOMENDAÇÕES E INSTRUÇÕES DE SEGURANÇA
Não instale a sua impressora foto nem em recintos húmidos (casas de banho, s ala de lavar
roupas, cozinha, etc.) a menos de 1 ,50 m de uma zona com água, nem no exterior. A sua
impressora deve ser utilizada a uma tempera tura ambiente compreen dida entre os 15 °C e os
35 °C para um resultado de impressão optimizada.
Não instalar a impressora num local com p oeiras, para estas não danificarem a qualid ade de
impressão das suas fotografias.
Utilize apenas a fonte de alimentação incluída, ligue-a à electricidade de acordo com as
instruções de instalação deste manual e indicações localizadas na etiqueta de identificação
afixada na fonte de alimentação (tensão, corrente, frequência da rede eléctrica). Por precaução,
em caso de perigo, os adaptadores servem para cortar a alim entação de 230 V. Devem ser
colocados perto do aparelho e ser facilmente acessíveis.
Nunca abrir a cobertura superior quando o aparelho estiver a imprimir, correrá risco de romper a
película e provocar um mau funcion amento da impressora. Depois de utilizar a impressora,
espere alguns momentos para que esta se desligue antes de a abrir. Para evitar qualquer ferida,
não toque em nenhuma situação na cabeça de impressão.
Utilize só e exclusivamente consumíveis de ma rca SAGEM, caso contrário poderá danificar o
aparelho e perder a garantia, para conhecer as referências dos consumíveis.
O símbolo de interdição do caixote do lixo, que se encontra no produto, significa que este
pertence ao grupo dos aparelhos eléctricos e electrónicos.
Neste caso, a regulamentação europeia obriga-o a proceder à sua recolha selectiva:
- Em pontos de distribuição no caso de aquisição de um equipamento equivalente
- Em pontos de recolha, colocados à sua disposição localmente (estação de tratamento de
resíduos, recolha selectiva, etc.)
O símbolo CE certifica a conformidade dos produtos com as exigê ncias essenciais da d irectiva
1999/5/CE do Parlamento e do Conselho Europeu referente aos equipamentos hertzianos e aos
equipamentos terminais de telecomunicações, par a a sua segurança e a saúde dos utilizadores
relativamente às perturbações electromagnéticas.
A declaração de conformidade pode ser consultada no site www.sagem.com na rubrica "Suporte"
ou pode ser requisitada pelo endereço seguinte:
Sagem Communication - Customer relations department
4, rue du Petit Albi - 95800 Cergy Saint-Christophe - FRANCE
- 1 -
Page 70

Liasse azur PE270.fm Page 2 Mercredi, 19. juillet 2006 10:50 10
A IMPRESSORA E OS SEUS ACESSÓRIOS
Coloque a embalagem à sua fre nte, r etire o s dive rsos e lemen tos da impr essora e ve rifique se e ncontra
os elementos descritos em baixo:
%ORFRGHDOLPHQWD©¥R
&DERGHOLJD©¥R¢UHGH
'HSµVLWRGHSDSHO
,PSUHVVRUDGHIRWRJUDILDV
*XLDGHLQVWDOD©¥R
)LWD
VHJXQGRRPRGHOR
7HOHFRPDQGR
VHJXQGRRPRGHOR
CONEXÕES - LIGAÇÕES
)HQGDVGHLQVHU©¥R
GHSODFDVGHPHPµULD
$GDSWDGRU:L)L
VHJXQGRRPRGHOR
VHJXQGRRPRGHOR
CD-Rom
%ORFRGHSDSHOIRWRJU£ILFR
VHJXQGRRPRGHOR
&DERY¯GHR
,5'$
,QIUDYHUPHOKR
:L)L6HJXQGRDRS©¥R
%OXHWRRWK6HJXQGRDRS©¥R
- 2 -
$OLPHQWD©¥R
UHGHHO«FWULFD
6D¯GDY¯GHR
86%PHVWUH
$GDSWDGRUHV
3LFWEULGJH
86%HVFUDYR
OLJD©¥R3&
Page 71

Liasse azur PE270.fm Page 3 Mercredi, 19. juillet 2006 10:50 10
Antes de efectuar as ligações, consultar as instruções de segurança
situadas no início do livro de utilização que se encontra no CD-ROM
entregue com a sua impressora.
Observações: Para assegurar a passagem correcta da folha de papel durante a impressão, deixar um
espaço livre de ao menos 10 centímetros atrás da impressora.
Não instalar a impressora num local poeirento, a poeira poderia degradar a qualidade de
impressão das suas fotografias.
2EVW£FXOR
5 cm
10 cm
- 3 -
Page 72

(
)
Liasse azur PE270.fm Page 4 Mercredi, 19. juillet 2006 10:50 10
COLOCAÇÃO EM SERVIÇO DA IMPRESSORA
LIGAÇÃO
2
4
3 s
INSTALAÇÃO DO PAPEL
1
3
1
2
R
em
V
e
ove
i
E
ll
ez
n
P
t
tf
ap
h
ern
à
Q
i
re
i
s
e
u
sh
rf
R
i
en
tar es
ti
a
ca
im
rer cette fe
ee
S
ch
ss
u
V
ie
t
ei
overe q
e
b
etto
t
a h
b
r
R
n
e
w
i
fo
l
tt
e
eg
ij
o
ti
.
e d
T
d
re p
ja
re
a
en
e
g
u
u
r d
V
as
es
an
b
i
e
.
y
u
l
l
sto
S
j
e
o
tti
e d
tes d
K
m
t
z
a fo
rt d
c
é
n
e
P
h
rj
e
fog
g
te t
sh
u
r
ü
p
e
p
l
os
e p
ha
tz
k tá
tt
2
r
eet v
a
l
5
e
o
a
i
b
2
2
6
1
99
7
A
pe
z
o
n
t
oner el p
p
d
l
ec
p
t
att
v
e
o u
o
r
ap
o
r
p
o
ti
i
li
i
l
n
m
b
í
o
o
p
r
s
tsa
th
s
ev
o
r
n
er i
t
a d
d
u
pe
t
e
av
at u
e
n
o
e
c
ap
nn
i
i
rS
p
l
i
ç
a
, m
d
a
n
c
ã
n
e
he
a
v
p
i
i
se
o
t
l
e
n
e
to
e
i
a
lož
en
te
e
d
di
r
ri
t
l
n
u
ca
p
u
re l
la
e
g
e
te
tt
t
a
fy
F
o
n
e i
ss
p
betes
s
b
í
a
o
arku
m
ie
ll
m
d
cart
a
ette
t
er
o
r
p
e
n
p
i
p
d
ress
co
a
n
p
ap
sza
e
.
z
p
de
a
å
j
i a
l
í
n
p
a
i
oca
r
ere
u
p
io
p
d
ap
el
p
d
e
r
n.
a
l
a
r o
i
’
z
p
p
o
p
a
p
e
ns
e
z
pp
ape
i
í
d
ercas
rsk
rt a
p
á
w
o
s
a
l
ob
pe
si
asse
.
o
kazett
to
s
l
n
n
en
et
í
k
t
a
te
ten
iem
u
c
.
á
assete.
p
b
.
laat
a.
p
ap
st.
i
eru
d
o
k
asety
.
4
R
em
V
e
o
i
Ent
l
ve t
le
P
ap
z
ferne
Q
h
à
i
u
erfach
re
i
Ri
s
i
t
c
s
a
ti
m
n
asse
r est
h
r
S
V
u
er cette feui
ee
e
o
i
ei
e
r
Retire e
v
t
w
tto
a
ere q
b
be
n
ho
i
T
i
j
leg
tt
.
d
a
fo
g
e
e
V
ja
b
r d
d
re putti
en
y
u
Ké
j
an
st
e
o
as
m
.
e
sto
rt de
a f
P
l
z
rjü
tes
Sc
l
e
e
r
t
2
e
o
o
5
d
s
2
fo
k
t
s
d
l
n
2
h
tt
h
h
e
e
z
6
t
g pa
g
u
e
a
a
eet voor
1
á
nt
pr
l
t
p
p
9
v
o u
i
z
d
9
o p
ol
o
b
7
o
o
a
e
A
p
l
la
t
p
pr
n
í
i
e
tsa el
e
sun
r
s
p
er el
tt
cti
im
r
t
er i
ot
p
i
b
n t
d
o
a d
i
e
ev
a
n
e
p
n
c
,
ci
t u
h
m
d v
n
çã
or
a
i
ap
e
i
e
a
va
het
n
i
o
te
n
p
e
Si
l
el
se
o
an
d
n
a
l
ž
e
g
p
t
en
u
rire la
tou
tt b
e
o
e
p
d
tes
fy
n
r
ap
l
i
arku
í
e F
m pap
cas
a
e
l
te
l
b
i
te
d
e
e
c
o
e
r
r
an
i
szi a p
sette
s
i
m
t
på
art
c
o
za p
n
d
o
pr
p
í
d
p
r
ej
a
lo
a
u d
e
e p
n
p
.
a
a
c
r
ss
i
pp
z
ap
e
ar o
e
de
o
e
a
l
i
re i
l
o
d
z
í
e
p
’
rt
p
ap
w
n
rs
i
ás
erca
p
.
n
ap
a ka
kasset
p
a
s
o
o
os
p
e
bn
e
l
en
ss
.
z
it
l
í
n
e
o
ku
iem
e
ttá
a
te
t
te
.
ca
b
n
p
a
.
p
ss
.
ap
l
a
a
ete.
i
e
t
st.
ru
d
o
ka
se
ty
.
5
3
6
- 4 -
Page 73

Liasse azur PE270.fm Page 5 Mercredi, 19. juillet 2006 10:50 10
INSTALAÇÃO DA FITA
Observações
: Utilise apenas os consumíveis do construtor. Estes são especialmente concebidos para
lhe darem um resultado de impressão optimizado
2
3
3
1
4
6
6
5
Estender a fita sobre estes eixos (6) e fechar a impressora.
7
5
- 5 -
Page 74

Liasse azur PE270.fm Page 6 Mercredi, 19. juillet 2006 10:50 10
APRESENTAÇÃO DA INTERFACE DO UTILIZADOR
Esta permite-lhe:
• seleccionar fotos uma por uma ou passar ao modo mosaico (9 fotos no ecrã),
• lançar directamente a impressão de uma foto,
• activar o melhoramento automático da foto para a sua impressão,
• ajustar os parâmetros "Formato", "Preferências" e "Ajustes das imagens" em função das suas
necessidades,
• seleccionar várias fotos e determinar um número diferente de exemplares para cada foto a imprimir,
• realizar um zoom sobre uma foto e o imprimir.
DESCRIÇÃO DO TECLADO
1
12
111
10
9
8
7
Item Tecla
1 / 5 / 7 / 9 Navegador
2 Validar / Entrada / Incluir uma cópia
3Zoom +
4 Crystal image / Olhos vermelhos
6Menu
8 Ligar / Desligar
10 Imprimir
11 Zoom 12 Retorno / Cancelar / Retirar uma cópia
2
3
4
5
6
- 6 -
Page 75

Liasse azur PE270.fm Page 7 Mercredi, 19. juillet 2006 10:50 10
APRESENTAÇÃO DA INTERFACE GRÁFICA
Um ecrã (1) LCD de 2,4 polegadas permite-lhe visualizar as suas fotos
O símbolo... indica...
o número da foto
o número de cópias seleccionadas
função Crystal Image activada
função olhos vermelhos activada
um zoom aplicado a uma parte da imagem
alterações introduzidas na imagem
retirar uma cópia tecla de selecção
aceder aos menus tecla MENU
incluir uma cópia tecla de selecção
IMPRESSÃO DE UMA FOTO A PARTIR DE UMA PLACA DE MEMÓRIA
Certifique-se de que os consumíveis (papel e fita) estão instalados.
Certifiq ue- se de que a impres sora está con ect ada à rede eléct rica e ligada.
- 7 -
Page 76

Liasse azur PE270.fm Page 8 Mercredi, 19. juillet 2006 10:50 10
Em função do formato da sua placa de mem ória, introduza-a na fenda corres pondente, como indicado na
ilustração abaixo.
Fenda prevista
para os formatos
Smart Media (SM),
Placa xD
Fenda prevista
para o formato
CompactFlash
Fenda prevista para
os formatos
Multi Media Card (MMC)
Standard Digital (SD)
Fenda prevista
para o formato
Memory Stick (MS)
Observações: SmartMedia CONTACTOS VOLTADOS PARA BAIXO.
As placas de memória não entram completamente na fenda de leitura. NÃO A FORCE
EM CASO ALGUM. Retire a placa e verifique se a inseriu na fenda adequada e no bom
sentido de introdução.
Para mais informações, consulte o livro do utilizador existente no CD-Rom
entregue com a sua impressora.
Insira a sua placa de memória, após uma fase de leitura, a última foto da su a placa de memória é
visualizada no ecrã LCD.
Prima a tecla para visualizar a primeira foto existente na memória, por meio das teclas
ou pode fazer desfilar as suas fotos. Uma vez selecionada a foto, prima a tecla e siga
as instruções que aparecem no ecrã para imprimir a foto.
- 8 -
Page 77

Liasse azur PE270.fm Page 9 Mercredi, 19. juillet 2006 10:50 10
MELHORAR A QUALIDADE DA IMPRESSÃO
Utilizando as funções "Crystal Image" e correcção de "Olhos Vermelhos".
A função Crystal Image procede automati camente a todo s as regulaçõe s e correcções necessárias em
relação à nitidez da imagem, à gestã o das cores e ao contraste para obter a melhor qualidade de
impressão possível.
Por outro lado, os defeitos de exposiç ão são corrigid os (po r exem plo as fotogra fias so bre-ex postas são
clareadas e as zonas da fotografias que apresent am fortes con trastes são comp ensadas). A funç ão de
correcção de olhos vermelhos corrige os "olho s vermelhos" das fotografias tiradas com flash. Deve
activar estas funções antes de as transferir para a impressora.
Observações: Por pré-definição, as funções "Crystal Image" e correcção de "Olhos Vermelhos" estão
O quadro seguinte indica o número de vezes que é preciso premi r a tecla para activar ou desactiva r
os componentes da função "Crystal Image".
desactivadas.
Aquando da impressão a partir de um computador individual, as funções "Crystal Image"
e correcção "Olhos Vermelhos" não são propostas.
Número de pressões na
tecla
0 (Estado predefinido) Desactivado Desactivado
1 Activado Desactivado
2 Activado Activado
3 Desactivado Activado
4 (retorno ao estado
predefinido)
Optimização de imagem
Estado da função "Crystal Image"
e correcção "Olhos Vermelhos"
"Crystal Image"
Desactivado Desactivado
Correcção "Olhos
Vermelhos"
OUTRAS FUNÇÕES
Novos e feitos (efeitos especiais, sépia, PeB, negativo, relevo preto e br anco e cores, solarização,
contorno preto e branco e cores, carvão).
Organi zaç ão das fotos (es colh a da loca liza ção ).
Diaporama.
Vizualiz açã o TV.
Sudoku.
Personalização do fundo de ecrã.
A utilização de todas estas funções é explicada detalhadamente no livro do utilizador existente no
CD-ROM entregue com a sua impressora.
- 9 -
Page 78

Liasse azur PE270.fm Page 10 Mercredi, 19. juillet 2006 10:50 10
CONDIÇÕES DE GARANTIA
Para recorrer ao serviço de garantia, deverá contactar o seu revendedor e apresentar-lhe o comprovativo de
compra. O revendedor também o aconselhará em caso de avaria.
O material novo (excluindo os consumív eis tais como as fitas e o papel de fotografia… ) tem garantia da
SAGEM para cada peça e para a mão-de-obra (fora casos de excepção de garantia mencionados mais
abaixo neste documento), nas condições e conforme as modalidades seguintes, contra todos os defeitos de
fabricação durante 24 meses a contar da data de compra d o materi al, ates tado pel o comprov ativo d e compra
(para os acessórios novos (cabos, etc.): 3 meses a contar da data de compra).
Os materiais reparados durante o p eríodo de garantia acima referido têm garantia da SAGEM (peças e
mão-de-obra)* até à última destas duas datas: fim do tempo de garantia mencionado mais acima ou três (3)
meses a contar da intervenção da SAGEM.
Esta garantia aplica-se logo que o material tenha sido utilizado nas condições normais e para o seu uso.
A título de garantia, o seu material será reparado ou subs tituído gratuitamente (conforme o procedime nto
indicado pelo seu revendedor).
Nenhum material emprestado será fornecido durante o tempo de reparação.
Estão excluídos da garantia:
1. As avarias ou os disfuncionament os ou as deteriorações devidas ao não respeito das instruções de
instalação ou de utilização, a uma causa exterior ao material (choque, raio, incêndio…), a
modificações do material efectuadas sem acordo escrito da SAGEM, a um defeito de manutenção
corrente, tal como descrito na documentação remetida com o material, de vigilância ou de cuidados,
ou ainda devido a uma reparação, uma intervenção (abertura ou tentativas de abertura do material) ou
manutenção efectuada por pessoas não autorizadas pela SAGEM.
2. As deteriorações devidas a uma insuficiência de embalagem e/ou a um mau condicionamento do
material devolvido.
3. O desgaste normal do material assim como o desgaste dos acessórios.
4. O fornecimento de novas versões de softwares
5. Os serviços de uso corrente: entrega, instalação ou substituição dos acessórios ou dos consumíveis…
6. as intervenções sobre o material ou softwares modificados ou acrescentados sem o acordo da
SAGEM.
7. As falhas devidas à utilização de produtos ou acessórios não compatíveis com o material.
OS DIREITOS LEGAIS A BENEFICIO DOS CONSUMIDORES A TITULO DE DISPOSIÇÕES LEGAIS
IMPERATIVAS NACIONAIS, ASSIM COMO OS DIREITOS DO CLIENTE EM RELAÇÃO AO SEU
REVENDEDOR, TAIS COMO ESTABELECIDOS NO CONTRATO DE COMPRA/VENDA, PER MANECEM
EM VIGOR E NÃO SÃO DE MODO ALGUM AFECTADOS PELA PRESENTE GARANTIA.
- 10 -
Page 79

Liasse azur PE270.fm Page 1 Mercredi, 19. juillet 2006 10:36 10
POLSKI
WSTĘP
Dziękujemy za zakupienie naszej nowej drukarki fotograficznej. Dzięki tej wysokiej jakości drukarce
będziesz mógł uzyskać jak najwięcej ze swoich cyfrowych zdjęć. Funkcje optymalizacji obrazów Crystal
Image (Krystaliczny Obraz) i Yeux rouges (Czerwone oczy) zapewniają wysoką jakość drukowania i
nienaganną kopię Twoich zdjęć.
Na stronie internetowej www.sagem.com znajdziesz także :
• sterowniki drukarki dla komputera osobistego,
• listę odpowiedzi na często zadawane pytania (FAQ).
Na dołączonej płycie CD-Rom znajdą Państwo szczegółowa instrukcję obsługi.
INSTRUKCJA I ZALECENIA BEZPIECZEŃSTWA
Nie instaluj swojej drukarki fotograficznej w pomieszczeniu wilgotnym (łazienka, pralnia, kuchnia
itp.), lub w odległości do 1,50 metra od kranu lub źródła wody. Nie instaluj drukarki również na
zewnątrz budynków. Twoja drukarka, w celu uzyskania optymalnych wyników drukowania,
powinna być eksploatowana w temperaturze otoczenia od 15°C do 35°C.
Nie ustawiaj swojej drukarki w środowisku zapylonym, ponieważ osadzający się kurz może
negatywnie wpłynąć na jakość wydruku twoich zdjęć.
Używaj wyłącznie dostarczonego zasilacza, podłącz go do sieci zgodnie ze wskazówkami
podanymi w niniejszej instrukcji instalacji i na etykietce identyfikacyjnej na zasilaczu (napięcie,
prąd, częstotliwość sieci elektrycznej). Jako zabezpieczenie, w przypadku zagrożenia, zasilacz
sieciowy działa jako urządzenie rozłączające dla zasilania 230V. Powinien zostać on
umieszczony w pobliżu drukarki i powinien być łatwo dostępny.
Nie wolno otwierać górnej pokrywy w czasie drukowania, taśma filmowa może zerwać się, co
spowoduje nieprawidłowe działanie Twojej drukarki.
Po użyciu drukarki, odczekaj chwilę po odłą
oparzeniu się nie dotykaj, w żadnym wypadku, głowicy piszącej.
Jeżeli nie chcesz spowodować uszkodzenia urządzenia i unieważnienia gwarancji stosuj jedynie
materiały dodatkowe SAGEM. W celu uzyskania informacji o materiałach eksploatacyjnych
Przekreślony kosz na śmiecie umieszczony na produkcie oznacza, że produkt należy do rodziny
wyposażenia elektrycznego i elektronicznego.
Zgodnie z obowiązującymi w Europie przepisami, należy utylizować go selektywnie:
- w punktach sprzedaży w przypadku zakupu podobnego wyposażenia,
- w lokalnych punktach odbioru (centra utylizacji odpadów, punkty selektywnego zbioru odpadów
itp.).
Oznaczenie CE potwierdza, że produkt spełnia wymagania dyrektywy 1999/5/WE Parlamentu
Europejskiego i Rady w sprawie urządzeń radiowych i końcowych urządzeń telekomunikacyjnych,
w zakresie bezpieczeństwa i zdrowia użytkowników i w zakresie zakłóceń elektromagnetycznych.
Z deklaracja zgodności można zapoznać się na stronie www.sagem.com karta "support", lub jej
kopię można uzyskać pisząc na adres:
czeniu napięcia zanim ją otworzysz. Aby zapobiec
Sagem Communication - Customer relations department
4, rue du Petit Albi - 95800 Cergy Saint-Christophe - FRANCE
- 1 -
Page 80

Liasse azur PE270.fm Page 2 Mercredi, 19. juillet 2006 10:36 10
TWOJA DRUKARKA I JEJ AKCESORIA
Ustaw pudełko przed sobą, wyjmij różne elementy Twojej drukarki i sprawdź, czy znajdują się
następujące elementy:
0RGXĄ]DVLODQLD
3U]HZµG]DVLODMÇF\
3RGDMQLNSDSLHUX
'UXNDUNDIRWRJUDILF]QD
,QVWUXNFMDLQVWDODFML
7DĝPD
]DOHľQLHRGPRGHOX
3LORW
]DOHľQLHRGPRGHOX
PODłĄCZANIE - ZłĄCZA
6]F]HOLQ\F]\WQLND
NDUWSDPLÛFL
.DUWD:L)L
]DOHľQLHRGPRGHOX
]DOHľQLHRGPRGHOX
CD-Rom
0RGXĄSDSLHUXIRWRJUDILF]QHJR
]DOHľQLHRGPRGHOX
.DEHOZLGHR
=DVLODQLH]VLHFL
,5'$
3RGF]HUZLHĆ
SRĄÇF]HQLH]NRPSXWHUHP
:\MĝFLHZLGHR
3RUW86%
.DUW\
:L)L]DOHľQLHRGRSFML
3LFWEULGJH
%OXHWRRWK]DOHľQLHRGRSFML
- 2 -
3RUW86%
Page 81

Liasse azur PE270.fm Page 3 Mercredi, 19. juillet 2006 10:36 10
Przed wykonaniem podłączeń, należy zapoznać się z zaleceniami
bezpieczeństwa umieszczonymi na początku instrukcji obsługi na płycie
CD-ROM dostarczonej z drukarką.
Uwagi: Aby zapewnić prawidłowy przesuw kartki papieru w czasie drukowania, należy zwracać
uwagę, aby w tylnej części drukarki znajdowało się przynajmniej 10 centymetrów wolnej
przestrzeni.
Nie instalować drukarki w miejscach zapylonych, pyły mogą obniżyć jakość druku zdjęć.
3U]HV]NRGD
5 cm
10 cm
- 3 -
Page 82

Liasse azur PE270.fm Page 4 Mercredi, 19. juillet 2006 10:36 10
URUCHOMIENIE DRUKARKI
WłąCZANIE ZASILANIA
INSTALACJA PAPIERU
1
2
(3 sek.)
4
1
3
4
R
em
V
e
o
i
E
ve
l
2
lez
n
P
t
tf
ap
h
ern
à
Q
i
re
i
s
e
u
sh
rf
R
i
en
tar es
ti
a
ca
im
rer cette fe
ee
ch
S
ss
u
V
ie
t
ei
overe q
e
b
etto
t
a h
r
b
R
n
e
w
i
fo
l
tt
e
eg
ij
o
ti
.
e d
T
d
re p
ja
re
a
en
e
g
u
ue
r d
V
as
es
an
b
i
.
y
u
l
l
sto
S
j
e
o
tti
e d
tes d
K
m
t
ze
a fo
rt d
c
é
n
P
h
rj
e
fog
g
te t
sh
u
r
ü
p
e
p
l
os
e p
ha
tz
k tá
tt
2
r
eet v
a
l
5
e
o
a
i
b
2
2
6
1
99
7
A
pe
z
o
n
t
oner el p
p
d
l
ec
p
t
att
v
e
o
o
r
ap
o
r
p
o
ti
i
u
li
i
l
n
m
b
í
o
o
p
r
s
tsa
th
s
ev
o
r
n
er i
t
a d
d
u
pe
t
e
av
at u
e
n
o
e
c
ap
nn
i
i
r
p
l
i
ç
a
,
d
S
a
m
n
c
ã
n
e
he
a
v
p
i
i
se
o
t
l
e
n
e
to
e
i
a
lož
en
te
e
d
di
r
ri
t
l
n
u
ca
p
u
re l
la
e
g
e
te
tt
t
a
fy
F
o
n
e i
ss
p
betes
s
b
í
a
o
arku
m
ie
ll
m
d
cart
a
ette
t
er
o
r
p
eco
n
p
i
p
d
ress
a
n
p
ap
sza p
e
.
z
p
de
a
å
j
i
l
í
n
p
a
a
iere
oca
r
u
io
p
d
app
el
p
d
e
r
n.
a
l
a
r o
i
’
z
o
p
a
p
p
e
ns
e
z
pp
ape
i
í
d
ercas
rsk
rt a
p
á
w
o
s
a
l
ob
pe
si
asse
.
o
kazett
to
s
l
n
n
en
et
í
k
t
a
te
ten
i
u
em
c
.
á
assete.
p
b
.
l
a.
p
aat
a
p
st.
i
eru d
o
k
asety
.
R
em
V
e
o
i
Ent
l
ve t
le
P
ap
z
ferne
Q
h
à
i
u
erf
re
i
Ri
s
i
t
c
s
a
ti
m
ach
n
asse
r est
h
r
S
V
u
er cette feui
ee
e
o
i
ei
e
r
Retire e
v
t
wi
tto
a
ere q
b
be
n
h
T
i
j
leg
tt
.
d
a
o
fo
g
e
e
V
ja
b
r d
d
re putti
en
y
u
Ké
j
an
st
e
o
as
m
.
e
sto
rt de
a f
P
l
z
rjü
tes d
Sc
l
e
e
r
t
2
e
o
o
5
d
s
2
fo
k
t
s
l
n
2
h
tt
h
h
e
e
z
6
t
g pa
g
u
e
a
a
eet voor
1
á
nt
pr
l
t
p
p
9
v
o u
i
z
d
9
o p
ol
o
b
7
o
o
a
e
A
p
l
la
t
p
pr
n
í
i
e
tsa el
e
sun
r
s
p
er el
tt
ctio
im
r
t
er i
ot
p
i
b
n t
d
a d
i
e
ev
a
n
e
p
n
c
,
ci
t u
h
m
d v
n
çã
or
a
i
ap
e
i
e
a
va
het
n
i
te
o
n
p
e
Si
l
el
se
o
an
d
n
a
l
ž
e
g
p
t
en
u
rire la
tou
tt be
e
o
e
p
d
tes
fy
n
r
ap
l
i
arku
í
e F
m pap
cas
a
l
te
l
b
i
te
d
e
e
c
o
e
r
r
a
i
szi a p
sette
s
i
m
t
på
n
art
c
o
za p
n
d
o
pr
p
í
d
p
r
ej
a
lo
a
u d
e
e p
n
p
.
a
a
c
r
ss
i
pp
z
ap
e
ar o
e
de
o
e
a
l
i
re i
l
o
d
z
í
e
p
’
rt
p
ap
w
n
rs
i
ás
erca
p
.
n
ap
a ka
kasset
p
a
s
o
o
os
p
e
bní
e
l
en
ss
.
z
it
l
n
e
o
ku
iem
e
ttá
a
te
t
te
.
cass
b
n
p
a
.
p
.
ap
l
a
at
ete.
i
e
st.
ru
d
o
ka
se
ty.
5
3
6
- 4 -
Page 83

Liasse azur PE270.fm Page 5 Mercredi, 19. juillet 2006 10:36 10
ZAKŁADANIE TAŚMY
Uwaga: Stosować tylko materiały eksploatacyjne producenta. Są one zaprojektowane specjalnie
do zapewnienia optymalnej jakości druku.
2
3
3
1
4
6
6
5
Naciągnąć taśmę na osiach (6) i zamknąć drukarkę.
7
5
- 5 -
Page 84

Liasse azur PE270.fm Page 6 Mercredi, 19. juillet 2006 10:36 10
PREZENTACJA INTERFEJSU UżYTKOWNIKA
Umożliwia:
• wybór pojedynczych zdjęć lub przejście do trybu miniatur (9 zdjęć na ekranie),
• bezpośrednie uruchomienie wydruku zdjęcia,
•włączenie automatycznej optymalizacji zdjęcia w celu wydrukowania go,
• ustawienie parametrów "Format", "Ustawienia" i "Ustawienia obrazu" odpowiednio do potrzeb,
• wybór kilku zdjęć i wybór ilości kopii dla każdego drukowanego zdjęcia,
• wykonanie powiększenia zdjęcia i wydrukowanie go.
OPIS KLAWIATURY
1
12
111
10
9
8
7
Oznaczenie Przycisk
1 / 5 / 7 / 9 Nawigacja
2 Zatwierdź / Enter / Dodaj kopię
3Zoom +
4 Obraz krystaliczny / Czerwone oczy
6Menu
8Włączony / Wyłączony
10 Drukuj
11 Zo om 12 Cofnij / Anuluj / Usuń kopię
2
3
4
5
6
- 6 -
Page 85

Liasse azur PE270.fm Page 7 Mercredi, 19. juillet 2006 10:36 10
PREZENTACJA INTERFEJSU GRAFICZNEGO
Ekran (1) LCD 2,4 cala umożliwia wyświetlanie zdjęć
Ikona... wskazuje...
numer zdjęcia
ilość wybranych kopii
włączenie funkcji Crystal Image
włączenie funkcji redukcji efektu czerwonych oczu
ustawienie powiększenia na wybranej części obrazu
modyfikacje wprowadzone na zdjęciu
usunięcie kopii przycisk wyboru
Przejście do menu przycisk MENU
dodanie kopii przycisk wyboru
DRUKOWANIE ZDJĘCIA Z KARTY PAMIĘCI
Upewnić się, że materiały eksploatacyjne (papier i taśma) są zainstalowane.
Upewnić się, że drukarka jest podłączona do sieci i włączona.
- 7 -
Page 86

Liasse azur PE270.fm Page 8 Mercredi, 19. juillet 2006 10:36 10
W zależności od formatu karty pamięci, należy ją włożyć do odpowiedniej szczeliny, zgodnie z ilustracją
poniżej.
6]F]HOLQDGODNDUW
6PDUW0HGLD60
NDUW['
6]F]HOLQDGODNDUW
0XOWL0HGLD&DUG00&
6WDQGDUG'LJLWDO6'
6]F]HOLQDGODNDUW
&RPSDFW)ODVK
6]F]HOLQDGODNDUW
0HPRU\6WLFN06
Uwagi: SmartMedia STYKI W DÓŁ.
Karty pamięci nie wsuwa się całkowicie w szczelinę czytnika. W ŻADNYM WYPADKU
NIE STOSOWAĆ SIŁY. Wyjąć kartę i sprawdzić, czy została włożona w prawidłową
szczelinę i poprawnie ustawiona.
Dodatkowe informacje można znaleźć w instrukcji użytkownika na płycie CD-Rom
dostarczonej z drukarką.
Włożyć kartę pamięci, po odczytaniu ostatnie zdjęcie z karty pamięci wyświetla się na ekranie LCD.
Nacisnąć przycisk , aby wyświetlić pierwsze zdjęcie znajdujące się na karcie, za pomocą
przycisków lub można przewijać zdjęcia. Po wybraniu zdjęcia, należy nacisnąć przycisk
i postępować zgodnie z zaleceniami wyświetlanymi na ekranie w celu wydrukowania zdjęcia.
- 8 -
Page 87

Liasse azur PE270.fm Page 9 Mercredi, 19. juillet 2006 10:36 10
POPRAWIANIE JAKOŚCI WYDRUKU
Za pomocą przycisków "Crystal Image" i korekta "czerwonych oczu".
Za pomocą funkcji ''Crystal Image'' dokonujesz automatycznie wszystkie nastawienia i korekty wymagane
dla ostrości obrazu, zarządzania kolorami i kontrastem w celu zapewnienia najwyższej jakości
drukowania.
Ponadto, zostaną skorygowane wady naświetlania (na przykład niedoświetlone zdjęcia zostaną
rozjaśnione lub partie zdjęcia o wysokim kontraście zostaną skorygowane). Za pomocą funkcji ''Yeux
rouges'' możesz retuszować "czerwone oczy" na kliszach wykonanych z użyciem lampy błyskowej.
Przed przesłaniem do drukarki, musisz uaktywnić przedstawione powyżej funkcje.
Uwagi: domyślnie, funkcje "Crystal Image" i korekta "czerwonych oczu" są wyłączone.
W czasie drukowania z komputera, funkcje "krystaliczny obraz" i korekta "czerwonych
oczu" nie są proponowane.
Następująca tabela wskazuje ilość naciśnięć przycisku w celu włączenia lub wyłączenia elementów
funkcji "Crystal Image".
Ilość naciśnięć
przycisku
0 (stan domyślny) Wyłączona Wyłączona
1Włączona Wyłączona
2Włączona Włączona
3Wyłączona Włączona
4 (powrót do stanu
domyślnego)
Optymalizacja obrazu -
"Crystal Image"
Stan funkcji "Crystal Image"
i korekta "czerwonych oczu"
Korekta "czerwonych
oczu"
Wyłączona Wyłączona
INNE FUNKCJE
Nowe efekty (efekty specjalne, sepia, Cz i B, negatyw, płaskorzeźba czarno-biała i kolorowa,
solaryzacja, kontur czarno-biały i kolorowy, węgiel).
Organizacja zdjęć (wybór lokalizacji).
Pokaz slajdów.
Wyświetlanie na telewizorze.
Sudoku.
Dostosowanie tła ekranu.
Działanie wszystkich funkcji zostało szczegółowo opisane w instrukcji obsługi znajdującej się na płycie
CD-ROM dostarczonej z drukarką.
- 9 -
Page 88

Liasse azur PE270.fm Page 10 Mercredi, 19. juillet 2006 10:36 10
GWARANCJA
Szanowny Kliencie!
Właśnie zakupiłeś drukarkę SAGEM Photo Easy i dziękujemy za twój zakup. Urządzenie zostało
wyprodukowane z największą troską i mamy nadzieję, że będziesz nim w pełni usatysfakcjonowany.
Niezależnie od troski podjętej do wyprodukowania niniejszego wyposażenia, w przypadku stwierdzenia
uszkodzenia prosimy o kontakt ze sprzedawcą, który poinformuje, jak należy postępować.
Wyposażenie, które właśnie zakupiłeś (za wyjątkiem taśmy, papieru…) posiada gwarancję na części
zamienne i robociznę* wystawioną przez SAGEM, zgodnie z warunkami i procedurami poniżej, na wszystkie
wady produkcyjne w okresie 12 (dwunastu) miesięcy od daty zakupu wyposażenia, jeżeli wady te są wynikiem
niewłaściwego wykonania (dla wyposażenia: trzy (3) miesiące od daty zakupu). Gwarancja obowiązuje przy
założeniu,
Wymagany będzie dowód zakupu; dlatego prosimy o przechowywanie rachunku w bezpiecznym miejscu.
Wyposażenie, które było naprawiane w czasie wymienionego wyżej okresu gwarancji jest objęte gwarancją
(części zamienne i robocizna) SAGEM do upływu późniejszej z dwóch dat:
W okresie naprawy nie będzie dostarczane wyposażenie zastępcze.
Przed oddaniem swojego urządzenia do sprzedawcy, prosimy pamiętać:
Gwarancja nie narusza ustawowych praw konsumentów prywatnych.
Poniższe obowiązuje jedynie w Wielkiej Brytanii. Jeżeli jakiekolwiek postanowienie niniejszej gwarancji
zostanie uznane za w całości lub w części nieważne lub niezgodne z prawem, ze względu na obowiązujące
przepisy dotyczące konsumentów wynikające z prawa Angielskiego, taka nieważność lub niezgodność nie
będzie naruszać lub wpływać w jakikolwiek sposób na pozostałe postanowienia lub części niniejszej
gwarancji.
*
za wyjątkiem przypadków wymienionych w dalszej części dokumentu.
Nie będzie wynikać żadna odpowiedzialność z gwarancji w odniesieniu do:
że wyposażenie jest stosowane właściwie i zgodnie z przeznaczeniem.
•upływu okresu gwarancji podanego wyżej,
• lub trzech (3) miesięcy od interwencji SAGEM.
• Zapisz wszystkie dane osobowe, ponieważ mogą zostać usunięte w czasie procesu naprawy. SAGEM
nie będzie ponosić odpowiedzialności za uszkodzenie twoich danych i nie będzie podejmować próby
ponownego wprowadzenia tych danych do urządzenia.
• W opakowaniu z urządzeniem umieść swoje nazwisko, adres i numer telefonu.
•Dołącz kopię dowodu zakupu wyposażenia.
•Na życzenie sprzedawcy, weź ze sobą całe wyposażenie (kable…), materiały eksploatacyjne i swoje
własne przedmioty (karty pami
1. Awarii lub uszkodzeń spowodowanych:
•niewłaściwym przeprowadzeniem procesu instalacji i nieprzestrzeganiem instrukcji użytkowania;
lub
• przyczyną zewnętrzną wobec urządzenia (włączając, ale nie ograniczając jedynie do, wstrząsy,
uderzenia pioruna, pożar, wandalizm, wrogie działanie, styczność z rożnymi cieczami lub szkody
spowodowane robactwem, lub wszelkie szkody spowodowane wodą, niewłaściwym napięciem
elektrycznym); lub
• modyfikacjami wyposażenia wykonanymi bez pisemnej zgody SAGEM; lub
• brakiem obsługi codziennej (zgodnie z opisem w dokumentacji dostarczonej z wyposażeniem)
lub brakiem nadzoru lub troski; lub
•złymi warunkami środowiskowymi, szczególnie tymi dotyczącymi temperatury i wilgotności,
skutkami zmian napięcia elektrycznego, oporami pasożytniczymi z sieci elektrycznej lub od ziemi;
lub
•naprawą, obsługą (otwieranie lub próba otwarcia urządzenia) lub konserwacją wyposażenia
2. Uszkodzenia spowodowane niewł
3. Zużycia lub rozerwania spowodowanego normalną, codzienną eksploatacją urządzenia i jego
przez osoby nieupoważnione przez SAGEM;
do Autoryzowanego centrum serwisowego.
wyposażenia.
WARUNKI GWARANCJI
ęci, klucz sprzętowy…).
WYŁĄCZENIA Z GWARANCJI
aściwym lub złym opakowaniem urządzenia w czasie przesyłania
- 10 -
Page 89

Liasse azur PE270.fm Page 11 Mercredi, 19. juillet 2006 10:36 10
4. Problemów komunikacyjnych związanych z niestabilnym środowiskiem, w tym w szczególności:
• problemów związanych z dostępem i/lub połączeniem z siecią telefoniczną takich jak przerwy w
sieciach dostępu lub niewłaściwa praca linii subskrybenta lub jego korespondenta,
•błędów komunikacji (przykładowo, zakłócenia lub zła jakość linii),
•błędów sieci lokalnej (okablowanie, serwery stacje robocze) lub uszkodzeń sieci komunikacyjnej
5. Dostarczenia nowej wersji oprogramowania bez uprzedniej zgody SAGEM,
6. Pracy w połączeniu z normalnym użytkowaniem: dostawa, instalacja lub wymiana materiałów
7. Pracy na wyposażeniu lub oprogramowaniu zmodyfikowanym lub dodanym bez gody SAGEM,
8. Uszkodzeń z powodu zastosowania produktów, materiałów eksploatacyjnych lub wyposażenia, które
9. Wyposażenia zwróconego do Autoryzowanego centrum serwisowego bez jego uprzedniej zgody.
Obowiązują opłaty (koszty naprawy i transportu) – zgodnie z zaleceniami SAGEM – za usługi w przypadku
wyłączenia gwarancji zgodnie z postanowieniami podanymi powyżej, jak również po upływie 12 miesięcznego
okresu gwarancji i muszą zostać one zapłacone przed zwróceniem wyposażenia do Autoryzowanego
centrum serwisowego lub przed jakąkolwiek interwencją.
W odniesieniu do 12 miesięcznej gwarancji obowiązuje poniższe:
1. We wszystkich przypadkach prosimy o zapisanie swoich osobistych danych na swój koszt. SAGEM
2. Uszkodzone części lub wymienione urządzenie stanie się własnością SAGEM.
3. Ze względu na obowiązujące postanowienia prawne, wyraźne gwarancje ustanowione w niniejszym
4. W zakresie obowiązujących postanowień prawnych, czas przez który urządzenie jest naprawiane
12 miesięczna gwarancja nie narusza ustawowych praw konsumentów.
Poniższe obowiązuje jedynie w Wielkiej Brytanii. Jeżeli jakiekolwiek postanowienie niniejszej 12 miesięcznej
gwarancji zostanie uznane za w całości lub w części nieważne lub niezgodne z prawem, ze względu na
obowiązujące przepisy dotyczące konsumentów wynikające z prawa Angielskiego, taka nieważność lub
niezgodność nie będzie naruszać lub wpływać w jakikolwiek sposób na pozostałe postanowienia lub częś
niniejszej 12 miesięcznej gwarancji.
(takich jak, ale nie ograniczonych do, zakłóceń, uszkodzeń lub złej jakości sieci)
eksploatacyjnych,…
nie jest zgodne z wyposażeniem,
******
******
OSTRZEŻENIE
w żadnym przypadku nie będzie ponosić odpowiedzialności za uszkodzenie twoich danych lub
programów. W żadnych warunkach, w przypadku uszkodzenia, w urządzeniu nie będą ponownie
instalowane przez SAGEM żadne programy ani dane.
dokumencie zastępują wszystkie inne gwarancje wyraźne lub domyślne. Szczególnie, SAGEM nie
czyni żadnych zobowiązań lub gwarancji odnośnie jakości lub przydatności urządzenia do
jakiegokolwiek celu. Odpowiedzialność SAGEM w odniesieniu do wszystkich roszczeń Klientów w
zakresie bezpośrednich strat lub uszkodzeń, powstałych albo w wyniku zetknięcia, czynu
niedozwolonego albo w inny sposób lub w wyniku zaniedbania SAGEM lub w inny sposób w
odniesieniu do jego dostaw lub usług, nie będzie przekraczać ceny zap
urządzenie. W żadnym przypadku SAGEM nie będzie ponosić odpowiedzialności za pośrednie,
szczególne lub będące wynikiem straty wszelkiego rodzaju (w tym, ale nie ograniczone do straty
zamówień, utratę zysków, naruszenie dobrej woli lub reputacji, przerwanie świadczenia usług i
wszelkie inne straty finansowe lub handlowe), czy w oparciu o gwarancję, czy w wyniku czynu
niedozwolonego.
lub niedostępne w czasie okresu 12 miesięcy gwarancji nie spowoduje przedłużenia gwarancji.
łaconej przez Klienta za
ci
www.sagem.com, podstrona support.
- 11 -
Page 90

Sansnom1.fm Page 1 Vendredi, 21. juillet 2006 10:50 10
M
EMO
...................................................................................................................................
...................................................................................................................................
...................................................................................................................................
...................................................................................................................................
...................................................................................................................................
...................................................................................................................................
...................................................................................................................................
...................................................................................................................................
...................................................................................................................................
...................................................................................................................................
...................................................................................................................................
...................................................................................................................................
Page 91

Liasse azur PE270.fm Page 1 Mardi, 18. juillet 2006 4:08 16
CESKY
MNOHO HEZKÝCH POZDRAVŮ
Blahopřejeme Vám ke koupi fototiskárny. Díky této mimořádné koupi dokážete pořídit kopie Vašich
nejzdařilejších digitálních fotografií. Funkce optimalizace obrázků "Crystal Image" a "Červené oči" zajišt’ují
bezvadný tisk a kopie vašich fotografií.
Na internetové adrese www.sagem.com najdete také:
• Tiskové ovladače pro jednotlivé počítače,
• Odpovědi na nejčastější otázky (FAQ).
Na přiloženém CD-ROM najdete podrobný návod k instalaci.
BEZPEČNOSTNÍ POKYNY A DOPORUČENÍ
Fototiskárnu nesestavujte ve vlhkém prostředí (v koupelně, prádelně, kuchyni, atd.) a ve
vzdálenosti do 1,50 m od vodovodního kohoutku. To platí též pro venkovní montáž. Optimálních
pracovních výsledků se dosáhne při teplotě 15-35°C.
Dbejte, abyste nesestavovali tiskárnu v prašném prostředí. Prachové částice by mohly mít
negativní dopad na kvalitu fotografií.
Používejte výhradně transformátor dodávaný s přístrojem. Připojujte ho k elektrické síti v souladu
s tímto návodem a s indikacemi na štítku transformátoru (napětí, proud, frekvence elektrické sítě).
Adaptéry v případě nebezpečí úrazu navíc zajistí přerušení dodávky od proudu 230 V. Umístěte
je někam poblíž, aby byly pohotově, pokud by vzniklo nebezpečí.
Nikdy neotvírejte horní kryt přístroje během tisku. Mohlo by dojít k přetržení filmu a následně k
nefunkčnosti vaší tiskárny.
Po použití tiskárny počkejte několik okamžiků po vypnutí tiskárny před jejím otevřením. V žádném
případě se nedotýkejte tiskové hlavy – vyhnete se tak zranění. Používejte výhradně materiálů
společnosti SAGEM. V jiném případě by se mohlo zařízení poškodit, což by mělo za následek
propadnutí záruk.
Přeškrtnutý odpadkový koš na obalu výrobku znamená, že jsou jeho součástí elektrické a
elektronické komponenty.
Podle úprav platných v Evropě tyto obaly likvidujte následovně:
- v prodejnách při nákupu podobného zařízení,
- v místních sběrnách (odkládací místa, místa pro tříděný odpad, atd.).
Certifikace CE zaručuje, že výrobek odpovídá požadavkům Evropského parlamentu a Směrnici
Rady 1999/5/CE o elektrickém vedení a telekomunikačních koncových zařízeních s důrazem na
zdraví a bezpečnost uživatelů, včetně elektromagnetického rušení.
Prohlášení o shodě naleznete na stránkách www.sagem.com v kategorii “pomocné údaje”.
Můžete se též písemně obrátit se žádostmi o konzultace na tuto adresu:
Sagem Communication - Customer relations department
4, rue du Petit Albi - 95800 Cergy Saint-Christophe - FRANCE
- 1 -
Page 92

Liasse azur PE270.fm Page 2 Mardi, 18. juillet 2006 4:08 16
VAŠE TISKÁRNA A JEJÍ PŘÍSLUŠENSTVÍ
Položte balení před vás, vyjměte součásti vaší tiskárny a zkontrolujte, že máte všechny tyto součásti:
PŘIPOJENÍ - ZAPOJENÍ
V
USB slave:
V
- 2 -
Page 93

Liasse azur PE270.fm Page 3 Mardi, 18. juillet 2006 4:08 16
Ne provedete pøipojení, pøeètìte si bezpeènostní pokyny umístìné na
zaèátku uivatelské pøíruèky, která se nachází na CD-ROM dodávaném
spolu s tiskárnou.
Poznámky : Aby byl zajištìn správný pohyb papíru bìhem tisku, dbejte na to, aby za tiskárnou bylo
alespoò 10 centimetrù volného prostoru.
Tiskárnu neinstalujte na prašné místo, prach by mohl zhoršit kvalitu tisku fotografií.
10 cm
5 cm
- 3 -
Page 94

(
)
Liasse azur PE270.fm Page 4 Mardi, 18. juillet 2006 4:08 16
UVEDENÍ TISKÁRNY DO CHODU
PŘIPOJENÍ K NAPĚTÍ
VLOŽENÍ PAPÍRU
1
2
3
4
3 s
1
2
R
em
V
e
o
i
E
ve
l
lez
n
P
t
tf
ap
h
ern
à
Q
i
re
i
s
e
u
sh
rf
R
i
en
ta
ti
a
ca
im
rer cette fe
r es
ee
S
ch
ss
u
V
ie
t
ei
overe q
e
b
etto
t
a h
b
r
R
n
e
w
i
fo
l
tt
e
eg
ij
o
ti
.
e d
T
d
re p
ja
re
a
en
e
g
u
ue
r d
V
as
es
an
b
i
.
y
u
l
l
sto
S
j
e
o
tti
e d
tes d
K
m
t
ze
a fo
rt d
c
é
n
P
h
rj
e
fog
g
te t
sh
u
r
ü
p
e
p
l
os
e p
ha
tz
k tá
tt
2
r
eet v
a
l
5
e
o
a
i
b
2
2
6
1
99
7
A
pe
z
o
n
t
oner el p
p
d
l
ec
p
t
att
v
e
o
o
r
ap
o
r
p
o
ti
i
u
li
i
l
n
m
b
í
o
o
p
r
s
tsa
th
s
ev
o
r
n
er i
t
a d
d
u
pe
t
e
av
at u
e
o
n
e
c
ap
nn
i
i
r
p
l
i
ç
a
, m
d
S
a
n
c
ã
n
e
he
a
v
p
i
i
se
o
t
l
e
n
e
to
e
i
a
lož
en
te
e
d
di
r
ri
t p
l
n
u
ca
u
re l
la
e
g
e
te
tt
t
a
fy
F
o
n
e i
ss
p
betes
s
b
í
a
o
arku
m
ie
ll
m
d
cart
a
ette
t
er
o
r
p
e
n
p
i
p
d
ress
co
a
n
p
ap
sza
e
.
z
p
de
a
å
j
i
l
í
n
p
a
a
i
oca
r
ere
u
p
io
p
d
ap
el
p
d
e
r
n.
a
l
a
r o
i
’a
z
p
o
p
p
p
e
ns
e
z
pp
ape
i
í
d
ercas
rsk
rt a
p
á
w
o
s
a
l
ob
pe
si
asse
.
o
kazett
to
s
l
n
n
en
et
í
k
t
a
te
ten
iem
u
c
.
á
assete.
p
b
.
laat
a.
p
ap
st.
i
eru
d
o
k
asety
.
4
R
em
V
e
o
i
En
l
ve t
le
P
ap
t
z
ferne
Q
h
à
i
u
erfach
re
i
Ri
s
i
t
c
s
a
ti
m
n
asse
r est
h
r
S
V
u
er cette feui
ee
e
o
i
ei
e
r
Retire e
v
t
w
tto
a
ere q
b
be
n
ho
i
T
i
j
leg
tt
.
d
a
fo
g
e
e
V
ja
b
r d
d
re putti
en
y
u
Ké
j
an
st
e
o
as
m
.
e
sto
rt de
a f
P
l
z
rjü
tes
Sc
l
e
e
r
t
2
e
o
o
5
d
s
2
fo
k
t
s
d
l
n
2
h
tt
h
h
e
e
z
6
t
g pa
g
u
e
a
a
eet voor
1
á
nt
pr
l
9
t
p
p
v
o u
i
z
d
9
o p
ol
o
b
7
o
o
a
e
A
p
l
la
t
p
pr
n
í
i
e
tsa el
e
s
r
s
p
er el
tt
cti
im
r
un
t
er i
ot
p
i
b
n t
d
o
a d
i
e
ev
a
n
e
p
n
c
,
ci
t u
h
m
d v
n
çã
or
a
i
ap
e
i
e
a
va
he
n
i
o
te
n
p
e
Si
l
el
se
o
an
d
n
a
l
ž
e
g
p
t
t
en
u
rire la
tou
tt be
e
o
e
p
d
tes
fy
n
r
ap
l
i
arku
í
e F
m pap
cas
a
l
te
l
b
i
te
d
e
e
c
o
e
r
r
an
i
szi a p
sette
s
i
m
t
på
art
c
o
za p
n
d
o
pr
p
í
d
p
r
ej
a
lo
a
u d
e
e p
n
p
.
a
a
c
r
ss
i
pp
z
ap
e
ar o
e
de
o
e
a
l
i
re i
l
o
d
z
í
e
p
’
rt
p
ap
w
n
rs
i
ás
erca
p
.
n
ap
a ka
kasset
p
a
s
o
o
os
p
e
bní
e
l
en
ss
.
z
it
l
n
e
o
ku
iem
e
ttá
a
te
t
te
.
ca
b
n
p
a
.
p
ss
.
ap
l
a
a
ete.
i
e
t
st.
ru
d
o
ka
se
ty.
5
3
6
- 4 -
Page 95

Liasse azur PE270.fm Page 5 Mardi, 18. juillet 2006 4:08 16
INSTALACE PÁSKY
Poznámky: Používejte jen materiálů výrobce. Tyto materiály byly vyrobeny, aby byla zajištěna
optimální kvalita tisku.
2
3
3
1
4
6
6
5
5
7
- 5 -
Page 96

Liasse azur PE270.fm Page 6 Mardi, 18. juillet 2006 4:08 16
PREZENTACE UŽIVATELSKÉHO ROZHRANÍ
Umožňuje:
• zvolit fotografie jednu po druhé nebo přejít do režimu mozaiky (9 fotografií na displeji),
•přímo spustit tisk fotografie,
• aktivovat automatické vylepšení fotografie během jejího tisku,
• nastavit parametry "Formát", "Preference" a "Nastavení obrázků" podle potřeby,
• zvolit více fotografií a zvolit rozdílný počet kusů pro každou tištěnou fotografii,
• provést zoom na jednu fotografii k vytištění.
POPIS KLÁVESNICE
1
12
111
10
9
8
7
Značka Tlačítko
1 / 5 / 7 / 9 Prohlížení
2 Potvrdit / Enter / Přijat jednu kopii
3 Zoom +
4 Crystal image / Červené oči
6 Menu
8 Start / stop
10 Tisk
11 Zoom -
12 Zpět / Zrušit / Odebrat jednu kopii
2
3
4
5
6
- 6 -
Page 97

Liasse azur PE270.fm Page 7 Mardi, 18. juillet 2006 4:08 16
PREZENTACE GRAFICKÉHO ROZHRANÍ
Jeden displej (1) LCD o velikosti 2,4 palce umožňuje zobrazit fotografie
Ikona ... znamená ...
číslo fotografie
zvolený počet kopií
funkce Crystal image aktivována
funkce červené oči aktivována
zoom použitý na část obrázku
změny provedené v obrázku
odebrat jednu kopii tlačítko volby
přístup k menu tlačítko MENU
odebrat jednu kopii tlačítko volby
TISK FOTOGRAFIE Z PAMĚT’OVÉ KARTY
Ujistěte se, že v tiskárně je spotřební materiál (papír a páska).
Ujistěte se, že tiskárna je připojená k síti a zapnutá.
- 7 -
Page 98

Liasse azur PE270.fm Page 8 Mardi, 18. juillet 2006 4:08 16
Podle formátu pamět’ové karty tuto vložte do příslušného slotu, jak je to uvedeno na následujícím obrázku.
Poznámky: SmartMedia KONTAKTY SMĚREM DOLŮ.
Pamět’ové karty se do čtecího slotu nezasunou úplně. V ŽÁDNÉM PŘÍPADĚ JI TAM
NETLAČTE SILOU. Vyjměte kartu a zkontrolujte, zda ji dáváte do správného slotu a
správným směrem.
Další informace najdete v uživatelské příručce na CD-ROM dodaném spolu s
tiskárnou.
Vložte pamět’ovou kartu, po fázi čtení se na displeji LCD objeví poslední fotografie z pamět’ové karty.
Stiskněte tlačítko , tím zobrazíte poslední tofografii na kartě, pomocí tlačítek nebo můžete
spustit prohlížení fotografií. Jakmile zvolíte fotografii, stiskněte tlačítko a postupujte podle pokynů
na displeji, abyste fotografii vytiskli.
- 8 -
Page 99

Liasse azur PE270.fm Page 9 Mardi, 18. juillet 2006 4:08 16
ZLEPŠENÍ KVALITY TISKU
Za pomoci funkcí "Crystal Image" a korekce "Červené oči".
Crystal Image provádí automaticky všechna nastavení a korekce ostrosti, barevnosti a kontrastu
fotografie pro dosažení nejlepší možné kvality tisku.
Kromě toho budou opraveny chyby expozice (například podexponované fotografie budou zjasněny nebo
části fotografie se silným kontrastem budou vyrovnány). Funkce korekce červených očí odstraňuje
"červené oči" na snímcích pořízených s bleskem.
Tyto funkce musíte aktivovat před přenosem dat do tiskárny.
Poznámky: Standardně jsou funkce "Crystal Image" a korekce "červené oči" deaktivovány.
Při tisku z inidividuálního počítače nejsou funkce "Crystal Image" a korekce "Červené
oči" k dispozici.
V následující tabulce je uvedeno, kolikrát je třeba stisknout tlačítko pro aktivaci nebo deaktivaci
součástí funkce "Crystal Image".
Počet
stisknutítlačítka
0 (výchozí stav) Deaktivováno Deaktivováno
1 Aktivováno Deaktivováno
2 Aktivováno Aktivováno
3 Deaktivováno Aktivováno
4 (návrat do výchozího stavu) Deaktivováno Deaktivováno
Optimalizace obrazu
"Crystal Image"
Stav funkce "Crystal Image"
a korekce "Červené oči"
a korekce "Červené oči"
OSTATNÍ FUNKCE
Nové efekty (speciální efekty, sépie, č&b, negativ, černobílý a barevný reliéf, solarizace, čerrnobílé a
barevné kontury, uhel).
Organizace fotografií (výběr umístění).
Promítání diapozitivů.
Zobrazení TV.
Sudoku.
Personalizace pozadí displeje.
Použití všech těchto funkcí je podrobně popsáno v uživatelské příručce na CD-ROM dodaném spolu s
tiskárnou.
- 9 -
Page 100

Liasse azur PE270.fm Page 10 Mardi, 18. juillet 2006 4:08 16
ZÁRUKY
ZÁRUČNÍ PODMÍNKY
Vážený zákazníku,
Zakoupil jste aparát Photo Easy od společnosti SAGEM, za což Vám děkujeme. Zhotovení výrobku jsme
věnovali maximální péči a věříme, že i Vy budete plně spokojen.
Pokud by však zařízení přes veškerou péči při výrobě vykazovalo určité závady, kontaktujte prodejce, který
Vám poskytne další rady o následujících krocích:
Podle níže uvedených postupů SAGEM zaručuje úplnost jednotlivých dílů a práce zakoupeného zařízení s
výjimkou barvící pásky, fotopapíru, atd. po dobu 12 (dvanácti) měsíců od data zakoupení výrobku, pokud
závada vznikla v důsledku nedokonalé řemeslné práce. U pomocných zařízení je tato lhůta 3 měsíce od
zakoupení výrobku. Záruka se dále vztahuje na výrobek pouze v tom případě, že je použit pouze k určeným
účelům.
Zakoupení aparátu musíte být schopni prokázat. Doklad o nákupu proto uschovejte na bezpečném místě.
Aparát opravovaný během záruční lhůty (náhradní díly a práce) je kryt zárukou takto:
•končí výše uvedená záruční lhůta,
•tři (3) měsíce po zásahu SAGEM.
Během opravy nelze poskytnout náhradní zařízení.
Před odevzdáním aparátu k oprav
• uložit osobní data, která by mohla být při opravě vymazána. SAGEM za poškození dat neodpovídá a
jejich reinstalaci nezabezpečuje,
• K aparátu připojte lístek se jménem, adresou a telefonním spojením,
•Přiložte důkaz o koupi aparátu,
• Podle dohody s prodejcem nepřikládejte k aparátu pomocná zařízení, jako jsou kabely, spotřební
materiál, pamět’ové karty, dongly, atd.
Tento záruční list nemá vliv na další zákonná práva zákazníka.
Předchozí se vztahuje jen na VB. Pokud by ustanovení této záruky byla zčásti nebo zcela neplatná pro
zákazníky, na něž se vztahují závazná ustanovení anglické legislativy, pak tato neplatnost nebo nelegálnost
nezmenší nebo neovlivní zbývající část či části této záruky.
ě neopomeňte:
*vyjma dalších případů tohoto dokumentu
VÝJIMKY ZE ZÁRUKY
Záruka se nevztahuje na následující případy :
1. Defekty a závady vzniklé:
•nedbalostmi při instalaci aparátu a nerespektování návodu k obsluze; nebo
•vnějšími příčinami (včetně, ale nejen včetně úderem, bleskem, ohněm, vandalismem, zlovolným
jednáním, kontaktem s tekutinami, vodou či dotěrným hmyzem, použitím nesprávného
elektrického napětí); nebo
•změnami aparátu, prováděnými bez písemného souhlasu společnosti SAGEM; nebo
•zanedbáním denní údržby (uvedené v dokumentaci, přiložené k aparátu) a nedostatkem dohledu a
péče; nebo
•špatným životním prostředím, zvláště pokud jde o teplotu a vlhkost vzduchu, kolísáním napětí,
cizopasníky v elektrické síti či v zemi; nebo
•opravami a jinými pracemi (otevírání či pokusy o otevírání aparatury) a údržbou zařízení techniky,
jež SAGEM nezplnomocnil;
- 10 -
 Loading...