

Page 1

PDG PHOTO EASY 160.fm Page 1 Lundi, 23. mai 2005 9:25 09
SAGEM
PHOTO EASY 260
Livret d’utilisation
Bedienungsanleitung
Manual del usuario
Manuale dell'utente
Gebruiksaanwijzing
Manual do utilizador
S
Date en cours : 23 mai 2005
C:\Documents and Settings\G097447\Bureau\LU 260\Couvertures\PDG PHOTO EASY 160.fm
User guide
Page 2
Notes.fm Page 100 Mercredi, 29. septembre 2004 10:40 10
Page 3

Liasse AZUR_GB.book Page I Lundi, 23. mai 2005 11:31 11
1WELCOME 1
Safety instructions and recommendations 2
2DISCOVER YOUR PHOTO PRINTER 3
3USER INTERFACE 4
4PREPARE YOUR PHOTO PRINTER 6
Connect the mains supply 6
First ribbon installation 7
To change the ribbon 8
Loading paper 10
5TRANSFERRING YOUR IMAGES 12
Insert a memory card 12
Transferring photos by infrared link 14
Transferring photos from a Bluetooth device (optional) 15
Using a DPOF-compatible peripheral device 17
Connecting a digital camera (pictbridge mode) 17
6PRINT YOUR PHOTOGRAPHS 19
Print 19
Create your shopping basket 20
Zoom 21
DEUTSCH
ESPAÑOLITALIANONEDERLANDSPORTUGUÊS FRANÇAIS ENGLISH
7CHOOSING YOUR OWN PRINTER SETTING 22
Formats 22
Set the photo quality 23
Your preferences 24
Crystal Image Function 25
8USE YOUR PRINTER WITH A PC 26
Printing from your PC 26
Processing the content of the memory card from your PC 27
9REPLACEMENT OF CONSUMABLES 29
10 MAINTENANCE 30
Cleaning the print head 30
Paper jam 31
Problems 32
- I -
Page 4
Liasse AZUR_GB.book Page II Lundi, 23. mai 2005 11:31 11
Error messages 33
Technical data 35
11 ENVIRONMENT 36
12 GUARANTEE 37
- II -
Page 5
Liasse AZUR_GB.book Page 1 Lundi, 23. mai 2005 11:31 11
1WELCOME
Thank you for purchasing our n ew photo printer. With this h igh quality printer
you can get the most out of your digita l pho tos. In a few simple steps you can
produce photo prints identical to those from a professiona l developer, for your
personal use or to share with friends and family.
Your photo printer has slots for all types of memory card and hooks up
directly to digital cameras.
Its Crystal Image picture optimisation guarantees perfect printing and
reproduction quality for your photos. With Crystal Image, you can also
correct red-eye on photos taken with a flash.
This user guide takes you through the following step by step:
• setting up your photo printer,
• printing photos from a flash card,
• printing from a digital camera,
• printing photos transferred from a mobile phone or other device,
• installing the image processing software and print driver on your PC,
• keeping your photo printer in good working order and solving any
problems.
DEUTSCH
ESPAÑOLITALIANONEDERLANDSPORTUGUÊS FRANÇAIS ENGLISH
The CD-ROM included with your kit contains an additional guide with
instructions for using the image processing software and printer driver on
your PC.
You can also find at the www.sagem.com website:
• software upgrades,
• answers to Frequently-Asked Questions (FAQ),
• a list of compatible devices.
- 1 -
Page 6
Liasse AZUR_GB.book Page 2 Lundi, 23. mai 2005 11:31 11
SAFETY INSTRUCTIONS AND RECOMMENDATIONS
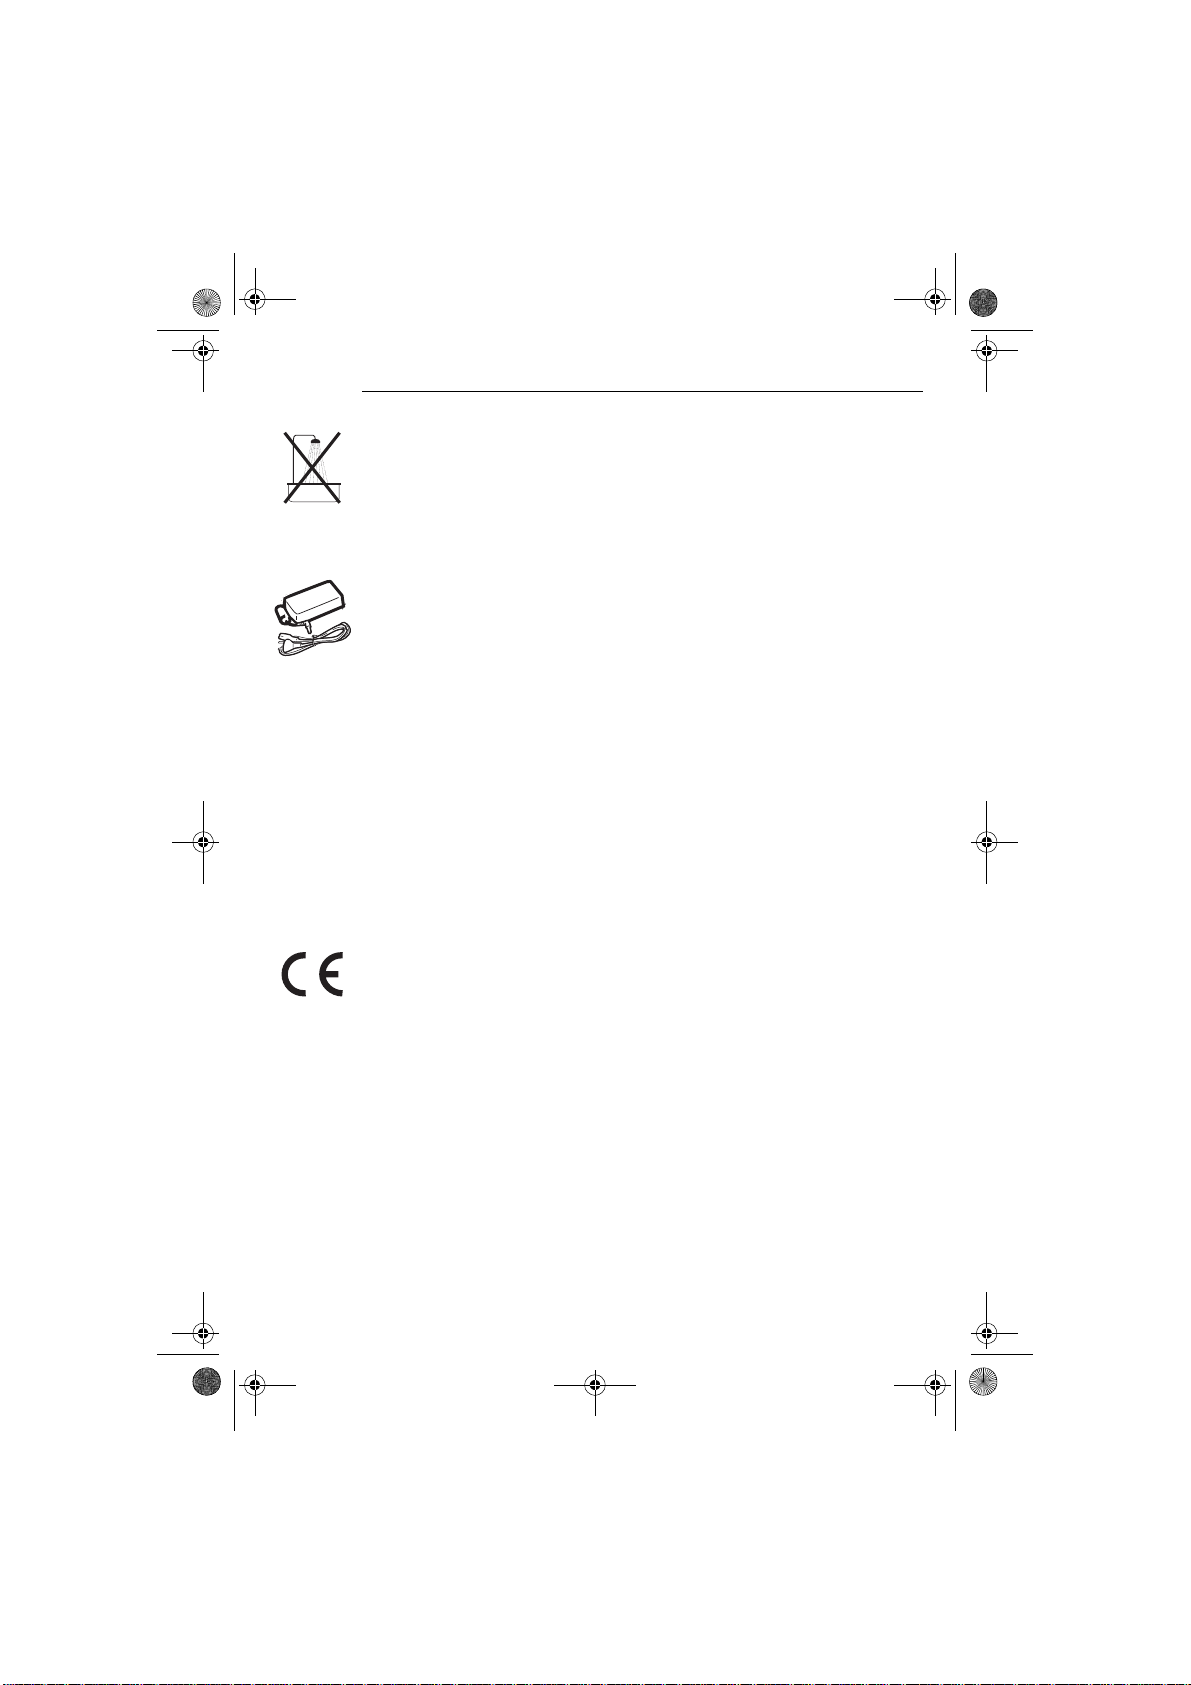
• Do not install your photo printer in a humid room (bathroom, laundry,
kitchen, etc.), or within 1.50 m of a tap or water source, or outside. Your
printer should be used at an ambient temperature of between15 °C and 35 °C
for optimum printing results.
• Do not set up your printer in a dusty environment as dust deposits might
adversely affect the print quality of your photos.
• Only the power supply provided with the printer should be used. Connect this
to the mains in accordance with the installation instructions in this user guide
and the information on the identification label affixed to the power supply
(voltage, current, mains frequency). As a precaution, in case of danger, the
mains adapters act as a disconnecting mechanism for the 230 V power
supply. They should be placed near the device and should be easily
accessible.
• Never open the cover of the film cartridge compar tment during pr inting.
This could break the film and cause printer malfunction.
• Only use SAGEM consumables, if not you are likely to damage the
equipment and invalidate the guarantee. To obtain the references of the
consumables (Refer to paragraph Replace ment of consumables, page 28).
• The CE marking certifies that the product meets the main requirements of the
European Parliament and Council directive 1999/5/CE on
telecommunications terminal equipment, regarding safety and health of users,
and regarding electromagnetic interference.
The declaration of compliance can be consulted on the site www.sagem.com
category "support", or can be requested at the following address:
SAGEM COMMUNICATION - Customer relations department
4 rue du Petit Albi - 95800 Cergy Saint-Christophe - FRANCE
- 2 -
Page 7
5
SA
GEM
PHO
O EASY 155
Liasse AZUR_GB.book Page 3 Lundi, 23. mai 2005 11:31 11
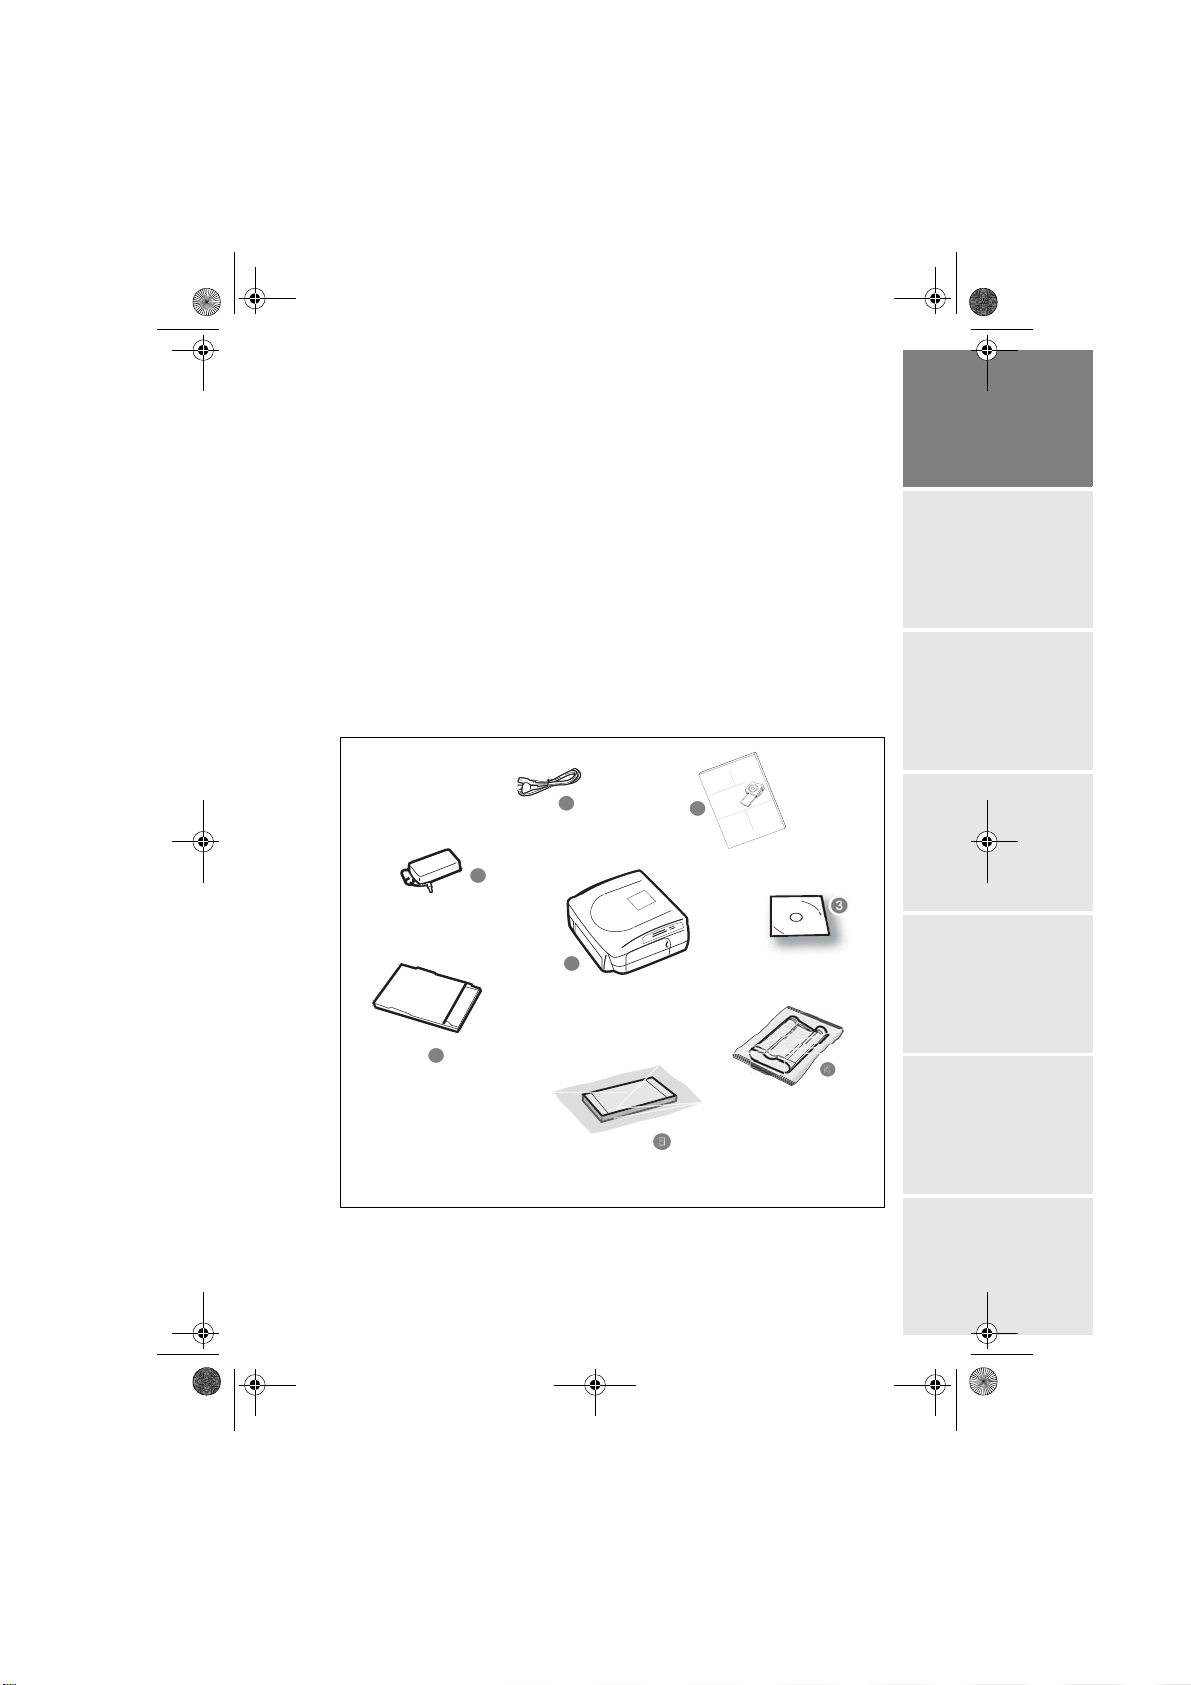
2DISCOVER YOUR PHOTO PRINTER
Place the box in front of you and check that you have received the items listed
below:
1. Photo printer
2. User manual
3. CD-ROM
4. Ink ribbon* (consumable)
5. Photo paper* (consumable)
6. Paper tray
7. Power supply unit
8. Mains cable
8
DEUTSCH
GEM
SA
TO EASY 155
PHO
ser guide
2
U
tilisation
tung
et d u
ei
anl
Livr
ario
nungs
l usu
Bedie
ll'utente
Manual de
wijzing
Manuale de
ksaan
Gebrui
S
7
ESPAÑOLITALIANONEDERLANDSPORTUGUÊS FRANÇAIS ENGLISH
1
6
depending on model
*
- 3 -
Page 8

Liasse AZUR_GB.book Page 4 Lundi, 23. mai 2005 11:31 11
3USER INTERFACE
The user interface enables you to:
• select photos one by one or switch over to mosaic mode (6 photos displayed
on screen),
• print a photo directly,
• activate auto improvement before printing a photo,
• set the "Format", "Preferences" and "Image settings" parameters according to
your needs,
• select several photos and choose a different number of copies for each photo
to be printed,
• zoom onto a photo and print it.
Keypad description
1
8
7
6
2
3
4
5
1. On/Off buttons (press and hold)
2. Selection buttons
3. Zoom + button
4. Menu access button
5. Browser
6. Print button
7. Zoom - and mosaic mode activation button
8. CRYSTAL IMAGE button (Automatic print quality enhancement and
red-eye correction)
- 4 -
Page 9
11
10
Liasse AZUR_GB.book Page 5 Lundi, 23. mai 2005 11:31 11
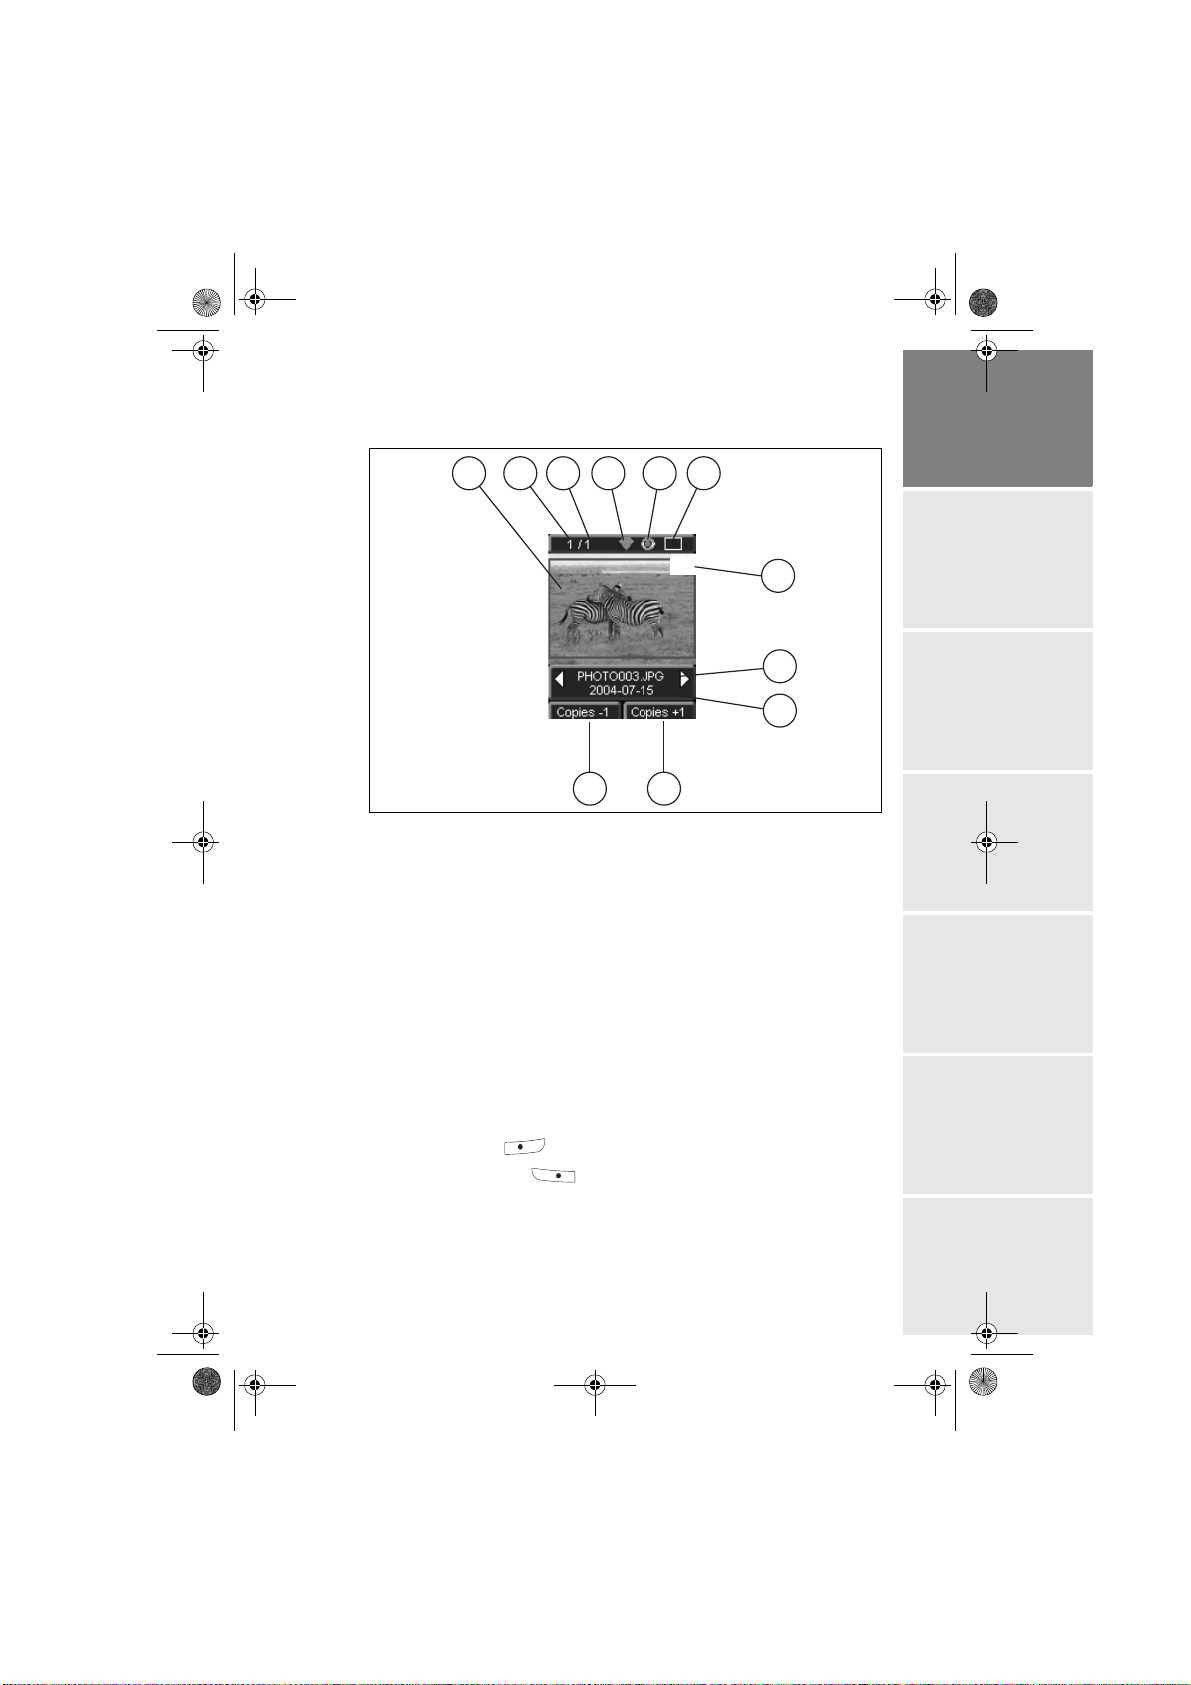
The visual interface
All the valid photos are displayed on the screen; use the ` or _ buttons to scroll
through them.
1 3
2
5
X1
6
7
4
8
9
11
10
The following information is available on the screen:
1. Photo selected
2. Number of the photo selected
3. Total number of valid photos contained in the memory card or
connected source
4. Auto improvement function icon
5. Red-eye correction function icon
6. Print format
7. Number of copies of the photo
8. Photo filename
9. Date when the photo was taken in Year/Month/Day format
10. Add a copy, button
11. Remove a copy, button
DEUTSCH
ESPAÑOLITALIANONEDERLANDSPORTUGUÊS FRANÇAIS ENGLISH
- 5 -
Page 10
Liasse AZUR_GB.book Page 6 Lundi, 23. mai 2005 11:31 11
4PREPARE YOUR PHOTO PRINTER
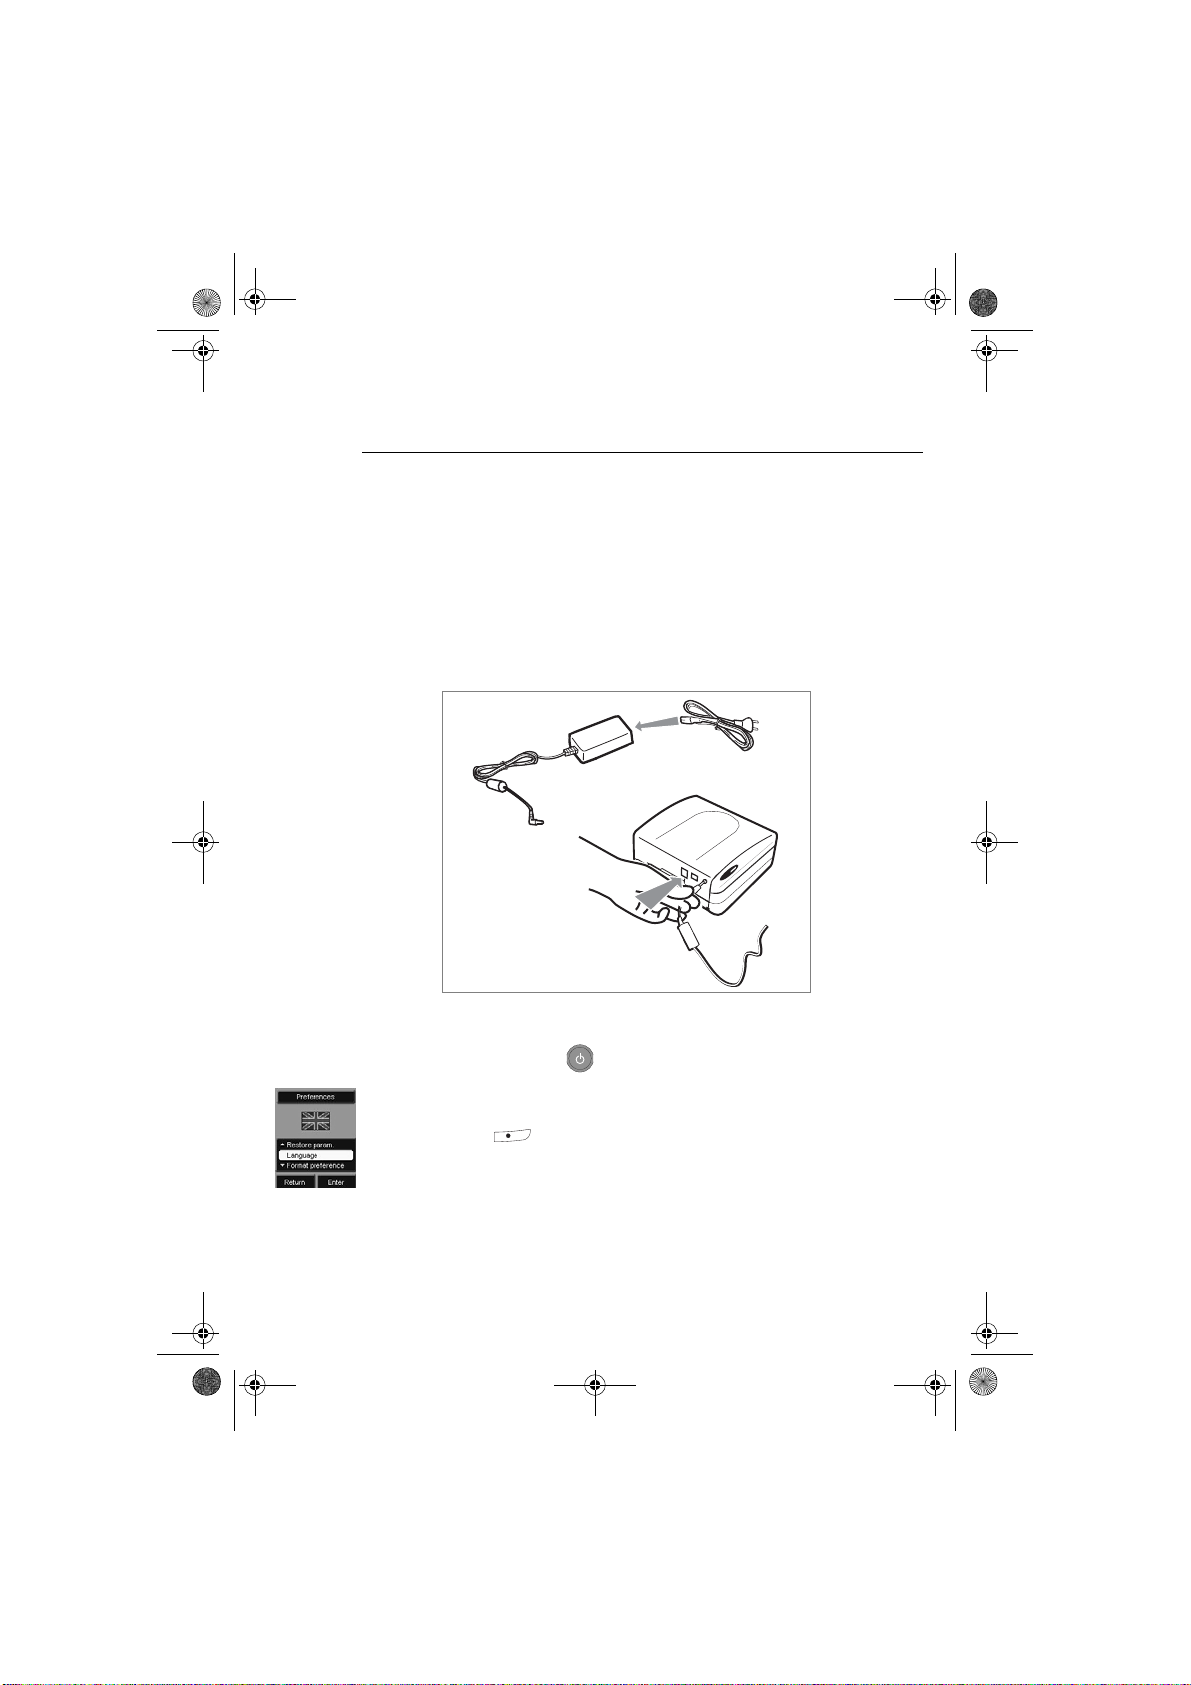
CONNECT THE MAINS SUPPLY
Remark: when installing your printer near a wall or some other object, keep an open space of at
least 4 inches at the back of the printer, to make sure the movement of the sheet of paper
being printed is not obstructed.
Please refer to the safety instructions at the beginning of this user guide
before making any connections.
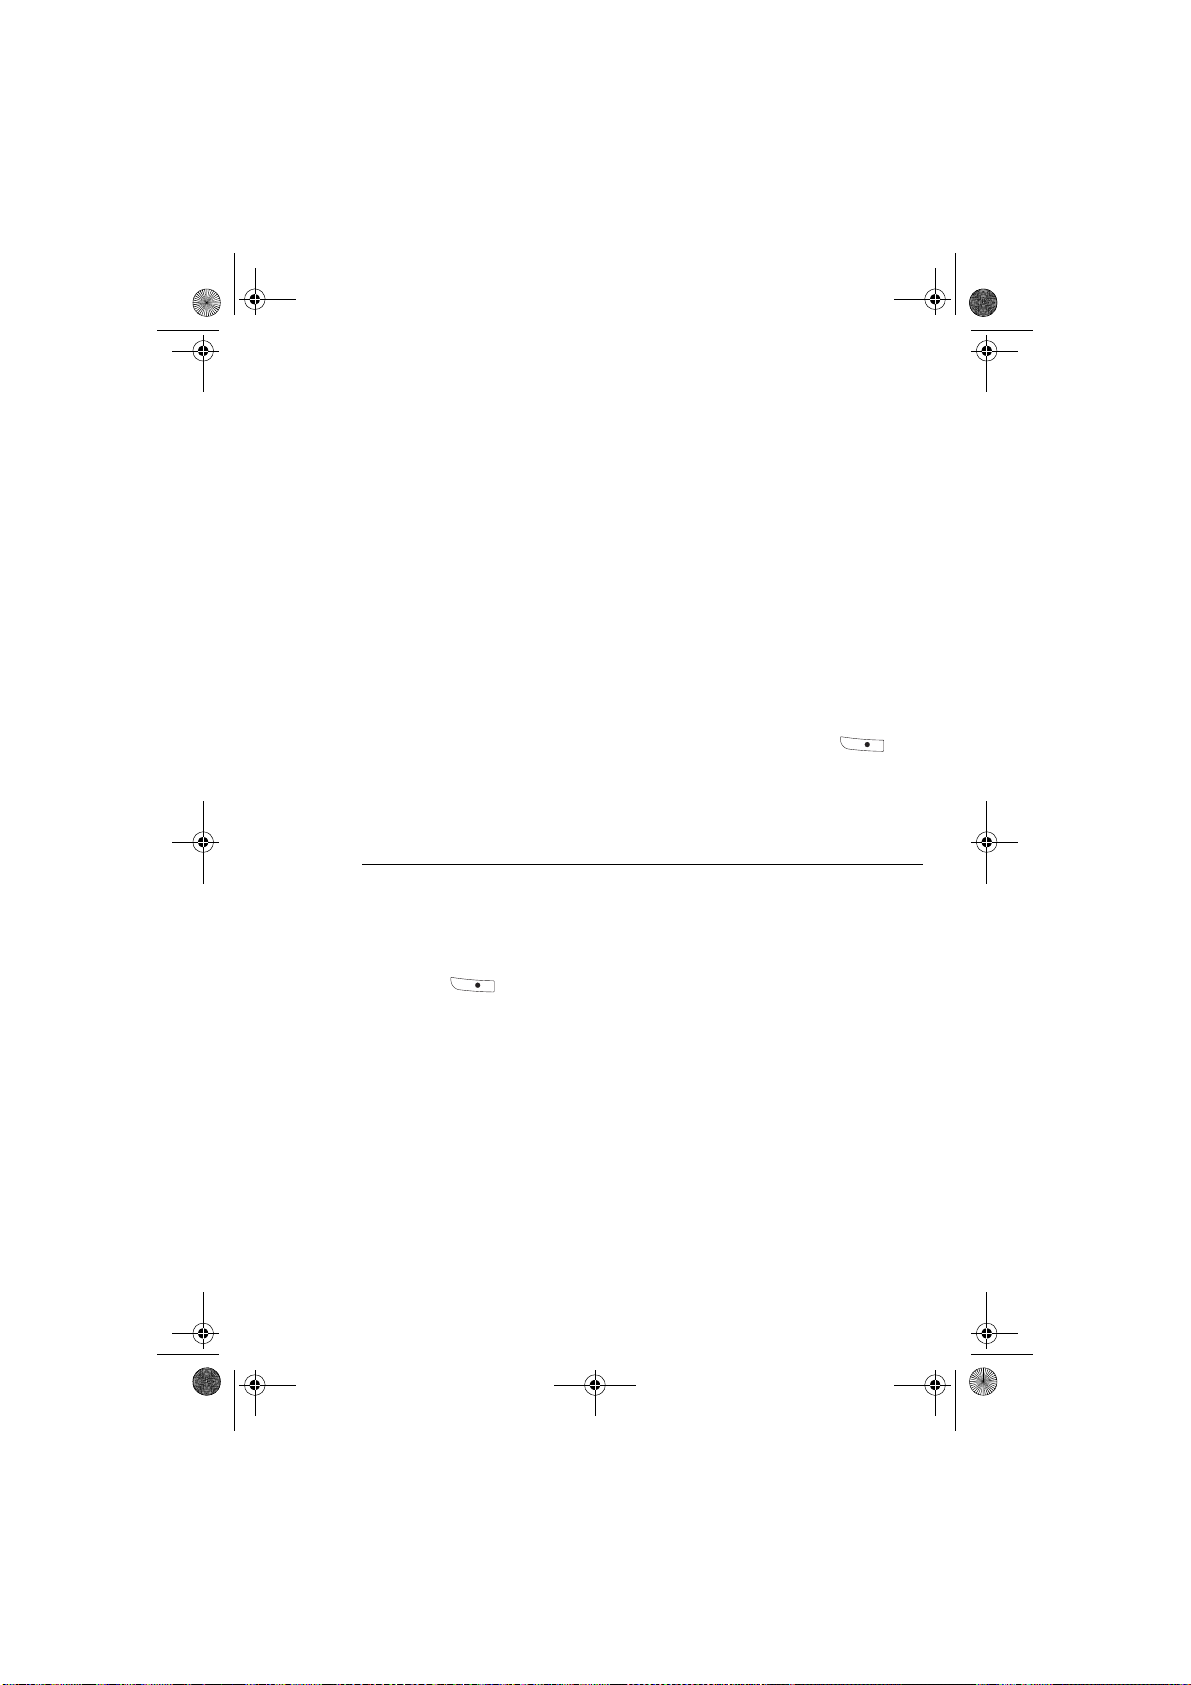
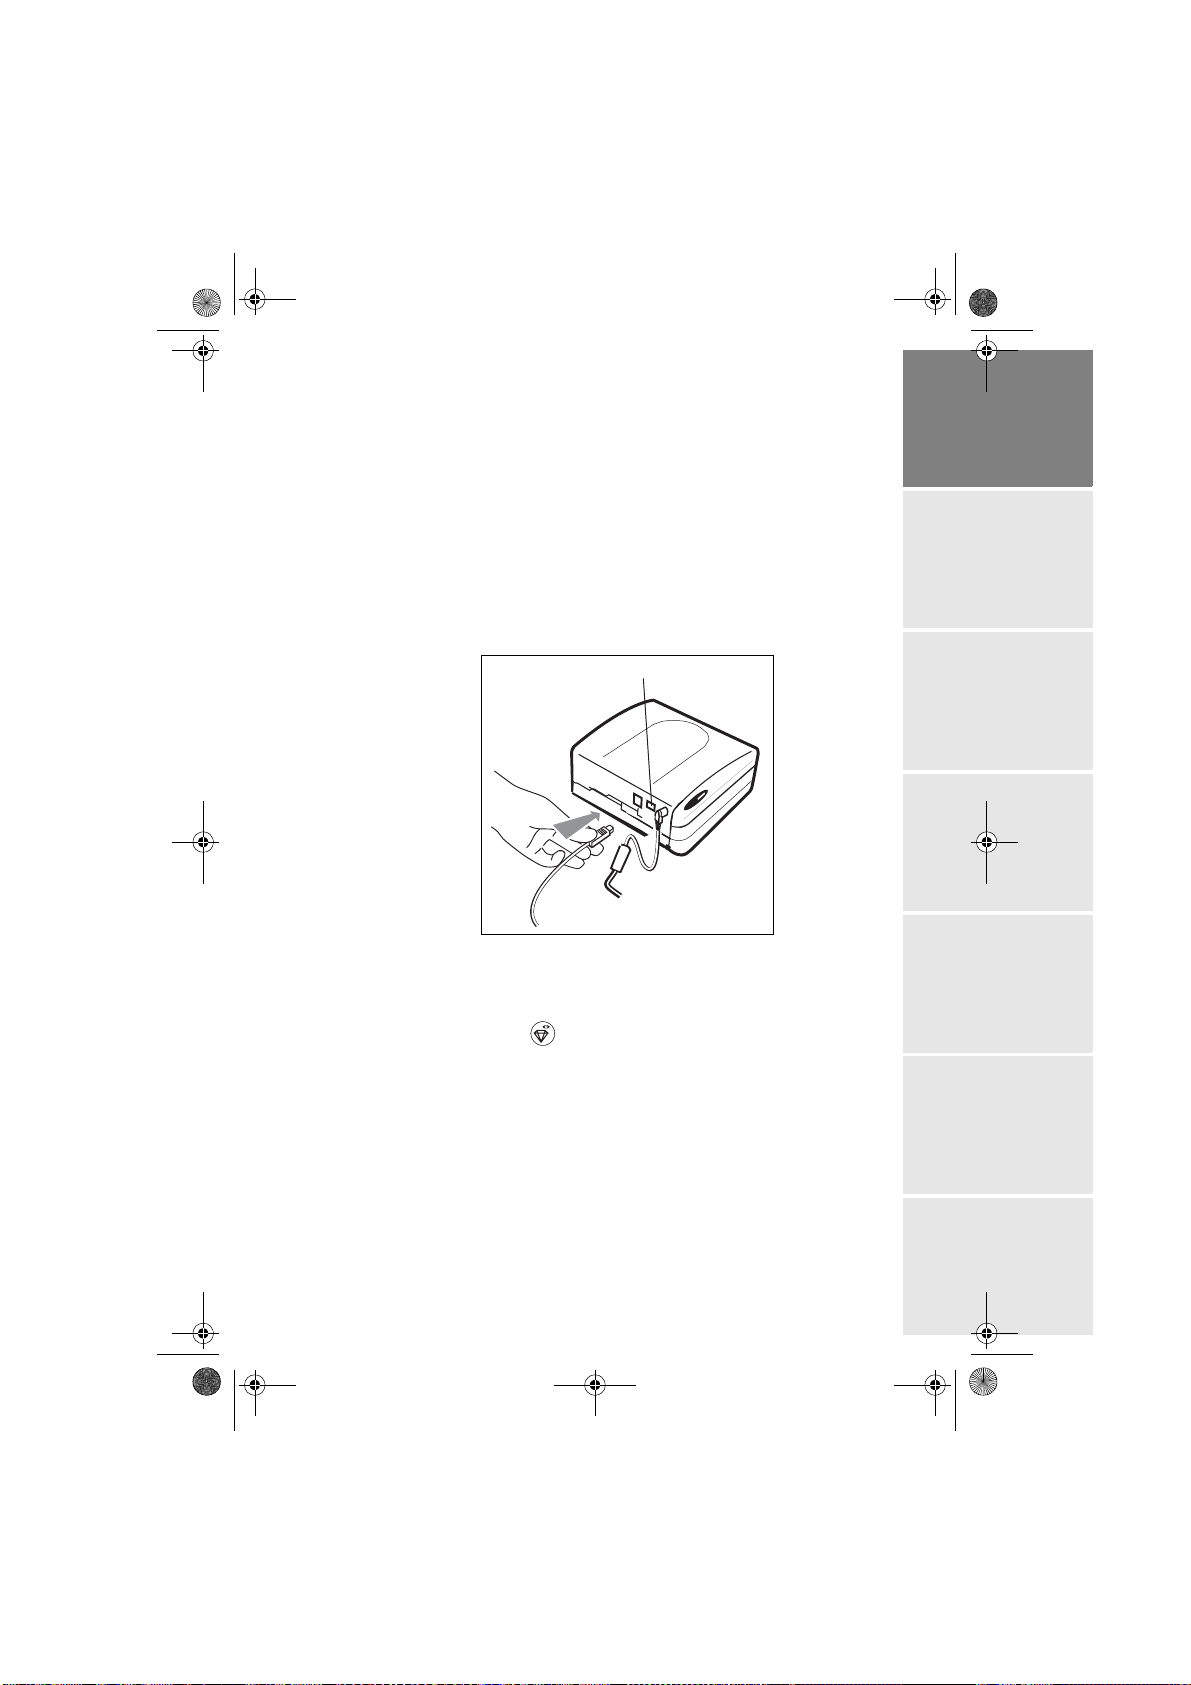
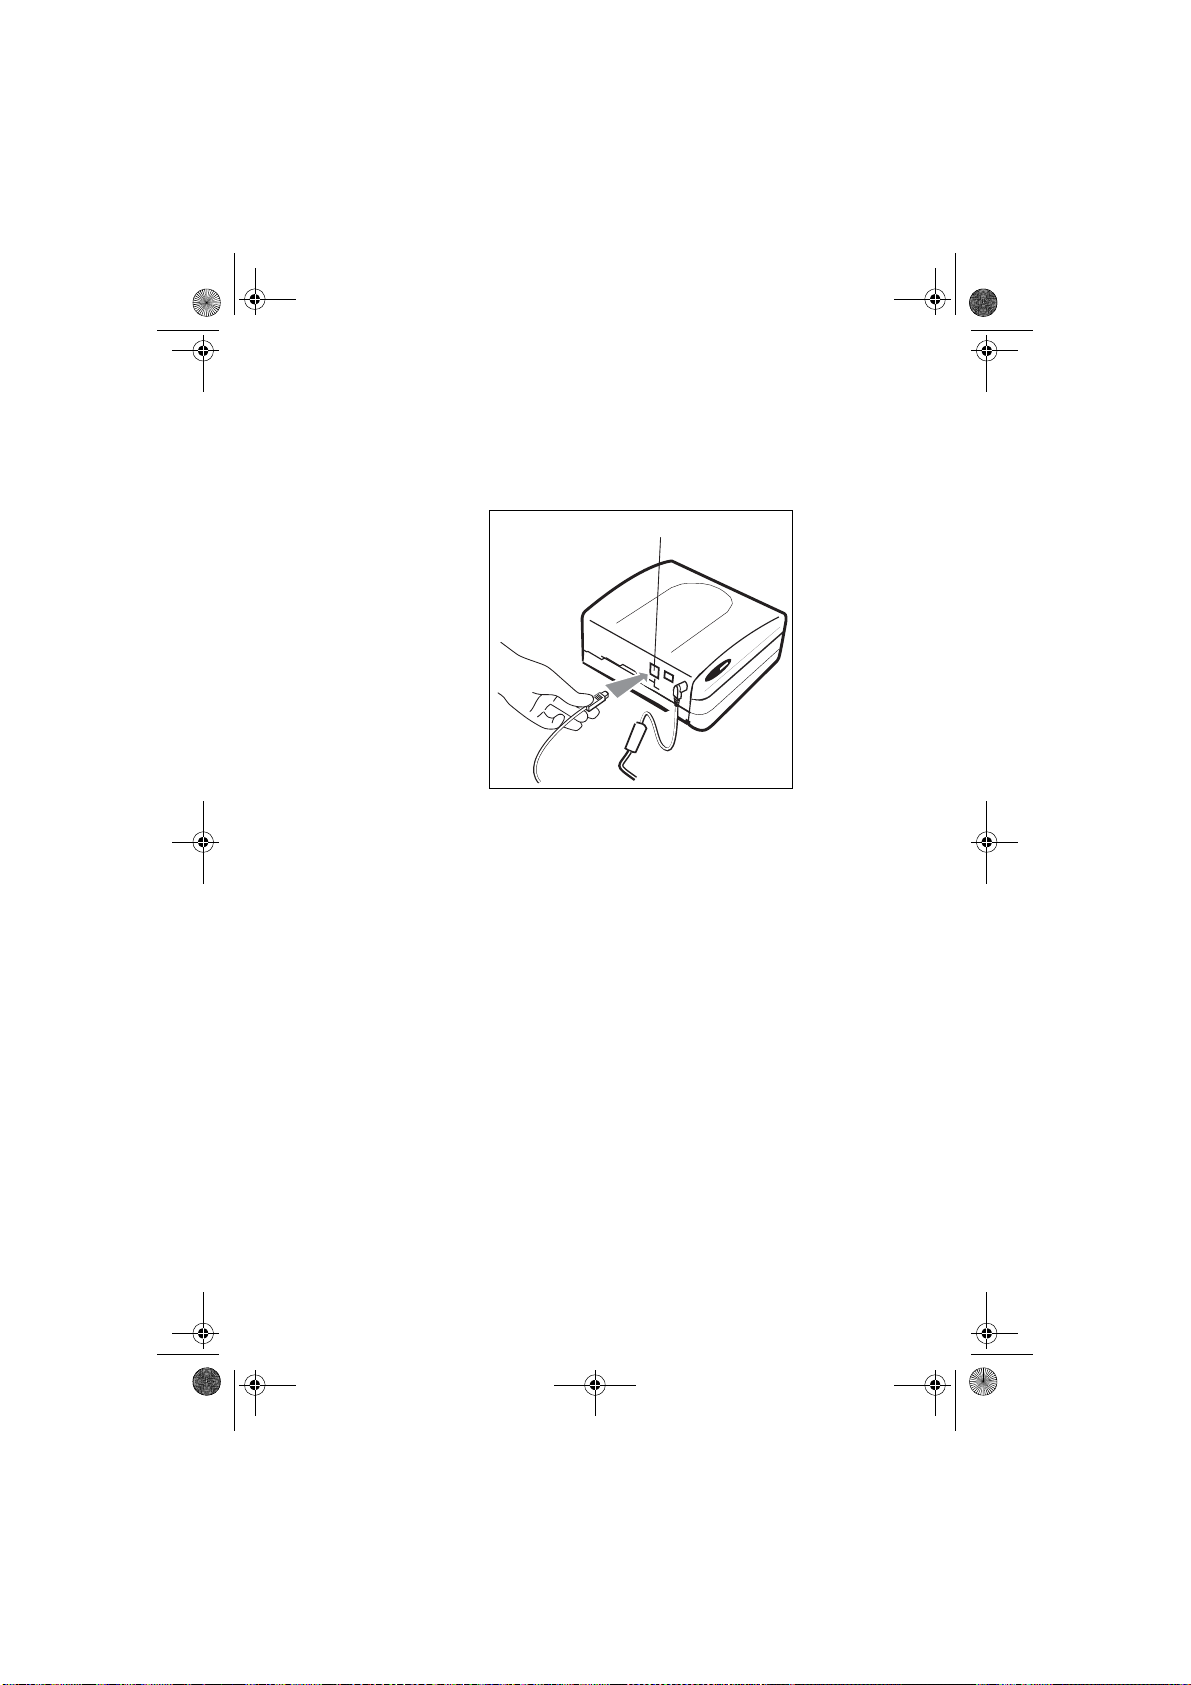
Insert one end of the mains lead into the corresponding socket of the power
supply.
Connect the power supply prug to the printer, pushing it in fully as shown in
the illustration below.
Plug the other end of the power supply mains lead into a wall socket.
Press the On/Off button until the screen lights up.
The language selection screen appea rs when you switch the printer o n for the
first time. Use the browser's S or T keys to select the language you want
and press the key to confirm.
A welcome screen is displayed.
- 6 -
Page 11
Liasse AZUR_GB.book Page 7 Lundi, 23. mai 2005 11:31 11
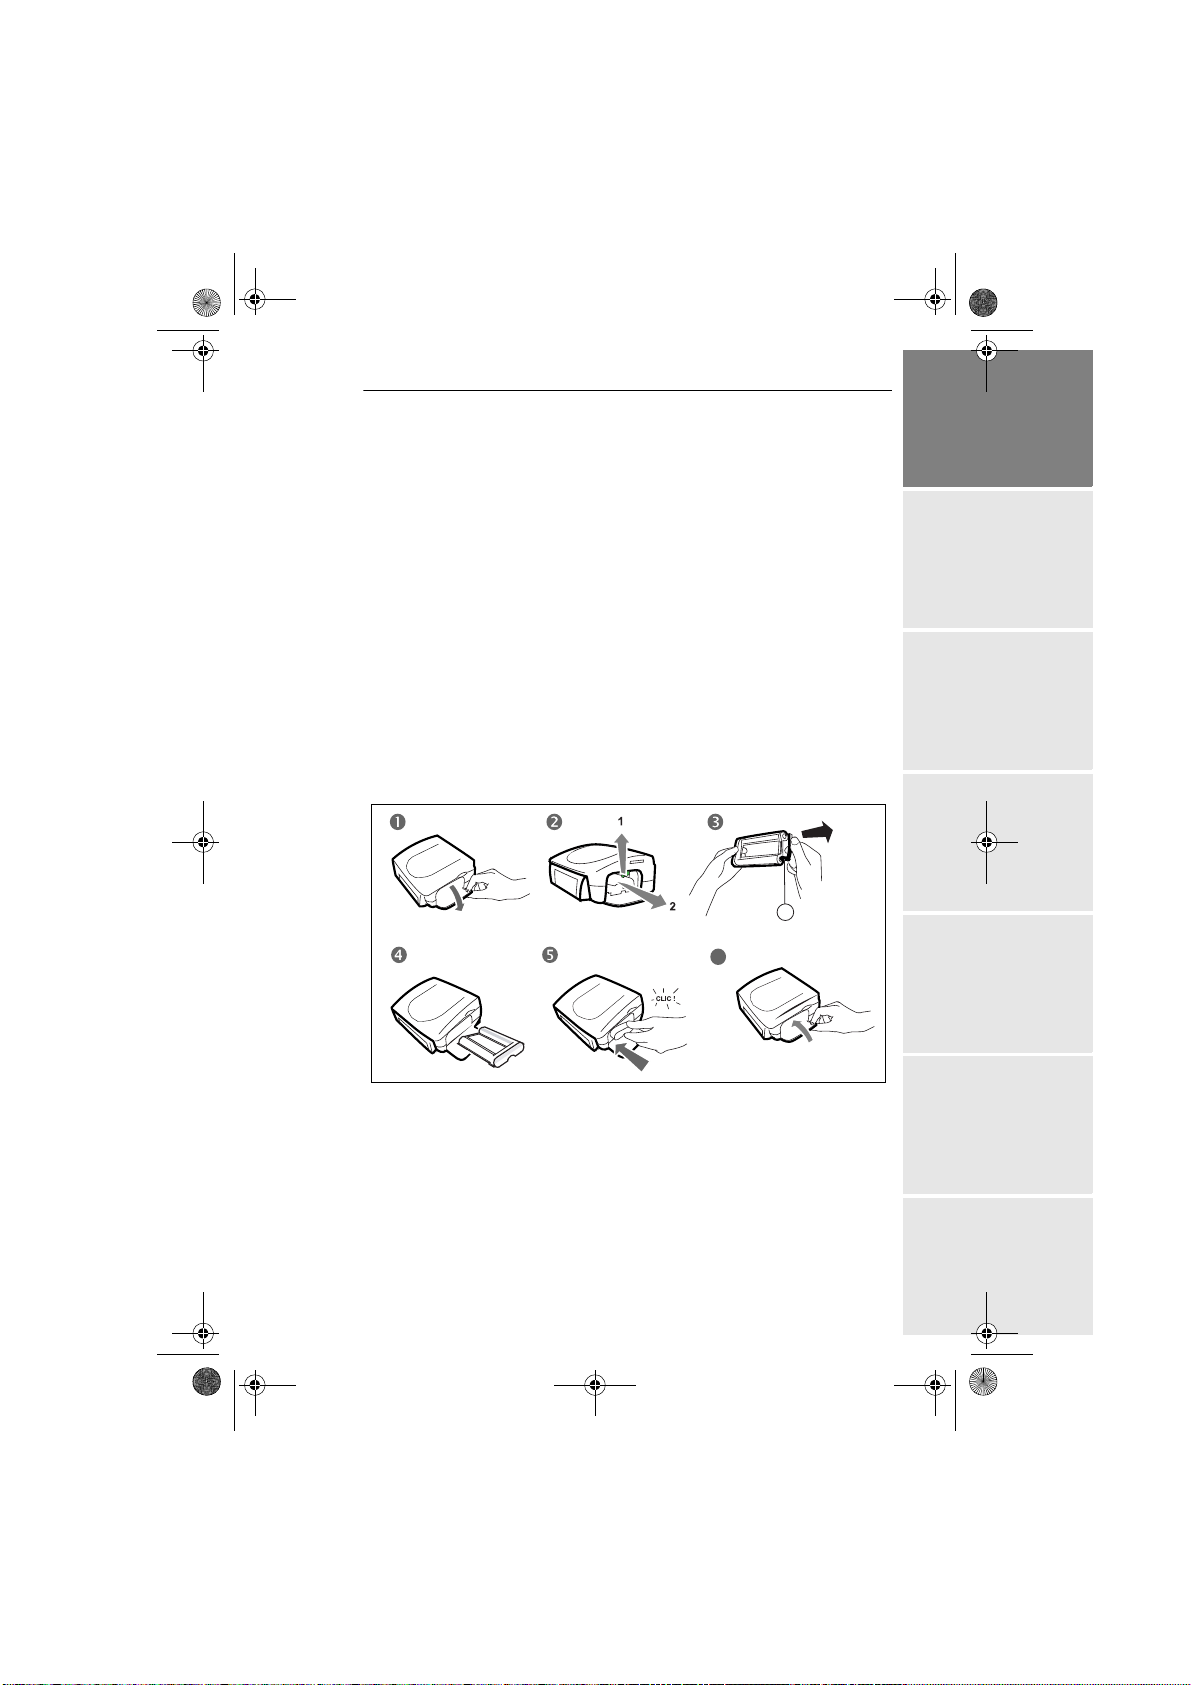
FIRST RIBBON INSTALLATION
Remark: use manufacturer consumables only. These are specially designed to provide
optimum print quality (Refer to paragraph Replacement of consumables,
page 28).
Remark: smart card validation is not necessary for the use of consumables supplied with the
printer (nature of supplies dependent on the model).
Switch on the printer. Wait 10 seconds for the printhead to lift, then:
1. Open the external flap located on the right-hand side of the printer.
2. Remove the protective foam.
3. Take the new ribbon out of its packaging and make sure that the film
is stretched after removing the card (A).
4. Install the ribbon in the position shown in the illustration below.
5. Insert the ribbon so that it is firmly seated in its housing. The locking
catch must be closed after insertion.
6. Close the external flap.
A
6
DEUTSCH
ESPAÑOLITALIANONEDERLANDSPORTUGUÊS FRANÇAIS ENGLISH
Warning:
Remark: in the event of any difficulty, check that there are no foreign objects in the film
never touch the film cartridge with your fingers. Make sure the cartridge is
completely inserted into the printer. Check that the green locking lever is correctly
lowered.
cartridge compartment.
- 7 -
Page 12
Liasse AZUR_GB.book Page 8 Lundi, 23. mai 2005 11:31 11
TO CHANGE THE RIBBON
Remark: use manufacturer consumables only. These are specially designed to provide optimum
print quality.
Switch on the printer. Wait 10 seconds for the printhead to lift, then:
1. Take the smart card supplied with the ribbon and photo paper and insert it
in the reader on the printer's left-hand side. The smart card is recognised
and read by the printer, and once the procedure is complete the
wording: "Transfer OK (40) - Remove card" or "Transfer OK (120) -
Remove card" appears on screen.
2. Remove the SIM card.
3. Take the new ribbon out of its packaging and make sure that the film is
stretched after removing the card (A).
4. Open the external flap located on the right-hand side of the printer.
5. Lift the locking lever and remove the used ink ribbon.
6. Install the ribbon in the position shown in the illustration below.
7. Lift the locking lever and push in the film cartridge until it touches the
back of the compartment the locking lever must be locked after insertion.
8. Close the external flap.
Remark: if the ribbon is replaced during a p rint job, you can resume printing where you left o ff
by pressing the button.
- 8 -
Page 13

Liasse AZUR_GB.book Page 9 Lundi, 23. mai 2005 11:31 11
7 8
A
6
DEUTSCH
Warning:
never touch the film cartridge with your fingers. Make sure the cartridge is
completely inserted into the printer. Check that the green locking lever is correctly
lowered.
Remark: in the event of any difficulty, check that there are no foreign objects in the film
cartridge compartment.
- 9 -
ESPAÑOLITALIANONEDERLANDSPORTUGUÊS FRANÇAIS ENGLISH
Page 14
Liasse AZUR_GB.book Page 10 Lundi, 23. mai 2005 11:31 11
LOADING PAPER
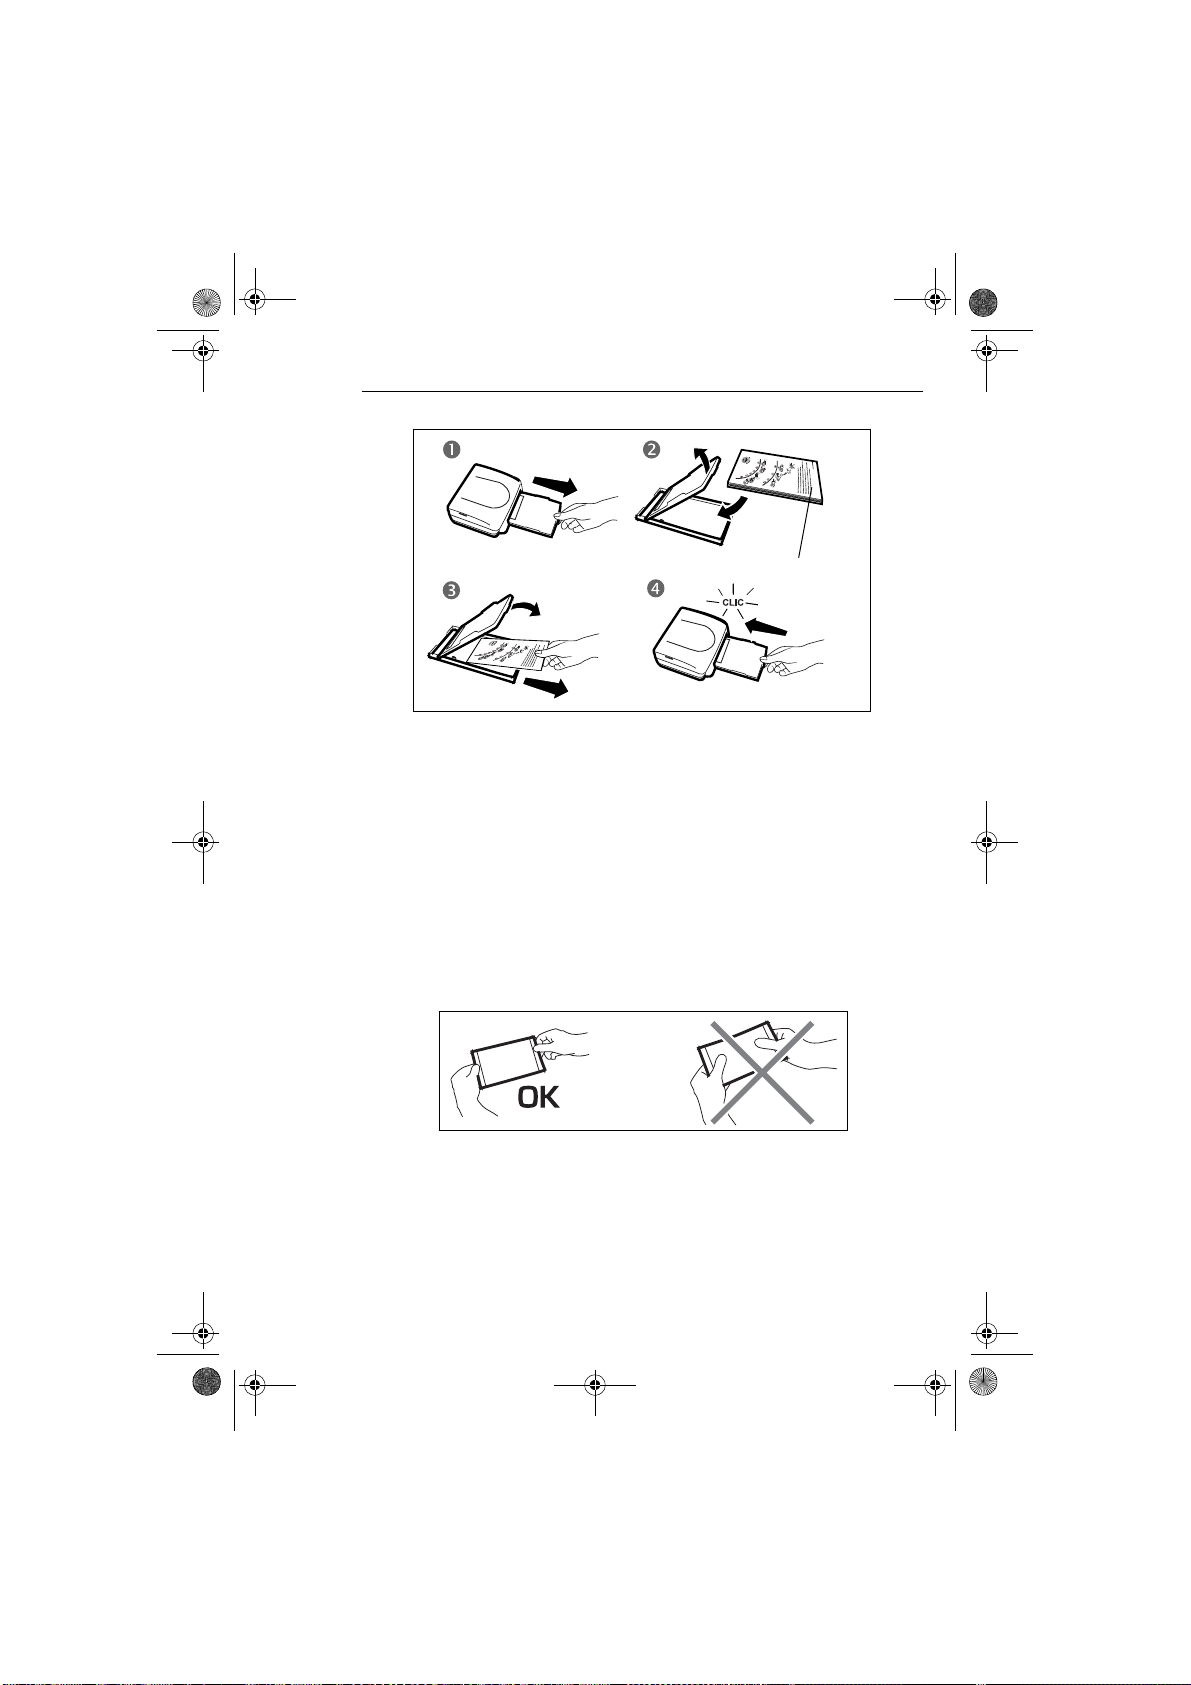
1. Pull the paper tray out of the printer.
2. Open a pack of paper with the protection sheet on the top, insert it in the
paper tray, making sure the rectangle reserved for postage stamps is on the
outside of the tray, that is, towards you.
3. Remove the protection sheet.
4. Line up the tray with its compartment and push it in slowly until the
locking system clicks.
Protection sh eet
Your photo printer is now ready to print your digital photographs.
Warning:
handle paper sheets by their pre-cut edges, never allow your fingers to come into contact
with the shiny surface before printing.
Warning: protect consumable items a gainst prolonged exposure to light, humidly, he at and dust.
Respect the operation conditions se t out ( Refer to pa ragr aph Technical data, page 34).
Use only the manufacturer consumables designed for this printer. The paper tray should
never contain more than 20 sheets at any one time.
Warning: make sure that a previously printed photograph has not been slipped inadvertently into a
packet of blank pages; this could damage the ribbon of your printer.
- 10 -
Page 15
Liasse AZUR_GB.book Page 11 Lundi, 23. mai 2005 11:31 11
5TRANSFERRING YOUR IMAGES
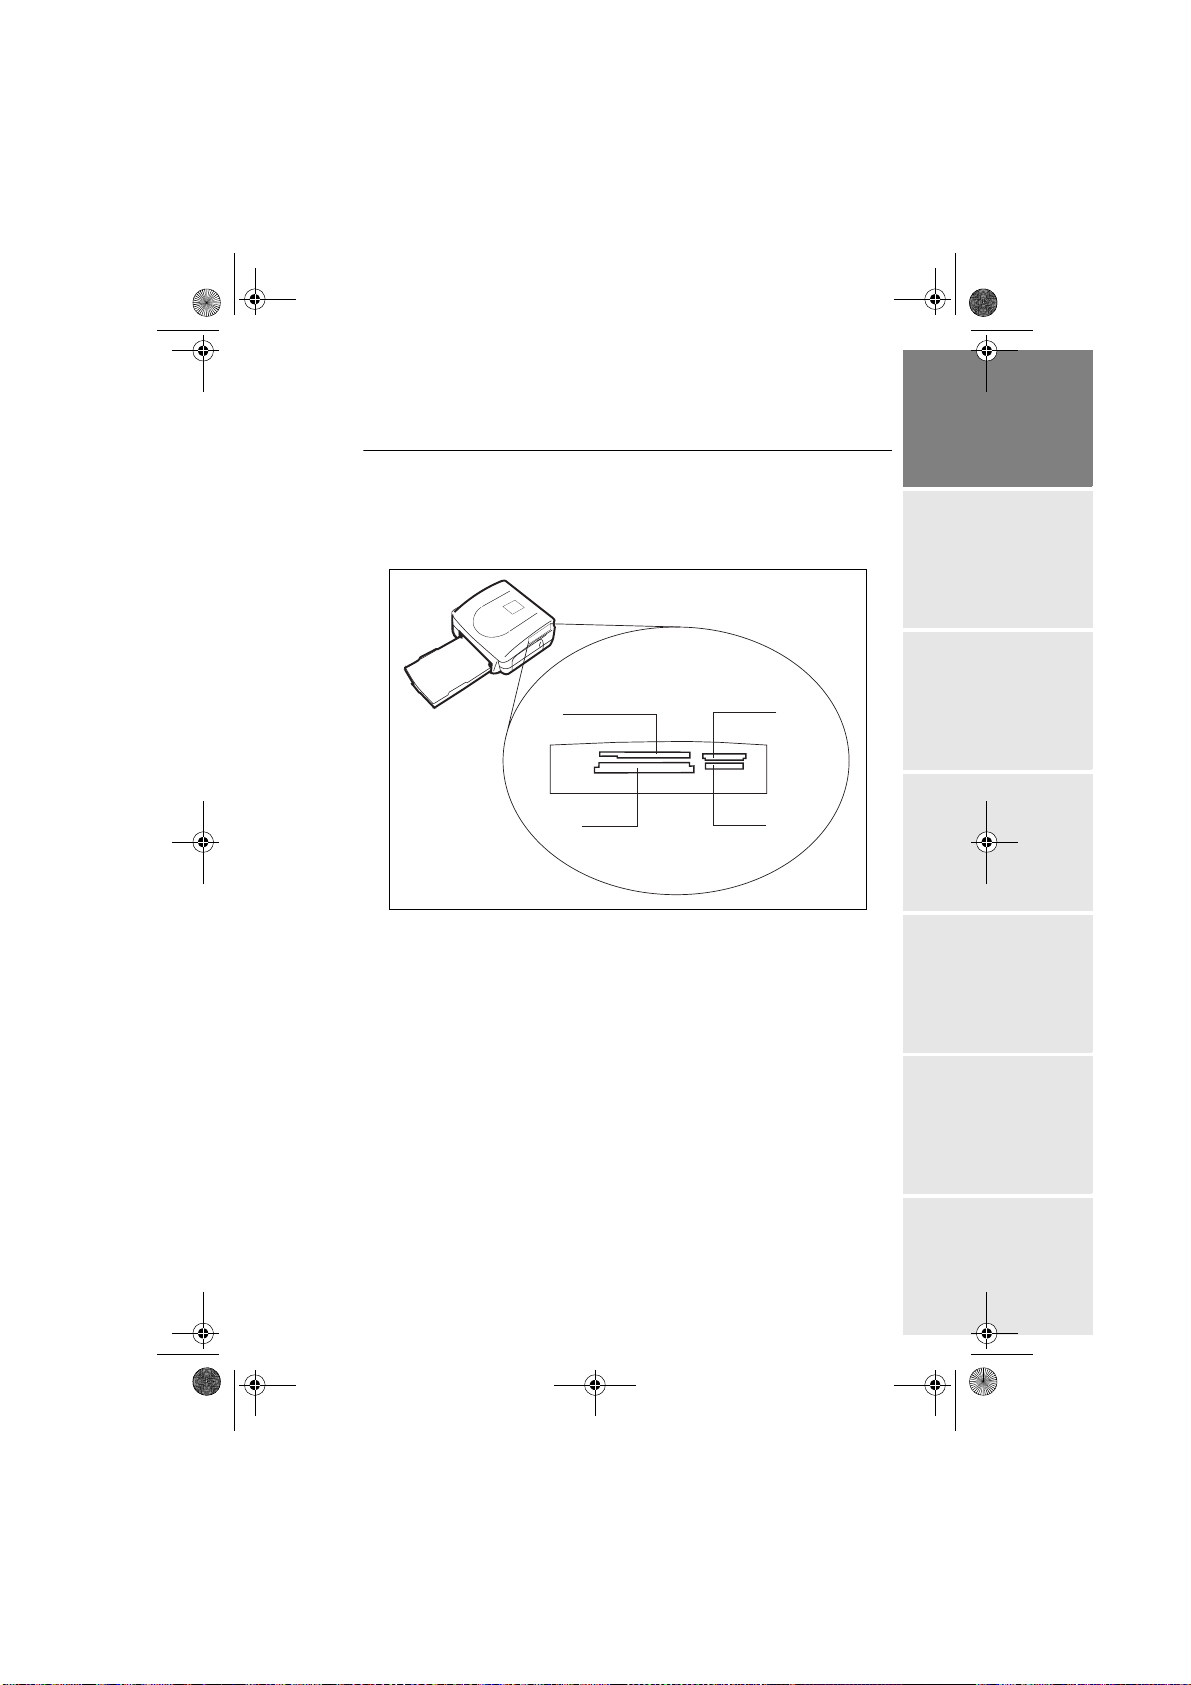
INSERT A MEMORY CARD
Insert your memory card into the corresponding slot, as shown in the
illustrations below.
Warning:
Slot compatible
Smart Media (SM),
with
Carte xD formats
Slot compatible
with Compact Flash
format
SmartMedia, CONTACTS FACING DOWNWARDS.
Slot compatible with
Multi Media Card (MMC
Standard Digital (SD) formats
Slot compatible
Memory
with
Stick (MS) format
)
Warning: the memory cards do not enter fully in the reader slot. DO NOT USE FORCE
UNDER ANY CIRCUMSTANCES. If a card does not enter properly, remove it
and check that you are introducing it in the correct slot and with the right
orientation.
Warning: printing of picture by ascending order relatively to the date of the pictures on the
memory board will be achieved if parameters "dates and hour" have been set on
your camera before the catch of pictures. Otherwise pictures will be read and
printed in a random order.
DEUTSCH
ESPAÑOLITALIANONEDERLANDSPORTUGUÊS FRANÇAIS ENGLISH
- 11 -
Page 16
Liasse AZUR_GB.book Page 12 Lundi, 23. mai 2005 11:31 11
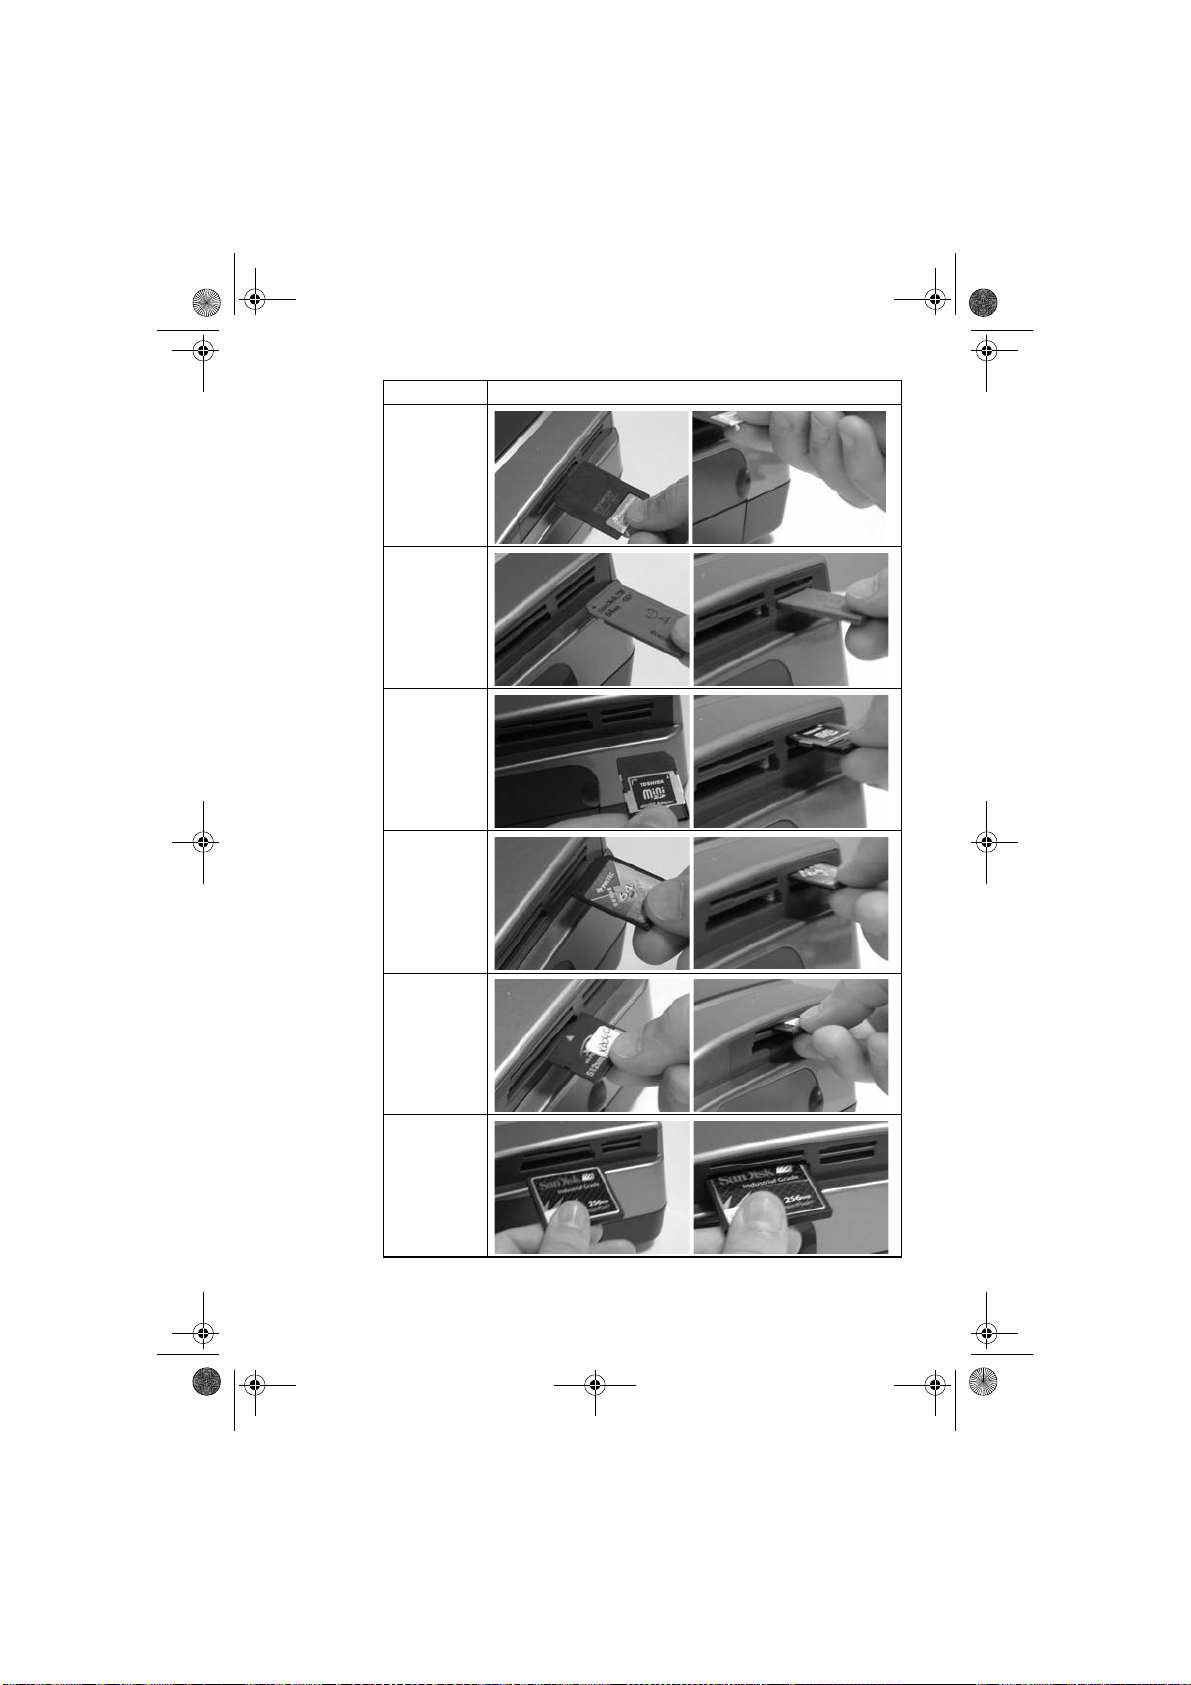
Card Location
Smart Media
(SM)
Memory Stick
(MS)
Standard Digital
(SD)
Multi Media
Card
(MMC)
Card xD
CompactFlash
- 12 -
Page 17
Liasse azur GB.fm Page 13 Mardi, 24. mai 2005 11:45 11
TRANSFERRING PHOTOS BY INFRARED LINK
Warning: if a memory card in inserted in the printer, you cannot access the infrared
transfer mode.
Warning:
Remark: for a list of compatible devices, go to www.sagem.com.
Warning:
if you have started transfer by Bluetooth, you will not be able to transfer photos by
infrared if you have not before hand erase d the internal memory by holding the
key down for 3 seconds.
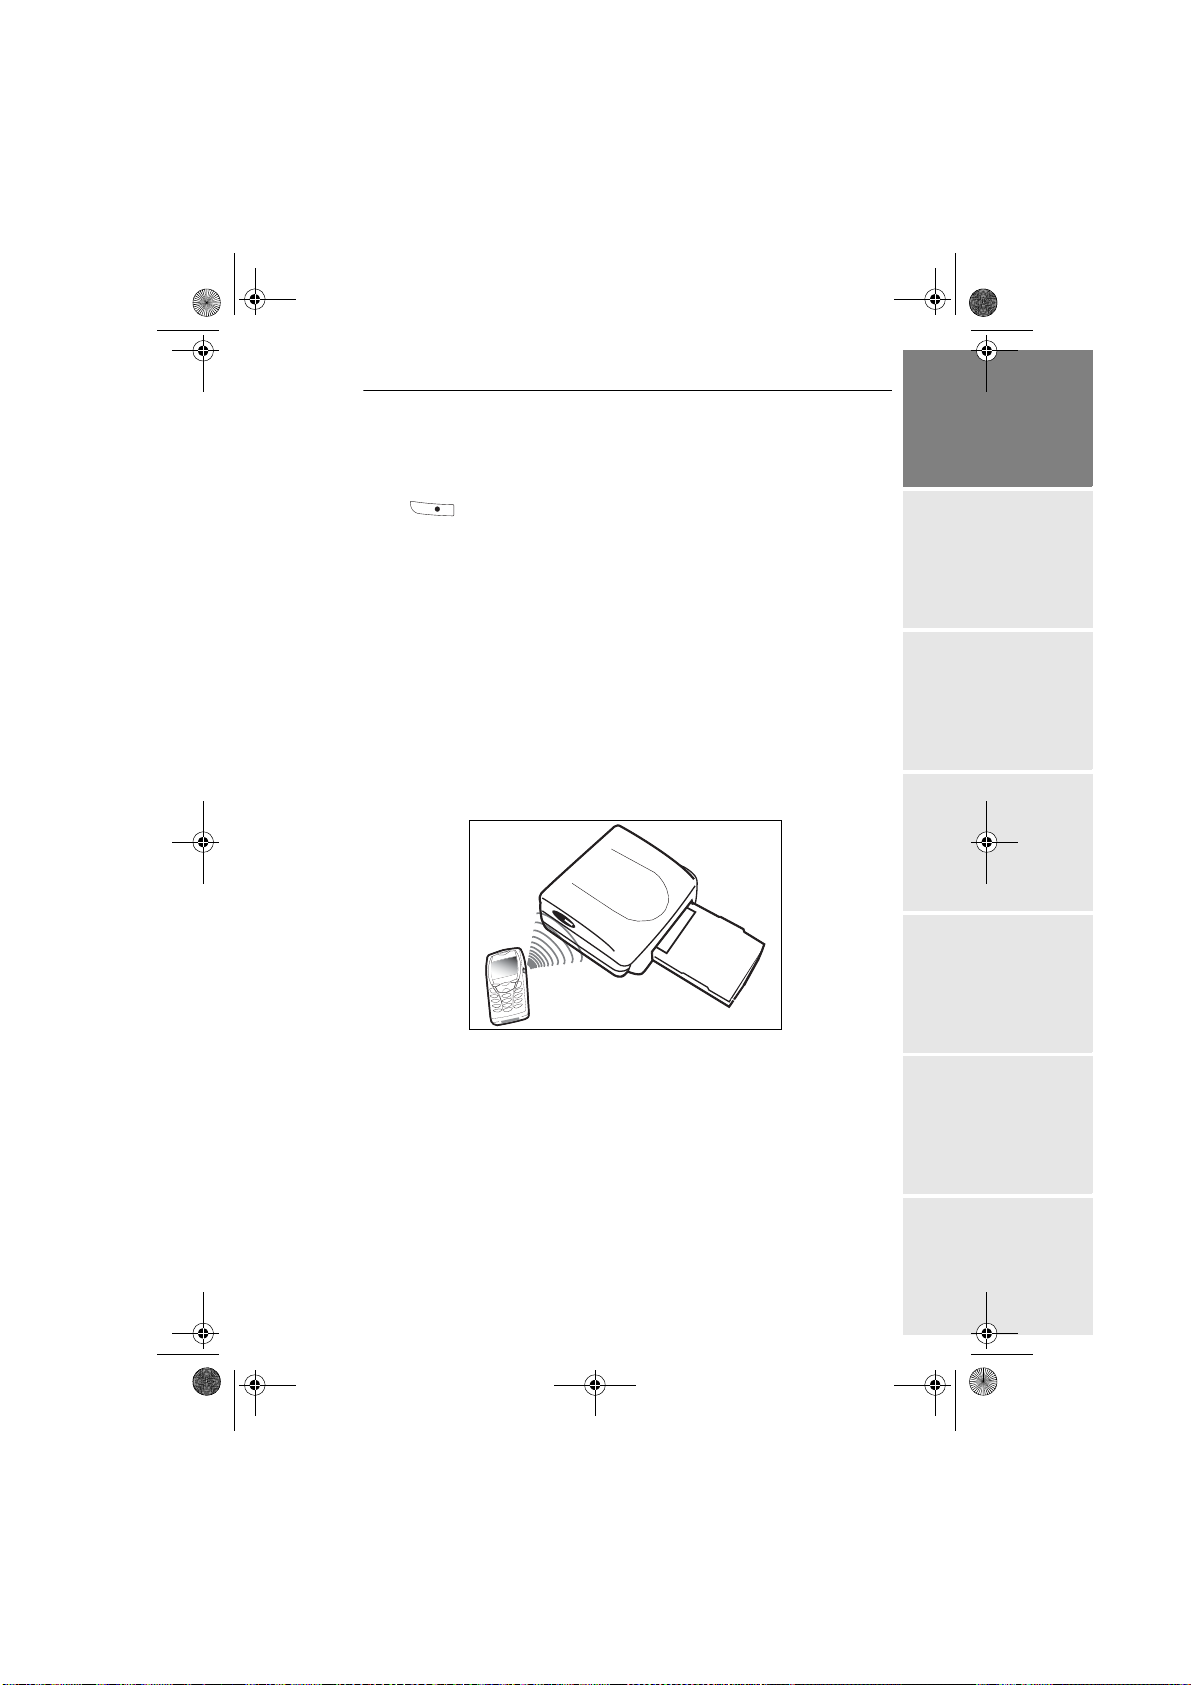
You can use the printer to print photos stored in a mobile phone, a PDA or a
PC. For this, you need to transfer the photos to the printer by means of the
infrared link.
Switch on the printer. Position the infrared window of your peripheral device
facing the infrared window of the printer, at a distance of no more
than 30 centimetres.
in an environment exposed to intense light, a distance of no more than 10
centimetres between the two infrared windows is recommended.
DEUTSCH
ESPAÑOLITALIANONEDERLANDSPORTUGUÊS FRANÇAIS ENGLISH
Select a photo on your device and launch its transfer via the infrared link.
When the transfer is complete, the following information is displayed on the
screen "Infrared transfer - Please wait".
- 13 -
Page 18
Liasse AZUR_GB.book Page 14 Lundi, 23. mai 2005 11:31 11
You can now:
• start printing the transferred photograph, after setting the print format and
number of copies if required,
• or, transfer another photo from your device, which is then added to the
photo(s) already stored in the printer. At the end of each transfer, the total
number of photographs stored is displayed on the printer screen (the one with
the highest number being the last one transferred),
• the same operations as described in the previous chapters can now be
performed before starting to print the photographs: (selecting the photographs
to be printed, selecting the format, selecting the number of copies).
You can now:
• start another print job, after selecting different parameters (photograph
number, format, number of copies) if required,
• or erase all selected photos. To do so, hold down the key
for 3 seconds.
TRANSFERRING PHOTOS FROM A BLUETOOTH DEVICE
(OPTIONAL)
Warning: if a memory card is inserted in the printer, you cannot access the Bluetooth
transfer mode.
Warning: if you have started transferring photos by infrared, you cannot transfer your
photos by Bluetooth until you f irst have cl eared th e interna l memory by h olding
down the key for 3 seconds.
The optional Bluetooth adapter for the printer is a fast and effective solution to
replace a connection by cable with a wireless connection.
The adapter transforms the photo printer into a Bluetooth receiver, allowing you
to print photos from devices equipped with Bluetooth technology, such as mobile
phones, PDAs, PCs and the like.
- 14 -
Page 19
Liasse AZUR_GB.book Page 15 Lundi, 23. mai 2005 11:31 11
Ensure that all hardware units are powered. Never force installation of
connectors on hardware, as the cable and the connector could be damaged.
Remark: for a list of compatible devices, go to www.sagem.com.
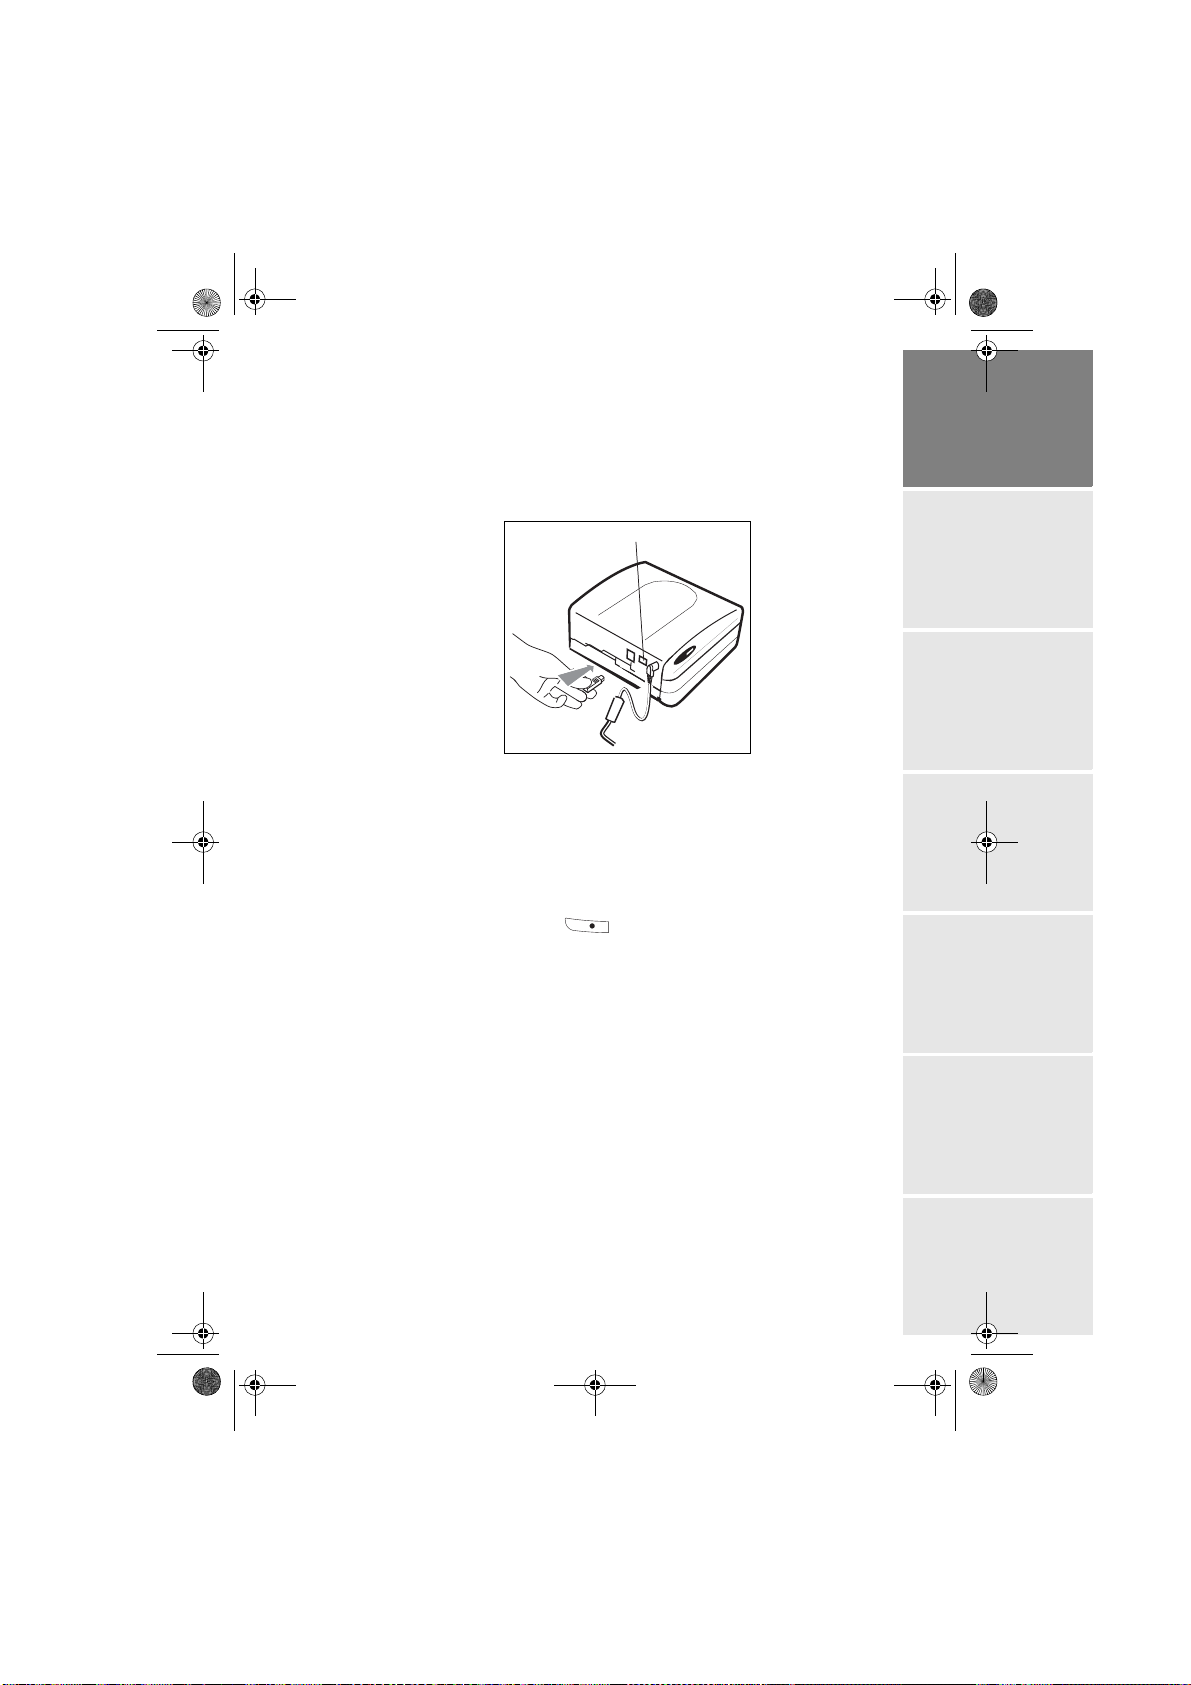
Connect the Bluetooth adaptor ( optional equipme nt) to the USB port (A)
of your photo printer.
A
Identification among hardware units is automatic.
Warning:
the size of the photo or photos to be transferred to the photo printer must be less
than 600 Kbytes. The photo format required is the JPEG format. An error message
"
Wireless memory full" will be displayed when the maximum storage capacity
is reached.
To transfer new data to the photo printer, you must clear the memory. To
do this, press and hold the
key for 3 seconds.
DEUTSCH
ESPAÑOLITALIANONEDERLANDSPORTUGUÊS FRANÇAIS ENGLISH
When the transfer is complete, the following information is displayed on the
screen "Bluetooth transfer - Please wait"
You can now:
• start printing the transferred photograph, after setting the print format
and number of copies if required,
• transfer another photograph, which will be added to those already stored
in the printer. At the end of each transfer, the total number of
photographs stored is displayed on the printer screen (the one with the
highest number being the last one transferred).
Remark: the following message is displayed if the photo printer memory is full "Wireless
memory full".
- 15 -
Page 20
Liasse AZUR_GB.book Page 16 Lundi, 23. mai 2005 11:31 11
USING A DPOF-COMPATIBLE PERIPHERAL DEVICE
This function allows you to select the photos that you want to print on your photo
printer from your digital camera in PictBridge mode or from your memory card.
Select the required photographs on the camera (follow the instructions in the
documentation of your camera).
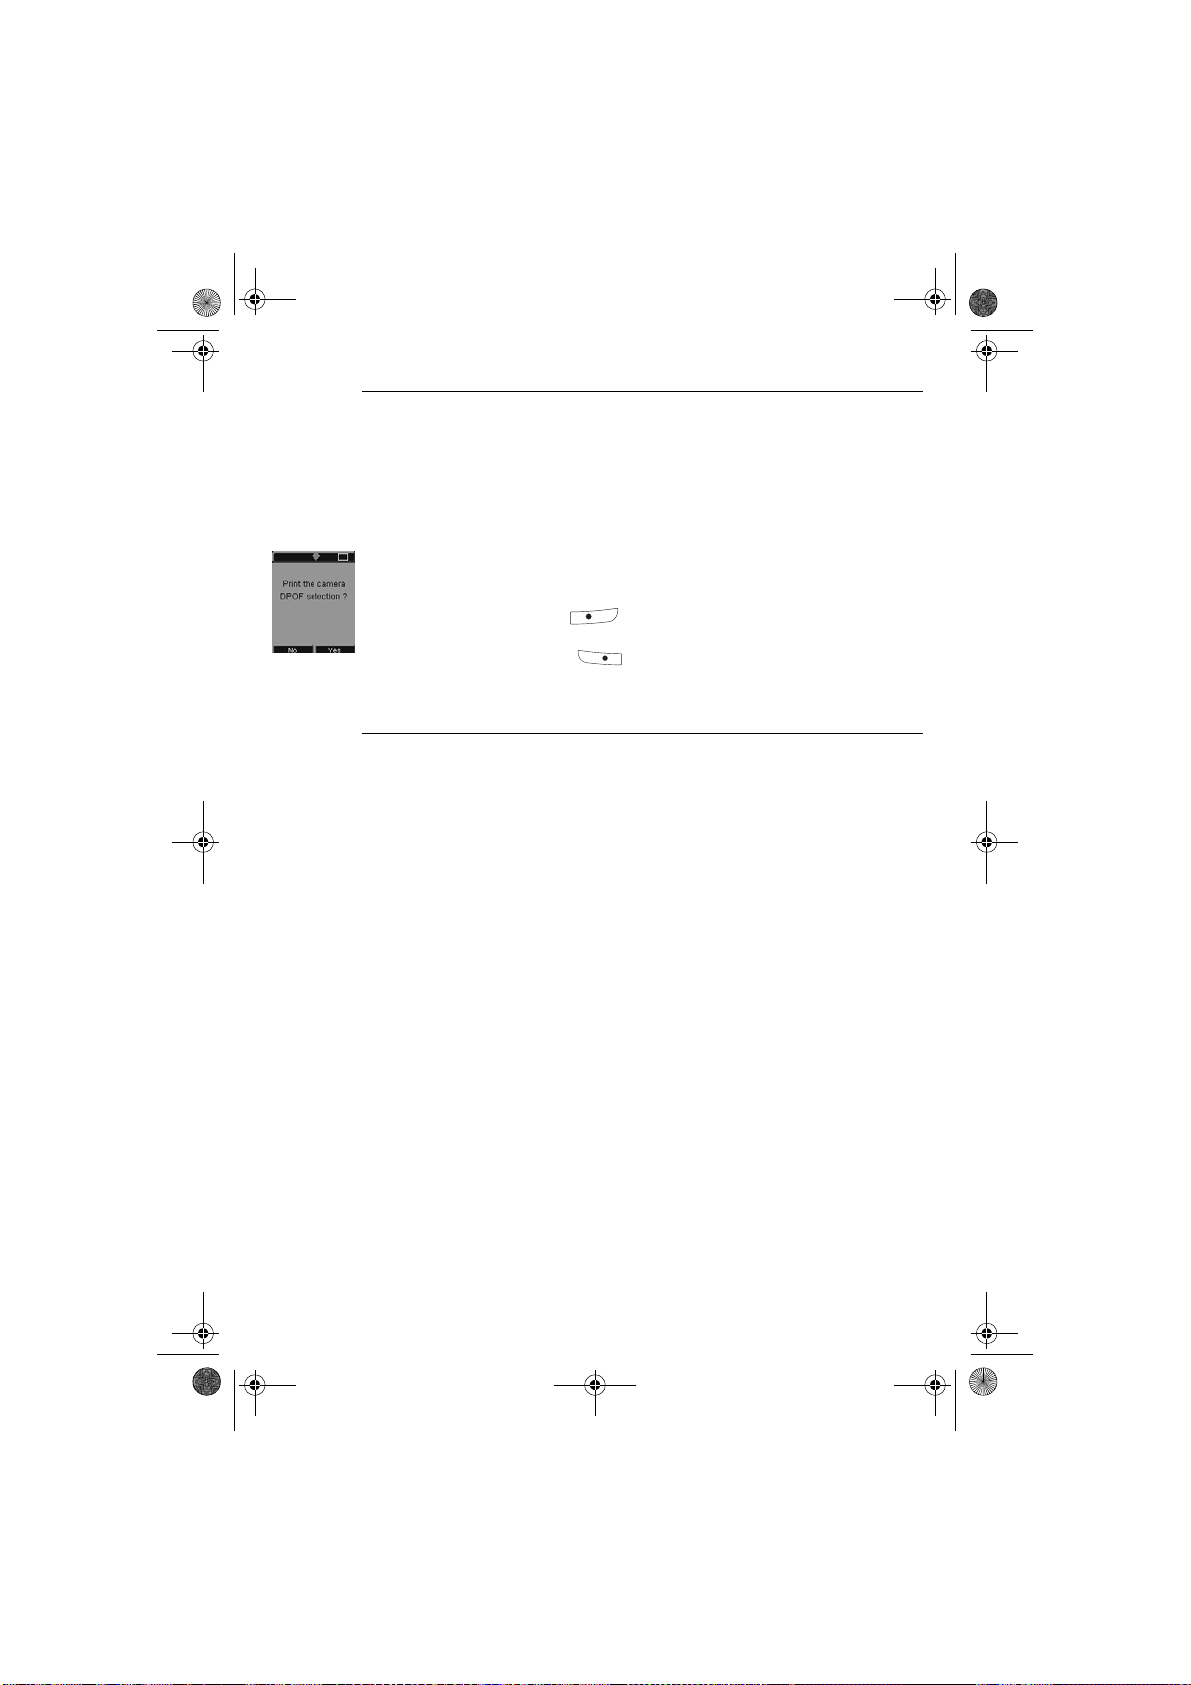
Switch the printer on. Place the memory card into its slot. The following message
is displayed on the screen "Print the camera DPOF selection?".
Start printing by pressing the key.
To exit DPOF mode, press the key.
CONNECTING A DIGITAL CAMERA (PICTBRIDGE MODE)
Warning: if a memory card is inserted in the printer, you cannot access PictBridge mode.
Your photo printer supports PictBridge standards, allowing you to print photos
directly from cameras that are PictBridge-compatible.
Refer to your camera's accompanying documentation.
From your camera, you can:
print a photo,
select them and print them severale times on the same paper,
print from a DPOF-standard file,
monitor printing and especially the beginning, progress and end of the
printing process. Also, error messages likely to occur (no paper, paper jam,
no ink, cover not closed, no cartridge, fatal error).
- 16 -
Page 21
Liasse azur GB.fm Page 17 Lundi, 23. mai 2005 2:00 14
Your photo printer does not support the following functions:
image cropping,
choosing a type of paper,
providing additional data (for e xample, dat e and time), in addition to the
photo to be printed.
Start PictBridge mode printing
Check that camera is set up in PictBridge mode.
Connect your printer (connector (A) in the illustration below) to the
camera by means of a USB cable.
A
DEUTSCH
ESPAÑOLITALIANONEDERLANDSPORTUGUÊS FRANÇAIS ENGLISH
Once the analysis and recognition phase is complete, a screen is
displayed indicating PictBridge mode.
To activate the CRYSTAL IMAGE automatic picture optimisation
function, press the key once.
The printer is controlled by the digital camera. You do not need to press
any of the keys on the printer.
Remove the USB cable to exit PictBridge mode.
- 17 -
Page 22
Liasse AZUR_GB.book Page 18 Lundi, 23. mai 2005 11:31 11
6PRINT YOUR PHOTOGRAPHS
Your photo printer is designed to be used with or without a computer. Thi s chapter
describes printer operation without a computer.
Refer to the technical data table at the end of this user manual to check whether
your memory card is compatible with the printer. In the event of incompatibility,
use a computer and the image processing software supplied on the CD-ROM.
Switch on your printer. Insert or connect a source (a memory card, a camera in
DPOF or Pictbridge mode, a peripheral device equipped with an infrared port, or
an optional Bluetooth peripheral device).
After the analysis and loading phase, the last photo saved is displayed on screen.
Use the browser's _ or ` keys to move from one photo to another.
PRINT
Press the key to display the Print menu. In this menu you may select:
the photo that is displayed on the screen select: Print current photo,
the shopping trolley you selected earlier : select Print selection (Refer to
paragraph Create your shopping basket, page 19),
all the photos recognised on the source : select Print all,
to print all the photos in miniature format with twenty photos per sheet of
paper, select Print index.
Make your selection using the browser's S or T keys.
Tips:
you may remove the edges from a series of pho tos by p lacing se vera l she ets one on top
of the other.
Tips: when all the photos are printed , do not te ar off these edges in one mo vement ; f old the
edges along the dotted lines several times before removing the edges gently.
- 18 -
Page 23
Liasse AZUR_GB.book Page 19 Lundi, 23. mai 2005 11:31 11
CREATE YOUR SHOPPING BASKET
You may store a selection of photos you make, with different print quantities
for each one. To do so, proceed as follows.
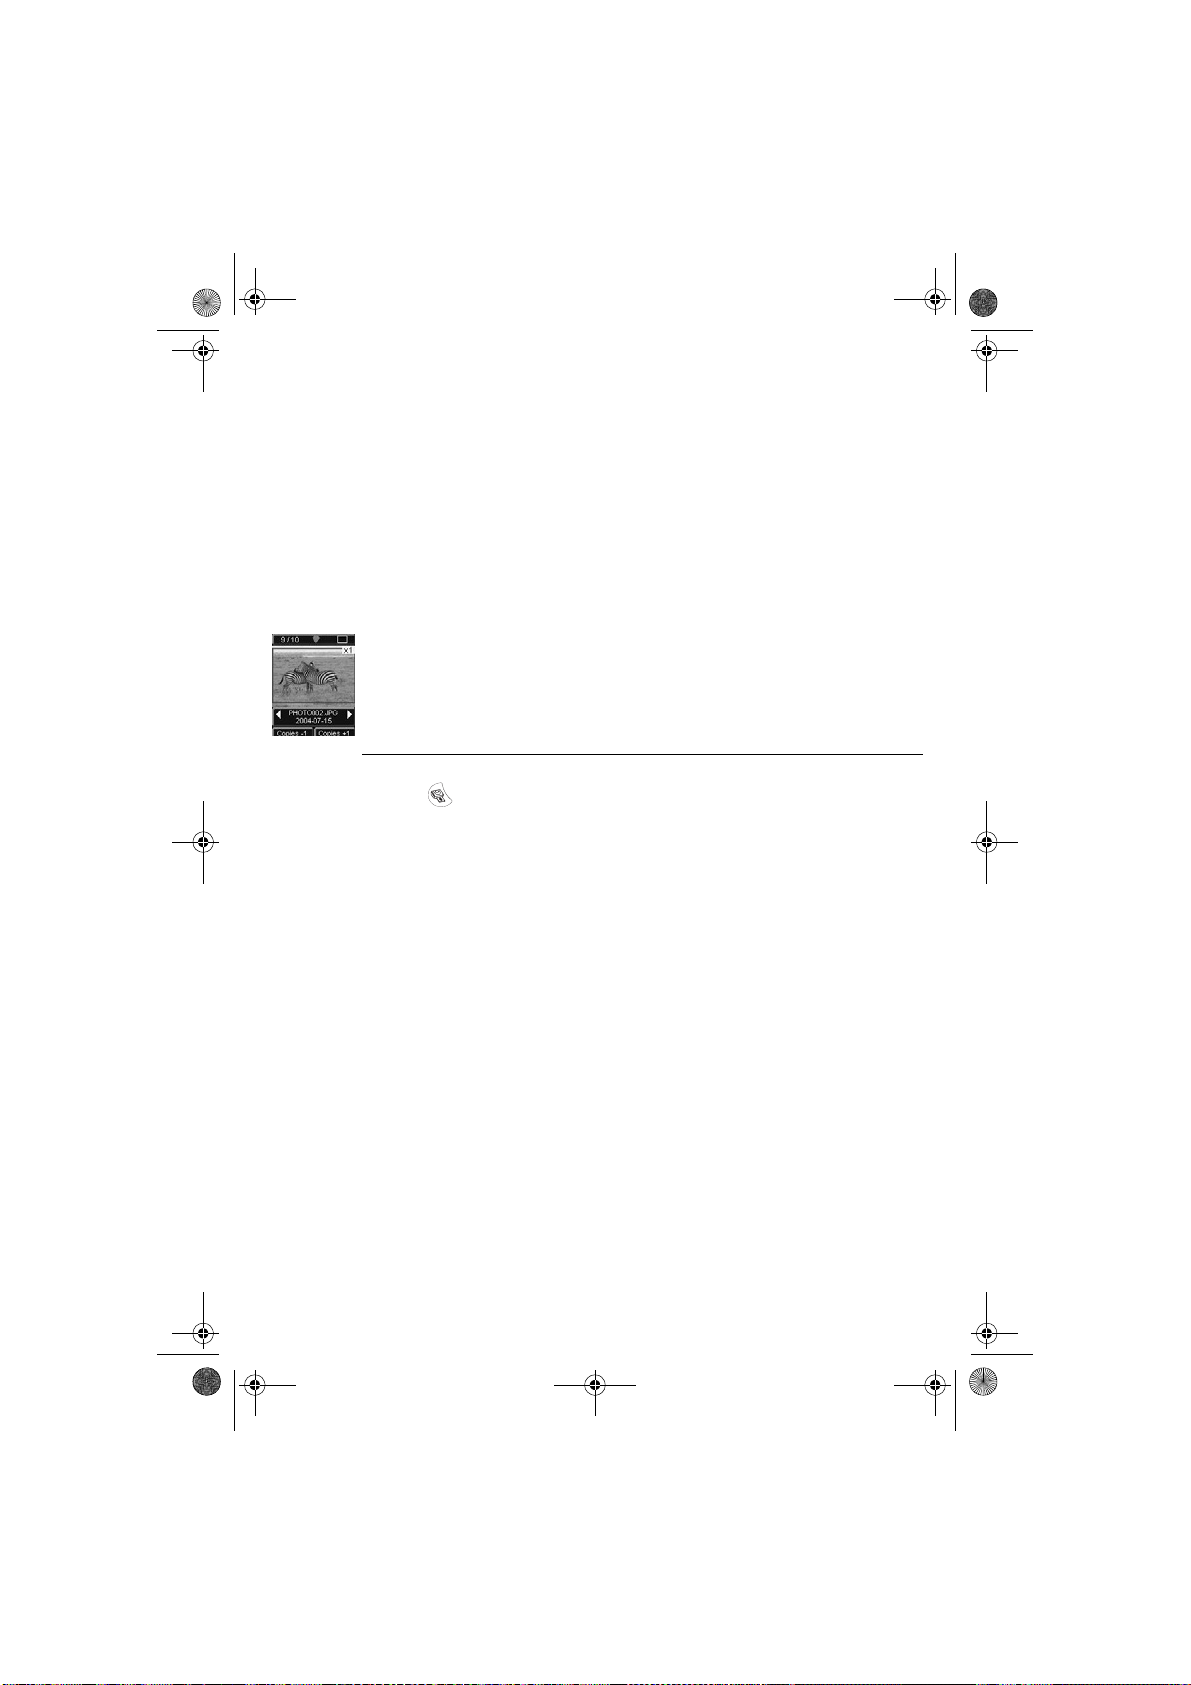
There are 2 modes to browse between photos:
full-screen mode to browse image by image,
mosaic mode, accessed by pressing the key, lets you browse more
quickly through 6 images (the key then lets you return to full-screen
mode).
The browser lets you move from one image to another.
Press the key to put the photo displayed into you shopping basket.
Press the key again, once for each copy you want.
Press the key to remove the selected photo or to remove a copy from
your shopping basket.
Repeat the operation above for each photo you want to add to your shopping
basket.
DEUTSCH
ESPAÑOLITALIANONEDERLANDSPORTUGUÊS FRANÇAIS ENGLISH
Once selected, the quantit y is displayed preceded b y an X in the top r ight hand
corner for each photo.
Press the key to display the Print menu.
Make your selection using the browser's S or T keys.
Check that you have enough paper in the drawer. Press the button again
or the button to start printing.
- 19 -
Page 24
Liasse AZUR_GB.book Page 20 Lundi, 23. mai 2005 11:31 11
ZOOM
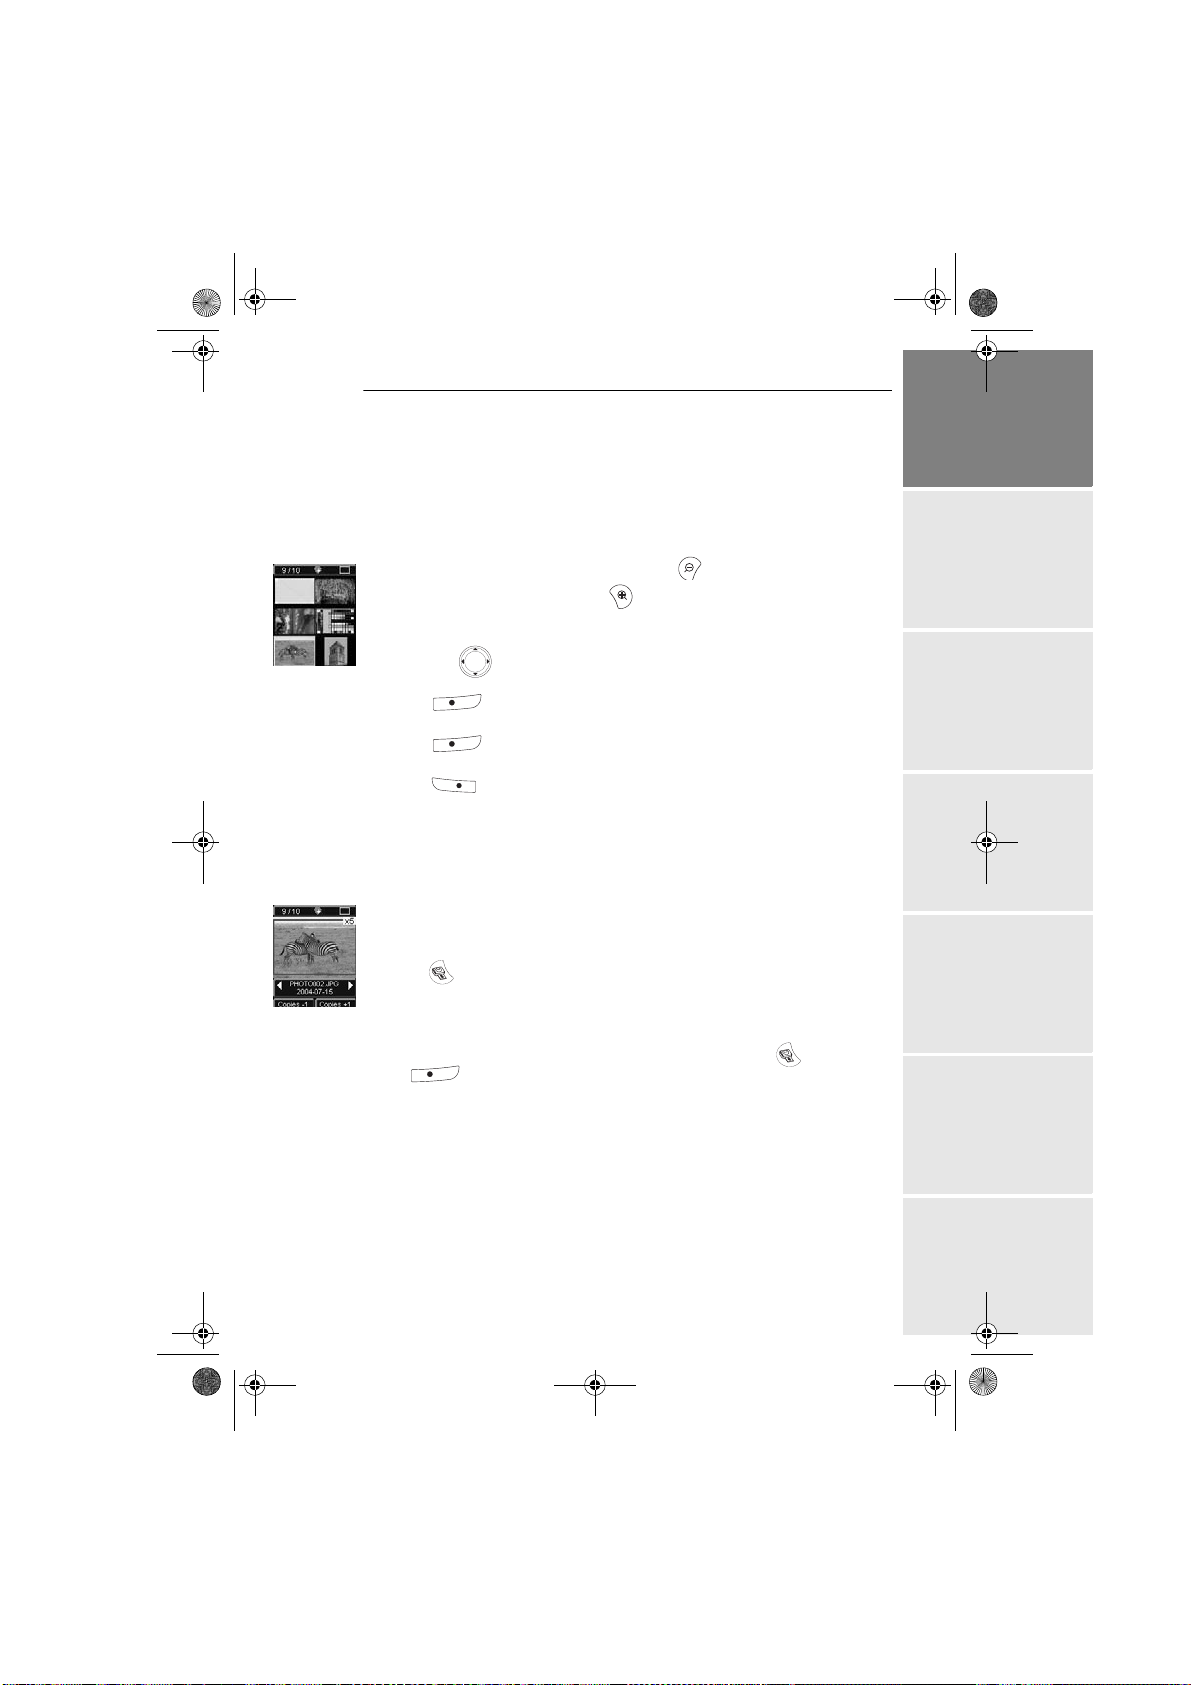
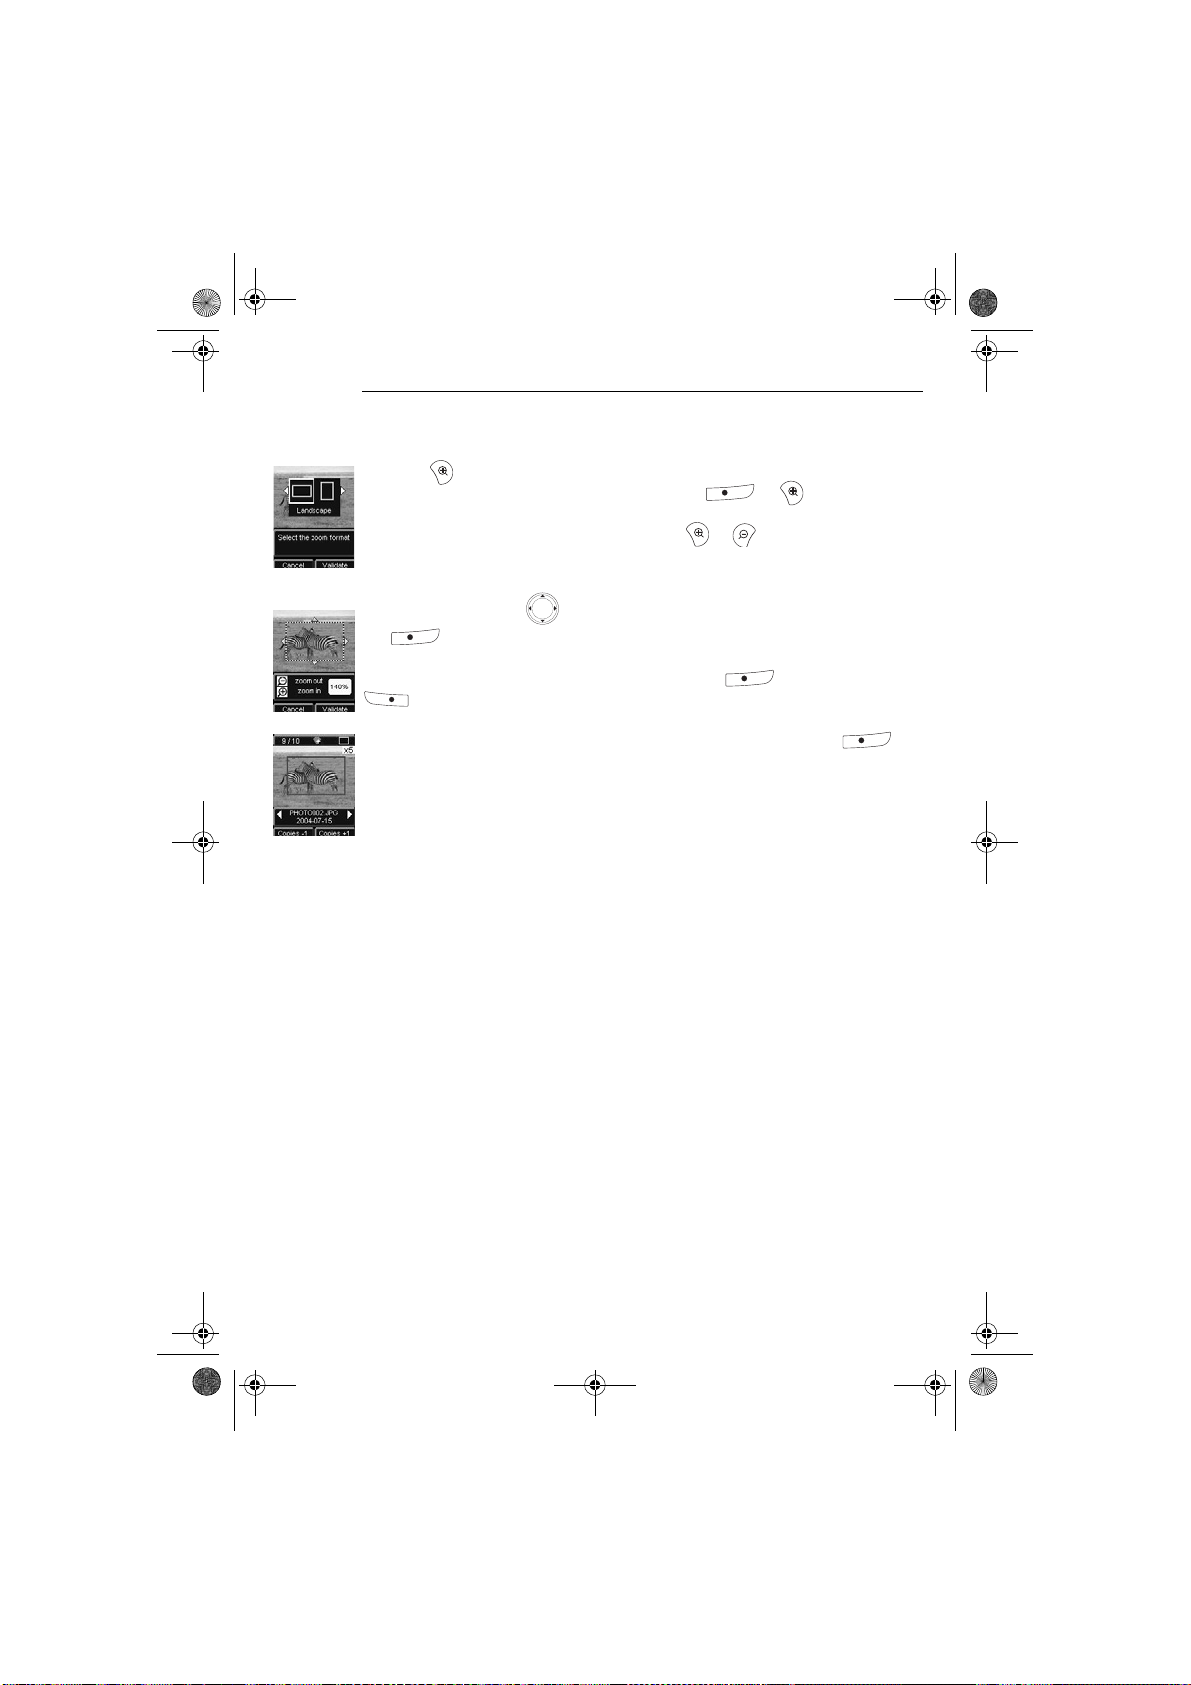
Select the photo you want using the browser's _ or ` keys.
Press the key to activate zoom mode. Use the browser's _ or ` keys to select
Portrait or Landscape and confirm by press the or key.
Adjust the size of the zoom you want u sing the or keys. The zoom may be
adjusted from 100% to 300% with the following ranges 100%, 120%, 140%,
160%, 200%, 240% and 300%.
Use the browser's keys to move to the part of the photo to be enlarged. Press
the key to preview the result.
The enlarged photo is displayed on sc reen. Press t he key to confirm or the
key to cancel.
The print area is represented on screen by a red rectangle. Press the key
for each copy you want; the number of copies is displayed in the top right hand
corner of thephoto.
Remark: this photo may be printed immediately or entered into a shopping basket selection to be
printed later.
- 20 -
Page 25

Liasse AZUR_GB.book Page 21 Lundi, 23. mai 2005 11:31 11
7CHOOSING YOUR OWN PRINTER SETTING
There are several parameters that you may set according to how you use your
printer. Press the key to set the paper formats, the image quality and your
own preferences.
FORMATS
This function lets you select a paper format to suit your own needs, for
example, to print passport photos select the 8 photos per page format.
Press the key, and select the Format menu using the browser's S or T
keys. Press the key to confirm.
You may print your photos according to the following predefined formats:
• print your photo in 10 x 15 cm Full Page format with no edging ,
• print your photo in 10 x 15 cm format With Margins ,
• print your photo in Full Page 4/3 format ,
•print 2 photos per page ,
DEUTSCH
ESPAÑOLITALIANONEDERLANDSPORTUGUÊS FRANÇAIS ENGLISH
•print 4 photos per page ,
•print 8 photos per page ,
•print 20 photos per page (contact sheet or index),
•print 2 pages per image (the photo is printed over 2 pages),
•print 4 pages per image (the photo is printed over 4 pages).
Select the paper format you want using the browser's S or T keys. Pres s
the key to confirm and return to browse mode.
- 21 -
Page 26

Liasse AZUR_GB.book Page 22 Lundi, 23. mai 2005 11:31 11
SET THE PHOTO QUALITY
This menu lets you adjust the colour parameters for the selected photo according
to your own requirements.
Press the key and select the Image settings menu using the browser's S or T
keys.
Select the parameter to be modified using the browser's S or T keys. The
browser's _ or ` keys are used to modify the value of the selected parameter.
The key lets you exit the current image setting screen without confirming
the modifications. You then return to the previous menu.
You may set:
•the Contrast of the photo between -2 and + 2; us e the b rowser's _ or ` keys to
make your selection,
•the Brightness of the photo between -2 and +2; use the browser's _ or ` keys
to make your selection,
•the Sharpness of the photo between -2 and +2; use the browser's _ or ` keys
to make your selection,
•the Effect of the photo: None for no settings, B&W to print a photo in black
and white, Sepia to print a photo in yellow, magenta and cyan over three
sheets of paper. Use the browser's _ or ` keys to make your selection,
Warning:
•the Colour of the photo between -2 and +2; use the browser's _ or ` keys to
make your selection,
•a Frame around your photo: No for no frame, Other frames to print a
predefined frame . Use the browser's _ or ` keys to make your selection.
When you have made all the modifications you want, press the key to
confirm and return to browse mode.
An icon is displayed at the bottom right of the photo to indicate that specific
settings have been made. The modifications made are only valid for the selected
photo.
If you press the key while you are setting the pa rameters you will automatically
return to browse mode without taking any modifications into account.
- 22 -
Page 27

Liasse AZUR_GB.book Page 23 Lundi, 23. mai 2005 11:31 11
YOUR PREFERENCES
This menu lets you modify the printer's default settings.
Press the key and select the Preferences menu using the browser's S or
T keys. Press the key to confirm.
Select your preference using the browser's S or T keys and press the
key to confirm.
You may select:
•the Language which will be used in the screens. Use the browser's S or
T keys to select between Français, Español, Português, Deutsch,
Nederlands, Italiano and English. Press the key to confirm,
1
•the Format preference
paper format you want. Press the key to confirm,
•the Copies preference
number of copies you want, from between 1 and 20 photos. Press the
key to confirm,
•the Image preference
Refer to paragraph Set the photo quality, page 22 to modify these
parameters. To modify the automatic image improvement, select the
Auto improvement command and press the key to confirm,
, use the browser's S or T keys to select the
1
, use the browser's S or T keys to select the
1
menu lets you modify the settings for the images,
DEUTSCH
ESPAÑOLITALIANONEDERLANDSPORTUGUÊS FRANÇAIS ENGLISH
•the After printing lets you keep or erase the selection stored in the
memory. Using the browser's S or T keys select the Keep selection or
Erase selection command and press the key to confirm,
• the screen's LCD contrast between -8 and +8. Use the browser's S or
T keys to make your selection and press the key to confirm,
•the Restore param. Menu lets you return to the original values. Press
the key to confirm and the parameters will be reset after a few
seconds.
1. These preferences are taken into account each time a new card is inserted.
- 23 -
Page 28
Liasse AZUR_GB.book Page 24 Lundi, 23. mai 2005 11:31 11
CRYSTAL IMAGE FUNCTION
Your printer comes equipped with the Crystal Image picture optimisation function
offering enhanced print quality.
Remark: crystal Image works independently of a PC.
Crystal Image consists of 2 components that can be utilised according to your
needs:
• image optimisation,
• red-eye correction.
Warning:
red-eye correction is a complex process that may require extensive processing time.
Crystal Image automatically implements all the settings and corrections required
with respect to the sharpness of the image as well as the colour and contrast
management, in order to achieve the best possible print quality. What is more,
exposure defects will also be corrected (e.g., under-exposed photos are made
brighter, or parts of a photo prese nting strong contrasts will be compensated) . The
red-eye correction function corr ects the red-eye phenomenon asso ciated with flash
photography.
Activation/deactivation
Remark: by default, the "image optimisation" component of Crystal Image is activated and
"red-eye correction" is deactivated.
The following table indicates how many times you need to press the button to
activate or deactivate the Crystal Image function.
Crystal Image function status
Number of times button pressed
0 (Default status) Deactivated Deactivated
1 Activated Deactivated
2 Activated Activated
3 Deactivated Activated
4 (return to default status) Deactivated Deactivated
- 24 -
Image optimisation Red-eye correction
Page 29

Liasse AZUR_GB.book Page 25 Lundi, 23. mai 2005 11:31 11
8USE YOUR PRINTER WITH A PC
PRINTING FROM YOUR PC
Connecting a computer (PC)
Your kit includes an installation CD-ROM containing a printer driver, image
processing software.
Warning:
to avoid any print problems associated with the picture for mat, you are adv ised to
use the software supplied with the printer, or other image retouching software.
Make sure that your PC is compatible with the requirements as specified:
PC configuration required:
Pentium or equivalent,
OS: Windows 98 SE / 2000 / Me / XP,
128 MB DRAM or more,
150 MB available on hard disk,
USB port available.
Install the software
Insert the CD-ROM in the drive to start installation. A command window
appears. Follow the instructions displayed on the screen.
If the installation program does not start automatically, you can start it by
double-clicking on the "setup.exe" file located in the CD-ROM root
directory.
The photo software is installed in three steps: running the Install program,
restarting the computer, and performing the final printer installation.
Do not connect the printer to the PC before installing the printer driver. After
you have installed the software, a message will be displayed asking you to
restart the PC. After restarting you can connect the printer to the PC.
DEUTSCH
ESPAÑOLITALIANONEDERLANDSPORTUGUÊS FRANÇAIS ENGLISH
The CD-ROM contains an installation manual which includes detailed
operating instructions for the printer driver. Refer to this manual for further
information.
Remark: the B/W print option is not available in Windows 98.
- 25 -
Page 30
Liasse AZUR_GB.book Page 26 Lundi, 23. mai 2005 11:31 11
Connect your printer
Make sure that both the PC and the printer are switched on. Never apply force
when plugging in connectors into the equipment as this could damage both the
cable and the connector.
Connect your photo printer (USB port (B)) to PC using an USB cable.
Recognition between the two devices is automatic.
Using your printer
B
Your printer can operate in two different modes:
• Print mode, selected by default.
• Memory Card Reader mode.
To print from PC, the Print mode must be activated.
Printing and infra-red or Bluetooth transfers are not possible. To quit this mode,
refer to the following chapter.
- 26 -
Page 31

Liasse AZUR_GB.book Page 27 Lundi, 23. mai 2005 11:31 11
PROCESSING THE CONTENT OF THE MEMORY CARD FROM
YOUR PC
From your PC you can access the card readers of your printer and process /
manage the image files.
Connect the printer to your PC via a USB cable.
Insert the memory card in your printer. The card comes up as another
disk drive in Windows Explorer.
You can access this drive to add, copy, move, save or delete images.
you can process photos directly on the memory card using the image retouch
software supplied with the printer.
Disconnect the device link then remove the memory card from its slot.
Your printer can operate in two different modes:
• Print mode, selected by default.
• Memory Card Reader mode.
To switch to Card Reader mode, Press the key, and select the Format
menu using the browser's S or T keys. Press the key to confirm.
To avoid corrupting the data on you memory card, make sure first of all, that
you have disconnected your peripheral device correctly under Windows,
before removing the memory card, disconnecting the USB cable, or quitting
the 'Memory Card Reader' mode.
Remark: In this mode, printing and infra-red or Bluetooth transfers are not possible.
To quit this mode and return to Print mode, Press the key.
Remark: When changing mode, Windows messages indicating the detection/disconnect of a
USB peripheral may be displayed.
DEUTSCH
ESPAÑOLITALIANONEDERLANDSPORTUGUÊS FRANÇAIS ENGLISH
- 27 -
Page 32

Liasse AZUR_GB.book Page 28 Lundi, 23. mai 2005 11:31 11
9REPLACEMENT OF CONSUMABLES
The consumable items used with the photo printer (film cartridge, paper) are
SAGEM (PLC) brand products. Consumables may be purchased in all big
stores in the photography or printer sections but also on our internet site
www.sagem.com or by using the cons umables order form sup plied with your
printer (nature of supplies dependent on the model).
Use of any consumable items other than SAGEM (PLC) brand prod ucts may
result in the loss of the printer's guarantee.
Film cartridge (ribbon + paper for 40 photos): ref. 251 559 421
Film cartridges (3 ribbons + paper for 120 photos): ref. 251 559 434
- 28 -
Page 33

Liasse AZUR_GB.book Page 29 Lundi, 23. mai 2005 11:31 11
10 MAINTENANCE
CLEANING THE PRINT HEAD
Continuous lines across the length of y our photogra phs ma y be caused by dirt
particles stuck to the print head.
Warning:
You will need a methylated alcohol
1
based cleaning product and some
off-the-shelf cotton tips ("Q-tips").
Switch off your printer, disconnect the main cables and wait for five
minutes; since the print head operates at a high temperature, there is a
risk of burning if you touch it.
1. Open the cartridge flap. Press on the locking lever and pull out the
film cartridge.
2. Pull out the paper tray.
3. Turn the printer upside down to remove the lower hatch.
4. Clean the heating line of the print head carefully using a cotton bud.
5. Replace the lower hatch, turn the printer right side up, connect the
mains cable and switch on the printer.
never touch the print head with your fingers or any object that might scratch it.
1
4
2
3
5
DEUTSCH
ESPAÑOLITALIANONEDERLANDSPORTUGUÊS FRANÇAIS ENGLISH
1. Do not use corrosive chemical s, they may damage your printer.
- 29 -
Page 34

Liasse AZUR_GB.book Page 30 Lundi, 23. mai 2005 11:31 11
Replace the film cartridge. Take care that the film is taut before inserting the
cartridge into its compartment. Check that the locking lever is pushed down
correctly and close the flap.
Push the paper tray back into place until the locking system clicks.
PAPER JAM
Follow this procedure if a sheet becomes stuck in the printer and canno t simply be
pulled out:
Turn off the printer then turn it on again. Wait for 10 seconds until the print
head is freed.
Switch off your printer by pressing button and disconnect the mains
cable.
Turn the printer upside down.
1. Remove the lower cover.
2. Gently and carefully remove the sheet causing the jam. Under no
circumstances touch the printhead.
3. Replace the lower cover and turn the printer right side up.
Switch on the printer and reconnect the mains cable.
Warning:
never use objects that could damage the printer (scissors, screwdriver, paper cutter, etc.).
1
- 30 -
2
3
Page 35

Liasse AZUR_GB.book Page 31 Lundi, 23. mai 2005 11:31 11
PROBLEMS
Remark: The printer is fitted with an automatic time-out to prevent overheating, this c an be
tripped when performing large print jobs. The printer automatically restarts the
current print job as soon as the temperature drops back to normal.
P
ROBLEMS SOLUTIONS
• Check that the power supply block is correctly plugged
into the mains.
No mains supply
(blank screen)
• Check that the power supply connector is correctly
plugged into the printer.
• Check that the mains socket is live (check fuses and/or
circuit breakers of your installation as necessary).
An error message is
displayed on screen
• Refer to paragraph Error messages, page 32.
• Set the printer on/off switch to "o" and then reconnect
the mains lead.
The printer was unplugged
during a print job
• Switch on the printer and wait for the initialisation phase
to be completed.
• If a sheet of pa per is jammed, carry out the procedure
(Refer to paragraph Paper jam, page 30).
• Restart printing.
• Are you using sheets that meet the technical
No photograph is printed
on a sheet
specifications (Refer to paragraph Technical data,
page 34).
• Have the sheets been inserted shiny face up?
The photograph is marked
with a continuous line or a
lot of spots
• Clean the printhead (Refer to paragraph Cleaning the
print head, page 29).
• Check that the USB cable is correctly connected.
No PC printing
• Is the printer driver installed?
• Make sure that you are in Print mode, not Memory
Card Reader mode (see chapter 8).
• Images with a size of less than 76,800 pixels cannot be
The photos on the inserted
card are not displayed
printed from memory cards.
• However, these photos can be printed from a PC or via
direct infrared link (or bluetoo th link with the optional
adapter).
The PC cannot read the
memory card
• Make sure that you are in Memory Card Reader mode
(see chapter 8).
DEUTSCH
ESPAÑOLITALIANONEDERLANDSPORTUGUÊS FRANÇAIS ENGLISH
- 31 -
Page 36

Liasse AZUR_GB.book Page 32 Lundi, 23. mai 2005 11:31 11
ERROR MESSAGES
After any intervention on your printer, do not forget to press the key to
restart the current print job.
Error
displayed
Paper tray
empty
Paper jam
Check ribbon
End of ribbon
Ribbon error
Cassette error
Insert ribbon
parameter card
Card empty Remove card SmartCard
Counter
saturated
Card
unreadable (01)
Card
unreadable (02)
Correction
displayed
Resolve error,
then press
PRINT key to
resume printing
Resolve error,
then press
PRINT key to
resume printing
Resolve error,
then press
PRINT key to
resume printing
Resolve error,
then press
PRINT key to
resume printing
Resolve error,
then press
PRINT key to
resume printing
Resolve error,
then press
PRINT key to
resume printing
Resolve error,
then press
PRINT key to
resume printing
Remove card SmartCard
Remove card SmartCard
Remove card SmartCard
Error type Action
Paper
Paper
Ribbon
Ribbon
Ribbon
Ribbon
Ribbon
Check that the paper has been
correctly inserted in the loading
tray.
Remove any paper jammed in
printer (do not reuse this sheet of
paper).
Insert a new film cartridge or
replace the current one.
Replace the film cartridge with a
new one.
Check that the film cartridge is
correctly inserted.
If error persists: replace the
cartridge.
Check that the cartridge is correctly
inserted and that the locking lever is
locked.
The selected number of photos is
greater than the remaining ribbon
capacity to print all photos.
The smart card has already been
used. Remove the inserted card and
insert a valid smart card.
The authorised print quantity has
been reached.
Data transfer error. Remove the
inserted card and insert a valid
smart card.
Data transfer error. Remove the
inserted card and insert a valid
smart card.
- 32 -
Page 37

Liasse AZUR_GB.book Page 33 Lundi, 23. mai 2005 11:31 11
Error
displayed
Card
unreadable (03)
Consumable
not compliant
(01)
Consumable
not compliant
(02)
Consumable
not compliant
(03)
Consumable
not compliant
(04)
Consumable
not compliant
(05)
File damaged
Format not
supported
Transfer error
Wireless
memory full
System error
Error
Type
Remove card SmartCard
Remove card Smart Card Mechanical problem.
Remove card Smart Card Ribbon problem.
Remove card Smart Card Brand name not dentified.
Remove card Smart Card Colorimetry error.
Remove card Smart Card Type (master/pack) unknown.
Abort the
operation and try
again
Abort the
operation and try
again
Abort the
operation and try
again
Abort the
operation and try
again
Abort the
operation and try
again
Error type Action
Data transfer error. Remove the
inserted card and insert a valid
smart card.
JPEG
decompression
Transfer error
Transfer error
Transfer error
Other
The JPEG file contains an
unsupported feature.
Photograph to be transferred is not
in JPEG format.
Error during transfer of
photographs from GSM mobile
phone camera. Restart transfer from
the GSM phone. Check that both
devices are facing each other.
Switch off printer, wait 30 seconds
and restart. If error persists, contact
your retailer.
Switch off printer, wait 30 seconds
and restart. If error persists, contact
your retailer.
DEUTSCH
ESPAÑOLITALIANONEDERLANDSPORTUGUÊS FRANÇAIS ENGLISH
- 33 -
Page 38

Liasse AZUR_GB.book Page 34 Lundi, 23. mai 2005 11:31 11
TECHNICAL DATA
PC configuration required:
Pentium or equivalent,
OS: Windows 98 SE / 2000 / Me / XP,
128 MB DRAM or more,
150 MB available on hard disk,
USB port available.
- - - - - - - - - - - - - - - - - - - - - - - - - - - - - - - - - - - - - - - - - - - - - - - - - - - - - - - - - - - - - - - - - - - - - -
Device name : PHOTO EASY 260
Print method : Dye-diffusion thermal transfer
Resolution : 309.8 x 309.8 dpi
Colours : 16.7 million continuous
Print speed : Less than 60 seconds per photo (excluding
Interface : Memory cards, type Compact Flash (support
Storage of photographs
transferred from a device : Up to 3 MB
Image resolution supported : Up to 12 million pixels
Image size supported : Up to 6 MB (JPEG compressed image)
Consumable items : Photo-quality paper. Film cartridge with
Paper size : 101 x 152,4 mm excluding detachable
Paper tray : By automatic loader, capacity 20 sheets
Mains supply : 230 V AC 50/60 Hz
Approval : EC
Field of use for optimum
print quality : 15 °C to 35 °C, 30 % to 75 % humidity
Size : 201 x 174 x 94 mm excluding paper tray
Weight : 1.5 kg (except power supply unit)
Power consumption : in standby: 10 W
image processing)
type I & II), SM / MS / MMC / SD / xD,
USB 2.0 compatible port.
three colours (yellow, magenta, cyan) and
protective coating, 40 print operations per
cartridge.
borders
in print mode: 80 W
All data are prov ide d for re fer enc e p urpo se s onl y. SAGEM COMMUNICATION (PLC) reserves the
right to make any ch anges without prior notice.
- 34 -
Page 39

Liasse AZUR_GB.book Page 35 Lundi, 23. mai 2005 11:31 11
11 ENVIRONMENT
Preservation of the environment as part of a sustainable development logic is
an essential concern of SAGEM COMMUNICATION. The desire of
SAGEM COMMUNICATION is to operate systems observing the
environment and consequently it has decided to integrate environmental
performances in the life cycle of its products, from manufacturing to
commissioning, use and elimination.
PACKAGING
The presence of the logo (green dot) means that a contribution is paid to an
approved national organisation to improve packaging recovery and recycling
infrastructures.
To facilitate recycling, please respect the sorting rules set up locally for this
kind of waste.
BATTERIES
If your product contains batteries, they must be disposed of at appropriate
collection points.
THE PRODUCT
The crossed-out waste bin stuck on the product means that the product
belongs to the family of electrical and electronic equipment.
DEUTSCH
ESPAÑOLITALIANONEDERLANDSPORTUGUÊS FRANÇAIS ENGLISH
In this respect, the European regulations ask you to dispose of it selectively:
• at sales points in the event of the purchase of similar equipment,
• at the collection points made available to you locally (drop-off centre,
selective collection, etc.).
In this way you can participate in the re-use and upgrading of Electrical and
Electronic Equipment Waste, which can have an effect on the environment
and human health.
- 35 -
Page 40

Liasse AZUR_GB.book Page 36 Lundi, 23. mai 2005 11:31 11
12 GUARANTEE
GUARANTEE (UK Terms and Conditions)
In order to apply the guarantee, you should contact your dealer. Proof of
purchase will be required. Should malfunctioning ar ise, the dealer will advise
If you bought your equipment from SAGEM directly, the following shall apply:
A SAGEM undertakes to remedy by repair, free of charge for labour and
replacement parts, any defects in the equip ment du ring a period of twelve (12)
months from the date of original delivery of the Equipment, where those
defects are a result of faulty workmanship.
During this twelve month guarantee period, the defective equipment will be
repaired free of charge; the customer must however return the defective
equipment at his/her own expense, to the address given by SAGEM After Sales
Department, the phone number of which can be found on the delivery slip.
Unless the customer has concluded with SAGEM a maintenance contract in
respect of the equipment which specifically provides for repairs to be carried
out at the customer’s premises, the repairs will not be carried out on the
equipment at the customer’s premises.
The following sentence applies to purchases of equipment for the customer’s
trade, business or profession. Except as otherwise expressly provided in this
Document and to the extent permitted by law, SAGEM makes no
representations or warranties, express or implied, statuto ry or other wise, and to
such extent, all terms and conditions implied by law are hereby excluded.
you what to do.
This guarantee does not affect the Customer’s statutory rights.
B Exclusions From Guarantee
SAGEM shall have no liability under the guarantee in respect of:
• damage, defects breakdown or malfunction due to:
- failure to properly follow the installation process and instructions for use;
or
- an external cause to the equipment (including but not limited to, lightening,
fire, shock or water damage of any nature); or
- modifications made without the written approval of SAGEM SA; or
- a failure or neglect to maintain the equipment or inappropriate
maintenance; or
- 36 -
Page 41

Liasse AZUR_GB.book Page 37 Lundi, 23. mai 2005 11:31 11
- unsuitable operating conditions, particularly of temperature and
humidity; or
- repair or maintenance of the equipment by persons not authorised by
SAGEM; or
• wear and tear from normal daily use of the equipment and its accessories
• damage due to insufficient or bad packa ging of equipme nt when returned
to SAGEM
• supply of new versions of software
• work on any equipment or software modified or added without the prior
written consent of SAGEM
• malfunctions not resulting from the Equipment or from software
installed in user workstations for the purpose of use of the equipment
• communication problems related to an unsuitable environment,
including :
- problems related to access and/or connection to the Internet such as
interruptions by access networks or mal functio n of the line used by the
subscriber or his correspondent,
- transmission faults (for example poor geographical coverage by radio
transmitters, interference or poor line quality),
- the local network fault (wiring, servers, workstations) or the failure of
the transmission network.
• the normal servicing (as defined in the user guide supplied with the
equipment) as well as malfunctioning due to servicing not being carried
out, servicing costs are in any event always borne by the customer.
C In the cases set forth in § B) as well as after expiry of the twelve month
guarantee period, the customer must ask SAGEM for an estimate, and he/
she must accept the estimate and agree to pay the charges mentioned in it
before returning the equipment to SAGEM. The repair and delivery costs
will be invoiced to the customer.
DEUTSCH
ESPAÑOLITALIANONEDERLANDSPORTUGUÊS FRANÇAIS ENGLISH
The foregoing shall apply unless otherwise agreed in writing with the
customer and only for the UK. If any provision of this guarantee shall be
held to be in whole or in part invalid or illegal due to an obligatory rule
applicable to consumers pursuant to their national legislation, such
invalidity or illegality shall not impair or affect the remaining provisions
or parts of this guarantee.
- 37 -
Page 42

Notes.fm Page 100 Mercredi, 29. septembre 2004 10:40 10
Page 43

Liasse AZUR_FR.book Page I Lundi, 23. mai 2005 9:05 09
1BIENVENUE 1
Recommandations et consignes de sécurité 2
2DÉCOUVERTE DE L’IMPRIMANTE PHOTO 3
3L’INTERFACE UTILISATEUR 4
4MISE EN SERVICE DE L’IMPRIMANTE PHOTO 6
Alimentation secteur 6
Première installation du ruban 7
Remplacer le ruban 8
Chargement du papier 10
5TRANSFÉRER VOS IMAGES 12
Insérer une carte mémoire 12
Transférer des photos par liaison infrarouge 14
Transférer des photos depuis un périphérique Bluetooth (optionnel)15
Utiliser un périphérique compatible DPOF 17
Connecter un appareil photo numérique (mode pictbridge) 17
6IMPRIMER VOS PHOTOS 19
Imprimer 19
Créer votre panier 20
Réaliser un agrandissement (zoom) 21
ENGLISH
FRANÇAIS
DEUTSCH
ESPAÑOL
7RÉGLER VOTRE IMPRIMANTE SELON VOS BESOINS 22
Les formats 22
Régler la qualité des photos 23
Vos préférences 24
Fonction Crystal Image 25
8UTILISER VOTRE IMPRIMANTE AVEC UN PC 26
Imprimer depuis un PC 26
Traiter le contenu de la carte mémoire depuis votre PC 28
9REMPLACEMENT DES CONSOMMABLES 29
10 ENTRETIEN 30
Nettoyage de la tête d'impression 30
Bourrage papier 31
Incidents 32
- I -
Date en cours : 23 mai 2005
C:\Documents and Settings\G097447\Bureau\LU 260\Français\Liasse AZUR_FRTDM.fm
ITALIANO
NEDERLANDSPORTUGUÊS
Page 44

Liasse AZUR_FR.book Page II Lundi, 23. mai 2005 9:05 09
Messages d’erreurs 33
Caractéristiques techniques 35
11 ENVIRONNEMENT 36
12 CONDITIONS DE GARANTIE 37
- II -
Date en cours : 23 mai 2005
C:\Documents and Settings\G097447\Bureau\LU 260\Français\Liasse AZUR_FRTDM.fm
Page 45

Liasse AZUR_FR.book Page 1 Lundi, 23. mai 2005 9:05 09
1BIENVENUE
Vous venez d'acquérir une imprimante photo et nous vous remercions de la
confiance que vous nous accordez. Avec cette imprimante de haute qualité
vous pourrez profiter pleinement de vos photos numériques. Par des étapes
très simples vous produirez des impressions de qualité identique aux
laboratoires spécialisés pour votre utilisation personnelle ou pour les partager
avec votre famille, vos amis ou vos collègues.
Votre imprimante photo dispose des slots requis pour toutes les cartes
mémoires photo courantes et pour les appareils photo numériques via une
connexion directe.
La fonction d’optimisation d’images Crystal Image assure une qualité
d’impression et de copie irréprochable de vos photos. Crystal Image vous
permet également de retoucher les éventuels "yeux rouges" de vos clichés pris
avec le flash (correction yeux rouges).
Ce livret d'utilisation vous guidera par des étapes simples à :
• Mettre en marche votre imprimante photo
• Imprimer les photos stockées sur une carte mémoire
• Imprimer depuis un appareil photo numérique
• Imprimer les photos transférées depuis un téléphone mobile ou autres
périphériques
• Installer le logiciel de traitement d'image et le pilote d'impression sur
un PC
• Entretenir votre imprimante photo et résoudre vos problèmes éventuels
ENGLISH
FRANÇAIS
DEUTSCH
ESPAÑOL
ITALIANO
Une documentation additionnelle concernant l'utilisation du logiciel de
traitement d'image et le pilote d'impression PC est disponible sur le CD-Rom
fourni dans votre coffret, reportez-vous à cette documentation.
Vous trouverez aussi sur le site web www.sagem.com :
• des mises à jour pour le logiciel,
• une liste de réponses aux questions les plus fréquentes (FAQ),
• la liste des périphériques compatibles.
- 1 -
NEDERLANDSPORTUGUÊS
Page 46

Liasse AZUR_FR.book Page 2 Lundi, 23. mai 2005 9:05 09
RECOMMANDATIONS ET CONSIGNES DE SÉCURITÉ
• Ne pas installer votre imprimante photo ni dans une pièce humide (salle
d'eau, salle de bain, buanderie, cuisine, etc..) à moins de 1,50 m d'un
point d'eau ni en extérieur. Votre imprimante doit être utilisée à une
température ambiante comprise entre 15 °C et 35 °C pour un rendu
d’impression optimal.
• Ne pas installer votre imprimante dans un endroit poussiéreux, ces
poussières pourraient dégrader la qualité d’impression de vos photos.
• Utilisez exclusivement le bloc secteur fourni, raccordez celui-ci sur le
secteur conformément aux instructions d'installation de ce livret et aux
indications portées sur l'étiquette d'identification apposée sur celui-ci
(tension, courant, fréquence du réseau électrique). Par précaution, en cas
de danger, les adaptateurs secteur servent de dispositif de sectionnement
de l'alimentation 230 V. Ils doivent être situés à proximité de l'appareil et
être aisément accessibles.
• Ne jamais ouvrir la trappe du ruban en cours d'impression, vous
risquez la rupture du film et par la suite un dysfonctionnement de
votre imprimante.
• Utilisez seulement les consommables de marque SAGEM et
exclusivement ceux-ci sinon vous risquez d'endommager l'appareil et de
perdre la garantie. Pour connaître les références des consommables
(reportez-vous au paragraphe Remplacement des consommables,
page 29).
• Le marquage CE atteste de la conformité du produit aux exigences
essentielles de la directive 1999/5/CE du Parlement et du Conseil
Européen concernant les équipements terminaux de télécommunication,
pour la sécurité et la santé des usagers, pour les perturbations
électromagnétiques.
La déclaration de conformité peut être consultée sur le site
www.sagem.com rubrique "Support" ou peut être demandée à l'adresse
suivante:
SAGEM COMMUNICATION - Customer relations department
4 rue du Petit Albi - 95800 Cergy Saint-Christophe - FRANCE
- 2 -
Page 47

5
SA
GEM
PHO
O EASY 155
Liasse AZUR_FR.book Page 3 Lundi, 23. mai 2005 9:05 09
2DÉCOUVERTE DE L’IMPRIMANTE PHOTO
Placez votre coffret devant vous et vérifiez que les éléments présentés
ci-dessous s'y trouvent :
1. Imprimante photo
2. Livret d'utilisation
3. CD ROM
4. Ruban* (consommable)
5. Papier photo* (consommable)
6. Bac papier
7. Bloc alimentation secteur
8. Cordon d'alimentation secteur
8
2
ENGLISH
FRANÇAIS
DEUTSCH
GEM
SA
TO EASY 155
PHO
guide
User
ation
g
et d utilis
leitun
Livr
ario
gsan
al del usu
Bedienun
'utente
Manu
nwijzing
a
Manuale dell
ksa
Gebrui
S
7
ESPAÑOL
1
ITALIANO
6
NEDERLANDSPORTUGUÊS
Fourniture selon modèle
*
- 3 -
Page 48

Liasse AZUR_FR.book Page 4 Lundi, 23. mai 2005 9:05 09
3L’INTERFACE UTILISATEUR
Elle vous permet de :
• choisir des photos une à une ou de passer en mode mosaïque (6 photos à
l’écran),
• lancer l’impression d’une photo directement,
• activer l’amélioration automatique de la photo en vue de son impression,
• régler les paramètres "Format", "Préférences" et "Réglages images" en
fonction de vos besoins,
• sélectionner plusieurs photos et de choisir un nombre d’exemplaires
différents pour chaque photo à imprimer,
• réaliser un zoom sur une photo et l’imprimer.
Descriptif du clavier
1
8
7
6
2
3
4
5
1. Touche Marche/Arrêt (appui long)
2. Touches de sélection
3. Touche zoom +
4. Touche d’accès au menu
5. Navigateur
6. Touche d’impression
7. Touche zoom - et d’activation du mode mosaïque
8. Touche CRYSTAL IMAGE (Amélioration automatique de la qualité
d’impression et correction des yeux rouges)
- 4 -
Page 49

11
10
Liasse AZUR_FR.book Page 5 Lundi, 23. mai 2005 9:05 09
L’interface visuelle
Les photos valides sont af fichées à l’écran, utilisez le s touches ` ou _ pour les
faire défiler.
1 3
2
ENGLISH
5
4
6
11
X1
10
7
8
9
Les informations suivantes sont disponibles sur l’écran :
1. Photo sélectionnée
2. Numéro de la photo affichée
3. Quantité totale de photos valides sur la carte mémoire ou la source
raccordée
4. Icône de la fonction auto-amélioration
5. Icône correction des yeux rouges
6. Format d’impression
7. Nombre de copies de la photo
8. Nom du fichier de la photo
9. Date de prise de vue de la photo dans le format Année/Mois/Jour
10. Ajouter une copie, touche
11. Retirer une copie, touche
FRANÇAIS
DEUTSCH
ESPAÑOL
ITALIANO
NEDERLANDSPORTUGUÊS
- 5 -
Page 50

Liasse AZUR_FR.book Page 6 Lundi, 23. mai 2005 9:05 09
4MISE EN SERVICE DE L’IMPRIMANTE PHOTO
ALIMENTATION SECTEUR
Remarque : lors de l’installation si un mur ou tout objet se trouve à proximité , veillez à ce que
celui-ci soit éloigné d’au moins 10 centimètres par rapport à l’arrière de votre
imprimante, ceci afin de garantir la bonne circulation de la feuille de papier en
cours d’impression.
Avant d'effectuer les connexions, veuillez consulter les consignes de
sécurité placées en début du présent livret d'utilisation.
Branchez l'une des extrémités du cordon secteur sur le connecteur du
bloc alimentation prévu à cet effet.
Raccordez la prise du bloc alimentation à fond sur l'imprimante comme
indiqué sur l'illustration ci-dessous.
Branchez l'autre extrémité du cordon secteur du bloc alimentation sur
une prise secteur murale.
Appuyez sur le bouton Marche/Arrêt jusqu’à ce que l’écran
s’allume.
A la première mise en marche, l’écran de réglage de la langue apparaît.
Sélectionnez avec les touches
S ou T du navigateur la langue souhaitée
et appuyez sur la touche pour valider.
Un écran d’accueil apparaît.
- 6 -
Page 51

Liasse AZUR_FR.book Page 7 Lundi, 23. mai 2005 9:05 09
PREMIÈRE INSTALLATION DU RUBAN
Remarque : utilisez uniquement les consommables constructeur. Ceux-ci sont spécialement
conçus pour vous apporter un rendu d’impression optimal (voir paragraphe p. 29).
Remarque : la validation par carte à puce n’est pas nécessaire pour l’utilisation des
consommables fournis avec l’imprimante (fournitures selon modèle).
Mettez l'imprimante sous tension. Attendez 10 secondes que la tête
d'impression se relève et procédez de la façon suivante :
1. Ouvrez la trappe extérieure située sur la partie droite de l'imprimante.
2. Retirez la mousse de protection.
3. Sortez le ruban neuf de son emballage et assurez-vous que le film est
tendu après avoir retiré la pièce cartonnée (A).
4. Présentez le ruban en respectant bien sa position conformément à
l’illustration ci-dessous.
5. Insérez le ruban jusqu'au fond d e son logem ent, le loquet de fermeture
doit impérativement être fermé après insertion.
6. Refermez la trappe extérieure.
A
6
ENGLISH
FRANÇAIS
DEUTSCH
ESPAÑOL
Attention : ne jamais toucher le film du ruban avec les doigts. Bien insérer le ruban
complètement dans l'imprimante. Vérifiez que le loquet de fermeture ve rt est bien
abaissé.
Remarque : en cas de problème, vérifier qu'aucun corps étranger n'est présent dans le logement
du ruban.
- 7 -
ITALIANO
NEDERLANDSPORTUGUÊS
Page 52

Liasse AZUR_FR.book Page 8 Lundi, 23. mai 2005 9:05 09
REMPLACER LE RUBAN
Remarque : Utilisez uniquement les consommables constructeur. Ceux-ci sont spécialement
conçus pour vous apporter un rendu d’impression optimal.
Mettez l'imprimante sous tension. Attendez 10 secondes que la tête
d'impression se relève et procédez de la façon suivante :
1. Prenez la carte à puce livrée avec le ruban et le papier photo,
insérez-la dans le lecteur situé sur le côté gauche de l’imprimante. La
carte à puce est reconnue et lue par l’imprimante, en fin de procédure
"Transfert OK (40) - Retirez la carte" ou "Transfert OK (120) -
Retirez la carte" apparaît à l’écran.
2. Retirez la carte à puce.
3. Sortez le ruban neuf de son emballage et assurez-vous que le film est
tendu après avoir retiré la pièce cartonnée (A).
4. Ouvrez la trappe extérieure située sur la partie droite de l'imprimante.
5. Soulevez le loquet de fermeture vert et sortez le ruban usagé.
6. Présentez le ruban en respectant bien sa position conformément à
l’illustration ci-dessous.
7. Soulevez le loquet de fermeture vert, insérez le ruban jusqu'au fond de
son logement, le loquet de fermeture doit impérativement être fermé
après insertion.
8. Refermez la trappe extérieure.
Remarque : si le remplacement du ruban intervient pendant une tâche d'impression, vous
pourrez reprendre l'opération d'impression après le remplacement du ruban en
appuyant sur la touche .
- 8 -
Page 53

Liasse AZUR_FR.book Page 9 Lundi, 23. mai 2005 9:05 09
A
6
7 8
Attention : ne jamais toucher le film du ruban avec les doigts. Bien insérer le ruban
complètement dans l'imprimante. Vérifiez que le loquet de fermeture ve rt est bien
abaissé.
Remarque : en cas de problème, vérifier qu'aucun corps étranger n'est présent dans le logement
du ruban.
ENGLISH
FRANÇAIS
DEUTSCH
ESPAÑOL
- 9 -
ITALIANO
NEDERLANDSPORTUGUÊS
Page 54

Liasse AZUR_FR.book Page 10 Lundi, 23. mai 2005 9:05 09
CHARGEMENT DU PAPIER
1. Retirez le tiroir de l'imprimante.
2. Ouvrez un paquet de feuilles avec sa feuille de protection sur le
dessus, insérez ce dernier dans le tiroir papier en vérifiant que
l’emplacement du rectangle prévu pour recevoir un timbre postal se
situe bien vers l’extérieur du tiroir papier à savoir vers vous.
3. Retirez la feuille de protection située sur le dessus du paquet de
feuilles.
4. Présentez le tiroir devant son logement de l'imprimante. Insérez le
lentement jusqu'au déclenchement du système de blocage.
Feuille de protection
Votre imprimante photo est maintenant prête à imprimer vos photos
numériques.
Attention : manipulez les feuilles de papier par les extrémités prédécoupées, ne m ettez jamais
de doigts sur la face brillante avant l'impression.
- 10 -
Page 55

Liasse AZUR_FR.book Page 11 Lundi, 23. mai 2005 9:05 09
Attention : protégez les consommables contre une exposition prolongée à la lumière, contre
l'humidité, la chaleur et les poussières. Respectez les conditions d'utilisation
(reportez-vous au paragraphe Caractéristiques techniques, page 35). N'utilisez
que les consommables constructeur, prévus pour cette imprimante. Ne me ttez pas
plus de 20 feuilles à la fois dans le bac papier.
Attention : vérifiez qu’une photo déjà imprimée ne se soit pas glissée par inadvertance dans un
paquet de feuilles vierges, cela pourrait endommager le ruban de votre imprimante.
ENGLISH
FRANÇAIS
DEUTSCH
ESPAÑOL
- 11 -
ITALIANO
NEDERLANDSPORTUGUÊS
Page 56

Liasse AZUR_FR.book Page 12 Lundi, 23. mai 2005 9:05 09
5TRANSFÉRER VOS IMAGES
INSÉRER UNE CARTE MÉMOIRE
En fonction du format de votre carte mémoire, introduisez-la dans la fente
correspondante, comme indiqué sur les illustrations ci-dessous.
Fente prévue
pour les formats
Smart Media (SM),
Carte xD
Fente prévue
pour le format
CompactFlash
Fente prévue
pour les formats
Multi Media Card (MMC
Standard Digital (SD)
Fente prévue
pour le format
Memory Stick (MS)
)
Attention : SmartMedia CONTACTS VERS LE BAS.
Attention : les cartes mémoires ne rentrent pas complètement dans la fente de lecture. NE
FORCEZ EN AUCU N CAS . Retirez la carte et vérifiez que vous la présentez dans
la bonne fente et dans le bon sens d’introduction.
Attention : pour réaliser une impression dans l’ordre croissant des photos présentes sur la carte
mémoire, les pa ra mèt re s " d ate et heu r e" do iv en t êt re ré glés sur votre a p pare i l av a nt
la prise de photo. Si ce n’est pas le cas les photos seront lues et imprimées dans un
ordre aléatoire.
- 12 -
Page 57

Liasse AZUR_FR.book Page 13 Lundi, 23. mai 2005 9:05 09
Carte Représentation
Smart Media
(SM)
Memory Stick
(MS)
Standard
Digital
(SD)
Multi Media
Card
(MMC)
ENGLISH
FRANÇAIS
DEUTSCH
ESPAÑOL
ITALIANO
Carte xD
CompactFlash
NEDERLANDSPORTUGUÊS
- 13 -
Page 58

Liasse AZUR_FR.book Page 14 Lundi, 23. mai 2005 9:05 09
TRANSFÉRER DES PHOTOS PAR LIAISON INFRAROUGE
Attention : si une carte mémoire est insérée, vous ne pourrez pas accéder au mode de transfert
sans fil infrarouge.
Attention : si vous avez commencé à transférer par Blueto oth, vous ne pourrez pa s transférer
vos photos par infrarouge avant d’avoir vidé la mémoir e interne par u n ap pui long
(3 secondes) sur la touche
Avec l'imprimante photo, vous pouvez imprimer les photos stockées dans un
téléphone mobile, un assistant personnel ou un ordinateur. Pour cela, vous
devez les transférer dans l'imprimante en utilisant la liaison sans fil
infrarouge.
.
Remarque : pour connaître la liste des périphériques compatibles, consulter le site
www.sagem.com.
Mettez l’imprimante sous tension. Placez la fenêtre infrarouge de votre
périphérique face à celui de l’imprimante à une distance ne dépassant pas
30 centimètres.
Attention : dans le cas d’un environnement exposé à une lumière intense, une distance
de 10 centimètres maximum entre les deux fenêtres infrarouge est préconisée.
Sur votre périphérique, sélectionnez une photo et déclenchez son transfert par
liaison infrarouge.
Le transfert démarre et pendant toute sa durée, le message "Transfert
infrarouge - Attendez SVP" clignote sur l'écran de l'imprimante.
- 14 -
Page 59

Liasse AZUR_FR.book Page 15 Lundi, 23. mai 2005 9:05 09
Vous pouvez :
• Soit déclencher l'impression de la photo transférée, après avoir
éventuellement modifié le format d'impression et le nombre de copies.
• Soit transférer depuis votre téléphone mobile une autre photo, celle-ci
venant s'ajouter à celle(s) déjà stockée(s) dans l'imprimante. A la fin de
chaque transfert, le nombre total de photos stockées est indiqué sur
l'écran de l'imprimante (celle ayant le numéro le plus élevé étant la
dernière transférée).
• Vous pouvez à ce moment effectuer les opérations décrites dans les
chapitres suivants avant de lancer l'impression de ces photos (sélection
des numéros de photos à imprimer, sélection du format, sélection du
nombre de copies).
Vous pouvez :
• Soit déclencher une nouvelle impression, après avoir éventuellement
sélectionné d'autres paramètres (numéro de photo, format, nombre de
copies).
• Soit effacer l’ensemble des photos sélectionnées. Pour cela, pressez la
touche pendant 3 secondes.
TRANSFÉRER DES PHOTOS DEPUIS UN PÉRIPHÉRIQUE
BLUETOOTH (OPTIONNEL)
ENGLISH
FRANÇAIS
DEUTSCH
ESPAÑOL
Attention : si une carte mémoire est insérée, vous ne pourrez pas accéder au mode de transfert
bluetooth.
Attention : si vous avez commencé à transférer par infrarouge, vous ne pourre z pas transférer
vos photos par Bluetooth avant d’avoir vidé la mémoire interne par un appui long
(3 secondes) sur la touche
.
L'adaptateur d'imprimante Bluetooth (équipement optionnel) est une solution
rapide et efficace pour passer d'une connexion filaire à une c onnexion sans fil.
L'adaptateur permet de transformer l’imprimante photo en récepteur
Bluetooth autorisant l’impression de photos depuis des équipements dotés de
la technologie Bluetooth comme les téléphones mobiles, les assistants
personnels, les ordinateurs ou autres.
- 15 -
ITALIANO
NEDERLANDSPORTUGUÊS
Page 60

Liasse AZUR_FR.book Page 16 Lundi, 23. mai 2005 9:05 09
Assurez-vous que les équipements sont sous tension. Ne forcez jamais à la
mise en place des connecteurs sur les équipements, vous risquez à la fois de
détériorer le câble et le connecteur.
Remarque : pour connaître la liste des périphériques compatibles, consulter le site
www.sagem.com.
Reliez l’adaptateur Bluetooth (équipement optionnel) sur le port USB
(A) de votre imprimante photo.
A
La reconnaissance entre les équipements est automatique.
Attention : la taille de la photo ou des photos à transférer dans l’imprimante photo doit être
inférieure à 600 Koctets. Le format de la ph oto doit être au format JPEG. Un
message d’erreur "Mémoire interne pleine" apparaîtra dès que la capacité
maximale de la mémoire est atteinte.
Pour transférer de nouvelles données vers l’imprimante photo, vous devrez vider la
mémoire. Pour cela appuyez 3 secondes sur la touche .
Le transfert démarre et pendant toute sa durée, le message "Transfert
Bluetooth - Attendez SVP" clignote sur l'écran de l'imprimante.
Vous pouvez :
• Soit déclencher l'impression de la photo transférée, après avoir
éventuellement modifié le format d'impression et le nombre de copies.
• Soit transférer une autre photo, celle-ci venant s'ajouter à celle(s) déjà
stockée(s) dans l'imprimante. A la fin de chaque transfert, le nombre total
de photos stockées est indiqué sur l'écran de l'imprimante (celle ayant le
numéro le plus élevé étant la dernière transférée).
Remarque : si la mémoire de l’imprimante photo est pleine, le message suivant apparaît
"Mémoire interne pleine".
- 16 -
Page 61

Liasse AZUR_FR.book Page 17 Lundi, 23. mai 2005 9:05 09
UTILISER UN PÉRIPHÉRIQUE COMPATIBLE DPOF
Cette fonction vous permet de sélectionner les photos que vous voulez
imprimer sur votre imprimante photo depuis votre appareil photo numérique
en mode pictbridge ou votre carte mémoire.
Procédez à la sélection des photos désirées sur l'appareil p hoto en uti lisant les
explications fournies dans la notice de votre appareil photo.
ENGLISH
Mettez l’imprimante sous tension. Placez la carte mémoire dans la fente
adéquate. Le message suivant apparaît à l’écran "Imprimer la sélection
DPOF ?".
Lancez l’impression en appuyant sur la touche .
Pour sortir du mode DPOF appuyez sur la touche .
CONNECTER UN APPAREIL PHOTO NUMÉRIQUE
(MODE PICTBRIDGE)
Attention : si une carte mémoire est insérée dans l’imprimante, vous ne pouvez pas accéder au
mode pictbridge.
Votre imprimante photo supporte les standards pictbridge et DPOF, elle
permet donc l’impression de photos à partir d’appareils photo compatibles
avec ces normes.
Reportez-vous à la documentation de votre appareil photo.
Depuis votre appareil photo, vous pouvez :
Imprimer une photo.
Sélectionner des photos et les imprimer plusieurs fois sur la même
feuille de papier.
Imprimer depuis un fichier au standard DPOF.
Suivre l’impression et notamment, le début, la progression et la fin de
l’impression. Mais également les messages d’erreurs pouvant intervenir
(pas de papier, bourrage, pas d’encre, capot non refermé, pas de
cartouche, erreur fatale).
FRANÇAIS
DEUTSCH
ESPAÑOL
ITALIANO
NEDERLANDSPORTUGUÊS
- 17 -
Page 62

Liasse AZUR_FR.book Page 18 Lundi, 23. mai 2005 9:05 09
Votre imprimante photo ne supporte pas les fonctions suivantes :
Cropping (recadrer une image).
Choisir un type de papier.
Indiquer une information supplémentaire (date et heure par exemple) en
complément de la photo à imprimer.
Lancer une impression en mode pictbridge
Assurez-vous que l’appareil photo est réglé en mode pictbridge.
Connectez votre imprimante (repère A de l’illustration ci-dessous) à
l’appareil photo en utilisant un câble USB.
A
Après une phase d'analyse et de reconnaissance, un écran indiquant le
mode pictbridge apparaît.
Pour activer la fonction d’auto amélioration de qualité d’impression
CRYSTAL IMAGE , appuyez une fois sur la touche .
L’imprimante est pilotée par l’appareil photo numérique. Aucun appui
sur les touches de l’imprimante n’est requis.
Retirez le câble USB pour sortir du mode PictBridge.
- 18 -
Page 63

Liasse AZUR_FR.book Page 19 Lundi, 23. mai 2005 9:05 09
6IMPRIMER VOS PHOTOS
Votre imprimante photo est prévue pour être utilisée avec ou sans ordin ateur.
Dans ce chapitre nous décrivons l'utilisation de l'imprimante sans ordinateur.
Consultez le tableau des caractéristiq ues technique s en fin de liv ret uti lisation
pour connaître la compatibilité de votre carte mémoire avec l'imprimante, en
cas d'incompatibilité utilisez un ordinat eur et le logiciel de traitem ent d'image
fourni sur le CD-Rom.
ENGLISH
Mettez votre imprimante sous tension. Insérez ou connectez une source (une
carte mémoire, un appareil en mode DPOF ou Pictbridge, un périphérique
équipé d’un port InfraRouge ou un périphérique optionnel Bluetooth).
Après une phase d’analyse et de chargement la dernière photo enregistrée est
affichée à l’écran.
Pour passer d’une photo à l’autre, utilisez les touches _ ou ` du navigateur.
IMPRIMER
Appuyez sur la touche , le menu Impression apparaît. Depuis ce menu
vous pouvez choisir :
la photo qui est affichée à l’écran, sélectionnez Imprimer photo
courante,
le panier que vous avez précédemment choisi, sélectionnez Imprimer
Sélection (reportez-vous au paragraphe Créer votre panier, page 20),
l’ensemble des photos reconnues sur la source, sélectionnez Imprimer
tout,
d’imprimer toutes les photos en format miniature, vingt photos par
feuille de papier, sélectionnez Imprimer index.
Sélectionnez votre choix avec les touches
Astuce :
les bords peuvent être découpés par petits paquets en superposant plusieurs feuilles.
Astuce : après l’impression, ne déchirez pas ces bords d'un seul coup, effectuez plusieurs fois
le pliage sur les pointillés, afin de détacher délicatement les bords.
S ou T du navigateur.
FRANÇAIS
DEUTSCH
ESPAÑOL
ITALIANO
NEDERLANDSPORTUGUÊS
- 19 -
Page 64

Liasse AZUR_FR.book Page 20 Lundi, 23. mai 2005 9:05 09
CRÉER VOTRE PANIER
Vous pouvez mémoriser la sélection d’une série de photos avec des quantités
d’impression indépendantes, pour cela procédez comme suit.
Vous pouvez naviguer d’une photo à l’autre selon 2 modes :
le mode plein écran, permet la navigation image par image,
le mode mosaïque, accessible en appuya nt sur la touche , permet une
navigation plus rapide sur 6 images (la touche permet alors de
revenir au mode plein écran).
Le navigateur permet le déplacement d’une image à l’autre.
Appuyez sur la touche pour placer la photo affichée dans votre panier.
Appuyez de nouveau sur la touche et cela au temps de fois de vous
voulez de copies.
Appuyez sur la touche pour retirer la photo sélect ionnée ou supprimer
une copie de votre panier.
Recommencez l’opération précédente sur les autres photos que vous voulez
ajouter à votre panier.
Une fois sélectionnée la quantité est affichée, précéd ée d’un X en haut à droite
pour chacune des photos.
Appuyez sur la touche , le menu Impression apparaît.
Sélectionnez votre choix avec les touches
S ou T du navigateur.
Vérifiez que vous avez la quantité nécessaire de papier dans le tiroir. Appuyez
de nouveau sur la touche ou sur la touche pour lancer
l’impression.
- 20 -
Page 65

Liasse AZUR_FR.book Page 21 Lundi, 23. mai 2005 9:05 09
RÉALISER UN AGRANDISSEMENT (ZOOM)
Sélectionnez la photo voulue avec les touches _ ou ` du navigateur.
Appuyez sur la touche pour activer le mode zoom. Choississez avec les
touches _ ou ` du navigateur le zoom Portrait ou Paysage et validez en
appuyant sur la touche ou .
Réglez la taille de l’agrandissement souhaitée avec les touches ou .
La taille du zoom est réglable de 100 % à 300 % avec les plages suivantes
100 %, 120 %, 140 % , 160 %, 200 %, 240 % et 300 %.
Utilisez les touches du navigateur pour positionner la partie de la photo
à agrandir. Pour prévisualiser le résultat, appuyez sur la touche .
ENGLISH
FRANÇAIS
La photo agrandie apparaît à l’écran. Appuyez sur la touche pour
valider ou pour annuler.
La zone d’impression est matérialisée sur la photo par un rectangle rouge.
Appuyez sur la touche et cela autant de fois que vous voulez
d’exemplaires, le nombre d’exemplaires s’affiche en haut et à droite de la
photo.
Remarque : cette photo peut-être imprimée immédiatement ou entrée dans la sélection d’un
panier pour une impression ultérieure.
DEUTSCH
ESPAÑOL
ITALIANO
NEDERLANDSPORTUGUÊS
- 21 -
Page 66

Liasse AZUR_FR.book Page 22 Lundi, 23. mai 2005 9:05 09
7RÉGLER VOTRE IMPRIMANTE SELON VOS BESOINS
Vous pouvez réglez plusieurs para mètres selo n vo tre utilisation. Appuyez sur
la touche pour accéder aux réglages des formats papiers, de la qualités des
images et de vos préférences.
LES FORMATS
Cette fonction vous permet de sélectionner un format papier en fonction de
vos besoins, par exemple pour réaliser des photos d’identité, choisissez le
format 8 photos par page.
Appuyez sur la touche , sélectionnez le menu Format avec les touches
ou T du navigateur. Appuyez sur la touche pour valider.
Vous pouvez imprimer vos photos depuis des formats prédéfinis :
• Imprimez votre photo au format 10 x 15 cm Pleine Page, sans
bord .
• Imprimez votre photo au format 10 x 15 cm Avec Marges .
• Imprimez votre photo au format Pleine Page 4/3 .
•Imprimez 2 photos par page .
•Imprimez 4 photos par page .
•Imprimez 8 photos par page .
•Imprimez 20 photos par page (planche contact ou d'index).
•Imprimez 2 pages par image (la photo est sur 2 pages).
•Imprimez 4 pages par image (la photo est sur 4 pages).
Avec les touches
S ou T du navigateur choisissez le format papier voulu.
Appuyez sur la touche pour valider et retourner au mode de
navigation.
S
- 22 -
Page 67

Liasse AZUR_FR.book Page 23 Lundi, 23. mai 2005 9:05 09
RÉGLER LA QUALITÉ DES PHOTOS
Ce menu vous permet selon vos critères personnels de procéder à des
ajustements des paramètres de colorimétrie pour la photo sélectionnée.
Appuyez sur la touche , sélectionnez le menu Réglages image avec les
touches
S ou T du navigateur.
ENGLISH
Sélectionnez le paramètre à modifier avec les touches
S ou T du navigateur.
Les touches _ ou ` du navigateur permettent de modifier la valeur du
paramètre sélectionné.
La touche vous permet de sortir de l’écran des réglages de l’image en
cours sans prise en compte des modifications. Vous retournez au menu
précédent.
Vous pouvez régler :
•Le Contraste de la photo entre -2 et +2, utilisez les touches _ ou ` du
navigateur pour faire votre choix.
•La Luminosité de la photo entre -2 et +2, utilisez les touches _ ou ` du
navigateur pour faire votre choix.
•La Netteté de la photo entre -2 et +2, utilisez les touches _ ou ` du
navigateur pour faire votre choix.
•L’Effet de la photo, Non pour aucun réglage, N&B pour obtenir une
photo imprimée en noir et blanc, Sép pour obtenir une photo imprimée
sur trois feuilles de papier en couleur jaune, magenta et cyan. Utilisez les
touches _ ou ` du navigateur pour faire votre choix.
•La Couleur de la photo entre -2 et +2, utilisez les touches _ ou ` du
navigateur pour faire votre choix.
•Un Cadre autour de votre photo, Non pour aucun, Autres cadres pour
imprimer un cadre prédéfini, utilisez les touches _ ou ` du navigateur
pour faire votre choix.
Lorsque l’ensemble des modifications a été réalisé, appuyez sur la touche
pour valider et retourner au mode de navigation.
Une icône apparaît en bas et à dr oite d e la photo pour vou s signaler la pri se en
compte des réglages spécifiques. Les modifications réalisées sont
uniquement valables pour la photo sélectionnée.
FRANÇAIS
DEUTSCH
ESPAÑOL
ITALIANO
NEDERLANDSPORTUGUÊS
- 23 -
Page 68

Liasse AZUR_FR.book Page 24 Lundi, 23. mai 2005 9:05 09
Attention : si vous appuyez sur la touche en cours de réglage des paramètres, vous
retournez automatiquement en mode navigation sans prise en compte d’aucune
modification.
VOS PRÉFÉRENCES
Ce menu permet de modifier des réglages par défaut de l’imprimante.
Appuyez sur la touche , sélectionnez le menu Préférences avec les
S ou T du navigateur. Appuyez sur la touche pour valider.
touches
Sélectionnez la préférence choisie avec les touches
S ou T du navigateur et
appuyez sur la touche pour valider.
Vous pouvez choisir :
•La Langue qui sera utilisée dans les affichages des écrans, utilisez les
S ou T du navigateur pour faire votre choix entre les langues
touches
FRANCE, ESPAGNE, PORTUGAL, ALLEMAGNE, PAYS-BAS,
ITALIE et UK et appuyez sur la touche pour valider.
1
•La Préférence format
, sélectionnez avec les touches S ou T du
navigateur le choix du format voulu. Appuyez sur la touche pour
valider.
•La Préférence copies
1
, sélectionnez avec les touches S ou T du
navigateur le nombre de copies voulu, entre 1 et 20 par photos. Appuyez
sur la touche pour valider.
•La Préf. Image
1
vous permet de modifier les réglages sur les images,
reportez-vous au paragraphe Régler la qualité des photos, page 23 pour
modifier ces paramètres. Pour une modification de l’amélioration
automatique de l’image, sélectionnez la commande Auto amélioration et
validez par la touche .
•L’Après Impression vous permet de garder ou d’effacer la sélection en
mémoire, sélectionnez avec les touches
S ou T du navigateur la
commande Garder sélection ou Effacer sélection et appuyez sur la
touche pour valider.
•Le Contraste LCD de l’écran entre -8 et +8, utilisez les touches
S ou T
du navigateur pour faire votre choix et appuyez sur la touche
pour valider.
• Réinit Paramètres vous permet de revenir à des valeurs de base,
appuyez sur la touche pour valider après quelques secondes les
paramètres sont réinitialisés.
1. Ces préférences sont prises en compte pour de nouvelles ins ertions de carte.
- 24 -
Page 69

Liasse AZUR_FR.book Page 25 Lundi, 23. mai 2005 9:05 09
FONCTION CRYSTAL IMAGE
Votre imprimante dispose de la fonction d’optimisation d’image Crystal
Image avec laquelle vous pouvez obtenir une qualité optimale d’impression.
Remarque : Crystal Image fonctionne indépendamment du PC.
Crystal Image comporte 2 composants pouvant être utilisés en fonction de
votre besoin :
• optimisation d’image
• correction yeux rouges
Attention : la correction yeux rouges est un procédé complexe qui peut nécessiter un temps de
traitement important.
Crytal Image procède automatiquement à tous les réglages et corrections
nécessaires en rapport avec la netteté de l’image, la gestion des couleurs et le
contraste pour obtenir la meilleure qualité d’impression possible.
Par ailleurs, les défauts d’exposition seront corrigés (par exemple les photos
sous-exposées seront éclaircies ou les portions de photo présentant de forts
contrastes seront compensées). La fonction correction yeux rouges retouche
les "yeux rouges" sur les clichés pris au flash.
Activation/désactivation
Remarque : par défaut, le composant "optimisation d’image" de la fonction Crystal Image est
désactivé et "correction yeux rouges" est désactivé.
Le tableau suivant indique le nombre de fois qu’il faut appuyer sur la
touche pour activer ou désactiver les composants de la fonction Crystal
Image.
ENGLISH
FRANÇAIS
DEUTSCH
ESPAÑOL
Nombre d’appui sur la
touche
Optimisation d’image Correction yeux rouges
Etat fonction Crystal Image
0 (Etat par défaut) Désactivé Désactivé
1 Activé Désactivé
2 Activé Activé
3 Désactivé Activé
4 (retour à l’état par
défaut)
Désactivé Désactivé
- 25 -
ITALIANO
NEDERLANDSPORTUGUÊS
Page 70

Liasse AZUR_FR.book Page 26 Lundi, 23. mai 2005 9:05 09
8UTILISER VOTRE IMPRIMANTE AVEC UN PC
IMPRIMER DEPUIS UN PC
Connecter un ordinateur (PC)
Votre kit comprend un CD-Rom d'installation du pilote de l'imprimante, un
logiciel de traitement d'images ainsi qu'une notice d'utilisation.
Attention : pour éviter tout problème d’impression lié au format de l’image, il est conseillé
d’utiliser le logiciel fourni avec l’imprimante ou des logiciels de retouche d’images.
Assurez-vous que votre PC est compatible avec les spécifications décrites
ci-après :
Configuration PC requise :
Pentium ou équivalent,
OS : Windows 98 SE / 2000 / Me / XP,
128 MO DRAM ou plus,
150 MO d’espace disponible sur disque dur,
Port USB disponible.
Installer le logiciel
Pour commencer l'installation, insérez le CD-Rom dans le lecteu r, une fenêtre
de commande apparaît, suivez les instructions qui s'affichent à l'écran.
Si le programme d'installation ne démarre pas automatiquement : lancez
l'exécution du programme d'installation, en cliquant deux fois sur le fichier
"setup.exe" situé à la racine du CD-Rom.
L'installation du logiciel photo se déroule en trois phases : l'exécution du
programme d'installation, le redémarrage de l'ordinateur puis l'installation
finale de l'imprimante.
Ne connectez pas l'imprimante au PC, avant l'installation du pilote
d'impression. En fin d'installation un message vous demandera de redémarrer
le PC, après le redémarrage vous pourrez connecter l'imprimante au PC.
Le CD-Rom contient un manuel d'installation et d'utilisation détaillé du pilote
d'impression. Reportez-vous à ce manuel pour l'utilisation du pilote.
- 26 -
Page 71
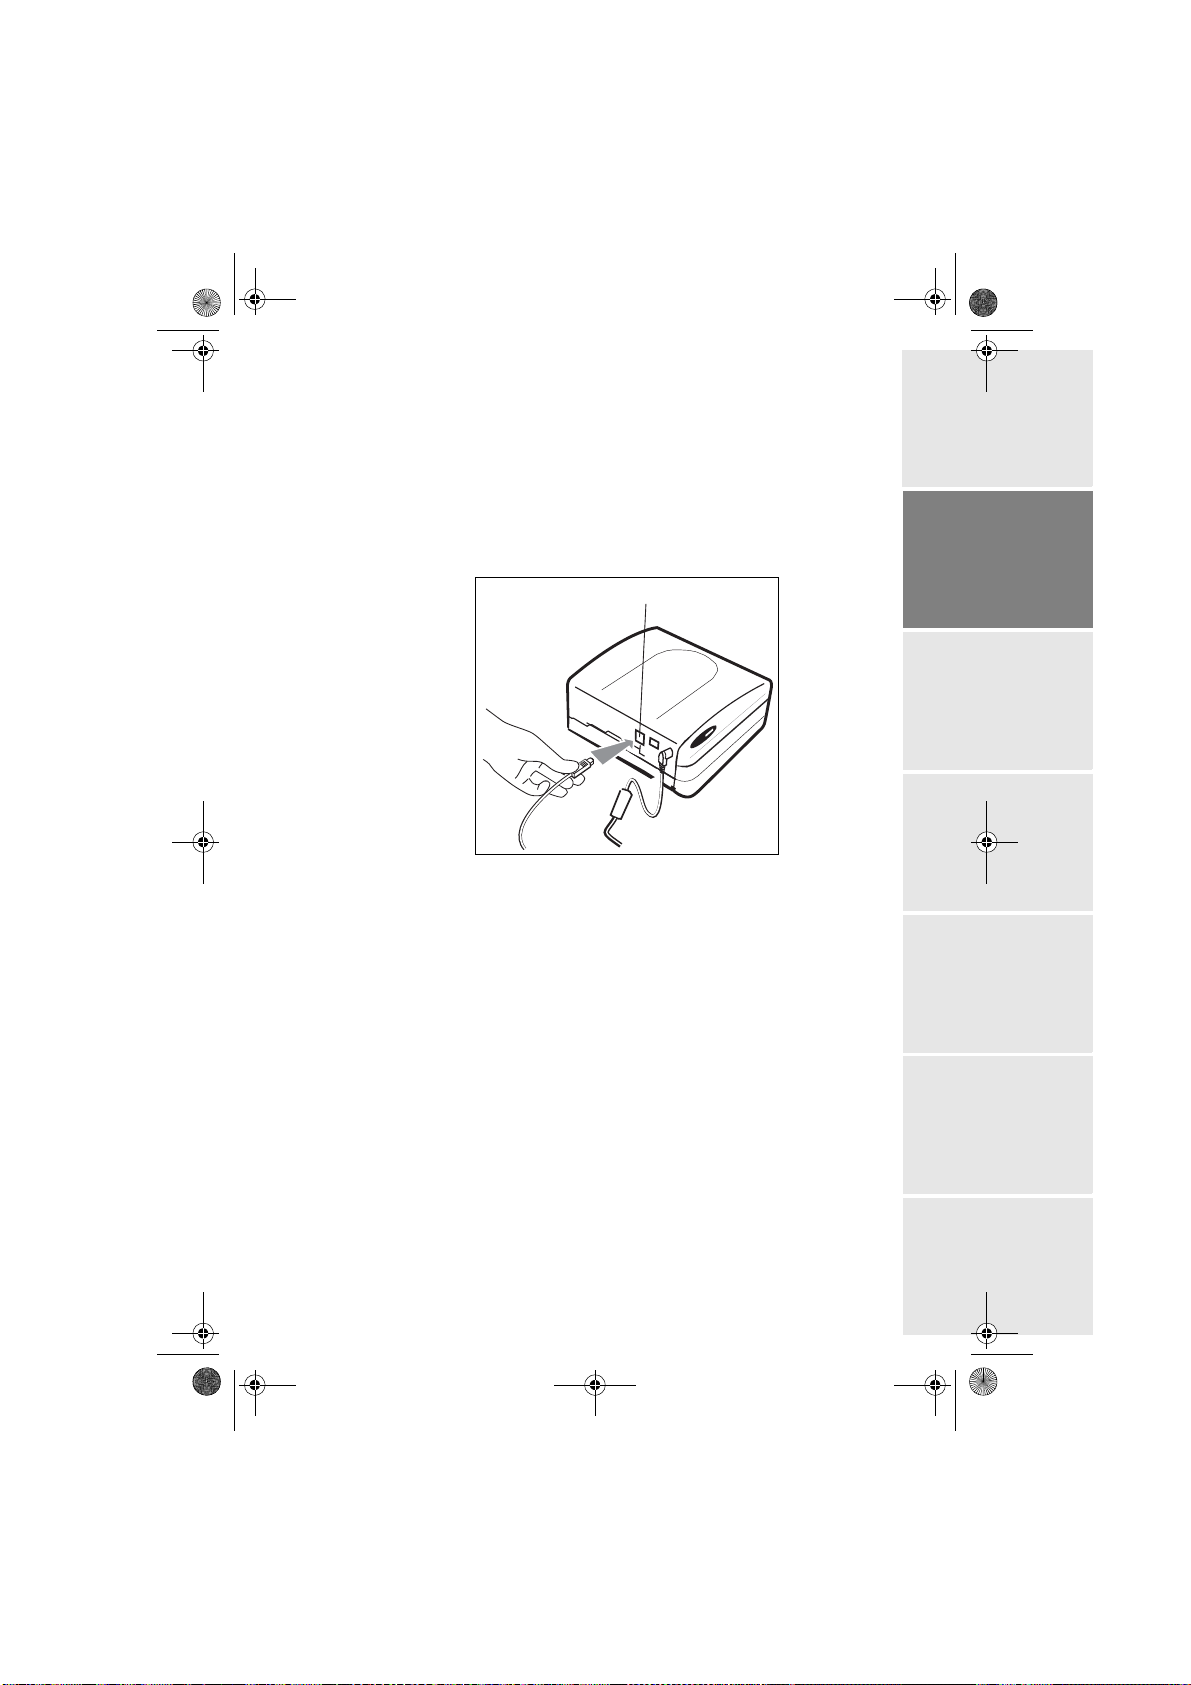
Liasse AZUR_FR.book Page 27 Lundi, 23. mai 2005 9:05 09
Remarque : L'option "impression N/B" proposée par le pilote d'impression de window s 98 est
non fonctionnelle.
Connecter votre imprimante
Assurez-vous que les équipements sont sous tension. Ne forcez jamais à la
mise en place des connecteurs sur les équipements, vous risquez à la fois de
détériorer le câble et le connecteur.
Connectez votre imprimante (port USB, repère B de la figure ci-dessous)
au PC en utilisant un câble USB.
B
La reconnaissance entre les équipements est automatique.
Utiliser votre imprimante
Votre imprimante peut fonctionner sous 2 modes différents :
• Mode Impression, activé par défaut
• Mode lecteur de cartes mémoires
ENGLISH
FRANÇAIS
DEUTSCH
ESPAÑOL
ITALIANO
Pour imprimer depuis le PC vous devez être en mode Impression.
Aucune impression, aucun transfert infra-rouge ou Bluetooth n'est possible
dans le mode lecteur de cartes mémoires. Pour en sortir, reportez-vous au
chapitre suivant.
- 27 -
NEDERLANDSPORTUGUÊS
Page 72

Liasse AZUR_FR.book Page 28 Lundi, 23. mai 2005 9:05 09
TRAITER LE CONTENU DE LA CARTE MÉMOIRE DEPUIS
VOTRE PC
Vous pouvez accéder depuis votre PC aux lecteurs de cartes de votre
imprimante ainsi que traiter et gérer des fichiers image.
Connectez l’imprimante à votre PC avec un câble USB.
Insérez la carte mémoire dans votre imprimante. Le support mémoire
s’affiche sous forme d’un lecteur supplémentaire dans l’Explorateur de
Windows.
Accédez à ce lecteur pour ajouter, copier, déplacer, enregistrer ou
effacer des images.
Vous pouvez traiter des photos directement sur la carte mémoire à l’aide du
logiciel de retouche d’image fourni avec l’imprimante.
Déconnectez la liaison avec le périphérique, puis retirez la carte
mémoire de son logement.
Votre imprimante peut fonctionner sous 2 modes différents :
• Mode Impression, activé par défaut
• Mode lecteur de cartes mémoires
Pour rentrer en mode lecteur de cartes mémoires, appuyez sur la touche ,
sélectionnez lecteur de cartes avec les touches
Appuyez sur la touche pour valider.
S ou T du navigateur .
Pour ne pas endommager les données votre carte mémoire, assurez-vous tout
d'abord d'avoir correctement déconnecté votre périphérique sous Windows
avant toute extraction de carte mémoire, de câble USB, ou de sortie du mode
lecteur de cartes mémoires
Remarque : Aucune impression, aucun transfert infra-rouge ou Bluetooth n'est possible dans ce
mode.
Pour sortir de ce mode et revenir au mode Impression, appuyez sur la
touche .
Remarque : A chaque changement de mode, des messages Windows de détection/déconnexion
de périphérique USB peuvent apparaître
- 28 -
Page 73

Liasse AZUR_FR.book Page 29 Lundi, 23. mai 2005 9:05 09
9REMPLACEMENT DES CONSOMMABLES
Les consommables employés sur l'imprimante photo, le ruban et le
papier sont des produits de marque SAGEM. Vous pouvez vous en
procurer dans les magasins grand public aux rayons photos ou
imprimantes, mais également sur notre s ite internet www.sag em.com ou
utilisez le bon de commande consommables fourni avec votre
imprimante (fourniture selon modèle).
Utilisez seulement les consommables de marque SAGEM et
exclusivement ceux-ci sinon vous risquez de perdre la garantie de
l'appareil.
Référence kit consommables (ruban + papier 40 photos) : 251 559 421
Référence kit consommables
(3 rubans + papier 120 photos) : 251 559 434
ENGLISH
FRANÇAIS
DEUTSCH
ESPAÑOL
- 29 -
ITALIANO
NEDERLANDSPORTUGUÊS
Page 74

Liasse AZUR_FR.book Page 30 Lundi, 23. mai 2005 9:05 09
10 ENTRETIEN
NETTOYAGE DE LA TÊTE D'IMPRESSION
Si vos photos présentent une marque constante sur toute la longueur de la
feuille, des impuretés sont peut être collées sur la tête d'impression.
Préparez un produit nettoyant à base d'alcool dénaturé
du commerce.
Mettez votre imprimante hors tension, débranchez le cordon secteur et
attendez cinq minutes, la tête d'impression étant montée à une
température élevée, vous pourriez vous blesser en la touchant.
1. Ouvrez la trappe ruban, appuye z sur le l oquet de maintien et retirez le
ruban.
2. Retirez le tiroir papier.
3. Retournez l'appareil pour retirer la trappe inférieure.
4. Nettoyez avec précaution la ligne de chauff age de la têt e d'impression,
à l’aide du coton tige.
5. Replacez la trappe inférieure, retournez l'imprimante, rebranchez le
cordon secteur et remettez votre imprimante sous tension à l’aide de
l’interrupteur.
Attention : Ne jamais toucher la tête d'impression avec les doigts ou des objets pouvant la rayer.
1
et des coton tiges
1
4
1. Ne pas utiliser de produits corrosifs, ces derniers pourraient endommager votre appareil.
2
- 30 -
3
5
Page 75

Liasse AZUR_FR.book Page 31 Lundi, 23. mai 2005 9:05 09
Replacez le ruban en faisant attention de bien tendre ce dernier avant
l'insertion dans son logement, vérifiez que le loqu et de mainti en est bien
en position et fermez la trappe.
Repositionnez le tiroir papier dans son logement jusqu'au
déclenchement du système de blocage.
BOURRAGE PAPIER
Si une feuille est coincée dans l'impriman te et ne peut être extrait e simplement
de l'appareil, procédez comme suit :
Eteignez et rallumez l’imprimante, attendez 10 secondes que la tête
d’impression se relève.
Mettez votre imprimante hors tension en appuyant sur le bou ton Marche/
Arrêt situé sur le dessus de votre appareil et débranchez le cordon
secteur.
Retournez l'appareil pour accéder au dessous de l'imprimante.
1 - Enlevez le couvercle inférieur.
2 - Retirez délicatement la feuille coincée, ne touchez e n aucun cas la tête
d'impression.
3 - Replacez le couvercle inférieur et retournez l'imprimante.
Rebranchez le cordon secteur et remettez votre i mprimante sous t ension.
ENGLISH
FRANÇAIS
DEUTSCH
ESPAÑOL
Attention : Ne jamais utiliser d'objets pouvant détériorer l'imprimante (ciseaux, tournevis,
coupe papier,…).
1
- 31 -
2
3
ITALIANO
NEDERLANDSPORTUGUÊS
Page 76

Liasse AZUR_FR.book Page 32 Lundi, 23. mai 2005 9:05 09
INCIDENTS
Remarque : si vous réalisez des grandes séries d'impressions sur votre appareil, celui-ci est
équipé d'un dispositif de temporisation automatique pour éviter une surchauffe de
l'appareil. L'imprimante redémarre automatiquement l'impression en cours dès que
la température a suffisamment diminué.
I
NCIDENTS REMÈDES
• Vérifiez que le bloc secteur est correctement relié à
une prise secteur.
Pas d’alimentation secteur
(écran éteint)
Un message d’erreur est
affiché à l’écran
L’appareil a été débranché
pendant une impression
Aucune photo n'est
imprimée sur la feuille
La photo est imprimée
avec un trait sur la
longueur ou beaucoup de
tâches
Pas d'impression PC
• Vérifiez que le connecteur secteur est correctement
branché à l’imprimante.
• Vérifiez que votre fusible et disjoncteur de votre
installation électrique sont en état de marche et que
la prise de courant est bien alimentée.
• Reportez-vous au paragraphe Messages d’erreurs,
page 33.
• Assurez-vous que l’imprimante est hors tension
puis reconnectez le câble d’alimentation secteur
correctement.
• Mettez l'imprimante sous tension et attendez que la
phase d'initialisation soit terminée.
• Si une feuille de papier est bloquée, (reportez-vous
au paragraphe Bourrage papier, page 31).
• Relancez l'impression.
• Utilisez-vous des feuilles conformes aux
spécifications techniques ? (reportez-vous au
paragraphe Caractéri stiques techni ques, page 35).
Avez-vous placé les feuilles face brillante dessus ?
• Procédez à un nettoyage de la tête d'impression
(reportez-vous au paragraphe Nettoyage de la tête
d'impression, page 30).
• Vérifiez que le câble USB est bien branché.
• Avez-vous installé le pilote d'impression ?
•
Êtes-vous sorti du mode lecteur de cartes
mémoires ? voir chapitre 8
• Les images de faibles tailles, inférieure à 76 800
Les photos de la carte
insérée ne sont pas vues
Lecture impossible de la
carte mémoire depuis le
PC
pixels ne sont pas imprimables à partir des cartes
mémoires. En revanche ces photos peuvent être
imprimées à partir d'un PC ou par un lien direct
infrarouge (ou Bluetooth équipement optionnel)
• Assurez-vous d'être en mode lecteur de cartes
mémoires, voir chapitre 8
- 32 -
Page 77

Liasse AZUR_FR.book Page 33 Lundi, 23. mai 2005 9:05 09
MESSAGES D’ERREURS
Après chaque intervention sur votre imprimante n’oubliez pas d’appuyer sur
la touche pour relancer l’impression en cours.
ENGLISH
Erreur
affichée
Bac papier vide
Bourrage papier
Vérifier ruban
Fin de ruban
Erreur Ruban
Erreur Cassette
Insérer la carte
de paramétrage
du ruban
Carte vide Retir er carte Carte à puce
Compteur
saturé
Carte non
reconnue (01 )
Carte non
reconnue (02 )
Correction
affichée
Corriger erreur, et
appuyer sur
IMPRESSION
pour reprendre
Corriger erreur, et
appuyer sur
IMPRESSION
pour reprendre
Corriger erreur, et
appuyer sur
IMPRESSION
pour reprendre
Corriger erreur, et
appuyer sur
IMPRESSION
pour reprendre
Corriger erreur, et
appuyer sur
IMPRESSION
pour reprendre
Corriger erreur, et
appuyer sur
IMPRESSION
pour reprendre
Corriger erreur, et
appuyer sur
IMPRESSION
pour reprendre
Retirer cart e Carte à puce
Retirer cart e Carte à puce
Retirer cart e Carte à puce
Type
d’erreur
Papier
Papier
Ruban
Ruban Changez le ruba n par un neuf.
Ruban
Ruban
Ruban
Commentaires
Vérifiez qu'il y a du papier
correctement placé dans le bac
chargeur.
Retirez le papier bloqué dans
l'imprimante (ne pas réutiliser
cette feuille de papier).
Mettez un nouveau ruban ou
remplacez le ruban actuel.
Vérifiez la bonn e insertion du
ruban, si l'erreur persiste,
remplacez-le.
Vérifiez que le ruban est
correctement inséré et que le
loquet de fermeture est verrouil l é.
Le nombre de photos
sélectionnées est supérieu r à la
capacité restant da ns le ruba n pour
imprimer toutes les photos.
La carte à puce a déjà été utilisée,
retirez la carte insérée et insérez
une carte à puce val i de.
La quantité d’impression est
atteinte.
Erreur de transfert de données,
retirez la carte insérée et insérez
une carte à puce val i de.
Erreur de transfert de données,
retirez la carte insérée et insérez
une carte à puce val i de.
FRANÇAIS
DEUTSCH
ESPAÑOL
ITALIANO
NEDERLANDSPORTUGUÊS
- 33 -
Page 78

Liasse AZUR_FR.book Page 34 Lundi, 23. mai 2005 9:05 09
Erreur
affichée
Carte non
reconnue (03 )
Consommable
incompatible
(01)
Consommable
incompatible
(02)
Consommable
incompatible
(03)
Consommable
incompatible
(04)
Consommable
incompatible
(05)
Fichier
endommagé
Format non
supporté
Erreur dura nt
transfert
Mémoire
interne pleine
Erreur Système
Correction
affichée
Retirer cart e Carte à puce
Retirer carte Carte à puce Problème méc anique.
Retirer carte Carte à puce Problème de ruban.
Retirer carte Carte à puce Marque non reconnue.
Retirer carte Carte à puce Erreur de colorimétrie.
Retirer carte Carte à puce Type (master/pac k) inconnu.
Annuler
l’opération et
recommencer
Annuler
l’opération et
recommencer
Annuler
l’opération et
recommencer
Annuler
l’opération et
recommencer
Annuler
l’opération et
recommencer
Type
d’erreur
Décodage
d’image JPEG
Transfert
sans fil
Transfert
sans fil
Transfert
sans fil
Autre
Commentaires
Erreur de transfert de données,
retirez la carte insérée et insérez
une carte à puce val i de.
Le fichier JPEG contient une
caractéristique non supportée.
La photo à transférer n’est pas au
format JPEG
Erreur durant le transfert d’une
photo depuis un téléph one mobil e.
Redémarrez le transfert depuis le
téléphone mobile. Vérifiez que les
2 appareils sont face à face.
Photo à transférer trop grosse ou
plus assez de place pour stocker la
photo dans l’imprimante.
Eteignez votre imprimante
30 secondes et rallu mez-la. Si
l'erreur persiste contactez votre
revendeur.
- 34 -
Page 79

Liasse AZUR_FR.book Page 35 Lundi, 23. mai 2005 9:05 09
CARACTÉRISTIQUES TECHNIQUES
Configuration PC requise :
Pentium ou équivalent,
OS : Windows 98 SE / 2000 / Me / XP,
128 MO DRAM ou plus,
150 MO d’espace disponible sur disque dur,
1 port USB disponible.
- - - - - - - - - - - - - - - - - - - - - - - - - - - - - - - - - - - - - - - - - - - - - - - - - - - - - - - - - - - - - - - - -
Nom appareil : PHOTO EASY 260
Méthode d'impression : : Sublimation thermique
Résolution : 309,8 x 309,8 dpi
Couleur : 16,7 Millions en continu
Vitesse d'impression : inférieur à 60 secondes par photo (hors
Interface : carte mémoire du type :
Stockage de photos transférées
depuis un périphérique : jusqu'à 3 Mega-octets
Résolution d'image supportée : jusqu'à 12 Millions de pixels
Taille d’image supportée : jusqu’à 6 Mega-octets (image
Consommables : papier photo, ruban trois couleurs
Taille papier : 101 x 152,4 mm hors bordures
Alimentation papier : par chargeur automatique de capacité
Alimentation secteur : 230 V AC 50/60 Hz
Approbation : CE
Plage d'utilisation pour une
qualité d’impression optimale : 15 à 35 °C et 30 à 75 % d'humidité
Dimensions en mm : 201 x 174 x 94 hors bac papier
Poids en kg : 1,5 hors alimentation
Consommation énergétique : en mode repos : 10 W
Toutes ces données vous sont fournies à titre indicatif. SAGEM COMMUNICATION s
le droit d'apport er toutes modifications sans aucun préavis.
- 35 -
traitement image)
Compact Flash Card (support type I &
II), SM / MS / MMC / SD / xD,
Port USB compatible 2.0
compressée JPEG)
(jaune, magenta, cyan) et un vernis,
40 impressions par ruban
détachables
20 feuilles
en mode impression : 80 W
e réserve
ENGLISH
FRANÇAIS
DEUTSCH
ESPAÑOL
ITALIANO
NEDERLANDSPORTUGUÊS
Page 80

Liasse AZUR_FR.book Page 36 Lundi, 23. mai 2005 9:05 09
11 ENVIRONNEMENT
La préservation de l'environnement est une préoccupation essentielle de
SAGEM COM MUNICAT ION. SAGE M COMMUN ICATION a la volont é
d'exploiter des installations respectueuses de l'environnement et a choisi
d'intégrer la performance environnementale dans l'ensemble du cycle de vie
de ses produits, de la phase de fabrication à la mise en service, l'utilisation et
l'élimination.
L'EMBALLAGE
La présence du logo (point vert) signifie qu'une contribution est versée à un
organisme national agréé, pour améliorer les infrastructures de récupération
et de recyclage des emballages.
Pour faciliter ce recyclage, veuillez respecter les règles de tri mises en place
localement pour ce type de déchets.
LES PILES ET BATTERIES
Si votre produit contient des piles ou des batteries, ces dernières doivent être
déposées dans les points de collecte désignés.
LE PRODUIT
La poubelle barrée apposée sur le produit signifie qu'il appartient à la famille
des équipements électriques et électroniques.
A ce titre, la réglementation européenne vous demande de procéder à sa
collecte sélective :
• Dans les points de distribution en cas d'achat d'un équipement équivalent
• Dans les points de collecte mis à votre disposition localement
(déchetterie, collecte sélective, etc.)
Ainsi, vous participez à la réutilisation et à la valorisation des Déchets
d'Equipement Electriques et Electroniques qui peuvent avoir des effets
potentiels sur l'environnement et la santé humaine.
- 36 -
Page 81

Liasse AZUR_FR.book Page 37 Lundi, 23. mai 2005 9:05 09
12 CONDITIONS DE GARANTIE
Pour toute mise en oeuvre de la garantie, vous devez vous
adresser à votre vendeur et lui présenter le justificatif d'achat
qu'il vous a remis.
En cas de panne, c'est lui qui vous conseillera.
Si vous avez achet é dire cteme nt vo tre ma tériel aupr ès de SAGEM, c elui- ci est gara nti
par SAGEM (pièces et main d'oeuvre), contre tout défaut de matière et tout vice de
fabrication pendant une durée d'un an à compter de la date de livraison. Durant cette
période, tout matériel défectueux sera remplacé ou réparé gratuitement, le client
devant retourner à ses frais l e matériel défectueux à l'adresse qui lui sera indiqué par
le Service Après-Vente SAGEM dont le numéro de téléphone figure sur le bordereau
de livraison. En l'absence de contrat d'entretien spécifique souscrit par le client, la
réparation ou l'échange ne sera en aucun cas effectué dans les locaux du client.
Sont exclus de la garantie :
a)Les pannes ou dysfonctionnements dus au non-respect des consignes
d'installation et d'utilisation, à une cause extérieure au matériel (foudre,
incendie, choc...), à des modifications de matériels effectués sans accord écrit
de SAGEM, à un défaut d'entretien courant, de surveillance ou de soins de
matériel, ou encore une réparation ou un entretien effectués par des personnes
non agréées par SAGEM.
b)L'usure normale du matériel ainsi que l'usure des accessoi res.
c)Les détériorations consécutives à une insuffisance d'emballage et/ou à un
mauvais conditionnement du matériel réexpédié à SAGEM. Dans les cas
ci-dessus ainsi qu'à l'expiration de la garantie, le client demandera à SAGEM un
devis qu'il devra accepter avant tout retour du matériel au Service Après-Vente
SAGEM. Les frais de réparation et de port (aller et retour) seront facturés au
client. Ces conditions relatives à la garantie sont applicables en France
Métropolitaine.
ENGLISH
FRANÇAIS
DEUTSCH
ESPAÑOL
ITALIANO
Votre matériel est, en tout état de cause,
soumis à la garantie légale contre les conséquences
des défauts ou vices cachés conformément
aux articles 1641 et suivants du Code Civil
- 37 -
NEDERLANDSPORTUGUÊS
Page 82

Notes.fm Page 100 Mercredi, 29. septembre 2004 10:40 10
Page 83

Liasse AZUR_ALL.book Page I Lundi, 23. mai 2005 8:40 08
1WILLKOMMEN 1
Empfehlungen und Sicherheitsvorkehrungen 2
2EINFÜHRUNG DES FOTODRUCKERS 3
3BENUTZERSCHNITTSTELLE 4
4DEN FOTODRUCKER VORBEREITEN 6
Netzversorgung 6
Zum ersten Mal ein Farbband einlegen 7
Das Farbband wechseln 8
Laden des Papiers 10
5ÜBERTRAGEN SIE IHRE BILDER 12
Führen Sie eine Speicherkarte ein 12
Übertragung von Fotos per Infrarot-Verbindung 14
Übertragung von Fotos aus einem
Bluetooth-Peripheriegerät (option) 15
Verwenden Sie eines DPOF-kompatiblen Peripheriegerät 17
Anschliessen einer Digitalkamera (PictBridge-Modus) 17
6IHRE FOTOS AUSDRUCKEN 19
Drucken 19
Ihren Warenkorb Kreieren 20
Ein bild Vergrößerung (Zoom) 21
7STELLEN SIE IRHEN DRUCKER NACH IHREN
WÜNSCHEN EIN 22
Die Formate 22
Stellen Sie die Qualität der Fotos ein 23
Ihre Präferenzen 24
Funktion Crystal Image 25
ENGLISH
FRANÇAIS
DEUTSCH
ESPAÑOL
ITALIANO
8VERWENDEN DES DRUCKERS MIT EINEM PC 26
Ausdrucken an einem PC 26
Bearbeiten Sie die Inhalte der Speicherkarte am PC 28
9VERBRAUCHSMATERIALIEN 29
10 WARTUNG 30
Reinigung des Druckkopfs 30
Papierstau 31
Störungen 32
- I -
Date en cours : 23 mai 2005
C:\Documents and Settings\G097447\Bureau\LU 260\Allemand\Liasse AZUR_ALLTDM.fm
NEDERLANDSPORTUGUÊS
Page 84

Liasse AZUR_ALL.book Page II Lundi, 23. mai 2005 8:40 08
Fehlermeldungen 33
Technische Daten 35
11 UMWELT 36
12 GARANTIE 37
- II -
Date en cours : 23 mai 2005
C:\Documents and Settings\G097447\Bureau\LU 260\Allemand\Liasse AZUR_ALLTDM.fm
Page 85

Liasse AZUR_ALL.book Page 1 Lundi, 23. mai 2005 8:40 08
1WILLKOMMEN
Wir beglückwünschen Sie recht herzlich zum Erwerb Ihres neuen
Fotodruckers und danken Ihnen für Ihr Vertrauen. Mit diesem hochwertigen
Drucker können Sie ihre digitalen Fotos in vollen Zügen geniessen; auf
einfachste Weise Ausdrucke herstellen, die der Qualität der in digital en Fotos
spezialisierten Labors entsprechen, und diese für Ihren Eigenbedarf
verwenden oder auch mit Ihrer Familie, Ihren Freunden oder Ihren Kollegen
teilen.
Ihr Fotodrucker ist mit Slots für alle gäng igen Foto-Speicherkarten sowie mit
einer Direktverbindung für Digitalkameras ausgestattet. Die
Bildoptimierungsfunktion Crystal Image sorgt für eine ausgezeichnete
Druck- und Kopiequalität Ihrer Fotos. Mit Crystal Image können Sie auch
eventuell durch Blitz hervorgerufene "rote Augen" in Ihren Aufnahmen
retuschieren (Rote-Augen-Korrektur).
Diese Bedienungsanleitung erläutert in einfachen Schritten folgende
Funktionen:
• Einschalten des Fotodruckers,
• Ausdrucken von Fotos, die in einer Speicherkarte gespeichert sind,
• Ausdrucken von Fotos, die in einer digitalen Kamera gespeichert sind,
• Ausdrucken von Fotos, die von einem Handy oder anderen
Peripheriegeräten übertragen worden sind,
• Installieren der Bildbearbeitungs-Software und des Druckertreibers auf
einem PC,
• Pflegen Ihres Fotodruckers und Beheben eventueller Probleme.
Eine zusätzliche Dokumentation über die Verwendung der
Bildbearbeitungs-Software und den PC-Druckertreiber gibt es in der
Lieferung enthaltenen CD-ROM.
Auf der Website www.sagem.com finden Sie außerdem:
• Updates für die Software,
• Eine Liste mit Antworten auf die am häufigsten gestellten Fragen (FAQ),
• Die Liste der kompatiblen Peripheriegeräte.
FRANÇAIS ENGLISH
DEUTSCH
ESPAÑOL
ITALIANO
NEDERLANDSPORTUGUÊS
- 1 -
Page 86

Liasse AZUR_ALL.book Page 2 Lundi, 23. mai 2005 8:40 08
EMPFEHLUNGEN UND SICHERHEITSVORKEHRUNGEN
• Installieren Sie Ihren Fotodrucker nicht in einem feuchten Raum (WC,
Badezimmer, Waschküche, Küche usw.), weniger als 1,50 m von einer
Wasserstelle entfernt oder im Außenbereich. Für eine optimale
Ausdruckqualität muss der Drucker bei einer Raumtemperatur
zwischen 15 °C und 35 °C verwendet werden.
• Installieren Sie den Drucker nicht an einem staubigen Ort. Der Staub könnte
die Ausdruckqualität der Fotos verschlechtern.
• Verwenden Sie ausschließlich das mitgelieferte Netzteil und schließen Sie
dieses gemäß den Installationsanweisungen in dieser Anleitung und den
Hinweisen auf seinem Typenetikett (Spannung, Strom, Frequenz des
Stromnetzes) an das Netz an. Im Gefahrenfall können die Netzstecker
vorbeugend zur Unterbrechung der 230V Stromversorgung gezogen werden.
Die Steckdosen müssen daher in der Nähe des Geräts und leicht zugänglich
sein.
• Öffnen Sie während des Ausdrucks niemals die Klappe zum Farbband.
Dies kann zum Reißen des Films und anschließend zu
Funktionsstörungen Ihres Druckers führen.
• Verwenden Sie nur und ausschließlich Verbrauchsgüter der Marke SAGEM,
da Sie andernfalls riskieren, das Gerät zu beschädigen und die Garantie zu
verlieren. Für die Bestellnummern der Verbrauchsgüter s (siehe Abschnitt
Verbrauchsmaterialien, Seite 29).
• Die CE-Markierung bescheinigt die Konformität des Produkts mit den
wesentlichen Anforderungen der Richtlinie 1999/5/CE des europäischen
Parlaments und Rates bezüglich Telekommunikationsendgeräten, der
Sicherheit und Gesundheit der Benutzer und der elektromagnetischen
Störungen.
Die Konformitätserklärung kann auf der Seite www.sagem.com unter der
Rubrik "Support" abgerufen oder an folgender Adresse angefordert werden:
SAGEM COMMUNICATION - Customer relations department
4 rue du Petit Albi - 95800 Cergy Saint-Christophe - FRANCE
- 2 -
Page 87
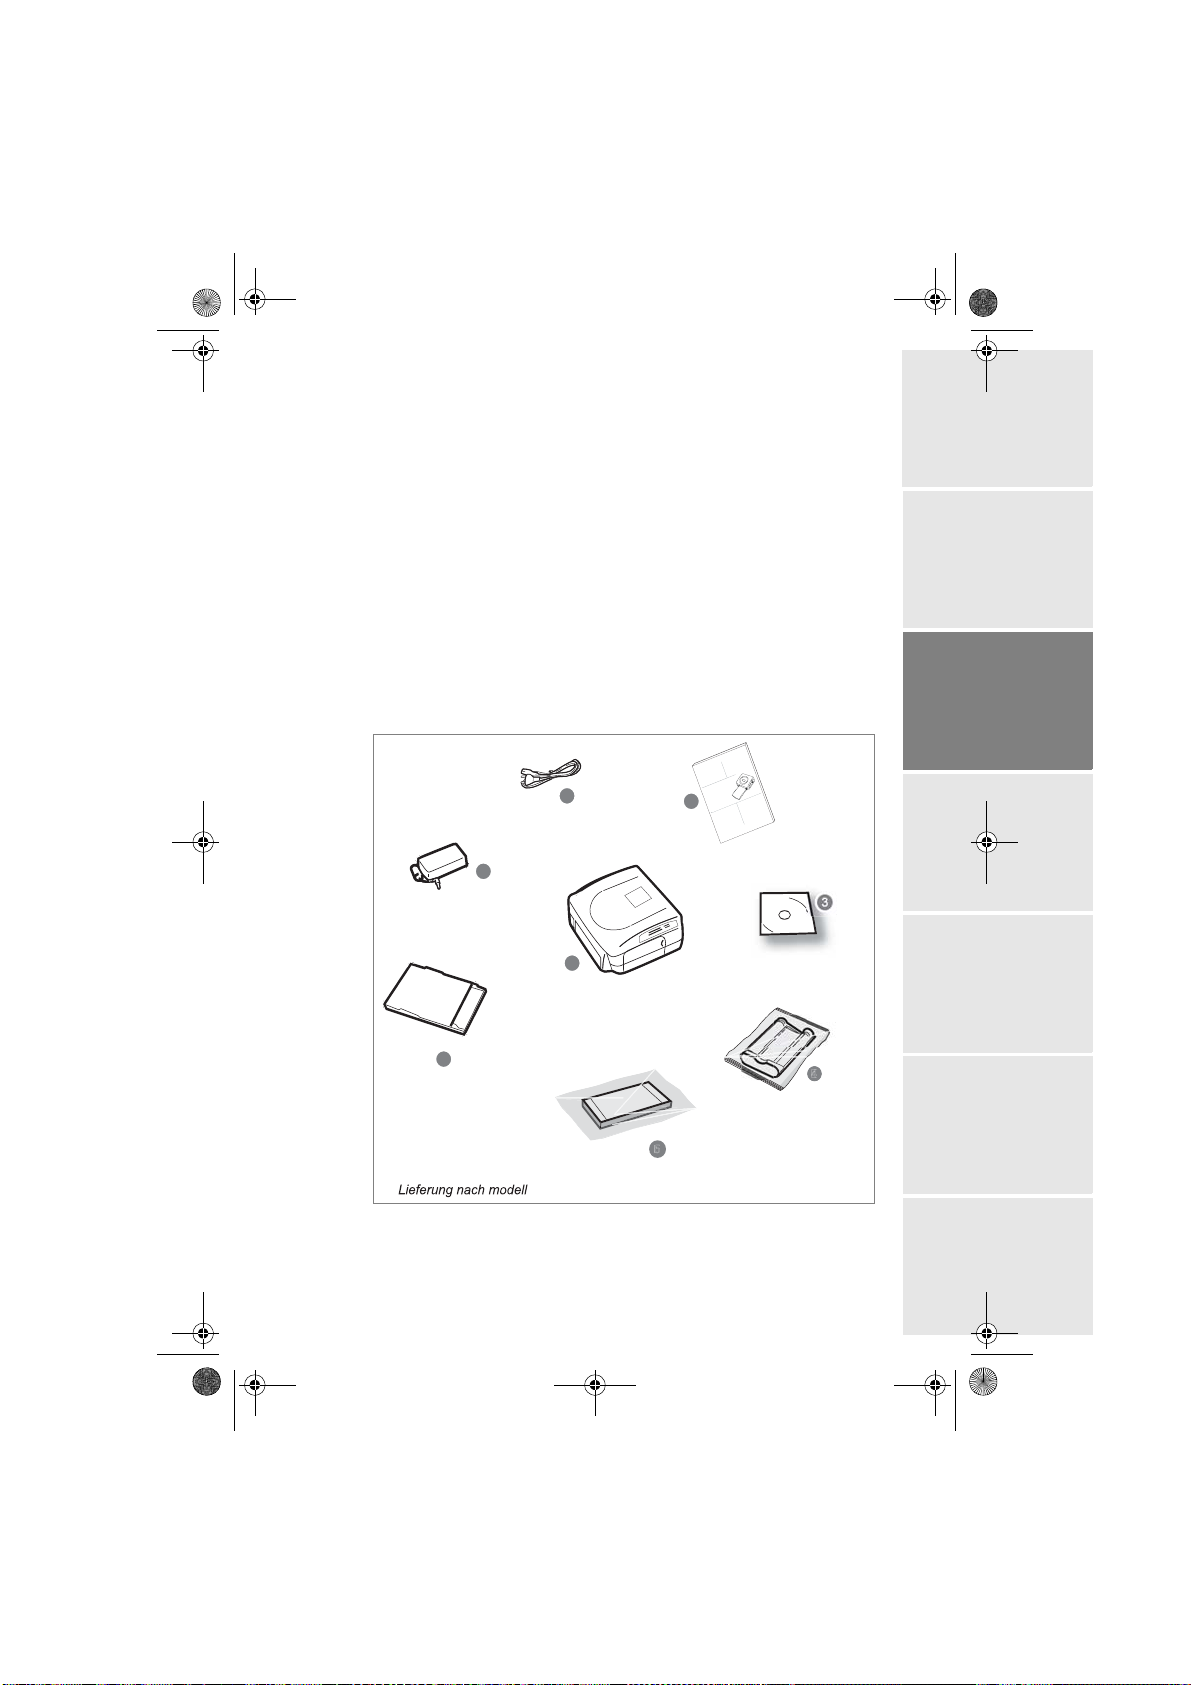
5
SA
GEM
PHO
O EASY 155
Liasse AZUR_ALL.book Page 3 Lundi, 23. mai 2005 8:40 08
2EINFÜHRUNG DES FOTODRUCKERS
Öffnen Sie die Verpackung und überprüfen Sie, ob alle nachfolgend
aufgeführten Elemente vorhanden sind:
1. Fotodrucker
2. Bedienungsanleitung
3. CD-ROM
4. Farbband* (Verbrauchsmaterial)
5. Fotopapier* (Verbrauchsmaterial)
6. Papierfach
7. Netzleitung
8. Netzteil
8
FRANÇAIS ENGLISH
DEUTSCH
GEM
SA
TO EASY 155
PHO
e
id
u
r g
e
s
n
2
U
io
t
a
s
tili
u
tung
i
et d
e
l
n
a
Livr
s
ario
u
s
u
nung
l
e
t
ie
e
d
d
l
Be
ua
ll'uten
n
e
d
Ma
e
l
wijzing
ua
n
n
a
Ma
ksa
i
Gebru
S
7
ESPAÑOL
1
ITALIANO
6
*
- 3 -
NEDERLANDSPORTUGUÊS
Page 88

Liasse AZUR_ALL.book Page 4 Lundi, 23. mai 2005 8:40 08
3BENUTZERSCHNITTSTELLE
Sie können mit der Benutzerschnittstelle folgendes tun :
• Ein Foto nacheinander auswählen oder in den Miniaturbild Modus übergehen
(6 Fotos pro Bildschirm),
• Ein Foto direkt ausdrucken,
• Das Foto im Hinblick auf seinen Ausdruck automatisch verbessern,
• Die Parameter „Format“, „Präferenzen“ und „Bildeinstellungen“ nach Ihren
Wünschen regulieren,
• Mehrere Fotos auswählen und das einzelne Foto in verschiedener Anzahl
ausdrucken,
• Die Zoomfunktion auf ein Foto ausführen und das regulierte Foto ausdrucken.
Beschreibung des Tastenfelds
1
8
7
6
2
3
4
5
1. Ein-/Aus-Taste (langer Tastendruck)
2. Auswahltaste
3. Taste Zoom +
4. Taste Menüzugang
5. Navigator
6. Ausdrucktaste
7. Taste Zoom - und Aktivierung des Miniaturbild Modus
8. Taste CRYSTAL IMAGE (Automatische Verbesserung der
Ausdruckqualität und Rote-Augen-Korrektur)
- 4 -
Page 89

11
10
Liasse AZUR_ALL.book Page 5 Lundi, 23. mai 2005 8:40 08
Optisches Menü
Die gültigen Fotos werden auf dem Bildschirm angezeigt, benutzen Sie die
Tasten oder , um sie aufzuzeigen.
1 3
2
5
X1
6
7
4
8
9
11
10
Folgende Informationen stehen auf dem Bildschirm zur Verfügung:
1. Ausgewähltes Foto
2. Nummer des angezeigten Fotos
3. Gesamtzahl der gültigen Fotos auf der Speicherkarte oder auf der
angeschlossenen Quelle
4. Symbol der Funktion Crystal Image
5. Symbol der Funktion Rote-Augen-Korrektur
6. Anzahl der auszudruckenden Seiten
7. Anzahl der Kopien des Fotos
8. Name der Datei des Fotos
9. Daten des aufgenommenen Fotos wie Jahr/Monat/Tag
10. Eine Kopie hinzufügen, T aste
11. Eine Kopie löschen, Taste
FRANÇAIS ENGLISH
DEUTSCH
ESPAÑOL
ITALIANO
NEDERLANDSPORTUGUÊS
- 5 -
Page 90

Liasse AZUR_ALL.book Page 6 Lundi, 23. mai 2005 8:40 08
4DEN FOTODRUCKER VORBEREITEN
NETZVERSORGUNG
Anmerkung: Sollte sich bei der Installation eine Wand bzw. ein anderer Gegenstand in der Nähe
befinden, achten Sie bitte darauf, daß hinter Ihrem Drucker mindestens 10 cm Raum zur
V e rfügung steht, damit sich das Blatt während des Druckvorgangs ungehindert bewegen
kann.
Bitte lesen Sie die Sicherheitsvorkehrungen zu Anfang der vorliegenden
Bedienungsanleitung, bevor Sie die Verbindungen zum Drucker herstellen.
Stecken Sie das passende Ende der 230V Netzleitung in den dafür
vorgesehenen Anschluss des Netzteils.
Stecken Sie den Stecker des Netzteils wie in der nachfolgenden Abbildung
gezeigt, ganz in den Drucker ein.
Stecken Sie den 230V Eurostecker in eine Netzsteckdose.
Drücken Sie auf die Ein-/Aus-Taste , bis sich der Bildschirm einsc haltet.
Bei dem ersten Start erscheint die Auswahl der Sprache.Wählen Sie mit den
Tasten
oder des Navigators die gewünschte Sprache und drücken Sie
zur Bestätigung die Taste .
Ein Begrüßungsbildschirm erscheint.
- 6 -
Page 91

Liasse AZUR_ALL.book Page 7 Lundi, 23. mai 2005 8:40 08
ZUM ERSTEN MAL EIN FARBBAND EINLEGEN
Anmerkung: Verwenden Sie nur Original-Verbrauchsmaterial. Dieses ist speziell für eine
optimale Ausdruckqualität entwickelt worden (siehe Abschnitt
Verbrauchsmaterialien, Seite 29).
Anmerkung: Die Bestätigung durch Chipkarte ist bei Verwendung des mit dem Drucker
gelieferten Verbrauchsmaterials nicht notwendig (Lieferungen je nach Modell).
Schalten Sie den Drucker ein. Warten Sie ca. 10 Sekunden, (bis sich der
Druckkopf anhebt), und gehen Sie folgendermaßen vor:
1. Öffnen Sie die äußere Klappe auf der rechten Seite des Druckers.
2. Entfernen Sie den Schaumstoffschutz.
3. Nehmen Sie das neue Farbband aus seiner Verpackung und Stellen
Sie sicher, daß der Film gespannt ist, nachdem Sie das Pappteil (A)
entfernt haben.
4. Beachten Sie die Position des Bandes gemäß der unten abgebildeten
Darstellung.
5. Legen Sie das Farbband ganz in die Aufnahme ein. Nach dem
Einlegen muss der Riegel verschlossen werden.
6. Schließen Sie die Außenklappe.
A
6
FRANÇAIS ENGLISH
DEUTSCH
ESPAÑOL
ITALIANO
Achtung:
Anmerkung: Ü berprüfen Sie bei Problemen, ob sich kein Fremdkörper in der Aufnahme des
Berühren Sie den Film des Farbbands niemals mit den Fingern. Die Kassette muss
vollständig in den Drucker eingeführt werde n. Achten Sie darauf, dass der grüne
Sperrhebel nach dem Einlegen des Farbbandes heruntergedrückt worden ist.
Farbbands befindet.
- 7 -
NEDERLANDSPORTUGUÊS
Page 92

Liasse AZUR_ALL.book Page 8 Lundi, 23. mai 2005 8:40 08
DAS FARBBAND WECHSELN
Anmerkung: Verwenden Sie nur Ori-Verbrauchsmaterial. Dieses ist speziell für eine optimale
Druckqualität entwickelt worden.
Schalten Sie den Drucker ein. Warten Sie 10 Sekunden, (bis sich der Druckkopf
anhebt), und gehen Sie folgendermaßen vor:
1. Nehmen Sie die zusammen mit dem Farbband und dem Fotopapier
gelieferte Chipkarte und setzen Sie sie in den Reader auf der linken Seite
des Druckers ein. Die Chipkarte wird vom Drucker erkannt und gelesen.
Am Ende des Vorgangs erscheint "Übertragung OK (40) - Karte
entfernen" oder "Übertragung OK (120) - Karte entfernen" am
Bildschirm.
2. Entnehmen Sie die Chipkarte; der Bildschirm zeigt jetzt wieder die
Startanzeige.
3. Nehmen Sie das neue Farbband aus seiner Verpackung und Stellen Sie
sicher, dass der Film gespannt ist, nachdem Sie das Pappteil (A) entfernt
haben.
4. Öffnen Sie die äußere Klappe auf der rechten Seite des Druckers.
5. Heben Sie den Sperrhebel an und legen. Entfernen Sie das benutzte
Farbband.
6. Beachten Sie die Position des Bandes gemäß der unten abgebildeten
Darstellung.
7. Heben Sie den Sperrhebel an und legen Sie das Farbband ganz in die
Aufnahme ein. Der Sperrhebel muss nach dem Einlegen wieder
geschlossen werden.
8. Schließen Sie die Außenklappe.
Anmerkung: wenn das Farbband während eines Ausdrucks ausgewechselt wird, können Sie den
Ausdruck nach dem Auswechseln des Farbbands wieder aufnehmen, indem Sie auf die
Taste drücken.
- 8 -
Page 93

Liasse AZUR_ALL.book Page 9 Lundi, 23. mai 2005 8:40 08
7 8
A
6
FRANÇAIS ENGLISH
DEUTSCH
Achtung:
Berühren Sie den Film des Farbbands niemals mit den Fingern. Die Kassette muss
vollständig in den Drucker eingeführt werde n. Achten Sie darauf, dass der grüne
Sperrhebel nach dem Einlegen des Farbbandes heruntergedrückt worden ist.
Anmerkung: Ü berprüfen Sie bei Problemen, ob sich kein Fremdkörper in der Aufnahme des
Farbbands befindet.
- 9 -
ESPAÑOL
ITALIANO
NEDERLANDSPORTUGUÊS
Page 94

Liasse AZUR_ALL.book Page 10 Lundi, 23. mai 2005 8:40 08
LADEN DES PAPIERS
1. Entfernen Sie das Papierfach.
2. Öffnen Sie die Papierpackung, so dass das Schutzblatt oben auf ist, legen
Sie letzteres in die Papierkassetteein. Überprüfen Sie, dass sich das für
eine Briefmarke vorgesehene Rechteck an der Aussenseite der
Papierkassette d.h. zu Ihnen gerichtet befindet.
3. Entfernen Sie die Schutzfolie.
4. Bringen Sie die Papierkassette mit der offenen Kante vor. Legen Sie die
Blätter ins Papierfach ein. Führen Sie die Kassette langsam bis zum
Einrasten in den dafür vorgesehenen Schacht des Druckers.
Schutzfolie
Achtung:
Ihr Fotodrucker ist jetzt bereit zum Ausdrucken Ihrer digitalen Fotos.
fassen Sie die Papierbögen an den perforierte n Ränder n an. Berüh ren Sie die glänzende
Seite vor dem Druck niemals mit den Fingern. Es besteht die Gefahr einer verminderten
Druckqualität.
- 10 -
Page 95

Liasse AZUR_ALL.book Page 11 Lundi, 23. mai 2005 8:40 08
Achtung: sc hützen Sie die Verbrauchsmaterialien gegen zu lange Lichteinwirk ung, gegen
Feuchtigkeit, Hitze und Staub. Halten Sie die im Abschnitt (siehe Abschnitt
Technische Daten, Seite 35). Verwenden Sie nur für diesen Drucker vorgesehenes
Original-Verbrauchsmaterial. Legen Sie nicht mehr als 20 Blätter gleichzeitig in
das Papierfach ein.
Achtung: ste llen Sie sicher, dass ein bereits ausgedrucktes Foto nicht aus Versehen in ein
Paket neuer Blätter gerät. Dies könnte das Band Ihres Druckers beschädigen.
FRANÇAIS ENGLISH
DEUTSCH
ESPAÑOL
- 11 -
ITALIANO
NEDERLANDSPORTUGUÊS
Page 96

Liasse AZUR_ALL.book Page 12 Lundi, 23. mai 2005 8:40 08
5ÜBERTRAGEN SIE IHRE BILDER
FÜHREN SIE EINE SPEICHERKARTE EIN
Führen Sie Ihre Speicherkarte je n ach Format in den entsprechenden S palt ein, wie
auf der unten abgebildeten Grafik dargestellt.
Schlitz für die
Format e
Multi Media Card (MMC
Standard Digital (SD)
Schlitz für das
Format Memory Stick (MS)
)
Achtung:
Schlitz für die
Formate
Smart Media (SM),
xD Karte
Schlitz für das
Format CompactFlash
smartMedia NACH UNTEN EINSCHIEBEN.
Achtung: die Speicherkarte lässt sich nicht vollständig in den Einschub einführen. BITTE
VERSUCHEN SIE ES AUF KEINEN FALL MIT GEWALT. Ziehen Sie die Karte
wieder heraus und stellen Sie sicher, dass Sie den richtigen Einschub wählen und die
Karte in der korrekten Richtung einführen.
Achtung: damit, die auf der Speicherkarte befindlichen Fotos in chronologische Reihenfolge
ausgedruckt werden, müssen die Parameter "Datum und Uhrzeit" vor der Fotoaufnahme
aktiviert werden. Andernfalls werden die Fotos in einer beliebigen Reihenfolge
ausgedruckt.
- 12 -
Page 97

Liasse AZUR_ALL.book Page 13 Lundi, 23. mai 2005 8:40 08
Karte Lage
Smart Media
(SM)
Memory Stick
(MS)
Standard
Digital
(SD)
Multi Media
Card
(MMC)
xD Karte
CompactFlash
FRANÇAIS ENGLISH
DEUTSCH
ESPAÑOL
ITALIANO
NEDERLANDSPORTUGUÊS
- 13 -
Page 98

Liasse AZUR_ALL.book Page 14 Lundi, 23. mai 2005 8:40 08
ÜBERTRAGUNG VON FOTOS PER INFRAROT-VERBINDUNG
Achtung: wenn sich eine Speicher karte im Drucker befindet, haben Si e keinen Zugriff auf die
Infrarotschnittstelle .
Achtung: wenn Sie die Übertragung mit Bluetooth begonnen haben, können Sie die Fotos erst mit
Infrarot übertragen, nachdem Sie den internen Speicher mit einem langen Druck (3
Sekunden) auf die Taste geleert haben.
Mit dem Fotodrucker können Sie in einem Handy, einem Palm oder einem
Computer gespeicherte Fotos au sdrucken. Dazu müss en Sie die Fotos mit Hilfe der
Infrarotschnittstelle auf den Drucker übertragen werden.
Anmerkung: auf der Website www.sagem.com finden Sie eine Liste der kompatiblen
Peripheriegeräten.
Schalten Sie den Drucker ein. Stellen Sie das Infrarotfenster des Peripheriegeräts
in einer Entfernung von maximal 30 Zentimetern gegenüber dem Infrarotfenster
des Druckers auf.
Achtung:
Bei Umgebungen, die einer starken Beleuchtung ausgesetzt sind, wird ein Abstand von
maximal 10
Zentimetern zwischen den beiden Infrarot-Fenstern empfohlen.
Wählen Sie an Ihrem Peripheriegerät ein Foto aus und starten Sie dessen
Übertragung per Infrarotverbindung.
Die Übertragung beginnt und während der ge samten Übertragung sdauer blinkt die
Meldung "Infrarot-Übertragung - Bitte warten" am Bildschirm des Druckers.
- 14 -
Page 99

Liasse AZUR_ALL.book Page 15 Lundi, 23. mai 2005 8:40 08
Sie können:
• entweder das übertragene Foto jetzt ausdrucken, nachdem Sie eventuell
das Druckformat und die Kopienanzahl geändert haben,
• oder ein weiteres Foto aus dem Peripheriegerät übertragen, das dann zu
dem (den) anderen bereits im Drucker gespeicherten Foto(s) hinzugefügt
wird. Nach jeder Übertragung wird die Gesamtanzahl gespeicherter Fotos
auf dem Display des Druckers angegeben (das Foto mit der höchsten
Nummer ist das letzte übertragene Foto),
• sie können jetzt die in den vorherigen Kapiteln beschriebenen
Operationen durchführen, bevor Sie den Ausdruck dieser Fotos starten
(Auswahl der Nummern der zu druckenden Fotos, Auswahl des Formats,
Auswahl der Kopienanzahl).
Sie können:
FRANÇAIS ENGLISH
• entweder einen neuen Ausdruck starten, nachdem Sie eventuell andere
Parameter ausgewählt haben (Fotonummer, Format, Kopienanzahl),
• oder alle ausgewählten Fotos löschen. Drücken Sie dazu 3 Sekunden lang
auf die Taste .
ÜBERTRAGUNG VON FOTOS AUS EINEM
BLUETOOTH-PERIPHERIEGERÄT (OPTION)
Achtung: wenn sich eine Speicherkarte im Drucker befindet, haben Sie keinen Zugriff auf den
Bluetooth-Übertragungsmodus.
Achtung: w enn Sie die Übertragung p er Infra rot begonnen ha ben, können Si e die Fotos ers t
mit Bluetooth übertragen, nachdem Sie den internen Speicher mit einem langen
Druck (3 Sekunden) auf die Taste geleert haben
Der Adapter des Bluetooth Druckers (Sonderau srüstung) ist eine schne lle und
wirkungsvolle Lösung, zum von einem telegraphischen Anschluß zu einem
Anschluß ohne Leitung zu überschreiten.
Mit dem Adapter kann der Fotodrucker in einen Bluetooth-Empfänger
verwandelt werden, damit Fotos aus Geräten ausgedruckt werden können , die
mit der Bluetooth-Technologie versehen sind. Dazu zählen zum Beispiel
Handys, Palms, Computer und andere Geräte.
.
DEUTSCH
ESPAÑOL
ITALIANO
NEDERLANDSPORTUGUÊS
- 15 -
Page 100

Liasse AZUR_ALL.book Page 16 Lundi, 23. mai 2005 8:40 08
Stellen Sie sicher, dass die Geräte mit Spannung versorgt werden. Forcieren Sie
niemals den Anschluss der Stecker in die Geräte. Sie riskieren, sowohl das Kabel
als auch den Stecker zu beschädigen.
Anmerkung: auf der Website www.sagem.com finden Sie eine Liste mit den kompatiblen
Peripheriegeräten.
Stecken Sie den Bluetooth-Adapter (Sonderausrüstung) in den
USB-Anschluss (A) Ihres Fotodrucker.
A
Die Geräte erkennen sich automatisch gegenseitig.
Achtung:
die Größe des bzw. der Fotos, die an den Drucker Foto übertragen werden sollen, muss
weniger als 600 KBytes betragen. Die Fotos müssen das Format JPEG haben. Wenn die
maximale Speicherkapazität erreicht ist, erscheint die Fehlernachricht „
Speicher voll“
Um neue Daten an den Drucker
.
Foto zu übertragen, müssen Sie den Speicher leeren.
Interner
Drücken Sie dazu 3 Sekunden lang auf die Taste .
Die Übertragung beginnt und während ihrer Dauer blinkt die Meldung „Bluetooth
Übertragung - Bitte warten“ auf dem Display des Druckers.
Sie können:
• entweder das übertragene Foto jetzt ausdrucken, nachdem Sie eventuell das
Druckformat und die Kopienanzahl geändert haben,
• oder ein weiteres Foto, dieses wird zu dem (den) bereits im Drucker
gespeicherten Foto(s) hinzugefügt. Nach jeder Übertragung wird die
Gesamtanzahl gespeicherter Fotos auf dem Display des Druckers angegeben
(das Foto mit der höchsten Nummer ist das letzte übertragene Foto).
Anmerkung: wen n der Speicher des Fotodruckers voll ist, erscheint folgende Meldung „Interner
Speicher voll“.
- 16 -
 Loading...