

Sagem PHONEF@X INTERNET 390-i, PHONEF@X INTERNET 395-i, PHONEF@X INTERNET 440-i, PHONEF@X INTERNET 445-i User Manual
Page 1

PHONEF@X INTERNET
390-i / 395-i / 440-i / 445-i
User manual
FACSIMILE MACHINES
This product is not designed for making emergency telephone calls when the power fails.
Alternative arrangements should be made for access to emergency services.
Page 2
GENERAL VIEW
2
440-i / 445-i
OR
2
3
1
7
8
91011
390-i / 395-i
OPERATION PANEL
3
1
7
8
91011
440-i / 445-i
4
OR
56
4
390-i / 395-i
56
12
13 14 15 16 17 18
19
20
35
21
34 33 27 29
32 24 25
31
30
22
28
26 23
42
4143
45
46
4044
36
37
38
39
Page 3

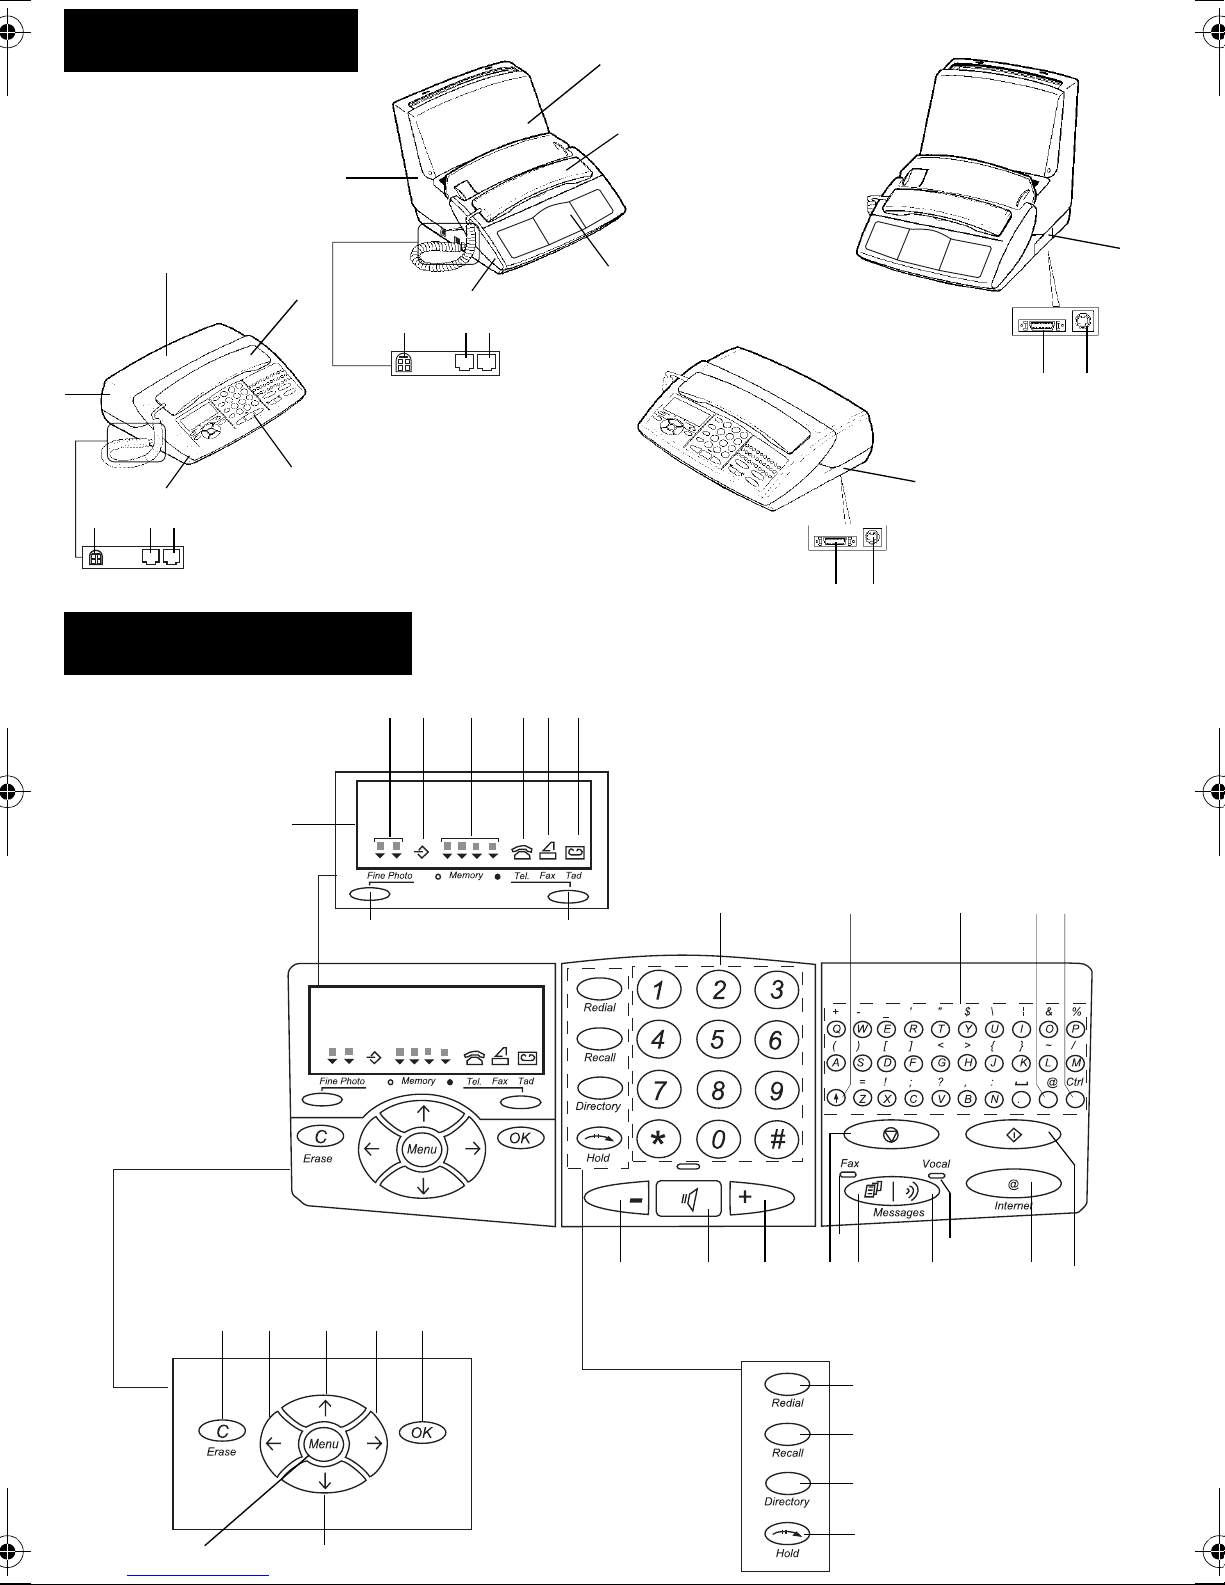
1 Rear cover
2 Fax access door (390-i / 395-i models) or printer
paper feeder (44 0-i / 445-i models)
3 Handset
4 Auxiliary connector access
5 Radio module connector
6 PC connector
7 Control panel
8 Front cover
9 Handset jack
10 Telephone line jack
11 Power supply jack
12 LCD display screen (2 lines of 16 characters and
10 icons)
13 Scan mode when sending faxes:
- normal: 2 icons off
- fine: fine icon lit
- photo: photo icon lit
14 Line icon:
Lit: communication in progress
Flashing: establi s hm ent of fax communication or
telephone commu-nication in pro gress
15 Memory status (0 to 100%)
16 Telephone icon : telephone in service
17 Fax icon: autom atic fax recept ion
18 TAD icon: answering ma chine in service
19 Choice of fax transm issi on sca n m ode when
sending faxes
20 Choice of rece ption mode
21 Numeric keypad
22 Alphabetic keypad
23 Start key: transmi ssio n of faxes or local copy
24 @ key: used to enter the @ ch aracter in e-mail
addresses
25 Ctrl ke y: u sed in co nj unc ti on wit h a ny le tt er on the
keypad to access the symbols shown above the
alphabeti c characters
26 Intern et @ key: for faxing via t h e Internet
27 Stop key: stop current operation or confidential
telephone mode (Mute)
28 Vocal message s lamp: presence o f v oice messages
on the ans w ering machine
29 Vocal mail ke y: to listen to messages
30 Fax message key: to print faxes received in memory
31 Fax messages lamp: there are fax messages stored
in memory
32 Shift key : used in conjunction with a ny le tter
on the keypa d to enter a capit al letter
33 Loudspeaker volume up key
34 Loudspeaker key: hands-free telephony or speaker
mode
35 Loudspeaker volume down key
36 Redia l ke y: automatic recall of last number dialled
37 Recall key: in sert a pause in dialling or PABX
recall (Flash key)
38 Direct ory key: call a nu mber in the direc tory
39 Hold k ey: transfer a telephone cal l to another
extension on the same line
40 OK key: confirmation of selection displayed on
screen
41 Screen cursor: move right
42 Screen cursor: m ove up
43 Screen curso r: m o ve left
44 C key: retu rn to previous message dis-played on
screen
45 Menu key: ac c ess th e various functions
46 Screen cursor: m ove down
Page 4

TABLE OF CONTENTS
CHAPTER 1: INSTALLATION......................................................................................................1
1. Unpacking the unit.............................................................................................................1
2. Output paper......................................................................................................................1
3. Connections ................ ......................................................................... .......................... .....2
4. Setting up the unit..............................................................................................................3
CHAPTER 2: DIRECTORY............................................................................................................5
1. Creating a new record....................................................................................................... 5
2. Consulting, editing or deleting a record ....................................................... ...................6
3. Deleting a record................................................................................................................7
4. Printing the directory........................................................................................................7
5. Saving/restoring the directory (option)............................................................................7
CHAPTER 3: TELEPHONE FUNCTIONS...................................................................................8
1. Using the handset...............................................................................................................8
2. Hands free telephony......................................................................................................... 8
3. Calling from the directory ................................................................................................8
4. Answering a call.................................................................................................................9
5. Redialling one of the last ten numbers called..................................................................9
6. Mute mode..........................................................................................................................9
7. Using recall, # and *...........................................................................................................9
8. Transferring a call ............................................................................................................. 9
9. Timing your calls...............................................................................................................9
10. Using a cordless handset..................................................................................................10
11. Using a mobile phone (depending on model).................................................................10
CHAPTER 4: FAX..........................................................................................................................11
1. Fax transmission............................................................................................................. .11
2. Fax reception: fax answering machine..........................................................................13
3. Making a telephone call during a fax transmission......................................................14
CHAPTER 5: INTERNET .............................................................................................................15
1. Subscription and access provider...................................................................................15
2. Sending/receiving via the internet..................................................................................16
3. Settings..............................................................................................................................17
CHAPTER 6: ANSWERING MACHINE.....................................................................................20
1. Set-up ................................................................................................................................20
2. Selecting the type of answering machine.......................................................................20
3. Announcements................................................................................................................20
4. Messages ........................................................................................................................... 21
5. Local memo ......................................................................................................................21
6. Call screening.... ...............................................................................................................22
7. Remote retrieval of messages on the answering machine............................................22
8. Privileged access...............................................................................................................23
Page 5

CHAPTER 7: RECEPTION MODES...........................................................................................24
1. Manual mode....................................................................................................................24
2. Automatic mode with answering machine.....................................................................24
3. Automatic mode without answering machine...............................................................24
CHAPTER 8: ADVANCED COMMUNICATION FUNCTIONS.............................................25
1. Deposit and retrieval (active polling).............................................................................25
2. Transmission waiting queue ...........................................................................................26
3. performing operations from another extension............................................................27
4. Mailbox.............................................................................................................................27
CHAPTER 9: OTHER FUNCTIONS...........................................................................................29
1. Photocopies.......................................................................................................................29
2. Printing.............................................................................................................................29
3. Viewing the ribbon...........................................................................................................29
4. Protecting your voice and fax messages.........................................................................29
5. Alarm ................................................................................................................................30
6. Economising printing paper .................. .........................................................................30
7. PC interface......................................................................................................................30
8. Special ringing (for Australia only)................................................................................31
CHAPTER 10: APPENDICES.........................................................................................................32
1. Replacing consumables....................................................................................................32
2. Technical parameters.................... ..................................................................................36
3. Technical characteristi cs.................. ...............................................................................36
4. Transmission report codes..............................................................................................37
5. Troubleshooting...............................................................................................................38
6. Notice for co nnec ti on to the tel ecommunication system (for Unite d K ingdo m onl y) 39
This equipment has been approved in accordance with Council Decision 98/482/EC for pan-European single
terminal conn e ct io n to t he public switched telephone network (PST N).
In the event of problems, you should con ta ct your equipment suppl ie r.
Page 6

NOTE POUR
L’IMPRIMEUR :
VOIR BAT
Page 7

Page 8
CHAPTER 1: INSTALLATION
1. UNPACKING THE UNIT
Check the presence of the following items:
Main unit
Power adapter
Telephone han dset
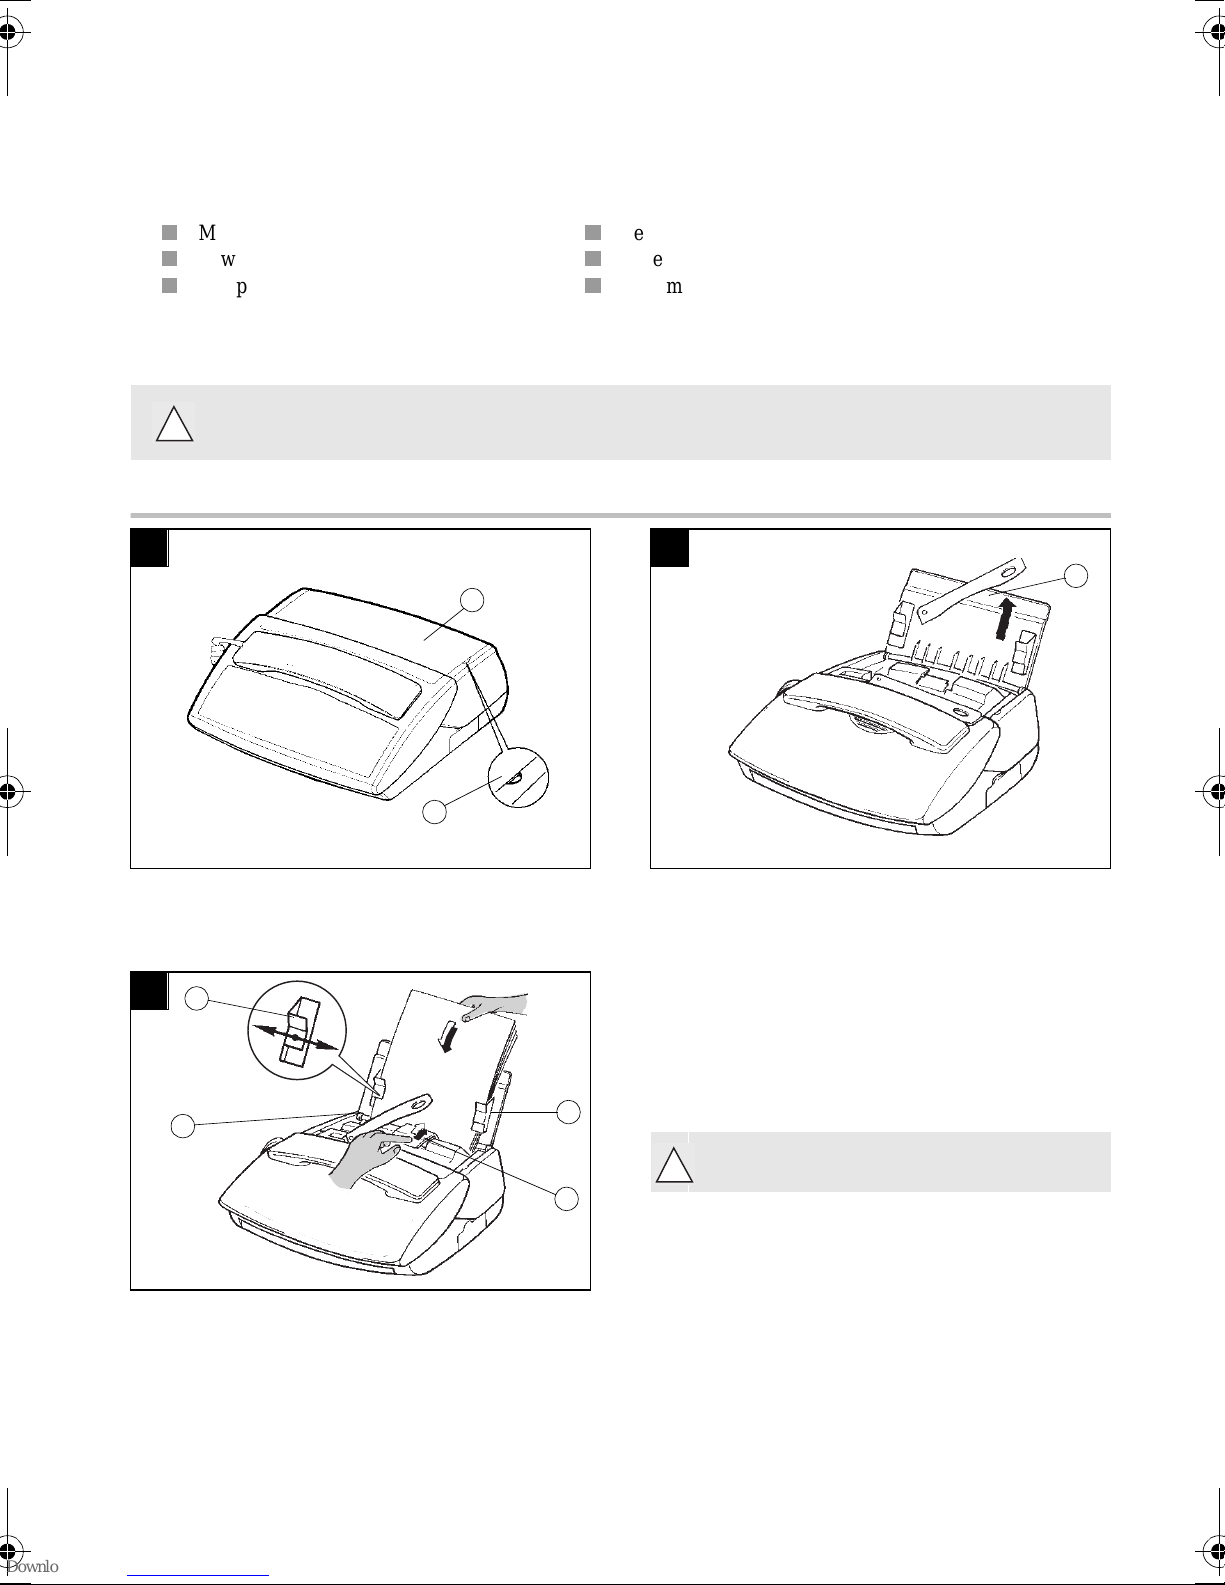
2. OUTPUT PAPER
You may u se a ny stan dard p lain p aper ( A4 fo rmat pho tocop yi ng pape r, approx. 80 g/m2). However, for
!
optimal print quality re sul ts, we sugg est you use the type of paper recom m e nded by the manufactur er.
FOR 390-I / 395-I MODELS
1 2
1
Telephone cable
Paper
User manual
3
2
To open the fax access door (1), use notch on the side
(2).
3
4
7
6
5
Lift the paper support bracket (3).
Prepare a stack of A4 paper (30 sheets max.).
Press the clip (5) to insert the paper in the unit’s paper
store.
Insert the paper between the paper guides (4 and 6).
Adjust the left paper guide (4) to the width of the paper
Lift the support guide (7) to facilitate print-
!
out stacking.
1
Page 9

FOR 440-I / 445-I MODELS
1 2
Snap the paper holder (1), in the two slots (2)at the top
of the sheet feeder.
Open the feeder cover (3).
!
2
3
Use only new paper that is not torn, crumpled or curle d.
Never reload th e fe eder during print ing.
Remove any remaining sheets of paper from the feeder before reloading paper.
1
2
3
Prepare a stack of plain paper (100 sheets maximum).
Place the paper stac k i nto the feeder (4).
Close the feeder cover (3).
4
3. CONNECTIONS
1 2
1
Connect the t elephone ha ndse t c ord to the appropriate
connector (1) on the main unit.
3 Connect the small plug of the power adaptor to
3
Connect the sma ll plug of the telepho ne cable to the
appropriate connector (2) on the main unit, and
connect the ot her end to your wall telephone socket
!
2
the connector (4) on the ma in unit. Ensure the
strip (3) is facing upwar ds.
or
2
Make sure the wall socket to which yo u are connecting
4
your machine complies with the specifications on the
label under the power adaptor.
Connect the m ains ca ble pl ug of the powe r adap tor to th e
wall socket.
Page 10
4. SETTING UP THE UNIT
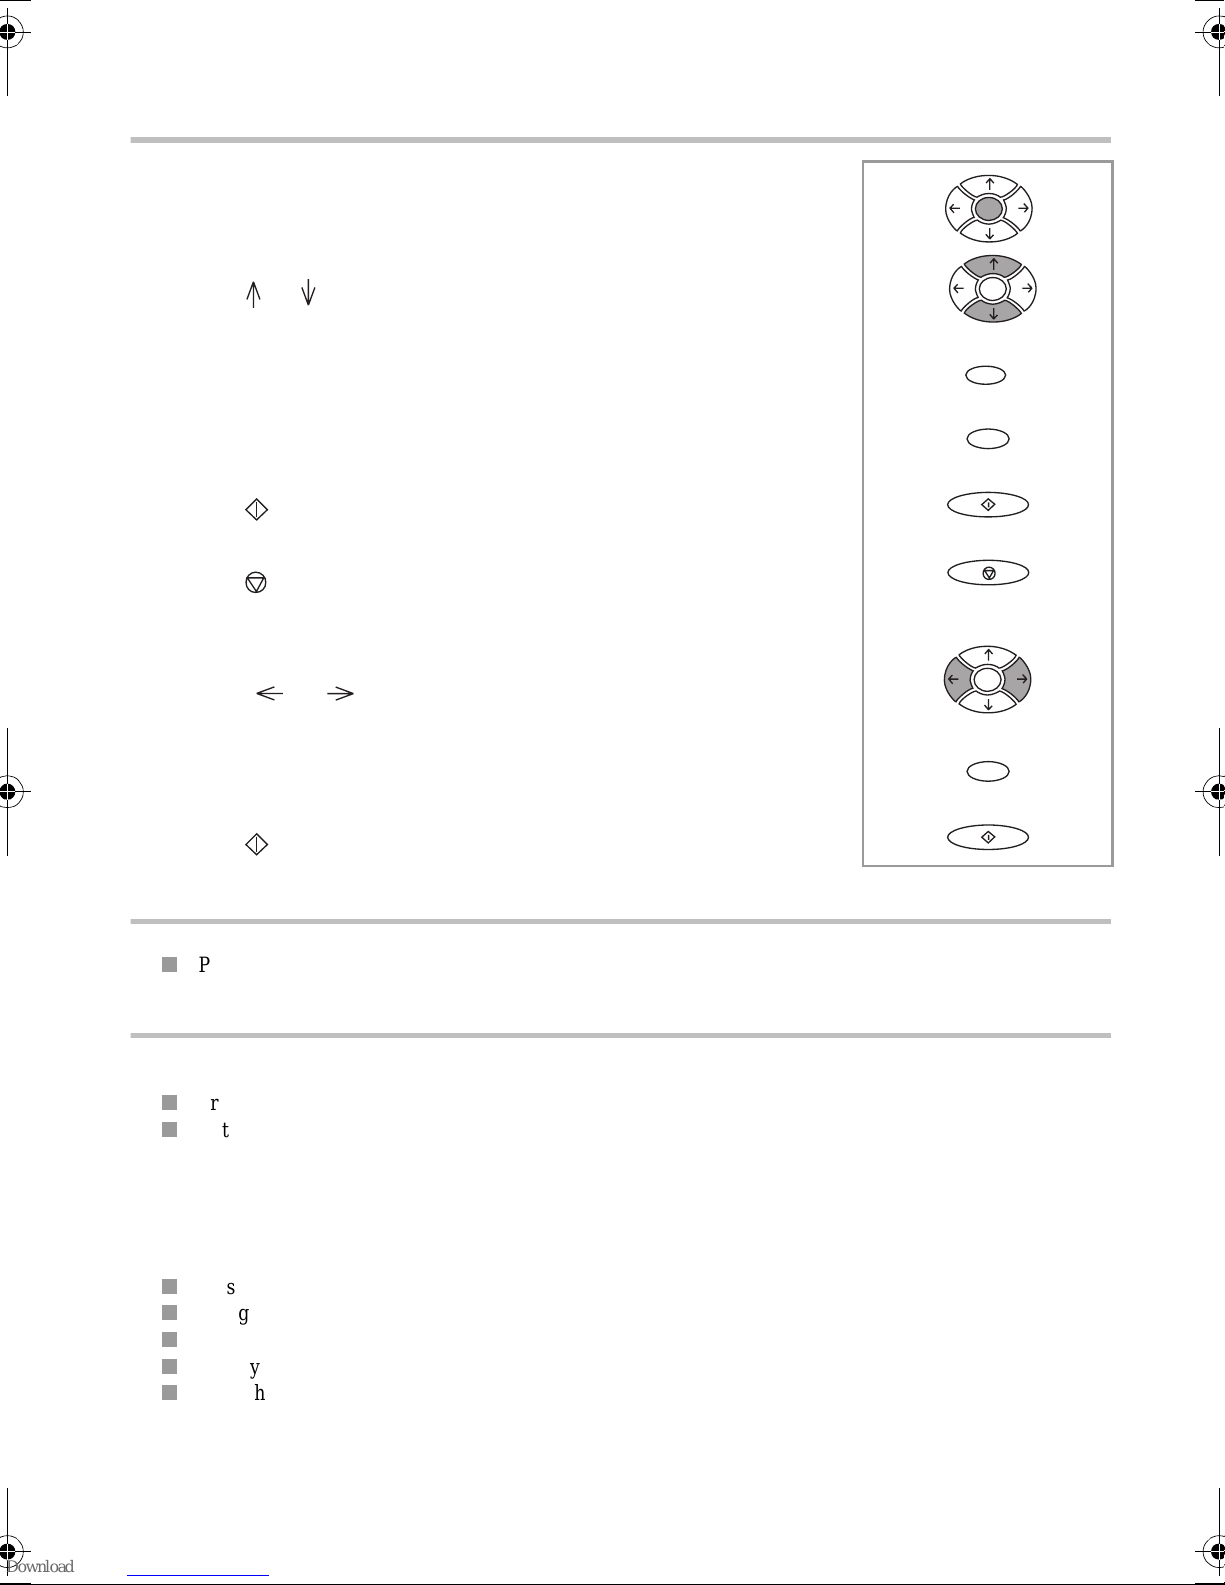
ACCESSING THE MENUS
ACCESSING THE MAIN MENU:
Press the MENU key.
MOVING WITHIN THE MENUS:
Press the or arrow to select the previous or th e ne xt line in the menu.
Menu
Menu
Press th e OK key to access the following menu.
Press th e C (COR RECTION) key to return to the previou s me nu.
Press the key (START) to c onfi rm and exit from the curr ent menu.
Press the key (STO P) to exit from the current menu.
MOVING WITHIN A DATA ENTRY FIELD:
Press the or key to delet e the last charac ter or to insert a spa ce or to
move with in a field (e.g. to record the date ).
Press th e C ke y to cancel entry and return to the in itial value.
Press the key to confirm ent ry a nd exit from the curre nt menu.
PRINTINGS THE MENUS
You can print the menus and discove r al l the functions of your machine:
Press MENU, 5, 1 and OK.
OK
C
Menu
C
PROGRAMMING
ENTERING OR CHANGING THE DATE AND TIME
Press MENU, 2, 1 and OK.
Enter the date and time using the numer ical keypad, then pr ess OK to confirm.
For example , to en t er 7 May 1999, 9:15, enter 0 7 0 5 9 9 0 9 1 5 then Press OK.
RECORD YOUR NUMBER AND NAME
Your number a nd name are pr inted on fax es transmitted wh en the HEADER se tting is acti ve. To record you r
number and your name:
Press MENU, 2, 2 and OK.
Using the numeric keypad, enter the telephone number of your fax machine.
Press the OK key to confirm your choice.
Enter you name using the alphabetic keyboard.
Press the OK key to confirm your choice.
3
Page 11

RINGING TONE
+
You can ch oose betwee n 4 different tone s or NO R INGING TONE a nd adjust the volume of th e ringing t one
chosen.
Press MENU, 2, 3 and OK.
Select the desire d ri ngi ng tone (N° 1 to 4 or NO RINGING TONE) using t he and na vi gation keys.
To adjust the volume of the tone, press keys.
When the tone and volume suit you, press the OK key.
TYPE OF NETWORK
The telephone line to which your machine is connected may be linked either to a private network or the public
network (via a switchb oard, for example).
To set your fax machine for a PABX (private network), press MENU, 2, 4, 1 and OK.
To set your fax machine for PSTN, press MENU, 2, 4, 2 and OK.
PREFIX
If your unit is connect ed to a private automa tic branch exchan ge (PABX), you must record th e prefix number
(generally 0).
Press MENU, 2, 5 and OK.
Select the WIT H opt ion using the or keys and press the OK key to confirm.
Enter the number use d by your PABX to access the tele phone networ k (for inst ance 0) follo wed by a / and
press th e OK key.
If necessary, enter the phone number length to which the prefix must be automatically added (in most cases
the value is 10) and press the OK key to confirm.
Then press the STOP key.
Note: choosing the prefix enabl es you to change from a private network (WITH prefix) to a pub lic network
(WITHOUT prefix). In this case, all the number in the directory are memorised without a prefix.
NUMBER OF RINGS
You can set the number of rings after which the answering machine is activat ed .
To set the number of rings (2 to 9), press MENU, 2, 6 and OK.
Change the numbe r of ri ngs if you wish and press the OK key to co nfi rm your choice (2 to 9).
REMOTE RETRIEVAL CODE
This function allows you to define the code to access locally or remotely messages recorded or faxes received by
your machine and stored in memory.
To enter a remote retrieval code, press MENU, 2, 7 and OK.
Enter your code and pre ss the OK key to confirm your choice.
TRANSMISSION REPORT
After sending a fax , yo ur fax machine can pr int the transmission report to your choic e.
Press MENU, 2, 8 and OK.
Select an option us ing the or keys.
• WITH: A transmission report is print ed whether the transmission has ende d successfully or h as failed.
There is thus one transmission report for each transmission request.
• WITHOUT: There is no rep ort for the do cuments se nd (refer t o the tran smission log to keep a t race of
communications).
• IF ERROR: A transmission report is printed only if the transmission fai led.
Press OK to confir m.
4
Page 12

CHAPTER 2: DIRECTORY
1. CREATING A NEW RECORD
To access this menu, press MENU, 1, 1 and OK.
Your fax machine cre ates a ne w record. You can now rec ord yo ur contact’s details.
Note: you can cancel creation of the record at any time by pressing the STOP key.
ENTERING THE CONTACT’S NAME
Using the alphabeti c keyboard, enter yo ur contact’s name.
You can correct your entry usi ng the key.
Press the OK key.
ENTERING THE CONTACT’S FAX NUMBER
Using the numeric keypad, enter the number of your contact’s fax machine.
Press the OK key to confirm.
Note: if you wish to insert a dialling pause (to exit a private company network, for example): press the / key on
the alphab et ic keyboard. The character / is inser ted in the num be r displayed.
ENTERING THE CONTACT’S INTERNET ADDRESS
If your contact has an Internet address, enter it in the directory.
Use the alphabetic keyboard to enter your contact’s e-mail address:
@
Notes: to enter the @ character, use the key,
to enter a full stop, press the key.
Press the OK key to confirm your entry.
.
ENTERING THE CONTACT’S VOICE MEMO
If you record a v oca l memo, you will he a r it when you call the contact associated to the record.
Move the indicator to "VOX MEMO" using the or keys and press the OK key.
Lift the hands et and record th e voice mes sage yo u wish to associ ate with th e cont act, for ex ample "SM ITH".
Hang up the contact is recorded in the directory.
If you do not wan t to associat e a voice mem o to your recor d, move th e indicator to "WITHOU T MEMO " and
press the OK key.
5
Page 13
2. CONSULTING, EDITING OR DELETING A RECORD
SELECTING A RECORD IN THE DIRECTORY
Press MENU, 1, 3 and OK.
Note: the contacts are recorded in alphabetical order in the directory.
There are two ways o selecting a record:
• Selection by name
Example: find th e SMIT H record in the directory:
- Enter the l ette r s S,M and I, your fax machine loo k s it up.
- If several contacts start with the same two letters, you can refine your search by typing more letters or
using the or keys: your fax m ac hi ne refines the search as you refine your selection.
- Press the OK key.
• Step by step selection using the and arrows
Example: find th e SMIT H record in the directory:
- Press MENU, 1, 3 and OK.
- Move the indic at or > usi ng t he or keys until you the SMITH record is displayed.
- Press the OK key.
EDITING A RECORD IN THE DIRECTORY
When you have se le cted a record:
You can correct the na me by using t he key and mod ify ing the na me wit h th e alph ab etic keyboa rd (as
for adding a re cord).
Press the OK key to confirm.
You can correct the fax number by using the key and cha ngi ng the number with the numeric key pad
(as for adding a record).
Press the OK key to confirm.
You can correc t the E-m ail address b y using the key and cha nging the address with the alphab etic
keyboard (as for ad ding a record).
Press the OK key to confirm.
You can modif y the speed dial number automatic ally attr ibuted to th e contact wit h the key and the
numeric ke ypad.
Press the OK key to confirm.
Move the indicator > to the chosen option using the o r keys:
• VOX MEMO:
- If there is no voice message associat ed to the record, you m ust record one:
* Pick up the receiver
* Record the vo ice message
* Hang up: the m odifications are re corded.
- If there is already a voice me s s age associated to the record: mo ve the indic ator > to the chosen option
using the or keys.
* KEEP MEMO: the vocal m essage a ssociated to the record is kept. Press the OK key.
. NEW MEMO: you can recor d a new voice message.
- Pick up the receiver
- Record the voi c e m essage
- Hang up.
6
Page 14

• WITHOUT MEMO: if there is a voice message associated to the record, it is deleted.
At this point, you can define certain "privileged" contacts you call frequently and personalise their
incoming calls:
- with a special ri n ging tone,
- by choosing a spec ia l m ai lbox number,
- on a particula r cordless handset.
Select an option using the or keys:
• PHONE CALL: If the number associated to the record is a phone number.
• FAX CALL: If the num ber associated to the record is a fax numb er.
Press the OK key.
If you chose APPEL TEL, select the ringing tone you want to use for calls from your contact.
Press the OK key.
Select the MAILBOX NUMBER you want to assign to faxes received fro m your c ont act .
Press the OK key.
Select the number of th e cordle ss handset you want to assign to c alls from your c ontact (onl y if a cordl ess
handset is connected to the unit).
Press the OK key.
3. DELETING A RECORD
Press MENU, 1, 4 and OK.
Select the record to be del et ed using the or keys or typing the letters of you r con ta ct ’s na me .
Press the OK key.
4. PRINTING THE DIRECTORY
Press MENU, 1, 2 and OK.
Your fax machine prints the directory.
5. SAVING/RESTORING THE DIRECTORY (OPTION)
A specific smar t ca rd allows you to save and restore the directory a s well as the unit’s parameters.
To do so, you must get a saving kit from your retailer. The saving kit includes a user manual. Refer to the manual
for further information.
7
Page 15

CHAPTER 3: TELEPHONE FUNCTIONS
Your machine is p rogrammed in the fa ctory to operate on tone dialling el ectronic telep hone exchanges.
(*)
1. USING THE HANDSET
Pick up th e receiver.
Type your party’s num ber.
The screen disp la ys the number dialled.
Notes: You can dial the number before lifting th e recei ve r.
You can call from the directory (see Calling from the directory of this chapter).
2. HAND S FREE TELEPHONY
You can dial dial your party’s number without lifting the receiver:
Dial your party’s num be r (or use the directory). The screen displays number dial led.
Press the SPEAKER key. The machine dials automa t ically.
When your party answers, lift the receiver or stay close to the machine’s control panel in order to speak.
You can also take the line before calling:
Press the SPEAKER key, you can h ea r the dial tone through the speaker.
Dial your party’s numbe r.
Note: at any time, y ou can pic k up the receiver and use it to cont inue the call (i n this case the S PEAKE R and
the microphone are automatically disabled ).
You can also switch from handset mode to speaker mode during a call:
Press and hold down the SPEAKER key,
Hang up the receive r,
Release the SPEAKER key.
Now you can continue the call using the SPEAKER.
3. CALLING FROM THE DIRECTORY
Your fax machine offers several options.
BY NAME
Example: call the YATES record in the directory.
Enter the letters Y, A and T , your fax machine looks up the number.
If several names start with the same letters, you can refine your search by typing more letters or using the and
keys.
Press the key or pick up the receiver.
2-DIGIT DIALLING
Example: call the YATES record in the directory using speed dial number 02.
Press the DIRECTORY key.
Enter the number 2 with the numeric keypad.
Press the key or pick up the receiver.
(*)
The telephone feature is only active when the unit is turned on.
8
Page 16

4. ANSWERING A CALL
Your telephone rings and the LINE icon fla s hes.
Pick up the receiver and speak.
To end the conversation, hang up.
5. REDIALLING ONE OF THE LAST TEN NUMBERS CALLED
Your fax machine allows you to redial one of the last ten numbers called.
Press the REDIAL key.
If necessary, use the nav igator and keys to select a number among the last ten ca ll ed .
To call the number displayed, press the SPEAKER key or pick up the receiver .
Note: you can delete the numbers stored in the REDIAL key at any time by pressing C, REDIAL and OK.
6. MUTE MODE
During a telephone call, if you want your party not to hear you :
Press the STOP key.
Press the STOP key again to resume the conversation.
7. USING RECALL, # AND *
ACCESSING SERVICES
The RECALL , # and * keys give access to Te lecom services. Re fer to your telephon e directory or conta ct your
Telecom age n c y to ge t information concerning thes e services.
COMMUNICATING WITH A SERVER AND REMOTE CONTROL
If your machi ne is in pulse d iallin g mode, you can wi tch to to ne diallin g during a call by p ressing the * key to
send a mult i-frequen cy (tone) sequence t o a server or access a ma chine e xternally (for exam ple, an answe ring
machin e).
RECALL KEY
If your ma chine is c on ne cted to a p riv at e net work (PA B X), this key g enera ll y all ows you t o t ran sfer a ca ll (see
exchange docum e nt at ion ).
8. TRANSFERRING A CALL
This function is useful when you want to conti nue your conversation on another extension on the same l in e.
Example: you a r e usi ng the handset.
You wish to continue the conversati on using a telepho ne loc at ed in another room:
Tell your party you are transferring the call.
Press the key.
Replace the handset (instead of freeing the lin e, your machine "ho ld s" the lin e).
Go to the other room, pick up the handset an d resume your conversation.
Note: pressing the key has no effect if the handset is not replaced within 4 seconds. You have 25 seconds
to pick up the other, handset before the com m unication is cut.
9. TIMING YOUR CALLS
10 seconds after the last digit is entered, th e counter indicatin g the duration of the call is displayed.
This count er indicates the communication time cal culated from th e l as t digit entered.
9
Page 17

10.USING A CORDLESS HANDSET
You can use the machine with one or several cordless handsets. To do this, you must use the "Cordless Telephone
Kit" delivere d with your ma chine, or purchase it fro m your dealer (depend ing on t he mo del). You then have a
phone system featuring telephone, fax, cordless phone, answering machine and copier.
The following functions are avail able:
REGISTERING A CORDLESS HANDSET
Press MENU, 6, 1 and START.
Press OK then 6 on the cordless handset.
DELETING THE REGISTRATION OF A CORDLESS HANDSET
Press MENU, 6, 2 and START.
Type the number of the handset to be deleted.
CHANGING THE BASE STATION ASSIGNMENT CODE
Press MENU, 6, 3 and START.
11.USING A MOBILE PHONE (DEPENDING ON MODEL)
You can connect a mobile phone (GSM) to your machine . This will allow you to send or receive faxes through
your mobile phone .
To do so, you must purchase the Fax-Mobile phone connectio n kit from your local retaile r. The mob ile kit
includes an operating instructions handbook. Please refer to the handbook for further informat ion.
10
Page 18

CHAPTER 4: FAX
1. FAX TRANSMISSION
SCANNING MODE
There are three mo des for scanning your docum e nt s:
• NORMAL mode is used when the document is of good qual it y and does not contain sm all details.
• FINE mode is used when the docum ent contains small c ha r ac ters or illustrations.
• PHOTO mode is used when the document is a photo.
The selected resolution mode is shown by the FINE and PHOTO icons.
To change the resolution mode, press the FINE PHOTO key.
IMMEDIATE TRANSMISSION
Insert the document (15 pages maximum), side to be transm it ted face down, in the document feeder.
Dial your party’s fax num be r.
Press START.
Notes: you can modify your entry using t he key.
In case of failure (line engaged, for ex ample) the machine redials after a few minutes’ wait.
TRANSMITTING A DOCUMENT FROM THE DIRECTORY
Insert the document in the fe eder.
Your fax machine allows you to transmit a docum en t in several ways:
BY NAME
Example: call the record YATES in the directory:
Enter the le tt ers Y, A and T.
Press the START key.
BY 2-DIGIT SPEED DIAL
Example: call the YATES record in the directory under th e s p e ed dial number 02:
Press the DIRECTORY key.
Enter the numbe r 2 with the numeric ke ypad.
Press the START key.
TRANSMISSION WITH SOUND MONITORING
This method of sendi ng a fax allows you to follow the progress of your communication through the speaker.
Insert the document in the document feed e r .
Press the SPEAKER key. You hear a ton e from the SPEAKER.
Dial your party’s numbe r.
When you hear a high pitched tone, press START.
TRANSMISSION FROM MEMORY OR THE FEEDER
Press MENU, 3, 4 and OK.
Move the indica tor > to the chosen option using the or keys:
• MEMORY
The document is first store d in the memory of your fa x m ac hi n e , th en it is transmitted.
• ADF
Document sca nning and tran smission are pe rformed at the sam e time. If your pa rty’s fax mach ine does
not answer, the document remains in the feede r .
Press the OK key to confirm.
11
Page 19

TRANSMISSION TO MULTIPLE RECIPIENTS
Place the document in the fax machine feeder.
Dial the name or nu mber the first recipie nt.
Press the key to enter the name or num ber of the next recipie nt.
Repeat the procedure for all the recipi ents you wish to se nd t h e document to (1 0 ma ximum).
Press the START key.
Notes: by pressing the DIRECTORY key, you can quickly access a number.
By pressing the REDIAL key, you recall the last numbers called.
SCHEDULED TRANSMISSION
Scheduled transmission allows you to automatically transmit a fax at a time you choose to one or several
recipients (10 maxi m um).
Insert the document in th e feeder.
Press MENU, 3, 1 and OK.
Enter the recipient’s number and press OK.
Enter the time at which you wish to transmit the document .
Press the START key.
The document will be sent at the time programmed.
Notes: Before pressing the START key, by pressing OK you can choose, if you wish:
• to send the document directly from the feede r ,
• the number of pages in the document.
To cancel transmission of a scheduled fax:
• if the document is in the feeder, press STOP,
• if the document is in memo ry, use the proc edure to c ance l a reque st from t he wai ting qu eue (se e the
ADVANCED COMMUNICATION FUNCTIONS chapter, Cancelling a transmission request).
To transmit immediately: press START.
TRANSMISSION OF A SHORT MESSAGE ENTERED ON THE KEYBOARD
You can transmit a fa x in the form of a short do cum e nt entered directly on the alphabet ic keyb oard.
Press MENU, 3, 1 and OK.
Enter the recipient’s number and press OK.
Enter the START time (for scheduled transmission) and press OK.
Move the cursor to ALPHA KEYPAD using the or keys displayed.
Press START.
If you press OK, the transmission request continues (number of pages, flyleaf, etc. ).
Using the alphabeti c ke ybo ard, enter the message to be tra nsm itted (up to 80 charact ers) and press OK.
The document wi ll be sent at the progra m me d time.
FLYLEAF
The flyleaf is an A4 documen t. This flyle af is the first s ent when trans mitting a do cument. Th e document w ill
thus be sent from memory (the ADF opt io n be ing ign ore d).
It can be inserted a t the user’s request for eac h transmission from me mory.
TO ADD A FLYLEAF
Press MENU, 3, 1 and OK.
Record the recipient’s numbe r, the transmission time, the type of document (memor y or feeder) and t he
number of pages.
Move the indicator to WITH HEADER PG using th e or keys.
Press OK.
Using the alphabet i c ke yboard, enter the message you want to appea r at the bottom of the flyleaf.
Press OK.
12
Page 20

STOPPING THE TRANSMISSION OF A FAX
Press STOP.
Press the STOP key again to confirm you want to sto p the transmission in progress.
2. FAX RECEPTION: FAX ANSWERING MACHINE
Your fax machine has a reception memory that allows the reception of faxes or E-mails even if there is no paper.
To receive faxes automatically, the FAX icon should be lit. If this is not the case, press Tel. Fax TAD.
FAX ANSWERING MACHINE
With this function, the faxes received can not be printed directly, but kept in memory.
Press MENU, 3, 5 and OK.
Move the indica tor > to the chosen option using the or keys:
• WITH: The fa xes re ceived are kept of your fax machine’s m em ory.
• WITHOUT: Th e faxes received are pr int ed directly (if there i s pape r).
Press the OK key to confirm.
PRESENCE OF FAX MESSAGES
The status of the "FAX MESSAGES" lamp shows if faxes were received in memory:
• "FAX MESSAGES" off: no messages.
• "FAX MESSAGES" flashing: at least one message was received in memory.
PRINTING FAXES RECEIVED
Put paper in the paper tray.
Press the FAX MESSAGES key.
Note: you can protect access to your messages with a code (see the OTHER FUNCTIONS chapter,
Protecting your voice and fax messages).
INBOUND MEMORY FULL
When there are too many fax es in me mory, the unit can no longer record any additional faxes.
The FAX icon blinks and the MEMORY FULL message is displayed:
You should pr int the faxes re ceived and/or delete the vo ic e messages recorded in order t o em pty the memor y .
DELETING RECORDED FAXES
• Fax documents are deleted automatically as soon as they are printe d.
• Indication that the docume nt wa s cleared when all the pages have been printed.
• If you run out of paper, ad d pa per and printing resum es at the first page not printed.
REMOTE RETRIEVAL OF THE FAXES
When you ar e away, you can print faxes received in your machine’s on a l ocal machine.
This function is not programmed by default. You must enter a remote retrieval code of four digits other than 0000
(see th e INSTALLATION chapter, Remote retrieval co de). The remo te retriev al code is also used for voice
mail. You can thus also li s ten to your voice m es s ages when you call.
13
Page 21

Remote retrieval of fax messages:
Dial your number on t he remote fax machine.
Press the * ke y during th e welcome me ssage, then enter the 4-d igit code. Th e machine delivers the voice
messages.
At the end of the messages and duri ng the beeps: Pres s ke ys 8 a nd 0. Your machine will then retra nsm it a ll
the faxes received i n me m ory.
Activate the fax machin e as soon as you hear the fax tone.
Note: when you proceed to remote r etrieval, the faxes retransmitted are automatically dele ted from memory.
For remote calling to work, you should use a telephone configured in tone dialli ng m ode .
!
3. MAKING A TELEPHONE CALL DURING A FAX
TRANSMISSION
If you wish, you can ta lk to the person on the other end of the line during a fax transmission.
TO CALL THE PERSON ON THE OTHER END OF THE LINE
During transmission of the document (sending or receiving):
Press the SPEAKER key, instead of "TRANSMISSION" or "RECEPTION", your machine will display
"PHONE".
As soon as the curre nt pa ge ha s gone th rough, your p arty’ s handse t (if his/he r ma chine is co m patible ) w ill ring
to signal you want to talk. If your part y decides to take the ca ll, your handset will ring; pi ck up the receiver to
begin the conv ersa tion.
ACCEPTING AN INCOMING CALL
If your party wants to talk to you over the line, your telephone rings. Pic k up the receiver to spe ak.
14
Page 22

CHAPTER 5: INTERNET
1. SUBSCRIPTION AND ACCESS PROVIDER
SUBSCRIPTION (DEPENDING ON MODEL)
Your machine already includes a free E-Mail account.
In order to use it and cre at e your own permanent E-Mail ad dre ss:
Fill in the Internet subscription form provided with your machine.
Insert this form into the document fe eder (as if you were sending a fax).
Press MENU, 9, 9, 1 and OK: the form will automatically be sent to the provider to register your
subscription.
If you wish to modify your e -mail address, proceed as fol lows:
Press MENU, 9, 9, 2 and OK.
Enter your new address.
Confirm with OK.
CHOOSING AN ACCESS PROVIDER
Press MENU, 9, 1 and OK.
Use the or keys.
Select an access provider in the list, or OTHER...
Press OK to confirm.
You will have to define the settings (not already defined) (which you can be obtained from your access provider):
• access n umber,
• login identifie r,
• login password,
• E-mail iden tifier,
• E-mail password,
• E-mail ad dress,
• SMTP server: automatical ly indic ates th e se rver address for all Internet transmissi ons,
• POP3 server: automa tically indica te s the se rver address for all documents received in your Internet mailbox,
• PRIMARY DNS, then SECONDARY DNS: transmits messages on the Internet (the server address consists
of four groups of three digi ts m ax im um , sepa rated by dots).
Note: if your access provider did not give you a Secondary DNS address, enter the PRIMARY DNS address
again.
DISABLING INTERNET FUNCTIONS
If you do not wish to use the Internet functions:
Press MENU, 9, 1 and OK.
Use the or keys to select "NO ACCESS" and press OK to confirm.
15
Page 23

2. SENDING/RECEIVING VIA THE INTERNET
CONNECTING TO THE INTERNET
When your fax connects to the Int ernet, it:
• sends all the Inte rne t-faxes lined up for tra n sm issi on to the recipient' s mailboxes,
• receives all the Internet-faxes located in your persona l Int ernet mailbox.
Note: the actual fax-document itself is sent as an E-mail attachment.
The connection can be made in one of two ways, depending on how your machine is programmed (see Settings,
Connection (menu 951)):
• automatical ly once or several time s a da y (you choose the frequency),
• immediately (a nd manuall y) by pressing the following key s: , TWICE or press MENU, 9, 2 and
OK.
SENDING VIA INTERNET
Whatever the document t o be sent (fax, E- mail or voice mail), the document is scanned and stored i n memory.
It will be sent via the Internet the next time you connect.
Note: if you are sending a document to a PC, it will be received as an E-mail attachment.
SENDING TO AN E-MAIL ADDRESS
Sending fax e s to an E-Mail address
Put the do cument in the feeder.
Press the key.
Enter the recipi en t’s E-mail address (or use the dir ec to ry key or the REDIAL key).
Note: to enter the @ character, use the co r respon ding key on the alphabetic keyboard,
• to enter a dot, press the • key on the alphabet i c ke yboard,
• for uppercase charact ers, use the (Shift) key .
Press the key.
Sending E-mail to an E-Mail address
You can send a messa ge ent ere d on the keyboard to an e le ct ronic mailbox:
Press the key or MENU, 9, 3 and OK.
Enter the E-mail address and press OK to confirm.
Enter the subject of the message and press OK to confirm.
Enter the message and press OK t o confirm.
Sending voice mail to an E-Mail address
You can send voice mail to an elec tronic mailbox :
Pick up the receiver and reco rd your voice mail,
Hang up the rece ive r whe n you have finished rec ordi ng the voice mail.
Press the key.
Enter the E-mail address,
Press the key,
or
Press MENU, 9, 4 and OK.
Enter the E-Mail address and press OK to confirm.
16
Page 24

SENDING A DOCUMENT TO ANOTHER FAX
This menu allows yo u to send a docume nt to ano ther fax (w hich doe s not have an y Interne t functi ons), via the
Internet. It also allows you to convert all the documents rec ei ved with your E-Mails.
In order to benefit from this offer, you have to subscribe to this service, filling in the subscription form provided
with your ma chine.
Insert the document in the pape r feeder.
Press the key and dial the international code (including '44' for UK) and recipient’s number, omitting
the '0'
Example: for 01 81 760 0708, type +44181 7600708).
Press : the document will be sent automatically.
Note: if you wish to keep the recipient’s "internation al" number in y our directory to send d ocuments via the
+
Internet in the f u ture, enter + (press the key), followed by this numb er, on the recipient’s E-Mail
address line in the directo ry.
The F@x-to-Fax setting (MENU 97 OK) must be active .
+
RECEIVING VIA THE INTERNET
All types o f docum ents (fa x, E-m ail o r voice mail) are re ceived automa tically wheneve r you connect to the
Internet.
Note: your fax cannot process files other than faxes (e.g. word processing files, CAD files, et c.). You can keep
these doc uments in you r Internet ma ilbox for use b y your comput er (see Settings, Mail switch (Menu
96)).
PRINTING E-MAILS AND FAXE S RECEIVED VIA THE INTERNET
To print your fax es or E-mail messages, use the same proce dure as for a fax: press the key.
LISTENING TO VOICE MAIL RECEIVED FROM THE INTERNET
To listen to your messages, use the same procedure as for listening to messages on your answering machine: press
the key.
3. SETTINGS
PRINTING YOUR INTERNET SETTINGS
To print a list of your parameter and Internet settings at any time, print all the settings press MENU, 5, 4, OK or
MENU, 9, 5, 4 and OK.
STANDARD SETTINGS
CONNECTION (MENU 951)
This menu allows yo u to c hoose your Internet connection mode:
Press MENU, 9, 5, 1 and OK and choose an option using the or keys:
• VOLUNTARY
The unit c onnec ts to the Inte rnet at yo ur r equest on ly, w hen you pr ess TWICE or MENU 9,
2, OK (INTERNET / IMMEDIATE ACCESS).
• PERIODICAL
You can define how many times per day the unit should connect to t he Internet. To do this, define:
- THE FIRST CALL: th e time of the first connec ti on.
17
Page 25

- THE NUMBER OF CALLS: the number of times per day that the unit should connect to the Internet.
- THE LAST CA LL : the time of the l ast connection for the da y (t hi s setting is displayed onl y if you set
the number of calls to 2 or more).
Press OK to confir m.
SENDING (MENU 952)
This menu allows you to choose the mode for sending/receivi ng documents via the Int ernet:
Press MENU, 9, 5, 2 and OK and choose an option using t h e or keys:
• IMMEDIATE
Internet-faxes are sent/re ce ived immediately (the connecti on starts immedia tely).
• ON CONNECTION
Internet-faxes are sent/received only during automatic or manual connections.
Press OK to confir m.
SERVERS (MENU 953)
If you are not co nne cted to OTHER as a provi de r, thi s menu allows you to acce ss the server settings:
Press MENU, 9, 5, 3 and OK.
Modify, if you wish, one or more of the server sett ings:
• SMTP Server: autom at ic ally indicates the server address for all standard Internet transmissions.
• POP3 Server: automatically indicates the server address for all documents to be retrieved in your Internet
mailbox,
• PRIMARY DNS / SECONDARY DNS: send messages via the Internet.
Press OK to confir m.
MAIL SWITCH (MENU 96)
This menu allows you to choose where the E-mail messages received on your fax should be stored: you can keep
them in your Internet mailbox for later use with a computer (a PC sharing the same Internet subscription as your
fax).
Press MENU, 9, 6 and OK and choose an option using the or keys:
• F@X ONLY: all message s are sent to your fax unit.
• PC ONLY: all messages are kept i n the mailbox to be re ad by the PC.
• SHARE PC: message s that can be processed by your fax (faxes, E-mail s and voice messages) ca n be
printed or liste ned to. Other messages are kept in the mai lbo x to be read by the PC.
- With the or keys choose one of the following:
* FORWARD TO PC: enter the E-Mail address of the PC to which you wish to send attached files not
read by your fax (th is is only necessa ry if your PC’s E-Ma il is diffe rent from y our f@x mac hine’s
E-Mail). Press OK and choose the type of E-Mails to be sent to your PC:
. all E-Mails,
. only E-Mails with un-readable attachments,
* SHARED PC-MAILBOX: (if the PC and your f@x share the same E-Mails address) and choose:
. delete E-Mails already read by the f@x,
. save E -Mails already read by the f@x (in order to receive a copy on the PC).
Note: if your have chosen SHARE PC or PC ONLY , your fax will indicate how many E-Mails are in your
mail-box after conn ec ting to your Internet serve r.
Press OK to confir m.
F@X TO FAX (MENU 97) (DEPENDING ON MODEL)
This menu allo ws you to send a d ocumen t to anothe r fax (whic h does n ot have a ny Intern et funct ions), vi a the
Internet. It also a ll ows you to convert all the attachments received with your E-Ma il s.
In order to us e t his function, you m ust subscribe to this service: fil l i n t he subscription form provided with your
machine.
18
Page 26

To activate this service:
Press MENU, 9, 7 and OK and choose one of the following with the or keys:
• WITH (service ena bled): ente r the PIN code (secu rity code), wh ich is given to you upon registration to
this service.
• WITHOUT (servi ce disa bled).
Press OK to confirm.
RELAY (MENU 98)
If you want to automatically transfer all received messages (faxes, E-mail messages or voice messages) to another
telephone and/ or fax machine, or to a co mputer:
Press the MENU, 9, 8 and OK,
Choose an option using the or keys:
• RELAY ON
- WITH RELAY: All your mes s ages are transferred to a telephone/fax:
*Enter the number of the recipient telephone/fax and press OK to confirm.
Note: the name and nu mber of this te lephone-fax a re automatically save d in the directory as the
last entry in the directory.
* Choose th e type of me ssage s to relay (VOICE, FAX or FAX/VOICE) and press OK to confirm.
* Type your 4 digit remote re trieval code and press OK to confirm (If you choose VOICE or FAX/
VOICE).
* Choose WITH or WIT H OUT OGM and press OK to conf irm .
If you choose W ITH OGM : a re corde d ann oun cem ent o n the reci pient tel ephon e/fax in dica tes t hat
relayed documents are about to arr ive .
To record th is announcemen t:
. Pick up the receiver,
. Rec ord t he announcement,
. Hang up ,
* Choose FREE or SECURED RELAY and press OK to confirm.
If you choose SECUR ED RELAY, when re ceiving rela yed docume nts on the recipie nt telephone/
fax, you must:
. Pick up the receiver,
. Enter the remote access code when you hear beeps or the recorded announcement for relay
broadcasting,
. Follow the procedure for the remote access facility in order to listen to your voice messages, or
receive the fax or E-mail messages.
- WITH RELAY @: all your messages are transferred to an E-mail address:
* Choose an option using the or keys:
. TO MY MAIL, to transfer all your messages to your E-Mail addresses (shared with a computer
for example),
. OTHER ADDRESS: enter the recipient E-Mail address.
The connecti on can be prog ram med one or se ve ral times a day: You define how many tim es pe r
day the unit should connect to the Internet. To do this, define:
- THE FIRST CA LL: the time of the fi rst connection.
- THE NUMBER OF CALLS: the number of times per day tha t the unit should connect to the
Internet.
- THE LAST CAL L: the time of the last conn ection for the day (th is set ti ng is di splayed only if
you set the number of calls to 2 or more).
- WITHOUT RELAY
• RELAY OFF: all your messages are kept on your fax
• RELAY SETUP: When you have al ready ac tivate d the tr ansfert , you can m odify the paramet ers of the
relay.
Press OK to confirm.
19
Page 27

CHAPTER 6: ANSWERING MACHINE
1. SET-UP
ACTIVATING YOUR ANSWERING MACHINE
The TAD icon should be lit. I f this is not the case, press the Tel. Fax TAD key .
DISABLING YOUR ANSWERING MACHINE
The TAD icon should be off. If th is is no t th e case, press the Tel. Fax TAD key.
Note: The TAD icon flashes in the following two cases:
• no announcement recorded,
• the answering machine memory is full: delete the VOICE messages.
The maximum length of a recorded message is 90 seconds.
2. SELECTING THE TYPE OF ANSWERING MACHINE
Your fax machine has two types of answering machines:
• answering mac hine - recorder (fir st record your announc e me nt),
• simple ans wering machine.
SELECTING THE ANSWERING MACHINE - RECORDER
Press MENU, 4, 5, 1 and OK.
SELECTING THE SIMPLE ANSWERING MACHINE
Press MENU, 4, 5, 2 and OK.
3. ANNOUNCEMENTS
The machine has two announceme nts, depending on the type of answering mac hine selected:
• the announcement for the answering machine - recorder (one pre-recorded announcement),
• the announcement for the simple answering machine.
ANNOUNCEMENT FOR THE ANSWERING MACHINE - RECORDER
RECORDING THE OGM
Press MENU, 4, 1, 1 and OK.
Pick up the rece iver and dictate your m essa ge.
Hang up to end the recording. The message is aut o m atically played back.
At the end of the playback th e answering machine can be activated.
OGM ANSWERING MACHINE - RECORDER ANNOUNCEMENT
Press MENU, 4, 2, 1 and OK.
Your fax machin e plays the announce ment you have recor ded.
20
Page 28

ANNOUNCEMENT FOR THE SIMPLE ANSWERING MACHINE
RECORDING THE SIMPLE OGM
Press MENU, 4, 1, 2 and OK.
Proceed in the same way as for recording the first answering machine message.
LISTENING TO THE SIMPLE OGM
Press MENU, 4, 2, 2 and OK.
Your fax machine pla ys the me ssage you have recorde d.
4. MESSAGES
PRESENCE OF MESSAGES
The status of the "VOICE MESSAGES" lamp tells you if messages have come in:
• "VOICE MESSAGES" off: no messages.
• "VOICE MESSAGES" flashing: at least one new message.
• "VOICE MESSAGES" lit: presence of messages. ALL the messages have been listened to.
LISTENING TO MESSAGES
Press VOICE MESSAGES.
Your machine gives the number of messages and, for each message being listened to, the order number and date/
time of recept ion.
Whilst listening to the VOICE messages, you can:
Press the key to return to the beg in ning of the message.
Press the key twice to go to the previous mes sage.
Press the key to start listening to the next message.
Press the VOICE MESSAGES key to pause. Press a second time to resume listening.
DELETING THE MESSAGES
To delete all voice messages:
Press MENU, 4, 4 and OK.
To delete a message:
Press the C key whilst listening to the mes s age to delete.
ANSWERING MACHINE MEMORY FULL
When there are too many messages in memory, the answering machine can no longer record new messages. The
TAD icon flashes and the screen displ ays "MEM ORY FULL".
Delete the reco rded messages to empty the memory.
5. LOCAL MEMO
A memo is a message which you record locally on your answering machine.
RECORDING A LOCAL MESSAGE
Press MENU then VOICE MESSAGES.
Pick up the receiver and speak.
Hang up the handset to end the record ing.
21
Page 29

LISTENING TO A LOCAL MESSAGE
To listen to a lo ca l m essa ge, proceed in the sa me way as for an incoming m essa ge.
6. CALL SCREEN ING
The call screening function allows you to li sten to a message whil e it is bei ng recorded.
• In "WITH CALL FILTE RING" mode you hear the messages being recorded on your answering machine:
- you can take the call by picking up th e receiver,
- you can adjust the volume of the SPEAKER us ing the keys.
• In "WITHOUT CALL FILTERING", you dont’ hea r the messages being recor ded:
- you can, h ow ever, take th e ca ll by picking up th e receiver,
- you can adj ust the volume of the SPE AKER using the keys in order to listen to a messa ge
being recor ded.
+
+
To activate the CALL FILTERING mode:
Press MENU, 4, 6, 1 and OK.
To disable the CALL FILTERING mode:
Press MENU, 4, 6, 2 and OK.
7. REMOTE RETRIEVAL OF MESSAGES ON THE ANSWERING
MACHINE
To activate rem ote ret rieval, yo u must ent er a rem ote retrie val code of four digits oth er than 0 000. The remote
retrieval cod e is the sa me a s for the fa x answe ring m ach in e. You can t hus al so pri nt you r fax m essa ges or you r
e-mails during the call.
To access your voice messages remotely:
On the remote telephone, dial your nu mber.
Press the * key during the ann ounc ement (or during the beeps if the announcem en t ha s not be e n rec orded).
Type your 4 digit remote retrieval code.
All the voice messages are automatically pl ayed.
After the last message, or if there are no messages, the machine sends a series of beeps.
For remote retrie val, your telephone must be configured in tone dialling mo de.
!
22
Page 30

You can carry out the following operations over a remote telephone:
Whilst listening:
• pa use or resume message listening by pressing .
• go on to next message, by pressing .
• go to the beginning of the me ssage, by pressing .
• go back to the previous message, by pressing twice.
After listening:
• delete received message s , by pressing and .
• re cord your announceme nt, by pressing and and
stop the recordin g of your announcement, by pressin g any
key,
• l ist en to your announcement, by pressing .
• swi tch on your answering ma chine, by pressing .
• swi tc h off your answering mach ine, by pressing .
• re s um e me ssage listening, by pressing .
8. PRIVILEGED ACCESS
PRIVILEGED ACCESS CODE
If you do not want to be disturbed by anyone except privileged access callers (with a special access code), set the
unit to TAD receive mode and ente r a pri vil eged access code:
Press MENU, 4, 7 and START.
Enter an acces s c ode other than 0 000 and press START to confirm.
Note: you must ac ti vate the privileged access facility usi ng MENU 48 (setti ng: WITH).
INCOMING CALLS
Only those ca ll ers to whom you have give n this code will be able to reach you. They must :
Dial your number.
Wait for your term i nal to answer the call.
Press the key, then enter the 4-digit privileged access code.
Notes: If you do not answer the call, the ca ller will be prompted to leave a messag e on your TAD.
The "remote message retrieval" and "privileged access" codes must be different. To disable the
privileged access facility, simply set the code to 0000.
23
Page 31

CHAPTER 7: RECEPTION MODES
Press the TEL FAX TAD key at least once to configure the reception mode you want:
1. MANU AL MODE
TEL icon lit, FAX and TAD icons off.
Your machine acts as a telephone. You use this mode when the fax tra ffi c is l ow.
Upon receiving an incoming call, the unit rings. It never answers automatically (except after 10 rings if remote
retrieval is enabled, in which case it transmits the announcement or beeps if no announcement has been recorded).
If you pick up the receiver, you can either have a c onversation or receive a fax by pre ssing the START key.
2. AUTOMATIC MODE WITH ANSWERING MACHINE
TEL, FAX and TAD icons lit.
Your machine acts as a telephone with an answering machine associated with a fax. You us e th is m ode w hen
you are away or if you do not want to miss teleph one calls and faxes.
Upon receiving an incoming call, the unit takes t he line afte r a few ring s and plays your answering m achine
announcement:
• if the call is a fax, your machine switches to fax rec eption mode,
• if it is a voic e call, your calle r can leave a message .
Note: you can set the number of rings bef ore your mach ine takes the line.
If you pick up the receiver, you can either have a c onversation or receive a fax by pre ssing the START key.
3. AUTOMATIC MODE WITHOUT ANSWERING MACHINE
TEL and FAX icons lit, TAD icon off.
Your machine automatically sorts calls before relaying them to you. You use this mode when fax traffic is high
and you do not want to be disturbed by an incoming fax.
(*)
Upon receiving an incoming call, the unit takes the line automatically without disturbing you
welcome announcement to the caller, invitin g him to wait (example: "Pl ease hold the line"), then :
• if the call is a fax, your unit receives the fax,
(**)
• if it is a voice ca ll , your machine rings (wa rni ng ring) for 30 seconds to notify you
ring at the othe r end of the line.
If you pick up the receiver, you can either have a c onversation or receive a fax by pre ssing the START key.
. The caller will hear a
, plays a
(*)
The unit will not play the ringing tone generated by the telephone networ k. However, if there are other extensions on the line,
they ring normally.
(**)
If there are other extensions on the line, they do not ring.
24
Page 32

CHAPTER 8: ADVANCED COMMUNICATION
FUNCTIONS
1. DEPOSIT AND RETRIEVAL (ACTIVE POLLING)
PLACING A DOCUMENT IN DEPOSIT
A document is left in your fax machine or of one or more recipients, who can obtain the document by calling your
fax mach ine us ing the POLLING function. T h e document is thus transmit ted to the reques ting fax mach ine.
You can deposit your document in the feeder or in memory. The second option is preferable, as it frees your fax
machine and allows retrieval by several recipien t s .
To prepare transmission by your machine of a document to be retrieved by another machine, proceed as follows:
Check that your machine is in automatic mode (FAX icon lit).
Insert the document in the fe eder.
Press MENU, 3, 3 and OK.
Choose SINGLE POLLING or MULTI POLLING using the or navigator keys and press OK.
Note: if you choose MULTI POLLING, the document will be recorded in memory and can be retrieved by
several recipients.
Choose PAPER FEEDER, MEMOR Y or ALPHA KEYPAD (in the case of a short message entered on the
keyboard) using the or navigator keys a nd pre ss OK.
Press START to start the de pos i t.
RETRIEVING A DOCUMENT
You retrie ve a d ocum ent dep osit ed in a r emote f ax mac hin e, ca ll th e fa x mach ine to r ece iv e th e do c umen t, whi ch
is transmitted to your fax machine in automatic mode.
Note: don’t leave any documen t s i n the feeder.
To retrieve a document deposited by the other party:
Press MENU, 3, 2 and OK.
To program the sender:
Enter the sender’s fax number (or use the dire ctory) and press OK.
To start retrieval immediatel y:
Press START.
To program the retrieval time:
Enter the retrieval time and press START.
25
Page 33

2. TRANSMISSIO N WAITING QUEUE
This function a ll ows to manage pending operations (schedule d t ransmission, deposit , re trieval).
PRINTING THE LIST OF PENDING OPERATIONS
It can be useful to print the list of pending operations before a modification (deletion, transmission, modification).
The list shows for each pending document: the number of the pending operation, the recipient’s name, the
planned transmission time, the type of pending operation and the number of pages of the document.
To print the w aiting queue directly, pres s M ENU, 8, 4, 5 and OK.
The list of pending operations is printed.
MODIFYING OR CONSULTING THE WAITING QUEUE
Press MENU, 8, 4, 2 and OK.
Move the cursor to the operation you wish to modify or consult using the or navigator keys.
Press OK.
Your fax mac hine indicates the status of the documents w hich are in the waiting queue:
DOC: Document deposited
POL: Document to be retrieved
TX: Scheduled transmission
NET: Internet transmission (fax or E-m ai l)
If you want to modify one of the operations in the waiting queue:
You can select the operation with th e or navigato r keys (or from the numb er).
Press OK. You can now modify th e pa rameters of the displayed request.
Press START to exit.
SENDING A PENDING TRANSMISSION IMMEDIATELY
This function allows you to process a transmission request as soon a s possibl e :
Press MENU, 8, 4, 1 and OK.
You can select the transmission requests with the or navigator key s (or from their order number).
Press OK to immediately execute the selected request. The pending operation is then executed.
CANCELLING A TRANSMISSION REQUEST
Press MENU, 8, 4, 3 and OK.
Select the do cument to cance l wit h the or navigator keys.
Press OK to cancel the requ est from the waiting queue.
Press OK to confir m.
PRINTING A DOCUMENT IN THE WAITING QUEUE
This function a ll ows you to view the contents of a document awai ti ng transmission.
Press MENU, 8, 4, 4 and OK.
Select the pe ndi ng document usi ng the or navigator keys.
Press OK, the selected document is printed .
26
Page 34

3. PERFORMING OPERATIONS FROM ANOTHER EXTENSION
Several ope rations can be perfor med from another exte nsion (in tone dialli ng mode) on the line (n ote: if the
extension is configured for pulse dia lling, press * in order to switch to tone dialli ng mode).
STOPPING THE ANSW ERI N G MACH INE
If you pick up the receiver o f another extensi on while the unit is playing the ann ouncement (or th e welcome
message), you can stop the announcement by entering #0 on your telephone keypad.
SWITCHING TO FAX RECEPTION
If you pick up the receiver of another extension when a fax is coming in, you can switch the unit to fax reception
mode by entering #7 on your telephone keypad.
4. MAILBOX
Your machine can h ave up to 5 ma ilbox es. They are use d to rece ive co nfide ntia l fax or v oice messag es sent b y
different people.
The caller enters on his telephone keypad (DTMF codes) the number of the mailbox in which he wants to deposit
his message.
Enter the number of your mailbox on the keypad of your machine to print the fax or listen to the voice message.
CREATING A MAILBOX
Press MENU, 7, 1 and OK.
Enter a number between 1 and 5 on the keypad and press OK twice:
Enter a 4 digit co de of your choice (othe r tha n 0000) on the keypad and pr ess OK.
Note: the 4 digit code lets allows remote retrie val and/or protects the m a i lbox.
Press OK.
Use to prote ct your mailbox and press OK to confirm your choice.
Choose «MBX ANNOUNCE » to send a message to the caller who wants to depo sit a message in your
mailbox.
Press OK.
Pick up the receiver and record a message.
Hang up: you will hear you r message. Your mailbox is creat ed .
If you have a DECT cordl ess ha ndse t, you can link your mailbox t o your handset. This functi on allows you
to look up the con tents of your mailbox from you r DECT handset, without havi ng to enter the mailbox
locking code.
Press OK.
Enter your handset’s num ber (from 1 to 4), then confirm by pressing OK.
Note: the value 0 indicates that no handset is used with the mail bo x.
DEPOSITING A MESSAGE IN YOUR MAILBOX
ACCESS BY DTMF CODE
Your machine must be in TEL FAX TAD mode.
Your caller dials your number and hears your answe rin g machine announcem e nt.
Your caller presses ke ys # and 1, then ent ers your mailbox num ber (betwee n 1 and 5) and hears you r mailbo x
announcem ent.
After the be ep, the calle r transmits his vocal or fax mess age (START key).
27
Page 35

TX MAILBOX (PRIVATE MODE) VIA MENU 73 AND MAILBOX POLLING VIA MENU 74.
ACCESSING YOUR MAILBOX
To access voice messages, press VOICE MESSAGES.
To access fax messages, press FAX MESSAGES.
Enter the mailbox number (between 1 and 5) and press OK.
• If you have not lo cked your m ailbox (MEM ACCESS = W ITHOUT), yo u hear your vo ice messages o r
your fax are printed.
• If you have locked your mailbox (MEM ACCESS = WITH), you must enter the 4-digit mailbox code and
press OK.
Note: after creating a mailbox, to hear all message s receive d or pr int all faxes, use mailbo x number 0.
REMOTE RETRIEVAL OF MESSAGES IN YOUR MAILBOX
On the remote telephone or fax machine, dial your number. You will hear of your answering machine
announcement.
Press keys # and 1 and your mai lbo x num ber (between 1 and 5).
Enter your mailbox 4-digit code:
• You can listen to the voice messages in your mailbox.
• If you are calli ng from a fax machine, press keys 8, 0 and START to print the faxes.
CANCELLING A MAILBOX
Press MENU, 7, 2 and OK.
Enter the number of the mailbox you wish to cancel and press OK.
Confirm the deletion of your mailbox by pressing the OK key.
28
Page 36

CHAPTER 9: OTHER FUNCTIONS
1. PHOTOCOPIES
The unit can be use d as a photocopier:
Insert the document to be cop ied in the document feeder, as for transmission.
Choose the resolution mode for local copying of photographic documents by pressing FINE PHOTO. If you
do not select PHOTO mode, the photocopies will be in FINE mode.
Press START.
The machine can make 1 to 99 copies of a document.
Press MENU, 5, 8 and OK.
Change the number of copies to print using the keys on the keypad.
Press OK. The document is scanne d, stored in memory and the n printed.
2. PRINTING
FUNCTION GUIDE
By printing the func tions guide you can access the list of funct io ns and their corresponding numbers.
Press the MENU key, then the 5, 1 and OK keys succes s ively.
The machine prints the guide.
LOGS
The last 30 calls a re re corded in transmissi on and reception logs whi c h can be printed at any tim e .
Printing is also automatic every 30 communications.
To print th e logs directly, press MENU, 5, 2 and OK.
DIRECTORY
Press MENU, 5, 3 and OK.
SETTINGS
The list of settings show the configuration of the mac hine at any given tim e.
To print the list of sett ings:
Press MENU, 5, 4 and OK.
3. VIEWING THE RIBBON
You can check the percentage of printer ribbo n rem aining at any tim e:
Press MENU, 5, 9 and OK.
4. PROTECTING YOUR VOICE AND FAX MESSAGES
You can prevent una uthorised persons from readi ng your messages.
To do so:
• lock access to your messages,
• set a retrieval code other than 0000 (refer to previous section).
29
Page 37

LOCKING ACCESS TO MESSAGES
Press MENU, 8, 2 and OK.
Select the desired option (WITH or WITHOUT) with the or navigator keys and press OK to confirm
your choice.
WITHOUT : Local acces s to m essages is made without entering the retrieval code.
WITH: Local access to messages is only possible after entering the retrieval code.
ACCESSING LOCKED MESSAGES
Depending on the case, press VOICE MESSAGES or FAX MESSAGES. If you have a personal mailbox
(n° 1 to 5), enter your number, otherwise enter 0 and press OK.
Enter the retrie va l code or mailbox code for a personal mailbox.
Press OK.
5. ALARM
The machine can set off an ala r m at a given time. You can use this as an alarm in the mo rning or a reminder for
an appointment .
ACTIVATING THE ALARM
Press MENU, 8, 1 and OK.
Select the optio n required (START or STOP) with th e or navigator keys an d press OK to co nfirm
your choice.
START: activation of the alarm.
STOP: deactivation of the alarm.
SETTING THE TIME FOR THE ALARM
Select the START option with the or navi gator keys and press OK.
Enter the time the alarm is to go off.
Press START to confirm the ti m e chosen.
The screen dis plays a symbol on the right indic at ing the alarm is set.
To stop the alarm, press any key on the keyboard. If you don’t, the alarm stops automatically after
30 seconds.
6. ECONOMISING PRINTING PAPER
In order to economise on paper, you can print messages received on two A4 pages reduced by 50% vertically on
a single A4 page.
To activate this function:
Press MENU, 5, 7 and OK.
Select the op ti on re quired with the or navigator ke ys and press OK.
The machine prints the doc uments received.
7. PC INTERFACE
When connected to a PC, the unit can print out PC files (GDI interface). You will need to purchase a “PC interface
Kit” from your reseller. The unit will t hen function as your occ asi onal PC printer.
30
Page 38

8. SPECIAL RINGING (FOR AUSTRALIA ONLY)
If you subscribe to a special ringing service from your telephone company, you must activate DUAL RING
(MENU 86) to u s e t his function. Your fa x machine will signal voice calls with the normal ri nging tone, and fa x
transmissions with a spec ia l rin gi ng tone. In the case of a fax transmission, your fax machine will automaticall y
answer the call after 2rings and receive the fax.
IMPORTANT:
The special ri nging function ca n only be used if y ou subscribe to th is se rvi ce with your telephone comp any. Do
not set DUAL RINGING to WITH if you are on a normal line, as the fax machine will not ope rat e prope rl y.
31
Page 39

CHAPTER 10: APPENDICES
1. REPLA CING CONSUMABLES
Ink ribbon an d ribbon gauge con sumables are alrea dy installed in th e machine. Yo u will eventually have to
replace them. To do so, refer to the instructions in the following paragraphs.
INK RIBBON
The ink ribbon enables the unit to print on normal paper.
Only use an i nk ribbon that ma tches the manufact urer’s specifications. The u se of other types of i nk
ribbons could result in damage to t h e m ai n unit and inva li date the warrant y. Documents print ed by your
!
unit can be rea d from the u sed portion of the ink ribbon . If these doc uments are confident ial, you may
want to remove the ink ribb on whenever you leave the unit.
1 1
OR
Open the front cover: lift it towards you until it rem ains open.
2 2
1
OR
1
Open the back cover: unlock the latches (1) before pushing the cover back.
1
1
32
Page 40

3 3
2
OR
Remove the worn ink ribbon from its housing.
Position the ink ribbon ove r its housing under the rear co ver
Insert the ink ribbon without removing the adhesive strip (2):
• position the right end of the ma in roller onto the retractable ax i s .
• position the left end of the main roller onto the left axis.
4 4
OR
2
2
2
Pull off the adhesive strip (2) from the ink ribbon .
5 5
5
6
OR
3
4
5
6
3
4
Insert the sma ll roller i n its hous ing: c heck that the gea r axis (3) is correct ly posit ioned in the slot (4), and that the
other axis (5) is also correctly positioned (6) in the slot.
33
Page 41

INK RIBBON GAUGE
The gauge enabl es scre en display, after pr int out, of the remain ing ink ribbon.
6
7
Remove the gauge compartment flap (7):
• slide the flap back, then
• li ft the front part of the fl ap to remove it from the
main unit.
Remove the worn gauge from its housing.
7
8
9
Remove the (pre-cut) gauge (9) from the ribbon
gauge card (8).
8
7
9
10
Insert the gauge (9) into the slit (10) in the gauge
compartment, chip towards you and beve lled corner
to the top right side. Repla ce the fla p (7).
34
Page 42

9 9
11
1
Close the rear cover: press down on both sides of t he cover (11) simu lt aneously, unti l the two latche s (1) click into
place.
11
OR
1
11
11
If the gauge is not instal le d or not properly installed, the unit displays:
!
MISSING GAUGE
35
Page 43

2. TECHNICAL PARAMETERS
To access the technical paramet ers, pre ss M E NU, 8, 3 and START.
The technica l pa rameters are shown in a l ist whic h the user can scroll with the or navi gation keys.
01 DIALLING: Choice of the type of dialling (pulse or tone).
02 TX HEADER: Transmission to the recipient of your name, fax n°, the date and time: this
informatio n appears on the head e r o f the fax he receives.
03 TX LOCK UP: Slow transmission speed.
04 ANTI ECHO: This parame te r inhibits satellit e ech o to avoid problems for lo ng distance faxes.
10 RX HEADER: To print at the top of the faxes you receive the sender’s name and fax n° as well as
the reception date and time.
11 RX LOCK UP: Restraint of reception speed.
20 REDUCE MODE: Reduced printing mode (faxes received, loca l copies): auto matic or manual.
21 REDUCE RATE: This parameter sets the prin ting reduction.
22 NB OF PAGES: This parame ter gives the number of pages print ed since the machine has been
operational (faxes receive d and local copies ).
40 RECALL LENGTH: Time du ring which t he line is cut (long or short) du ring th e "Flash" si gnal of the
Recall key.
50 SORTED PRINT: Print documen ts in the reverse order they were recei ved (or scanned for a local
copy).
60 HQ OGM: "High Quality" Announcement parameter, for recording music in an
announcement. This requires more space in memory, and can be disabled.
71 NET ACTIVE: This parameter enab les you to define whether Pe riodic or Fixed Time Intern et
connections are authorised during weekends.
72 MODEM SPEED: Used to limit the modem speed for send/r eceive sessions over th e Internet.
73 RECORD REP @: This parameter enables you to automatically record in the directory a fax sender’s
Internet address.
74 EMPTY MAIL BOX: At the next conn ection, the first m essa ge in the mail box wil l be deleted.
75 PPP COMPRESSION: To connect to certain access providers.
3. TECHNICAL CHARACTERISTICS
Internet access provider specifications supported by the mac hine.
Your fax machine supports any Internet ac ce ss provider that meet s al l of the following speci fications:
• modem access: V32a (14,400 bps) or (9 ,600 bps) - V42
• protocols: TCP / IP / PPP
• messaging: SMTP-POP3
36
Page 44

4. TRANSMISSION REPORT CODES
The result of ea ch transmission is give n by t he l ogs (transmission/reception) and by the communications report.
In the case of an incident, one of th e codes described below is use d :
PHONEFAX COMMUNICATION ERROR CODES
Code 01 - No reply
Call later.
Code 02 - No fax reply, number may be wrong
Check the recipient’s numb er.
Code 03 - STOP
You pressed STOP durin g the communica ti on.
Code 04 - Invalid speed-dial number
Check the numb er .
Code 05 - Document feeder incident during the communication
Document jam or docum ent feeder fail ure.
Code 07 - The remote termina l or line malfunction
Redial.
Code 08 - The document transmitted may have been badly received
Resend it. Che ck with the recipient.
Code 0A - Retrieve
You tried to retrieve a document but the remote terminal had no dep os ited documen t.
Code 0B - Difference between the number of pages defined for transmission and the number of pages sent
Check the number of page s.
Code 13 - Memory full
Fax reception impossible.
Code 17 - Your machine is in protected access mode
A party tried to call you and did not have your password.
Code 23 - Mailbox unknown, n°
The mailbox num ber indicated do es not exist in the other fax m ac hine.
INTERNET COMMUNICATION ERROR CODES
Codes 40 and 41 - No ISP reply
The modem cannot connect to the Internet service provider. If the error occurs systematically, check the
supplier’s dial-up number.
Code 42 - Cannot connect to Internet service provider
The service provider refuses the connection, the service is temporarily unavailable. If the error occurs
systematic al ly, check the Internet connecti on parameters.
Code 43 - Cannot connect to the SMTP server
Cannot conne ct to the SMTP server to send mail, the service is temporarily unavailable. If the error occurs
systematic al ly, check the Internet e-mail and server paramet e rs.
37
Page 45

Code 44 - Cannot connect to the POP3 server
OUT OF PAPER
PRINTER COVER
PAPER JAM
Cannot connect to the POP3 server to receive mail, the service is temporarily unavaila ble. If the error occurs
systemati cally, chec k the Internet e- ma il and server parameters.
Code 45 - Internet service provider disconnected
The servic e is temporarily unavailab le ; try again late r.
Code 46 - SMTP server disconnected
The SMTP server to send mail is disconnected. The serv ice is temporar ily unavailable; try again later.
Code 47 - POP3 server disconnected
The POP3 s erver to receive mail is disconnected. The se rvi ce is temporarily unavail able; try again la ter.
Code 48 - Internet disconnected
The servic e is temporarily unavailab le ; try again late r.
5. TROUBLESHOOTING
PROBLEM SOLUTION
• T he screen re mains blank. • Check that the mains supply cable a nd the power supp ly cable of th e
adaptor are correctly conn ected.
• The machine does not answer the
call after severa l ri ngs.
• T he photocopy printed is blank. • The document in the document fe eder was placed upside down.
• The telephone exchange does not
recognise the number you have
called.
• The machine does not ring. • The TEL icon flashes: restore ringing (see the INSTALLATION
• T he telephone does not work. • Check th at th e mains sup ply cab le and the powe r supply cable for the
• The screen displays:
• The FAX icon may be off: check the reception mode (manual/
automatic).
• Check the number of rings (see the INST ALLATION chapter, Setting
up the unit).
• Configure the machine on "private network" (see the
INSTALLATION chapter, Type of networ k).
• Check that th e telephone li ne cable is properl y connected.
• Configure the machine in pulse dia ll ing mode.
• Check the tel ephone line and the phone outlet .
chapter, Ringing tone).
adaptor are properly connec ted.
• There may be a power failure.
• Check the tel ephone line and the phone outlet .
• P ut paper into the paper feeder.
38
• Close the rear cover.
• O pen the rear co ver to access the pa per path and remo ve the piece of
paper. Make sure the rear cover is properly c lose d.
Page 46

PROBLEM SOLUTION
OVERHEATING
GAUGE EMPTY
MISSING GAUGE
CHANGE RIBBON
REMOVE DOCUMENT
MEMORY FULL
• The last documents printed have a lot of black smears, the temperature
of the printer is too high.
Wait a few mome nt s for it to cool.
• You probably forgot to replace the gauge when you replaced the printer
ribbon.
• Remove the ga uge housing cove r and make sure the gauge is p resent
and correctly positioned.
• Install a new printer ribbon with its new gauge and remove the piece of
paper. Make sure the rear cover is prope rly closed.
• Open the front cover and check the document path.
• Print the faxes rece ived and/or listen to th e vocal messages recorded.
• One or several ve rtical bla ck strip s
are printed on the documents
copied or received by your
correspondent.
• Other cases. • Call your after sales service.
• Open the front co ver a nd cl ean th e sca nning devi ce l oc ated i n fr ont of
white rolle r. Use a soft rag soaked wit h alcohol. After clean ing, close
the front cover and make a copy to check that black strips have
disappeared.
6. NOTICE FOR CONNECTION TO THE TELECOMMUNICATION
SYSTEM (FOR UNITED KINGDOM ONLY)
1. B A BT Certificate Num b e r/Approval Number for the:
SAGEM PHONEFAX INTERNET 390-i/440-i N° 608 817
and
SAGEM PHONEFAX INTERNET 395-i/445-i N° 608 816
Approved for conne ction to te lecommuni cation syste m specified in t he instructi ons for use subjec t to the
conditio ns set out in them.
2. This apparatus has been approved for the use of the following facilities:
• Facsimile
• Simple telephone
• Terminal a nd subsriber identi fier
• Transmission status report (send report only)
• Manual mode (RX and TX)
• Auto-Answering
• Auto calling
• Delayed tran smission- Time recorder and logs
• Automatic re dial (5 times, 5 mi nut es intervals)
• Fax switch
• Polling RX (To poll a docume nt f rom on a distant fax)
• Polling TX (pre pare a document t o be polled)
• Automatic document feeder
• Halftone 16 shades of grey
• Modem Fax up to 1440 0 bps
39
Page 47

• Facsimile transmission and reception
• Call progressing mode
• Full Numeric Handsfree
• Answering Recording Device
• Fax Answeri ng Device
• PC Printing (GDI Protocole)
• Internet Access
Any other usage will i nva lidate the approval of the appara tus i f as a re sult, it then ceases to conform to the
standards for which appr ova l was granted.
3. The connection to the telecommunication system must be unplugged before the earth is disconnected. The
connection to the te lecommunica ti on syst em must be hardwired.
4. This apparatus may be used on the tel ec om m u nication employ ing loop disconnect or MF dialling.
5. This apparatus is suitable for connection to direct exchange lines on the PSTN directly or via a compatible
PABX (selection done by parameter setting).
6. Ringing delay: the maximum number of ring before automatic answ eri ng i s 5.
7. Ringer Equivalent Number (REN) = 1
The REN is a customer guide indicating ap po ximately the maxi mu m nu mber of items of apparatus that
should be connected simultaneously to the line.
The sum of the REN’s of the individual ite ms sh ould be no t exce ed 4. The REN valu e of a BT tel ep hone i s
assumed to be 1 unless otherwi se marked.
8. Voltage Dro p
While operat ion may be possible ini tially, ch ange to or moderniza tion of the network ta king place in the
normal cour se of events may result in the apparatus bein g connected being in compatible. Fa ilure of the
apparatus to work under these circumstances is not the responsibility of the ne twork operator.
In the unlikely e vent of su ch prob lems o ccuring, t he user shou ld conta ct the su pplier o r maintai ner of the
apparatus.
Note: the definition of RBS (Relevant branch system) for PSTN lines is given in BS6789 section 6.1 (1986)
clause 2.4
9. Naive caller
« Callers are accustomed to being answered normally within 10s and the majority abandon calls that are not
answeed within 45s »
It is « normal » to set the number of rings at between 1 to 5 rings before the answering machine responds
The machine is al ready preset for a plug a nd pl ay mode.
« If the intention is to delay answer so that normal voice callers would abandon the call before the non-voice
TE answered, then delay shoul d be at least 45s ».
It is helpful to include with the statement of the answering telephone number the exchange name or
international code, and anno unceme nts must be suita ble for t he purpose for whic h they a re in tended. T he
announcement shoul d al so start within 3s of answering.
Paytone may be received after answering calls from some types of payphones and may persist for up to 13s.
Answering announcements should be constructed so as to ensure that an answering announcement
containing the identity of t he called l ine and, whe re appropr iate , the invitat ion to rec ord, will be heard by
the callers aft er paytone has ceased.
IMPORTANT ! Compatible switchboards
40
Page 48

Your terminal is approved only for use with compatible switchboards including those which do not provide
secondary proceed indication. If you would like a list suitable switchboards, contact BT on 0800 800 152.
If you do have a c ompat ible switchb oard it c annot be gua rantee d that th e appara tus w ill operat e correc tly
under all possib l e c ondi tions of connection .I f you ha ve any difficulti es, contact BT on 0800 800 152.
Calling the Eme rgency services
This equipment is not designed for m aking emergency telep hone call (999) when the power fails. Alter-
!
native arrangemen ts shou ld be made for access to emergenc y se rvi ces
10. SAFETY WARNING
Interconnection circuits should be such that the equipment contibues to comply with the requirements of 4.2
of EN 41003 for TNV c ircuits a nd 2.3 of EN 60950 for SE LV circu its , after m aking co nne ctions be twee n
circuits.
Interconnection directly, or by way of the other apparatus, of ports marked « SAFETY WARNING ». SEE
INSTRUCTION FOR USE, with ports marked or not so marked may produce hazardous conditions on the
network. Advic e should be obtaine d from a competent engineer be fore such a connection is made.
To prevent fi re or shock ha zard, do no t expose thi s product to rain or a ny type of moisture emergency
!
services
How to connect the mai ns lead to a plug
Your apparatus comes complete with fitted plug. If however, it becomes necessary to fit an alternative main
plug, the foll owing instructio ns must be adhered to.
For apparatus c onnecte d by mains plu g, the wall socke t must be instal led nea r the apparatus a nd must be
easely accessible.
Note: the wires in the mains lead are coloured in accordance with the following code:
Green-and-yellow: earth connected
Blue: neutral
Brown: live
Read the inst ruction ca refully bef ore conne cting the m ains lead to a plug . If in doubt, consult a qu alified
electrician.
As the colours of the w ires in the mains lead of the apparatus m ay not correspond with the colo ured
markings iden ti fying the terminals in your plug, proceed as fol lows:
• The wire which is coloured blue m ust be connected t o the terminal which is marked with the letter N or
coloured black
• The wire which is col our ed bro wn m ust be con nect ed to th e te rmina l whi ch is mark ed with t he l etter L
or coloured red
• The wire which is coloured green and yellow must be connected to the terminal which is marked with the
letter C or coloure d green
41
Page 49

42
Page 50

DETACHABLE GUIDE
Your TAD security code : *
• To go to next message, press .
• To go to beginning of message, press .
• To go bac k t o previous message, press twice.
• Delete received m essag e s by pres s ing and .
• To record yo ur announ cement, press and
to stop the recordin g of your announcement, press
any key.
• To listen to your announcem en t, press .
• To switc h on your answering machin e, press .
• To switc h off your answering machine, press .
• To resum e me ssag e li ste ning, by pressing .
43
Page 51

LIASSE 23228000-2 A
44
Page 52

TO ORDER RIBBONS AND PAPER
RIBBON AND GAUGE CARD
You can use the following ribbons :
(*)
• the TTR 815 ribbon prints over 230 pages
• the TTR 816 (for the 440i / 445i models only) ribbon prints over 350 pages(*) with CCITT n°1-type printed
pages.
Use the follo wing references to order new ribbons :
TTR 815 RIBBON Refere nc e: 23327983-7
TTR 816 RIBBON (models 440i / 445i) Refer en ce : 23 330760-2
PAPER
Print quality will vary according to the kind of paper use d.
For best results, use SAGEM “Series 300” paper, available in packe ts of 500 sheets
, whatever the contents of the documents printed.
SAGEM “Series 300” Paper Reference: 23273604-9
* NOTE: the free sa m ple ink ribbon provide d wi th your unit will allo w you to print about 50 pages.
LU 23227998-7 IND A
6, avenue d'Iéna - 75783 PARIS CE DE X 16 - FRANC E
Spec. Dept. : 23310796-6 / 23310728-9
*23227998-7*
DATA SUBJECT TO CHANGE WITHOUT NOTICE
http://www.sagem.com
 Loading...